

Walkthrough Menu
General Tips
- This is the official guide for Myths of the World: Fire from the Deep.
- This guide won't tell you when to zoom into a location; the screenshots show each zoom scene.
- Hidden-object puzzles are referred to as HOPs. Only the locations of the HOPs will be shown.
- Use the Map to fast travel to a location.
Chapter 1: Village
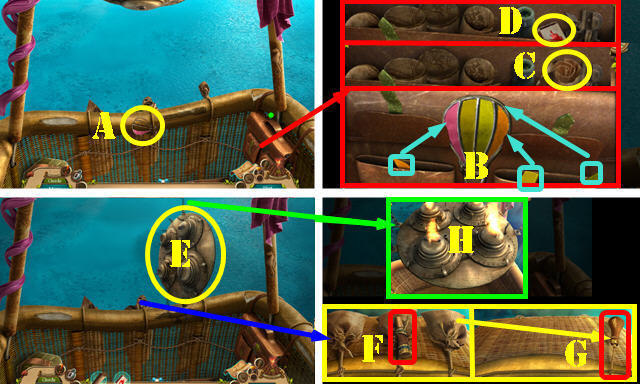
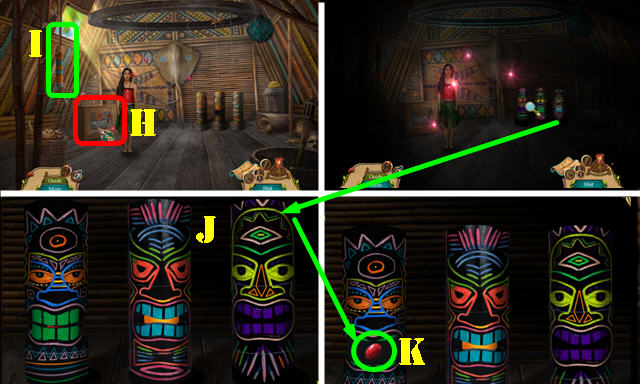
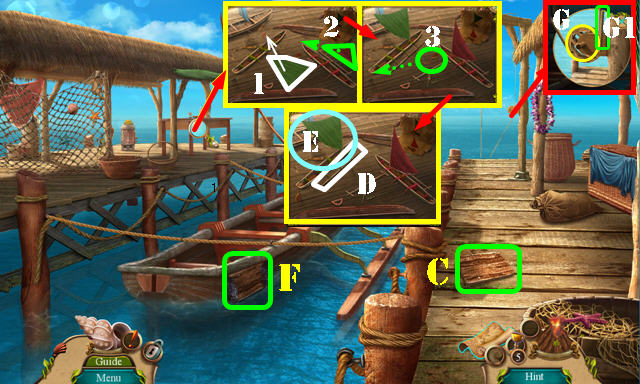
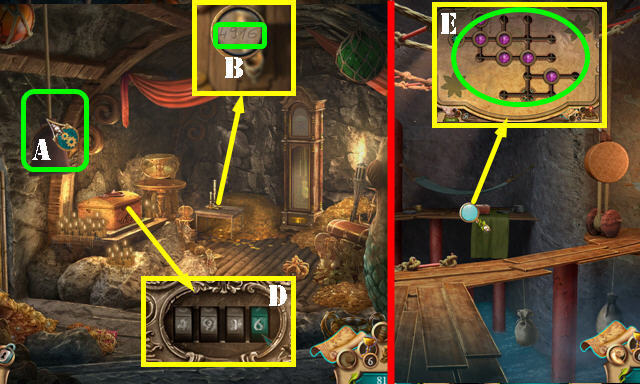
- Select letter on scene.
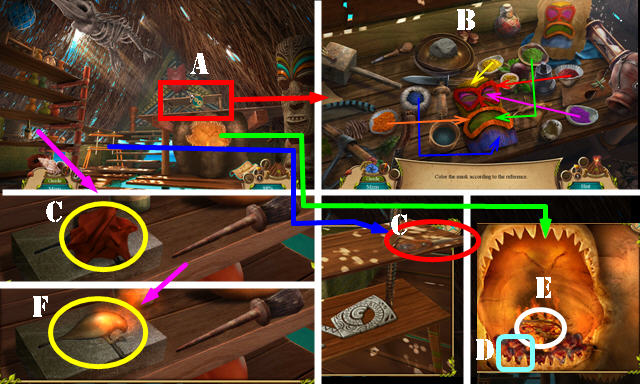
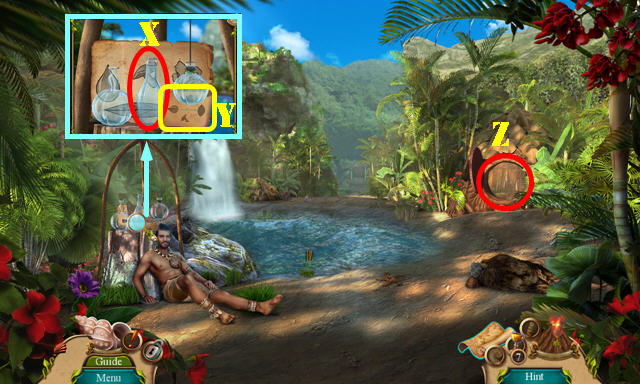
- Take BALLOON (A).
- Place BALLOON (B). Open both pockets and place pieces on balloon (light blue).
- Take MAPS and MATCHES (C-D).
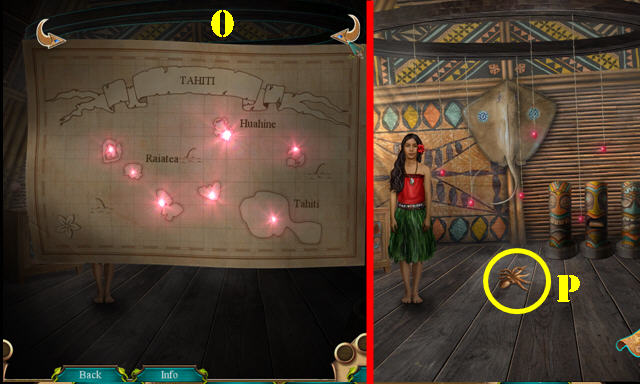
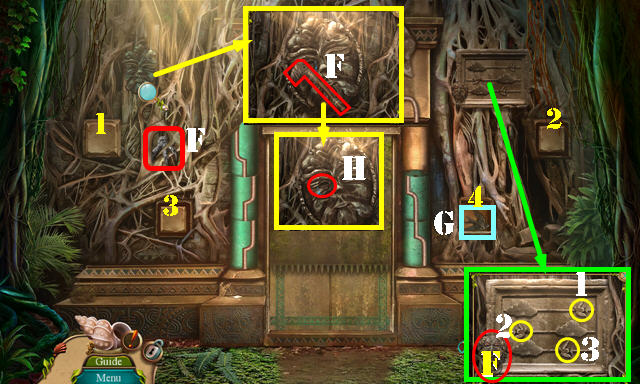
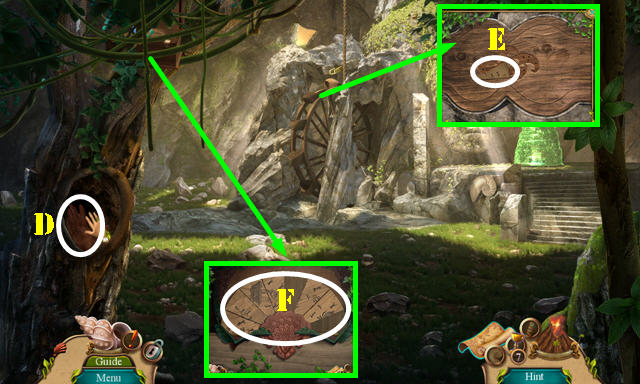
- Move mechanism (E); take SPYGLASS (F).
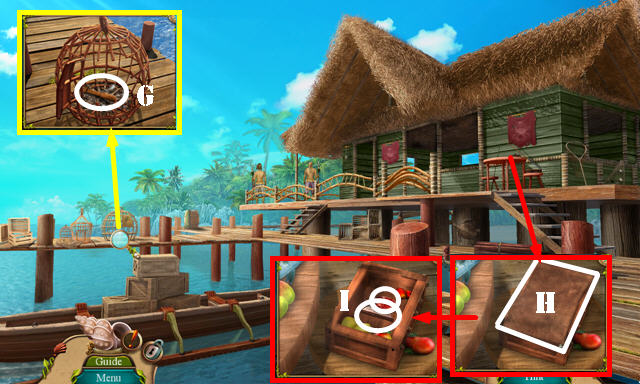
- Select three bags; take OIL (G). The oil is always under the last bag you select.
- Use OIL and MATCHES (H).
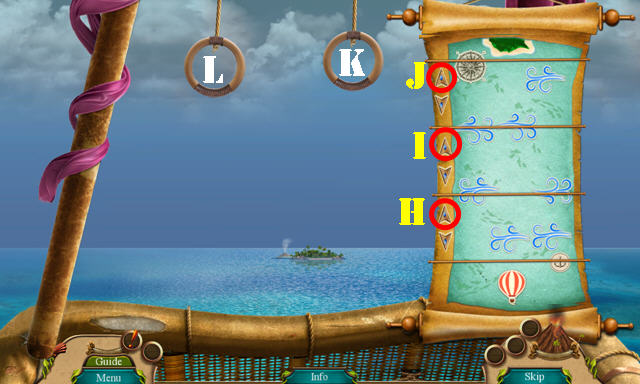
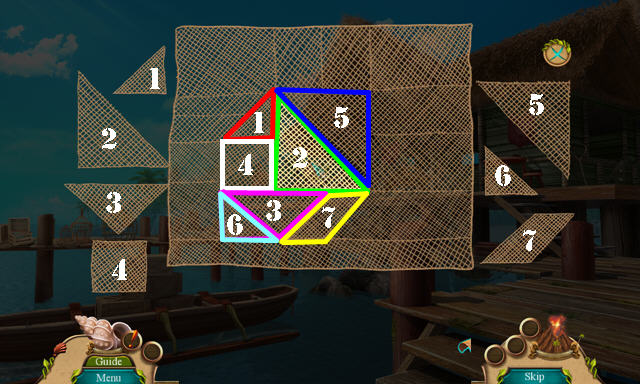
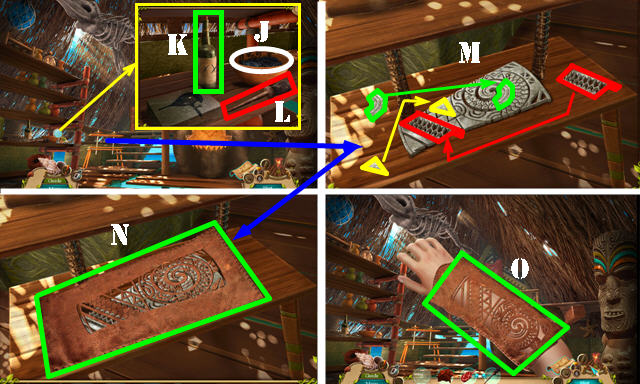
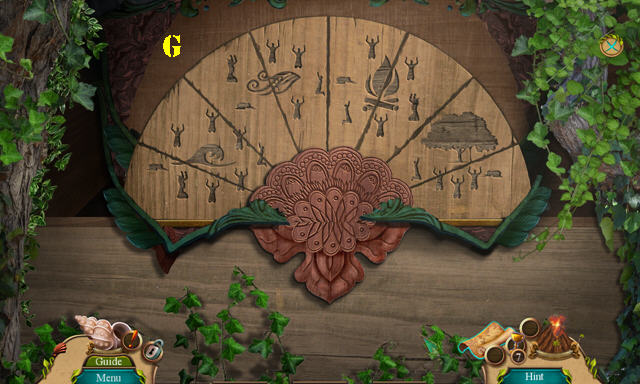
- Solution (H-I-Jx2).
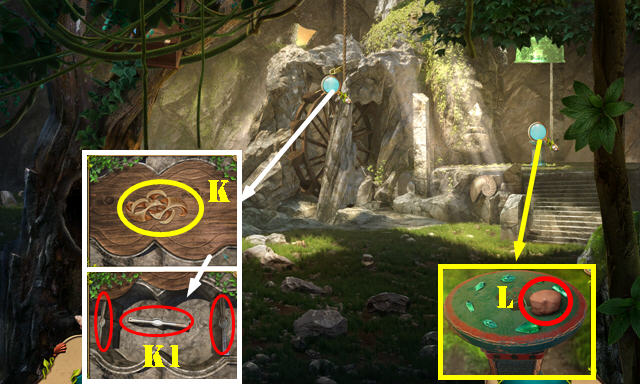
- L-Kx2-L.
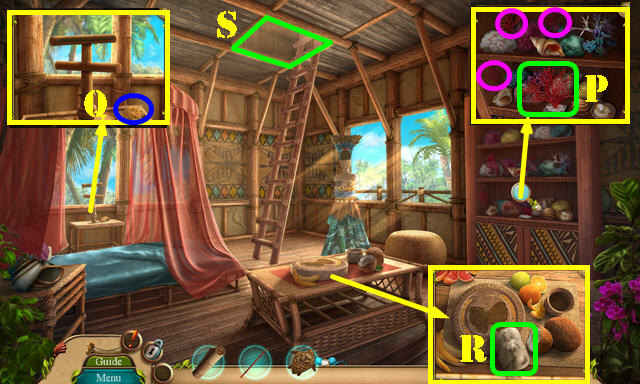
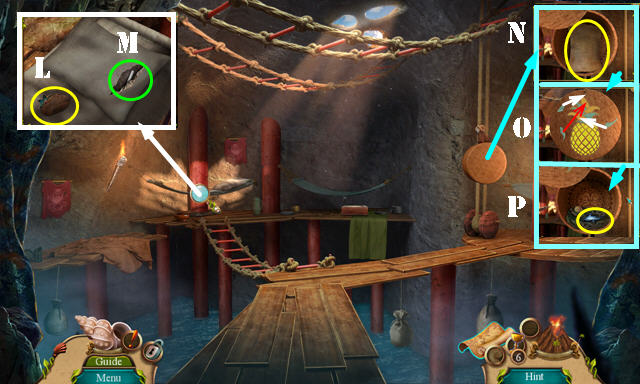
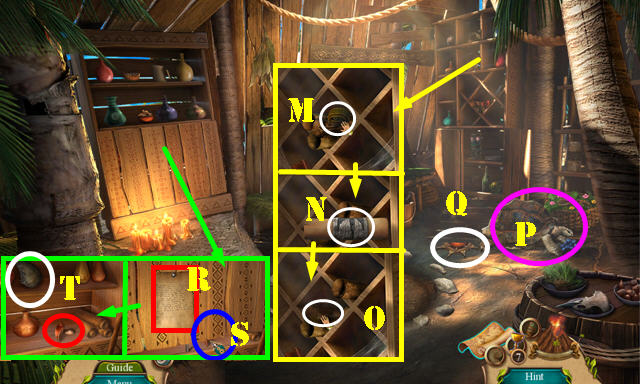
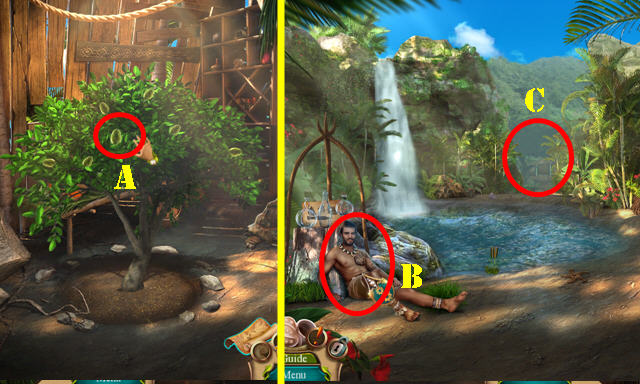
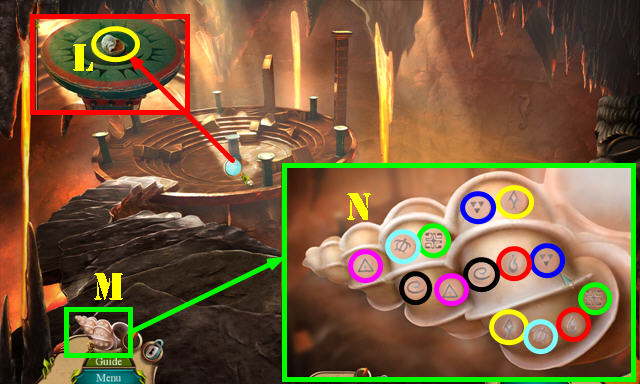
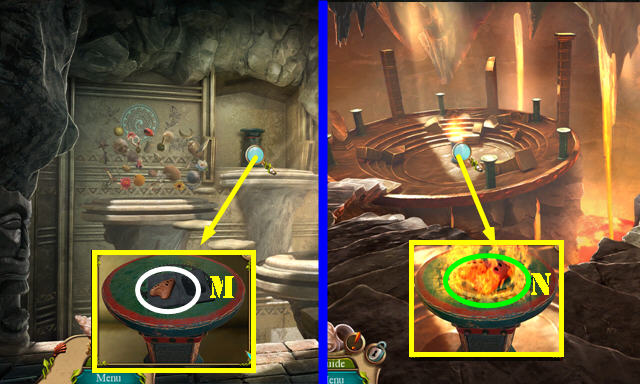
- Play HOP (M); receive EYEPIECE.
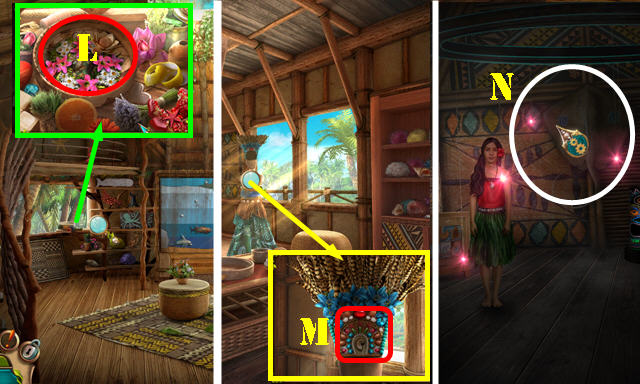
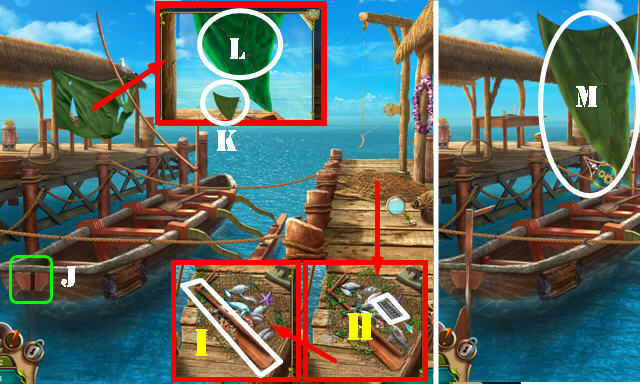
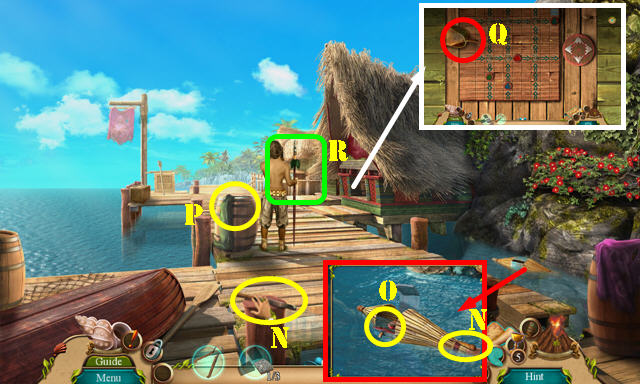
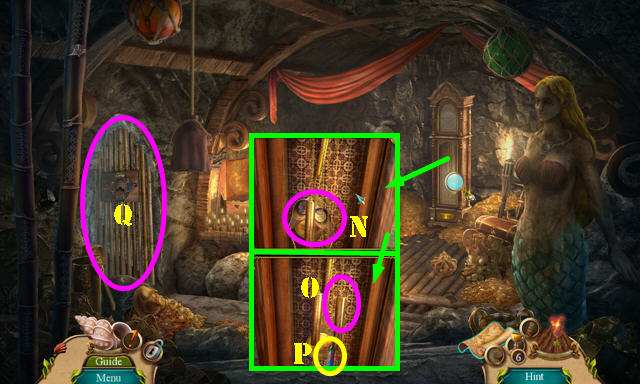
- Take JAR and MEAT 1/3 (N).
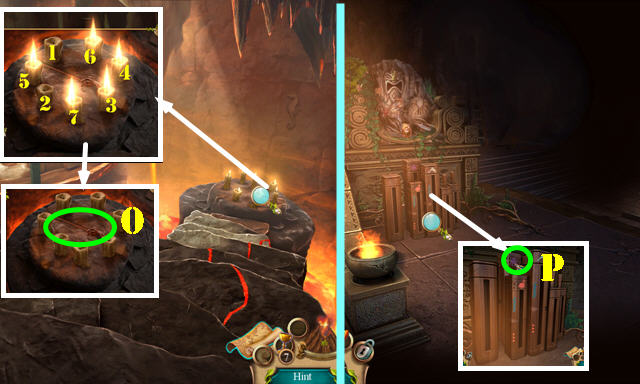
- Take MEAT 2/3-3/3 (O).
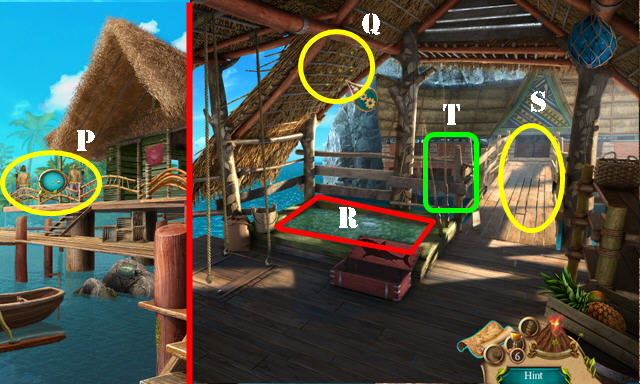
- Throw MEAT 3/3 (P).
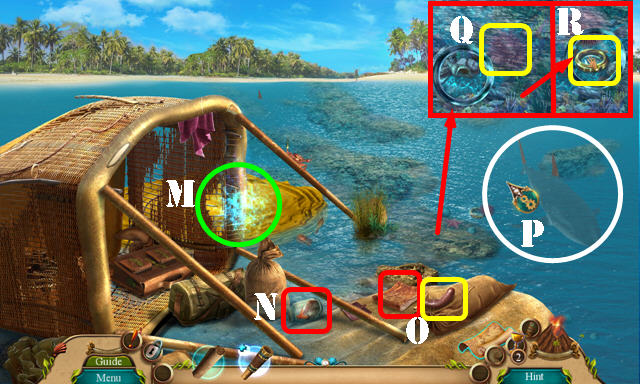
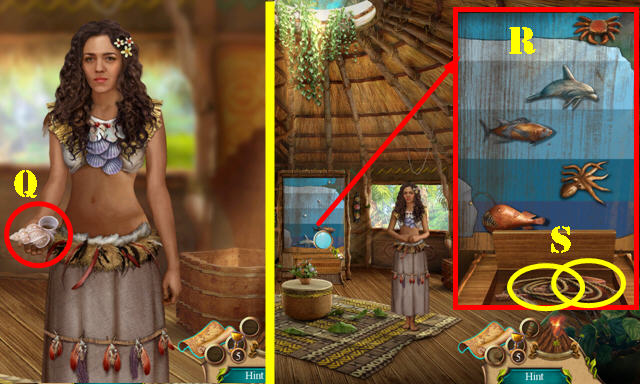
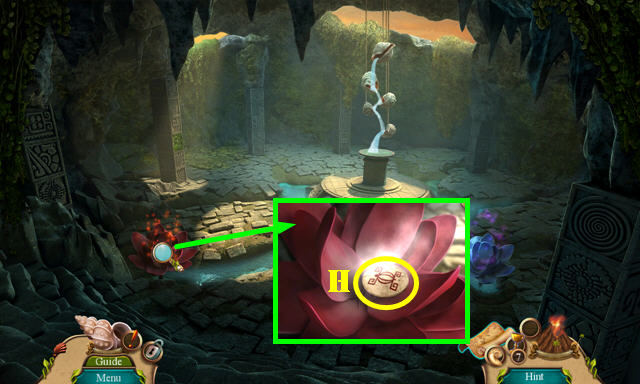
- Use JAR and select sea urchin (Q); receive NEEDLE.
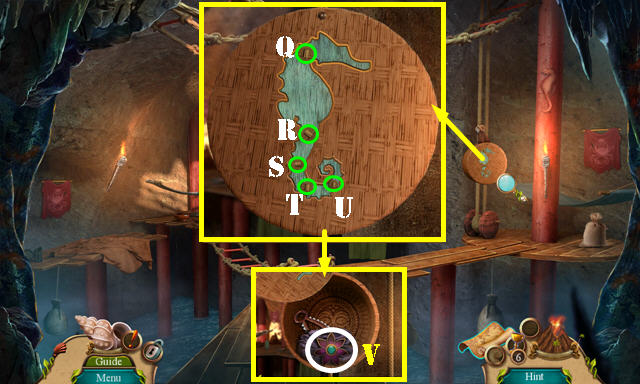
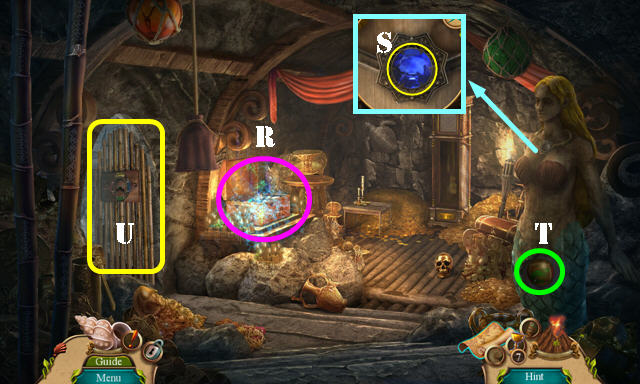
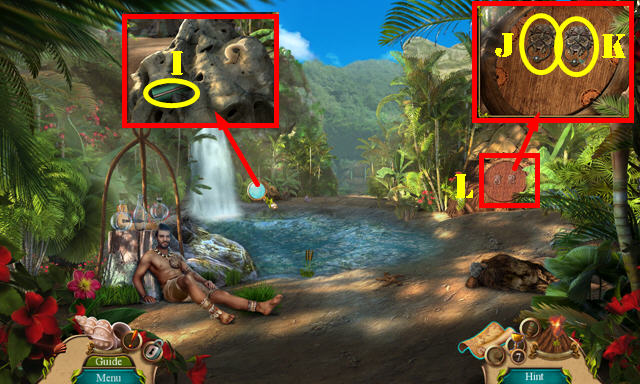
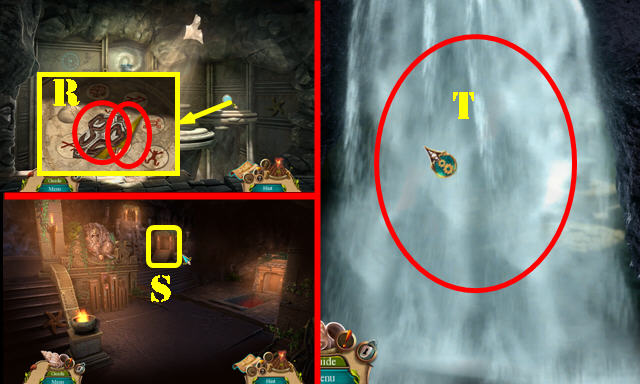
- Take LENS (R).
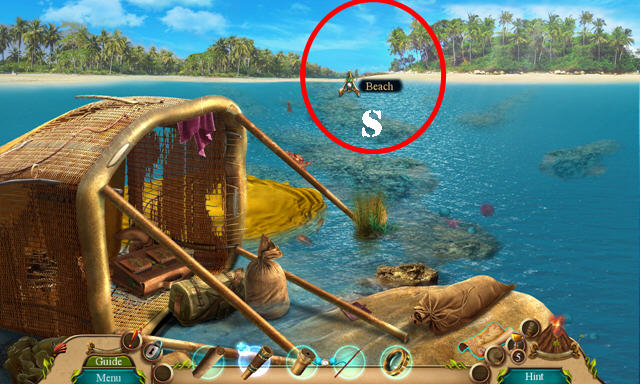
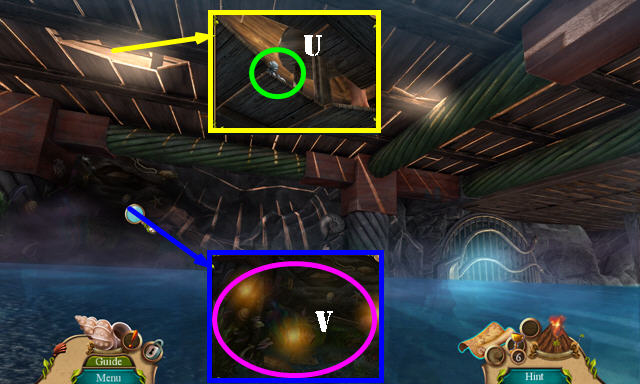
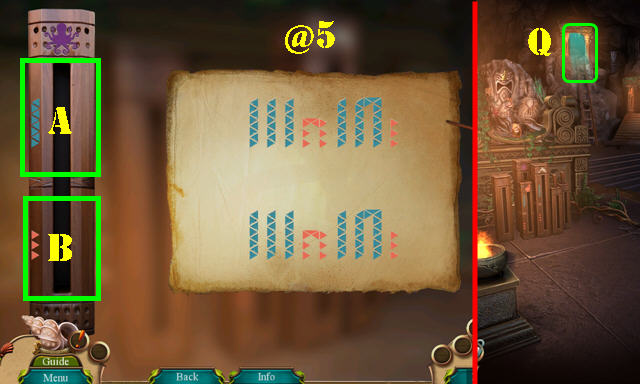
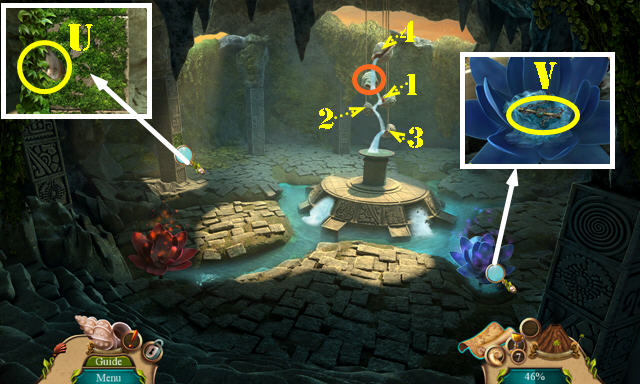
- Try to go (S).
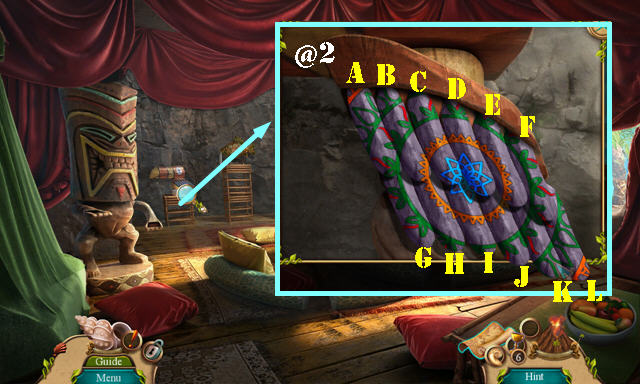
- EYEPIECE and LENS on SPYGLASS.
- Use SPYGLASS (S).
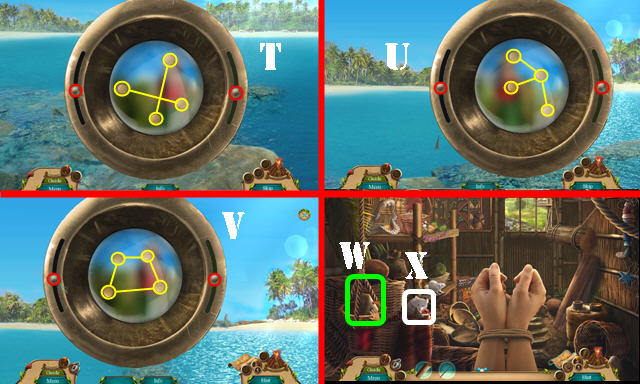
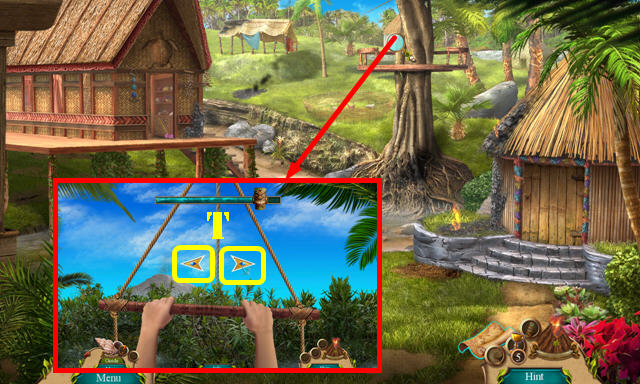
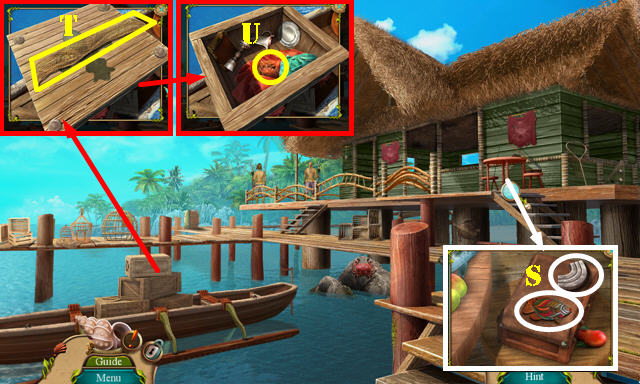
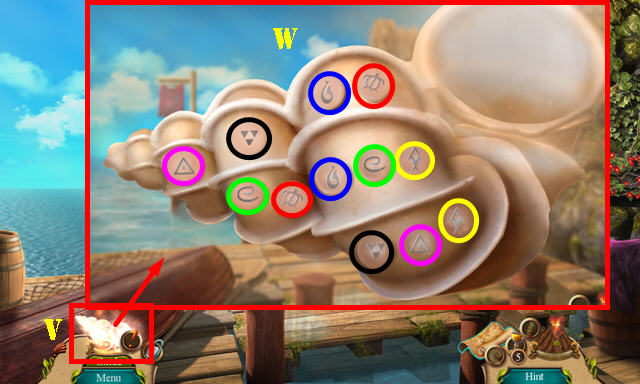
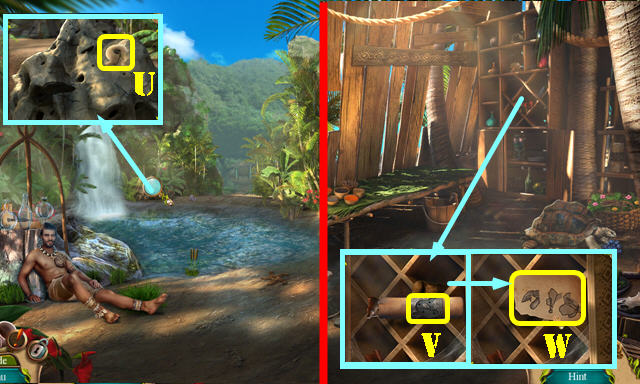
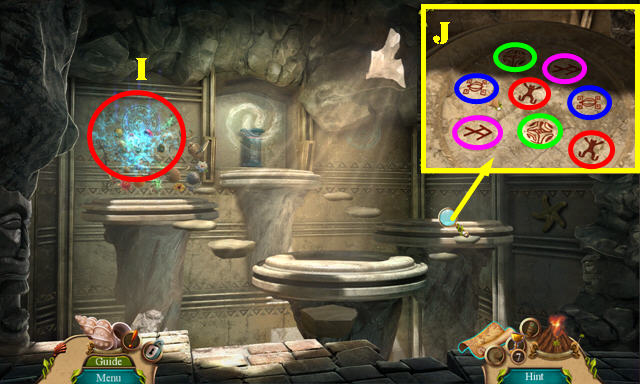
- Solution (T-U-V).
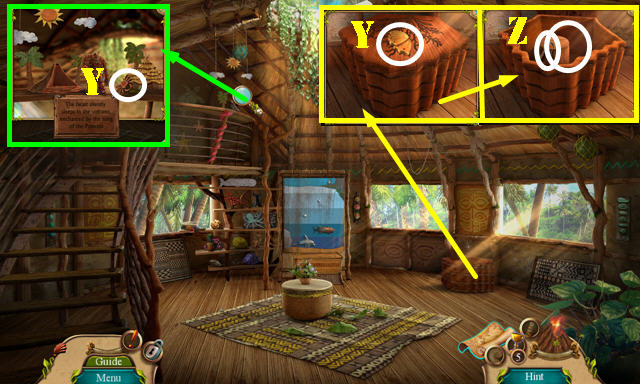
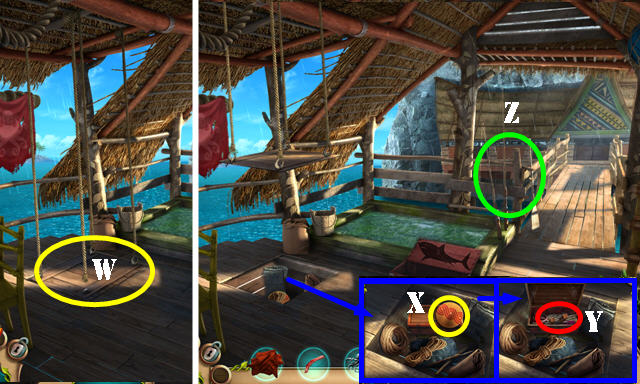
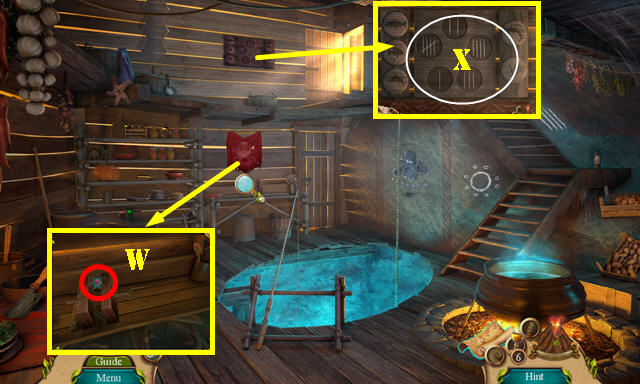
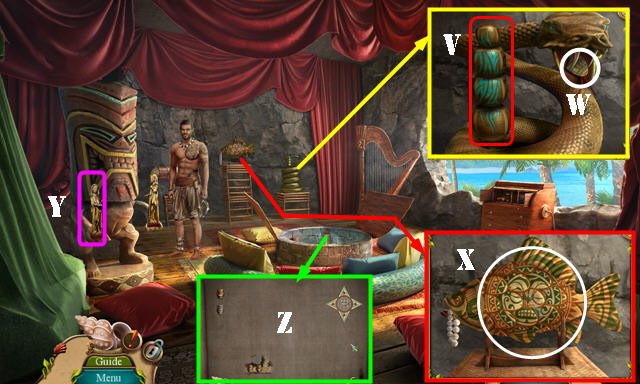
- Select cheese (W) and mouse (X).
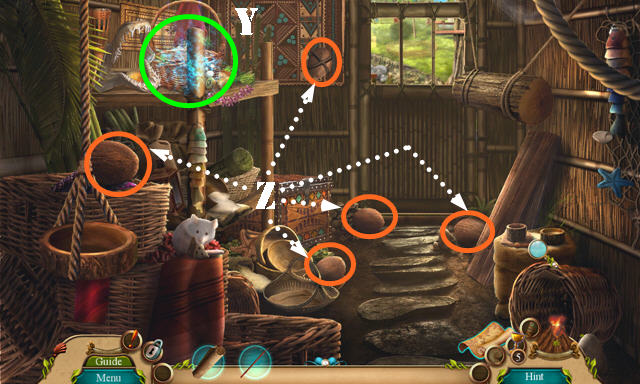
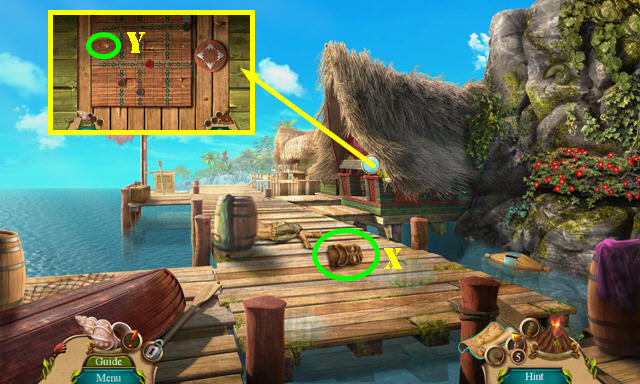
- Play HOP (Y); receive PALM FRUIT.
- Take COCONUTS 1/5-5/5 (Z).
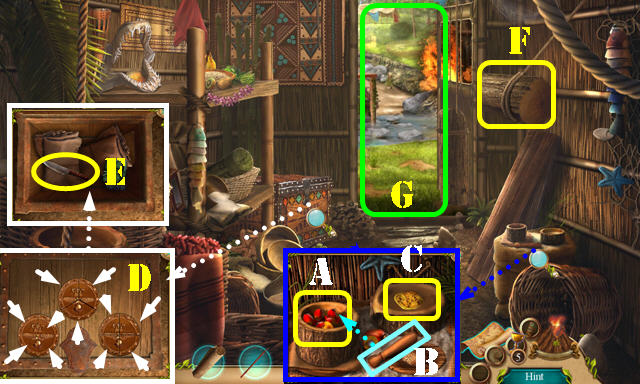
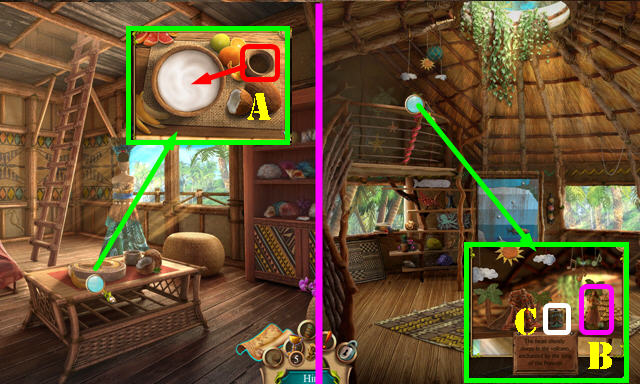
- Place PALM FRUIT (A); use pestle (B) and select mortar. Remove bag and take PALM OIL (C).
- Receive COIN.
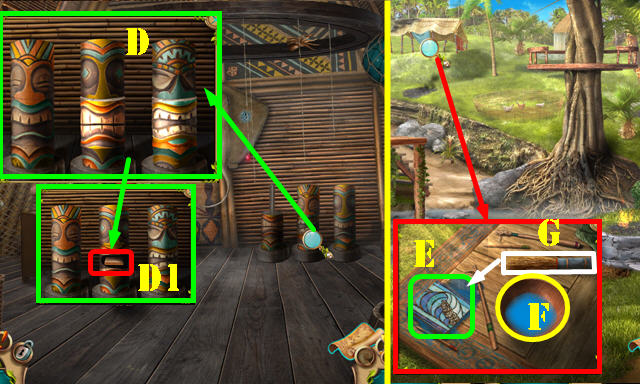
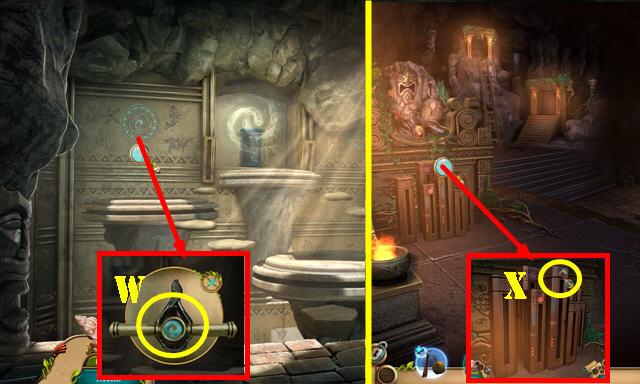
- Use PALM OIL and place COIN; select each section once (D). Select diary twice; take KNIFE (E).
- Use KNIFE (F).
- Go (G).

- Throw COCONUTS 5/5 (H).
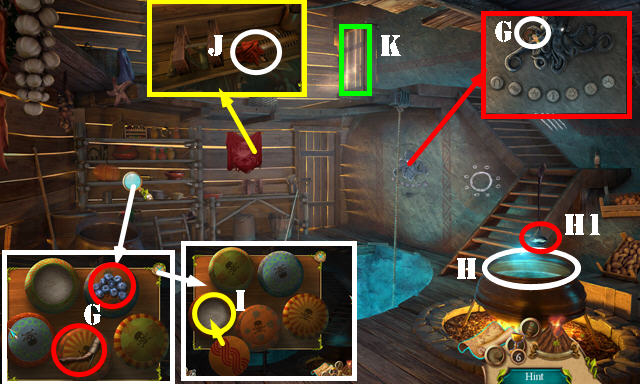
- Select: I-J-K when the center turns green.
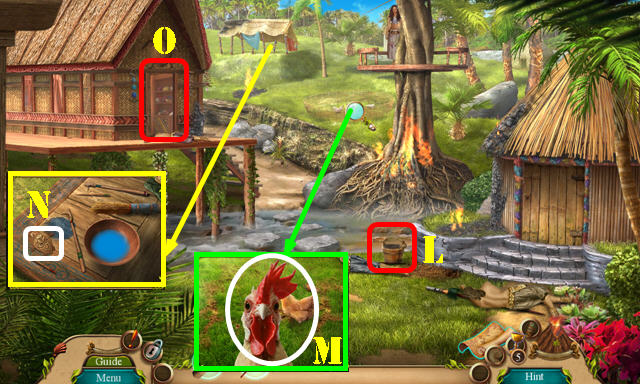
- Select bucket (L).
- Look at chickens (M).
- Take TURTLE (N).
- Enter Princess' Cabin (O).
- Select coral fragments (purple); take CORAL (P).
- Open curtain and look at note; take SEEDS (Q).
- Take STONE FIGURINE (R).
- Go (S).

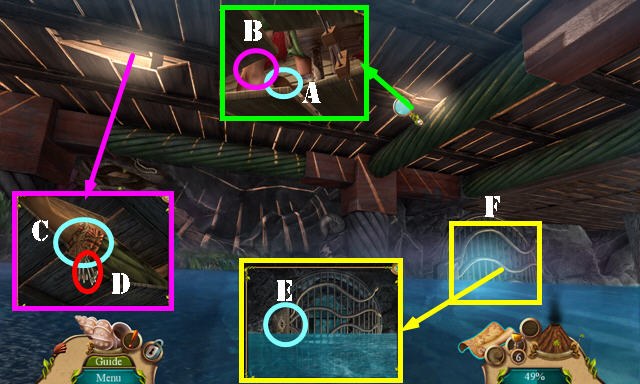
- Take BUTTERFLY 1/2 (T).
- Walk down twice.
- Throw SEEDS (U).; take SEA LIFE 1/3 (V).
- Place TURTLE; select marked areas (W).
- Enter Classroom (X).
- Take BUTTERFLY 2/2 and SEA LIFE 2/3 (Y).
- Place CORAL; take TONGS and CEREMONIAL BOX (Z).
- Go to Princess' Cabin.
- Place BUTTERFLY 2/2; use cup (A); receive COCONUT CREAM.
- Go to Classroom.
- Open CEREMONIAL BOX; take STARS 1/3. COCONUT CREAM on CEREMONIAL BOX. Open box; take PRINCES DOLL.
- Place PRINCESS DOLL (B); take TOTEM PIECE (C).
- Return to Attic.
- Place TOTEM PIECE; arrange as shown (D); take ILLEGIBLE PLATE (D1).
- Go to Village.
- Place ILLEGIBLE PLATE (E); select ink (F) and use brush (G). Take STORY PLATE (E).
- Go to Attic.
- Place STORY PLATE (H). Play HOP; receive INCOMPLETE JEWELRY.
- Pull lever (I).
- Switch totem parts (J). Take STARS 2/3 (K).
- Go to Classroom.
- Place INCOMPLETE JEWELRY (L). Play HOP; receive HEADPIECE PART.
- Go to Princess' Cabin.
- Place HEADPIECE PART (M); receive STARS 3/3.
- Go to Attic.
- Place STARS 3/3 and MAPS (N).
- Hold down either arrow until stars fall in place (O).
- Receive DIRECTIONS.
- Take SEA LIFE 3/3 (P).
- Go to Classroom.
- Take Shell (Q).
- Place SEA LIFE 3/3; arrange fish as shown (R).
- Take ROPE and HARNESS (S).
- Walk down.
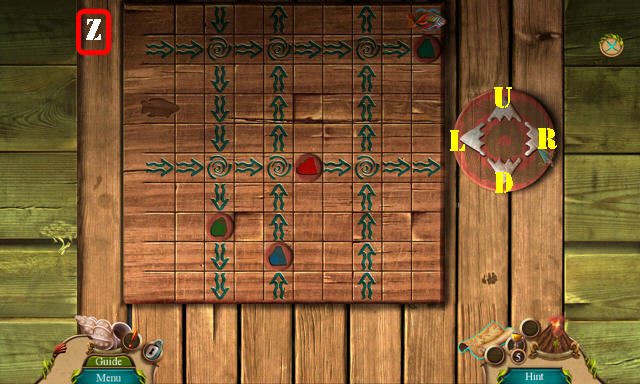
- Place HARNESS and use arrows (T) to navigate. Solution is random.
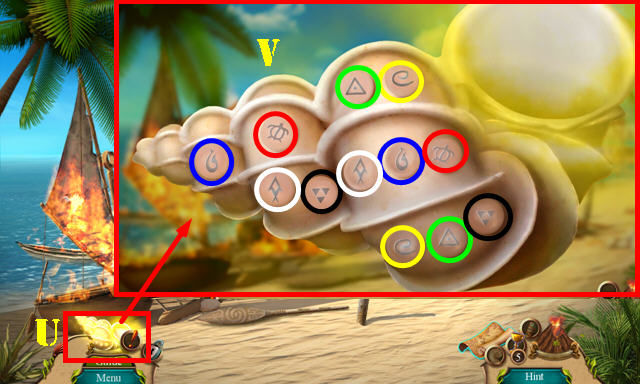
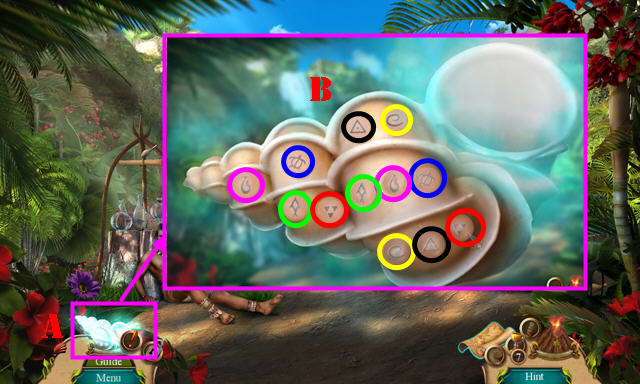
- Select shell (U); select matching pairs (V).
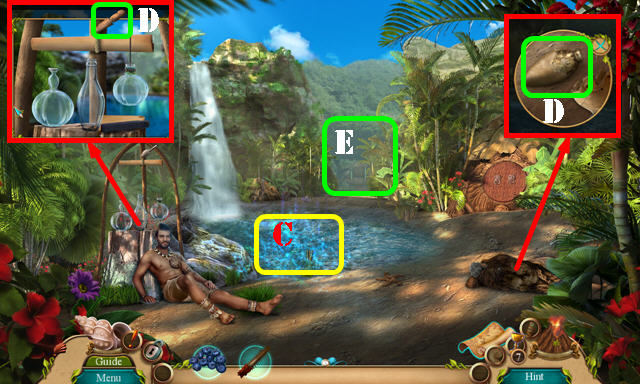
- Take PADDLE and MINIATURE FLOAT (W).
- Use PADDLE (X); receive WHEEL.
- ROPE on STONE FIGURINE; select; take ROCK ON ROPE.
- Use ROCK ON ROPE (Y).
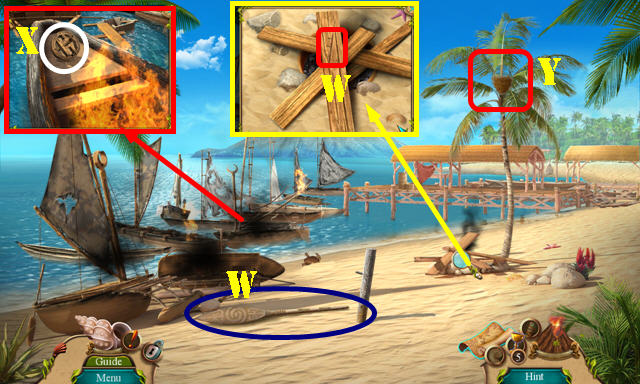
- Play HOP (Z); receive BRUSH.
- Select planks 4x; use BRUSH (A); receive TAR.
- Go (B).
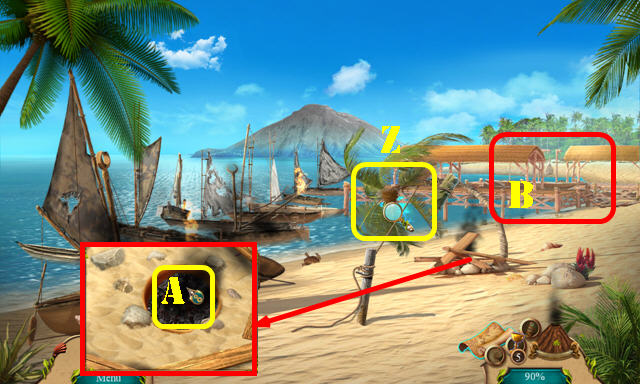
- Take WOODEN PATCH (C).
- Look at note; assemble parts as shown (1-3). Place MINIATURE FLOAT (D). Take BOAT MODEL (E).
- Use TAR and WOODEN PATCH (F).
- Place WHEEL (G); pull on rope (G1).
- Select net 3x; take PRESS PIECE 1/3 (H). Select net 2x; take RUDDER (I).
- Place RUDDER (J).
- Place BOAT MODEL (K); select sail twice and use NEEDLE (L); take SAIL.
- Place SAIL and use DIRECTIONS (M).
Chapter 2: Dock
- Take FILE and FORK (N).
- Use FILE and TONGS (O); receive EEL.
- Use EEL (P).
- Take SMALL SHOVEL (Q).
- Go (R).
- Take CLAY FISH and PRESS PIECE 2/3 (S).
- Look at note; take NET (T).
- Use FORK; take IRON ORE (U).
- Select NET. Solution (1-7).
- Take NET.
- Walk down.
- Select Shell (V).
- Solution (W).
- Take BLANK MASK (X).
- Place CLAY FISH (Y).
- Solution (Z): Dx2-R-Dx3-Rx2-Ux3-R-Ux2-R.
- Go forward.
- Place BLANK MASK (A); play HOP. HOP puzzle solution (B).
- Take CLOTH and SCREWDRIVER (C).
- Use SMALL SHOVEL (D); receive COAL. Place IRON ORE; take MELTED IRON (E).
- Use MELTED IRON; take PARROT SYMBOL (F).
- Go to Building Front.
- Place PARROT SYMBOL; take PESTLE (G).
- Use SCREWDRIVER; take LEATHER (H). Take MEAT CHOP and PRESS PIECE 3/3 (I).
- Go to Costume Shop.
- Use COAL and PESTLE (J); select bottle (K). Take INK BRUSH (L).
- Place PRESS PIECE 3/3; place as shown (M). Place LEATHER over it and take TATTOO PATTERN (N).
- Place TATTOO PATTERN on arm; use INK BRUSH on it (O).
- Go to Building Front.
- Talk (P).
- Use NET (Q); receive FIREFLIES.
- Throw MEAT CHOP (R); receive SHARP BONE.
- Try to go (S) and then go (T).
- Take OCTOPUS PENDANT (U).
- Use FIREFLIES (V). Play HOP; receive HOOK.
- Walk down.
- Use HOOK (W); take LID (X).
- Place OCTOPUS PENDANT; take CLAMP (Y).
- Go (Z).
- Use CLAMP; take LADLE (A). Use SHARP BONE (B).
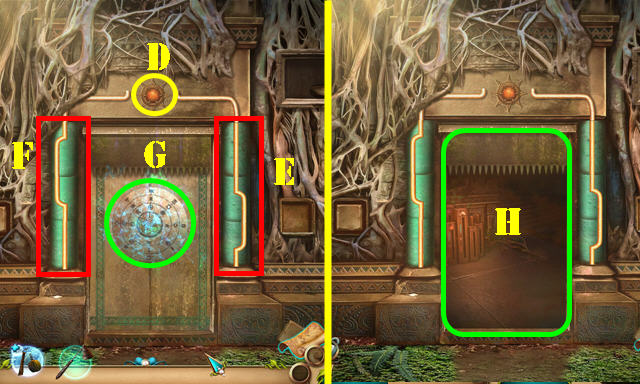
- Select 3x (C); take KEY (D).
- Use KEY (E).
- Go (F).
- Take HIRO'S PENDANT 1/3, SEAM RIPPER, and BERRIES (G).
- Use LADLE (H); take PINEAPPLE LEAVES (H1).
- Place LID; swap as shown; take FLOUR (I).
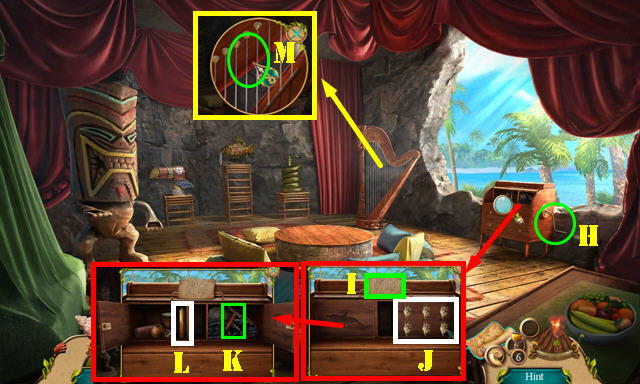
- Use CLOTH; take SAW and CRANK (J).
- Go (K).
- Take LAVA CHUNK (L).
- Use SEAM RIPPER; take CHALK (M).
- Select cover; take TINY SCROLL (N).
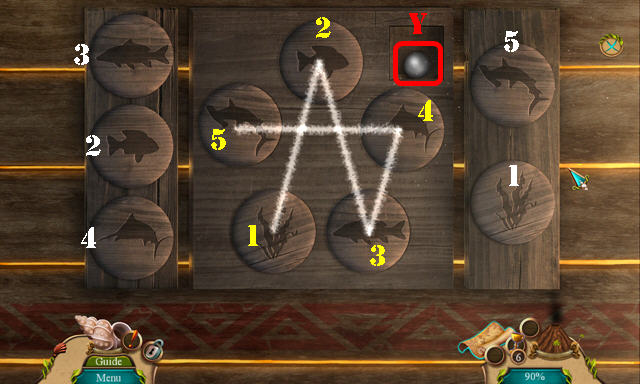
- Place PINEAPPLE LEAVES; arrange as shown (O). Take DOLPHIN SYMBOL (P).
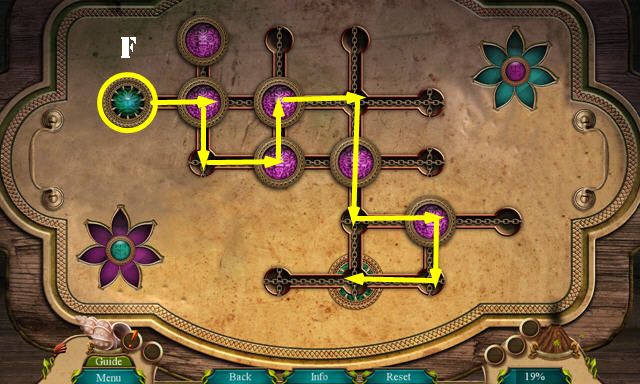
- Solution: (Qx2-Rx2-Sx2-Tx2-Ux2).
- Take FLOWER 1/2 (V).
- Walk down.
- Place LAVA CHUNK; take FLOWER 2/2 (W).
- Use CHALK (X).
- Solution (1-5).
- Take PEARL (Y).

- Place PEARL (Z). Arrange tentacles as shown (Z1).
- Go (Z2).
Chapter 3: Treasury
- Use SAW (A); receive SCALE 1/2.
- Place TINY SCROLL; take VAULT CODE (B).
- Use FLOUR and place VAULT CODE; enter 4916 (D). Play HOP; receive HIRO'S PENDANT 2/3.
- Go to Sleeping Quarters.
- Place FLOWER 2/2 (E).
- Solution (F).
- Take HIRO'S PENDANT 3/3.
- Go to Treasury.
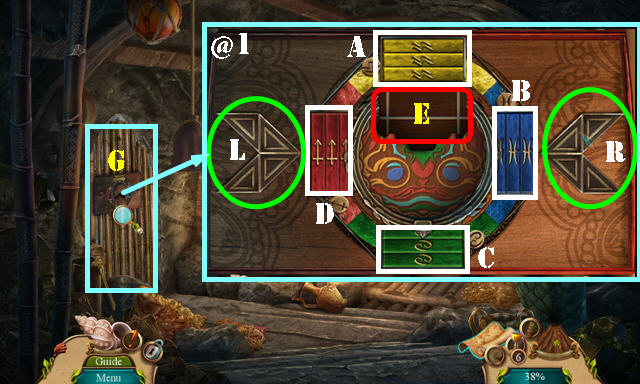
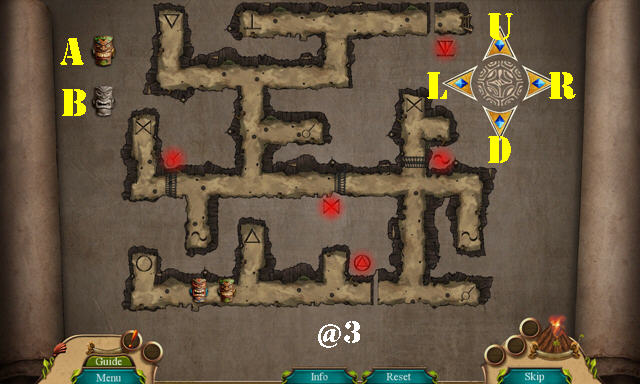
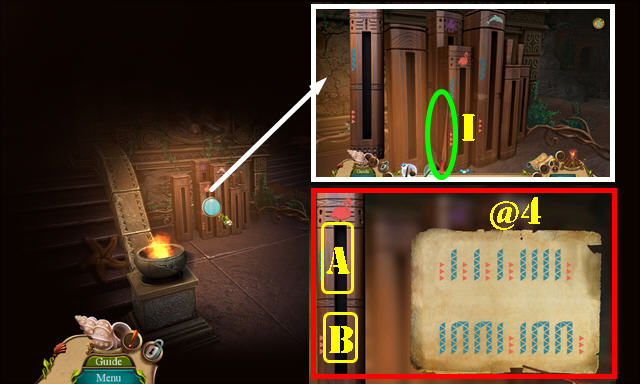
- Place HIRO'S PENDANT 3/3. Solution (@1): Dx2-Rx2-B-Lx2-E-Rx2-E-L-Cx2-L-E-L-A.
- Lx2-E-R-B-L-E-R-B-R-E-L-E-R-Ax2-L-E-R-Ex2. Note: the (E) refers to the center amulet in any position.
- Enter Hiro's Quarters (G).
- Place CRANK (H). Look at note (I).
- Select each shell (J); take TUNING KEY (K).
- Place DOLPHIN SYMBOL; take CLOCK WEIGHT (L).
- Use TUNING KEY (M); receive WIRE.
- Walk down.
- Use WIRE; take GOGGLES (N).
- Place CLOCK WEIGHT (O); take FEATHER (P).
- Go (Q).
- Place FEATHER. Solution @2: (C-H)-(I-E)-(B-I)-(B-J)-(B-C)-(B-G)-(A-D)-(G-L)-(F-K).
- Take SAPPHIRE.
- Walk down.
- Play HOP (R); receive GOLDEN STATUE.
- Place SAPPHIRE (S); take TAIL PART (T).
- Go (U).
- Place TAIL PART; arrange as shown (V). Take SCALE 2/2 (W).
- Place SCALE 2/2; arrange pattern (X).
- Place GOLDEN STATUE (Y).
- Play puzzle (Z).
- Solution @3: B–Lx2–U; A–R–Ux2–Dx2–Rx6; B–D–Rx9; A–Ux4–Rx2–Dx2; B–R–Ux7.
- A–Ux2–Lx10–Dx2; B–Dx7–Rx2; A–Ux2–Lx2–Ux2; B–Lx2–Ux4–Lx6–Ux2–Rx2.
- A–Dx2–Rx4–Ux4–Lx3–Ux2; B–Lx2–Ux2–Rx3–Ux2–Lx3–Rx8; A–Dx2–Rx6–Ux2–Rx4.
- Remove 1-5.
- Select shell (A).
- Solution (B).
- Use GOGGLES (C). Play HOP; receive FLOWER.
- Take SPEARHEAD and VIAL (D).
- Go (E).
- Use SAW on spikes on scene.
- Take TALONS, KNOCKER, and PICKAXE (F).
- Press buttons 1-4; take STONE SWALLOW (G).
- Use VIAL (H); receive TEARS.
- Place STONE SWALLOW; select 1-3; take SUN 1/2.
- Walk down.
- Use PICKAXE; take COLUMN RING (I).
- Place KNOCKER; select Jx2-K-J-K.
- Enter (L).
- Take POI (M); select two scrolls.
- Place TALONS and select each claw (N); look at note; take ANT REPELLENT (O) and select next scroll.
- Give BERRIES (P); take SUN 2/2 (Q).
- Look at note (R) and use SPEARHEAD (S); take MUSHROOM and WATERSKIN (T).
- Walk down.
- Use ANT REPELLENT; take WHALE PENDANT (U).
- Go to Healer's Hut.
- Place WHALE PENDANT (V); take SNUFFER and ENCRYPTED RECIPE (W).
- Walk down.
- Place ENCRYPTED RECIPE and use WATERSKIN (X); take GROWTH RECIPE (Y).
- Go (Z).
- FLOWER, MUSHROOM, and TEARS on GROWTH RECIPE; take GROWTH AID.
- Use GROWTH AID; take NONI FRUIT (A).
- Walk down.
- Give NONI FRUIT (B); receive CRYPT KEY.
- Go (C).
- Place SUN 2/2 (D).
- Place COLUMN RING; arrange rings as shown (E-F).
- Place CRYPT KEY (G); play HOP.
- Enter Crypt (H).
Chapter 4: Crypt
- Grab Stick (I).
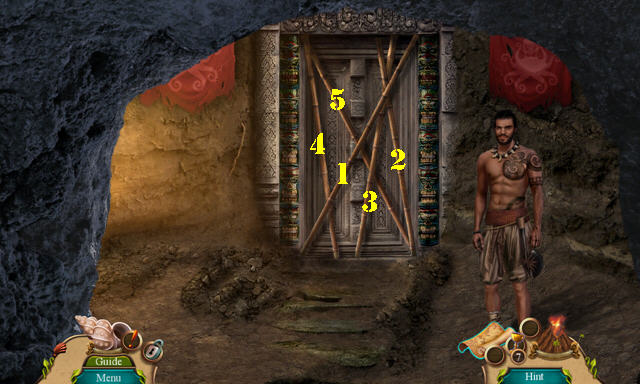
- Solution (@4): (B-A-B-A-B-A-B-A-A-A-A-B)-(A-Ax2-Ax2-A-B-A-Ax2-Ax2-B).

- Play HOP (J); receive LEVER 1/2.
- Go (K).
- Take SHELL (L).
- Select shell (M). Solution (N).
- Use SNUFFER; select 1-7. Take OCTOPUS STICK (O).
- Walk down.
- Use OCTOPUS STICK (P).
- Solution (@5): (A-A-A-Bx2-A-Ax2-B)-(A-A-A-Bx2-A-Ax2-B).
- Go (Q).
- Take SHIELD and LIGHTNING BOLT (R).
- Walk down; enter Water Chamber (S).
- Use SHIELD (T).
- Take CLAM (U).
- Place SHELL (orange); select 1-4.
- Use LIGHTNING BOLT; take CHAIN and LEVER 2/2 (V).
- Go to Air Chamber.
- Place LEVER 2/2 (W). Play HOP; receive DOLPHIN STICK.
- Walk down.
- Use DOLPHIN STICK (X).
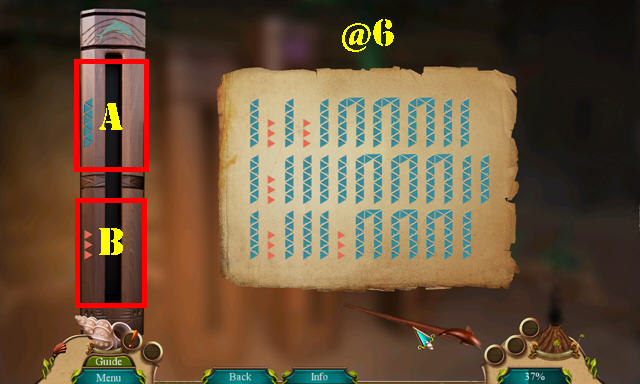
- Solution (@6): A-B-A-B-A-Ax2-Ax2-Ax2-A-A.
- A-B-A-A-A-A-Ax2-Ax2-Ax2-A-A.
- A-B-A-A-A-B-Ax2-Ax2-Ax2-A.
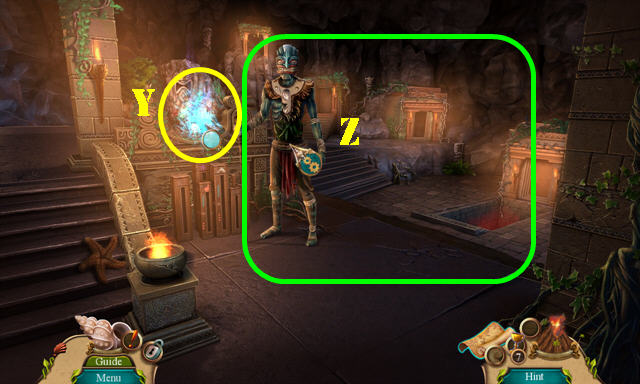
- Play HOP (Y); receive PUZZLE PIECES 1/2.
- CHAIN on POI.
- Use POI on scene (Z).

- Rotate Z1 counterclockwise until lit. Rotate Z2 clockwise until lit. Rotate Z3 clockwise until lit.
- Go (C).
- Use CLAM; take GLOVE (D).
- Take PUZZLE PIECES 2/2 (E).
- Place PUZZLE PIECES 2/2 (F).
- Solution (G).
- Take OCARINA MOLD.
- Go to Water Chamber.
- Use GLOVE (H); receive PRESSURE PLATE.
- Go to Air Chamber.
- Play HOP (I); receive BONE CARVING.
- Place PRESSURE PLATE; select matching pairs (J).
- Go to Earth Chamber.
- Place BONE CARVING (K); select each lever (K1).
- Take CLAY (L).
- Go to Air Chamber.
- Place OCARINA MOLD and use CLAY; take RAW OCARINA (M).
- Go to Fire Chamber.
- Place RAW OCARINA; take FLAMING OCARINA (N).
- Go to Water Chamber.
- Place FLAMING OCARINA; take OCARINA (O).
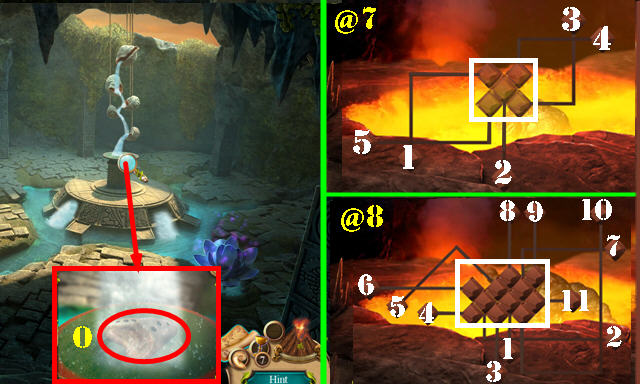
- Play automatic HOP.
- Play automatic puzzle. Solution one (@7): (1-5).
- Solution two (@8) (1-11).
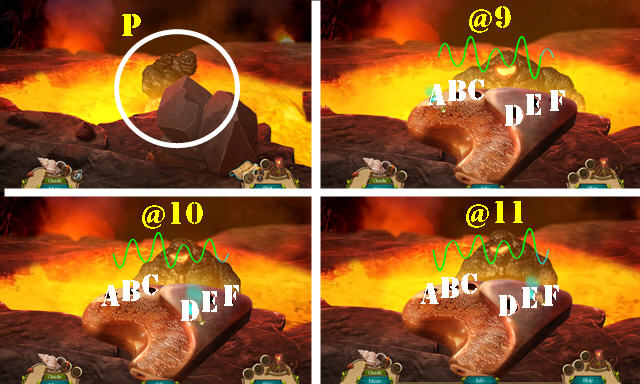
- Place OCARINA on scene (P).
- Solution one (@9): (B-D)-(C-E)-(A-D)-(C-F)-(A).
- Solution two (@10): (E-B)-(D-C)-(E-A)-(D-B)-(D).
- Solution three (@11): (F-A)-(D-B)-(E-A)-(D-C)-(E).
- Congratulations, you've completed Myths of the World: Fire from the Deep!
Created at: 2018-09-14