

Walkthrough Menu
- General Tips
- Chapter 1: Valor's Light
- Chapter 2: The Secret Cave
- Chapter 3: The Dungeon
- Chapter 4: Basil
- Chapter 5: The Mansion
- Chapter 6: Pandora's Box
General Tips
- This is the official guide for Myths of the World: Island of Forgotten Evil.
- This guide will not show when you have to zoom into a location; the screenshots will show each zoom scene.
- Hidden-object puzzles are referred to as HOPs. This guide will not show screenshots of the HOPs, however, it will mention when an HOP is available and the inventory item you'll collect from it.
- Use the Map to fast travel to a location.
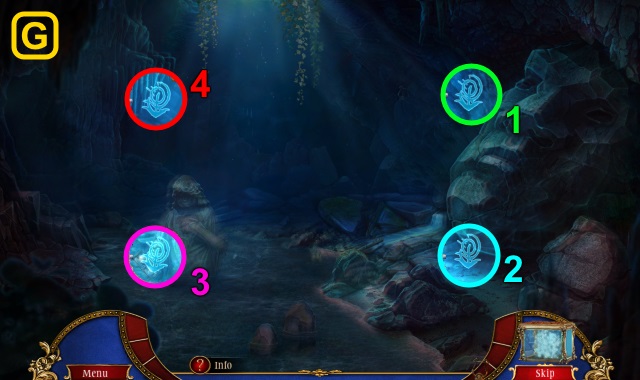
Chapter 1: Valor's Light

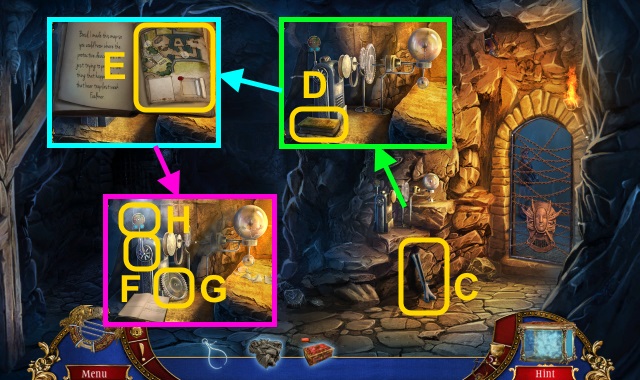
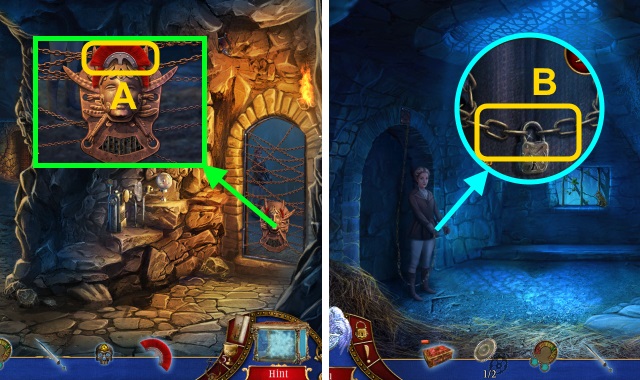
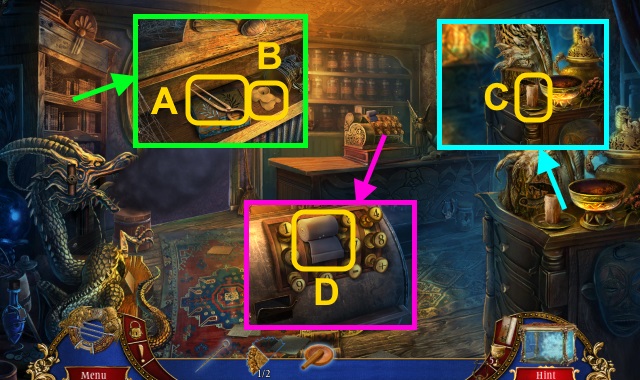
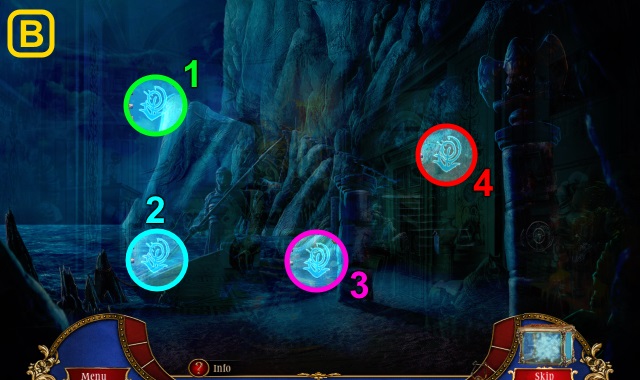
- Examine the door (A).
- Take the MACE and LIGHTER (B).
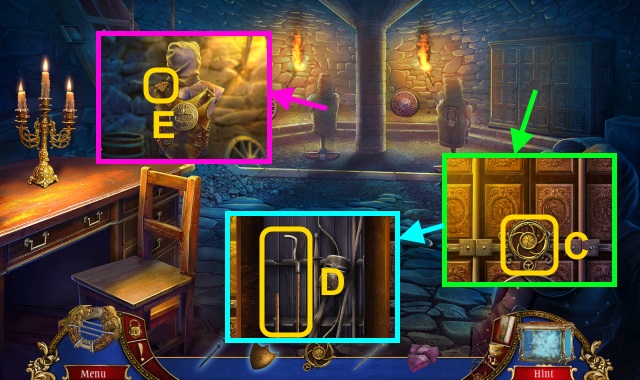
- Use the MACE 3x (C).
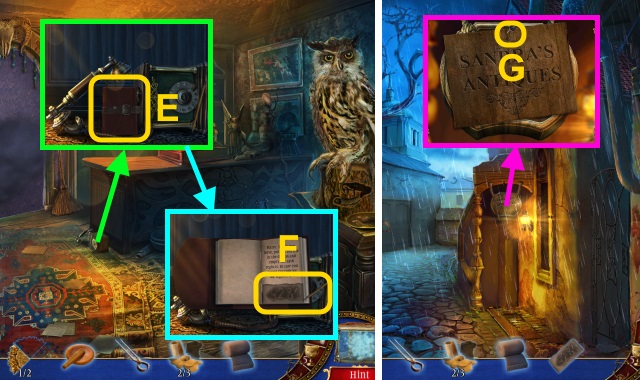
- Walk forward.
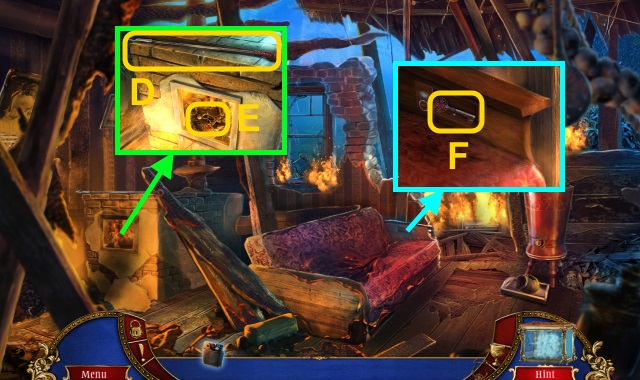
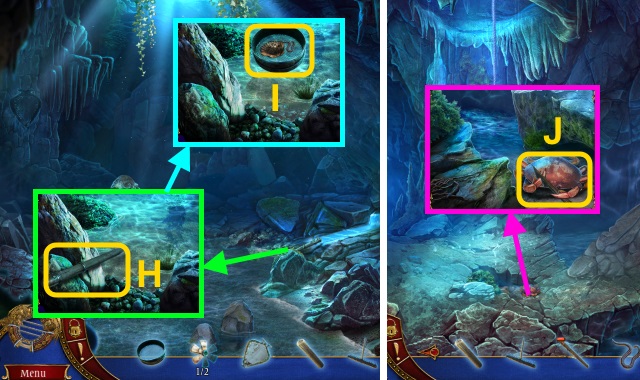
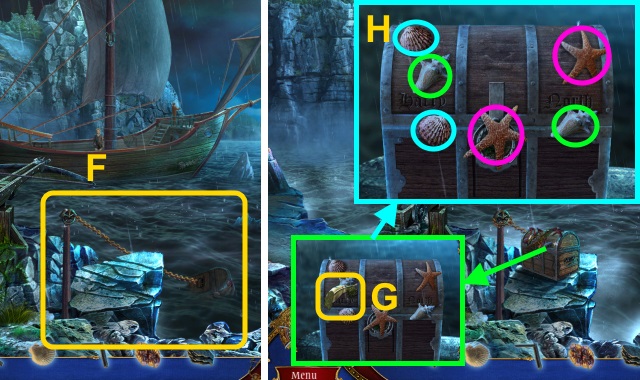
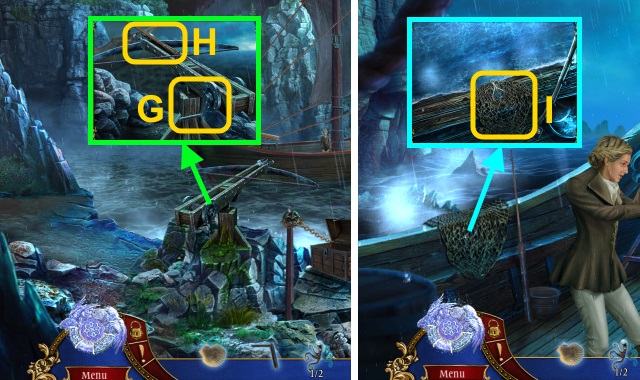
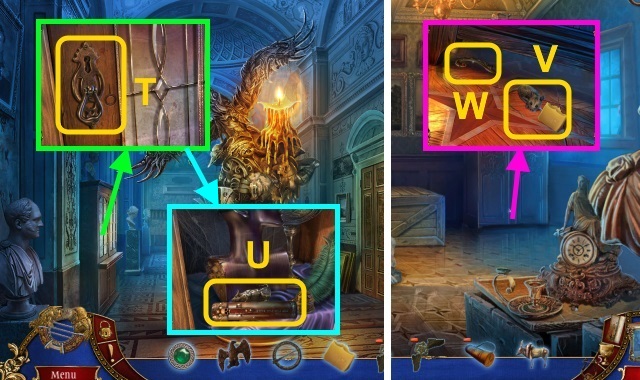
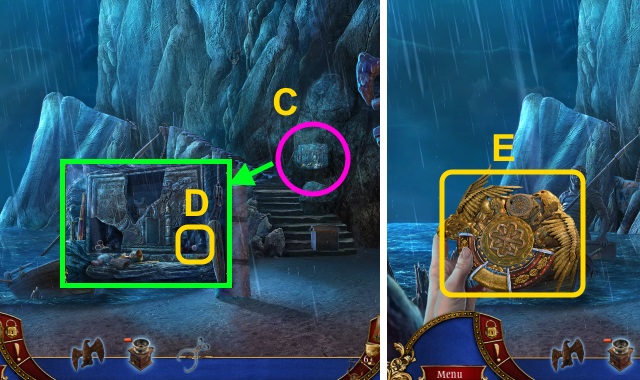
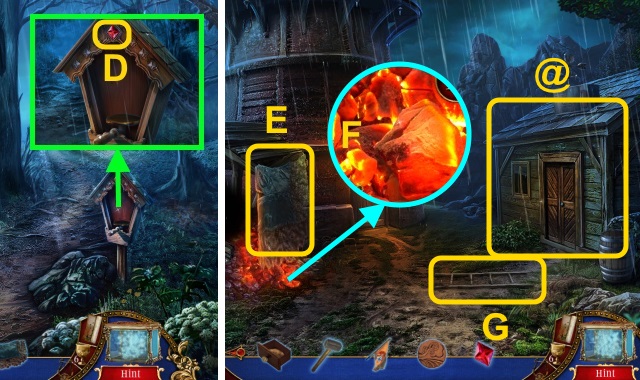
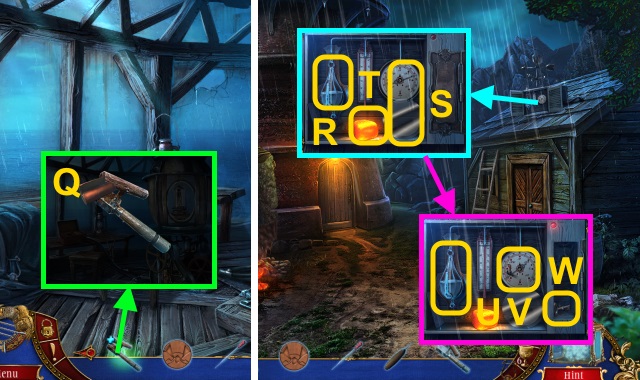
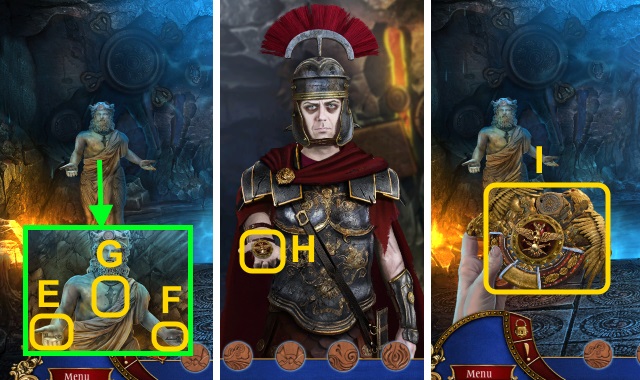
- Take the FIRE POKER (D). Use the FIRE POKER (E); receive the VALVE.
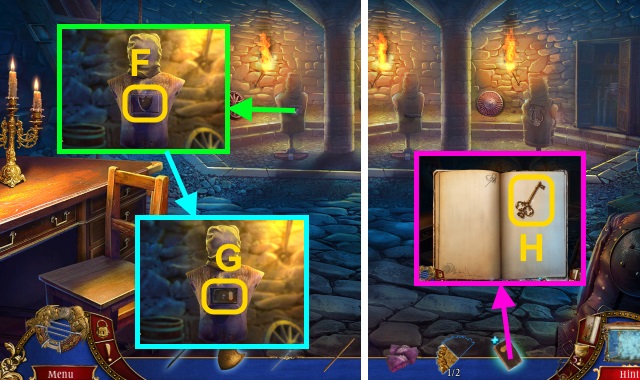
- Open the compartment; take the KEY (F).
- Walk down.
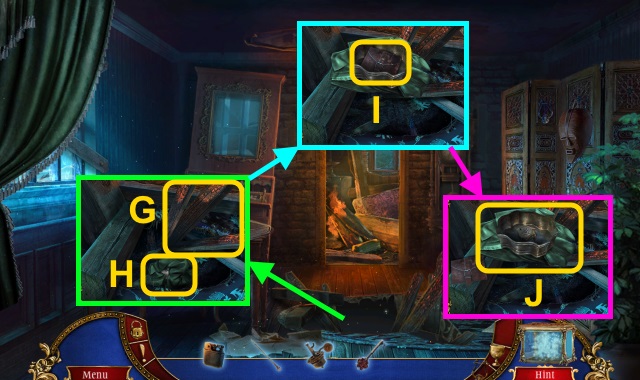
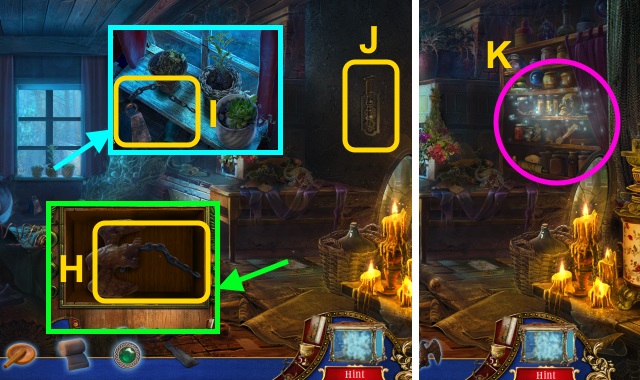
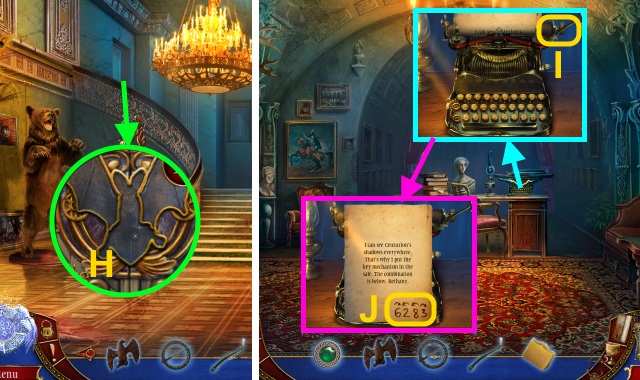
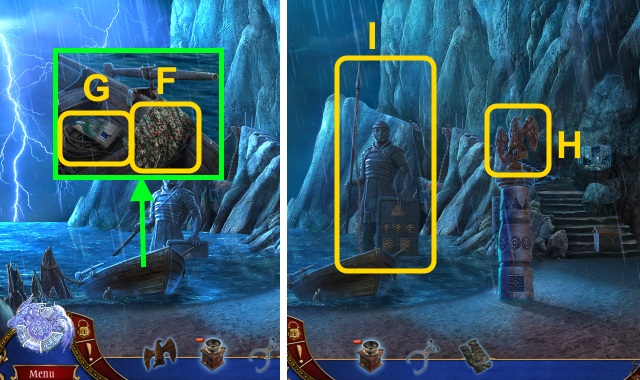
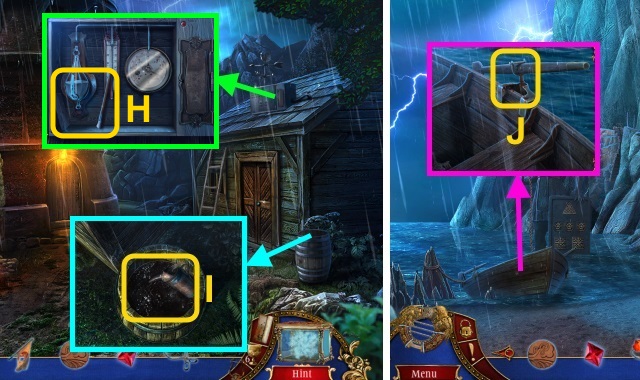
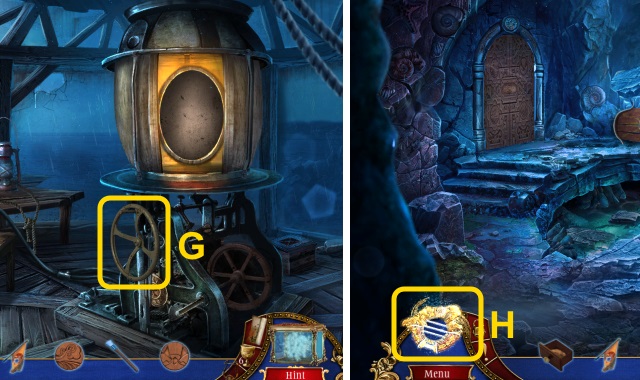
- Use the FIRE POKER 3x (G); examine the bundle (H).
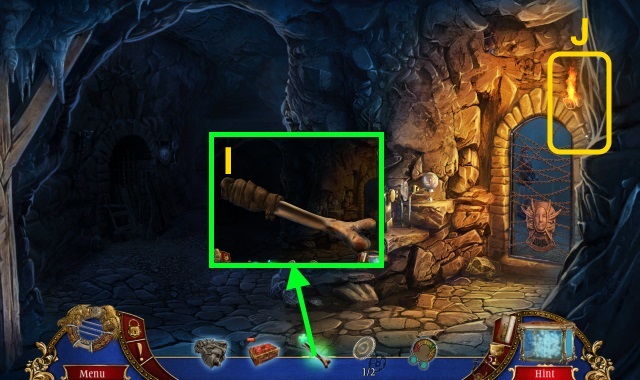
- Open the box; read the journal (I).
- Take the UNCLE'S ARTIFACT and BLANKET (J).
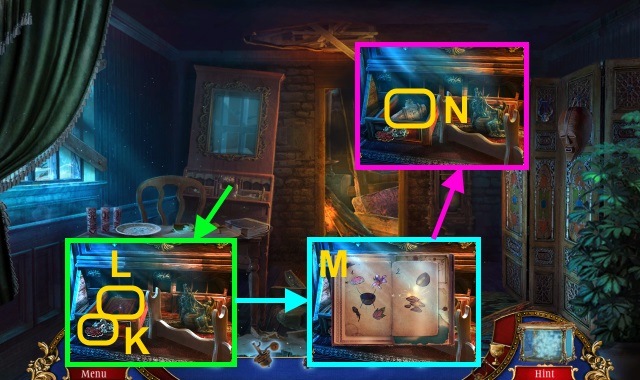
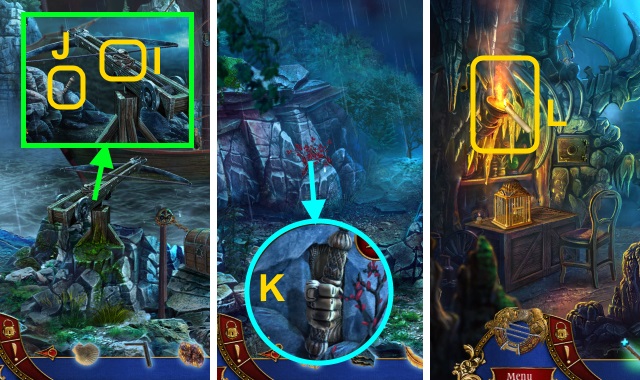
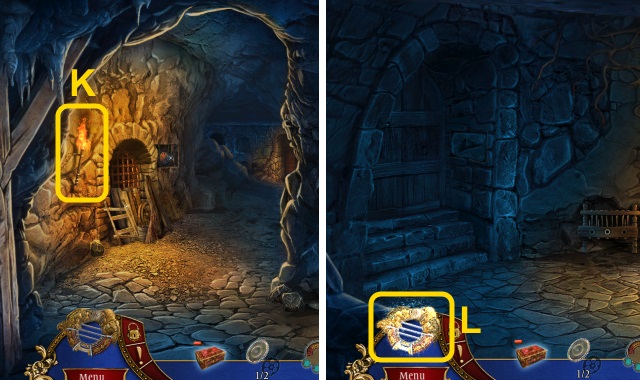
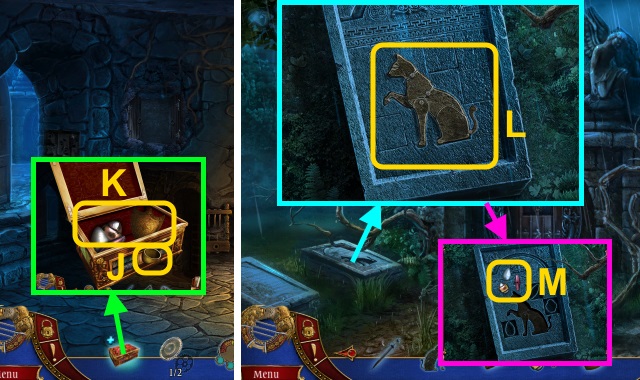
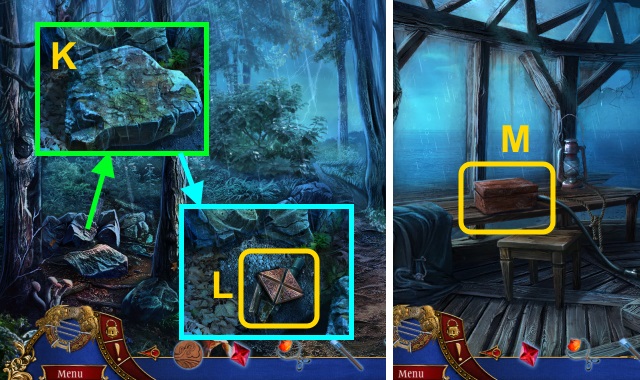
- Use the KEY (K); read the book (L).
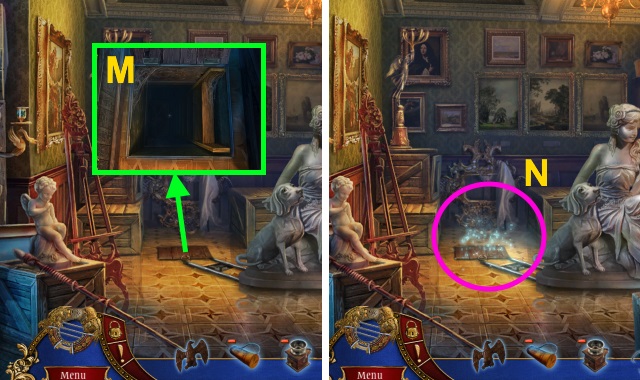
- Take the recipe and Map (M).
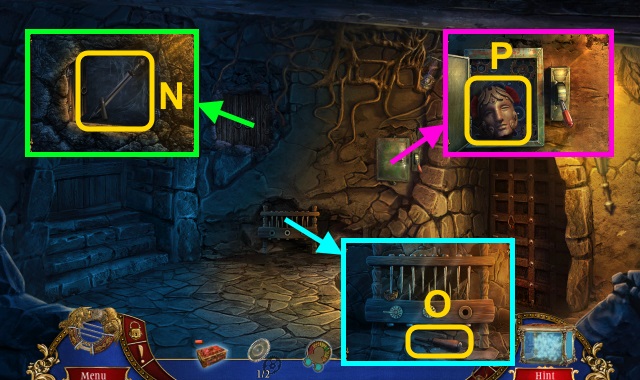
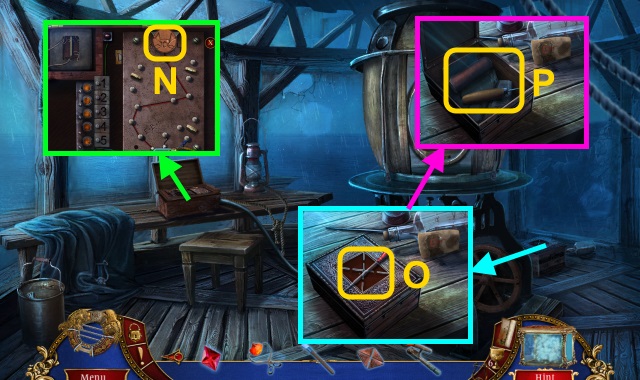
- Take the TAP (N).
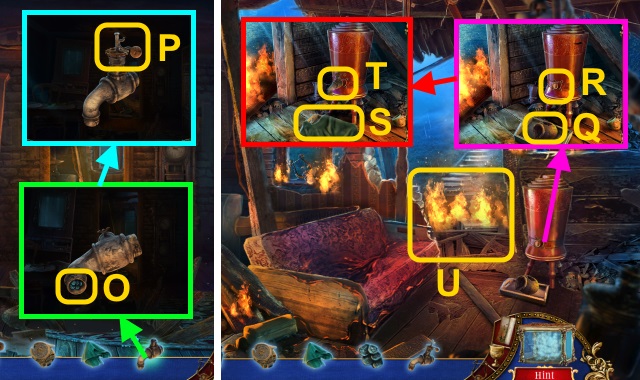
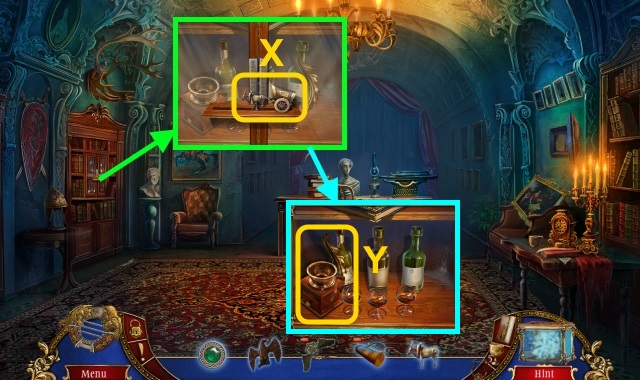
- Examine the TAP; take the FISH SCALES (O).
- Use the VALVE; take the TAP (P).
- Walk forward.
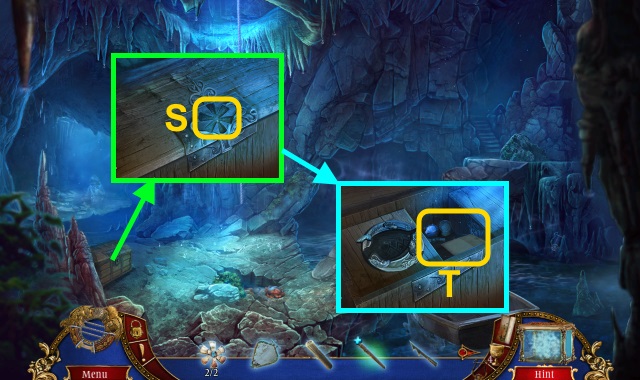
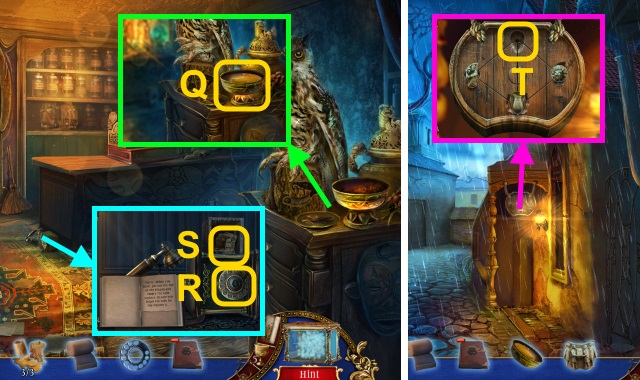
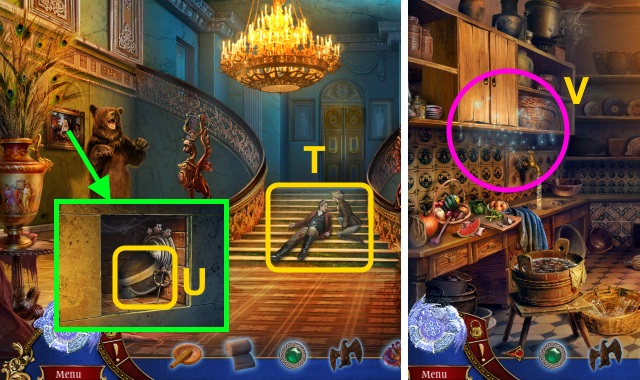
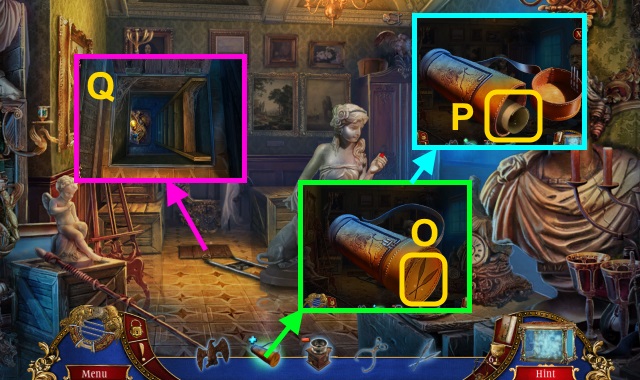
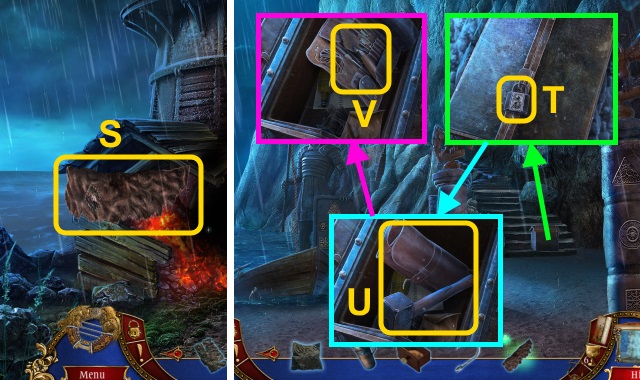
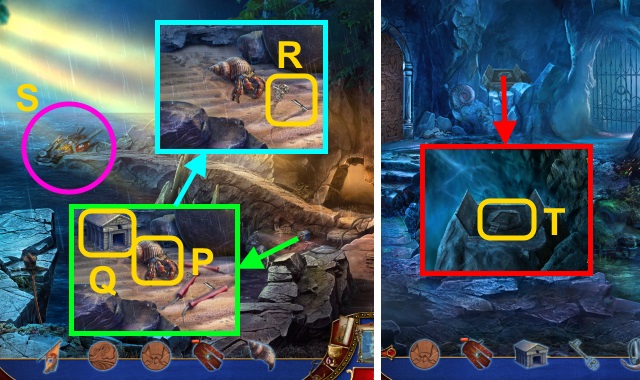
- Take the FOUNTAIN POTS (1/3) (Q); place the TAP (R).
- Place the BLANKET (S); turn the tap (T). Receive the WET BLANKET.
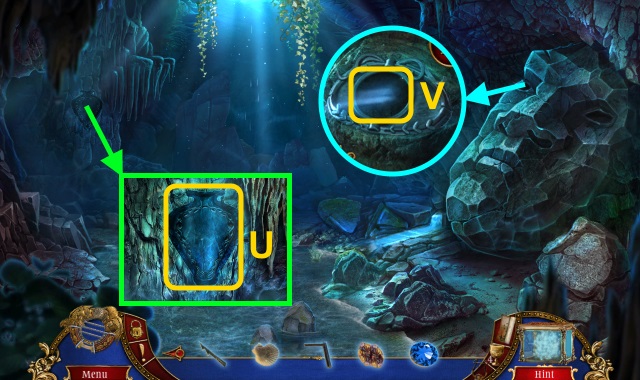
- Use the WET BLANKET (U).
- Walk forward.
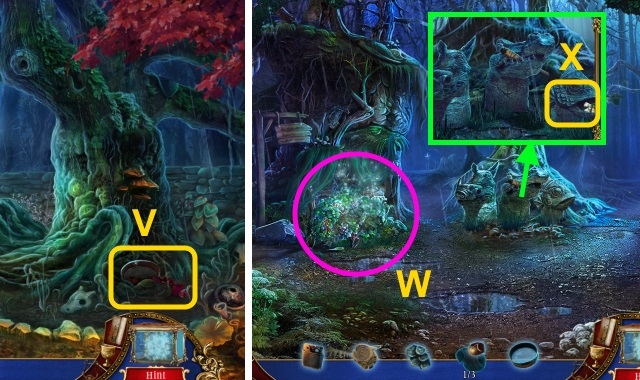
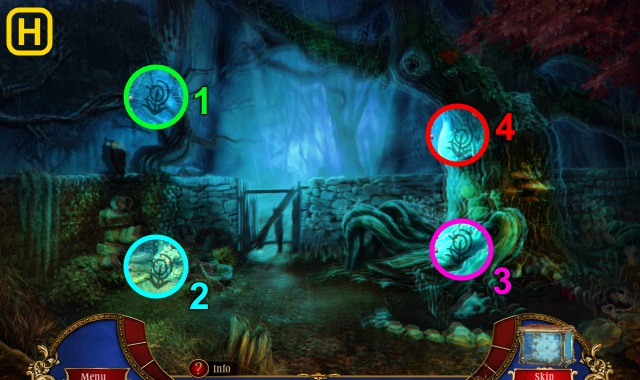
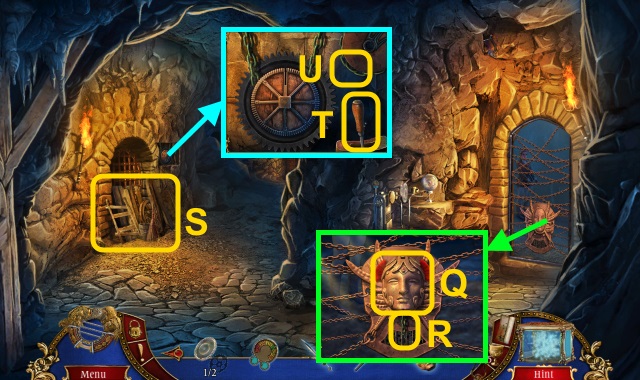
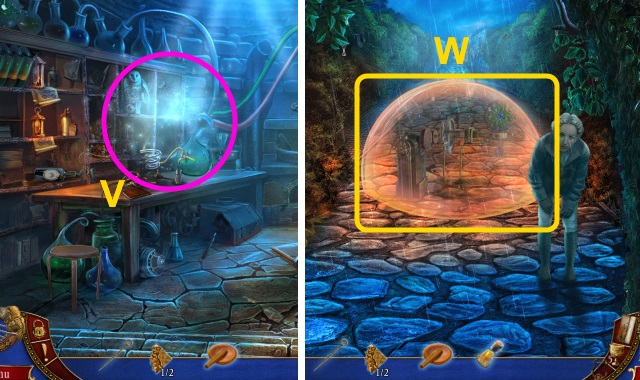
- Move the leaves 2x; take the SIEVE (V).
- Walk forward.
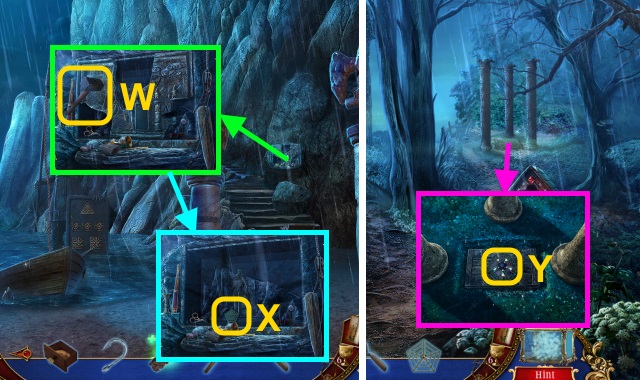
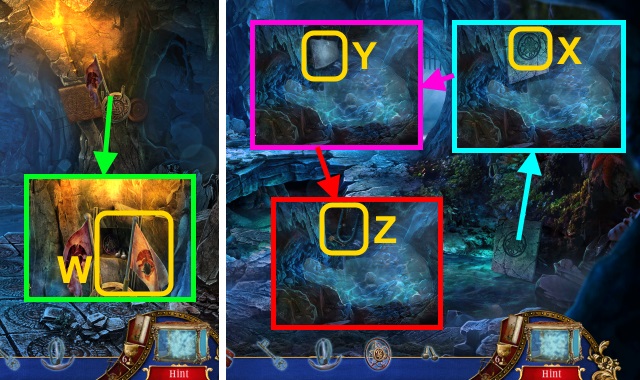
- Move the plants. Play the HOP; receive the GLOWING POWDER (W).
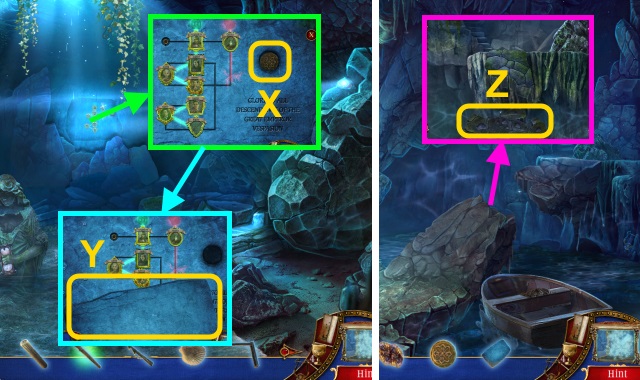
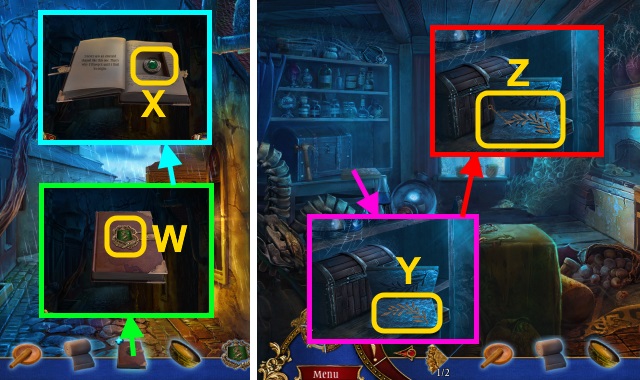
- Place the FISH SCALES; take the METAL FLOWER (1/2) (X).
- Take the FOUNTAIN POTS (2/3) (Y).
- Walk down.
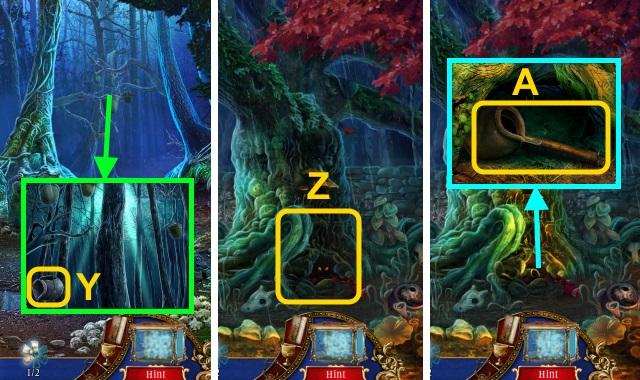
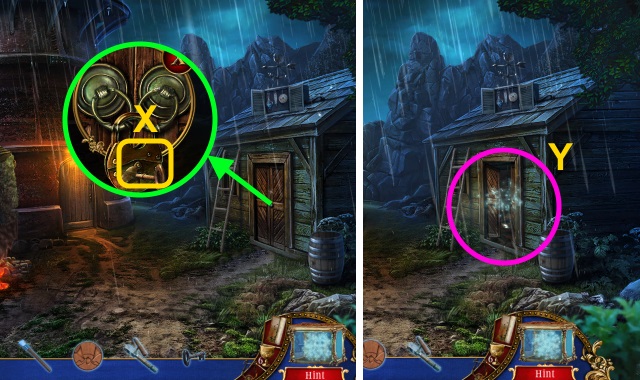
- Use the GLOWING POWDER (Z).
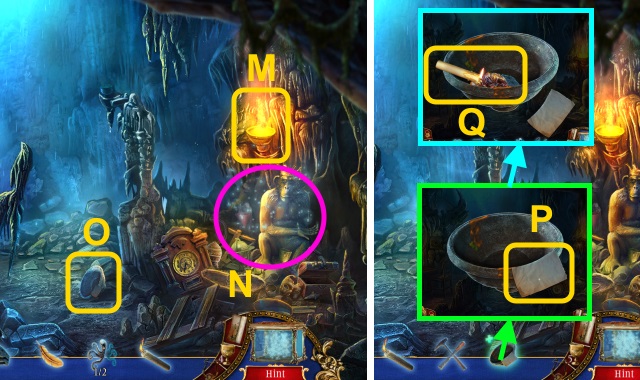
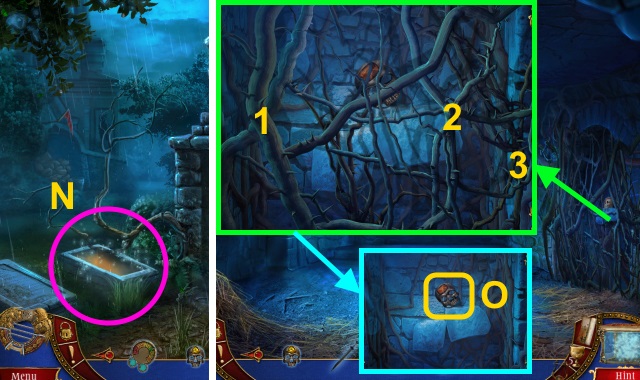
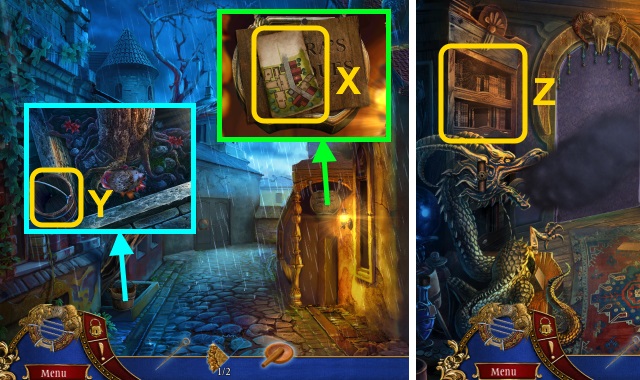
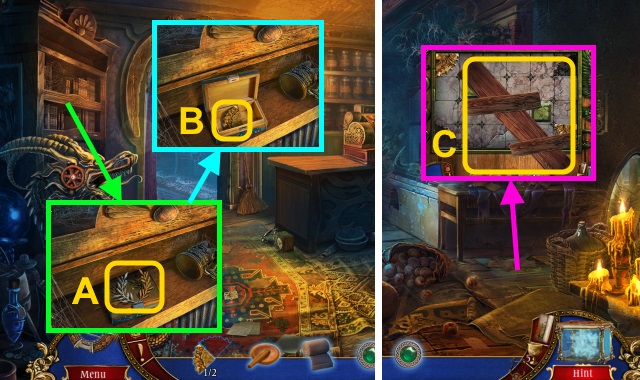
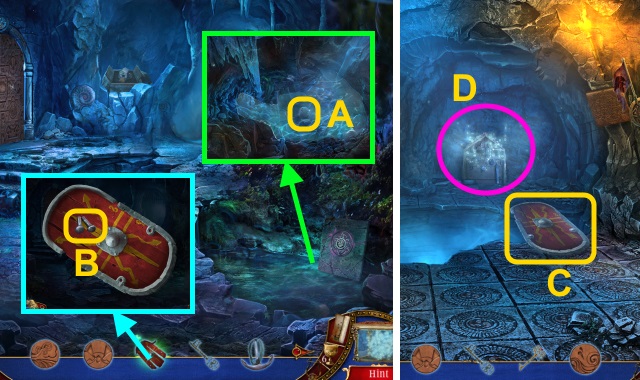
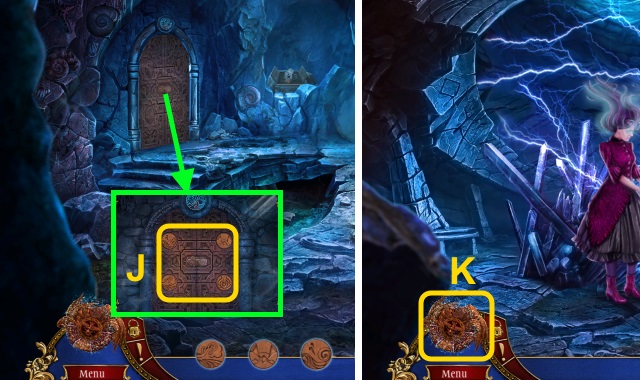
- Take the FOUNTAIN POTS (3/3) and SHOVEL (A).
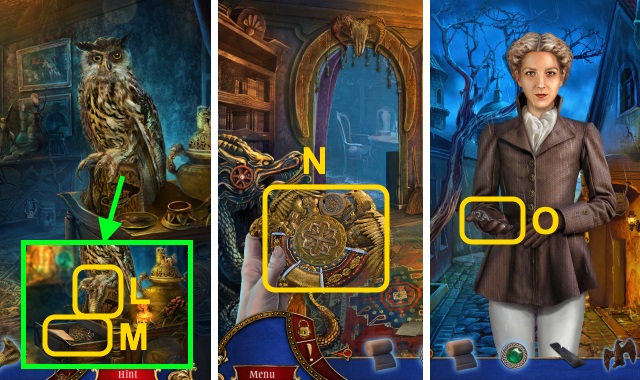
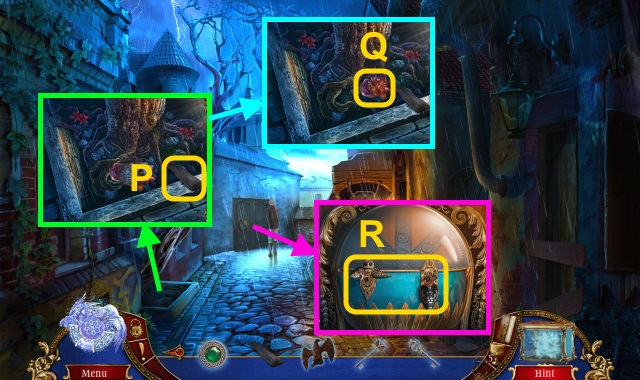
- Examine the plaque (B); move the pot and leaves.
- Use the SHOVEL; open the case (C).
- Read the letter (D); take the BRACER.
- Examine the BRACER (E).
- Place the UNCLE'S ARTIFACT (F). Receive Valor's Light.
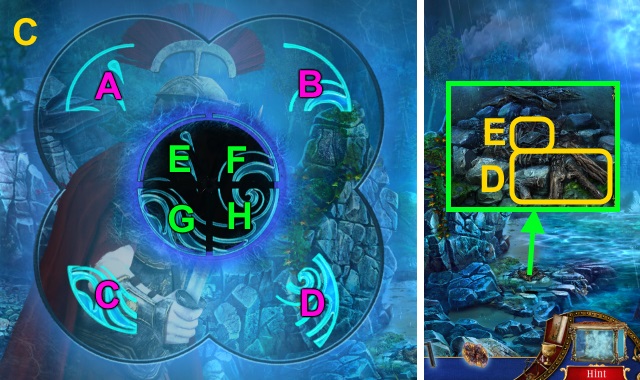
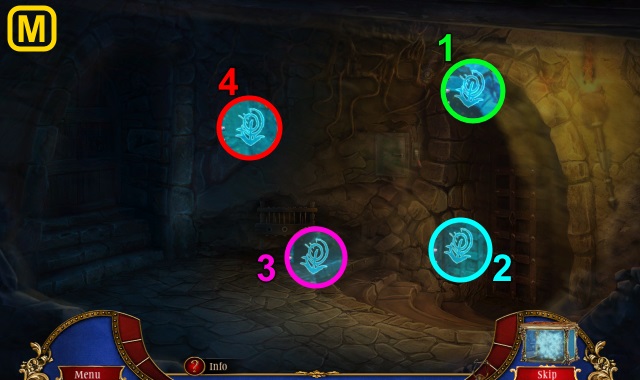
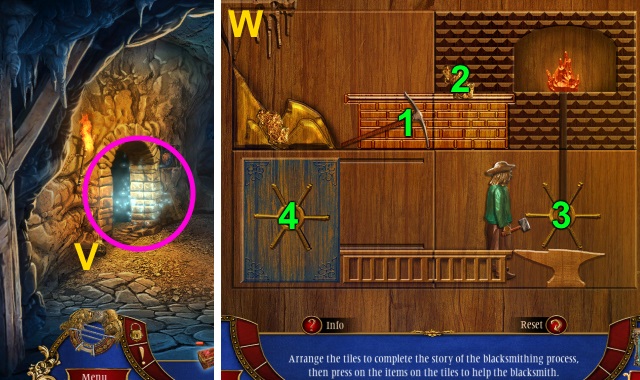
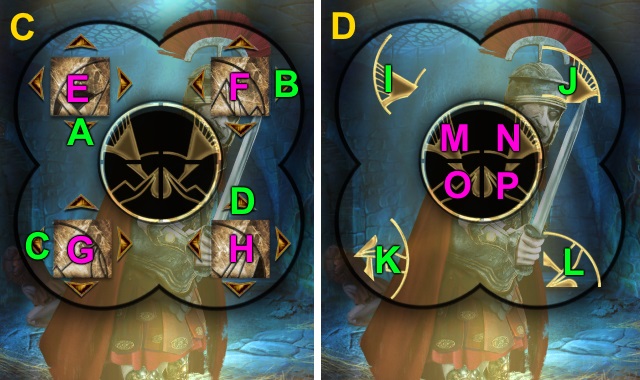
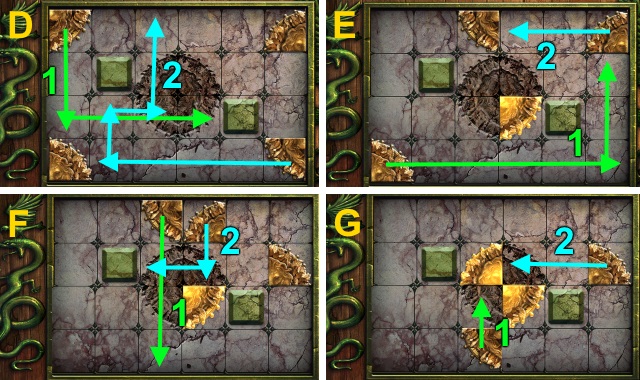
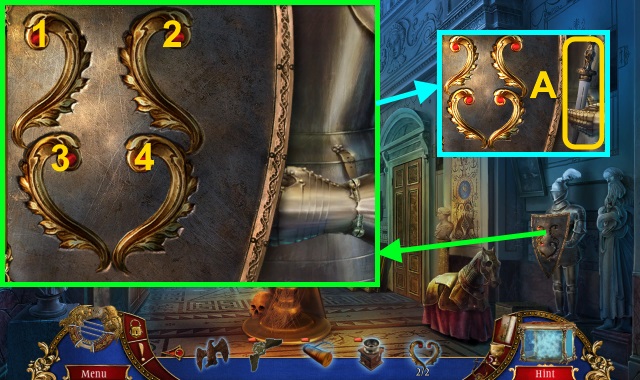
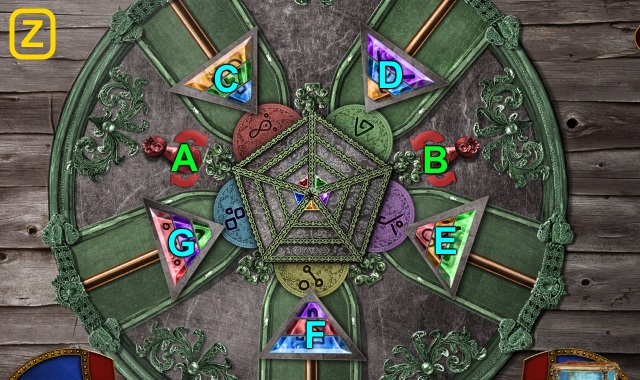
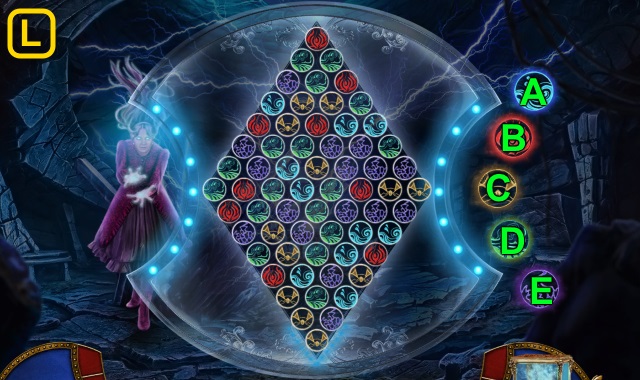
- Use Valor's Light for a mini-game (G).
- Solution (H).
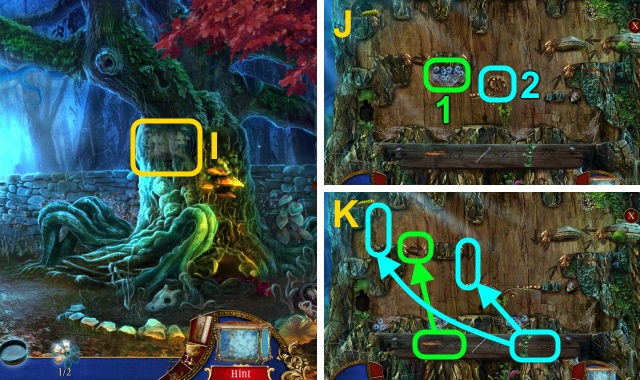
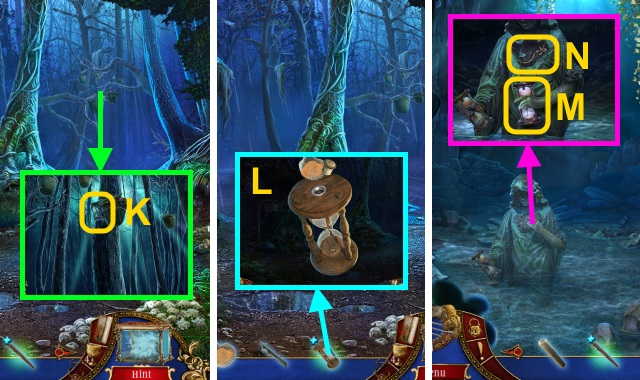
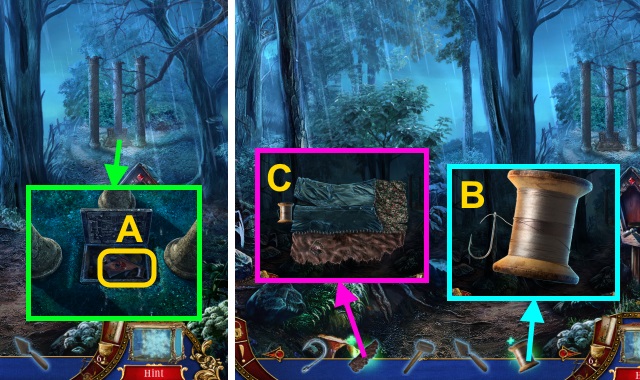
- Examine the tree for a mini-game (I).
- Solution (J-M).
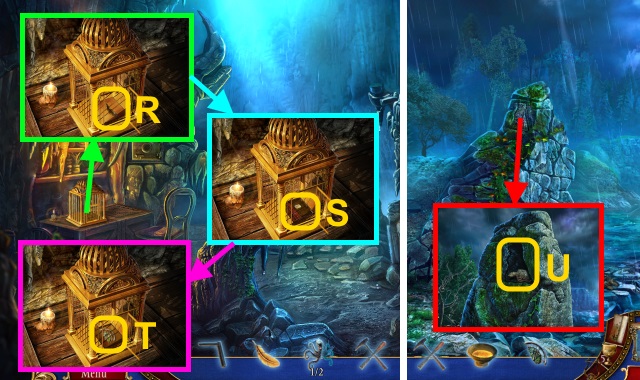
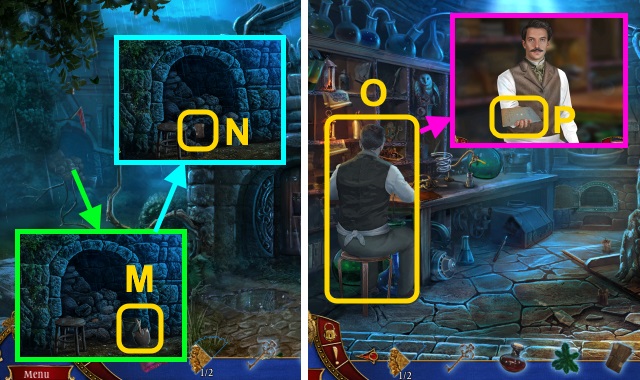
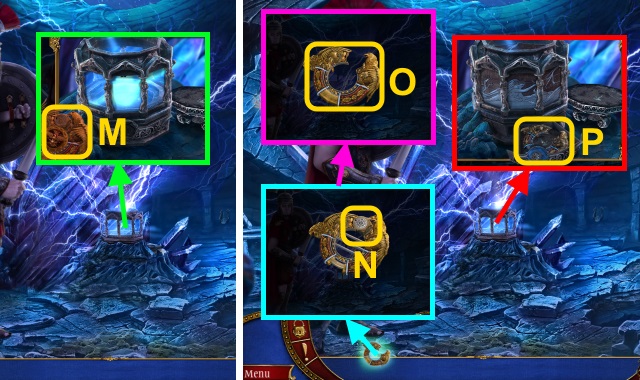
- Take the ANCIENT COMPASS (N).
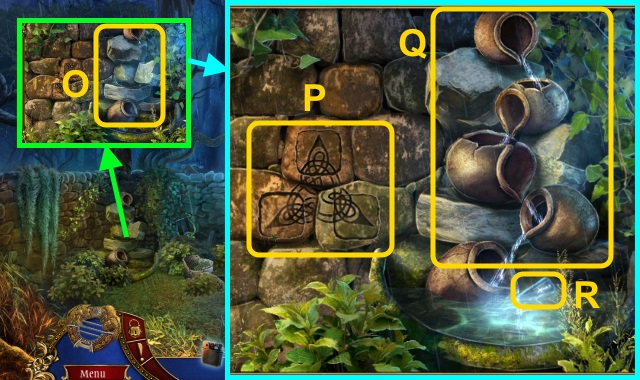
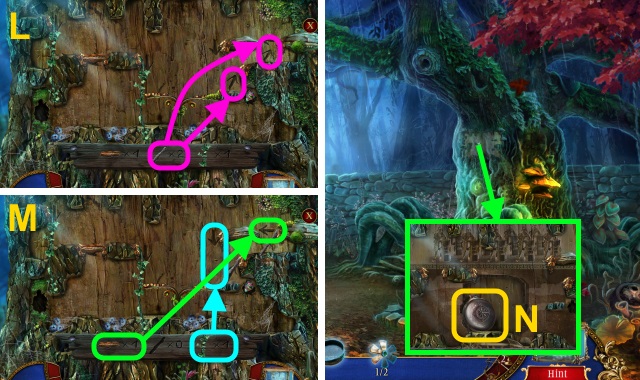
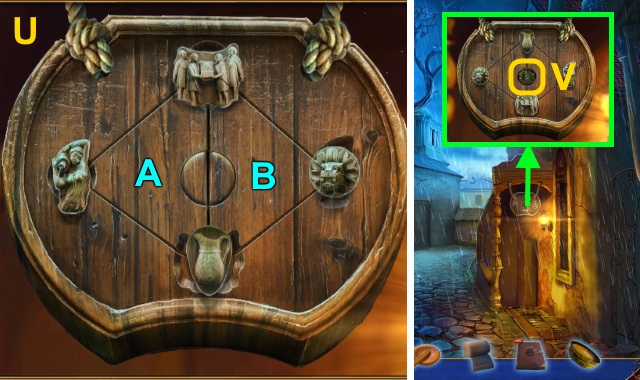
- Place the FOUNTAIN POTS (3/3) (O).
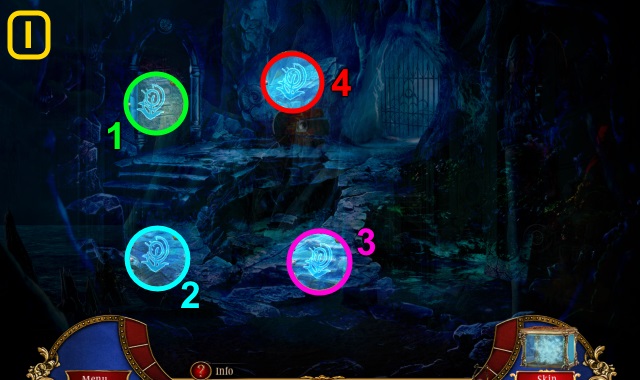
- Arrange the symbols (P); turn the pots (Q).
- Take the TOOTH (R).
- Walk forward.
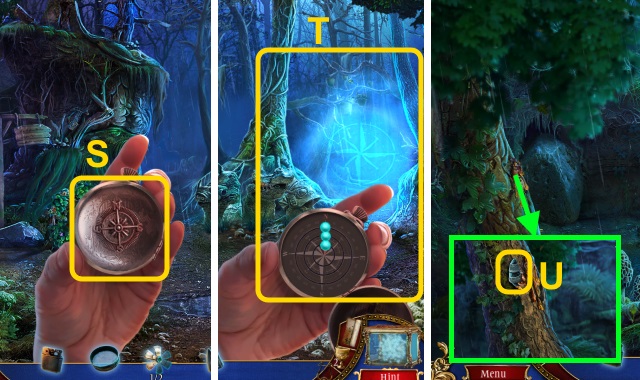
- Use the ANCIENT COMPASS (S); examine it.
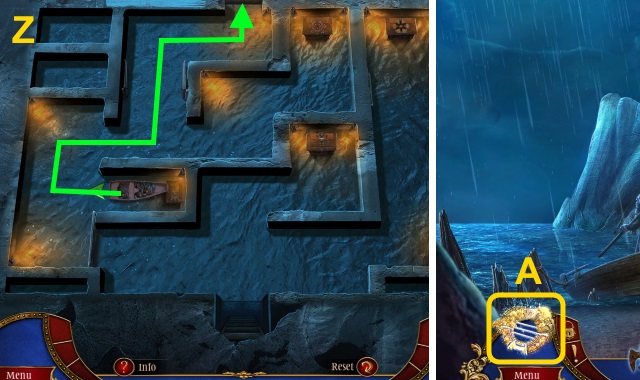
- Examine the path on the right (T).
- Walk right.
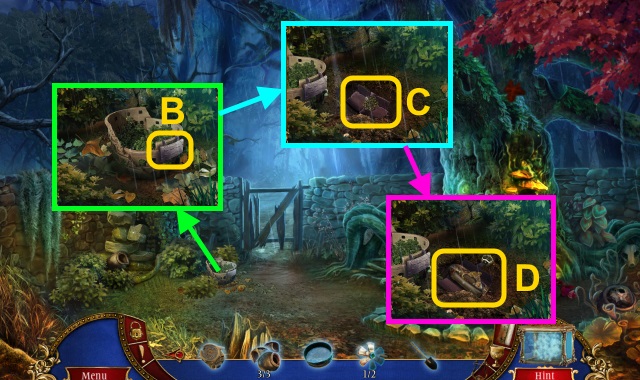
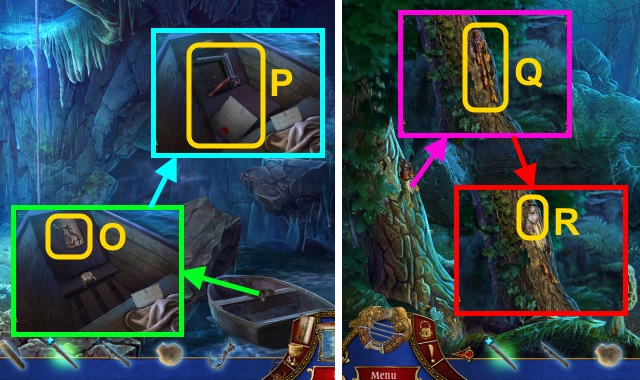
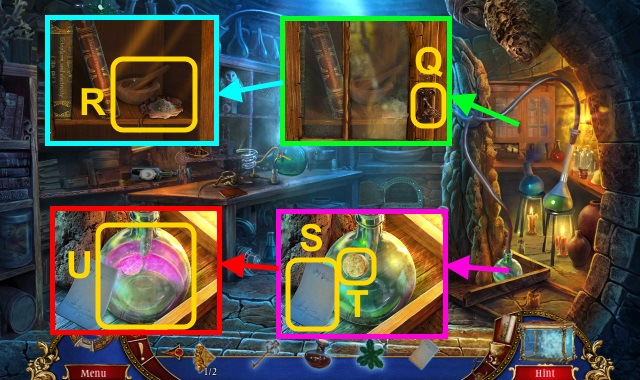
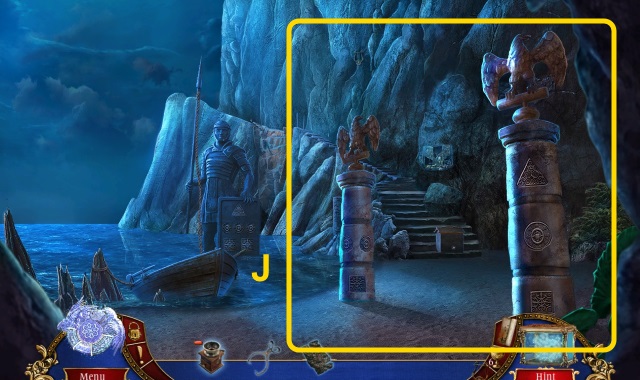
- Take the TUSK (U).
- Walk down.
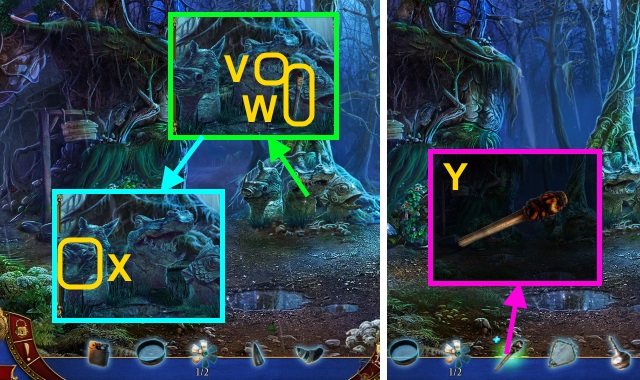
- Place the TOOTH (V); take the EXTINGUISHED TORCH (W).
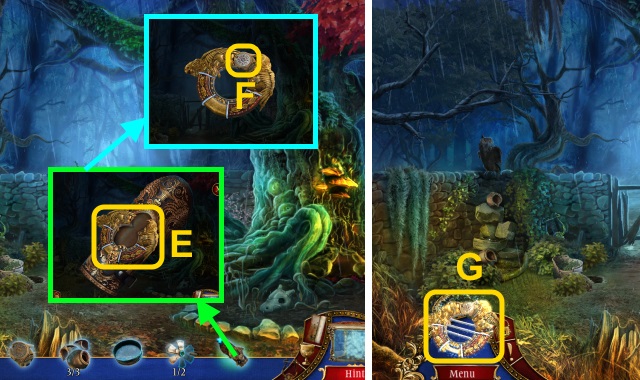
- Place the TUSK; take the MIRROR and OIL (X).
- Combine the EXTINGUISHED TORCH, OIL, and LIGHTER (Y); receive the TORCH.
- Walk right.
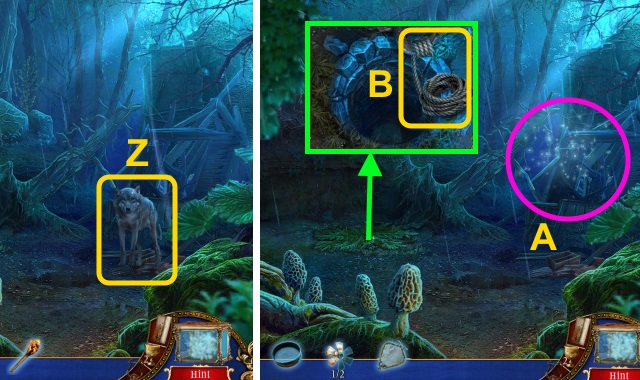
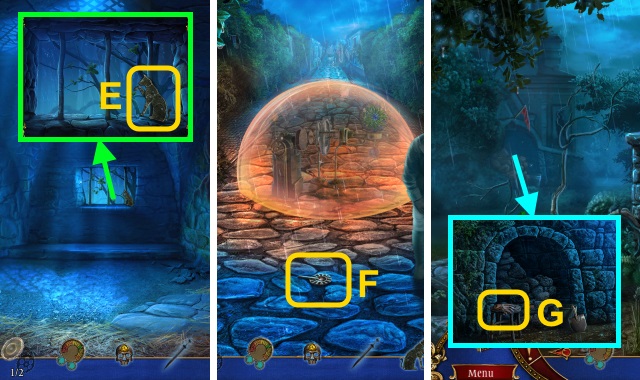
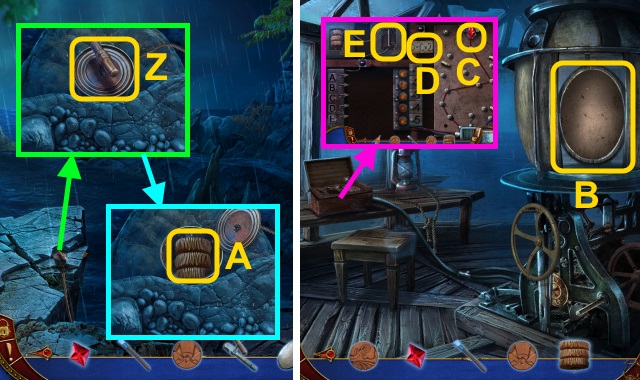
- Use the TORCH (Z).
- Play the HOP; receive the ROPE (A).
- Move the branches; Use the ROPE (B).
- Go forward.
Chapter 2: The Secret Cave
- Remove the cloth (C).
- Read the note; take the CANDLE (D).
- Take the RAKE (E).
- Walk left.
- Use Valor's Light for a mini-game (F).
- Solution (G).
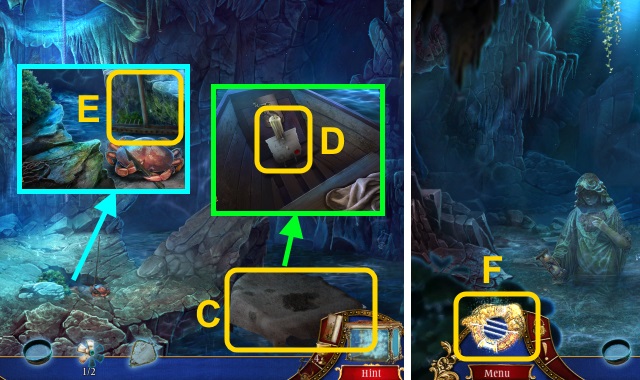
- Take the HARPOON BASE (H).
- Use the SIEVE; take the SHELL WITH SAND and WORM (I).
- Walk down.
- Give the WORM (J); receive the HARPOON TOP.
- Go forward, then down.
- Use the RAKE (K); receive the EMPTY HOURGLASS.
- Combine the EMPTY HOURGLASS and SHELL WITH SAND (L); receive the SHARP SHELL and HOURGLASS.
- Go to the Underground Pool.
- Give the HOURGLASS (M); take the SIREN (N).
- Walk down.
- Place the SIREN (O).
- Read the note; take the SAP SCRAPER and CRANK (P).
- Go forward.
- Use the SAP SCRAPER (Q); receive the RESIN.
- Take the METAL FLOWER (2/2) (R).
- Go forward.
- Place the METAL FLOWER (2/2) (S); examine it.
- Read the note; take the SAPPHIRE (T).
- Walk left.
- Place the MIRROR (U).
- Place the SAPPHIRE for a mini-game (V).

- Solution (W).
- Take the ROMAN COIN (X).
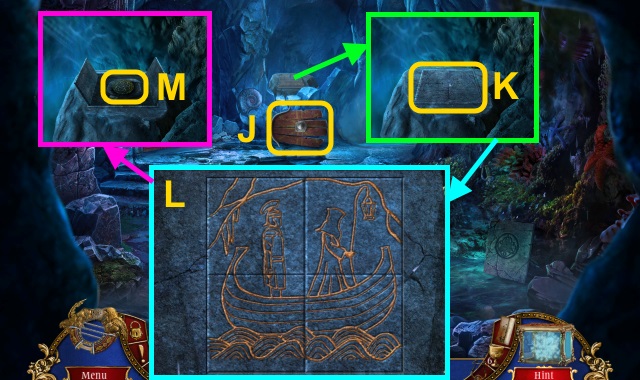
- Take the STONE TABLET (Y).
- Walk down.
- Move the stones (Z); place the STONE TABLET.
- Walk right.

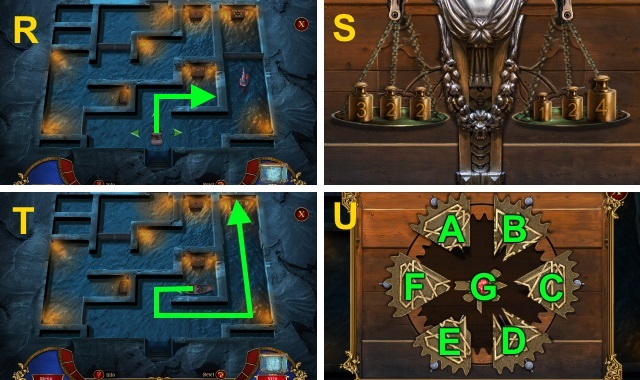
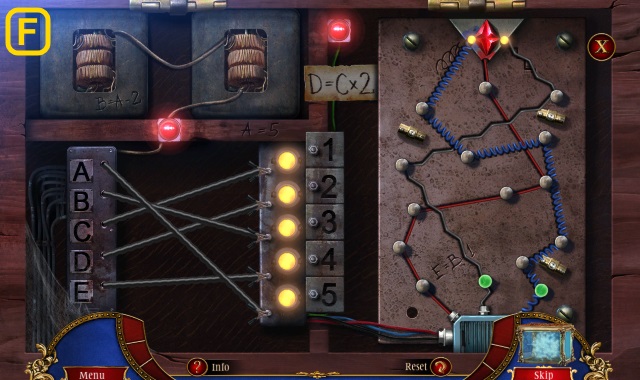
- Use the ROMAN COIN for a mini-game (A).
- Solution (B): Ax3-E-Bx2-F-Cx3-G-Dx3-H.
- Solution (C): (D)-(A-E)-(B-F)-(C-G)-(D-H).
- Move the wood (D); take the CHARCOAL (E).
- Walk forward.
- Examine the chain (F).
- Remove the plants; take the FEATHER TRINKET (G).
- Match the shells (H).
- Take the OCTOPUS PIECE (1/2) (I) and LEVER (J).
- Walk down.
- Move the plants. Place the LEVER (K); turn it.
- Walk left.
- Use the CANDLE (L); receive the LIT CANDLE.
- Use the LIT CANDLE (M).
- Play the HOP; receive the CHISEL AND HAMMER (N).
- Take the TORCH STAND (O).
- Examine the TORCH STAND; read the note (P).
- Use the RESIN, CHARCOAL, and LIT CANDLE (Q); receive the GLUE.
- Open the cage; place the FEATHER TRINKET (R).
- Read the book (S).
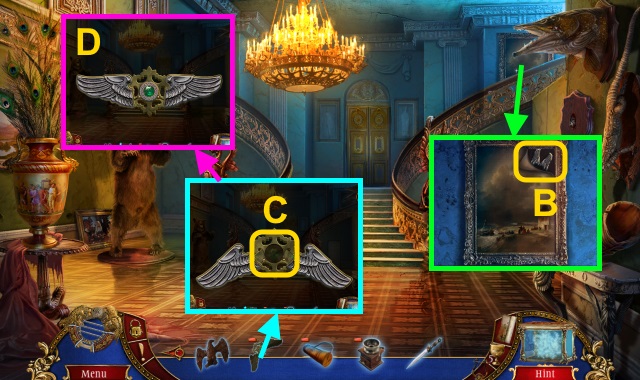
- Take the MEDALLION PIECE (T).
- Walk down.
- Use the CHISEL AND HAMMER; take the BRONZE TURTLE (U).
- Walk down.
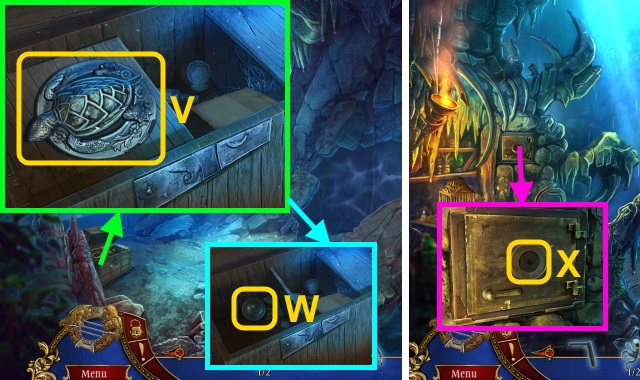
- Place the BRONZE TURTLE; arrange the fins (V).
- Take the SAFE WHEEL (W).
- Walk right, then left.
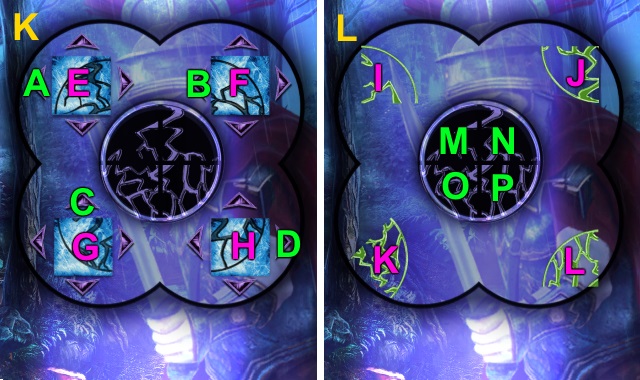
- Place the SAFE WHEEL for a mini-game (X).
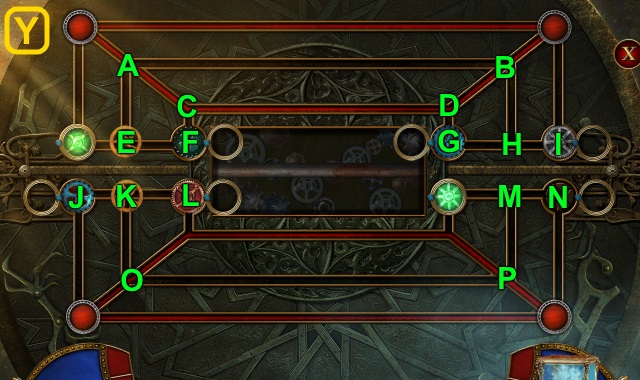
- Solution (Y): (K-O)-(J-K)-(I-H)-(O-P)-(P-M).
- (H-I)-(E-A)-(M-N)-(K-J)-(A-B)-(B-H)-(G-D).
- (D-C)-(C-F)-(J-K)-(H-B)-(I-G)-(B-H)-(K-O).
- (L-J)-(O-K)-(K-L)-(H-I).
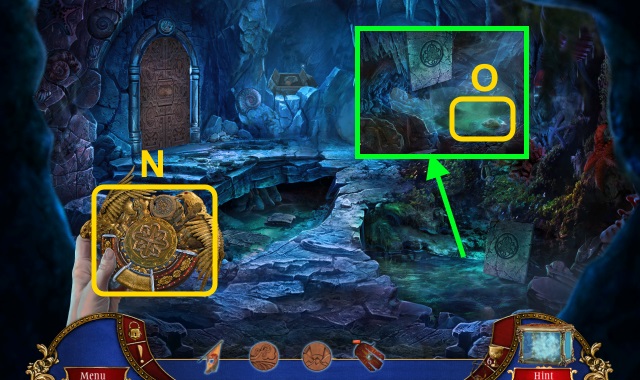
- Read the letter; take the ROMAN COIN (Z).
- Use the ROMAN COIN (A).
- Take the BROKEN MEDALLION (Z).
- Combine the BROKEN MEDALLION, MEDALLION PIECE, and GLUE (B); receive the MEDALLION.
- Walk down, then forward.
- Place the MEDALLION (C).
- Take the BELT and HARPOON BOTTOM (D).
- Examine the HARPOON BASE (E); place the HARPOON TOP.
- Examine the base (F); place the HARPOON BOTTOM. Receive the HARPOON.
- Place the CRANK (G) and HARPOON (H); turn the crank 3x.
- Go forward.
- Examine the net. Use the SHARP SHELL; take the PINCERS and OCTOPUS PIECE (2/2) (I).
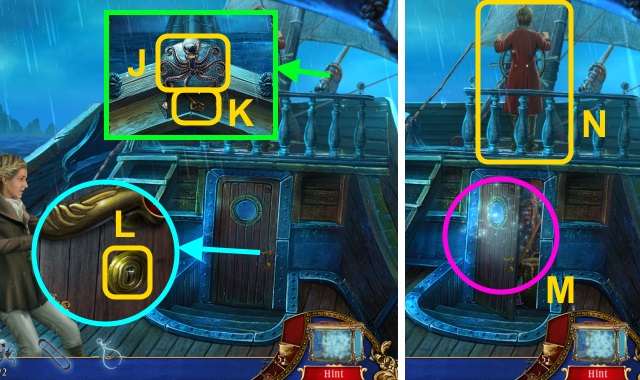
- Place the OCTOPUS PIECE (2/2) (J); take the CABIN KEY (K).
- Use the CABIN KEY (L).
- Play the HOP; receive the NAVIGATIONAL INSTRUMENTS (M).
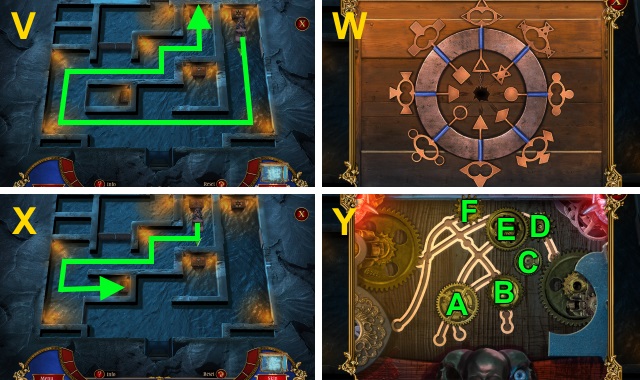
- Give the NAVIGATIONAL INSTRUMENTS for a mini-game (N).
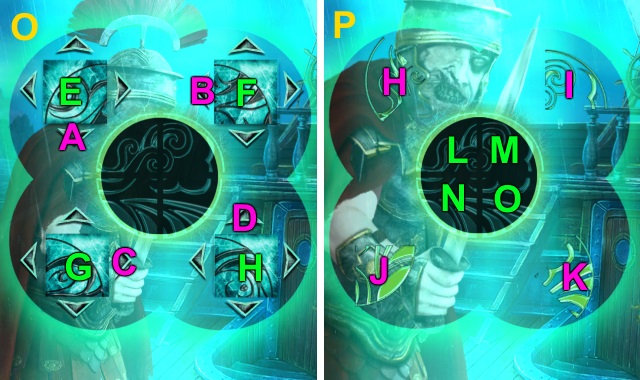
- Solution (O): A-E-Bx2-F-C-G-D-H.
- Solution (P): (H)-(K)-(Jx2)-(H-L)-(I-M)-(J-N)-(K-O).
Chapter 3: The Dungeon
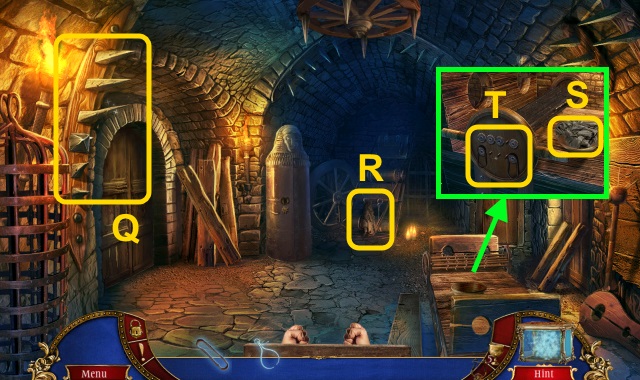
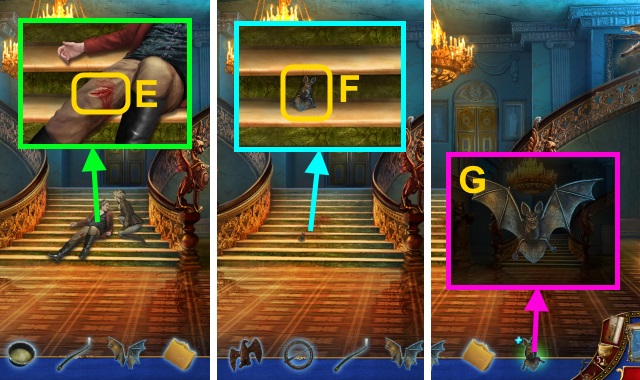
- Examine the spikes 3x (Q).
- Take the TORN SHIRT (R).
- Use the TORN SHIRT (S); receive the SOAKED RAG.
- Place the BELT (T).
- Arrange the belts (U).
- Take the STAPLE NAIL (V).
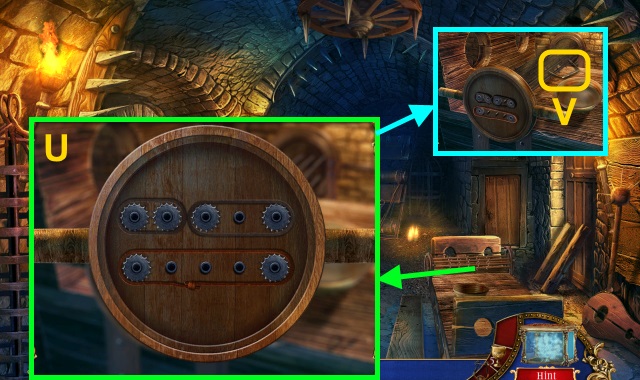
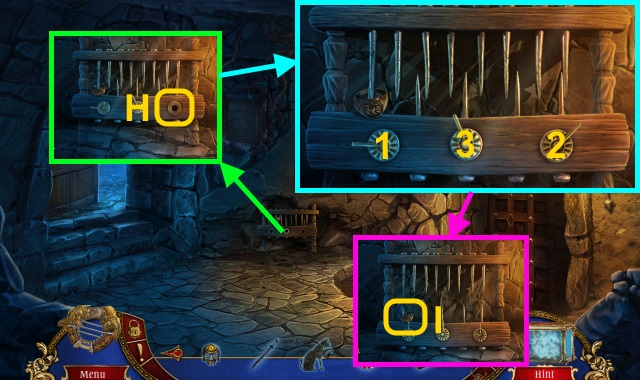
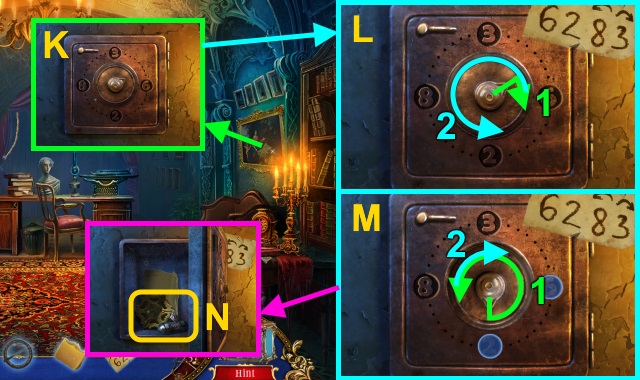
- Use the STAPLE NAIL (W).
- Examine the tumblers (1-2).
- Place the staple nail; examine the tumblers (3-4).
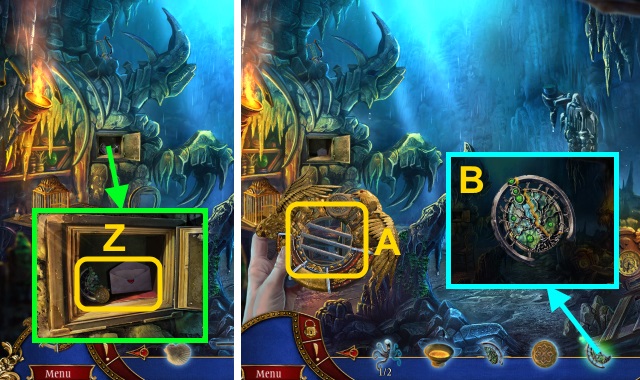
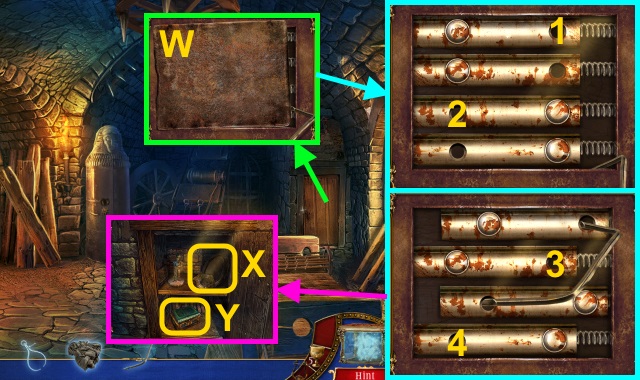
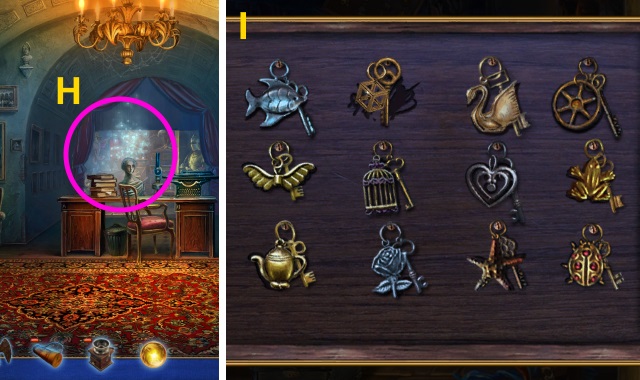
- Take Valor's Light and the RUSTY PLATE (X). Examine the book; take the JEWELRY BOX (Y).
- Examine the RUSTY PLATE; use the SOAKED RAG 3x (Z). Receive the SHINY PLATE.
- Examine the door; use the SHINY PLATE for a mini-game (A).
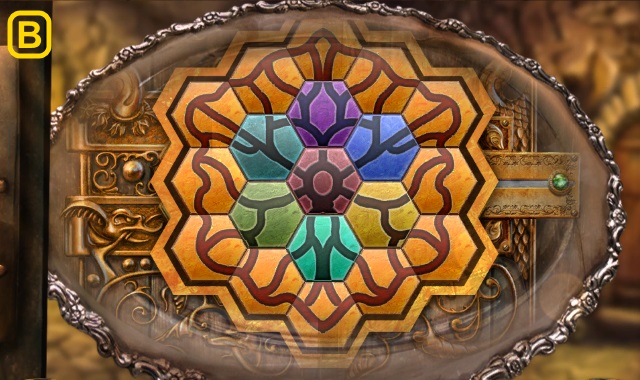
- Solution (B).
- Walk left.
- Take the BONE (C).
- Read the book (D); take the Map (E).
- Turn the crank (F); take the COGS (1/2) (G).
- Use the PINCERS (H); receive the PRESSURE GAUGE.
- Combine the BONE and SOAKED RAG (I); receive the IMPROVISED TORCH.
- Use the IMPROVISED TORCH (J); receive the LIT TORCH.
- Use the LIT TORCH (K).
- Go forward.
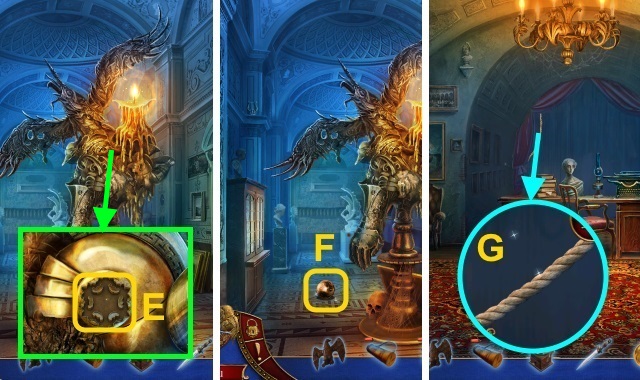
- Use Valor's Light for a mini-game (L).
- Solution (M).
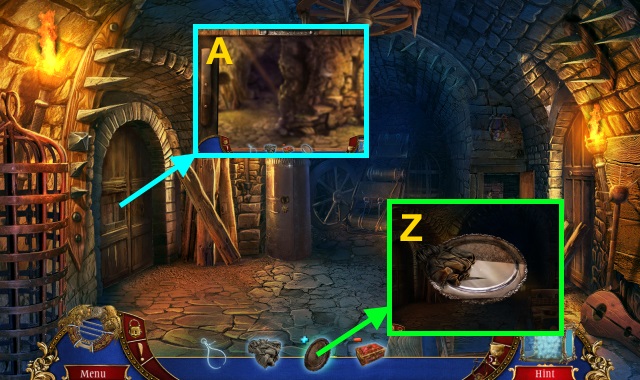
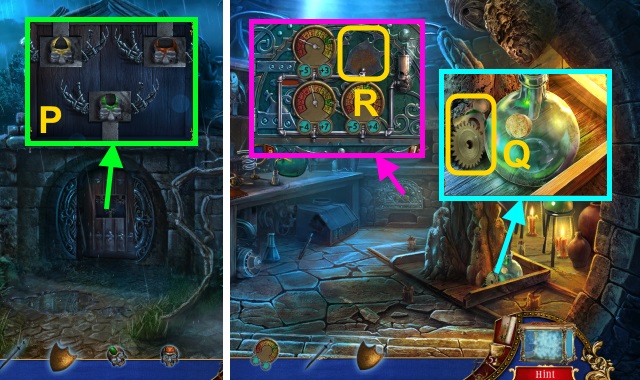
- Open the door. Read the note; take VESPASION'S SWORD (N).
- Take the HANDLE (O).
- Open the door; take the CEREMONIAL MASK (P).
- Walk down.
- Place the CEREMONIAL MASK (Q); take the CHAIN (R).
- Move the boards (S).
- Place the HANDLE (T) and CHAIN (U); pull the handle.
- Play the HOP; receive the IRON HAND (V).
- HOP mini-game solution: (W).
- Walk down.
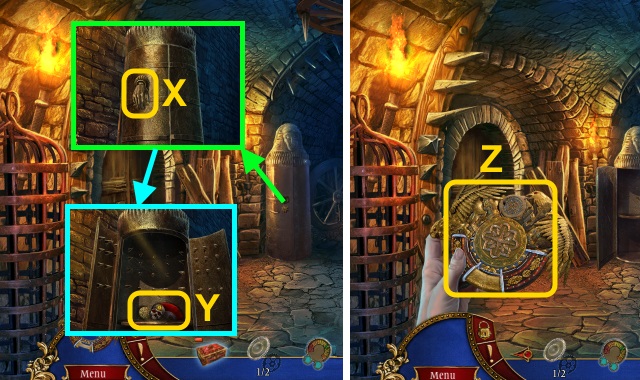
- Place the IRON HAND (X); examine it.
- Take the GOLDEN SKULL and ROMAN COIN (Y).
- Use the ROMAN COIN (Z).
- Take the PLUME CREST (Y).
- Walk left.
- Place the PLUME CREST (A).
- Walk right.
- Use VESPASION'S SWORD (B); receive the DULL SWORD.
- Play the mini-game.
- Solution (C): A-E-Bx2-F-Cx3-G-D-H.
- Solution (D): (I)-(Lx2)-(Kx3)-(I-M)-(J-N)-(K-O)-(L-P).
- Take the EGYPTIAN CAT (E).
- Walk down, forward, left, then right.
- Take the WING NUT (F).
- Walk down.
- Take the WORK GLOVES (G).
- Walk down.
- Place the WING NUT (H).
- Examine the dials (1-3).
- Take the SIGNET RING (I).
- Combine the JEWELRY BOX and SIGNET RING (J); take the GLASS PEARLS and MINIATURE SHIELD (K).
- Walk left.
- Place the EGPYTIAN CAT; examine the pieces (L). Examine the cat.
- Place the GLASS PEARLS (M); examine them.
- Play the HOP; receive the JADE SKULL (N).
- Go to the Dungeon.
- Use the WORK GLOVES; examine the vines (1-3).
- Take the COPPER SKULL (O).
- Go to the Castle Yard.
Chapter 4: Basil
- Place the GOLDEN SKULL, JADE SKULL, and COPPER SKULL (P).
- Walk forward.
- Take the COGS (2/2) and SPICE BOTTLE (Q).
- Place the PRESSURE GAUGE for a mini-game (R).
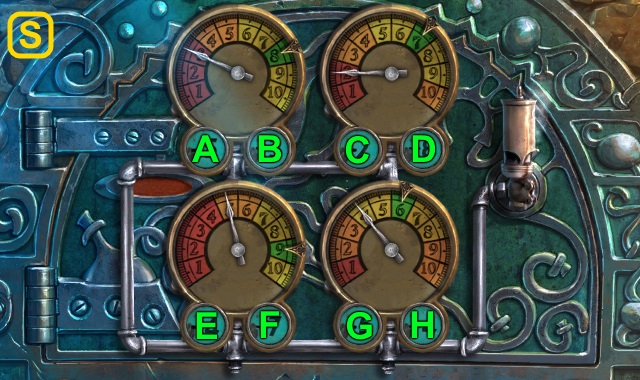
- Solution (S): Bx2-A-B-A-Bx2-D.
- Cx5-D-C-F-Ex2-F-H-G-H-G-H.
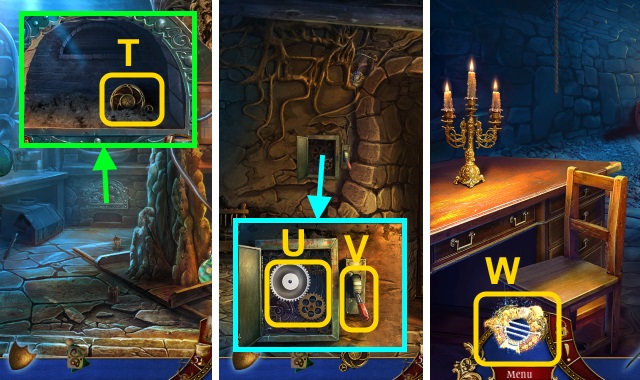
- Take the MECHANICAL SUN (T).
- Walk down twice.
- Place the COGS (2/2) (U); pull the lever (V).
- Walk right.
- Use Valor's Light for a mini-game (W).
- Solution (X).
- Pull the cord (Y).
- Take the PICK (Z); place the SPICE BOTTLE.
- Arrange the bottles (A).
- Take the HACKMANITE (B).
- Place the MECHANICAL SUN (C); examine it.
- Take the BILL HOOK and POLE (D).
- Take the BADGE (1/2) (E).
- Place the MINIATURE SHIELD (F).
- Take the NOTEBOOK (G).
- Read the NOTEBOOK; take the CABINET KEY (H).

- Place the DULL SWORD (I).
- Read the book (J).
- Read the note; take the AEGOPODIUM (K).
- Go to the Dungeon.
- Use the BILL HOOK (L); receive the MISTLETOE.
- Go to the Castle Yard.
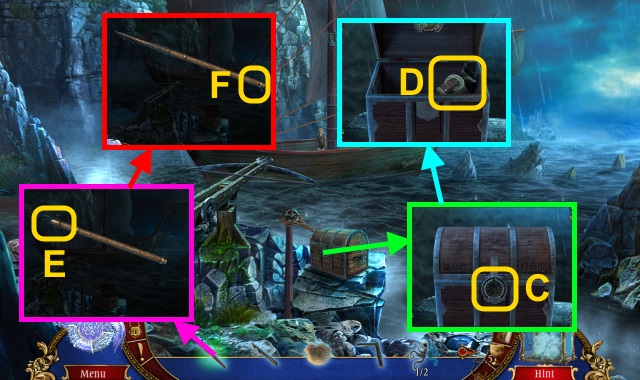
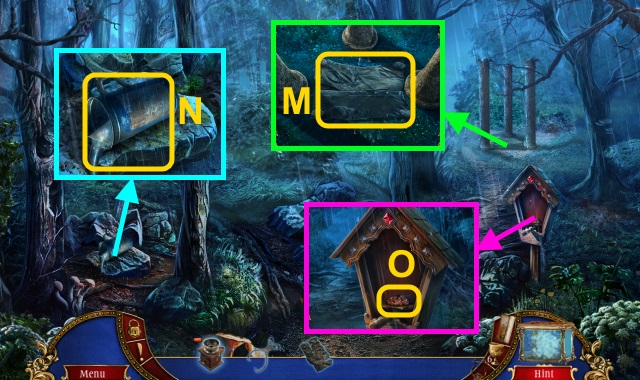
- Place the POLE (M); take the SHOVEL.
- Use the SHOVEL 3x; take the BUNDLE OF LETTERS (N).
- Walk forward.
- Give the BUNDLE OF LETTERS (O); take BASIL'S INSTRUCTIONS (P).
- Use the CABINET KEY (Q).
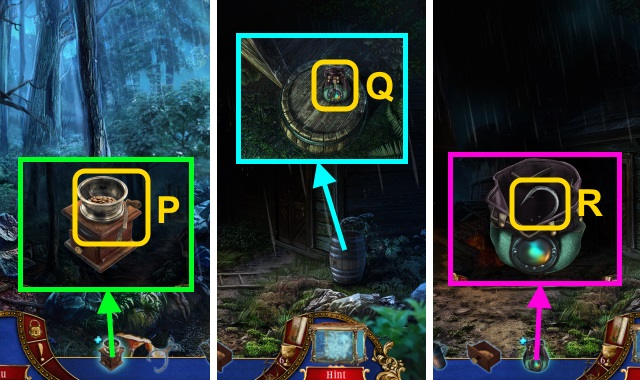
- Take the DUST RESIDUE and PESTLE AND MORTAR (R).
- Place BASIL'S INSTRUCTIONS (S); remove the cork (T).
- Use the AEGOPODIUM, HACKMANITE, DUST RESIDUE, and MISTLETOE (U).
- Play the HOP; receive BASIL'S MIXTURE (V).
- Walk down, then right.
- Use BASIL'S MIXTURE (W).
- Walk forward.
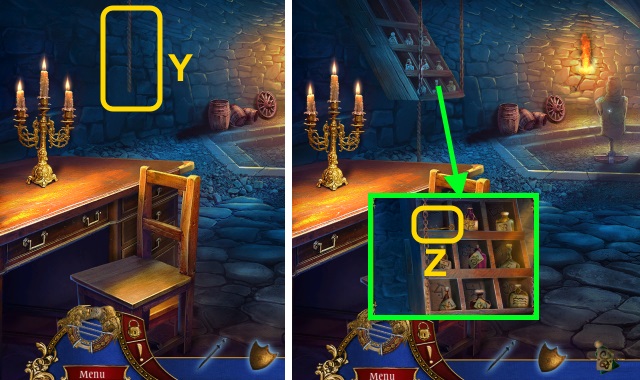
- Take the Map (X).
- Take the BUCKET (Y).
- Walk right.
- Use the BUCKET (Z).
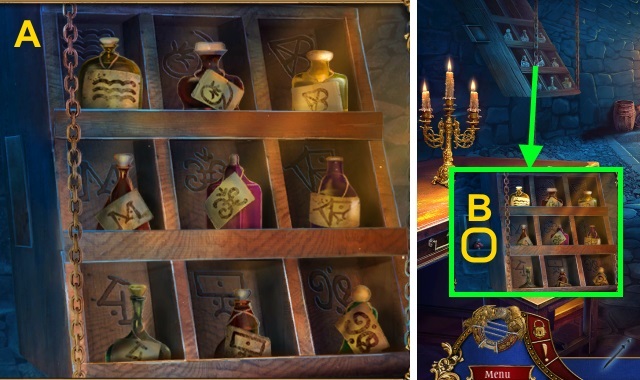
- Open the cupboard; take the PLIERS (A) and CANDLES (1/3) (B).
- Take the CANDLES (2/3) (C).
- Take the BANDAGE (D).
- Examine the book (E).
- Use the pencil; take the REGISTER CODE (F).
- Walk down.
- Use the PLIERS (G); receive the NAIL.
- Walk right.
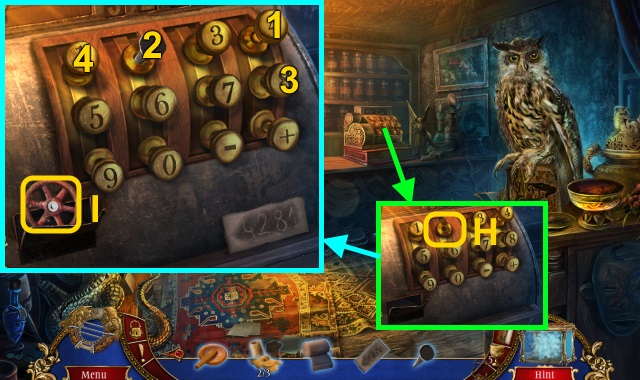
- Place the NAIL and REGISTER CODE (H).
- Enter the CODE (1-4); take the DRAGON VALVE (I).
- Use the DRAGON VALVE (J); turn it.
- Open the curtain (K).
- Walk forward.
- Use Valor's Light for a mini-game (L).
- Solution (M).
- Take the PHONE DIAL (N).
- Take the DIARY (O).
- Move the plants; take the CANDLES (3/3) (P).
- Walk down.
- Place the CANDLES (3/3); take the MELTED WAX (Q).
- Place the PHONE DIAL (R); examine it 2x. Take the CARVED PIECE (S).
- Walk down.
- Place the CARVED PIECE for a mini-game (T).
- Solution (U): B-Ax2-B.
- Take the FAMILY SEAL (V).
- Combine the DIARY and FAMILY SEAL (W).
- Read the diary; take the EMERALD (X).
- Walk right, then forward.
- Examine the mold; pour the MELTED WAX (Y). Close the mold.
- Use the PICK; examine it. Take the WAX ORNAMENT (Z).
- Walk down.
- Examine the ornament. Place the WAX ORNAMENT (A); examine it.
- Take the BADGE (2/2) (B).
- Walk forward.
- Move the boards; take the PLANK (C). Place the BADGE (2/2) for a mini-game.
- Solution (D-G).
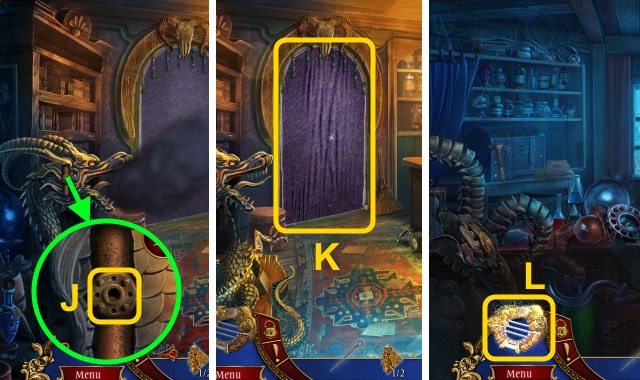
- Take the STONE EAGLE and CHAIN (H).
- Use the CHAIN; take the WEIGHT WITH CHAIN (I).
- Place the WEIGHT WITH CHAIN (J).
- Play the HOP; receive the SNAKE FIGURE (K).
- Walk down.
- Place the SNAKE FIGURE (L).
- Read the note; take the ROMAN COIN (M).
- Use the ROMAN COIN (N).
- Take the OWL KEY (M).
- Walk down.
- Take the SNAKE KEY (O).
- Place the PLANK (P).
- Collect the herbs; take the HERBS (Q).
- Examine the locks; use the SNAKE KEY and OWL KEY for a mini-game (R).

- Solution (S).
- Walk forward.
Chapter 5: The Mansion
- Talk to Sandra (T).
- Remove the picture; take the MESH MASK and BROOCH (U).
- Walk right.
- Play the HOP; receive the ALCOHOL (V).
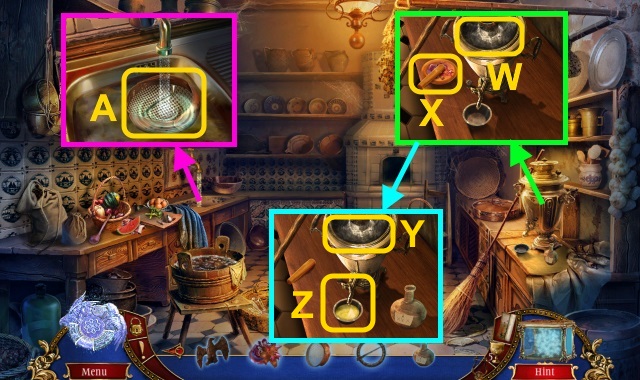
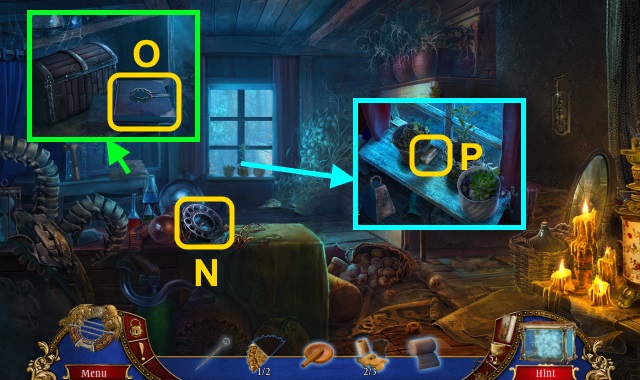
- Remove the lid (W). Place the PESTLE AND MORTAR and HERBS (X); examine the pestle 2x.
- Use the ALCOHOL (Y). Examine the tap; take the SALVE (Z).
- Use the MESH MASK; take the CARRIAGE RELEASE (A).
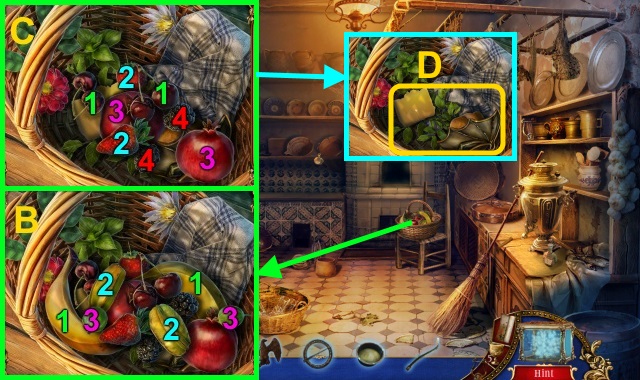
- Match the fruit (B-C).
- Take the BAT WINGS and CHEESE (D).
- Walk down.
- Use the SALVE and BANDAGE (E).
- Take the BROKEN BAT (F).
- Combine the BROKEN BAT and BAT WINGS (G); receive the BAT.
- Place the BAT (H).
- Walk left.
- Place the CARRIAGE RELEASE (I); pull it.
- Take the COMBINATION (J).
- Move the painting; place the COMBINATION (K).
- Enter the code (L-M).
- Take the ADORNED LEVER and INCOMPLETE CREST (N).
- Walk down for a mini-game.
- Solution (O): Ax2-F-B-G-D-Cx2-H-E-I.
- Solution (P): (Jx5)-(J-N)-(Kx5)-(K-O)-(Lx3)-(L-P)-(Mx2)-(M-Q).
- Place the ADORNED LEVER; examine it (Q).
- Walk forward.
- Use Valor's Light for a mini-game (R).
- Solution (S).
- Use the BROOCH (T).
- Take the TUBE and BULL FIGURINE (U).
- Walk right.
- Give the CHEESE (V); take the ORNAMENTS (1/2) (W).
- Go to the Study.
- Place the BULL FIGURINE (X).
- Take the COFFEE GRINDER and ORNAMENTS (2/2) (Y).
- Walk down, then forward.
- Place the ORNAMENTS (2/2); select them in order (1-4).
- Take the DAGGER (A).
- Walk down.
- Use the DAGGER; take the CREST PART (B).
- Combine the INCOMPLETE CREST and CREST PART; place the EMERALD (C).
- Examine the wings; take the ANCIENT CREST (D).
- Walk forward.
- Examine the wax 3x; place the ANCIENT CREST (E).
- Take the ORB (F).
- Walk down, then left.
- Use the DAGGER (G).
- Play the HOP; receive the WOLF HEAD (H).
- HOP mini-game solution: (I).
- Walk down.
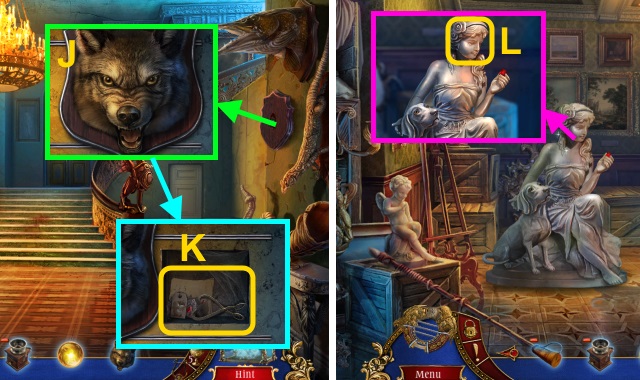
- Place the WOLF HEAD (J).
- Read the paper. Take the TONGS; examine the note. Take the CROWN (K).
- Walk forward, then right.
- Place the CROWN (L).
- Open the hatch; use the ORB (M).
- Play the HOP; receive the CROSSED QUILLS (N).
- Combine the TUBE and CROSSED QUILLS (O); take the TUNNEL MAP (P).
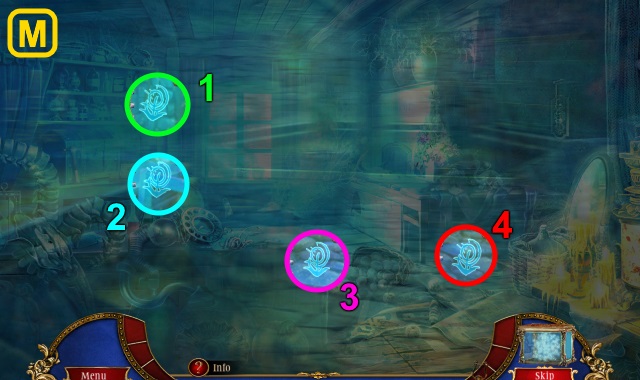
- Use the TUNNEL MAP for a mini-game (Q).
- Solution (R-S).
- Solution (U): E-G-C-Gx2-A-G-D-G-F-B.
- Solution (V-X).
- Solution (Y): F-E-Dx2-E-Bx2-A-E.
- Solution (Z).
- Use Valor's Light for a mini-game (A).
- Solution (B).
- Play the HOP; receive the ROMAN COIN (C).
- Examine the lever (D).
- Use the ROMAN COIN (E).
- Take the PIECE OF BLANKET (F).
- Take the Map and LINE (G).
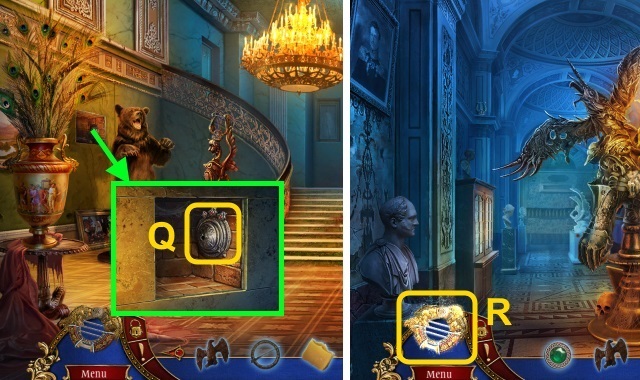
- Place the STONE EAGLE (H).
- Use the LINE (I).
- Arrange the pillars (J).
- Walk forward.
Chapter 6: Pandora's Box
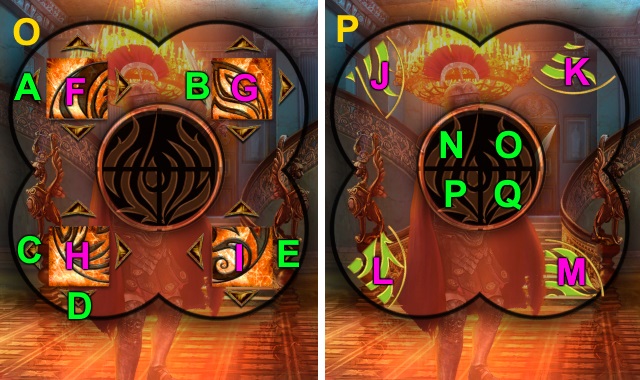
- Play the mini-game; solution (K): Ax2-E-B-F-C-G-D-H.
- Solution (L): (Ix6)-(Jx4)-(K)-(Lx4)-(I-M)-(J-N)-(K-O)-(L-P).
- Remove the stones; take the RAIN COAT (M).
- Take the EMPTY CAN (N).
- Take the BIRD SEEDS (O).
- Combine the COFFEE GRINDER and BIRD SEEDS; turn the handle (P). Receive the FINE POWDER.
- Walk forward.
- Take the POUCH (Q).
- Open the POUCH; take the FISHING HOOK (R).
- Take the TORN TARP (S).
- Walk down twice.
- Use the FISHING HOOK (T).
- Take the MALLET; open the case (U).
- Take the TROWEL (V).
- Use the MALLET 3x (W).
- Take the METAL PENTAGON (X).
- Walk forward.
- Place the METAL PENTAGON for a mini-game (Y).
- Solution (Z): A-F-C-A-E-A-D-G-B-D-G.
- A-F-A-C-D-E-F-G-Ax2-E-A-C-Bx2.
- Take the THREAD, FLAG, and WIND SYMBOL (A).
- Combine the THREAD and FISHING HOOK (B); receive the HOOK WITH THREAD.
- Combine the TORN TARP, PIECE OF BLANKET and RAIN COAT; use the HOOK WITH THREAD 3x (C). Receive the MAKESHIFT SHEET.
- Use the TROWEL (D); receive the RED GLASS.
- Walk forward.
- Use the MAKESHIFT SHEET (E).
- Use the TONGS (F); receive the HOT COAL.
- Examine the ladder (G) on the shed (@).
- Open the cupboard. Read the sign; take the BRUSH (H).
- Use the MALLET; use the EMPTY CAN (I). Receive the OIL CAN.
- Walk down twice.
- Use the OIL CAN; examine the screw (J). Receive the OAR.
- Walk forward.
- Use the OAR (K); take the BOX DECORATION and RUSTY CAN OPENER (L).
- Walk forward, then left.
- Open the box (M).
- Take the EARTH SYMBOL (N).
- Take the PIPETTE; place the BOX DECORATION (O).
- Take the SMALL TOOL and SAND PAPER (P).
- Combine the RUSTY CAN OPENER and SAND PAPER (Q); receive the CAN OPENER.
- Walk down.
- Examine the bottle (R) and glass (S); place the HOT COAL (T).
- Use the PIPETTE (U).
- Use the SMALL TOOL (V); take the SHED KEY (W).
- Examine the lock; use the SHED KEY (X).
- Play the HOP; receive the CONCAVE MIRROR (Y).
- Walk forward.
- Remove the handle; use the CAN OPENER (Z).
- Take the COIL (A).
- Walk down, then left.
- Place the CONCAVE MIRROR (B).
- Place the RED GLASS; (C) examine the code (D).
- Place the COIL for a mini-game (E).
- Solution (F).
- Turn the handle (G).
- Walk down, then forward twice.
- Use Valor's Light for a mini-game (H).
- Solution (I).
- Take the BROKEN SHIELD (J).
- Use the FINE POWDER and BRUSH for a mini-game (K).
- Solution (L).
- Take the ROMAN COIN (M).
- Use the ROMAN COIN (N).
- Examine the water; take the SHELL (O).
- Walk down.
- Give the SHELL (P); take the MINIATURE TEMPLE (Q).
- Move the dynamite; take the SILVER KEY (R).
- Play the HOP; receive the SMALL ANCHOR (S).
- Walk forward.
- Place the MINIATURE TEMPLE (T); examine it.
- Walk right for a mini-game.
- Solution (U): Ax2-E-B-F-C-G-D-H.
- Solution (V): (Ix3)-(J)-(L)-(I-M)-(J-N)-(K-O)-(L-P).
- Try to walk forward.
- Place the FLAG; take the ANCIENT PENDANT and IRON RIVETS (W).
- Walk down.
- Place the ANCIENT PENDANT (X); read the tablet (Y).
- Take the GOLDEN KEY and IRON BENDS (Z).
- Use the SMALL ANCHOR (A); receive the WATER SYMBOL.
- Combine the BROKEN SHIELD, IRON BENDS, and IRON RIVETS; place the rivets (B). Receive the SHIELD.
- Walk right.
- Place the SHIELD (C).
- Play the HOP; receive the AMULET (D).
- Give the SILVER KEY and GOLDEN KEY (E-F); place the AMULET (G).
- Receive the FIRE SYMBOL.
- Take the SPECIAL ROMAN COIN (H).
- Use the SPECIAL ROMAN COIN (I).
- Walk down.
- Place the WIND SYMBOL, EARTH SYMBOL, WATER SYMBOL, and FIRE SYMBOL (J).
- Walk left.
- Use Valor's Light for a mini-game (K).
- Solution (L): B-D-C-E-A-D-E-C-D-B-A-E.
- Examine Valor's Light (M); receive VALOR'S LIGHT.
- Examine VALOR'S LIGHT (N); receive PANDORA'S BOX KEY. Take the VALOR'S LIGHT PART (O).
- Place PANDORA'S BOX KEY; place the VALOR'S LIGHT PART (P).
- Congratulations! You have completed Myths of the World: Island of Forgotten Evil.
Created at: 2016-09-16