
Walkthrough Menu
- General Tips
- Chapter 1: Cliff
- Chapter 2: Garden
- Chapter 3: Lorelei's House
- Chapter 4: Margrit's House
- Chapter 5: Catacombs
General Tips
- This is the official guide for Myths of the World: Love Beyond.
- This guide won't tell you when to zoom into a location; the screenshots show each zoom scene.
- Hidden-object puzzles are referred to as HOPs. Only the locations of the HOPs will be shown.
- Use the Map to fast travel to a location.
Chapter 1: Cliff
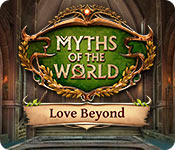
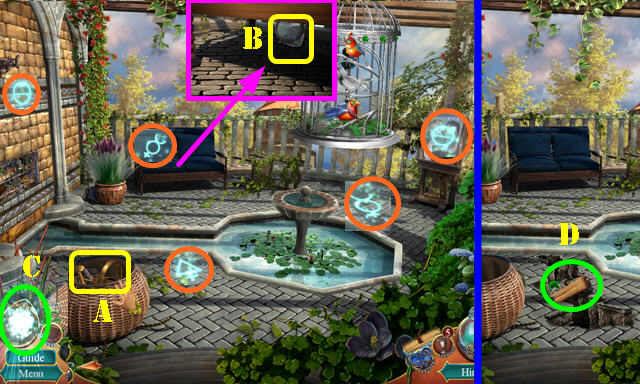
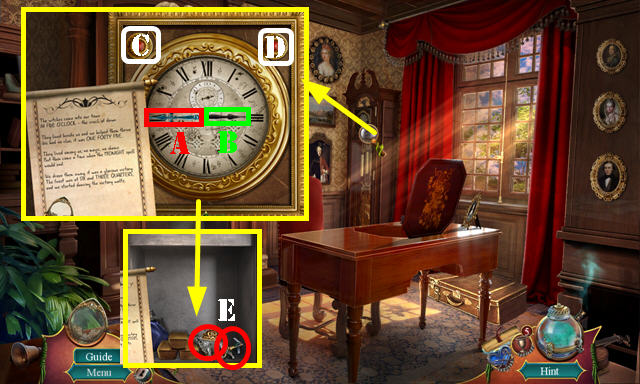
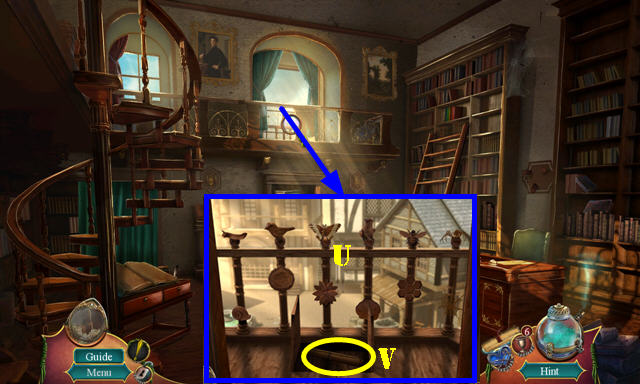
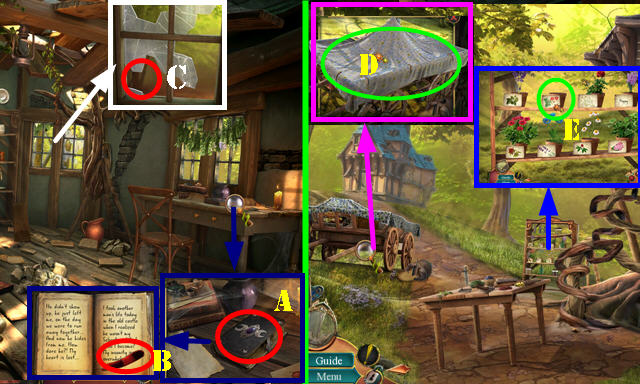
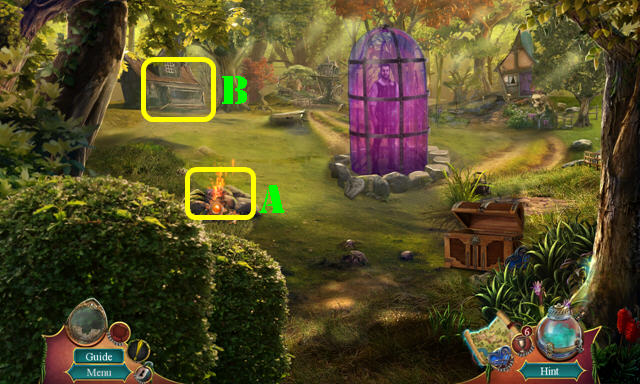
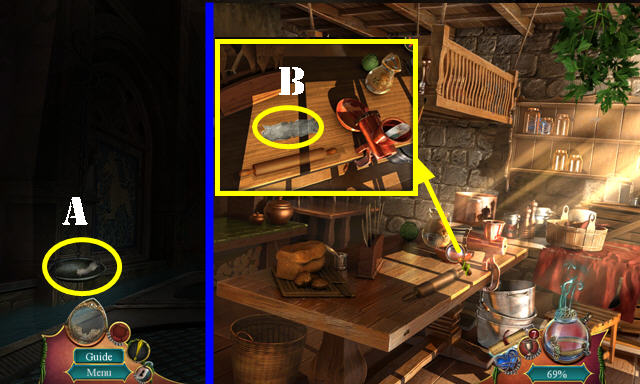
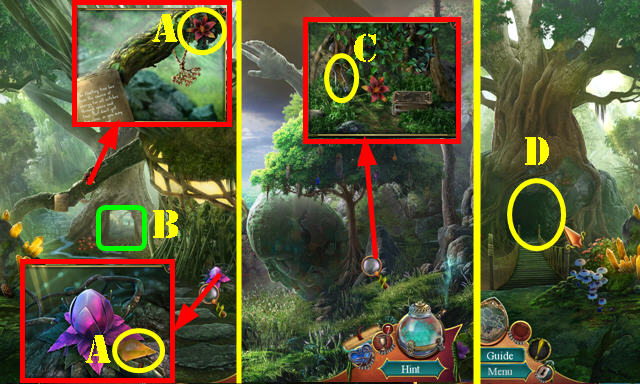
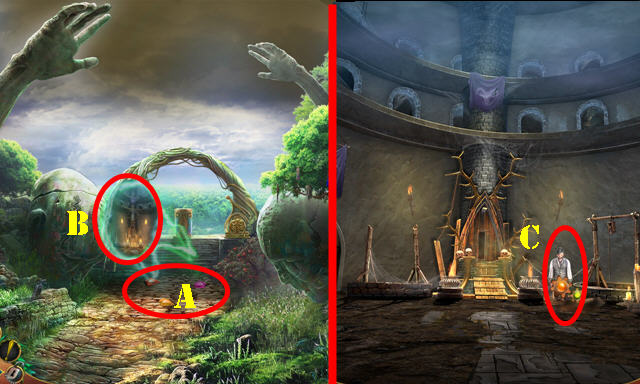
- Take BOARDS 1/4, BOARDS 2/4, and Map (A).
- Select rope (B); take STURDY PADDLE (C).
- Use STURDY PADDLE (D); receive BOARDS 3/4. Play HOP; receive POUCH.
- Open POUCH; take ROPE and NAVAL BADGE.
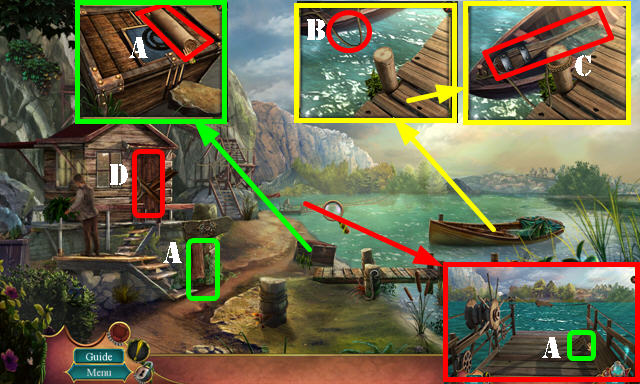
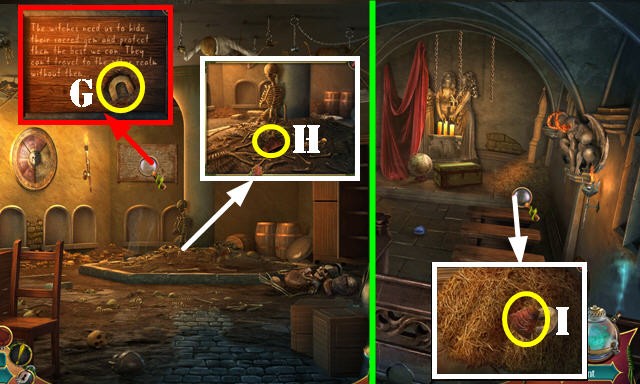
- Place NAVAL BADGE; take NET and BOARDS 4/4 (E).
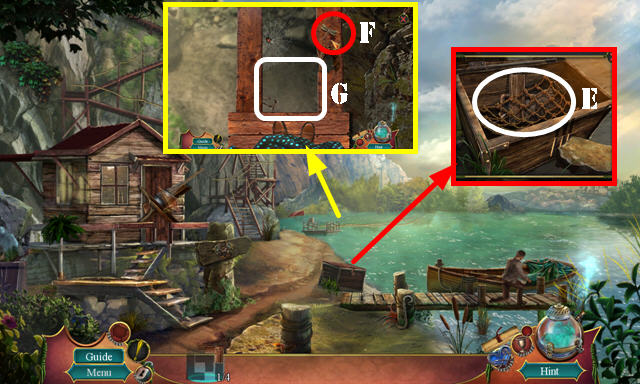
- Take DRAGONFLY PENDANT 1/2 (F). Place BOARDS 4/4 (G).
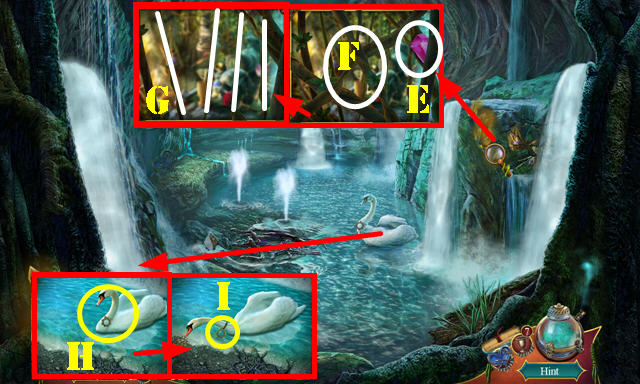
- Solution (1-7).
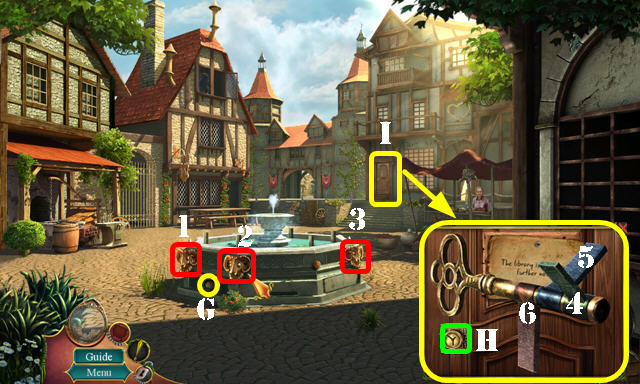
- Go to Cliff (H).
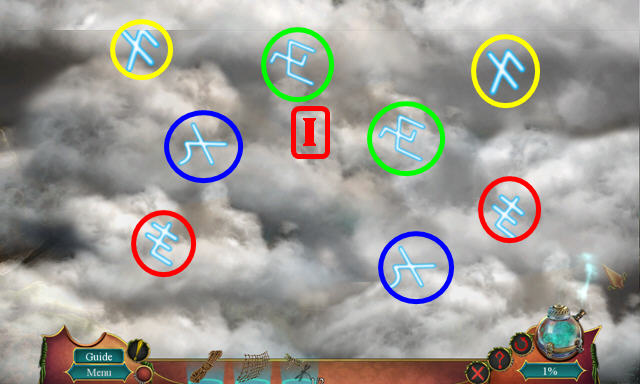
- Solution (I).
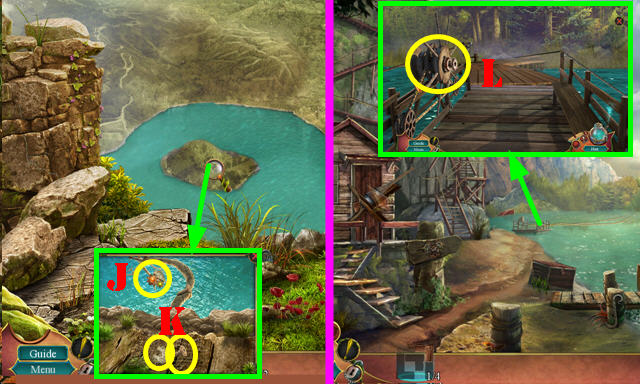
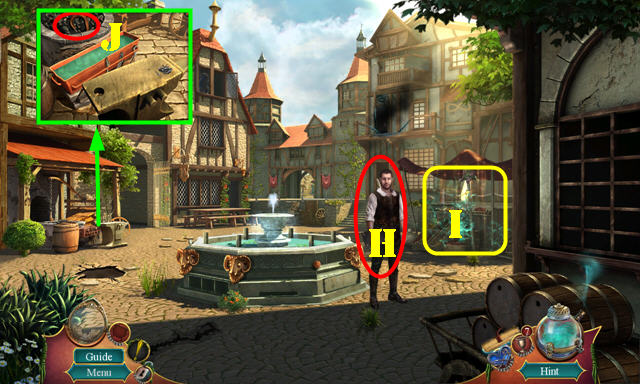
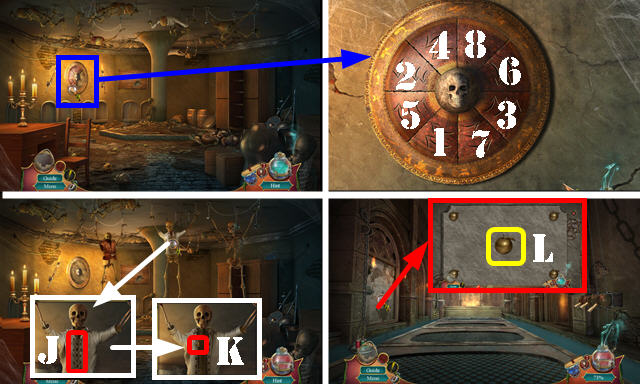
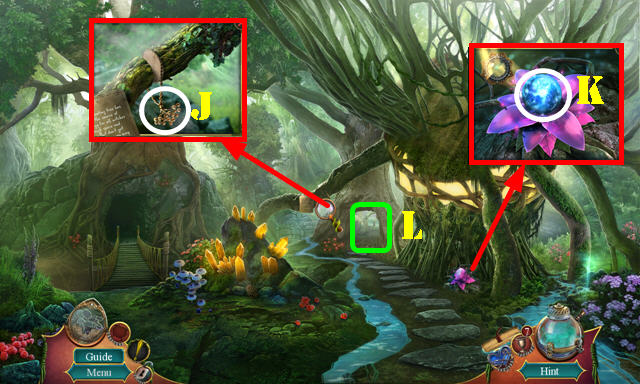
- Use NET (J); take CITY EMBLEM and WHEEL (K).
- Walk down.
- Place WHEEL and ROPE (L). Turn wheel counterclockwise until you reach dock.
- Go forward.
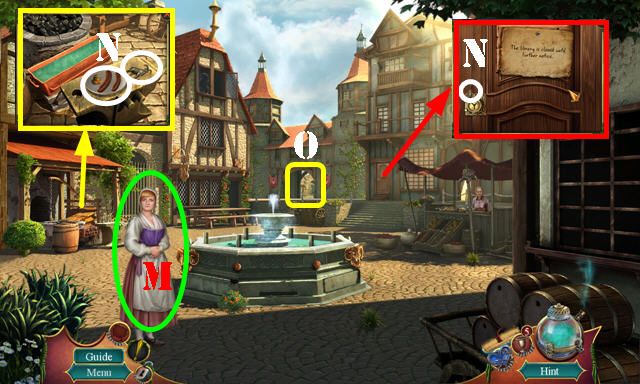
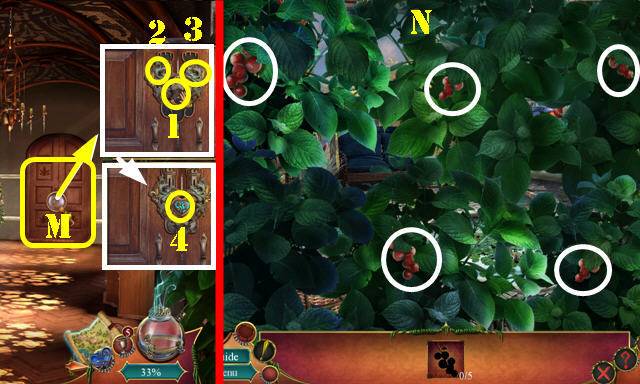
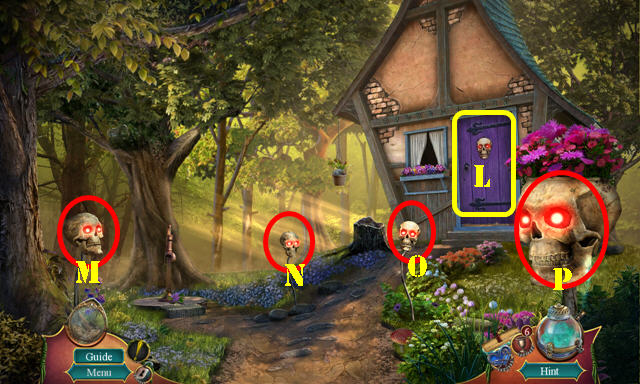
- Talk (M).
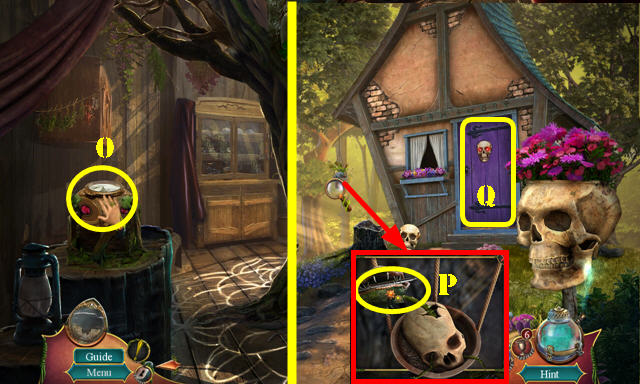
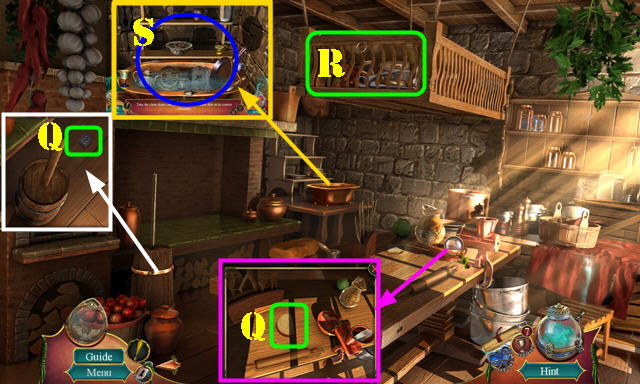
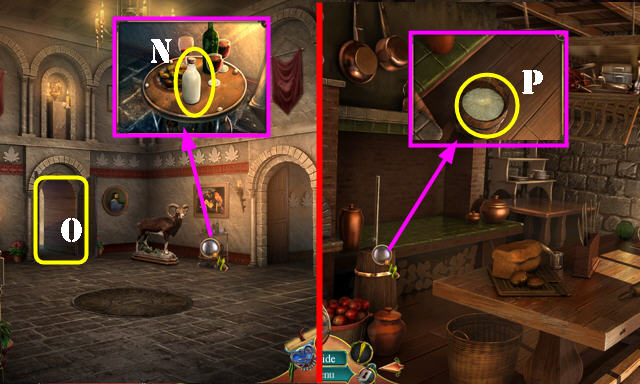
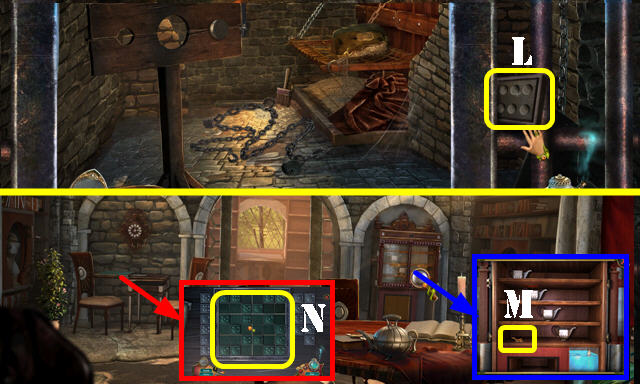
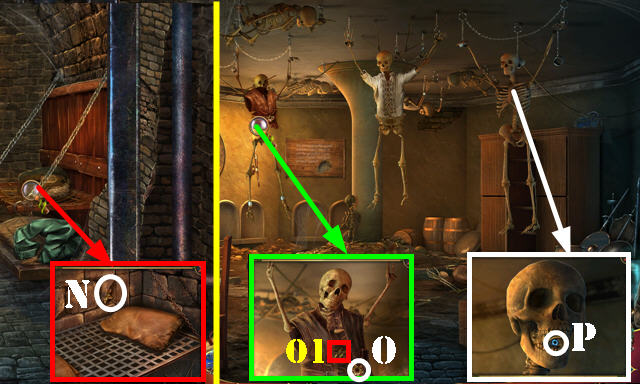
- Take COPPER COIN 1/4, SAUSAGES, and IBEX FIGURE 1/2 (N).
- Go (O).
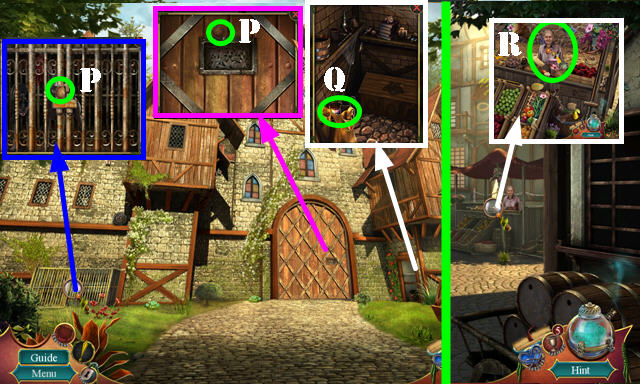
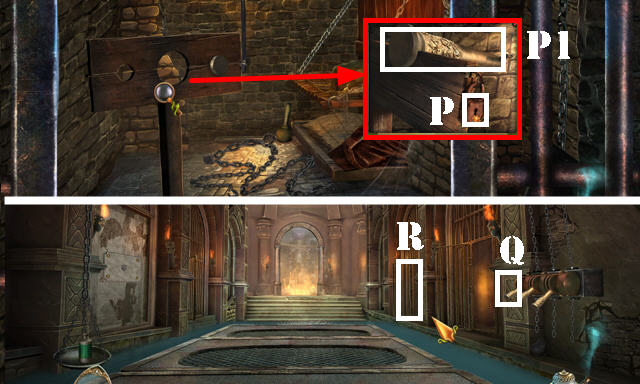
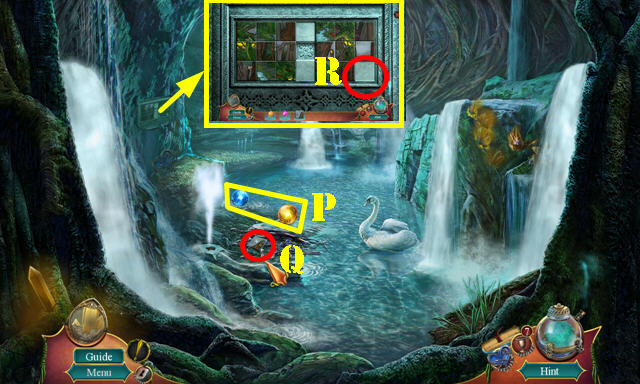
- Take COPPER COIN 2/4 and COPPER COIN 3/4 (P).
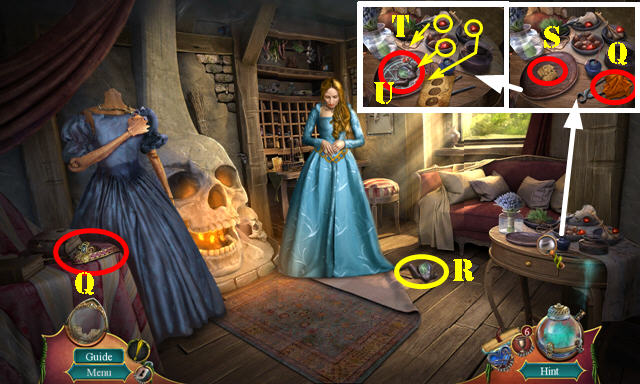
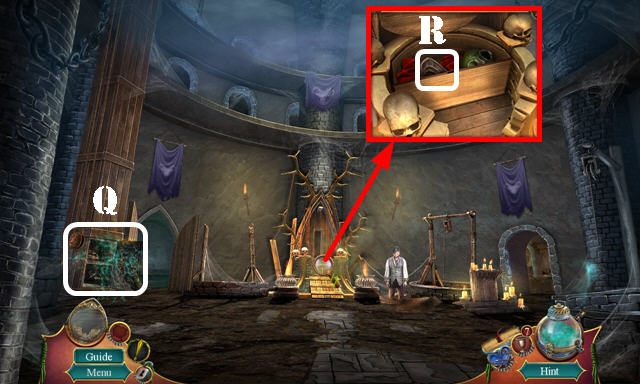
- Open pouch; take COPPER COIN 4/4 and HOURGLASS (Q).
- Walk down.
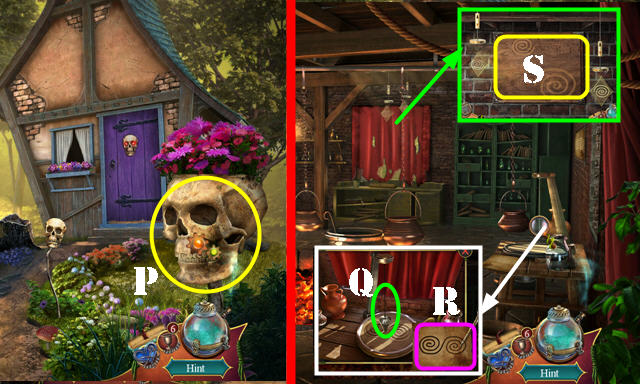
- Give COPPER COIN 4/4 (R). Play HOP; receive OIL.
- Go forward.
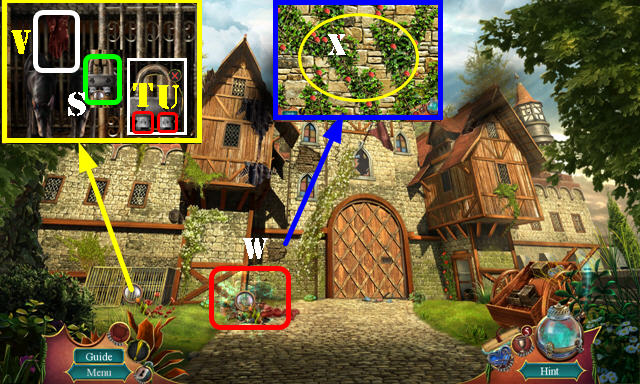
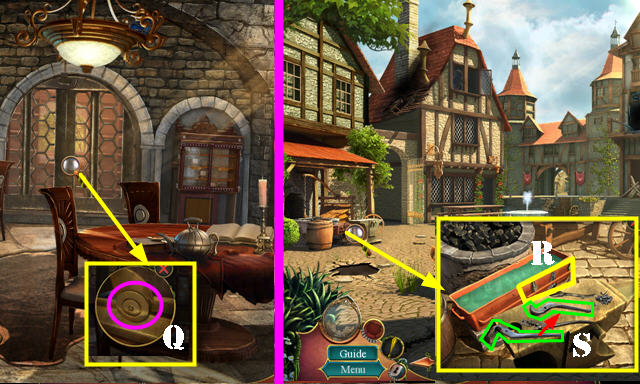
- Use OIL and SAUSAGES (S).
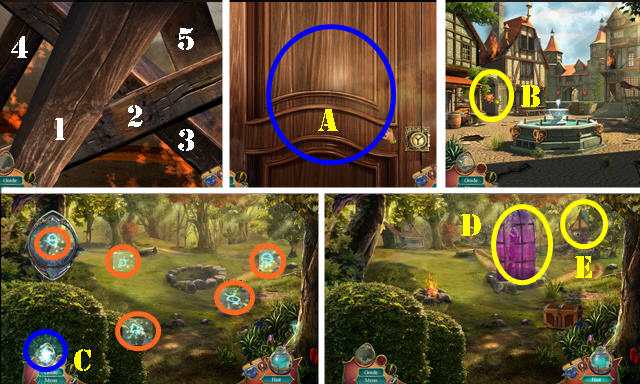
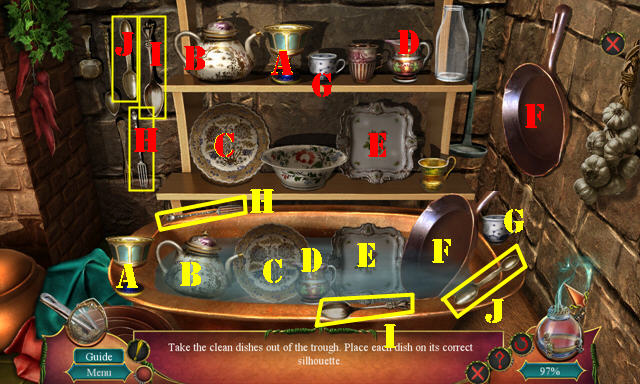
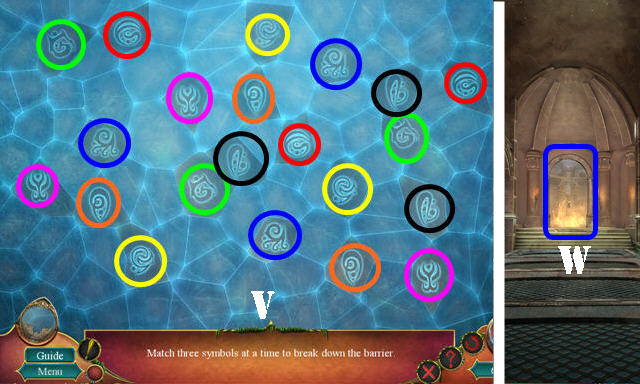
- Select Tx3-Ux5. Take THICK GLOVES (V).
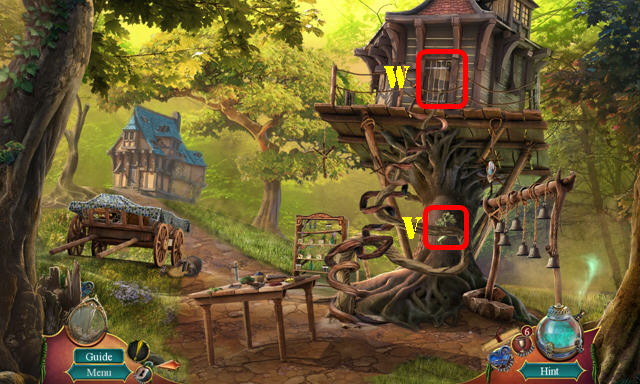
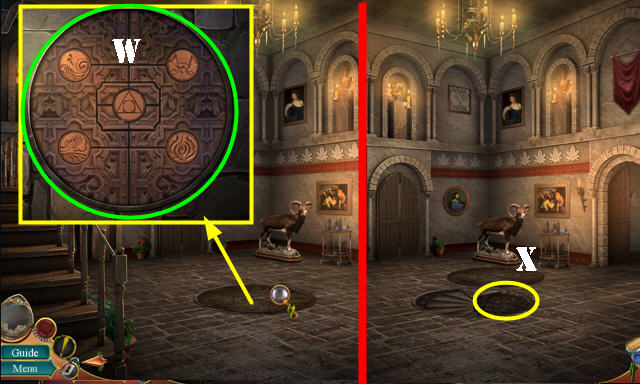
- Play HOP (W): receive INCOMPLETE BADGE.
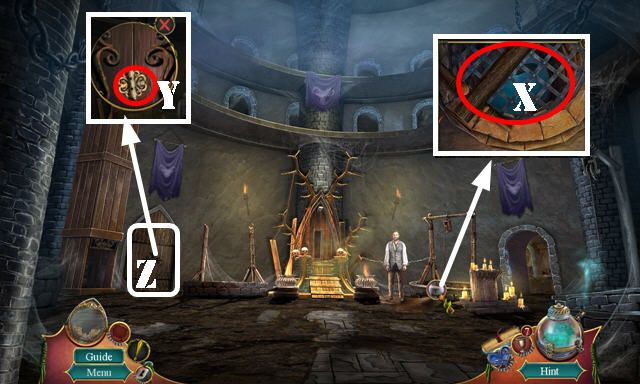
- Use THICK GLOVES (X).
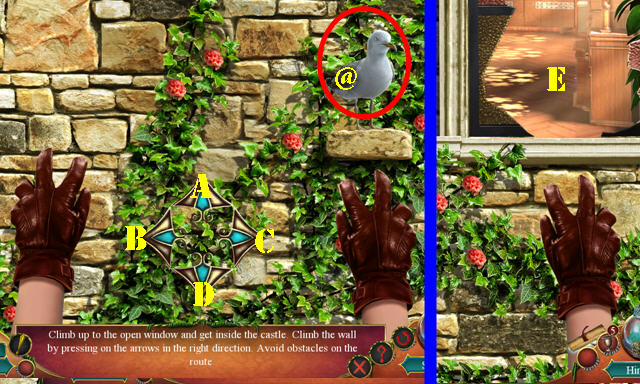
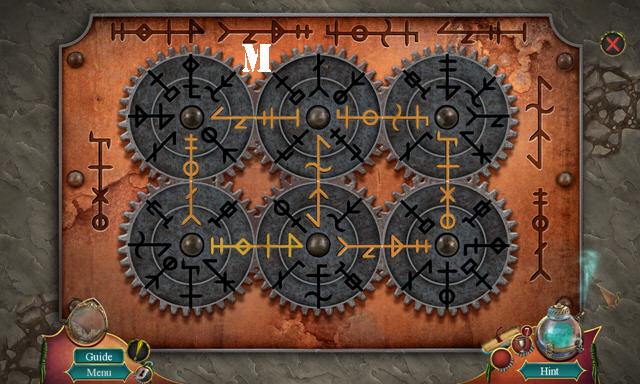
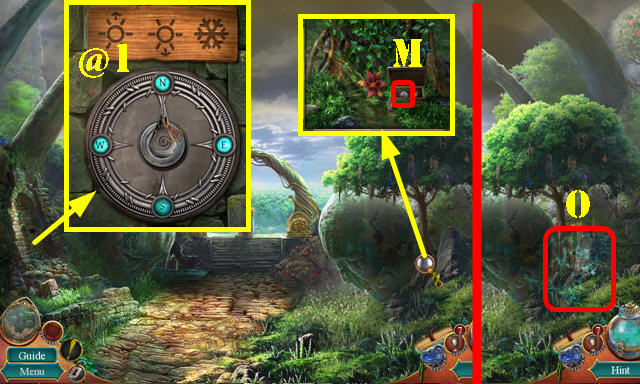
- Solution (A-B-Ax3-C-A-@-Cx4).
- Go (E).
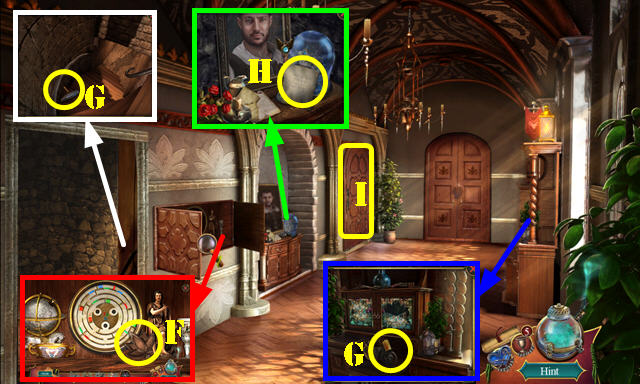
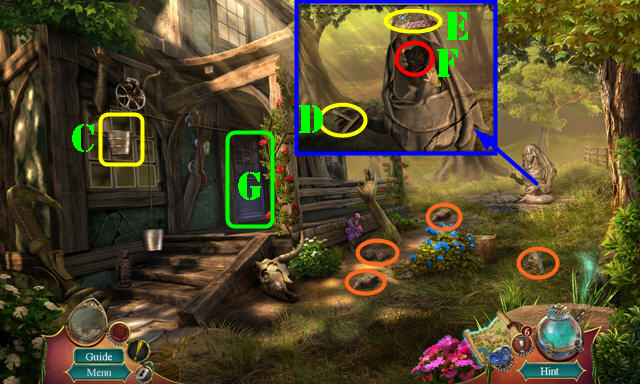
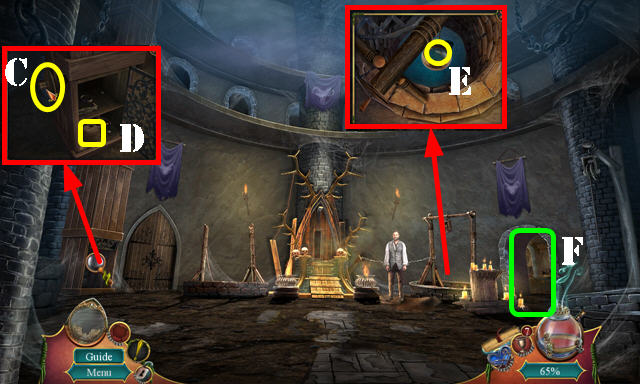
- Open cabinets; take LOTUS TILE (F).
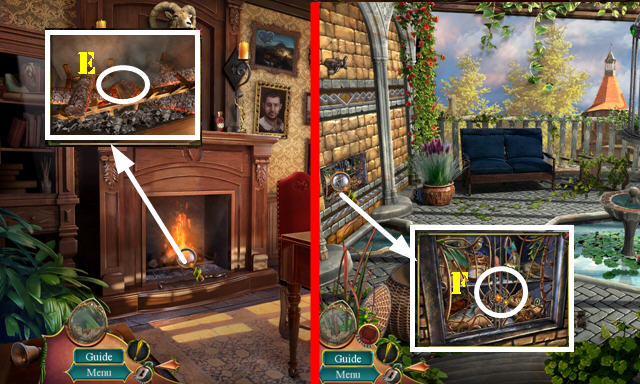
- Take CLAMP 1/2 and CANDELABRA (G).
- Look at note (H).
- Go (I).
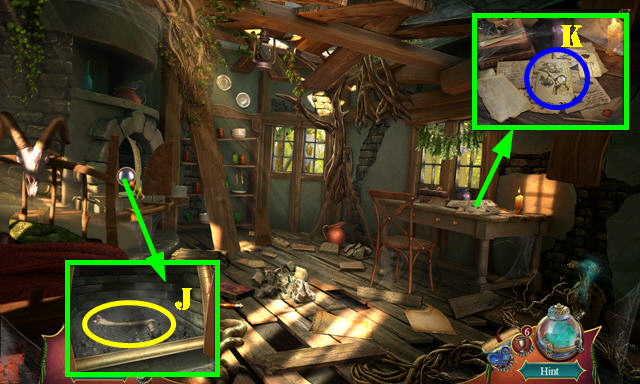
- Take WOODPECKER; look at note (J).
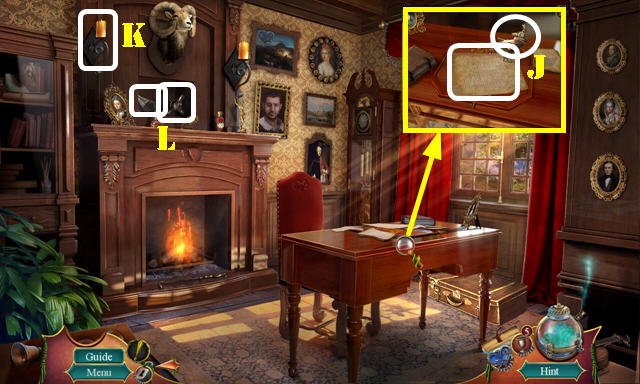
- Place CANDELABRA (K); take PAINT THINNER and FAUCET HANDLE (L).
- Walk down.
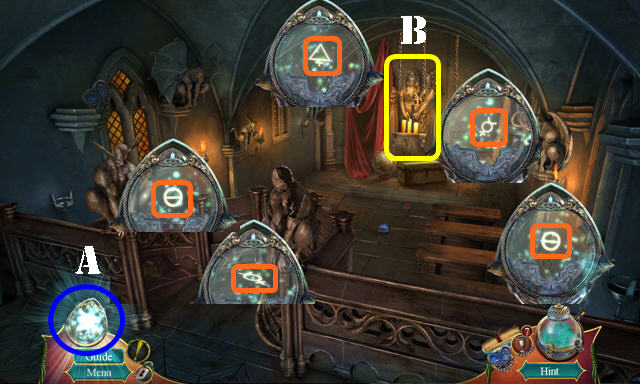
- Place CITY EMBLEM; select 1-4.
- Go (M).
- Select (N).
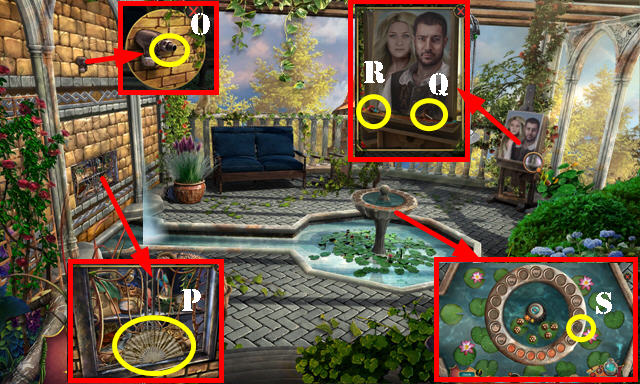
- Place FAUCET HANDLE (O); take FAN (P).
- Take WINDING KNOB (Q).
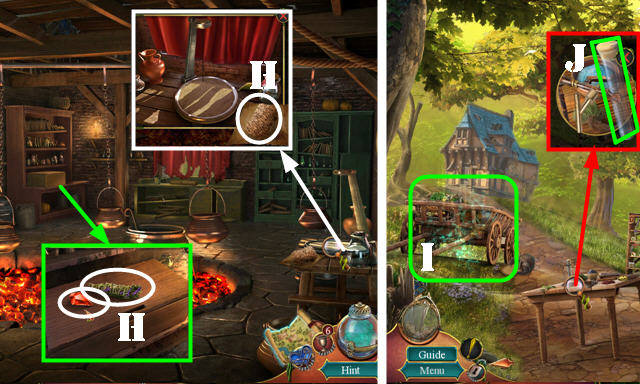
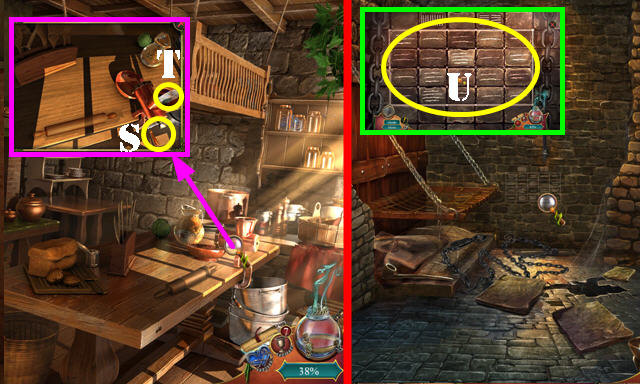
- Use PAINT THINNER; take GLASS RAY 1/2 and MARBLES 1/3 (R).
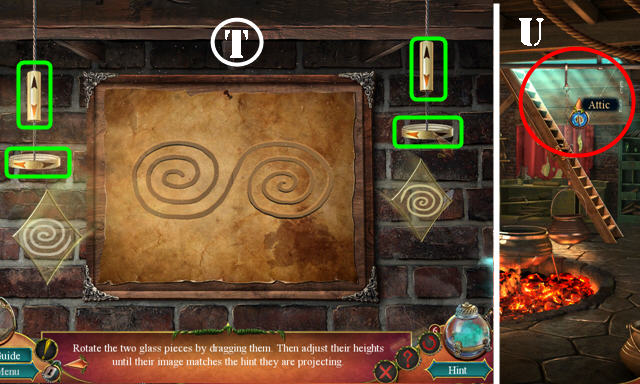
- Place LOTUS TILE (S).
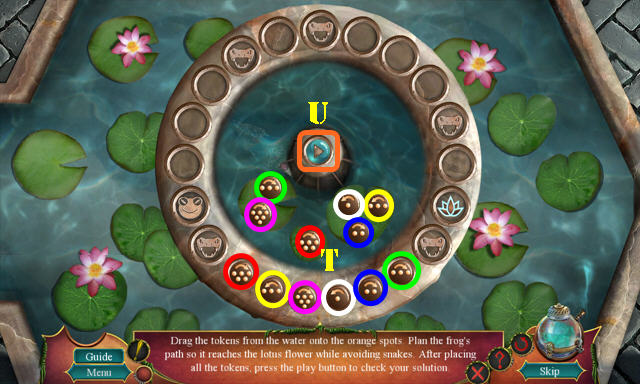
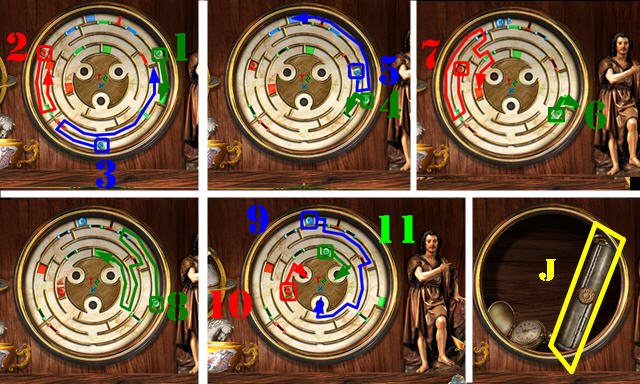
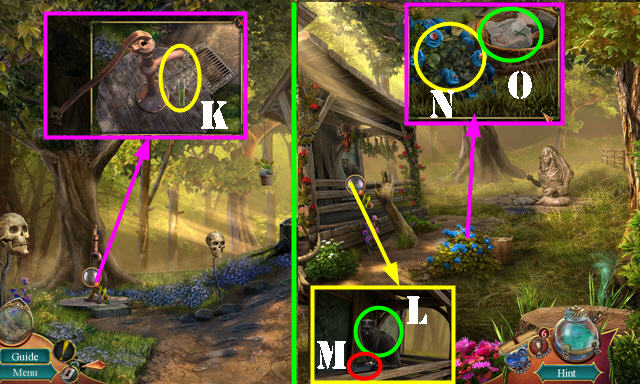
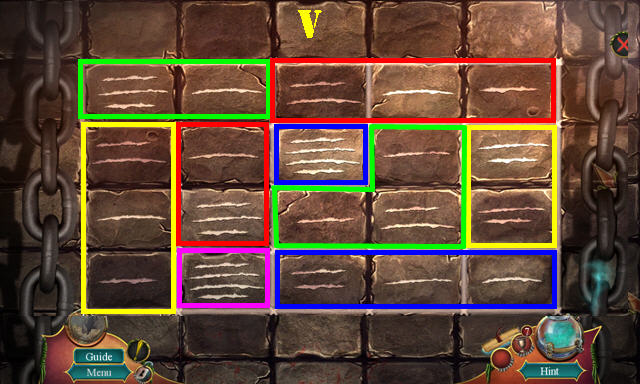
- Solution (T); press play (U).
- Take GLASS RAY 2/2.
- Walk down.
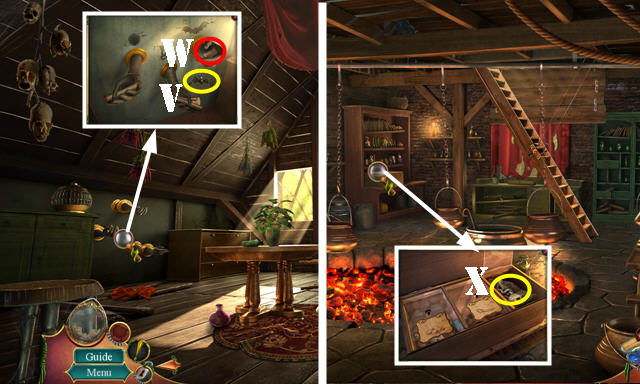
- WINDING KNOB on WOODPECKER; receive WOODPECKER.
- Place WOODPECKER (V); take GLASS STAR (W).
- GLASS RAY 2/2 on GLASS STAR; receive GLASS STAR.
- Place GLASS STAR; select both pieces (X) to receive SHARP SCISSORS.
- Go to Garden (Y).
Chapter 2: Garden
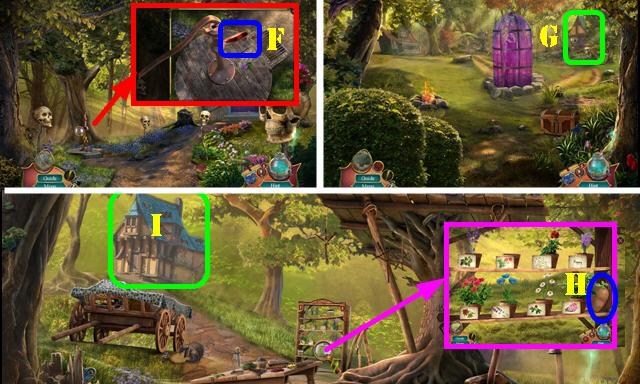
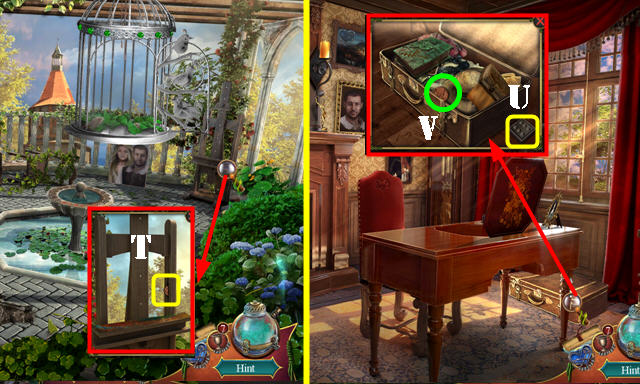
- Use SHARP SCISSORS; take WATERING CAN and RAKE (A).
- Use RAKE (B).
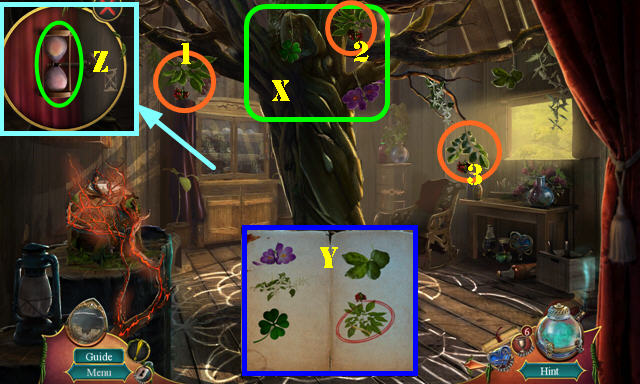
- Select crystal (C) and then symbols (orange).
- Look at note; take MOON FIGURINE and MARBLES 2/3 (D).
- Go to Study.
- Use WATERING CAN; select twice; take CLAMP 2/2 (E).
- Go to Garden.
- Use CLAMP 2/2 (F). Play HOP; receive WOODEN PLATE.
- Go to Study.
- Place WOODEN PLATE; take BELL TOP and EMERALD BIRD (G).
- Go to Garden.
- Place EMERALD BIRD; take CLOCK HAND and MARBLES 3/3 (H).
- Walk down.
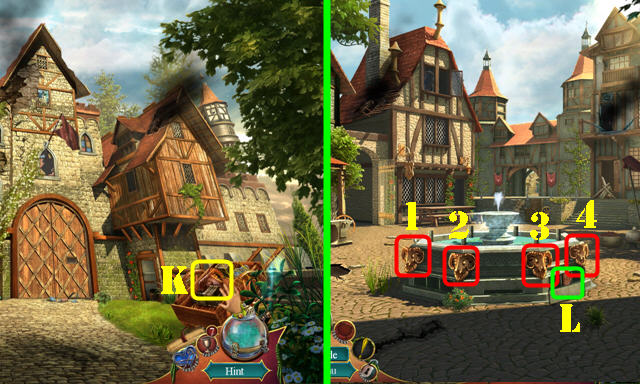
- Place MARBLES 3/3 (I).
- Solution (1-11).
- Take CHILDREN'S TALE (J).
- Go to Study.
- Place CHILDREN'S TALE and CLOCK HAND. Solution (@1): (A-D-B-C-D-C-D)-(Cx2-A-Dx3)-(D-B-C-D-C)-(Dx2-A-Dx3).
- Take IBEX FIGURE 2/2 and LIBRARY KEY (E).

- IBEX FIGURE 2/2 on INCOMPLETE BADGE; receive MILITARY BADGE.
- Place MILITARY BADGE; take IBEX HEAD (F).
- Walk down.
- Place IBEX HEAD; select 3-1-2; take SATURN EMBLEM (G).
- Place LIBRARY KEY (H); select 4-5-6.
- Enter (I).
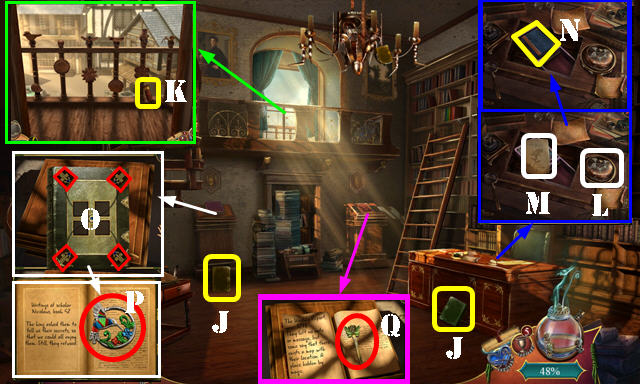
- Take BOOK COVERS 1/5 and BOOK COVERS 2/5 (J).
- Open window; take BOOK COVERS 3/5 (K).
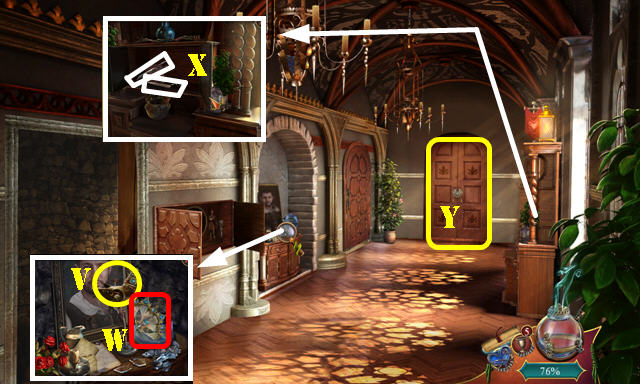
- Place BELL TOP (L); take HERB GUIDE (M).
- Place SATURN EMBLEM; take BOOK COVERS 4/5 (N).
- Select four tiles (O) and flip page; take HUMMINGBIRD EMBLEM (P).
- Place HUMMINGBIRD EMBLEM and flip page; take LETTER OPENER (Q).
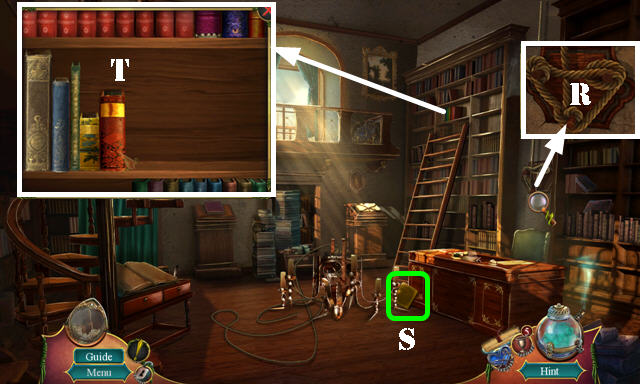
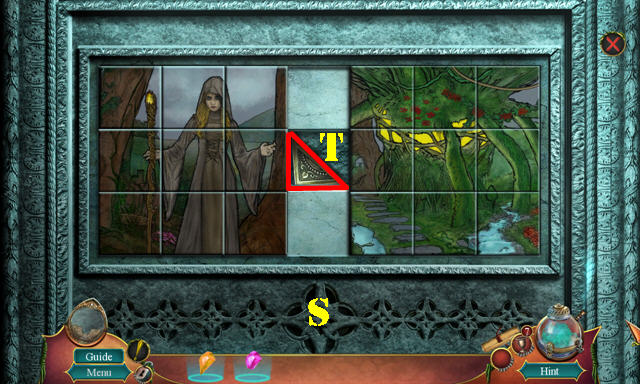
- Use LETTER OPENER (R); take BOOK COVERS 5/5 (S).
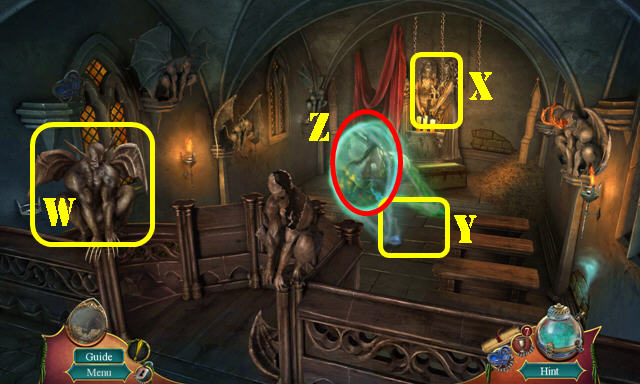
- Place BOOK COVERS 5/5. Solution (T).
- Play automatic HOP; receive BUTTERFLY.
- Place BUTTERFLY. Solution: (U).
- Take MAP (V).
Chapter 3: Lorelei's House
- Select (1-5).
- Kick door twice (A). Go forward.
- Place MAP (B).
- Select crystal (C) and then symbols (orange).
- Talk (D).
- Go (E).
- Take FEATHER 1/2 (F).
- Walk down; go to Evelyn's Yard (G).
- Take DOLL HEAD (H).
- Go (I).
- Use FAN; take BONE (J).
- Select papers (K).
- Go to Wilhelmine's Yard.
- Use BONE (L).
- Sequence one: P-O-N-O.
- Sequence two: M-O-P-P-N.
- Sequence three: P-N-M-N-O-P.
- (L).
- Take TIARA and HANDKERCHIEF (Q).
- Move rug; take BROKEN FIGURINE (R).
- Look at note and place BROKEN FIGURINE (S).
- Place stones (T); take GODDESS FIGURINE (U).
- Go to Evelyn's Yard.
- Place GODDESS FIGURINE (V).
- Go to Evelyn's House (W).
- Receive DISTRACTION RECIPE.
- Place HERB GUIDE (X) and open note (Y); select 1-3; receive GINSENG.
- Place HOURGLASS (Z). Play HOP; receive STARDUST.
- Go to Lorelei's House.
- Place MOON FIGURINE and use STARDUST (A).
- Open book; take FEATHER 2/2 (B). Close book; receive LORELEI'S DIARY.
- Use HANDKERCHIEF (C); receive GLASS SHARD.
- Walk down.
- Use GLASS SHARD (D). Play HOP; receive TRINITY KNOT.
- Place GINSENG (E).
- Solution: (F).
- Take BLUE POPPY (G).
- Go to Evelyn's House.
- Play HOP (H); receive OCTOPUS INK.
- Place FEATHER 2/2; take PHOENIX EGG (I).
- Go to Campfire.
- Place TRINITY KNOT; take FRUIT PICKER (J).
- Go (K).
- Use FRUIT PICKER (L); take ICE CRYSTAL and CATERPILLAR (M).
- Go (N).
- Use ICE CRYSTAL; take BEAUTY CREAM (O).
- Go to Wilhelmine's Yard.
- Use CATERPILLAR (P); receive PEN.
- Enter (Q).
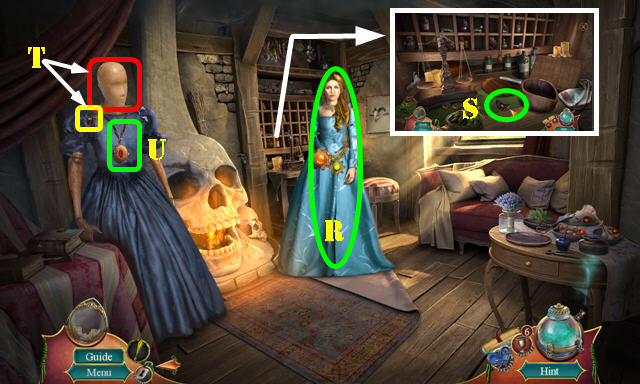
- Give BEAUTY CREAM (R).
- Take BROOCH (S).
- Place DOLL HEAD and BROOCH (T); take EVELYN'S LOCKET (U).
- Open EVELYN'S LOCKET; take CHALK and LORELEI'S BLOOD.
- Go to Evelyn's House.
- Use CHALK (V); take GALACTIC SPHERE (W).
- Go to Wilhelmine's House.
- Place DISTRACTION RECIPE, BLUE POPPY, OCTOPUS INK, PHOENIX EGG, and GALACTIC SPHERE (X).
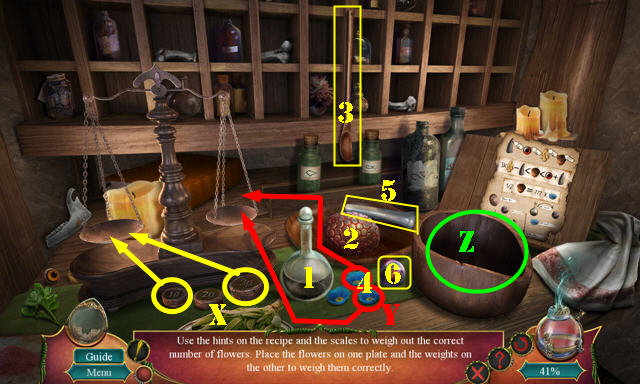
- Place weights (X) and flowers (Y).
- Use 1-2-3-4-4-5-6 in bowl (Z).
- Take STARBURST POWDER.
- Go to Campfire.
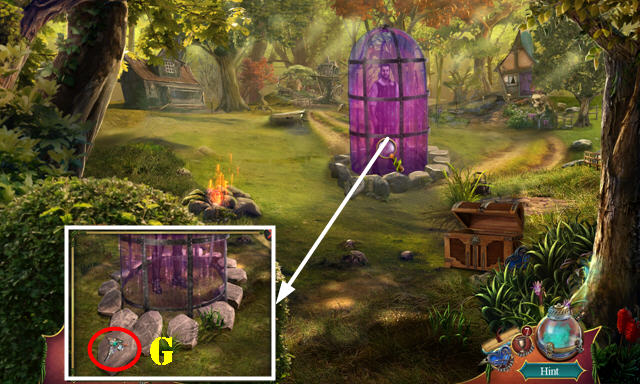
- Use STARBURST POWDER (A).
- Go (B).
Chapter 4: Margrit's House
- Place four stones (orange) in bucket (C).
- Take WRENCH (D).
- Place TIARA (E); take BAT PENDANT (F).
- Enter (G).
- Take STEEL WOOL, SMUDGE STICK, and PORTAL GEM (H).
- Return to Evelyn's Yard.
- Play HOP (I); receive FISH.
- Use WRENCH; take VIAL (J).
- Go to Wilhelmine's Yard.
- Place VIAL (K); receive BLINDING POISON.
- Go to Front Porch.
- Give FISH (L); take WOODEN BOX (M).
- Use BLINDING POISON (N); take CONSTELLATION CLUE (O).
- Go to Wilhelmine's Yard.
- Use WOODEN BOX (P); receive PENDULUM.
- Go to Margrit's House.
- Place PENDULUM (Q).
- Select paper and use PEN; take PENDULUM SYMBOL (R).
- Place PENDULUM SYMBOL (S).
- Solution (T).
- Go (U).
- Hang BAT PENDANT (V); look at note and take LABEL (W).
- Walk down.
- Open box; place LABEL; swap last two labels; take SNAKE (X).
- Go to Attic.

- Hang SNAKE (Y); look at note and take HORN (Y1).
- Go to Front Porch.
- Place HORN (Z); take DRAGONFLY PENDANT 2/2 (Z1).
- Go to Attic.

- Use DRAGONFLY PENDANT 2/2 and select twice (A). Play HOP; receive ORB.
- Hang ORB (B); look at note and take FLINT AND STEEL (C).
- Use FLINT AND STEEL (D).
- Place CONSTELLATION CLUE on scene.
- Take clue and place it (E).
- Select wall; take CAGE KEY (F).
- Go to Campfire.
- Use CAGE KEY (G).
- Walk down.
- Give LORELEI'S DIARY (H).
- Play HOP (I); receive CHESS PIECE.
- Take UMBRELLA KNOB (J).
- Go to Castle Gate.
- Take IBEX HEAD (K).
- Walk down.
- Place IBEX HEAD. Select 1-4-2-3.
- Take AIR SYMBOL (L).
- Go to Castle Gate and enter Main Hall.
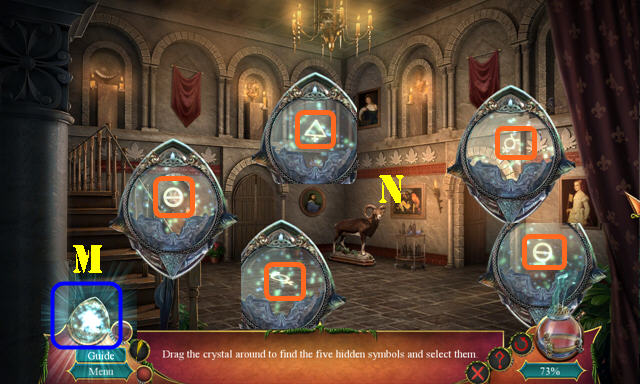
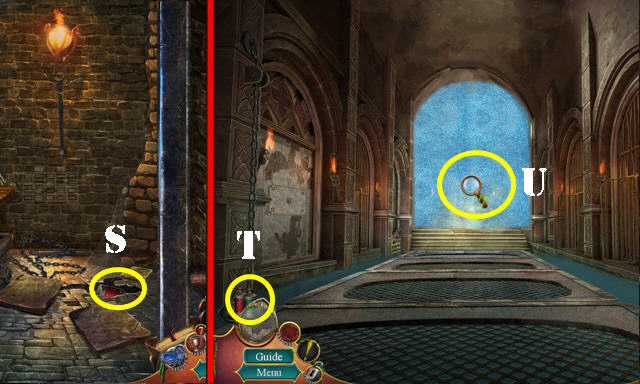
- Select crystal (M); find symbols (N).
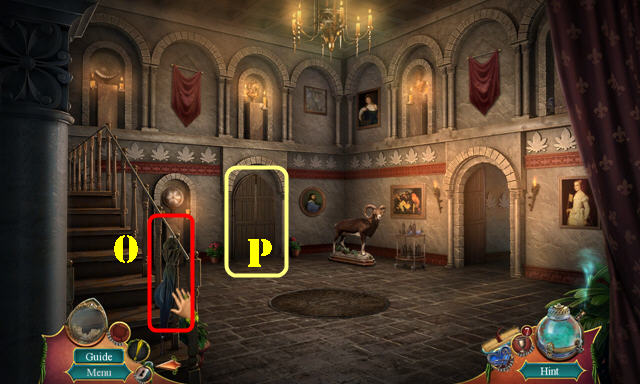
- Take UMBRELLA (O).
- UMBRELLA KNOB on UMBRELLA; take CLAW.
- Go (P).
- Take BREAD and SUDOKU TILES 1/3 (Q).
- Open cabinet (R); receive BROKEN PLIERS.
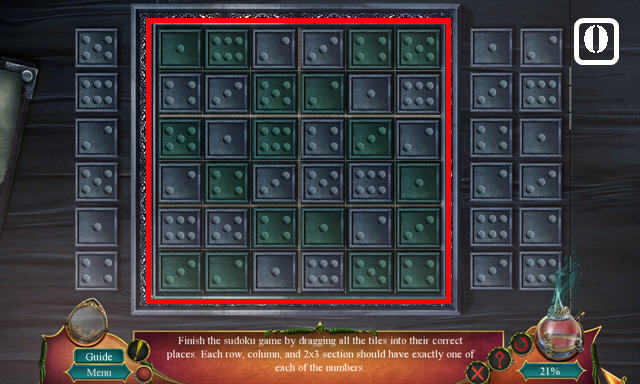
- Play puzzle (S).
- Solution (A-J).
- Receive TROUGH.
- Walk down; enter Council Meeting Room on right.
- Use TROUGH (K); take SPIRIT SYMBOL (L).
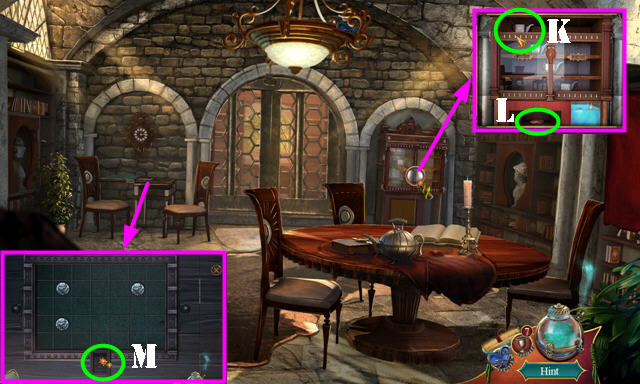
- Place CHESS PIECE (M).
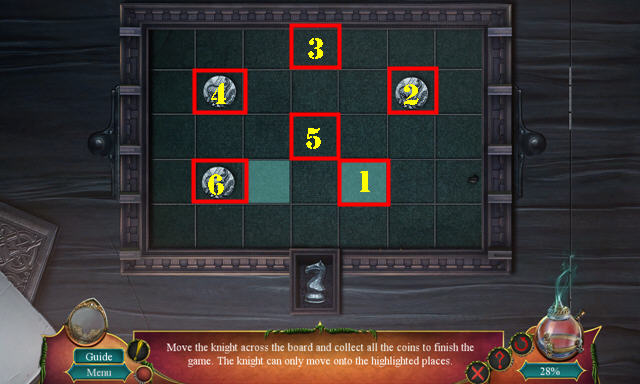
- Solution (1-6).
- Take CORKSCREW.
- Walk down.
- Use CORKSCREW (N); receive MILK.
- Go (O).
- Use MILK; take BUTTER (P).
- Go to Council Meeting Room.
- Use BUTTER (Q). Play HOP; receive WATER SYMBOL.
- Go to Town Square.
- Select three plier parts (R) and place BROKEN PLIERS. Move piece over (S); take PLIERS.
- Go to Garden.
- Use PLIERS (T); receive FIRE SYMBOL.
- Go to Study.
- Take SUDOKU TILES 2/3 (U).
- Use CLAW on right strap; select twice; take EARTH SYMBOL (V).
- Go to Main Hall.
- Place AIR SYMBOL, SPIRIT SYMBOL, WATER SYMBOL, FIRE SYMBOL, EARTH SYMBOL, and LORELEI'S BLOOD (W).
- Go to Catacombs (X).
Chapter 5: Catacombs
- Take BENT PLAQUE (A).
- Go to Kitchen.
- Put down BENT PLAQUE; take SILVER PLAQUE (B).
- Go to Upper Hall.
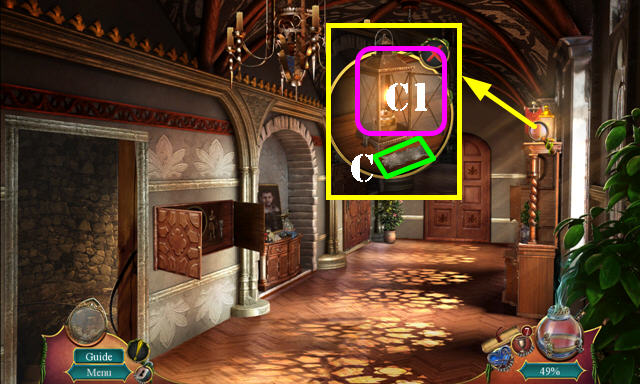
- Place SILVER PLAQUE (C); take LANTERN (C1).
- Go to Catacombs.
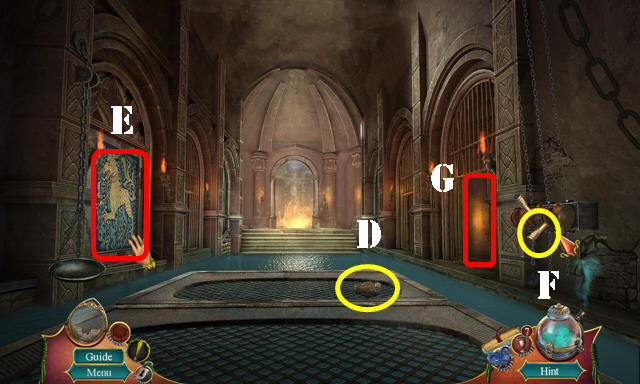
- Use LANTERN on scene.
- Take ORNATE OWL (D).
- Select tapestry (E).
- Pull lever (F).
- Enter Cell 1 (G).
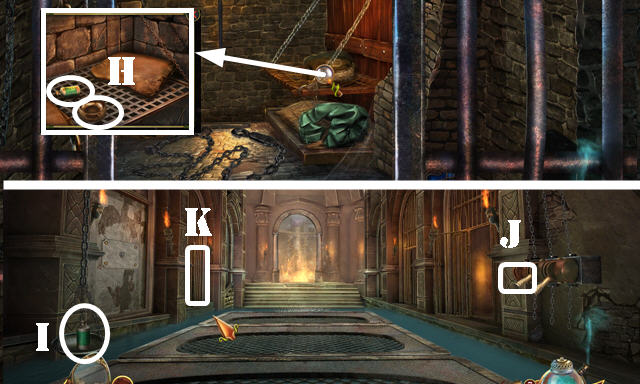
- Move blanket; take BOWL and JADE WEIGHT (H).
- Walk down.
- Place JADE WEIGHT (I). Pull lever (J).
- Go to Cell 2 (K).
- Take SUDOKU TILES 3/3 (L).
- Go to Council Meeting Room.
- Place ORNATE OWL; take SMALL KEY (M).
- Place SUDOKU TILES 3/3 (N).
- Solution (O).
- Take KNOB.
- Go to Cell 1.
- Use SMALL KEY (P); take LEVER (P1).
- Walk down.
- Place LEVER (Q).
- Enter Cell 3 (R).
- Select tiles 3x; tale RUBY WEIGHT (S).
- Walk down.
- Place RUBY WEIGHT (T).
- Play puzzle (U).
- Solution (V).
- Go (W).
- Remove grid (X).
- Place KNOB (Y).
- Enter (Z).
- Select crystal (A); find symbols (orange).
- Play HOP (B); receive PULLEY.
- Walk down.
- Place PULLEY (C); take TWINE (D).
- TWINE in BOWL; select loose string; take BUCKET.
- Place BUCKET; take SHIELD PIECE 1/3 (E).
- Go (F).
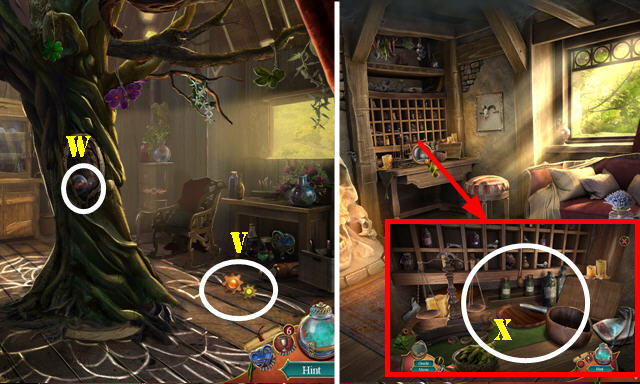
- Use STEEL WOOL; take MAGNET (G).
- Select four bones; use SMUDGE STICK; take SHIELD PIECE 2/3 (H).
- Go to Chapel.
- Use MAGNET; take SHIELD PIECE 3/3 (I).
- Go to Training Room.
- Place SHIELD PIECE 3/3. Solution 1-8.
- Select laces 6x (J); take GOLDEN APPLE (K).
- Go to Catacombs.
- Place GOLDEN APPLE (L).
- Solution (M).
- Take MINING TOOLS.
- Go to Cell 1.
- Use MINING TOOLS; take BELT BUCKLE (N).
- Go to Training Room.
- Place BELT BUCKLE (O); take COLLAR STAYS (O1).
- Use COLLAR STAYS; take GOLDEN EYE (P).
- Walk down.
- Play HOP (Q); receive HANDLE.
- Place GOLDEN EYE; take WINGS 1/2 (R).
- Go to Kitchen.
- Place HANDLE (S); take MARBLE CHUNK (T).
- Go to Cell 3.
- Use MARBLE CHUNK (U).
- Solution (V).
- Take WINGS 2/2.
- Go to Chapel.
- Place WINGS 2/2 (W).
- Play HOP (X): receive PORTAL GEM.
- Place two PORTAL GEMS (Y).
- Go (Z).
- Take PORTAL GEM and FLOWER (A).
- Go (B).
- Use FLOWER; take SHEARS (C).
- Walk down; go (D).
- Take PORTAL GEM (E).
- Use SHEARS (F); select 4 vines (G). Play HOP; receive SAW.
- Throw BREAD (H); take LENS (I).
- Walk down.
- Use SAW; take PEARL TREE (J).
- Use LENS; take CRYSTAL BALL 1/2 (K).
- Go (L).
- Place PEARL TREE; take DIAL (M).
- Place DIAL; move needle to (E-W-N) (@1).
- Play HOP (O); receive CRYSTAL BALL 2/2.
- Go to Thousand Springs.
- Throw CRYSTAL BALL 2/2 (P).
- Take MURAL TILE (Q).
- Place MURAL TILE (R).
- Solution (S).
- Take TRIANGULAR PLATE (T).
- Go to Second Garden.
- Place TRIANGULAR PLATE. Solution: (3-L)-(7-L)-(4-L)-(8-U-R)-(4-D-R)-(3-R)-(7-R).
- (2-R)-(6-U)-(2-L)-(6-D-R)-(2-D)-(5-R)-(2-U)-(1-R)-(6-L).
- Completed image (@2).
- Take STAFF (@3).
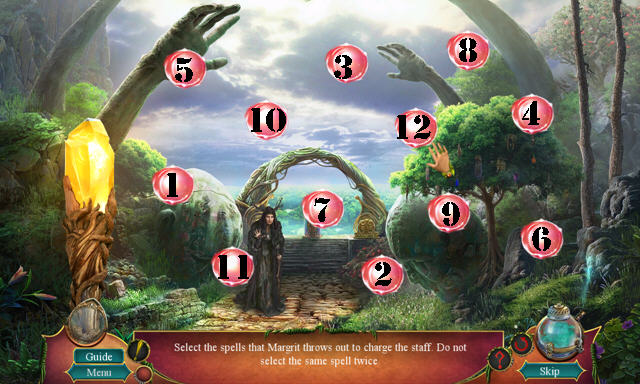
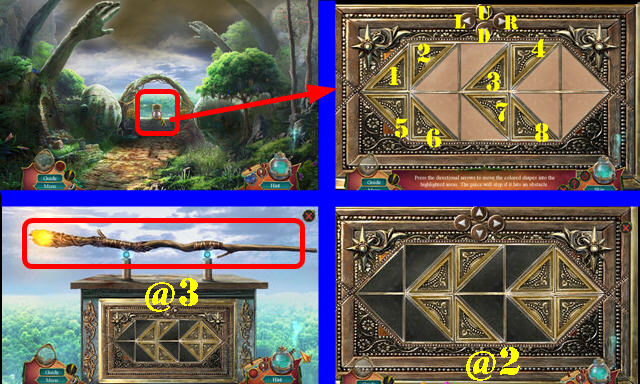
- Solution (1-12).
- Place 2 PORTAL GEMS (A).
- Go (B).
- Give STAFF (C).
- Solution (D-E-F).
- Congratulations, you've completed Myths of the World: Love Beyond!
Created at: 2018-03-09