

Walkthrough Menu
- General Tips
- Chapter 1: Slums
- Chapter 2: Tavern
- Chapter 3: Town
- Chapter 4: The College
- Chapter 5: Land of the Faeries
- Chapter 6: Swamp
General Tips
- This is the official guide for Myths of the World: Of Fiends and Faeries!
- This guide will not mention each time you have to zoom into a location; the screenshots will show each zoom scene.
- Hidden-object puzzles are referred to as HOPS. This guide will not show screenshots of the HOPS, however, it will mention when an HOP is available and the inventory item you'll collect from it.
- This guide will give step-by-step solutions for all puzzles which are not random. Please read the instructions in the game for each puzzle.
Chapter 1: Slums
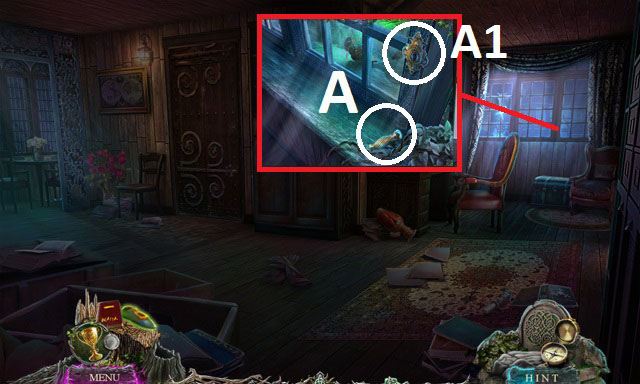
- Take the WINDOW HANDLE (A).
- Use the WINDOW HANDLE (A1).
- Talk to the pixie.
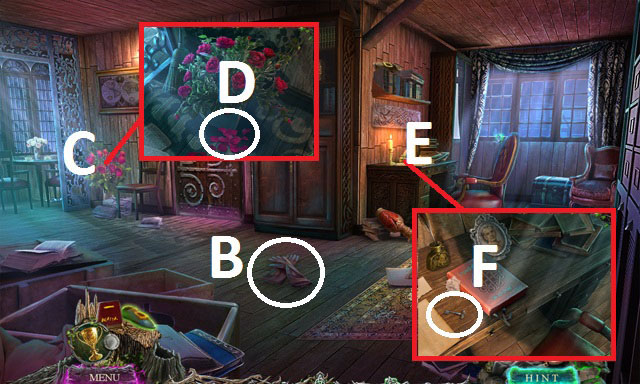
- Take the GLOVES (B).
- Use the GLOVES (C); take the ROSE PETALS (D).
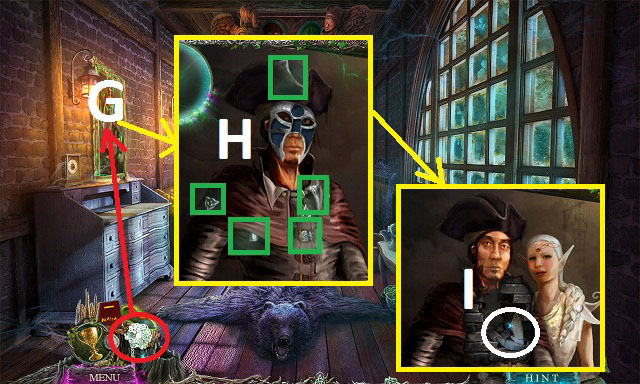
- Move the papers (E); take the SHELF KEY (F).
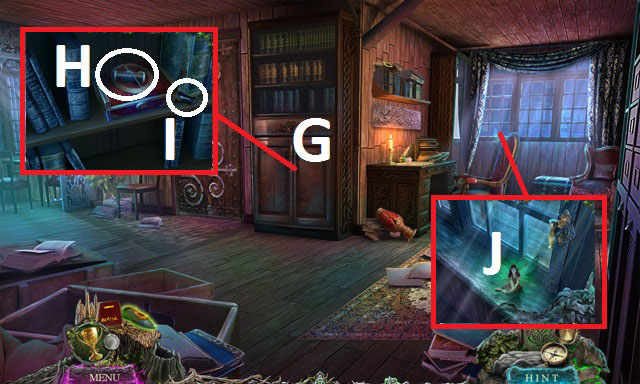
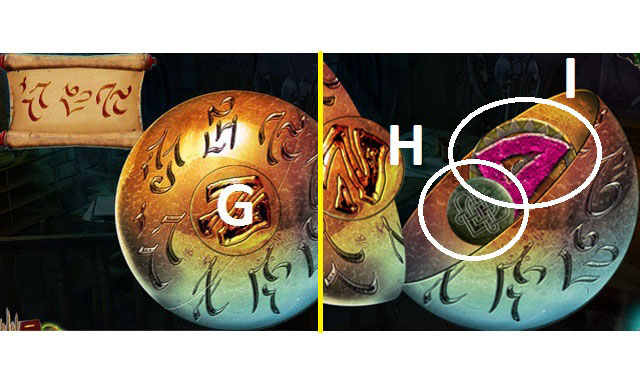
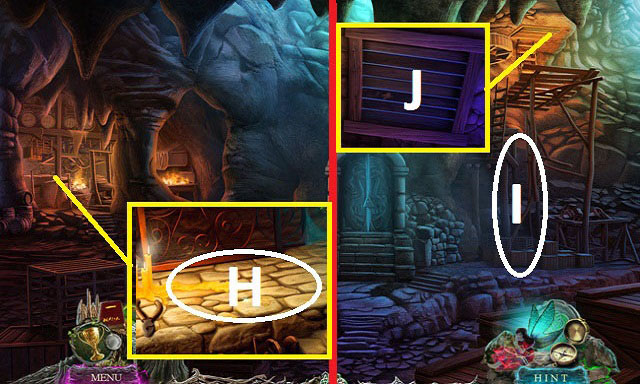
- Use the SHELF KEY (G); take the NEEDLE AND THREAD (H) and CORKSCREW (I).
- Combine the NEEDLE AND THREAD and ROSE PETALS (inventory) to receive a ROSE PETAL DRESS.
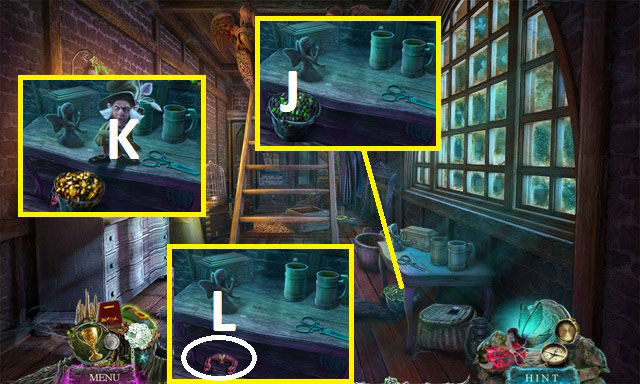
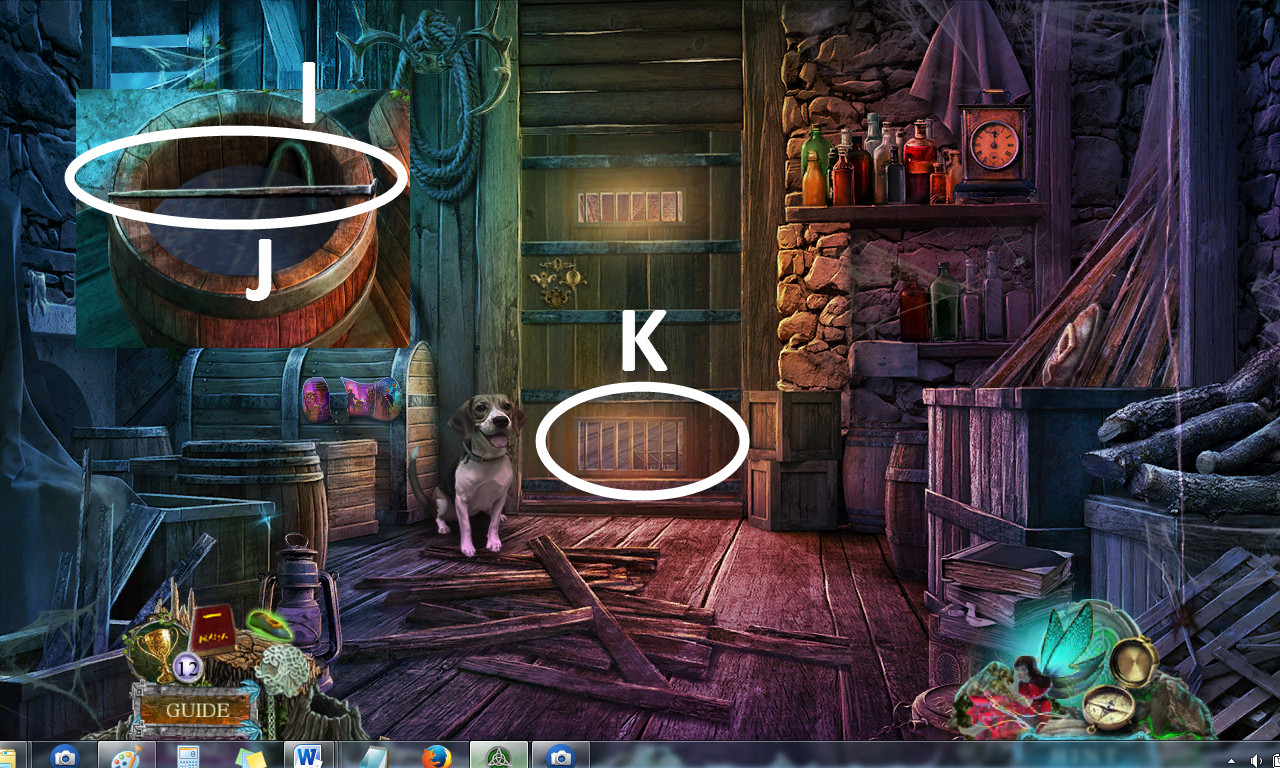
- Give the ROSE PETAL DRESS (J); take the MONOCLE.
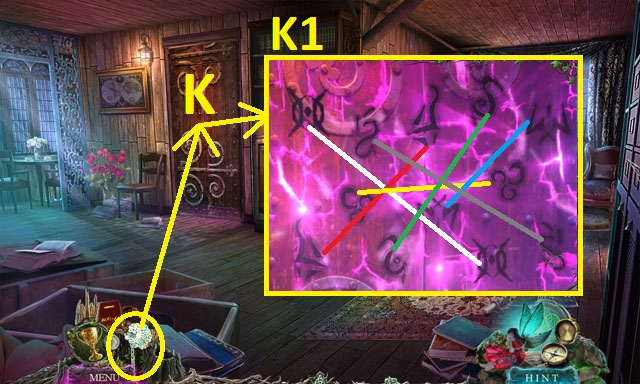
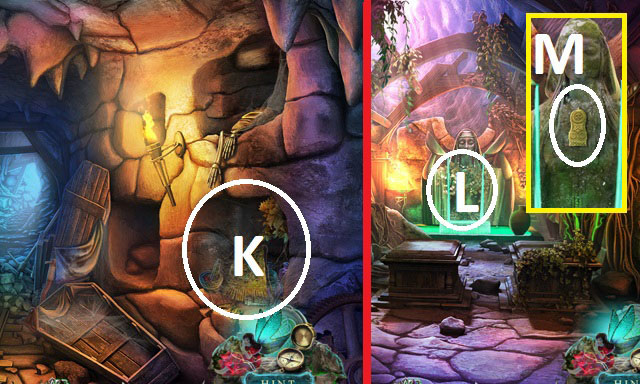
- Use the monocle (K) to activate a puzzle.
- Solution (K1).
- Exit.
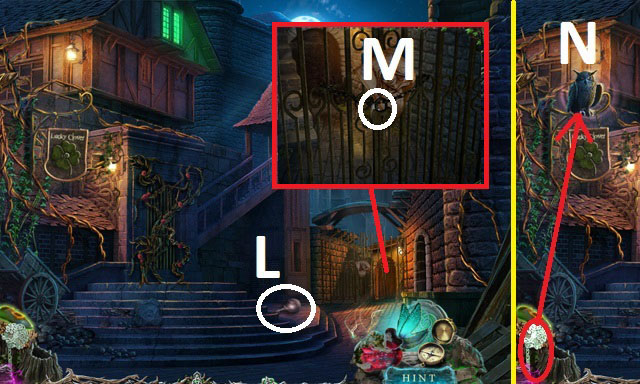
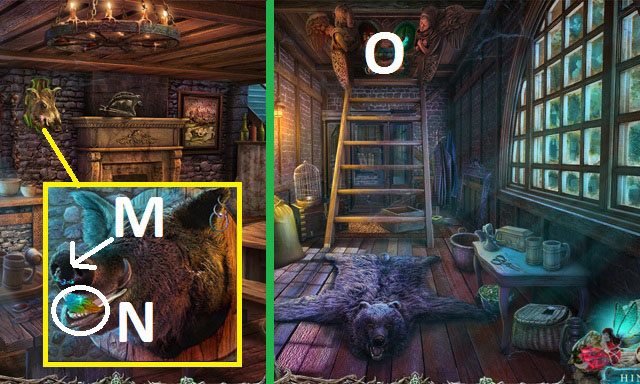
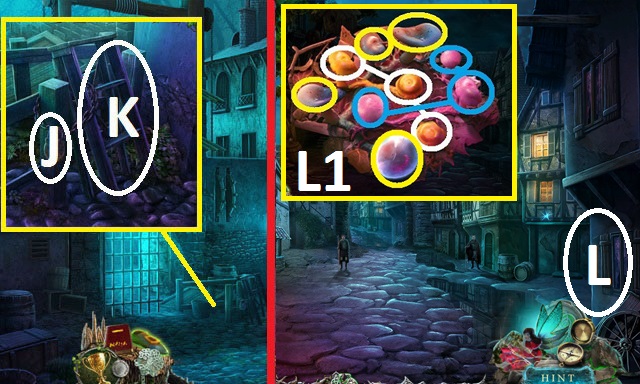
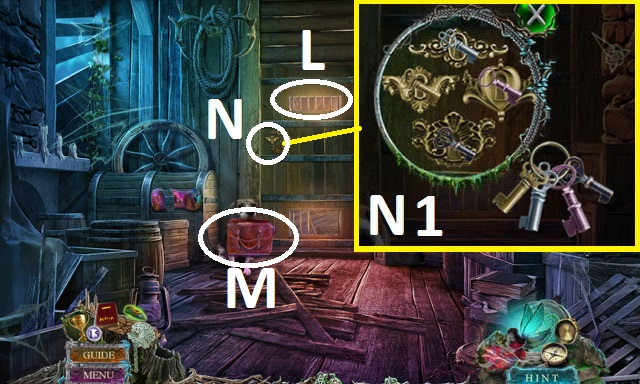
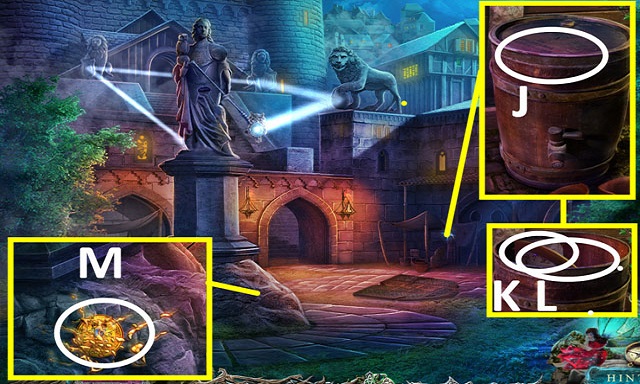
- Take the BOTTLE (L) and HARP TOKEN (M).
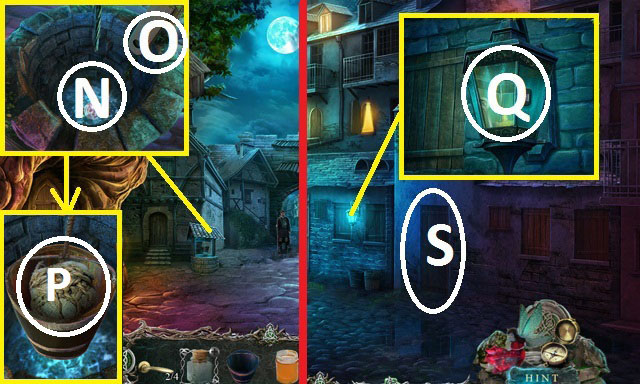
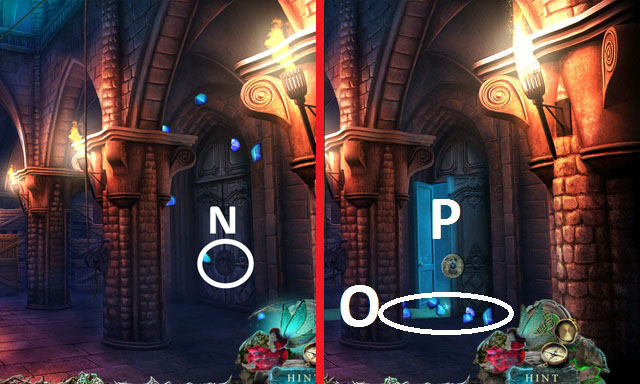
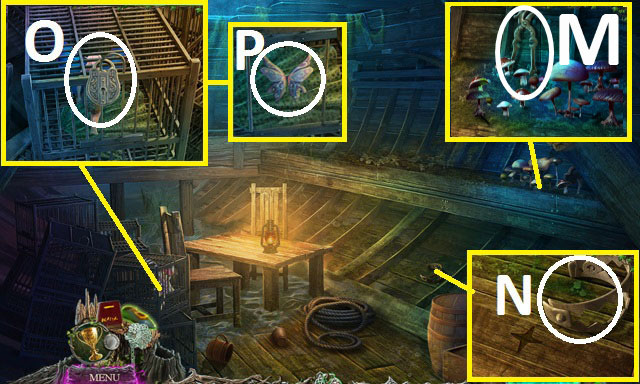
- Use the monocle (N) to trigger a HOP.
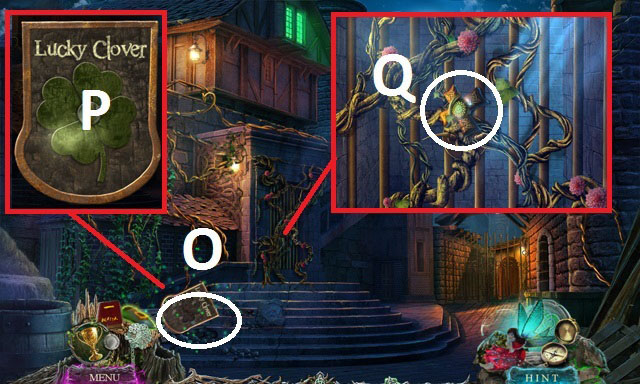
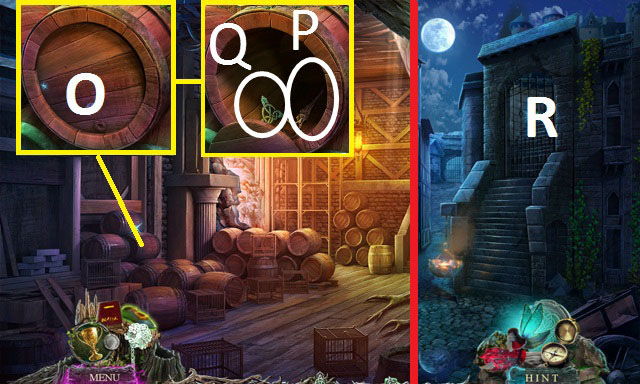
- Play the HOP (O) to receive the BROKEN SIGN.
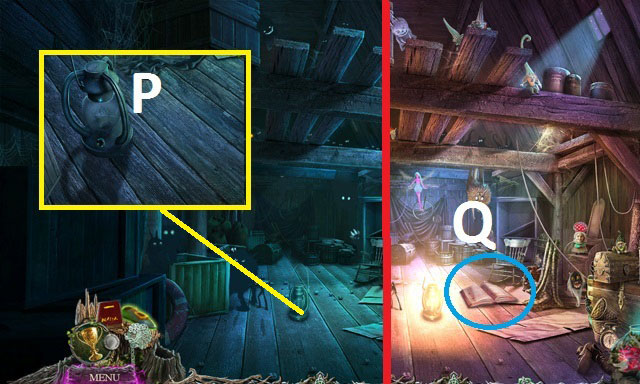
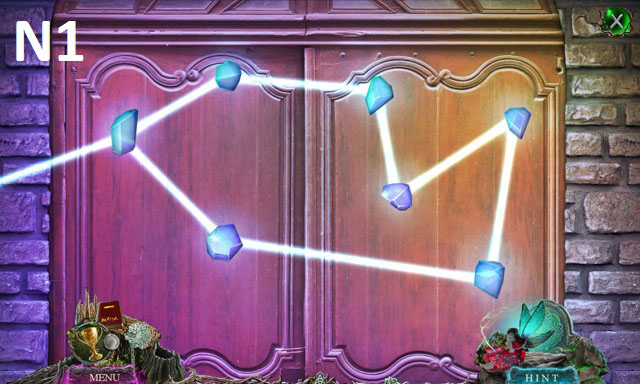
- Fix the BROKEN SIGN (inventory) and touch the center (P) to receive the LUCK TOKEN.
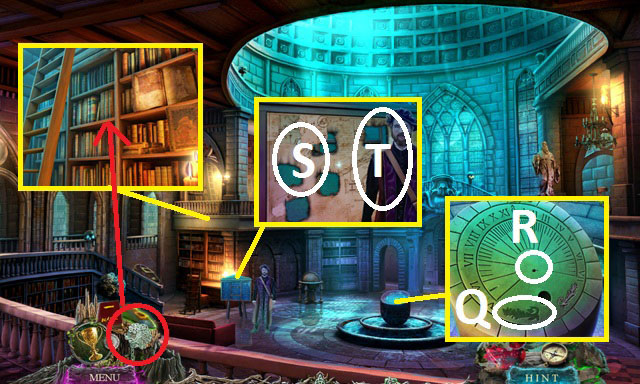
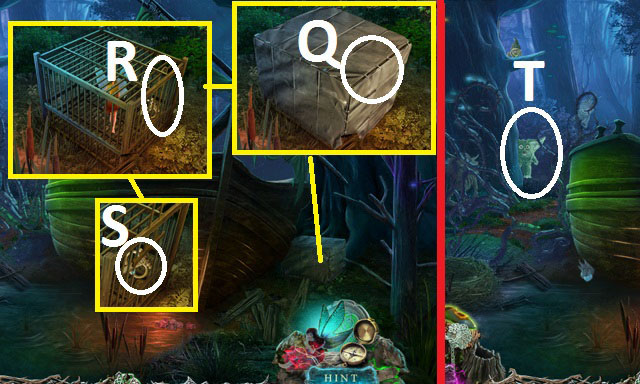
- Take the WATCHHOUSE TOKEN (Q).
- Walk down.
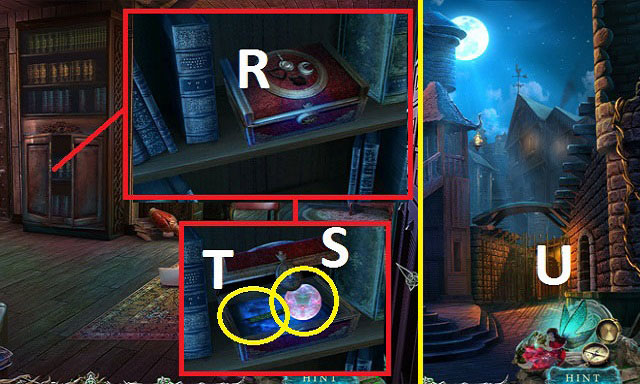
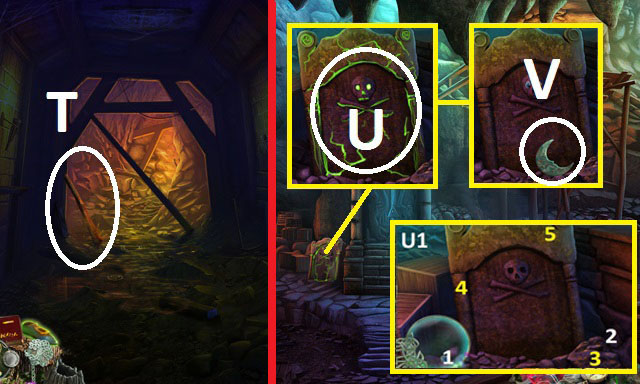
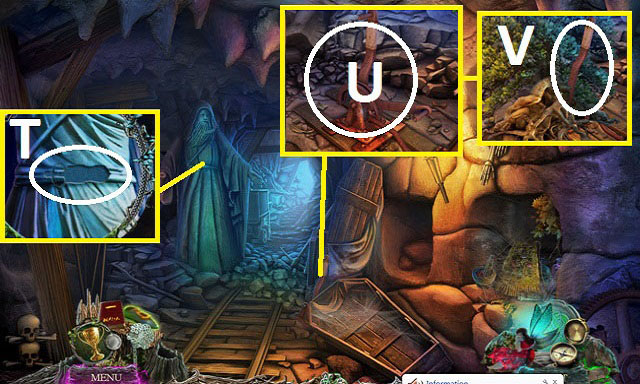
- Use the LUCK TOKEN and HARP TOKEN (R); take the CRYSTAL BALL (S) and LOCKPICK (T).
- Exit.
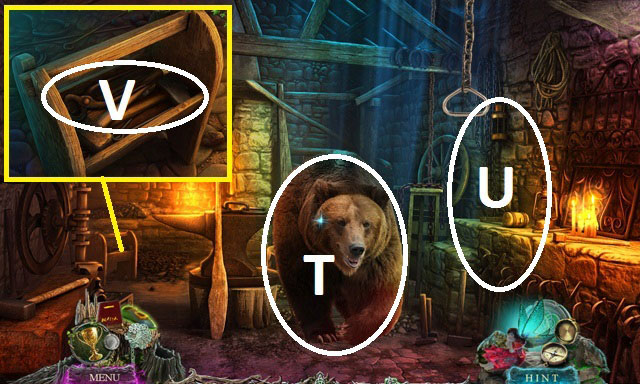
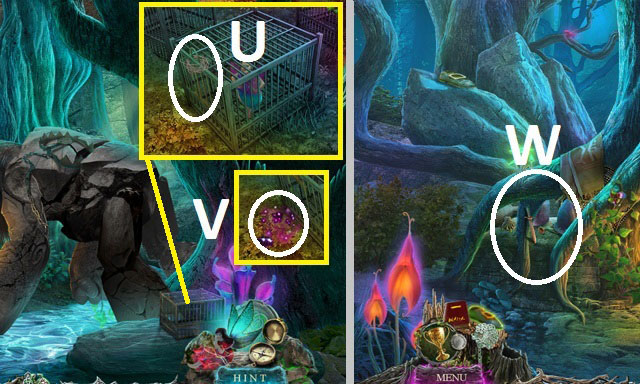
- Use the LOCKPICK (U) to trigger a puzzle.
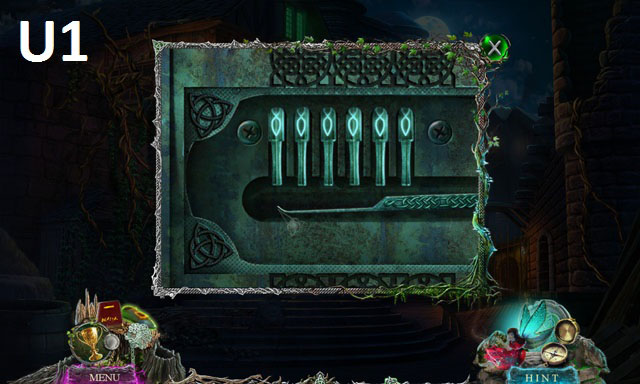
- Solution (U1).
- Walk through the gate.
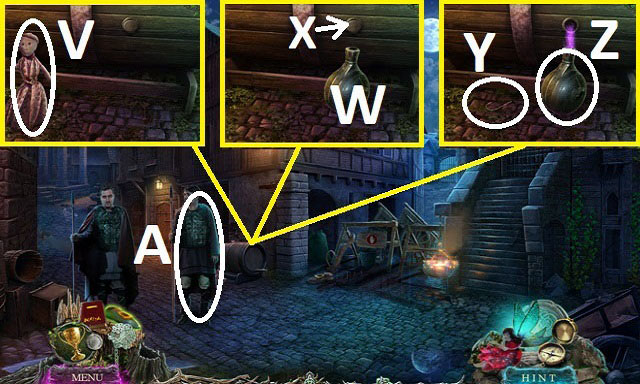
- Take the STUFFED DOLL (V).
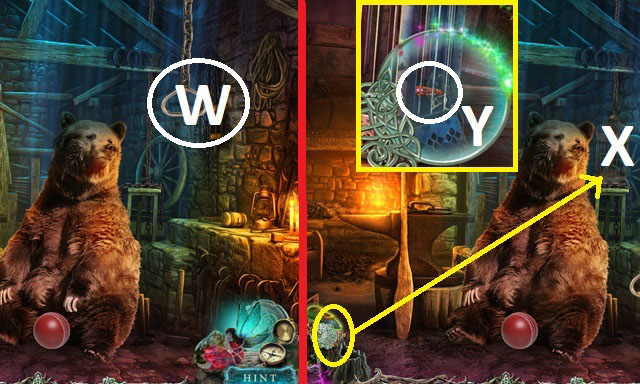
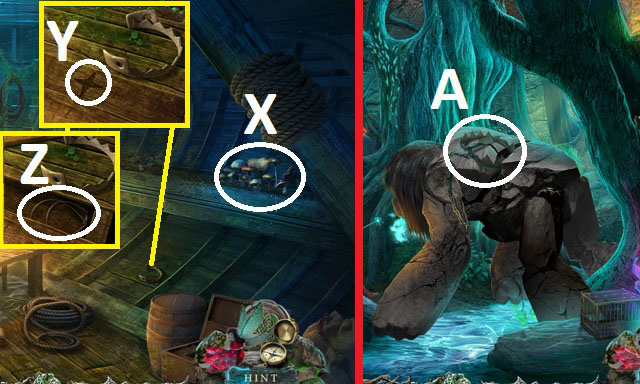
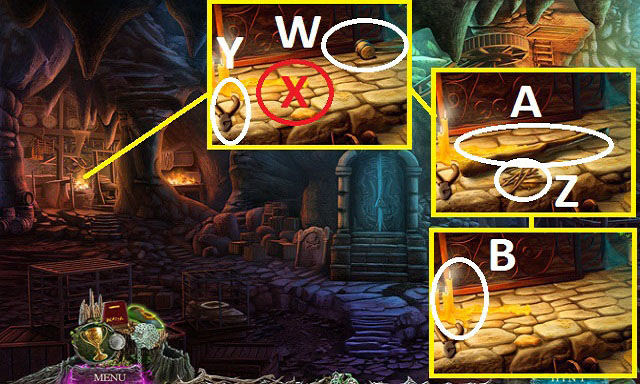
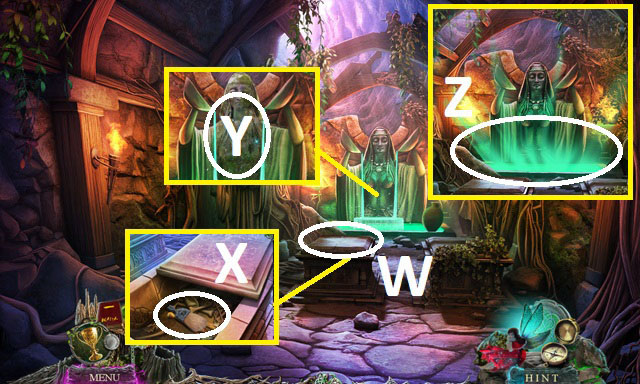
- Place the BOTTLE (W); use the CORKSCREW (X).
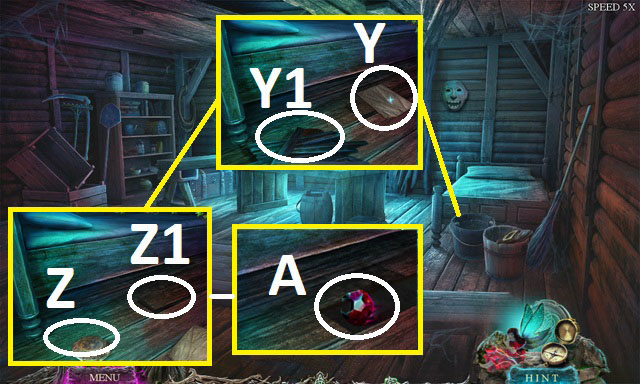
- Take the FISHHOOK (Y) and BOTTLE OF JUICE (Z).
- Give the BOTTLE OF JUICE (A) to trigger a puzzle.
- Solution: Charm, Compassion, Humour, Humour.
- Walk left.
- Combine the FISHHOOK and NEEDLE AND THREAD (inventory) to get FISHING GEAR.
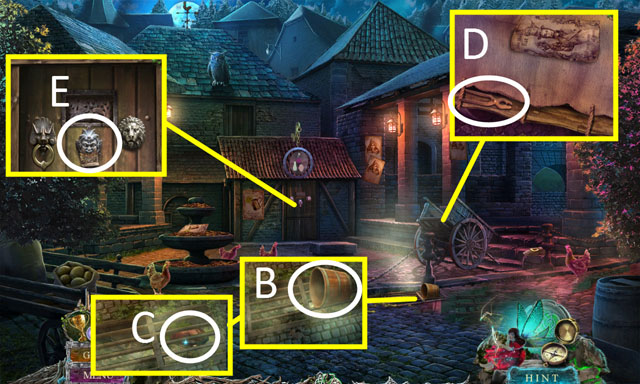
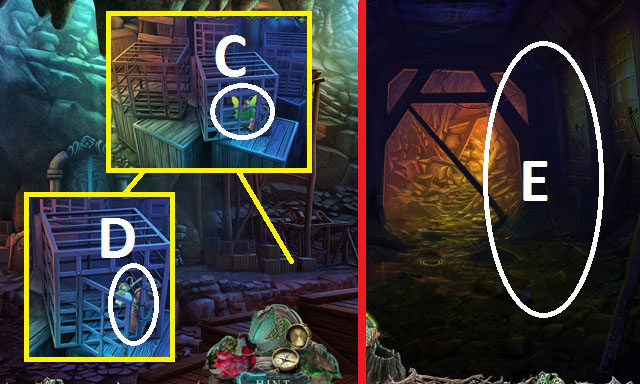
- Take the BROKEN BUCKET (B); use the FISHING GEAR to take the POUCH (C).
- Open the POUCH (inventory) to get SIGNET 1 and KNOCKER 1/2.
- Take the PLIERS (D) and BOOK OF MATCHES (E).
- Walk south.
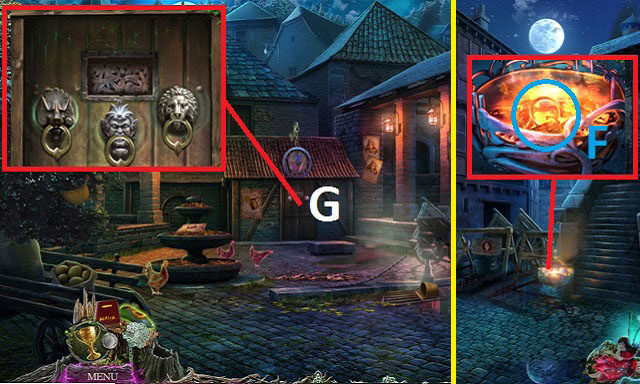
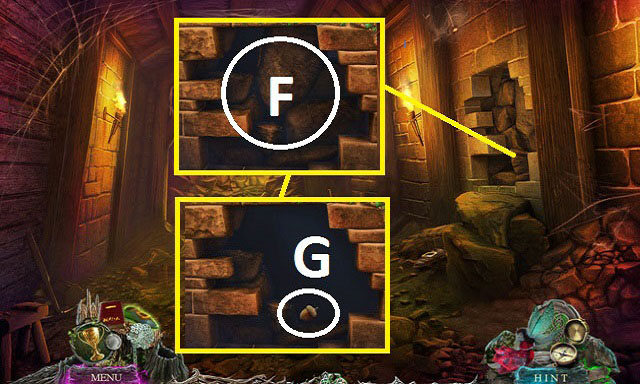
- Use the PLIERS to get KNOCKER 2/2 (F).
- Walk forward.
- Touch the door.
- Place the two KNOCKERS (G); use the monocle to trigger a puzzle.
- Solution: Left knocker 2 times, middle 1 time, right 3 times.
- Enter the fruit shop.
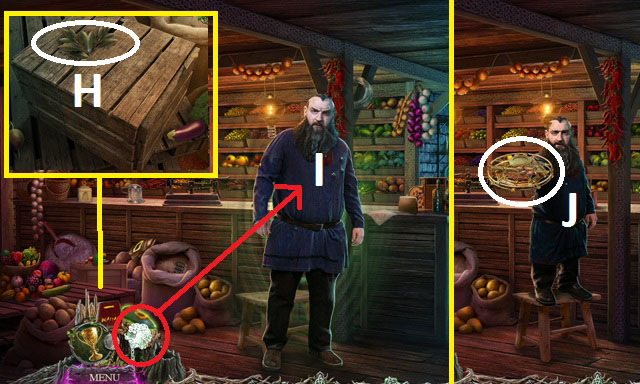
- Move the vegetables; take the LAUREL LEAVES (H).
- Combine the STUFFED DOLL, LAUREL LEAVES and NEEDLE AND THREAD (inventory); receive the PIXIE DECOY.
- Use the monocle (I); play the HOP; take the TRAP (J).
- Open the TRAP to trigger a puzzle.
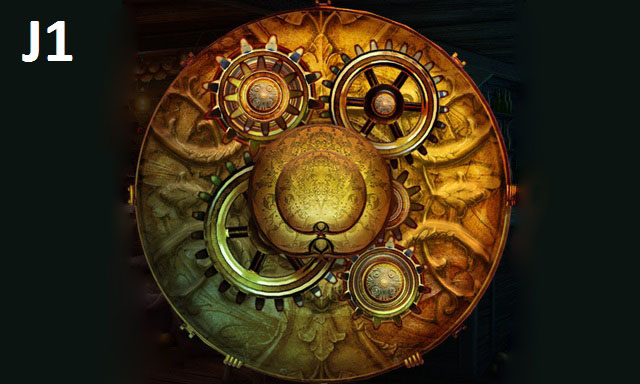
- Solution (J1).
- Combine the TRAP and PIXIE DECOY (inventory) to receive OWL TRAP.
- Exit.
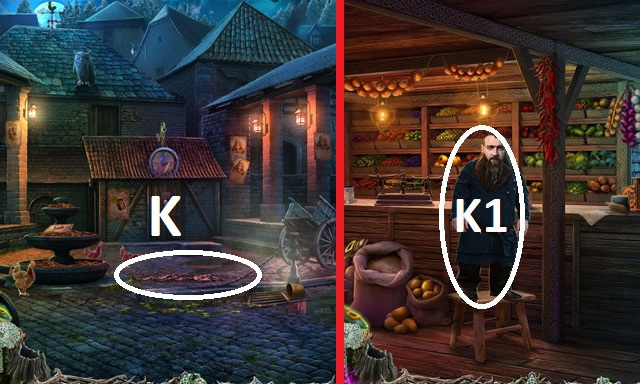
- Place the OWL TRAP (K); take the TRAPPED OWL.
- Enter the fruit shop.
- Give the TRAPPED OWL to Mr. Odjobs (K1) to trigger a puzzle.
- Solution: Compassion, Bluff, Intimidate, Compassion; receive the MENU.
- Open the MENU (inventory); receive the TILL BUTTON.
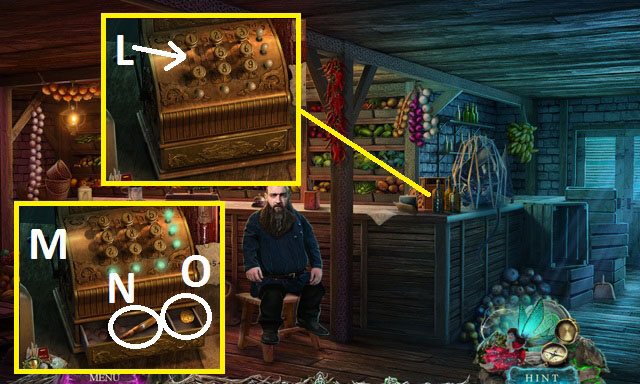
- Place the TILL BUTTON (L).
- Solution: Top row 9, 1, 5; Middle 4, 8, 3; Bottom 2, 6, 7.
- Pull the handle (M); take the KNIFE (N) and GOLDEN COIN (O).
- Exit.
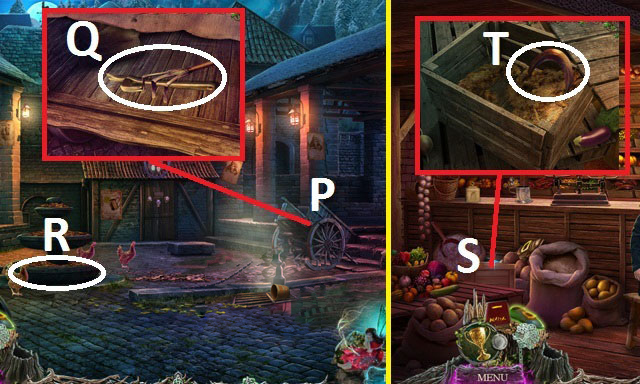
- Use the KNIFE (P); take the RAKE and CROWBAR (Q).
- RAKE the leaves three times (R) to activate a HOP; play it to receive the SICKLE HANDLE.
- Enter the fruit shop.
- Use the CROWBAR (S); take the SICKLE BLADE (T).
- Combine the SICKLE BLADE and SICKLE HANDLE (inventory) to receive SICKLE.
- Walk down three times to the streets.
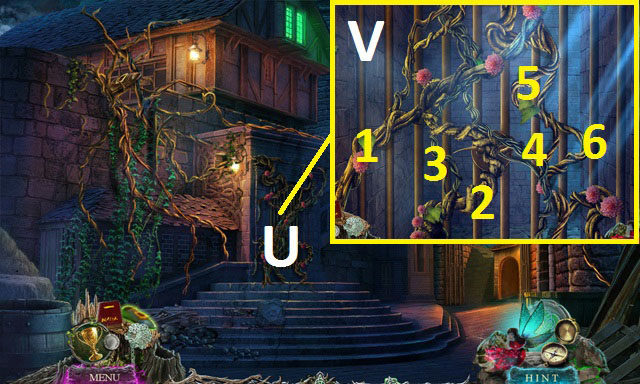
- Use the SICKLE (U) to trigger a puzzle.
- Solution (V).
- Enter the tavern.
Chapter 2: Tavern
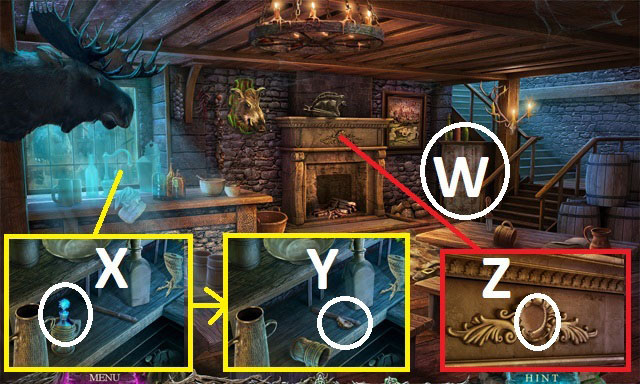
- Move the curtain and play the HOP (W) to receive LAMP OIL.
- Take the BLUE SAPPHIRE (X), MANTELPIECE KEY 1/2 (Y) and LAMP WICK (Z).
- Go upstairs.
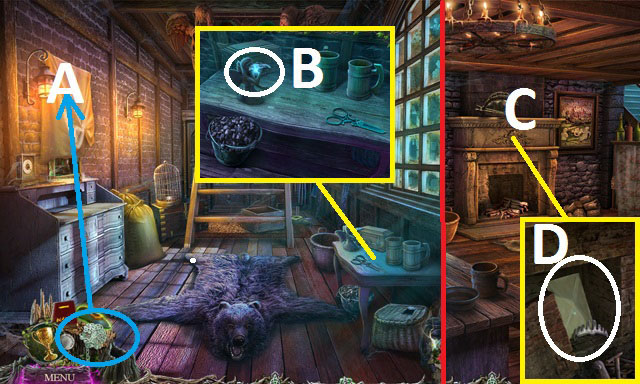
- Remove the tarp; use the monocle (A); receive BROKEN MONOCLE.
- Take the MANTELPIECE KEY 2/2 (B).
- Go downstairs.
- Use the MANTELPIECE KEY (C); take the CROWN TOKEN and LETTER (D).
- Read the LETTER (inventory) to receive the LENS.
- Combine the BROKEN MONOCLE and LENS (inventory) to receive a MONOCLE.
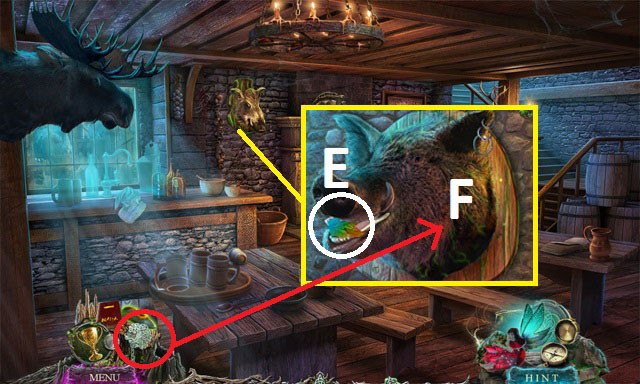
- Touch the leaf (E). Use the monocle (F).
- Go upstairs.
- Use the monocle (G).
- Repair the mask (H).
- Take the WING TOKEN (I).
- Touch the bucket (J), then use the monocle on it.
- Give the GOLDEN COIN (K); receive the PIG RING.
- Take the HAT TOKEN (L).
- Go downstairs.
- Place the PIG RING (M); take the LEAF TOKEN (N).
- Go upstairs.
- Place the WING TOKEN, CROWN TOKEN, HAT TOKEN, and LEAF TOKEN (O); press the center button to trigger a puzzle.
- Solution: 1-3, 3-5, 1-4, 1-3, 3-5, 2-5, 3-5.
- Climb the ladder.
- Use the LAMP OIL, LAMP WICK, and BOOK OF MATCHES (P).
- Read the book (Q); receive the CRUMPLED PAPER.
- Read the CRUMPLED PAPER; select the locations on the map to trigger four puzzles.
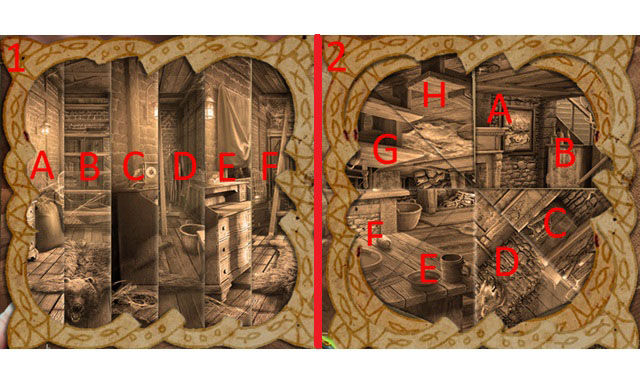
- Solution 1: Swap D-F, B-E, C-A.
- Solution 2: Swap D-G, C-H, D-C.
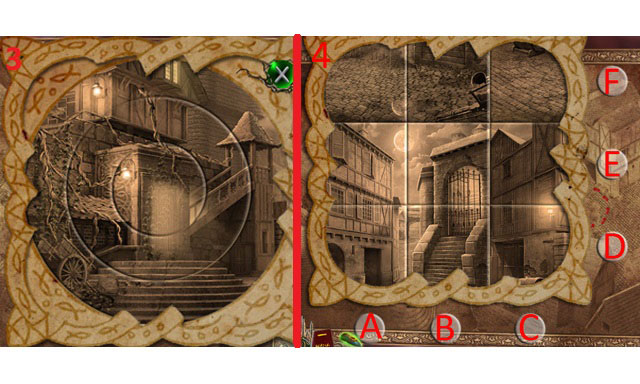
- Solution 3: Rotate.
- Solution 4: Swap D-E, A-C, D-F, B-C.
Chapter 3: Town

- Walk up twice.
- Talk to Magrat to trigger a puzzle.
- Solution: Intimidate, Compassion, Bluff, Compassion.
- Receive the SIGNET RING.
- Combine the SIGNET RING and SIGNET 1 (inventory).
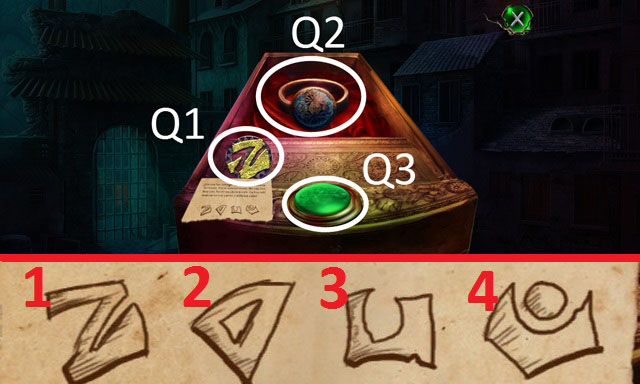
- Select SIGNET 1 by dragging SIGNET 1 (Q1) onto the SIGNET RING (Q2) and pressing the button (Q3). Repeat these steps to select different signets once you acquire all four.
- The signets are labelled 1, 2, 3, and 4, and will be referred to by number in the guide. For example, when the instruction says 'Use SIGNET 4,' you must equip the signet ring with the signet marked 4.
- Use the WATCHHOUSE TOKEN (R); go through the door.
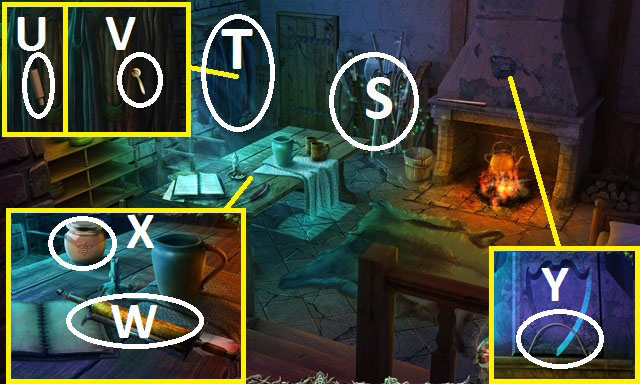
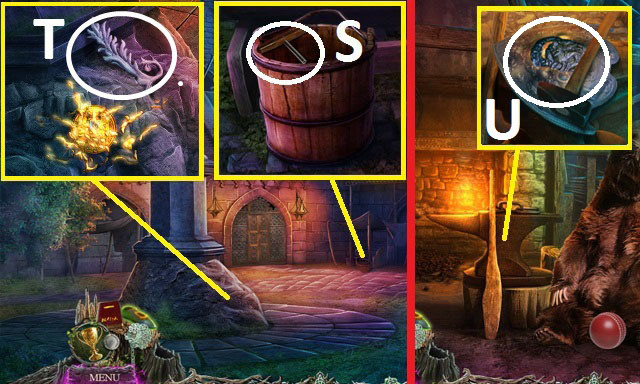
- Play the HOP (S) to receive an AXE.
- Move the coats twice (T) to get the WELL CRANK (U) and DOOR PIECE 1/4 (V).
- Read the scroll (W); take the HONEY JAR (X), and WIRE (Y).
- Open the JAR OF HONEY (inventory) to receive HONEY.
- Combine the BROKEN BUCKET and WIRE (inventory) to receive BUCKET.
- Go forward.
- Play the HOP (Z) to receive the INK BOTTLE.
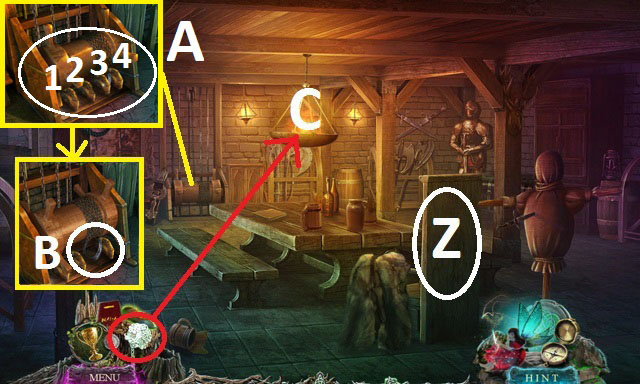
- Press the chain buttons (A) in order: 3, 4, 2, 1; take the HORSESHOE (B).
- Use the monocle (C) to trigger a HOP; play it to receive the METALLIC BOX.
- Walk down.
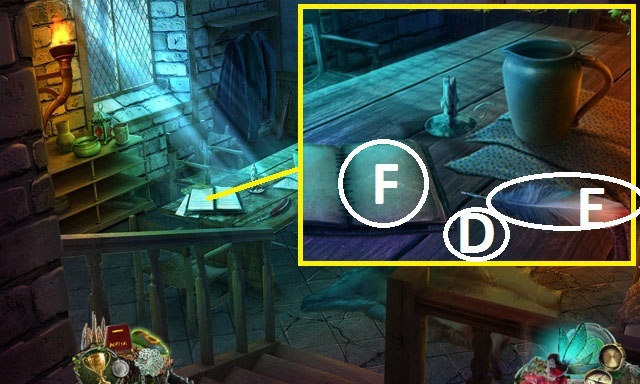
- Place the INK BOTTLE (D).
- Dip the feather (E) in the ink and color the page (F) to receive the METALLIC BOX CODE.
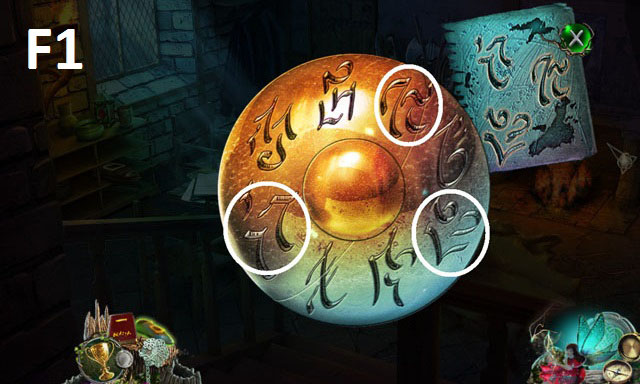
- Combine the METALLIC BOX and METALLIC BOX CODE (inventory) to trigger a puzzle.
- Solution (F1).
- Use the SIGNET RING (G); take the DOOR PIECE 2/4 (H) and SIGNET 2 (I).
- Combine SIGNET RING and SIGNET 2 (inventory) by dragging SIGNET 2 into the ring box and pressing the green button.
- Walk down.
- Use the AXE (J); take the LADDER (K).
- Walk down.
- Use the LADDER (L) to receive DEBRIS.
- Examine the DEBRIS; move the leaves to receive SIGNET 3 (inventory).
- Solution (L1).
- Combine the SIGNET RING and SIGNET 3 (inventory).
- Use the BUCKET (N) and WELL CRANK (O).
- Touch the bucket to trigger a puzzle.
- Solution: Paper, Rock, Scissors, Scissors, Paper, Rock.
- Take the BALL (P).
- Walk forward.
- Use the SIGNET RING with SIGNET 3 (Q); take DOOR PIECE 3/4.
- Use the HORSESHOE (S); twist the horseshoe handle; enter.
- Give the BALL (T) to trigger a HOP.
- Play the HOP (U) to receive BROKEN CROSSBOW.
- Take the LARD JAR (V).
- Use the HONEY (W).
- Use the monocle (X); take the STRING (Y).
- Exit; walk down.

- Use LARD JAR (Z); take ARROW.
- Combine the BROKEN CROSSBOW with the STRING, ARROW and SIGNET RING with SIGNET 2 (inventory) to receive CROSSBOW.
- Use the CROSSBOW (A) to trigger a minigame.
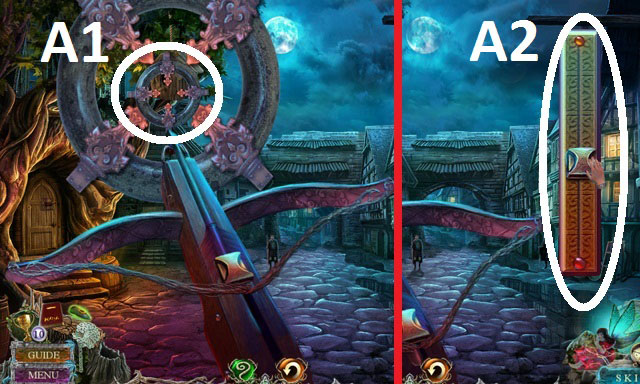
- Solution: Target the bird house (A1); Drag the slider half way and release the arrow (A2).
- Take the DOOR PIECE 4/4 (B).
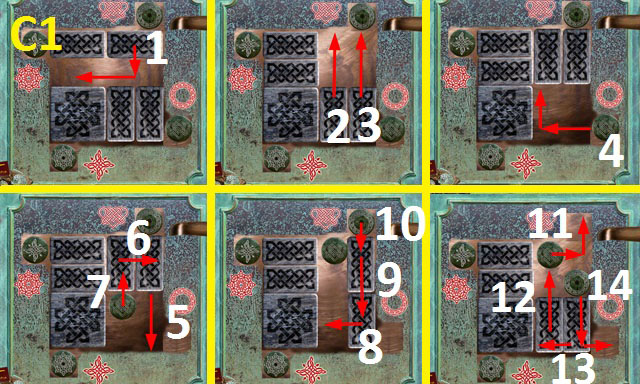
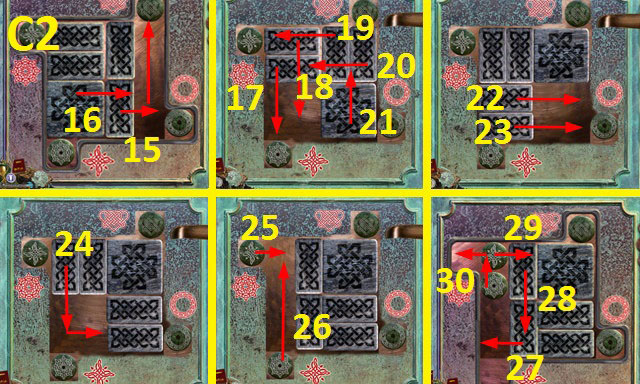
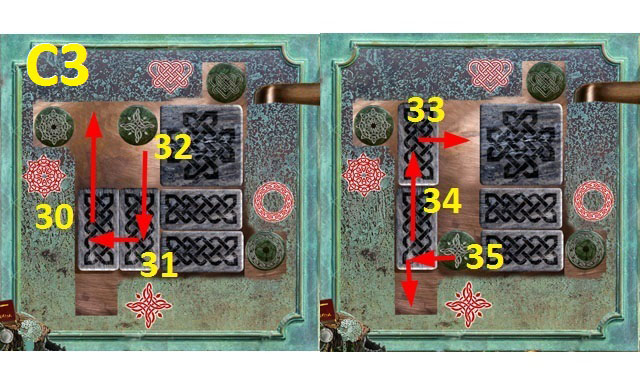
- Use DOOR PIECE (C).
- Solution (C1, C2, C3).
- Go through the door.
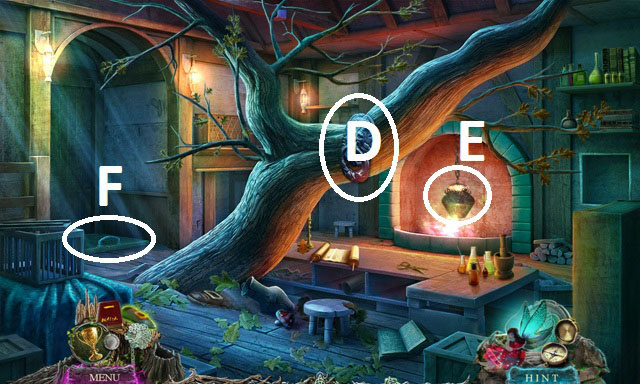
- Take the SHIELD EMBLEM (D).
- Touch the cauldron (E) to trigger a HOP.
- Play the HOP to receive an ACID VIAL.
- Unrap the ACID VIAL; remove the stopper (inventory).
- Combine the ACID VIAL with BLUE SAPPHIRE (inventory) to receive STRONG ACID.
- Use STRONG ACID (F); lift the door; go through the trapdoor.
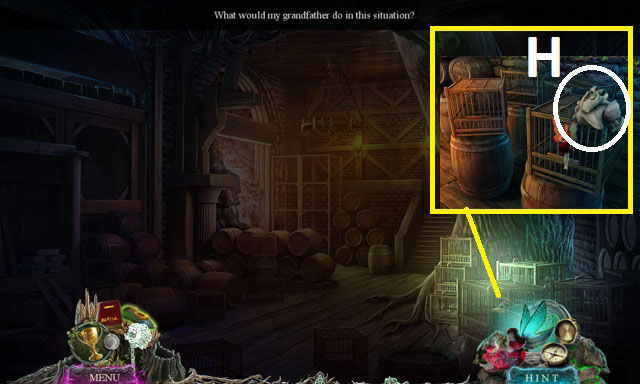
- Take the OLD RAG (H).
- Use the monocle on each cage to trigger a puzzle.
- Solution (H1).
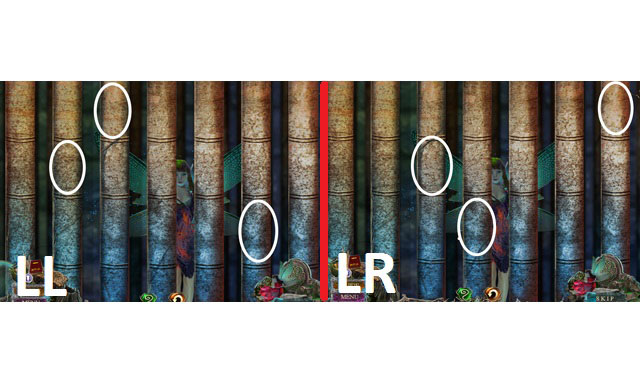
- Lower Left (LL).
- Lower Right (LR).

- Use the monocle to trigger a HOP (H2). Take SIGNET 4.
- Combine the SIGNET RING and SIGNET 4 (inventory).
- Take the IRON BAR (I).
- Dip the OLD RAG (J); receive a WET RAG.
- Use the WET RAG and IRON BAR (K).
- Touch the bars (L) to trigger a HOP.
- Take the HANDBAG (M).
- Examine the HANDBAG (inventory) and take the KEYS.
- Use KEYS (N) to trigger a puzzle.
- Solution (N1).
- Walk through the door.
- Use the SIGNET RING with SIGNET 4 (O); take the STAFF OF SILENCE (P) and COLLEGE GATE TOKEN (Q).
- Walk left, and down twice to the town square.
- Use the COLLEGE GATE TOKEN (R).
- Touch the emblem to trigger a puzzle.
- Solution (R1).
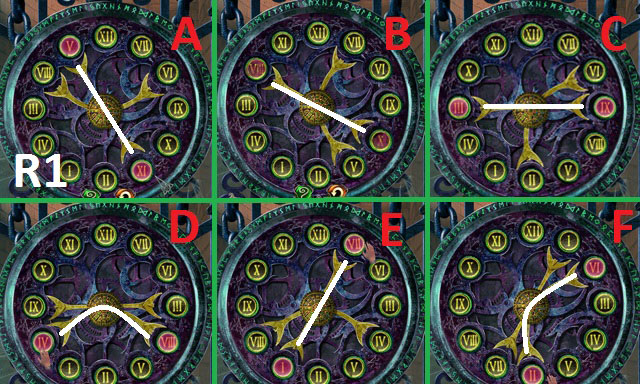
- Swap V and XI (A).
- Swap X and VIII (B).
- Swap IX and III (C).
- Swap VIII and IV (D).
- Swap VII and I (E).
- Swap VI and II (F).
- Go through the gate.
Chapter 4: The College
- Take the T-HANDLE (S) and SILVER FILIGREE (T).
- Return to the smithy.
- Use the SHIELD EMBLEM (U); use the hammer three times; take the SHIELD.
- Return to the watchhouse.
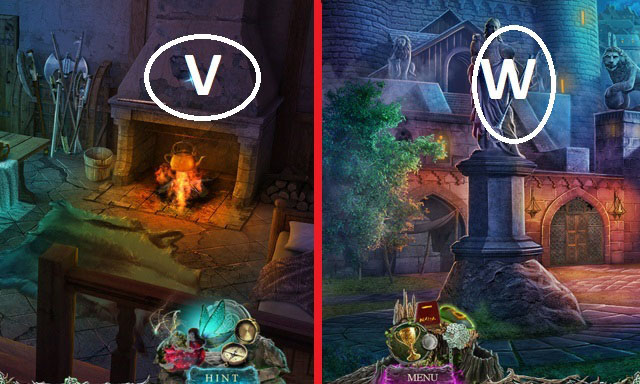
- Use the shield (V); take the FIGUREHEAD.
- Return to the college fairground.
- Use the FIGUREHEAD (W); touch the statue.
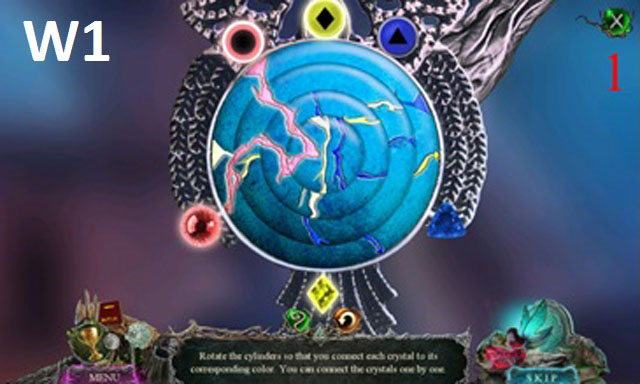
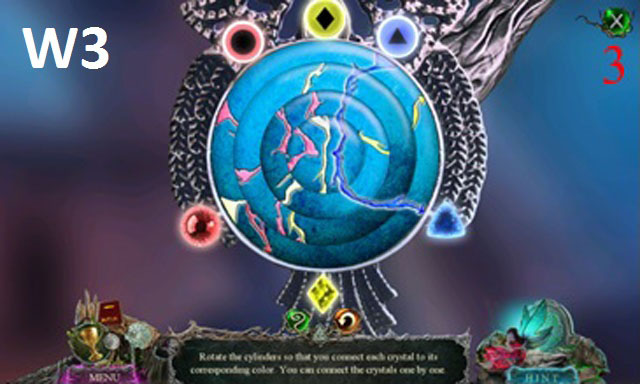
- Solution: Red (W1); then touch the red circle symbol.
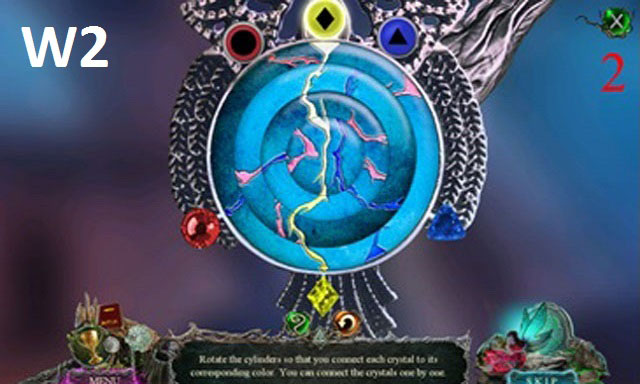
- Yellow (W2). Touch the yellow diamond symbol.
- Blue (W3). Touch the blue triangle symbol.
- Take the RECEIVER PART (X).
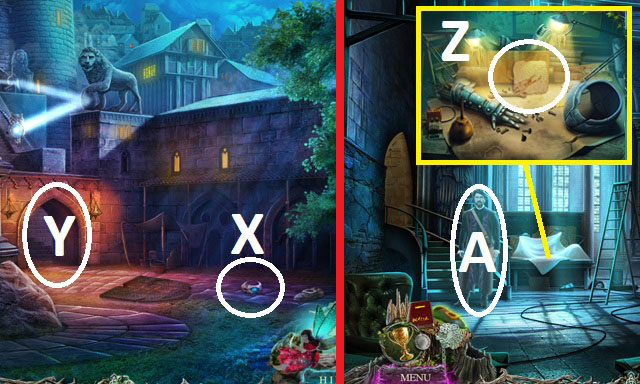
- Enter (Y).
- Take the SCHEMATICS 1/3 (Z).
- Talk (A) to trigger a puzzle.
- Solution: Charm, Compassion, Humour, Charm.
- Go upstairs.
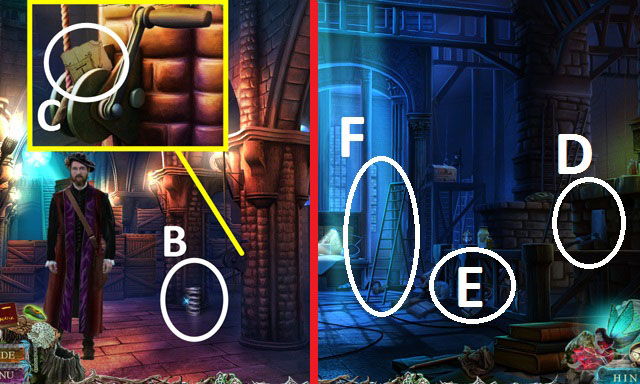
- Take the SPRING (B); touch it three times (inventory) to receive WIRE.
- Take the SCHEMATICS 2/3 (C).
- Walk down.
- Use the WIRE (D) to trigger a HOP.
- Play the HOP (E) to receive the GNOMON.
- Move the ladder (F).
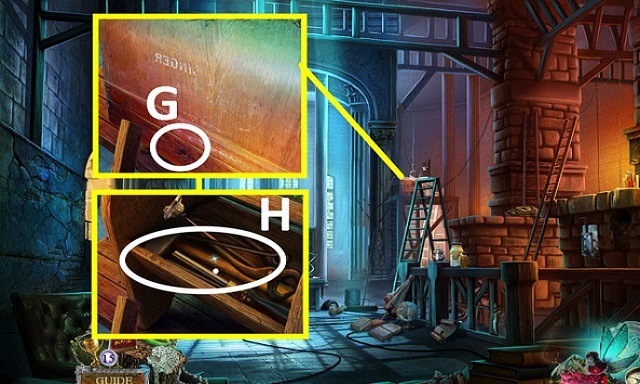
- Use the T-HANDLE (G); move the tools; take the PICKAXE (H).
- Walk down.
- Use the PICKAXE (J).
- Take the SCHEMATICS 3/3 (K) and MERIDIAN FRAGMENT (L).
- Use the PICKAXE (M); take the COLLEGE EMBLEM.
- Return to the college lobby.
- Use the COLLEGE EMBLEM (N) to trigger a puzzle.
- Solution (N1).
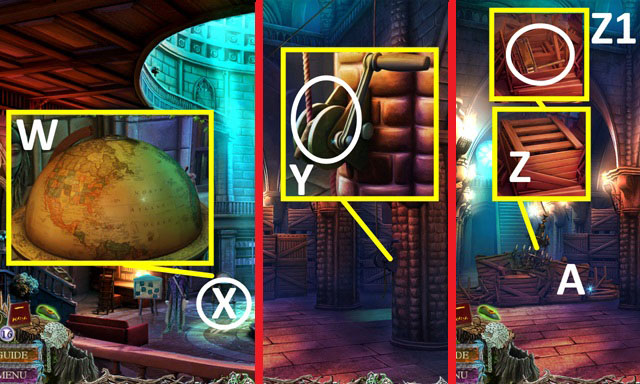
- Take the CRYSTAL (O).
- Exit (P).
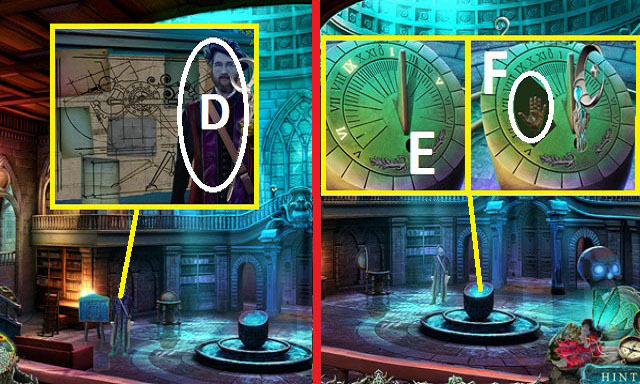
- Place the SILVER FILIGREE (Q) and GNOMON (R).
- Place the SCHEMATICS (S) to trigger a puzzle.
- Solution (S1).
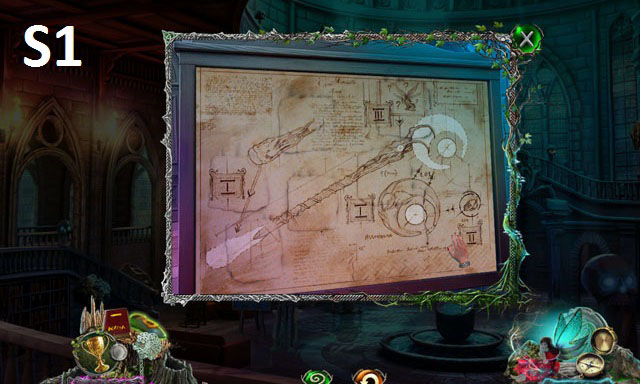
- Give Mr. O'Hare (T) the STAFF OF SILENCE and RECEIVER PART.
- Move the ladder; use the monocle to trigger a puzzle (red).

- Solution (T1).
- Match A-1, B-3, C-3, D-2, E-2, F-1.
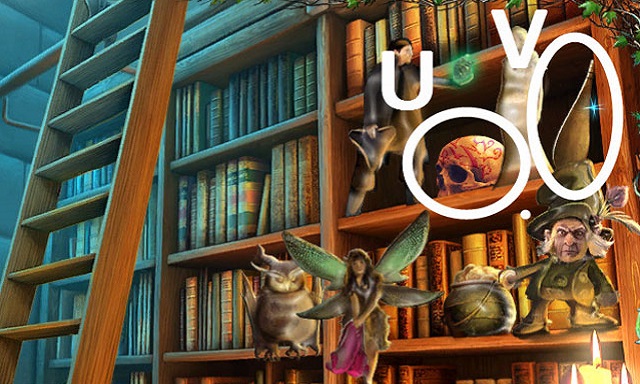
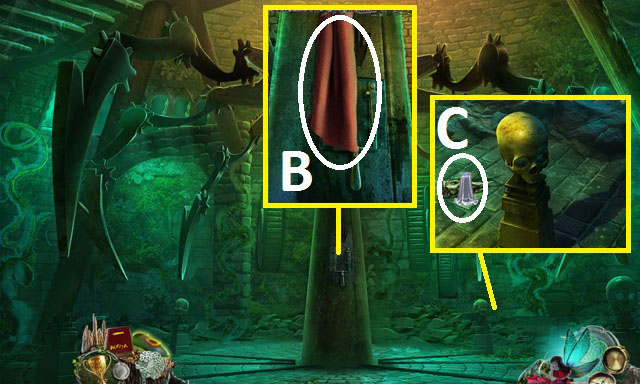
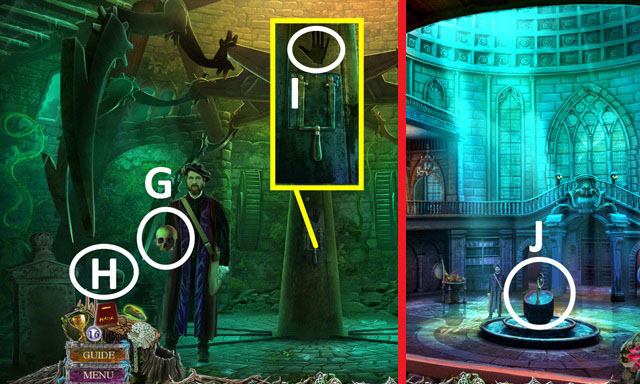
- Take the MARKED SKULL 1/3 (U) and SHOEHORN (V).
- Use the MERIDIAN FRAGMENT (W) to trigger a HOP.
- Play the HOP (X) to receive MARKED SKULL 2/3.
- Walk down.
- Use the SHOEHORN (Y).
- Open the box (Z).
- Take the WOODEN NOISEMAKER (Z1).
- Clear the rubble (A); walk up the stairs.
- Take the CLOTH (B).
- Take the GLASS THIMBLE and BASE PART (C).
- Return to the college library.
- Give the BASE PART, CRYSTAL and SIGNET RING (D) to receive the UPGRADED STAFF OF SILENCE.
- Use the UPGRADED STAFF OF SILENCE (E); take the HAND (F).
- Walk down, then up the stairs to the college aviary.
- Take the MARKED SKULL 3/3 (G).
- Place the MARKED SKULL (H).
- Use the HAND (I); flip the switch.
- Return to the college library.
- Activate (J) to trigger a puzzle.
- Solution: Compassion, Compassion, Intimidate, Compassion.
- Enter the waypoint.
Chapter 5: Land of the Faeries
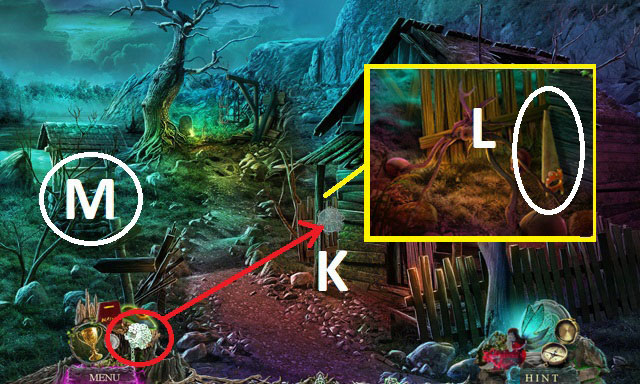
- Use the monocle (K); take the SAW (L).
- Examine (M) to trigger a puzzle.

- Solution (M1): D up, right, A up, B left, C left, up, E down, left, G down.
- Solution (M2): D right, up. A right. C up, left. E up. G left.
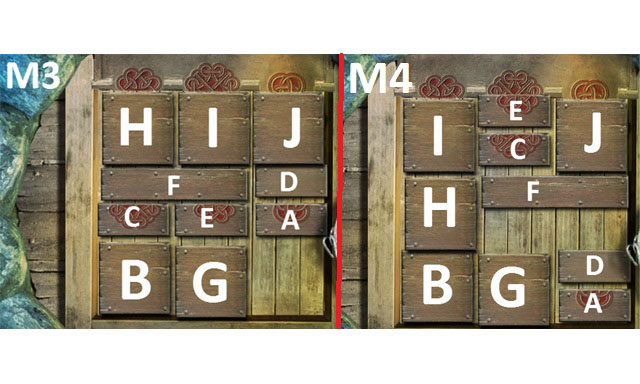
- Solution (M3): A down. D down. E right, up. C right. F down. E left. C up, left. F right. C right. E right. H down. I left. E up. C left, up. F up.
- Solution (M4): D up, left. A up. G right. B right. H down. D left, up. A left. F down. D right. A up. F left. A right. I down. E left. C up. A up. D left. J down. A right, up.
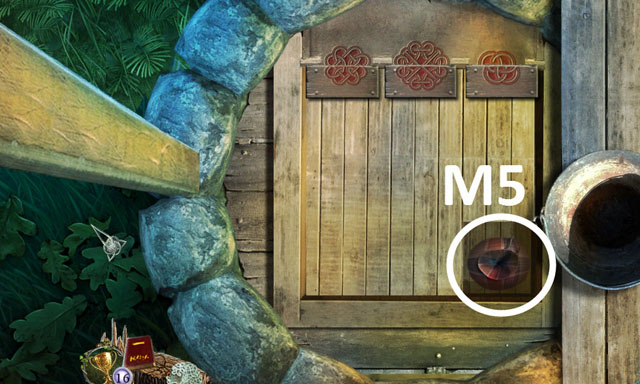
- Take the BAG (M5).
- Examine the BAG (inventory) to receive the BROOCH and COMBINATION SKETCH.
- Walk forward.

- Move the vines (N); Take the ROAD SIGN (N1); use the SAW (O) to active a HOP.
- Play the HOP (P) to receive the TOOTH.
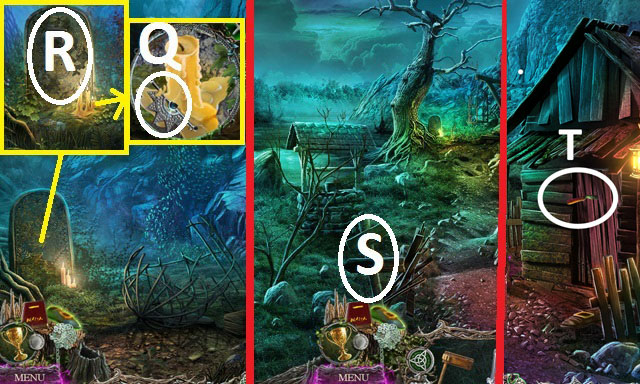
- Take the UNICORN KEY (Q); use the CLOTH (R).
- Walk down.
- Use the ROAD SIGN (S).
- Take the GARDEN FORK (T).
- Enter the cottage.
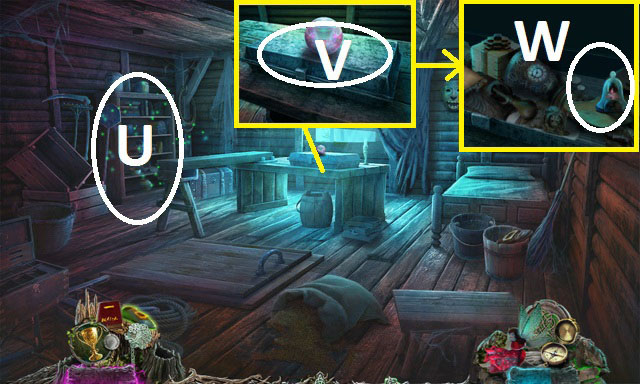
- Play the HOP (U) to receive the LEATHER SCROLL.
- Touch the lid twice (V); read the paper; take the WING PRESERVER (W).
- Combine the WING PRESERVER and UNICORN KEY (inventory); take the MAGIC DUST.
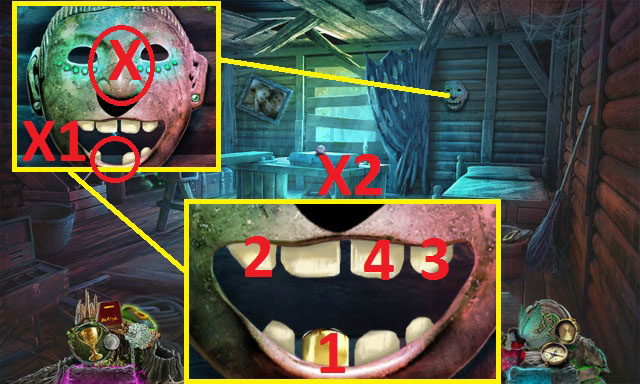
- Use the TOOTH (X) and COMBINATION SKETCH (X1) to trigger a puzzle.
- Solution (X2); receive the CRYSTAL BALL STAND.
- Read the paper (Y); move the planks (Y1).
- Take the JAMMER (Z).
- Use the GARDEN FORK (Z1); take the CRYSTAL BALL (A).
- Exit.
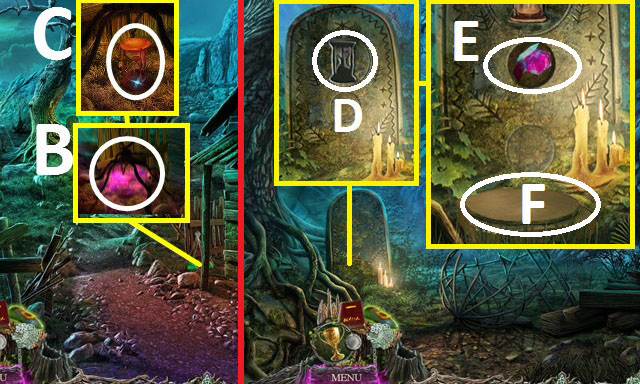
- Use the LEATHER SCROLL (B); remove the charred shrine; take the HOURGLASS (C).
- Walk forward.
- Use the HOURGLASS (D); take the CRYSTAL (E).
- Place the CRYSTAL BALL STAND, CRYSTAL BALL, CRYSTAL, and MAGIC DUST (F).
- Enter the portal.
- Go to the armory.
- Use the JAMMER (G).
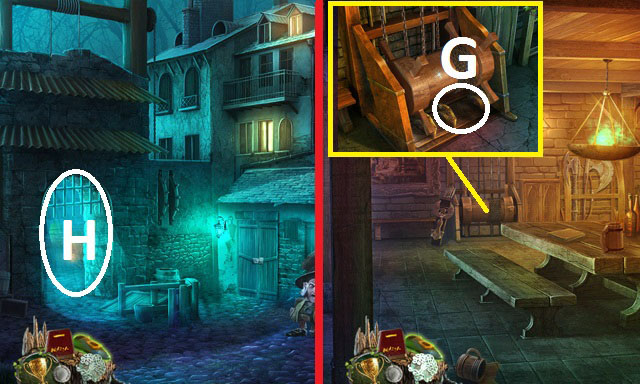
- Go through the gate (H).
Chapter 6: Swamp
- Use the WOODEN NOISEMAKER (I) to trigger a HOP; play it to receive a WAYSTONE 1/4.
- Take the BUTTON (J) and HOLLOW TUBE (K).
- Enter the swamp galley (L).
- Take the CAN OPENER (M).
- Use the BUTTON (N) to receive the JAW PIECE.
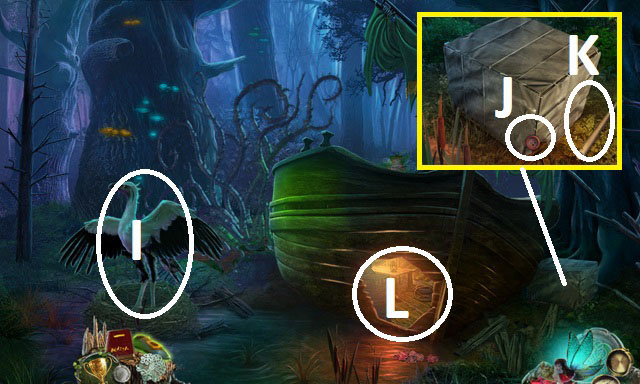
- Use the BROOCH (O); take the FAIRY WING (P).
- Exit.
- Use the JAW PIECE (Q).
- Open the cage (R); take the STONE BUCKLE 1/2 (S) to trigger a HOP.
- Walk forward (T).
- Use the CAN OPENER (U); open the cage; take the FAIRY DUST (V).
- Walk forward.
- Play the HOP (W) to receive the BOX TOKEN.
- Walk down twice; enter the swamp galley.
- Use the FAIRY DUST and MONOCLE (X) to trigger a HOP; receive the GLOWING MUSHROOMS.
- Place the BOX TOKEN (Y); touch it; take the HUNTING SNARE (Z).
- Combine the HOLLOW TUBE and HUNTING SNARE to receive a POLE SNARE (inventory).
- Exit; walk forward.
- Use the POLE SNARE (A); receive the REPELLANT WAND.
- Walk right.
- Use the REPELLANT WAND (B).
- Use the GLASS THIMBLE (C) to receive VENOM.
- Use the GLOWING MUSHROOMS (D) to trigger a HOP; play it to receive a WAYSTONE (2/4).
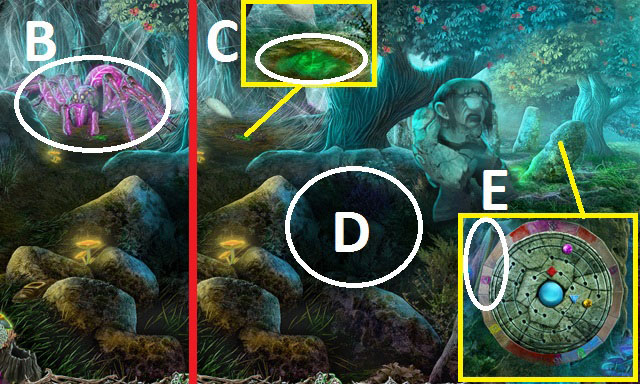
- Take the RAILROAD SPIKE (E).
- Return to the cave entrance.

- Use the VENOM (F).
- Take the WAYSTONE 3/4 (G); place the FAIRY WING (H); receive the FAIRY SWORD.
- Return to the summoning stones.
- Use the FAIRY SWORD (I); take the WAYSTONE 4/4 (J).
- Use the WAYSTONE (K) to trigger a puzzle.
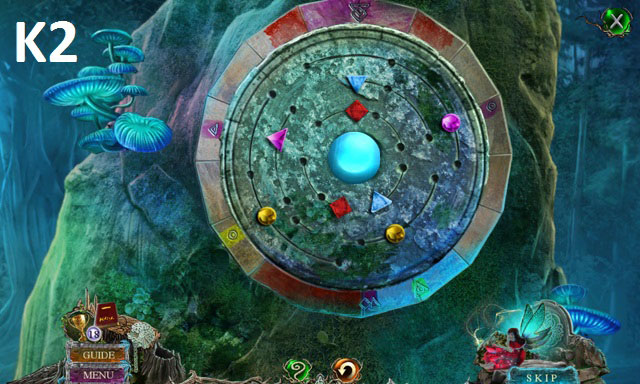
- Solution (K2).
- Enter the portal.
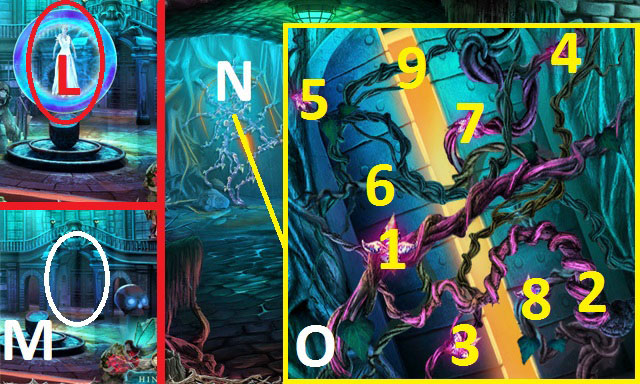
- Use the MONOCLE (L) to trigger a puzzle (solution random).
- Enter (M).
- Clear the vines (N).
- Solution (O).
- Take the SUN (P).
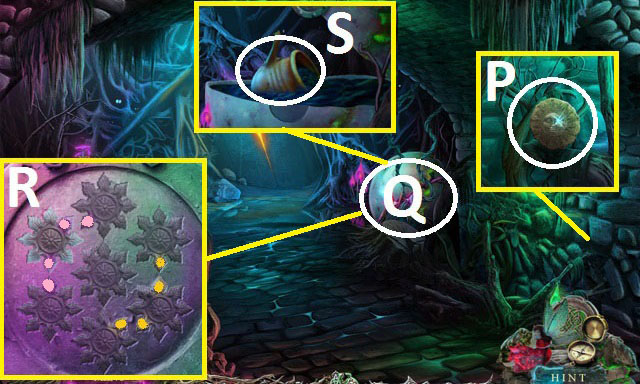
- Remove vines and touch Q) to trigger a puzzle.
- Solution (R).
- Open the orb; take the PITCH POT (S).
- Walk forward.
- Take the SPIKED CLUB (T).
- Walk forward.
- Use the MONOCLE (U) to trigger a puzzle.
- Solution (U1).
- Place 1,2.
- Place 3,4,5.
- Take the MOON (V).
- Take the HAMMER (W); place the SPIKED CLUB (X) and use the pliers (Y).
- Take the NAILS (Z).
- Use the RAG and PITCH POT (A); take the TORCH.
- Use the TORCH (B) to receive BURNING TORCH.
- Use the RAILROAD SPIKE and HAMMER (C); take the MILFOIL ELIXIR (D).
- Walk down.
- Use the BURNING TORCH (E) to trigger a HOP; play to receive BOARDS.
- Move the rocks (F); take the ACORN 1/3 (G).
- Walk up.
- Use the BOARDS, NAILS, and HAMMER (H); take the LADDER.
- Use the LADDER (I); push the trapdoor (J) and go through.
- Play the HOP (K) to receive an ACORN 2/3.
- Walk forward.
- Move the vines (L); take the STONE BUCKLE 2/2 (M).

- Use the MONOCLE (N) to trigger a puzzle (solution random).
- Place the SUN (O).
- Use the MONOCLE (P) to trigger a puzzle (solution random).
- Place the MOON (Q).
- Move the vines (R).
- Examine the three plaques (S).
- Walk down.
- Use the STONE BUCKLE (T) to trigger a HOP; play it to receive ACORN 3/3.
- Use the ACORN and MILFOIL ELIXIR (U); take the LEVER (V).
- Walk forward.
- Use the LEVER (W); take the BRUSH (X).
- Use the BRUSH (Y) to trigger a puzzle.
- Solution: Star, Moon, Leaf, Sun.
- Enter (Z).
- Touch the heart (A) to trigger a puzzle.
- Solution: Lie, Fear.
- Touch the heart again to trigger a HOP.
- Play the HOP (B) to receive the WOODEN HEART and FLOWER TOKEN.
- Return to the smugglers hall.
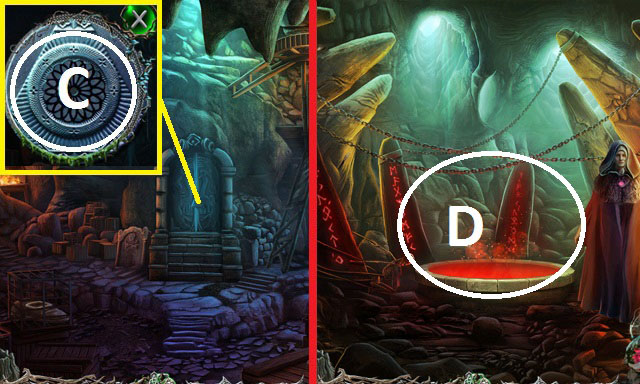
- Place the FLOWER TOKEN (C).
- Go through the door.
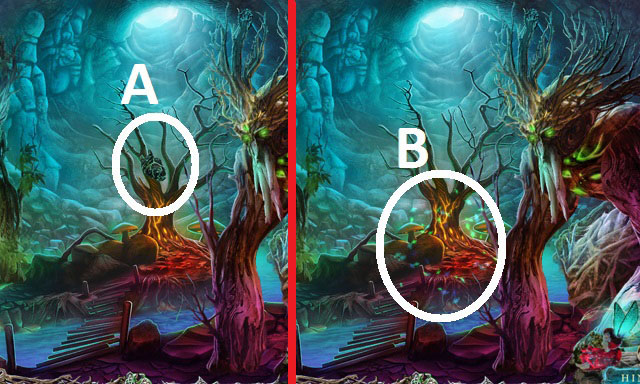
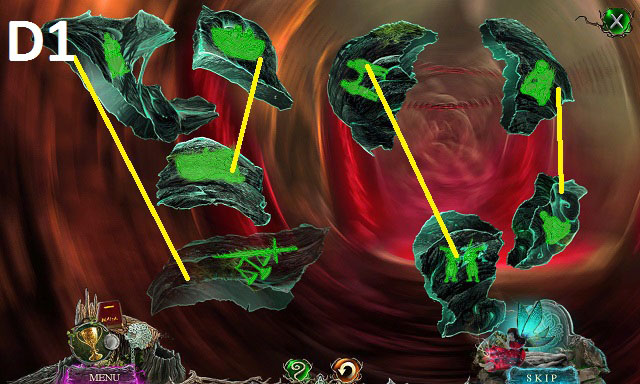
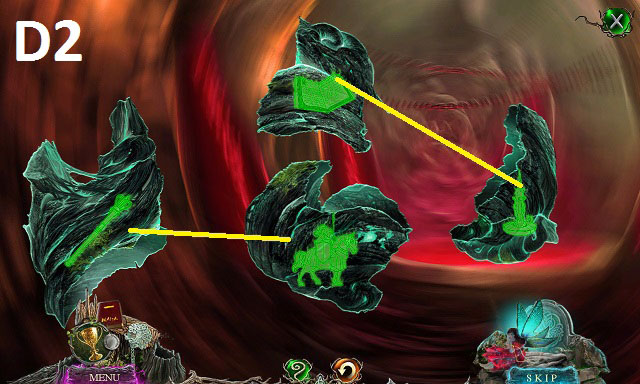
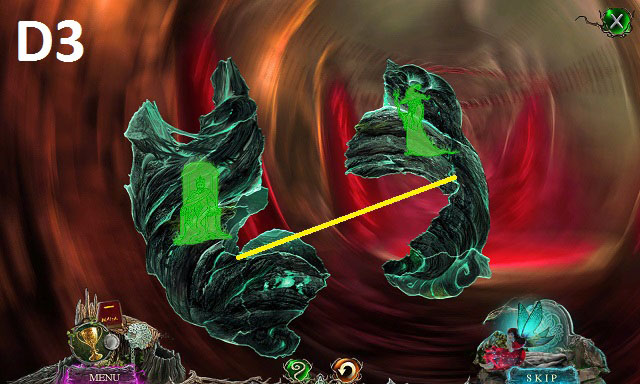
- Use the WOODEN HEART (D) to trigger a puzzle.
- Solution (D1, D2, D3).
- Congratulations! You have successfully completed Myths of the World: Of Fiends and Fairies.
Created at: 2014-07-06