

Walkthrough Menu
- General Tips
- Chapter 1: The Tavern
- Chapter 2: Healer's House
- Chapter 3: The Granary
- Chapter 4: The Tunnel
- Chapter 5: Commander's Office
- Chapter 6: Grand Foyer
General Tips
- This is the official guide for Myths of the World: The Black Sun.
- This guide will not tell you when you have to zoom into a location; the screenshots will show each zoom scene.
- Hidden-object puzzles are referred to as HOPs. This guide will not show screenshots of the HOPs, however, it will mention when an HOP is available and the inventory item you'll collect from it.
- Use the Map to fast travel to a location.
Chapter 1: The Tavern
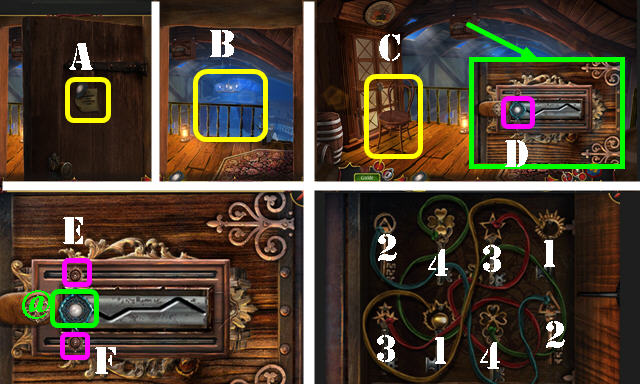
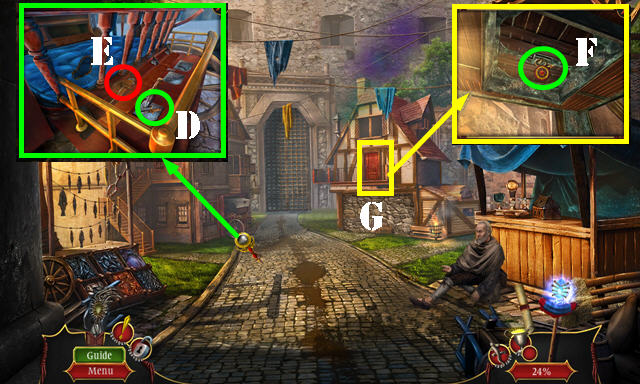
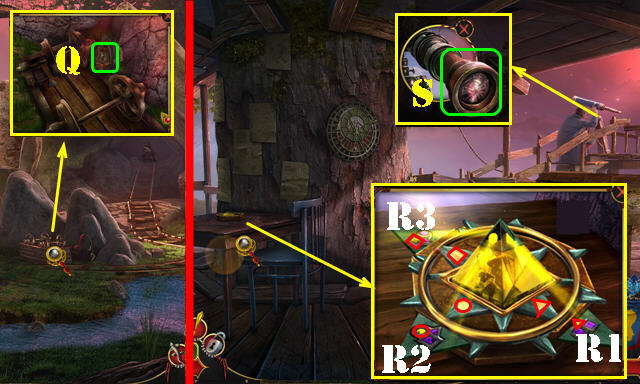
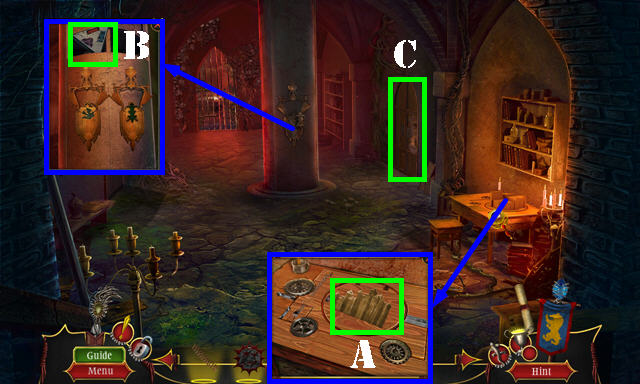
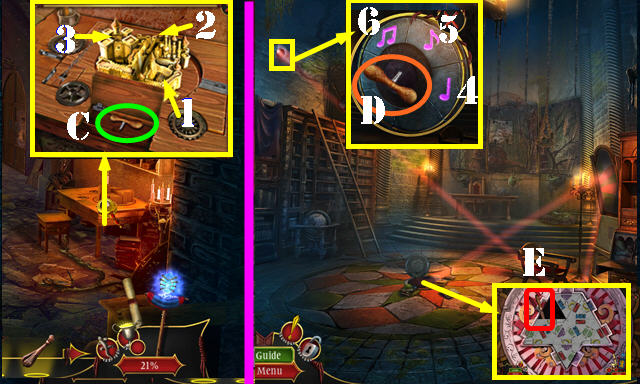
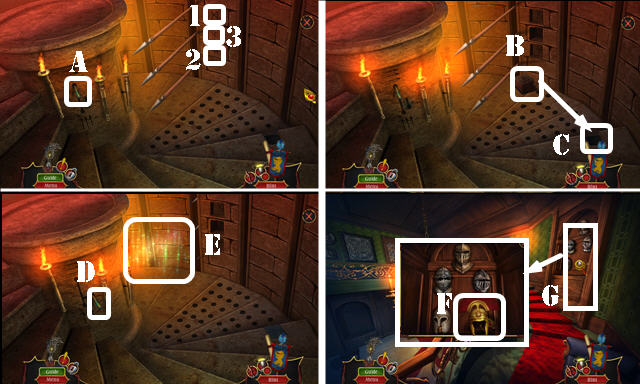
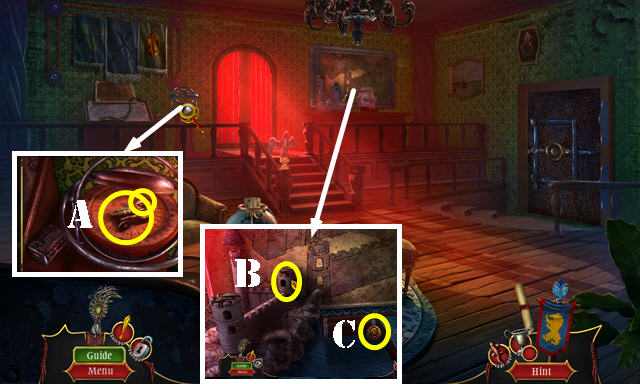
- Take the CACHE ORNAMENT and look at the note (A).
- Open the door and go to the Tavern Top (B).
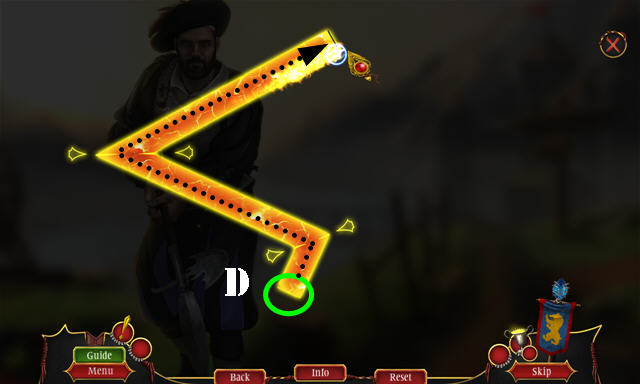
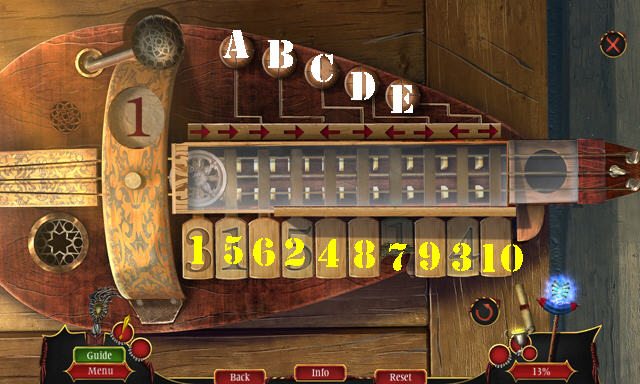
- Move the chair (C); slide the latch and place the CACHE ORNAMENT (D).
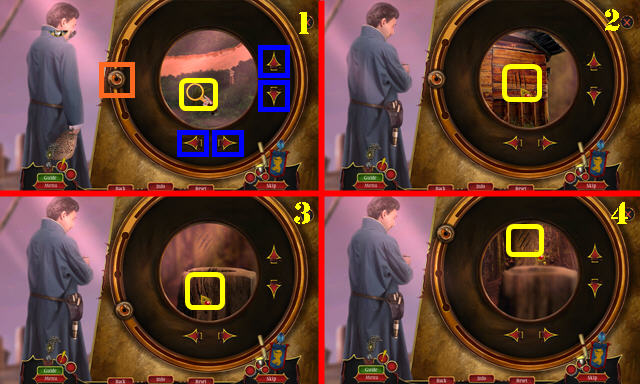
- (@ slide right)-(F)-(E)-(@ slide right)-(E)-(F) for a puzzle.
- Solution (1-4).
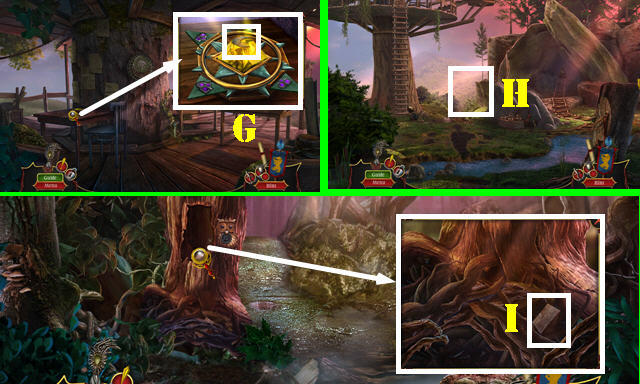
- Take the ARMOIRE KEY.
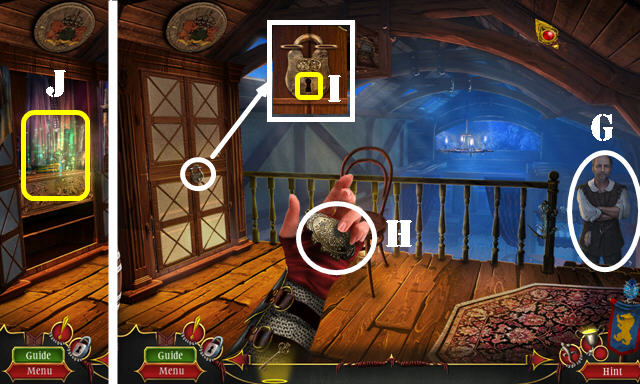
- Talk to the man (G).
- Take the LOCKET (H).
- Use the ARMOIRE KEY and turn it to get the PADLOCK (I).
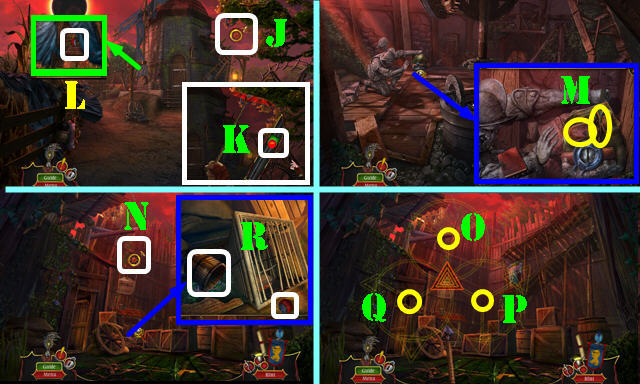
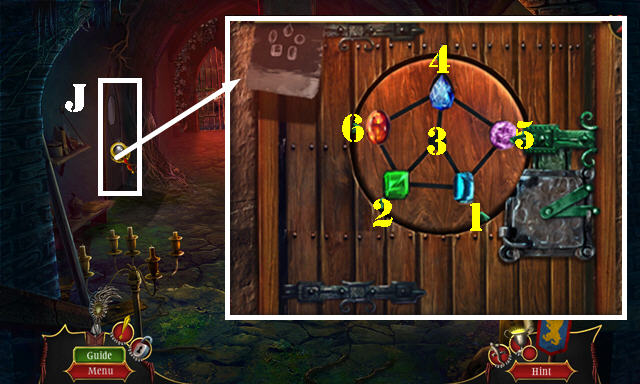
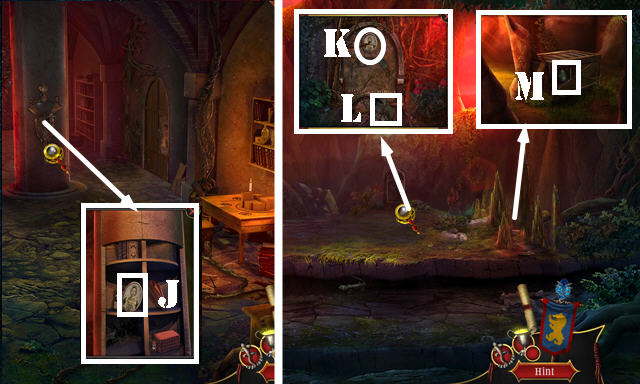
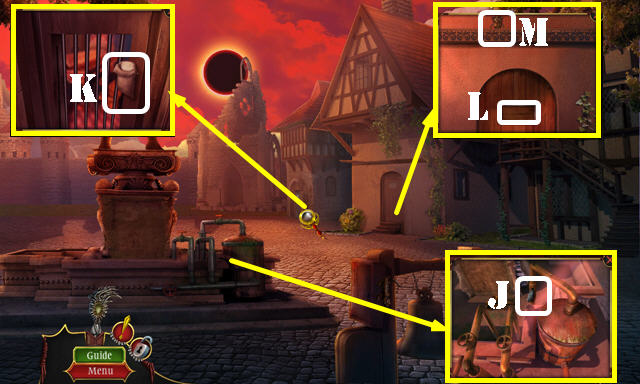
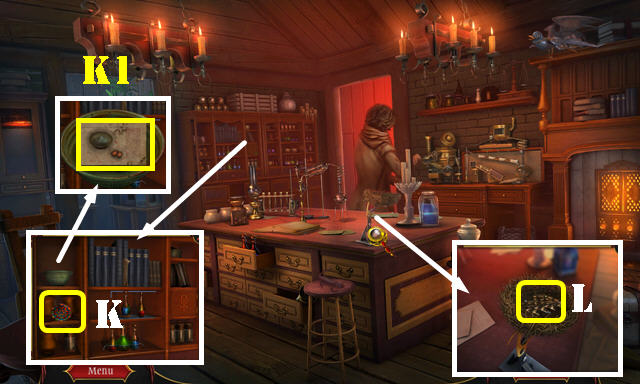
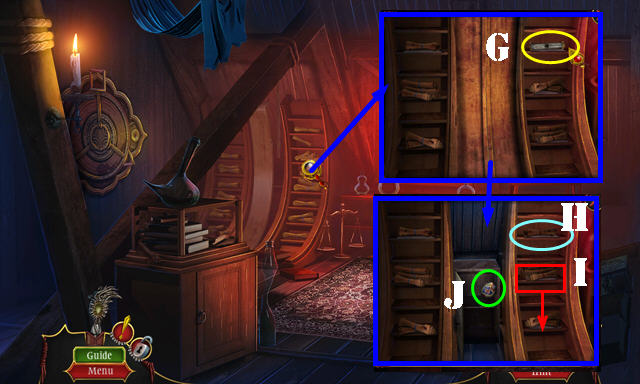
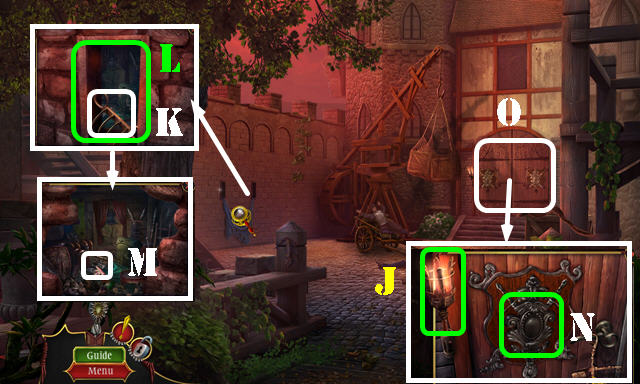
- Play the HOP (J) to get the CROSSBOW.
- Go forward.
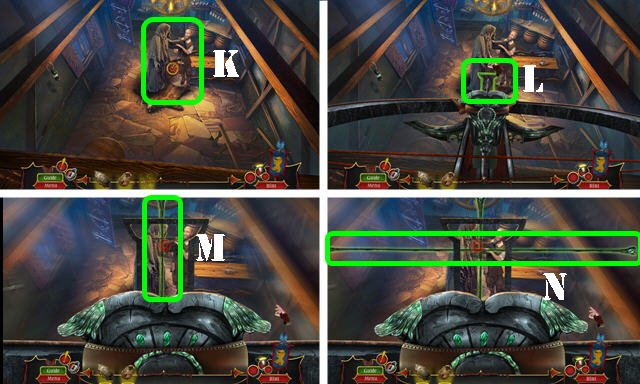
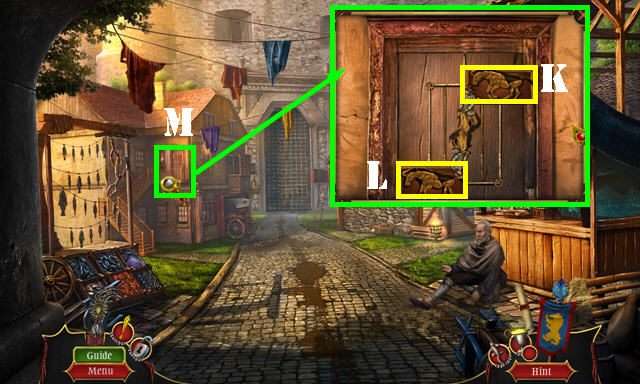
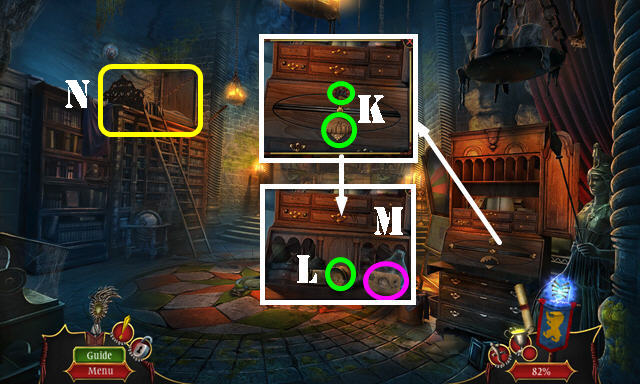
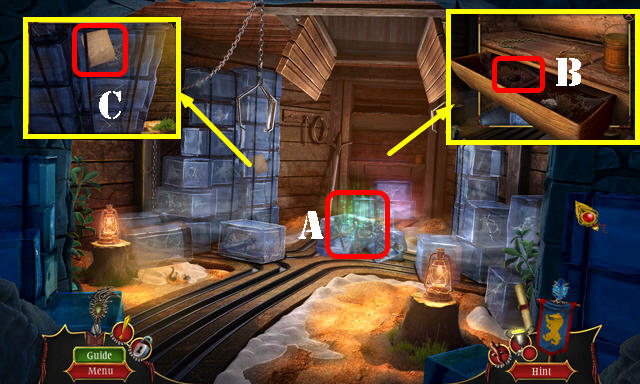
- Place the CROSSBOW (K) and select it once it turns green (L).
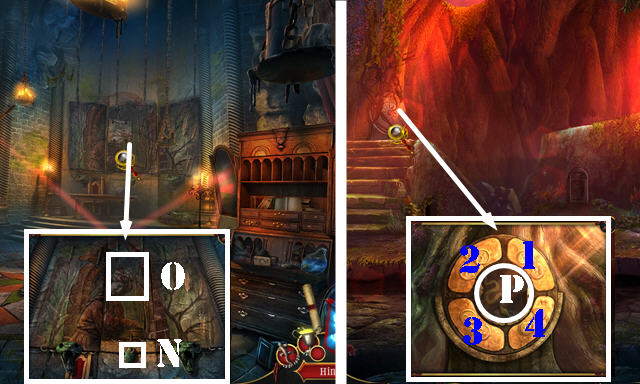
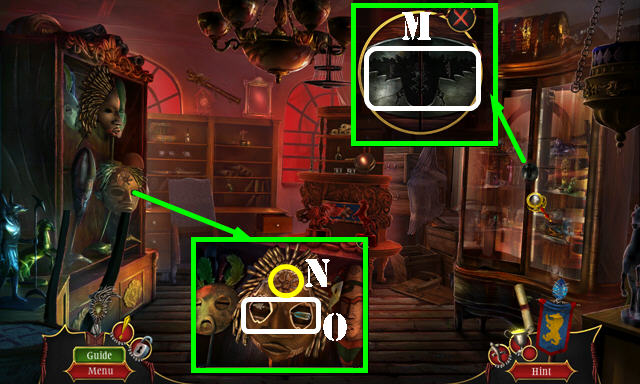
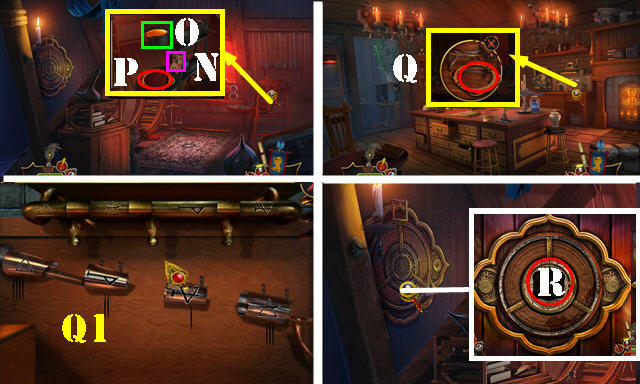
- Stop the line once it turns green (M-N).
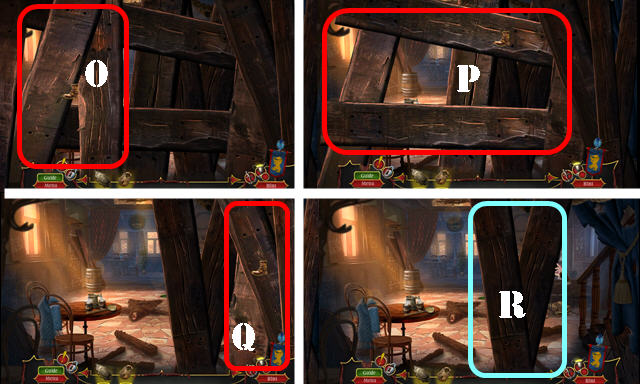
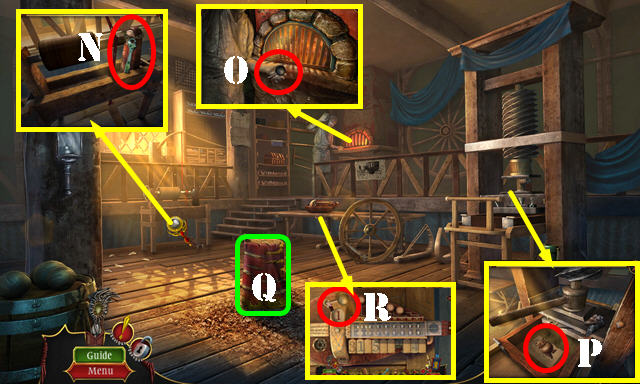
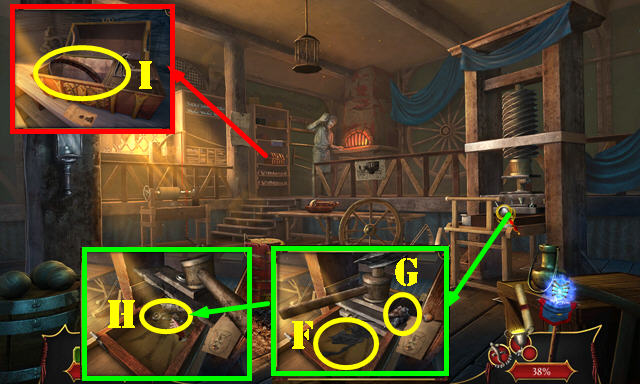
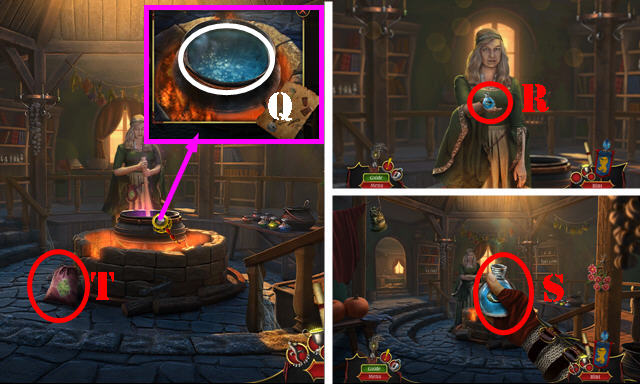
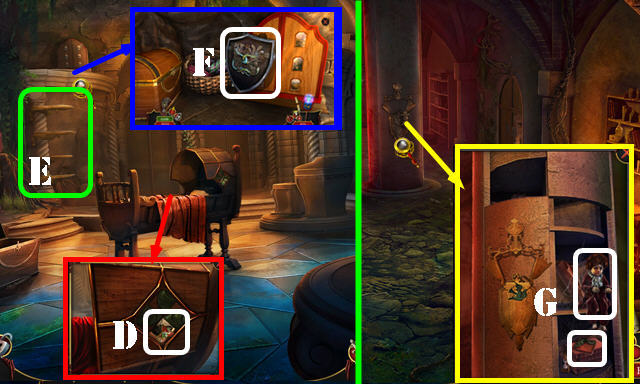
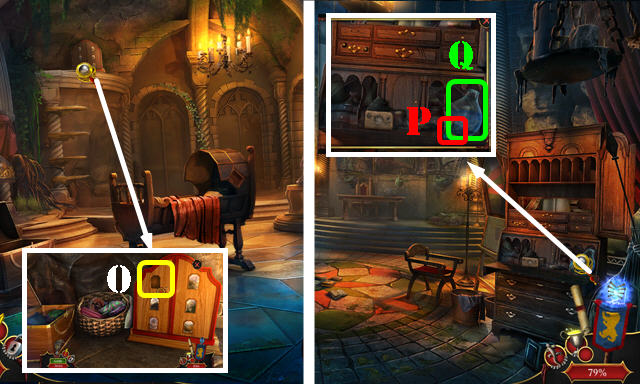
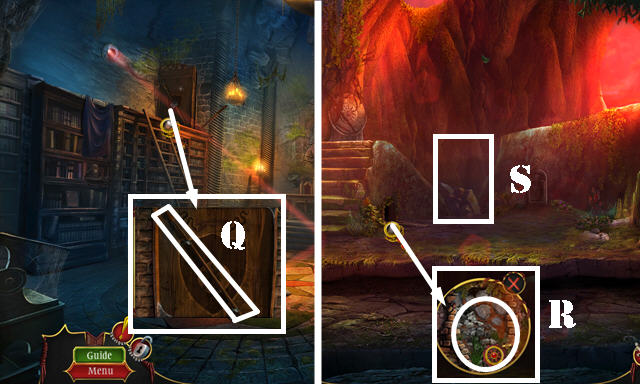
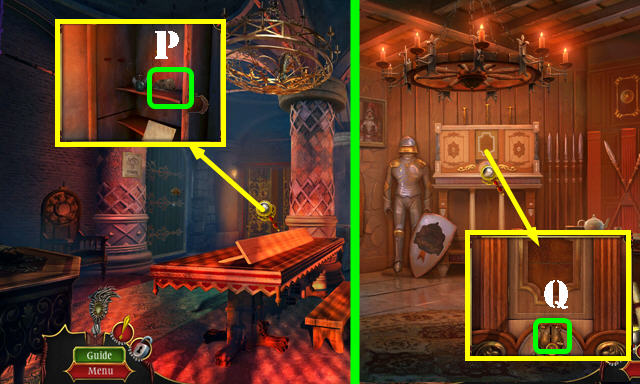
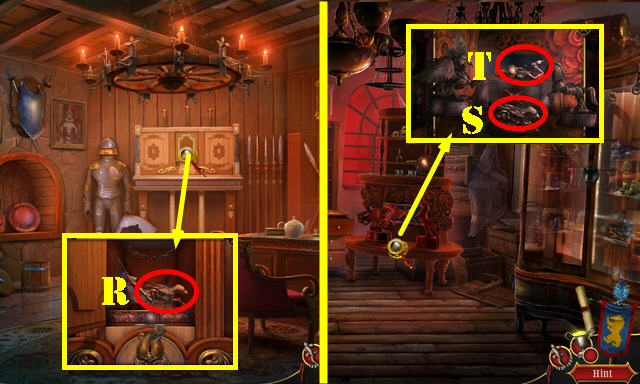
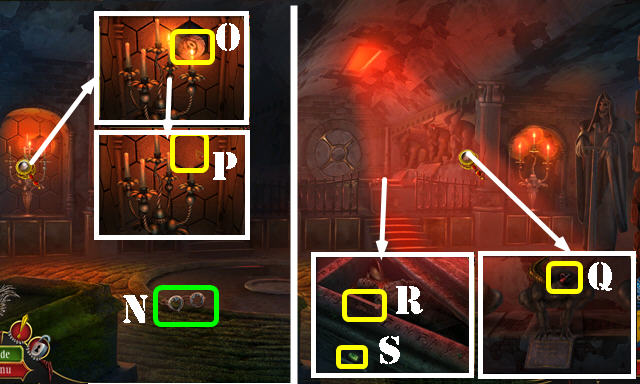
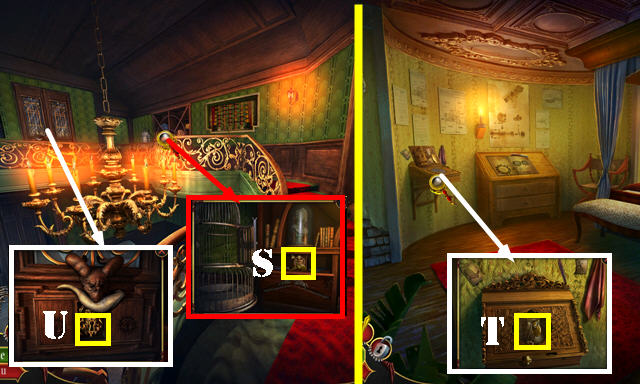
- Kick (O-P-Q). Take the BOARDS (R).
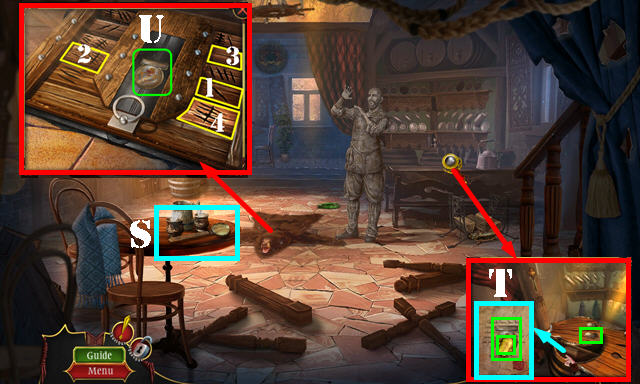
- Take the SMELTING LADLE (S).
- Place the LOCKET and open the note; take the GEM and MEDAL (T).
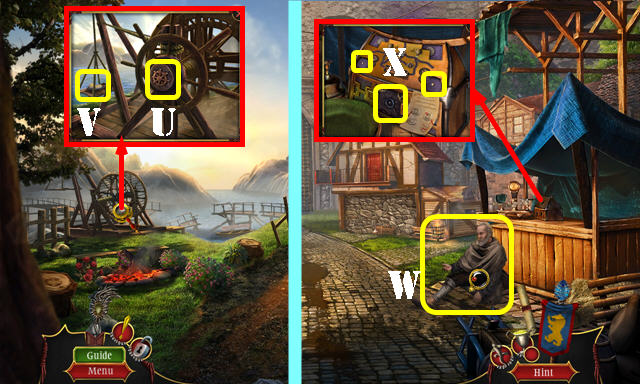
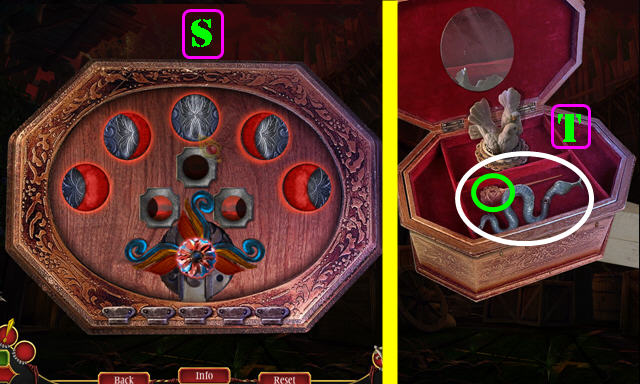
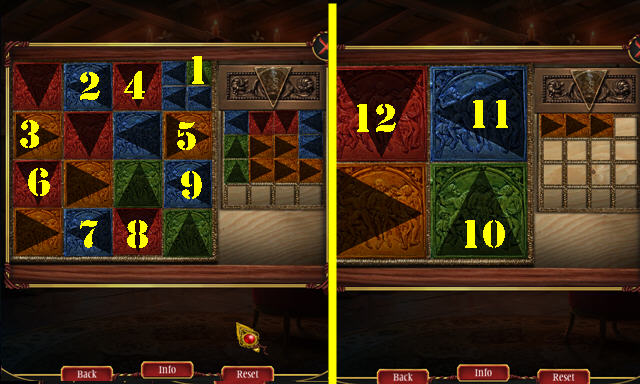
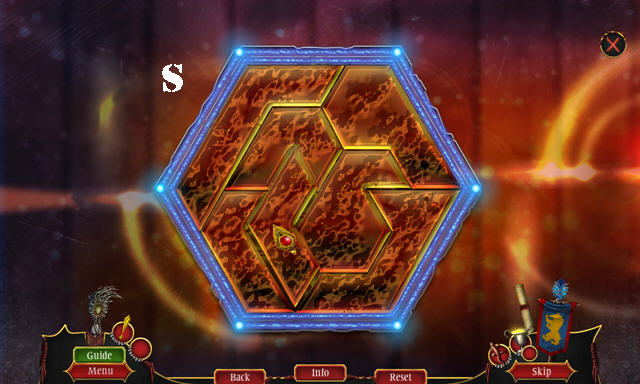
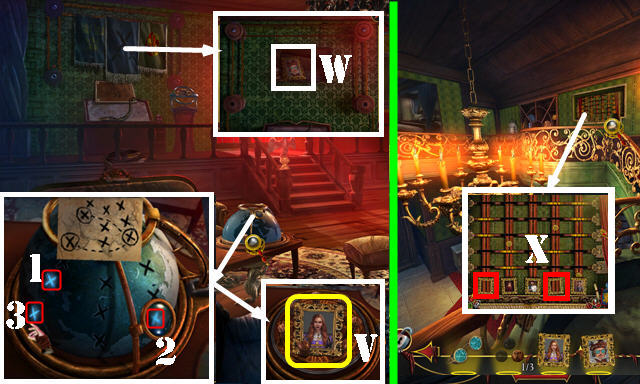
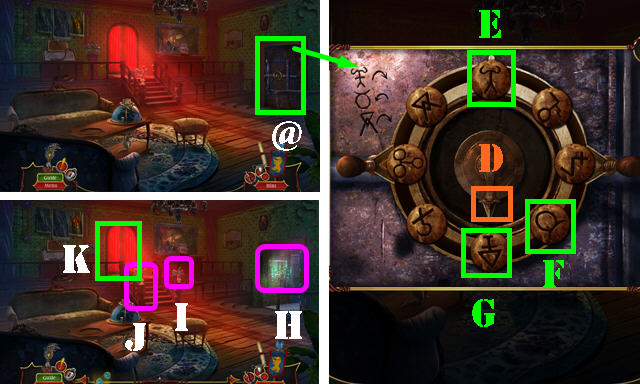
- Move the bear; place the MEDAL (U). Select 1-4 for a puzzle.
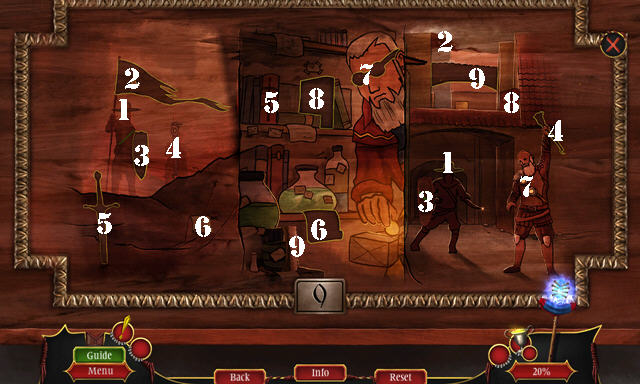
- Solution (1-9).
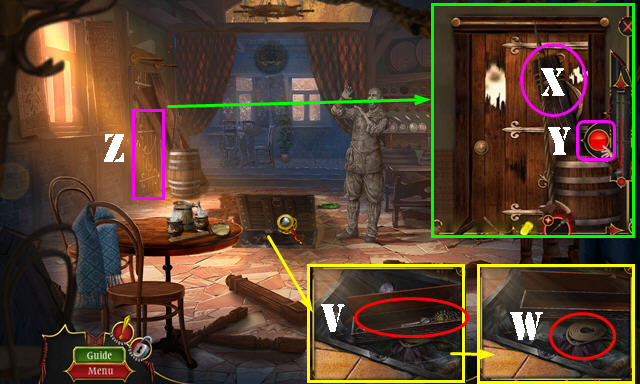
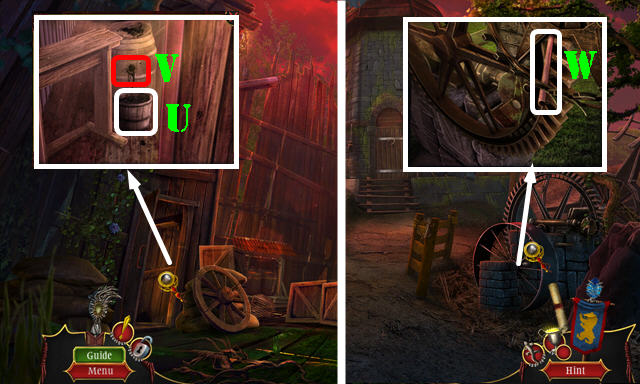
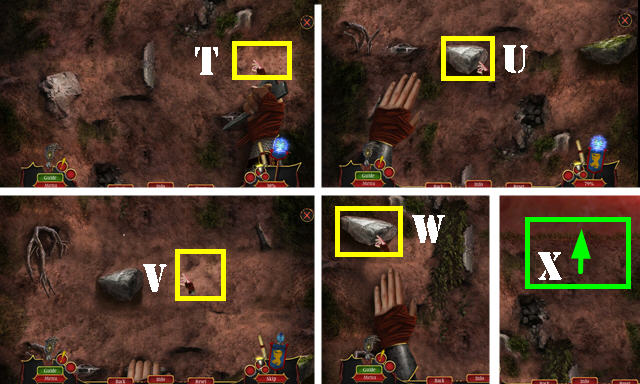
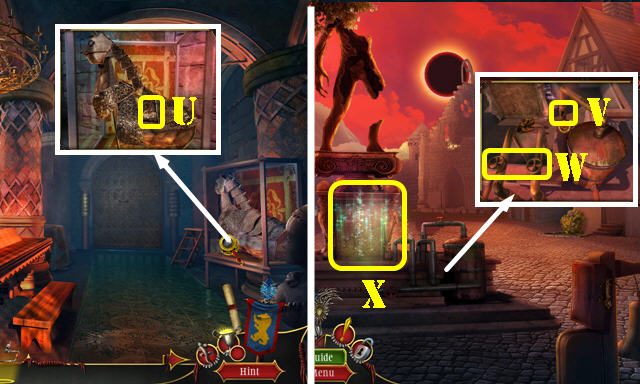
- Open the case; take the PROTECTOR'S STAFF (V). Move the case and take the ROPE (W).
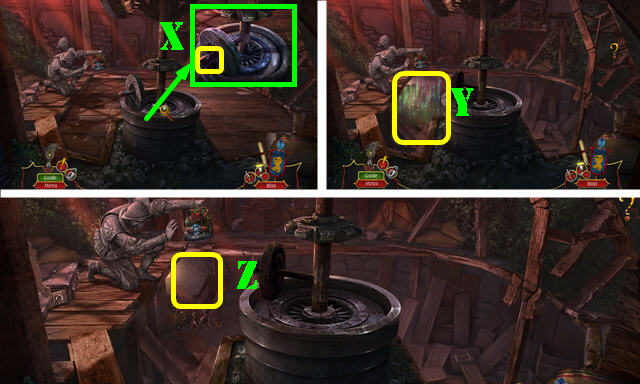
- Select the boards 3x; use the ROPE and pull it (X). Keep hitting the button (Y) until the arrow reaches the top.
- Place the GEM on the PROTECTOR'S STAFF.
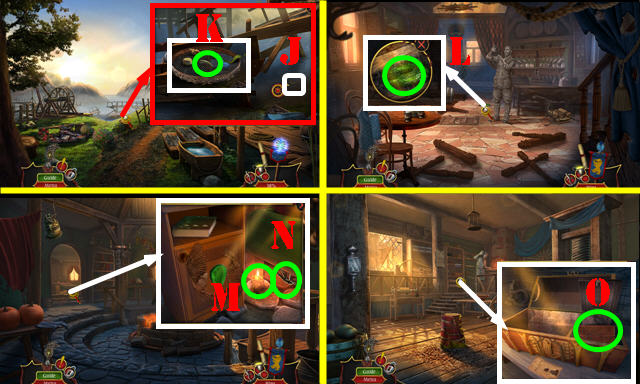
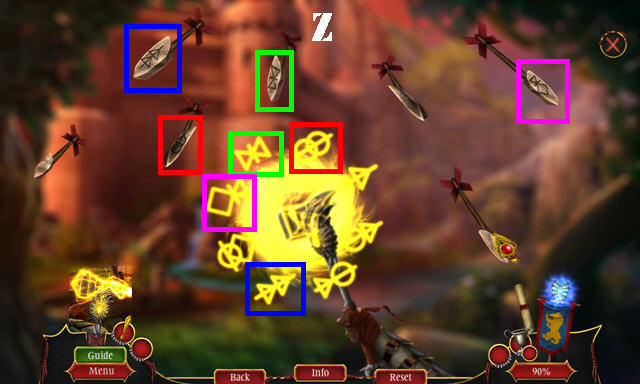
- Go to the Outside Tavern (Z).
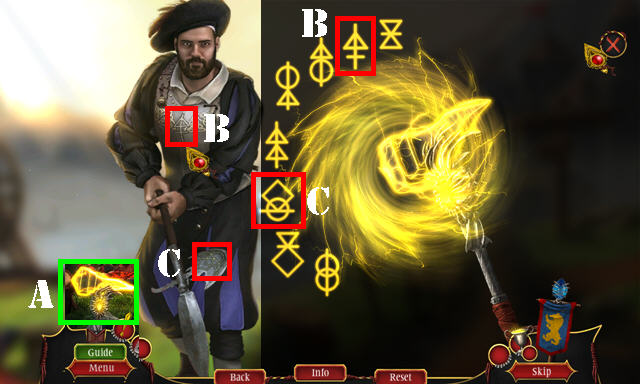
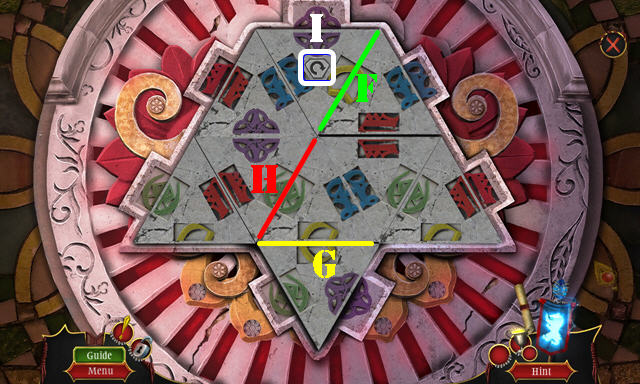
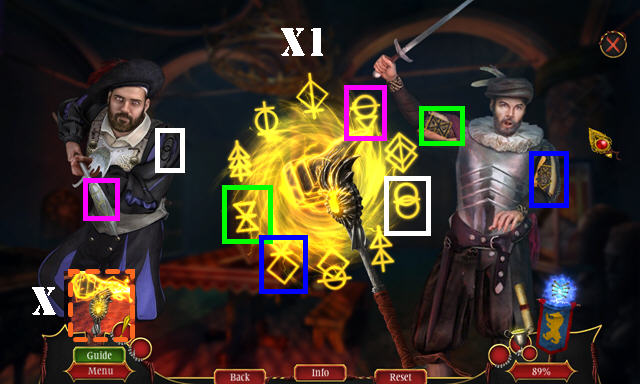
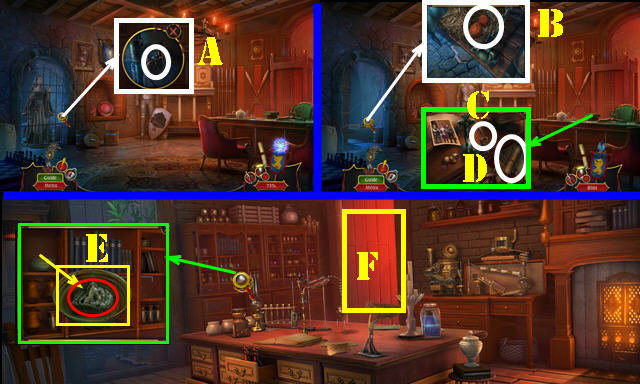
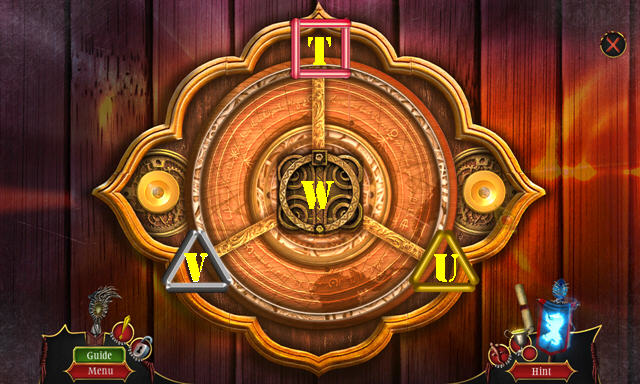
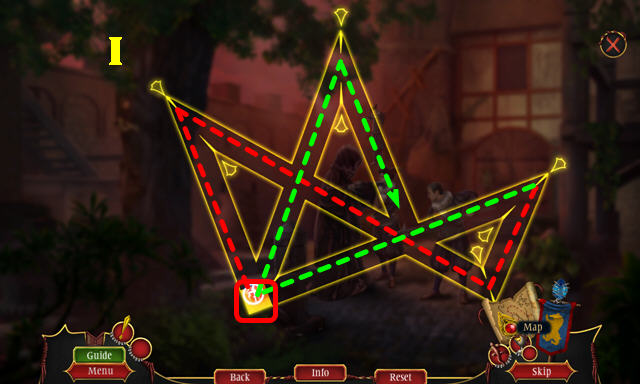
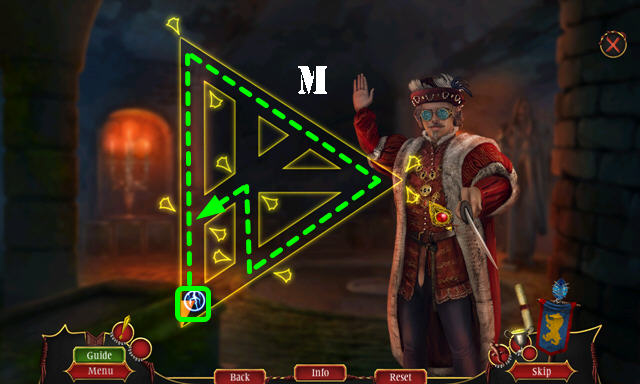
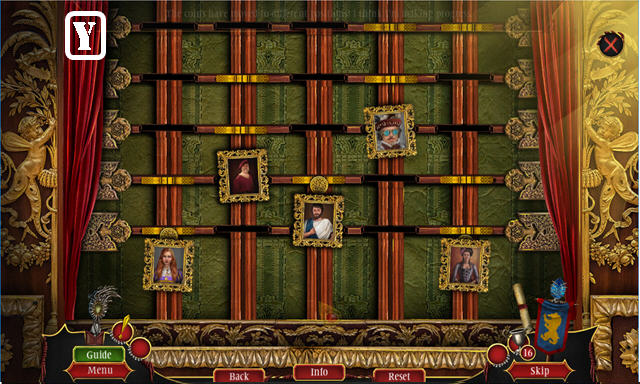
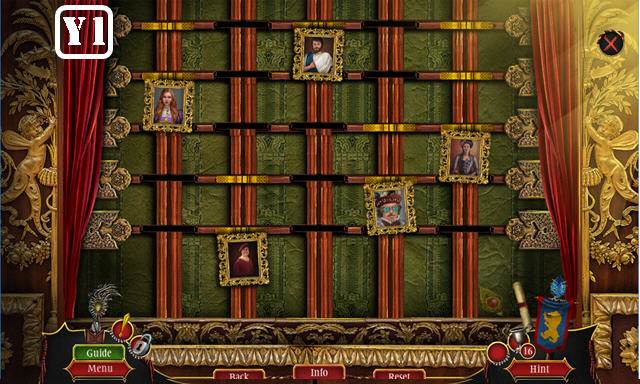
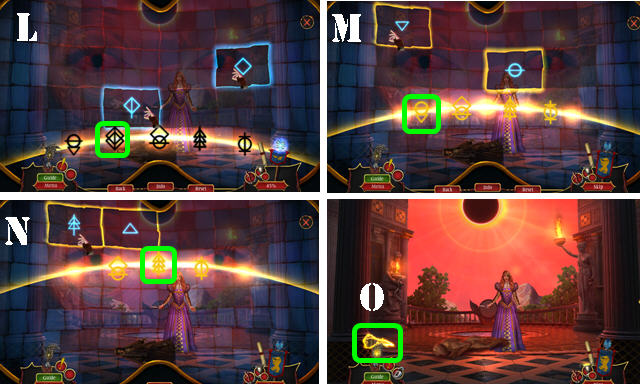
- Select the Protector's Staff (A) for a puzzle.
- Select matching symbols (B-C).
- Drag the energy ball as shown (D).
- Select the claw (E).
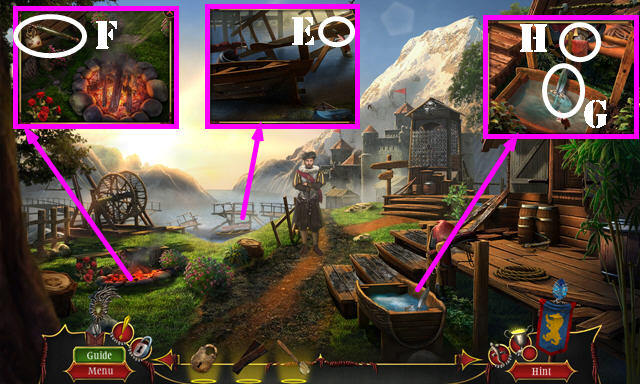
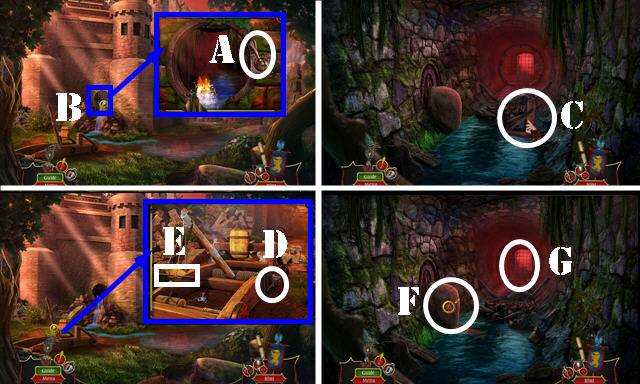
- Look at the note; take the SPRAYER (F).
- Take the SPEARHEAD (G). Open the pouch; take the CARD DECK (H).
- Walk down.
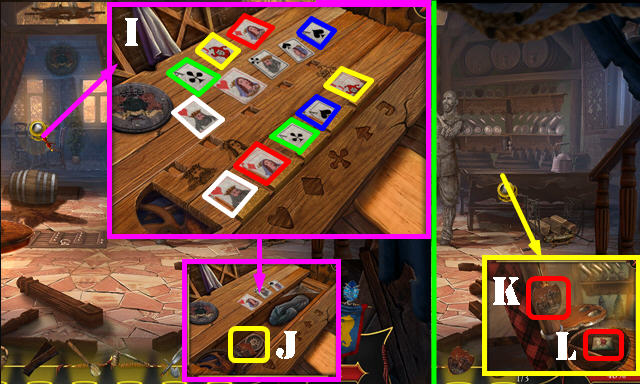
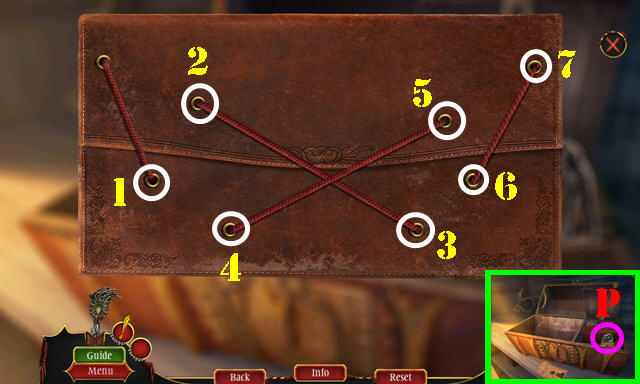
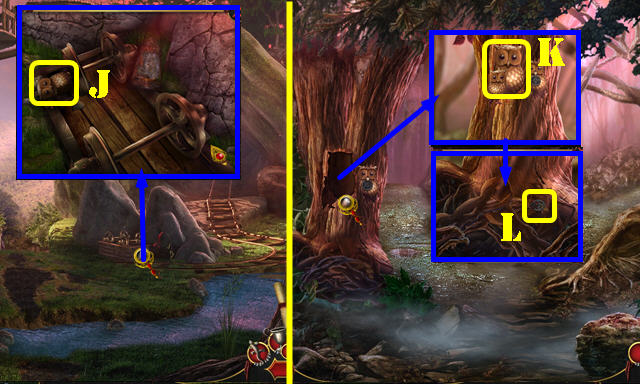
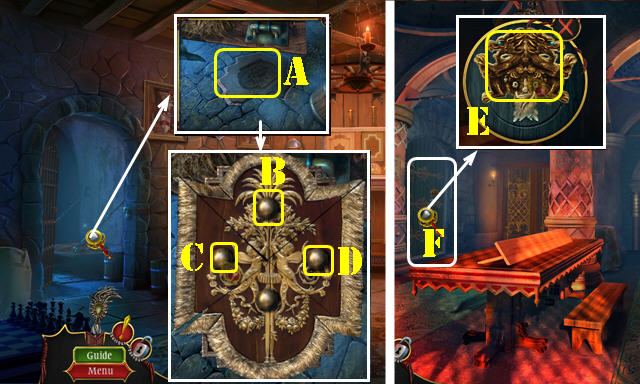
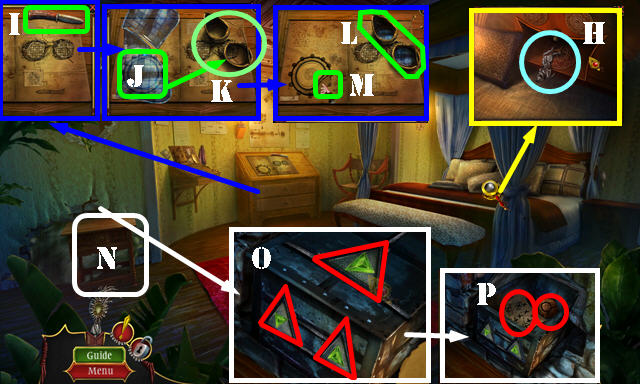
- Put down the CARD DECK; place as shown (I). Take the CREST SLIDER and COGS 1/3 (J).
- Place the CREST SLIDER (K); take the INVITATION LETTER (L).
- Go to the Outside Tavern.

- Give the INVITATION LETTER (M); take the Map (N).
- Go to the Market (O).
- Take the MOLD (P).
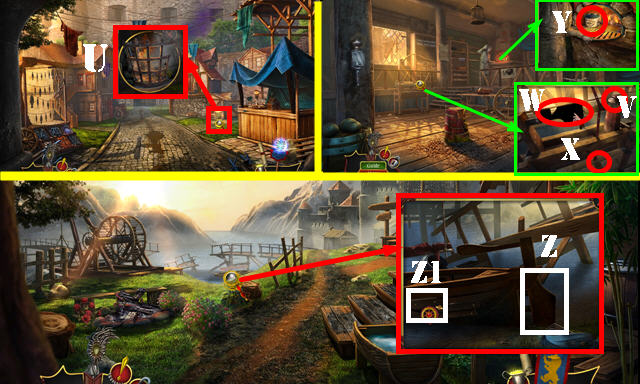
- Use the BOARDS and select them. Look at the note and take the WHEEL HANDLE (Q).
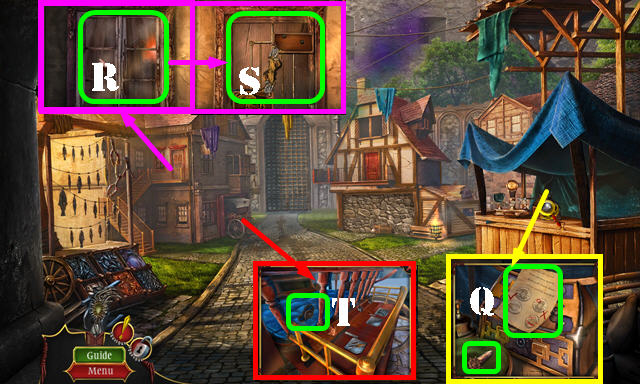
- Knock on the window (R). Kick the door (S).
- Use the SPEARHEAD; take the COGS 2/3 (T).
- Walk down.
- Select the wheel. Place the WHEEL HANDLE and select it (U). Take the GUARD FLAGON and COGS 3/3 (V).
- Go to the Market.
- Talk to the man (W).
- Place the COGS 3/3 for a puzzle (X).
- Solution (1-11).
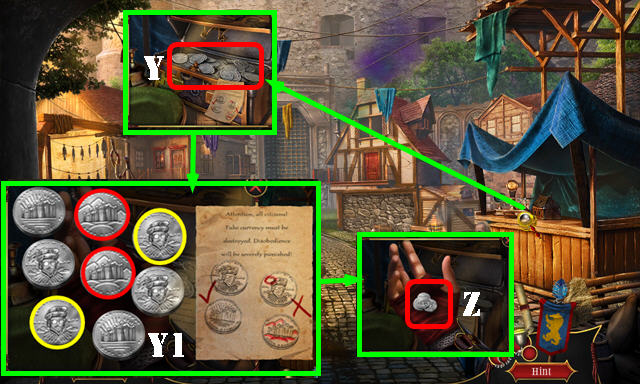
- Select the coins (Y).
- Select matching pairs (Y1).
- Take the FAKE COINS (Z).
- Walk down.
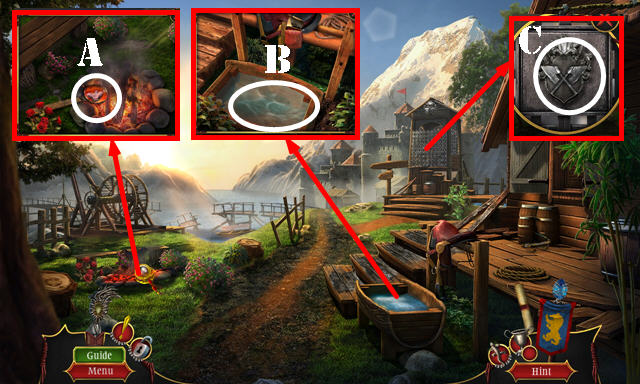
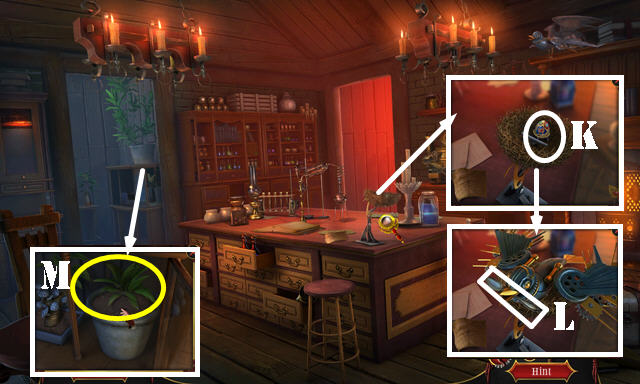
- Place the SMELTING LADLE and FAKE COINS; take the MOLTEN METAL (A) and kick the fire.
- Select the MOLD and place the MOLTEN METAL; take the HOT MOLD.
- Dip the HOT MOLD (B); open it and take the COAT OF ARMS.
- Place the COAT OF ARMS and select it (C); play the HOP to get the COMMANDER'S GEAR.
- Open the COMMANDER'S GEAR; select the note and take the CEREMONIAL DAGGER.
- Go to the Market.
- Use the CEREMONIAL DAGGER (D); take the HOOK and WOODEN WING (E).
- Use the HOOK (F); go to the Healer's House (G).
Chapter 2: Healer's House
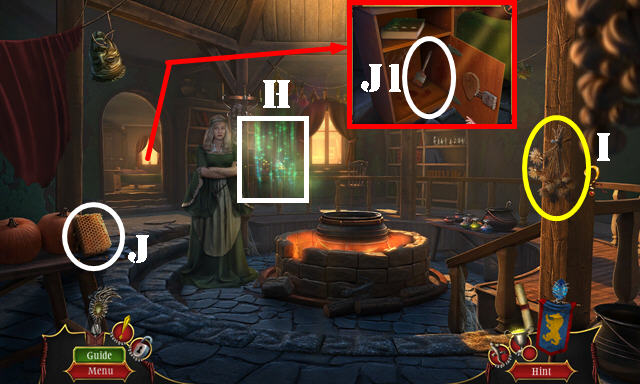
- Play the HOP (H) to get the METAL SYRINGE.
- Use the SPRAYER (I).
- Take the HONEYCOMB and the WOODEN HORSE (J).
- Place the WOODEN WING and open the door; take the PAINTBRUSH (J1).
- Walk down.
- Place the WOODEN HORSE; select (L-K-L).
- Enter the Coach Maker's Shop (M).
- Take the WRENCH (N).
- Look at the note; take the GURDY CRANK (O).
- Take the SMALL OWL and look at the note (P).
- Use the CEREMONIAL DAGGER (Q); receive the REDWOOD BARK.
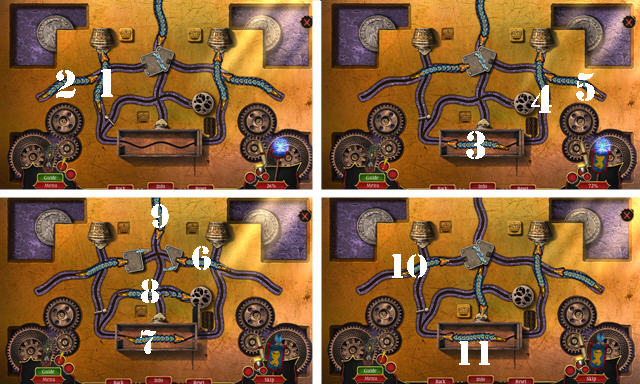
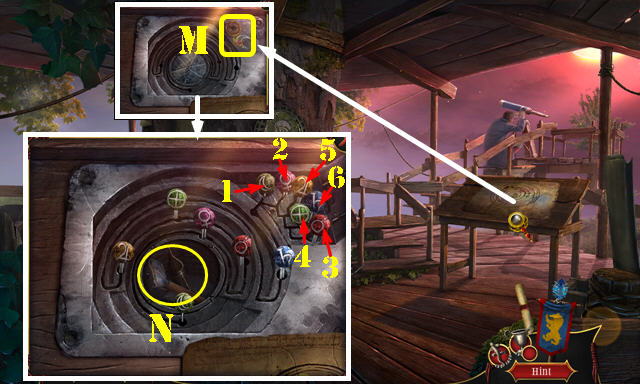
- Place the GURDY CRANK and select it for a puzzle (R).
- 1-2-3-Bx2-4-5-A-6-7-Cx2-8-9-Ex3-10.
- Take the MINIATURE WHEEL.
- Place the MINIATURE WHEEL on the GUARD FLAGON; take the GUNPOWDER FLASK.
- Use the GUNPOWDER FLASK (F); select the flint (G); receive the FLINT. Take the WIRE CUTTERS (H).
- Use the WIRE CUTTERS; look at the note and take the SIEVE (I).
- Return to the Outside Tavern.
- Use the SIEVE (J); select twice and take the BASILISK CLAW (K).
- Walk down.
- Use the METAL SYRINGE (L); take the BLOOD-FILLED-SYRINGE.
- Go to the Healer's House.
- Use the FLINT (M); take the BLACKSMITH FIGURINE (N).
- Go to the Coach Maker's Shop.
- Place the BLACKSMITH FIGURINE and move the three items; select the envelope for a puzzle (O).
- Solution: (1-7).
- Take the BASILISK SCALE (P).
- Go to the Healer's House.
- Place the BLOOD-FILLED-SYRINGE, REDWOOD BARK, BASILISK CLAW, and BASILISK SCALE (Q).
- Select the potion 2x (R-S).
- Take the HEALER'S POUCH (T).
- Select the HEALER'S POUCH 4x; take the GLOVE. Look at the note and take the SPECIAL RESIN.
- Walk down.
- Use the SPECIAL RESIN (U); play the HOP to get the CARVING TOOLS.
- Go to the Coach Maker's Shop.
- Step on the pedal (X). Place the PADLOCK (V). Use the CARVING TOOLS (W). Step on the pedal 3x; take the RUDDER (W).
- Select the bars. Use the GLOVE; take the TAR (Y).
- Go to the Outside Tavern.
- Place the RUDDER (Z). Put down the TAR and use the PAINTBRUSH 3x (Z1). Select the boat twice and then kick it.

- Play the puzzle. Solution one (A).
- Solution two (A1).
- Use the WRENCH; take the CLOCK SETTINGS (B).
- Try to take the torch (C). Toss the HONEYCOMB (D); take the CLOCK HANDS 1/2 and BRASS COIL (E).
- Go to the Astronomer's Tower (F).
- Take the CRESCENT ORNAMENT (G).
- Walk down; go Into the Forest (H).
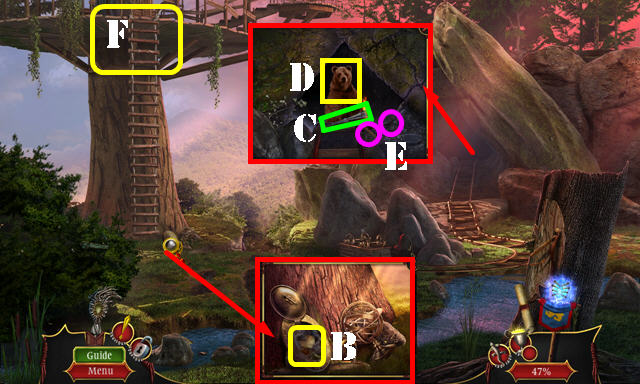
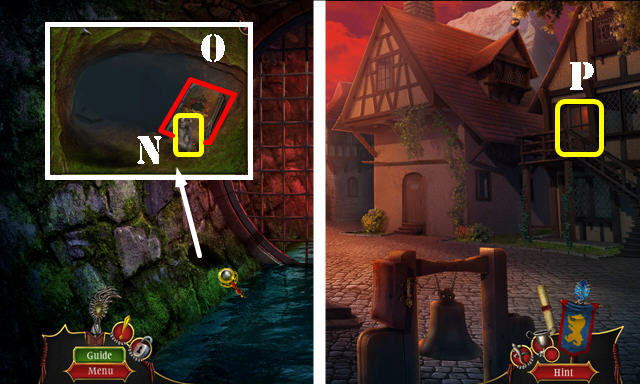
- Look down; select the branches 3x; take the WEDGE (I).
- Walk down.
- Place the WEDGE and kick it; take the BIG OWL (J).
- Go Into the Forest.
- Look up; place the BIG OWL and SMALL OWL; select the owls (K). Look down; take the BLACK SUN and EARTH ORNAMENT (L).
- Go to the Astronomer's Tower.
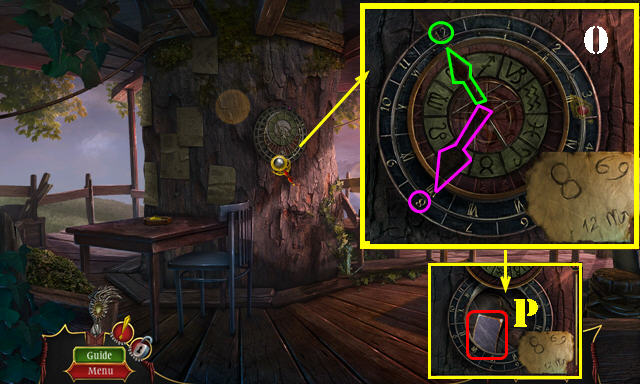
- Remove the paper; place the CRESCENT ORNAMENT and EARTH ORNAMENT (M). Select 1-6. Take the HAMMER and CLOCK HANDS 2/2 (N).
- Place the CLOCK HANDS 2/2 and CLOCK SETTINGS; set the hands as shown (O).Take the SANDPAPER (P).
- Walk down.
- Use the SANDPAPER; take the PRISM (Q).
- Go to the Astronomer's Tower.
- Place the PRISM; select R1-R2x3-R3x2.; take the LENS.
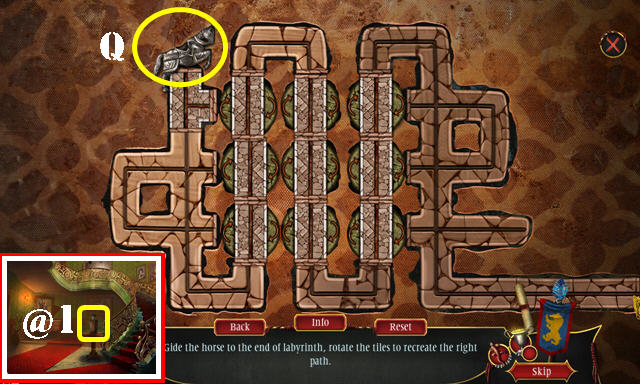
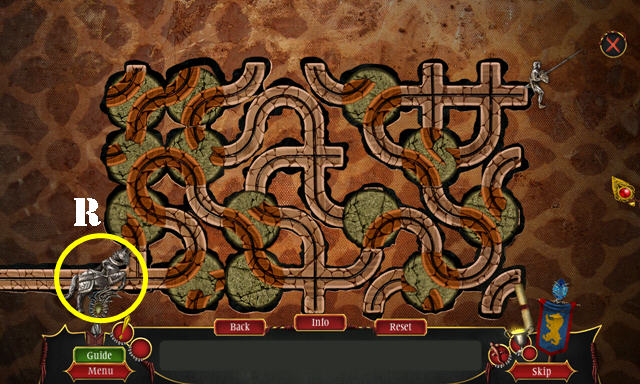
- Remove the broken lens; place the LENS for a puzzle (S).
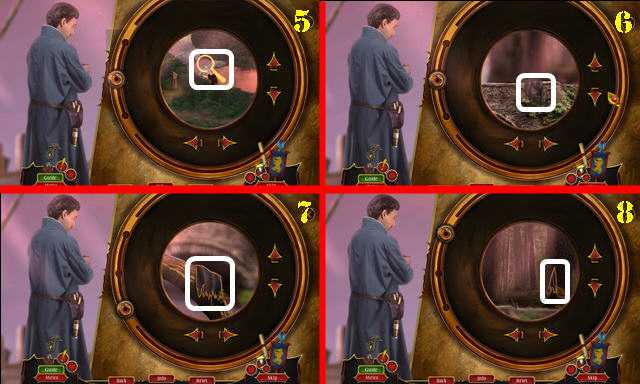
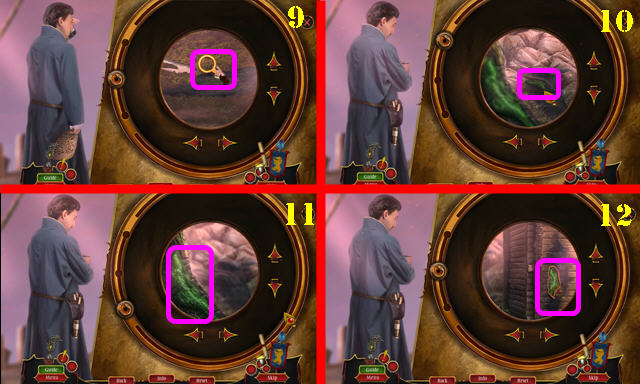
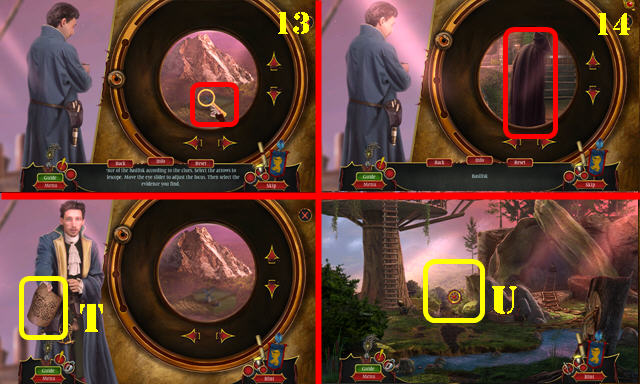
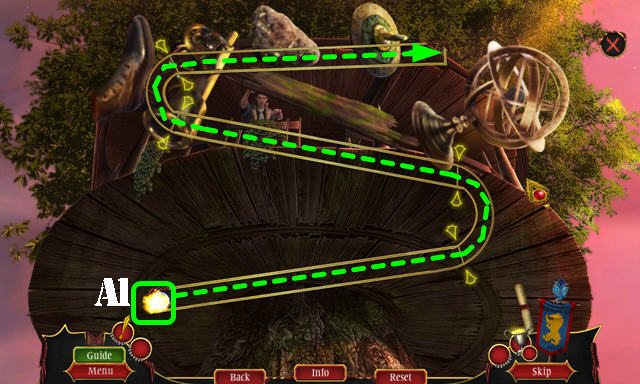
- Use the arrows (blue) to move the telescope. Move the eye slider (orange) to adjust the focus. Solution 1-14.
- Take the FOREST MAP (T).
- Walk down.
- Place the FOREST MAP (U).
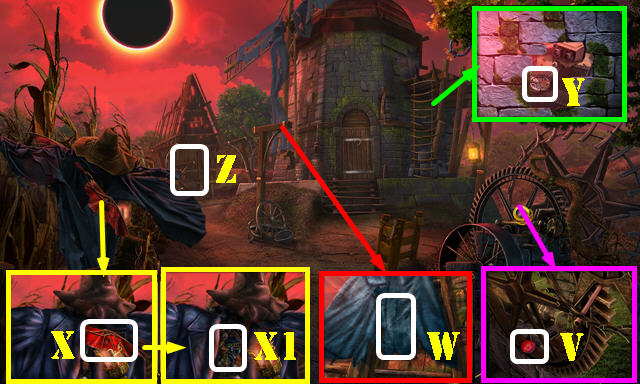
- Take the UMBRA PIECES 1/3 (V) and CLOTH (W).
- Take the OLD KITE (X); open the coat (X1).
- Use the HAMMER 2x and kick the wall; take the WINDMILL SYMBOLS 1/2 and KITE PENDANT (Y).
- Go to the Granary (Z).
Chapter 3: The Granary
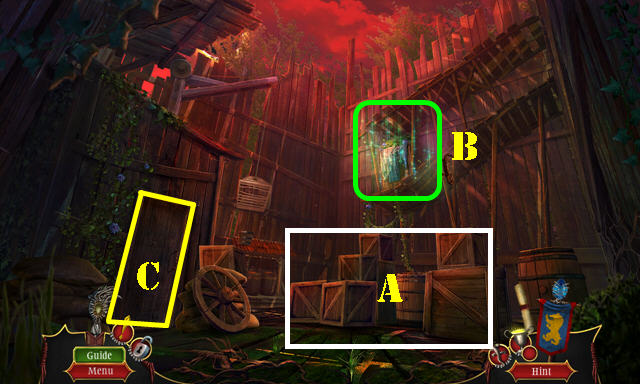
- Select the crates 4x (A).
- Play the HOP (B) to get the INCENSE.
- Open the door (C).
- Walk down.
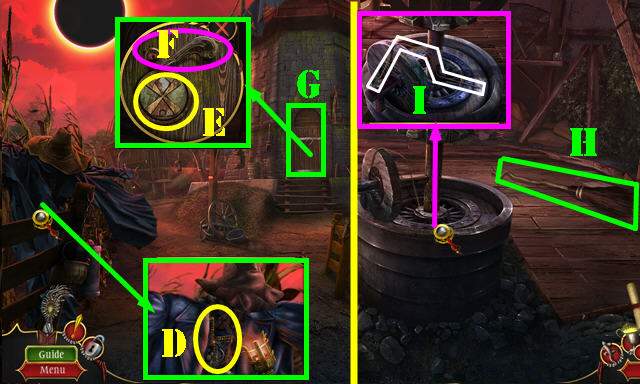
- Use the INCENSE; take the WINDMILL SYMBOLS 2/2 (D).
- Place the WINDMILL SYMBOLS 2/2 and select it (E). Select the handle (F).
- Enter the Ruined Windmill (G).
- Take the BROOM (H) and STRING (I).
- Walk down.
- Place the KITE PENDANT and STRING on the OLD KITE; receive the MAGNETIC KITE.
- Use the MAGNETIC KITE (J); stop the ball in the green zone (K) to receive the BACKPACK BUTTON.
- Use the BROOM; take the UMBRA PIECES 2/3 (L).
- Go to the Ruined Windmill.
- Place the BACKPACK BUTTON and look at the book; take the ORNAMENTAL BOX and SWISS DART (M).
- Return to the Granary.
- Use the SWISS DART (N). Select O-P-Qx2. Kick the cage; take the UMBRA PIECES 3/3 and BUCKET (R).
- Place the UMBRA PIECES 3/3 on the ORNAMENTAL BOX for a puzzle. Solution (S).
- Look at the letter; take the ADDER and HAIRPIN (T).
- Place the BUCKET (U); use the HAIRPIN (V); take the BUCKET OF OIL (U).
- Walk down.
- Use the BUCKET OF OIL; take the HOLLOW ROD (W).
- Go to the Ruined Windmill.
- Use the HOLLOW ROD (X).
- Play the HOP (Y) to get the VIAL OF WATER.
- Go to the Secret Corridor (Z).
- Take the CASTLE CUTOUT (A).
- Use the CLOTH; take the TRIANGULAR TILE (B).
- Go to the Nursery (C).
- Take the LIZARD BROOCH (D).
- Select the shelves 3x (E); take the SERPENT SHIELD (F).
- Walk down.
- Place the LIZARD BROOCH; take the DOLL and CRADLE PANEL (G).
- Go to the Nursery.

- Place the CRADLE PANEL; arrange as shown (H); take the DOLL MECHANISM.
- Select the DOLL twice; insert the DOLL MECHANISM and BRASS COIL; receive the MECHANICAL DOLL.
- Place the MECHANICAL DOLL; take the GEM SKETCH and GEMSTONE (I).
- Walk down.
- Place the GEMSTONE and GEM SKETCH for a puzzle. Solution: 1-5-4-3-2-1-3-4-5-1-3-2-1-5-4-3.
- Enter the Living Quarters (J).
- Place the CASTLE CUTOUT and BLACK SUN and select (K). Take the SULFUR and DOLLHOUSE WINDOW (L); look at the note (M).
- Select the bed (N).
- Return to the Nursery.
- Place the DOLLHOUSE WINDOW (O); play the HOP to get the SMALL VIAL.
- Go to the Living Quarters.
- Place the SMALL VIAL (P) and use the VIAL OF WATER (Q); select the vial and take the FREEZING POTION.
- Walk down.
- Use the FREEZING POTION and kick the gate (R).
- Go to the Memorial Garden (S).
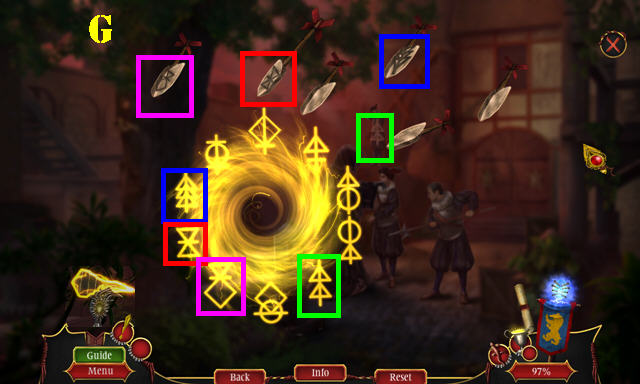
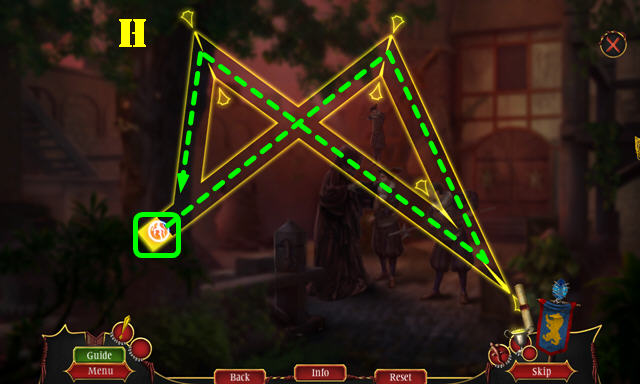
- Select the Protector's Staff for a puzzle (T).
- Solution (U).
- Drag the image (V).
- Take the HEDGE CLIPPERS (A).
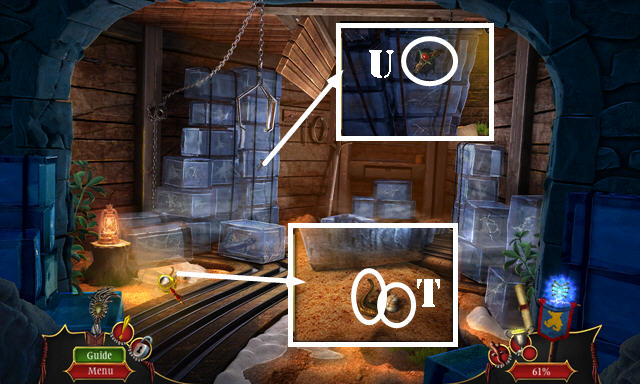
- Use the HEDGE CLIPPERS 3x; take the WEED FIBERS and RUSTY CRANK (B).
- Walk down.
- Use the WEED FIBERS; select 1-3; take the TUNING KEY (C).
- Go to the Living Quarters.
- Place the TUNING KEY (D); select 4-5-6 and the tuning key.
- Take the METAL FILE. Place the TRIANGULAR TILE for a puzzle (E).
- Solution: F-G-H-Ix2-F.
- Take the DOVE BROOCH.
- Walk down.
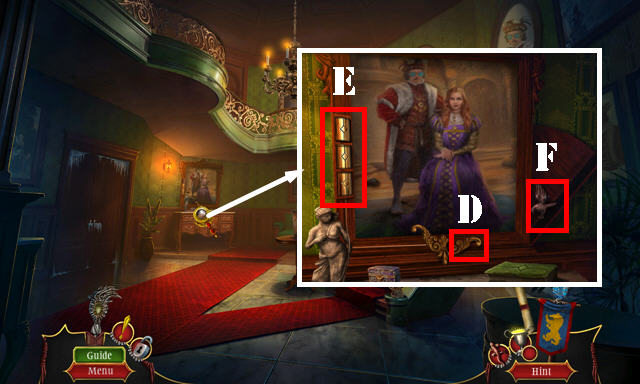
- Place the DOVE BROOCH; take OTTILIA'S PORTRAIT (J).
- Go to the Memorial Garden.
- Select the area 2x; place OTTILIA'S PORTRAIT (K); take the MURAL TILE (L).
- Kick the crate; use the METAL FILE; take the PETRIFIED EGG (M).
- Go to the Living Quarters.
- Place the PETRIFIED EGG (N) and MURAL TILE (O). Receive the SUNSTONE.
- Go to the Memorial Garden.
- Place the SUNSTONE; select 1-4 and take the VIPER (P).
- Go to the Living Quarters.
- Place the ADDER and VIPER on the SERPENT SHIELD; select both snakes; take the OBSIDIAN SHIELD.
- Place the OBSIDIAN SHIELD; take the JAVELIN (Q).
- Return to the Memorial Garden.
- Use the JAVELIN (R); play the HOP to get the CLIMBING SPIKE.
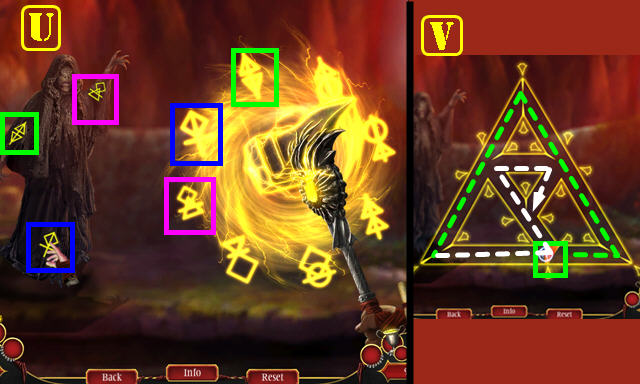
- Use the CLIMBING SPIKE for a puzzle (S).
- Solution (T-W).
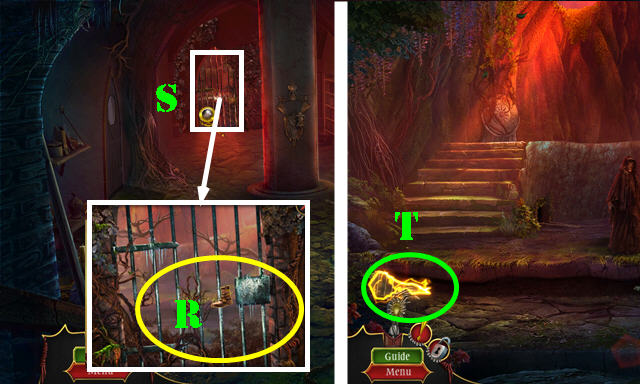
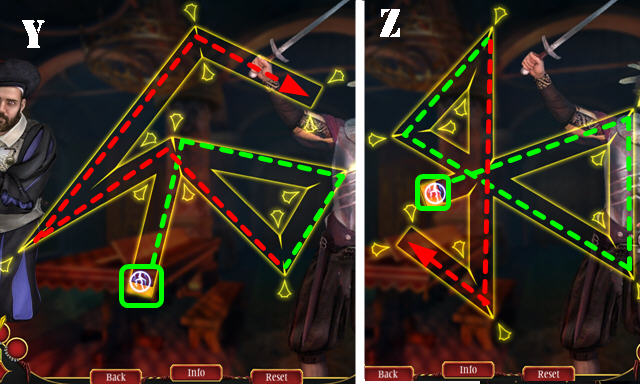
- Go Out of the Cave (X) for a puzzle.

- Solution (Z).
- Solution (Z1). Follow green, then white.
Chapter 4: The Tunnel
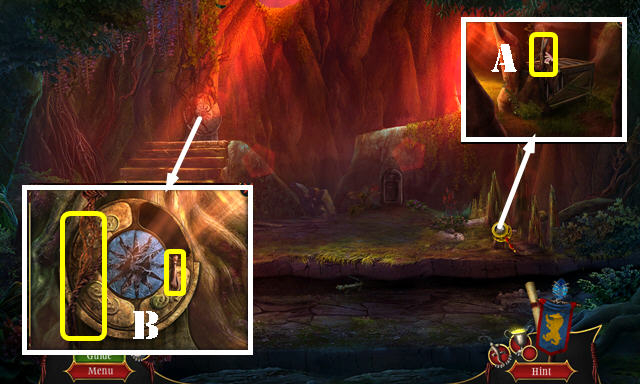
- Remove the lever and place the RUSTY CRANK (A); receive the GOLDEN PYRAMID and BELT.
- Go to the Tunnel (B).
- Select the area 4x; receive the CATAPULT PART (C).
- Walk down.
- Place the CATAPULT PART and pull it (D); take the ROD (E).
- Go to the Tunnel.
- Use the ROD (F); play the HOP to get the MASTER LINK.
- Go to the Tunnel Gate (G).

- Take the BROKEN CHAIN and LARGE ROCK (H).
- Place the MASTER LINK on the BROKEN CHAIN; take the CHAIN.
- Place the CHAIN and the ROD; select it and go to Town Square (I).
- Take the CHARCOAL (J) and SACK OF GRAIN (K).
- Select the door (L). Use the BELT (M) to get the SCARAB.
- Walk down.
- Use the SACK OF GRAIN (N); take the HALF-EATEN BOOK (O).
- Go forward; enter the Antique Store (P).
- Take the HEXAGONAL STONE and EDELWEISS ORNAMENT (Q). Look at the note (R).
- Go to the City Outskirts.
- Place the LARGE ROCK and select it (S). Select the case twice; take the DRAGON HEAD (T).
- Go to the Antique Store.
- Use the SULFUR and CHARCOAL; place the DRAGON HEAD to get the FIRE LANCE (U).
- Walk down.
- Use the FIRE LANCE (V).
- Enter the Garrison (W).
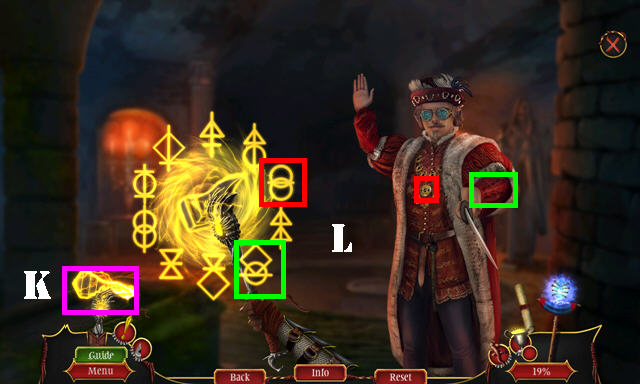
- Select the Protector's Staff for a puzzle (X).
- Solution one (X1).
- Solution two (Y-Z). Follow green, then red.
- Take the SILVER WING (A).
- Look at the note (B).
- Place the EDELWEISS ORNAMENT (C). Arrange the image as shown (D).
- Go to the Commander's Office (E).
Chapter 5: Commander's Office
- Take the SEAL RING (F).
- Look at the photo (G).
- Go to the Town Square.
- Use the SEAL RING (H).
- Enter the Alchemy Shop (I).
- Place 1-3 as shown. Swap the image (J).
- Look at the note (K1); take the STAINED GLASS (K).
- Take the GOLD WING (L).
- Return to the Antique Store.
- Place the SILVER WING, GOLD WING, and GOLDEN PYRAMID on the SCARAB; receive the EGYPTIAN SCARAB.
- Place the EGYPTIAN SCARAB (M); play the HOP to get the BONE STAR.
- Place the BONE STAR (N); take the BRASS ARROW (O).
- Go to the Garrison.
- Use the BRASS ARROW and look at the note; take the METAL PLATE (P).
- Go to the Commander's Office.
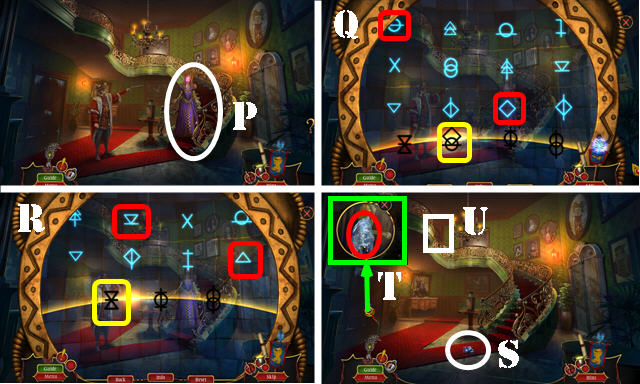
- Use the METAL PLATE for a puzzle (Q).
- Solution (1-12).
- Place the HALF-EATEN BOOK and select it; take the HIPPOGRIFF FIGURINE (R).
- Go to the Antique Store.
- Place the HIPPOGRIFF FIGURINE (S); take the ARMOR DRILL (T).
- Go to the Garrison.
- Use the ARMOR DRILL 3x; take the PASTE (U).
- Walk down.
- Use the PASTE (V); select the valves (W).
- Play the HOP (X) to get the SPECIAL INGREDIENT.
- Go to the Alchemy Shop.
- Place the SPECIAL INGREDIENT and swap as shown (Y); take the WIND ESSENCE (Z).
- Go to the Commander's Office.
- Use the WIND ESSENCE (A).
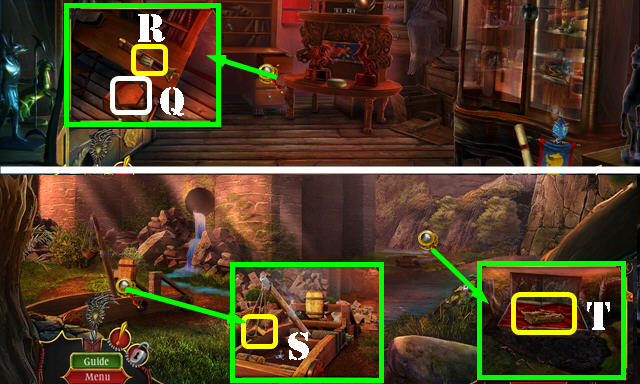
- Take the GUM ARABIC and MINIATURE HAMMER (B). Move the equipment.
- Use the MINIATURE HAMMER (C); take the ALCHEMY SCROLL (D).
- Go to the Alchemy Shop.
- Use the GUM ARABIC; take the QUICKSILVER (E).
- Go to the Back Room (F).
- Take the SCROLL HOLDER (G).
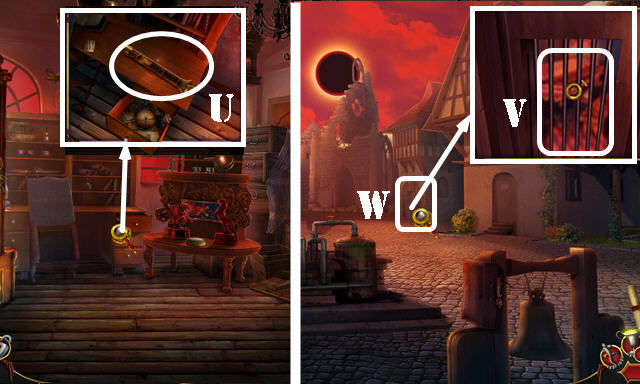
- Open the SCROLL HOLDER; take the MIRROR INSTRUCTIONS.
- Place the ALCHEMY SCROLL (H); move the scroll as shown (I). Take the JEWELED EGG (J).
- Walk down.
- Look at the note; place the JEWELED EGG (K). Take the SILVER SPOON (L).
- Open the door; use the SILVER SPOON and take the MANDRAKE ROOT (M).
- Go to the Back Room.
- Place the MIRROR INSTRUCTIONS (N). Place the STAINED GLASS, QUICKSILVER, and MANDRAKE ROOT (O). Take the MIRROR (P).
- Walk down.
- Place the MIRROR (Q); play the HOP to get the COATED MIRROR.
- HOP puzzle solution (Q1).
- Go to the Back Room.
- Place the COATED MIRROR for a puzzle (R).
- Solution one (S).
- Solution two: Vx2-W-V-Tx3-W.
- Take the PROTECTIVE MIRROR and SLAB ARTIFACT.
- Go to the Commander's Office.
- Place the SLAB ARTIFACT (A); select Bx2-Cx2-Dx2. Take the TWO-LEGGED SNAKE.
- Walk down.
- Place the TWO-LEGGED-SNAKE (E).
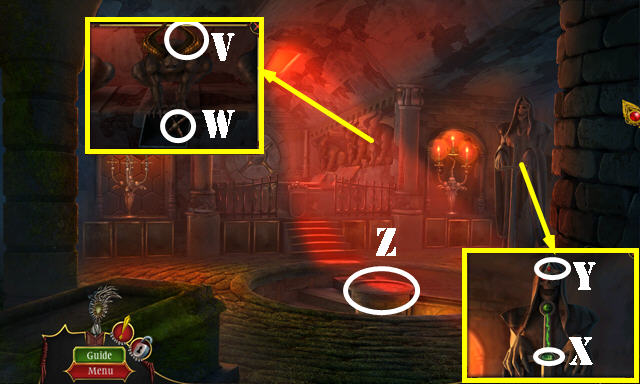
- Enter the Castle Yard for a puzzle (F).
- Solution (G).
- Drag the image (H).
- Drag the image (I). Select red, then green.
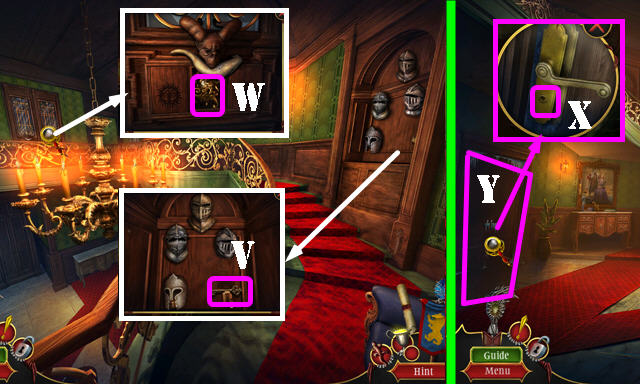
- Take the TORCH (J) and METAL CLAW (K).
- Use the TORCH (L); take the COAT OF ARMS (M).
- Place the COAT OF ARMS and select it twice (N).
- Enter the Grand Foyer (O).
Chapter 6: Grand Foyer
- Use the PROTECTIVE MIRROR for a puzzle (P).
- Solution one (Q).
- Solution two (R).
- Take the MIRROR SHARDS (S).
- Remove the icicle (T).
- Go to the Upstairs Hallway (U).
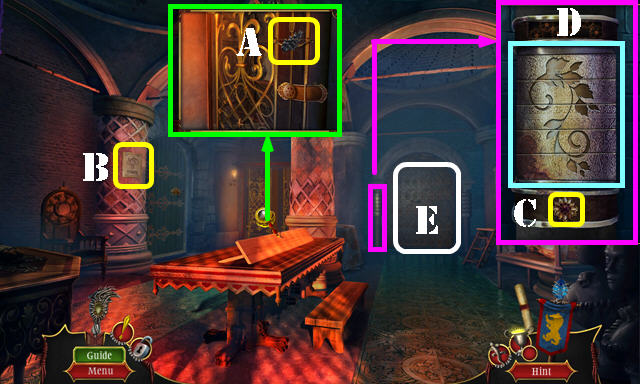
- Take the IRON KEY (V).
- Open the cabinet; take the FRAME PART (W).
- Walk down.
- Use the IRON KEY (X).
- Enter the Frozen Storage (Y).
- Select the scene. Play the HOP (A) to get the CYLINDER.
- Use the METAL CLAW; take the ANCIENT TABLET (B).
- Look at the note (C).
- Walk down.
- Place the FRAME PART and select it (D).
- Place the CYLINDER and select all three (E). Take the FALCON EMBLEM (F).
- Go to the Upstairs Hallway.
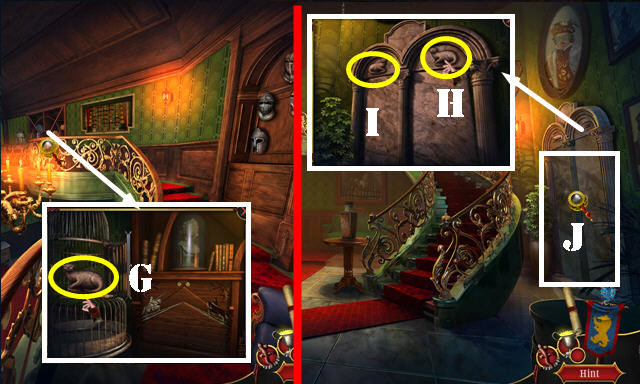
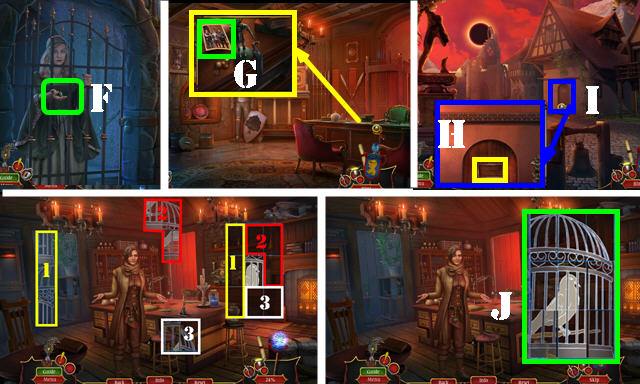
- Place the FALCON EMBLEM; take the OTTER (G).
- Walk down.
- Place the OTTER (H). Select H-I.
- Enter the Undercroft (J).
- Select the Protector's Staff for a puzzle (K).
- Solution (L).
- Drag the image (M).
- Take the BROKEN GLASSES (N).
- Select the candelabra; take the CLAY CIRCLE (O).
- Place the HEXAGONAL STONE (P).
- Take the VINEGAR (Q).
- Place the CLAY CIRCLE on the ANCIENT TABLET; receive the CLAY TABLET.
- Place the CLAY TABLET (R); take the GREEN JEWEL (S).
- Return to the Frozen Storage.
- Use the VINEGAR and select the sand; take the GOLD HORN and SALT JAR (T).
- Use the SALT JAR; take the ANCESTRAL CROWN (U).
- Go to the Undercroft.
- Place the GOLD HORN (V); take the FOREFATHER'S STAR (W).
- Place the GREEN JEWEL (X) and ANCESTRAL CROWN (Y).
- Look (Z).
- Select the lever (A); select 1-3.
- Grab the brick (B) and place in the lower-right corner (C).
- Select the lever (D).
- Play the HOP (E) to get the ROMAN HELMET.
- Go to the Upstairs Hallway.
- Place the ROMAN HELMET (F).
- Go to the Boudoir (G).
- Select three pillows; place the FOREFATHER'S STAR; take the HORSE MINIATURE (H).
- Take the KNIFE (I).
- Place the BROKEN GLASSES and MIRROR SHARDS; select the shards. Place the KNIFE (J) and select it 3x; place the glass (K). Use the KNIFE again 3x and place the glass. Take BARON'S GLASSES (L) and the SECRET COMBINATION (M).
- Move the stand (N) and select the wall. Place the SECRET COMBINATION. Rotate the triangles as shown (O). Look at the note; take the RUNIC DISCS 1/3 and NAUTICAL CHART (P).
- Go to the Grand Foyer.
- Place the HORSE MINIATURE for a puzzle (@1). Solution one (Q) and select the horseman figurine.
- Solution two (R) and select the horseman figurine.
- Take the HORSEMAN FIGURINE.
- Go to the Upstairs Hallway.
- Place the HORSEMAN FIGURINE; take the BRASS DEER (S).
- Go to the Boudoir.
- Place the BRASS DEER and select it (T); play the HOP to get the STUDY KEY.
- Walk down.
- Use the STUDY KEY (U).
- Enter Barons' Study.
- Place the NAUTICAL CHART; select 1-3; take JANA'S PORTRAIT (V).
- Use the KNIFE and open the compartment; take BARON'S PORTRAIT (W).
- Walk down.
- Place JANA'S PORTRAIT and BARON'S PORTRAIT for a puzzle (X).
- Solution one (Y).
- Solution two (Y1).
- Take the DEFENSE TOWER and ANTIQUE COIN.
- Go to Barons' Study.
- Use the ANTIQUE COIN; take the MINIATURE CANNON and RUNIC DISCS 2/3 (A).
- Place the DEFENSE TOWER and MINIATURE CANNON (B); take the RUNIC DISCS 3/3 (C).
- Place the RUNIC DISCS 3/3 (@). Move (E) clockwise to (D). Move (F) counterclockwise to (G). Move (H) clockwise to (D).
- Play the HOP (H) to get the CARVED EAGLE.
- Place the CARVED EAGLE (I). Select (I-J).
- Go to the Balcony (K).
- Use BARON'S GLASSES on the scene for a puzzle.
- Solutions (L-N).
- Select the Protector's Staff (O).
- Congratulations, you've completed Myths of the World: The Black Sun!
Created at: 2017-04-16