

Walkthrough Menu
- General Tips
- Chapter 1: The Golden Heart
- Chapter 2: The Village
- Chapter 3: The Forest
- Chapter 4: The Mysterious Man
- Chapter 5: The Guard Tower
- Chapter 6: The Volcano
- Chapter 7: The City
General Tips
- This is the official guide for Myths of the World: The Heart of Desolation.
- This guide will not show when you have to zoom into a location; the screenshots will show each zoom scene.
- Hidden-object puzzles are referred to as HOPs. This guide will not show screenshots of the HOPs, however, it will mention when an HOP is available and the inventory item you'll collect from it.
- Use the Map to fast travel to a location.
Chapter 1: The Golden Heart
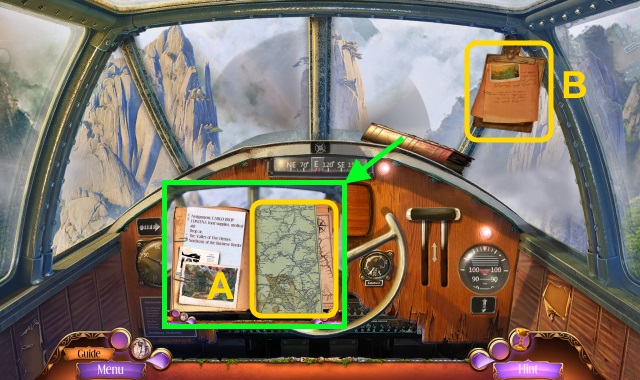
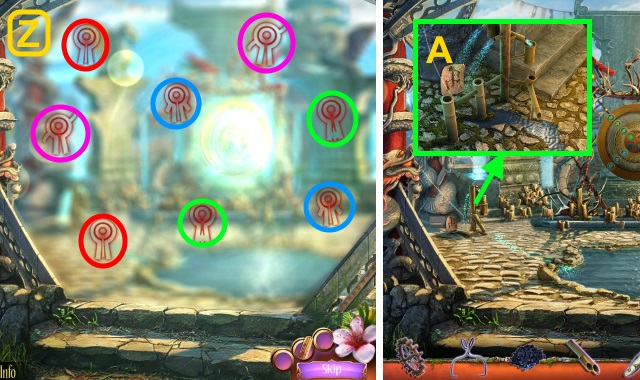
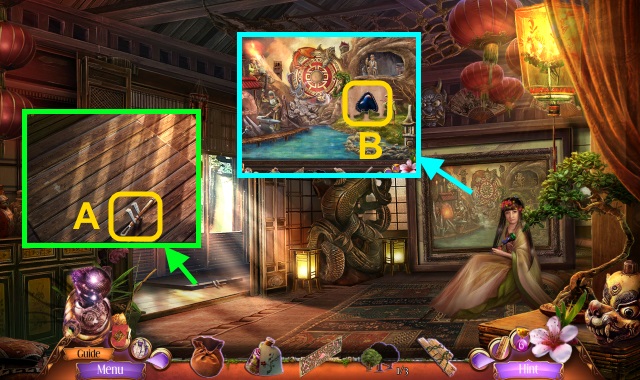
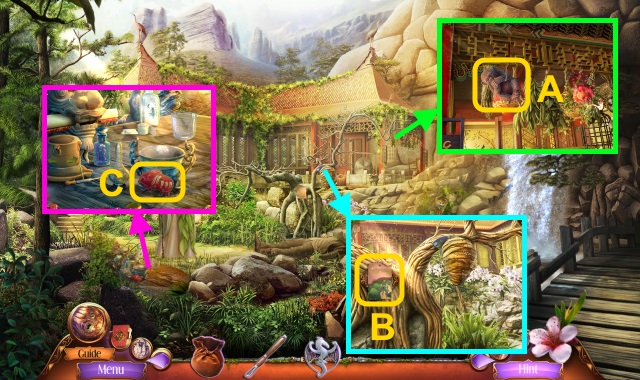
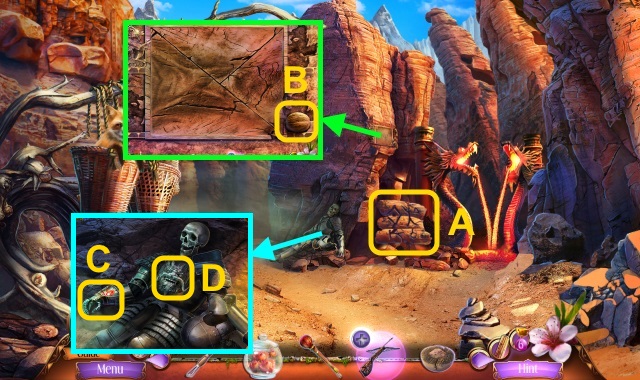
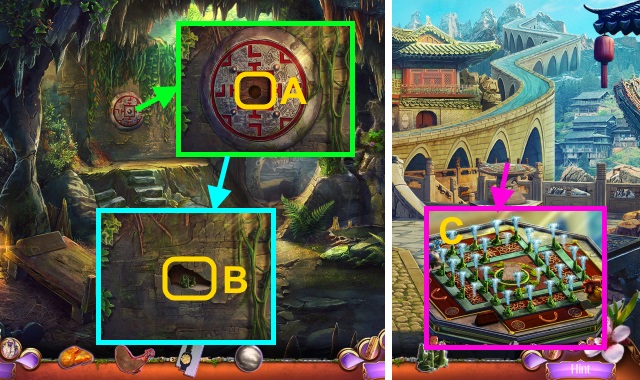
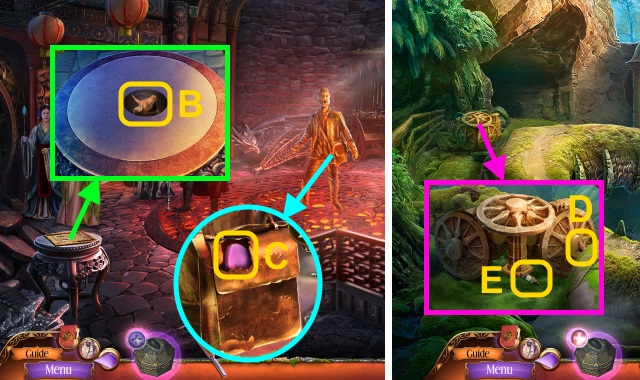
- Open the book; take the pages and NAVIGATION (A).
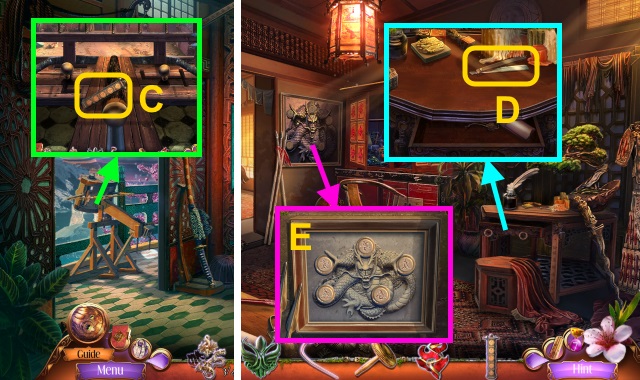
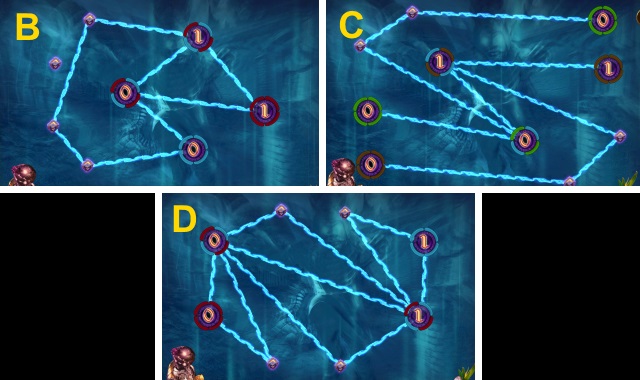
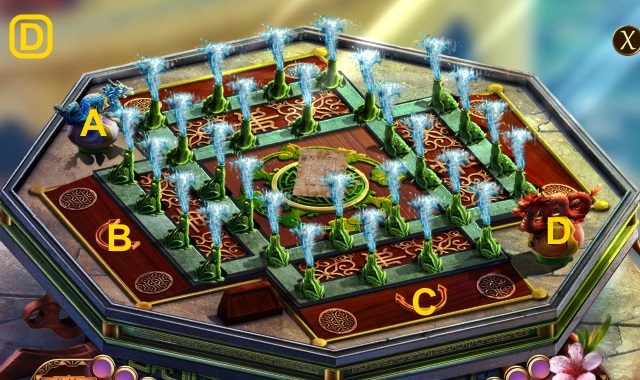
- Place the NAVIGATION for a mini-game (B).
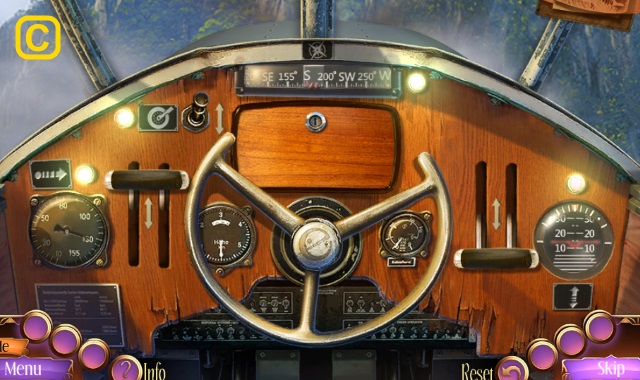
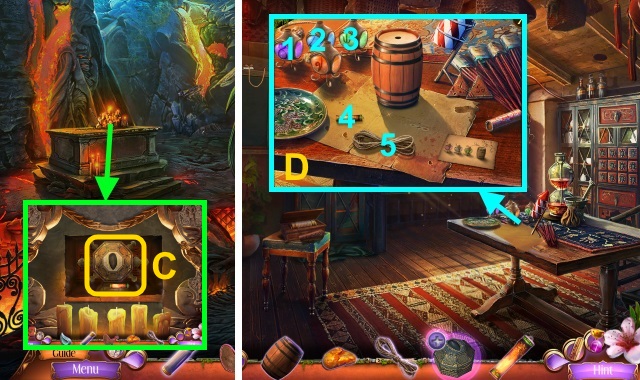
- Solution (C).
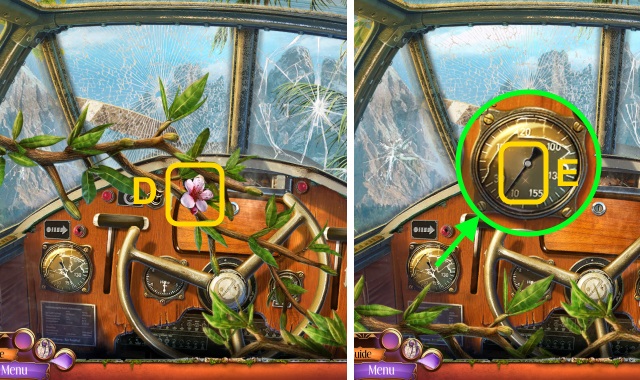
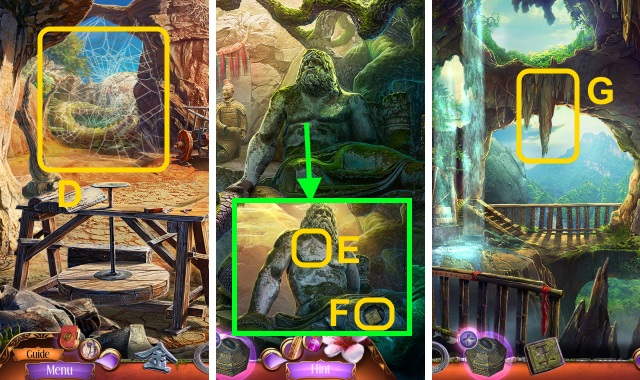
- Move the branches; take the Flower (D).
- Move the branches.
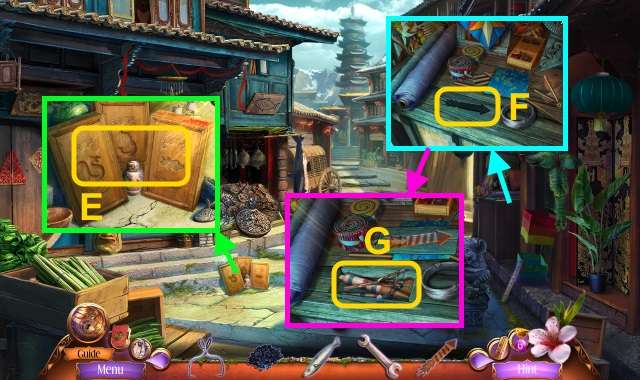
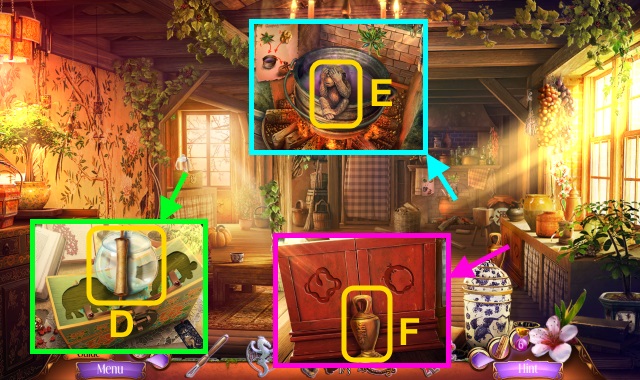
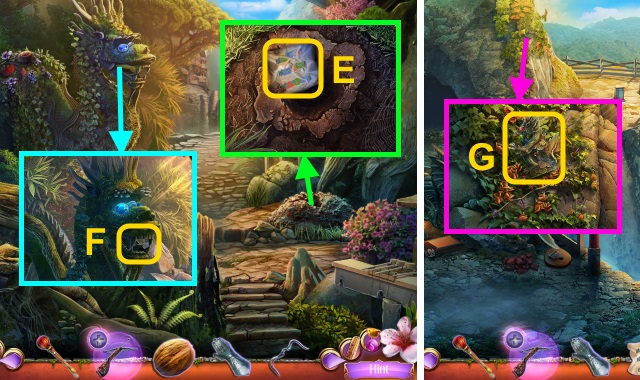
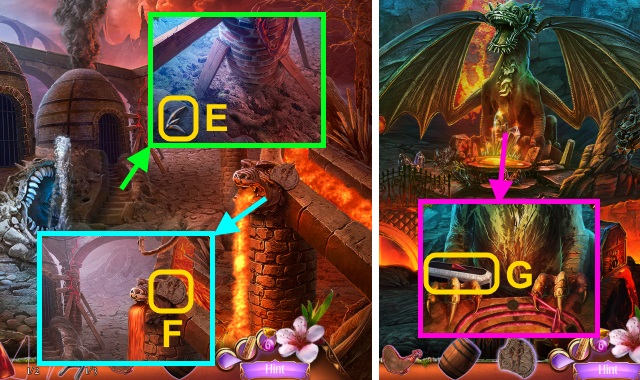
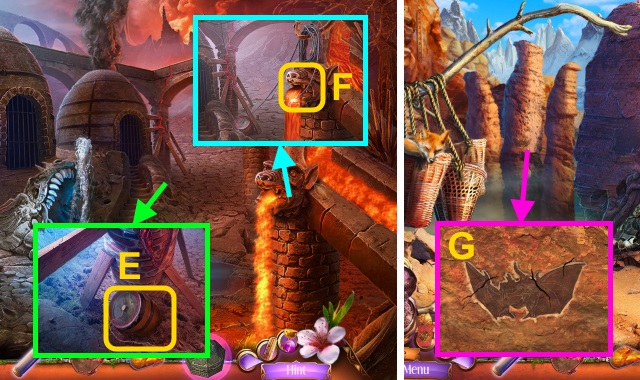
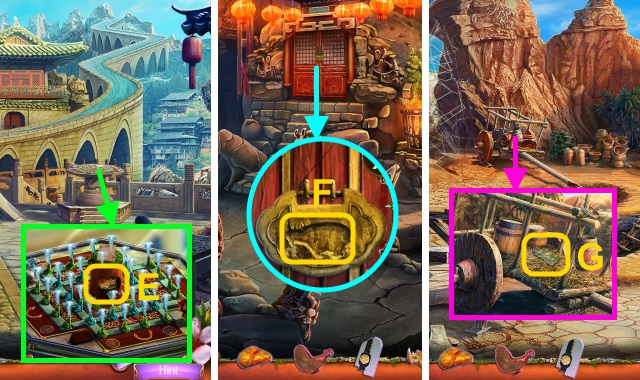
- Move the glass; take the NEEDLE (E).
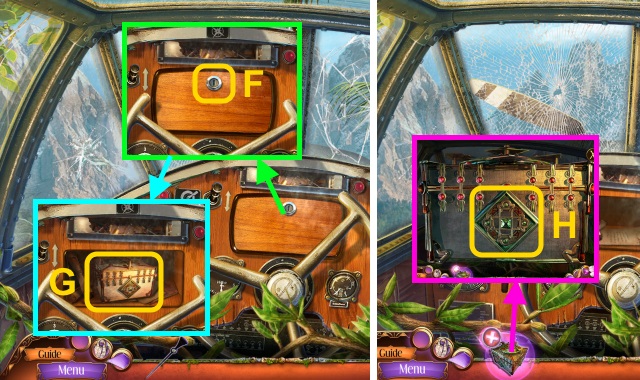
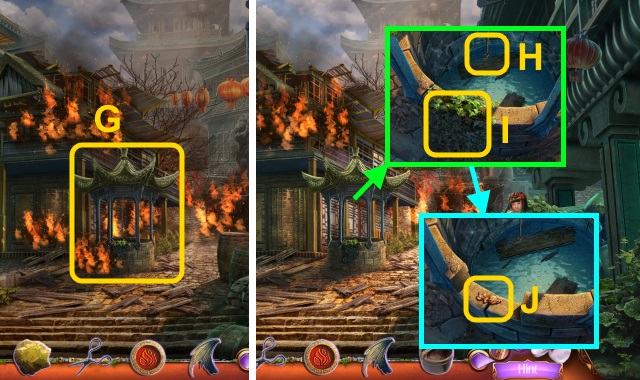
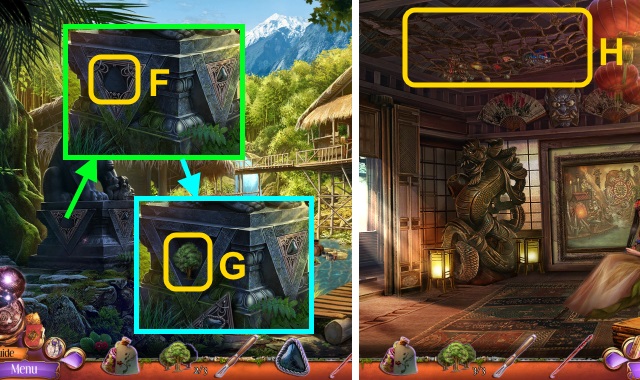
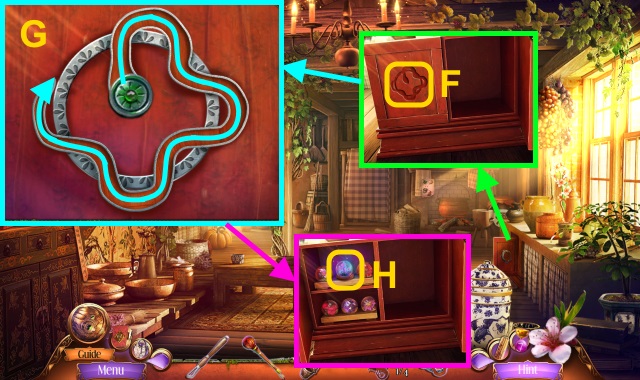
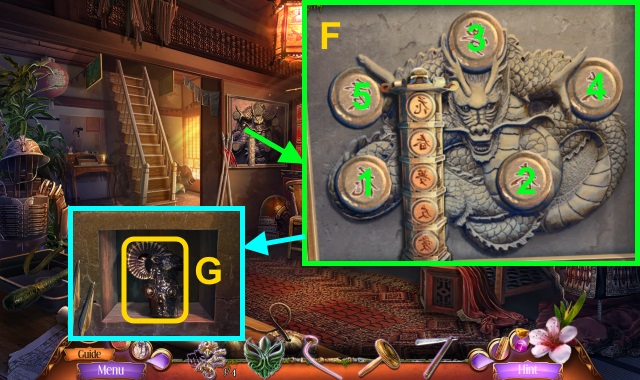
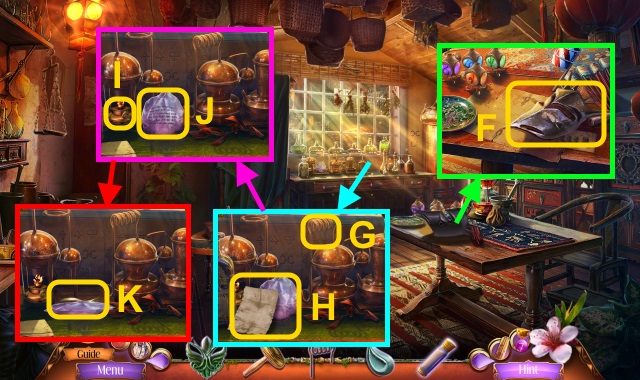
- Use the NEEDLE (F); take the METAL BOX (G).
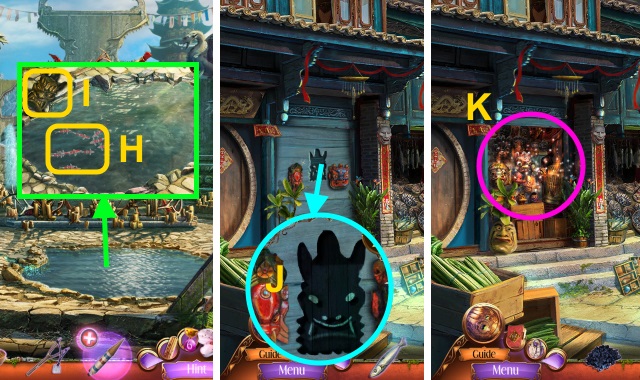
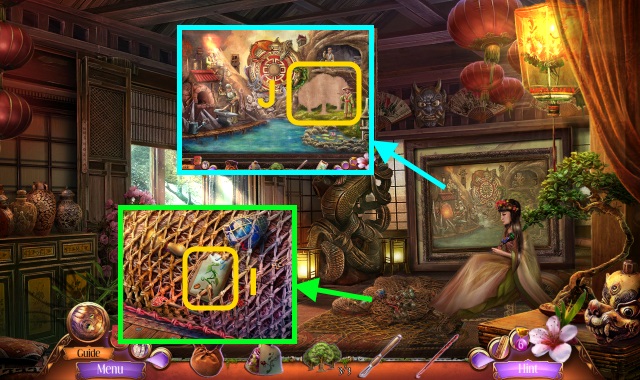
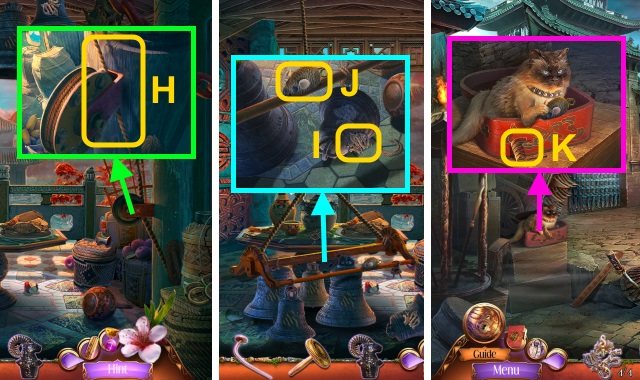
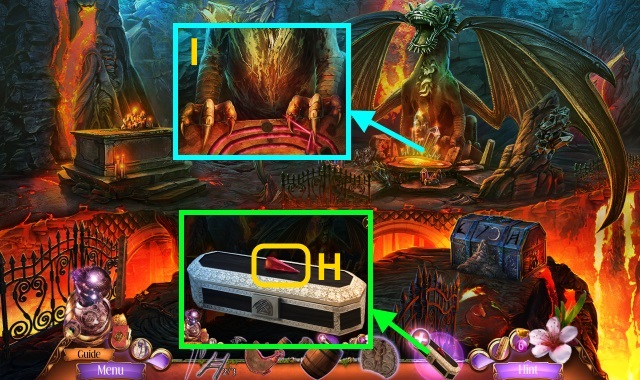
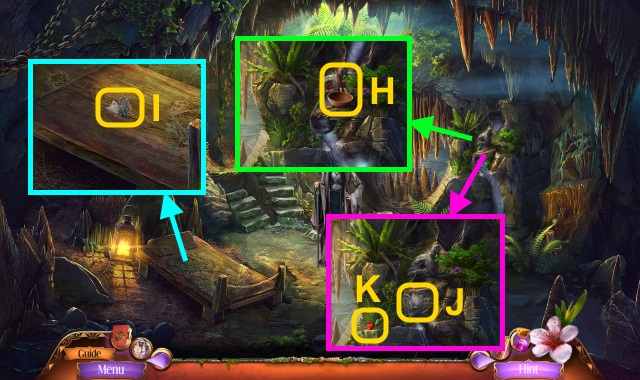
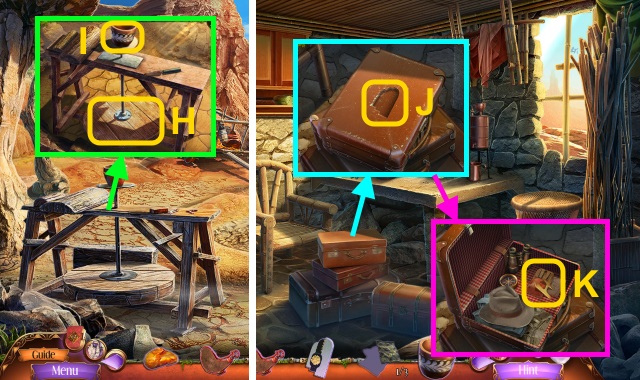
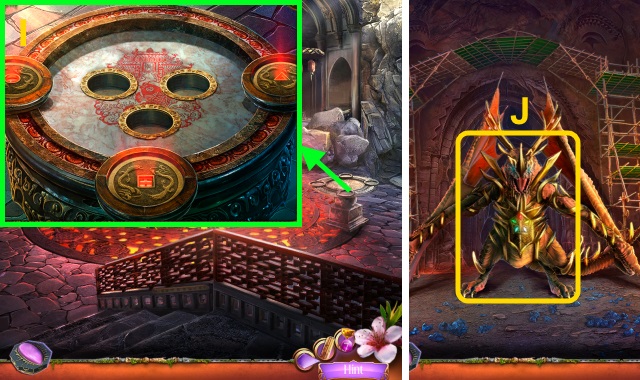
- Examine the METAL BOX; turn the lock three times for a mini-game (H).
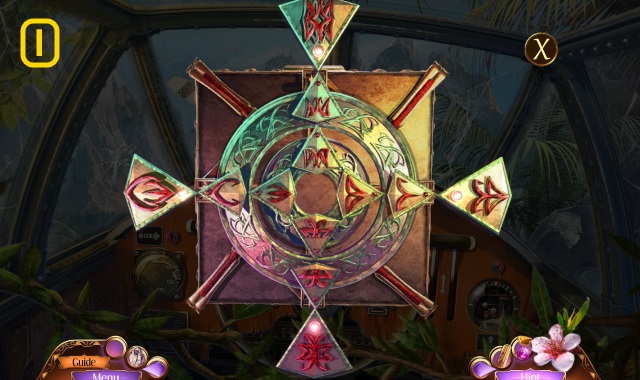
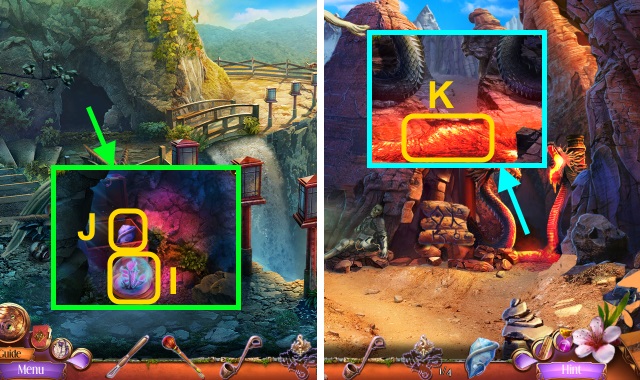
- Solution (I).
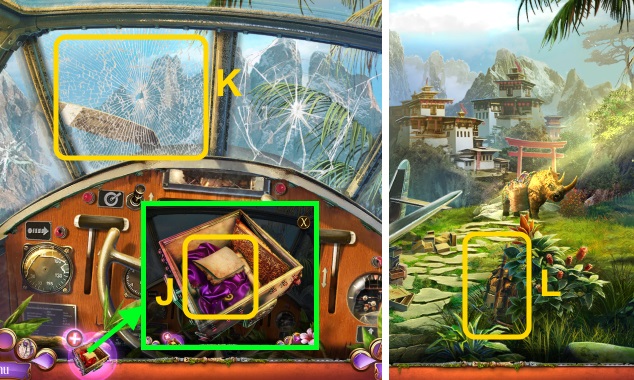
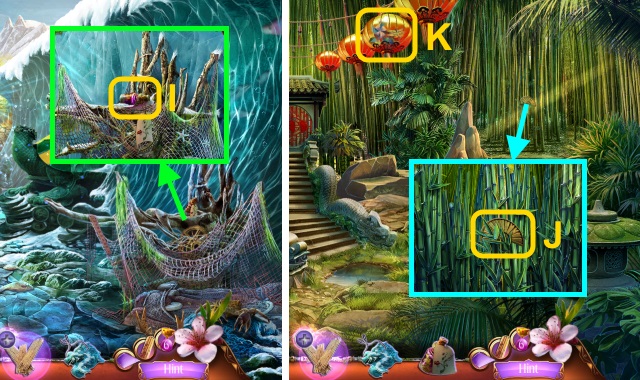
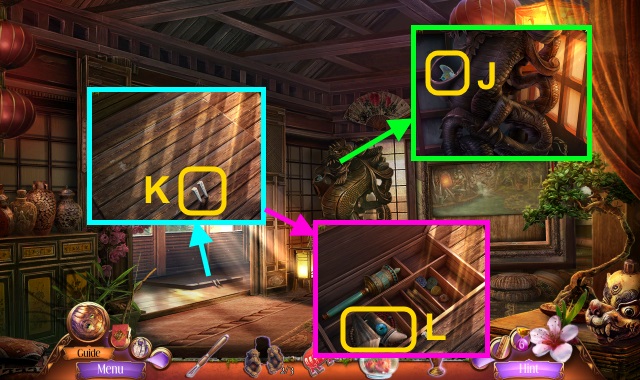
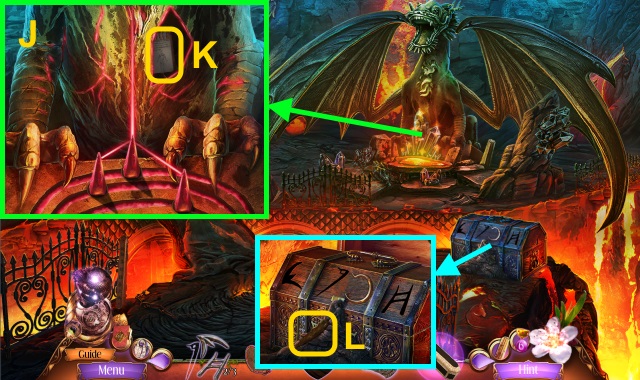
- Take the note; move the cloth (J).
- Take the ELEPHANT STATUETTE.
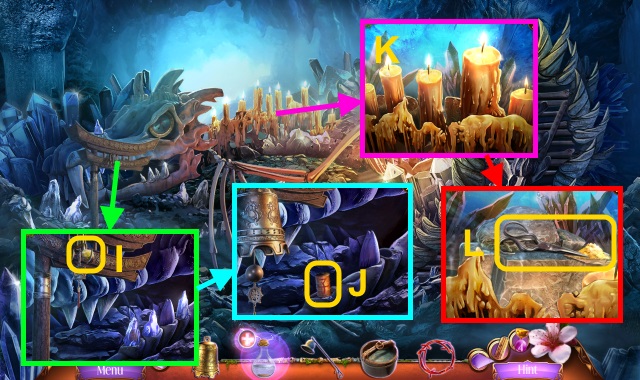
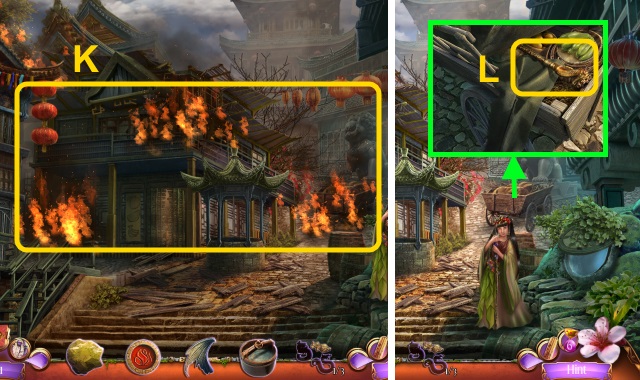
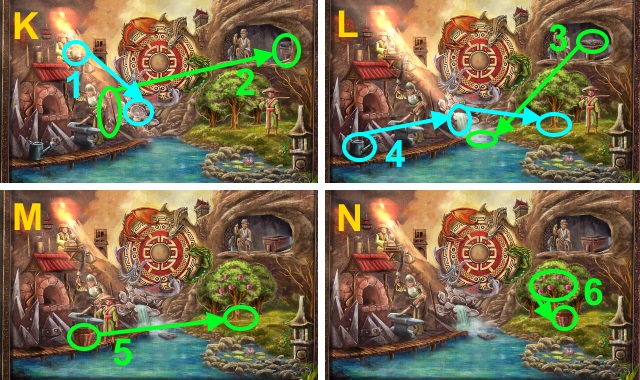
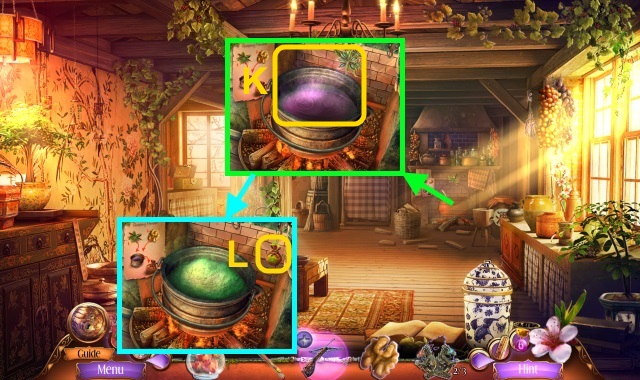
- Use the ELEPHANT STATUETTE (K).
- Go forward.
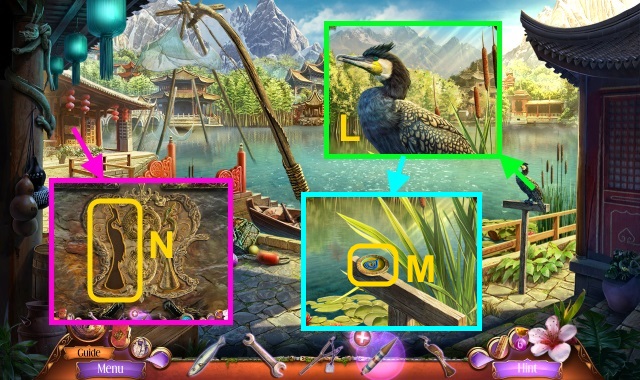
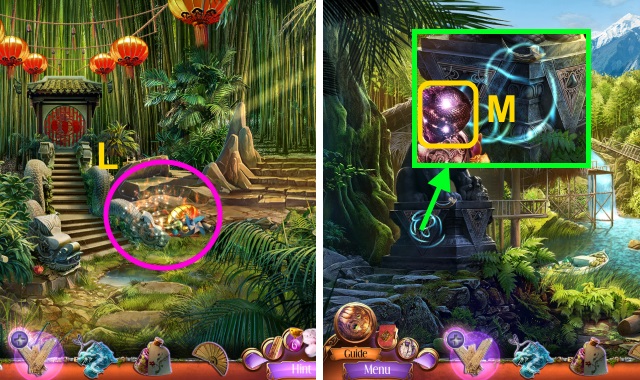
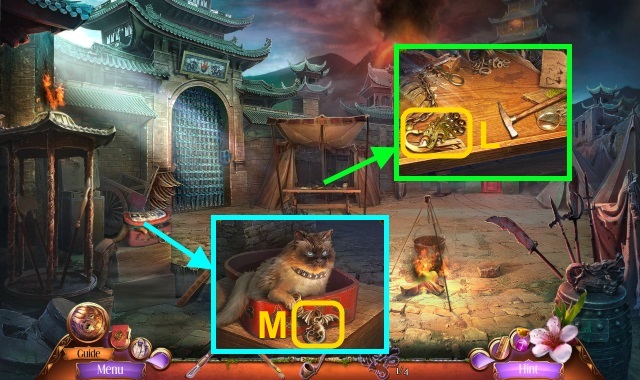
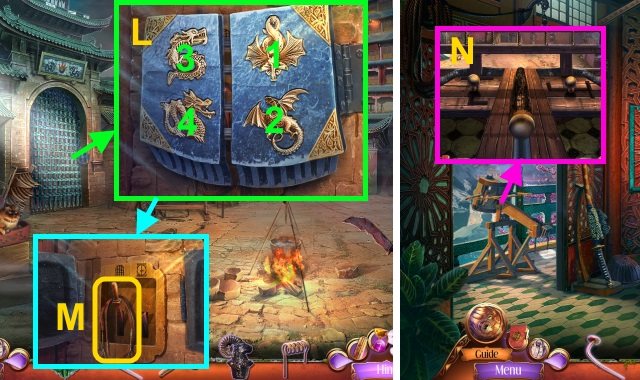
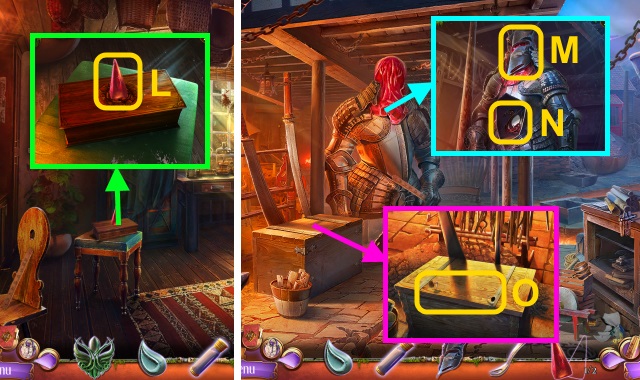
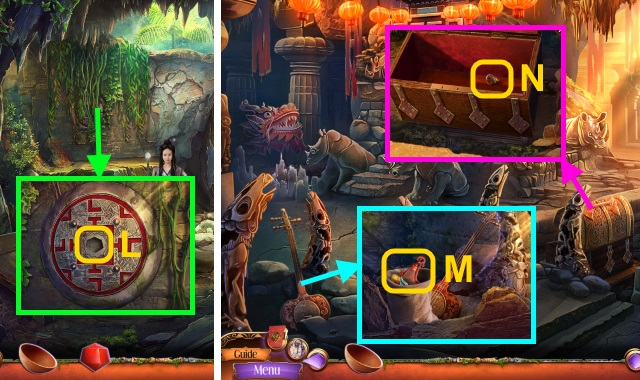
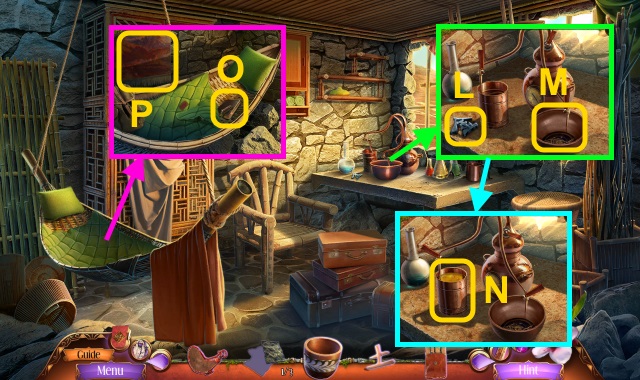
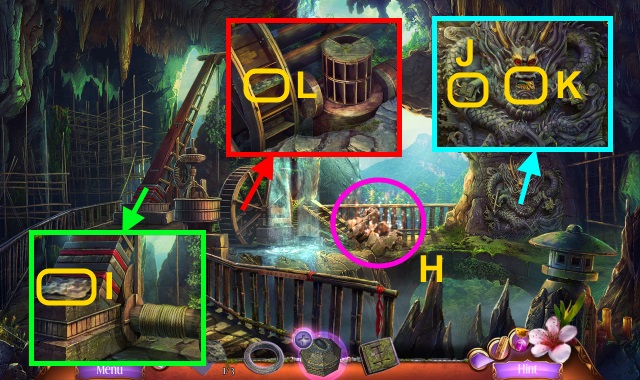
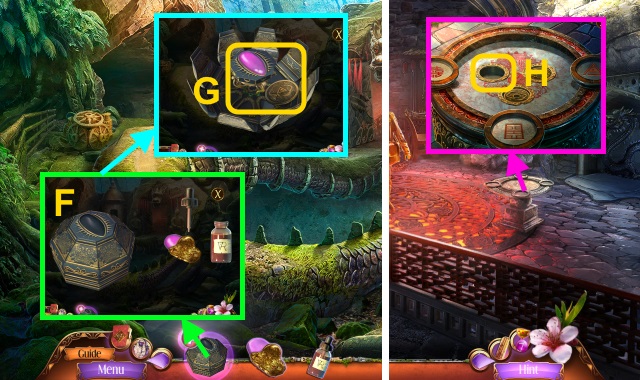
- Move the grass; take the PICKAXE (L).

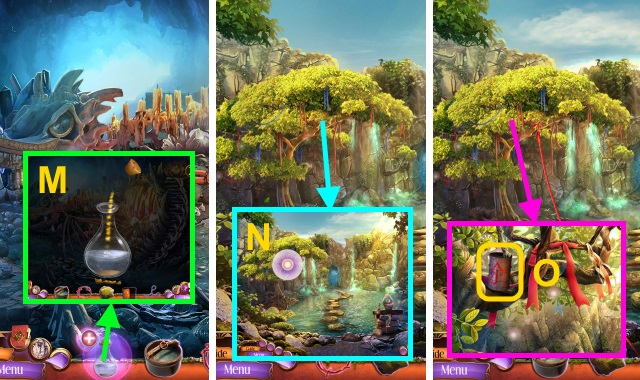
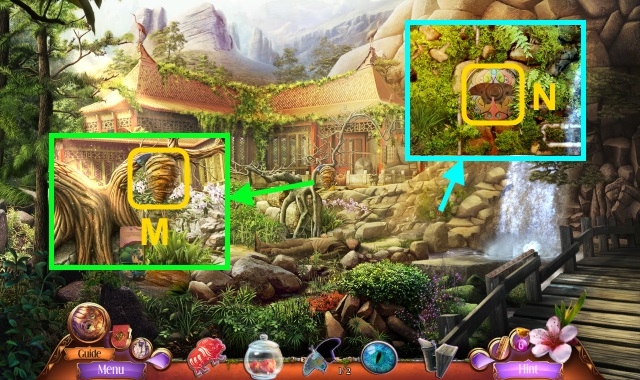
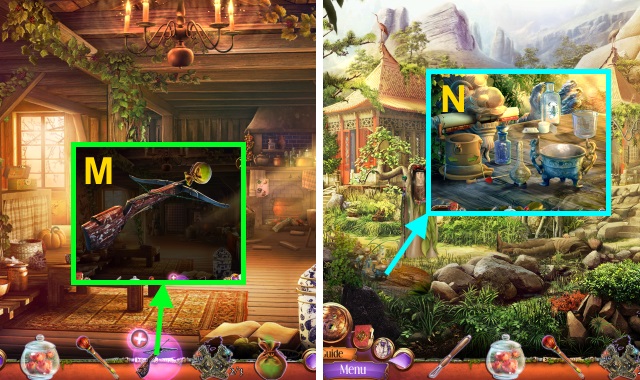
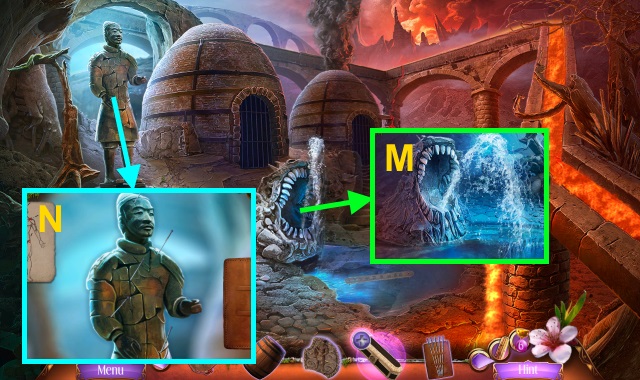
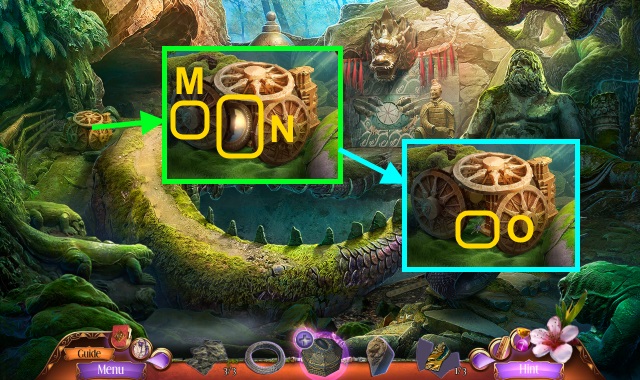
- Move the bush; take the WATER SYMBOLS (1/3) (M).
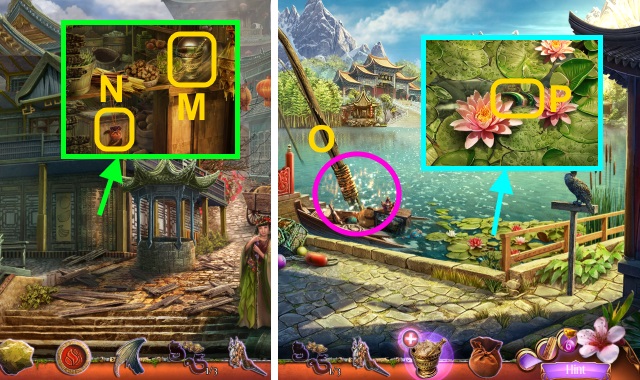
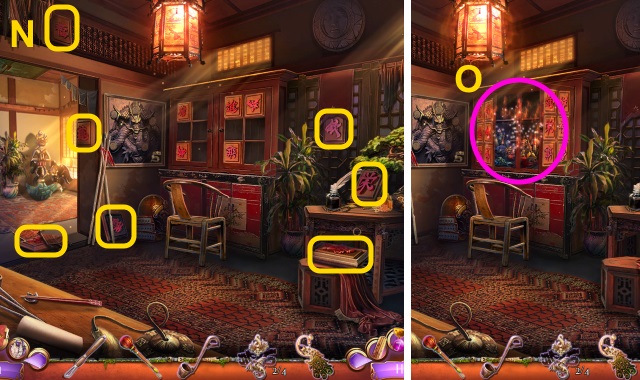
- Open the bag; take the Map and APPLES (N).
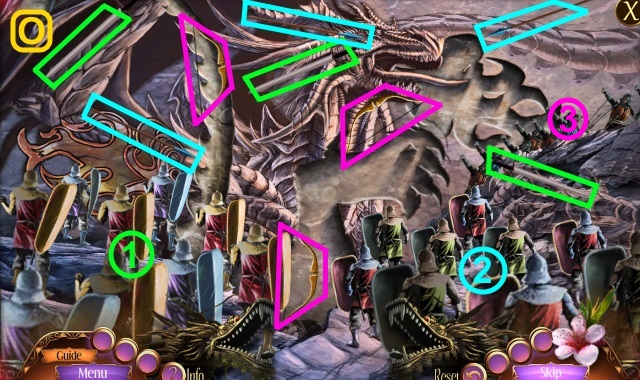
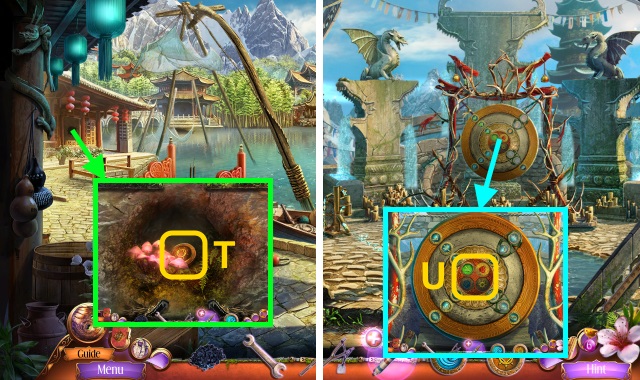
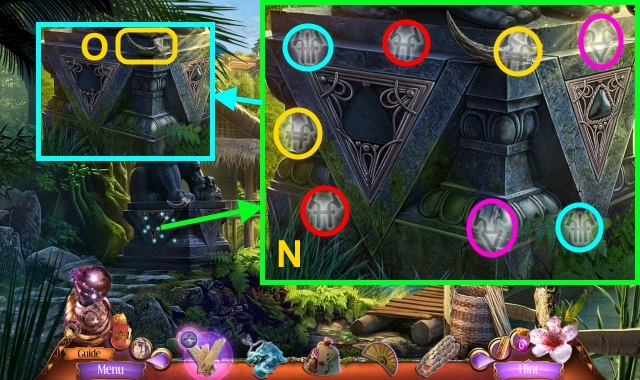
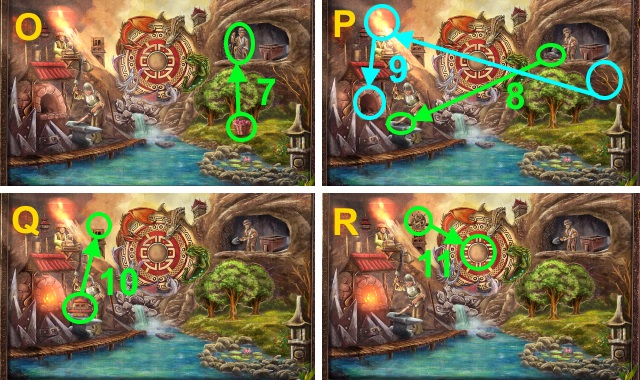
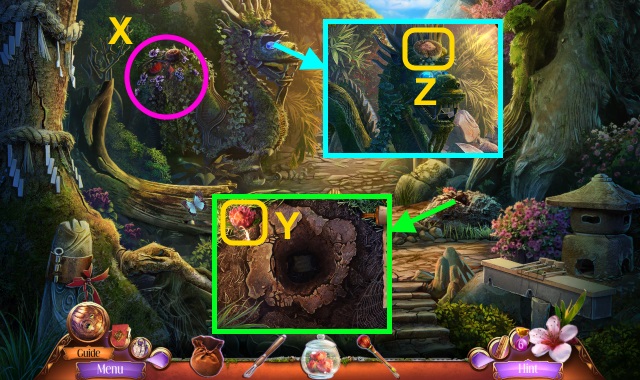
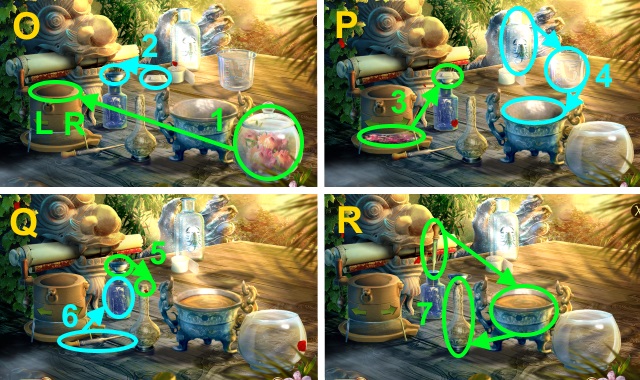
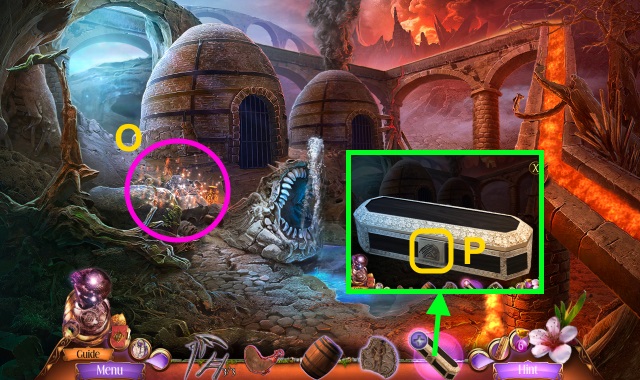
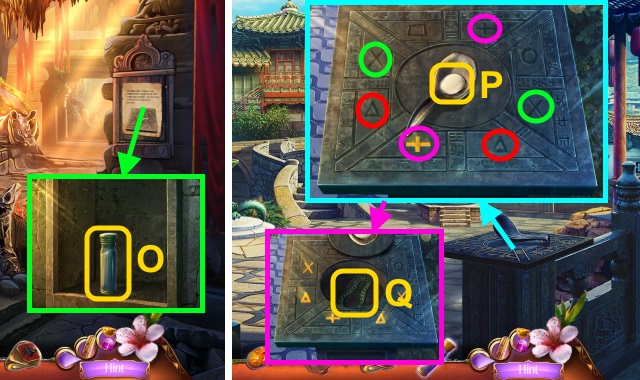
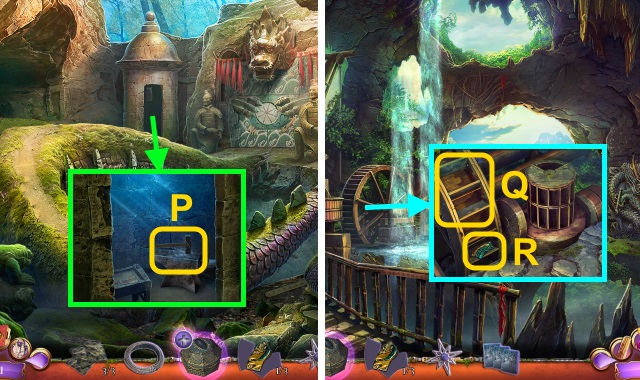
- Open the plane (O).
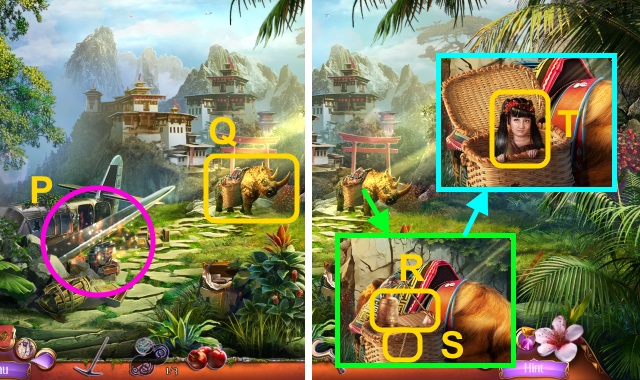
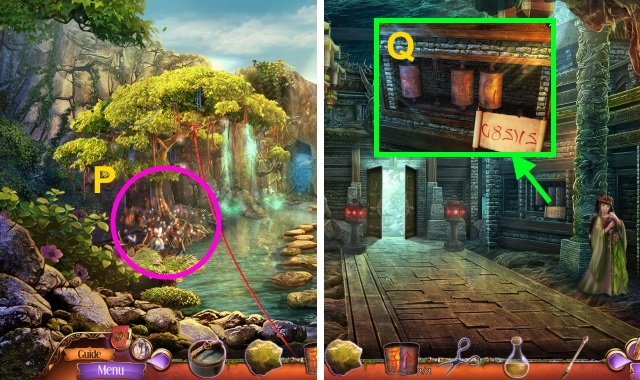
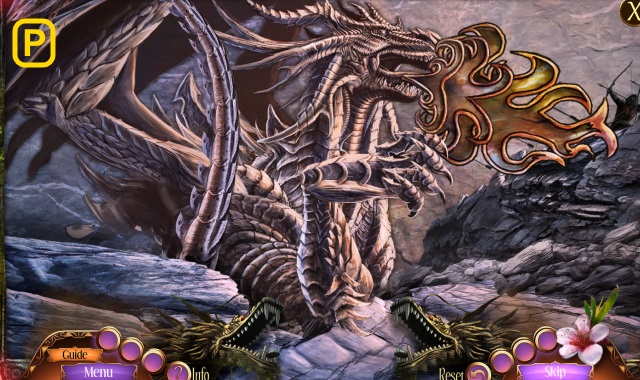
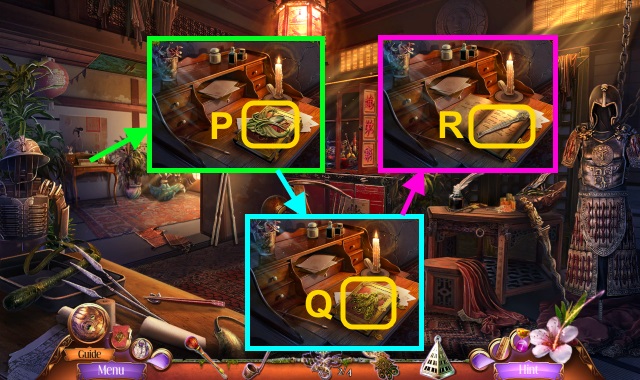
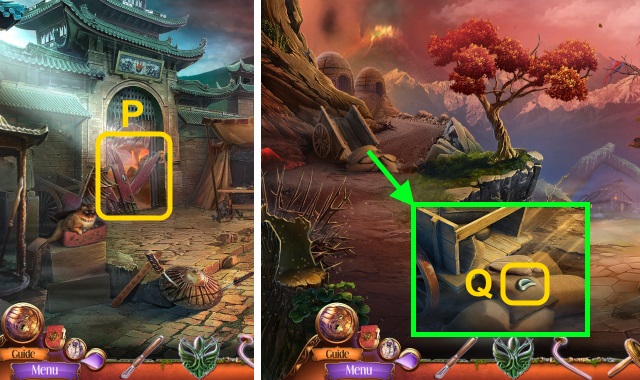
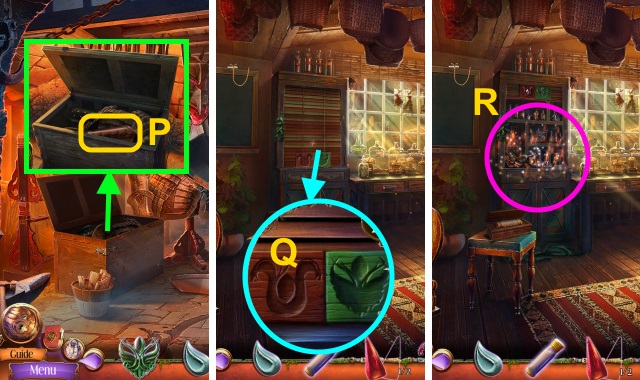
- Play the HOP to receive the SICKLE (P).
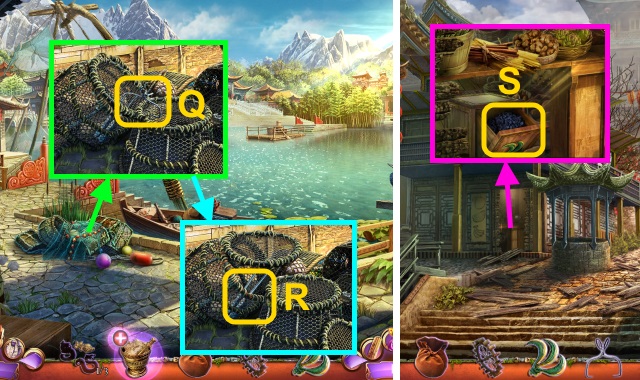
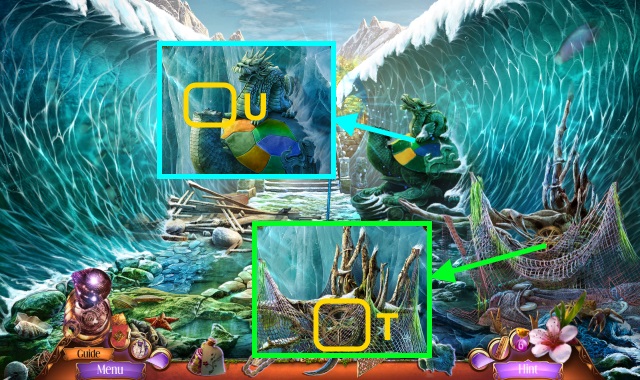
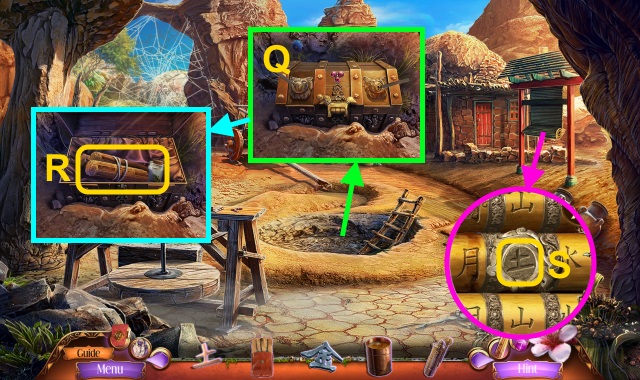
- Give the APPLES (Q).
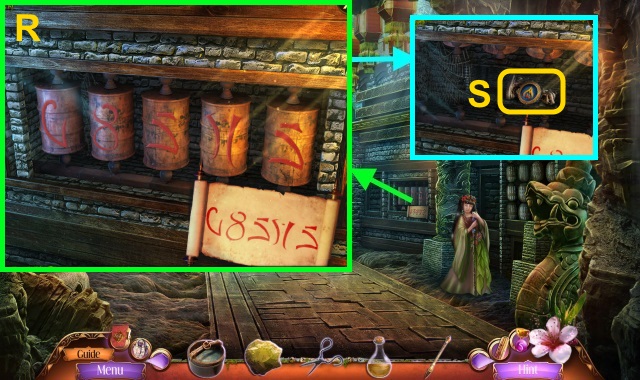
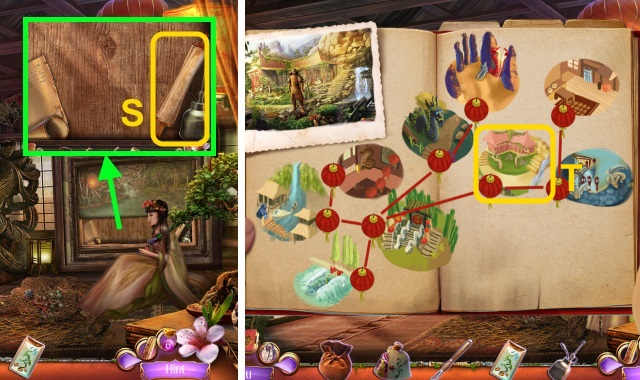
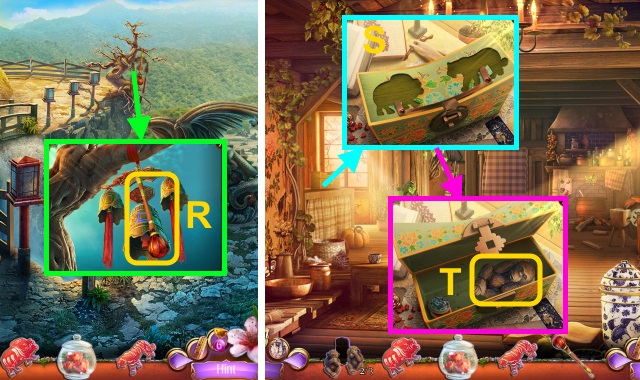
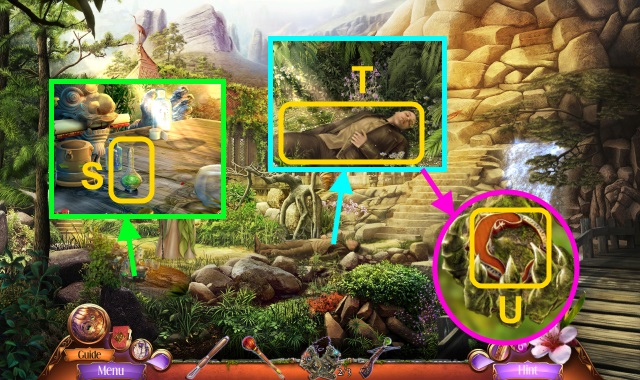
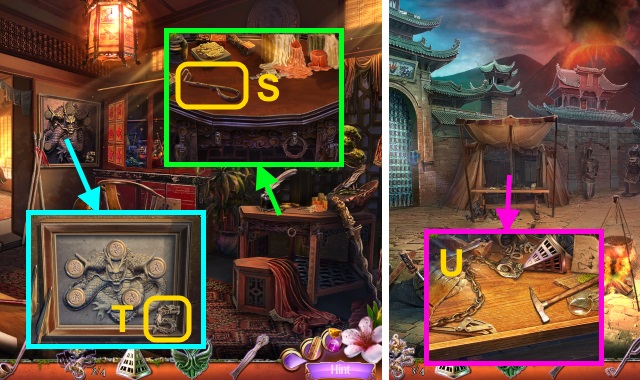
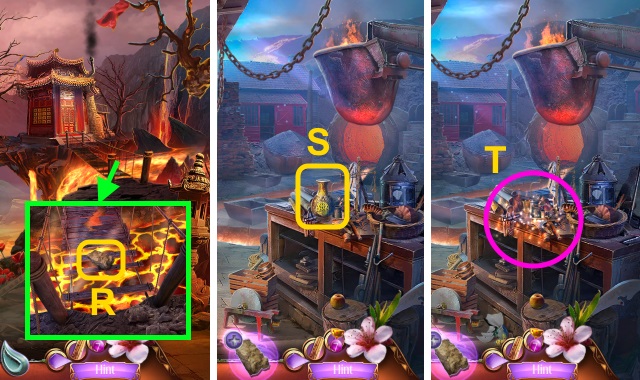
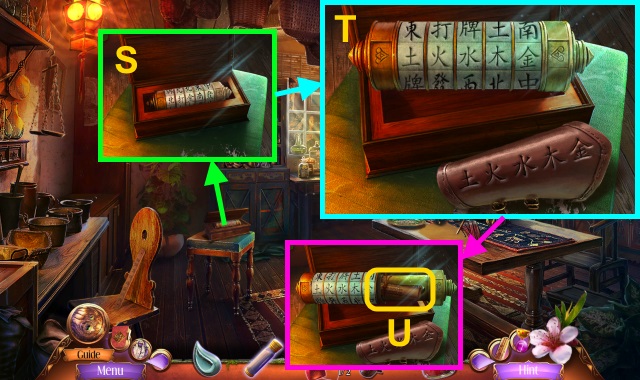
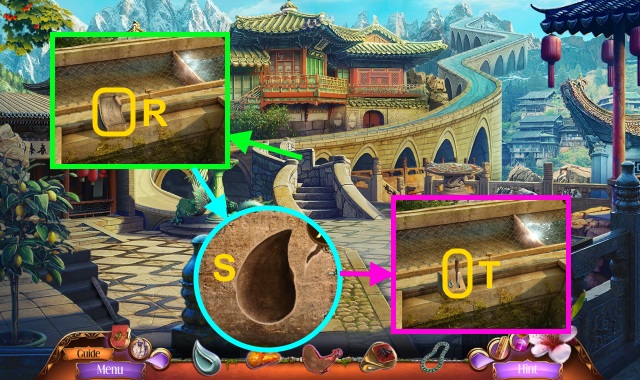
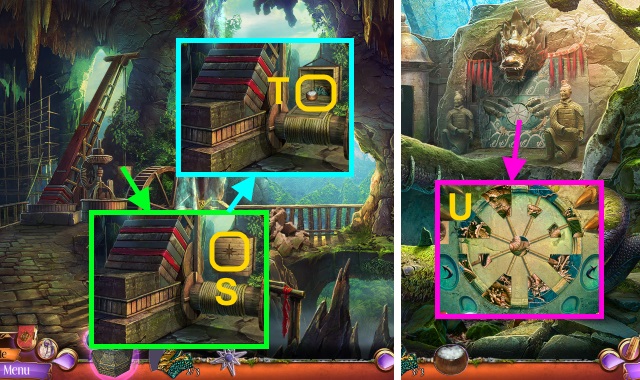
- Take the BELL and CRYSTAL PYRAMID (R); use the SICKLE (S).
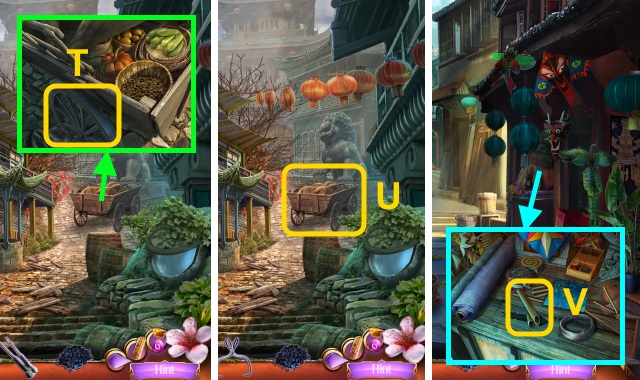
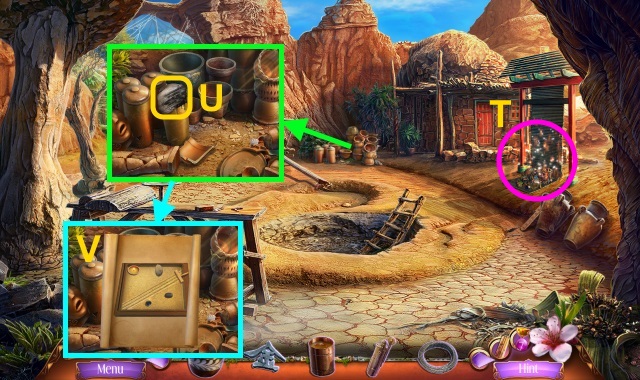
- Talk to the girl (T).
- Walk forward.
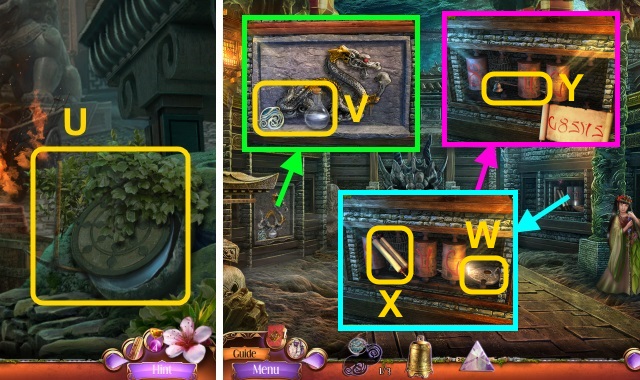
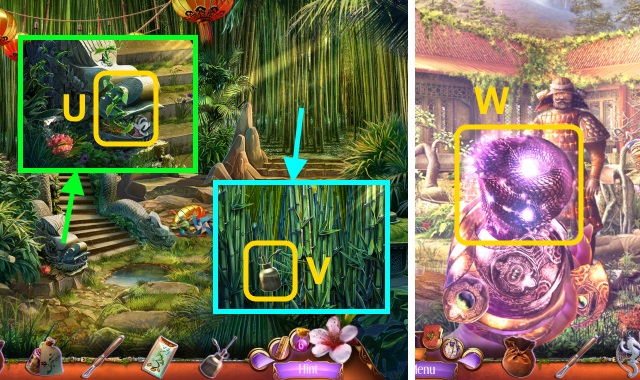
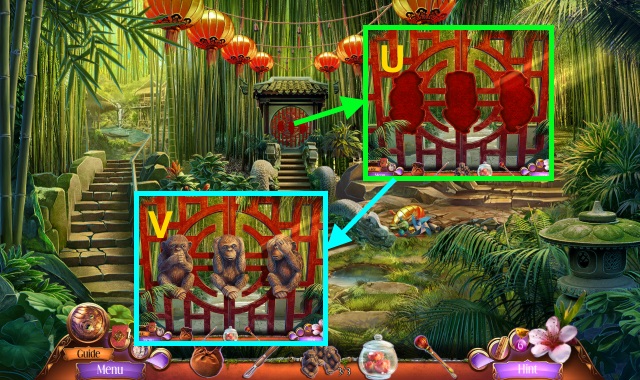
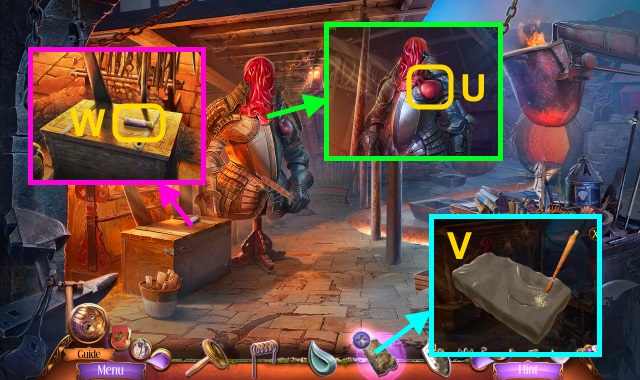
- Use the PICKAXE (U).
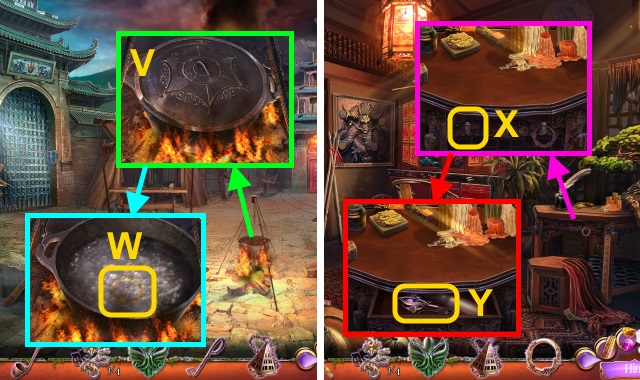
- Walk right.
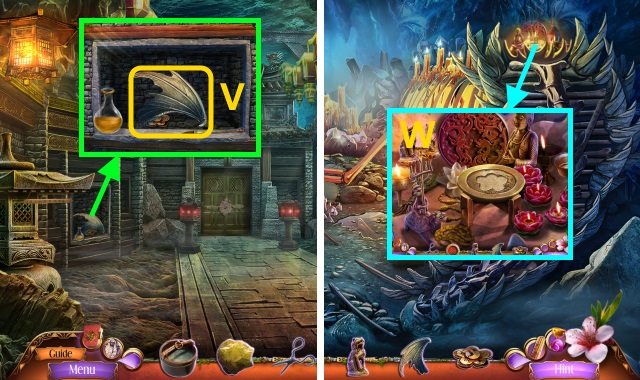
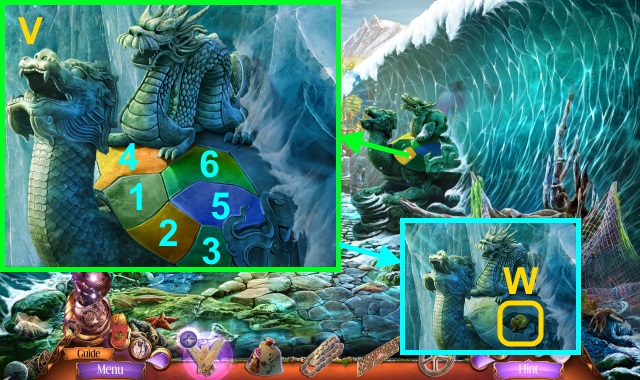
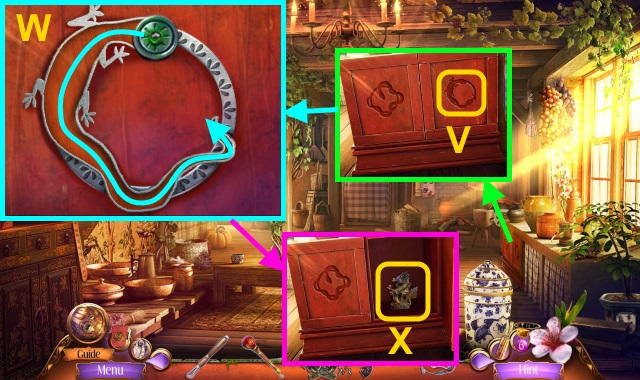
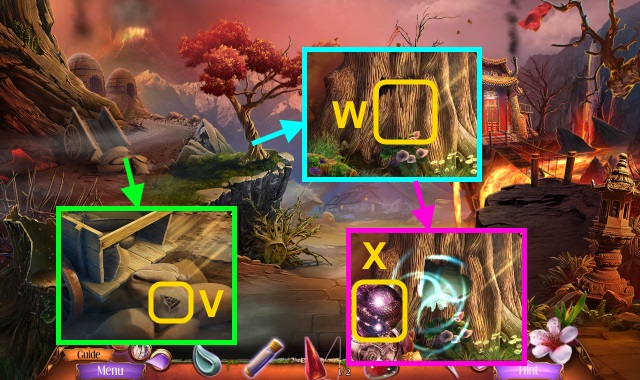
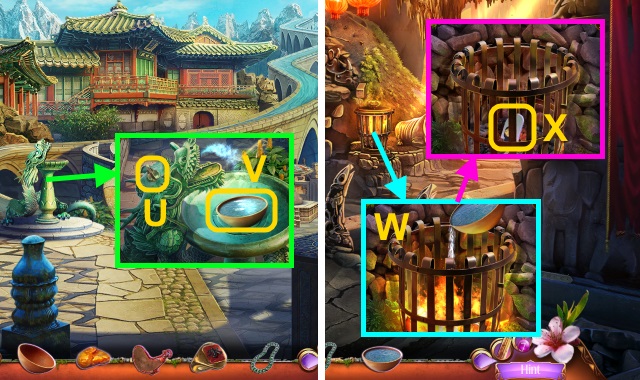
- Take the BOTTLE OF OIL and WATER SYMBOLS (2/3) (V).
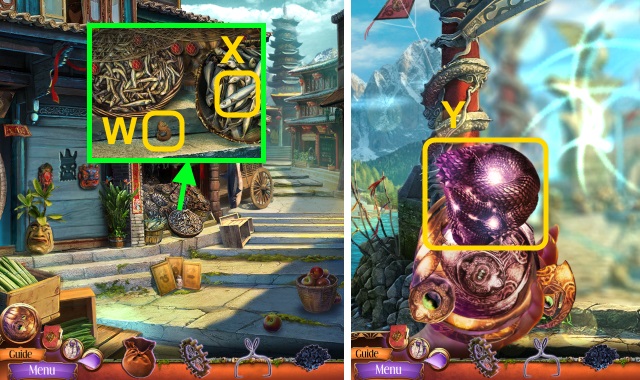
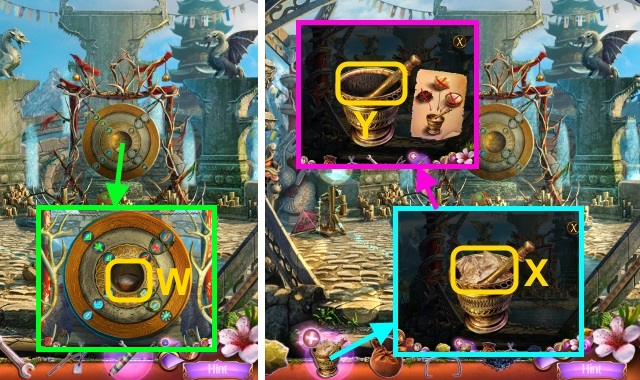
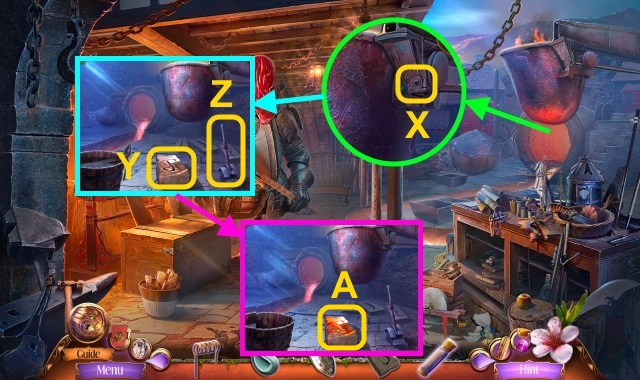
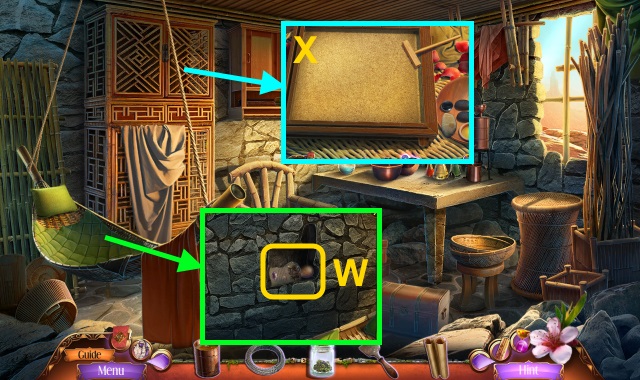
- Take the LIT OIL LAMP (W).
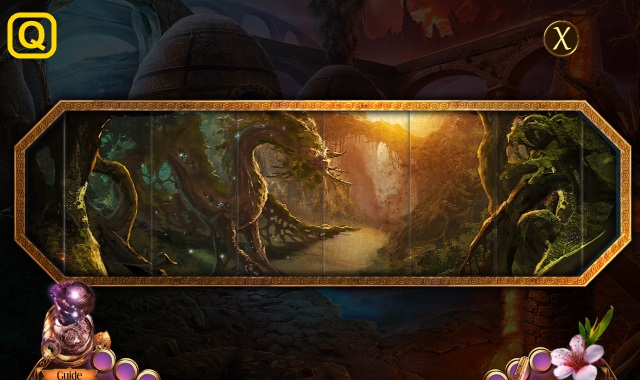
- Open the scroll (X); take the note.
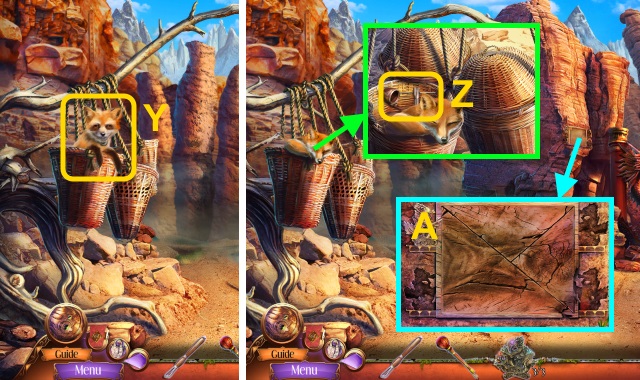
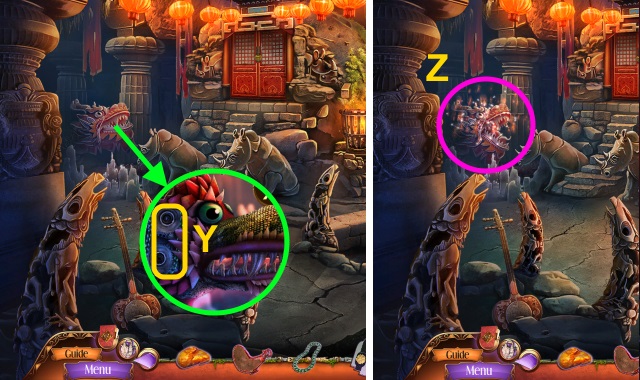
- Take the CANDLE SNUFFER (Y).
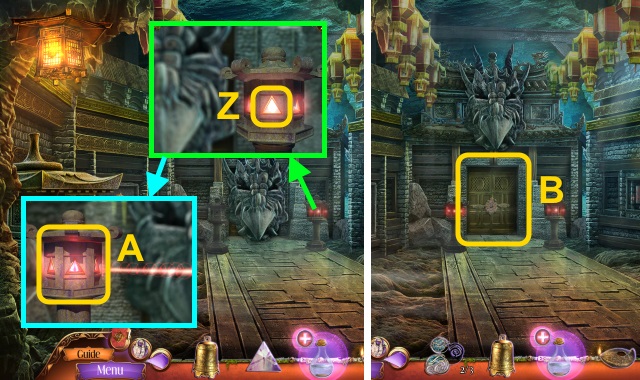
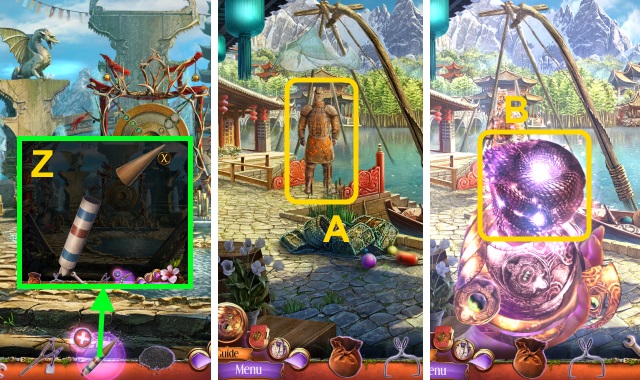
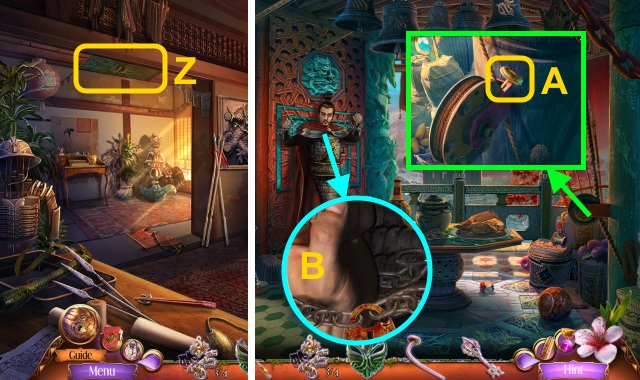
- Place the CRYSTAL PYRAMID (Z); turn the lamp (A).
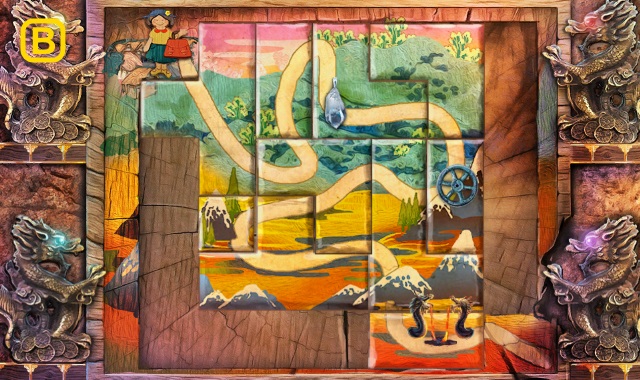
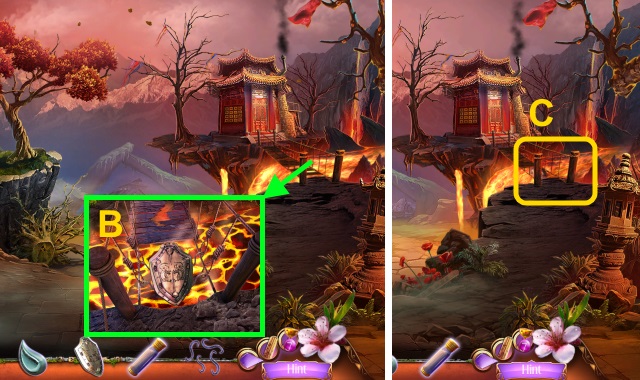
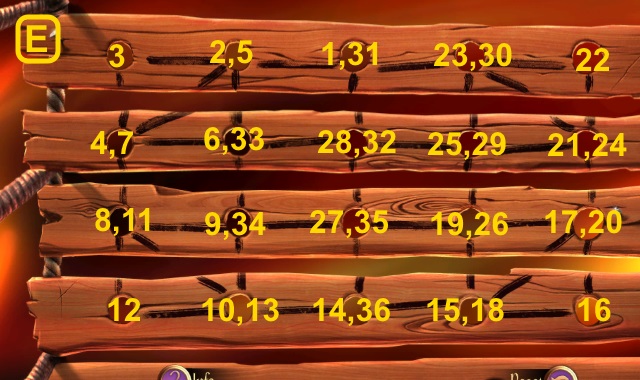
- Examine the door for a mini-game (B).
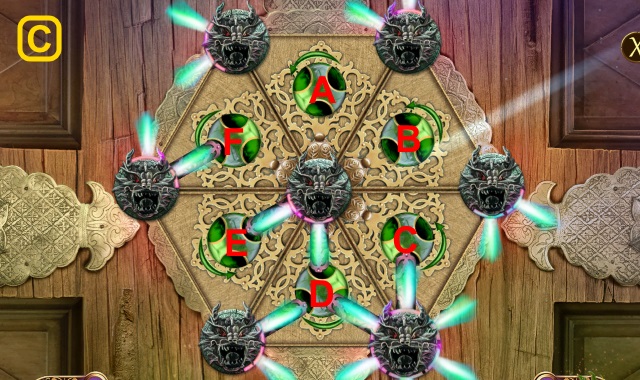
- Solution (C): A, C, F, Ex2, C.
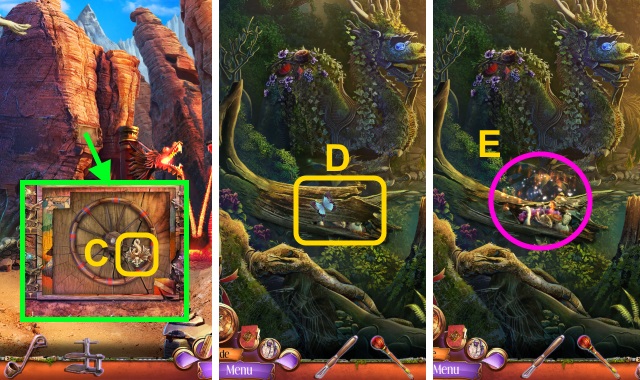
- Walk forward.
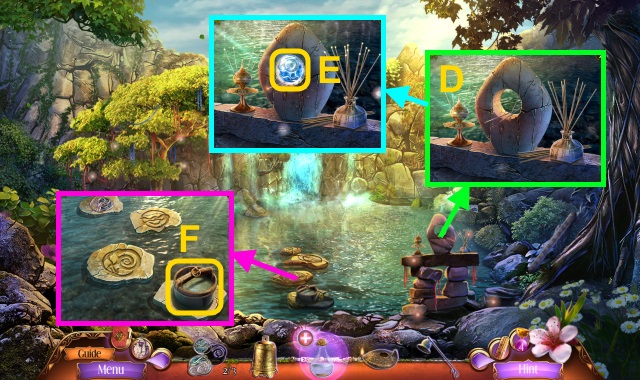
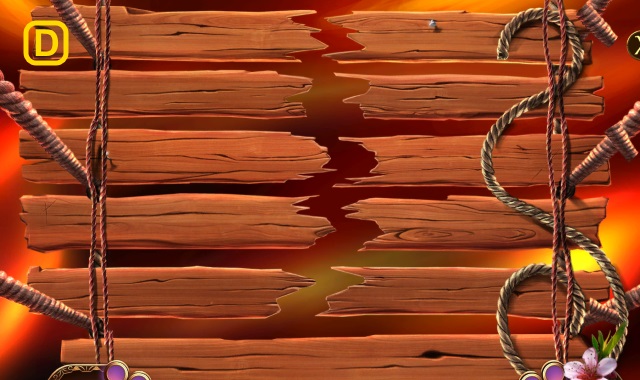
- Use the LIT OIL LAMP (D).
- Take the WATER SYMBOLS (3/3) (E).
- Take the BUCKET OF WATER (F); place the WATER SYMBOLS (3/3).
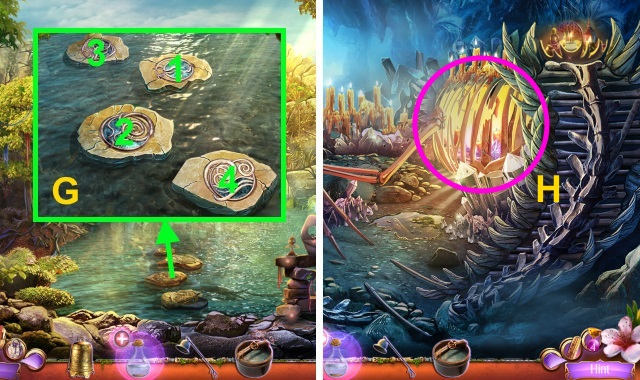
- Press the stones in order (G).
- Walk forward.
- Play the HOP to receive the ROPE (H).
- Take the SULPHUR (I); place the BELL.
- Take the PAINTED CYLINDERS (1/2) (J).
- Use the CANDLE SNUFFER (K); take the SHEARS and GOLD POWDER (L).
- Open the BOTTLE OF OIL; use the GOLD POWDER to receive the GOLD PAINT (M).
- Walk down.
- Use the ROPE for a mini-game (N); press the large circle when the small circles are in the center.
- Take the PAINTED CYLINDERS (2/2) (O).
- Play the HOP to receive the BRUSH (P).
- Walk down.
- Place the PAINTED CYLINDERS (2/2) for a mini-game (Q).
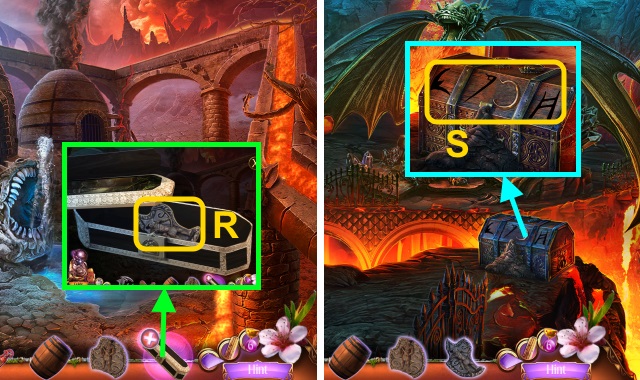
- Solution (R).
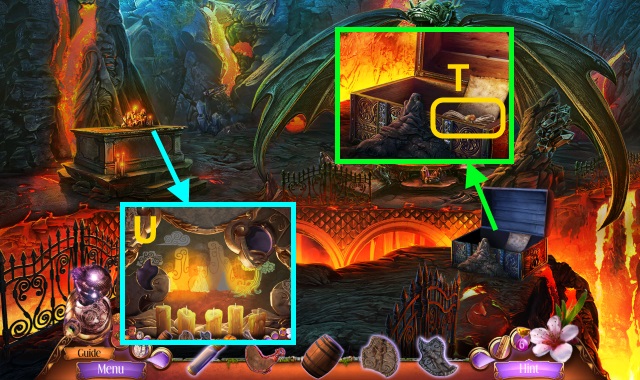
- Take the FIRE TOKEN and RITUAL FIGURINE (S).
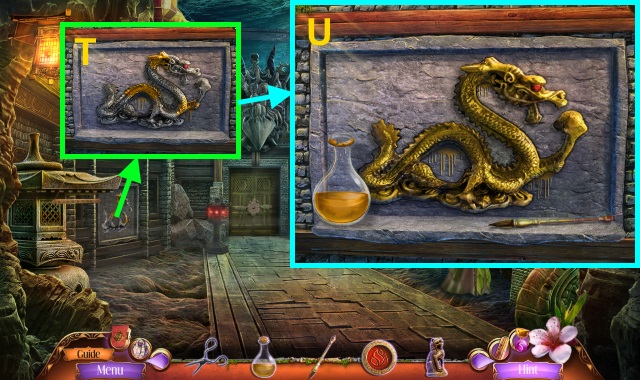
- Use the GOLD PAINT and BRUSH for a mini-game (T).
- Solution (U).
- Take the DRAGON WING and RITUAL CANDLE (V).
- Walk forward twice.
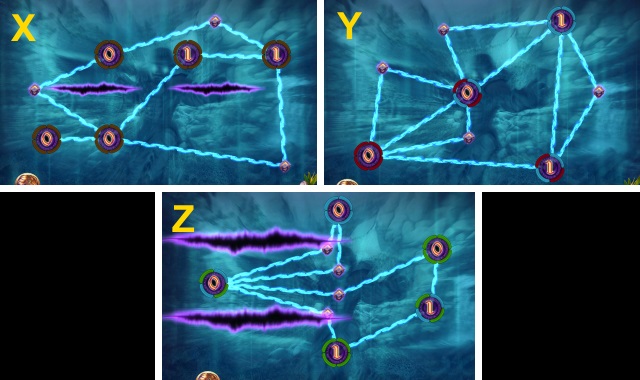
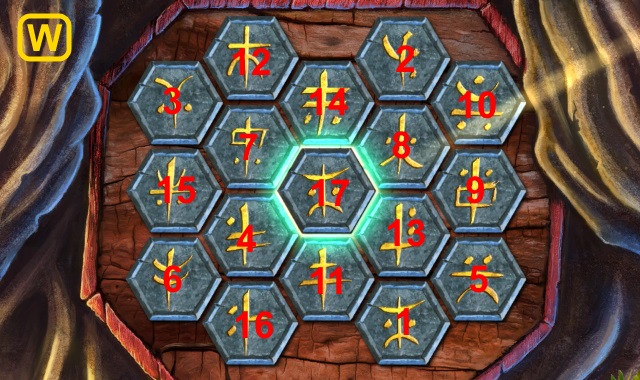
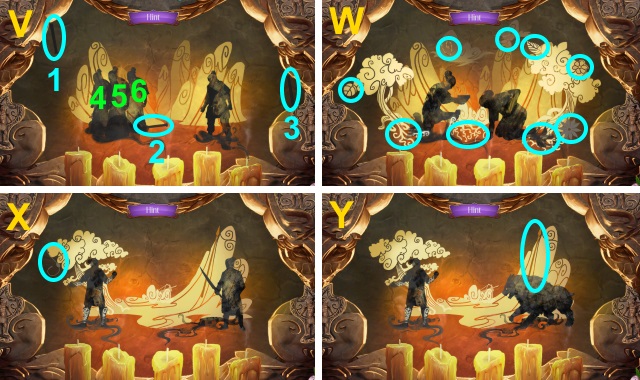
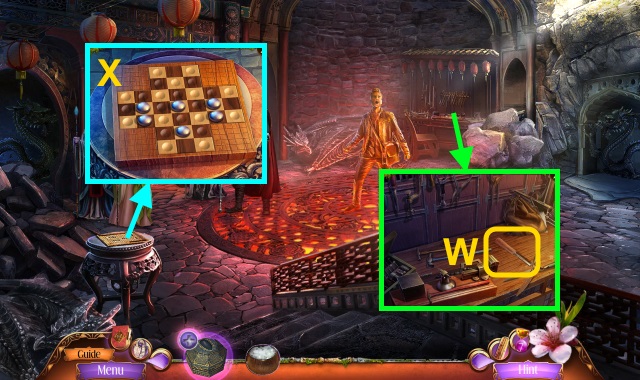
- Place the RITUAL CANDLE and RITUAL FIGURINE for a mini-game (W).
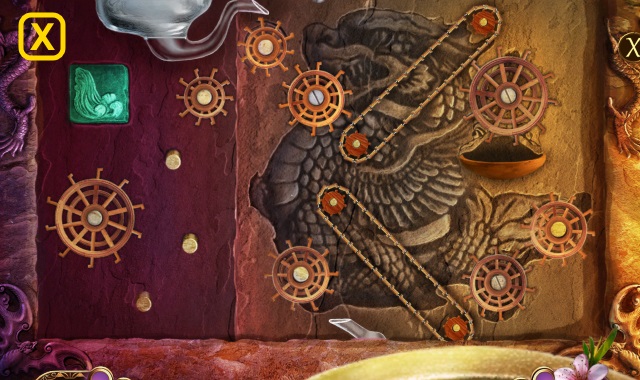
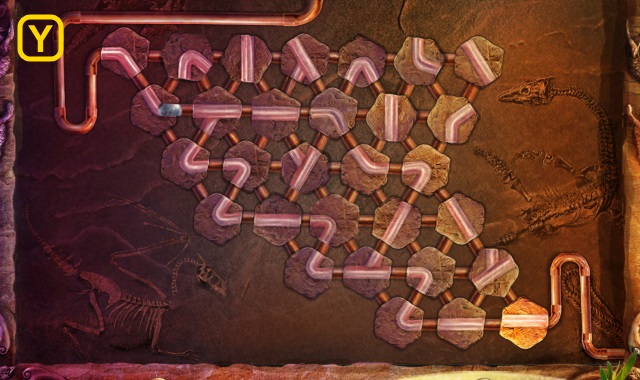
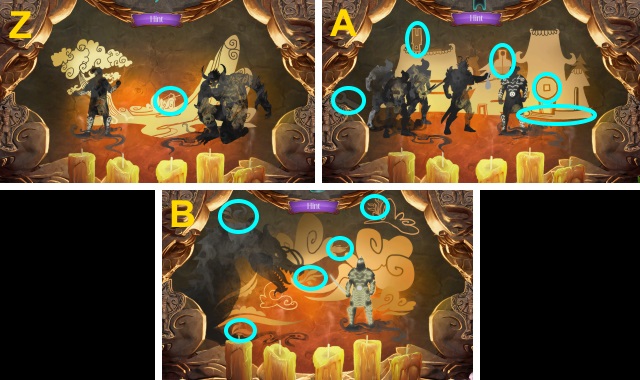
- Solution (X, Y).
- Solution (Z): A, B, A, B.
- You receive the Golden Heart.
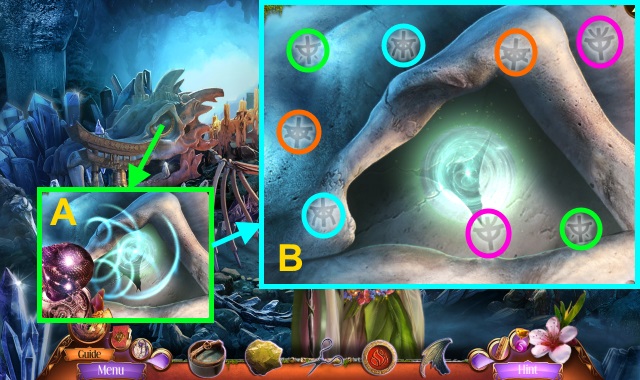
- Use the Golden Heart for a mini-game (A).
- Solution (B).
- Go to the Village High Street.
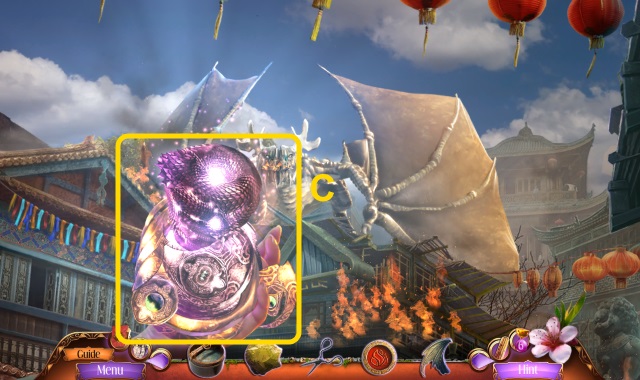
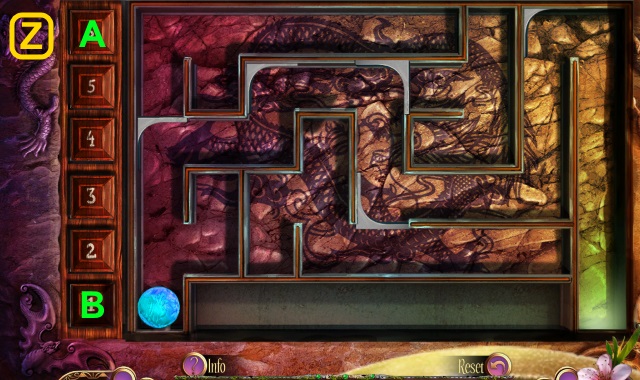
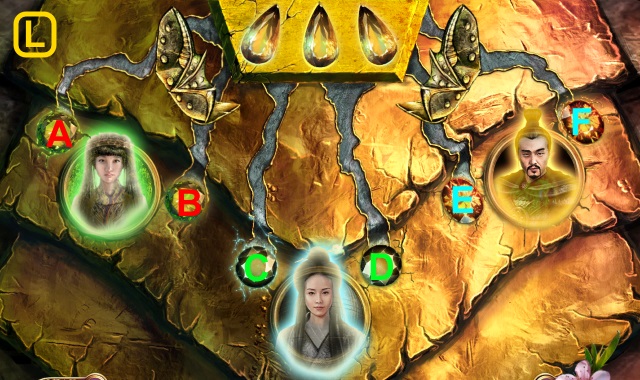
- Use the Golden Heart for a mini-game (C).
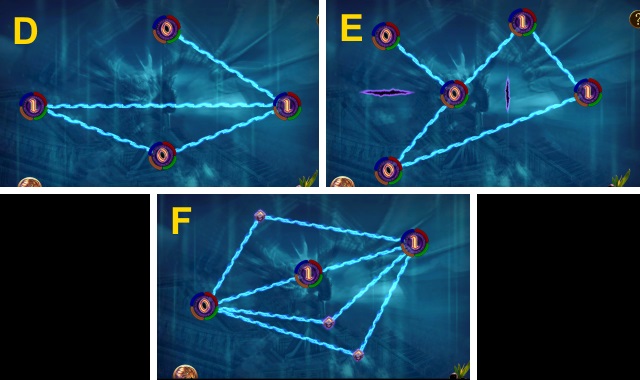
- Solution (D-F).
Chapter 2: The Village
- Use the BUCKET OF WATER (G); you receive the EMPTY BUCKET.
- Use the EMPTY BUCKET to receive the BUCKET OF WATER (H).
- Use the SHEARS (I); move the brick.
- Take the COPPER ANIMALS (1/3) (J).
- Use the BUCKET OF WATER (K).
- Move the cloth; take the DRAGON CANE (L).
- Open the door; take the MORTAR AND PESTLE (M) and EMPTY POUCH (N).
- Walk left.
- Move the cloth; play the HOP to receive the PADDLE WHEEL (O).
- Use the DRAGON CANE (P); take the LEMONGRASS EMBLEM.
- Move the net; take the ICE TONGS (Q).
- Open the basket; take the PLIERS (R).
- Walk down.
- Place the LEMONGRASS EMBLEM; take the CHARCOAL (S).
- Use the PLIERS (T).
- Push the cart (U).
- Walk forward.
- Move the tiles; take the BAMBOO PIPES (V).
- Take the COPPER ANIMALS (2/3) (W) and FISH (X).
- Walk forward.
- Use the Golden Heart for a mini-game (Y).
- Solution (Z).
- Place the BAMBOO PIPES and PADDLE WHEEL (A).

- Take the COPPER ANIMALS (3/3) (B).
- Place the DRAGON WING (C); take the WRENCH and ROCKET EMBLEM (D).
- Walk down.
- Place the COPPER ANIMALS (3/3) (E); play the HOP to receive the KOI FOOD.
- Place the ROCKET EMBLEM (F); take the SLINGSHOT and EMPTY ROCKET (G).
- Walk forward.
- Use the KOI FOOD (H); take the BRONZE MASK (I).
- Walk down.
- Place the BRONZE MASK (J).
- Play the HOP to receive the CRANE STATUETTE (K).
- Walk down, then left.
- Try to take the element; give the FISH (L).
- Take the WATER TOKEN (M).
- Place the CRANE STATUETTE for a mini-game (N).
- Solution (O).
- Solution (P).
- Solution (Q).

- Solution (R).
- Solution (S).
- Take the METAL TOKEN (T).
- Go to the Dragon Temple.
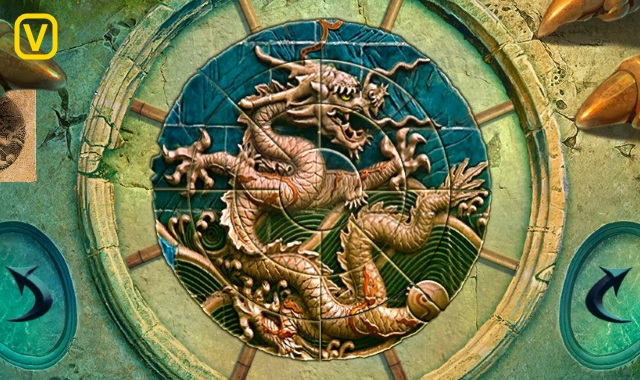
- Place the FIRE TOKEN, WATER TOKEN, and METAL TOKEN for a mini-game (U).
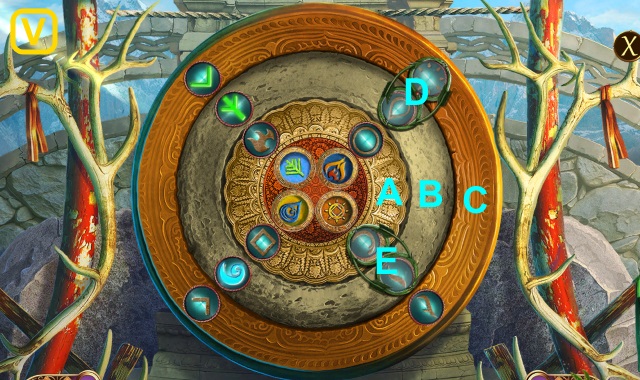
- Solution (V): Cx2, D, Cx2, B, Ax2, E, Bx2, D, Cx3, D, C, B, Ax2, E, Ax3, E, A, E, A, E, Ax3.
- Take the SALTPETER (W).
- Examine the MORTAR AND PESTLE; take the note (X).
- Place the SULPHUR, CHARCOAL, and SALTPETER.
- Use the MORTAR AND PESTLE; take the GUNPOWDER (Y).
- Open the EMPTY ROCKET; place the GUNPOWDER to receive the FIREWORK (Z).
- Go to the Lakeside Dock.
- Use the FIREWORK (A).
- Use the GOLDEN HEART for a mini-game (B).
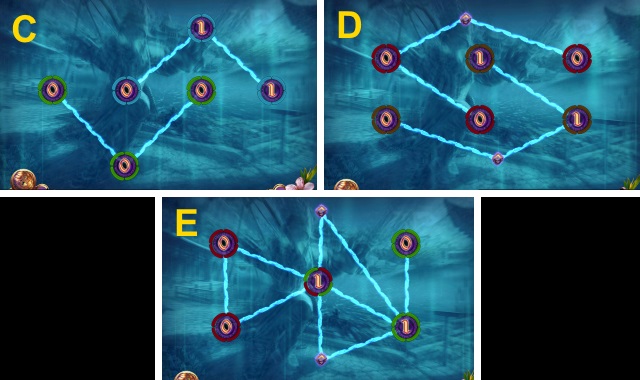
- Solution (C-E).
- Walk forward.
Chapter 3: The Forest
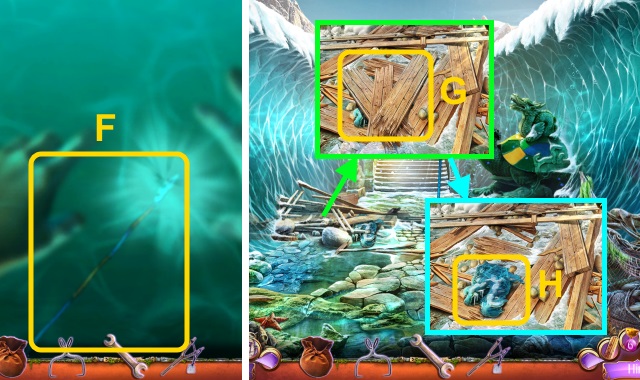
- Take the staff (F).
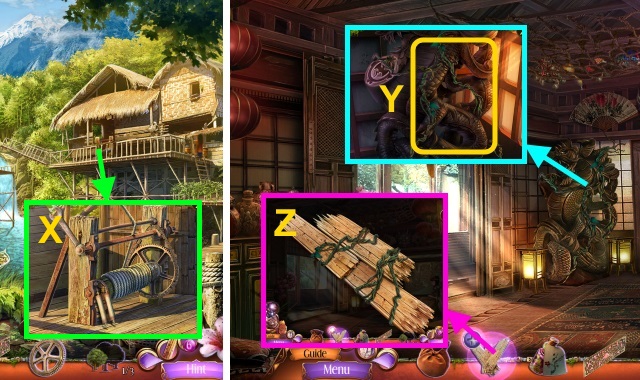
- Move the wood; take the PLANKS (G).
- Use the ICE TONGS to take the FROZEN HEAD (H).
- Take the GROWTH ELIXIR (I).
- Walk forward.
- Take the FAN (J).
- Use the SLINGSHOT (K).
- Play the HOP to receive the CHAIN (L).
- Walk left.
- Use the Golden Heart for a mini-game (M).
- Solution (N).
- Take the SHARP CLAW (O).

- Read the scroll (P); take the MINIATURE RELIEF (Q).
- Place the FAN (R); use the FROZEN HEAD to receive the STATUE HEAD (S).
- Walk down twice.
- Use the SHARP CLAW to receive the GEAR (T).
- Place the STATUE HEAD for a mini-game (U).
- Solution (V).
- Take the PAPER TREES (1/3) (W).
- Walk forward, then left.
- Place the GEAR and CHAIN; use the WRENCH (X).
- Go forward.
- Take the STRONG VINES (Y).
- Use the STRONG VINES on the PLANKS to make the IMPROVISED BRIDGE (Z).
- Take the SCULPTING TOOL (A).
- Take the JADE AMULET (B).
- Walk down.

- Use the IMPROVISED BRIDGE; play the HOP to receive the INTRICATE CHEST (C).
- Place the MINIATURE RELIEF on the INTRICATE CHEST (D); press the lid.
- Take the PAPER TREES (2/3) and CROCHET HOOK (E).
- Place the JADE AMULET (F); take the PAPER TREES (3/3) (G).
- Walk forward.
- Move the net (H).
- Use the CROCHET HOOK; take the SEEDS (I).
- Place the PAPER TREES (3/3) for a mini-game (J).
- Solution (K-R).
- Take the scroll and HERBICIDE SPRAYER (S).
- Examine the map (T).
- Walk down twice.
- Use the SEEDS and GROWTH ELIXIR; take the DRAGON EMBLEM (U).
- Use the HERBICIDE SPRAYER (V).
- Walk right.
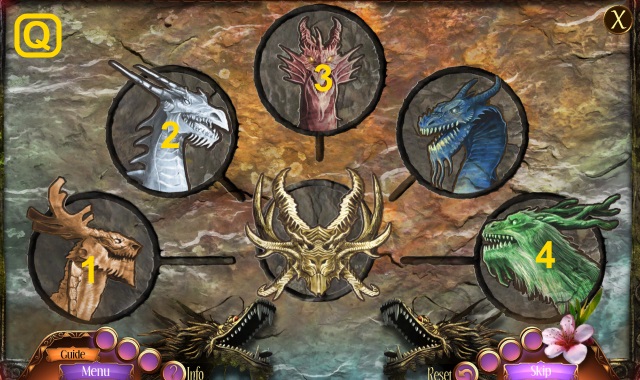
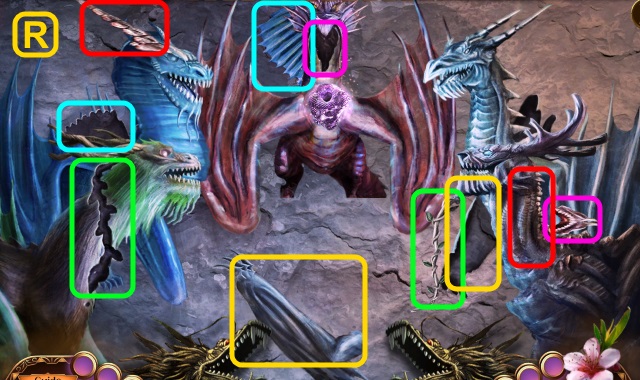
- Use the Golden Heart for a mini-game (W).
- Solution (X-Z).
Chapter 4: The Mysterious Man
- Take the MONKEY STATUES (1/3) (A).
- Take the note and CARVED FRAME (B).
- Take the OX (C).
- Walk left.
- Take the scroll and EMPTY JAR (D).
- Take the MONKEY STATUES (2/3) (E).
- Take the HEAVY WEIGHT (F).
- Walk down.

- Use the EMPTY JAR (G).
- Walk down.
- Use the QUARTER FILLED JAR (H).
- Walk left, then forward.
- Place the CARVED FRAME and DRAGON EMBLEM (I).
- Take the BUTTERFLY (1/2) (J).
- Use the HEAVY WEIGHT (K); take the EMERALD EYE and BEE SMOKER (L).
- Go to the Forest Clearing.
- Use the BEE SMOKER; take the BUTTERFLY (2/2) (M).
- Move the pieces; place the BUTTERFLY (2/2) (N).
- Turn the tile.
- Walk right.

- Use the HALF FILLED JAR (O).
- Place the EMERALD EYE (P).
- Play the HOP to receive the TIGER (Q).
- Take the GONG MALLET (R).
- Walk down, then left.
- Place the OX and TIGER (S); open the box.
- Take the MONKEY STATUES (3/3) (T).
- Walk down twice.
- Place the MONKEY STATUES (3/3) (U); move the arms for a mini-game (V).
- Solution (W).
- Play the HOP to receive the CROSSBOW (X).
- Use the THREE QUARTER FILLED JAR (Y).
- Take the REVEALING POWDER (Z).
- Walk forward.
- Move the planks (A).
- Take the WALNUT (B).
- Use the REVEALING POWDER; take the GAUNTLET (C) and DRAGON WHISKERS (D).
- Walk down.
- Use the DRAGON WHISKERS; take the MUSIC NOTES (E).
- Place the WALNUT to receive the SHELLED NUT (F).
- Go to the Cliff Overlook.
- Use the GAUNTLET; take the DRAGON STATUES (1/3) (G).

- Place the MUSIC NOTES for a mini-game (H).
- Solution (I): A, B, C, B, C, A, C, A, B.
- Take the DRAGON STATUES (2/3) (J).
- Walk down, then left.
- Place the herb and SHELLED NUT (K); use the EMPTY POUCH.
- Take the TRANQUILIZING POUCH (L).
- Examine the CROSSBOW; move the arrow.
- Place the TRANQUILIZING POUCH to receive the CROSSBOW WITH POUCH (M).
- Walk down.
- Place the JAR WITH FLOWERS for a mini-game (N).
- Solution (O): L, R, Lx2, R.
- Solution: (P-R).
- Take the ULTIMATE REMEDY (S).
- Use the ULTIMATE REMEDY (T).
- Take the REPTILE EMBLEM (U).
- Walk left.
- Place the REPTILE EMBLEM for a mini-game (V).
- Solution (W).
- Take the DRAGON STATUES (3/3) (X).
- Go to Whispering Gorge.
- Use the CROSSBOW WITH POUCH (Y).
- Take the ANCIENT LADLE and CAST SPREADER (Z).
- Place the DRAGON STATUES (3/3) for a mini-game (A).
- Solution (B).
- Take the ORNAMENTS (1/4) (C); turn the wheel.
- Walk down.
- Move the butterfly; use the CAST SPREADER (D).
- Play the HOP to receive the SNAKE EMBLEM (E).
- Go to the Healer's Cottage.
- Place the SNAKE EMBLEM for a mini-game (F).
- Solution (G).
- Take the GLOWING PLANT (H).
- Walk down, then right.
- Place the GLOWING PLANT (I); open the box.
- Take the ICE PENDANT (J).
- Go to Whispering Gorge.
- Use the ICE PENDANT (K).
- Walk right.
Chapter 5: The Guard Tower
- Take the PEACOCK (L).
- Open the box; take the ORNAMENTS (2/4) (M).
- Walk right.
- Gather the tiles (N).
- Play the HOP to receive the PAPERWEIGHT (O).
- Take the LIFE SYMBOL (P).
- Place the PEACOCK; turn the feathers (Q).
- Read the book; take the METAL BOOKMARK (R).
- Move the cube; take the LID LIFTER (S).
- Take the ORNAMENTS (3/4) (T).
- Walk down.
- Place the METAL BOOKMARK and PAPERWEIGHT; use the hammer.
- Take the TRIANGLE WEIGHT (U).
- Use the LID LIFTER (V); use the ANCIENT LADLE to take the METAL RING (W).
- Walk right.
- Place the METAL RING (X); open the drawer.
- Take the NAIL and DRAGON KEY (Y).
- Use the TRIANGLE WEIGHT (Z).
- Walk left.
- Take the BURNER KNOB (A).
- Use the DRAGON KEY twice to receive the FIRE PENDANT (B).
- Take the TOWER MODEL (C).
- Walk down.
- Use the FIRE PENDANT; take the RAZOR (D).
- Use the TOWER MODEL for a mini-game (E).
- Solution (F).
- Move the picture; take the RAM BUST (G).
- Walk left.
- Use the RAZOR (H).
- Use the GONG MALLET; take the ORNAMENTS (4/4) (I) and MOUSE TOY (J).
- Walk down twice.
- Give the MOUSE TOY; take the BRASS PIPE (K).
- Place the ORNAMENTS (4/4) (L); press the dragons in order.
- Pull the lever; you receive the STRONG CORD (M).
- Walk right, then left.
- Place the RAM BUST and STRONG CORD for a mini-game (N).
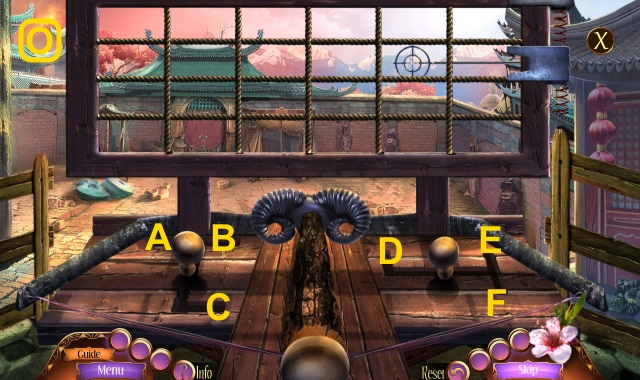
- Solution (O): C, D, B, C, D, C, Dx2, C.
- Walk down twice.
- Move the planks (P).
- Walk left.
- Take the RAINDROP TOKEN (Q).
- Take the HARDENED CLAY (R).
- Walk forward.
- Move the vase (S).
- Play the HOP to receive the SHIELD (T).
- Take the WATER BOTTLE (U).
- Use the WATER BOTTLE and SCULPTING TOOL on the HARDENED CLAY to receive the MOLD (V).
- Take the VIAL OF MERCURY (W).
- Place the NAIL (X).
- Place the MOLD (Y); pull the lever (Z).
- Take the STEEL HOOKS (A).
- Walk down.
- Move the planks and ropes; place the STEEL HOOKS and SHIELD (B).
- Examine the bridge for a mini-game (C).
- Solution (D, E).
- Walk right.
- Take the WARRIOR HELMET (F).
- Move the pipes; place the BRASS PIPE (G).
- Read the note (H); move the bottle.
- Place the BURNER KNOB (I); turn it.
- Examine the crystal (J); take the METAL FORK (K).
- Take the CRYSTALS (1/2) (L); open the box.
- Walk down, then forward.
- Place the WARRIOR HELMET (M); take the DEATH SYMBOL (N).
- Use the METAL FORK (O); open the box.
- Move the objects; take the ENGRAVED BRACER (P).
- Walk down, then right.
- Move the cloth; place the LIFE SYMBOL and DEATH SYMBOL (Q).
- Play the HOP to receive the JAR OF TERMITES (R).
- Place the ENGRAVED BRACER for a mini-game (S).
- Solution (T).
- Take the scroll and DAGGER (U).
- Walk down.
- Use the DAGGER; take the RUNES (1/3) (V).
- Use the JAR OF TERMITES (W).
- Use the Golden Heart for a mini-game (X).

- Solution (Y).
- Take the FISH OIL and SMALL BARREL (Z).
- Walk left.
- Use the Golden Heart for a mini-game (A).
- Solution (B-D).
Chapter 6: The Volcano
- Take the RUNES (2/3) (E).
- Take the FIRE STATUETTE (F).
- Walk forward.
- Take the IVORY BOX (G).
- Examine the IVORY BOX; take the CRYSTALS (2/2) (H).
- Place the CRYSTALS (2/2) for a mini-game (I).
- Solution (J).
- Take the CHI NEEDLES (K).
- Take the MUDDY RUNE (L).
- Walk down.
- Use the MUDDY RUNE to receive the RUNES (3/3) (M).
- Use the CHI NEEDLES; place them (N).
- Play the HOP to receive the INTRICATE EMBLEM (O).
- Place the INTRICATE EMBLEM on the IVORY BOX for a mini-game (P).
- Solution (Q).
- Take the GUARDIAN STATUETTE (R).
- Walk forward.
- Place the RUNES (3/3) (S).
- Take the RESIN and LONG WICK (T).
- Place the FIRE STATUETTE and GUARDIAN STATUETTE for a mini-game (U).
- Solution (V-B).
- Take TERRACOTTA CONTROLLER and WILDFIRE ESSENCE (C).
- Go to the Alchemist's Workshop.
- Place the SMALL BARREL, LONG WICK, and WILDFIRE ESSENCE; use the items to receive the EXPLOSIVE (D).
- Walk down, then left.
- Place the EXPLOSIVE (E); move the fuse (F).
- Go to Whispering Gorge.
- You receive the EARTH DRAGON.
- Place the EARTH DRAGON (G).
Chapter 7: The City
- Take the CLAY BOWL and CHOPSTICKS (H).
- Move the hay; use the CHOPSTICKS to take the STONE DEMON (I).
- Place the STONE DEMON (J); take the RUBY ORNAMENT (K).
- Move the vines; place the RUBY ORNAMENT (L).
- Walk forward.
- Move the bag; take the RAINDROP TOKEN, RESIN, and FISH OIL (M).
- Move the scrolls; take the JADE RING (N).
- Move the poster; take the VIAL OF MERCURY (O).
- Walk right.
- Pour the VIAL OF MERCURY (P); match the symbols.
- Take the JADE CHAIN (Q).
- Read the note (R); place the RAINDROP TOKEN (S).
- Press the token; pull the lever (T).
- Use the JADE RING (U); place the CLAY BOWL to receive the BOWL OF WATER (V).
- Walk down.
- Move the lid; pour the BOWL OF WATER (W).
- Take the BROOCH (X).
- Place the JADE CHAIN (Y).
- Play the HOP to receive the SILVER BALL (Z).
- Walk down.
- Place the SILVER BALL (A); take the METAL FROGS (B).
- Walk forward, then right.
- Place the METAL FROGS for a mini-game (C).
- Solution (D): A, Cx8, A, C, B, C, B, C, B, C, B, A, Cx8, A, Cx2, D, Cx8, D, Cx5, Bx4, Cx3, Bx8, C, Bx7, Cx6, Bx9, Cx3, Bx6, Cx6.
- Take the AMBER RHINO (E).
- Walk down.
- Place the AMBER RHINO (F).
- Walk forward.
- Move the pot; take the METAL SHEETS (1/3) (G).
- Turn the wheel (H); use the tool to take the CLAY POT (I).
- Walk right.
- Place the BROOCH (J).
- Move the hat; take the BRASS SYMBOL and LOCKPICKS (K).
- Take the METAL SYMBOL (L); pour the FISH OIL (M).
- Pull the levers; take the REFINED FISH OIL (N).
- Move the blanket; take the LIGHTER (O).
- Read the book; move the poster (P).
- Walk down.
- Use the LOCKPICKS (Q); take the STEEL WIRE, scrolls, and PHOTOPHORE POWDER (R).
- Place the BRASS SYMBOL (S).
- Play the HOP to receive the SCRAPER (T).
- Use the LIGHTER (U); open the jar.
- Take the ZEN GARDEN SCROLL (V).
- Walk right.
- Use the SCRAPER; take the note, TERRACOTTA CONTROLLER, and CATALYST (W).
- Place the ZEN GARDEN SCROLL for a mini-game (X).

- Solution (Y-A).
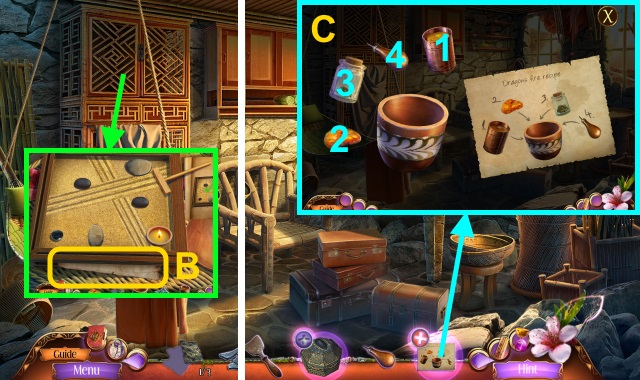
- Take the DRAGON FIRE RECIPE (B).
- Examine the DRAGON FIRE RECIPE; place the CLAY POT, REFINED FISH OIL, RESIN, PHOTOPHORE POWDER, and CATALYST for a mini-game.
- Solution (C).
- You receive the DRAGON FIRE.
- Walk down.
- Use the DRAGON FIRE (D).
- Walk left.
- Use the SCRAPER; place the METAL SYMBOL (E).
- Take the ETCHED INLAY (F).
- Walk left.
- Move the stalactite (G).
- Play the HOP to receive the LION STATUE (H).
- Take the METAL SHEETS (2/3) (I).
- Place the ETCHED INLAY (J); take the STONE TILE (1/3) (K).
- Take the METAL SHEETS (3/3) (L).
- Walk down.
- Place the LION STATUE (M); take the mirror (N).
- Take the PEARL STAR (O).
- Place the STEEL WIRE and METAL SHEETS (3/3) to receive the PADDLES (P).
- Walk left.
- Place the PADDLES (Q); take the STONE TILES (2/3) (R).
- Place the PEARL STAR (S); take the GAME PIECES and STONE TILES (3/3) (T).
- Walk down.
- Place the STONE TILES (3/3) for a mini-game (U).
- Solution (V).
- Walk forward.
- Move the bag; take the CHISEL (W).
- Place the GAME PIECES for a mini-game (X).

- Solution (Y-A).
- Take the BULL STATUE (B).
- Use the CHISEL; take the ENCRUSTED JEWEL (C).
- Walk down.
- Place the BULL STATUE (D); take the AQUA REGIA (E).
- Place the ENCRUSTED JEWEL on the TERRACOTTA CONTROLLER (F); use the AQUA REGIA.
- Open the box; take the EARTH REALM KEY and TERRACOTTA AMULET (G).
- Walk forward.
- Place the EARTH REALM KEY for a mini-game (H).
- Solution (I).
- Walk left.
- Use the TERRACOTTA AMULET (J).
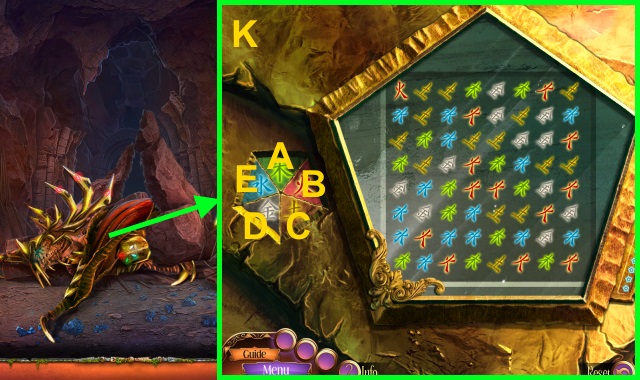
- Examine the dragon for a mini-game.
- Solution (K): E, B, D, E, A, C, B, E, A, C, D, E, B, A, C.
- Solution (L): C, A, E, F, A, C, A, F, D, F, A.
- Congratulations! You have completed Myths of the World: The Heart of Desolation.
Created at: 2015-05-10