

Walkthrough Menu
- General Tips
- Chapter 1: Whispering Marsh
- Chapter 2: Nebelwald Fringes
- Chapter 3: Shipwreck
- Chapter 4: The Docks
- Chapter 5: Abandoned Village
- Chapter 6: The Castle
General Tips
- This is the official guide for Myths of the World: The Whispering Marsh.
- This guide will not tell you when you have to zoom into a location; the screenshots will show each zoom scene.
- Hidden-object puzzles are referred to as HOPs. This guide will not show screenshots of the HOPs, however, it will mention when an HOP is available and the inventory item you'll collect from it.
- Use the Map to fast travel to a location.
Chapter 1: Whispering Marsh
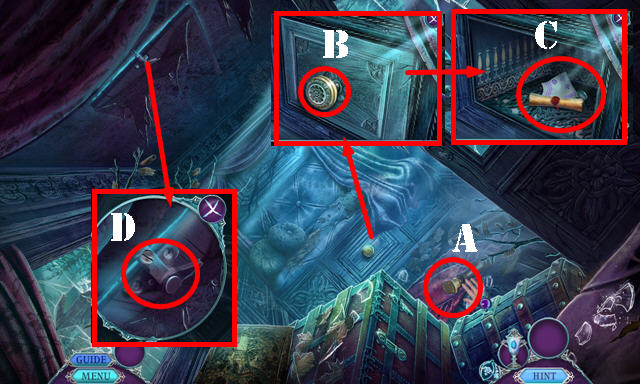
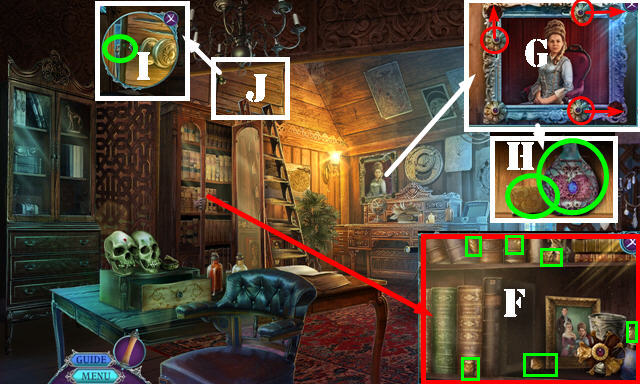
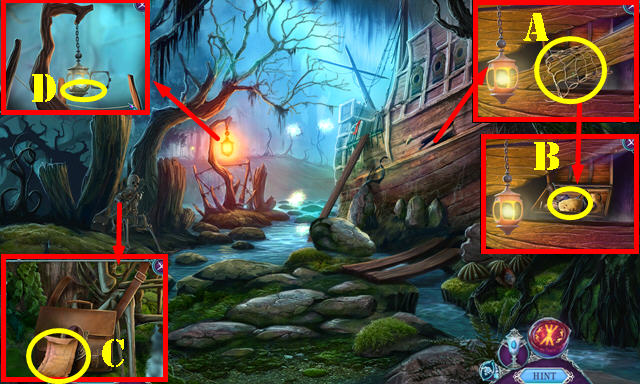
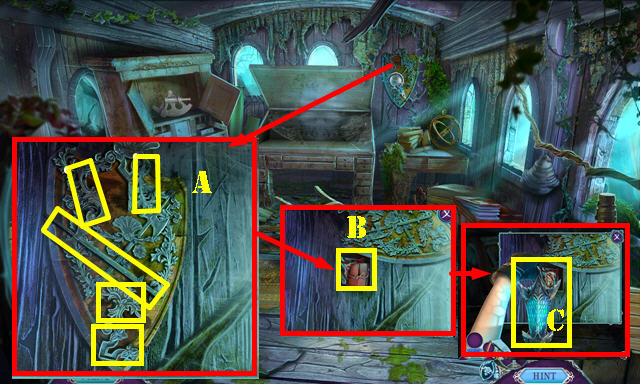
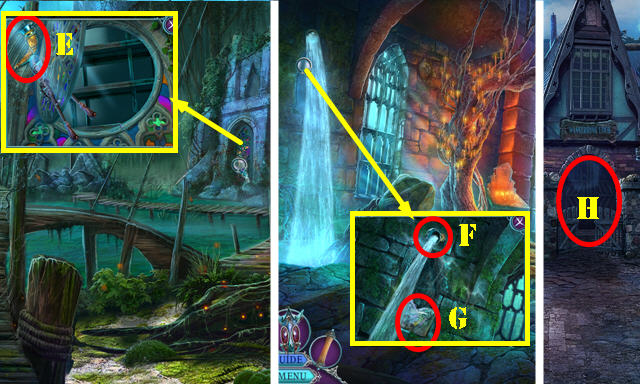
- Take the BOUNDER'S SEAL (A).
- Use the BOUNDER'S SEAL (B). Select the letter and remove the seal; take the IDENTIFICATION LETTER (C); take the COMBINATION and SPOON below.
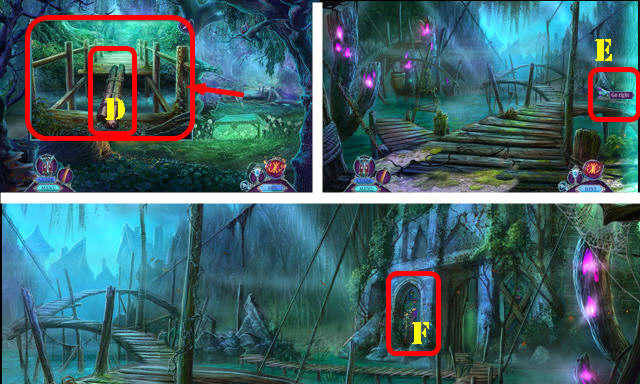
- Use the SPOON and then exit (D).
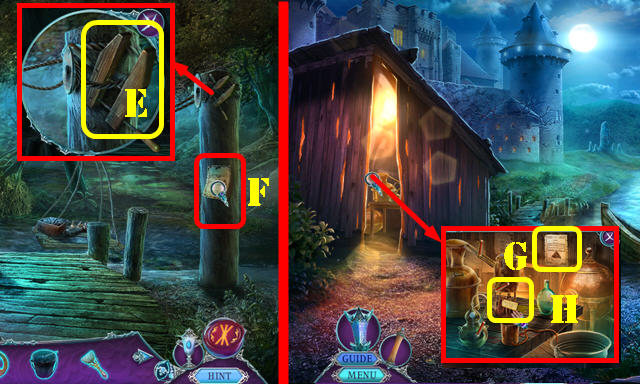
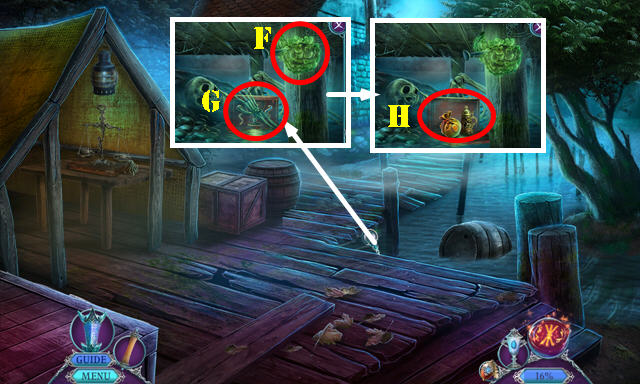
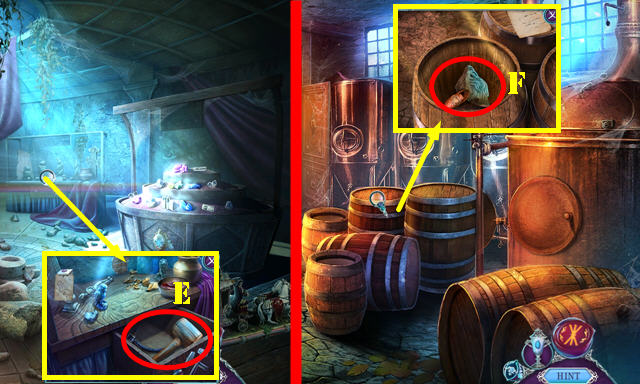
- Take the BROKEN FISHING ROD (E); select the metal bars twice.
- Take the Map and INK BOTTLE (F).
- Place the COMBINATION and enter the code (G) for a HOP; play it to get the LEATHER STRAPS.
- Place the LEATHER STRAPS (H). Take the CLOCK KEY (I). Select the metal bars twice and place the LEATHER STRAPS.
- Go forward.
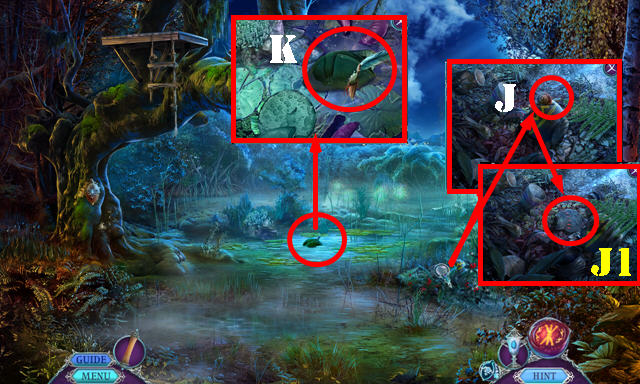
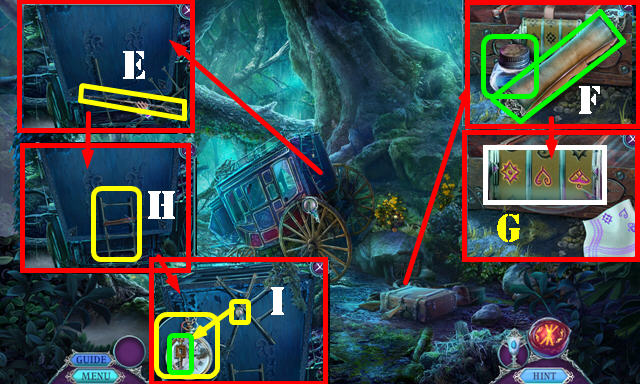
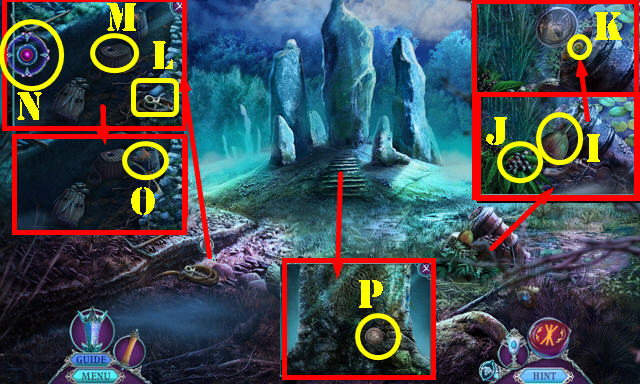
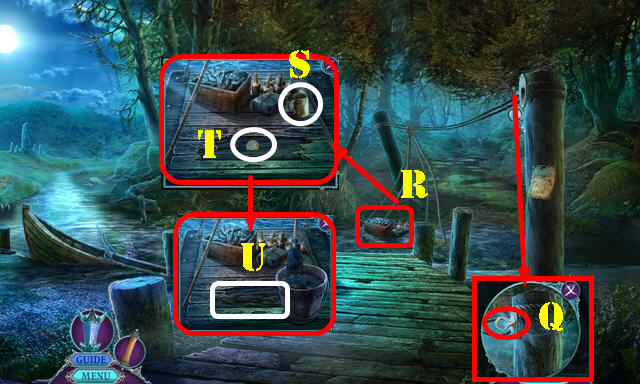
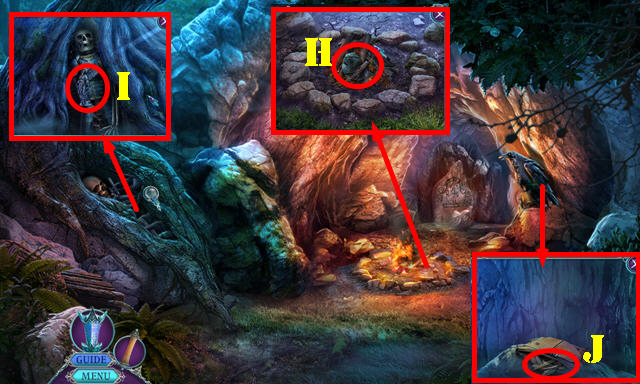
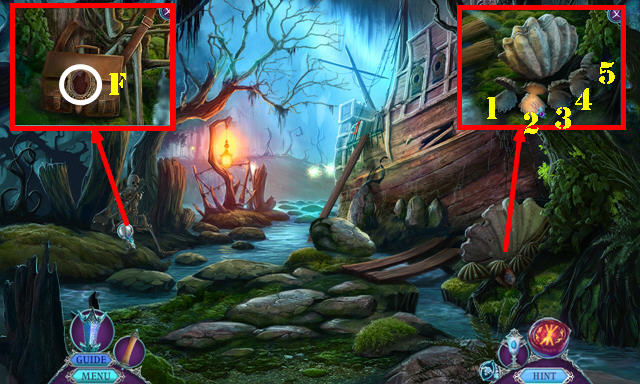
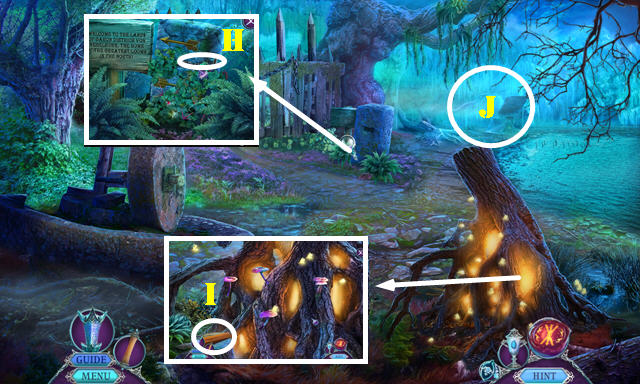
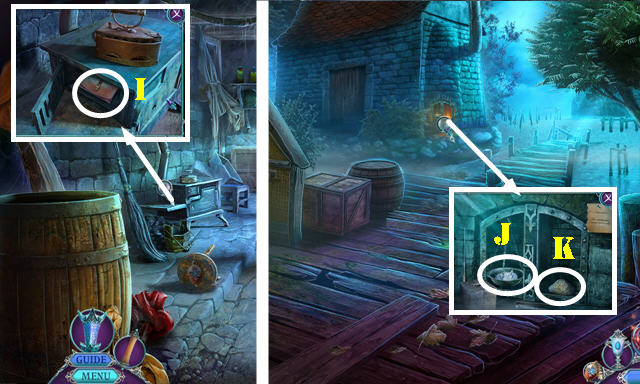
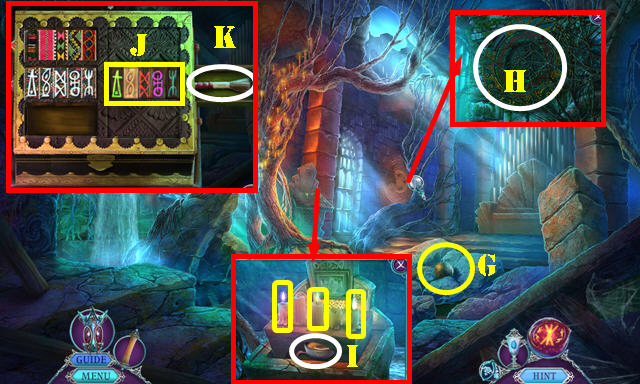
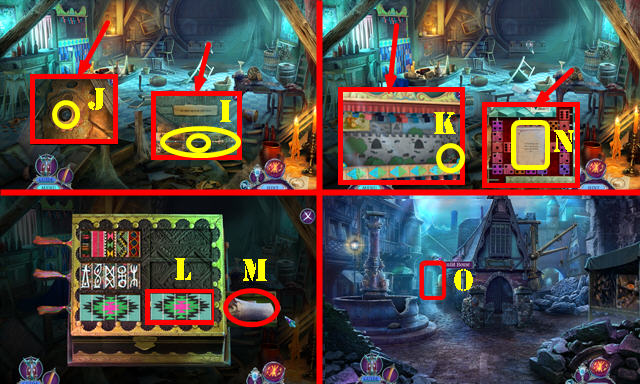
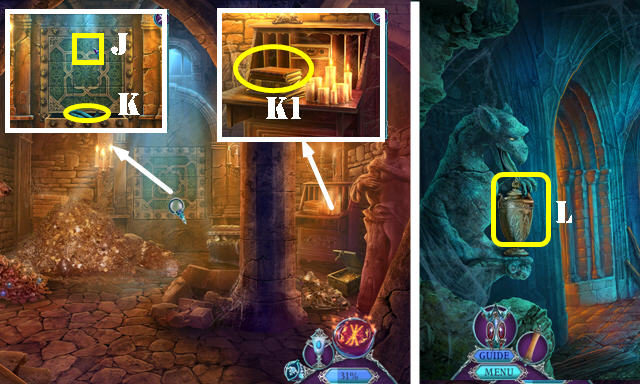
- Take the SNAIL SHELL (J). Select the items 3x and take the SHARP POTTERY FRAGMENT (J1).
- Select the BROKEN FISHING ROD 5x; to get the FISHING ROD (inventory).
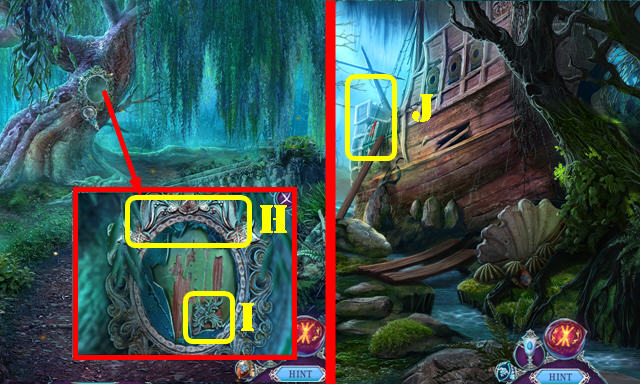
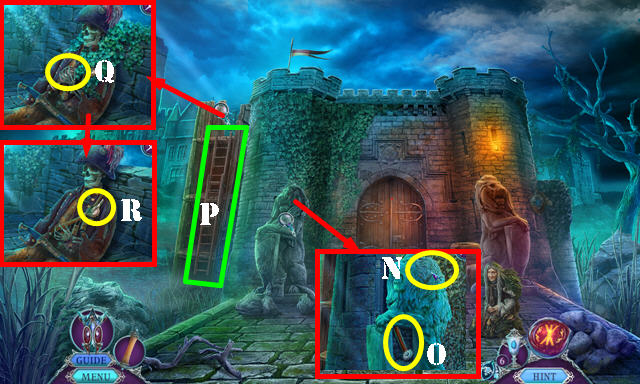
- Use the FISHING ROD; take the FEATHERED CAP and STATUE FACE (K).
- Walk down.
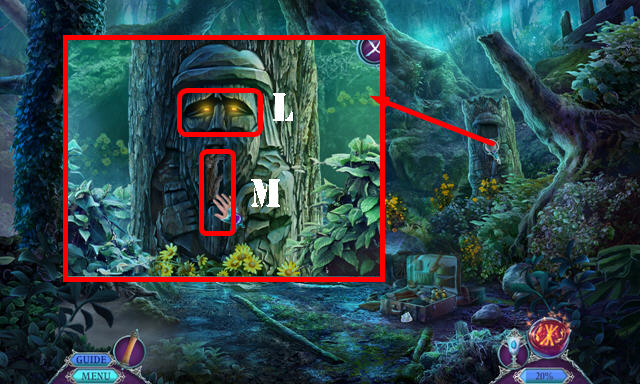
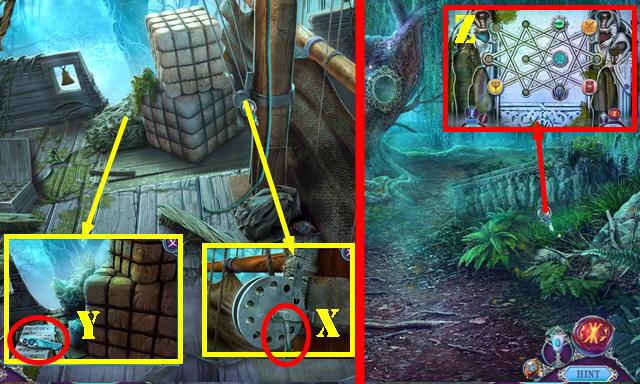
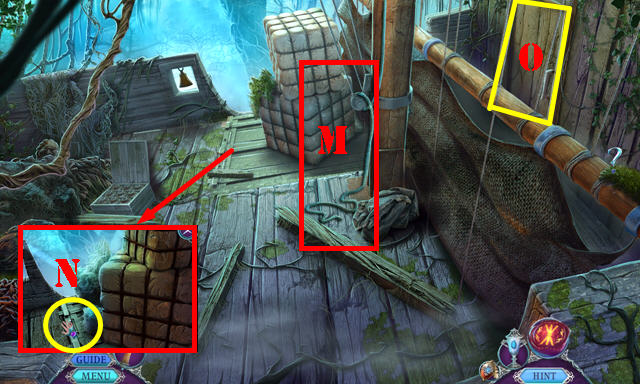
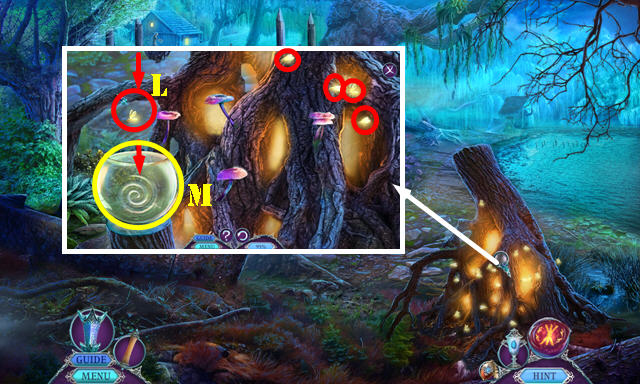
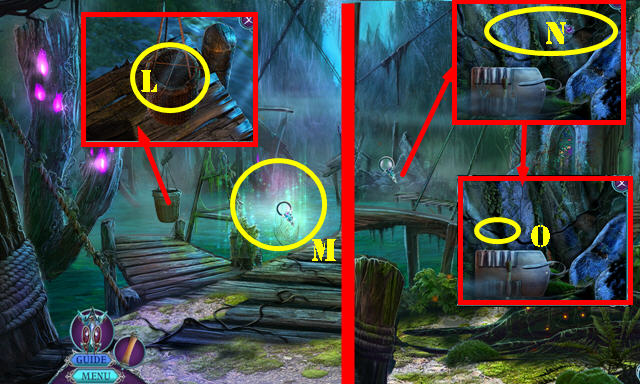
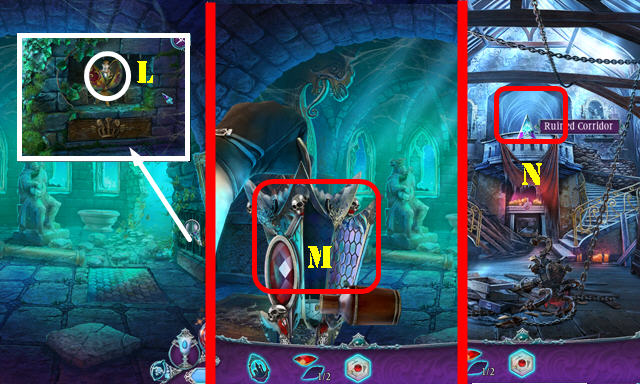
- Place the STATUE FACE (L); take the KNOTTED ROPE (M).
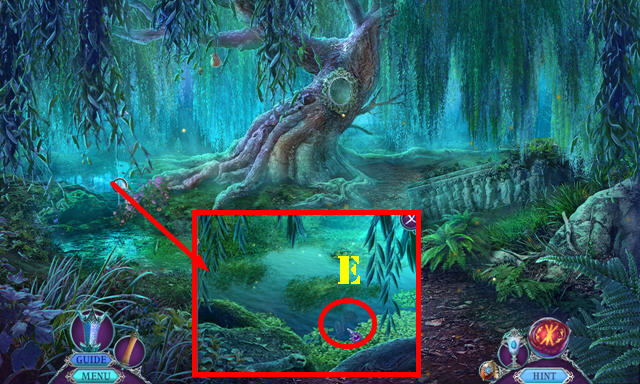
- Go to the Whispering Marsh.
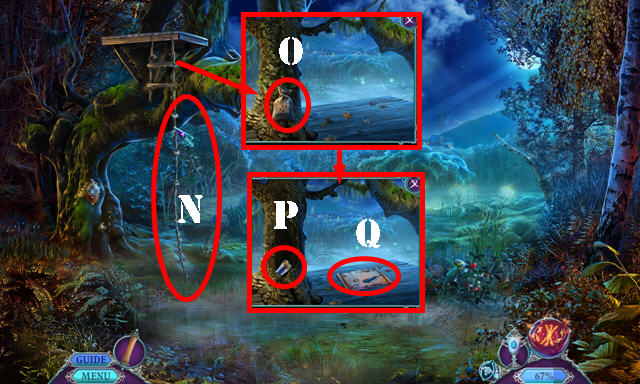
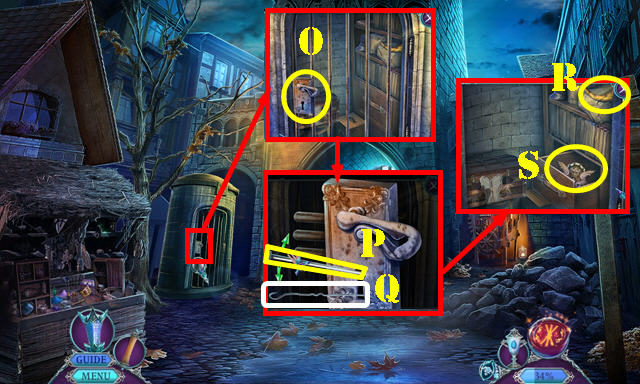
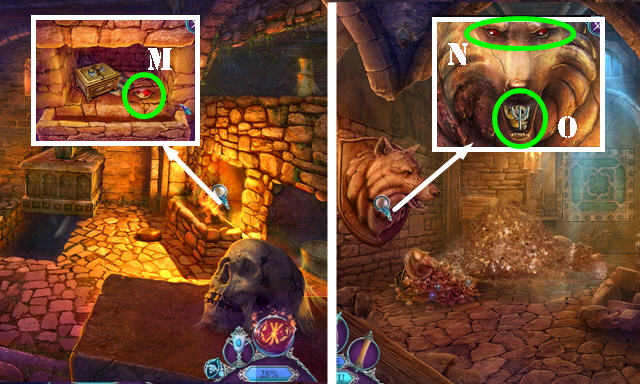
- Place the KNOTTED ROPE (N); take the SEEDS (O).
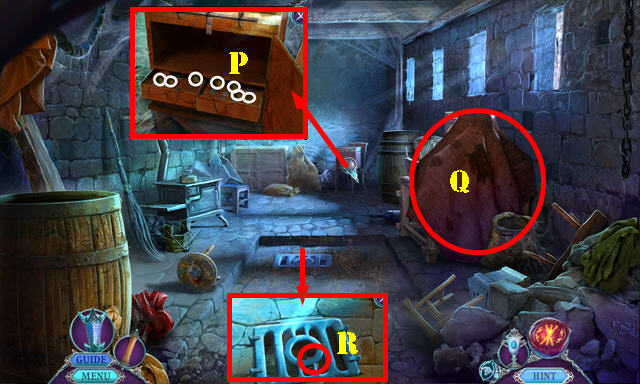
- Remove the 6 strings on the FEATHERED CAP (remove the top ones first); take the GOOSE FEATHER (inventory).
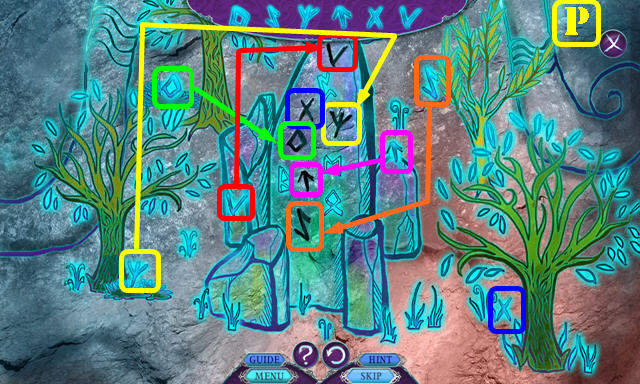
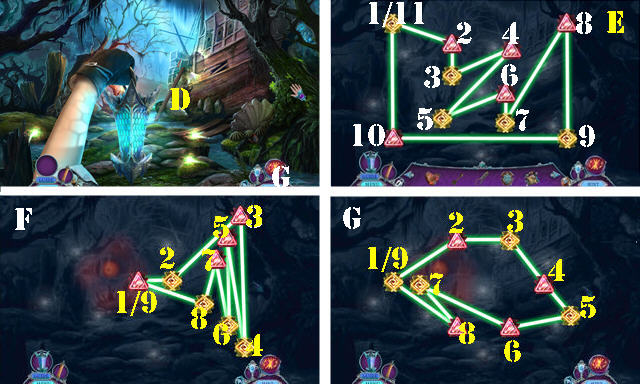
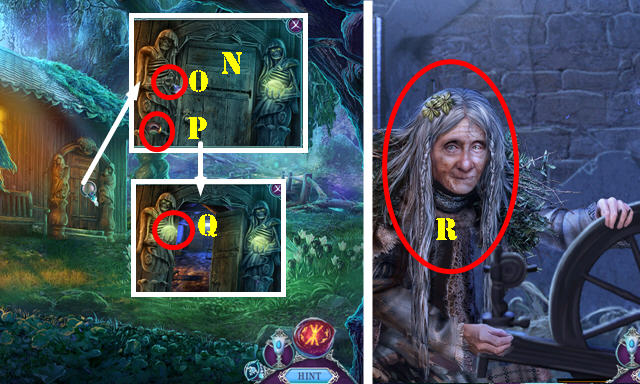
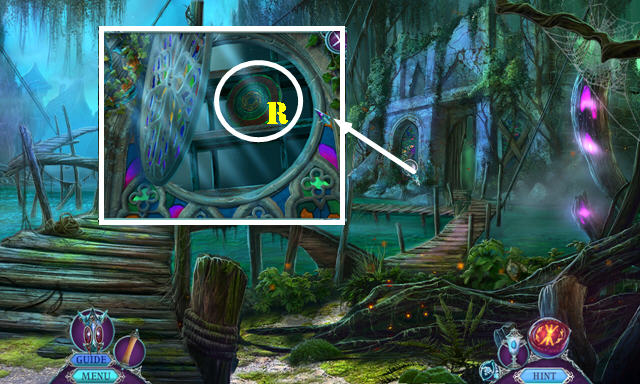
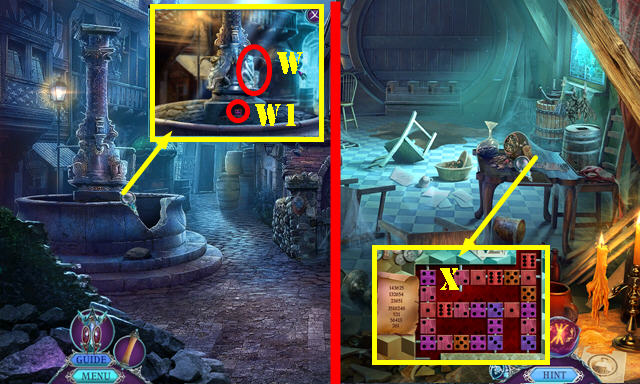
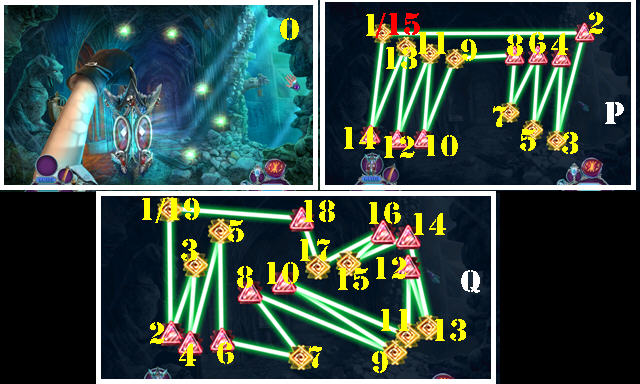
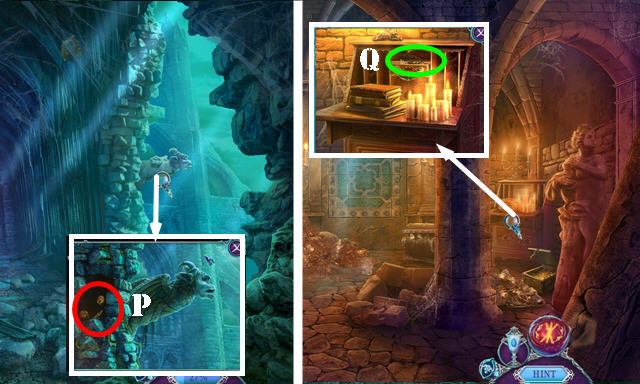
- Use the SHARP POTTERY FRAGMENT; look at the map (P); place the GOOSE FEATHER and INK BOTTLE on the map for a puzzle (Q).
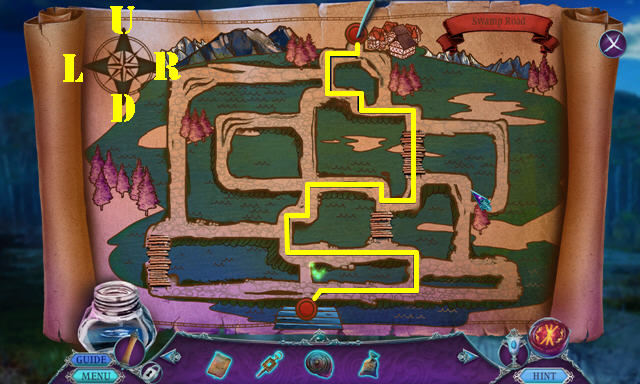
- Solution: U-R-Ux2-Lx2-Ux2-R-D-R-Ux3-Lx2-U-L-Ux2-R-U.
- Go forward.
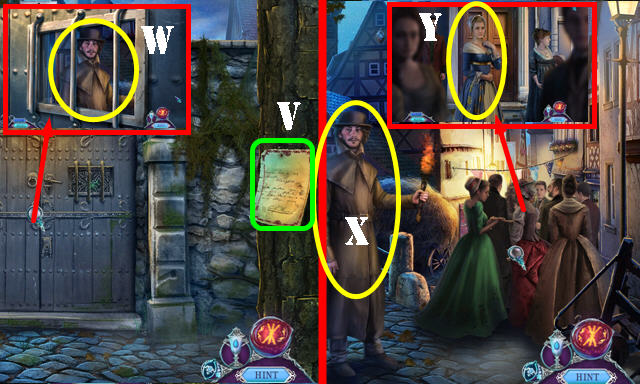
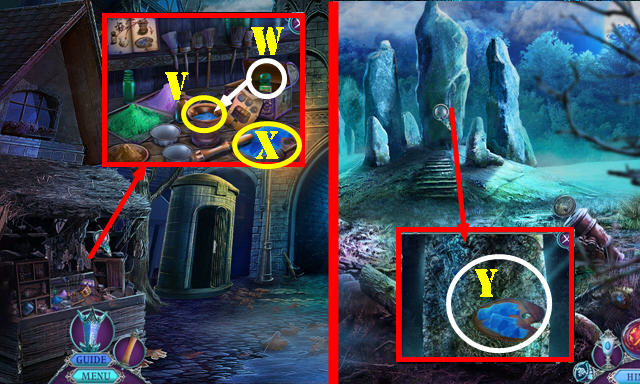
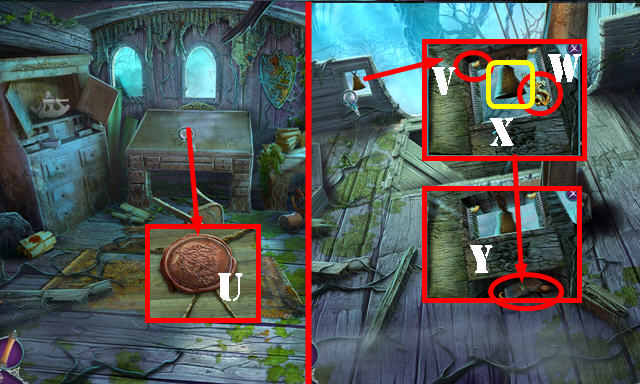
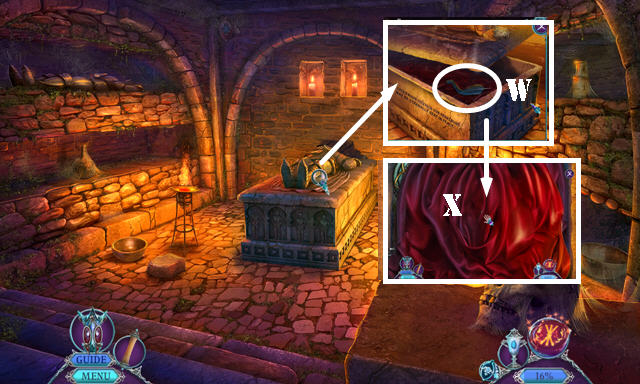
- Look at the note (V).
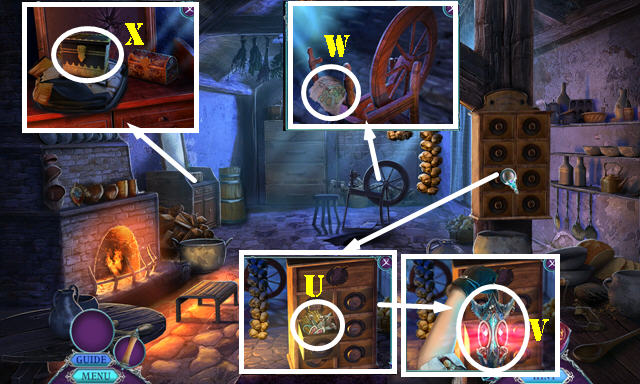
- Select the door and knock on it. Talk to the man and give him the IDENTIFICATION LETTER (W).
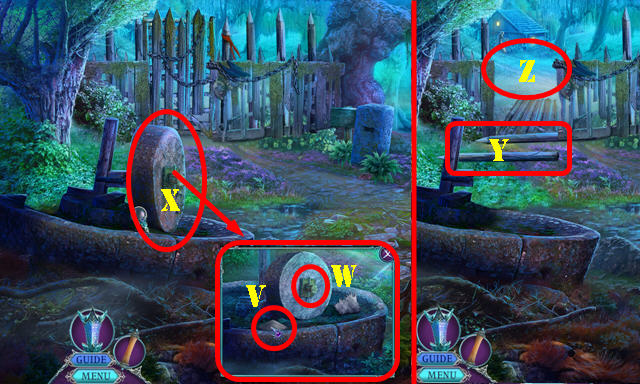
- Talk to Wilhelm (X).
- Select the people 3x and talk to Hilda (Y).
- Open the door.
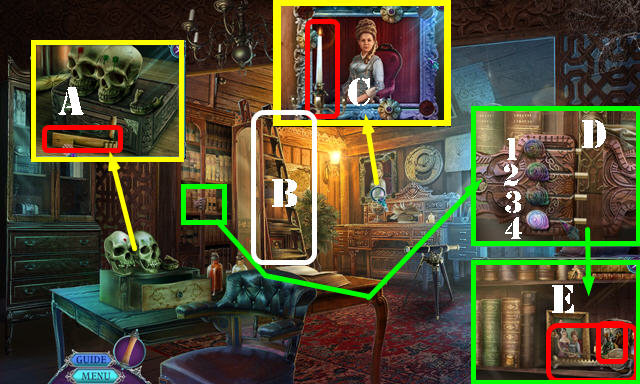
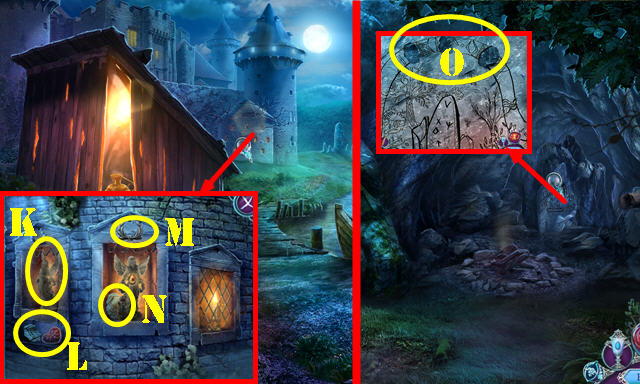
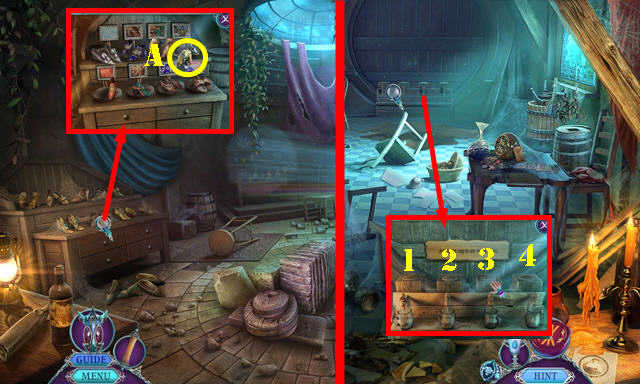
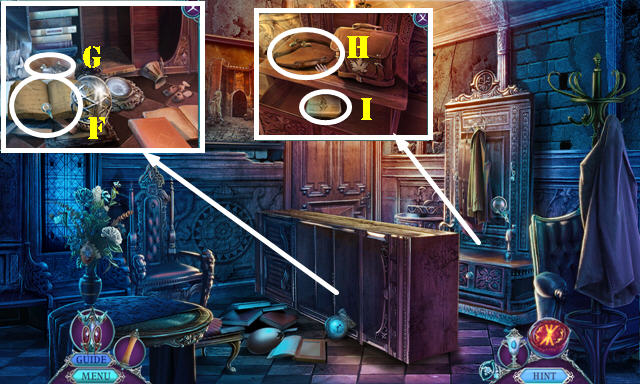
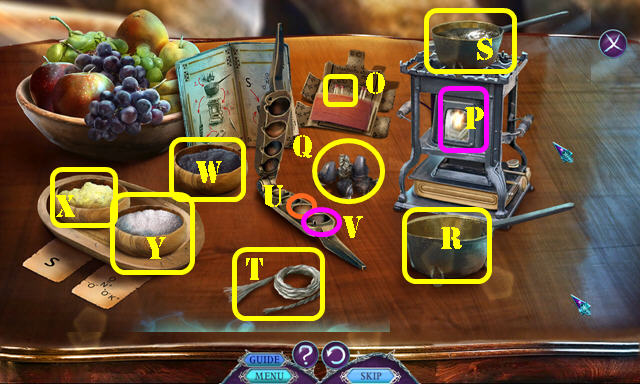
- Take the NOISEMAKER (A) and open the drawer.
- Move the ladder (B).
- Take the CANDLE (C).
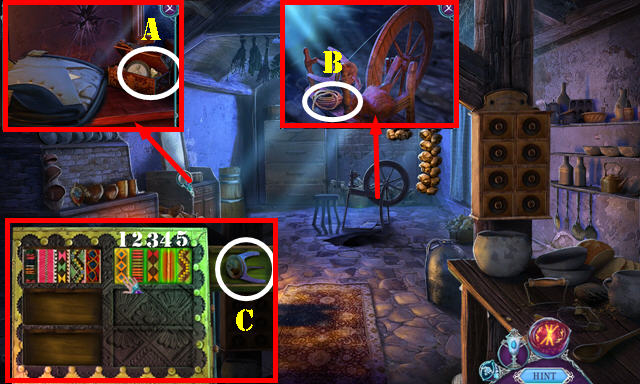
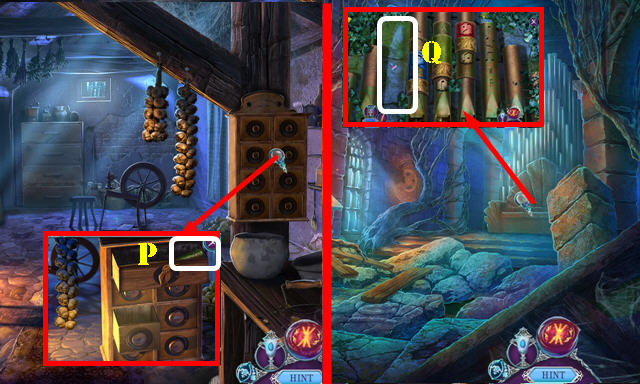
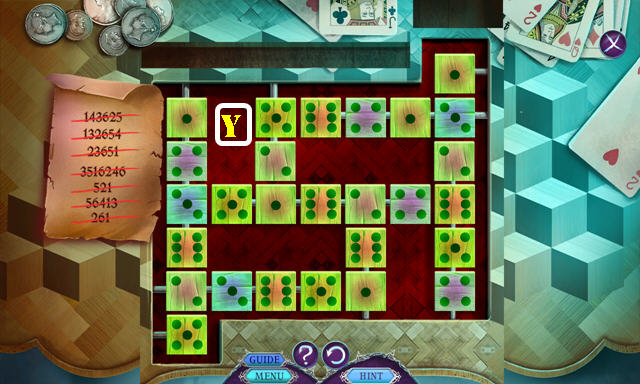
- Place the SNAIL SHELL and select: 2-3-1-4 (D). Take the CROSSBOW CRANK and LEAD SOLDIER (E).
- Move items and select the 6 petals to get the METAL FLOWER (F).
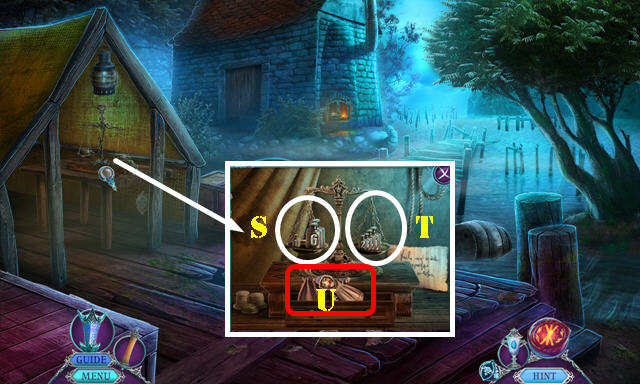
- Place the METAL FLOWER and slide the others in place (G). Read the note; take the LANTERN OIL and BRASS SHEET (H).
- Use the BRASS SHEET (I).
- Go to the Attic (J).
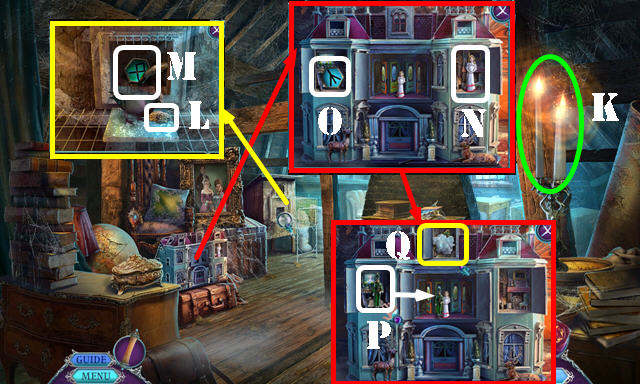
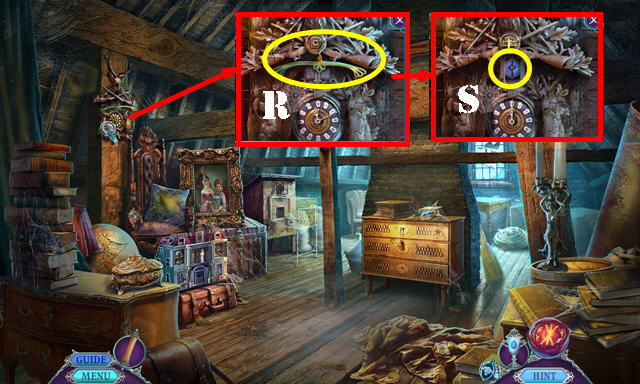
- Use the CANDLE (K).
- Open the cage and place the SEEDS (L). Read the note; take the STONE CLAW and GLASS PIECE 1/4 (M).
- Select the doll (N). Open the window and take the GLASS PIECE 2/4 (O).
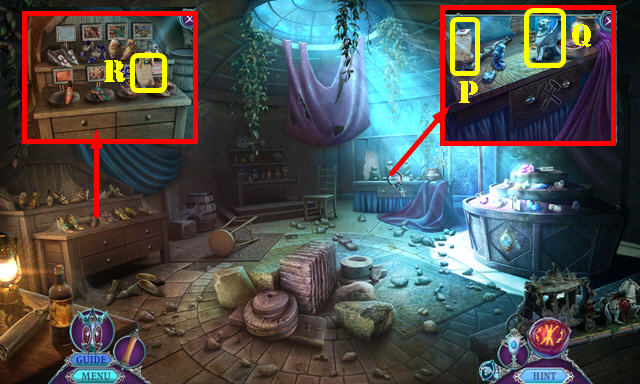
- Place the LEAD SOLDIER and touch it (P). Take the ROCK SALT and BROOCH (Q).
- Take the COAT HANGER (R).
- Use the CLOCK KEY; take the GLASS PIECE 3/4 (S).
- Walk down.
- Place the BROOCH and look at the book. Flip the pages twice; take the METAL VALVE and GLASS PIECE 4/4 (T).
- Return to the Attic.
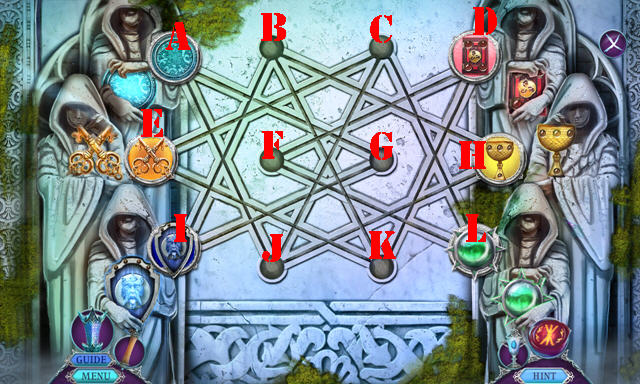
- Remove the note (U). Place the 4 GLASS PIECES for a puzzle.
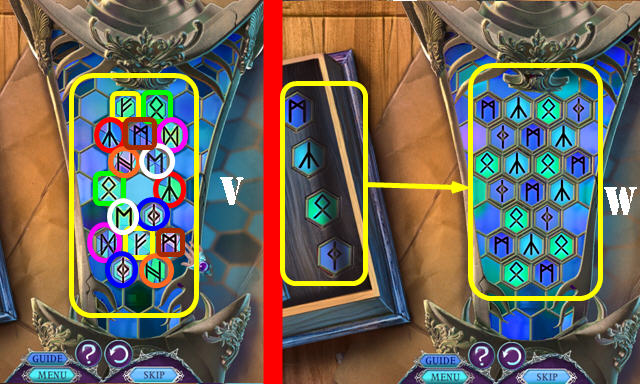
- Solution one: find the matching pairs (V).
- Solution two (W).
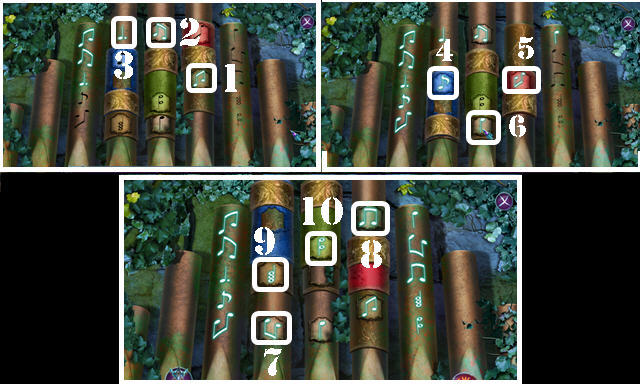
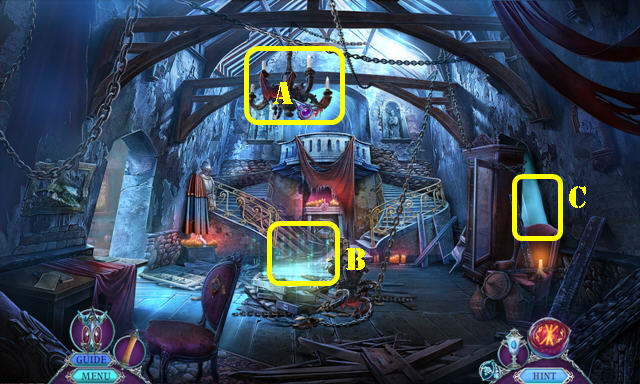
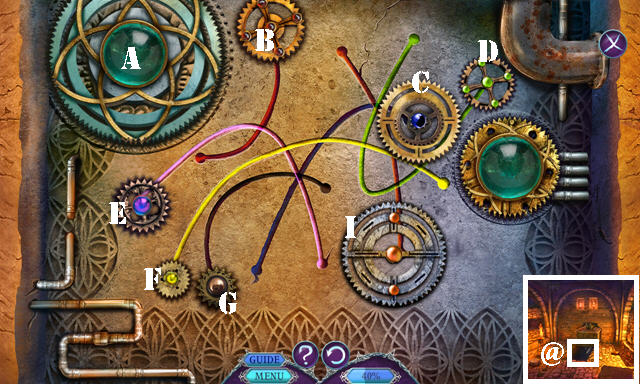
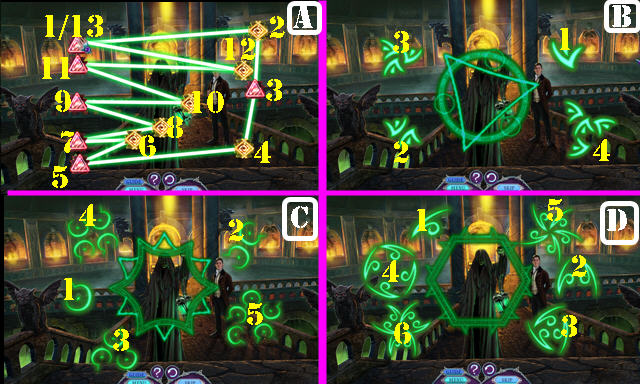
- Use the LANTERN OIL and select the lights for another puzzle (A).
- Solution one (B).
- Solution two (C).
- Solution three (D).
- Return to Main Street.
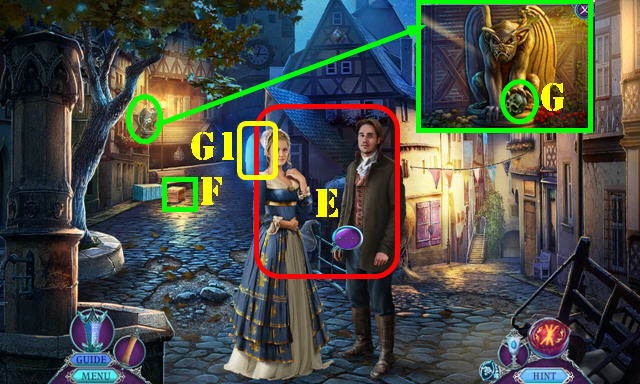
- Talk to Hilda and Albrecht (E).
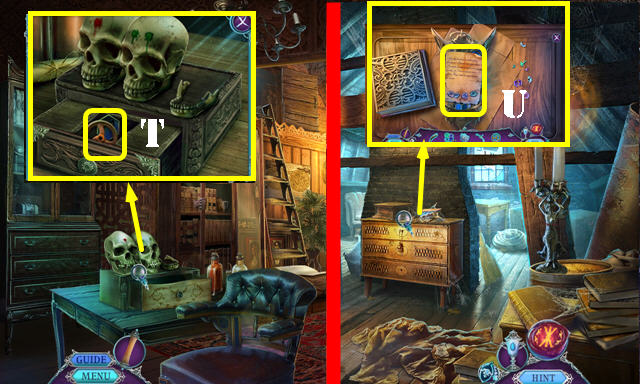
- Select the box (F). Place the STONE CLAW; take the STONE SKULL (G).
- Go to the City Gate (G1).

- Take the TAR (H).
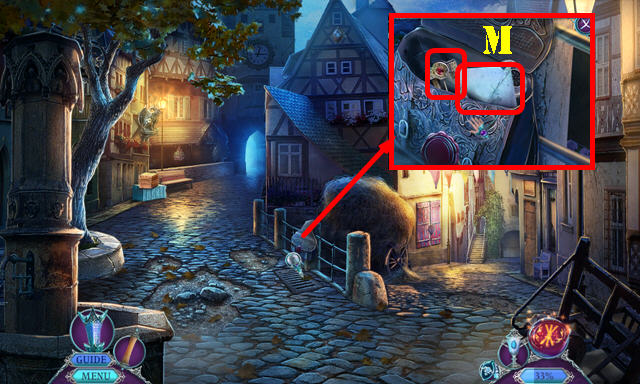
- Place the CROSSBOW CRANK (I); take the CROSSBOW STRING (J).
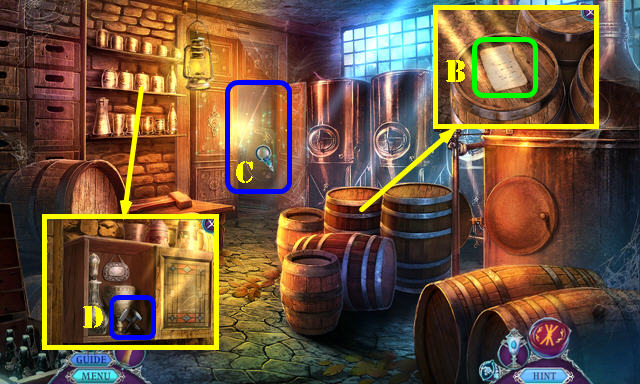
- Look at the clue (K) and the recipe (L).
- Walk down.
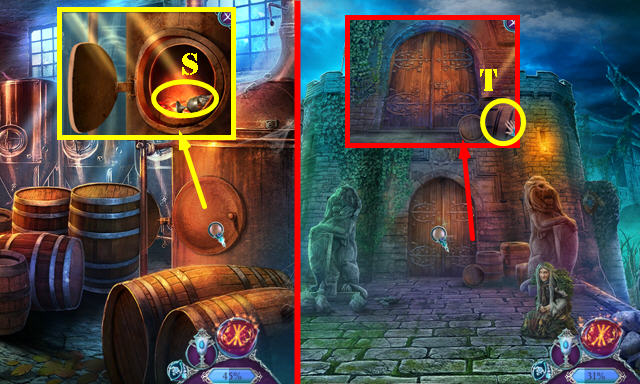
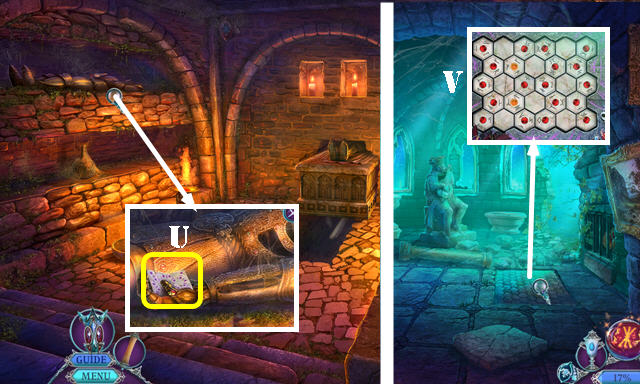
- Use the CROSSBOW STRING; take the PIPE CLEANER and read the letter (M). Remove the cover, pin, and coiled wire. Select the coiled wire on the PIPE CLEANER to get the LOCKPICK (inventory).
- Go to City Gate.
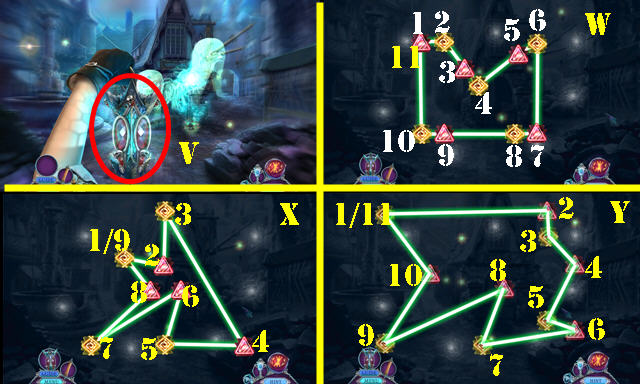
- Use the LOCKPICK for a puzzle (O).
- Solution: P down, Q, P up, Q, P down, Q.
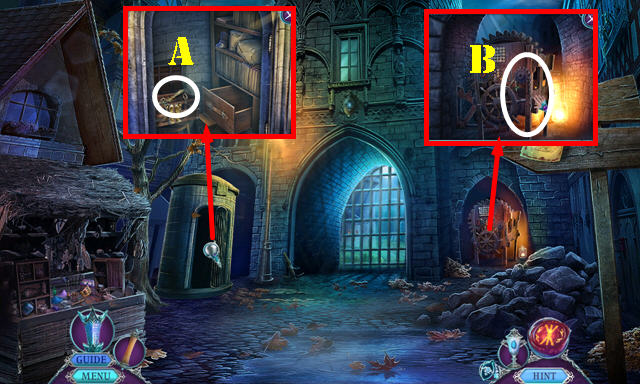
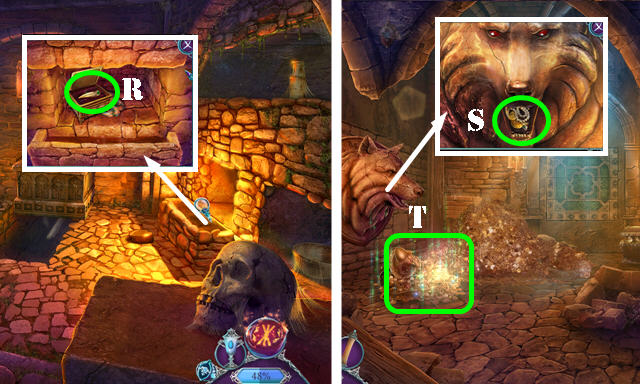
- Take the GARGOYLE HORN (R). Open the drawer and take the TOWN SIGIL (S).
- Walk down.
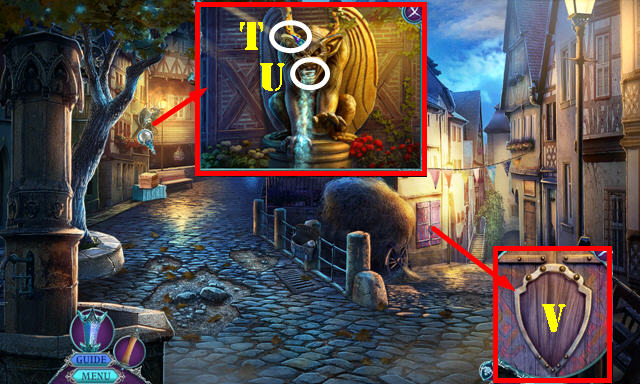
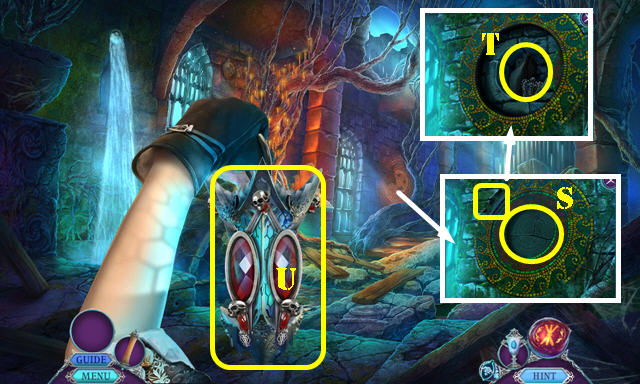
- Place the GARGOYLE HORN (T); select it twice and take the LINCHPIN (U).
- Place the TOWN SIGIL for a HOP (V); play it to get the GOLDEN IBIS 1/2.
- Go to the Study.
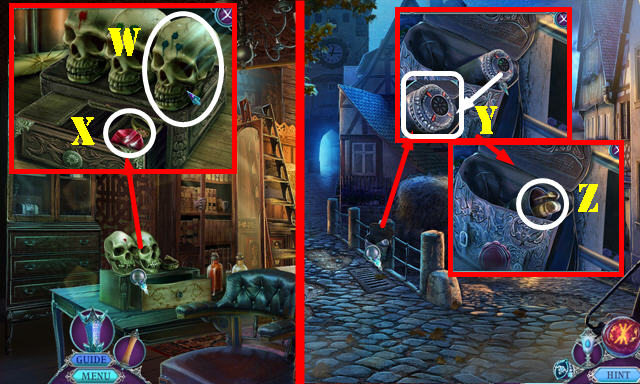
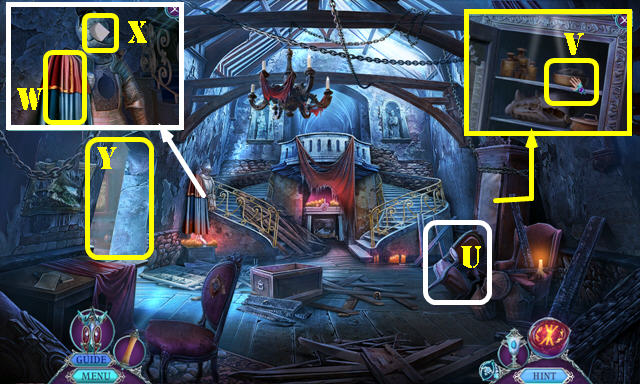
- Place the STONE SKULL (W); take the SIGNET RING (X).
- Walk down.
- Use the SIGNET RING (Y). Look at the instructions and take the GOLDEN IBIS 2/2 (Z).
- Go to City Gate.
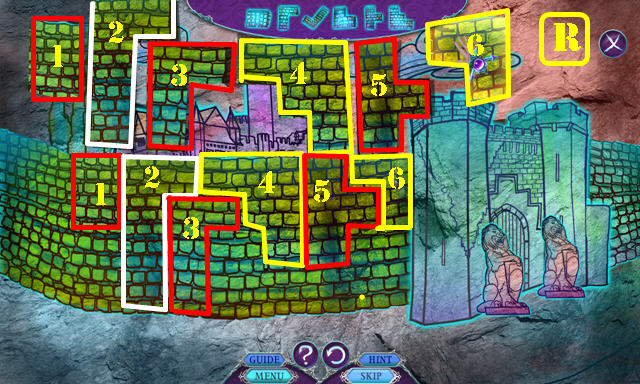
- Place the 2 GOLDEN IBIS'; take the SCRAPER and CHAIN (A).
- Select the CHAIN and place the LINCHPIN to get the GATE CHAIN (inventory).
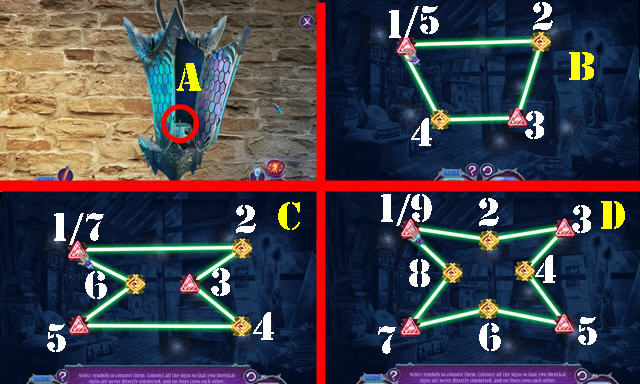
- Remove the broken chain (B); place the GATE CHAIN for a puzzle.
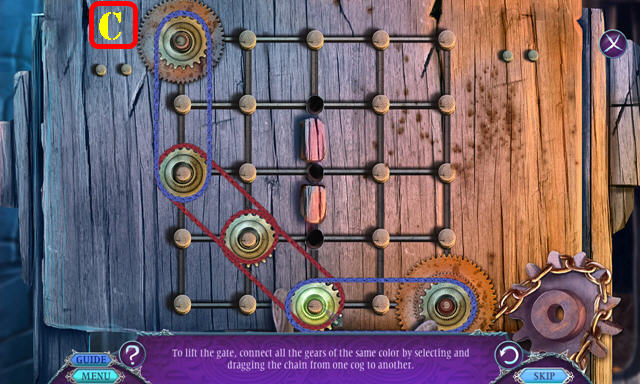
- Solution one (C).
- Solution two (D).
- Go forward.
Chapter 2: Nebelwald Fringes
- Take the WOODEN CLAMP (E).
- Read the note (F).
- Go left.
- Read the note (G).
- Take the ROOT POWDER (H).
- Go forward.
- Take the WOODEN SHOVEL (I) and ELDERBERRIES (J).
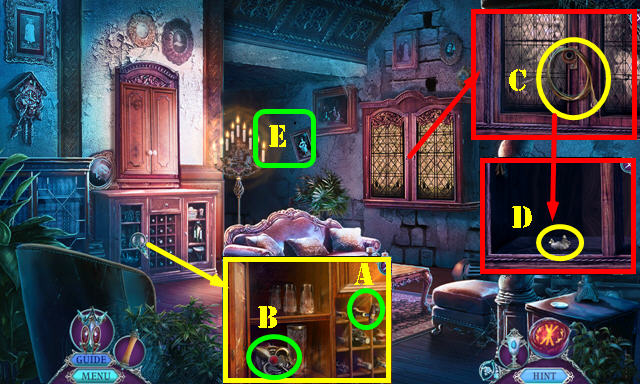
- Select the container; place the METAL VALVE and twist it. Take the SILVER THALER 1/3 (K).
- Take the METAL PEG (L).
- Use the COAT HANGER (M) to activate a puzzle.
- Select the ball once it's in the middle, and then select again once the two balls are in the middle of the circle (N). Take the PEAT (O).
- Use the SCRAPER; take the SILVER THALER 2/3 (P).
- Walk down and go right.
- Place the METAL PEG and twist it twice (Q).
- Select the barge (R); touch the cup 3x (S) and take the SILVER THALER 3/3 (T).
- Use the TAR (U). Try to go forward to the Forest Cave. Return to City Gate.
- Place the ROCK SALT (V).
- Insert the 3 SILVER THALERS. Pour the bottle (W).
- Place the ELDERBERRIES (V).
- Take the DYE PALETTE (X).
- Return to the Runestones.
- Place the DYE PALETTE for a HOP (Y); play it to get the FLINT.
- Walk down.
- Remove the top and place the PEAT (A).
- Use the FLINT (B).
- Select the 3 valves (purple) to get the LANTERN OIL.
- Use the LANTERN OIL (C).
- Return to the Forest Cave.
- Select the lights for a puzzle (D).
- Solution one (E).
- Solution two (F).
- Solution three (G).
- Use the WOODEN SHOVEL; take the RUNES 1/3 (H).
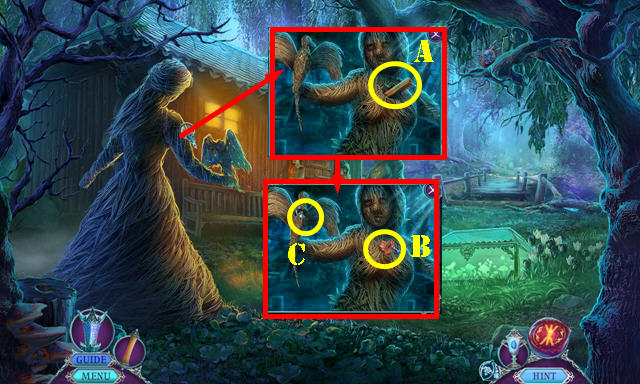
- Use the ROOT POWDER; select the hand and take the ANGEL (I).
- Use the NOISEMAKER; open the bag and read the note. Take the TWEEZERS and LAUREL WREATH (J).
- Walk down and go left.
- Place the ANGEL (K); take the CINNABAR PENDANT and RUNES 2/3 (L).
- Place the LAUREL WREATH (M); take the RUNES 3/3 (N).
- Return to Forest Cave.
- Place the 3 RUNES for a puzzle (O). Select the note on the scene after you complete each puzzle.
- Solution one (P).
- Solution two (Q).
- Solution three (R).
- Solution four (S).
- Solution five (T).
- Go forward.
- Select the bag twice; take the WICKER HEART and MARBLE FIGURINE 1/3 (U).
- Place the CINNABAR PENDANT; take the PIN (V).
- Take the NET HOOP and ARROW (W); remove the vines twice.
- Take the NET HANDLE (X).
- Place the NET HOOP on the NET HANDLE. Remove the net and place the SMALL NET to get the HAND NET (inventory).
- Go to the Stepping Stones (Y).
- Select the stones; take the SMALL NET (A).
- Use the WOODEN CLAMP; take the SPONGE (B).
- Read the note (C).
- Select the lantern; use the PIN on it and take the CRANK (D).
- Walk down.
- Place the NET HOOP on the NET HANDLE. Remove the net and place the SMALL NET to get the HAND NET (inventory).
- Use the HAND NET; take the SHELL and PROSPECTOR'S KEY (E).
- Go to the Stepping Stones.
- Use the PROSPECTOR'S KEY (F) for a HOP; play it to get the SILVER IVY.
- Place the SHELL and select them in order:2-1-4-3-5. Take the MARBLE FIGURINE 2/3.
- Walk down.
- Use the SPONGE on the glass; place the SILVER IVY (H); take the SHIELD ORNAMENT 1/2 (I).
- Return to the Stepping Stones and enter the Ship Deck (J).
Chapter 3: Shipwreck
- Place the CRANK and turn it (X).
- Remove the wool 3x; take the MARBLE FIGURINE 3/3 and SHEET MUSIC (Y).
- Return to Willow of Regrets.
- Place the 3 MARBLE FIGURINES for a puzzle (Z).
- Solution: (G-A)-(I-G)-(K-B)-(B-I)-(L-F)-(C-L)-(D-K)-(K-E)-(F-D)-(I-B)-(B-K)-(G-I)-(I-B)-(B-H)-(K-B)-(B-1).
- Take the DOUBLE HOOK.
- Return to the Ship Deck.
- Use the DOUBLE HOOK (M).
- Select the trapdoor (N).
- Enter the Captain's Quarters (O).

- Take the EXTINGUISHED TORCH (P).
- Place the SHEET MUSIC (Q); pull the handle (R) and take the GEAR (S).
- Walk down twice.
- Use the EXTINGUISHED TORCH to get the TORCH (T).
- Return to the Captain's Quarters.
- Use the TORCH (U) for a HOP; play it to get the PAPER WEIGHT.
- Walk down.
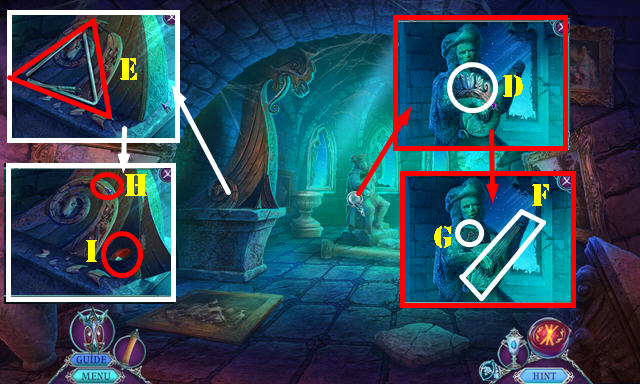
- Place the GEAR (V) and use the PAPER WEIGHT (W). Select the bell twice (X). Look at the book and take the SEXTANT ARM (Y).
- Return to the Captain's Quarters.

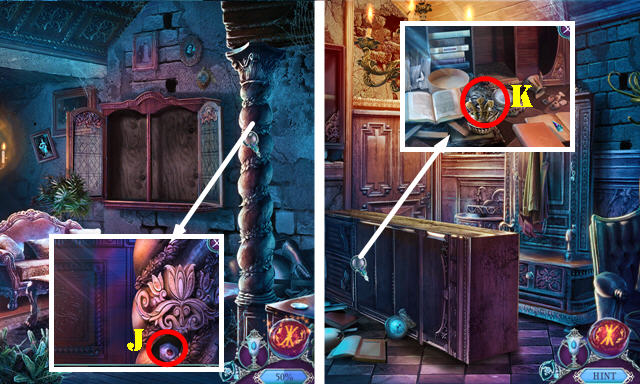
- Place the SEXTANT ARM; select 3-2-1-4; take the NUTCRACKER and CASE COMBINATION (Y).
- Walk down.
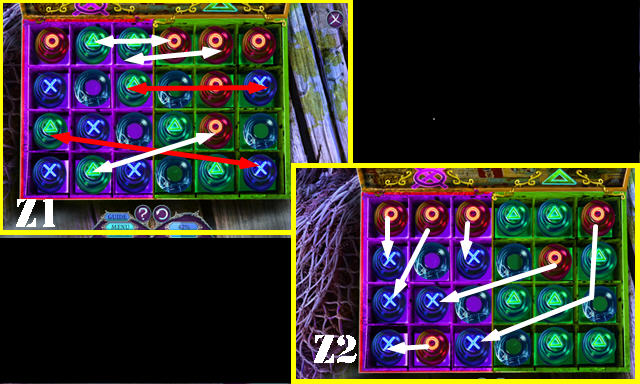
- Place the CASE COMBINATION for a puzzle. Solution one (Z).
- Solution two (Z1-Z2).
- Take the SHIELD ORNAMENT 2/2.
- Go to the Captain's Quarters.
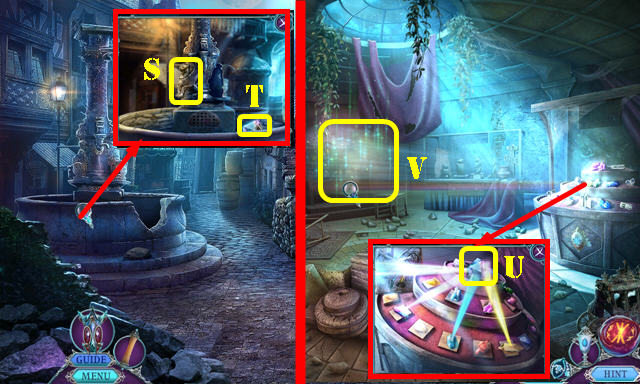
- Place the SHIELD ORNAMENTS. Select the five pieces (A). Look at the book; take the GUILD EMBLEM and LANTERN OIL (B).
- Use the LANTERN OIL (C). Take the TRIBUTE FABRIC.
- Return to the Stepping Stones.
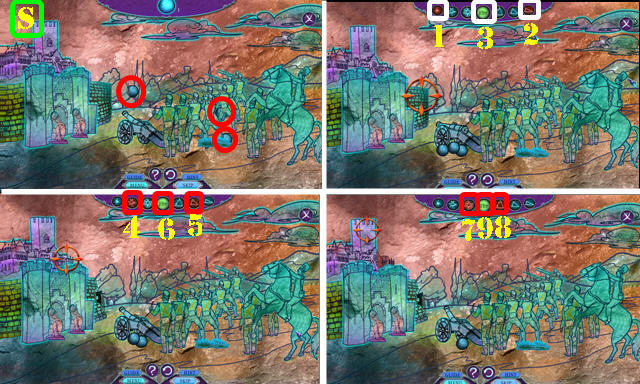
- Select the lights for a puzzle (D).
- Solution one (E).
- Solution two (F).
- Solution three (G).
- Go forward.
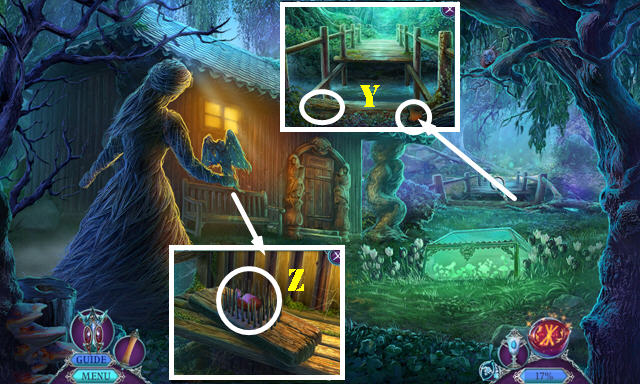
- Place the ARROW; take the ANCIENT KEY (H).
- Take the SMALL WEDGE 1/3 (I).
- Go to the Docks (J).
Chapter 4: The Docks

- Read the note (K).
- Read the two notes (L-M); take the SMALL WEDGE 2/3 (N).
- Use the ANCIENT KEY (O). Enter the Factory.
- Place the GUILD EMBLEM; open the drawers; select the 7 pieces (P) and take the WEIGHTS.
- Remove the cloth (Q) for a HOP; play it to get the WEIGHTS PAN.
- Use the TWEEZERS to get the MATCHES (R).
- Walk down.
- Place the WEIGHTS PAN and the WEIGHTS for a puzzle.
- Solution: S (6-1-7), T (5, 2, 3, 4).
- Take the SMALL POUCH and DOLL (U).
- Walk down.
- Use the SMALL POUCH (V) to get the QUARTZ POWDER.
- Use the NUTCRACKER (W) and push the wheel (X).
- Take the POLE FRAME (Y).
- Go to Aleida Weber's Garden (Z).
- Take the SMALL WEDGE 3/3 (A).
- Place the WICKER HEART (B); take the FLUID HERBICIDE and PHARMACIST'S CUP (C).
- Walk down.

- Use the FLUID HERBICIDE; take the GLASS TULIP (D).
- Return to Aleida Weber's Garden.
- Place the GLASS TULIP (E) for a HOP; play it to get the LUMINESCENT FUNGUS.
- Return to the Docks.
- Place the LUMINESCENT FUNGUS (F).
- Take the SKELETAL HAND (G).
- Place the PHARMACIST'S CUP; take the SEDATION POWDER and ORNATE MUG (H).
- Go to the Factory.
- Place the 3 SMALL WEDGES. Read the note; take the CRAFTSMAN'S KIT and SAWDUST (I).
- Walk down.
- Place the QUARTZ POWDER (J) and SAWDUST (K).
- Use the MATCHES on the sawdust to get the GLASS ORNAMENT.
- Return to the Swamp Shore.
- Place the GLASS ORNAMENT and use the SEDATION POWDER on the scene for a puzzle.
- Lead the five fireflies into the orb by using your cursor to lead them there (L).
- Take the GLOWING ORB (M).
- Return to Aleida Weber's Garden.
- Knock on the door (N).
- Place the SKELETAL HAND (O); take the CABINET ORNAMENT (P).
- Place the GLOWING ORB (Q).
- Enter Aleida's Hut.
- Give her the TRIBUTE FABRIC (R) and talk to her for a puzzle.
- Solution one (S).
- Solution two (T).
- Take the DRIVE BAND.
- Place the CABINET ORNAMENT; read the note. Take the RADIANT LENS, SCISSORS, and FLAX BUNDLE 1/3 (U).
- Select the lantern. Place the RADIANT LENS (V).
- Select the map (W).
- Take the TASSEL READER and FLAX BUNDLE 2/3 (X).
- Walk down.
- Take the SHELL KEY and FLAX BUNDLE 3/3 (Y).
- Place the 3 FLAX BUNDLES; take the FLAX FIBERS (Z).
- Enter Aleida's Hut.
- Use the SHELL KEY; look at the photo; take the TASSEL and WICK DIPPER (A).
- Place the TASSEL in the TASSEL READER (inventory). Select 2-4-3-5-1. Select the note. Take the FLYER AND BOBBIN (B).
- Place the FLYER AND BOBBIN, DRIVE BAND and FLAX FIBERS. Spin the wheel 3x and take the STURDY ROPE (C).
- Walk down.
- Place the STURDY ROPE on the POLE FRAME to get the IMPROVISED BRIDGE (inventory).
- Place the IMPROVISED BRIDGE (D).
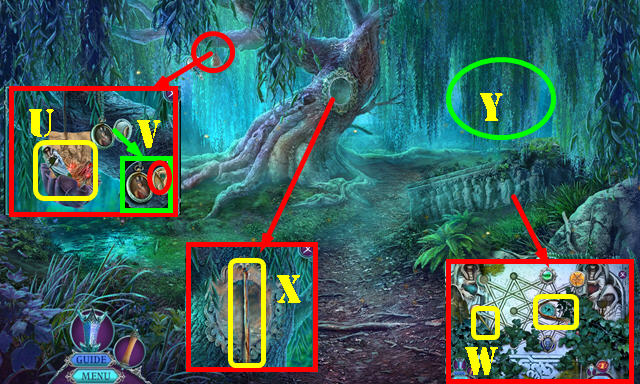
- Go forward, right (E), and into the Sunken Ruins (F).
- Take the CANNON BALL (G).
- Remove the branches twice (H).
- Use the WICK DIPPER on the three marked candles. Take the BOWL OF RESIN and TASSEL (I).
- Place the TASSEL in the TASSEL READER (inventory). Arrange as shown (J). Look at the scroll and take the BRUSH (K).
- Walk down and go left.
- Select the basket 3x (L); place the CANNON BALL for a HOP; play it (M) to get the WOODEN HALCYON.
- Go right.
- Place the SCISSORS and BRUSH in the CRAFTSMAN'S KIT to get the COMPLETE CRAFTSMAN'S KIT (inventory).
- Place the COMPLETE CRAFTSMAN'S KIT. Use the SCISSORS and ICE PICK (N). Use the BRUSH and take the MOSAIC PIECE (O).
- Return to Aleida's Hut.
- Place the WOODEN HALCYON; take the ORGAN LANGUID (P).
- Go to the Sunken Ruins.
- Place the ORGAN LANGUID for a puzzle (Q).
- Solution (1-10).
- Take the WINDOW ORNAMENT.
- Walk down.
- Place the WINDOW ORNAMENT; take the MOSAIC CENTERPIECE (R).
- Enter the Sunken Ruins.
- Place the MOSAIC PIECE and MOSAIC CENTERPIECE (S).
- Take the CROWN EMBLEM and LANTERN OIL (T).
- Use the LANTERN OIL (U).
- Walk down, go left and then forward to the Abandoned Village.
- Select the lights for a puzzle (V).
- Solution one (W).
- Solution two (X).
- Solution three (Y).
Chapter 5: Abandoned Village

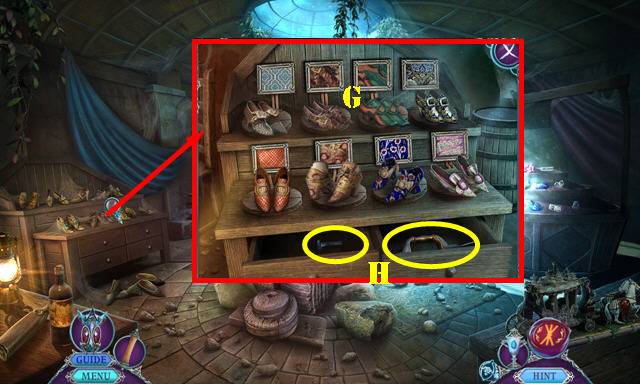
- Take the WOODEN ORNAMENT (A) and SHOE 1/3 (B).
- Read the note (C).
- Place the CROWN EMBLEM (D) for a HOP; play it to get the BOLT CUTTERS.
- Walk down and go right.
- Use the BOLT CUTTERS to get the HUNTING HORN (E).
- Enter the Sunken Ruins.
- Use the HUNTING HORN (F); take the SPECTRUM CARVING (G).
- Return to the Abandoned Village and enter the Inn (H).
- Take the POLEARM and SHELL ORNAMENT (I).
- Place the WOODEN ORNAMENT; take the PROTECTIVE ARTIFACT (J).
- Place the DOLL; select it twice; take the SHOE 2/3 and TASSEL (K).
- Place the TASSEL in the TASSEL READER (inventory). Arrange as shown (L). Select the note (M). Take the DICE 1/2.
- Read the note (N).
- Walk down and enter the Guild House (O).
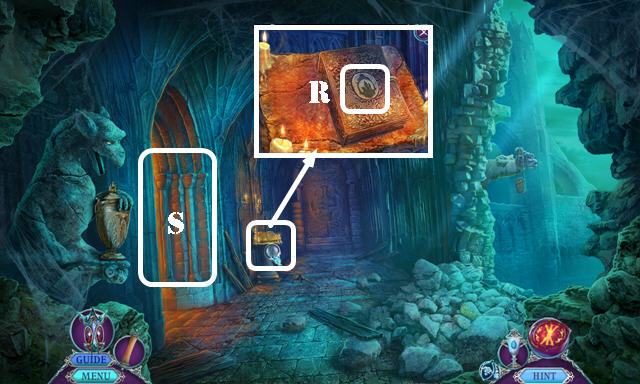
- Look at the note (P). Select the head (Q); put down the BOWL OF RESIN; select the head and take the STONE STATUE.
- Read the note (R).
- Walk down.
- Place the STONE STATUE (S); take the GLASS PRISM (T).
- Return to the Guild House.
- Place the GLASS PRISM and SPECTRUM CARVING; rotate crystals as shown (U) to activate a HOP (V). Play it to get the PORCELAIN STATUE.
- Walk down.
- Place the PORCELAIN STATUE (W); take the DICE 2/2 (W1).
- Return to the Inn.
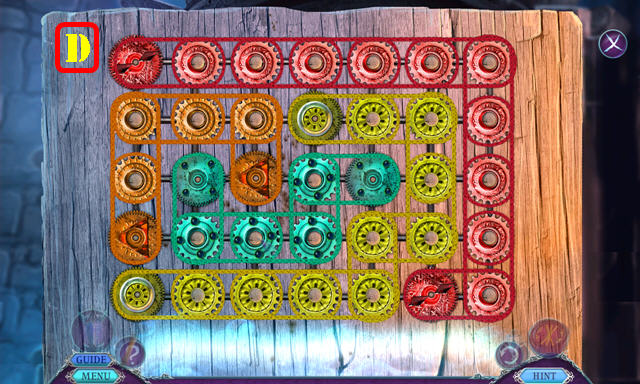
- Place the 2 DICE for a puzzle (X).
- Solution (Y).
- Take the BOTTLE OF SOLVENT.
- Return to the Guild House.
- Use the BOTTLE OF SOLVENT; take the BARREL TAP (A).
- Return to the Inn.
- Place the BARREL TAP; select the buttons: 3-4-1-2.
- Go forward to the Brewery.
- Read the note (B).
- Open the doors (C) for a HOP; play it to get the BROKEN LIFTING TONGS.
- Place the ORNATE MUG; take the CROSSED HAMMERS (D).
- Return to the Guild House.
- Place the CROSSED HAMMERS; take the WOODEN MALLET and TONG ARM (E).
- Return to the Brewery.
- Use the WOODEN MALLET; take SHOE 3/3 and MANE SEGMENT (F).
- Return to the Guild House.
- Place the 3 SHOES for a puzzle. Solution (G).
- Read the note; take the WOODEN BRACE and BOLT (H).
- Select the BROKEN LIFTING TONGS; place the TONG ARM and BOLT; take the STONE LIFTING TONGS (inventory).
- Walk down.
- Use the STONE LIFTING TONGS 3x (I).
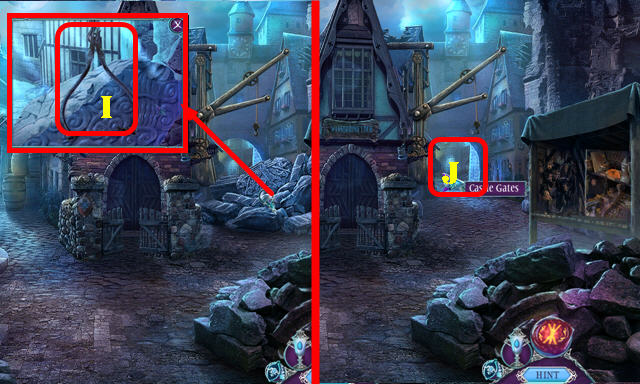
- Go to the Castle Gates (J).
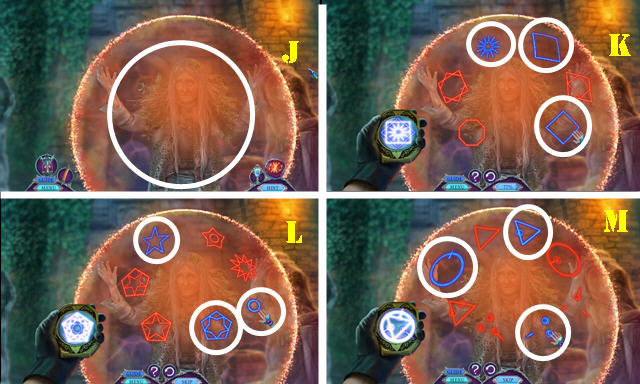
- Use the PROTECTIVE ARTIFACT for a puzzle (J).
- Solution one (K).
- Solution two (L).
- Solution three (M).
- Place the MANE SEGMENT (N); take the OVEN HANDLE and HELM HINGE (O).
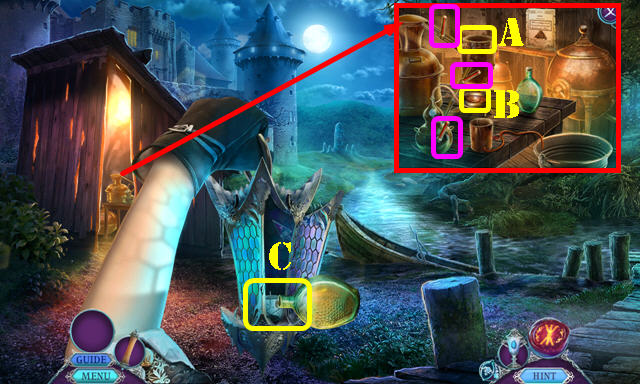
- Use the POLEARM (P); open the hand to get the INCENSE BURNER (Q). Remove the vine and take the BRASS KNOB (R).
- Return to the Brewery.
- Place the OVEN HANDLE; use the INCENSE BURNER to get the BURNING EMBERS (S).
- Return to the Castle Gates.
- Use the WOODEN BRACE; push the barrel (T). Use the BURNING EMBERS.
- Talk to Hilda and Albrecht.
- Go forward.
Chapter 6: The Castle
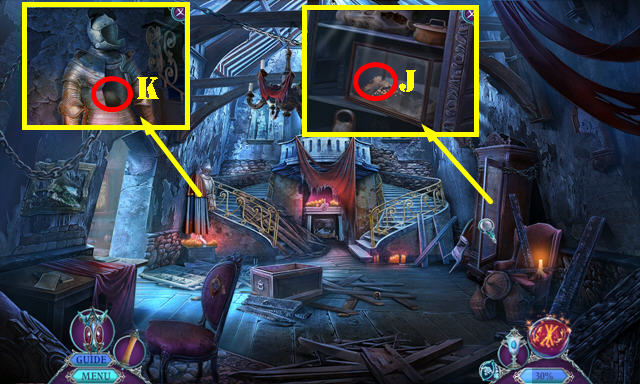
- Push the chair (U). Place the SHELL ORNAMENT; take the CHARCOAL POWDER (V).
- Take the CAPE (W). Place the HELM HINGE; look at the note and take the CABINET KEY (X).
- Go to the Living Room (Y).
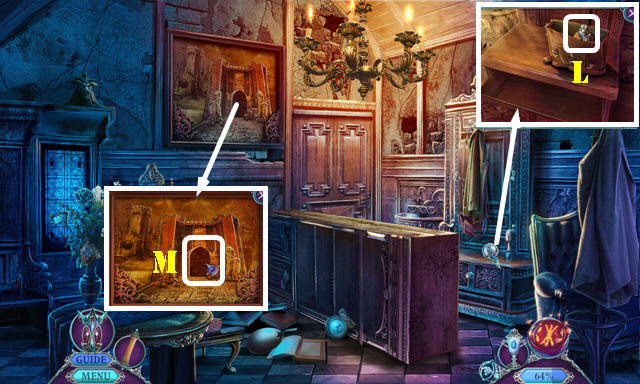
- Take the CORKSCREW (A). Use the CABINET KEY; take the CHEST ORNAMENT (B).
- Take the MANDOLIN STRINGS (C). Place the BRASS KNOB; take the BULLET FRAGMENTS 1/3 (D).
- Go to the Foyer (E).
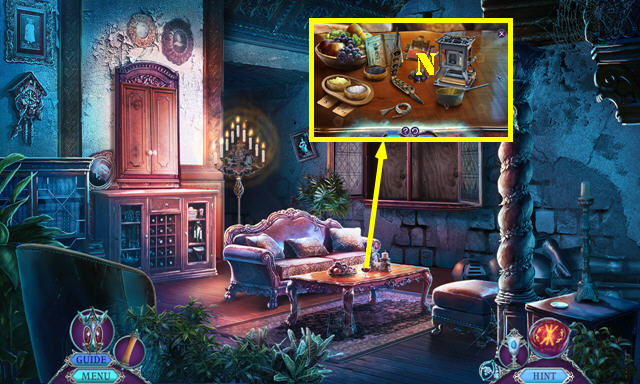
- Knock over the cabinet; look at the book (F). Open the box; take the BULLET FRAGMENTS 2/3 (G).
- Take the SHOULDER STRAP (H). Open the drawer; take the TINDERBOX (I).
- Use the CORKSCREW on the TINDERBOX; take the MATCHES (inventory).
- Return to the Atrium.
- Use the SHOULDER STRAP to get the LEAF BROOCH (J).
- Place the CHEST ORNAMENT; take the BRASS PANEL (K).
- Return to the Foyer.
- Place the LEAF BROOCH; take the BULLET FRAGMENTS 3/3 and SCHNAPPS (L).
- Place the BRASS PANEL (M) for a HOP; play it to get the FLINTLOCK PISTOL.
- Walk down.
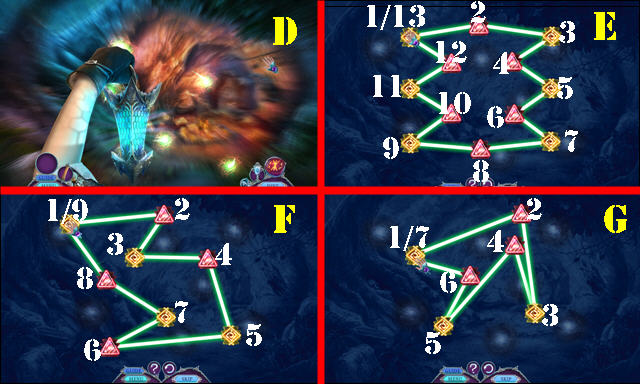
- Place the CHARCOAL POWDER, 3 BULLET FRAGMENTS and MATCHES for a puzzle (N).
- Solution: (O-P)-(Q-R)-(R-S)-(S-U)-(T-V)-(W, X, Y-R).
- Take the GUNPOWDER and BULLET.
- Walk down.
- Place the GUNPOWDER and BULLET into the FLINTLOCK PISTOL to get the LOADED PISTOL (inventory).
- Use the LOADED PISTOL (A) for a HOP (B); play it to get the WOODEN SNAKE PIECE.
- Move the cabinet and go to the Hall of Arts (C).
- Take the FLORAL BRANCH (D) and MUSICAL TRIANGLE (E).
- Place the MANDOLIN STRINGS (F); take the CASTLE CAMEO (G).
- Place the WOODEN SNAKE PIECE (H); take the GEM EYES 1/2 (I).
- Return to the Living Room.
- Use the SCHNAPPS and CAPE. Place the FLORAL BRANCH; take the HEXAGONAL PLAQUE (J).
- Return to the Foyer.
- Use the MUSICAL TRIANGLE; take the FEATHER CREST (K).
- Return to the Hall of Arts.
- Place the FEATHER CREST; open the egg and take the LANTERN OIL (L).
- Use the LANTERN OIL (M).
- Walk down and go to the Ruined Corridor (N).
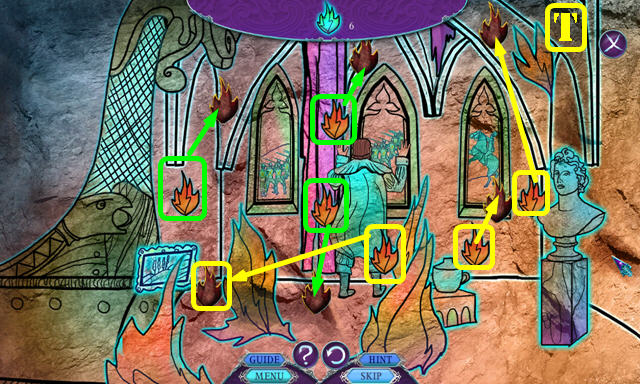
- Select the lights for a puzzle (O).
- Solution one (P).
- Solution two (Q).
- Place the CASTLE CAMEO (R) for a HOP; play it to get the WOLF FANGS 1/3.
- Go to the Family Crypt (S).
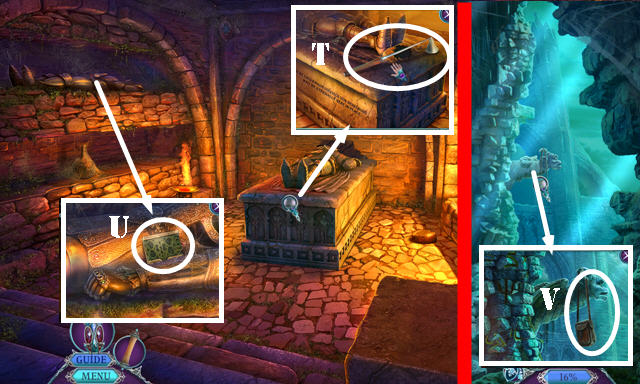
- Take the CANDLE EXTINGUISHER (T).
- Take the STONE TILE (U).
- Walk down.
- Use the CANDLE EXTINGUISHER to get the LEATHER BAG (V).
- Return to the Family Crypt.
- Take the VON NEBELBURG INSIGNIA from the LEATHER BAG (inventory).
- Place the VON NEBELBURG INSIGNIA; take the CARVED ARM (W).
- Look inside the coffin; select the sheet 3x for a puzzle (X).
- Solution; C-I-F-I-E-B-E-C-G-D-A.
- Take the WOLF FANGS 2/3.
- Enter the Treasury (@).
- Place the STONE TILE; take the GARGOYLE'S TONGUE (K).
- Select the book (K1).
- Walk down twice.
- Place the GARGOYLE'S TONGUE; take the SAND-FILLED URN (L).
- Return to the Family Crypt.
- Use the SAND-FILLED URN; take the GEM EYES 2/2 (M).
- Return to the Treasury.
- Place the 2 GEM EYES (N); take the METAL RUNE (O).
- Walk down twice.
- Place the METAL RUNE; read the note and take the DRAWER HANDLE (P).
- Return to the Treasury.
- Place the DRAWER HANDLE; take the DRAGON BODY (Q).
- Walk down.
- Place the DRAGON BODY; take the WOLF FANGS 3/3 (R).
- Return to the Treasury.
- Place the 3 WOLF FANGS (S) for a HOP (T); play it to get the JEWELS.
- Walk down.
- Place the JEWELS; take the MOSAIC ILLUSTRATION (U).
- Return to the Hall of Arts.
- Place the HEXAGONAL PLAQUE and MOSAIC ILLUSTRATION for a puzzle (V).

- Solution (W). Take the CARVED HEAD.
- Return to the Ruined Corridor.

- Place the CARVED HEAD and CARVED ARM (Y).
- Enter the Inner Sanctum.
- Solve the puzzles.
- Solution (A-B-C-D).
- Congratulations, you've completed Myths of the World: The Whispering Marsh.
Created at: 2015-10-02