

WALKTHROUGH MENU
- GENERAL TIPS
- CHAPTER 1: A STRANGE LETTER
- CHAPTER 2: THE ART GALLERY
- CHAPTER 3: THE ADVENTURE BEGINS!
- CHAPTER 4: MYSTERY OF THE LIGHTHOUSE
- CHAPTER 5: BACK TO SCHOOL
- CHAPTER 6: SUDDEN DISCOVERY
- CHAPTER 7: THE BLACK CAT GANG
- CHAPTER 8: THE BANK ASSAULT
- CHAPTER 9: THE FINAL CONFRONTATION
- CHAPTER 10: THE BIG CHASE
GENERAL TIPS
- The game consists of 10 chapters, all varying in length. Each chapter has several mini-games and Hidden Object scenes.
- You can skip any mini-game after the skip button in the lower right has been filled.
- The instructions for the mini-games can be found at the bottom of each puzzle.
- There are no timers in the game.
- There are no penalties for random clicking.
- Read what Natalie is telling you at the bottom of the scene because she might be giving you a hint of what to do next.
- The items in the Hidden Object scenes will be the same for everyone.
- Goals for each section will always be shown in the lower right. When you have several goals, you can click on the UP and DOWN arrows to scroll through all of them.
ICONS & CURSORS
- You can pick up items when you see the HAND cursor appear.
- Hover your mouse over an item to learn its name.
- The LIPS icon in the scene symbolizes dialogue between characters.
- The GEARS icon symbolizes spots or items that need an inventory item to be used.
- The MAGNIFYING GLASS allows you to take a closer look at an item.
HINTS
- Click on the “?” in the lower right to obtain a hint.
- The hint button will show you the exact location of one item in a Hidden Object list. The hint button can also show you an area that needs to be investigated further.
- Hints are unlimited but you have to wait for them to recharge before you can use them again.
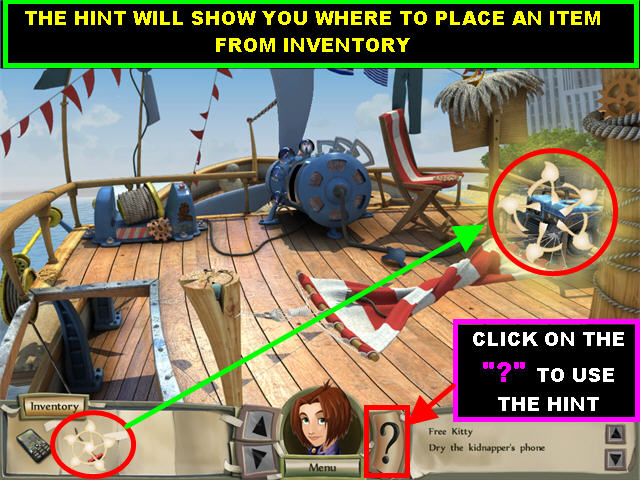
- Once in a while the hints will show a circle around an item from inventory and another circle where it needs to be placed. When this occurs place the inventory item where the hint is showing.
- If you click on a hint and nothing is highlighting move on from that area and explore another one.
INVENTORY ITEMS
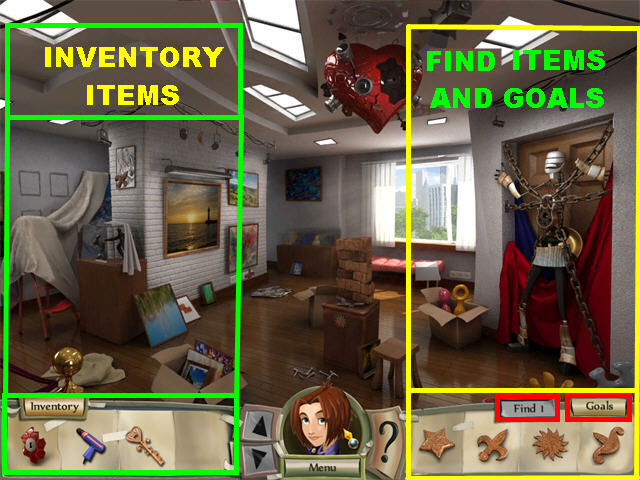
- Your inventory items are stored at the bottom left side of each scene.
- When your inventory tray gets full, click on the UP and DOWN arrows to scroll through all available items.
- You will receive 1 or 2 inventory items at the end of each Hidden Object scene.
- Some inventory items can be used more than once.
- When you want to pick up an inventory item left-click on it. To get rid of an inventory item right-click it.
CHAPTER 1: A STRANGE LETTER
CHECK MAIL
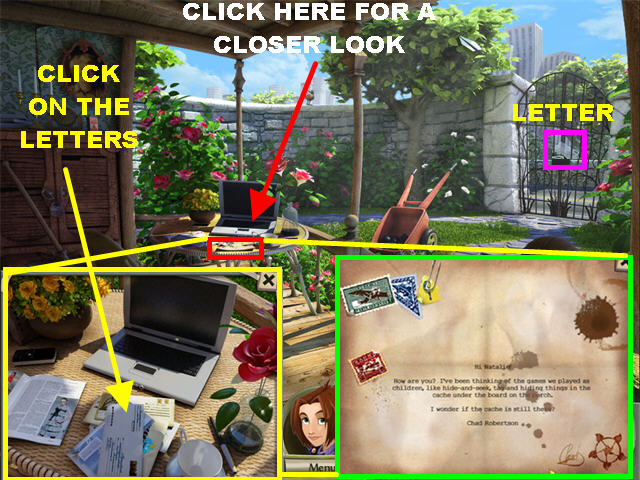
- Grab the Mail on the gate and it will land on the table.
- Click on the Mail on the table for a closer view.
- Click on all the mail on the table until only one remains.
- Click on the last Letter for a closer view. It’s a letter from Chad, he’s wondering if the cache is still under the board on the porch.
- Close out the pop-up window.
FIND SECRET CACHE
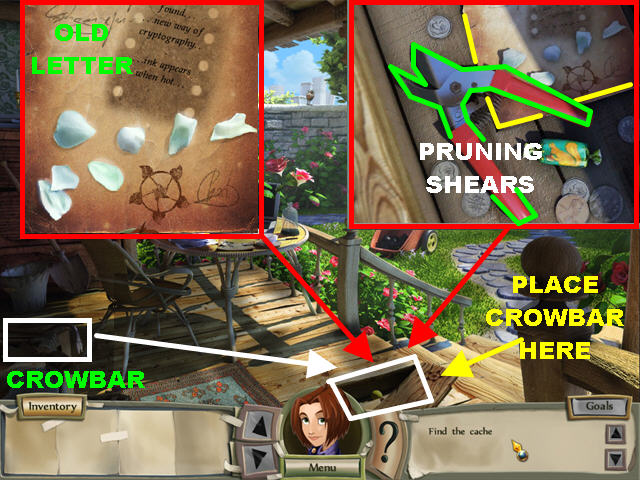
- Pick up the Crowbar the arrow is pointing to in the lower left corner.
- Place the Crowbar on the loose board in the lower right side of the floor to reveal the cache under the porch.
- Click on the cache for a closer view.
- Pick up the Pruning Shears inside the cache.
- Click on the Old Letter and read it. It says that Chad found a new way to do cryptography, ink appears when hot.
- Exit out of the cache.
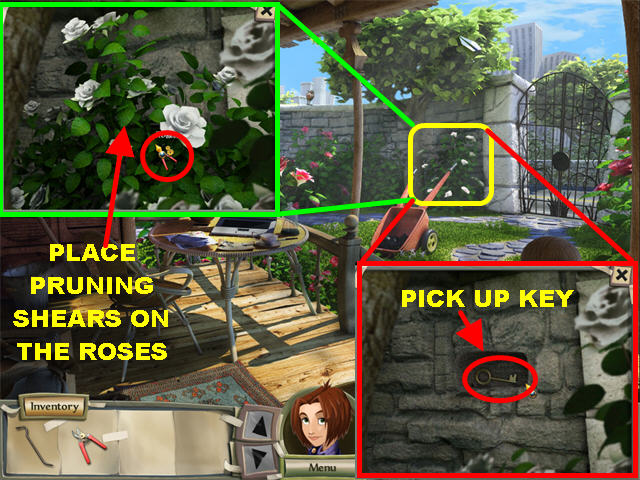
- Use the Pruning Shears to cut the White Roses close to the gate to find another cache.
- Click on the Loose Stone for a closer view.
- Place the Crowbar on the Loose Stone to remove it and pick up the Key.
- Place the Key on the lock of the Wardrobe on the left to unlock it.
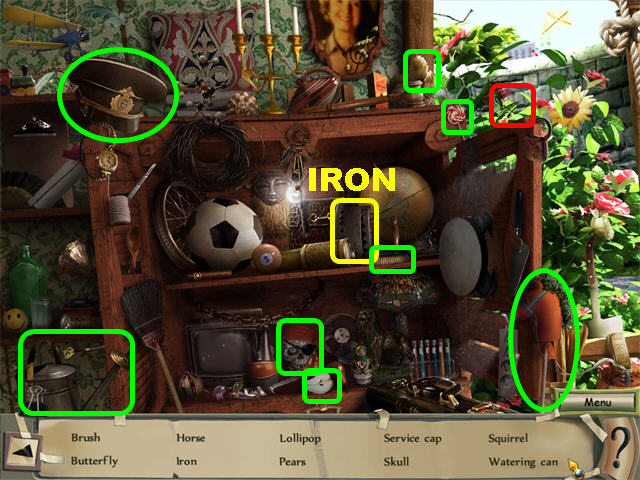
- Click on the Wardrobe to take a closer look.
- Pick up the Iron on the top shelf. Look for the rest of the items on the list.
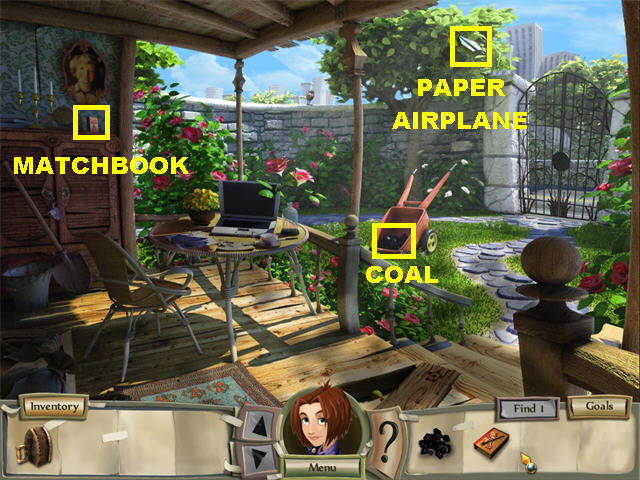
- Pick up the Matchbook on top of the Wardrobe.
- Pick up the Paper Airplane on the tree close to the gate.
- Pick up the Coals in the red wheelbarrow.
IRON MINI-GAME
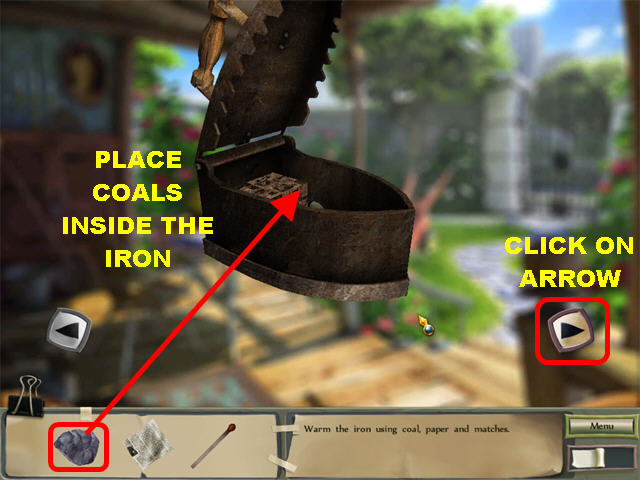
- The iron pops up in the middle of the screen.
- Click on the cover to open it.
- Place the Coals inside the Iron and the lid will shut.
- Use the right arrow to change the view of the Iron.
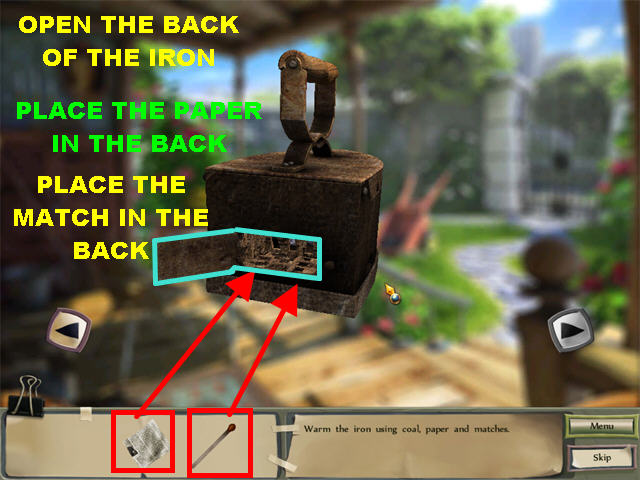
- Click on the latch in the back of the Iron to unhook it.
- Click on the cover to open it.
- Insert the Paper in the back of the Iron.
- Insert the Match in the back of the Iron to heat it.
- The Heated Iron will go back into inventory.
REVEAL INVISIBLE INK
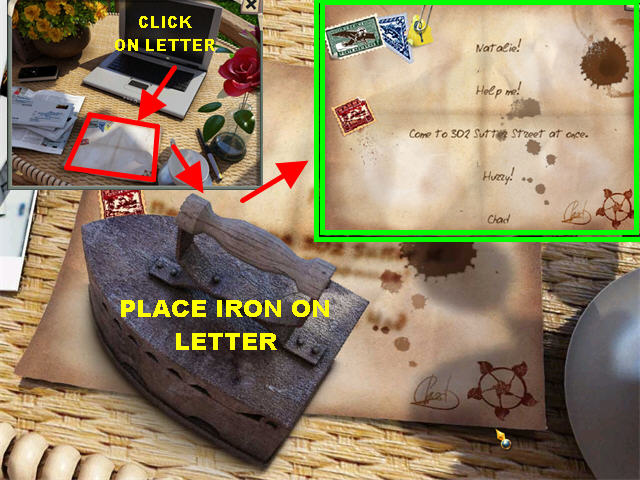
- Click on the Mail on the table for a closer view.
- Place the Heated Iron directly on the Letter.
- You will be taken to a new scene in which you see the Heated Iron passing through the letter.
- The note appears on the screen, it says:”Natalie! Help me! Come to 302 Sutter Street at once. Hurry! Chad.”
- Exit out of that window.

- Click on the Laptop’s Keyboard so you can use Mapit.com to find the location.
- When you click on the Laptop, the address will be typed into the screen and the mapping will begin on its own.
- Click on the pulsating square on the screen to end this chapter.
CHAPTER 2: THE ART GALLERY
HEART EXHIBIT

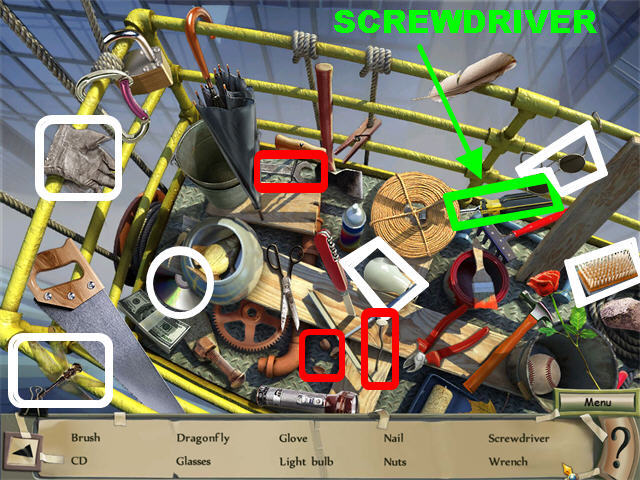
- Pick up the Screwdriver on the left side of the ground.
- Pick up the blue Drill without a Bit in the middle of the floor.
- Click on the red Heart Exhibit in the ceiling.
- Find the 9 pieces of the heart in the scene.
- The 9 Heart pieces are circled in yellow in the screenshot.

- Click on the Key Exhibit in the middle of the floor for a closer view.
- Use the Screwdriver on each of the screws to remove them.
- Pick up the Key to the Heart.
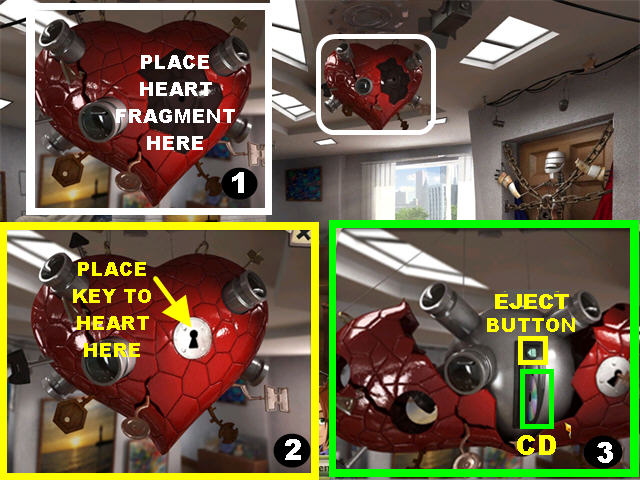
- Click on the Heart for a closer view.
- Place the Heart Fragment into the Heart and a Keyhole will appear.
- Place the Key to the Heart in the Keyhole for a Camera to appear.
- Click on the Camera’s Eject Button and a CD will come out of the slot.
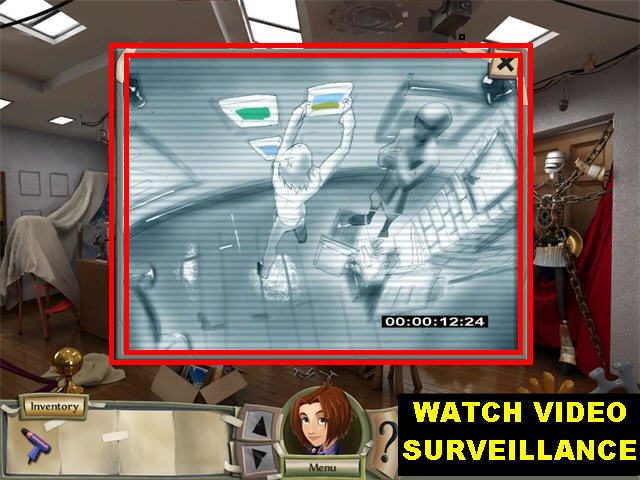
- Click on the CD and watch the surveillance video.
- You will notice someone taking pictures off the wall.
- Exit out of that window.
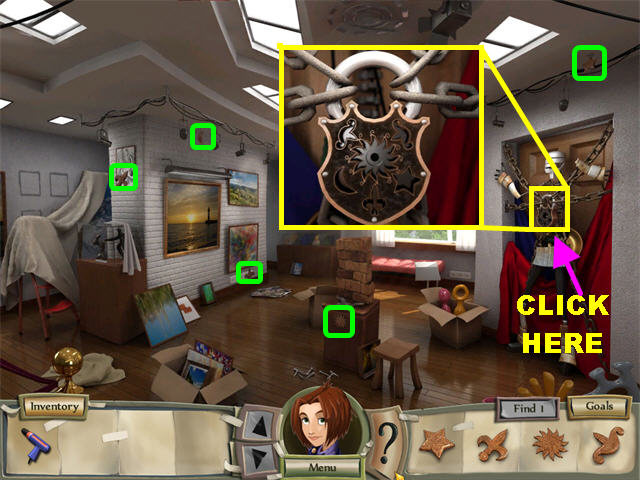
- Click on the Guardian on the right for a closer view.
- Look at the symbols on the Lock and find them in the scene. The 5 Lock pieces are highlighted in green in the scene.
FIND PAINTINGS
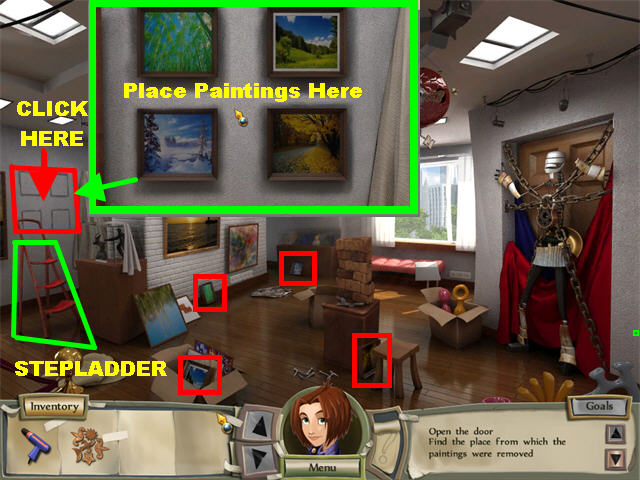
- Click on the curtain on the left to remove it.
- Grab the red Stepladder on the left.
- Click on the left side of the wall to uncover the place in which the paintings were removed. You will be asked to find the 4 Paintings after this action has been performed.
- Please look at the screenshot for the locations of the Paintings.
- Click on the Four Seasons Exhibit on the left side of the wall for a closer view.
- Place the 4 Paintings on the wall.
UNLOCK DOOR
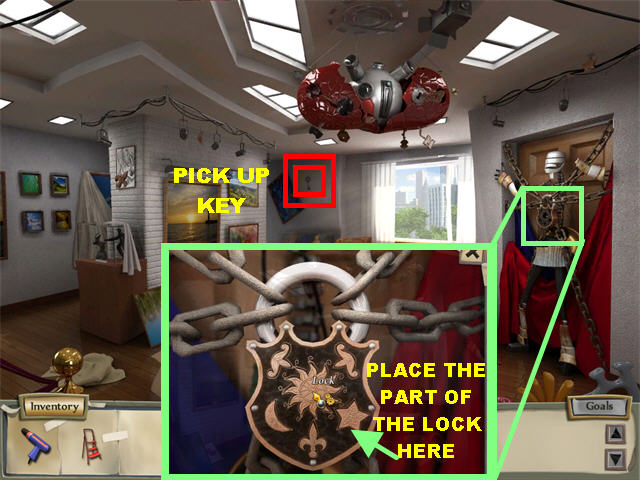
- Once the paintings are placed, picture on the back wall, close to the window falls down.
- Pick up the Key that appears on the back wall.
- Click on the Guardian for a closer look.
- Place the ‘Part of the Lock’ on the lock.
- Place the Key on the door’s keyhole.
- Click on the Basement door and you will be taken to a quick cut scene.
BASEMENT
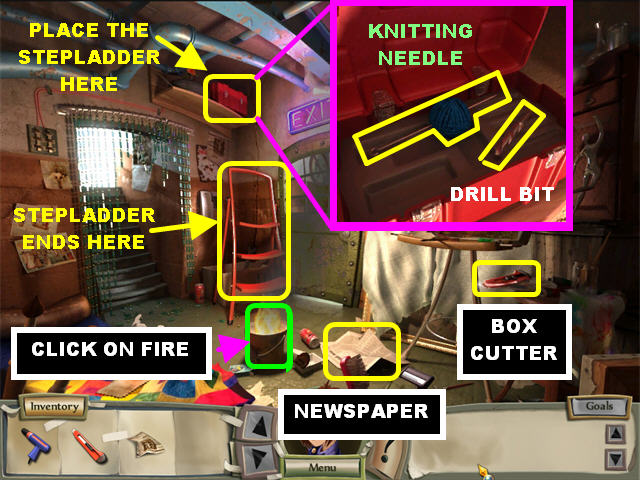
- Pick up the red Box Cutter close to the painting on the right.
- Pick up the Newspaper on the ground.
- Click on the fire on the floor to receive a message to put out the fire.
- Place the Stepladder on the Toolbox that’s in between the steps and the exit door.
- Click on the Toolbox for a closer view.
- Pick up the Drill Bit and the Knitting Needle inside the Toolbox.
- The Drill Bit automatically merges with the Drill in inventory.
OPEN THE DOOR
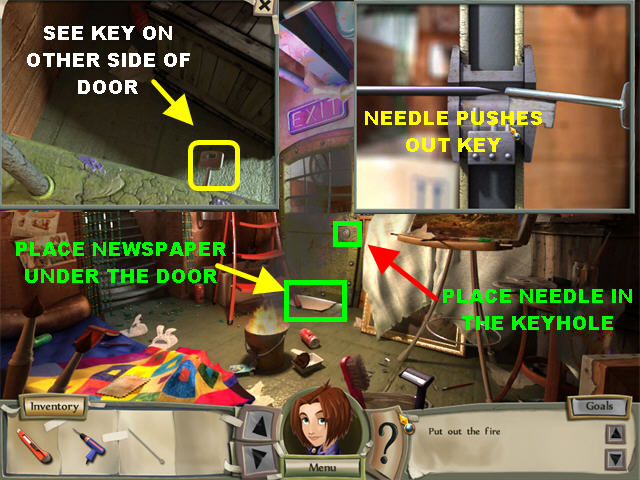
- Click on the Door Window for a closer view and you will see the Key. Close the window view for now.
- Place the Newspaper under the door.
- Place the Knitting Needle in the Keyhole.
- The Knitting Needle pushes the Key out of the lock and onto the Newspaper.
- Click on the Newspaper under the door and the Key will go into your inventory.
- Place the Key into the keyhole to open the door.
- Click on the door to enter.
HIDDEN OBJECT SCENE
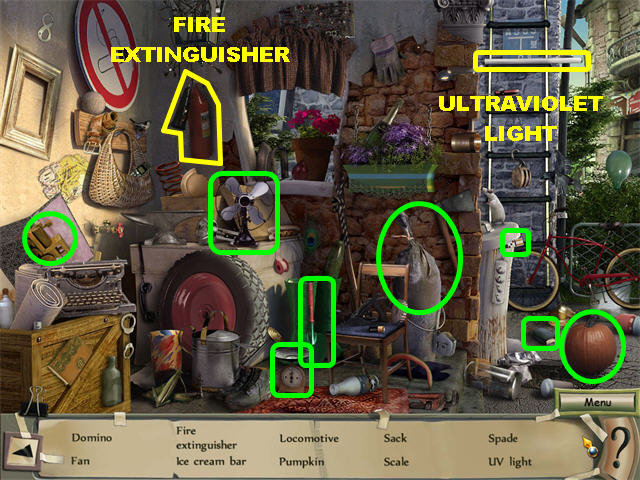
- Pick up the Fire Extinguisher on the left side of the wall.
- Pick up the UV Light on top of the ladder.
EXTINGUISH FIRE

- Place the Fire Extinguisher on the fire in the bucket.
- Click on the bucket for a closer view.
- Pick up the Switch inside the bucket.
- Click on Chad’s Diary to read it. The message talks about Kitty. He also says that he wrote Kitty’s number on the back of a painting. To see the number you have to turn on the Ultraviolet Light.
- Exit out of that window.
REPAIR SWITCH
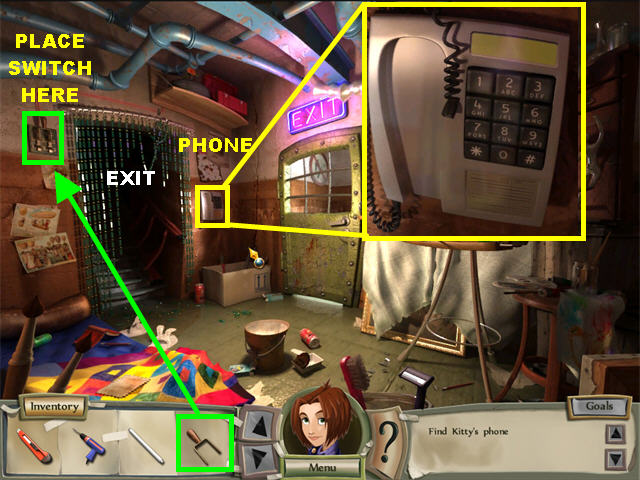
- Place the Switch on the Broken Switch in the upper left side of the scene.
- Click on the Switch to turn off the lights in the Art Gallery.
- Close the exit door and click on the phone. The receiver is missing.
- Let’s go back to the Art Gallery.
OPEN SAFE
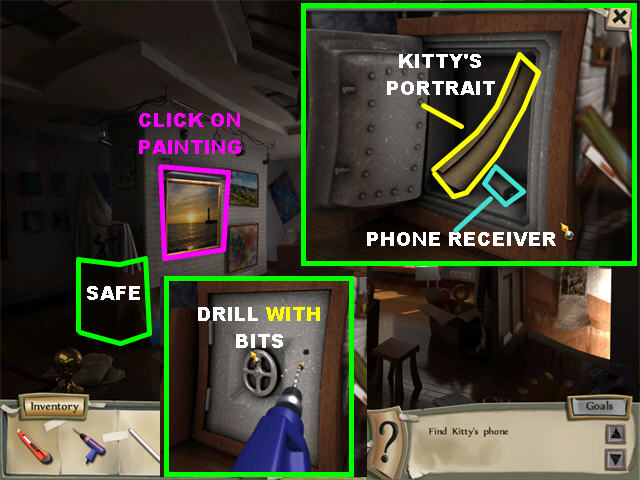
- Click on the safe on the left for a closer view.
- Click on the wooden door to remove it.
- Place the Drill with a Bit on the safe and it will drill 3holes into the safe.
- Click on the safe to open it.
- Pick up Kitty’s Portrait and the Phone Receiver inside the safe.
REVEAL PHONE NUMBER
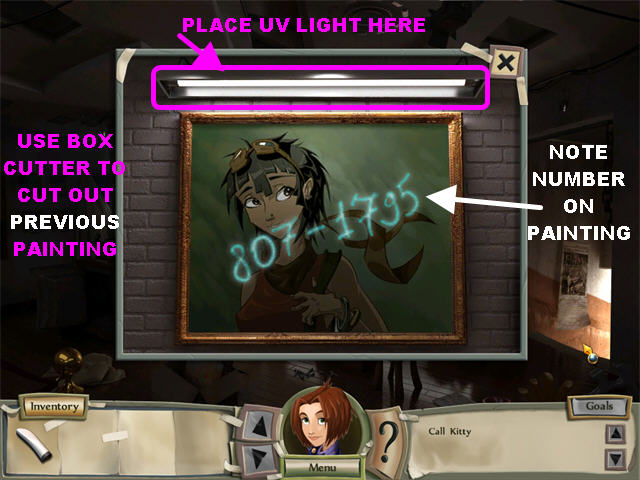
- Click on the large painting for a closer view.
- Place the Ultraviolet Light in the Fluorescent Light Fixture.
- Use the Box Cutter to cut the Painting out.
- Place Kitty’s Portrait in the empty frame.
- The numbers 807-1795 appear on the painting.
- Go back to the Basement.
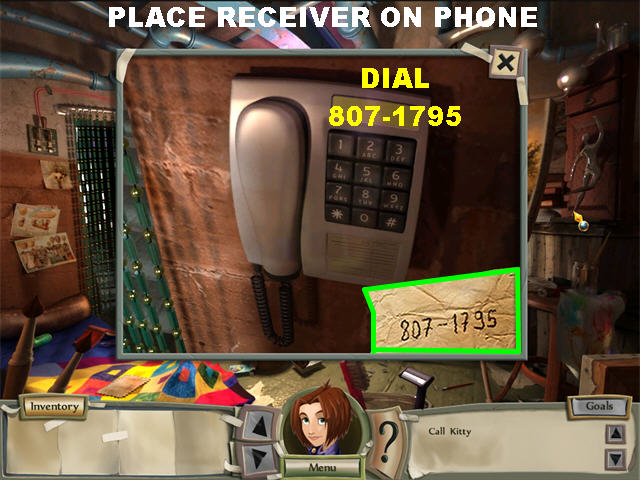
- Click on the door to closer it if you haven’t done so already.
- Click on the Phone for a closer view.
- Place the Phone Receiver on the Phone.
- Dial “8071795” and you will be taken to a cut scene of Natalie talking to Kitty.
CHAPTER 3: THE ADVENTURE BEGINS!
THE BOAT
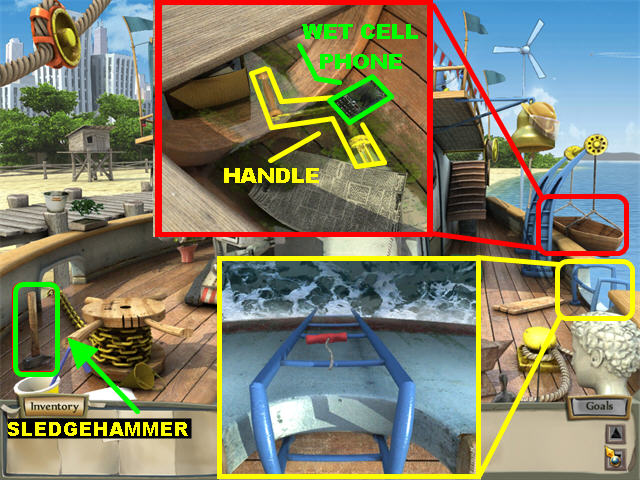
- Pick up the Sledgehammer in the lower left.
- Click on the row boat on the side of the boat for a closer view.
- Pick up the Wet Cell Phone inside the row boat.
- Pick up the Handle inside the row boat.
- Click on the right side of the water for a closer view.
- Pick up the red Starter Cord on the ladder. Close the window.
ACCESS UPPER DECK
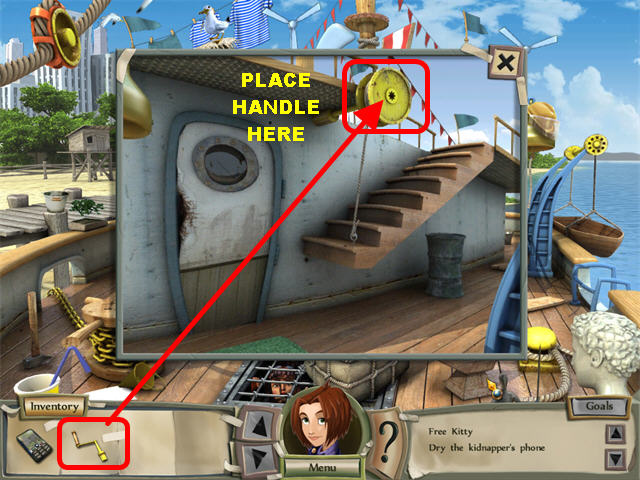
- Click on the steps on the right for a closer view.
- Place the Handle on the yellow wheel in the scene. This action releases the steps so you can reach the Upper Deck.
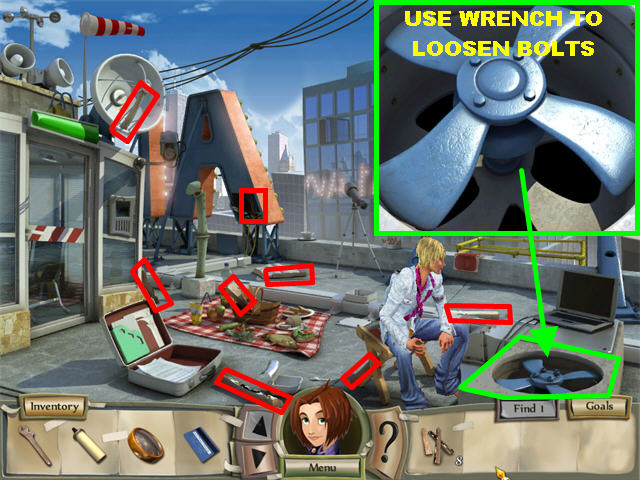
UPPER DECK
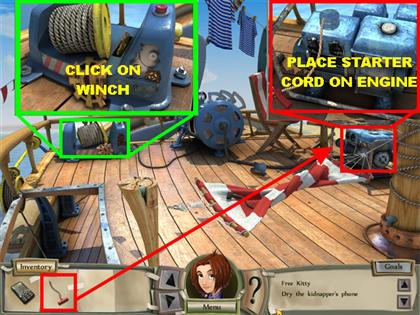
- Place the Starter Cord on the blue engine on the right.
- The Engine will start working and the fan will start moving.
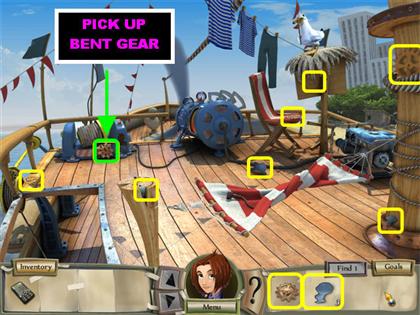
- Click on the Winch on the left and find the 7 parts needed to fix it.
- Pick up the Bent Gear on the Winch itself.
- The Winch Parts are highlighted in yellow in the screenshot.
- Go back to the Lower Deck.
FIX BENT GEAR
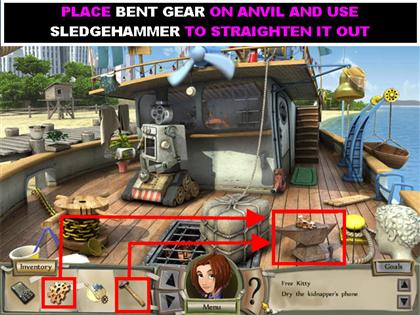
- Place the Bent Gear on the Anvil on the right.
- Use the Sledgehammer on the Anvil to straighten out the Bent Gear.
- Pick up the Gear.
- Go back to the Upper Deck.
FIX WINCH
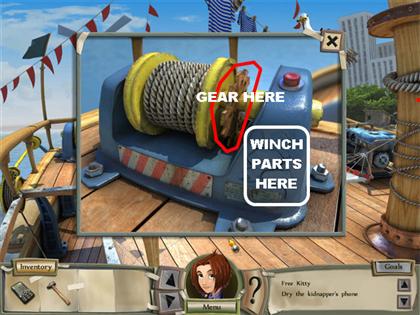
- Click on the Winch for a closer view.
- Place the Winch Parts on the right side of the Winch.
- Place the Gear on the ‘Space for a Gear’ on the Winch.
- Click on the red Start Button on top of the Winch.
- You will be automatically taken back to the Lower Deck.
OPEN HOLD
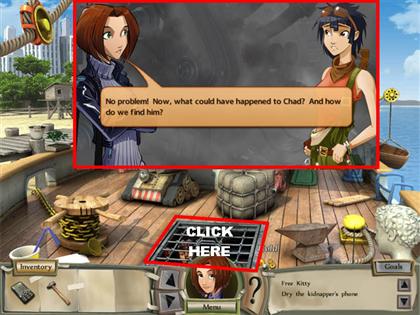
- Click on the Cargo Hold Grate on the ground.
- Click on it again and you will be taken to a cut scene of Kitty and Natalie talking.
DRY KIDNAPPER’S PHONE
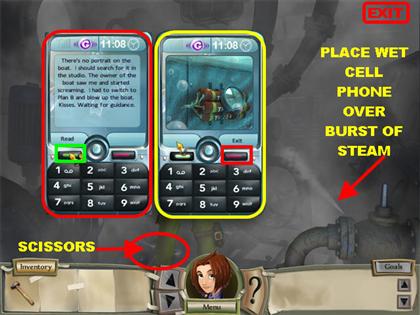
- Place the Wet Cell Phone on the burst of steam coming out in the lower right.
- You will see a close-up view of the phone pop up on your screen.
- Click on the Green Button (READ) to read the message.
- Click on the Green Button (READ) to see picture of a bomb.
- Click on the Red Button (EXIT) to close that window.
- Pick up the Scissors in the lower center.
- Exit the scene by clicking in the upper right side.
ACCESS CABIN
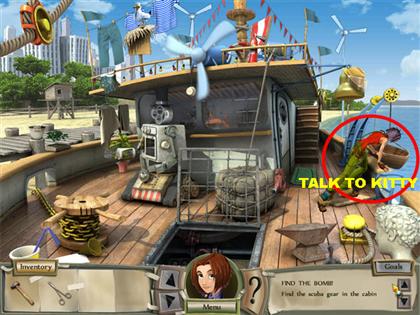
- When you get back to the Lower Deck, Kitty is on the boat.
- Click on Kitty and she tells you that the Scuba Gear should be in the cabin but the door has been blocked.
- Go to the Upper Deck.
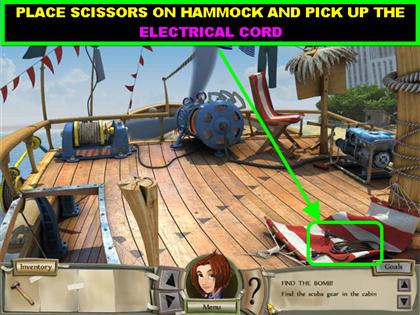
- Place the Scissors on the Hammock to make it fall to the ground.
- Pick up the Electrical Cord on the Hammock.
- Go back to the Lower Deck.

- Place the Electrical Cord on the Robot in the Lower Deck.
- The Robot moves to the side as soon as it is plugged in.
- Place the Sledgehammer on the window to break it.
- Click on the broken window to enter the Cabin.
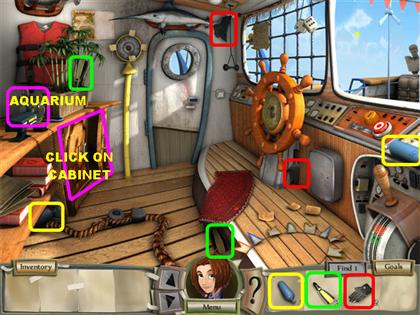
FIND SCUBA GEAR
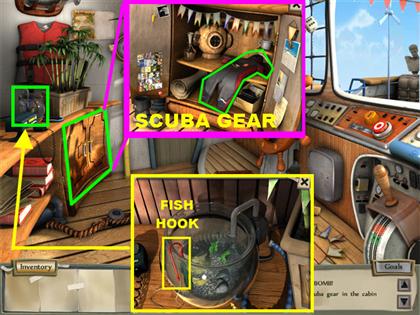
- Click on the cabinet on the left to open for a closer view.
- Pick up the Scuba Gear inside. You have to find the rest of the accessories for it.
- Click on the Aquarium on the left for a closer view.
- Pick up the Fish Hook on the side of the bowl.
- Please look at the screenshot for the locations of all the items.
- Click on the window to exit the Cabin.
FIND THE BOMB
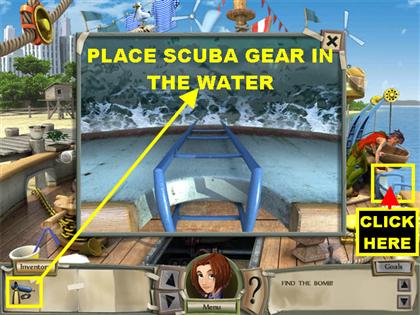
- Click on the blue ladder for a closer view of the water.
- Place the Scuba Gear in the water to trigger a Hidden Object scene.
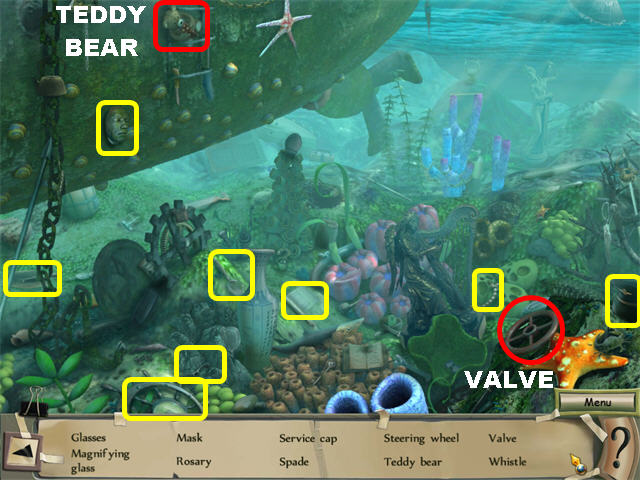
- Pick up the Valve in the lower right.
- Pick up the Teddy Bear on the top left.
- Find the rest of the items on the list and the Teddy Bear will be on your screen afterwards.
TEDDY BEAR BOMB
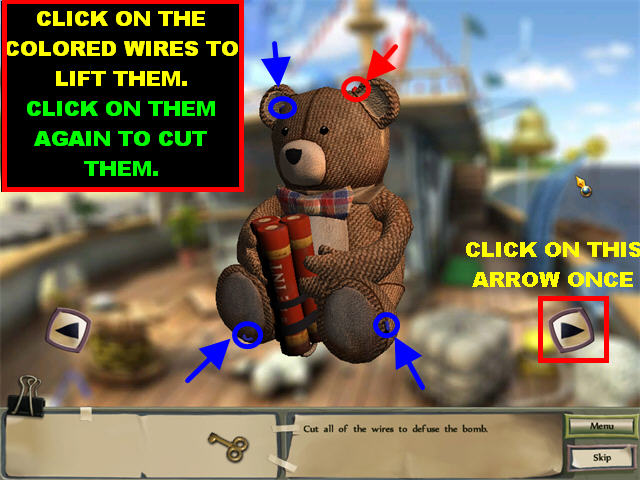
- Click on the wires circled in blue and red in the screenshot to pull them out.
- Click on the wires a second time to cut them.
- Click on the right arrow ONCE to see the back of the Teddy Bear.
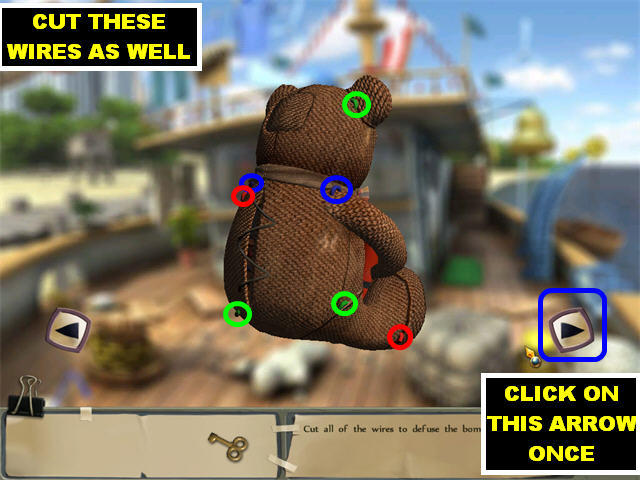
- Follow the same procedure to cut these wires.
- Click on the right arrow ONCE to move the bear’s position.
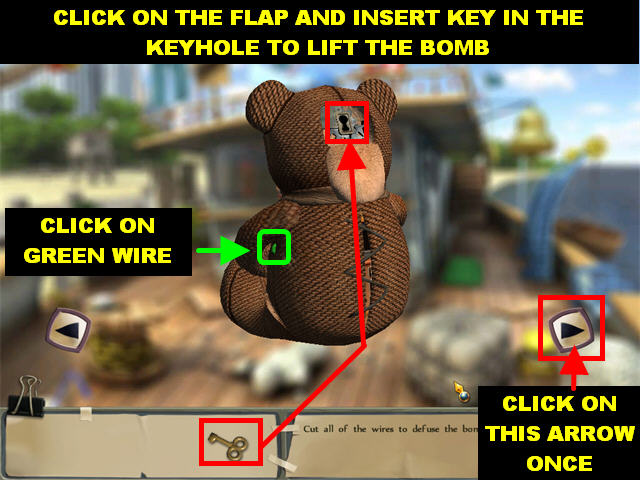
- Eliminate the green wire.
- Click on the back of the head to open a compartment.
- Place the Key in the Keyhole in the back of the head.
- Turn the Key once to lift the explosives in the Bear’s hands.
- Flip the Teddy Bear back to the front by clicking on the right arrow ONCE.
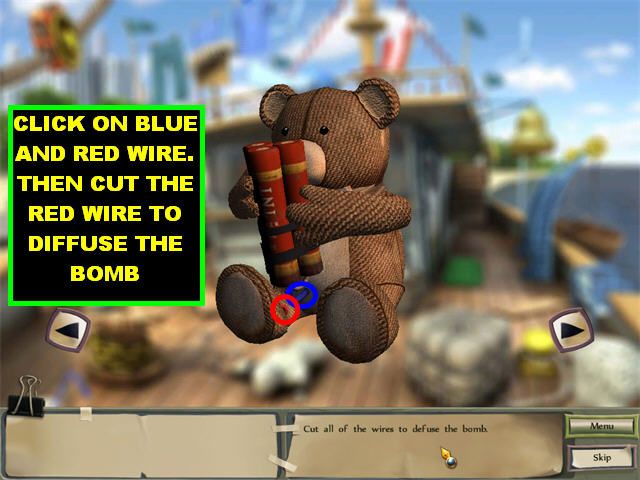
- Click on the Red and Blue Wires on the Teddy Bear.
- Click on the red wire to diffuse the bomb.
- Go back to the Cargo Hold.
GET CHAD’S LETTER OUT OF ROBOT
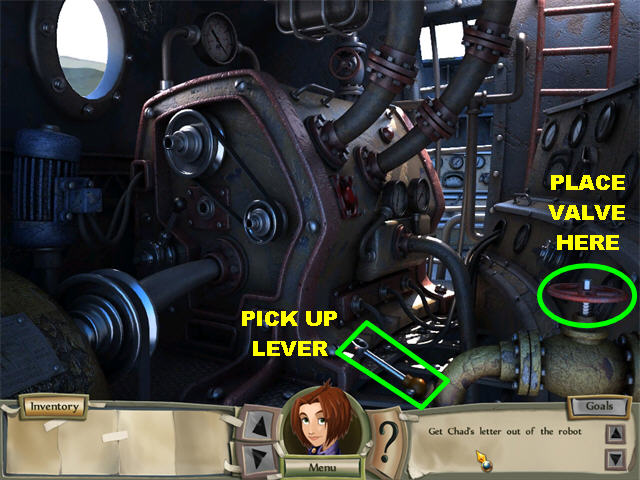
- Place the Valve in the lower right corner and all the steam will disappear.
- Pick up the Lever on the lower right.
- Go back to the Lower Deck by using the ladder on the top right side.
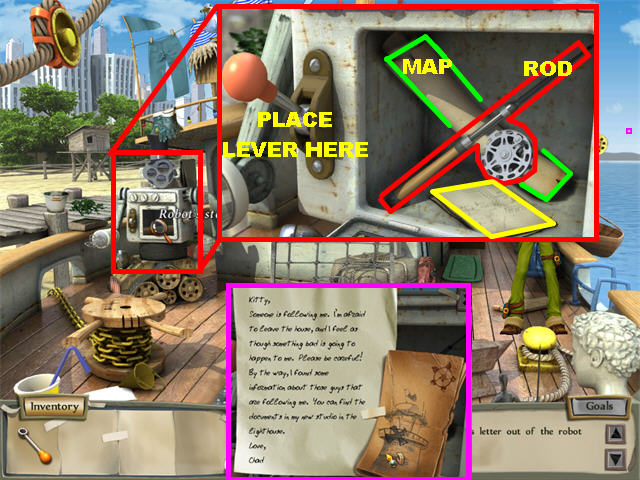
- Click on the Robot’s Stomach for a closer view.
- Place the Lever on the left side of the Robot.
- Click on the Lever to open the compartment.
- Pick up the Fishing Rod without a Hook. It will automatically connect with the Fish Hook in inventory to form a Fishing Rod.
- Pick up the Torn Map.
- Click on the Lighthouse Blueprint for a closer view. There’s a note that states Chad has some documents hidden in his new studio in the lighthouse.
- Click on the Lighthouse Blueprint and it will go into your inventory.
CATCH FISH MINI-GAME
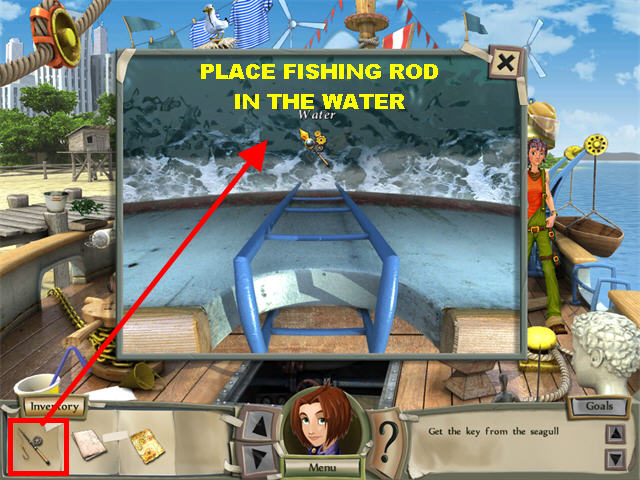
- Click on the right side of the boat for a closer view.
- Place the Fishing Rod in the water to trigger a mini-game.
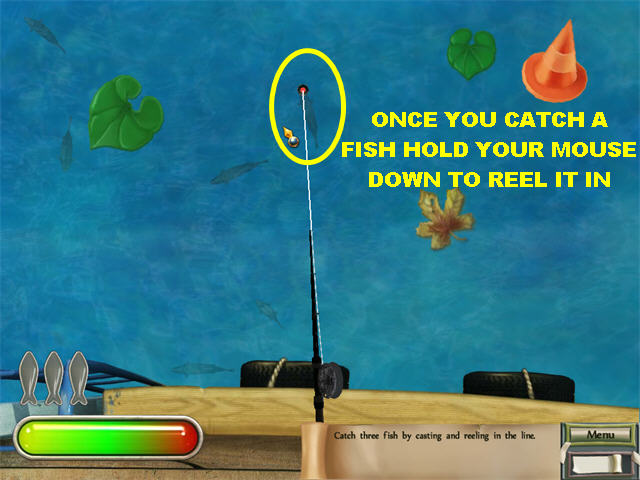
- Your goal is to catch 3 fish by casting and reeling the line.
- Hold your mouse down in the water, the longer you hold it, the further the line will go in the water. Release the mouse at the right time.
- Once you catch a fish, hold your mouse down to reel it in.
- Go back to the Upper Deck.
GET KEY FROM SEAGULL
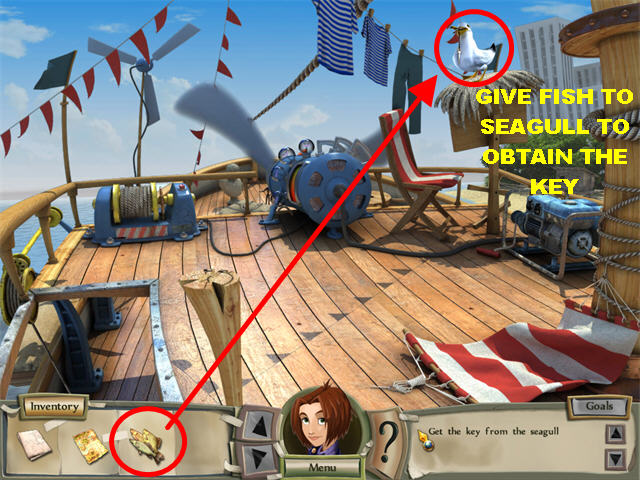
- Give the Fish to the Seagull in the upper right and the Key will go into your inventory.
- Go back to the Lower Deck.
- Go to the Cabin through the window.
LET’S GO!
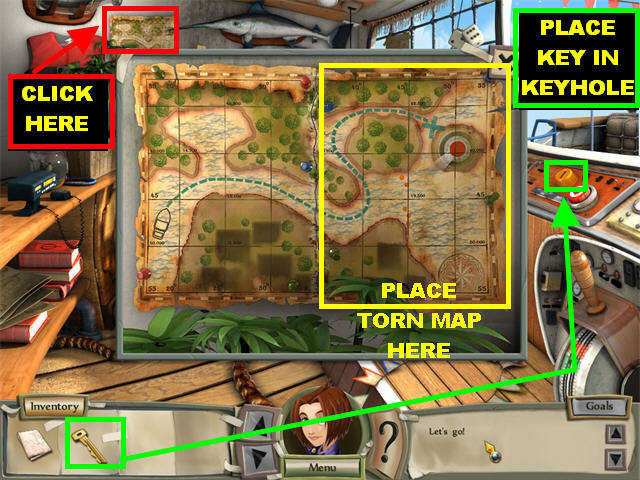
- Click on the Half Map in the upper left side of the back wall for a closer view.
- Place the Torn Map on the right side of the pop-up window.
- Place the Key in the Keyhole closer to the wheel and a fire will break out.
- Go out the window and go back to the Cargo Hold.
PUT OUT THE FIRE/ PUMP OUT WATER
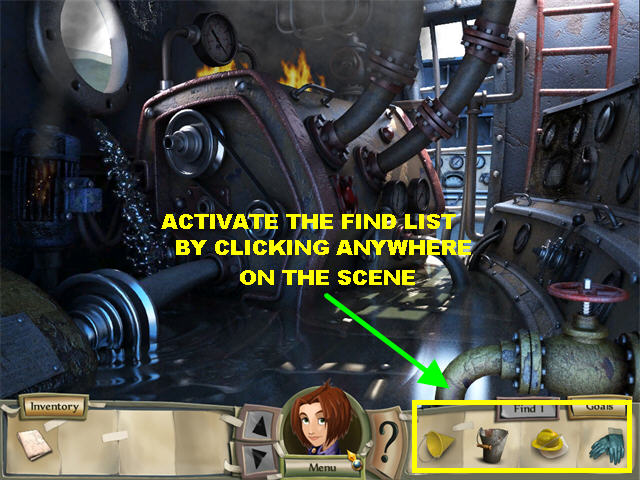
- Click on the scene so the items needed to fight the fire can appear on your find list.
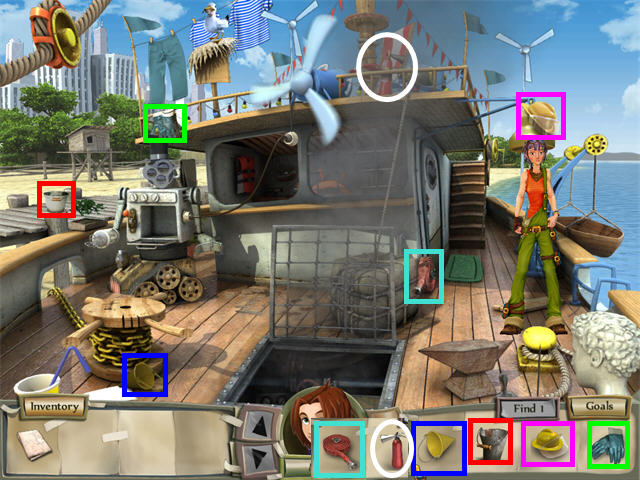
- Go back to the upper deck to locate the items.
- Please look at the screenshots for the location of all the items. You can only click on the items when they are visible on your list. As you find one, another item appears.
- Go back to the Cargo Hold.
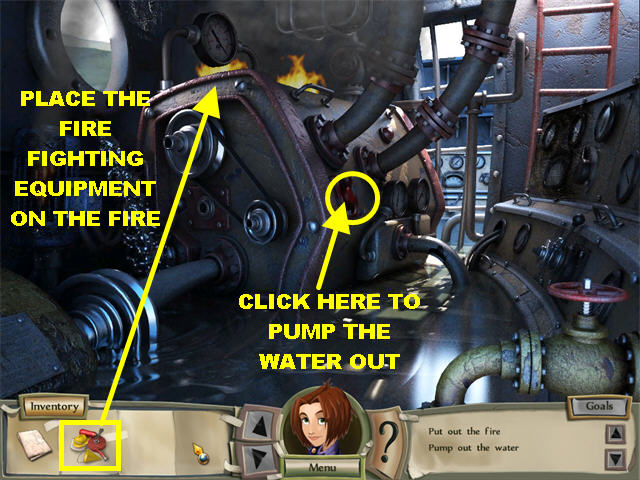
- Place the Fire Fighting Equipment on the fire.
- Click on the Red Start Button in the center of the scene to shut off the water.
NOW GO!
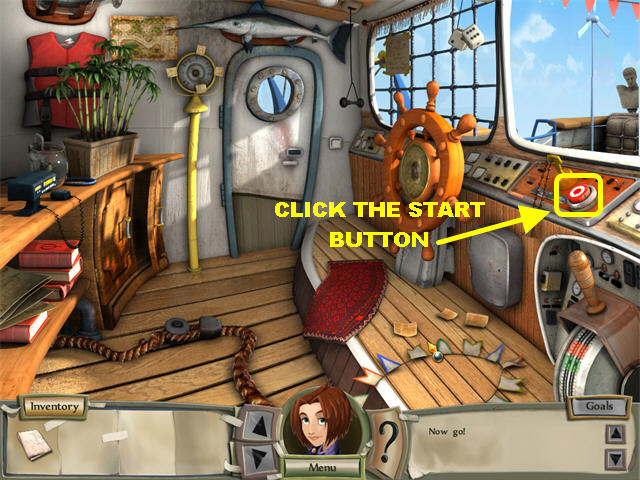
- Go back to the Cabin.
- Click on the Start Button on the right to go to the Lighthouse.
STEER THE BOAT MINI-GAME
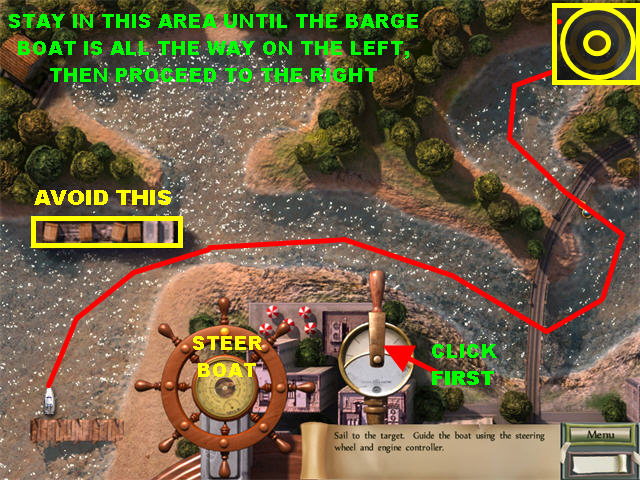
- Your goal is to sail to the yellow target in the upper right corner.
- Click on the lever on the right to get the boat started.
- Use the steering wheel on the lower left to steer the boat.
- Shortly after you start sailing wind and thunder will set in.
- Even if you hit some rocks along the way you will be able to continue through the game without penalty.
CHAPTER 4: MYSTERY OF THE LIGHTHOUSE
TURN LIGHTS ON
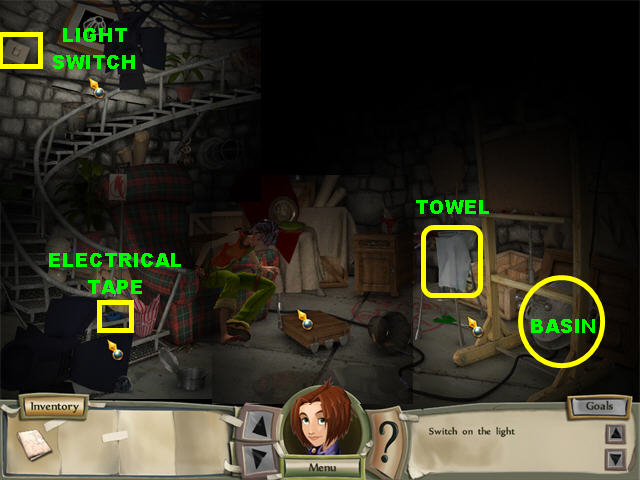
- The scene is dark when you first enter. You need to turn on the lights but you cannot do so until you repair the wire.
- Pick up the Basin in the lower right.
- Pick up the Electrical Tape in the lower left corner.
- Pick up the Towel in the lower right.
- Click on the light switch in the upper left side of the scene to turn the power off.
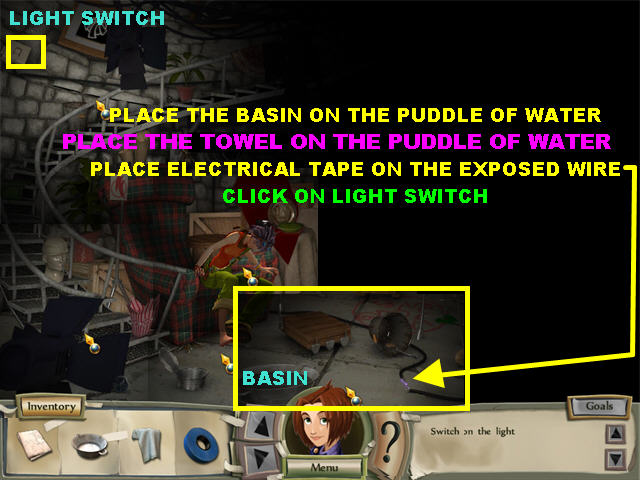
- Place the Basin under the dripping water in the lower center.
- Place the Towel on the puddle of water.
- Place the Electrical Tape on the Exposed Wire.
- Click on the light switch again to turn on the lights.
FIRST AID KIT
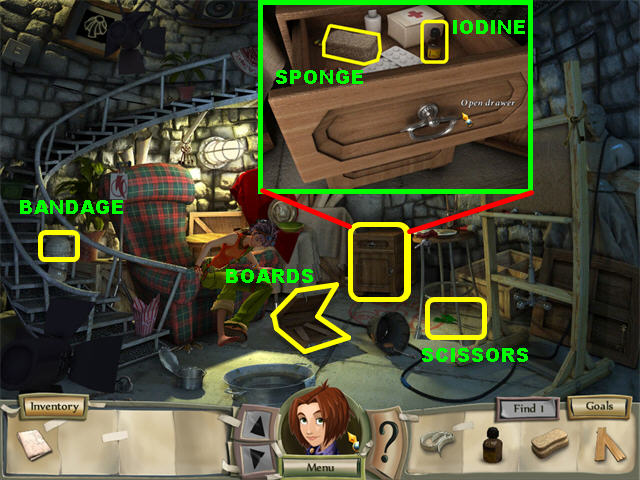
- The bandage can be found by clicking on the silver head at the bottom of the steps.
- Click on the cabinet in the back of the scene for a closer view. Open the top drawer of the cabinet.
- Pick up the Sponge and the Iodine inside the drawer. Exit that pop-up window.
- Click on the case on the floor to open it.
- Pick up the Boards inside the case.
- Pick up the Scissors in the lower right side, under the stool.
- After all the items have been picked up the First Aid Kit will go into your inventory.
- Place the First Aid Kit on Kitty’s leg.
EXAMINE BLUEPRINT
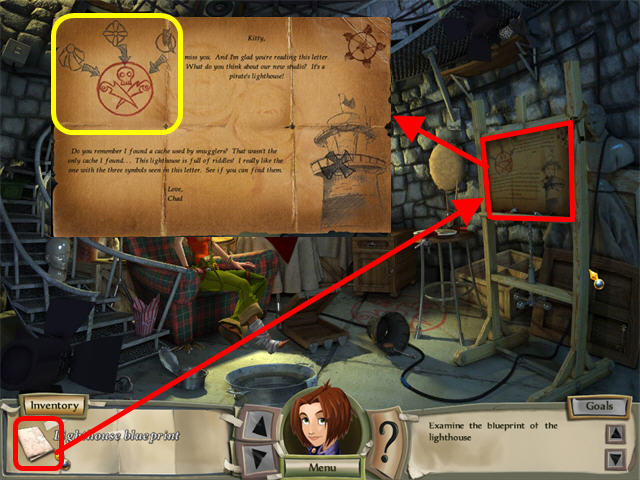
- Place the Lighthouse Blueprint on the corkboard.
- Click on the corkboard for a closer view.
- The letter from Chad asks you to find the 3 symbols shown on the letter.
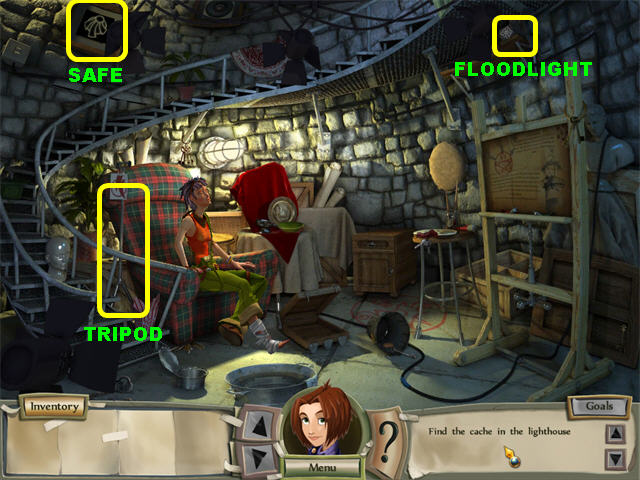
- Click on the Floodlight in the upper right for the first symbol.
- Pick up the Tripod on the left, next to Kitty’s chair for the second symbol.
- Click on Chad’s safe in the upper left corner and the panel will move aside.
- Click on Chad’s safe again to trigger a puzzle.
TOKEN PUZZLE
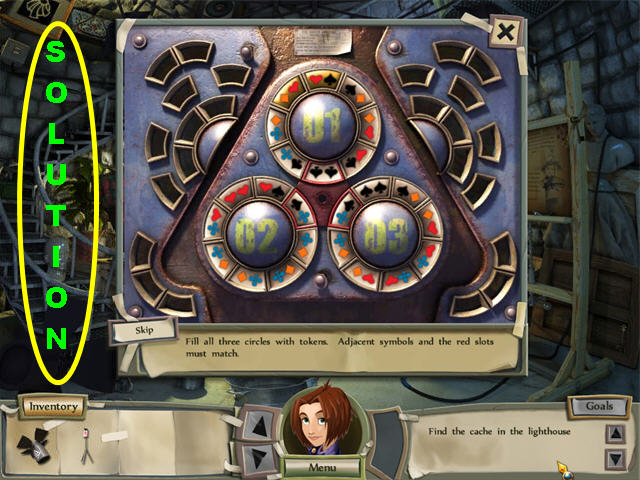
- Your goal in this puzzle to fill all three circles with tokens.
- Adjacent symbols and the red slots must match.
- The two pieces in the top symbols cannot be moved, start with those pieces first.
- The pieces will not go into the slots if they are not placed next to a matching symbol.
- When you want to reset the puzzle, exit out of it.
- There are several possible solutions for this puzzle, please look at the screenshot for one of the solutions.
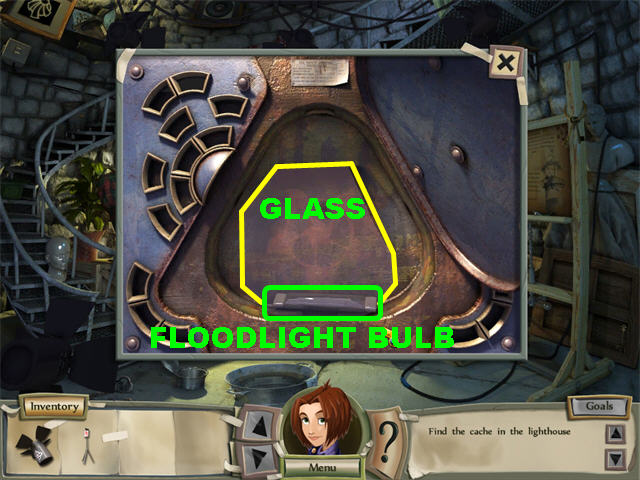
- Pick up the Glass and the Floodlight Bulb inside the safe after the puzzle has been solved.
PLACE SYMBOLS
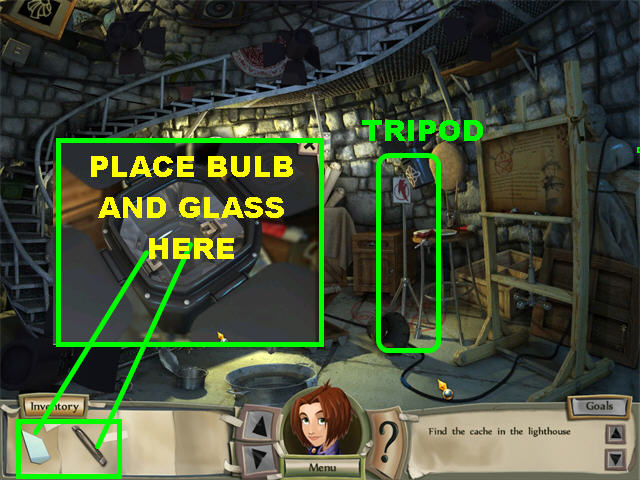
- There is strange symbol marked in red on the right side of the ground.
- Place the Tripod on the strange symbol.
- Place the Floodlight on the tripod.
- Click on the Floodlight for a closer view.
- Place the Floodlight Bulb in the Floodlight.
- Place the Glass in the Floodlight and the scene will zoom into the ceiling and you will see bats flying around.
DRIVE AWAY BATS

- Click on the Sledgehammer in the upper right side.
- Click on the window to open it and trigger a mini-game.
BATS MINI-GAME
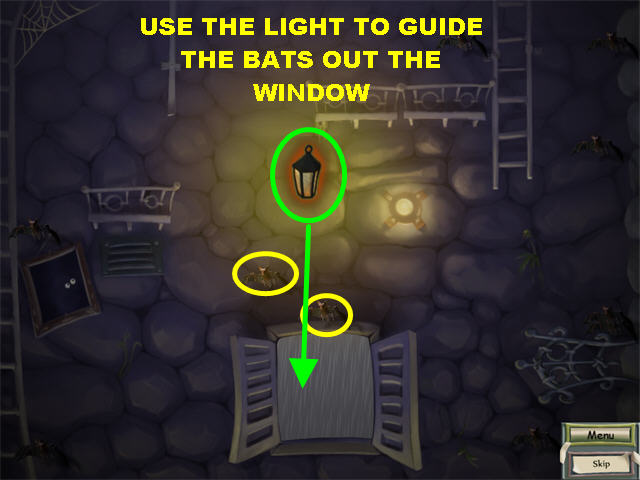
- Use the light to move the bats out the window.
- Keep the lights above the bats to move them downwards.
- Place the lights below the bats to make them fly upwards.
- Once the bats are close to the window, use the lights to make them go outside.
- You will win the game once all the bats have gone out the window.
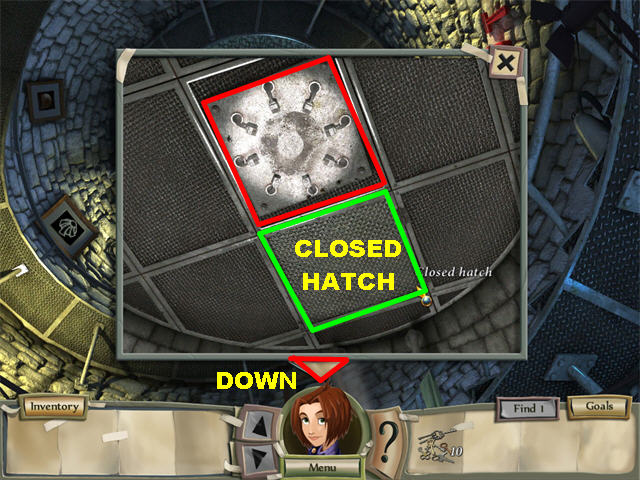
- Click on the hatch in the ceiling for a closer view.
- The top part of the pop-up window is a spot in which you need to place a mirror.
- Click on the closed hatch and the game will ask you to find 10 keys.
- Click on the arrow at the bottom of the scene to return to the previous view.
FIND 10 KEYS
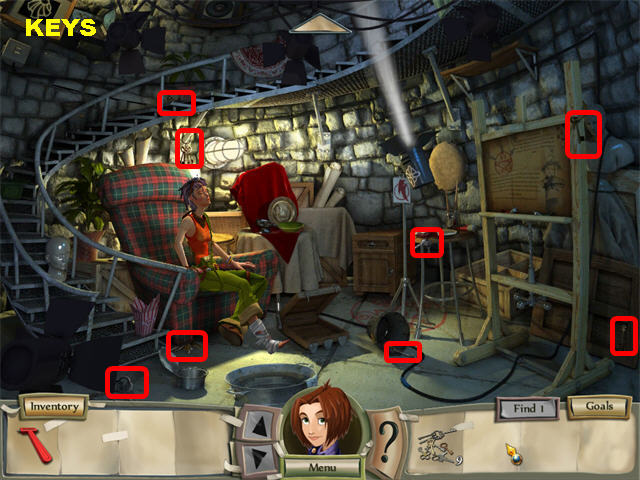

- Please look at the screenshots for the locations of all the keys.
- Some keys are found in the lower scene and others are found in the upper scene.
- Go back upstairs and click on the hatch.
- Place the Key in the keyhole in the hatch.
- Go through the opening to access the Lighthouse.
LIGHTHOUSE
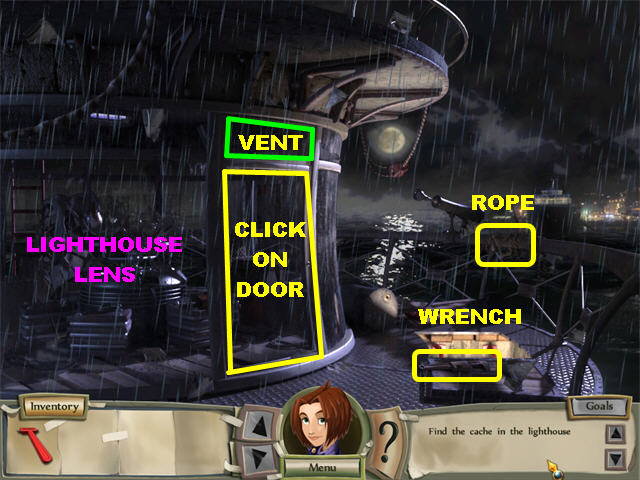
- Pick up the Rope on the right side of the railing.
- Pick up the wrench in the lower right side.
- Click on the door for a closer view. It tells you there is a handle on the other side of the door. You must find a way to get to it.
- Exit out of that scene and click on the vent above the door.
- Place the Rope on the vent directly above the door.
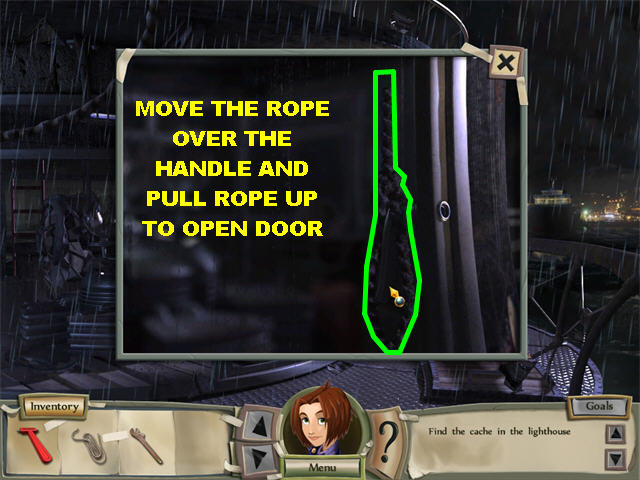
- Guide the Rope to attach itself to the door’s handle on the right. Pull the rope up once it is over the handle.
- You will have access to the Lighthouse Lens as soon as you’ve hooked the handle.
- Click on the Lighthouse Lens for a closer view.
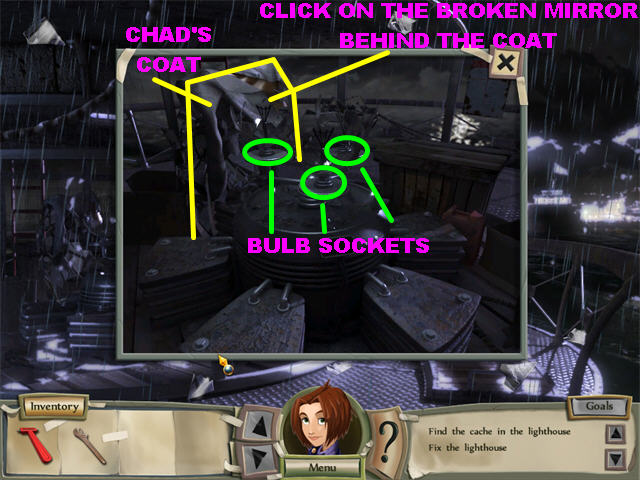
- Click on the broken bulb in the center and the game will tell you to replace the bulbs.
- Pick up Chad’s Coat in the upper center. The Key from Chad’s pocket will go into your inventory.
- Click on the broken mirror behind the coat and you will be asked to find 12 mirror pieces.
FIX THE MIRROR
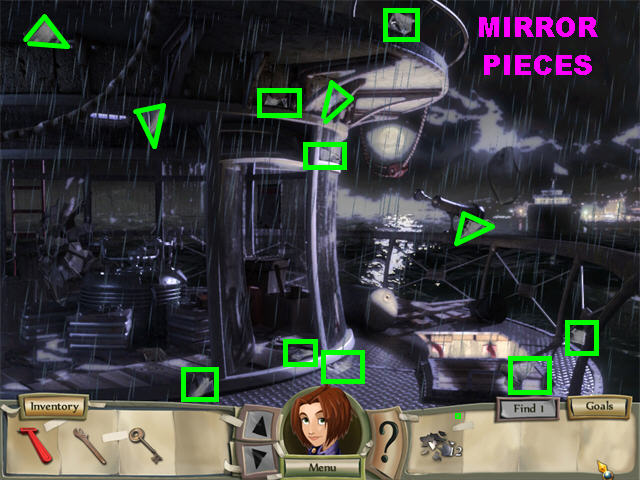
- Please look at the screenshot for the locations of all the mirror pieces. The pieces can best be seen when lightning illuminates the area.
- Go downstairs by clicking on the hatch on the right. Go down one more time after that.
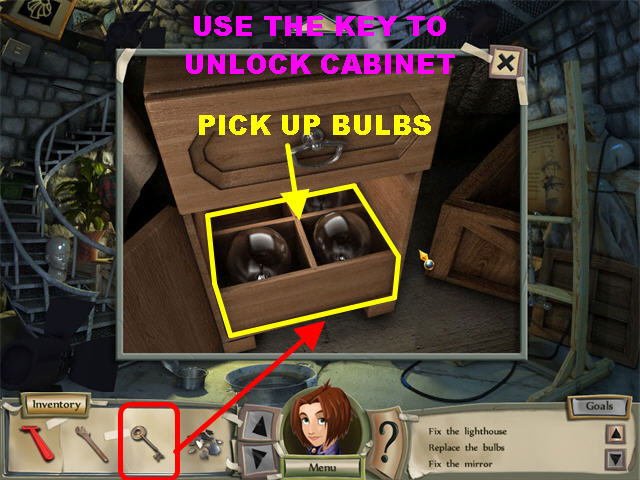
- Click on the cabinet for a closer view.
- Use the Key to the Cabinet on the keyhole to open it.
- Pick up the Bulb Sockets inside the drawer.
- Click on the arrow to go back upstairs. Go through the hatch.
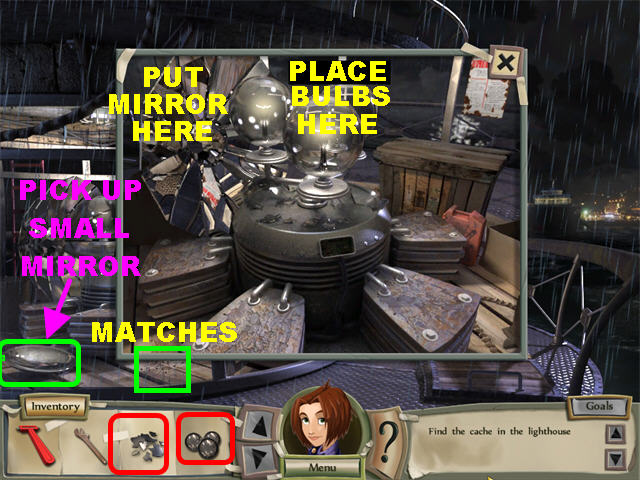
- Click on the Lighthouse Lens for a closer view.
- Place the Mirror pieces in the upper left side.
- Place the Bulbs in the Bulb Sockets to turn on the lights. Close the pop-up window.
- Grab the Matches in the lower left.
- Pick up the Small Mirror on the lower left and you will find a secret cache.
- Go back downstairs.
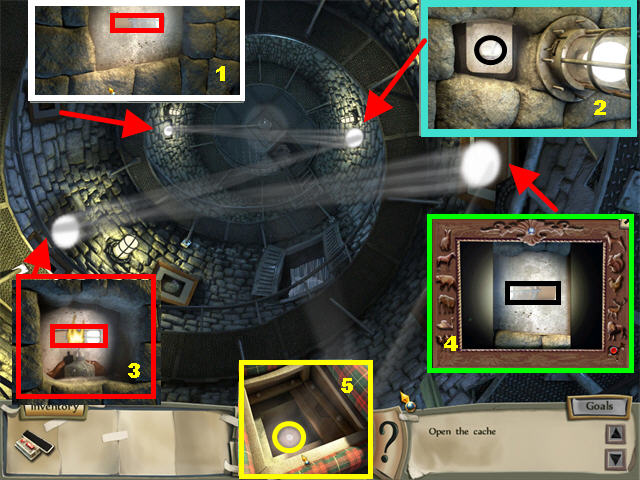
FIND THE CACHE IN THE LIGHTHOUSE
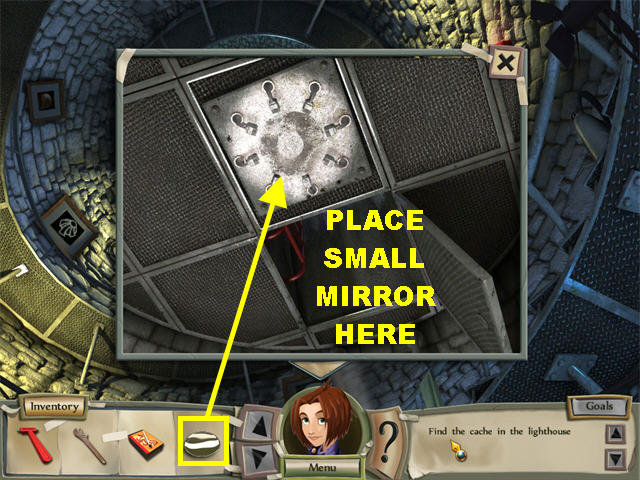
- Click on the hatch for a closer view.
- Place the Small Mirror on the ‘Spot for the Mirror’ and a light will shine in the ceiling.
- Click on the light for a closer view of the cache in the wall.
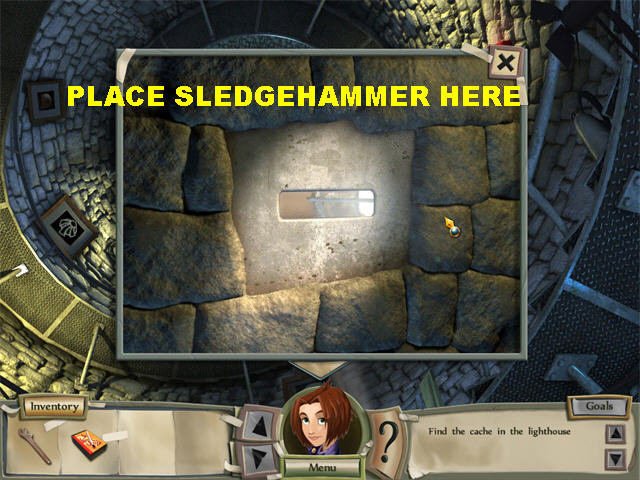
- Place the Sledgehammer on the loose rock and a light will shine on the right side of the wall.
- Click on the light on the right side to see the other cache in the wall.
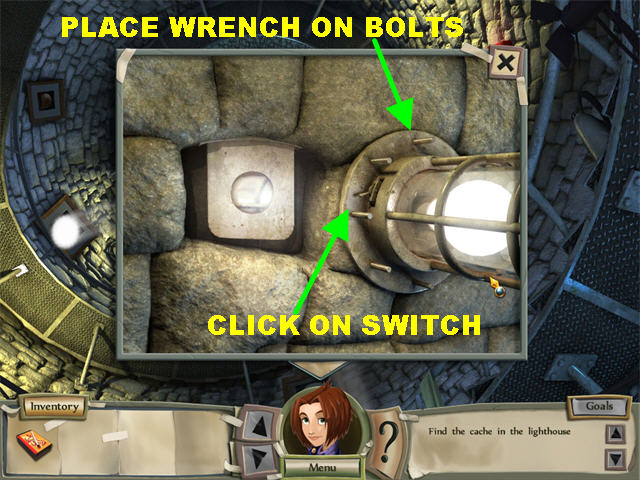
- Place the Wrench on the bolts that are on the lamp’s rim.
- Click on the switch at the base of the lamp and a third light will appear.
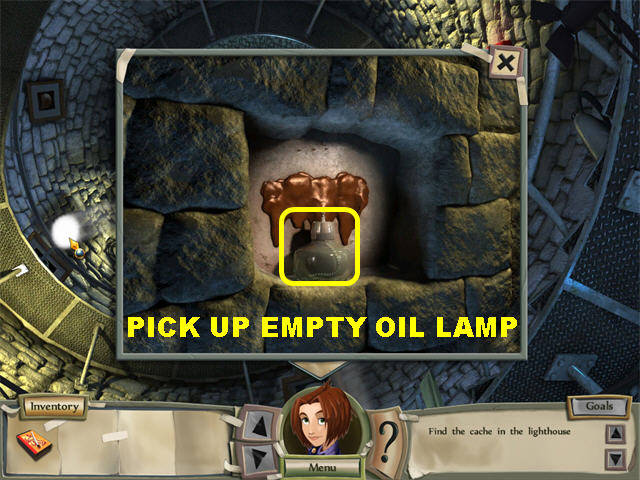
- Click on the third light twice for a closer view.
- Pick up the Empty Oil Lamp and you will leave some melted wax behind.
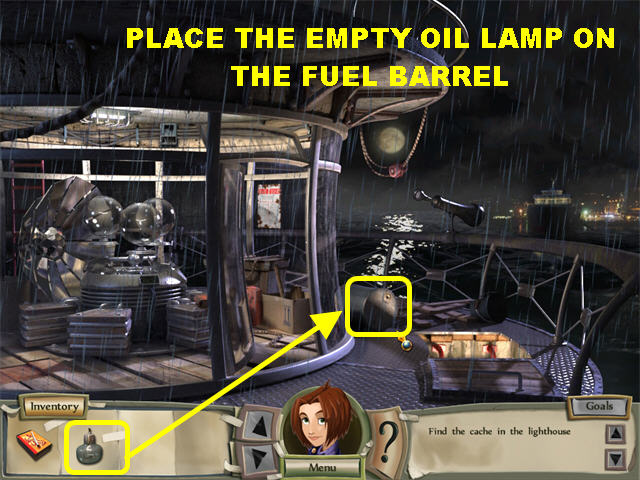
- Go back to the top of the lighthouse.
- Place the Empty Oil Lamp on the Fuel Barrel on the far right.
- Go back downstairs and click on the third spotlight.
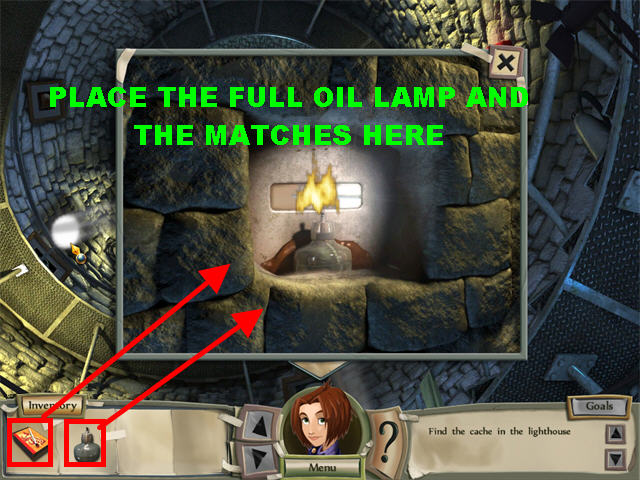
- Place the Full Oil Lamp on the melted wax.
- Place the Matches on the Full Oil Lamp and a 4th spotlight will appear.
- Click on the 4th spotlight to see another cache in the wall.
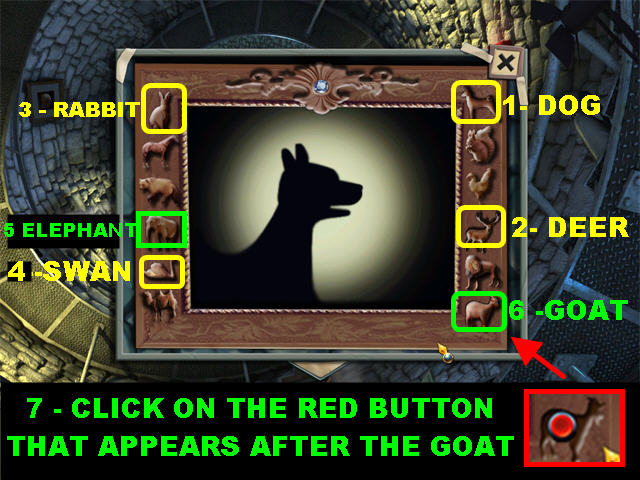
- Click on the animals in the following order:Dog Deer Rabbit Swan Elephant Goat
- Once you click on the goat, a red button will appear, click on it and the light will point down to the chair Kitty was sitting in.
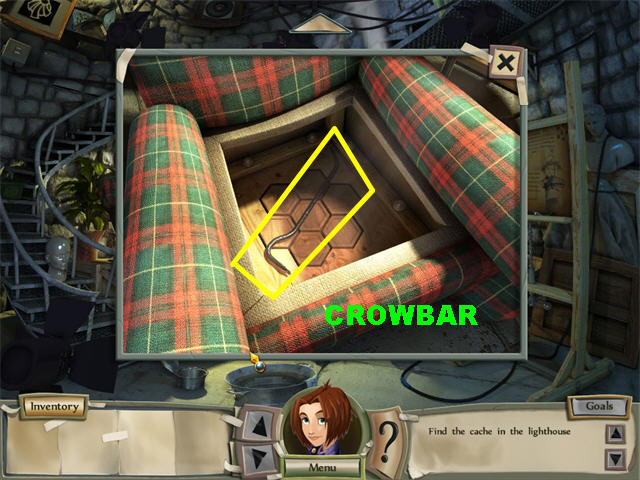
- Click on the seat cushion for a closer look.
- Click on it again to remove the cushion.
- Pick up the Crowbar inside the chair.
- Go back to the very top of the lighthouse.
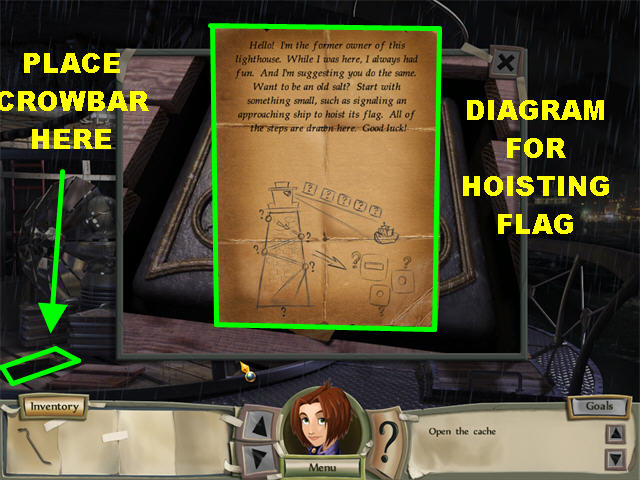
- Place the Crowbar on the cache in the lower left.
- Click on the cache for a closer view.
- Click on the letter inside the cache for a closer view. The letter talks about hoisting the flag.
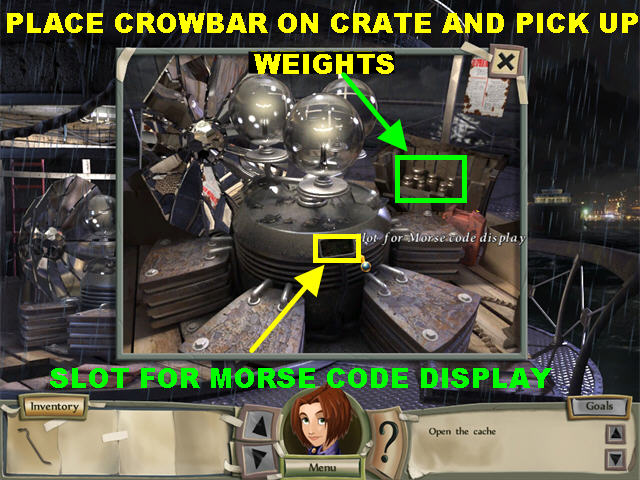
- Click on the Lighthouse Lens for a closer view.
- Click on the ‘Slot for Morse Code Display’ and you will be asked to solve the puzzle with the weights.
- Place the Crowbar on the crate on the right to open it.
- Pick up the Weights inside the crate.
- Go all the way back down.
- Click on the chair for a closer view.
- Place the Weights on the chair to trigger a mini-game.
WEIGHT PUZZLE
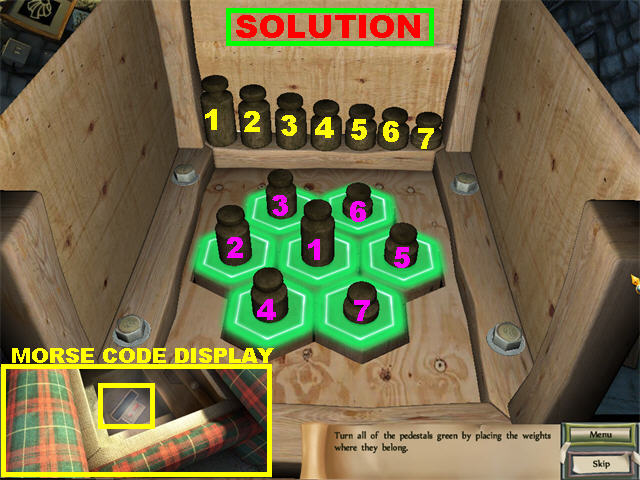
- Your goal is to turn all the pedestals green by placing the weights where they belong.
- Click on a weight and then on the post you want it to land in.
- Once weights are on the board you can also swap them by clicking on any 2 pieces.
- The easiest way to complete the puzzle is to switch the weights around after all of them had been placed on the board.
- Please look at the screenshot for the solution.
- Pick up the Morse Code Display inside the chair.
MORSE CODE

- Go all the way back up.
- Click on the Lighthouse Lens for a closer view.
- Place the Morse Code Display on the Morse Code Slot to trigger a mini-game.
- Your goal is to enter the Morse Code correctly so you can hoist the flag.
- Look at the caches in the wall in order to know which buttons to push. Each one of them has a Morse code symbol.
- For the solution, click on the codes in the following order:Dash Dot Dash Dash Dot
- Entering the Morse code correctly raises the flag on the ship.
OPEN THE CACHE
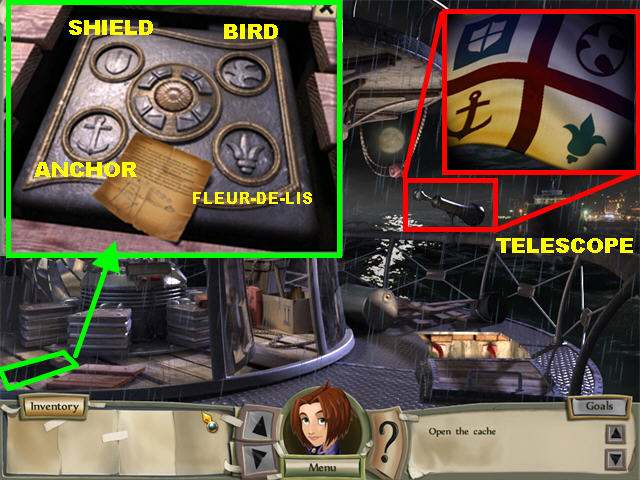
- Click on the Telescope for a closer look at the flag. Pay attention to the symbols on the flag.
- Exit out of the Telescopic view and click on the cache in the lower left to solve the puzzle.
- Click on the arrows in the middle of the board.
- The arrows correspond to the symbols in the circles adjacent to them.
- Please place the symbols in the same order as you saw on the flag. From left to right, the solution is:Shield Bird Anchor Fleur-de-lis
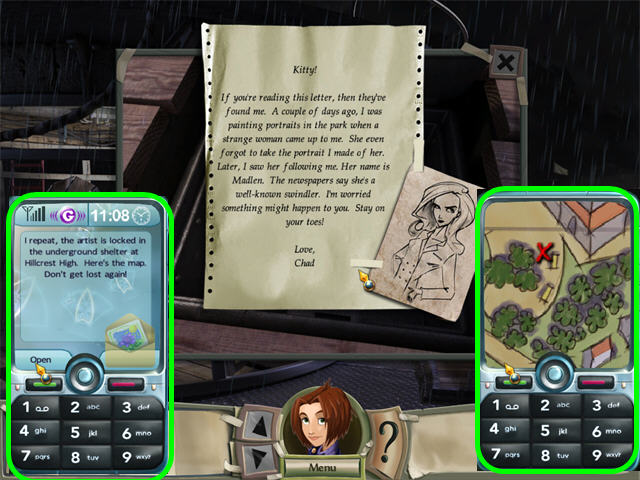
- Click on the Old Letter inside for a closer view.
- Exit out of the letter and a cell phone will appear on the screen.
- Click on the “READ” button on the phone to see the message.
- Click on the phone’s display to see the map.
CHAPTER 5: BACK TO SCHOOL
SCHOOL HALL
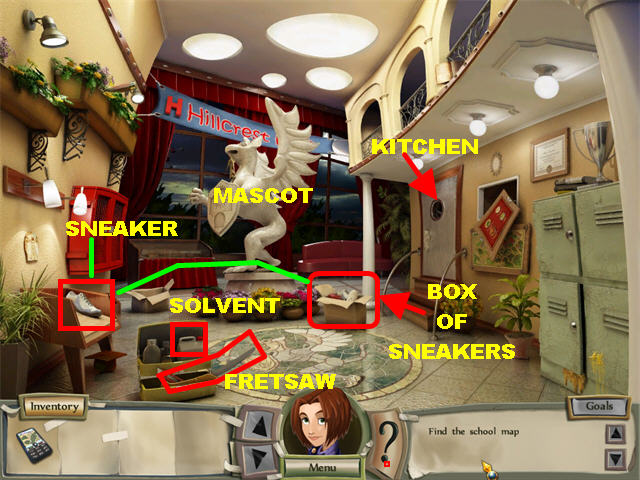
- Pick up the Fretsaw inside the yellow box on the lower left.
- Pick up the Solvent inside the yellow box.
- Click on the Sneaker on the lower left, on top of the wooden stand.
- Click on the box of Sneakers on the floor for a closer view.
- Place the Sneaker inside the box to trigger a mini-game.
SNEAKERS MINI-GAME
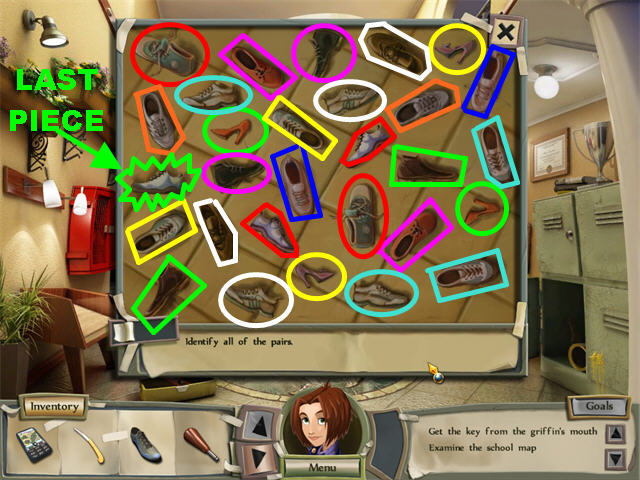
- Your goal is to identify the pairs of sneakers and eliminate them from the box.
- Click on one sneaker and then on its match to eliminate both of them.
- Once you’ve eliminated all the pairs of sneakers, only one will remain. That last pair will merge with your other shoe in inventory.
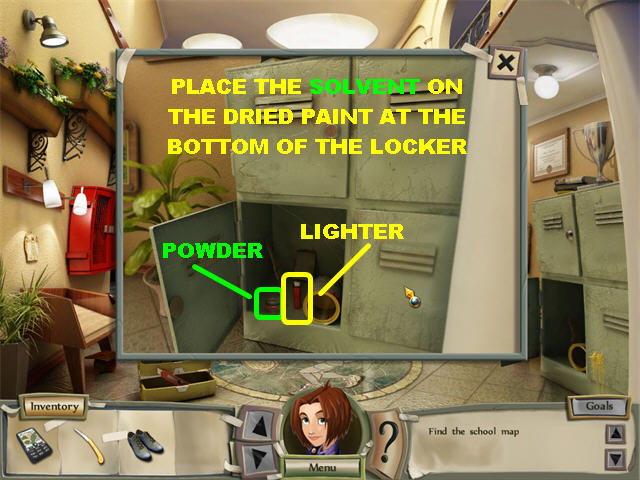
- Click on the locker on the right for a closer view.
- Place the Solvent on the dried paint sticking out of the bottom of the locker.
- Click on the door to open it.
- Pick up the Powder inside the locker.
- Pick up the Lighter inside the locker.
GLASS DISPLAY
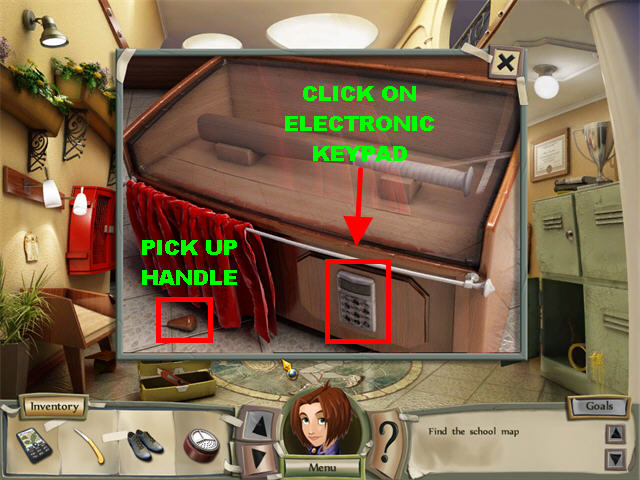
- Click on the ‘Display case with Bat’ on the left for a closer look.
- Pick up the Handle on the lower left corner.
- Click on the red curtain to move it aside and reveal an electronic keypad.
KEYPAD PUZZLE
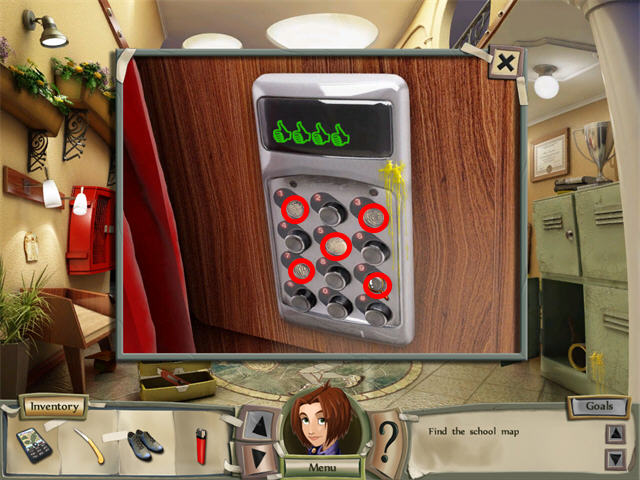
- Your goal is to decipher the code to unlock the cabinet.
- Place the Powder on the buttons of the keypad.
- The numbers 1, 3, 5, 7, and 9 show fingerprints on them.
- You have to click on the keys in the correct order in order to crack the code.
- When you get a red thumb’s down icon, the number you entered is incorrect. A green thumb’s up icon means the number you entered is correct.
- Please click on the keys in the following order: 1-3-5-7-9. The solution is random, it all depends on your game but this combination worked more than once.
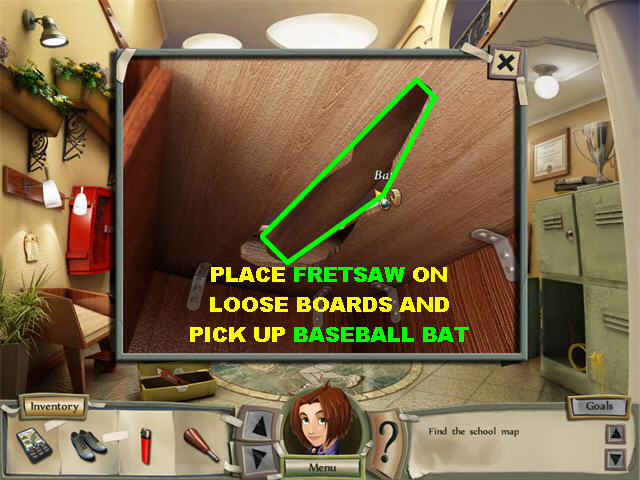
- You now have access to the inside part of the case.
- Place the Fretsaw on the loose boards.
- Click on the Bat in the hole in the cabinet and the Baseball Bat will go into your inventory.
FIRE CABINET
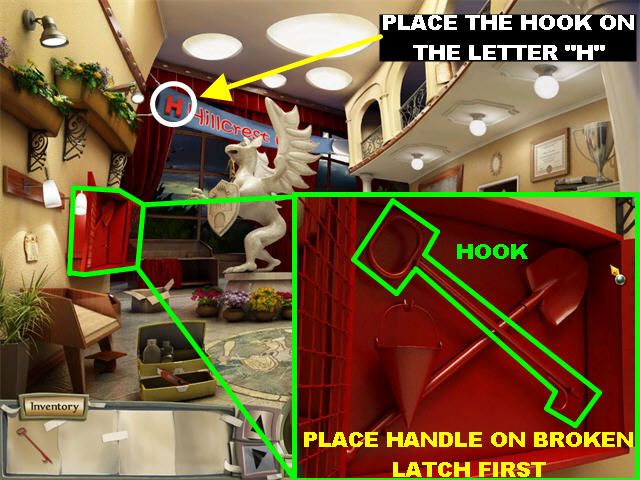
- Click on the fire cabinet on the left for a closer view.
- Place the Handle on the broken latch to open it.
- Pick up the Hook inside the case.
- Place the Hook on the letter “H” on the banner in the upper side of the back wall.
SCHOOOL SEAL PIECES
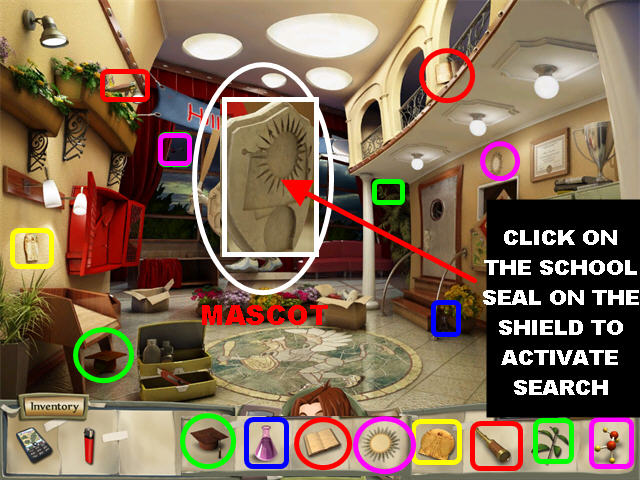
- Click on the school mascot in the center for a closer view.
- Click on the spot for the school seal on the shield and the game will ask you to find parts of the seal.
- Click on the Man on the lower left side of the wall.
- Click on the Branch above the plant on the back wall.
- Pick up the Molecule on the top left window.
- Click on the telescope in the upper left side of the wall.
- Click on the Flask next to the potted plant on the right.
- The Sun symbol is on the upper right side of the wall.
- The Graduation Hat is in the lower left corner.
- Click on the Book in the upper right side.
- The pieces for the school seal are now assembled.
GET KEYS FROM GRIFFIN’S MOUTH
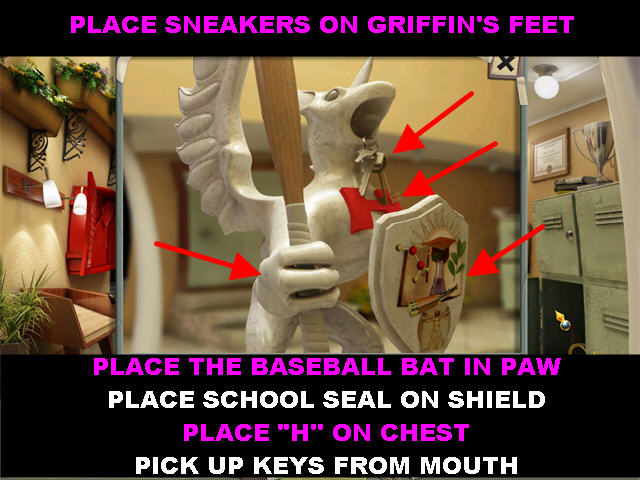
- Place the Sneakers on the Griffin’s feet.
- Click on the Griffin (School Mascot) for a closer view.
- Place the letter H on the Griffin’s chest.
- Place the School Seal on the shield.
- Place the Baseball Bat on the mascot’s paw and the Griffin will open its mouth.
- Grab the Keys from the Griffin’s mouth.
OPEN KITCHEN DOOR
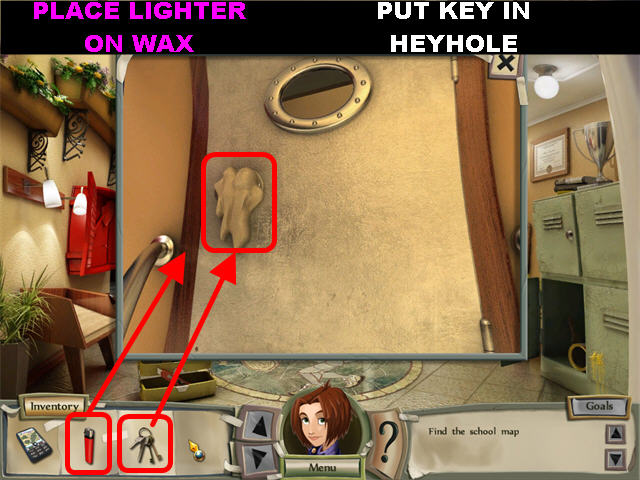
- Click on the kitchen door for a closer look.
- Place the Lighter on the Wax to remove it.
- Place the Key on the lock to open it. Enter the kitchen.
KITCHEN
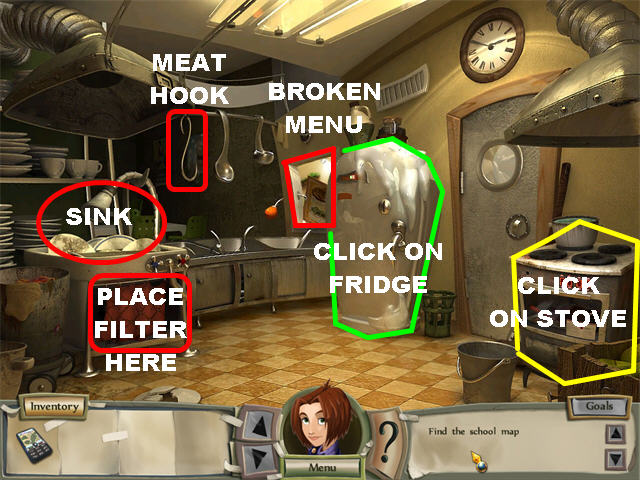
- Pick up the Meat Hook hanging above the sink.
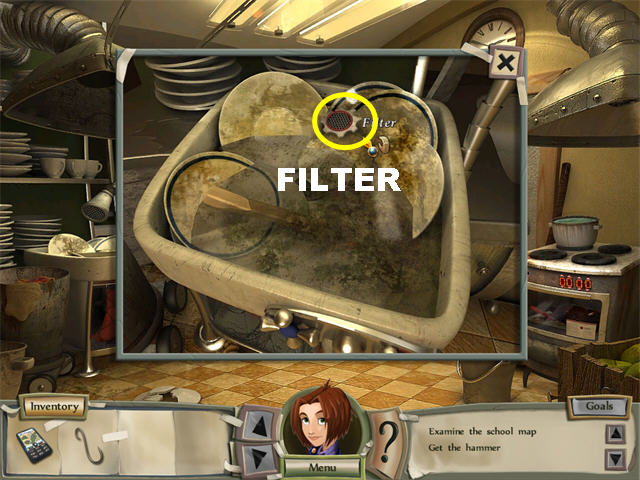
- Click on the sink for a closer view.
- Pick up the Filter above the pile of dirty dishes.
- If you try to click on the hammer, Natalie says she does not want to put her hands in the dirty water.
- Click on the red curtain below the sink to open it.
- Place the Filter under the sink. This action drains the water from the sink.
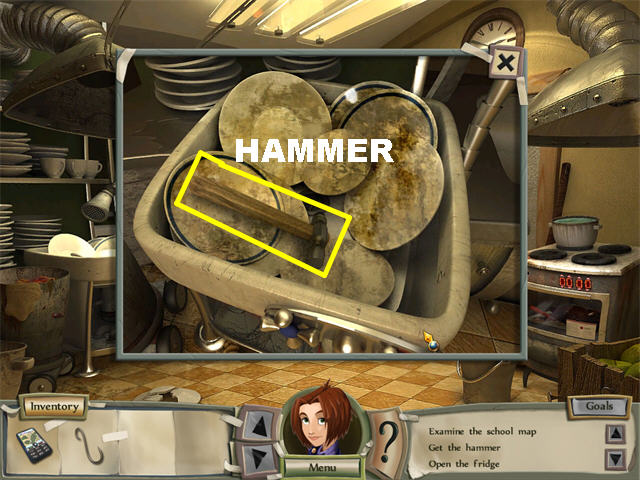
- Click on the sink again for a closer view.
- Grab the Hammer on top of the dirty dishes.
- Place the Hammer on the broken menu next to the fridge. This action will give you access to the school map and the menu on the other side of the door.
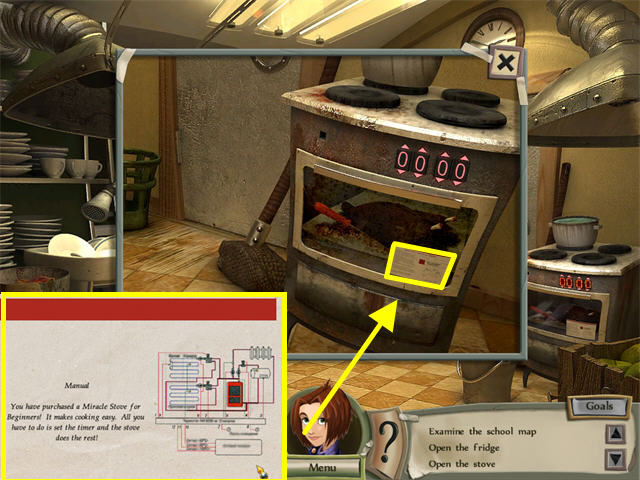
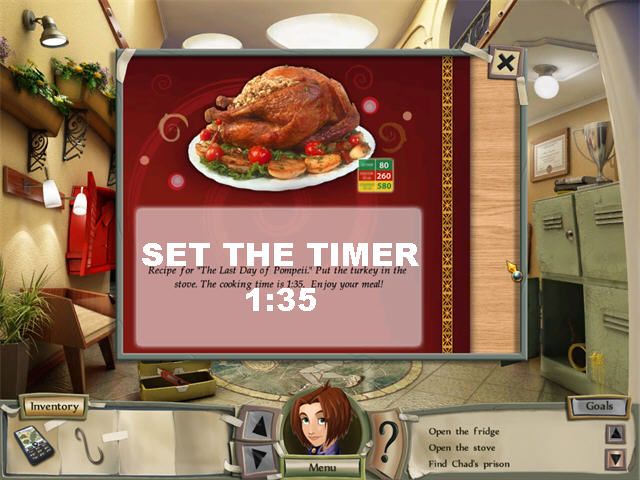
- Click on the stove for a closer view and you will receive a message that the timer is broken.
- Click on the Manual at the bottom of the stove for a closer look. The manual states that all you have to do is set the timer.
- Click on the handle of the fridge and a task will appear that you need to open the fridge.
- Go back to the hall.
- Click on the Menu next to the locker for a closer view.
- The menu says that the cooking time is “1:35”
EXAMINE SCHOOL MAP
- Click on the Map on the right side of the wall for a closer view.
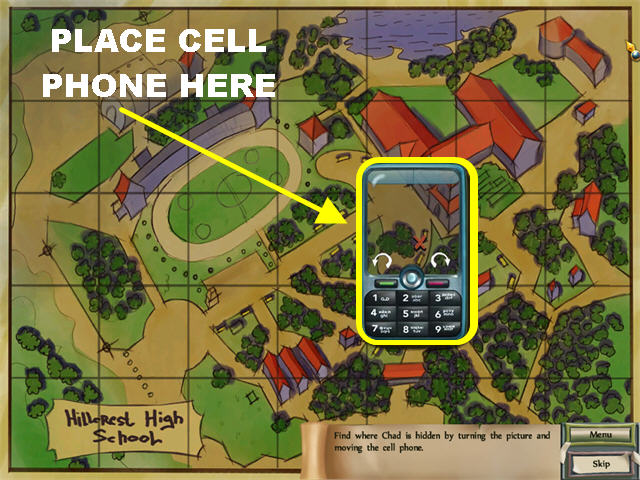
- Place the Cell Phone on the Map to trigger a mini-game.
- Your goal is to find where Chad is hidden by placing the cell phone in the right spot.
- Click on the RIGHT arrow 2 Times in order to change the position of the map on the cell phone display.
- Drag the cell phone to the spot in the upper right that matches what is on the display.
- Once the cell phone is in the right spot, you will know that the kidnappers are hiding him near the stage in the school yard.
- You will be automatically taken to the school yard.
SCHOOL YARD
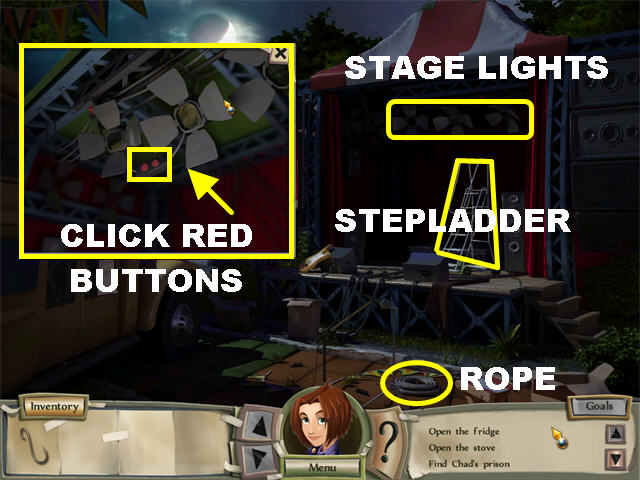
- Click on the stage lights in the upper center for a closer view.
- Click on the red switch.
- Pick up the Rope on the lower right side of the scene.
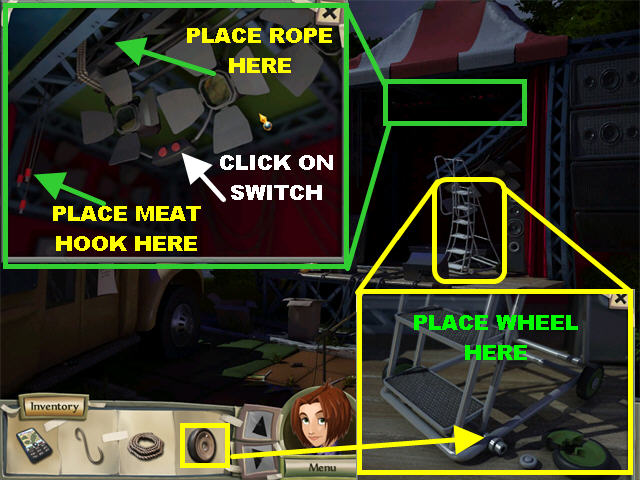
- Click on the Stepladder on the right side of the stage. You will notice that you need a wheel to fix it.
- Click in the lower right corner to go back inside. Once inside proceed to the kitchen.
OPEN STOVE
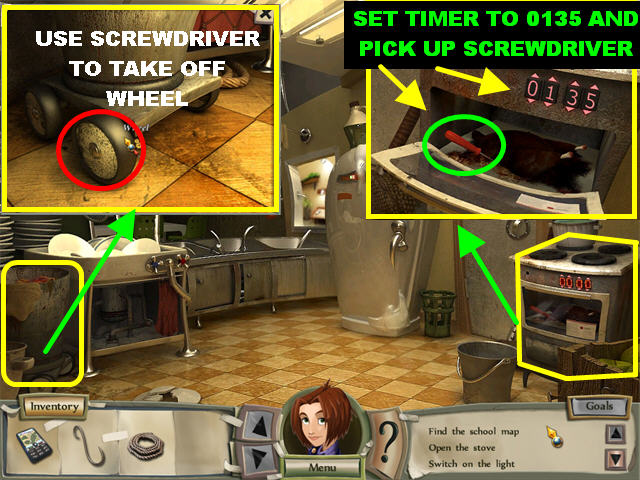
- Click on the stove for a closer view.
- Use the arrows on the digital display to change the numbers to “0135”.
- Pick up the Screwdriver inside the stove.
- Click on the trashcan on the left side of the Kitchen for a closer view.
- Place the Screwdriver on the wheel to take it off.
- Go back to the Yard by clicking at the bottom of the scene in the hall.
SWITCH ON LIGHT
- Click on the stepladder for a closer look.
- Place the Wheel on the stepladder.
- Click on the Stage Lights for a closer view.
- Place the Rope on the Broken Floodlights.
- Place the Meat Hook on the Ripped Wires in the lower left side of the pop-up window.
- Click on the red switch to turn on the lights.
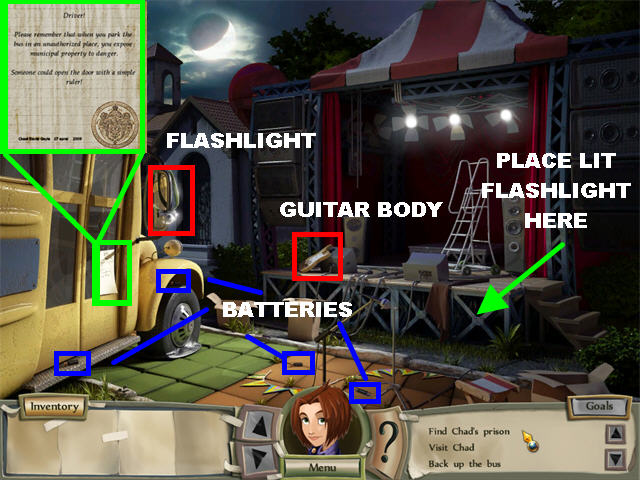
- Pick up the Guitar Body on the left side of the stage.
- Click on the bus door to read a note that states that the door could be opened with a simple ruler.
- Click on the Flashlight without Batteries attached to the side view mirror on the bus and you will be asked to find 4 Batteries.
- Please pick up the Batteries as shown in the screenshot. All batteries are highlighted in blue.
- The Flashlight will now go into inventory.
- Place the Flashlight in the spot under the stage.
HIDDEN OBJECTS UNDER THE STAGE

- The Guitar Neck is in the upper right corner.
- After all the items have been found, the Guitar Neck and the Guitar Body will automatically merge in inventory forming a Guitar.

- Place the Guitar on the Guitar Stand in front of the stage and it will [lay some loud music.
- Click on the speaker on the right side of the stage for a closer view.
- Pick up the Keys inside the speaker.
- Go back inside.
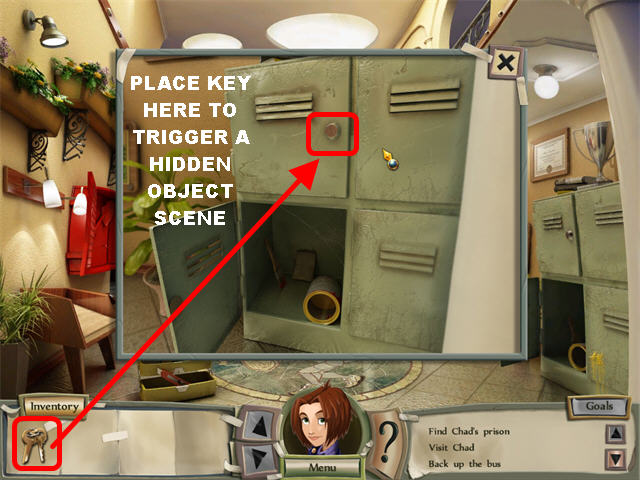
- Click on the locker for a closer view.
- Place the Keys in the locked locker to trigger a Hidden Object scene.
HIDDEN OBJECT SCENE
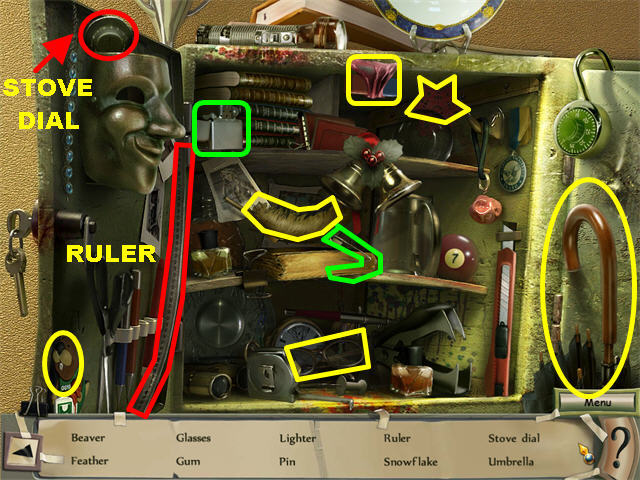
- Pick up the Ruler on the left edge of the scene.
- Pick up the Stove Dial in the upper left side.
- Go into the Kitchen.
KITCHEN

- Place the Stove Dial on the ‘Place for the Stove Dial’ in the upper left side of the stove.
- Click on the Pot with Boiling Water on top of the stove.
- Place the Pot with Boiling Water on the ice that covers the fridge.
- Click on the fridge to trigger a Hidden Object scene.
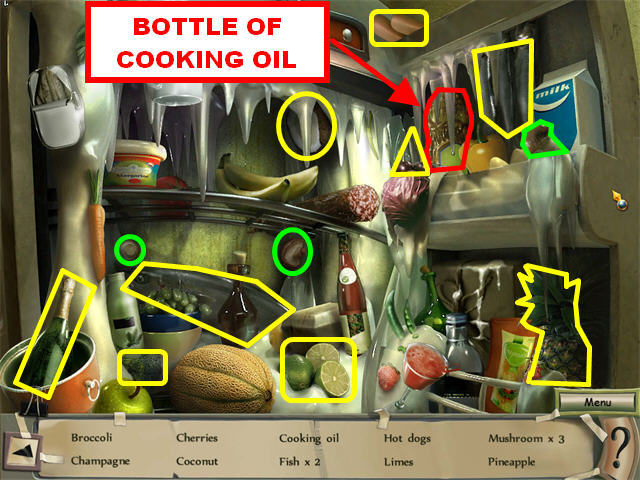
- Pick up the Bottle of Cooking Oil in the upper right side of the scene.
- Go back outside to the Yard.
BACK UP THE BUS
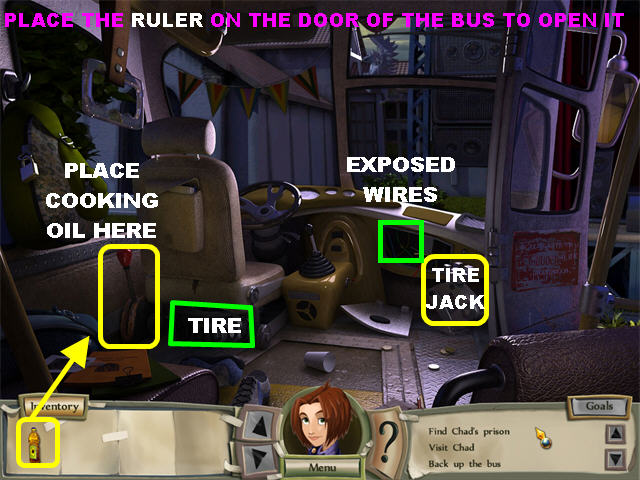
- Place the Ruler on the bus door to open it. Go inside the bus.
- Pick up the Tire Jack in the lower right.
- Place the Bottle of Cooking Oil on the Rusty Handle in the lower left.
- Click on the Tire below the seat.
- Click on the exposed wires in the front of the bus to trigger a mini-game.
BUS TOKEN MINI-GAME
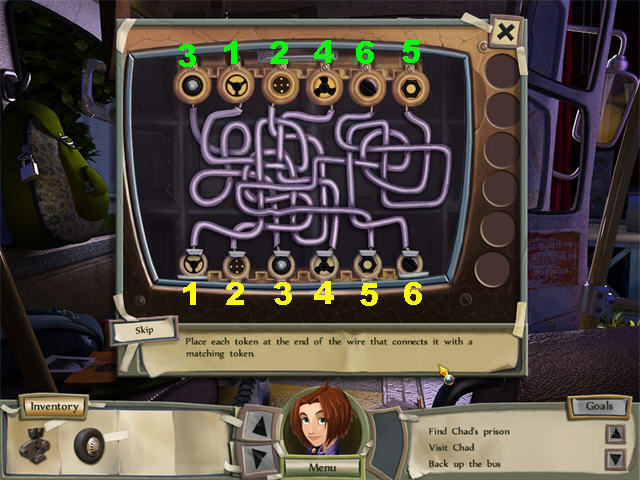
- Your goal is to place the tokens in the right slots on top of the board.
- Choose any token at the bottom and trace the pipes to see where they lead to. Once you figure out where it goes, drag the right token in the slot above the board.
- You will not know which pieces are in the right spots until all of them have been placed.
- For the solution, I numbered the tokens at the bottom from 1 to 6, from left to right. Place the tokens in the upper slots in the following order:3-1-2-4-6-5
- The bus will turn on at this point.
BACK UP THE BUS CONTINUED
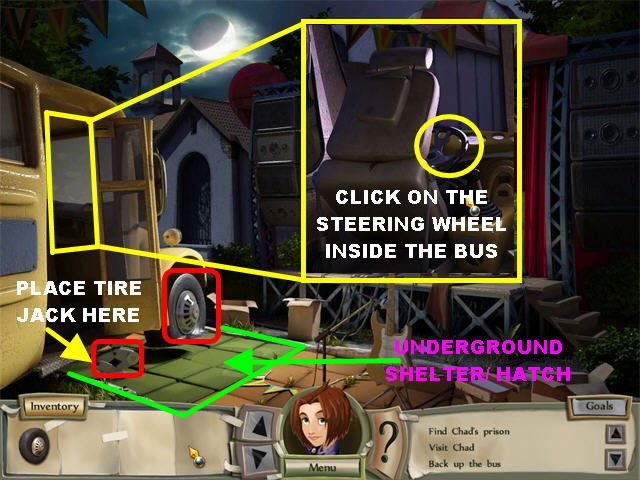
- Place the Tire Jack on the flat tire.
- Click on the tire to remove it.
- Place the Tire on the bus.
- Go back inside the bus and click on the steering wheel.
- You will be taken back outside. Click on the green part of the ground to expose an underground shelter.
- Click on the hatch for a closer look and you will be taken to a cut scene. You will be automatically taken back inside the bus after the cut scene.
- Click by the door to look under the bus.
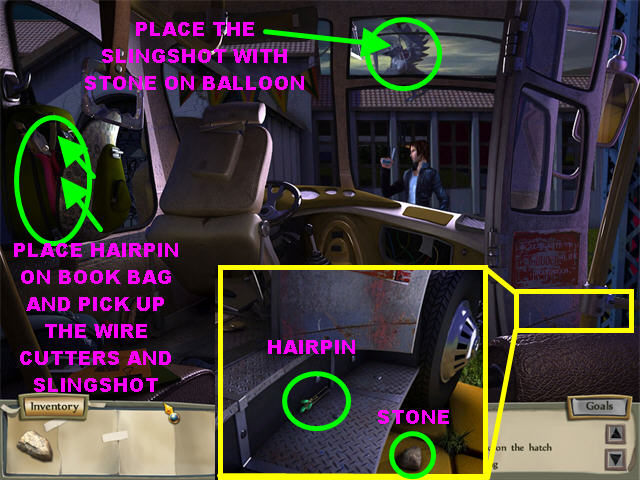
- Pick up the Hairpin on the steps.
- Pick up the Stone on the ground.
- Place the Hairpin on the Book Bag on the left to open it.
- Pick up the Wire Cutters inside the Book Bag.
- Pick up the Slingshot inside the Book Bag.
- The Slingshot and the Stone automatically merge in inventory.
- Place the Slingshot with Stone on the balloon above the kidnapper’s head.
- You will be taken straight back to the Kitchen.
FIND KEY RING
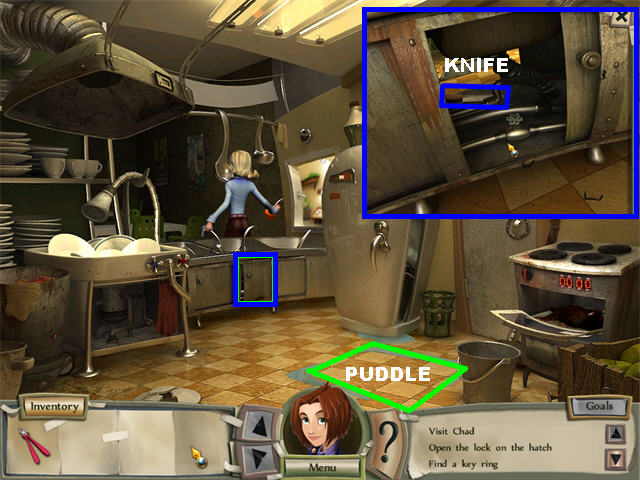
- Click on the cabinet on the far right for a closer view.
- Pick up the Knife inside the cabinet.
- Place the Knife on the Puddle on the right side of the ground to reveal a hatch.
- Click on the closed hatch to go to the Basement.
MAZE
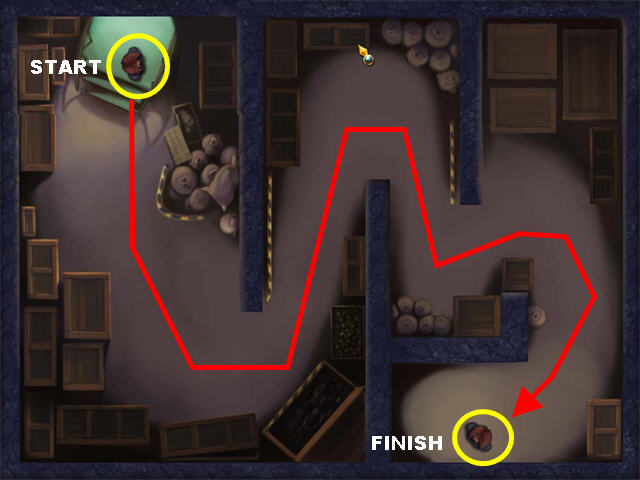
- Drag Natalie around the maze by clicking and holding your mouse as she moves around.
- When you hit any walls you will be taken back to the start.
- Please look at the screenshot for Natalie’s Path.
FIND A KEY RING
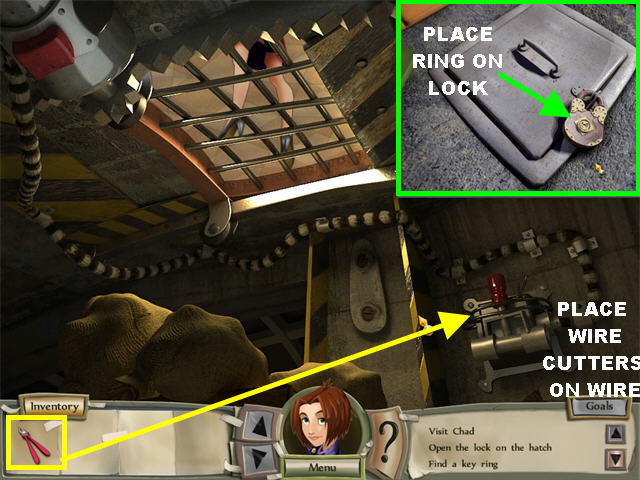
- Place the Wire Cutters on the Wire located on the switch on the right.
- Click on the switch to open the hatch. Madlen will fall to the basement when the hatch opens.
- The Ring goes into your inventory.
- You will be taken to a close-up view of the hatch.
- Place the Ring on the lock to end the chapter.
CHAPTER 6: SUDDEN DISCOVERY
REMOVE HANDCUFFS
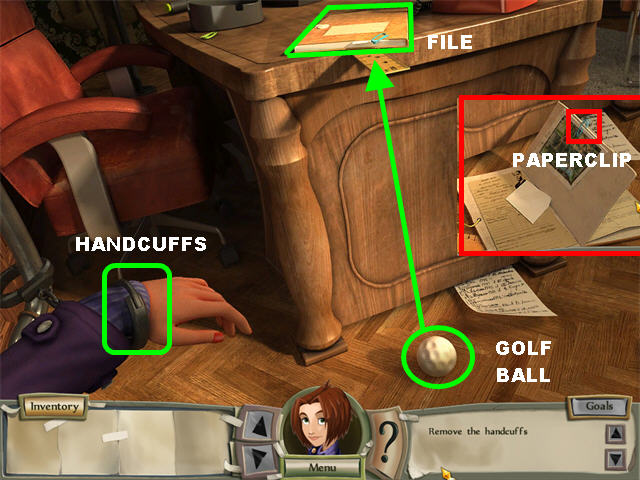
- Pick up the Golf ball on the ground.
- Place the Golf Ball on the file on top of the counter.
- Pick up the Paper Clip attached to the file that falls on the ground.
- Place the Paper Clip on the handcuffs.
FREE CHAD
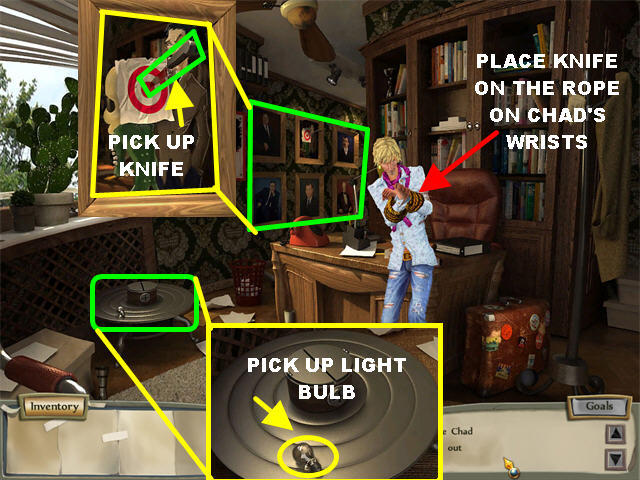
- Click on the Solar System on the left.
- Pick up the Light Bulb.
- Click on the Portraits on the left side of the wall.
- Pick up the Knife in the center of the portrait.
- Place the Knife on the rope around Chad’s wrists.
OPEN THE WINDOW
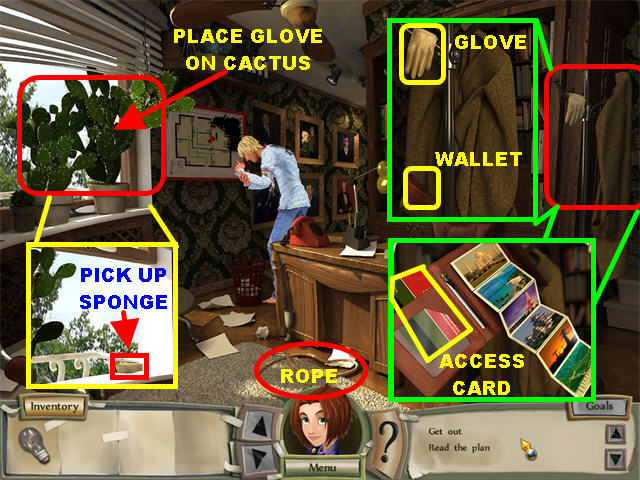
- Pick up the Rope on the floor.
- Click on the Coat Rack for a closer view.
- Pick up the Glove.
- Click on the wallet in the pocket to open it.
- Pick up the Access Card on the left side of the wallet. Pay attention to the postcards, there are 6 images showing, remember this for later.
- Place the Gloves on the Cactus by the window to move them aside.
- Click on the window to open it.
- Pick up the Sponge by the window sill.
- Click on the window one more time for a closer view.
- When Natalie looks out the window, she sees cops surrounding the area.
FIND 14 POLICEMEN
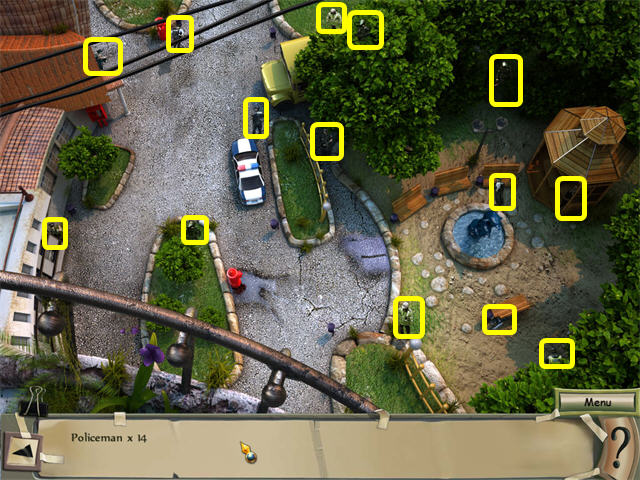
- Please look at the screenshot for the locations of all the policemen.
UNLOCK DESK
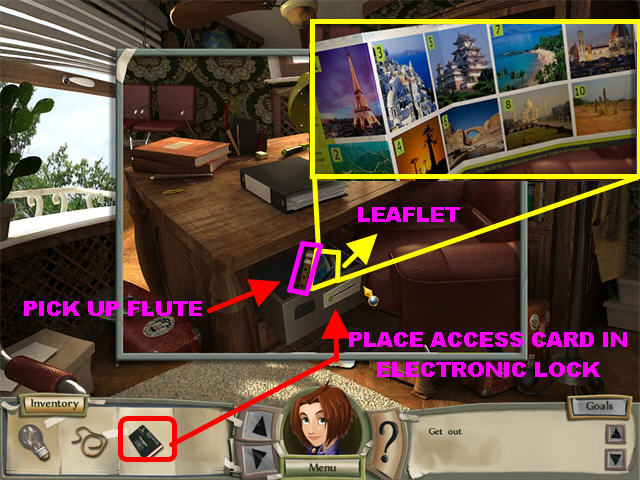
- Click on the desk for a closer view.
- Place the Access Card on the electronic lock on the left side of the desk.
- Pick up the Flute inside the drawer.
- Click on the Leaflet to open it. Some of the same images that were on the postcards in the wallet are here. Make note of the numbers on the leaflets.
OPEN SUITCASE
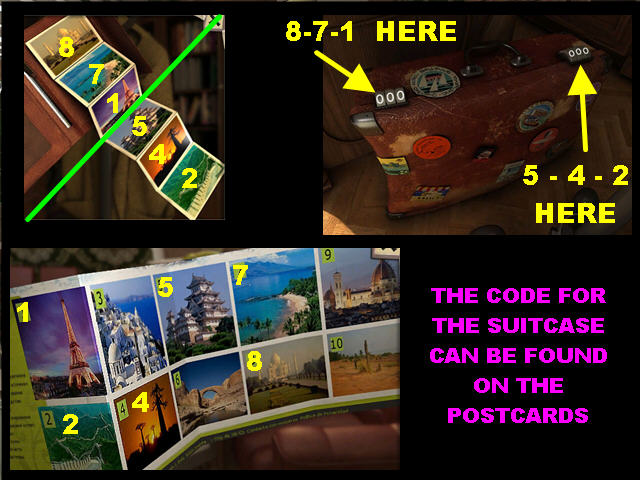
- Click on the suitcase for a closer view.
- There are 2 sets of numbers needed to unlock it. Remember the images on the postcards in the wallet and the leaflet in the drawer.
- When you find the numbers of the first 3 postcards in the wallet, you will find that the leaflet has them numbered as 871.
- When you find the numbers of the last 3 postcards in the wallet, you will find that the leaflet has them numbered as 542.
- The solution to open the case is:Left Side: 871Right Side: 542
- The suitcase opens, click on the inside the trigger a Hidden Object scene.
SUITCASE HIDDEN OBJECTS
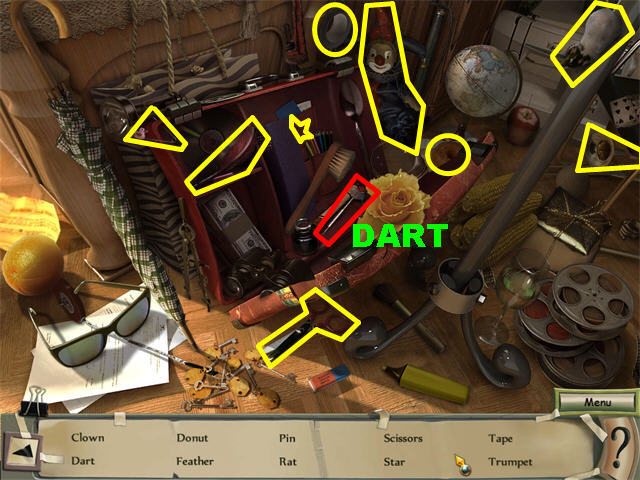
- Pick up the Dart in the lower center.
- Click on the window after all the items have been found.
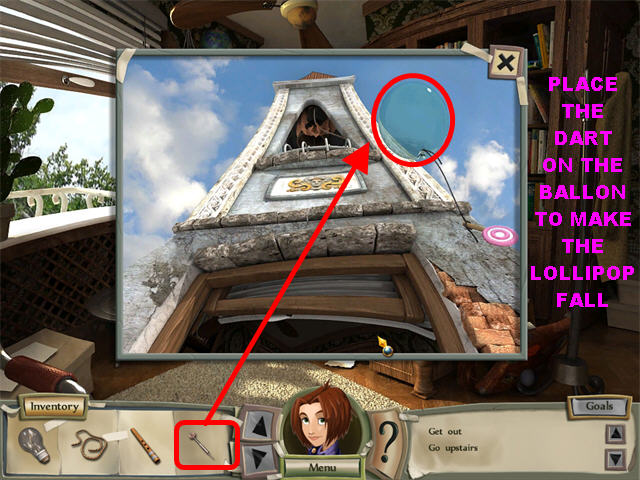
- Place the Dart on the balloon outside the window.
- Close out the pop-up window.
MOLD OF A BLACK CAT

- Pick up the Lollipop on the window sill.
- Click on the desk for a closer view.
- Click on the closed file on the desk to open it. Notice the mold on the right side of the page.
- Place the Light Bulb on the Lamp with no Bulb.
- Place the Lollipop on the hot lampshade.
- Pick up the Melted Lollipop from the lampshade.
- Click on the document on the desk for a closer view.
- Place the Melted Lollipop on the Mold of a Black Cat on the right side of the page.
- Click on the Dry Lollipop to enter it into inventory as “Stamp of a cat”.
GOBLETS
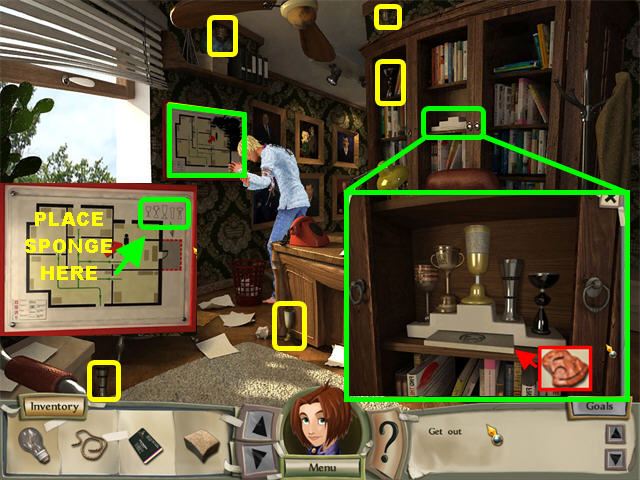
- Click on the loose board on the left side of the wall.
- Place the Sponge on the black marks to remove them and you will see a goblet diagram.
- Click on the goblet diagram in the upper right and the game will ask you to find the goblets in the scene.
- Please look at the screenshot for the locations of all the goblets.
- Click on the Goblet Display in the center of the bookcase.
- Place the Goblets on the display.
- Place the ‘Stamp of a Cat’ on the tray at the bottom of the display. This action will reveal a door.
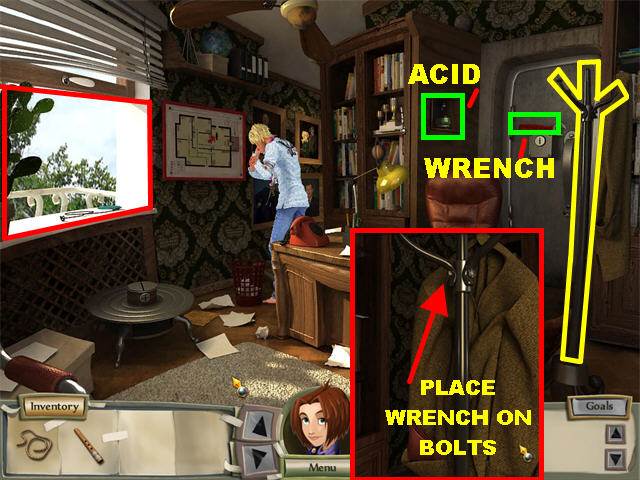
- Pick up the Wrench on top of the door.
- Pick up the Acid on the right side of the bookcase.
- Click on the coat rack for a closer view.
- Place the Wrench on the loose bolts on top of the rack to remove them.
- The Hook on the rack goes into your inventory and merges with the Rope you have in there.
GO UPSTAIRS
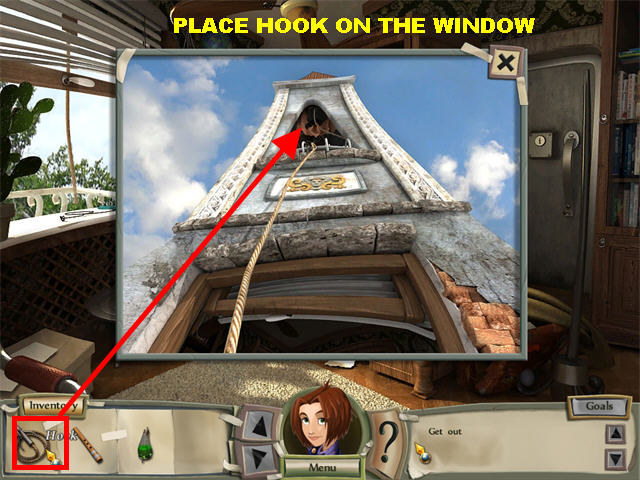
- Click on the window for a closer view.
- Place the Hook on the window on top of the tower.
- Click on the window to enter.
FIND THE CACHE
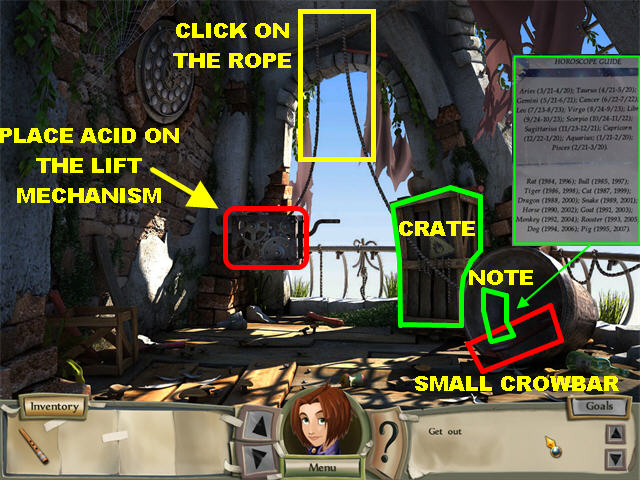
- Place the Acid on the Lift Mechanism on the left side of the scene.
- Click on the lift to move the barrel.
- Pick up the Crowbar inside the barrel on the right.
- Click on the Horoscope Guide inside the barrel and you will be asked to find the cache.
- Pick up the Rope attached to the crate.
- Place the Crowbar on the crate to open it.
- Click on the crate for a closer view.
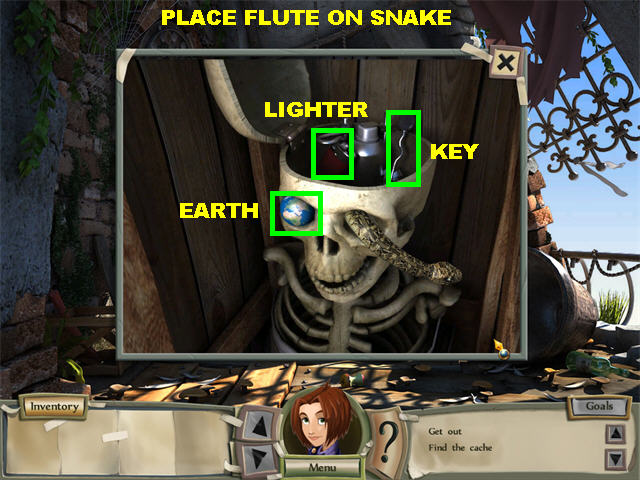
- Place the Flute on the snake.
- Click on the skull to open it.
- Pick up the Strange Key inside the skull’s head.
- Pick up the Lighter inside the skull.
- Pick up the Earth inside the eye socket.
- Click on the balcony to go back down.
OPEN THE SUN
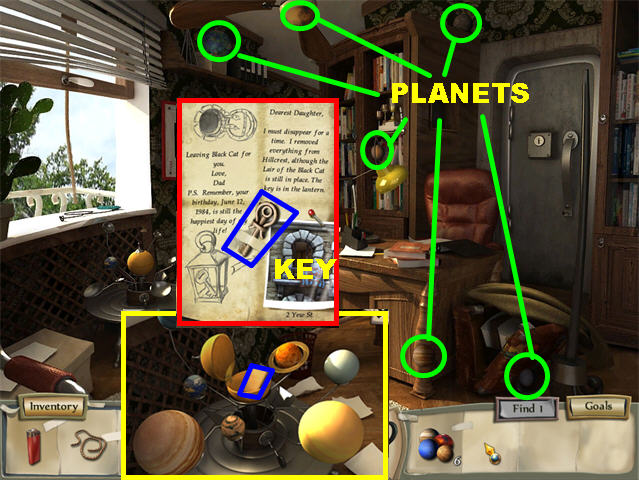
- Click on the Solar System for a closer view.
- Place the Strange Key in the keyhole and the Solar System will appear.
- Place the Earth model on the stand. You now have to find the rest of the models.
- Please look at the screenshot for the locations of all the planets.
- Click on the Solar System again. Place the rest of the planets on it.
- Click on the letter inside the SUN after all the planets have been placed. The letter mentions June 12, 1984 which is the Zodiac sign for Gemini.
- Pick up the ‘Key from the Clock’ in the center of the letter.
- Go back upstairs.
ZODIAC CLOCK
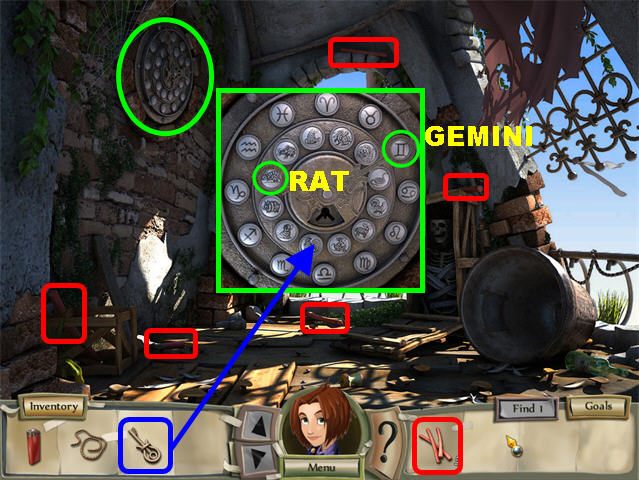
- Place the rope on the Zodiac Clock in the upper left side. You will receive a message that you need to make some makeshift steps.
- Look for the 5 red step pieces in the scene.
- Place the Rope Ladder on the clock.
- Click on the clock for a closer look.
- This clock is a combination of Zodiac signs and a Chinese Horoscope.
- Move the clock hands to the position shown in the screenshot and a keyhole will appear.
- The large hand should point to the Gemini horoscope sign (II).
- The small hand should point to the Rat, since 1984 was the year of the Rat.
- Place the ‘Key from the Clock’ in the keyhole.
- Pick up the other Key that appears once the clock has been opened.
- Go back downstairs.
GET OUT
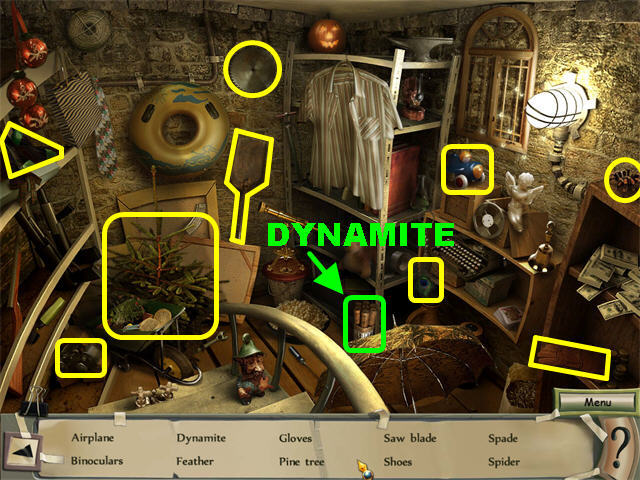
- Place the Door Key on the door on the right to enter the secret room.
- Click on the secret room to enter a Hidden Object scene.
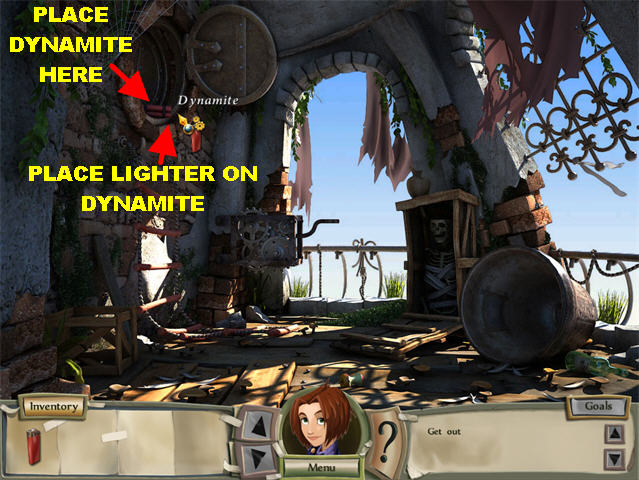
- Pick up the Dynamite and place it in the hole behind the clock.
- Place the Lighter on the fuse of the Dynamite for it to explode.
- Click on the hole to end this chapter.
CHAPTER 7: THE BLACK CAT GANG
OPEN THE HIDEOUT
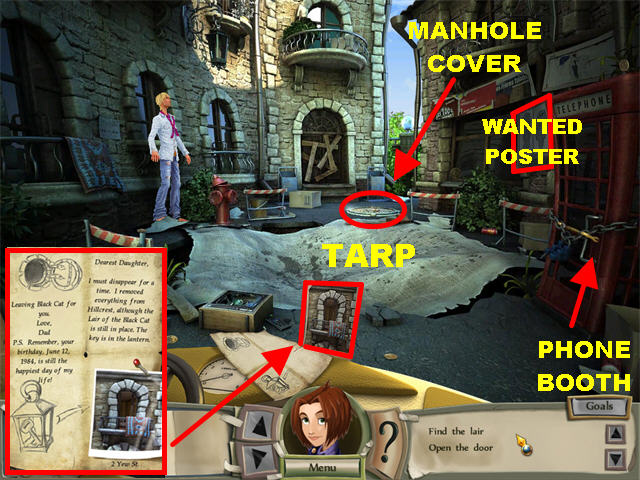
- Click on the letter in the lower center of the scene for a closer view. The letter tells you that the key is in the lantern.
- There are many areas to explore in this scene. The tarp in the middle of the ground is hiding something.
- The manhole cover on the far right needs to be opened.

- Click on the wanted poster on the right side of the scene.
- Pick up the Hook on the right side of the poster.
- Click on the lock attached to the phone booth.
- Pick up the Small Crowbar above the chains. Close that window out for now.
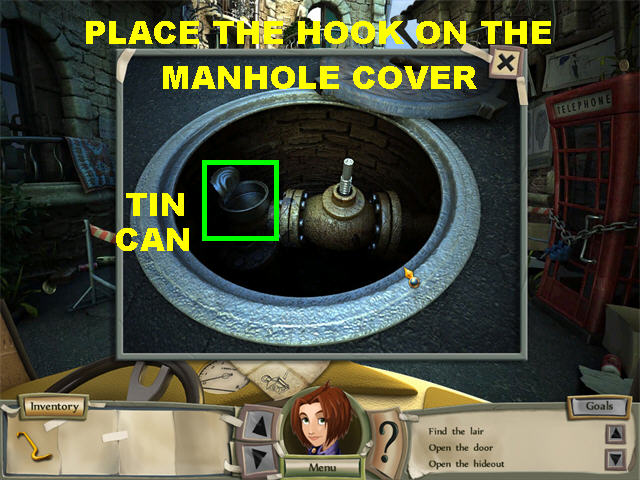
- Click on the Manhole on the ground.
- Place the Hook in the Manhole Cover.
- Pick up the Tin Can Lid inside the Manhole.
- Place the Tin Can Lid on the Tarp in the center of the ground to trigger a Hidden Object scene.
HIDDEN OBJECT SCENE
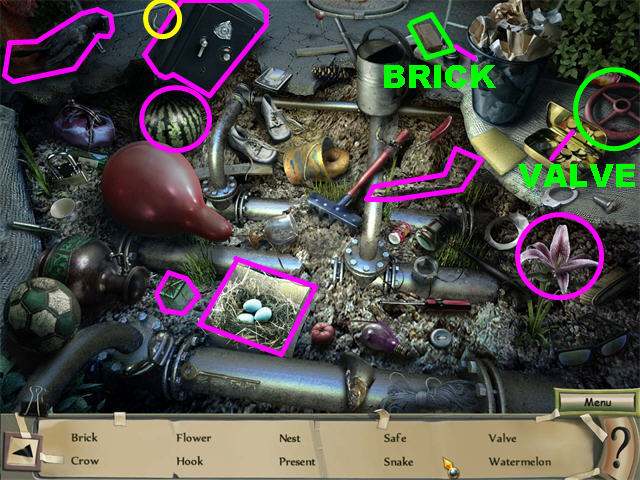
- Pick up the Valve in the upper right.
- Pick up the Brick in the upper right as well.
- Click on the Manhole for a closer view.
- Place the Valve in the Manhole and water will erupt.
- Pick up the Key on top of the fallen lantern, close to fire hydrant.
OPEN THE DOOR
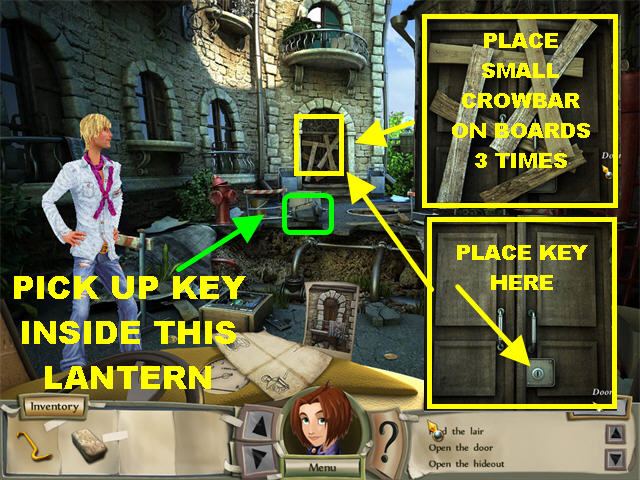
- Click on the boarded door in the back of the scene.
- Place the Small Crowbar on the board 3 TIMES so you can eliminate all the boards.
- Place the Key in the keyhole and enter the building.
BREAK THE MIRROR

- Click on the mirror on the left for a closer view.
- Place the Brick on the broken mirror.
- Pick up Cat Statue #1 behind the mirror.
- Click on the Lever to open the drawer and the secret closet next to the wardrobe.
- Pick up Cat #2 inside the closet next to the broken mirror.
GATHER ALL THE STATUES
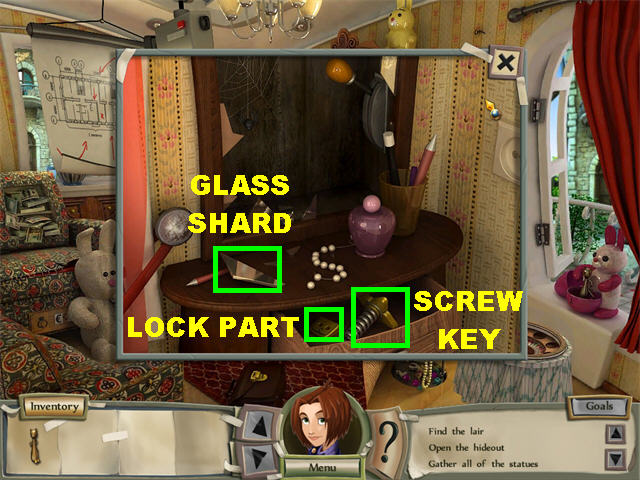
- Click on the broken mirror for a closer view.
- Pick up the Glass Shard on the left side of the dresser.
- Pick up the Part of the Lock inside the drawer.
- Pick up the Screw Key inside the drawer. Close the window out for now.
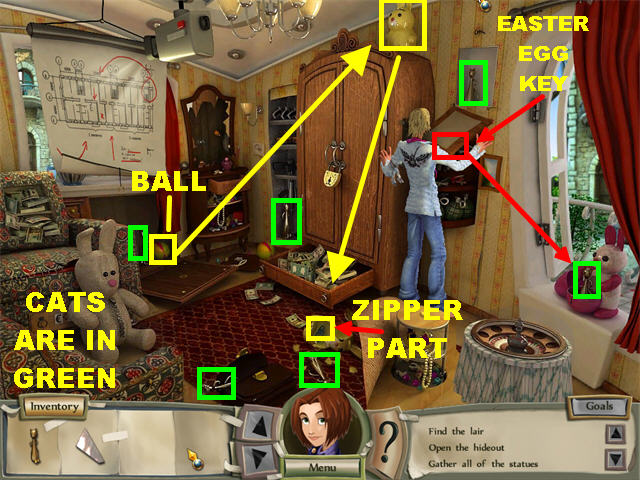
- Click on the cat painting in the upper right side of the wall and it will fall down.
- Pick up Cat Statue #3 in the niche that appears behind the painting.
- Pick up the Easter Egg Key behind the picture. Chad is holding the picture that holds the key.
- Place the Easter Egg Key on the Easter Egg by the window.
- Pick up Cat Statue#4 inside the Easter Egg.
- Place the Screw Key on the Screw Lock on the wooden flower on the left. It is on the cabinet to the left of the mirror.
- Pick up Cat Statue #5 inside the cabinet.
- Pick up the Ball inside the cabinet as well.
- Place the Ball on the ceramic rabbit above the wardrobe. The Ball will make the rabbit fall and break.
- Pick up the Zipper Part inside the broken rabbit.
- Pick up Cat Statue #6 on the floor, next to broken rabbit.
- Place the Part of the Lock on the closed bag in the lower center.
- Pick up Cat Statue #7 inside the open bag.
CURRENCY PUZZLE
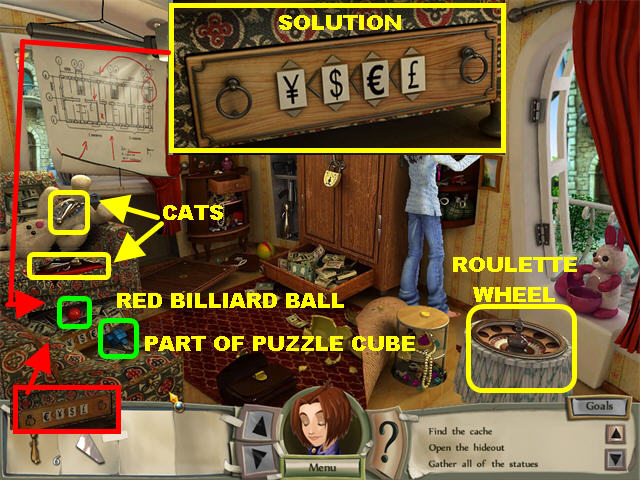
- Place the Zipper Part on the stuffed rabbit in the lower left.
- Pick up Cat Statue #8 inside the rabbit.
- Click on the locked drawer that appears below the chair once the rabbit has moved out of the way.
- Click on the symbols to place them in the right order.
- Please look at the screenshot for the solution
- The order from left to right is:Yen Dollar Euro Pounds
- Pick up the Red Billiard Ball inside the chair.
- Pick up the ‘Part of a Puzzle Cube’ inside the chair.
- Place the Glass Shard on the sofa lining to cut it open.
- Pick up Cat Statue #9 inside the chair.
ROULETTE TABLE
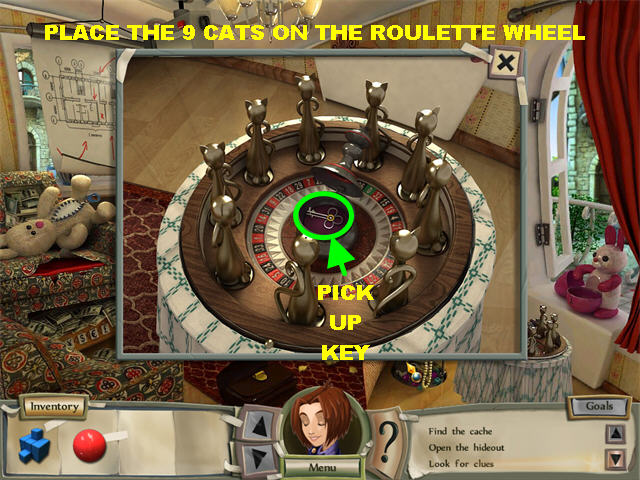
- Click on the roulette table on the right.
- Place the 9 Cat Statuettes on the roulette wheel.
- Pick up the Key in the center of the roulette wheel.
OPEN THE HIDEOUT
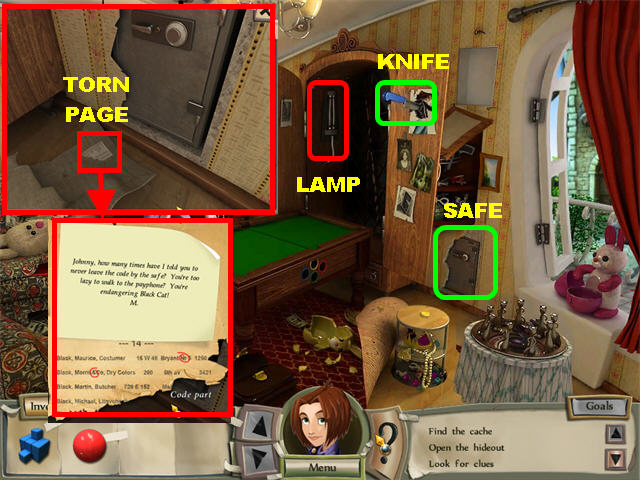
- Place the Key on the wardrobe’s lock and a pool table appears.
- Click on the lamp inside the wardrobe and you’ll notice it is missing a wire.
- Pick up the Knife on the wardrobe’s right door.
- Click on the lower right side of the wall, close to the window and a safe will appear.
- Click on the safe for a closer view.
- Click on the Torn Page at the bottom of the safe. The paper has 2 symbols that are circled in red.
- Exit through the window.
CUBE PUZZLE
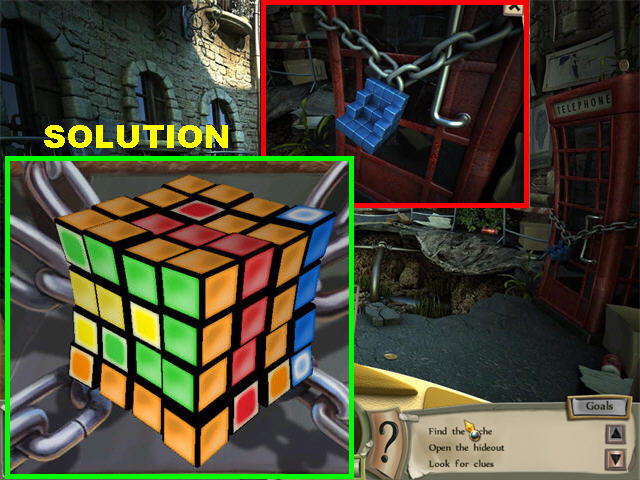
- Click on the phone booth for a closer view.
- Place the ‘Puzzle Cube Piece’ over the piece on the door.
- Your goal is to connect all the squares of the same color without any colors crossing each other.
- Click on the color you wish to use to color the cubes and that color will be attached to your cursor.
- Continue clicking on the cubes you want to color with the matching color.
- To switch colors, click on one of the cubes of a different color. These cubes will have a white circle in the middle.
- Click on the Reset button if you want to start over.
- Please look at the screenshot for the solution.

- Click on the phone booth door for a closer look.
- Pick up the Jar.
- Click on the torn phonebook for a closer look.
- Click on the left side of the page to tear it out. This paper contains the second part of the code for the safe.
- Go back inside.
SPIDER
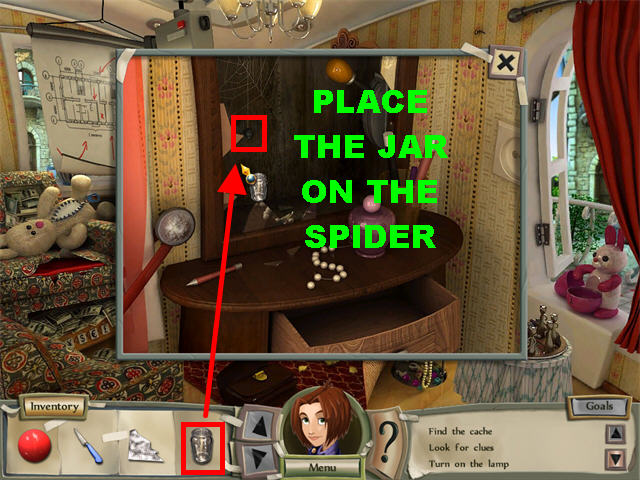
- Click on the mirror for a closer view.
- Place the Jar on the spider on the top left side of the mirror. The Jar goes back into inventory with the spider.
- Click on the safe in the lower right.
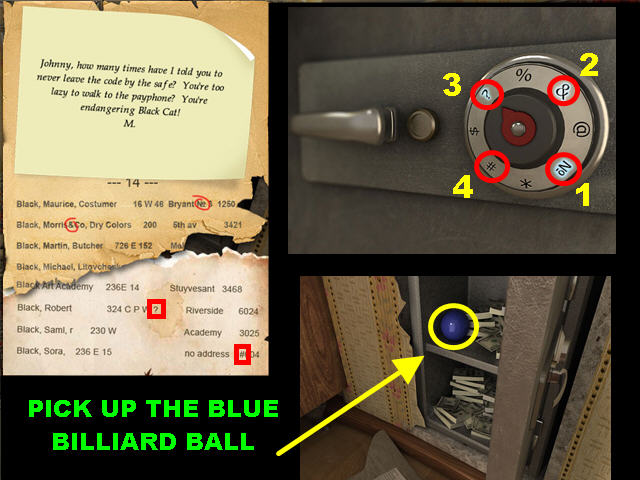
- Click on the Torn Page on the ground for a closer look.
- Place the Torn Page from inventory onto the page by the safe.
- The codes on the bottom of the page are “?” and “#”. Click on those 2 codes and the paper will disappear.
- Click on the lock for a closer look.
- Turn the dial Clockwise and stop on the “No.” symbol.
- Turn dial the Counterclockwise and stop on the “&” symbol.
- Turn the dial Clockwise and stop on the “?” symbol.
- Turn the dial Counterclockwise and stop on the “#” symbol.
- When you enter the combination correctly, the safe will open.
- Pick up the Blue Billiard Ball inside the safe.
- Go back outside.
MAGGOT MINI-GAME
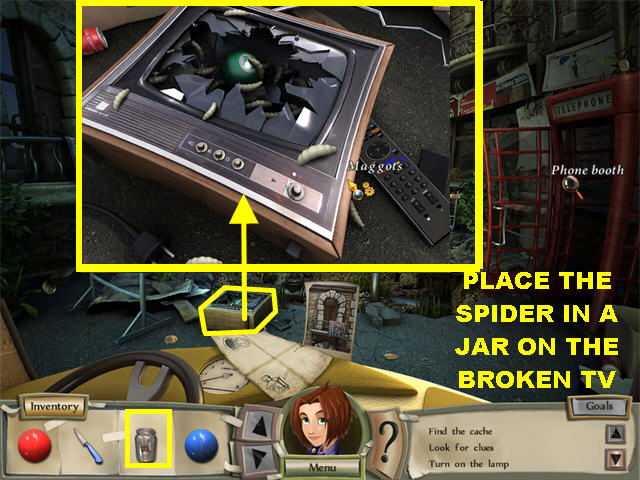
- Click on the broken TV.
- Place the Spider in a Jar on the maggots to trigger a mini-game.
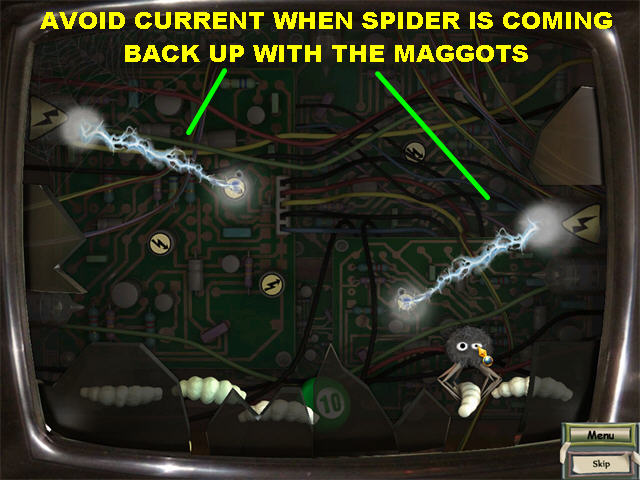
- Your goal is to pick up the maggots using the spider.
- The spider can hit the current going down but he cannot hit it going back up if he is carrying a maggot or he will drop it.
- The spider can only pick up a maggot if it lands directly above it.
- Drop the spider over a maggot and it will pick it up. Guide the spider upwards and away from the current.
- Get all the maggots out to win the game.
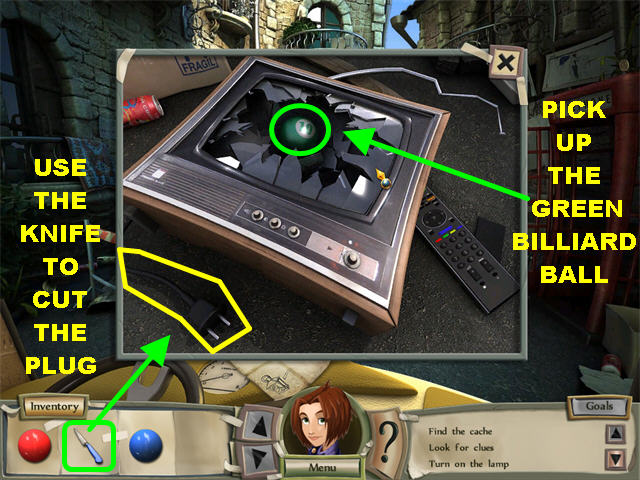
- Once the game has been completed, cut the TV plug using the Knife.
- Pick up the Green Billiard Ball inside the TV.
- Go back inside.
LAMP
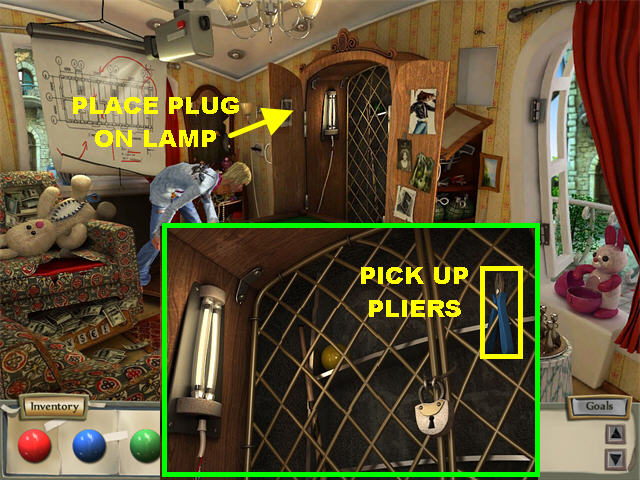
- Place the plug on the lamp inside the wardrobe.
- Click on the wardrobe for a closer view.
- Pick up the Pliers in the top right.
- Go back outside.
ANTENNA

- Click on the broken TV one more time.
- Use the pliers on the Antenna to cut them.
- Go back inside.
- Click on the wardrobe one more time.
- Place the Antenna on the lock to open it.
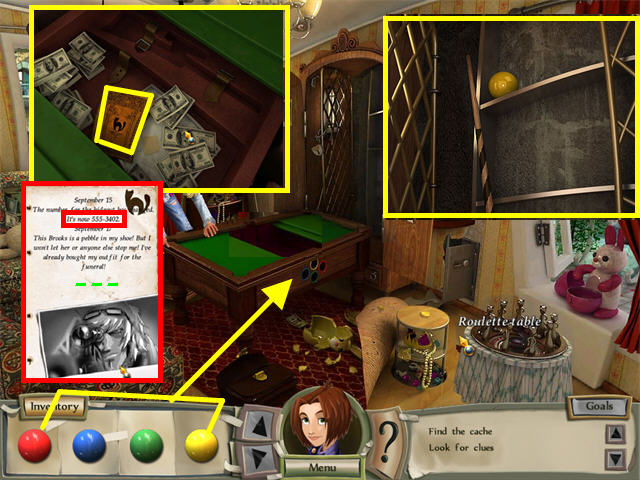
- Pick up the Yellow Billiard Ball.
- Place the 4 Billiard Balls inside the colored slots on the side of the pool table. The right color will go into the right hole once you click them into that spot.
- The center of the pool table opens up after all the balls have been placed.
- Click on Madlen’s Diary to see numbers written on the pages. The number for the new hideout is 555-3402.
- Go back outside.
PHONE BOOTH
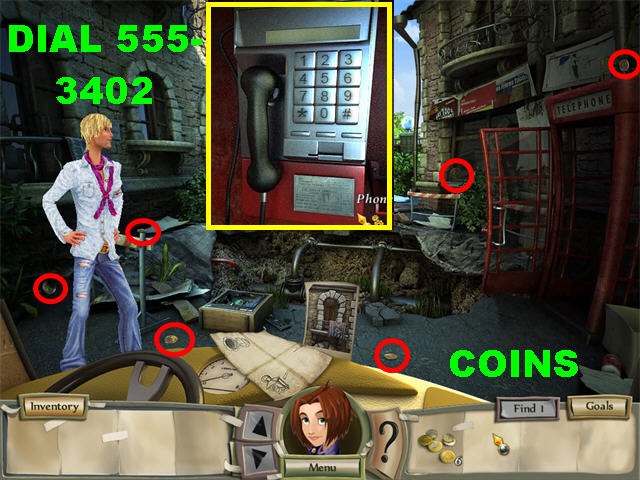
- Click on the phone booth. You will receive a message that you need change.
- Pick up the coins as indicated on the screenshot. They are circled in red.
- Click on the phone booth again.
- Place the coins in the coin slot.
- Dial the numbers 555-3402.
- Click on the paper behind the open phone. It is a picture of Madlen’s husband.
CHAPTER 8: THE BANK ASSAULT
OPEN THE SUITCASE
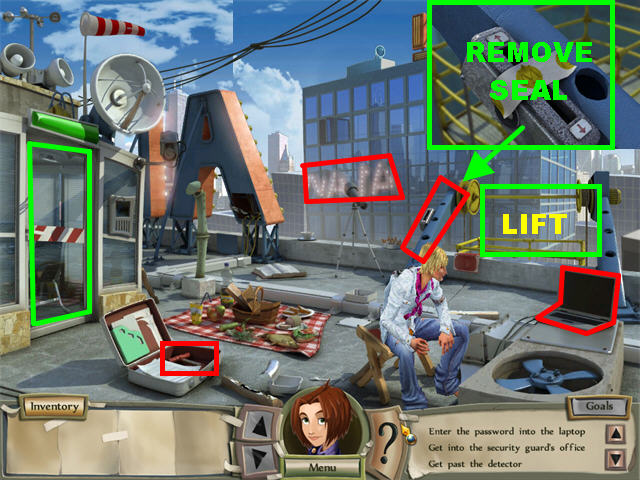
- Click on the laptop and it will ask you to enter the code.
- Click on the door on the left. A new task will be added after this action has been performed.
- Click on the place for a lever on the right for a closer view.
- Click on the seal to remove it.
HIDDEN OBJECT SCENE
- Click on the Lift on the right to trigger a Hidden Object scene.
- Pick up the Screwdriver on the right. Look for the rest of the items on the list.
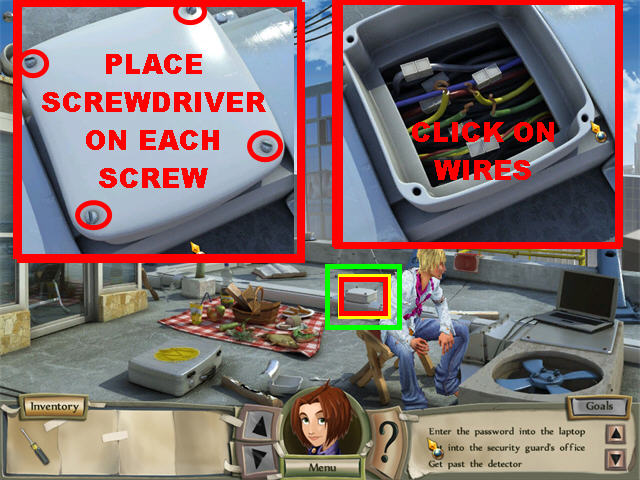
- Click on the Distributor in the center of the scene.
- Place the Screwdriver on each of the 4 screws.
- Click on the cover to remove it.
- Click on the wires to connect them.
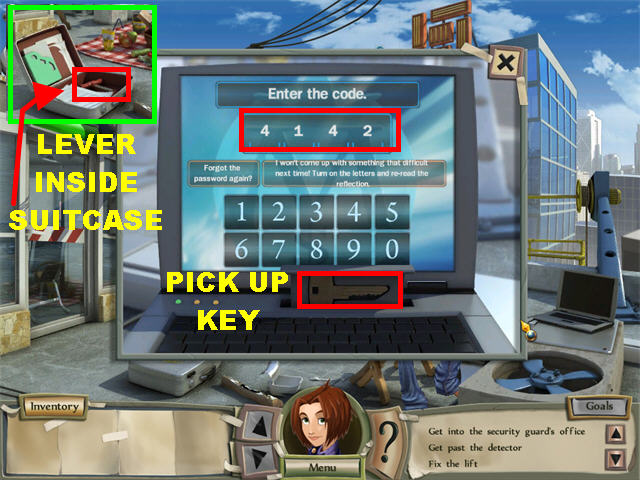
- The lights on the sign are reflecting on the building across the street. Some bulbs are not lit so they form the numbers “4142” backwards.
- Click on the laptop. You can click on “Forgot the password again?” for a clue on what to do.
- Enter the numbers “4142”.
- Click on the Key that slid out of the laptop.
- Place the Key on the suitcase in the lower left to open it.
- Pick up the Lever inside the suitcase.
FIX THE LIFT
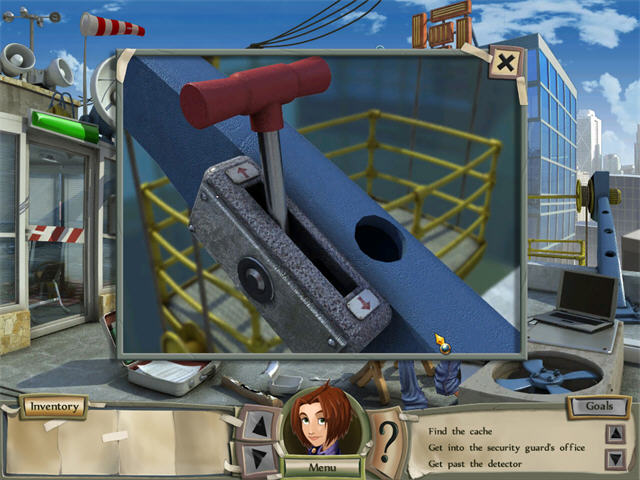
- Click on the ‘Place for a Lever’ for a closer view.
- Place the Lever in the slot.
- Click on the Lever to activate the lift. You will be automatically taken to the office.
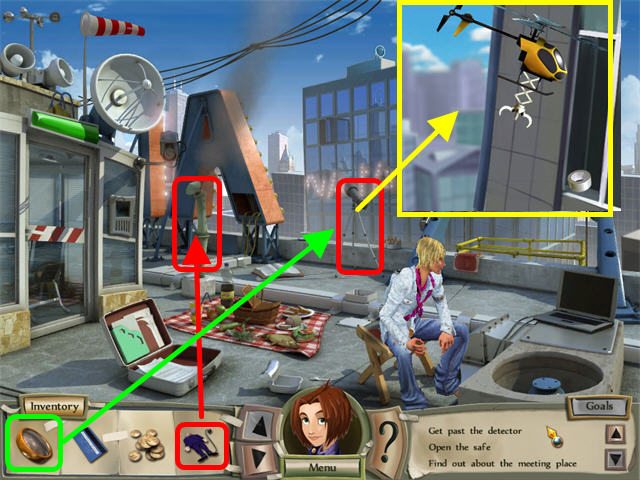
ENTER BANK OFFICE
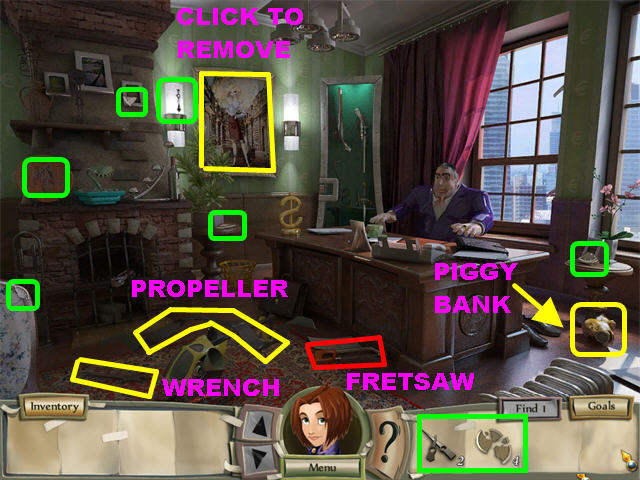
- Pick up the Fretsaw in front of the desk.
- Click on the broken helicopter in the lower left.
- Click on the broken propeller close to the desk.
- Pick up the Wrench in the lower left.
- Click on the large painting on the wall to remove it and you’ll discover a safe.
- Click on the safe and you’ll discover that you need several keys to open it.
- Click on the piggy bank on the floor and you will be asked to find the missing pieces.
- The piggy bank pieces are all highlighted in green.
- Click on the desk for a closer view.
- Place the Fretsaw on the chain around the ankle of the inflatable banker.
- Click on the inflatable banker to enter it into inventory.
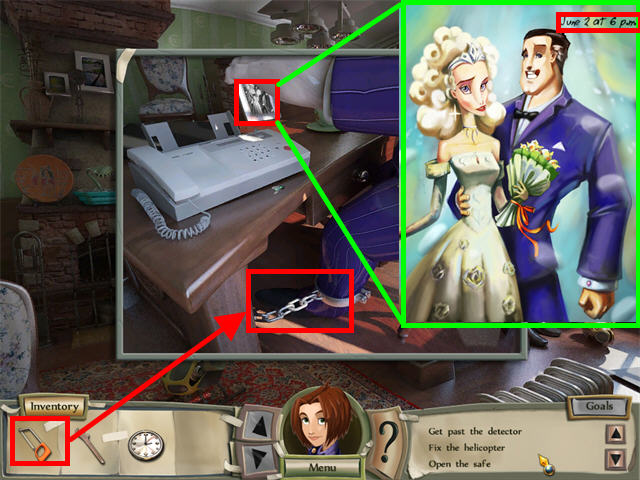
- Click on the photo on the desk. The date on the photo says:”June 2 at 6PM”
- Exit out of the pop-up window.
REPAIR CLOCK
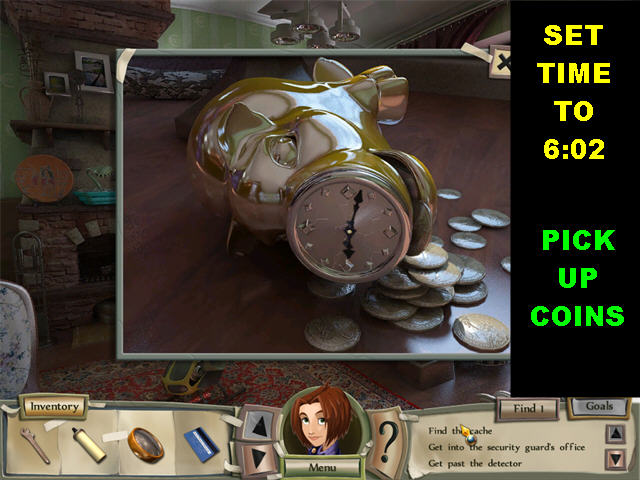
- Click on the piggy bank again.
- Place the Clock Face on the bank.
- Turn the hands of the clock to “6:02”. Place the hour hand to 6 and the minute hand to 2 minutes.
- Click on the coins that appear next to the piggy bank.
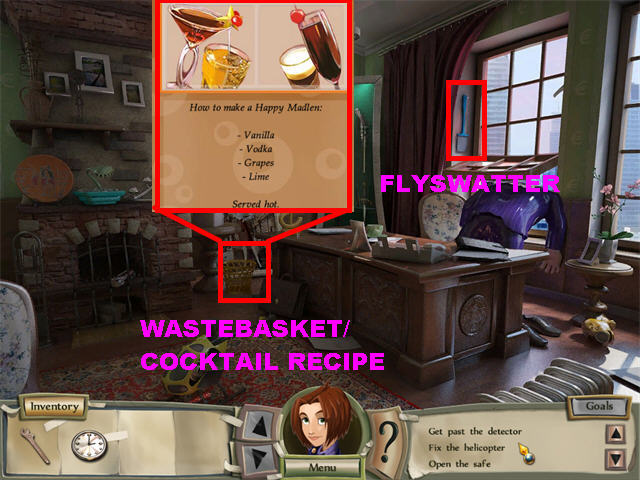
- Click on the window behind the desk and the inflatable banker gets stuck in it.
- Pick up the Flyswatter next to the window.
- Click on the wastebasket close to the fireplace for a closer view.
- Click on the cocktail recipe inside the basket. It says to make a Happy Medlen you have to add Vanilla, Vodka, Grapes and Lime, served hot.
DESK
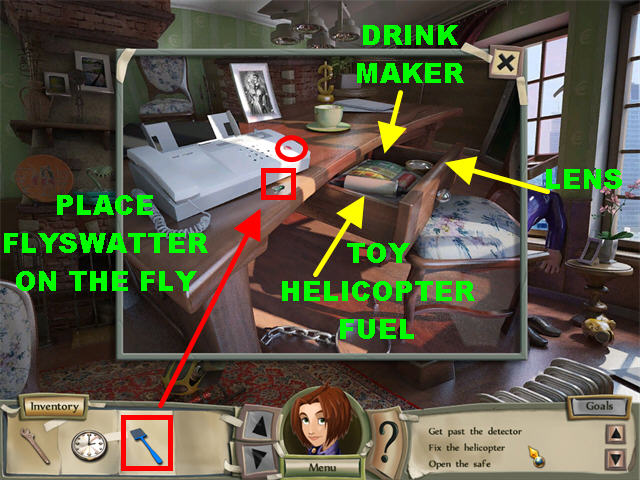
- Click on the desk for a closer view.
- Place the Flyswatter on the fly close to the phone.
- Click on the drawer to open it.
- Pick up the Toy Helicopter Fuel inside the drawer.
- Pick up the Lens inside the drawer.
- Click on the flashing red button on the phone to hear the last recorded message.
- Click on the Drink Maker inside the drawer.
DRINK MAKER
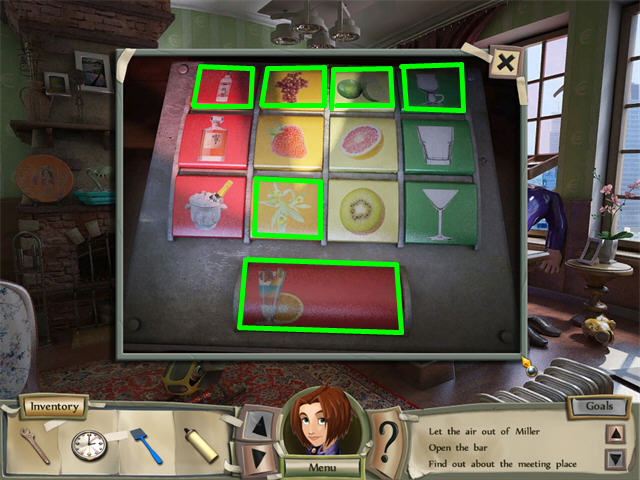
- Click on the drink maker inside the drawer for a closer look. You can press the following buttons in any order:Vanilla Vodka Grapes Lime Glass for hot drinks
- Click on the large button at the bottom to finish dialing the order in. The bar will automatically pop out of the side of the desk.
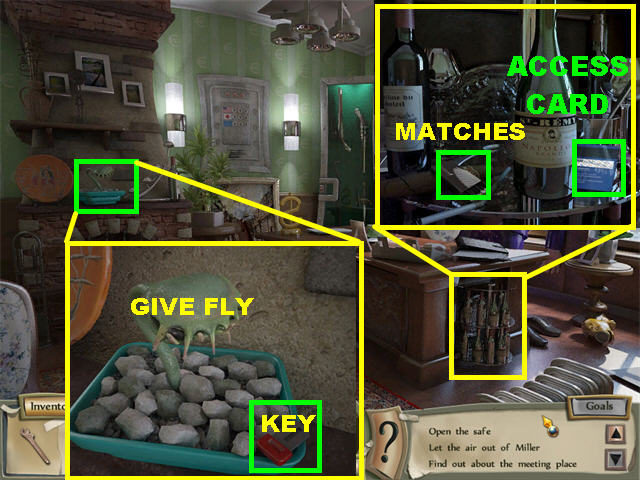
- Click on the bar on the side of the desk for a closer look.
- Pick up the Matches on the left.
- Pick up the Access Card next to the bottle in the center.
- Click on the Venus Flytrap above the mantle.
- Place the Fly on the Venus Flytrap.
- Pick up the Electronic Key that the plant spits out.
GUN RACK/ FIREPLACE
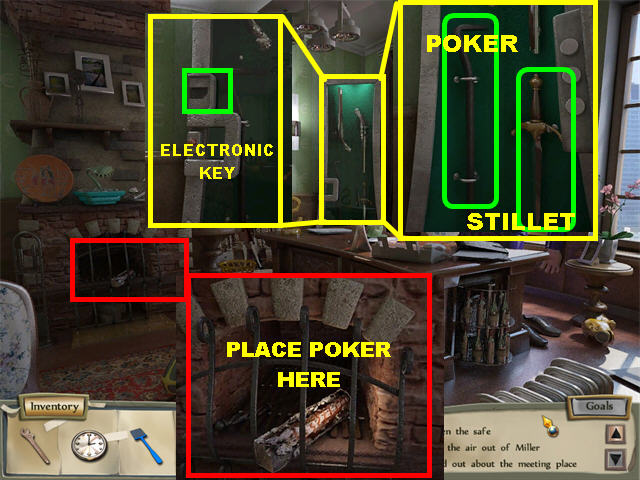
- Click on the gun rack in the back.
- Place the Electronic Key in the Electronic Lock.
- Pick up the Poker inside the rack.
- Pick up the Stillet inside the rack.
- Place the Stillet on the inflatable banker by the window and it will go into your inventory.
- Click on the Fireplace.
- Place the Fire Poker on the smoldering log.
- Click on the log in the fireplace and you are asked to find 8 logs.
- Go back to the roof to pick up the logs.
FIND 8 LOGS
- Please look at the screenshot for the locations of all the logs. The logs are all highlighted in red.
- Click on the Ventilator in the lower right.
- Use the Wrench to loosen the bolts.
- Pick up the Propeller.
- Use the lift to go back to the office.
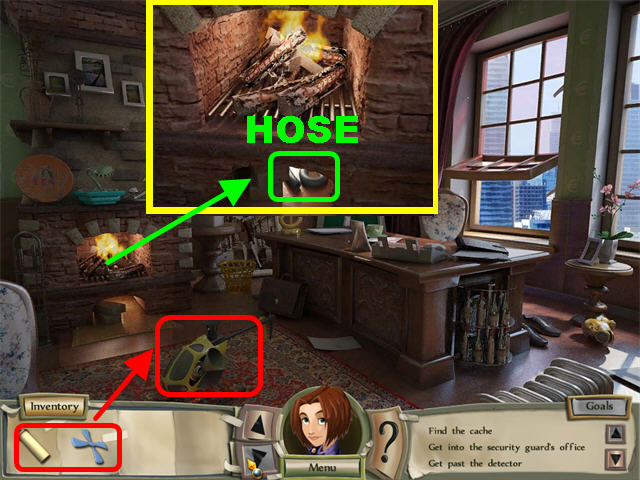
- Place the firewood into the fireplace.
- Place the Matches on the wood.
- Pick up the Hose below the fire. The Hose will automatically merge with the inflatable banker in your inventory.
- Place the Toy Helicopter Fuel in the Gas Tank of the helicopter on the floor.
- Place the Propeller on the Helicopter and it will go into inventory.
- Go back upstairs.
TELESCOPE
- Place the banker with Hose on the chimney.
- Place the Lens on the Telescope.
- You can see the electrical tape far away.
- Place the helicopter on the view of the telescope and it will fly and pick up the tape.
- Place the Tape on the Deflated Banker by the door and the door will open.
FIND THE DIFFERENCES AND GATHER 6 KEYS
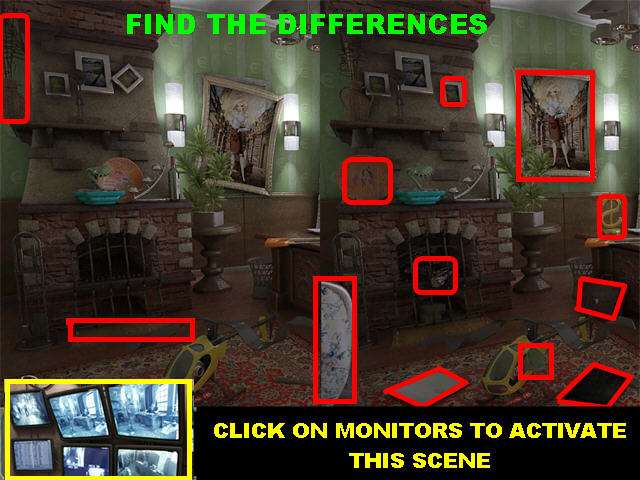
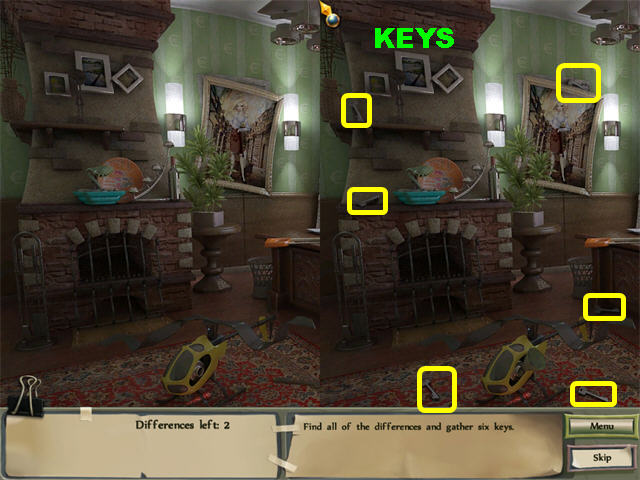
- Click on the door for a closer view.
- Click on the monitors to trigger a find the differences puzzle.
- Please look at the screenshots for the locations of all the differences and the keys.
- You don’t have to find all the differences to end this section; all you have to do is find the 6 keys.
- Exit the scene and go back into the office.
OPEN SAFE
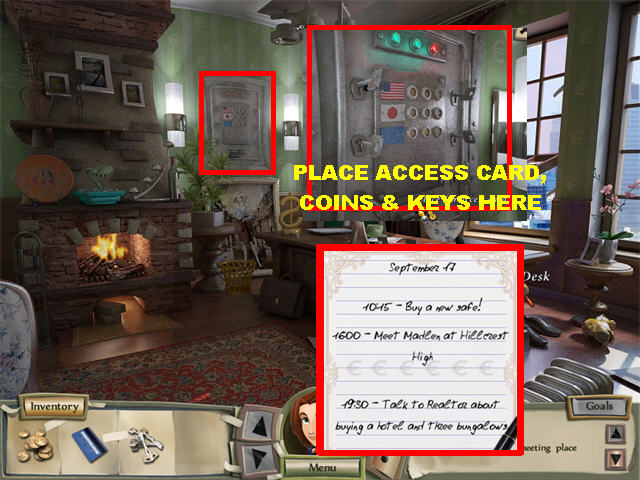
- Click on the safe for a closer view.
- Place the Access Card at the bottom of the safe.
- Place the Keys in the slots.
- Place the Coins in the center of the safe to trigger a mini-game.
SAFE COINS MINI-GAME
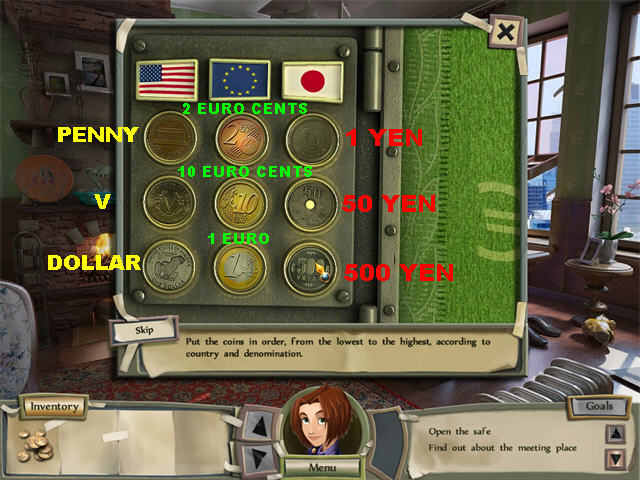
- The goal of this game is to place the coins from lowest to highest according to the country and their denomination.
- Once a set of coins are inserted in the right spots, the flag will light up.
- The solution is as follows:
- The American Flag Column: Penny - V Cents - Dollar Coin
- The Flag of European Union Column: 2 Euro Cents – 10 Euro Cents – 1 Euro
- The Japanese Flag Column: 1 Yen – 50 Yen – 500 Yen
- Click on the note inside the safe. It says 1600 – Meet Madlen at Hillcrest High.
CHAPTER 9: THE FINAL CONFRONTATION
SCARE MADLEN
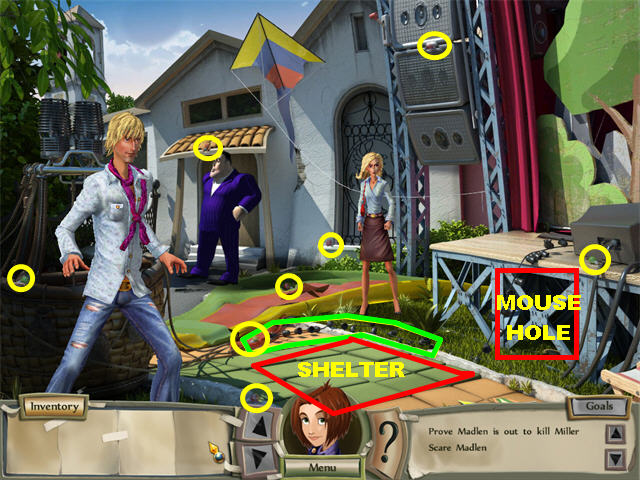
- Pick up the String of Lights on the right. You will be asked to find 8 Bulbs.
- Please look at the screenshot for the locations of all the bulbs, they are circled in yellow.
- Click on the green mat on the ground to reveal an underground shelter.
- Place the Glowing Lights inside the shelter.
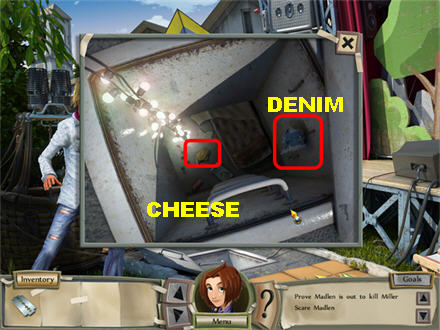
- Pick up the Piece of Denim inside the shelter.
- Pick up the Cheese inside the shelter.

- Click on the mouse hole on the right.
- Pick up the Razor.
- Place the Cheese on the hole and the mouse will come out.
- Click on the Mouse to enter it into inventory.
- Place the Mouse on Madlen, she jumps and drop her purse.
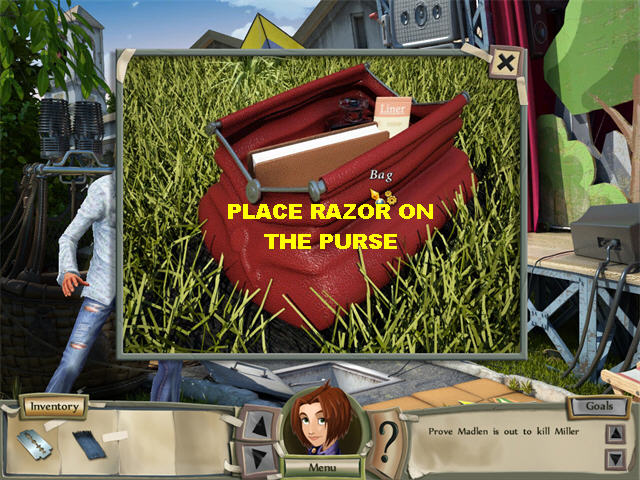
- Click on Madlen’s red purse on the ground.
- Place the Razor on the purse to trigger a Hidden Object scene.

- Pick up the Passport in the lower left. Search for the rest of the items on the list.
- Give the Fake Passport to the Banker.
- Place the Razor on the Kite.
- Click on the branches in the upper left.
- Place the Razor on the kite in the upper left. The string will go into your inventory.
- Click on the hot air balloon basket on the left.
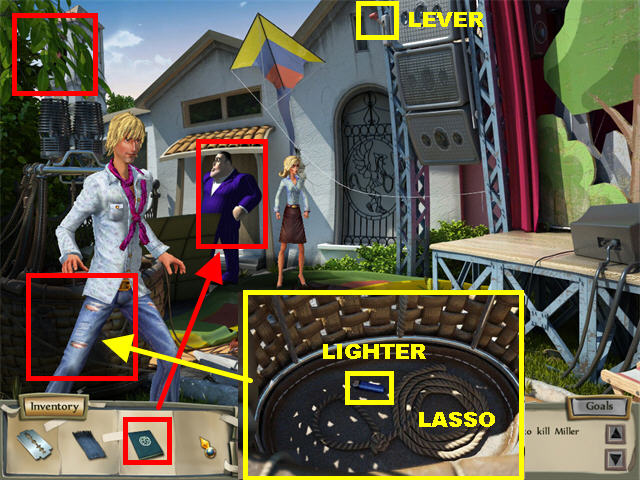
- Pick up the Lighter inside the basket.
- Pick up the Lasso inside the basket.
- Place the Lasso on the Lever in the upper center. The stage curtains open up.
- Click on the stage to trigger a Hidden Object scene.
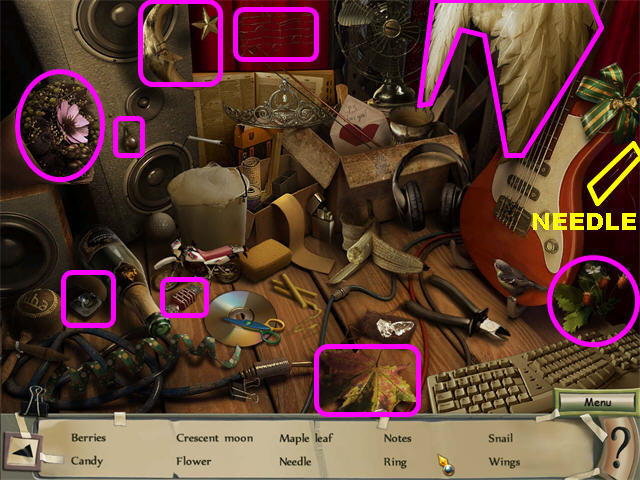
- Pick up the Needle on the side of the guitar. Continue looking for the rest of the items.
- The needle, string and the Denim will automatically combine in your inventory tray to form a Sewing Kit.
- Place the Sewing Kit on the ‘Hot Air Balloon with a Hole’ located on the ground.
- Put the Lighter on the burner above the hot air balloon basket.
- Click on the front door.
FIND CHAD AND JOHNNY DIFFERENCES
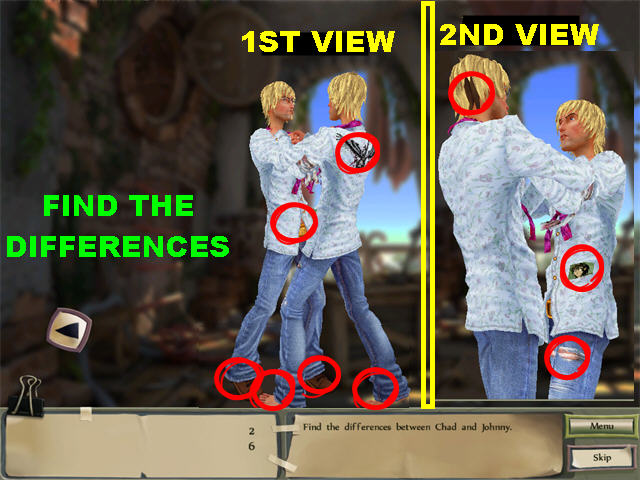
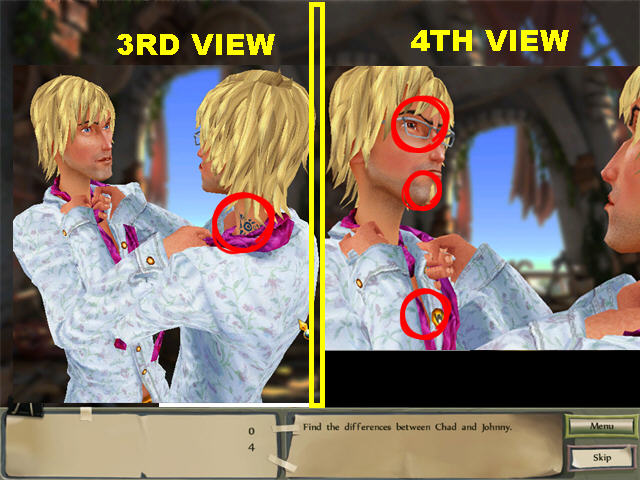
- Your goal is to find the differences between Chad and Johnny.
- There are 4 different angles in which you need to see all the differences.
- Click on the arrows to change positions.
- Please look at the 2 screenshots for the exact locations of all the differences.
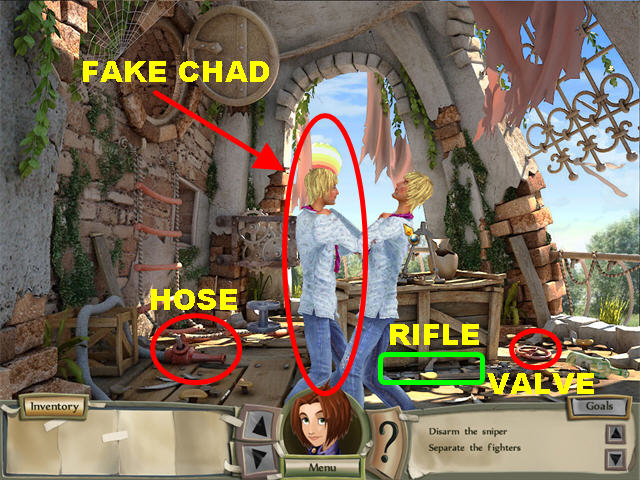
- Pick up the Valve in the lower right.
- Place the Valve on the water hose in the lower left, below the ladder. A Fire Hose with Valves will go into your inventory.
- Place the Fire Hose with Valves on Chad’s double on the left.
GET INTO HOT AIR BALLOON
- Pick up the Rifle in the lower center of the scene.
- Place the Rifle on the Rifle Stand on top of the wooden table.
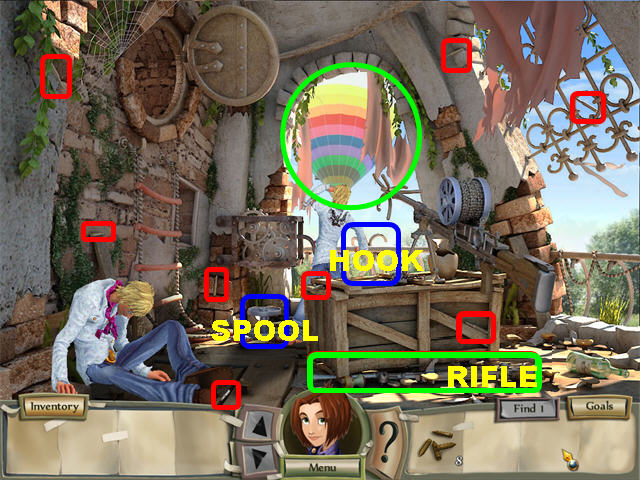
- Pick up the Hook below the hot air balloon.
- Pick up the Spool, next to the real Chad standing close to the balloon.
- Place the Hook on the rifle.
- Place the Spool on the rifle. You will be asked to find 8 cartridges.
- Please look at the screenshot for the locations of all the cartridges, they are marked in red.
- Place the Spent Cartridges on the rifle.
- Click on the Hot Air Balloon to end the chapter.
CHAPTER 10: THE BIG CHASE
SAVE KITTY
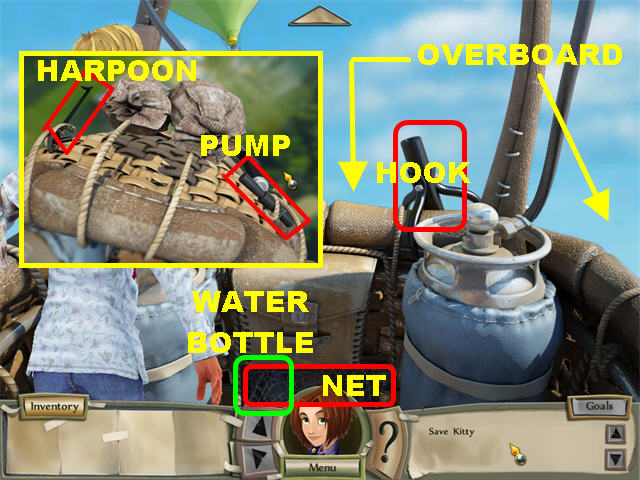
- Click on the Hook in the upper right.
- Pick up the Net in the lower center.
- Pick up the Bottle of Water in the lower center, it appears below the net.
- Look overboard. You need to find a way to get rid of the ballasts.
- Pick up the Harpoon on the left side of the ballasts.
- Pick up the Pump on the right side of the ballasts.
- Click on the arrow on top of the scene.
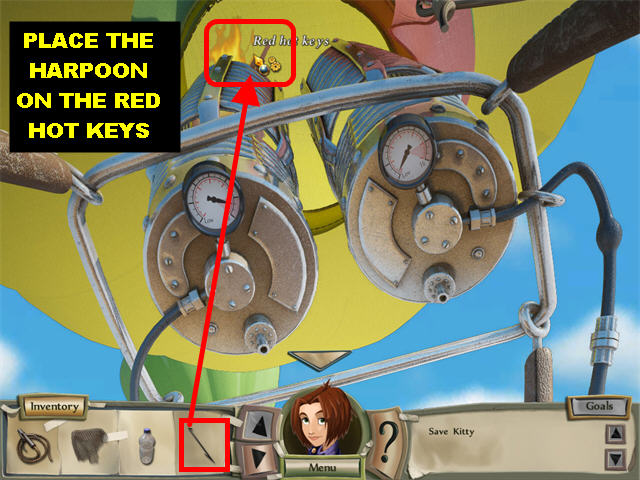
- Place the Harpoon on the red hot keys, on the left burner. The Keys fall down below.
- Go back down.
- Place the Bottle of Water on the hot keys on the side of the basket.
- Pick up the Keys.
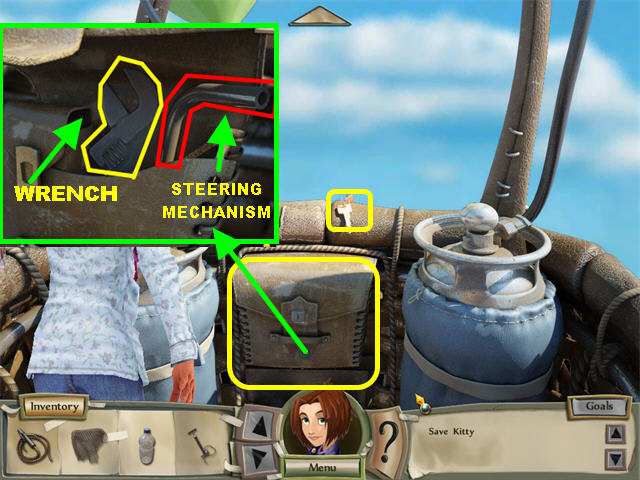
- Place the Keys on the lock on the bag. Click on the bag for a closer view.
- Pick up the Wrench inside the bag.
- Pick up the Steering Mechanism inside the bag.
- Go back up.
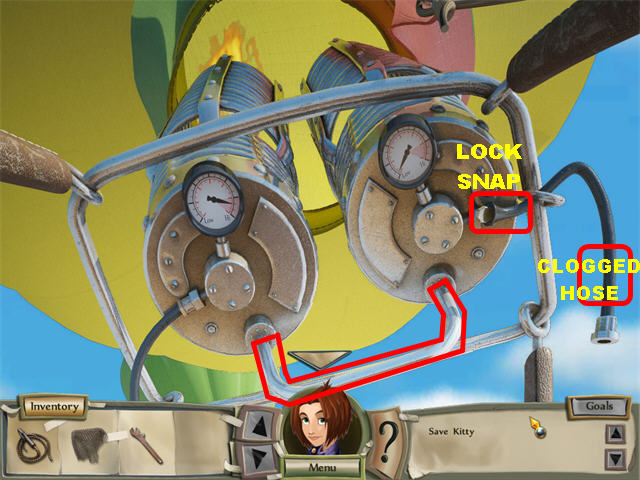
- Place the Wrench on the clogged hose on the right.
- Place the Pump on the clogged hose on the right.
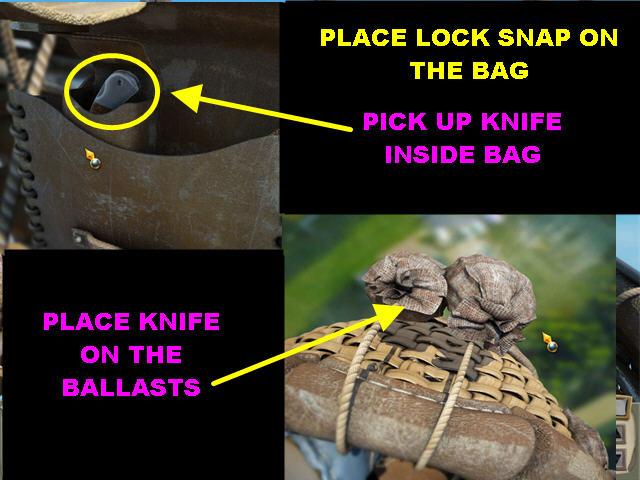
- Pick up the Lock Snap at the end of the hose.
- Place the Wrench on the hose one more time.
- Place the Steering Mechanism on the ‘Place for a Lever’ at the bottom. You will be automatically moved to the basket view.
- Click on the Bag.
- Place the Lock Snap on the Bag.
- Pick up the Knife inside the bag.
- Look overboard by clicking on the side of the basket.
- Place the Knife on the ballasts.
- Go back up.
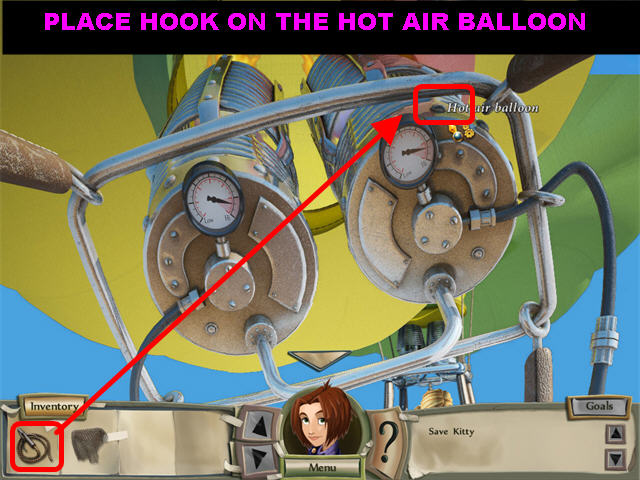
- Place the Hook on the hot air balloon.
- Go back down.
CAPTURE MADLEN/ SAVE KITTY
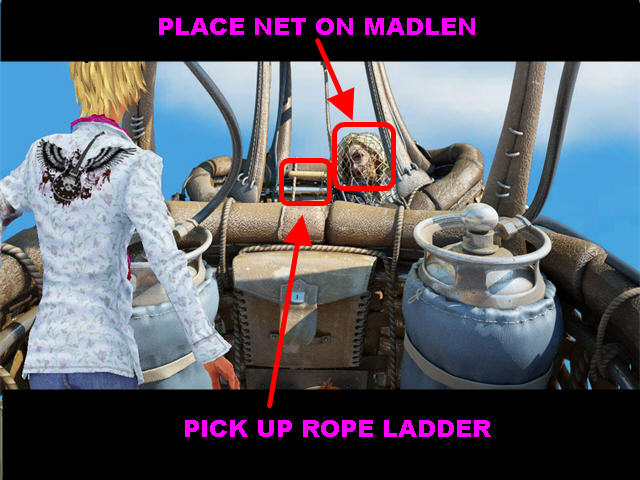
- Place the Net on Madlen.
- Pick up the Rope Ladder close to Madlen.
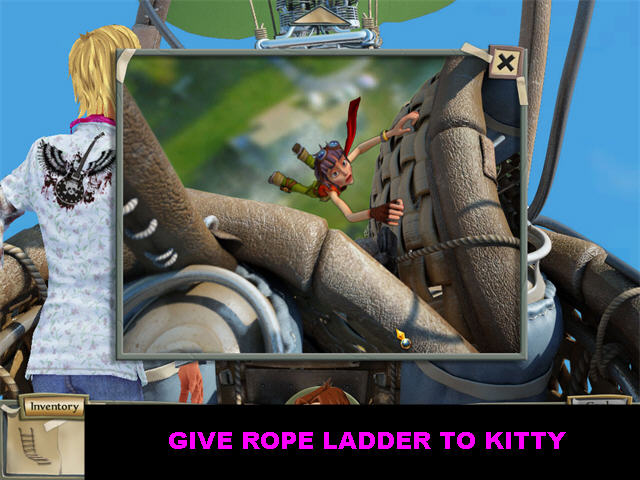
- Click overboard again and you will see Kitty hanging on the side of the other basket.
- Give the Rope Ladder to Kitty to end the game.
- Watch the ending scenes!
Created at: 2009-12-23