

Walkthrough Menu
- General Tips
- Chapter 1: Another World
- Chapter 2: Crossing the Mountain
- Chapter 3: The Land of the Gnomes
- Chapter 4: The Great Tree
General Tips
- This is the Official Guide for Nearwood.
- There are three difficulty levels: Casual, Normal, and Expert.
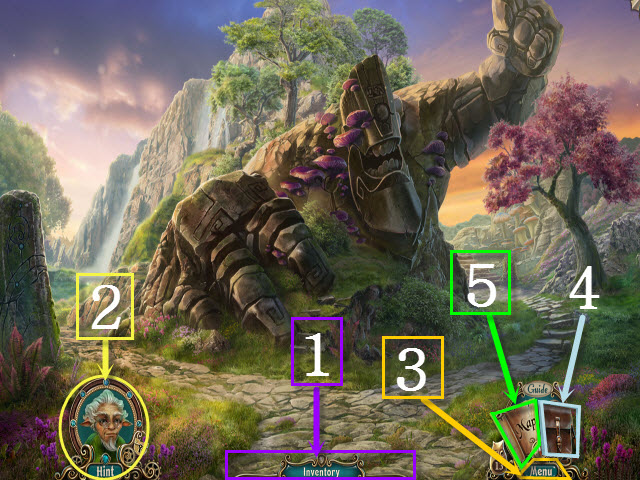
- The Inventory items are stored here (1).
- The Hint button will offer hints and allow you to skip puzzles, but will take some time to recharge (2).
- Selecting the Menu button will bring up the Sound Settings, Widescreen Options, Cursor Options, and allow you to return to the Main Menu (3).
- The Bag will show your current items of interest (4).
- Early on you will be given an in-game map. This may be used to fast travel from location to location, but will take some time to recharge (5).
Chapter 1: Another World
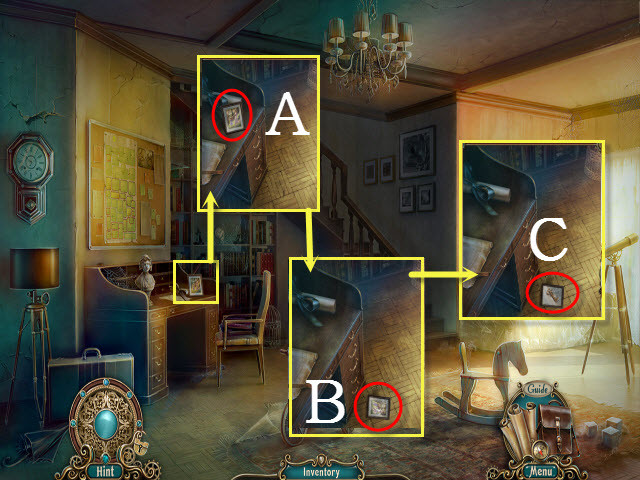
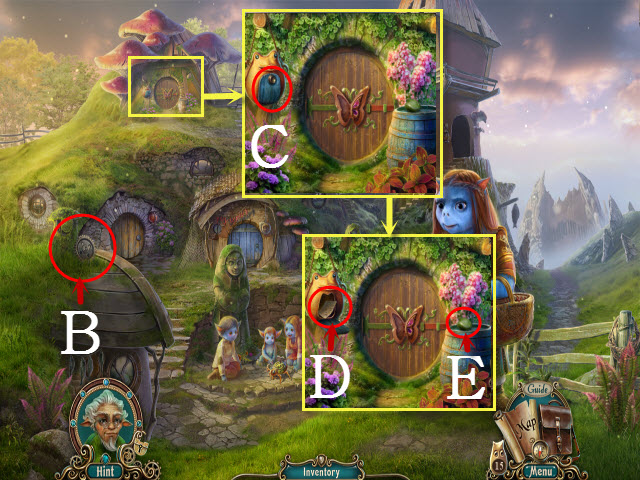
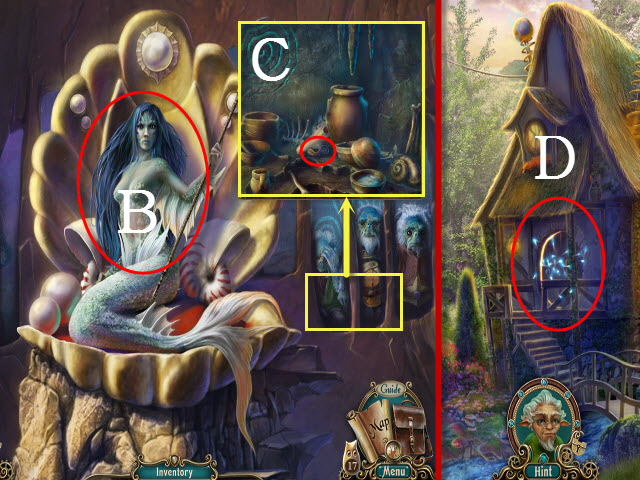
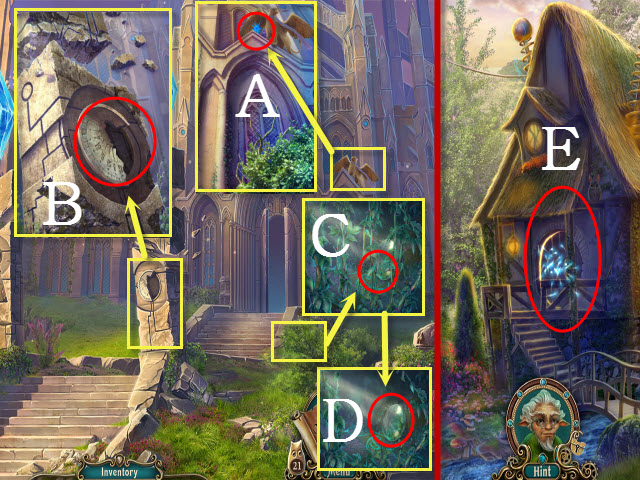
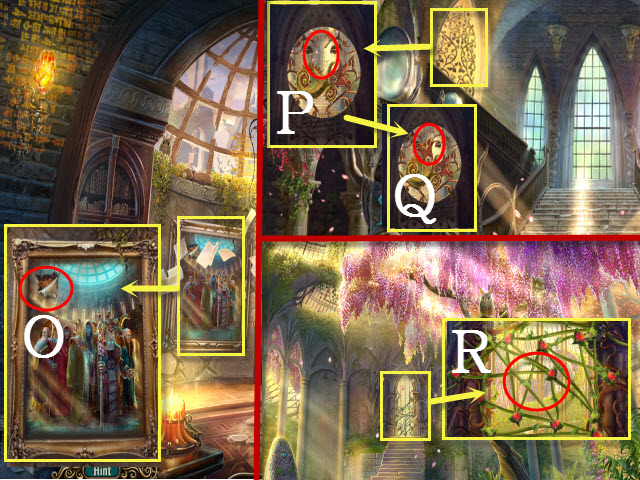
- Examine the desk; select the portrait (A).
- Look at the photo (B) and take the KEY (C).
- Walk upstairs.

- Take the MEDALLION (D).
- Use the MEDALLION on the mirror (E).
- Walk forward.
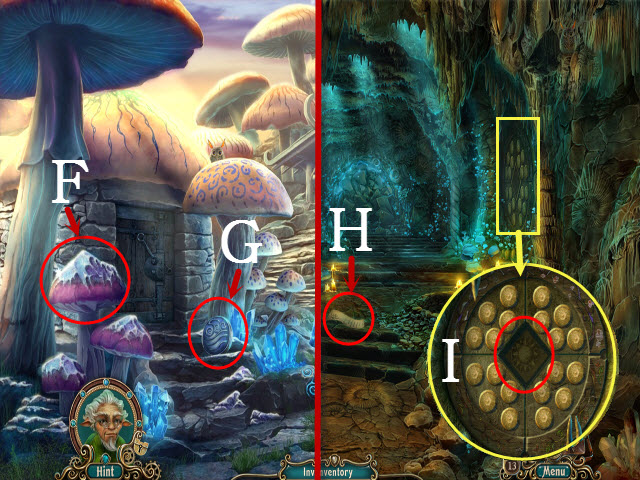
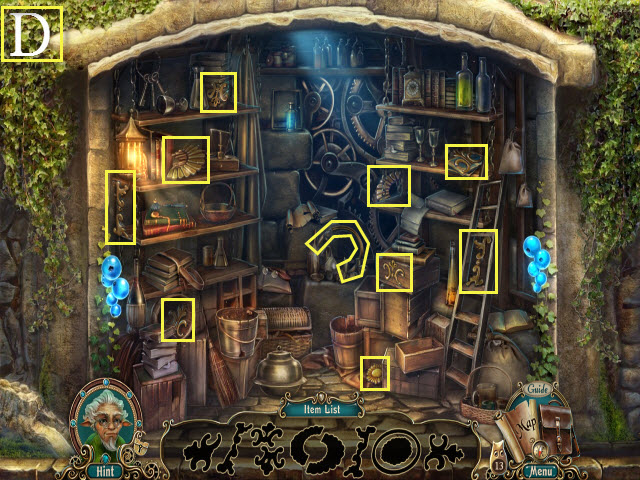
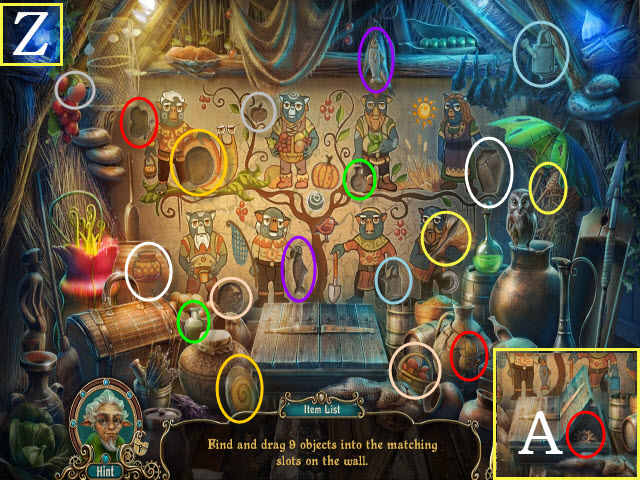
- Examine the lock; place the KEY in the hole and turn it (F) to trigger a HOP.
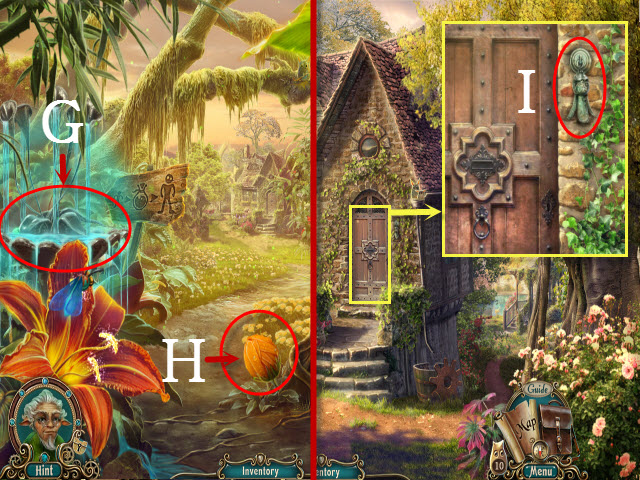
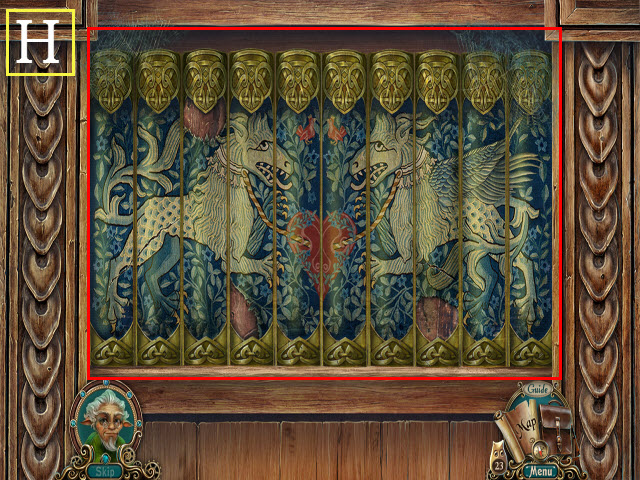
- Examine the turtle to activate a HOP (G).
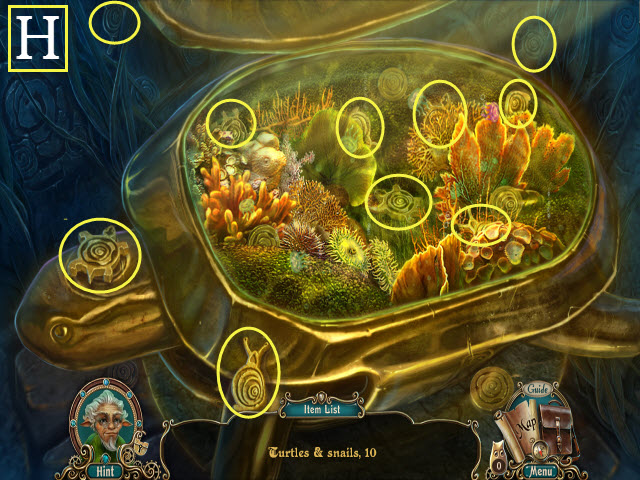
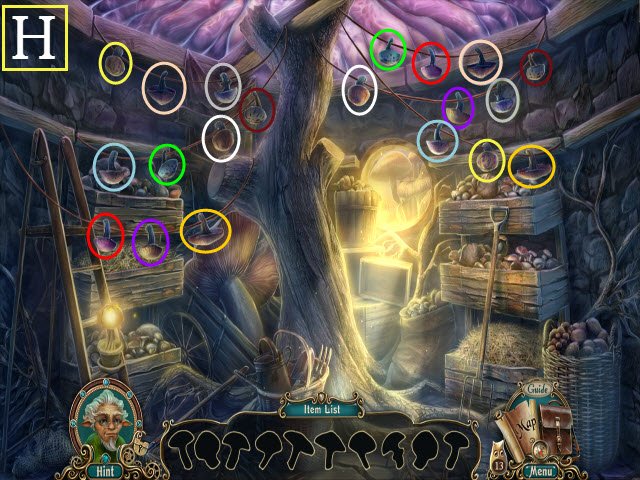
- Play the HOP (H).
- You will receive the BRASS FIGURINES.
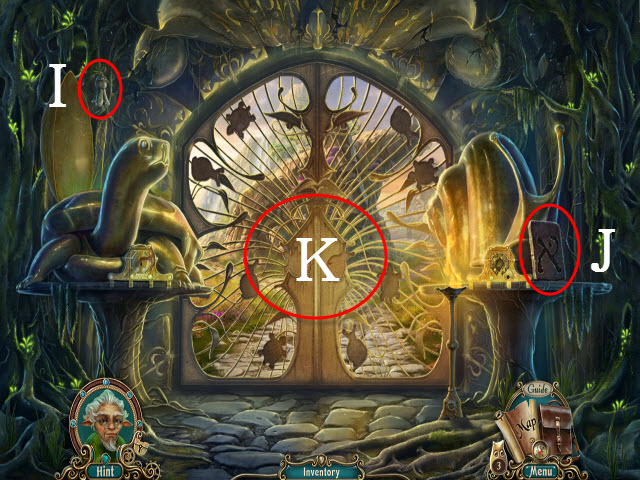
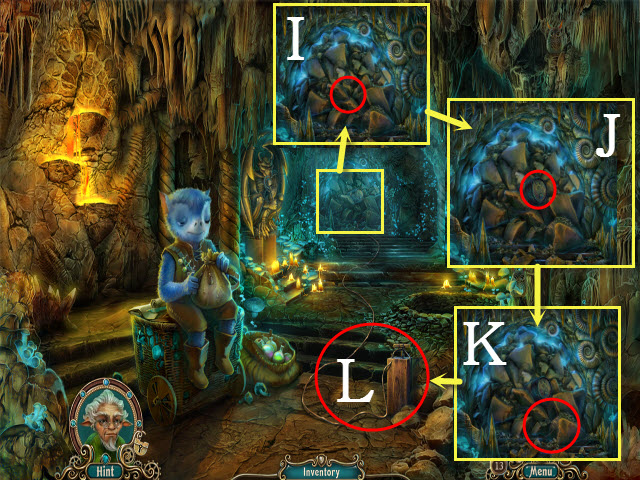
- Take the BELL (I) and the STONE SLAB (J).
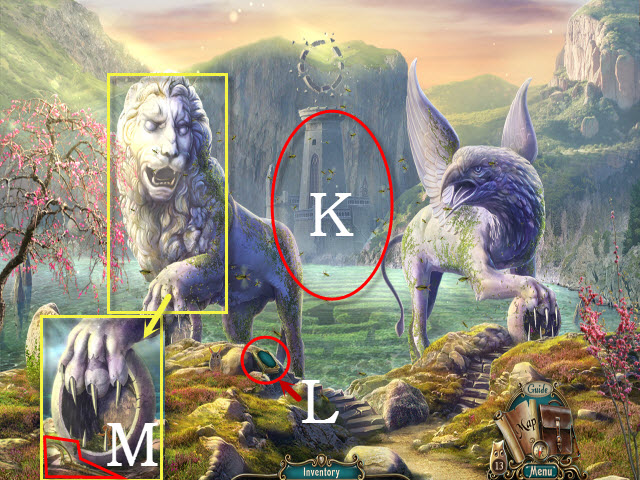
- Place the BRASS FIGURINES on the mural (K) to activate a mini-game.
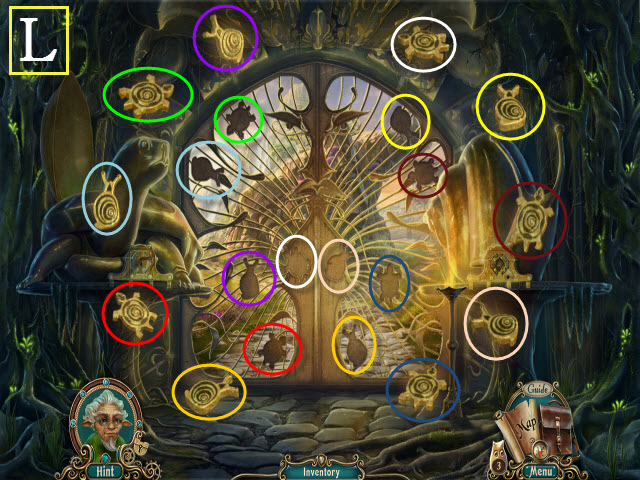
- Select the turtles and snails; place them in their matching slots (L).
- Walk forward to the Golem.
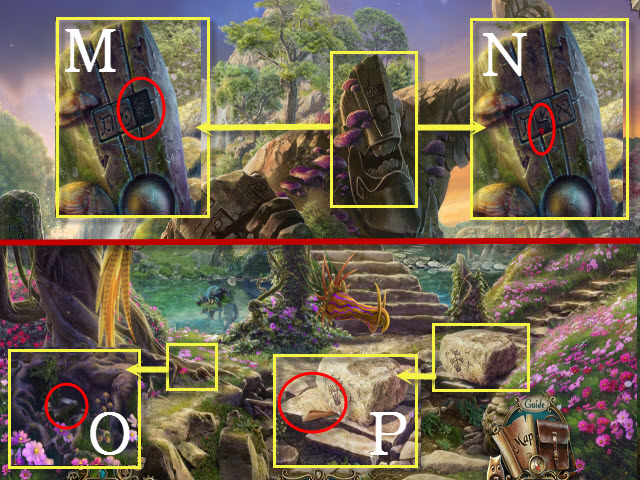
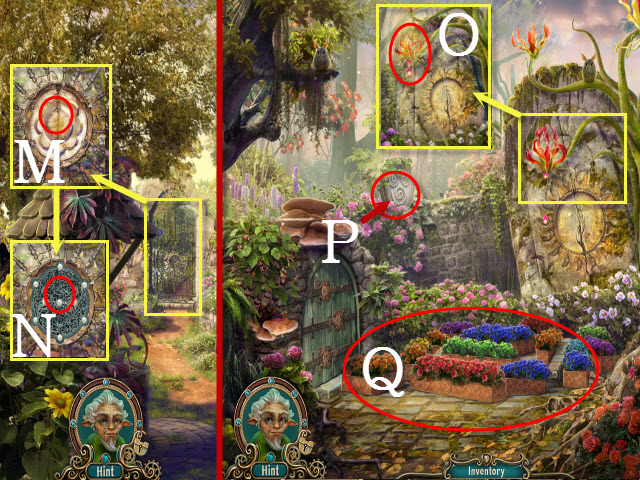
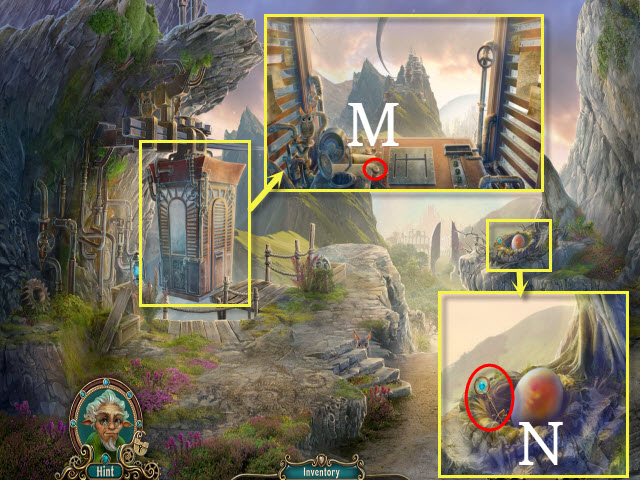
- Examine the golem; place the STONE SLAB in the slot (M).
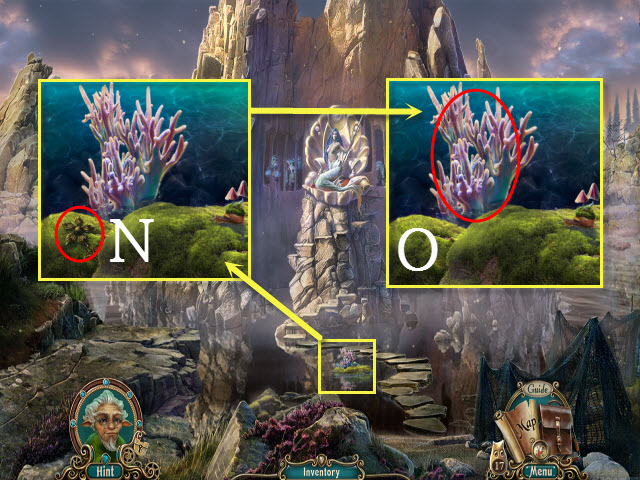
- Examine the golem; take the RUBY (N).
- Walk right to the Crossroads.
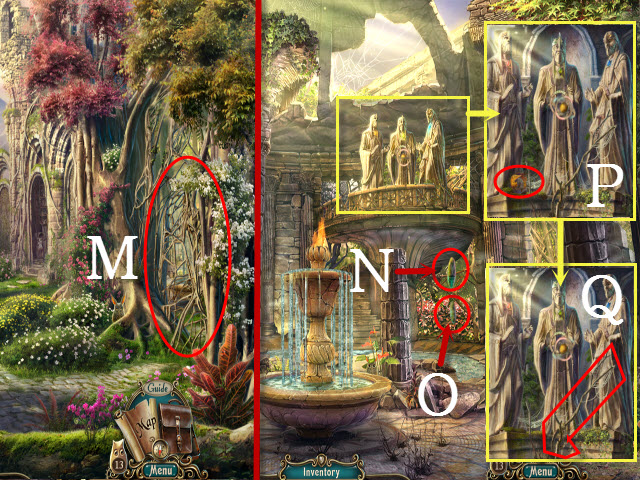
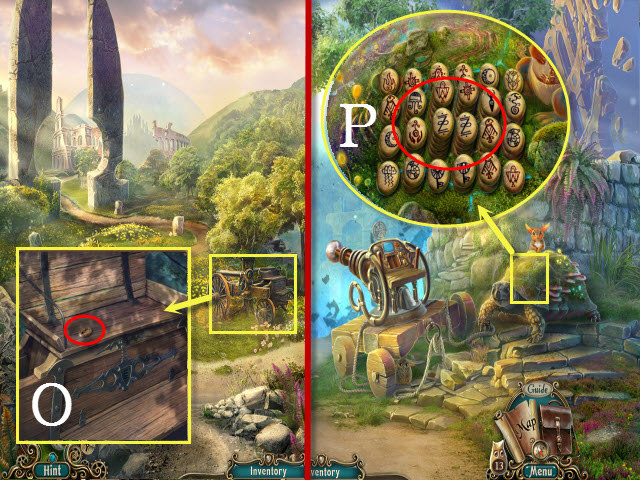
- Examine the flowers; take the KNIFE (O).
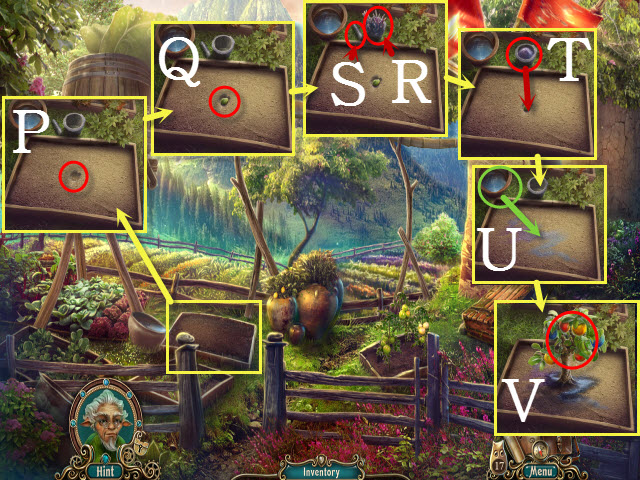
- Examine the rock; look at the recipe (P).
- Walk right to the Statue.
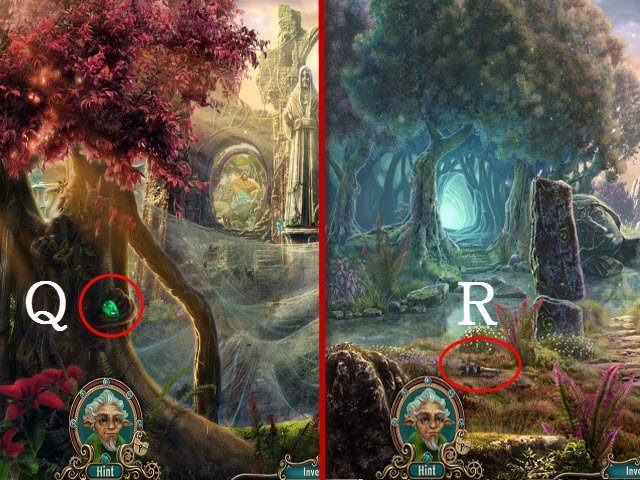
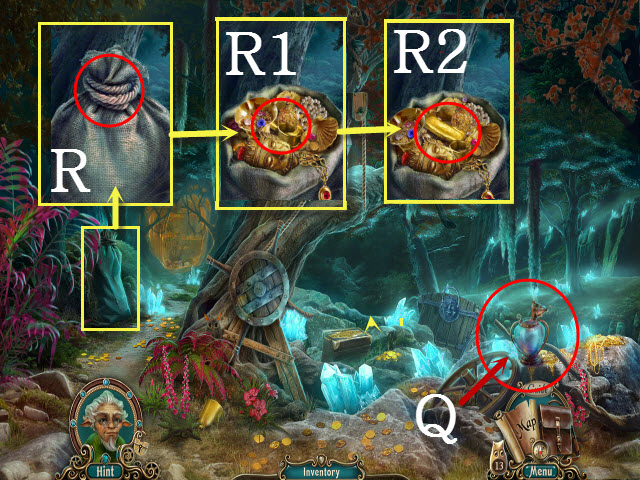
- Take the EMERALD (Q).
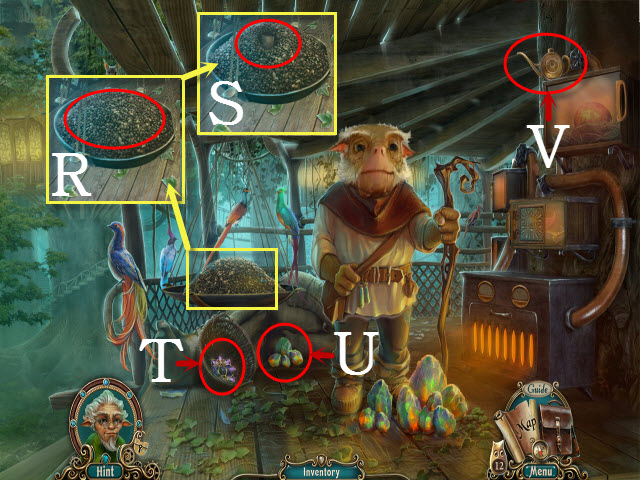
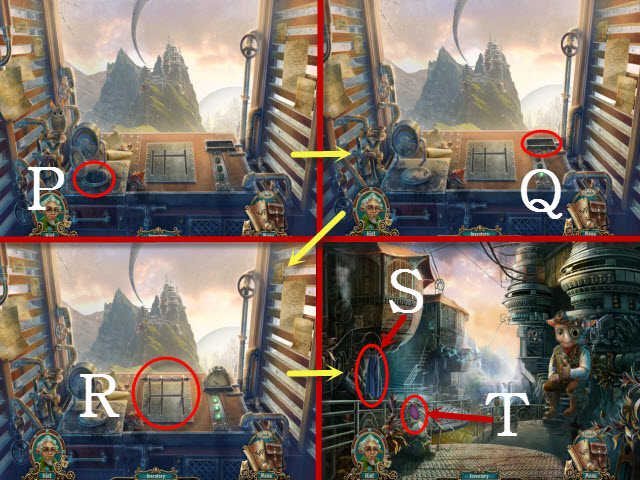
- Return to the Golem and then walk left to the River.
- Pick up the TORCH (UNLIT) (R).
- Walk down twice.
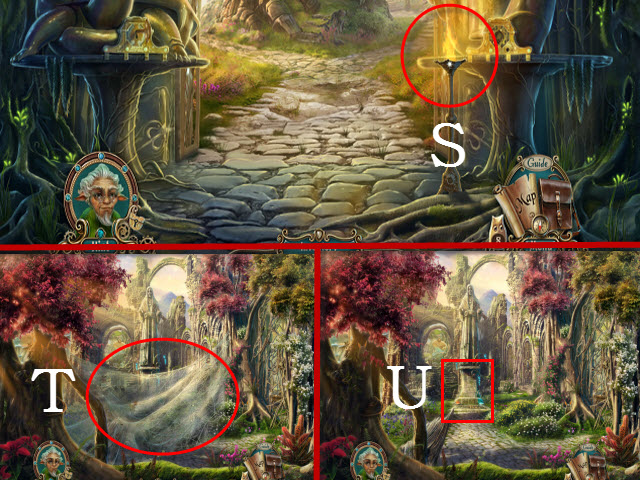
- Use the TORCH (UNLIT) with the flame to receive the TORCH (S).
- Return to the Statue.
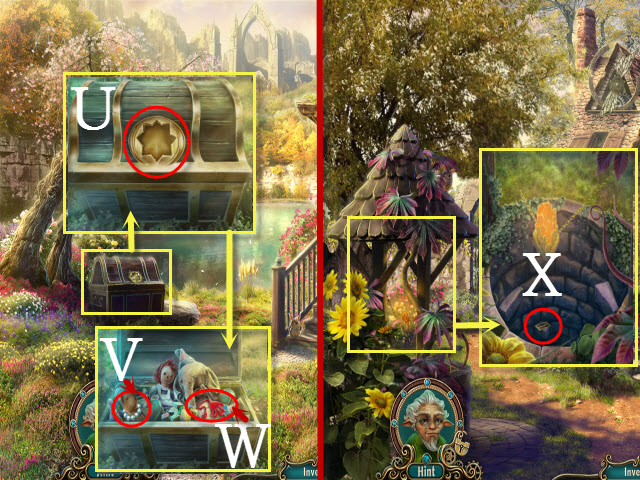
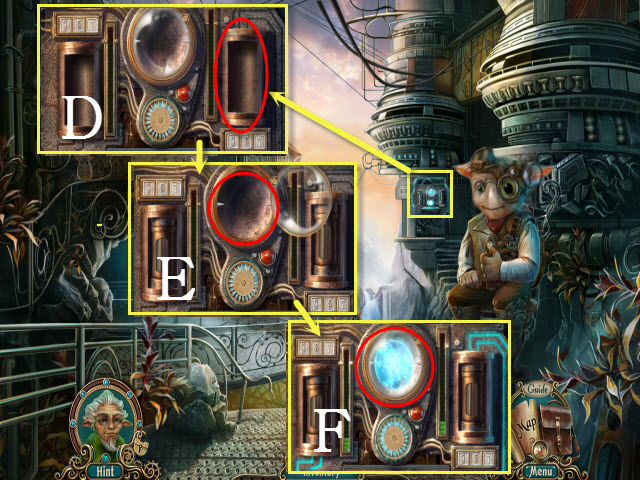
- Use the TORCH on the cobwebs (T).
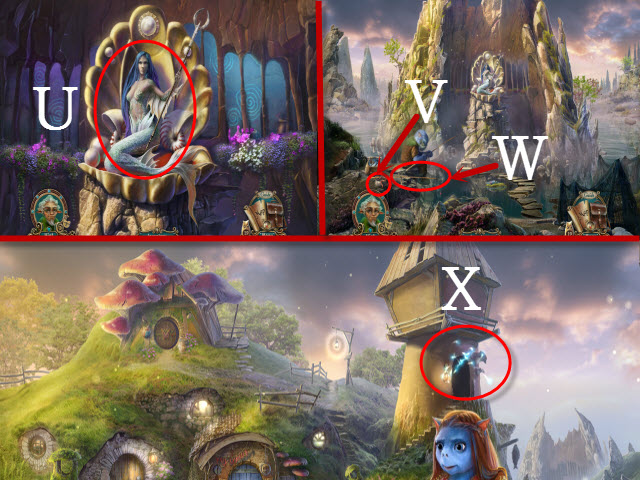
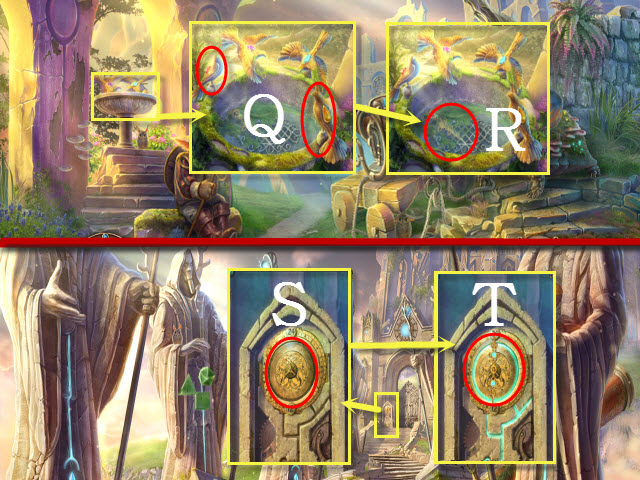
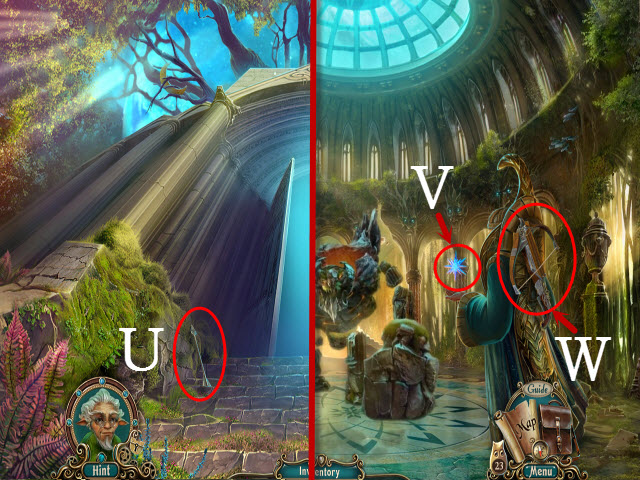
- Examine the statue to activate a puzzle (U).
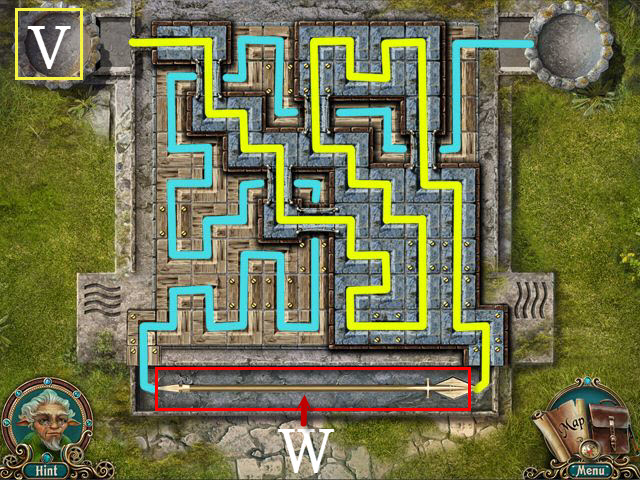
- To solve the puzzle, swap the tiles to create pathways for the water and lava to flow to their corresponding symbols on the bottom.
- Please see the screenshot for the solution (V).
- Take the SPEAR (W).
- Walk forward to the Path.
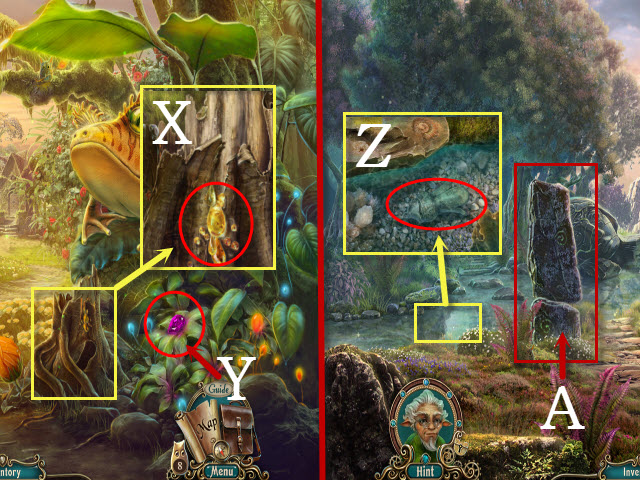
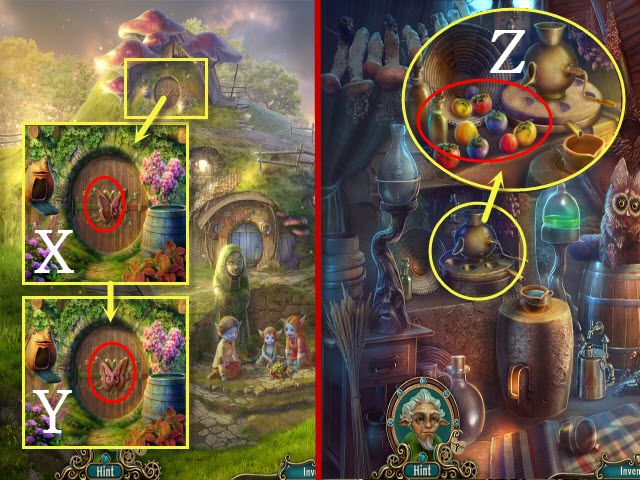
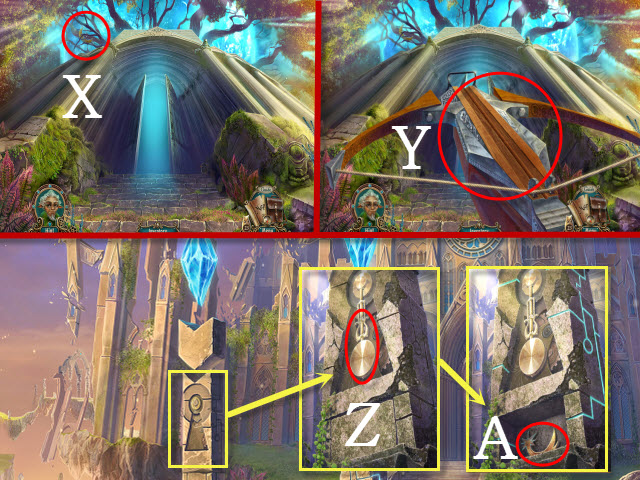
- Examine the trunk; use the KNIFE on the sap to get the TREE SAP (X).
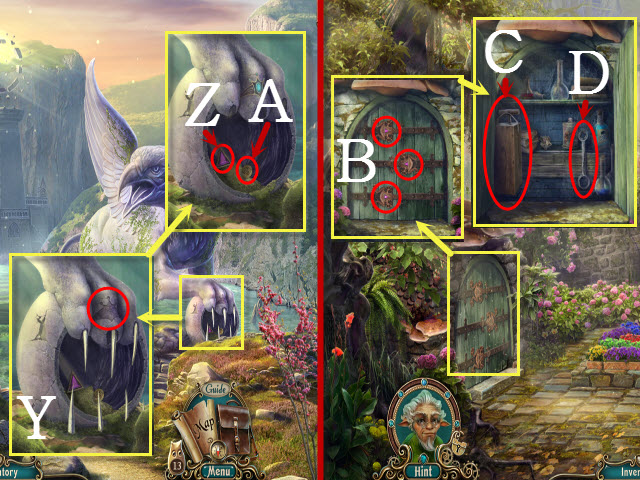
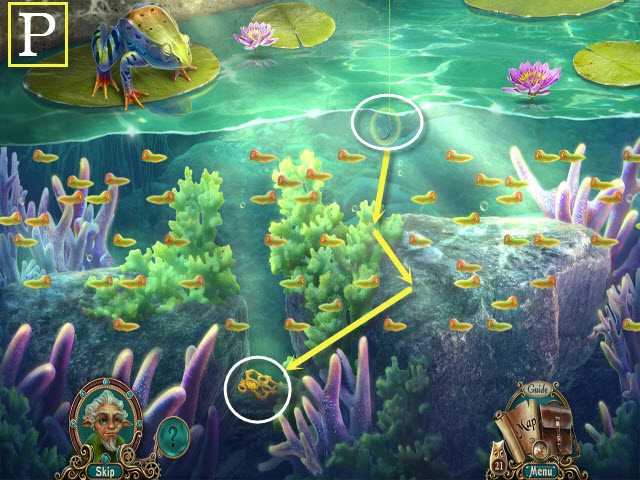
- Take the AMETHYST (Y).
- Return to the River.
- Use the SPEAR on the stone (A).
- Examine the river and take the 2nd BELL (Z).
- Walk forward to the Bells.
- Take the TOPAZ (B).
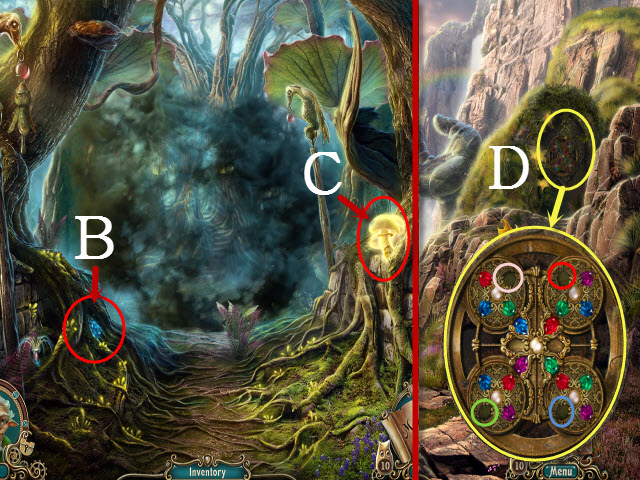
- Use the KNIFE on the mushroom to get the GLOWING MUSHROOM (C).
- Walk down.
- Examine the plate; place the RUBY (red), the AMETHYST (pink), the TOPAZ (blue), and the EMERALD (green) in the slots to activate a puzzle (D).
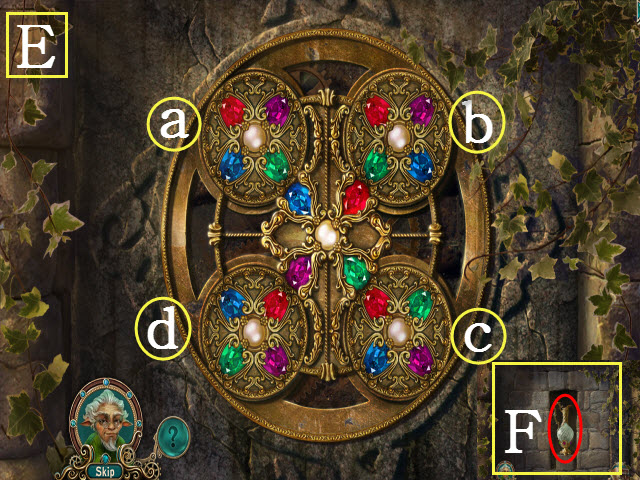
- Rotate the gemstones so that the like-colored gems are aligned with each other.
- Please see the screenshot for the solution: Ax3, Bx1, Сx3, Dx3, Bx2 (E).
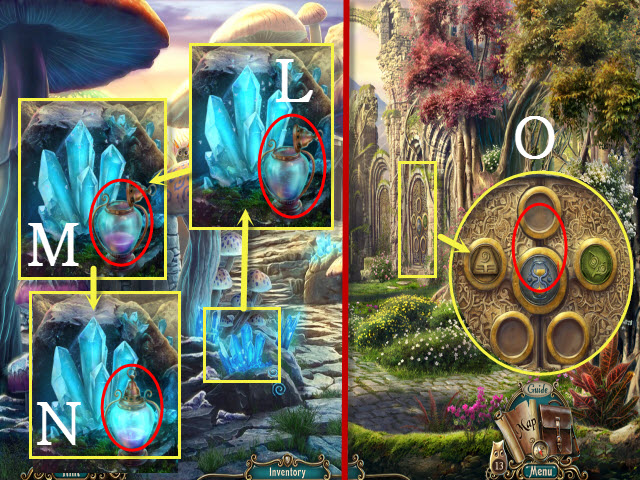
- Take the CRYSTAL PITCHER (F).
- Return to the Path.
- Use the CRYSTAL PITCHER on the fountain to receive the GROW WATER (G).
- Use the GROW WATER on the flower (H).
- Walk forward to the Front Yard.
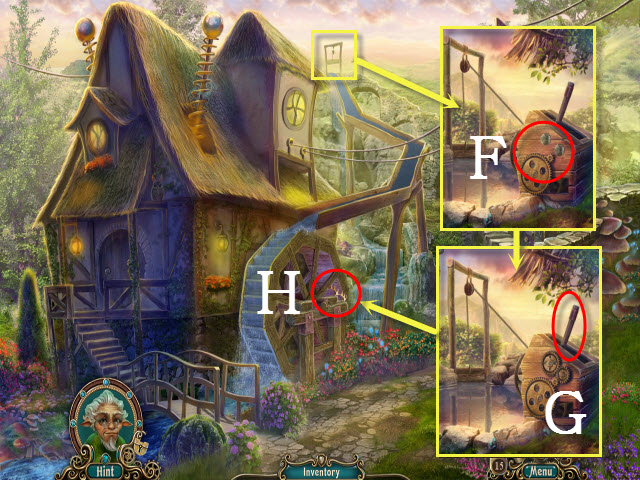
- Examine the door; take the 3rd BELL (I).
- Walk right to the Gazebo.
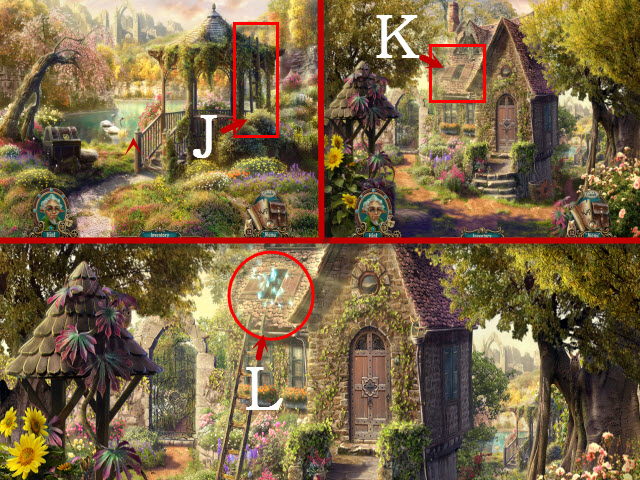
- Move the two vines and then take the LADDER (J).
- Walk down.
- Place the LADDER with the window (K).
- Examine the window to activate a HOP (L).
- Play the HOP (M).
- You will receive the ANIMAL NET.
- Return to the Crossroads.
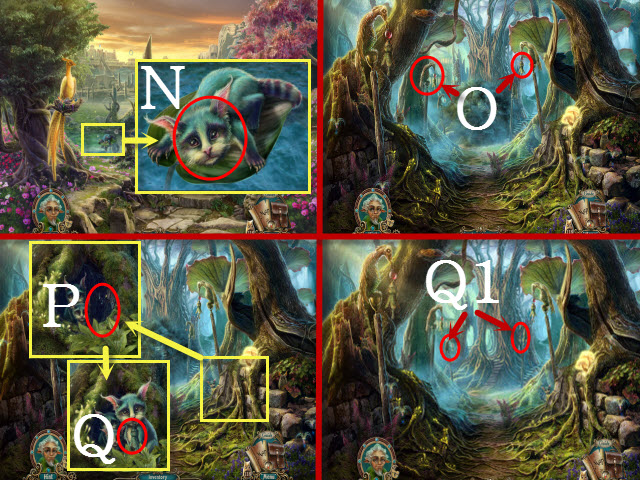
- Examine the ferret; use the ANIMAL NET on it to receive the RAINBOW FERRET (N).
- Return to the Bells.
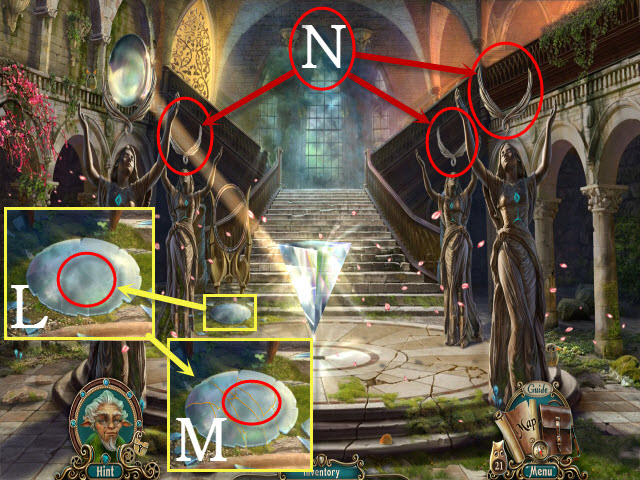
- Place the BELL and the 2nd BELL on the holders (O).
- Examine the tree; place the RAINBOW FERRET on the trunk (P).
- Take the 4th BELL (Q).
- Place the 3rd BELL and the 4th BELL on the holders (Q1).
- Walk forward.
- Examine the scale; take the BIRD SEED (R) and the PICTURE SLIDE (S).
- Select the metal star (T).
- Take the RAINBOW COAL (U) and the RUST REMOVER (V).
- Return to the River.
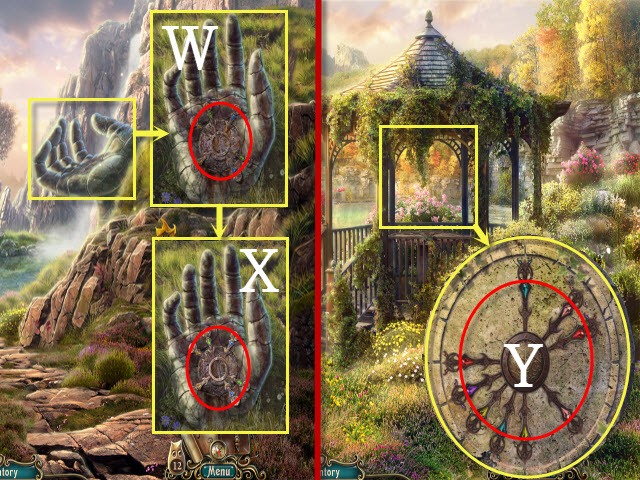
- Examine the hand and use the RUST REMOVER on the spikes (W); take the METAL SPIKES (X).
- Return to the Gazebo.
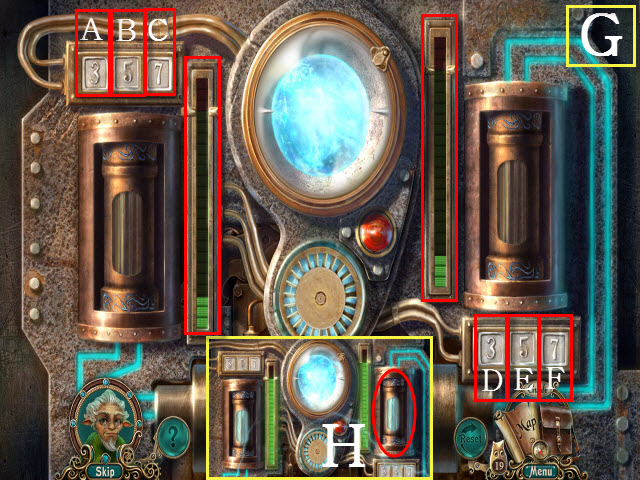
- Examine the gazebo; place the METAL SPIKES on the stone to activate a puzzle (Y).
- To solve the puzzle, swap the clock hand positions until every hand is visible.
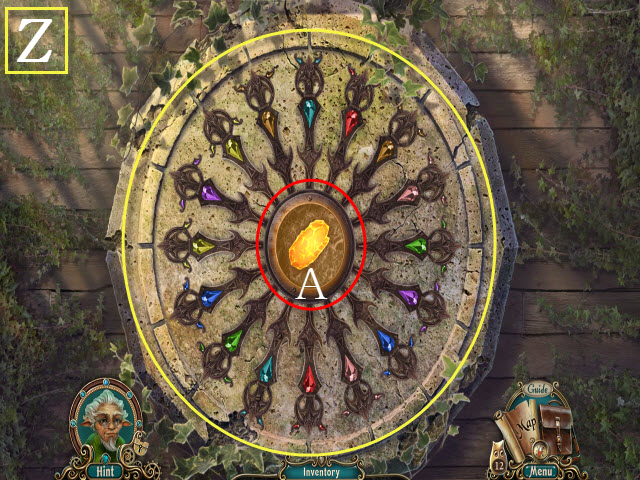
- Please see the screenshot for the solution (Z).
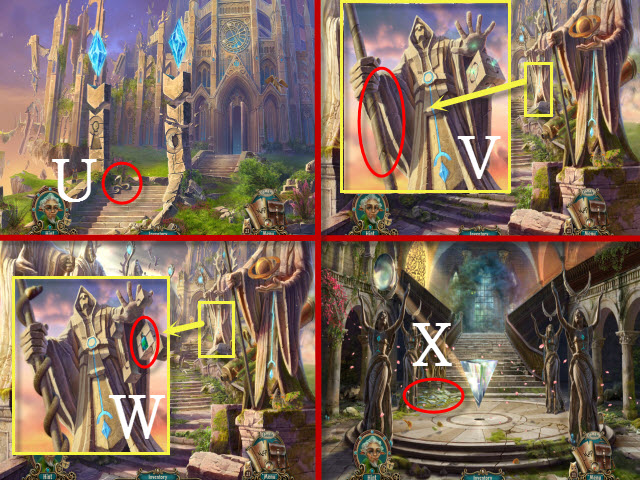
- Take the GLOWING CRYSTAL (A).
- Walk down.
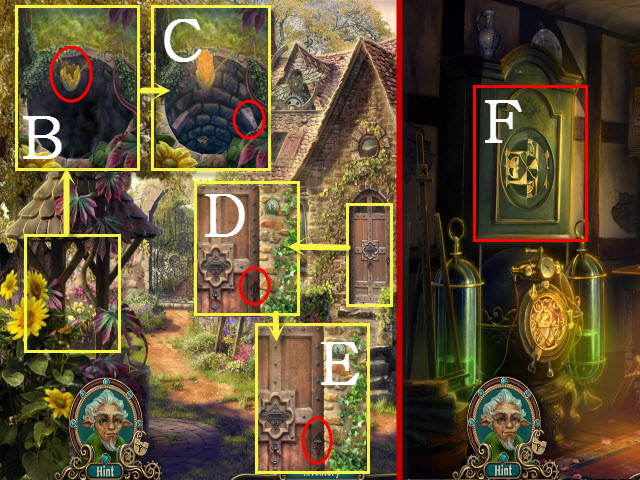
- Examine the well; place the GROWING CRYSTAL in the holder (B).
- Take the HOUSE KEY (C).
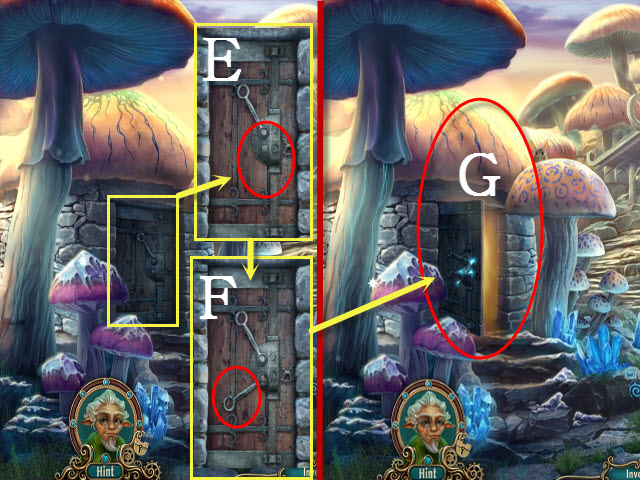
- Examine the door; place the HOUSE KEY in the lock (D) and turn it (E).
- Enter your Parents' House.
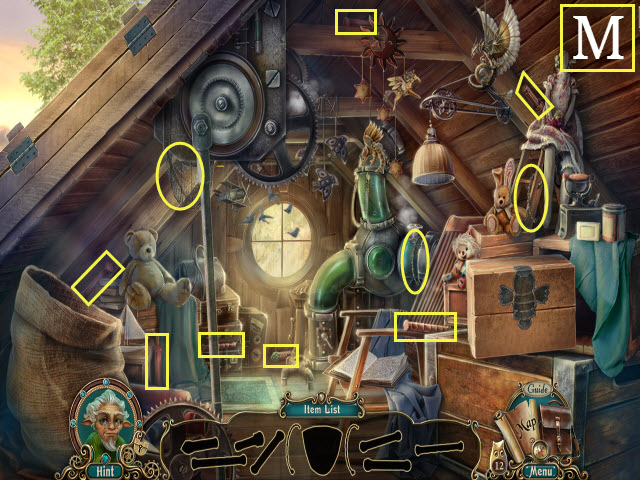
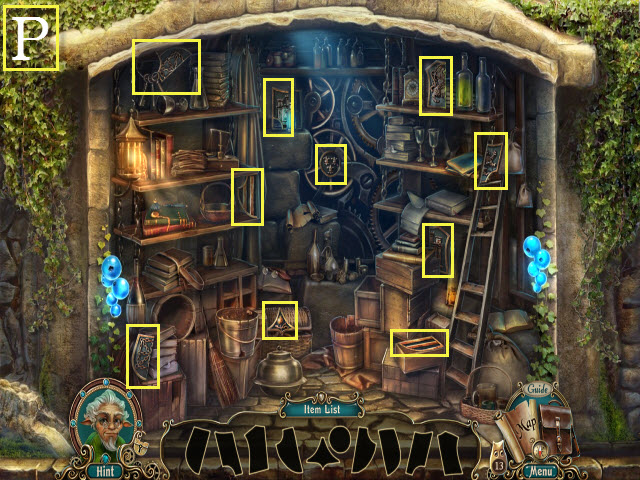
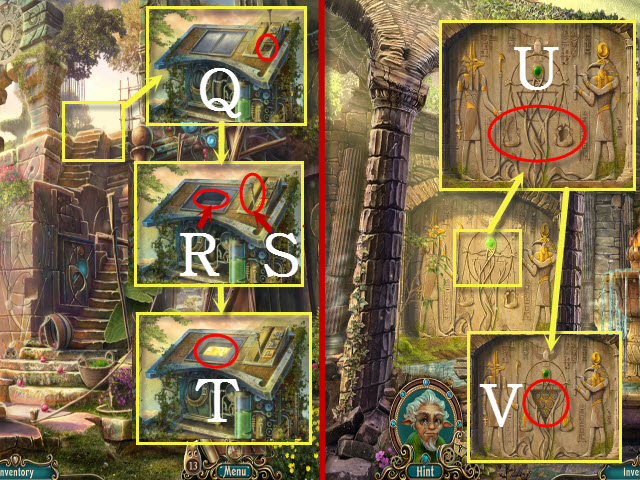
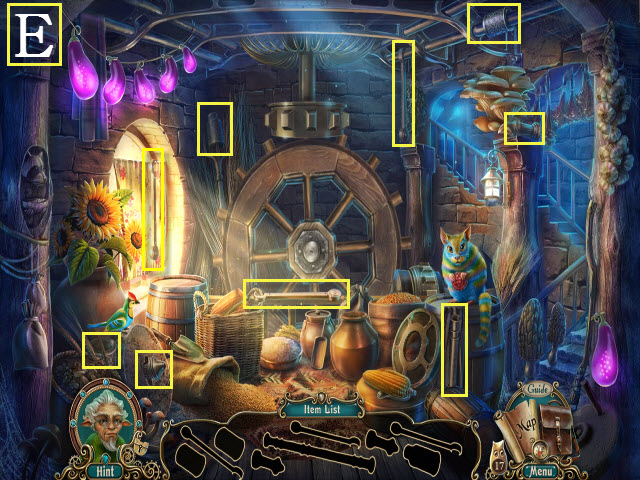
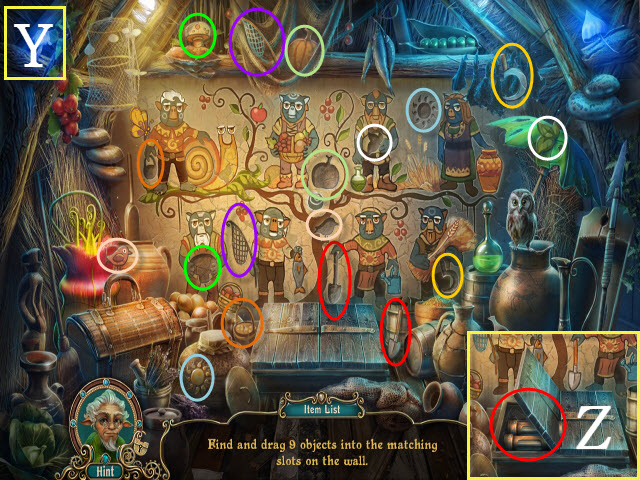
- Examine the cupboard to activate a mini-game (F).
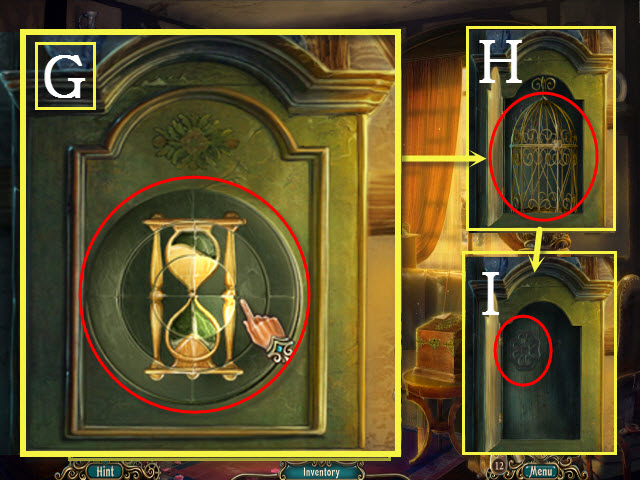
- To complete the mini-game, swap the puzzle pieces to form the image of an hourglass.
- Please see the screenshot for the solution (G).
- Pick up the BIRD CAGE (H) and then the VALVE HANDLE (I).
- Return to the Crossroads.
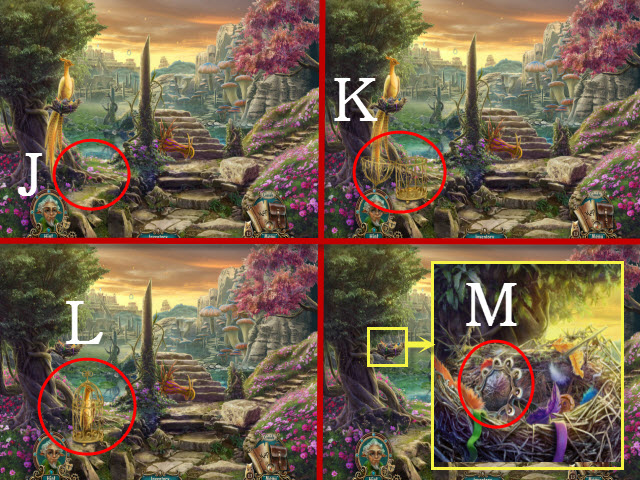
- Place the BIRD CAGE with the phoenix (J).
- Place the BIRDSEED in the cage (K).
- Take the CAPTURED PHOENIX (L).
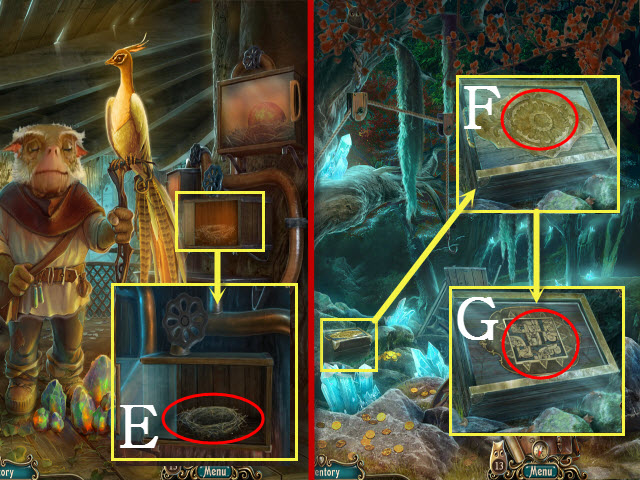
- Examine the nest; take the BOX HANDLE (M).
- Return to the Gnome Village.
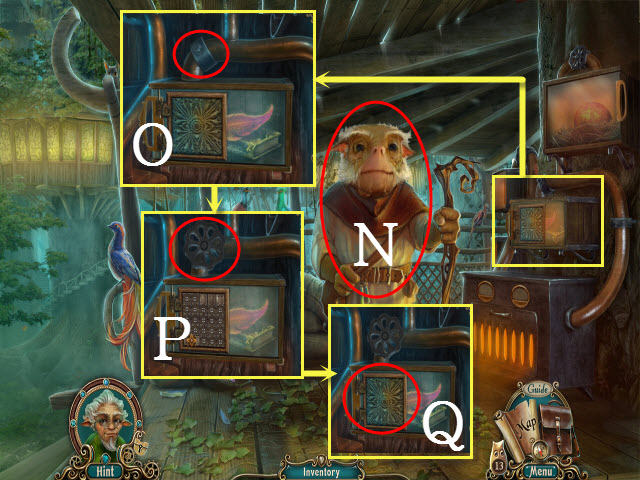
- Give the Gnome the CAPTURED PHOENIX and you will receive the METAL STAR (N).
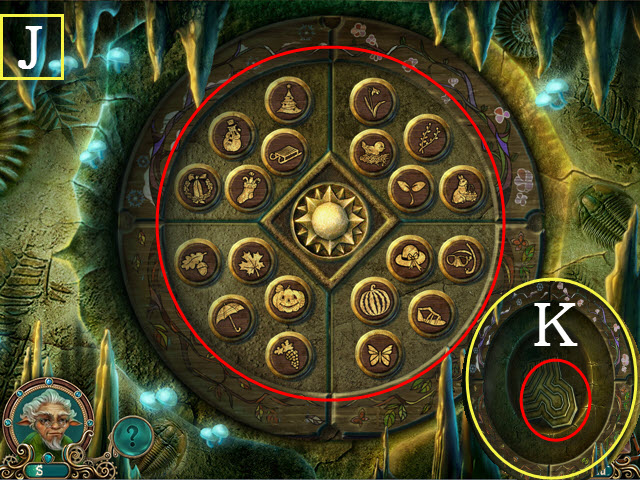
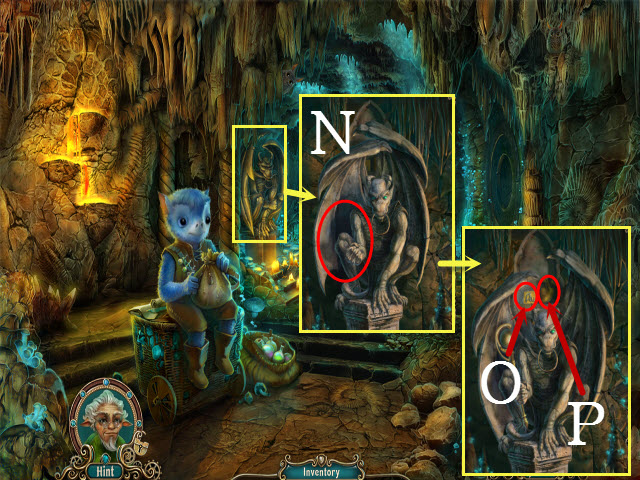
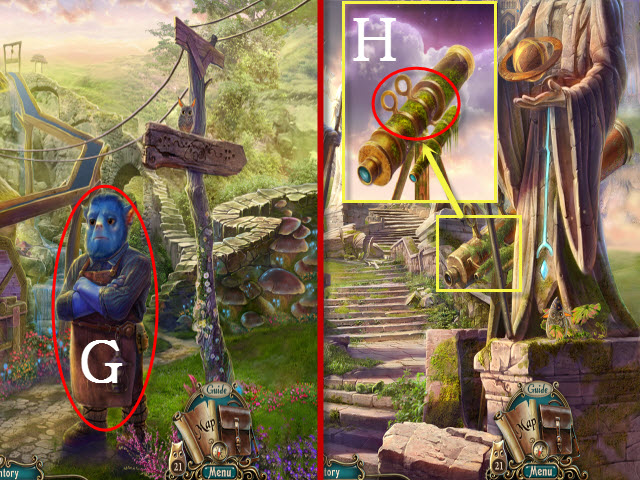
- Examine the furnace and place the VALVE HANDLE on the pipe (O); turn the handle (P).
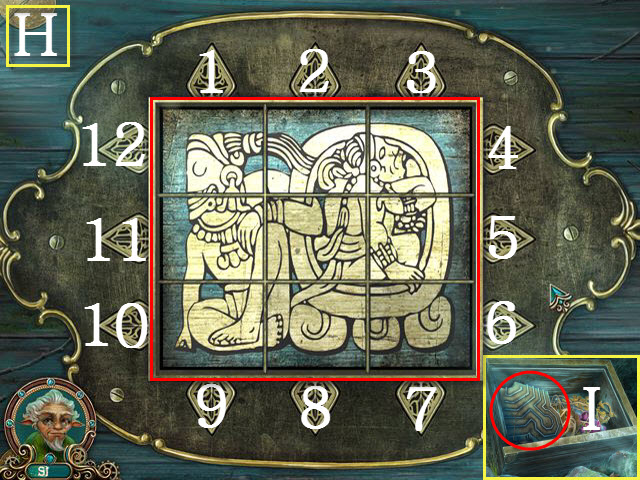
- Look at the plate to activate a puzzle (Q).
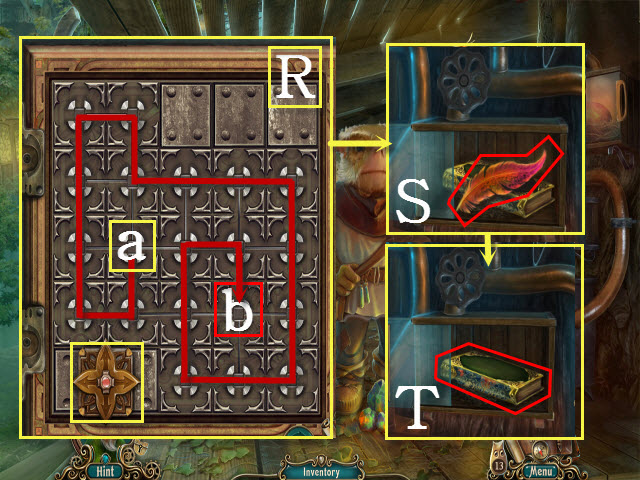
- To solve the puzzle, select a starting point for the slider and then use the arrows to slide it around the board. The slider must cross through every square on the grid one time, but the game will reset if you cross the same square twice.
- Please see the screenshot for the solution; place the slider on A to start (R).
- Take the PHOENIX FEATHER (S) and the BOOK: BIRDKEEPING (T).
- Return to the Gazebo.
- Examine the chest; place the METAL STAR in the slot (U).
- Take the PEARLS (V) and the STICKY HAND (W).
- Walk down.
- Examine the well; use the STICKY HAND to get the 2nd PICTURE SLIDE (X).
- Enter your Parents' House.
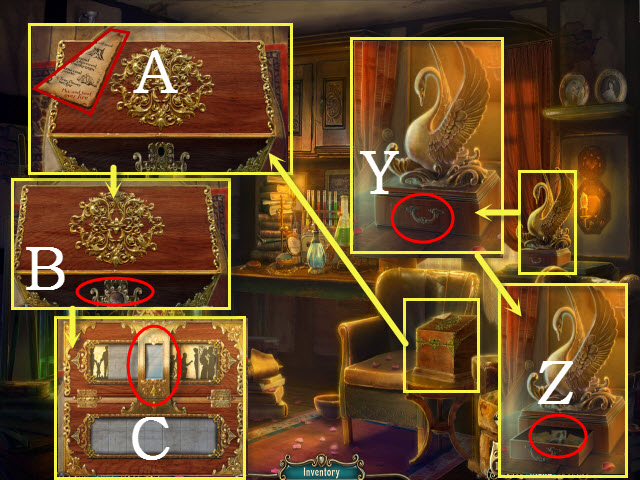
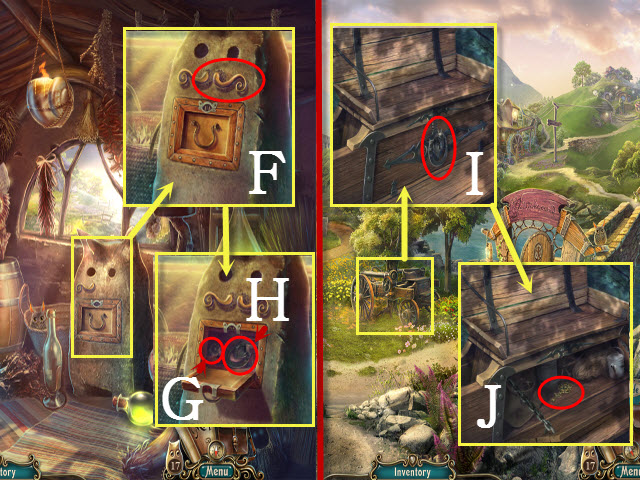
- Examine the swan box; open the drawer (Y) and take the 3rd PICTURE SLIDE (Z).
- Examine the chest; select the recipe (A).
- Place the BOX HANDLE in the slot and select the handle (B).
- Place the PICTURE SLIDE, the 2nd PICTURE SLIDE, and the 3rd PICTURE SLIDE on the viewer to activate a puzzle (C).
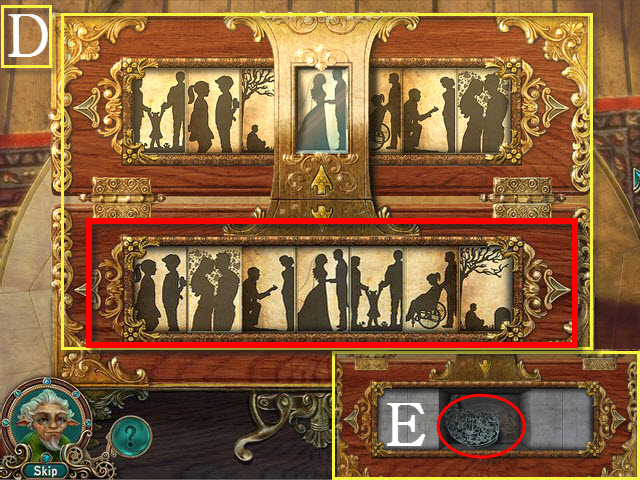
- To solve the puzzle, select the arrows to move the picture slides into the correct order.
- Please see the screenshot for the solution (D).
- Take the GATE KEY HALF (E).
- Walk down twice; examine the window to activate a HOP.

- Play the HOP (F).
- You will receive the OWL FIGURINE.
- Place the OWL FIGURINE in the slot and take the 2nd GATE KEY HALF (G).
- Enter your Parents' House.
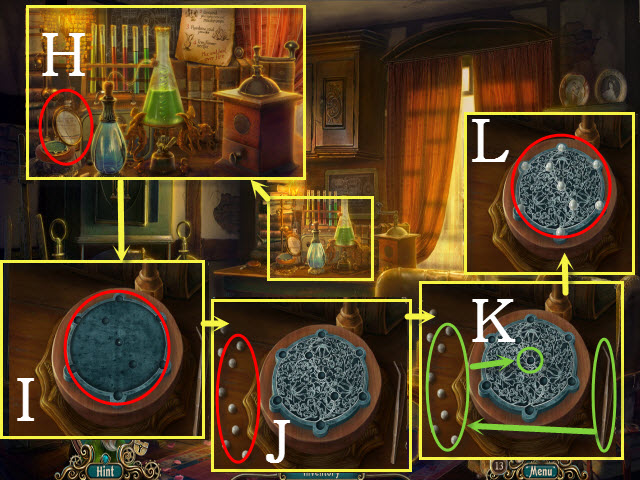
- Examine the flasks and look at the holder (H).
- Place the GATE KEY HALF and the 2nd GATE KEY HALF on it (I).
- Place the PEARLS with the holder (J).
- Select the tweezers; use them to place the pearls in the holes (K).
- Take the GATE KEY (L).
- Walk down.
Chapter 2: Crossing the Mountain
- Examine the gate and place the GATE KEY in the slot (M).
- Turn the handle (N).
- Walk forward to the Garden.
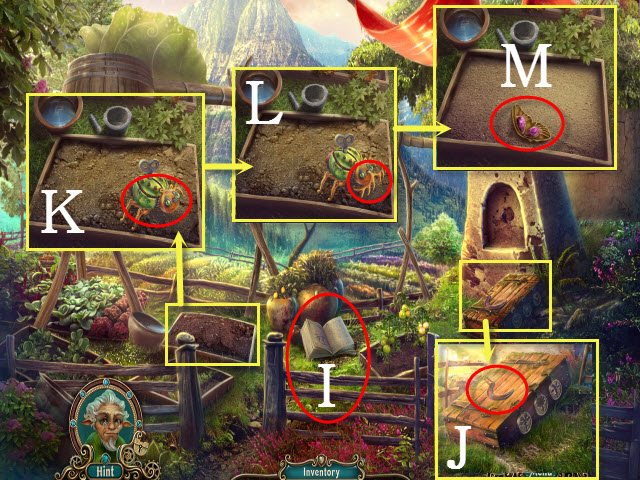
- Examine the branch; use the CRYSTAL PITCHER on it to receive the TREE FLOWER NECTAR (O).
- Take the AIR FIGURINE (P).
- Examine the flower bed to activate a puzzle (Q).
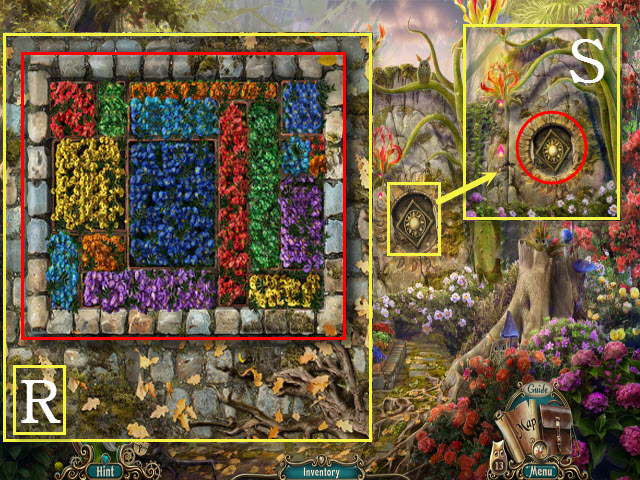
- Arrange the flower beds so that all the pieces fit into the square. No two beds with like colors can be adjacent to each other.
- Please see the screenshot for the solution (R).
- Examine the crevice; take the SUN SYMBOL (S).
- Return to your Parents' House.
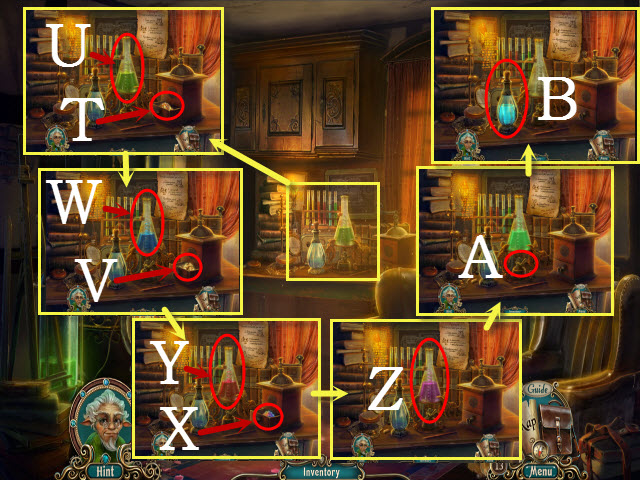
- Examine the flasks; place the TREE SAP in the grinder and take the TREE SAP POWDER (T).
- Place the TREE SAP POWDER in the flask (U).
- Place the GLOWING MUSHROOM in the grinder and take the MUSHROOM POWDER (V).
- Place the MUSHROOM POWDER in the flask (W).
- Place the RAINBOW COAL in the grinder and take the COAL POWDER (X).
- Place the COAL POWDER in the flask (Y).
- Place the TREE FLOWER NECTAR in the flask (Z).
- Select the handle (A).
- Take the WEED KILLER (B).
- Return to the Crossroads.
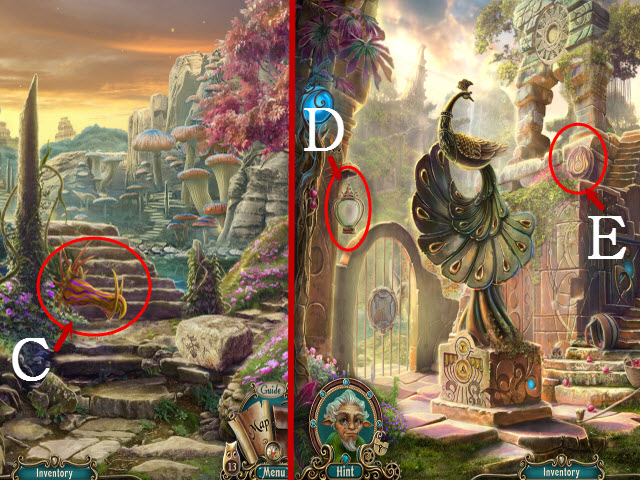
- Use the WEED KILLER on the plant (C).
- Walk northwest to the Courtyard.
- Take the EMPTY JAR (D) and the FIRE FIGURINE (E).
- Walk down and then northeast to the Cliffs.
- Take the MUSHROOM SPORES (F) and the WATER FIGURINE (G).
- Walk forward to the Mountain Cave.
- You will receive the SWEET SYRUP.
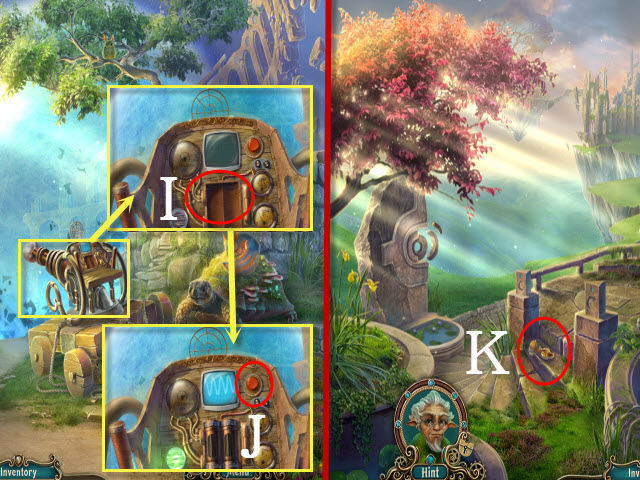
- Select the page (H).
- Examine the wall; place the SUN SYMBOL in the slot to activate a puzzle (I).
- To solve the puzzle, sort each section by the four seasons.
- Please see the screenshot for the solution (J).
- Take the MAZE STONE (K).
- Walk down.
- Examine the crystals; place the EMPTY JAR with them (L).
- Place the SWEET SYRUP in the jar (M).
- Take the CAPTURED FIREFLIES (N).
- Return to the Statue.
- Examine the door; place the WATER FIGURINE, the AIR FIGURINE, and the FIRE FIGURINE on it to activate a HOP (O).
- Play the HOP (P).
- You will receive the COAT OF ARMS.
- Return to the Bells and walk northeast.
- Place the CAPTURED FIREFLIES with the tree (Q).
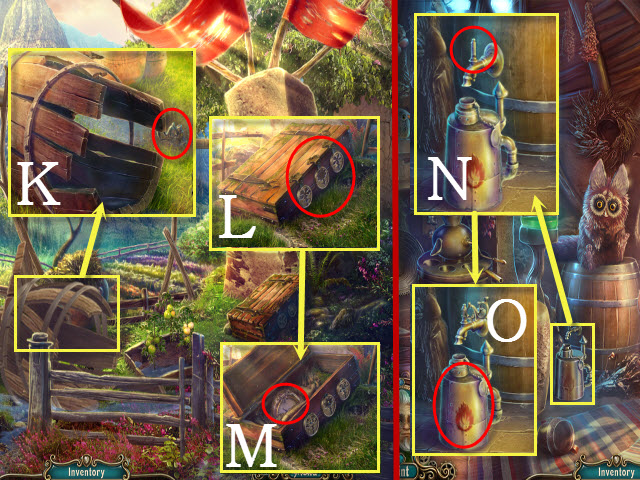
- Examine the satchel; take the ROPE (R).
- Move the three valuables (R1) and take the GOLD BAR (R2).
- Walk forward to the Forest.
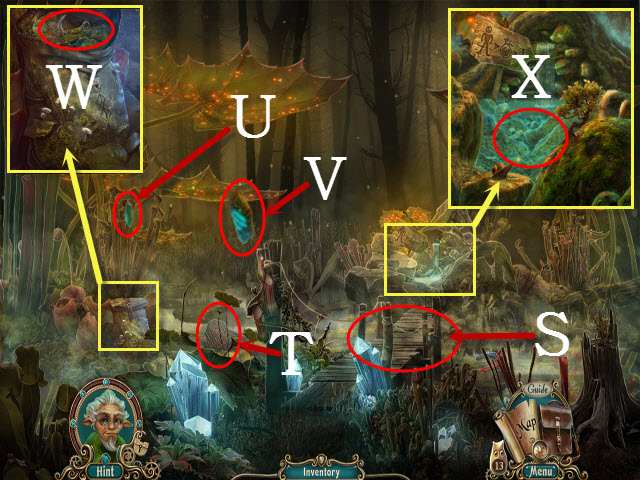
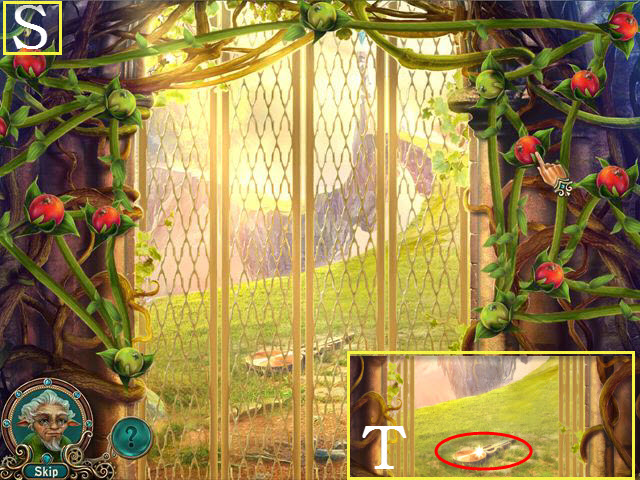
- Place the MUSHROOM SPORES on the bridge (S).
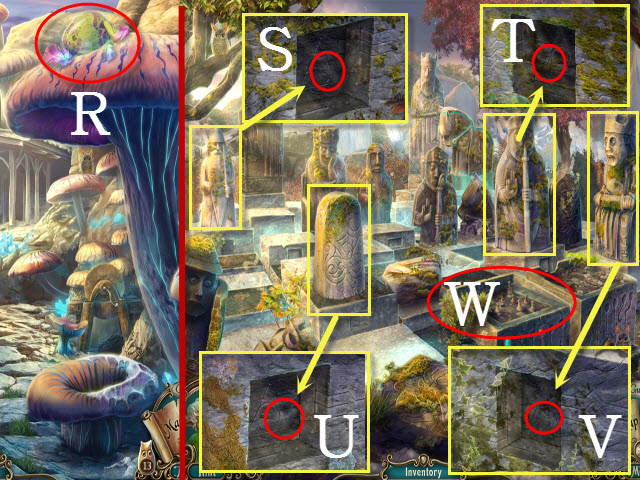
- Take the 2nd MAZE STONE (T), the FLOATING STONE (U), and the 2nd FLOATING STONE (V).
- Examine the backpack; open it and take the HOOK (W).
- Examine the fountain; use the CRYSTAL PITCHER on it to get the SHRINK WATER (X).
- Walk down.

- Place the ROPE and the HOOK on the pulley (Y).
- Examine the cart; select the hook (Z).
- Turn the wheel (A).
- Examine the cart; place the COAT OF ARMS in the slot (B).
- Take the DULL MACHETE (C) and the GUNPOWDER BARREL (D).
- Take the NET (E).
- Walk forward.
- Use the NET to get the MAGNET (F).
- Return to the Courtyard.
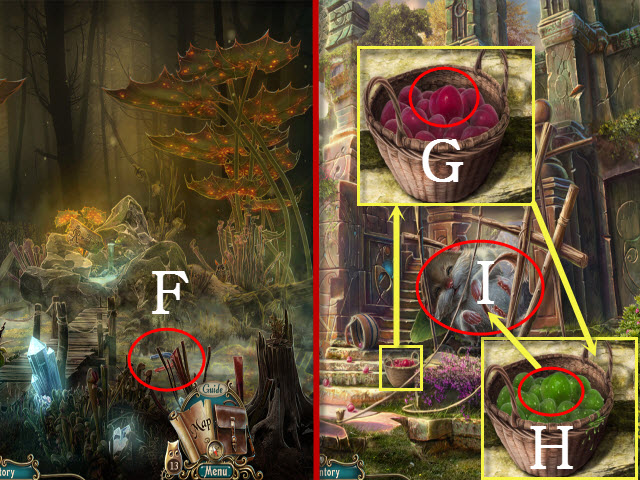
- Examine the apples; use the SHRINK WATER on them (G).
- Take the SHRINK APPLE (H).
- Give the SHRINK APPLE to the creature (I).
- Return to the Cliffs.
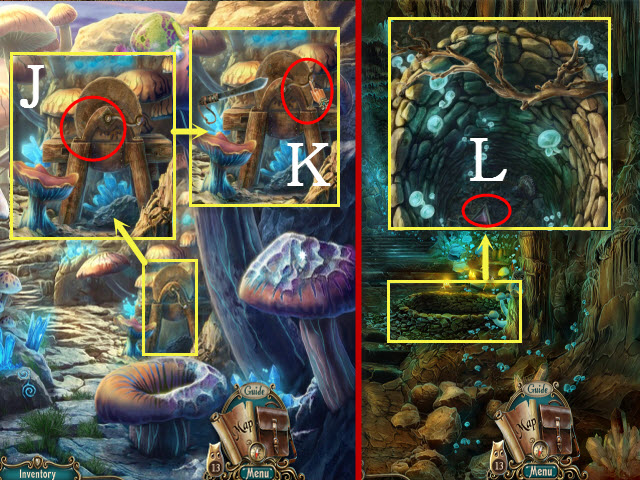
- Examine the grinding stone and place the DULL MACHETE on it (J).
- Select the handle; drag to rotate it and you will receive the SHARP MACHETE (K).
- Walk forward.
- Examine the well; use the MAGNET to get the CELLAR RIVET (L).
- Return to the Statue.
- Use the SHARP MACHETE on the branches (M).
- Walk right to the Fountain.
- Take the 3rd FLOATING STONE (N) and the 4th FLOATING STONE (O).
- Examine the statues; take the BRONZE CROWN (P).
- Use the SHARP MACHETE on the branch to get the WEB THREAD (Q).
- Return to the Cliffs.
- Use the WEB THREAD on the egg to get the PHOENIX EGG (R).
- Return to the Courtyard; walk right to the Chessboard.
- Examine the statues; place the FLOATING STONE (S), the 2nd FLOATING STONE (T), the 3rd FLOATING STONE (U), and the 4th FLOATING STONE in the spaces (V).
- Examine the chessboard to activate a puzzle (W).
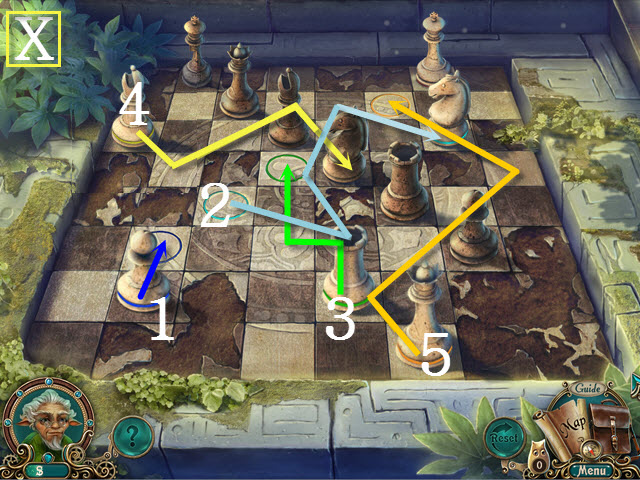
- To solve the puzzle, move the chess pieces to their matching colored circles on the board. The pieces may be moved according to chess rules.
- Please see the screenshot for the solution; 1-5 (X).
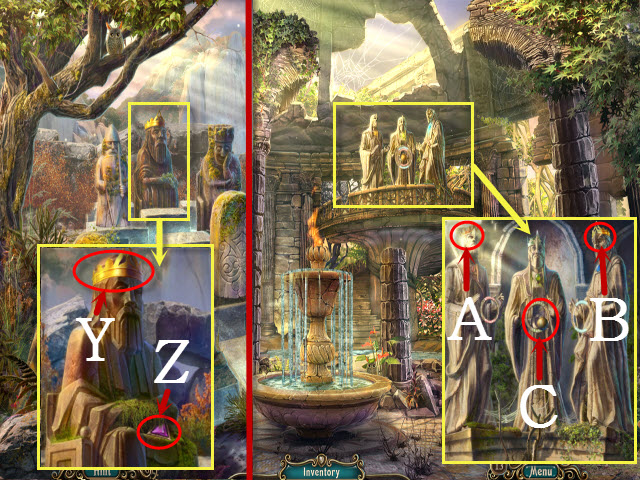
- Examine the king; take the GOLDEN CROWN (Y) and the 2nd CELLAR RIVET (Z).
- Return to the Fountain.
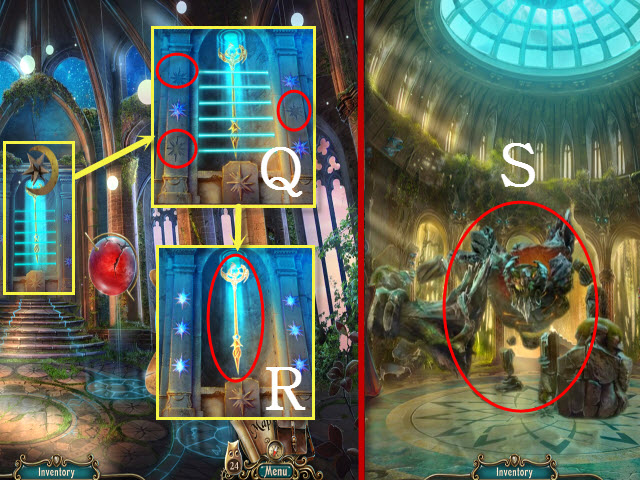
- Examine the statues; place the BRONZE CROWN (A) and the GOLDEN CROWN (B) on them.
- Take the SCEPTER BALL (C).
- Walk down; examine the archway to activate a HOP.
- Play the HOP (D).
- You will receive the STUCCO.
- Return to the Gnome Village.
- Examine the furnace; place the PHOENIX EGG in the nest (E).
- You will receive the BIRD WHISTLE.
- Walk down and then walk right.
- Examine the chest; place the STUCCO in the inlay (F).
- Examine the plaque to activate a puzzle (G).
- To solve the puzzle, select the arrows to move the tiles so that they complete a whole image.
- Please see the screenshot for the solution: 5, 5, 3, 3, 5, 8, 7, 7, 6, 3, and 10 (H).
- Take the 3rd MAZE STONE (I).
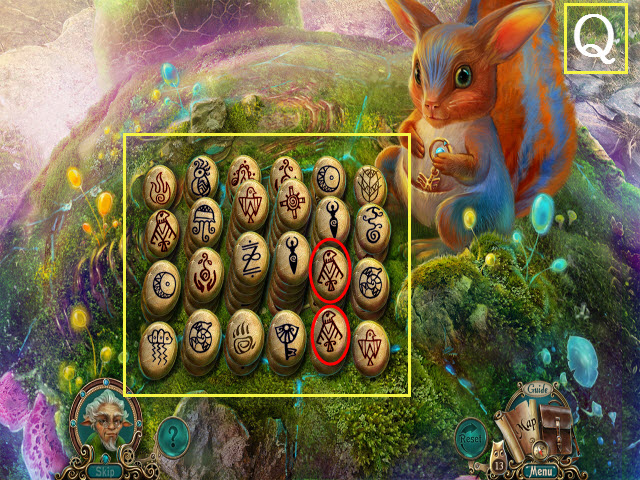
- Return to the Courtyard and examine the gate; place the MAZE STONE, the 2nd MAZE STONE, and the 3rd MAZE STONE on it to activate a mini-game.
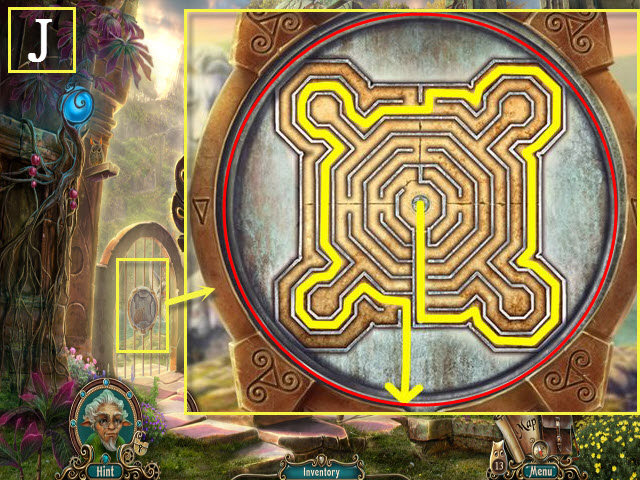
- To solve the mini-game, select the maze and rotate it to guide the ball to the exit.
- Please see the screenshot for the solution (J).
- Walk left to the Lake.
- Use the BIRD WHISTLE with the insects (K).
- Take the BOOK: HISTORY (L).
- Examine the statue; take the SCEPTER HANDLE (M).
- Return to the Mountain Cave.
- Examine the gargoyle; place the SCEPTER HANDLE and the SCEPTER BALL in its hand (N).
- Take the AURUM SIGN (O) and the GOLDEN HEART (P).
- Return to the Courtyard.
- Examine the control console; place the AURUM SIGN in the slot (Q).
- Place the GOLD BAR in the inlay (R) and pull the lever (S).
- Place the PHOENIX FEATHER in the liquefied gold to receive the GOLDEN FEATHER (T).
- Return to the Fountain.
- Examine the wall; place the GOLDEN FEATHER and the GOLDEN HEART in the slots (U).
- Examine the compartment to activate a puzzle (V).
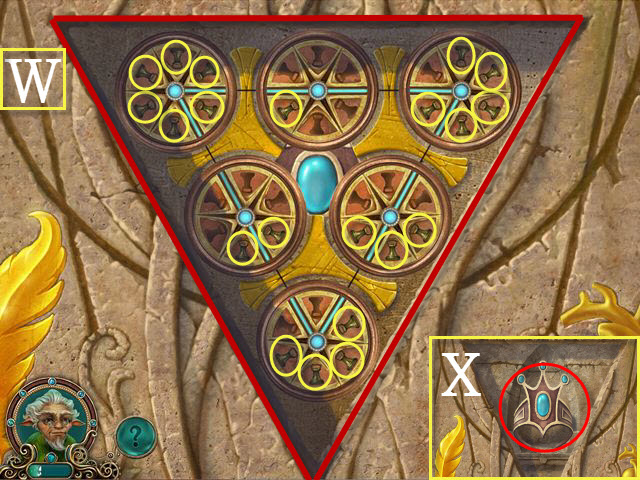
- To solve the puzzle, drag the weights from one dial to another so that they they form a triangle with the blue lines.
- Please see the screenshot for the solution; the color yellow indicates how many weights should be placed on each dial (W).
- Take the GRYPHON RING (X).
- Return to the Lake.
- Examine the statue; place the GRYPHON RING in the slot (Y).
- Take the 3rd CELLAR RIVET (Z) and the PEBBLE (A).
- Return to the Garden.
- Examine the door; place the CELLAR RIVET, the 2nd CELLAR RIVET, and the 3rd CELLAR RIVET in the slots and select them (B).
- Take the DETONATOR (C) and the DOOR HANDLE (D).
- Return to the Cliffs.
- Examine the door; place the DOOR HANDLE in the slot (E).
- Select the handle (F).
- Examine the hut to activate a HOP (G).
- Play the HOP (H).
- You will receive the WIRE.
- Walk forward.
- Examine the rubble; place the GUNPOWDER BARREL on it (I).
- Place the WIRE with the gunpowder (J).
- Place the DETONATOR with the wire (K).
- Select the detonator (L).
- Walk forward to the Vista.
Chapter 3: The Land of the Gnomes
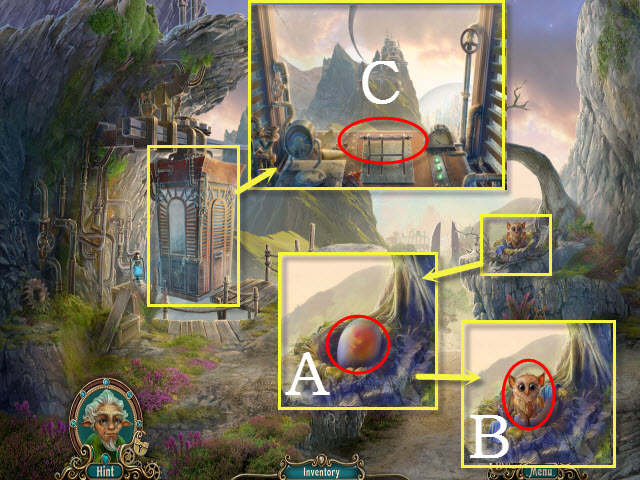
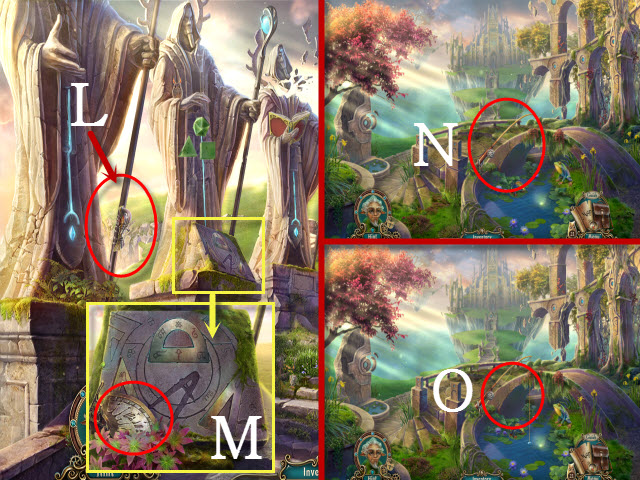
- Examine the nest; take the STATUE KEY (M).
- Enter the Gondola.
- Take the 2nd PEBBLE (N).
- Exit the Gondola and walk forward to the Countryside.
- Examine the carriage; take the 3rd PEBBLE (O).
- Walk left to the Guard Post.
- Examine the turtle; place the PEBBLE, the 2nd PEBBLE, and the 3rd PEBBLE on the board to activate a puzzle (P).
- To solve the puzzle, play a game of Mahjong (Q).
- Select matching pairs until no more pebbles remain. You can only choose pebbles that do not have another blocking it on either side.
- You will receive the 2nd STATUE KEY.
- Return to the Courtyard.

- Examine the statue; place the STATUE KEY and the 2nd STATUE KEY in the locks (R).
- Take the LION RING (S).
- Walk left.
- Examine the statue; place the LION RING in the slot (T).
- Take the HUMAN FIGURINE (U).
- Return to the Countryside.
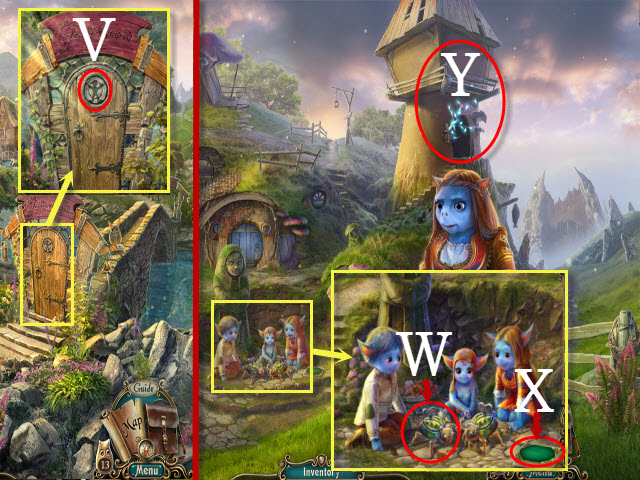
- Examine the door; place the HUMAN FIGURINE in the slot (V).
- Enter the door to the Waterwheel and then walk right.
- Examine the children; take the BUG TOY (W) and the BOOK: HERBS (X).
- Examine the tower to activate a HOP (Y).
- Play the HOP (Z).
- Take the GEAR (A).
- Take the 2nd GEAR (B).
- Examine the cottage; open the panel (C) and select the recipe (D).
- Take the MAGIC BEAN (E).
- Walk down.
- Examine the controls; place the GEAR and the 2nd GEAR with the gears (F).
- Pull the lever (G).
- Take the RAKE ANTLER (H).
- Walk right and then walk up to the Vineyards.
- Take the BOOK: FARMING (I).
- Examine the crate; take the SICKLE (J).
- Examine the soil; place the BUG TOY on it (K).
- Place the RAKE ANTLER with the bug and select it (L).
- Take the BUTTERFLY KEY (M).
- Walk down and then right to the Peak.
- Examine the coral; take the METAL CLOVE (N).
- Use the SICKLE on the coral to get the CORAL (O).
- Return to the Vineyards.
- Examine the soil and select it (P).
- Place the MAGIC BEAN in the soil (Q).
- Place the CORAL in the cup (R) and select the masher (S).
- Take the CORAL DUST and then place it on the soil (T).
- Drag the water onto the soil (U).
- Take the MAGICAL FRUIT (V).
- Walk down.
- Examine the door; place the BUTTERFLY KEY in the slot (X).
- Select the butterfly emblem (Y).
- Enter the Cottage.
- Examine the juicer; place the MAGICAL FRUIT with it to activate a puzzle (Z).
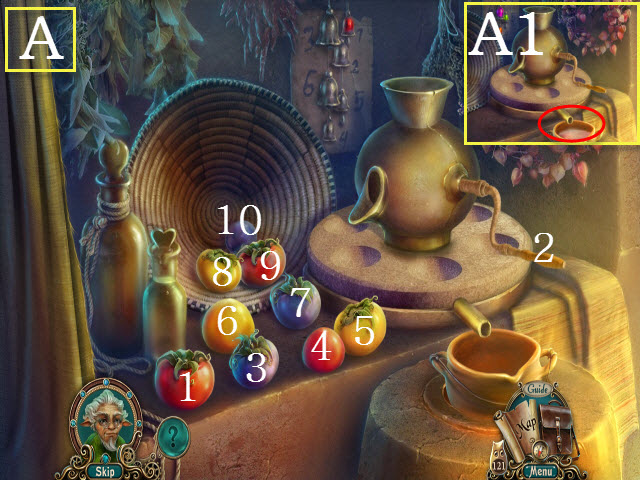
- To solve the puzzle, drag the fruits into the juicer and grind them so that they match the color indicated above.
- Solution: 1, 2, 3, 2, 6, 2, 4, 5, 2, 7, 8, 2, 9, 10, and 2. (A).
- Take the MAGIC POTION (A1).
- Return to the Peak and walk forward to the Throne.
- Give the MAGIC POTION to the evil spirit (B).
- Examine the shelf; take the HANDLE (C).
- Return to the Waterwheel; examine the door to activate a HOP (D).
- Play the HOP (E).
- You will receive the CABLE CAR HANDLE.
- Return to the Cottage.
- Examine the stone figure; place the HANDLE in the slot and select it (F).
- Take the METAL CAMOMILE (G) and the HORSE FIGURINE (H).
- Return to the Countryside.
- Examine the carriage; place the HORSE FIGURINE in the slot and select the handle (I).
- Take the METAL CORNFLOWER (J).
- Return to the Vineyard.
- Examine the debris; take the TAP HANDLE (K).
- Examine the crate; place the METAL CLOVE, the METAL CAMOMILE, and the METAL CORNFLOWER in the slots (L).
- Take the GAUGE (M).
- Return to the Cottage.
- Examine the can; place the TAP HANDLE on the faucet and then select it (N).
- Take the FUEL CANISTER (O).
- Return to the Vista; enter the Gondola.
- Use the FUEL CANISTER on the tank (P).
- Place the GAUGE in the slot (Q).
- Place the CABLE CAR HANDLE in the slot and pull the handle (R).
- You will receive the TIARA.
- Take the WOOL SCARF (S) and the BOOK: ELECTRICITY (T).
- Return to the Throne.
- Give the TIARA to the Mermaid (U).
- You will receive the ENERGY SPHERE.
- Walk down.
- Take the CAN OF WORMS (V) and the FISHING ROD (W).
- Walk down; examine the tower to activate a HOP (X).
- Play the HOP (Y).
- Take the EMPTY BATTERIES (Z).
- Return to the Vista.
- Examine the nest; place the WOOL SCARF on the egg (A).
- Give the CAN OF WORMS to the baby Gryphon (B).
- Enter the Gondola and pull the handle (C).
- Examine the panel; place the EMPTY BATTERIES in the slots (D).
- Move the lens (E).
- Place the ENERGY SPHERE in the slot to activate a puzzle (F).
- To solve the puzzle, press the buttons to raise the power meter levels. They must reach the line on both sides simultaneously. Moving one side will reduce the level of the other.
- Please see the screenshot for the solution: C, B, D, E, E, D, C, D, and D (G).
- Take the CHARGED BATTERIES (H).
- Return to the Guard Post.
- Examine the gun; place the CHARGED BATTERIES in the slots (I).
- Press the red button (J).
- Walk forward to the Pond.
- Take the METALLIC CUCKOO (K).
- Walk forward to the Stairs.
Chapter 4: The Great Tree
- Take the 2nd METALLIC CUCKOO and you will receive the HOOK AND STRING (L).
- Examine the statue; take the SUNDIAL PIECE (M).
- Walk down.
- Place the FISHING ROD and the HOOK AND STRING with the pond (N).
- Examine the fishing pole to activate a mini-game (O).
- To complete the mini-game, drag the fish hook to the clock hand on the bottom without getting hit by any fish along the way (P).
- You will receive the CLOCK HAND.
- Walk down.
- Examine the bird bath; place the METALLIC CUCKOO and the 2nd METALLIC CUCKOO on it (Q).
- Take the 2nd CLOCK HAND (R).
- Return to the Stairs.
- Examine the clock; place the CLOCK HAND and the 2nd CLOCK HAND on the face (S).
- Set the time to 6:00 (T).
- Walk forward to the Palace Entrance.
- Take the METAL SNAKE (U).
- Walk down.
- Examine the statue; place the METAL SNAKE on the staff (V).
- Take the POTION OF FERTILITY (W).
- Walk forward twice to the Palace Foyer.
- Examine the glass shards to activate a mini-game (X).
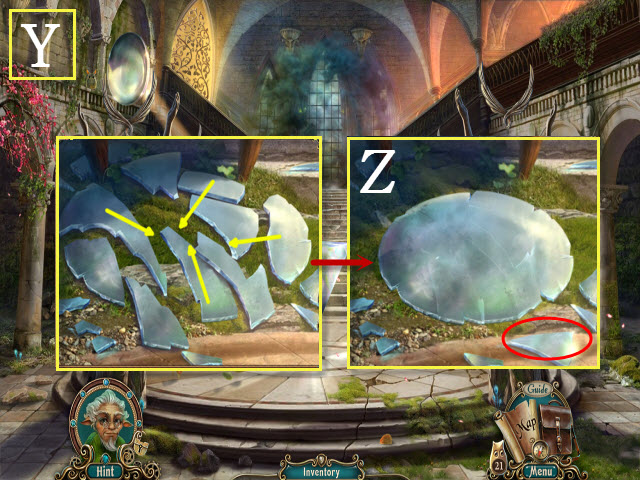
- To solve the mini-game; place the shards back together (Y).
- Take the GLASS SHARD (Z).
- Walk down.
- Examine the Gryphon; select and then take the CRYSTAL STAR (A).
- Examine the pillar; place the SUNDIAL PIECE in the slot (B).
- Examine the branches; use the GLASS SHARD on them (C).
- Take the LENS (D).
- Return to the Waterwheel; examine the doorway to activate a HOP (E).

- Play the HOP (F).
- You will receive the SPYGLASS.
- Give the POTION OF FERTILITY to the Gnome (G).
- You will receive the GRASS GLUE.
- Return to the Stairs.
- Examine the telescope; place the SPYGLASS on it to activate a mini-game (H).
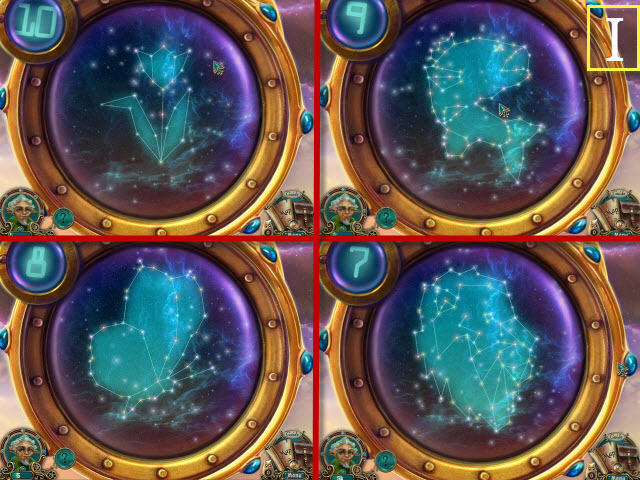
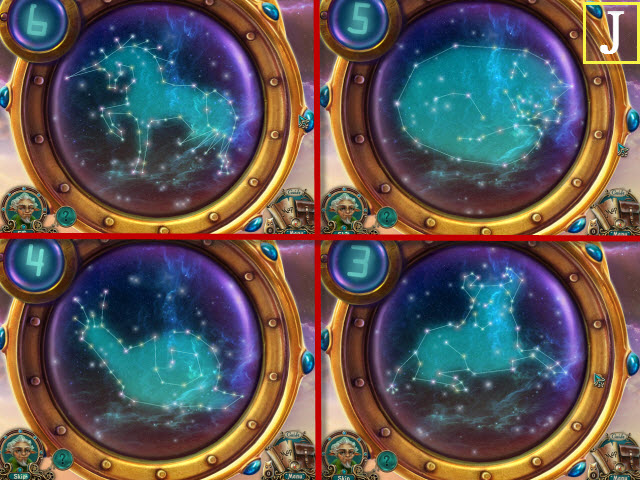
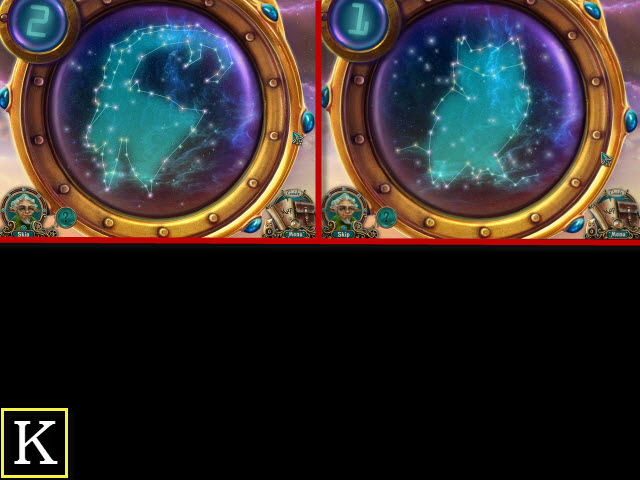
- To solve the puzzle, rotate the lens until you align each image properly.
- Please see the screenshot for 10-7 (I).
- Please see the screenshot for 6-3 (J).
- Please see the screenshot for 2-1 (K).
- You will receive the 2nd LENS.
- Return to the Palace Foyer.
- Examine the glass; use the GRASS GLUE on it (L).
- Take the 3rd LENS (M).
- Place the LENS, the 2nd LENS, and the 3rd LENS on the statues (N).
- Walk right to the Library.
 #
#
- Examine the painting; take the LILLY (O).
- Walk down.
- Examine the doorway and look at the handle (P).
- Place the LILLY on the handle and open it (Q).
- Enter the Greenshouse; examine the doorway to activate a puzzle (R).
- To solve, complete the Untangle puzzle. Move all of the vines out of the way, without having any of them overlap.
- Please see the screenshot for one possible solution (S).
- Take the CLOCK PENDULUM (T).
- Walk forward twice to the Great Tree Entrance.
- Take the ARROW (U).
- Enter the Great Tree.
- Take the 2nd CRYSTAL STAR (V) and the CROSSBOW (W).
- Walk down.
- Use the CROSSBOW on the crescent (X).
- Place the ARROW on the crossbow to get the CRESCENT (Y).
- Return to the Palace Entrance.
- Examine the pillar; place the CLOCK PENDULUM on the clock and select it (Z).
- Take the COMET (A).
- Walk down twice.
- Examine the pillar; place the CRESCENT in the slot (B).
- Examine the second pillar; place the COMET in the slot (C).
- Examine the stone; take the FORMULA PLATE (D).
- Walk forward.
- Examine the statue; place the FORMULA PLATE in the slot (E).
- Take the BOOK: ALCHEMY (F).
- Return to the Library.
- Examine the shelf; place the BOOK: BIRDKEEPING, the BOOK: HISTORY, the BOOK: HERBS, the BOOK: FARMING, the BOOK: ELECTRICITY, and the BOOK: ALCHEMY on it to activate a puzzle (G).
- To solve the puzzle, rearrange the books to form a complete image.
- Please see the screenshot for the solution (H).
- Walk upstairs to the Planetarium.
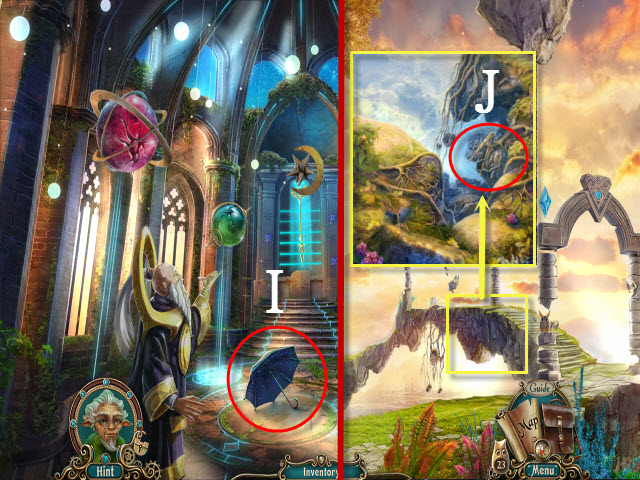
- Take the UMBRELLA (I).
- Return to the Greenshouse and then walk forward.
- Examine the bridge; use the UMBRELLA to get the COMPASS (J).
- Return to the Stairs.

- Examine the statue; place the COMPASS in the slot (K).
- Examine the debris to activate a HOP (L).
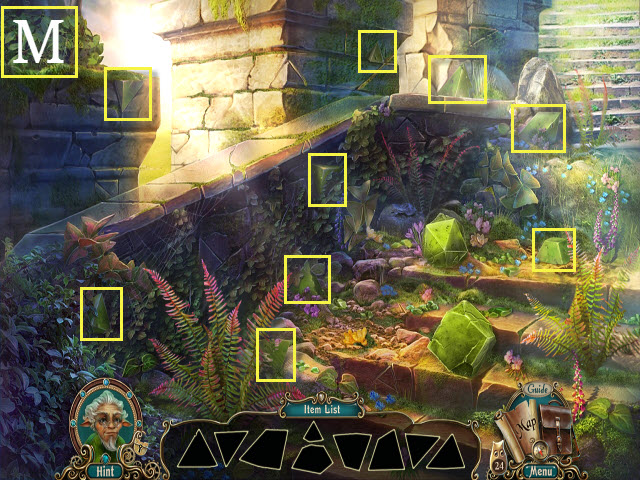
- Play the HOP (M).
- You will receive the EMERALD PYRAMID.
- Return to the Greenshouse.
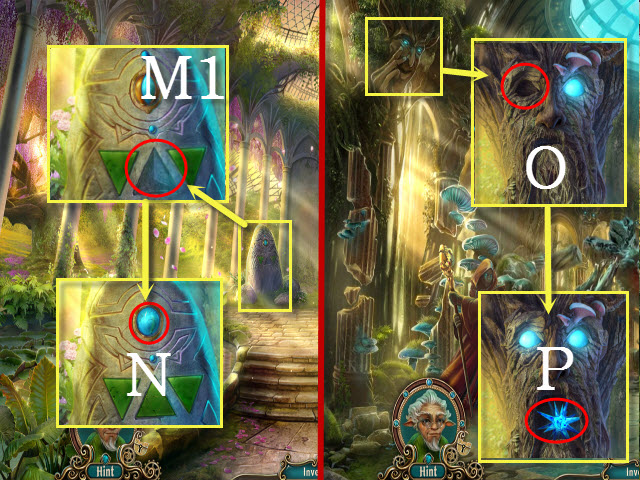
- Examine the stone; place the EMERALD PYRAMID in the slot (M1).
- Take the EYE OF TRUTH (N).
- Return to the Great Tree.
- Examine the Treant; place the EYE OF TRUTH in the socket (O).
- Take the 3rd CRYSTAL STAR (P).
- Return to the Planetarium.
- Examine the wall; place the CRYSTAL STAR, the 2nd CRYSTAL STAR, and the 3rd CRYSTAL STAR in the slots (Q).
- Take the STAFF OF RIGHANON (R).
- Return to the Great Tree.
- Use the STAFF OF RIGHANON on the elemental to activate a puzzle (S).
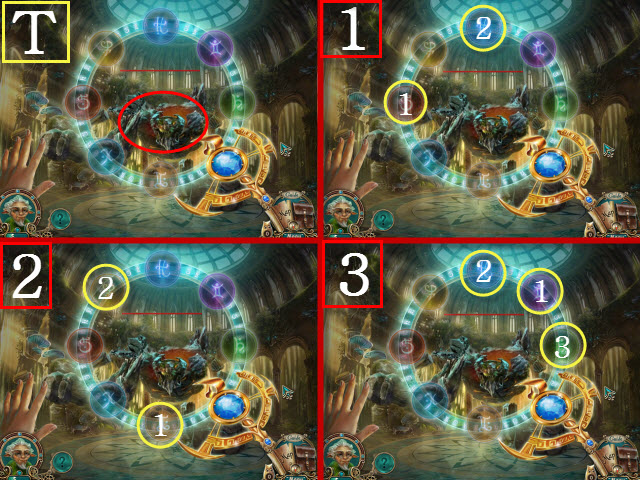
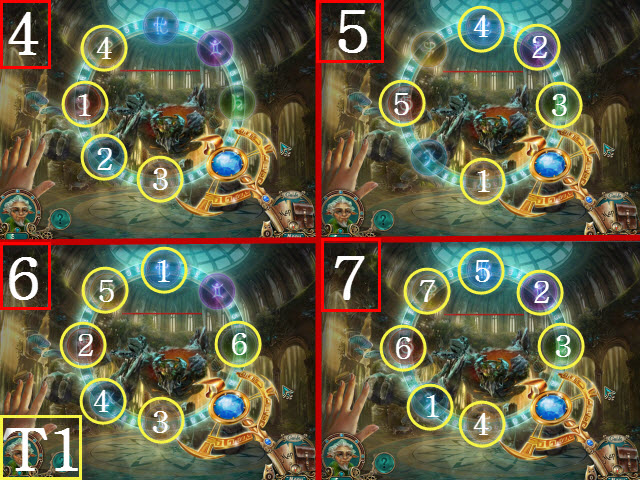
- To solve the puzzle, select the elemental and then press the buttons to repeat the patterns shown.
- Please see the screenshots for the solution; follow the steps 1-7 (T and T1).
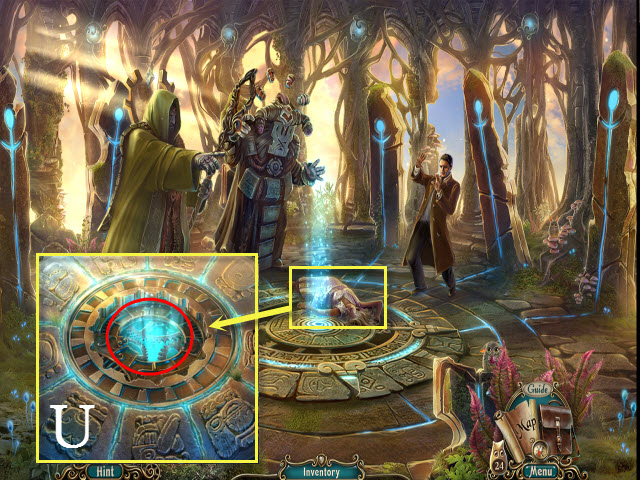
- Walk forward.
- Examine the gears; place the MEDALLION in the slot (U).
- Congratulations! You have completed Nearwood!
Created at: 2013-09-06