

Walkthrough Menu
- General Tips
- Chapter 1: The Publishing House
- Chapter 2: The Manor
- Chapter 3: Nowheretales
- Chapter 4: The Black Tower
General Tips
- This is the official guide for Nevertales: Forgotten Pages.
- This guide won't tell you when to zoom into a location; the screenshots show each zoom scene.
- Hidden-object puzzles are referred to as HOPs. Only the locations of the HOPs will be shown.
- Use the Map to fast travel to a location.
Chapter 1: The Publishing House
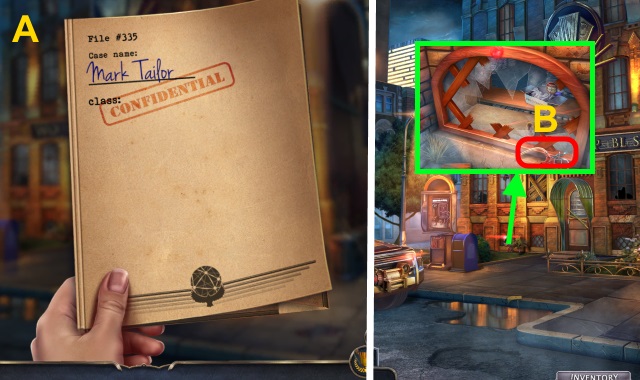
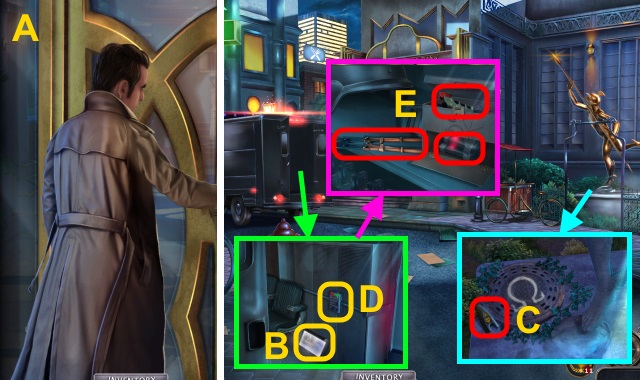
- Read file (A).
- Examine 3; take MACHINE OIL (B).
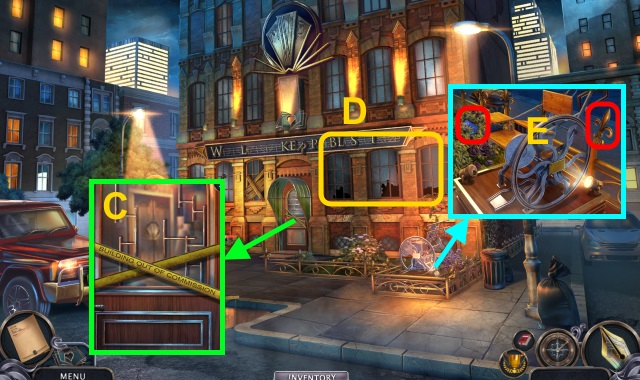
- Remove tape; examine door (C).
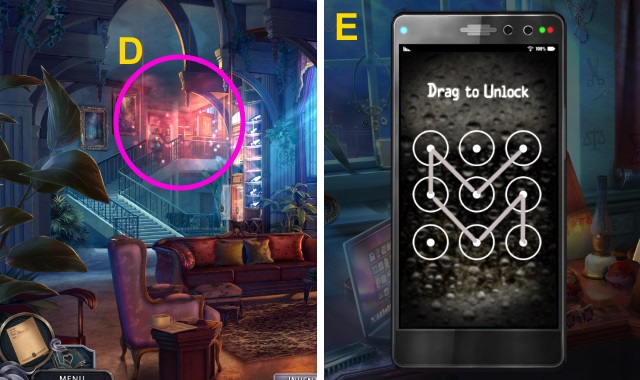
- Examine window (D).
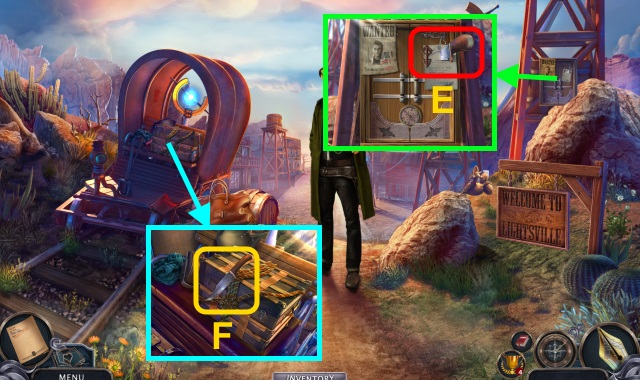
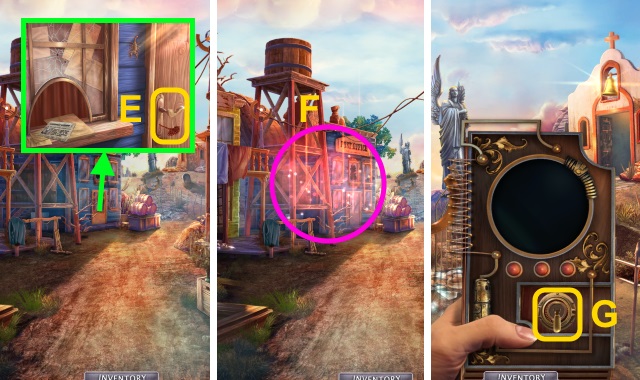
- Take PHONE CARD and FENCE ORNAMENT (E).

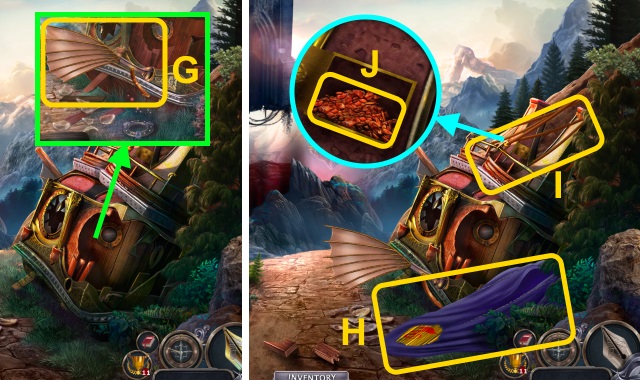
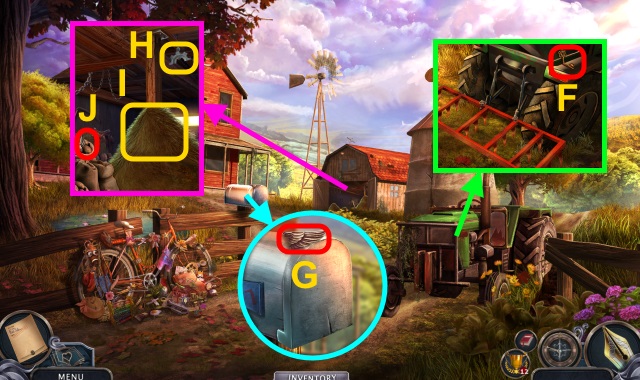
- Take PLASTIC RINGS; use PHONE CARD and phone (F). Move paper; take WINCH BUTTON (G).
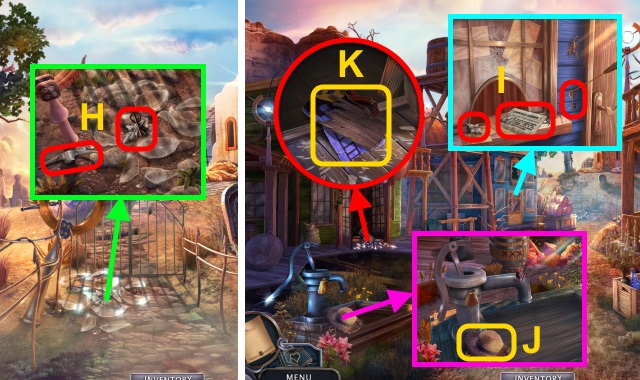
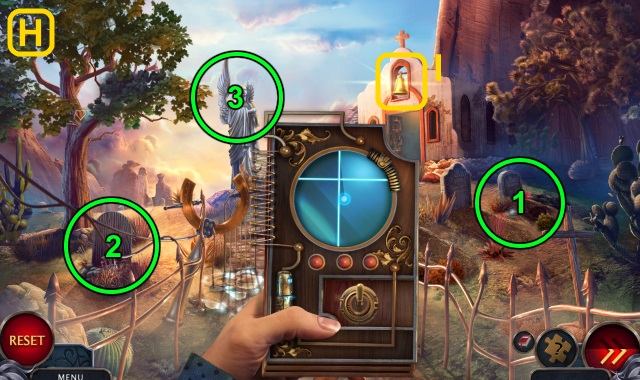
- Place FENCE ORNAMENT and WINCH BUTTON. Place ornament; press button (H).
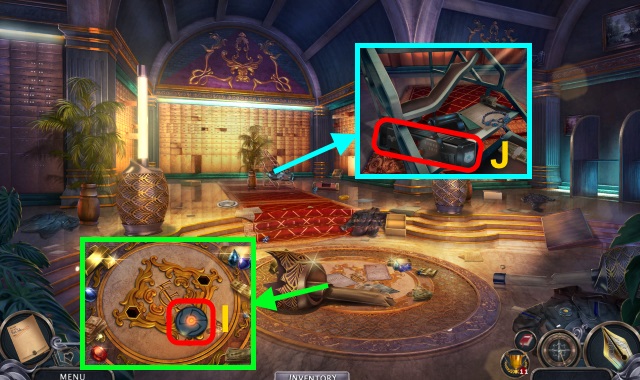
- Examine door (I); open.
- Walk forward.
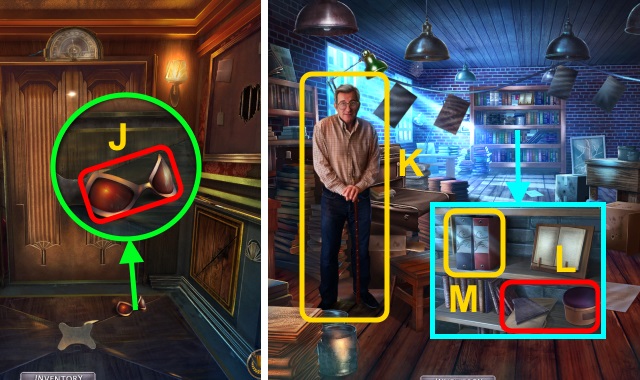
- Flip switch (J).
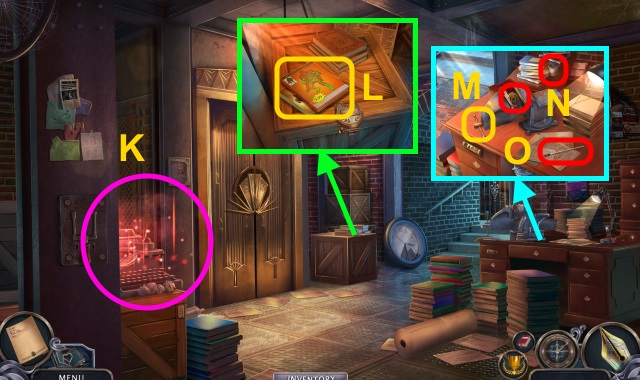
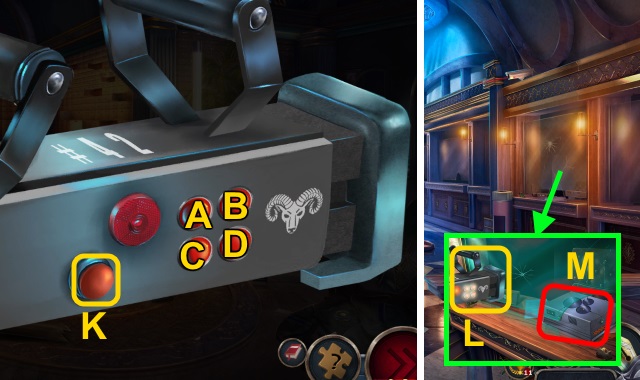
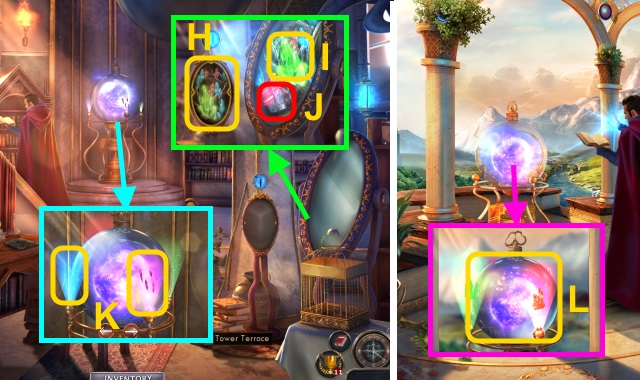
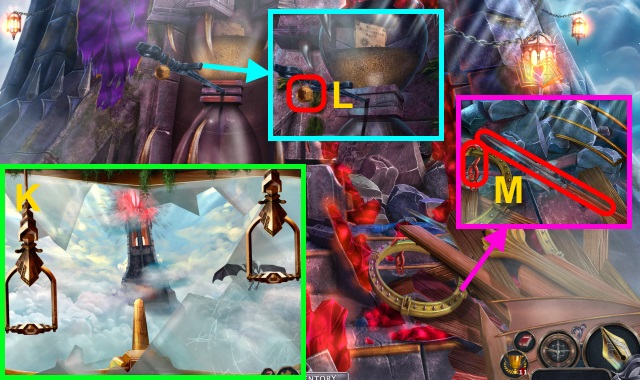
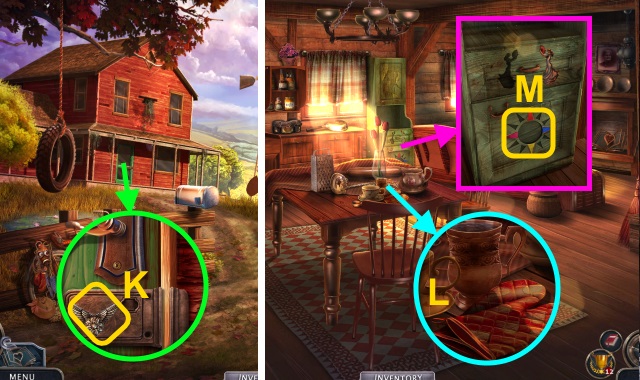
- Remove cloth. Play HOP; receive COLLAPSIBLE RULER (K).
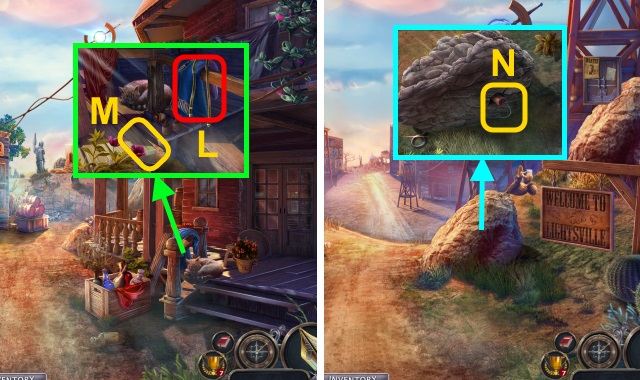
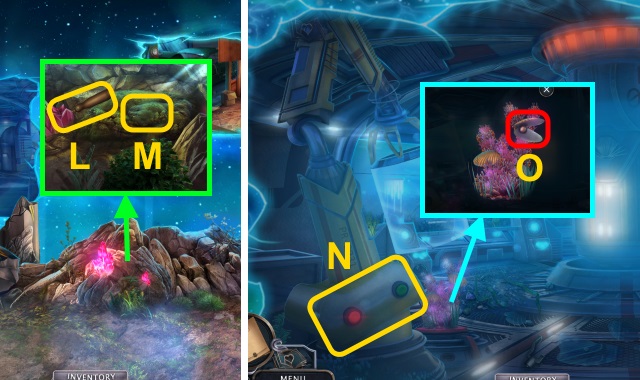
- Examine books (L); take BOOK PAGE.
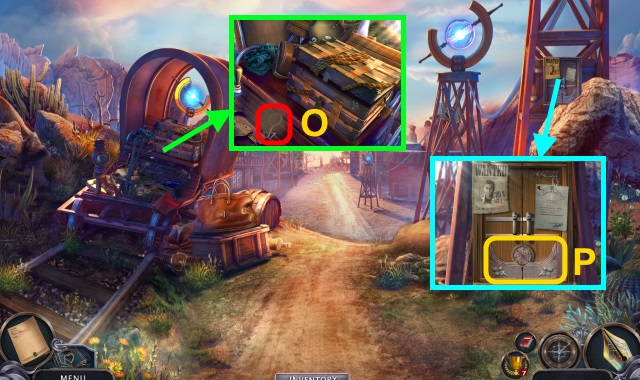
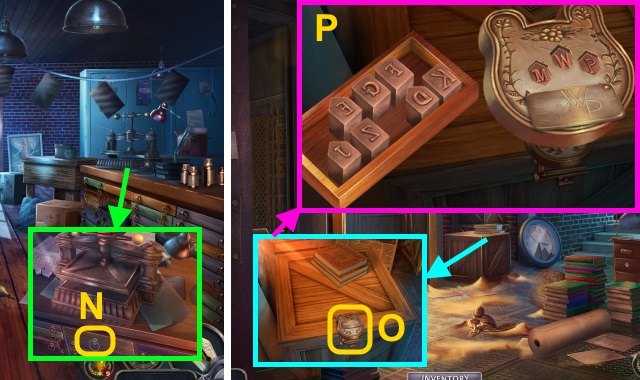
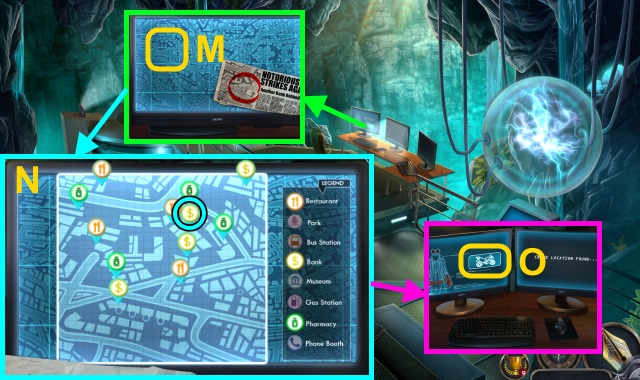
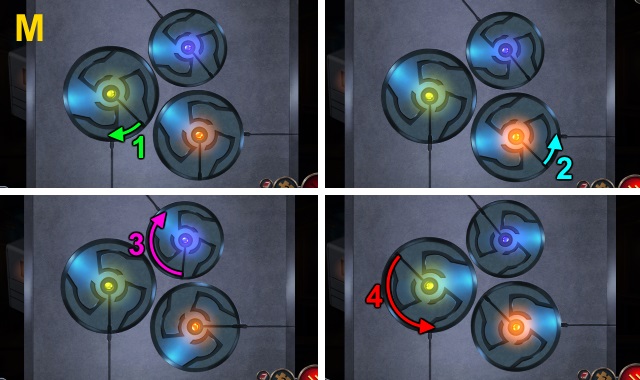
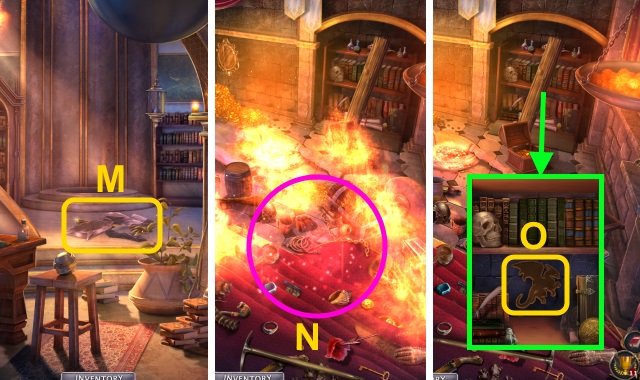
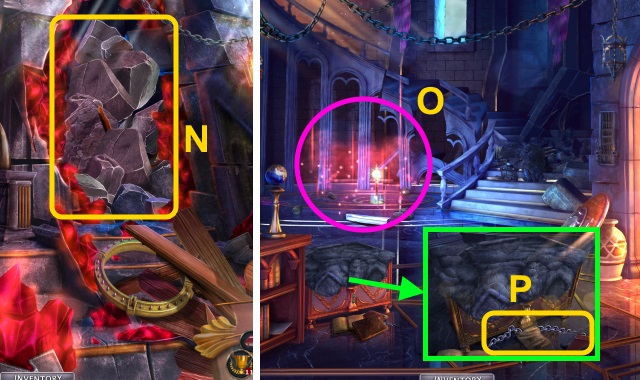
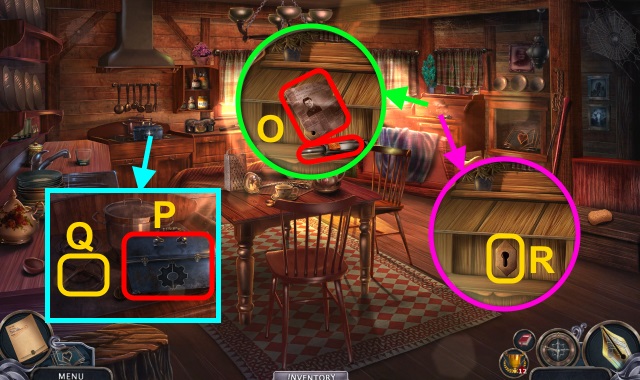
- Use MACHINE OIL (M); turn handle. Take FLOOR POINTER PIECE and ADHESIVE TAPE (N). Move paper; take PAINT BRUSH (O).
- Open COLLAPSIBLE RULER; use PLASTIC RINGS and ADHESIVE TAPE. Take GRABBER.
- Walk right.
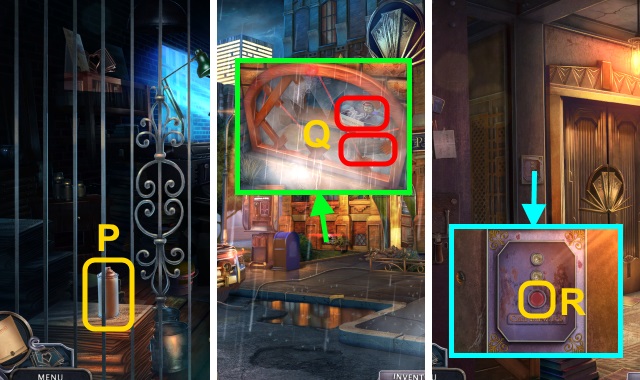
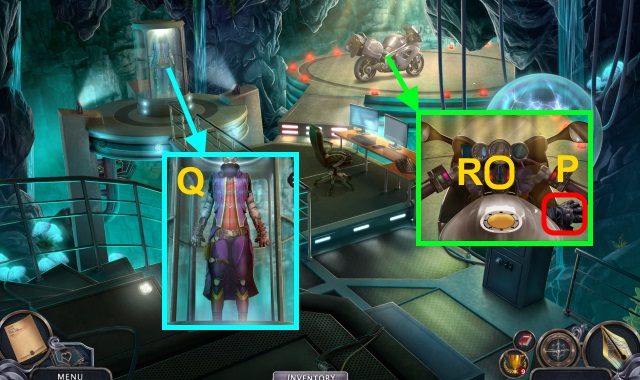
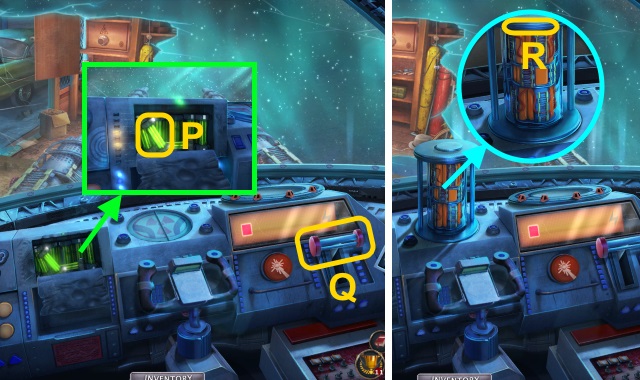
- Use GRABBER; take AEROSOL SPRAY (P).
- Walk down twice.
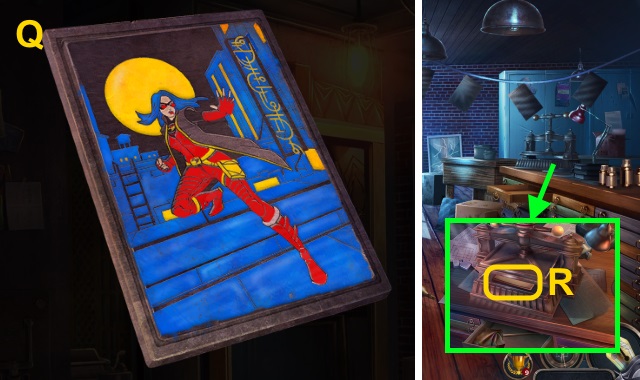
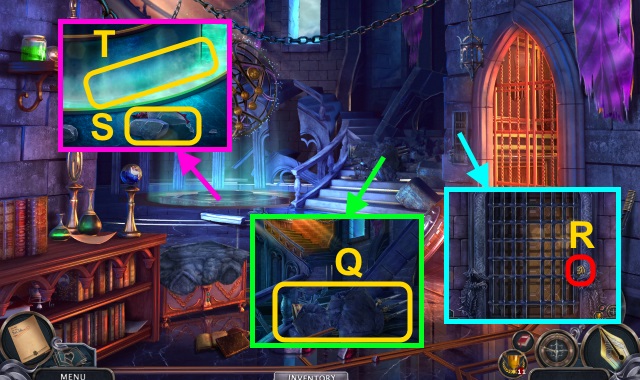
- Use AEROSOL SPRAY; take WIRE CONNECTORS and FLASHLIGHT (Q).
- Walk forward.
- Press button (R); remove cover. Examine wires; place WIRE CONNECTORS. Press button.
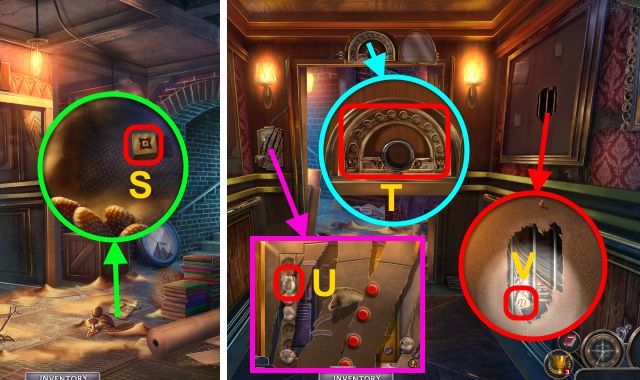
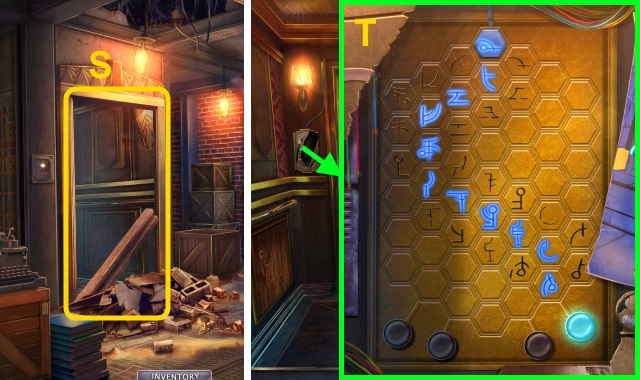
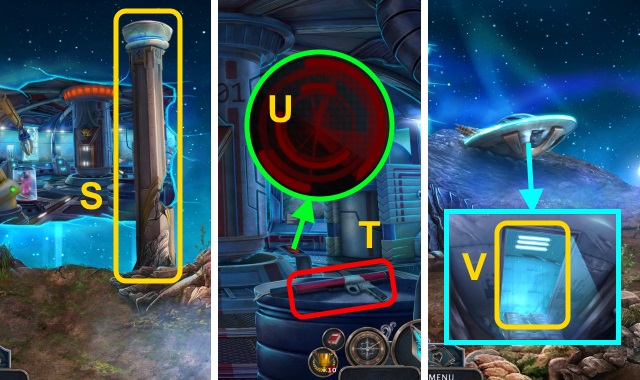
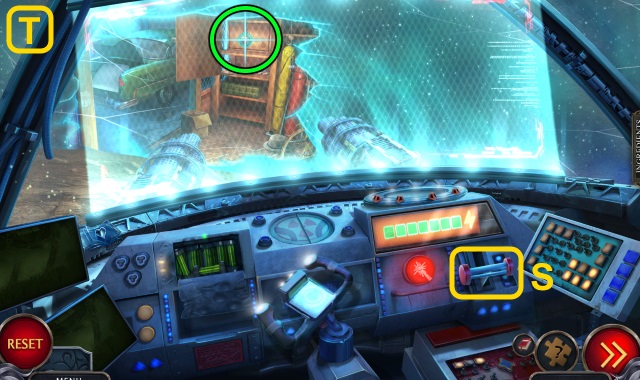
- Move paper; take DRAWER TOKEN (1/2) (S).
- Walk forward.
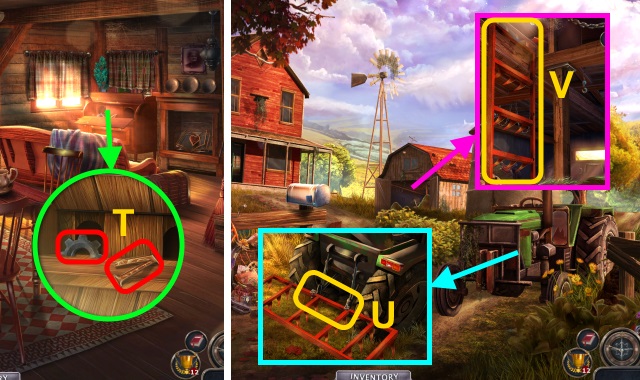
- Take BROKEN FLOOR POINTER (T).
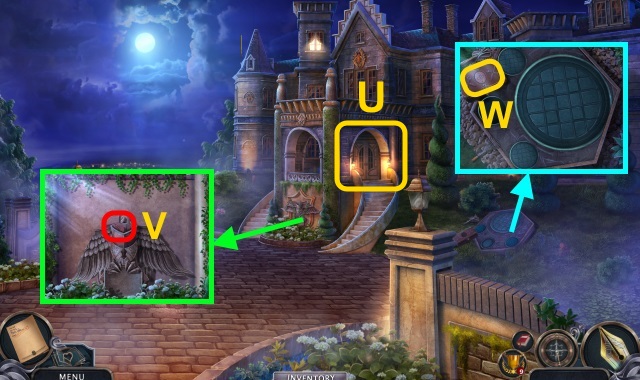
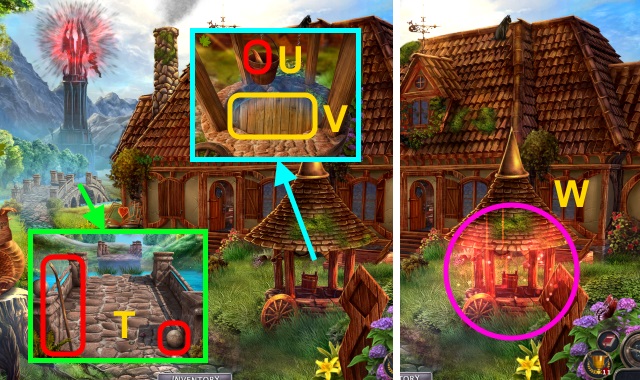
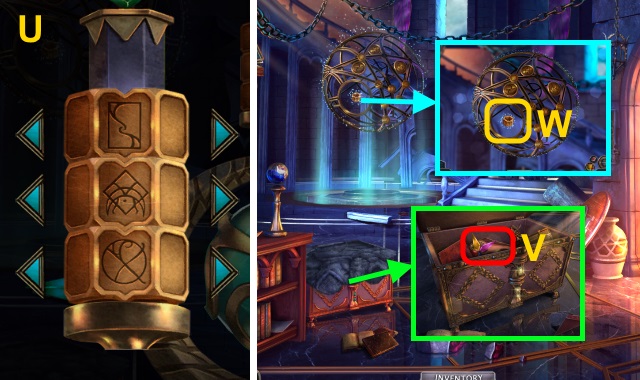
- Take LIGHTBULB (U); remove debris.
- Open FLASHLIGHT; replace LIGHTBULB. Take FLASHLIGHT.
- Use FLASHLIGHT; take DRAWER TOKENS (2/2) (V).
- Walk forward.
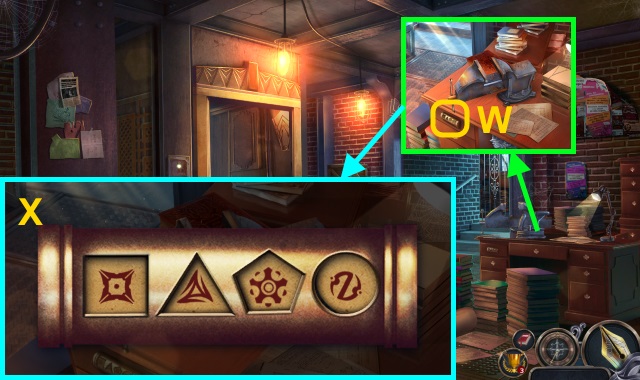
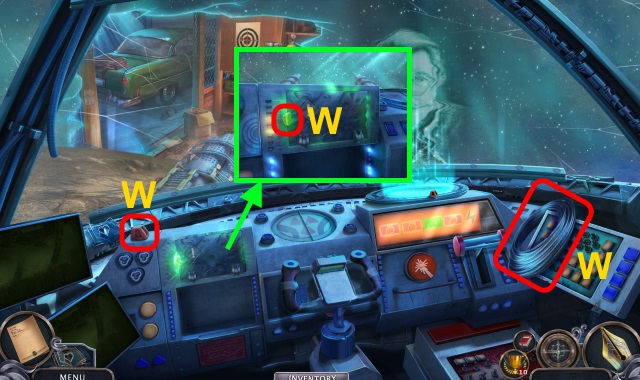
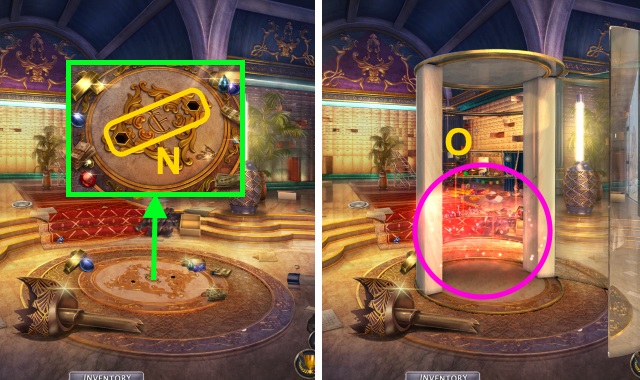
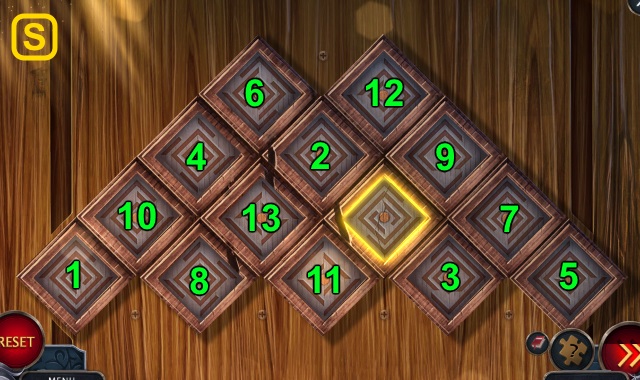
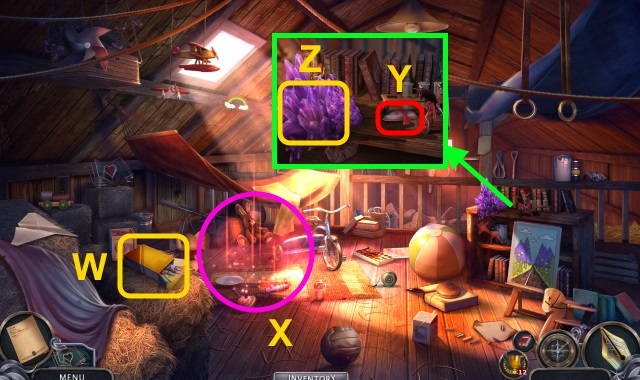
- Examine (W); place DRAWER TOKENS (2/2).
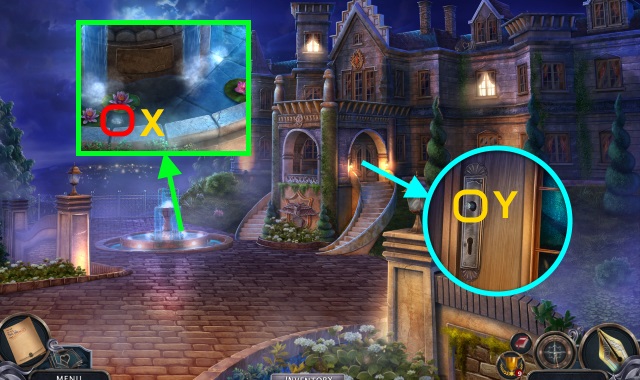
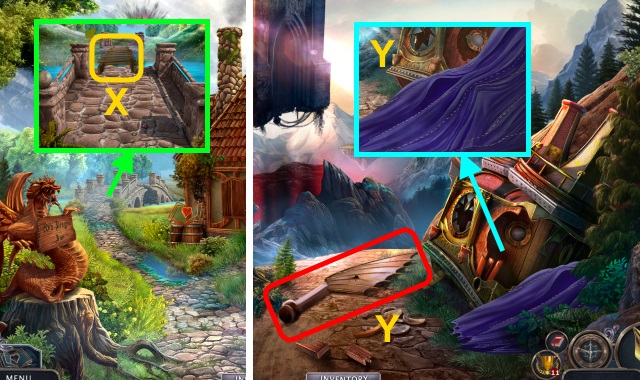
- Solution (X).
- Move item; take ELEVATOR POINTER.
- FLOOR POINTER PIECE and ELEVATOR POINTER on BROKEN FLOOR POINTER; receive FLOOR POINTER.
- Walk forward.
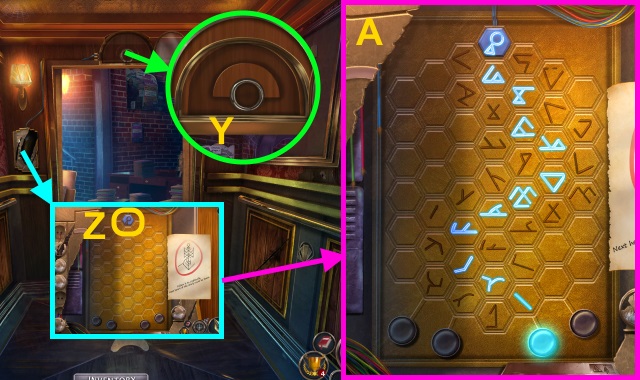
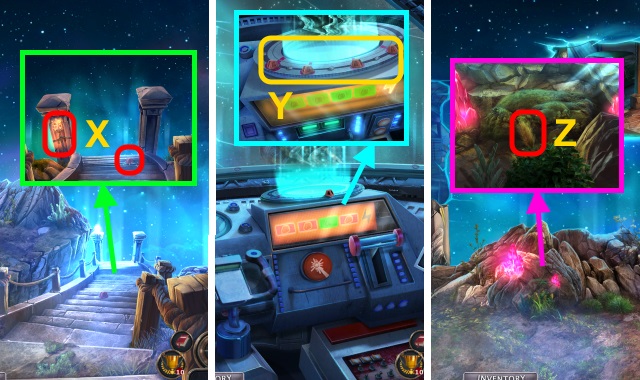
- Place FLOOR POINTER (Y).
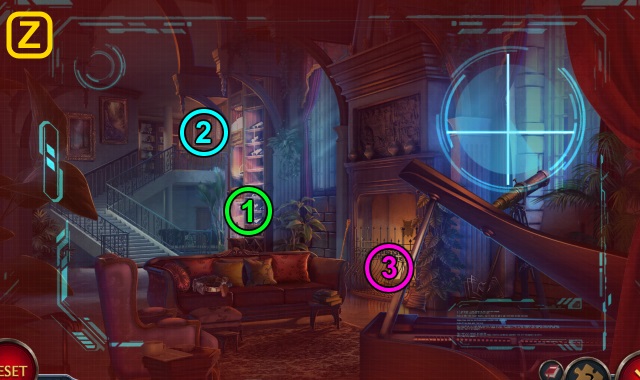
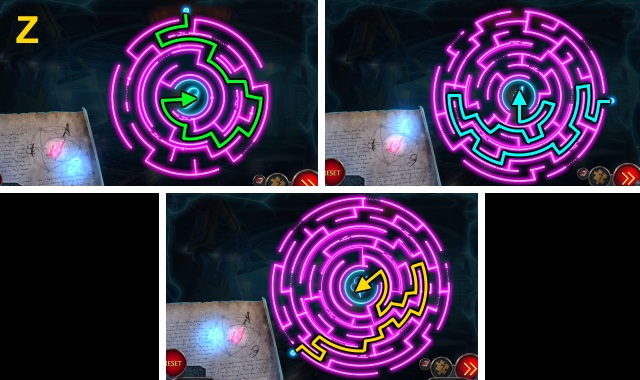
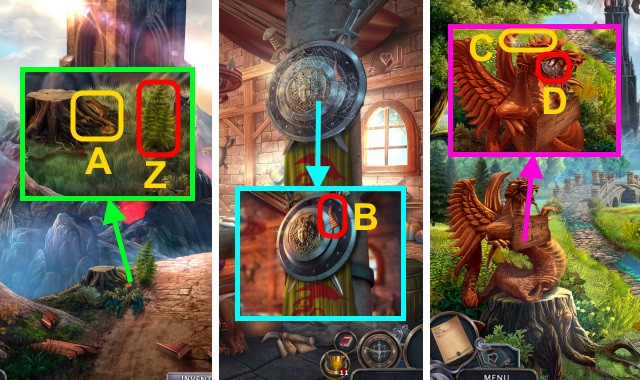
- Use BOOK PAGE; press button (Z).
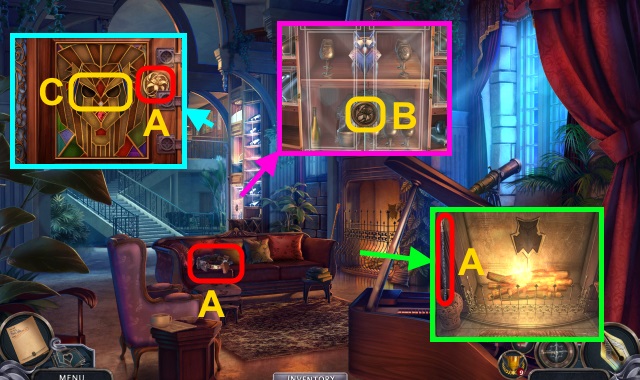
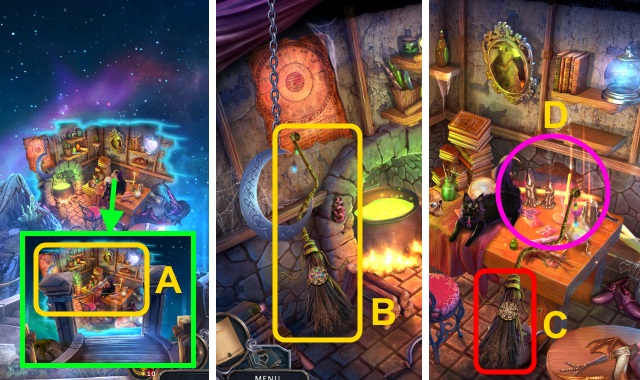
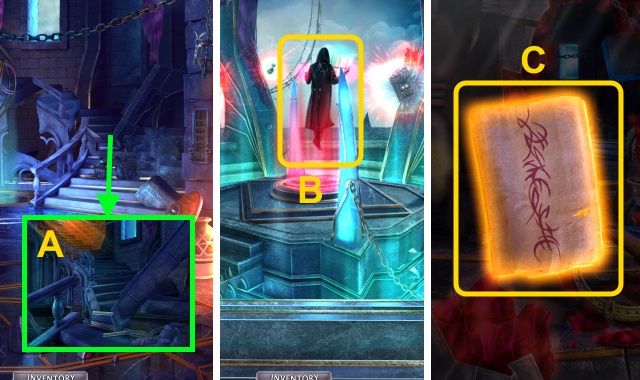
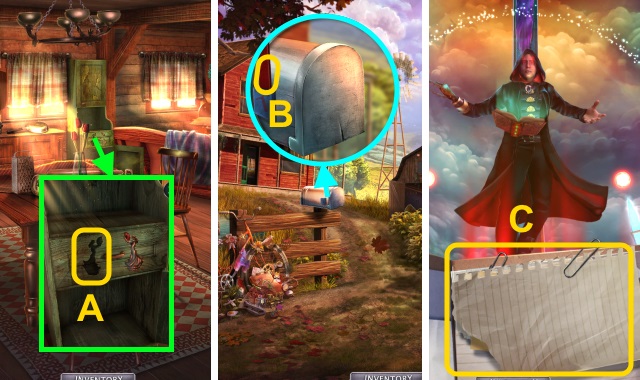
- Solution (A).
- Walk forward.
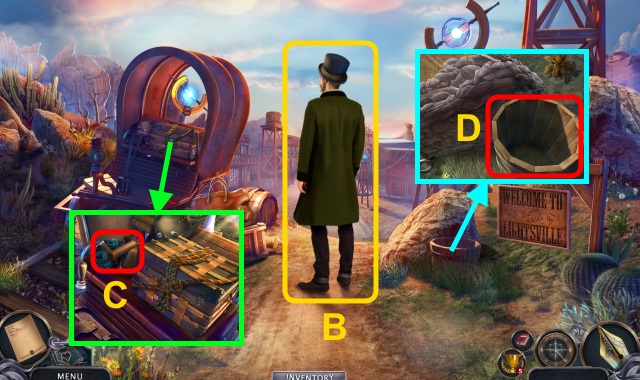
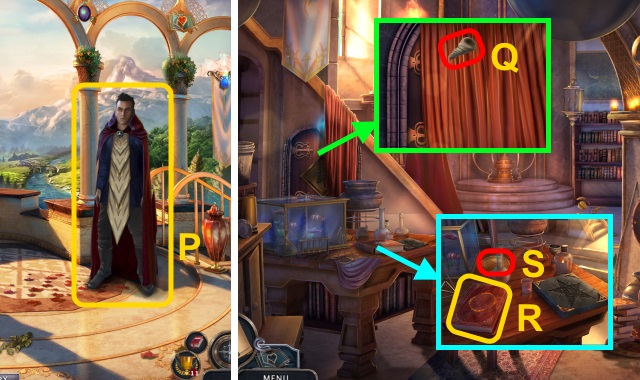
- Talk (B).
- Move cloth and hat; take DYNAMITE STICK and KNIFE HANDLE (C).
- Take BUCKET (D).
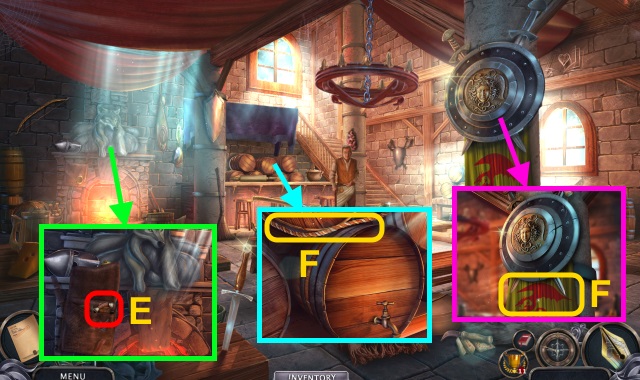
- Place KNIFE HANDLE; take KNIFE and BRASS ORNAMENT (1/9) (E).
- Examine chest. Use KNIFE (F); open.

- Play HOP; receive LOADED GUN (G).
- Walk forward.
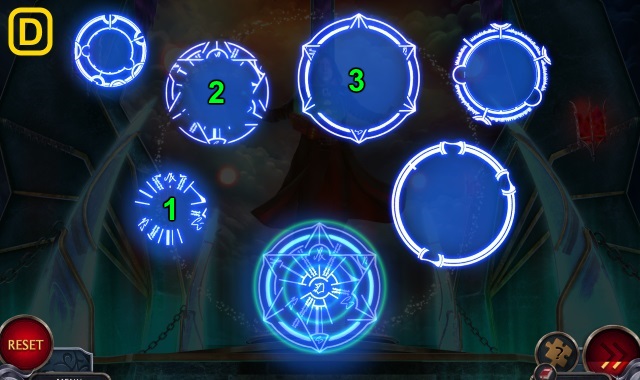
- Examine scene; examine window. Scroll (1-4).
- Walk forward.
- Move glass; take BRASS ORNAMENTS (2/9), PICKAXE HEAD, and DECORATIVE FLOWER (1/2) (H).
- Walk down.
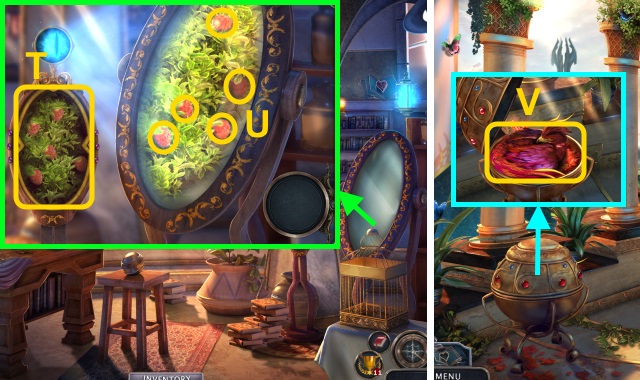
- Take newspaper, DECORATIVE FLOWER (2/2), BRASS ORNAMENTS (3/9), and GLASSES (I).
- Examine GLASSES; take LENS.
- Move hat (J); take BRASS ORNAMENTS (4/9).
- Move board (K); take COMIC-COVER PIECE and STRANGE STONE.
- Take SUSPENDERS (L); examine coat. Examine pocket; take MATCHES. Use PICKAXE HEAD (M); take SHOVEL.
- Walk down.
- Place DYNAMITE (N); use MATCHES.
- Take BRASS ORNAMENTS (5/9) (O).
- Place DECORATIVE FLOWER (2/2) (P); open. Examine.
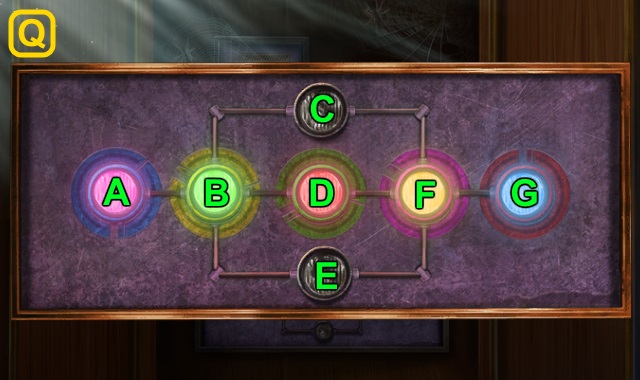
- Solution (Q): (F-C)-(B-E)-(C-B)-(G-F-C)-(D-F-G)-(E-F-D)-(B-E-F)-(A-B-E)-(C-B-A)-(F-C-B)-(E-F).
- Walk forward twice.
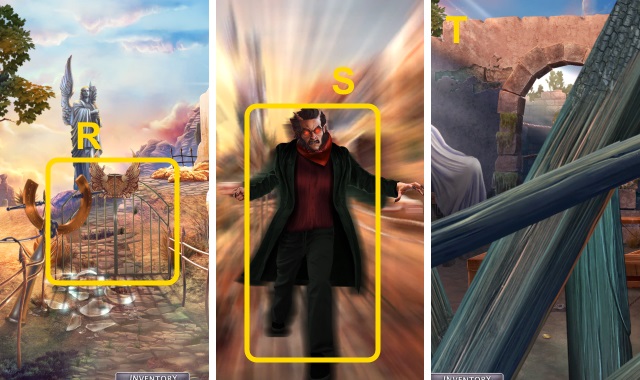
- Open gate (R).
- Use LOADED GUN (S).
- Walk forward.
- Open door; move boards (T).
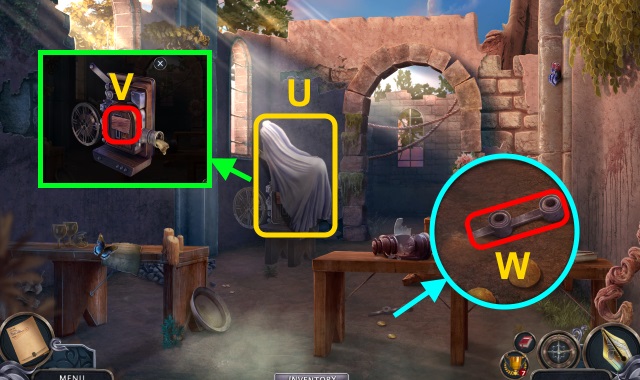
- Remove cloth (U).
- Read note (V); take BRASS ORNAMENTS (9/9).
- Take PUMP ROD (W).
- Walk down twice.
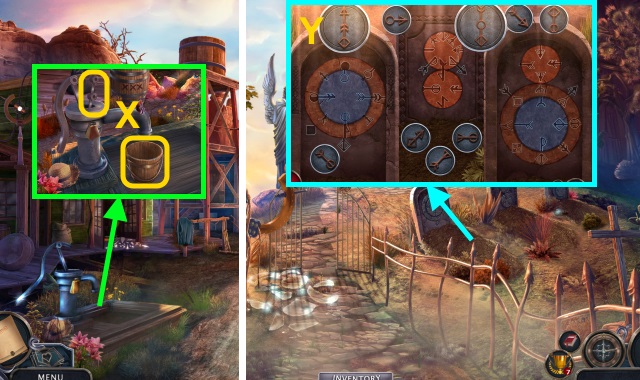
- Place BUCKET and PUMP ROD (X). Use pump; take BUCKET.
- Examine BUCKET; take SLINGSHOT. Receive FULL BUCKET.
- Examine SLINGSHOT; use SUSPENDERS and STRANGE STONE.
- Walk forward.
- Examine; place BRASS ORNAMENTS (9/9) (Y).
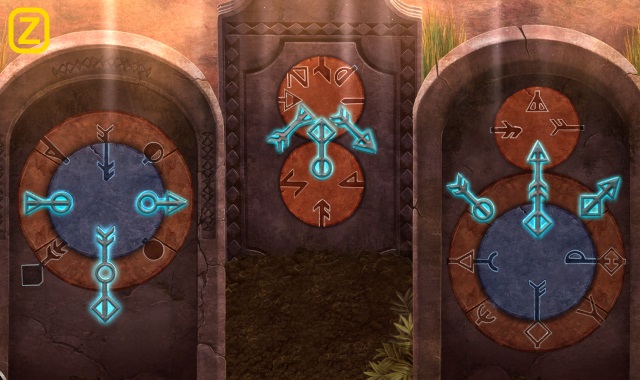
- Solution (Z).
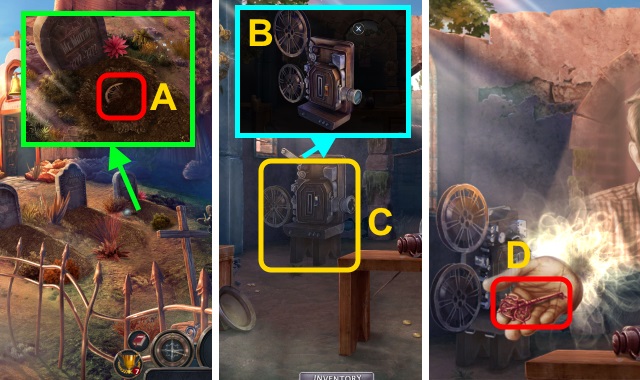
- Use FULL BUCKET and SHOVEL; take FILM REEL (A).
- Walk forward.
- Remove claw; replace LENS. Place FILM REEL; press switch (B).
- Examine (C).
- Take POST OFFICE KEY (D).
- Walk down twice.
- Use POST OFFICE KEY; open (E).
- Play HOP; receive PACKAGE (F).
- Open PACKAGE; take note and TRACKING DEVICE.
- Walk forward.
- Use TRACKING DEVICE; examine switch (G).
- Solution (H).
- Use SLINGSHOT (I).
- Walk forward.
Chapter 2: The Manor
- Take OCULAR DEVICE (J); examine scene.
- Walk forward, then right.
- Talk (K); play HOP.
- Move plate; take COLORED INK (1/3), BLANK PAPER, and DRAWER HANDLE (L). Read binders (M); take PRINTING PLATE.
- Place DRAWER HANDLE (N); open. Take COLORED INK (2/3) and LETTER-SET BOX.
- Walk down.
- Examine lock 2x (O); use LETTER-SET BOX.
- Select LETTERS (P). Open crate; move items. Take PRINTING PLATE PART and COLORED INK (3/3).
- PRINTING PLATE PART, COMIC-COVER PIECE, COLORED INK (3/3), and PAINT BRUSH on PRINTING PLATE. Paint plate (Q); use BLANK PAPER. Receive PRIMED PRINTING PLATE.
- Walk right.
- Place PRIMED PRINTING PLATE (R); examine. Take COMIC COVER.
- Walk down.
- Examine elevator (S); move beam.
- Walk forward.
- Place COMIC COVER; press button. Solution (T).
- Walk forward.
- Examine (U).
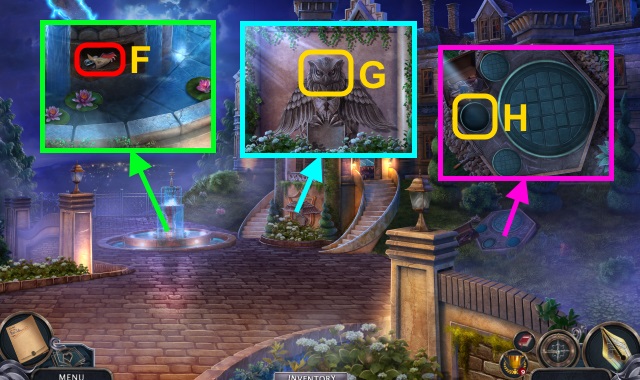
- Move plants; take TOOLBOX ORNAMENT (V).
- Place TOOLBOX ORNAMENT (W); open. Take PLIERS.
- Move all three lily pads; take EMBELISHED BUTTON (X).
- Examine; use PLIERS (Y).
- Walk forward.
- Use OCCULAR DEVICE on scene.
- Solution (Z).
- Take UTILITY BELT, IRON POKER, FLOWER ORNAMENT (A).
- EMBELISHED BUTTON on UTILITY BELT; take STAINED GLASS PIECE (1/2) and FREEZING GUN.
- Place FLOWER ORNAMENT; open (B). Move items; take STAINED GLASS PIECES (2/2) and EMBLEM.
- Place STAINED GLASS PIECES (2/2) (C); open.
- Play HOP; receive OWL HEAD (D).
- HOP mini-game solution (E).
- Walk down.
- Use IRON POKER; take OWL WING (1/2) and FREEZING CHARGE (F).
- FREEZING CHARGE on FREEZING GUN; receive CHARGED FREEZING GUN.
- Place OWL HEAD (G); take GARDEN ORNAMENT PIECE.
- Place GARDEN ORNAMENT PIECE (H).
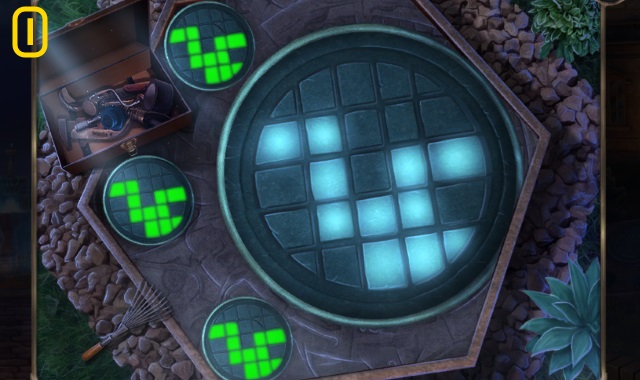
- Solution (I).
- Take GLOVE.
- Examine GLOVE; take OWL WING (2/2).
- OWL WING (2/2) on EMBLEM; receive SUPERHERO EMBLEM.
- Walk forward.
- Use CHARGED FREEZING GUN; place SUPERHERO EMBLEM (J). Examine entrance.
- Go forward.
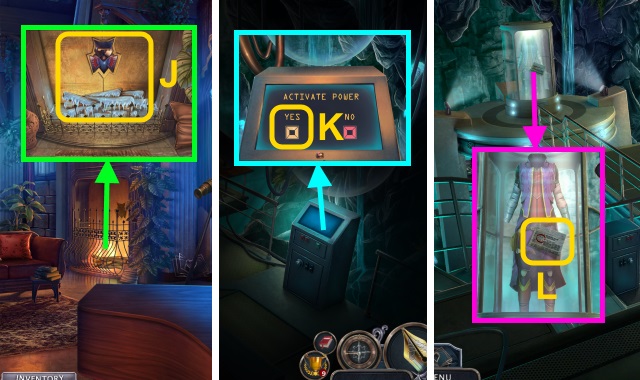
- Examine 2x; select Yes (K).
- Read newspaper (L); take NEWSPAPER CLIPPING.
- Examine screens; place NEWSPAPER CLIPPING. select (M).
- Solution (N).
- Press Open Chamber; press button (O).
- Take GLOVES (2/2) (P).
- Place UTILITY BELT, OCCULAR DEVICE, and GLOVES (2/2) (Q); examine suit.
- Turn key (R).
Chapter 3: Nowheretales
- Examine 2x (S).
- Walk left.
- Take UNARMED HARPOON (T).
- Examine (U).
- Walk down.
- Examine 2x; go (V).
- Take METAL ROPE and HOLOGRAM PART (1/3)-(2/3) (W).
- Walk down.
- Take HOLOGRAM PART (3/3) and BURNING TORCH (X).
- Enter Saucer.
- Place HOLOGRAM PART (3/3) (Y).
- Walk down; scroll left.
- Take BUSH BLOSSOM (Z).
- Walk left.
- Use BURNING TORCH on scene; receive IRON TORCH.
- Examine IRON TORCH; take IMPROVISED HARPOON and IRON TORCH GRIP.
- METAL ROPE and IMPROVISED HARPOON on UNARMED HARPOON; take LOADED HARPOON.
- Walk down; scroll right.
- Use LOADED HARPOON and IRON TORCH GRIP (A).
- Examine broom (B).
- Take BROKEN BROOM (C).
- Play HOP; receive GEMS (D).

- Read recipes (E); take CENTRAL GEM. Move items. Use scoop; receive CRYSTAL POWDER. Take MALLET.
- GEMS and CENTRAL GEM on BROKEN BROOM; receive FLYING BROOM.
- Walk down; scroll left.
- Use FLYING BROOM (F).
- Move hat; take note, TRUNK KEY, BRASS SHELLS, and INCOMPLETE INVESTIGATION KIT (G).
- Open INCOMPLETE INVESTIGATION KIT; place CRYSTAL POWDER and BUSH BLOSSOM. Take INVESTIGATION KIT.
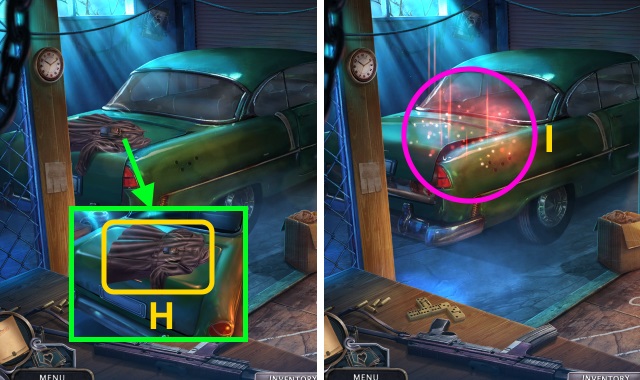
- Examine radio; move coat (H). Use TRUNK KEY; open.
- Play HOP; receive LOCKBOX (I).
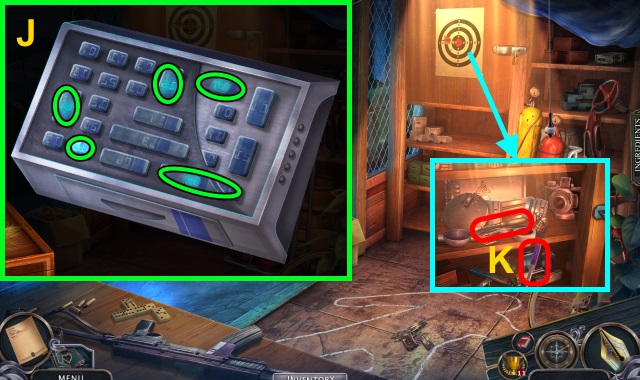
- INVESTIGATION KIT on LOCKBOX. Use brush; press buttons (J). Take LOCKPICK.
- Use LOCKPICK; open. Take SWITCHBLADE and CHISEL (K); move items. Take TONGS.
- Walk down.
- Use CHISEL and MALLET (L); receive CRYSTAL. Use SWITCHBLADE (M); receive MOSS.
- Walk left.
- Examine (N).
- Use SWITCHBLADE; take PEARL (O).
- Go to Saucer Inside.
- Use TONGS; receive ENERGY CORE (P).
- Examine lever (Q).
- Examine (R); replace ENERGY CORE.
- Pull lever (S).
- Solution (T).
- Go to Mobster Garage.
- Move items; take SAPPHIRE (U).
- Go to Witch's Home.
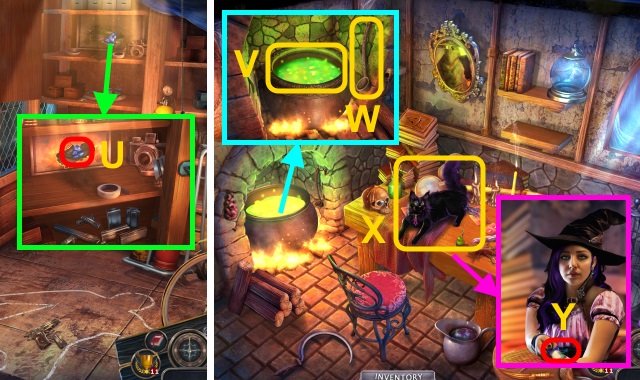
- Place PEARL, MOSS, BRASS SHELLS, and SAPPHIRE (V); use ladle (W). Receive LADLE.
- Give LADLE (X).
- Talk; take WATER SCROLL (Y).
- Go to Underwater Facility.
- Use WATER SCROLL and CRYSTAL on scene.
- Solution (Z).
- Walk forward.
- Talk (A); take FOLDED LETTER.
- Read FOLDED LETTER; take KEY ELEMENT (1/2).
- Take tablet (B).
- Move plants; take POLICE TASER (C).
- Examine (D). Remove cover; use POLICE TASER. Examine locker.
- Open box; take BOLTCUTTER and EXPLOSIVE. Use key; take REMOTE DETONATOR (E).

- Place EXPLOSIVE (F).
- Examine REMOTE DETONATOR; press.
- Take SPEAR (G).
- Go right.
- Open pocket; take GOLD COINS, POLICE ID CARD, and DISC KEY (1/2) (H).
- Walk forward.
- Use SPEAR; move papers. Take DISC KEY (2/2) (I).
- Use BOLTCUTTER; take BREACHING TOOL (J).
- POLICE ID CARD on BREACHING TOOL.
- Solution: D-Ax2-B-Cx2.
- Press button (K).
- Walk down.
- Use BREACHING TOOL (L); take LOCKBOX (M).
- DISC KEY (2/2) on LOCKBOX.
- Solution (M).
- Open; take KEY ELEMENT (2/2).
- Walk forward.
- Place KEY ELEMENT (2/2) (N).
- Play HOP; receive LEATHER-BOUND BOOK (O).
- Read LEATHER-BOUND BOOK.
- Walk forward twice.
Chapter 4: The Black Tower
- Talk (P).
- Walk right.
- Take UNICORN HORN (Q).
- Read book (R); take FOREST OVAL. Move flask; take IRON PLATE (S).
- Place FOREST OVAL (T); collect berries (U). Receive FIREBERRIES.
- Walk down.
- Open; examine (V). Give FIREBERRIES. Take BURNING FEATHER and RED CRYSTAL.
- Walk right.
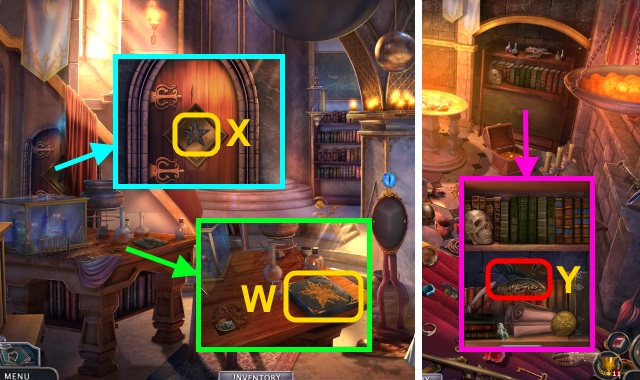
- Place GOLD COINS and BURNING FEATHER; take GOLDEN STAR (W).
- Move curtain; place GOLDEN STAR (X).
- Walk left.
- Place IRON PLATE; take RIGHT CREST PIECE (Y).
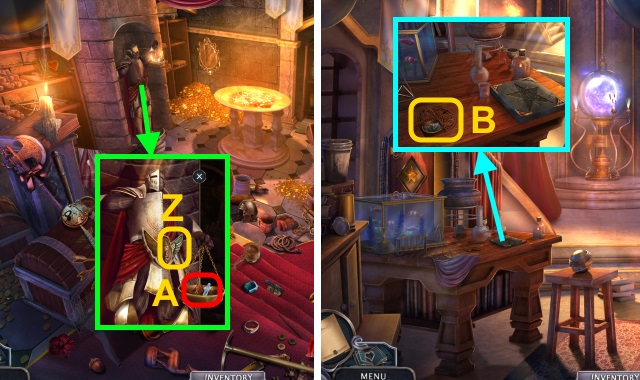
- Place RIGHT CREST PIECE (Z). Use BURNING FEATHER; take BLUE CRYSTAL and SANCTUM TABLE PIECE (A).
- Walk down.
- Place SANCTUM TABLE PIECE (B).
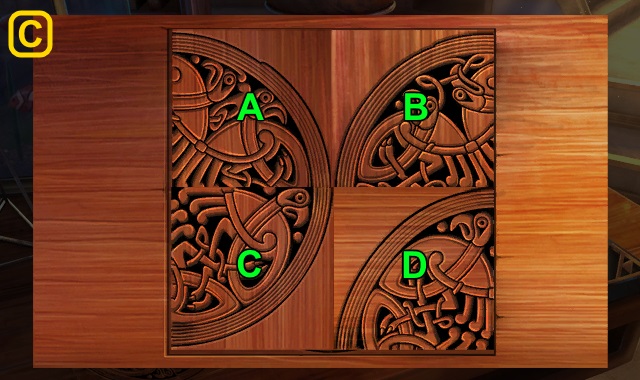
- Solution (C): (A-Bx3-Cx3-Dx2)-(A-Cx2-D-Bx2).
- Take BATTLEFIELD OVAL.
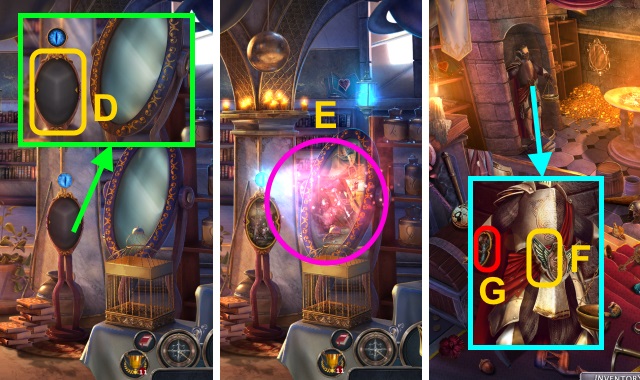
- Place BATTLEFIELD OVAL (D).
- Play HOP; receive LEFT CREST PIECE (E).
- Walk left.
- Place LEFT CREST PIECE (F); take CRYSTAL CAVE OVAL (G).
- Walk down.
- Place CRYSTAL CAVE OVAL (H). Use UNICORN HORN (I); receive GREEN CRYSTAL. Take BROKEN LANTERN (J).
- Place CRYSTAL and BLUE CRYSTAL (K); scroll right. Place RED CRYSTAL and GREEN CRYSTAL.
- Walk down.
- Examine (L).
- Play HOP; receive RED DRAGON EMBLEM.
- Walk right.
- Move items (M); take BANNER POLE.
- Walk left.
- Play HOP; receive LANTERN MIRROR (N).
- Examine BROKEN LANTERN 2x; place LANTERN MIRROR and BURNING FEATHER. Take PHOENIX LANTERN.
- Use BANNER POLE; move items. Place RED DRAGON EMBLEM (O).
- Walk forward.
- Use PHOENIX LANTERN on scene.
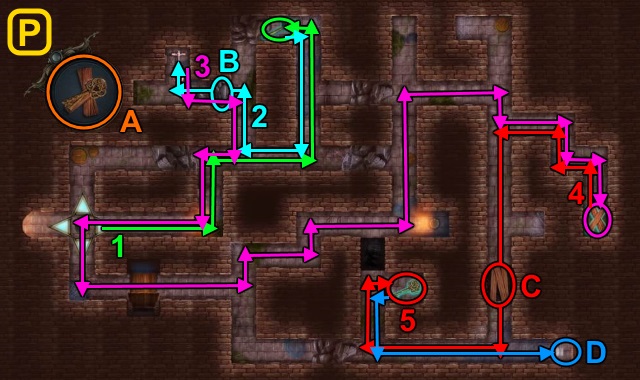
- Solution (P): follow paths (1-5). Use items (A-B)-(A-C)-(A-D).
- Walk forward.
- Take FIREPLACE FORK (Q).
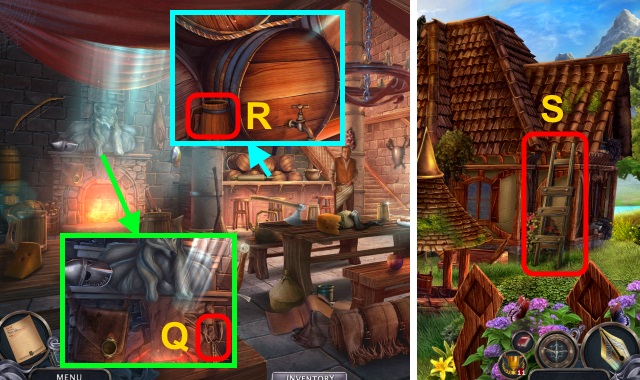
- Take TANKARD (R). Use FIREPLACE FORK; receive NAILS.
- Walk down.
- Take BROKEN LADDER (S).
- Take STONE ORB and LEVER (T).
- Take DRAGON HORN (1/2) (U); use LEVER (V).
- Play HOP; receive WOODEN BOARDS (W).
- WOODEN BOARDS and NAILS on BROKEN LADDER; use STONE ORB. Receive IMPROVISED BRIDGE.
- Place IMPROVISED BRIDGE (X).
- Walk left.
- Take BALLOON WING and TORN BALLOON (Y).
- Take FERN (Z). Use TANKARD (A).
- Walk down, then forward.
- Use FERN; take DRAGON HORN (2/2) (B).
- Walk down.
- Place DRAGON HORN (2/2) (C); take WOLF SYMBOL (D).
- Walk forward.
- Place WOLF SYMBOL (E); open. Take DAGGER and NEEDLE AND THREAD.
- Use DAGGER; receive BARREL ROPE and BANNER (F).
- Open TORN BALLOON; use NEEDLE AND THREAD and BANNER. Repair; receive BALLOON.
- Walk down, then left.
- Place BALLOON WING and part. Use TANKARD 3x (G).
- Place BALLOON (H).
- Place BARREL ROPE (I).
- Open; use BURNING FEATHER (J).
- Go right.
- Solution (K): dodge monsters once they are close.
- Take STAFF RING (1/2) (L).
- Move items; take HOOK and HALBERD (M).
- Use HALBERD (N); examine 3x.
- Walk forward; try to walk forward.
- Play HOP; receive STAFF (O).
- Move books; take DEPETRIFICATION SPELL and CHAIN (P).
- Move rocks (Q); take GOLDEN TRIDENT and CHALICE.
- HOOK and CHALICE on CHAIN; receive CHALICE ON CHAIN.
- Take FLOOR INLAY (R).
- Move stones; place FLOOR INLAY (S). Take STAFF RING (2/2). Use CHALICE ON CHAIN (T); receive STAFF LIQUID.
- DEPETRIFICATION SPELL, STAFF LIQUID, and STAFF RING (2/2) on STAFF; solution (U).
- Use STAFF; remove stone. Open chest; take SUN ORNAMENT and SPHERE PART (V).
- Place SPHERE PART (W).
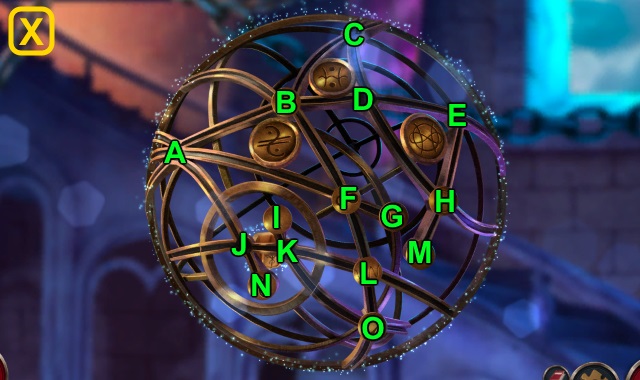
- Solution (X): (B-C)-(H-D)-(M-H)-(D-B-A)-(C-B)-(H-D-C).
- (B-D-H)-(F-B)-(L-F)-(I-K-L)-(A-J-K-I)-(B-D-E)-(C-B-A)-(F-B).
- (G-F)-(B-C)-(F-B)-(L-F)-(B-D)-(F-B)-(A-F)-(N-J-A).
- Take STAFF RING.
- Walk down.
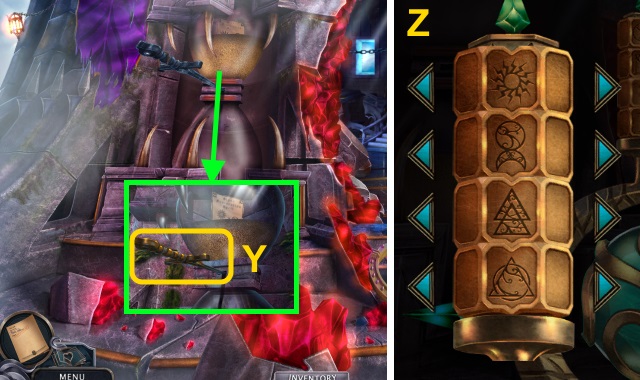
- Use STAFF. Remove sword (Y); take STONE RESTORATION SPELL.
- STONE RESTORATION SPELL and STAFF RING on STAFF; solution (Z).
- Walk forward.
- Use STAFF (A).
- Go forward.
- Examine (B).
- Take ELEVATOR CLUE (C).
- Walk forward.

- Examine; use ELEVATOR CLUE. Press button; solution (D).
- Walk left, then forward.
- Move cloth. Play HOP; receive DOOR LOCK (1/3) (E).
- Move leaves; take CROOKED KEY (F).
- Take DOOR LOCK (2/3) (G).
- Examine (H). Use GOLDEN TRIDENT (I); take TOOLBOX BADGE (1/2). Take DOOR LOCK (3/3) (J).
- Place DOOR LOCK (3/3) (K); open.
- Walk left.
- Take KITCHEN MITTENS and WATER CUP (L).
- Place SUN ORNAMENT (M).

- Solution (N): Bx3-C-Bx3-E-F-Bx3-D.
- Open; take MURRAY's DIARY.
- Take newspaper and FIRESTARTER (O).
- Take TOOLBOX (P). Use FIRESTARTER; place CROOKED KEY (Q). Turn stove knob; use KITCHEN MITTENS. Take HOT KEY.
- HOT KEY on WATER CUP; receive DESK KEY.
- Use DESK KEY (R); open.
- Solution (S).
- Take DIARY INITIAL (1/2) and TOOLBOX BADGES (2/2) (T).
- TOOLBOX BADGES (2/2) on TOOLBOX; open. Play HOP; receive HARROW WRENCH.
- Walk down.
- Use HARROW WRENCH (U); take HARROW.
- Use HARROW (V).
- Go forward.
- Examine (W); take DIARY INITIAL HALVES (2/2).
- DIARY INITIAL HALVES (2/2) on MURRAY'S DIARY; open. Play HOP; receive RED SUBMARINE and TREASURE MAP.
- Use TREASURE MAP on scene.
- Play HOP; receive CRYSTAL SOLVENT (X).
- Move; take RED SUBMARINE PART (1/3) (Y). Pour CRYSTAL SOLVENT (Z); take FIGURINE.
- Walk down, then left.
- Place FIGURINE (A); open. Examine; take MAILBOX FLAG and RED SUBMARINE PARTS (2/3).
- Walk down.
- Place MAILBOX FLAG (B); open. Read letters; take RED SUBMARINE PARTS (3/3).
- RED SUBMARINE PARTS (3/3) on RED SUBMARINE; open. Take GOLDEN PEN.
- Use GOLDEN PEN (C); examine.
- Solution (D).
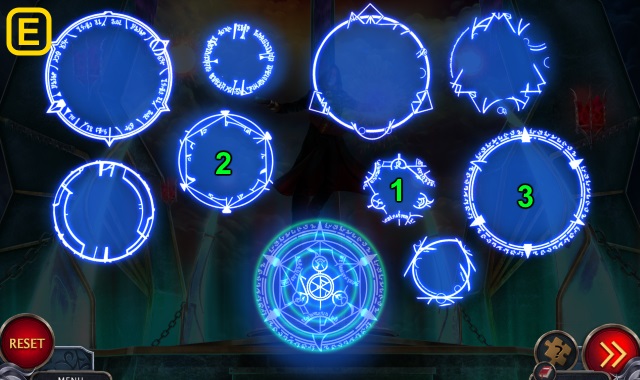
- Examine notebook; solution (E).
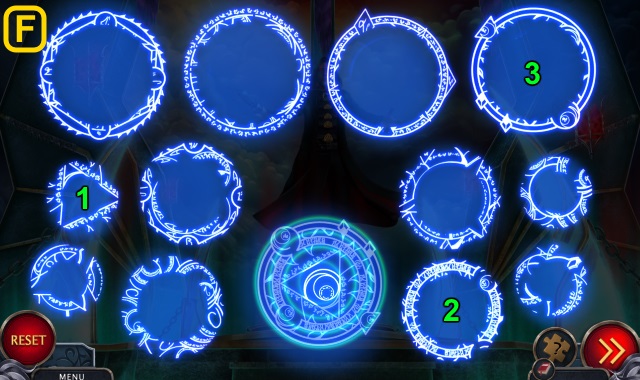
- Examine notebook; solution (F). Circle locations are random.
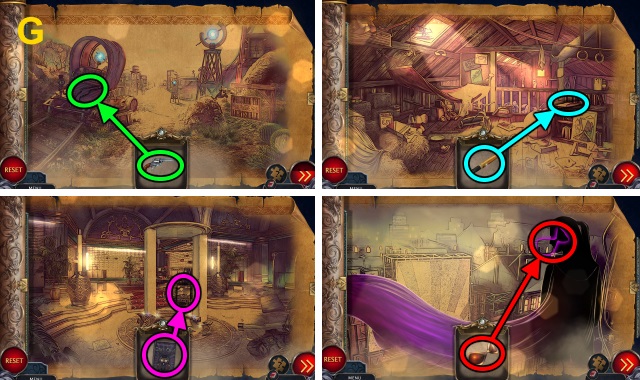
- Solution (G).
- Congratulations! You have completed Nevertales: Forgotten Pages.
Created at: 2017-07-23