

Walkthrough Menu
- General Tips
- Prologue
- Tale 1: The Unlikely Gardener
- Tale 2: Cerulean Peak Part One
- Tale 3: Tranquility
- Tale 4: The Mason's Dream
- Tale 5: Cerulean Peak Part Two
- Epilogue
General Tips
- This is the official guide for Nevertales: Hidden Doorway.
- Hidden-object puzzles are referred to as HOPs. This guide will not show screenshots of the HOPs, however, it will mention when an HOP is available and the inventory item you'll collect from it.
- This guide will not mention each time you have to zoom into a location; the screenshots will show each zoom scene.
Prologue
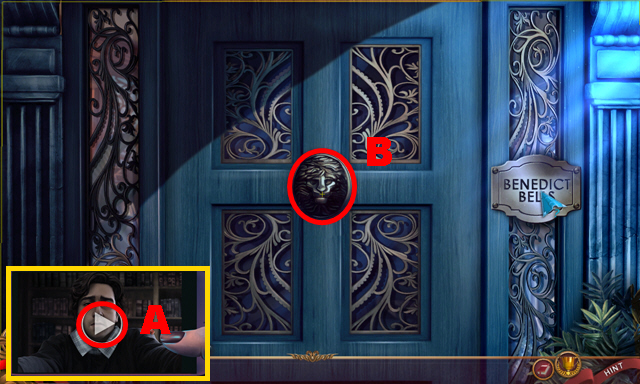
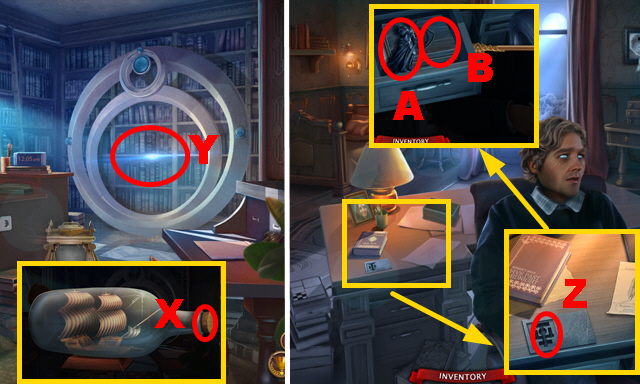
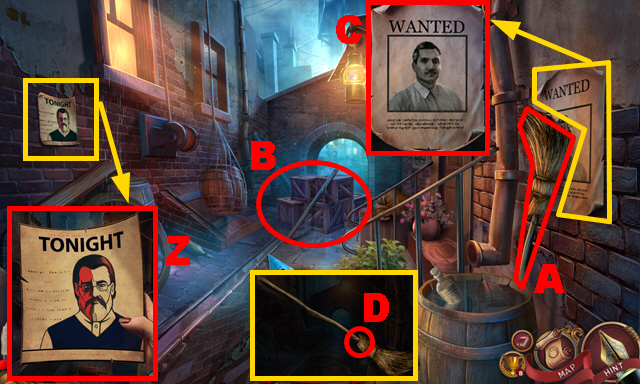
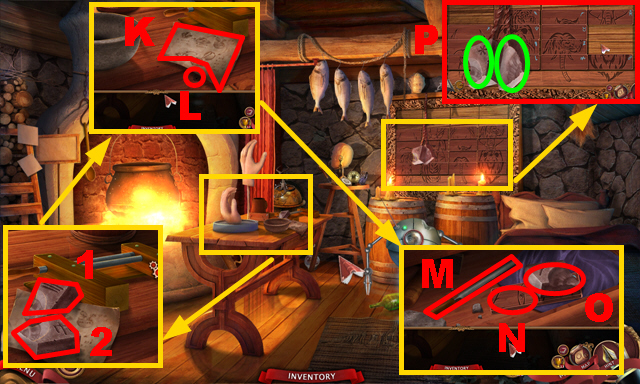
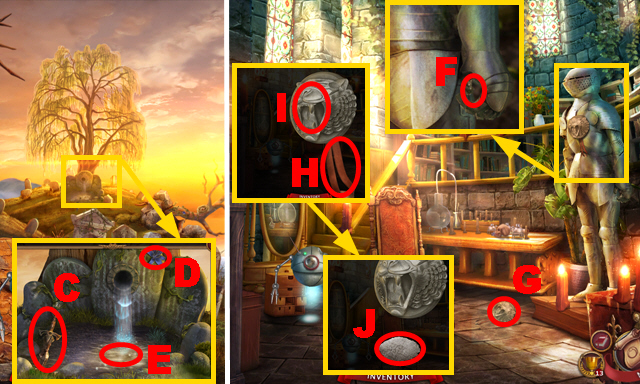
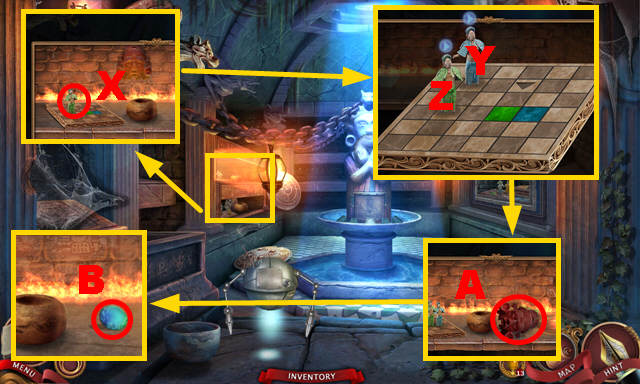
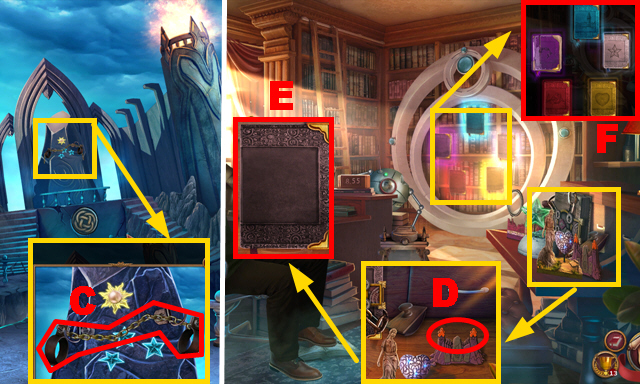
- Play the message (A).
- Knock on the door (B); open it.
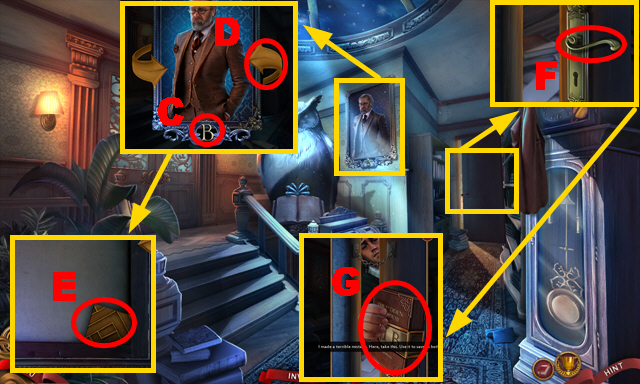
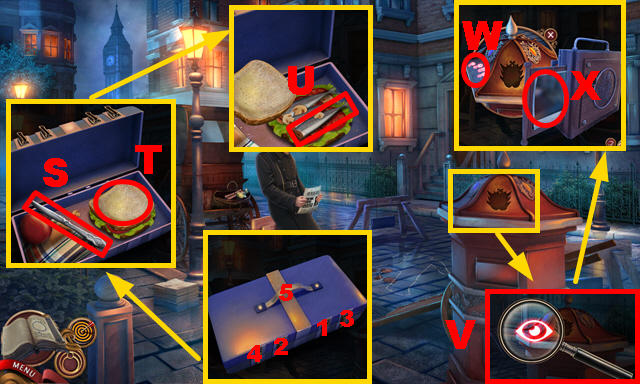
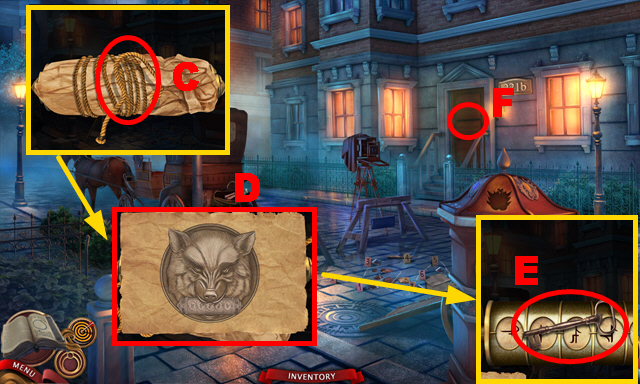
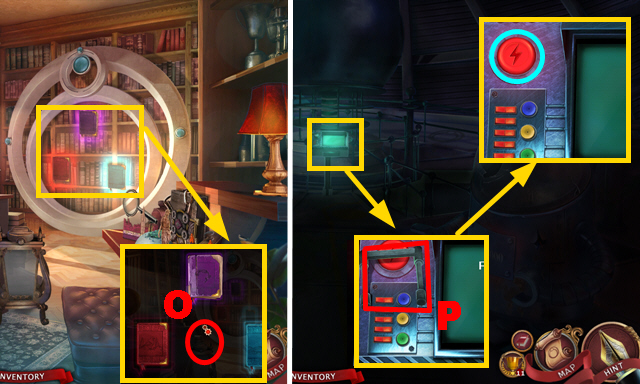
- Take LETTER B 1/2 (C); flip the portrait (D).
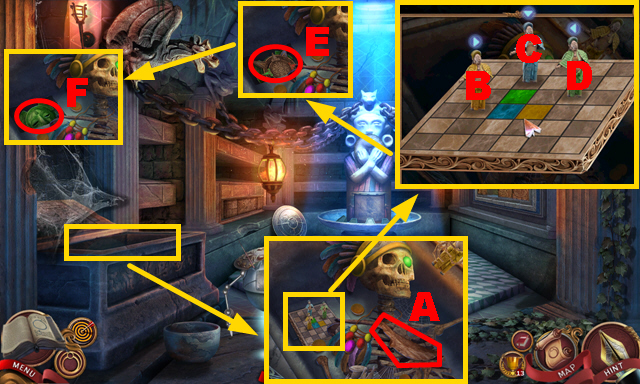
- Take MAZE PIECE 1/3 (E).
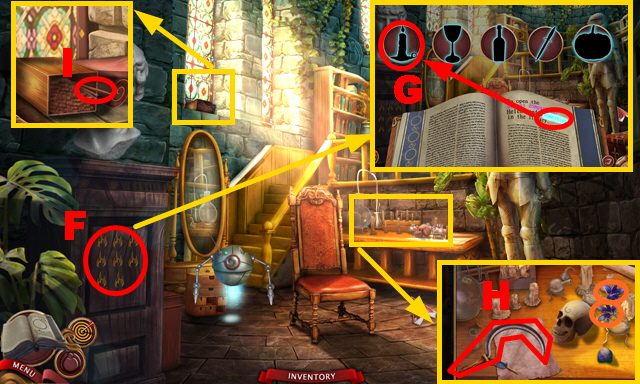
- Try to open the door twice (F); take IAN'S NOVEL (G).
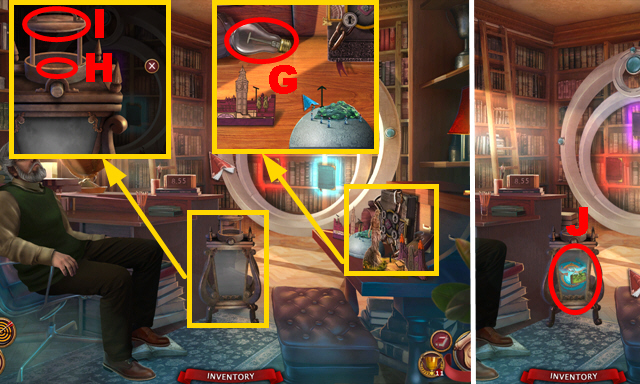
- Take the PEN BOX (H).
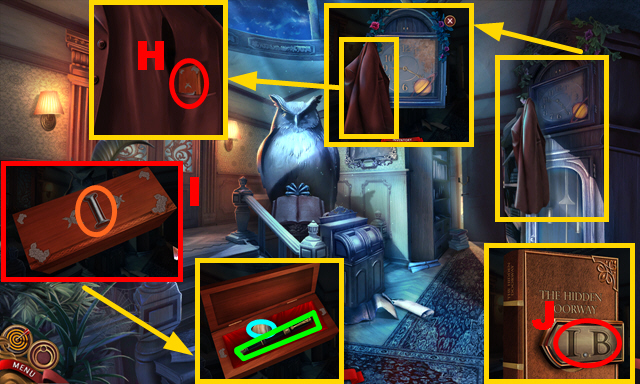
- Take LETTER I 2/2 from the PEN BOX (orange); open the PEN BOX (I).
- Take the pen (green) and MINIATURE PLANET 1/5 (blue).
- Place the LETTERS I and B 2/2 on IAN'S NOVEL (J); open the book and turn a page.
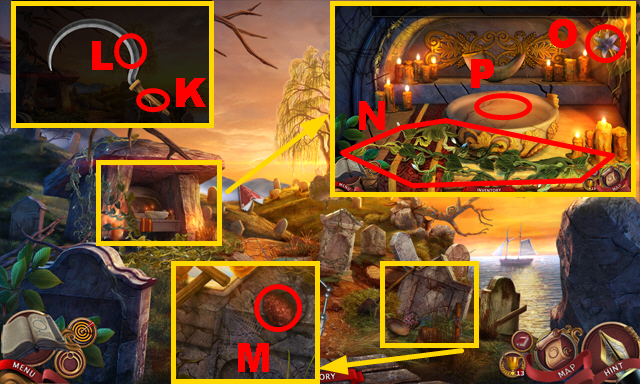
- Rewrite the story (K).
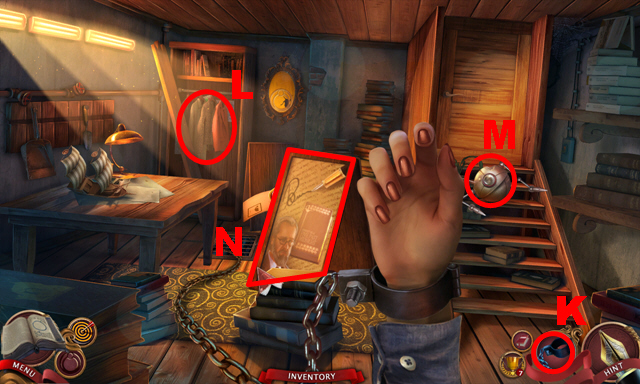
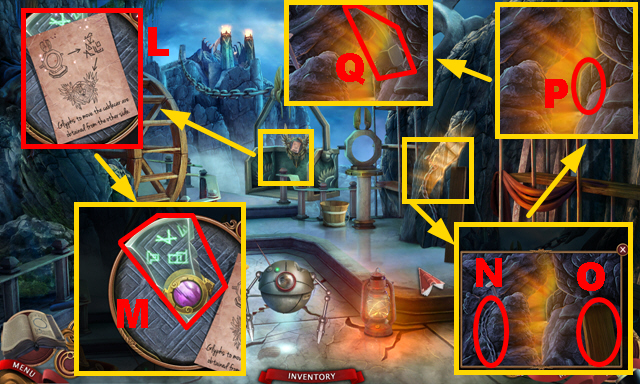
- Take the BOLT CUTTERS (L).
- Use the BOLT CUTTERS (M).
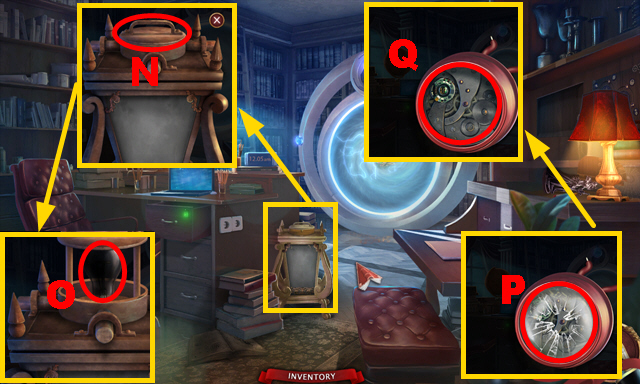
- Open the door (N).
- Move forward.
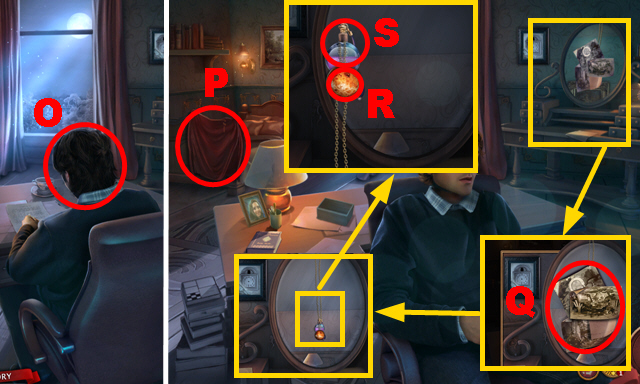
- Talk to Ian (O).
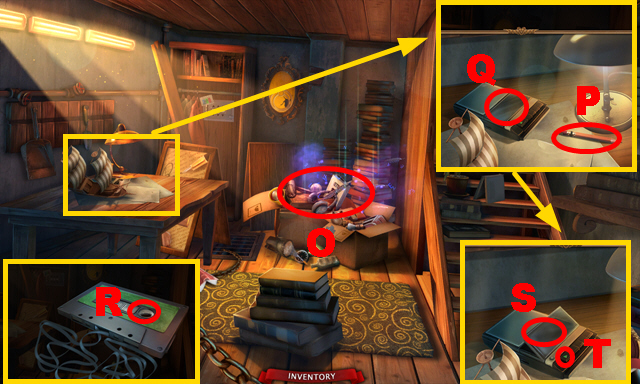
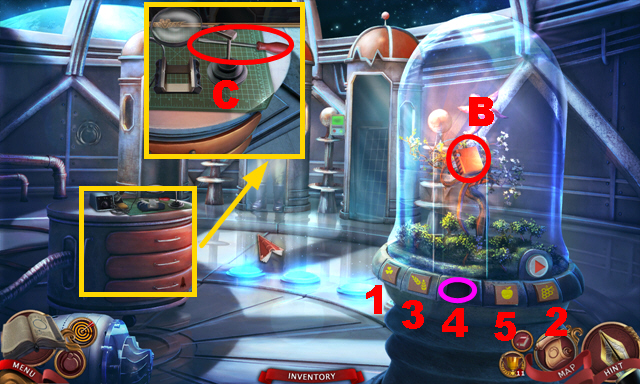
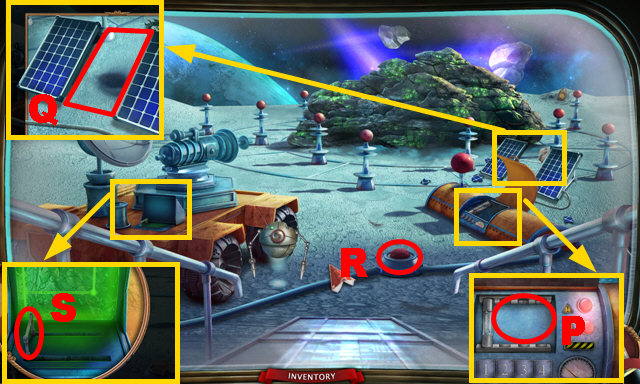
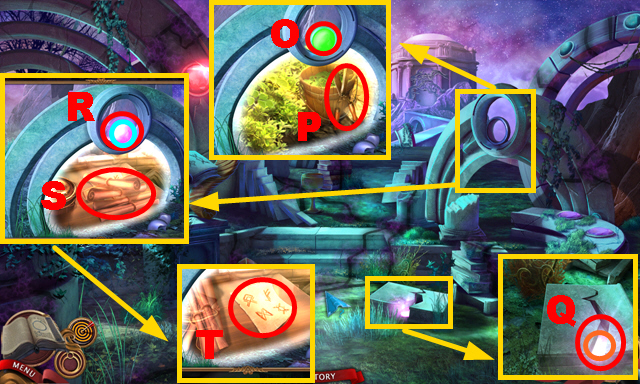
- Take the RED CLOTH (P).
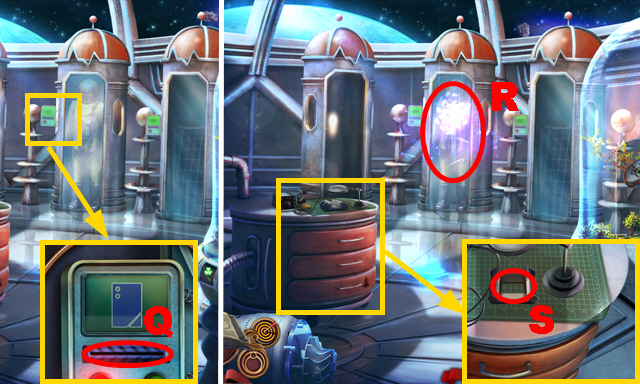
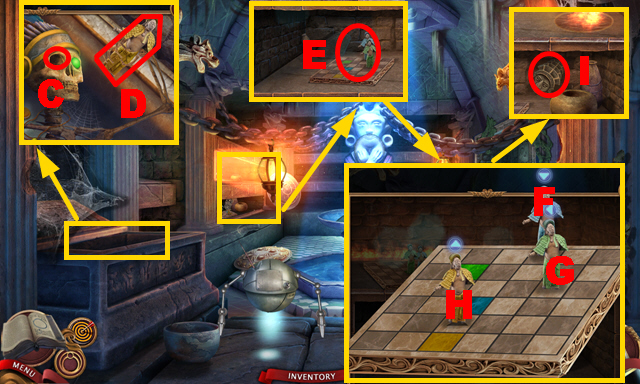
- Remove 4 pages (Q); take MINIATURE PLANET 2/5 (R) and the PERFUME (S).
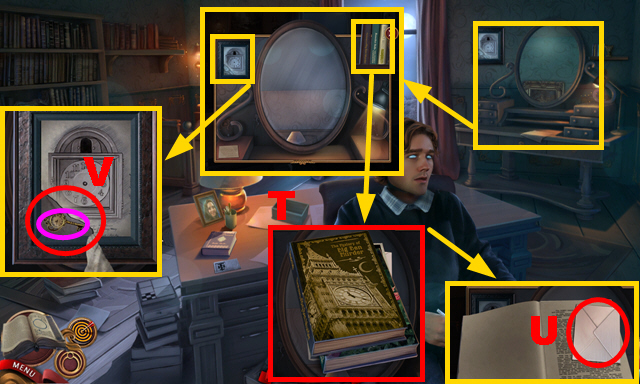
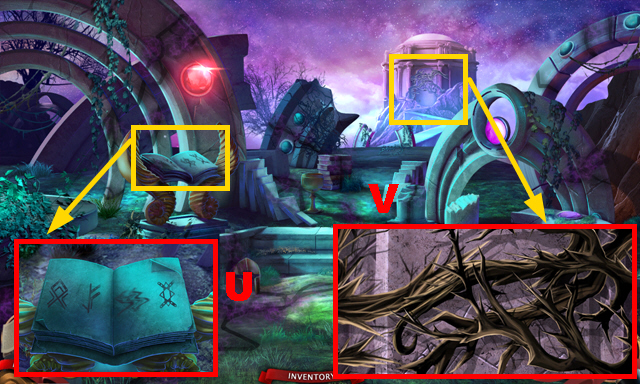
- Move aside 2 books (T); open the book and take the ENVELOPE (U).
- Rip the picture (V); take the CLOCK KEY (purple).
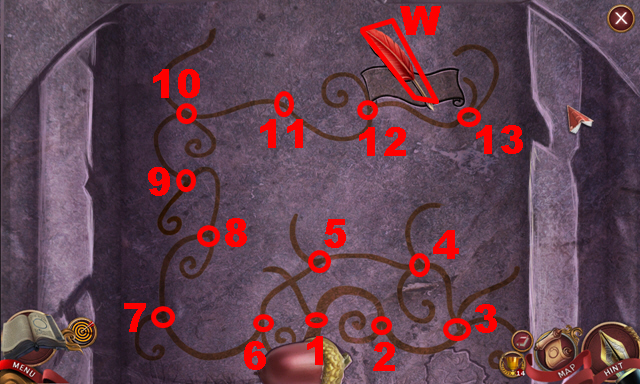
- Take the MATCHES (W).
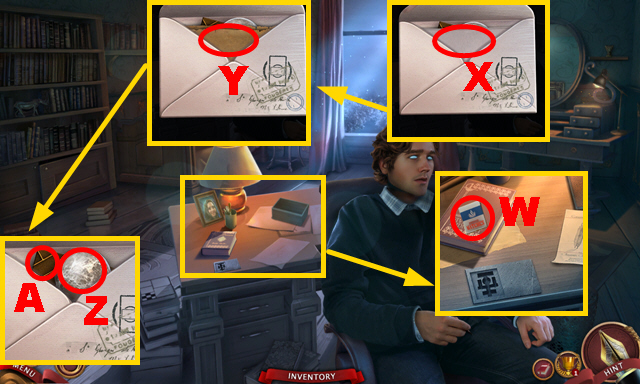
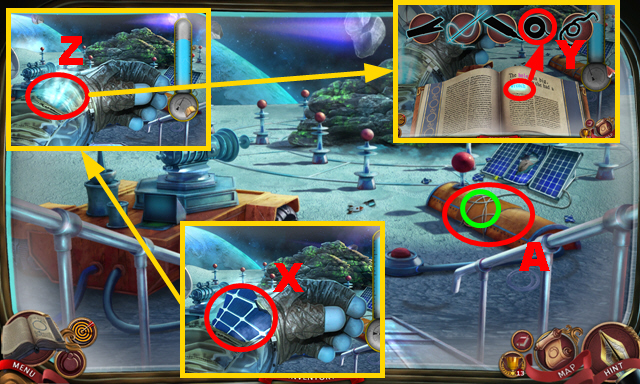
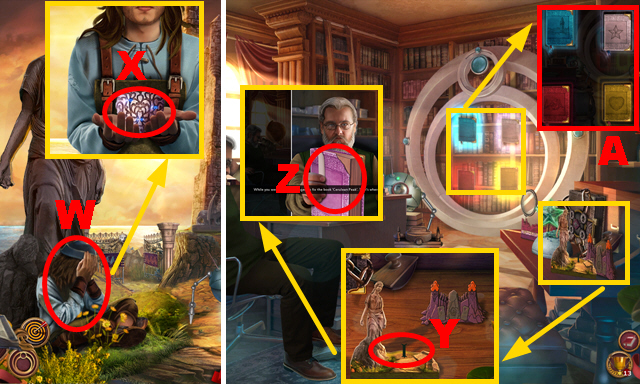
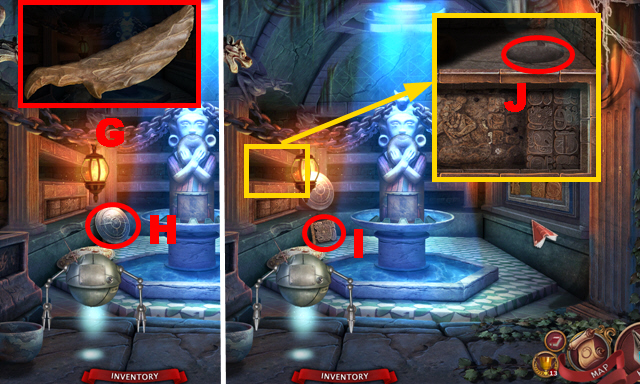
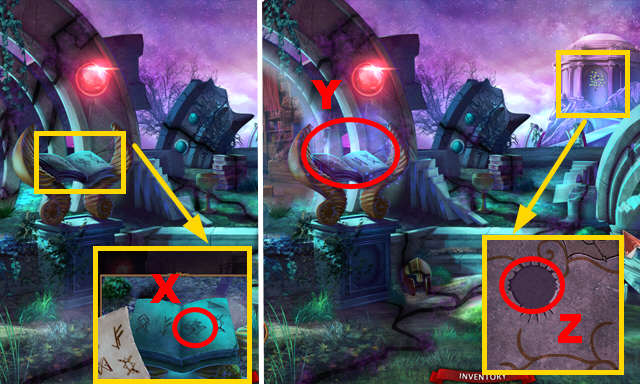
- Open the ENVELOPE; take the letter (X), map (Y), MINIATURE PLANET 3/5 (Z), and MAZE PIECE 2/3 (A).
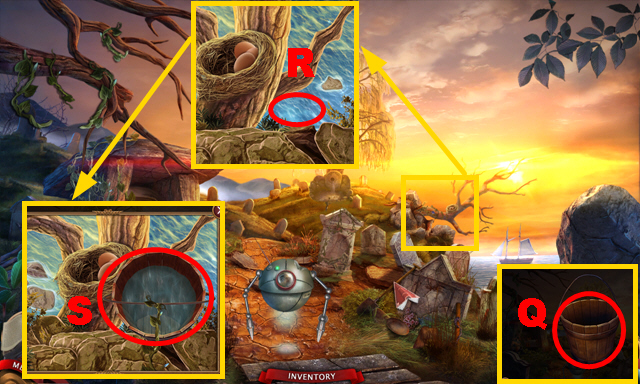
- Walk down.
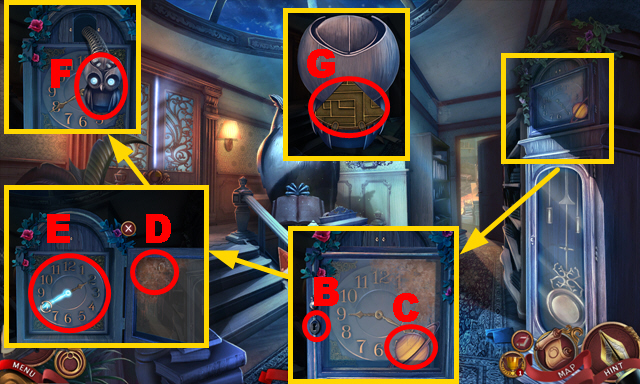
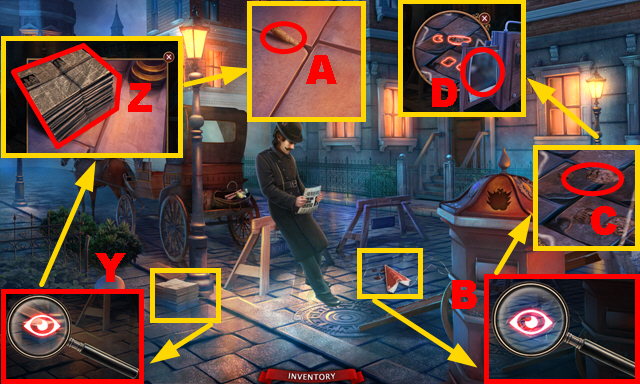
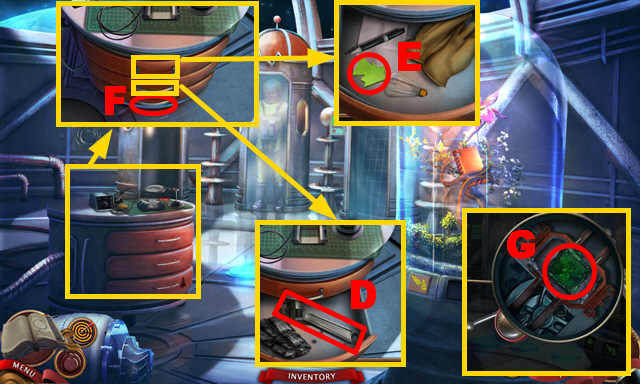
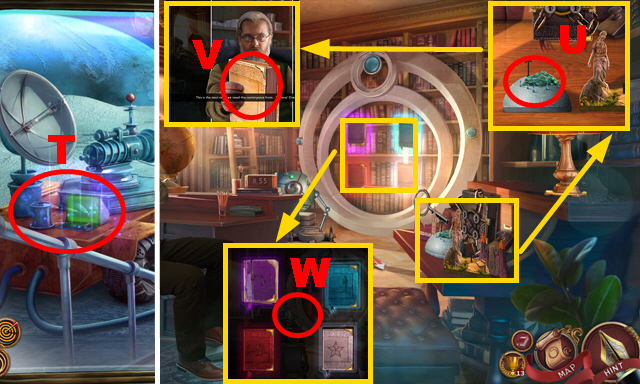
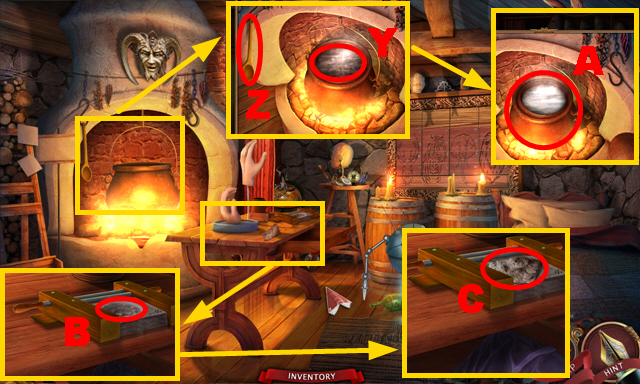
- Insert the CLOCK KEY (B); turn it.
- Take MINIATURE PLANET 4/5 (C).
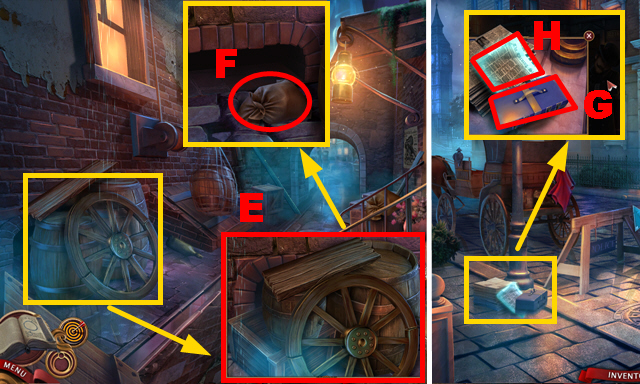
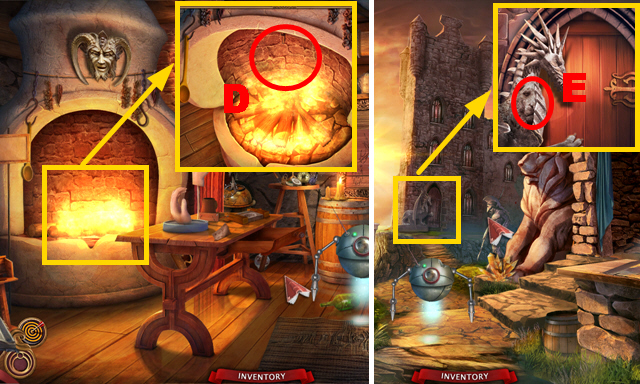
- Use the PERFUME and RED CLOTH (D); set the clock to 2:40 (E).
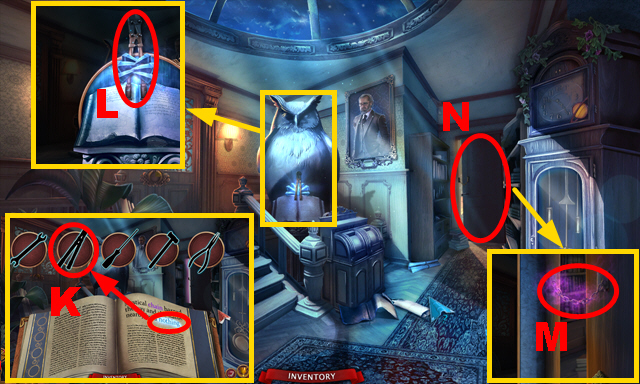
- Take the WOODEN OWL (F).
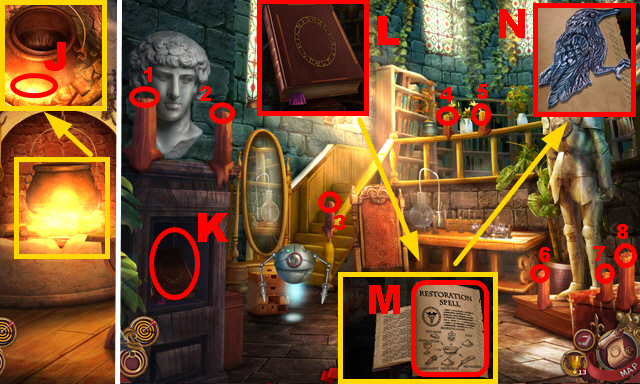
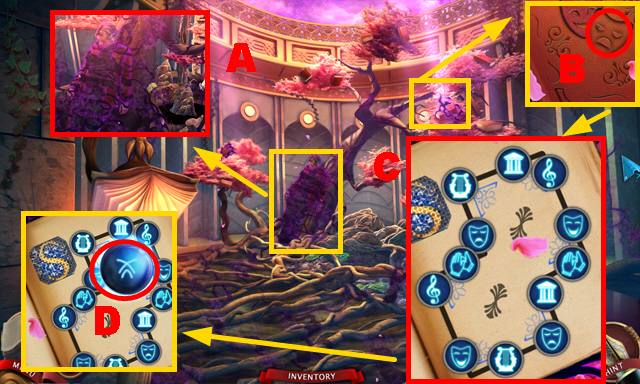
- Flip the WOODEN OWL; take MAZE PIECE 3/3 (G).

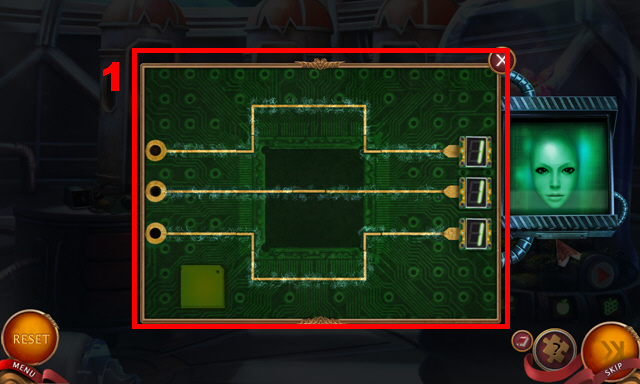
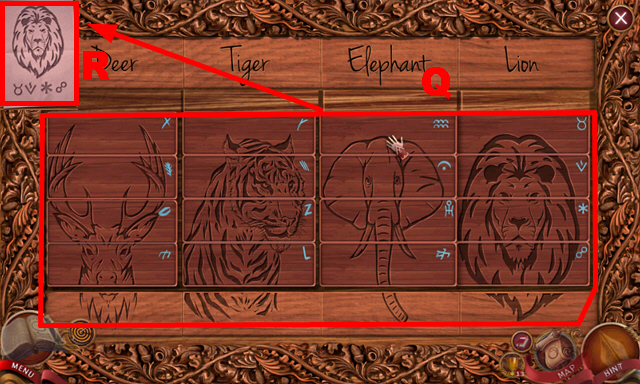
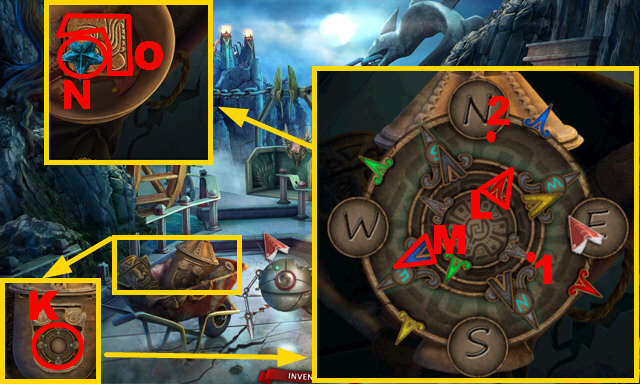
- Place 3 MAZE PIECES (H).
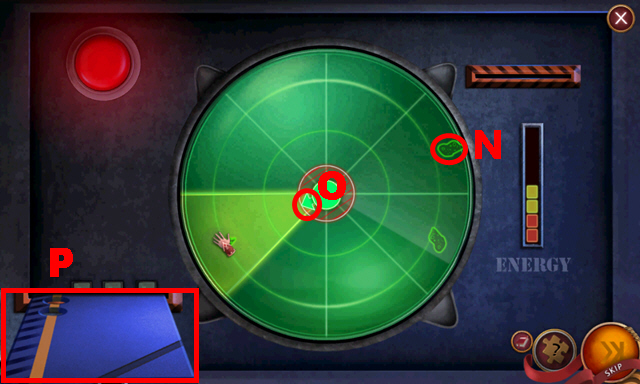
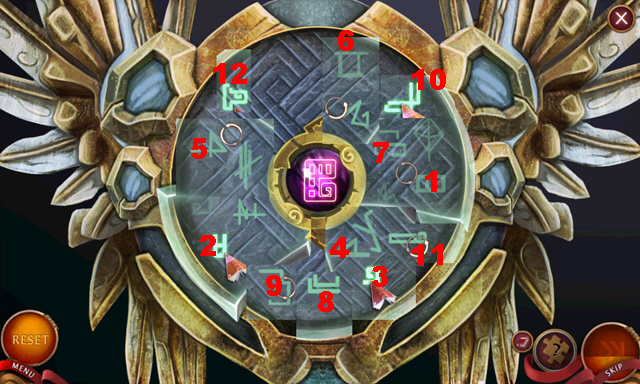
- Play the mini-game.
- Solution: (I-J)-(J-K).
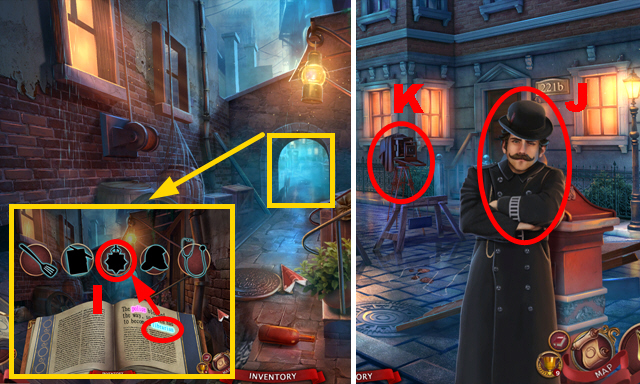
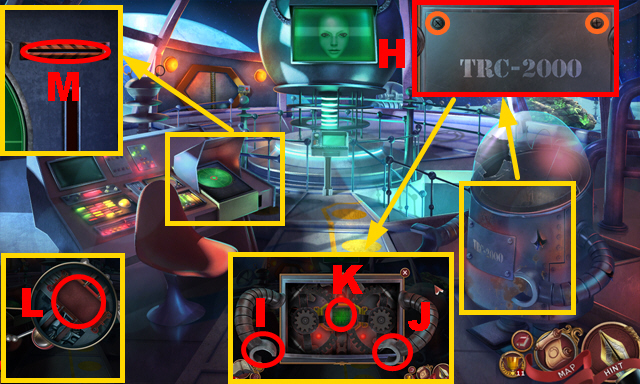
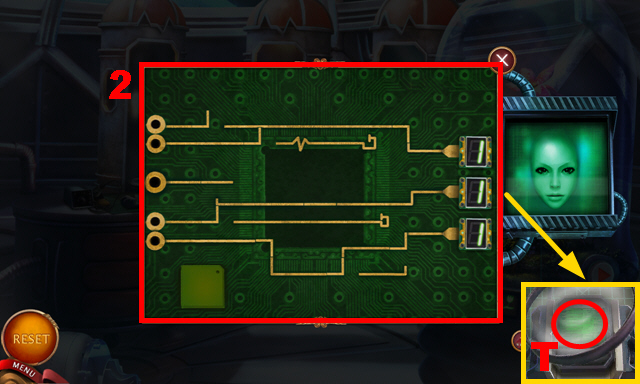
- Turn left.
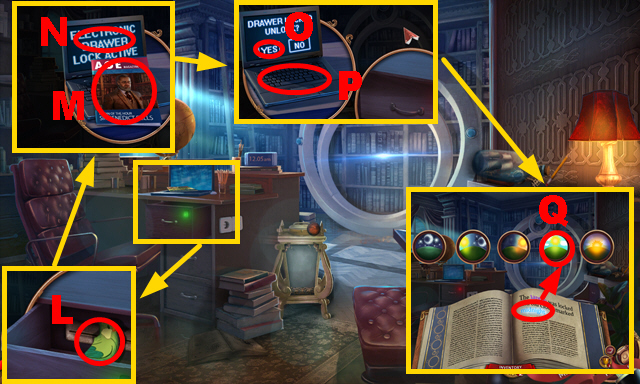
- Try to take the bird (L).
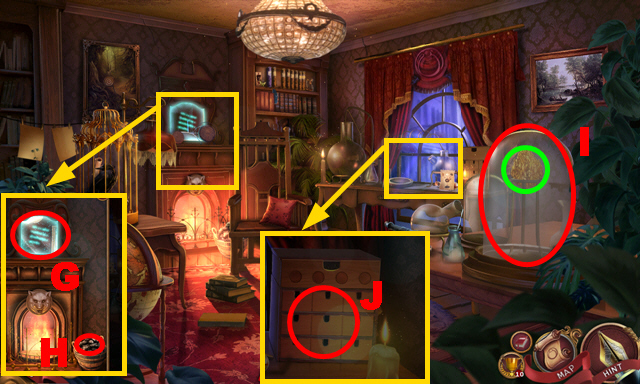
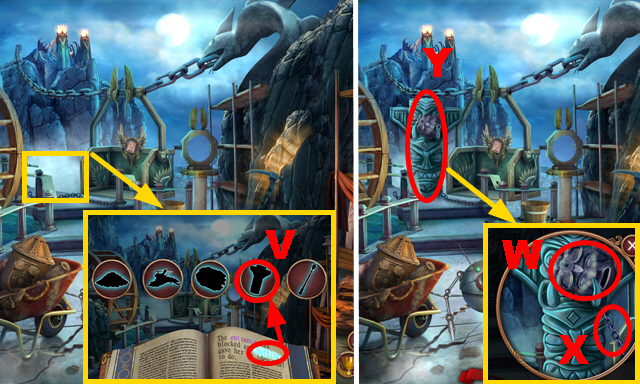
- Remove the magazine (M); activate the laptop (N).
- Enter yes (O); select the laptop (P).
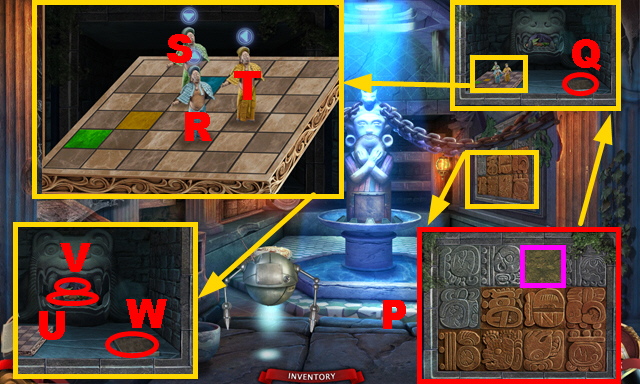
- Rewrite the story (Q).
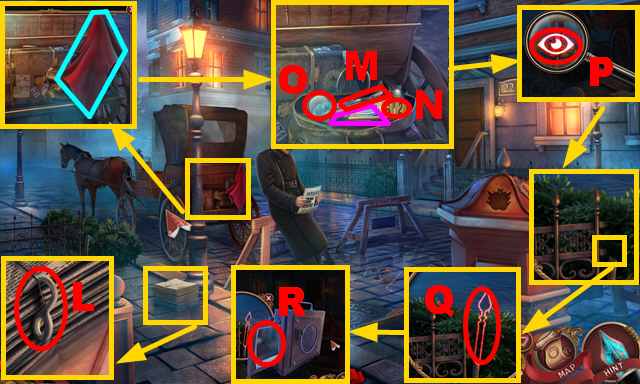
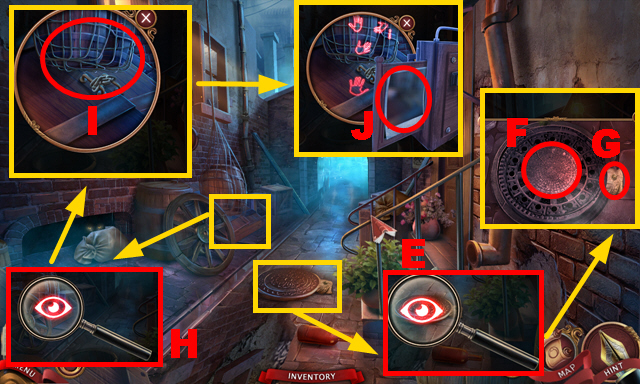
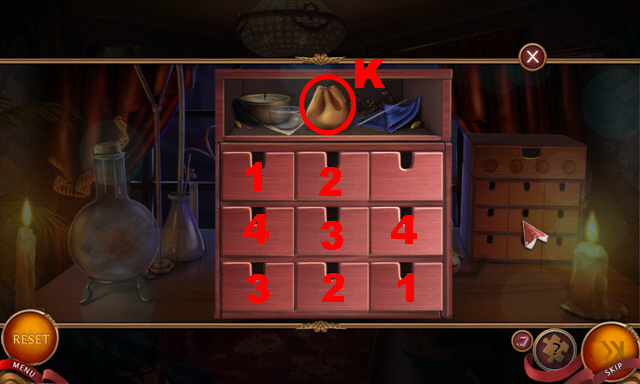
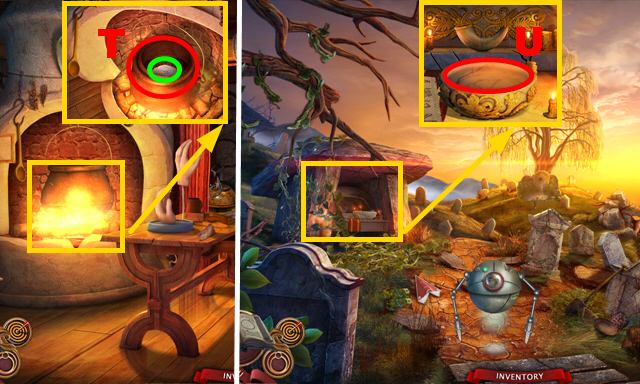
- Play the HOP (R) to unlock the drawer.
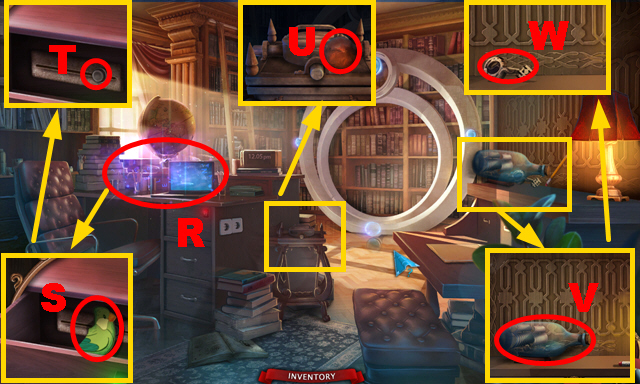
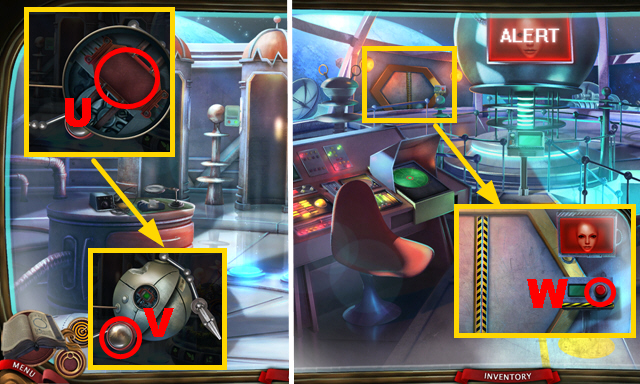
- Take VIRIDIAN BIRD PART 1/2 (S); move the slider (T).
- Take MINIATURE PLANET 5/5 (U).
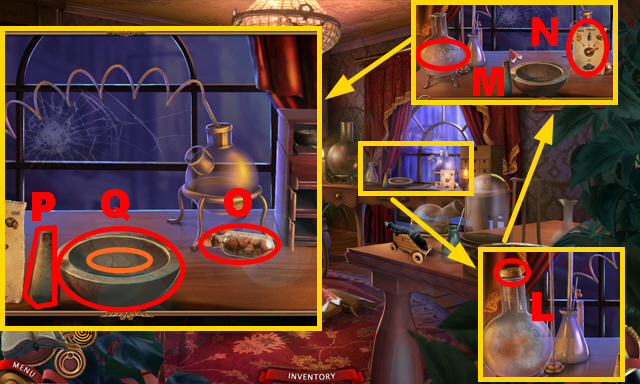
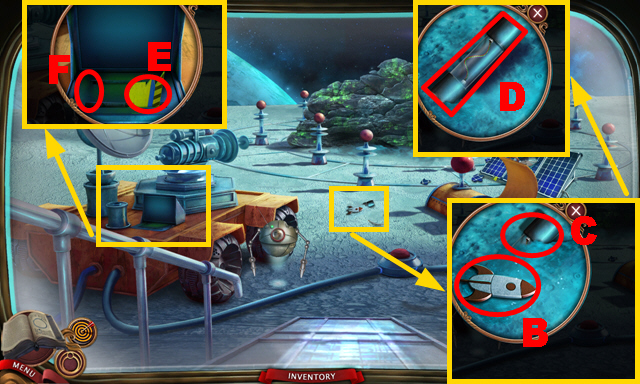
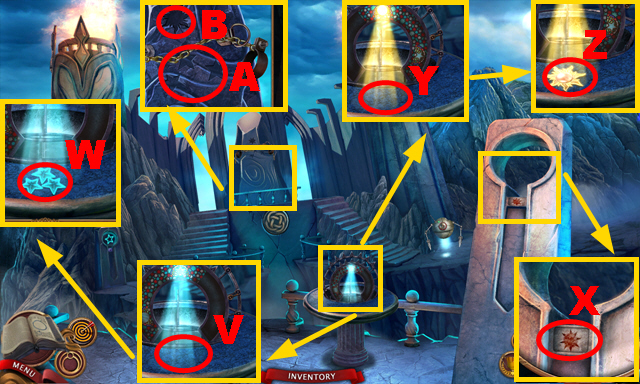
- Take the GLASS BOTTLE (V) and COMPLEX KEY (W).
- Take the CORK from the GLASS BOTTLE (X).
- Inspect the area (Y).
- Walk down, turn right.
- Insert the COMPLEX KEY (Z); turn it.
- Take the STURDY FIGURINE (A) and MYSTERIOUS BOX (B).
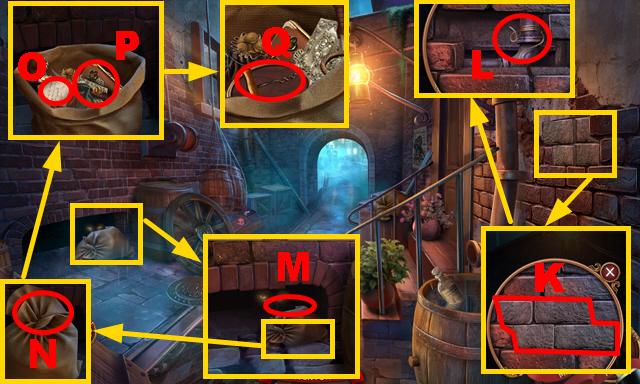
- Walk down, turn left.

- Place the STURDY FIGURINE (C).
- Move the slider (D).
- Open the compartment (E); take VIRIDIAN BIRD PART 2/2 (F).
- Place 5 MINIATURE PLANETS (G).
Tale 1: The Unlikely Gardener
- Place 2 VIRIDIAN BIRD PARTS (H).
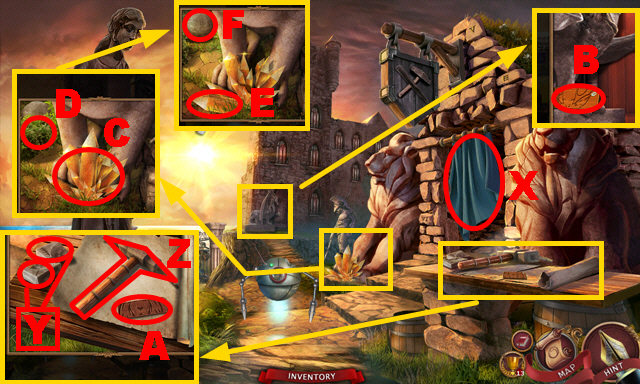
- Move forward.
- Rewrite the story (I).
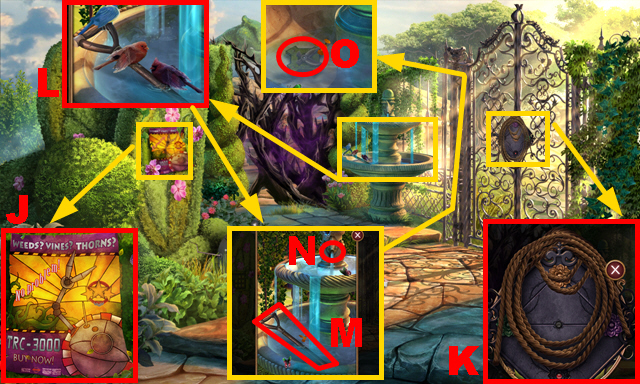
- Remove the poster (J).
- Take the ROPE (K).
- Chase away 3 birds (L).
- Take the SHOVEL HANDLE (M); place the CORK (N).
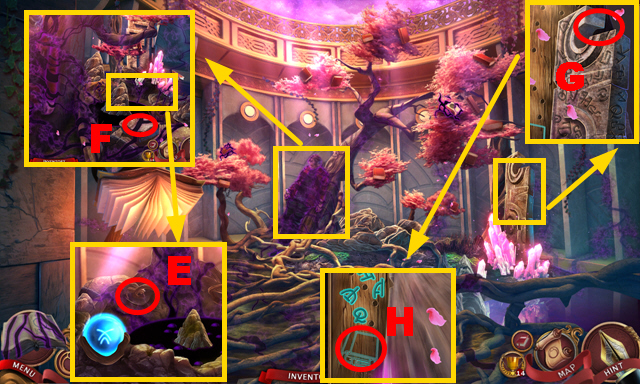
- Take the PRUNING MAQUETTE (O).

- Take the BROKEN OCULUS (P); remove the antennae (Q).
- Flip the robot (R).
- Open the cover (S); turn the switch (T).
- Fold the ROPE three times (U); take the LASSO.
- Place the PRUNING MAQUETTE (V).
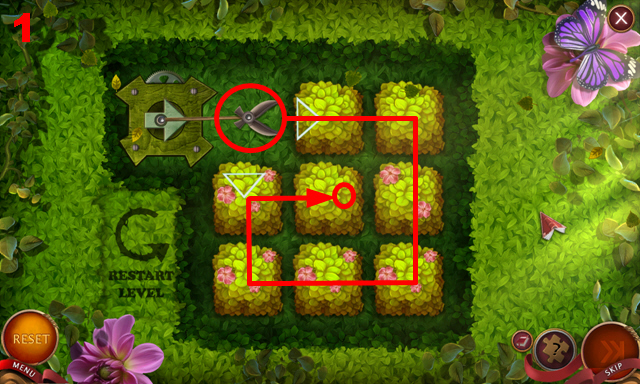
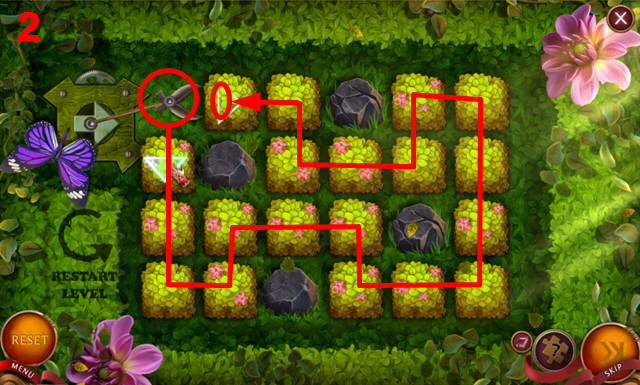
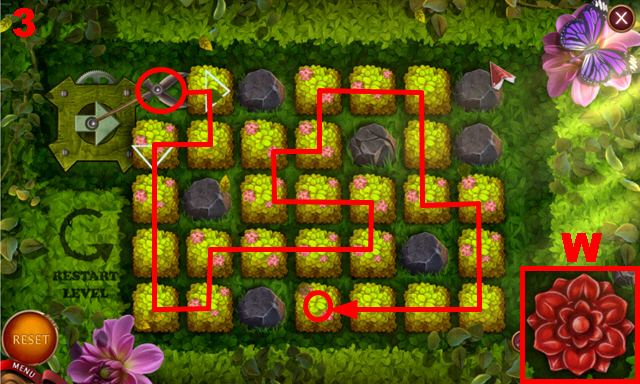
- Play the mini-game.
- Solution: 1-3.
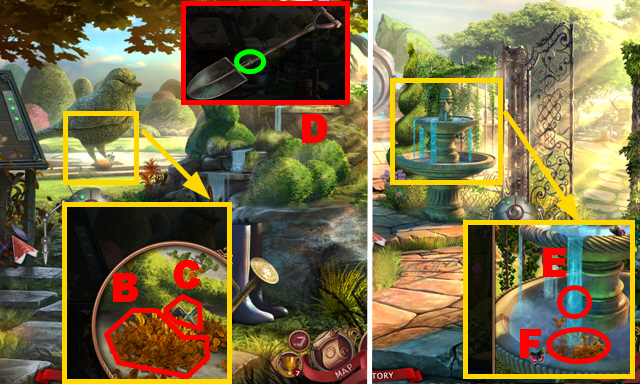
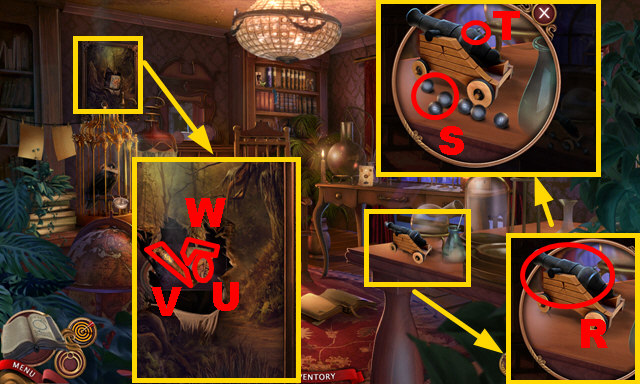
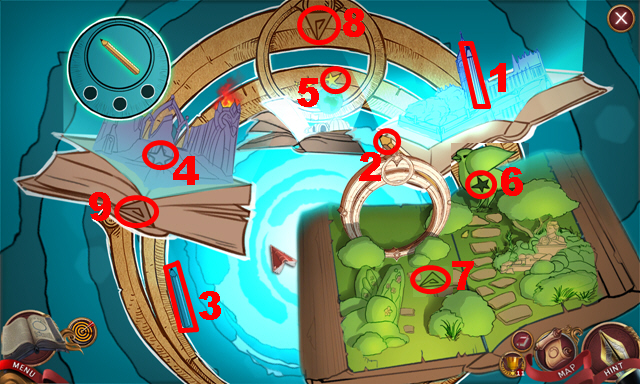
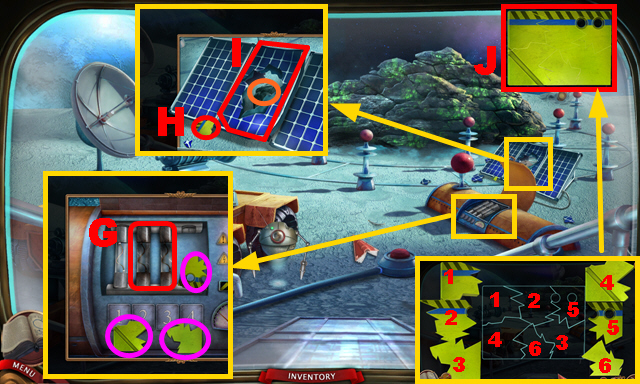
- Take the ROSE ORNAMENT (W).
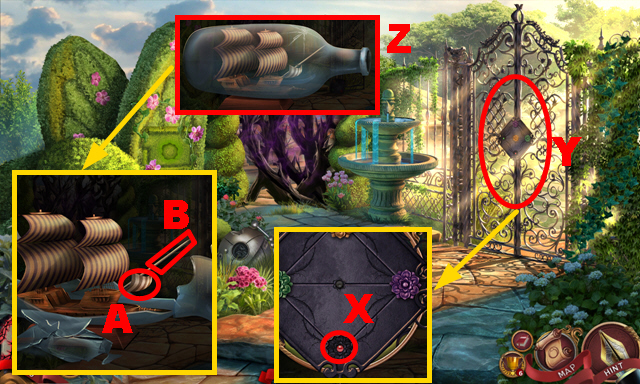
- Place the ROSE ORNAMENT (X); open the gate (Y).
- Use the SHOVEL HANDLE to hit the GLASS BOTTLE (Z).
- Remove the sail (A); take the SHORT METAL ROD (B).
- Turn right.
- Throw the LASSO (C).
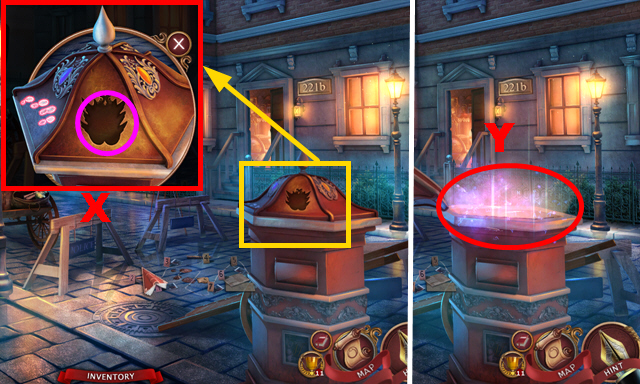
- Take the SUN DISC (D).
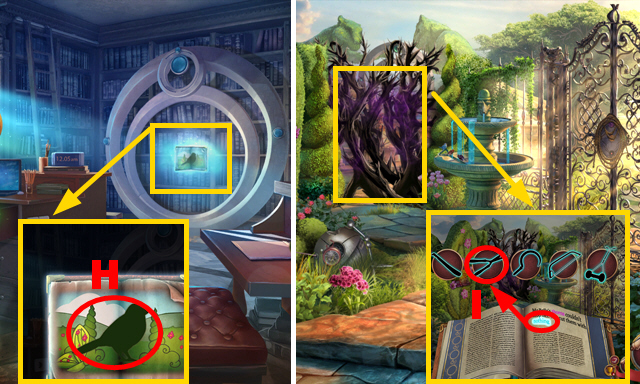
- Play the HOP (E) to acquire the ORNATE EYE.
- Walk down twice.
- Place the ORNATE EYE on the MYSTERIOUS BOX (F); open the box.
- Remove 2 items (G); take the GLASS LENS (H).
- Place the SUN DISC (I).
- Play the mini-game.
- Solution: (K-counterclockwise-x2)-(J-ccw-x2)-(K-ccw)-(J-cw)-(K-cw)-(J-cw).
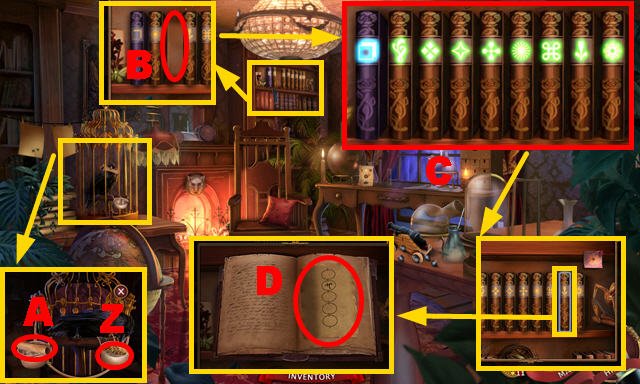
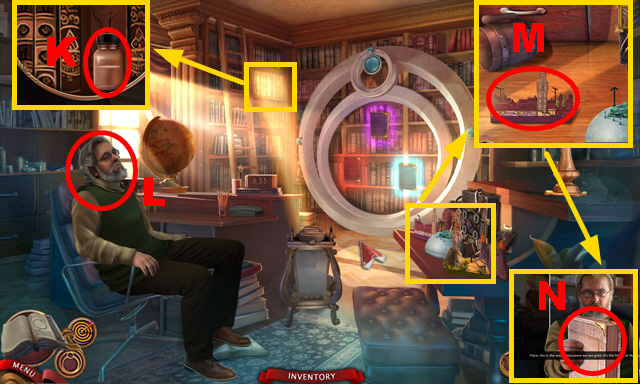
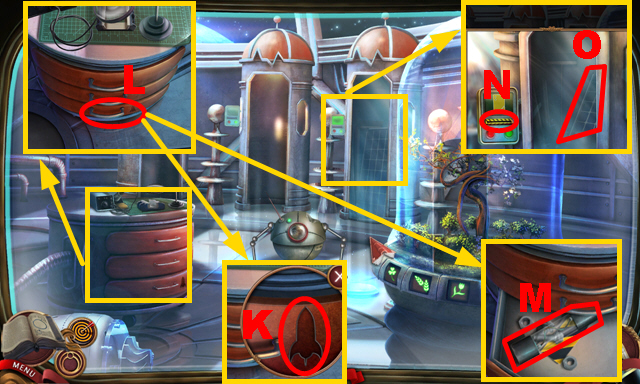
- Take the SPYGLASS (L) and ROBOTIC ARM (M).
- Open the compartment (N); remove the bulb (O).
- Rotate the lens from the BROKEN OCULUS twice (P); remove the lens.
- Place the GLASS LENS (Q); take the FIXED OCULUS.
- Move forward.
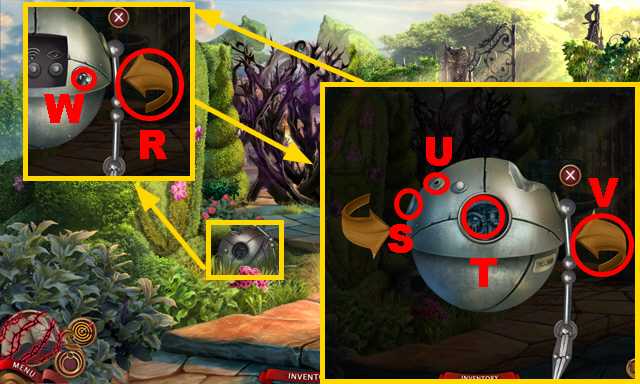
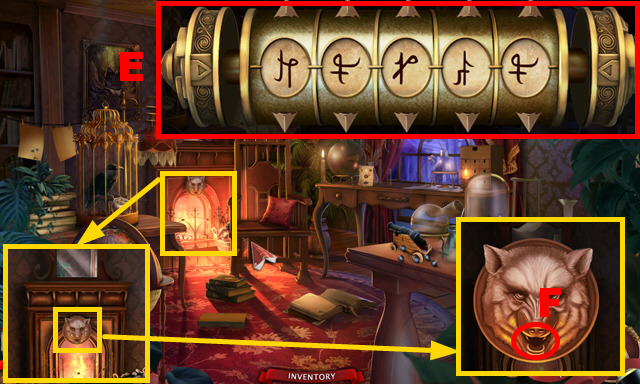
- Flip the robot (R); place the ROBOTIC ARM (S), FIXED OCULUS (T), and SHORT METAL ROD (U).
- Flip the robot (V); pull the switch (W).
- Move forward.
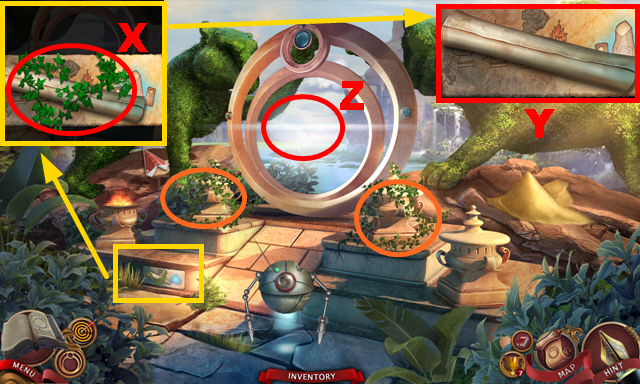
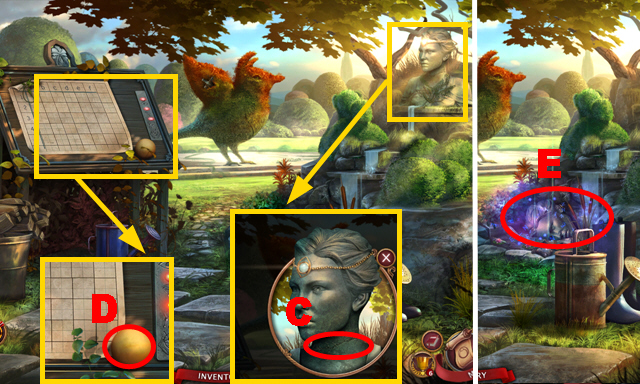
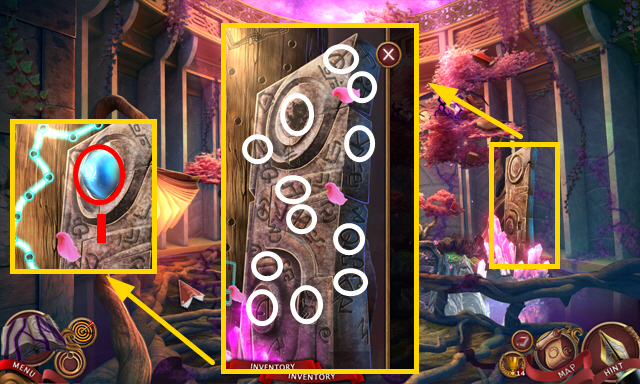
- Remove branches twice (X); take the SPARROW PRUNING PLAN (Y).
- Remove greenery twice (orange).
- Inspect the area (Z).
- Walk down, turn right.
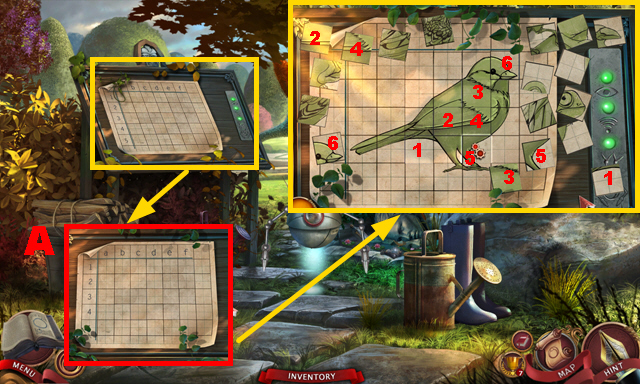
- Place the SPARROW PRUNING PLAN (A).
- Play the mini-game.
- Solution: 1-6.
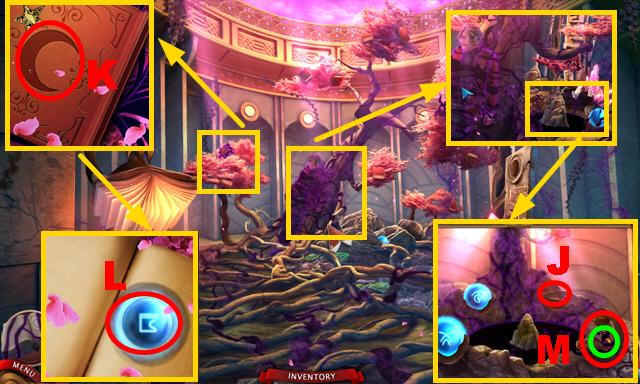
- Take the DRY LEAVES (B) and SHOVEL BLADE (C).
- Place the SHOVEL HANDLE on the SHOVEL BLADE (green); take the SHOVEL (D).
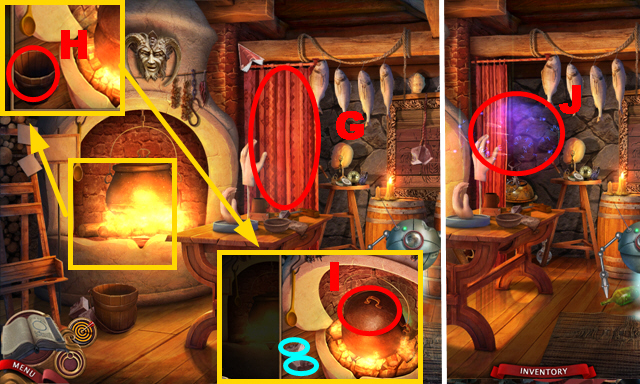
- Walk down.
- Place the DRY LEAVES (E); take the WET LEAVES (F).
- Move forward.
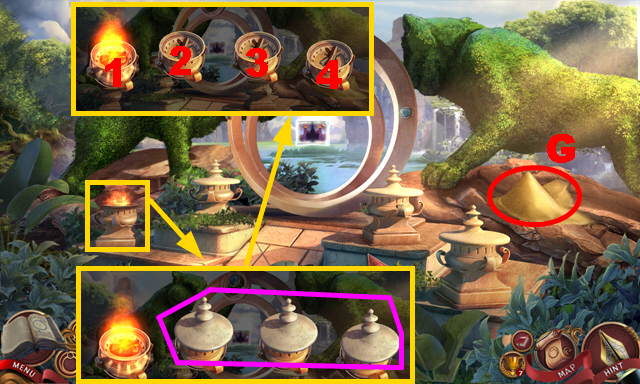
- Use the SHOVEL (G) to acquire the SAND.
- Open 3 covers (purple); use the MATCHES (2-4), SAND (1), and WET LEAVES (3).
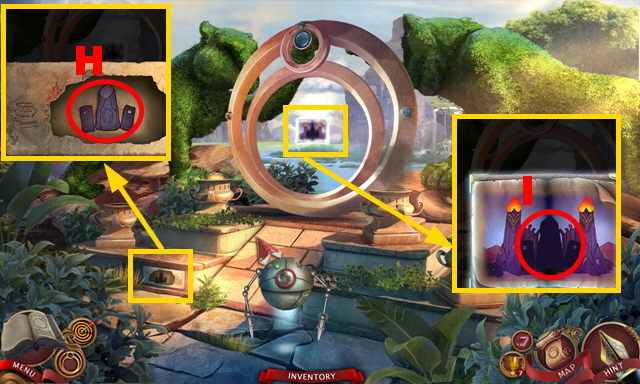
- Take the CERULEAN OBELISK (H).
- Place the CERULEAN OBELISK (I).
- Move forward.
Tale 2: The Cerulean Peak
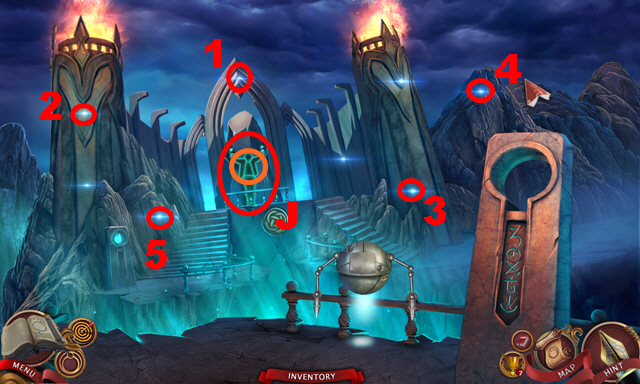
- Inspect the area (J).
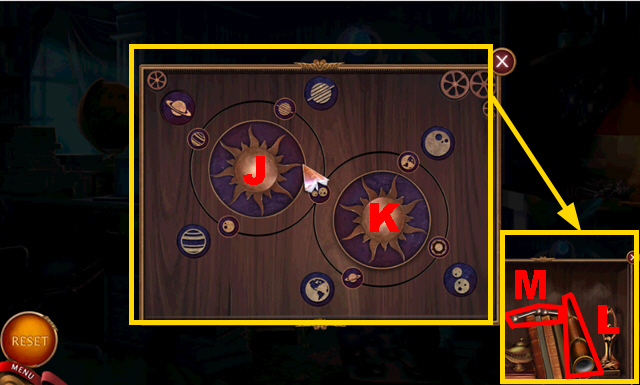
- Use the SPYGLASS and activate 1-5.
- Talk to Ian (orange).
- Select the button (K).
- Move the clothes (L).
- Take the BROKEN ROBOT (M).
- Move the signboard (N).
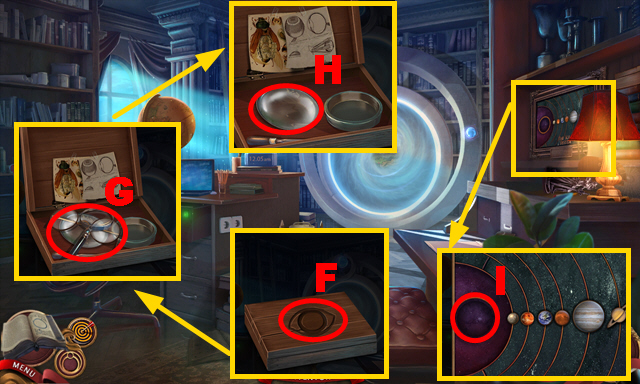
- Play the HOP (O) to acquire the UNWOUND TAPE.
- Take the PENCIL (P); open the player (Q).
- Place the PENCIL on the UNWOUND TAPE (R); turn it three times.
- Take the WOUND TAPE.
- Place the WOUND TAPE (S); close the player.
- Push the button (T).
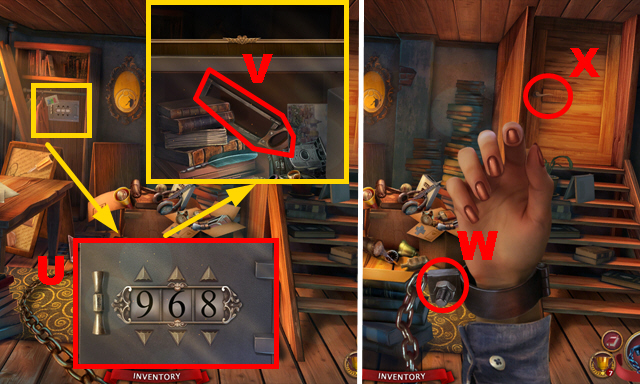
- Enter the code '968' (U); open the safe.
- Move aside 3 objects; take the HANDSAW (V).
- Use the HANDSAW (W).
- Open the door (X).
- Move forward, turn left, move forward.
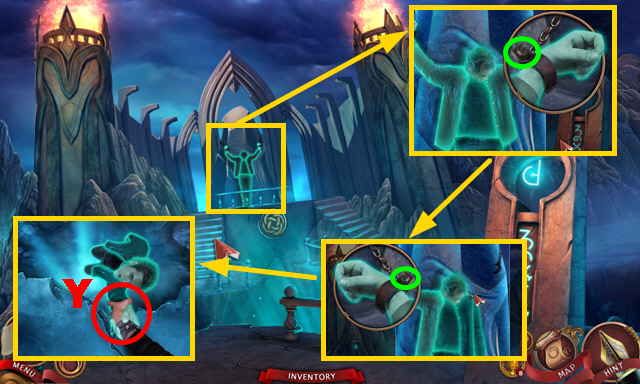
- Use the HANDSAW twice (green).
- Pull up Ian (Y).
Tale 3: Crime Most Foul
- Inspect any area; read the poster (Z).
- Take the BROKEN BROOM (A).
- Remove 6 objects (B).
- Remove the poster (C).
- Break the BROKEN BROOM (D) to acquire the STICK.
- Remove 5 wooden items (E); try to take the bag (F).
- Move forward.
- Take the POLICE LUNCHBOX (G) and newspaper (H).
- Rewrite the story (I); take the POLICE BADGE.
- Move forward.
- Use the POLICE BADGE (J).
- Take the CAMERA (K).
- Take the HOOK (L).
- Remove the cloth (blue).
- Open the bag; take the TWEEZERS (M), BRUSH AND POWDER (purple), WOODEN TAGS (N), and MAGNIFYING GLASS (O).
- Select the clue (P); use the CAMERA (Q).
- Take CLUE 1/7 (R).
- Open the POLICE LUNCHBOX: 1-5.
- Take the BUTTER KNIFE (S); move the bread (T).
- Take the FISH (U).
- Use the MAGNIFYING GLASS (V); use the BRUSH AND POWDER and CAMERA (W).
- Take CLUE 2/7 (X).
- Use the MAGNIFYING GLASS (Y).
- Move the newspapers (Z); use the TWEEZERS to collect CLUE 3/7 (A).
- Use the MAGNIFYING GLASS (B).
- Inspect the footprints and use the CAMERA (C); take CLUE 4/7 (D).
- Walk down.
- Use the MAGNIFYING GLASS (E).
- Move the cover (F); take CLUE 5/7 (G) and move the cover twice
- Use the MAGNIFYING GLASS (H).
- Use the BRUSH AND POWDER and CAMERA (I); take CLUE 6/7 (J).
- Use the BUTTER KNIFE four times (K); take the OLD WIRE (L).
- Give the FISH (M); open the sack (N).
- Take the note (O); move 4 objects (P).
- Take the BOTTLE OPENER (Q).
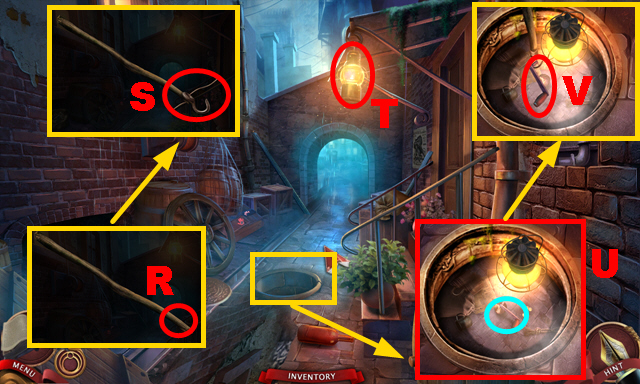
- Place the OLD WIRE and HOOK on the STICK (R); bend the wire 3 times (S) to acquire the IMPROVISED HOOK.
- Use the IMPROVISED HOOK to collect the LANTERN (T).
- Place the LANTERN (U); use the IMPROVISED HOOK (blue).
- Take the PULLEY HANDLE (V).
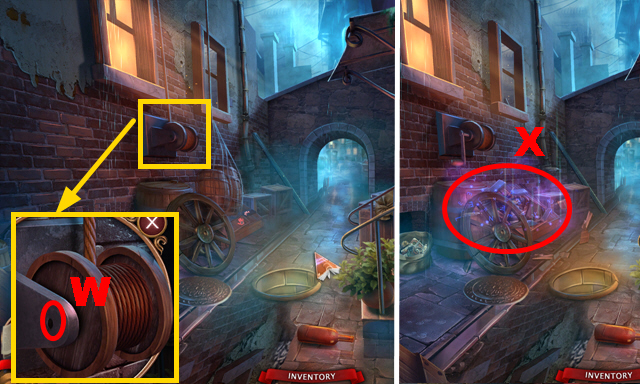
- Place the PULLEY HANDLE (W); pull it.
- Play the HOP (X) to collect CLUE 7/7.
- Move forward.
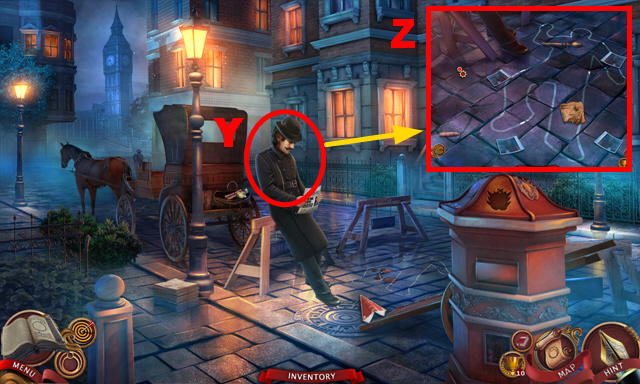
- Give 7 CLUES (Y).
- Place the WOODEN TAGS (Z).
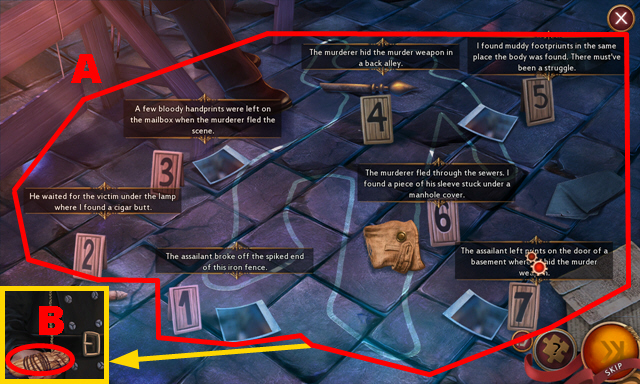
- Play the mini-game.
- Solution: Arrange the crime scene correctly (A).
- Take the MYSTERIOUS PACKAGE (B).
- Open the MYSTERIOUS PACKAGE twice (C); take the note (D) and DETECTIVE HOUSE KEY (E).
- Use the DETECTIVE HOUSE KEY (F).
- Move forward.
- Read the message (G); take the COAL (H).
- Remove the cover (I); take the SULPHUR (green).
- Inspect the shelf (J).
- Play the mini-game.
- Solution: Match pairs 1-4.
- Take the LEAD BALLS (K).
- Use the CORKSCREW (L).
- Take the code (M); move the recipe (N).
- Take the SALTPETER (O).
- Place the SULPHUR, SALTPETER, and COAL (orange); use the PESTLE (P).
- Take the GUNPOWDER (Q).
- Use the GUNPOWDER and LEAD BALLS (R); move a lead ball (S).
- Use the MATCHES (T).
- Take the MAILBOX ORNAMENT (U), DUSTY BOOK (V), and note (W).
- Walk down.
- Place the MAILBOX ORNAMENT (purple); open the mailbox (X).
- Play the HOP (Y) to acquire the BIRD FOOD.
- Move forward.
- Use the BIRD FOOD (Z); take the note (A).
- Place the DUSTY BOOK (B).
- Play the mini-game.
- Solution: (C).
- Turn three pages; take the note (D).
- Enter the correct code into the UNWRAPPED CRYPTEX (E) to acquire the ACTIVATED CRYPTEX.
- Place the ACTIVATED CRYPTEX (F).
- Move forward.
- Take the LIGHTBULB (G).
- Place the LIGHTBULB (H); close the compartment (I).
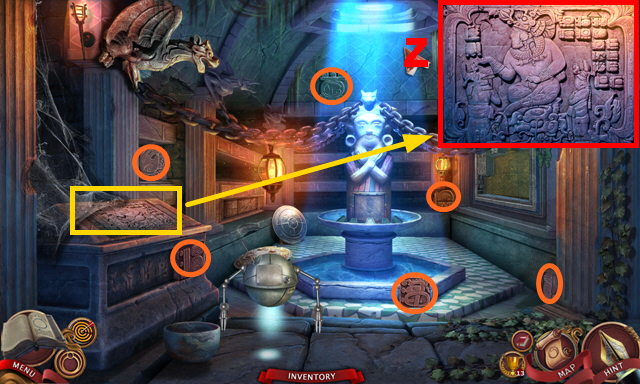
- Inspect the area (J).
- Play the mini-game.
- Collect symbols: 1-18.
- Take the SMELLING SALTS (K).
- Use the SMELLING SALTS (L).
- Place the MAGNIFYING GLASS (M); take the 'TRANQUILITY' NOVEL (N).
- Place the 'TRANQUILITY NOVEL' (O); open it.
- Move forward.
- Take the LASER HANDLE (P); push the button (blue).
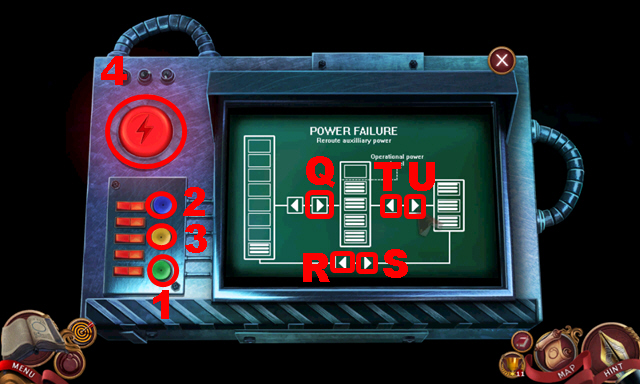
- Play the mini-game.
- Solution: S-T-S-Q-R-U-R-U-Q-U.
- Push buttons 1-4.
Tale 4: Tranquility
- Inspect the area (V).
- Examine the display (W).
- Take RESISTOR 1/3 (X).
- Remove the lens from the BROKEN ROBOT (Y).
- Talk to Haley (Z); take the CHAMBER BUTTON (A).
- Go downstairs.
- Place the CHAMBER BUTTON (purple); push buttons 1-5.
- Take the METEOR DEFENSE KEYCARD (B) and SCREWDRIVER (C).
- Take the WRENCH (D) and BROKEN KEYCARD 1/6 (E); close both drawers.
- Try to open the drawer (F).
- Use the SCREWDRIVER on the BROKEN ROBOT (G).
- Walk down.
- Use the WRENCH twice (orange); remove the cover (H).
- Move arm three times (I); move arm (J).
- Take the ROBOT CIRCUIT BOARD (K).
- Try to place the ROBOT CIRCUIT BOARD on the BROKEN ROBOT (L).
- Insert the METEOR DEFENSE KEYCARD (M).
- Play the mini-game.
- Solution: Shoot the asteroids (N) by rotating the arrow (O).
- Take the BLUE KEYCARD (P).
- Go downstairs.
- Insert the BLUE KEYCARD (Q).
- Play the HOP (R) to acquire the spacesuit.
- Place the ROBOT CIRCUIT BOARD (S).
- Play the mini-game.
- Solution: 1-2.
- Take the ROBOT CORE (T).
- Place the ROBOT CORE on the BROKEN ROBOT (U); move the lens (V).
- Walk down.
- Push the button twice (W).
- Move forward.
- Remove the piece (X); rewrite the story (Y).
- Use the DUCT TAPE (Z).
- Send the robot (A); open the compartment (green).
- Take the DRAWER KEY (B); remove sand twice (C).
- Take RESISTOR 2/3 (D) and BROKEN KEYCARD 2/6 (E).
- Place the LASER HANDLE (F); try to pull it.
- Take 3 BROKEN KEYCARDS (purple); remove 2 resistors (G).
- Take BROKEN KEYCARD 6/6 (H); remove the panel (I) and rock (orange).
- Repair the BROKEN KEYCARD: 1-6.
- Place the DUCT TAPE (J) to acquire the YELLOW KEYCARD.
- Walk down, go downstairs.
- Place the DRAWER KEY (K); open the drawer (L).
- Take RESISTOR 3/3 (M).
- Place the YELLOW KEYCARD (N); take the SOLAR PANEL (O).
- Go to the Moon Surface.
- Place 3 RESISTORS (P) and the SOLAR PANEL (Q).
- Try to push the button (R); apply the DUCT TAPE to it.
- Pull the handle (S).
- Play the HOP (T) to acquire the COMET HEART.
- Walk down twice.
- Place the COMET HEART (U); take the 'MASON'S DREAM' NOVEL (V).
- Place the 'MASON'S DREAM' NOVEL (W).
- Move forward.
Tale 4: The Mason's Dream
- Move the curtain (X).
- Take 2 MOLD PIECES (Y), the STONE PICK (Z), and WOODEN TABLET 1/3 (A).
- Take WOODEN TABLET 2/3 (B).
- Use the STONE PICK (C); remove bushes three times (D).
- Take the GYPSUM CRYSTAL (E) and HEAVY ROUND STONE (F).
- Turn right.
- Move the curtain (G).
- Take the WOODEN BUCKET (H) and 2 MOLD PIECES (blue); remove the lid (I).
- Play the HOP (J) to acquire the DRAWER HANDLE.
- Take 2 MOLD PIECES (1-2).
- Read the recipe (K); place the DRAWER HANDLE (L).
- Take MOLD PIECE 7/9 (M), WOODEN TABLET 3/3 (N), and the OLD FILE (O).
- Take 2 MOLD PIECES (green); place 3 WOODEN TABLETS (P).
- Play the mini-game.
- Solution: (Q).
- This puzzle is randomized.
- Take the HEAD INSTRUCTIONS (R).

- Place the HEAD INSTRUCTIONS on 9 MOLD PIECES (S).
- Collect 4 parts (purple); take the HEAD MOLD (T).
- Place the GYPSUM CRYSTAL (U) and HEAD MOLD (V).
- Use the HEAVY ROUND STONE (W); take the POWDER FOR PLASTER (X).
- Place the POWDER FOR PLASTER (Y); use the ladle (Z).
- Take the LIQUID PLASTER (A).
- Use the LIQUID PLASTER (B); take the LION HEAD HALF (C).
- Place the IRON CAULDRON (D).
- Walk down.
- Place the LION HEAD HALF (E).
- Move forward.
- Inspect the area (F); rewrite the story (G).
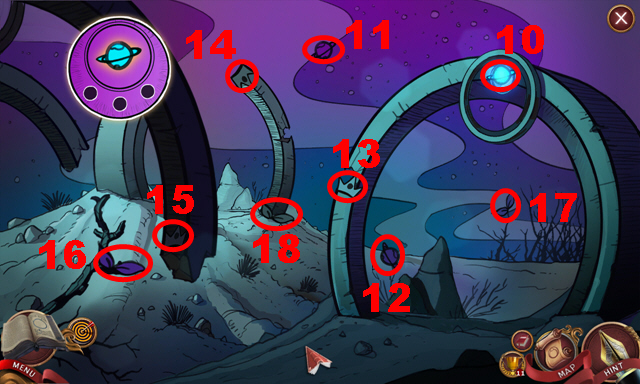
- Take the DULL SICKLE (H), 2 MORNING GLORIES (orange), and LIGHTING STICK (I).
- Walk down, turn right.
- Hold the LIGHTING STICK (J) to acquire the LIGHTED STICK.
- Walk down, move forward.
- Use the LIGHTED STICK 1-8.
- Take the WIZARD'S SPELL BOOK (K).
- Open the WIZARD'S SPELL BOOK (L); turn two pages.
- Take the RESTORATION SPELL RECIPE (M) and BLUE RAVEN MINIATURE (N).
- Walk down.
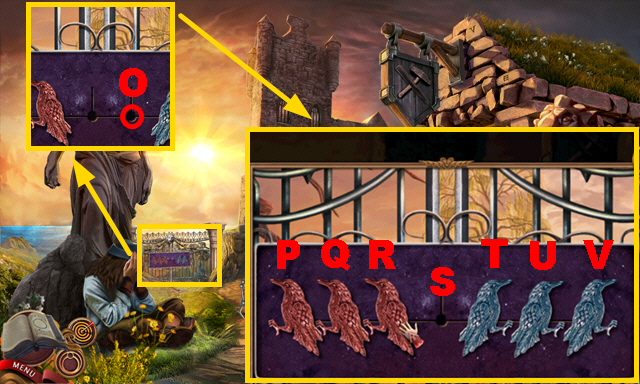
- Place the BLUE RAVEN MINIATURE (O).
- Play the mini-game.
- Solution: R-T-U-S-Q-P-R-T-V-U-S-Q-R-T-S.
- Enter the Clifftop Cemetery.
- Send the robot 1-2.
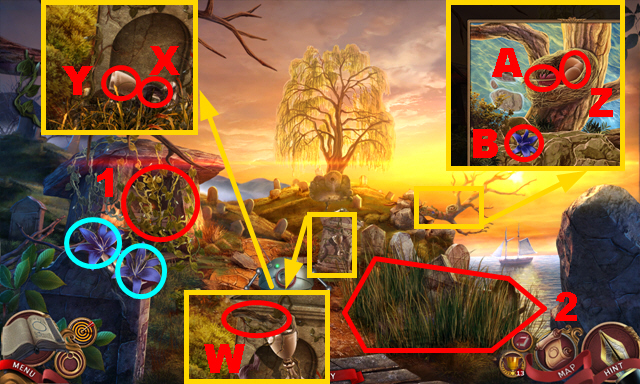
- Take 2 MORNING GLORIES (blue).
- Send the robot (W); take the PIECE OF GRAVEROOT (X) and ORNATE GOBLET (Y).
- Move 3 eggs (Z); take the BIRD FEATHER (A) and MORNING GLORY 5/7 (B).
- Take the BROKEN SWORD (C) and MORNING GLORY 6/7 (D); hold the ORNATE GOBLET (E) to acquire the GOBLET OF SPRING WATER.
- Go to the Keep Library.
- Place the BROKEN SWORD (F).
- Take the SILVER ORNAMENT (G).
- Take the LEATHER STRAP from the SILVER ORNAMENT (H); apply the OLD FILE to it (I).
- Take the SILVER DUST (J).
- Go to the Clifftop Cemetery.
- Apply the LEATHER STRAP to the DULL SICKLE and select it 2 times (K); sharpen it with the OLD FILE (L) and take the DRUID SICKLE.
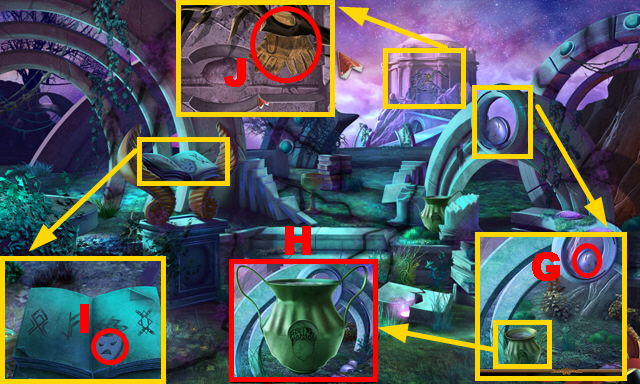
- Use the DRUID SICKLE (M) to play the HOP; you receive the RED MOSS.
- Take the VINES (N) and MORNING GLORY 7/7 (O); place the RESTORATION SPELL RECIPE (P).
- Place the VINES on the WOODEN BUCKET (Q); tie it twice to acquire the BUCKET AND ROPE.
- Place the BUCKET AND ROPE (R); pull it up three times.
- Take the SEA WATER (S).
- Walk down, turn right.
- Use the SEA WATER (T); take the SALT (green).
- Go to the Clifftop Cemetery.
- Place the BIRD FEATHER, SILVER DUST, PIECE OF GRAVEROOT, GOBLET OF SPRING WATER, RED MOSS, 7 MORNING GLORIES, and SALT (U).
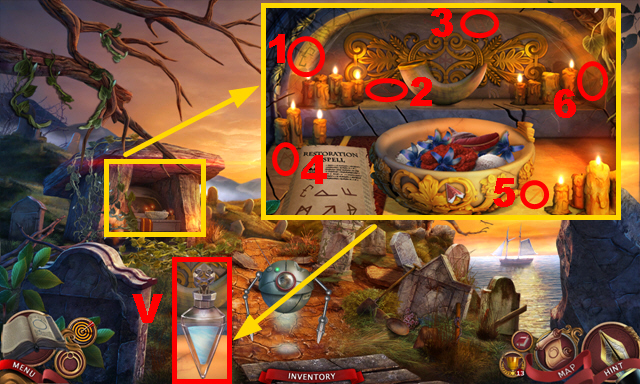
- Activate symbols 1-6.
- Take the RESTORATION POTION (V).
- Walk down.
- Use the RESTORATION POTION (W); take the STONE HEART (X).
- Walk down.
- Place the STONE HEART (Y).
- Take the 'CERULEAN PEAK' NOVEL (Z).
- Place the 'CERULEAN PEAK' NOVEL (A).
- Move forward.
Tale 5: Cerulean Peak Part 2
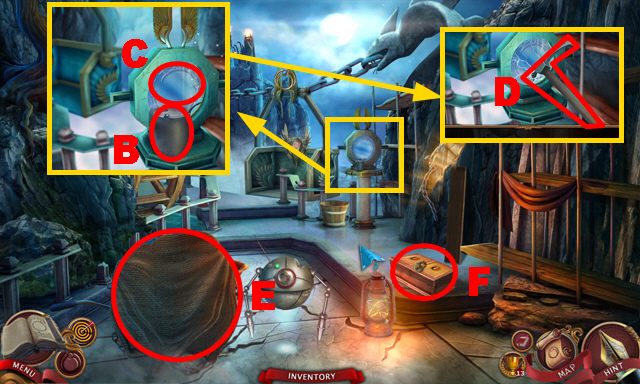
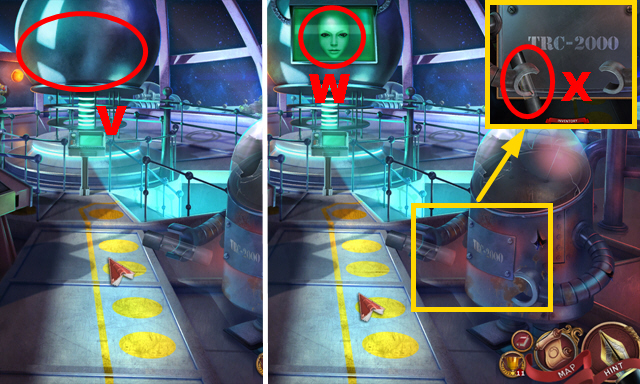
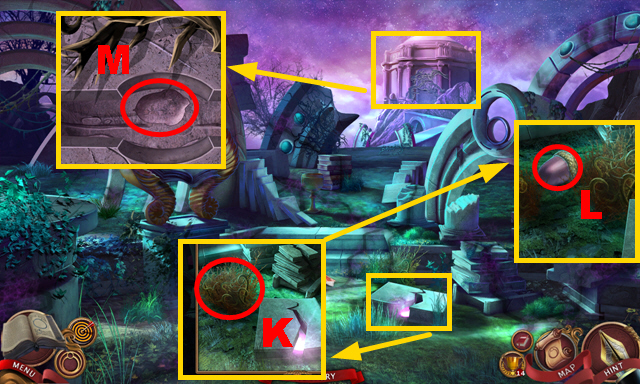
- Take the OIL CAN (B); look through the lens (C).
- Grab the PICKAXE twice (D).
- Send the robot (E).
- Take the TOOLBOX (F).
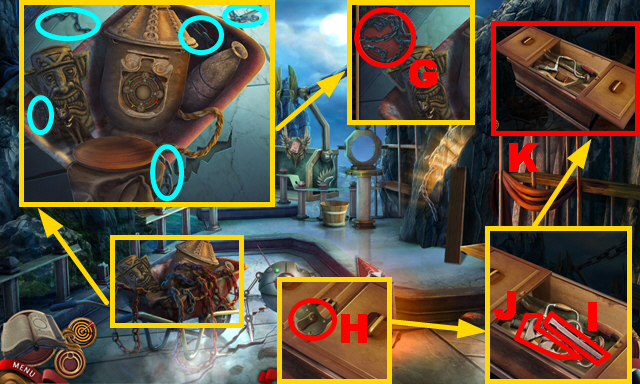
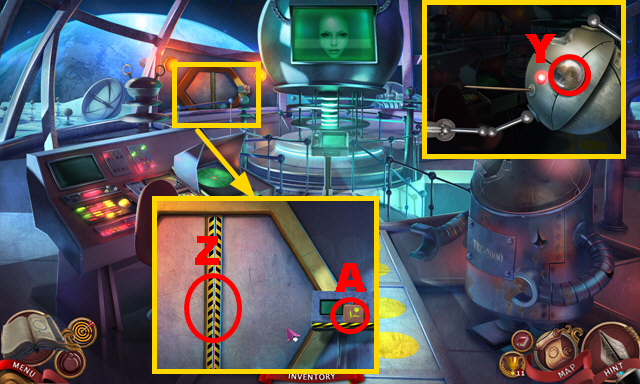
- Collect five pieces (blue); take CHAIN PIECE 5/6 (G).
- Apply the OLD FILE to the TOOLBOX (H); remove the padlock.
- Open the TOOLBOX; take the STEEL NAIL (I), STURDY BUCKLES (J), and HEAVY TOOLBOX (K).
- Move the note (L); grab the SIGHTSTONE twice (M).
- Take CHAIN PIECE 6/6 (N) and the STURDY PLANK (O); use the PICKAXE (P).
- Pull the pickaxe; take the PICK HEAD (Q).
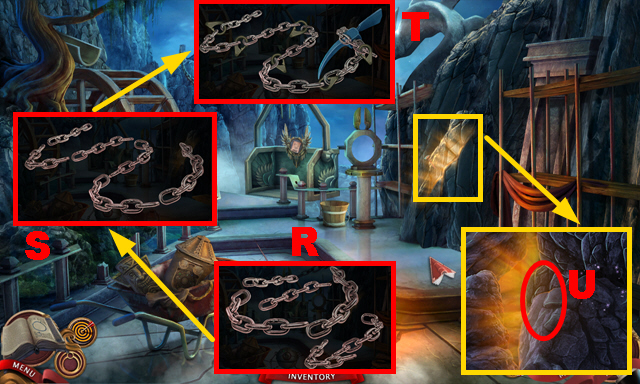
- Assemble 6 CHAIN PIECES (R); place the STURDY BUCKLES and PICK HEAD on it (S).
- Take the HOOK AND CHAIN (T).
- Place the HOOK AND CHAIN (U).
- Rewrite the story (V).
- Take CEREMONIAL MASK 1/5 (W); move the chain (X).
- Place the STURDY PLANK (Y); push it.
- Turn right.
- Collect six pieces (orange).
- Use the SIGHTSTONE (Z) to play the HOP.
- Take the FLINT BLADE (A).
- Play the mini-game.
- Solution: Bx2-Cx2-Dx2.
- Take the CACHE ORNAMENT (E) and CEREMONIAL MASK 2/5 (F).
- Place the STEEL NAIL on the FLINT BLADE (G); take the FLINT AND STEEL.
- Move the shield (H); collect the piece (I).
- Use the OIL CAN and FLINT AND STEEL (J).
- Walk down.
- Place the CACHE ORNAMENT (K).
- Play the mini-game.
- Solution: (L-clockwise-1)-(M-clockwise-2)-(L-clockwise-1).
- Take STARSTONE 1/3 (N) and the GLYPH STONE (O).
- Turn right.
- Place the GLYPH STONE (purple); open the compartment (P).
- Push the button (Q).
- Play the mini-game.
- Solution: R-S-T-Rx2-Tx2-S.
- Take CEREMONIAL MASK 3/5 (U) and BLUE FIGURINE (V); place the HEAVY TOOLBOX (W).
- Place the BLUE FIGURINE (X).
- Play the mini-game.
- Solution: Yx4-Zx2.
- Take CEREMONIAL MASK 4/5 (A) and the LARGE GEM (B).
- Place the LARGE GEM (C); take the YELLOW FIGURINE (D).
- Place the YELLOW FIGURINE (E).
- Play the mini-game.
- Solution: Fx2-G-Hx2-Fx2-G-H-G-Fx3.
- Take CEREMONIAL MASK 5/5 (I).

- Place 5 CEREMONIAL MASKS (J).
- Play the mini-game.
- Solution: K-N-M-L-M-L-K-N.
- Take the MYSTICAL LENS (O).
- Walk down.

- Place the MYSTICAL LENS (P); look through it.
- Search for the clue (Q).
- Place the SIGHTSTONE (R).
- Inspect the area (S).
- Play the mini-game.
- Solution: 1-12.
- Move forward.

- Take the SUNSTONE (T) and 2 STARSTONES (green).
- Push the button (U).
- Place 3 STARSTONES (V); take the STARLIT STARSTONE (W).
- Push the button (X).
- Place the SUNSTONE (Y); take the SUNLIT SUNSTONE (Z).
- Place the STARLIT STARSTONE (A) and SUNLIT SUNSTONE (B).
- Take the CENTERPIECE CHAIN (C).
- Place the CENTERPIECE CHAIN (D) to play the HOP.
- Take the FORBIDDEN BOOK (E).
- Place the FORBIDDEN BOOK (F).
- Move forward.
Epilogue
- Remove the lens (G); take the WATER JUG (H).
- Take the TRAGEDY TOKEN (I) and OLD LEATHER GLOVES (J).
- Use the OLD LEATHER GLOVES (K); take the STRANGE ACORN (L).
- Use the STRANGE ACORN and WATER JUG (M).
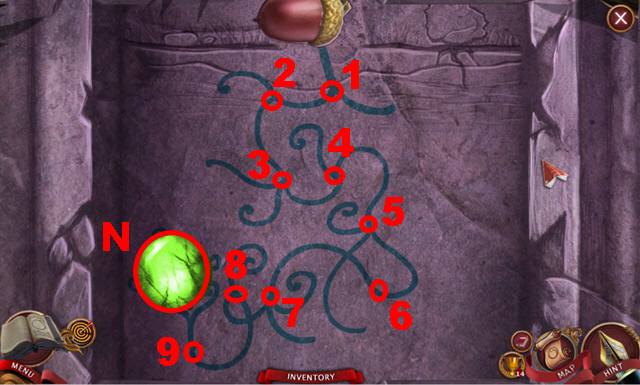
- Play the mini-game.
- Solution: 1-9.
- Take the PORTAL STONE (N).
- Place the PORTAL STONE (O); take the GARDEN SHEARS (P).
- Use the GARDEN SHEARS (Q); take the PURPLE PORTAL STONE (orange).
- Remove the portal stone (R); place the PURPLE PORTAL STONE (blue).
- Move 4 scrolls (S); take the GLYPH SCROLL (T).
- Place the GLYPH SCROLL (U).
- Use the GARDEN SHEARS (V).
- Play the mini-game.
- Solution: 1-13.
- Take the REDSTONE FEATHER (W).
- Use the REDSTONE FEATHER (X).
- Play the HOP (Y) to acquire the STONE KEY.
- Place the STONE KEY (Z).
- Move forward.
- Examine the tree; rewrite the story (A).
- Place the TRAGEDY TOKEN (B).
- Play the mini-game.
- Solution: Match six pairs (C).
- Take the ORB OF TEMPERANCE (D).
- Place the ORB OF TEMPERANCE (E); take the SEALSTONE PART (F).
- Place the SEALSTONE PART (G); select the book (H).
- Select 12 symbols (white).
- Take the ORB OF CONVICTION (I).
- Place the ORB OF CONVICTION (J); take the BRASS MOON (green).
- Place the BRASS MOON (K); take the ORB OF VALOR (L).
- Place the ORB OF VALOR (M).
- Congratulations, you have completed Nevertales: Hidden Doorway.
Created at: 2016-10-23