

Walkthrough Menu
- General Tips
- Chapter 1: Save the King
- Chapter 2: The Wind Palace
- Chapter 3: The Eternal Forest
- Chapter 4: The Underwater City
- Chapter 5: The Crystal Castle
- Chapter 6: The Afterlife
General Tips
- This is the official guide for Nevertales: Legends.
- This guide will not mention each time you have to zoom into a location; the screenshots will show each zoom scene.
- Hidden-object puzzles are referred to as HOPs. This guide will not show HOP solutions. It will identify the location of the HOP and the inventory item acquired.
- This guide will show solutions for non-random puzzles. Please read the in-game instructions for each puzzle.
Chapter 1: Save the King
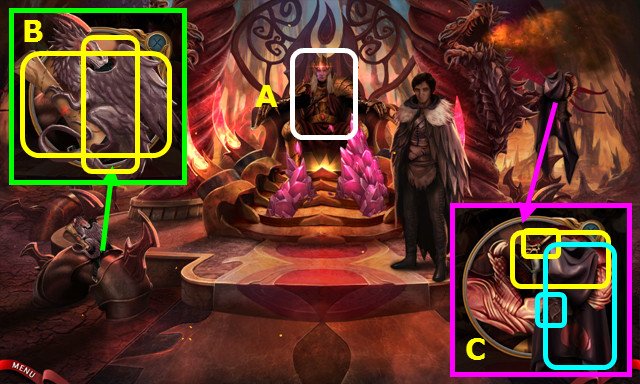
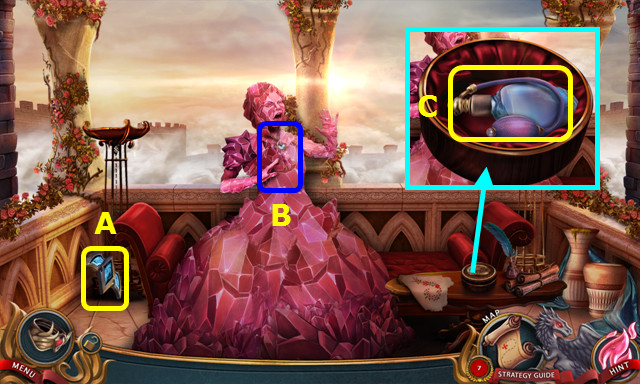
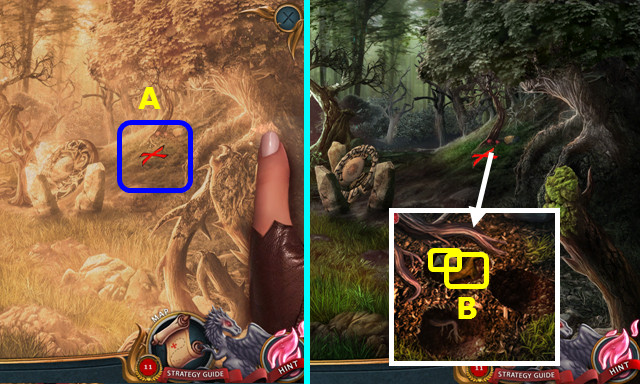
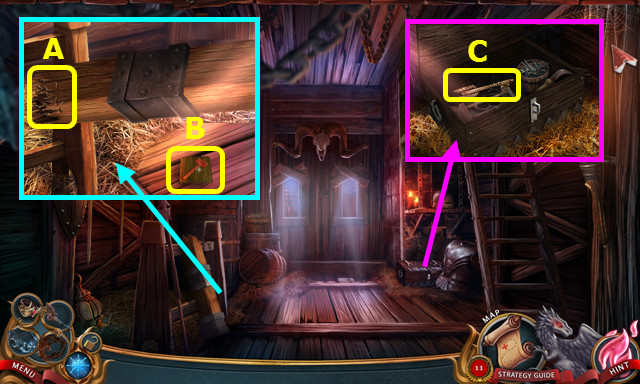
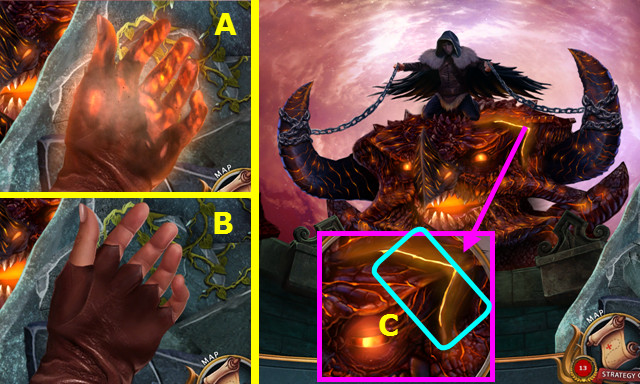
- Talk to Ashbringer (A).
- Take the MAP and INVENTORY BAG (B). Both now appear in the menu bar.
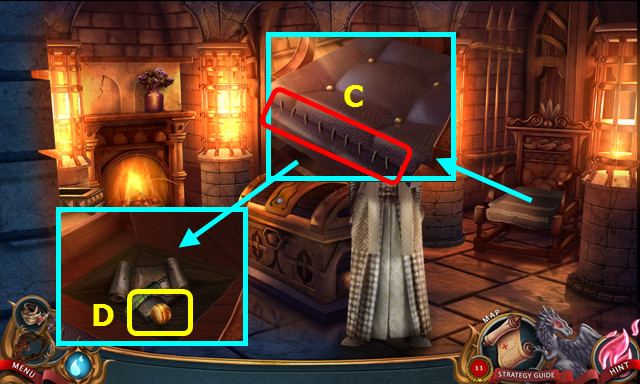
- Take the cloak, gloves, ROYAL KEY, and ROYAL CHEST (C).
- Combine the ROYAL CHEST and ROYAL KEY; take the LETTER OPENER (inventory).
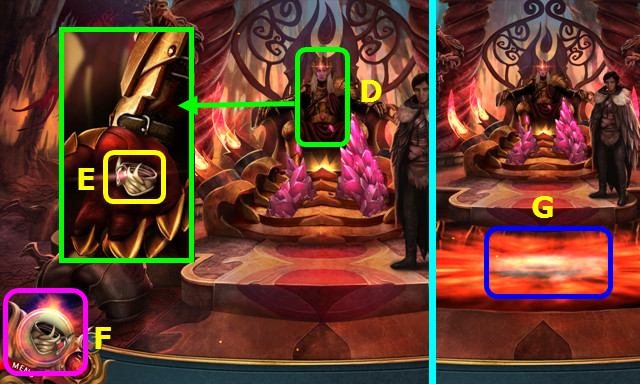
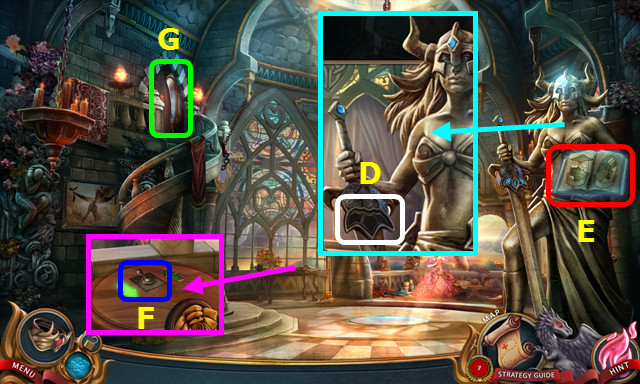
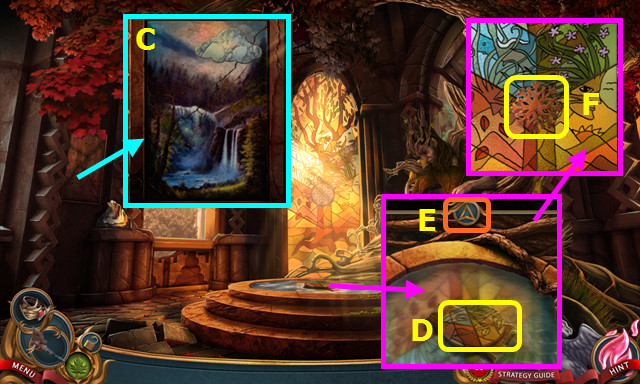
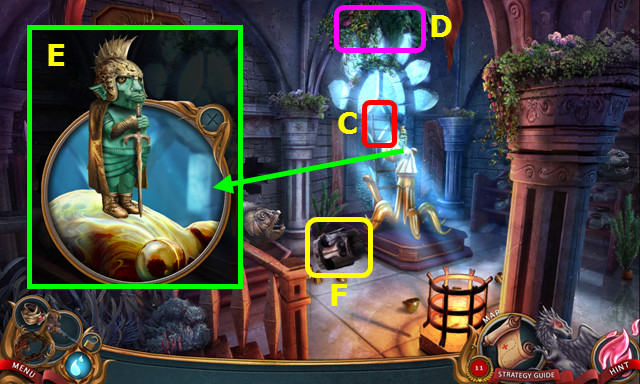
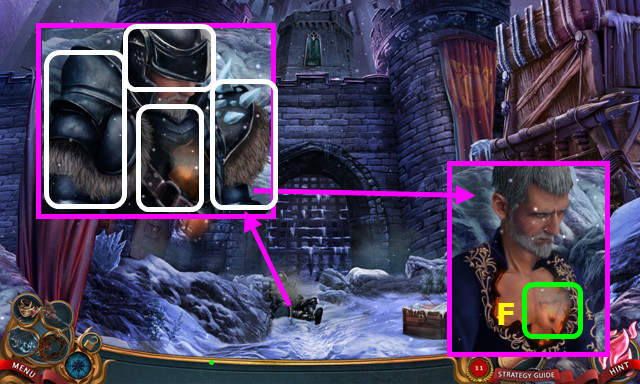
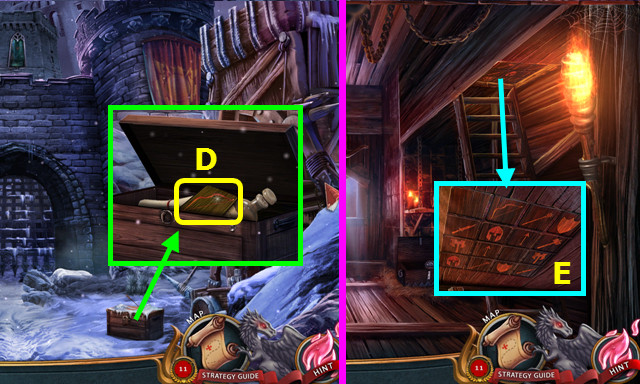
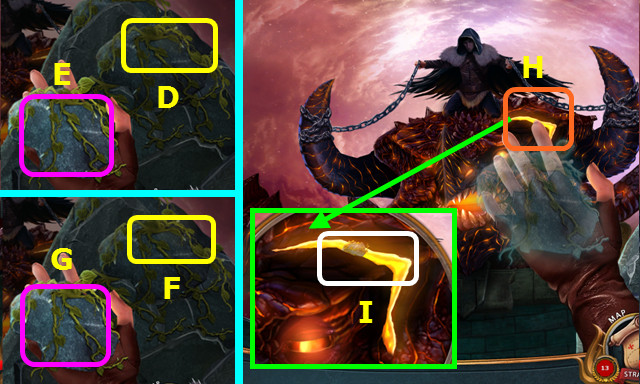
- Talk to Ashbringer (D); take the RING OF FIRE (E).
- The RING OF FIRE in now in the menu bar (F).
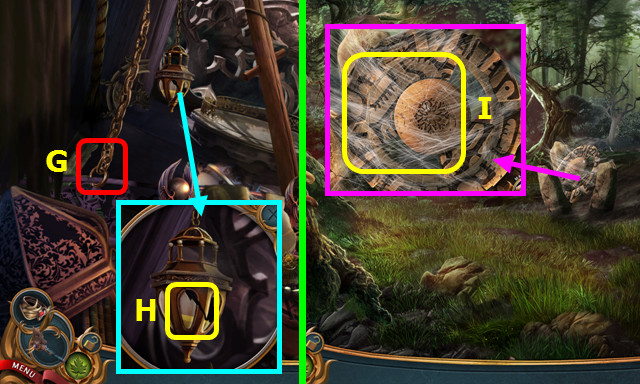
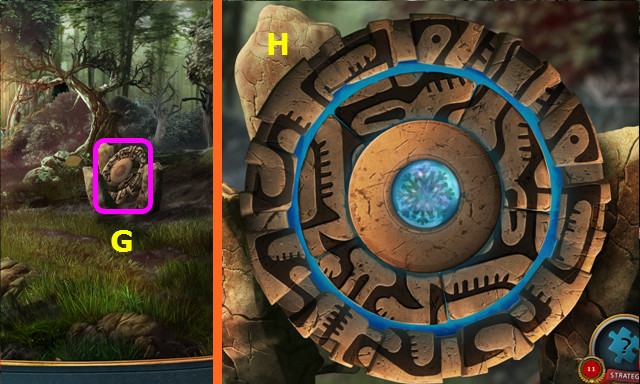
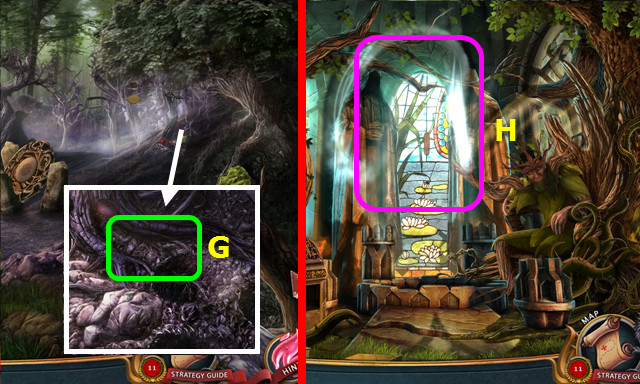
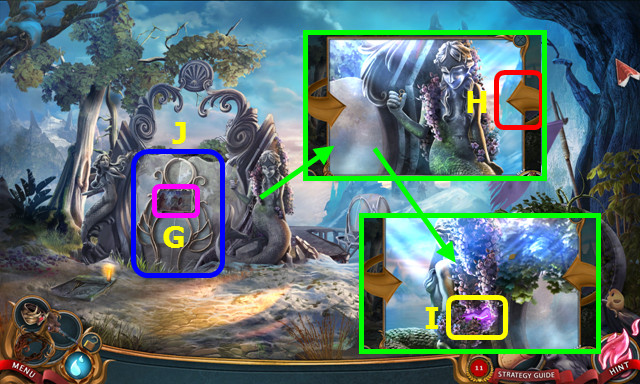
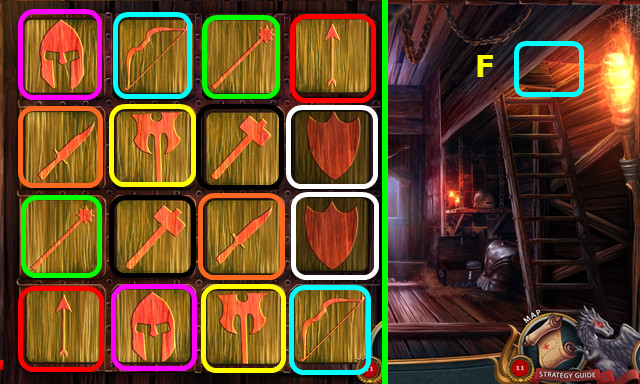
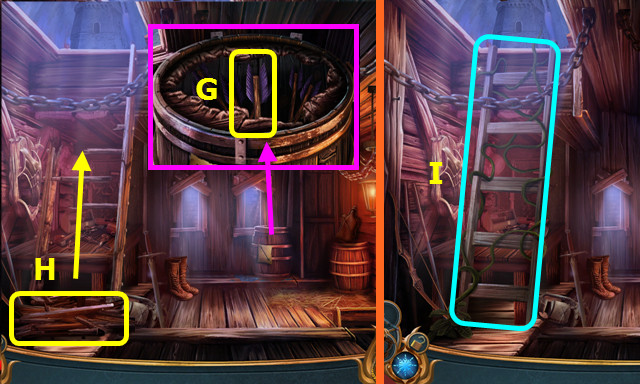
- Use the RING OF FIRE; enter the portal (G).
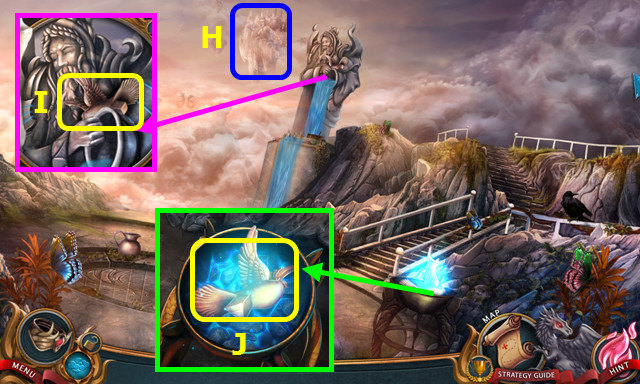
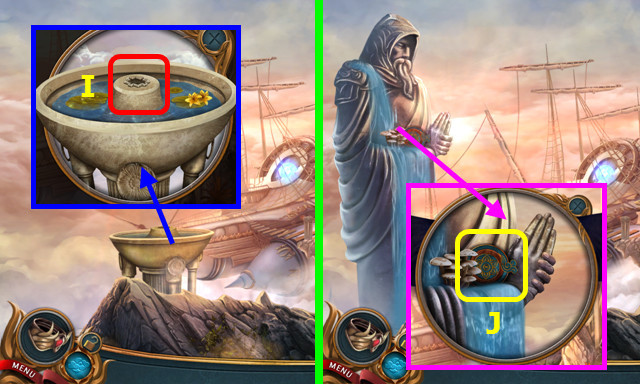
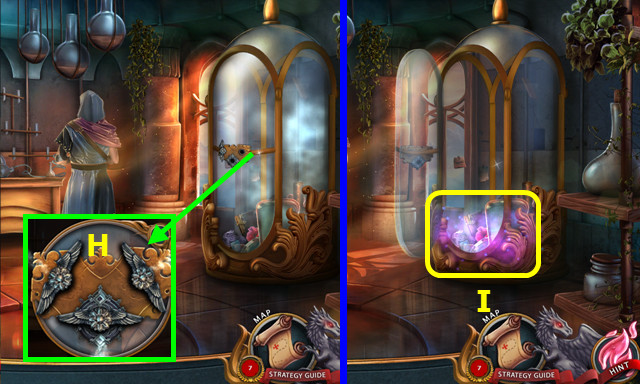
- Look at the Wind Palace (H).
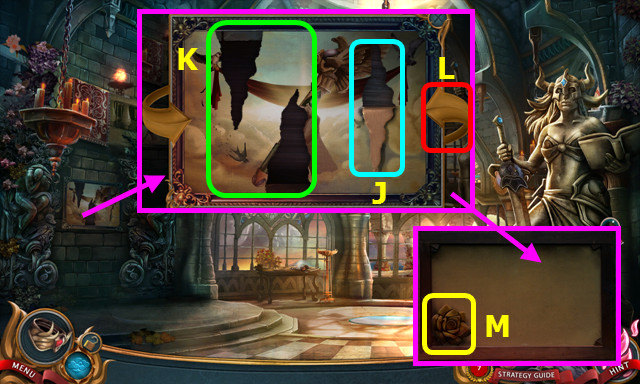
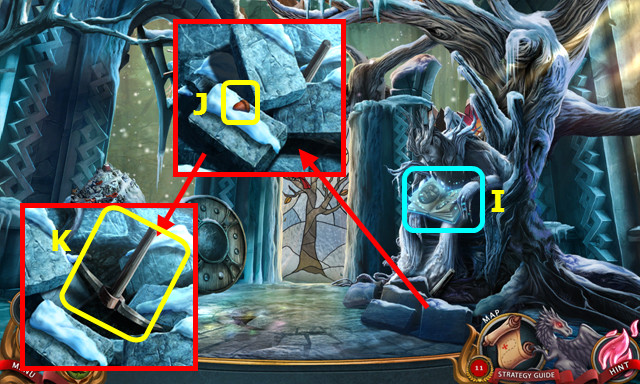
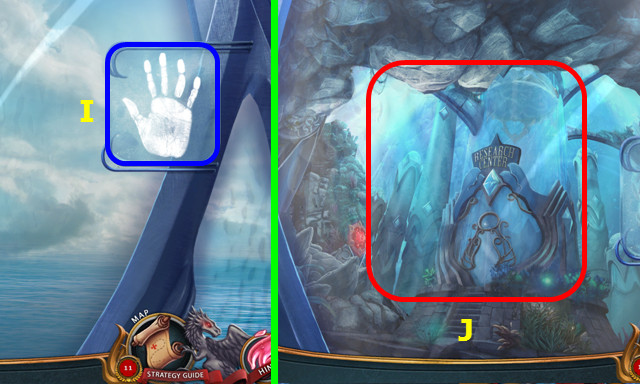
- Take the SQUARE-SHAPED DOVE (I).
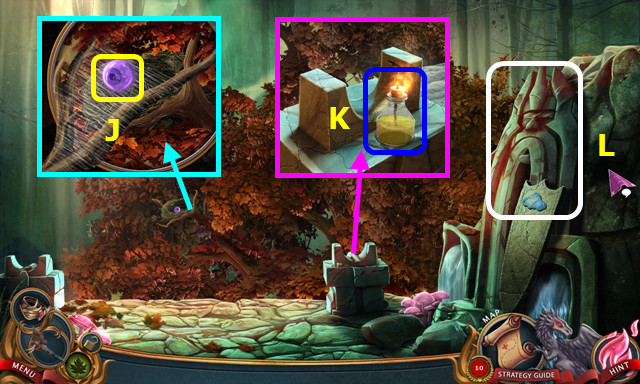
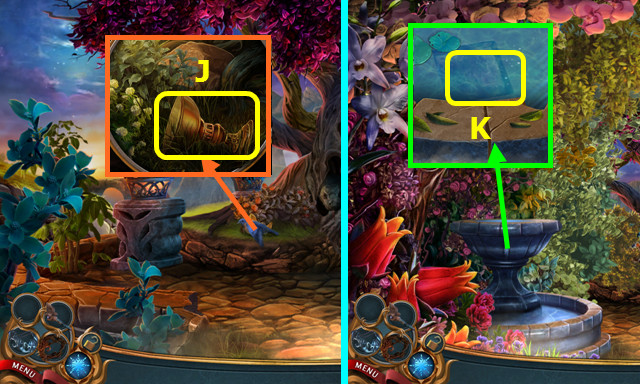
- Select the cauldron and talk to Hark; use the RING OF FIRE and take the TRIANGLE-SHAPED DOVE (J).
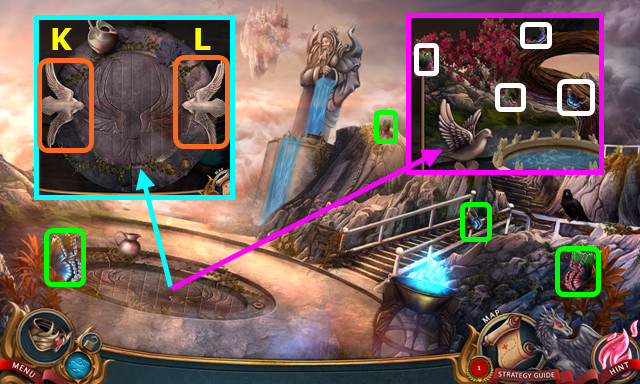
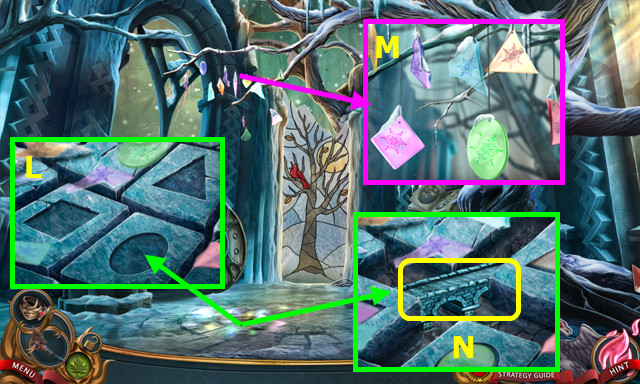
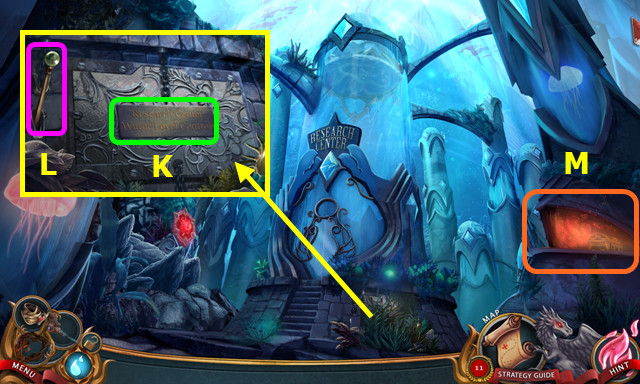
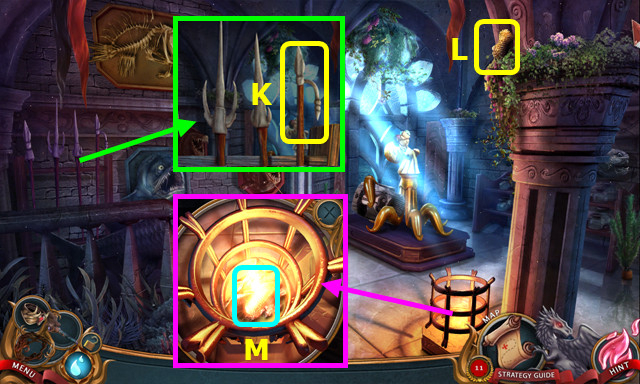
- Place the TRIANGLE-SHAPED DOVE (K) and the SQUARE-SHAPED DOVE (L); turn both doves.
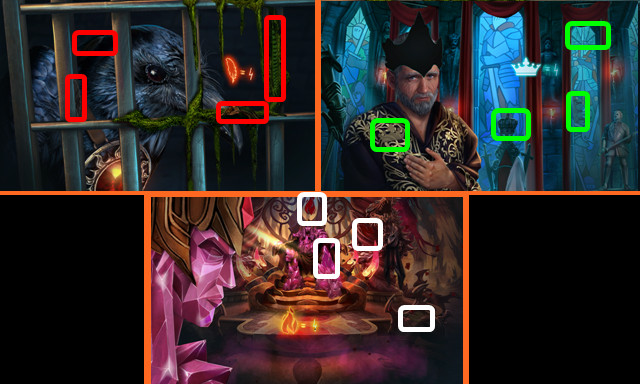
- Select the 4 butterflies (white).
- Select the 4 butterflies (green).
- Walk right.
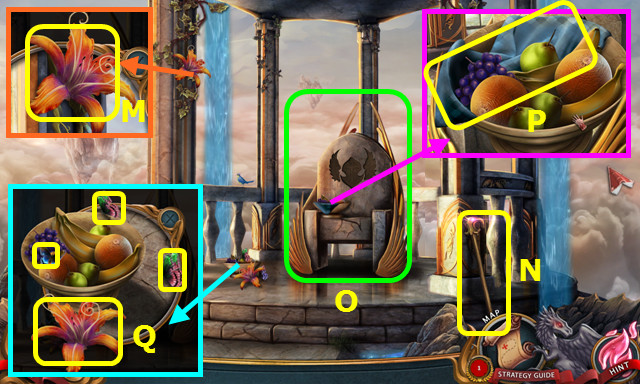
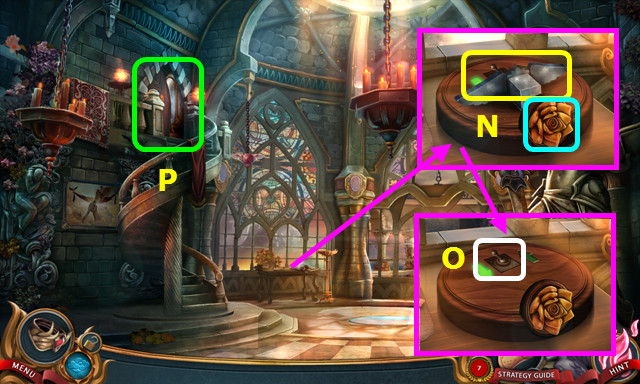
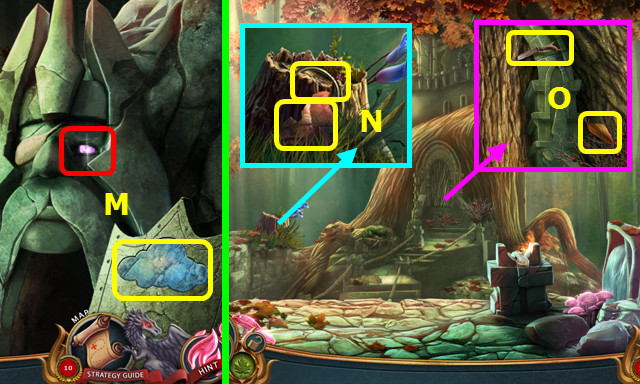
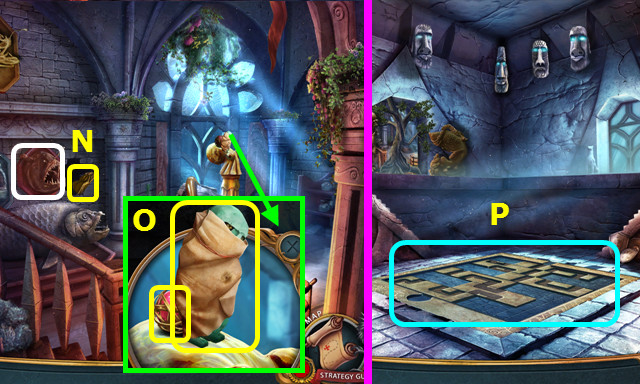
- Take the NECTAR FLOWER (M) and CANE (N).
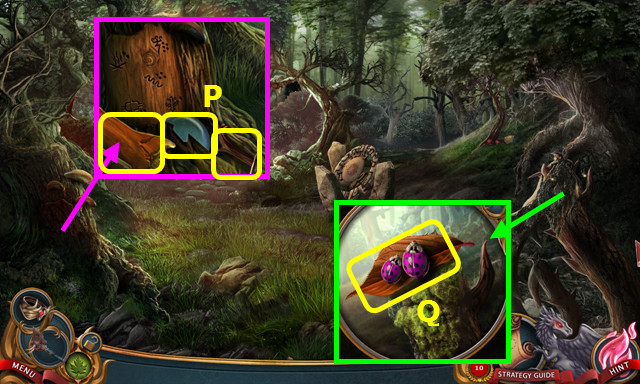
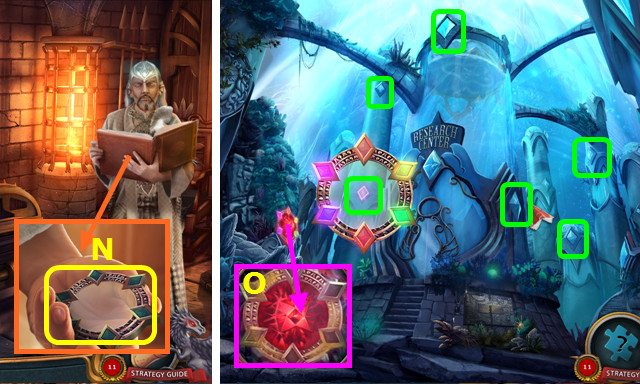
- Turn the throne (O); move the fruit and take the CLOTH (P).
- Place the NECTAR FLOWER and select the 3 butterflies; take the NECTAR FLOWER (Q).
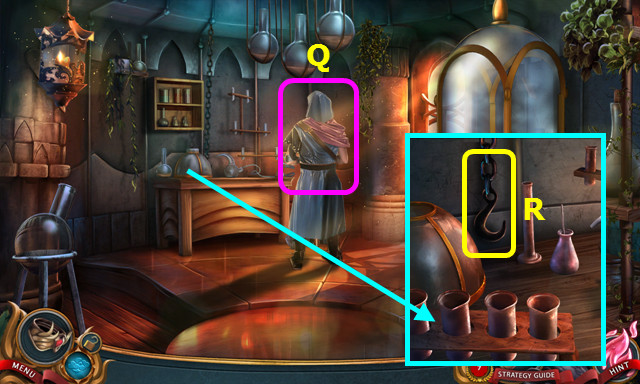
- Walk down.
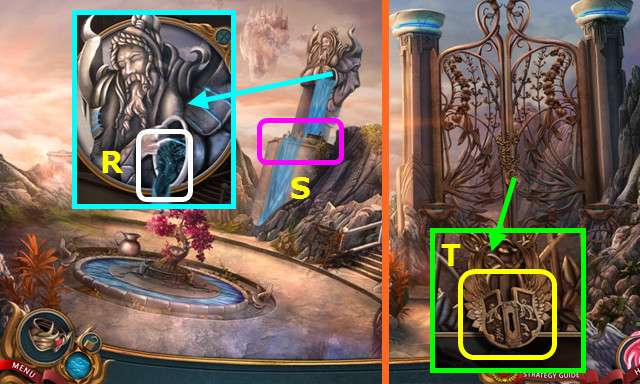
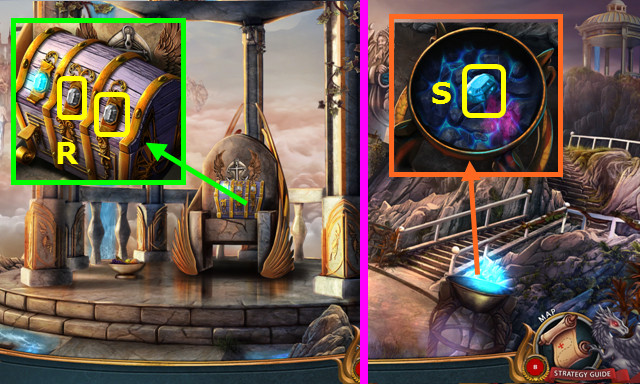
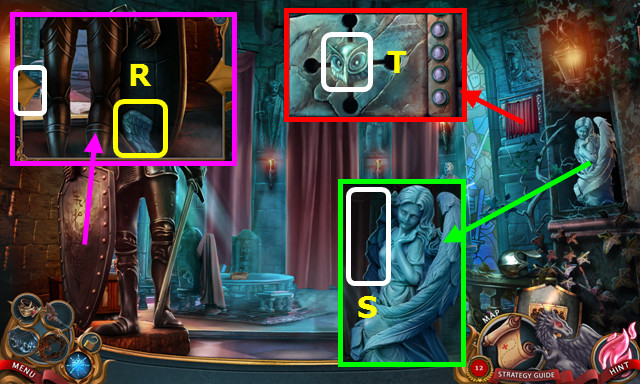
- Place and push the CLOTH (R).
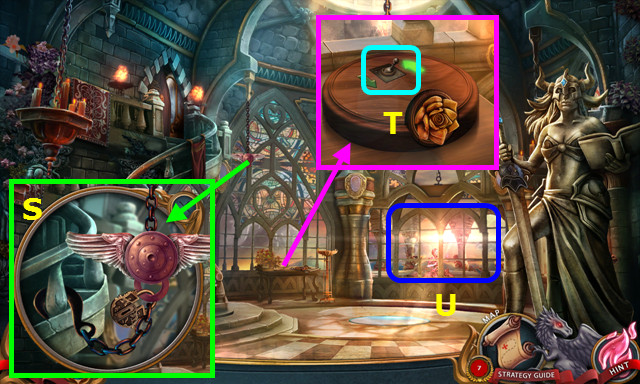
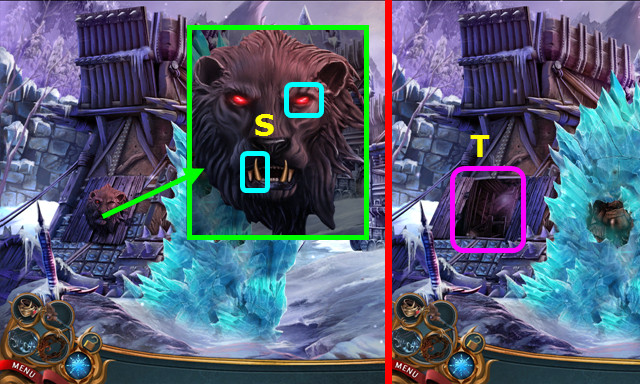
- Play the HOP; earn the WINGED KEY (S).
- Walk left.
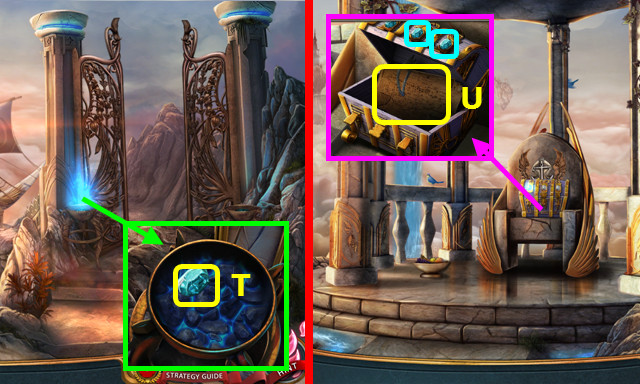
- Use the WINGED KEY (T); earn the WING PADLOCK.
- Disassemble the WING PADLOCK to find the 2 WINGS and PADLOCK (inventory).
- Open the gate; go forward.
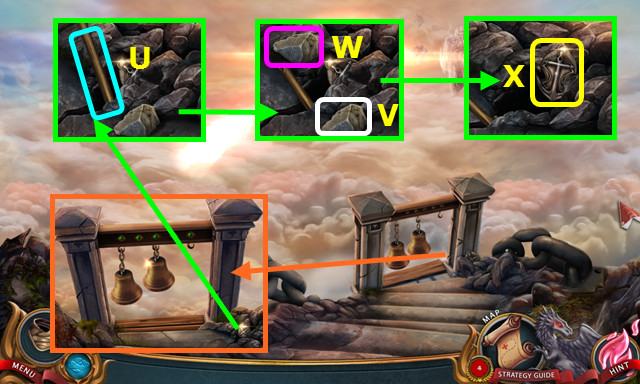
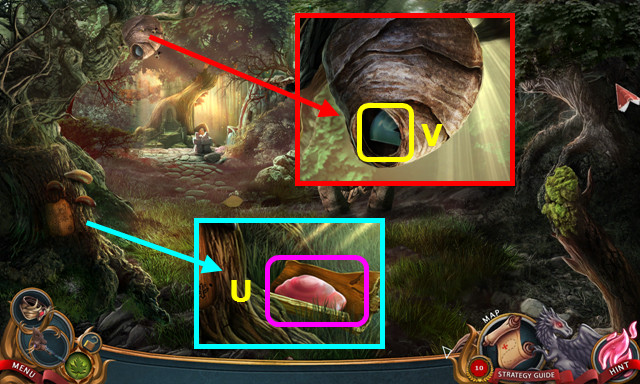
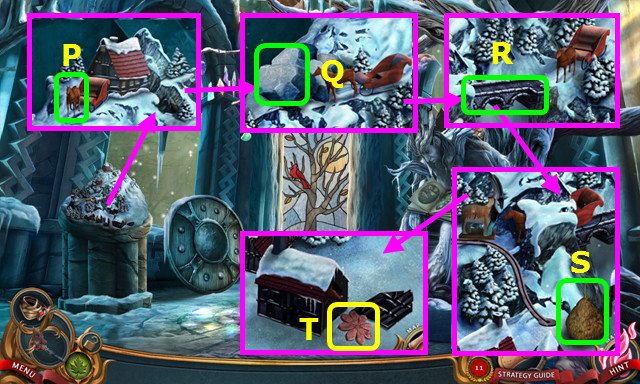
- Place, then use the CANE 3x (U).
- Pick up the rock (V); select the rock 2x (W).
- Take the HARBOR EMBLEM (X).
- Go to the Cliff Gazebo.
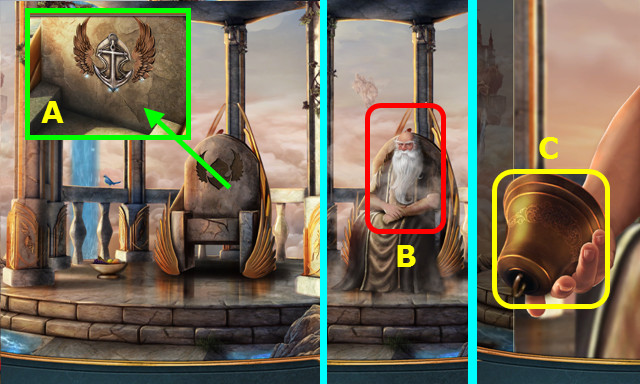
- Place the HARBOR EMBLEM and 2 WINGS (A).
- Talk to the Harbor Master (B).
- Take the BELL (C).
- Return to the Skyport.
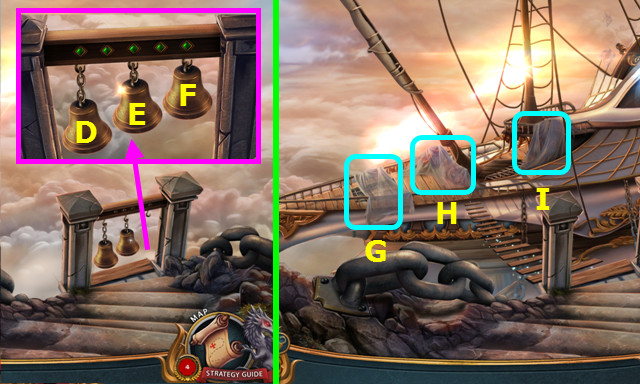
- Place the BELL; select D-F-E-F-D.
- Select G-H-I.
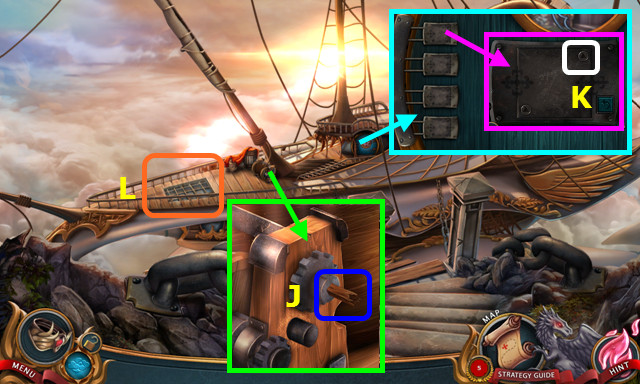
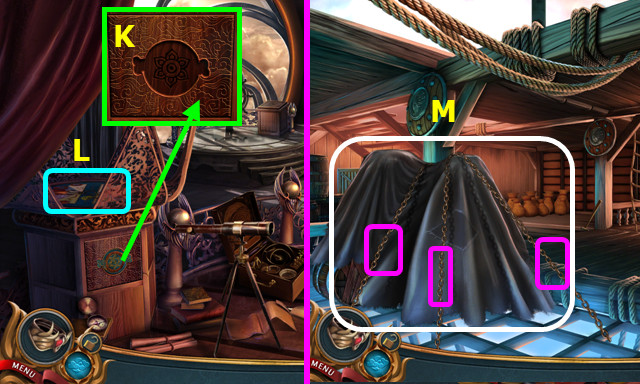
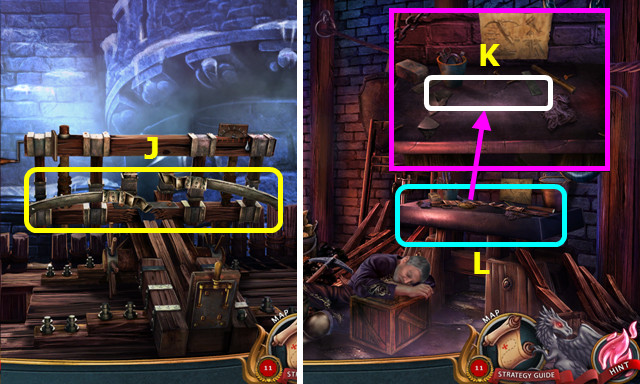
- Pull the wood shard (J).
- Note the screw-hole shape (K).
- Enter (L).
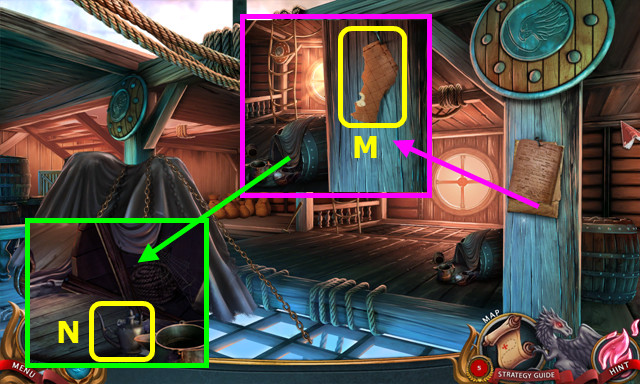
- Remove the 3 papers; take the 1/3 SKYMAP PIECE (M).
- Remove the items; take the OIL (N). The OIL will be behind the third item.
- Walk down 3x.
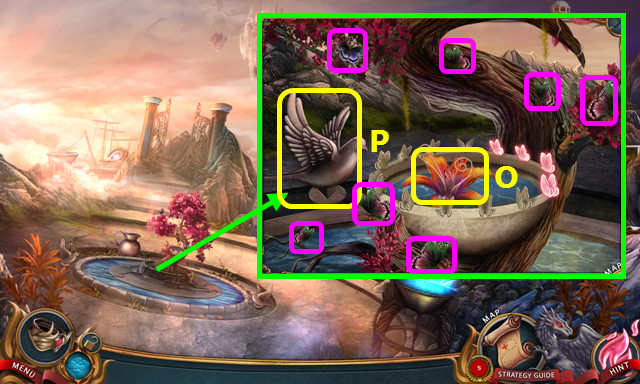
- Place the NECTAR FLOWER; select the 7 butterflies (pink); take the NECTAR FLOWER (O).
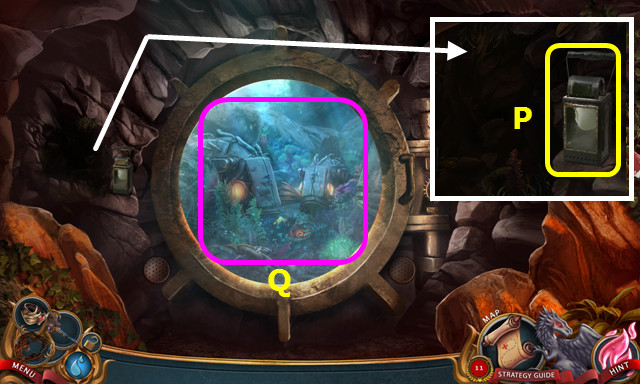
- Use the OIL; take the TRIANGLE-SHAPED DOVE (P).
- Return to the Skyport.
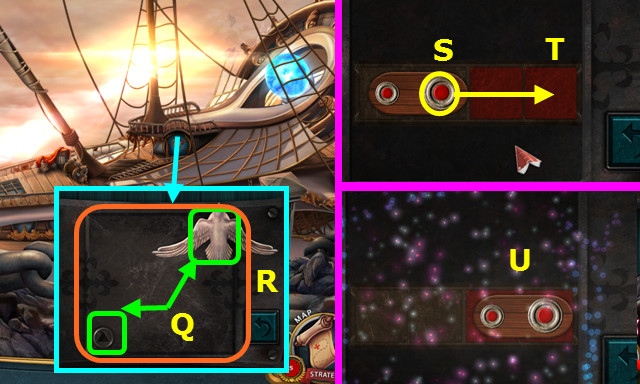

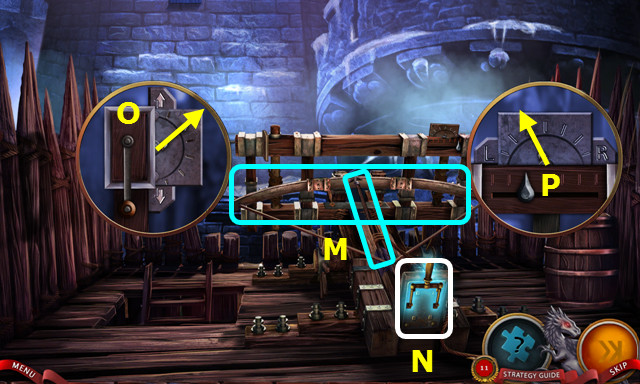
- Place and turn the TRIANGLE-SHAPED DOVE 2x (Q).
- Remove the panel (R).
- Drag the piece S-T.
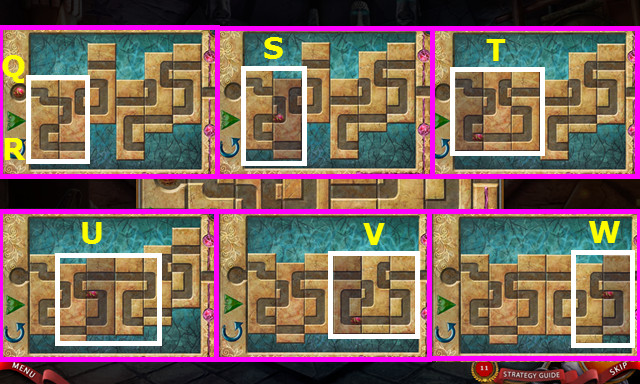
- Solution (U).
- Drag the piece A-B.
- Drag C-D, E-F, and G-H. I-J.
- Drag K-L.
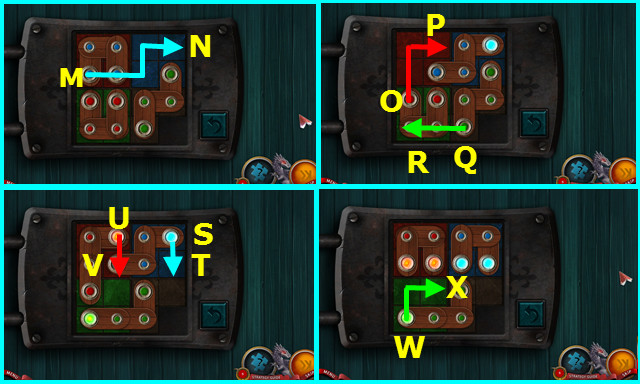
- Drag M-N, O-P, Q-R, S-T, U-V, W-X.
- Go forward.
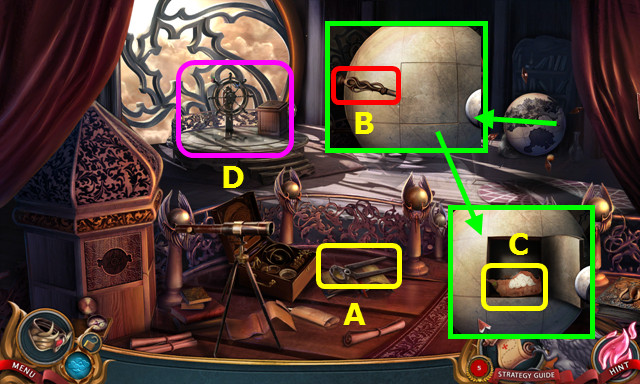
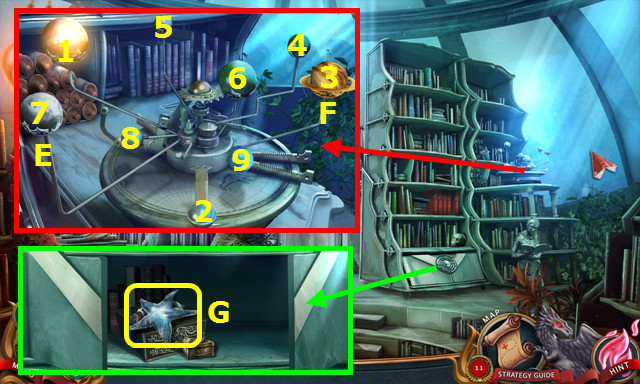
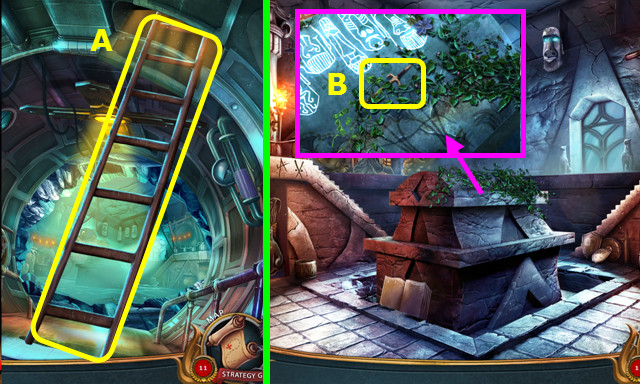
- Take the METAL CUTTERS (A).
- Turn the globe; use the LETTER OPENER 3x (B).
- Take the 2/3 SKYMAP PIECE (C).
- Select (D).

- Place the NECTAR FLOWER and select the 2 butterflies; take the NECTAR FLOWER (E).
- Take the CRANK HANDLE (F).
- Walk down 4x.
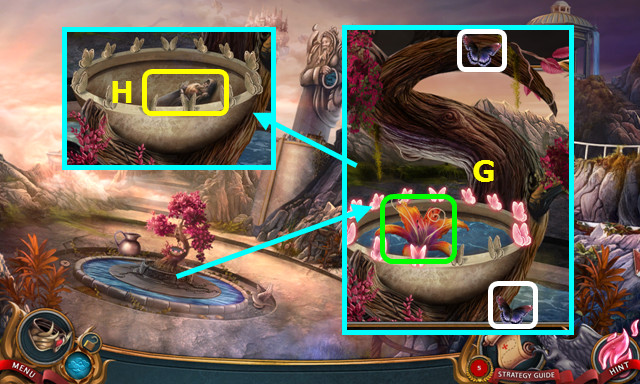
- Place the NECTAR FLOWER; select the 2 butterflies (G).
- Take the STATUETTE (H).
- Walk left.
- Place the STATUETTE (I).
- Take the CABINET ORNAMENT (J).
- Go to the Falcon's Bridge.
- Place the CABINET ORNAMENT (K).
- Play the HOP; take the 3/3 SKYMAP PIECE (L).
- Go to the Falcon's Cargo Hold.
- Use the METAL CUTTERS 3x; remove the cover (M).
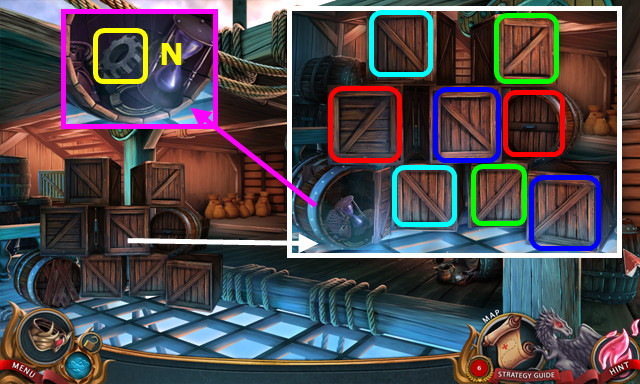
- Select pairs (color-coded).
- Move the items; take the IRON GEAR (N).
- Walk down.
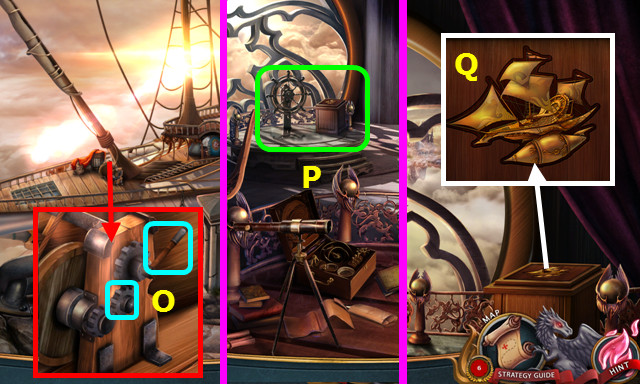
- Place the IRON GEAR and CRANK HANDLE; select the handle (O).
- Go forward.
- Select (P).
- Select (Q).
- Place and restore the 3 SKYMAP PIECES.
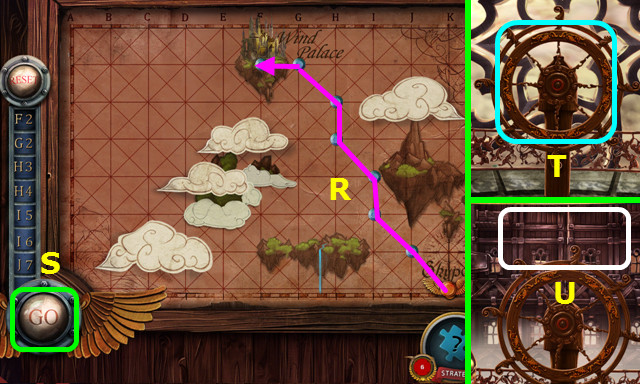
- Select the route (R).
- Press (S).
- Select (T).
- Go forward (U).
Chapter 2: The Wind Palace
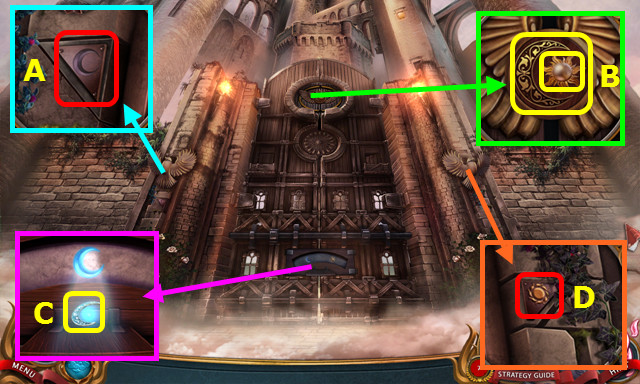
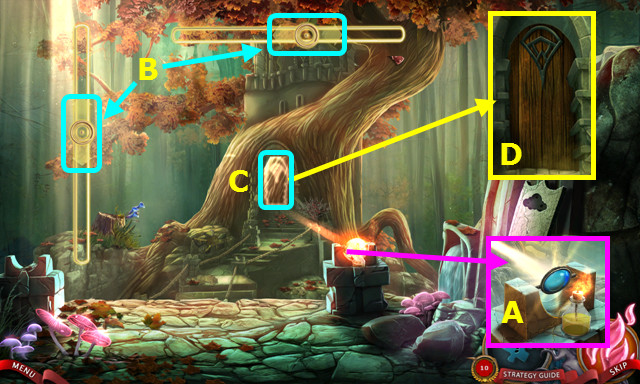
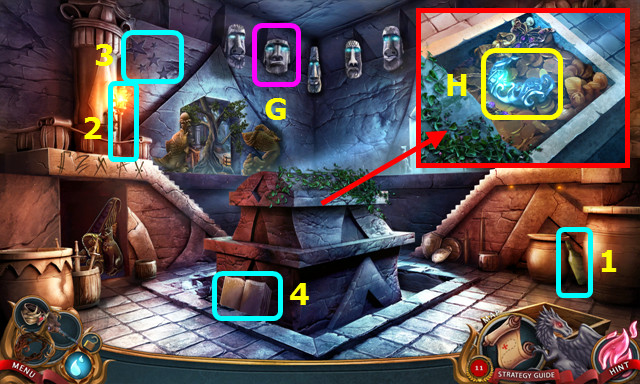
- Press (A).
- Take the DRAINED SUN and DRAINED MOON (B).
- Place the DRAINED MOON; earn the CHARGED MOON (C).
- Move the ivy 2x; press (D).
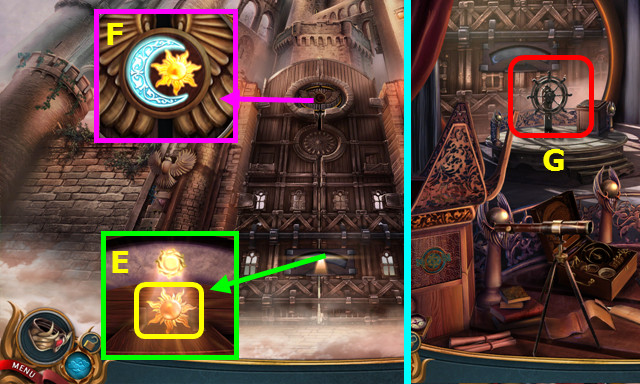
- Place the DRAINED SUN; earn the CHARGED SUN (E).
- Place and press the CHARGED MOON and CHARGED SUN (F).
- Walk down.
- Select (G).
- Go forward.
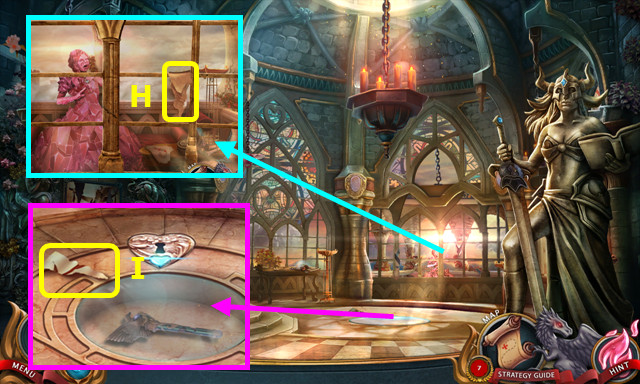
- Take the 1/2 PORTRAIT PIECE (H).
- Take the 2/2 PORTRAIT PIECE (I).
- Place the 2 PORTRAIT PIECES (K); lift the torn piece (J).
- Select (L).
- Take the ROSE (M).
- Place the ROSE; take the 1/2 WINGED KNOB (N).
- Select (O).
- Enter (P).
- Talk to Gaston (Q).
- Take the CHAIN (R).
- Walk down.
- Pull the winged fitting. Place the CHAIN on the banister and fitting; add the PADLOCK (S).
- Select (T).
- Select (U).
- Take the SWORD INSERT (A).
- Note the key (B).
- Open the box; take the PERFUME BOTTLE (C).
- Walk down.
- Place the SWORD INSERT (D).
- Play the HOP; take the 2/2 WINGED KNOB (E).
- Select (F).
- Enter (G).
- Place the 2 WINGED KNOBS; turn all 3 knobs (H).
- Play the HOP; earn the ACID (I).
- Empty the PERFUME BOTTLE and combine with the ACID to make the ACID (inventory).
- Walk down.

- Use the ACID 3x (J).
- Move the glass; reach for the scepter (K).
- Select (L).
- Select the HEALING SCEPTER 3x (M).
- The HEALING SCEPTER is now in the menu bar (N).
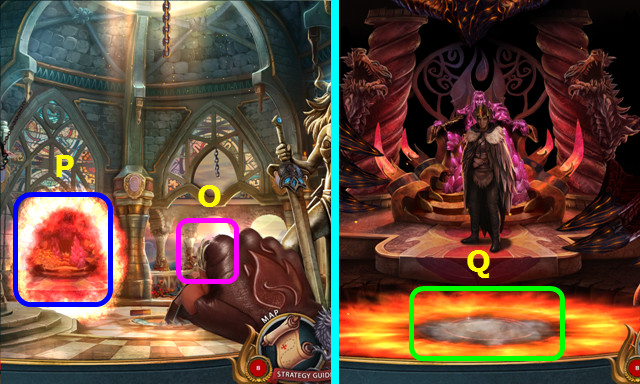
- Select (O).
- Enter the portal (P).
- Enter the portal (Q); walk right.
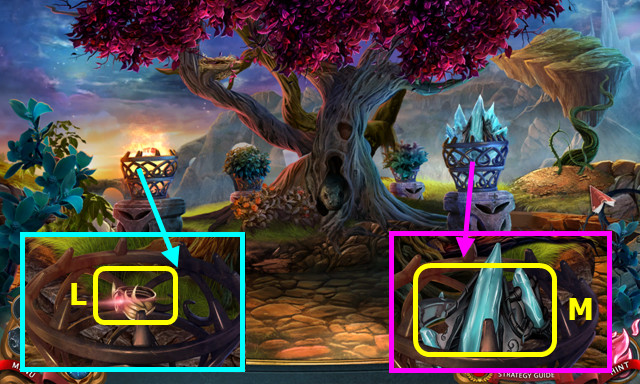
- Take the 2 DEPLETED GEMS (R).
- Walk down.
- Place a DEPLETED GEM; take the 1/2 GLOWING GEM (S).
- Walk left.
- Place a DEPLETED GEM; take the 2/2 GLOWING GEM (T).
- Walk down and right.
- Place the 2 GLOWING GEMS; take the REALM MAPS (U).
- Sort the REALM MAPS; take the GELLUM MAP (inventory).
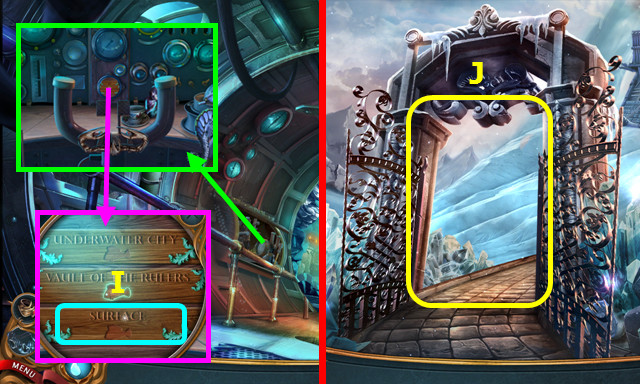
- Go to the Falcon's Bridge; select the ship's wheel.
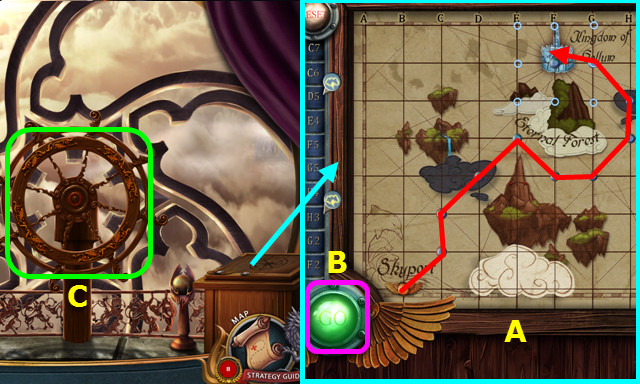
- Place the GELLUM MAP; select the path (A).
- Select (B).
- Select the helm (C).
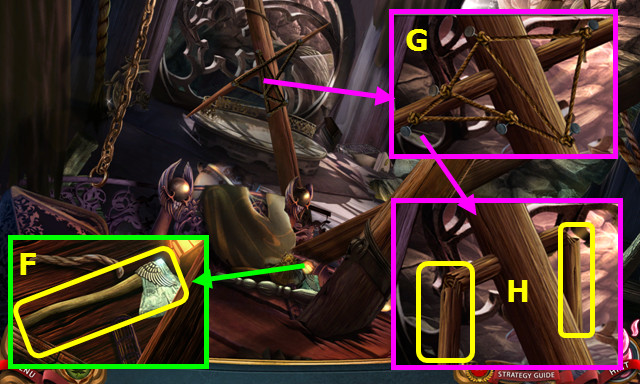
- Move the items; take the AXE (F).
- Arrange the ropes; take the ROPE (G).
- Use the AXE 2x; take the 2 MAST POLES (H).
- Combine the 2 MAST POLES and ROPE to make the ROPE LADDER (inventory).
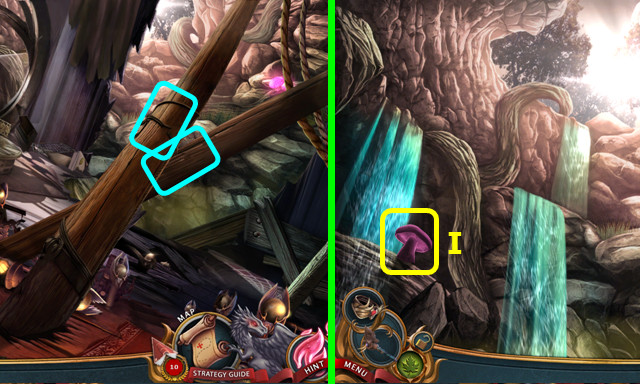
- Use the AXE 3x on each mast (blue).
- Go forward.
- Take the 1/3 GLOWING MUSHROOM (I).
- Place the ROPE LADDER (J).
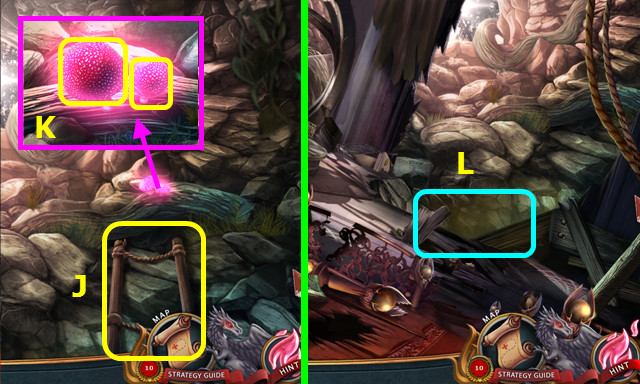
- Take the 2/3 and 3/3 GLOWING MUSHROOMS (K).
- Take the ROPE LADDER.
- Remove the ROPE from the ROPE LADDER (inventory).
- Walk down.
- Select (L); use the GLOWING MUSHROOMS 3x.
- Play the HOP; earn the ANCHOR EMBLEM.
- Remove the anchor from the ANCHOR EMBLEM; add the ROPE to make the GRAPPLING HOOK (inventory).
- Go forward.
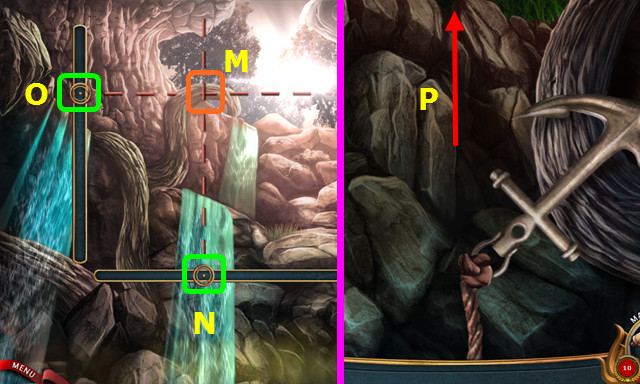
- Use the GRAPPLING HOOK (M).
- Select the root when the indicator (N) is directly below.
- Select the root when the indicator (O) is directly next to it.
- Go forward.
- Go forward (P).
Chapter 3: The Eternal Forest

- Take the 1/3 and 2/3 GLASS PIECES (A).
- Walk left.
- Select (B).
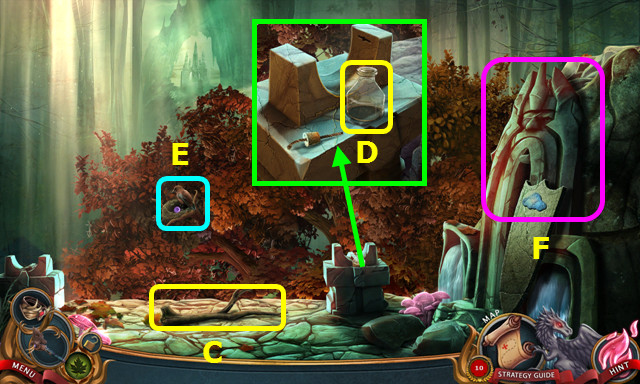
- Take the BRANCH (C).
- Remove the cork; take the EMPTY OIL LAMP (D).
- Select (E).
- Talk to the Statue (F).
- Walk down 3x.
- Select (G).
- Use the EMPTY OIL LAMP; take the FULL OIL LAMP (H).
- Go forward 2x.
- Use the BRANCH to make the STICKY BRANCH (I).
- Walk left.
- Use the STICKY BRANCH; take the STATUE EYE (J).
- Place the FULL OIL LAMP, select the wick, and use the RING OF FIRE (K).
- Select (L).
- Place the STATUE EYE and take the MARBLE CLOUD (M).
- Pull and take the LENS FRAME and 1/3 MURAL PIECE (N).
- Take the DRUID KNIFE and LEAF (O).
- Walk down.
- Use the DRUID KNIFE 2x; take the 1/3 LENS PIECE, TREE BARK, and KNIFE HANDLE (P).
- Remove the wood; use the LEAF 3x to take the LEAF WITH BUGS (Q).
- Walk left.

- Place the LEAF WITH BUGS (R).
- Play the HOP; earn the 2/3 LENS PIECE (S).
- Place the TREE BARK, select the flowers 10x, and take the NECTAR (T).
- Walk down.
- Place the NECTAR (U).
- Take the 3/3 LENS PIECE (V).
- Combine the LENS FRAME and 3 LENS PIECES to make the DOOR LENS (inventory).
- Walk left.
- Place the DOOR LENS (A).
- Move the sliders (B) to move the door image over the door (C).
- Open the door (D); go forward.
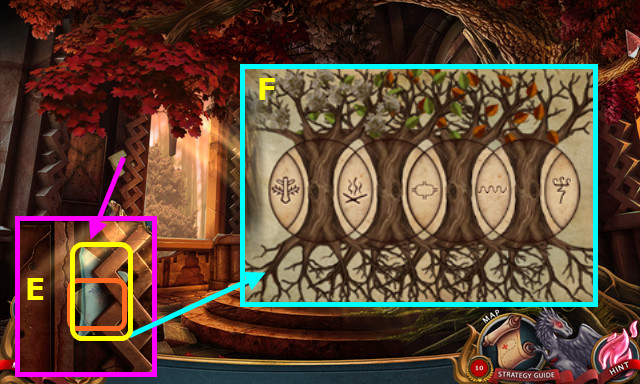
- Take the 3/3 GLASS PIECE and read the paper (E).
- Solution (F).
- Take the FOREST MAP.

- Take the 1/2 CALENDAR ELEMENT (H).
- Arrange the panes (I).
- Pan down (J).
- Take the BROKEN CUP (K).
- Use the KNIFE HANDLE to take the BLUNT SICKLE (L).
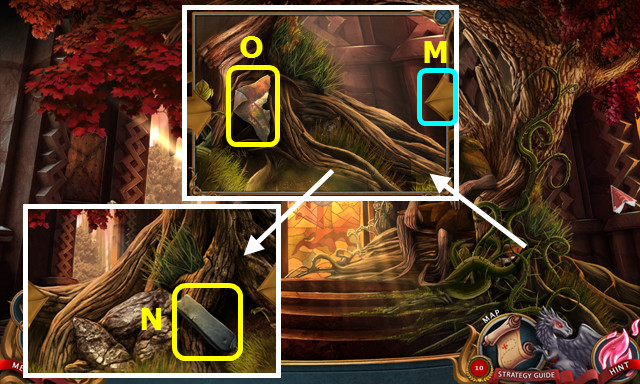
- Rotate the view (M); take the SANDSTONE (N).
- Combine the BLUNT SICKLE and SANDSTONE; take the SICKLE (inventory).
- Use the SICKLE 3x; take the 2/3 MURAL PIECE (O).

- Try to wake the King (P).
- Walk down.
- Talk to the Statue; take the 2/2 CALENDAR ELEMENT (Q).
- Walk down.
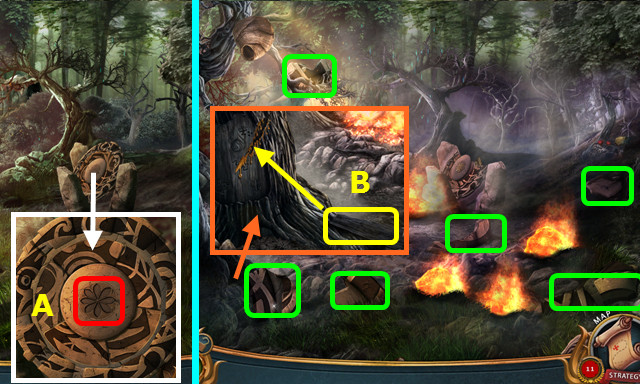
- Select the FOREST MAP (inventory); select the X (A).
- Use the BROKEN CUP 3x; take the HORSE and 3/3 MURAL PIECE (B).
- Walk left; go forward.
- Place the 3 MURAL PIECES; restore the 4th piece and add the MARBLE CLOUD (C).
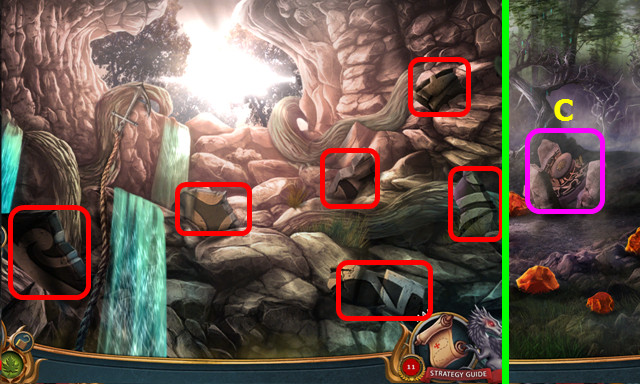
- Take the SHARD (D); pan up (E).
- Place the SHARD; take the SNOWFLAKE (F).
- Walk down 2x.
- Select (G).
- Place the 2 CALENDAR ELEMENTS and SNOWFLAKE; restore the ring (H).
- Walk left; go forward.
- Play the HOP; take the HAYSTACK (I).
- Take the ACORN (J); move the 3 bricks and take the PICKAXE (K).
- Look at the floor (L).
- Place the 3 GLASS PIECES; arrange as shown (M).
- Take the STONE BRIDGE (N).
- Place the HORSE (P).
- Use the PICKAXE (Q).
- Place the STONE BRIDGE (R).
- Place the HAYSTACK (S).
- Take the STONE FLOWER (T).
- Walk down 2x.
- Try to place the STONE FLOWER (A).
- Use the wood on the resin; earn the WOOD WITH RESIN (B).
- Take the 6 CALENDAR PIECES (green).
- Walk down.
- Take the 6 CALENDAR PIECES (red).
- Combine the 12 CALENDAR PIECES and WOOD WITH RESIN to make the GLUED CALENDAR PIECES (inventory).
- Go forward.
- Select (C).
- Place the GLUED CALENDAR PIECES and STONE FLOWER; restore the ring (D).
- Walk left and forward.

- Talk to the King; take the BRACELET OF GROWTH (E).
- Walk down 2x.
- Use the BRACELET OF GROWTH from the menu bar (F).
- Use the BRACELET OF GROWTH (G).
- Walk left and forward.
- Enter the Portal (H).
Chapter 4: The Underwater City
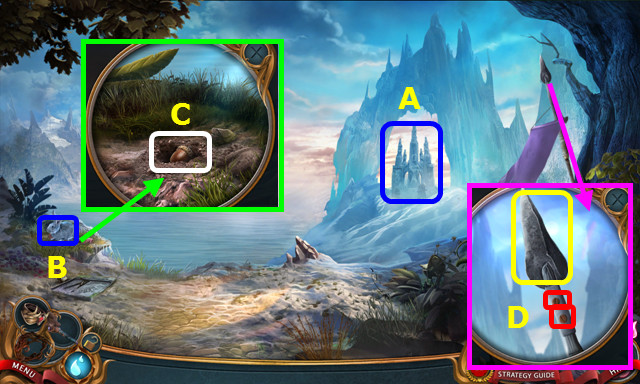
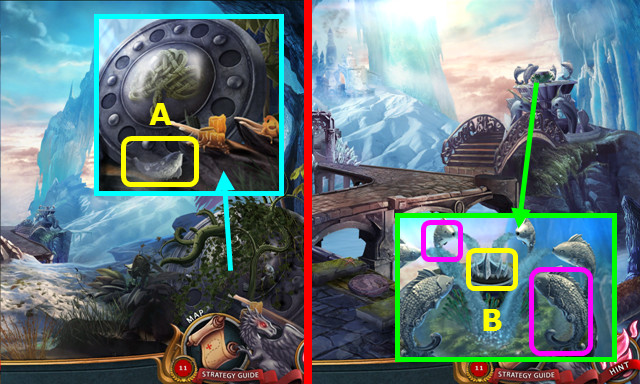
- Look at the castle (A).
- Select (B).
- Move the dirt 3x and place the ACORN; cover with dirt and use the BRACELET OF GROWTH (C).
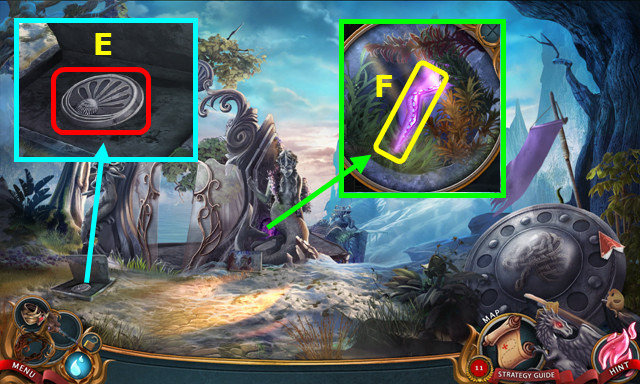
- Remove the 2 screws; take the SPEARHEAD (D).
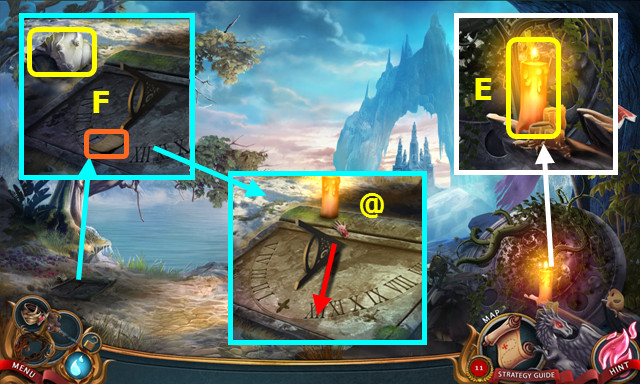
- Take the BURNING CANDLE (E).
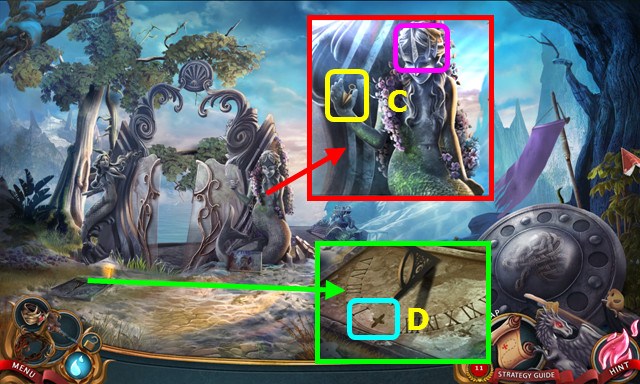
- Take the HEAVY STATUE PART and read the note (F).
- Place the BURNING CANDLE; drag the candle to move the shadow to 12 (@).
- Read the legend (G).
- Flip the image (H).
- Take the 1/4 AMETHYST SHARD (I).
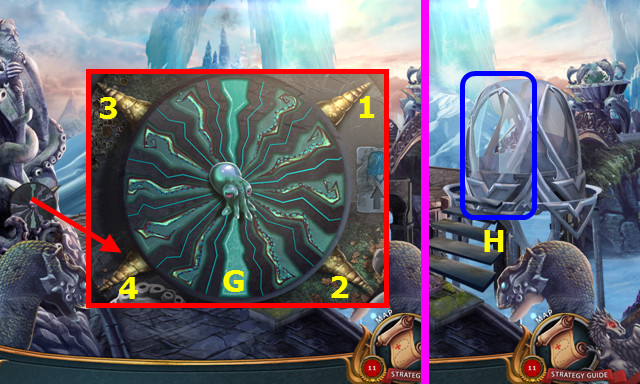
- Enter (J). Go forward.
- Use the SPEARHEAD and HEAVY STATUE PART; take the TILE and 2/4 AMETHYST SHARD (K).
- Open the gate; go forward (L).
- Select (M).
- Walk down.
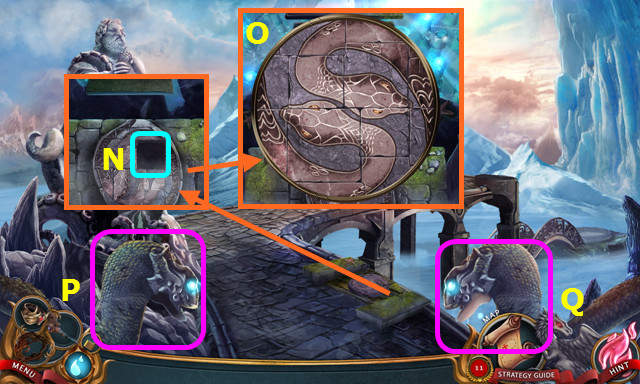
- Place the TILE (N).
- Solution (O).
- Select P-Q-Q-P.
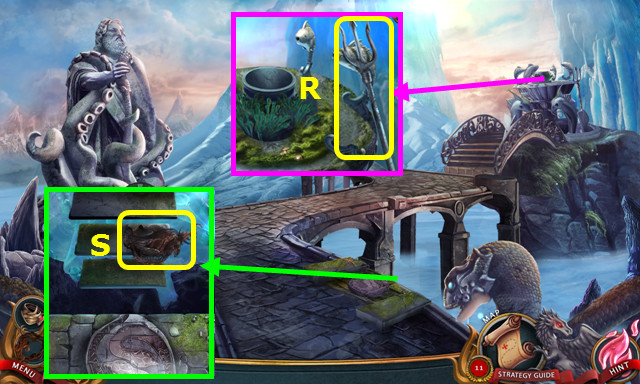
- Take the TRIDENT (R).
- Use the TRIDENT to take the JUNK PILE (S).
- Move the items in the JUNK PILE; take the 1/2 FISH FIGURINE. Continue sorting to find the bottle and use the HEAVY STATUE PART; take the 3/4 AMETHYST SHARD and SHARP GLASS (inventory).
- Walk down.
- Use the SHARP GLASS 3x; take the 2/2 FISH FIGURINE (A).
- Go forward.
- Place the 2 FISH FIGURINES; take the STONE CROWN (B).
- Walk down.
- Place the STONE CROWN; take the STRANGE KEY (C).
- Use the STRANGE KEY (D).
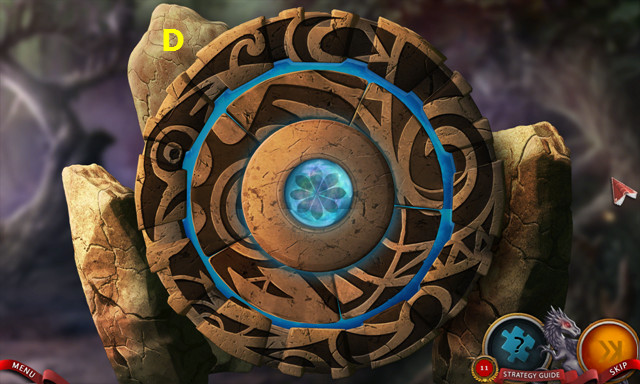
- Restore and press the disc (E).
- Move the 3 plants; take the 4/4 AMETHYST SHARD (F).
- Walk forward.
- Place the 4 AMETHYST SHARDS; arrange as shown (G).
- Select 1-4. This sequence is random; your solution may vary.
- Enter (H).
- Select (I).
- Open the glass (J).
- Go forward.
- Move the bushes; read the sign (K).
- Select (L).
- Walk right (M).
- Talk to the City Historian; take the SUBMARINE KEY (N).
- Walk down.
- Use the SUBMARINE KEY (O).
- Select the finder; locate the diamonds (green).
- Walk left.
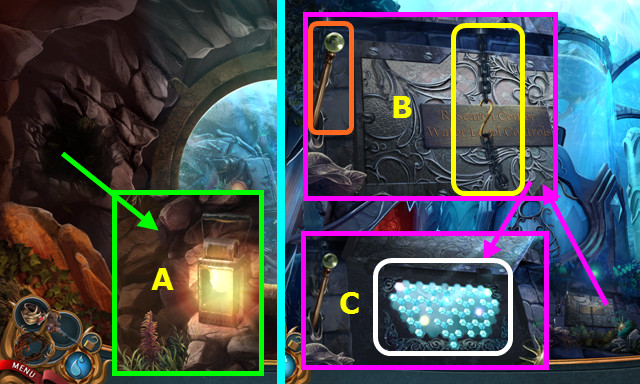
- Take the EMPTY LANTERN (P).
- Note the flooded chamber (Q).
- Walk down and right.
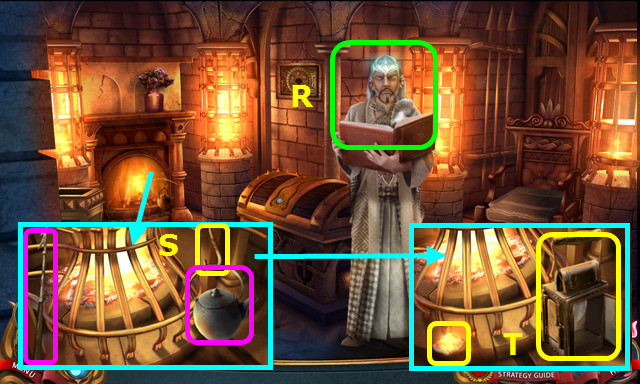
- Talk to the City Historian (R).
- Select the poker; remove the teapot and take the S-HOOK (S).
- Place the EMPTY LANTERN; use the RING OF FIRE and take the GLOWING LANTERN (T).
- Walk down and left.
- Place the GLOWING LANTERN; play the HOP and take the LOBSTER FIGURINE (A).
- Walk down.
- Place the S-HOOK, select the lower chain, and pull the lever (B).
- Select (C).
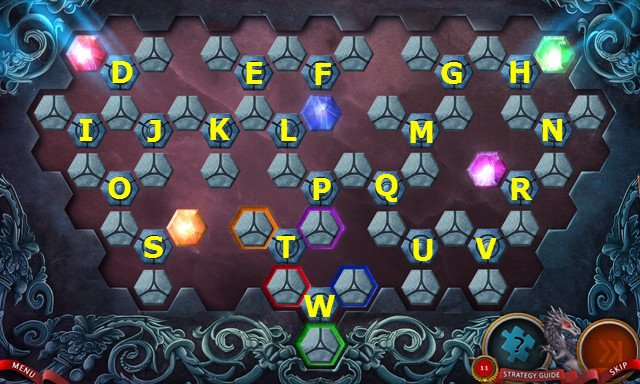
- Solution Hx2-G-M-Qx2-L-P-T-P-W-T-W-Sx2-Ox2-Dx2-J-K-J.
- L-K-L-P-L-Px2-T-Px2-T-Rx2-Vx2-Ux2-Q-P.
- Walk forward.
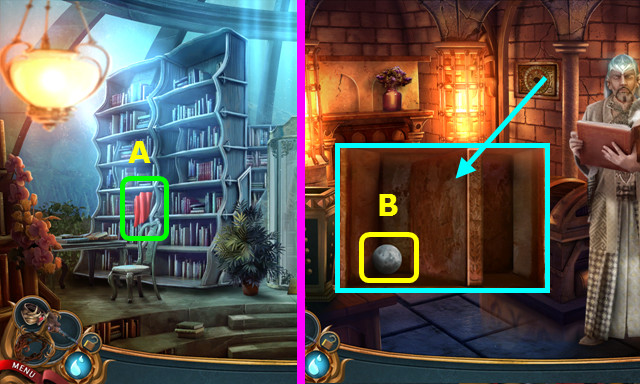
- Move the cloth, select and play the HOP; take the SHELL (A).
- Walk down and right.
- Place and select the SHELL; take the SILVER GLOBE (B).
- Remove the cloth; use the SHARP GLASS and remove the cushion (C).
- Place the LOBSTER FIGURINE, open the panel, and take the GOLDEN GLOBE (D).
- Walk down and forward.
- Place the SILVER GLOBE (E) and GOLDEN GLOBE (F).
- Select the silver globe, watch the sequence, and select 1-4.
- Watch the sequence and select 5-9.
- Remove the lock, open the door, and take the GLASS STARFISH (G).
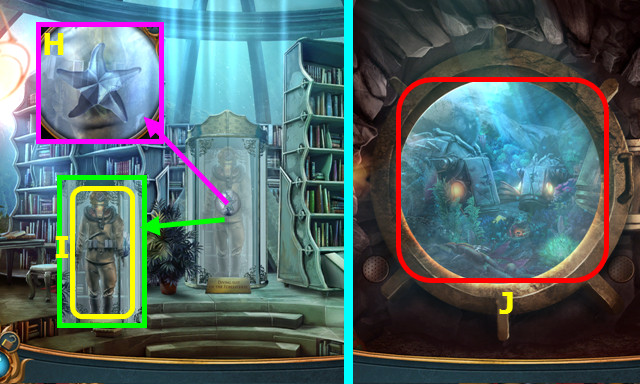
- Place the GLASS STARFISH (H).
- Take the DIVING SUIT (I).
- Walk down and left.
- Use the DIVING SUIT (J).
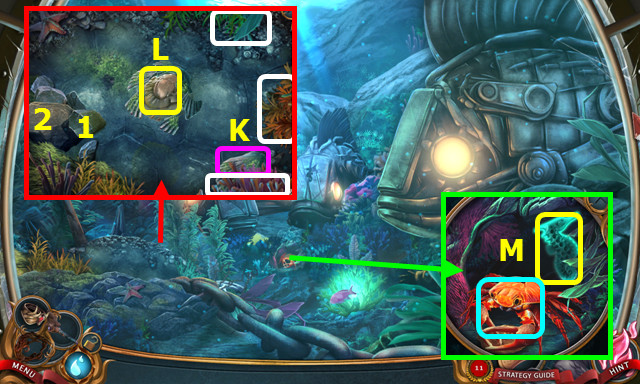
- Move the plants (white); select the clam (K).
- Select 1-2.
- Take the SCALLOP MEAT (L).
- Use the SCALLOP MEAT; take the SEAHORSE INLAY (M).
- Take the DIVER'S WEIGHT (N).
- Place the SEAHORSE INLAY (O).
- Enter (P).

- Use the DIVER'S WEIGHT (Q).
- Arrange the pieces (R); select (S).
- Pull (T).

- Press the 2 buttons (A).
- Play the HOP (B).
- Walk forward.
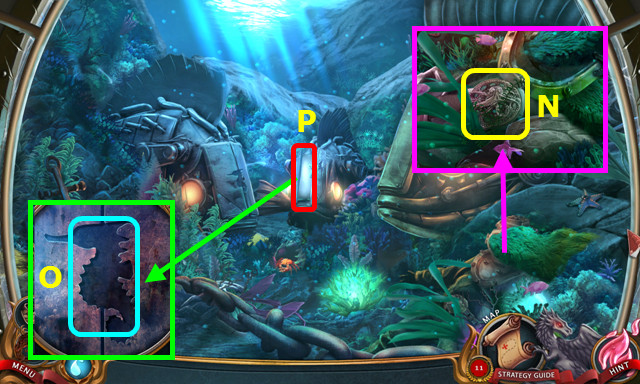
- Take the STONE FISH HEAD and CLOTH (C).
- Use the CLOTH (D).
- Note the symbols (E).
- Walk left.
- Place the STONE FISH HEAD (G).
- Take the GONG MALLET (H).
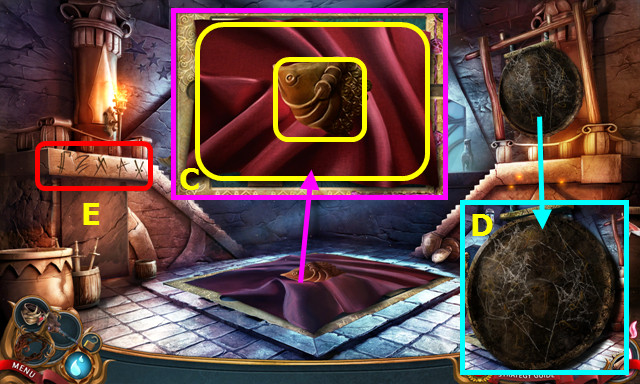
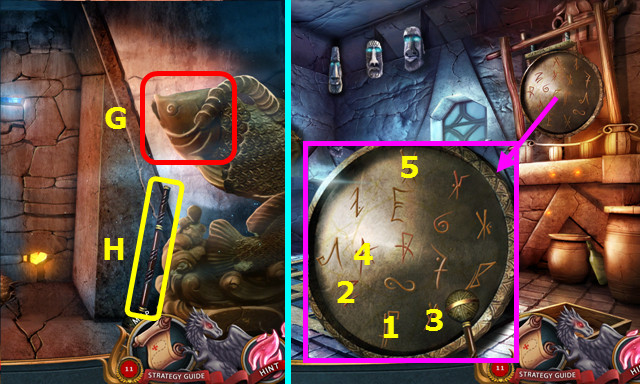
- Walk down.
- Use the GONG MALLET; select 1-5.
- Take the SMALL TREE and MINIATURE HELMET (I).
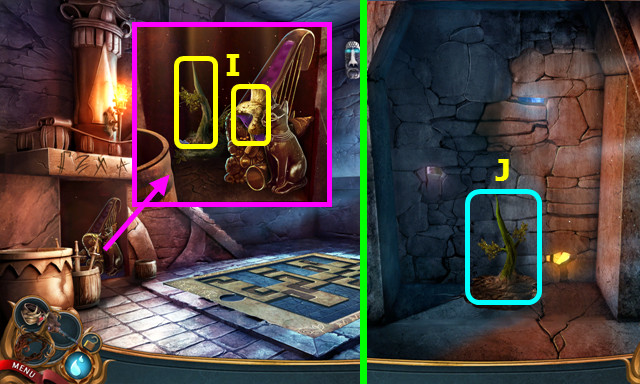
- Go left.
- Place the SMALL TREE and use the BRACELET OF GROWTH (J).
- Walk forward.
- Take the HOOKED SPEAR (K).
- Use the HOOKED SPEAR (L).
- Use the RING OF FIRE to earn the MINIATURE GAUNTLET (M).
- Select the fish head; take the MINIATURE CAPE (N).
- Take the JADE STATUE and PUZZLE PART (O).
- Walk down.
- Select (P).
- Place the PUZZLE PART (Q).
- Slide the pieces to create the 1st section of path and press the green button (R).
- Continue the path and press the button (S-W).
- Walk down.
- Use the HOOKED SPEAR; take the LADDER (A).
- Go forward.
- Take the MINIATURE SWORD (B).
- Walk left.
- Place the LADDER (C).
- Move the plants and play the HOP; earn the MINIATURE BOOTS (D).
- Unwrap the JADE STATUE; add the MINIATURE HELMET, MINIATURE CAPE, MINIATURE SWORD, MINIATURE GAUNTLET, and MINIATURE BOOTS to make the ASSEMBLED STATUE (inventory).
- Place the ASSEMBLED STATUE (E).
- Take the WATCHER HEAD (F).
- Walk down.
- Place the WATCHER HEAD (G).
- In response to the head's questions, select 1-4.
- Slide the lid; take the NECKLACE OF CUNNING (H). It is now in the menu bar.
- Walk down.
- Select (I).
- Go forward.
- Use the NECKLACE OF CUNNING (J).
- Go forward 2x.
Chapter 5: The Crystal Castle
- Select the King (A).
- Select B-C-D-E.
- Talk to the King again.
- Shake the King; remove the 4 pieces of armor (white).
- Use the HEALING SCEPTER (F); shake the King again.
- Walk down.
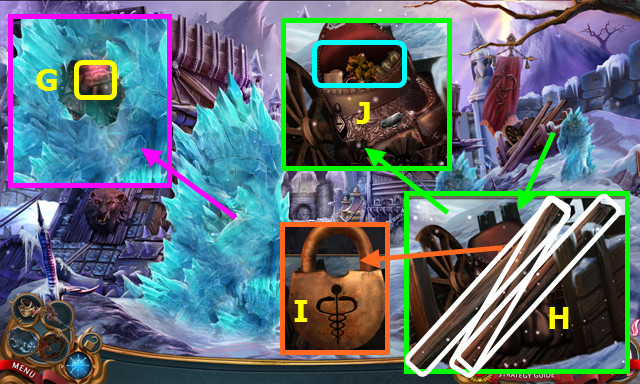
- Use the RING OF FIRE; take the CADUCEUS (G).
- Remove the 3 logs (H).
- Place the CADUCEUS (I).
- Open the bag; select and play the HOP. Earn the SMELLING SALTS (J).
- Walk forward.
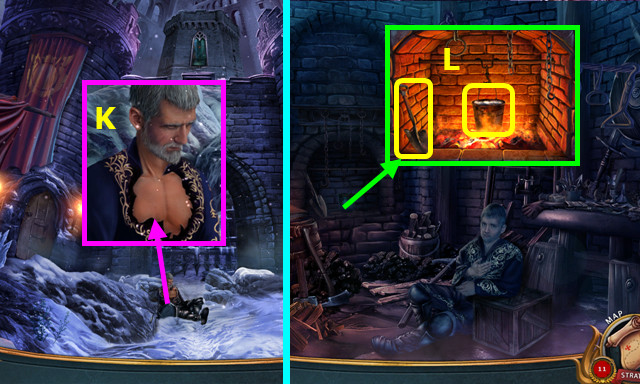
- Use the SMELLING SALTS; select the King (K).
- Walk left.
- Use the RING OF FIRE; take the SHOVEL and HOT WATER (L).

- Select (M); turn the page, play the HOP, and take the OWL EMBLEM.
- Read the instructions, move the items, and take the TONGS (N).
- Walk down.
- Use the HOT WATER; take the PLANT (O).
- Walk down.
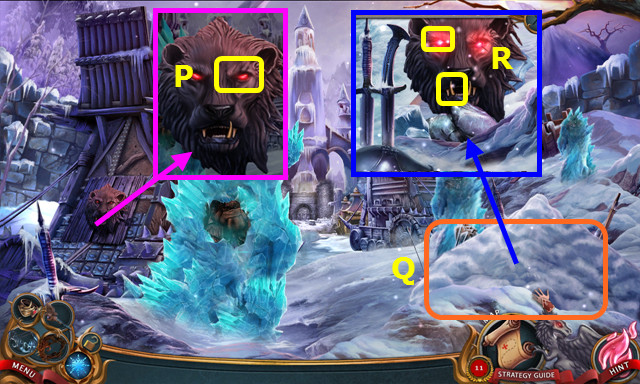
- Take the LION'S EYE (P).
- Select 3x (Q).
- Use the SHOVEL and place the LION'S EYE; use the TONGS to take the LION'S TOOTH and retrieve the LION'S EYE (R).
- Place the LION'S EYE and LION'S TOOTH (S).
- Enter (T).
- Select the beam; take the TERMITES (A).
- Move the hay 3x; take the 1/2 WOODEN TILE (B).
- Open the box, move the items, and take the CHEST KEY (C).
- Walk down and forward.
- Use the CHEST KEY; take the 2/2 WOODEN TILES (D).
- Walk down and left.
- Place the 2 WOODEN PLATES (E).
- Select the pairs (color-coded).
- Enter (F).
- Place the TERMITES; take the ARROW (G).
- Try the ladder; take the BROKEN LADDER (H).
- Restore the BROKEN LADDER; add the plant and use the BRACELET OF GROWTH to make the REPAIRED LADDER (inventory).
- Place the REPAIRED LADDER and go up (I).
- Take the BROKEN BOW (J).
- Return to the Guard House.
- Place the BROKEN BOW (K).
- Play the HOP; earn the REPAIRED CROSSBOW (L).
- Return to the top of Siege Tower.
- Place the REPAIRED CROSSBOW and ARROW (M).
- Select the switch (N).
- Turn the crank 4x (O); move the slider left 1x (P).
- Select the switch again (N).
- Go forward.
- Rotate the view; take the ANGEL WING (R).
- Place the ANGEL WING (S).
- Open the curtain; place the OWL EMBLEM (T).
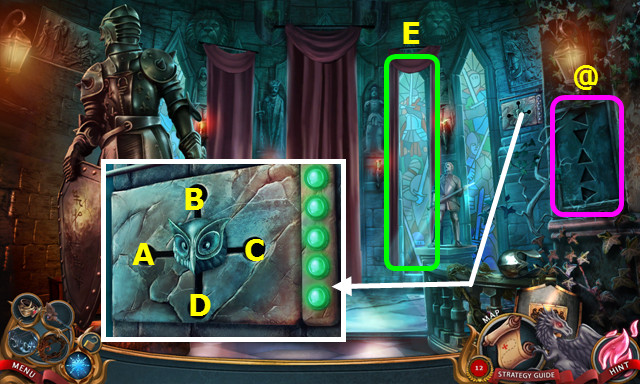
- Note the code (@).
- Select A-D-B-B-C.
- Play the HOP; take the KNIGHT'S INSIGNIA (E).
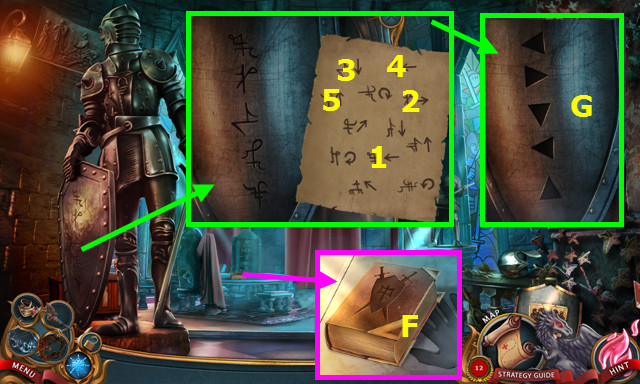
- Place the KNIGHT'S INSIGNIA; read the book; take the RUNE PAGE (F).
- Use the RUNE PAGE; select (1-5).
- Note the code (G).
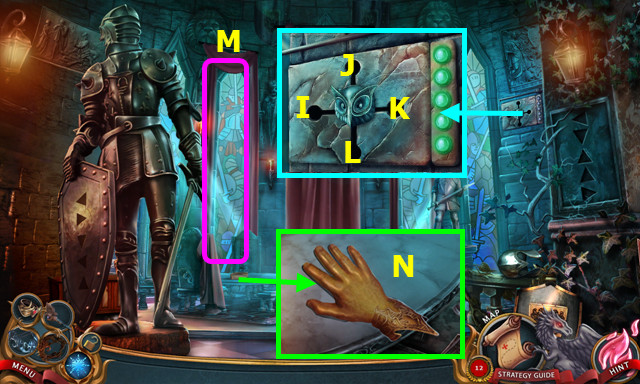
- Select I-K-L-I-J.
- Play the HOP; take the GOLDEN HAND (M).
- Place and press the GOLDEN HAND (N).
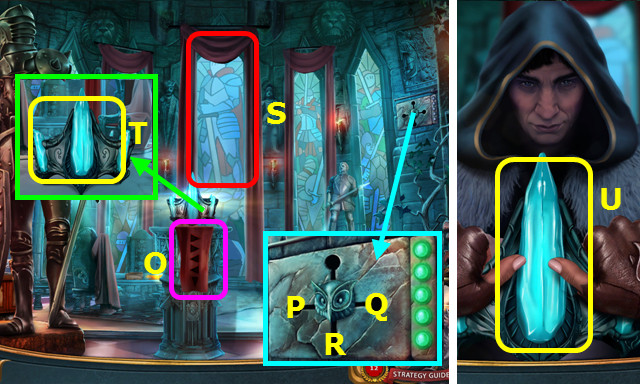
- Note the code (O).
- Select Q-Q-P-P-R.
- Play the HOP; pull the lever (S).
- Select (T).
- Select the crown 3x (U).
Chapter 6: The Afterlife
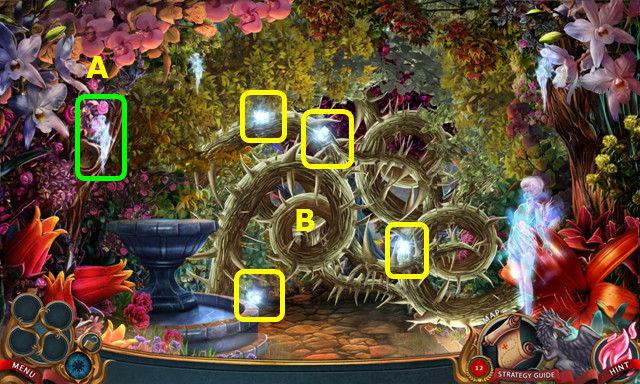
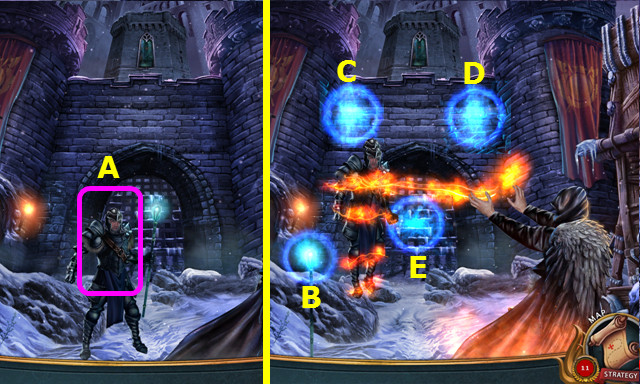
- Try to walk forward.
- Select (A).
- Select each of the 4 moving Fairies (B).
- Walk forward.
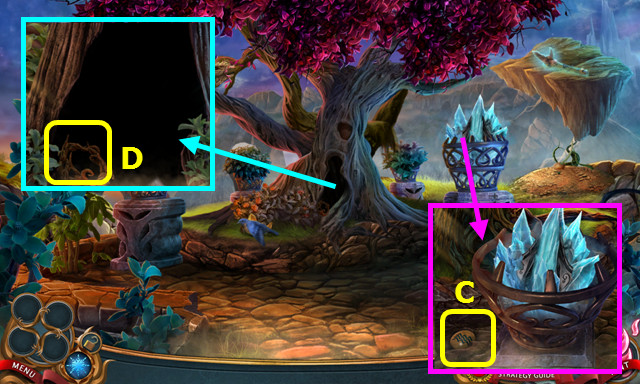
- Take the WATER SYMBOL (C).
- Select (D).
- Walk down.
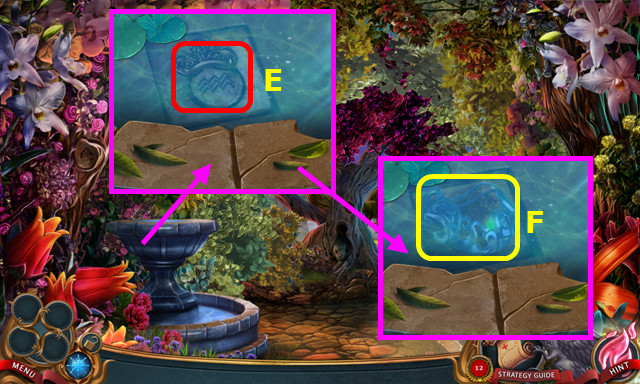
- Use the WATER SYMBOL (E).
- Take the NECKLACE OF CUNNING (F).
- Go forward.
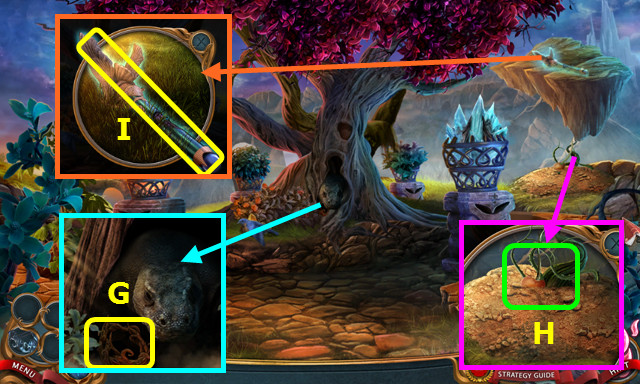
- Use the NECKLACE OF CUNNING; take the BRACELET OF GROWTH (G).
- Use the BRACELET OF GROWTH (H).
- Take the HEALING SCEPTER (I).
- Use the HEALING SCEPTER; take the EMPTY GOBLET (J).
- Walk down.
- Use the EMPTY GOBLET to take the GOBLET OF WATER (K).
- Go forward.
- Use the GOBLET OF WATER; take the RING OF FIRE (L).
- Use the RING OF FIRE; take the BROKEN CROWN (M).
- Place the NECKLACE OF CUNNING (N), the RING OF FIRE (O), the BRACELET OF GROWTH (P), and HEALING SCEPTER (Q).
- Place the BROKEN CROWN (R).
- Restore the crown (S).
- Take the CROWN OF COURAGE (T).
- Move left.
- Use the HEALING SCEPTER (A).
- Use the RING OF FIRE (B).
- Move left.
- Use the RING OF FIRE (C).
- Take (D); select (E).
- Take (F); use the NECKLACE OF CUNNING (G).
- Move left.
- Select (H).
- Use the HEALING SCEPTER and the BRACELET OF GROWTH (I).
- Select the 4 feathers (red).
- Select the 4 crowns (green).
- Select the 4 flames (white).
- Congratulations! You have completed Nevertales: Legends!
Created at: 2015-10-12