
Walkthrough Menu
- General Tips
- Chapter 1: Belle and Pierre's Home
- Chapter 2: Volcano Island
- Chapter 3: Nautilus
- Chapter 4: Dream
- Chapter 5: Oasis
- Chapter 6: Midnight Kingdom
- Chapter 7: Ritual Mountain
General Tips
- This is the official guide for Nevertales: Shattered Image.
- This guide will not mention each time you have to zoom into a location; the screenshots will show each zoom scene.
- Hidden-object puzzles are referred to as HOPs. This guide will not show screenshots of the HOPs, however, it will mention when an HOP is available and the inventory item you'll collect from it.
- This guide will give step-by-step solutions for all puzzles which are not random. Please read the instructions in the game for each puzzle.
Chapter 1: Belle and Pierre's Home
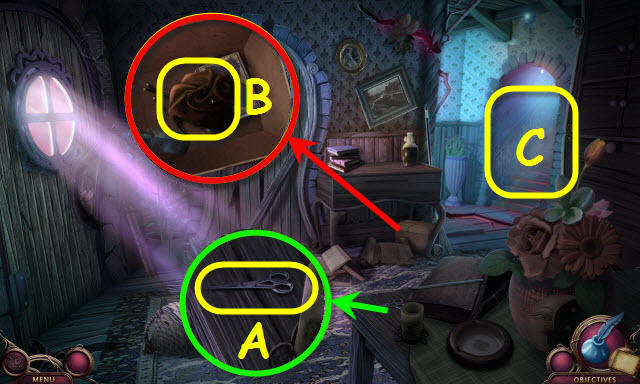
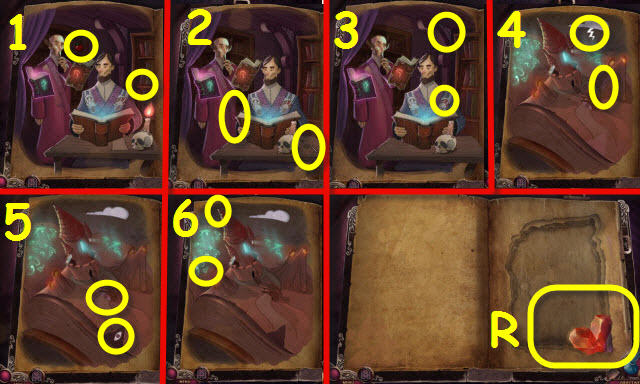
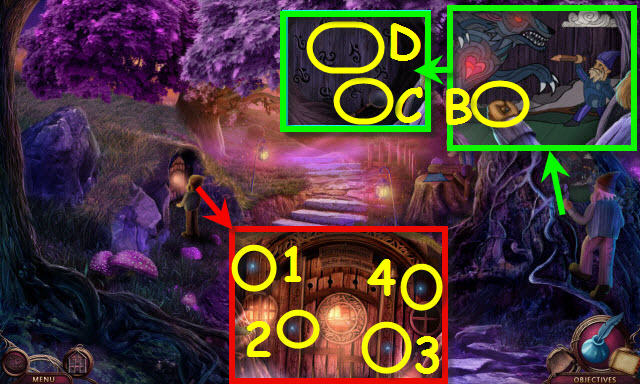
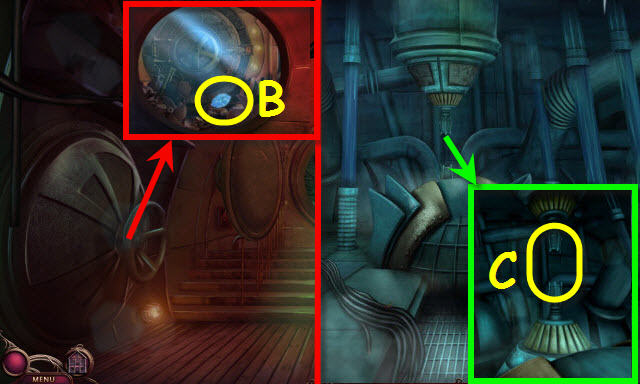
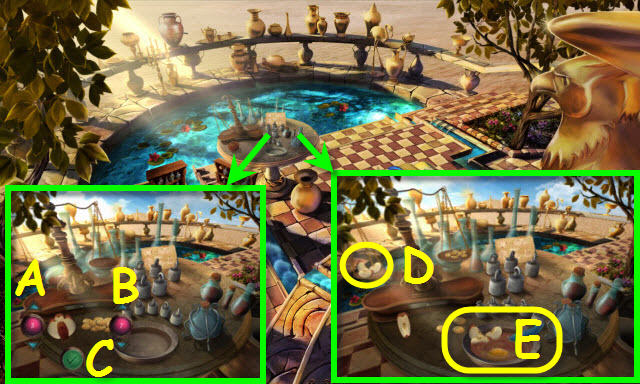
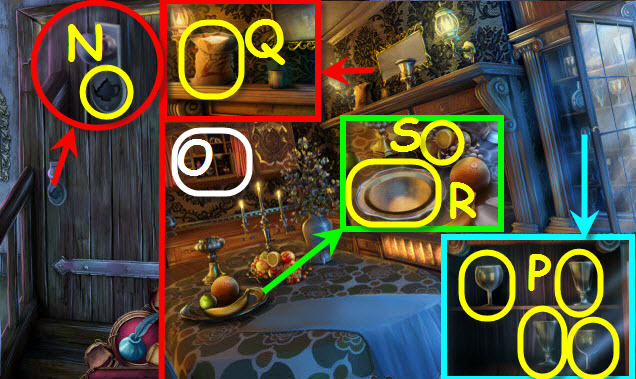
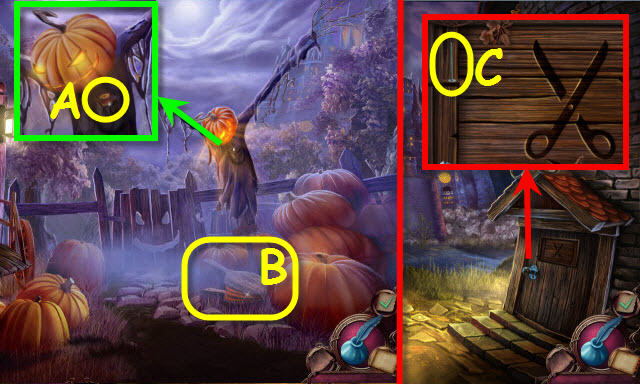
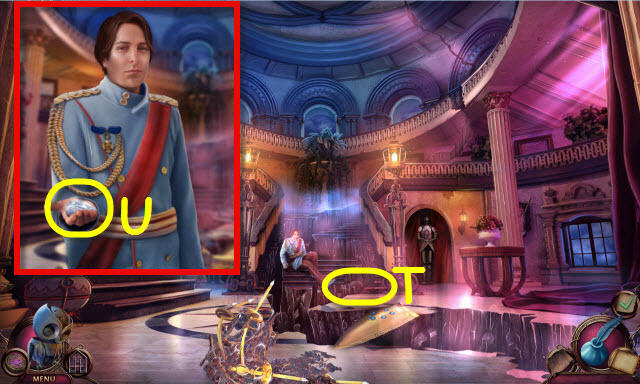
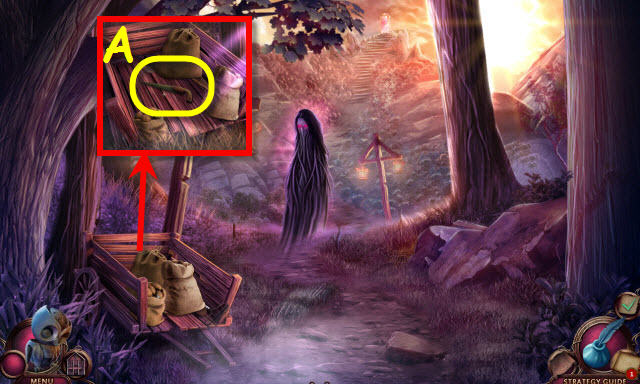
- Take the SCISSORS (A).
- Use the SCISSORS on the string and open the box; take the CLOTH (B).
- Go up (C).
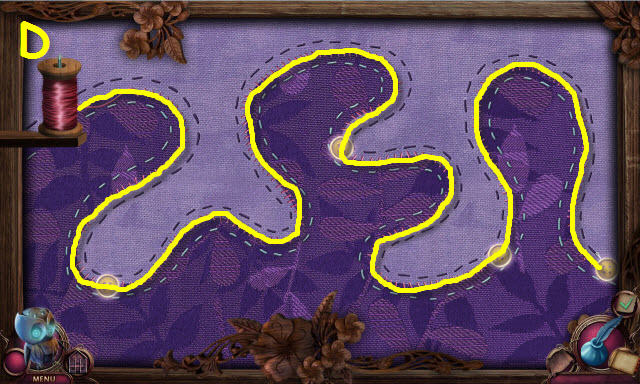
- Remove the picture; use the CLOTH three times to get a clue (D).
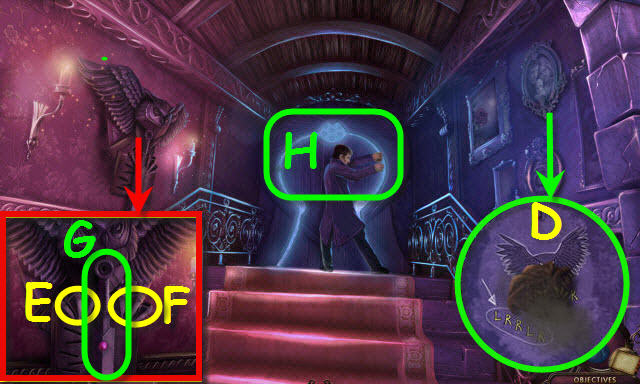
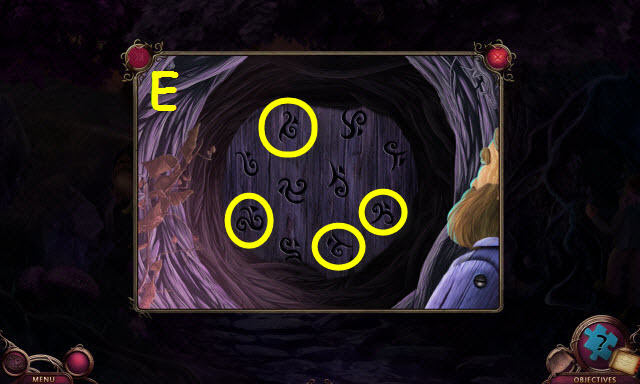
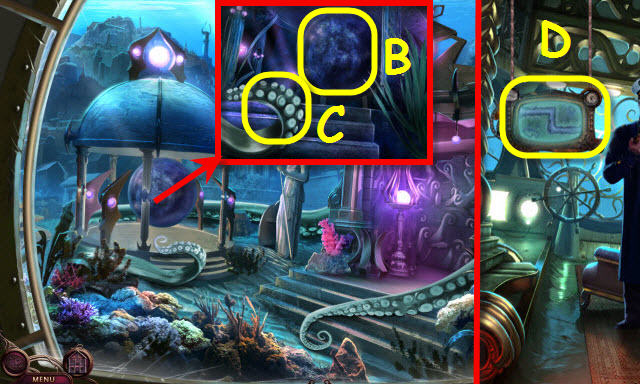
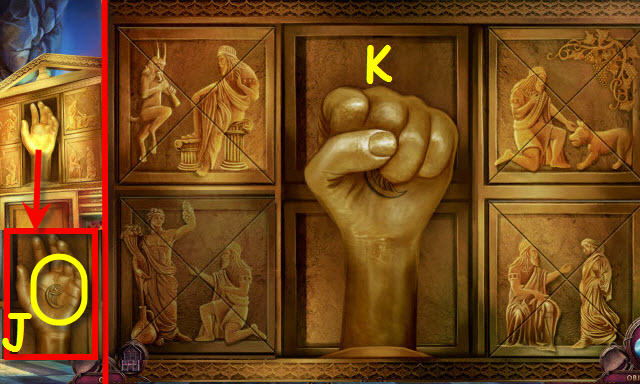
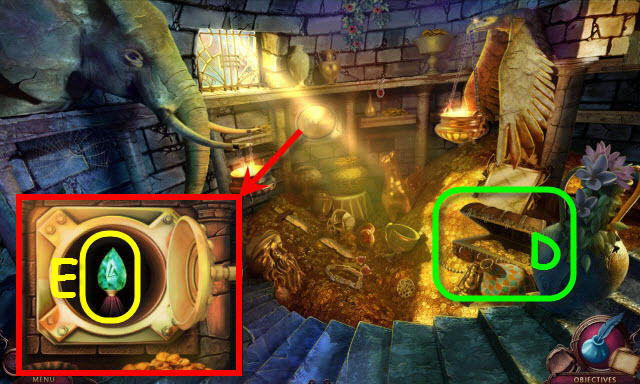
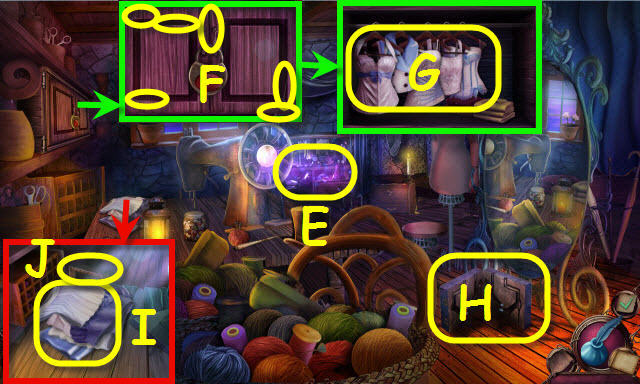
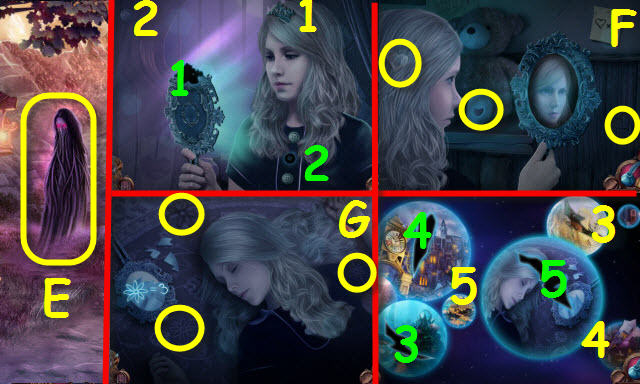
- Select the claws E-Fx2-E-F; take the sword (G).
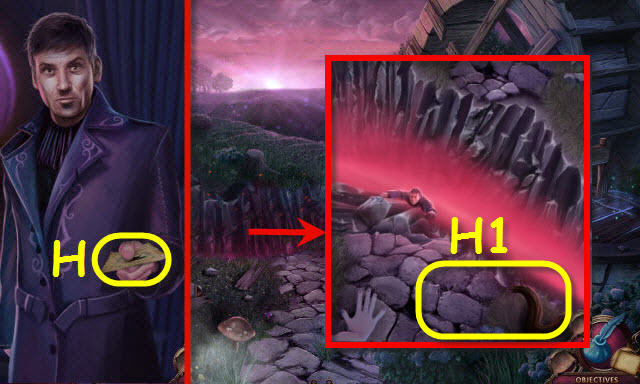
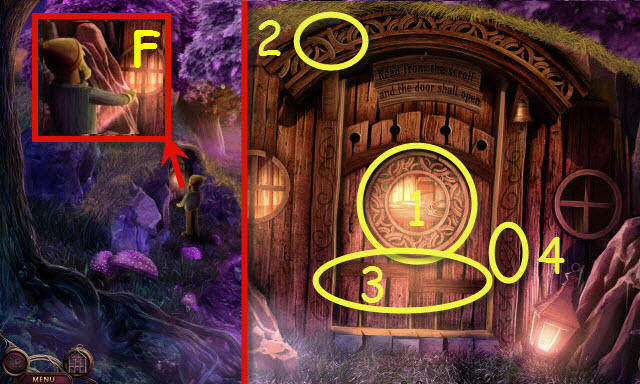
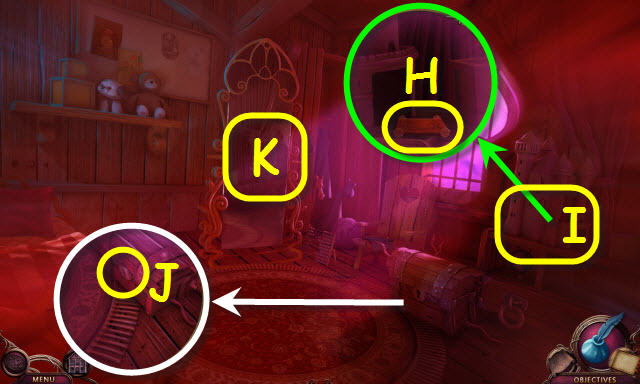
- Go forward; select the door 3x (H).
- Back out twice.
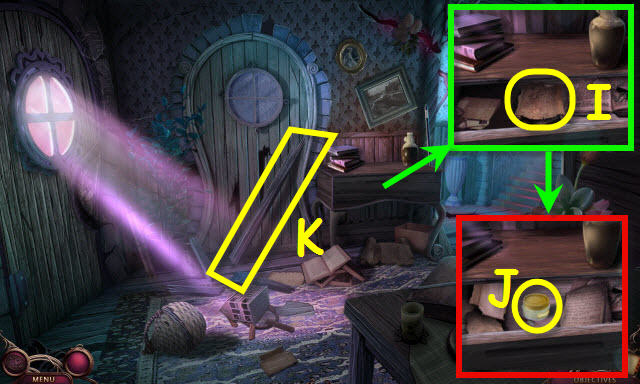
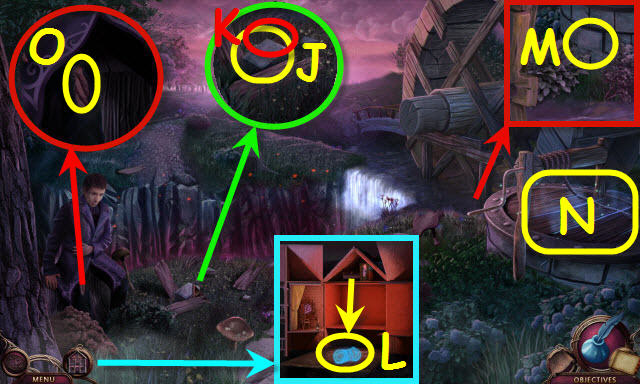
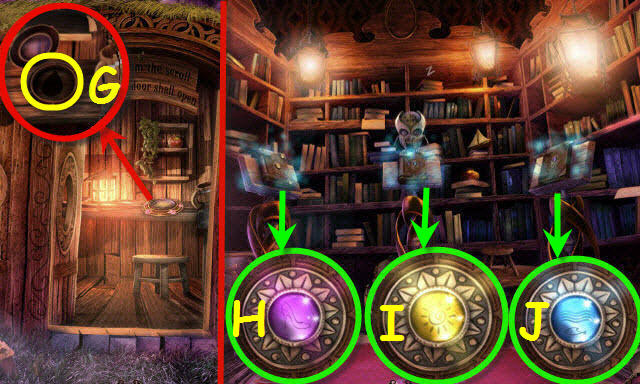
- Open the drawer; take the map (I) which is added to your toolbar.
- Move the papers; take the GLUE (J).
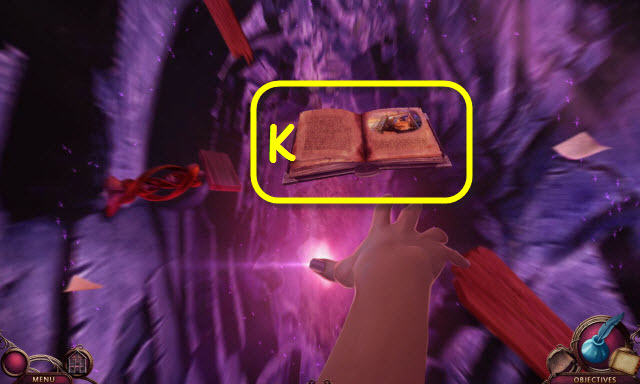
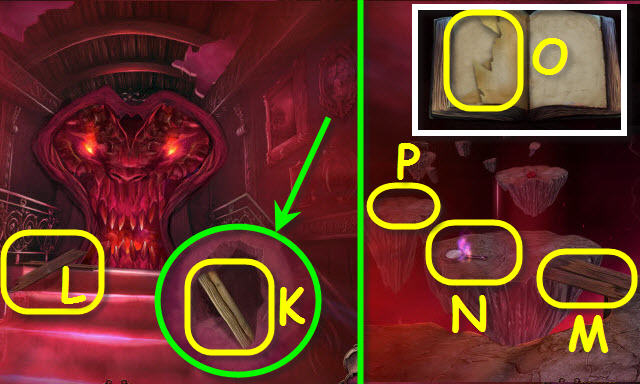
- Take the PLANK (K) and open the door.
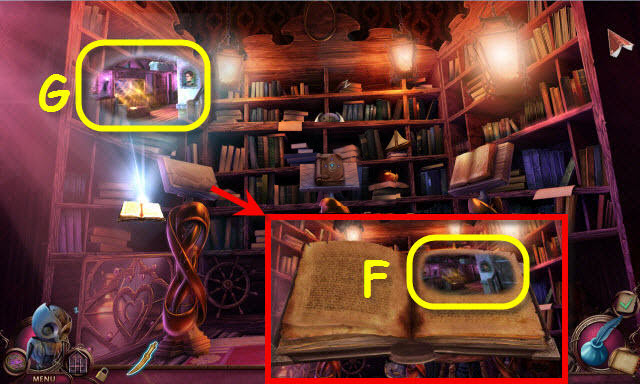
- Go forward.
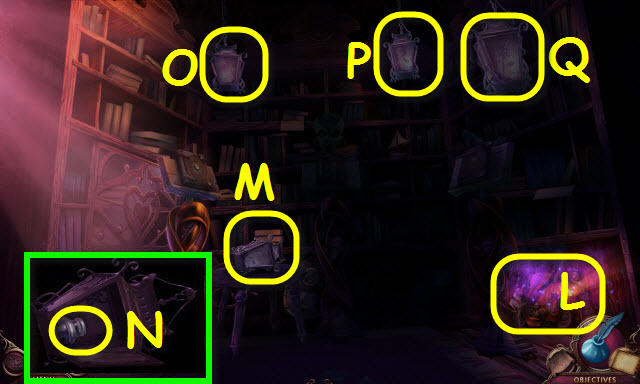
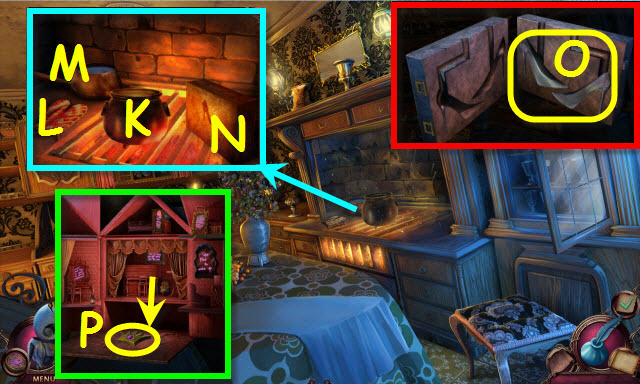
- Play the HOP (L) to receive a CANDLE.
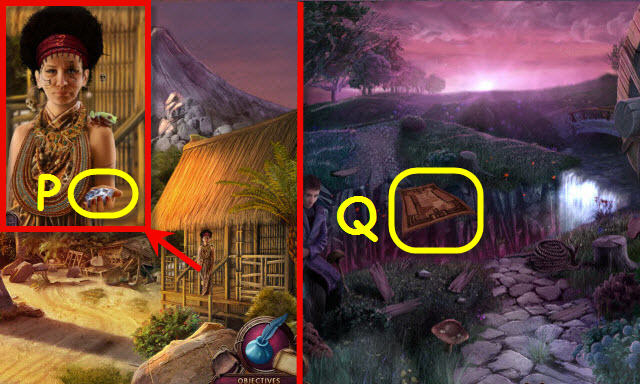
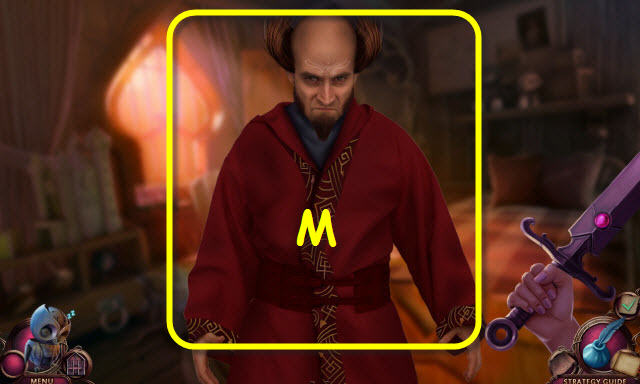
- Take the BROKEN LAMP (M); examine it. Open the door; take the LAMP OIL (N).
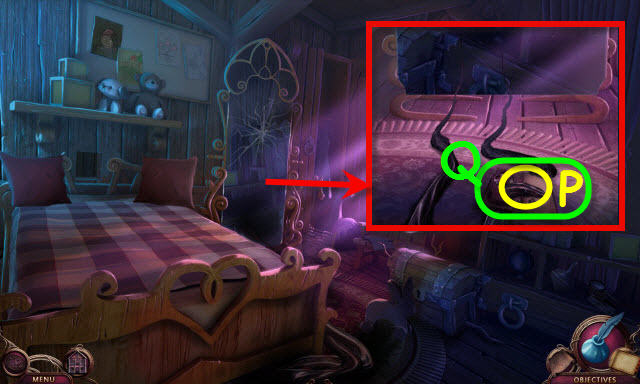
- Combine the PLANK, CLOTH, LAMP OIL and CANDLE to create an IMPROVISED TORCH. Use the IMPROVISED TORCH (O-P-Q).
- Back out.
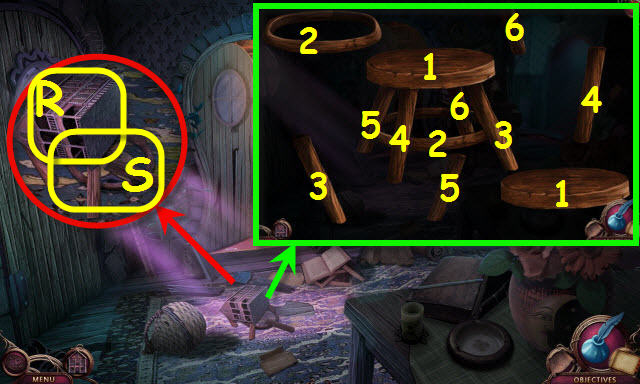
- Take the dollhouse (R) which is added to your toolbar; take the BROKEN STOOL (S) and examine it.
- Assemble the stool (1-6) and apply the GLUE; receive a STOOL.
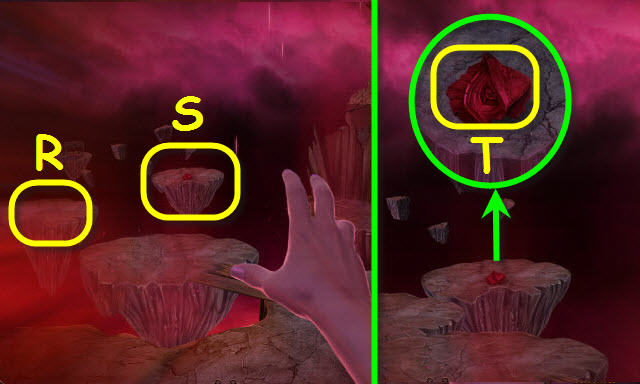
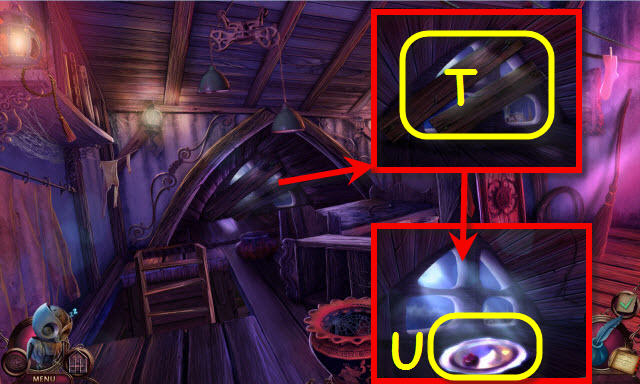
- Go forward.
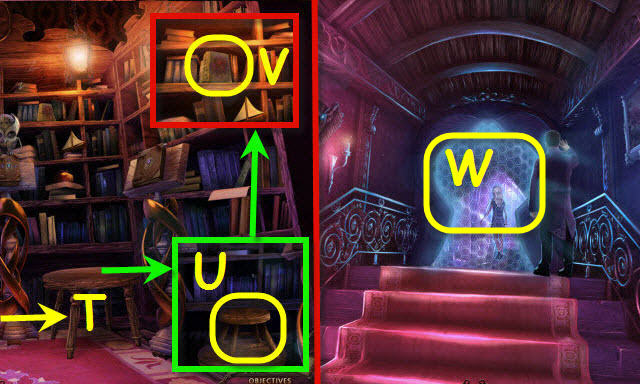
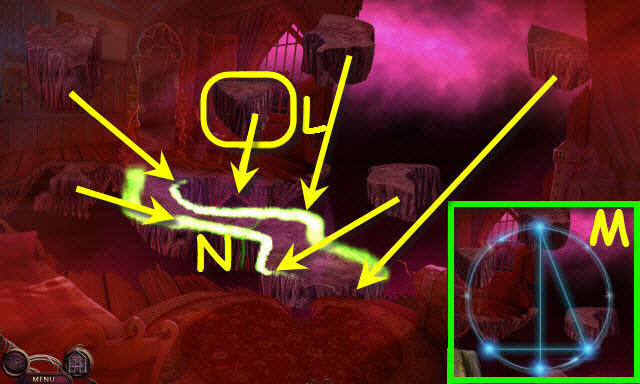
- Move the stool (T).
- Place the STOOL (U) and go up.
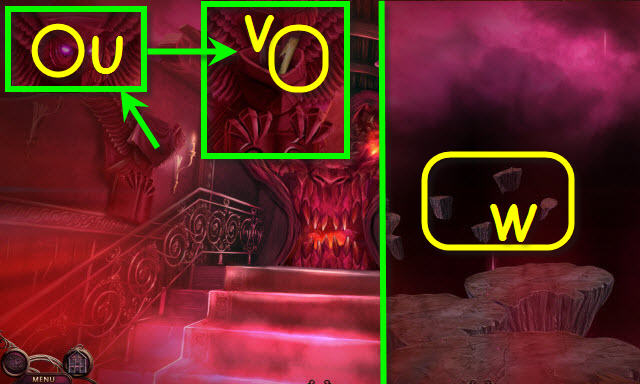
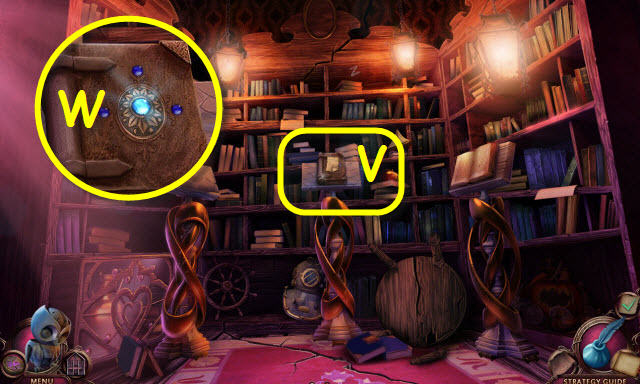
- Take the SPELLBREAKER BOOK (V).
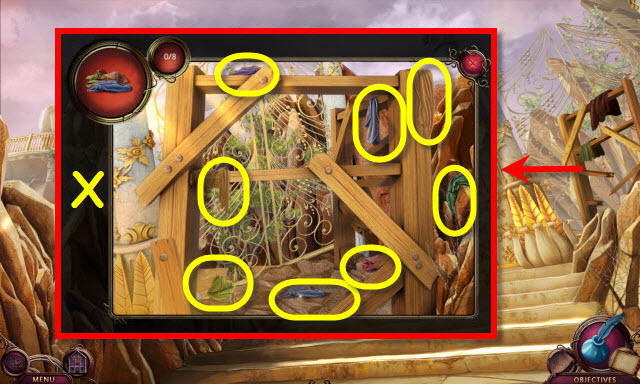
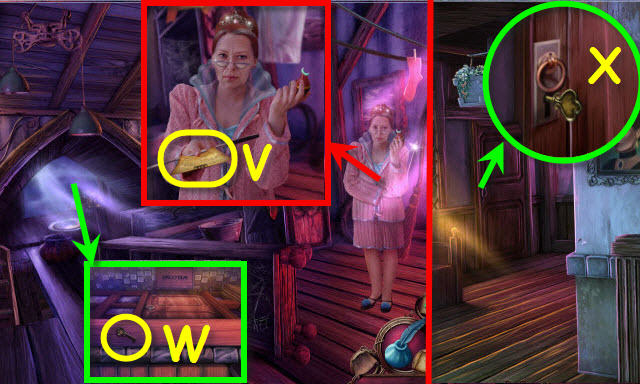
- Go to the cottage stairway.
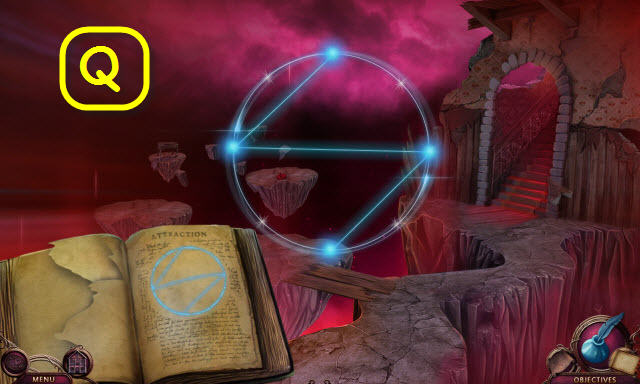
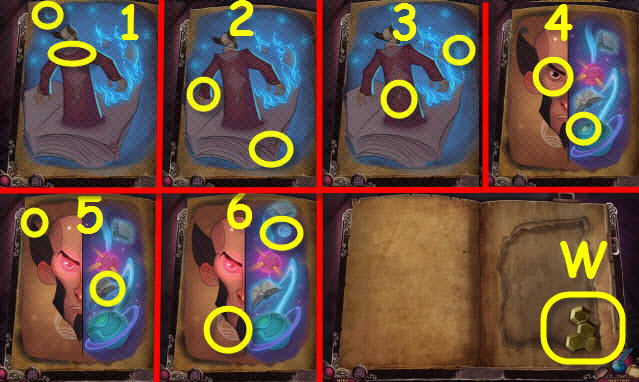
- Go forward and use the SPELLBREAKER BOOK (W) to trigger a puzzle.
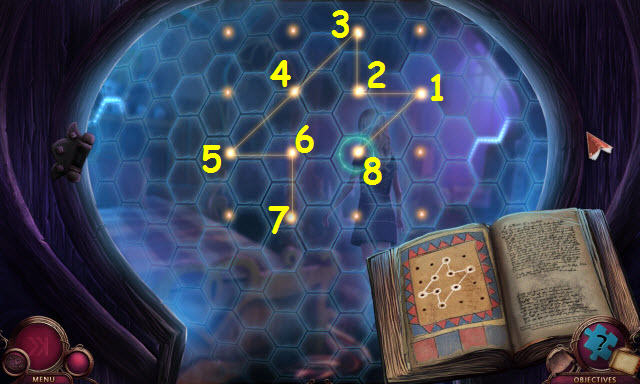
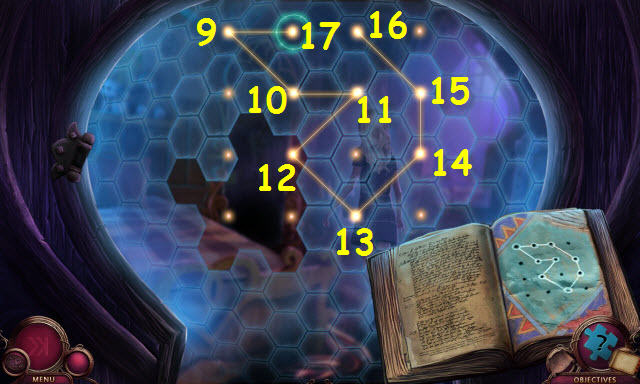
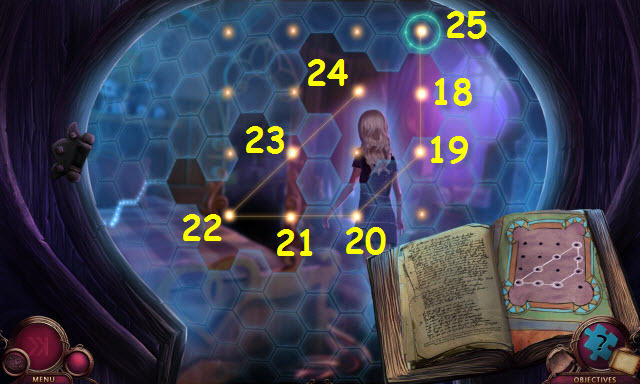
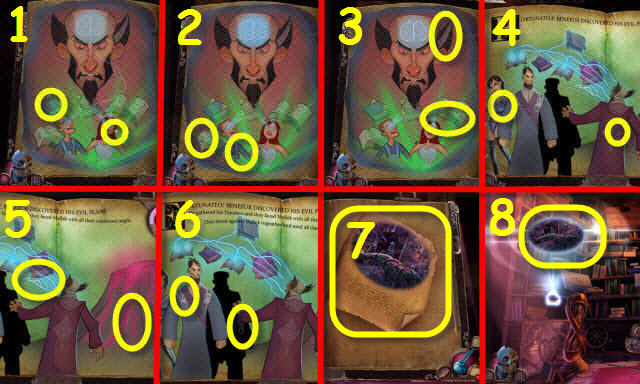
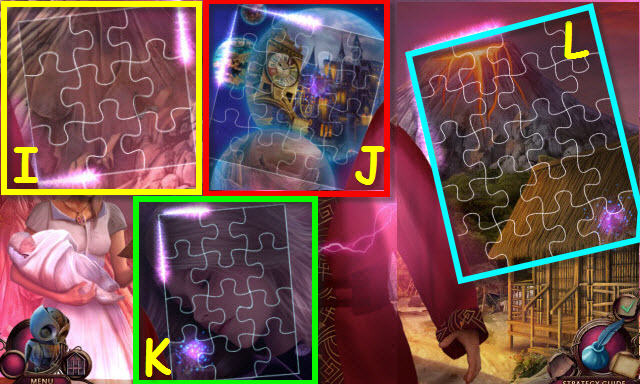
- Complete the pattern. Page lineup is random; turn the pages to see the other images.
- Solution: 1-8.
- Solution: 9-17.
- Solution: 18-25.
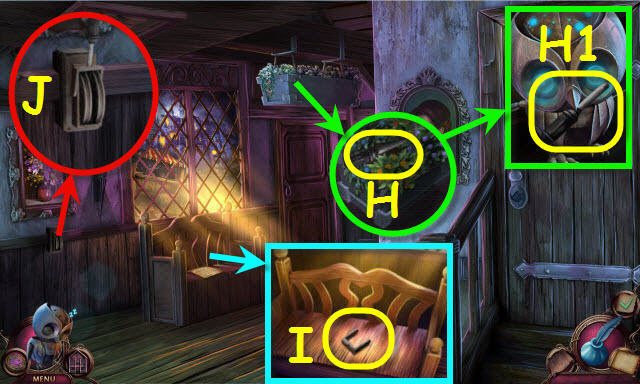
- Go forward.
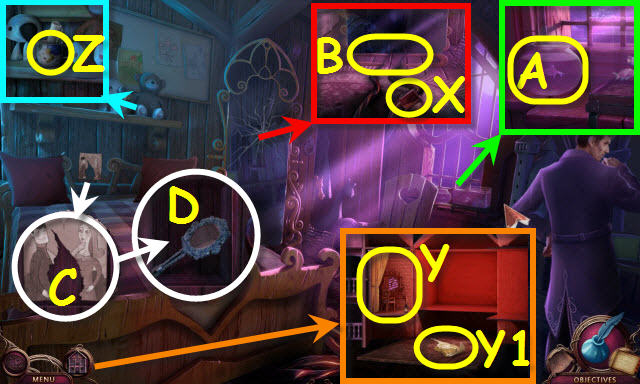
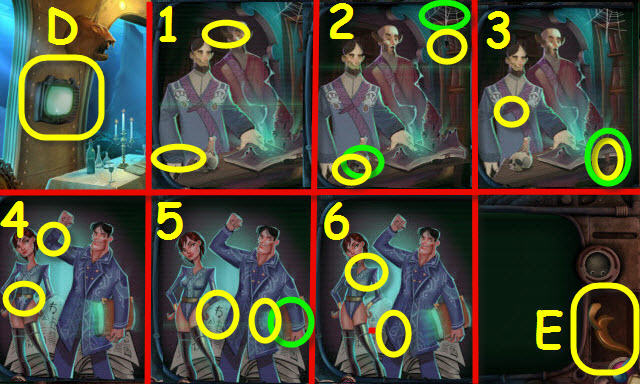
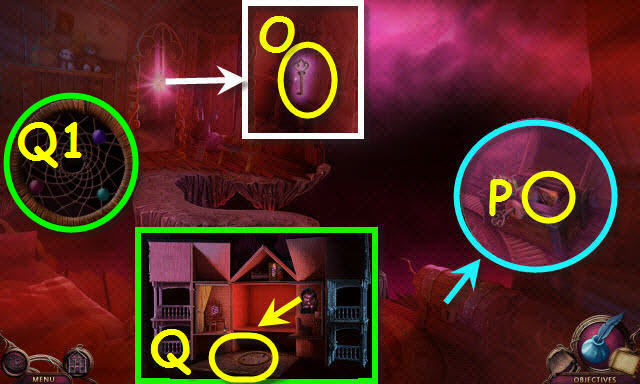
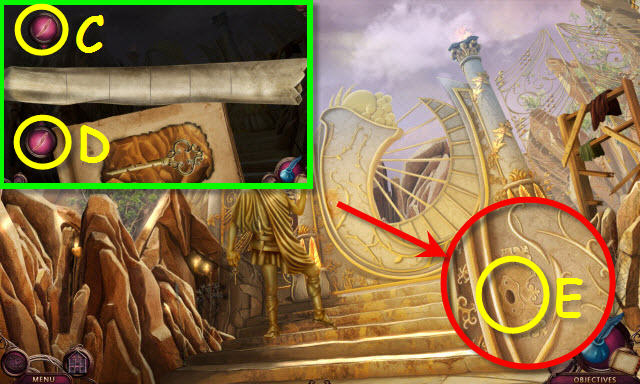
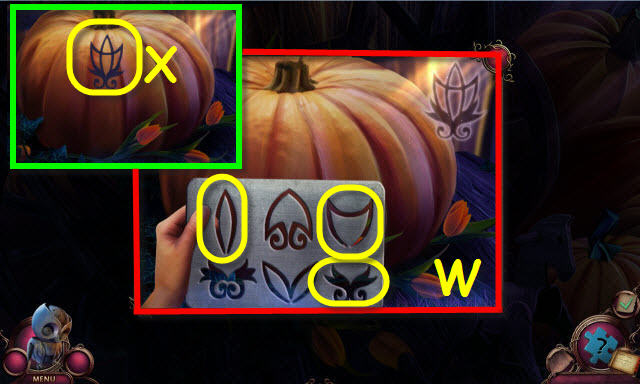
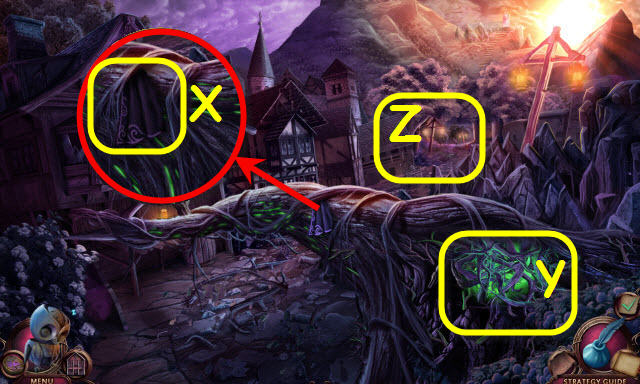
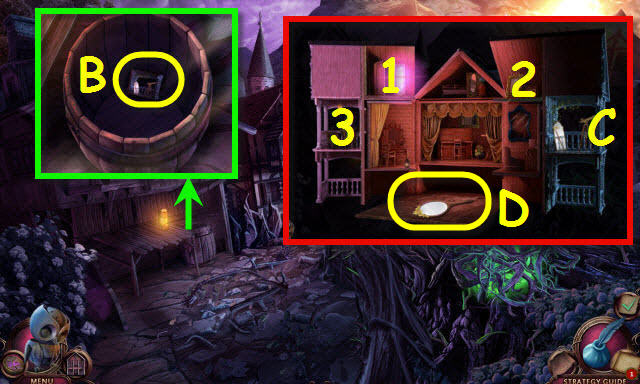
- Examine the mirror twice; take the DOLLHOUSE PIECE (X).
- Open the dollhouse and place the DOLLHOUSE PIECE (Y); take the DRAWING PIECE (Y1).
- Take the note and MUG (Z).
- Use the MUG; take the WATER (A).
- Use the WATER (B).
- Move the pillows; place the DRAWING PIECE (C).
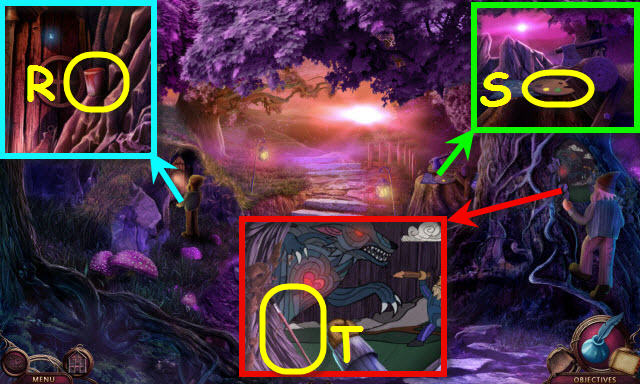
- Select the mirror (D) and play the HOP; receive an OWL FIGURINE.
- Back out twice.
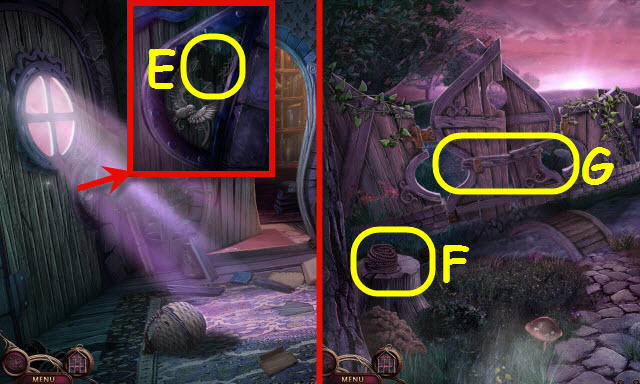
- Place the OWL FIGURINE (E); go to the backyard.
- Take the ROPE (F).
- Select the gate (G).
- Go to Alice's room.
- Speak to Pierre; take the note (H).
- Return to the backyard.
- Place the ROPE (H1); select it and go down.
- Select anywhere to trigger a puzzle.
- Find the matches.
- Layout is random (I).
- Take the BRICK (J) and DOLLHOUSE PIECE (K).
- Place the DOLLHOUSE PIECE; take the MAGIC BANDAGE (L).
- Move the plants; place the BRICK and push it (M).
- Play the HOP to receive the SHEARS (N).
- Use the MAGIC BANDAGE (O).
- Go to Alice's room.
- Use the SHEARS; take the STRANGE SUBSTANCE (P).
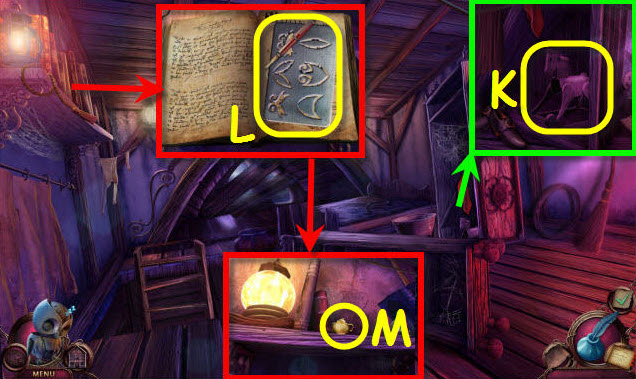
- Examine (Q) to trigger a puzzle.
- Move the items to find the images and turn the pages (1-6).
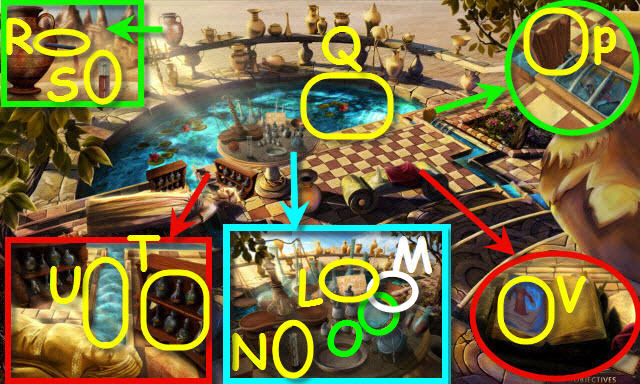
- Take the HEART-SHAPED GEM (R).
- Go to the library.
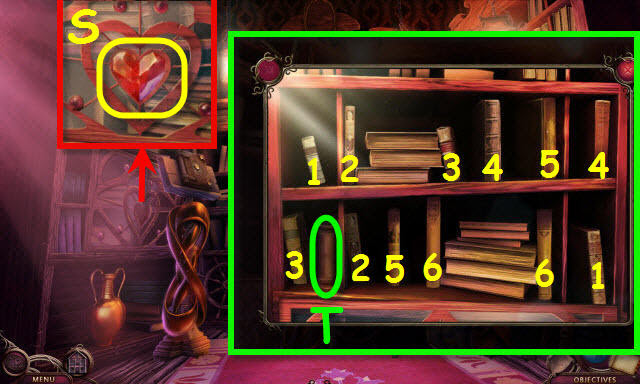
- Place the HEART-SHAPED GEM and select it to trigger a puzzle (S).
- Find the matches (1-6).
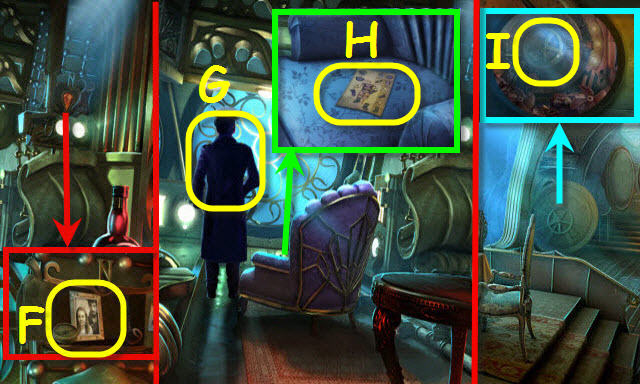
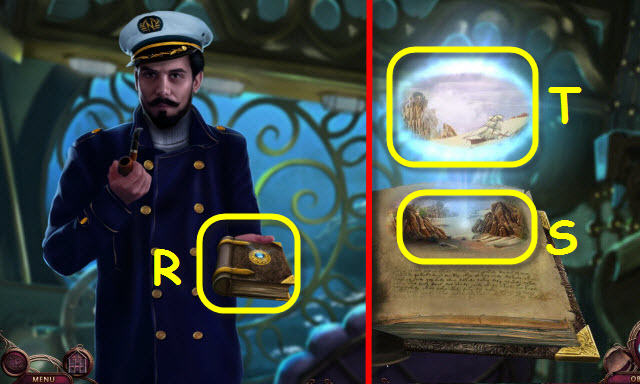
- Select the book (T).
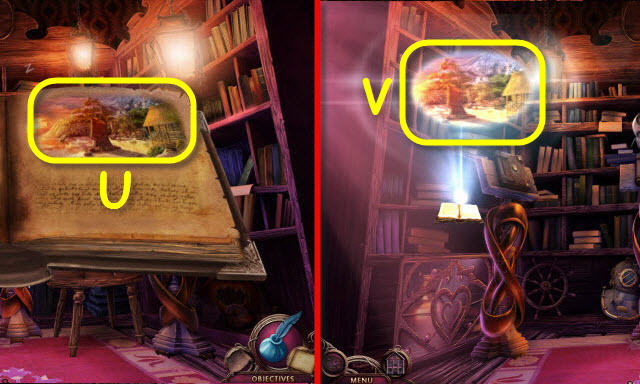
- Open the book and turn the pages; select the photo (U).
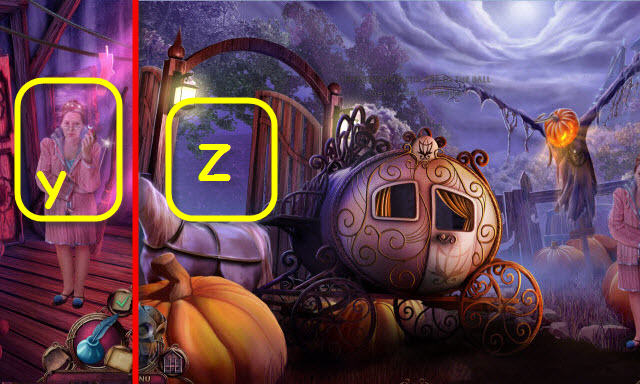
- Go through the portal (V).
Chapter 2: Volcano Island
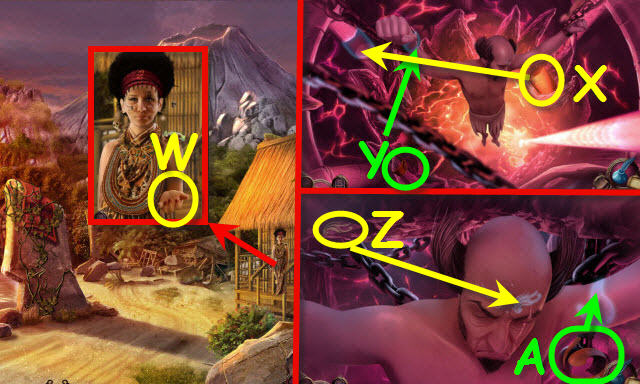
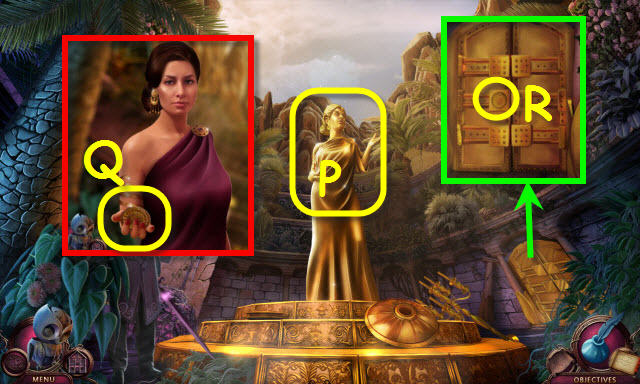
- Speak to Maria; give her the STRANGE SUBSTANCE (W).
- Place the pieces (X-Y); select anywhere.
- Place the pieces (Z-A); select anywhere.
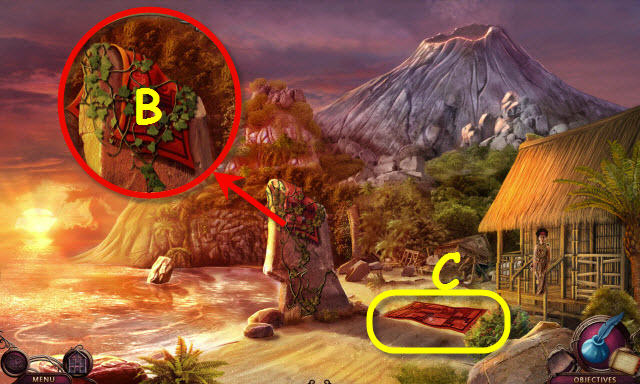
- Use the SHEARS (B).
- Select the carpet to trigger a puzzle (C).
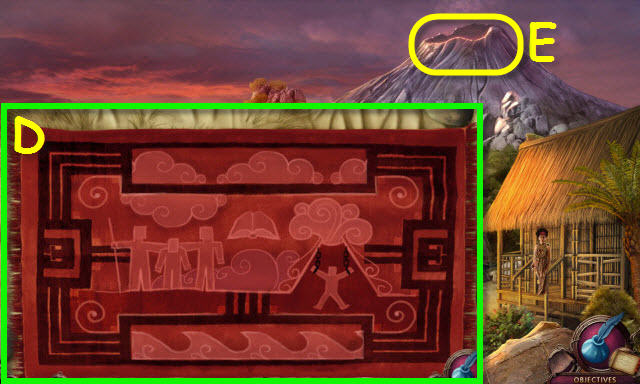
- Complete the image.
- Solution (D).
- Receive a MAGIC CARPET.
- Use the MAGIC CARPET (E).
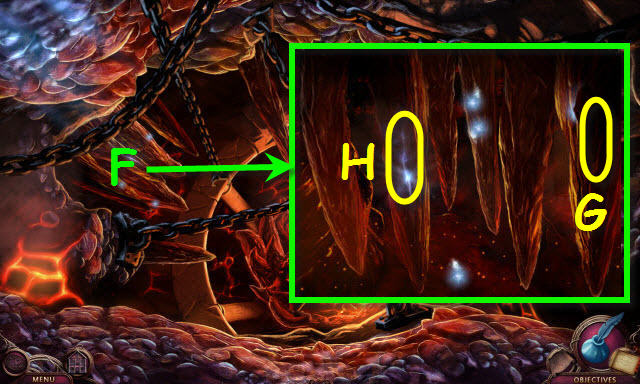
- Examine to trigger a puzzle (F).
- Remove the piece (G) and chase the particles into the crack (H).
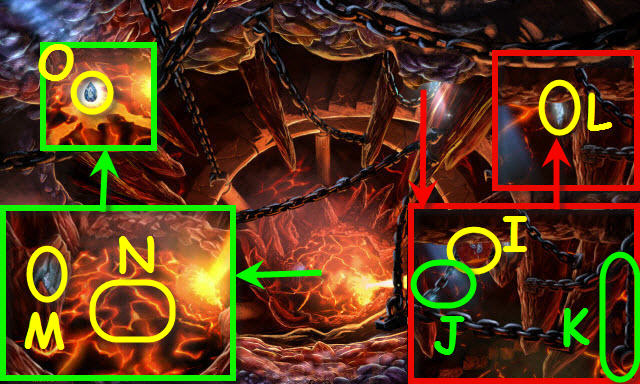
- Take the diagram (I); pull the chain (J) and then pull the chain 3x (K).
- Take the CRYSTAL SHARD 1/2 (L).
- Take the CRYSTAL SHARD 2/2 (M).
- Place the 2 CRYSTAL SHARDS (N); take the MAGIC CRYSTAL (O).
- Back out.
- Speak to Maria and give her the MAGIC CRYSTAL; take the MAGIC CRYSTAL (P).
- Go to the backyard.
- Place the MAGIC CARPET on the rift (Q); go forward.
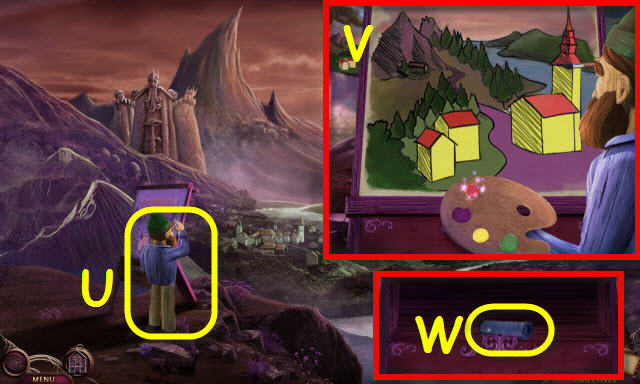
- Take the RED PAINT (R).
- Take the COLOR PALETTE (S); attempt to take the axe.
- Combine the COLOR PALETTE and RED PAINT to create a PAINTING KIT.
- Take the BRUSH (T).
- Go forward and right.
- Give the PAINTING KIT and BRUSH to the painter to trigger a puzzle (U).
- Complete the image.
- Solution (V).
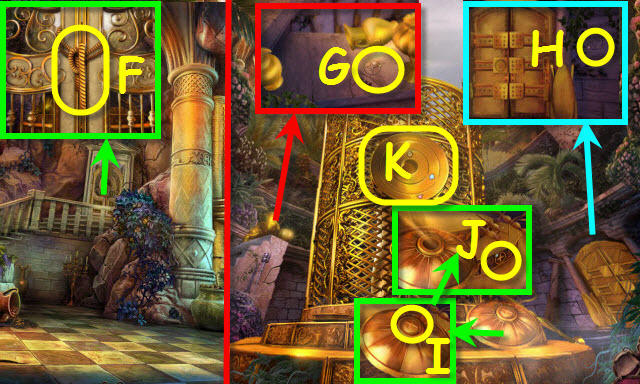
- Open the panel; take the LUMBERJACK BLUEPRINT (W).
- Back out.
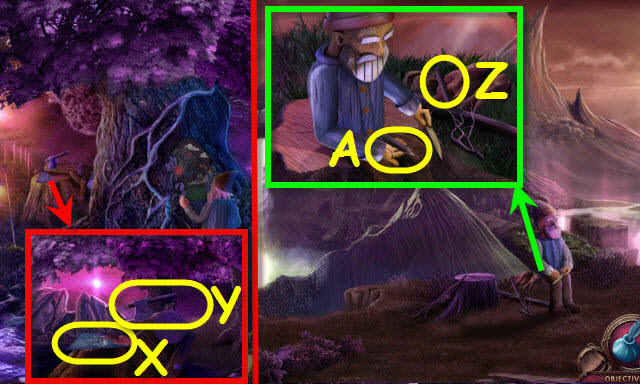
- Select the print (X) and place the LUMBERJACK BLUEPRINT on it to trigger a HOP.
- Play the HOP; take the AXE (Y).
- Go forward and left.
- Use the AXE; select the branch (Z) and take the WOODEN STAKE (A).
- Back out.
- Place the WOODEN STAKE (B).
- Take the MAGNIFIER (C).
- Use the MAGNIFIER on the 4 symbols (1-4); take them.
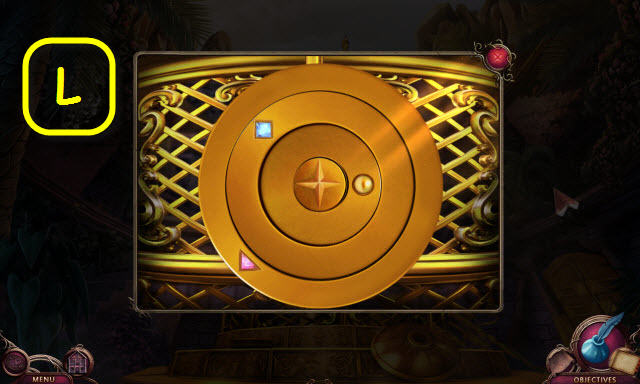
- Examine to trigger a puzzle (D).
- Select the correct symbols.
- Solution (E).
- Take the GNOME SCROLL.
- Give the GNOME SCROLL to the gnome (F).
- Find the images.
- Solution: 1-4.
- Open the door.
- Open the compartment; take the note and place the MAGIC CRYSTAL (G).
- Go to the library.
- Select the books (H-I-J).
- Select the book 3x (K).
Chapter 3: Nautilus
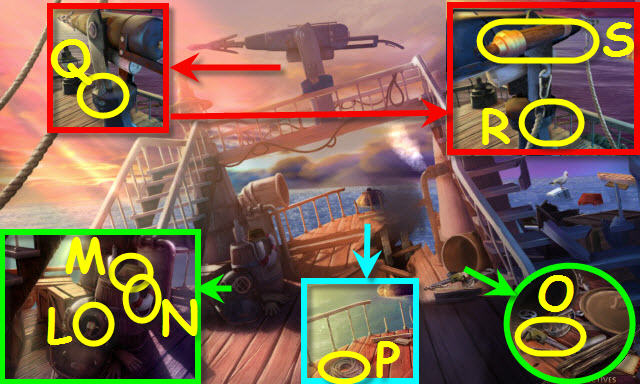
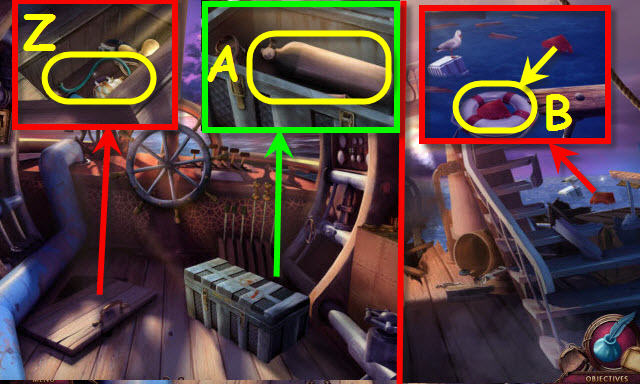
- Attempt to go forward.
- Open the faceplate; take the SPYGLASS (L).
- Select the book 3x (M) to receive it; take the DEFLATED LIFE RING (N).
- Take the MONKEY WRENCH (O).
- Take the ROPE (P).
- Use the MONKEY WRENCH (Q) and select the harpoon.
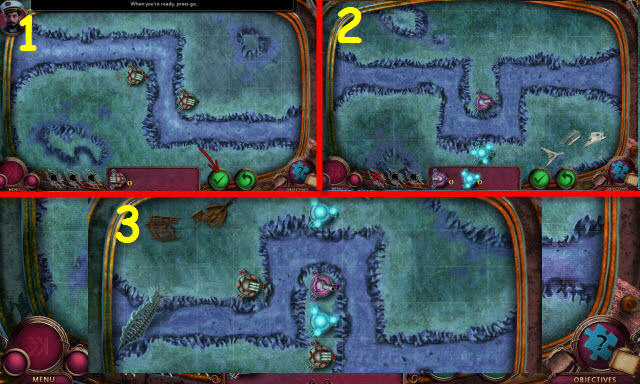
- Attach the ROPE (R) and SPYGLASS (S); look through to trigger a puzzle.
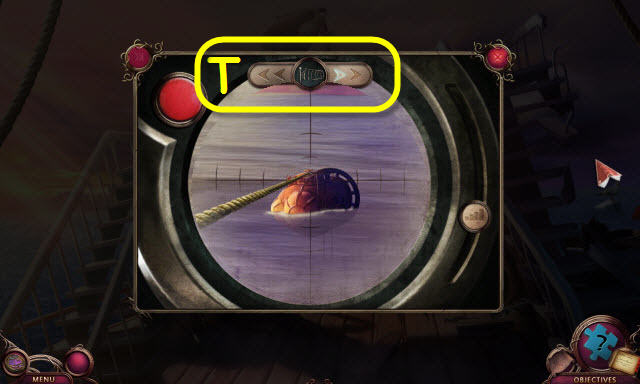
- Snag the submarine with the harpoon.
- Watch your wind speed; it varies (T).
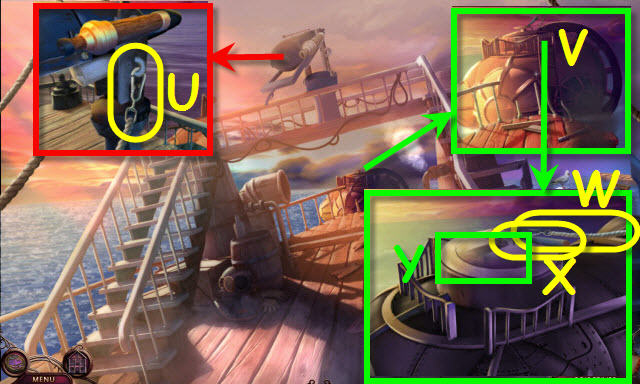
- Unhook the rope (U).
- Zoom in (V) and take the ROPE (W).
- Remove the harpoon (X); open the hatch (Y) and go down.
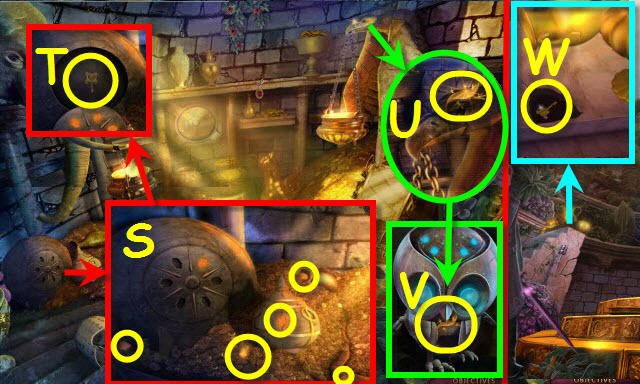
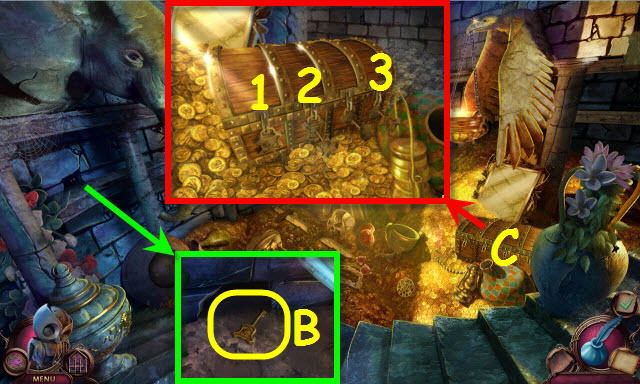
- Move the cover and items; take the OXYGEN HOSE (Z).
- Open the latches and lid. Move the items; take the OXYGEN TANK (A).
- Combine the DEFLATED LIFE RING, OXYGEN HOSE, OXYGEN TANK and ROPE to create a LIFE BELT WITH ROPE.
- Back out.
- Use the LIFE BELT WITH ROPE on the FIRST-AID KIT (B); take it and examine it.
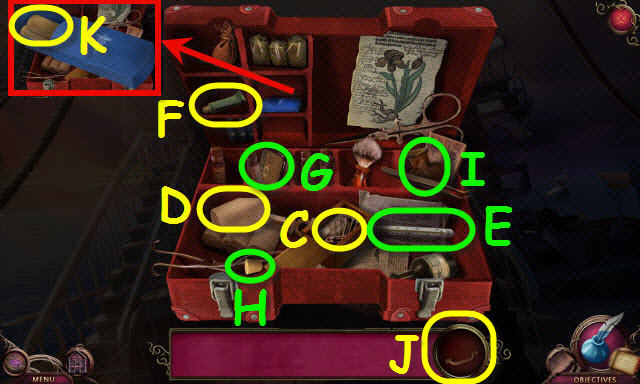
- Open the box; take the pins (C).
- Take the gauze (D); move the bottle and take the thermometer (E).
- Open the drawer; take the tube (F). Remove the panel; take the tin (G).
- Place the cork (H) on the bottle (I); take the handle (J).
- Open the container; take the ADHESIVE BANDAGE (K).
- Go forward.
- Open the panel; use the ADHESIVE BANDAGE on the wires (L).
- Play the HOP (M).

- Take the DOLLHOUSE PIECE (N).
- Place the DOLLHOUSE PIECE; take the SHIP'S WHEEL (N1).
- Read the book; take the note (O).
- Go forward.
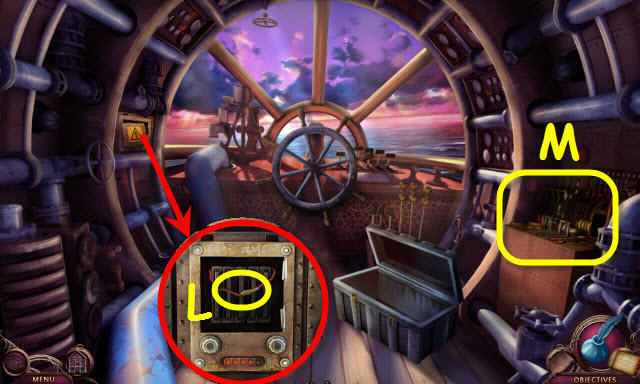
- Examine the picture and place the SHIP'S WHEEL on it; select it (P) to get a clue.
- Zoom in to trigger a puzzle (Q).
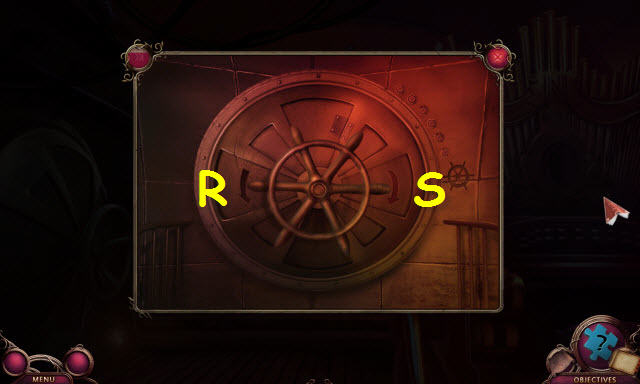
- Turn the wheel.
- Solution: R-Sx2-R-S-R.
- Open the hatch; go forward.
- Go up the stairs.
- Use the MONKEY WRENCH to get the FROZEN PART (T).
- Go to the nautilus lounge.
- Open the teapot and place the FROZEN DOOR PART in it (U). Select the fork (V) and take the DOOR PART (W).
- Return to the generator.
- Place the DOOR PART in the socket (X); turn it.
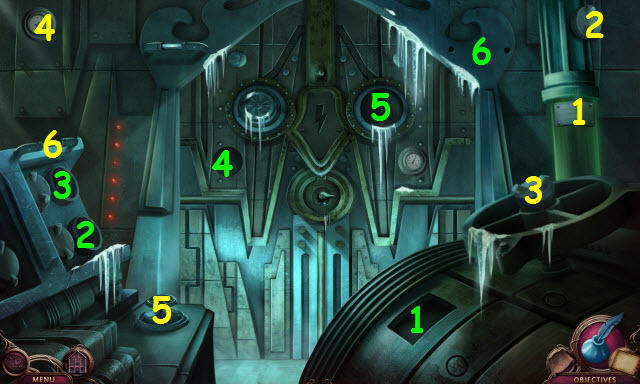
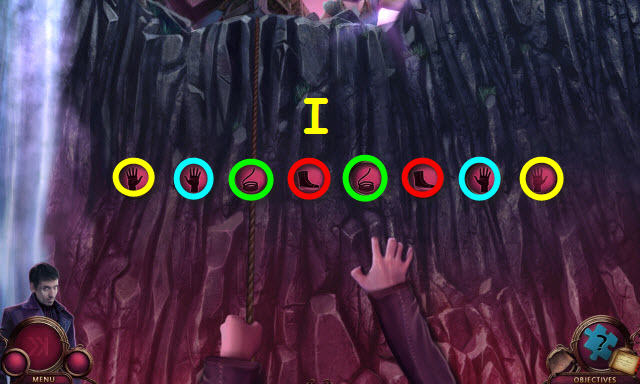
- Move the pieces numbered in yellow to the matching numbered spots in green (1-6).
- Go forward.
- Use the MONKEY WRENCH to get the DEPLETED BATTERY (Y); examine it.
- Open it and take the SPENT CRYSTAL (Z); get an EMPTY BATTERY.
- Back out twice.
- Place the SPENT CRYSTAL (A) to trigger a puzzle.
- Play the correct notes.
- Solution: G-D-A-E-B.
- Go right.
- Open the hatch; take the CHARGED CRYSTAL (B).
- Combine the EMPTY BATTERY and CHARGED CRYSTAL to create a RECHARGED BATTERY.
- Go to the generator.
- Place the RECHARGED BATTERY (C).
- Back out twice.
- Examine to trigger a puzzle (D).
- Find the images; select the areas in green to retrieve the items in yellow (1-5).
- Take the GOLDEN DOLPHIN (E).
- Go to the bridge.
- Place the GOLDEN DOLPHIN on the compartment; move the items and take the FAMILY PICTURE (F).
- Speak to the captain; give him the FAMILY PICTURE (G).
- Take the INSTRUCTIONS (H).
- Back out.
- Place the INSTRUCTIONS in the hatch to trigger a HOP (I).
- Enter the hatch and play the HOP.
- Go forward.
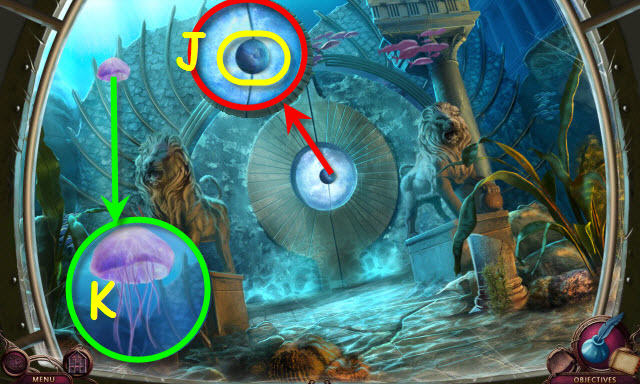
- Take the ROUGH PEARL (J).
- Take the JELLYFISH (K).
- Back out.
- Gather the plankton; use the JELLYFISH on them (L) to get a GLOWING JELLYFISH.
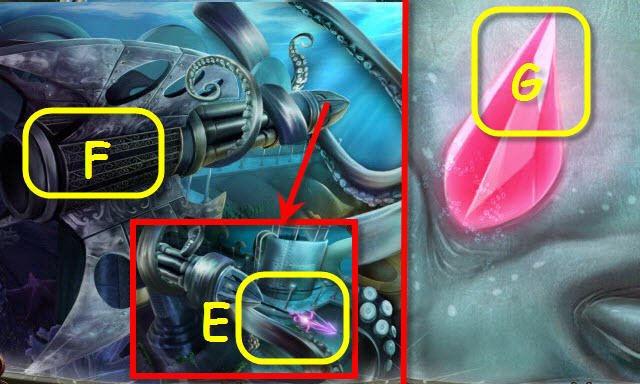
- Take the STONE EYE 1/2 (M).
- Use the GLOWING JELLYFISH on the hole; take the CRAB CLAW (N).
- Use the CRAB CLAW on the clam; place the ROUGH PEARL inside (O).
- Find the matches (color coded) and take the PERFECT PEARL.
- Go forward.

- Place the PERFECT PEARL (P).
- Move the weeds; take the STONE EYE 2/2 (Q).
- Place the 2 STONE EYES (R-S).
- Go forward.
- Select the TRIDENT 3x to receive it (T).
- Take the PILE OF SHELLS (U).
- Back out.
- Use the PILE OF SHELLS twice to receive SHELL WITH ONE HOLE x2 (V).
- Use the PILE OF SHELLS twice to receive SHELL WITH TWO HOLES x2 (W).
- Go forward.
- Place the PILE OF SHELLS (X), the SHELLS WITH ONE HOLE (Y) and the SHELLS WITH TWO HOLES (Z).
- Play the HOP to receive an ATLANTEAN POWER (A).
- Use the ATLANTEAN POWER and TRIDENT on the sphere (B); receive a CHARGE TRIDENT.
- Use the CHARGED TRIDENT (C).
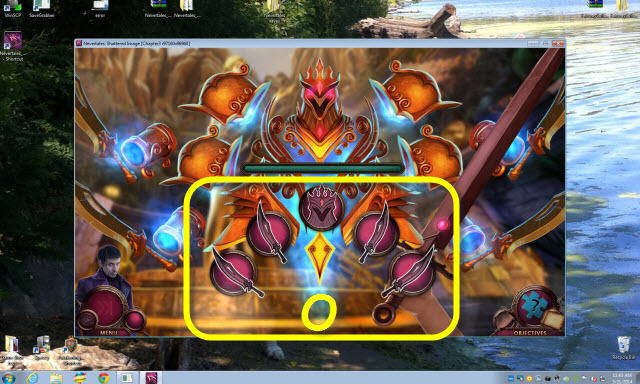
- Examine the screen to trigger a puzzle (D).
- Set the weapons.
- Solution (1-3).
- Place the CHARGED TRIDENT; select it (E).
- Fire the harpoon (F).
- Go forward.
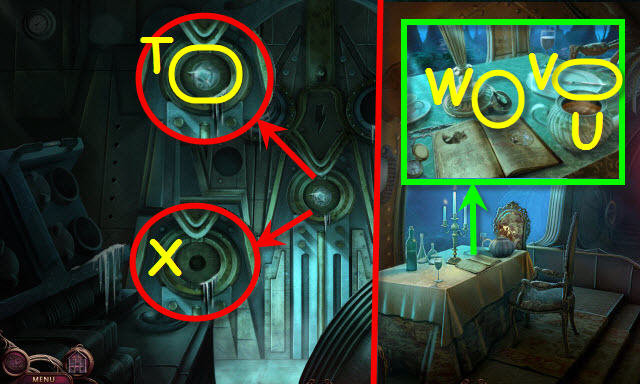
- Select the crystal 4x (G).
Chapter 4: Dream
- Select anywhere (H).
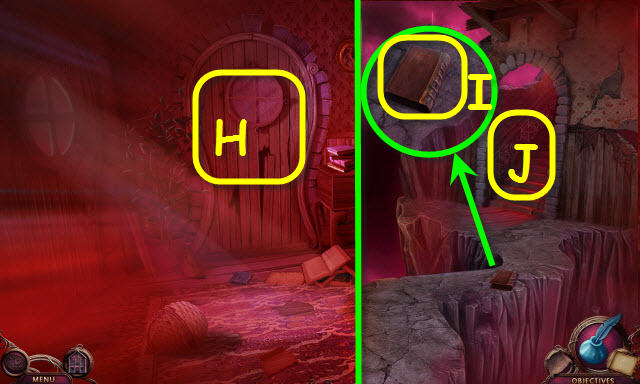
- Read the note; take the SPELL-BOOK COVERS (I).
- Go up (J); attempt to go forward.
- Select the picture twice; take the PAPERS (K).
- Take the BROKEN PLANK (L).
- Back out.
- Place the BROKEN PLANK (M).
- Play the HOP (N); receive an ATTRACTION SPELL.
- Combine the SPELL-BOOK COVERS and PAPERS; open the book and place the ATTRACTION SPELL (O) to create a SPELL BOOK.
- Use the SPELL BOOK (P) to trigger a puzzle.
- Duplicate the image.
- Solution (Q).
- Select the islands (R-S).
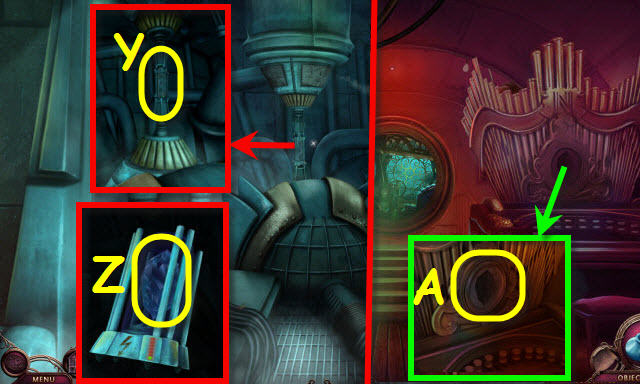
- Take the OWL PART (T).
- Back out; go right.
- Remove the cloth; place the OWL PART (U); take the RESTORATION SPELL (V).
- Combine the SPELL BOOK and RESTORATION SPELL.
- Back out; go forward.
- Use the SPELL BOOK on the fragments (W).
- Duplicate the image.
- Solution (X).
- Wave your hand to gather all the fragments (Y).
- Select the island (Z).
- Remove the panels; take the DESTRUCTION SPELL (A).
- Combine the SPELL BOOK and DESTRUCTION SPELL.
- Back out; go right.
- Use the SPELL BOOK on the beast (A1).
- Duplicate the images.
- Solution (B-C-D).
- Go forward.
- Select the buttons per the code (1-3); take the INSIGNIA SYMBOL (E).
- Back out.
- Place the INSIGNIA SYMBOL (F); take the TOY HORSE (G).
- Go forward.
- Place the TOY HORSE on the stand (H).
- Play the HOP (I) to receive a CHEST KEY.
- Use the CHEST KEY (J).
- Select the mirror (K).
- Use the SPELL BOOK on the fragments (L) to trigger a puzzle.
- Complete the image (M).
- Move the fragments (yellow arrows) to complete the path (N).
- Select the mirror three times; take the CHEST KEY (O).
- Use the CHEST KEY on the lock; move the items and take the DOLLHOUSE PIECE (P).
- Place the DOLLHOUSE PIECE in the dollhouse; take the DREAM CATCHER (Q).
- Examine the DREAM CATCHER; select the beads (Q1).
- Take the book (R).
- Open the book; flip the pages and select the picture (S).
- Go through the portal (T).
Chapter 5: Oasis
- Uncover the ribs; take the BONE (U).
- Take the BLUNT ROCK (V) and HOOKED BONE (W).
- Go forward.
- Move the loose boards.
- Collect the RAGS (X).

- Combine the RAGS (Y) and attach the HOOKED BONE to create a ROPE WITH HOOK.
- Back out.
- Attach the ROPE WITH HOOK (Z) to get a BUCKET OF OIL.
- Go forward.
- Select the key twice (A) to get a note.
- Use the BUCKET OF OIL and BLUNT ROCK on the dagger; take the GOLDEN DAGGER (B).
- Combine the BONE and GOLDEN DAGGER to trigger a puzzle.
- Duplicate the key.
- Select the following: C-D-Cx2-D.
- Receive a SKELETON KEY.
- Use the SKELETON KEY (E).
- Go forward.
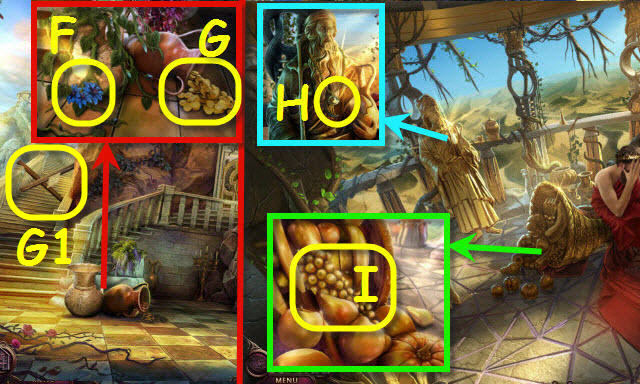
- Move the vines; take the BLUE FLOWERS (F) and SMALL GOLD COINS (G).
- Examine the boards (G1); read the note and select the boards.
- Go up the stairs.
- Take the PHILOSOPHER'S STONE (H).
- Take the GOLDEN GRAPES (I).
- Back out.
- Place the PHILOSPHER'S STONE to trigger a puzzle (J).
- Complete the image.
- Solution (K).
- Go right.
- Read the recipe (L), take the MORTAR AND PESTLE (M), BEAKER (N) ) and EMPTY BOTTLE (O).
- Pull the wood 3x (P).
- Play the HOP (Q) to receive a METAL PIPE.
- Place the METAL PIPE (R) and BEAKER; hold the beaker under the pipe until it is 2/3rds full and take the VIAL OF WINE (S).
- Examine the bottles; take the VINEGAR (T); use the EMPTY BOTTLE to get a BOTTLE OF WATER (U).
- Uncover the book, examine the photo and select it to trigger a puzzle (V).
- Move the items to find the images and turn the pages (1-6).
- Take the HONEYCOMB (W).
- Go to Midas' room.
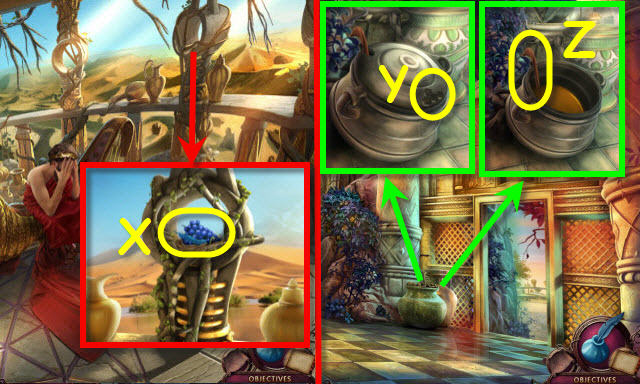
- Combine the MORTAR AND PESTLE, BLUE FLOWERS, BOTTLE OF WATER and GOLDEN GRAPES to create BLUE GRAPES.
- Place the BLUE GRAPES in the nest; take the BLUEBIRD FEATHER (X).
- Go to the temple hall.
- Place the HONEYCOMB (Y); remove the lid and take the HONEY (Z).
- Go right.
- Use the GOLDEN DAGGER on the apple and place the SMALL GOLD COINS next to it. Set the scale for 3 apples (A) and 7 coins (B); select the check mark (C).
- Select the apple (D).
- Place the VINEGAR, HONEY, VIAL OF WINE, BLUEBIRD FEATHER and PHILOSOPHER'S STONE in the bowl (E); select it to receive the CURSE-BREAKER.
- Back out.
- Use the CURSE-BREAKER and GOLDEN DAGGER on the rope (F).
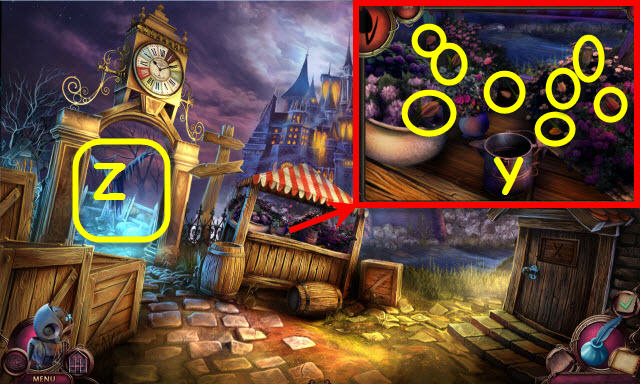
- Enter the gardens.
- Move the vases; take the clue (G). Locations are random.
- Move the vines; take the 2nd clue (H).
- Take the STAR (I), move the dome and take the 3rd clue (J).
- Place the STAR in the center to trigger a puzzle (K).
- Rotate the rings per the clues.
- Solution (L).
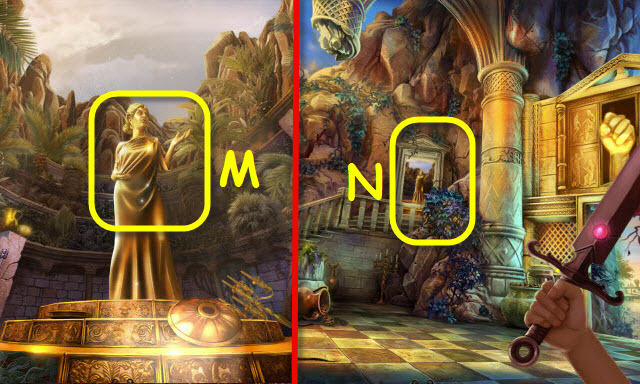
- Use the CURSE-BREAKER on the princess (M).
- Enter to trigger a puzzle (N).
- Repeat the sequence.
- The order is random (O).
- Use the CURSE-BREAKER (P); take the VAULT-DOOR KEY (Q).
- Place the VAULT-DOOR KEY (R).
- Go right.
- Select the 5 gems (S); take the VAULT KEY 1/3 (T).
- Select the GOLDEN LIZARD (U); take it (V).
- Back out.
- Place the GOLDEN LIZARD in the slot; take the VAULT KEY 2/3 (W).
- Back out.

- Select the DOLLHOUSE PIECE (X); take it (Y).
- Place the DOLLHOUSE PIECE in the dollhouse; take the CRACKER (Z).
- Go to the vault.
- Move the branch; give the CRACKER to the mouse and take the VAULT KEY 3/3 (B).
- Use the 3 VAULT KEYS (C) to trigger a puzzle.
- Arrange the keys.
- Solution: 1-3 and 1-2.
- Play the HOP to receive a VAULT HANDLE (D).
- Place the VAULT HANDLE on the vault; open it and take the catalyst (E).
Chapter 6: Midnight Kingdom
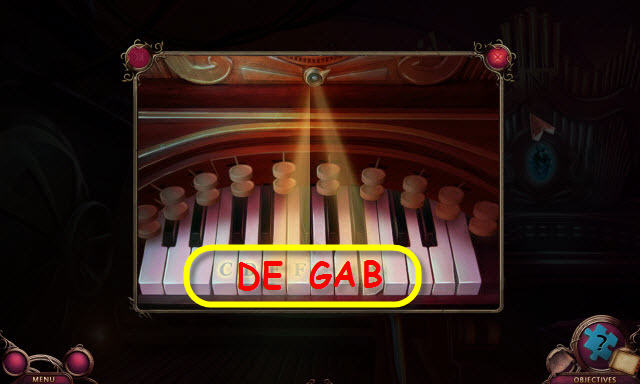
- Open the book and turn the pages; select the vision (F).
- Go through the portal (G).
- Move the flowers and select the lever twice (H); take the LEVER PART (H1).
- Read the paper; take the LEVER BASE (I).
- Combine the LEVER BASE and LEVER PART to create a LEVER.
- Place the LEVER and pull it (J).
- Go up.
- Take the WOODEN HORSE (K).
- Move the books; take the CARVING TEMPLATE (L) and recipe.
- Take the BRONZE TEAPOT (M).
- Go down the ladder.
- Use the BRONZE TEAPOT (N).
- Enter the kitchen.
- Open the curtain; play the HOP (O) to receive a CHERRY MARMALADE.
- Open the door; take the 4 CRYSTAL GLASSES (P).
- Select the sack twice; receive FLOUR (Q).
- Move the fruit; take the SILVER PLATE (R) and LEMON (S).
- Go to the attic.
- Use the GOLDEN DAGGER (T).
- Place the SILVER PLATE, CHERRY MARMALADE, FLOUR and LEMON (U).
- Take the instructions (V).
- Take the HOUSE KEY (W).
- Go down.
- Place the HOUSE KEY; turn it (X).
- Go to Midnight Street.
- Move the pot and vase; find the TULIPS (Y).
- Go left (Z).
- Open the pocket; take the THREAD (A).
- Take the BELLOWS (B).
- Back out.
- Place the THREAD on the spindle to trigger a puzzle (C).
- Follow the stitches.
- Solution (D).
- Go right.
- Open the curtain; play the HOP and receive GLOVES (E).
- Select the 6 pins (F).
- Open the door; take all 5 CORSETS (G).
- Take the SLIPPERS MOLD (H); examine it and select it.
- Take the SKIRTS (I) and DOLLHOUSE PIECE (J).
- Go to the kitchen.
- Place the CRYSTAL GLASS in the pot (K); use the BELLOWS and SLIPPERS MOLD on it.
- Select the oven mitts (L) and the pot (M); take the SLIPPERS MOLD (N).
- Examine the SLIPPERS MOLD; open the latches. Remove the GLASS SLIPPERS (O) and take them.
- Place the DOLLHOUSE PIECE; take the CROWN EMBLEM (P).
- Back out.
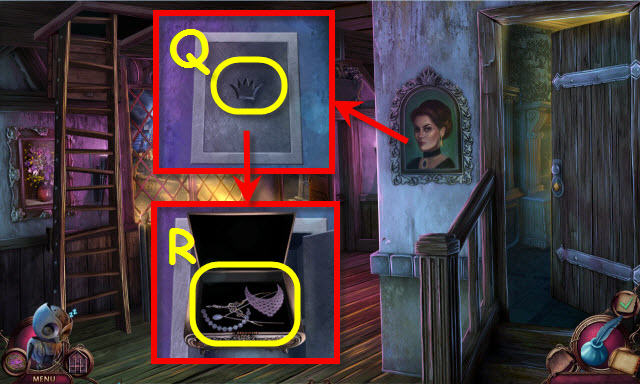
- Remove the picture and place the CROWN EMBLEM (Q).
- Remove the items and open the box; take the JEWELRY (R).
- Go to the tailor.
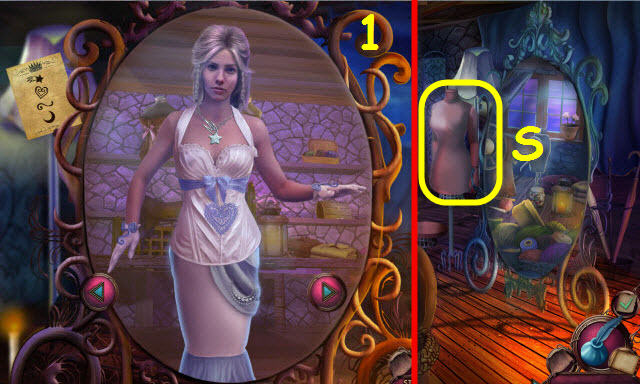
- Zoom in and place the SKIRTS, CORSETS, GLOVES, GLASS SLIPPERS and JEWELRY on the dummy (S).
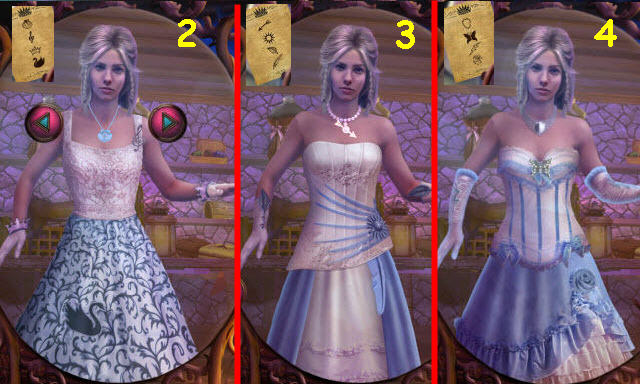
- Select the correct clothing.
- Solutions (1-4).
- Go to the pumpkin field.
- Place the WOODEN HORSE and TULIPS (U).
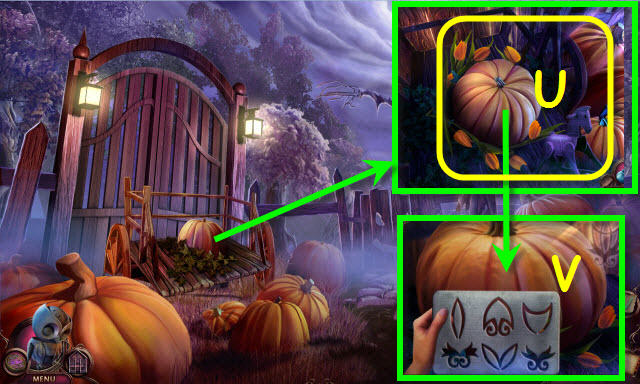
- Use the CARVING TEMPLATE to trigger a puzzle (V).
- Draw the symbol.
- Solution (W).
- Use the GOLDEN DAGGER (X).
- Go to the attic.
- Speak to Fairy Godmother (Y).
- Go to the pumpkin field.
- Select anywhere; go through the gate (Z).
- Open carriage door and exit.
- Take the DOLLHOUSE PIECE (A).
- Place the DOLLHOUSE PIECE; take the LION CREST 1/2 (B).
- Select the CHISEL (C); take it (D).
- Use the CHISEL on the panel; select the mirror (E) to trigger a HOP.
- Play the HOP to receive a LION CREST 2/2.
- Place the 2 LION CRESTS (F).
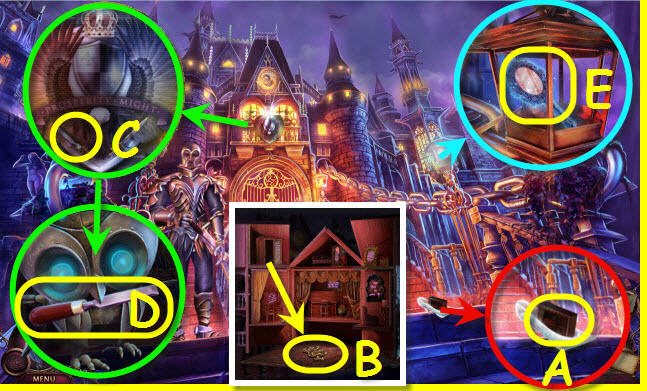
- Take the INVITATION (G).
- Give the INVITATION to the guard (H).
- Go forward.
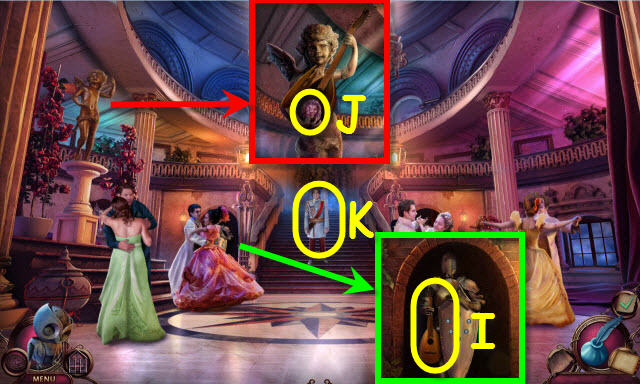
- Take the LUTE (I).
- Place the LUTE; take the ARMOR EMBLEM (J).
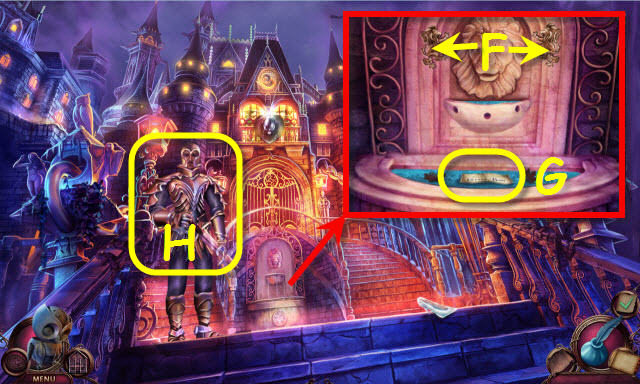
- Select the couples; speak to the Prince (K).
- Back out.
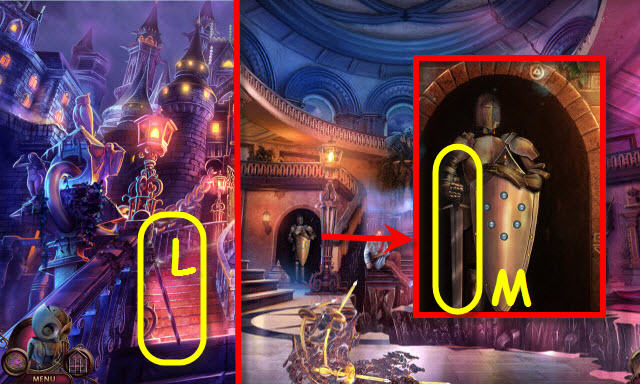
- Take the GUARD SWORD (L).
- Go forward.
- Place the GUARD SWORD (M) to trigger a puzzle.
- Match the runes.
- Solution (N).
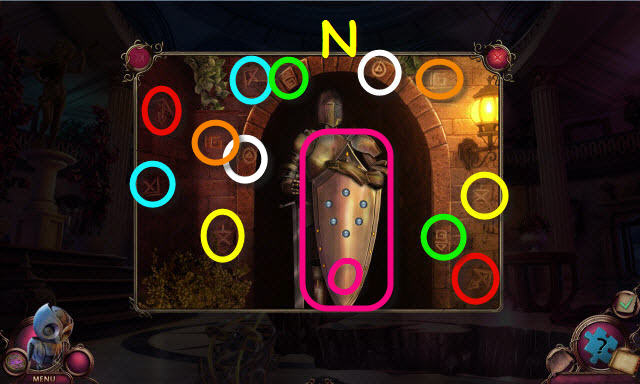
- Take the SILVER SHIELD (O).
- Place the SILVER SHIELD (P).
- Place the ARMOR EMBLEM (Q) to trigger a puzzle.
- Find the matches.
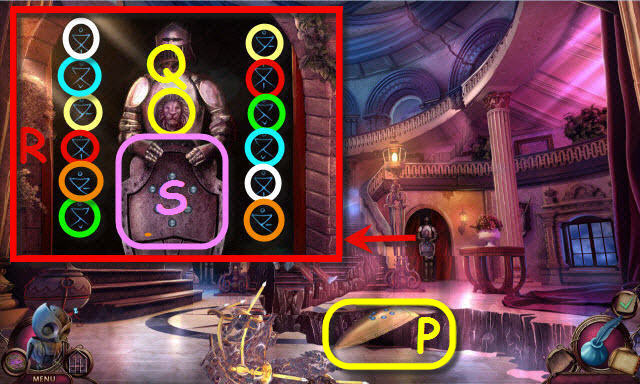
- Solution (R).
- Take the SILVER SHIELD (S).
- Place the SILVER SHIELD (T).
- Take the catalyst (U).
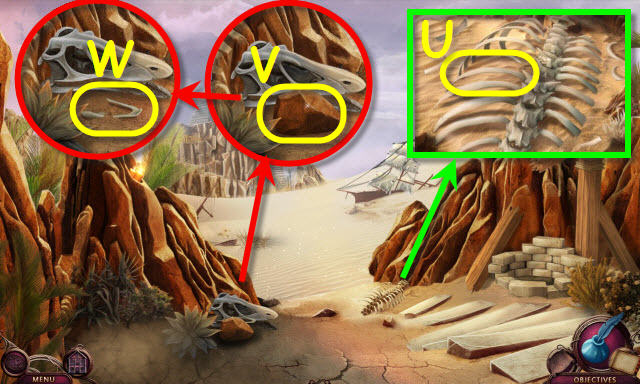
Chapter 7: Ritual Mountain
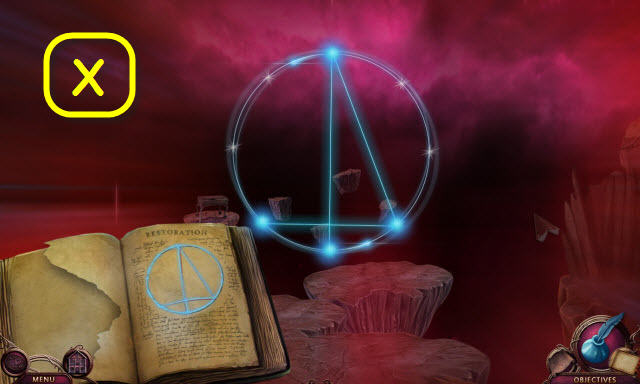
- Examine the book (V).
- Read the note; select the cover (W).
- Move the items to find the images and turn the pages (1-6).
- Select the page (7).
- Enter the portal (8).
- Examine the cloth (X).
- Play the HOP (Y).
- Go forward (Z).
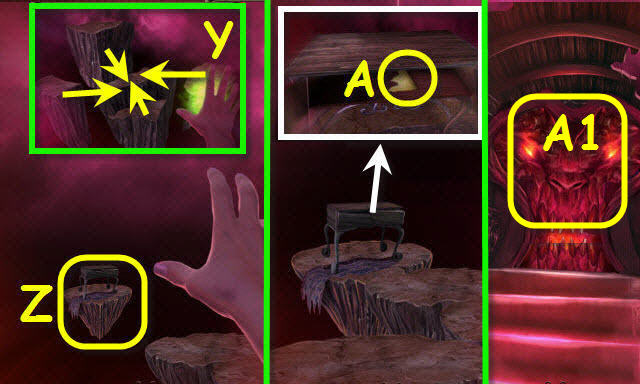
- Move the sacks; take the OLD SAW (A).
- Back out.
- Use the OLD SAW on the lid; take the DOLLHOUSE PIECE (B).
- Place the DOLLHOUSE PIECE (C); select the room in order (1-3).
- Take the TRUTH MIRROR (D).
- Go forward.
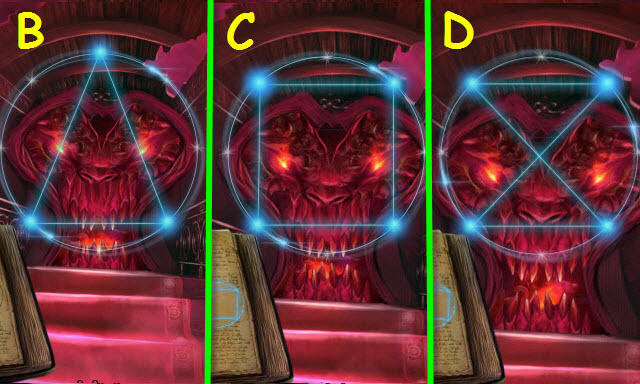
- Use the TRUTH MIRROR (E).
- Move the pieces numbered in yellow to the matching numbered spots in green (1-2 and 3-5). Find the images (F-G).
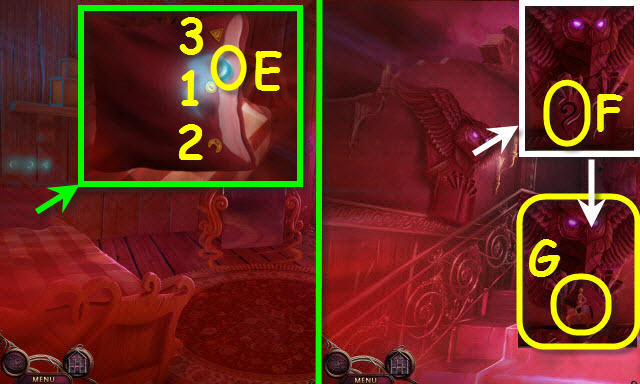
- Go forward; speak to the woman.

- Take the sword (H).
- Go forward.
- Select the man to trigger a puzzle.
- Complete the images.
- Solution (I-L).
- Select the man (M).
- Congratulations! You have successfully completed Nevertales: Shattered Image.
Created at: 2014-08-17