

Walkthrough Menu
- General Tips
- Chapter 1: Taleworld
- Chapter 2: The Casino
- Chapter 3: The Rebel Camp
- Chapter 4: Prepare for Battle
- Chapter 5: The Castle
- Chapter 6: The Tower of Power
General Tips
- This is the official guide for Nevertales: Smoke and Mirrors.
- This guide will not mention each time you have to zoom into a location; the screenshots will show each zoom scene.
- Hidden-object puzzles are referred to as HOPs. This guide will not show screenshots of the HOPs, however, it will mention when an HOP is available and the inventory item you'll collect from it.
- Some inventory items require further actions; these items are noted with a plus or circle symbol in your inventory. The guide will not instruct you to take the item from your inventory, it will only refer to the item.
- This guide will give step-by-step solutions foll puzzles which are not random. Please read the instructions in the game for each puzzle.
Chapter 1: Taleworld
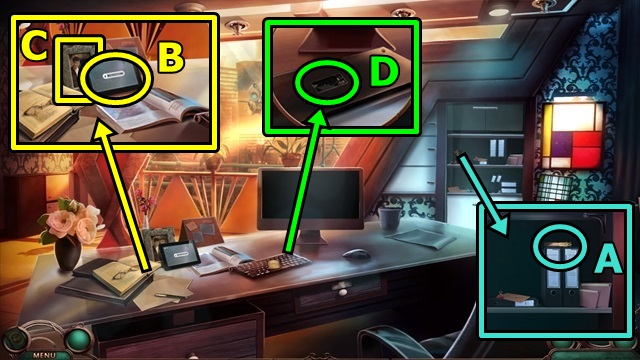
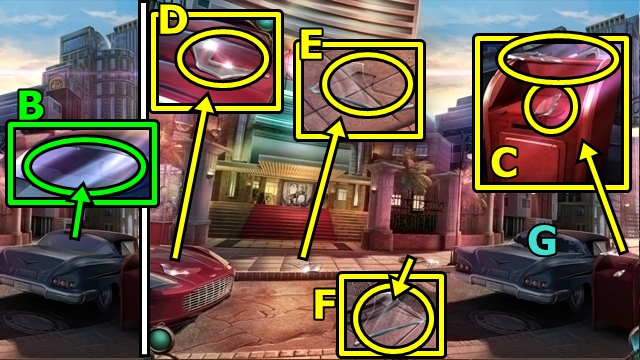
- Take the BATTERIES (A).
- Take the TABLET (B) and FRAMED PHOTO (C).
- Examine the FRAMED PHOTO (inventory); remove the borders and frame to get the password (tablet).
- Read the note; insert the BATTERIES (D); turn on the keyboard.
- Move the windows on the monitor to trigger a mini-game.
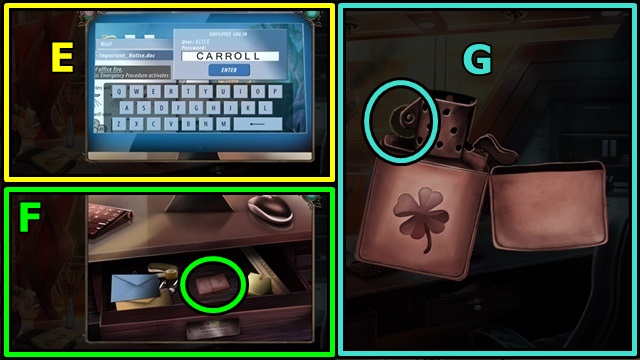
- Solution: Enter 'CARROLL' (E); select 'enter'.
- Open the drawer; move items; take the LUCKY CHARM (F).
- Open the LUCKY CHARM (inventory); flick the thumbwheel (G); receive the LIT LIGHTER.

- Use the LIT LIGHTER (H).
- Go out the window.
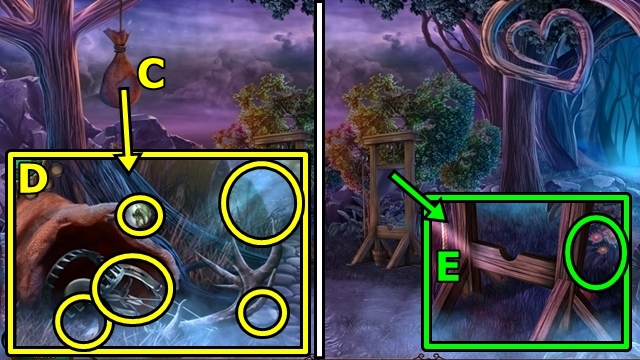
- Turn the handle (I); take the TOOLBOX KEY.
- Read the note. Use the TOOLBOX KEY (J); expand the toolbox. Open the compartments; take the SCREWDRIVER.
- Return to Alice's Office.
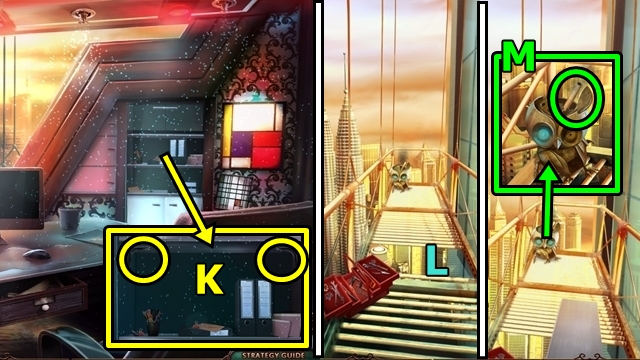
- Use the SCREWDRIVER (K); take the SHELF.
- Return to the Scaffolds.
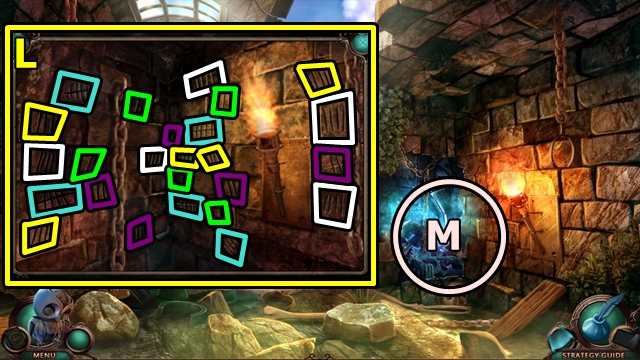
- Place the SHELF (L).
- Move towards Gears.
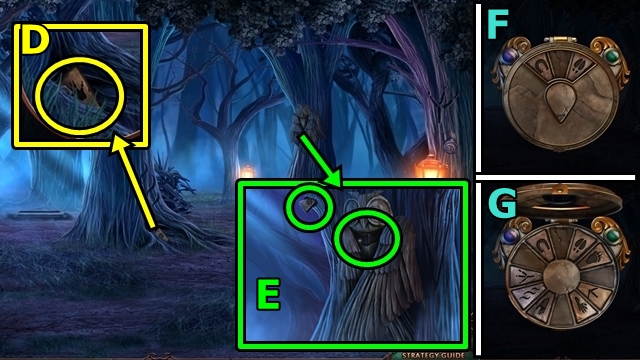
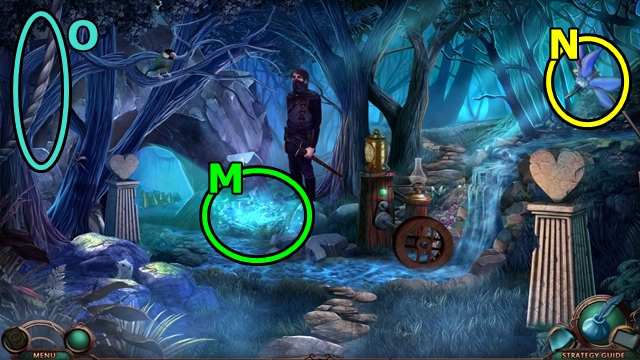
- Remove the pipe (M); close the lid. Take GEARS.
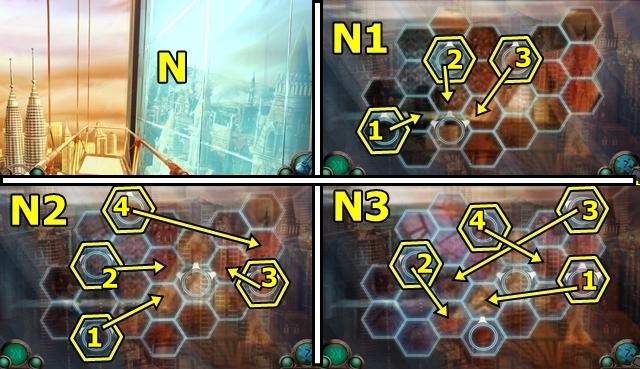
- Focus on the mirrored building (N) to trigger a mini-game.
- Solution: (N1, N2, N3).
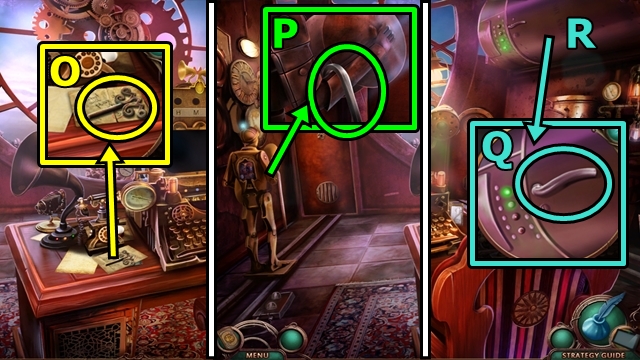
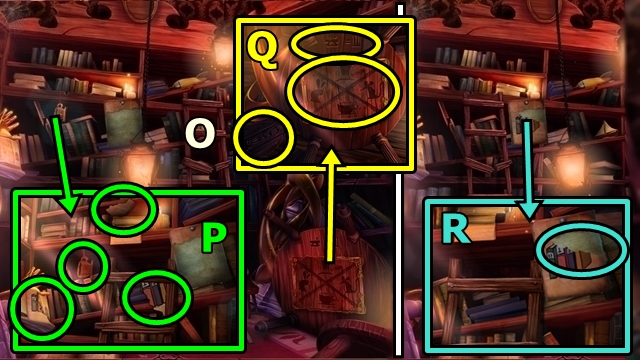
- Pick up the WINDING KEY (O); read the note (tablet); press the button.
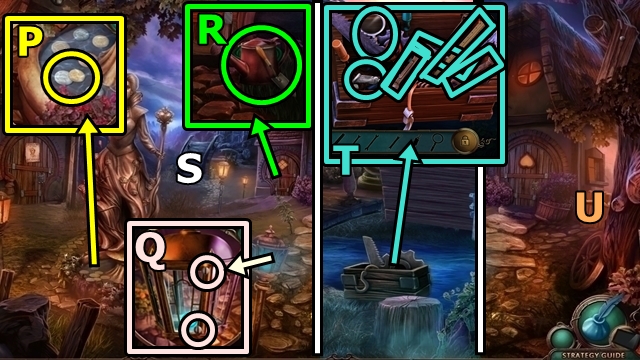
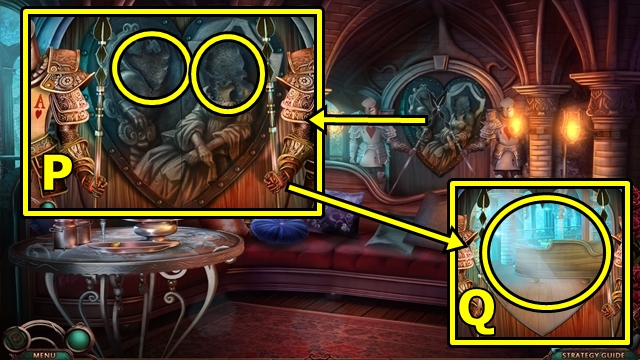
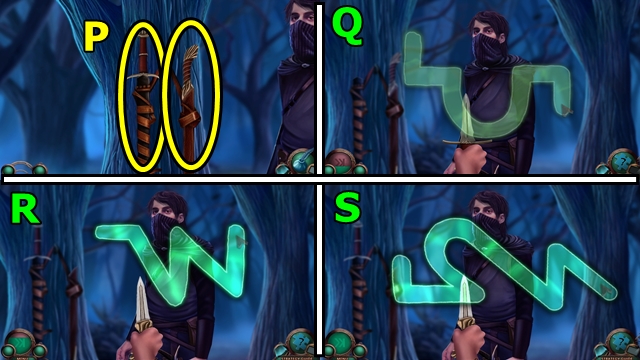
- Take the CANE (P).
- Use the CANE (Q).
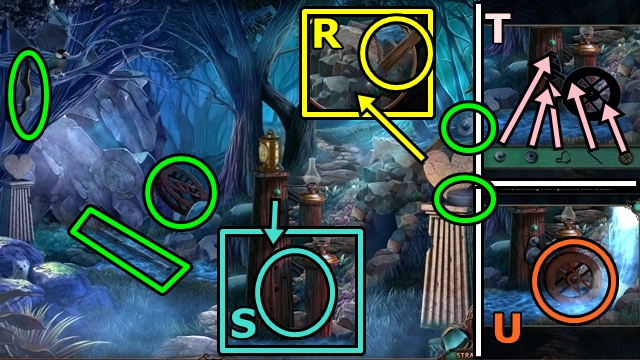
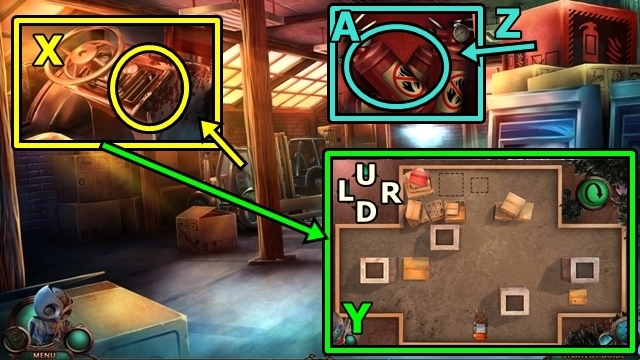
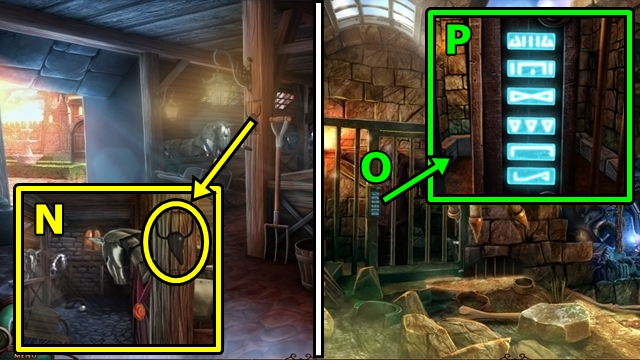
- Play the HOP (R); receive the SET OF GEARS.
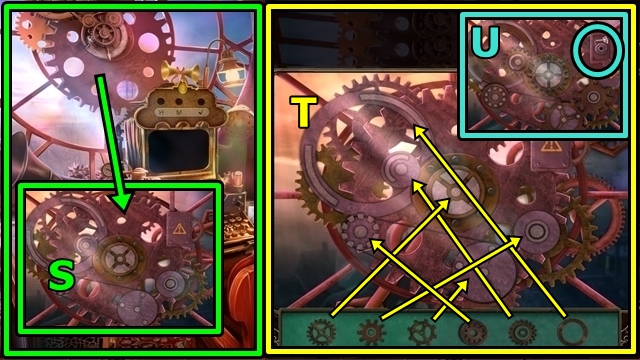
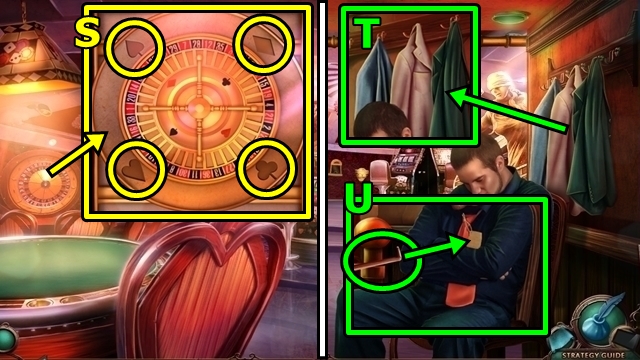
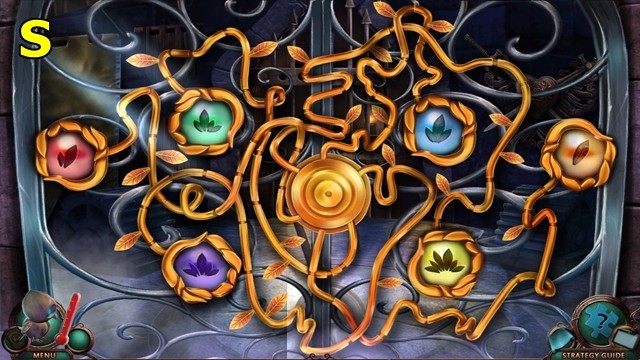
- Place the SET OF GEARS (S).
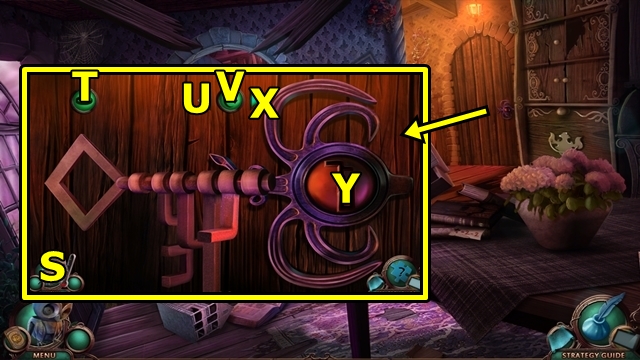
- Insert the gears (T).
- Insert the WINDING KEY (U); take the CLOCK CABLE.
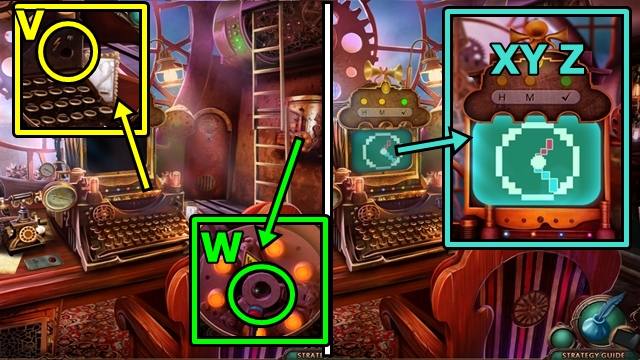
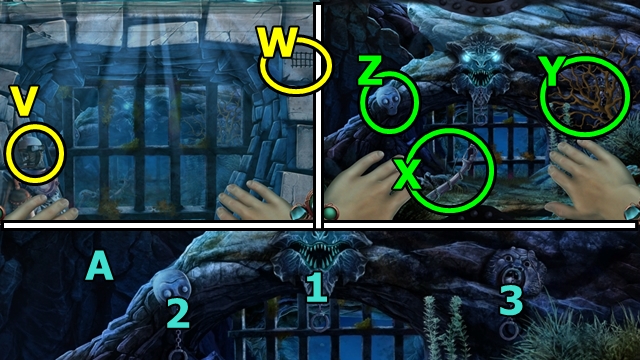
- Plug in the CLOCK CABLE (V).
- Plug in the other end of the clock cable (W) to trigger a mini-game.
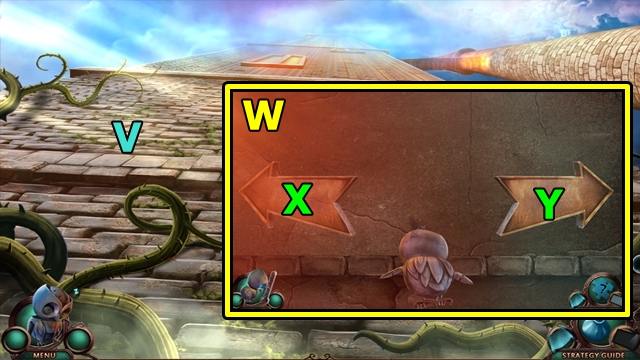
- Solution: Xx2-Yx7-Zx1.
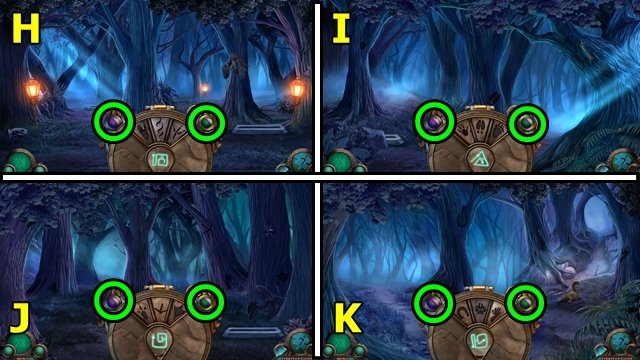
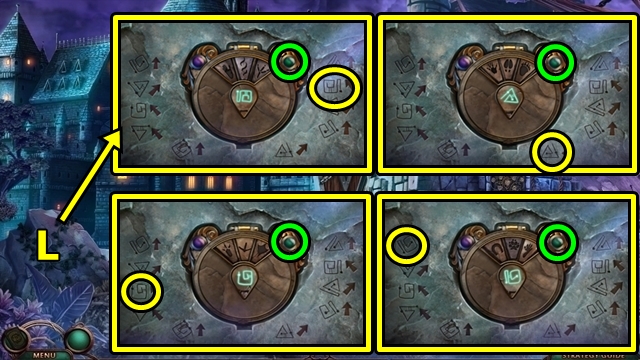
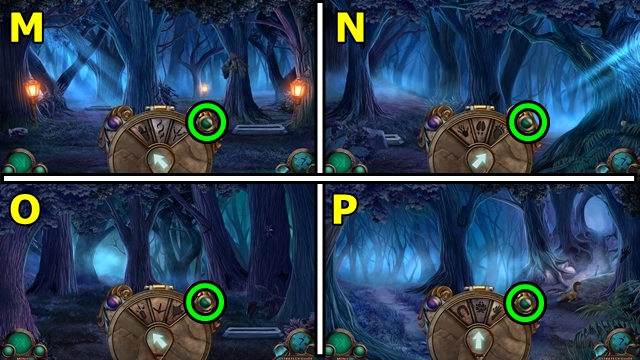
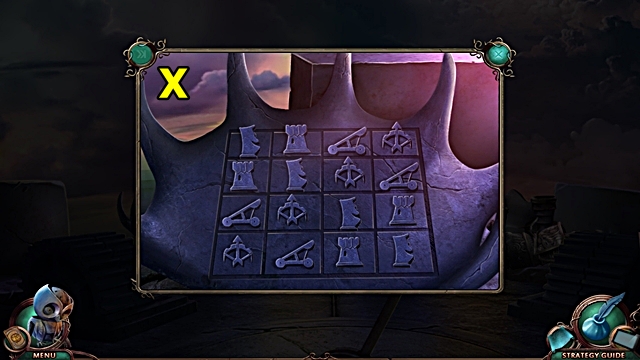
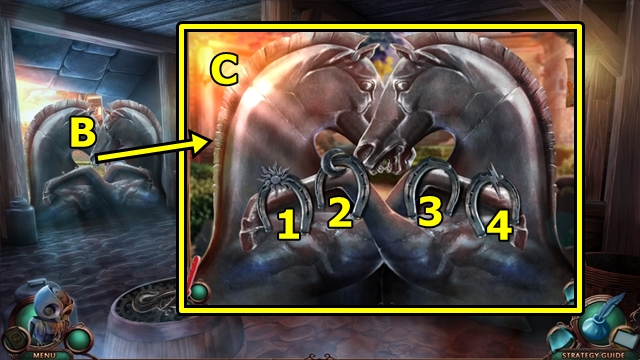
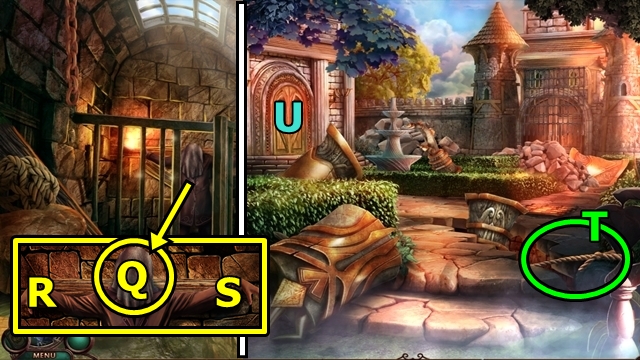
- Use either door to the Tower Sill.
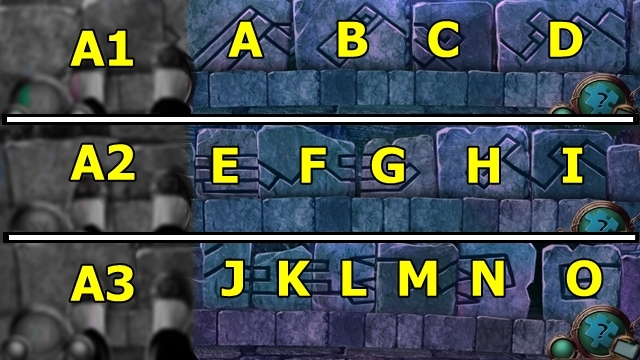
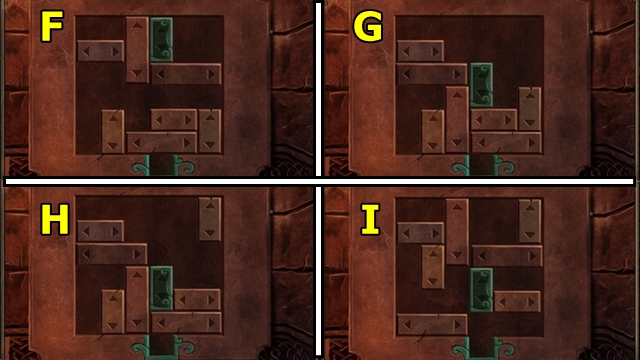
- Solution: A-C-B (A1), G-H-F-E-G-F-G (A2), O-N-L-M-K-L (A3).
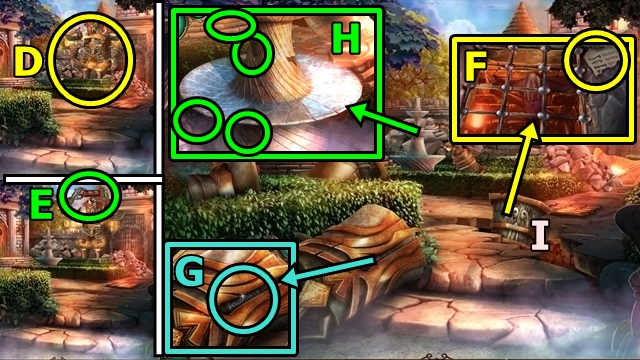
- Take the COIN (P).
- Use the COIN (Q); take the SCREWS 2/2. Open the lamp; take the GLOWING SPHERE.
- Knock on the three doors. On the third door, move the items; pick up the DOOR HANDLE (R).
- Go to the Bridge (S).
- Pick up the TOOLBOX (T).
- Select the TOOLBOX (inventory); find the items; receive the SET OF TOOLS.
- Move down.
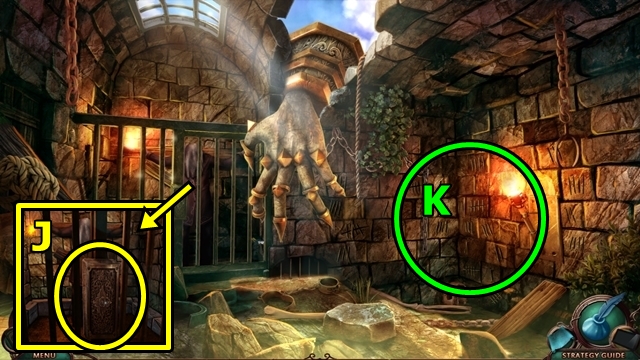
- Lift the latch; go through the gate (U).
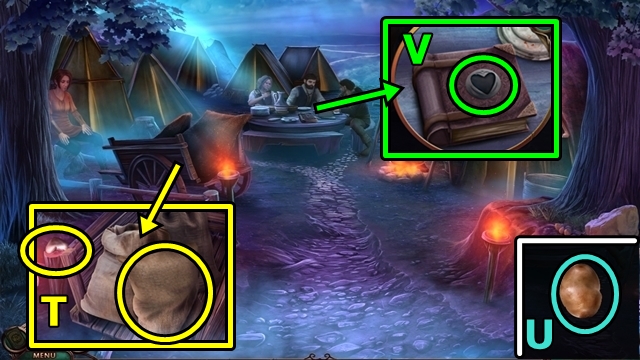
- Move the laundry (V); take the BELT WITHOUT A BUCKLE.
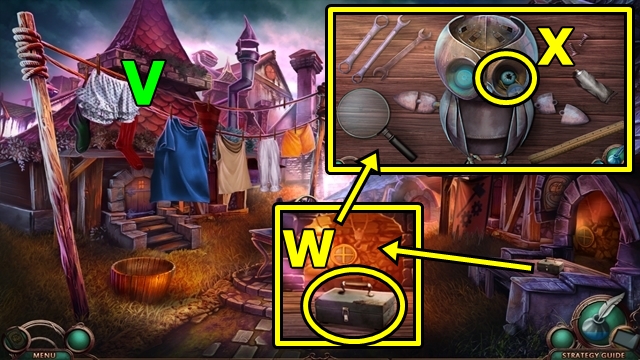
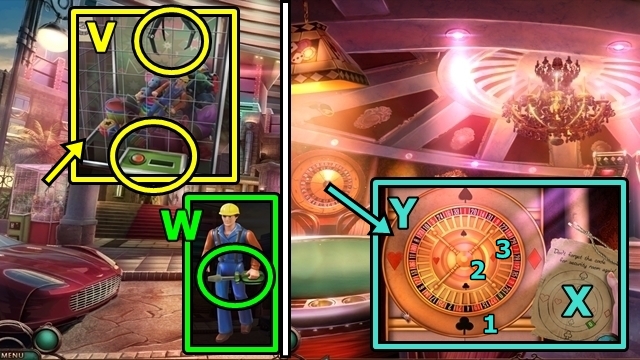
- Move the items; take the map (W); place GEARS.
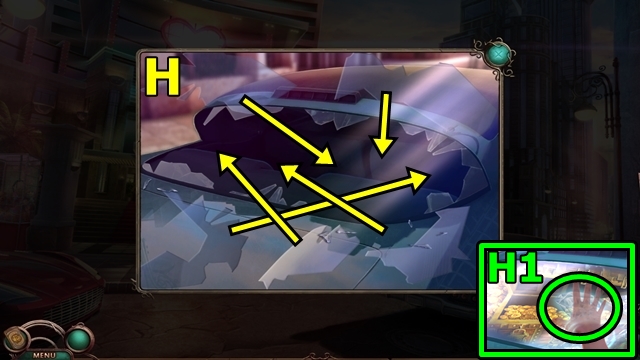
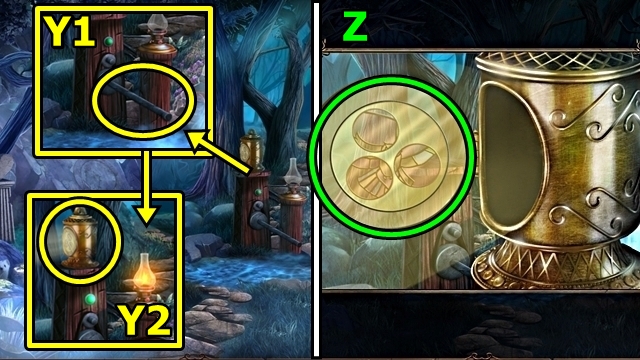
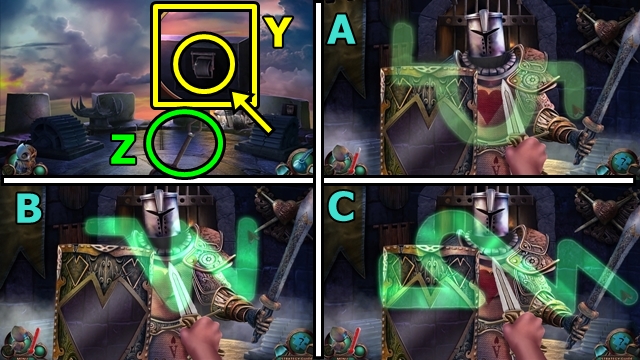
- Add the SET OF TOOLS (X) and the SCREWS 2/2. Remove the eye; add the GLOWING SPHERE to trigger a mini-game.
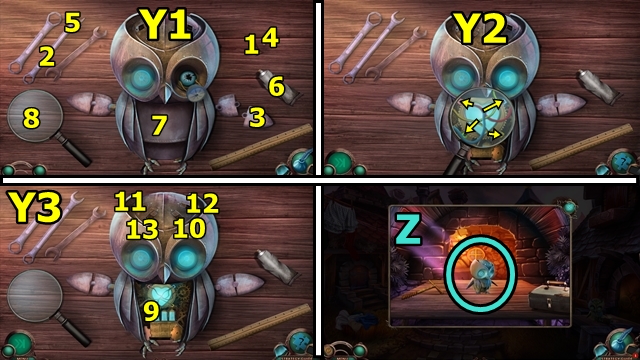
- Solution: Follow steps 1-8 (Y1). Select a wire and match it to its matching color's terminal (Y2). Follow steps 9-13 (Y3).
- Take Gears (Z).
- Move the items; take the BELT BUCKLE (A).
- Place the BELT BUCKLE and BELT WITHOUT A BUCKLE (B) to trigger a mini-game.
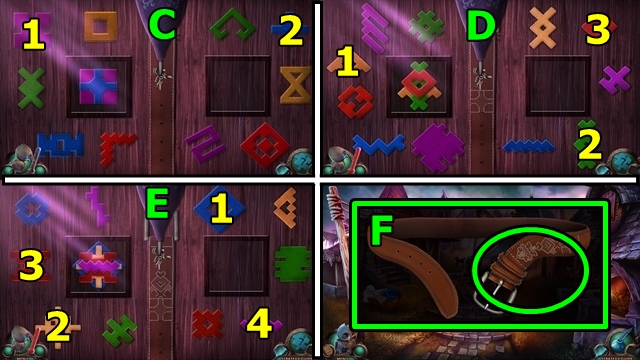
- Solution: (C, D, E). You receive a BELT.
- Pick up the BELT (inventory); buckle it (F); receive the IMPROVISED BELT.
- Move down.
- Take the ARROWHEAD (G).
- Move forward to the Bridge.
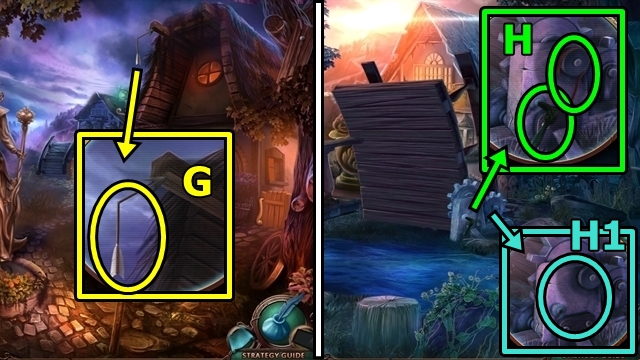
- Take the BROKEN CRANK (H); remove the broken belt; place the IMPROVISED BELT.
- Examine the BROKEN CRANK (inventory); use the ARROWHEAD on the BROKEN CRANK; add the DOOR HANDLE; receive the IMPROVISED CRANK.
- Add the IMPROVISED CRANK (H1). Turn the crank.
- Go to the Cottage.
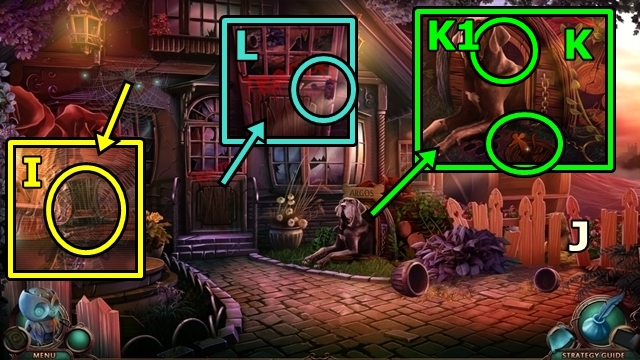
- Take the WOODEN HAT (I). Move the board (J); play the HOP; receive the DOG FOOD. Take the WOODEN MOUSE (K); add the DOG FOOD; take the DOOR KEY (K1).
- Use the DOOR KEY (L).
- Enter the Cottage Interior.
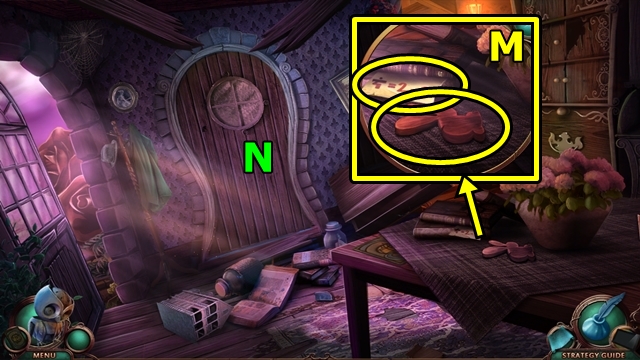
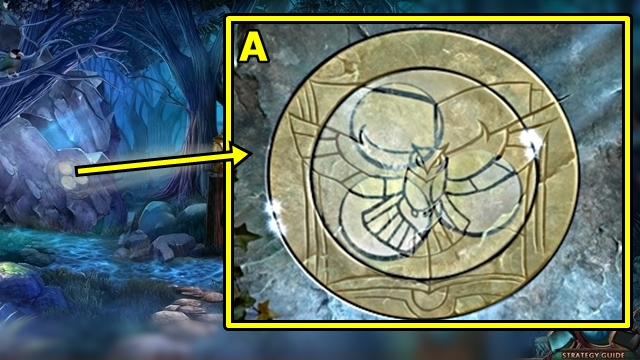
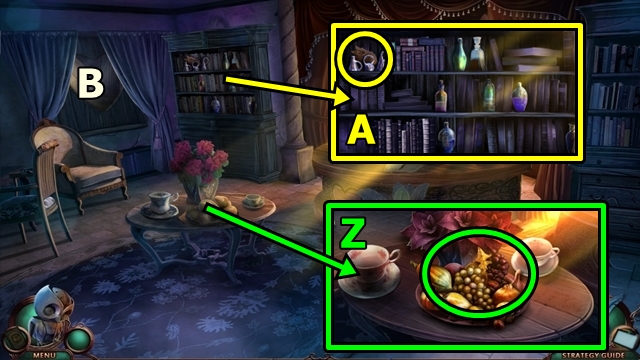
- Take the WOODEN RABBIT (M) and the Symbol (tablet). Enter the Family Library (N).
- Move the ladder (O); take the WOODEN TEA CUP (P) and the ripped Book Lists.
- Note the Symbols (tablet) (Q); place the WOODEN HAT, WOODEN MOUSE, WOODEN RABBIT and WOODEN TEA CUP; take the BOOK LIST.
- Add the BOOK LIST (R); play the HOP; receive the SKELETON KEY.
- Move down.
- Insert the SKELETON KEY (S) to trigger a mini-game.
- Solution: Vx2-Ux2-Vx2-Tx1-Yx1.
- Enter Alice's Room.
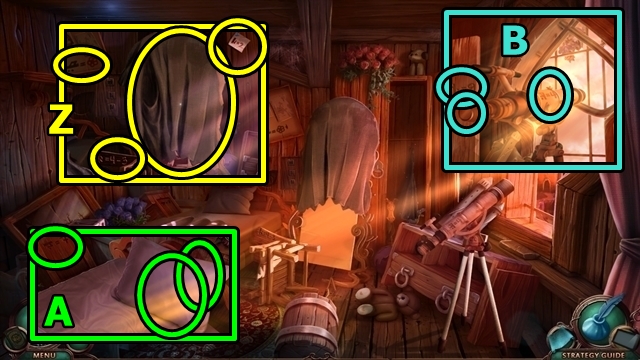
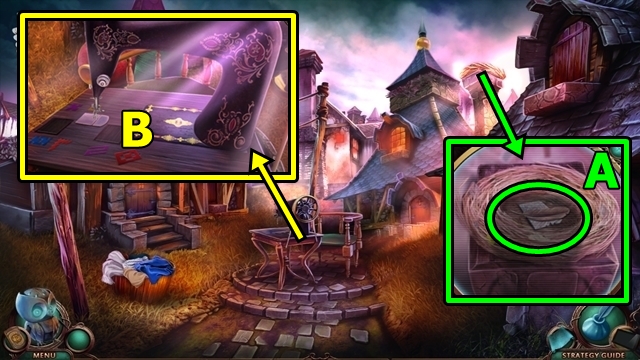
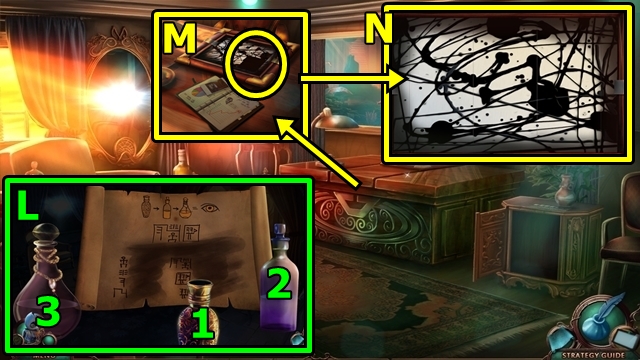
- Grab the SHEET (Z) and the Symbols (tablet).
- Move the pillow; take BELLE'S PERSONAL BOX (A) and the Symbols (tablet).
- Examine BELLE'S PERSONAL BOX (inventory); clean it with the SHEET.
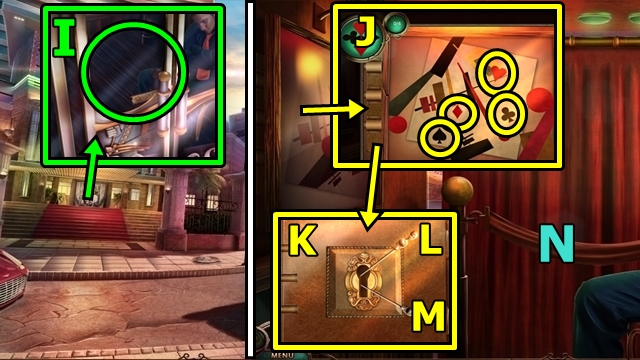
- Note the Symbols (tablet) (B); remove the lens to trigger a mini-game.
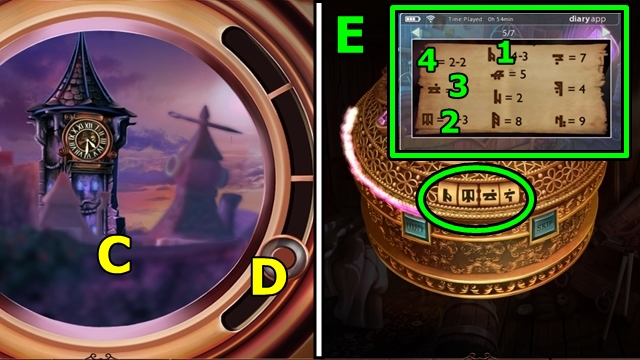
- Solution: Drag the view (C) left, then up, to locate the clock tower; drag the slider to focus (D); examine the clock tower to note the time, 16:30 (tablet).
- Examine BELLE'S PERSONAL BOX (inventory) to trigger a mini-game.
- Solution (E).
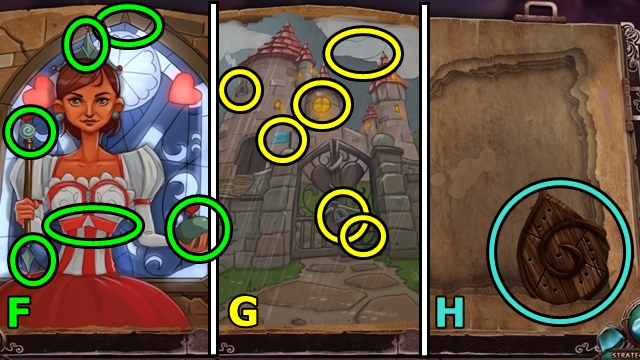
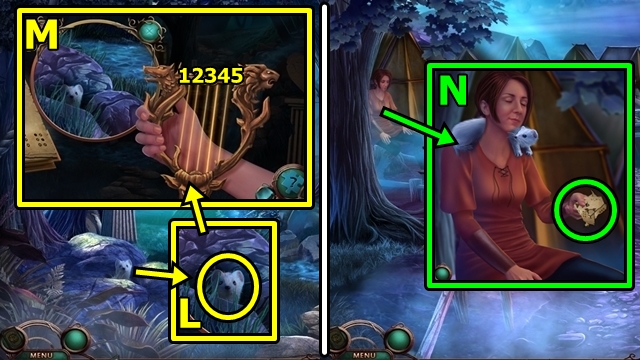
- Open the book. Find the shapes (F, G); take the SNAIL (H).
- Insert the SNAIL (I) to trigger a mini-game.
- Solution: K-L-M-M-K-L (J). Take the TRAVELER'S EMBLEM (N) and BELLE'S NOTE.
- Move down and left.
Chapter 2: The Casino
- Use the CANE (O).
- Go to Alice's Room.
- Examine the mirror (P) to trigger a mini-game.
- Solution: (Q).
- Solution: (R, S, T). You earn the GUARD HELMET.
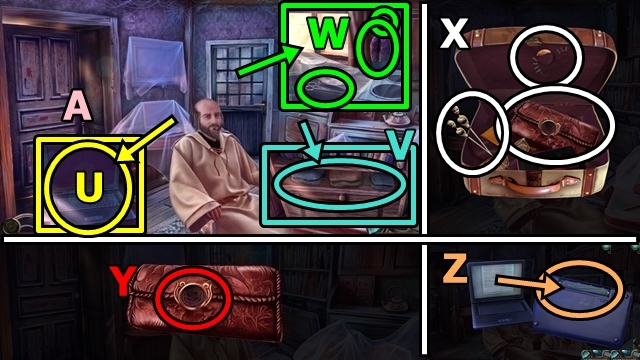
- Remove the sheet (U); pick up BELLE'S OLD LAPTOP.
- Move the items; open the cabinet; take the HOUSE KEYS (V) and BELLE'S CASE.
- Grab the KITCHEN GLOVES (W) and the HANGER. Lift the sheet; take the SCISSORS.
- Examine BELLE'S CASE (inventory), open it; take the WALLET and HAIRPINS (X). Use the SCISSORS; take the WALLET EMBLEM.
- Examine the WALLET (inventory); insert the WALLET EMBLEM (Y). Open the wallet; remove the photos; take the MONEY.
- Examine BELLE'S OLD LAPTOP (inventory); turn it over; remove the cover; take the LAPTOP CABLE (Z).
- Use the HOUSE KEYS (A).
- Go out to the Peaceful Street.
- Try to activate the windshield (B).
- Use the KITCHEN GLOVES (C) to pick up the GLASS SHARDS 5/5 (D, E, F).
- Add the GLASS SHARDS (G).
- Solution: (H).
- Activate the mirror twice; receive the GIANT DIAMOND (H1).
- Add the HANGER (I) and GIANT DIAMOND. Lift the handle.
- Enter the Casino Hallway.
- Find the shapes (J); take the HEART SYMBOL. Insert the HAIRPINS (K) to trigger a mini-game.
- Solution: Move top Hairpin (L) until bottom Hairpin (M) shakes, then click (M). Repeat three times. Take the SPADES SYMBOL.
- Unhook the red velvet rope (N); pull the curtain.
- Enter the Casino Hall.
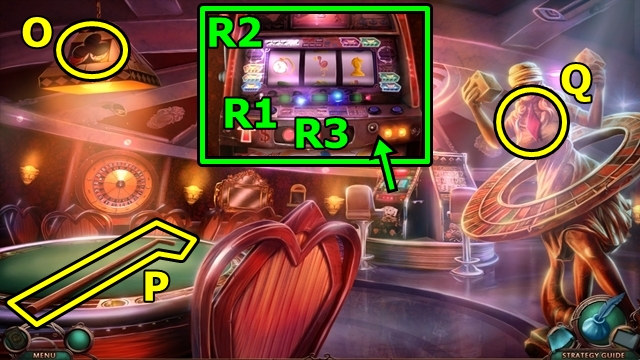
- Pick up the CLUBS SYMBOL (O), CRAPS STICK (P) and the DIAMONDS SYMBOL (Q).
- Insert the MONEY (R1); pull the lever (R2). Repeat three times; take the COIN (R3).
- Place the SPADES SYMBOL, DIAMONDS SYMBOL, CLUBS SYMBOL and HEARTS SYMBOL (S).
- Return to the Casino Hallway.
- Use the CRAPS STICK (T) on all three coats. Try to take the roulette instructions to trigger a mini-game.
- Solution: Guide the CRAPS STICK towards the ROULETTE INSTRUCTIONS (U).
- Move down to the Peaceful Street.
- Insert the COIN (V). Use the claw; take the CONSTRUCTION WORKER.
- Examine the CONSTRUCTION WORKER (inventory); take the TOY SCREWDRIVER (W).
- Return to the Casino Hall.
- Use the ROULETTE INSTRUCTIONS (X) to trigger a mini-game.
- Solution: From the starting position (Y), move the outer ring (1) to bring the two clubs symbols to the 11:55 position. Move the inner ring (2) to bring the two clubs symbols to the 6:00 position. Move the middle ring (3) so the green zero is in the position shown in the roulette instructions.
- Use the TOY SCREWDRIVER (Z). Add the LAPTOP CABLE (A).
- Enter the Surveillance Room.
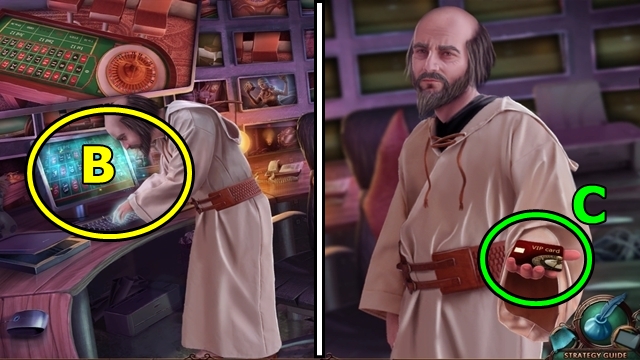
- Play the HOP (B).
- Take the VIP CARD (C).
- Move down.
- Use the GUARD HELMET to trigger a mini-game.
- Solution: (D).
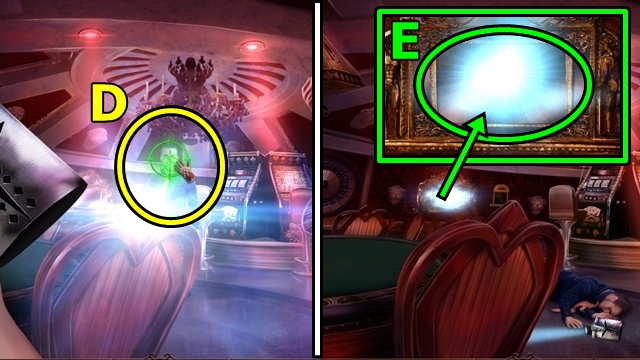
- Activate the mirror (E).
- Enter the Observation Room (F).
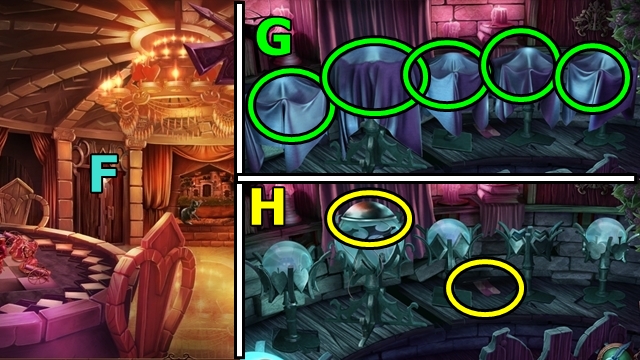
- Remove the sheets (G). Take the FLAG 1/4 (H) and the JUSTICE SCALE.
- Move down.

- Add the JUSTICE SCALE (I).
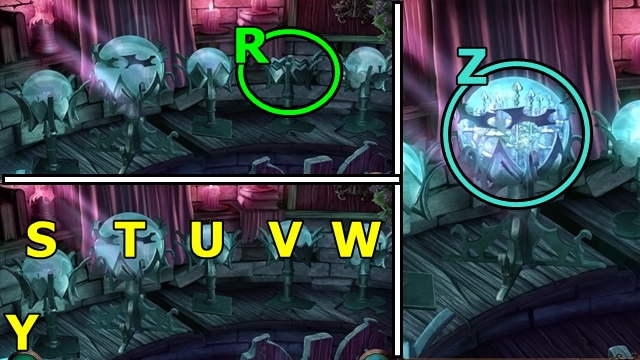
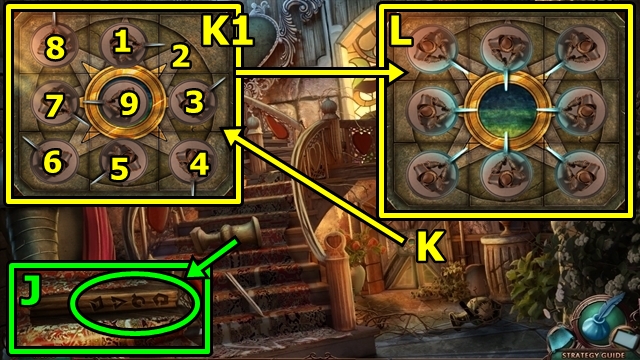
- Examine the statue's hand (J1) to trigger a mini-game.
- Solution: K-N-O-L-M (J2).
- Take the AXE (P).
- Examine the AXE (inventory); rotate the bar (Q); activate the hearts; take the CRYSTAL BALL.
- Enter the Observation Room.
- Place the CRYSTAL BALL (R) to trigger a mini-game.
- Solution: U-S-V-W-U (Y).
- Examine the glowing crystal ball (Z).
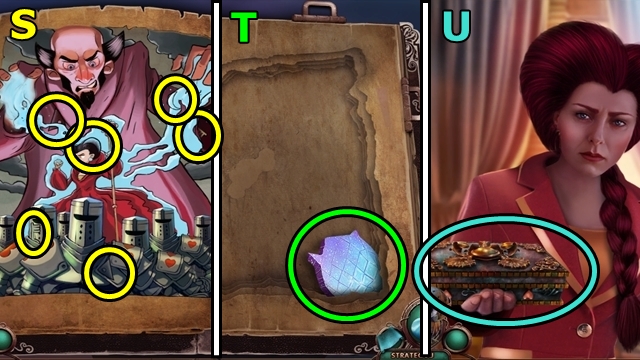
- Find the shapes (A, B). Take the LARGE ORB.
- Examine the LARGE ORB (inventory); strike with the AXE. Take the PILLAR STONE (C).
- Move down.
- Add the PILLAR STONE (D) to trigger a mini-game.
- Solution: (E).
- Enter the Crimson Guestroom.
- Take the HERRING (F) and the FLAG 2/4.
- Take the FLAG 3/4 (G). Move the pillows; take the GIRL PLATE.
- Take the FLAG 4/4 (H).
- Return to the Hall of Justice.
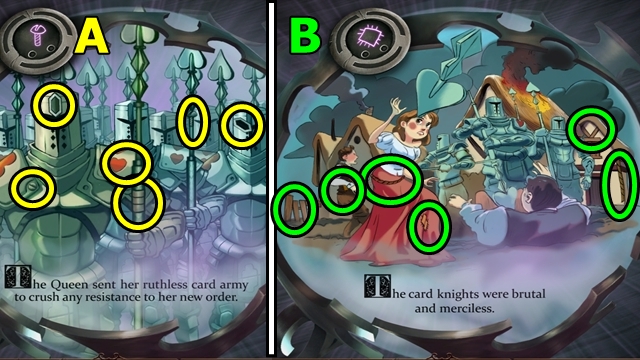
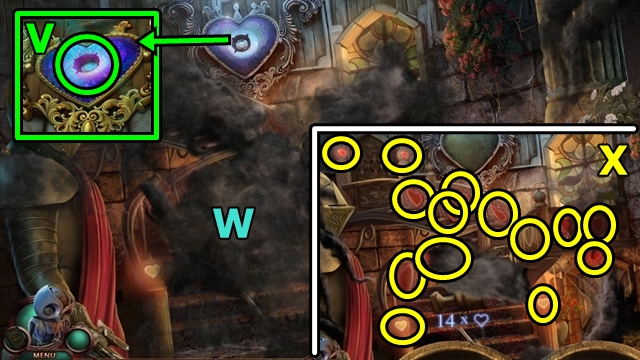
- Offer the HERRING (I); take the SOLDIER FIGURE. Place the four FLAGS (I) to trigger a mini-game.
- Solution: (J). Take the VILLAGER FIGURE.
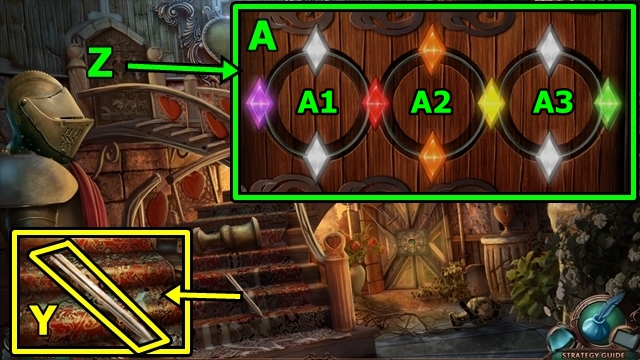
- Place the SOLDIER FIGURE (K) and VILLAGER FIGURE to trigger a mini-game.
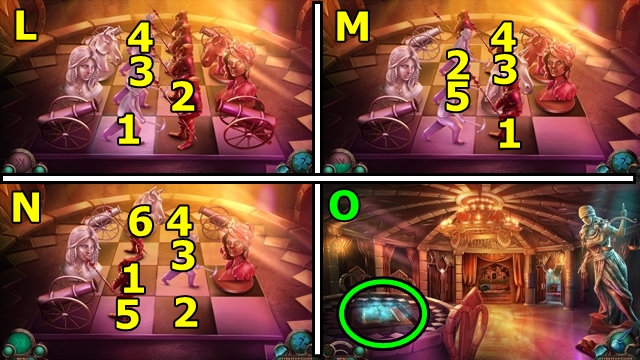
- Solution: (L, M, N).
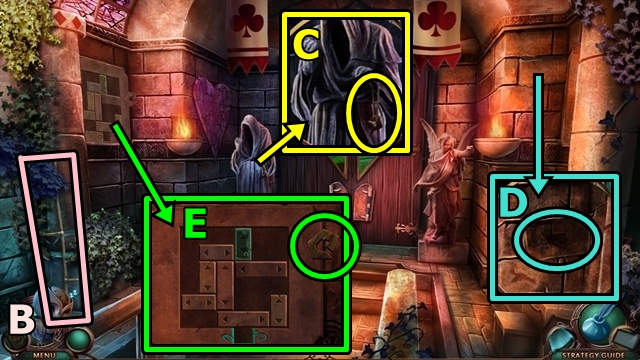
- Examine the book (O); play the HOP. Take the GARGOYLE PLATE.
- Enter the Crimson Guestroom.
- Move the spears; add the GIRL PLATE (P) and the GARGOYLE PLATE.
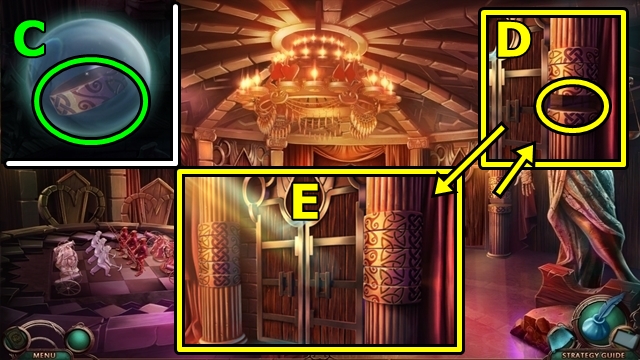
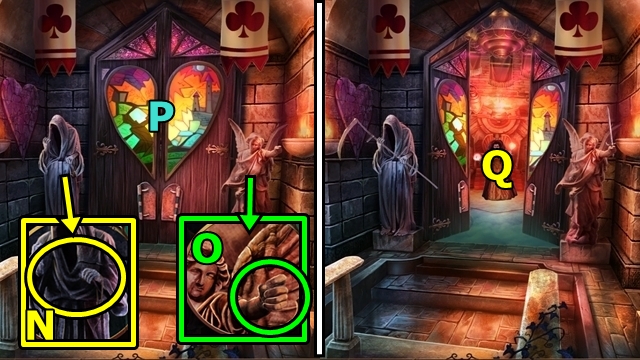
- Examine the mirror (Q) to trigger a mini-game.
- Solution: Defeat the guards.
- Activate the mirror.
Chapter 3: The Rebel Camp
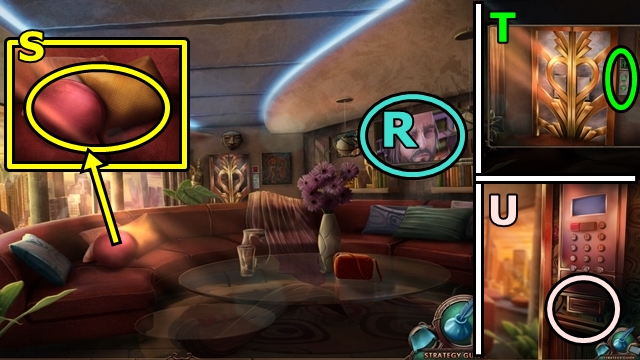
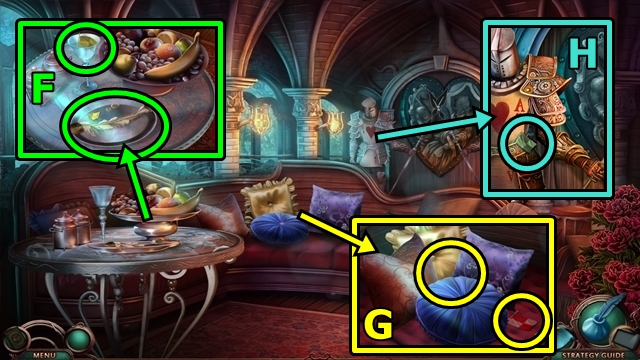
- Zoom into the TV (R).
- Move the pillows (S); take the REMOTE CONTROL. Use the REMOTE CONTROL on the TV.
- Examine the TV; play the HOP to activate the elevator.
- Press the elevator button (T); enter the elevator.
- Insert the VIP CARD (U).
- Unhook, then take the DIVING MASK (V); put it on.
- Loosen the stone (W); pull the lever; swim forward.
- Take the RUSTY SWORD (X).
- Examine the RUSTY SWORD (inventory); remove the CHAIN.
- Use the RUSTY SWORD (Y).
- Add the CHAIN (Z).
- Pull the chains in the order shown (A).
- Swim forward three times.
- Move right.
- Move the leaves; take the NAVIGATOR PIECE 1/4 (B).
- Take the NAVIGATOR PIECE 2/4 (C) and the MUSHROOM 1/3.
- Go right to the Forest of Hearts.
- Take the NAVIGATOR PIECE 3/4 (D).
- Take the NAVIGATOR PIECE 4/4 (E). Place the TRAVELLER'S EMBLEM; take the SEEKING STONE.
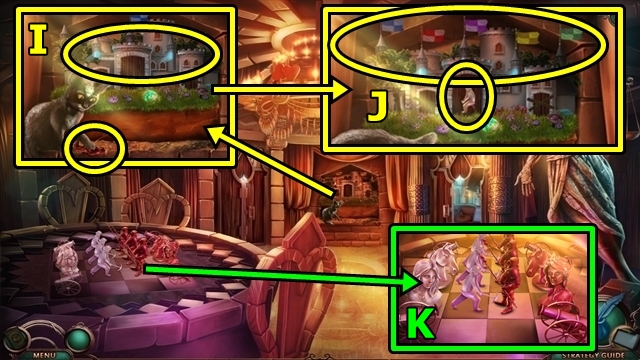
- Examine the SEEKING STONE (inventory); raise the cover (F); add the four NAVIGATOR PIECES (G).
- Use the SEEKING STONE to trigger a mini-game.
- Solution: Press the left button to open the Seeking Stone; match the symbols to the scene; press the left button to close the Seeking Stone; press the right button to rotate the symbols; move to the next scene and repeat until all symbols are properly positioned (H, I, J, K).
- Move down to the Rocky Fields and move left.
- Brush away the ivy. Insert the SEEKING STONE (L).
- Press the matching symbol; press the green button; select the next matching symbol. Continue until all the symbols are arrows. Take the SEEKING STONE.
- Return to the Forest of Hearts.
- Use the SEEKING STONE to trigger a mini-game. Follow the directions of the SEEKING STONE. Match the symbols to your location and move in that direction. Use the green button to scroll through the symbols.
- Solution: (M, N, O, P).
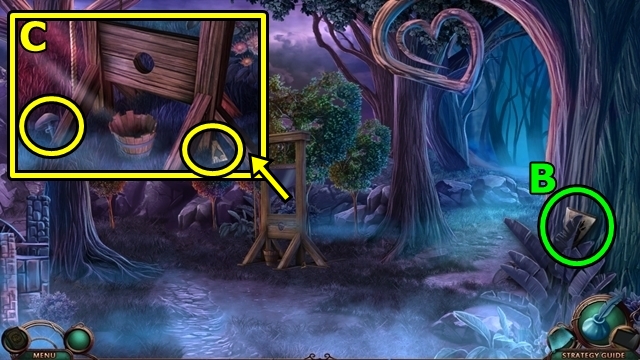
- Grab the WATER MILL PART 5/5.
- Remove the STURDY PLANK (R).
- Add the WATER MILL PARTS 5/5 (S).
- Assemble the WATER MILL PARTS (T); take the WATER MILL WHEEL (U).
- Move down.

- Remove the top plank (V1); add the STURDY PLANK; pull the rope four times (V2); take the BUCKET (V3).
- Examine the BUCKET (inventory); take the PLANK PIECES (W).
- Examine the WATER MILL WHEEL (inventory); add the PLANK PIECES (X); receive the REPAIRED WHEEL.
- Go right.
- Add the REPAIRED WHEEL (Y1). Open the lamp cover (Y2) to trigger a mini-game.
- Solution: (Z). Close the lamp.
- Examine the stone to continue the mini-game.
- Solution: (A).
- Move towards the Rebel Camp.
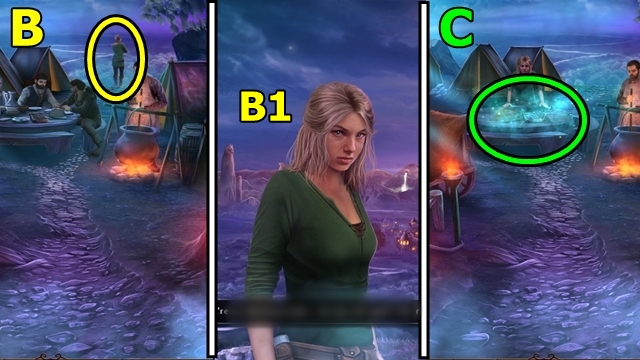
- Move towards the Cliff (B).
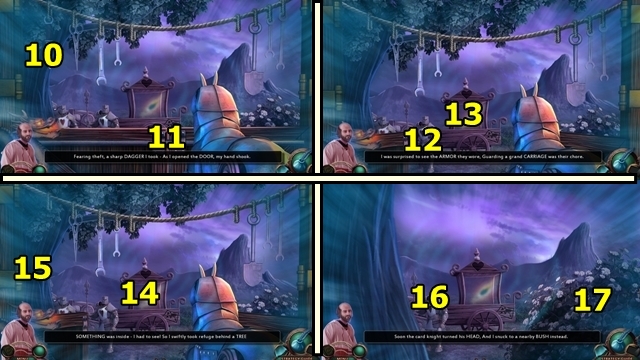
- Talk to Belle (B1). Select either answer.
- Play the HOP (C).
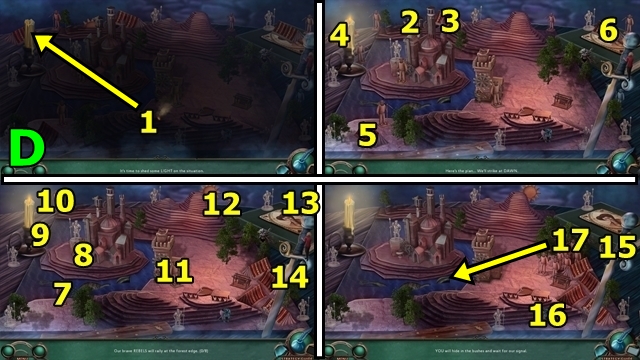
- Solution: (D, E).
- Take the MUSHROOM 2/3 (F).
- Move down.
Chapter 4: Prepare for Battle
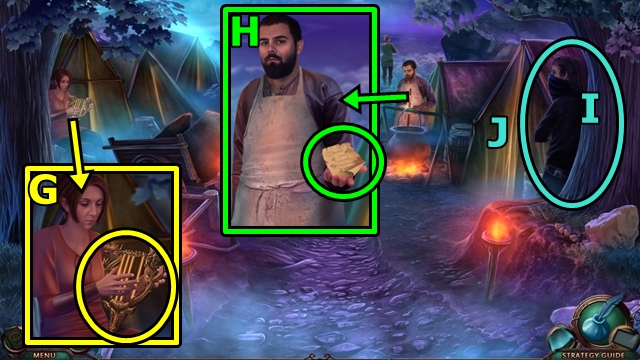
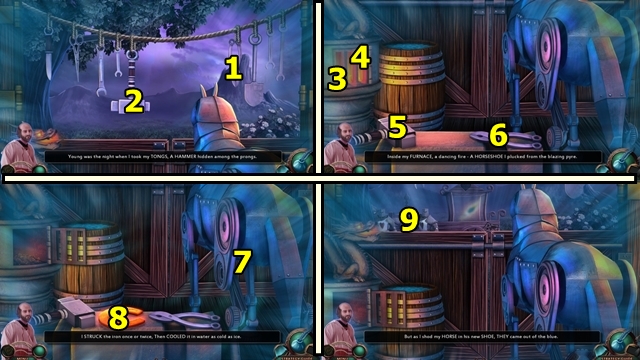
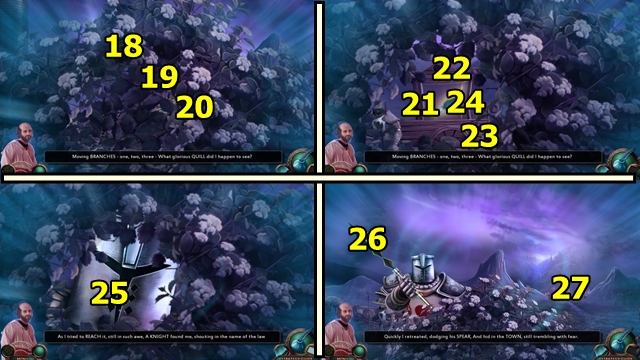
- Talk to the animal charmer (G); take the HARP and the BOOK OF MELODIES.
- Talk to the cook (H); take the Recipe (tablet).
- Talk to the swordsman (I). Enter the tent (J) to trigger a mini-game.
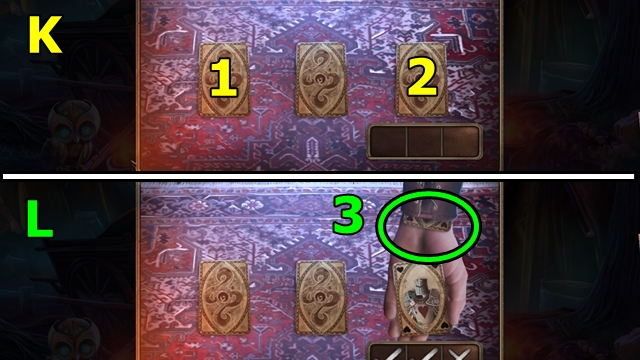
- Solution: (K). Third round (L), choose any card; choose the swordsman's sleeve.
- Play the HOP (M); earn a CROSSBOW.
- Take the MOONDEW FLOWER (N).
- Pull the rope (O) to trigger a mini-game.
- Solution: Shoot the targets.
- Choose either sword (P) to trigger a mini-game.
- Solution: (Q, R, S).
- Take the HEART STONE (T). Use the SWORD; take the POTATO.
- Examine the POTATO (inventory); use the SWORD; receive the SLICED POTATO (U).
- Insert the HEART STONE (V). Read the book.
- Find the shapes (W, X). Take the Braille Table (Y).
- Move down.

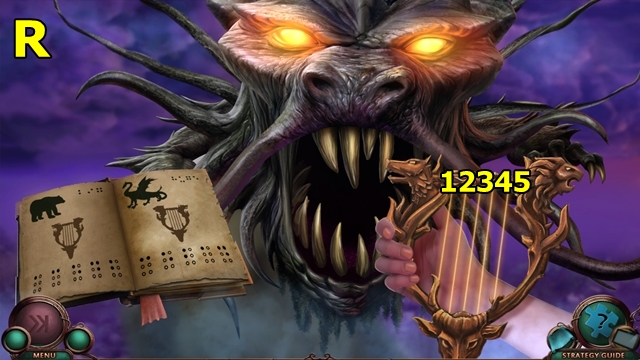
- Use the HARP (Z) to trigger a mini-game.
- Solution: 5-2-4-1-3 (A).
- Examine the BROKEN HARP (inventory); remove the WORN STRING (B).
- Move down.
- Use the CROSSBOW (C). Take the HORSESHOE 1/4, PEARL, MINIATURE CROSSBOW, LENS and the MUSHROOM 3/3 (D).
- Take the STARDUSK (E).
- Return to the Rebel Camp.

- Offer the WORN STRING (F).
- Add the STARDUSK (G), SLICED POTATO (H), MOONDEW FLOWER (I) and three MUSHROOMS (J).
- Move up.
- Place the LENS (K); add the WORN STRING; receive the HARP STRING.
- Move down twice.
- Examine the BROKEN HARP (inventory); add the HARP STRING; receive the HARP.
- Use the HARP (L) to trigger a mini-game.
- Solution: 5-2-4-1-3 (M).
- Take the FERRET.
- Go to the Rebel Camp.
- Offer the FERRET (N); take the TORN PAGE.
- Examine the BOOK OF MELODIES (inventory); open the book; turn the page; add the TORN PAGE. Assemble the page (O).
- Move forward.
- Talk to Belle (P).
- Move down two times.
- Move towards the Castle Guard Tower (Q).
- Use the HARP to trigger a mini-game.
- Solution: 3-5-2-1-4-(R).
- Move towards the Castle Guard Tower.
- Add the PEARL to trigger a mini-game.
- Solution: (S).
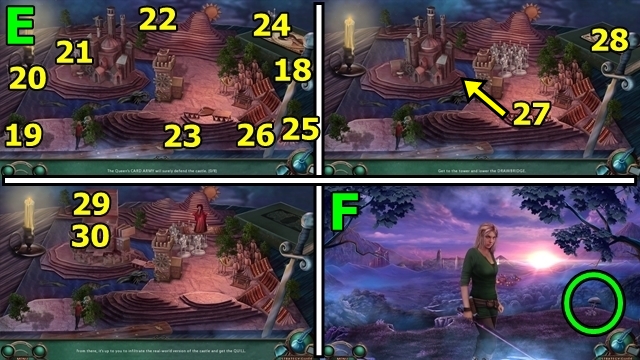
Chapter 5: The Castle

- Pull the lever (T).
- Use the CROSSBOW (U) on either guard.
- Move the armor (V); take the Code (tablet).
- Add the MINIATURE CROSSBOW (W) to trigger a mini-game.
- Solution: (X).
- Lower the drawbridge (Y).
- Pull the lever (Z) to trigger a mini-game.
- Solution: (A, B, C).
- Move towards the Peaceful Street.
- Take the GLOVES (D).
- Go left.
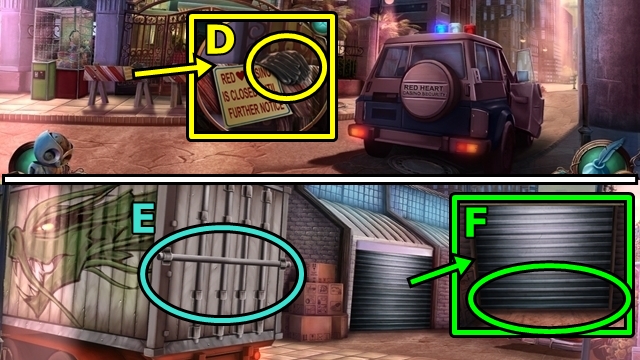
- Open the back of the truck (E); play the HOP; receive the CAR JACK.
- Try to lift the warehouse door. Use the CAR JACK (F).
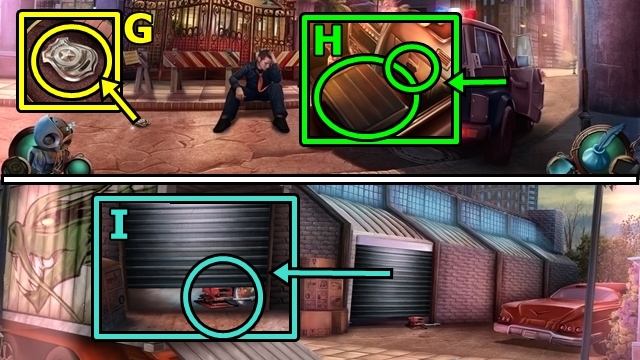
- Take the BADGE (G).
- Take the SECURITY CASE (H). Insert the BADGE; take the GUARD KEYS.
- Examine the GUARD KEYS (inventory); look through the keys; take the LOCKER KEY.
- Move left.
- Use the car jack (I).
- Enter the Casino Warehouse.
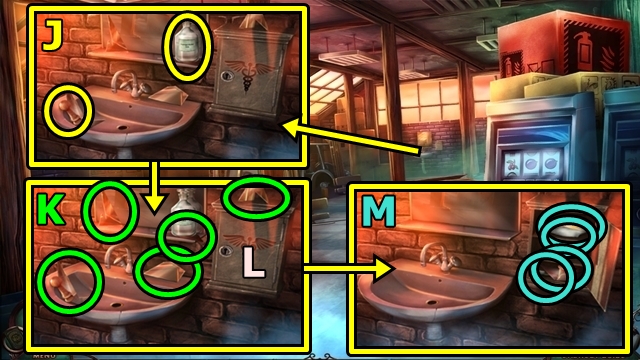
- Take the HANDLE and ISOPROPYL ALCOHOL (J). Put on the GLOVES; take the MIRROR PIECES (K).
- Use the LOCKER KEY (L); take the BANDAGE, GAUZE and two MIRROR PIECES (M).
- Add the seven MIRROR PIECES (N); reassemble the mirror (O).
- Return to the right side of the Peaceful Street.
- Examine the GAUZE (inventory); add the ISOPROPYL ALCOHOL and BANDAGE; receive the FIRST AID SUPPLIES.
- Offer the FIRST AID SUPPLIES (P).
- Take the ACCESS CARD (Q).
- Examine the ACCESS CARD (inventory); turn it over; note the code '1987' (tablet).
- Examine the SECURITY CASE (inventory); enter 1987. Take the CLIMBING GEAR 2/2 and the CLIMBING ROPE (R).
- Return to the Casino Warehouse; move forward to the Stables.
- Take the HORSESHOE 2/4 (S).
- Take the OIL CAN. Move the items; take the HORSESHOE 3/4 (T).
- Take the HORSESHOE 4/4 (U).
- Take the RAG (V); note the color and symbols on the medals (tablet).
- Use the RAG (W).
- Return to the Casino Warehouse.
- Insert the HANDLE (X); use the OIL CAN. Pull the handle to trigger a mini-game.
- Solution: Lx2-U-Lx2-Ux2-Rx2-D-U-Lx2-Dx2-Rx3-D-R-Ux4-D-Rx2-Ux2-Lx2-Dx2-Rx4-Dx2-L-R-Ux2-Lx4-Dx3-Rx2-Ux2-D-Rx2-Ux2-Lx3-D-L-Ux2 (Y).
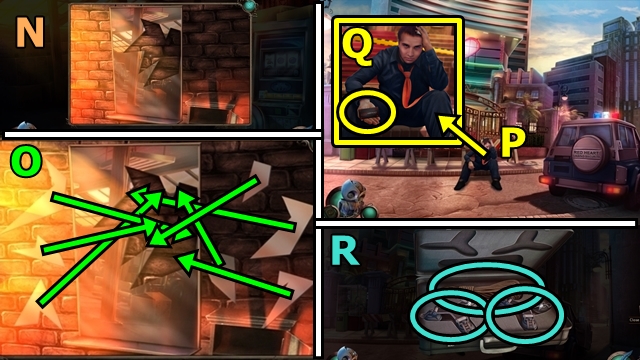
- Move towards the Warehouse Boxes (Z).
- Use the SWORD (A); take the FIRE EXTINGUISHER.
- Return to the Stables.
- Add the four HORSESHOES (B) to trigger a mini-game.
- Solution: Arrange the horseshoes according to the screenshot (C). Press the horseshoes in the following order: 1-4-2-4-3-4.
- Go out to the Castle Courtyard.
- Throw the FIRE EXTINGUISHER (D). When the Golem picks up the FIRE EXTINGUISHER (E), shoot it with the CROSSBOW. If you miss, return to the Casino Warehouse and get another FIRE EXTINGUISHER.
- Talk to Pierre (F). Take the RUNIC PLATE PIECE.
- Take the METAL PLATES 1/5 (G).
- Take the METAL PLATES 5/5 (H).
- Use the CLIMBING ROPE (I).
- Go down into the Dungeons.
- Use the SWORD (J); add the five METAL PLATES.
- Zoom into the wall (K) to trigger a mini-game.
- Solution: (L).
- Play the HOP (M); earn a BULL'S HEAD.
- Return to the Stables.
- Add the BULL'S HEAD (N); take the RUNIC PLATE.
- Examine the RUNIC PLATE (inventory); add the RUNIC PLATE PIECE to complete the RUNIC PLATE.
- Return to the Dungeons.
- Examine the metal plates (O), flip the plates. Add the RUNIC PLATE to trigger a mini-game.
- Solution: (P).
- Enter Pierre's cell.
- Remove the mask (Q). Use the SWORD (R, S).
- Go up to the Castle Courtyard.
- Take the CLIMBING ROPE (T).
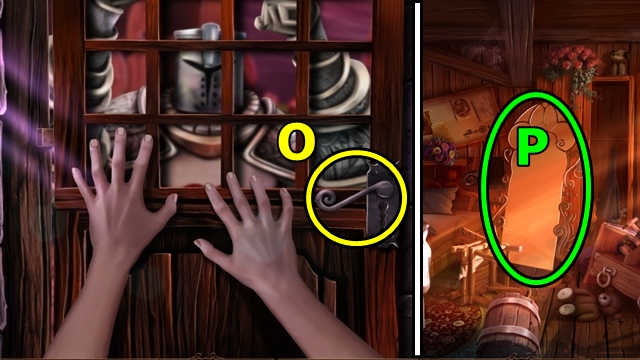
- Try to open the door (U).
- Go up the Tower Walls.
- Examine the wall (V). Use the CLIMBING ROPE to trigger a mini-game.
- Solution: After the first gargoyle, press X-Y-Y-X-Y-X-X-Y to pass the remaining gargoyles (W). Press the arrow, then pass a gargoyle, then press an arrow.
- Use the CLIMBING GEAR.
- Move the item (Z); take the PARCHMENT PIECE 1/5.
- Move the items (A); take the PARCHMENT PIECE 2/5.
- Activate the mirror (B); enter the Queen's Office.
- Answer the phone (you will have to answer).
- Move the item (C); take the PARCHMENT PIECE 3/5.
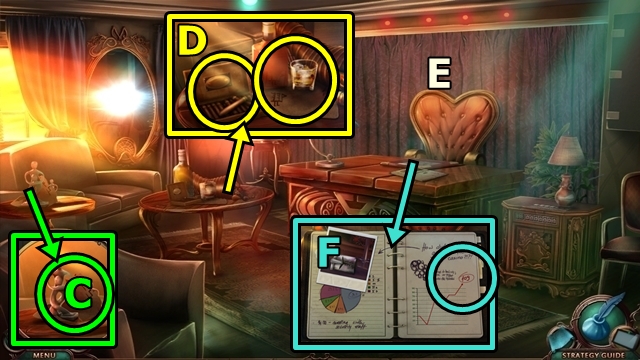
- Take the BOX OF CIGARS (D); move the items; take the PARCHMENT PIECE 4/5.
- Open the curtain (E); play the HOP; receive the PARCHMENT PIECE 5/5.
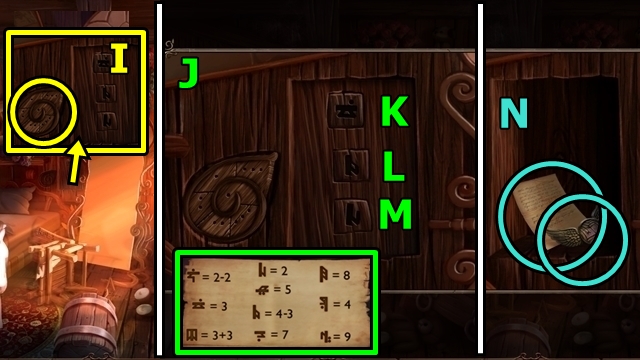
- Read the notebook (F); note '109' (tablet).
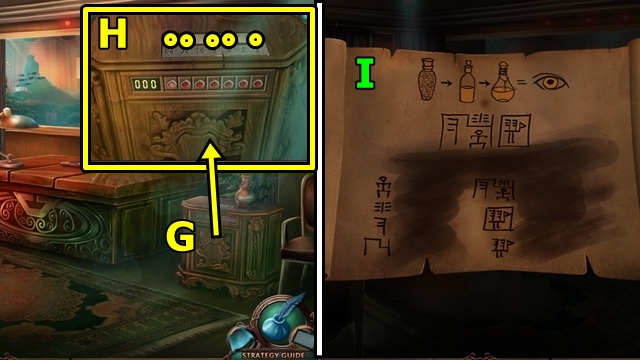
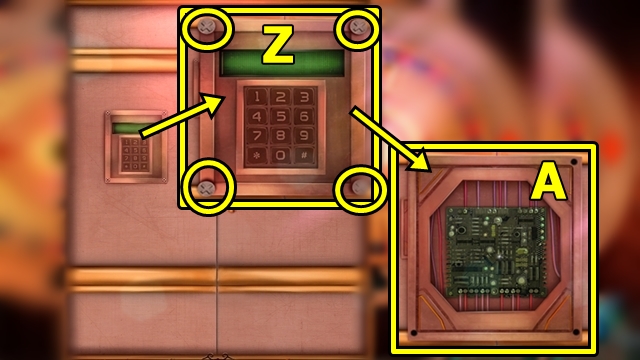
- Examine the cabinet (G) to trigger a mini-game.
- Solution: Press 64-32-8-4-1 (H).
- Take the PICTURE FRAGMENT and the PARCHMENT.
- Examine the PARCHMENT (inventory); add the five PARCHMENT PIECES. Rearrange the pieces (I).
- Return to the Queen's Chambers.
- Take the CRYPTOLOGY POTIONS 2/3 (J).
- Take the CRYPTOLOGY POTION 3/3 (K).
- Return to the Queen's Office.
- Examine the PARCHMENT (inventory); add the three CRYPTOLOGY POTIONS.
- Solution: (L). You receive the PARCHMENT.
- Add the PICTURE FRAGMENT (M) to trigger a mini-game.
- Solution: (N).
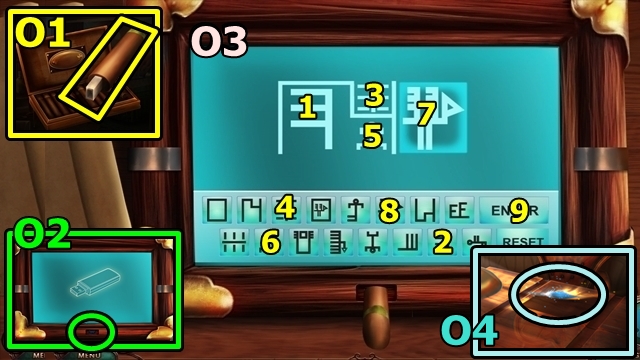
- Examine the BOX OF CIGARS (inventory); pick up the fake cigar; remove the cover; take the USB DONGLE (O1).
- Insert the USB DONGLE (O2); add the PARCHMENT to trigger a mini-game.
- Solution: (O3).
- Reach for the Author's Quill (O4) to trigger a mini-game.
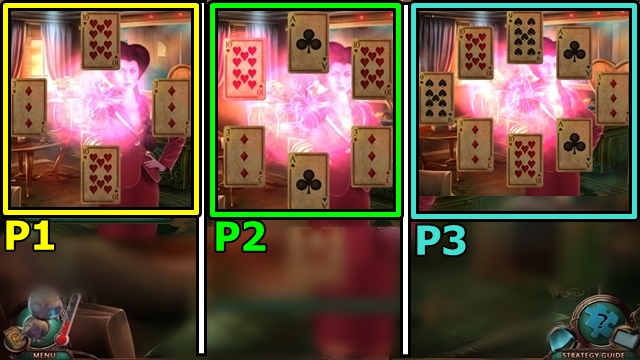
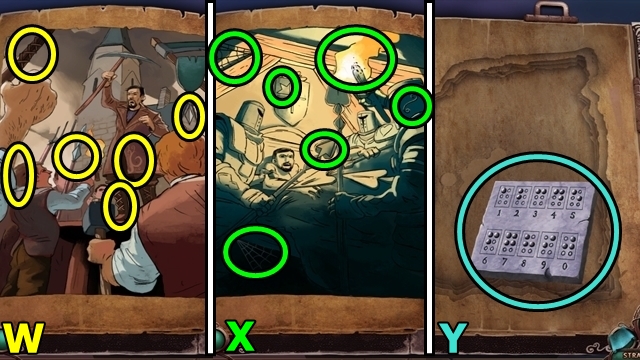
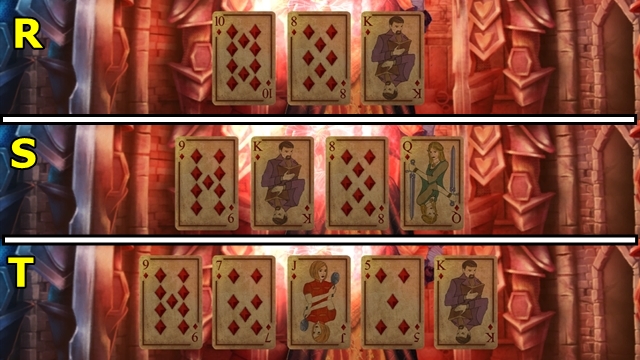
- Solution: The puzzle is random; the screenshot shows one possible solution (P1, P2, P3).
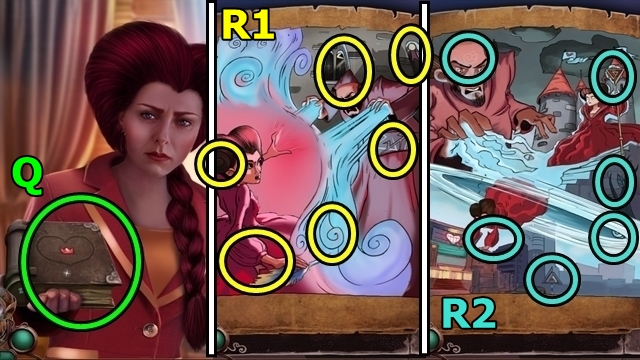
- Open the book (Q); find the shapes (R1, R2, S).
- Take the HEART MIRROR PIECE (T).
- Take the CARD BOX (U).
- Activate the mirror; enter the Tower of Power.
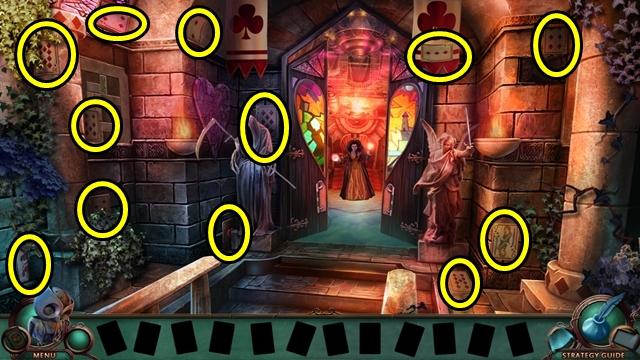
Chapter 6: The Tower of Power
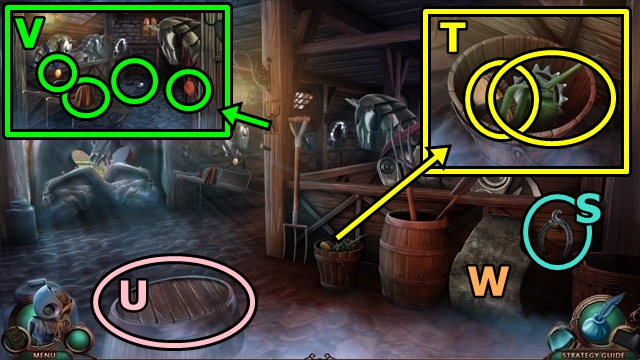
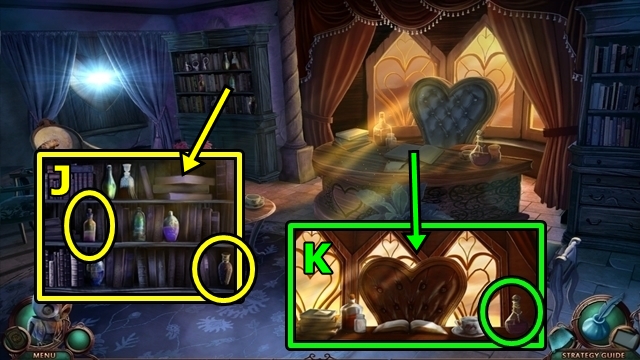
- Insert the HEART MIRROR PIECE (V); receive the HEART MIRROR; take the WOODEN SHAPE 1/4.
- Use the HEART MIRROR (W); find the hearts (X).
- Take the SWORD BLADE (Y).
- Examine the door (Z) to trigger a mini-game.
- Solution: Rotate all rings clockwise and the following spots: A1x1-A2x2-A3x2-A2x1-A3x2-A2x2-A1x3 (A).
- Enter the Royal Antechamber.
- Use the HEART MIRROR.
- Take the SCYTHE HANDLE (B).
- Take the WOODEN SHAPE 2/4 (C).
- Remove the brick; take the WOODEN SHAPE 3/4 (D) and SWORD HILT.
- Take the WOODEN SHAPE 4/4 (E) to trigger a mini-game.
- Solution: (F, G, H, I). Take the FIGURINE.
- Move down.
- Lift the carpet (J); add the four WOODEN SHAPES; take the SCYTHE BLADE.
- Add the FIGURINE (K) to trigger a mini-game.
- Solution: Move the figurines in the following order: 3-4-5-9-7-8-1-2-3-4-5-6-7-8-1-9-7-8-1-2-3-4-5-6-7-9 (K1) to position them correctly (L).
- Examine the door (M); play the HOP; receive the CARD KNIGHT'S ARMOR.
- Return to the Royal Antechamber.
- Examine the SWORD HILT (inventory); add the SWORD BLADE; receive the ANGELIC SWORD.
- Examine the SCYTHE HANDLE (inventory); add the SCYTHE BLADE; receive DEATH'S SCYTHE.
- Place DEATH'S SCYTHE (N).
- Place the ANGELIC SWORD (O).
- Enter the Chamber of Power (P).
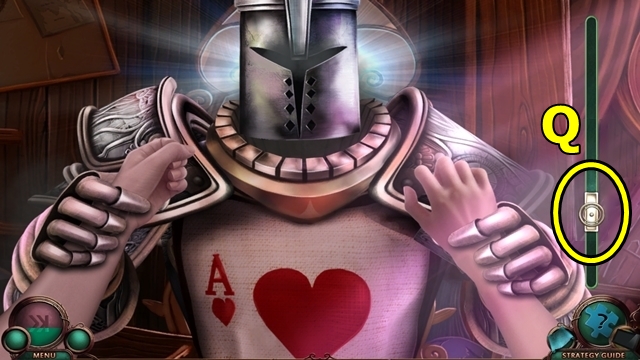
- Use the CARD KNIGHT'S ARMOR (Q).
- Enter the Chamber of Power to trigger a mini-game.
- Solution: (R, S, T).
- Find the cards; obtain the BLACK ACE.
- Examine the CARD BOX (inventory); open the box; take the CARD DECK; add the BLACK ACE; receive the CARD DECK.
- Enter the Chamber of Power to trigger a mini-game.
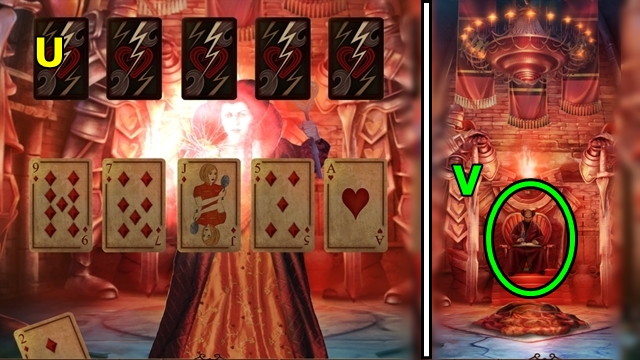
- Solution: (U).
- Confront Mallek (V).
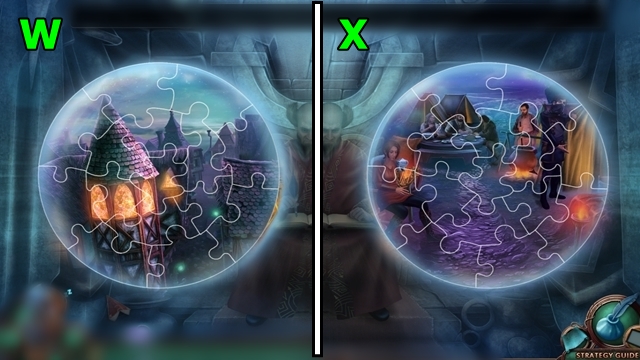
- Choose either to trigger a mini-game.
- Solution: Choose the rebel camp (W); choose the town (X).
- Choose either to trigger a mini-game.
- Solution: Choose the casino (Y); choose the castle (Z).
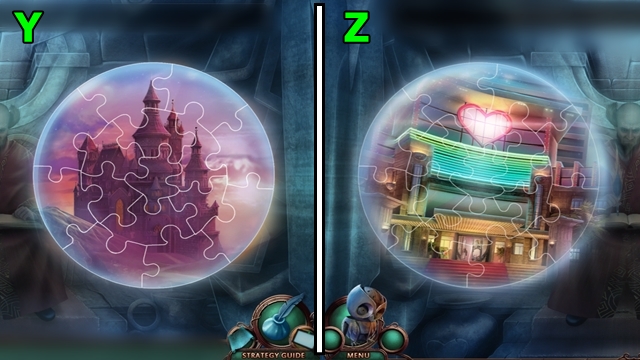
- Choose Alice.
- Solution: (A).
- Activate all the pieces (B).
- Use the HEART MIRROR (C).
- Congratulations, you've completed Nevertales: Smoke and Mirrors.
Created at: 2014-12-07