

Walkthrough Menu
- General Tips
- Chapter 1: The Chapel
- Chapter 2: The Study
- Chapter 3: The Ship
- Chapter 4: The Mail Room
- Chapter 5: The Theater Lobby
- Chapter 6: The Crypt
General Tips
- This is the official guide for Nightfall Mysteries: Haunted by the Past.
- Hidden-object puzzles are referred to as HOPs. This guide will not show screenshots of the HOPs, however, it will mention when an HOP is available and the inventory item you'll collect from it.
- This guide will not mention each time you have to zoom into a location; the screenshots will show each zoom scene.
Chapter 1: The Chapel
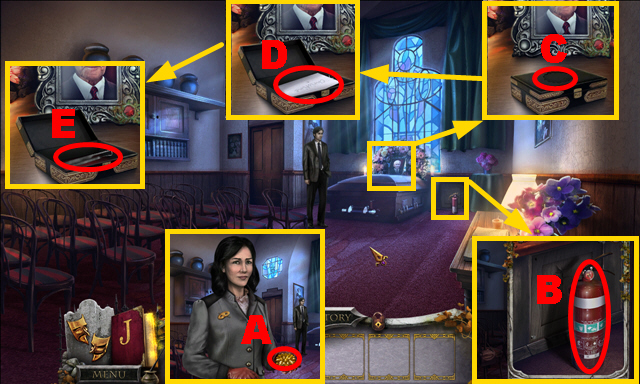
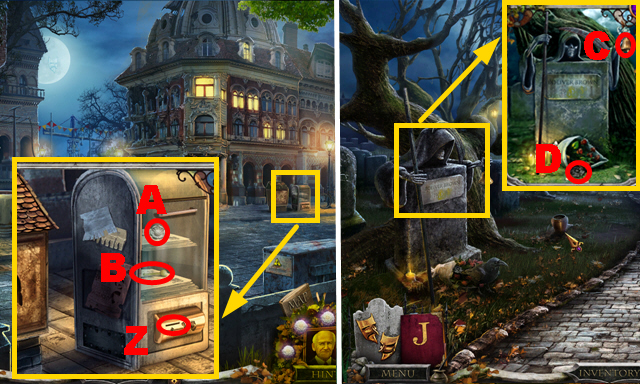
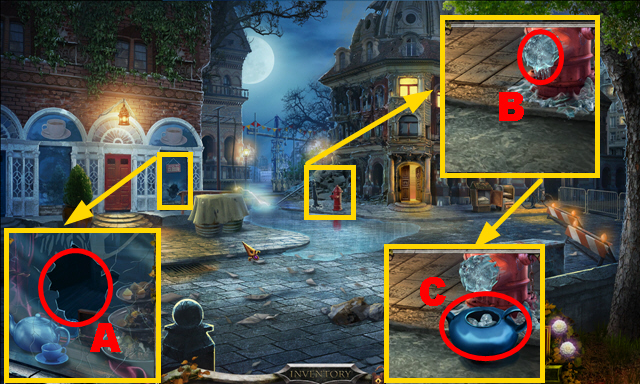
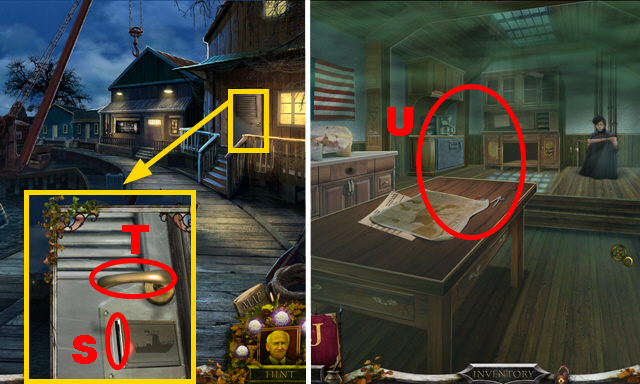
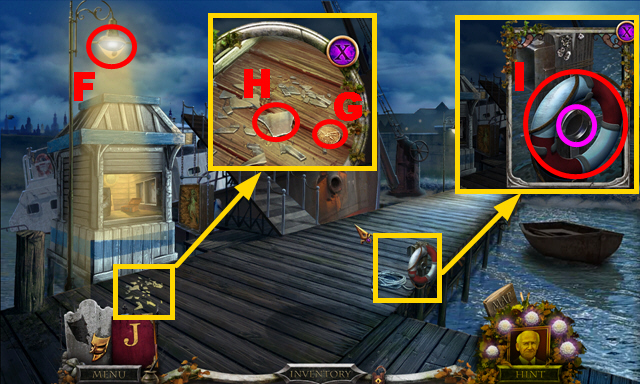
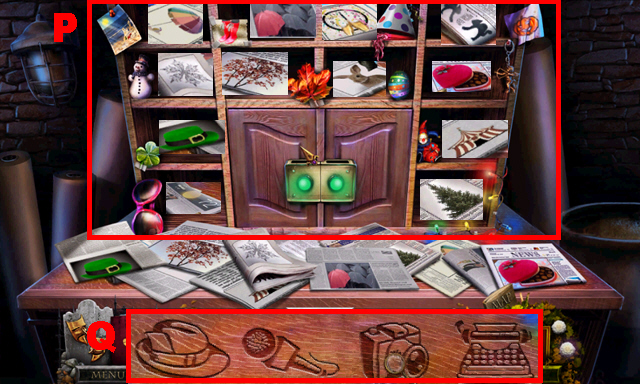
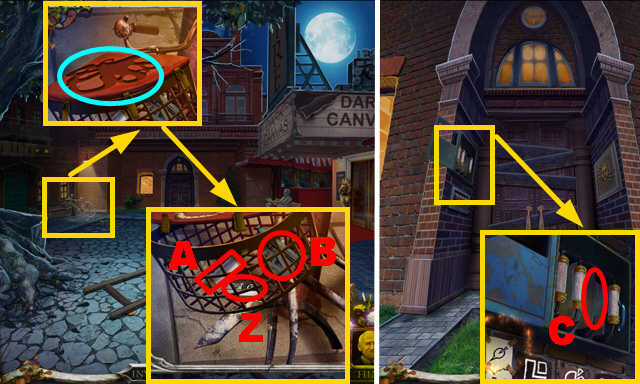
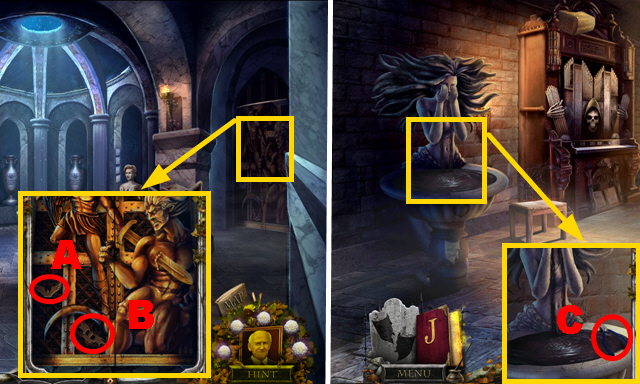
- Take the FLOWER CREST (A) and FIRE EXTINGUISHER (B).
- Place the FLOWER CREST (C); take the note (D) and LOCKPICK (E).

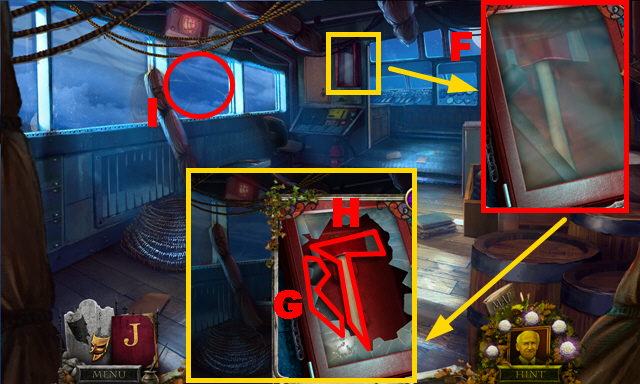
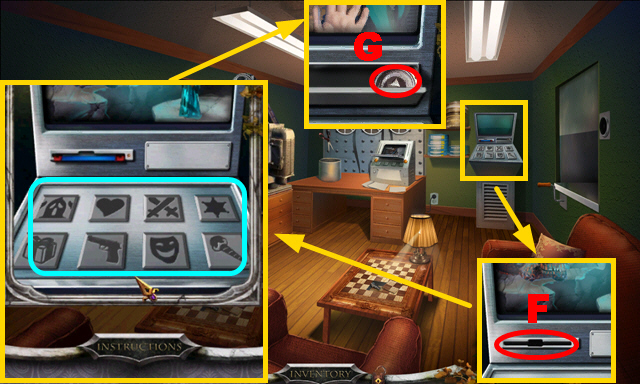
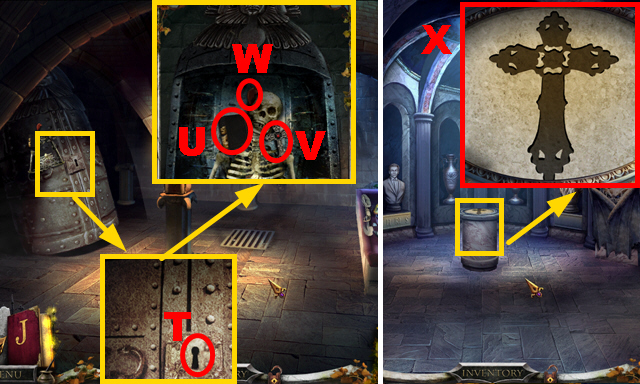
- Take the note (F); use the LOCKPICK (G).
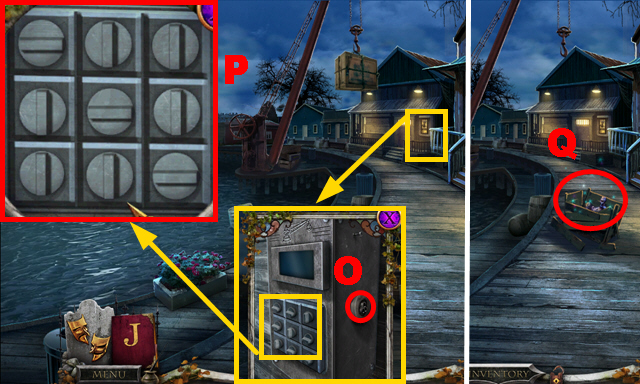
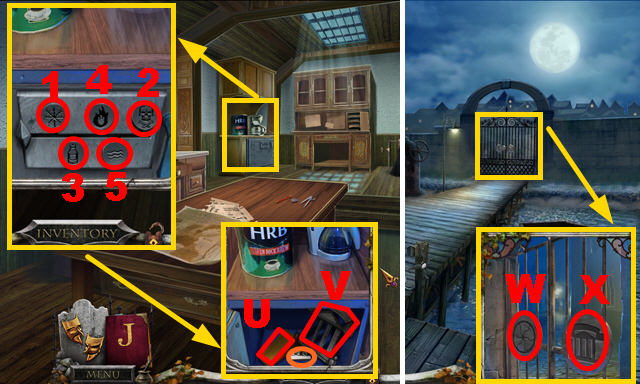
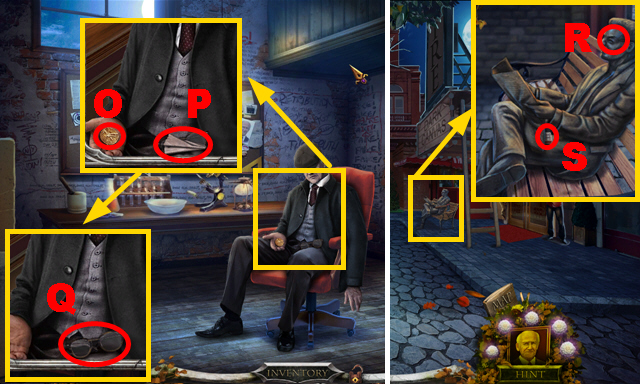
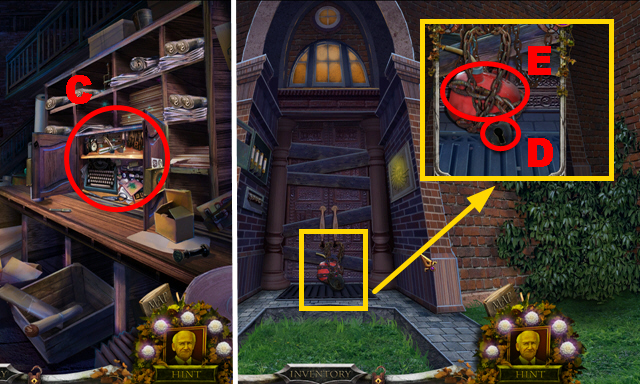
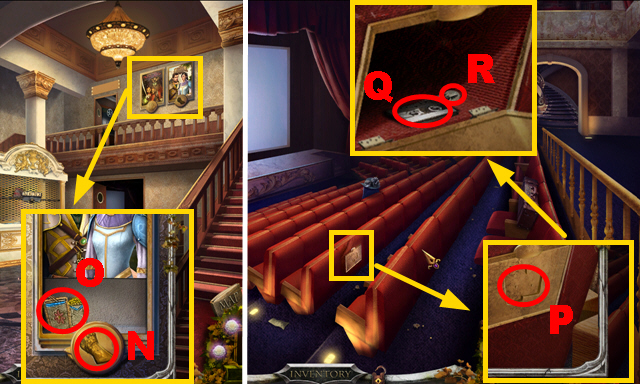
- Take the PAPER CLIP (H), CABINET KNOB (I), and STONE FLOWER 1/3 (J).
- Use the PAPER CLIP (K).
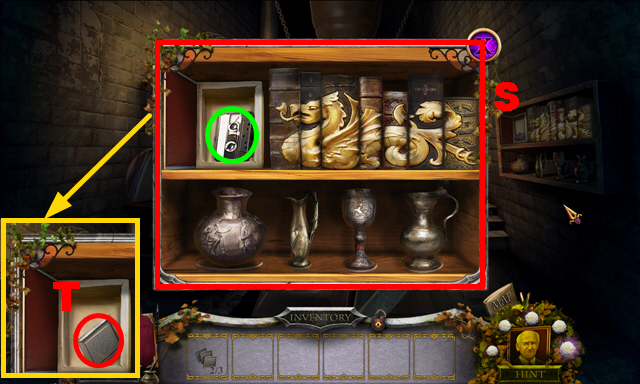
- Take the photo (L), tape (M), and NAIL POLISH REMOVER (N).
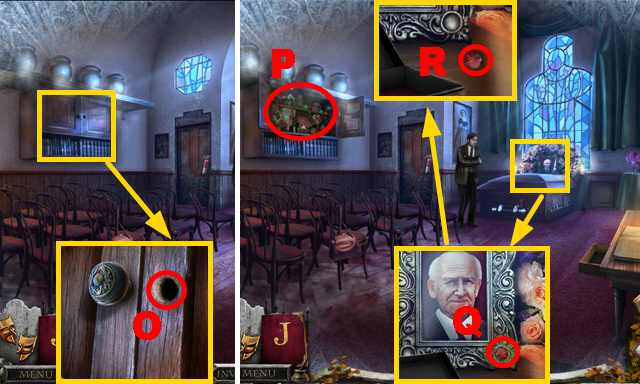
- Place the CABINET KNOB (O).
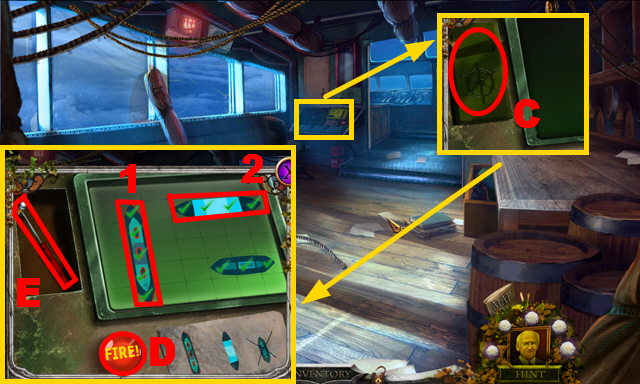
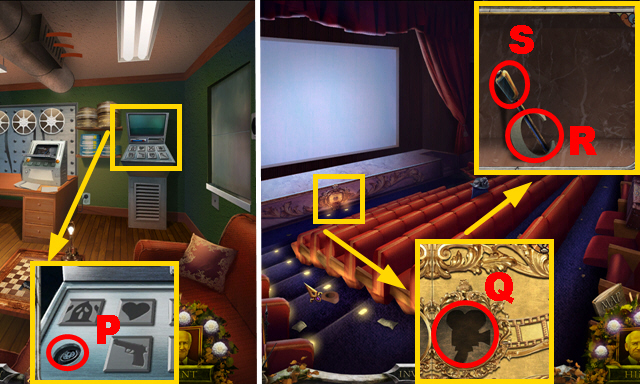
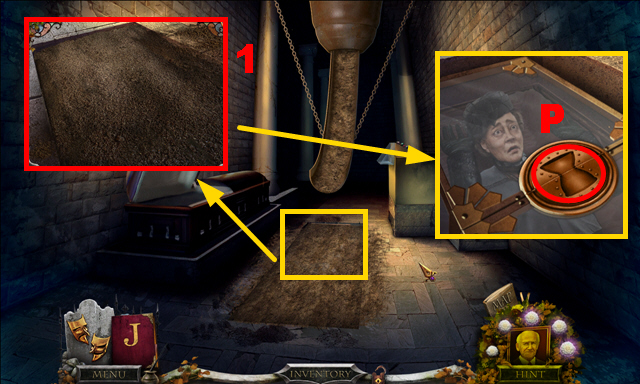
- Play the HOP (P) to receive the THROWING AXE.
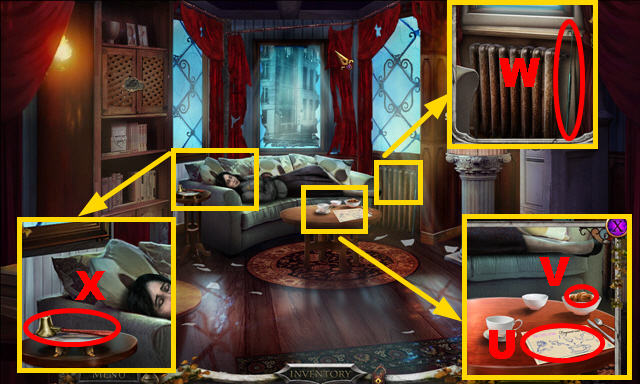
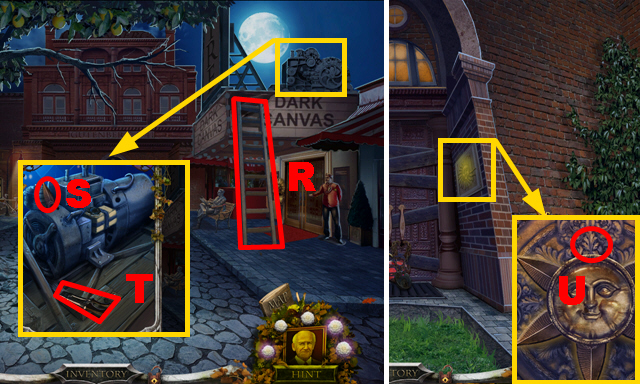
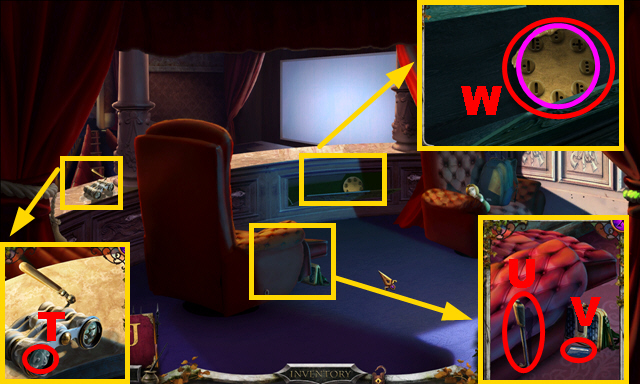
- Use the NAIL POLISH REMOVER (Q); take the RUBY (R).
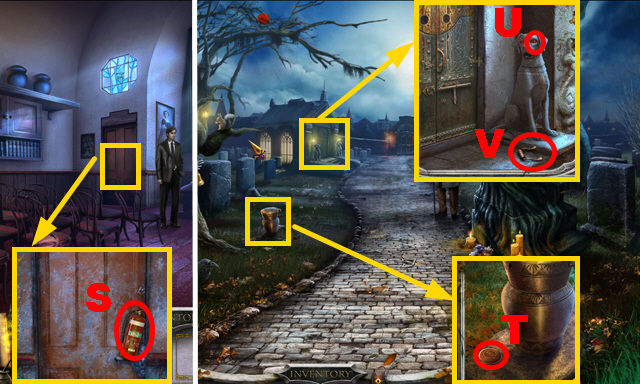
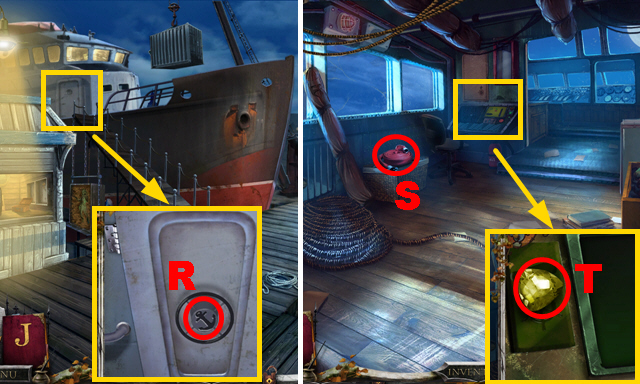
- Use the FIRE EXTINGUISHER and THROWING AXE (S).
- Move forward.
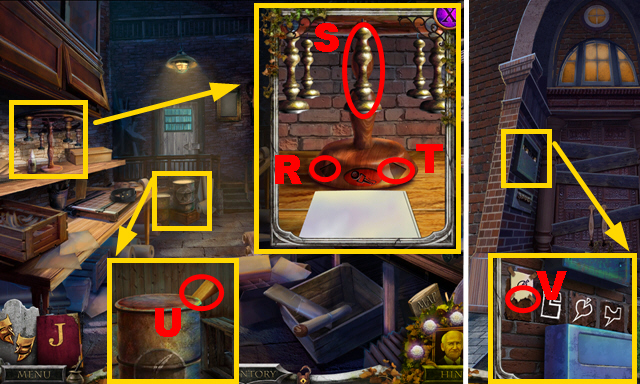
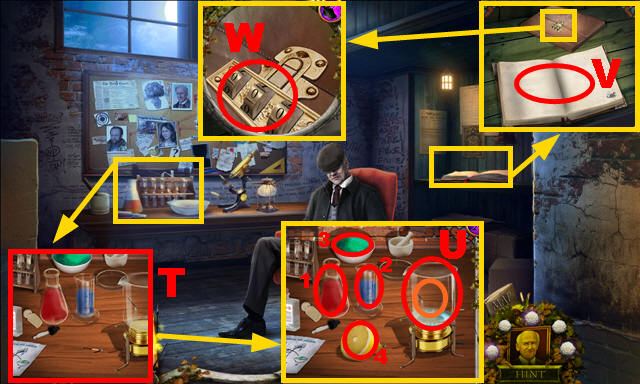
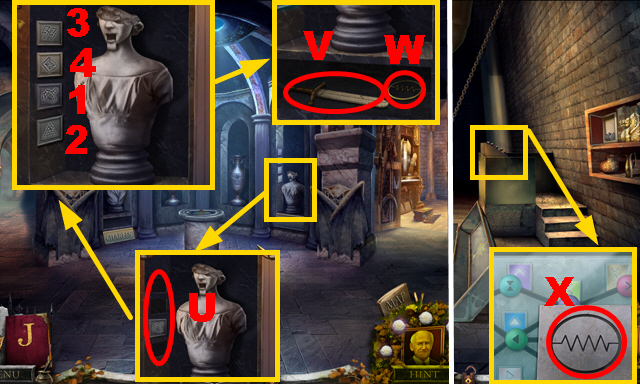
- Take the COIN (T).
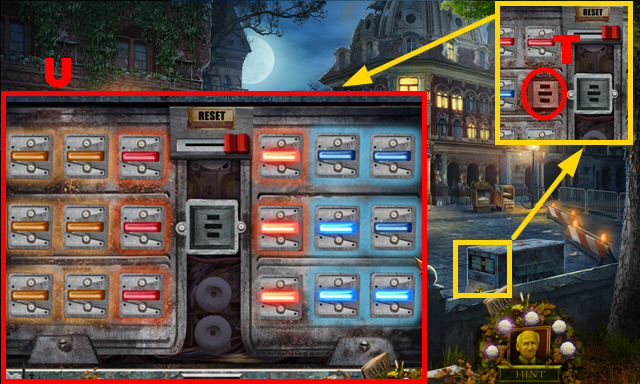
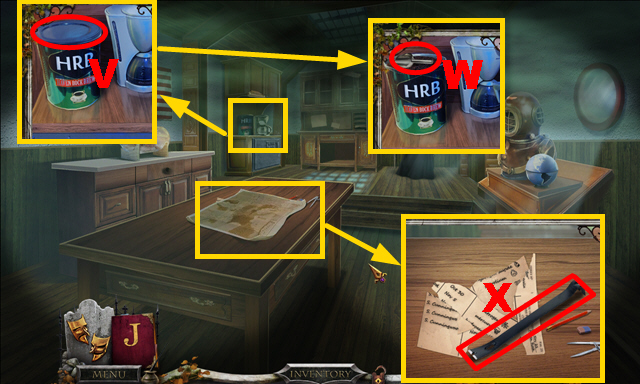
- Place the RUBY (U); take the BRASS HANDLE (V).
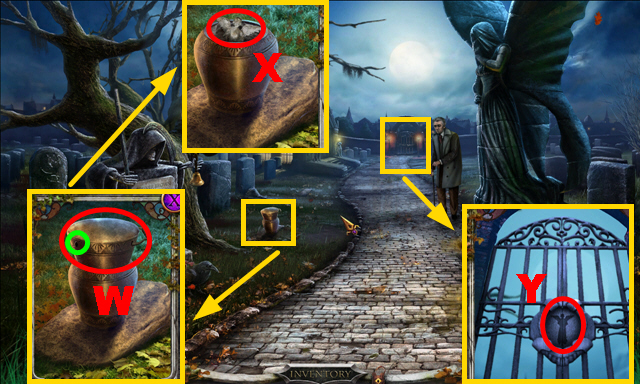
- Place the BRASS HANDLE (green); remove the cover (W).
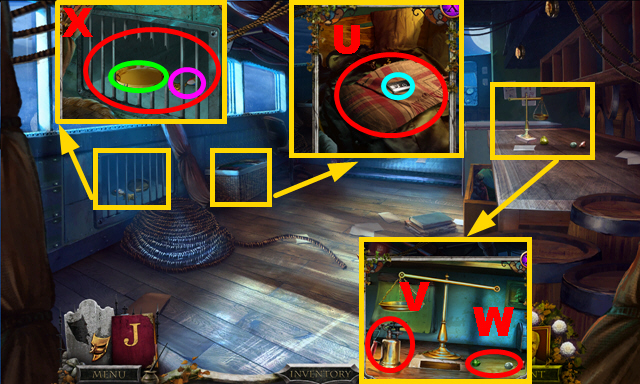
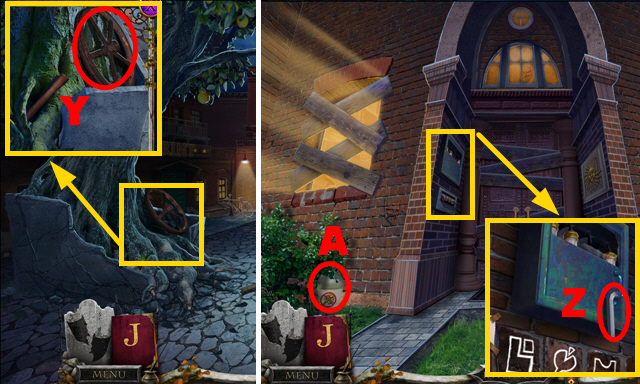
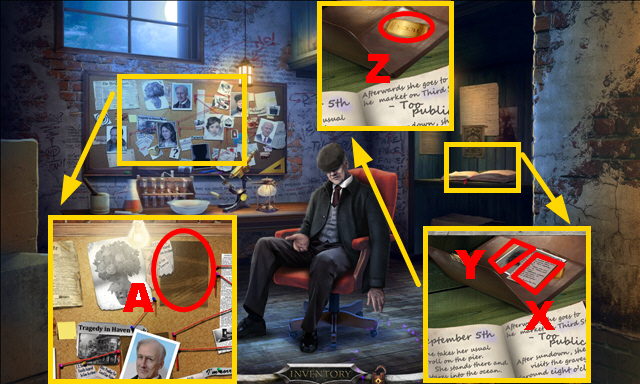
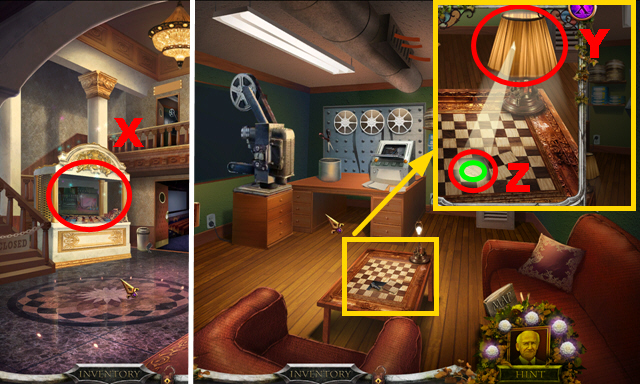
- Take the ANGEL (X).
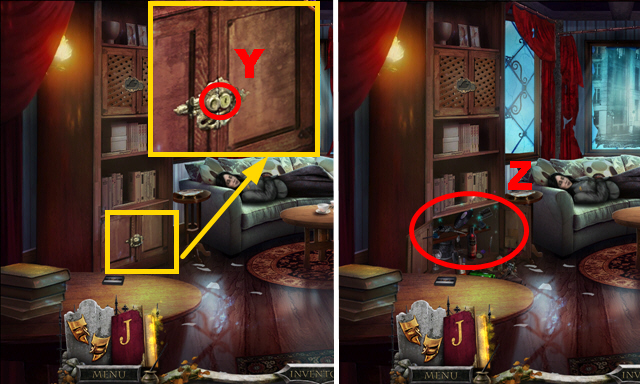
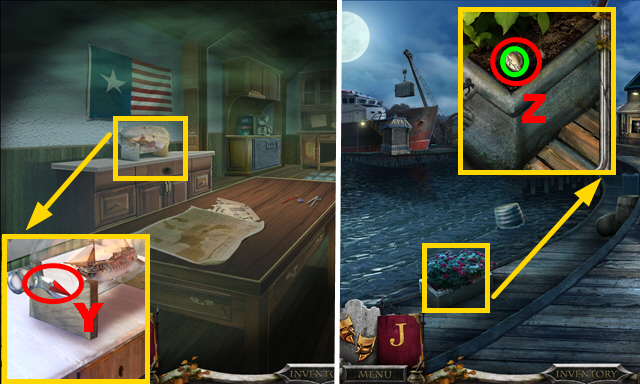
- Place the ANGEL (Y).
- Go through the gate.
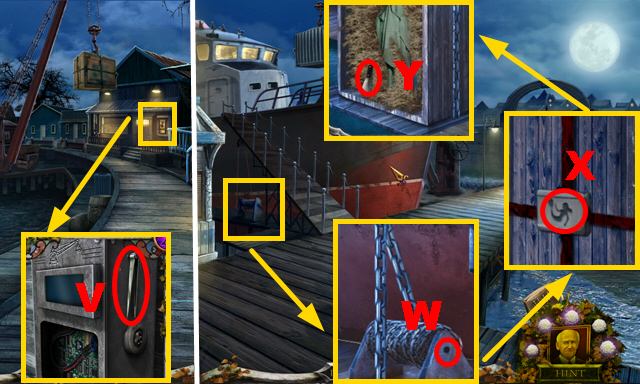
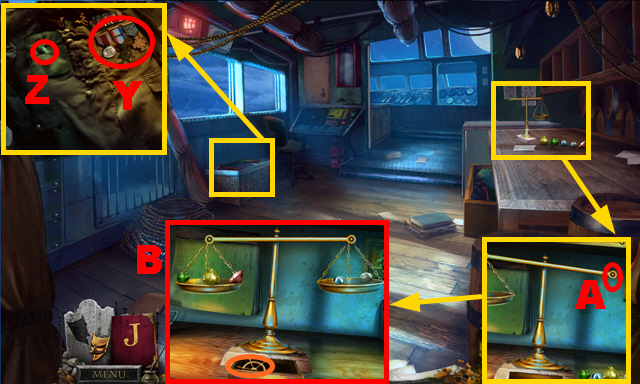
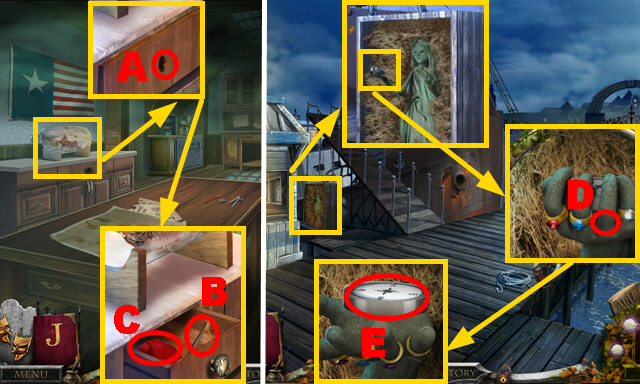
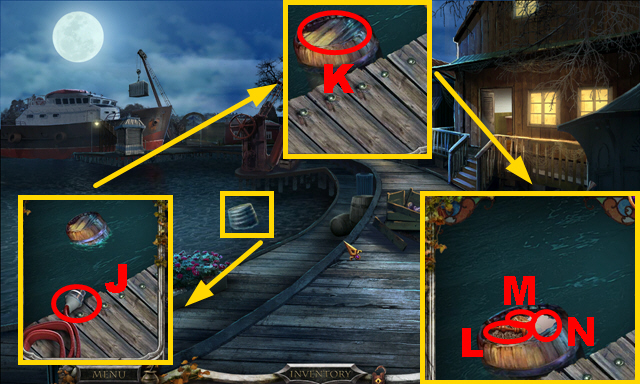
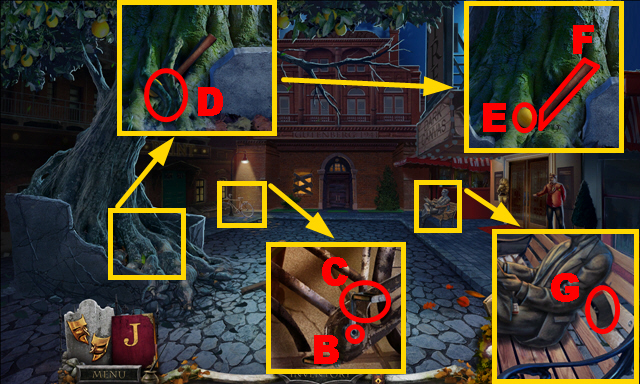
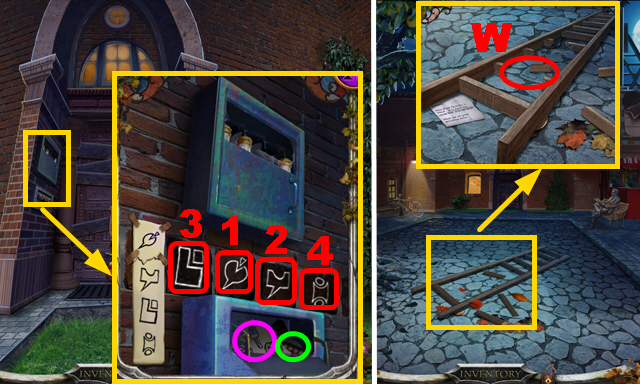
- Use the COIN (Z); take STONE FLOWER 2/3 (A) and the BELL CLAPPER (B).
- Walk down.
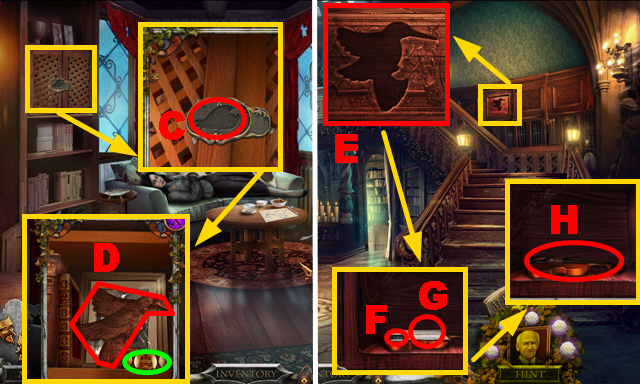
- Place the BELL CLAPPER (C); take STONE FLOWER 3/3 (D).
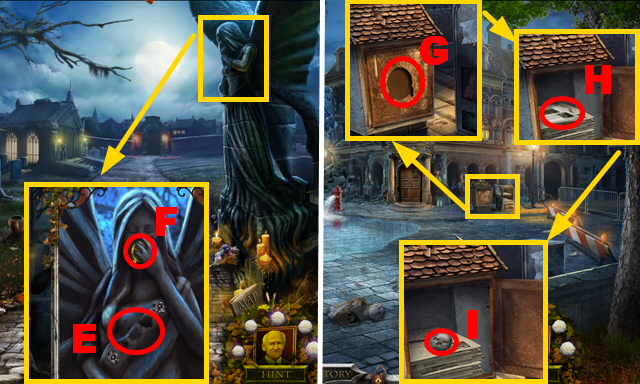
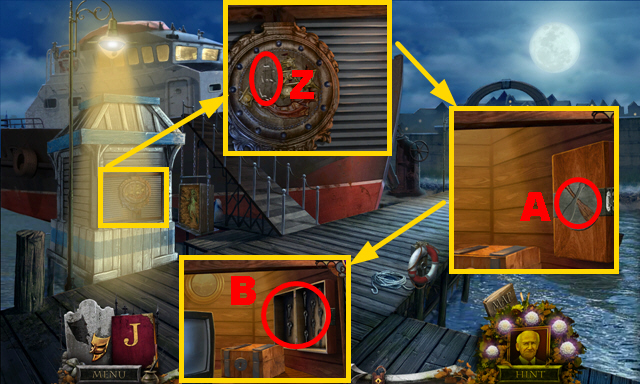
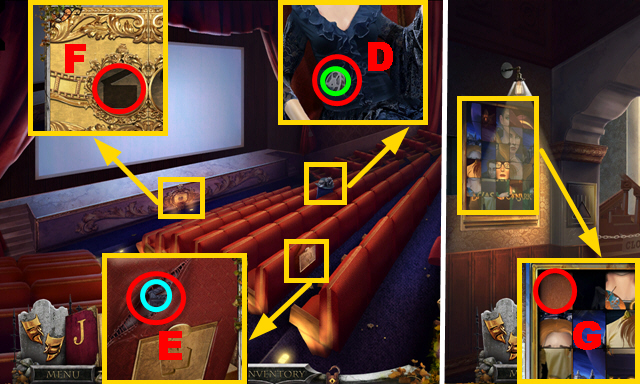
- Place 3 STONE FLOWERS (E); take the NEWSSTAND EMBLEM (F).
- Move forward.
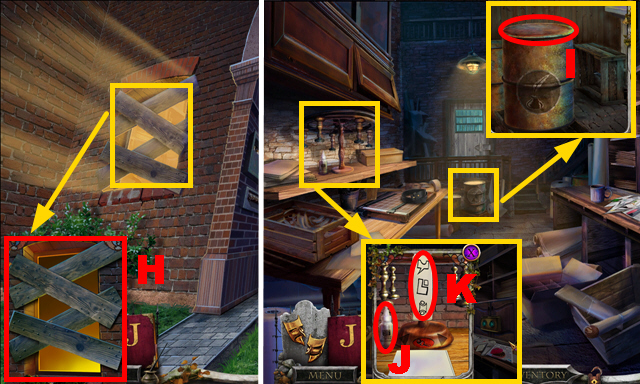
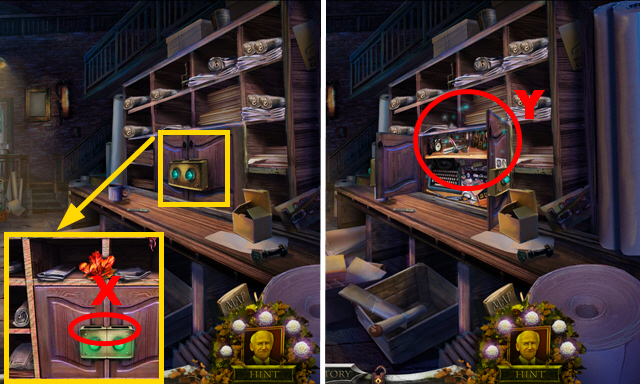
- Place the NEWSSTAND EMBLEM (G); take the newspaper (H) and SKULL EMBLEM (I).
- Walk down.

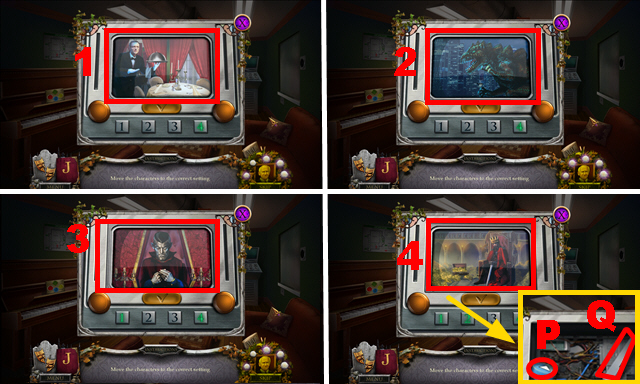
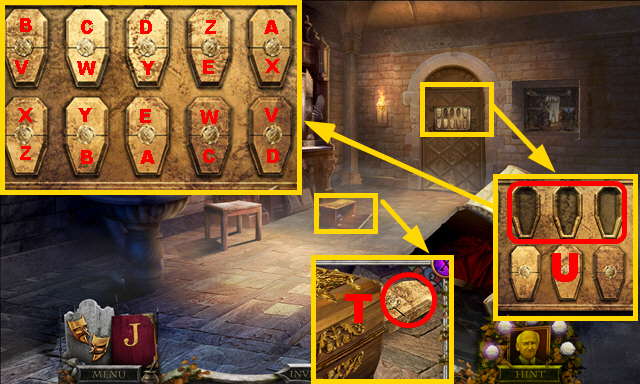
- Place the SKULL EMBLEM (J).
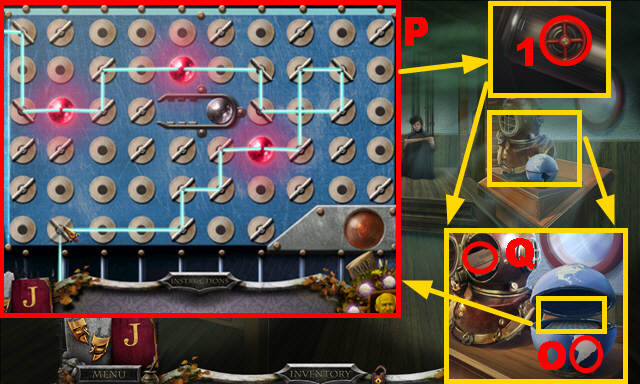
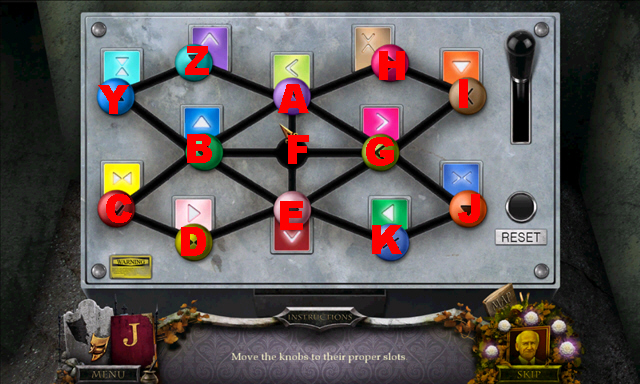
- Play the mini-game.
- Solution: (K).
- Take the note (purple) and HAMMER (blue).
- Walk down.
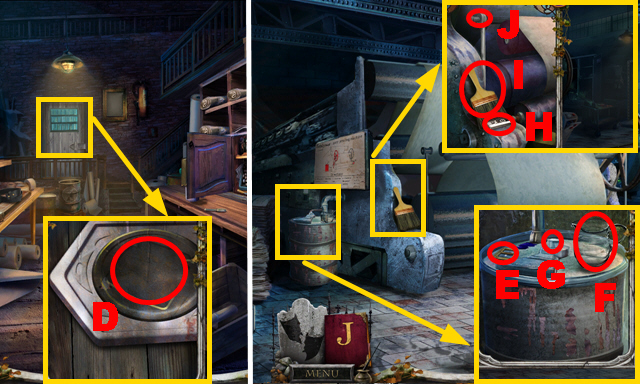
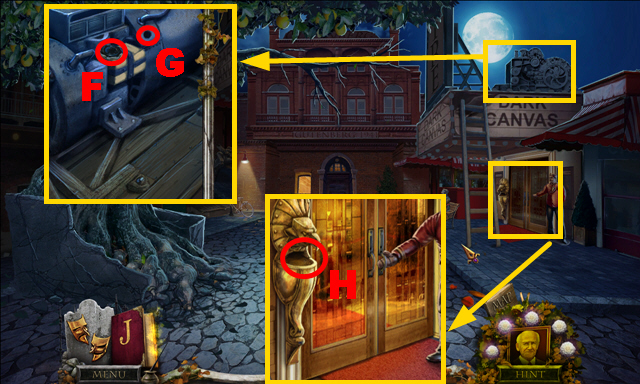
- Play the HOP (L) to acquire the SCREWDRIVER.
- Use the HAMMER (M).
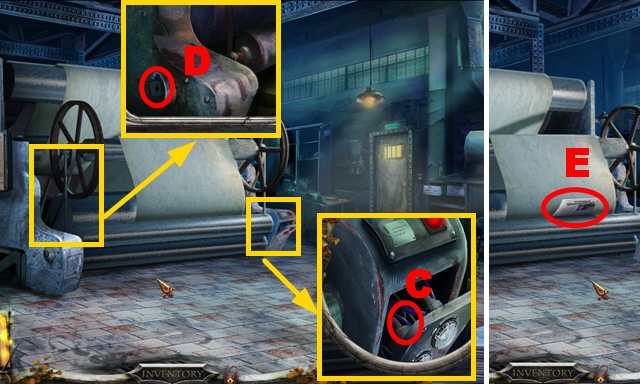
- Turn the valve (N); take the FREEZING GAS (O).
- Move forward twice.
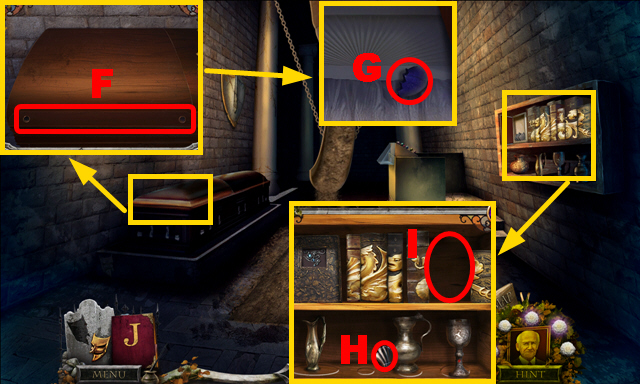
- Use the SCREWDRIVER (P) and FREEZING GAS (Q); take the BLACK HEART (R).
- Place the BLACK HEART (S); push it.
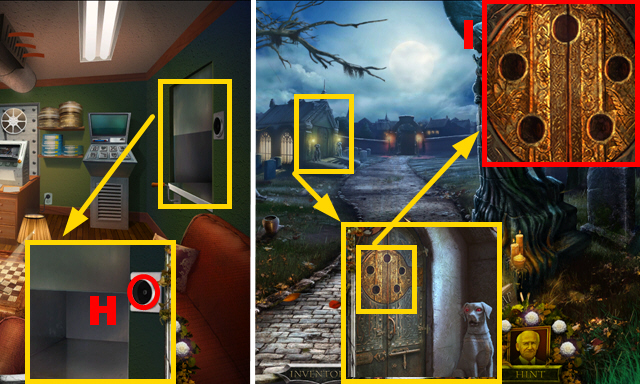
- Enter the house, move forward.
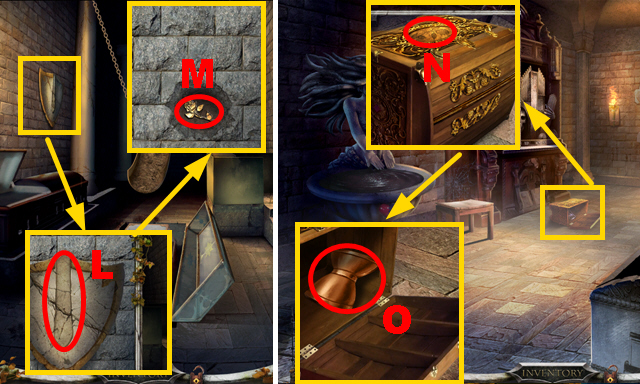
- Inspect the recipe (U); take the WALNUT (V).
- Take the FIRE HOOK (W) and CANDLE SNUFFER (X).
- Use the LOCKPICK (Y).
- Play the HOP (Z) to acquire the CLOTH ROPE.
- Walk down.
- Use the CANDLE SNUFFER (A).
- Play the mini-game.
- Solution: 1-4.
- Take the BABY CREST (B).
- Move forward.
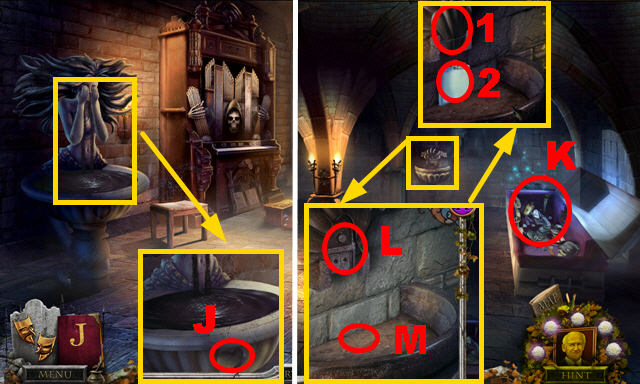
- Place the BABY CREST (C); open the cupboard.
- Take the CARVED ORNAMENT (D) and TITLE BELT (green).
- Walk down.
- Place the CARVED ORNAMENT (E).
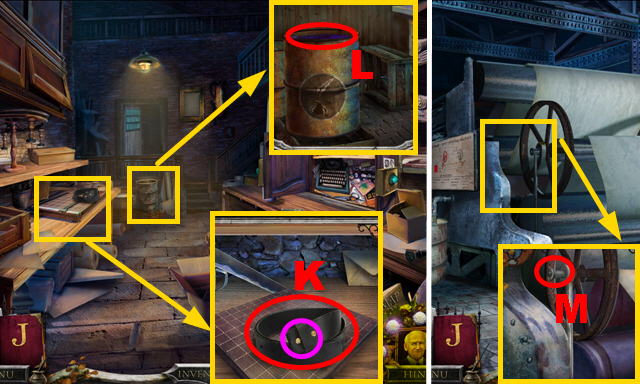
- Take the tape (F), note (G), and MINIATURE VIOLIN (H).
- Move forward.
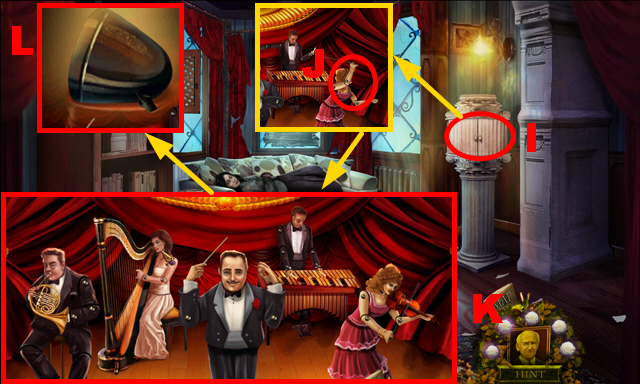
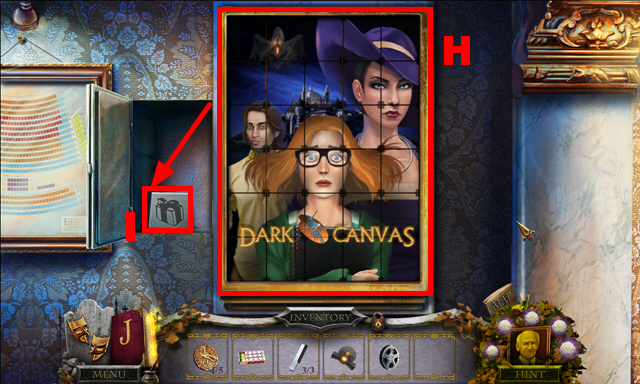
- Open the compartment (I); place the MINIATURE VIOLIN (J).
- Play the mini-game.
- Solution: (K).
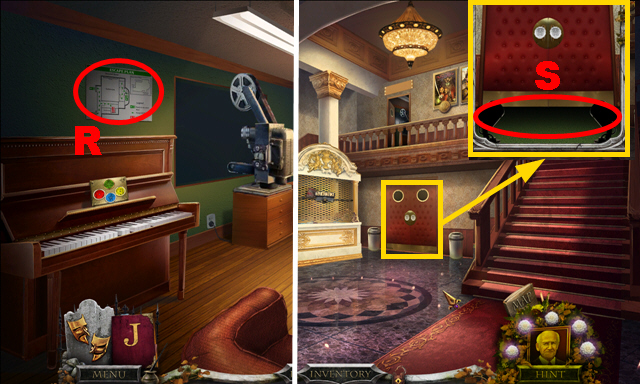
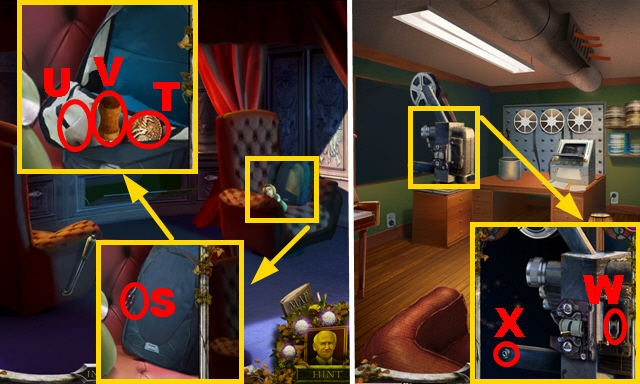
- Take the SPOTLIGHT (L).
- Walk down three times.
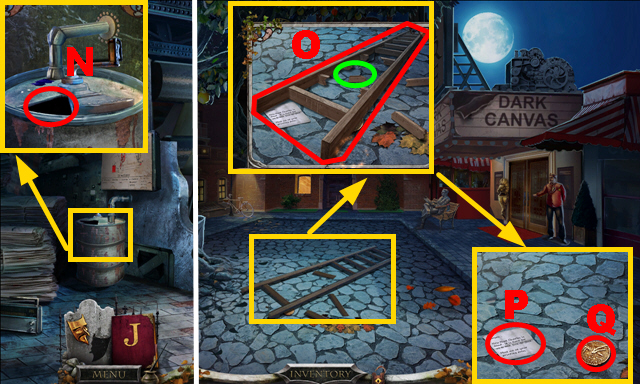
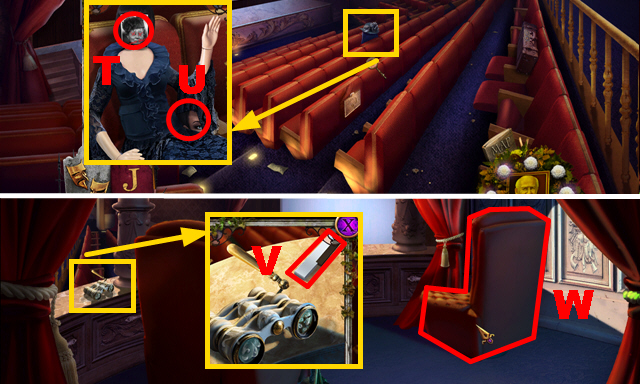
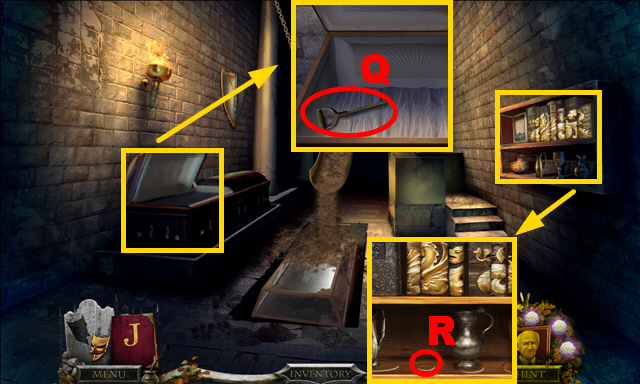
- Use the WALNUT (M); take the WHEEL (N).
- Use the FIRE HOOK (O); take GEAR 1/2 (P).
- Use the CLOTH ROPE (Q) to acquire the SCYTHE.
- Move forward twice.
Chapter 2: The Study
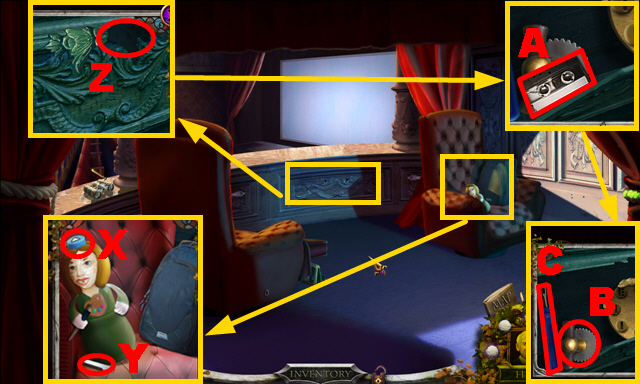
- Use the SCYTHE (R).
- Go upstairs.
- Take the CRANK (S) and KNOB (T); place the SPOTLIGHT (U).
- Take the ROSE PETALS (V).
- Place the WHEEL (W).
- Move the ladder (purple).
- Place the TITLE BELT (X); take the note (Y) and GLOVES (Z).
- Walk down twice.
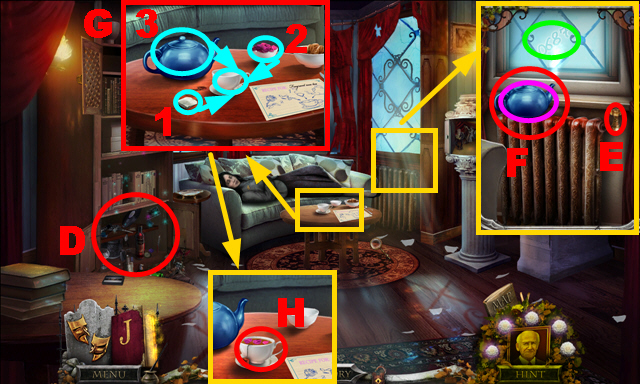
- Use the GLOVES (A) to acquire the EMPTY KETTLE and TEABAG.
- Use the EMPTY KETTLE and HAMMER (B); take the KETTLE WITH ICE (C).
- Go to the Parlor.
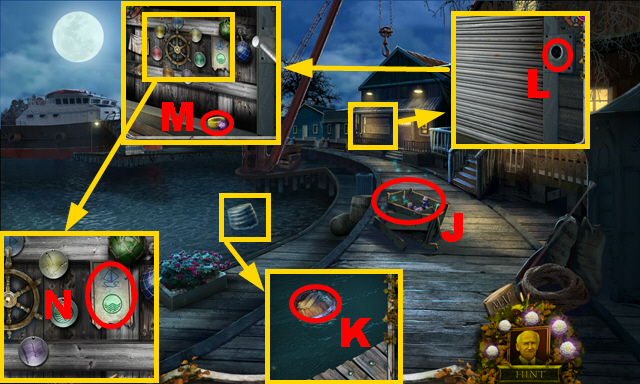
- Play the HOP (D) to receive the OAR EMBLEM.
- Place the KNOB (E) and KETTLE WITH ICE (F); make note of the code (green).
- Take the HOT WATER (purple).
- Place the TEABAG, HOT WATER, and ROSE PETALS (G); use items 1-3.
- Take the FRAGRANT TEA (H).
- Use the FRAGRANT TEA (I); you receive the CARETAKER'S KEY.
- Walk down, go upstairs.
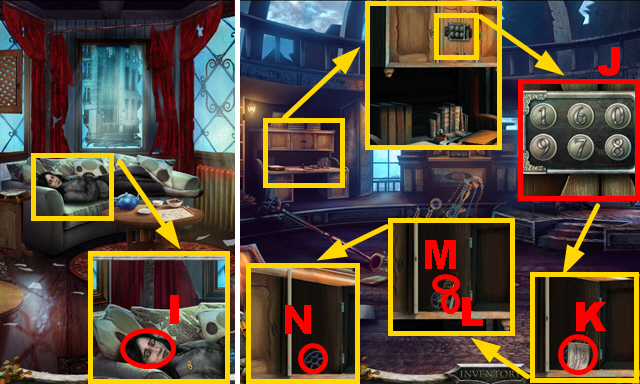
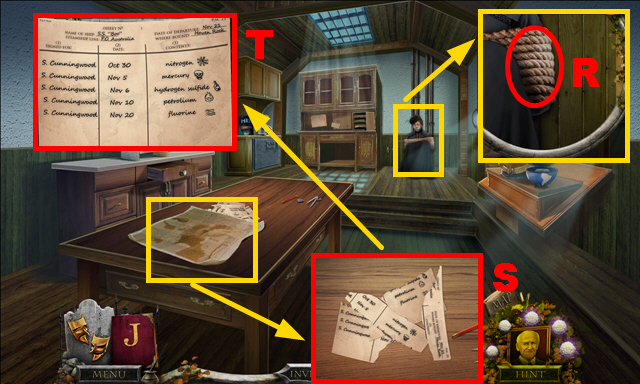
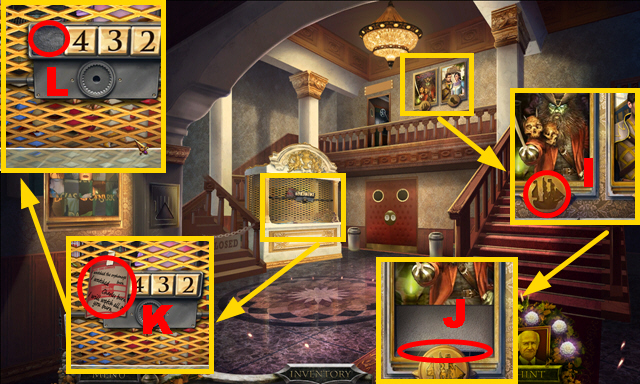
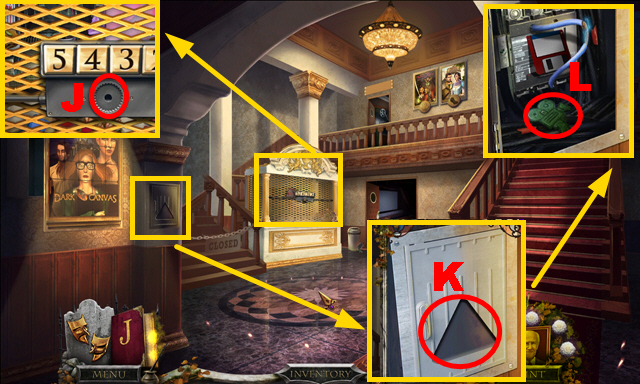
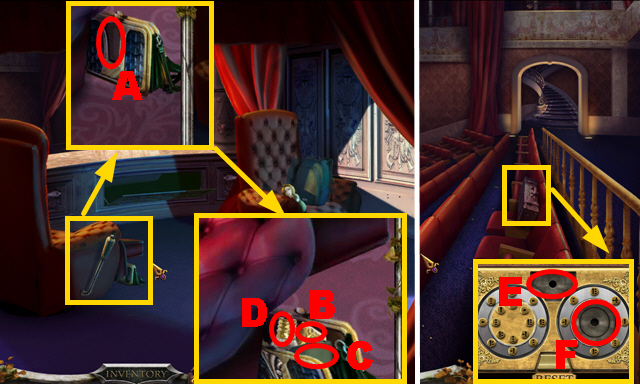
- Enter the code '0687' (J); take the note (K), tape (L), SAIL (M), and GEAR 2/2 (N).
- Use the CARETAKER'S KEY (O); take the note (P), FUSE (Q), and MERMAID (R).
- Go to the Parlor.
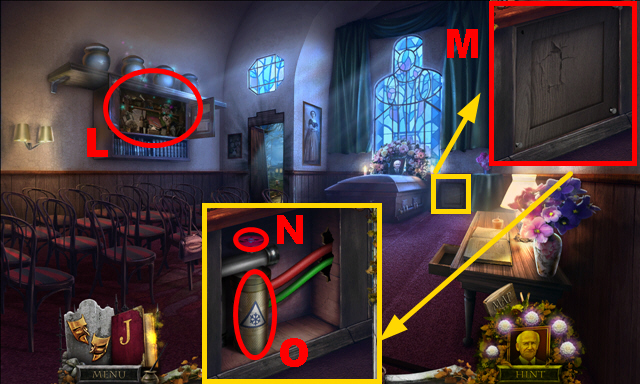
- Take the tape (S).
- Walk down twice.
- Place the FUSE (T).
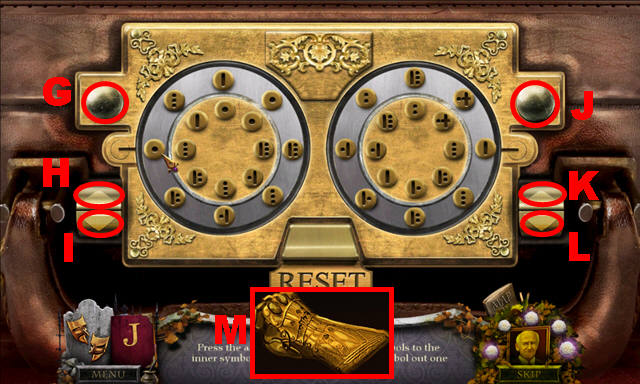
- Play the mini-game.
- Solution: (U).
- Move forward to the Boardwalk.
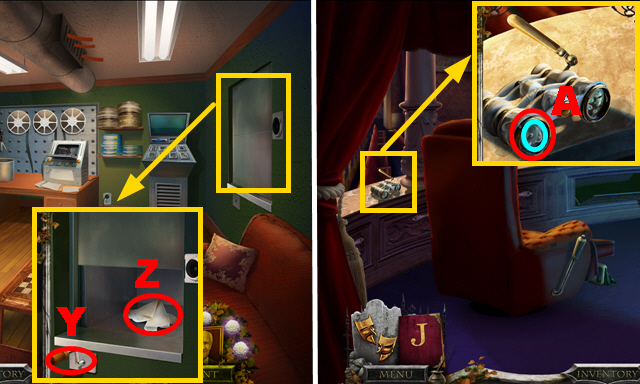
- Take the TWEEZERS (V).
- Turn left.
- Place the CRANK (W) and MERMAID (X); take the SCRAPER (Y).
- Place the SAIL (Z) and OAR EMBLEM (A).
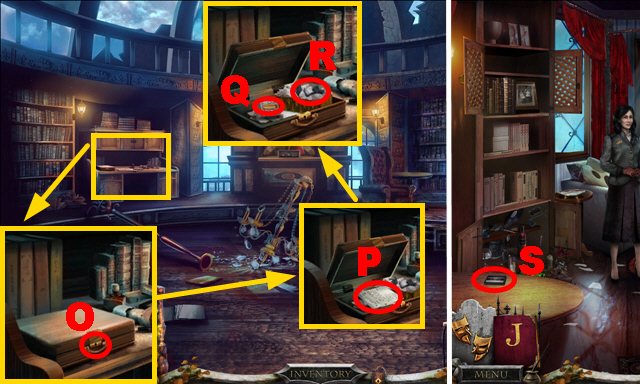
- Examine the compartment (B).
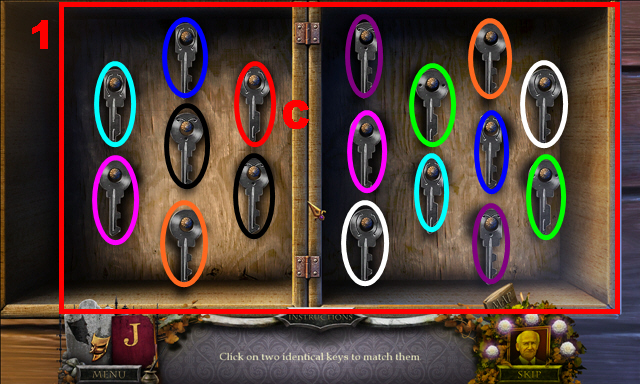
- Play the mini-game.
- Match identical pairs (1).
- Take the CARTON KEY (C).
- Place the CARTON KEY (D); take the WHEEL SOLUTION (E).
- Use the SCRAPER (F); take the NUMBER PANEL (G).
- Walk down.
- Place the NUMBER PANEL (H).
- Go to the Foyer.
- Place 2 GEARS (I).
- Play the mini-game.
- Solution: 1-4.
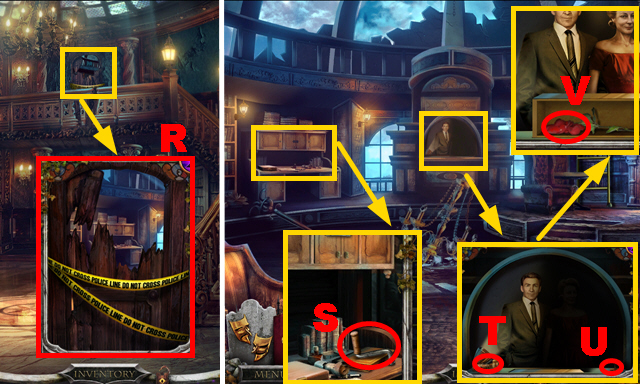
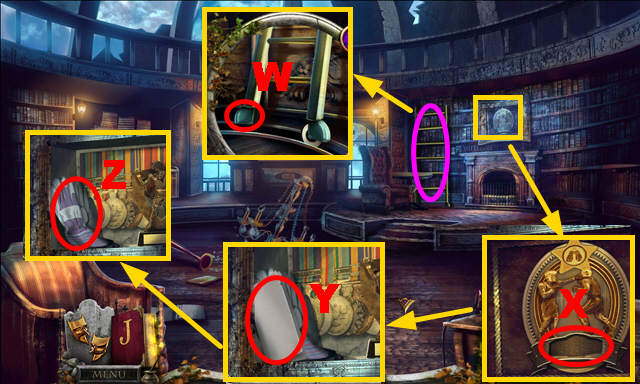
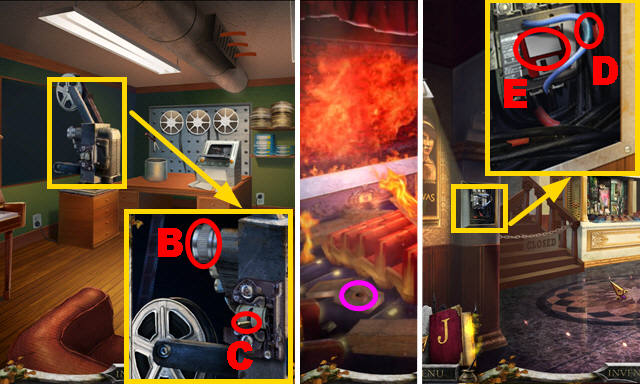
- Take the BLUE TOPAZ (J), note (K), and VIDEOTAPE (L).
- Go to the Boardwalk.
- Use the VIDEOTAPE (M); take the CORD (N).
- Walk down.
- Place the CORD (O).
- Adjust the panel correctly (P).
- Play the HOP (Q) to acquire the ANCHOR.
- Turn left.
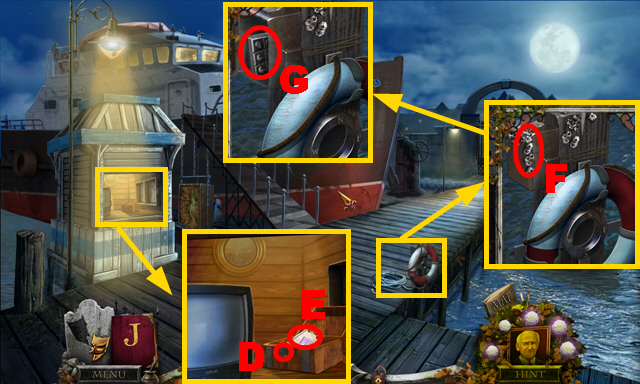
Chapter 3: The Ship
- Place the ANCHOR (R).
- Turn left.
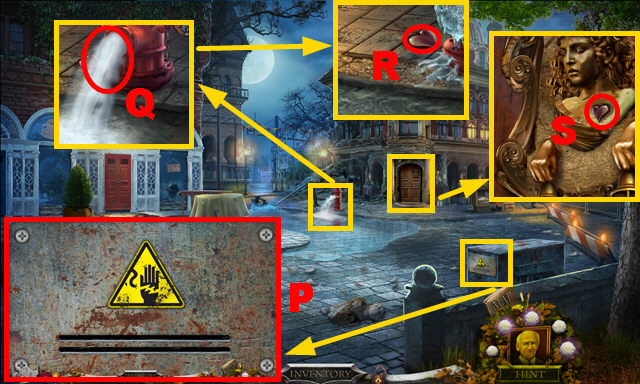
- Take the HOSE (S) and EMERALD (T).
- Remove the clothes; take the tape (blue) and BLANKET (U).
- Take the TORCH LIGHTER (V); place the EMERALD and BLUE TOPAZ (W).
- Use the TORCH LIGHTER (X); take the SCALE PLATE (green) and CAPTAIN'S MEDAL (purple).
- Place the CAPTAIN'S MEDAL (Y); take the CANNON (Z).
- Place the SCALE PLATE (A).
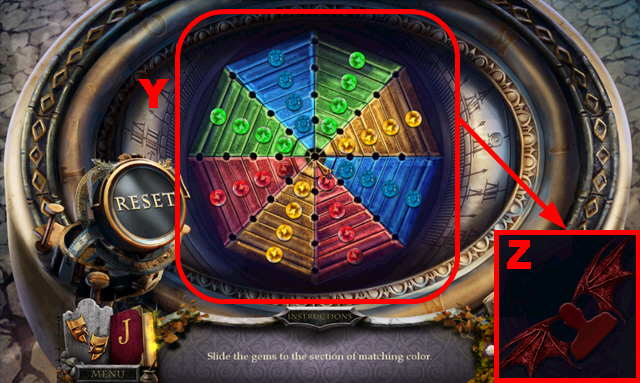
- Arrange the gems correctly (B); take the SHIP'S WHEEL (orange).
- Place the CANNON and SHIP'S WHEEL (C).
- Select the button (D) nine times to discover two ships 1-2.
- Take the EMERGENCY HAMMER (E).
- Use the EMERGENCY HAMMER (F); take the SHUTTER LEVER (G) and AXE (H).
- Use the AXE and BLANKET (I).
- Turn left, walk down.
- Play the HOP (J) to acquire the GAS MASK.
- Place the HOSE (K).
- Use the SHUTTER LEVER (L).
- Take the RING (M); place the WHEEL SOLUTION (N).
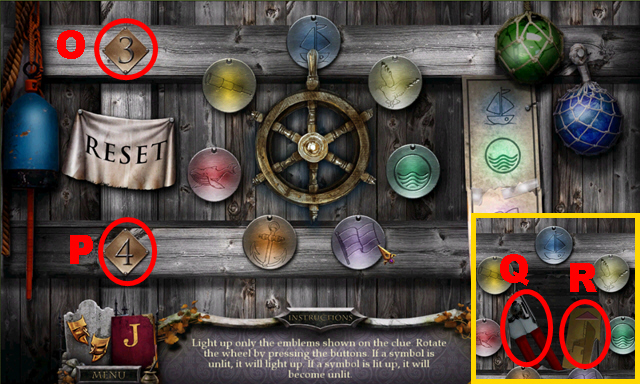
- Play the mini-game.
- Solution: O-Px5-Ox3-Px2-O.
- Take the CAN OPENER (Q) and KEY CARD (R).
- Use the KEY CARD (S); open the door (T).
- Turn right.
- Use the GAS MASK (U).
- Remove the lid; use the CAN OPENER (V).
- Take the SCOOPER (W).
- Remove the map; take the CROWBAR (X).
- Collect the COMPASS NEEDLE with the TWEEZERS (Y).
- Walk down.
- Use the SCOOPER (Z); take the DRAWER HANDLE (green).
- Turn right.
- Place the DRAWER HANDLE (A); take the SLINGSHOT (B) and FABRIC (C).
- Walk down, turn left.
- Place the RING (D); take the COMPASS (E).
- Use the SLINGSHOT (F).
- Take CRYPT COIN 1/5 (G); collect the GLASS SHARD with the FABRIC (H).
- Place the COMPASS and COMPASS NEEDLE (purple); take the LIFE SAVER (I).
- Walk down.
- Place the LIFE SAVER (J); use the CROWBAR (K).
- Take the STAMP (L), CRYPT COIN 2/5 (M), and SOUTH AMERICA (N).
- Turn right.
- Place SOUTH AMERICA (O).
- Play the mini-game.
- Solution: (P).
- Turn the valve (1).
- Take the TORN PAGE (Q).
- Use the GLASS SHARD (R).
- You receive the PRINTING EMBLEM.
- Place the TORN PAGE (S); take the complete page (T).
- Activate symbols 1-5; take the tape (orange), WEDGE (U), and THEATER EMBLEM (V).
- Walk down, turn left.
- Place the PRINTING EMBLEM (W) and THEATER EMBLEM (X).
- Move forward.
- Take the MECHANICAL WHEEL (Y).
- Move forward.
- Take the HEX KEY (Z) and HERBICIDE (A).
- Walk down.
- Use the HEX KEY (B); take the PEDAL (C).
- Use the HERBICIDE (D); take the LEMON (E) and AXE HANDLE (F).
- Place the AXE HANDLE (G); take the HATCHET.
- Move forward.
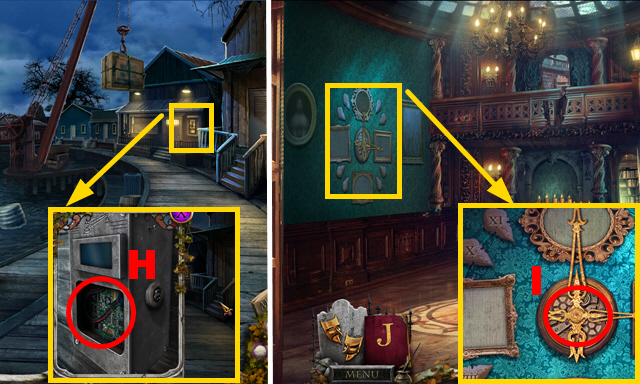
Chapter 4: The Mail Room
- Use the HATCHET twice (H).
- Go through the window.
- Place the WEDGE (I).
- Take the GLUE (J) and LETTERBOX CLUE (K).

- Place the STAMP (L).
- Place the LEMON (M); take the SLICED LEMON and MALLET (N).
- Inspect the area (O).
- Play the mini-game.
- Solution: (P).
- Make note of the symbols (Q).
- Use the stamps: Tx2-S-Rx2-S-Rx3-S-Rx2-S.
- You receive PUNCH CARD 1/2.
- Use the MALLET (U).
- Walk down.
- Place the LETTERBOX CLUE (V).
- Select buttons 1-4; take PUNCH CARD 2/2 (purple) and PRINTING SYMBOL 1/2 (green).
- Walk down.
- Use the GLUE (W).
- Move forward twice.
- Use 2 PUNCH CARDS (X).
- Play the HOP (Y) to receive the BIKE CREST.
- Walk down twice.
- Place the BIKE CREST (blue), take the tape (Z), TRANSISTOR (A), and PRINTING SYMBOL 2/2 (B).
- Move forward.
- Open the door; place the TRANSISTOR (C).
- Move forward.
- Place 2 PRINTING SYMBOLS (D).
- Move forward.
- Take the BUCKLE (E) and JUG (F).
- Place the PEDAL (G); rotate it.
- Take the tape (H) and BRUSH (I); place the MECHANICAL WHEEL (J).
- Walk down.
- Place the BUCKLE (purple); take the BELT (K).
- Use the JUG (L) to acquire the INK.
- Move forward.
- Place the BELT (M).
- Use the INK (N).
- Walk down three times.
- Use the BRUSH (green); take the LADDER (O), note (P), and CRYPT COIN 3/5 (Q).
- Place the LADDER (R).
- Take the SUNBEAM (S) and MECHANICAL ARM (T).
- Move forward.
- Place the SUNBEAM (U).
- Play the mini-game.
- Solution: V-Y-W-Y-A-Y-Z-X.
- Take the CONDUCTOR (B).
- Move forward twice.
- Place the CONDUCTOR (C) and MECHANICAL ARM (D); pull the arm.
- Take the UNCUT NEWSPAPER (E).
- Walk down.
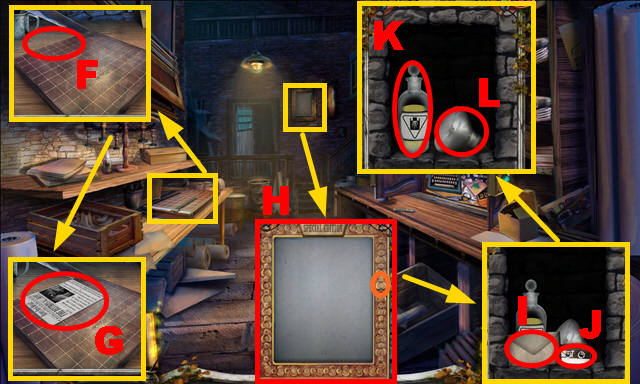
- Place the UNCUT NEWSPAPER (F); take the SPECIAL EDITION (G).
- Place the SPECIAL EDITION (H); push the button (orange).
- Take the letter (I), tape (J), ACID (K), and SPOT LIGHT 1/2 (L).
- Move forward.

- Use the ACID twice (green).
- Move forward.
- Take the tape (purple), GOLDEN SHIP (blue), and note (M).
- Turn around the chair (N).
- Take CRYPT COIN 4/5 (O), the note (P), and GLASSES (Q).
- Walk down four times.
- Place the GLASSES (R); take the MATCHES (S).
- Move forward four times.
- Place the SLICED LEMON and use the MATCHES (T).
- Pour ingredients 1-4 into the container (orange); take the INVISIBLE INK SOLUTION (U).
- Use the INVISIBLE INK SOLUTION (V); enter the code '538' (W).
- Take the note (X), PHOTO (Y), and GOLDEN TICKET (Z).
- Place the PHOTO (A).
- Play the mini-game.
- Solution: (B).
- Take the PULL CORD (blue).
- Walk down twice.
- Play the HOP (C) to receive the HAIRPIN.
- Walk down.
- Use the HAIRPIN (D); take the FUEL (E).
- Walk down.
- Use the FUEL (F).
- Place the PULL CORD (G); pull it.
- You receive the NUMBER SLIDE.
- Place the GOLDEN TICKET (H).
- Turn right.
Chapter 5: The Theater Lobby
- Place the GOLDEN SHIP (I); take the FILMSTRIPS (J).
- Take the note (K); place the NUMBER SLIDE (L).
- Go upstairs.
- Take the DECORATION (M) and SPOT LIGHT 2/2 (N).
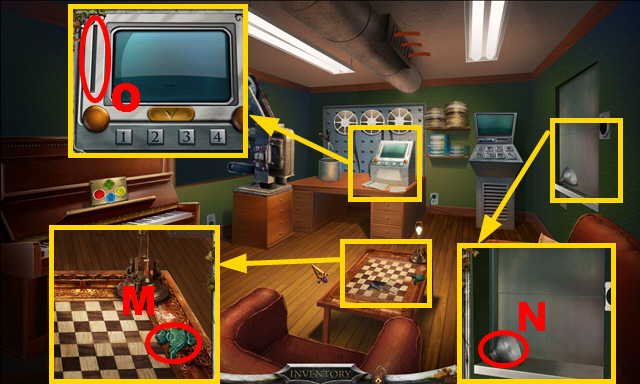
- Use the FILMSTRIPS (O).
- Play the mini-game.
- Solution: 1-4.
- Take the PLAY BUTTON (P) and PIANO KEY 1/3 (Q).
- Inspect the escape plan (R).
- Walk down.
- Place 2 SPOT LIGHTS (S).
- Enter the Auditorium.
- Take the photo (T) and POSTER PANEL (U).
- Move forward.
- Take PIANO KEY 2/3 (V).
- Turn around the chair (W).
- Place the PLAY BUTTON (X); push it.
- Take PIANO KEY 3/3 (Y).
- Place the DECORATION (Z).
- Take the tape (A), CONCESSION CRANK (B), and THREAD PULLER (C).
- Walk down.
- Use the THREAD PULLER (D); take the REEL (green).
- Use the THREAD PULLER (E); take the CLAPBOARD (blue).
- Place the CLAPBOARD (F).
- Walk down.
- Place the POSTER PANEL (G).
- Play the mini-game.
- Solution: (H).
- Take the CONNECTOR BUTTON (I).
- Place the CONCESSION CRANK (J) to play the HOP.
- You receive the SUPPLY SYMBOL.
- Place the SUPPLY SYMBOL (K); take the CAMERA SYMBOL (L).
- Go upstairs.

- Place 3 PIANO KEYS (M).
- Play the mini-game.
- Solution: Nx5-purplex4-greenx2.
- Take the GLASS CLEANER (O).
- Place the CONNECTOR BUTTON (P).
- Go to the Auditorium.
- Place the CAMERA SYMBOL (Q); take the LETTER C (R) and LEVER (S).
- Move forward.
- Use the GLASS CLEANER (T).
- Place the LEVER (U); pull it.
- Take the CREDIT CARD (V).
- Use the CREDIT CARD (W); take the SHOWTIMES (purple).
- Walk down twice.
- Play the HOP (X) to acquire the LAMPSHADE.
- Go upstairs.
- Place the LAMPSHADE (Y).
- Open the compartment (Z); take the PURSE TRADEMARK (green).
- Go to the Balcony.
- Place the PURSE TRADEMARK (A).
- Take the DECODER WHEEL (B), FLASK (C), and LIGHTBULB (D).
- Walk down.
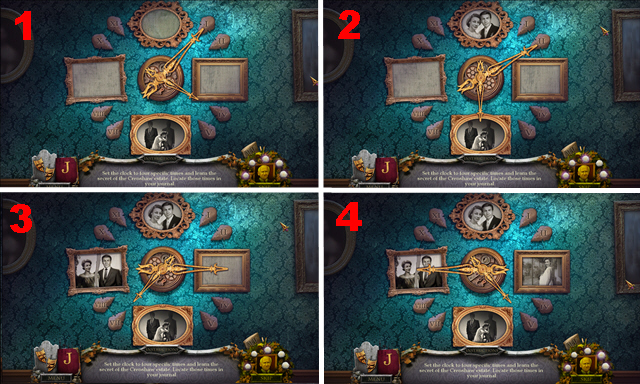
- Place the DECODER WHEEL (E) and SHOWTIMES (F).
- Play the mini-game.
- Solution: G-Hx4-G-Hx5-G-H-G-Ix3-J-Kx3-J-Lx6-J-K-J-Kx2.
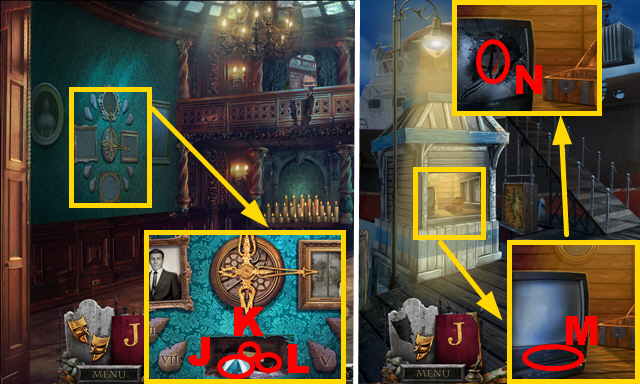
- Take the GOLDEN GAUNTLET (M).
- Walk down.
- Place the GOLDEN GAUNTLET (N); take the SNACK CREST (O).
- Go to the Auditorium.
- Place the SNACK CREST (P); take the tape (Q) and ZIPPER (R).
- Move forward.
- Place the ZIPPER (S).
- Take CRYPT COIN 5/5 (T), the STONE NOSE (U), and ELEVATOR CRANK (V).
- Walk down twice, go upstairs.
- Place the LIGHTBULB (W) and REEL (X).
- Place the ELEVATOR CRANK (Y); turn it.
- Take the HANDKERCHIEF (Z).
- Go to the Balcony.
- Use the HANDKERCHIEF (A); take the LENS (blue).
- Walk down twice, go upstairs.
- Place the LENS (B); push the lever (C).
- Go to the Auditorium.
- Take the ELECTRICAL TAPE (purple).
- Walk down.
- Place the ELECTRICAL TAPE (D); take the MOVIE ICON (E).
- Go upstairs.
- Place the MOVIE ICON (F).
- Play the mini-game.
- Activate the buttons (blue) in the correct sequence.
- This puzzle is randomized.
- Take the ELEVATOR BUTTON (G).
- Place the ELEVATOR BUTTON (H); push it.
- Turn right, walk down four times.
- Place 5 CRYPT COINS (I).
- Turn left.
Chapter 6: The Crypt

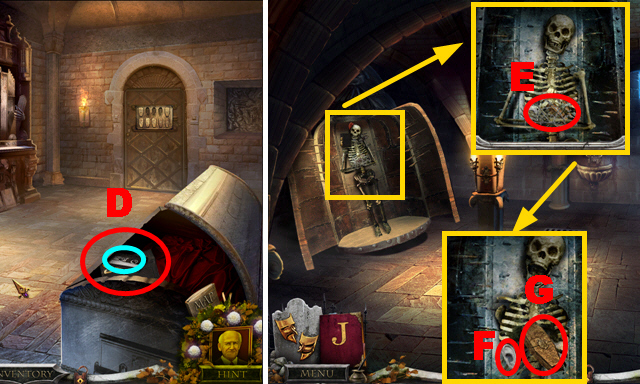
- Take the COFFIN HANDLE (J), HUMAN SKULL (K), and ORGAN TOKEN 1/2 (L).
- Place the STONE NOSE (M).
- Turn left.
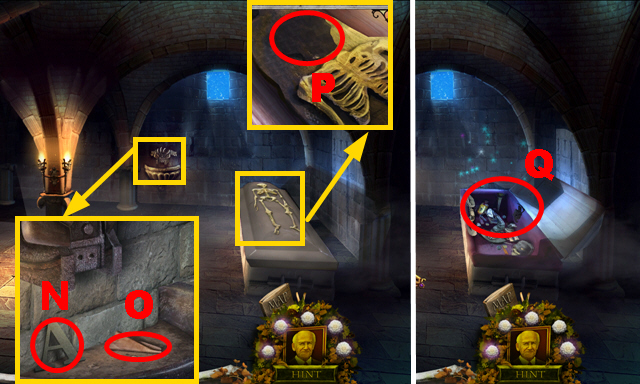
- Take the LETTER A (N) and note (O).
- Place the HUMAN SKULL (P).
- Play the HOP (Q) to receive the TORCH.
- Walk down.
- Place the TORCH (R); use the MATCHES (green).
- Take the ANGEL (purple) and SAPPHIRE (blue).
- Place the SAPPHIRE (S) to acquire the SKULL KEY.
- Turn left.
- Use the SKULL KEY (T).
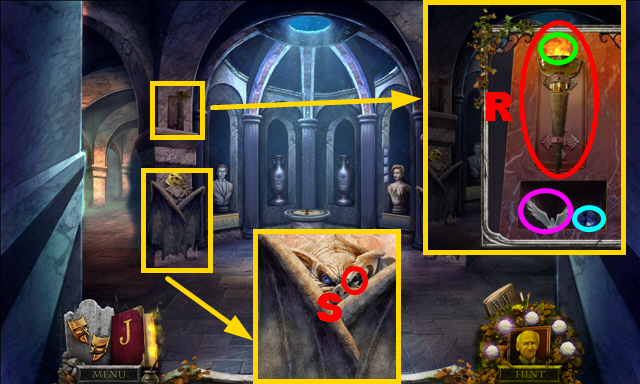
- Take BOOK 1/2 (U), the ORNATE CROSS (V), and HEART HALF (W).
- Walk down.
- Place the ORNATE CROSS (X).
- Play the mini-game.
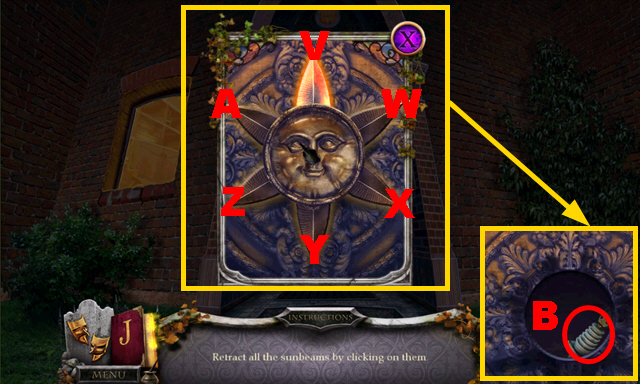
- Solution: (Y).
- Take the DEMON (Z).
- Place the ANGEL (A) and DEMON (B).
- Turn right.
- Take the WIRE CUTTER (C).
- Open the coffin; take the tape (blue) and BOOK 2/2 (D).
- Walk down, turn left.
- Use the WIRE CUTTER (E); take the STONE EAR (F) and COFFIN 1/3 (G).
- Walk down.

- Place the STONE EAR (H); take the GARGOYLE HEAD (I).
- Turn right.
- Place the GARGOYLE HEAD (J).
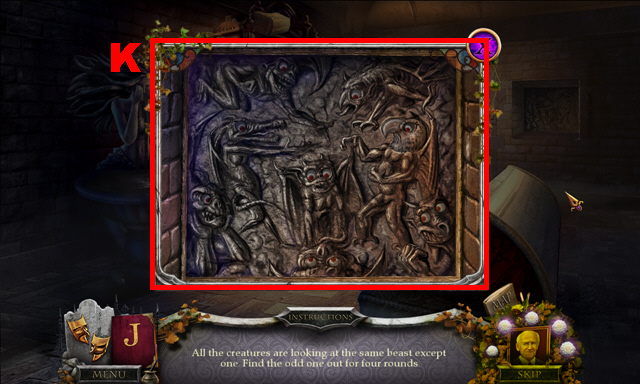
- Play the mini-game.
- Find the incorrectly gazing figure until all eyes are closed (K).
- This puzzle is randomized.
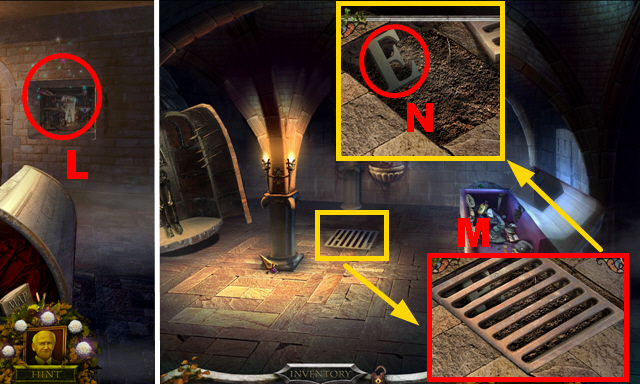
- Play the HOP (L) to receive the SEWER HOOK.
- Walk down, turn left.
- Use the SEWER HOOK (M); take the LETTER E (N).
- Walk down.
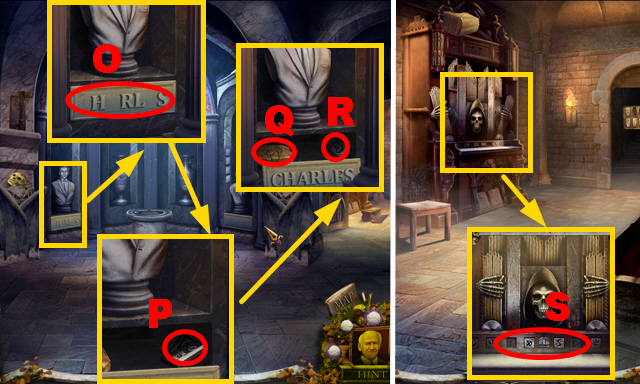
- Place the LETTER C, LETTER A, and LETTER E (O).
- Take the tape (P), COFFIN 2/3 (Q) and ORGAN TOKEN 2/2 (R).
- Turn right.
- Place 2 ORGAN TOKENS (S).
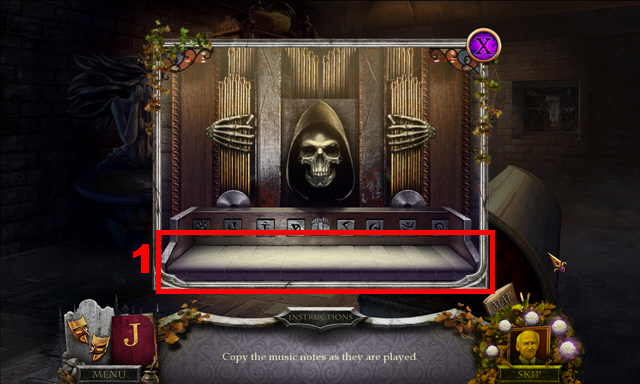
- Play the mini-game.
- Enter the correct sequence of piano keys (1) three times.
- The puzzle is randomized.
- Take COFFIN 3/3 (T).
- Place 3 COFFINS (U).
- Play the mini-game.
- Solution: V-E.
- Move forward.
- Place the COFFIN HANDLE (F); take the RIGHT HEART HALF (G).
- Take the FAUCET (H); place 2 BOOKS (I).
- Walk down.
- Place the HALF HEART and RIGHT HEART HALF (J) to acquire the BUST CODEX 1/3.
- Walk down, turn left.
- Play the HOP (K) to acquire the SHOVEL BLADE.
- Place the FAUCET (L) and FLASK (M).
- Turn the faucet (1); take the PURIFIED WATER (2).
- Walk down, turn right.

- Play the HOP (N) to acquire the URN.
- Use the PURIFIED WATER (O); take BUST CODEX 2/3 (P).
- Move forward.
- Place the SHOVEL BLADE (Q) to acquire the SHOVEL.
- Place the URN (R).
- Play the mini-game.
- Solution: (S).
- Take the tape (green) and BUST CODEX 3/3 (T).
- Walk down twice.
- Place 3 BUST CODEXES (U).
- Activate buttons 1-4; take the SWORD (V) and BURIAL PIECE (W).
- Turn right, move forward.
- Place the BURIAL PIECE (X).
- Play the mini-game.
- Solution: A-H-I-G-J-K-E-B-F-G-I-H-A-G-F-A-H-I-G-F-E-K-J-G-F-E-G-J-K-E-F-A-G-F-B-C-D-E-B-F-A-B-Y-Z-A-F.
- Place the SWORD (L); take the DECORATIVE ROSE (M).
- Walk down.
- Place the DECORATIVE ROSE (N); take the COFFIN INSIGNIA (O).
- Move forward.
- Use the SHOVEL (1); place the COFFIN INSIGNIA (P).
- Congratulations, you have completed Nightfall Mysteries: Haunted by the Past.
Created at: 2015-03-22