

Walkthrough Menu
- General Tips
- Chapter 1
- Chapter 2
- Chapter 3
- Chapter 4
- Chapter 5
- Chapter 6
- Chapter 7
- Chapter 8
- Audio Tape Locations
General Tips
- Nightfall Mysteries: Asylum Conspiracy is a Hidden Object Puzzle Adventure game.
- You can replay or skip cut scenes by clicking on the appropriate buttons at the top of the screen.
- As you exit a scene, or try to enter a door, the name of that location will be shown above the scene. This, along with the Map in the Notebook, makes it a lot easier to find places in the game.
- Sparkling indicates an area that needs to be investigated.
- Inventory items you pick up along the way will be stored in the tray at the bottom of each screen.
- Use the arrows at both ends of your inventory tray to scroll through all available items.
- Click on the large circle in the lower right corner to use a hint. A lit circle will show you a random item from the list. You can also click on a name from your list to locate a specific item in a Hidden Object Scene.
- The hints are unlimited but have to be charged between uses.
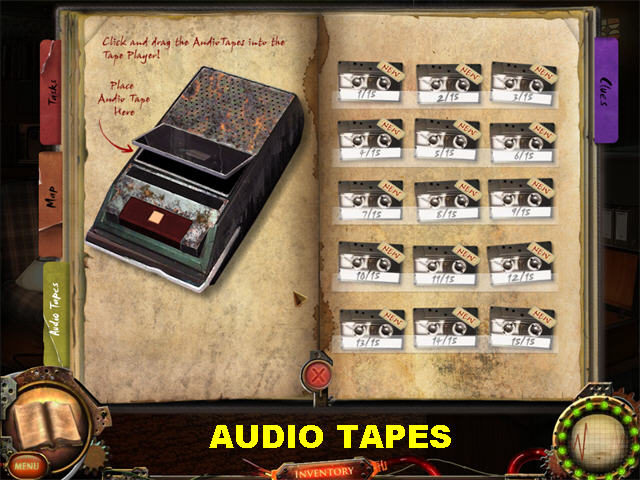
- There are 15 Audio Tapes to find in the game. Each time you find one, it will fall into a numbered slot.
- Audio Tapes can be found out in the open, in a hidden compartment, or in a Hidden Object Scene.
- Drag the tapes to the tape player to listen to them. You can exit out of the Notebook and still listen to the tape without interrupting your game.
- If you don't wish to listen to the audio tape, you can choose to read the text on the right side of the page.
- The locations of all the Audio Tapes are listed at the end of the guide and are also noted throughout the guide in order of appearance.
- Tapes that have not been listened to will have "new" written across them.
- Your Notebook contains a Map, and keeps track of Tasks, Audio Tapes, and Clues.
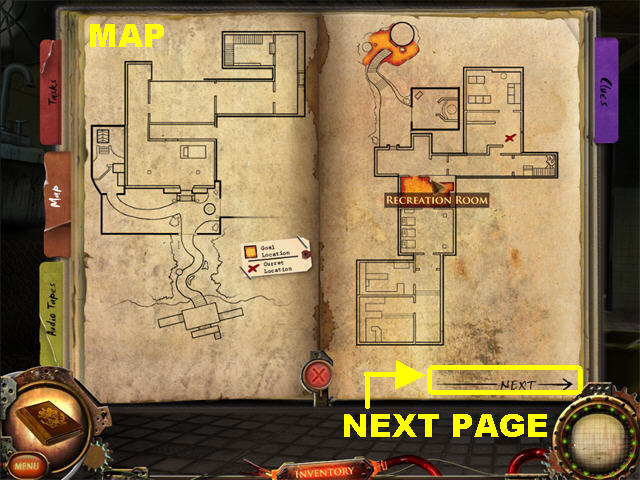
- Click on the Map Tab in your Notebook to view all accessible areas. Areas marked in yellow need to be investigated. The red "X" marks your current location.
- Hover your mouse over an area of the map to read the location's name. Make sure you flip to the third map page as you progress through the game, so you can view the map in its entirety.
- Click on the Clues Tab to view puzzle solutions and hints about the game.
- Click on the Task Tab to view your current tasks.
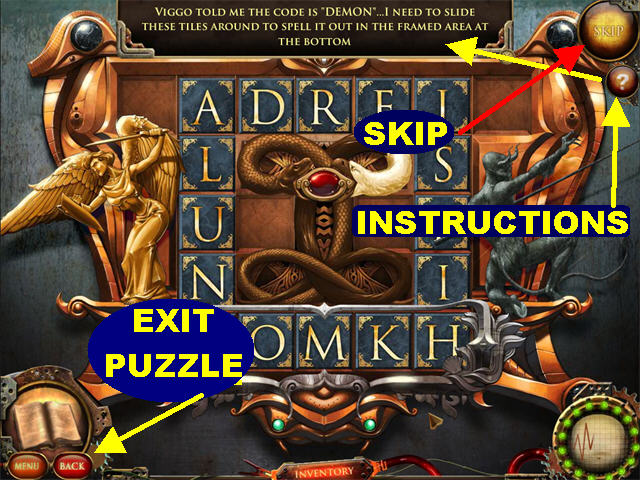
- Puzzles can be skipped once the skip button is charged. The jigsaw puzzle icon in an area indicates the location of a puzzle.
- Click on the "?" in the puzzle scenes to view instructions for the game.
- Some puzzles have a Reset button that can be used to return the puzzle to its original state.
- You can exit most puzzles by clicking on the BACK button in the lower left, or by clicking at the bottom of the screen.
Chapter 1
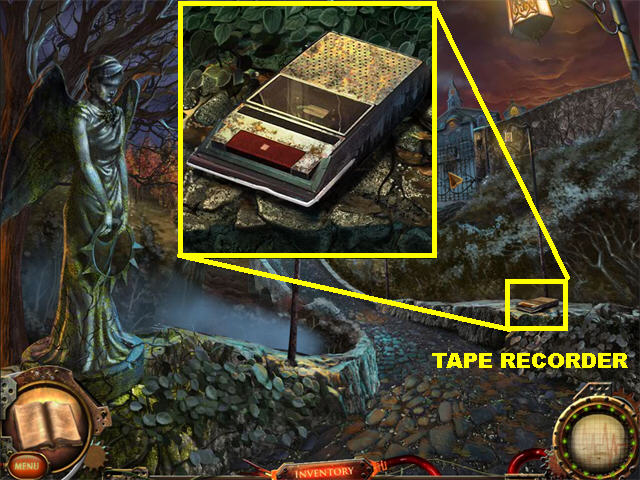
- Go forward.
- Pick up the TAPE RECORDER on the right.
- Go forward.
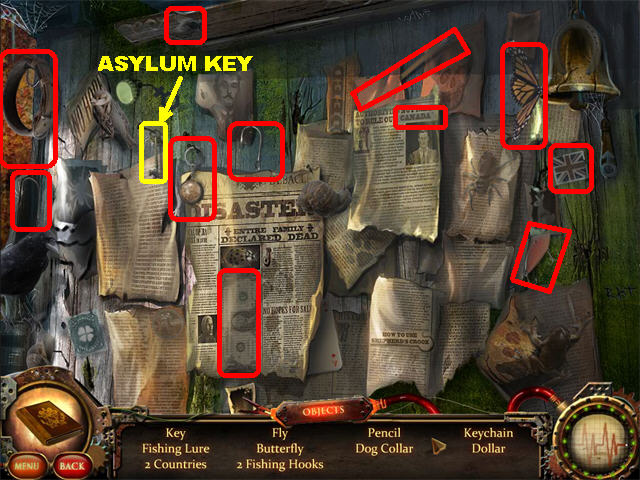
- Play the Hidden Object Scene to obtain the ASYLUM KEY.
- Zoom into the gate to trigger a puzzle.
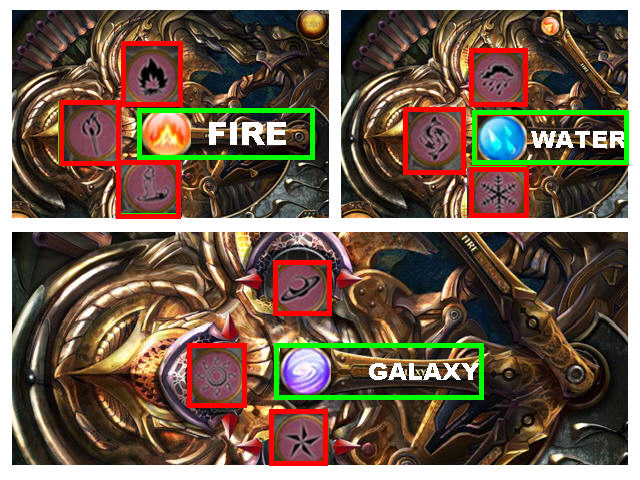
- Using the keyword in the center of the puzzle, place the correct symbols on the three sections of the puzzle by using the up and down arrows.
- Place the Flame, Lit Match, and Candle on the fire section.
- Place the Rain, Fish, and Snowflake on the water section.
- Place Saturn, the Sun, and a Star on the galaxy section.
- Place the ASYLUM KEY in the keyhole after the puzzle has been completed.
- Go forward to the main entrance.
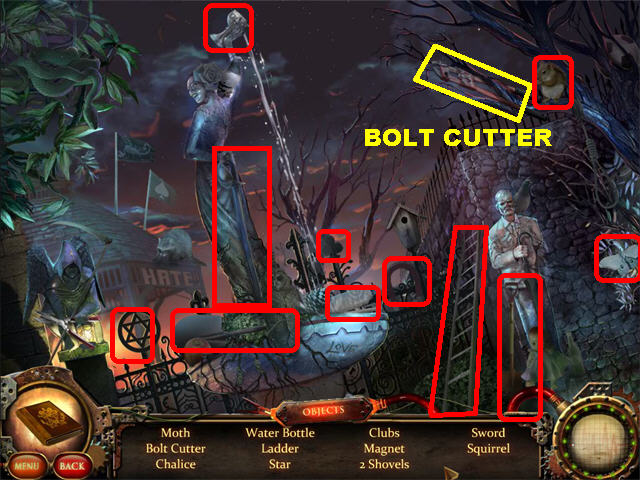
- Play the Hidden Object Scene to obtain the BOLT CUTTER.
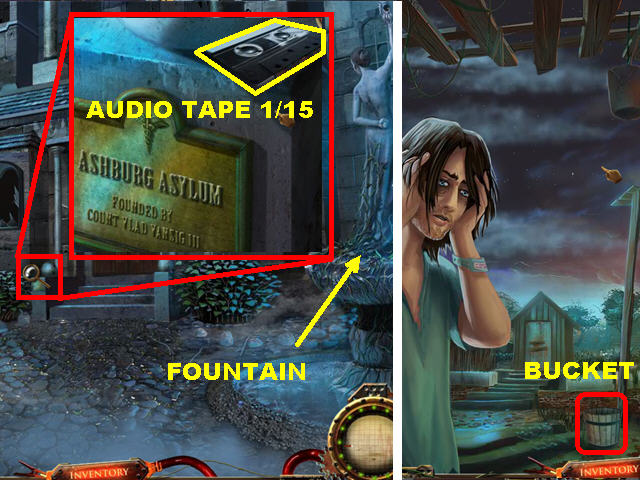
- Zoom into the steps; pick up AUDIO TAPE 1/15 and place it in the tape recorder.
- Go left towards the garden.
- Speak to the stranger in the scene.
- Pick up the BUCKET on the ground.
- Click down to return to the main entrance.
- Place the BUCKET in the fountain to create the FILLED BUCKET.
- Click down until you reach the pathway.
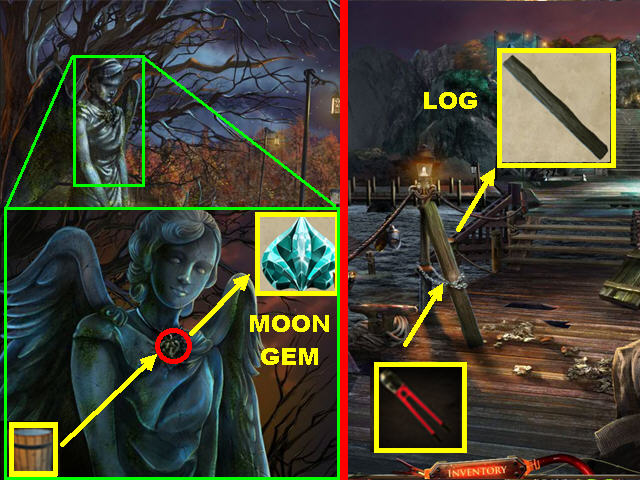
- Zoom into the statue; clean it with the FILLED BUCKET and pick up the MOON GEM around its neck.
- Click down to reach the dock.
- Cut the chains with the BOLT CUTTER to obtain the LOG.
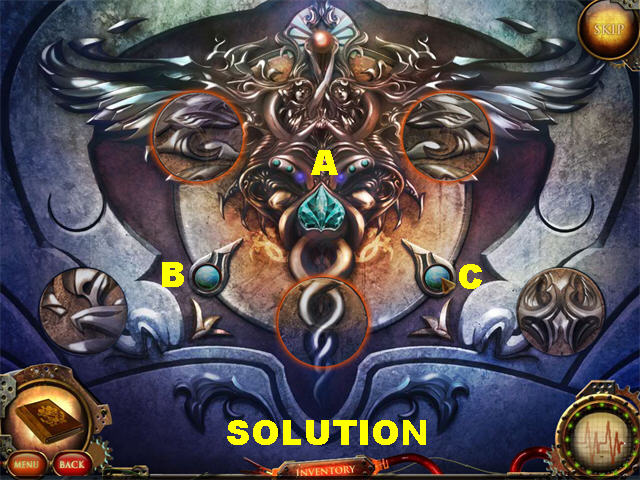
- Return to the main entrance and zoom into the front door.
- Place the MOON GEM in the center of the puzzle.
- Rotate the pieces using the buttons (A, B, C) to complete the image.
- Please look at the screenshot for the solution.
- Go through the door to reach the main hall.
Chapter 2
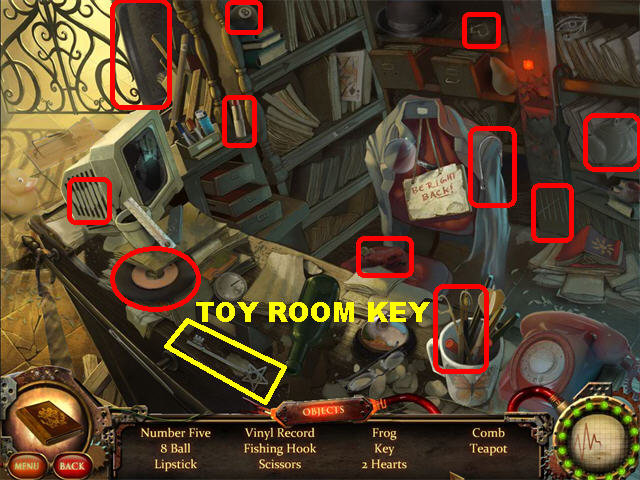
- Play the Hidden Object Scene to obtain the TOY ROOM KEY.
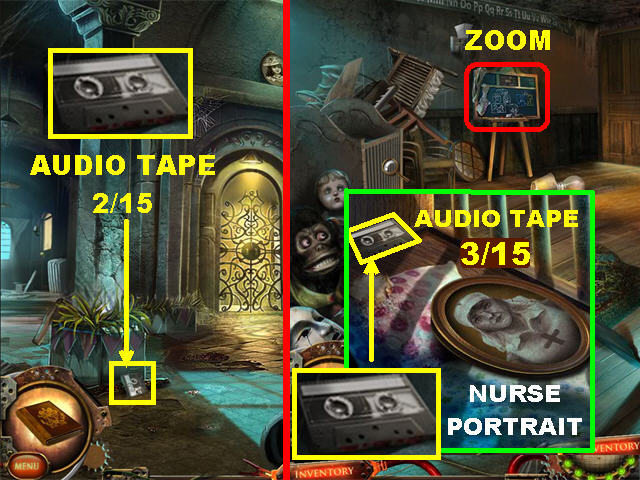
- Pick up AUDIO TAPE 2/5 in the lower left corner, against the pillar.
- Go left to the front hallway.
- Zoom into the door and open it with the TOY ROOM KEY. Go into the toy room.
- Zoom into the crib on the left; pick up AUDIO TAPE 3/15 and the NURSE PORTRAIT.
- Take a closer look at the chalkboard in the back. The diagram will be added to your Notebook and show you the puzzle solution.
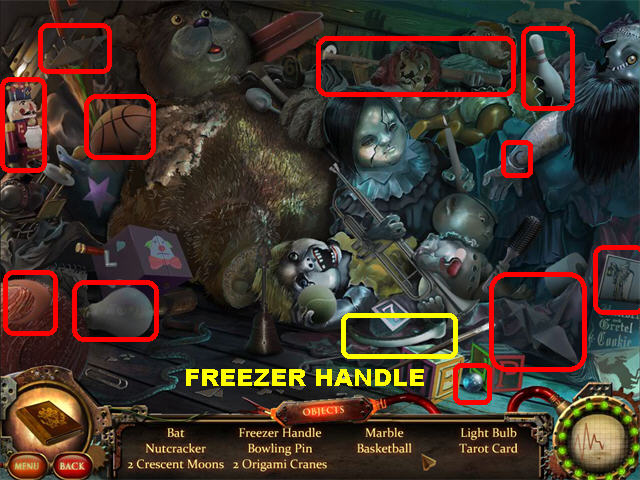
- Play the Hidden Object Scene in the toy room to obtain the FREEZER HANDLE.
- Click down.
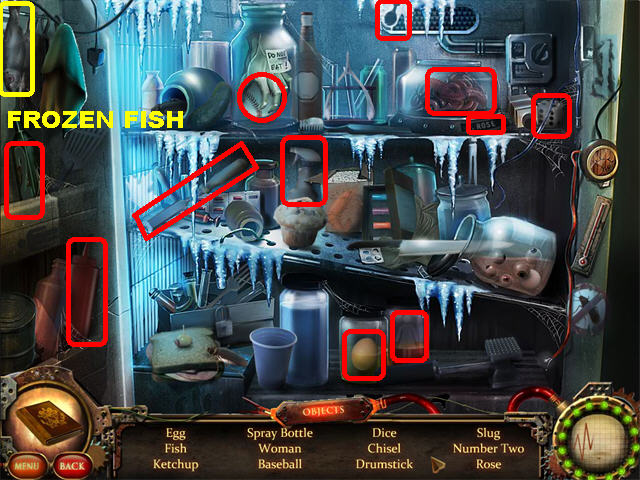
- Place the FREEZER HANDLE on the freezer to trigger a Hidden Object Scene; play it to obtain the FROZEN FISH.
- Return to the garden.
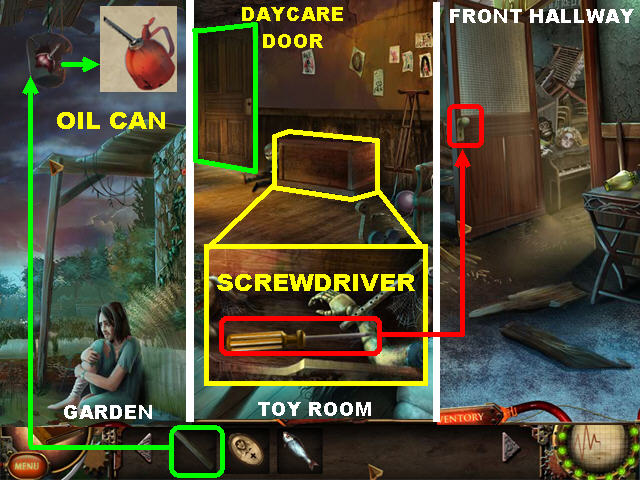
- Hit the pot in the upper center with the LOG and pick up the OIL CAN.
- Return to the toy room.
- Zoom into the chest by the door; place the OIL CAN on the chest and pick up the SCREWDRIVER inside.
- Return to the front hallway.
- Zoom into the door; unscrew the DOORKNOB using the SCREWDRIVER.
- Return to the toy room.
- Zoom into the door and put the DOORKNOB in place. Proceed forward to the daycare.
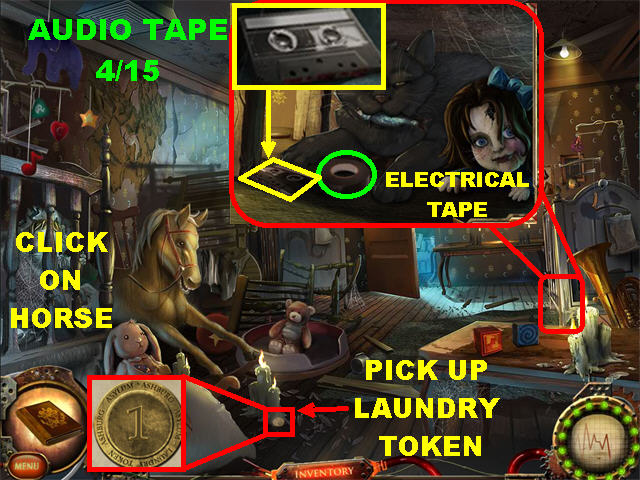
- Zoom into the area below the crib on the right; give the cat the FROZEN FISH.
- Pick up AUDIO TAPE 4/15 and the ELECTRICAL TAPE.
- Click on the rocking horse on the left and it will rock harder; pick up the LAUNDRY TOKEN that falls on the ground.
- Go through the door to reach the maintenance hallway.
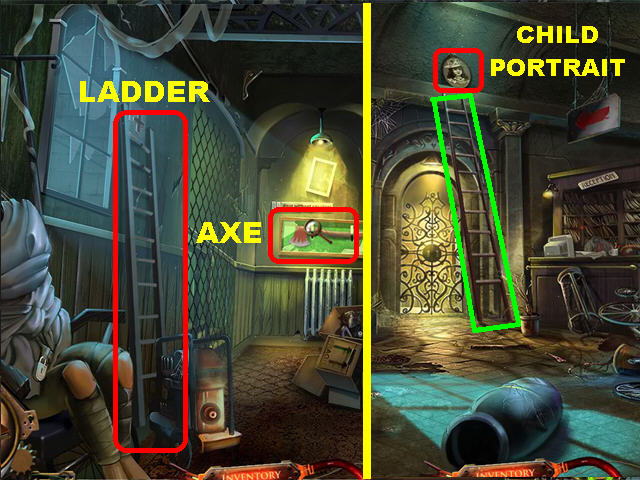
- Zoom into the glass case in the back wall and pick up the AXE.
- Pick up the LADDER on the left.
- Return to the main hall.
- Place the LADDER against the elevator and pick up the CHILD PORTRAIT.
- Return to the garden.
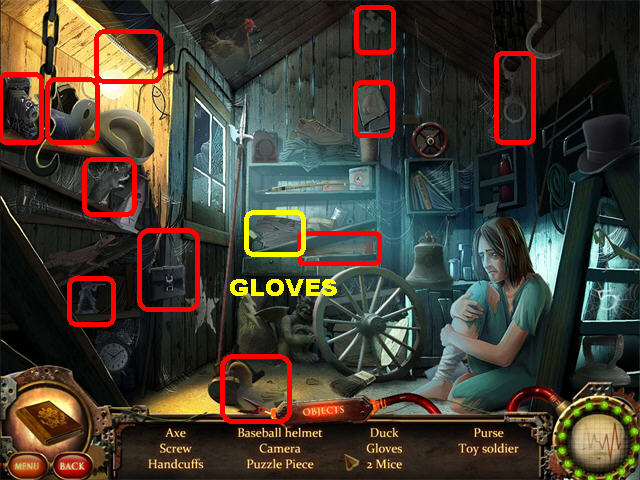
- Zoom into the shed; break the boards with the AXE.
- Enter the shed to play a Hidden Object Scene and obtain the GLOVES.
- Return to the main entrance where Thomas will be waiting for you; talk to him.
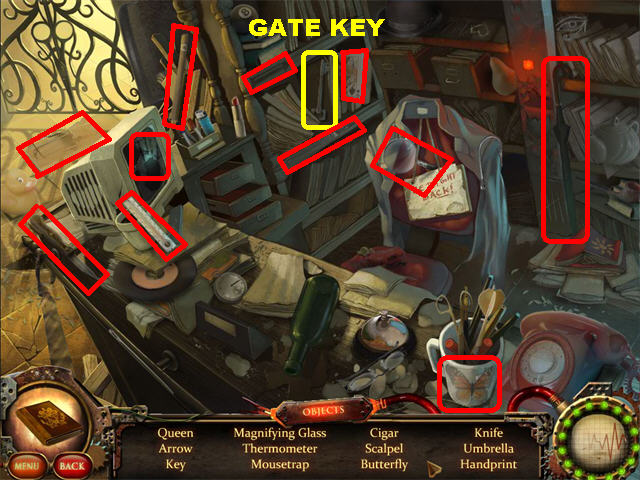
- Go to the main hall. Play the Hidden Object Scene to obtain the GATE KEY.
- Return to the maintenance hallway.
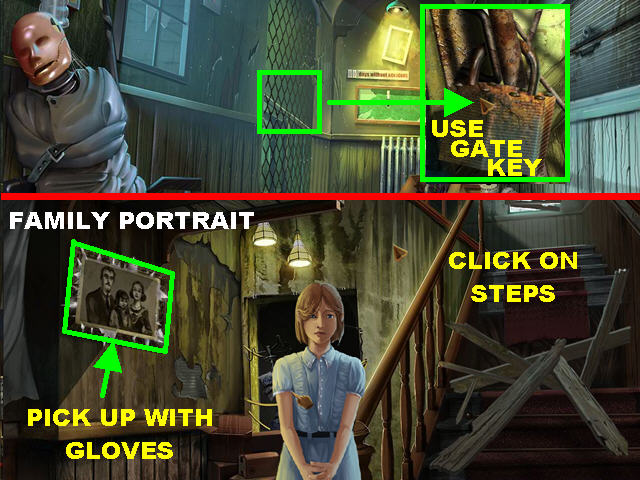
- Zoom into the gate; use the GATE KEY on the lock and enter the west staircase.
- Talk to Alice.
- Zoom into the portrait on the left; pick it up using the gloves to add the FAMILY PORTRAIT to inventory.
- Click on the stairs and debris will fall.
- Zoom into the stairs and you will see a badge; exit out of there, for now.
- Return to the daycare.
- Zoom into the portraits on the back wall.
- Place the CHILD PORTRAIT, FAMILY PORTRAIT, and the NURSE PORTRAIT on the wall to trigger a puzzle.
- Arrange the pictures in the right order using the clue you found in the toy room's chalkboard.
- Click on any two pictures to swap their positions.
- Please look at the screenshot for the solution.
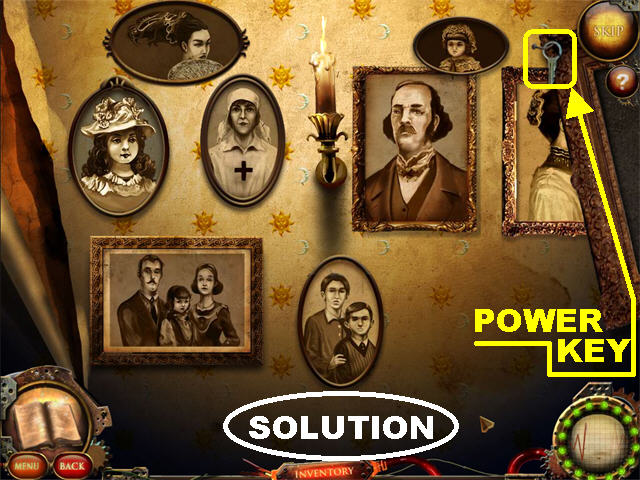
- Pick up the POWER KEY in the upper right corner after the puzzle has been solved.
- Return to the maintenance hallway.
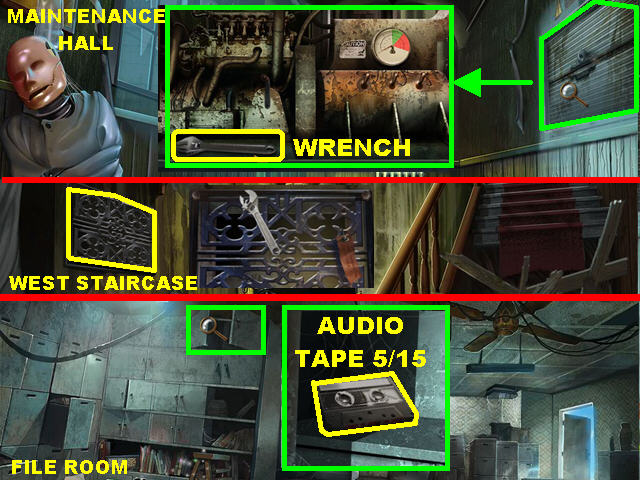
- Zoom into the power gate on the right; place the POWER KEY in the lock and pick up the WRENCH.
- Go left to the west staircase.
- Zoom into the vent on the upper left and loosen the bolts with the WRENCH.
- Go up the vent to reach the file room.
Chapter 3
- Zoom into the cabinet in the upper left side of the file room; pick up AUDIO TAPE 5/15.
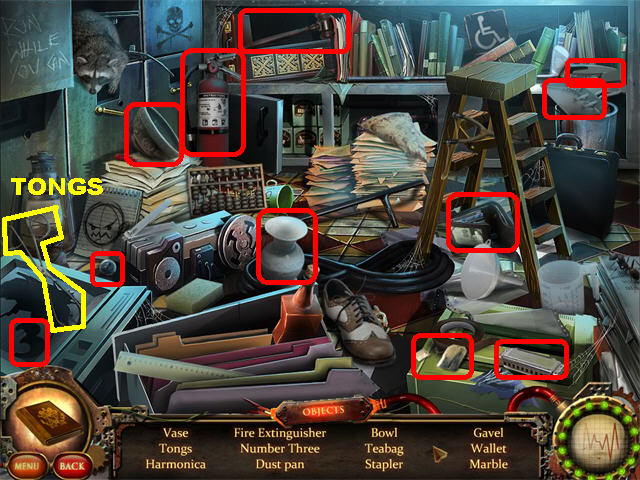
- Play the Hidden Object Scene in the file room to obtain the TONGS.
- Return to the west staircase.
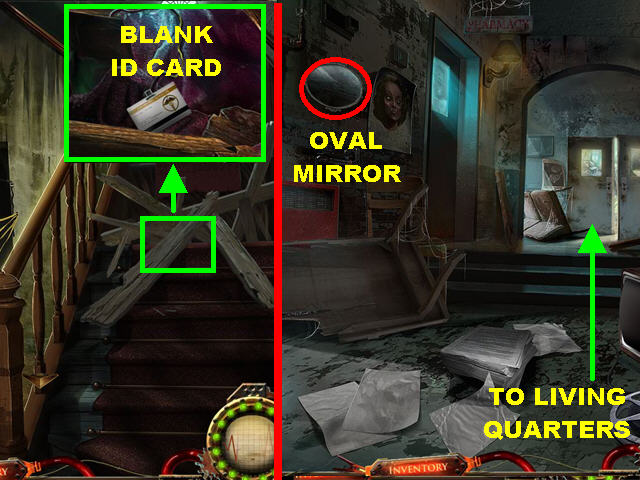
- Zoom into the broken steps; pick up the BLANK ID CARD with the TONGS.
- Return to the file room and go through the right door to reach the access corridor.
- Pick up the OVAL MIRROR in the upper left.
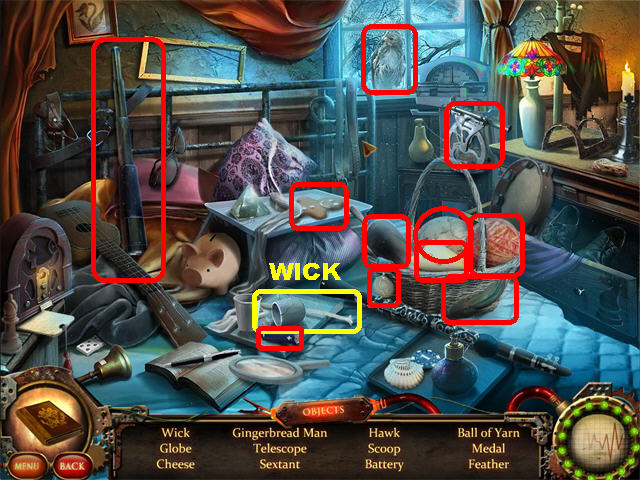
- Go forward to the living quarters. Play the Hidden Object Scene to obtain the WICK.

- Click on the back door and someone will lock it.
- Click down and talk to Thomas.
- Return to the living quarters after speaking with Thomas; go through the back door to reach the recreation room.
- Play the Hidden Object Scene in the recreation room to obtain the POWER CORD.
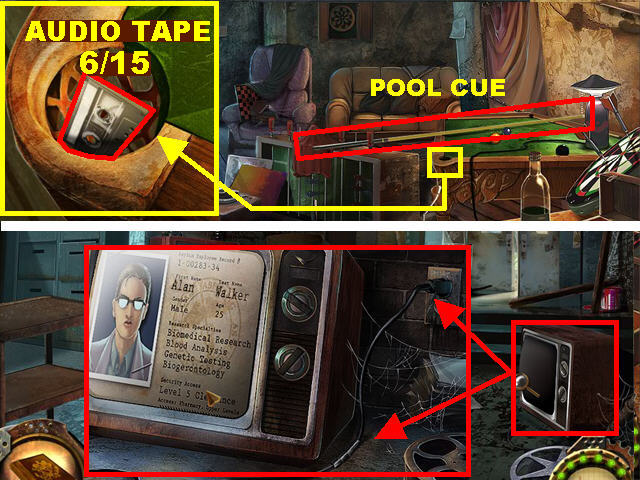
- Zoom into the corner pocket of the pool table; pick up AUDIO TAPE 6/15.
- Pick up the POOL CUE on the side of the table.
- Return to the access corridor.
- Zoom into the TV; place the POWER CORD in the socket.
- Mend the broken wire with the ELECTRICAL TAPE.
- Alan Walker's ID badge will appear on the screen. You will need this name to solve a puzzle.
- Return to the file room.

- Zoom into the typewriter in the lower right; place the BLANK ID CARD in the slot.
- Using the typewriter keys type "Alan" for the first name and "Walker" for the last name to obtain the PHARMACY ID.
- To clear a letter from the screen, click on the backspace key (left arrow) in the upper right.
- Go to the access corridor.
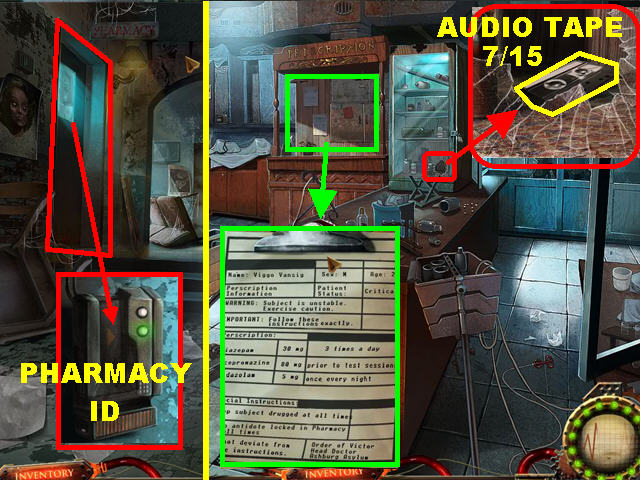
- Zoom into the pharmacy door on the left; place the PHARMACY ID in the keypad. Go into the pharmacy.
- Take a closer look at the board on the back wall (it's Viggo's chart).
- Zoom into the broken glass case in the back; pick up AUDIO TAPE 7/15.
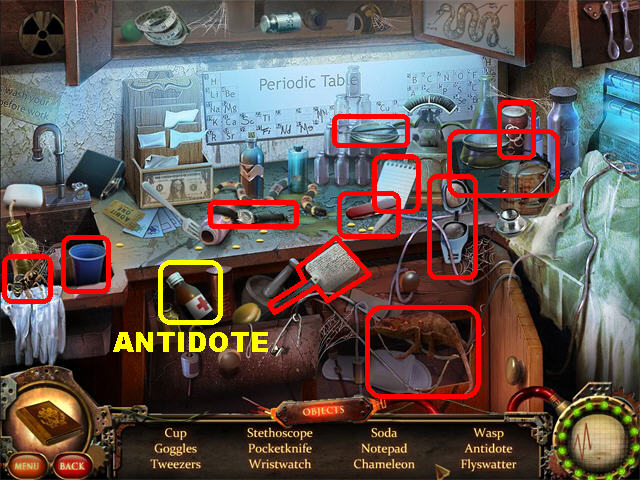
- Play the Hidden Object Scene in the pharmacy to obtain the ANTIDOTE.
- Return to the shed.
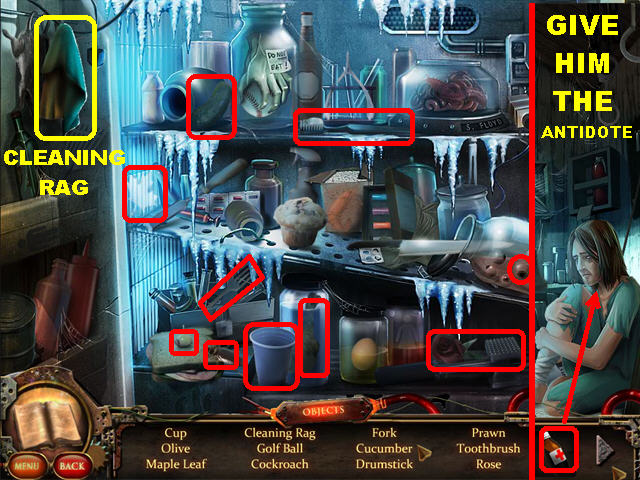
- Give the ANTIDOTE to the stranger; he tells you his name is Viggo and gives you the code word "DEMON" (you will need this code to solve a puzzle in the recreation room).
- Go to the front hallway. Play the Hidden Object Scene on the freezer to obtain the CLEANING RAG.
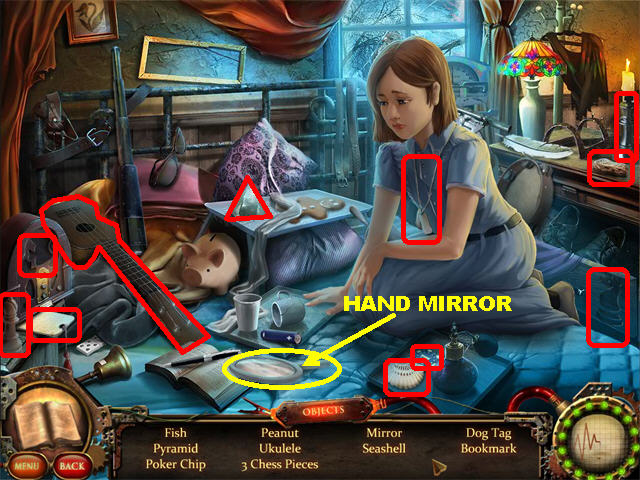
- Go to the living quarters and talk to Alice.
- Play the Hidden Object Scene to obtain the HAND MIRROR.
- Go to the recreation room.
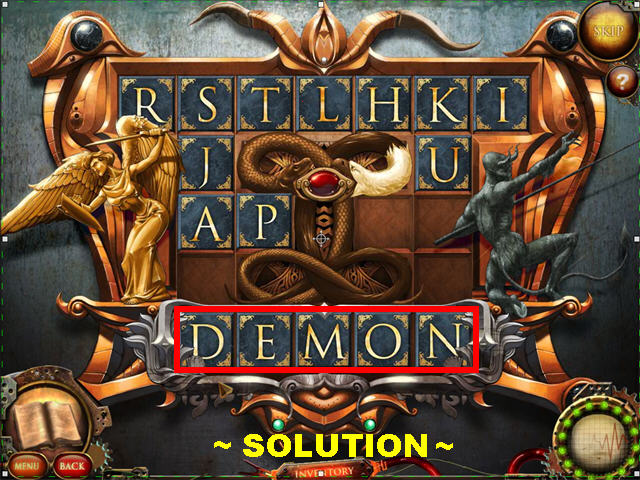
- Zoom into the back door to trigger a puzzle.
- Your goal is to spell "demon" in the bottom row of the puzzle.
- You can slide the letters through the grid one by one or in large groups as long as there are empty spaces in the direction you want them moved.
- Use the empty spaces in the corners to store valuable letters for easy access.
- Please look at the screenshot for the solution.
- Go through the door after the puzzle has been solved to reach the vestibule.
Chapter 4
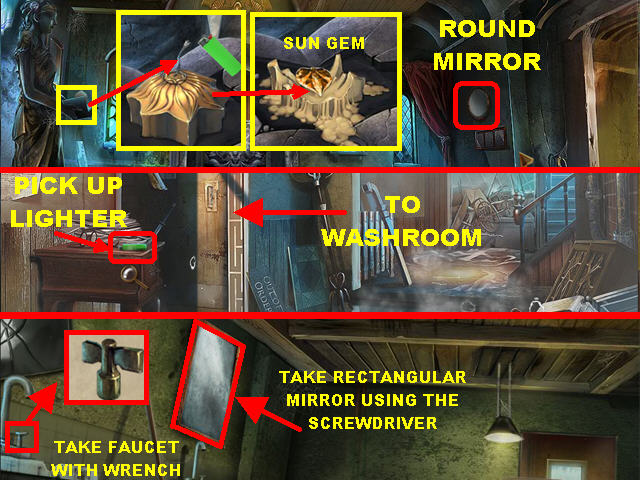
- Zoom into the mirror on the right; wipe it with the CLEANING RAG and the ROUND MIRROR will be added to inventory.
- Go right towards the east wing.
- Talk to Victor and Viggo.
- Zoom into the small table; pick up the LIGHTER.
- Go through the left door to enter the washroom.
- Zoom into the left sink; take the FAUCET using the WRENCH.
- Zoom into the RECTANGULAR MIRROR; remove it with the SCREWDRIVER to add it to inventory.
- Go to the vestibule.
- Zoom into the statue.
- Place the WICK and the LIGHTER on the candle to melt it.
- Pick up the SUN GEM after the candle melts.
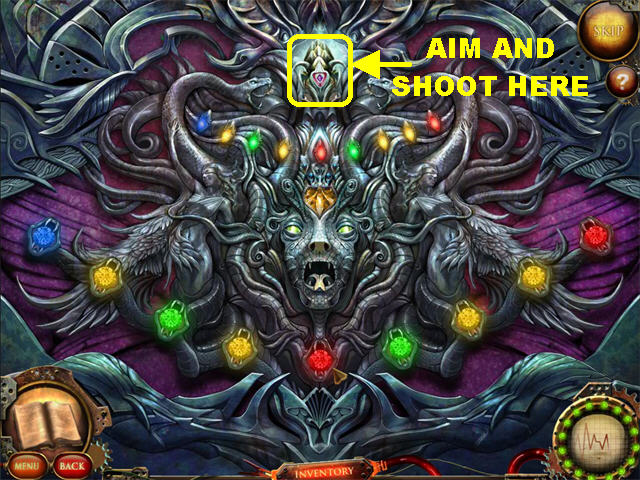
- Zoom into the back door; place the SUN GEM in the door to trigger a puzzle.
- You must click and shoot the snake heads below, changing their colors to match the colors above.
- Try to position the shooter (on the top) so it can hit the correct snake head. Sometimes it is hard to predict where the ball will hit since the smallest movement can cause it to hit many targets at once.
- You have to complete three rounds of this puzzle. The first one has four lights to match, the second round has six lights, and the third round has nine lights to match.
- Please look at the screenshot for a look at the last round.
- Go through the door to reach the cliff trail.
- Talk to Thomas.
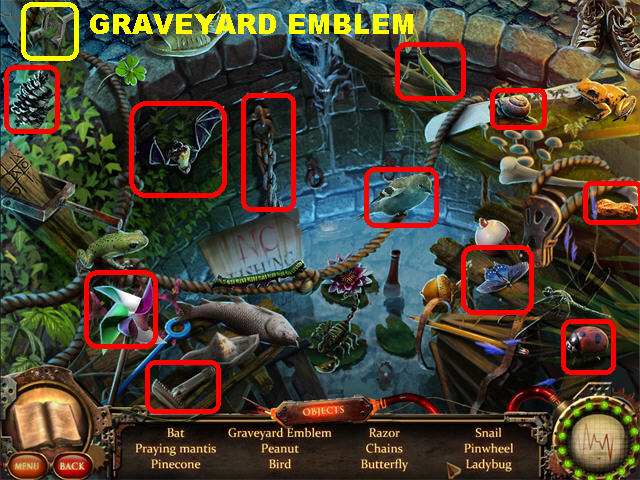
- Go forward to the cliff edge. Play the Hidden Object Scene to obtain the GRAVEYARD EMBLEM.
- Use the POOL CUE to knock down the bird's nest.
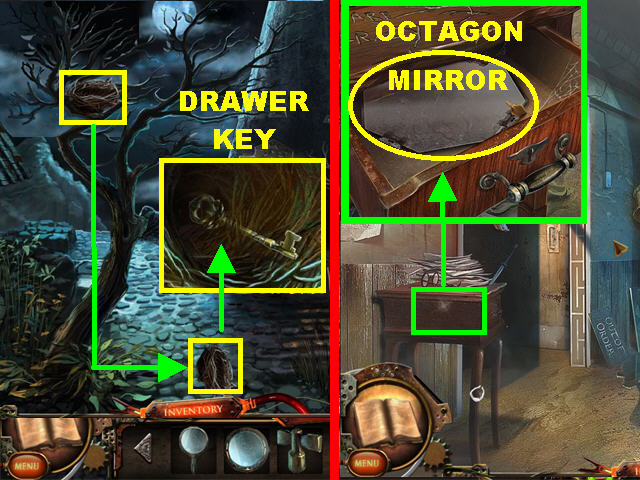
- Zoom into the bird's nest on the ground; pick up the DRAWER KEY.
- Go to the east wing.
- Zoom into the small table; open the drawer with the DRAWER KEY and pick up the OCTAGON MIRROR.
- Return to the cliff trail.
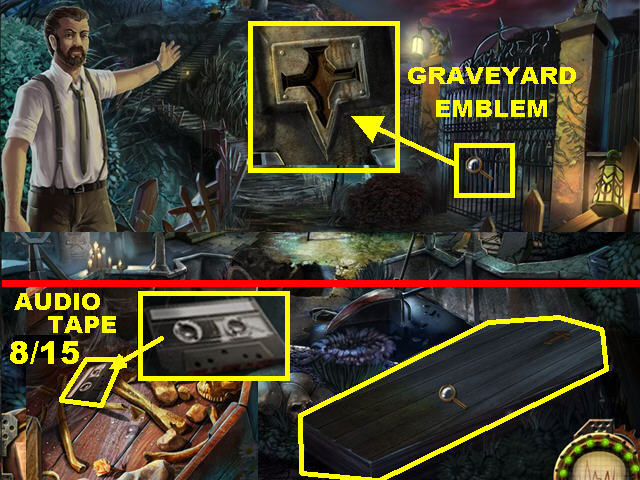
- Zoom into the gates; use the GRAVEYARD EMBLEM on the gate to unlock it.
- Go through the gate to enter the cemetery.
- Zoom into the coffin in the lower right; open it and pick up AUDIO TAPE 8/15.
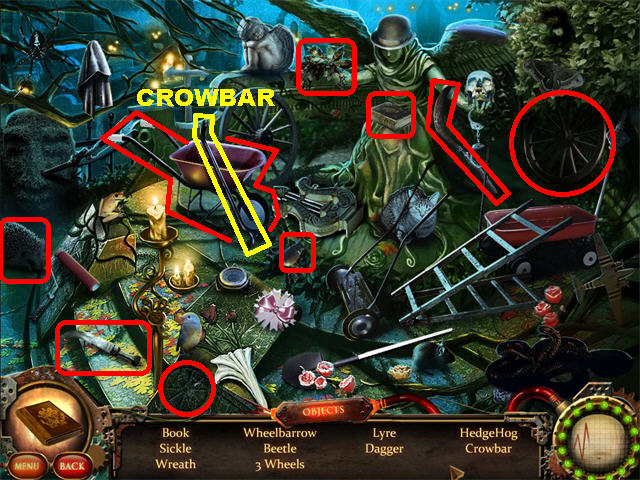
- Play the Hidden Object Scene in the cemetery to obtain the CROWBAR.
- Go to the washroom.
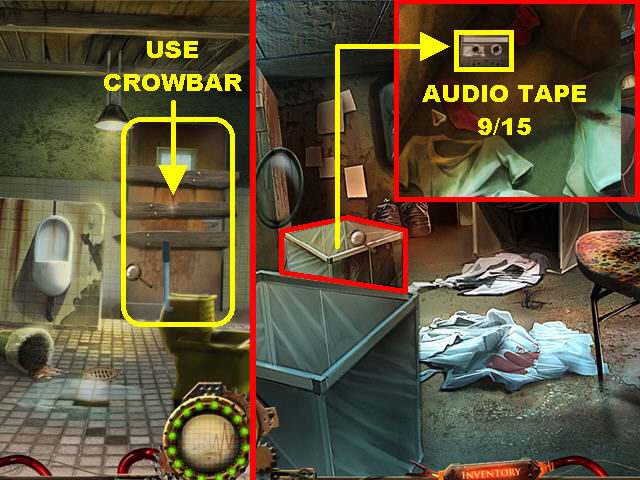
- Zoom into the back door and remove the boards with the CROWBAR.
- Go into the laundry room.
- Zoom into the hamper; pick up AUDIO TAPE 9/15.
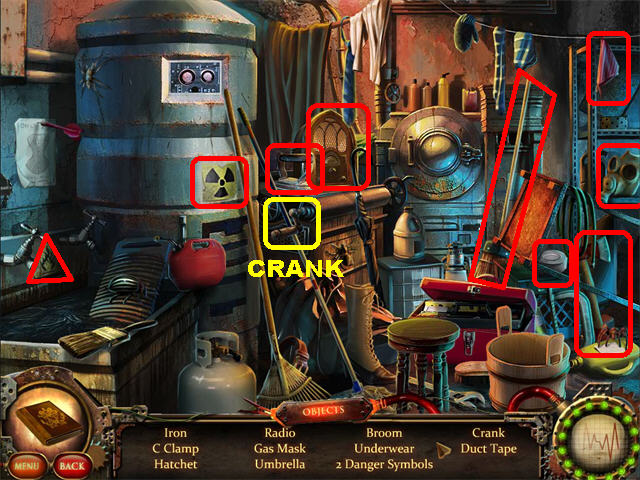
- Play the Hidden Object Scene in the laundry room to obtain the CRANK.
- Go to the cliff edge.
Chapter 5
- Zoom into the lighthouse door; place the CRANK on the winch and enter the lighthouse.
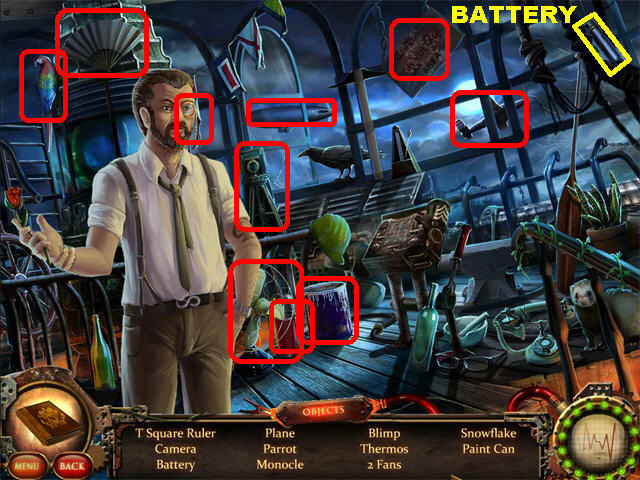
- Talk to Thomas to trigger a Hidden Object Scene at the end of the conversation.
- The BATTERY will be added to inventory.
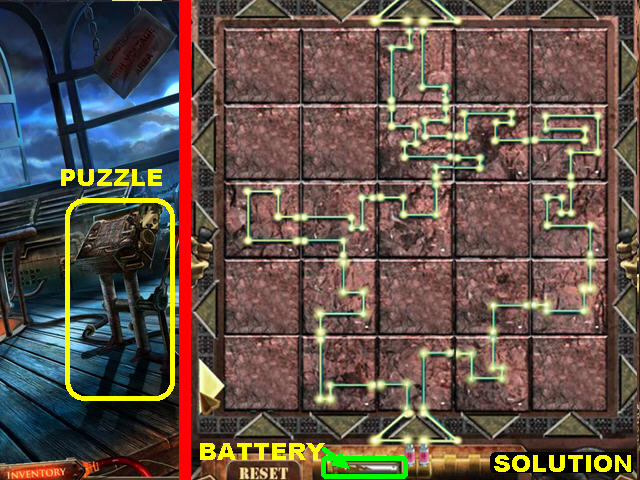
- Zoom into the mechanism on the floor.
- Place the BATTERY at the bottom of the puzzle.
- Complete the circuit by connecting the lines so they all light up using the arrows surrounding the puzzle.
- You can click on the reset button to start over.
- Please look at the screenshot for the solution.
- Return to the cemetery.
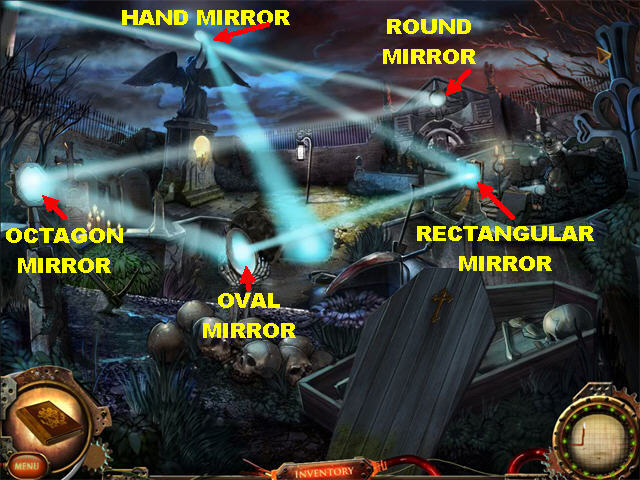
- Place all the mirrors on the mirror holders. This step can only be performed if you completed the circuit puzzle in the lighthouse.
- Please look at the screenshot for the correct positions of the mirrors.
- Once all the mirrors are in place they will light up and the hand mirror will point a beam of light to a shallow grave.
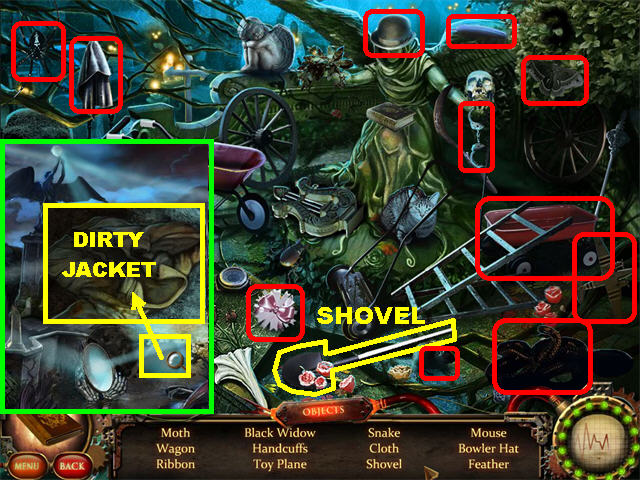
- Play the Hidden Object Scene in the cemetery to obtain the SHOVEL.
- Zoom into the shallow grave; dig up the dirt with the SHOVEL and pick up the DIRTY JACKET.
- Go to the vestibule and talk to Viggo. He asks you if you want to go to the garden now or later. Choose "No" and he will ask you to come find him later. Choose "Yes" and you will be taken straight to the garden. For the purpose of this guide, we chose "Yes."
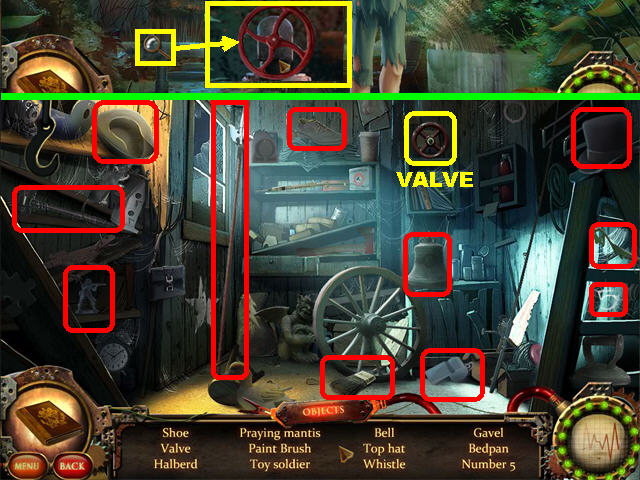
- Viggo tells you to go to the shed once you get to the garden; go into the shed.
- Play the Hidden Object Scene to obtain the VALVE. You will be returned to the garden after you finish finding the items.
- Zoom into the water valve; place the VALVE on the water valve to shut off the water in the east wing.
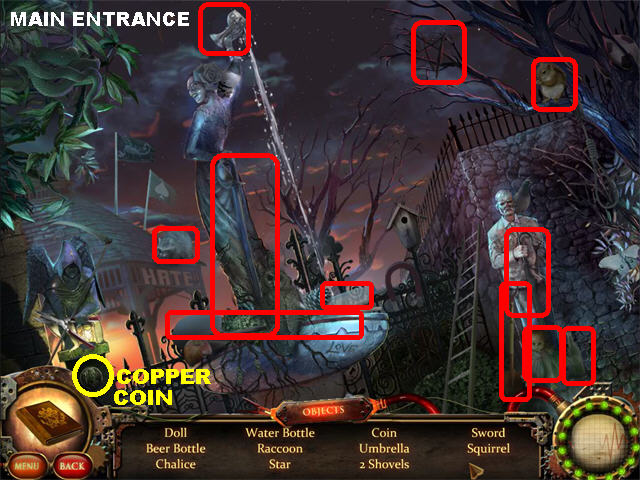
- Go to the main entrance. Play the Hidden Object Scene to obtain the COPPER COIN.
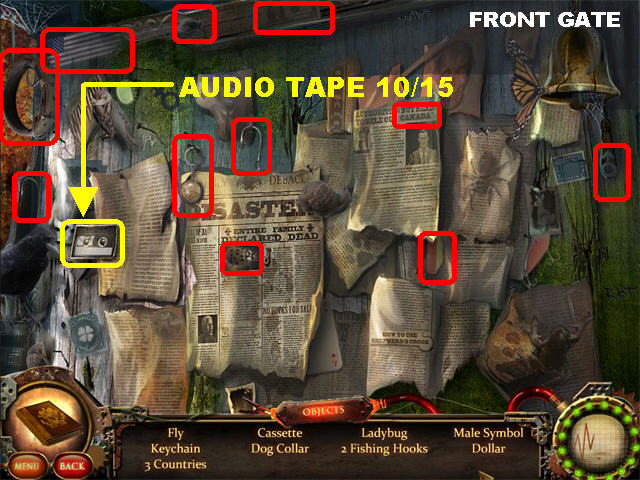
- Go down to the front gate. Play the Hidden Object Scene and AUDIO TAPE 10/ 15 will be added to inventory.
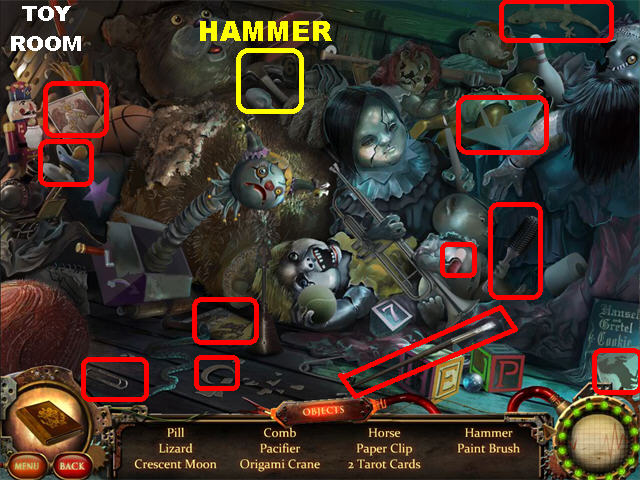
- Go into the toy room. Play the Hidden Object Scene to obtain the HAMMER.
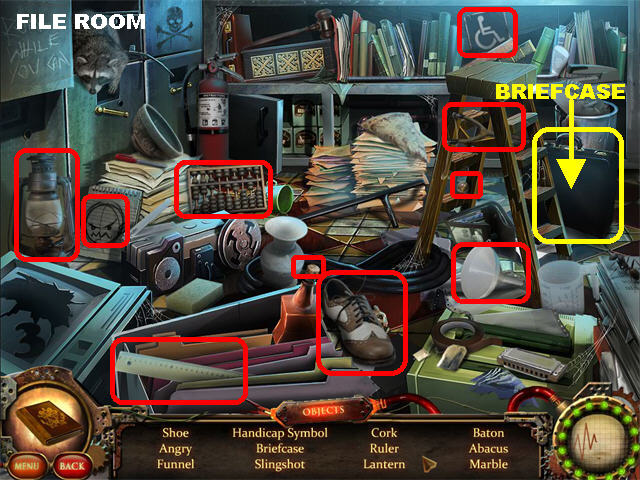
- Go into the file room. Play the Hidden Object Scene to obtain the BRIEFCASE.
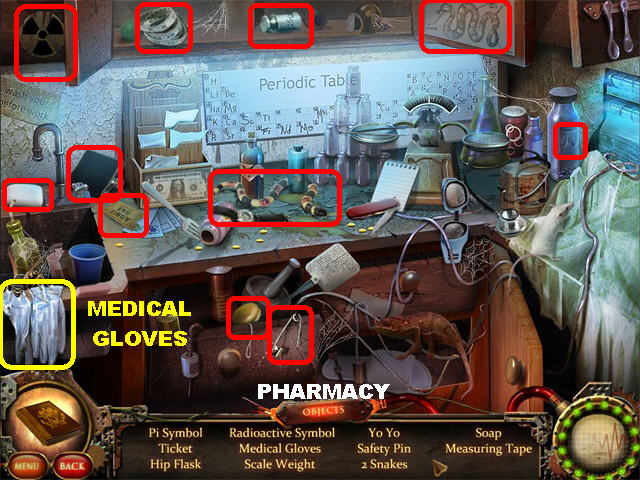
- Go into the pharmacy. Play the Hidden Object Scene to obtain the MEDICAL GLOVES.
- Return to the laundry room.
- Zoom into the washing machine on the left.
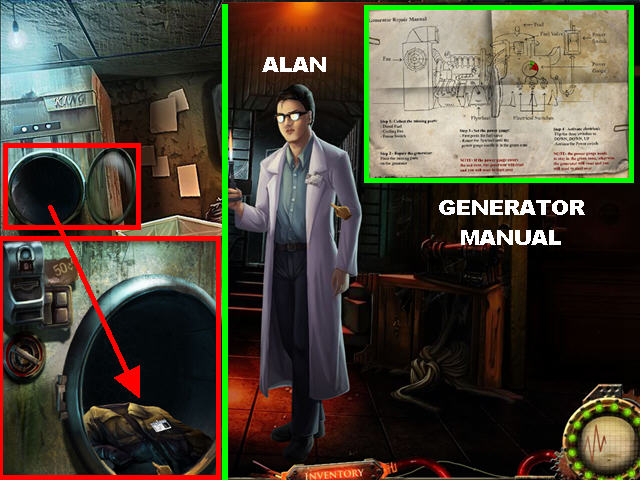
- Place the DIRTY JACKET in the machine; then place the LAUNDRY TOKEN in the coin slot.
- Pick up the SECURITY BADGE after the lid opens back up.
- Go to the east wing and head forward to the east staircase. If the east wing is not unlocked, you must turn off the valve in the garden first.
- Keep going through the hallways and stairs until you reach the bridge access. Use the map in your Notebook if you get lost (turn the page to access the full map).
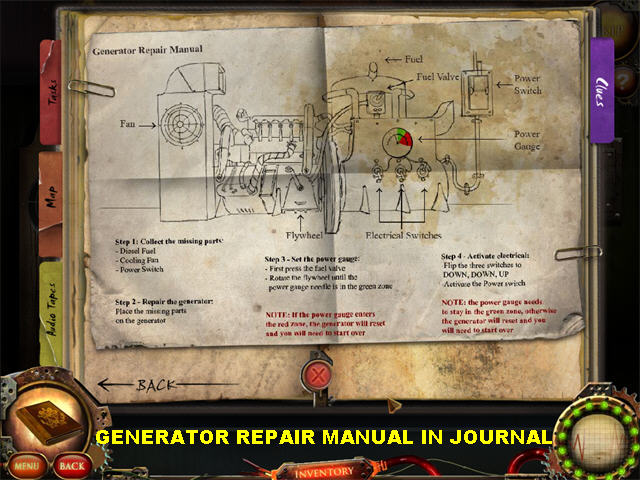
- Talk to Alan. The GENERATOR MANUAL will be added to your Notebook once the conversation ends.
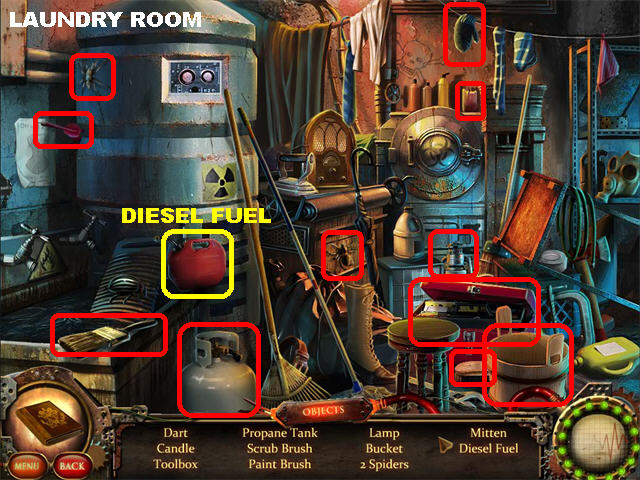
- Go to the laundry room. Play the Hidden Object Scene to obtain the DIESEL FUEL.
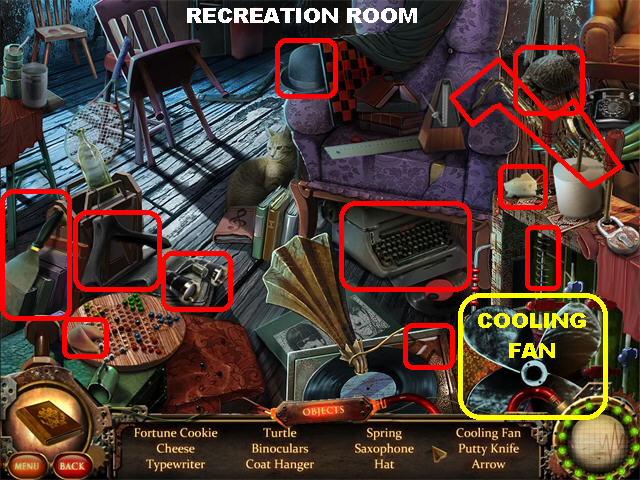
- Go into the recreation room. Play the Hidden Object Scene to obtain the COOLING FAN.
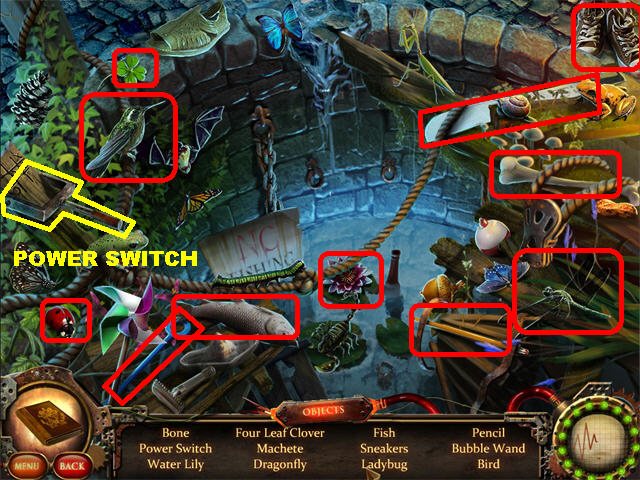
- Go into the cliff edge. Play the Hidden Object Scene to obtain the POWER SWITCH.
- Go to the maintenance hallway.
- Zoom into the generator on the right wall.
- Use the GENERATOR MANUAL in your Notebook to repair the generator.
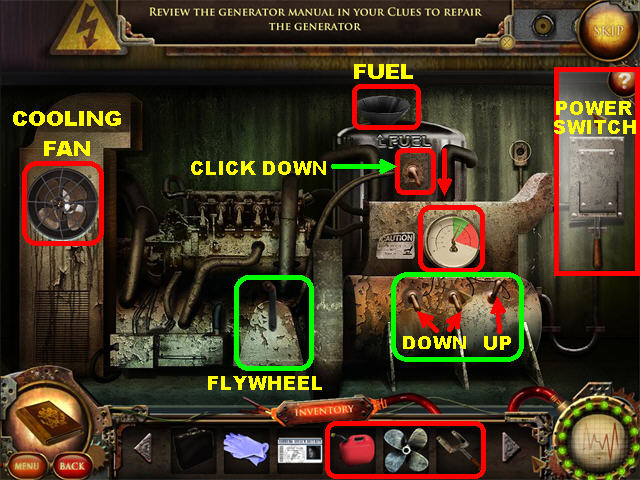
- Place the DIESEL FUEL in the fuel tank in the upper right.
- The COOLING FAN belongs on the top left side of the generator.
- Place the POWER SWITCH in the upper right.
- Rotate the FLYWHEEL in the lower center until the meter is in the green zone. If the meter hits the red zone, you will have to start over.
- Place the switches in the lower, from left to right, in the down, down, up positions.
- Click on the POWER SWITCH (upper right) immediately after you put the switches into position, otherwise the puzzle will reset if the meter falls out of the green zone.

- Go to the living quarters; Thomas will be talking to Alice and Christine.
- Go to the second floor and talk to Victor.
- Click on the body on the ground to trigger a puzzle.
- Place the body parts back in place in the order shown in the screenshot.
- You will receive the X-RAY CONTROL DIAL after all the parts have been positioned correctly.
Chapter 6
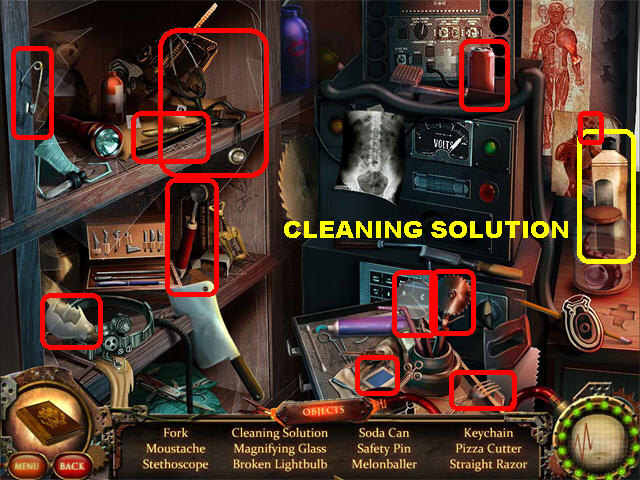
- Go to the surgery room door. Play the Hidden Object Scene to obtain the CLEANING SOLUTION.
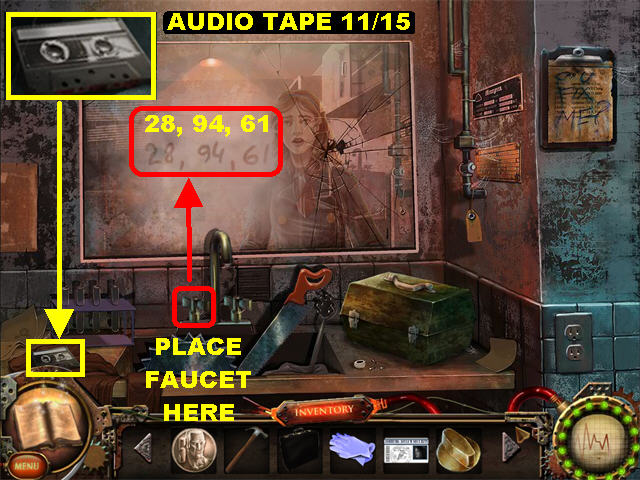
- Go into the preparation room in the back. Pick up AUDIO TAPE 11/15 in the lower left.
- Place the FAUCET on the sink and the mirrors will fog up revealing the numbers 28, 94, and 61.
- Go to the first floor.
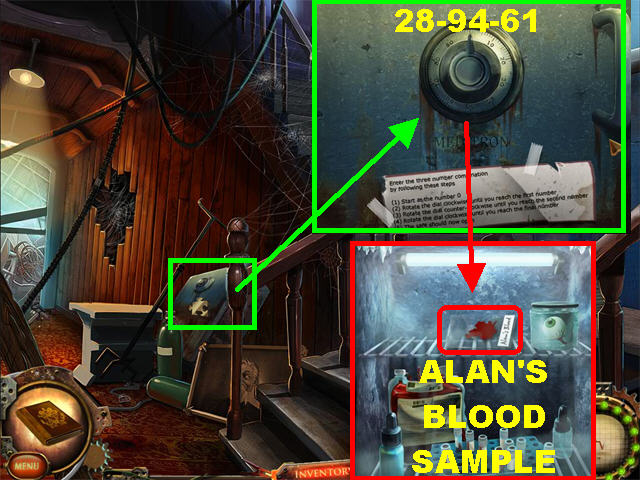
- Zoom into the safe on the left.
- Start the safe dial at 0, turning it clockwise until you reach 28. Turn the dial counterclockwise to 94 and then clockwise, again, to 61, to open the safe.
- Pick up ALAN'S BLOOD SAMPLE inside the safe.
- Go to the radiology wing upstairs.

- Zoom into the water fountain on the left; use the MEDICAL GLOVES to drain the water and retrieve the SILVER COIN.
- Zoom into the vending machine; place the SILVER COIN and the COPPER COIN in the slot. Pick up the FROST AGATE STONE in the tray.
- Zoom into the right door and break the glass with the HAMMER. Enter the x-ray room.
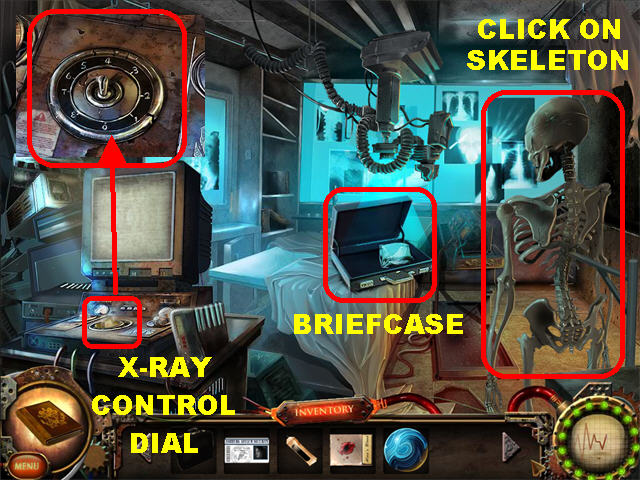
- Click on the skeleton and it will shake; you will automatically receive the DOOR KNOCKER.
- Zoom into the x-ray machine and place the X-RAY CONTROL DIAL on the panel; the machine will activate and shine a light on the table.
- Place the BRIEFCASE on the table to trigger a puzzle.
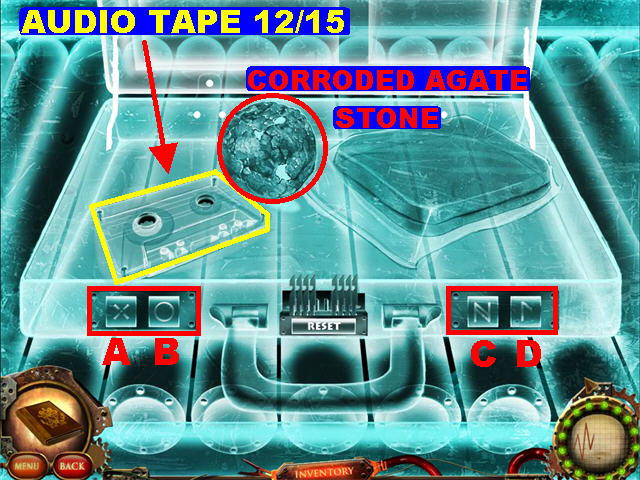
- Click the combination buttons to try to figure out the code, watch the locking pins move to help you solve it.
- Looking at the screenshot you can solve the puzzle by clicking on buttons A, A, B, B, B, C, D, D, and D. You can also look at the symbols on the briefcase for the solution.
- Pick up AUDIO TAPE 12/15 and the CORRODED AGATE STONE inside the briefcase.
- Go to the medical ward.
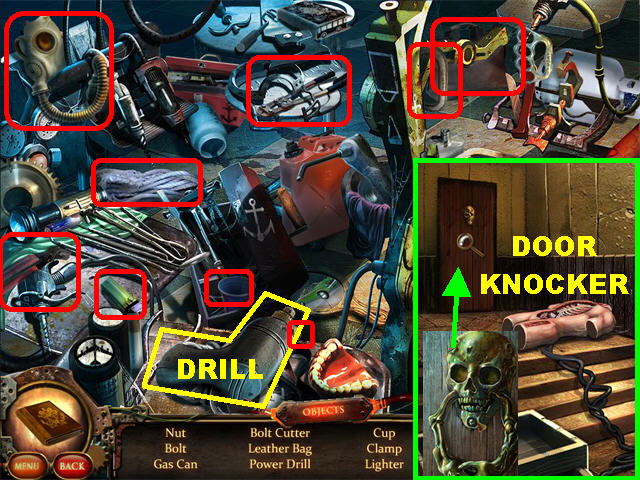
- Zoom into the left door; place the DOOR KNOCKER. Go into the dentist's office.
- Play the Hidden Object Scene to obtain the DRILL.
- Go into the preparation room in the back of the surgery room.
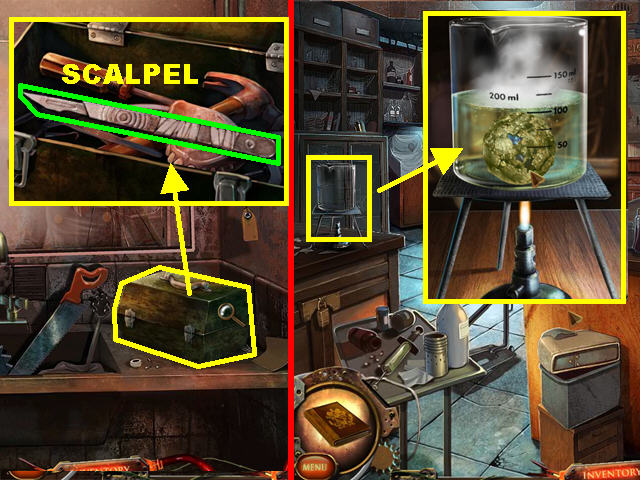
- Zoom into the box on the right; open it with the DRILL and pick up the SCALPEL.
- Go to the pharmacy.
- Zoom into the beaker in the lower left.
- Place the CLEANING SOLUTION and the CORRODED AGATE STONE into the beaker to obtain the DARK AGATE STONE.
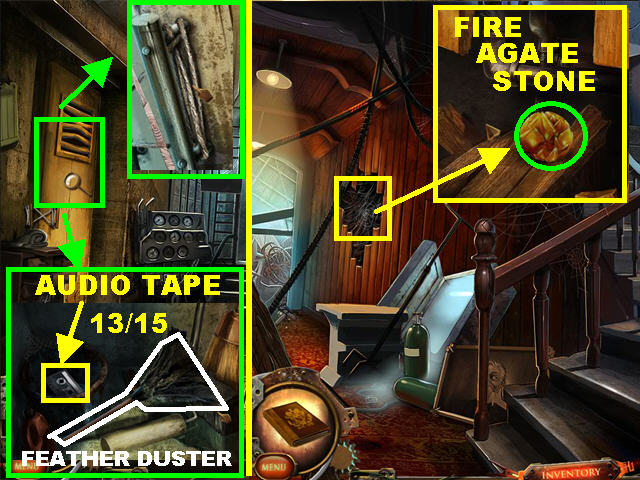
- Go to the bridge access on the second floor.
- Zoom into the locker on the left and cut the rope with the SCALPEL.
- Pick up AUDIO TAPE 13/15 and the FEATHER DUSTER.
- Return to the first floor.
- Zoom into the hole on the left side of the wall; remove the cobwebs with the FEATHER DUSTER and pick up the FIRE AGATE STONE.
Chapter 7

- Go up to the bridge access.
- Zoom into the back door and place the FIRE AGATE STONE, DARK AGATE STONE, and the FROST AGATE STONE on the door.
- Click on the wheel to unlock the door.
- Continue forward to the bridge and go straight to the hidden offices. Go to the far right to enter Alan's Office.
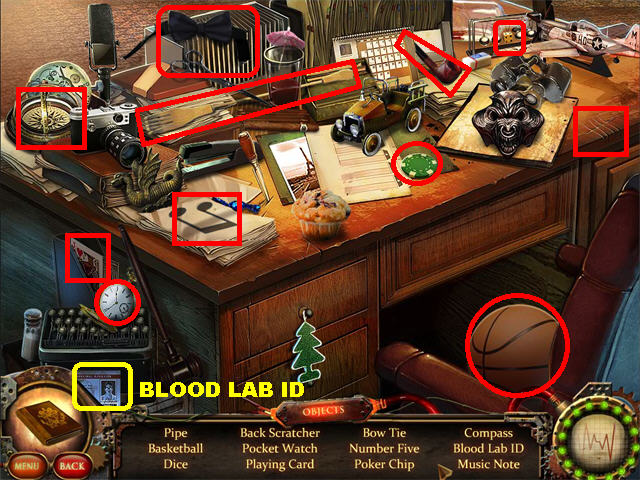
- Alan tells you to come back to the office after you retrieve his research.
- Play the Hidden Object Scene in Alan's Office to obtain the BLOOD LAB ID.
- Go to the bridge access.
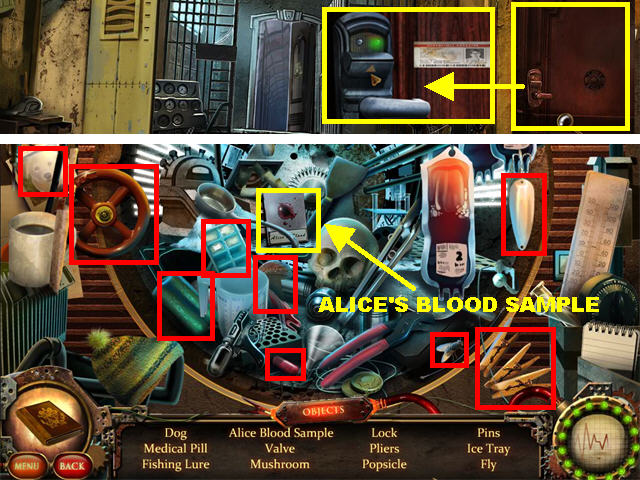
- Zoom into the right door; open it with the BLOOD LAB ID.
- Play the Hidden Object Scene to obtain ALICE'S BLOOD SAMPLE.
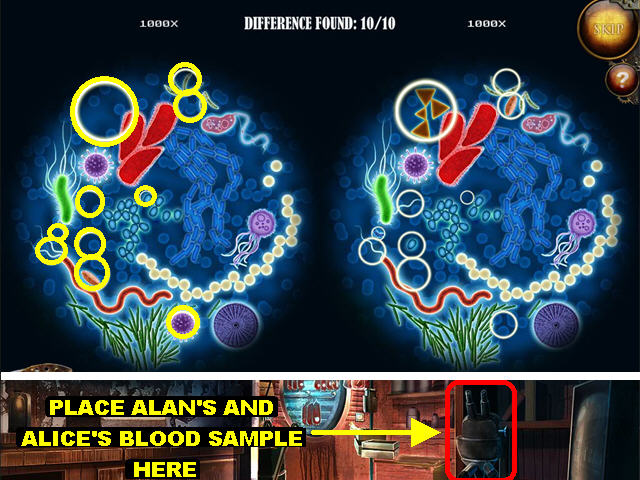
- Zoom into the microscope on the right; set ALICE'S BLOOD SAMPLE and ALAN'S BLOOD SAMPLE in place.
- Spot the 10 differences between both samples.
- Please look at the screenshot for the solution.
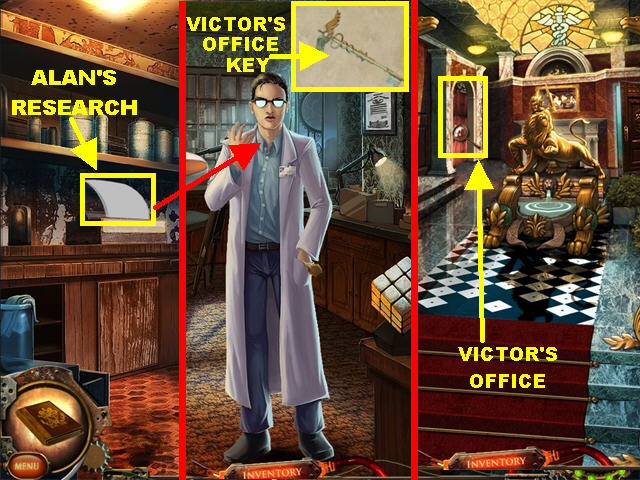
- Pick up ALAN'S RESEARCH from the printer on the left after the puzzle has been solved.
- Return to Alan's Office and give him ALAN'S RESEARCH.
- Alan gives you VICTOR'S OFFICE KEY.
- Click down; zoom into the door on the far left and open it with VICTOR'S OFFICE KEY.
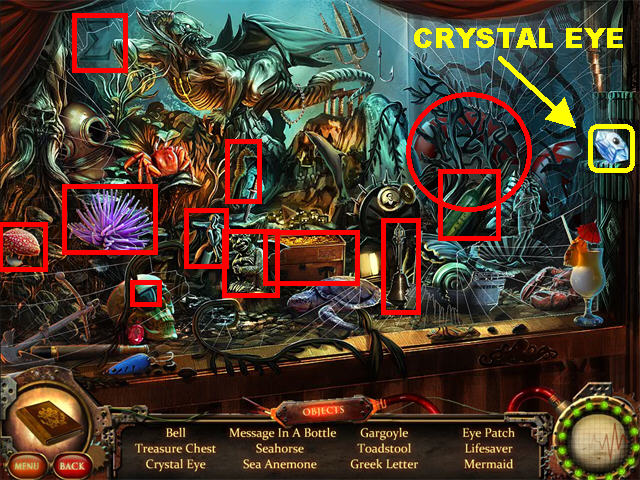
- Play the Hidden Object Scene in Victor's Office to obtain the CRYSTAL EYE.
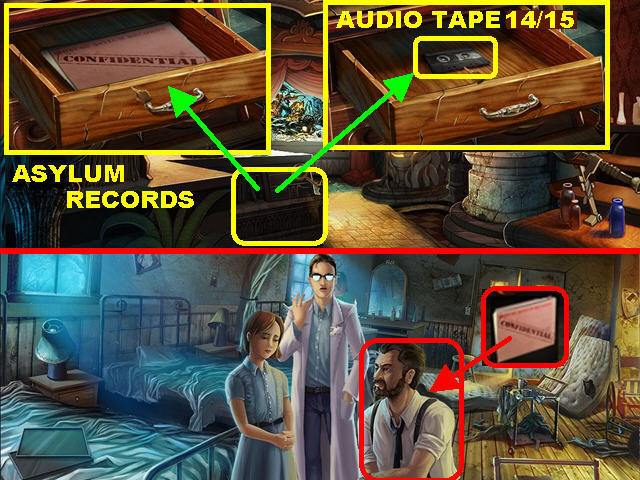
- Zoom into the left drawer; pick up the ASYLUM RECORDS. AUDIO TAPE 14/15 can be found below the records.
- Go to the living quarters and give Thomas the ASYLUM RECORDS.
- You are taken to the dock. Alan tells you there is a secret message hidden somewhere in his office.
Chapter 8
- Go to the east staircase and Viggo will be waiting for you. Go to the bridge and Victor will lock the gate on you.
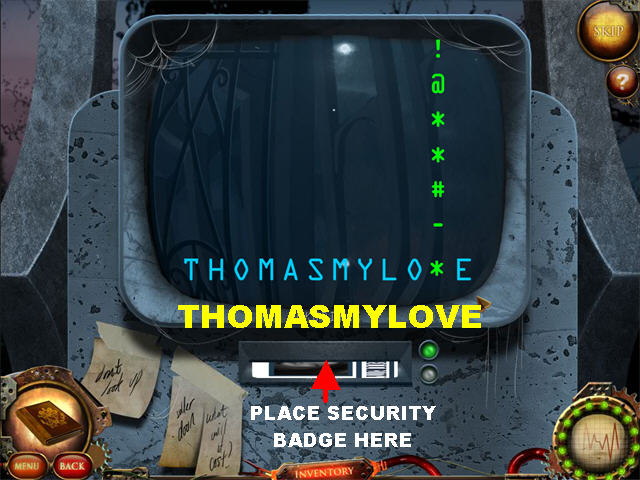
- Zoom into the monitor on the right; place the SECURITY BADGE in the slot to activate a puzzle.
- There are symbols scrolling down on the screen and symbols at the bottom of the screen. Your goal is to click on the symbols at the bottom as soon as its matching symbol falls directly above it.
- Once the bottom symbols turn yellow it means that the matching symbol is almost above it, use that as your cue to click!
- The message "THOMASMYLOVE" will appear at the bottom of the screen once the puzzle has been completed.
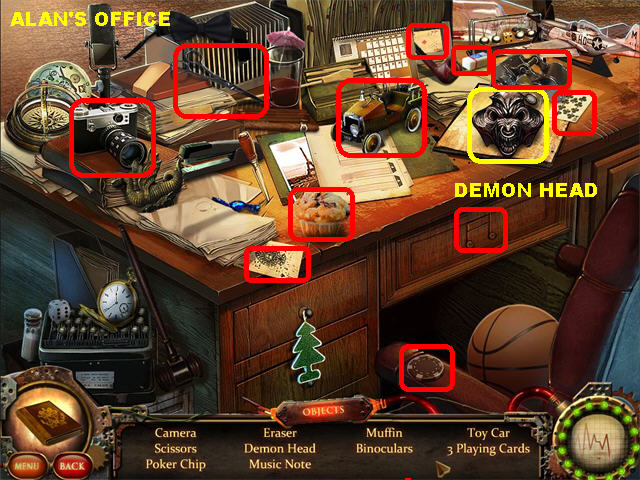
- Go to Alan's Office. Play the Hidden Object Scene to obtain the DEMON HEAD.
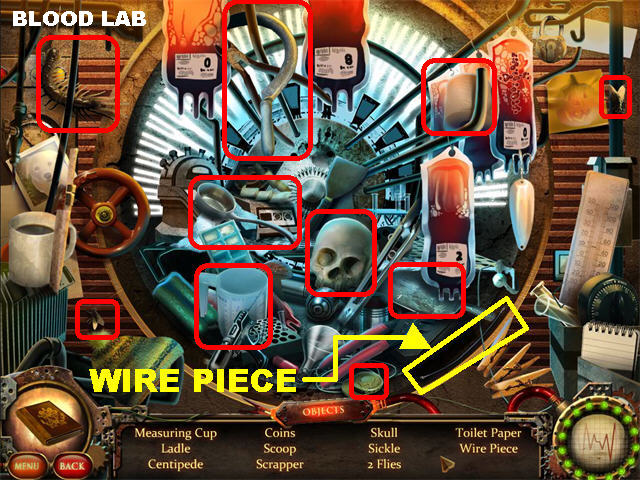
- Go to the blood lab. Play the Hidden Object Scene to obtain the WIRE PIECE.
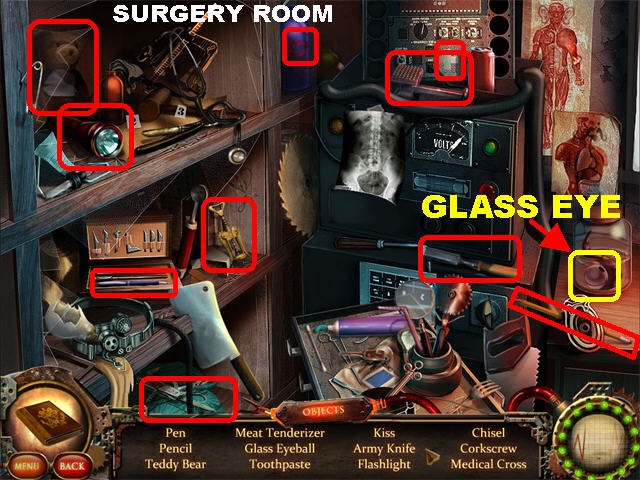
- Go to the surgery room. Play the Hidden Object Scene to obtain the GLASS EYE.
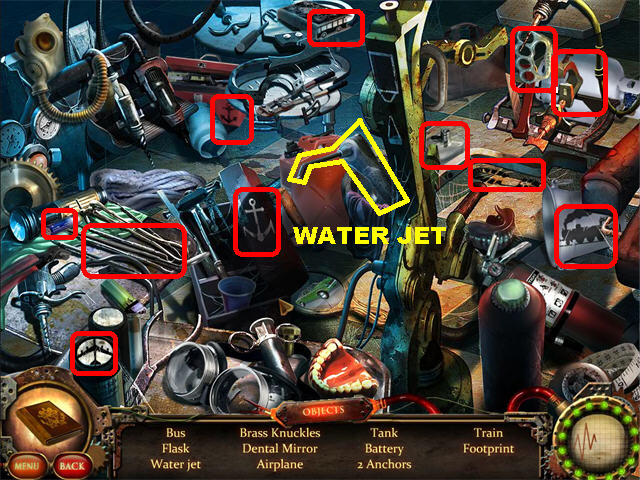
- Go to the dentist's office. Play the Hidden Object Scene to obtain the WATER JET.
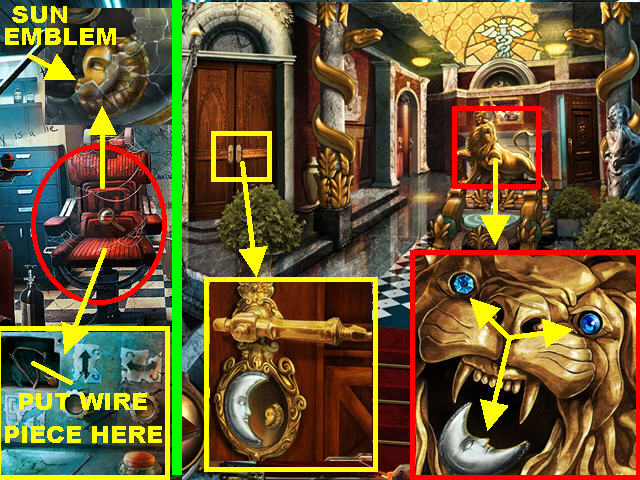
- Zoom into the red chair in the dentist's office; place the WIRE PIECE in the upper left.
- Click on the RED BUTTON and pick up the SUN EMBLEM.
- Go to the hidden offices; zoom into the lion statue and place the GLASS EYE and the CRYSTAL EYE into the sockets. Pick up the MOON EMBLEM from its mouth.
- Zoom into the left door; place the MOON EMBLEM and the SUN EMBLEM into the slot.
- Go into the study.
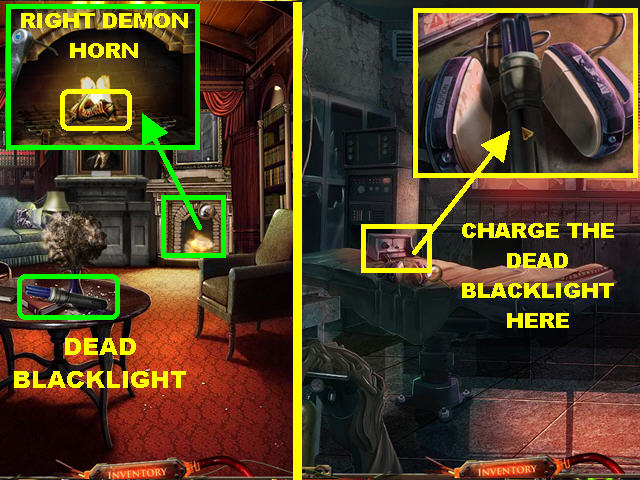
- Zoom into the fireplace in the study; extinguish the fire with the WATER JET. The RIGHT DEMON HORN will be added to inventory.
- Pick up the DEAD BLACKLIGHT on the small table.
- Go to the surgery room.
- Zoom into the paddles on the table; place the DEAD BLACKLIGHT on the paddles to obtain the CHARGED BLACKLIGHT.
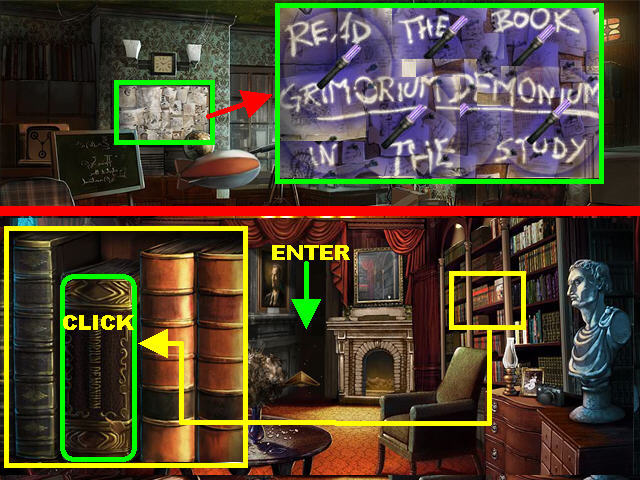
- Go to Alan's Office and zoom into the board in the back; place the CHARGED BLACKLIGHT on the board to reveal the words "READ THE BOOK GRIMORIUM DEMONIUM IN THE STUDY."
- Go to the study and zoom into the books on the far right; click on the Grimorium Demonium book and a secret passageway will appear next to the fireplace; go through it to access Charles' Cell.
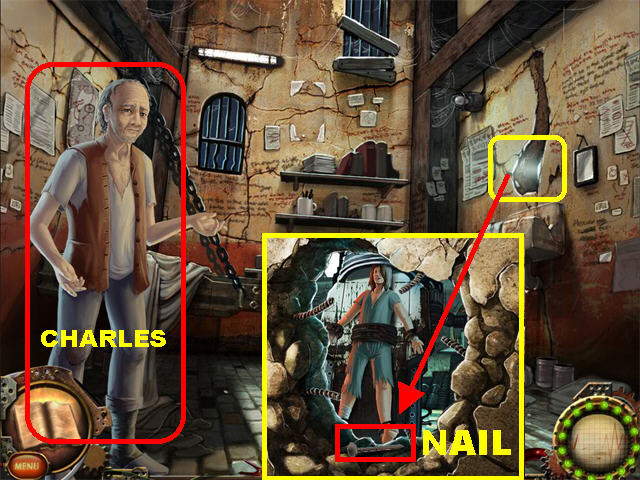
- Talk to Charles.
- Zoom into the right side of the wall and you will see Viggo tied up. Pick up the NAIL at the bottom of the pop-up window.
- Click down to talk to Christine's grandfather in the study.
- Go into Alan's Office.
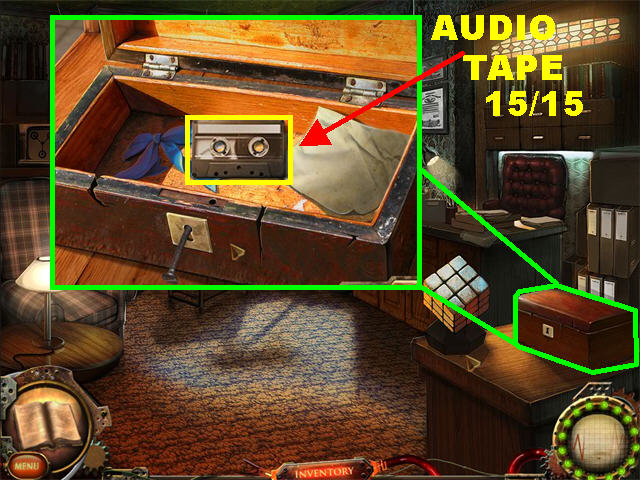
- Zoom into the box in the lower right; open it with the NAIL and pick up the AUDIO TAPE 15/15.
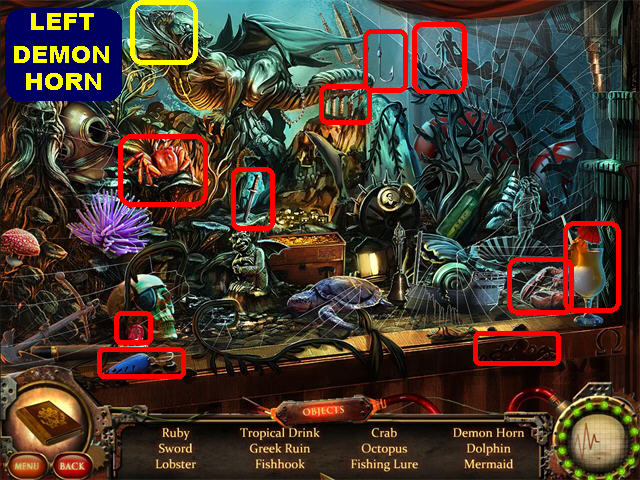
- Go into Victor's Office. Play the Hidden Object Scene to obtain the LEFT DEMON HORN.
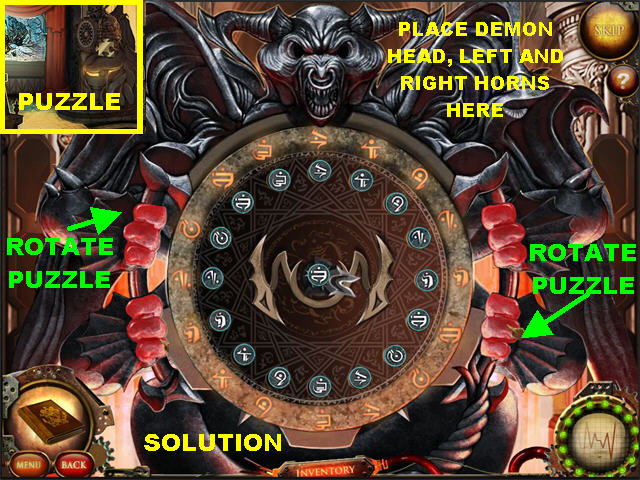
- Zoom into the Demon statue on the far right to trigger a puzzle.
- Place the LEFT DEMON HORN, RIGHT DEMON HORN, and the DEMON HEAD on top of the puzzle.
- Shoot the balls into the slots so that they match the outer ring. Use the demon's hands on the left and right to rotate the puzzle.
- If you place a disc into the wrong slot, keep shooting until you receive the image you need.
- Slots that have been entered correctly will light up.
- If you're down to the last slot, keep firing the balls into that slot until you get the one you need.
- This puzzle takes a lot of time and patience because you have to keep rotating the puzzle to get access to the blocked slots. Try to keep track of the slots you've filled, otherwise you will find yourself changing slots that were previously correct. Each time you move the puzzle, the slots will shift.
- Please look at the screenshot for the final solution.
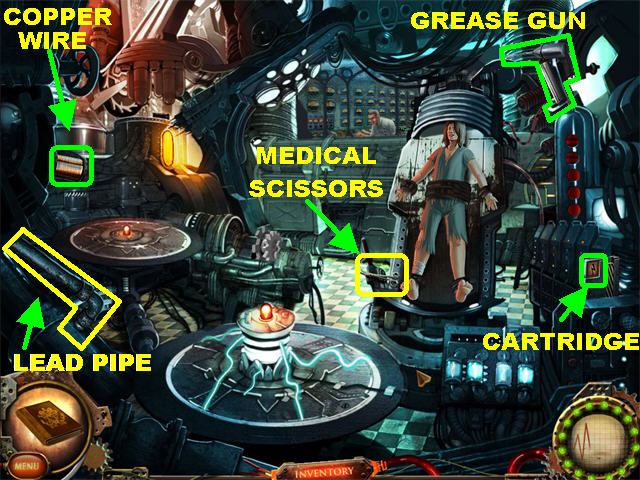
- Go to the right after the puzzle has been completed to reach the experiment chamber. Victor and Viggo are there. Click on Viggo to trigger a cut scene with Victor.
- Pick up the CARTRIDGE in the lower right.
- Pick up the GREASE GUN in the upper right.
- Pick up the LEAD PIPE in the lower left.
- Pick up the MEDICAL SCISSORS next to Viggo's foot.
- Pick up the COPPER WIRE in the upper left.
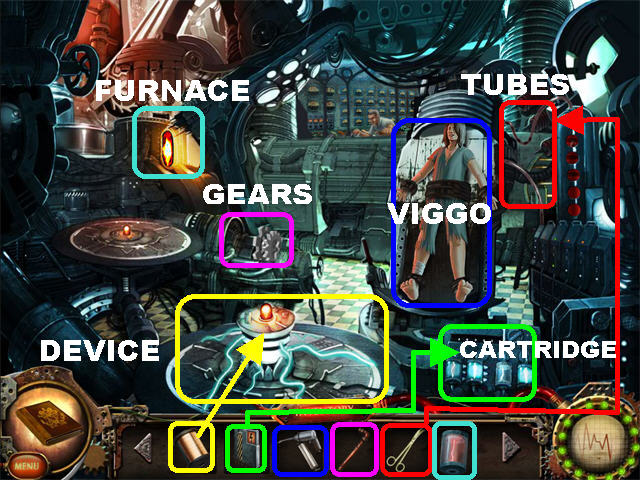
- Jam the gears with the LEAD PIPE.
- Place the CARTRIDGE on the machine in the lower right to acquire the UNSTABLE ELEMENT.
- Place the UNSTABLE ELEMENT in the furnace to cause an explosion.
- Loosen Viggo's straps with the GREASE GUN.
- Cut the tubes connected to Viggo with the MEDICAL SCISSORS.
- Place the COPPER WIRE on the device in the lower center to short-circuit it.
- Talk to Charles, Viggo, and Christine out in the study.
- Congratulations! You've completed Nightfall Mysteries: Asylum Conspiracy
Audio Tape Locations
- This is a list of the Audio Tape Locations in order of appearance.
- Audio Tape 1/15 (Main Entrance): Zoom into the area close to the steps and pick up the tape.
- Audio Tape 2/15 (Main Hall): In the lower left corner, the tape is leaning against a pillar.
- Audio Tape 3/15 (Toy Room): Zoom into the crib and pick up the tape in the lower left corner.
- Audio Tape 4/15 (Daycare): Zoom into the crib on the right; pick up the tape after you feed the cat the frozen fish.
- Audio Tape 5/15 (File Room): Zoom into the cabinet in the upper left to pick up the tape.
- Audio Tape 6/15 (Recreation Room): Take a closer look at the pool table's corner pocket and pick up the tape.
- Audio Tape 7/15 (Pharmacy): Zoom into the broken glass case on the right and pick up the tape.
- Audio Tape 8/15 (Cemetery): Take a closer look at the coffin in the lower right and pick up the tape.
- Audio Tape 9/15 (Laundry Room): Zoom into the hamper and pick up the tape.
- Audio Tape 10/15 (Front Gate): Play the Hidden Object Scene on the board to obtain the tape.
- Audio Tape 11/15 (Preparation Room): The tape is in the lower left corner.
- Audio Tape 12/15 (X-Ray Room): The tape can be found inside the briefcase after you solve the puzzle.
- Audio Tape 13/15 (Bridge Access): The tape is inside the left locker and can only be accessed after you cut the rope with the SCALPEL.
- Audio Tape 14/15 (Victor's Office): The tape is inside the drawer on the left, below the Asylum Records.
- Audio Tape 15/15 (Alan's Office): The tape is in the box in the lower right that can only be opened with the NAIL.
Created at: 2010-07-29