

Walkthrough Menu
- General Tips
- Chapter 1: Haunted Exhibition
- Chapter 2: The Ghost Ship
- Chapter 3: Shores of the Skull Island
- Chapter 4: Visit in the Fortress
- Chapter 5: The Lighthouse
- Chapter 6: Below the Fortress
- Chapter 7: Underground Bay
General Tips
- Click the Options button to change the screen size, sound and music volume, gameplay mode, and the cursor.
- Click the Welcome signpost on the Main menu to manage player profiles.
- This guide's terminology matches the in-game terminology to describe locations and inventory items.
- Click the Map to find available actions (in Regular mode only) and your current location.
- To collect items listed in yellow in Hidden Object Scenes (HOS), you must perform an additional action, such as combining items or locating zoom zones.
- Instead of playing a HOS, you can click the Mahjong tiles to the lower left of the HOS to play a game of Mahjong.
- The lists in HOS are random; your lists may vary from the ones in the guide.
Chapter 1: Haunted Exhibition
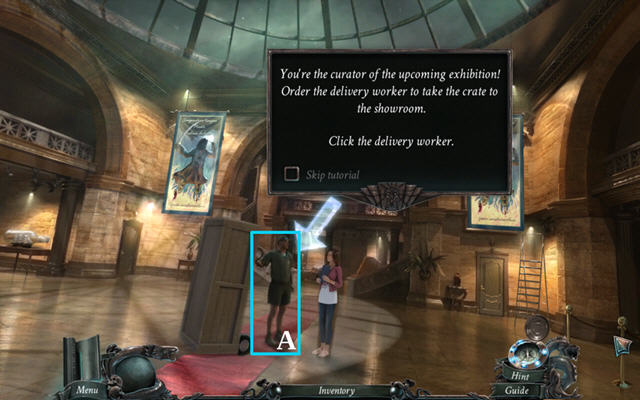
- Click the delivery worker (A) to order him to take the crate to the showroom.
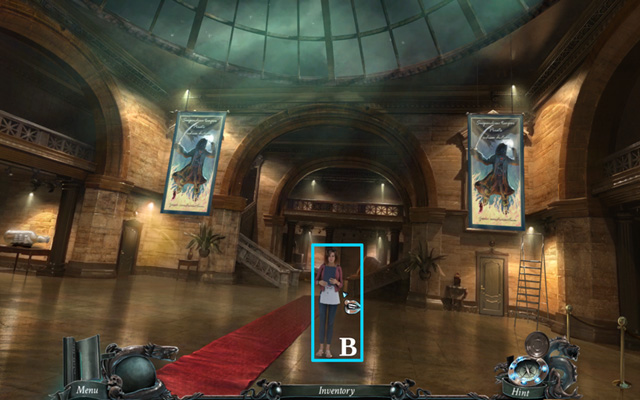
- Click your daughter (B) to talk to her.
- Go forward.
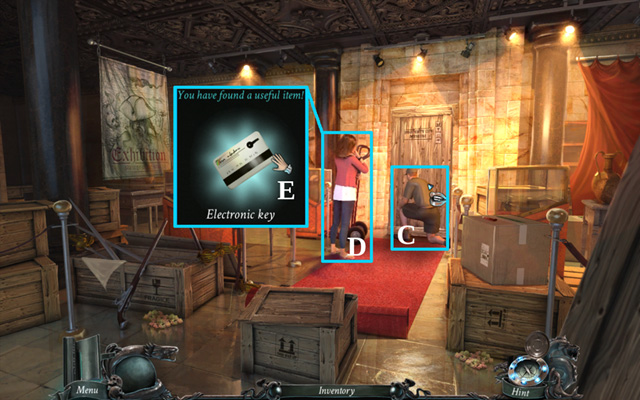
- Click the delivery worker (C); he'll set up the crate and leave.
- Click your daughter (D) to talk to her; take the ELECTRONIC KEY (E).
- Go back to the Hall.

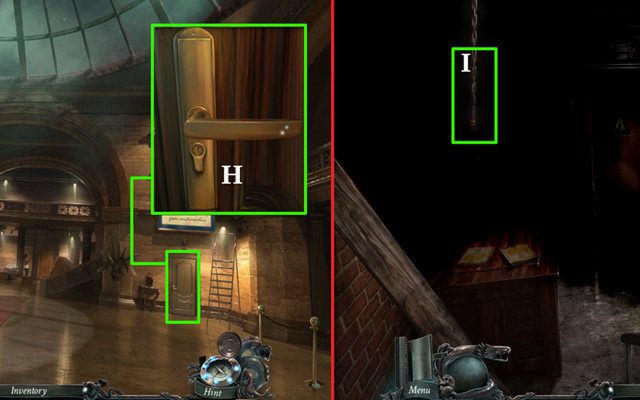
- Zoom in on the door on the left; use the ELECTRONIC KEY on the door lock (F) to unlock it; click the door handle.
- Go into your office.
- Zoom in on the key rack.
- Take the BASEMENT KEY from the hook (G).
- Go back to the Hall.
- Zoom in on the door on the right; use the BASEMENT KEY on the lock; click the key in the hole to turn it; press the door handle to open the door.
- Go into the Basement.
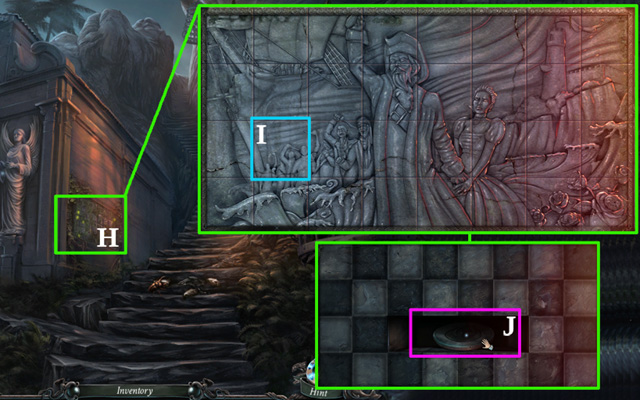
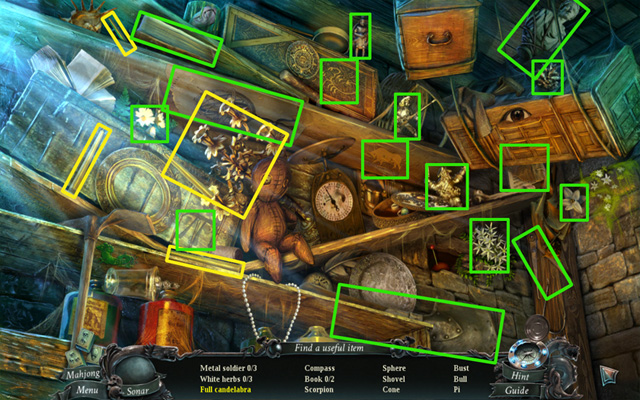
- Pull the light switch (I).
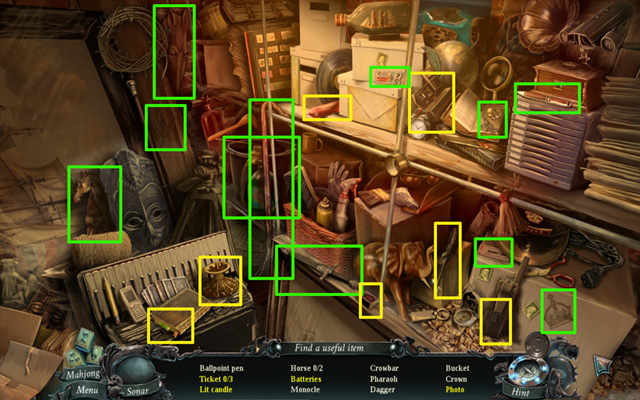
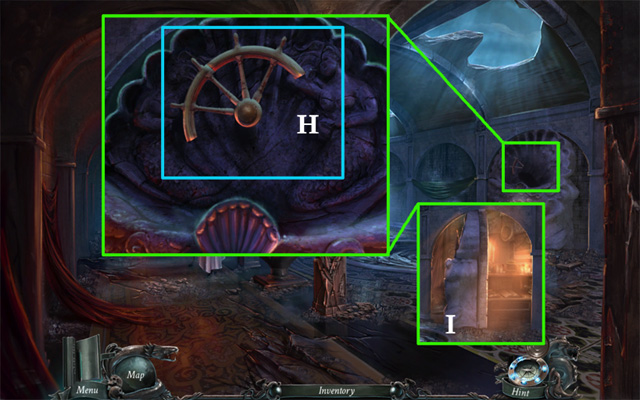
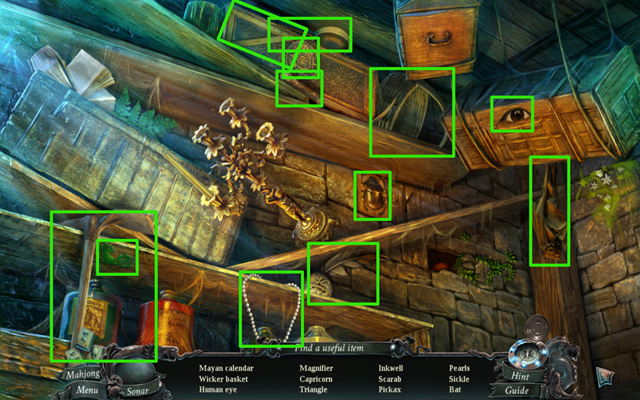
- Play the HOS; click the protective sheets to remove them; use the screwdriver to open the walkie-talkie and collect the batteries; click the Polaroid camera to collect a photo; open the book to find one of the tickets; put the candle on the candlestick and light it with matches to pick up the lit candle; collect the remaining items on the list to receive a CROWBAR.

- Go back to the Hall and forward to the Exhibition.
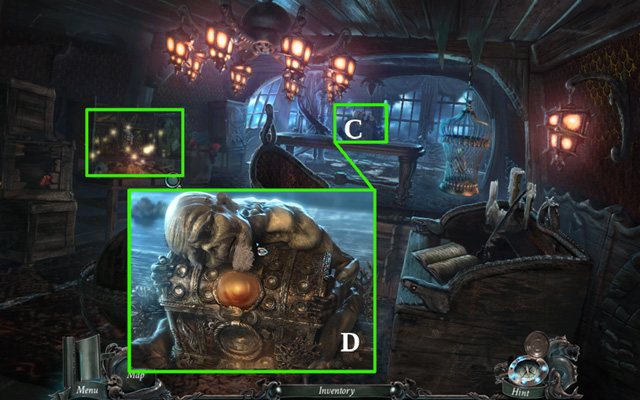
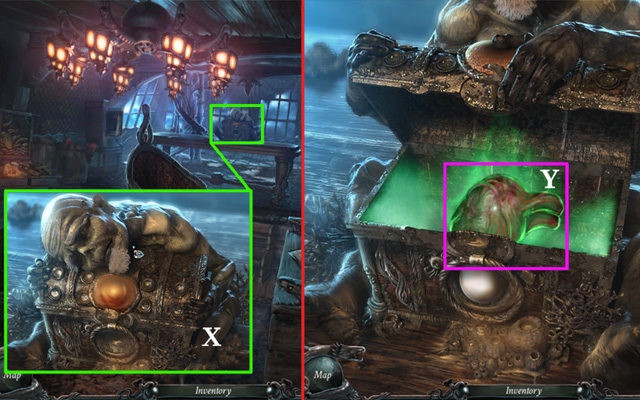
- Zoom in on the crate in the back of the room (J); use the CROWBAR on the crate 2 times to open it.
- Zoom in on and click the pirate's mouth to reveal the CRYSTAL (K); click the CRYSTAL to take it (L).
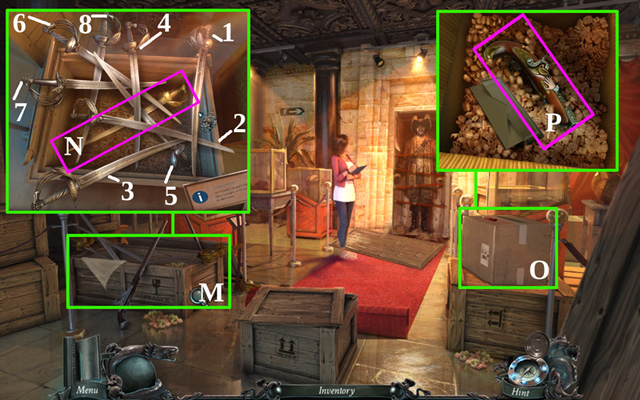
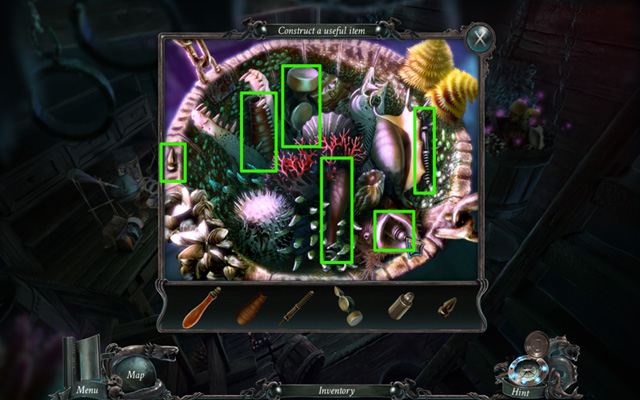
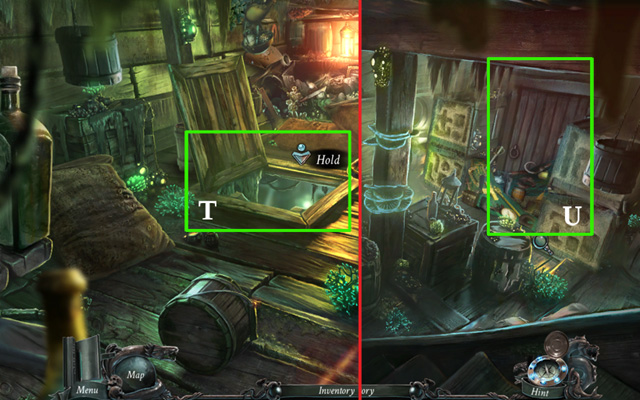
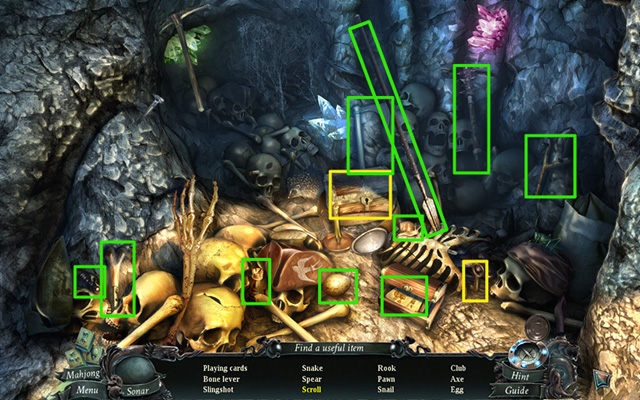
- Examine the crate on the left (M); remove the cutlasses, starting from the one lying on top (click the screenshot to see the solution); take the PIRATE CUTLASS (N).
- Zoom in on the box on the right (O); use the retractable knife lying on the box to cut it open; click each box flap to open it; click the note; pick up the FLINTLOCK PISTOL (P).
- Go back to the Hall and inside your Office.
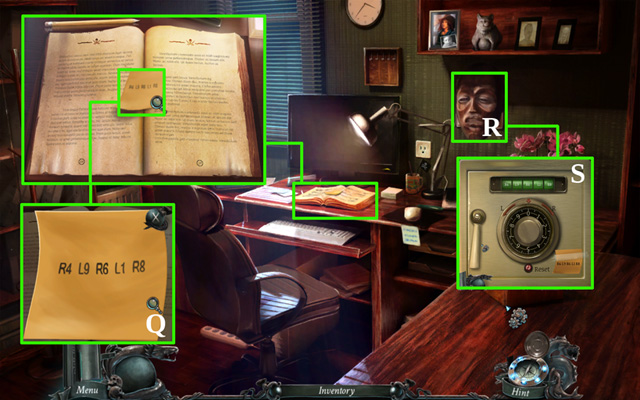
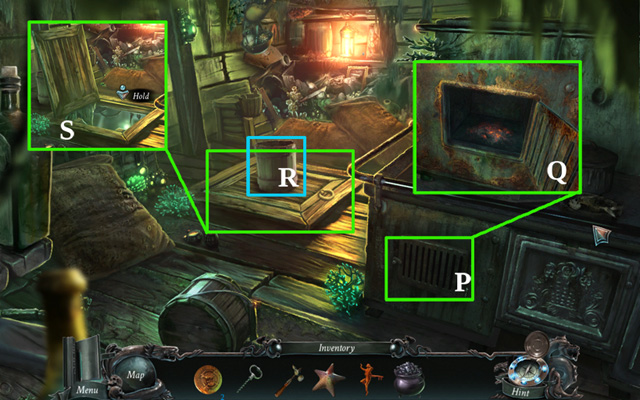
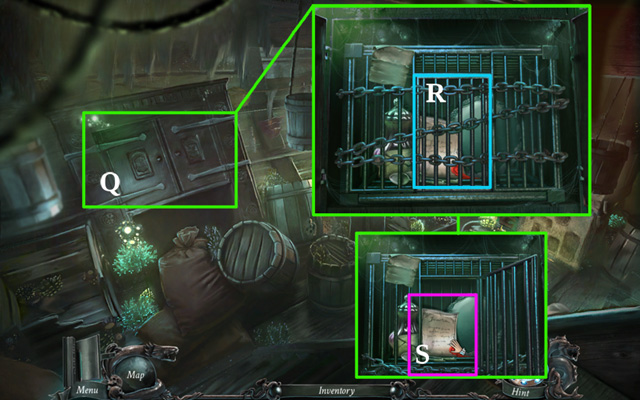
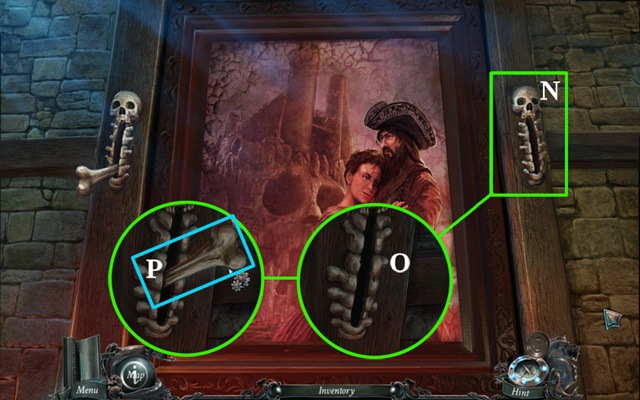
- Zoom in on the book lying on the desk; click the note (Q).
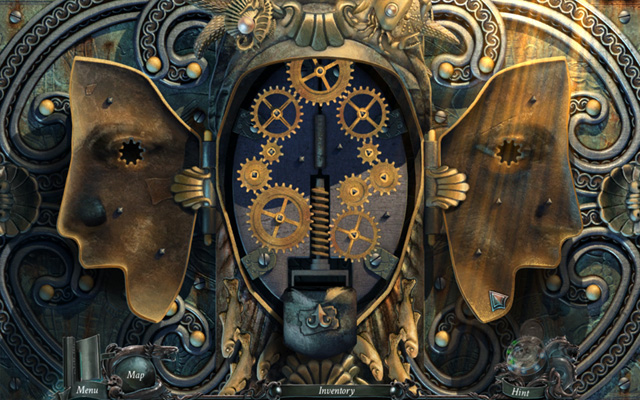
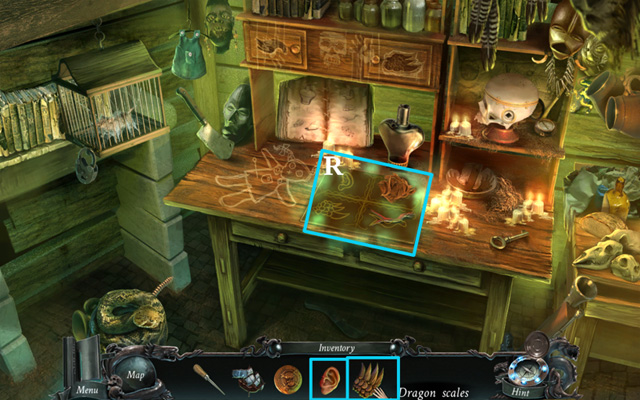
- Click the mask (R) on the wall to reveal the safe.
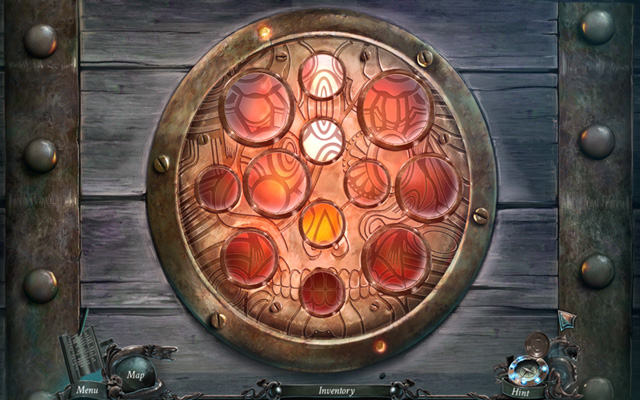
- Click the safe (S) to activate the mini-game.
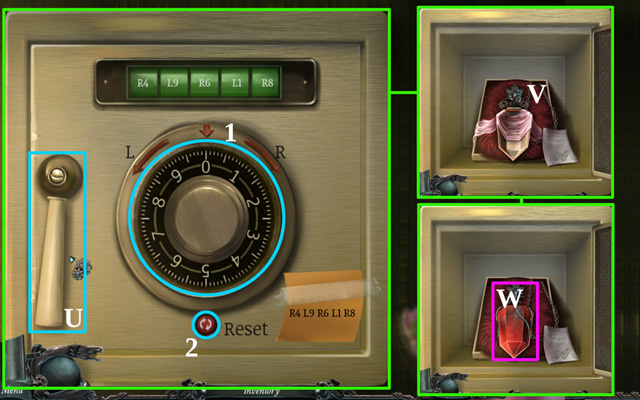
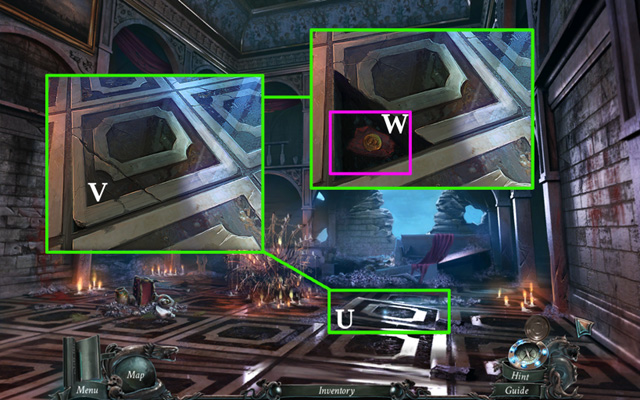
- Rotate the wheel right and left to enter the correct sequence of digits; rotate the wheel (1) clockwise until the arrow above it indicates '4'; rotate the wheel counter-clockwise until the arrow above it indicates '9'; rotate the wheel clockwise until the arrow above it indicates '6'; rotate the wheel counter-clockwise until the arrow above it indicates '1'; rotate the wheel clockwise until the arrow above it indicates '8'; if you make a mistake, click the reset button (2).
- Click the safe handle (U) to open the safe; remove the cloth and put the CRYSTAL inside the casing (V); pick up the PIRATE NECKLACE (W).
- Go back to the Hall and forward to the Exhibition.
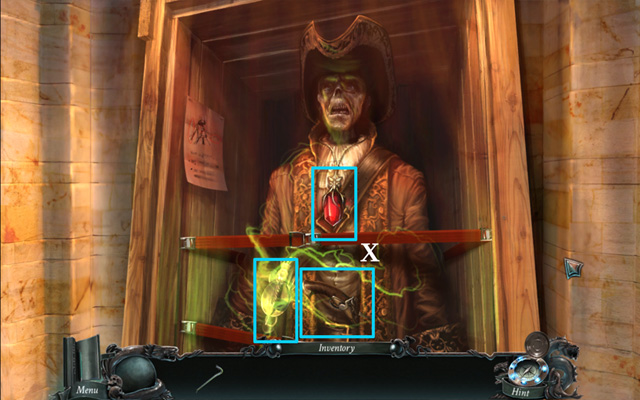
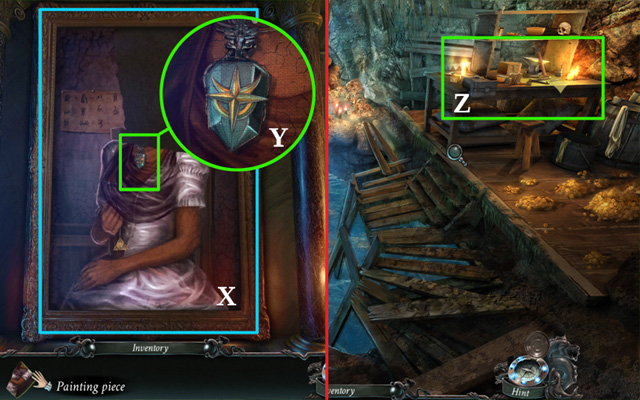
- Zoom in on the pirate exhibit; adorn the mummy pirate with the PIRATE CUTLASS, FLINTLOCK PISTOL, and PIRATE NECKLACE (X).
- Talk to your daughter.
- Go back to the Hall and into your Office.
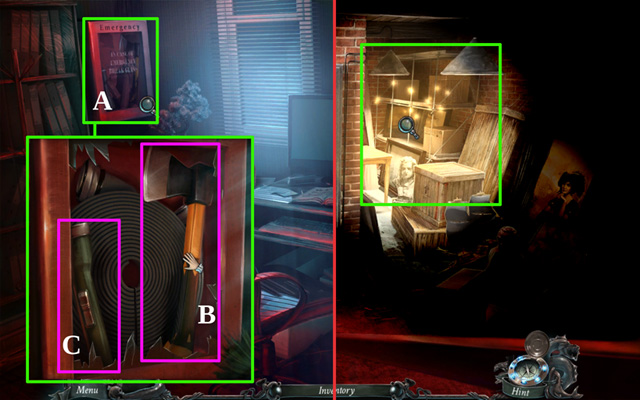
- Zoom in on the emergency box (A); use the CROWBAR on it 3 times; take the AX (B) and the FLASHLIGHT (C).
- Go back to the Hall and into the Basement.
- Use the FLASHLIGHT.
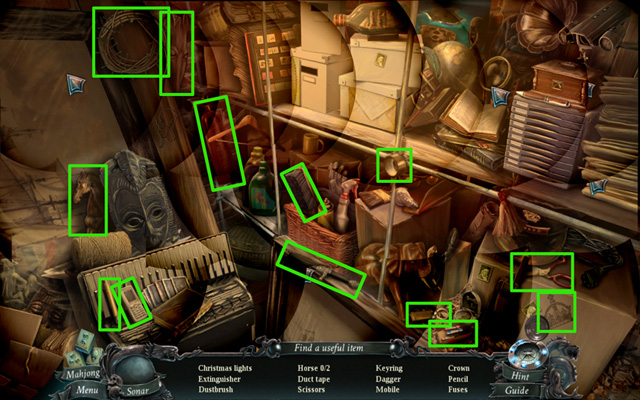
- Play the HOS; collect all the items on the list to receive FUSES.
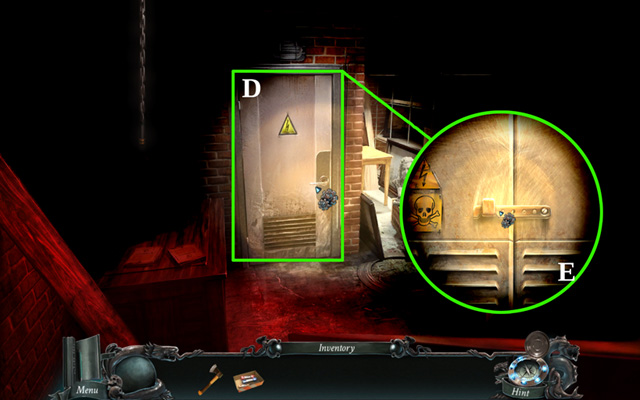
- Open the metal door in front of you (D).
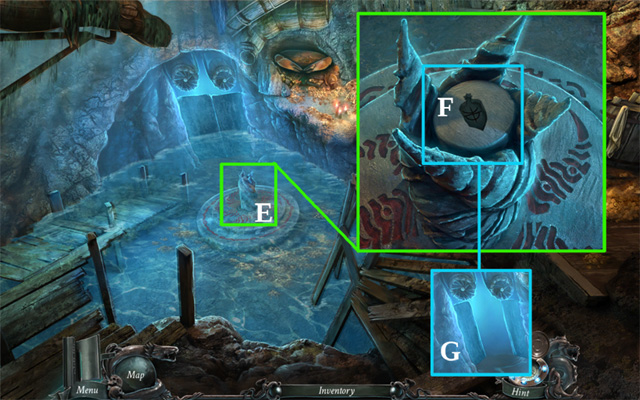
- Zoom in on the fuse box (E); click it once to open the latch, and once again to open the fuse box.
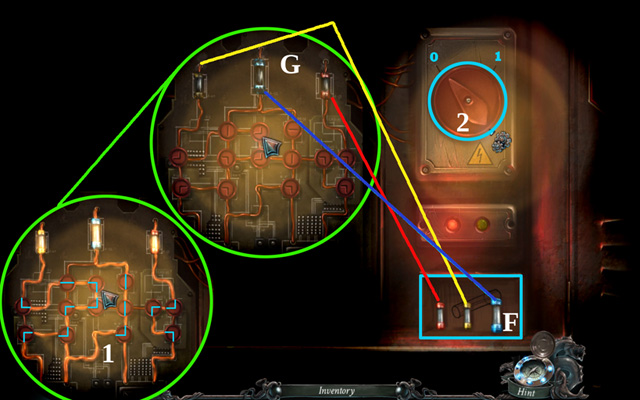
- Put the FUSES in the cardboard box (F) on the right; remove the old fuses from the top of the circuit, and insert the new ones according to the colors and slot sizes (click the screenshot for the solution).
- Rotate the nodes (1) so that the current flows from the bottom of the circuit to each fuse (click the screenshot for the solution); turn the red switch (2) from 0 to 1.
- Go back to the Hall and forward to the Exhibition.
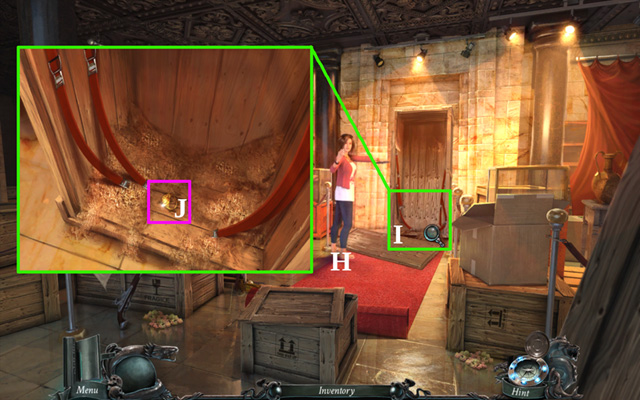
- Talk to your daughter (H).
- Zoom in on the crate (I) in the back of the room; remove the wood shavings; pick up the GOLDEN SIGNET (J).
- Go back and into your Office.
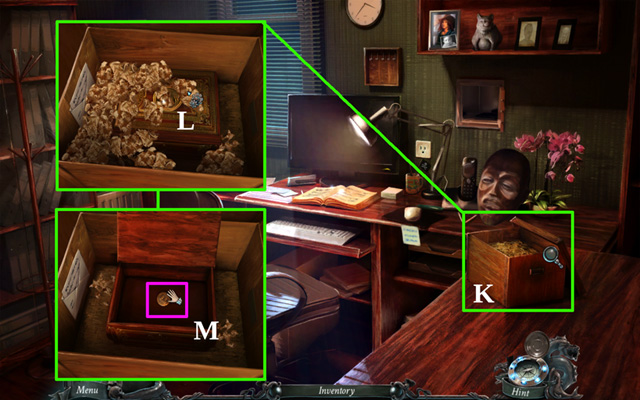
- Click the wooden box on the right (K); click again to zoom in on it; remove the wood shavings; use the GOLDEN SIGNET on the treasure chest (L); click the inserted GOLDEN SIGNET to open the lid.
- Pick up the DOUBLOON (M).
- Go back to the Hall; talk to your daughter on the balcony and watch the cutscene.
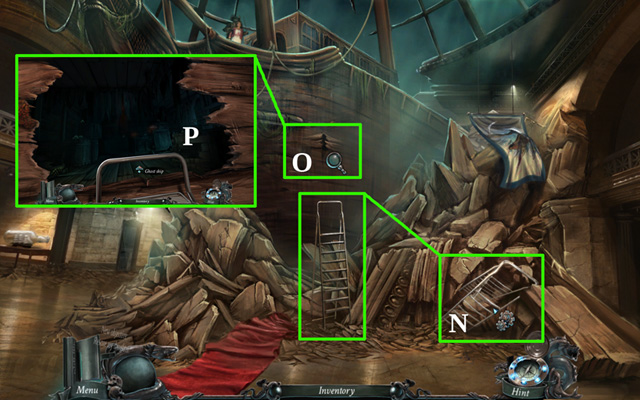
- Click the ladder (N) lying on the ground to place it next to the ship.
- Zoom in on the crack (O) in the ship's side; use the AX on it twice.
- Go inside the Ghost Ship (P) and watch the cutscene.
Chapter 2: The Ghost Ship
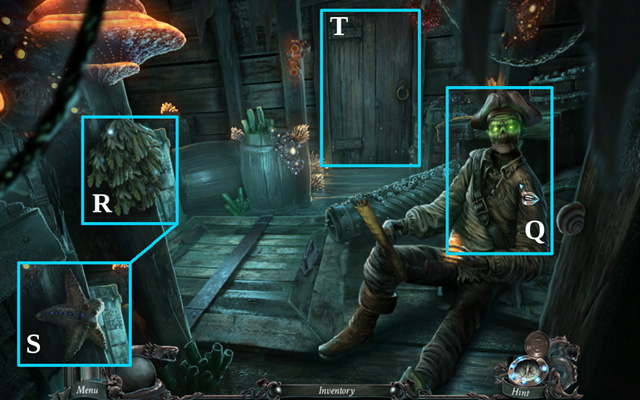
- Talk to the undead pirate (Q) to receive a SHIP MAP.
- Click the algae on the beam (R) on the left several times to reveal a GOLD STARFISH (S); collect it.
- Open the door to the Crew Quarters (T); go inside.
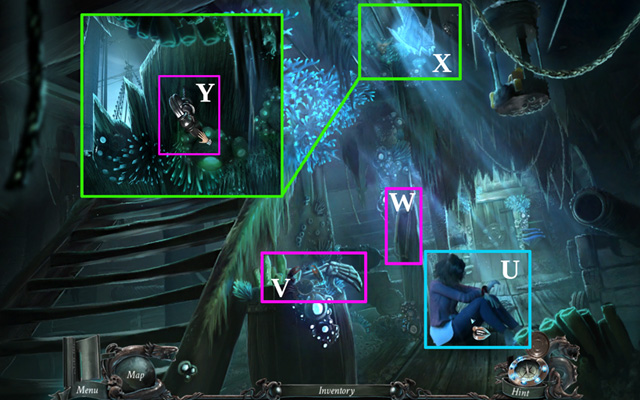
- Talk to your daughter (U) to watch a cutscene.
- Pick up the SKELETON HAND (V) from the barrel; take the HACKSAW (W) from the beam.
- Zoom in on the crack in the ceiling (X); pick up the CORKSCREW (Y).
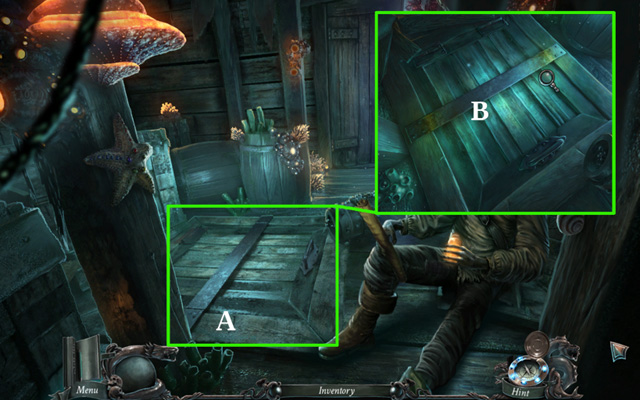
- Go back 2 locations to the ship's Passage.
- Zoom in on the hatch in the floor (A); use the HACKSAW twice on the iron bar (B); click the bar to remove it and open the hatch.
- Go down to the Infirmary.
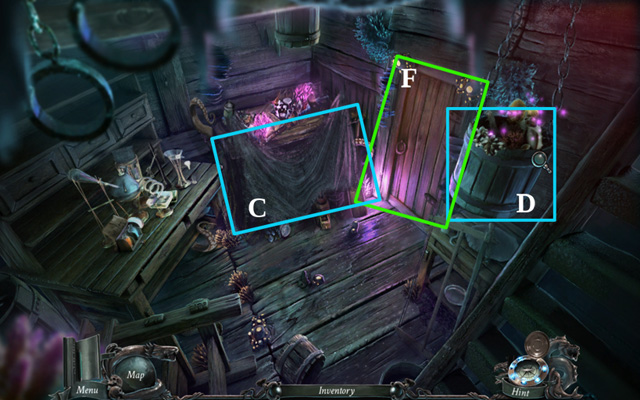
- Click the cloth covering the cupboard (C).
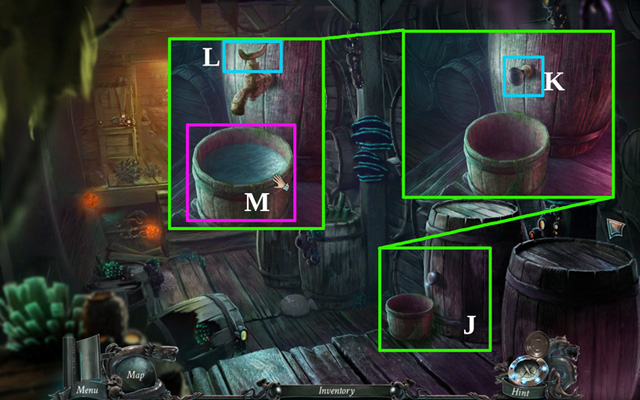
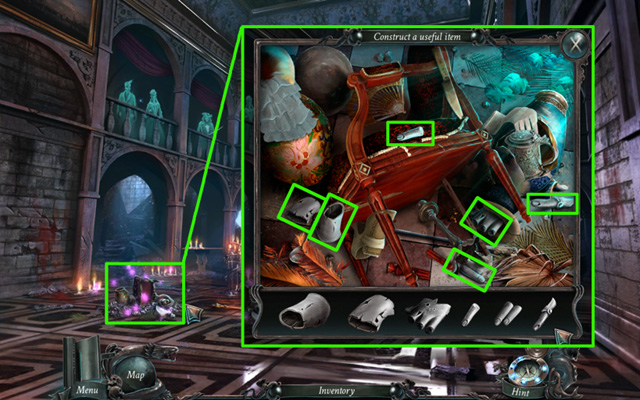
- Click the bucket hanging from the ceiling (D) to play the Fragmented Object Game (FROG); find all the elements pictured at the bottom to assemble the object (click the screenshot for the solution); receive a HAMMER.
- Open the door (F) and go forward to the Water Reserves.
- Zoom in on the second barrel on the right (G); pick up the GOLD STARFISH (H).
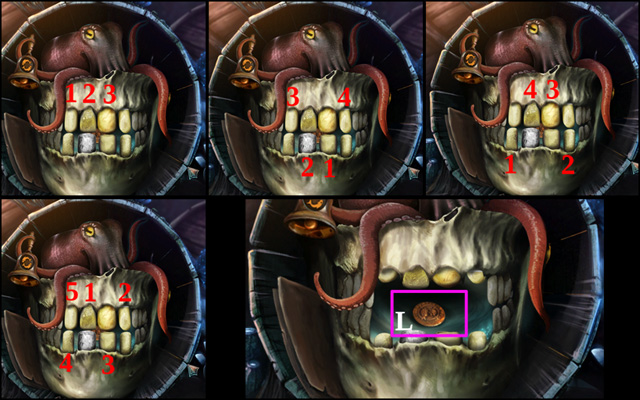
- Zoom in on the little barrel next to the stairs (I); use the HAMMER on the barrel boards (J) to reveal an octopus; click the DOUBLOON to activate the mini-game; repeat the moves of the octopus by clicking on the teeth in the same sequence; use the bell to reset the puzzle (click the screenshot for the solution); win the mini-game to receive a DOUBLOON (L).
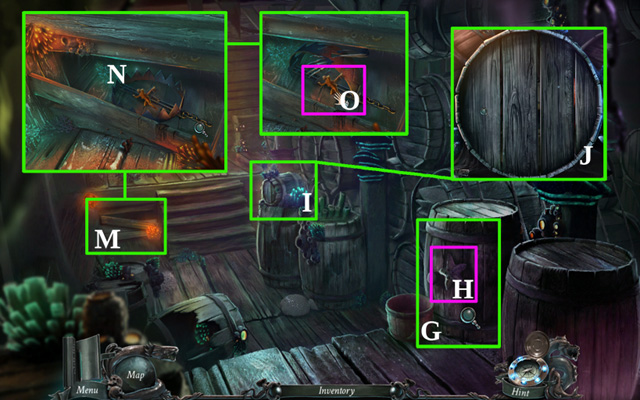
- Zoom in on the planks to the left of the stairs (M); click the planks to reveal the trap (N); use the SKELETON HAND on the trap; pick up the BRONZE KEY (O).
- Go forward into the Galley.
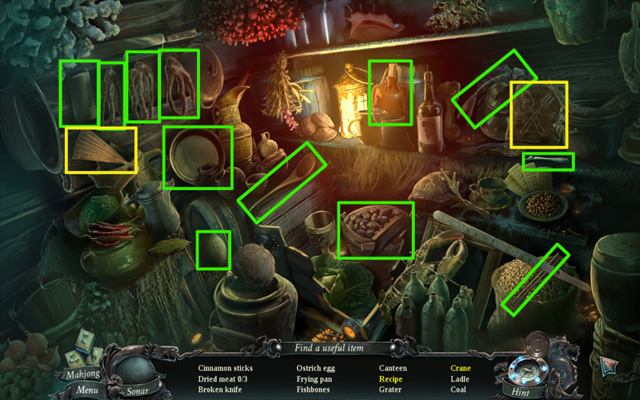
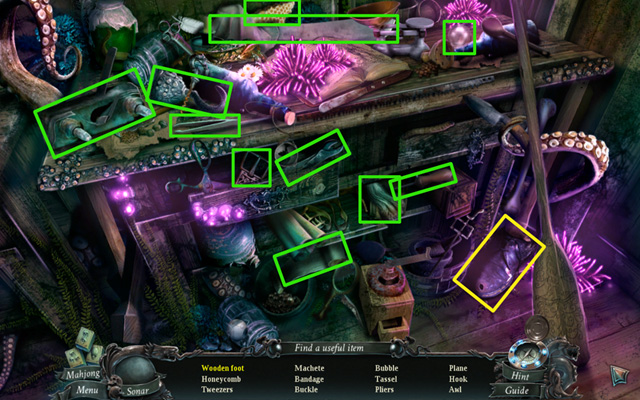
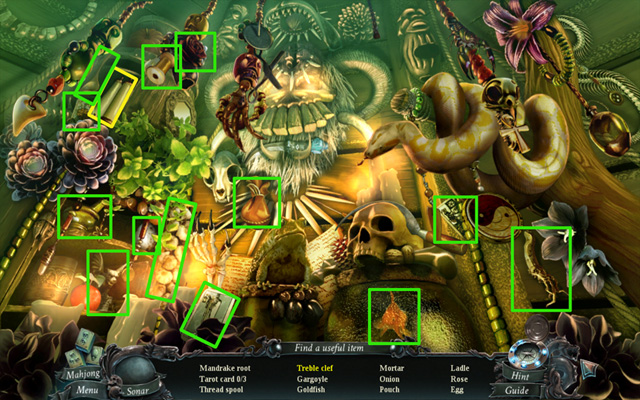
- Click the objects in the back of the room to play the HOS.
- Open the cookbook to find the recipe; unfold the fan to find the crane; collect all the items on the list to receive COAL.

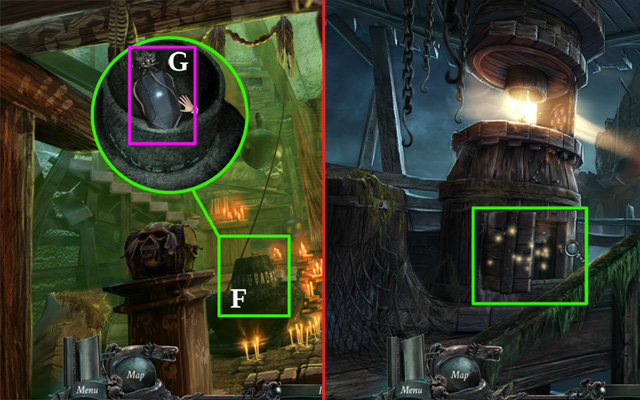
- Zoom in on the stove door (P); click the latch and then on the stove door; put the COAL in the stove (Q).
- Move the bucket standing on top of the hatch (R); open the hatch (S).
- Go down into the Hold (T).
- Click the door in the back of the room (U) to activate the mini-game; match each item to the appropriate hay indentation in the 2 crates (see screenshot for the solution).

- Go forward to the Ammunition Storage; pick up the CANNONBALL (V).
- Talk to the undead pirate (W).
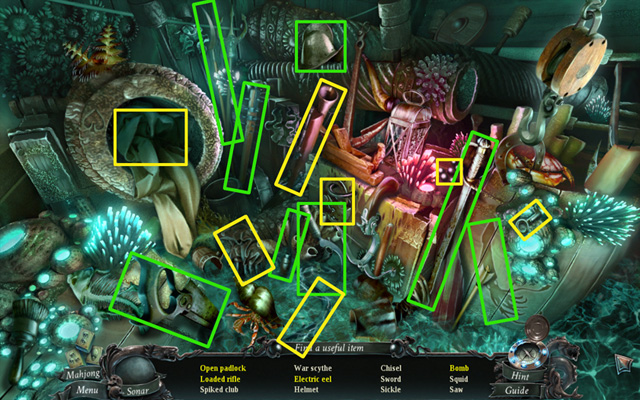
- Play the HOS; use the key on the padlock to pick up the open padlock; remove the covering from the porthole to find the shackles; use the gloves to catch the electric eel; insert a lead shot in the rifle to pick up a loaded rifle; pick up all remaining items on the list to receive a CHISEL.
- Go back five locations to the Passage; then forward to the Crew Quarters.
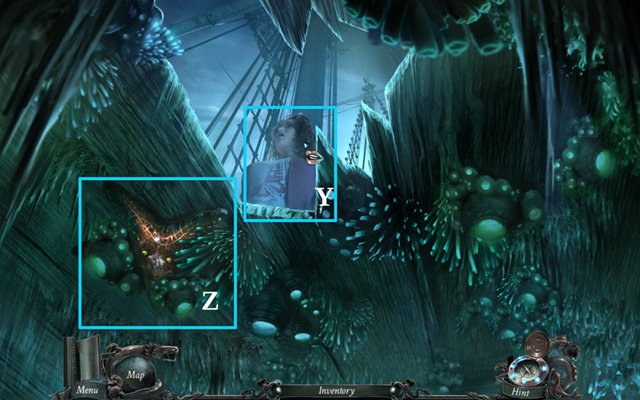
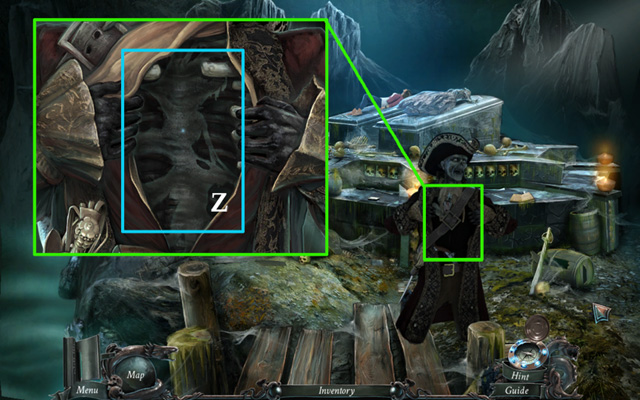
- Zoom in on the crack in the ceiling; talk to your daughter (Y).
- Place the chisel on the algae and barnacles (Z) holding the GOLD STARFISH; use the HAMMER on the CHISEL; free the GOLD STARFISH; pick it up.
- Go back.
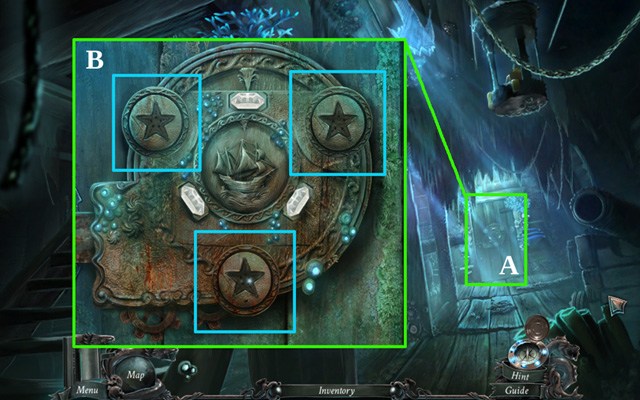
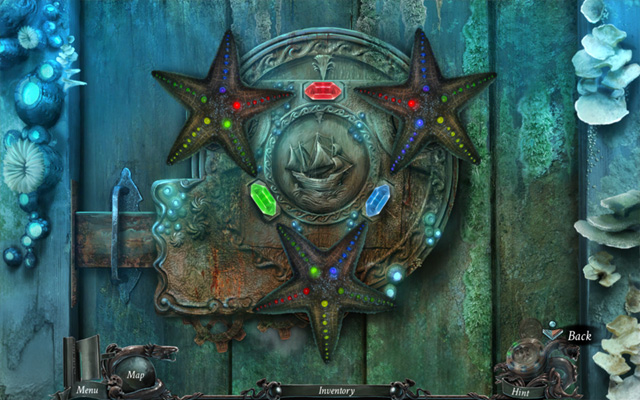
- Zoom in on the door (A); apply the 3 GOLD STARFISH from your Inventory to the free slots to activate the mini-game (B); rotate the starfish so that both halves of each gem are the same color and all three gems are a different color.
- To solve the puzzle, rotate the 2 upper starfish so that the upper gem turns red, then rotate the lower starfish so that the gem on the left turns green and the gem on the right turns blue.
- Go inside the Captain's Cabin.
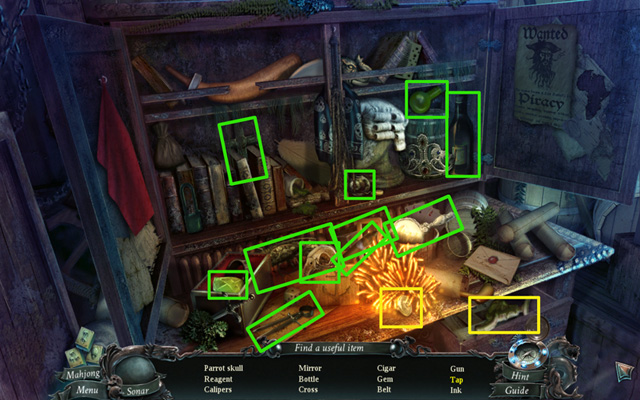
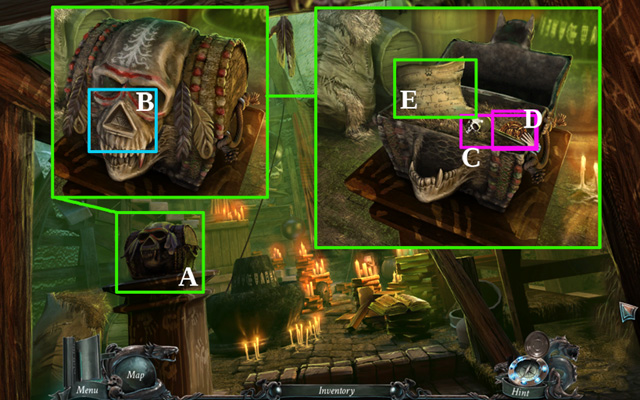
- Click the cupboard to activate the HOS; open the cabinet door to access some of the listed objects; pick up the knob and use it on the drawer; open it to find the TAP; collect all remaining items on the list.
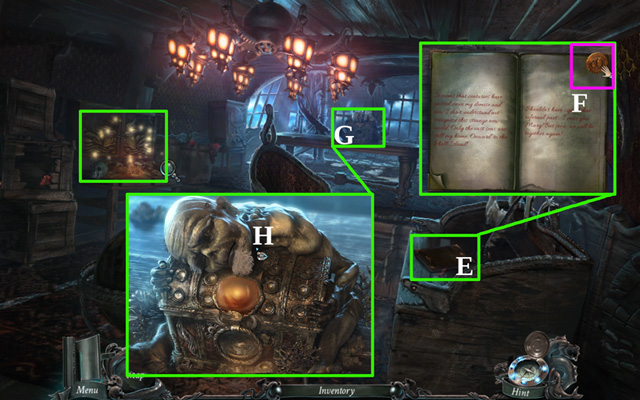
- Zoom in on the book lying on the cabinet (E); flip through the pages to find a DOUBLOON (F).
- Zoom in on the dwarf holding a chest (G) in the back of the room; speak to him and then give him a DOUBLOON to hear a story (H); then give him the second and third DOUBLOON.
- Go back 3 locations to the Passage; then go down to the Infirmary.
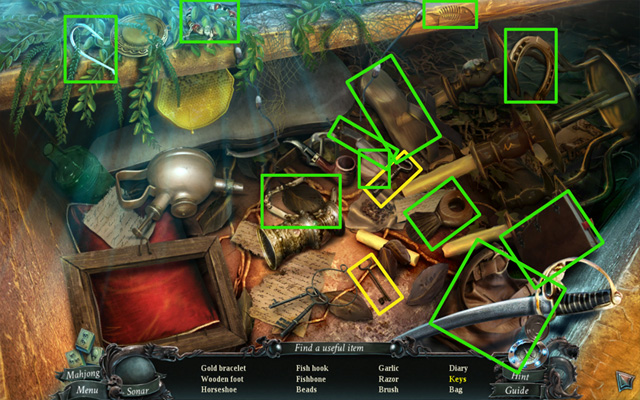
- Play the HOS; click the shoe to find a wooden foot; find the remaining items on the list to receive TWEEZERS.
- Go forward to the Water Reserves.
- Zoom in on the second barrel from the right (J); use the TAP on the barrel to receive a PLUG (K); open the TAP (L) and pick up a BUCKET OF WATER (M).
- Go forward to the Galley, down to the Hold and forward to the Ammunition storage.
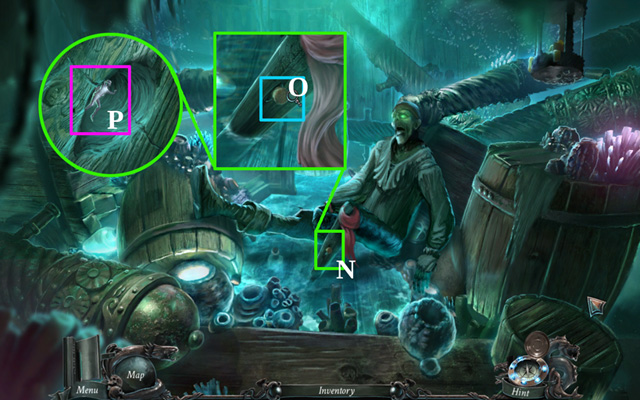
- Zoom in on the undead pirate's wooden leg (N); use the CORKSCREW to remove the cork (O).
- Examine the hole in the pirate's leg.
- Use the TWEEZERS to extract the SILVER KEY (P).
- Go back 2 locations to the Galley.
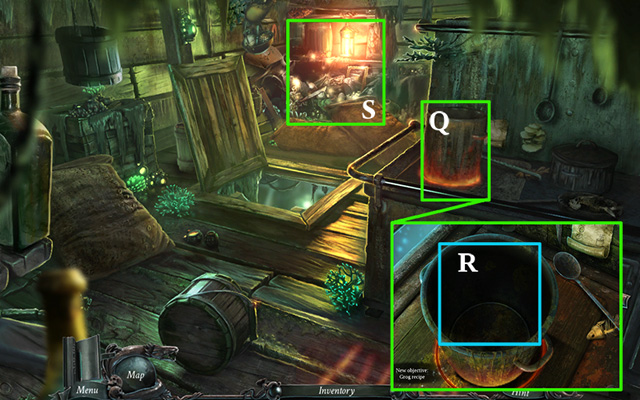
- Zoom into the pot (Q); use the BUCKET OF WATER on the pot (R).
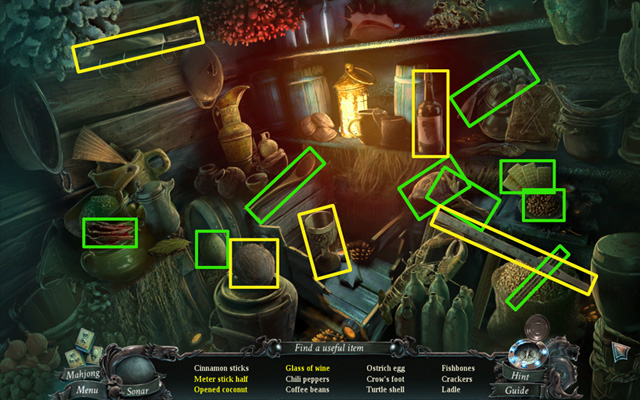
- Play the HOS (S); give the measuring stick to the lobster to get a half meter stick; pour wine into the glass to pick up a glass of wine; take the machete down from the wall on the left and use it to cut the coconut open; collect the remaining items on the list to receive CRACKERS.
- Go back twice to the Infirmary and then up to the Passage.
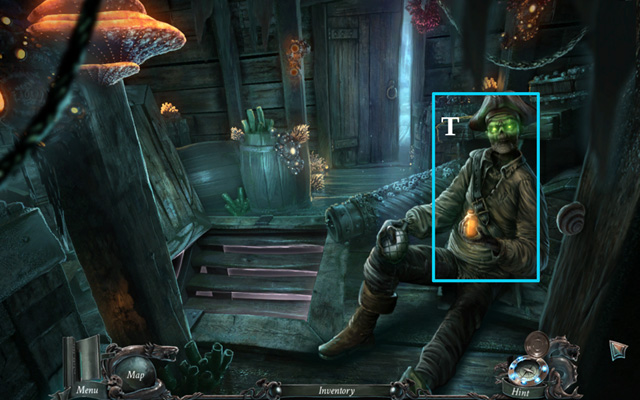
- Talk to the undead pirate (T); he'll give you an EMPTY BOTTLE.
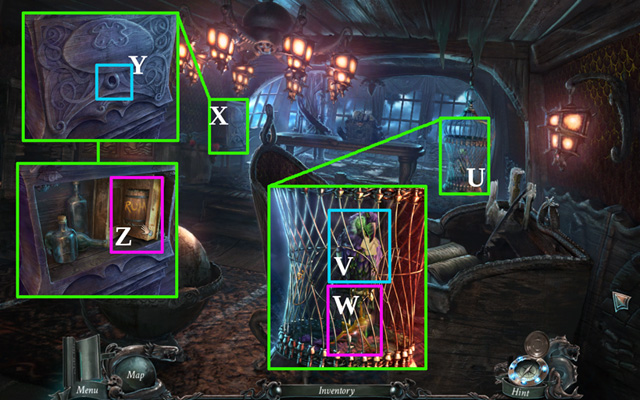
- Go forward 2 locations to the Captain's Cabin.
- Zoom in on the cage (U); open the cage door; give the CRACKERS to the parrot (V); pick up the GOLDEN KEY (W).
- Zoom in on the armoire in the back of the room (X); insert the PLUG into the hole (Y); click the armoire doors to open them; open the book to pick up the BARREL OF RUM (Z).
- Go back.
- Zoom in on the crack in the ceiling.
- Go back.
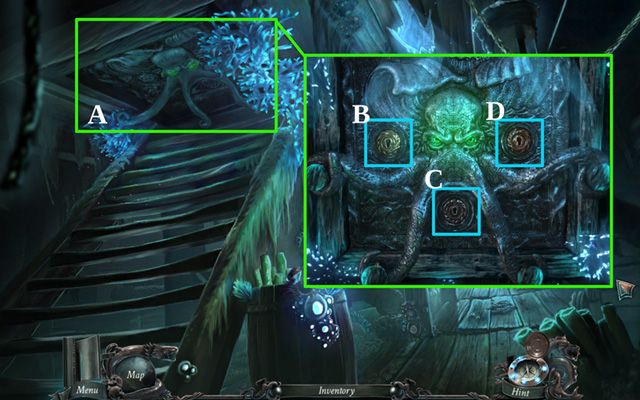
- Zoom in on the hatch at the top of the stairs (A); insert the GOLDEN KEY into the upper left keyhole (B); insert the SILVER KEY into the middle keyhole (C); insert the BRONZE KEY in the upper right keyhole (D).
- Go up to the Deck (A).
Chapter 3: Shores of Skull Island
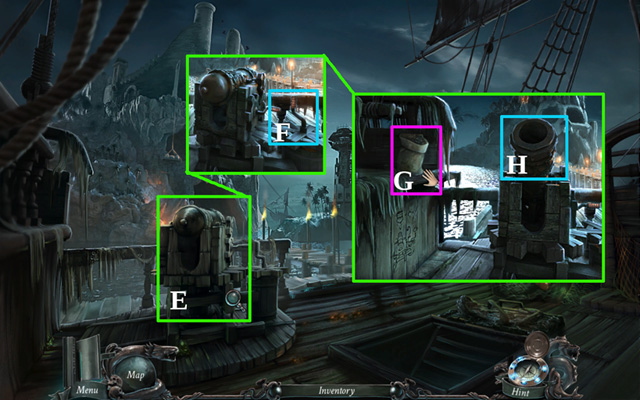
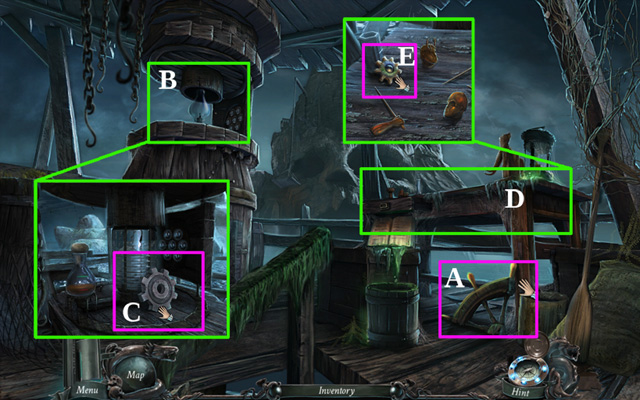
- Zoom in on the cannon (E); click the handle next to the cannon (F); pick up the GUN POWDER (G); put it inside the cannon; load the CANNONBALL from your Inventory into the cannon (H).
- Go forward to the Pier.
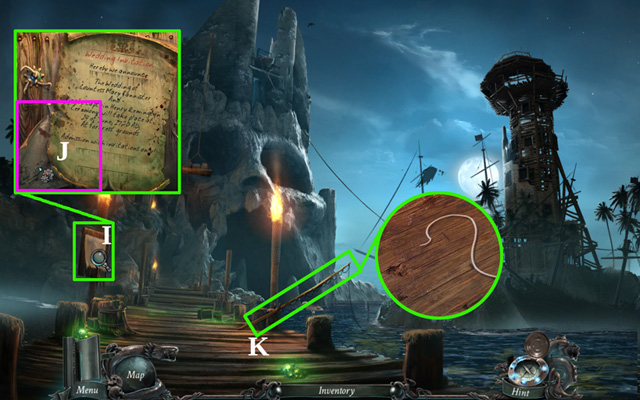
- Zoom in on the message board (I) and pick up the ISLAND MAP (J).
- Examine the fishing rod (K); a hook is missing.

- Go forward.
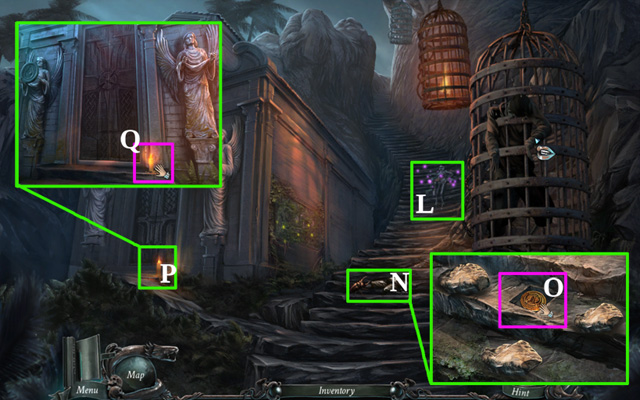
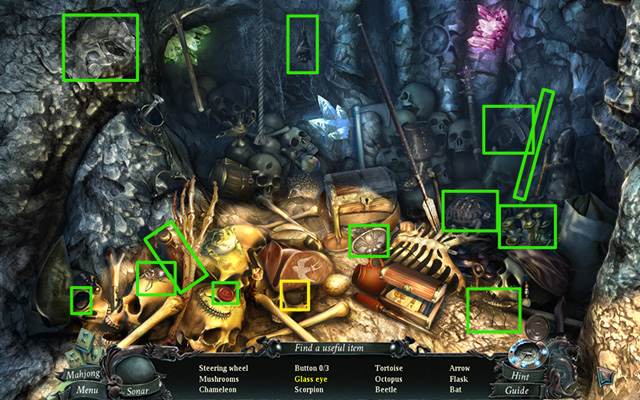
- Examine the corpse lying on the stairs to activate the FROG (L); find all the elements pictured at the bottom to assemble the object (click the screenshot for the solution); receive BAIT.
- Zoom in on the stairs (N); click the beetle to get rid of it; click the stones to move them away; pick up the DOUBLOON (O).
- Zoom in on the Crypt (P); pick up the CANDLE (Q).
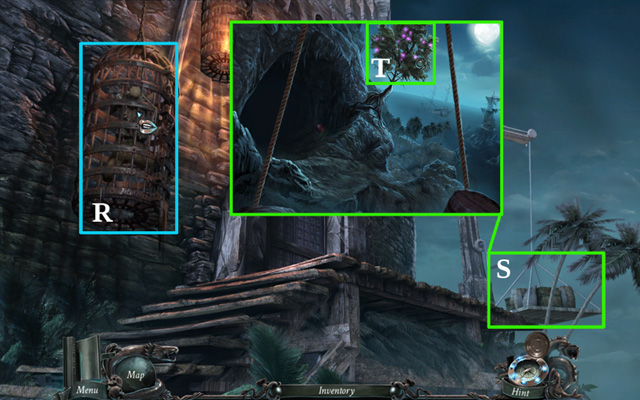
- Go up the stairs; talk to the undead pirate in the cage (R); receive a KNIFE.
- Click the platform hanging from the crane (S) to go down to the Eyehole.
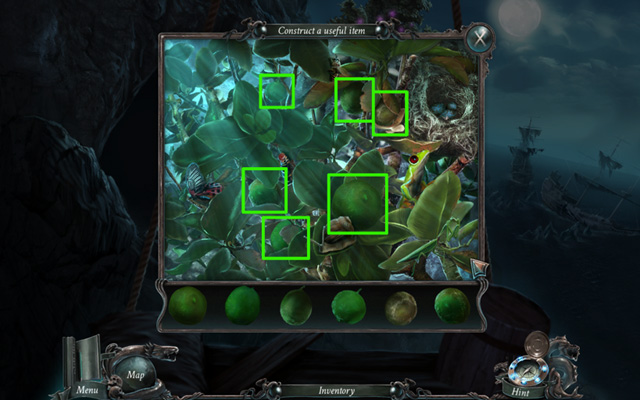
- Click the tree (T) to activate the FROG; find all the elements pictured at the bottom to assemble the object (click the screenshot for the solution); receive LIMES.
- Click the eyes inside the cave.
- Go back 4 locations to the Deck.
- Zoom in on the rammer entangled in the ropes on the railing (U); use the KNIFE on the ropes and pick up the RAMMER (V).
- Zoom in on the cannon (W); use the RAMMER on it (X); click the handle next to the cannon to rotate the cannon (Y); click the handle again; use the CANDLE to light up the fuse on the cannon (Z).
- Go forward 2 locations and up the stairs to the Wall; watch a cutscene.
- Go into the Yard; click the pirate to watch a cutscene.
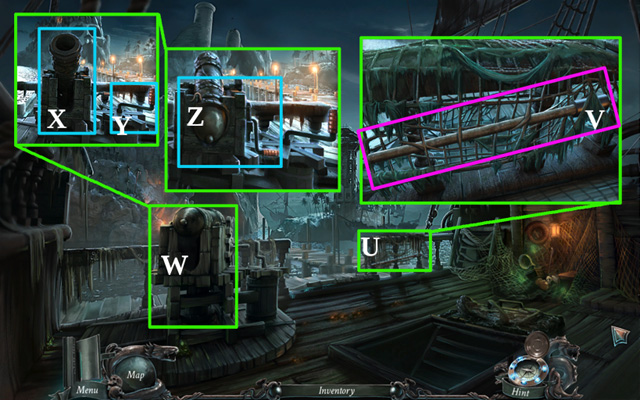
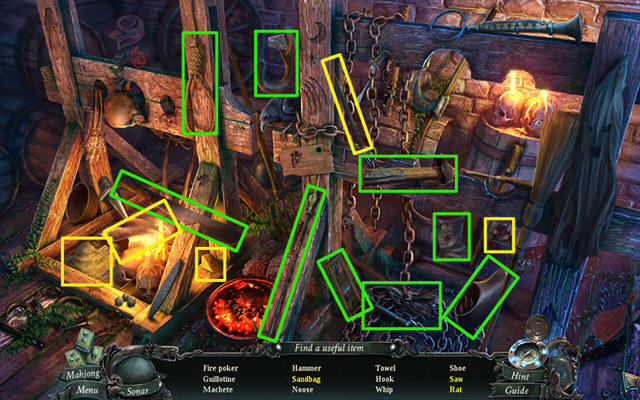
- Play the HOS; use the broom on the pile of sand to get a bag of sand; attach the saw blade to the saw to pick it up; grab the cheese and give it to the rat; collect the remaining items on the list to receive a TILE.
- Go back four times to the Deck of the ship.
- Go down to the Crew Quarters and forward to the Captain's Cabin.
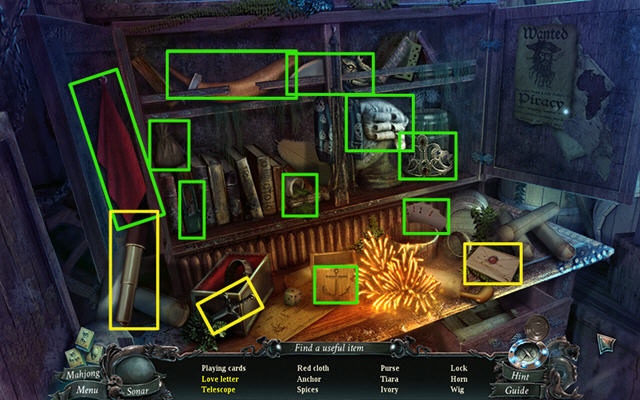
- Play the HOS; collect the telescope first; then open the cabinet door to access some of the listed objects; use the letter opener on the envelope to pick up the love letter; collect the remaining items on the list to receive SPICES.
- Zoom in on the dwarf holding a chest in the back of the room (C); give the DOUBLOON to the dwarf and watch a cutscene (D).
- Go back 3 locations; go down to the Infirmary, and then go forward three locations to the Galley.
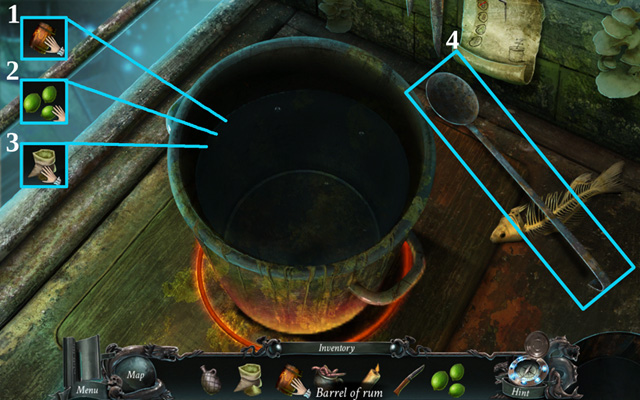
- Zoom in on the pot on the stove; first add RUM (1), then LIMES (2), and finally SPICES (3) to the pot; pick up the ladle and stir the mixture (4); use the EMPTY BOTTLE from your Inventory on the pot to receive a BOTTLE OF GROG.
- Go back 2 locations and up to the Passage.
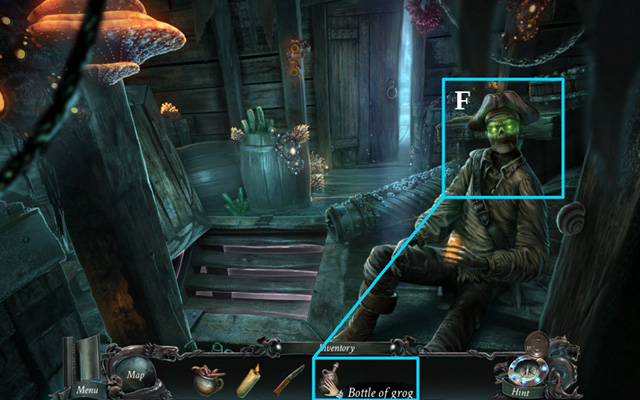
- Give the BOTTLE OF GROG to the undead pirate to receive the CHEMICAL bottle (F).
- Go forward and up to the Deck.
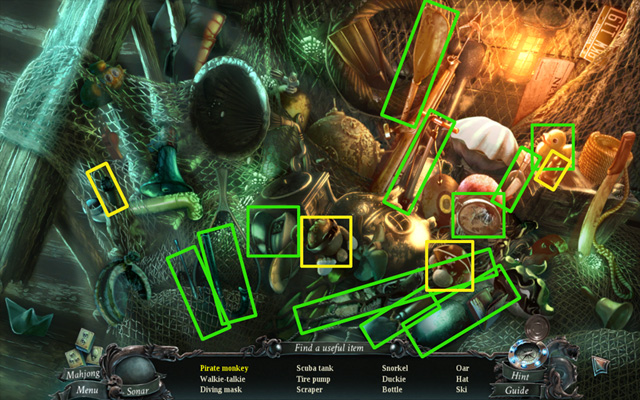
- Play the HOS; add the pirate monkey head, a wooden leg, and a paw with a hook to the doll's body to pick up a Fixed Doll; collect the remaining items on the list to receive a SCRAPER.
- Go forward 2 locations.
- Examine the relief (H); use the SCRAPER 3 times; place the TILE in the free slot (I); swap the tiles to restore the relief's image (click the screenshot for the solution); collect the FIRE DISC (J).
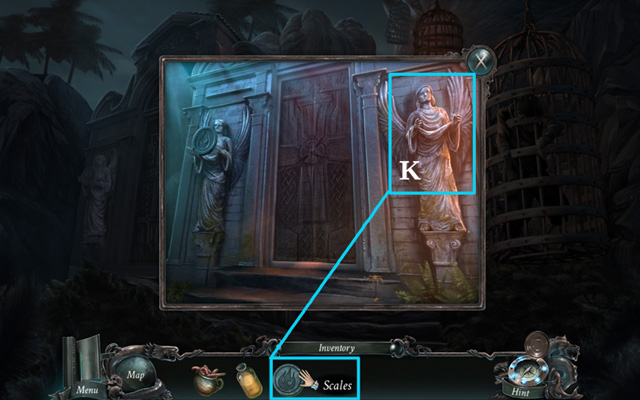
- Zoom in on the Crypt; place the FIRE DISC in the hands of the right statue (K).
- Go inside the Crypt.
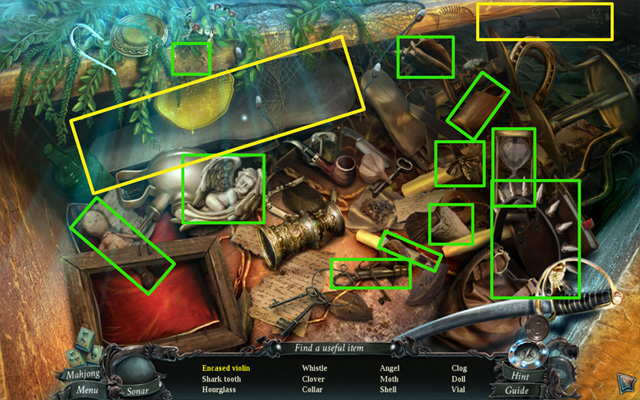
- Play the HOS; open the violin case and place the violin inside; collect the remaining items on the list to receive a VIAL.
- Pick up the IRON ROD (M).
- Go back 3 locations and down to the Crew Quarters; then go back to the Passage and down to the Infirmary.


- Zoom in on the chemical set (N); place the CHEMICAL bottle between the red and blue bottles (O); place the VIAL in the chemical set to activate the mini-game; open the valve (1); open the kettle lid (2); pour the yellow chemical into the kettle (3); close the lid; turn the grate (4); pour the blue chemical into the beaker (5); click the retort stand (6); pour the red chemical into the retort and uncork it (7); pick up a VIAL OF ACID (P).
- Go forward 2 locations and down to the Hold.
Chapter 4: Visit in the Fortress
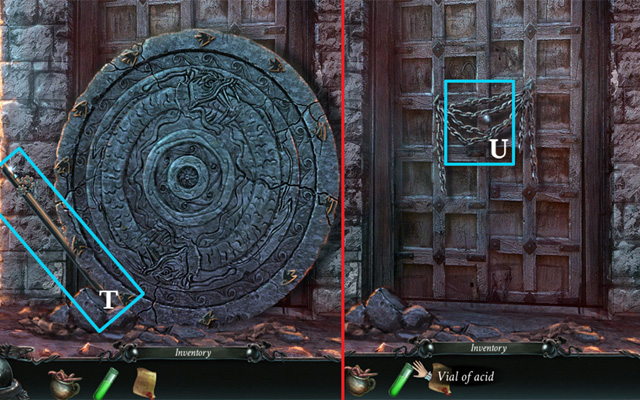
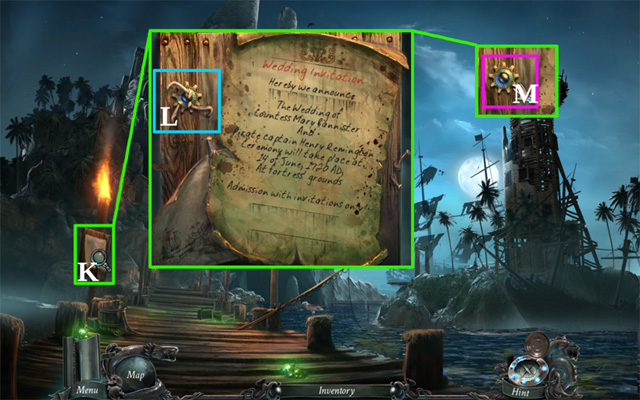
- Zoom in on the cupboard (Q); open the cupboard doors; use the VIAL OF ACID on the chain (R); open the cage door; pick up the WEDDING INVITATION (S).
- Go back 3 locations and up to the Passage; then go forward to the Crew Quarters and up to the Deck.
- Go forward 2 locations, then up the stairs and into the Yard.
- Examine the stone wheel; place the IRON ROD between the wheel and the stones (T); click the IRON ROD 3 times to remove the stone wheel; use the VIAL OF ACID on the chain (U).
- Go into the Lobby; pick up the FISH BOWL (W).
- Go back.

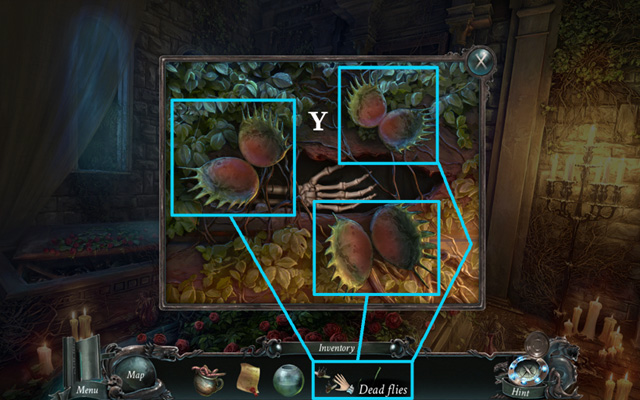
- Play the HOS; use the flyswatter on the fly to pick up a dead fly; collect the remaining items on the list to receive DEAD FLIES.
- Go back 2 locations and into the Crypt.
- Play the HOS; attach the keys to the key ring; collect the remaining items on the list to receive a FISH HOOK.
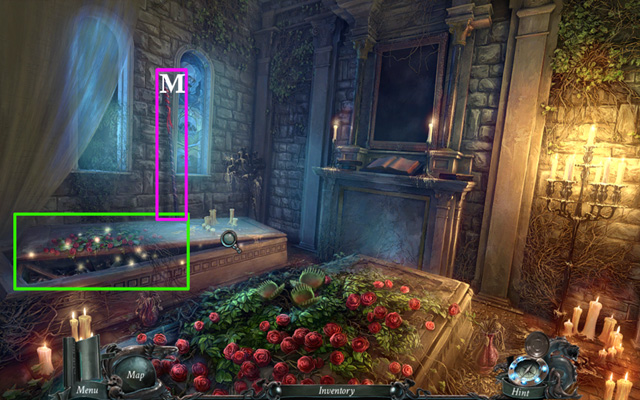
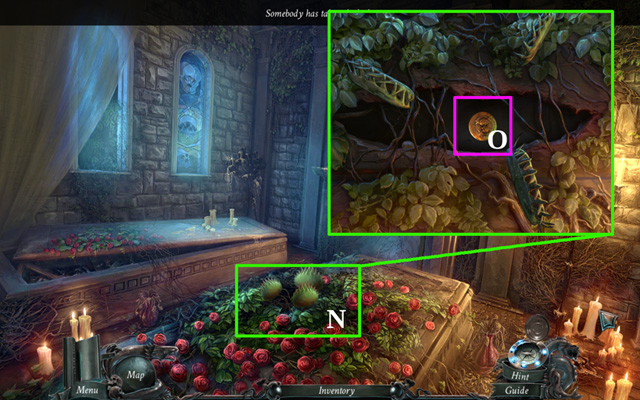
- Zoom in on the grave with roses on it; give the DEAD FLIES to the carnivorous plants (Y).
- Go back 3 locations.
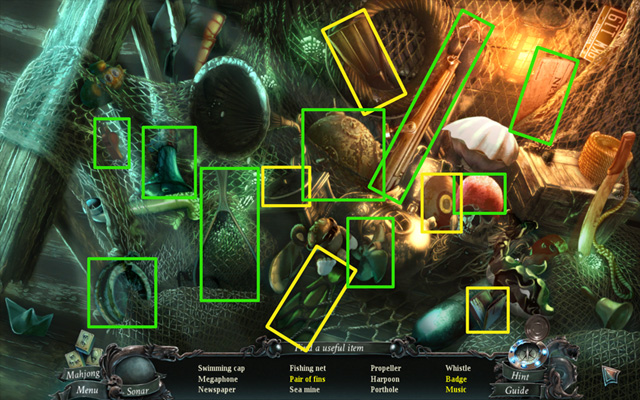
- Play the HOS on the Deck; pick up the fin lying in the flotation ring and attach it near the fin at the bottom of the screen; put the record on the gramophone, click the notes to collect the music; open the wallet to find the badge; collect the remaining items on the list to receive a FISHING NET.
- Go forward to the Pier.
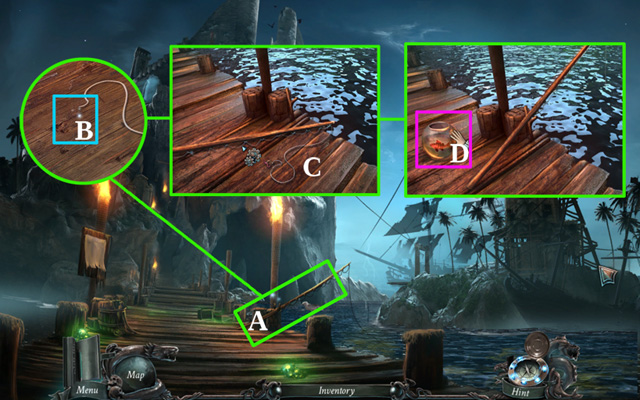
- Zoom twice on the fishing rod (A); attach the FISH HOOK to the fishing rod (B); place the BAIT on the hook; click the fishing rod to start fishing (C); place the FISH BOWL to the left of the fishing rod; use the FISHING NET on the fish; pick up the FISH in a fish bowl (D).
- Go forward, up the stairs, into the Yard, and then into the Lobby.
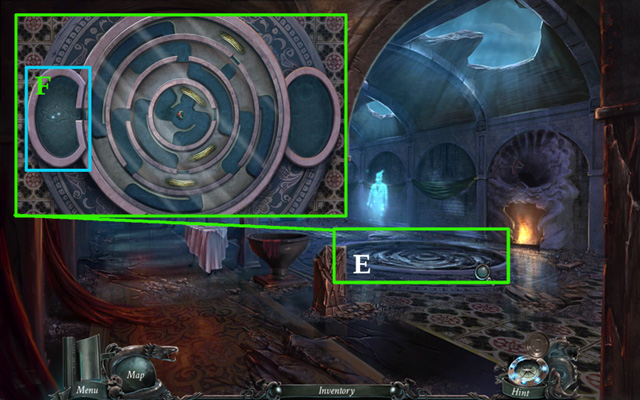
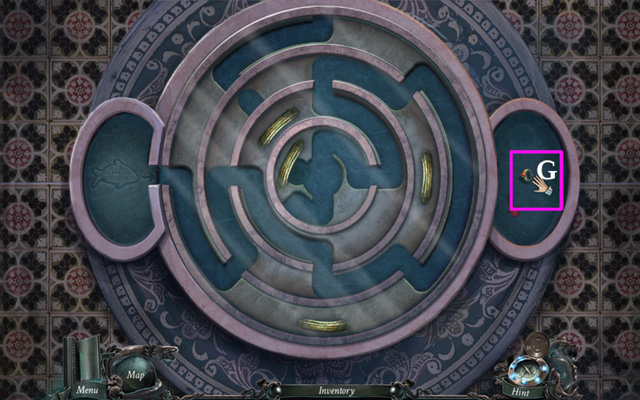
- Examine the circle in the middle of the room (E); place the FISH in the pool to the left side of the maze (F); arrange the rings to create a path from the pool with the fish to the center of the maze (click the screenshot for the solution); pick up the RING (G).
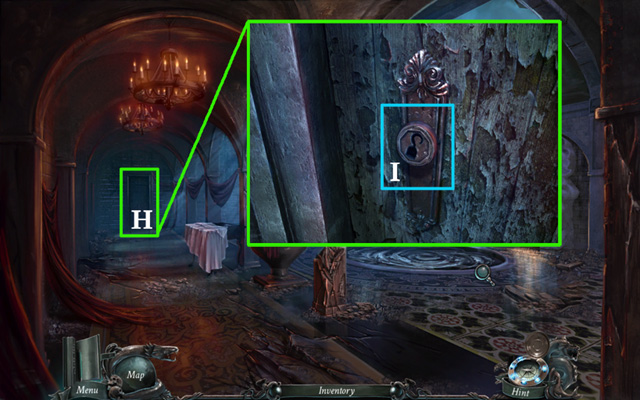
- Take a closer look at the door on the left (H); use the RING on the door lock (I); click the door to open it.

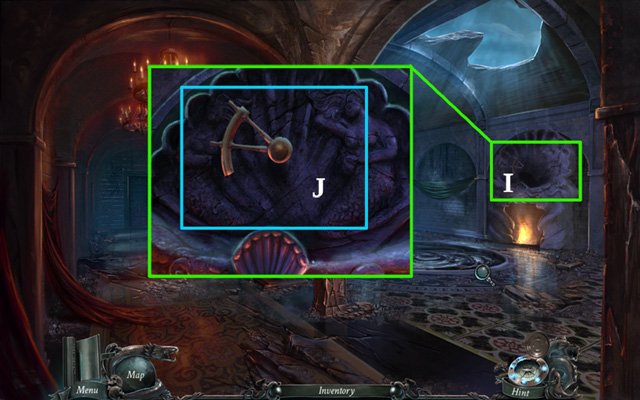
- Go through the door; zoom in on the door on the left (J); a cutscene will appear.
- Go back.
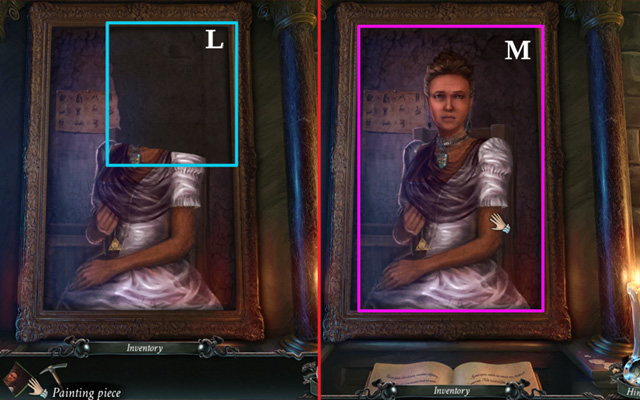
- Examine the docked gondola (K); pick up a PORTRAIT PIECE (L).
- Go back 4 locations and down the stairs.
- Go inside the Crypt.
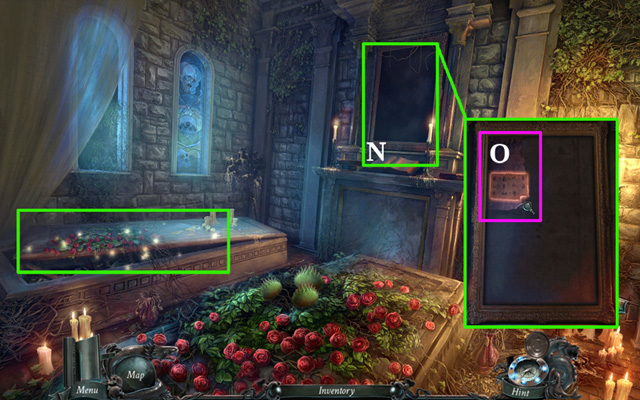
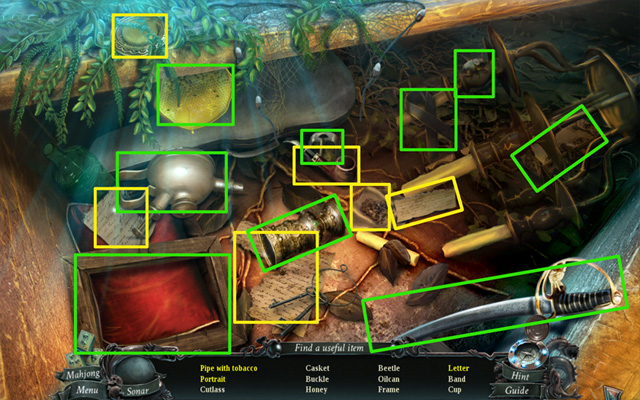
- Play the HOS; put the tobacco inside the pipe; attach the two mobile letter pieces to the stationary piece; open the brooch to find the portrait; collect the remaining items on the list to receive the OILCAN.
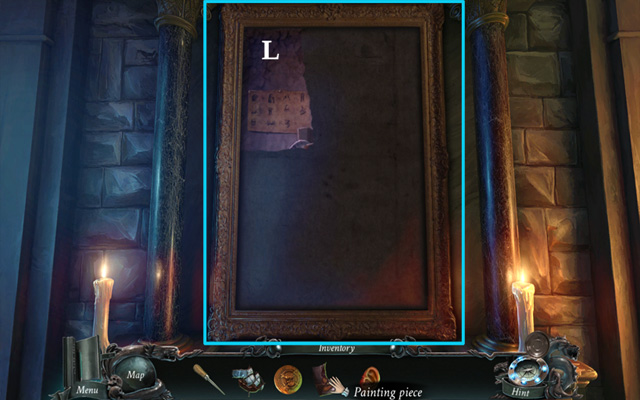
- Zoom in on the empty picture frame (N); place the PORTRAIT PIECE inside; watch a cutscene; click the painting piece in the frame to receive the MAP LEGEND (O).
Chapter 5: The Lighthouse
- Go back to the Lobby and through the left door to the Terrace.
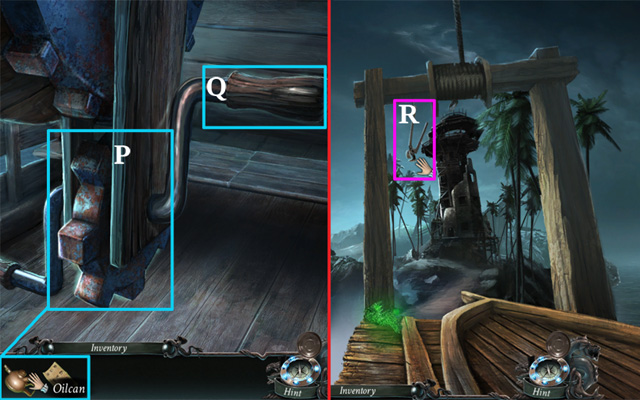
- Zoom in on the docked gondola; use the OILCAN on the gondola's mechanism (P); click the mechanism to ride the gondola (Q).
- Pick up the PLIERS (R).
- Go forward toward the Lighthouse.
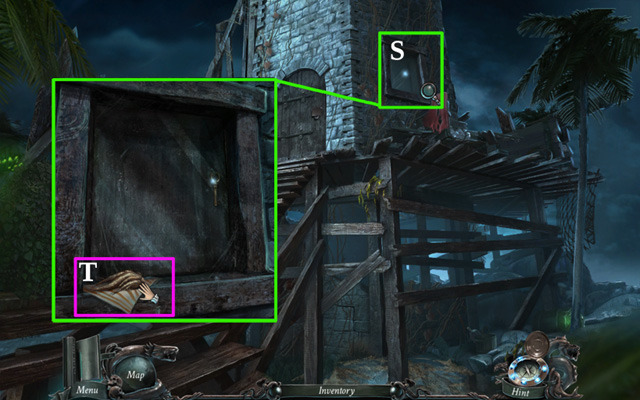
- Examine the window (S).
- Click the piece of cloth; pick up the SMALL ROOT (T).
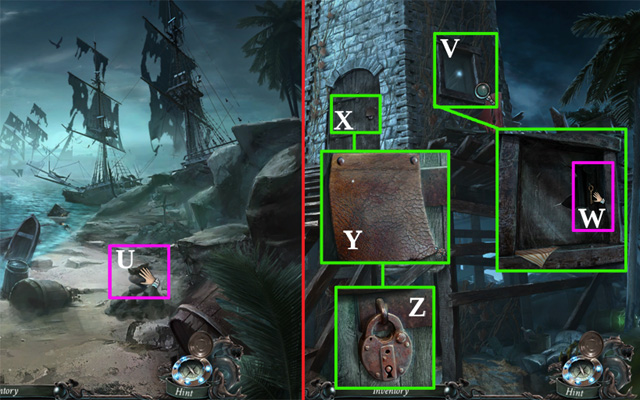
- Go back to the Landing and left toward the Shipwrecks; pick up a STONE from the pile of rocks (U).
- Go back and then right toward the Lighthouse.
- Zoom in on the window (V); use the STONE to break it; pick up the LIGHTHOUSE KEY (W).
- Zoom in on the door (X); click the piece of leather to uncover a padlock (Y); use the LIGHTHOUSE KEY on the padlock; click it twice to open the door (Z).
- Go inside the Lighthouse; pick up a STEERING WHEEL PART (1/3) (A).
- Zoom in on the lighthouse lamp (B); pick up the COG (C).
- Examine the table (D); pick up a MECHANICAL EYE (1/2) (E).
- Open the door of the lighthouse mechanism.
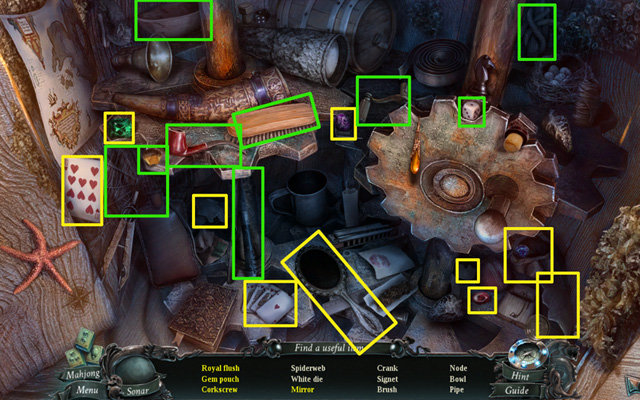
- Play the HOS; collect 3 mirror shards; click the pen-knife to collect the corkscrew; add the 10 of Hearts card to the poker hand to collect the royal flush; collect 3 gems and put them in the pouch; collect all the remaining items on the list to receive the CRANK HANDLE.
- Leave the Lighthouse and then go back to the Landing.
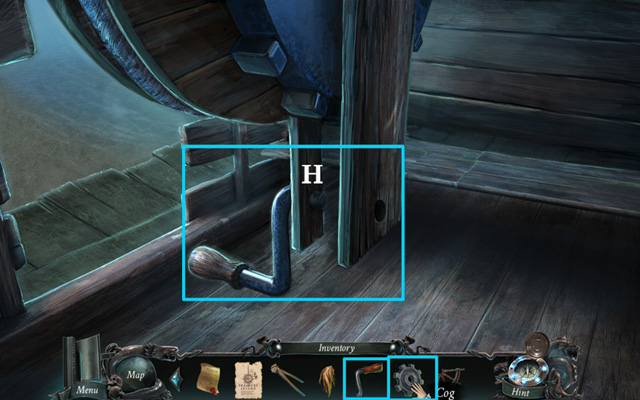
- Zoom in on the gondola; click the mechanism; place the COG and the CRANK HANDLE in the gondola mechanism (H); click on it.
- Go back to the Lobby.
- Zoom in on the steering wheel (I) and place the STEERING WHEEL PART in it (J).
- Go back 2 locations, down the stairs, and back to the Pier.
- Zoom in on the message board (K); use the PLIERS to remove the 3 nails holding the MECHANICAL EYE (2/2) (L) and collect it (M).


- Return to the Lobby.
- Zoom in on the door on the right (N); insert both MECHANICAL EYES into the face's eyeholes to activate the mini-game (O,P); place the gears on the bolts so that each one is spinning (click the screenshot for the solution).
- Place the WEDDING INVITATION in the door mechanism's mouth (Q).
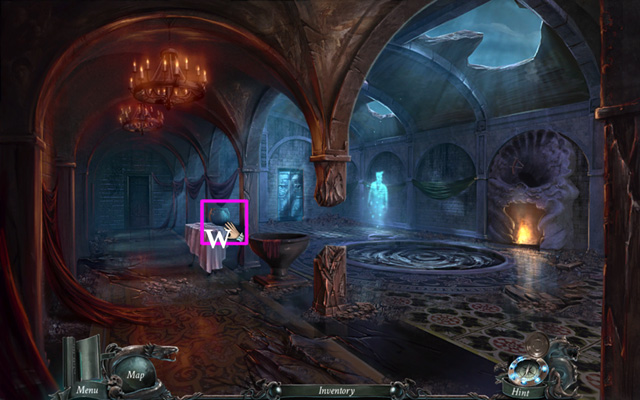
- Go inside the Ballroom; watch a cutscene.
- Click the turned-over chair to activate the FROG; find all the elements pictured at the bottom to assemble the object (click the screenshot for the solution); receive the STONE HAND.
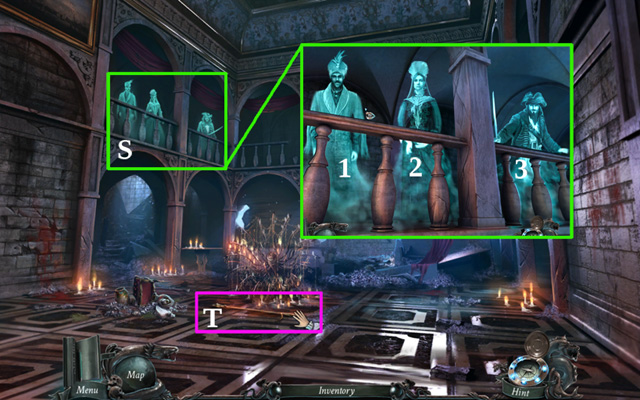
- Zoom in on the ghosts on the balcony (S); click each one to talk to him/her; a cutscene will appear.
- Pick up the BOAT HOOK lying near the fallen chandelier (T).
- Go back to the Lobby.
- Go through the door on the left to the Terrace; go forward to the Landing.
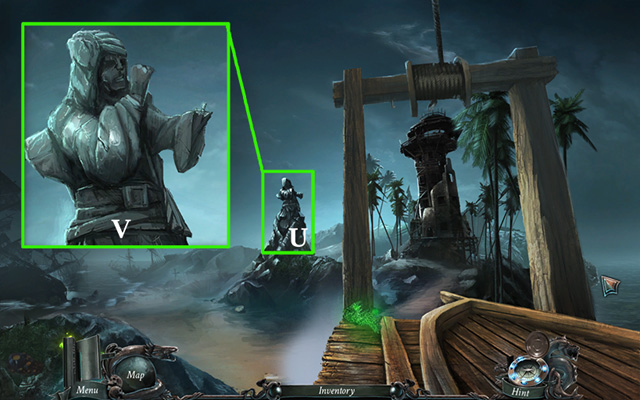
- Zoom in on the stone statue (U) and apply the STONE HAND to it (V).
- Go left to the Shipwrecks.
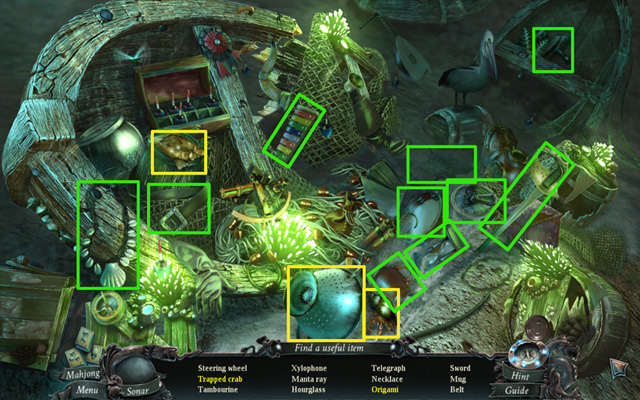
- Play the HOS; click the piece of paper 6 times to get the origami; click the crab and then the wooden stick to get the trapped crab; collect all the items on the list to receive a STEERING WHEEL PART (2/3).
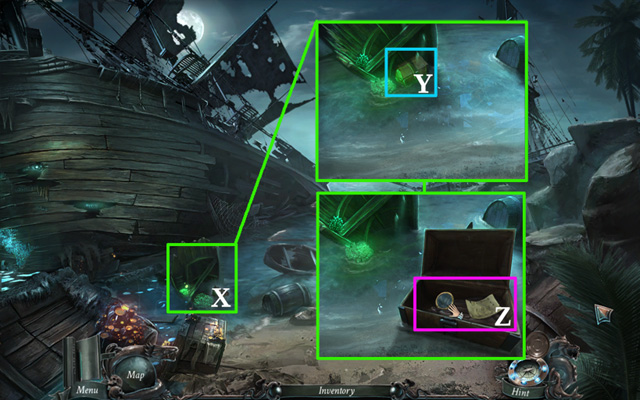
- Zoom in on the floating piece of wood with the glowing green algae (X); use the BOAT HOOK on the chest; open the chest (Y); pick up the LENS and the TORN PAGE (Z).
- Go back and then right to the Lighthouse.
- Go inside the Lighthouse.
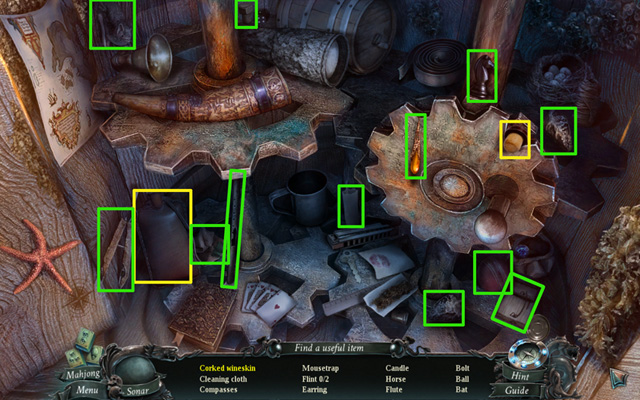
- Play the HOS; use the cork on the wineskin; collect all the items on the list to receive FLINT.
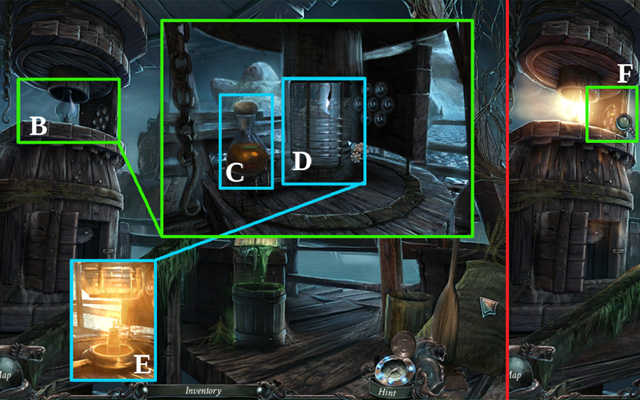
- Zoom in on the lighthouse lamp (B).
- Uncork the flask and use the OILCAN on it (C); slide the glass chimney up (D); use the FLINT to light the lamp; click the chimney again to slide it down (E); click the lenses (F); place the LENS in the empty slot to activate the mini-game; rotate the lenses to restore the image (click the screenshot for the solution).
- Return to the Landing and use the gondola to return to the main island; go all the way back to the Wall and then down to the Eyehole.
- Click the eyes inside the cave.
- Play the HOS; click the eye patch to get the glass eye; collect the remaining items on the list to receive a STEERING WHEEL PART (3/3).
Chapter 6: Below the Fortress
- Go back to the Wall and forward 2 locations to the Lobby; apply the remaining STEERING WHEEL PARTS from your Inventory to the steering wheel on the wall (H); rotate the wheel to open the secret door (I).
- Go inside the Hideout.
- Play the HOS; find 3 candles and put them in the candlestick to collect it collect the remaining items on the list to receive a SHOVEL.
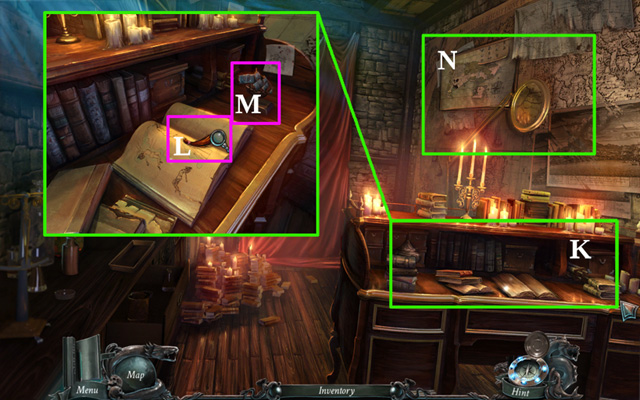
- Zoom in on the desk on the right (K); pick up the MODEL SHIP (L) and a LOCK OF HAIR (M).
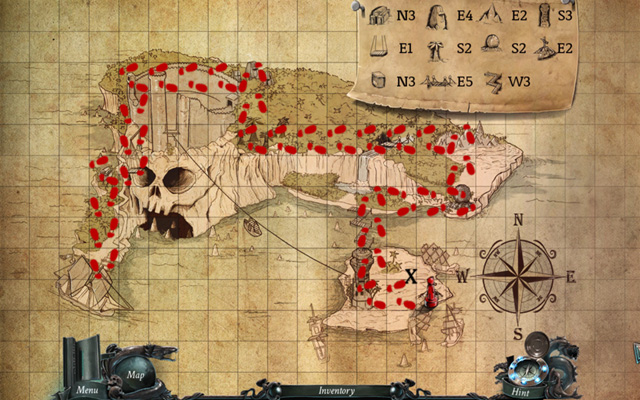
- Examine the maps on the wall (N); place the MAP LEGEND on the map; move the red figure across the map; the legend in the upper-left corner indicates your next move; the number tells you how many squares you have to travel, and the letter indicates the direction in which you are supposed to move.
- N stands for North, S for South, E for East, W for West; look at the compass rose in the lower-right corner to find out where these directions are on the map; solve the puzzle to watch a cutscene.
- Go back to the Lobby, then back two locations to the Wall, and down to the Eyehole.
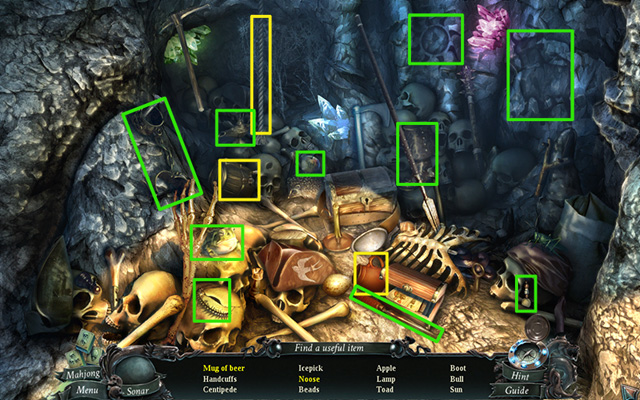
- Play the HOS; hold the mug up to the beer barrel; click the rope to form a noose; collect the remaining items on the list to receive a METAL SPIKE.
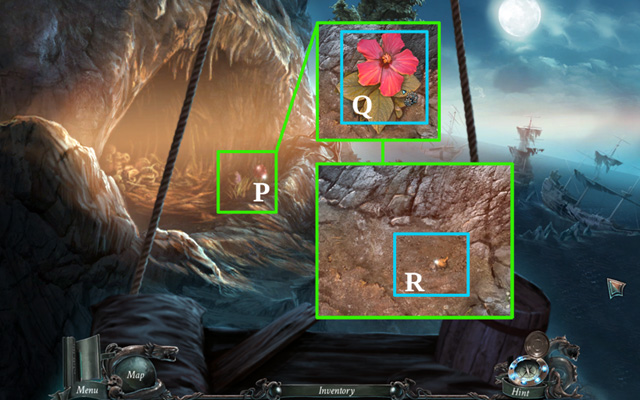
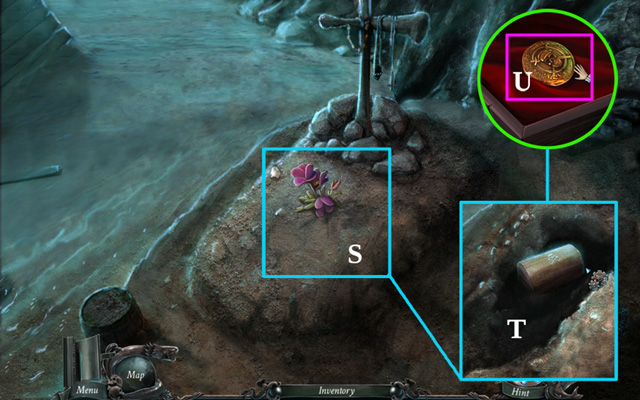
- Zoom in on the flower in the cave (P); pluck it (Q); use the SHOVEL on the ground beneath it (R); pick up the DELICATE ROOT.
- Return to the Terrace and use the gondola to get to the Landing; then go left to the Shipwrecks.
- Zoom in on the grave in the back; pick up the JATROPHA FLOWER (S); use the SHOVEL on the grave twice (T); open the chest; pick up a DOUBLOON (U).
- Go back to the Landing; use the gondola to get to the Terrace and then the Lobby.
- Go inside the Hideout.
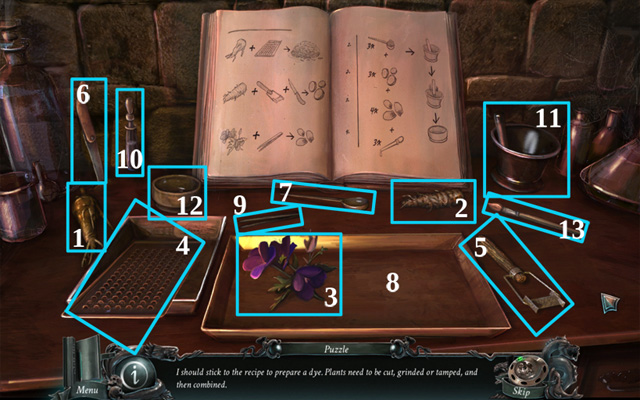
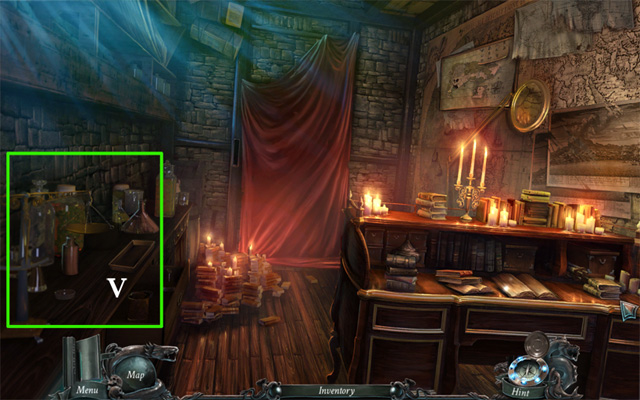
- Zoom in on the table on the left (V); place the SMALL ROOT (1), DELICATE ROOT (2), and the JATROPHA FLOWER (3) on the table; grate the small root using the grater (4).
- Peel the delicate root using the peeler (5) and then chop the peeled root with a knife (6); use the measuring spoon to add 3 spoonfuls of grated Small Root into the mortar (7); add 3 slices of Delicate Root (8); use the tweezers to tear petals off the Jatropha flower and add 4 petals to the mortar (9).
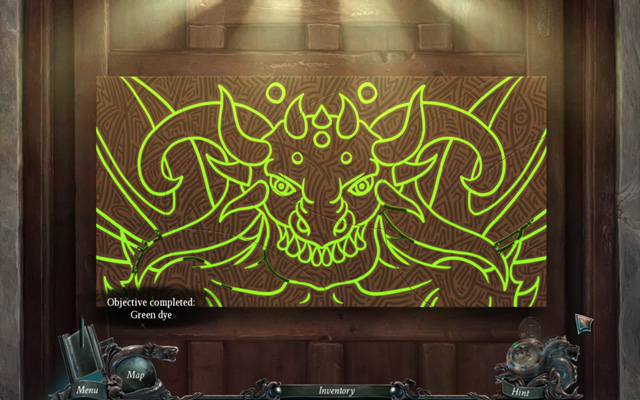
- Use the dropper to add 3 drops of liquid to the mortar (10); grind the mixture (11); pick up the mortar and pour the mixture into the bowl (12); put a brush inside the bowl (13); pick up the GREEN DYE..
- Go back to the Lobby and take the left door to the Terrace.
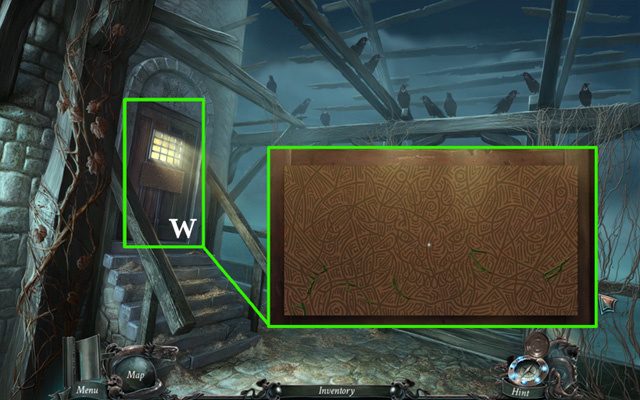
- Zoom in on the door on the left (W); use the GREEN DYE on the painting to activate the mini-game; click the pieces of the painting until they form the shape of the guardian (click the screenshot for the solution).
- Go inside the Tower.
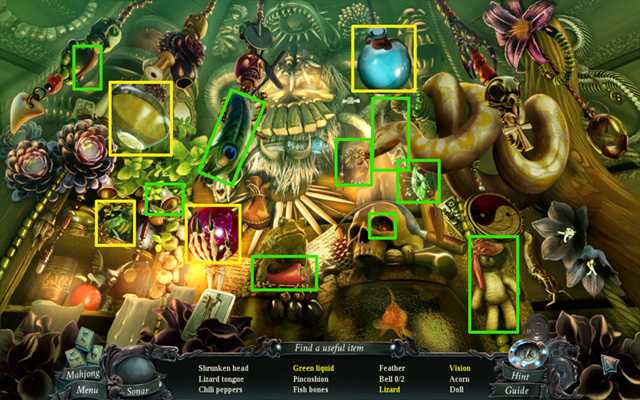
- Play the HOS; pick up the blue bottle and use on the yellow one to create a green liquid; click the glass sphere to light it up and collect the vision; click the lizard, it will show its collar, then pick it up; collect the remaining items on the list to receive a LIZARD TONGUE.
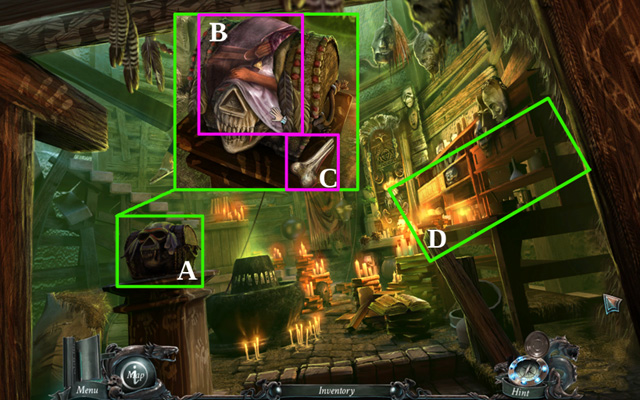
- Zoom in on the chest on the left (A); pick up the PORTRAIT PIECE (B) and the BONE LEVER (C).
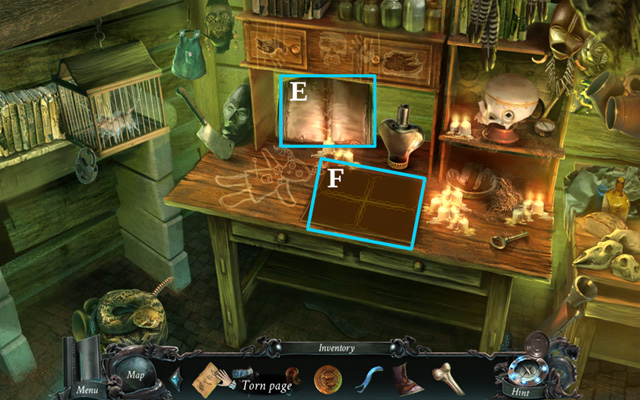
- Examine the cabinet on the right (D); insert the TORN PAGE in the book (E); click the book; place the LIZARD TONGUE and the LOCK OF HAIR on the table (F).
- Go back 3 times and into the Hideout.
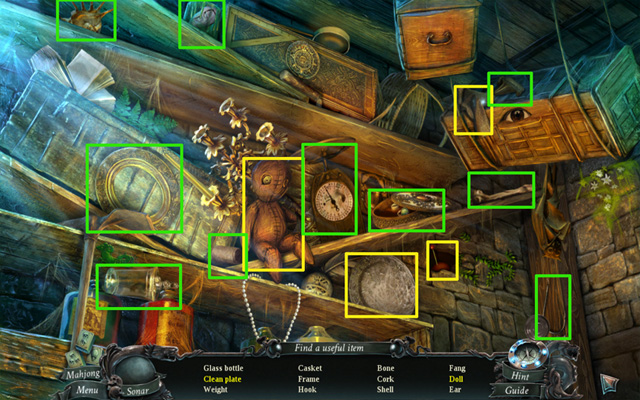
- Play the HOS; pick up the cloth and clean the plate; pick up the pin and stick it in the doll to collect the voodoo doll; collect the remaining items on the list to receive an EAR.
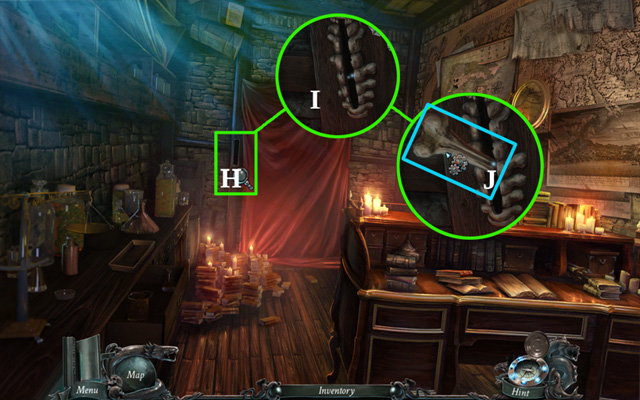
- Zoom in on an empty slot next to the red curtain (H); put the BONE LEVER in the slot (I); click the bone lever (J).
- Zoom in on an empty slot on the other side of the painting (K).
- Go 5 times back and into the Crypt.
- Zoom in on the painting frame; apply the PORTRAIT PIECE (L).
- Go back up the stairs and then down to the Eyehole.
- Play the HOS; pick up the key and use it on the chest to collect the scroll; collect the remaining items on the list to receive a BONE LEVER.
- Go back to the Lobby and into the Hideout.
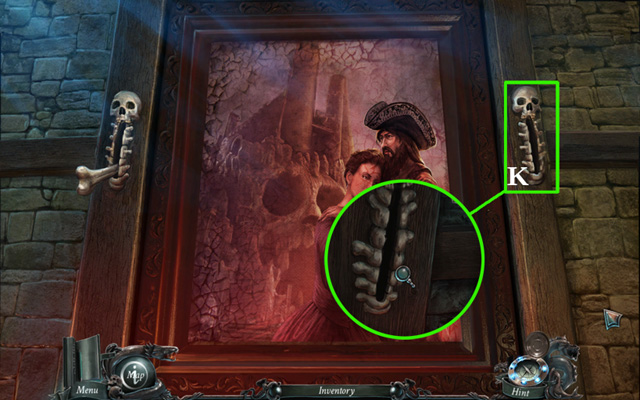
- Examine the painting; zoom in on the slot on the right (N); put the BONE LEVER in it (O); pull the lever (P).
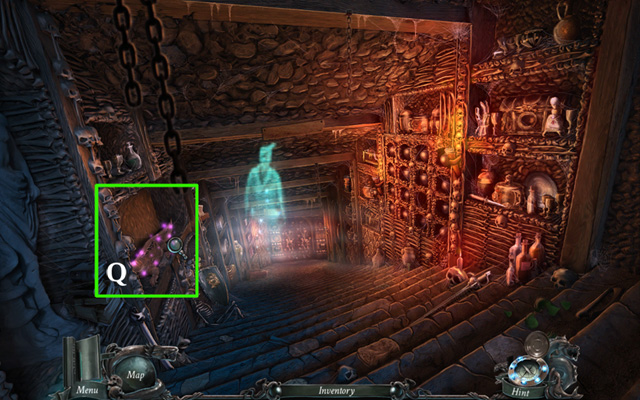
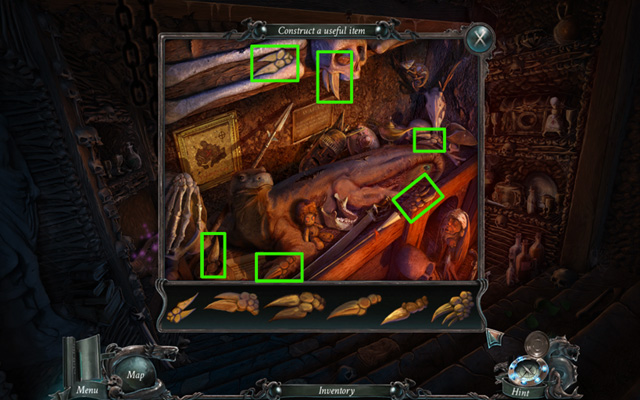
- Go forward; play the FROG (Q); find all the objects pictured at the bottom to assemble the object (click the screenshot for more instructions); receive DRAGON SCALES.
- Go back to the Lobby and then the Terrace; go inside the Tower.
- Zoom in on the cabinet; put the EAR and the DRAGON SCALES (R) on the tabletop to activate the mini-game.
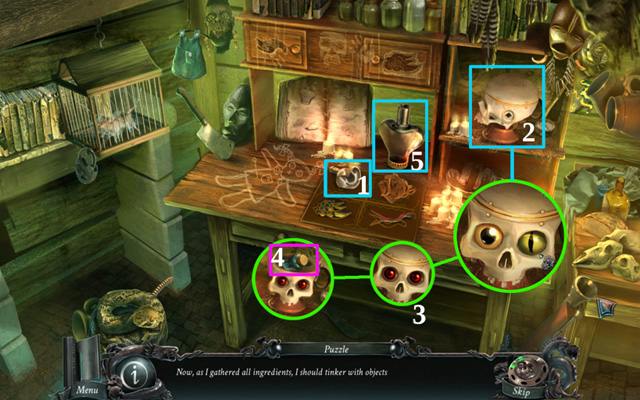

- Pick up the ear (1) and apply it to the skull (2); zoom in on the skull and click on each eye until they are both red (3); pick up the blue bottle (4) and use it on the heart-shaped flask (5).
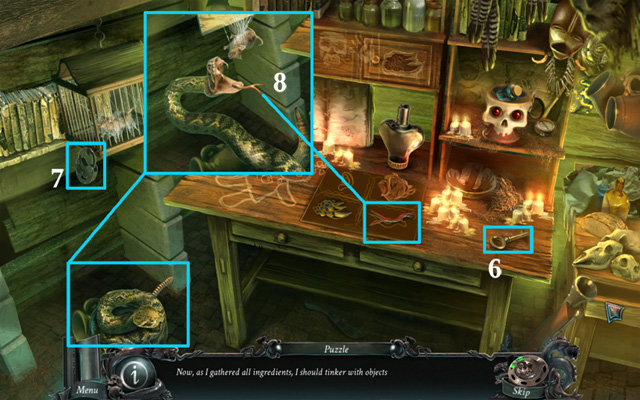
- Use the key (6) to open the padlock on the cage (7); click the padlock twice to remove it; put the lizard tongue in the snake's mouth (8).
- Open the bottom-right drawer (9); put the doll on the chalk outline (10); open the bottom-left drawer and pick up the ribbons (12); put them on the hair and pick up the braid (13).
- Put the braid on the doll; open the little door on the left side of the cabinet and pick up a button (14); put it on the doll; pick up the dress and put it on the doll; insert the scales in the slot on the little door on the right side of the cabinet; open the cabinet doors; pick up a pin and stick it in the doll (15).
- Collect the REGENERATION OINTMENT (S).
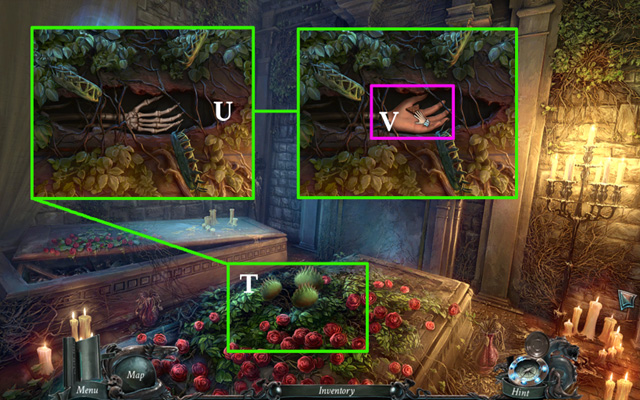
- Go back 6 locations and into the Crypt.
- Zoom in on the grave with the flowers (T); use the REGENERATION OINTMENT on the hand (U); collect the COUNTESS' SYMBOL (V).
- Go back to the Tower.
- Play the HOS; open the scroll to collect the treble clef; collect the remaining items on the list to receive the WOODEN ARM.
- Zoom in on the chest (A); put the COUNTESS' SYMBOL in the slot (B); collect the SKULL KEY (C) and a DOUBLOON (D); examine the letter (E).
- Examine the stone bowl in the center of the room (F); pick up the PIRATE NECKLACE (G).
- Go back and use the gondola to get to the Lighthouse; go inside the Lighthouse.
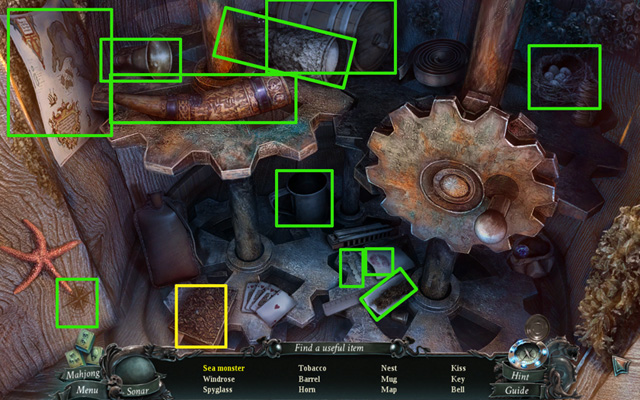
- Play the HOS; pick up the key and use it on the chest to collect the scroll; collect the remaining items on the list to receive the STONE SPYGLASS.
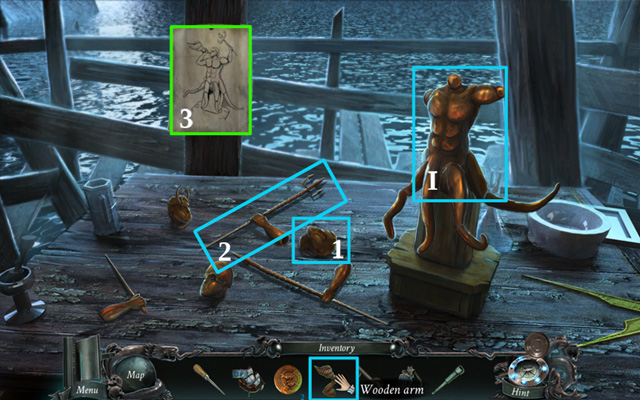
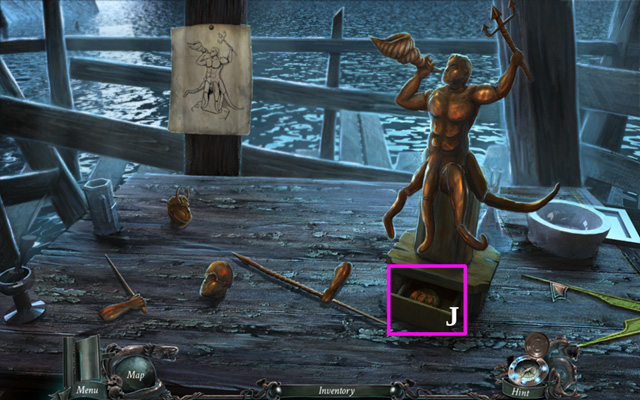
- Zoom in on the table; put the WOODEN ARM on the figurine (I); pick up the head with neither horns nor helmet (1); attach it to the figurine; pick up the arm holding a trident and put it on the figurine (2).
- Click the tentacles to adjust them as shown on the sketch (3) (click the screenshot for the solution); collect a DOUBLOON (J).
- Go back 2 locations.
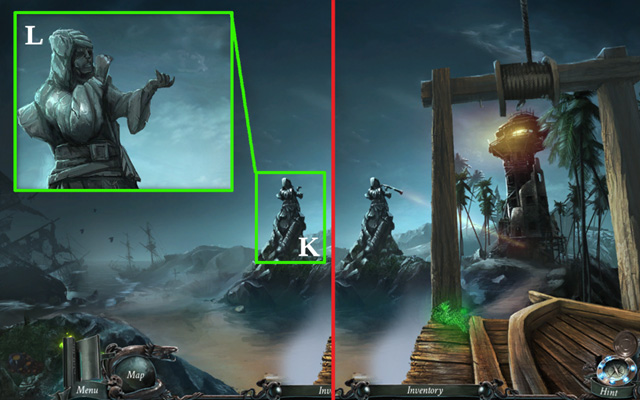
- Zoom in on the stone statue (K); put the STONE SPYGLASS in his hands (J).
- Go forward.
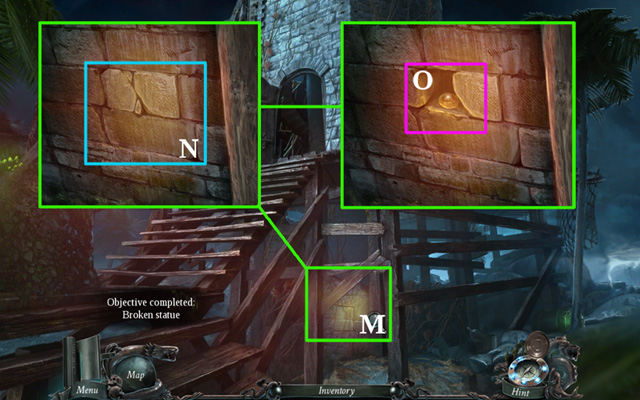
- Examine the place where the light from the spyglass shines (M); use the METAL SPIKE on the cracked stone twice (N); pick up a DOUBLOON (O).
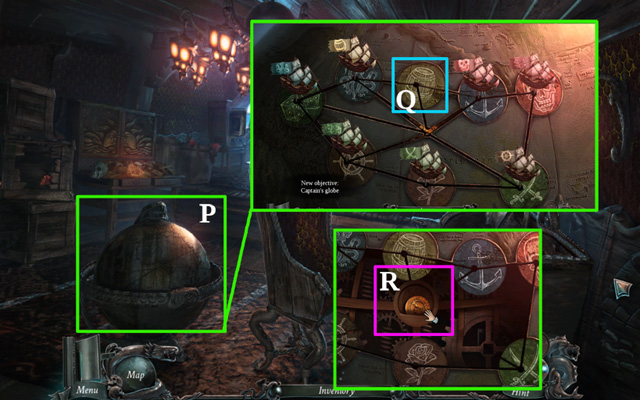
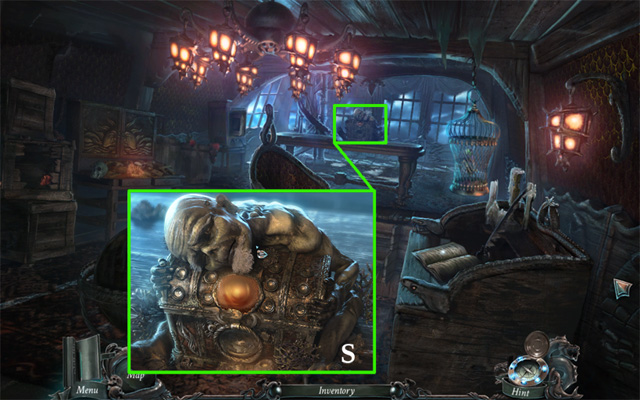
- Go back to the ship and into the Captain's Cabin.
- Examine the globe (P); insert the MODEL SHIP in the empty slot to activate the mini-game (Q); move the ships so that each is docked in a port with a matching symbol; you will receive a DOUBLOON (R).
- Give the dwarf guarding the chest all 5 DOUBLOONS (S).
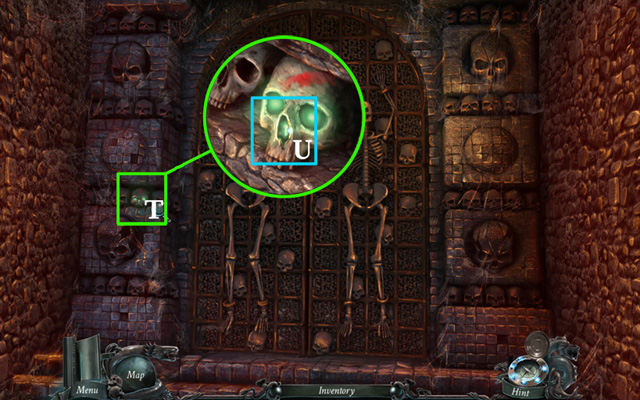
- Return to the Lobby and enter the Hideout; go forward to the Catacombs and examine the door.
- Zoom in on the skull with the green eyeholes (T); use the SKULL KEY on it (U).
Chapter 7: Underground Bay
- Go inside the Treasury.
- Examine the table on the right (V); pick up the PORTRAIT PIECE (W).
- Go back to the Crypt.
- Zoom in on the painting frame; put the PORTRAIT PIECE inside it (X); examine the necklace on the painting (Y); NECKLACE PATTERN will be added to your Inventory.
- Go back to the Catacombs through the Hideout and into the Treasury.
- Zoom in on the table on the right (Z).

- Place the PIRATE NECKLACE in the box (B) and remove the broken pieces of it (C); place the NECKLACE PATTERN next to the box to activate the mini-game; choose the necklace pieces that will fit the shape of the slot and create the pattern on the schema next to the box (click the screenshot for the solution); pick up the COUNTESS NECKLACE.
- Examine the sculpture in the center of the room (E).
- Place the COUNTESS NECKLACE in the slot on top of the sculpture (F).
- Go forward into the Bay (G).
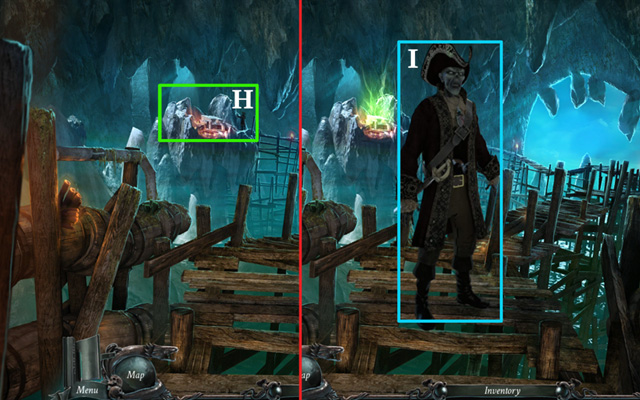
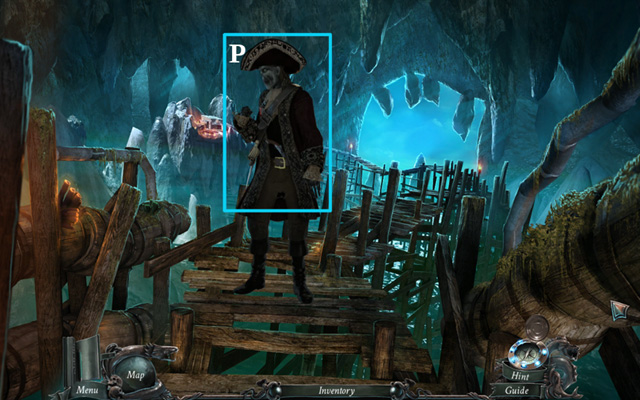
- Examine the rock where Remington is standing (H); watch the cutscene; talk to Remington (I).
- Go back.
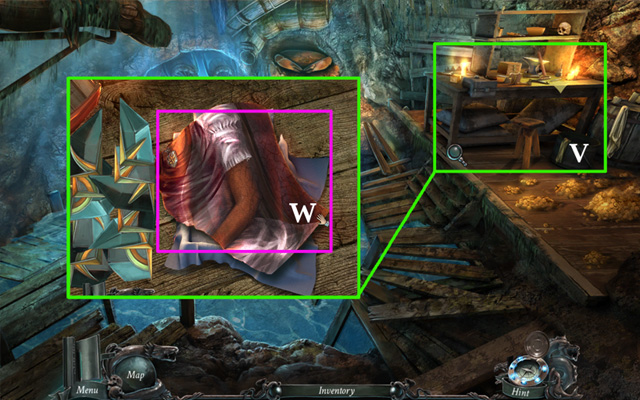
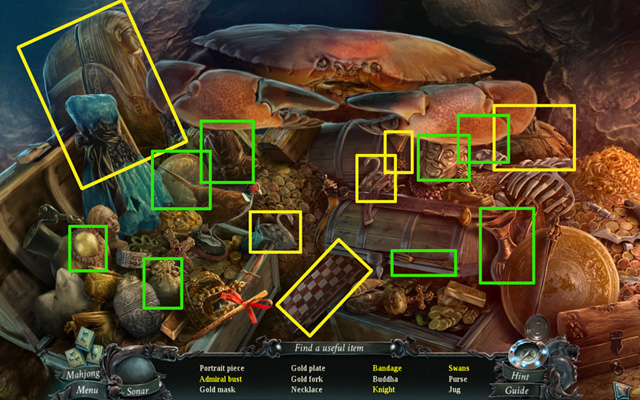
- Play the HOS; pin the medal to the admiral's bust; open the chess box to find the knight; open the sarcophagus to get the bandage; put the 2 swans together; collect the remaining items on the list to receive a PORTRAIT PIECE.
- Go back 2 locations to the Hideout.
- Play the HOS; collect the remaining items on the list to receive a PICKAX.
- Go back to the Crypt.
- Zoom in on the painting frame; put the PORTRAIT PIECE inside it (L); pick up MARY'S PORTRAIT (M).
- Examine the grave with the roses (N); collect a DOUBLOON (O).
- Return to the Treasury through the Hideout and go to the Bay.
- Give MARY'S PORTRAIT to Remington (P); watch a cutscene.
- Talk to Remington; collect the MYSTIC PEARL.
- Go back.
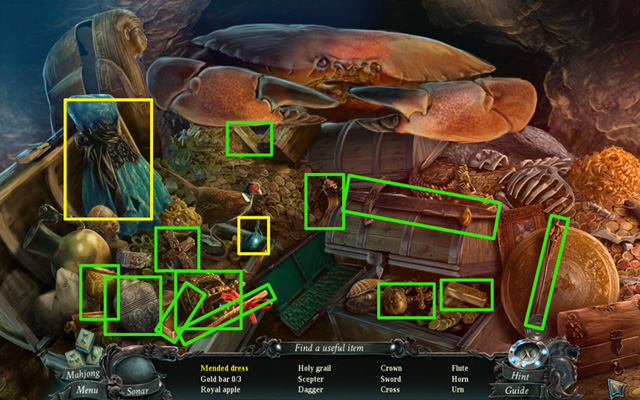
- Play the HOS; pick up the needle and thread and mend the tear in the dress; collect the remaining items on the list to receive an URN.
- Go back.
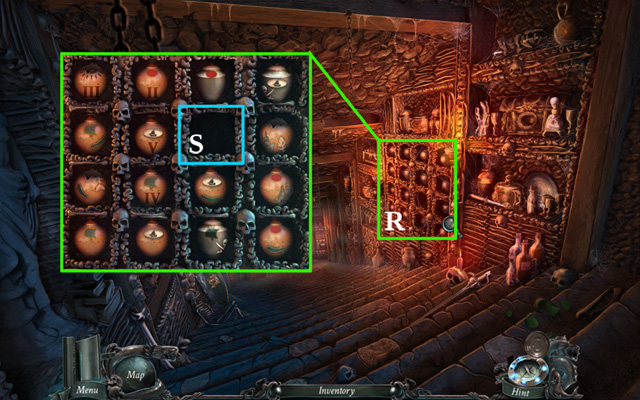
- Examine the urns on the right wall of the way (R); put the URN in an empty slot (S) to activate the mini-game.
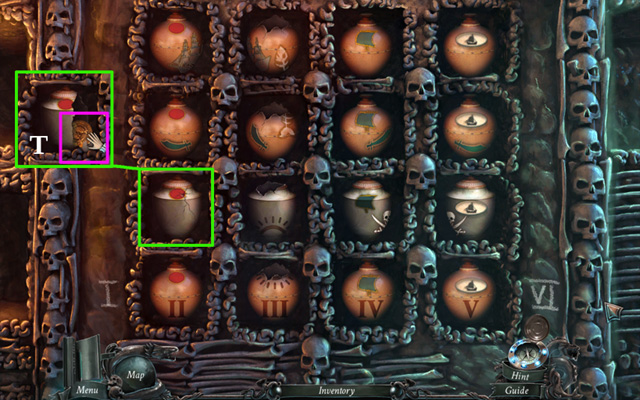
- Examine the symbol on the bottom half of an urn to determine in which row it belongs; examine the symbol on the top half to determine in which column it belongs.
- Start by arranging the urns in the bottom row with the roman numbers from lowest to highest (II, III, IV, V); then arrange the columns: urns in the first column all have a red dot, urns in the second have damaged tops, urns in the third are symbolized by a sail, and urns in the fourth by a black ship on a white oval.
- Finally, arrange the rest of the rows; remember to swap only urns within the same column; all the urns in the second row from the bottom are gray and white; those in the third row from the bottom all have a sword symbol painted on them; 2 urns in the first row from the top have matching ship halves painted on their bottoms, the other 2 don't have any symbols on them; collect a DOUBLOON (T).
- Go back to the Lobby and take the right door to the Ballroom.
- Examine the broken tile (U); use the PICKAXE on it 3 times (V); click the red cloth; collect a DOUBLOON (W).
- Go back to the ship and into the Captain's Cabin.
- Give the dwarf guarding the chest 3 DOUBLOONS (X); then put the MYSTIC PEARL in the chest; collect the HEART (Y).
- Return to the Hideout, go forward 4 locations to the Altar.
- Place the HEART in Remington's chest (Z).
- Congratulations, you have completed Nightmares from the Deep: Cursed Heart!
Created at: 2012-06-15