

Walkthrough Menu
- General Tips
- Chapter 1: The Hotel
- Chapter 2: The Kidnapping
- Chapter 3: The River
- Chapter 4: Walker's Estate
- Chapter 5: Amabel's Apartment
General Tips
- This is the official guide for Off the Record: Liberty Stone.
- This guide will not show when you have to zoom into a location; the screenshots will show each zoom scene.
- Hidden-object puzzles are referred to as HOPs. This guide will not show screenshots of the HOPs, however, it will mention when an HOP is available and the inventory item you'll collect from it.
- Use the Map to fast travel to a location.
Chapter 1: The Hotel
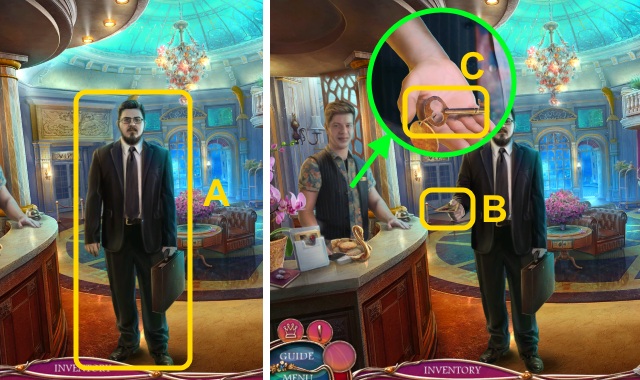
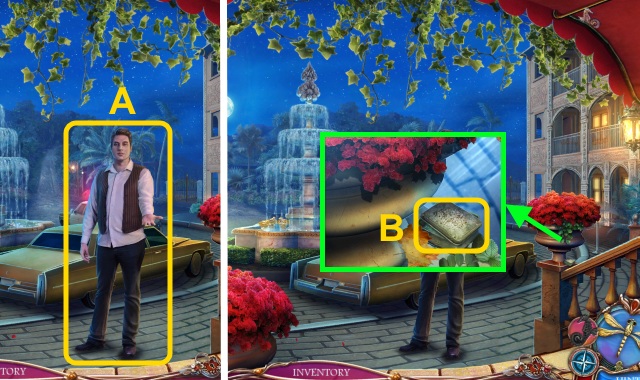
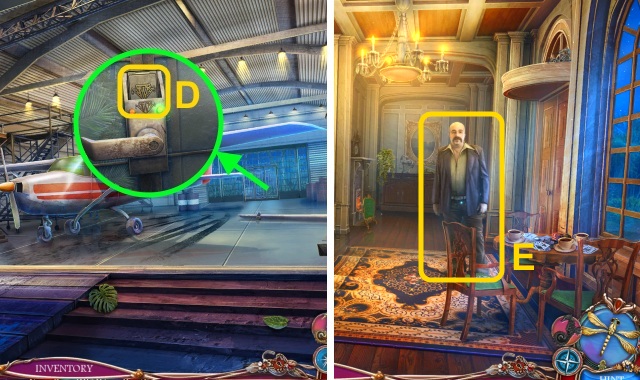
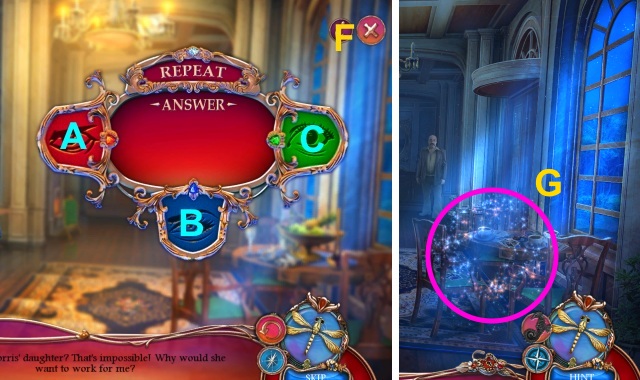
- Talk to Carlos (A).
- Take the Map (B); open it.
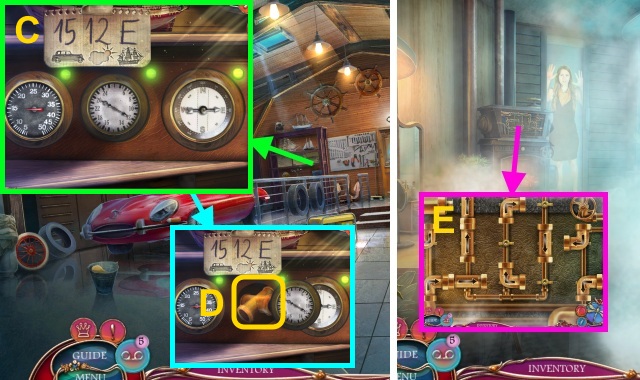
- Take the ROOM KEY (C).
- Walk right.
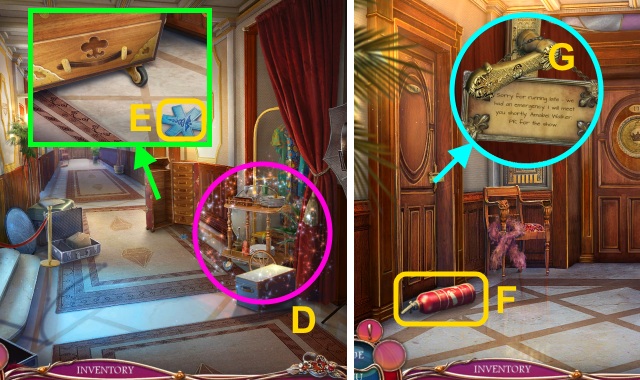
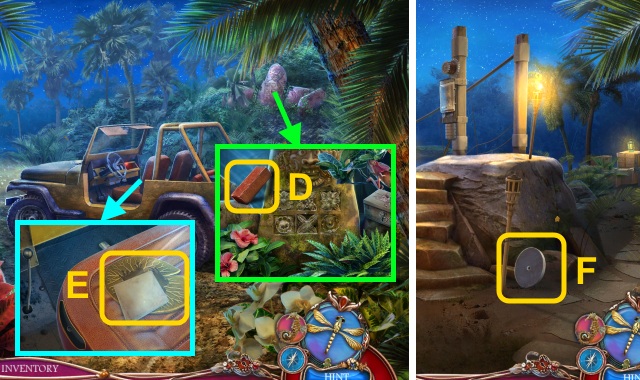
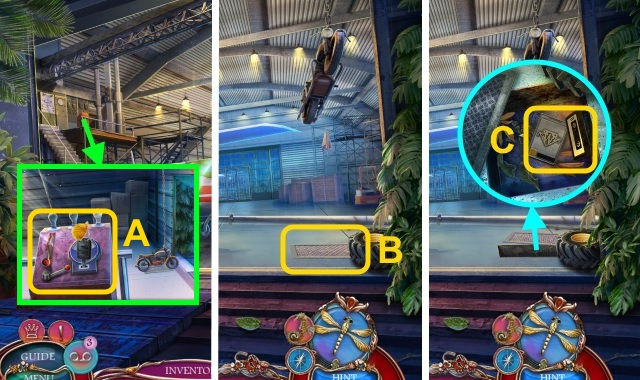
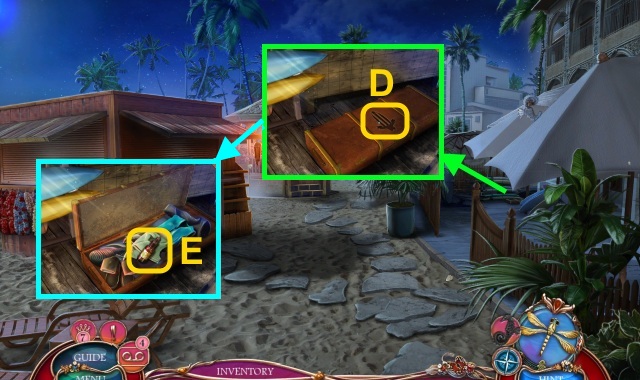
- Play the HOP to receive the MAGNIFYING GLASS (D).
- Take the MEDICAL SYMBOL (E).
- Walk forward.
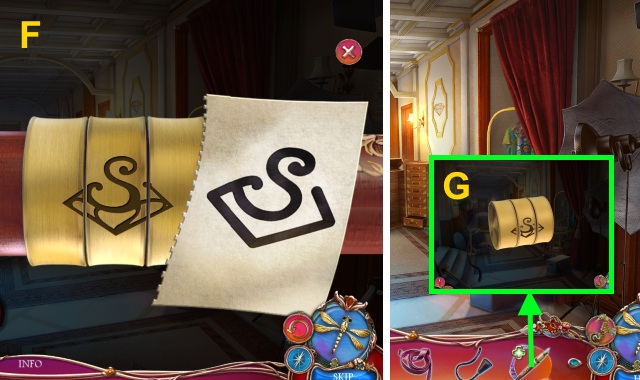
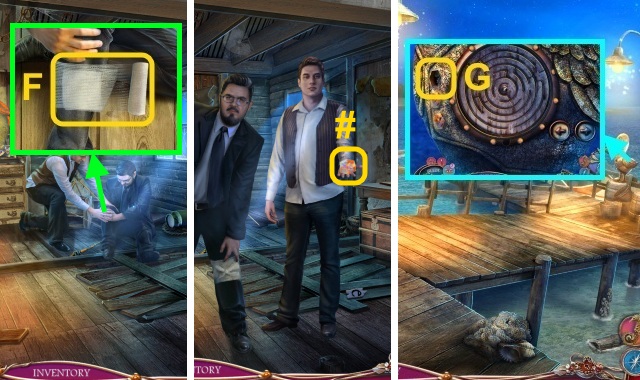
- Take the FIRE EXTINGUISHER (F).
- Move the note (G); use the ROOM KEY.
- Walk left.
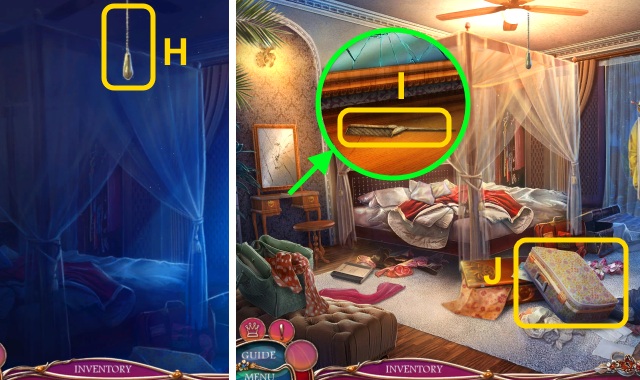
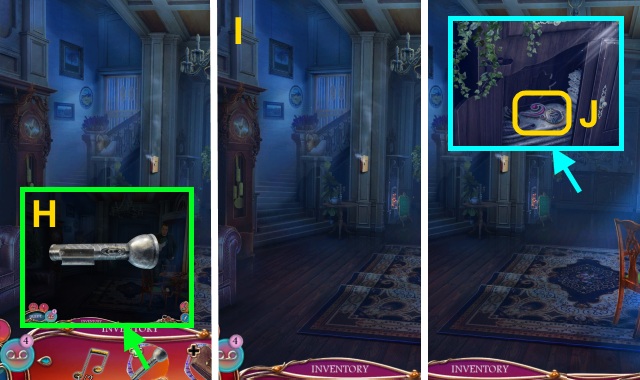
- Pull the cord (H).
- Take the COMB (I).
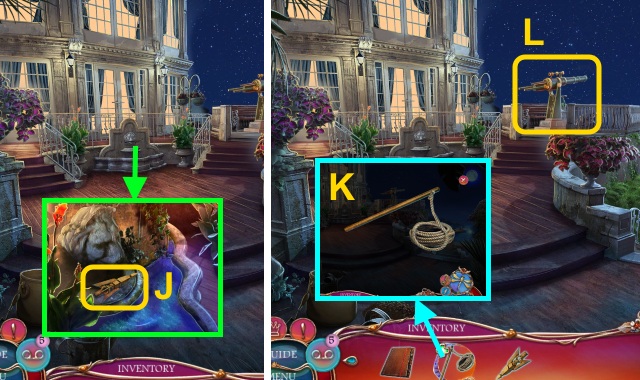
- Move the suitcase (J).

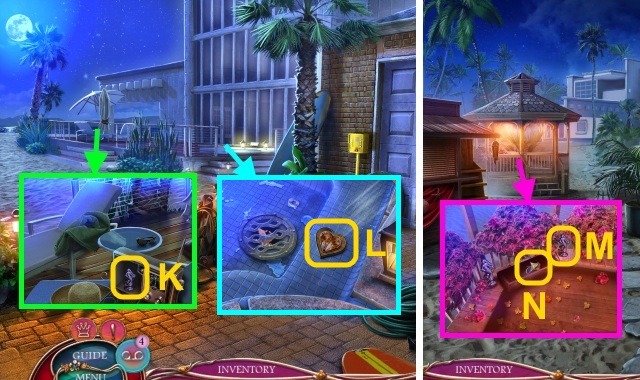
- Read the note (K); use the COMB.
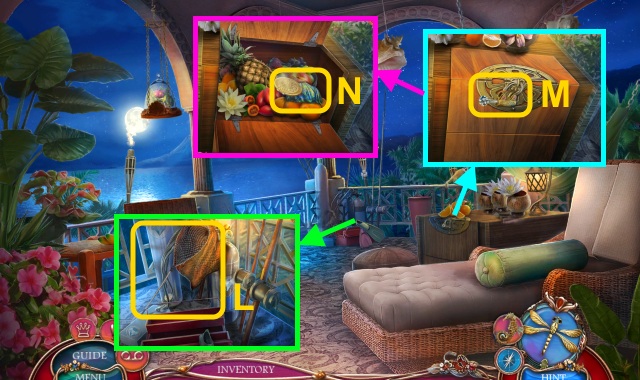
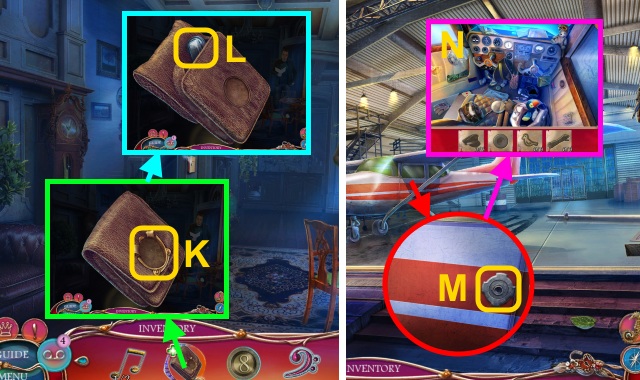
- Take the case (L); open it.
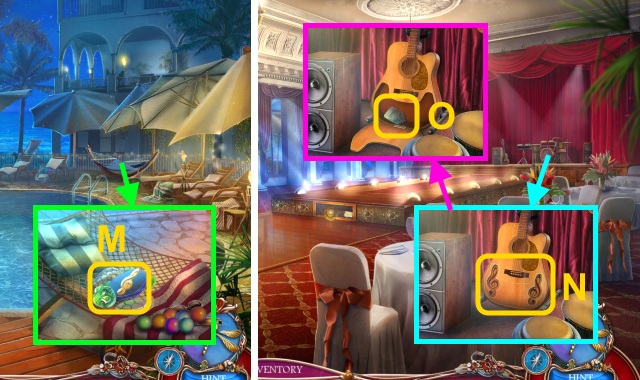
- Take the EMPTY GEM CASE (M).
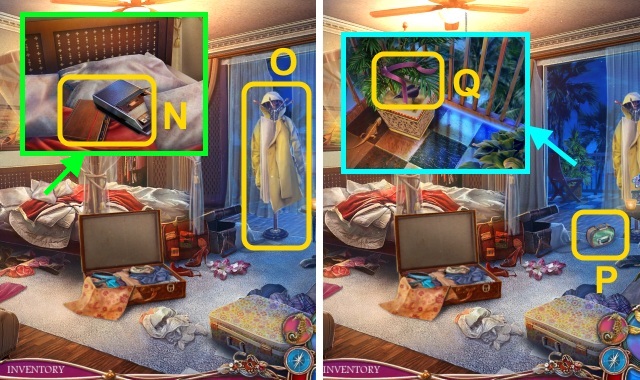
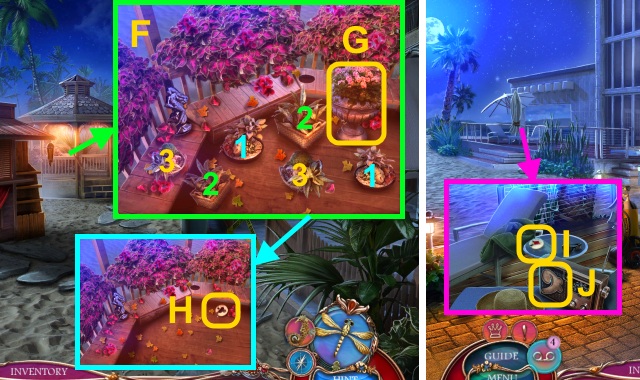
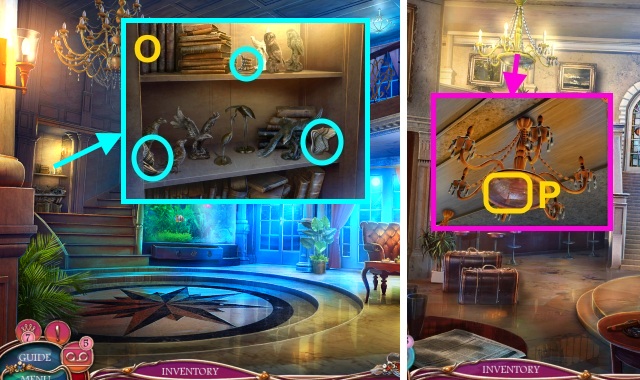
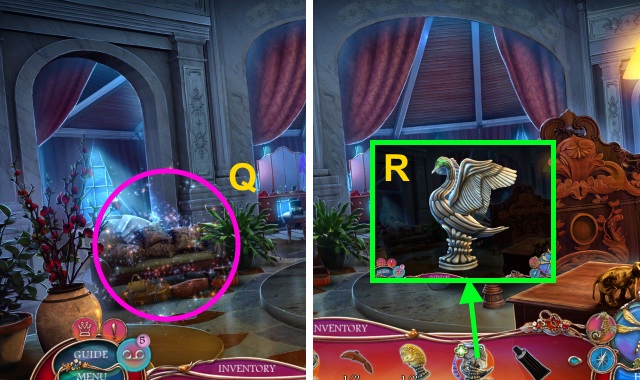
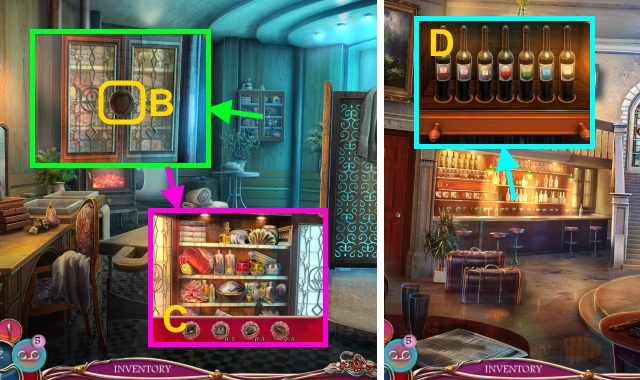
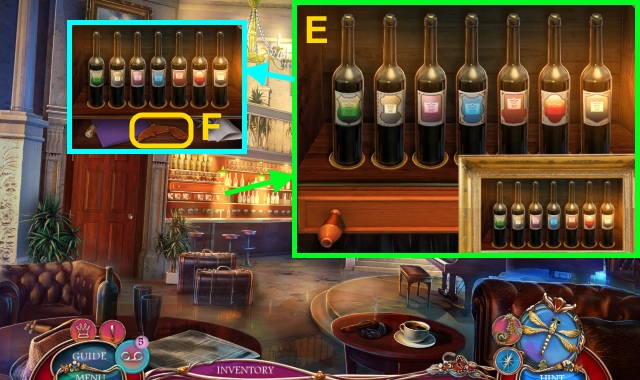
- Move the pillows; take the Tape Recorder and NOTEBOOK (N).
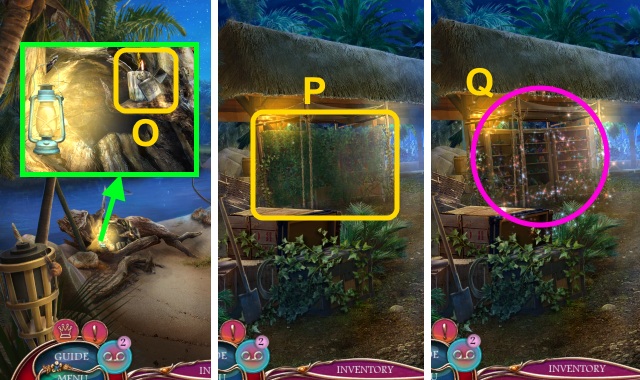
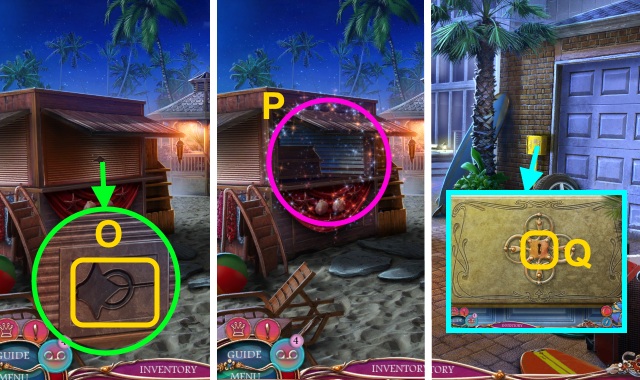
- Move the coat rack (O).
- Take the VANITY CASE (P).
- Take the RIBBON (Q).
- Walk down.

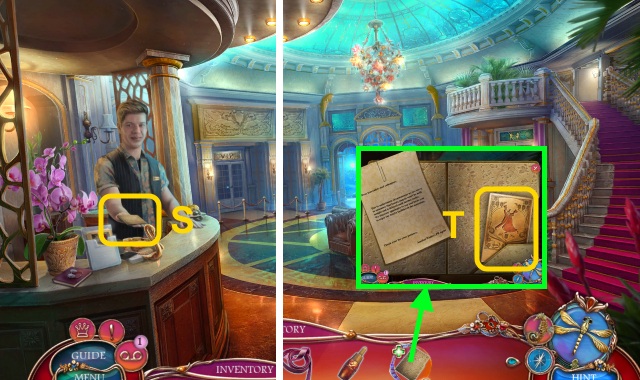
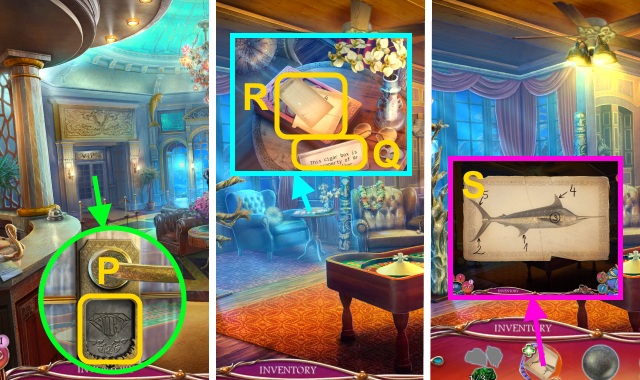
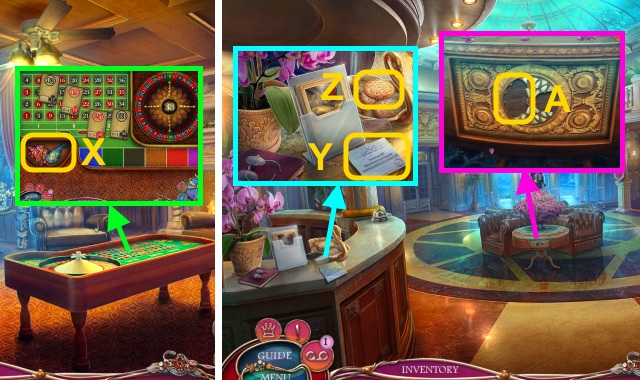
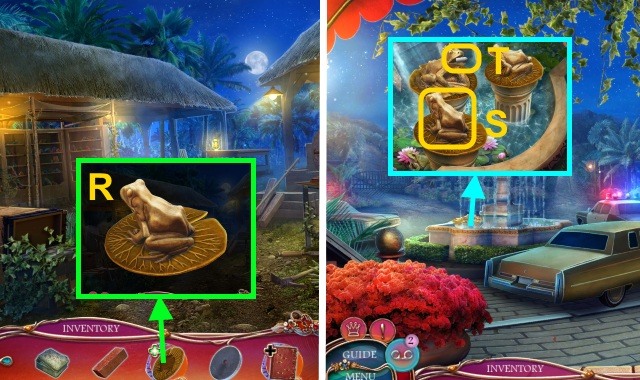
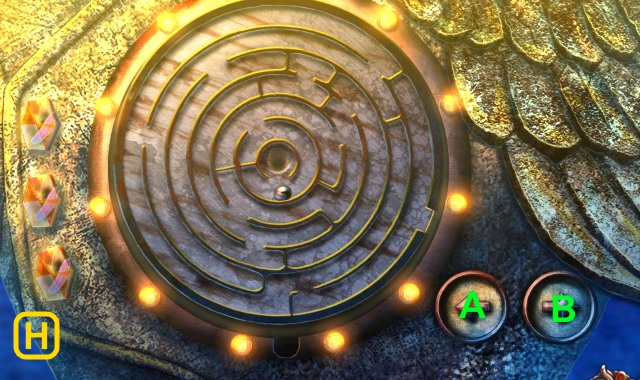
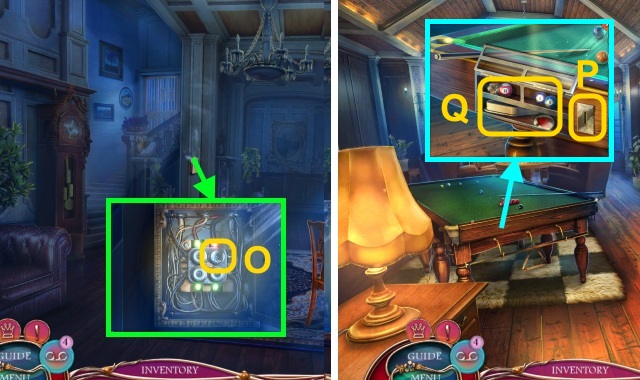
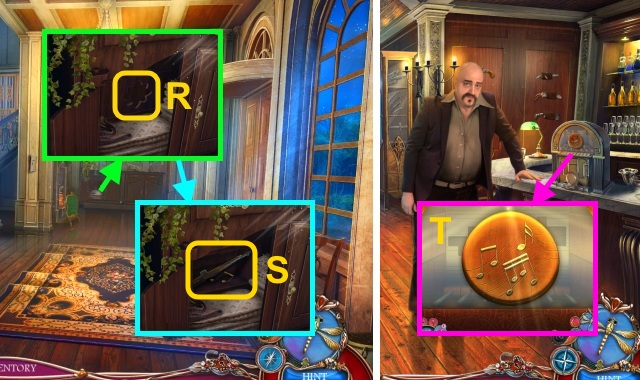
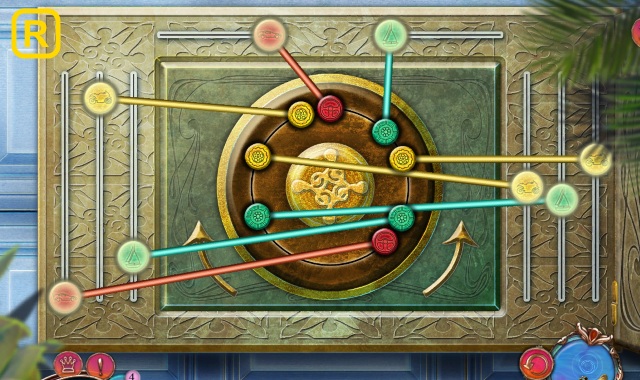
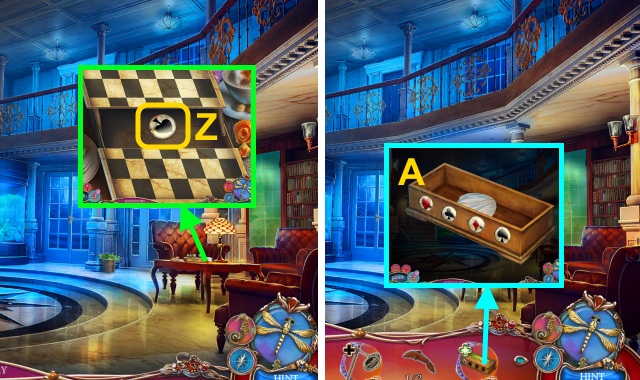
- Give the EMPTY GEM CASE for a mini-game (R).
- Solution (S): A, Bx2.
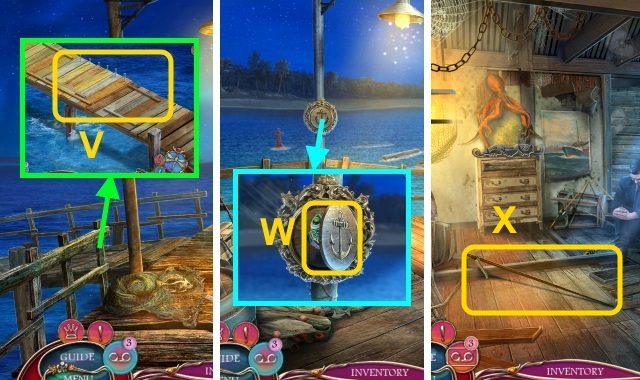
- Walk down, then left.
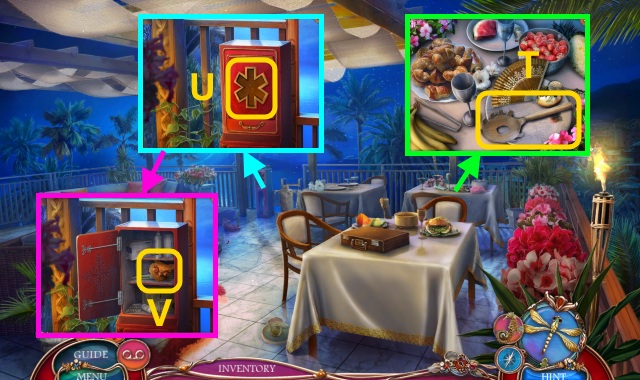
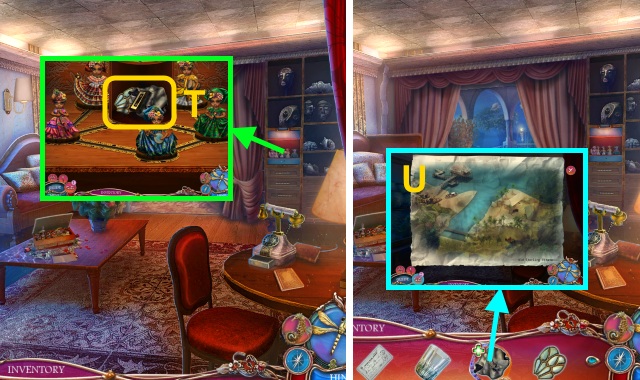
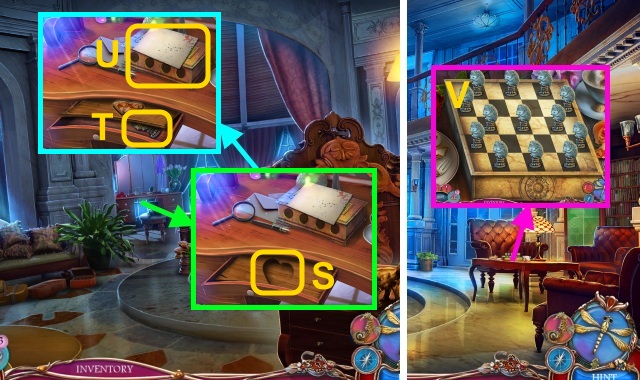
- Move the spoon and fan; take the PASTA SPOON (T).
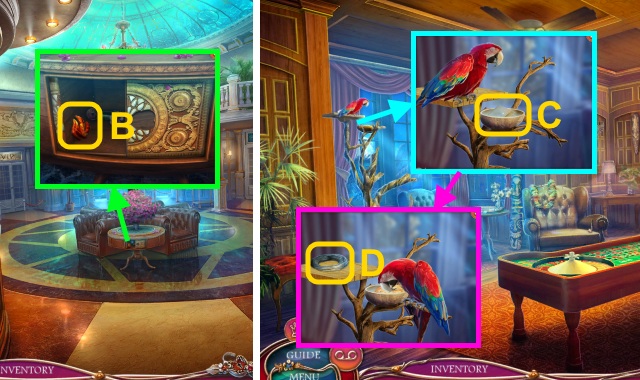
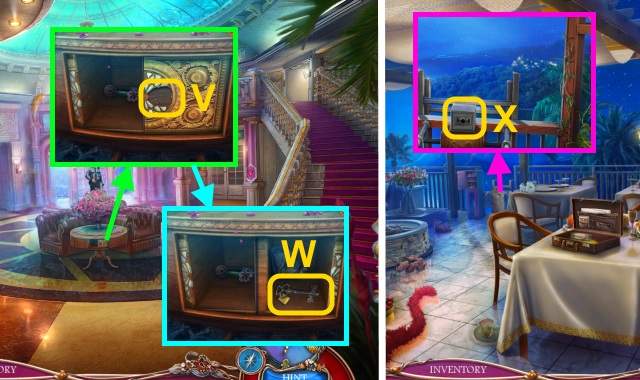
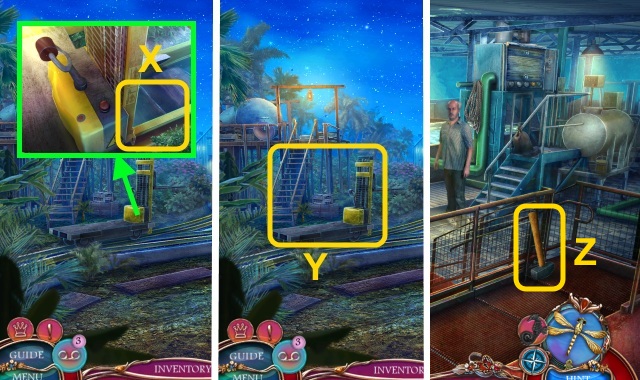
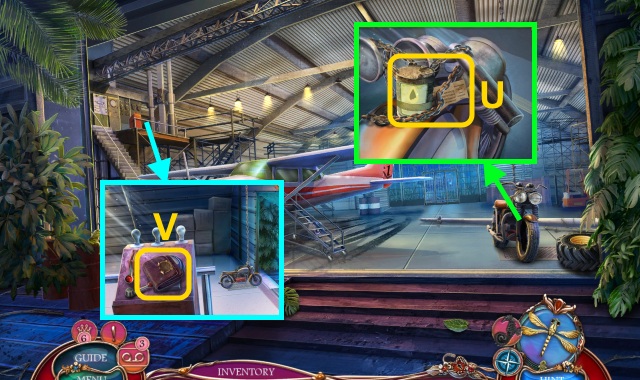
- Place the MEDICAL SYMBOL (U); take the OWL HEAD (V).
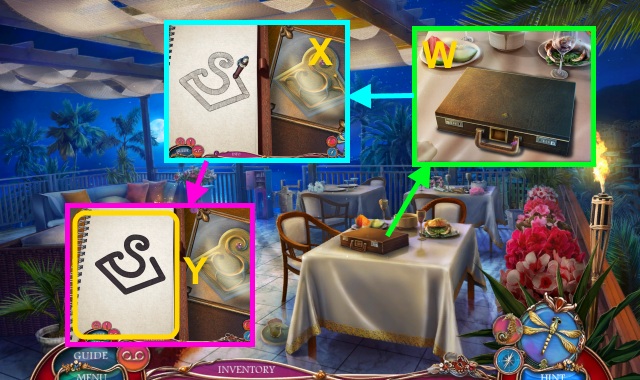
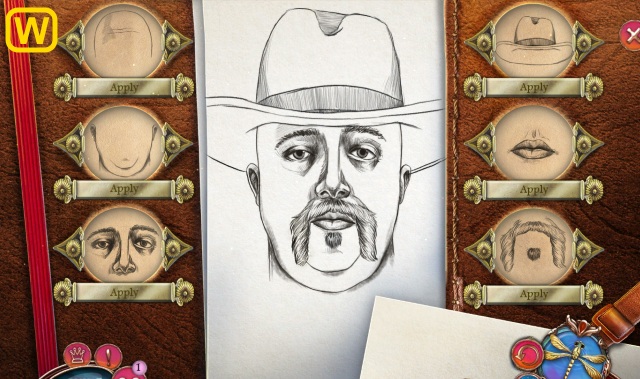
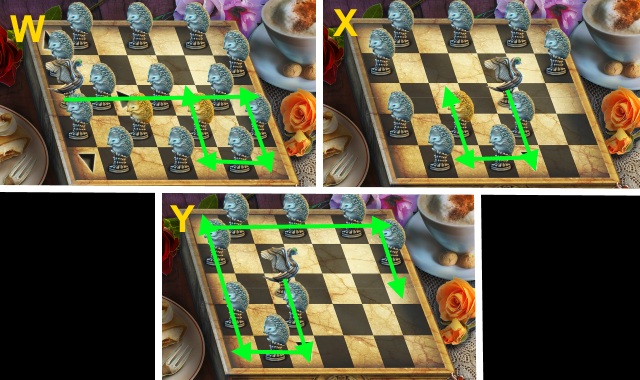
- Use the MAGNIFYING GLASS and NOTEBOOK for a mini-game (W).
- Solution (X): trace the symbol.
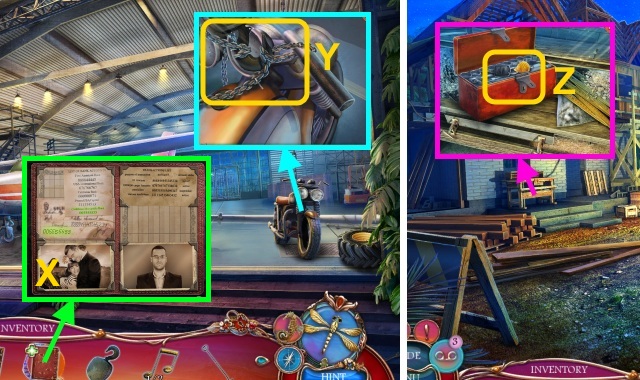
- Take the SKETCH (Y).
- Walk down, then forward.
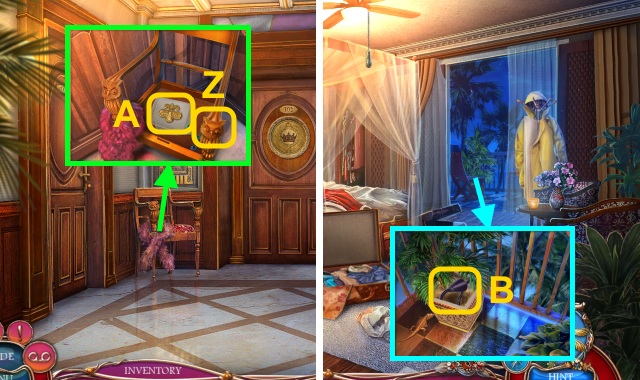
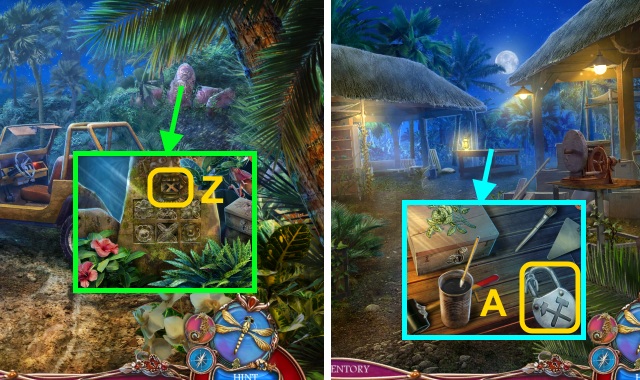
- Place the OWL HEAD (Z); take the FLEUR-DE-LIS (A).
- Walk left.
- Use the PASTA SPOON; take the HOSE (B).
- Walk down twice.
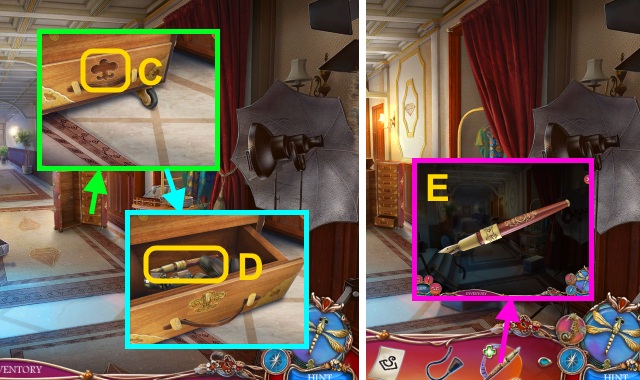
- Place the FLEUR-DE-LIS (C).
- Move the film; take the PEN (D).
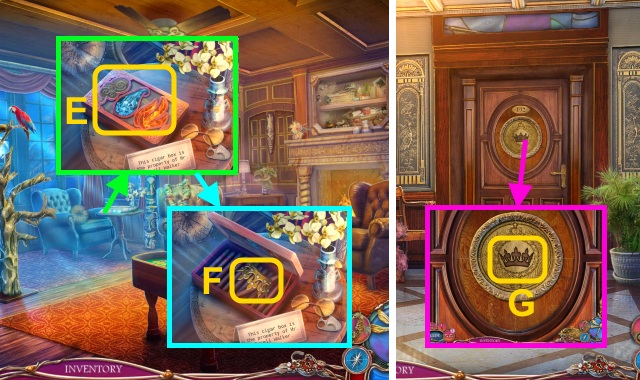
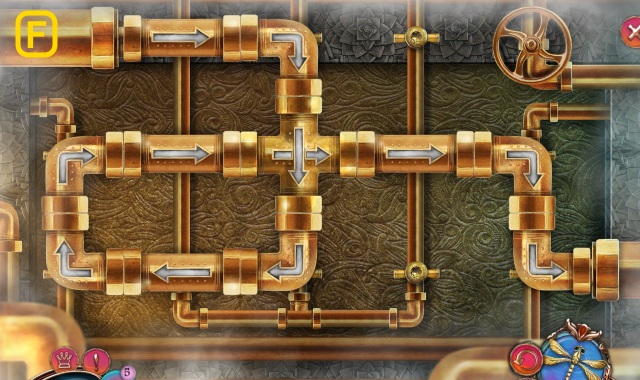
- Use the SKETCH on the PEN for a mini-game (E).
- Solution (F).
- Take the BRIEFCASE LOCK (G).
- Walk left.
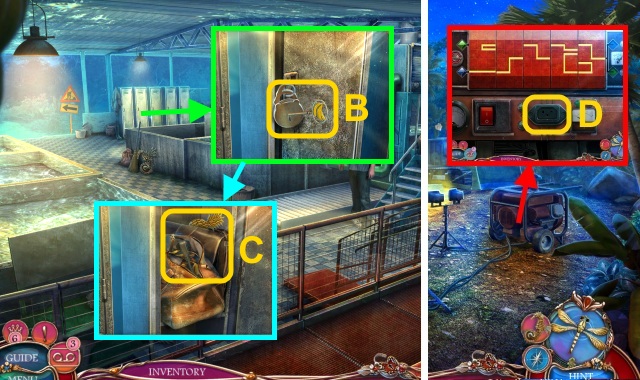
- Place the BRIEFCASE LOCK (H).
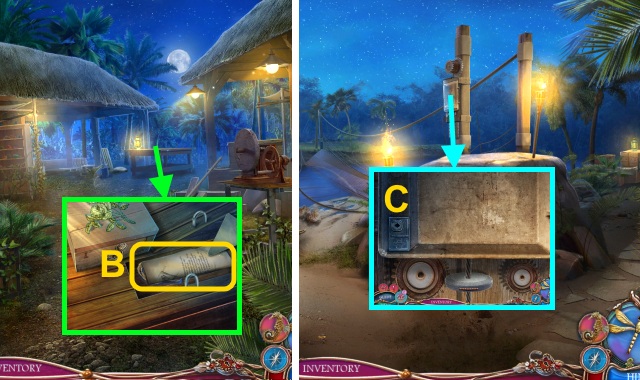
- Read the letter (I); take the Tape.
- Place the Tape in the Tape Recorder (J); press play (K).
- Take the VALVE (L).
- Place the HOSE and VALVE on the FIRE EXTINGUISHER (M).
- Use the FIRE EXTINGUISHER three times (N).
- Move the log; take the MISSING INSIGNIA (O).
- Place the MISSING INSIGNIA on the VANITY CASE (P); take the PASSPORT and AVOCADO OIL (Q).
- Walk down twice.
- Give the PASSPORT (R).
- Take the FOLDER (S); open it.
- Move the note; take the BALLROOM KEY CARD (T).
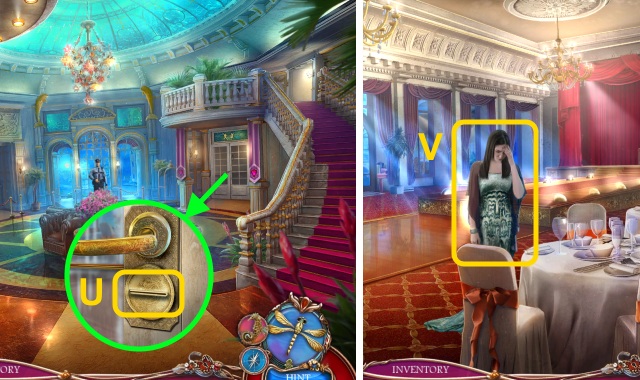
- Use the BALLROOM KEY CARD (U).
- Walk right.
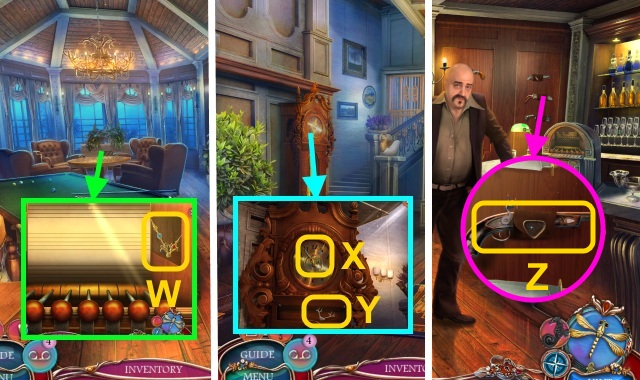
- Talk to the girl (V); use the NOTEBOOK for a mini-game.
- Solution (W).
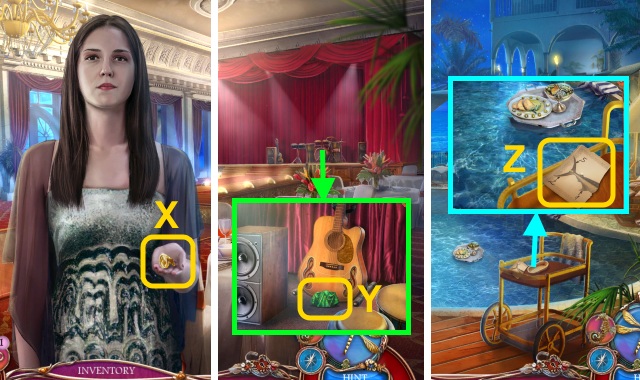
- Take the CUFF LINK (X).
- Take the MUSICIAN SKIRTS (1/3) (Y).
- Walk left.
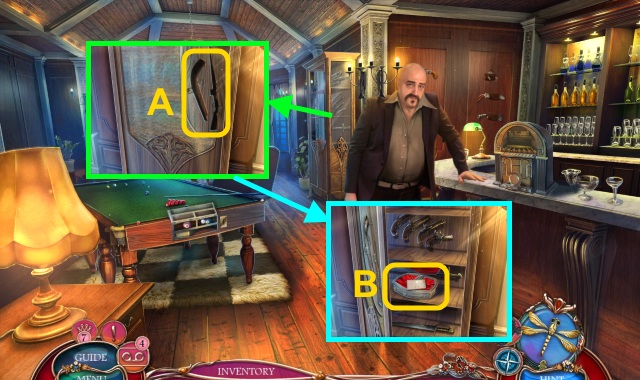
- Take the DRAWING PART (Z).
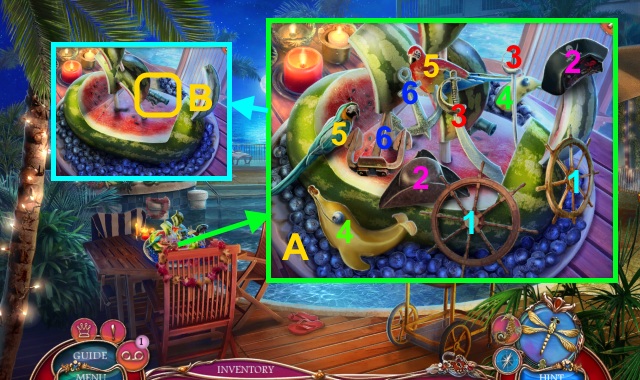
- Match the items (A); take the MINIATURE CANNON (B).
- Use the AVOCADO OIL on the MINIATURE CANNON; take the MINI CANNONBALL (C).
- Dump the bag (D); take the NET PART.
- Use the RIBBON (E).
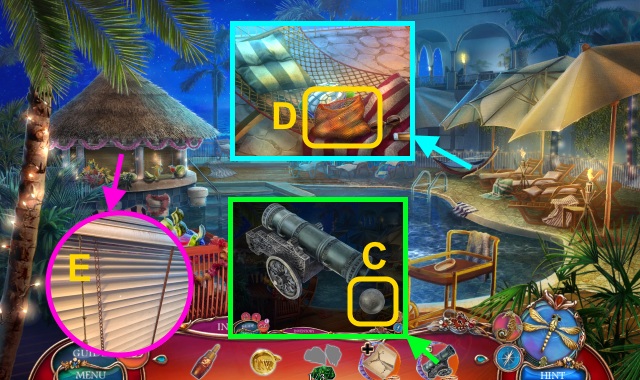
- Play the HOP to receive the BEACH HAT (F).
- Walk down.
- Talk to the woman (G).
- Place the BEACH HAT; take the GOLDEN CLEFS (1/2) and CANE (H).
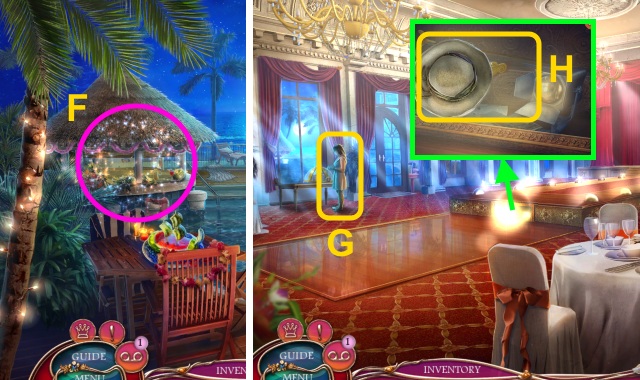
- Walk forward.
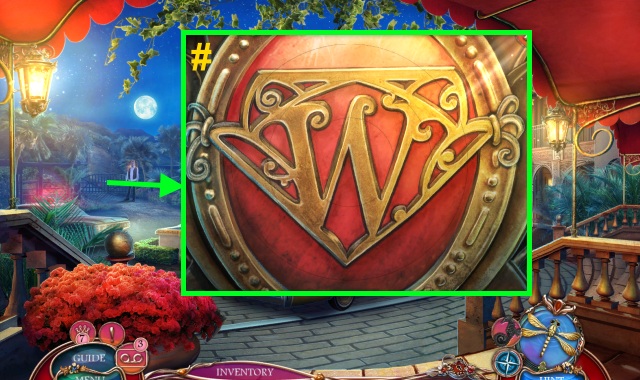
- Use the CANE (I); take the HOTEL LOGO and SMOKE SYMBOL (J).
- Walk down.
- Read the note (K); place the HOTEL LOGO.
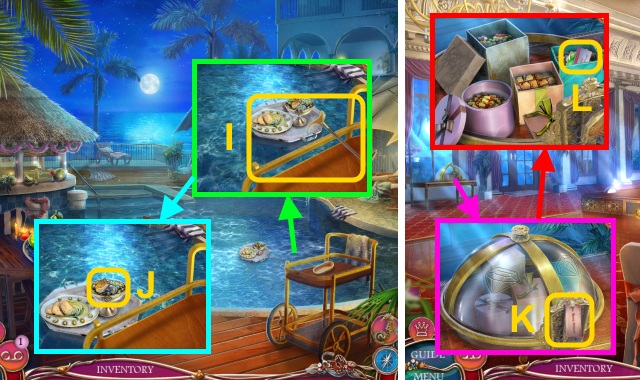
- Open the boxes; take the note and TURTLE HEAD (L).
- Walk forward.
- Place the TURTLE HEAD; take the GOLDEN CLEFS (2/2) (M).
- Walk down.
- Place the GOLDEN CLEFS (2/2) (N); take the VIP PASS (O).
- Walk down.
- Use the VIP PASS (P).
- Walk left.
- Move the note (Q); take the CHECK and DRAWING PART (R).
- Combine the DRAWING PARTS to make the SWORDFISH DRAWING (S).
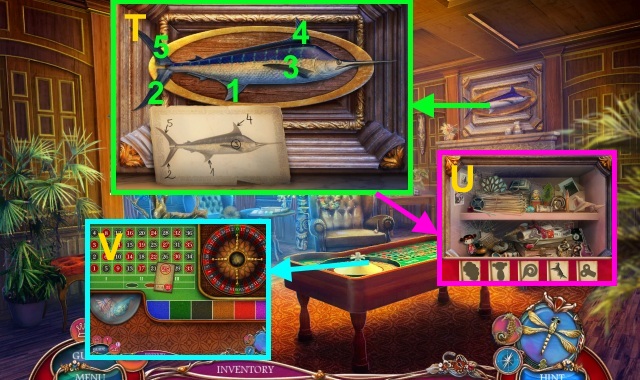
- Place the SWORDFISH DRAWING (T); press the parts in order.
- Play the HOP to receive the ORNAMENT (U).
- Place the MINI CANNONBALL for a mini-game (V).
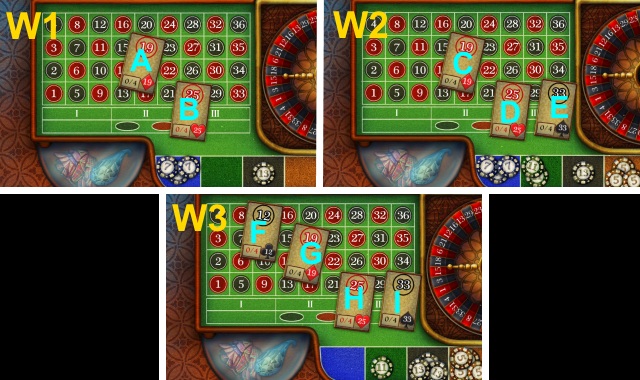
- Solution (W1): 7, 7, 3, and 2 to A; 13, 7, 3, and 2 to B.
- Solution (W2): 7, 5, 5, and 2 to C; 11, 7, 5, and 2 to D; 13, 11, 7, and 2 to E.
- Solution (W3): 5, 3, 2, and 2 to F; 11, 3, 3, and 2 to G; 13, 5, 5, and 2 to H; 13, 13, 5, and 2 to I.
- Take the MUSICIAN SKIRTS (2/3) and WATER SYMBOL (X).
- Walk down.
- Take the note (Y) and CRACKER (Z).
- Place the ORNAMENT (A).
- Take the FIRE SYMBOL (B).
- Walk left.
- Read the note (C); place the CRACKER.
- Take the WIRE COIL (D).
- Place the SMOKE SYMBOL, WATER SYMBOL, and FIRE SYMBOL (E); open the box.
- Take the ROYAL-SUITE EMBLEM (F).
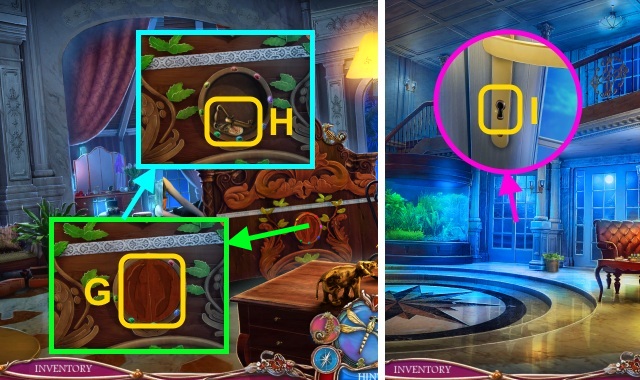
- Go to the Hotel room door.
- Place the ROYAL-SUITE EMBLEM for a mini-game (G).

- Solution (H).
- Walk forward.
Chapter 2: The Kidnapping
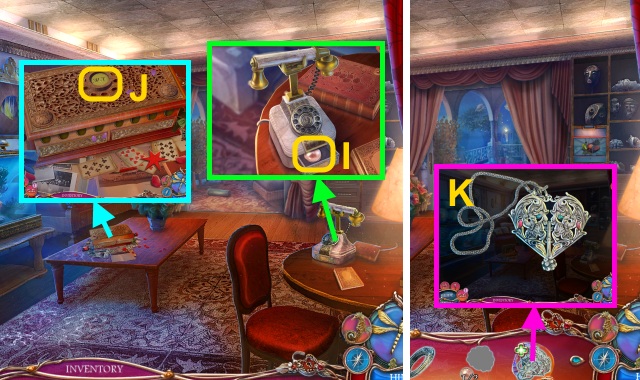
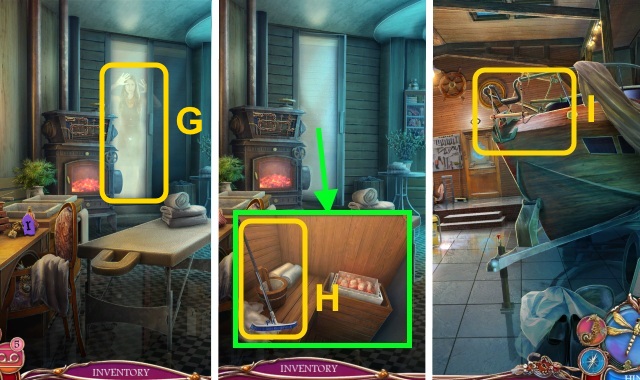
- Open the drawer; take the SHELL JEWELRY (1/2) (I).
- Place the CUFF LINK (J); play the HOP to receive the HEART NECKLACE.
- Open the HEART NECKLACE to receive the JEWELED KEY (K).
- Walk forward.
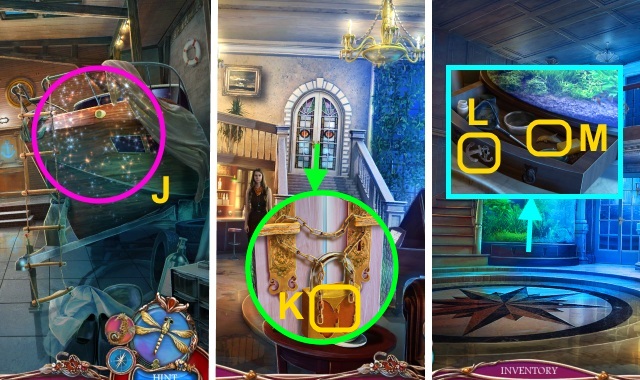
- Use the NET PART and WIRE COIL; take the NET (L).
- Use the JEWELED KEY; move the lock (M).
- Open the locket (N); take the MUSICIAN SKIRTS (3/3).
- Walk down.
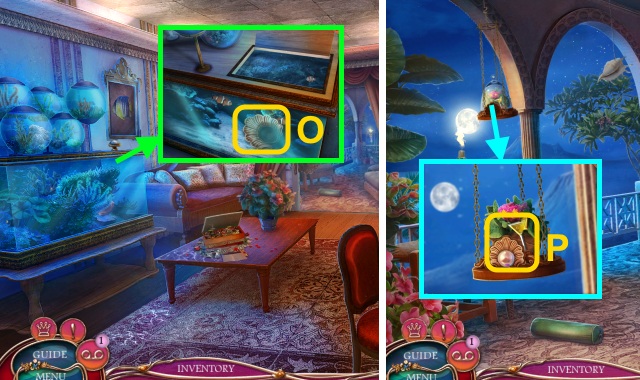
- Open the aquarium; use the NET to take the SHELL JEWELRY (2/2) (O).
- Walk forward.
- Place the SHELL JEWELRY (2/2) (P); take the COCKTAIL SYMBOL.
- Walk down.
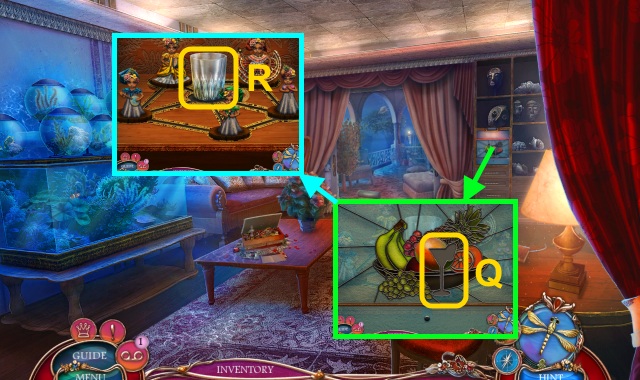
- Place the COCKTAIL SYMBOL (Q).
- Take the WHISKEY GLASS (R); place the MUSICIAN SKIRTS for a mini-game.
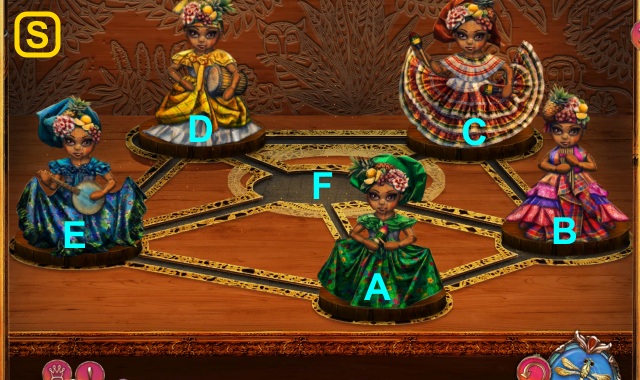
- Solution (S): B, A, E, F, C, D, F.
- Take the Tape, FOLDED PAPER, and ORNAMENT (T).
- Open the FOLDED PAPER; take the MAP (U).
- Go to Reception.
- Place the ORNAMENT (V); take the EMERGENCY-LADDER KEY (W).
- Walk right, then left.
- Use the EMERGENCY-LADDER KEY (X).
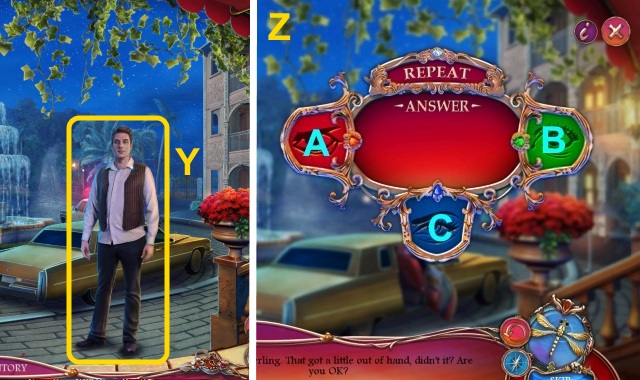
- Talk to Roderick for a mini-game (Y).
- Solution (Z): C, B, A.
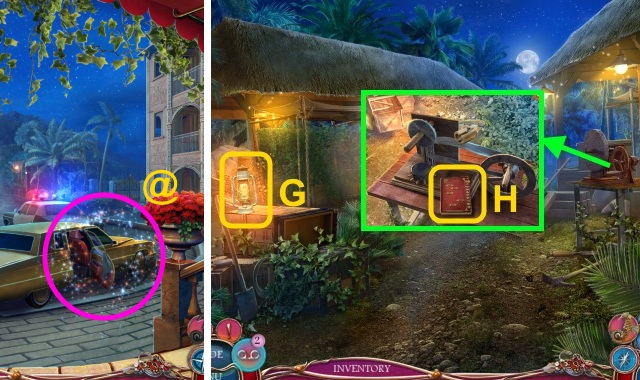
- Give the MAP (A).
- Move the leaves; take the TIN BOX (B).
- Walk forward.
- Take the BRICK (D).
- Take the note and ORNAMENT BASE (E).
- Walk left.
- Take the GRINDSTONE (F).
- Walk down twice.
- Play the HOP to receive the CRANK (@).
- Walk forward, left, then right.
- Take the LAMP (G).
- Take the CHECKBOOK (H).
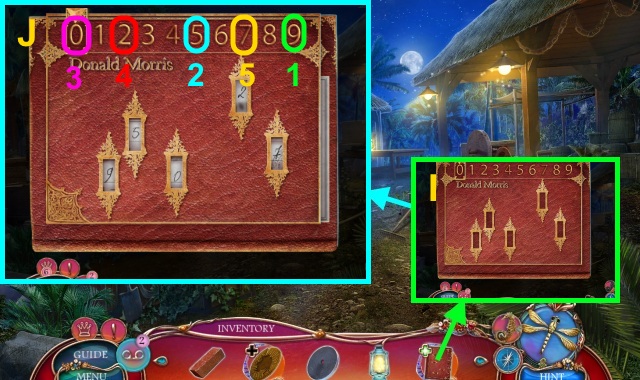
- Place the CHECK in the CHECKBOOK for a mini-game (I).
- Solution (J).
- Walk down.
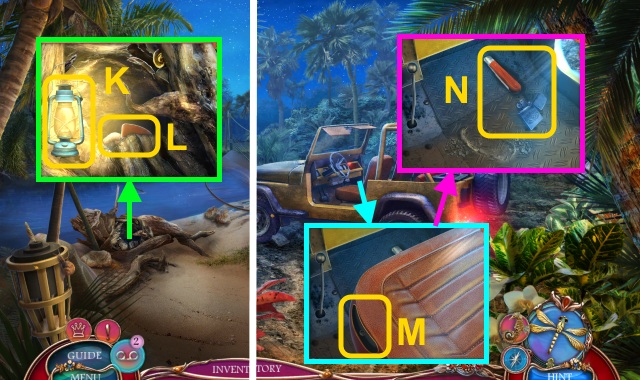
- Place the LAMP (K); take the SEAT HANDLE and BARREL TAP (L).
- Walk down.
- Place the SEAT HANDLE (M); take the POCKET KNIFE and LIGHTER (N).
- Walk left.
- Place the WHISKEY GLASS; use the LIGHTER to receive the RESIN (O).
- Walk right.
- Use the POCKET KNIFE (P).
- Play the HOP to receive the ORNAMENT TOP (Q).
- Place the RESIN and ORNAMENT TOP on the ORNAMENT BASE to receive the FOUNTAIN ORNAMENT (R).
- Go to the Hotel Square.
- Place the FOUNTAIN ORNAMENT (S); take the CHALK (T).
- Go to the Mining Camp.
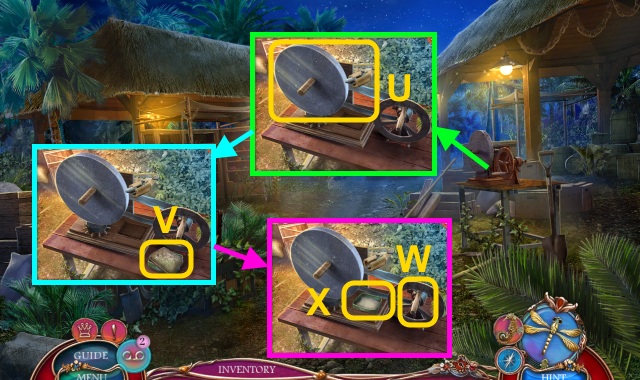
- Place the GRINDSTONE and CHALK (U).
- Place the TIN BOX (V); open it.
- Turn the handle (W); take the POWDER BOX (X).
- Walk down twice.
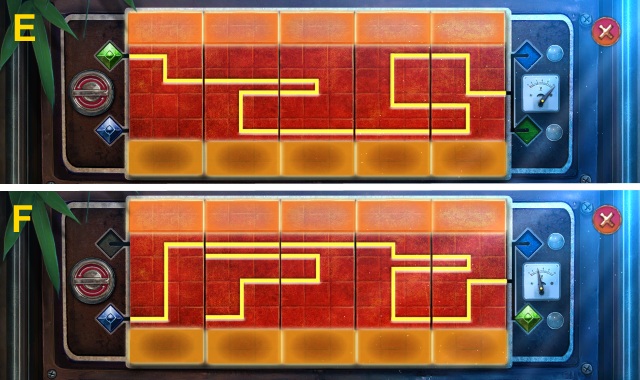
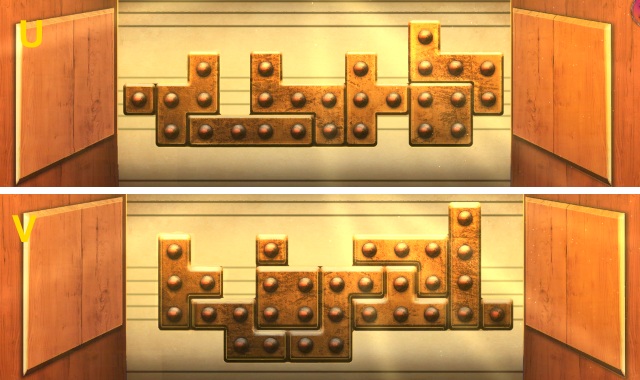
- Use the POWDER BOX for a mini-game (X).
- Solution (W): D, B, A, C.
- D, B, A, C, E, F.
- D, B, A, C, E, F, D.
- Take the MINING SYMBOL (Z).
- Go to the Mining Camp.
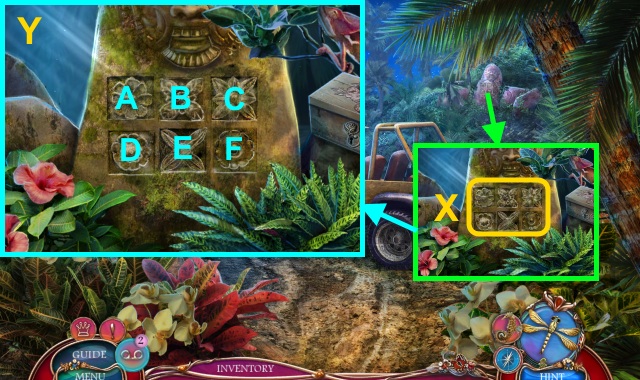
- Place the MINING SYMBOL (A).
- Take the newspaper and COGWHEEL (B).
- Walk down.
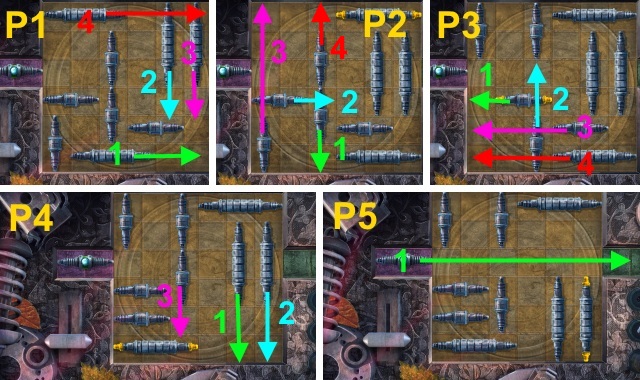
- Place the CRANK and COGWHEEL for a mini-game (C).
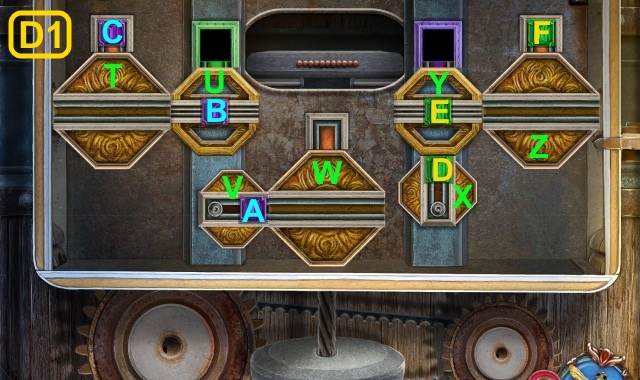
- Solution (D1): A right, W, A up, B left, W, X, D left twice, V, U.
- D up twice, X, Y, E down, X, V, E left twice, V, E up twice, Z.
- F down, Z, Y, F left, Y, X, F down, X, V, F left twice, V, F up twice.
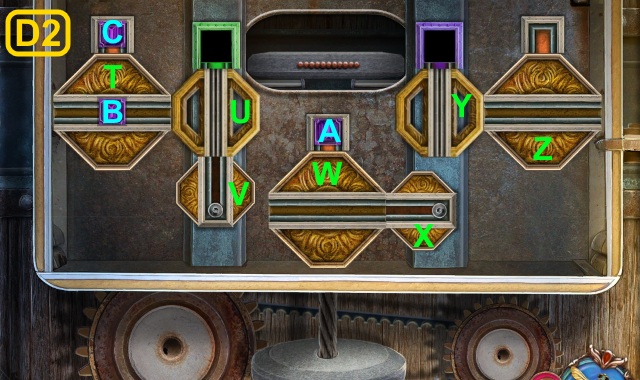
- Solution (D2): W, A down, W, A right, X, A up twice, U, B right.
- U, B down, V, X, B right twice, X, B up twice, T, C down, T, U.
- C right, U, V, C down, V, X, C right twice, X, C up twice.
- Walk left.
Chapter 3: The River
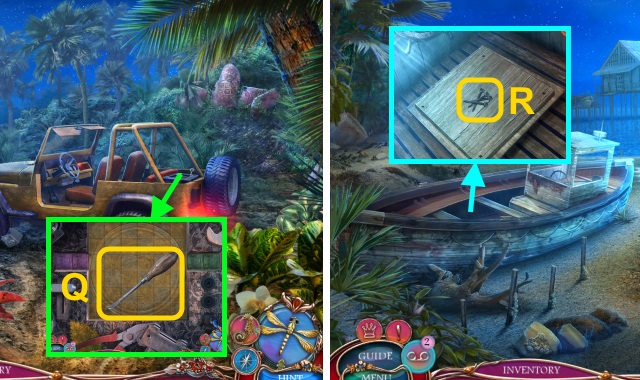
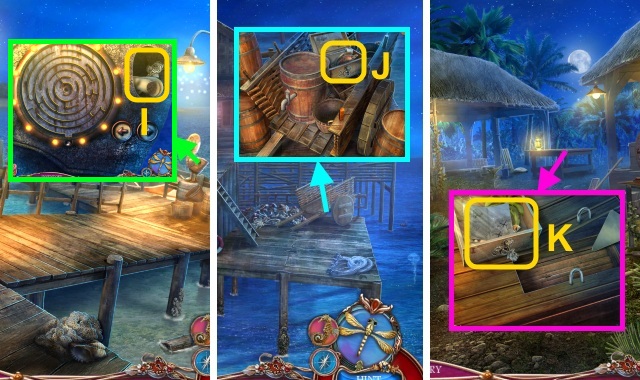
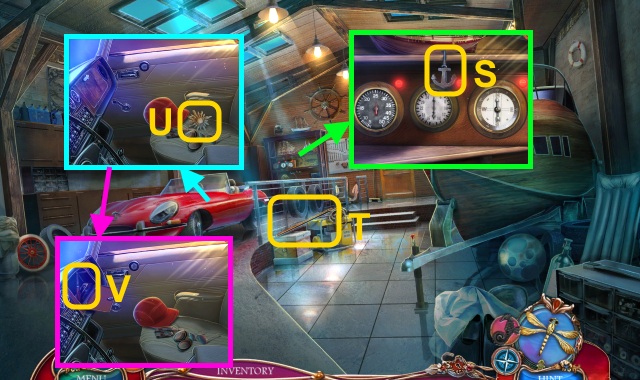
- Use the POCKET KNIFE (E); take the ANCHOR (F).
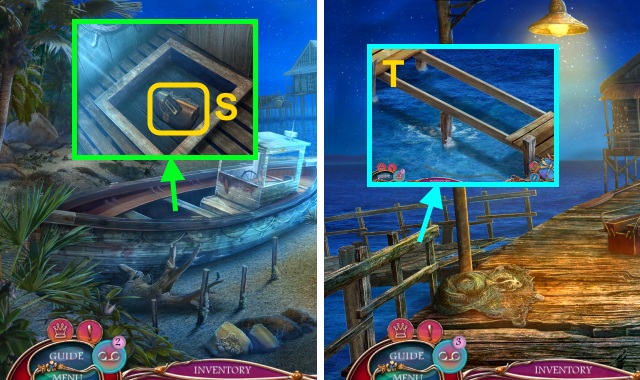
- Stack the planks; take the PLANKS (G).
- Walk forward.
- Take the SMALL BOTTLE (H).
- Place the BARREL TAP and SMALL BOTTLE (I).
- Turn the tap; take the RUM (J).
- Use the RUM; open the box (K).
- Take the DIAL (L).
- Go to the Jungle.
- Place the DIAL (M); take the SPARK PLUG (N).
- Place the SPARK PLUG for a mini-game (O).
- Solution (P1-P5).
- Take the NAIL PULLER (Q).
- Walk left twice.
- Use the NAIL PULLER; take the NAILS (R).
- Take the Tape and FIRST-AID KIT (S).
- Walk forward.
- Place the PLANKS for a mini-game (T).
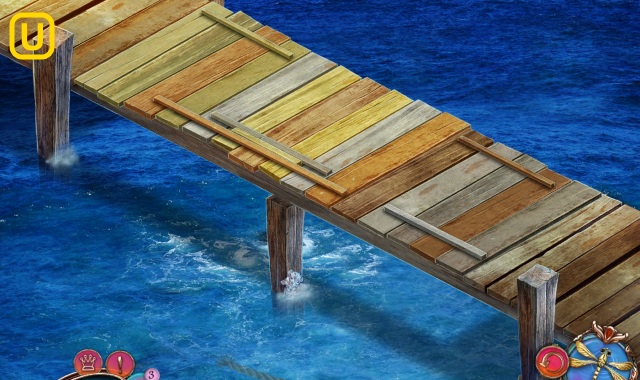
- Solution (U).
- Place the NAILS (V); use the BRICK.
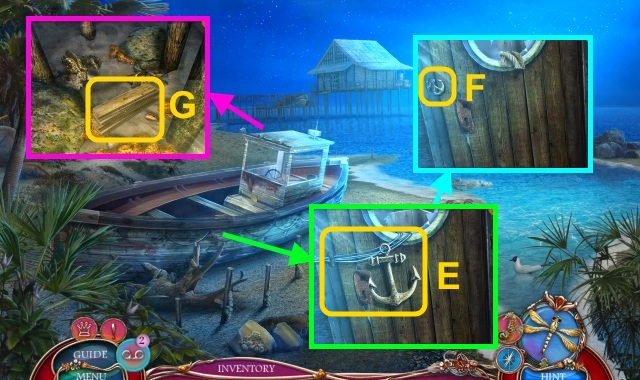
- Walk left.
- Place the ANCHOR; take the FISH EMBLEMS (1/3) (W).
- Walk down, then forward.
- Take the HAWAIIAN SLINGSHOT(X).
- Walk down, then left.
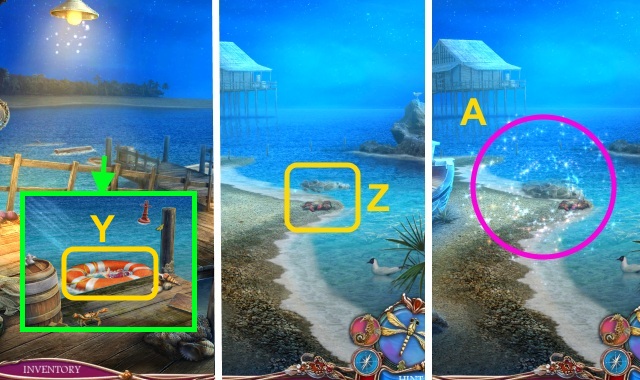
- Use the HAWAIIAN SLINGSHOT; move the net (Y).
- Take the FISH EMBLEMS (2/3).
- Walk down twice.
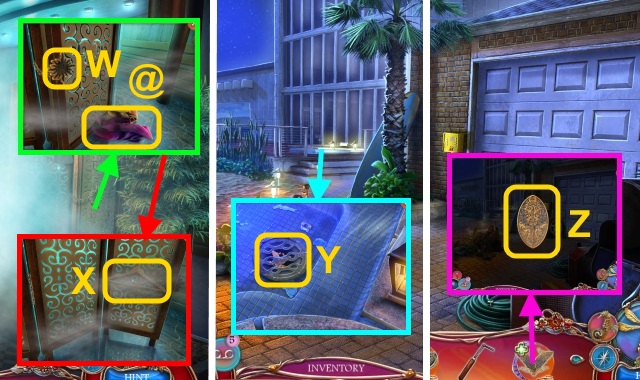
- Use the HAWAIIAN SLINGSHOT (Z).
- Play the HOP to receive the MERMAID PENDANT (A).
- Walk forward twice.
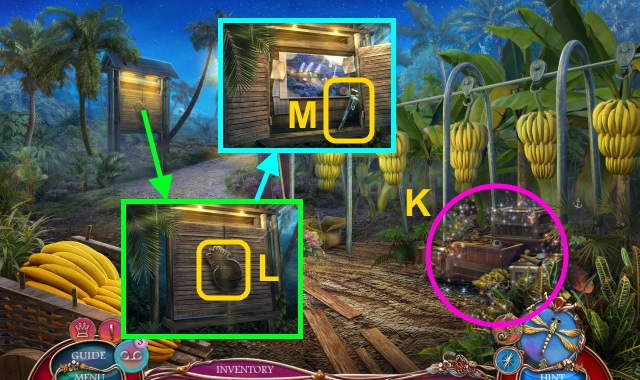
- Place the MERMAID PENDANT; take the BANANA EMBLEM and FISH EMBLEMS (3/3) (B).
- Take the JACK (@).
- Place the FISH EMBLEMS (3/3); take the CADUCEUS (C).
- Place the CADUCEUS on the FIRST-AID KIT (D); take the STERILE GAUZE, IODINE BOTTLE and BANDAGES (E).
- Use the IODINE BOTTLE, STERILE GAUZE, and BANDAGE (F).
- Take the HEXAGON TRINKET (#).
- Walk down, then left.
- Place the HEXAGON TRINKET for a mini-game (G).
- Solution (H): B, Ax3, B, A, Bx3, A, B.
- Take the note and ROSE KEY (I).
- Walk down.
- Use the ROSE KEY; take the note and FAMILY CREST (1/3) (J).
- Go to the Mining Camp.
- Use the ROSE KEY; take the note and FAMILY CREST (2/3) (K).
- Walk down twice.
- Use the ROSE KEY; take the note and FAMILY CREST (3/3) (L).
- Walk down.
- Place the FAMILY CREST (3/3) for a mini-game (M).
- Solution (#).
- Walk left.
Chapter 4: Walker's Estate
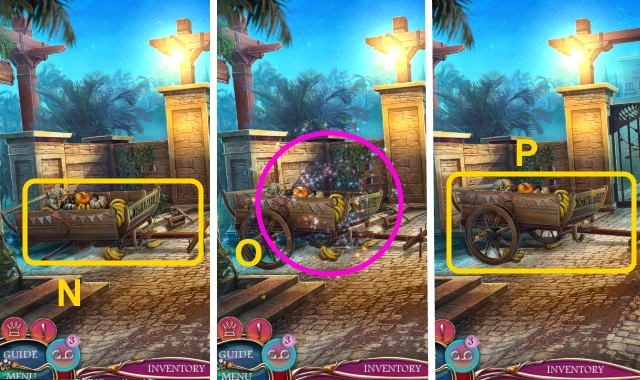
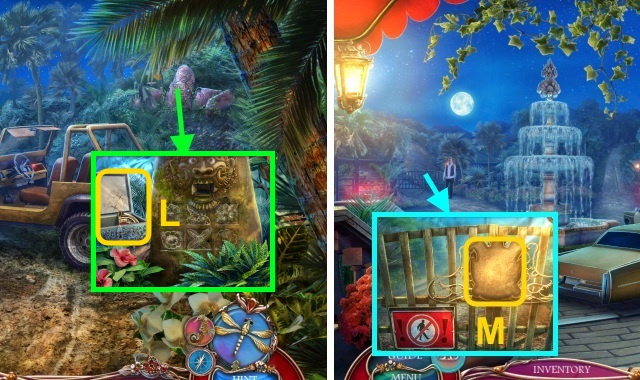
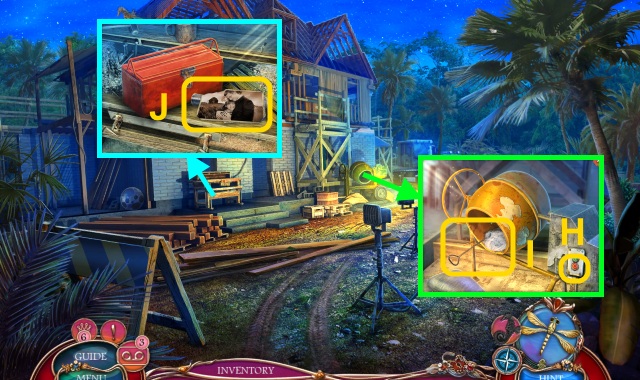
- Move the cart; use the JACK (N).
- Play the HOP to receive the BANANA KEY (O).
- Move the cart (P).
- Walk left, then forward.
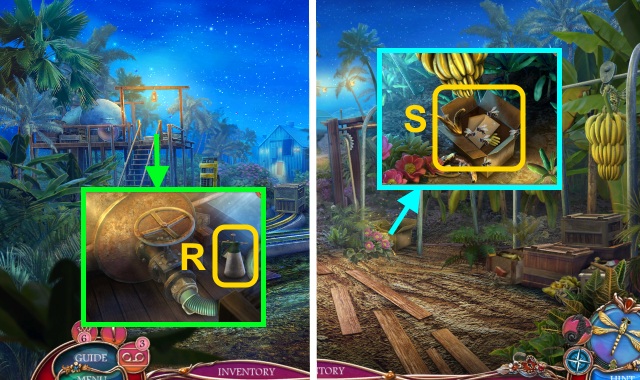
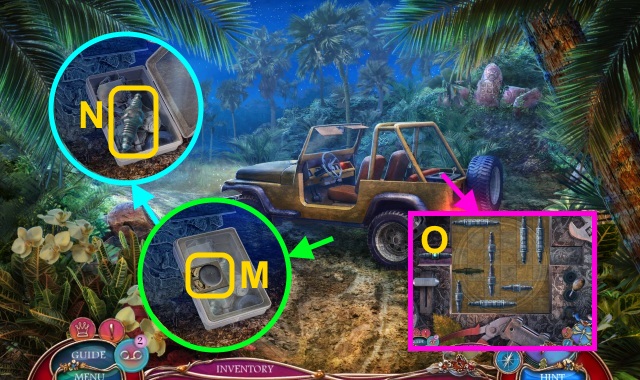
- Take the PESTICIDE (R).
- Walk down.
- Use the PESTICIDE (S); take the RUBBER GLOVES and SAFETY CODE.
- Walk forward.
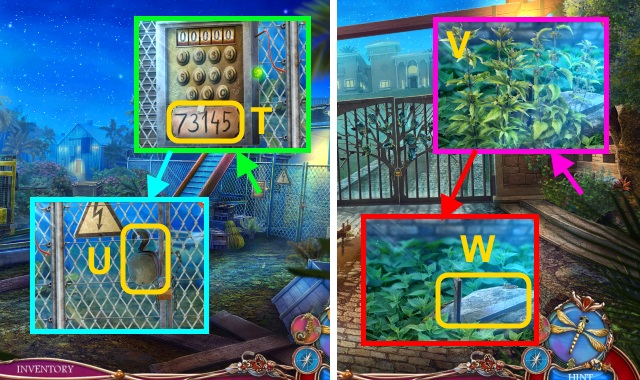
- Place the SAFETY CODE (T); enter 73145.
- Take the CARGO HOOK (U).
- Walk down twice.
- Use the RUBBER GLOVES (V); take the FORKLIFT FORK (W).
- Walk left, then forward.
- Place the FORKLIFT FORK (X).
- Move the forklift (Y).
- Walk forward.
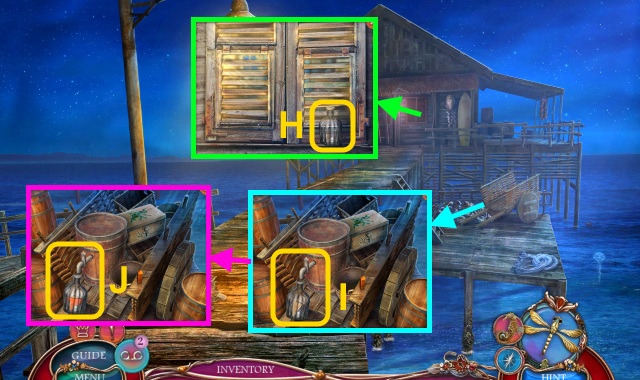
- Take the SLEDGEHAMMER (Z).
- Use the BANANA KEY (B); open the locker.
- Unzip the bag; take the POWER PLUG, MUSIC NOTES (1/2), and PINEAPPLE EMBLEM (C).
- Walk forward.
- Place the POWER PLUG for a mini-game (D).
- Solution (E, F).
- Press the button (H).
- Use the SLEDGEHAMMER (I); take the MANHOLE OPENER.
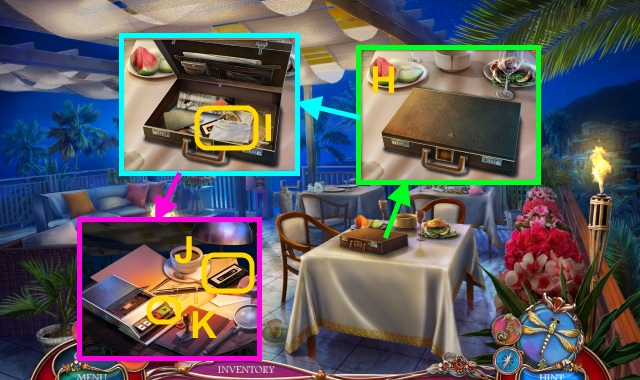
- Take the FAMILY PHOTO and EMPTY FLASHLIGHT (J).
- Walk down three times.
- Use the MANHOLE OPENER; play the HOP to receive the PUMP MOTOR (K).
- Place the BANANA EMBLEM and PINEAPPLE EMBLEM (L); take the SPANNER (M).
- Walk forward.
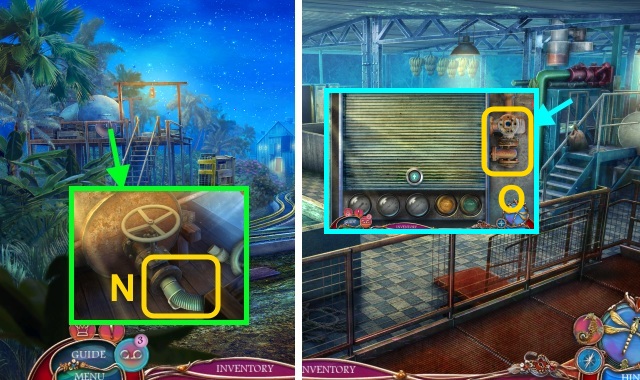
- Use the SPANNER; take the PUMP HOSE (N).
- Walk forward.
- Place the PUMP HOSE and PUMP MOTOR (O).
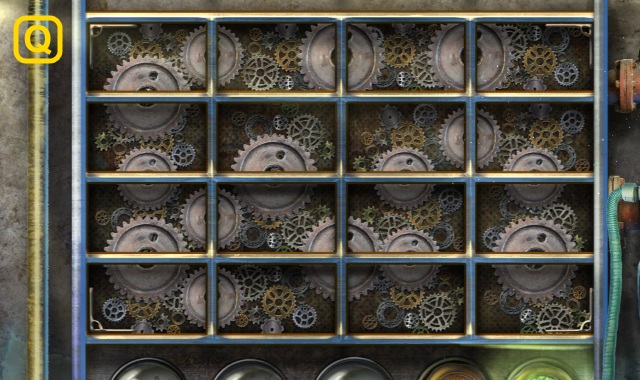
- Solution (Q).
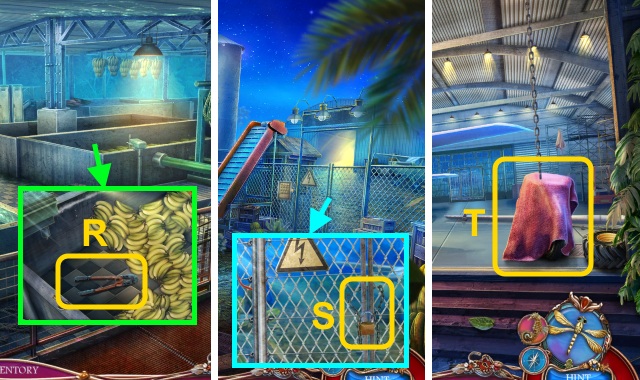
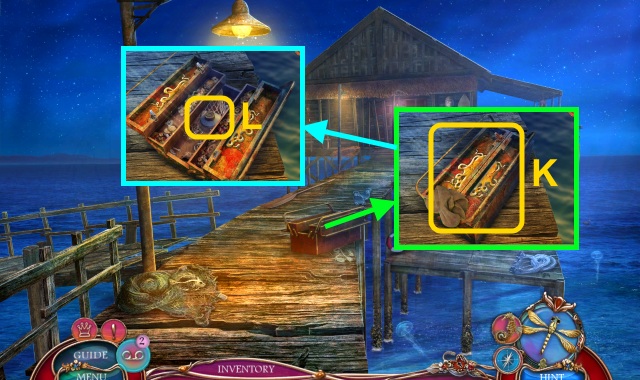
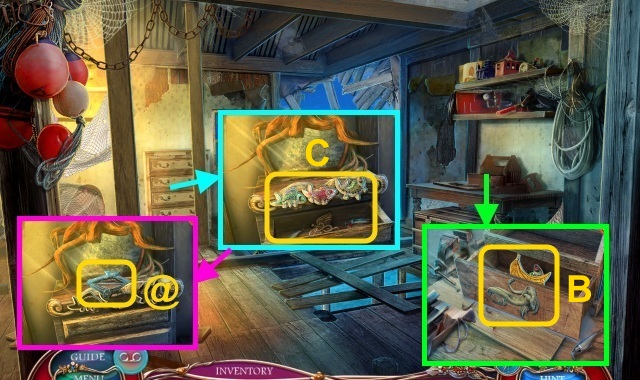
- Move the bananas; take the CHAIN CUTTER (R).
- Walk down.
- Use the CHAIN CUTTER (S).
- Walk right.
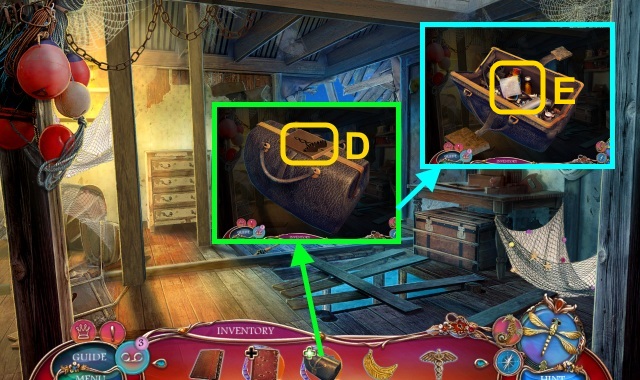
- Move the cloth (T).
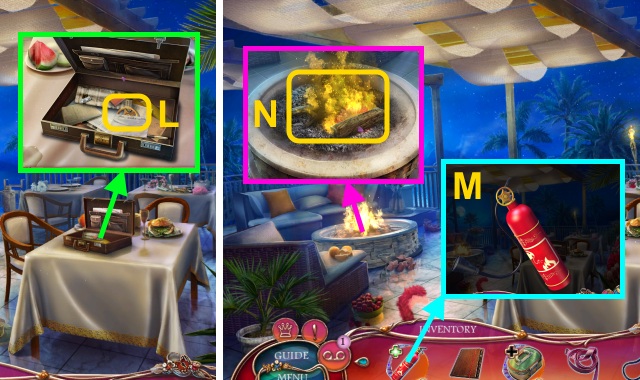
- Take the OIL and TRANSACTION LISTING (U).
- Take the LEATHER POUCH and BILLIARD COIN (V).
- Place the TRANSACTION LISTING and FAMILY PHOTO in the CHECKBOOK; take the EVIDENCE (X).
- Place the CARGO HOOK (Y).
- Go to the Construction Site.
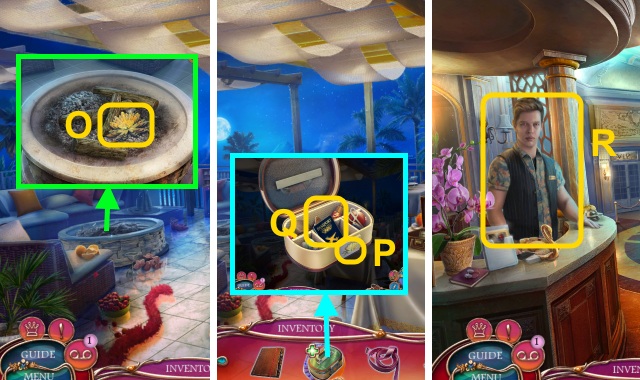
- Use the OIL; take the CRANE KEY (Z).
- Go to the Hangar.
- Use the CRANE KEY (A); flip the switches.
- Use the MANHOLE OPENER (B).
- Take the DOOR CARD and Tape (C).
- Use the DOOR CARD (D); turn the handle.
- Walk forward.
- Give the EVIDENCE for a mini-game (E).
- Solution (F): A, C, B.
- Play the HOP to receive the BATTERIES (G).
- Place the BATTERIES in the EMPTY FLASHLIGHT (H); take the FLASHLIGHT.
- Use the FLASHLIGHT (I).
- Open the CUPBOARD; take the SMALL FAMILY CREST and BASS CLEF (J).
- Place the SMALL FAMILY CREST on the LEATHER POUCH (K); take the PLANE HANDLE (L).
- Walk down.
- Place the PLANE HANDLE (M).
- Play the HOP to receive the FUSE (N).
- Walk forward.
- Open the box; replace the FUSE (O).
- Walk left.
- Place the BILLIARD COIN (P); take the PLAYING-CARD SYMBOL (1/4) and FLOWER EMBLEM (Q).
- Walk down.
- Place the FLOWER EMBLEM (R); take the MUSIC NOTES (2/2) and RIFLE FIGURINE (S).
- Walk left.
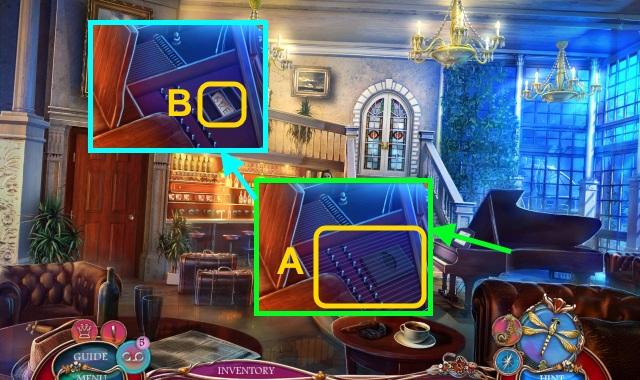
- Place the MUSIC NOTES (T); open the case for a mini-game.
- Solution (U, V).
- Take the CLOCK HANDS (W).
- Walk down.
- Place the CLOCK HANDS (X); take the ANTLERS EMBLEM (Y).
- Walk left.
- Place the ANTLERS EMBLEM (Z); take the PISTOL FIGURINE.
- Place the RIFLE FIGURINE and PISTOL FIGURINE (A).
- Take the SURFBOARD EMBLEM and note; open the box (B).
- Go to the Ranch Gate; walk down, then right.
Chapter 5: Amabel's Apartment
- Walk forward, then down.
- Place the SURFBOARD EMBLEM (D); move the clothes.
- Take the TANNING OIL (E).
- Match the plants (F); move the flowerpot (G).
- Take the PLAYING-CARD SYMBOL (2/4) (H).
- Walk forward.
- Take the PLAYING-CARD SYMBOL (3/4) (I); place the BASS CLEF (J).
- Take the MERMAID (K).
- Take the HEART (L).
- Walk down.
- Place the MERMAID (M); take the STINGRAY EMBLEM (N).
- Place the STINGRAY EMBLEM (O).
- Play the HOP to receive the GARAGE-PANEL KEY (P).
- Walk forward.
- Use the GARAGE-PANEL KEY for a mini-game (Q).
- Solution (R).
- Walk right.
- Take the ANCHOR KEY (S).
- Take the BROKEN HARPOON (T).
- Move the objects; take the SUN EMBLEM (U).
- Pour the TANNING OIL; take the PIANO STRING TUNER and Tape (V).
- Walk forward, then left.
- Take the TOWEL (@); place the SUN EMBLEM (W).
- Take the HANGER (X).
- Walk down three times.
- Use the HANGER (Y); take the SHIELD PENDANT.
- Examine the SHIELD PENDANT; move the pieces to make the SHIELD ORNAMENT (Z).
- Walk right, then forward.
- Use the PIANO STRING TUNER (A); place the SHIELD ORNAMENT.
- Take the NAVIGATION CODE (B).
- Walk down.
- Place the NAVIGATION CODE; arrange the dials (C).
- Take the PIPE (D).
- Walk forward, then left.
- Place the PIPE for a mini-game (E).
- Solution (F).
- Open the door (G).
- Take the LONG BRUSH (H).
- Walk down twice.
- Use the LONG BRUSH (I).
- Play the HOP to receive the BUTTERFLY EMBLEM (J).
- Walk forward.
- Place the BUTTERFLY EMBLEM (K).
- Walk forward.
- Use the ANCHOR KEY (L); take the DOLPHIN ORNAMENT (1/2) (M).
- Gather the SWAN-FIGURINE PARTS (O).
- Walk down.
- Use the TOWEL to take the GOLDEN HEDGEHOG (1/2) (P).
- Walk forward, then up.
- Play the HOP to receive the GLUE (Q).
- Examine the SWAN FIGURINE PARTS; arrange the parts (R).
- Use the GLUE to receive the SWAN FIGURINE.
- Open the drawer (S); use the HEART.
- Take the GOLDEN HEDGEHOG (2/2) (T), note, and WOODEN BOX (U).
- Walk down.
- Place the GOLDEN HEDGEHOG (2/2) and SWAN FIGURINE for a mini-game (V).
- Solution (W-Y).
- Take the PLAYING-CARD SYMBOL (4/4) (Z).
- Place the PLAYING-CARD SYMBOL (4/4) on the WOODEN BOX; take the SEASHELL PENDANT (A).
- Walk down, then left.
- Place the SEASHELL PENDANT (B); play the HOP to receive the BAR PICTURE (C).
- Walk down.
- Place the BAR PICTURE for a mini-game (D).
- Solution (E).
- Take the DOLPHIN ORNAMENT (2/2) (F).
- Walk forward, then up.
- Place the DOLPHIN ORNAMENT (2/2) (G); take the TERRACE KEY (H).
- Walk down.
- Use the TERRACE KEY (I).
- Walk forward.
- Take the HARPOON TIP (J).
- Combine the HARPOON TIP and BROKEN HARPOON to make the HARPOON (K).
- Place the HARPOON for a mini-game (L).
- Solution (M): A, B, Cx2.
- Talk to Liliana for a mini-game.
- Solution (N): C, B, C.
- You receive the ANTIDOTE.
- Take the LIBERTY STONE.
- Walk down, then up.
- Give the ANTIDOTE (O).
- Congratulations! You have completed Off the Record: Liberty Stone.
Created at: 2015-06-28