

Walkthrough Menu
- General Tips
- Chapter 1: The Main House
- Chapter 2: The Dressing Room and More
- Chapter 3: The Village
- Chapter 4: Benjamin's House
- Chapter 5: The Caves
- Chapter 6: The Tower
General Tips
- This is the official guide for Ominous Objects: Phantom Reflection.
- This guide will not mention each time you have to zoom into a location; the screenshots will show each zoom scene.
- Hidden-object puzzles are referred to as HOPs. This guide will not show HOP solutions. It will identify the location of the HOP and the inventory item acquired.
- This guide will show solutions for non-random puzzles. Please read the in-game instructions for each puzzle.
Chapter 1: The Main House
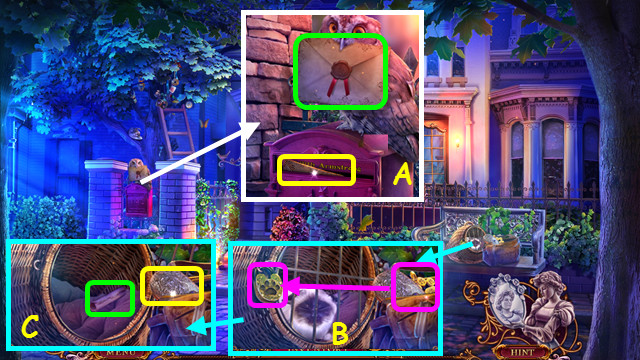
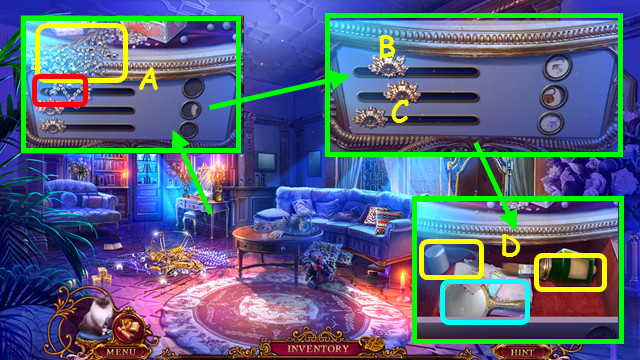
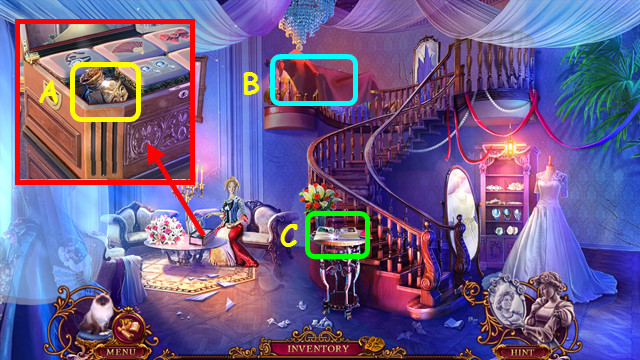
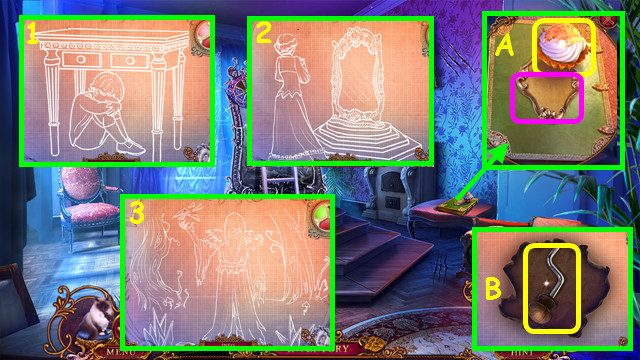
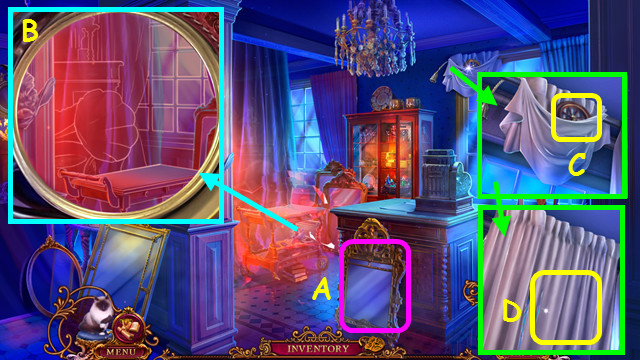
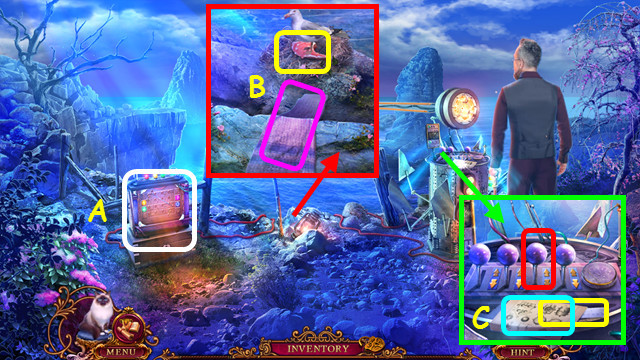
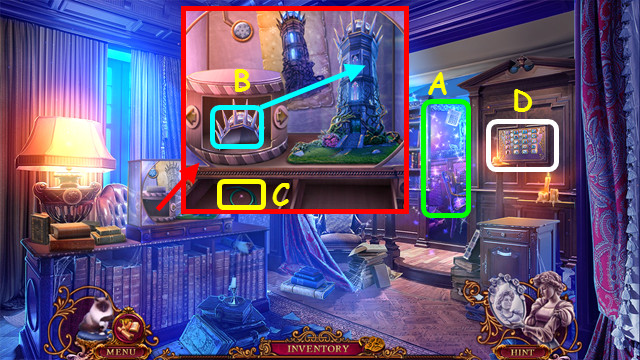
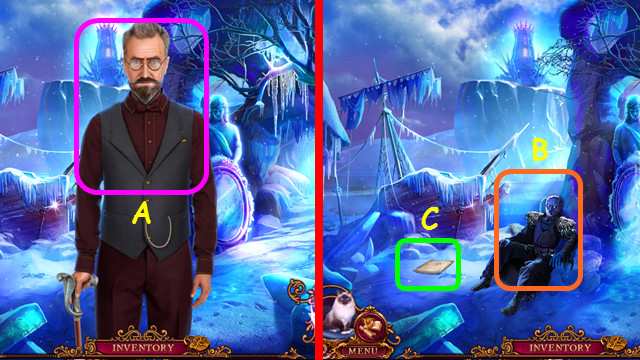
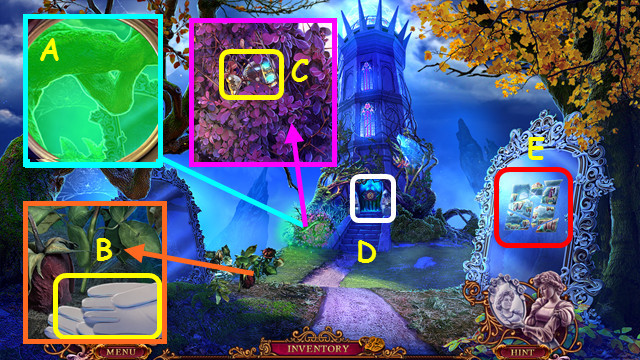
- Touch the letter; take the LETTER (A).
- Open and read the LETTER; take the WOMAN FIGURE and PIN (inventory).
- Bend the PIN twice to make the LOCKPICK (inventory).
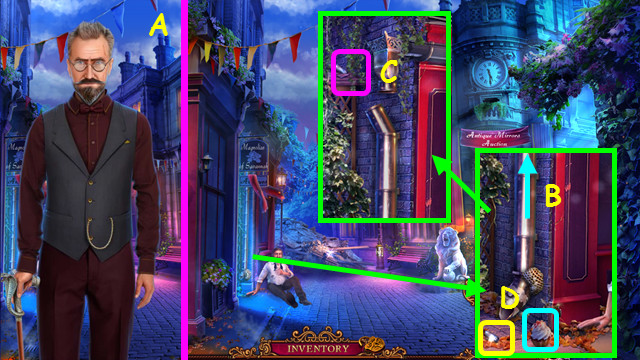
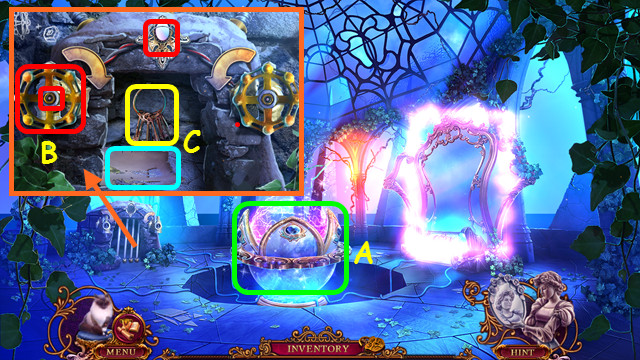
- Take the PAW KEY; use it on the lock (B). You earn MR. JENKINS.
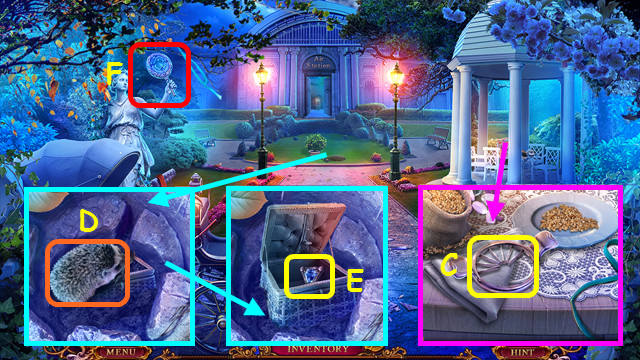
- Take the photo and GOGGLES CASE (C).
- Open the GOGGLE CASE; take the note, instructions, and GOGGLES (inventory).
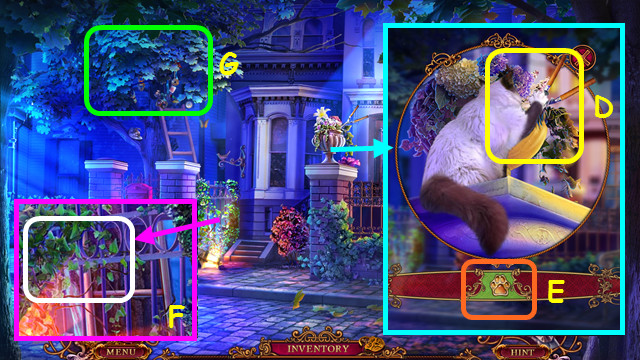
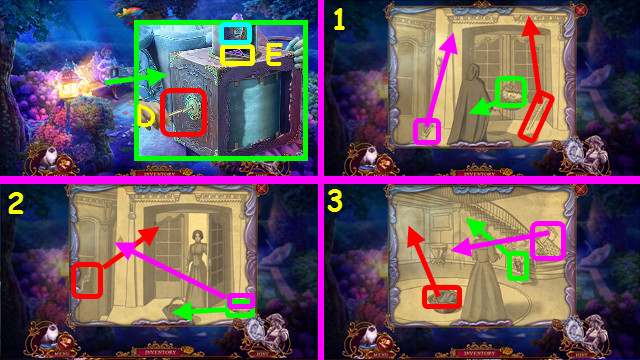
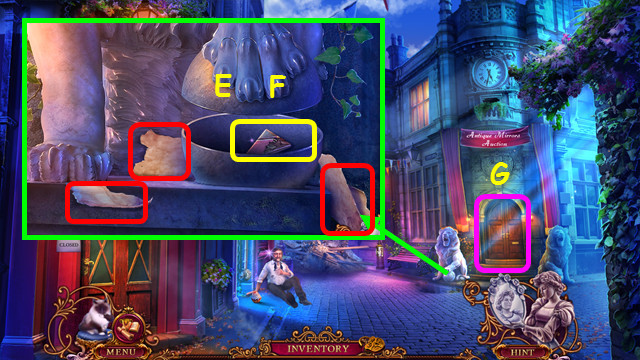
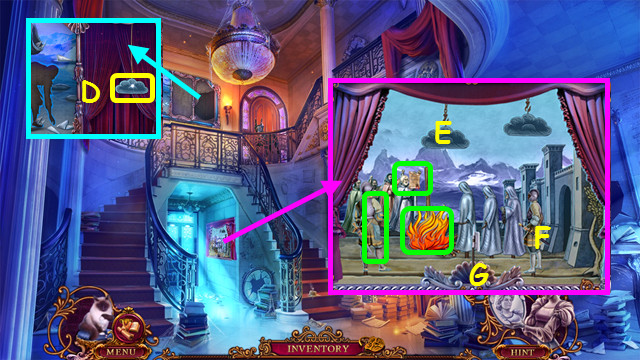
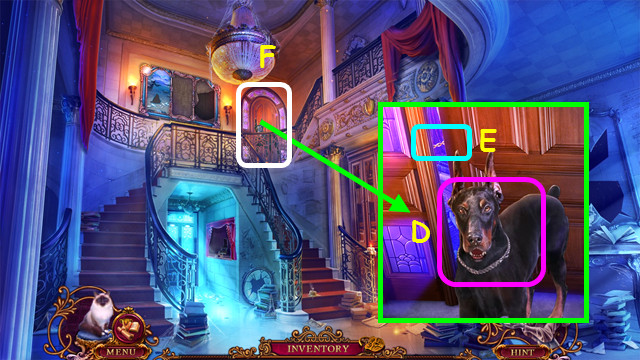
- Use MR. JENKINS (D).
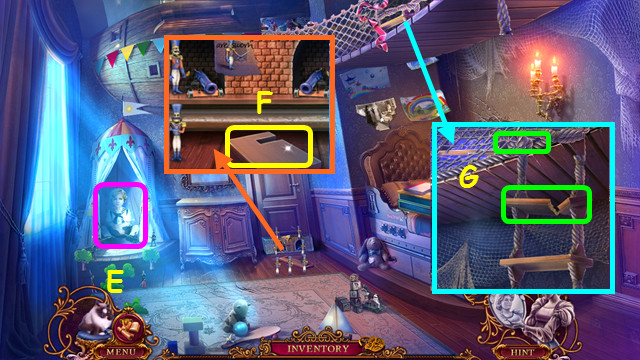
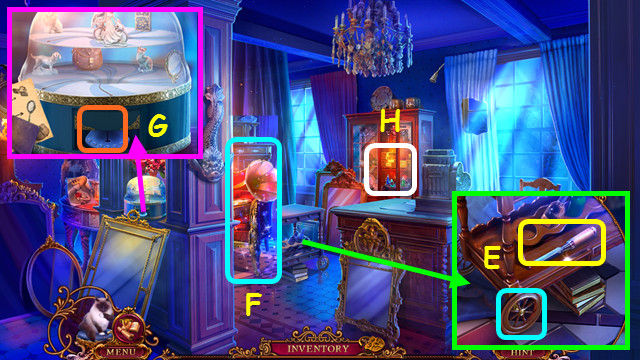
- Press when the paw is in the green area; earn the SHEARS (E).
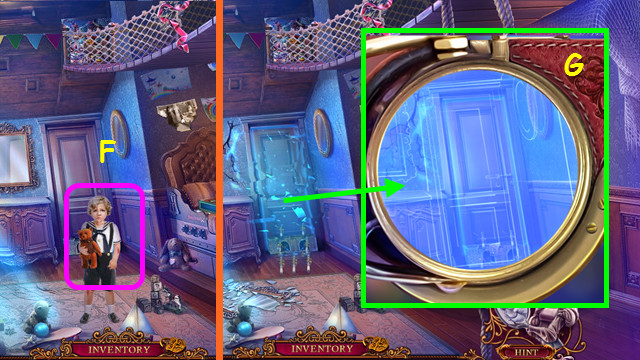
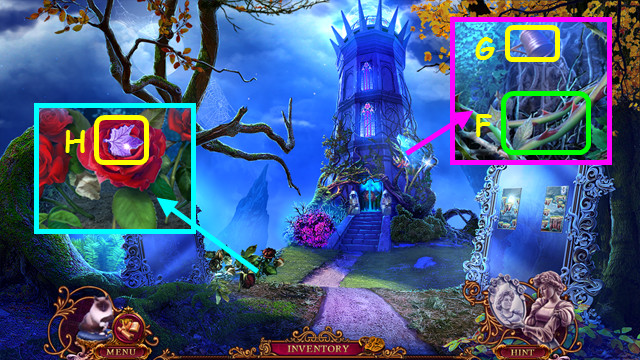
- Use the SHEARS (F).
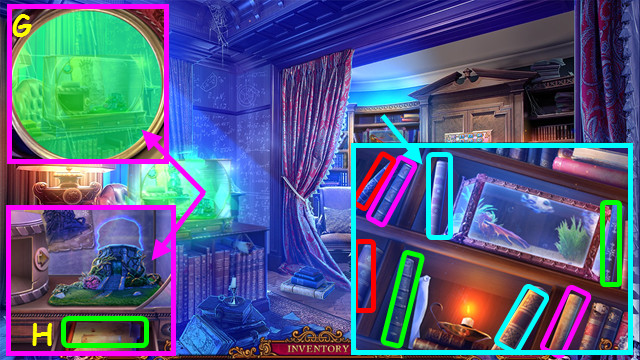
- Play the HOP; earn the CORKED ACID (G).
- Open the CORKED ACID to make the ACID (inventory).
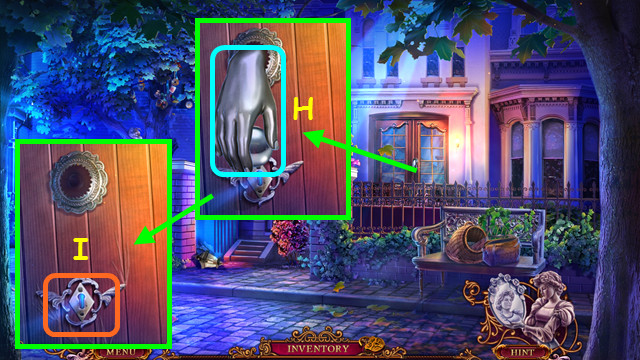
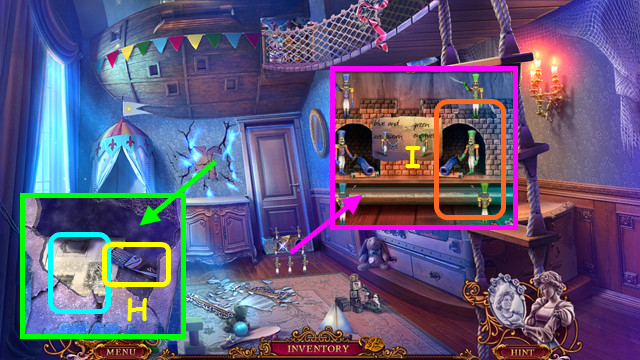
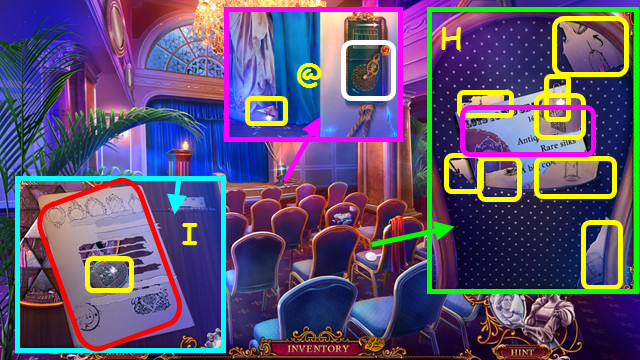
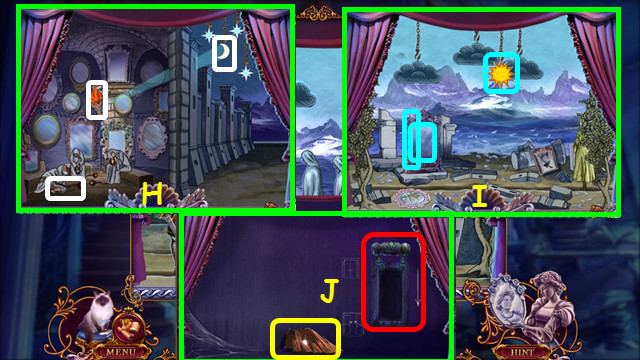
- Touch the hand; use the ACID (H).
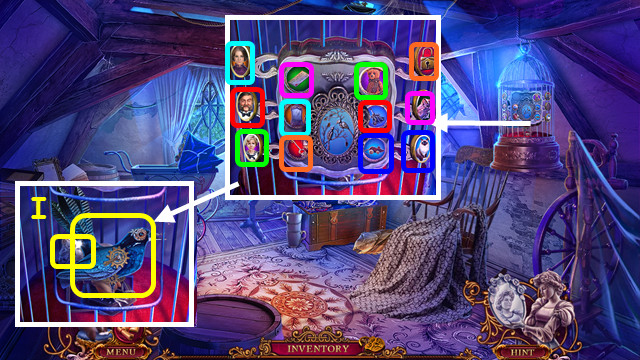
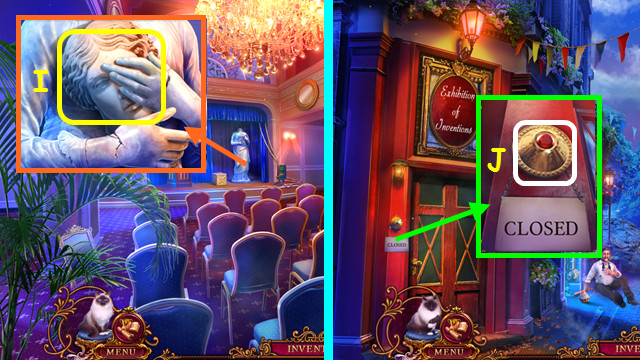
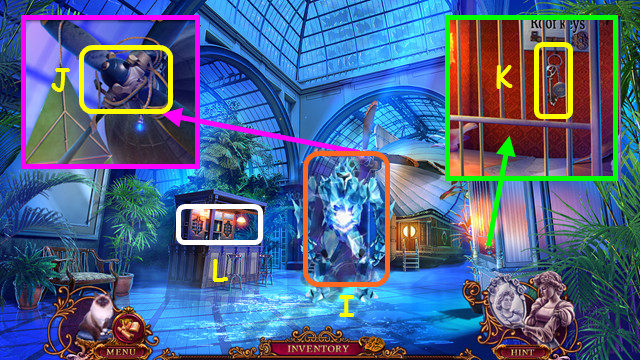
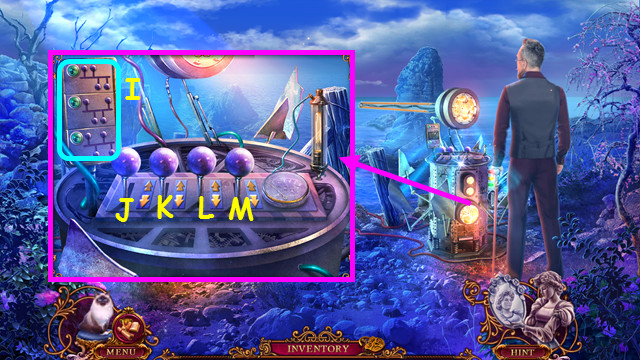
- Use the LOCKPICK (I).
- Walk forward.
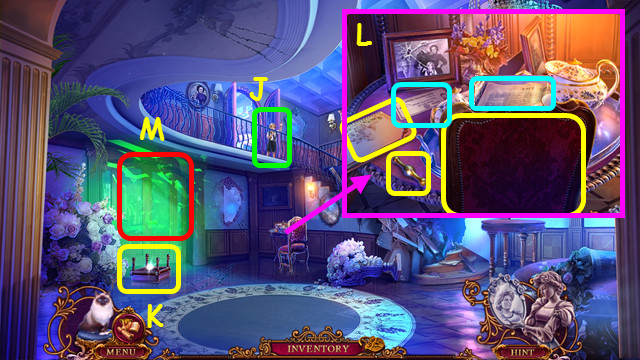
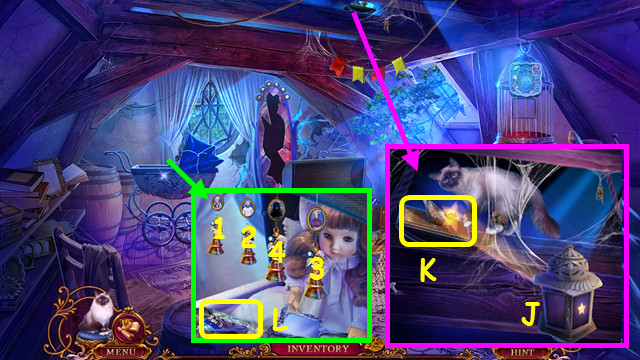
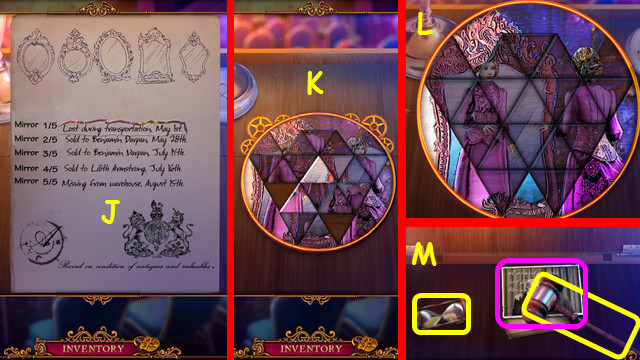
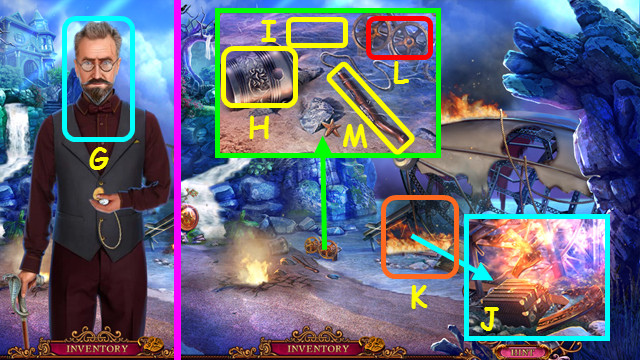
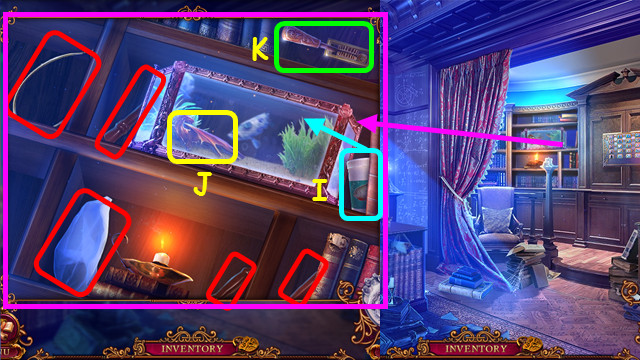
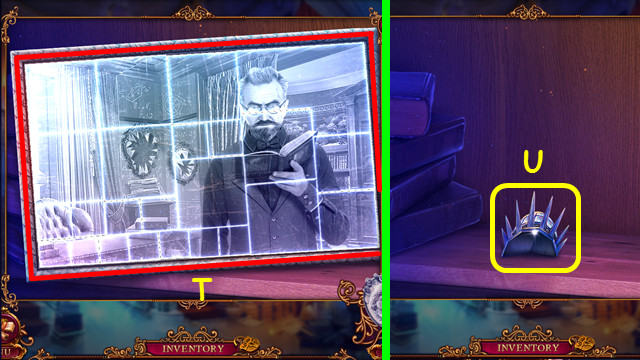
- Look at Patrick (J).
- Take the OTTOMAN (K).
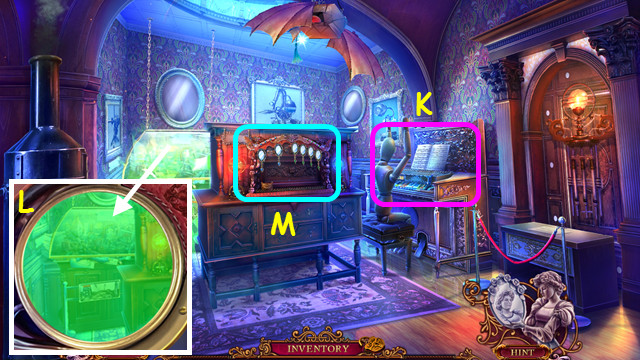
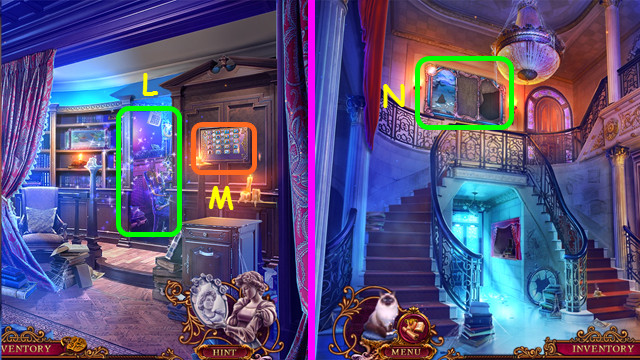
- Take the CHAIR, MAP, and CORKSCREW HANDLE; read the paper and receipt (L).
- Restore the MAP and take the PENCIL (inventory).
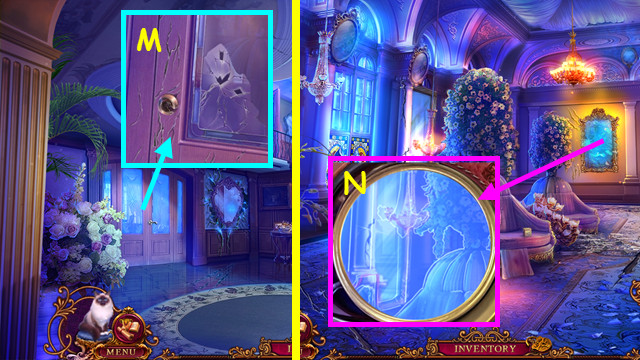
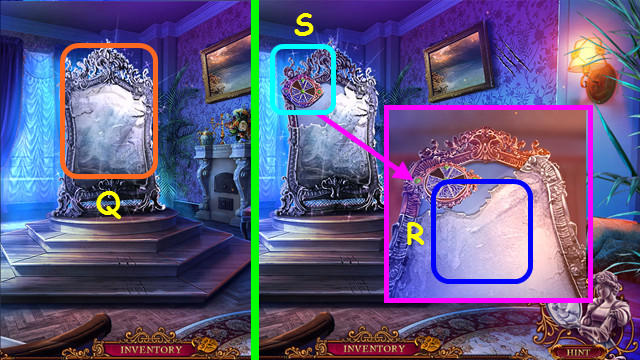
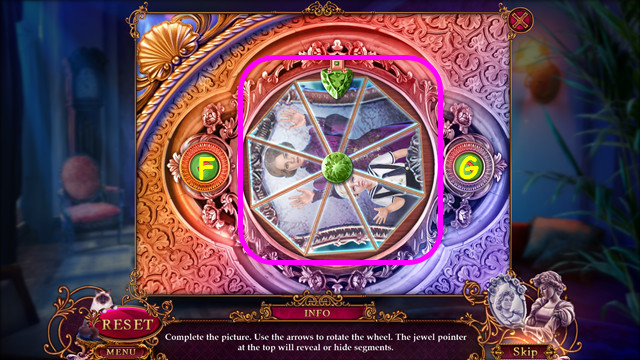
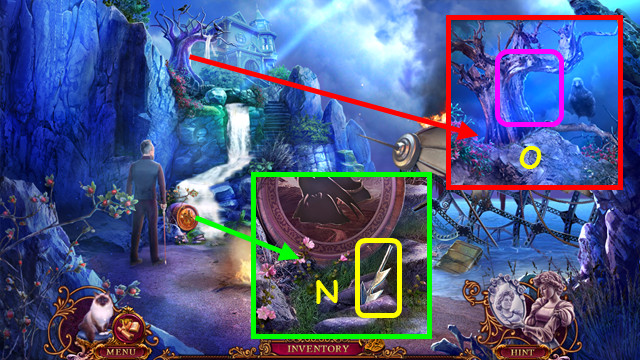
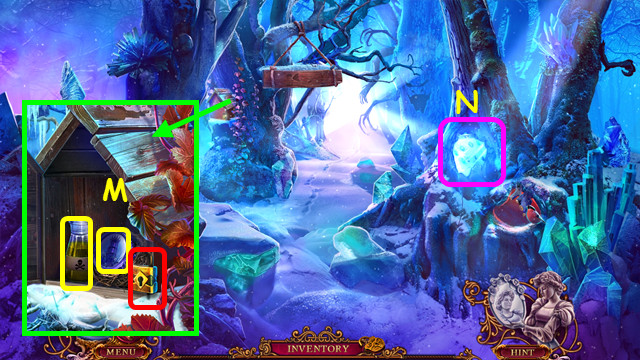
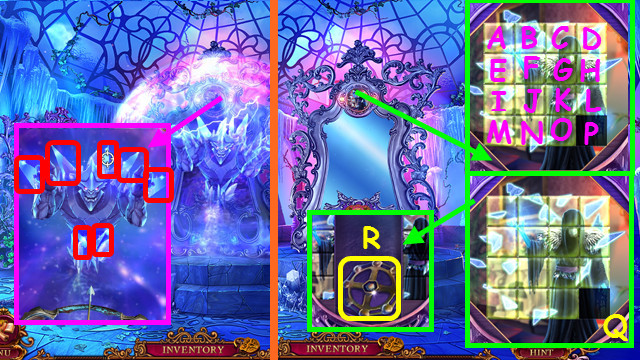
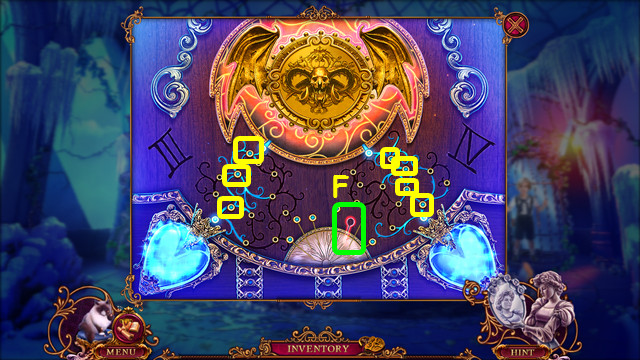
- Select the door (M).
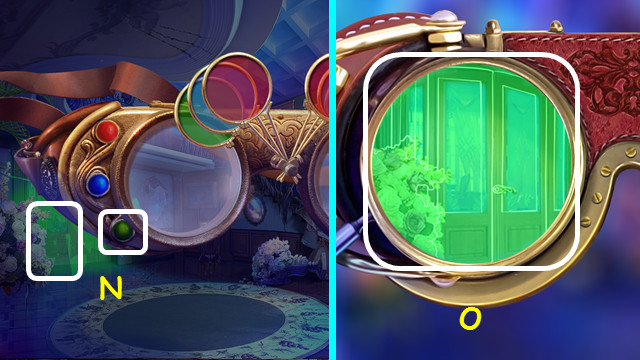
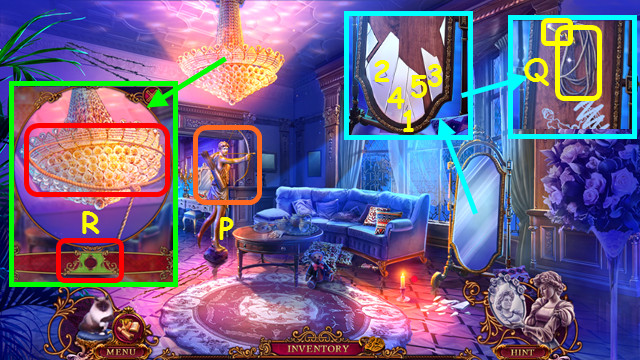
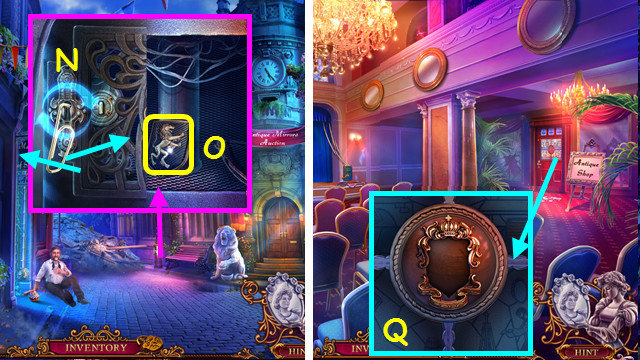
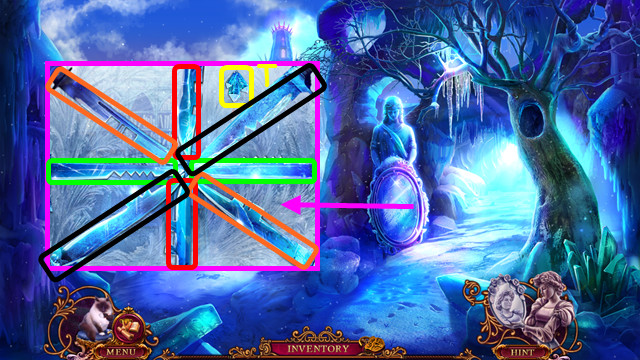
- Select the green lens to match the anomaly color (N).
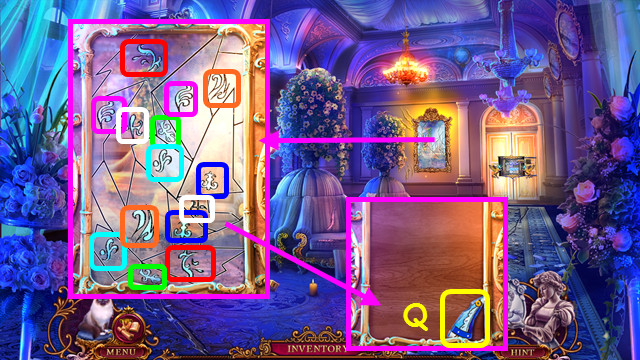
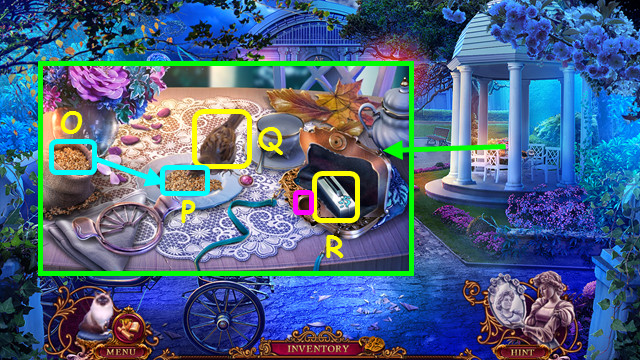
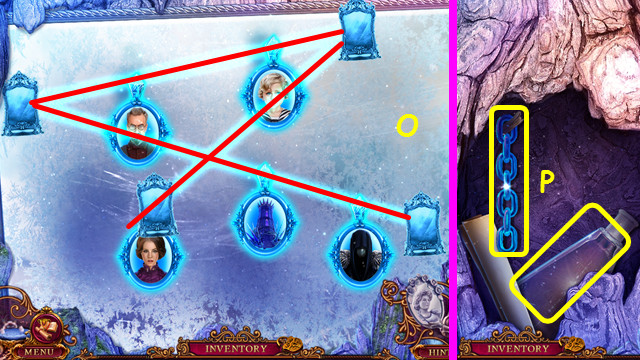
- Rotate the lines to match the scene (O).
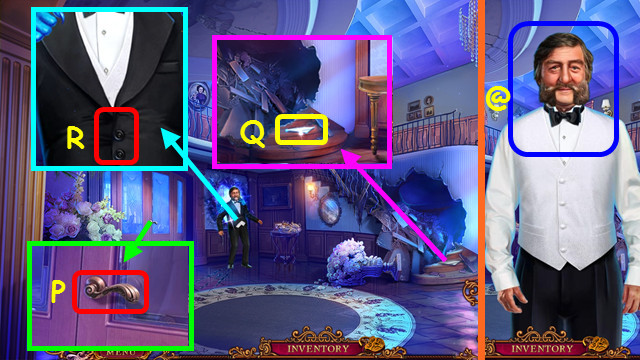
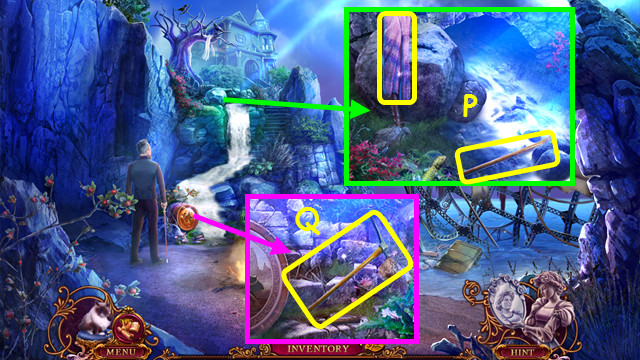
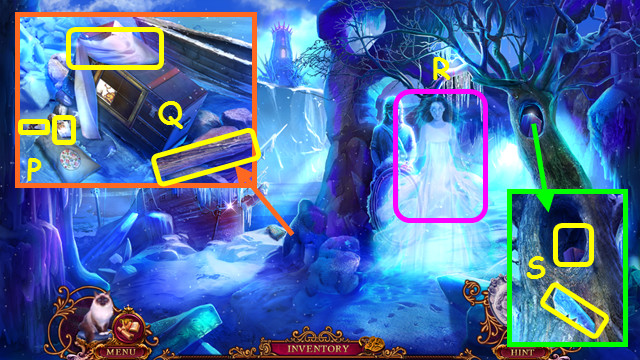
- Turn the handle (P).
- Take the GLASS PIECE (Q).
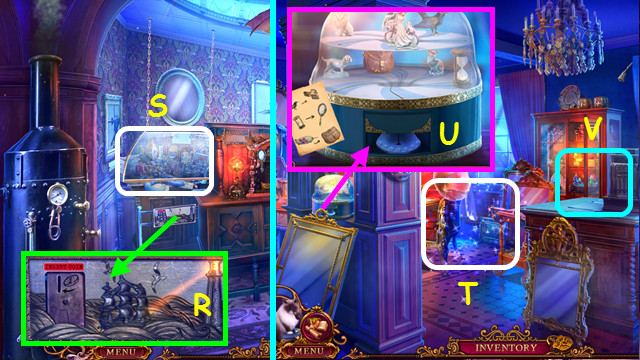
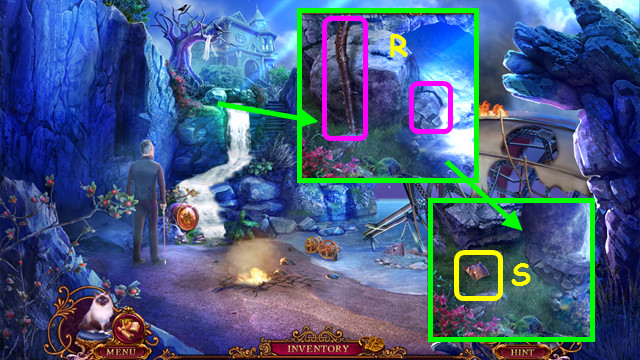
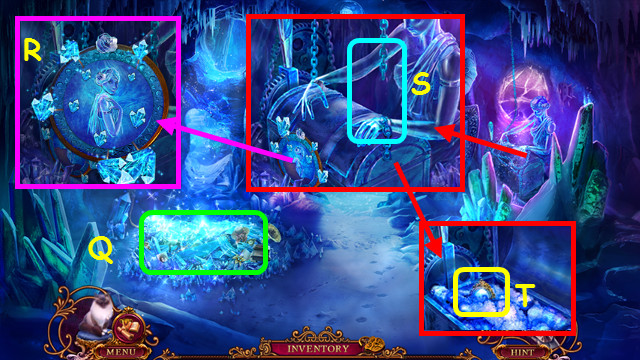
- Use the GLASS PIECE (R).
- Talk to the Butler (@).
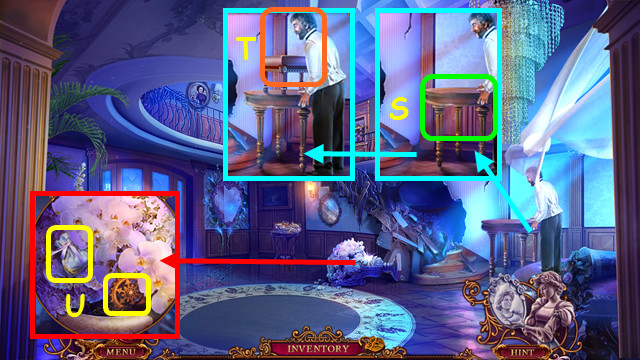
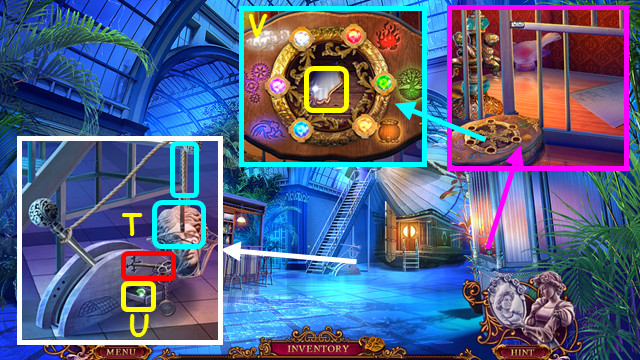
- Move the table (S).
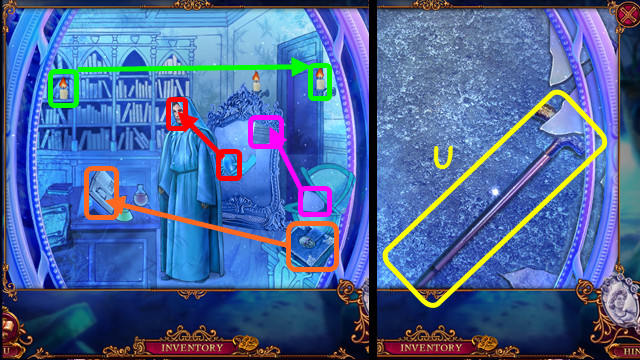
- Place the OTTOMAN and CHAIR (T).
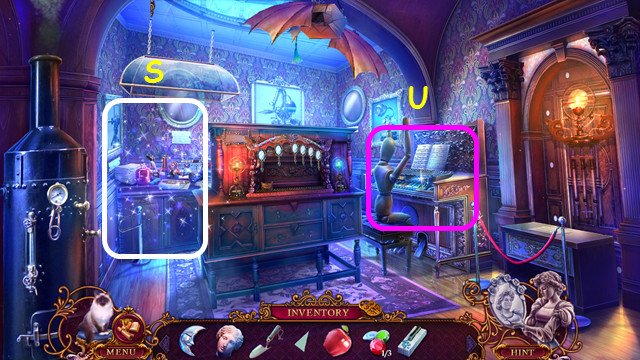
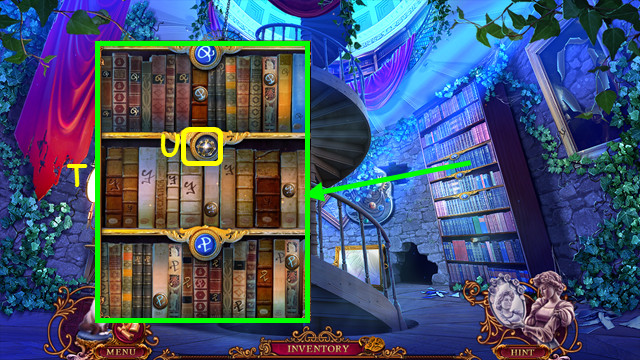
- Move the flowers; take the POUCH and GEAR (U).
- Open the POUCH to find the PELLETS (inventory).
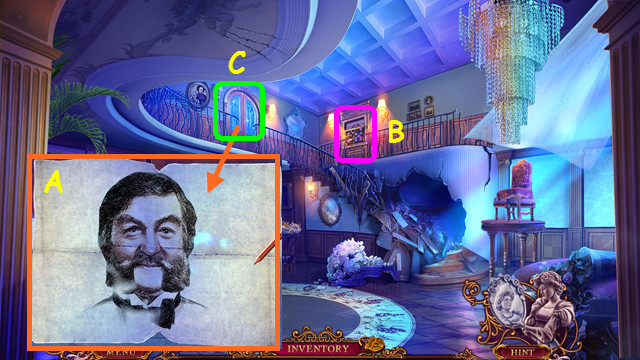
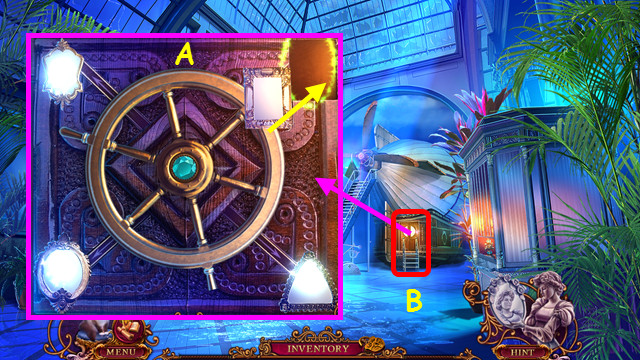
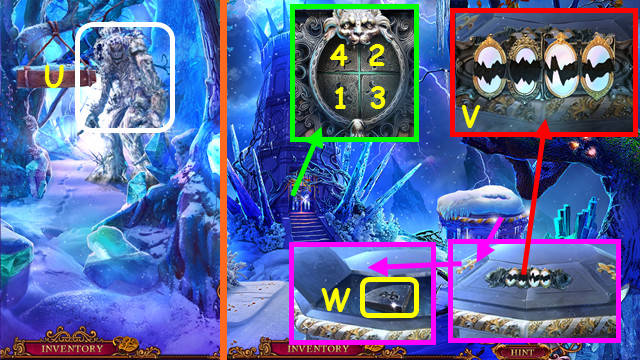
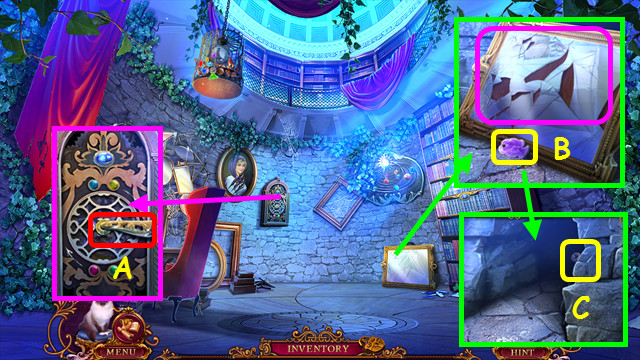
- Select the door; use the PENCIL on the paper until it folds (A).
- Note the mini-game (B).
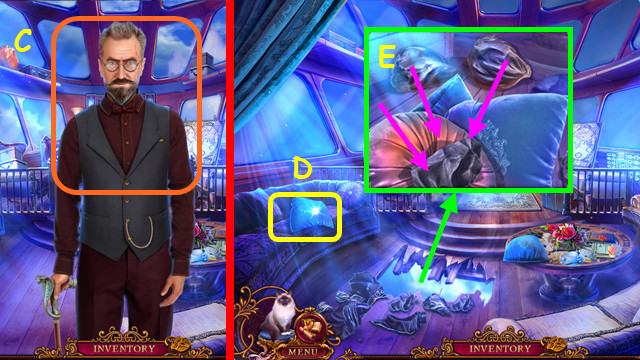
- Enter Patrick's Room (C).
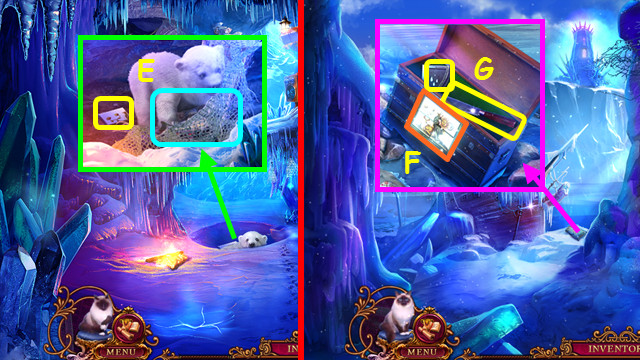
- Look at Patrick (E).
- Take the BOARD (F).
- Use MR. JENKINS; replace the BOARD (G).
- Play the HOP; earn the TOY GUN.
- Combine the TOY GUN and PELLETS to make the LOADED TOY GUN (inventory).
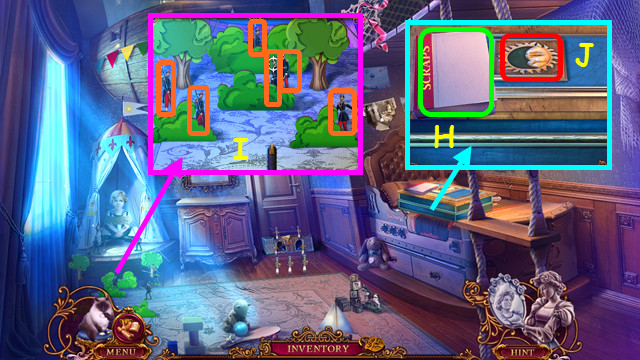
- Open the scrapbook; read the articles (H).
- Use the LOADED TOY GUN on the 6 toy soldiers (I).
- Talk to Patrick; earn the MOON FIGURE.
- Place the MOON FIGURE (J).
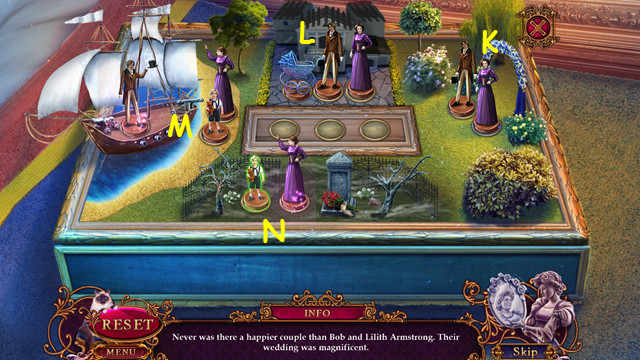
- Place Bob and Lilith (K).
- Place Bob, Lilith, and Patrick (L).
- Place Bob, Lilith, and Patrick (M).
- Place Lilith and Patrick (N).
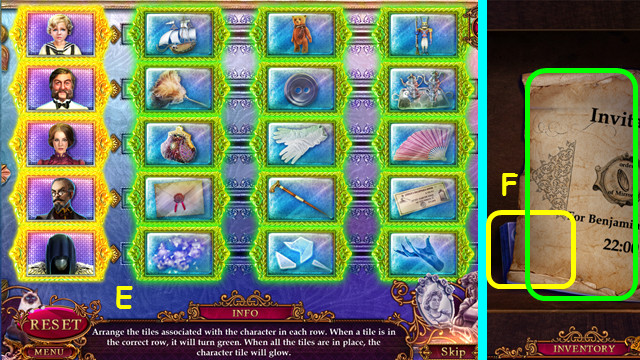
- Take the invitation, BOTTLE, METAL SLIDER, and MAN FIGURE from the box.
- Walk down and select the mini-game on Lilith's door.
- Place the MAN FIGURE, WOMAN FIGURE, and GEAR on the device.
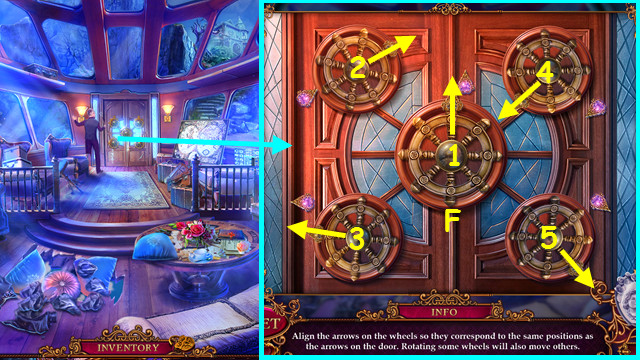
- Solution (O).
- Enter Lilith's Room.
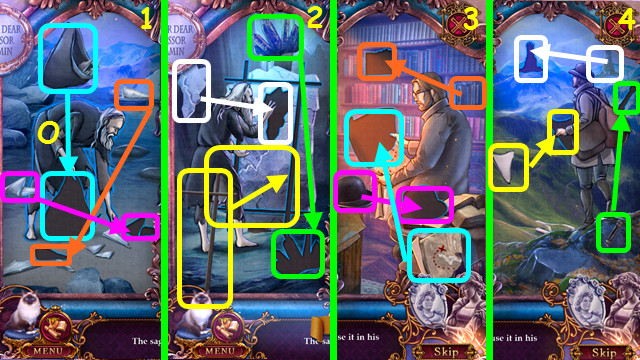
- Look at the statue (P).
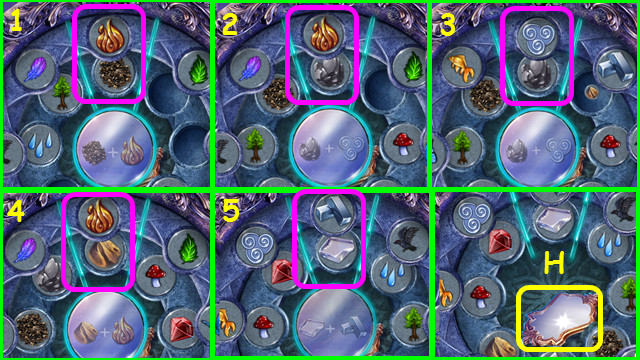
- Solution (1-5).
- Take the CORKSCREW PART and ROPE (Q).
- Combine the CORKSCREW HANDLE and CORKSCREW PART to make the CORKSCREW (inventory).
- Combine the BOTTLE and CORKSCREW to find the INSTRUCTIONS (inventory).
- Use the ROPE; click when the indicator is in the green (R).
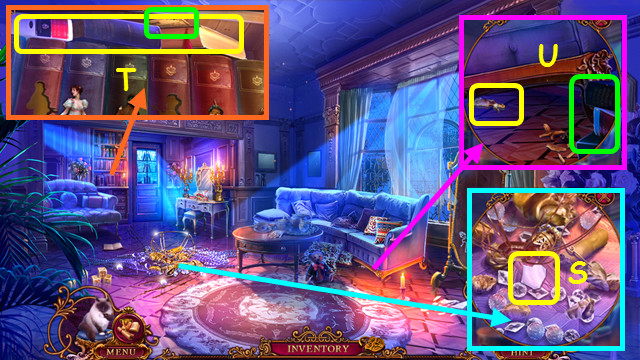
- Move the pieces; take the SHARD (S).
- Take the invitation and BOOKS (T).
- Place the BOOKS; use MR. JENKINS to take the 1st PAPER FIGURE (U).
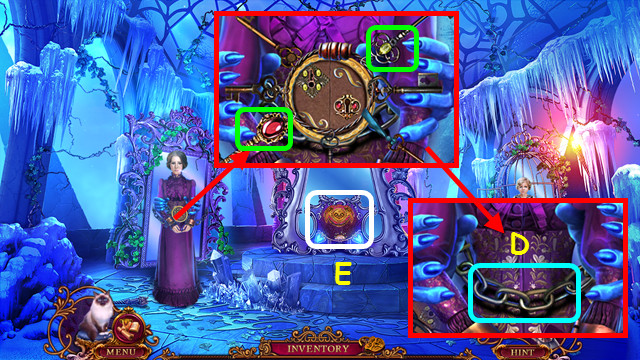
- Take the NECKLACE; place the METAL SLIDER (A).
- Slide B all the way right, and then back left until the lock appears; slide the other 2 slowly until the locks appear (C).
- Take the BANDAGE, GREEN PAINT, and mirror (D).
- Go to Patrick's Room.
- Select Patrick (F).
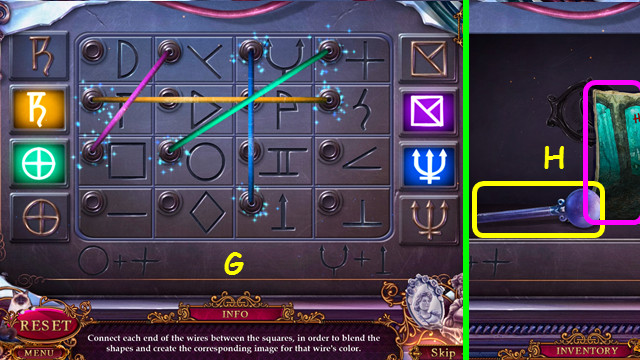
- Select the door, use the blue lens, and align the lines (G).
- Remove the wallpaper and bricks; take the MATCHES and article (H).
- Use the GREEN PAINT (I).
- Walk forward.
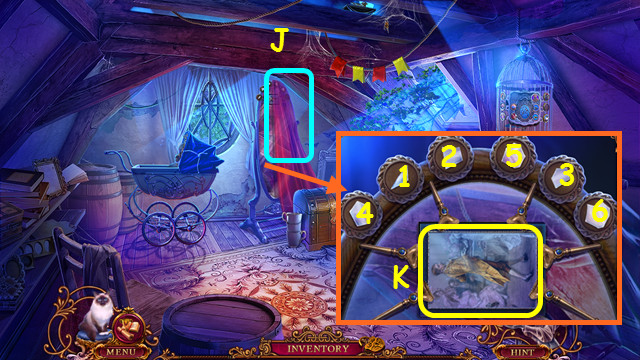
- Uncover the mirror (J).
- Place the SHARD; select the shards (1-6).
- Take the PAINTING (K).
- Remove the glass from the PAINTING; take the 2nd PAPER FIGURE (inventory).
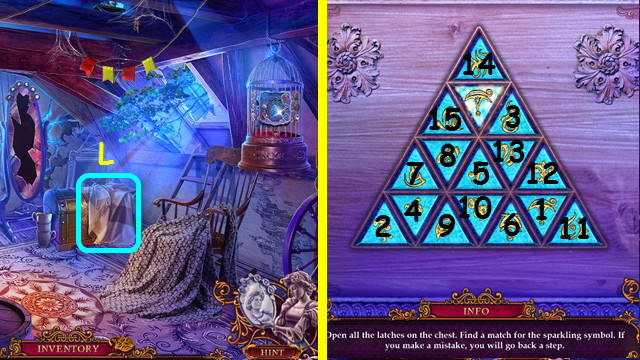
- Move the blanket; select the chest (L).
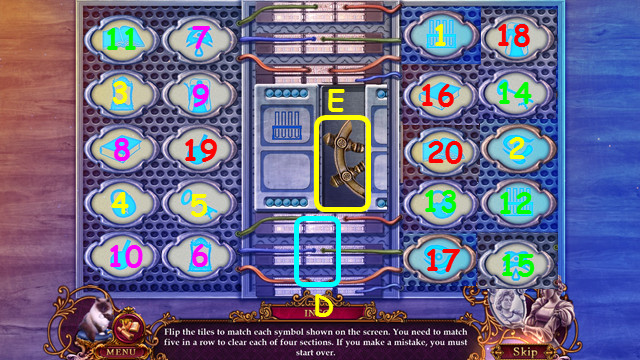
- Select the tiles (1-15).
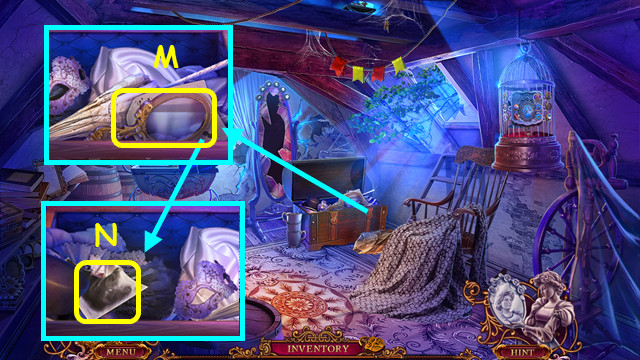
- Take the PAPER WITH MIRROR (M).
- Move the items; take the 1/2 PICTURE PART (N).
- Go to Lilith's Room.
Chapter 2: The Dressing Room and More
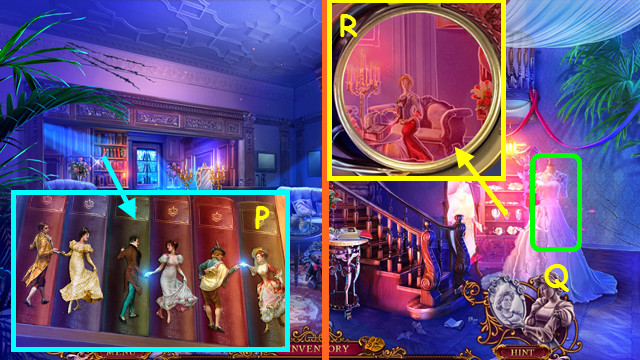
- Place the 2 PAPER FIGURES; swap the figures as shown (P).
- Walk forward.
- Look at the dress (Q).
- Select the bookcase; use the red lens, and align the lines (R).
- Take the INK (A).
- Combine the PAPER WITH MIRROR and INK to make the INSTRUCTIONS (inventory).
- Move the blanket, play the HOP to earn the 1st CAGE BUTTON (B).
- Select the book (C).

- Restore the items in the scenes (1-3).
- Take the 1/5 GLASS PIECE (@).
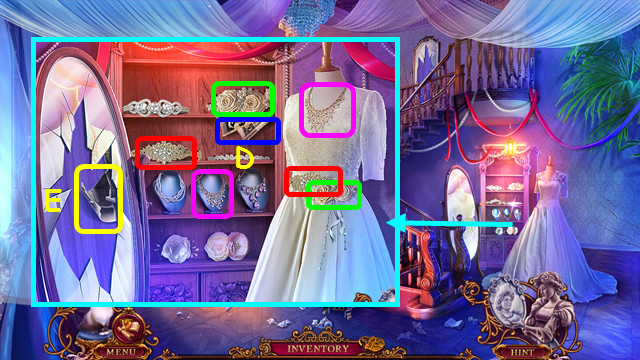
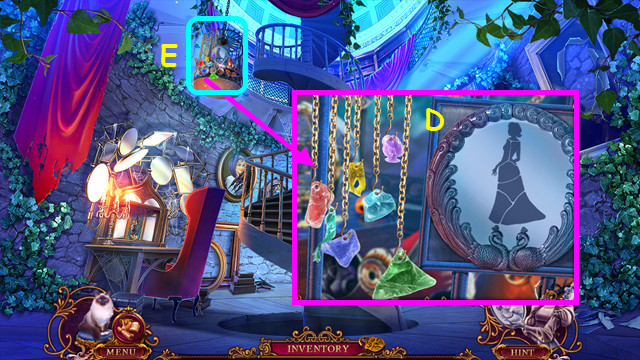
- Read the notes and place the NECKLACE (D).
- Restore the dress (color-coded).
- Take the 2/2 PICTURE PART (E).
- Go to Patrick's Room.
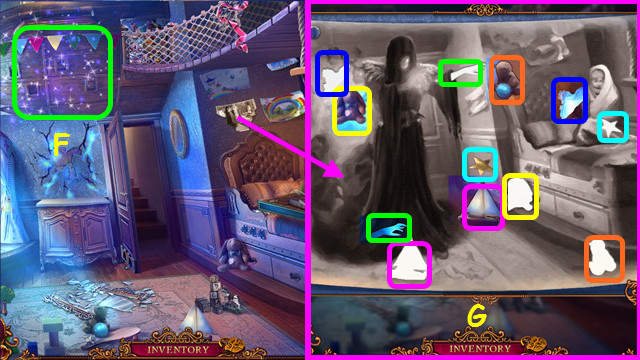
- Play the HOP; earn the BELL (F).
- Place the 2 PICTURE PARTS (G).
- Restore the elements (color-coded).
- Take the 2nd CAGE BUTTON.
- Walk forward.
- Place the 2 CAGE BUTTONS on the cage.
- Select the pairs (color-coded).
- Take the BIRD and BROKEN LANTERN (I).
- Restore the BROKEN LANTERN and use the MATCHES to make the LANTERN (inventory).
- Use the LANTERN (J).
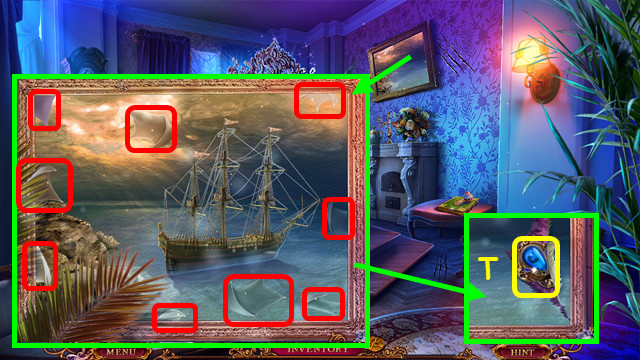
- Touch the PAPERWEIGHT (K).
- Combine the BOTTLE and PAPERWEIGHT; take the SHIP (inventory).
- Place the BELL; select (1-4).
- Take the 2/5 GLASS PIECE (L).
- Walk down 2x.
- Use the PAPERWEIGHT (M).
- Walk left.
- Select the mirror, select the blue lens, and align the lines (N).

- Use MR. JENKINS to take the PURSE (O).
- Open the PURSE; take the 3/5 GLASS PIECE and TONGS (inventory).
- Touch the column; use the TONGS to take the BUTTON (P).
- Select the pairs (color-coded).
- Take the 4/5 GLASS PIECE (Q).
- Return to the Dressing Room.

- Play the HOP; earn the PUZZLE PART (R).
- Place the BUTTON and push; use the comb on the mannequin (S).
- Press the choker and earring buttons; place the items on the mannequin (red).
- Take the 5/5 GLASS PIECE (T).
- Return to the Ballroom.
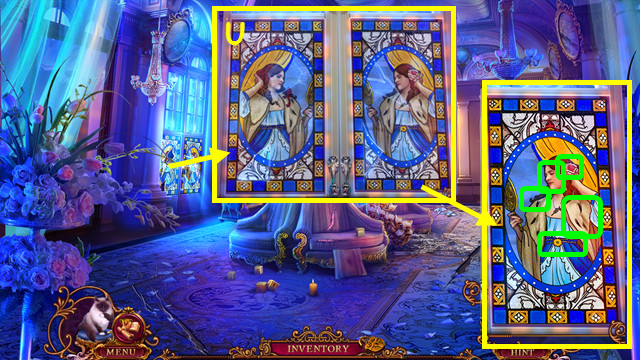
- Place the 5 GLASS PIECES; restore the windows (U).
- Select the differences (green).
- Walk left.

- Use the TONGS and BANDAGE (A).
- Take the 1/2 IRON TRIANGLE (B).
- Use MR. JENKINS to take the RUBBER GLOVE (C).
- Use the RUBBER GLOVE to take the 2/2 PUZZLE PART (D).
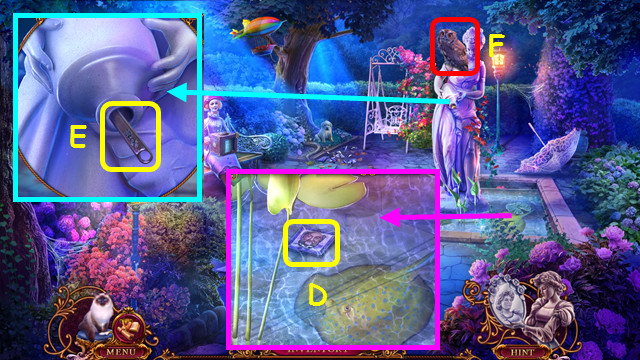
- Open the jug; take the WRENCH (E).
- Touch the owl (F).
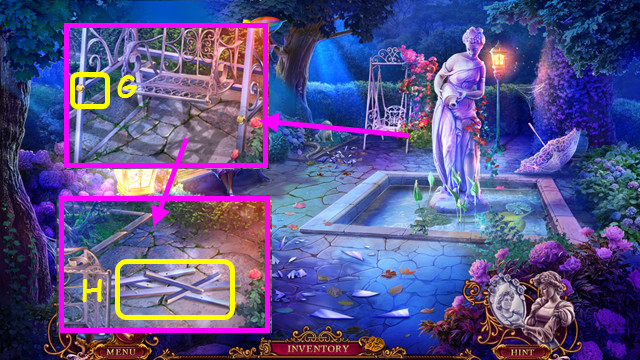
- Use the WRENCH to take the BOLTS (G).
- Take the BROKEN LADDER (H).
- Combine the BROKEN LADDER, BOLTS, and WRENCH to make the LADDER (inventory).
- Walk down.
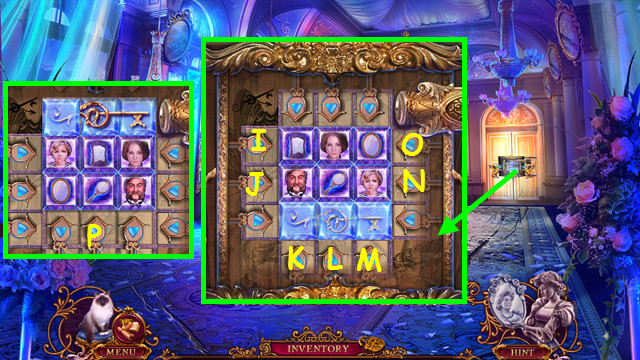
- Place the 2 PUZZLE PARTS in the grid.
- Solution: M-L-K-J-L-M-J-M-I-M-I-M-N-L-N-I-L-I-L-N-L-N-M-L-M-K-N-K-N-O-K-O-K.
- Final position (P).
- Walk forward.
- Select the mirror (Q).
- Place the LADDER (R).
- Note the mini-game (S).
- Place the SHIP; place the 9 sails on the boat (red).
- Take the BOOK EMBLEM (T).
- Take the CAKE WITH HONEY; place the BOOK EMBLEM (A).
- Rotate the lines to reform the drawings (1-3).
- Take the CRANK (B).
- Go to the Backyard.
- Place the CRANK (D).
- Restore the items (1-3).
- Take the 2/2 IRON TRIANGLE and drawing (E).
- Return to the Secret Room; select the mini-game.
- Place the 2 IRON TRIANGLES in the device.
- Select G-Fx5-Gx2.
Chapter 3: The Village
- Speak to Benjamin and Edward (A).
- Pan up (B).
- Use MR. JENKINS (C).
- Place the CAKE WITH HONEY; take the STONE FINGER (D).
- Select and take the 3 note pieces (red).
- Place the STONE FINGER, press E-F; take the 1/2 STONE TRIANGLES.
- Enter City Hall (G).
- Take the PAPER CLIP, 7 INSTRUCTIONS, and notice (H).
- Restore the INSTRUCTIONS (inventory).
- Turn the handle clockwise 4x; take the 2/2 STONE TRIANGLES (@).
- Take the COIN; select the note (I).
- Restore the note (J).
- Place the 2 STONE TRIANGLES; select the mini-game (K).
- Solution (L).
- Take the HOURGLASS, HAMMER, and notes (M).
- Walk down.
- Use the PAPERCLIP; drag it right and left (N).
- Take the COAT OF ARMS EMBLEM (O).
- Walk right.
- Place the COAT OF ARMS EMBLEM; play the HOP (Q).
- Walk right.
- Look at the mirror (A).
- Select the cart, select the red lens, and align the lines (B).
- Use MR. JENKINS to take the WHEEL (C).
- Take the CURTAIN (D).
- Take the CHISEL; place the WHEEL (E).
- Play the HOP; earn the DOORBELL (F).
- Place the BIRD to take the LIGHTER; place the HOURGLASS to take the MIRROR (G).
- Note the mini-game (H).
- Walk down.
- Use the CHISEL and HAMMER; earn the STATUE HEAD (I).
- Walk down.
- Place and push the DOORBELL (J).
- Walk left.
- Look at the organ (K).
- Select the machine, use the green lens, and align the lines (L).
- Select the cabinet (M).
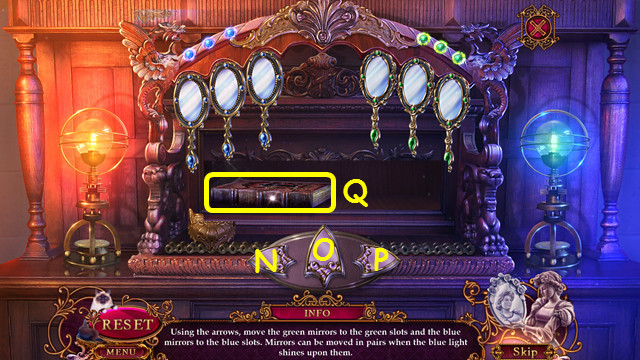
- Touch the mirrors; place the MIRROR as replacement.
- Solution: P-O-P-O-Px2-O-Nx3-O-Px5-O-N-O-N-O-Px2-O-Nx2-O-Nx4-O-Px5-O-Nx2-O-Nx3-O.
- Take the BOOK (Q).
- Select the BOOK (inventory).
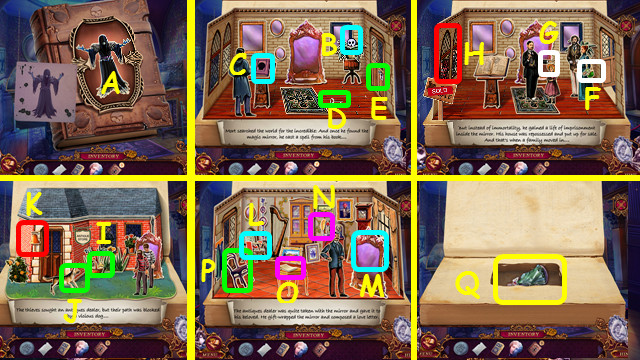
- Arrange the arms as shown (A).
- Move (B-C), (D-E), (F-G); select (H).
- Move (I-J), select (K), move (L-M), (N-O), select (P).
- Take the WOMAN FIGURE (Q).
- Touch the boat; insert the COIN (R).
- Play the HOP; earn the AIRSHIP FIGURE (S).
- Return to the Antique Shop.
- Play the HOP; earn the TROWEL (T).
- Place the AIRSHIP FIGURE; earn the MEDICAL BAG (U).
- Open the MEDICAL BAG; take the MEDICAL SUPPLIES (inventory).
- Select the figurine mini-game (V).
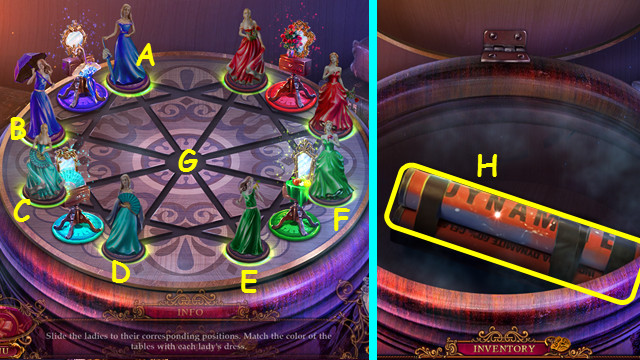
- Place the WOMAN FIGURE.
- Solution: AG-CA-GC-FG-DF-BD-GB.
- Take the DYNAMITE (H).
- Walk down 2x.
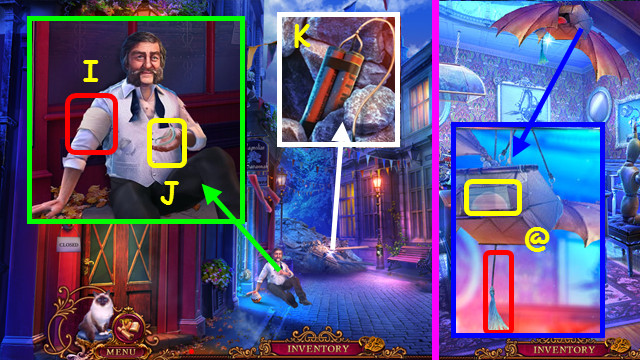
- Use the MEDICAL SUPPLIES (I).
- Take the PIECE OF GLASS and DYNAMITE FUSE (J).
- Walk left.
- Pull the tassel; use the PIECE OF GLASS to take the APPLE and GUNPOWDER (@).
- Combine the DYNAMITE, GUNPOWDER, and DYNAMITE FUSE to make the DYNAMITE WITH FUSE (inventory).
- Walk down.
- Use the DYNAMITE WITH FUSE and LIGHTER (K).
- Walk forward.
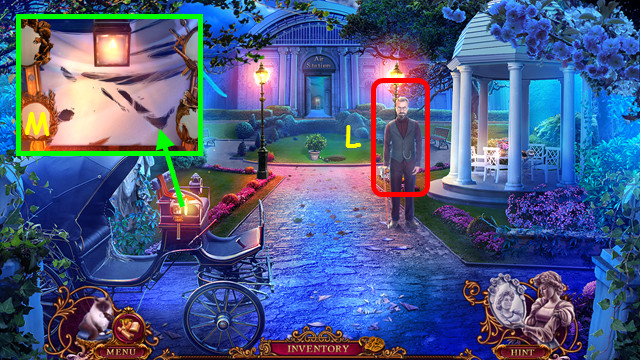
- Talk to Benjamin (L).
- Remove the cloth; place the CURTAIN (M).

- Find the symbols in the scenes (1-4).
- Take the 1/3 CRYSTALS (N).
- Open the sack; move (O-P).
- Take the BIRD (Q).
- Remove the GEM from the BIRD (inventory).
- Place the GEM; take the PIANO KEY (R).
- Return to the Exhibition.
- Play the HOP; earn the RIFLE (S).
- Select the piano (U).

- Place the PIANO KEY (A).
- Select 1-9.
- Take the BLADES (B).
- Walk down and forward.
- Use the BLADES and APPLE to earn the APPLE SLICES (C).
- Use the APPLE SLICES (D).
- Use the TROWEL; take the GEM (E).
- Select (F).
- Place the GEM on the device.
- Rotate rings to show pairs (1-5).
- Take the 1/2 MIRROR (H).
- Walk forward.
- Use the RIFLE (I).
- Use the PIECE OF GLASS; take the ROPE (J).
- Use MR. JENKINS to take the KEY (K).
- Select (L).

- Slide the bars (M).
- Move N-O, P-Q, and slide the bars.
- Take the CORK (R).
- Take the 2/3 CRYSTALS (S).
- Use the KEY; place the STATUE HEAD and ROPE (T).
- Take the 3/3 CRYSTALS (U).
- Place the 3 CRYSTALS and swap the crystals as shown; take the 2/2 MIRROR (V).
- Place the 2 MIRRORS; swap as shown (A).
- Walk forward (B).
- Talk to Benjamin (C).
- Take the PILLOWS (D).
- Place the PILLOWS; move the 3 rocks onto the pillows (E).
Chapter 4: Benjamin's House

- Use MR. JENKINS to take the LUGGAGE (A).
- Move all the items; take the 5 of 6 WHEEL PARTS (B).
- Open the LUGGAGE; take the INSULATING TAPE (inventory).
- Select (C).
- Use the INSULATING TAPE (D).
- Select the tiles (1-20).
- Take the 6/6 WHEEL PARTS (E).
- Restore the 6 WHEEL PARTS to make the WHEEL (inventory).
- Place the WHEEL (F).
- Solution (1-5).
- Talk to Benjamin (G).
- Take the BROKEN BUCKET (H).
- Combine the BROKEN BUCKET and CORK to make the EMPTY BUCKET (inventory).
- Use the EMPTY BUCKET to take the BUCKET WITH WATER (I).
- Use the BUCKET WITH WATER (J).
- Play the HOP; earn the OILCAN (K).
- Use the OILCAN (L); take the HARPOON BASE (M).
- Take the HARPOON KNIFE (N).
- Combine the HARPOON BASE and HARPOON KNIFE to make the HARPOON (inventory).
- Use the HARPOON (O).
- Take the SCARF and PICKAXE HANDLE (P).
- Replace the PICKAXE HANDLE; take the PICKAXE (Q).
- Use the PICKAXE and move the stick (R).
- Take the 1/4 BARREL COVER PART (S).
- Walk forward.

- Talk to Benjamin (A).
- Select the mural, use the blue lens, and restore the lines (B).
- Open the cupboard; take the GUARD FIGURE (C).
- Take the CLOUD (D).
- Place the CLOUD (E) and GUARD FIGURE (F).
- Place the items that appear at G into the scene (green).
- Place the items that appear at H into the scene (white).
- Place the items that appear at I into the scene (blue).
- Take the 2/4 BARREL COVER PART; pull the lever (J).
- Walk forward.
- Note the mini-game (A).
- Use the SCARF and MR. JENKINS to take the STEAK (B).
- Read the instructions, take the RULER, and remove the lever (C).
- Walk down.
- Use the STEAK (D).
- Use the RULER (E).
- Enter Benjamin's Office (F).
- Select the aquarium, use the green lenses, and align the lines (G).
- Take and read the folder (H).
- Select book pairs (color-coded).
- Take the 5 NET PARTS (red).
- Restore the NET PARTS to make the NET (inventory).
- Use the food on the tank (I).
- Use the NET to take the 3/4 BARREL COVER PARTS (J).
- Flip the lever (K).
- Play the HOP; earn the PAINTING PART (L).
- Note the mini-game (M).
- Walk down.
- Select (N).
- Place the PAINTING PART (O).
- Restore the items in each scene (1-6).
- Take the 4/4 BARREL COVER PART, FLINT, and 1/3 WIRES (P).
- Restore the 4 BARREL COVER PARTS to make the BARREL COVER PART (inventory).
- Walk down.
- Play the HOP; earn the TILE (Q).
- Place the BARREL COVER PART; open the book and take the PUZZLE PART (R).
- Walk forward.
- Select the mini-game (S).
- Place the PUZZLE PART in the frame.
- Restore the photo (T).
- Take the TOWER PART (U).
- Go to Benjamin's Office.
- Play the HOP; earn the 2/3 WIRES (A).
- Place the TOWER PART; use the buttons to find the tower parts and rebuild the tower (B).
- Take the 3/3 WIRES (C).
- Select the mini-game (D).
- Place the TILE on the device.
- Sort the tiles as shown (E).
- Move the invitation; take the ELECTRONIC PANEL (F).
- Go to the Cliffside and select the wires mini-game.
- Place the 3 WIRES on the device.
- Solution (G).
- Take the drawing and LEVER (H).
- Place the ELECTRONIC PANEL (I).
- Place the LEVER. Solution: J-K-K-M-L-M.
Chapter 5: The Caves
- Talk to Benjamin (A).
- Talk to the Guardian (B).
- Take the paper (C).
- Open the sack; take 2 of the 3 PICTURE TILES (P).
- Take the SAIL and PLANK (Q).
- Combine the PLANK, SAIL, and FLINT to make the TORCH (inventory).
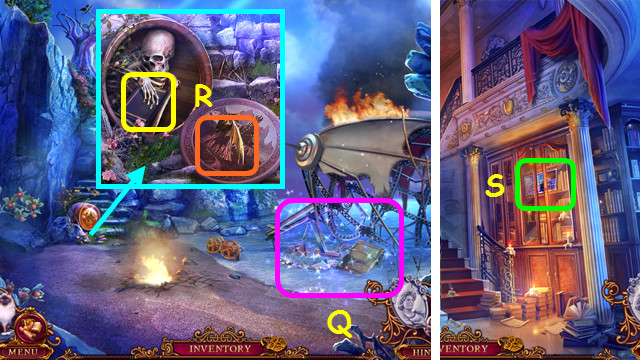
- Use the TORCH (R).
- Take the SERRATED DAGGER; use MR. JENKINS to take the OLD BOX (S).
- Take the 1/3 CRYSTAL and place the SERRATED DAGGER (T).
- Select pairs (color-coded).
- Restore the items (color-coded).
- Take the CANE (U).
- Walk forward.

- Use the CANE (A).
- Play the HOP; earn the NET (B).
- Walk forward.
- Take the BRUSH (C).
- Take the FISH (D).
- Walk down.
- Use the NET and FISH; take the 3/3 PICTURE TILES (E).
- Walk down.
- Place the 3 PICTURE TILES; restore the mosaic (F).
- Take the MACHETE and SHIELD PART (G).
- Walk forward 2x.
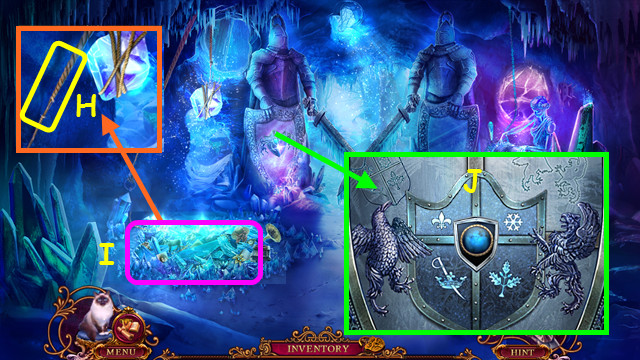
- Pan up; use the MACHETE to take the ROPE (H).
- Play the HOP: earn the SEEDS (I).
- Place the SHIELD PART; restore the shield (J).
- Walk forward.

- Use the BRUSH until the meter fills (K).
- Take the TOKEN (L).
- Place the SEEDS; take the HOOK (M).
- Combine the HOOK and ROPE to make the GRAPPLING HOOK (inventory).
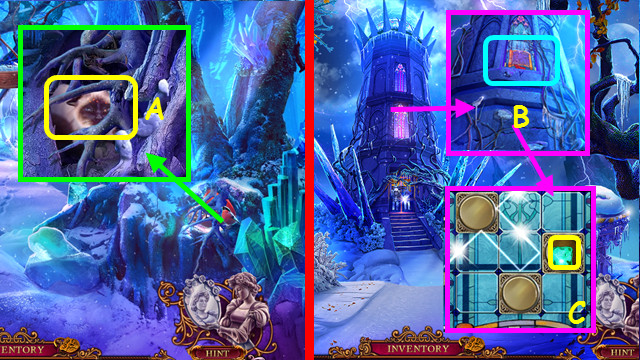
- Use MR. JENKINS (N).
- Walk forward.
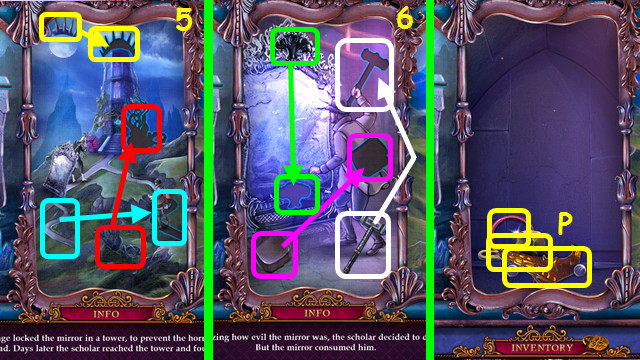
- Look at the tower (O).
- Select the door, use the red lens, and align the lines (P).
- Select the mirror (Q).
- Place the TOKEN; restore the pictures (1-3).
- Take the AXE (R).
- Walk down.
- Use the AXE to take MR. JENKINS and the 2/3 CRYSTAL (A).
- Walk forward.
- Use the GRAPPLING HOOK (B).
- Move the tiles as shown; take the ENCHANTED ICE CUBE (C).
- Walk down 3x.
- Play the HOP; earn the KEY (E).
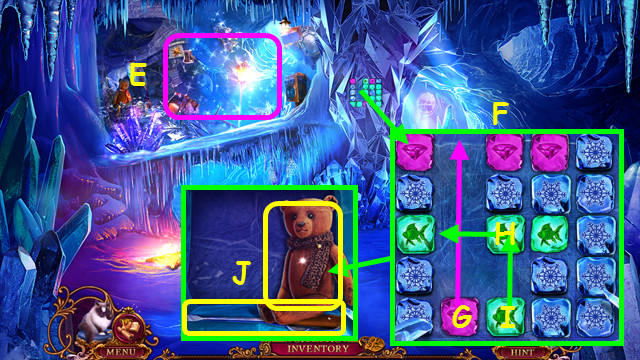
- Place the ENCHANTED ICE CUBE on the board (F).
- Move the red cube up (G).
- Move green cube left (H).
- Move green cube up (I).
- Take the TEDDY BEAR and SCREWDRIVER (J).
- Touch the lid of the OLD BOX and use the SCREWDRIVER (inventory).
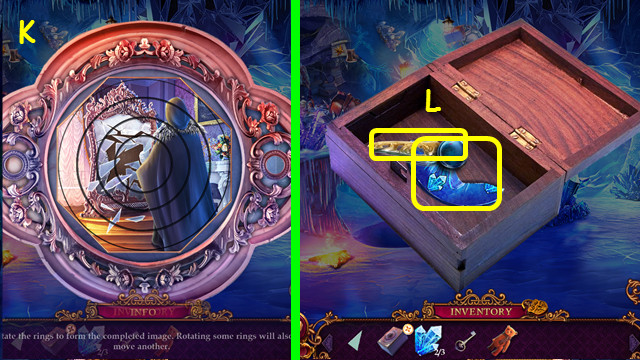
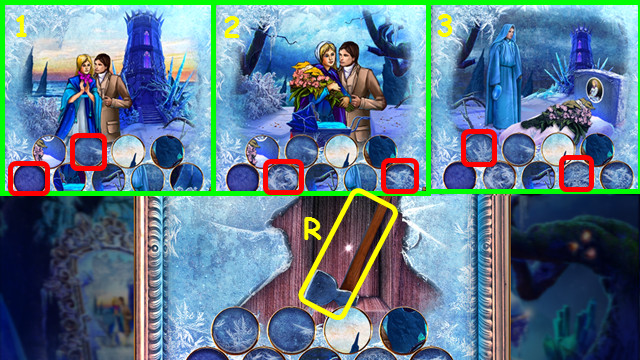
- Restore the picture; start in the center and work out (K).
- Take the drawing, HANDLE, and 3/3 CRYSTALS (L).
- Walk forward 2x.
- Use the KEY; take the photos, notes, MIRROR, and PHOSPHOR (M).
- Select the mini-game (N).
- Place the MIRROR on the frame.
- Arrange the mirrors as shown (O).
- Take the CHAINS and EMPTY FLASK (P).
- Walk down.
- Play the HOP; earn the MANGANESE (Q).
- Combine the EMPTY FLASK, PHOSPHOR, and MANGANESE to make the EXPLOSIVE POTION (inventory).
- Place the 3 CRYSTALS; move the outer crystals as shown (R).
- Place the CHAINS (S).
- Take the PIECE OF MIRROR (T).
- Walk forward.
- Use the EXPLOSIVE POTION (U).
- Walk forward.
- Brush off the snow, place the PIECE OF MIRROR, and swap as shown (V).
- Take the DOOR PART (W).
- Place the DOOR PART; press 1-4.
Chapter 6: The Tower
- Select the bush, use the green lens, and align the lines (A).
- Take the GLOVES (B).
- Use the GLOVES to take the CUP (C).
- Note the mini-game (D).
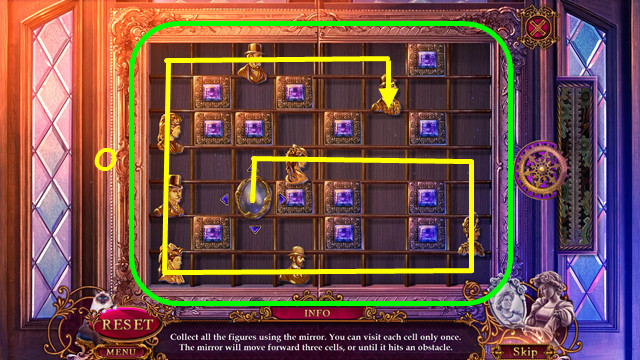
- Select the mirror (E).

- Press and hold (I) to move Patrick to (K).
- Use (F) to move him to the left edge of K.
- Press and hold (G) to move him to (L).
- Use (J) to move him to the right edge of L.
- Press and hold (I) to move Patrick to (M).
- Read the note and take the 1/2 CLUE.
- Select the door mini-game.

- Place the CUP (N).
- Fill and return the cups (O-P-Q) with water (R).
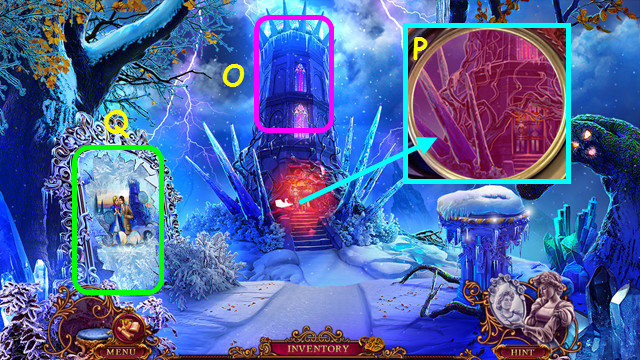
- Walk forward.
- Place and rotate the HANDLE clockwise several times (A).
- Take the STONE HEAD and move the mirror (B).
- Use MR. JENKINS to take the SCREW (C).
- Place the STONE HEAD; adjust the stones as shown (D).
- Play the HOP; earn the ACID (E).
- Walk down.
- Use the ACID (F).
- Use MR. JENKINS to take the WATERING CAN (G).
- Use the WATERING CAN 2x; take the METAL LEAF (H).
- Walk forward.
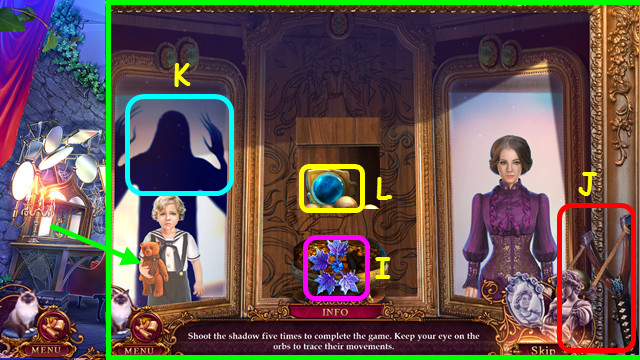
- Place the METAL LEAF (I).
- Use the slingshot (J) to shoot the shadow (K) 5 times.
- Take the AMULET (L).
- Go up the stairs.
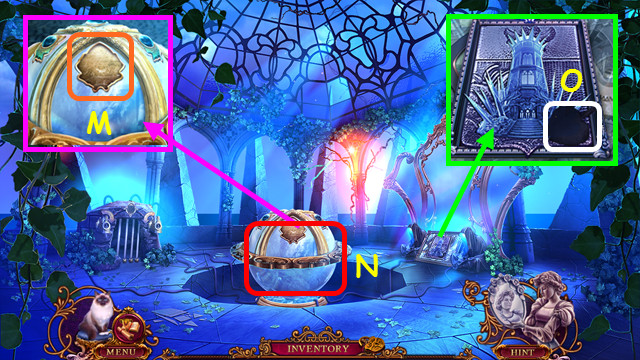
- Place the AMULET (M).
- Play the HOP; earn the IRON HEART (N).
- Place the IRON HEART (O).
- Walk right.
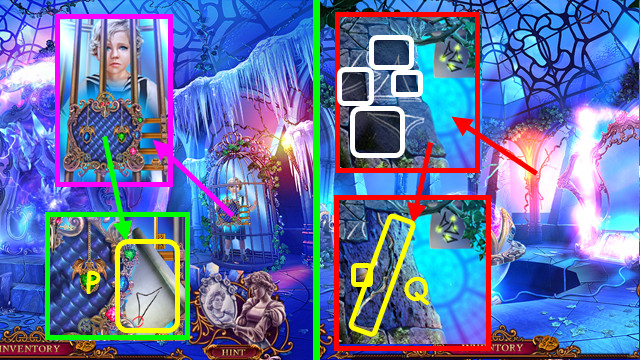
- Take the 2/2 CLUE (P).
- Walk down.
- Place the 2 CLUES; press the rocks (white).
- Take the BOW and PLANET (Q).
- Walk down.
- Play the HOP; earn the ARROW (R).
- Combine the BOW and ARROW to make the BOW AND ARROW (inventory).
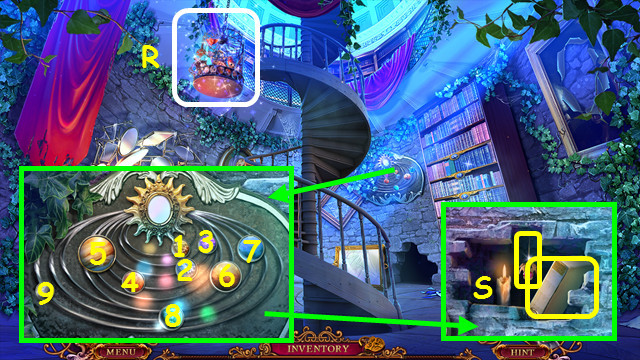
- Place the PLANET; Select 1-9.
- Take the BOOK and PENDANT (S).
- Open the BOOK; restore the photos to make the BOOK (inventory).
- Place the BOOK. Solution (T).
- Take the 1/2 VALVE (U).
- Walk up and right.

- Place the PENDANT; position the pendants as shown (V).
- Select the KEY (W).
- Give Patrick the TEDDY BEAR; earn the MECHANISM PART (X).
- Use the BOW AND ARROW; shoot the icy thorns (red).
- Select O-N-M-I-E-A-B-C-D-H-L-K-J-F-B-C-G-F-J-K-L-H-D-C-G-K-L-P-O-N-J-F-G-K-L-H-D-C-G-K-O-N-M-I-J-N-O-P-L-H-G-F-J-N-O-P-L-H-G-F-J-N-O-K-G-F-J-N-O-K-J-N-O-P-L-H-G-K-O-N-M-I-J-K-L-P-O-K-J-I-M-N-O-P.
- Solution (Q).
- Take the 2/2 VALVE (R).
- Walk down.
- Play the HOP; earn the MAGIC POWDER (A).
- Place the 2 VALVES, SCREW, and MECHANISM PART (red).
- Select Bx5.
- Take the note and KEYS (C).
- Walk right.
- Place the KEYS; select 2 keys (green).
- Use the MAGIC POWDER; earn the ENCHANTED PIN (D).
- Select the mini-game (E).
- Place the ENCHANTED PIN (F).
- Place the pins (yellow).
- Congratulations! You have completed Ominous Objects: Phantom Reflection!
Created at: 2015-05-15