
Walkthrough Menu
- General Tips
- Chapter 1: The Green Knight
- Chapter 2: The Red Knight
- Chapter 3: The Blue Knight
- Chapter 4: The Black Knight
- Chapter 5: Saving Alfred
General Tips
- This is the official guide for Ominous Objects: The Cursed Guards.
- This guide does not mention each time you have to zoom into a location; the screenshots show each zoom scene.
- Hidden-object puzzles are referred to as HOPs. This guide does not show screenshots of the HOPs, however, it is mentioned when a HOP is available and the inventory item collected.
- Use the Map to travel quickly to a location.
Chapter 1: The Green Knight
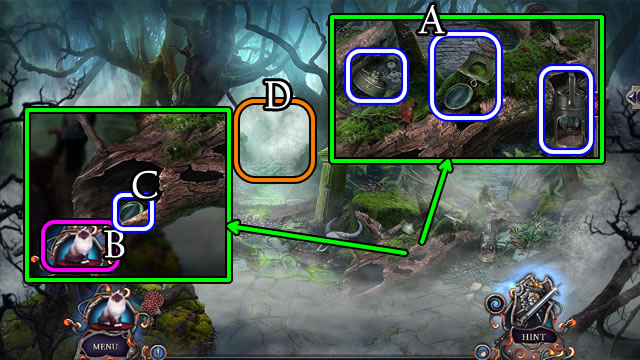
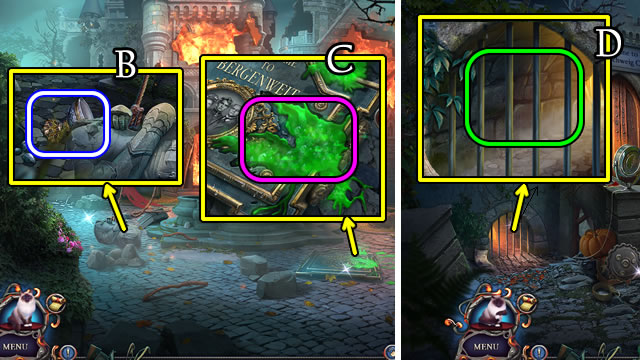
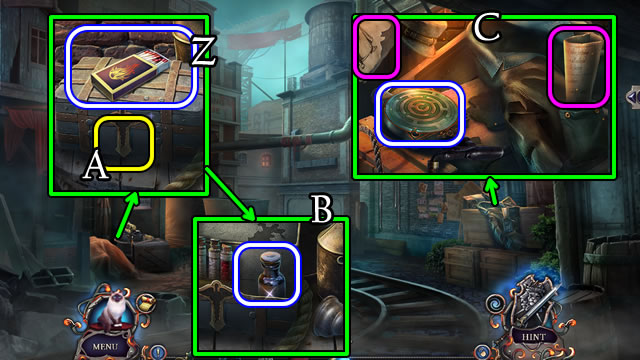
- Take the BROKEN LANTERN, LID and OIL (A).
- Place Mr. Jenkins (B) on the log to get a LENS (C).
- Combine the BROKEN LANTERN, LID, OIL and LENS for a LIT LANTERN.
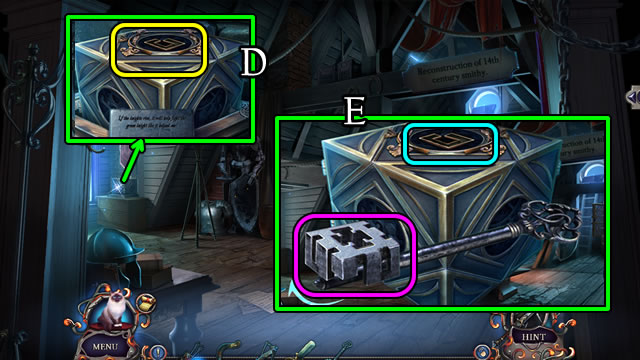
- Place the LIT LANTERN (D).
- Walk forward.
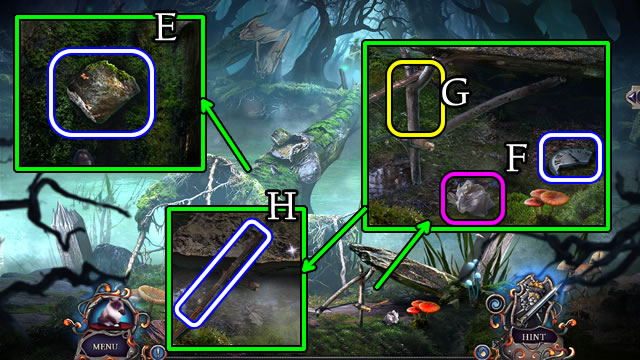
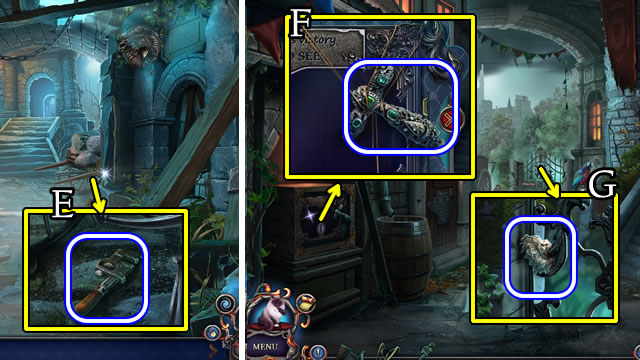
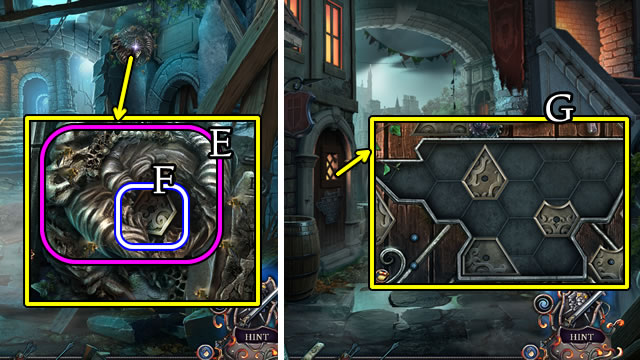
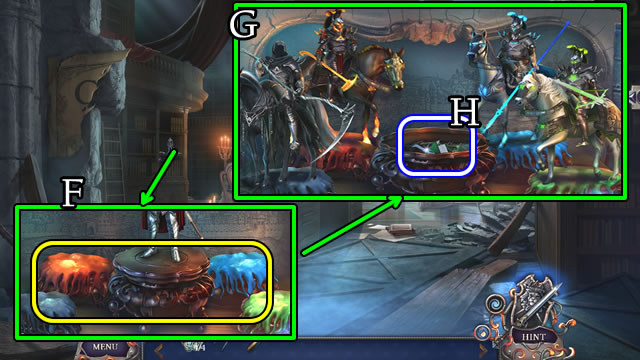
- Take the STONE (E).
- Take 1/2 CLOCK PART; read the note (F).
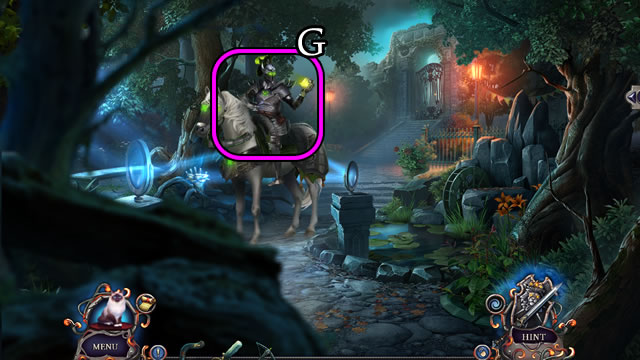
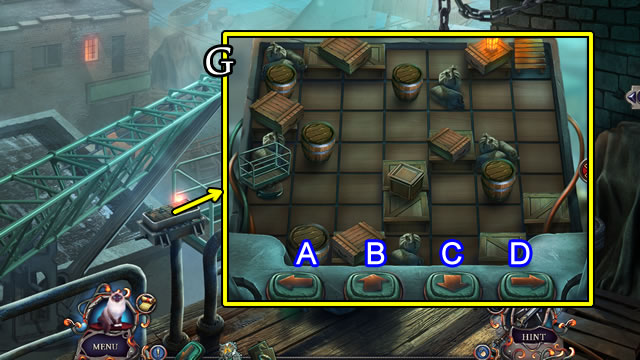
- Use the STONE (G).
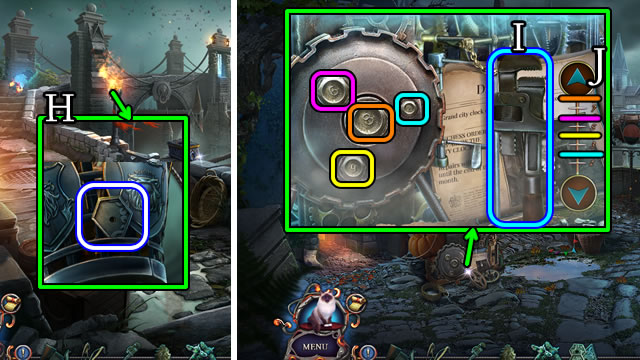
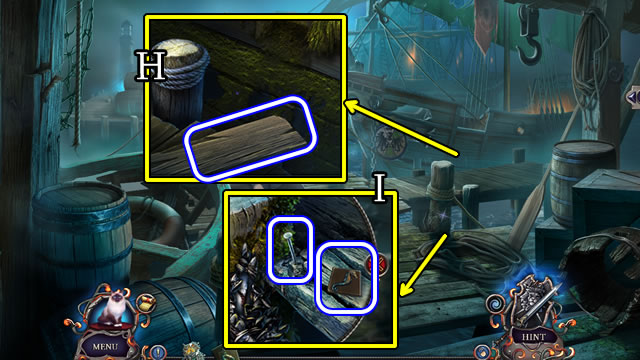
- Take the STICK (H).
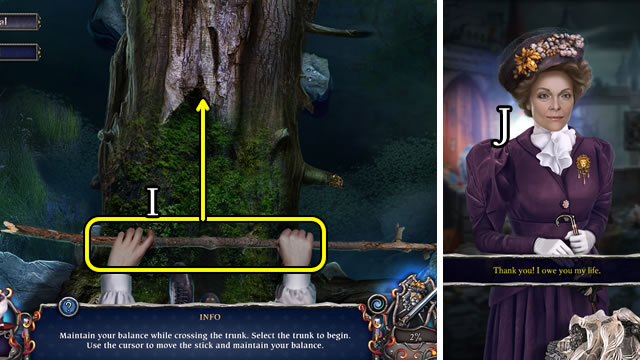
- Use the STICK for a puzzle (I).
- Solutions vary.
- Play the HOP.
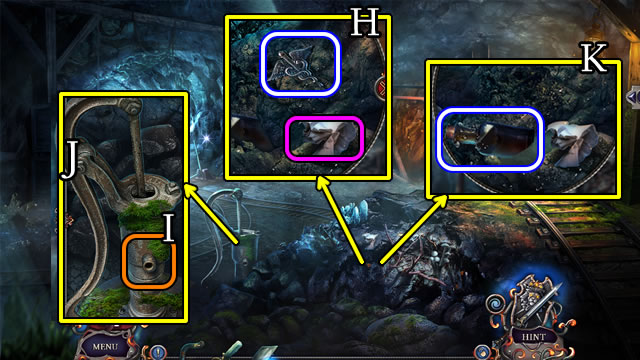
- Speak to the woman (J).
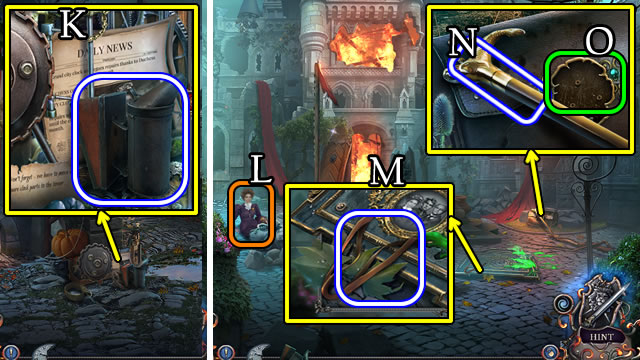
- Take the SMOKER; read the newspaper and note (K).
- Walk forward.
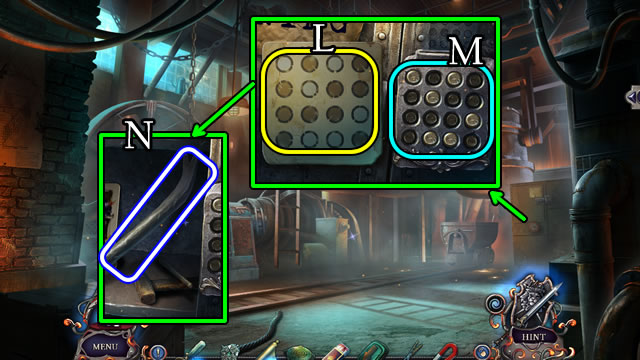
- Speak to the woman (L); receive the BERGENWEIT KEY.
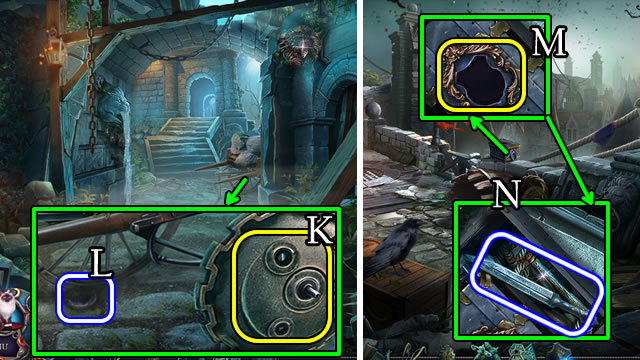
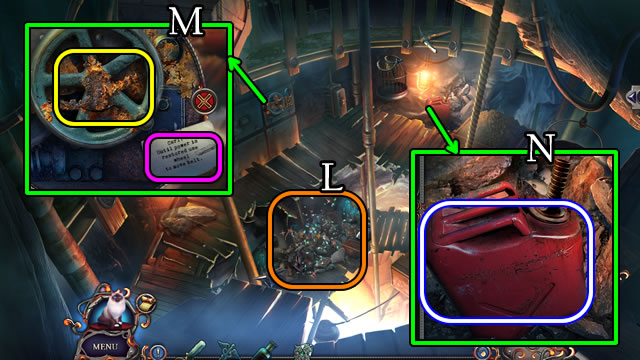
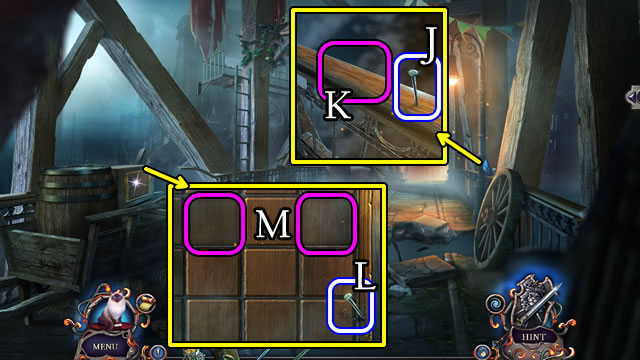
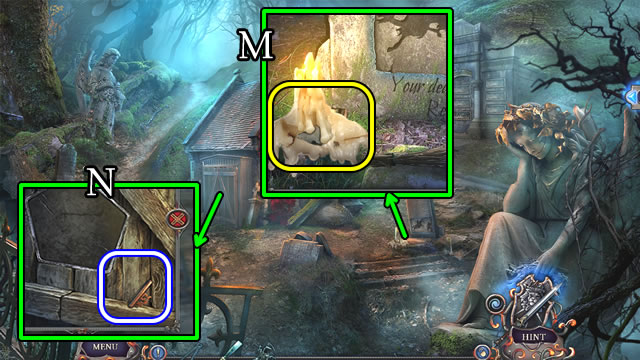
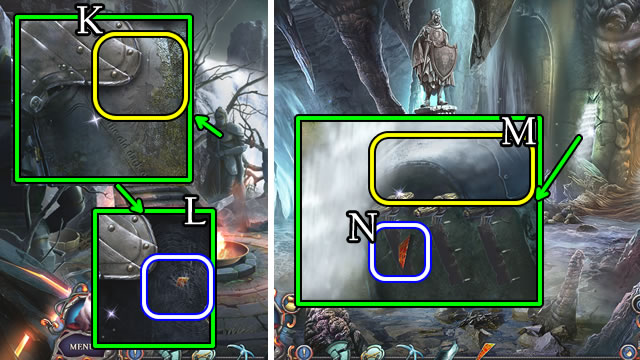
- Take the TOURNIQUET (M).
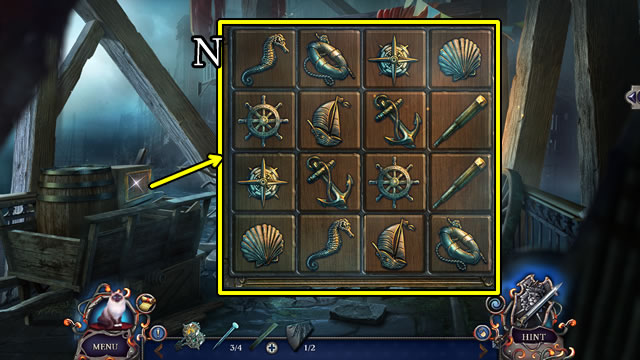
- Take the WALKING STICK (N).
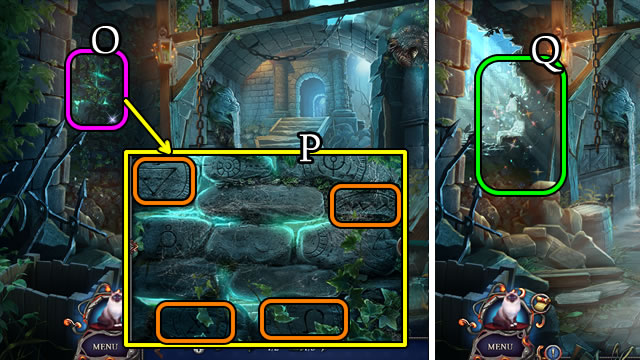
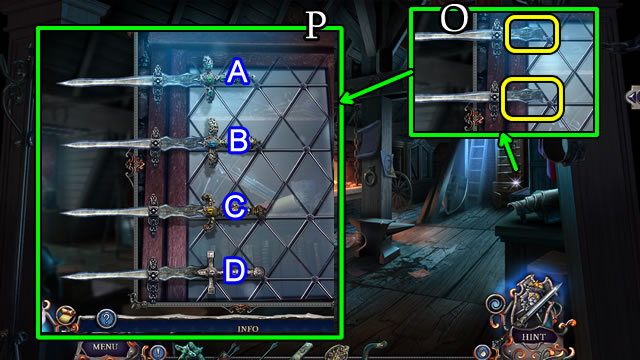
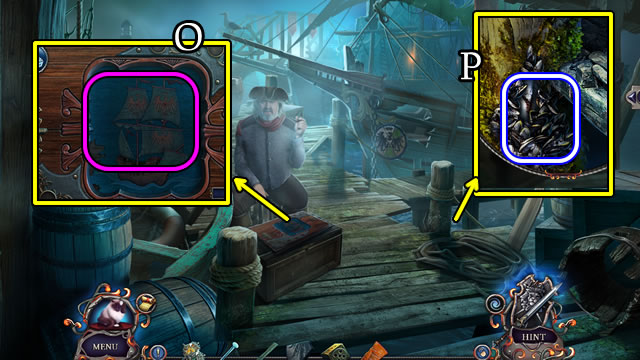
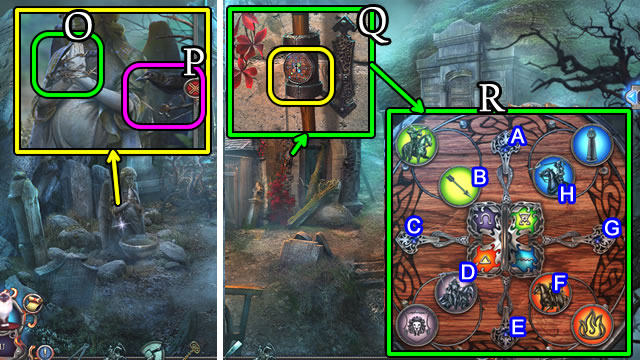
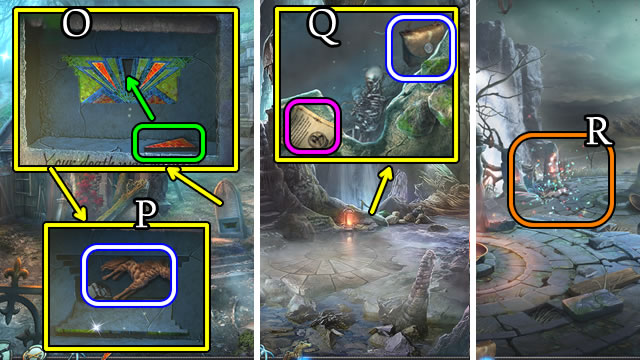
- Place the BERGENWEIT KEY for a puzzle (O).
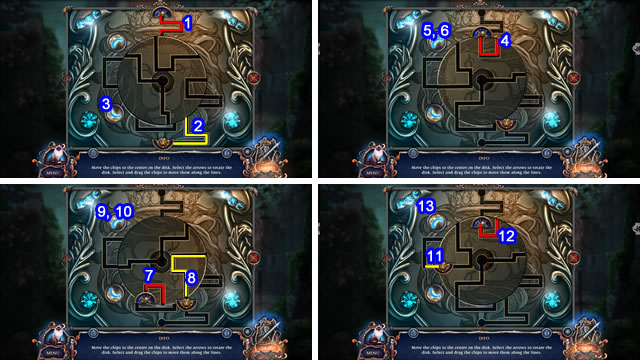
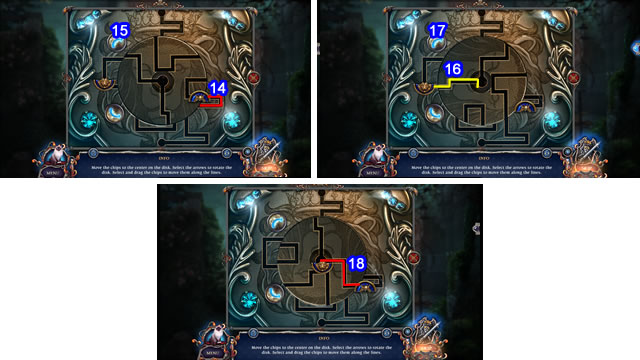
- Solution. 1-18.
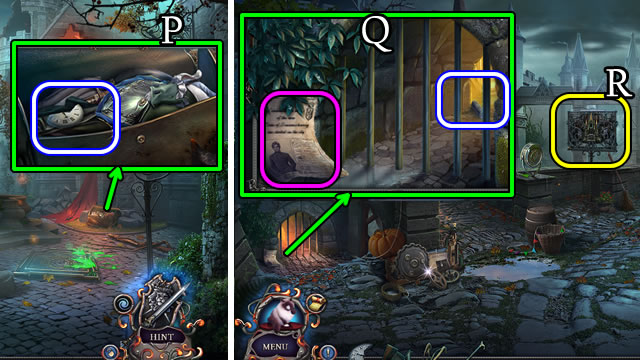
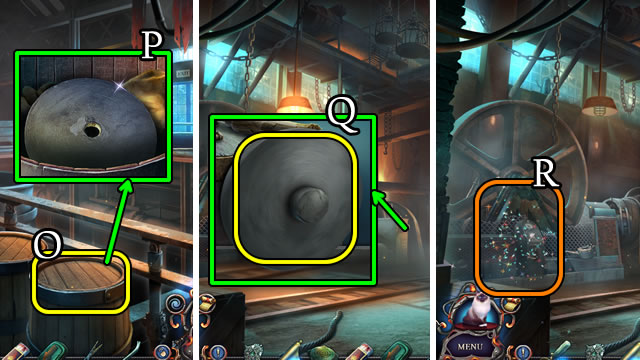
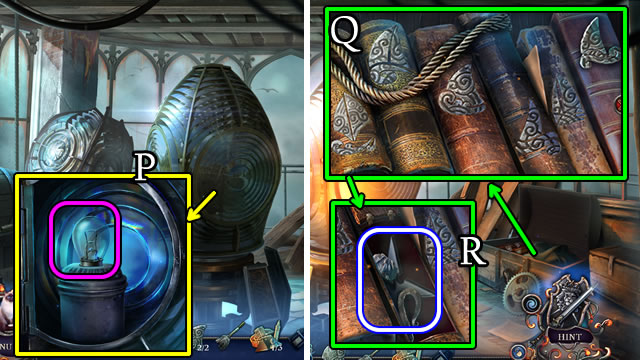
- Select the photo 2x. Open the book; read the note, take the Map; select the book. Take 2/2 CLOCK PART (P).
- Walk down.
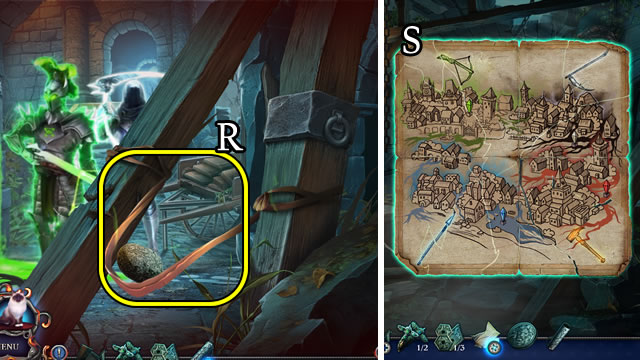
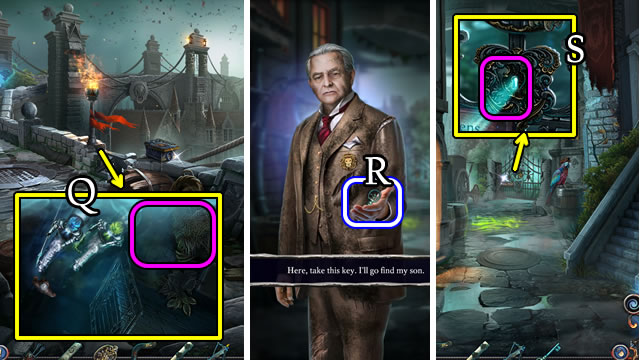
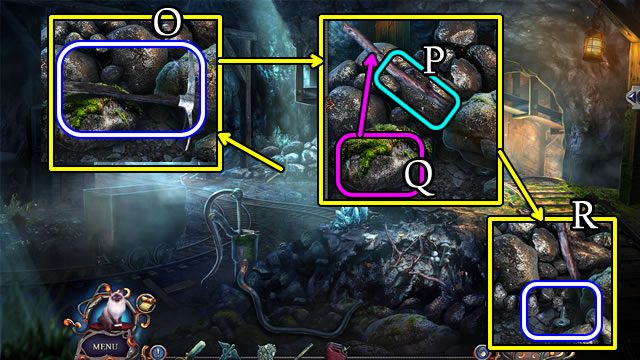
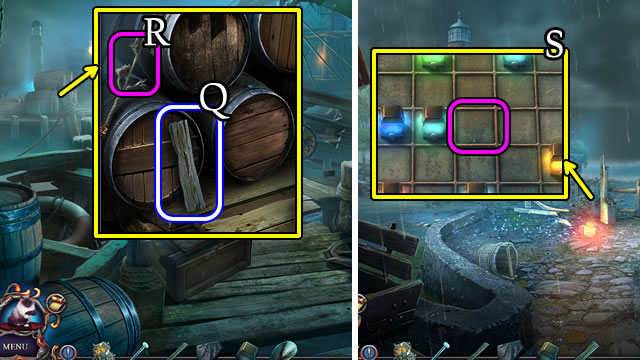
- Read the note. Use the WALKING STICK to receive 1/2 METAL ROD (Q).
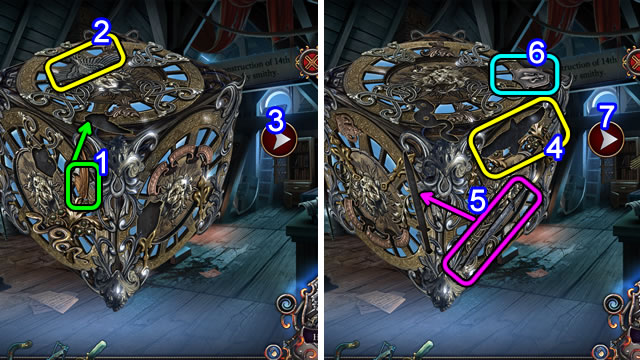
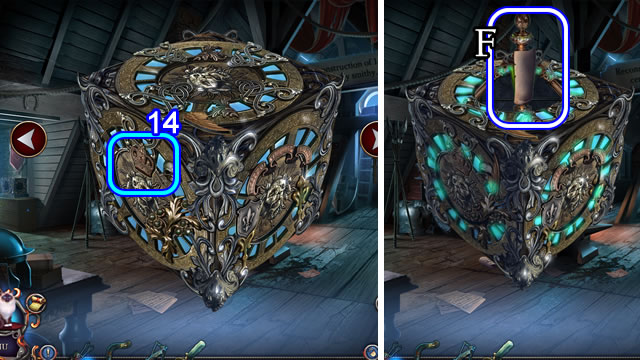
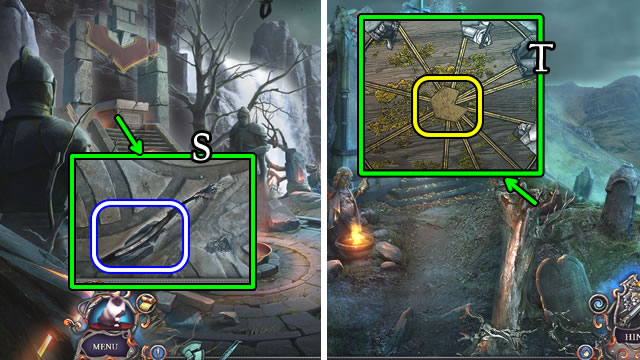
- Place the 2/2 CLOCK PARTS for a puzzle (R).
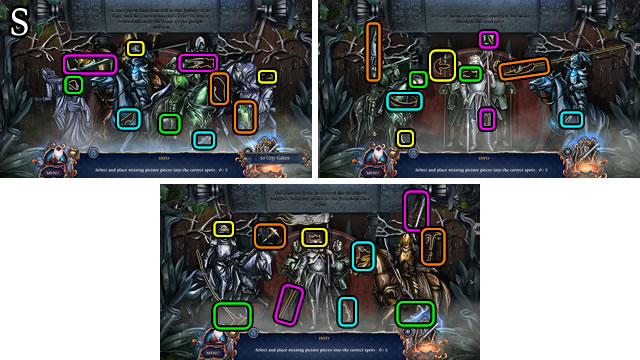
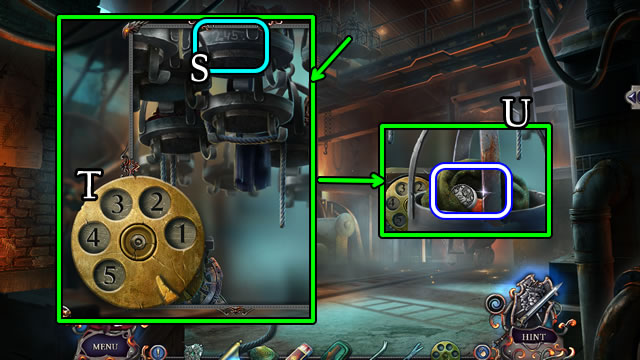
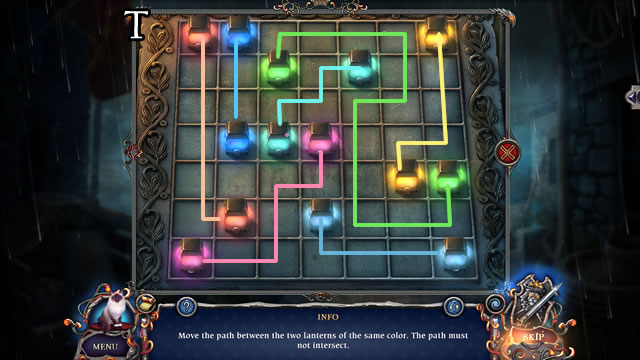
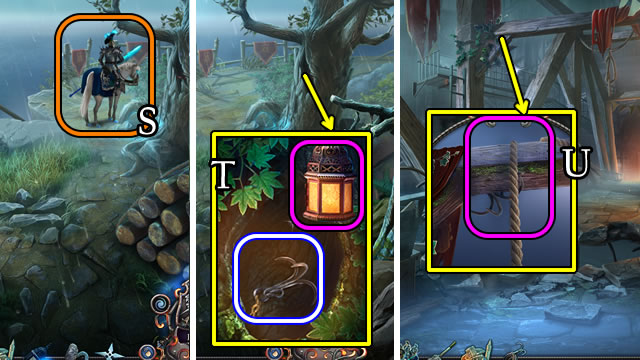
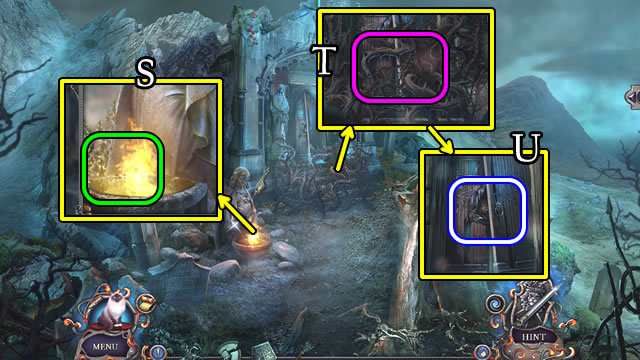
- Solution (S).
- Open the tube to receive 2/2 METAL ROD.
- Walk forward.
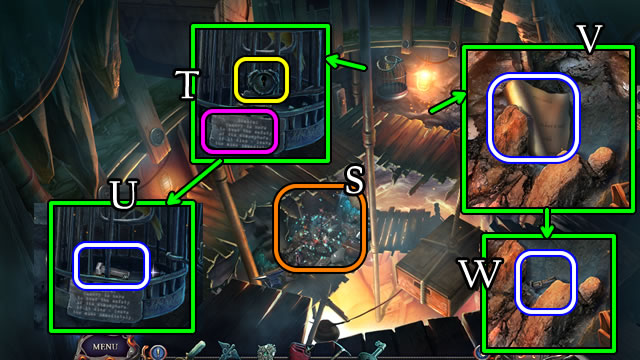
- Place the 2/2 METAL RODS on the pole.
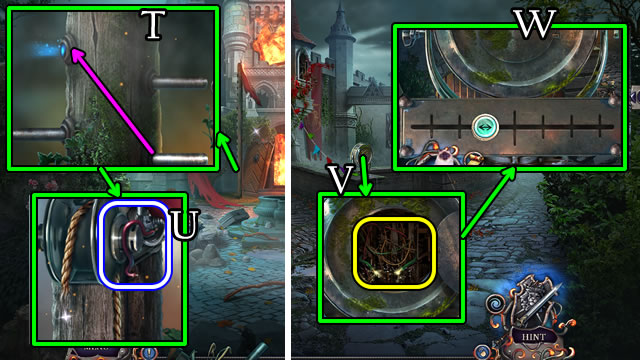
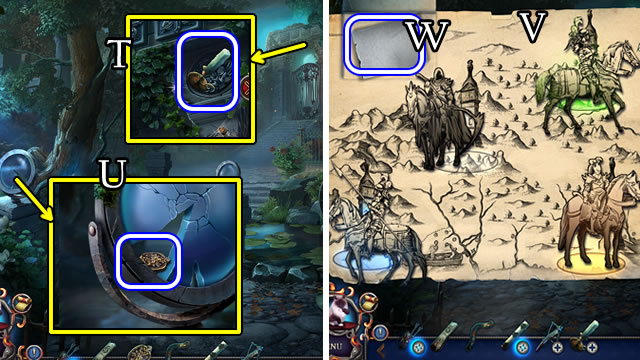
- Repeatedly move the bottom rod to the open hole to climb the pole (T).
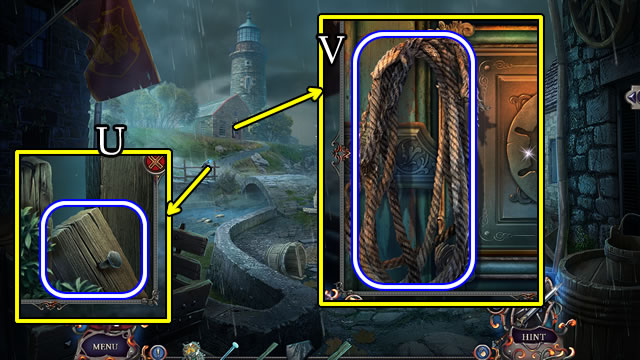
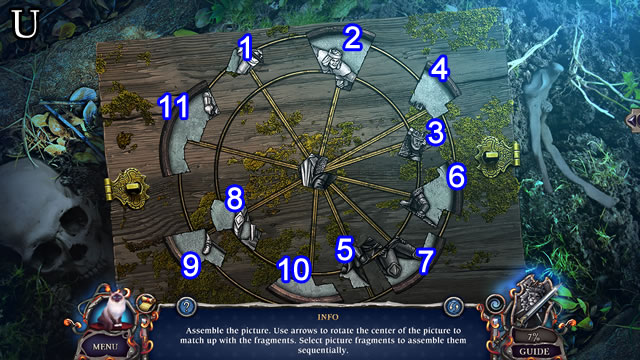
- Take the WIRE (U).
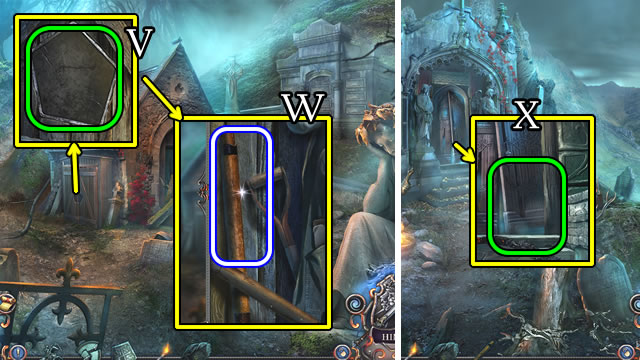
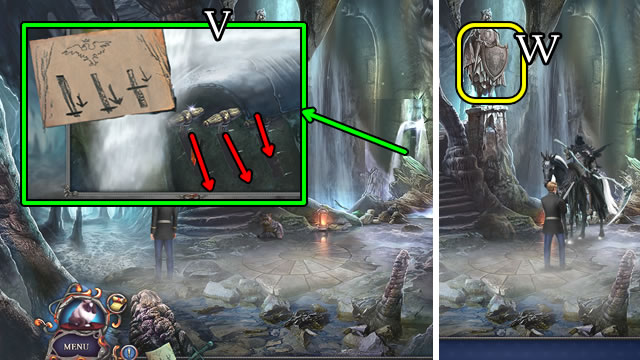
- Walk down.
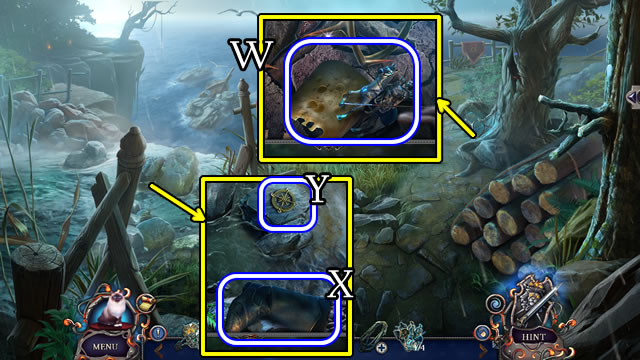
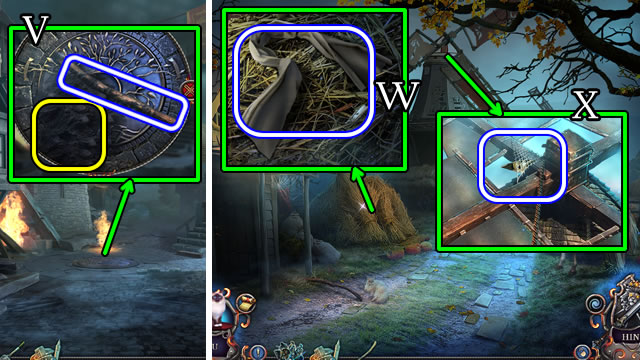
- Open and place the WIRE (V).
- Slide the button (W).
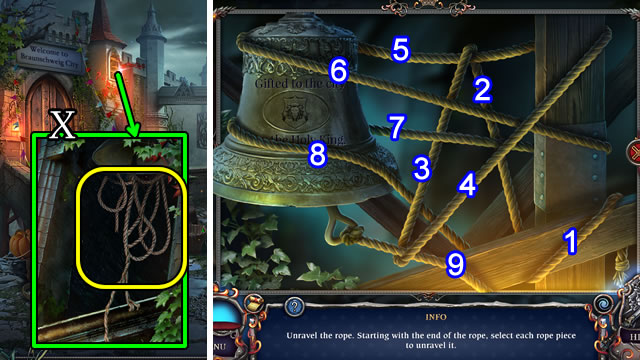
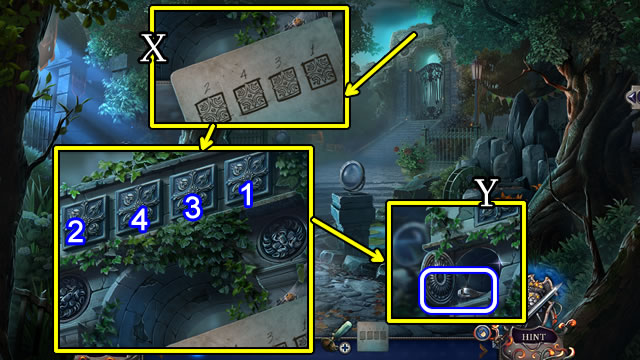
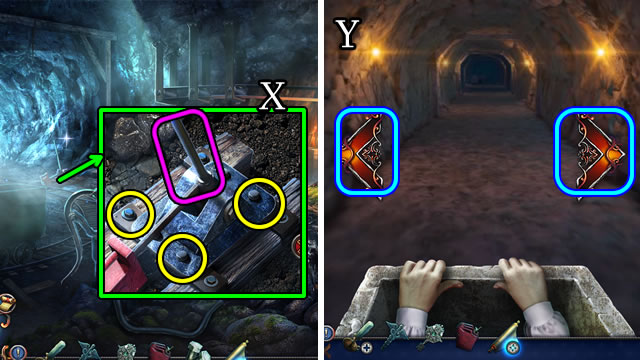
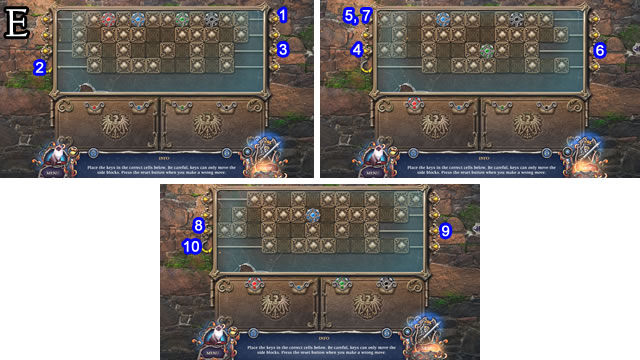
- Place Mr. Jenkins (X).
- Solution. 1-9.
- Receive a ROPE.
- Walk forward.
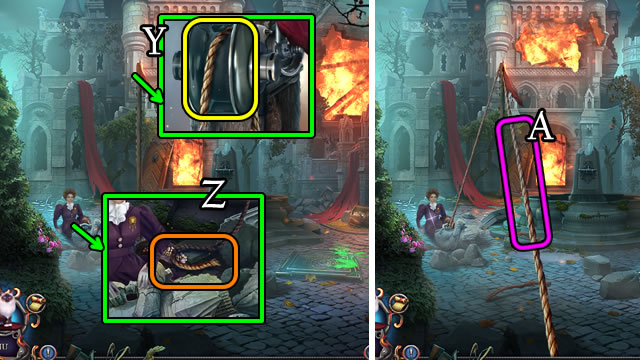
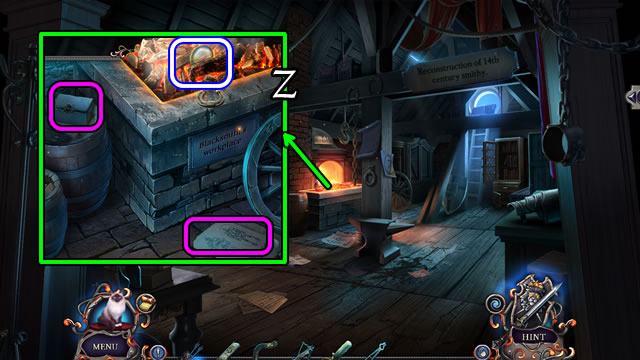
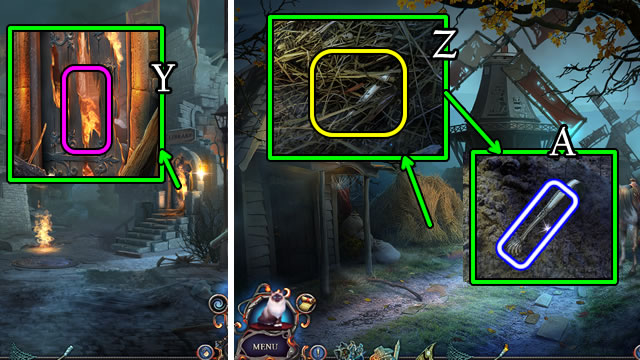
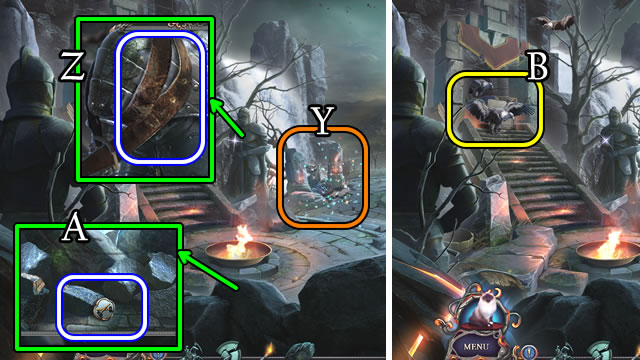
- Place the ROPE (Y).
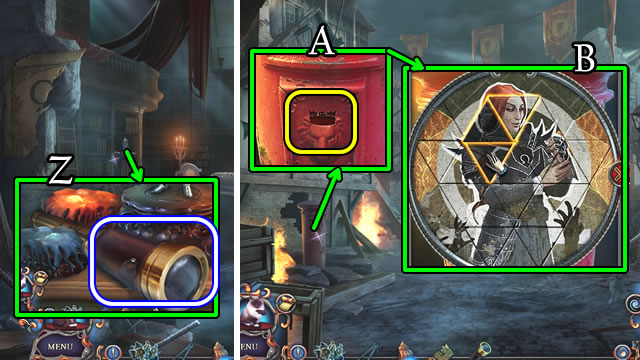
- Select the rope (Z).
- Drag the rope 3x (A).
- Take the CUP (B).
- Place the CUP to receive a CUP WITH ACID (C).
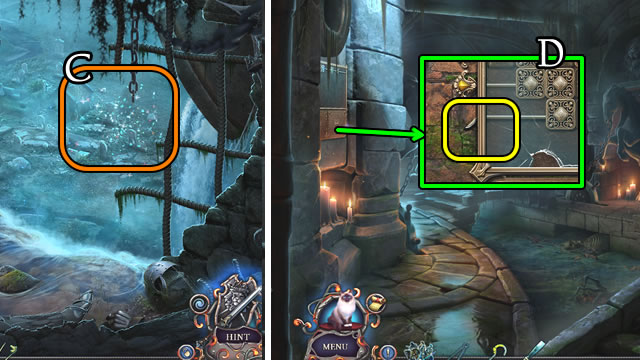
- Walk down.
- Use the CUP WITH ACID to remove the bars (D).
- Crawl forward.
- Take the PIPE WRENCH (E).
- Walk forward.
- Take 1/2 SWORD HANDLE (F).
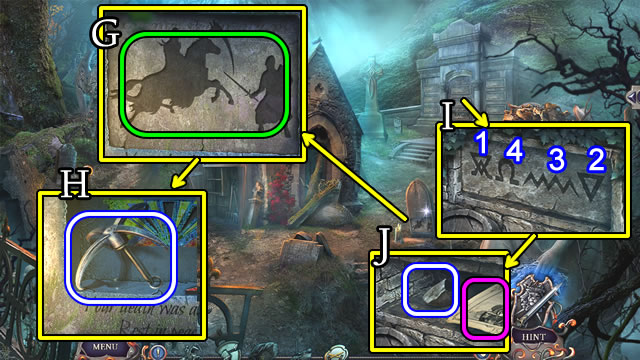
- Select the gate; take the EMBLEM PART (G).
- Walk right.
- Take 1/3 PUZZLE PIECE (H).
- Walk down 3x.
- Place the PIPE WRENCH (I). Move the up arrow to match the numbers on the bolts (J). Remove each bolt. Take a LARGE GEAR.
- Walk left.
- Place and select the LARGE GEAR (K). Take the EMBLEM (L).
- Walk forward, then right.
- Combine the EMBLEM and EMBLEM PART for a LION EMBLEM.
- Place the LION EMBLEM (M); take the DAGGER (N).
- Walk down 2x.
- Use the DAGGER (O).
- Select (P). Receive a STONE.
- Play the HOP (Q) to receive the SCROLL TUBE.
- Place the TOURNIQUET and STONE (R).
- Open the SCROLL TUBE for SECRET MAP PARTS, COIN and EMPTY SCROLL TUBE.
- Select the SECRET MAP PARTS.
- Solution (S).
- Take the SECRET MAP.
- Walk forward.
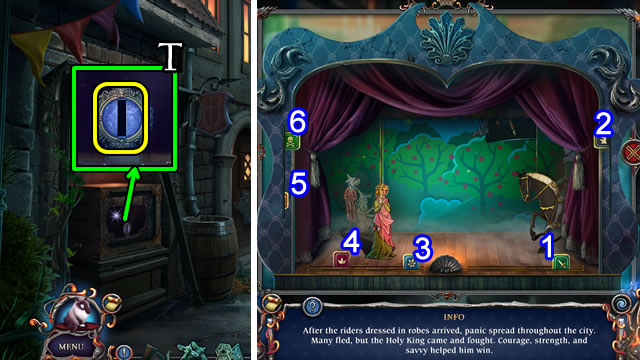
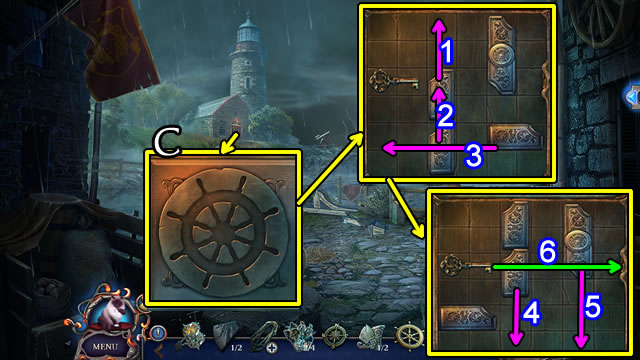
- Place the COIN (T).
- Solution. 1-5.
- Take the PIRATE CAP.
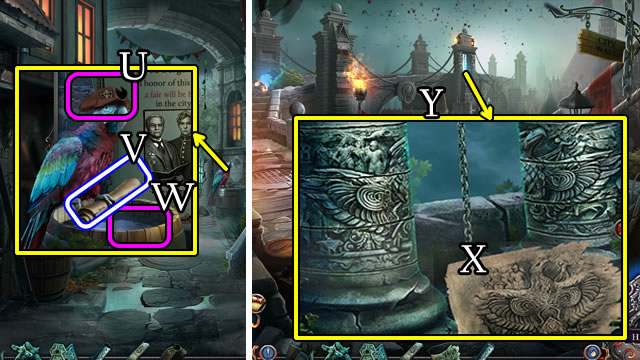
- Place the PIRATE CAP (U) for a PILLAR HINT (V).
- Place the EMPTY SCROLL TUBE in the water barrel for a TUBE OF WATER (W).
- Walk right.
- Place the PILLAR HINT (X).
- Solution (Y).
- Take the QUIVER.

- Use the TUBE OF WATER (Z) for an interactive HOP to take 2/3 PUZZLE PIECE (A).
- Take the CLOTH (B). Use the scraper to get HOT COALS (C).
- Take an ARROW from the QUIVER.
- Combine the ARROW and CLOTH for a CLOTH-WRAPPED ARROW.
- Place the CLOTH-WRAPPED ARROW for a LIT ARROW (D).
- Walk down 2x.
- Combine the SMOKER and HOT COALS for a SMOKER.
- Use the SMOKER (E). Take 3/3 PUZZLE PIECE (F).
- Walk forward.
- Place 3/3 PUZZLE PIECES (G).
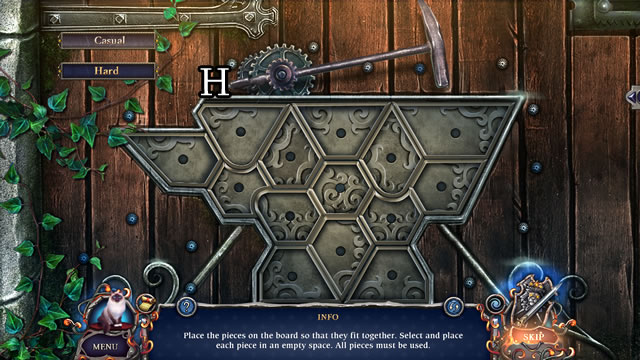
- Solution - Hard and Casual (H).
- Walk left.
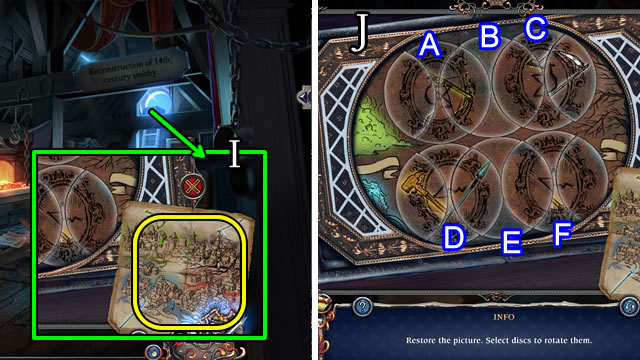
- Place the SECRET MAP (I).
- Solution (J). A-B-C-B-C-B-C-B-C-A-D-E-F-E-D-F.
- Take the note and 1/3 CLASP.
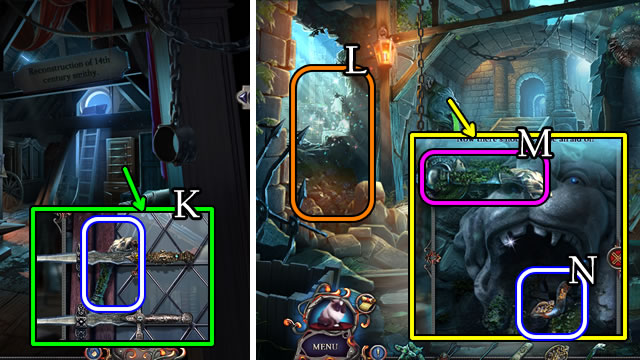
- Take the LEVER (K).
- Walk down 2x.
- Play the HOP (L) for a SWORD.
- Replace the LEVER and drag up (M). Take the HOSE and 2/3 CLASP (N).
- Walk forward, then left.
- Select the SWORD for 2/2 SWORD HANDLES.
- Place 2/2 SWORD HANDLES (O).
- Solution (P). A-C-D-B-A-B.
- Take the SCROLL and CROSSBOW.
- Walk down, then right.
- Combine the CROSSBOW and LIT ARROW for a LOADED FIRE BOW.
- Use the LOADED FIRE BOW (Q).
- Walk down.
- Speak to the man; receive a GATE KEY (R).
- Use the GATE KEY (S).
- Walk forward.
- Take the CANDLE (T).
- Take the 3/3 CLASP (U).
- Combine the SCROLL and 3/3 CLASPS.
- Solution (V).
- Take the ARCH CODE (W).
- Place the ARCH CODE (X).
- Select 1-4.
- Take the TONGS (Y).
- Walk down, then left.
- Take the notes; use the TONGS to get a LENS (Z).
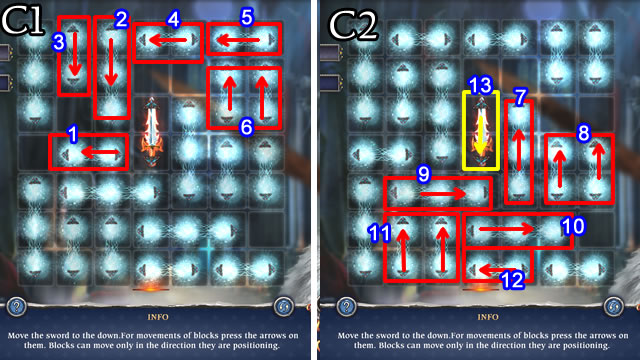
- Walk down.
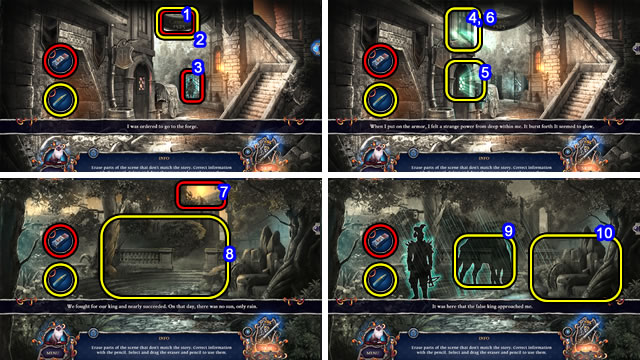
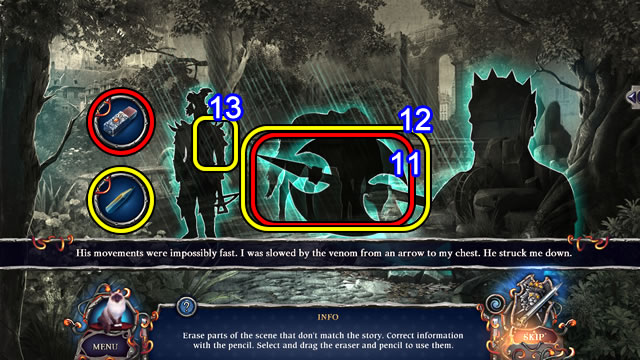
- Solution. 1-13.
- Play the arrow HOP.
- Walk forward.
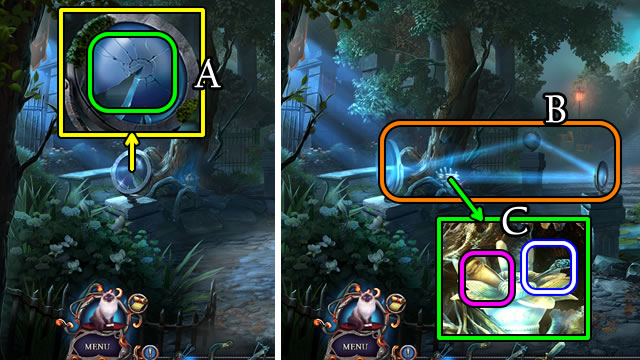
- Replace the LENS (A).
- Position the lenses (B).
- Take the note and the BOX KEY (C).
- Walk down, then left.
- Select the box (D); place the BOX KEY.
- Select the key 2x and use to open the box (E).

- Solution. 1-13.
- Solution. 14.
- Take the note and POISON (F).
- Take an ARROW from the QUIVER.
- Combine the CROSSBOW, ARROW and POISON for a POISONED BOW.
- Walk down, then forward.
- Use the POISONED BOW.
- Receive an ENVELOPE.
Chapter 2: The Red Knight
- Take the note and CADUCEUS FIGURINE (H).
- Place the HOSE (I). Select and hold the handle (J).
- Take the OIL (K).
- Open the ENVELOPE; take the note and GREEN RELIC.
- Walk forward.
- Remove the cloth; play the HOP to receive a STICK (L).
- Take the note; use the OIL (M).
- Take the GASOLINE CANISTER (N).
- Walk down.
- Take the BROKEN PICKAXE (O).
- Combine the BROKEN PICKAXE and STICK for a PICKAXE.
- Use the stone (Q) on the stick (P); take the KEY (R).
- Walk forward.
- Play the HOP to receive SCREW 1/3 (S).
- Read the message; place and select the KEY (T).
- Take 2/3 SCREW (U).
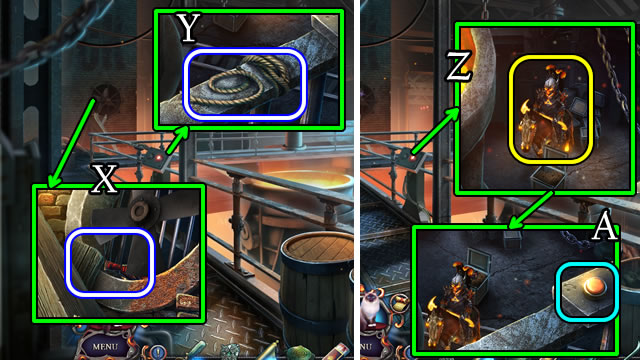
- Use the PICKAXE; take the SCROLL (V) and 3/3 SCREW (W).
- Walk down.
- Place the 3/3 SCREWS; pull the lever (X).
- Walk left.
- Solution (Y). R-L-R-R-L.
- Speak to the man.
- Take the MATCHBOX (Z).
- Place the CADUCEUS FIGURINE (A).
- Take the ALCOHOL (B).
- Read the notes; take the MAZE TOY and EMPTY BURNER beneath it (C).

- Use the ALCOHOL on the broken ladder. Take and place 1-7 rungs on the ladder (D).
- Combine the EMPTY BURNER and GASOLINE CANISTER for a BURNER.
- Use the BURNER (E).
- Walk forward.
- Take 1/3 BUTTONS (F).
- Climb the ladder.
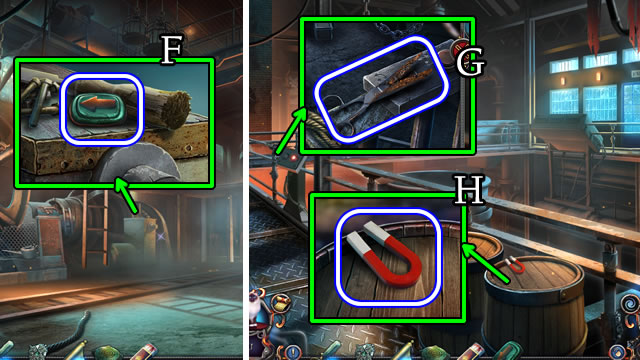
- Take the RUSTED SCISSORS (G).
- Take the MAGNET (H).
- Walk down.
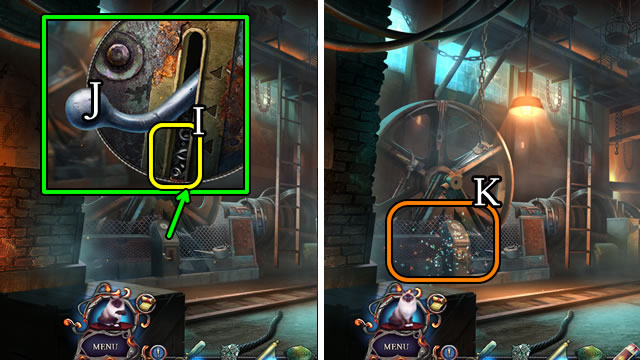
- Use the MAGNET (I); select the lever (J) to play a HOP (K). Receive a CARD.
- Place the CARD (L). Depress the buttons (M).
- Take the CROWBAR (N).
- Walk forward.
- Use the CROWBAR (O). Take the GRINDSTONE (P).
- Walk down.
- Place the GRINDSTONE (Q).
- Place the RUSTED SCISSORS on the grindstone for SCISSORS.
- Play the HOP to receive a ROTARY DIAL (R).
- Place the ROTARY DIAL. Note the code (S). Dial 2-4-5 (T).
- Take the SIGNET KEY (U).
- Walk forward.
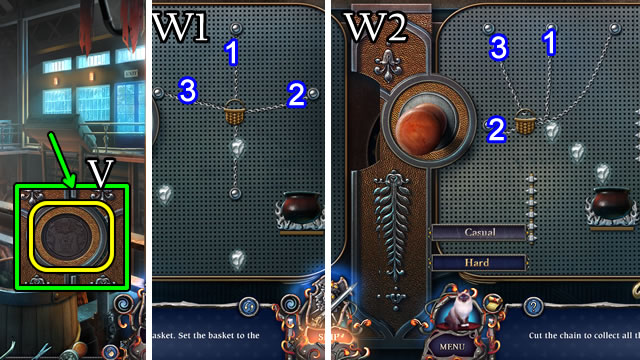
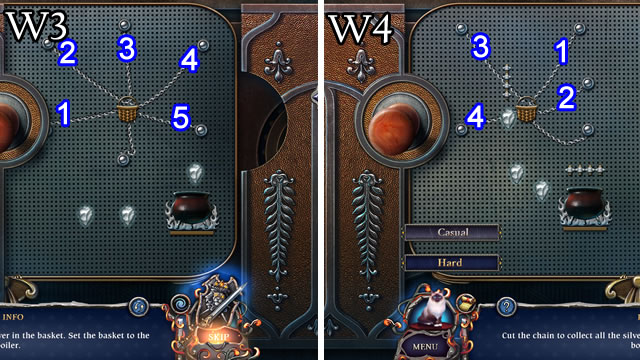
- Place the SIGNET KEY (V).
- Solution - Casual (W1-W2).
- Solution - Hard (W3-W4).
- Place the CROWBAR in the fan. Use Mr. Jenkins to get a TOY (X).
- Use the SCISSORS to get a ROPE (Y).
- Combine the TOY and ROPE for a ROPED TOY.
- Use the ROPED TOY (Z).
- Press (A). Receive RELICS.
- Walk forward.
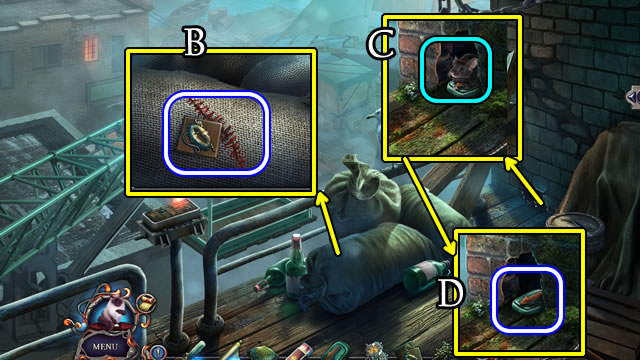
- Take 1/2 BOX PART; use the SCISSORS on the stitching; take the GRAIN (B).
- Place the GRAIN (C); take 2/3 BUTTONS (D).
- Combine the CANDLE and MATCHBOX for a LIT CANDLE.
- Combine the SCROLL and LIT CANDLE. Move the candle to read the message; take the BALL.
- Combine the MAZE TOY and BALL.
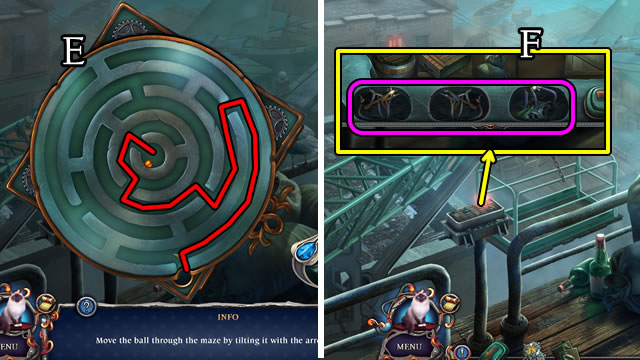
- Solution (E).
- Take 3/3 BUTTONS.
- Place the 3/3 BUTTONS (F).
- Solution (G). D-B-A-C-D-B.
- Walk forward.
Chapter 3: The Blue Knight
- Speak to the man.
- Take the LONG PLANK (H).
- Take 1/4 NAIL and 2/2 BOX PART (I).
- Walk forward.
- Take 2/4 NAIL (J).
- Use Mr. Jenkins to get 1/2 SHIP PART (K).
- Take 3/4 NAIL (L).
- Place 2/2 BOX PARTS for a puzzle (M).
- Solution (N).
- Take the DIE and FISHING GLOVE.
- Walk down.
- Use the DIE for a puzzle (O).
- Solutions vary.
- Speak to the man; receive a LANTERN.
- Use the FISHING GLOVE to get a SHARP SHELL (P).
- Take 2/3 PLANK (Q).
- Use the SHARP SHELL (R).
- Walk to the Lighthouse Path.
- Select, then place the LANTERN (S).
- Solution (T).
- Take 4/4 NAIL AND 3/3 PLANK (U).
- Remove the coat. Take the ROPE and 1/4 KNIGHT FIGURE (V).
- Walk forward.
- Take 2/4 KNIGHT FIGURE and OLD CHEESE (W).
- Take the OLD BOOT (X).
- Use Mr. Jenkins to receive a COMPASS KEY (Y).
- Walk down.

- Give the OLD CHEESE; receive 1/2 SHIP BADGE (Z).
- Walk down.
- Combine the LONG PLANK, 3/3 PLANKS, 4/4 NAILS and OLD BOOT for a GANGWAY.
- Place the GANGWAY (A) to play a HOP (B). Receive a HELM.
- Return to the Lighthouse Path.
- Place the HELM (C).
- Solution. 1-6.
- Enter the Lighthouse.
- Select 1-5. Take the completed MOP (D).
- Take the GLOVE (E).
- Take 1/3 LANDMARK (F).
- Take UNLIT LAMP (G).
- Return to the Cliff.

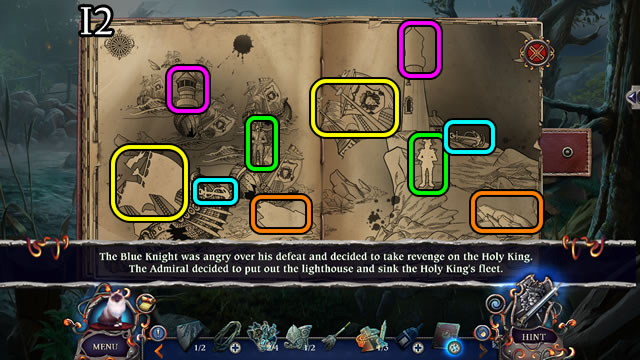
- Use the GLOVE. Take the JOURNAL (H).
- Combine the JOURNAL and COMPASS KEY. Open for a puzzle.
- Solution (I1-I2).
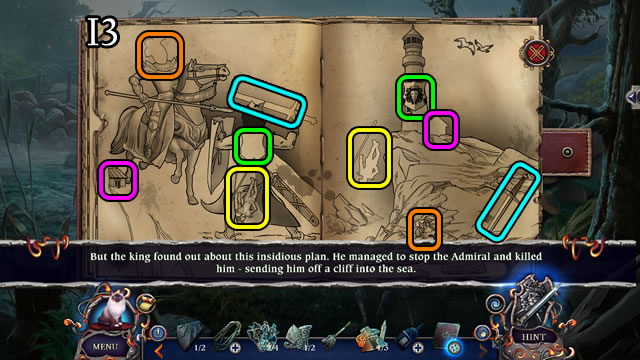
- Solution (I3).
- Take the LENS.
- Walk down.
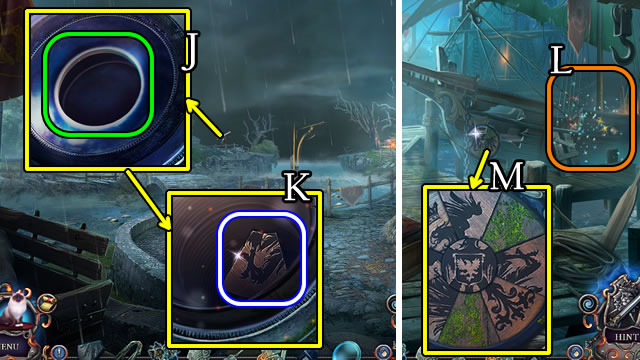
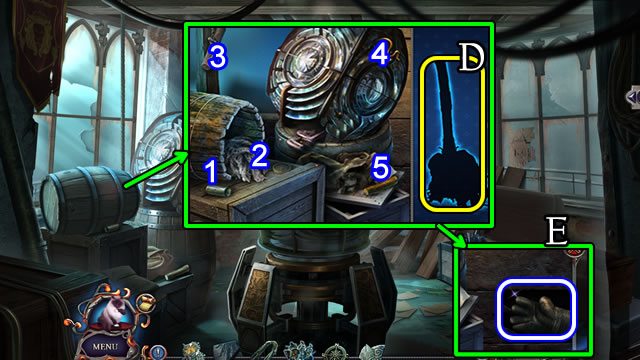
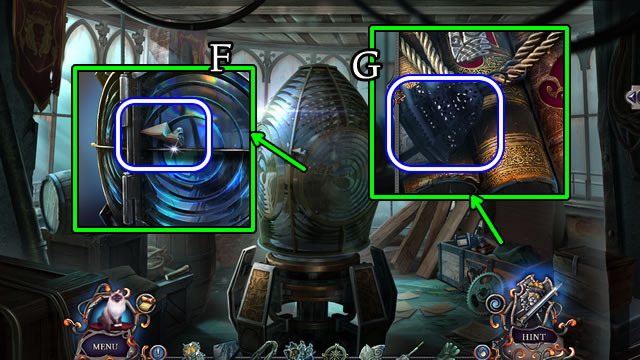
- Place the LENS (J). Select to receive 2/2 SHIP PART (K).
- Walk down.
- Play the HOP (L) for a 2/2 SHIP BADGE.
- Place the 2/2 SHIP PARTS (M).
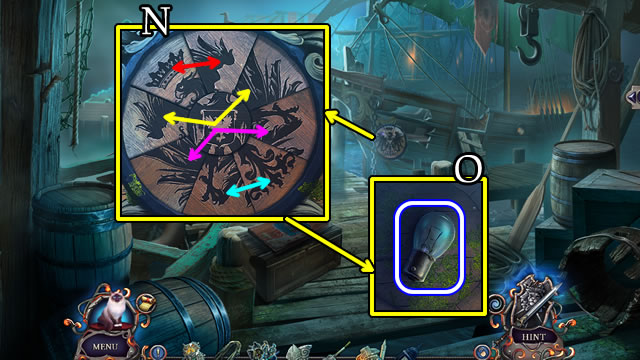
- Solution (N).
- Take the LIGHTBULB (O).
- Return to the Lighthouse.
- Open and place the LIGHTBULB (P).
- Place 2/2 SHIP BADGES.
- Solution (Q).
- Take the FLINT and SHURIKEN (R).
- Return to the Cliff.
- Use the SHURIKEN (S). Receive the BLUE RELIC.
- Combine the UNLIT LAMP and FLINT for a LAMP.
- Place the LAMP. Take the HOOK (T).
- Combine the ROPE and HOOK for a HOOKED ROPE.
- Return to the Broken Bridge.
- Use the HOOKED ROPE (U).
- Walk forward.
Chapter 4: The Black Knight
- Use the MOP; take the STICK (V).
- Walk forward.
- Take the SCARF (W).
- Use Mr. Jenkins on the windmill to get a CHEST PIECE and NET (X).
- Walk down.
- Combine the STICK and SCARF for a TORCH.
- Place the TORCH for a LIT TORCH (Y).
- Walk forward.
- Use the LIT TORCH (Z).
- Take the TWEEZERS (A).
- Walk down.
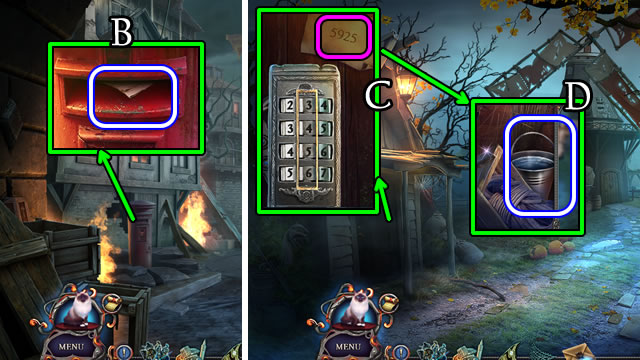
- Use the TWEEZERS to get an ENVELOPE (B).
- Walk forward.
- Open the ENVELOPE to get a CODE HINT.
- Place the CODE HINT. Set the tumblers to 5-9-2-5 (C).
- Take the BUCKET WITH WATER (D).
- Walk down.
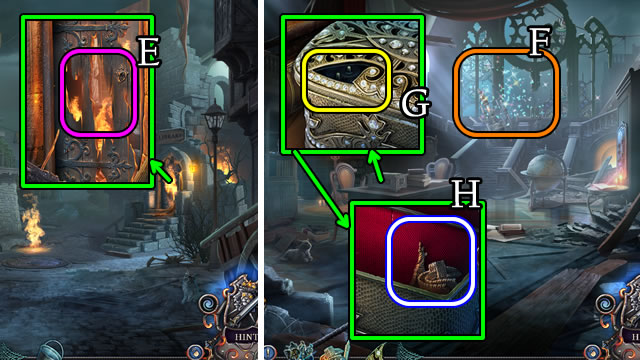
- Use the BUCKET WITH WATER (E).
- Open the door and enter the building.
- Play the HOP (F) for a MEDALLION.
- Place the CHEST PIECE (G).
- Take the note and 2/3 LANDMARK (H).
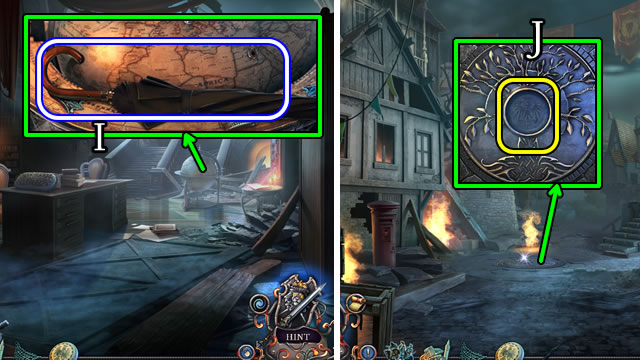
- Take the UMBRELLA (I).
- Walk down.
- Place the MEDALLION; climb down (J).
- Take the UMBRELLA BUTTON (K).
- Combine the UMBRELLA and UMBRELLA BUTTON for a SWORD.
- Place the SWORD (L).
- Take 3/3 LANDMARK (M).
- Return to the Library.
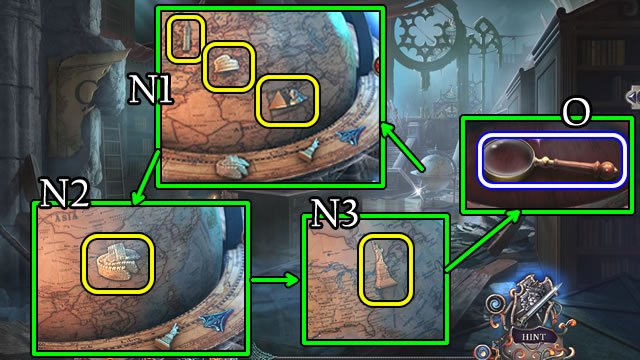
- Place the 3/3 LANDMARKS on the globe.
- Solution (N1-N3).
- Take the MAGNIFIER (O).
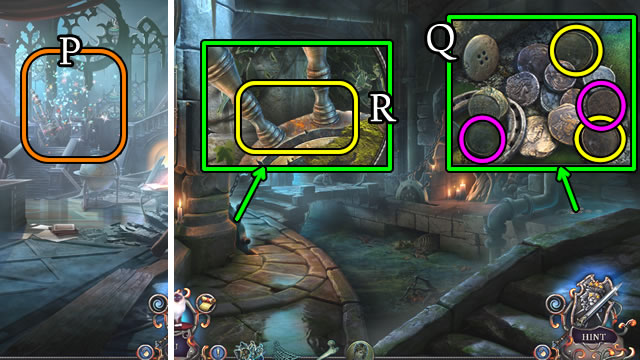
- Play the HOP for a BONE (P).
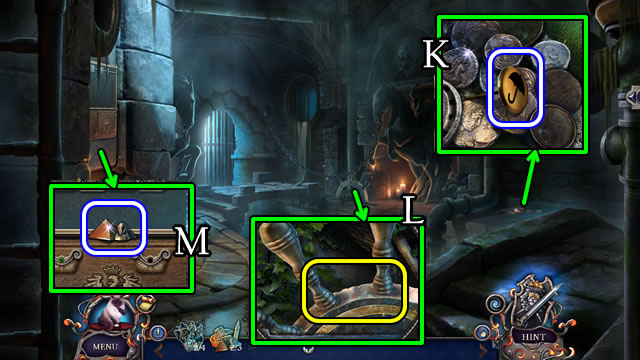
- Walk down and go down the Sewer.
- Use the MAGNIFIER on the coins.
- Solution (Q).
- Receive 3/3 GENEALOGICAL TOKEN.
- Use the BONE (R).
- Walk forward.
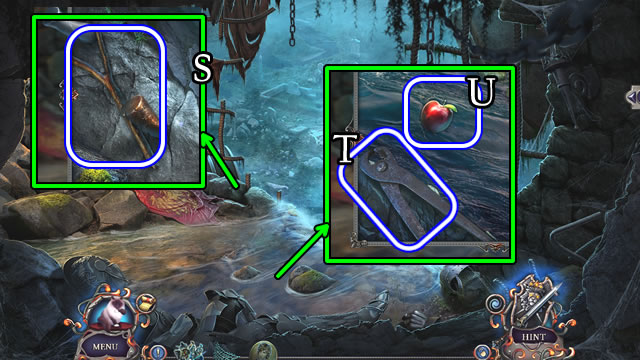
- Take the STICK (S).
- Take the PLIERS (T).
- Combine the STICK and NET for a HAND NET.
- Use the HAND NET for an APPLE (U).
- Return to the Windmill.
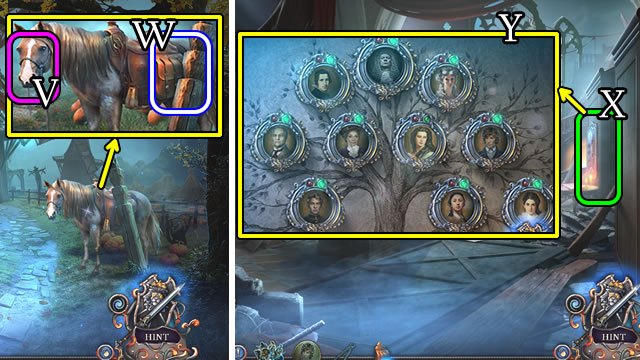
- Give the APPLE (V); take the SADDLEBAG (W).
- Return to the Library.
- Place the 3/3 GENEALOGICAL TOKENS (X).
- Solution (Y).
- Take the CROWN EMBLEM.
- Take the SPYGLASS (Z).
- Walk down.
- Place the CROWN EMBLEM (A).
- Solution (B).
- Take the PIN.
- Return to the Drainage Pipe.
- Use the SPYGLASS to activate a HOP (C). Play it to receive 3/4 KNIGHT FIGURE.
- Walk down.
- Combine the SADDLEBAG and PIN for a HOOK. Open and take the note and SCRAPER.
- Use the HOOK (D).
- Solution (E). 1-10.
- Take 4/4 KNIGHT FIGURE.
- Return to the Library.
- Place the 4/4 KNIGHT FIGURES (F).
- Solution (G).
- Take the CANVAS PART (H).
- Return to the Drainage Pipe.

- Play the HOP (I) for a PIECE OF ROPE.
- Place the CANVAS PART (J). Take the SHORT ROPE, note and DEATH KNIGHT FIGURE (K).
- Combine the SHORT ROPE and PIECE OF ROPE for a ROPE.
- Place the ROPE (L) and climb down.
Chapter 5: Saving Alfred
- Use the SCRAPER to get 1/4 CHEST KEY (M).
- Take 1/2 TORCH KEY (N).
- Walk forward.
- Use the PLIERS to get 1/2 CUPBOARD KEY (O).
- Use Mr. Jenkins to get 2/2 TORCH KEY (P).
- Walk down.
- Use 2/2 TORCH KEY (Q).
- Solution (R). D-F-H-A-B-D-F-H-A.
- Take the TORCH.
- Walk forward.
- Place the TORCH for a LIT TORCH (S).
- Use the LIT TORCH (T) to take 2/2 CUPBOARD KEY and a PIECE OF CLOTH (U).
- Walk down.
- Place the 2/2 CUPBOARD KEYS (V).
- Take the SHOVEL SHANK (W).
- Walk forward.
- Use the SHOVEL SHANK (X).
- Enter the Cave, then walk left.
- Select to trigger a HOP (Y) to receive a KNIGHT FIGURE.
- Take the BELT (Z).
- Take the SECRET KEY (A).
- Use the LIT TORCH (B).
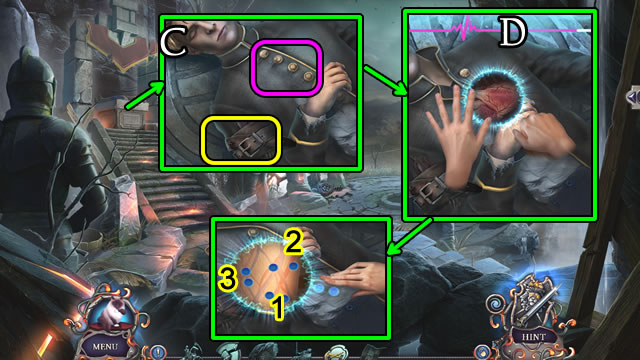
- Use the BELT; open the coat (C).
- Do a chest compression 3x (D). Place the dots 1-3.
- Speak with Alfred.
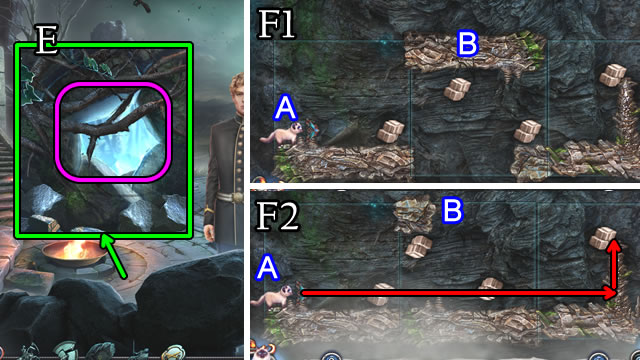
- Place Mr. Jenkins (E).
- Solution - Casual (F1). Bx2.
- Solution - Casual (F2). Ax10-A2-Bx2.
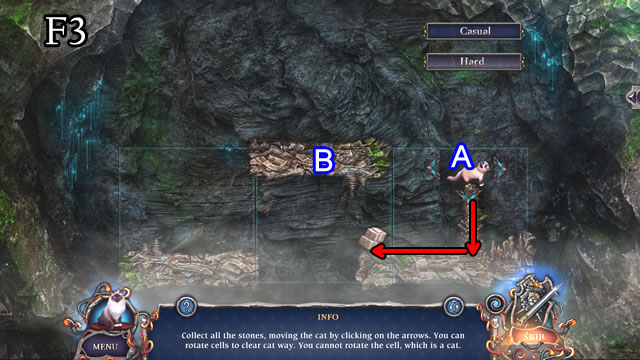
- Solution - Casual (F3). Ax2-Ax3.
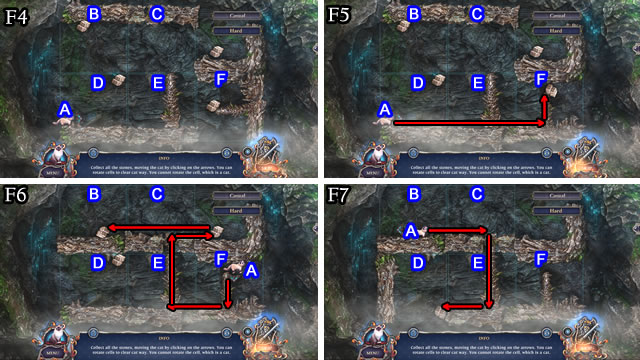
- Solution - Hard (F4). Fx3.
- Solution - Hard (F5). Ax10-Ax2-Bx2-Cx2.
- Solution - Hard (F6). Ax2-Ax4-Ax4-Ax3-Ax7-Dx3.
- Solution - Hard (F7). Ax4-Ax4-Ax3.
- Walk down 3x.
- Place the DEATH KNIGHT FIGURE and KNIGHT FIGURE (G).
- Take the HOOK (H).
- Use the PIECE OF CLOTH (I).
- Select 1-4.
- Take the note and HEAVY STONE (J).
- Return to the Waterfall.
- Use the HEAVY STONE (K).
- Take the BREASTPLATE and 1/2 PIECE OF STAINED GLASS (L).
- Walk down.
- Use the BREASTPLATE (M).
- Take 2/2 PIECE OF STAINED GLASS (N).
- Walk down 2x.
- Place the 2/2 PIECES OF STAINED GLASS and third piece (O).
- Take the WICKER DOLL and 2/4 CHEST KEY (P).
- Walk forward 2x.
- Select the WICKER DOLL for a ROPE.
- Combine the ROPE and HOOK for a HOOKED ROPE.
- Read the note; use the HOOKED ROPE to get the POUCH (Q).
- Walk left.
- Play the HOP to receive 3/4 CHEST KEY (R).
- Combine the POUCH and SECRET KEY. Take the note and TWEEZERS.
- Use the TWEEZERS for 4/4 CHEST KEY (S).
- Walk down 2x.
- Remove the dirt. Place 4/4 CHEST KEYS (T).
- Solution (U). 1-11.
- Take the HINT and SWORD.
- Walk forward.
- Place the HINT.
- Solution (V).
- Attempt to walk forward.
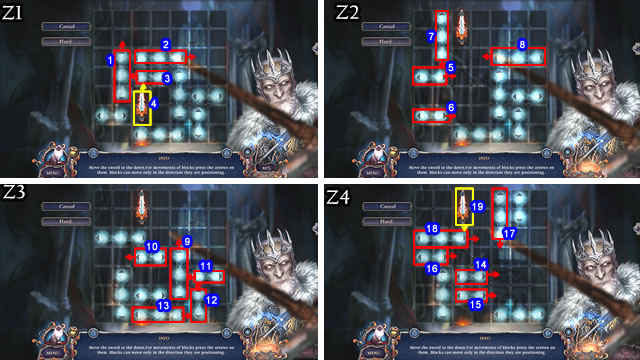
- Place the SWORD (W).
- Solutions vary.

- Walk forward.
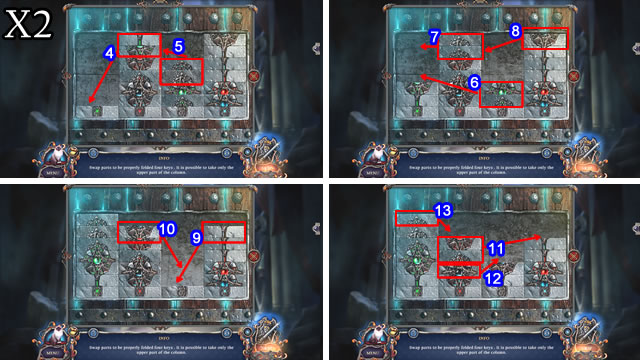
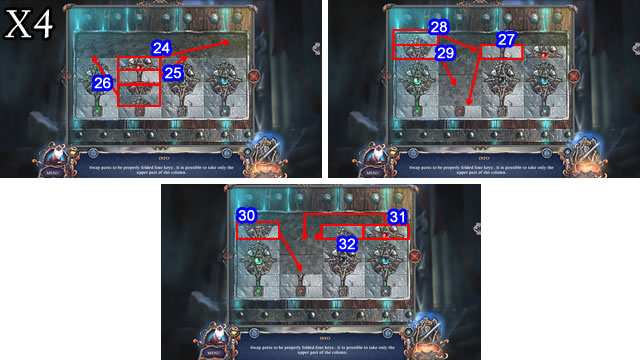
- Select @ for a puzzle.
- Solution (X1). 1-3.
- Solution (X2). 4-13.
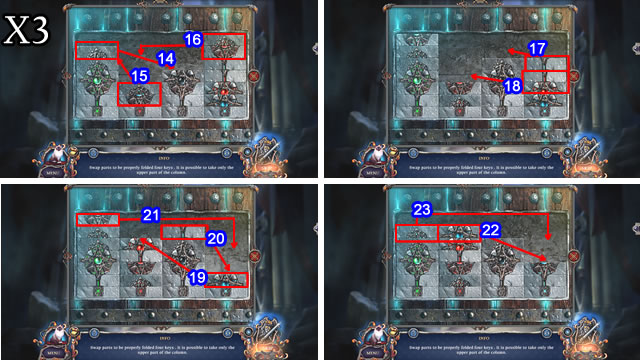
- Solution (X3). 14-23.
- Solution (X4). 24-32.
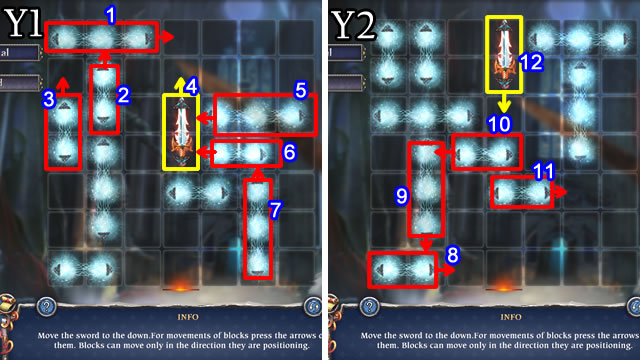
- Solution - Casual (Y1-Y2).
- Solution - Casual (Z1-Z4).
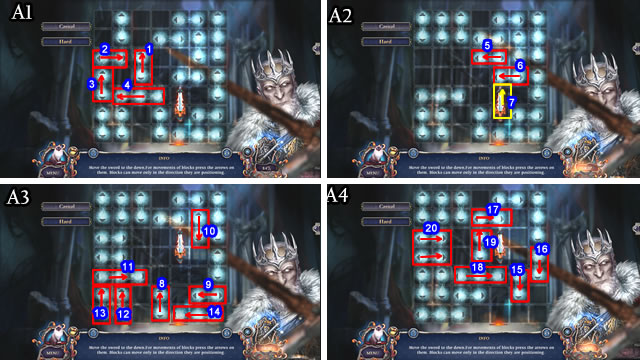
- Solution - Hard (A1-A4).
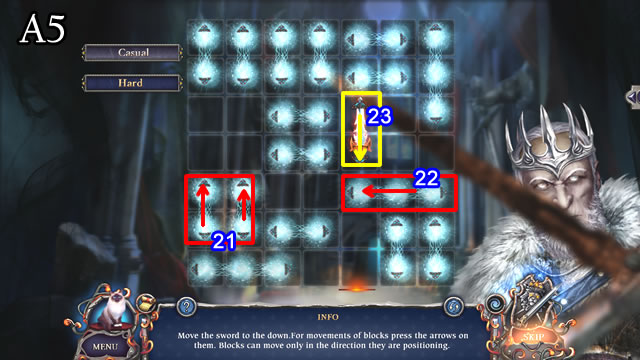
- Solution - Hard (A5).
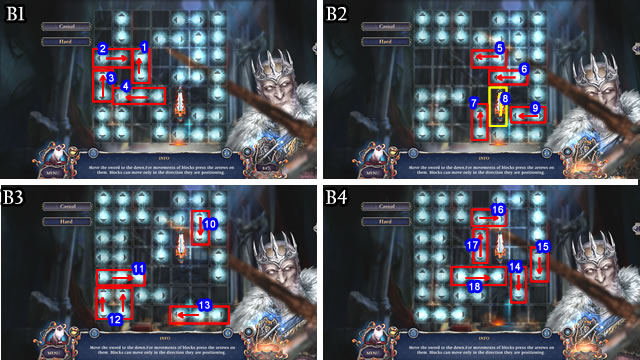
- Solution - Hard (B1-B4).
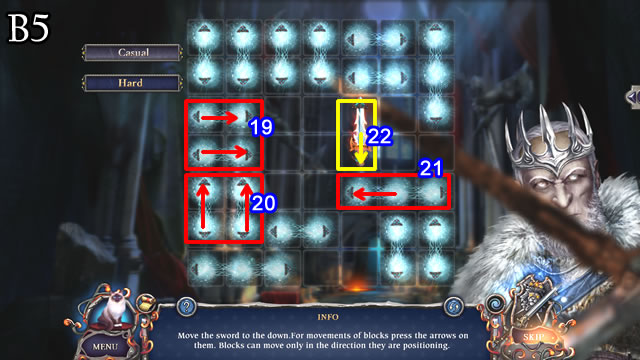
- Solution - Hard (B5).
- Solution - Hard (C1-C2).
- Congratulations. You have completed the Ominous Objects: The Cursed Guards.
Created at: 2017-05-26