

Walkthrough Menu
- General Tips
- Chapter 1: Town Entrance
- Chapter 2: Smalltown Museum
- Chapter 3: The Crossroads
- Chapter 4: The Chapel
- Chapter 5: Rupert's House
- Chapter 6: The Riverside
General Tips
- This is the official guide for Order of the Light: The Deathly Artisan!
- This guide will not mention each time you have to zoom into a location; the screenshots will show each zoom scene.
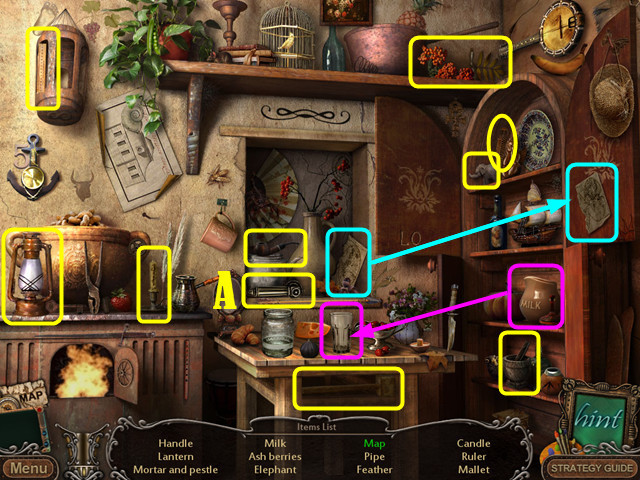
- Hidden-object puzzles are referred to as HOPs in this guide. List items shown in green are hidden or require additional actions to locate. Interactive items in HOPs are color-coded.
- Puzzles are sometimes randomized; your solution may vary.
- This guide will give step-by-step solutions for all puzzles that are not random. Please read the instructions in the game for each puzzle.
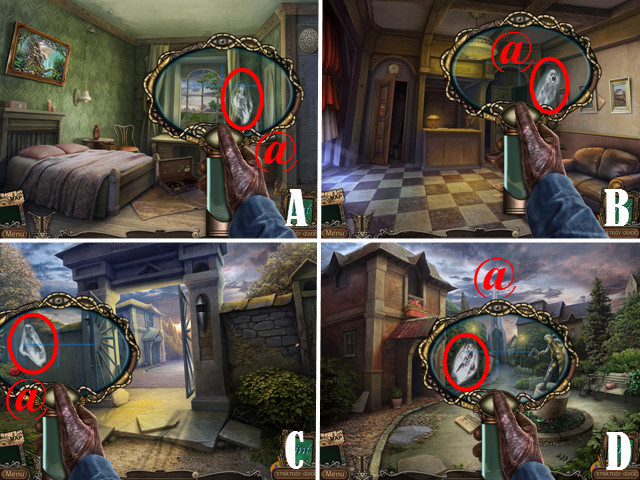
- This game features 35 ghosts that you must locate and capture with a toolbar item, the Ghost Catcher, in order to complete the adventure. The guide will not discuss every ghost, but all will be marked in the screenshots with '@.'
Chapter 1: Town Entrance
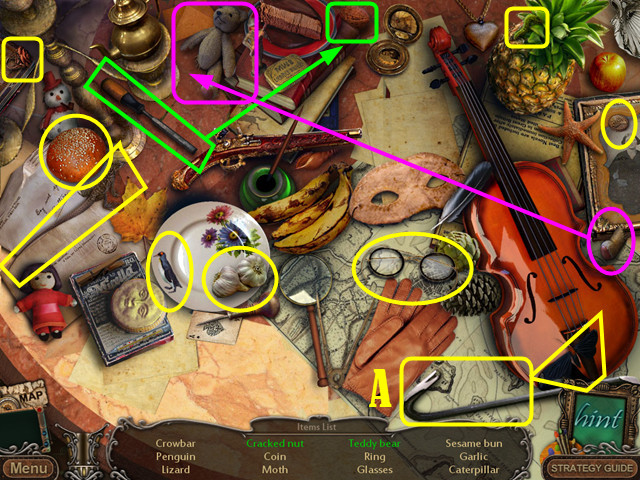
- Take the map from the officer.
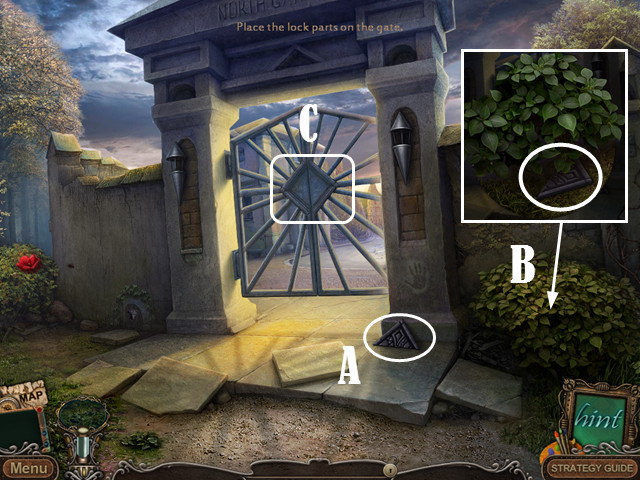
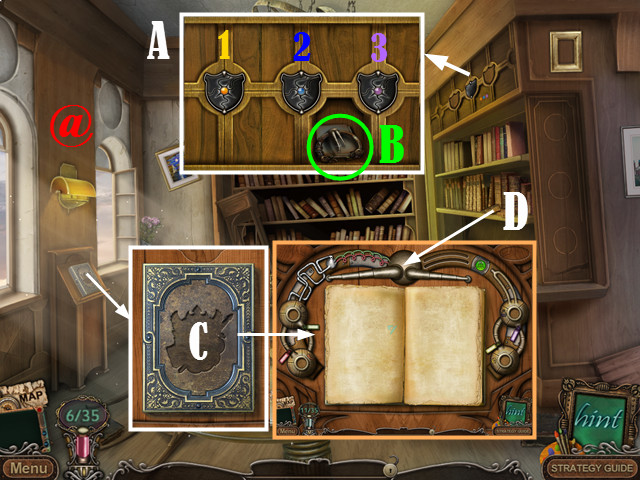
- Pick up the CARVED TRIANGLE (A).
- Take the CARVED TRIANGLE (B).
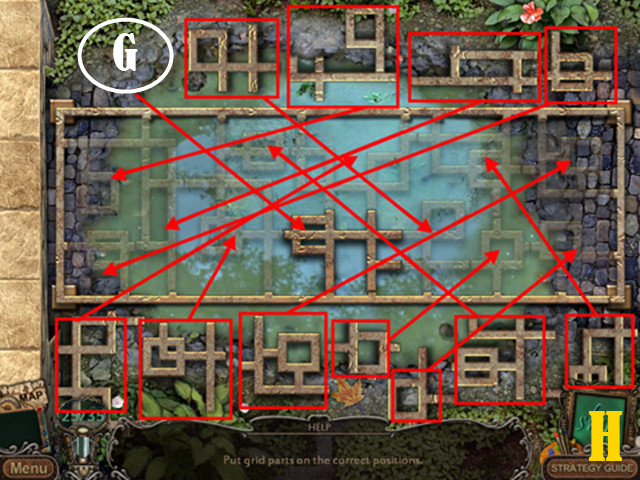
- Place the two CARVED TRIANGLES in the slots (C) to enter Monument Square.
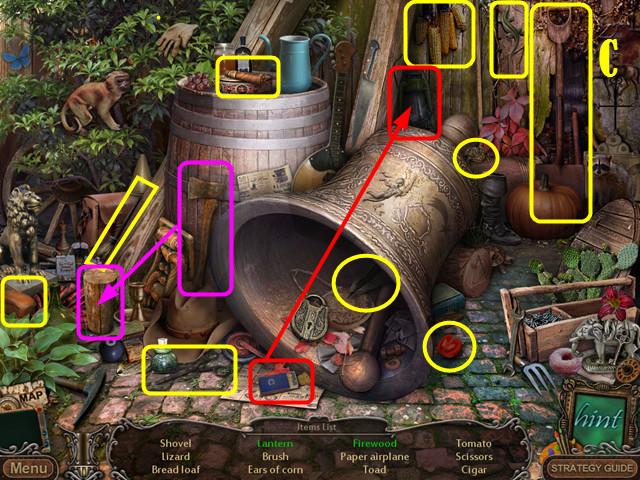
- Touch the fireball.
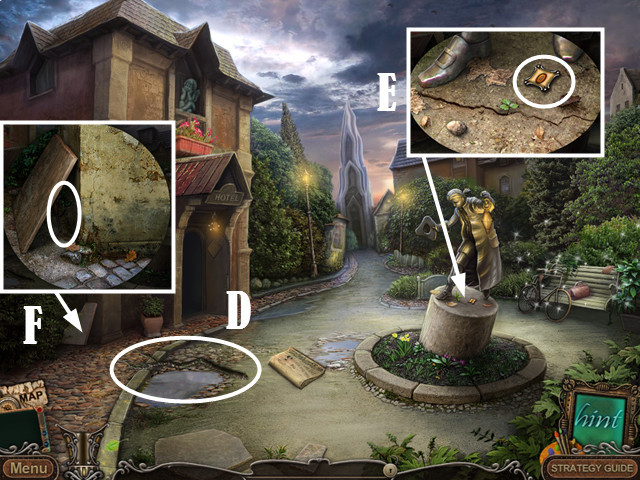
- Take the BRANCH (D).
- Pick up the KEYHOLE TILE (E).
- Use the BRANCH to retrieve the SCREWDRIVER (F) from behind the board.

- Play the HOP.
- You receive the FACE PART (G).
- Return to the North Gate.
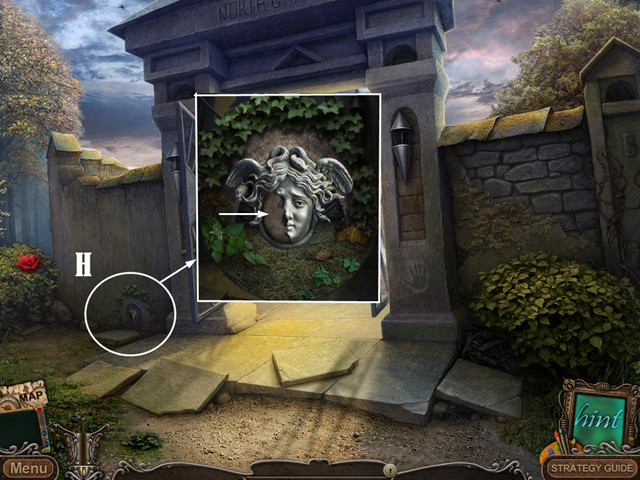
- Insert the FACE PART (H).
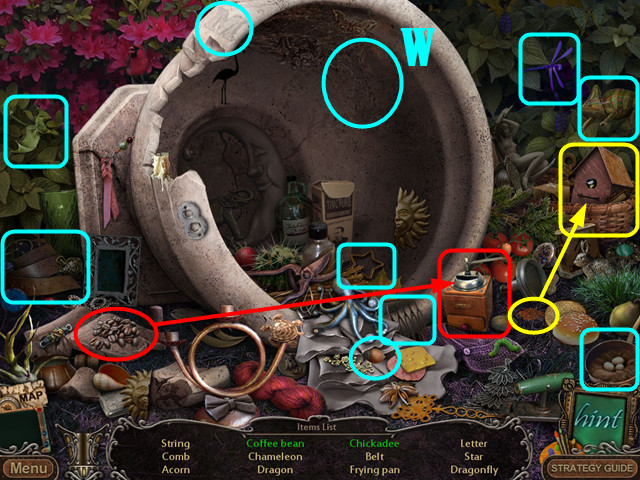
- Take the BROOMS SYMBOL.
- Enter the Hotel Lobby.
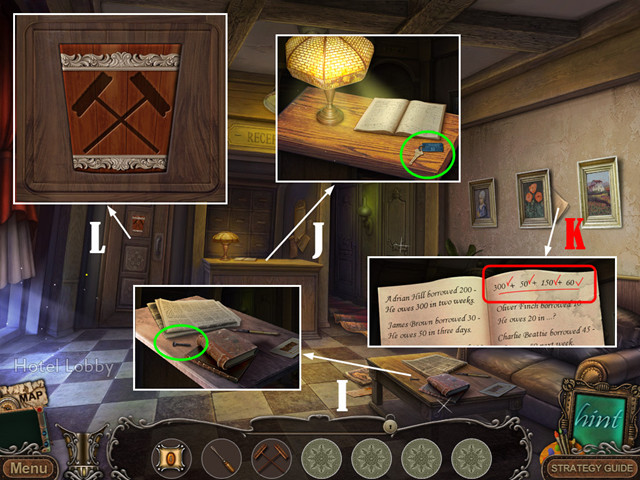
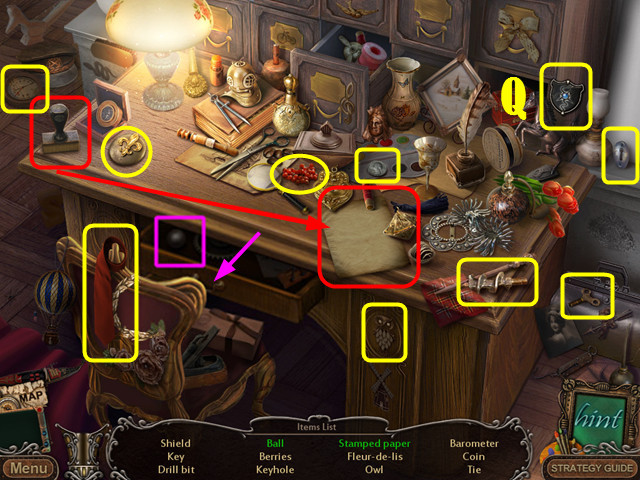
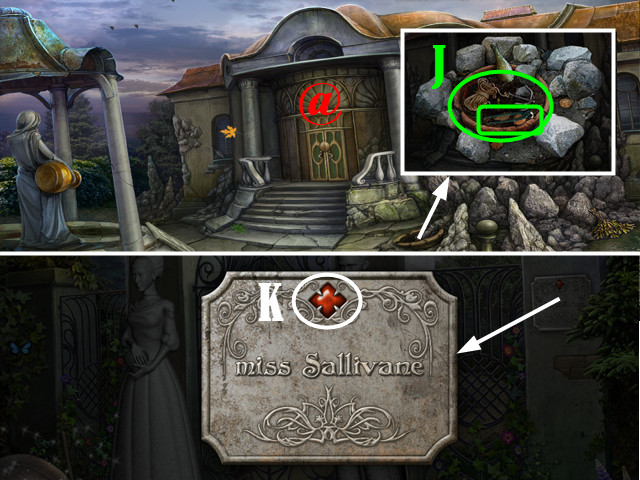
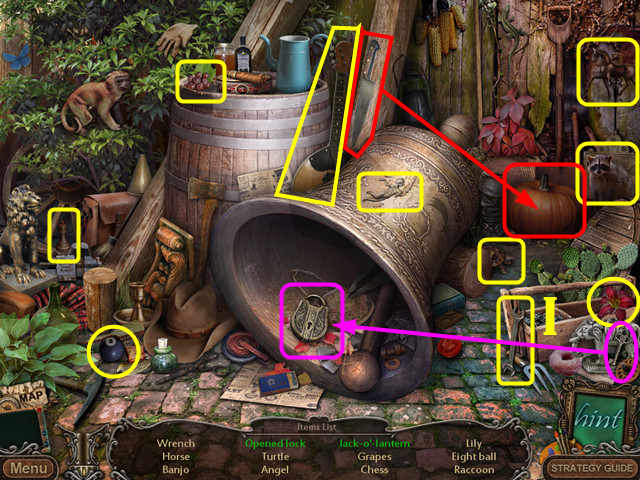
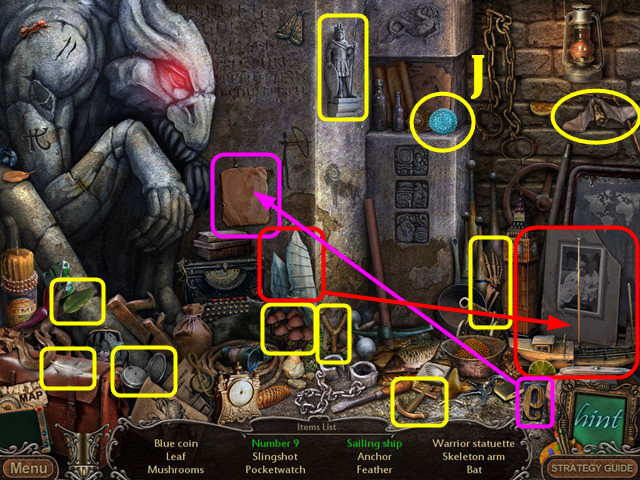
- Take the SCREW (I) and the ROOM KEY (J).
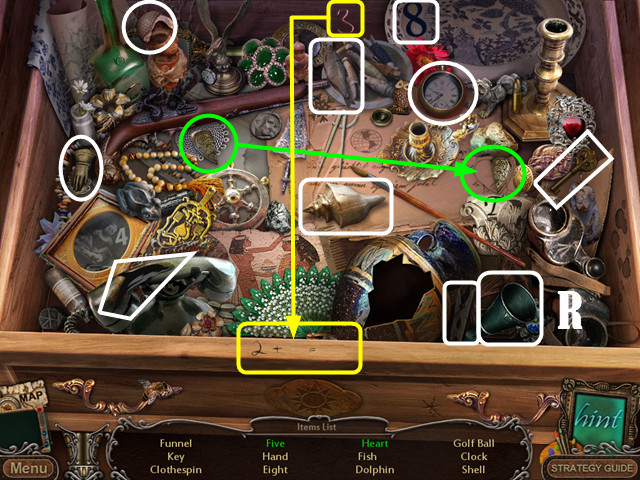
- Read the letter. Note that the sum of the numbers is 560 (K).
- Use the BROOMS SYMBOL (L) to activate a HOP.
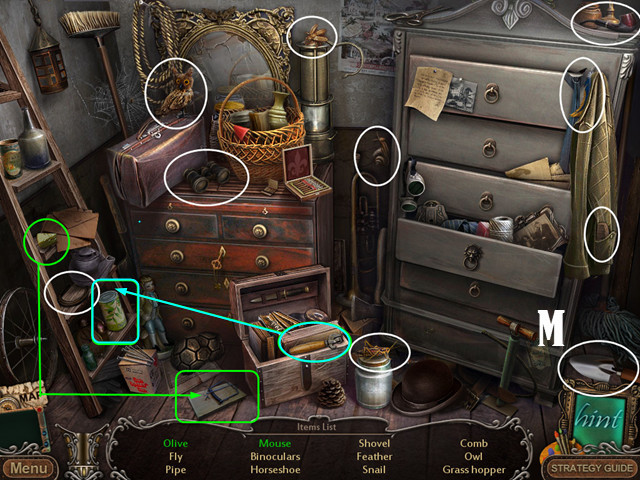
- Play the HOP.
- You receive the HAND SPADE (M).
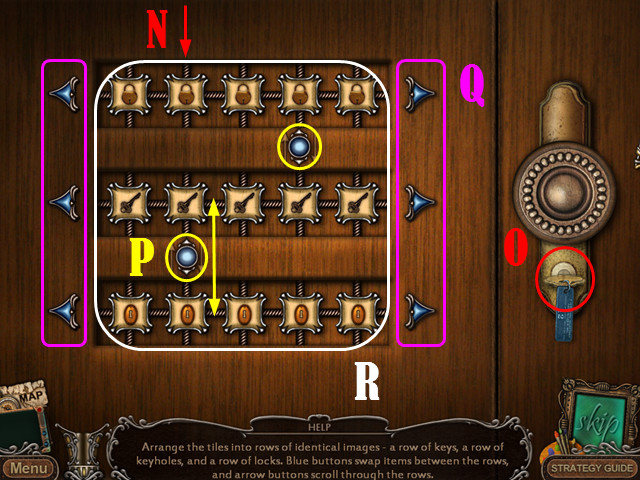
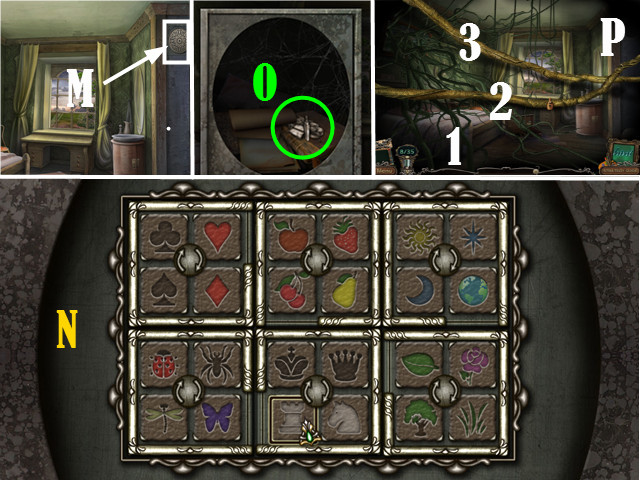
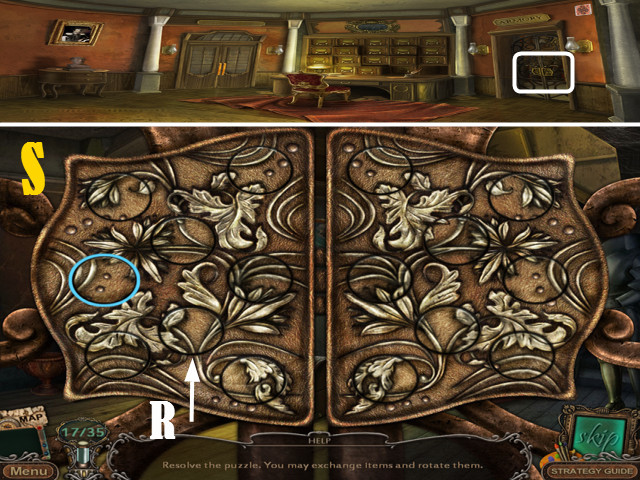
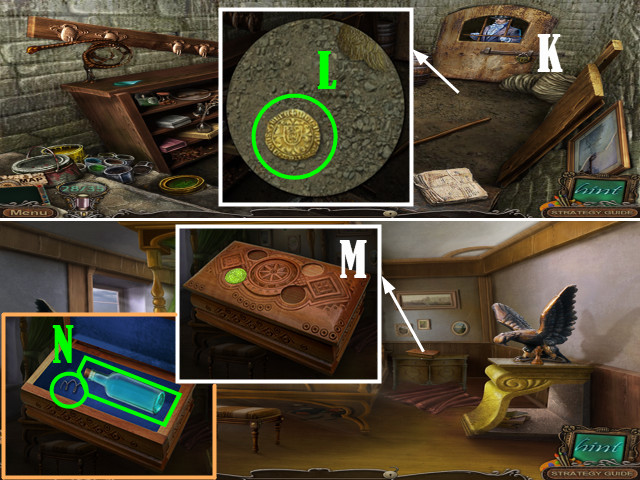
- Examine the room door puzzle.
- Place the KEYHOLE TILE in the empty space (N) and the ROOM KEY (O) in the keyhole.
- Arrange the symbol types in matching rows.
- The buttons (P; circled in yellow) swap the pieces above and below. The arrows (Q; purple) scroll rows right or left.
- Solution (R).
- Return to Monument Square.
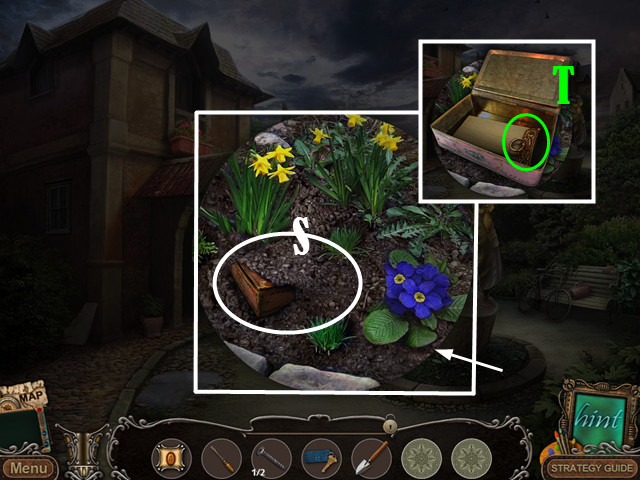
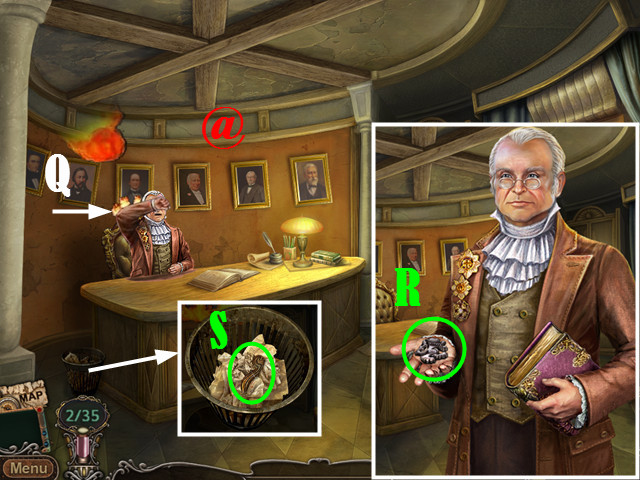
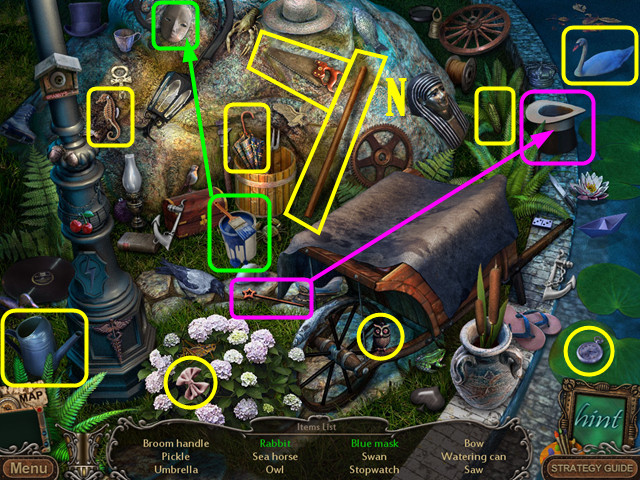
- Dig three times with the HAND SPADE (S).
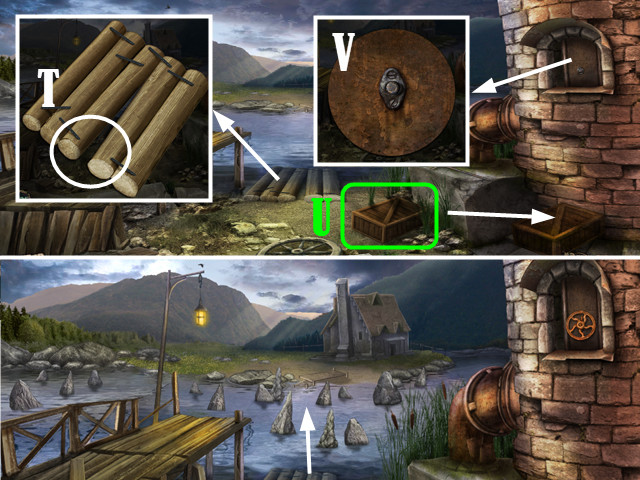
- Read the note. Take the DRAWER HANDLE (T).
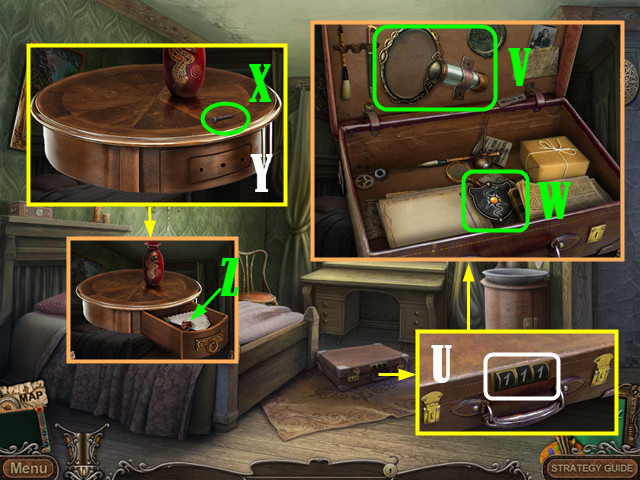
- Return to the Hotel Lobby. Go forward.
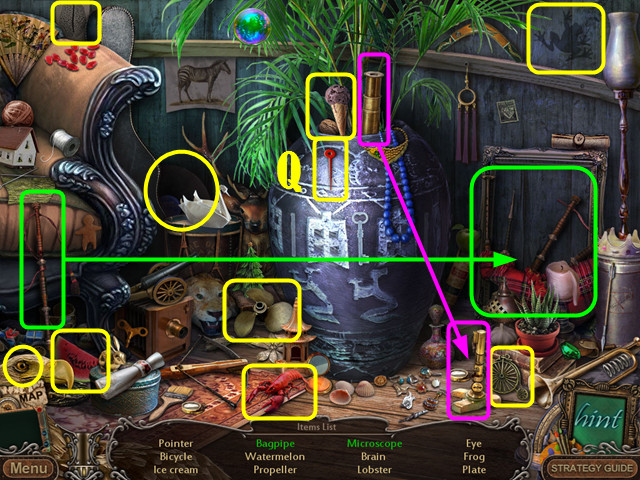
- Enter the code 560 on the briefcase (U).
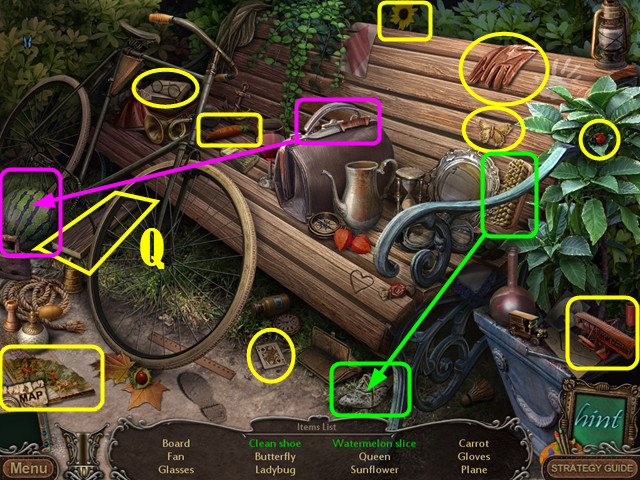
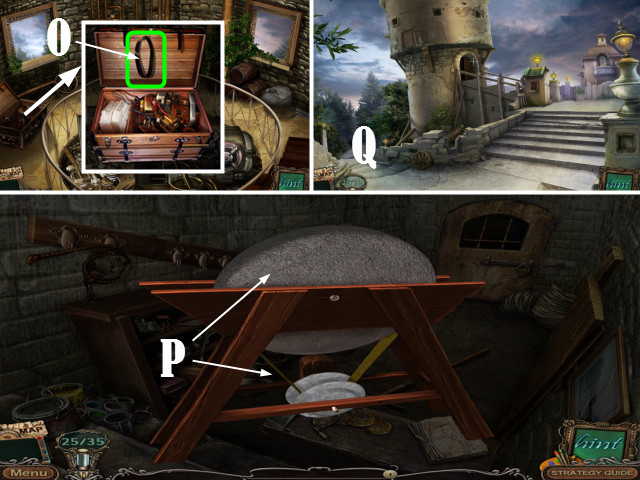
- Take the GHOST CATCHER (V) to add to your tool bar. Pick up the SHIELD (W) to start the dialogue.
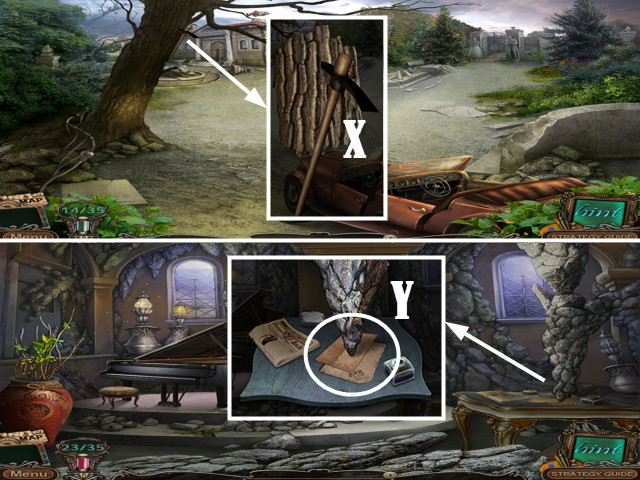
- Take the SCREW (X). Place the DRAWER HANDLE and SCREWS (Y). Use the SCREWDRIVER.
- Grab the HANDKERCHIEF (Z) and the FEATHER EMBLEM beneath it.
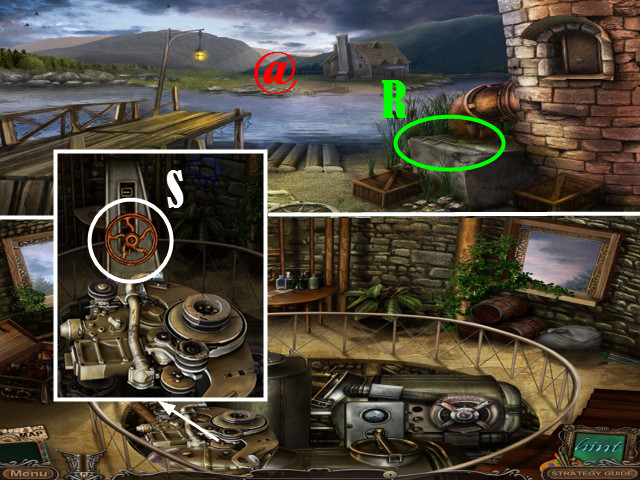
- Use the Ghost Catcher on the sink (A). Select the ghost when it is in the crosshairs to capture it.
- Use the Ghost Catcher in the Hotel Lobby (B), the North Gate (C), and Monument Square (D).
- Go forward.
- Speak to Rupert Hill.
- Move the objects in the box aside to find the GLOVES (E).
- Take the KEY (F).
- Head right to Market Street (G).
- Take the TIRE (H).
- Return to Main Street. Go forward (I).

- Take the BUCKET (J).
- Use the FEATHER EMBLEM (K).
- Enter City Hall.
- Apply the GLOVES (L).
- Enter the Mayor's Office.
- Return to City Hall.
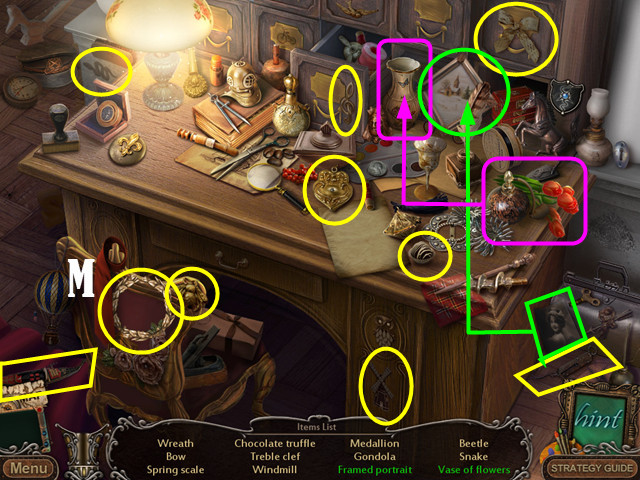
- Play the HOP.
- You receive the WREATH (M).
- Place the WREATH (N). Retrieve the HANDLE.
- Return to the Town Square.
- Install the HANDLE (O) and place the BUCKET (P).
- Touch the handle to pump water. Take the BUCKET OF WATER.
- Return to the Mayor's Office. Use the BUCKET OF WATER (Q).
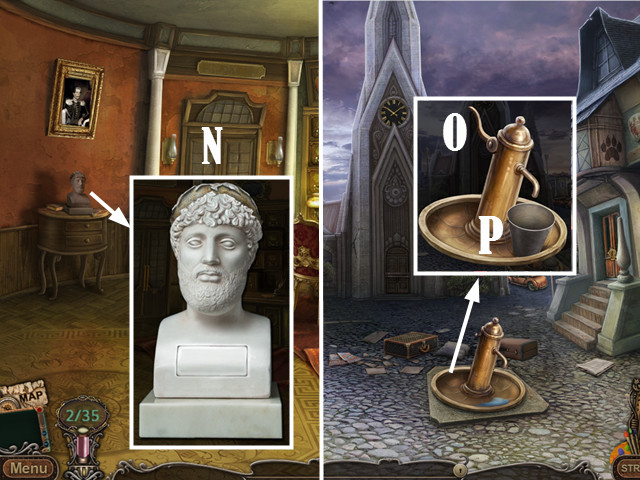
- Speak to the Mayor. Take the LION EMBLEM (R).
- Take the HANDLE (S). Move papers aside to read the letter.
- Return to the Town Square.
Chapter 2: Smalltown Museum
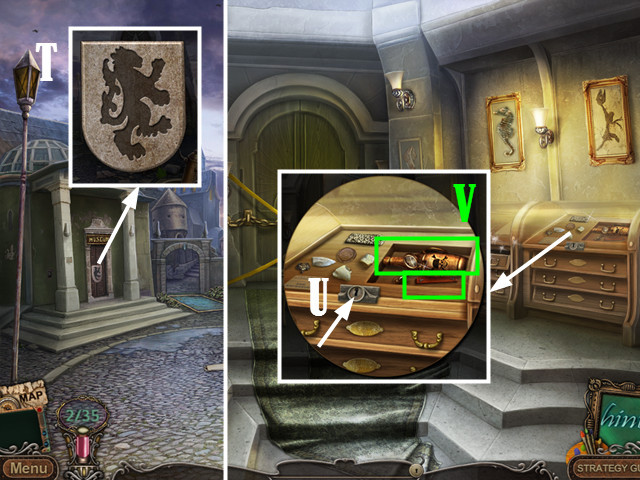
- Use the LION EMBLEM (T) to enter the building.
- Use the KEY (U). Grab the CHEMICALS and the BROKEN PART (V).
- Play the HOP.
- You receive BOLT CUTTERS (W).

- Touch the yellow tape to remove it (X).
- Use the BOLT CUTTERS on the chain (Y).
- Go forward to start the dialogue.
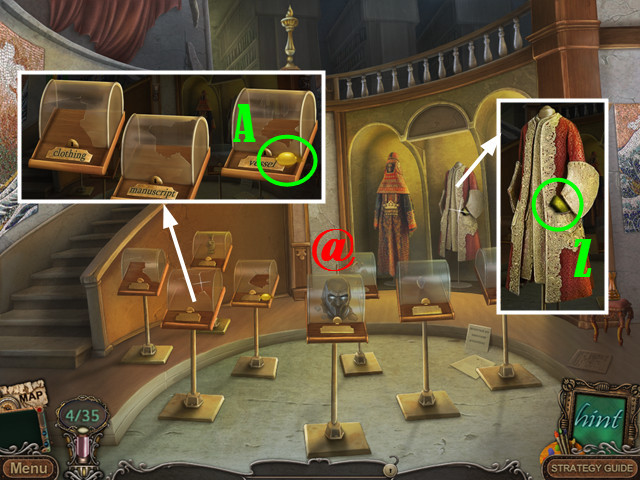
- Take the RING SECTION (Z) from the costume.
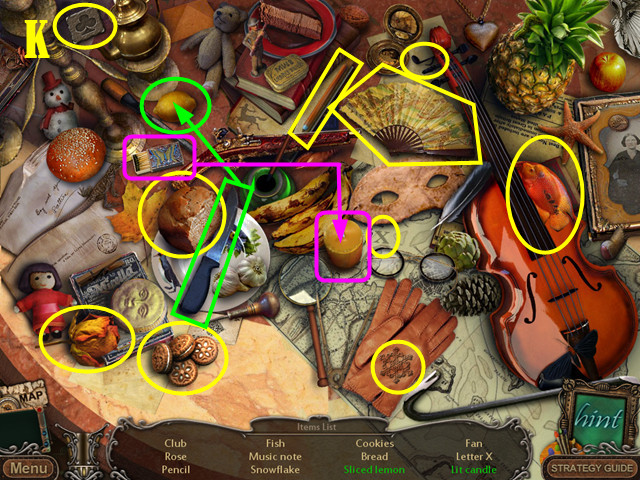
- Pick up the LEMON (A).
- Return to the Smalltown Museum.
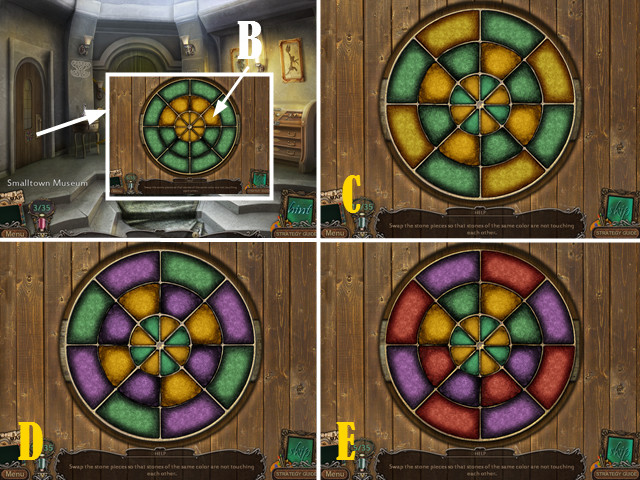
- Insert the RING SECTION (B) to activate the puzzle.
- Make patterns of alternating colors.
- Solutions (C, D, E).
- Go left.
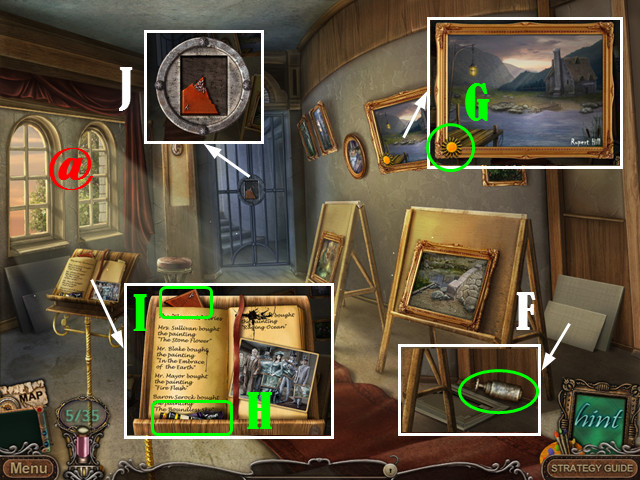
- Move the canvases (F). Take the PISTON.
- Pick up the SUN (G).
- Take the PAINTS (H) and the BROKEN PART (I).
- View the lock (J). Insert the two BROKEN PARTS.
- Go upstairs.
- Play the HOP.
- You receive the CLUB TILE (K).
- Return to the Hotel Lobby.
- Play the HOP.
- You receive the KNIFE (L).
- Return to Your Room.
- Use the SCREWDRIVER to remove the grate (M). Insert the CLUB TILE to activate the puzzle.
- Move related symbols into the same square. Swap adjacent symbols.
- Solution (N).
- Take the COAT OF ARMS (O) to start the cut scene.
- Remove the three vines (P) with the CHEMICALS.
- Return to Monument Square.
- Play the HOP.
- You receive the BOARD (Q).
- Return to the Smalltown Museum.
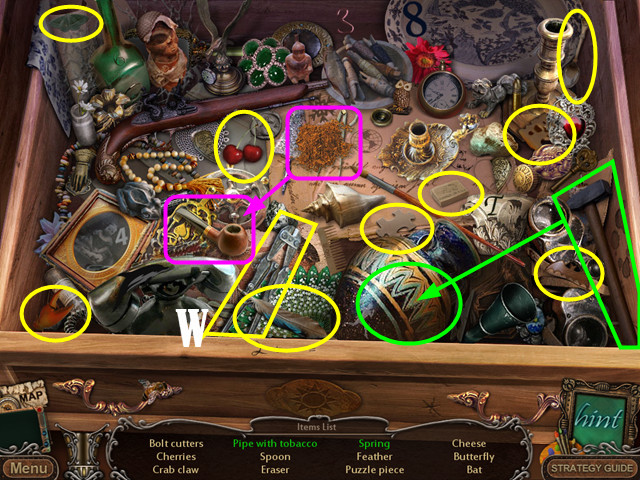
- Play the HOP.
- You receive the FUNNEL (R).
- Return to the Town Square.
- Go forward to the right (S).
- Use the KNIFE to cut the rope (T). Take two BOARDS.
- Return to Market Street.

- Place the three BOARDS (U).
- Pick up the 13 BALL (V).
- Grab the JERRY CAN (W).
- Use the HANDKERCHIEF to read the time (X) written on the dirty windows. Note that the time is 10:40.
- Enter the Antique Shop.
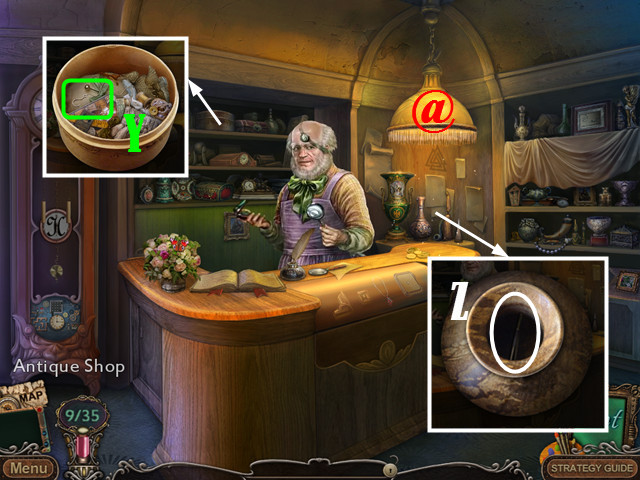
- Speak to the shopkeeper.
- Take the FISH HOOK (Y).
- Use the FISH HOOK on the vase (Z) to retrieve the TWEEZERS.
- Examine the clock to hear the shopkeeper's second dialogue.
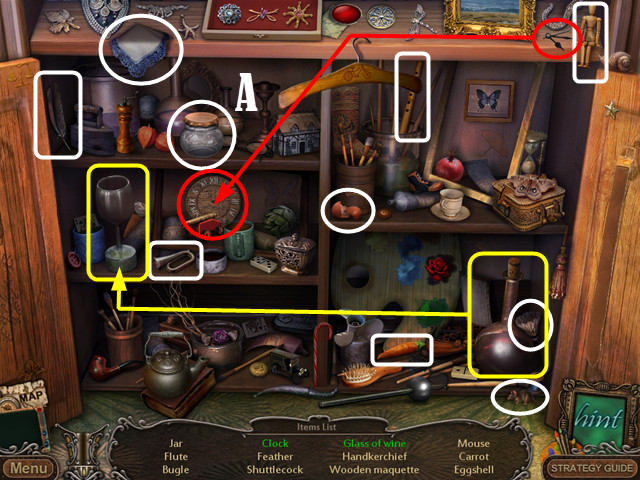
- Play the HOP.
- You receive the JAR (A).
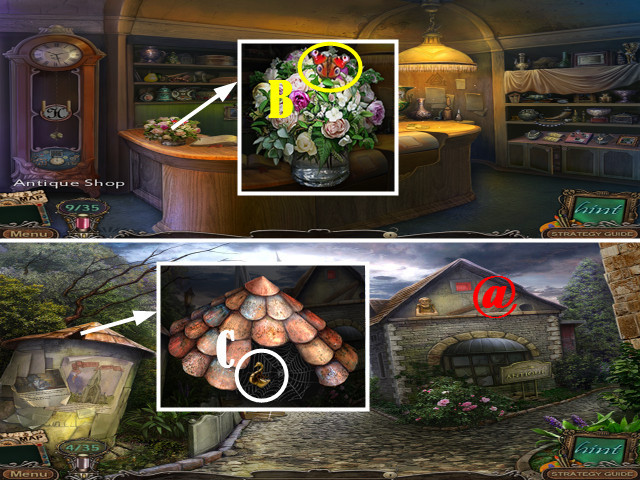
- Use the JAR to capture the butterfly (B). You receive the BUTTERFLY IN A JAR.
- Return to Main Street.
- Use the BUTTERFLY IN A JAR to distract the spider (C). Take the SWAN.
- Return to the Antique Shop.
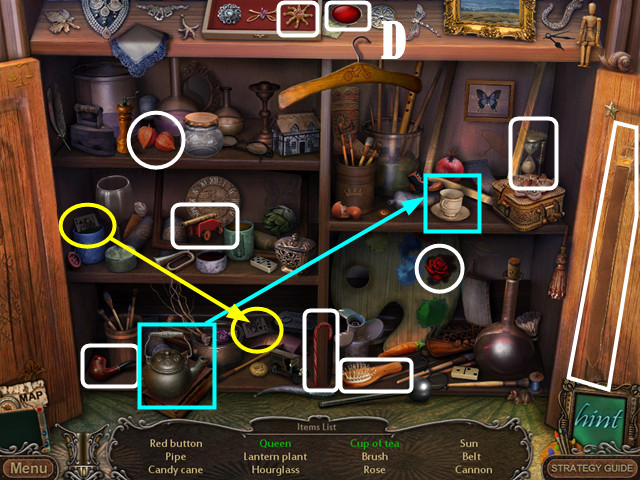
- Play the HOP.
- Receive the RED LIGHT (D).
- Return to the Crossroads.
- Use the FUNNEL and JERRY CAN (E) to fuel the car.
- Replace the TIRE (F).
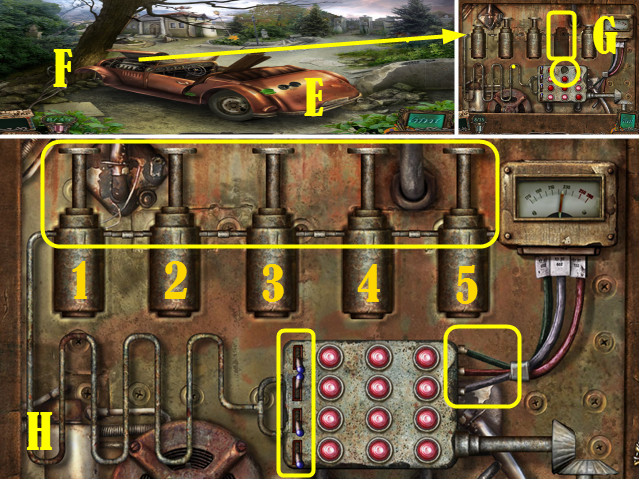
- Insert the PISTON and the RED LIGHT (G) to activate the puzzle.
- Move all the pistons into the highest position (move Piston 1 six times, Piston 2 one time, and Piston 4 three times). Flip switches to light all the buttons (down, up, down, down from top to bottom). Attach the wires in the correct order (green, red, and blue from top to bottom).
- Solution (H).
Chapter 3: The Crossroads
- Go forward and left.
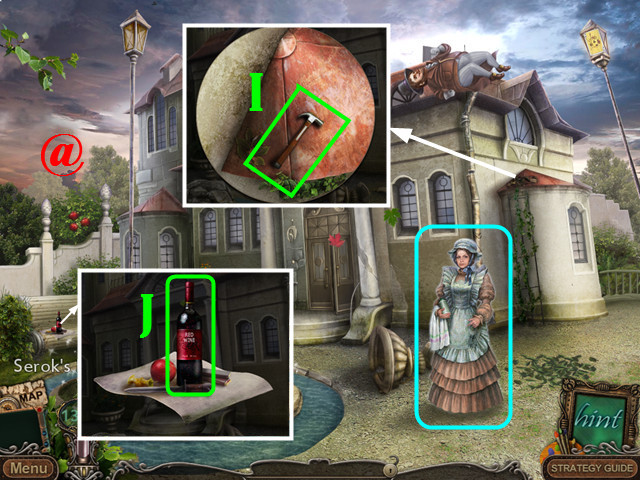
- Speak to the housekeeper.
- Take the CLAW HAMMER (I).
- Pick up the WINE BOTTLE (J).
- Play the HOP. Move the cloth to reveal all items.
- You receive the SPADE (K).
- Enter the house.

- Touch the door (L) to access Serock's Study.
- Take the ROUND TILE (M).
- Use the CLAW HAMMER to open the crate (N). Take the BOTTLE.
- Touch the drawer (O) to search it. Pick up the HOLDER.
- Return to the Crossroads. Go forward to the right.
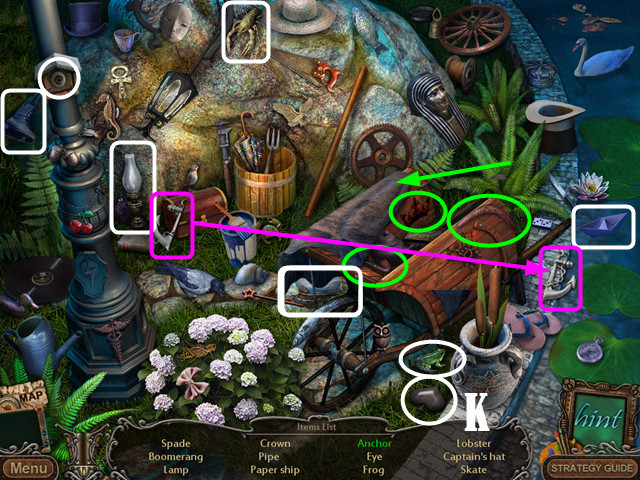
- Play the HOP.
- You receive the PRUNERS (P).
- Return to City Hall.
- Play the HOP.
- You receive a SHIELD (Q).
- Insert the ROUND TILE (R) to activate the puzzle in the Armory door.
- Swap and rotate the pieces to complete the image.
- Solution (S).
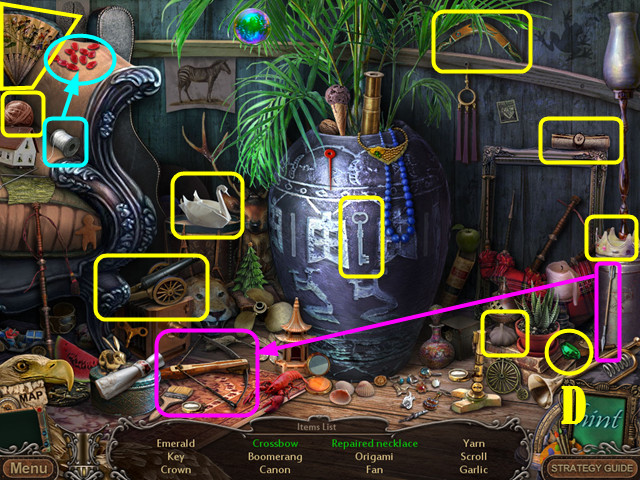
- Enter the Armory.
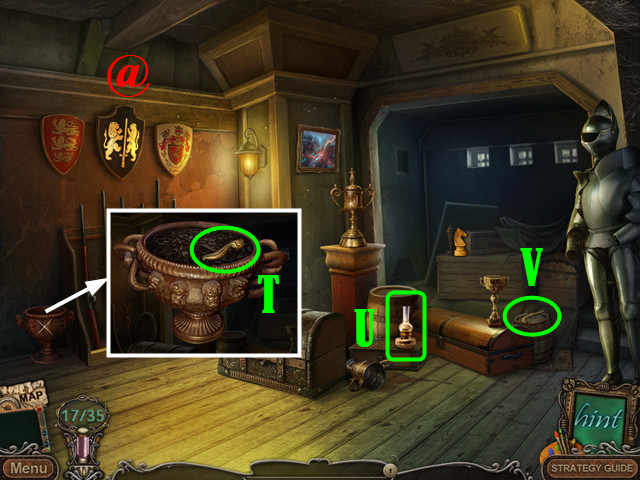
- Take the HANDLE (T).
- Grab the OIL LAMP (U).
- Pick up the PISTOL (V).
- Return to the Mayor's Office.
- Apply the PAINTS (W) and pick up the MOON.
- Return to the Chapel Exhibition.
- Place the SUN (X) and MOON (Y). Take the INK (Z).
- Return to the Library.
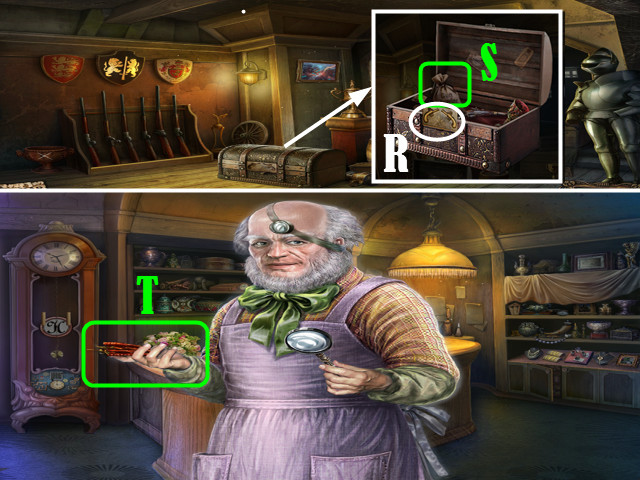
- Place the SHIELDS in the correct order of color (A). Take the SPECIAL DEVICE (B). Read the note.
- Insert the COAT OF ARMS (C) to read the book.
- Install the SPECIAL DEVICE (D) on the book.
- Return to Main Street.

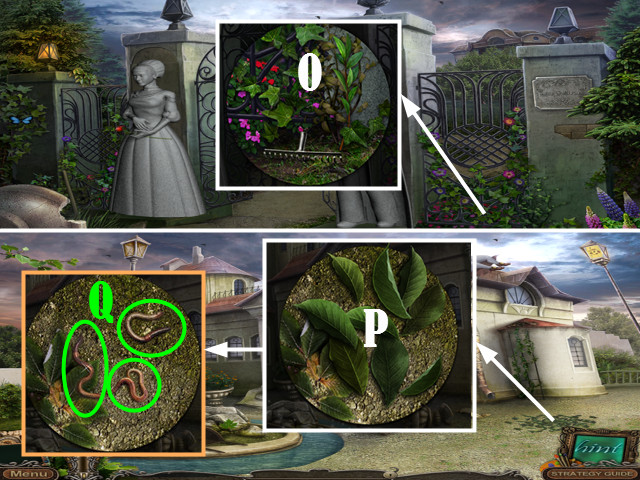
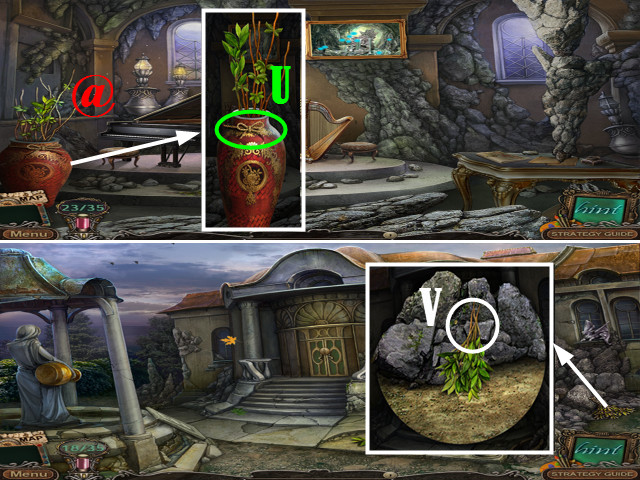
- Use the PRUNERS to remove a ROSE (E).
- Return to Salivan's Gates.
- Touch the stone rose (F) to remove it.
- Place the ROSE in the statue's hands (G) to animate the statues.
- Take the STONE HEART (H) from the male statue.
- Place the STONE HEART in the lock (I) to open the gates.
- Go forward.
- Take the NIPPERS and the GRAPPLING HOOK (J).
- Return to Salivan's Gates.
- Use the NIPPERS to remove the DIAMOND (K) from the sign.
- Return to the Antique Shop.
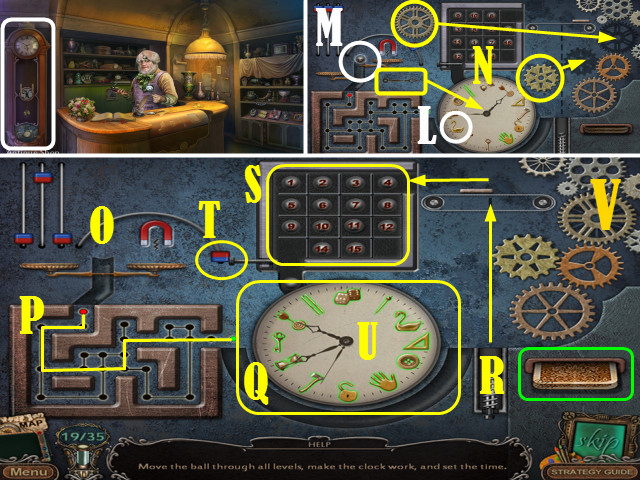
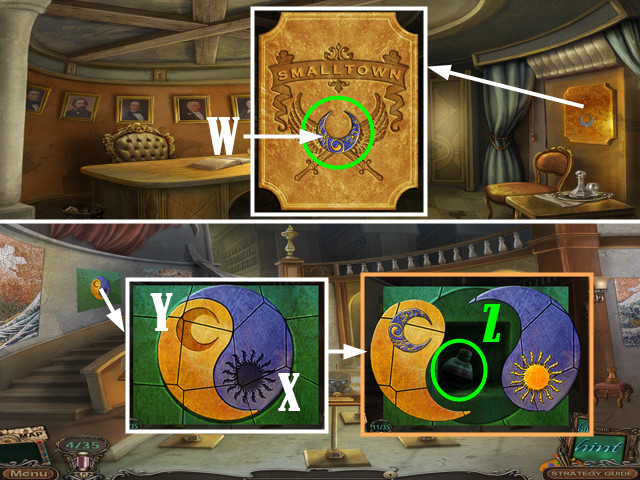
- Insert the SWAN (L) and the 13 BALL (M) to activate the puzzle on the clock.
- Place the clock hand and the gears (N).
- Move the magnets to balance the scales (O). Navigate the maze (P). Order the numbers on the clock (Q). Launch the ball (R). Put the numbers in order (S). Position the magnet to release the ball down to the clock (T). Set the time to 10:40 (U).
- Solution (V).
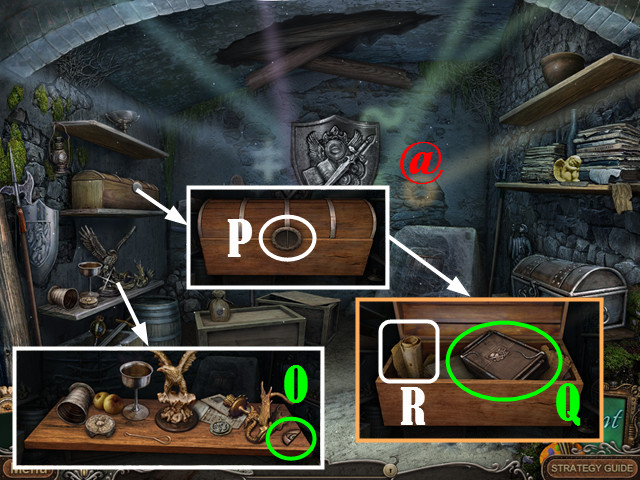
- You receive CARDS.
- Return to Serock's Porch.
- Use the HOLDER and the CLAW HAMMER to fix the pipe (W).
- Take the PIPE (X) from Baron Serock.
- Enter Serock's Front Hall.

- Place the CARDS on the table to start the memory mini-game.
- Flip over two cards at a time. Compete with the two other players to find matching pairs (Y). Use your memory skills to win two rounds.
- You receive the FISH TAIL.
- Touch the cabinet doors (Z).
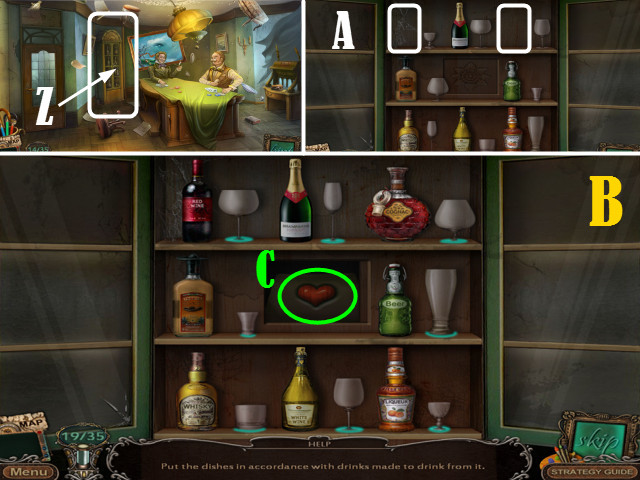
- Place the BOTTLE and the WINE BOTTLE (A) on the shelves to activate the puzzle.
- Match each glass to the correct beverage.
- Solution (B).
- Take the HEART (C).
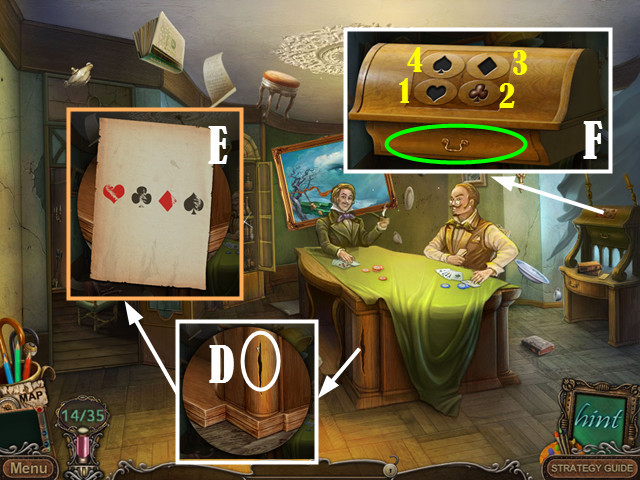
- Use the TWEEZERS to extract the paper (D) from the crack.
- Note the code (E).
- Place the SPADE, DIAMOND, and HEART on the secretary desk (F).
- Press the heart, club, diamond and spade in that order. Take the DOMINO.
- Return to Serock's Study.
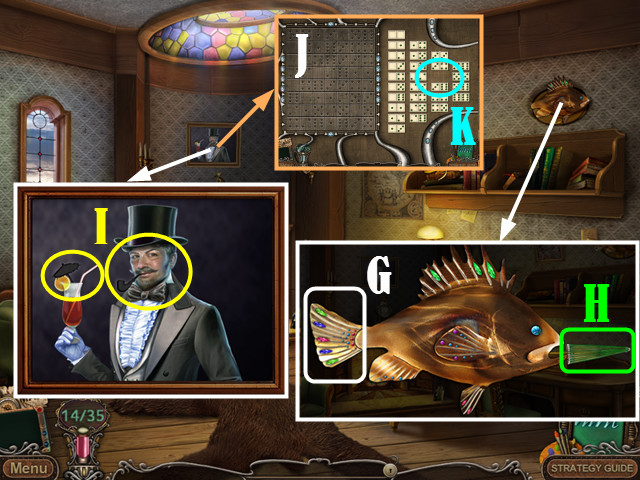
- Attach the FISH TAIL (G) to the fish to receive the UMBRELLA (H).
- Insert the UMBRELLA and the PIPE (I) into the picture to reveal the puzzle (J).
- Place the DOMINO (K) to activate the puzzle.
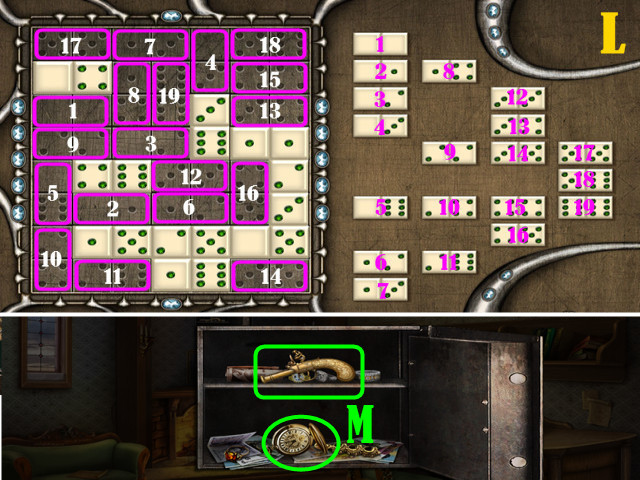
- Fill in the spaces with the available dominoes, placed horizontally or vertically.
- Solution (L).
- Retrieve the PISTOL and POCKETWATCH (M).
- Return to Serock's Porch.
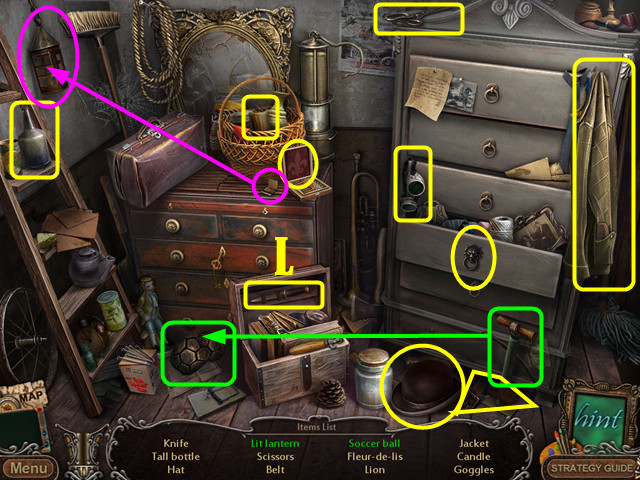
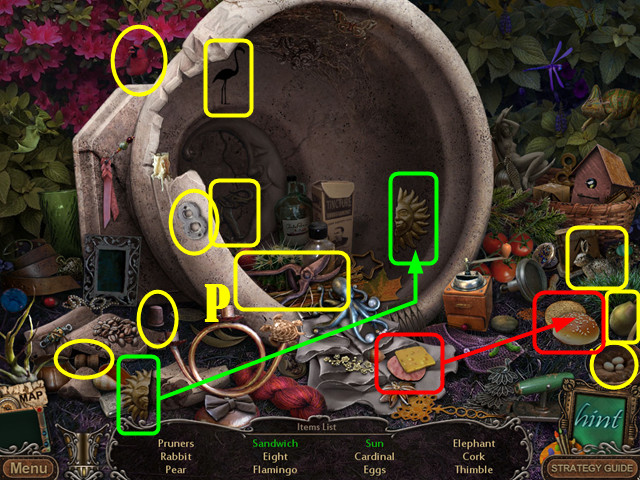
- Play the HOP.
- You receive the RAKE HANDLE (N).
- Return to Salivan's Gates.
- Attach the RAKE HANDLE (O) to the rake head. Take the RAKE.
- Return to Serock's Porch.
- Use the RAKE (P). Pick up three WORMS (Q).
- Return to the Armory.
- Insert the two PISTOLS (R) to open the chest. Take the GUNPOWDER (S).
- Return to the Antique Shop.
- Give the shopkeeper the POCKETWATCH to begin the dialogue. Take the PEPPERS (T).
- Return to the Library.
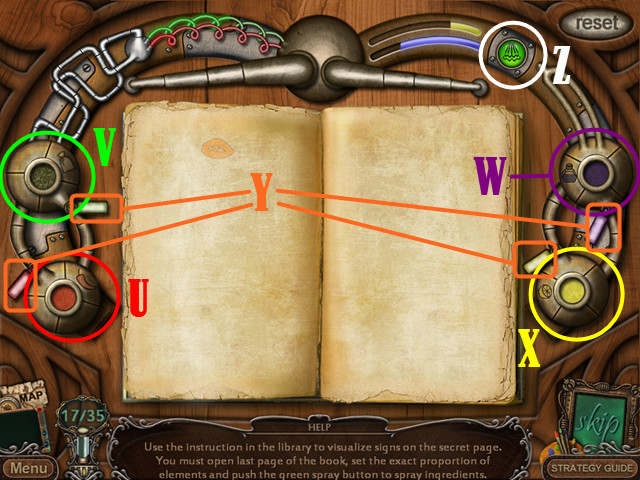
- Place the PEPPERS (U), the GUNPOWDER (V), the INK (W), and the LEMON (X) to activate the special device.
- Pull the levers (Y) for three parts lemon, two parts pepper, seven parts ink, and six parts gunpowder.
- Touch the green spray button (Z) to reveal the writing.
- You receive the SECRET PAPER.
- Play the HOP.
- You receive the CROWBAR (A).
- Return to the Town Square.
Chapter 4: The Chapel
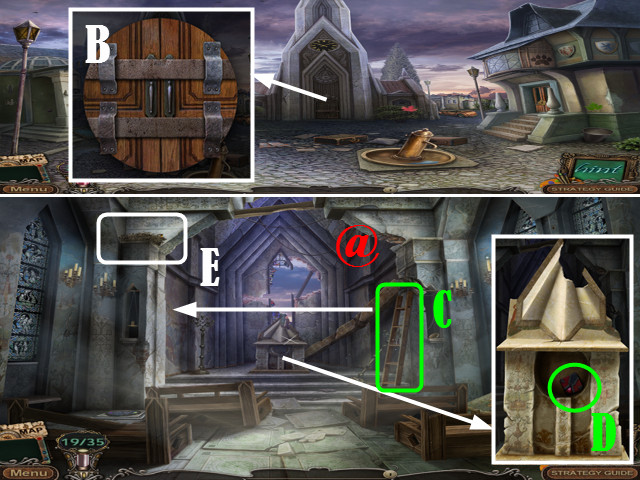
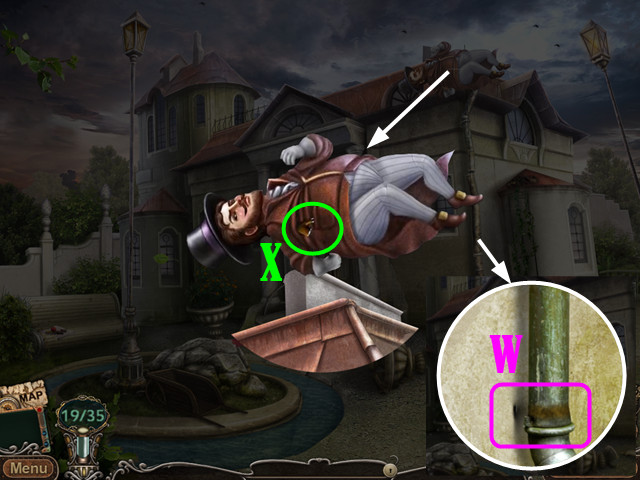
- Use the CROWBAR to pry open the chapel door (B).
- Enter the Chapel.
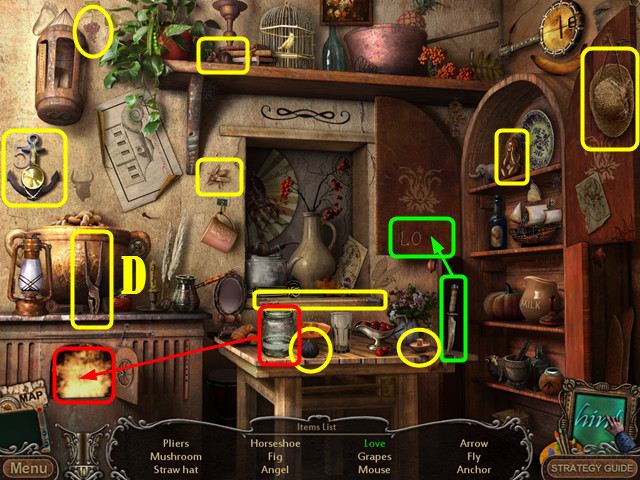
- Take the LADDER (C).
- Take the RED TILE (D).
- Place the LADDER to access the nest (E). Feed the WORMS to the birds to calm them. Take the MATCHES and MOSAIC TILE.
- Return to the Mayor's Office.
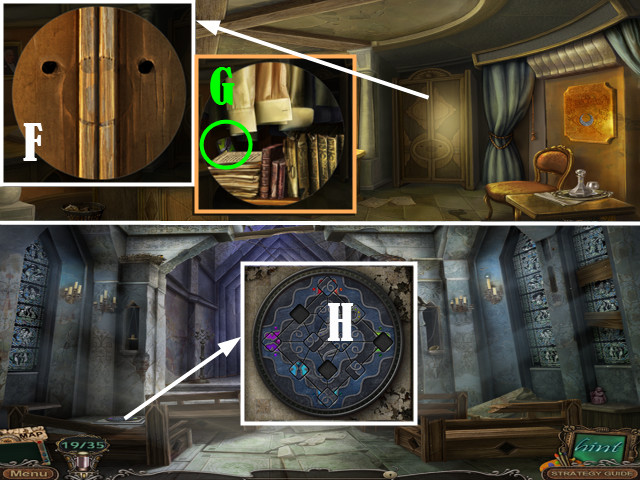
- Place the two HANDLES and the MOSAIC TILE (F) to access the wardrobe.
- Take the GREEN TILE (G). Read the note.
- Return to the Chapel.
- To activate the puzzle in the floor, insert the RED TILE and GREEN TILE (H).
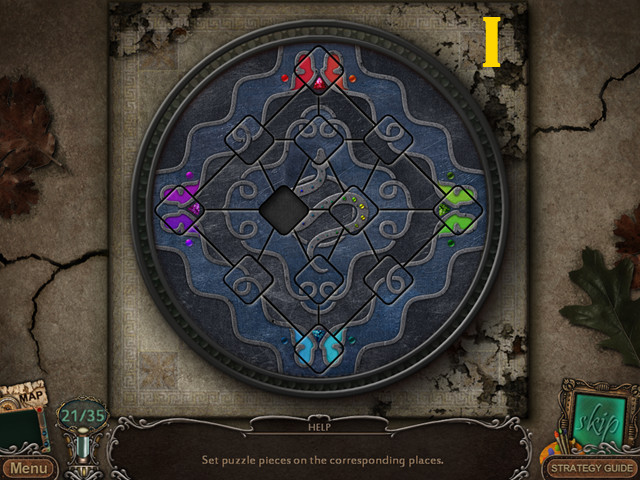
- Slide the pieces around to complete the image.
- You can only move pieces to an empty spot.
- Solution (I).
- Go downstairs.
- Play the HOP.
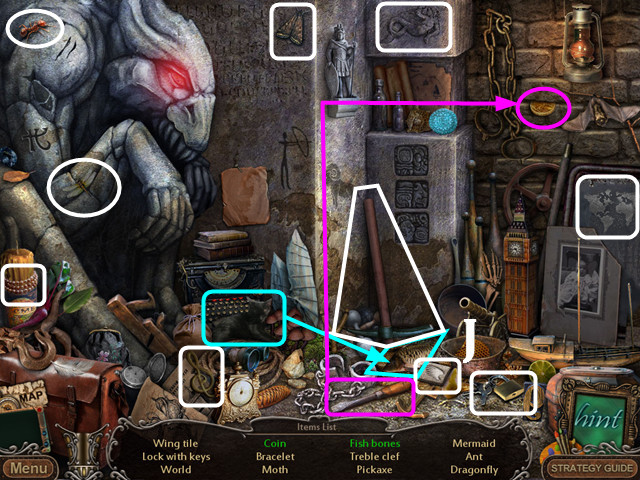
- You receive the WING TILE (J).

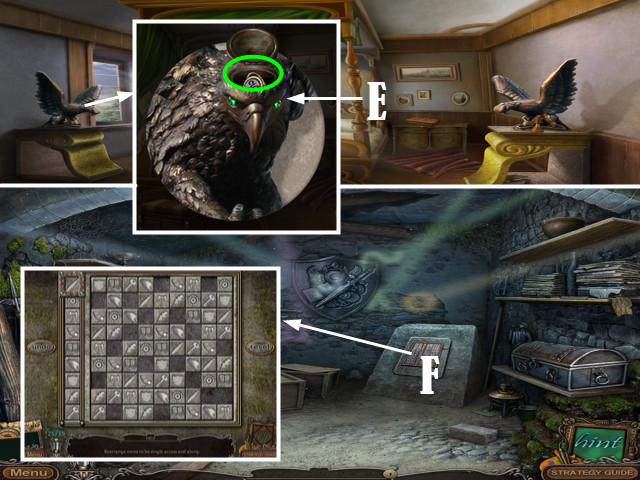
- Take the EYE HALF (K).
- Insert the SECRET PAPER (L) in the screen. Place the OIL LAMP (M) and light it with MATCHES.
- Press the lit stones in rainbow order (N) to open the secret doorway.
- Go forward.
- Take the EYE HALF (O).
- Insert the two EYE HALF pieces into the chest (P). Retrieve the SPIRIT CATCHER (Q). Read the instructions (R).
- Return to the Chapel.
- Speak to Miss Salivan.
- Pick up the TREBLE CLEF (S).
- Return to Salivan's Front Yard.
- Use the TREBLE CLEF in the slot (T) to enter the house.
- Take the ROPE (U).
- Return to Salivan's Front Yard.
- Use the ROPE to bind the branches (V). Take the SIMPLE BROOM.
- Return to Salivan's Gates.
- Play the HOP.
- You receive the STRING (W).
- Return to the Crossroads.
- Use the GRAPPLING HOOK to retrieve the PICKAXE (X).
- Return to Salivan's Front Hall.
- Use the PICKAXE to free the MUSIC SHEET (Y).
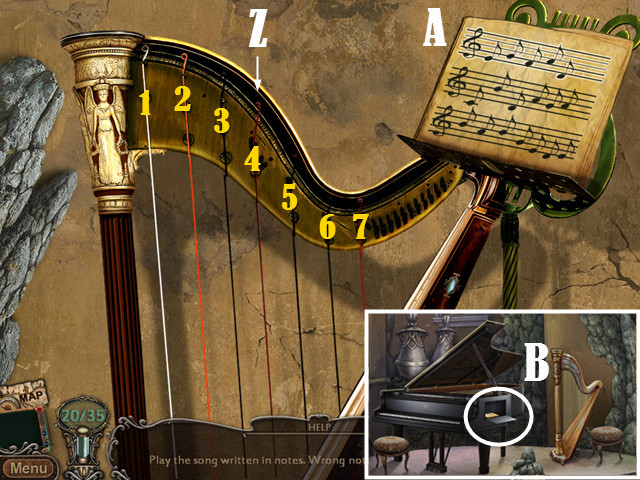
- Place the STRING (Z) and the MUSIC SHEET (A) to activate the puzzle.
- Observe the melody and repeat the notes.
- Pluck the indicated strings (1 through 7) for Melody 1 (3, 5, 4, 6, 2), Melody 2 (1, 7, 2, 6, 5, 6), and Melody 3 (7, 6, 7, 5, 3, 2, 3) to open the piano cache.
- Take the SQUARE TILE from the piano (B) and read the note.
- Return to Salivan's Front Yard.
- Add the SQUARE TILE to activate the puzzle (C).
- Move pieces to form the complete harp image.
- Solution (D).
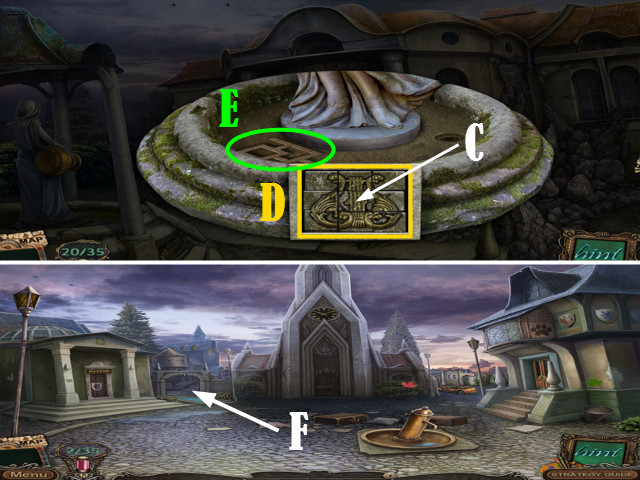
- Take the STONE PATH (E).
- Return to the Town Square. Go forward (F).
Chapter 5: Rupert's House
- Place the STONE PATH (G) to activate the puzzle.
- Move and rotate the path components to match the submerged pattern.
- Solution (H).
- Go forward.
- Play the HOP.
- You receive the WRENCH (I).
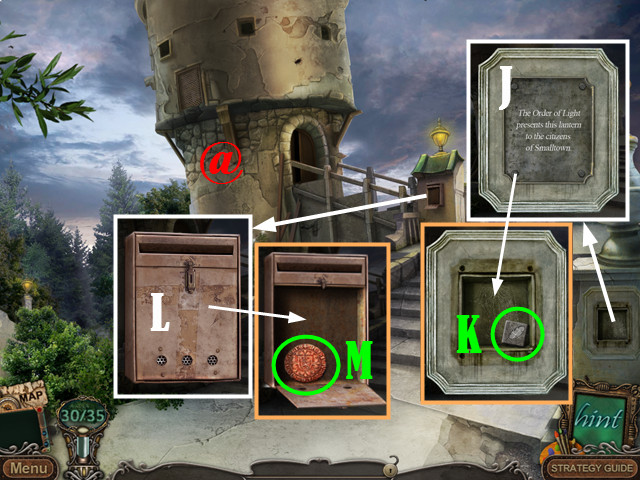
- Use the WRENCH on the plaque (J) to retrieve the FEATHER TILE (K).
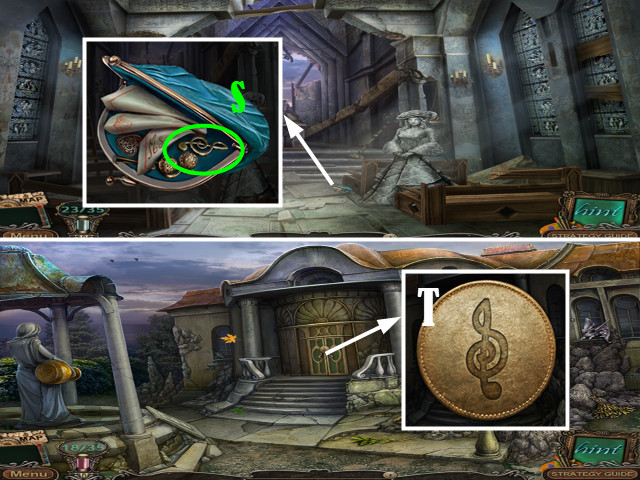
- Open the mailbox (L) to take the RED COIN (M).
- Go forward.
- Take the IRON BAR (N).
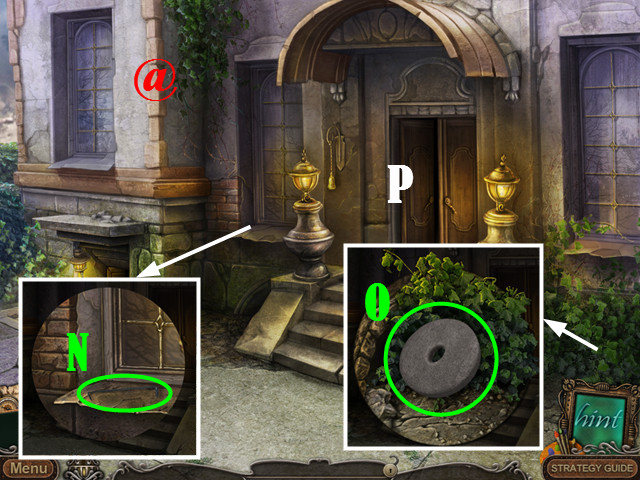
- Touch the plants twice to clear them. Pick up the ROCK (O).
- Push the door (P) to access the house.
- Go forward.
- Play the HOP.
- You receive the POINTER (Q).

- Take the BLUNT KATANA (R).
- Push the door (S).
- Go upstairs.
- Take the GEAR (T). Read the journal.
- Return to Rupert's Front Yard.
- Insert the GEAR (U) to open the door.
- Go down.
- Speak to Rupert.
- Pick up the RAINDROP (V).
- Return to the Fork to Rupert's House.
- Insert the RAINDROP (W) to enter the Watertower.
- Take the NOTE ABOUT GAUGES (X).
- Pick up the RED BUTTON (Y).
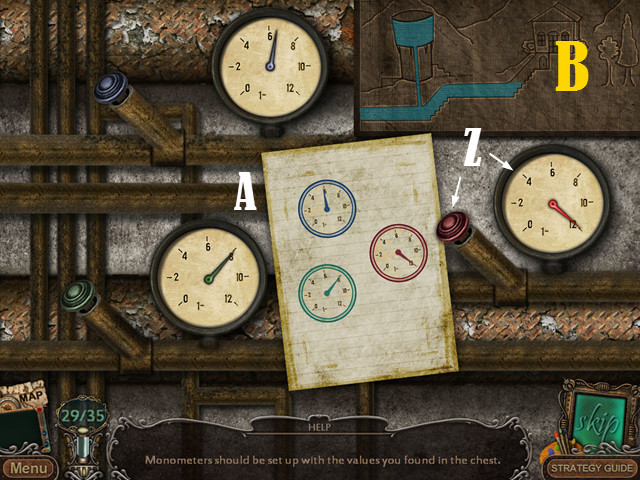
- Insert the RED BUTTON and POINTER (Z) and place the NOTE ABOUT GAUGES (A) to activate the puzzle.
- Push the green, blue, and red buttons so that the pointers hit the target positions at the same time.
- Solution (B).
- Walk down.
- Play the HOP.
- You receive the SHOVEL (C).
- Return to Rupert's Front Hall.
- Play the HOP.
- You receive the ROUND EMERALD (D).
- Return to Rupert's Bedroom.
- Insert the ROUND EMERALD to open the compartment (E). Take the RING.
- Return to the Secret Room.
- Use the SIMPLE BROOM to clean the Secret Room (F).
- Zoom into the puzzle.
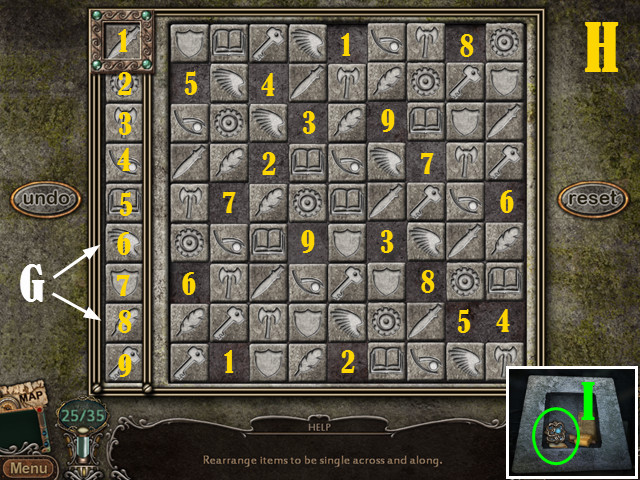
- Add the WING TILE and the FEATHER TILE (G) to activate the puzzle.
- Select a symbol in the left column using the square selector to fill in a gap in the grid. All symbols must appear in each column and each row only once.
- Solution (H).
- Take the BLUE AMULET from the compartment (I).
- Return to the Chapel Basement.
- Play the HOP.
- You receive the BLUE COIN (J).
- Return to Rupert's Basement.
- Give Rupert the SHOVEL (K).
- Pick up the YELLOW COIN (L).
- Return to Rupert's Bedroom.
- Use the RED COIN, BLUE COIN, and YELLOW COIN to open the box (M).
- Take the HOLY WATER and the WIRE (N).
- Return to the Watertower.
- Use the WIRE to repair the belt (O). Take the BELT.
- Return to Rupert's Basement.
- Install the STONE and BELT (P). Sharpen the BLUNT KATANA.
- You receive the SHARP KATANA.
- Return to the Fork to Rupert's House.
- Use the SHARP KATANA on the bushes (Q).
- Go down.
Chapter 6: The Riverside
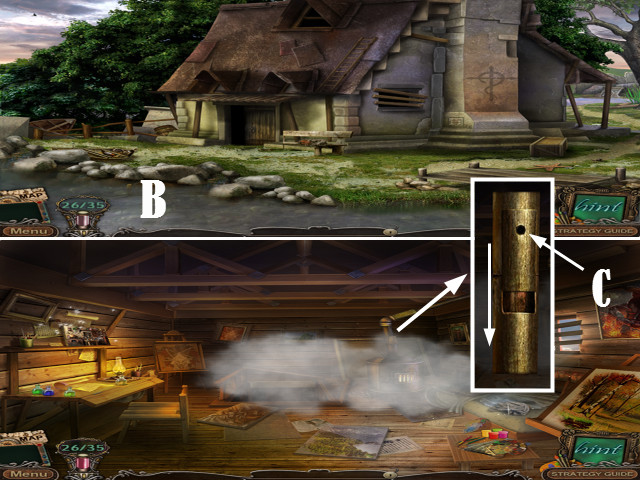
- Pick up the VALVE WRENCH (R).
- Return to the Watertower.
- Use the VALVE WRENCH to retrieve the VALVE (S).
- Return to the Riverside.
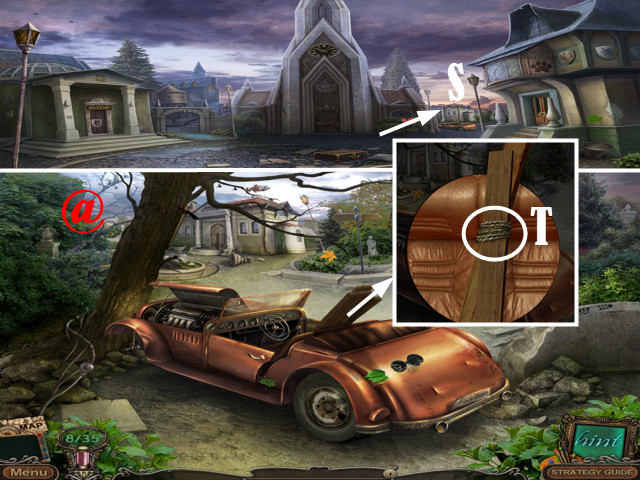
- Use the IRON BAR to repair the raft (T).
- Take the CRATE (U).
- Place the CRATE on top of the other crate to reach the window.
- Attach the VALVE (V). Go forward to activate the puzzle.
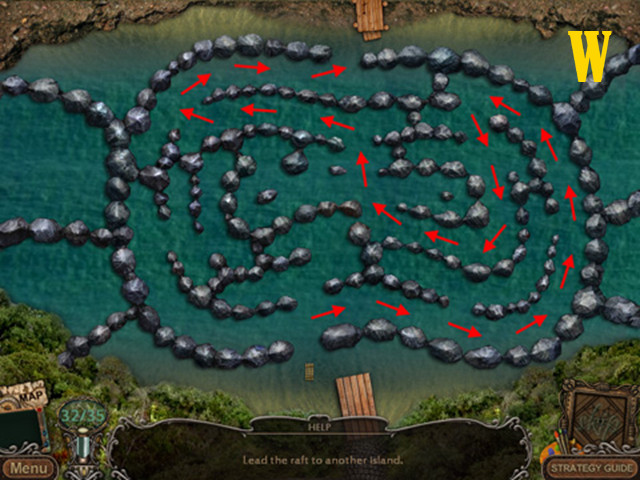
- Navigate the raft through the maze to reach the opposite bank.
- Solution (W).
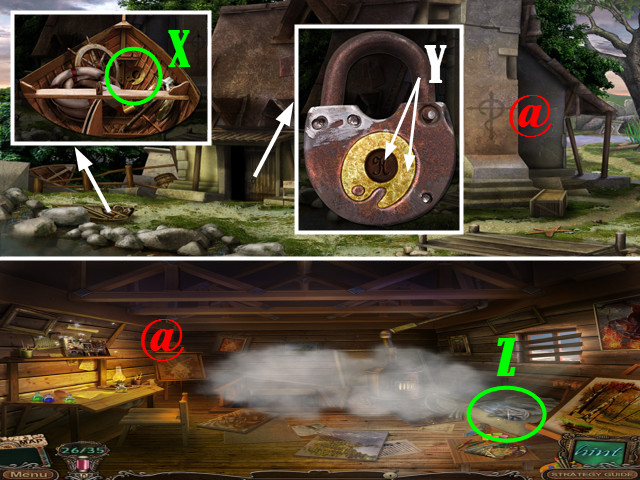
- Clear the objects to find the PALETTE (X).
- Insert the PALETTE and the RING (Y) to open the padlock.
- Enter the workshop.
- Speak to Sayman.
- Pick up the RAG (Z).
- Play the HOP.
- You receive the HANDLE (A).
- Return to Sayman's Front Yard.
- Soak the RAG in the river (B). You receive the WET RAG.
- Return to Sayman's Workshop.
- Install the HANDLE on the stovepipe (C).
- Use the DAMP RAG to cool the hot handle. Pull the pipe shut.
- Play the HOP.
- You receive the PLIERS (D).
- Return to Sayman's Front Yard.
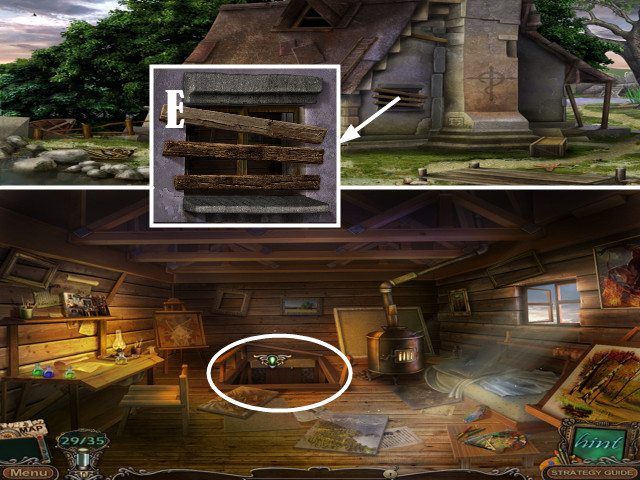
- Use the PLIERS to remove the three boards (E) and clear the smoke inside.
- Return to Sayman's Workshop.
- Go forward.
- Hear Sayman's ritual.
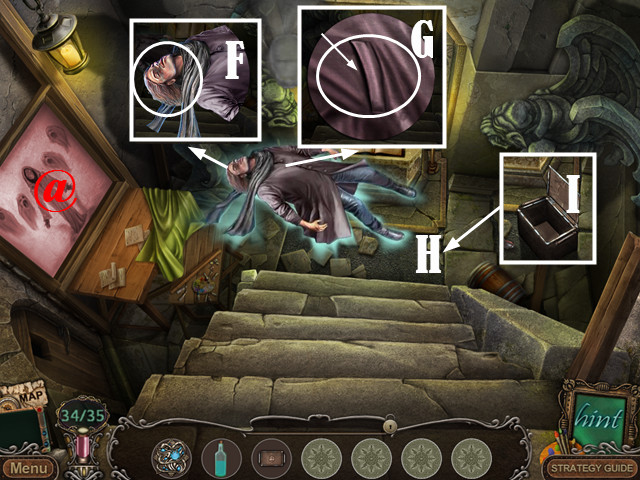
- Drop HOLY WATER in Sayman's mouth (F).
- Place the BLUE AMULET in Sayman's pocket (G).
- Place the SPIRIT CATCHER on the ground (H).
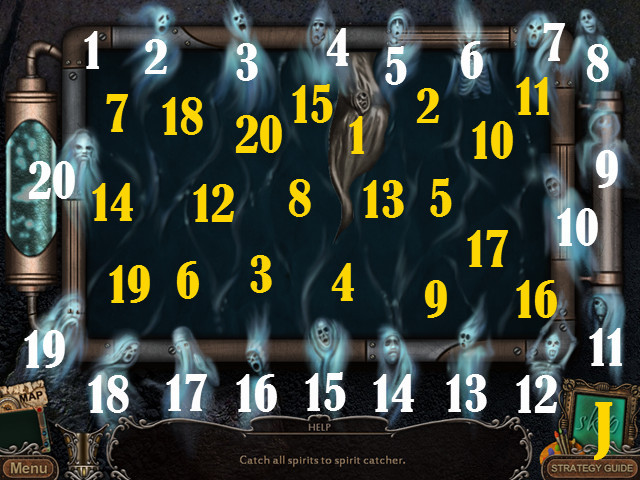
- Capture all 35 ghosts in the game to receive the CAPSULE.
- Place the CAPSULE in the SPIRIT CATCHER (I) to activate the final puzzle.
- Fit the ghosts into the correct spaces in the spirit catcher.
- Solution (J).
- Congratulations, you have completed Order of the Light: The Deathly Artisan.
Created at: 2014-02-16