

Walkthrough Menu
- General Tips
- Chapter 1 – The Beginning
- Chapter 2 – The Tower
- Chapter 3 – The Sage
- Chapter 4 – The Fire Rune
- Chapter 5 – The Water Rune
- Chapter 6 – The Air Rune
- Chapter 7 – The Monastery and Final Battle
General Tips
 • Select Menu (1) to bring up Options and adjust the Music and
SFX Volume, Windowed Mode and Animated Cursor. • In Options,
you may set your difficulty level and choose Casual Mode to
get extra clues and easier puzzles. • You may change to Casual
Mode at any time you wish by checking the button in Options. •
Some Puzzles can be skipped. • Press on the center (2) of the
inventory bar to access your inventory. • Read all the books
you collect and also the ones you find lying around as they
contain your puzzle clues.
• Select Menu (1) to bring up Options and adjust the Music and
SFX Volume, Windowed Mode and Animated Cursor. • In Options,
you may set your difficulty level and choose Casual Mode to
get extra clues and easier puzzles. • You may change to Casual
Mode at any time you wish by checking the button in Options. •
Some Puzzles can be skipped. • Press on the center (2) of the
inventory bar to access your inventory. • Read all the books
you collect and also the ones you find lying around as they
contain your puzzle clues.
Chapter 1 – The Beginning
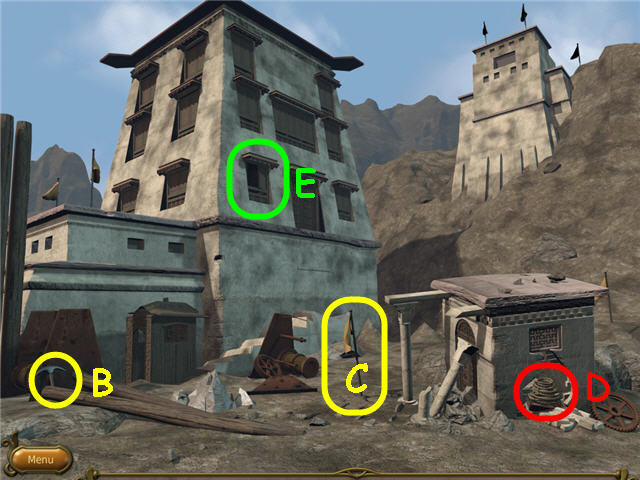
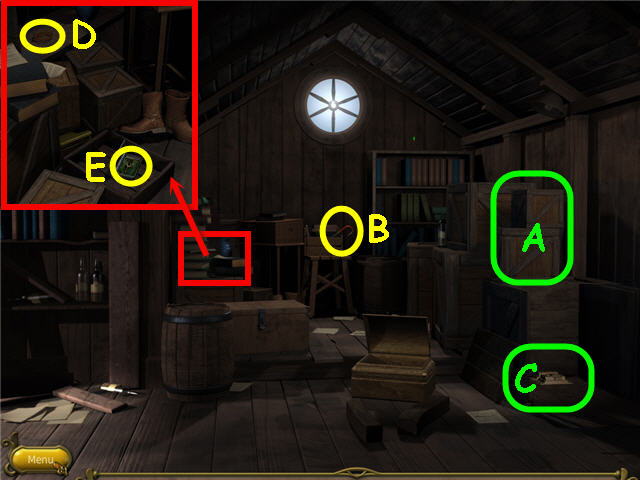 • Move the two crates (A) and select the large crate
underneath to trigger the crowbar. • Take the IRON CROWBAR
(B). • Use the IRON CROWBAR on the large crate; select the
trapdoor lock (C) to trigger the books. • Examine the stack of
books; take the WIRE PIECE (D); open the small case and take
the BRASS KEY (E). • Exit close-up. • Use the BRASS KEY on the
trapdoor lock; open the lock. • Go down the hatch.
• Move the two crates (A) and select the large crate
underneath to trigger the crowbar. • Take the IRON CROWBAR
(B). • Use the IRON CROWBAR on the large crate; select the
trapdoor lock (C) to trigger the books. • Examine the stack of
books; take the WIRE PIECE (D); open the small case and take
the BRASS KEY (E). • Exit close-up. • Use the BRASS KEY on the
trapdoor lock; open the lock. • Go down the hatch.
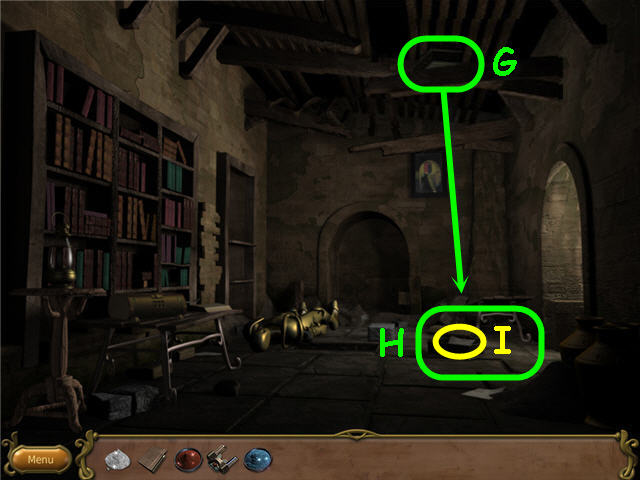
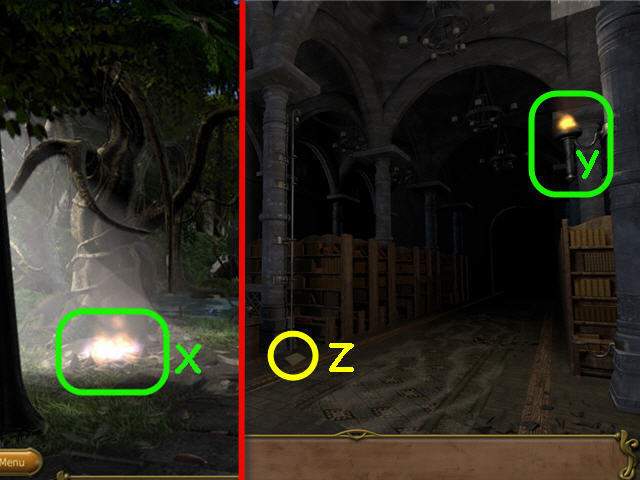
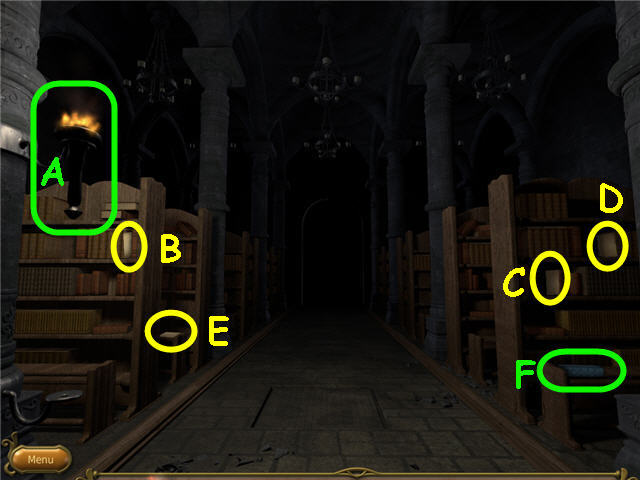
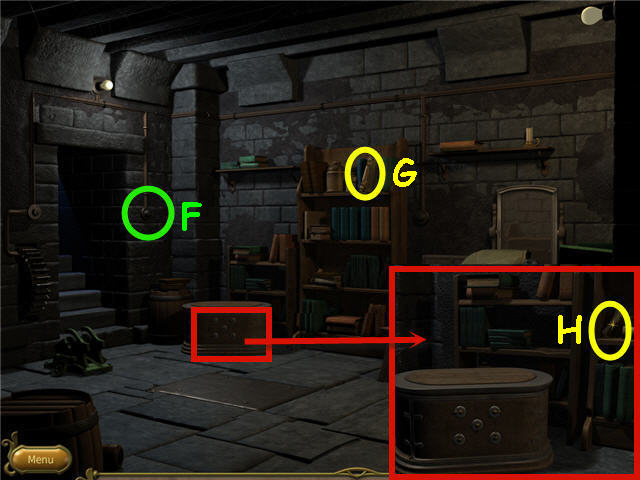 • Flip the light switch (F). • Take the BOOK WITH A METAL
COVER (G). • Examine the chest; take the PAPER (H). • Examine
the PAPER in inventory to get a clue; this clue will be
different for casual mode. • Back out of the close-up; go up
the stairs on the left and go left.
• Flip the light switch (F). • Take the BOOK WITH A METAL
COVER (G). • Examine the chest; take the PAPER (H). • Examine
the PAPER in inventory to get a clue; this clue will be
different for casual mode. • Back out of the close-up; go up
the stairs on the left and go left.
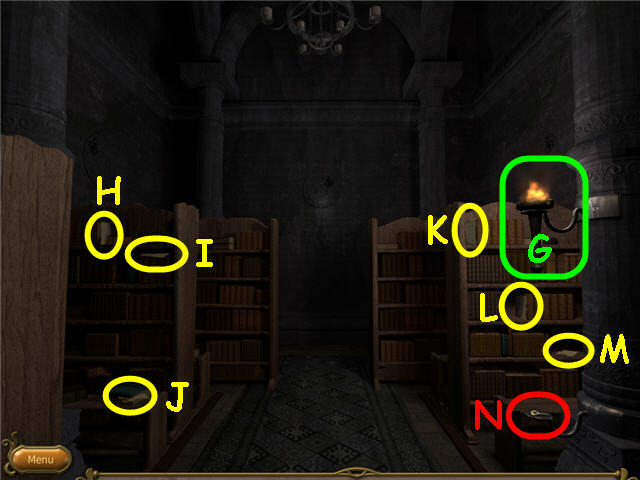
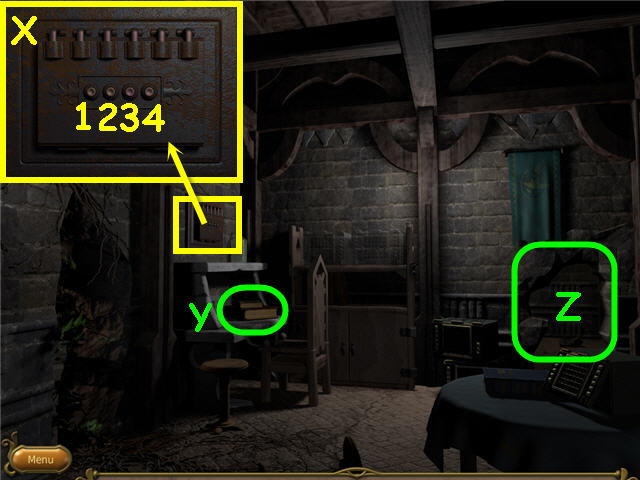
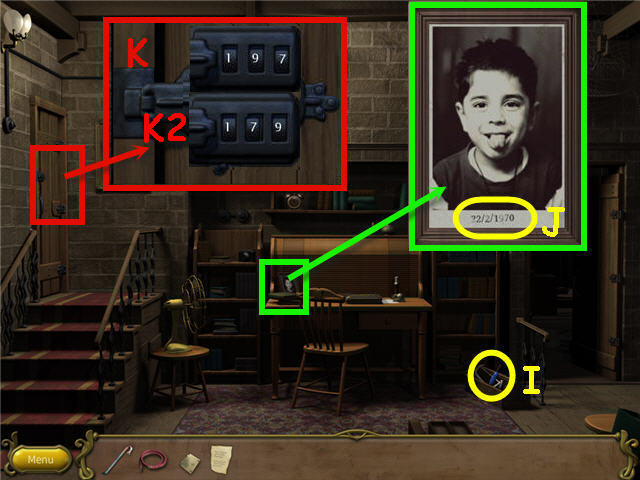 • Take the SCREWDRIVER (I). • In Inventory, use the
SCREWDRIVER on the BOOK WITH METAL COVER. • Select the opened
BOOK WITH METAL COVER to get a PAPER. • Examine the PAPER and
read the to-do list. • Examine the photo on the desk and note
the date (J) in regular mode it will be 11 NOV 1979. • Casual
Mode: Examine the door lock on the door on the left; using the
date from the photo 22/2/1970 minus the code from the paper to
remove 2’s and 0’s; enter 197 (K). • Regular Mode: Examine the
door lock on the door on the left; using the date from the
photo 11 NOV 1979 and the clues from the paper; enter 179
(K2). • Go through the newly opened door.
• Take the SCREWDRIVER (I). • In Inventory, use the
SCREWDRIVER on the BOOK WITH METAL COVER. • Select the opened
BOOK WITH METAL COVER to get a PAPER. • Examine the PAPER and
read the to-do list. • Examine the photo on the desk and note
the date (J) in regular mode it will be 11 NOV 1979. • Casual
Mode: Examine the door lock on the door on the left; using the
date from the photo 22/2/1970 minus the code from the paper to
remove 2’s and 0’s; enter 197 (K). • Regular Mode: Examine the
door lock on the door on the left; using the date from the
photo 11 NOV 1979 and the clues from the paper; enter 179
(K2). • Go through the newly opened door.
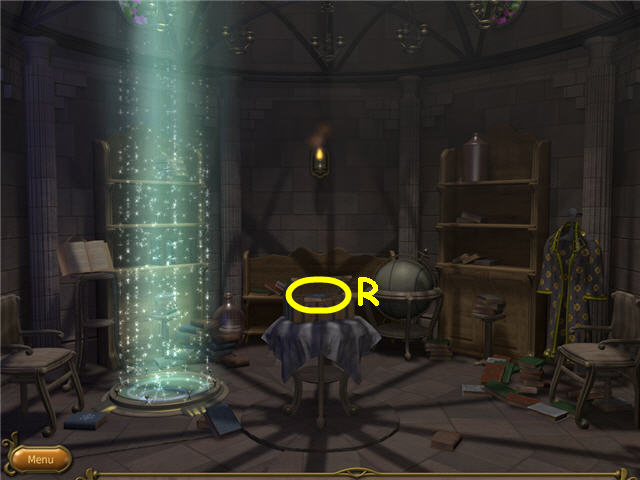
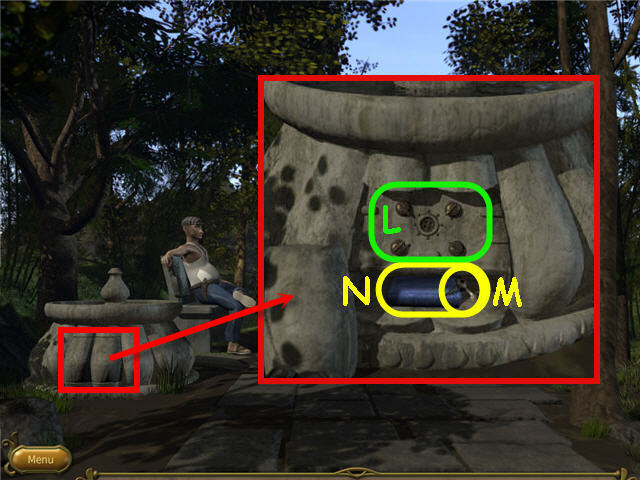
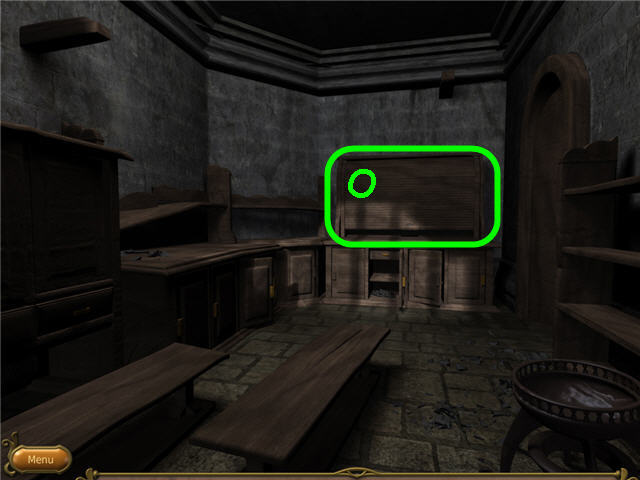
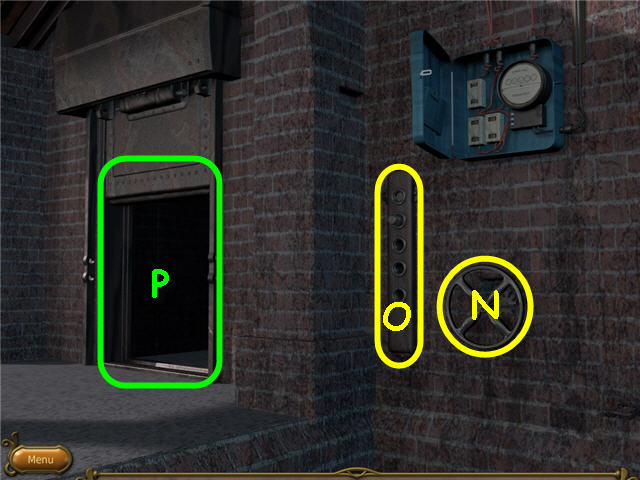
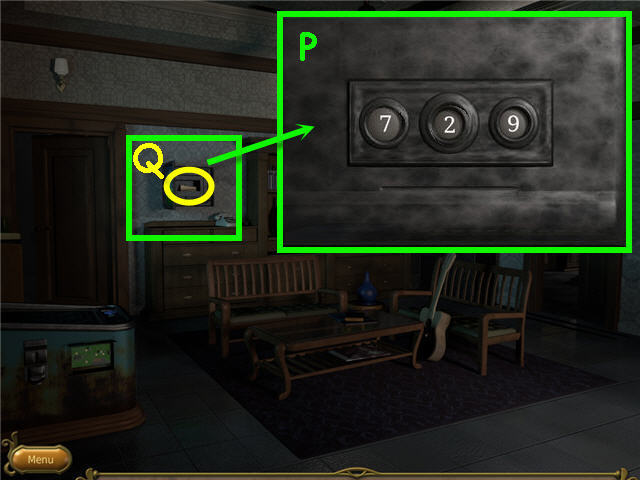
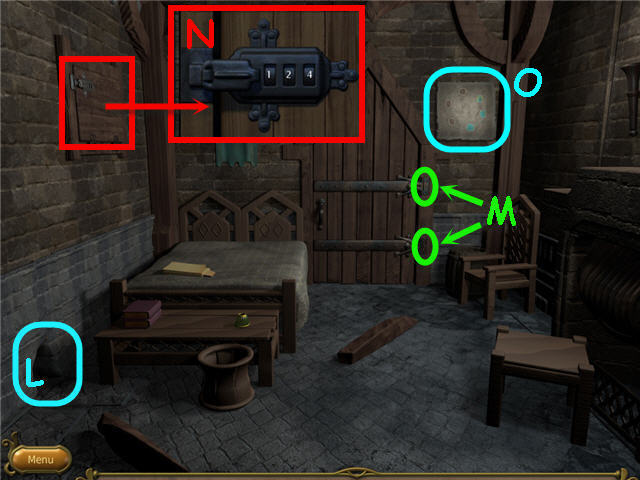
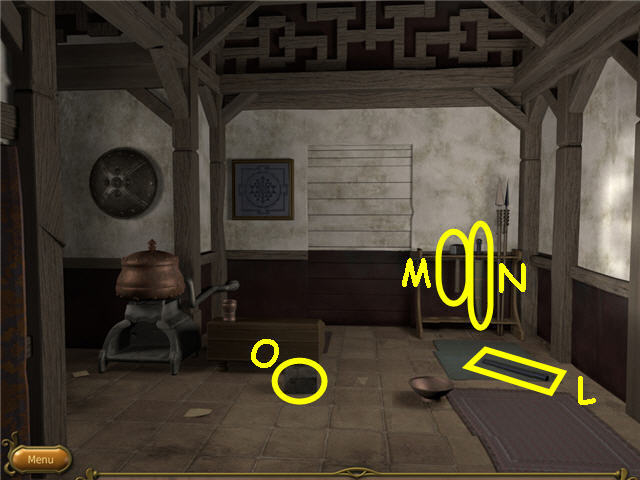
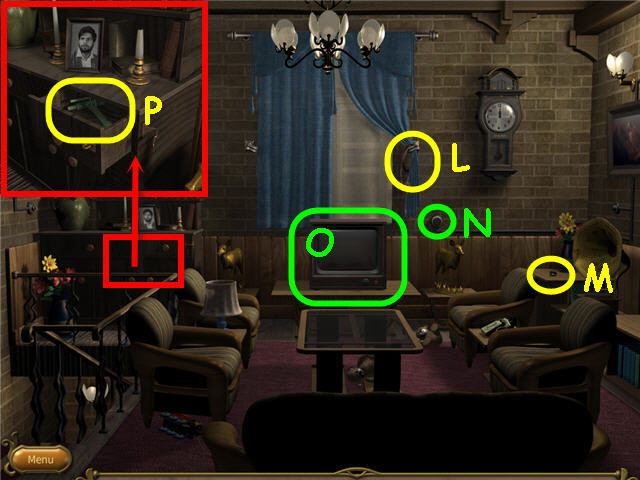 • Take the ELECTRIC CORD (L) and KNOB (M). • Place the
ELECTRIC CORD in the socket (N). • Place the KNOB on the
television (O). • Examine the cabinet; use the IRON CROWBAR on
the lock. • Open the drawer; take the IRON HANDLE (P). • Exit
out of the close-up. • Go down via the bottom left; go through
the door on the right and down the hatch on the right.
• Take the ELECTRIC CORD (L) and KNOB (M). • Place the
ELECTRIC CORD in the socket (N). • Place the KNOB on the
television (O). • Examine the cabinet; use the IRON CROWBAR on
the lock. • Open the drawer; take the IRON HANDLE (P). • Exit
out of the close-up. • Go down via the bottom left; go through
the door on the right and down the hatch on the right.
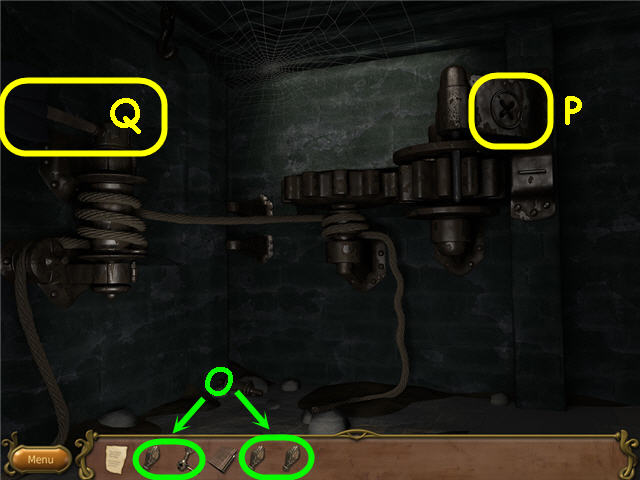
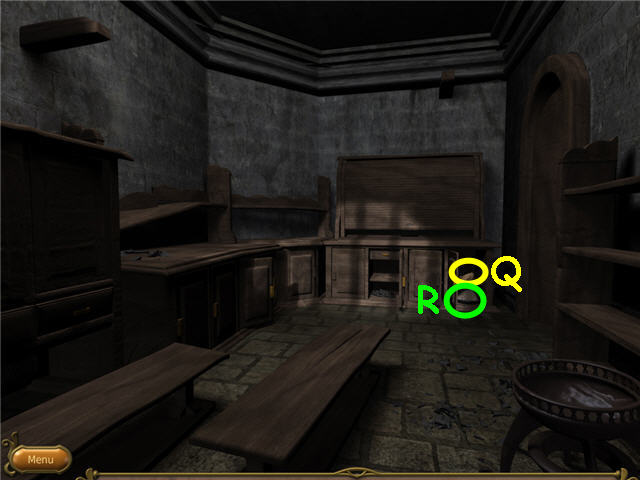
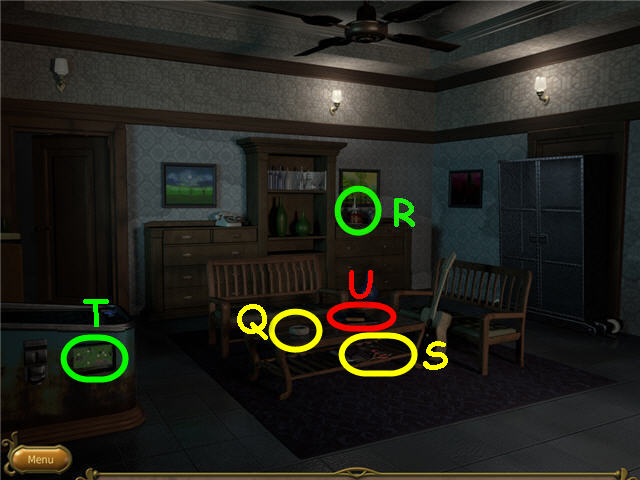
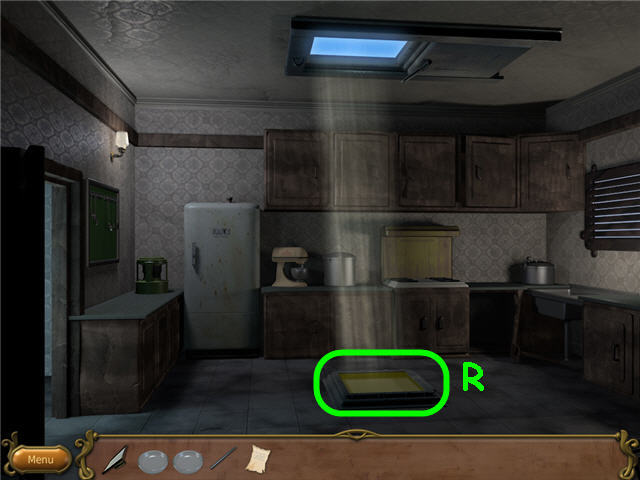
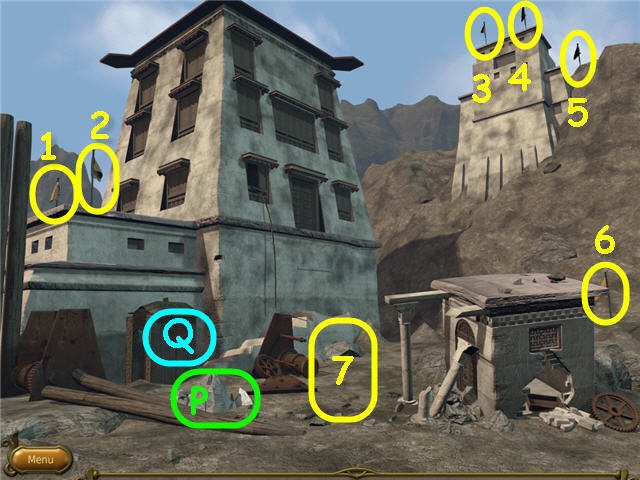
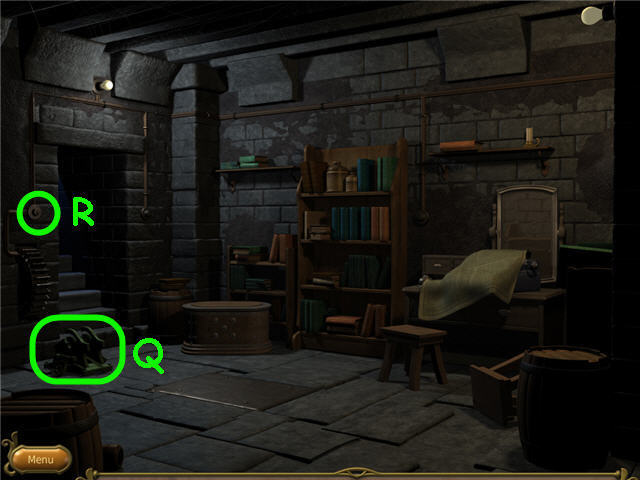 • Place the IRON HANDLE on the mechanism (Q). • Use the
SCREWDRIVER on the switch (R). • Place the WIRE PIECE on the
opened switch; close and flip the switch to start the
mechanism. • Pull the lever (Q) to descend a level; you may
need to pull more than once to descend.
• Place the IRON HANDLE on the mechanism (Q). • Use the
SCREWDRIVER on the switch (R). • Place the WIRE PIECE on the
opened switch; close and flip the switch to start the
mechanism. • Pull the lever (Q) to descend a level; you may
need to pull more than once to descend.
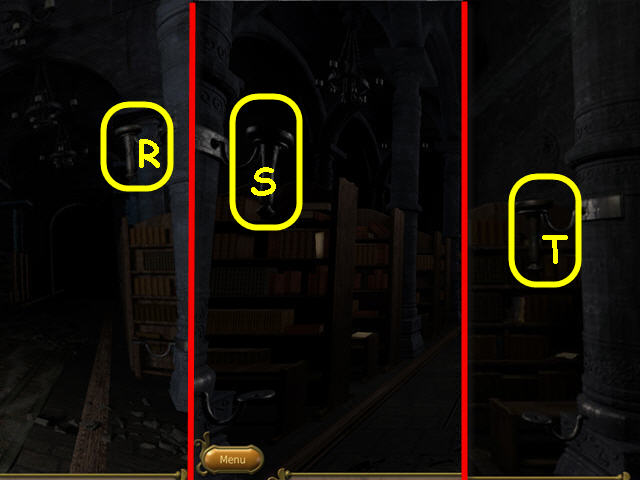
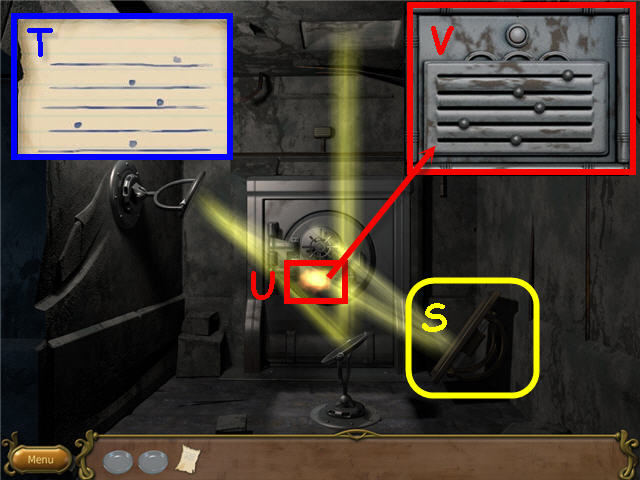
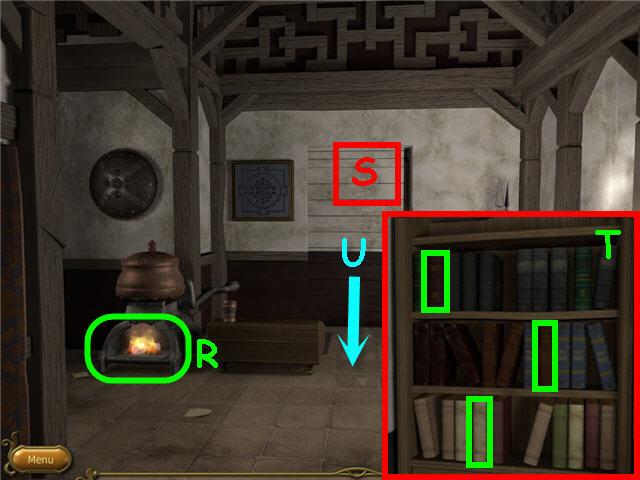
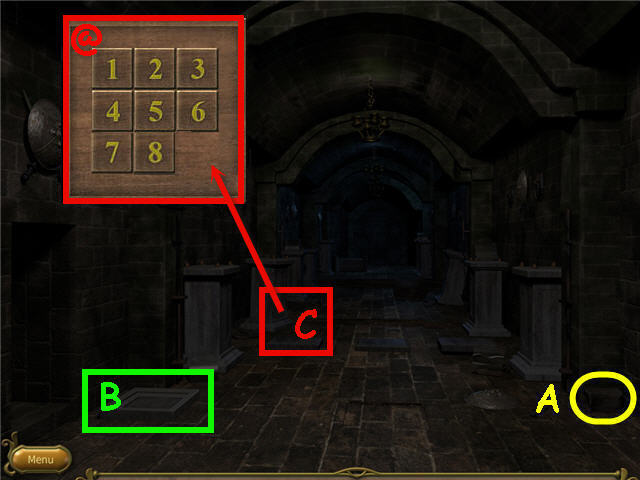
 • Open the center vault; take the PAPER (1). • In Inventory;
select the PAPER to read the riddle. • Examine the circuit
board to trigger a puzzle. • Complete the circuit by switching
the tiles from the top to the bottom without touching a
circuit breaker in the middle. • The puzzle is random; see
screenshot (S) for my solution. • Pull the lever (T) to go
back up. • Go up the left stairs; go left and then through the
left door. • Examine the television to trigger a cutscene.
• Open the center vault; take the PAPER (1). • In Inventory;
select the PAPER to read the riddle. • Examine the circuit
board to trigger a puzzle. • Complete the circuit by switching
the tiles from the top to the bottom without touching a
circuit breaker in the middle. • The puzzle is random; see
screenshot (S) for my solution. • Pull the lever (T) to go
back up. • Go up the left stairs; go left and then through the
left door. • Examine the television to trigger a cutscene.
Chapter 2 – The Tower
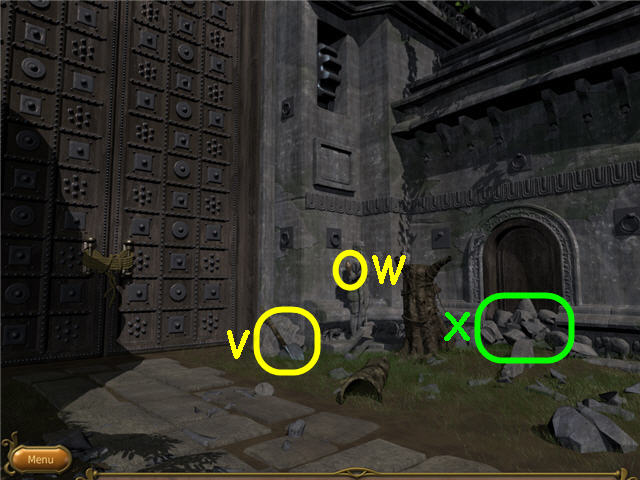
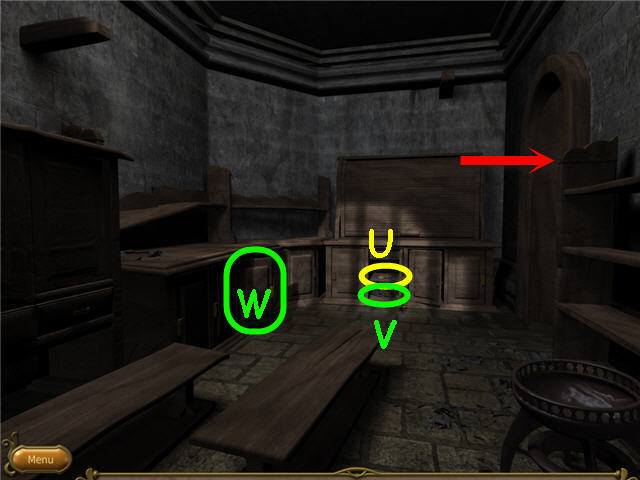
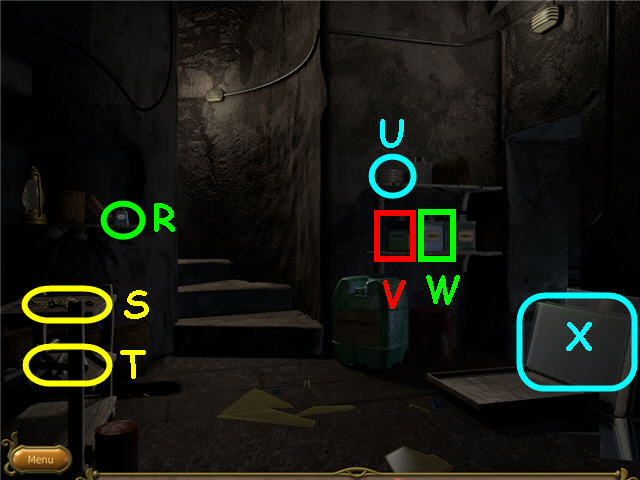
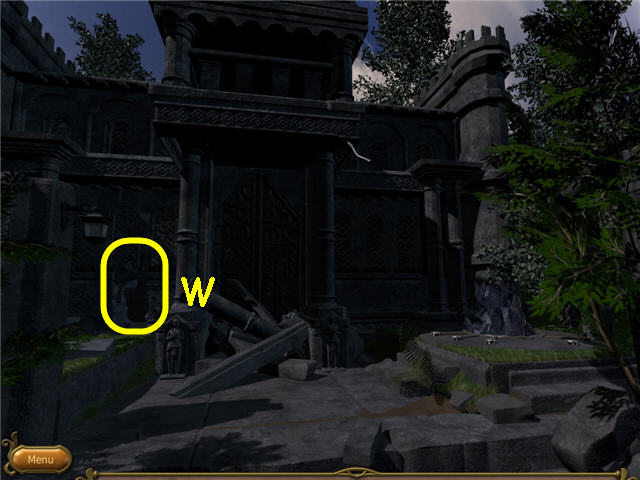
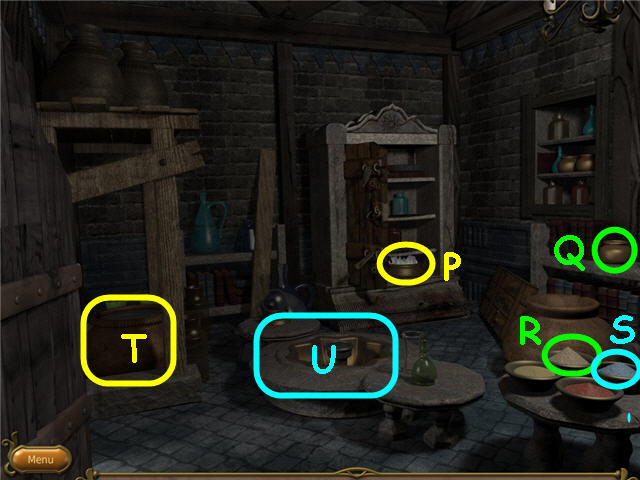
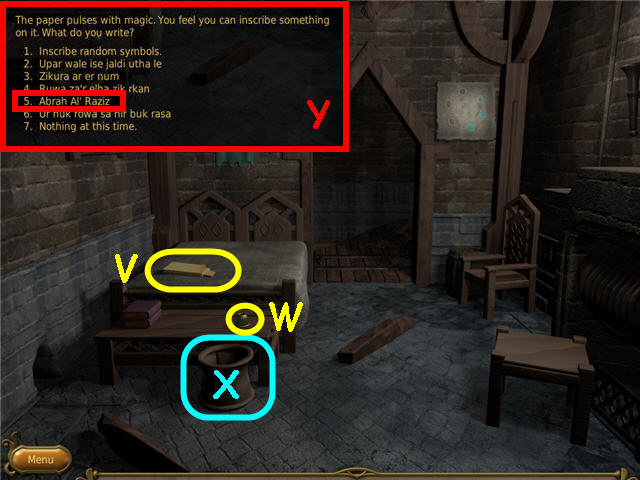
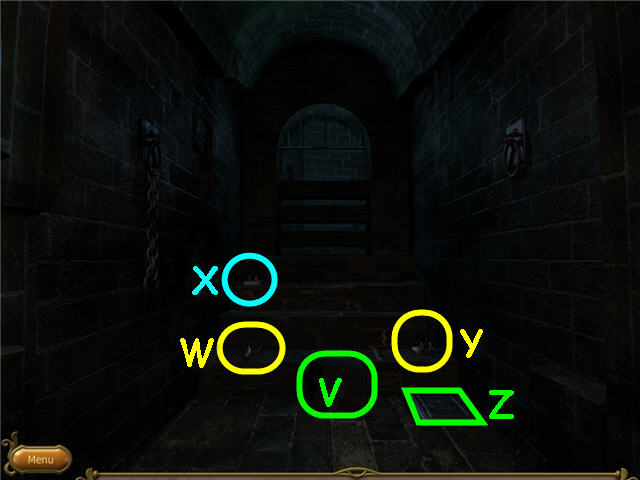
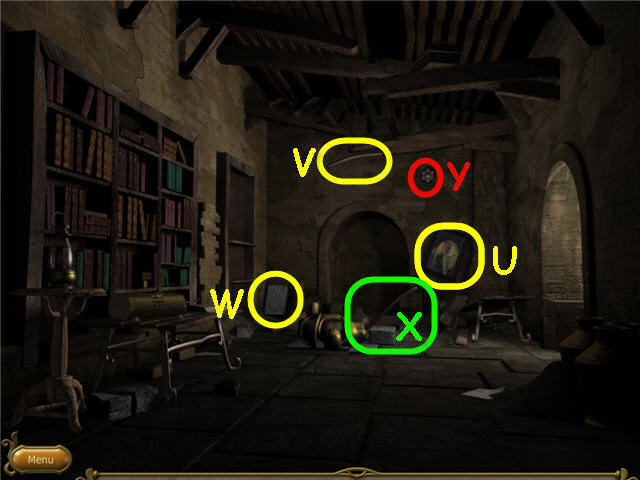 • Take the PAINTING (U), IRON ROD (V) and STONE (W). • Place
the STONE and IRON ROD by the golem; push on the IRON ROD (X).
• Take the IRON ROD. • Hang the PAINTING on the hook (Y). • Go
down the trapdoor in the floor to the right of the golem. • Go
through the portal in the center of the room.
• Take the PAINTING (U), IRON ROD (V) and STONE (W). • Place
the STONE and IRON ROD by the golem; push on the IRON ROD (X).
• Take the IRON ROD. • Hang the PAINTING on the hook (Y). • Go
down the trapdoor in the floor to the right of the golem. • Go
through the portal in the center of the room.
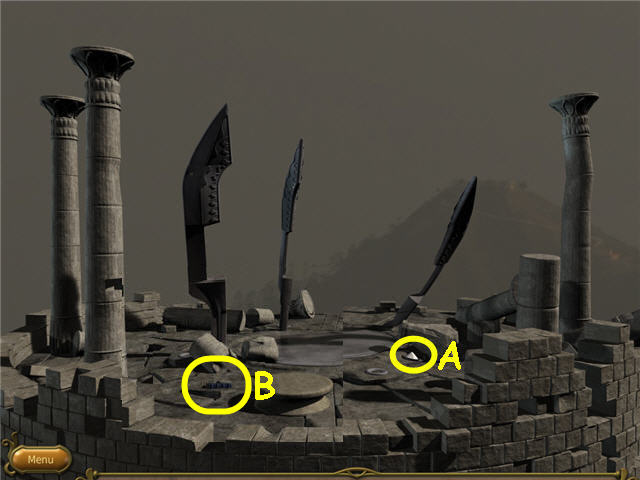 • Take the MAGICAL WHITE POWDER (A). • Move the 2 stones; take
the JOURNAL (B). • In Inventory; examine the JOURNAL to see a
recipe. • Press the area where the journal was to expose a
hole. • Go down the hole and then down the trapdoor next to
the golem.
• Take the MAGICAL WHITE POWDER (A). • Move the 2 stones; take
the JOURNAL (B). • In Inventory; examine the JOURNAL to see a
recipe. • Press the area where the journal was to expose a
hole. • Go down the hole and then down the trapdoor next to
the golem.
 • Examine the lower part of the cupboard; open the door; take
the MAGICAL RED POWDER (C), MAGICAL BLUE POWDER (D), KEY (E)
and PORTAL METER (F). • Exit out of the close-up and go up the
ladder.
• Examine the lower part of the cupboard; open the door; take
the MAGICAL RED POWDER (C), MAGICAL BLUE POWDER (D), KEY (E)
and PORTAL METER (F). • Exit out of the close-up and go up the
ladder.
 • Use the IRON ROD on the chest (G). • Use the KEY on the
chest (H); take the SCROLL (I). • In Inventory; examine the
SCROLL and note the instructions. • Go down the trapdoor.
• Use the IRON ROD on the chest (G). • Use the KEY on the
chest (H); take the SCROLL (I). • In Inventory; examine the
SCROLL and note the instructions. • Go down the trapdoor.
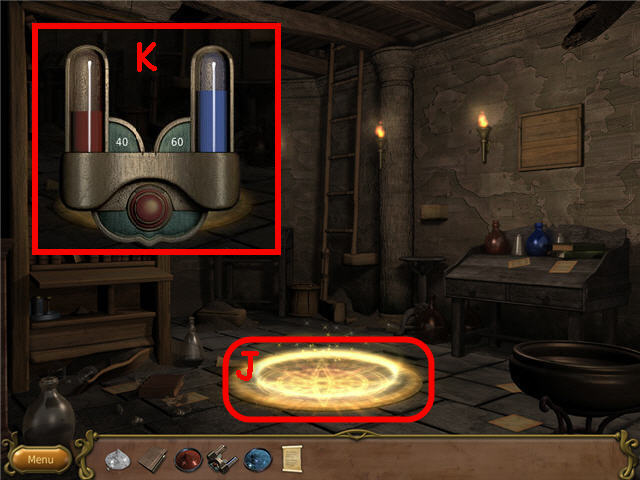 • Use the PORTAL METER on the portal (J); push the red button
and check the level. • Your goal is to adjust the meter
according to the SCROLL; 40 – red, 60 – blue (K). • The
MAGICAL WHITE POWDER decreases both the red and blue by 5, the
MAGICAL BLUE POWDER increases the blue by 5, and the MAGICAL
RED POWDER increases the red by 5. • Solution: Place the
MAGICAL WHITE POWDER 2x and the MAGICAL BLUE POWDER 4x on the
portal. • Enter the portal; open and go through the door on
the left and go straight.
• Use the PORTAL METER on the portal (J); push the red button
and check the level. • Your goal is to adjust the meter
according to the SCROLL; 40 – red, 60 – blue (K). • The
MAGICAL WHITE POWDER decreases both the red and blue by 5, the
MAGICAL BLUE POWDER increases the blue by 5, and the MAGICAL
RED POWDER increases the red by 5. • Solution: Place the
MAGICAL WHITE POWDER 2x and the MAGICAL BLUE POWDER 4x on the
portal. • Enter the portal; open and go through the door on
the left and go straight.
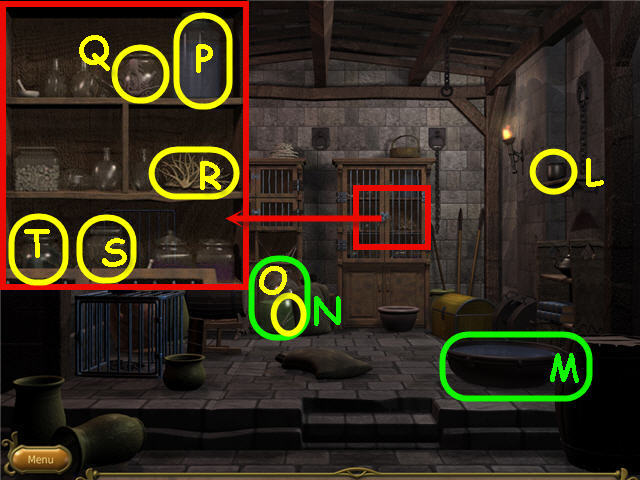 • Take the MUG (L). • Use the MUG on the bowl (M) and empty
the MUG full of water into the jar (N); repeat 3 more times
until the MUG disappears. • Take the BOLT CUTTER (O). •
Examine the right cupboard. • Use the BOLT CUTTER on the 4
hinges. • Take 7 of each of the following items to be sure you
have enough; ETHER VIAL (P), DEADWOOD (Q), DEVIL’S ROOT (R),
IRWAK ROOT (S), and KAWRA LEAVES (T). • Exit out of the
close-up and back out to the portal. • Open and go through the
door on the right and go straight.
• Take the MUG (L). • Use the MUG on the bowl (M) and empty
the MUG full of water into the jar (N); repeat 3 more times
until the MUG disappears. • Take the BOLT CUTTER (O). •
Examine the right cupboard. • Use the BOLT CUTTER on the 4
hinges. • Take 7 of each of the following items to be sure you
have enough; ETHER VIAL (P), DEADWOOD (Q), DEVIL’S ROOT (R),
IRWAK ROOT (S), and KAWRA LEAVES (T). • Exit out of the
close-up and back out to the portal. • Open and go through the
door on the right and go straight.
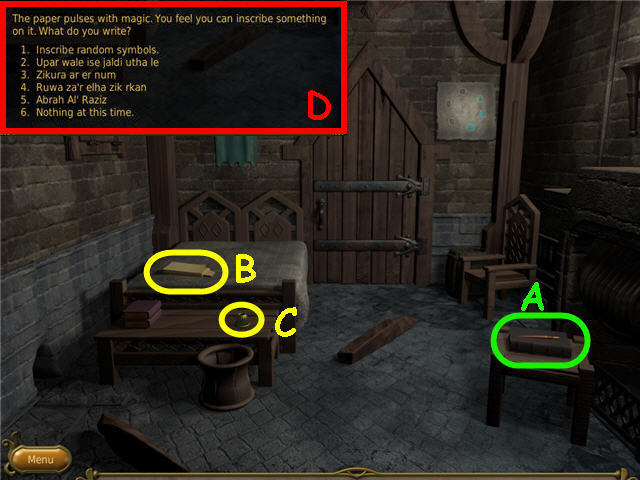
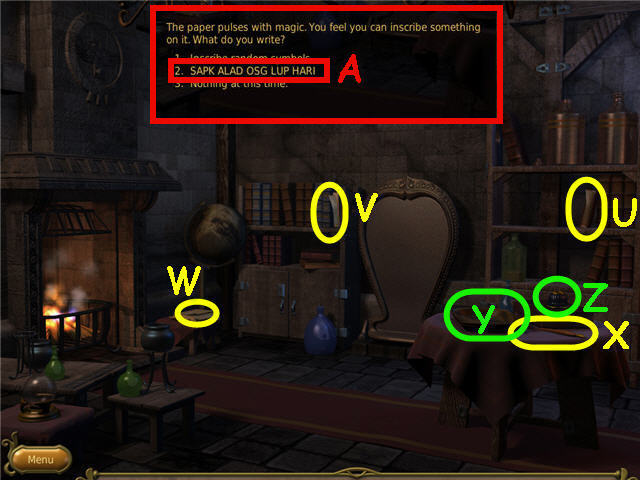 • Collect the pages (U-V) that will go into your JOURNAL. • In
Inventory, examine and read the JOURNAL and turn the page. •
Take the SHEET OF PAPER (W) and QUILL (X). • Per the
directions in the JOURNAL; place the SHEET OF PAPER in the
tray (Y). • Place an ETHER VIAL, IRWAK ROOT and KAWRA LEAVES
in the tray; take the PREPARED PAPER. • Dip the QUILL in the
ink well (Z). • In Inventory, use the QUILL on the PREPARED
PAPER; choose the 2nd line (A); get a DISPEL SCROLL. • Back
out twice and use the portal.
• Collect the pages (U-V) that will go into your JOURNAL. • In
Inventory, examine and read the JOURNAL and turn the page. •
Take the SHEET OF PAPER (W) and QUILL (X). • Per the
directions in the JOURNAL; place the SHEET OF PAPER in the
tray (Y). • Place an ETHER VIAL, IRWAK ROOT and KAWRA LEAVES
in the tray; take the PREPARED PAPER. • Dip the QUILL in the
ink well (Z). • In Inventory, use the QUILL on the PREPARED
PAPER; choose the 2nd line (A); get a DISPEL SCROLL. • Back
out twice and use the portal.
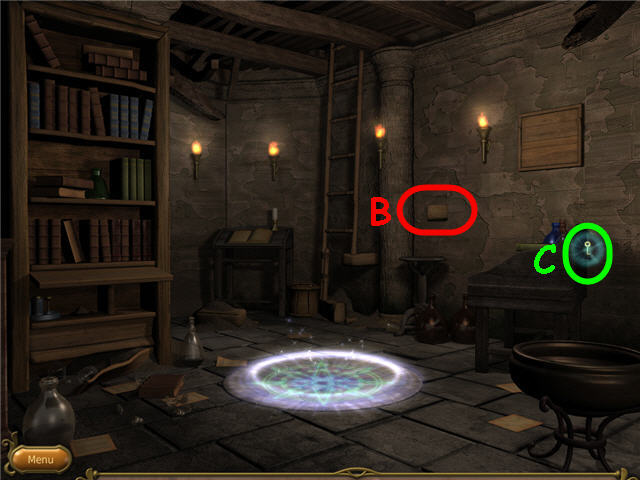 • Press on the brick sticking out (B). • Select the DISPEL
SCROLL in Inventory to break the spell. • Take the STRANGE KEY
(C). • Go through the portal, through the door on the right
and straight.
• Press on the brick sticking out (B). • Select the DISPEL
SCROLL in Inventory to break the spell. • Take the STRANGE KEY
(C). • Go through the portal, through the door on the right
and straight.
 • Use the STRANGE KEY on the left cupboard. • Open the
cupboard; take the paper (D) that is automatically placed in
your JOURNAL. • In Inventory, examine the JOURNAL; read the
last page. • Take a SHEET OF PAPER (E). • Place the SHEET OF
PAPER, ETHER VIAL, IRWAK ROOT and KAWRA LEAVES in the tray
(F); take the PREPARED PAPER. • Dip the QUILL in the ink (G).
• In Inventory, use the QUILL on the PREPARED PAPER; choose
the 3rd line (H) to get a MIRROR PORTAL SCROLL. • In
Inventory, press on the MIRROR PORTAL SCROLL. • Enter through
the portal in the mirror (I).
• Use the STRANGE KEY on the left cupboard. • Open the
cupboard; take the paper (D) that is automatically placed in
your JOURNAL. • In Inventory, examine the JOURNAL; read the
last page. • Take a SHEET OF PAPER (E). • Place the SHEET OF
PAPER, ETHER VIAL, IRWAK ROOT and KAWRA LEAVES in the tray
(F); take the PREPARED PAPER. • Dip the QUILL in the ink (G).
• In Inventory, use the QUILL on the PREPARED PAPER; choose
the 3rd line (H) to get a MIRROR PORTAL SCROLL. • In
Inventory, press on the MIRROR PORTAL SCROLL. • Enter through
the portal in the mirror (I).
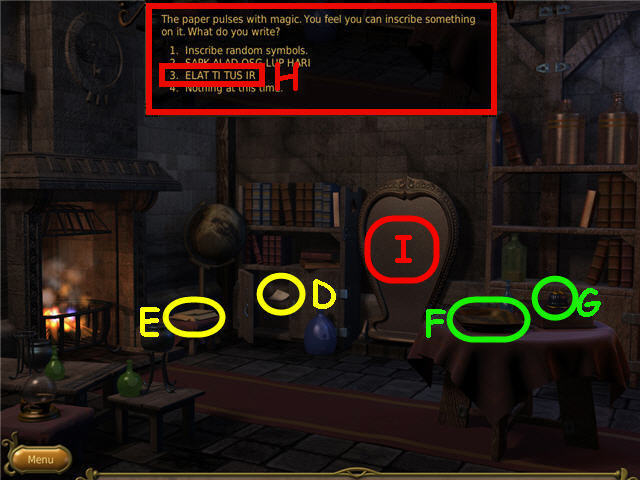
 • Take the EMPTY BOTTLE (J) and paper (K) which will be added
to your JOURNAL. • In Inventory; examine the JOURNAL, turn to
the last page. • Go through the portal; back out twice; go
through the portal.
• Take the EMPTY BOTTLE (J) and paper (K) which will be added
to your JOURNAL. • In Inventory; examine the JOURNAL, turn to
the last page. • Go through the portal; back out twice; go
through the portal.
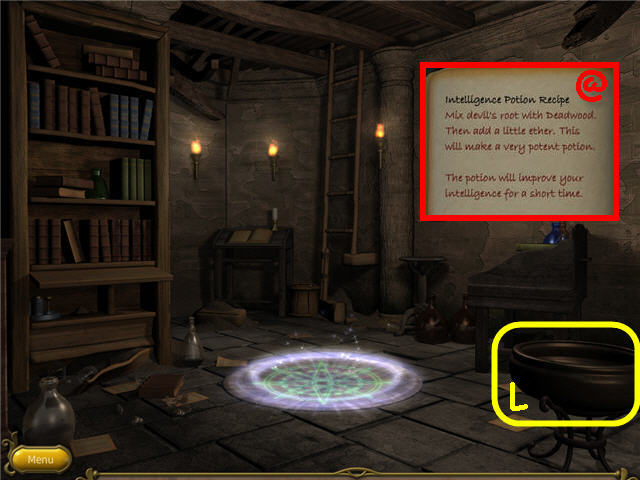 • In Inventory; examine the JOURNAL and read the intelligence
potion recipe (@) on the first page. • Following the recipe;
place the DEVIL’S ROOT, DEADWOOD and ETHER VIAL in the
cauldron (L). • Use the EMPTY BOTTLE on the cauldron to get a
POTION BOTTLE. • In Inventory; press on the POTION BOTTLE to
drink it. • In Inventory; examine the JOURNAL; advance to the
last page and read the unlock recipe. • Go through the portal;
go through the right door and straight.
• In Inventory; examine the JOURNAL and read the intelligence
potion recipe (@) on the first page. • Following the recipe;
place the DEVIL’S ROOT, DEADWOOD and ETHER VIAL in the
cauldron (L). • Use the EMPTY BOTTLE on the cauldron to get a
POTION BOTTLE. • In Inventory; press on the POTION BOTTLE to
drink it. • In Inventory; examine the JOURNAL; advance to the
last page and read the unlock recipe. • Go through the portal;
go through the right door and straight.
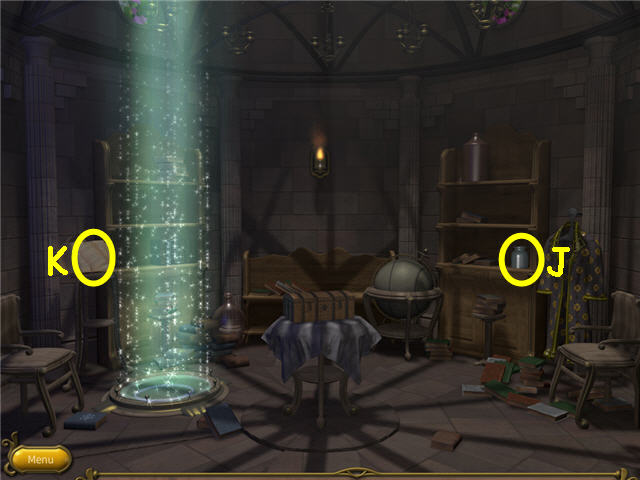
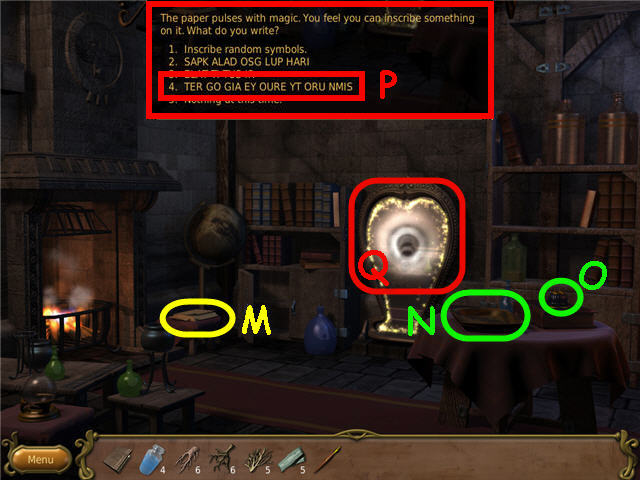 • Take a SHEET OF PAPER (M). • Place the SHEET OF PAPER, ETHER
VIAL, IRWAK ROOT and KAWRA LEAVES in the tray (N); take the
PREPARED PAPER. • Dip the QUILL in the ink (O). • In
Inventory, use the QUILL on the PREPARED PAPER; choose the 4th
line (P) to get an UNLOCK SCROLL. • Go through the portal (Q).
• Take a SHEET OF PAPER (M). • Place the SHEET OF PAPER, ETHER
VIAL, IRWAK ROOT and KAWRA LEAVES in the tray (N); take the
PREPARED PAPER. • Dip the QUILL in the ink (O). • In
Inventory, use the QUILL on the PREPARED PAPER; choose the 4th
line (P) to get an UNLOCK SCROLL. • Go through the portal (Q).
 • In Inventory, press on the UNLOCK SCROLL. • Open the chest;
take the WIZARD’S JOURNAL (R). • In Inventory; press on the
WIZARD’S JOURNAL. • Close the book to trigger a conversation;
select the replies to advance.
• In Inventory, press on the UNLOCK SCROLL. • Open the chest;
take the WIZARD’S JOURNAL (R). • In Inventory; press on the
WIZARD’S JOURNAL. • Close the book to trigger a conversation;
select the replies to advance.
Chapter 3 – The Sage
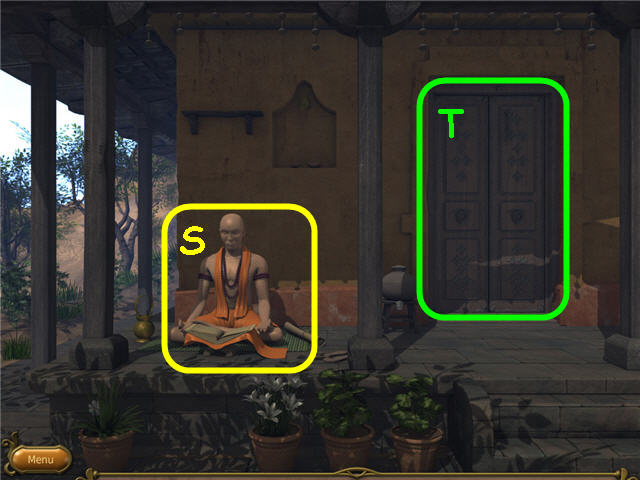 • Speak to the monk (S) and exhaust all conversation choosing
any of the responses. • Open and then go through the door (T).
• Speak to the monk (S) and exhaust all conversation choosing
any of the responses. • Open and then go through the door (T).
 • Select each of the heads (circled in yellow) and answer as
you see fit. • Select the guardian (U) and he will give you a
riddle. • Go through the door under the guardian.
• Select each of the heads (circled in yellow) and answer as
you see fit. • Select the guardian (U) and he will give you a
riddle. • Go through the door under the guardian.
 • The correct door to choose is based on the riddle you were
told by the guardian. • Riddle 1 – Though your knowledge is
imperfect, your answers satisfied. You have earned the right
to meet the sage. But when opening the door, remember: it is
not just completion, but perfection that you must seek.
Solution: Door Number 1. • Riddle 2 – Your knowledge is
perfect, but are you humble enough? You may proceed inside,
but know this: those that are most able should also be the
last. Solution: Door number 8. • Riddle 3 – You are not the
first, nor are you the second. Still your answers satisfied
and you have passed the test. The door you must open is the
door of progress. Progress in knowledge and progress in
position. Solution: Door number 2. • Riddle 4 – Your knowledge
is perfect, your answers are correct. You may proceed inside.
But know that the right choice sometimes is not the one that
is obvious, but the one that is hidden. Solution: Door number
4. • When you choose your correct door; open and then enter
the door.
• The correct door to choose is based on the riddle you were
told by the guardian. • Riddle 1 – Though your knowledge is
imperfect, your answers satisfied. You have earned the right
to meet the sage. But when opening the door, remember: it is
not just completion, but perfection that you must seek.
Solution: Door Number 1. • Riddle 2 – Your knowledge is
perfect, but are you humble enough? You may proceed inside,
but know this: those that are most able should also be the
last. Solution: Door number 8. • Riddle 3 – You are not the
first, nor are you the second. Still your answers satisfied
and you have passed the test. The door you must open is the
door of progress. Progress in knowledge and progress in
position. Solution: Door number 2. • Riddle 4 – Your knowledge
is perfect, your answers are correct. You may proceed inside.
But know that the right choice sometimes is not the one that
is obvious, but the one that is hidden. Solution: Door number
4. • When you choose your correct door; open and then enter
the door.
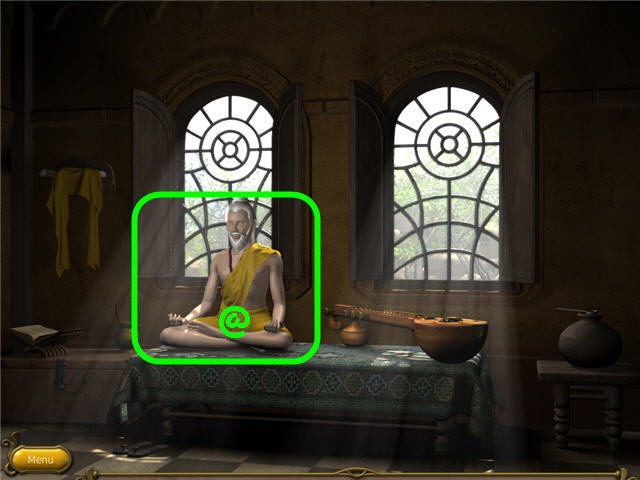 • Speak to the Sage (@). • Exhaust all conversation. If you
wish to have further details to fill in the story you may ask
him additional questions when the conversation is complete. •
Back out.
• Speak to the Sage (@). • Exhaust all conversation. If you
wish to have further details to fill in the story you may ask
him additional questions when the conversation is complete. •
Back out.
Chapter 4 – The Fire Rune
 • Go forward twice, read the dialogue, go forward one more
time. • Take the SHOVEL (V) and PETAL (W). • Use the SHOVEL on
the stones (X); get a SHOVEL BLADE. • Back out three times.
• Go forward twice, read the dialogue, go forward one more
time. • Take the SHOVEL (V) and PETAL (W). • Use the SHOVEL on
the stones (X); get a SHOVEL BLADE. • Back out three times.
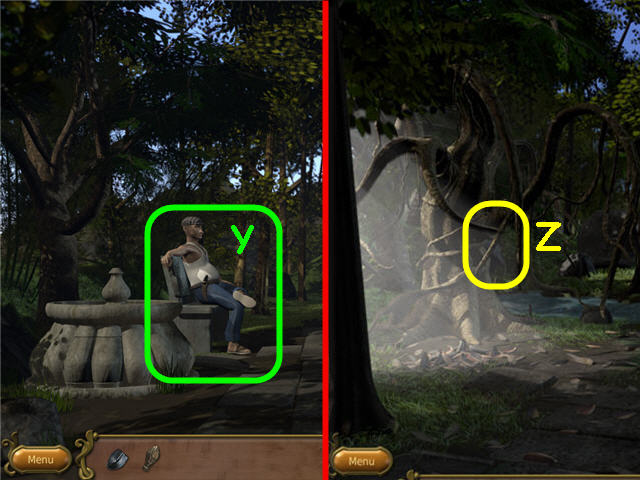 • Speak to the gentleman (Y) on the bench about the petal and
knife. • Give the PETAL to the man; get the KNIFE. • Go
forward. • Use the KNIFE on the hanging branch four times; get
a BRANCH (Z). • In Inventory, combine the BRANCH with the
SHOVEL BLADE to get a SHOVEL. • Go forward twice.
• Speak to the gentleman (Y) on the bench about the petal and
knife. • Give the PETAL to the man; get the KNIFE. • Go
forward. • Use the KNIFE on the hanging branch four times; get
a BRANCH (Z). • In Inventory, combine the BRANCH with the
SHOVEL BLADE to get a SHOVEL. • Go forward twice.
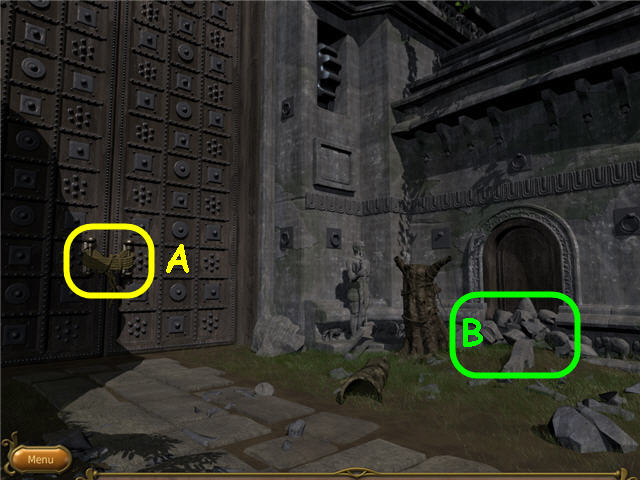 • Use the KNIFE on the rope; take the ROPE (A). • Use the
SHOVEL on the stones (B) twice. • Open the cleared door on the
right and enter.
• Use the KNIFE on the rope; take the ROPE (A). • Use the
SHOVEL on the stones (B) twice. • Open the cleared door on the
right and enter.
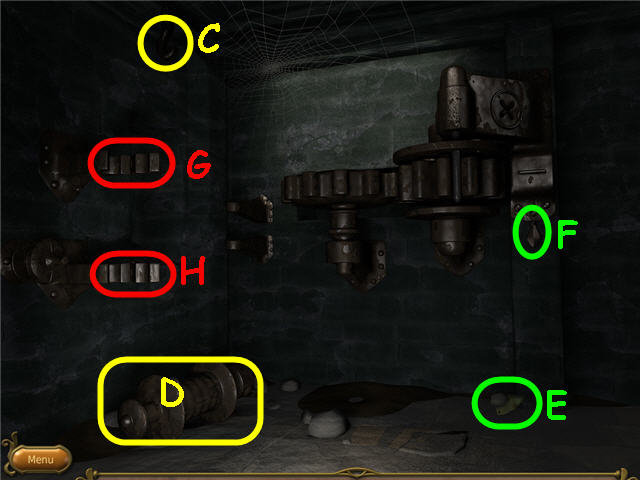 • Use the ROPE on the hook (C) and then press on the wheel (D)
to attach the rope; pull the bottom of the rope to pull up the
wheel. • Take the OLD PARCHMENT (E). • In Inventory, examine
and read the OLD PARCHMENT. • Take the PETAL (F). • Close the
clamps on the wheel (G-H) and take the ROPE.
• Use the ROPE on the hook (C) and then press on the wheel (D)
to attach the rope; pull the bottom of the rope to pull up the
wheel. • Take the OLD PARCHMENT (E). • In Inventory, examine
and read the OLD PARCHMENT. • Take the PETAL (F). • Close the
clamps on the wheel (G-H) and take the ROPE.
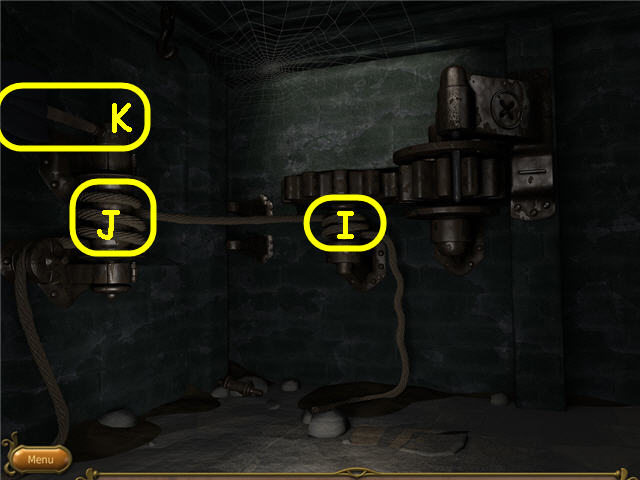 • Attach the ROPE to the right gear (I) and then press on the
wheel (J) to attach the other end of the rope. • Attach the
SHOVEL on the top of the pulley (K). • Back out four times.
• Attach the ROPE to the right gear (I) and then press on the
wheel (J) to attach the other end of the rope. • Attach the
SHOVEL on the top of the pulley (K). • Back out four times.
 • Examine the fountain base; take to the man, examine the
fountain base again and remove the cover. • Using the clue on
the OLD PARCHMENT, turn all the dials so the arrows face the
center (L). • Take the STRANGE STAMP (M) and VERY OLD JOURNAL
(N). • Back out of the close-up. • Speak to the gentleman on
the bench until he agrees to exchange his petals for the
knife. • Give the KNIFE to the man; get the 2nd and 3rd PETAL.
• Go forward three times and through the door on the right.
• Examine the fountain base; take to the man, examine the
fountain base again and remove the cover. • Using the clue on
the OLD PARCHMENT, turn all the dials so the arrows face the
center (L). • Take the STRANGE STAMP (M) and VERY OLD JOURNAL
(N). • Back out of the close-up. • Speak to the gentleman on
the bench until he agrees to exchange his petals for the
knife. • Give the KNIFE to the man; get the 2nd and 3rd PETAL.
• Go forward three times and through the door on the right.
 • In Inventory, combine the 3 PETALS and the STRANGE STAMP to
get a STRANGE STAMP (O). • Use the STRANGE STAMP on the slot
(P). • Pull on the SHOVEL (Q) to turn it. • Back out and go
left through the large doors into the library.
• In Inventory, combine the 3 PETALS and the STRANGE STAMP to
get a STRANGE STAMP (O). • Use the STRANGE STAMP on the slot
(P). • Pull on the SHOVEL (Q) to turn it. • Back out and go
left through the large doors into the library.
 • Take the TORCH (R) on the right. • Go forward. • Take the
2nd TORCH (S) on the left. • Go forward. • Take the 3rd TORCH
(T) on the right. • Back out twice. • Open the door on the
left and go through the door.
• Take the TORCH (R) on the right. • Go forward. • Take the
2nd TORCH (S) on the left. • Go forward. • Take the 3rd TORCH
(T) on the right. • Back out twice. • Open the door on the
left and go through the door.
 • Open the second from left bottom cabinet in the back of the
room; take the MAGNIFYING GLASS (U). • Take three scoops of
COAL (V). • In Inventory, place a scoop of COAL into each
TORCH. • Use the MAGNIFYING GLASS on the cabinet scratches
(W). • Go right through the doorway and then back out three
times.
• Open the second from left bottom cabinet in the back of the
room; take the MAGNIFYING GLASS (U). • Take three scoops of
COAL (V). • In Inventory, place a scoop of COAL into each
TORCH. • Use the MAGNIFYING GLASS on the cabinet scratches
(W). • Go right through the doorway and then back out three
times.
 • Use the MAGNIFYING GLASS on the dried leaves to start a fire
(X). • Light the three TORCHES on the fire. • Go forward twice
and into the library. • Place the burning TORCH on the right
(Y). • Pick up the paper (Z) to get an update in the VERY OLD
JOURNAL. • Go forward.
• Use the MAGNIFYING GLASS on the dried leaves to start a fire
(X). • Light the three TORCHES on the fire. • Go forward twice
and into the library. • Place the burning TORCH on the right
(Y). • Pick up the paper (Z) to get an update in the VERY OLD
JOURNAL. • Go forward.
 • Place the burning TORCH on the left holder (A). • Pick up
the papers (B-C-D) to get an updated VERY OLD JOURNAL. • Pick
up the STRANGE POEM (E) and VIZIER’S JOURNAL (F). • Go
forward.
• Place the burning TORCH on the left holder (A). • Pick up
the papers (B-C-D) to get an updated VERY OLD JOURNAL. • Pick
up the STRANGE POEM (E) and VIZIER’S JOURNAL (F). • Go
forward.
 • Place the burning TORCH on the right holder (G). • Take the
papers (H-M) to get an updated VERY OLD JOURNAL. • Take the
WOODEN KEY (N). • Back out twice; read the dialogue; go left
into the next room.
• Place the burning TORCH on the right holder (G). • Take the
papers (H-M) to get an updated VERY OLD JOURNAL. • Take the
WOODEN KEY (N). • Back out twice; read the dialogue; go left
into the next room.
 • Use the WOODEN KEY on the roll top (O). • Examine the opened
top to trigger a puzzle.
• Use the WOODEN KEY on the roll top (O). • Examine the opened
top to trigger a puzzle.
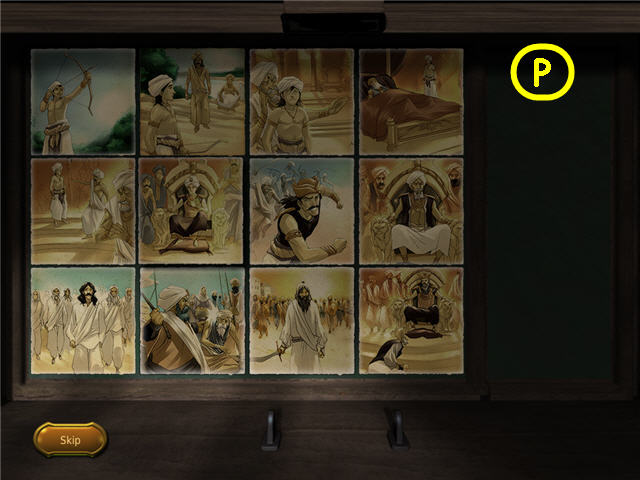 • Using the VERY OLD JOURNAL as your guide, arrange the
pictures in chronological order. • Casual Mode: There are
dates on the top of the journal pages to help you get the
proper in chronological order. • Regular Mode: You will need
to arrange them based on how the story flows best to you. The
pages in the book are not in chronological order. • You may
back out of the puzzle at any time to consult the journal
without losing your progress on the puzzle. • See screenshot
(P) for solution.
• Using the VERY OLD JOURNAL as your guide, arrange the
pictures in chronological order. • Casual Mode: There are
dates on the top of the journal pages to help you get the
proper in chronological order. • Regular Mode: You will need
to arrange them based on how the story flows best to you. The
pages in the book are not in chronological order. • You may
back out of the puzzle at any time to consult the journal
without losing your progress on the puzzle. • See screenshot
(P) for solution.
 • Take the POUCH (Q). • In Inventory, press on the POUCH to
get a POUCH and an OLD PARCHMENT. • Use the POUCH on the sand
(R) to get a SAND FILLED POUCH. • Go right through the
doorway; go forward twice.
• Take the POUCH (Q). • In Inventory, press on the POUCH to
get a POUCH and an OLD PARCHMENT. • Use the POUCH on the sand
(R) to get a SAND FILLED POUCH. • Go right through the
doorway; go forward twice.
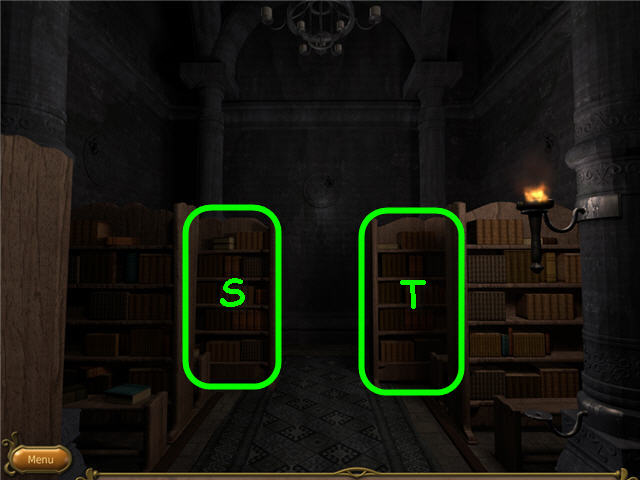 • In Inventory, examine the OLD PARCHMENT to trigger the
bookcases. • Push the two bookcases (S-T) to expose the
scales. • Back out twice. • Speak to the ghost on the left and
exhaust all conversation. • Go forward twice. • Use the SAND
FILLED POUCH on the torch on the right. • Back out and use the
SAND FILLED POUCH on the torch on the left. • Back out and use
the SAND FILLED POUCH on the torch on the right. • Close the
door on the left.
• In Inventory, examine the OLD PARCHMENT to trigger the
bookcases. • Push the two bookcases (S-T) to expose the
scales. • Back out twice. • Speak to the ghost on the left and
exhaust all conversation. • Go forward twice. • Use the SAND
FILLED POUCH on the torch on the right. • Back out and use the
SAND FILLED POUCH on the torch on the left. • Back out and use
the SAND FILLED POUCH on the torch on the right. • Close the
door on the left.
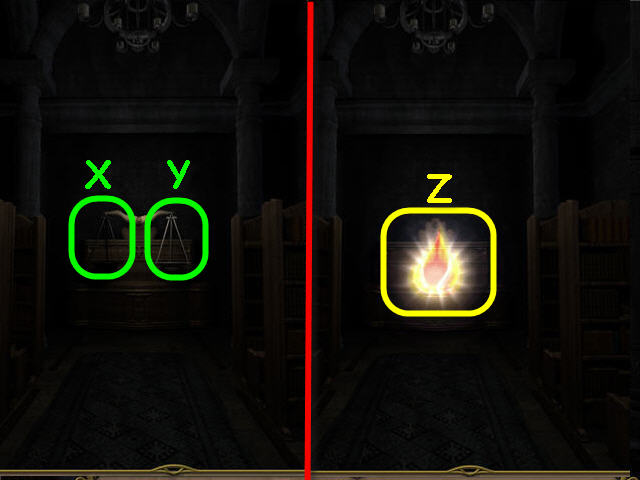
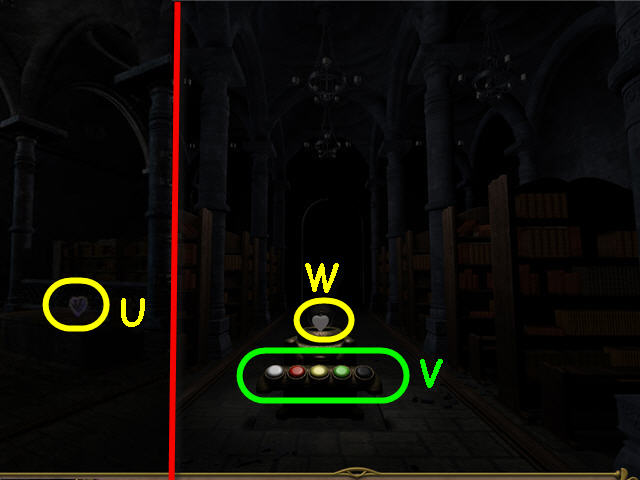 • Take the HEART OF DARKNESS (U). • Go forward. • In
Inventory, examine the STRANGE POEM to get the clues for the
order of lights. • Press the buttons until the color you
desire appears. • Solution: A sum of all colors = white; of
heart = red, of hope = yellow, of freshness = green, the
colors of nothing =black. From left; white, red, yellow,
green, black. • See screenshot (V) for solution. • Take the
HEART OF PURENESS (W). • Go forward.
• Take the HEART OF DARKNESS (U). • Go forward. • In
Inventory, examine the STRANGE POEM to get the clues for the
order of lights. • Press the buttons until the color you
desire appears. • Solution: A sum of all colors = white; of
heart = red, of hope = yellow, of freshness = green, the
colors of nothing =black. From left; white, red, yellow,
green, black. • See screenshot (V) for solution. • Take the
HEART OF PURENESS (W). • Go forward.
 • Place the HEART OF DARKNESS in the left pan of the scale
(X). • Place the HEART OF PURENESS in the right pan of the
scale (Y). • Take the fire rune (Z).
• Place the HEART OF DARKNESS in the left pan of the scale
(X). • Place the HEART OF PURENESS in the right pan of the
scale (Y). • Take the fire rune (Z).
Chapter 5 – The Water Rune
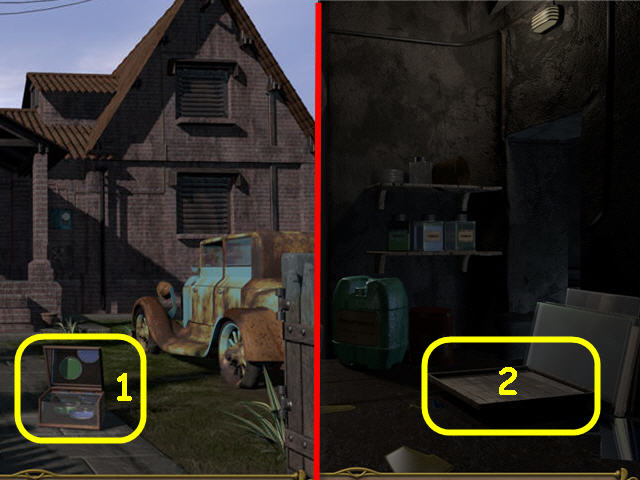
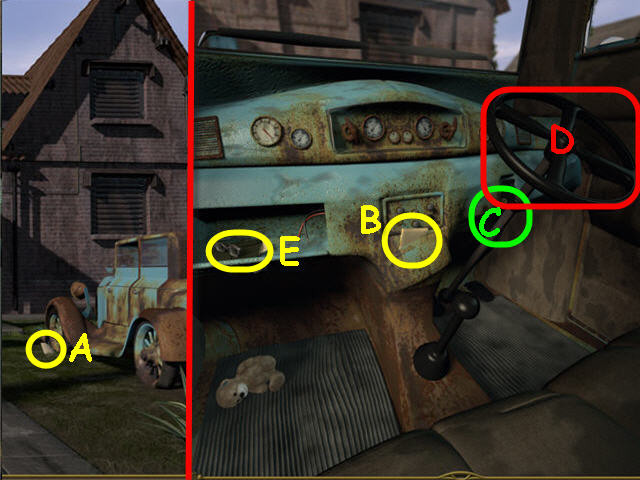 • Go left. • Take the OLD PAPER (A). • Examine the car; take
the 2nd OLD PAPER (B). • Press on the steering column (C) and
then take the steering wheel to get a CAR HANDLE (D). • Open
the glove box; take the 3rd OLD PAPER (E). • Exit the car; go
forward to the door and right.
• Go left. • Take the OLD PAPER (A). • Examine the car; take
the 2nd OLD PAPER (B). • Press on the steering column (C) and
then take the steering wheel to get a CAR HANDLE (D). • Open
the glove box; take the 3rd OLD PAPER (E). • Exit the car; go
forward to the door and right.
 • Take the COVER (F). • Open the fuse box; take the 4th OLD
PAPER (G) and the FUSE (H). • Place the CAR HANDLE on the
gears (I). • Go to the door (J).
• Take the COVER (F). • Open the fuse box; take the 4th OLD
PAPER (G) and the FUSE (H). • Place the CAR HANDLE on the
gears (I). • Go to the door (J).
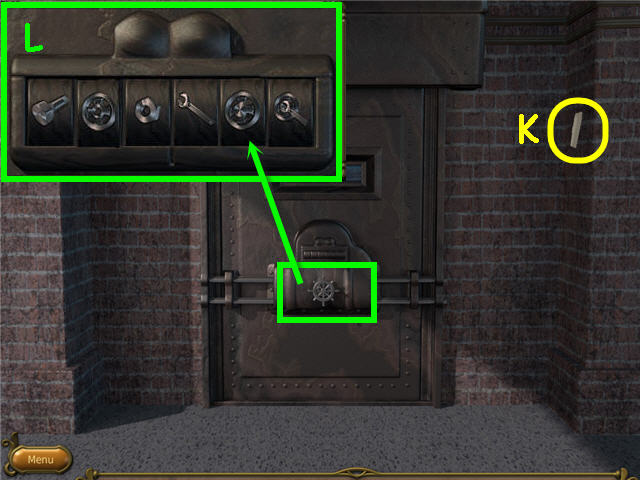 • Take the 5th OLD PAPER (K). • Examine the door lock. • Using
the 5 OLD PAPERS in your inventory as your guide; rotate the
tumblers on the lock to match the clues. • You will be missing
one of the codes; rotate the remaining tumbler till the lock
opens. See screenshot (L) for solution. • Go right. • Turn the
wheel and note the door will not stay up. • Go towards the
door; back out twice, go towards the house to the right and
forward.
• Take the 5th OLD PAPER (K). • Examine the door lock. • Using
the 5 OLD PAPERS in your inventory as your guide; rotate the
tumblers on the lock to match the clues. • You will be missing
one of the codes; rotate the remaining tumbler till the lock
opens. See screenshot (L) for solution. • Go right. • Turn the
wheel and note the door will not stay up. • Go towards the
door; back out twice, go towards the house to the right and
forward.
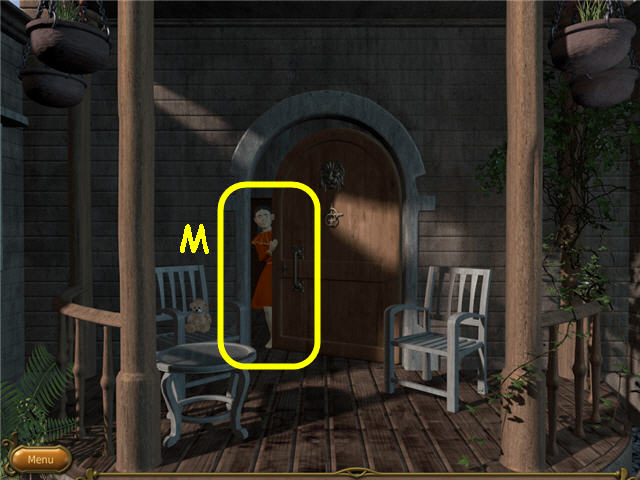 • Knock on the door. • Speak to the little girl (M) about a
rod until she gives you a THIN ROD. • Back out twice; go left.
• Examine the fuse box.
• Knock on the door. • Speak to the little girl (M) about a
rod until she gives you a THIN ROD. • Back out twice; go left.
• Examine the fuse box.
 • Before you begin the next steps, make sure your inventory
bar is in the up position. • Turn the wheel (N) and do not
stop until the door is up and all the holes (O) are open. •
Quickly place the THIN ROD in one of the upper holes to keep
the door open. I found the second from top to be the easiest.
• Go towards the opened door and enter in the house (P).
• Before you begin the next steps, make sure your inventory
bar is in the up position. • Turn the wheel (N) and do not
stop until the door is up and all the holes (O) are open. •
Quickly place the THIN ROD in one of the upper holes to keep
the door open. I found the second from top to be the easiest.
• Go towards the opened door and enter in the house (P).
 • Take the IRON WHEEL (Q), OIL CAN (R), and SCISSORS (S) •
Remove the panel cover on the arcade game; take the
MOTHERBOARD (T). • Read the book (U) on the coffee table to
get puzzle clues. • Back out twice.
• Take the IRON WHEEL (Q), OIL CAN (R), and SCISSORS (S) •
Remove the panel cover on the arcade game; take the
MOTHERBOARD (T). • Read the book (U) on the coffee table to
get puzzle clues. • Back out twice.
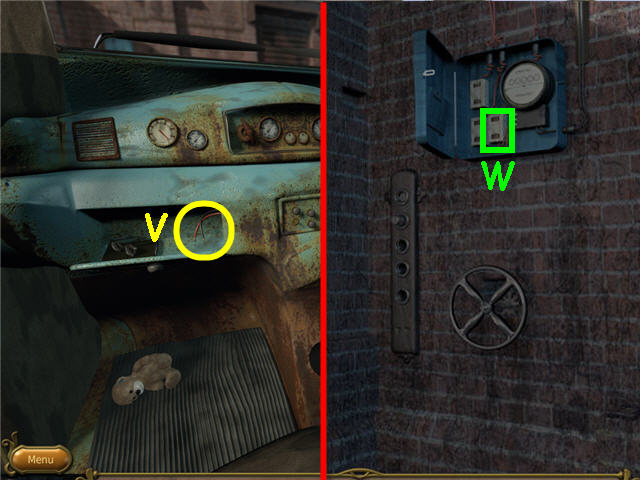 • Examine the car. • Use the SCISSORS on the wires; get a WIRE
(V). • Exit the car and examine the fuse box. • In Inventory,
combine the WIRE and the FUSE. • Use the FUSE on the lower
right socket (W); the bottom right green light should be on if
correct. • Go towards the door, enter the house and go through
the door in the left rear of the room.
• Examine the car. • Use the SCISSORS on the wires; get a WIRE
(V). • Exit the car and examine the fuse box. • In Inventory,
combine the WIRE and the FUSE. • Use the FUSE on the lower
right socket (W); the bottom right green light should be on if
correct. • Go towards the door, enter the house and go through
the door in the left rear of the room.
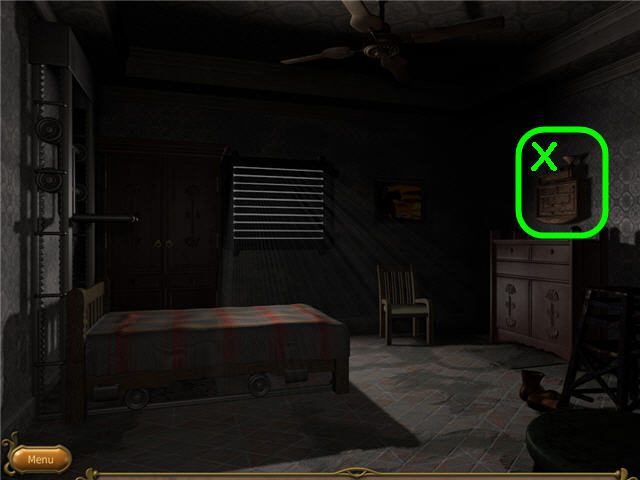 • Use the OIL CAN on the control panel (X) on the wall. •
Examine the control panel.
• Use the OIL CAN on the control panel (X) on the wall. •
Examine the control panel.
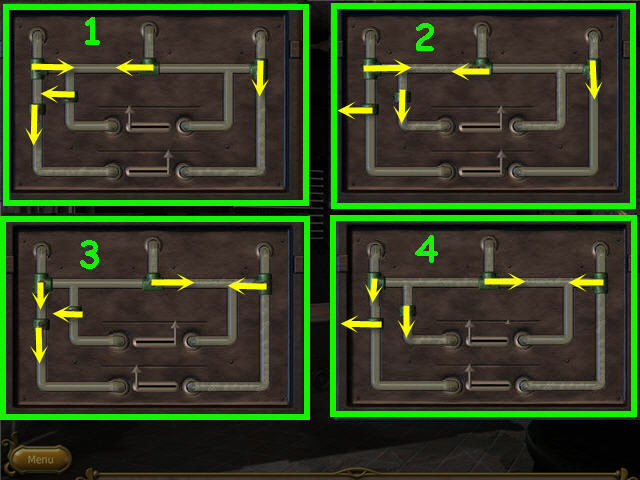 • The goal is to activate the hydraulics to move the bed and
get the lift that is on the wall underneath the bed to lift it
up off the floor. • Solution: See screenshot for the valve
settings to move the bed forward (1), lower the lift (2), move
the bed back (3), and raise the bed (4). • Go down the hatch
under the bed.
• The goal is to activate the hydraulics to move the bed and
get the lift that is on the wall underneath the bed to lift it
up off the floor. • Solution: See screenshot for the valve
settings to move the bed forward (1), lower the lift (2), move
the bed back (3), and raise the bed (4). • Go down the hatch
under the bed.
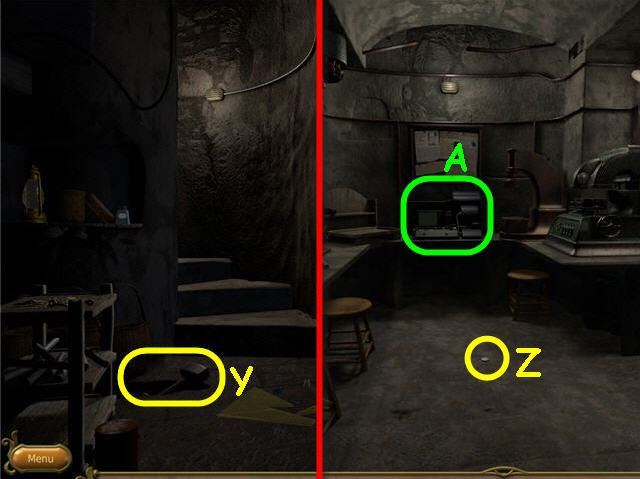 • Take the HAMMER (Y). • Go into the room on the right. • Pick
up the ODD COIN (Z). • Place the MOTHERBOARD on the workbench
(A).
• Take the HAMMER (Y). • Go into the room on the right. • Pick
up the ODD COIN (Z). • Place the MOTHERBOARD on the workbench
(A).
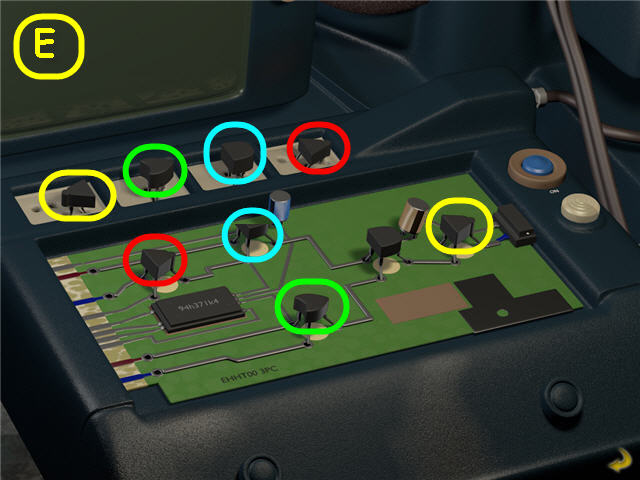 • Place the circuits on the board in the correct spots. •
Press the blue button when complete. See screenshot (E) for
solution. • Get the MOTHERBOARD. • Exit the room via the
bottom left; go up the stairs and back out.
• Place the circuits on the board in the correct spots. •
Press the blue button when complete. See screenshot (E) for
solution. • Get the MOTHERBOARD. • Exit the room via the
bottom left; go up the stairs and back out.
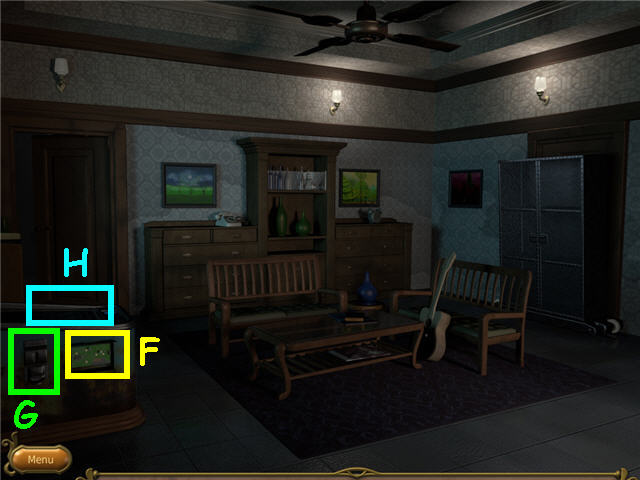 • Place the repaired MOTHERBOARD in the panel on the side of
the arcade game (F). • Place the ODD COIN in the slot (G). •
Examine the top of the arcade game (H) to play the game.
• Place the repaired MOTHERBOARD in the panel on the side of
the arcade game (F). • Place the ODD COIN in the slot (G). •
Examine the top of the arcade game (H) to play the game.
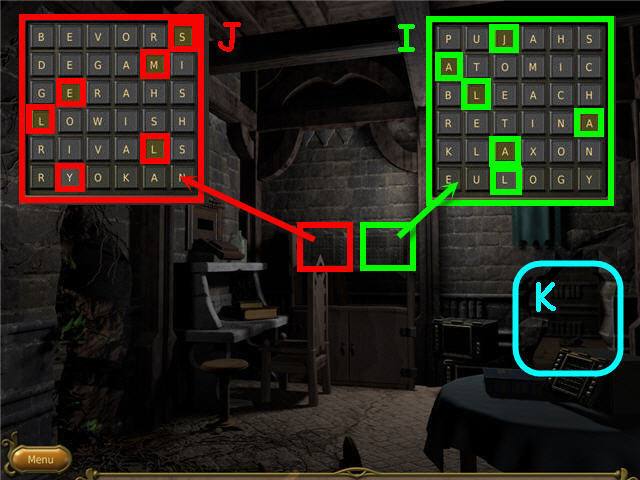
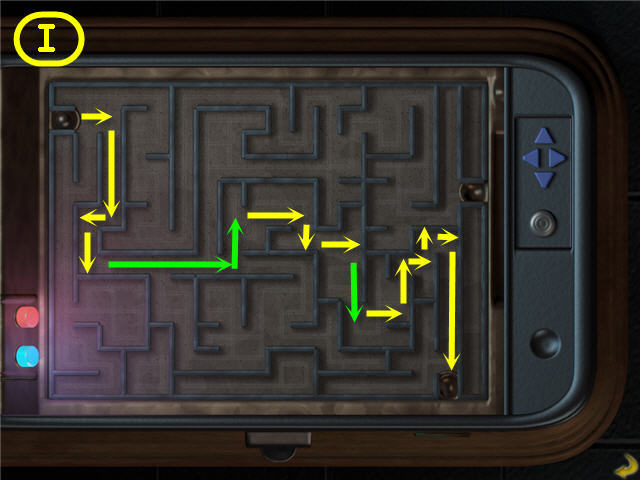 • Use the arrows to guide the ball from the upper left to the
lower right. • You will need to press some arrows (marked in
green on the screenshot) before the ball comes to a stop.
Press a little before you want the ball to turn because it
takes a moment to register. • Solution: The moves that will
require you press the arrow before the ball rolls to a stop
are marked in capital letters; right, down, left, down, RIGHT,
UP, right, down, right, DOWN, right, up, right, up, right,
down. • See screenshot (I) for solution. • You will get a red
light signifying failure even though the ball goes in the
lower hole. • Back out of the close-up. • Use the HAMMER on
the arcade machine; take the BALL BEARING from the holder
under the coin slot. • Note: If you steer the ball to the hole
on the right instead of the bottom; you will get a green
light. You will need to hit the machine with the HAMMER to get
the ODD COIN back and play again.
• Use the arrows to guide the ball from the upper left to the
lower right. • You will need to press some arrows (marked in
green on the screenshot) before the ball comes to a stop.
Press a little before you want the ball to turn because it
takes a moment to register. • Solution: The moves that will
require you press the arrow before the ball rolls to a stop
are marked in capital letters; right, down, left, down, RIGHT,
UP, right, down, right, DOWN, right, up, right, up, right,
down. • See screenshot (I) for solution. • You will get a red
light signifying failure even though the ball goes in the
lower hole. • Back out of the close-up. • Use the HAMMER on
the arcade machine; take the BALL BEARING from the holder
under the coin slot. • Note: If you steer the ball to the hole
on the right instead of the bottom; you will get a green
light. You will need to hit the machine with the HAMMER to get
the ODD COIN back and play again.
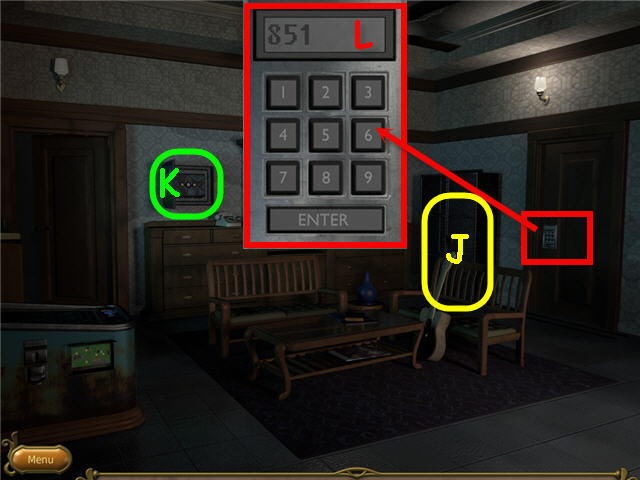 • In Inventory; combine the BALL BEARING and the IRON WHEEL. •
Place the repaired IRON WHEEL on the cabinet (J); roll the
cabinet to the left twice; you will expose a safe (K). •
Examine the lock on the door; using the clue from the coffee
table book, you have to guess the numbers. • After you hit
enter, you will get a message saying you have a cow that lets
you know if you have a correct number in the wrong place and
it will say how many correct numbers in the correct place by
telling you how many bulls you have. Continue guessing numbers
till you have them all. • Casual Solution: 851. See screenshot
(L) for solution. • Regular Solution: My solution was 953;
yours may be different. • Open and go through the door on the
right.
• In Inventory; combine the BALL BEARING and the IRON WHEEL. •
Place the repaired IRON WHEEL on the cabinet (J); roll the
cabinet to the left twice; you will expose a safe (K). •
Examine the lock on the door; using the clue from the coffee
table book, you have to guess the numbers. • After you hit
enter, you will get a message saying you have a cow that lets
you know if you have a correct number in the wrong place and
it will say how many correct numbers in the correct place by
telling you how many bulls you have. Continue guessing numbers
till you have them all. • Casual Solution: 851. See screenshot
(L) for solution. • Regular Solution: My solution was 953;
yours may be different. • Open and go through the door on the
right.
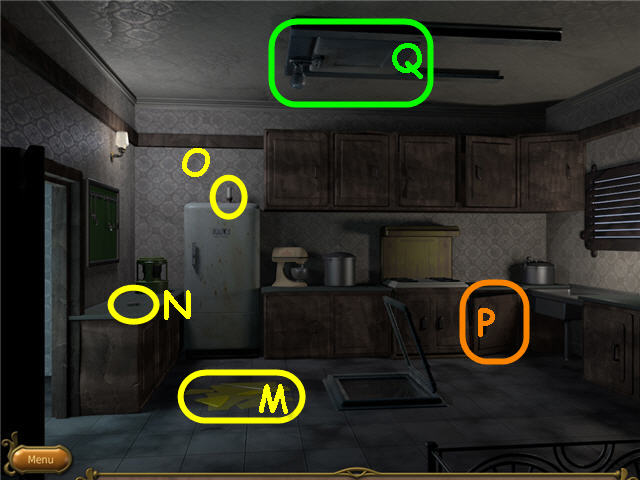 • Take the GLASS SHARDS (M), LIGHTER (N), and CANDLE. • Use
the HAMMER on the cabinet (P) twice; take the SOLAR COOKER. •
Use the HAMMER on the roof hatch (Q) and press on it to open
it up. • In Inventory, use the LIGHTER on the CANDLE. • Go
left, go straight through the left rear door; go down under
the bed.
• Take the GLASS SHARDS (M), LIGHTER (N), and CANDLE. • Use
the HAMMER on the cabinet (P) twice; take the SOLAR COOKER. •
Use the HAMMER on the roof hatch (Q) and press on it to open
it up. • In Inventory, use the LIGHTER on the CANDLE. • Go
left, go straight through the left rear door; go down under
the bed.
 • Take the GLUE (R). • Take 9 RAW KEYS (S) and 3 RAW RODS (T);
you will have extras in case you make a mistake. • Take 2
SIMPLE BOWLS (U); use one SIMPLE BOWL on the Rochelle salts
mixture (V) and the other SIMPLE BOWL on the silver nitrate
mixture (W). You will have a blue SIMPLE BOWL and a green
SIMPLE BOWL in inventory. • Take a PLAIN GLASS (X). • Go
straight up the stairs; back out three times.
• Take the GLUE (R). • Take 9 RAW KEYS (S) and 3 RAW RODS (T);
you will have extras in case you make a mistake. • Take 2
SIMPLE BOWLS (U); use one SIMPLE BOWL on the Rochelle salts
mixture (V) and the other SIMPLE BOWL on the silver nitrate
mixture (W). You will have a blue SIMPLE BOWL and a green
SIMPLE BOWL in inventory. • Take a PLAIN GLASS (X). • Go
straight up the stairs; back out three times.
 • Place the SOLAR COOKER on the right side of the walkway (1).
• Place the COVER, the green SIMPLE BOWL and the blue SIMPLE
BOWL in the SOLAR COOKER. • When it states that it is warmed
up take the 2 SIMPLE BOWLS. • Go forward twice; through the
left rear door and down under the bed. • Place the PLAIN GLASS
and the two warmed SIMPLE BOWLS in the frame (2); take the
MIRROR. • Go right.
• Place the SOLAR COOKER on the right side of the walkway (1).
• Place the COVER, the green SIMPLE BOWL and the blue SIMPLE
BOWL in the SOLAR COOKER. • When it states that it is warmed
up take the 2 SIMPLE BOWLS. • Go forward twice; through the
left rear door and down under the bed. • Place the PLAIN GLASS
and the two warmed SIMPLE BOWLS in the frame (2); take the
MIRROR. • Go right.
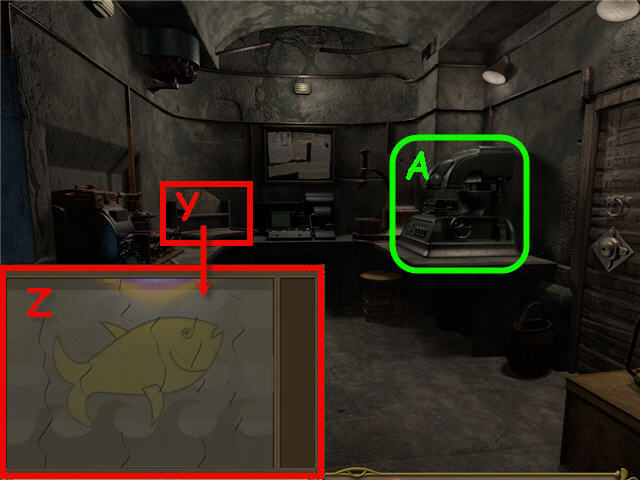 • Place the GLUE and GLASS SHARDS on the work area (Y);
examine the work area. • Assemble the pieces to complete the
puzzle; press the right mouse button to rotate. • See
screenshot (Z) for solution. • Get a POLARISED GLASS. •
Examine the key cutting machine (A).
• Place the GLUE and GLASS SHARDS on the work area (Y);
examine the work area. • Assemble the pieces to complete the
puzzle; press the right mouse button to rotate. • See
screenshot (Z) for solution. • Get a POLARISED GLASS. •
Examine the key cutting machine (A).
 • Place the RAW KEY on the upper right (B). • Flip the second
from left switch (C) and then the leftmost switch (D); take
the PROCESSED KEY. • In Inventory; use the CANDLE on the
PROCESSED KEY to get a PROCESSED WAX KEY. • Back out of the
close-up. • Use the PROCESSED WAX KEY on the lock on the right
door (E); turn the key; take the USED WAX KEY. • In Inventory;
examine the USED WAX KEY and note where the grooves are. •
Examine the key cutting machine. • Place a RAW KEY on the
upper right plate (B). • Adjust the bottom 4 right levers to
get the grooves in the right spot; flip the switch on the left
when you are ready. • If you make a mistake, dispose of your
key in the left container (F). • Solution: From left; down,
down, up, down. See screenshot (G) for solution. • Take the
PROCESSED KEY. • Back out of the close-up. • Use the PROCESSED
KEY on the door on the right; turn the key, open the door and
go right.
• Place the RAW KEY on the upper right (B). • Flip the second
from left switch (C) and then the leftmost switch (D); take
the PROCESSED KEY. • In Inventory; use the CANDLE on the
PROCESSED KEY to get a PROCESSED WAX KEY. • Back out of the
close-up. • Use the PROCESSED WAX KEY on the lock on the right
door (E); turn the key; take the USED WAX KEY. • In Inventory;
examine the USED WAX KEY and note where the grooves are. •
Examine the key cutting machine. • Place a RAW KEY on the
upper right plate (B). • Adjust the bottom 4 right levers to
get the grooves in the right spot; flip the switch on the left
when you are ready. • If you make a mistake, dispose of your
key in the left container (F). • Solution: From left; down,
down, up, down. See screenshot (G) for solution. • Take the
PROCESSED KEY. • Back out of the close-up. • Use the PROCESSED
KEY on the door on the right; turn the key, open the door and
go right.
 • Shift the center mirror two times to get a code (H). If you
have no light shining in you need to open the skylight in the
kitchen. • Take the MIRROR FRAME (I). • In Inventory, place
the MIRROR in the MIRROR FRAME. • Go left. • Examine the lathe
(J).
• Shift the center mirror two times to get a code (H). If you
have no light shining in you need to open the skylight in the
kitchen. • Take the MIRROR FRAME (I). • In Inventory, place
the MIRROR in the MIRROR FRAME. • Go left. • Examine the lathe
(J).
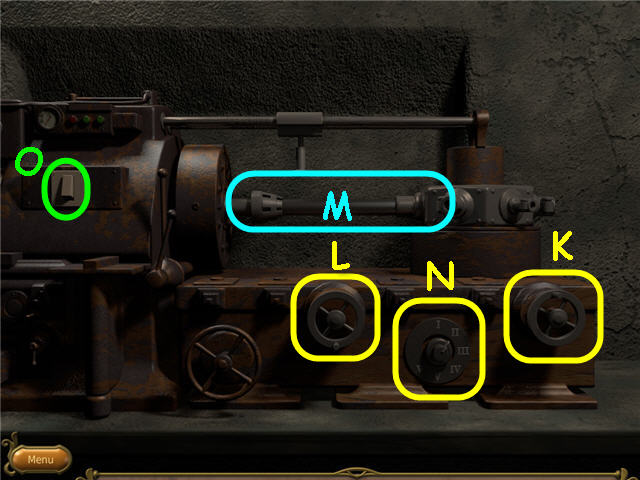 • Turn the right wheel (K) once and the middle wheel (L) once.
• Place a RAW ROD in the center (M). • Turn the dial (N) to
II. • Flip the switch (O); take the PROCESSED ROD. • In
Inventory; place the PROCESSED ROD on the MIRROR FRAME. • Back
out of the close-up. • Go left; up the stairs and back out.
• Turn the right wheel (K) once and the middle wheel (L) once.
• Place a RAW ROD in the center (M). • Turn the dial (N) to
II. • Flip the switch (O); take the PROCESSED ROD. • In
Inventory; place the PROCESSED ROD on the MIRROR FRAME. • Back
out of the close-up. • Go left; up the stairs and back out.
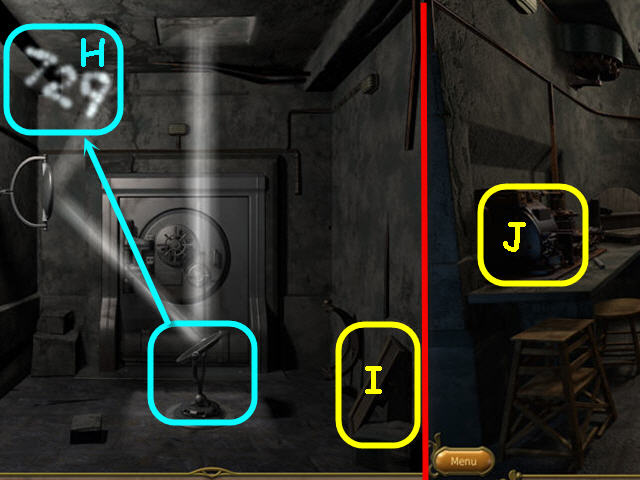
 • Examine the safe. If the safe is not there, be sure you
moved the cabinet earlier. • Enter the code from the mirror
room to open the safe. • Solution: 729. See screenshot (P) for
solution. • Take the IMPORTANT PARCHMENT (Q). • Go right into
the kitchen.
• Examine the safe. If the safe is not there, be sure you
moved the cabinet earlier. • Enter the code from the mirror
room to open the safe. • Solution: 729. See screenshot (P) for
solution. • Take the IMPORTANT PARCHMENT (Q). • Go right into
the kitchen.
 • Place the POLARISED GLASS on the bottom glass frame; close
the hatch (R). • Go left and straight through the left rear
door; go down under the bed and right two times.
• Place the POLARISED GLASS on the bottom glass frame; close
the hatch (R). • Go left and straight through the left rear
door; go down under the bed and right two times.
 • Place the MIRROR FRAME on the bottom right holder (S). •
Rotate the mirrors so that the beam creates a red glow on the
vault door. See screenshot for correct positioning of the
three mirrors. • In Inventory, examine the IMPORTANT PARCHMENT
to get a clue (T). • Examine the red glowing area (U). • Move
the silver balls to the same location as the dots on the
IMPORTANT PARCHMENT. • Solution: Move the balls in the
following order to the locations listed and do not re-set any
of them if they move because you moved other balls. It is okay
if the other balls move. Move the top ball to the middle of
the upper right hump; move the middle ball in between the two
right humps, move the second from bottom ball to the beginning
of the first hump, move the bottom ball to the center of the
middle hump. See screenshot (V) for solution. • Take the WATER
RUNE.
• Place the MIRROR FRAME on the bottom right holder (S). •
Rotate the mirrors so that the beam creates a red glow on the
vault door. See screenshot for correct positioning of the
three mirrors. • In Inventory, examine the IMPORTANT PARCHMENT
to get a clue (T). • Examine the red glowing area (U). • Move
the silver balls to the same location as the dots on the
IMPORTANT PARCHMENT. • Solution: Move the balls in the
following order to the locations listed and do not re-set any
of them if they move because you moved other balls. It is okay
if the other balls move. Move the top ball to the middle of
the upper right hump; move the middle ball in between the two
right humps, move the second from bottom ball to the beginning
of the first hump, move the bottom ball to the center of the
middle hump. See screenshot (V) for solution. • Take the WATER
RUNE.
Chapter 6 – The Air Rune
 • Go through the hole in the wall (W).
 • Examine and open the wall safe. • Solution: Press the
following buttons; 2-1-3-4-2. See screenshot (X) for solution.
• Take the KEEPER’S JOURNAL and KEY from the safe. • In
Inventory; examine the KEEPER’S JOURNAL. • Examine the book
(Y). • Go straight through the hole in the wall (Z). • Use the
KEY on the door on the left. • Go through the door on the
left.
• Examine and open the wall safe. • Solution: Press the
following buttons; 2-1-3-4-2. See screenshot (X) for solution.
• Take the KEEPER’S JOURNAL and KEY from the safe. • In
Inventory; examine the KEEPER’S JOURNAL. • Examine the book
(Y). • Go straight through the hole in the wall (Z). • Use the
KEY on the door on the left. • Go through the door on the
left.
 • Take the SPELL BOOK and QUILL (A). • In Inventory; examine
the SPELL BOOK. • Take 5 PREPARED PAPERS (B). • You will need
numerous spells so you can make them now. • Use the QUILL on
the inkwell (C) before making each scroll. • In Inventory; use
the QUILL on the PREPARED PAPER; choose answer 2 - twice,
choose 3 - twice and choose 4 – once (D). When complete you
will have 2 LEVITATE SCROLL, 2 LOWER SCROLL and 1 SEE
INVISIBLE SCROLL. • Back out twice and go left.
• Take the SPELL BOOK and QUILL (A). • In Inventory; examine
the SPELL BOOK. • Take 5 PREPARED PAPERS (B). • You will need
numerous spells so you can make them now. • Use the QUILL on
the inkwell (C) before making each scroll. • In Inventory; use
the QUILL on the PREPARED PAPER; choose answer 2 - twice,
choose 3 - twice and choose 4 – once (D). When complete you
will have 2 LEVITATE SCROLL, 2 LOWER SCROLL and 1 SEE
INVISIBLE SCROLL. • Back out twice and go left.
 • In Inventory, press on a LOWER SCROLL to get an IRON ROD
(E). • Examine the platform on the right (F); use the IRON ROD
on the stone (G); get a MAGNETIZED ROD. • Back out of the
close-up. • Go into the hole in the wall on the left (H).
• In Inventory, press on a LOWER SCROLL to get an IRON ROD
(E). • Examine the platform on the right (F); use the IRON ROD
on the stone (G); get a MAGNETIZED ROD. • Back out of the
close-up. • Go into the hole in the wall on the left (H).
 • In Inventory press on the SEE INVISIBLE SCROLL to unlock the
strongboxes. • Examine the strongbox on the right; unlock the
box by using the clues from the KEEPER’S JOURNAL. • Solution:
Press one letter in each row; J-A-L-A-A-L. See screenshot (I)
for solution. • Take JALAAL’S JOURNAL from the opened box. •
In Inventory, examine and read JALAAL’S JOURNAL to the clue
for the strongbox on the left. • Examine the strongbox on the
left; unlock the box by using the clues from the JALAAL’S
JOURNAL. • Solution: Press one letter in each row;
S-M-E-L-L-Y. See screenshot (J) for solution. • Take RULADE’S
JOURNAL from the opened box. • Go through the hole in the wall
on the bottom right (K) and go through the door on the left.
• In Inventory press on the SEE INVISIBLE SCROLL to unlock the
strongboxes. • Examine the strongbox on the right; unlock the
box by using the clues from the KEEPER’S JOURNAL. • Solution:
Press one letter in each row; J-A-L-A-A-L. See screenshot (I)
for solution. • Take JALAAL’S JOURNAL from the opened box. •
In Inventory, examine and read JALAAL’S JOURNAL to the clue
for the strongbox on the left. • Examine the strongbox on the
left; unlock the box by using the clues from the JALAAL’S
JOURNAL. • Solution: Press one letter in each row;
S-M-E-L-L-Y. See screenshot (J) for solution. • Take RULADE’S
JOURNAL from the opened box. • Go through the hole in the wall
on the bottom right (K) and go through the door on the left.
 • Use the MAGNETIZED ROD on the mouse hole (L); press on the
MAGNTIZED ROD in Inventory to get a WRENCH. • Use the WRENCH
on the door hinge where it is connected to the right door
frame (M). • In Inventory; examine and read RULADE’S JOURNAL
to get a clue. • Examine the safe; use the clue from RULADE’S
JOURNAL to open. • Solution: 124. See screenshot (N) for
solution. • Take the transfer elements scroll from the safe
which is automatically added to your SPELL BOOK. • In
Inventory, examine the SPELL BOOK and read the transfer
elements scroll recipe. • Make 6 TRANSFER ELEMENTS SCROLLS by
taking a PREPARED PAPER from the bed; dip the QUILL in the ink
well; use the QUILL on the PREPARED PAPER in Inventory; choose
line 6 of the options for the spell code. Repeat 5 more times.
• Note the position and colors of the dots on the diagram (O)
signifying 3 earth crystals and 3 water crystals. • Go
straight through the opened door. • In Inventory; press a
LEVITATE SCROLL to lift the rocks on the left. • Open the left
door and go through.
• Use the MAGNETIZED ROD on the mouse hole (L); press on the
MAGNTIZED ROD in Inventory to get a WRENCH. • Use the WRENCH
on the door hinge where it is connected to the right door
frame (M). • In Inventory; examine and read RULADE’S JOURNAL
to get a clue. • Examine the safe; use the clue from RULADE’S
JOURNAL to open. • Solution: 124. See screenshot (N) for
solution. • Take the transfer elements scroll from the safe
which is automatically added to your SPELL BOOK. • In
Inventory, examine the SPELL BOOK and read the transfer
elements scroll recipe. • Make 6 TRANSFER ELEMENTS SCROLLS by
taking a PREPARED PAPER from the bed; dip the QUILL in the ink
well; use the QUILL on the PREPARED PAPER in Inventory; choose
line 6 of the options for the spell code. Repeat 5 more times.
• Note the position and colors of the dots on the diagram (O)
signifying 3 earth crystals and 3 water crystals. • Go
straight through the opened door. • In Inventory; press a
LEVITATE SCROLL to lift the rocks on the left. • Open the left
door and go through.
 • In Inventory; press a LEVITATE SCROLL to lift the cabinet
and press on the LOWER SCROLL to drop it. • Take 6 of the
PLAIN QUARTZ (P). • Take the METAL BOWL (Q). • Take 3 bowls of
the EARTH POWDER (R) and 3 bowls of the WATER POWDER (S). •
Use the METAL BOWL on the jug (T) and then use the METAL BOWL
full of water on the center receptacle (U). • Place a PLAIN
QUARTZ and an EARTH POWDER in the receptacle and press on the
TRANSFER ELEMENTS SCROLL. Take the EARTH QUARTZ from the
center of the receptacle. • Repeat the METAL BOWL/water, PLAIN
QUARTZ, EARTH POWDER, TRANSFER ELEMENTS SCROLL 2 more times to
get 3 EARTH QUARTZ in Inventory. • Make 3 WATER QUARTZ -
Repeat the METAL BOWL/water, PLAIN QUARTZ, WATER POWDER,
TRANSFER ELEMENTS SCROLL 3 times to get 3 WATER QUARTZ in
Inventory. • Back out twice.
• In Inventory; press a LEVITATE SCROLL to lift the cabinet
and press on the LOWER SCROLL to drop it. • Take 6 of the
PLAIN QUARTZ (P). • Take the METAL BOWL (Q). • Take 3 bowls of
the EARTH POWDER (R) and 3 bowls of the WATER POWDER (S). •
Use the METAL BOWL on the jug (T) and then use the METAL BOWL
full of water on the center receptacle (U). • Place a PLAIN
QUARTZ and an EARTH POWDER in the receptacle and press on the
TRANSFER ELEMENTS SCROLL. Take the EARTH QUARTZ from the
center of the receptacle. • Repeat the METAL BOWL/water, PLAIN
QUARTZ, EARTH POWDER, TRANSFER ELEMENTS SCROLL 2 more times to
get 3 EARTH QUARTZ in Inventory. • Make 3 WATER QUARTZ -
Repeat the METAL BOWL/water, PLAIN QUARTZ, WATER POWDER,
TRANSFER ELEMENTS SCROLL 3 times to get 3 WATER QUARTZ in
Inventory. • Back out twice.
 • Take a PREPARED PAPER (V). • Dip the QUILL in the ink well
(W). • In Inventory, use the QUILL on the PREPARED PAPER and
choose the 5th line (Y) to get an OPEN PLANAR PORTAL SCROLL. •
If you have an extra inventory items such as powders or
crystals you can discard them in the bin (X). • Back out twice
and go left. • Examine the platform on the right.
• Take a PREPARED PAPER (V). • Dip the QUILL in the ink well
(W). • In Inventory, use the QUILL on the PREPARED PAPER and
choose the 5th line (Y) to get an OPEN PLANAR PORTAL SCROLL. •
If you have an extra inventory items such as powders or
crystals you can discard them in the bin (X). • Back out twice
and go left. • Examine the platform on the right.
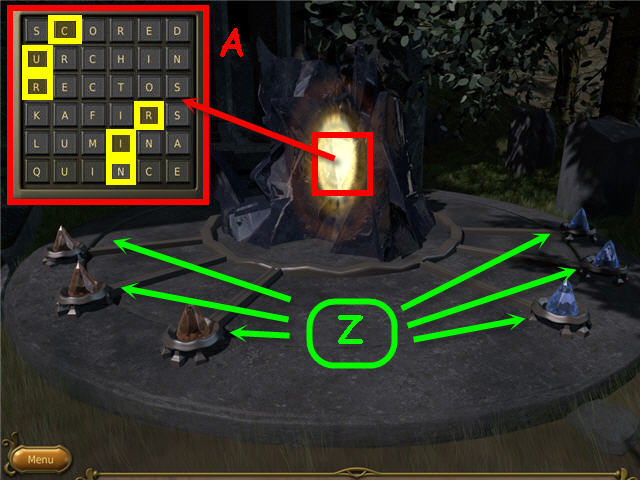 • Using the sketch on Rulade’s wall as your guide; place the 3
EARTH QUARTZ and 3 WATER QUARTZ in the holders. • Solution:
Place the 3 EARTH QUARTZ on the left holders and the 3 WATER
QUARTZ on the right holders. See screenshot (Z) for solution.
• In Inventory, press the OPEN PLANAR PORTAL SCROLL to open
the portal. • Examine the portal; use the code from RULADE’S
JOURNAL to open. • Solution: Place one letter in each row;
C-U-R-R-I-N. See screenshot (A) for solution. • Take the AIR
RUNE from the opened portal.
• Using the sketch on Rulade’s wall as your guide; place the 3
EARTH QUARTZ and 3 WATER QUARTZ in the holders. • Solution:
Place the 3 EARTH QUARTZ on the left holders and the 3 WATER
QUARTZ on the right holders. See screenshot (Z) for solution.
• In Inventory, press the OPEN PLANAR PORTAL SCROLL to open
the portal. • Examine the portal; use the code from RULADE’S
JOURNAL to open. • Solution: Place one letter in each row;
C-U-R-R-I-N. See screenshot (A) for solution. • Take the AIR
RUNE from the opened portal.
Chapter 7 – The Monastery and Final Battle
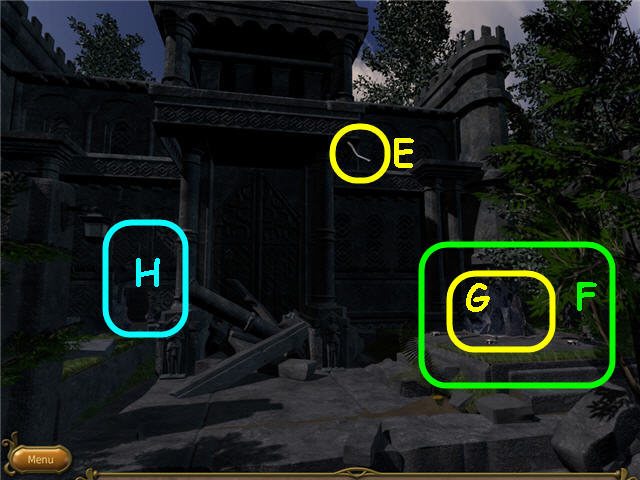
 • Take the OLD PICKAXE (B). • Use the OLD PICKAXE on the
flagpole; take the FLAGPOLE (C). • Use the OLD PICKAXE on the
crumbling wall two times; take the STRONG ROPE (D). • In
Inventory, combine the FLAGPOLE and STRONG ROPE. • Use the
FLAGPOLE with rope on the open window (E). • Enter through the
open window.
• Take the OLD PICKAXE (B). • Use the OLD PICKAXE on the
flagpole; take the FLAGPOLE (C). • Use the OLD PICKAXE on the
crumbling wall two times; take the STRONG ROPE (D). • In
Inventory, combine the FLAGPOLE and STRONG ROPE. • Use the
FLAGPOLE with rope on the open window (E). • Enter through the
open window.
 • Take the STRANGE KNOB (F), CRUMPLED PAPER (G), and DECAYING
PAPER (H). • In Inventory; read the DECAYING PAPER. • Open the
dresser drawer; take the COTTON (I). • In Inventory; combine
the CRUMPLED PAPER and STRANGE KNOB. • Place the STRANGE KNOB
(with the crumpled paper) on the mechanical puzzle (J). •
Examine the mechanical puzzle to trigger a puzzle.
• Take the STRANGE KNOB (F), CRUMPLED PAPER (G), and DECAYING
PAPER (H). • In Inventory; read the DECAYING PAPER. • Open the
dresser drawer; take the COTTON (I). • In Inventory; combine
the CRUMPLED PAPER and STRANGE KNOB. • Place the STRANGE KNOB
(with the crumpled paper) on the mechanical puzzle (J). •
Examine the mechanical puzzle to trigger a puzzle.
 • Use the arrows to rotate the circles and place the numbers
with their corresponding numbers on the board. • The starting
location of the numbers is random; also, if you back out of
the puzzle it will reset it to a different layout. • The
difference in Casual or Regular mode is that the Casual has a
skip button. If you are stuck in regular mode you may open the
options and switch to Casual to get the skip. • See screenshot
(K) for solution. • Take the 2nd DECAYING PAPER from the cubby
behind the puzzle. • In Inventory; read the 2nd DECAYING
PAPER. • Go forward through the door.
• Use the arrows to rotate the circles and place the numbers
with their corresponding numbers on the board. • The starting
location of the numbers is random; also, if you back out of
the puzzle it will reset it to a different layout. • The
difference in Casual or Regular mode is that the Casual has a
skip button. If you are stuck in regular mode you may open the
options and switch to Casual to get the skip. • See screenshot
(K) for solution. • Take the 2nd DECAYING PAPER from the cubby
behind the puzzle. • In Inventory; read the 2nd DECAYING
PAPER. • Go forward through the door.
 • Take the ROD (L), HAMMER (M), SWORD (N) and ROCK (O). • Back
out and go down through the window on the right.
• Take the ROD (L), HAMMER (M), SWORD (N) and ROCK (O). • Back
out and go down through the window on the right.
 • Per the 2nd riddle on the 2nd DECAYING PAPER; count the
number of flapping flags. • There are 6 flags plus the 7th one
you took when you grabbed the FLAGPOLE earlier. • Use the
HAMMER three times on the flint stone (P); get a FLINTSTONE. •
Use the SWORD on the trolley (Q); get DRY WOOD. • Go up
through the open window and straight through the door.
• Per the 2nd riddle on the 2nd DECAYING PAPER; count the
number of flapping flags. • There are 6 flags plus the 7th one
you took when you grabbed the FLAGPOLE earlier. • Use the
HAMMER three times on the flint stone (P); get a FLINTSTONE. •
Use the SWORD on the trolley (Q); get DRY WOOD. • Go up
through the open window and straight through the door.
 • Use the DRY WOOD, COTTON and the FLINTSTONE in the furnace
(R). • Examine the partially opened panel (S). • Using the
solution of the riddles in the 2nd DECAYING PAPER; pull the
number of the book on the first shelf based on the answer of
the first riddle; repeat the same for the second and third
shelves. • Solution: The answers to the riddles are 2, 7 and
4; pull the 2nd book on the top shelf, the 7th book on the
middle shelf, the 4th book on the bottom shelf. See screenshot
(T) for solution. • Go down in front of the moved bookcase
(U). • Ignore the pressure plate and go forward.
• Use the DRY WOOD, COTTON and the FLINTSTONE in the furnace
(R). • Examine the partially opened panel (S). • Using the
solution of the riddles in the 2nd DECAYING PAPER; pull the
number of the book on the first shelf based on the answer of
the first riddle; repeat the same for the second and third
shelves. • Solution: The answers to the riddles are 2, 7 and
4; pull the 2nd book on the top shelf, the 7th book on the
middle shelf, the 4th book on the bottom shelf. See screenshot
(T) for solution. • Go down in front of the moved bookcase
(U). • Ignore the pressure plate and go forward.
 • Move the rock on the left side of the bottom step; use the
HAMMER on the rock (V); get a ROCK. • Use the HAMMER on the
bottom left lever (W) twice; pull the lever up. • Place the
ROD on the upper left lever (X); pull the lever up. • Pull the
lever (Y) on the bottom right up to open the passage. • Place
a ROCK on the pressure plate (Z). • Go forward.
• Move the rock on the left side of the bottom step; use the
HAMMER on the rock (V); get a ROCK. • Use the HAMMER on the
bottom left lever (W) twice; pull the lever up. • Place the
ROD on the upper left lever (X); pull the lever up. • Pull the
lever (Y) on the bottom right up to open the passage. • Place
a ROCK on the pressure plate (Z). • Go forward.
 • Take the ROCK (A). • Place a ROCK on the pressure plate (B).
• If the far right pedestal arises it means you have a ROCK on
the very first pressure plate; you will need to remove it in
order to get the pedestal you need to complete the game. Go
left and back to get to the pressure plate. • If the center
pedestal arises, it means you do not have a ROCK on the second
pressure plate. Go left to get to the pressure plate. •
Examine the pedestal (C) to trigger a puzzle. • Slide the
number squares to place them in numerical order. • The
starting layout of the numbers is random. See screenshot (@)
for solution. • Take the SANDS OF INFINITY from the pedestal.
• Take the ROCK (A). • Place a ROCK on the pressure plate (B).
• If the far right pedestal arises it means you have a ROCK on
the very first pressure plate; you will need to remove it in
order to get the pedestal you need to complete the game. Go
left and back to get to the pressure plate. • If the center
pedestal arises, it means you do not have a ROCK on the second
pressure plate. Go left to get to the pressure plate. •
Examine the pedestal (C) to trigger a puzzle. • Slide the
number squares to place them in numerical order. • The
starting layout of the numbers is random. See screenshot (@)
for solution. • Take the SANDS OF INFINITY from the pedestal.
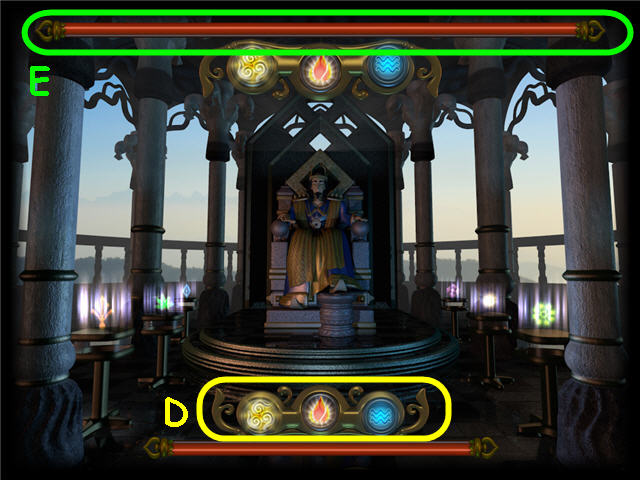 • Open the door and enter. • Speak to Jalaal. • In Inventory,
select the SANDS OF INFINITY to trigger the battle. • You will
choose an element (D) to throw and then Jalaal will throw one.
• The strategy is: Air beats Water, Water beats Fire, Fire
beats Air. • Tip 1: If Jalaal chooses a winning element, he
will choose the same one the next time. For example; if Jalaal
won the round by throwing Water, he will throw Water again the
next round so make sure you throw Air in order to win. • Tip 2
: If Jalaal lost the round, he will throw one of the other two
elements the next time, so in order to win you need to choose
an element that can win on one of the other elements to give
you a 50% chance of winning. • You can watch the health meters
(E) to check the status of who is winning. • Congratulations!
You have successfully completed Pahelika Revelations.
• Open the door and enter. • Speak to Jalaal. • In Inventory,
select the SANDS OF INFINITY to trigger the battle. • You will
choose an element (D) to throw and then Jalaal will throw one.
• The strategy is: Air beats Water, Water beats Fire, Fire
beats Air. • Tip 1: If Jalaal chooses a winning element, he
will choose the same one the next time. For example; if Jalaal
won the round by throwing Water, he will throw Water again the
next round so make sure you throw Air in order to win. • Tip 2
: If Jalaal lost the round, he will throw one of the other two
elements the next time, so in order to win you need to choose
an element that can win on one of the other elements to give
you a 50% chance of winning. • You can watch the health meters
(E) to check the status of who is winning. • Congratulations!
You have successfully completed Pahelika Revelations.
Created at: 2012-03-04