

Walkthrough Menu
- General Tips
- Chapter 1: The Family
- Chapter 2: Abigail
- Chapter 3: Claude
- Chapter 4: Norman
- Chapter 5: Lisbeth
- Chapter 6: Patrick
- Chapter 7: Thomas
General Tips
- This is the official guide for Phantasmat: Behind the Mask.
- This guide will not mention each time you have to zoom into a location; the screenshots will show each zoom scene.
- Hidden-object puzzles are referred to as HOPs. This guide will not show HOP solutions. It will identify the location of the HOP and the inventory item acquired.
- This guide will show solutions for non-random puzzles. Please read the in-game instructions for each puzzle.
- In this game, you will sometimes have to select the new scene to trigger dialog, cut-scenes, or tasks prior to interacting with the scene.
Chapter 1: The Family

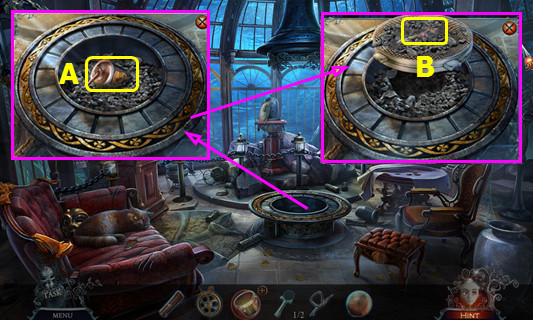
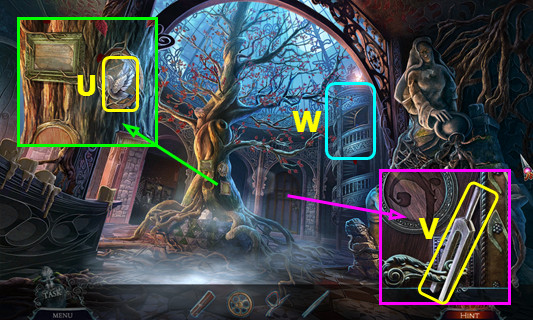
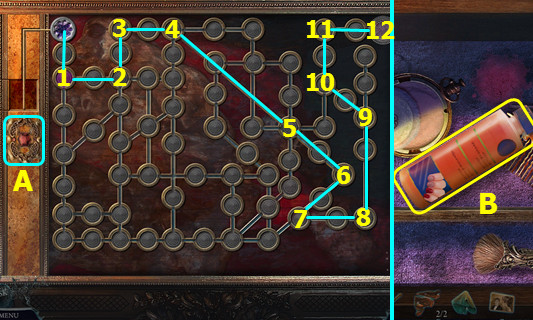
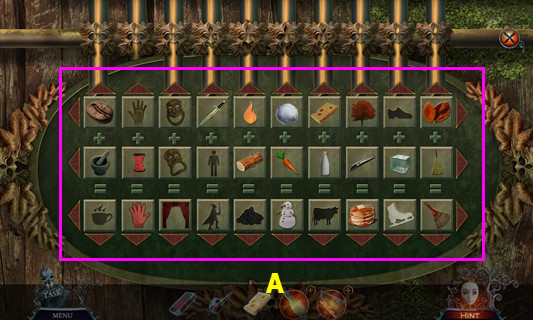
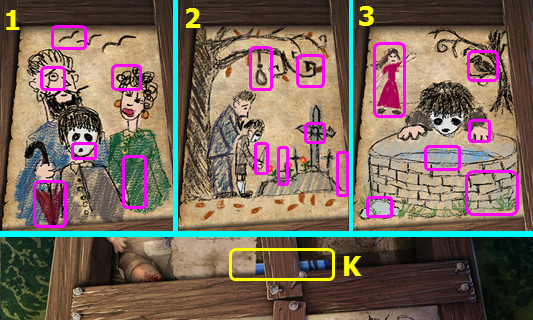
- Select (A).
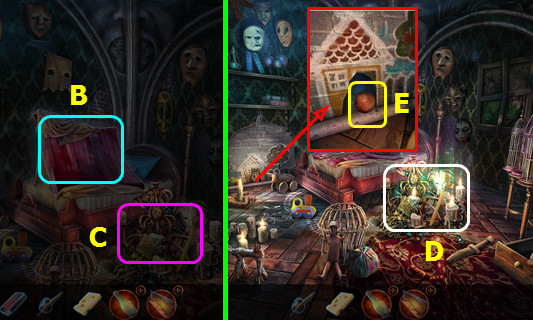
- Select (B).
- The CELL PHONE will go into your inventory.
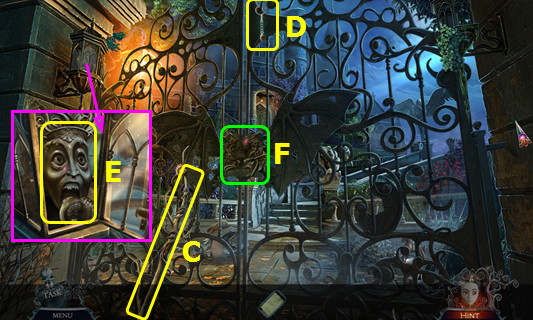
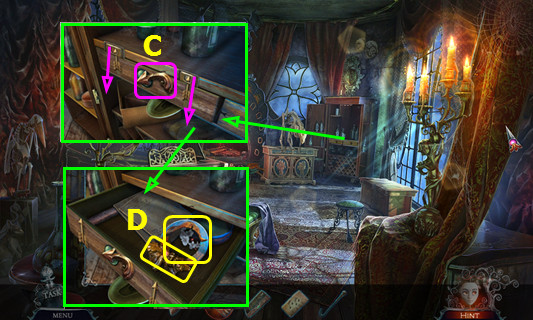
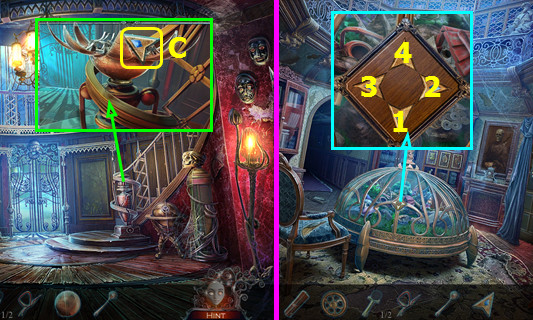
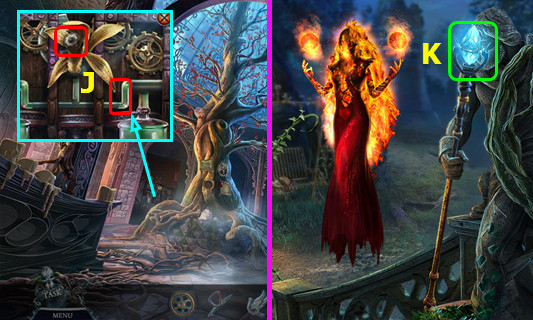
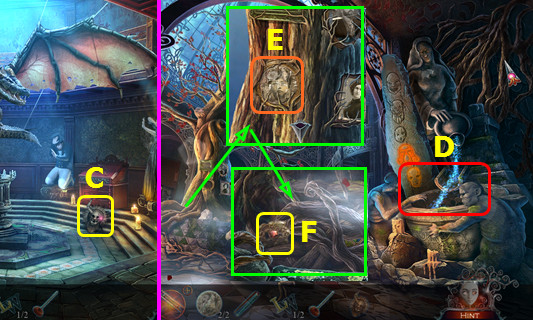
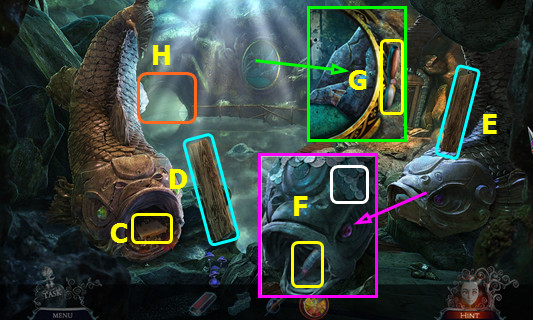
- Take the BRANCH (C).
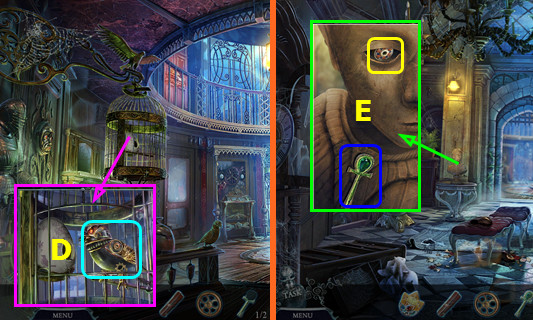
- Use the BRANCH to take the KEYCHAIN (D).
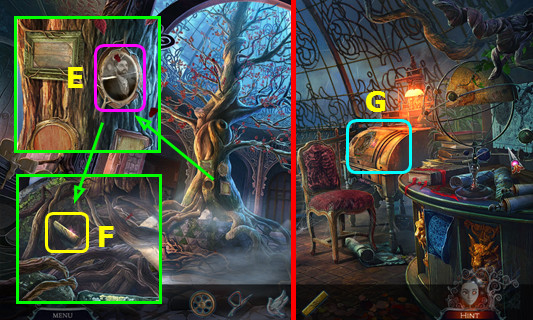
- Use the KEYCHAIN; take the FACE IN AGONY (E).
- Place the FACE IN AGONY (F).
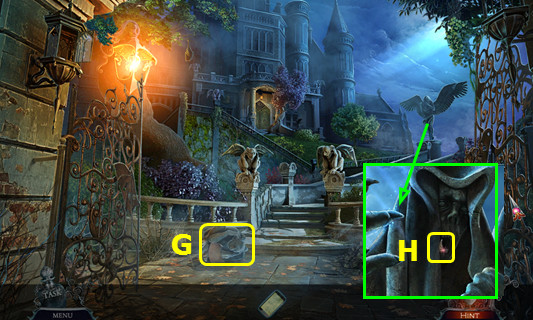
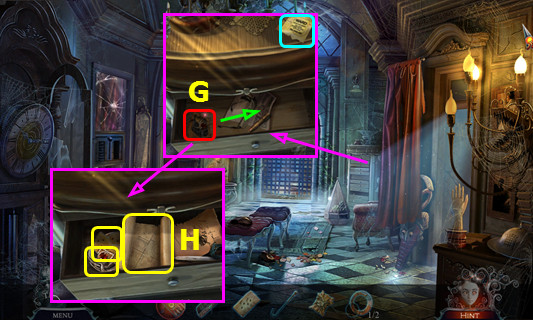
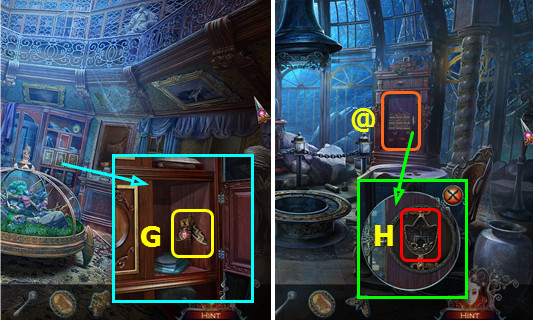
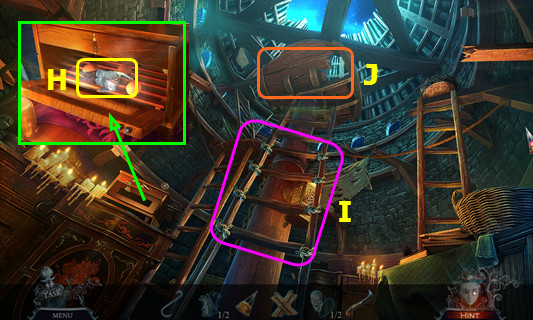
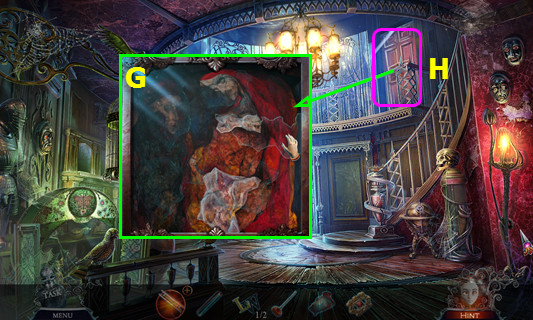
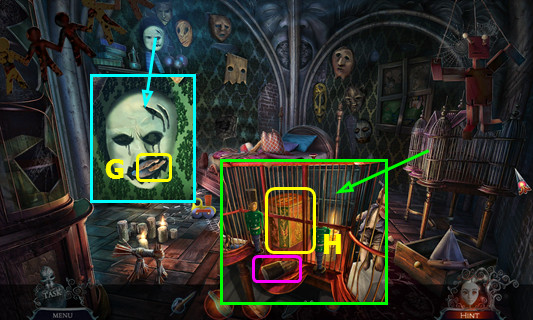
- Read the note and take the GARGOYLE (G).
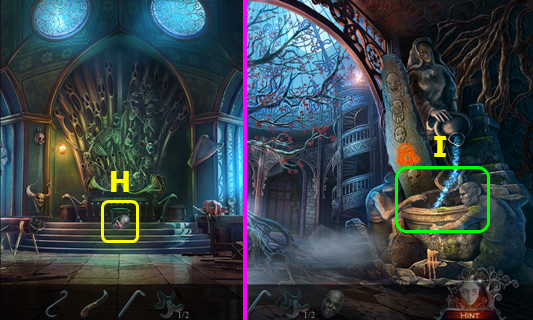
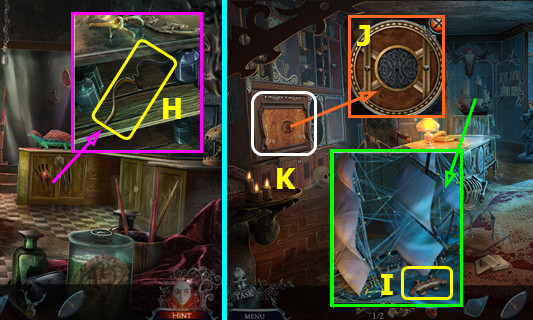
- Remove the vines 3x; take the SHARP TOOTH (H).
- Go forward.
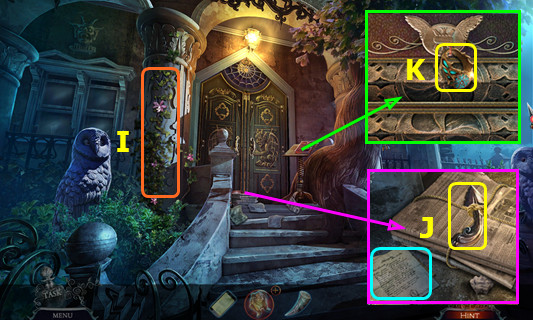
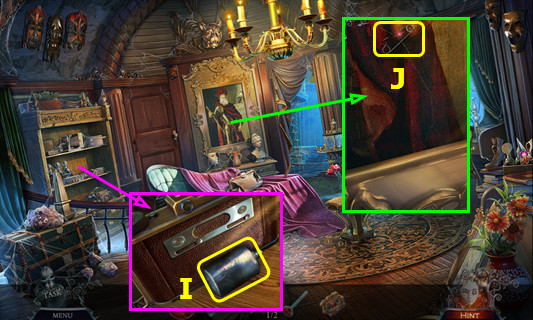
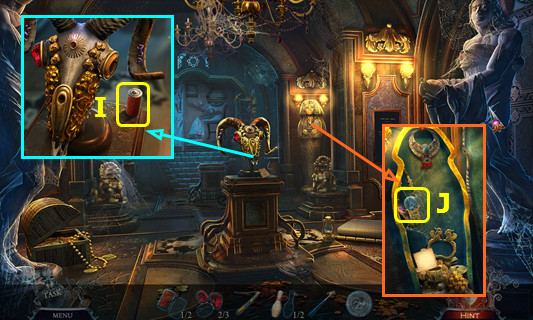
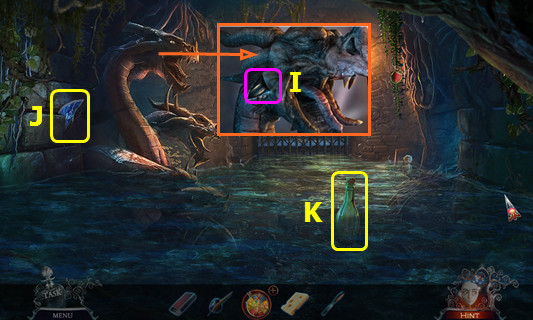
- Touch the vines (I).
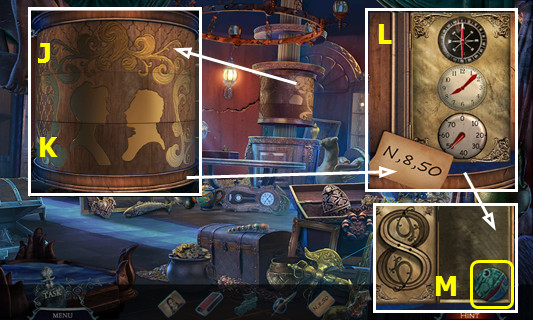
- Read the letter; use the SHARP TOOTH to take the ARROW EMBLEM (J).
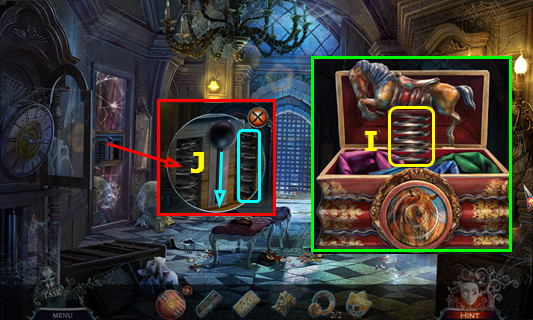
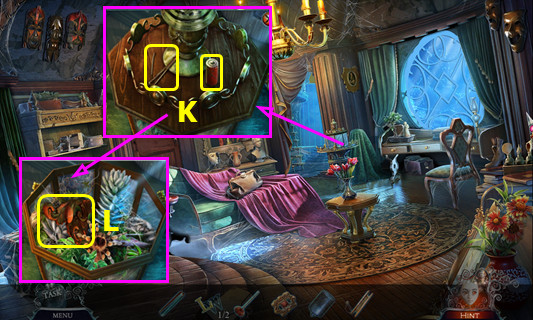
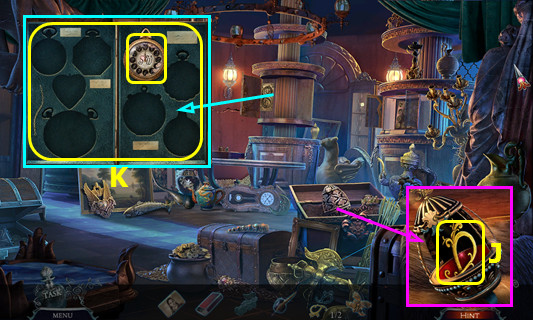
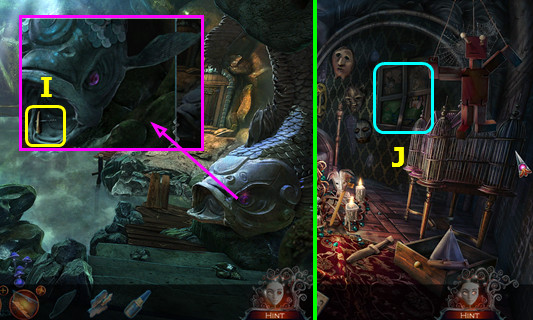
- Take the RING (K).
- Walk down.
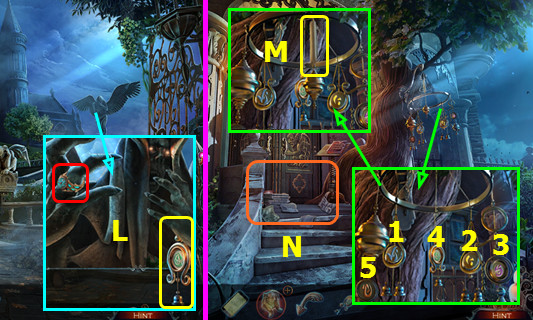
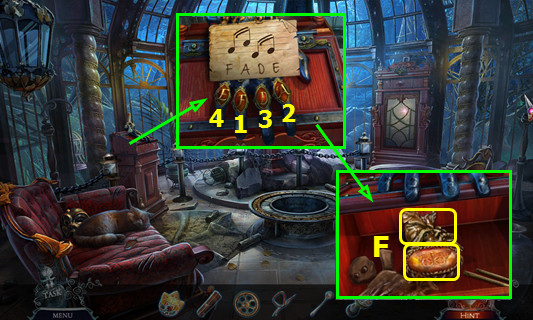
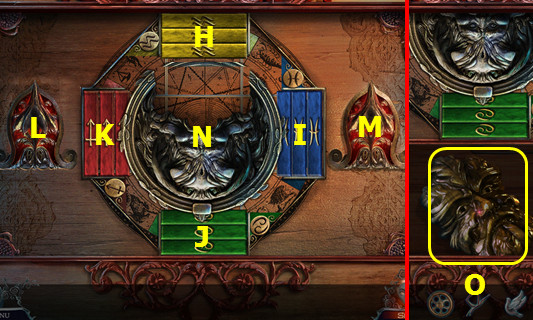
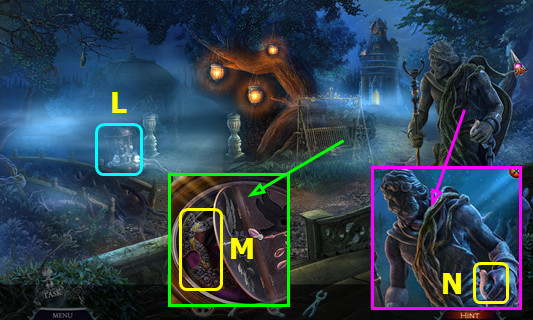
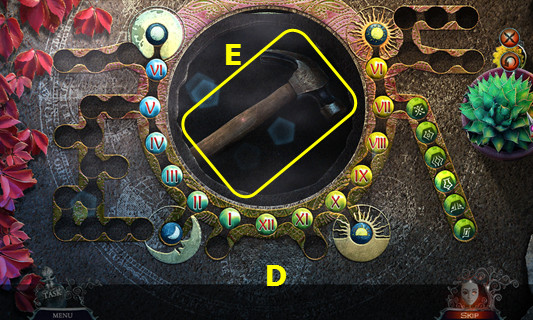
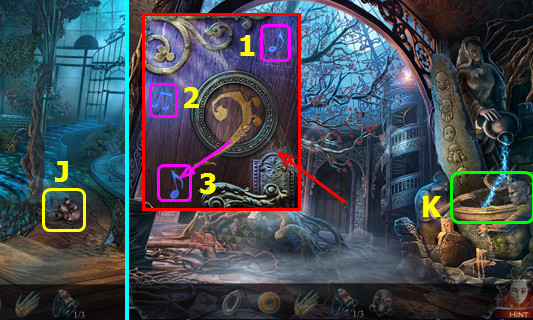
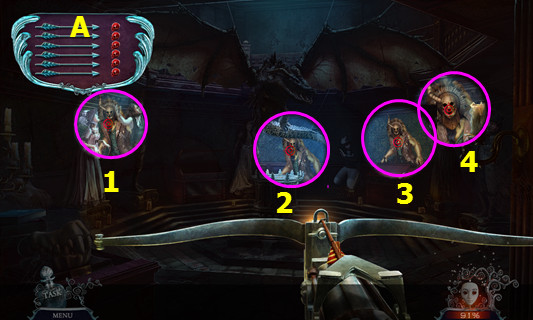
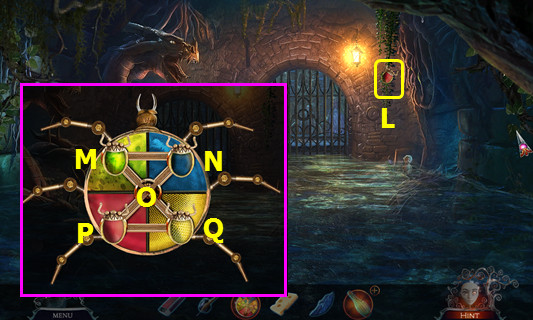
- Place the RING; take the BELL (L).
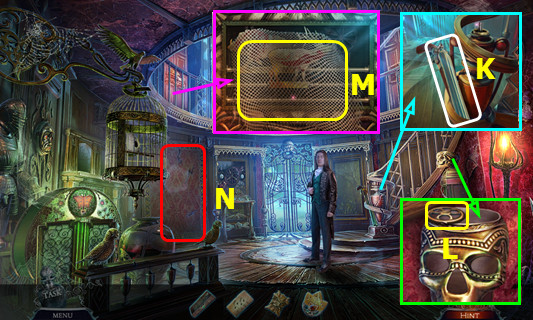
- Walk forward.
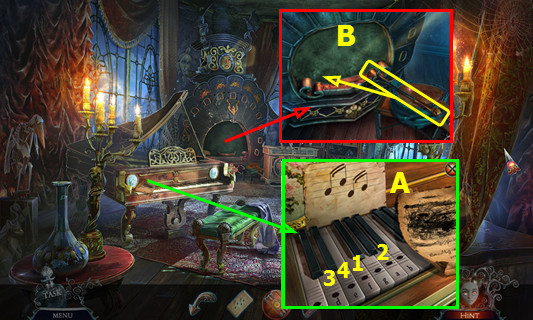
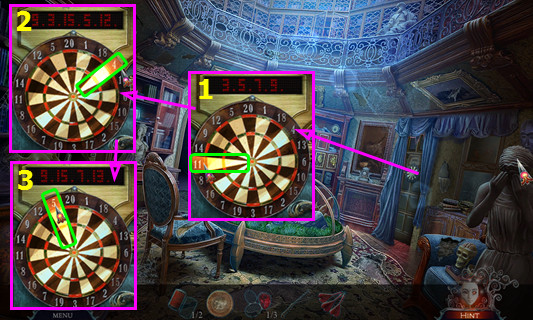
- Place the BELL and select (1-5).
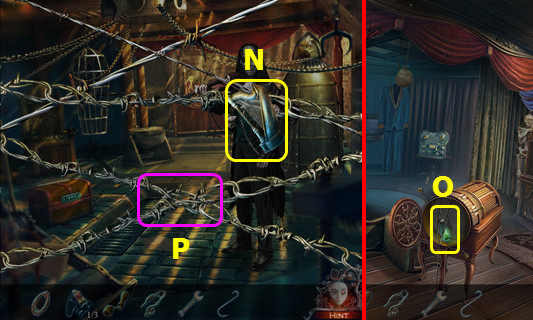
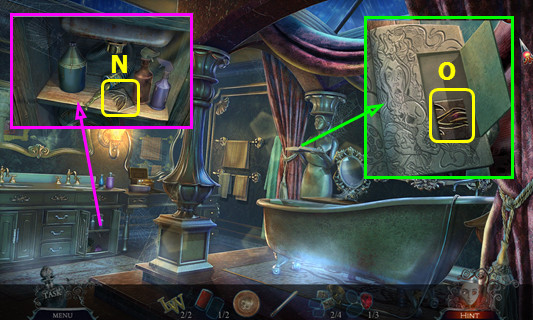
- Take the SHEET MUSIC (M).
- Play the HOP; earn the STONE WING (N).
- Combine the GARGOYLE and STONE WING to make the REPAIRED GARGOYLE (inventory).
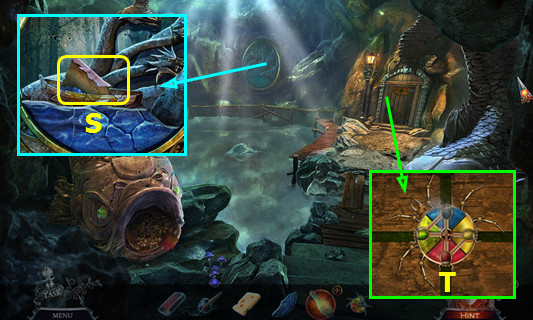
- Walk down.
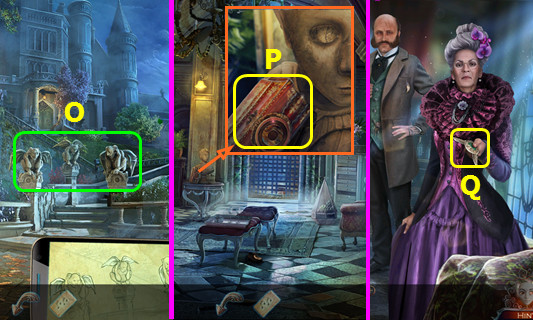
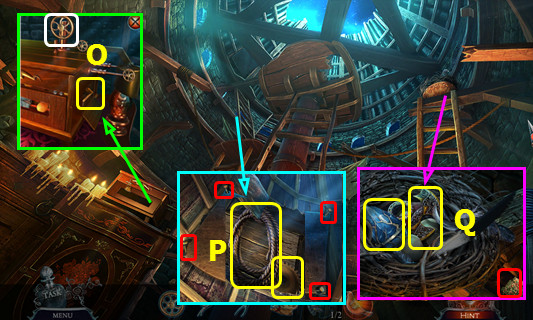
- Use the REPAIRED GARGOYLE and CELL PHONE; arrange the wings as shown (O).
- Go forward 2x.
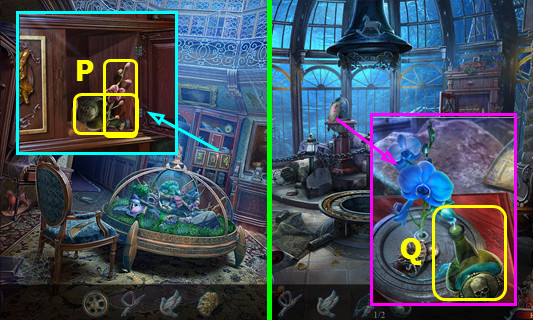
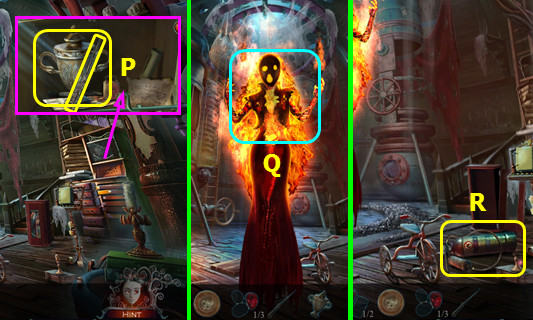
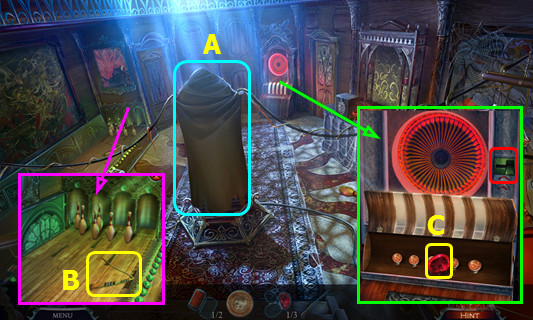
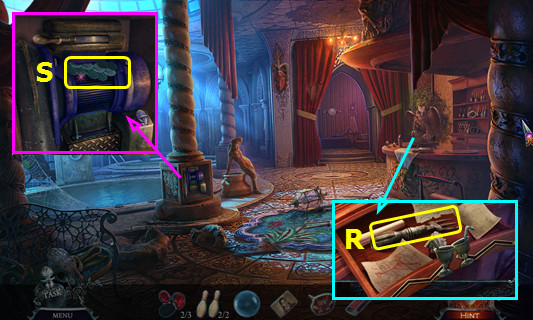
- Take the MAHOGANY BOX (P).
- Walk right.
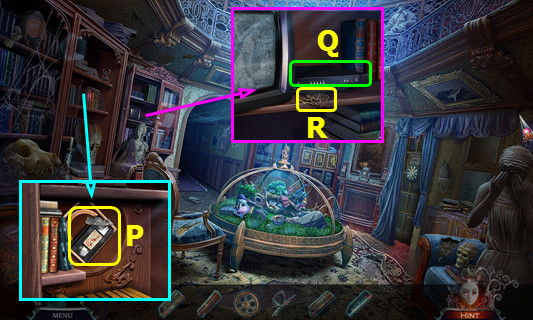
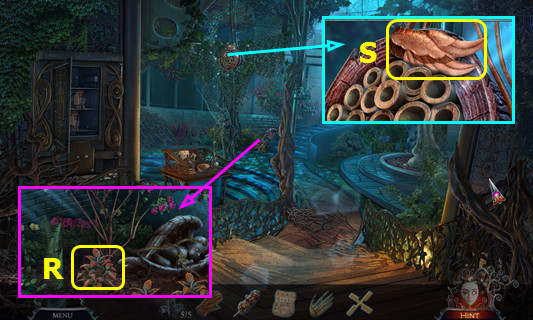
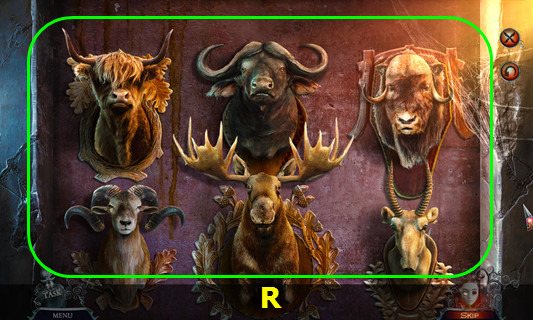
- Talk to the family; take the WINGED EMBLEM (Q).
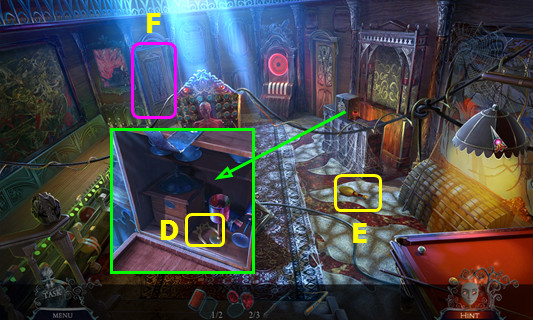
- Walk down 2x.
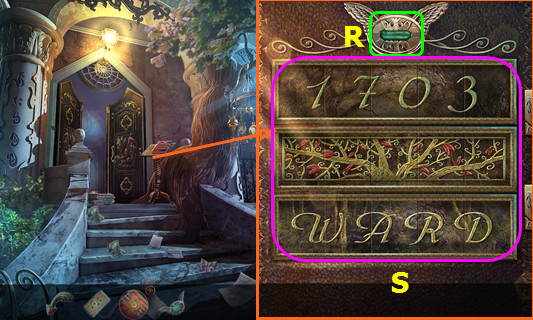
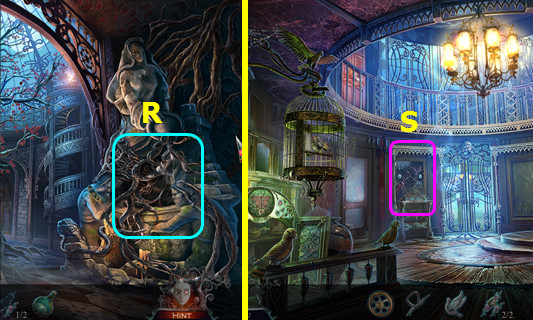
- Place the WINGED EMBLEM (R).
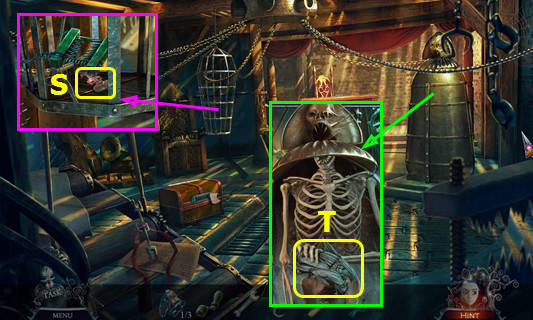
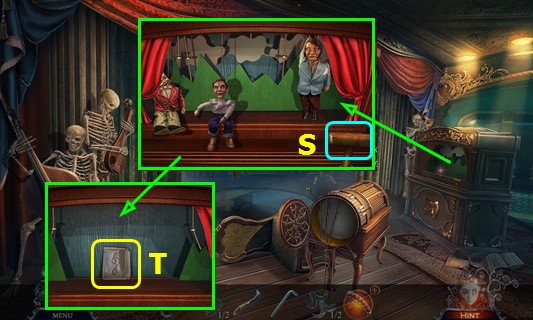
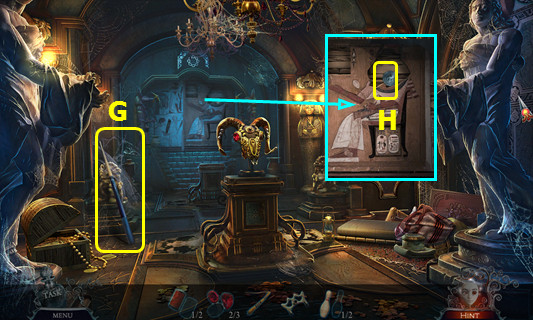
- Restore the 3 panels (S).
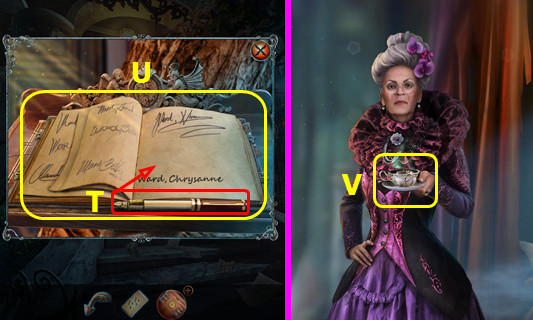
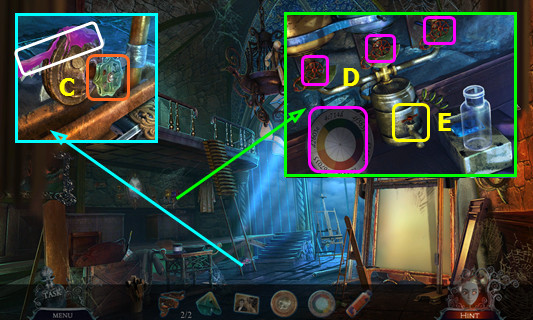
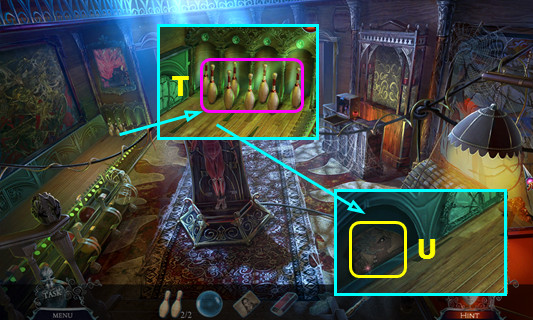
- Select the pen (T) and use it on the page; take the GUESTBOOK (U).
- Walk forward.
- Talk to Abigail; reach for the tea (V).
- Walk right.
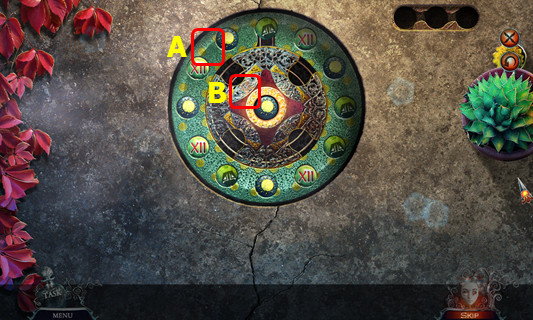
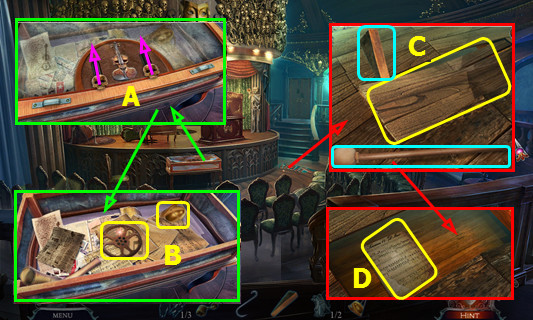
- Read the note; place the SHEET MUSIC (A).
- Select F-A-D-E (1-4); receive the CODE.
- Use the poker to open the stove; earn the POKER (B).
- Place the ARROW EMBLEM (C); slide the 2 arrows.
- Take the LEFT GREEN MAN and 1/2 PAINTED RINGS (D).
- Walk down.
- Open the drawer and move the items. Read the pages, and use the POKER (G).
- Take the MAP, 2/2 PAINTED RINGS, and PLANT ORNAMENT (H).
- Add the 2 PAINTED RINGS to the MAHOGANY BOX (inventory).
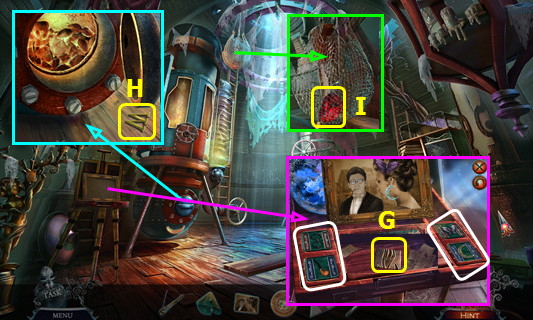
- Restore the picture, remove the horse, and take the SPRING (I).
- Place the SPRING and pull the lever (J).
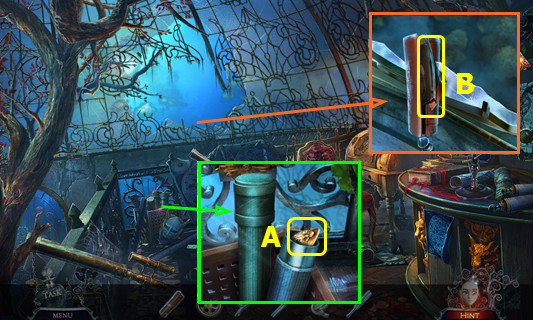
- Select and open the pistol; earn the SEALED SCROLL HOLDER (K).
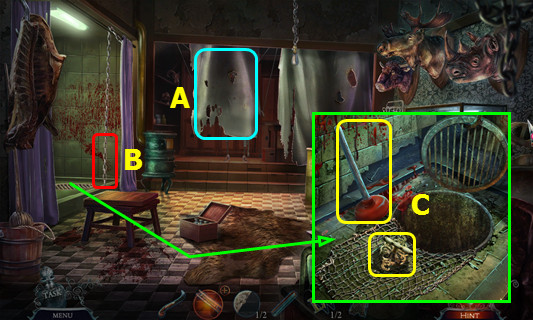
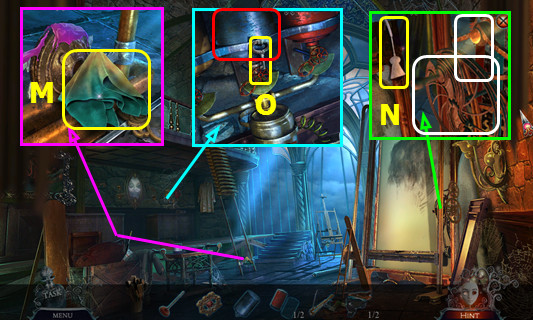
- Take the VALVE (L).
- Take the NETTING (M).
- Open the door and walk left (N).

- Take the BONGO DRUM (O).
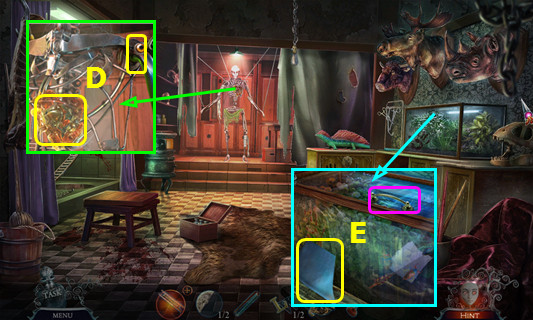
- Take the 1/2 JADE ANKH (P).
- Read the clipping and place the LEFT GREEN MAN; take the WIRES and MECHANICAL SPHERE (Q).
- Walk forward.
- Take the LIGHTER FLUID (A).
- Combine the BONGO, LIGHTER FLUID, and NETTING to make the IMPROVISED SIEVE (inventory).
- Use the IMPROVISED SIEVE; take the SILVER SPOON (B).
- Walk down 2x.
- Place the MECHANICAL SPHERE; take the ARROW BUTTON (C).
- Walk left.
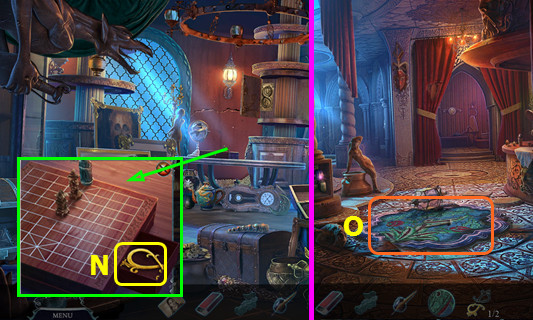
- Place the ARROW BUTTON; press 1-4.
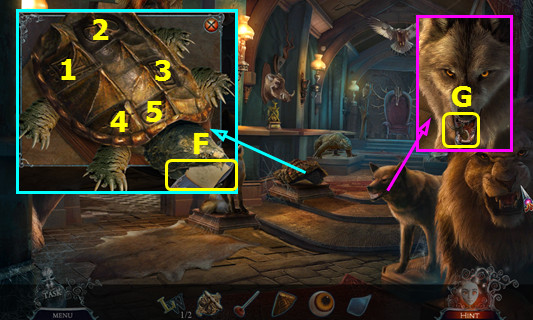
- Play the HOP; earn the MECHANICAL BIRD.
- Walk down.
- Open the cage and place the MECHANICAL BIRD; earn the 2/2 JADE ANKH (D).
- Walk down.
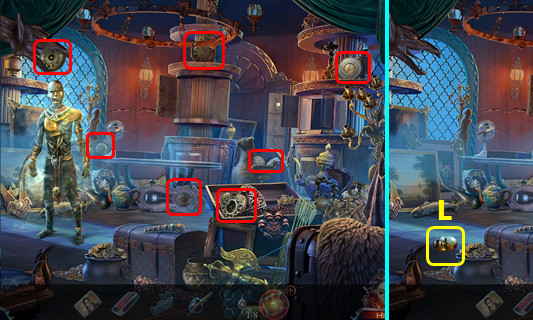
- Place the 2 JADE ANKH; use the SILVER SPOON to take the COG STAMP (E).
- Walk forward, left, and forward.
- Place the COG STAMP and CODE; select 1-4.
- Move the items; take the AMBER ORNAMENT and RIGHT GREEN MAN (F).
- Walk down.
- Place the RIGHT GREEN MAN; take the MOTH (G).
- Walk forward.
- Place the PLANT ORNAMENT (H).
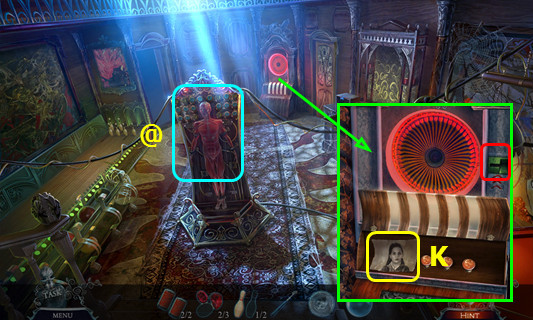
- Select (@).

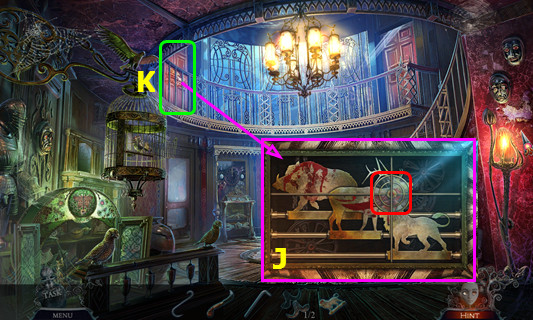
- Place the MOTH; arrange as shown (I).
- Set the numbers (J).
- Take the BOOK OF THE DEAD (K).
- Walk down 3x; go right.
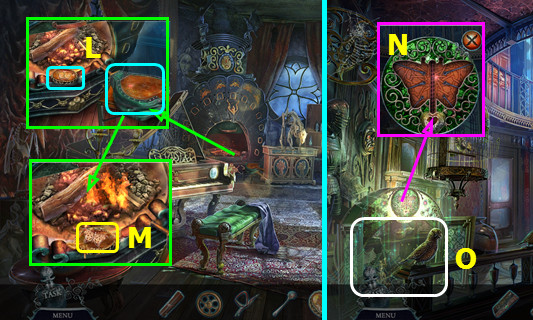
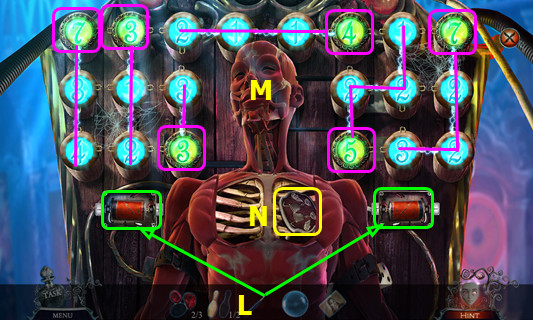
- Place the AMBER ORNAMENT and press the bellows 3x (L).
- Use the SILVER SPOON to take the METAL BUTTERFLY (M).
- Walk down and forward.
- Place the METAL BUTTERFLY (N).
- Play the HOP; earn HERBAL POISONS (O).
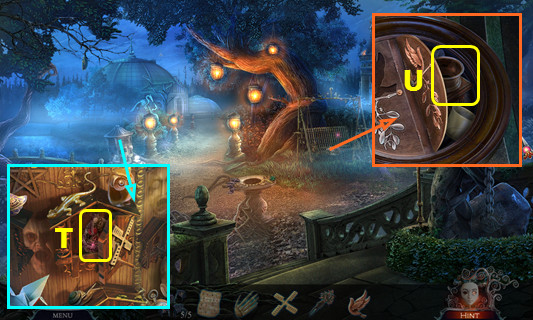
- Walk left.
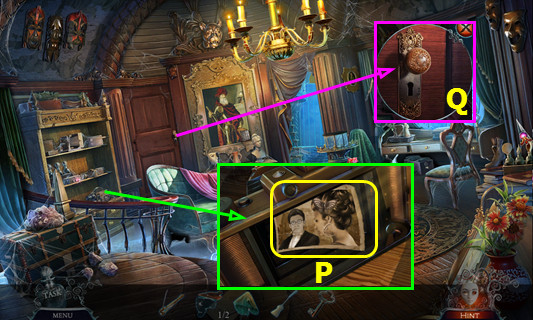
- Place the GUESTBOOK, HERBAL POISONS, and BOOK OF THE DEAD; remove the tape and take the VIDEOTAPE (P).
- Place the VIDEOTAPE (Q).
- Take the METAL TREE (R).
- Walk down.
- Place the METAL TREE (S).
- Walk forward.
- Take the TWEEZERS (T).
- Take the SILVER DOVE (U).
- Take the TUNING FORK (V).
- Walk right (W).
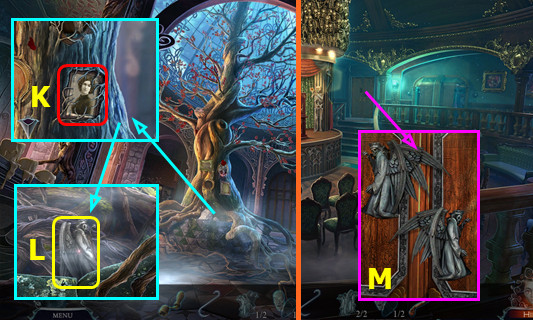
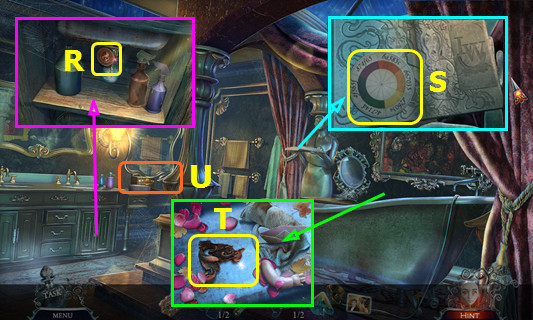
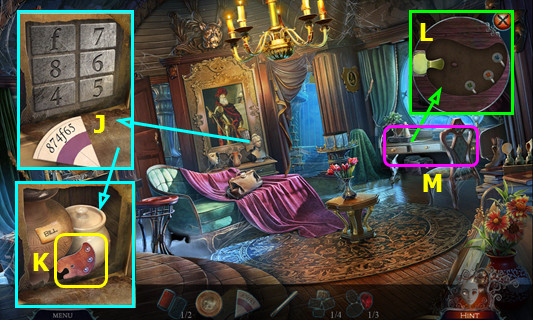
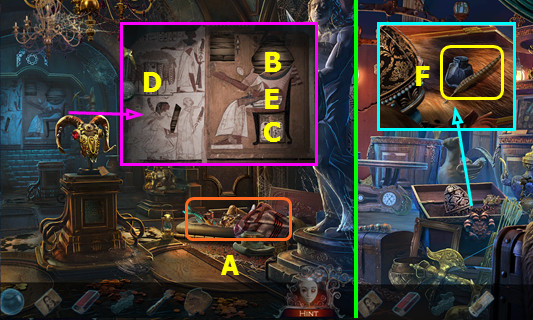
- Remove the cap; use the TWEEZERS to take the METAL SCALP (A).
- Use the SEALED SCROLL HOLDER; take 1/3 FATHER'S PICTURE (B).
- Walk down 2x.
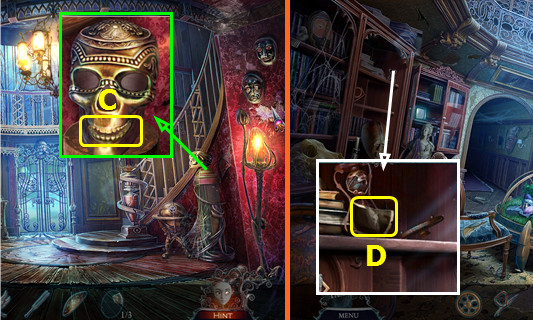
- Place the METAL SCALP; take the PROSTHETIC JAW (C).
- Open the PROSTHETIC JAW; take the 2/3 FATHER'S PICTURE (inventory).
- Walk left.
- Use the TUNING FORK; take the 3/3 FATHER'S PICTURE (D).
- Walk down and forward.
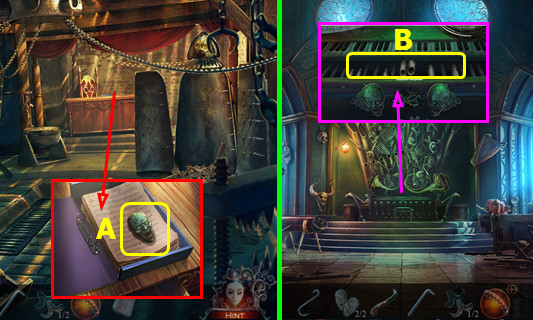
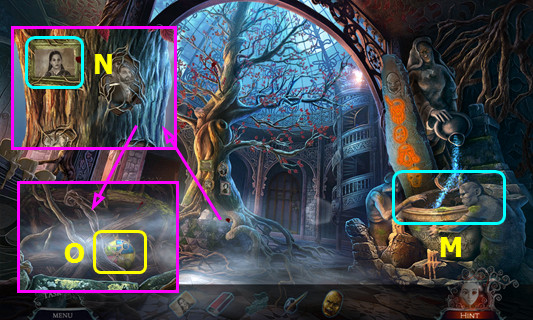
- Place FATHER'S PICTURE (E).
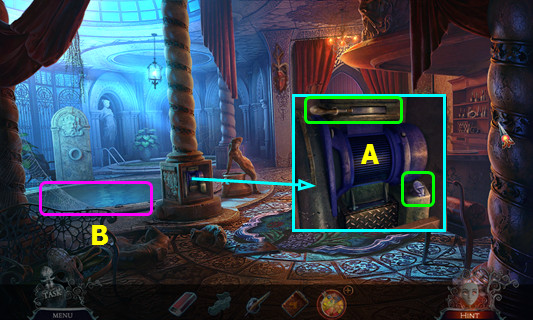
- Take the COLORED BAR (F).
- Go right.
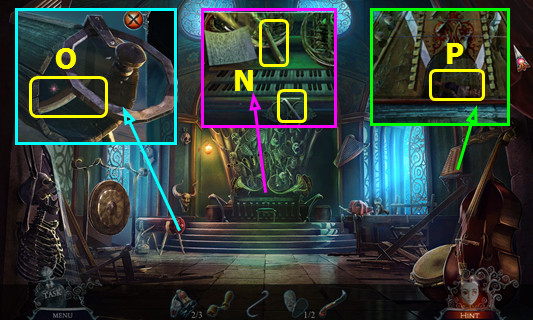
- Select (G).
- Place the COLORED BAR (K).
- Solution: Kx2-Lx2-I-Lx2-N-Lx2-I-Lx2-N-M-J-M-N-L-N-Lx2-Hx2-L-N-Lx2-K-L-Nx2-Lx2-Jx2-L-N-L-H-Mx2-Nx2-Lx2-N.
- Read the book and note; take the MIDDLE GREEN MAN (O).
- Walk down 2x; go left.
- Place the MIDDLE GREEN MAN; take the 1/2 CLOCK HANDS and the EMPTY BOTTLE (P).
- Go forward.
- Read the award, remove the glass, and use the EMPTY BOTTLE to collect the POISON (Q).
- Walk down 2x; go forward.
- Use the POISON; play the HOP and earn the 2/2 CLOCK HANDS (R).
- Select (S).
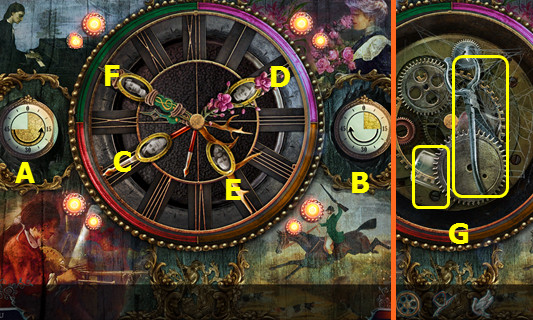
- Place the two CLOCK HANDS.
- Solution: E-Bx3-C-Bx7-F-Ax10-D-Ax4.
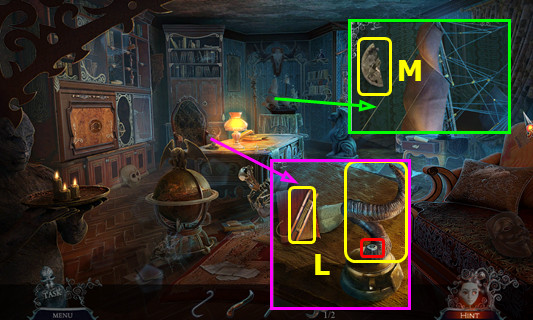
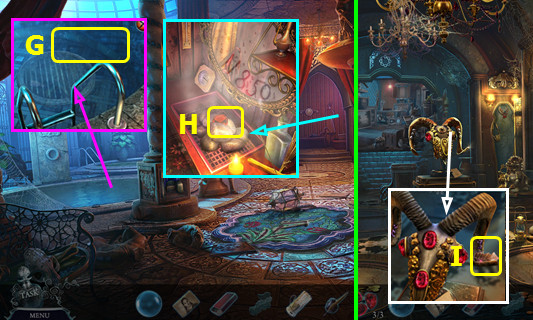
- Open the clock face; take the NAIL PLIERS and GLASS PIPE (G).
- Walk forward.
Chapter 2: Abigail
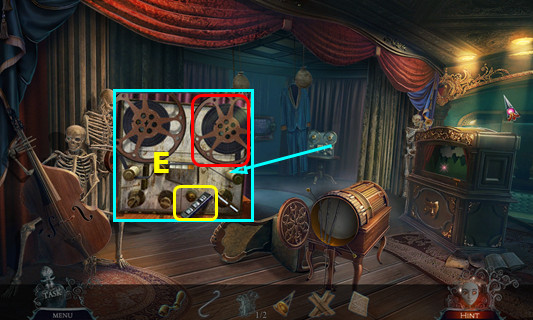
- Place the GLASS PIPE; turn the knob (J).
- Walk left.
- Select (K).
- Play the HOP; earn the BIRD FOOD (L).
- Place the SILVER DOVE; take the 1/2 SUNDIAL PLATE (M).
- Take the BROKEN DOVE (N).
- Walk right.
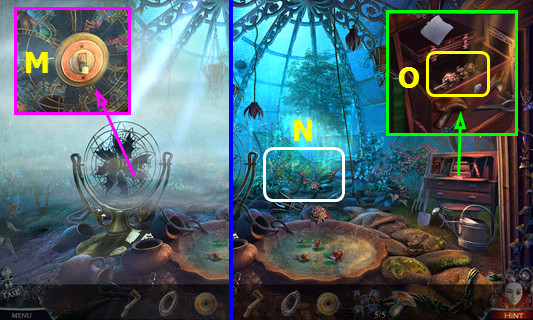
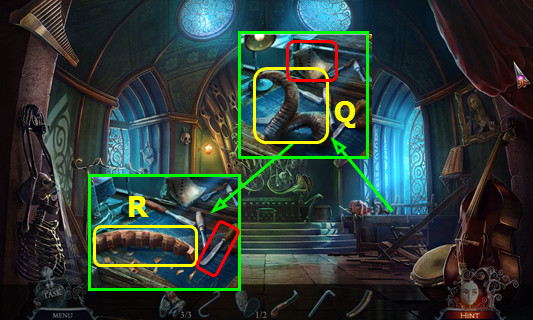
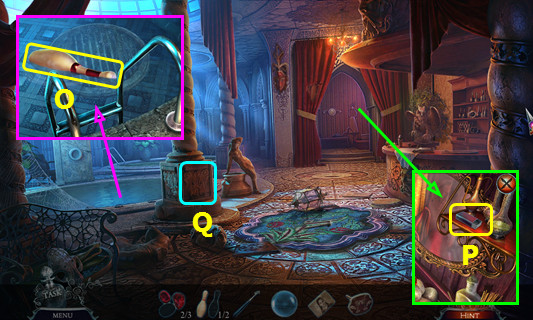
- Place the VALVE; take the GRINDER HANDLE (O).
- Use the NAIL PLIERS 4x; take the ROPE and COGWHEEL (P).
- Use the BIRD FOOD; take the 2/2 SUNDIAL PLATE and BRIGHT CRYSTAL (Q).
- Walk down.

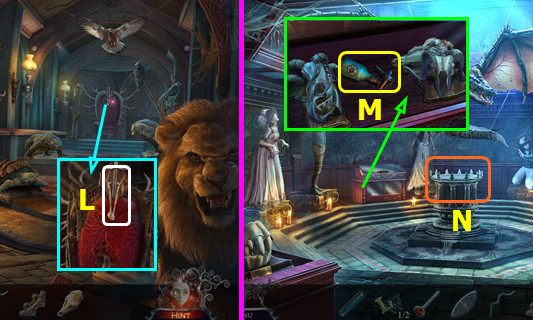
- Place the BRIGHT CRYSTAL (R).
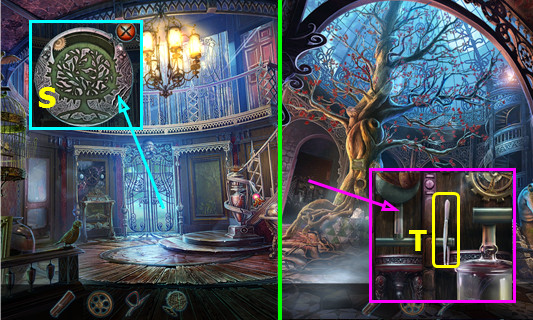
- Select (S).
- Place the 2 SUNDIAL PLATE.
- Solution select: Ax2-B-Ax4-Bx2-Ax3-Bx2-Ax2-Bx3-Ax2-B-Ax4-Bx2-Ax3-Bx2-Ax2-Bx2-Ax2-Bx2-Ax3-Bx2-A-Bx2-Ax3.
- Arrange the tokens as shown (D).
- Take the HAMMER (E).
- Walk forward.
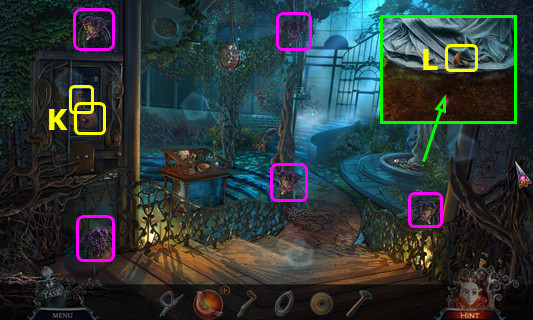
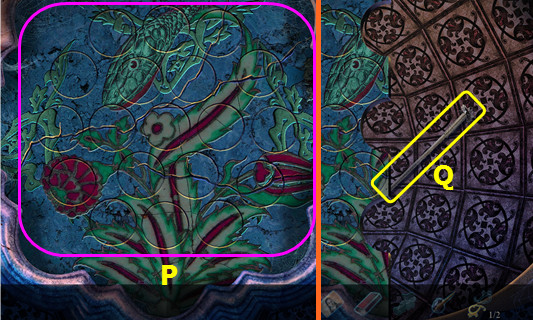
- Collect the 5 FLOWERS (pink).
- Open the door, use the HAMMER, and take the SWITCH and SEEDS (K).
- Take the MUSHROOM (L).
- Walk forward.
- Place the WIRES and SWITCH; select the switch (M).
- Play the HOP; earn the GARDENING GLOVE (N).
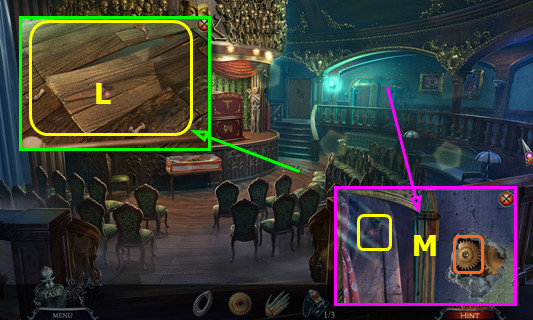
- Place the MUSHROOM; read the note and take the CANDY (O).
- Take the PARTIAL INSTRUCTIONS and SKELETON HAND (P).
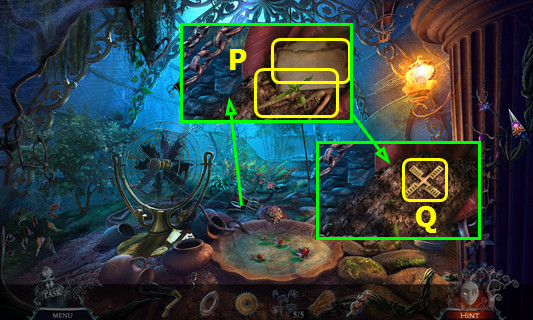
- Move the soil 4x; take the WINDMILL SAIL (Q).
- Walk down.
- Use the GARDENING GLOVE to take the MANDRAKE ROOTS (R).
- Use the CANDY; take the DOVE WINGS (S).
- Combine the BROKEN DOVE and DOVE WINGS to make the BRONZE DOVE (inventory).
- Walk down.
- Place the WINDMILL SAIL; take the SKULL WITH THORNS (T).
- Place the BRONZE DOVE; take the COFFEE GRINDER (U).
- Go forward 2x.

- Place the SKULL WITH THORNS (V).
- Read the note; take the 1/3 MARIONETTES and GRINDER BLADE (W).
- Combine the COFFEE GRINDER, GRINDER HANDLE, GRINDER BLADE, and MANDRAKE ROOTS to make the GROUND ROOTS (inventory).
- Walk down.
- Select (X).
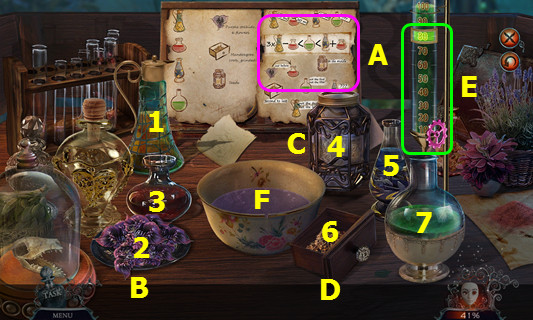
- Read the note and place the PARTIAL INSTRUCTIONS (A), 5 FLOWERS (B), SEEDS (C), and GROUND ROOTS (D).
- Set the measure to 80 and turn the valve (E).
- Place the ingredients into the bowl (F) in numerical order 1-7.
- Take the bowl of FERTILIZER.
- Use the FERTILIZER; take the BOTTLE WITH TEARS (G).
- Use the BOTTLE WITH TEARS (H).
- Click when the green spheres are in the center 3x (I).
- Take ABIGAIL'S MASK (J).
- Walk down 2x.
- Place ABIGAIL'S MASK; play the HOP to earn the BASS CLEF (K).
- Place the BASS CLEF; rotate the clef so the tail points at (1-3).
- Walk forward.
Chapter 3: Claude
- Select and take the SKELETON FINGERS (L).
- Place the COGWHEEL; take the STRING WINDER (M).
- Walk forward.
- Open the curtain (N).
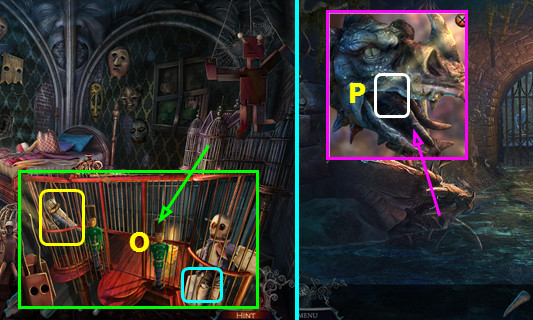
- Place the SKELETON HAND and SKELETON FINGERS; take the DRAWER KEY (O).
- Take the HOOK (P).
- Take the WRENCH (Q).
- Select (R).
- Solution: B-Dx2-E-Kx3-B-Ax2-Bx2-G-Kx2-Bx2-J-Kx2-Dx2-Kx3-D-Bx2.
- Enter the floor.
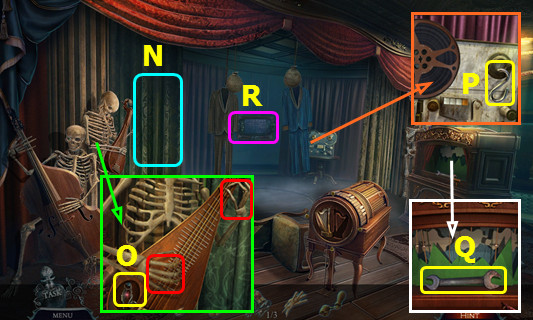
- Take the ORNATE LYRE (N).
- Walk down.
- Place the ORNATE LYRE; take the ACID (O).
- Enter the floor.
- Use the ACID (P).

- Read the notes; take the WEDGE (Q).
- Use the DRAWER KEY; read the letter and take the THUMBSCREW (R).
- Use the THUMBSCREW; take the VIOLIN (S).
- Use the WRENCH, open the doors and take the 1/2 ANGELS OF DEATH (T).
- Walk down 2x.
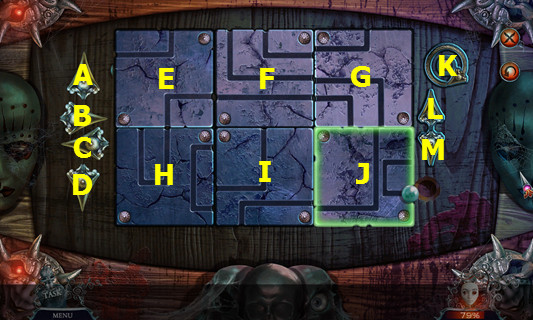
- Place the VIOLIN and move the 2 skulls up (A).
- Read the notes; take the MAGNETOPHON REEL and SCALE PAN (B).
- Place the WEDGE and select the baton; take the FLOORBOARDS (C).
- Take the SYMPHONY (D).
- Go forward.
- Place the MAGNETOPHON REEL; take the DIAL (E).
- Enter the floor.

- Place the DIAL and SYMPHONY; set the dial to 1-7-D (F).
- Take the 1/2 SCREAMING FACES and CURVED KNIFE (G).
- Walk down 3x; go left and right.
- Place the SCALE PAN; take the 2/3 MARIONETTES (H).
- Use the FLOORBOARDS and ROPE (I).
- Play the HOP; earn MOTHER'S PICTURE (J).
- Walk down 2x.
- Pan up; place MOTHER'S PICTURE (K).
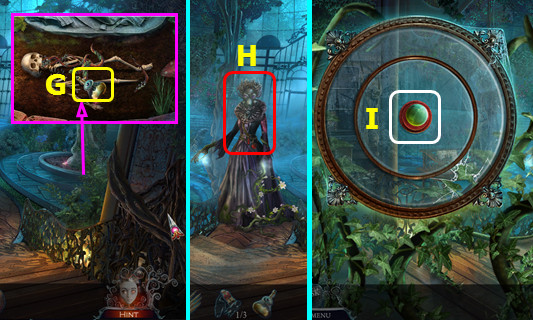
- Read the clipping; take the 2/2 ANGELS OF DEATH (L).
- Go forward.
- Place the 2 ANGELS OF DEATH (M).
- Go right.
- Read the note; take the PIECE OF WOOD and ALLEN KEY (N).
- Open the door and place the PIECE OF WOOD; take the CURVED WOOD (O).
- Use the STRING WINDER; take the 3/3 MARIONETTES (P).
- Read the instructions; take the 1/2 ANTLERS (Q).
- Place the CURVED WOOD and select the carving tool; take the INSTRUMENT BASE (R).
- Walk down and forward.
- Place the 3 MARIONETTES, select the pieces, and push the lever (S).
- Take the REGISTER LOCK (T).
- Enter the floor.
- Place the REGISTER LOCK; take the 2/2 SCREAMING FACES (A).
- Walk down 2x; go right.
- Place the 2 SCREAMING FACES; take EMILY'S BONES (B).
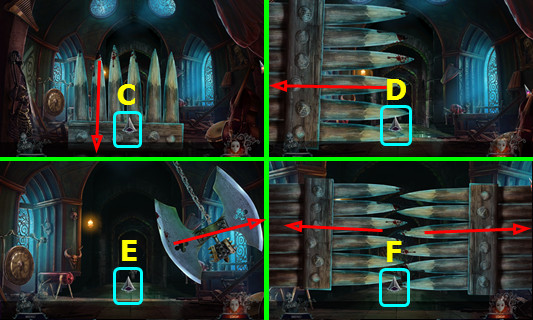
- Select (C) when the spikes go down the second time.
- Select (D) when the spikes go left.
- Select (E) when the blade stops on the left or right.
- Select (F) when the spikes recede.
- Combine the INSTRUMENT BASE and EMILY'S BONES to make the RESONATING INSTRUMENT (inventory).
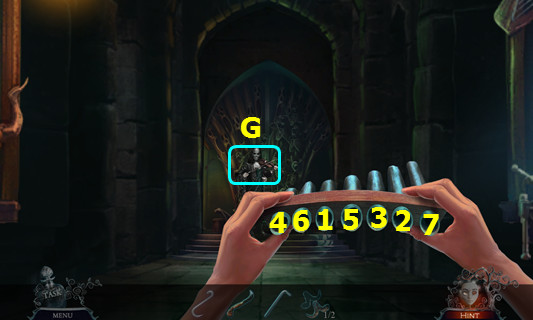
- Use the RESONATING INSTRUMENT (G).
- Select 1-7.
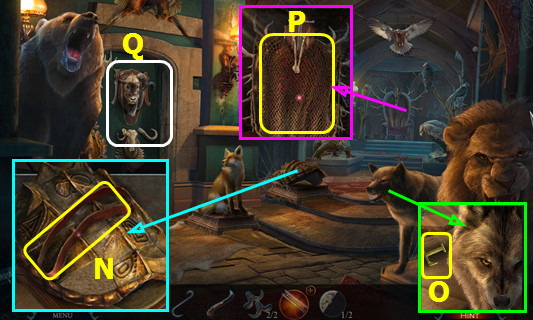
- Take CLAUDE'S MASK (H).
- Walk down 2x.
- Place CLAUDE'S MASK; play the HOP to earn the LION (I).
- Walk down.
Chapter 4: Norman
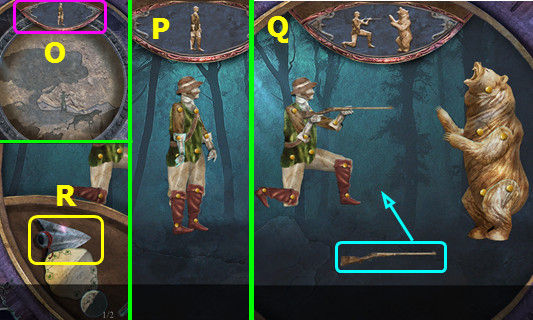
- Place the LION; drag the target and shoot all three animals (J).
- Enter the Study (K).
- Use the ALLEN KEY; take the 2/2 ANTLERS and FISHING SPOOL (L).
- Take the 1/2 of THOMAS'S PICTURE (M).
- Walk forward.
- Take the LEATHER BELT (N).
- Take the 1/2 LETTERS (O).
- Use the CURVED KNIFE; take the WEIGHTED NET (P).
- Select (Q).
- Place the 2 ANTLERS; restore the horns as shown (R).
- Walk left.
- Remove the sheet (A).
- Use the HOOK (B).
- Take the PLUNGER; use the WEIGHTED NET and take the CABINET HANDLE (C).
- Take the WOLF EYE; use the CURVED KNIFE and take the SHELL PLATE (D).
- Take the SAIL and open the terrarium (E).
- Walk down.
- Place the SHELL PLATE and press 1-5; read the note and take the HUNTER ILLUSTRATION (F).
- Place the WOLF EYE; take the DEER INSIGNIA (G).
- Walk left.
- Place the DEER INSIGNIA; read the note and take the CROSSBOW LATH (H).
- Walk down 2x.
- Place the SAIL; take the CARVED HANDLE (I).
- Use the CABINET HANDLE (J).
- Play the HOP; earn the DEER SKULL (K).
- Go forward.
- Place the DEER SKULL (L).
- Walk forward.
- Place the CARVED HANDLE; move the items and take the INSECT REPELLENT (M).
- Select (N).
- Place the HUNTER ILLUSTRATION (O).
- Move the marionettes as shown (P-Q).
- Take the BOLT TIP (R).
- Walk down and left.
- Use the INSECT REPELLENT; read the note and take the CROSSBOW BOLT and 2/2 THOMAS'S PICTURE (S).
- Walk down and forward.
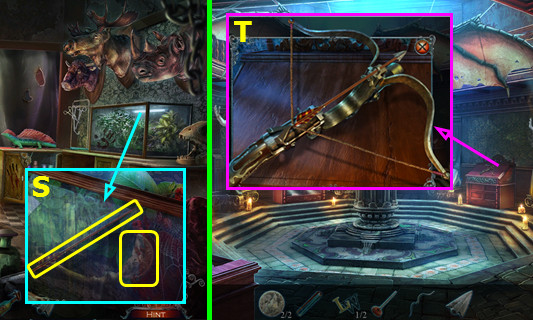
- Replace the CROSSBOW LATH and attach the string; add the CROSSBOW BOLT and BOLT TIP. Take the CROSSBOW (T).
- Take the CROSSBOW from inventory; select the scene.
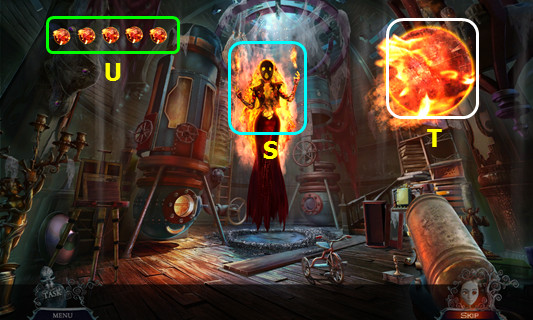
- Find and shoot Norman 6 times; he will appear randomly in positions 1-4.
- Track your hits (A).
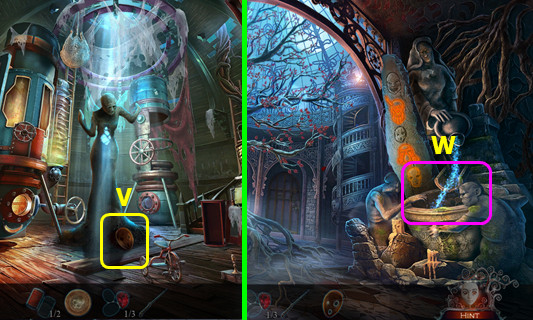
- Take NORMAN'S MASK (C).
- Walk down 3x; go forward.
- Place NORMAN'S MASK; play the HOP and earn the CANVAS FRAGMENT (D).
- Pan up; place THOMAS'S PICTURE (E).
- Take the ORNATE EMBLEM (F).
- Walk down.
Chapter 5: Lisbeth
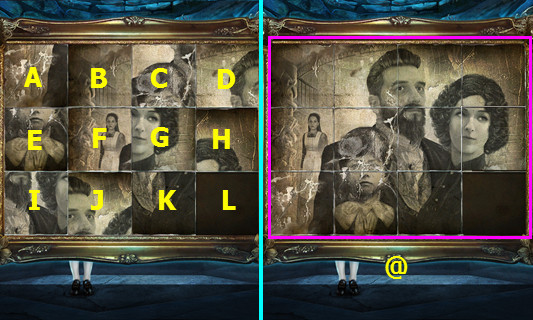
- Place the CANVAS FRAGMENT; restore the painting (G).
- Enter the Portrait Room (H).
- Take the PAINT CANISTER (I).
- Take the SAFETY PIN (J).
- Combine the FISHING SPOOL and SAFETY PIN to make the FISHING RIG (inventory).
- Take the NAIL CLIPPERS and 1/2 BATTERIES; remove the lid (K).
- Use the FISHING RIG to take the 1/2 FRAME PIECES (L).
- Walk right.
- Take the RAG (M).
- Place the LEATHER BELT and select the WHEEL; take the PAINTING SPATULA (N).
- Take the BATHROOM KEY and place the PAINT CANISTER (O).
- Walk down.
- Use the PAINTING SPATULA; take the PHOTO (P).
- Use the BATHROOM KEY and turn the handle (Q).
- Walk left.
- Open the cabinet; take the COPPER TOKEN (R).
- Take the COLOR WHEEL (S).
- Use the PLUNGER, move the items, and take the 2/2 FRAME PIECE (T).
- Select (U).
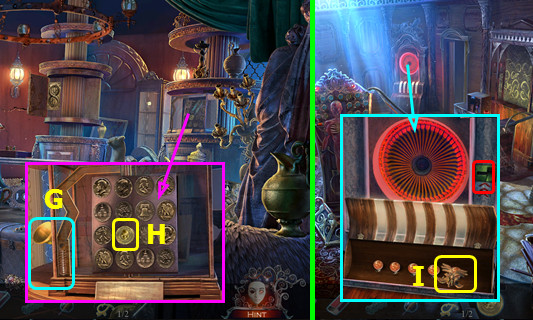
- Place the ORNATE EMBLEM (A).
- Select 1-16.
- Take the NAIL POLISH REMOVER (B).
- Walk down and right.
- Use the NAIL POLISH REMOVER; turn the valve 2x (C).
- Place the COLOR WHEEL and select each valve (D).
- Select the tap and earn the COLOR CODE (E).

- Place the 2 FRAME PIECES; take the FOUNTAIN PEN (F).
- Open the FOUNTAIN PEN (inventory).
- Select (1-5) to take the PEN.
- Walk left.
- Place the PHOTO and change the tiles as shown; take the 1/4 PAINTED TILES (G).
- Use the RAG; take the 2/2 LETTERS (H).
- Use the NAIL CLIPPERS; take the 1/3 RUBIES (I).
- Walk down 2x.
- Place the COLOR CODE; press 8-7-4-f-6-5 (J).
- Read the letter and take the PALETTE (K).
- Place the PALETTE (L).
- Play the HOP; earn the 2/4 PAINTED TILES (M).
- Walk left.
- Use the PEN; take the 3/4 PAINTED TILES (N).
- Place the 2 LETTERS; take the 4/4 PAINTED TILES (O).
- Walk down, right, and left.
- Place the 4 PAINTED TILES. Read the note; take the BUTTONHOOK and LOVER'S URN (P).
- Use the LOVER'S URN (Q).
- Take the FIRE EXTINGUISHER (R).
- Use the FIRE EXTINGUISHER (S).
- Select and hold to extinguish each fireball (T).
- Try not to miss any as they regenerate.
- The number of fireballs remaining (U).
- Take LISBETH'S MASK (V).
- Walk down 3x; go forward.
- Place LISBETH'S MASK; play the HOP to earn the DARTS (W).
- Walk down and left.
Chapter 6: Patrick
- Use the DARTS; select 11-4-5 (1-3).
- Walk right.
- Remove the cover (A).
- Take the PHARAOH'S WHIP (B).
- Use the COPPER TOKEN; take the 2/3 RUBIES (C).
- Use the BUTTONHOOK, remove the lock, open the box, and take the CUE REST (D).
- Take the 1/2 BOWLING PINS (E).
- Walk left (F).
- Take the ROD (G).
- Combine the ROD and CUE REST to make the SNOOKER REST STICK (inventory).
- Take the SILVER TOKEN (H).
- Take the 2/2 BATTERIES (I).
- Place the PHARAOH'S WHIP and open the sarcophagus; read the note and take the MARBLE (J).
- Walk down.
- Use the SILVER TOKEN; take the STEPMOTHER'S PICTURE (K).
- Select (@).
- Place the 2 BATTERIES (L).
- Connect the fuses (M).
- Take the SLIDER (N).
- Walk right.
- Use the SNOOKER REST STICK; take the 2/2 BOWLING PINS (O).
- Take the MATCHES (P).
- Press the panel (Q).
- Place the SLIDER; move the papers and take the ICE PICK (R).
- Take the FISH SCALES (S).
- Walk down.
- Place and select the 2 BOWLING PINS (T).
- Take the MURAL FRAGMENT (U).
- Walk left.
- Use the ICE PICK; play the HOP to earn the ORNATE CUP (A).
- Place the MURAL FRAGMENT (B).
- Select C-D-E.
- Walk forward.
- Take the QUILL AND INK (F).
- Walk down 2x; go right.
- Use the ORNATE CUP to take the CUP OF WATER (G).
- Use the CUP OF WATER; earn the DIAL SETTINGS and take 3/3 RUBIES (H).
- Walk down and left.
- Place the 3 RUBIES; read the note and take the CHESS PIECE (I).
- Walk forward.
- Rotate Jx4 and Kx3.
- Place the DIAL SETTINGS; set the dials as shown (L).
- Take the MOSAIC PART (M).
- Place the CHESS PIECE; take the 1/2 ORNATE DECORATIONS (N).
- Walk down 2x; go right.
- Select (O).
- Place the MOSAIC PART.
- Restore the mosaic (P).
- Take the PIPE CLEANER (Q).
- Walk down, left, and forward.
- Use the MARBLE and PIPE CLEANER (G).
- Open the case and take the GOLD TOKEN (H).
- Walk down 2x.
- Use the GOLD TOKEN; take the WINDING KEY (I).
- Walk left and forward.
- Use the WINDING KEY; take the 2/2 ORNATE DECORATIONS (J).
- Place and select the 2 ORNATE DECORATIONS; take the 1/8 WATCH COLLECTION and COLLECTION CASE (K).
- Select the 7 parts of the WATCH COLLECTION (red).
- Combine the COLLECTION CASE and 8 WATCH COLLECTION (inventory).
- Take PATRICK'S MASK (L).
- Walk down 4x; go forward.
- Place PATRICK'S MASK; play the HOP and earn the GASOLINE (M).
- Pan up and place STEPMOTHER'S PICTURE (N).
- Take the BROOCH (O).
- Walk down and left; go right 2x.
Chapter 7: Thomas
- Pour the GASOLINE and pull the switch (A).
- Enter the Water Reservoir (B).
- Move the leaves 2x; take the CHEESE (C).
- Select (D-E).
- Place the FISH SCALES; take HYDRA'S HORN (F).
- Take the STONE CHISEL (G).
- Go left (H).
- Place HYDRA'S HORN (I).
- Use the STONE CHISEL; take the RELIEF FRAGMENT (J).
- Take the MESSAGE BOTTLE (K).
- Take the ORNATE BUG (L).
- Combine the BROOCH and ORNATE BUG (inventory).
- Select M-N-O-P-Q-O; take the BUG EMBLEM.
- Walk down.
- Place the RELIEF FRAGMENT; take the FANG BASE (S).
- Place and select the BUG EMBLEM (T).
- Move the tiles to form the sets (A).
- The location of the sets does not matter.
- Walk forward.
- Select (B).
- Use the MATCHES (C).
- Play the HOP; earn the FISH FIN (D).
- Place the CHEESE; take the RED NOSE (E).
- Use the QUILL AND INK; take the FANG PIECES (G).
- Select the head, open the gate, and take the JACK-IN-THE-BOX (H).
- Combine the JACK-IN-THE-BOX and RED NOSE; take the GLUE (inventory).
- Walk down.
- Place the FISH FIN; take the CORKSCREW (I).
- Combine the MESSAGE BOTTLE and CORKSCREW; take the DRAWING (inventory).
- Go forward.
- Select (J).
- Place the DRAWING.
- Find the differences (1-3).
- Read the note; take the BLUE CRAYON (K).

- Use the BLUE CRAYON; take HYDRA'S EYE (L).
- Walk down and left.
- Place HYDRA'S EYE (M).
- Play the HOP; earn the MAGNET (N).
- Walk down and forward.
- Use the MAGNET; take the FANG TIP (O).
- Combine the FANG BASE, FANG PIECES, FANG TIP, and GLUE to make the FANG (inventory).
- Walk down and left.
- Place the FANG (P).
- Walk forward.
- Restore the picture.
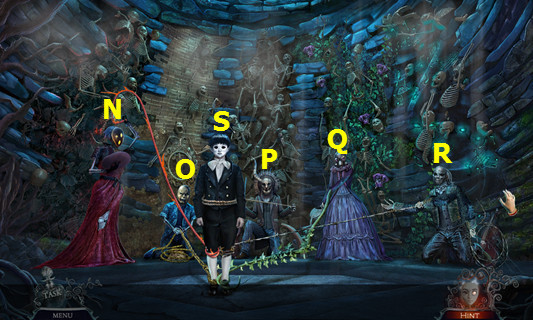
- Select K-G-C-D-H-L-K-J-I-E-A-B-C-D-H-L-K-J-I-E-F-J-K-L-H-D-C-G-k-J-F-G-K-J-I-E-A-B-F-G-C-B-A-E-I-J-F-G-H-L-K-J-I-E-F-G-K-L-H-G-F-E-I-J-K-G-H-L.
- Final solution (@).

- Restore the jigsaw puzzle (M).
- You earn LISBETH'S MASK, CLAUDE'S MASK, PATRICK'S MASK, ABIGAIL'S MASK, and NORMAN'S MASK.
- Place LISBETH'S MASK (N), PATRICK'S MASK (O), NORMAN'S MASK (P), ABIGAIL'S MASK (Q), and CLAUDE'S MASK (R).
- Select Thomas and remove his mask (S).
- Congratulations! You have completed Phantasmat: Behind the Mask!
Created at: 2016-01-15