

Walkthrough Menu
General Tips
- This is the official guide for Phantasmat: Curse of the Mist.
- This guide won't tell you when to zoom into a location; the screenshots show each zoom scene.
- Hidden-object puzzles are referred to as HOPs. Only the locations of the HOPs will be shown.
- Use the Map to fast travel to a location.
Chapter 1: Camp
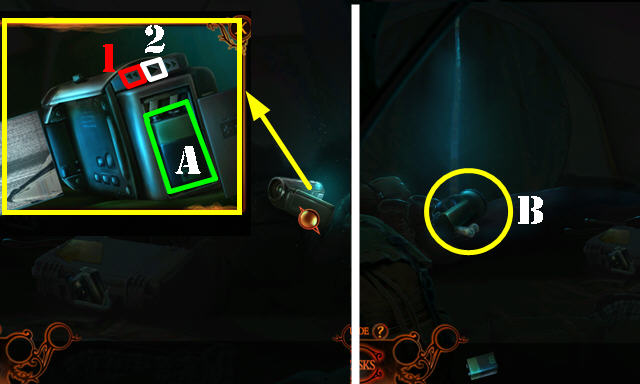
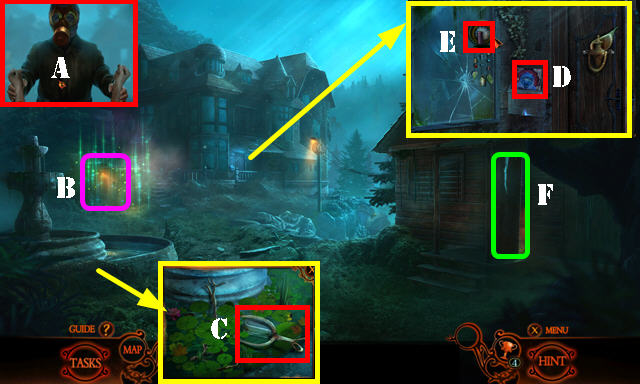
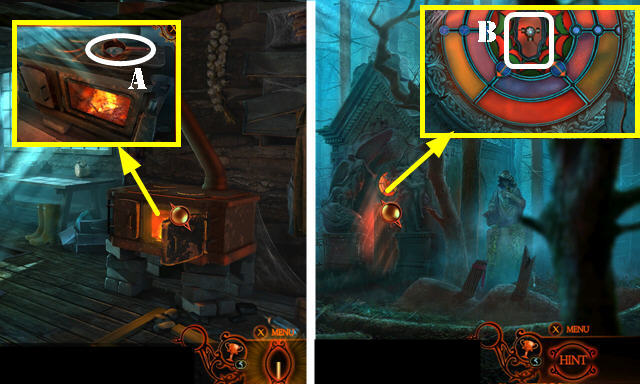
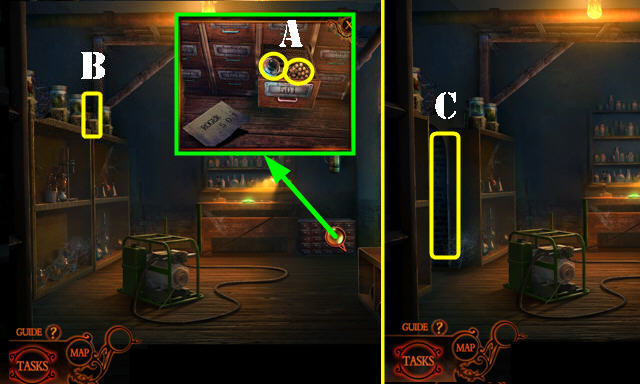
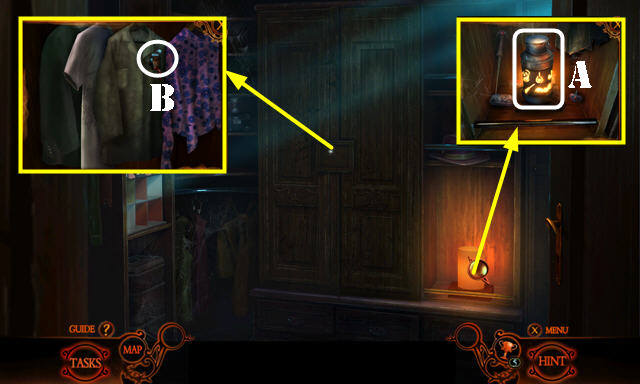
- Press 1-2. Open compartment; take BATTERY (A).
- Take SIGNAL FLARE and FLASHLIGHT (B).
- Open compartment on FLASHLIGHT; insert BATTERY; take CHARGED FLASHLIGHT.
- CHARGED FLASHLIGHT on scene.
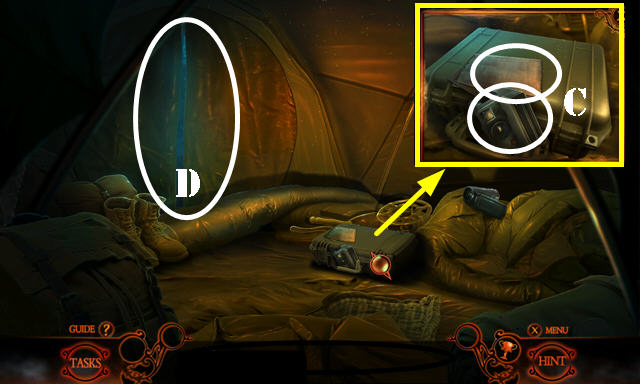
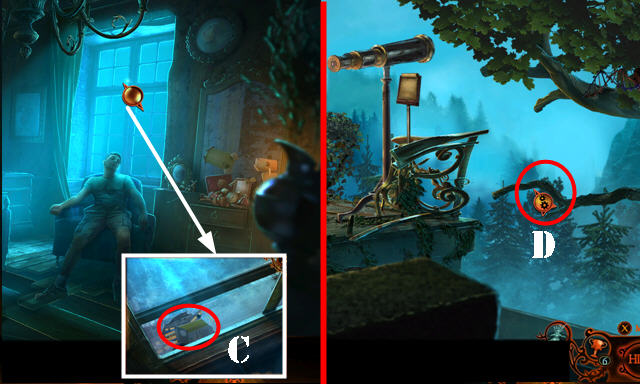
- Take INSTANT CAMERA and remove note (C).
- Go (D).
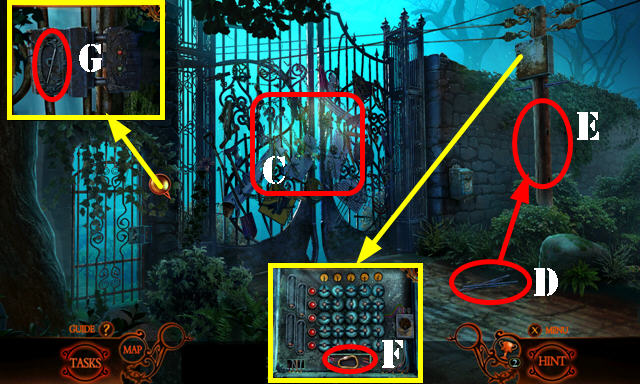
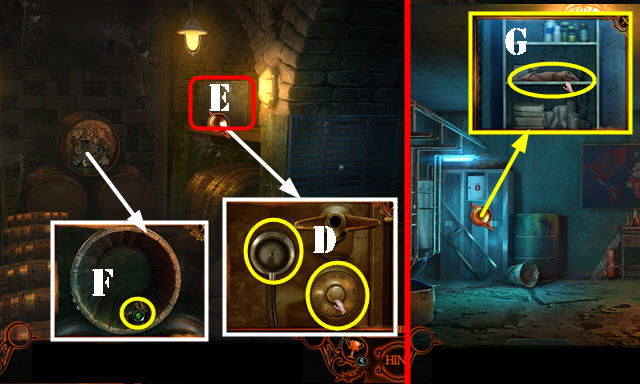
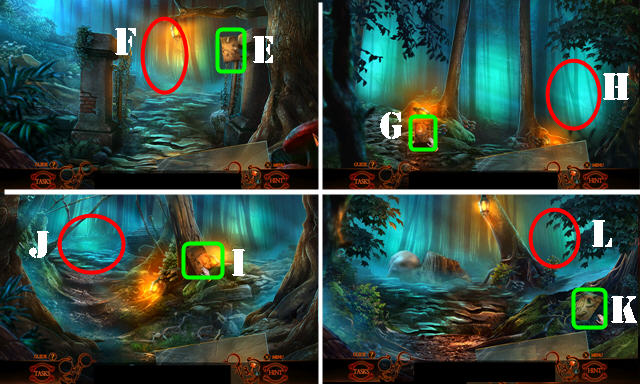
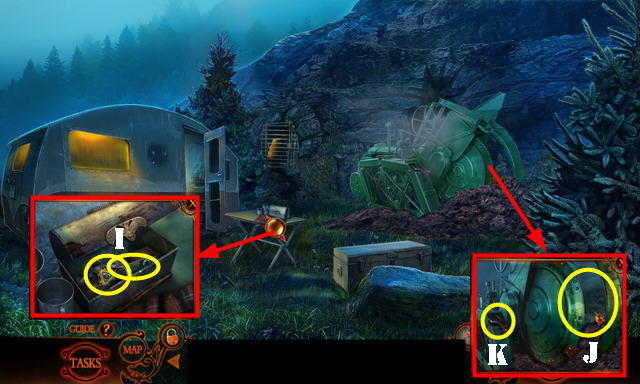
- Take FLARE GUN and TENT PEGS 1/3 (E).
- SIGNAL FLARE in FLARE GUN; take LOADED FLARE GUN.
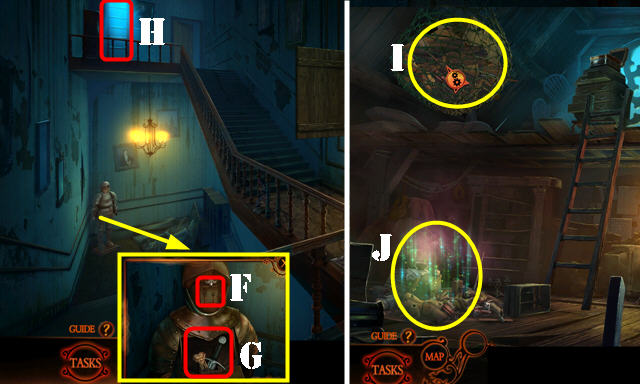
- Use LOADED FLARE GUN (F).
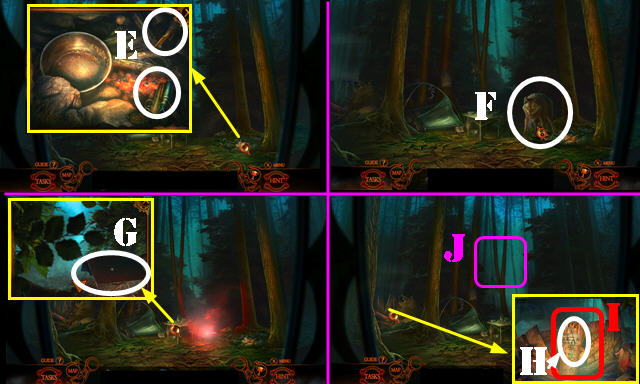
- Pan up; take SANDPAPER (G).
- Take TRINKET CHAIN (H). Use INSTANT CAMERA (I); receive INSTANT PHOTOGRAPH.
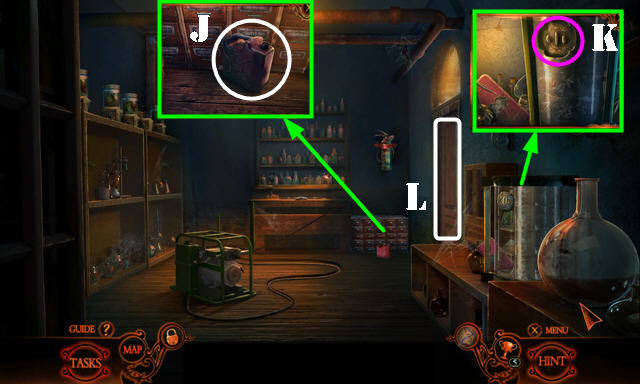
- Go (J).
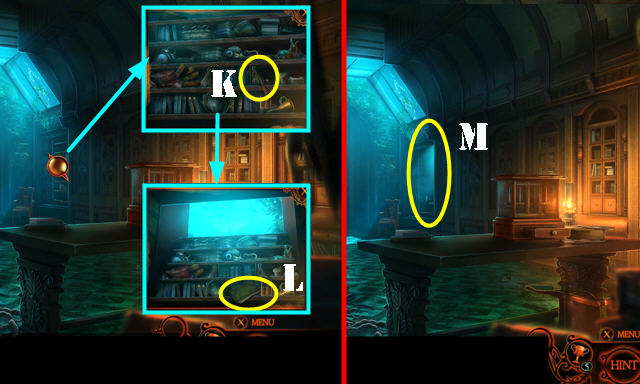
- Talk (K).
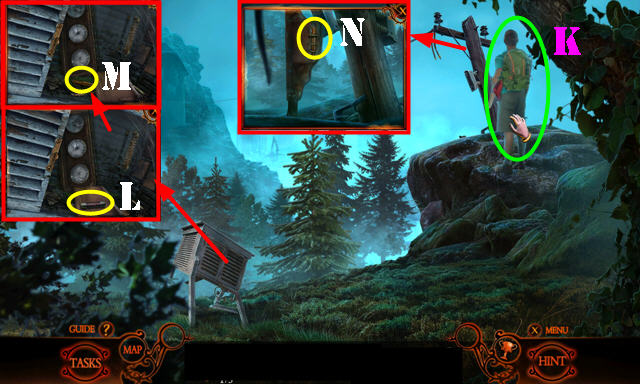
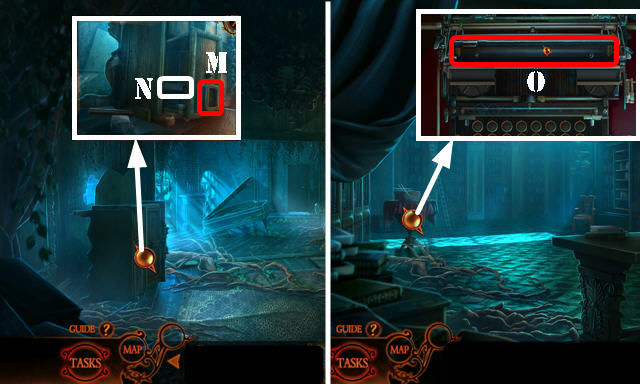
- Use SANDPAPER and select; take SPARE FUSES 1/4 (L).
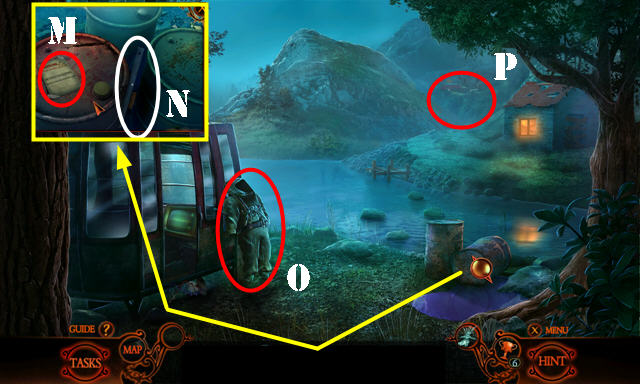
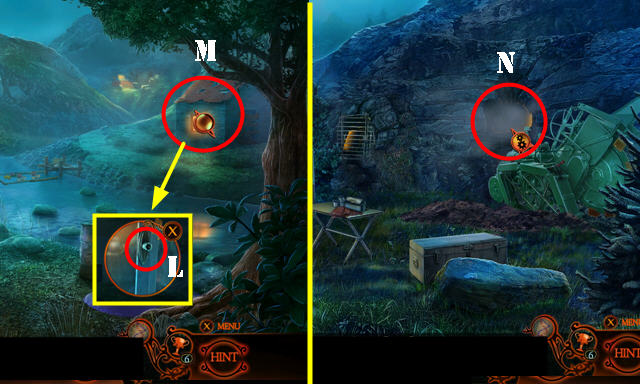
- Open folder and select; take TENT PEGS 2/3 (M).
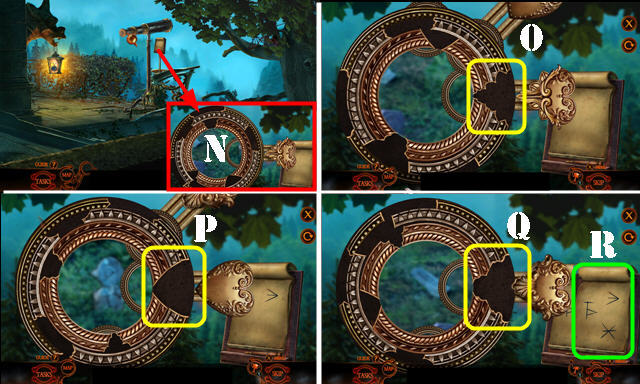
- Take TENT PEGS 3/3 (N).
- Walk down.
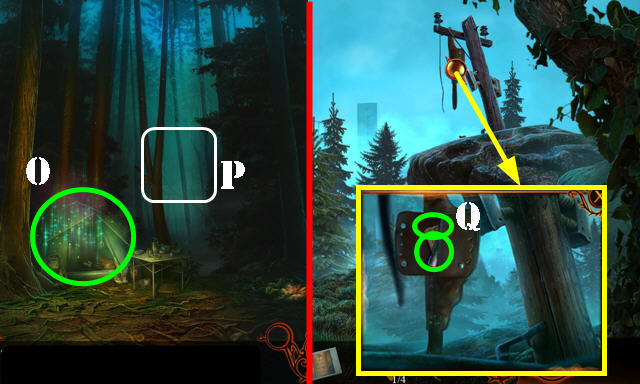
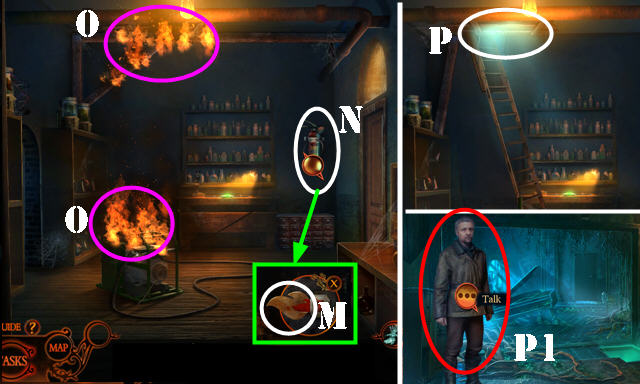
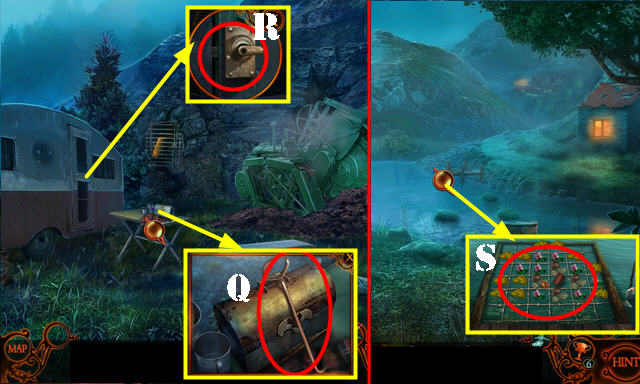
- Use TENT PEGS 3/3 (O). Play HOP; receive CLIPPERS.
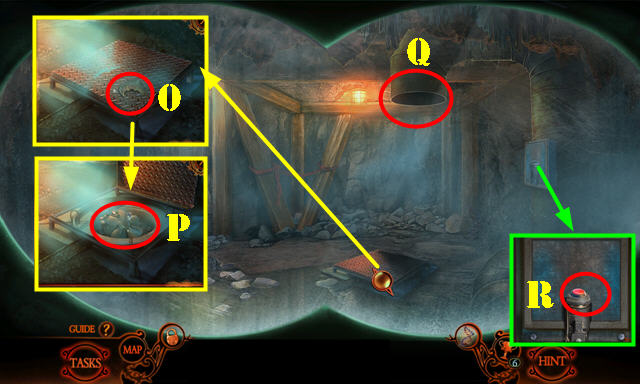
- Go (P).
- Use CLIPPERS and open case; take SPARE FUSES 2/4 and CODE NOTE (Q).
- Walk down twice.
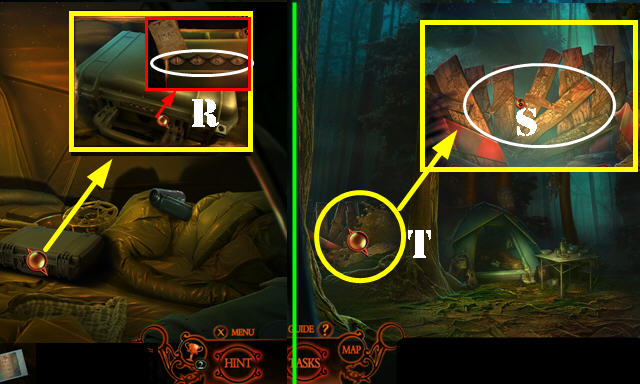
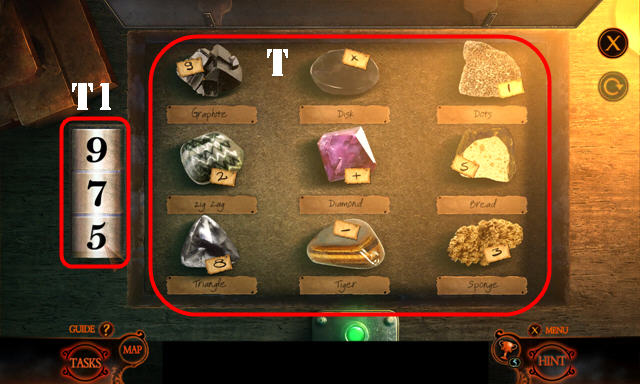
- Place CODE NOTE; enter 1385 (R); take AXE.
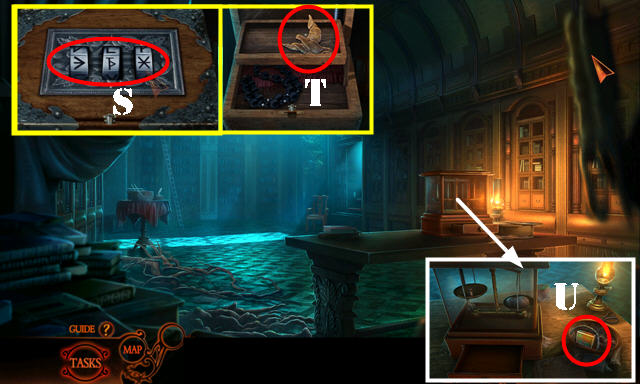
- Go to Camp.
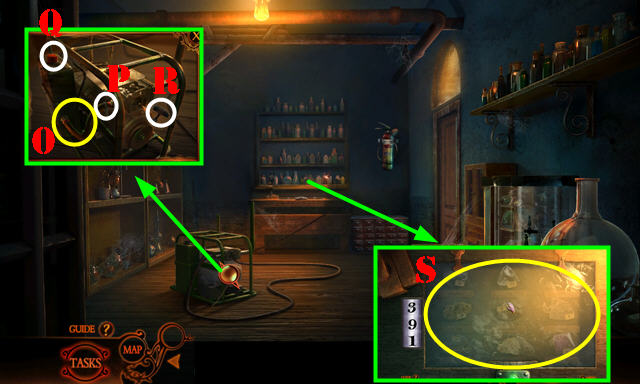
- Use AXE (S).
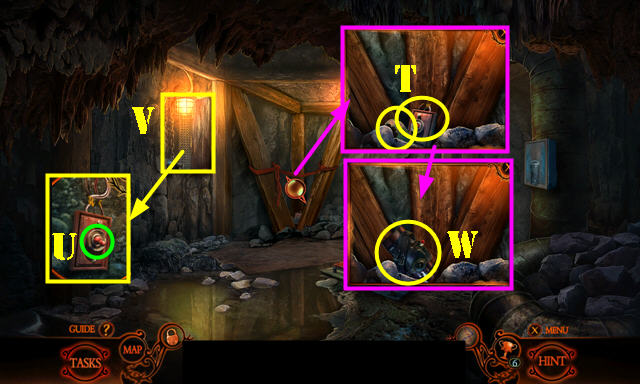
- Go (T).
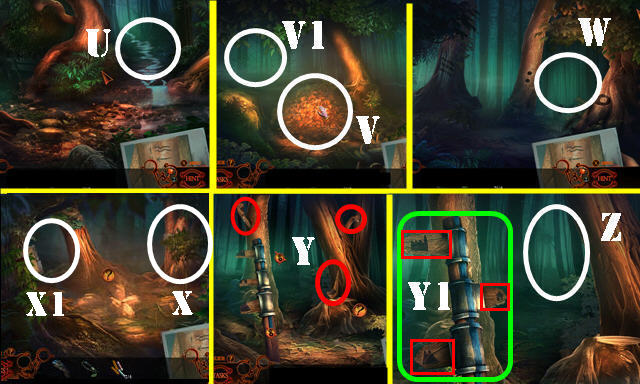
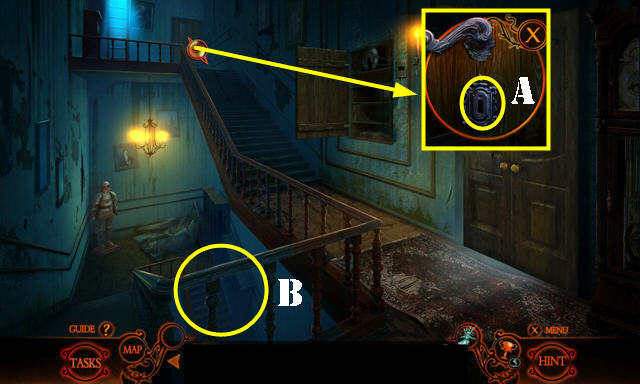
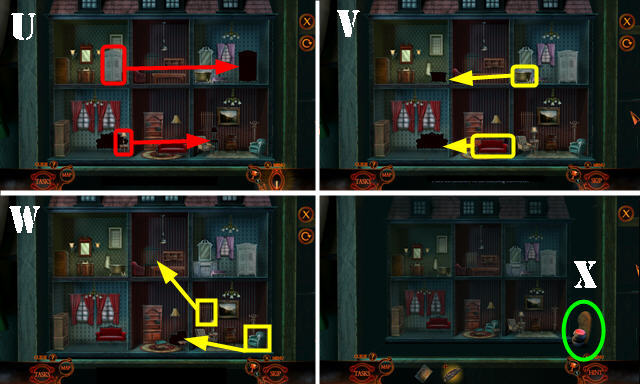
- Use INSTANT PHOTOGRAPH on scene; go forward (U).
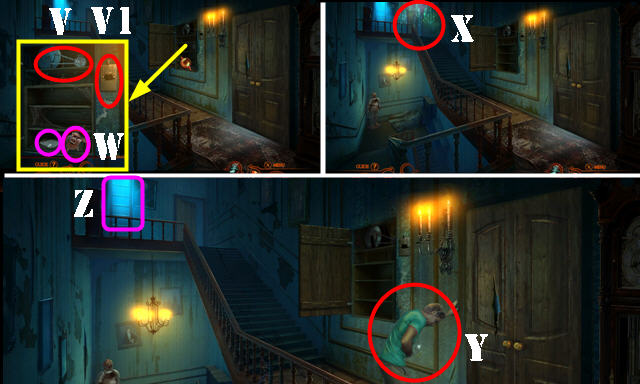
- Select leaves (V); go left (V1).
- Go right (W).
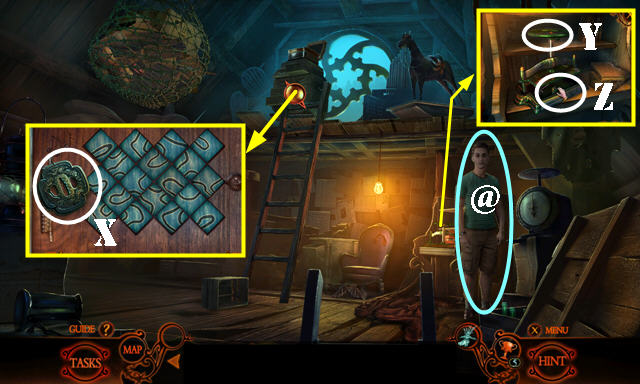
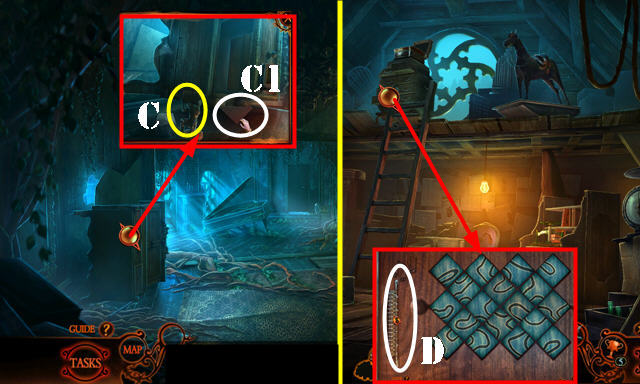
- Select bush (X). Go left (X1).
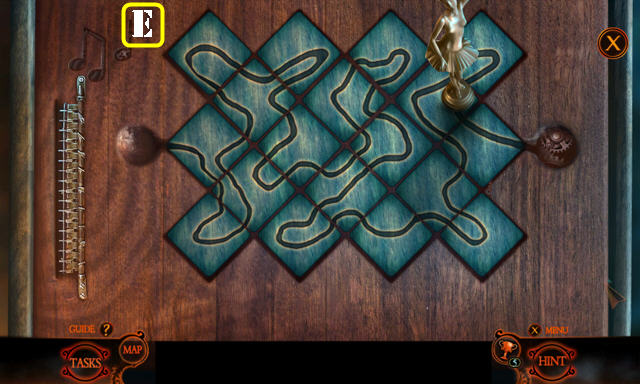
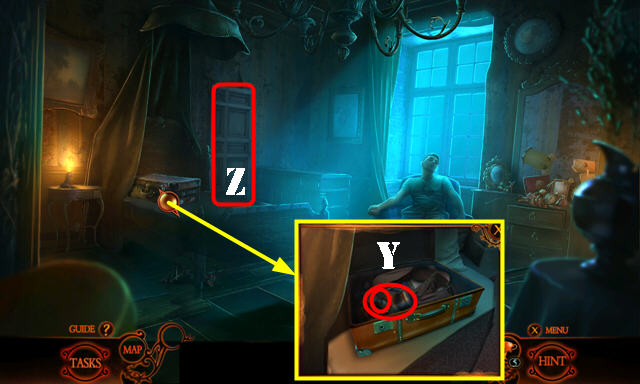
- Select pieces (Y); arrange signs (Y1).
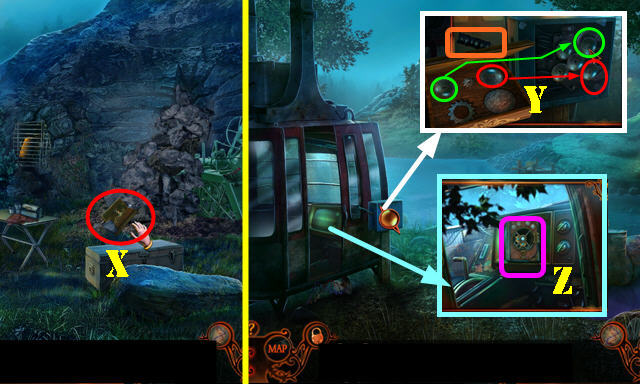
- Go forward (Z).
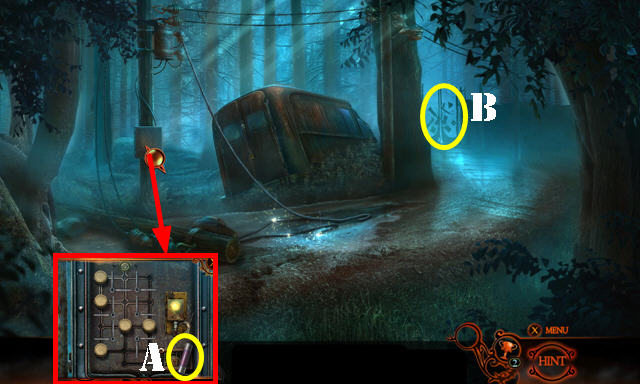
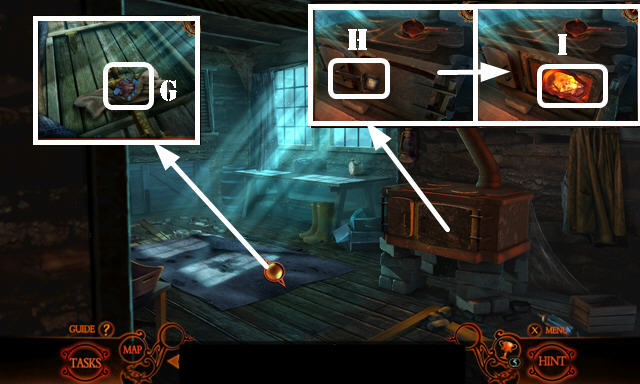
- Open cover; take SPARE FUSES 3/4 (A).
- Go (B).
- Play HOP (C); receive HOOK.
- Take two pegs (D) and place them (E).
- Open cover; take CARABINER (F).
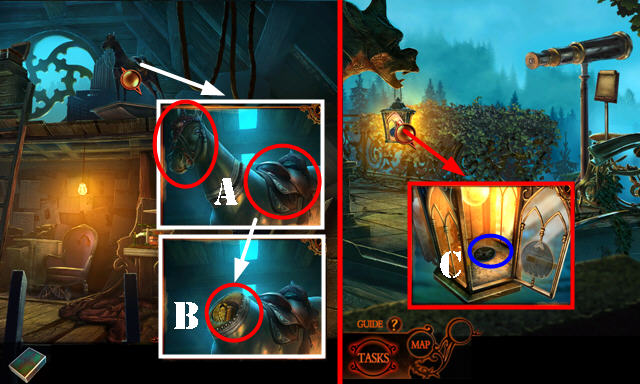
- Remove vines; take ALLEN WRENCH (G).
- Walk down.
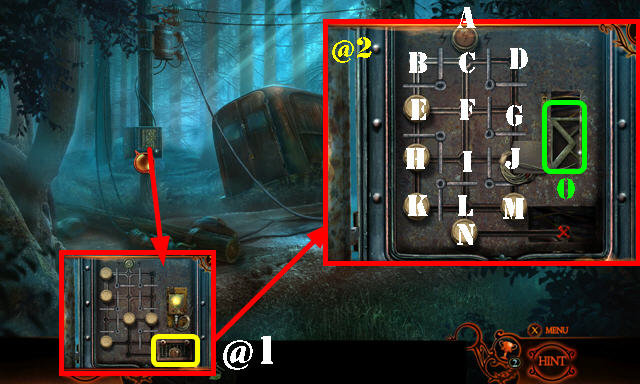
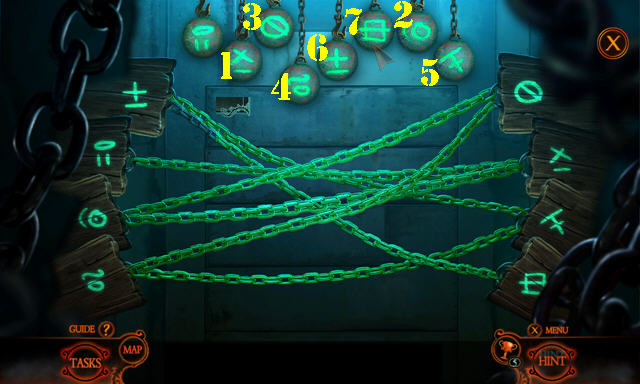
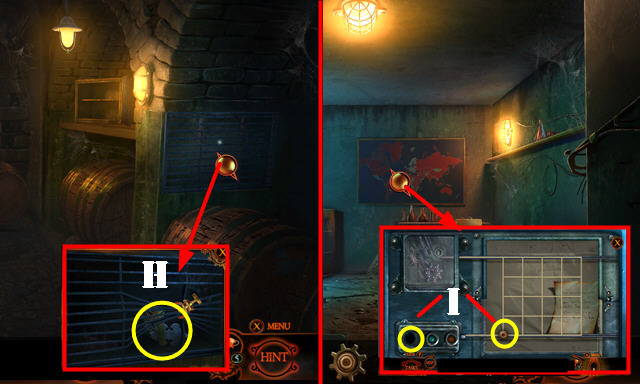
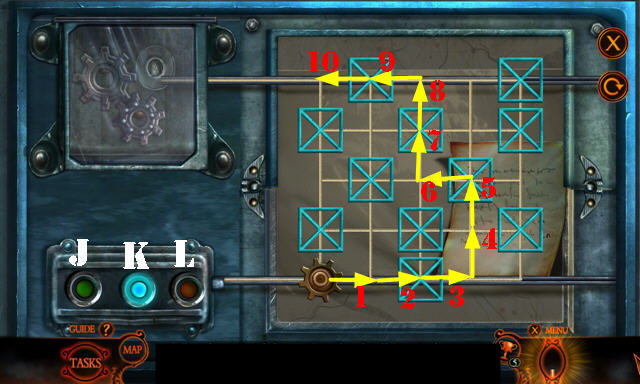
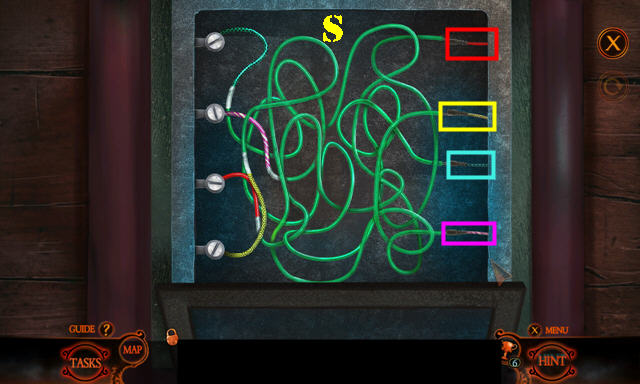
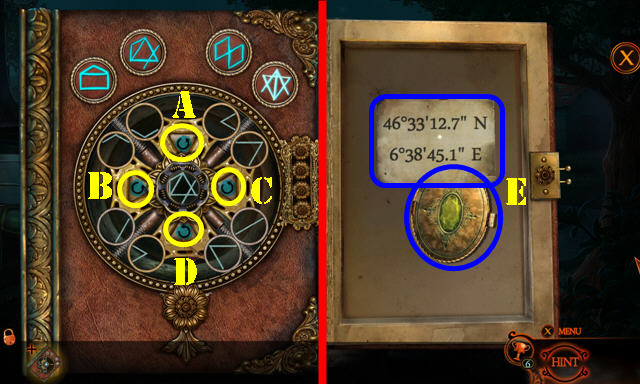
- Use ALLEN WRENCH (@1).
- Solution (@2): (J-M)-(I-J)-(N-F)-(M-N)-(J-M)-(K-L)-(L-I)-(I-H)-(H-K)-(E-H)-(B-E)-(F-A).
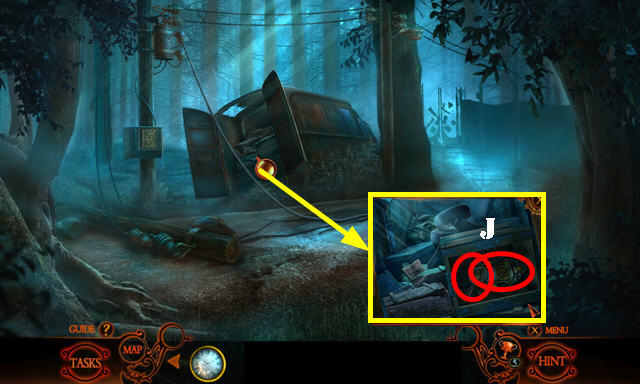
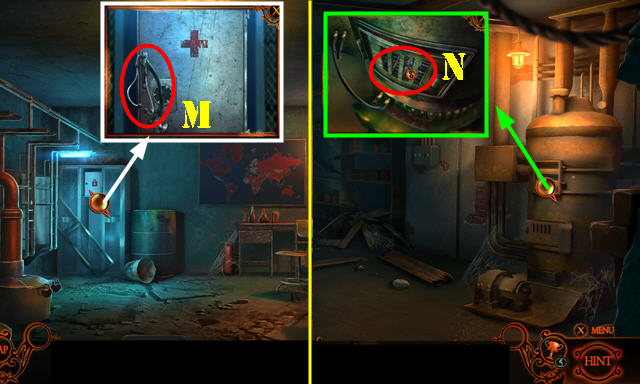
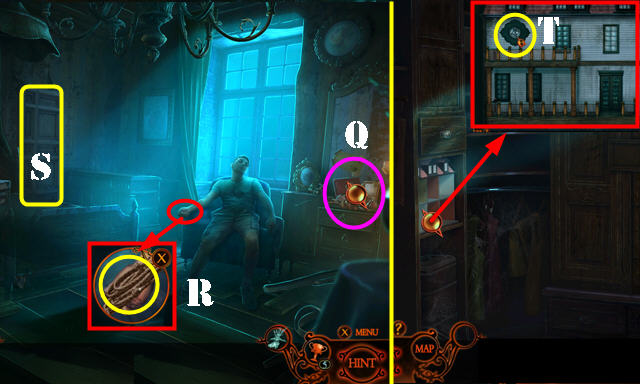
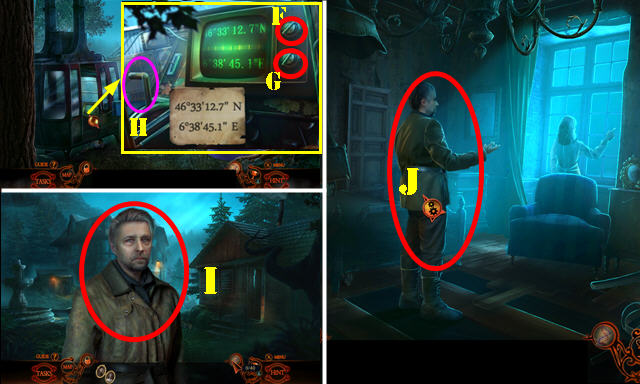
- Take MAILBOX TOKEN (O).
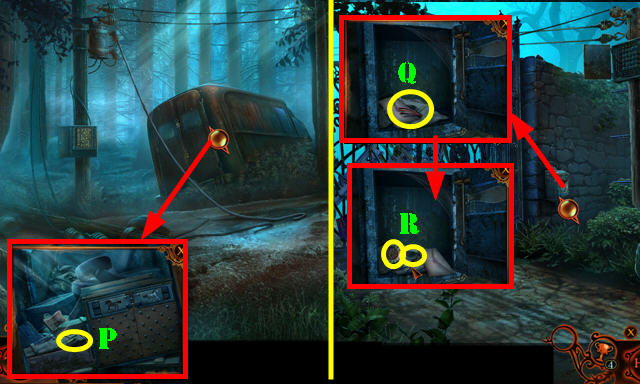
- Use HOOK. Look at newspaper; take SPARE FUSES 4/4 (P).
- Go to Gate.
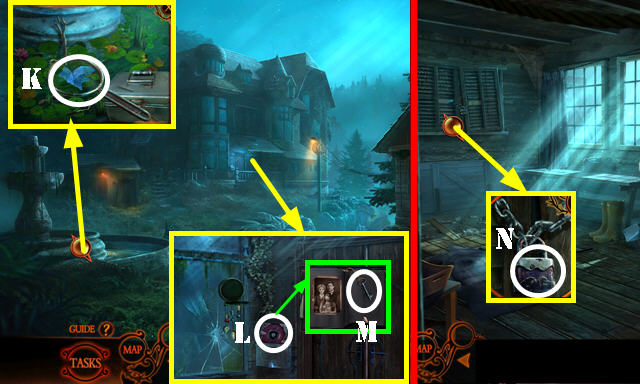
- Place MAILBOX TOKEN; take WIRES (Q).
- Look at envelope; take SILVER COIN 1/2 and ORNATE HANDLE (R).
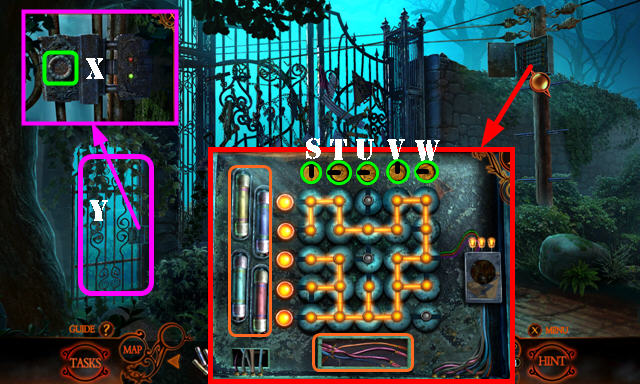
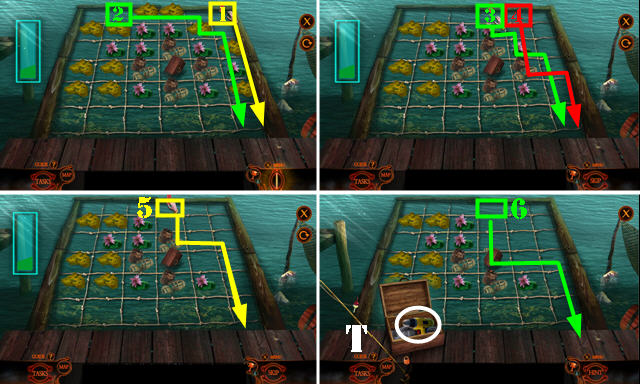
- Place SPARE FUSES 4/4 and WIRES (orange).
- Solution: Sx2-Tx3-Ux3-Vx2-Wx3.
- Place ORNATE HANDLE (X); go (Y).
- Use LOADED FLARE GUN (A).
- Open door (B). Play HOP; receive HORSE SLIDER.
- Take TONGS (C) and select box.
- Take BROKEN STAINED GLASS (D).
- Use TRINKET CHAIN; select 3x and take CLOCK FACE (E).
- Enter (F).
- Lift rug; select twice and take ENCRUSTED ITEM (G).
- Take PIANO LEVER (H).
- Use TONGS (I); receive METAL FRAME.
- Go to Road.
- Place HORSE SLIDER and select; take SIEVE and FAMILY CLOCK (J).
- Go to Yard.
- Use SIEVE and ENCRUSTED ITEM; take GLASS PIECES (K).
- CLOCK FACE on FAMILY CLOCK; take FAMILY SIGIL and look at note.
- Place FAMILY SIGIL (L); take CUPBOARD KEY (M).
- Go to Shack.
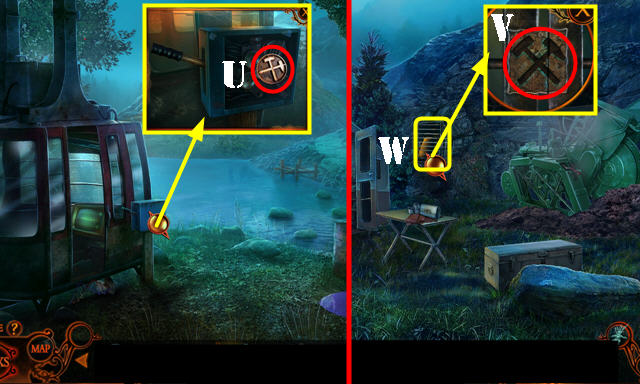
- Use CUPBOARD KEY and select (N).
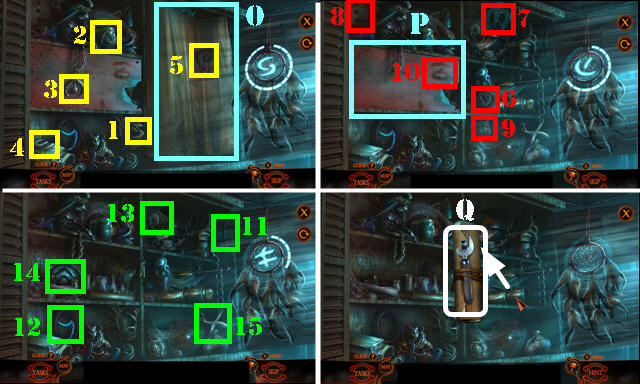
- Select 1-5. Open (O). Select 6-10. Open (P). Select 11-15.
- Take CAN OPENER and look at note (Q).
- Walk down.
- Use CAN OPENER; look at note and take SECRET DOOR TILE (R).
- Go to Shack.
- Place SECRET DOOR TILE; take ROPE and CYLINDER BASE (S).
- Walk down.
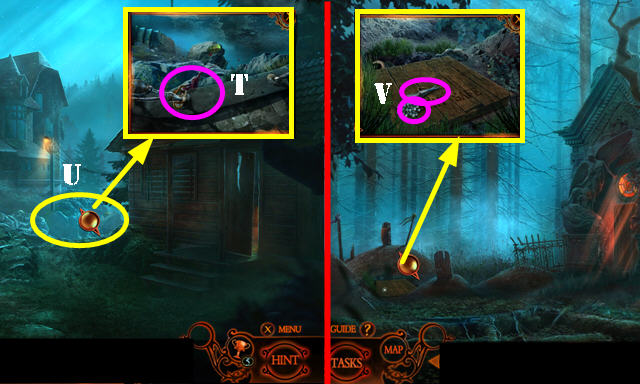
- Use CARABINER and ROPE (T).
- Go (U).
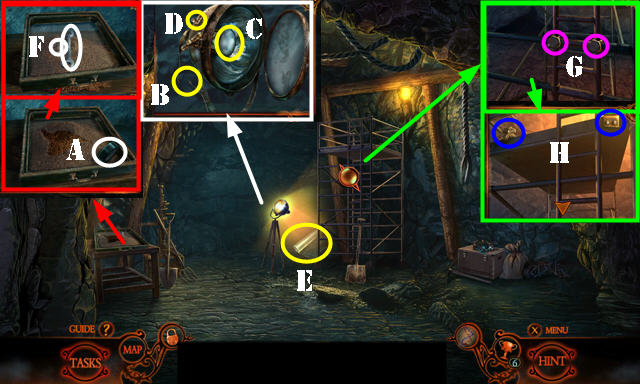
- Take CRUMBLED LEAD 1/2 and NAIL PULLER (V).
- Walk down.
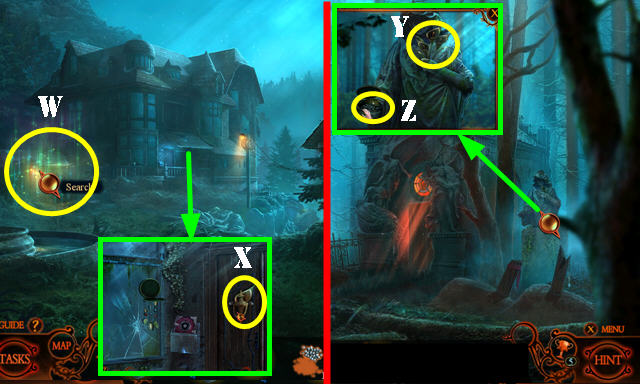
- Play HOP (W): receive CALLA LILIES 1/2.
- Use NAIL PULLER (X); receive CALLA LILIES 2/2.
- Go to Garden.
- Place CALLA LILIES 2/2 (Y); take CRUMBLED LEAD 2/2 (Z).
- Go to Shack.
- Place CRUMBLED LEAD 2/2; take MELTED LEAD (A).
- BROKEN STAINED GLASS, GLASS PIECES, and MELTED LEAD on METAL FRAME; take STAINED GLASS.
- Go to Garden.
- Place STAINED GLASS (B).
- Solution: (3-7)-(7-8)-(8-4)-(2-3)-(3-7)-(7-8)-(4-5)-(8-4).
- (5-6)-(4-5)-(1-2)-(2-3)- (3-7)-(7-8)-(8-4).
- Take SERRATED SHOVEL (C).
- Use SERRATED SHOVEL (D).
Chapter 2: Library
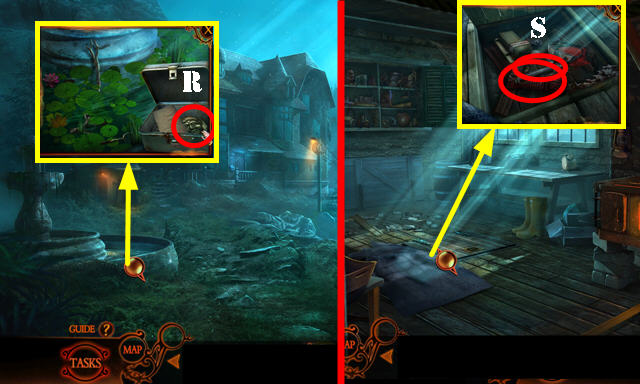
- Remove sheet (E). Play HOP; receive SILVER COIN 2/2.
- Take SPATULA; look at note (F).
- Use PIANO LEVER; take SCALE PAN (G).
- Take SPYGLASS LENS 1/2 (H).
- Go (I).
- Take BOOK PRESS WHEEL and STRONGBOX (J).
- Place SCALE PAN and SILVER COIN 2/2 (K).
- Take CYLINDER WHEEL and NAME PLATE (L).
- Walk down.
- Place NAME PLATE (M); open drawer; take CYLINDER WRAP (N).
- CYLINDER WRAP and CYLINDER WHEEL on CYLINDER BASE; take TYPEWRITER CYLINDER.
- Go to Library.
- Place TYPEWRITER CYLINDER (O).
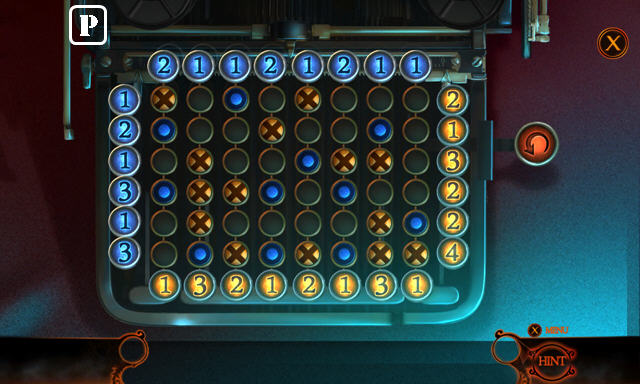
- Solution (P).
- Take SONG LYRICS.
- Walk down.
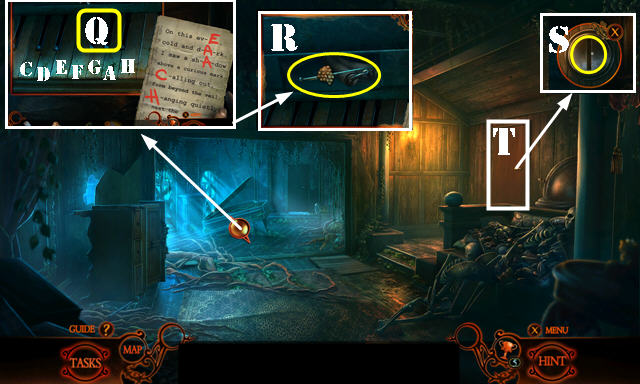
- Pan down; place SONG LYRICS. Select E-A-A-C-H (Q).
- Open compartment; take WINE BARREL BADGE 1/2 and PIN SET (R).
- Use PIN SET (S).
- Go (T).
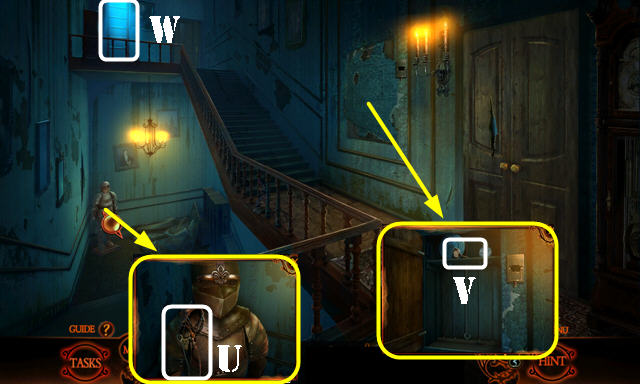
- Take REINS (U).
- Use SPATULA and open door; take OIL BOTTLE (V).
- Go (W).
- Talk (@).
- Take SPECIMEN RACK KEY (X).
- Place BOOK PRESS WHEEL; use OIL BOTTLE and select (Y).
- Take ROOM KEY (Z).
- Walk down.
- Use ROOM KEY (A). Play HOP; receive SUPPORT STATUETTE.
- Go (B).
- Place SUPPORT STATUETTE (C); take MUSIC CARD (C1).
- Go to Attic.
- Use MUSIC CARD (D).
- Solution (E).
- Take FLEUR-DE-LYS.
- Walk down.
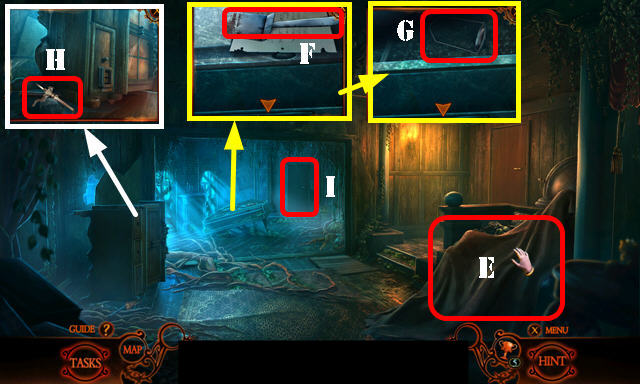
- Place FLEUR-DE-LYS and pull switch (F). Take SWORD and SPYGLASS LENS 2/2 (G).
- Go (H).
- Use SWORD (I). Play HOP (J); receive ORNATE BOOKEND.
- Go to Library.
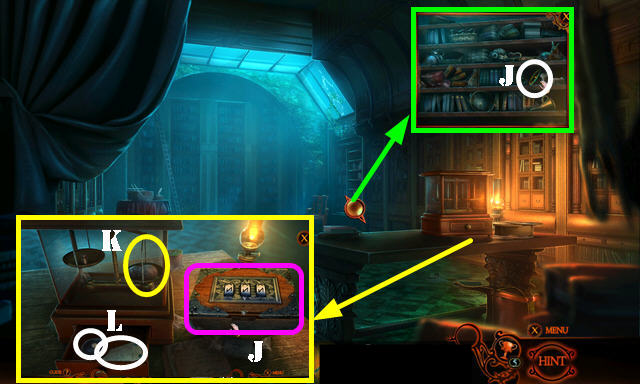
- Place ORNATE BOOKEND (K). Open folder (L).
- Go (M).
- Place SPYGLASS LENS 2/2 (N).
- Solution (O-P-Q).
- Take SYMBOL COMBINATION (R).
- Walk down.
- SYMBOL COMBINATION on STRONGBOX; solution (S). Take BIRD CARVING (T).
- Place BIRD CARVING and look at note; take MATCHES and CHAIN (U).
- Go to Stairway.
- Use CHAIN (V). Pull switch (V1).
- Look at note and take SADDLE (W).
- Play HOP (X); receive TORN MASK.
- Talk (Y).
- Go (Z).
- Place REINS and SADDLE (A).
- Look at note; take GOLDEN ORNAMENT (B).
- Go to Terrace.
- Place GOLDEN ORNAMENT; take ADHESIVE PATCH (C).
- Go to Stairway.

- ADHESIVE PATCH on TORN MASK; take SEALED MASK.
- Use SEALED MASK (D).
- Go (E).
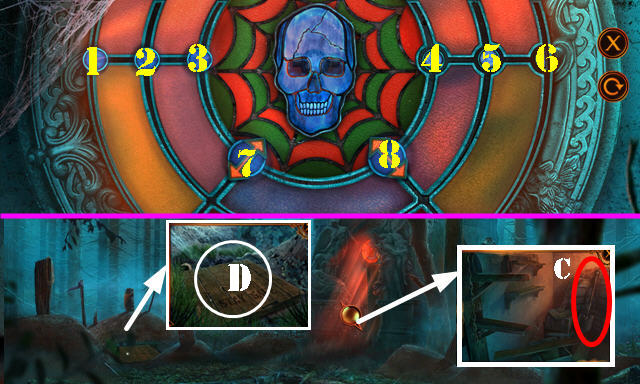
- Use MATCHES on scene. Flip switch (F).
- Take BOX CUTTER (G).
- Solution (1-7).
- Use BOX CUTTER (H); receive RUBBER TUBE.
- Go (I).
Chapter 3: Research Lab
- Take FUEL CANISTER (J).
- Place SPECIMEN RACK KEY and select (K). Play HOP; receive GEOLOGICAL TOOL KIT.
- Take TWEEZERS from GEOLOGICAL TOOL KIT.
- Go (L).
- Take STETHOSCOPE (M).
- Go to Basement.
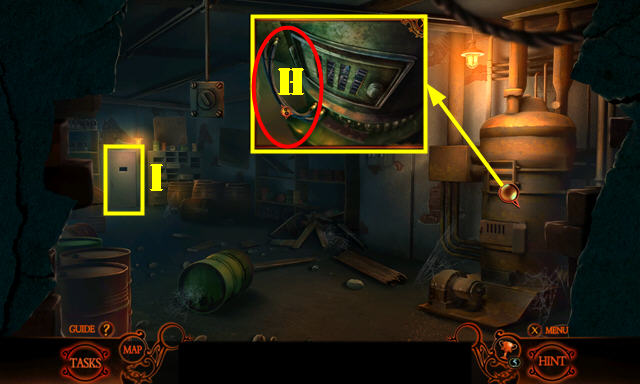
- Use TWEEZERS (N); receive ZIP TIE.
- Go to Research Lab.
- Place RUBBER TUBE (O).
- Use ZIP TIE (P).
- Remove cap and use FUEL CANISTER (Q). Pull cord (R).
- Select glass (S).
- Solution (T-T1).
- Take STRONG CORROSIVE and RECORDER TAPE.
- Go to Sample Storage.

- Plug cord (U).
- Place RECORDER TAPE (V).
- Press play (W).
- Take FILE HINT (X).
- Use STRONG CORROSIVE and open; take SPECIMEN JAR (Y).
- Walk down.
- Use FILE HINT; open drawer; take SAFE DIAL and WINE BARREL BADGE 2/2 (A).
- Place SPECIMEN JAR (B).
- Go to Wine Cellar (C).
- Place STETHOSCOPE and SAFE DIAL (D) and turn dial. Play HOP (E); receive FIRST AID ORNAMENT.
- Place WINE BARREL BADGE 2/2; take MAP MAKER BUTTON and TOURNIQUET BAR (F).
- Go to Sample Storage.
- Place FIRST AID ORNAMENT; take TOURNIQUET BAND (G).
- Go to Wine Cellar.
- TOURNIQUET BAND on TOURNIQUET BAR; take TOURNIQUET.
- Use TOURNIQUET and select. Look at note; take NAME TAG and DOLL HOUSE ORNAMENT 1/2 (H).
- NAME TAG on GEOLOGICAL TOOL KIT; take MAP MARKER COG.
- Go to Sample Storage.
- Place MAP MAKER BUTTON and MAP MARKER COG (I).
- Solution: 1-L-2-J-3-K-4-L-5-J-6-7-L-8-9-J-10.
- Look at note: take FOREST MAP and EXTINGUISHER KEY.
- Walk down.
- Use EXTINGUISHER KEY (M); take FIRE EXTINGUISHER (N).
- Use FIRE EXTINGUISHER (O).
- Go (P).
- Talk (P1).
- Go to Clara's Room.
- Remove sheet; play HOP (Q); receive DOLL HOUSE ORNAMENT 2/2.
- Open hand; take LADDER ROPE (R).
- Remove sheet; go (S).
- Place DOLL HOUSE ORNAMENT 2/2 (T).
- Solution (U-V-W).
- Take HEART HALF and POWER SWITCH (X).
- Walk down.
- Place HEART HALF and select. Look at note; take LIGHT BULB and LAMP SHADE (Y).
- Go (Z).
- Place LAMP SHADE (A). Play HOP; receive CARVED DRESS.
- Place CARVED DRESS and select. Move shirt and select note 3x; take HAMMER (B).
- Walk down.
- Use HAMMER; take ROPE LADDER STEPS and SEALING RESIN (C).
- Go to Terrace.
- Select LADDER ROPE; place ROPE LADDER STEPS; take ROPE LADDER.
- Place ROPE LADDER (D) and go down.
- Place FOREST MAP on scene. Take Map Piece (E); go forward (F).
- Take Map Piece (G); go right (H).
- Take Map Piece (I); go left (J).
- Take Map Piece (K); go right (L).
- Use SEALING RESIN and look at note (M); take RULER and DIGGING BLADE 1/2 (N).
- Take INCOMPLETE SUIT (O).
- Go (P).
Chapter 4: Excavation Site
- Take LEVER (Q).
- Use RULER (R). Play HOP; receive FISHING ROD.
- Walk down.
- Use FISHING ROD (S).
- Solution (1-6).
- Open box; take ELECTRIC HAND DRILL (T).
- Use ELECTRIC HAND DRILL; take MINERS SIGIL (U).
- Go to Excavation Site.
- Place MINERS SIGIL (V).
- Go to Caverns (W).
- Take INSULATION TAPE (A).
- Use INSULATION TAPE (B). Open lamp and place LIGHT BULB (C). Close lamp and select switch (D).
- Take WIRE MESH (E).
- Remove cover; use WIRE MESH and select dirt; take WRENCH and KEEPER LOCK PIECE 1/2 (F).
- Use WRENCH and pan up (G); take LUNCH BOX KEY and DIGGING BLADE 2/2 (H).
- Walk down.
- Place LUNCH BOX KEY; take WINDOW HANDLE and KEEPER LOCK PIECE 2/2 (I).
- Use DIGGING BLADE 2/2 (J). Flip switch (K).
- Walk down.
- Place WINDOW HANDLE (L). Play HOP (M); receive PROTECTIVE MASK.
- PROTECTIVE MASK on INCOMPLETE SUIT; take SAFETY SUIT.
- Go to Excavation Site.
- Place SAFETY SUIT and go (N).
- Take GEAR BOX LOCK 1/2 (O).
- Use LEVER; take VENTILATOR BLADE and DYNAMITE (P).
- Place VENTILATOR BLADE (Q) and POWER SWITCH (R).
- Solution (S).
- Take GEAR BOX LOCK 2/2 and ELEVATOR REMOTE (T).
- Use ELEVATOR REMOTE and flip switch (U).
- Play HOP (V); receive TIMER.
- TIMER on DYNAMITE; take TIMED BOMB.
- Place TIMED BOMB (W).
- Take CLOSED GEARBOX (X).
- GEAR BOX LOCK 2/2 on CLOSED GEARBOX; take GEARBOX.
- Walk down.
- Use GEARBOX; place gears (Y). Select handle (orange).
- Take MEMORY KEEPER (Z).
- KEEPER LOCK PIECE 2/2 on MEMORY KEEPER. Solution: (Ax2-Cx2-Ax2)-(A-Dx2-C)-(A-Dx2-B)-(A-B-D).
- Open book; take MANSION COORDINATES and MEDALLION (E).
- Place MANSION COORDINATES; Fx2-Gx2; select lever (H).
- Talk (I).
- Go to Clara's Room.
- Give MEDALLION (J).
- Congratulations, you've completed Phantasmat: Curse of the Mist Collector's Edition!
Created at: 2018-01-21