

Walkthrough Menu
General Tips
- This is the official guide for Phantasmat: Insidious Dreams.
- This guide won't tell you when to zoom into a location; the screenshots show each zoom scene.
- Hidden-object puzzles are referred to as HOPs. Only the locations of the HOPs will be shown.
- Use the Map to fast travel to a location.
Chapter 1: Children's Room
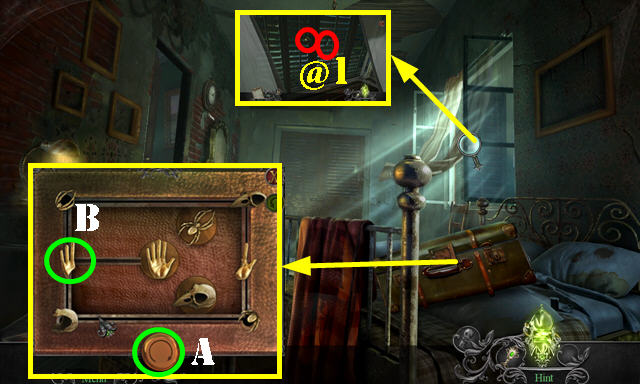
- Close shutters; take PINBALL LAUNCHER and SUITCASE PIECE (@1).
- Place SUITCASE PIECE. Solution: Ax5-B-Ax3-B-Ax5-B-Ax3-B-Ax5-B-Ax3-B.
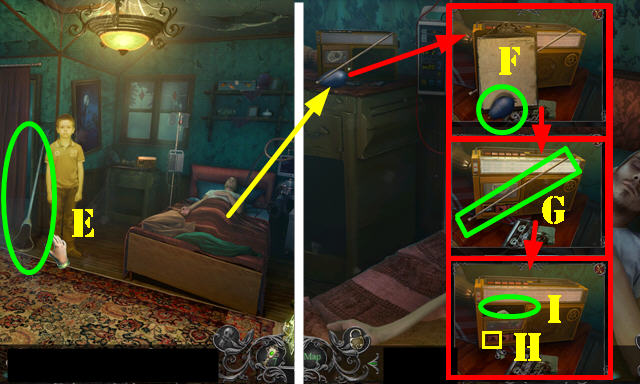
- Take BELT and ROSE BUTTON.
- Use BELT (C); select twice.
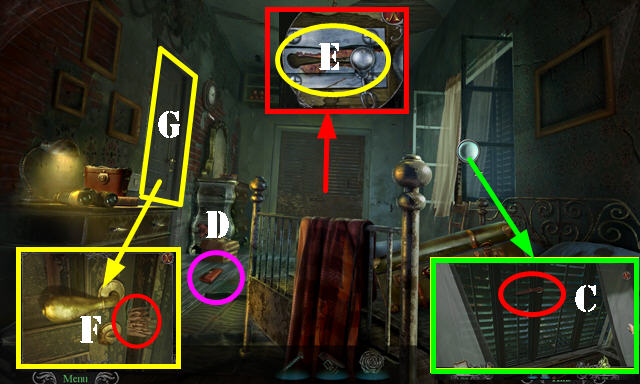
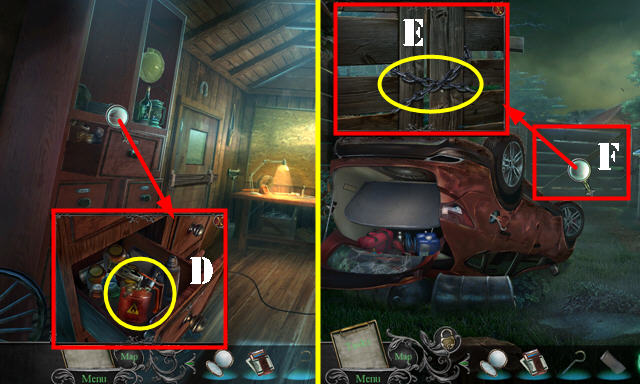
- Take WALLET (D).
- ROSE BUTTON on WALLET. Take WEDDING PHOTOGRAPH and ANTIQUE COIN.
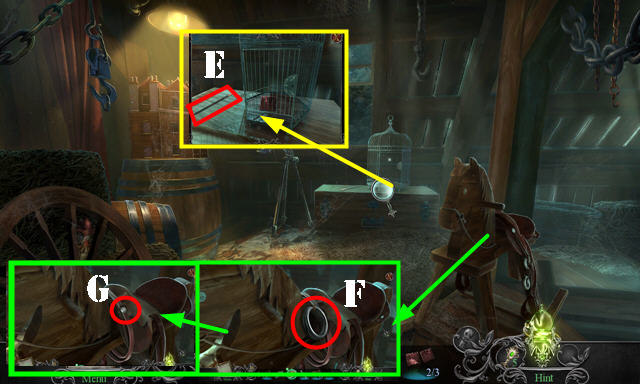
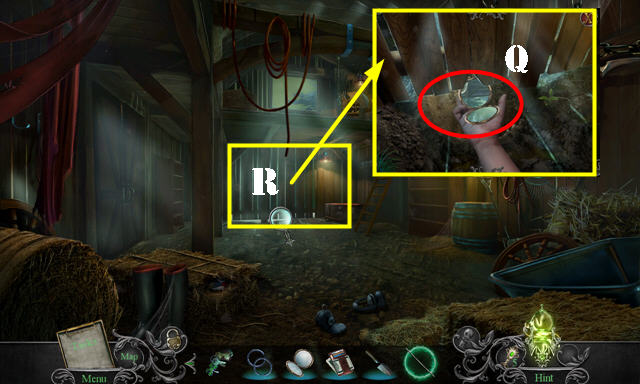
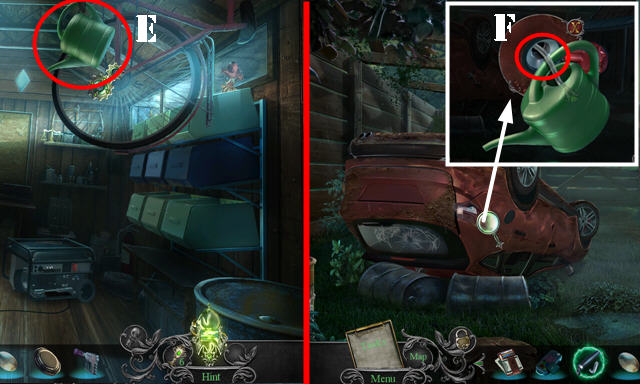
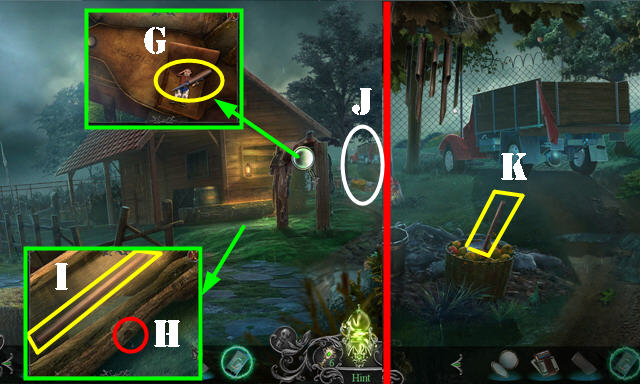
- Use ANTIQUE COIN (E). Play HOP; receive BROKEN SKI.
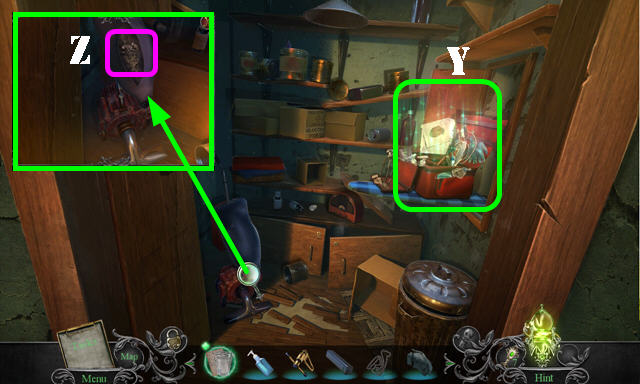
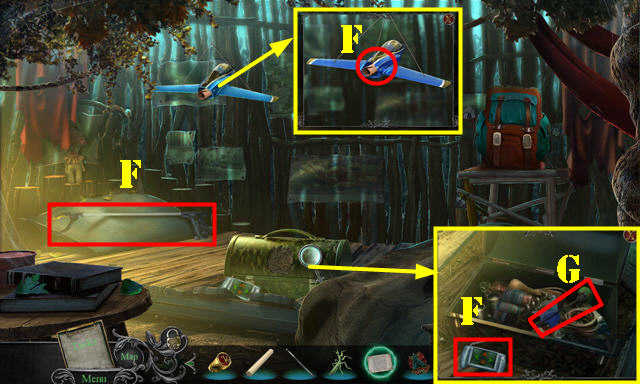
- Use BROKEN SKI (F); go (G).
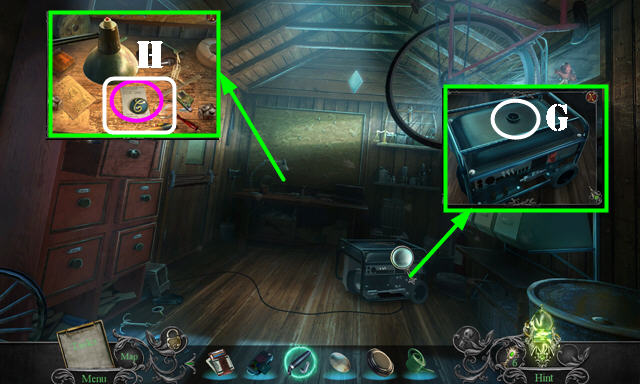
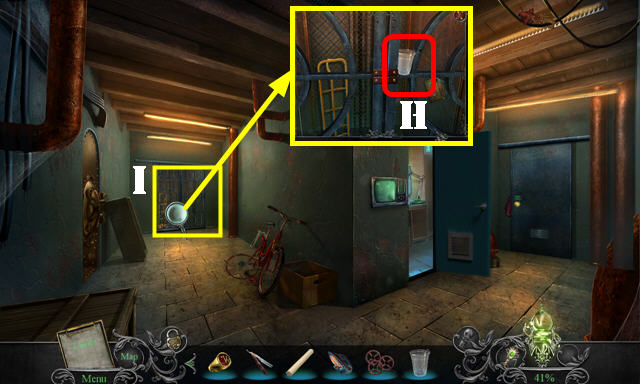
- Take WET BLANKET and ELECTRICAL TAPE (H).
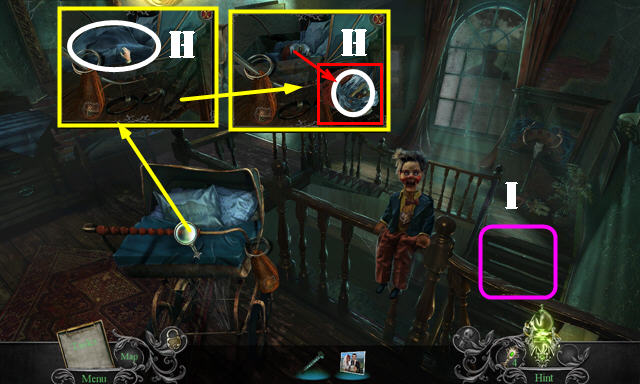
- Go (I).
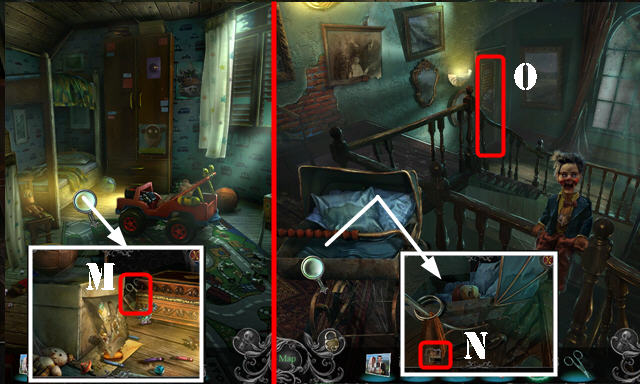
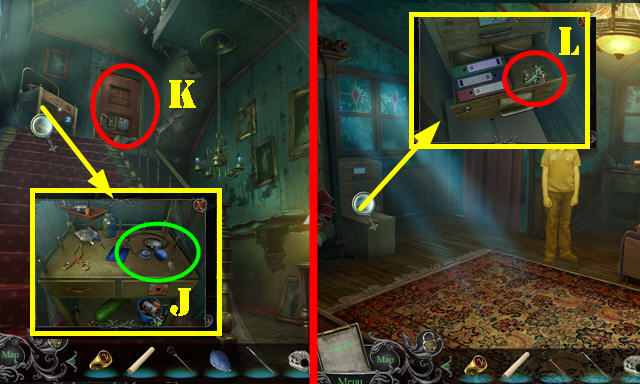
- Take HEART PIECES 1/2 and MAGNET HANDLE (J).
- Use MAGNET HANDLE (K); take MAGNETIC TWEEZERS.
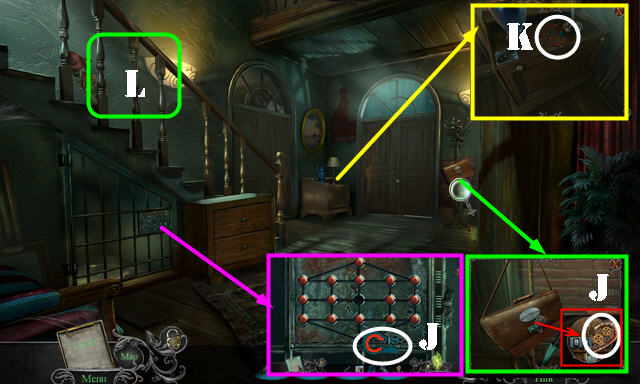
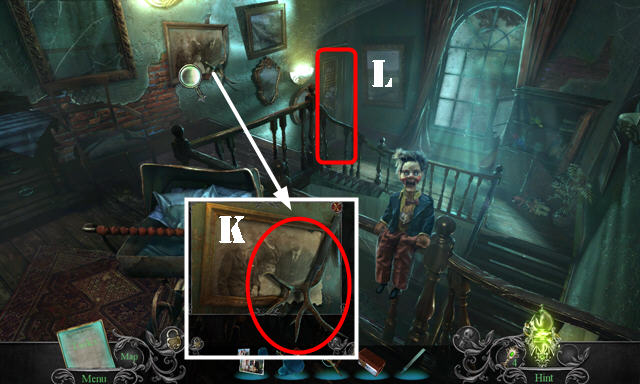
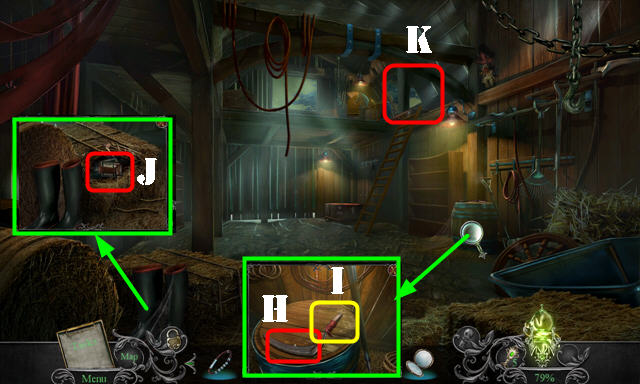
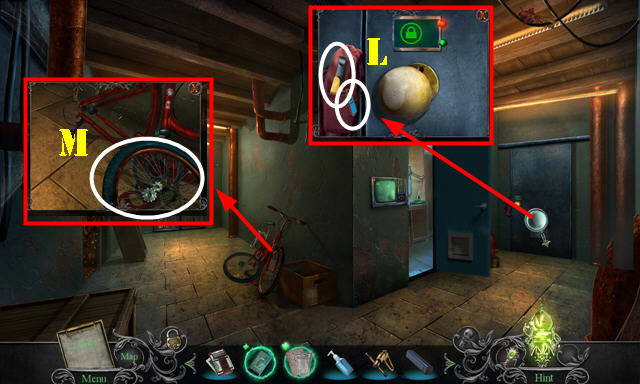
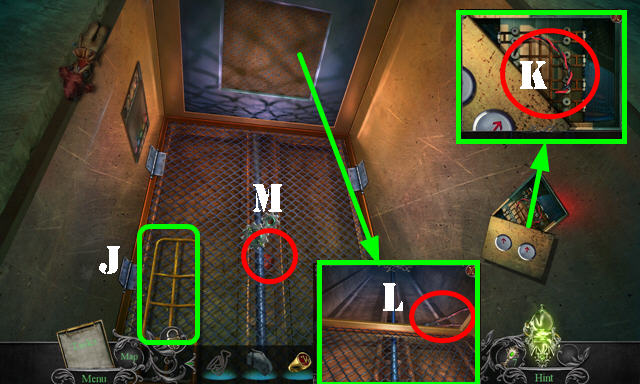
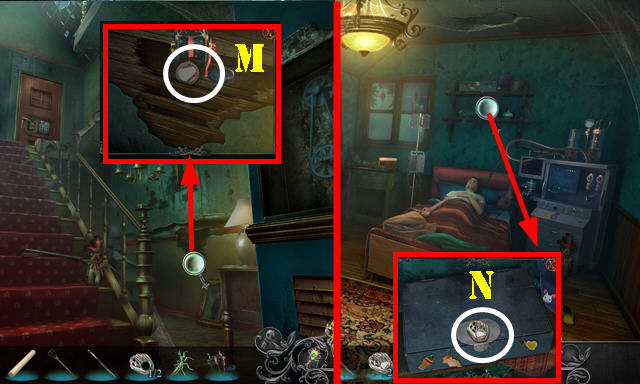
- Go (L).
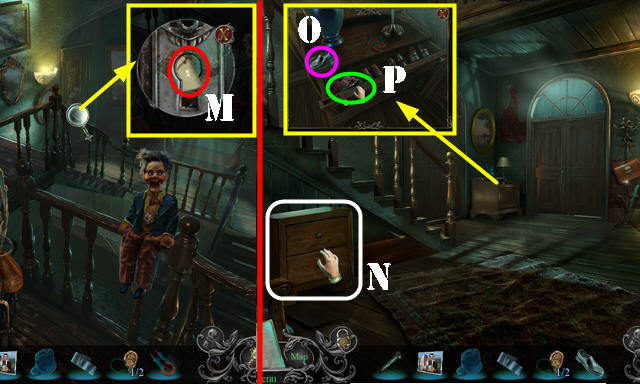
- Use MAGNETIC TWEEZERS; take SILVER SHOE (M).
- Go to Main Hall.
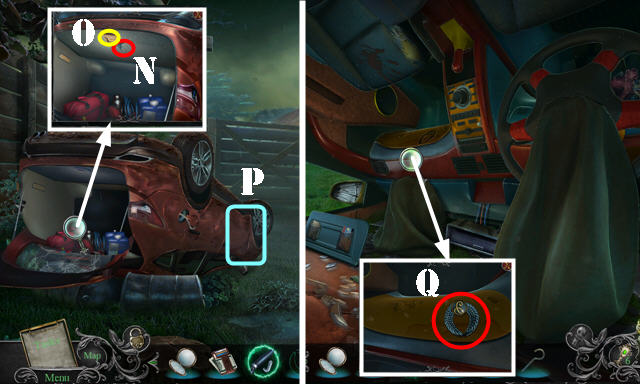
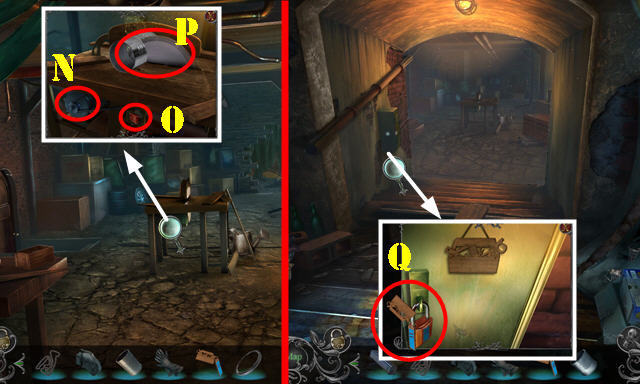
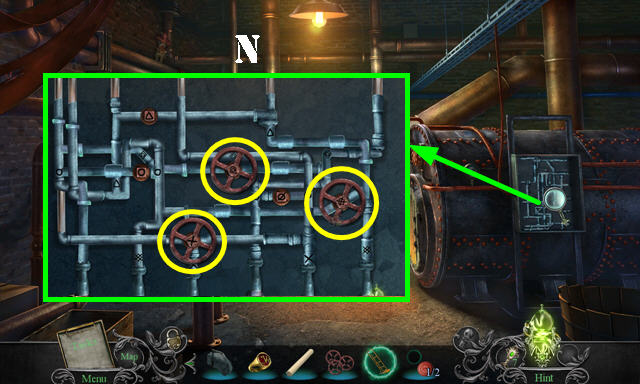
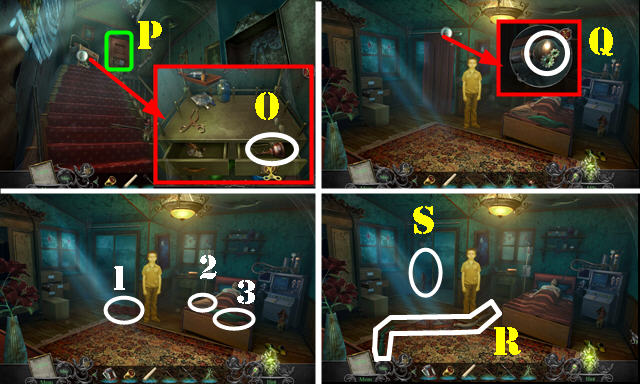
- Move cabinet (N).
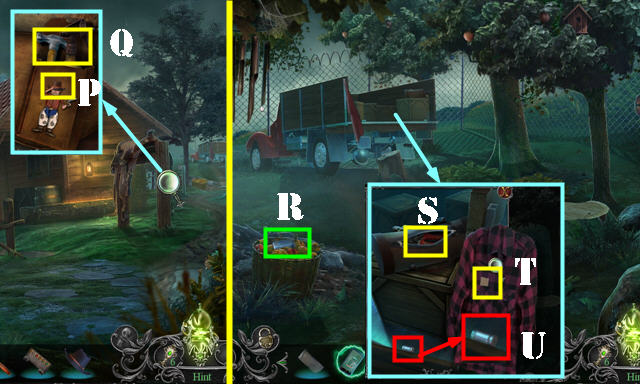
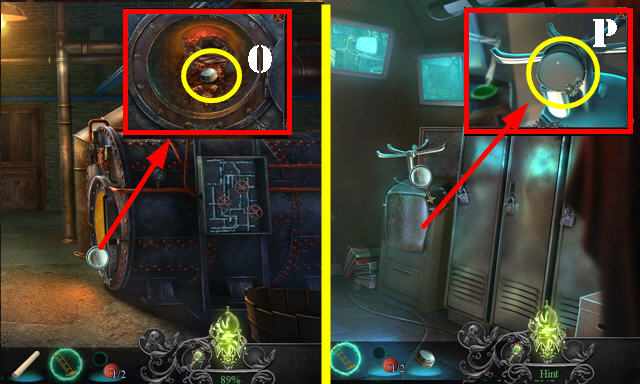
- Place SILVER SHOE (O); take HEART PIECES 2/2 (P).
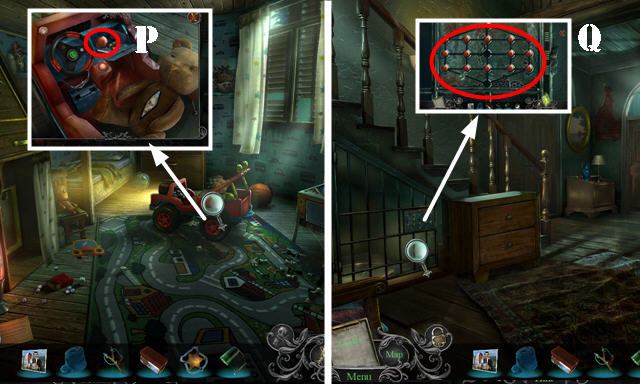
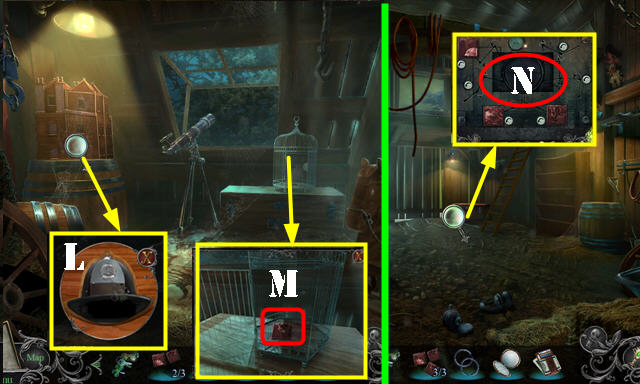
- Go to Hallway.
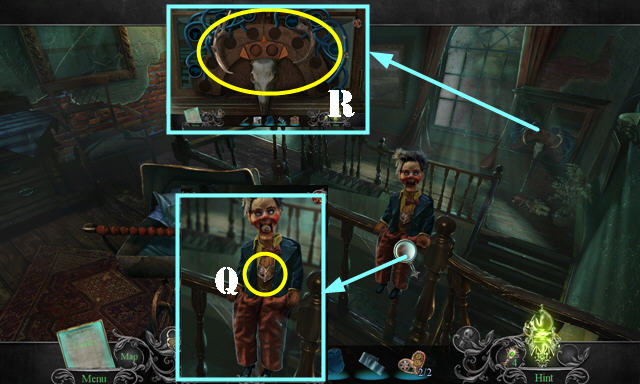
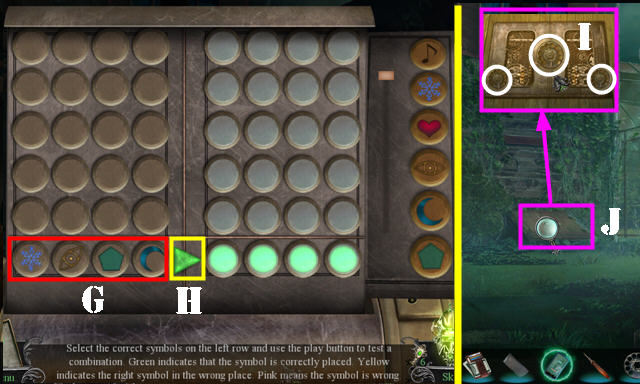
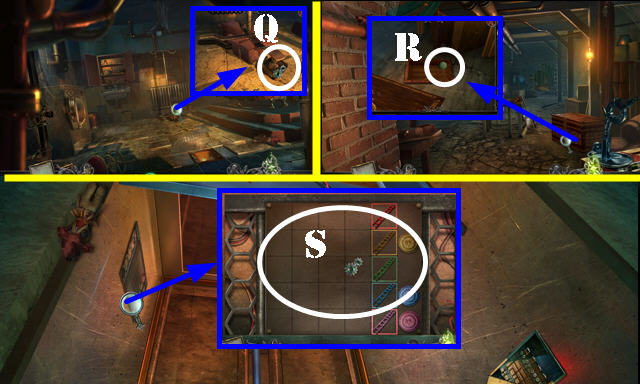
- Place HEART PIECES 2/2 (Q); receive WOODEN TOKENS.
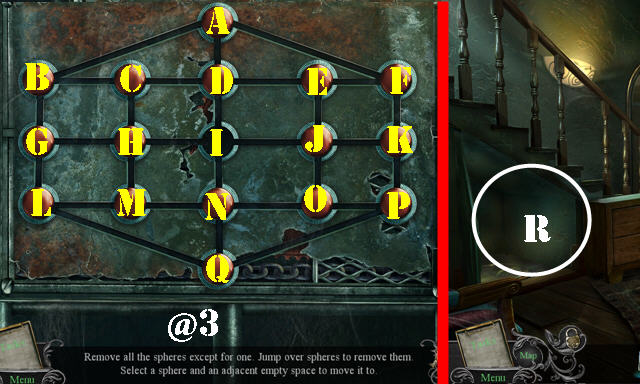
- Place WOODEN TOKENS (R).
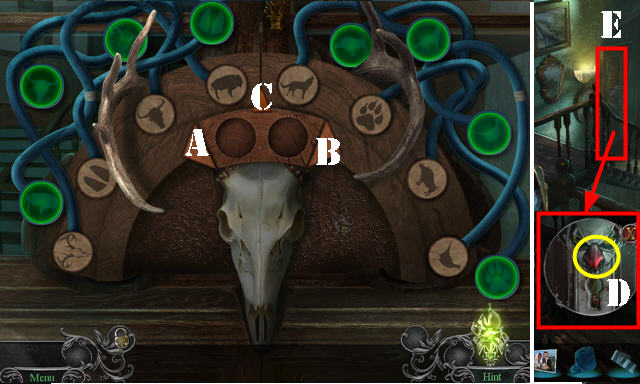
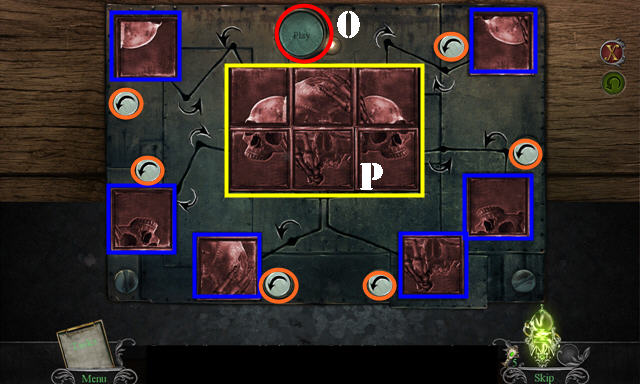
- Solution: Bx3-C-Ax4-C-A-C-A-C-B-C-Bx3-C-B-C-B-C-A-C-B-C-Ax3-C-Ax3-C-Bx3-C-Bx2-C-Ax3-C-Bx3-C-A-C-B-C-A-C-B-C-A-C.
- Move items; take CLOWN'S NOSE and STAR EMBLEMS 1/2.
- Place CLOWN'S NOSE (D); go (E).
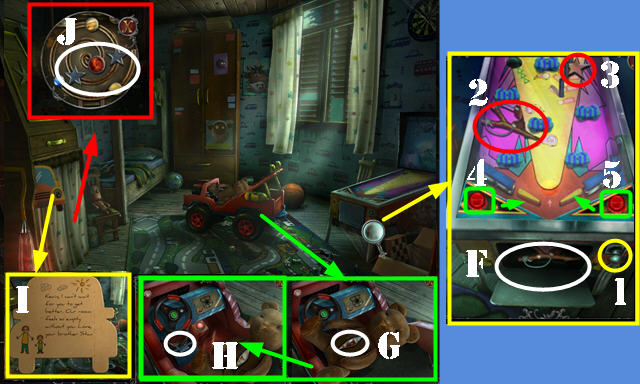
- Place PINBALL LAUNCHER (1). Hit both targets (2-3) using the controls for the flippers (4-5).
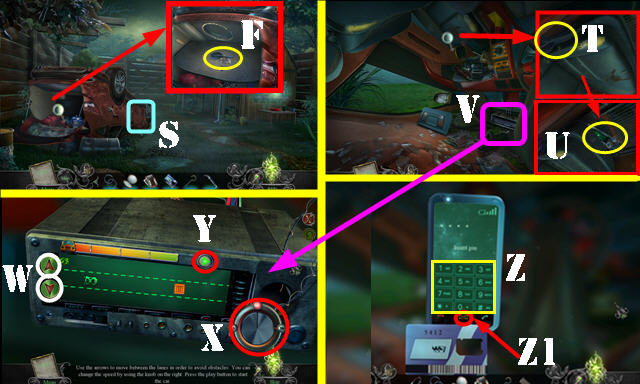
- Take SLINGSHOT and STAR EMBLEMS 2/2 (F).
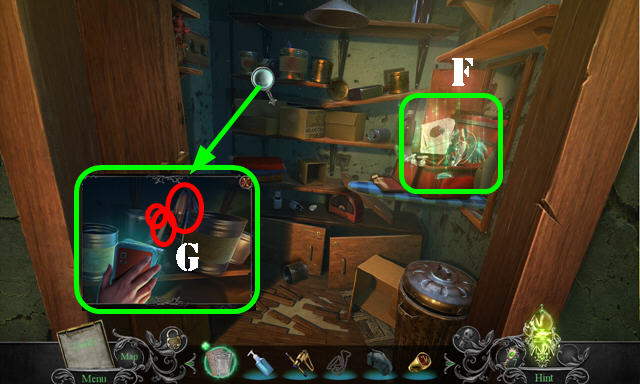
- Open bear; take PENCIL SHARPENER (G). Use ELECTRICAL TAPE (H).
- Look at note and open curtain (I); place STAR EMBLEMS 2/2 (J). Play HOP; receive FILE.
- Walk down.
- Use FILE (K); receive WOODEN ANTLER.
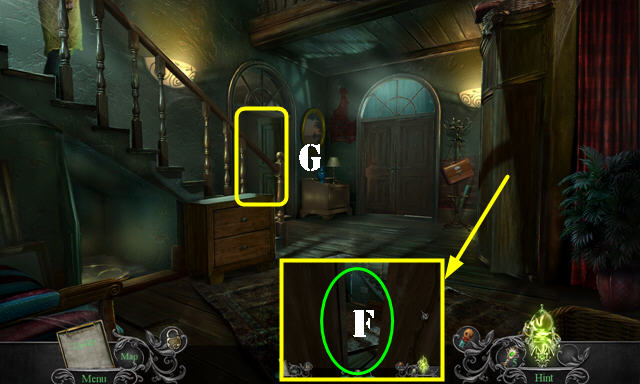
- Go (L).
- Look at photo. Use WOODEN ANTLER (M); receive INCOMPLETE ELECTROMAGNET and SCISSORS.
- Walk down.
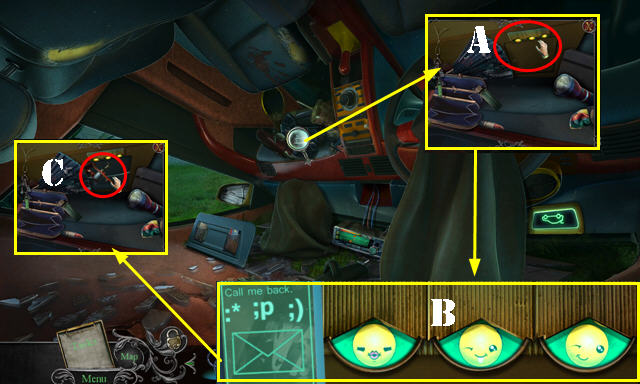
- Use SCISSORS; take BATTERY and POLICE BADGE (N).
- Select INCOMPLETE ELECTROMAGNET and place BATTERY; receive ELECTROMAGNET.
- Go (O).
- Place POLICE BADGE; take LOCK SPHERE (P).
- Go to Main Hall.
- Place LOCK SPHERE (Q).
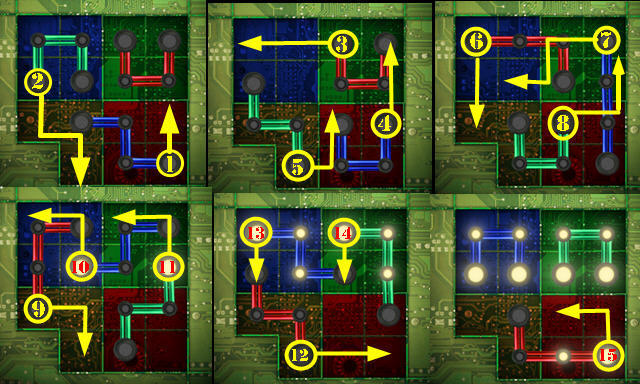
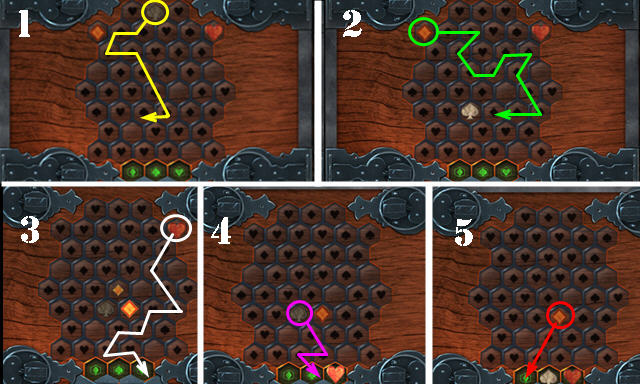
- Solution (@3): (A-I)-(N-D)-(K-I)-(P-N)-(H-J)-(M-O)-(G-A)-(A-K).
- (K-I)-(L-P)-(P-N)-(D-F)-(N-D)-(C-E)-(F-D).
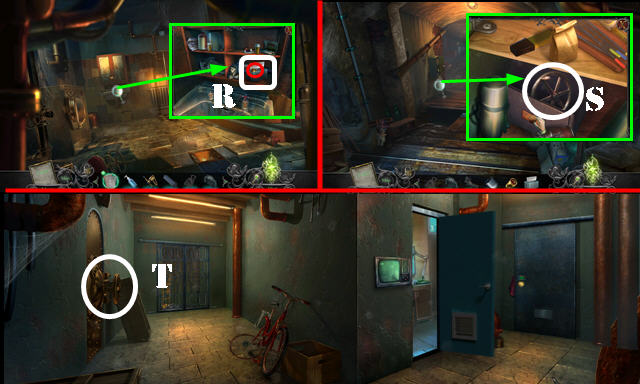
- Go (R).
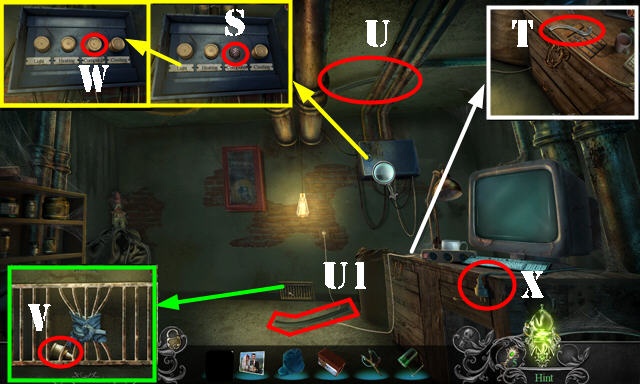
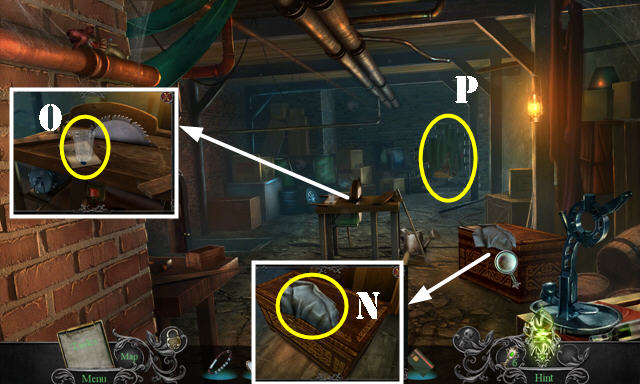
- Open cover; take PADLOCK PIN (S).
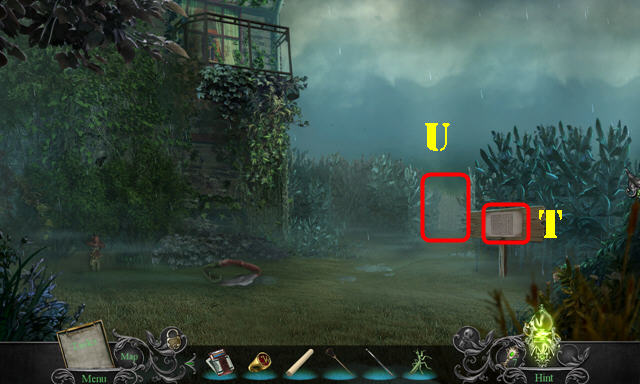
- Take RUBBER TUBE (T).
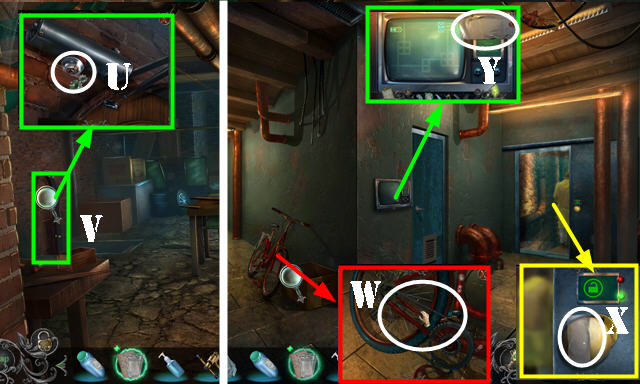
- Use SLINGSHOT (U); take METAL ROD (U1).
- Use WET BLANKET and METAL ROD; take FUSE (V).
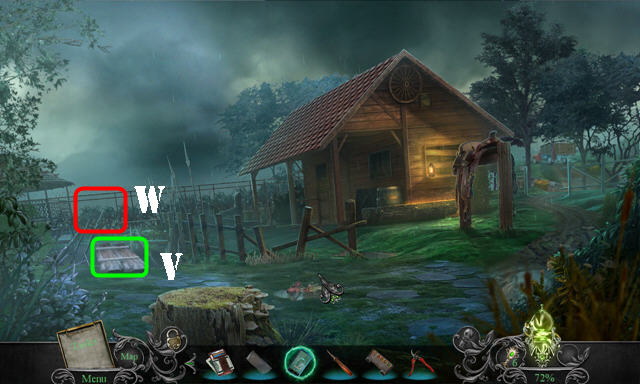
- Place FUSE (W); select cord (X).

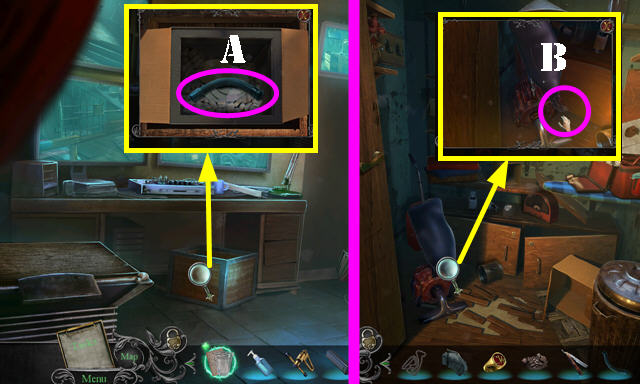
- Play HOP (Y). WEDDING PHOTOGRAPH is automatically used; receive DULL PENCIL.
- PENCIL SHARPENER on DULL PENCIL; take SHARP PENCIL.
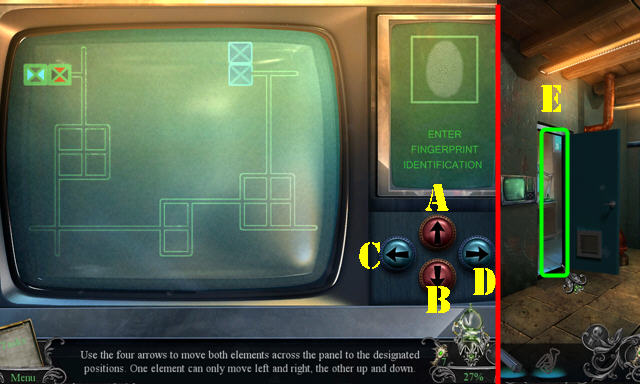
- Use SHARP PENCIL (Z). Slide marker (A).
- Move items; take EMERGENCY HAMMER (B).
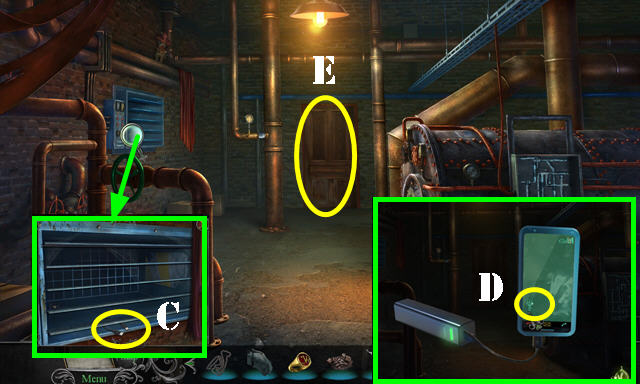
- Use EMERGENCY HAMMER; select hose (C).
- Use METAL ROD (D) and go (E).
- Look (F).
- Go to Kitchen (G).
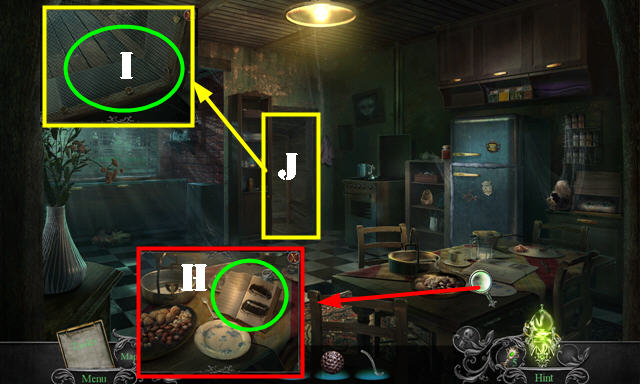
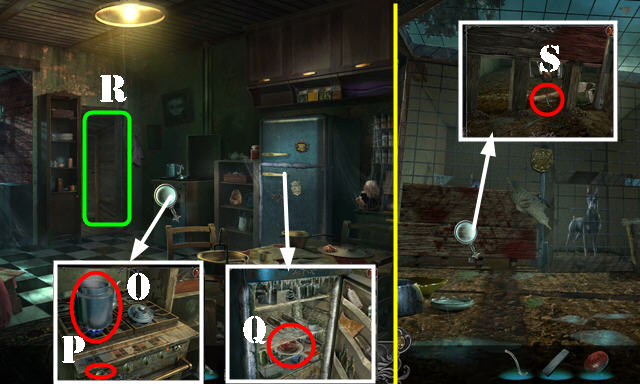
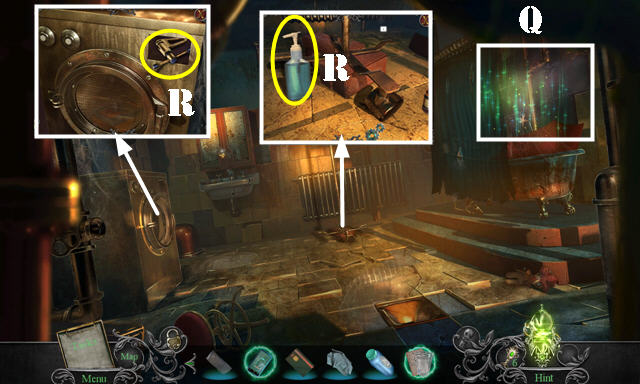
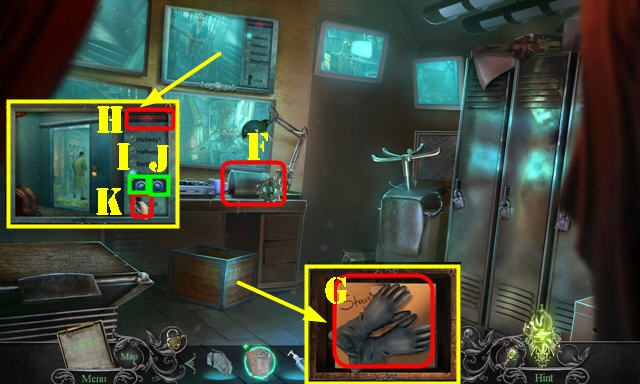
- Look at book (H); take BOTTLE OPENER and BEER GLASS.
- Use BOTTLE OPENER (I).
- Go (J).
- Use BEER GLASS (K); receive WATER.
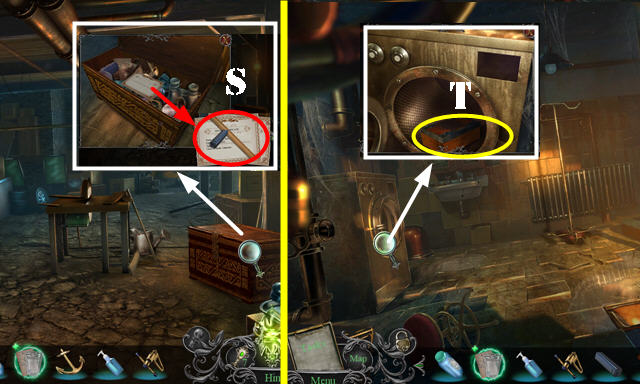
- Take SHARPENING STONE (L).
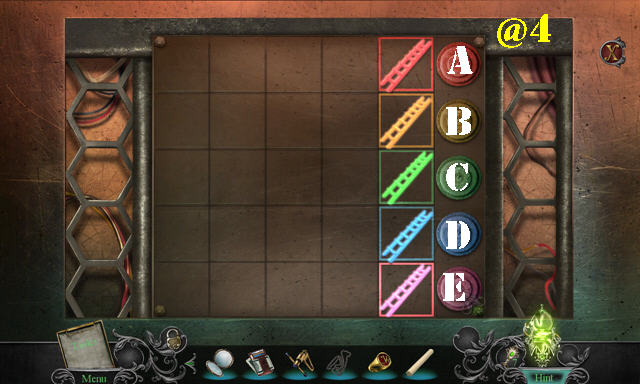
- Place PADLOCK PIN (M).
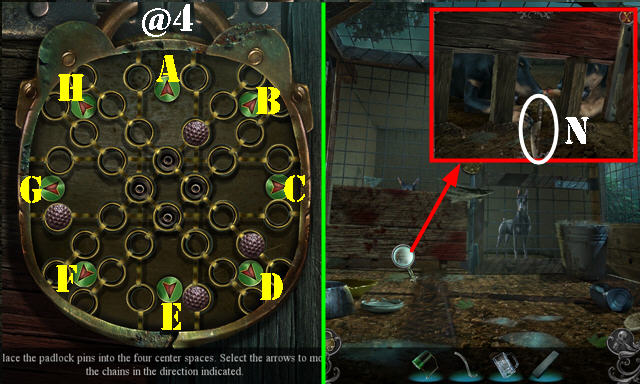
- Solution (@4): H-A-D-Cx3-Ex3-Hx2.
- Use ELECTROMAGNET; take KNIFE (N).
- Walk down.
- Place WATER (O). Select knob (P); take BOILING WATER.
- Use BOILING WATER and open door; take WRAPPED HAM (Q).
- KNIFE on WRAPPED HAM; take HAM.
- Go (R).
- Give HAM; take JEN'S CODED BRACELET (S).
- Go to Main Hall.
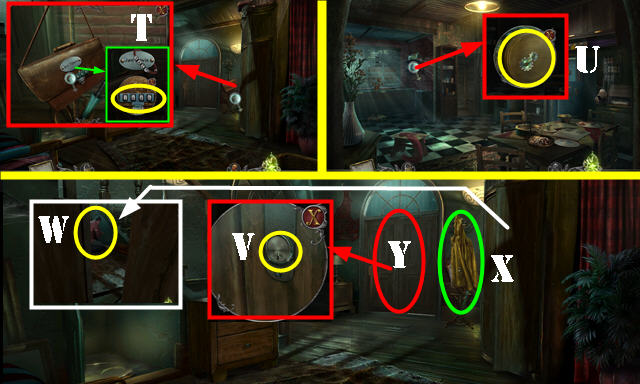
- Place JEN'S CODED BRACELET; enter 1629 (T). Look at napkin and take JAR OPENER.
- Go to Kitchen.
- Use JAR OPENER (U). Play HOP; receive HOUSE KEYS.
- Walk down.
- Use HOUSE KEYS (V); receive KEYS.
- Push (W).
- Take RAINCOAT (X). Take HAND MIRROR and PLIERS from RAINCOAT.
- Use PLIERS (V); KEYS get automatically used. Select key fob.
- Exit (Y).
Chapter 2: The Barn
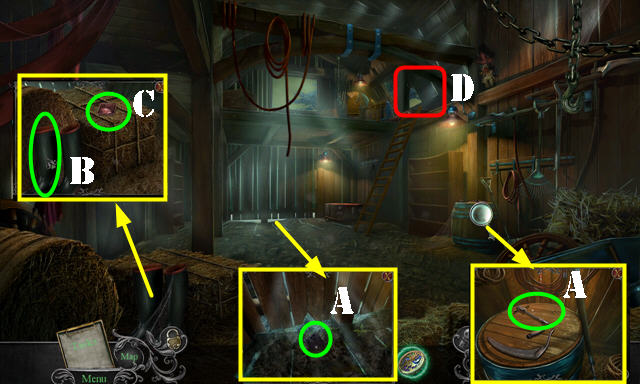
- Take PIN REMOVER and TILES 1/3 (A).
- Select boot (B); take TILES 2/3 (C).
- Go (D).
- Take KNITTING NEEDLE (E).
- Take METAL RINGS (F). Use PIN REMOVER (G); take LEATHER REINS.
- KNITTING NEEDLE on HAND MIRROR; take LINDA'S HAND MIRROR.
- Walk down.
- Select piece; use SHARPENING STONE (H) and LEATHER REINS (I); take SICKLE.
- Use SICKLE and select. Move items; take MIKE'S MONEY CLIP and FIREFIGHTER HELMET (J).
- Go (K).
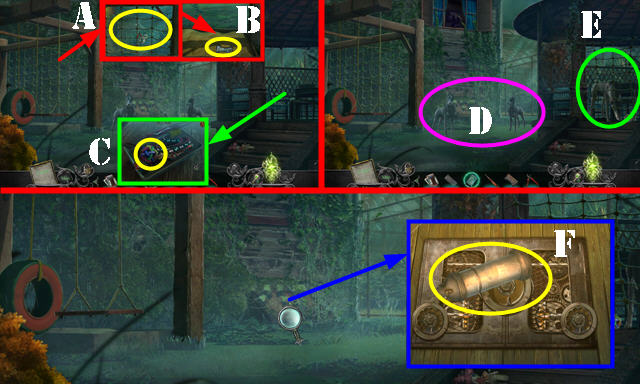
- Place FIREFIGHTER HELMET (L). Play HOP; receive SPARROW EMBLEM.
- Place SPARROW EMBLEM; take TILES 3/3 (M).
- Walk down.
- Place TILES 3/3 (N).
- Solution; use the buttons (orange) to rotate the tiles as shown (blue). Press play (O). Solved image (P).
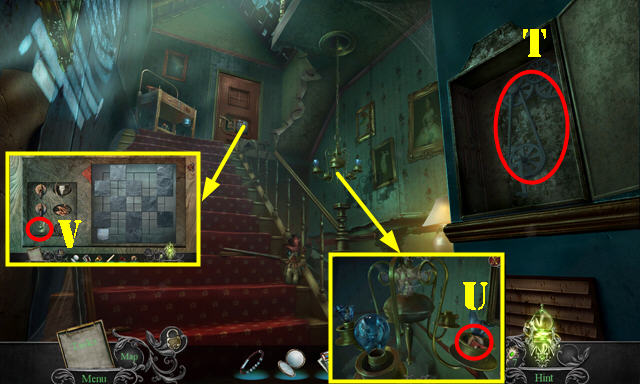
- Look at note; take TROWEL and METAL ROD.
- Use TROWEL and LINDA'S HAND MIRROR (Q).
- Go (R).
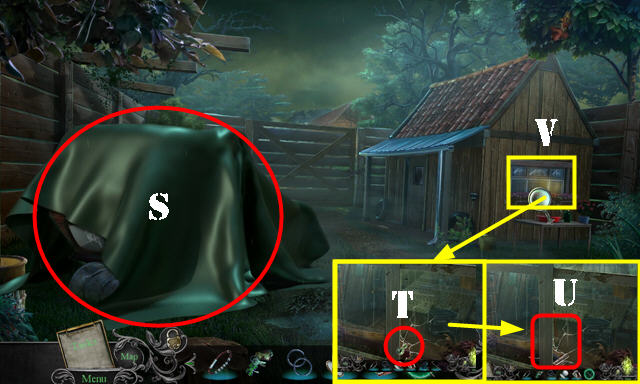
- Remove covers (S).
- Move flowers; take WELDING TONGS (T).
- Select KEYS; receive BROKEN CAR REMOTE.
- WELDING TONGS on METAL ROD; take METAL HOOK.
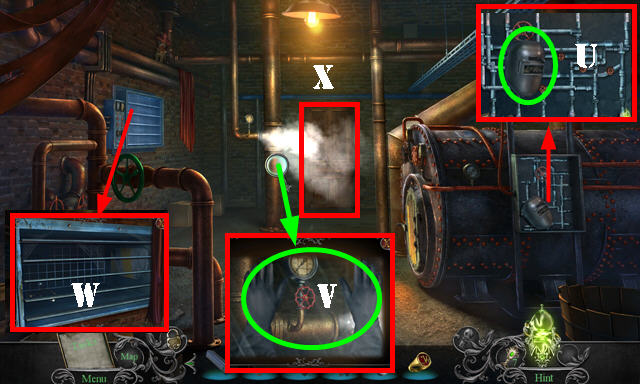
- Use METAL HOOK (U).
- Enter (V).
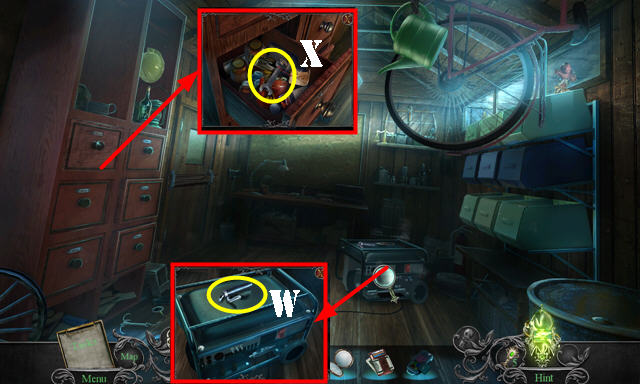
- Take BENT HANDLE and open cap (W).
- Open drawer; take WRENCH (X).
- Go to Barn Attic.
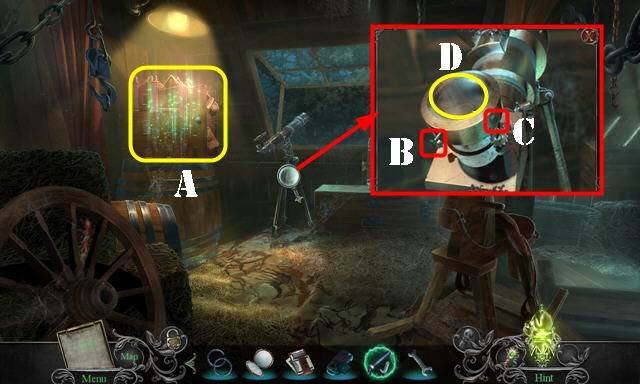
- Play HOP (A); receive BOXING GLOVE TOY.
- Select pin (B) and use WRENCH (C).
- Take TELESCOPE LENS and PHONE BATTERY (D).
- Go to Workshop.
- Use BOXING GLOVE TOY (E); receive WATERING CAN.
- Walk down.
- Open tank; insert RUBBER TUBE and use WATERING CAN; take CAN WITH GASOLINE (F).
- Go to Workshop.
- Use CAN WITH GASOLINE (G).
- Take CAR LOGO PARTS 1/3 and look at note (purple).
- Place TELESCOPE LENS, BROKEN CAR REMOTE, and PHONE BATTERY (H).
- Solution (1-15).
- Receive CAR REMOTE.
- Walk down.
- Use CAR REMOTE (I). Enter (J).
- Take SCREW HOOK and CAR LOGO PARTS 2/3 (K).
- Release latch (L).
- Select visor twice; take PHONE CIPHER (M).
- Walk down.
- Take CAR LOGO PARTS 3/3 (N); select handle (O).
- Go (P).
- Place CAR LOGO PARTS 3/3 (Q). Play HOP; receive GLUE.
- GLUE on BENT HANDLE; take FIXED HANDLE.
- Walk down.
- Place FIXED HANDLE; take PACKING TAPE and SEAT ADJUSTER (R).
- Go (S).
- Use SEAT ADJUSTER (T); take RADIO PANEL (U).
- Place RADIO PANEL (V). Solution is random. Use the buttons (W) to move up and down. Select speed (X) and press play (Y) to begin.
- Place PHONE CIPHER and dial 5412 (Z). Select email icon (Z1); receive CELL PHONE.
- Select panel and place CELL PHONE (A).
- Solution (B).
- Take BLOWTORCH PART (C); receive UNCHARGED CELL PHONE.
- Go to Workshop.
- Select area and place BLOWTORCH TOP; take BLOWTORCH (D).
- Walk down.
- Use BLOWTORCH (E).
- Go (F).
- Take SEAM RIPPER (G).
- Use SCREW HOOK (H); take POLES 1/2 (I).
- Go (J).
- Take POLES 2/2 (K).
- Walk down.

- Use POLES 2/2 (L). Play HOP; receive SAW WIRE.
- Go to Orchard.
- METAL RINGS on SAW WIRE; take WIRE SAW.
- Use WIRE SAW (M); take STUMP.
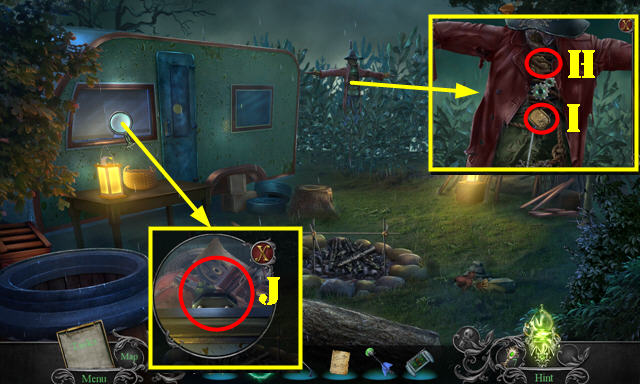
- Place STUMP (N). Open door; take CONTAINER CLUE and MINIATURE HAT (O).
- Walk down.
- Place MINIATURE HAT (P); take INSECT REPELLENT and HAMMER (Q).
- Go to Orchard.
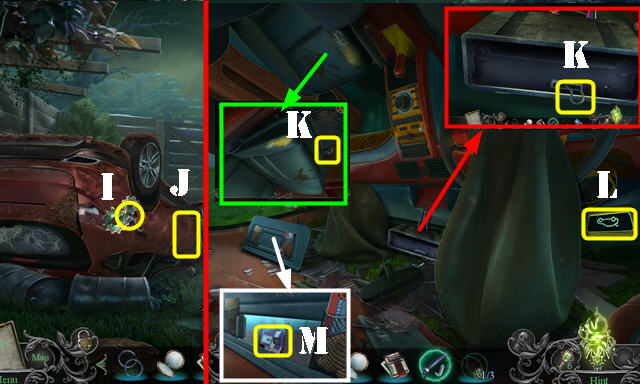
- Use INSECT REPELLENT; take SOAP (R).
- Use SOAP and select shirt (S); look at note (T). Take PRUNERS (S).
- Use HAMMER (U); receive TRUCK DOOR.
- Walk down.
- Place TRUCK DOOR (V).
- Go (W).
Chapter 3: Basement
- Use PRUNERS (A); receive ROPE NET. Take ORNATE BONE (B).
- Place ORNATE BONE; take TOY BALL (C).
- Throw TOY BALL (D).
- Place ROPE NET (E).
- Use PRUNERS; take CYLINDRICAL CONTAINER (F).
- Select CYLINDRICAL CONTAINER; place CONTAINER CLUE. Select symbols as shown (G). Press (H).
- Take DIAL and ACCESS CARD.
- Place DIAL; select all three dials (I).
- Go (J).

- Use SEAM RIPPER; take MATTRESS FABRIC (K).
- Use MATTRESS FABRIC (L).
- Go (M).
- Take RAG and BABY POWDER (N).
- Take GLASS WITH RECIPE (O).
- Go (P).
- Open curtain. Play HOP (Q); receive ANCHOR EMBLEM.
- Take HAND SANITIZER and BIKE CHAIN TOOL (R).
- Walk down.
- Place ANCHOR EMBLEM; look at note; take PORTABLE CHARGER and RULER (S). Close the chest.
- Go forward.
- Use RULER; take LOCKBOX (T).
- Select LOCKBOX. Solution (1-5).
- Take SCREWDRIVER.
- Walk down.
- Use SCREWDRIVER (U).
- Go (V).
- Use BIKE CHAIN TOOL; take BIKE CHAIN (W) and select bicycle.
- Use BABY POWDER and PACKING TAPE; take STAN'S FINGERPRINT (X).
- Place STAN'S FINGERPRINT (Y).
- Solution: D-A-D-Bx4-D-B-C-A-C-Bx2-C-B-Dx5-B-D-A-C-A-Dx3-B-D-Ax5-D-A-C-A-C.
- Enter Surveillance Room (E).
- Use RAG (F); receive WET RAG.
- Take CAN (F) and ASBESTOS GLOVES (G).
- Use ACCESS CARD (H); select Jx3-K.
- Walk down.
- Take TIRE SCRAPER and MAGNETIC KEY (L).
- Use TIRE SCRAPER (M); take RUBBER TIRE.
- Walk down.
- Place RUBBER TIRE (N); flip switch (O). Place CAN (P); receive CUT CAN.
- Walk down.
- Use MAGNETIC KEY (Q). Play HOP; receive GOLDEN HANDLE.
- Go to Bathroom.
- Place GOLDEN HANDLE; take WAYNE'S RING and ACETONE WIPES (R).
- Go to Basement Stairs.
- Use ACETONE WIPES; take VALVE (S).
- Go to Underground Hallway.
- Place VALVE and enter (T).
- Take WELDING MASK (U).
- Use WELDING MASK, ASBESTOS GLOVES, and CUT CAN (V).
- Open vent (W).
- Go (X).
- Play HOP (Y): receive RAZOR.
- Open bag; take EXPLOSIVE PEBBLES (Z).
- Go to Surveillance Room.
- Use RAZOR and look at note; take VACUUM HOSE (A).
- Go to Utility Closet.
- Attach VACUUM HOSE; take VACUUM CLEANER (B).
- Walk down.
- Use VACUUM CLEANER; take USB CABLE (C).
- PORTABLE CHARGER and USB CABLE on UNCHARGED CELL PHONE. Select phone screen. Select flashlight icon (D); take CELL PHONE WITH FLASHLIGHT.
- Go (E).
- Play HOP (F); receive HEMP WICK.
- Use CELL PHONE WITH FLASHLIGHT; take CHALK, HOT IRON, and VALVES (G).
- Go to Underground Hallway.
- HAND SANITIZER, EXPLOSIVE PEBBLES, and HEMP WICK on GLASS WITH RECIPE. Take EXPLOSIVE CONCOCTION.
- Use EXPLOSIVE CONCOCTION and HOT IRON (H).
- Enter (I).
- Take BROKEN LIFT CART (J).
- Use RAZOR; take WIRES (K).
- Place WIRES; take BOLT CUTTERS (L).
- Use BOLT CUTTERS; take BUTTON 1/2 (M).
- Go to Boiler Room.
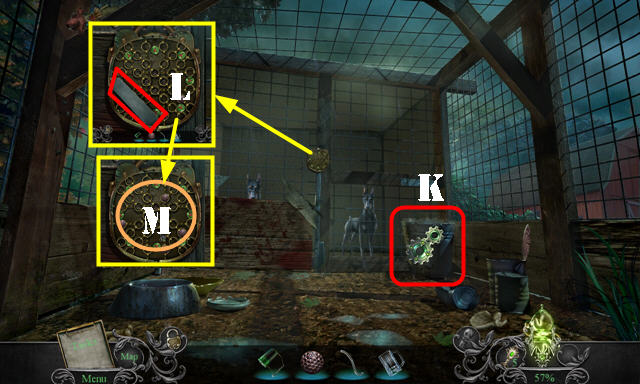
- Place VALVES. Solution (N).
- Use WET RAG; take PAPERWEIGHT (O).
- Go to Surveillance Room.
- Use PAPERWEIGHT; receive WHEEL 1/2 (P).
- Go to Bathroom.
- Use PAPERWEIGHT; receive WHEEL 2/2 (Q).
- Walk down.
- WHEEL 2/2 on BROKEN LIFT CART; take LIFT CART.
- Use LIFT CART; take BUTTON 2/2 (R).
- Go to Elevator Shaft.
- Place BUTTON 2/2 (S).
- Solution (@4): Ax4-Bx5-Ex10-D-Ex6-Dx4-Ex6-D-Ex7-Dx4-Ex5.
- Open door; place BIKE CHAIN and use BIKE CHAIN TOOL (T).
- Take EJECT BUTTON and KNOB (U).
- Place KNOB (V).
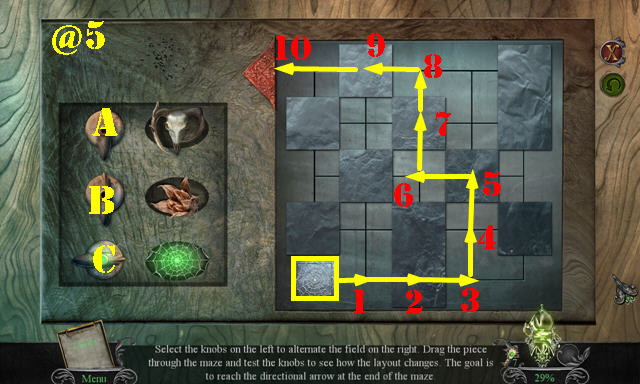
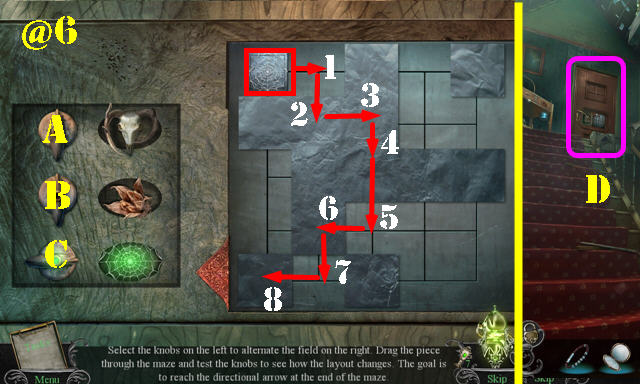
- Solution one (@5): 1-A-2-B-3-C-4-A-5-B-6-7-A-8-9-B-10.
- Solution two (@6): 1-A-2-3-4-B-5-6-7-A-8.
- Enter (D).
Chapter 4: Kevin's Room
- Take LACROSSE STICK (E).
- Take RUBBER HORN (F).
- Look at note; take ANTENNA (G).
- Place EJECT BUTTON (H); take BASEBALL MITT EMBLEM 1/2 (I).
- Walk down.
- Place RUBBER HORN; take BLOOD PRESSURE METER (J).
- Go (K).
- Use BLOOD PRESSURE METER; open folder; take MANTIS and FISHING REEL (L).
- Walk down.
- Use FISHING REEL; take BASEBALL MITT EMBLEM 2/2 (M).
- Go to Kevin's Room.
- Place BASEBALL MITT EMBLEM 2/2 (N). Play HOP; receive WINDING KEY.
- Walk down.
- Use WINDING KEY; take OILER (O).
- Go (P).
- Use OILER (Q).
- Select (1-3); take CURTAIN ROPE (R).
- Select door; use CURTAIN ROPE and go (S).
- Take MAZE MAP (T).
- Place MAZE MAP (U).
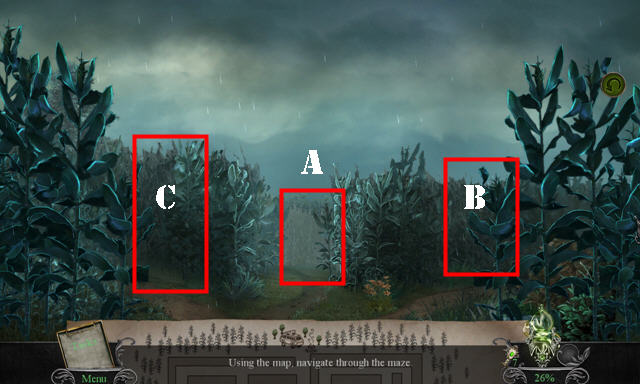
- Solution: B-C-A-Bx3-C-B-C.
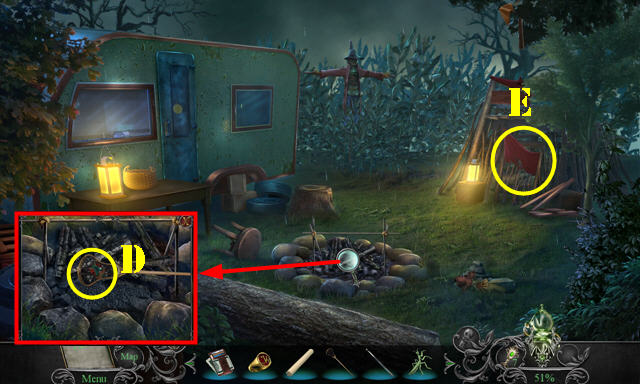
- Use LACROSSE STICK; take CAMPER BADGE (D).
- Open curtain and enter (E).
- Remove sheet; take GRABBER TOOL, SIGN CLUE, and CONTROLLER (F).
- Place CAMPER BADGE; take BOW SUCTION CUP (G).
- ANTENNA on CONTROLLER; take AIRPLANE CONTROLLER.
- Walk down.
- Use GRABBER TOOL (H); take BUCKLE PIECE (I).
- Use BOW SUCTION CUP (J). Play HOP; receive AIRPLANE PART.
- Go to Children's Shack.
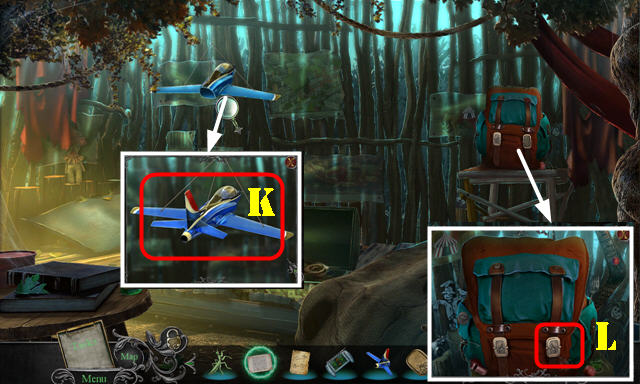
- Place AIRPLANE PART; take REMOTE-CONTROLLED AIRPLANE (K).
- Place BUCKLE PIECE (L). Play HOP; receive SPREADER.
- Walk down.
- Use SPREADER (M); take WOODEN SIGN (N).
- AIRPLANE CONTROLLER on REMOTE-CONTROLLED AIRPLANE; take CONTROLLER AND PLANE.
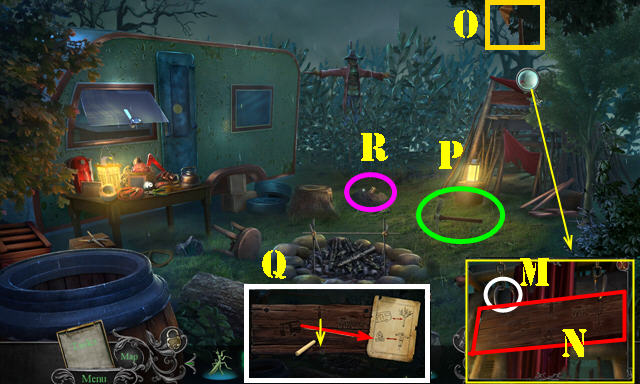
- Use CONTROLLER AND PLANE (O).
- Take PICKAXE (P).
- SIGN CLUE and CHALK on WOODEN SIGN. Solution (Q).
- Use PICKAXE; take TIME CAPSULE (R).
- MANTIS on TIME CAPSULE; take MEMENTO LOCATIONS.
- MEMENTO LOCATIONS on MAZE MAP.
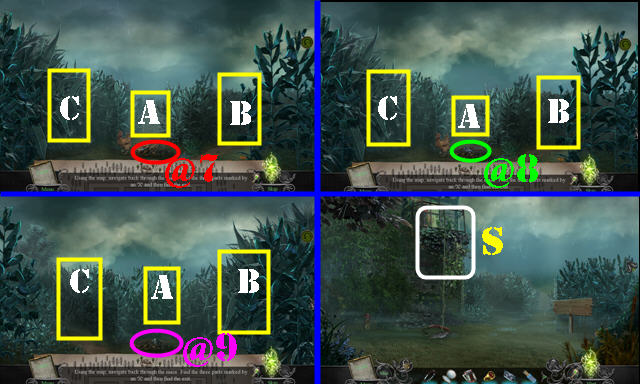
- Solution one: B-C-B-Cx2-A. Take (@7).
- Solution two: Ax2. Take (@8).
- Solution three: B-A-B-A-B. Take (@9). Back-C.
- Go (S). Receive PERFUME.
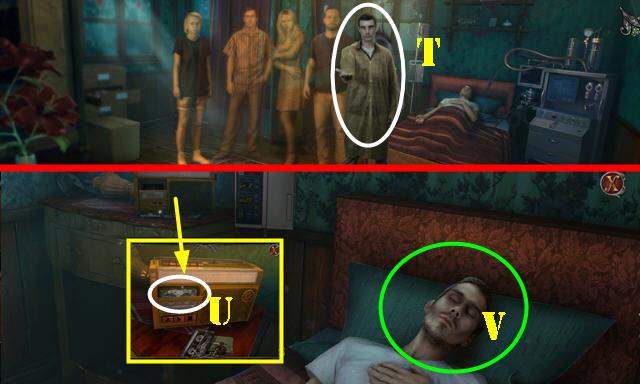
- Give JEN'S CODED BRACELET, WAYNE'S RING, LINDA'S HAND MIRROR, and MIKE'S MONEY CLIP (T).
- Place KEVIN'S CASSETTE (U).
- Use PERFUME and give KEVIN'S TOY (V).
- Congratulations, you've completed Phantasmat: Insidious Dreams!
Created at: 2017-10-13