

Walkthrough Menu
- General Tips
- Chapter 1: Arcadia Resort
- Chapter 2: The Main Hall
- Chapter 3: Underground hallway
- Chapter 4: The Backyard
- Chapter 5: Bungalow Gallery
- Chapter 6: Library
General Tips
- This is the official guide for Phantasmat: Reign of Shadows.
- This guide will not tell you when you have to zoom into a location; the screenshots will show each zoom scene.
- Hidden-object puzzles are referred to as HOPs. This guide will not show screenshots of the HOPs, however, it will mention when an HOP is available and the inventory item you'll collect from it.
- Use the Map to fast travel to a location.
Chapter 1: Arcadia Resort
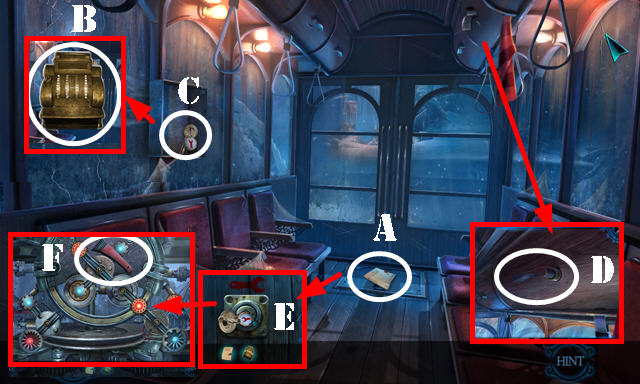
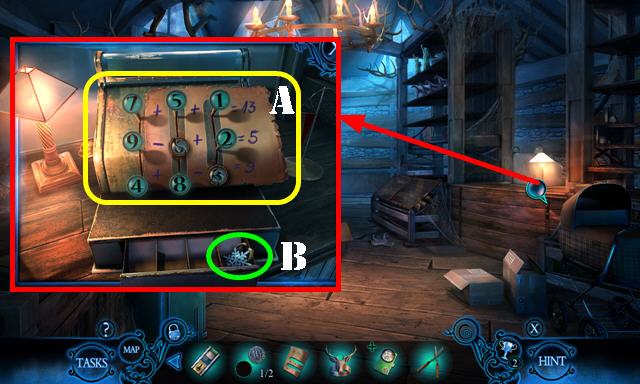
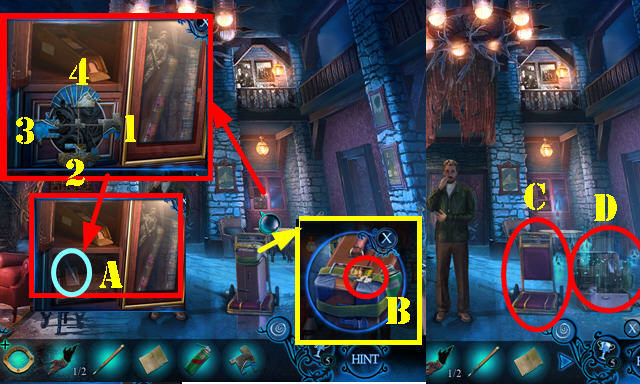
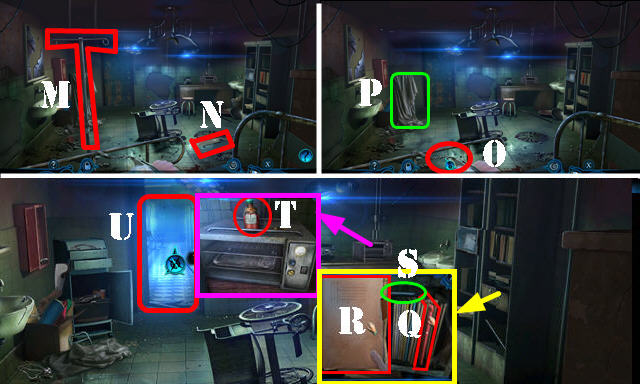
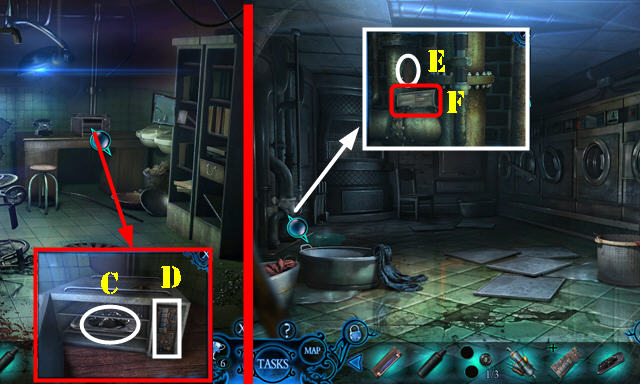
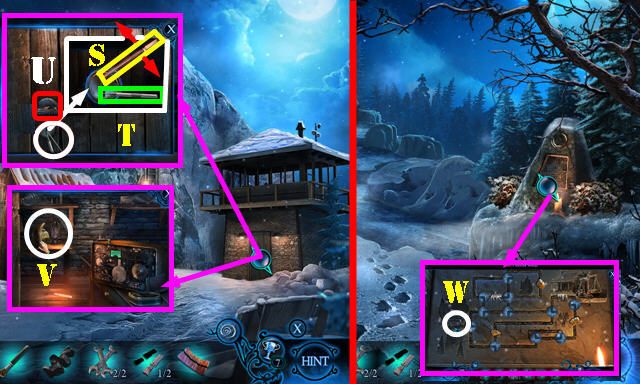
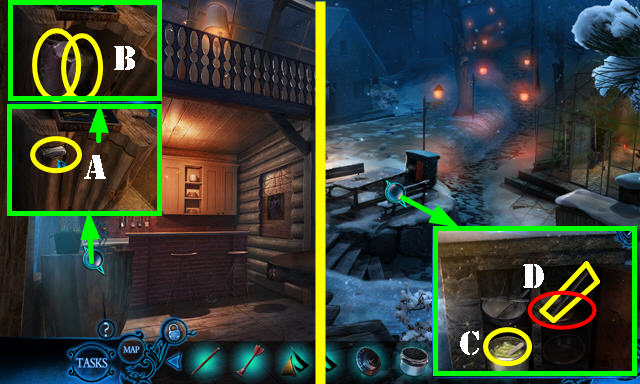
- Select the notes on the screen 2x; take the FATHER'S WILL (A).
- Open the box; look at the note and take the WALLET BUCKLE (B) and MAINTENANCE KEY (C).
- Break off the handle (D).
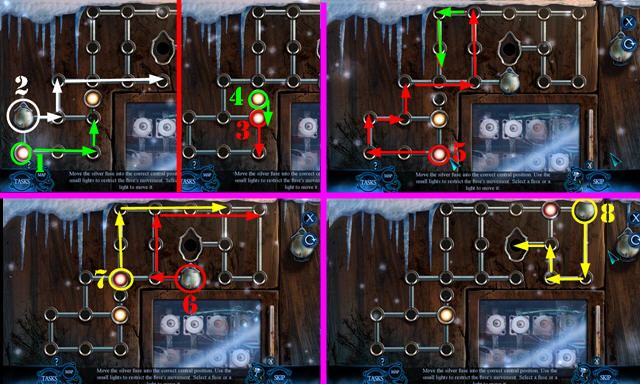
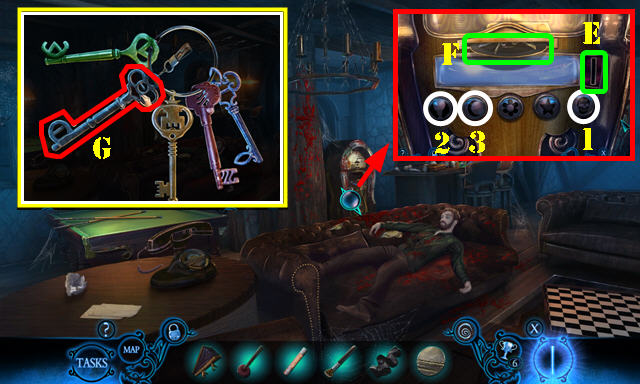
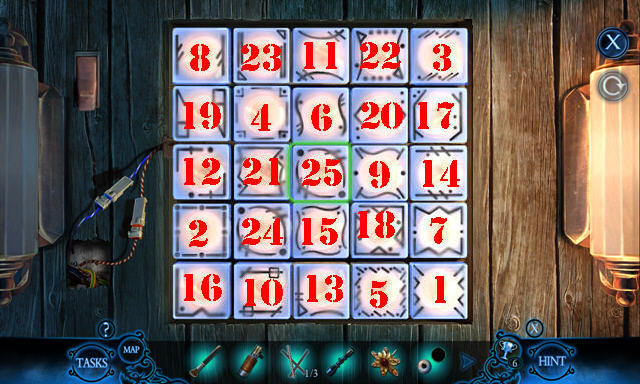
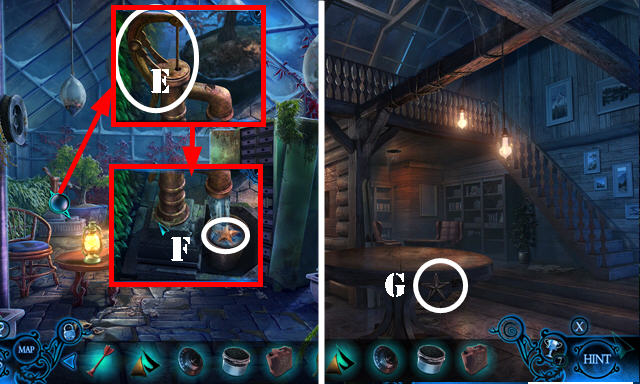
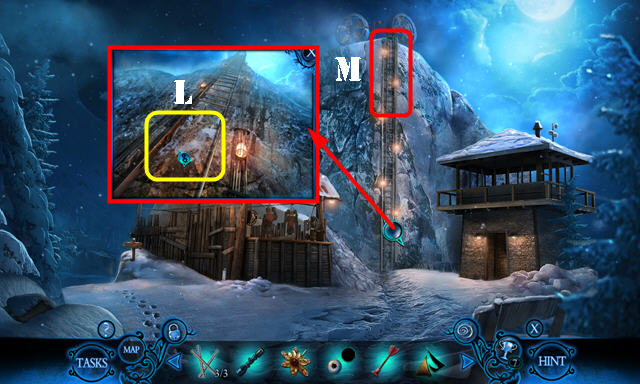
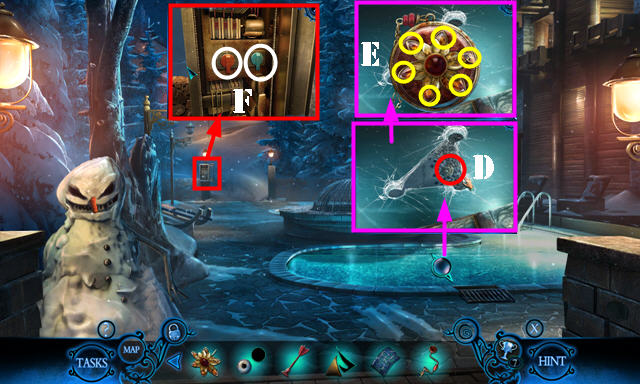
- Use the MAINTENANCE KEY; turn it (E) and take the ICE SCRAPER (F) for a puzzle to begin.
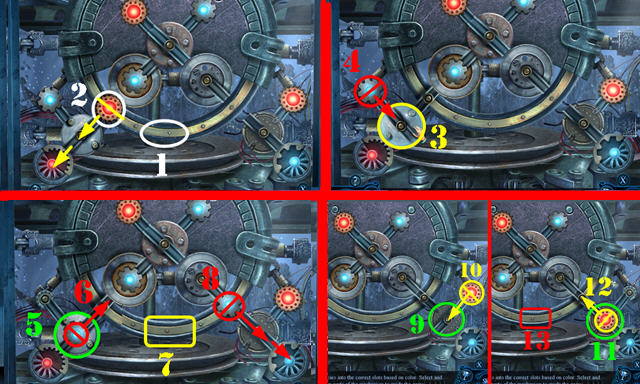
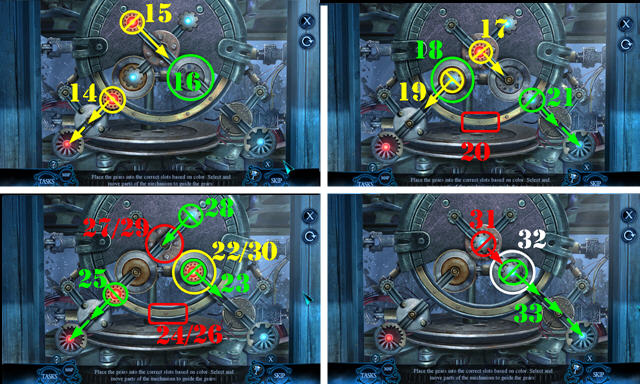
- Solution (1-33).
- Go forward.
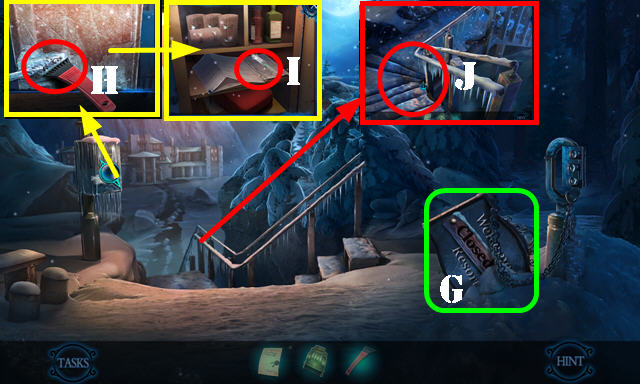
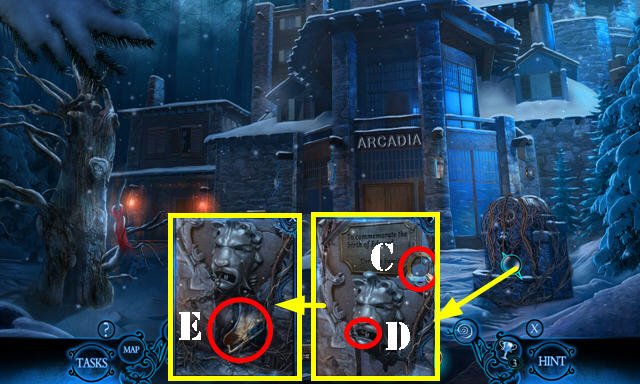
- Select the sign (G).
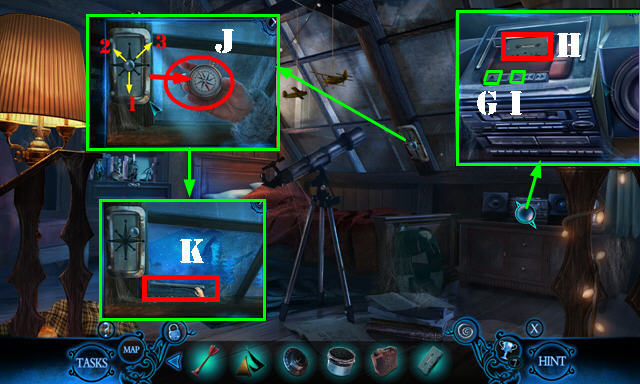
- Use the ICE SCRAPER and then drag it to remove the ice on the handle (H); select the handle. Move two items and take the MEDICAL TONGS (I).
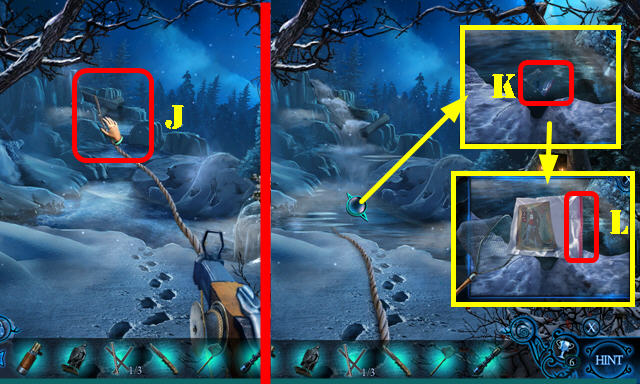
- Try to go down the steps (J).
- Walk down.
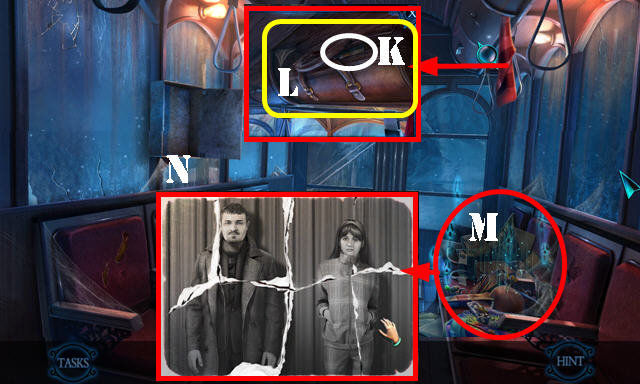
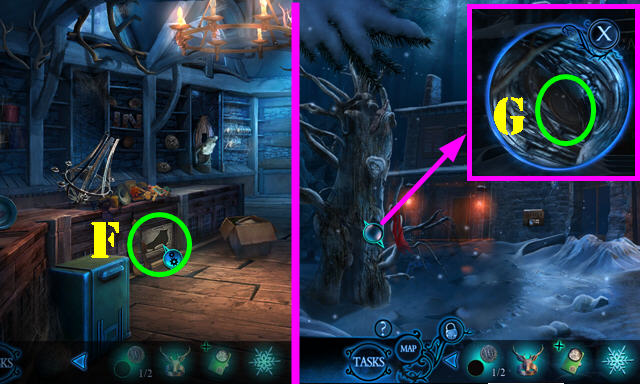
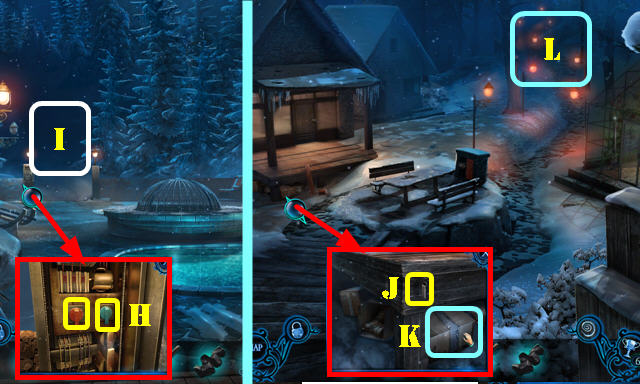
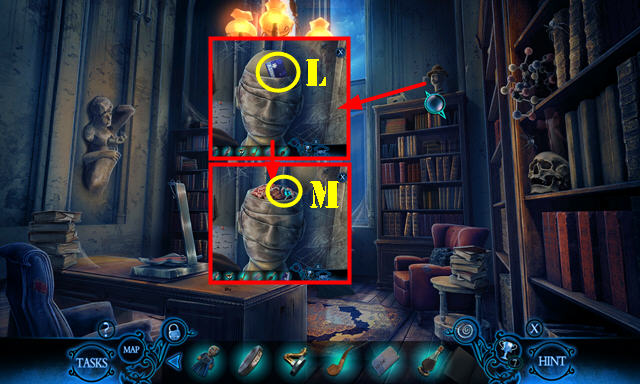
- Use the MEDICAL TONGS; take the SCREWDRIVER (K) and select the suitcase (L).
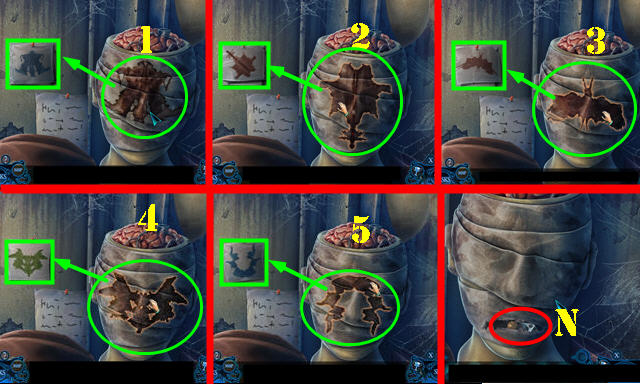
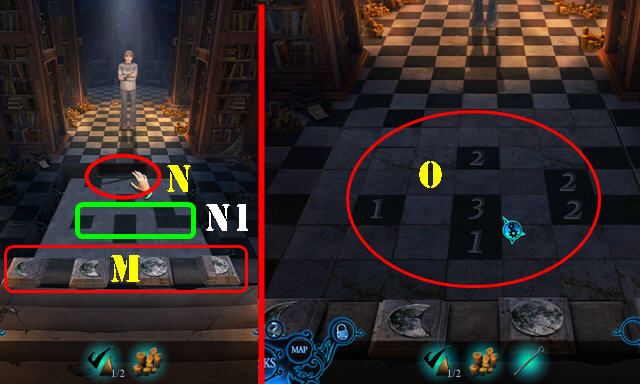
- Play the HOP (M) to receive the PADLOCK. HOP Puzzle solutions (N) and 198.
- Swap letters on the PADLOCK to form 'ARCADIA RESORT'.
- Go forward.
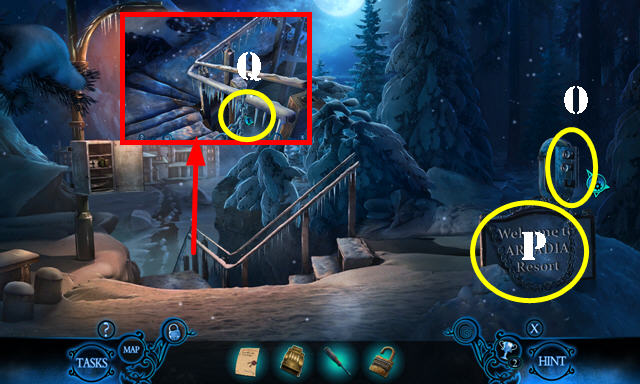
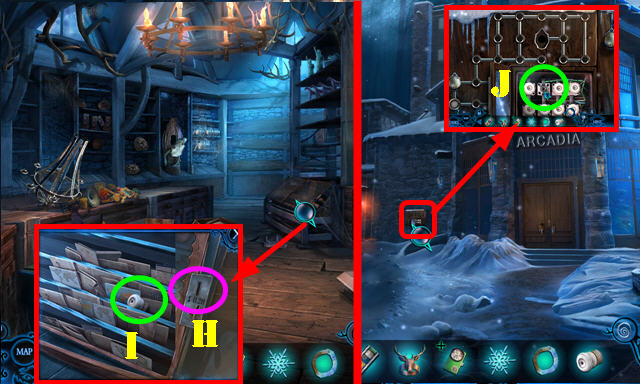
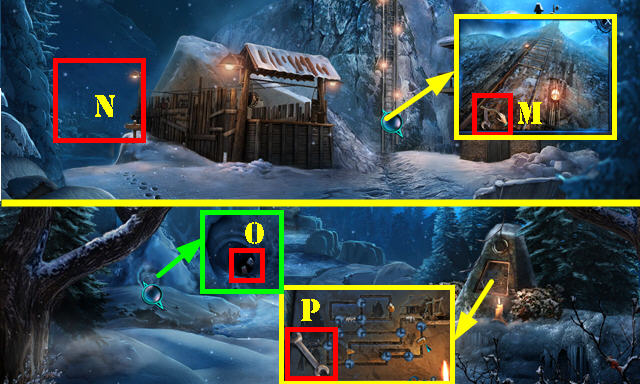
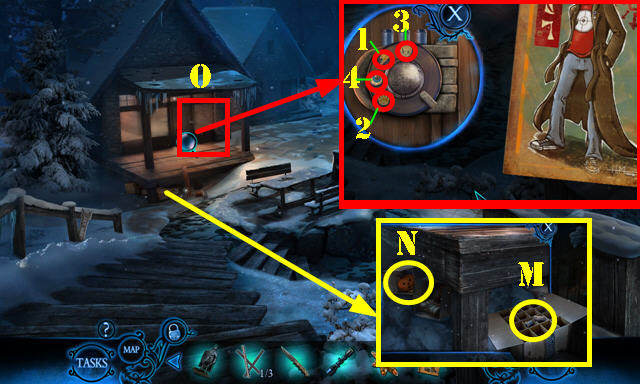
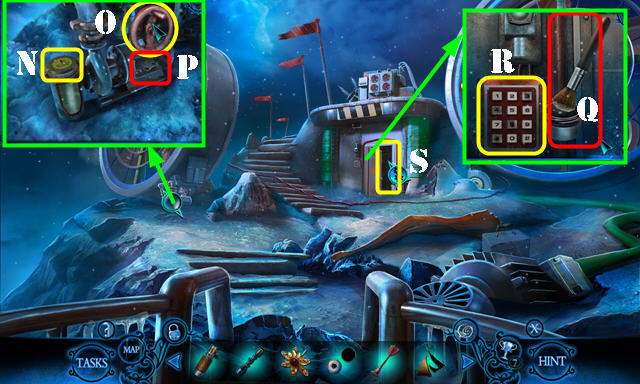
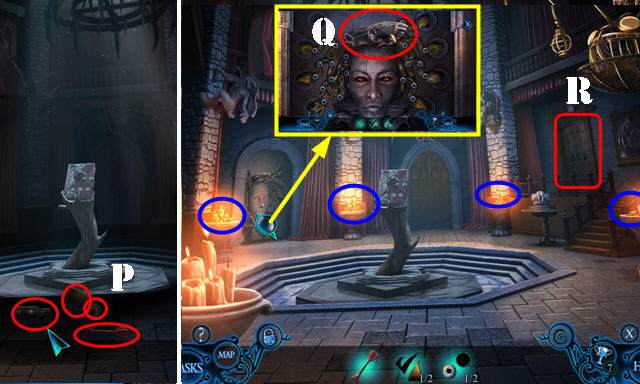
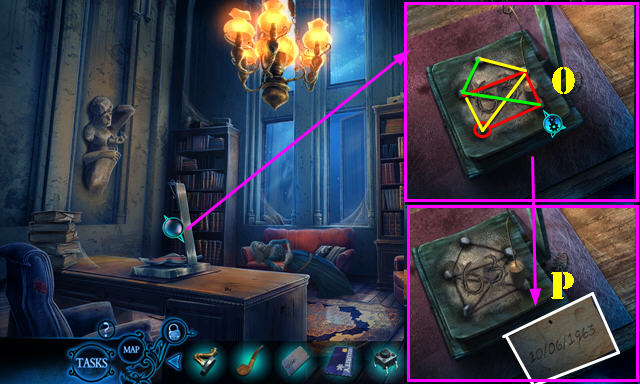
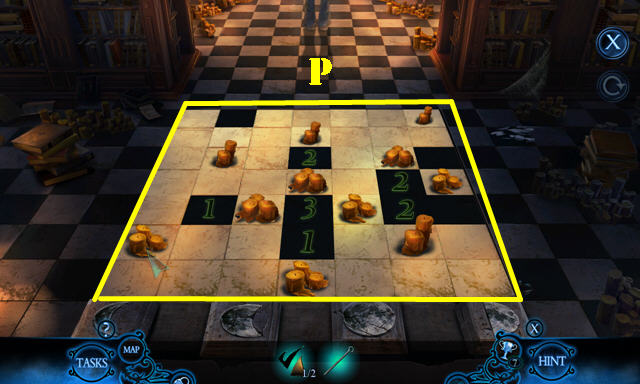
- Use the SCREWDRIVER 3x (O), open the lock, and take the CHAIN (P).
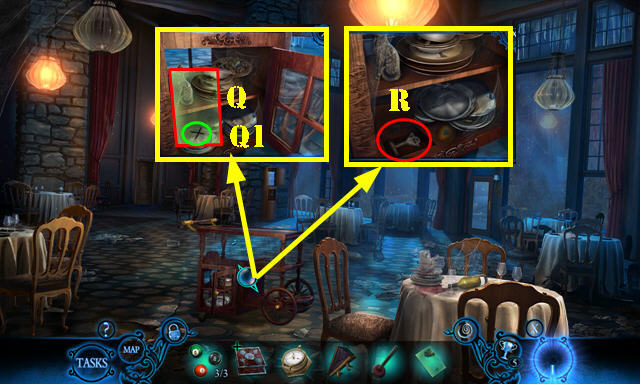
- Use the CHAIN and the PADLOCK (Q).
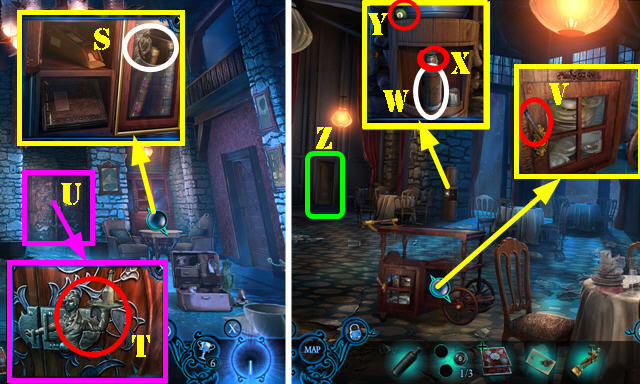
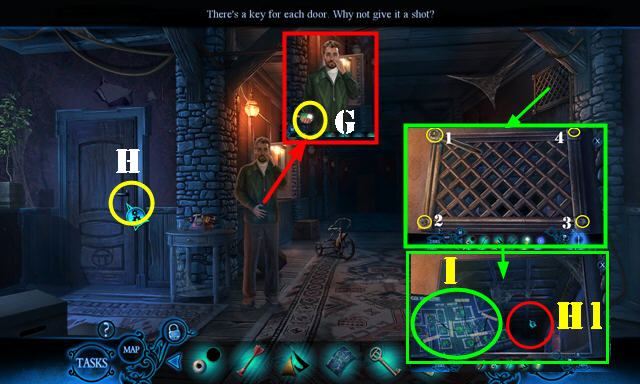
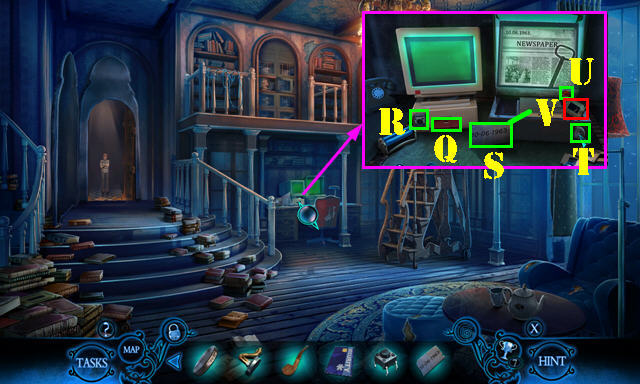
- Talk to the man (R); take the KEY CARD (S).
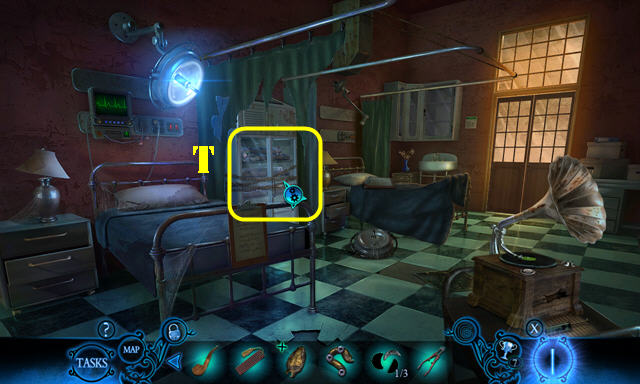
- Select the box twice; look at the note and take the WALLET (T).
- Take the DOOR KNOCKER (U).
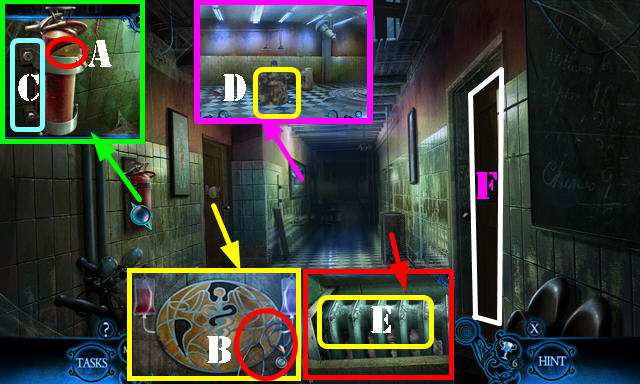
- Place the WALLET BUCKLE on the WALLET and select it; take the DIMES 1/2 and ACTIVATION PATTERN.
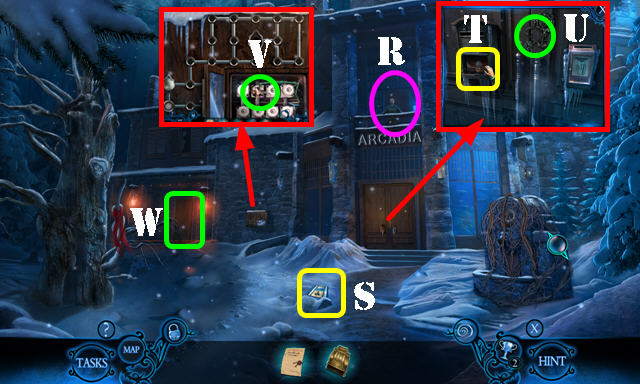
- Open the compartment; take the FAMILY RING and remove the fuse (V).
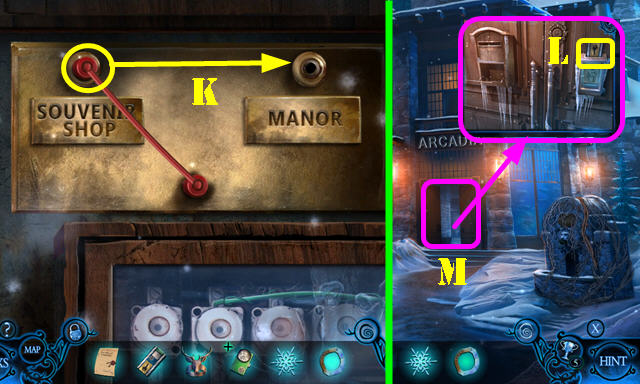
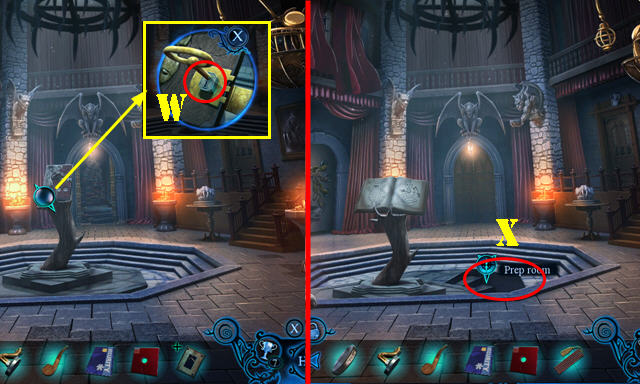
- Go to the Souvenir shop (W).
- Take the Map (X).
- Use the DOOR KNOCKER; take the GARDEN SHEARS (Y).
- Take the EMPTY FLASHLIGHT (Z).
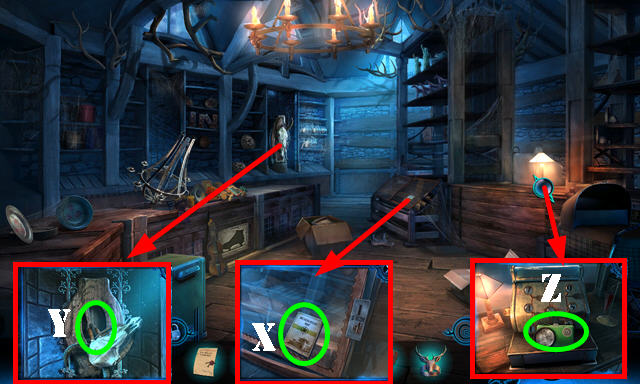
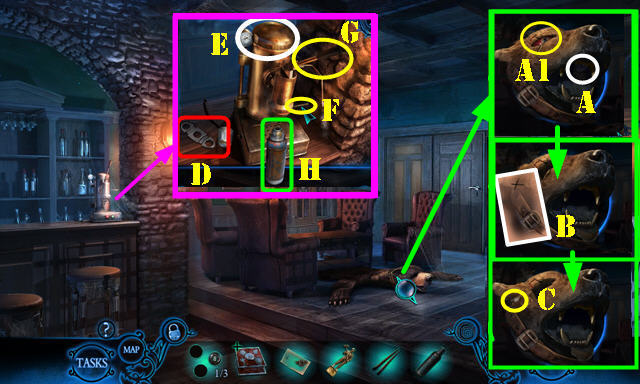
- Place the ACTIVATION PATTERN for a puzzle. Solution (A).
- Take the SNOWFLAKE and ARM CUFF (B).
- Walk down.
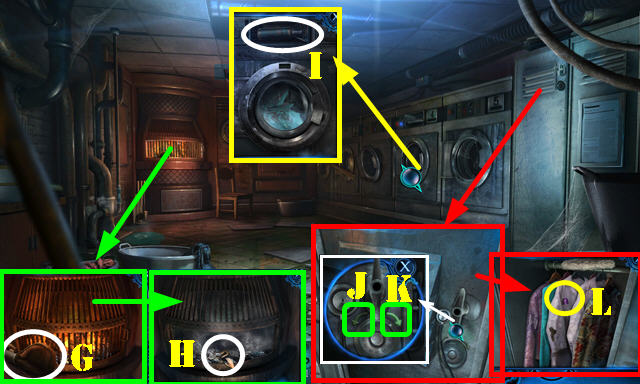
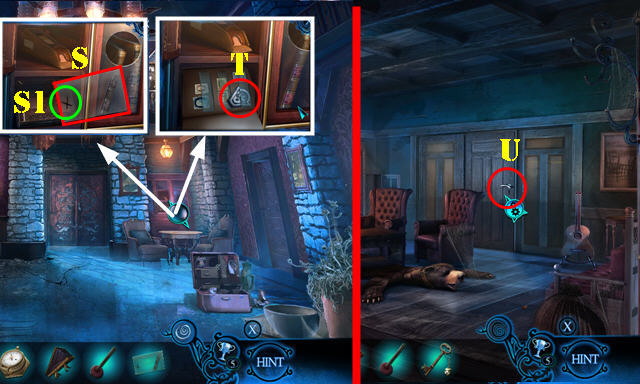
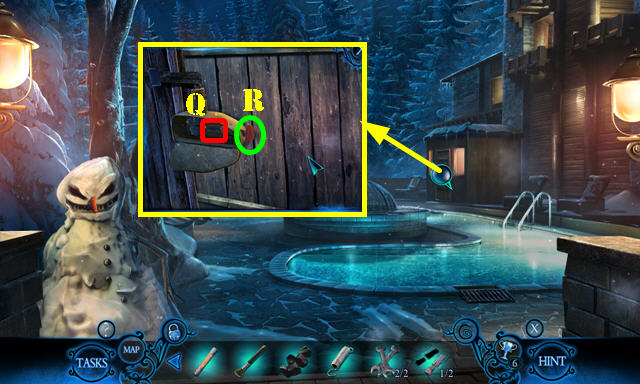
- Use the GARDEN SHEARS twice and remove the vines twice; take the FROZEN RESORT LOGO (C).
- Use the ARM CUFF (D); take the ICE SKATE (E).
- Return to the Souvenir shop.
- Place the ICE SKATE (F); play the HOP to receive the MAGNET.
- Walk down.
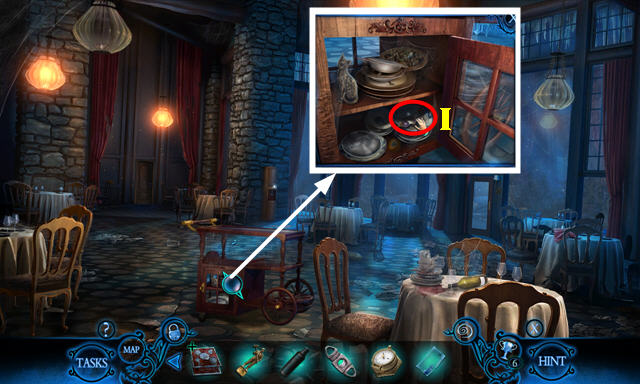
- Use the MAGNET; receive the DIMES 2/2 (G).
- Return to the Souvenir shop.
- Insert the DIMES 2/2 (H) and open the glass; select the papers 3x and take the FUSE (I).
- Walk down.
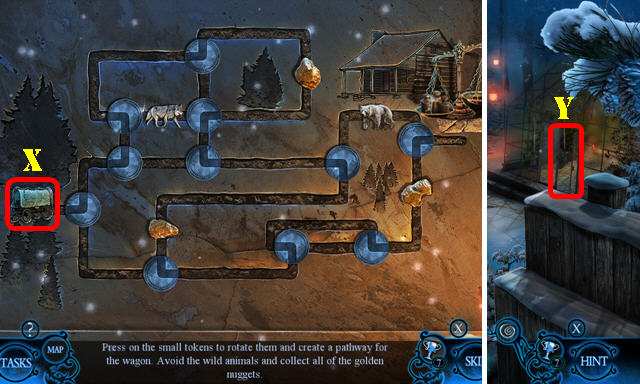
- Place the FUSE for a puzzle (J).
- Solution (1-8).
- Move the cable (K).
- Use the KEY CARD (L); enter the Main hall (M).
Chapter 2: The Main Hall
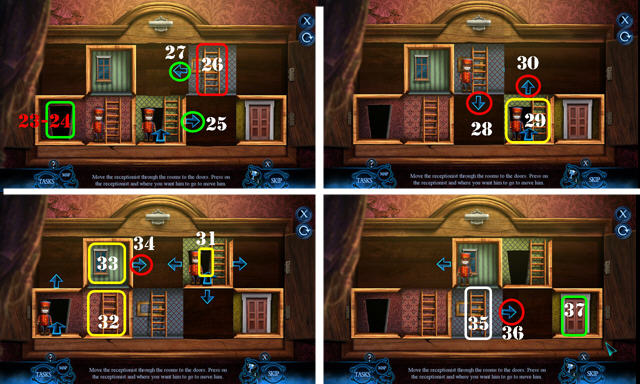
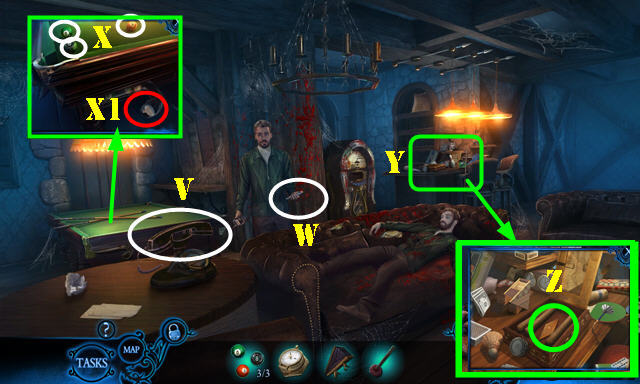
- Move the items into the right spots (N). Take the RESORT LOGO RIM (O).
- Take the FIRE POKER (P). Place the FROZEN RESORT LOGO (Q); receive the RESORT LOGO BASE.
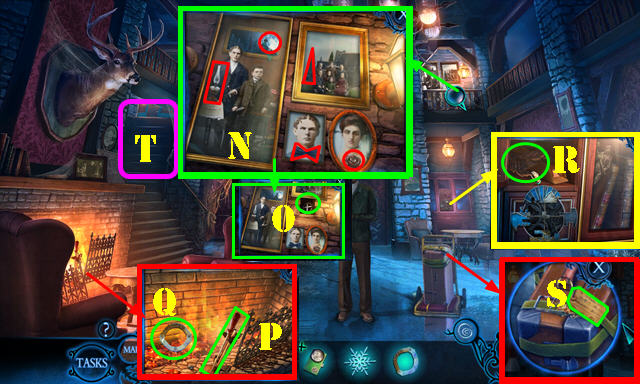
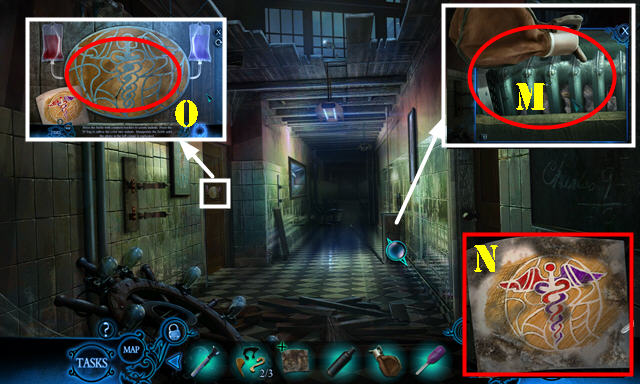
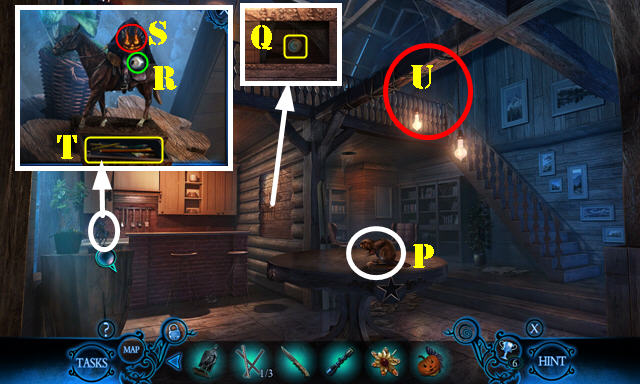
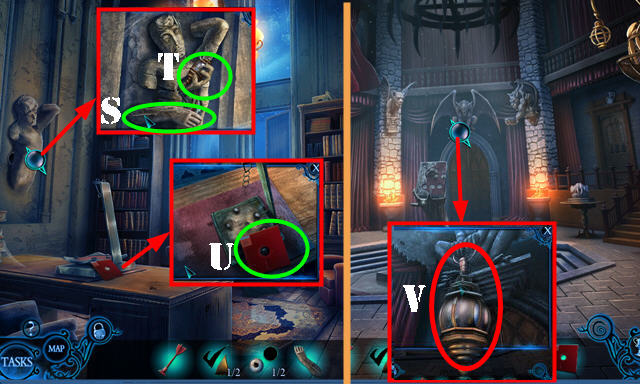
- Use the FAMILY RING; take the WOODEN CARVING 1/2 (R).
- Remove the tag (S).
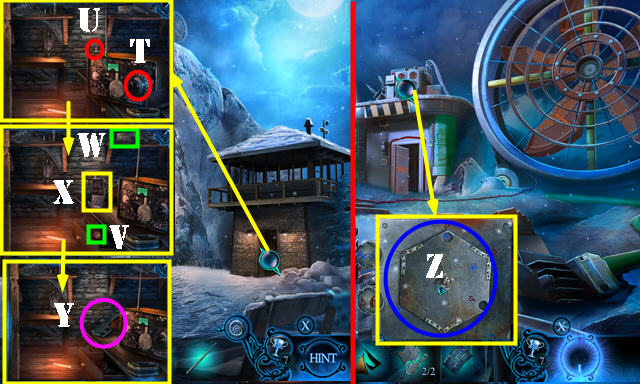
- Go to the Hallway (T).
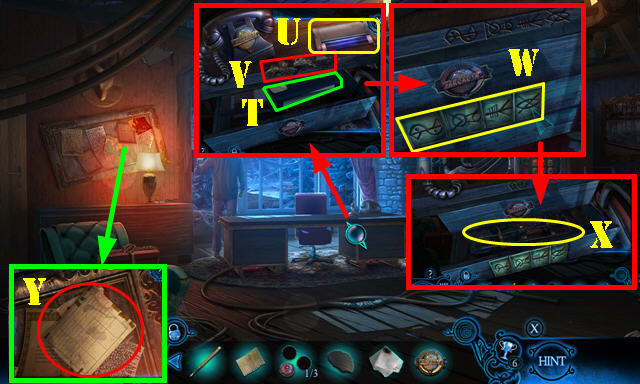
- Answer the phone (U). Open the drawer; take the PEN (V).
- Move the three boxes and the tricycle (orange).
- Take the BLANK PAPER (W), HINGE LUBRICANT (X), and MOUNTAIN PEAK (Y).
- Walk down.
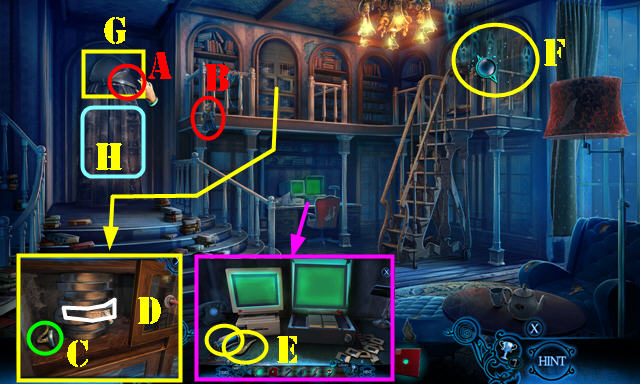
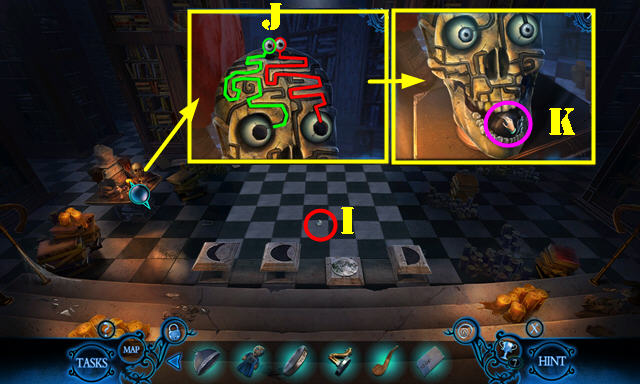
- Place the MOUNTAIN PEAK; select 1-4. Take the TWEEZERS (A).
- Use the HINGE LUBRICANT (B) and select 3x. Remove the suitcase; take the LUGGAGE CART (C).
- Play the HOP (D) to receive the TOY CAR.
- Go to the Hallway.

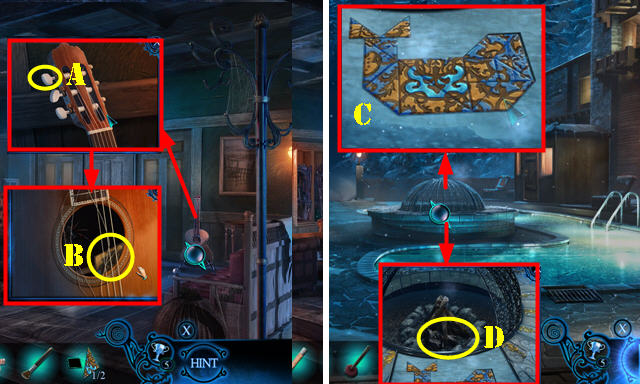
- Use the TWEEZERS; receive the CLOTH (E).
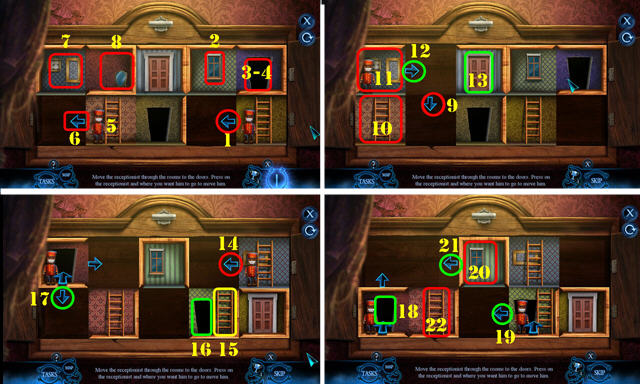
- Use the LUGGAGE CART and select it (F). Enter Valerie's room (G).
- Give the FATHER'S WILL (H).
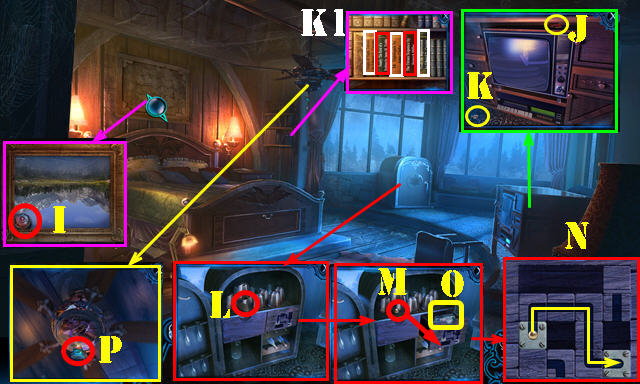
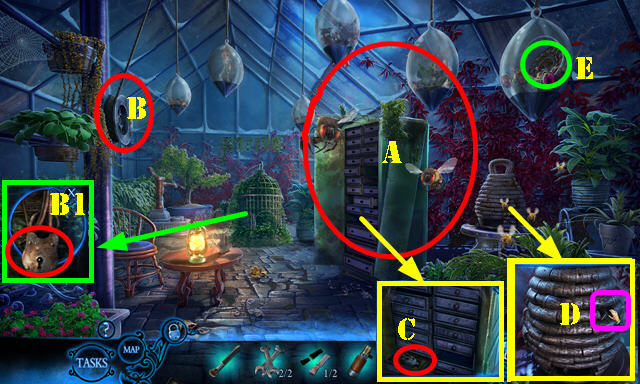
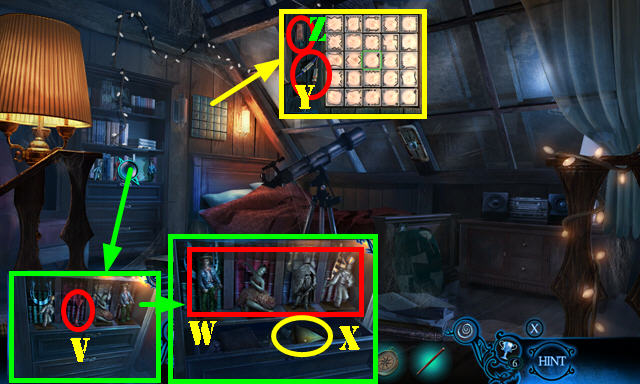
- Select the painting; take the SMALL LIGHT BULBS 1/3 (I).
- Use the TOY CAR (J); take the RECEPTION KEY (K).
- Place the SNOWFLAKE and select it twice. Lift the cup; take the PIECE OF RUBBER (L).
- Place the ball on the maze (M). Arrange the maze as shown (N).
- Open the drawer; take the GIN (O).
- Use the FIRE POKER to receive the FLASHLIGHT BATTERY (P).
- Return to the Main hall.
- Open the EMPTY FLASHLIGHT and remove the old battery; place the FLASHLIGHT BATTERY and close it to receive the FLASHLIGHT.
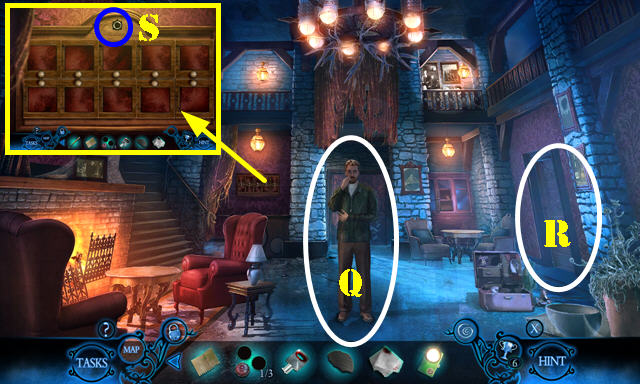
- Give the FLASHLIGHT (Q).
- Note the Manager's office (R).
- Use the RECEPTION KEY for a puzzle (S).
- Solution (1-37).
- Take the RESORT LOGO CREST.
- Go to the Manager's office.
- Place the RESORT LOGO RIM and RESORT LOGO CREST on the RESORT LOGO BASE; receive the RESORT LOGO.
- Place the RESORT LOGO; take the VIDEOTAPE (T).
- Take the UV LAMP (U).
- Use the GIN on the CLOTH; receive the CLEANING CLOTH.
- Use the CLEANING CLOTH (V).
- Arrange the symbols as shown (W); take the MEDICAL RETRACTOR and WOODEN CARVING 2/2 (X).
- Select the report twice (Y).
- Walk down.

- Place the UV LAMP, BLANK PAPER and PEN; use the UV lamp over the whole area to receive the SAFE COMBINATION (A).
- Go to Valerie's room.
- Insert the VIDEOTAPE (B); push play (C). Take the GLASS SHARD (D).
- Place the WOODEN CARVING 2/2 and select it (E); play the HOP to receive the DUMBWAITER KEY.
- Walk down.
- Use the DUMBWAITER KEY and select it; take the SAFE DIAL (F).
- Go to the Manager's office.
- Place the SAFE COMBINATION and SAFE DIAL; turn to 80-40-10-20 (G). Select the papers and then the clipboard 3x; take the SMALL LIGHT BULBS 2/3.
- Use the GLASS SHARD; open the box and take the SMALL LIGHT BULBS 3/3 (H).
- Place the SMALL LIGHT BULBS 3/3 for a puzzle (I).
- Solution (J).
- Solution two (K).
- Pull the switch (L).
Chapter 3: Underground Hallway
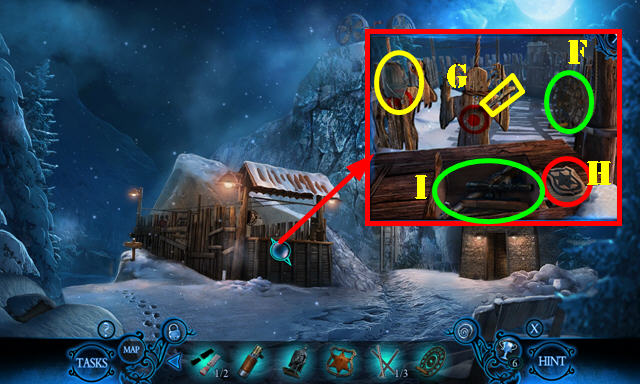
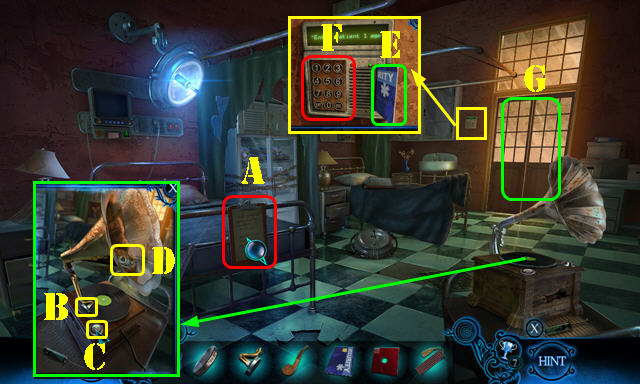
- Select the pole (M).
- Take the BONE SAW (N).
- Use the BONE SAW (O).
- Remove the cloth (P); play the HOP to receive the SKULL DRILL.
- Select the folder (Q) and select the files 4x; take the AUTOPSY REPORT (R) and EAR SCOPE (S).
- Take the RESTORATION SOLVENT (T).
- Go to the Underground hallway (U).
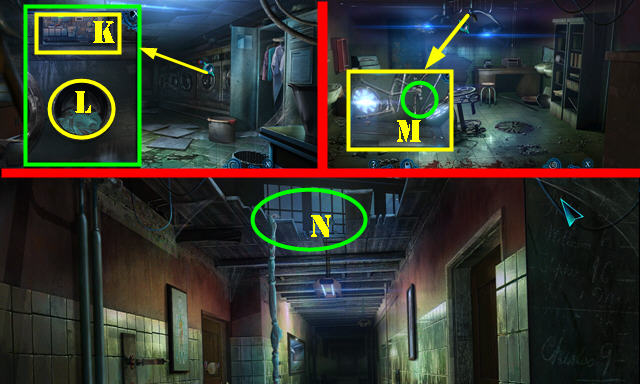
- Take the PUZZLE PIECE 1/3 (A) and STETHOSCOPE (B).
- Use the SKULL DRILL (C); select both clamps and take the FIRE EXTINGUISHER.
- Take the ILLEGIBLE PHOTO (D).
- Open the cover (E).
- Enter the Laundry (F).
- Take the EMPTY CLEANER (G). Open the door and use the FIRE EXTINGUISHER on the fire until it goes out. Take the PUZZLE PIECE 2/3 (H).
- Take the THERMOS BOTTLE (I).
- Place the STETHOSCOPE; select Kx6-Jx9-Kx7. Move the feather boa and take the EYEDROPPER (L).
- Walk down.
- Use the EMPTY CLEANER; receive the FULL CLEANER (M).
- Select the FULL CLEANER, then select the dust 3x; take the PUZZLE PIECE 3/3.
- Place the RESTORATION SOLVENT on the ILLEGIBLE PHOTO; remove the cap on the solvent and use the EYEDROPPER on the bottle. Use the eyedropper all over the photo until you receive the PUZZLE PHOTO (N).
- Place the PUZZLE PIECE 3/3 and PUZZLE PHOTO for a puzzle (O).
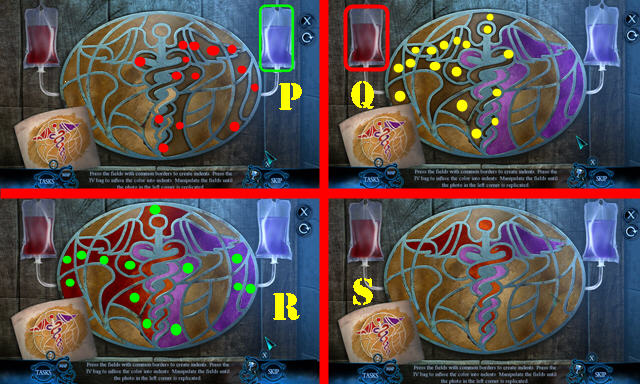
- Select the red dots and the bag (P).
- Select the yellow dots and the bag (Q).
- Select each green dot twice (R).
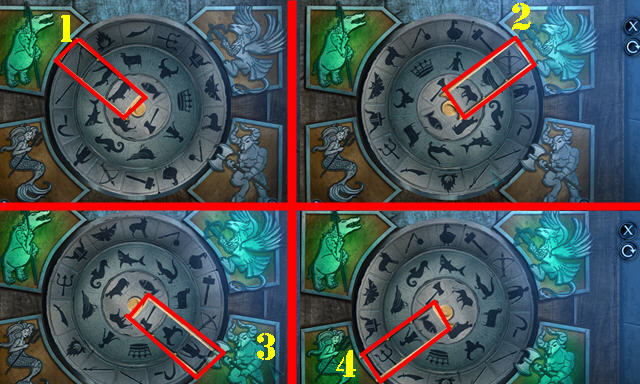
- Final image (S).
- Solution two (1-4).
- Enter the Nurse's office.
- Pull the curtain.
- Read the note (T); place the MEDICAL RETRACTOR and select the screw (U). Take the DENTAL TOOL (V).
- Look at the ball and shake it; take the POOL BALLS 1/3 (W).
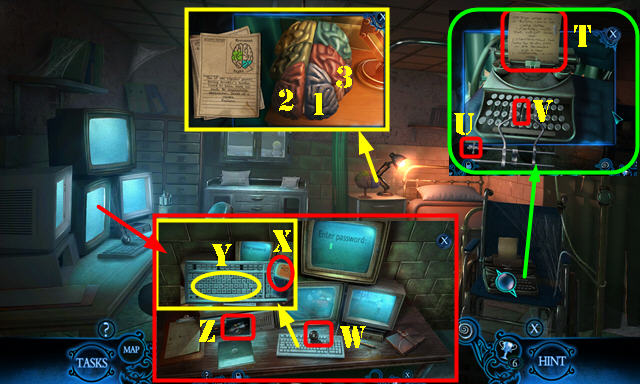
- Use the AUTOPSY REPORT; select (1-3) and take the STREAMER.
- Use the EAR SCOPE on the STREAMER and select it; move it around until you receive the PASSWORD.
- Place the PASSWORD (X); enter GC7E (Y). Take the ELECTRICAL PIECES (Z).
- Return to the Examination room.
- Use the DENTAL TOOL; look at the clipboard and take the CUP OF HYGEIA (A).
- Go to the Nurse's office.
- Use the CUP OF HYGEIA and select it (B); play the HOP to get the TAR NUGGET.
- Return to the Examination room.
- Place the TAR NUGGET (C). Remove the cover; take the BROKEN CIRCUIT (D). Open the door; take the MELTED TAR.
- Return to the Laundry.
- Use the MELTED TAR and PIECE OF RUBBER (E); take the MANUAL and CRANK ARM (F).
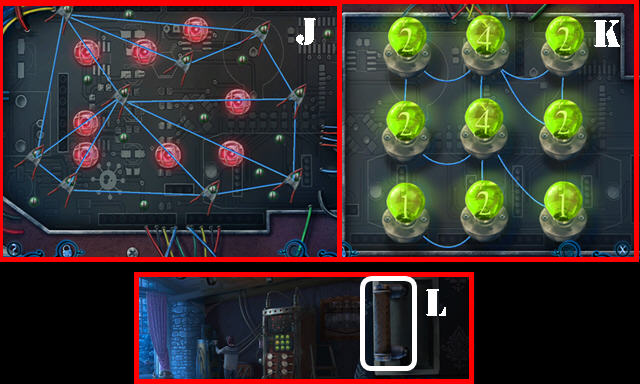
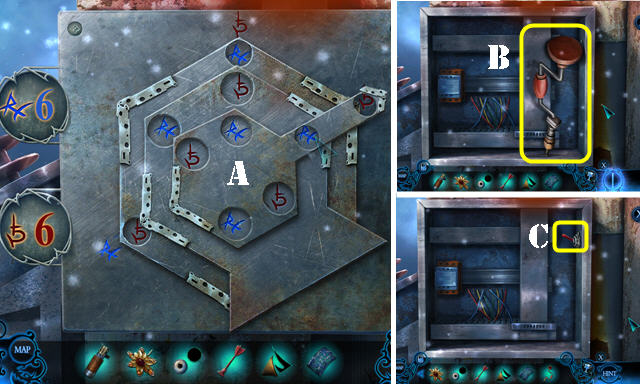
- Place the ELECTRICAL PIECES and MANUAL on the BROKEN CIRCUIT for a puzzle.
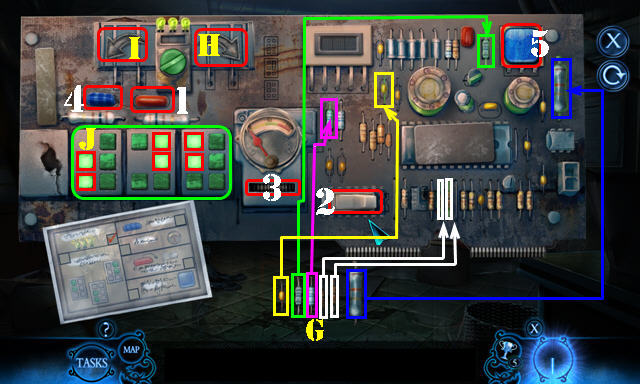
- Place the diodes as shown (G).
- Select: H-I-Hx2.
- Select the marked buttons (J).
- Select 1-5.
- Receive the CONTROL CIRCUIT.
- Place the CONTROL CIRCUIT (K); open the door and take the SHEETS (L).
- Return to the Examination room.
- Use the CRANK ARM (M); receive the IMPROVISED GRAPPLING HOOK.
- Go to the Underground hallway.
- Open the SHEETS and select the four pieces; place the IMPROVISED GRAPPLING HOOK and take the GRAPPLING HOOK.
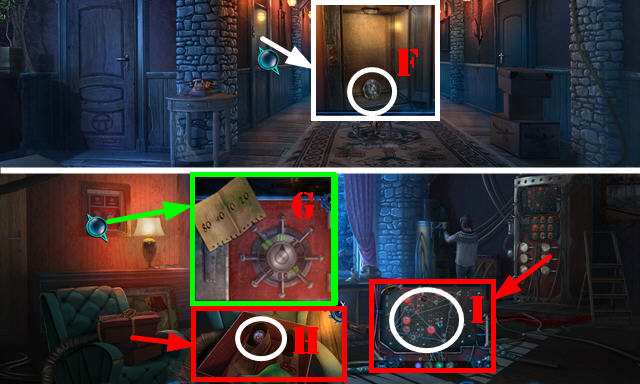
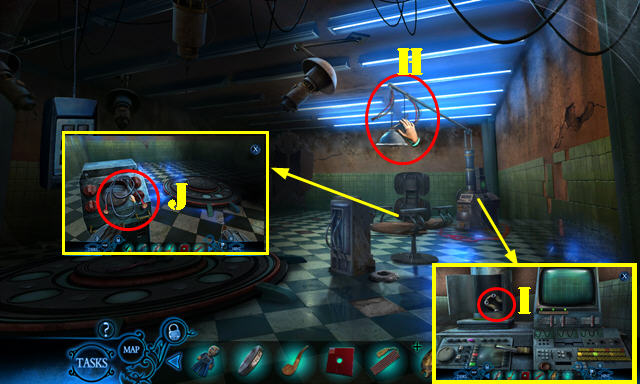
- Use the GRAPPLING HOOK (N) and go up.
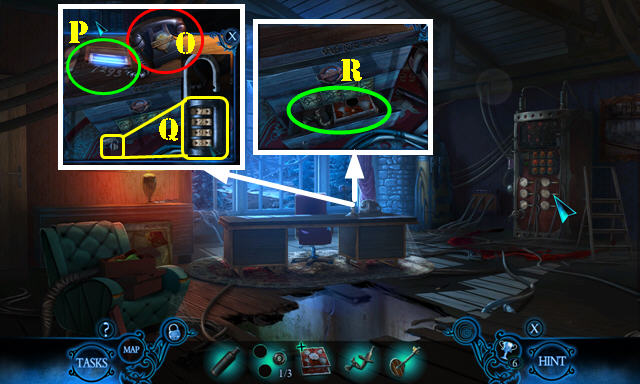
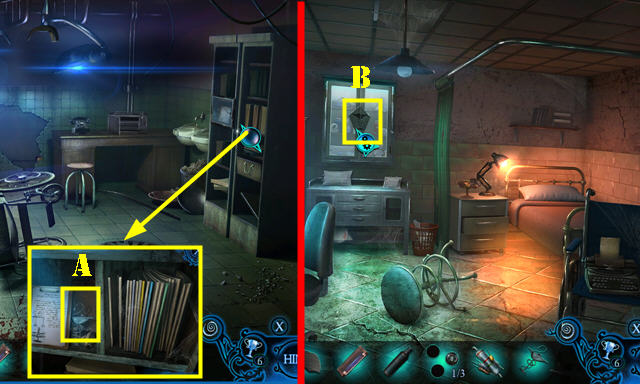
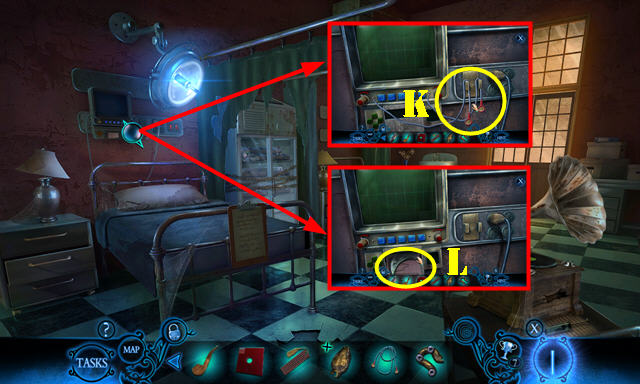
- Answer the phone (O). Move the phone and use the UV LAMP (P).
- Enter 7293 (Q).
- Take the INTRICATE BOX, WAITER, and GLASS CUTTER (R).
- Press the center button on the INTRICATE BOX; read the note and take the BROWN ACETATE.
- Walk down.
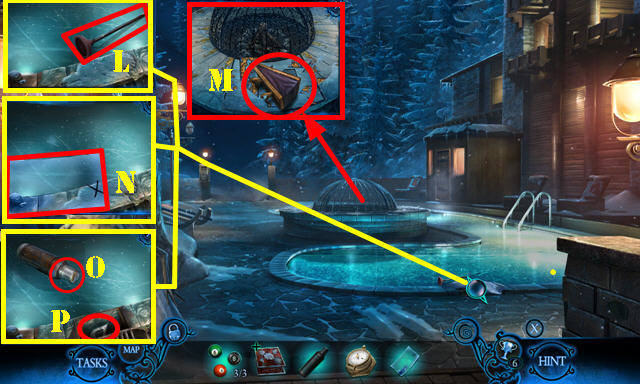
- Use the GLASS CUTTER and select it; take the WORKERS' STATUE (S).
- Place the WAITER (T); enter the Dining hall (U).
- Take the CHOPSTICKS (V).
- Place the THERMOS BOTTLE (W); select the nozzle (X); receive the COLD WATER. Open the door; take the POOL BALLS 2/3 (Y).
- Go to the Lounge (Z).
- Use the CHOPSTICKS (A); take the BAROMETER.
- Take the POOL BALLS 3/3 (A1).
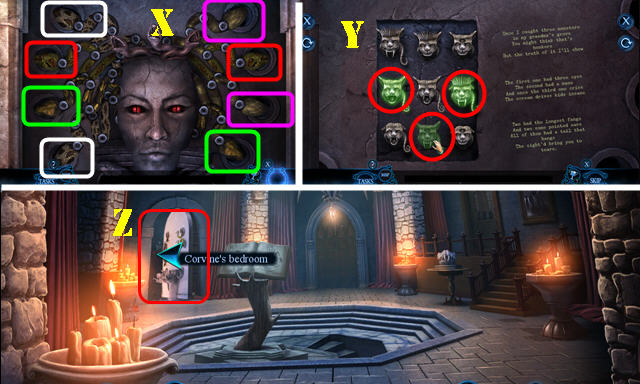
- Place the BROWN ACETATE as shown (B); select the ear and take the CLAW ORNAMENT (C).
- Take the CIGAR CUTTER (D). Use the COLD WATER (E); select the nozzle (F) and handle (G); take the HOT WATER (H).
- Walk down.
- Use the CIGAR CUTTER; take the MECHANICAL BAT (I).
- Return to the Lounge.

- Place the MECHANICAL BAT (J); play the HOP to get the BULLET.
- Walk down.
- Use the BULLET and the WORKERS' STATUE (K); enter the Backyard.
Chapter 4: The Backyard
- Take the PLUNGER (L) and SMALL BELLOWS (M).
- Place the CLAW ORNAMENT on the INTRICATE BOX; look at the note and take the BLUE ACETATE.
- Place the BLUE ACETATE as shown (N); select the stone.
- Use the HOT WATER; remove the cap (O). Select the grate; take the WATER DROP ORNAMENT (P).
- Place the WATER DROP ORNAMENT on the INTRICATE BOX. Look at the note and take the GREEN ACETATE.
- Walk down.
- Place the GREEN ACETATE as shown (Q) and select the 'X' (Q1). Open the compartment; take the COCKTAIL ORNAMENT (R).
- Place the COCKTAIL ORNAMENT on the INTRICATE BOX. Look at the note and take the BLACK ACETATE.
- Walk down.
- Place the BLACK ACETATE as shown (S); select the 'X' (S1) and take the MONSTER ORNAMENT (T).
- Place the MONSTER ORNAMENT on the INTRICATE BOX. Look at the note and take the GAME ROOM KEY.
- Return to the Lounge.
- Use the GAME ROOM KEY (U). Enter the Game room.
- Answer the phone (V).
- Take the FLARE (W).
- Put down the POOL BALLS 3/3 (X); select each ball and take the PEG (X1).
- Play the HOP (Y) to receive the BRUSH.
- Place the BAROMETER; select the cigars 3x; take the TANGRAM PIECES 1/2 (Z).
- Walk down.
- Place the PEG and select it (A); take the TANGRAM PIECES 2/2 (B).
- Go to the Backyard.
- Place the TANGRAM PIECES 2/2 for a puzzle. Solution (C).
- Take the COAL LUMPS and TOKEN (D).
- Return to the Game room.
- Insert the TOKEN (E). Select 1-2-3; take the KEY CHAIN (F).
- Swap the pieces of the keys on the KEY CHAIN as shown. Take the CONTROL BOX KEY (G).
- Return to the Backyard.
- Use the CONTROL BOX KEY; select the 2 buttons (H).
- Go to the Bungalows (I).
- Take the SPRING (J) and move the box (K).
- Go to the Plateau (L).
- Remove the pipe; take the WRENCHES 1/2 (M).
- Go to Hot springs (N).
- Place the PLUNGER and select it; take the WIRE CONNECTOR 1/2 (O).
- Take the WRENCHES 2/2 (P).
- Return to the Backyard.
- Open the compartment; place the SPRING (Q) and press the button (R); play the HOP to get the LOCKPICK SET.
- Return to the Plateau.
- Use the LOCKPICK SET; select (S up)-(T)-(S down)-(T)-(S up)-(T)-(U).
- Use the FLARE; take the TIN BURNER and STONE WAGON (V).
- Go to Hot springs.
- Place the STONE WAGON for a puzzle (W).
- Rotate tokens as shown and select the wagon (X).
- Look at the note; take the LIGHTER.
- Walk down twice; enter the Greenhouse (Y).
- Open the TIN BURNER, place the COAL LUMPS, use the LIGHTER on it, and close the lid. Attach the SMALL BELLOWS and select it; receive the BEE SMOKER.
- Use the BEE SMOKER (A).
- Use the LIGHTER (B).
- Use the WRENCHES 2/2 (B1); play the HOP to receive the RANGER BADGE.
- Open the drawer; use the BRUSH and take the FIGURINE (C).
- Select the piece; take the RUNGS 1/3 (D).
- Select the glass; take the CRANK (E).
- Return to the Plateau.
- Place the CRANK and select it (F); take the SCOOP NET and HUNTING KNIFE (G).
- Place the RANGER BADGE and select it (H); open the door; take the BROKEN RIFLE and HARPOON (I).
- Remove the screw from the BROKEN RIFLE; take the NIGHTVISION SCOPE.
- Go to Hot springs.
- Use the HARPOON and pull the rope (J).
- Use the SCOOP NET; take the FLOWER ORNAMENT (K).
- Open the bag; take the COMIC BOOK (L).
- Return to the Bungalows.
- Place the COMIC BOOK; Select 1-4.
- Use the HUNTING KNIFE and open the box; select twice and take the WIRE CONNECTOR 2/2 (M).
- Use the HUNTING KNIFE; open the box and take the PUMPKIN HEAD (N).
- Enter the Bungalow interior (O).
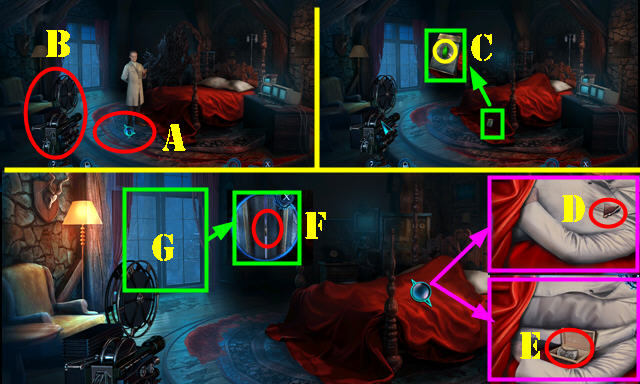
- Take the HEAVY STATUE (P).
- Look at the note; use the HUNTING KNIFE and take the COMPASS (Q).
- Take the MARBLE PUPILS 1/2 (R).
- Place the PUMPKIN HEAD (S); take the COLORED PENCIL (T).
- Go to the Bungalow gallery (U).
- Take the SUCTION CUP DART (V).
- Place the FIGURINE and swap as shown (W). Take the TOOTH 1/2 and FREQUENCY KNOB (X).
- Place the WIRE CONNECTOR 2/2 and select them (Y). Press the button (Z) for a puzzle.
- Solution (1-25).
- Look at the note; take the POWDER and PLIERS.
- Walk down.
- Use the PLIERS (A) and open the cabinet; take the ANTIFREEZE CANISTER and COOKING GREASE (B).
- Walk down.
- Place the COOKING GREASE and select twice (C). Open the door; take the RUNGS 2/3 and PUMPING LEVER (D).
- Go to the Greenhouse.
- Place the PUMPING LEVER (E) and select it; take the WOODEN STAR (F).
- Return to the Bungalow interior.
- Place the WOODEN STAR (G); play the HOP to receive the AUDIOTAPE.
- Use the COLORED PENCIL on the AUDIOTAPE and select 3x.
- Go to the Bungalow gallery.
Chapter 5: Bungalow Gallery
- Press the eject button (G); remove the tape and place the AUDIOTAPE (H). Close the lid and press play (I).
- Place the COMPASS (J). Drag the knob 1-3.
- Use the HEAVY STATUE; look at the notebook and take the RUNGS 3/3 (K).
- Return to the Plateau.
- Place the RUNGS 3/3 (L).
- Go to the Mountain peak (M).
- Open the cap; use the ANTIFREEZE CANISTER and close the cap (N). Turn the valve (O) and take the STEEL PLATES 1/2 (P).
- Place the POWDER and BRUSH (Q); dip the brush in the powder; select 384*(R).
- Use the NIGHTVISION SCOPE (S); play the HOP to get the HANGING BLUEPRINTS.
- Select the HANGING BLUEPRINTS; receive the HOTEL BLUEPRINTS. Remove the cap and take the RADIO ANTENNA.
- Walk down.
- Place the FREQUENCY KNOB (T) and RADIO ANTENNA (U); turn the knob twice.
- Move the radio and open the drawer. Select the knob (V) and cover (W). Pick up the walkie-talkie (X); take the STEEL PLATES 2/2 (Y).
- Go to the Mountain peak.
- Place the STEEL PLATES 2/2 for a puzzle (Z).
- Solution (A).
- Take the ICE DRILL (B) and pull the switch (C).
- Return to the Backyard.
- Use the ICE DRILL; select the ice and the pendant (D); place the FLOWER ORNAMENT and select the six petals (E). Take the PANTRY KEY.
- Turn the two knobs (F).
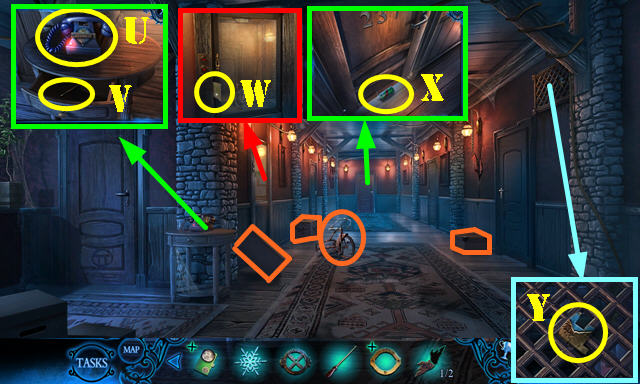
- Return to the Hallway.
- Take the FLASHLIGHT (G).
- Use the PANTRY KEY (H) and select the doorway; play the HOP to receive the RATCHET.
- Use the RATCHET 4x and remove the grid (1-4). Use the FLASHLIGHT (H1) and place the HOTEL BLUEPRINTS (I).
- Go into the Ventilation duct.
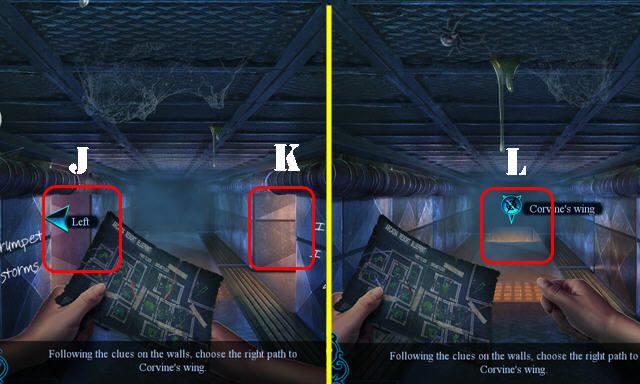
- Select: K-Jx2-K-J-Kx2-L.
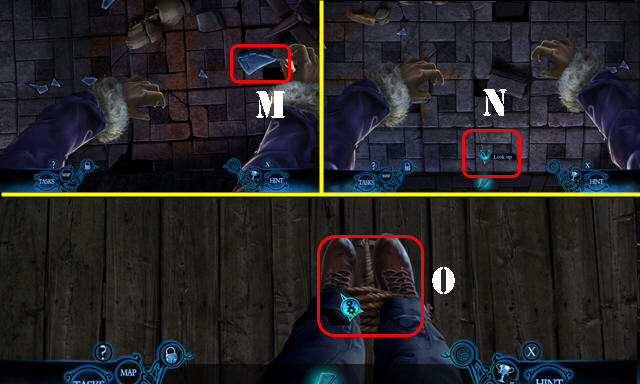
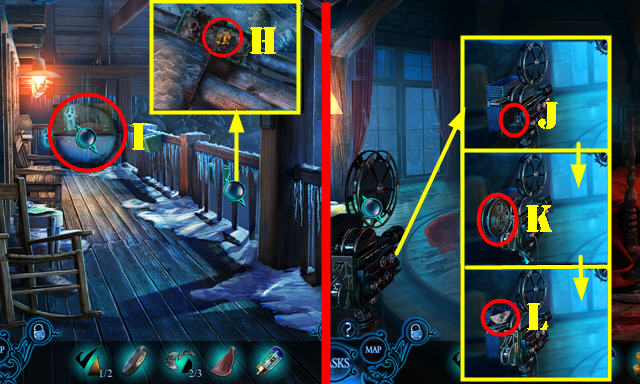
- Swing right; take the GLASS SHARD (M).
- Look up (N).
- Use the GLASS SHARD (O).
- Take the MARBLE PUPILS 1/2, TOOTH 1/2, SUCTION CUP DART, and LIGHTER (P).
- Use the LIGHTER 4x (blue).
- Take the SEVERED HAND (Q).
- Go to the Psychiatrist's office (R).
- Place the SEVERED HAND (S); take the SPHERE LAMP and METALLIC HOSE PIPE (T).
- Take the FLOPPY DISK (U).
- Walk down.
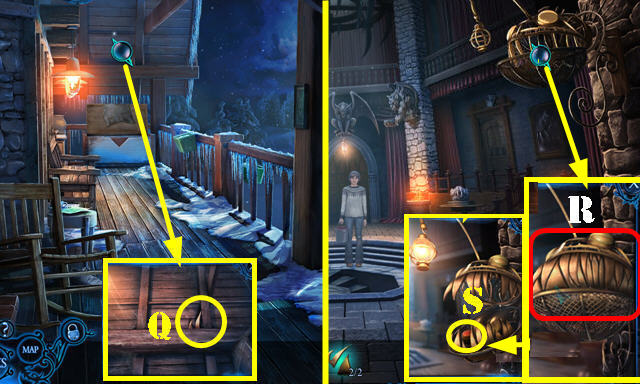
- Hang the SPHERE LAMP (V); enter the Library.
Chapter 6: Library
- Select the books; take the HEADPIECE (A).
- Take the VOODOO DOLL (B).
- Use the SUCTION CUP DART and select it; take the GRAMOPHONE ARM (C). Select the reel 3x; receive the FILM REEL (D).
- Move the ladder; take the PIPE EMBLEM and INCOMPLETE DATE (E).
- Move the ladder; play the HOP (F) to receive the GOLDEN MASK.
- Place the GOLDEN MASK (G) and select it. Enter the Dungeon (H).
- Take the MARBLE PUPILS 2/2 (I).
- Place the MARBLE PUPILS 2/2 and drag them as shown (J).
- Take the BOTTLE OF INK (K).
- Return to the Psychiatrist's office.
- Look at the note and remove the hat; take the SECURITY CARD (L).
- Lift the top; use the BOTTLE OF INK (M) for a puzzle.
- Solution (1-5).
- Take the ENTER KEY and PENDULUM (N).
- Hang the PENDULUM. Draw the lines as shown; follow the lines in order: red-yellow-green (O).
- Place the INCOMPLETE DATE; take the DATE (P).
- Go to the Library.
- Insert the FLOPPY DISK and select it (Q).
- Place the ENTER KEY (R) and select it; take the COMPUTER PROGRAM (Q).
- Place the DATE (S); push the button 4x (T). Push the red button (U); take the SLIDE CASING (V).
- Take the BOOK KEY from the SLIDE CASING.
- Walk down.
- Use the BOOK KEY and select it (W); play the HOP to receive the BOOKMARK.
- Go to the Prep room (X).
- Look at the clipboard (A).
- Place the GRAMOPHONE ARM and select it (B). Press the button (C); take the SNAKE HEAD (D).
- Use the SECURITY CARD (E). Press 32 Enter-Press 42 Enter (F).
- Go to the Grand Machine (G).
- Remove the hose pipe; place the HEADPIECE and METALLIC HOSE PIPE (H).
- Open the compartment; take the SNAKE SEGMENT (I).
- Take the ELECTRODE (J).
- Walk down.
- Place the ELECTRODE (K) and select it; take the STONE SYMBOLS 1/3 and EKG PRINT (L).
- Go to the Grand Machine.

- Insert the COMPUTER PROGRAM (M) and EKG PRINT (N).
- Position the three sliders as shown (O). Pull the lever (P).
- Select: Q-R.
- Take the BOLT CUTTERS (S).
- Walk down.
- Use the BOLT CUTTERS (T) and open the doors; play the HOP to get the THICK NEEDLE.
- Return to the Psychiatrist's office.

- Use the VOODOO DOLL and the THICK NEEDLE (U). Select the compartment; take the LEATHER CLEANER and CIRCULAR JOINT (V).
- Walk down.
- Place the SNAKE SEGMENT and CIRCULAR JOINT on the SNAKE HEAD; receive the SNAKE.
- Place the SNAKE for a puzzle (W).
- Select matching pairs (X).
- Select the marked monsters (Y).
- Go to Corvine's bedroom (Z).
- Use the LEATHER CLEANER (A).
- Select the projector (B).
- Press the button (C).
- Remove the sheet; take the VASE SHARD (D) and select the pocket. Select the shirt twice. Place the PIPE EMBLEM and open the box; take the STONE SYMBOLS 2/3 (E).
- Use the BOOKMARK (F); go to the Balcony (G).
- Use the VASE SHARD; take the CANDLES (H).
- Open the box (I); play the HOP to get the STRANGE LIGHT BULB.
- Walk down.
- Remove the cover and the bulb in the projector; place the STRANGE LIGHT BULB and close the compartment (J).
- Place the FILM REEL and select it (K). Take the STONE SYMBOLS 3/3 (L).
- Return to the Dungeon.
- Place the STONE SYMBOLS 3/3 (M).
- Select the floor (N1) and place the CANDLES for a puzzle.
- Solution (P); take the JACK ROD (N).
- Return to the Balcony.
- Use the JACK ROD; receive the TOOTH 2/2 (Q).
- Walk down twice.
- Place the TOOTH 2/2 and arrange as shown (R). Take the PUSH BUTTON (S).
- Go to Corvine's bedroom.
- Place the PUSH BUTTON for a puzzle (T).
- The solution is random for both puzzles (U-V).
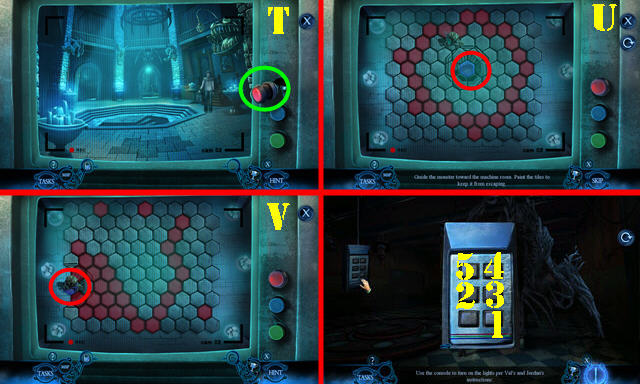
- Return to the Grand Machine.
- Select the console and then select 1-5.
- Congratulations, you've completed Phantasmat: Reign of Shadows.
Created at: 2016-11-04