

Walkthrough Menu
General Tips
- This is the official guide for Phantasmat: Remains of Buried Memories.
- This guide won't tell you when to zoom into a location; the screenshots show each zoom scene.
- Hidden-object puzzles are referred to as HOPs. Only the locations of the HOPs will be shown.
- Use the Map to fast travel to a location.
Prologue
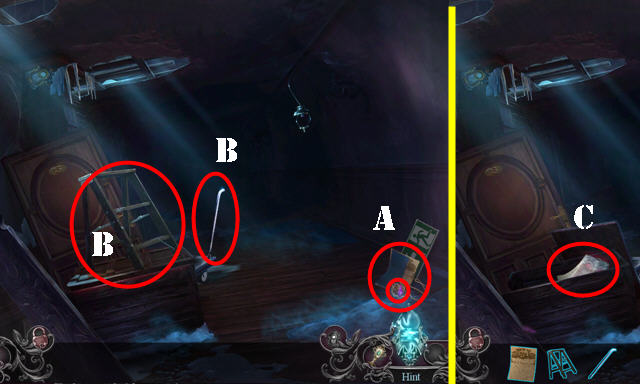
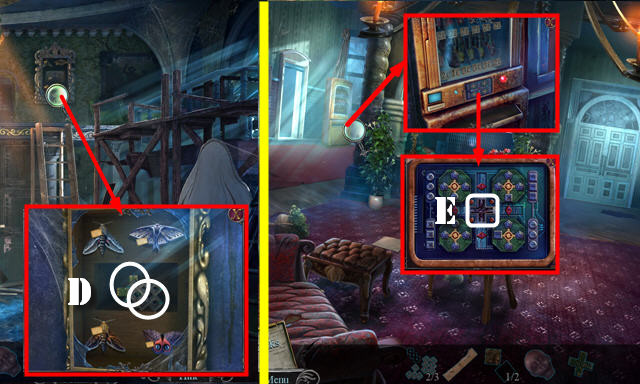
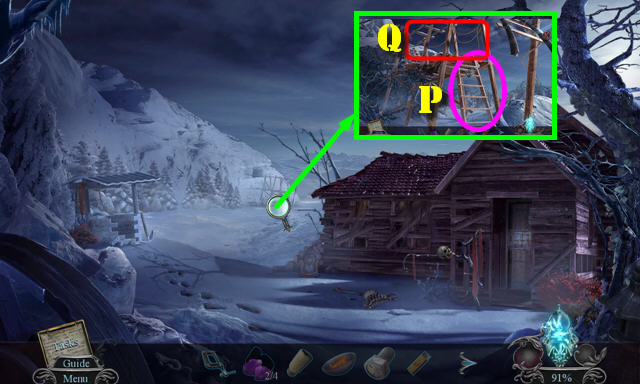
- Look at medallion; take FLYER (A) and select.
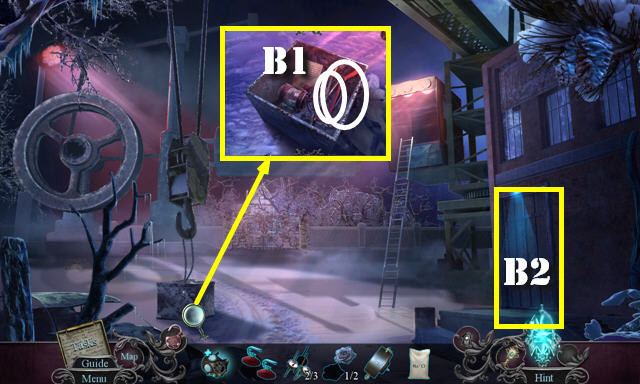
- Take METAL ROD and LADDER (B).
- Use METAL ROD; take LAMP (C).
- Select LAMP; take FISH TOOTH. Select skull on lamp; take LIGHTBULB.
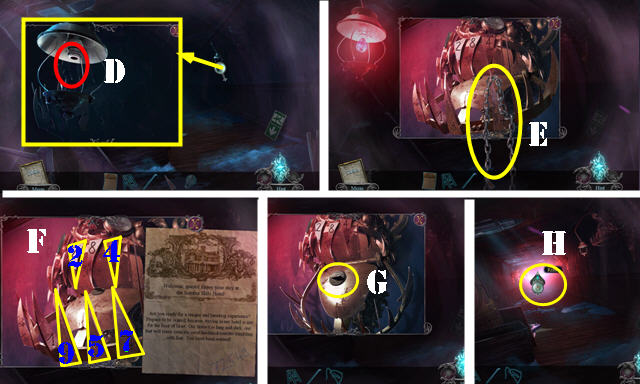
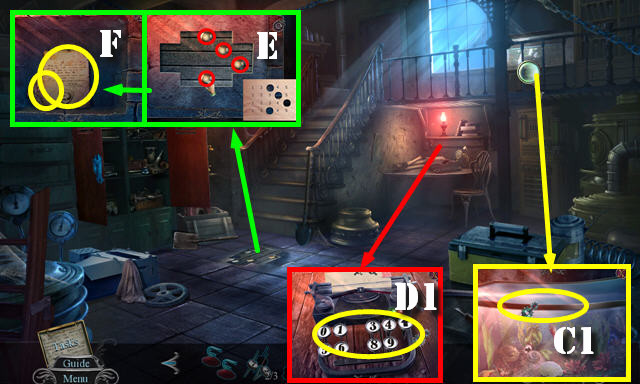
- Place LIGHTBULB (D). Take CHAIN (E).
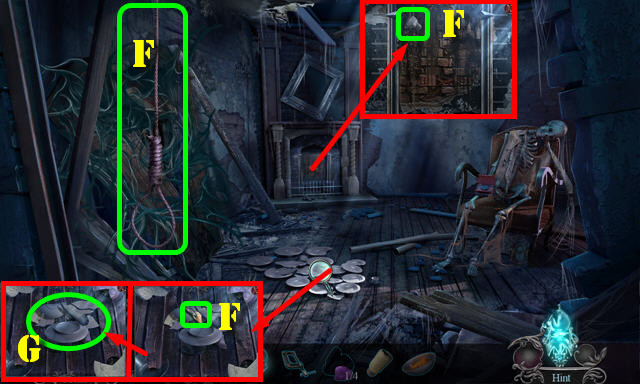
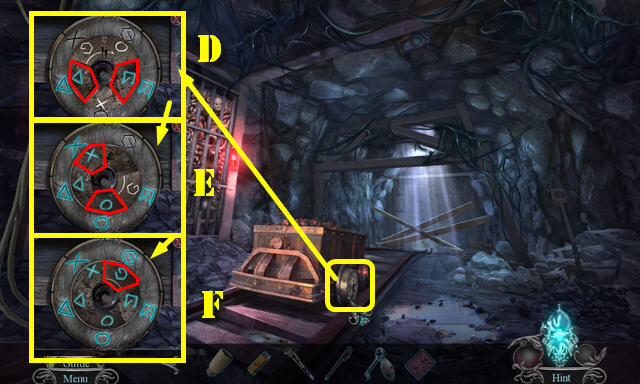
- Use FISH TOOTH and FLYER; select 72549 (F).
- Turn knob (G).
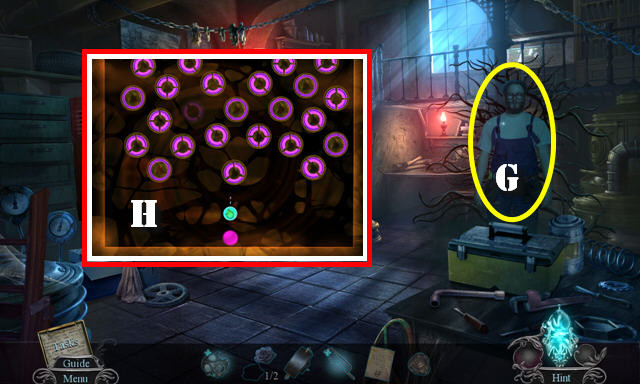
- Go (H).
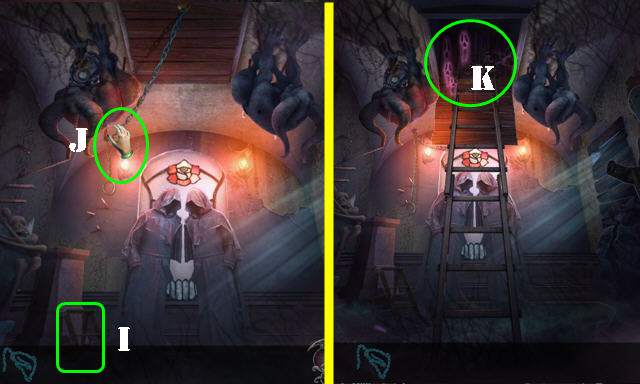
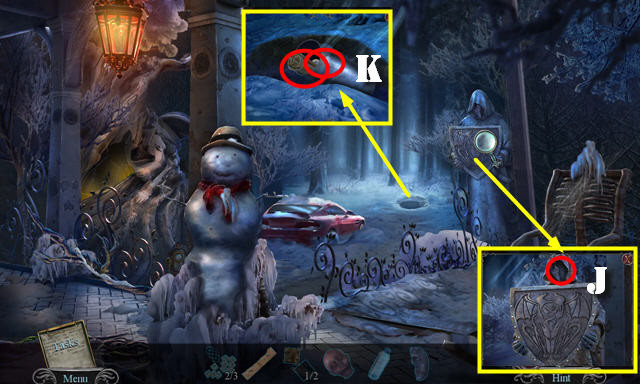
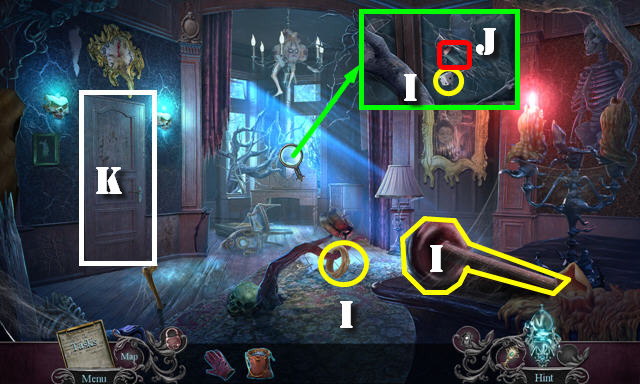
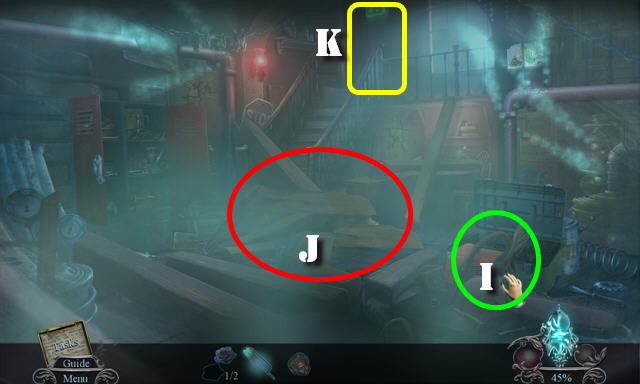
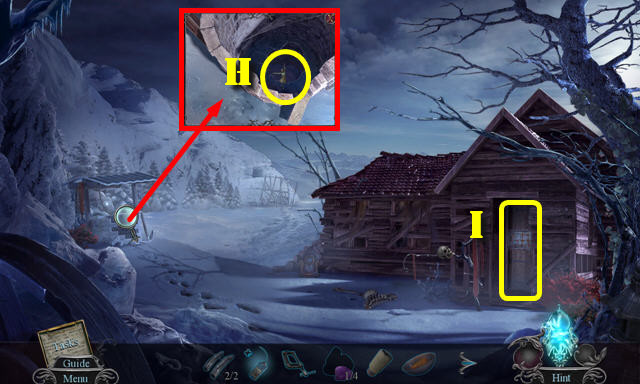
- Use METAL ROD on scene 4x.
- Place LADDER (I).
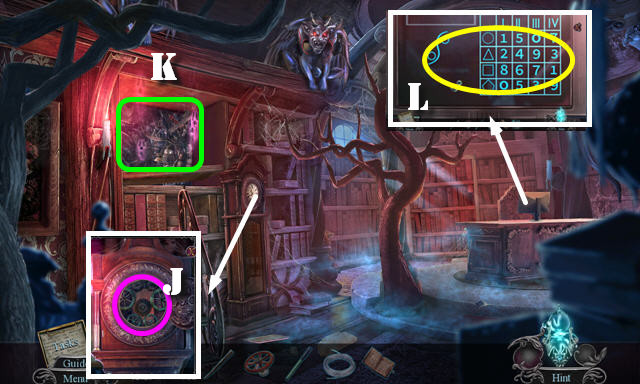
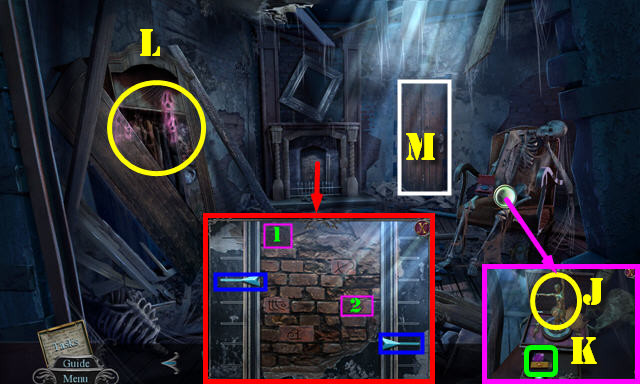
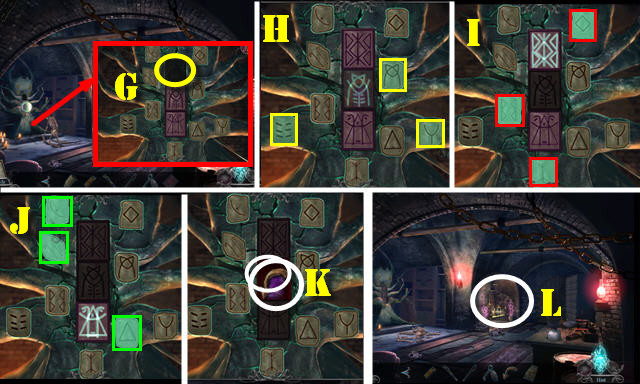
- Pull chain (J).
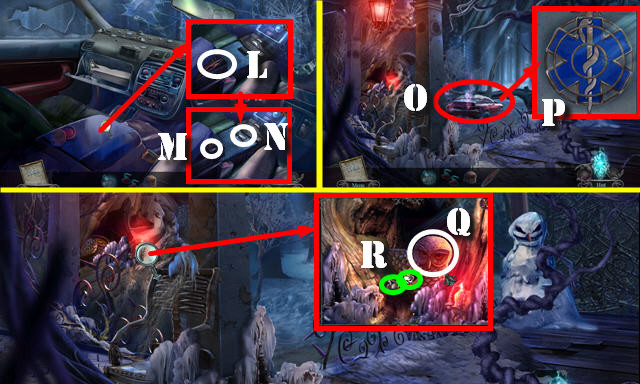
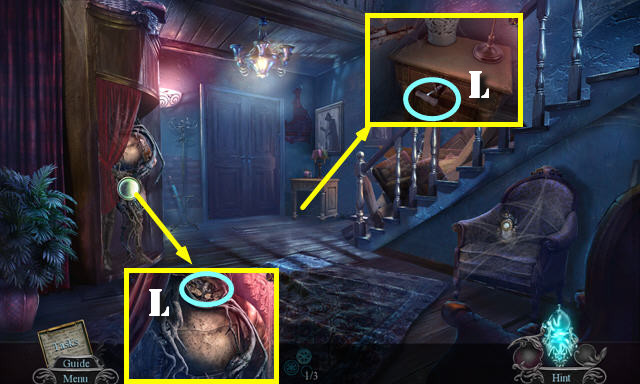
- Play HOP (K); receive KEY RING.
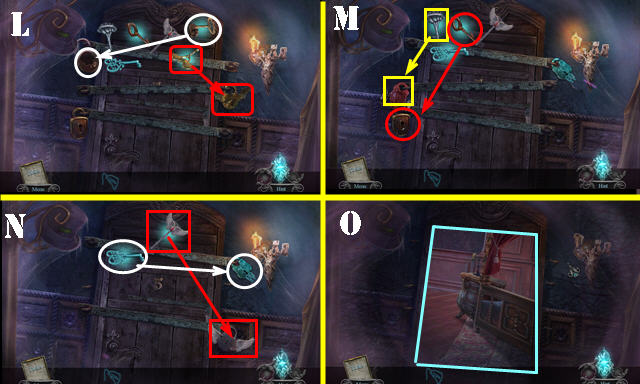
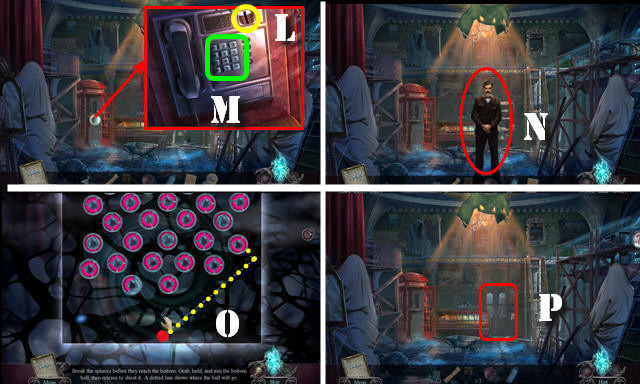
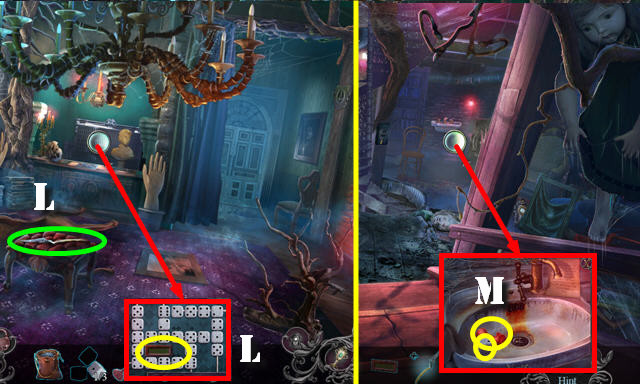
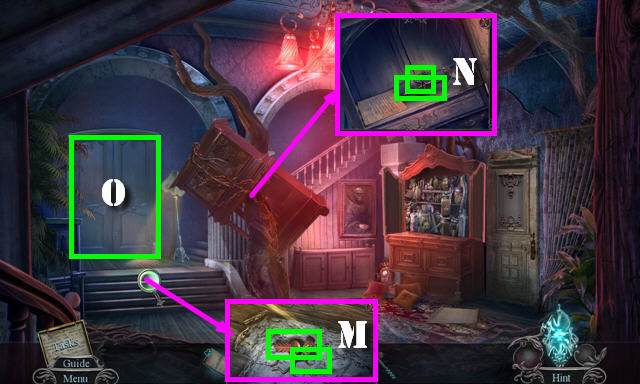
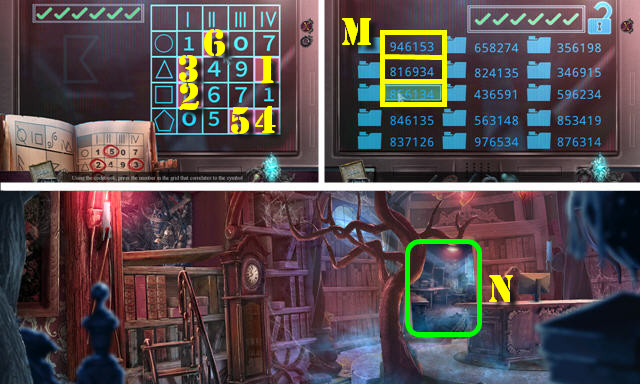
- Use KEY RING on scene. Place keys in matching locks (L-M-N).
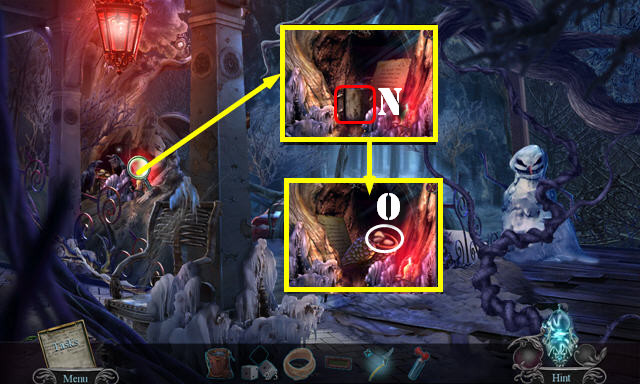
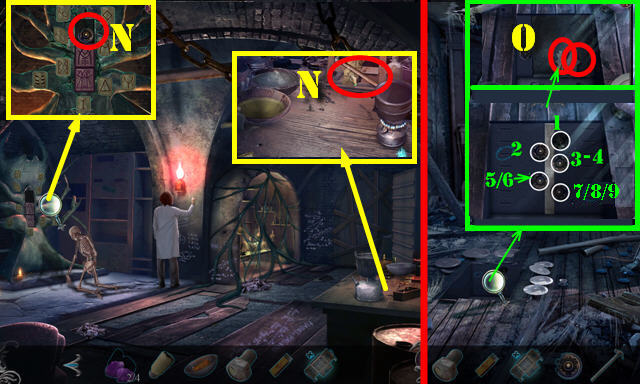
- Go (O).
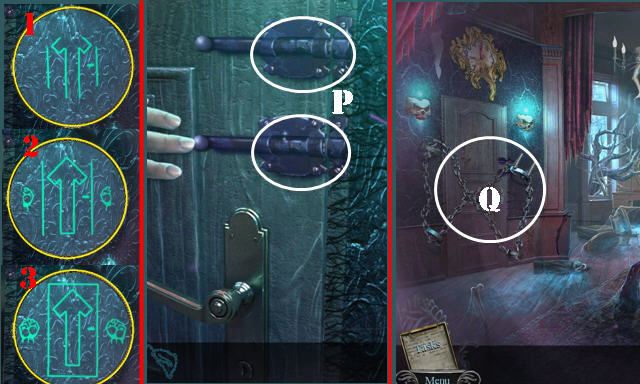
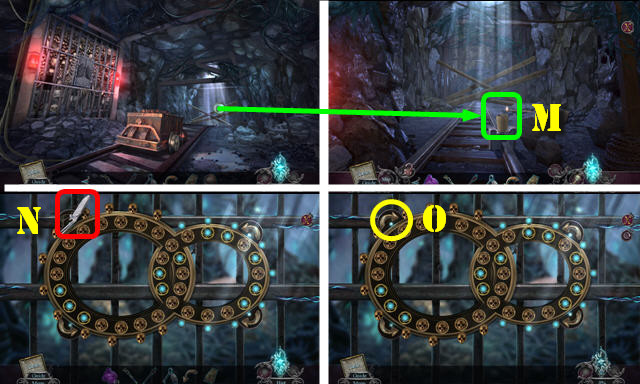
- Select when image section is correct. Solution (1-3).
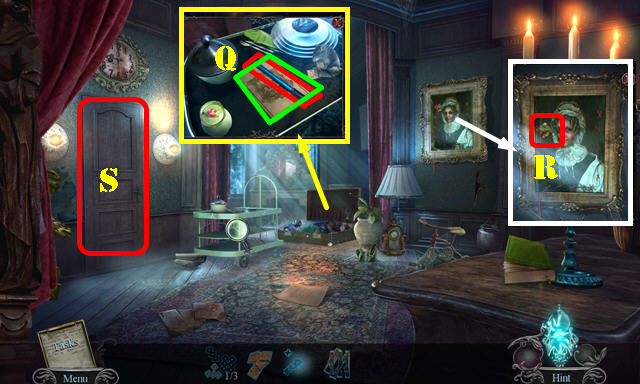
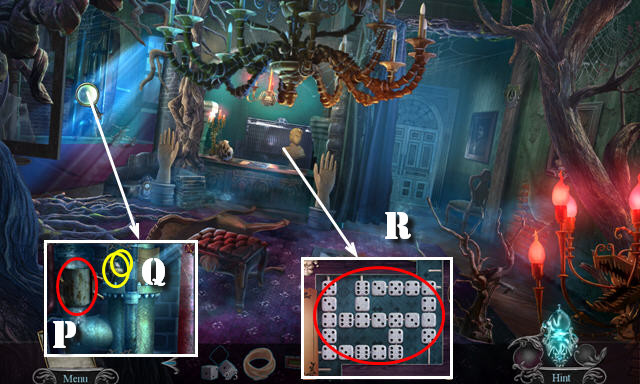
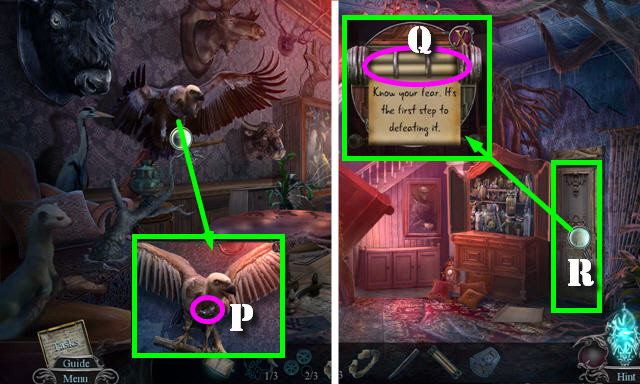
- Select both latches (P).
- Place CHAIN (Q).
- Enter your profile name and select your difficulty level, and then press play.
Chapter 1: Hotel
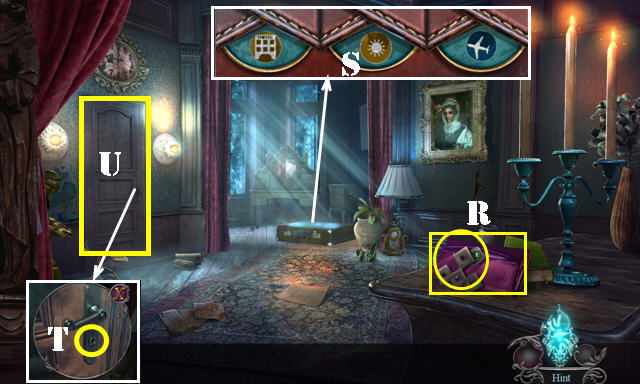
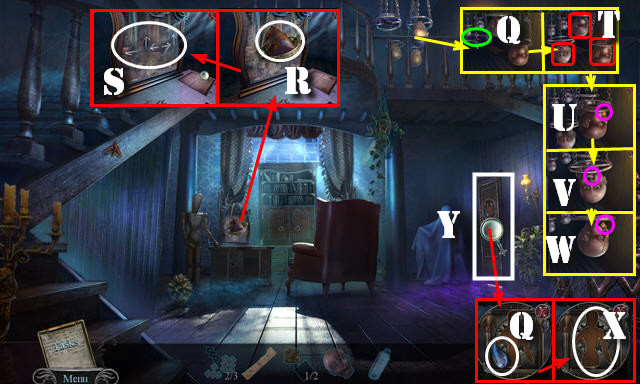
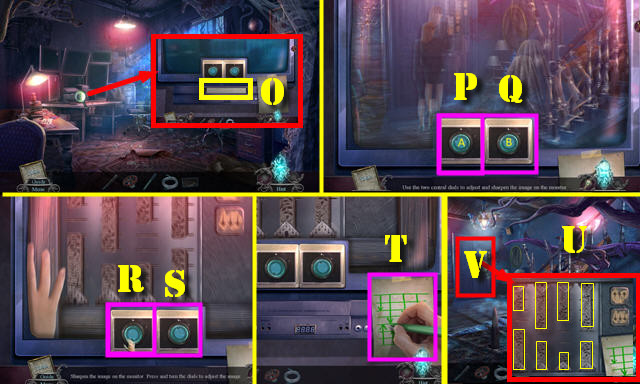
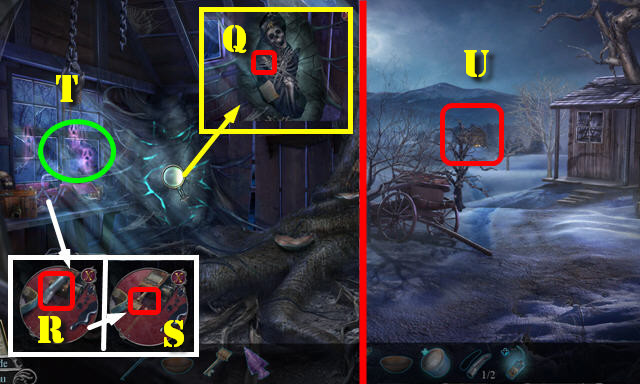
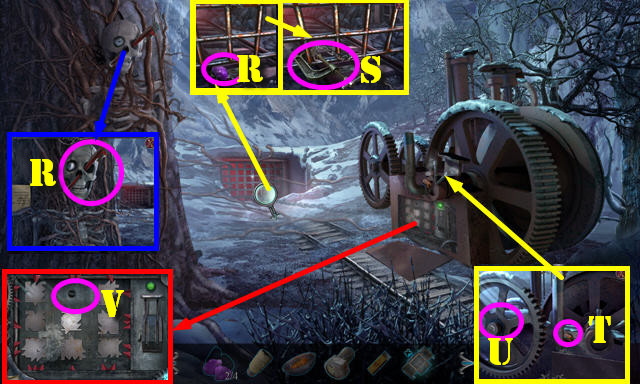
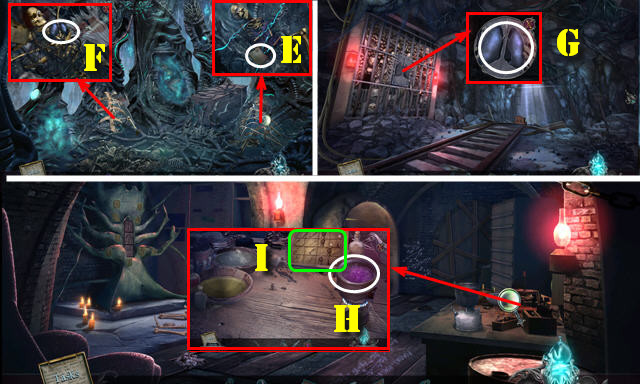
- Take ORNAMENTS 1/3 and WALLET (R).
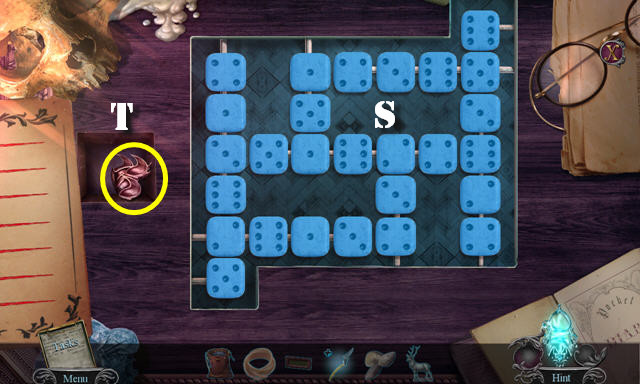
- Open WALLET; select twice; take COMBINATION.
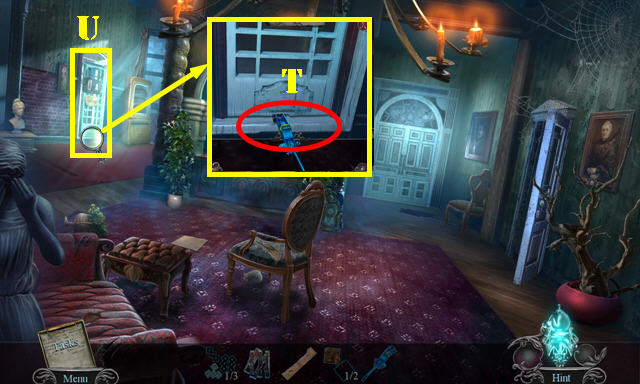
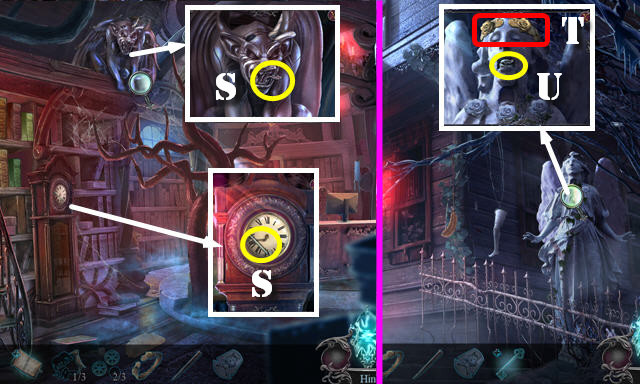
- Place COMBINATION; solution (S). Play HOP; receive LETTER OPENER.
- Use LETTER OPENER (T).
- Go (U).
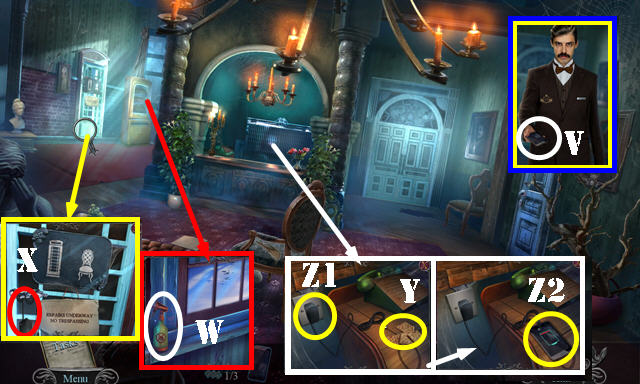
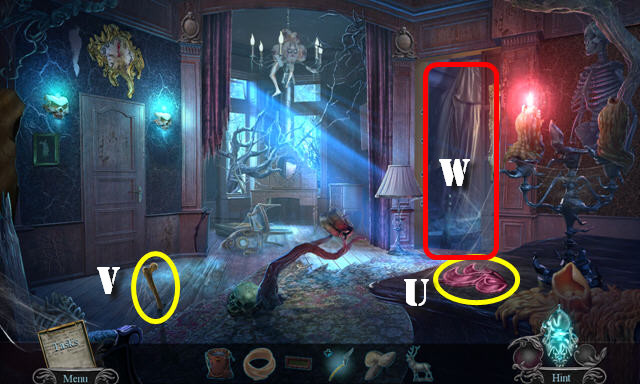
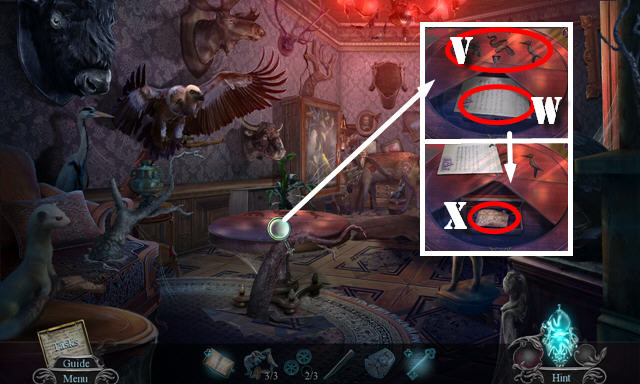
- Take CELL PHONE and select (V).
- Take BUG REPELLENT (W).
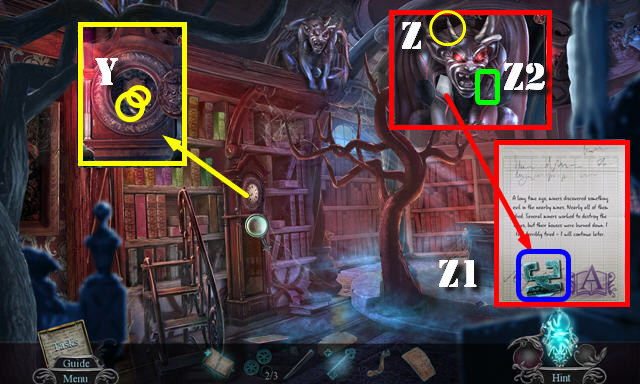
- Take PHONE CHARGER (X); select door handle.
- Look at letter; take CRACKERS (Y). Plug in PHONE CHARGER (Z1) and CELL PHONE (Z2).
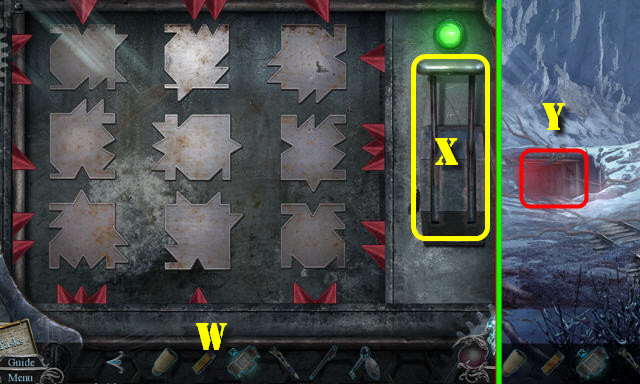
- Select screen for a puzzle.
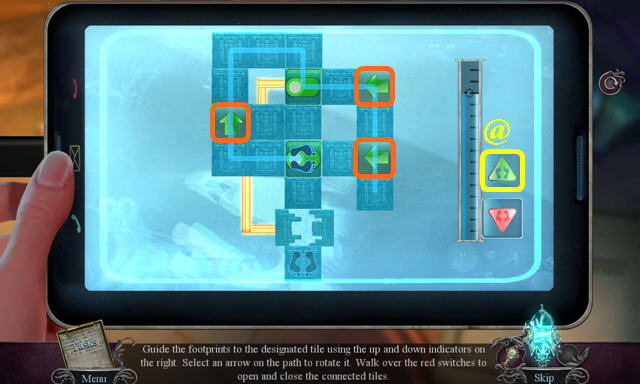
- Solution: Arrange arrows (orange). Press @x16.
- Solution two: Dx3-Ax4-Dx2-Ax4-Ex2-Ax2-C-Ex2-Ax7.
- Select phone on scene.
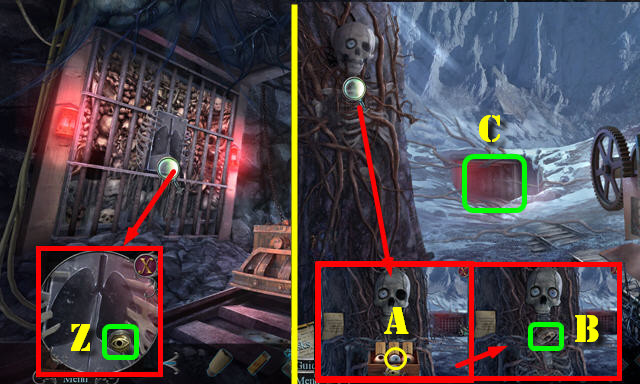
- Remove cover; use BUG REPELLENT and take MATCHES (G).
- Go (H).
- Take DOORKNOB (I).
- Use MATCHES; take CAR KEYS (J).
- Select CAR KEYS twice; receive FOB and MOUTH 1/2.
- Place FOB; select green button (K).
- Enter (L).
- Take BROKEN JACK and MOUTH 2/2 (M).
- Place MOUTH 2/2 (N). Play HOP; receive EYELASH CURLER.
- Use EYELASH CURLER (O).
- Return to Lobby.
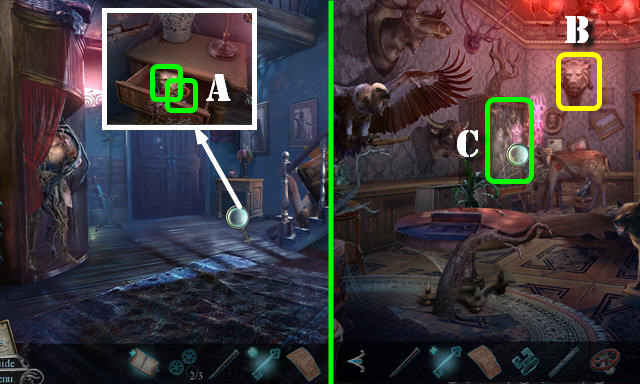
- Place DOORKNOB and select (P). Play HOP; receive TORN PHOTO.
- Walk down.
- Place CRACKERS; take JACK HANDLE and MAGAZINE (Q).
- Receiving the MAGAZINE automatically triggers HOP. Play HOP to receive ORNAMENT CLUE.
- Take TILES 1/2 (R).
- Go (S).
- JACK HANDLE on BROKEN JACK; receive JACK.
- Use JACK (T).
- Enter (U).
- Move cart (V).
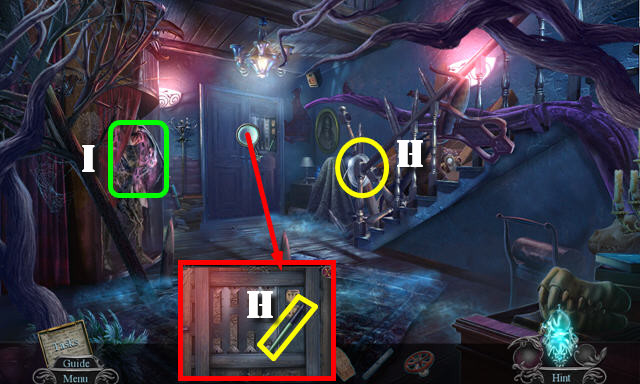
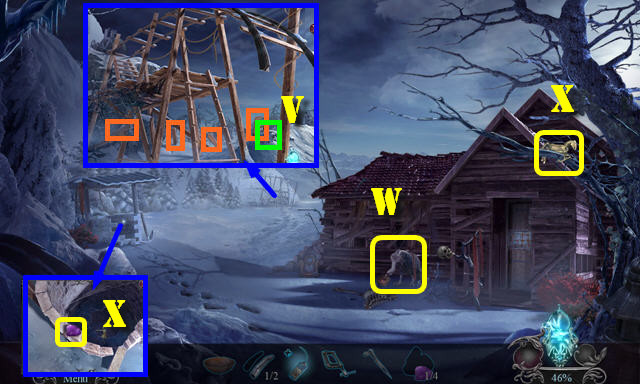
- Open door; take WINGS 1/2 and STAPLE REMOVER (W).
- Take CLIPBOARD (X).
- TORN PHOTO on CLIPBOARD and arrange as shown (Y); take PHOTO.
- Walk down twice.
- Use STAPLE REMOVER; select picture and take WINGS 2/2 (A).
- Go to Porch.
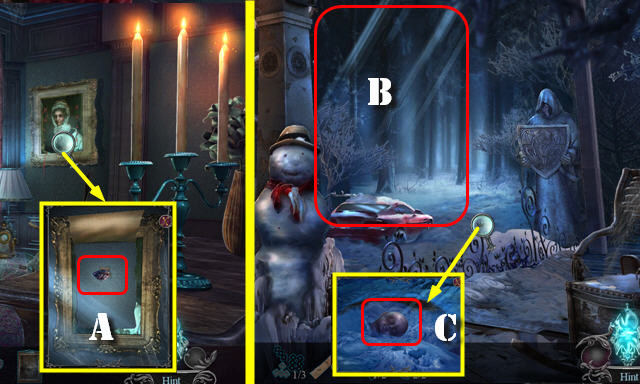
- Place PHOTO and select (B).
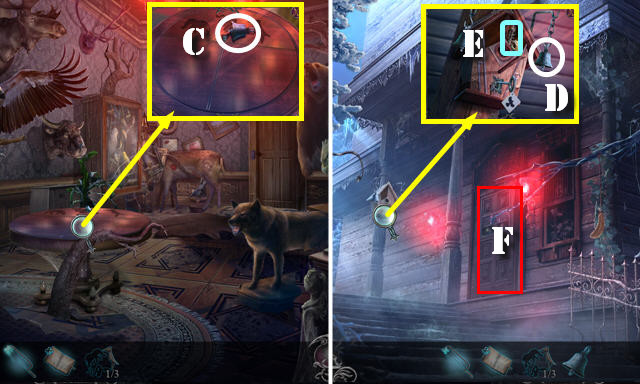
- Take HEAD (C). Select snow 3x.
- Go to Phone Kiosk.
- Place WINGS 2/2; take ORNAMENTS 2/3 and CIRCUIT BOARD (D).
- Walk down.
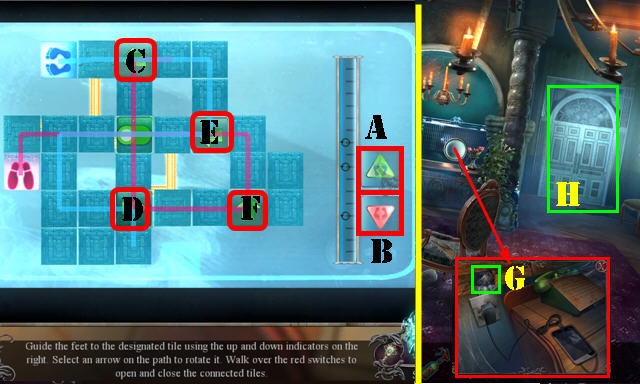
- Place CIRCUIT BOARD (E).
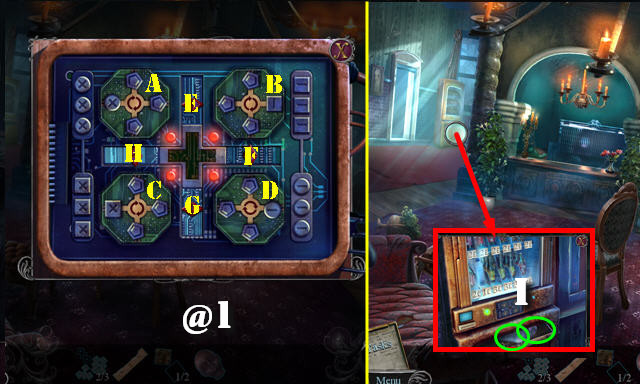
- Solution: H-D-F-Dx3-C-G-A-Bx3-Dx2-Cx2 (@1).
- Take WATER and FACE (I).
- Go to Porch.
- Place FACE (J); receive SHIELD.
- Use SHIELD and select tube twice; take ALFRED'S LETTER and COINS (K).
- Go to Phone Kiosk.
- Use COINS (L). Play HOP; receive BUTTONS.
- Place BUTTONS (M) and select.
- Give ALFRED'S LETTER (N).
- Play automatic puzzle; solution is random (O).
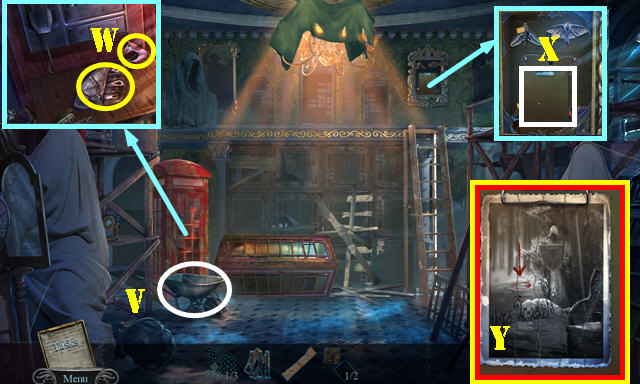
- Select planks 3x; go (P).
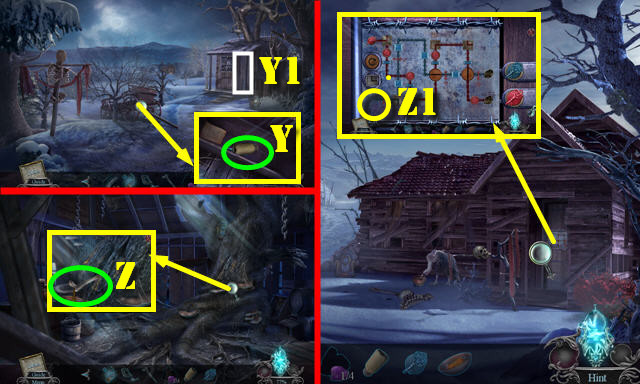
- Take TEARDROP and RAG (Q).
- Look at book; take SMALL BOX (R).
- Take TILES 2/2 from SMALL BOX.
- WATER on RAG; receive WET RAG.
- Use WET RAG (S).
- Place HEAD; select Left-Up-Left-Right-Up (T). Take MANNEQUIN 1/3-3/3 from each mouth (U-V-W).
- Place MANNEQUIN 3/3 (X).
- Go (Y).
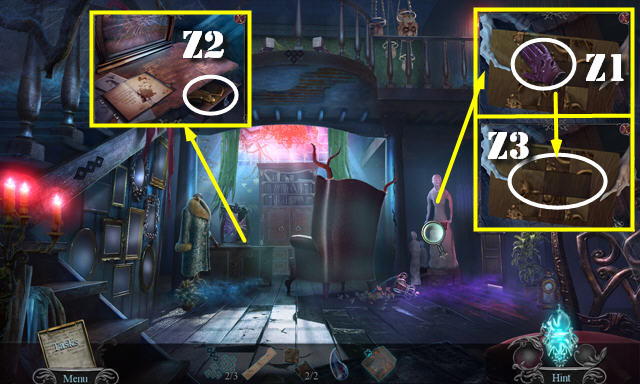
- Take GLOVE (Z1).
- Place TEARDROP; look at book and take GRIM REAPERS 1/2 (Z2).
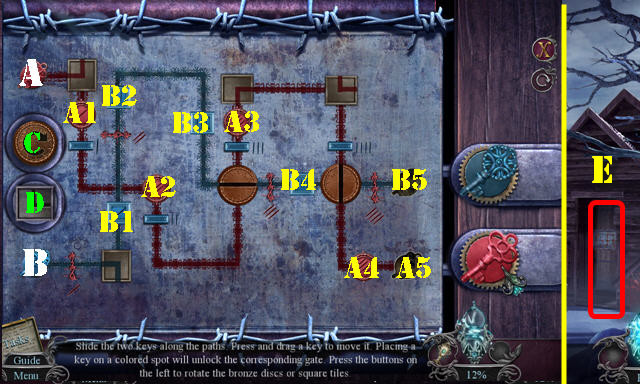
- Place TILES 2/2 (Z3).
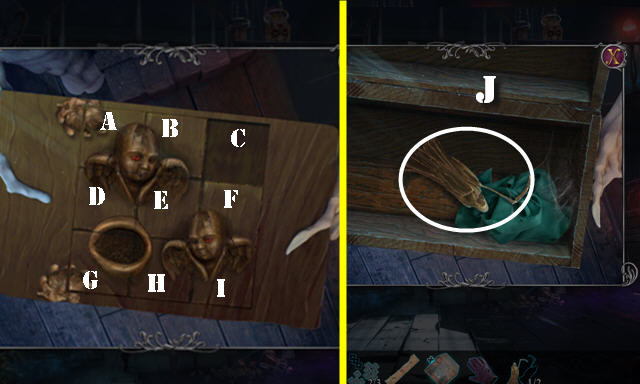
- Solution: (E-D-A-B-C-F-I)-(H-G-D-A-B-C)-(F-E-H-G-D-A-B-C).
- Take GRIM REAPERS 2/2 (J).
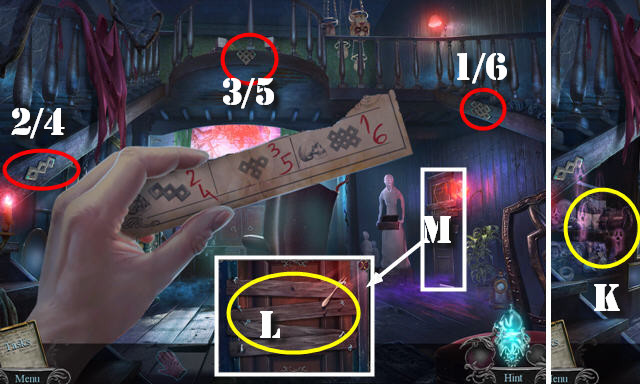
- GRIM REAPERS 2/2 on SMALL BOX. Open box and take ORNAMENTS 3/3.
- Place ORNAMENTS 3/3 and ORNAMENT CLUE on scene. Select 1-6.
- Play HOP (K); receive FORK.
- Use FORK (L).
- Go (M).
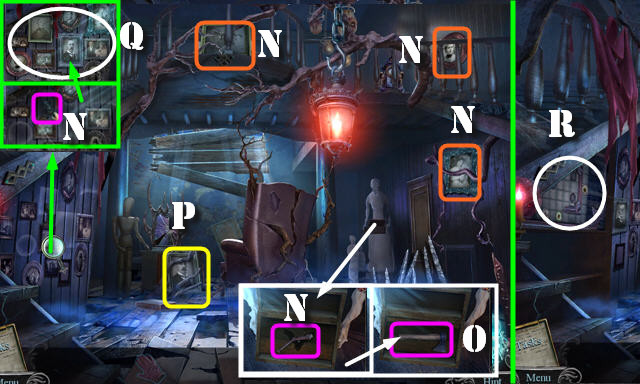
- Select scene.
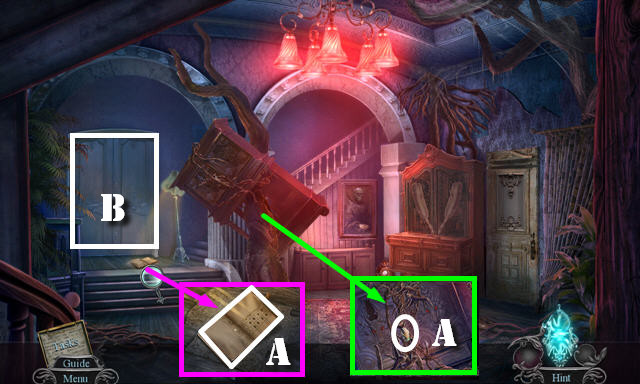
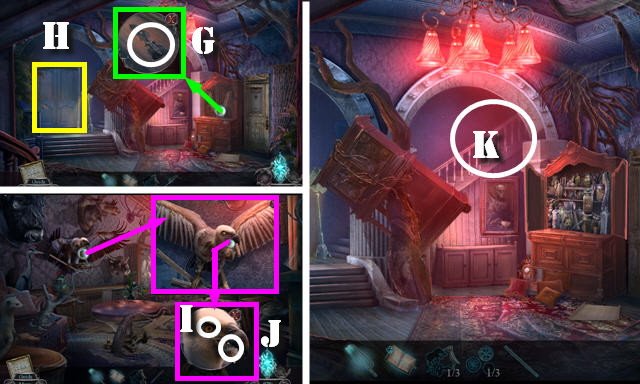
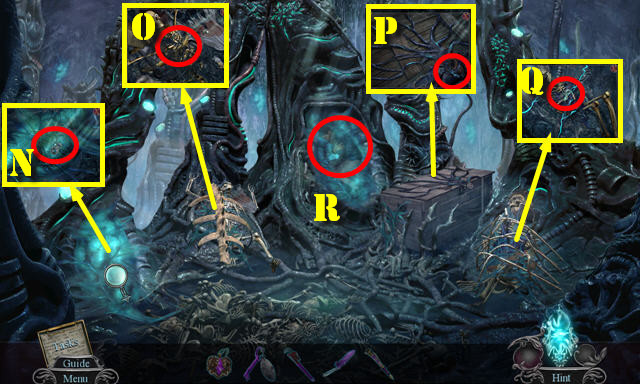
- Take PAINTINGS 1/4-3/4, BAT, and HAND CRANK (N).
- Place BAT; take HATCHET (O).
- Use HATCHET; take PAINTINGS 4/4 (P).
- Place PAINTINGS 4/4 (Q).
- Play puzzle (R).
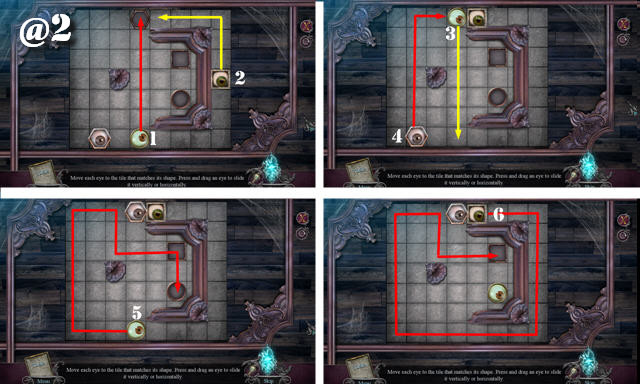
- Solution one (1-6) (@2).
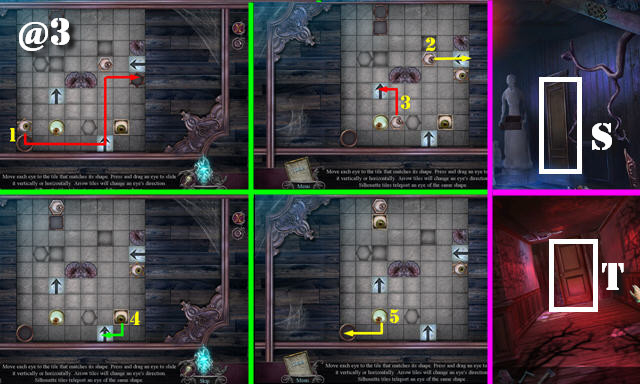
- Solution two (1-5) (@3).
- Go (S).
- Select door 5x (T).
Chapter 2: Bedroom
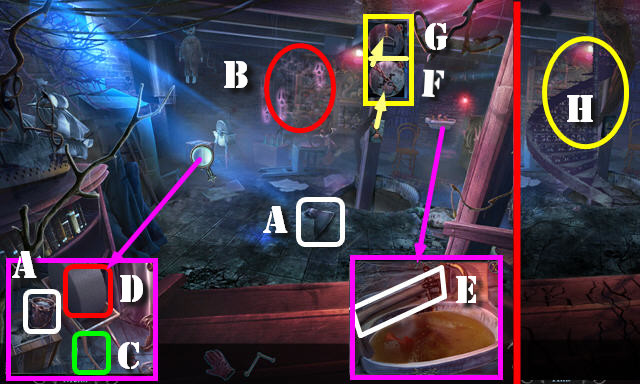
- Take DUST and AXE HEAD (A).
- Play HOP (B); receive DULL KNIFE.
- Place HAND CRANK (C) and use DULL KNIFE (D); receive SHARP KNIFE.
- Look at note; take AXE HANDLE (E).
- AXE HEAD and SHARP KNIFE on AXE HANDLE; select axe head; receive AXE.
- Use AXE (F) and pull handle (G).
- Go (H).
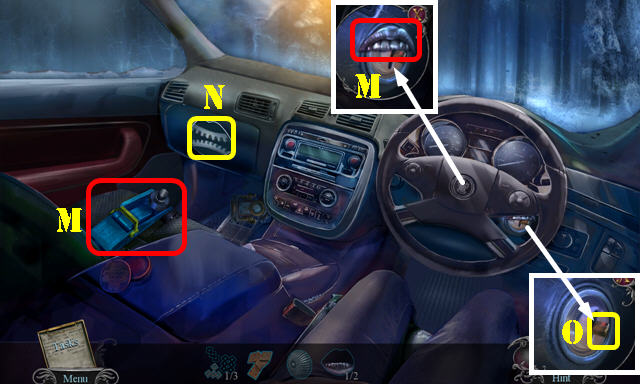
- Take PLUNGER, RUBBER BAND, and DICE 1/3 (I).
- Use GLOVE and select (J); receive AIR CAN.
- Select scene.
- Go (K).
- Take KEYPAD DISPLAY and BROKEN SHEARS (L).
- Go to Basement.
- Use PLUNGER; take DICE 2/2 and PLASTIC HORN (M).
- Go to Porch.
- PLASTIC HORN on AIR CAN; receive AIR HORN.
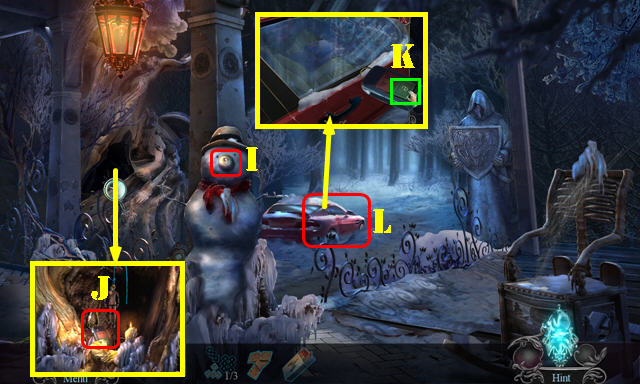
- Use AIR HORN; take REPAIR CLAMP (N). Look at note; take ROCKS (O).
- Walk down.
- Use REPAIR CLAMP (P). Look at note; take STAG and DICES 3/3 (Q).
- Place DICE 3/3 (R).
- Solution (S).
- Take FIRE (T).
- Walk down.
- Place FIRE (U).
- Pull lever (V).
- Go (W).
- Take SHEARS HALF and ANTLERS (A).
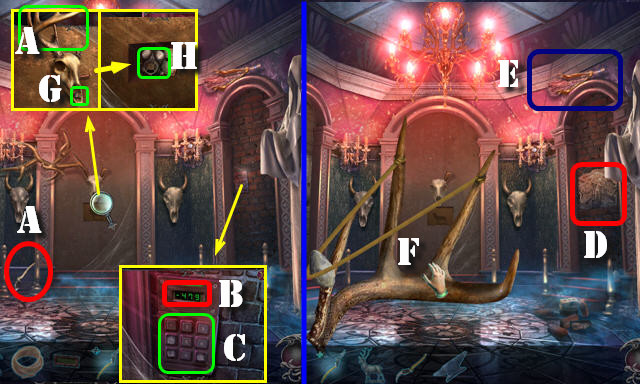
- Remove cover; place KEYPAD DISPLAY (B). Use DUST and enter 479 (C).
- Play HOP (D); receive ANVIL EMBLEM.
- RUBBER BAND and ROCKS on ANTLERS; receive SLINGSHOT.
- Place SLINGSHOT (E) and select twice (F); receive DEER JAW and BROOM.
- Place DEER JAW; take SHEARS SCREW (G).
- Place STAG and look at note; take DAMAGED MASK and POISON (H).
- Go to Basement.
- Place ANVIL EMBLEM; take SUCTION CUPS and OWL HEAD (I).
- Go to Porch.
- Use POISON; enter (J).
- SHEARS SCREW and SHEARS HALF on BROKEN SHEARS; select screw; take SHEARS.
- Use SHEARS and BROOM on scene (K).
- Open compartment; take TWEEZERS (L).
- Take button (M) and place it (N); push button.
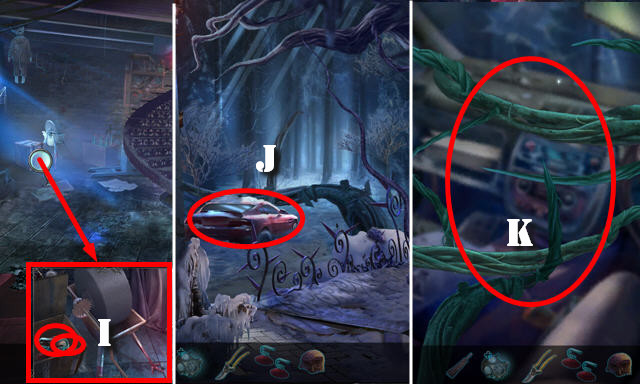
- Play HOP (O). HOP solution (P); receive FLASHLIGHT.
- Place OWL HEAD (Q); take TYPEWRITER KEYS 1/3 and ARROWS (R).
- Go to Secret Room.


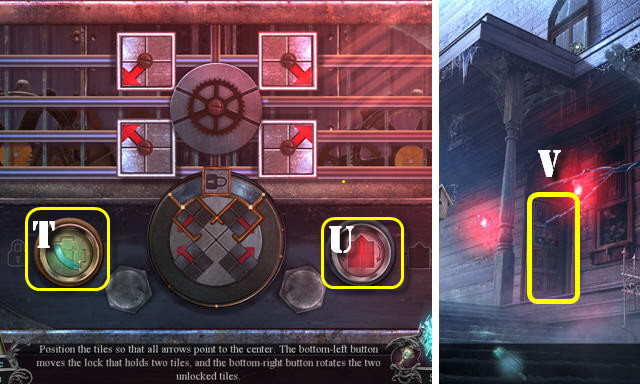
- Place ARROWS (S).
- Solution (@4): B-D-H-Kx2-D-B-A-K-I-K-B-D.
- Kx2-F-Kx3-A-C-C-D-H-K-D-B-I-Kx2-B-A.
- B-Kx3-F-Kx3-A-B-A-K-G-Kx2-B-D-J-K-D.
- C-A-G-Kx2-A-B-A-Kx2-D-J-K-Bx2.
- Take AREA MAP.
- Go to Porch.
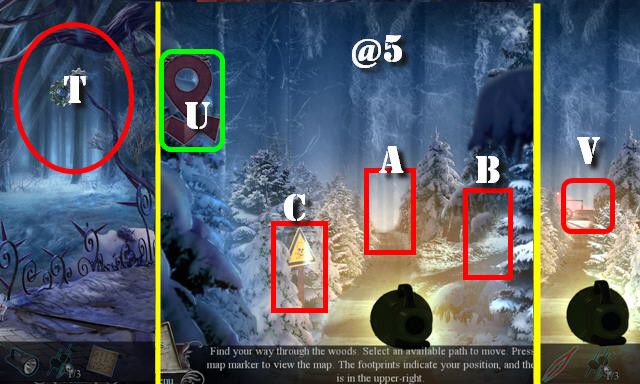
- Place AREA MAP and FLASHLIGHT on scene (T).
- Solution (@5): A-C-Ax2-Bx2-C-Bx2-C-A-C-A-C-Bx3-C. View map here (U).
- Go (V).
- Take METAL HANDLE (W).
- Place METAL HANDLE and pull it (X).
- Take TYPEWRITER KEYS 2/3 (Y).
- Go (Z).
- Take ROSES 1/2 and MASK FILTER (A1).
- Use TWEEZERS (A2); receive TOOL EMBLEM.
- Place TOOL EMBLEM (A3). Play HOP: receive SALT.
- Go (A4).
- Use SALT; open box and look at letter; take SAW FRAME and GRABBER (B1).
- Go (B2).
- Use SUCTION CUPS and GRABBER (C1); receive TYPEWRITER KEYS 3/3.
- Place TYPEWRITER KEYS 3/3 (D1); take TYPED CODE.
- Place TYPED CODE; solution (E). Take EDGAR'S LETTER and CHERUB HEAD (F).
- Give EDGAR'S LETTER (G).
- Solution is random (H).
- MASK FILTER on DAMAGED MASK; receive GAS MASK.
- Use GAS MASK on scene.
- Take CHAINSAW (I).
- Use CHAINSAW (J).
- Go (K).

- Place CHERUB HEAD (L). Play HOP.
- Go (M).

- Take ROSES 2/2 (N).
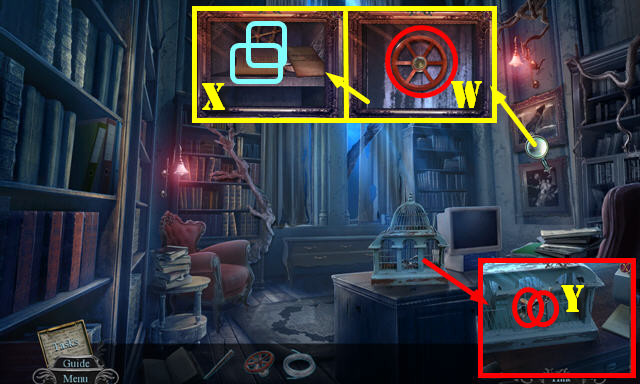
- Place ROSES 2/2 (O); take BIRDHOUSE KEY (P).
- Use BIRDHOUSE KEY (Q); take LOCK MECHANISM (R).
- Place LOCK MECHANISM (S).
- Solution: Ux2-T-Ux3-Tx2-U.
- Enter Foyer (V).
Chapter 3: Foyer
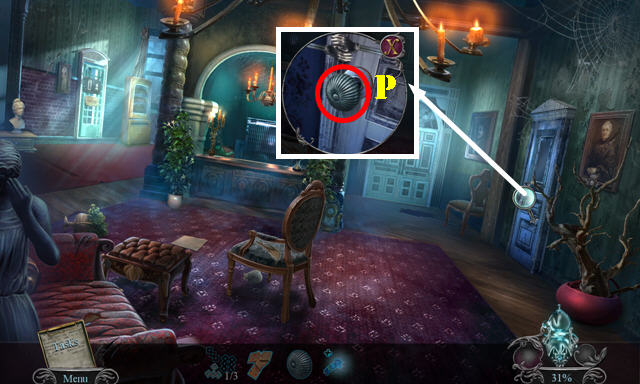
- Take TORN BOOK and ANIMAL TILES 1/3 (A).
- Go (B).
- Take BELL (C).
- Walk down twice.
- Hang BELL (D); take QUILL (E).
- Go (F).
- Place QUILL (G). Play HOP; receive BOX CUTTER.
- Go (H).
- Use BOX CUTTER (I); take GEARS 1/3 (J) and receive SAW BLADE.
- Walk down; go (K).
- Select SAW FRAME and place SAW BLADE; take HACKSAW.
- Use HACKSAW on scene.
- Take CORKSCREW and LAURELS (L).
- Walk down.
- Use CORKSCREW; take RIB SPREADER and DEER ORNAMENT (M).
- Select branches, place DEER ORNAMENT, and look at note; take GEARS 2/3 and ANIMAL BONE (N).
- Go (O).
- Use RIB SPREADER; take SCROLL and HUNTING INSIGNIA (P).
- Walk down.
- Place SCROLL (Q).
- Go (R).
- Take BROKEN KEY and ANIMAL TILES 2/3 (S).
- Go to Lodge.
- Place LAURELS (T); take ANIMAL TILES 3/3 (U).
- Go to Trophy Room.
- Place ANIMAL TILES 3/3 (V). Look at note; take CLOCK HAND (W).
- Place HUNTING INSIGNIA; take CIPHER (X).
- Go to Archives.
- Place CLOCK HAND; take GARGOYLE HORN and KNIGHT (Y).
- Place GARGOYLE HORN (Z).; look at note and take KEY BIT (Z1). Take LOCK PIECE (Z2).
- Go to Hallway.
- Place KNIGHT; take VALVE and LION HEAD (A).
- Go to Trophy Room.
- Place LION HEAD (B). Play HOP (C); receive HELMET.
- Go to Hallway.

- Place HELMET (D); take SUPERGLUE and GEARS 3/3 (E).
- KEY BIT and SUPERGLUE on BROKEN KEY; select key bit; receive ORNATE KEY.
- Use ORNATE KEY (F).
- Select (G).
- Take STEEL WIRE and HIGHLIGHTER (H).
- Play HOP (I); receive PAGE HALF.
- Go to Archives.
- Place GEARS 3/3 (J). Play HOP (K); receive UNWOUND VIDEOTAPE.
- CIPHER and PAGE HALF on TORN BOOK; take CODEBOOK.
- Use CODEBOOK (L).
- Solution one (1-6).
- Solution two is random (M).
- Go (N).
- HIGHLIGHTER on UNWOUND VIDEOTAPE; take VIDEOTAPE.
- Place VIDEOTAPE (O); move left and right buttons (P-Q) until both images are adjusted.
- Use buttons (R-S) to adjust image.
- Use HIGHLIGHTER (T); receive OFFICE CODE.
- Go to Office Hallway.
- Place LOCK PIECE and OFFICE CODE; arrange pieces as shown (U).
- Enter (V).
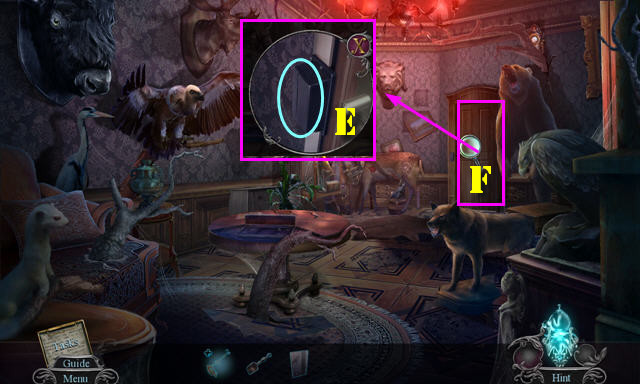
- Select painting 6x; place VALVE and spin (W). Look at note; take FILE LIST and BROKEN LADDER (X).
- Use STEEL WIRE and ANIMAL BONE; take SCOOP and ICE PICK (Y).
- Go to Monitoring Room.
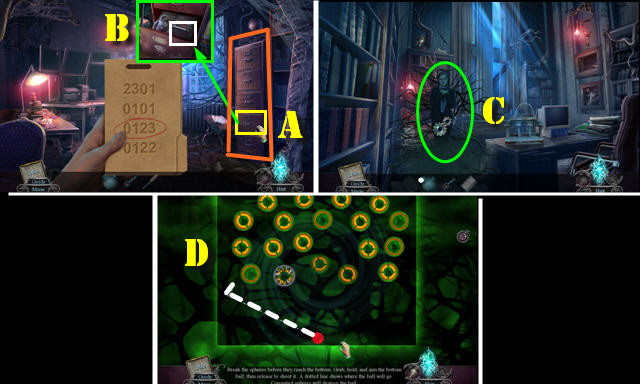
- Place FILE LIST (orange); select drawer 0123 (A). Use ICE PICK; take AMELIA'S JOURNAL (B).
- Go to Office.
- Give AMELIA'S JOURNAL (C).
- Solution is random (D).
- Receive AMELIA'S CARD.
- Go to Trophy Room.
- Use AMELIA'S CARD (E).
- Enter (F).
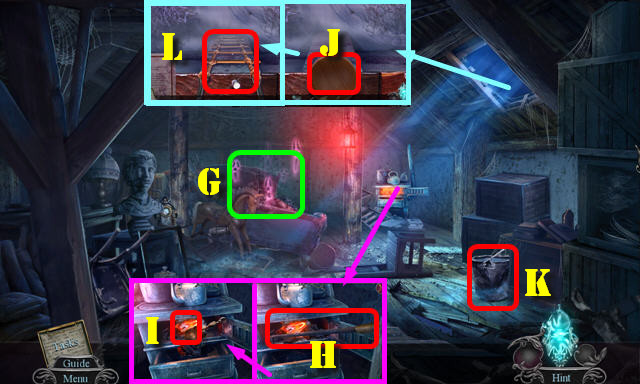
- Play HOP (G); receive BOARDS.
- Take POKER (H). Use SCOOP (I); receive HOT HOOK.
- Look at note; take BOWL (J).
- Dip HOT HOOK (K); receive HOOK.
- HOOK and BOARDS on BROKEN LADDER; receive ROPE LADDER.
- Place ROPE LADDER (L).
Chapter 4: Shed
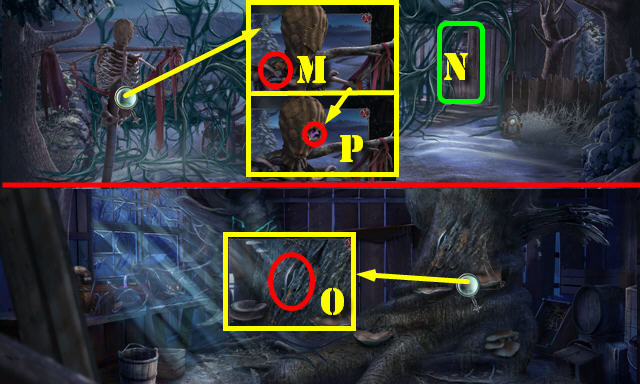
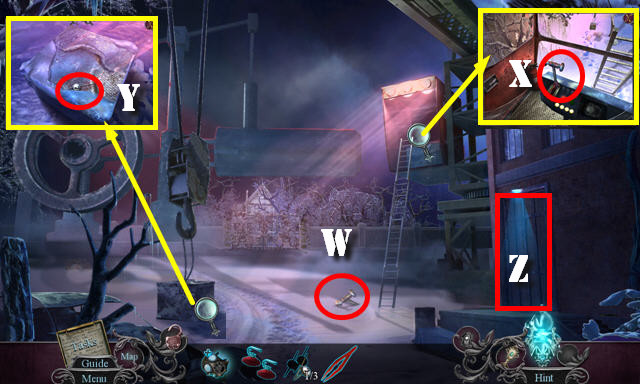
- Take MINER KEY (M).
- Enter (N).
- Take FORCEPS (O).
- Walk down.
- Remove patch and use FORCEPS (P); receive AGATE ARROWHEAD.
- Enter (N).
- Use AGATE ARROWHEAD; look at note; take CAN (Q).
- Take PROSTHETIC FINGERS (R).
- Use MINER KEY (S). Play HOP (T): receive SPRAY BOTTLE.
- Walk down; go (U).
- Take C-CLAMP (V). Select 4 planks (orange).
- POKER on CAN; receive ROTTEN MEAT.
- Throw ROTTEN MEAT (W); receive HOLLOW BONE.
- Take HORSE and AGATE ORE 1/4 (X).
- Walk down.
- Move two pillows; place HORSE and look at note; take CRUCIBLE and BLUE KEY (Y).
- Go (Y1).
- Use HOLLOW BONE and BOWL (Z); receive SAP.
- Go to Desolated Yard.
- Place BLUE KEY (Z1).
- Solution: A is for Red Key and B is Blue key. (D)-(A -A1)-(Dx2)-(B-B1)-(A-A2)-(B-B2)-(slide A down).
- (B-B3)-(C)-(A-A3)-(C)-(B-B4)-(D)-(slide A up)-(Dx2)-(A-A4)-(C)-(B-B5)-(A-A5).
- Enter (E).
- Take BOLT, NOOSE, and FINGERS 2/2 (F).
- Select plate fragments 8x (G).
- Walk down.
- Use NOOSE (H); receive BALLERINA.
- Go (I).
- Place BALLERINA (J) and look at note; take MATCHES and AGATE ORE 2/4 (K).
- Play HOP (L); receive PROSTHETICS BOX.
- FINGERS 2/2 on PROSTHETICS BOX; take NOZZLE.
- NOZZLE on SPRAY BOTTLE; receive DEGREASER.
- Use DEGREASER; slide arrows to positions shown (blue). Select 1-2.
- Go (M).
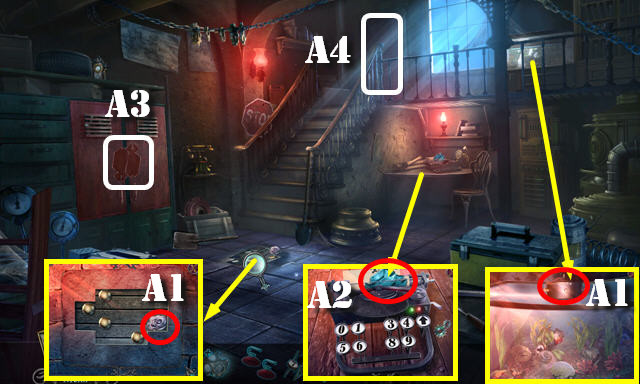
- Take KNOB and HAMMER (N).
- Walk down.
- Place KNOB and select 1-9; take AMELIA'S PEN and MACHINE PART (O).
- Walk down.
- Use HAMMER (P).
- Go (Q).
- Take AGATE ORE 3/4 and EDGAR'S WRENCH (R).
- Place C-CLAMP (S).
- Use TREE SAP (T).
- Place INDUSTRIAL BOLT and use EDGAR'S WRENCH (U). Receive ALFRED'S KEY.
- Place MACHINE PART (V).
- Solution (W).
- Pull lever (X).
- Go (Y).
- Take BRONZE EYE (Z).
- Walk down.
- BRONZE EYE on PROSTHETICS BOX; take ALTAR SEAL and EYE DRAWER.
- Place EYE DRAWER; pick middle eye (A); take CART WHEEL (B).
- Go (C).
- Place CART WHEEL; line up symbols as shown (D-E-F).
- Go to Cellar.
- Place ALTAR SEAL (G); solution (H-I-J).
- Take AGATE ORE 4/4 and GOLDEN ARROW (K).
- Receive RIGHT-HAND INSTRUCTIONS.
- Play HOP (L); receive WELDING POWDER.
- Go to Mineshaft.
- Look at note. Place CRUCIBLE; use WELDING POWDER and MATCHES (M).
- Take ROSEMARY'S BONE SAW (N).
- Place GOLDEN ARROW (O).
- Solution: Bx4-C-Bx2-Cx4-Dx5-Cx4-D-C-D-C-Dx2.
- Look at note; take LUNGS (E).
- Look at note (F).
- Walk down.
- Place LUNGS (G). Play HOP; receive ORNAMENTED SKULL.
- Go to Cellar.
- Open ORNAMENTED SKULL; take LEFT-HAND INSTRUCTIONS and TILLY'S NECKLACE.
- Place AGATE ORE 4/4 (H). Place RIGHT-HAND INSTRUCTIONS and LEFT-HAND INSTRUCTIONS (I).

- Place ALFRED'S KEY (J). Select (4-5-6) receive INFUSED KEY.
- Place EDGAR'S WRENCH (K); select (4-6-5); receive INFUSED WRENCH.
- Place ROSEMARY'S BONE SAW (L); select (4-6); receive INFUSED SAW.
- Place AMELIA'S PEN (M); select (4); receive INFUSED PEN.
- Go to Heart of Darkness.
- Place INFUSED PEN (N), INFUSED SAW (O), INFUSED KEY (P), and INFUSED WRENCH (Q).
- Use TILLY'S NECKLACE (R).
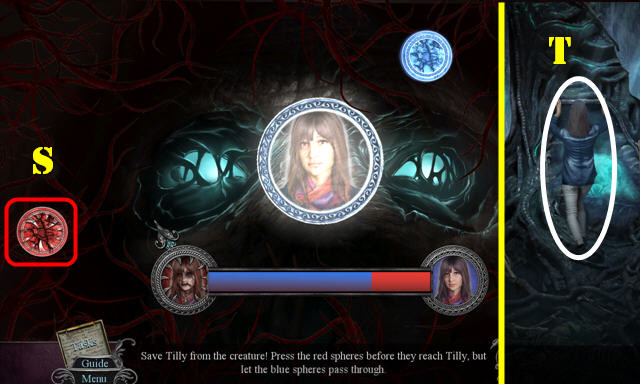
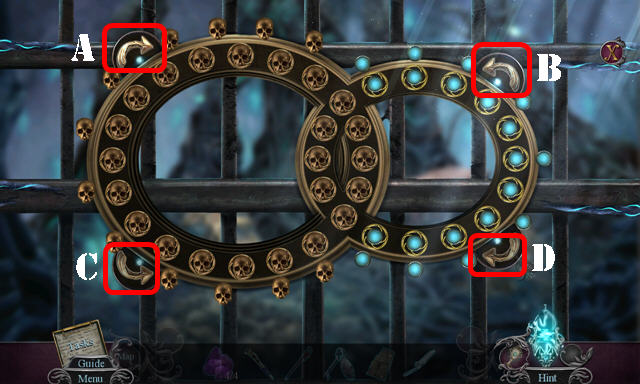
- Solution: Select red spheres (S) before they reach the center.
- Use TILLY'S NECKLACE on scene (T).
- Congratulations, you've completed Phantasmat: Remains of Buried Memories!
Created at: 2019-03-15