

Walkthrough Menu
- General Tips
- Chapter 1: Cable Car
- Chapter 2: Grimes Manor
- Chapter 3: Lake Shore
- Chapter 4: Winding Corridor
- Chapter 5: Attic
- Chapter 6: Meditation Garden
General Tips
- This is the official guide for Phantasmat: The Dread of Oakville.
- This guide will not show when you have to zoom into a location; the screenshots will show each zoom scene.
- Hidden-object puzzles are referred to as HOPs. This guide will not show screenshots of the HOPs, however, it will mention when an HOP is available and the inventory item you'll collect from it.
- Use the Map to fast travel to a location.
Chapter 1: Cable Car
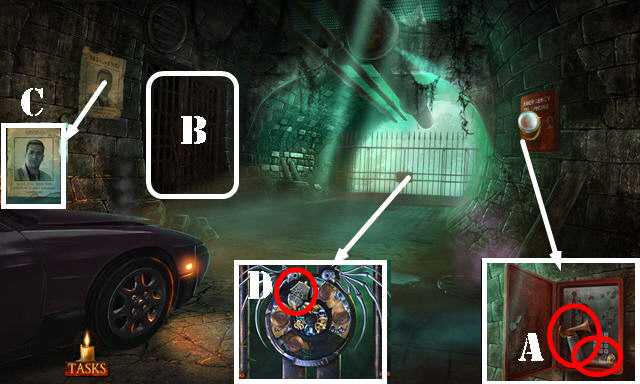
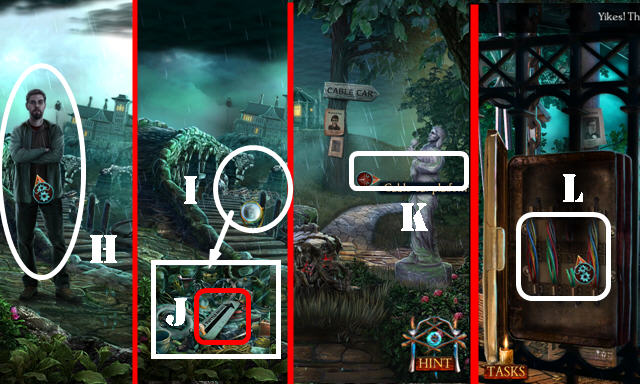
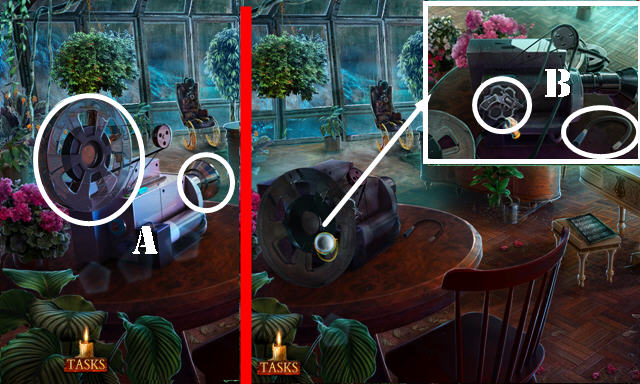
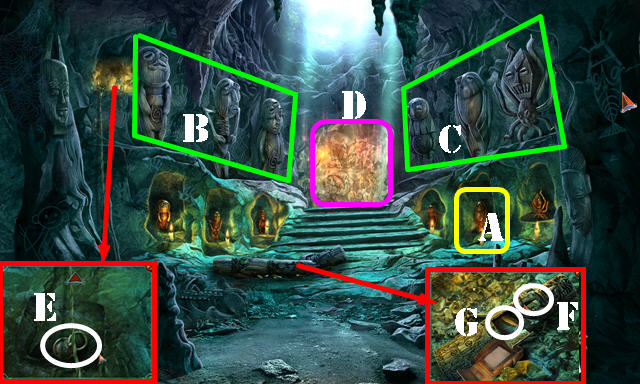
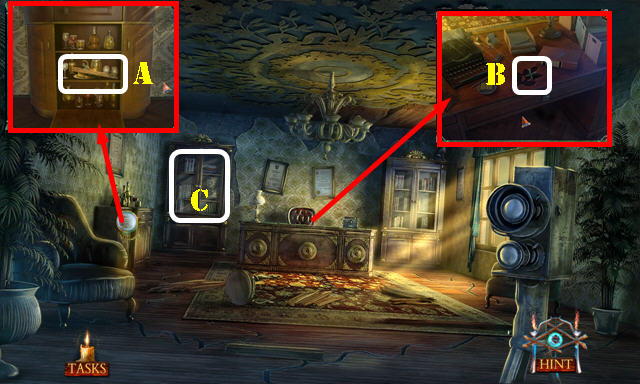
- Open the cover; take the AIR HORN and answer the phone; take the FLASHLIGHT (A).
- Use the FLASHLIGHT (B) for a HOP; play it to get the LEATHER POUCH.
- Open the LEATHER POUCH; read the note and take the TOWN CREST FRAGMENTS (inventory).
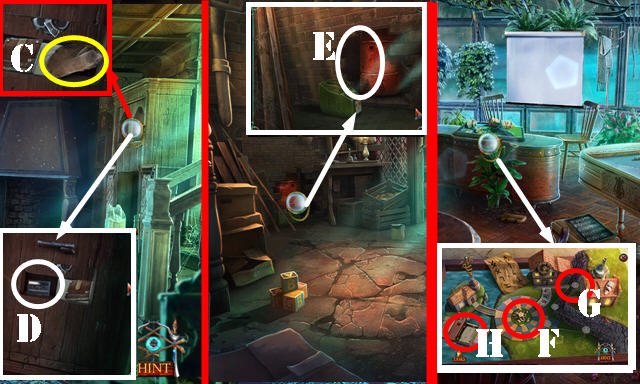
- Look at the note (C).
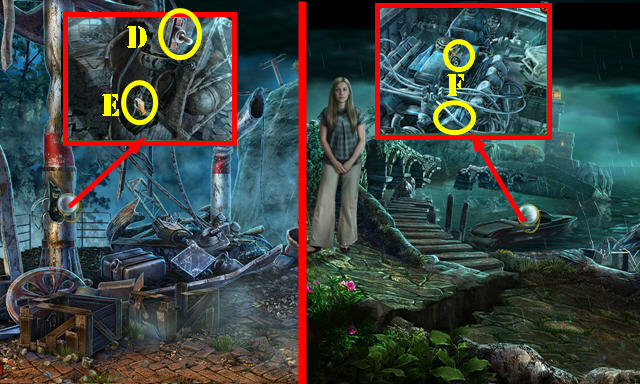
- Take the SHIP EMBLEM (D); place the TOWN CREST FRAGMENTS for a puzzle.
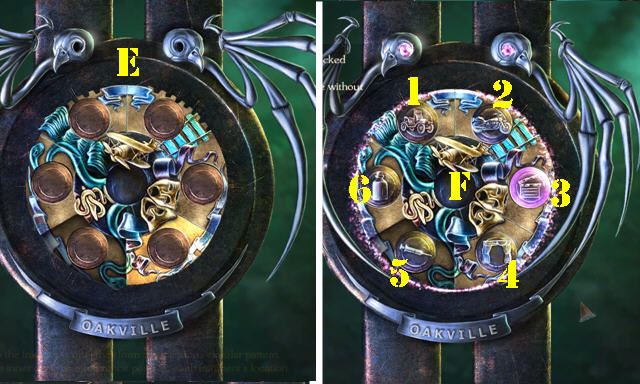
- Solution: Swap the outer pieces as shown (E). Then, select: 3-2-F-5-4-3-F-1-2-3-F.
- Go forward.
- Talk to the little girl.
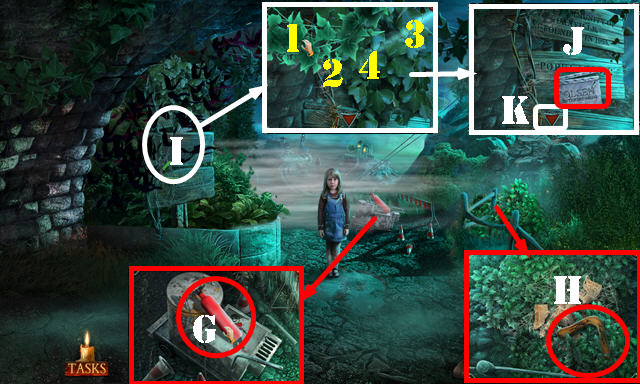
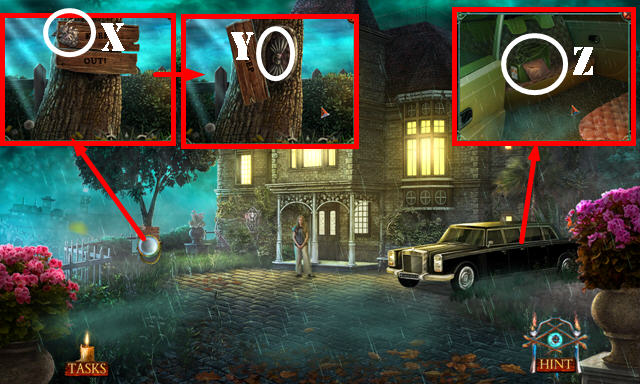
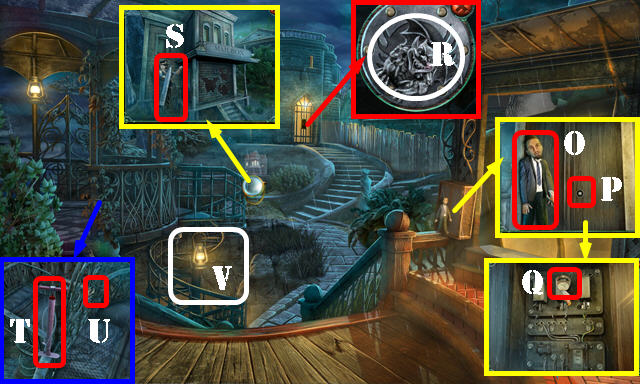
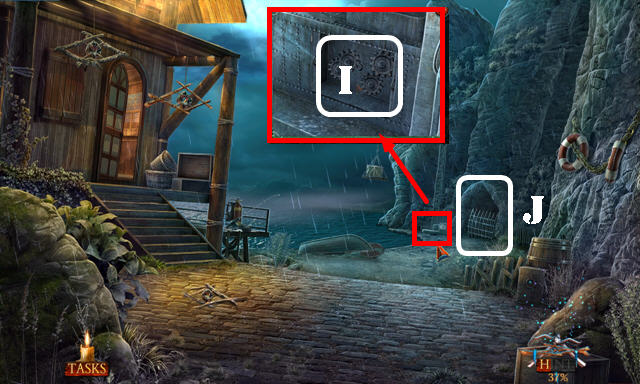
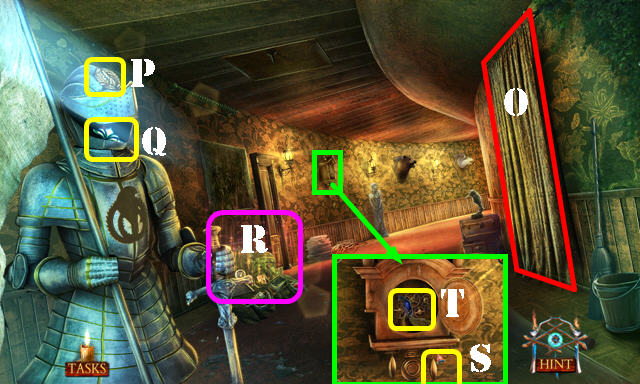
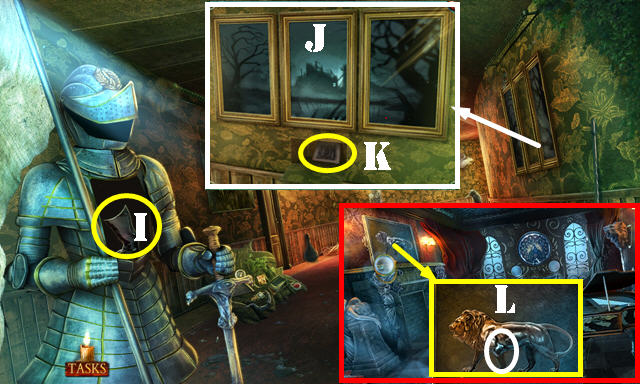
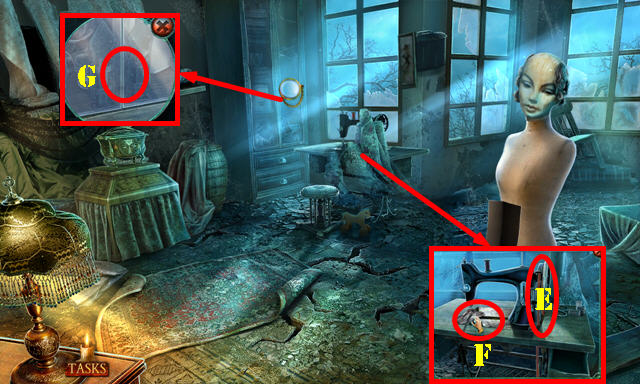
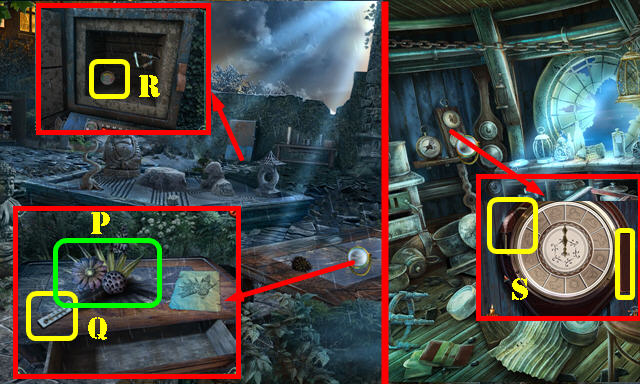
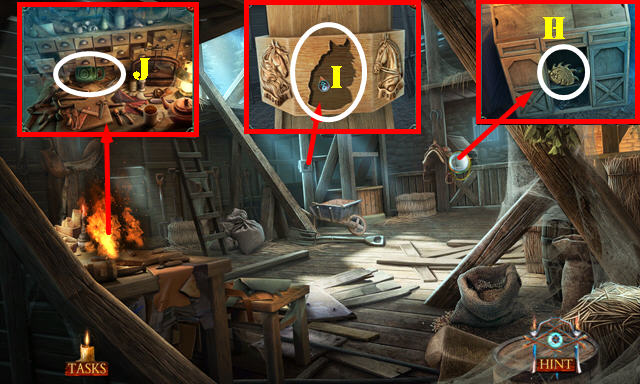
- Take the FIRE EXTINGUISHER (G) and BOOMERANG (H).
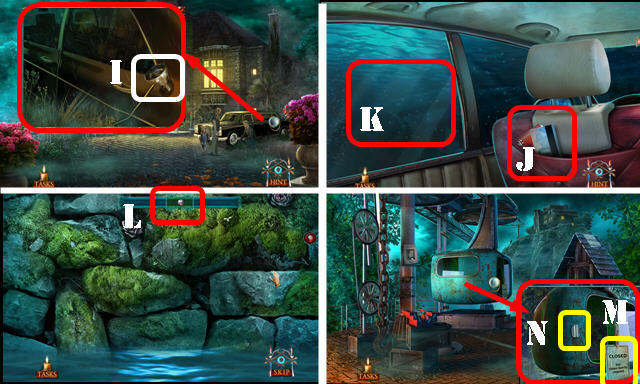
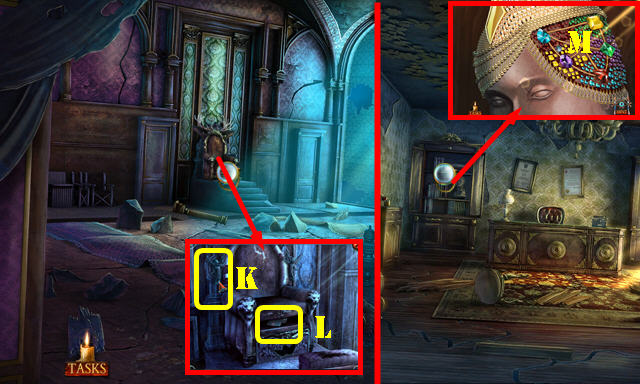
- Use the AIR HORN (I); remove the leaves (1-4) and take the MARBLE CLAPPER (J). Select the arrow (K).
- Go forward.
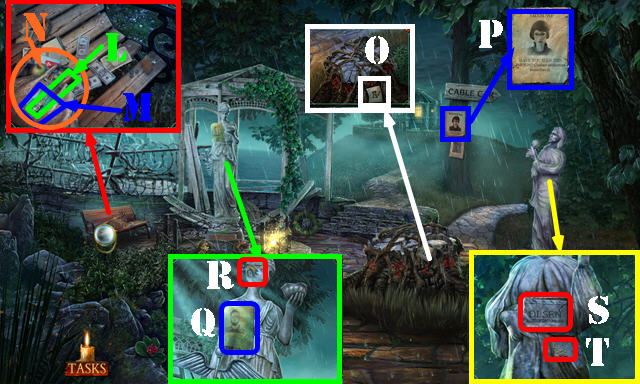
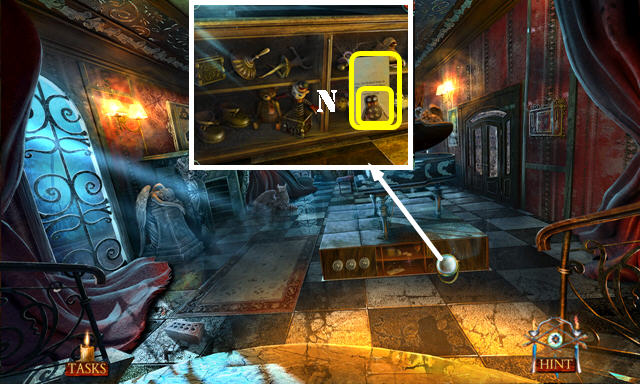
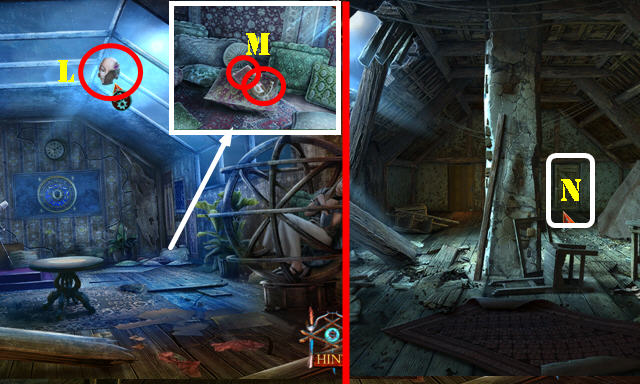
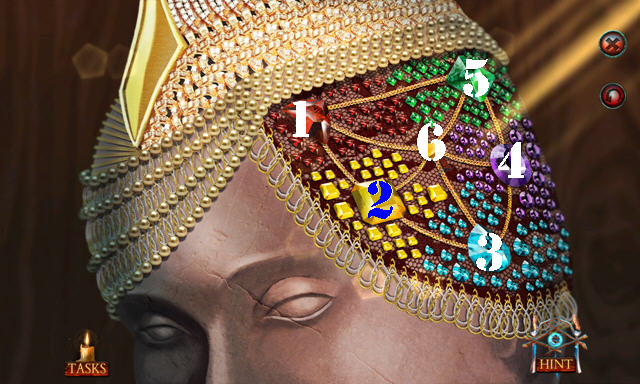
- Take the NAIL FILE (L). Look at the ID (M) and shake the purse (N) for a HOP. Play it to receive the HAND LOTION.
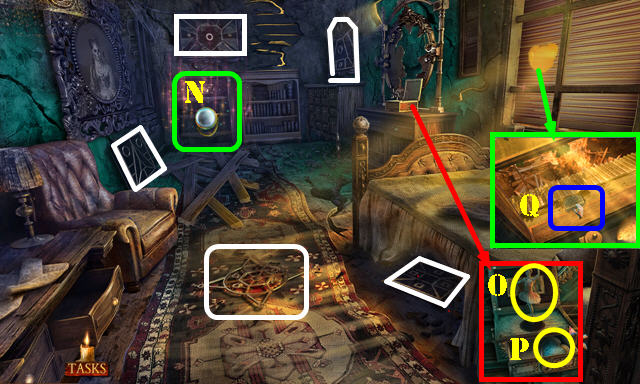
- Take the CODE (O).
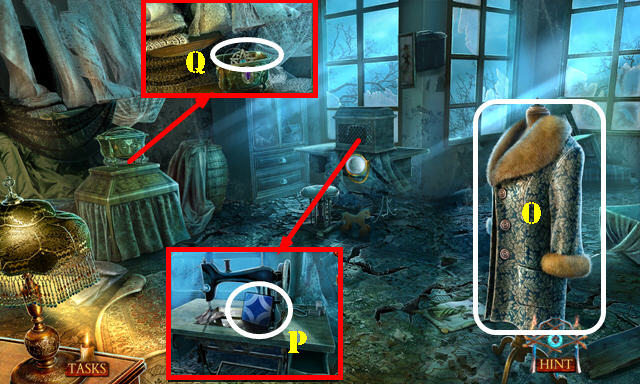
- Look at the two notes (P-Q).
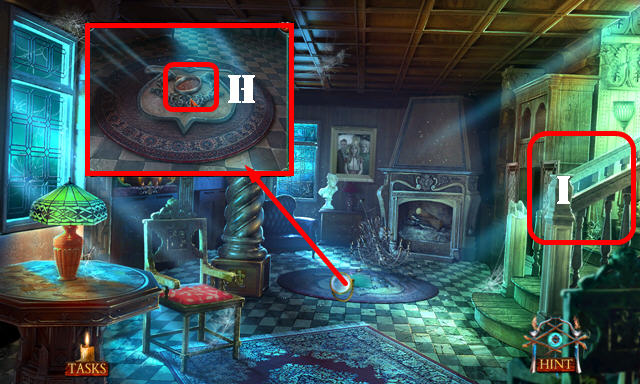
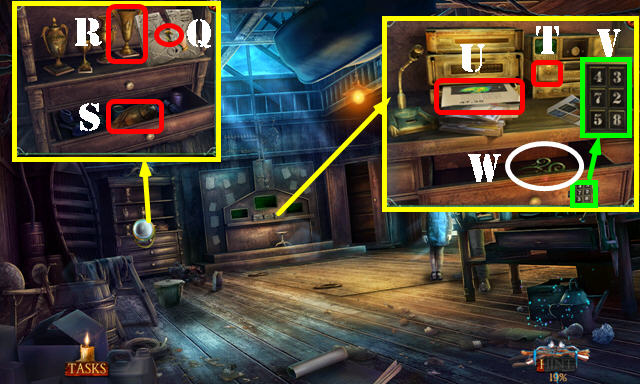
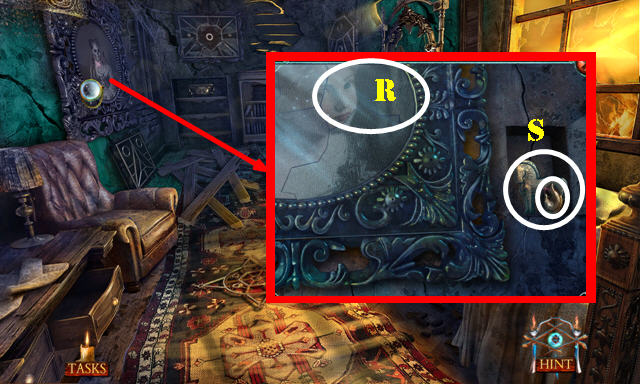
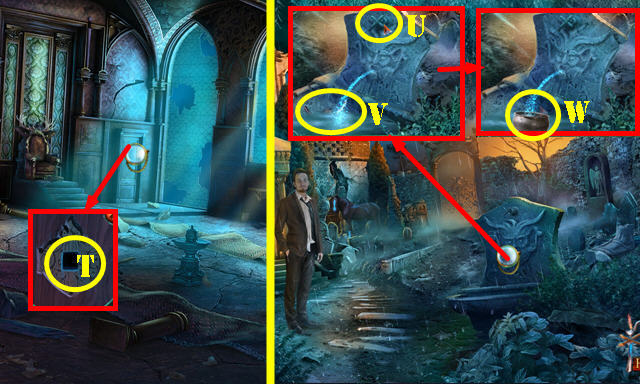
- Use the BOOMERANG to get the WAVE EMBLEM (R).
- Place the MARBLE CLAPPER (S); take the MOON 1/2 (T).
- Walk down.
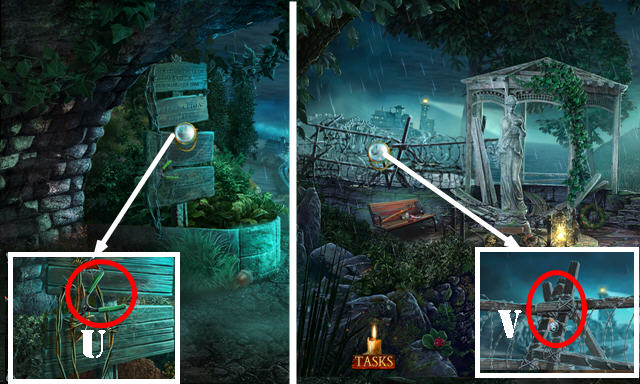
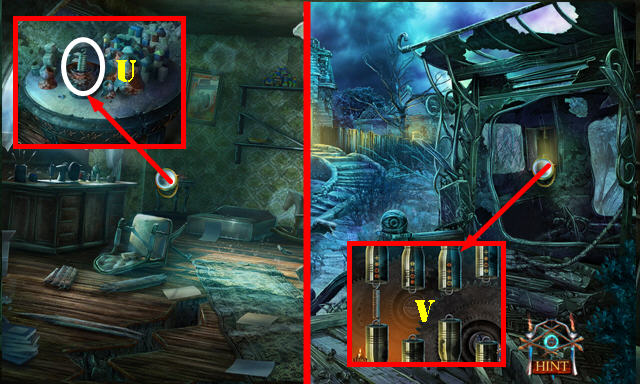
- Use the HAND LOTION to get the WIRE CUTTER (U).
- Go forward.
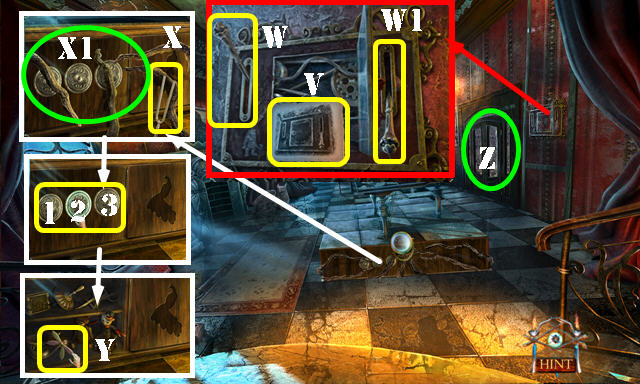
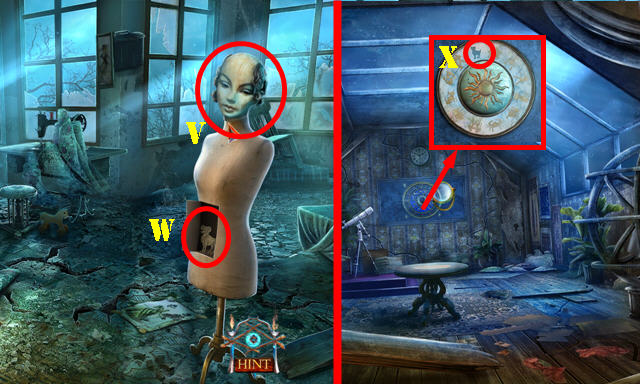
- Use the WIRE CUTTER (V) and go left.
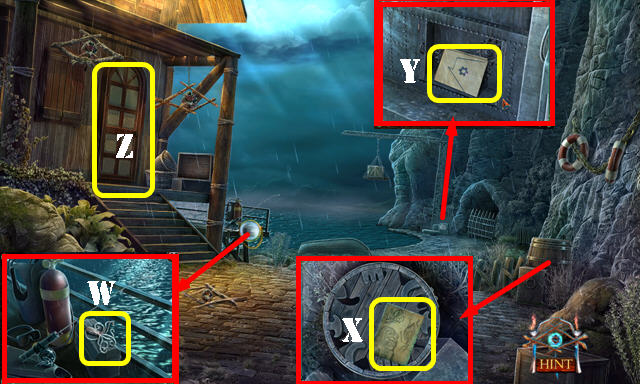
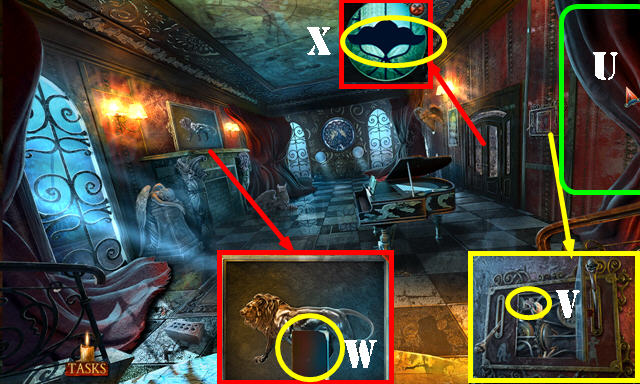
- Take the SEAT STUFFING (W). Place the SHIP EMBLEM and WAVE EMBLEM (X); take the LIPSTICK (Y).
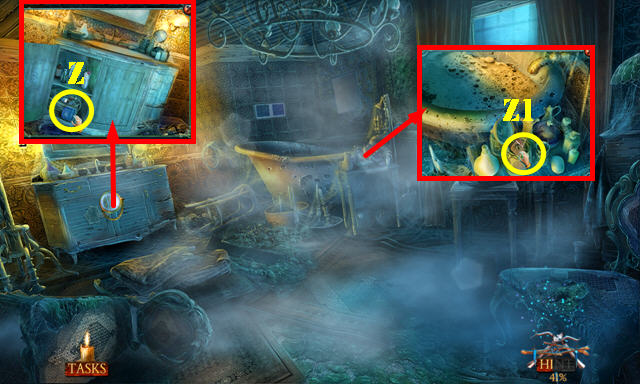
- Use the NAIL FILE; take the FISHHOOK and STONE FLOWER (Z).
- Walk down.
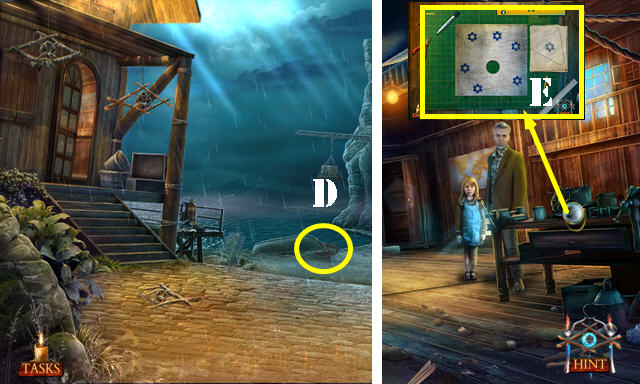
- Place the STONE FLOWER (A); move the leaves and take the ACETONE (B).
- Use the LIPSTICK (C); take the RAVEN FEATHER (D).
- Walk down.
- Use the ACETONE and SEAT STUFFING; take the BRUSH WITH GLUE (E).
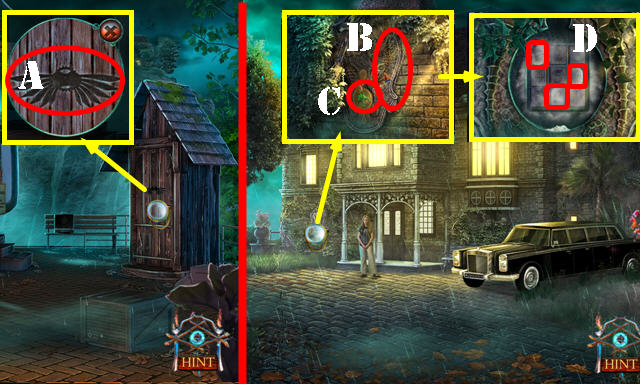
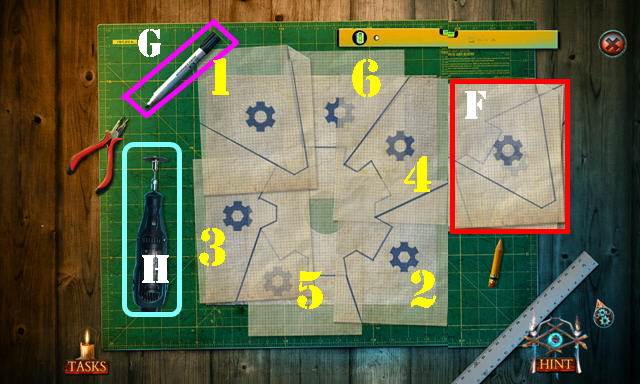
- Move the leaves. Use the RAVEN FEATHER 3x; select the torn pieces 3x to get the TORN POSTER (F).
- Play the puzzle. Solution (G). Take the NET.
- Go to the Stone bridge.
- Take the MOON 2/2 from the TORN POSTER. Select the pieces and use the BRUSH WITH GLUE; take the MISSING PERSON POSTER (inventory).
- Give the MISSING PERSON POSTER to James and talk to him (H).
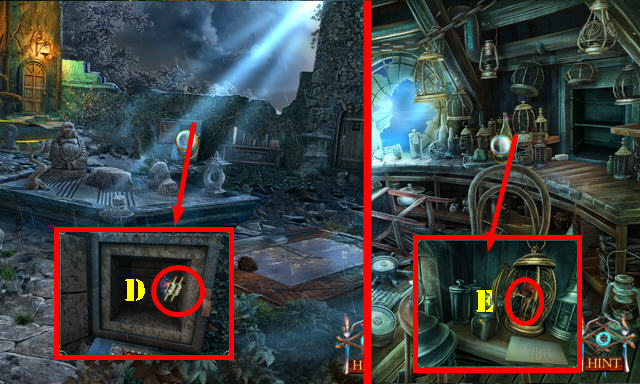
- Throw the NET (I); take the sign (J) for a HOP; play it to get the JUMPER CABLES.
- Walk down and go right (K).
- Use the JUMPER CABLES (L).
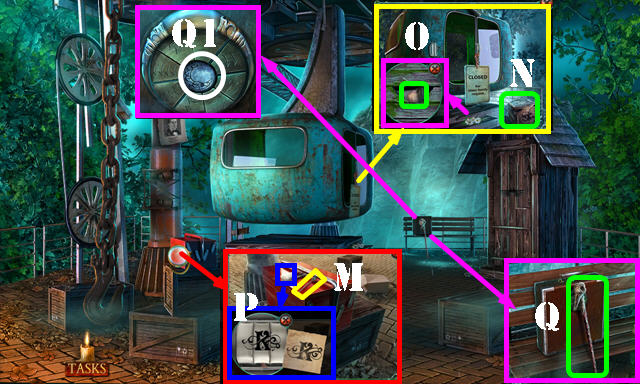
- Take the METAL PIN (M) and DECORATED CHEST (N).
- Remove the flowers; use the FISHHOOK and take the TALCUM POWDER (O).
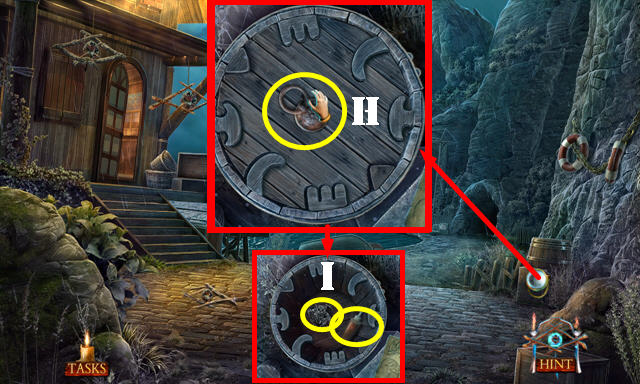
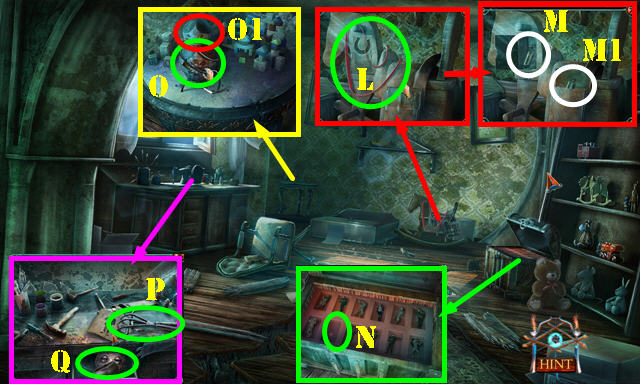
- Place the CODE. Solution (P); take the FOLDING SPADE.
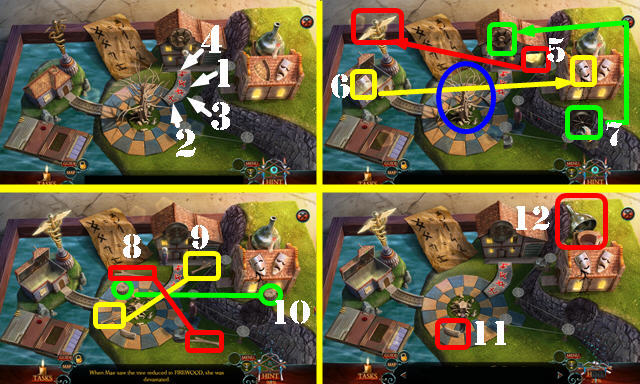
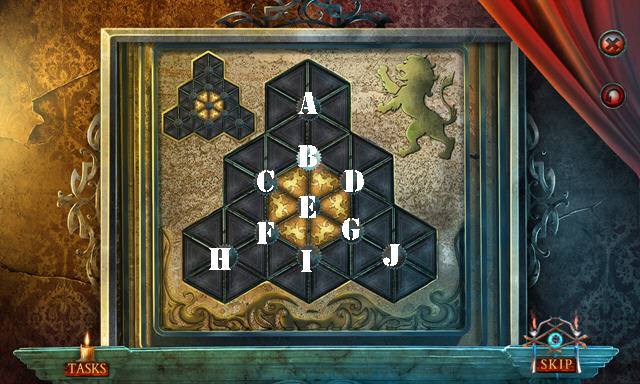
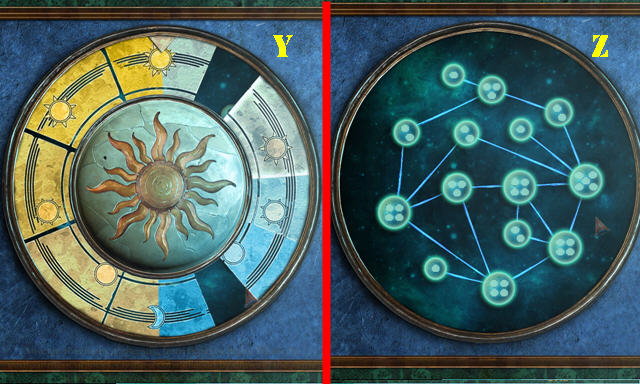
- Take the WALKING STICK (Q). Place the 2 MOONS for a puzzle (Q1).
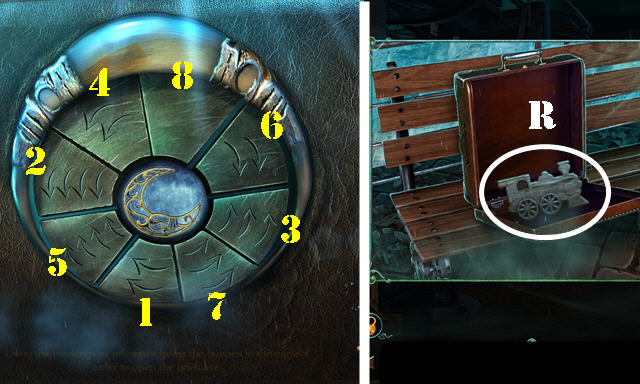
- Solution (1-8).
- Take the POLICE REPORT and TRAIN (R).
- Return to Stone bridge.
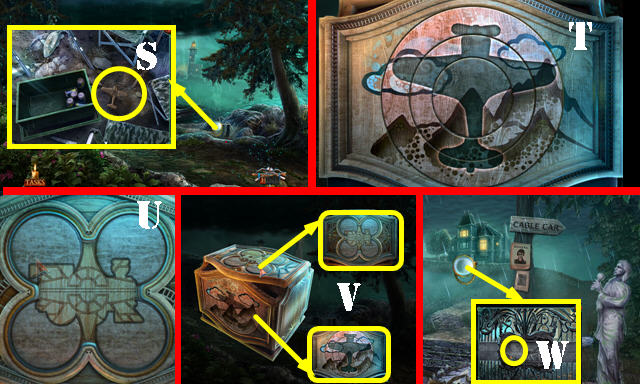
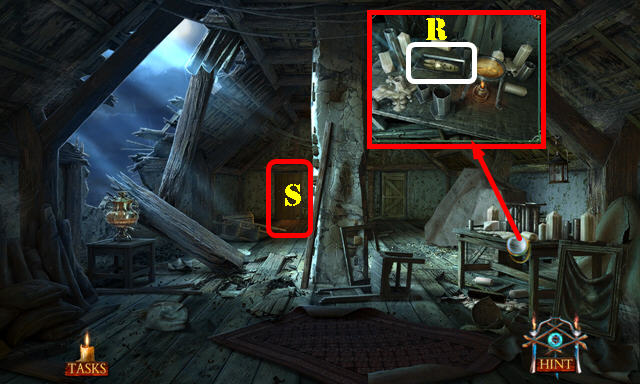
- Use the FOLDING SPADE; take the AIRPLANE (S).
- Solve the puzzle on the DECORATED CHEST (inventory).
- Solution one (T).
- Solution two (U). Place the AIRPLANE and TRAIN (V); take the CARRIAGE.
- Walk down.
- Place the CARRIAGE (W) and go forward.
- Give the POLICE REPORT to Josie.
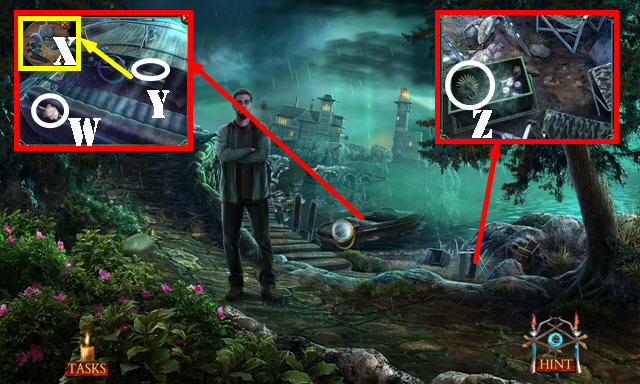
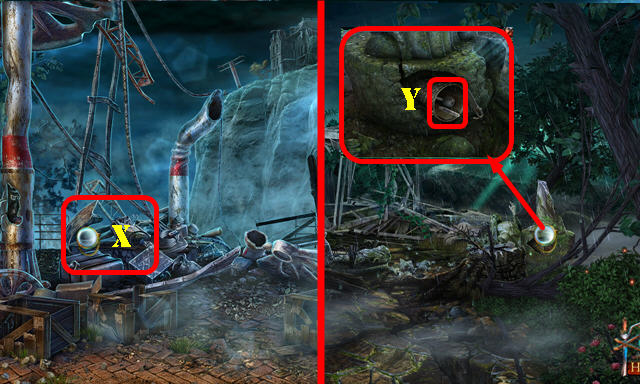
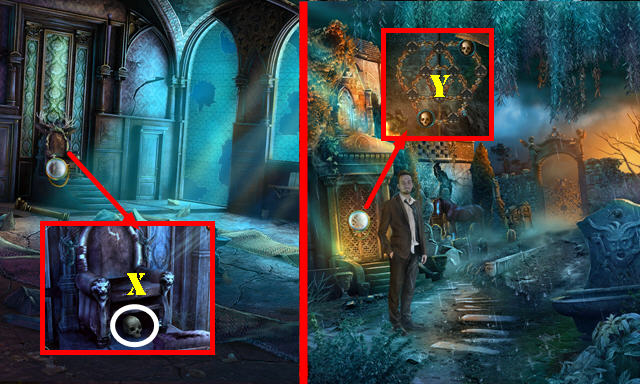
- Take the MARBLE ORNAMENT 1/3 (X). Use the WALKING STICK; take the SHACK ORNAMENT (Y).
- Open the door. Read the note and take the EMPTY CAN (Z).
- Return to the Cable car platform.
- Place the SHACK ORNAMENT (A) for a HOP: play it to get the SEAHORSE.
- Return to Grimes manor.
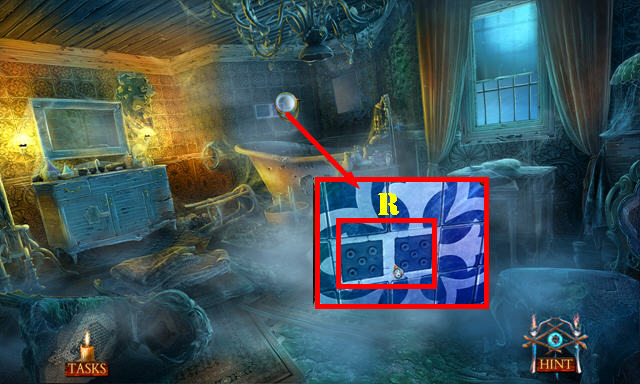
- Place the SEAHORSE (B); take the ETCHED PIECE (C). Use the TALCUM POWDER; press the three buttons (D).
- Go through the door.
Chapter 2: Grimes Manor
- Open the doors; take the MARBLE ORNAMENT 2/3 (E).
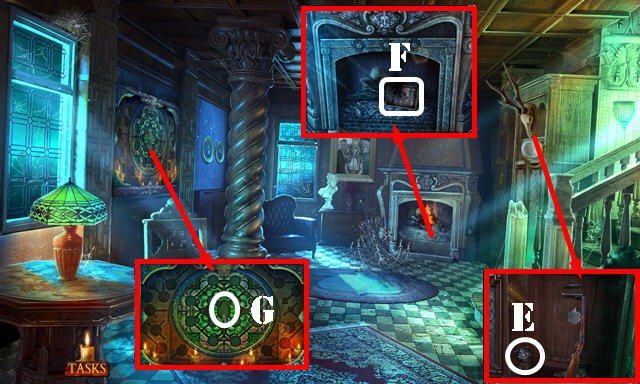
- Use the FIRE EXTINGUISHER; take the SHEET MUSIC (F).
- Place the ETCHED PIECE for a puzzle (G).
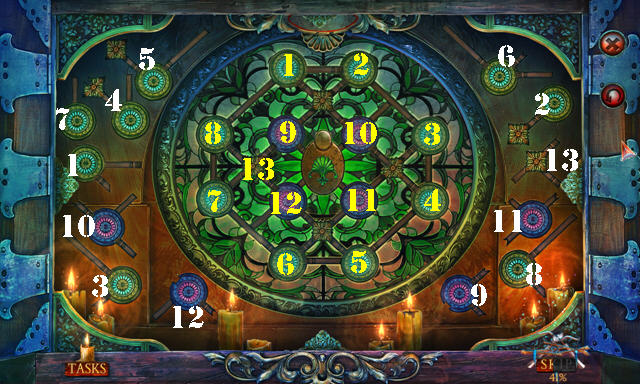
- Solution (1-13).
- Take the PIANO HAMMERS.
- Remove the note; take the PIANO WIRE (H).
- Go (I).
- Take the BULLET (J).
- Remove the sheet; take the DOLL (K).
- Lower the screen (L).
- Take the TOY ARM (M).
- Place the PIANO HAMMERS and PIANO WIRE (N). Place the SHEET MUSIC (O) and touch the hammers. Take the MARBLE ORNAMENT 3/3 (P).
- Walk down.

- Place the BULLET to get the RIFLE (Q).
- Place the 3 MARBLE ORNAMENTS (R) and go forward.
- Flip the switch (S).
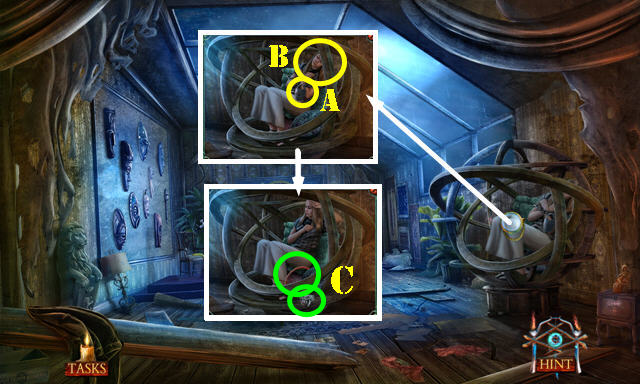
- Touch the dolls on the left and right. Talk to the little girl (Vivien).
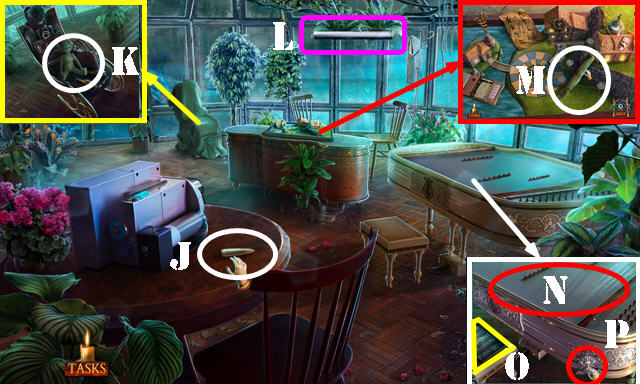
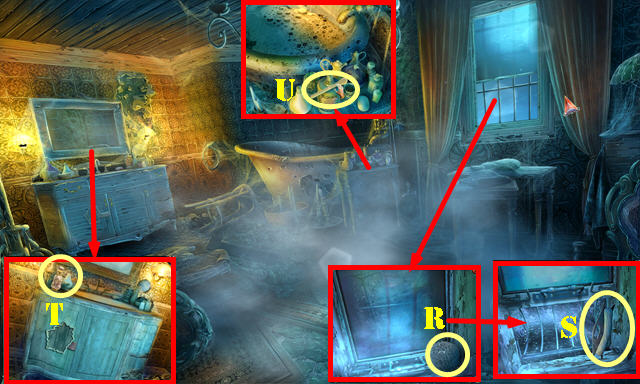
- Move the boards; take the ROPE LASSO and TREE (T). Put down the EMPTY CAN (U).
- Take the SUCTION CUP (V).
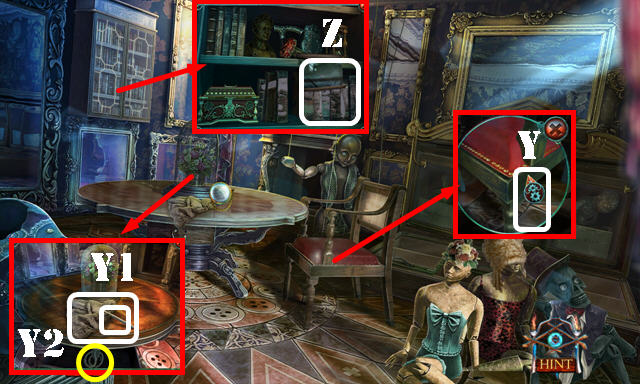
- Place the DOLL (W); take the FILM REEL (X). Place the TOY ARM (Y); take the CABLE CAR (Y1).
- Aim the RIFLE (Z) and shoot it for a HOP; play it to get the PROJECTOR LENS.
- Return to the Sunroom.
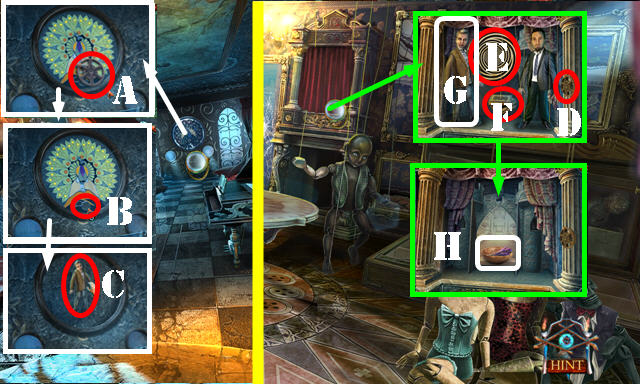
- Place the FILM REEL and PROJECTOR LENS (A).
- Move the reel; take the GUN SYMBOL and RUBBER PIPE (B).
- Walk down.
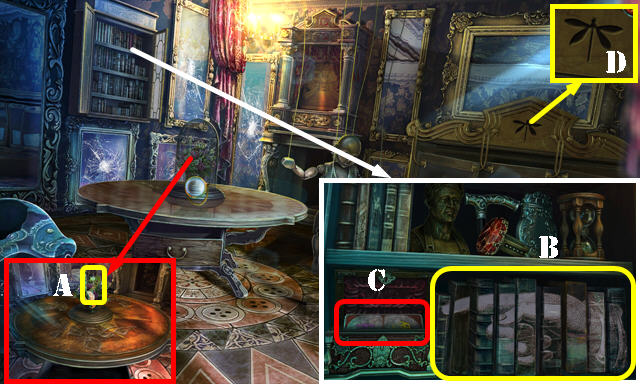
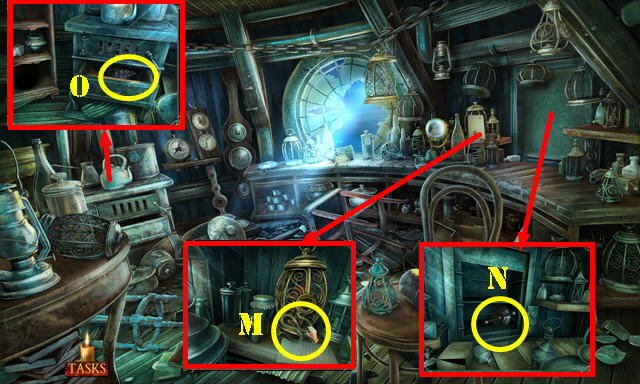
- Place the GUN SYMBOL; take the FLINT (C). Move the book and letter; take the AUDIO CASSETTE (D).
- Go forward.
- Insert the RUBBER PIPE (E); take the FUEL CAN.
- Return to the Sunroom.
- Place the TREE (F), CABLE CAR (G) and AUDIO CASSETTE (H).
- Select 1-4.
- Open and place (5-7). Select the large tree (blue). Select matching pairs of wood (8-10).
- Select the log (11).
- Take the FUNNEL (12).
- Walk down twice.
- Place the FUNNEL (I) and use the FUEL CAN.
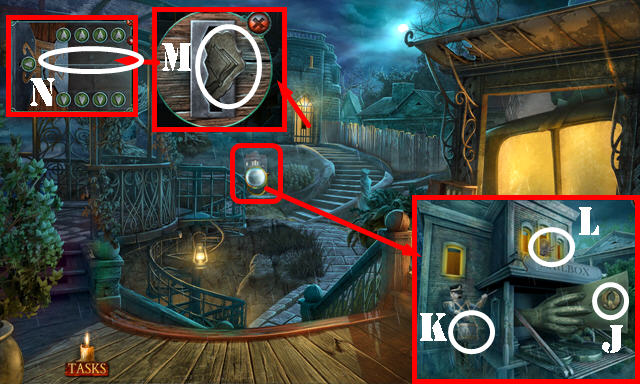
- Take the GUEST CARD and WINDOW BREAKER (J). Use the WINDOW BREAKER (K).
- Select the ball the ball 3x when it's in the middle (L).
- Select the card on the screen. Walk down and go right.
- Move the note (M) and swipe the GUEST CARD (N). Enter the Cable car.
Chapter 3: Lake Shore
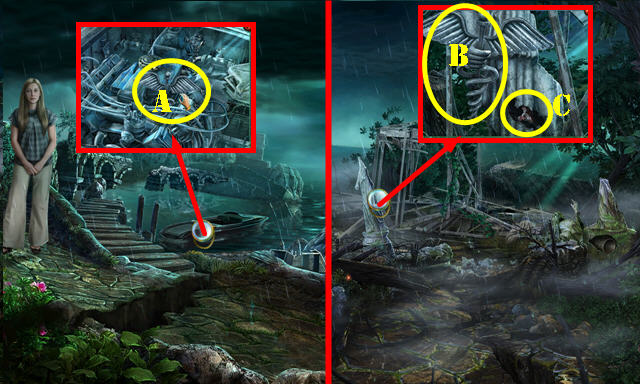
- Take the GREGORY PUPPET (O). Use the SUCTION CUP (P); take the SIGNET RING (Q).
- Take the GARGOYLE 1/3 (R).
- Take the METAL MARKER (S) and PUMP (T). Use the METAL PIN (U).
- Go (V).
- Take the OCTOPUS (W).
- Read the note (X).
- Use the SIGNET RING; take the CRANE SCHEMATICS (Y).
- Go (Z).

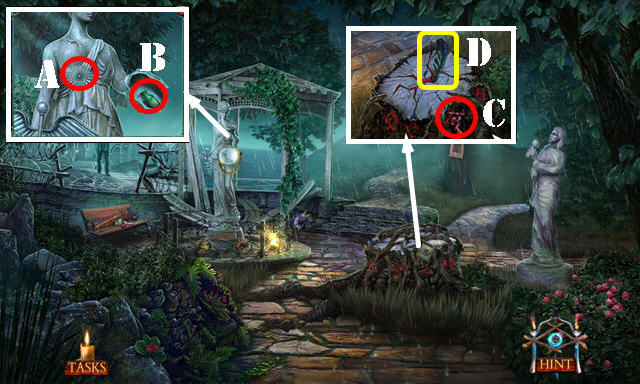
- Take the GARGOYLE 2/3 (A) and FISHING WEIGHT (B).
- Place the OCTOPUS; move the items and take the LIFE PRESERVER (C).
- Walk down.
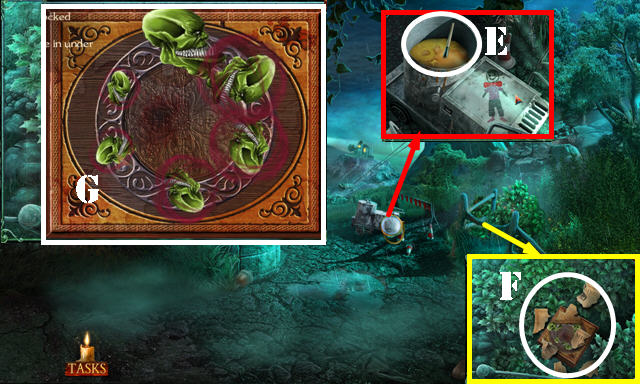
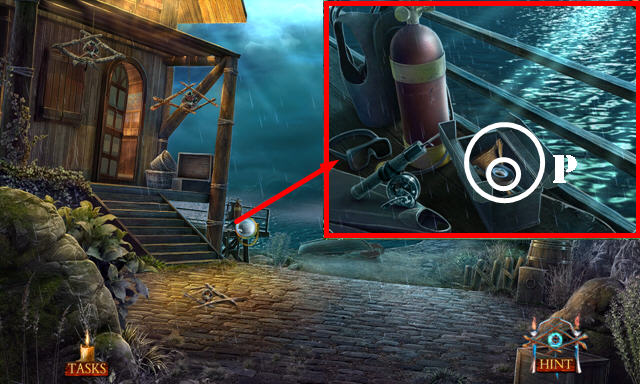
- Place the LIFE PRESERVER and use the PUMP (D) for a HOP; play it to get the SANDER.
- Return to the Boathouse.
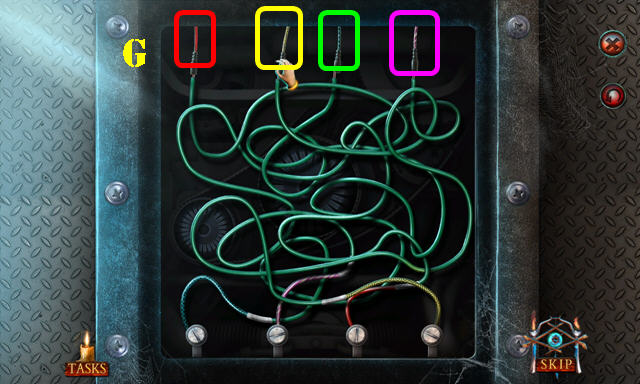
- Place the METAL MARKER, CRANE SCHEMATICS and SANDER for a puzzle (E).
- Pick up the pieces (F) and place them on the gears on the board in order of 1-5. Then, select the marker (G) and then the sander (H).
- You receive the COG.
- Walk down.
- Place the COG (I).
- Enter (J).
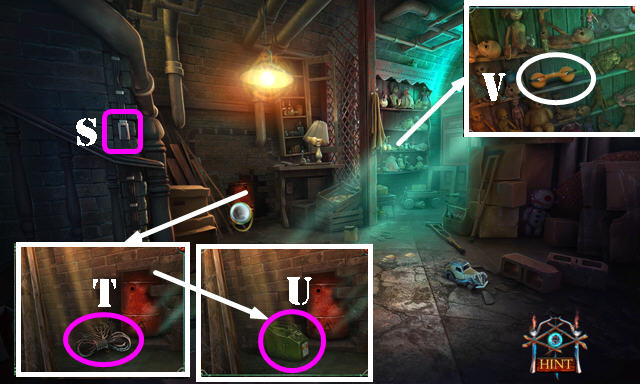
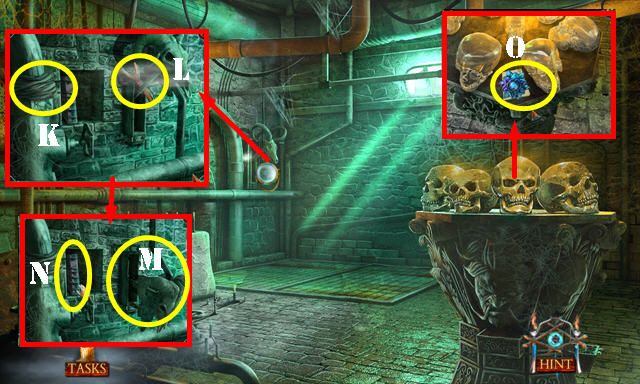
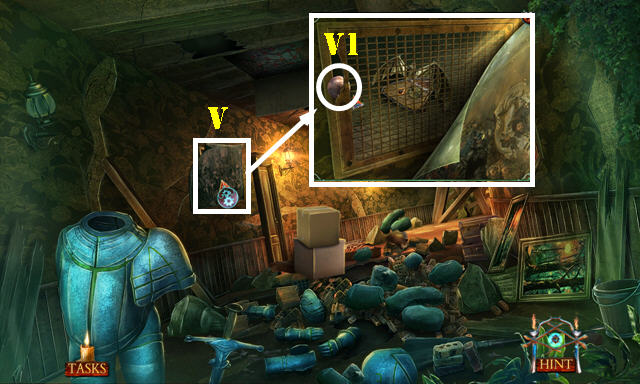
- Open the bag (K); read the note and take the OBSIDIAN BLADE (L).
- Use the ROPE LASSO (M). Select the up arrow. Use the FLINT (N). Open the box and take the EYE TOKEN (O). Arrow down.
- Walk down.
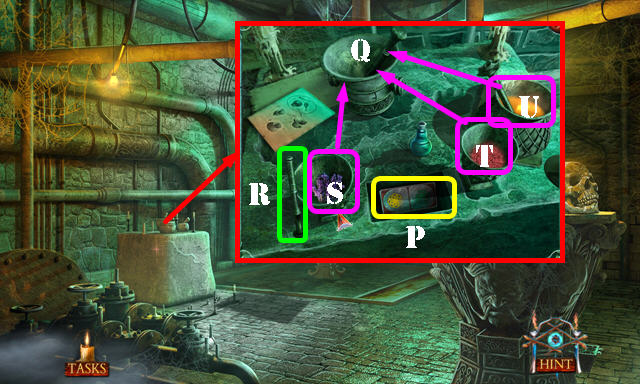
- Use the OBSIDIAN BLADE; take the ELECTRICAL TAPE and FISHING TROPHY (P).
- Go to the Boathouse.
- Place the EYE TOKEN; take the TOTEM PART (Q). Place the FISHING TROPHY (R); take the WOODEN FIGURINE (S).
- Use the ELECTRICAL TAPE (T). Look at the clue (U). Enter 4735 (V). Take the ANCIENT GLYPH (W).
- Return to the Cave.
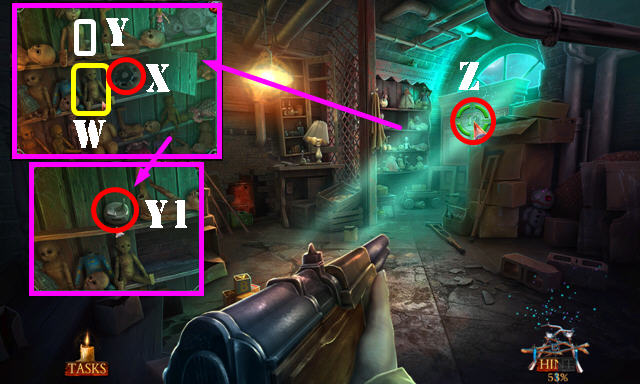
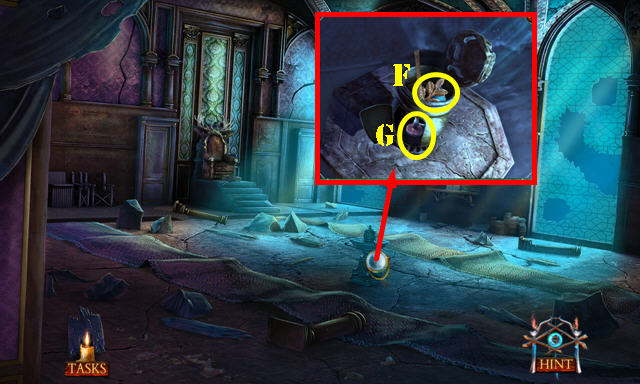
- Place the WOODEN FIGURINE (A).
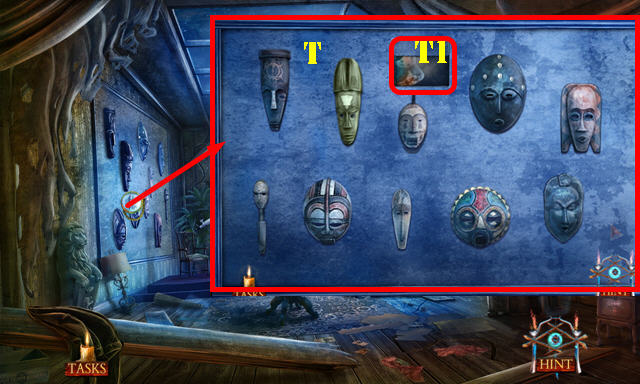
- Flip the statues to face forward (B-C) for a HOP (D); play it to get the SPIDER FIGURINE.
- Take the WIRE from the SPIDER FIGURINE (inventory).
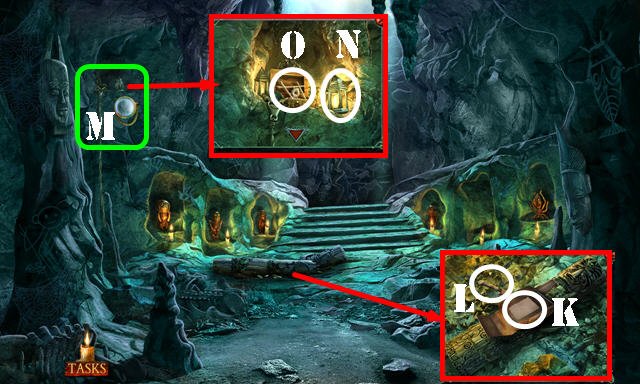
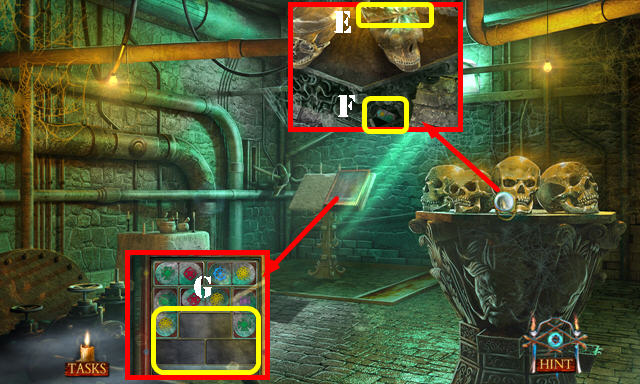
- Place the ANCIENT GLYPH; take the BENT HANDLE (E).
- Place the TOTEM PART (F); take the SMALL DRUM (G).
- Walk down.
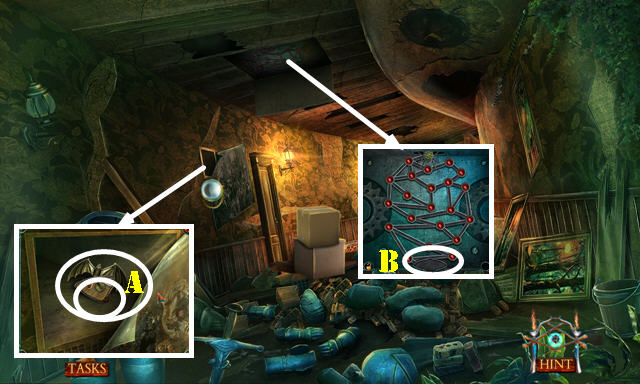
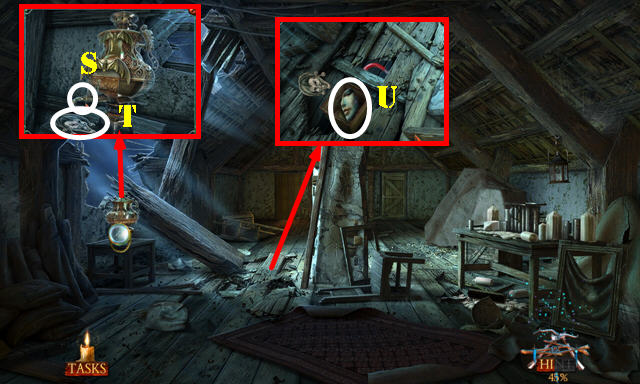
- Place the BENT HANDLE (H) and spin the cover in place; take the GARGOYLE 3/3 and WOOD GLUE (I).
- Walk down.
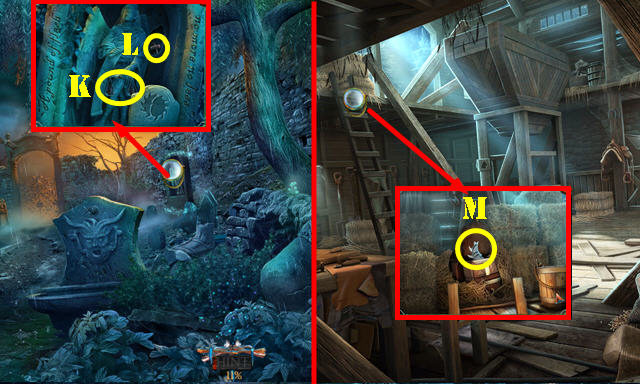
- Place the 3 GARGOYLES; take the HELMET CREST (J).
- Place the SMALL DRUM (K); take the OLSEN SEAL (L).
- Place the OLSEN SEAL; take the BOOKSHELF LABEL (M).
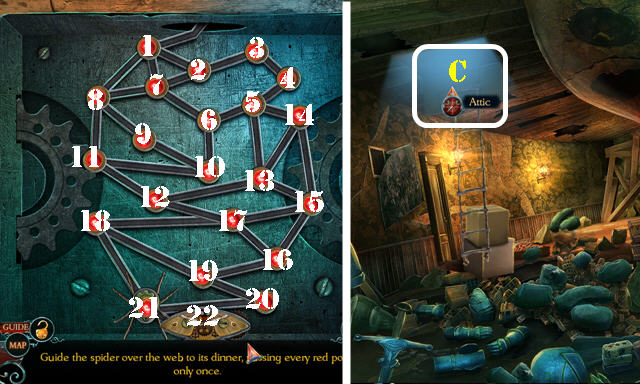
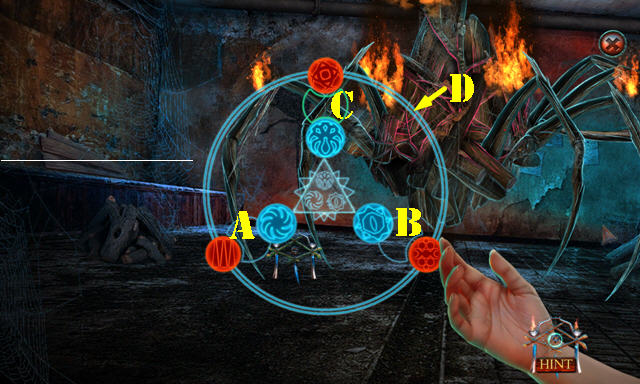
- Place the WIRE for a puzzle (N).
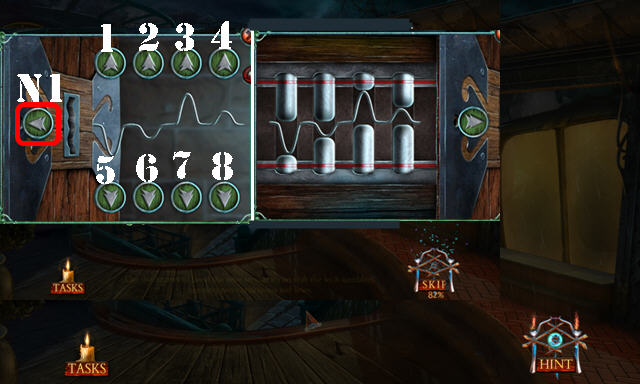
- Select 3-3-4-5-5-6, then select the arrow (N1).
- Enter the Winding corridor.
Chapter 4: Winding Corridor
- Remove the curtain (O).
- Place the HELMET CREST (P); take the MIRRORED DECORATION (Q).
- Play the HOP (R) to get the FAMILY SHIELD.
- Place the FISHING WEIGHT (S); take the BROKEN PEACOCK (T).
- Take the GLASS APPLE from the BROKEN PEACOCK (inventory).
- Go forward.
- Pull the curtain (U); place the FAMILY SHIELD; take the SCREW (V).
- Look at the book (W).
- Place the MIRRORED DECORATION (X); go through the door.
- Use the WOOD GLUE (Y); take the BAROQUE CHAIR.
- Take the SCALPEL and COTTON SCARF (Y1). Place the SCREW and take the COILED SERPENT (Y2).
- Place the BOOKSHELF EMBLEM; take the SMALL PAINTING (Z).
- Walk down.
- Place the BAROQUE CHAIR; take the CURTAIN CRANK (A). Place the GLASS APPLE (B); take the ANSELL PUPPET (C).
- Go to the Mirror room.
- Place the CURTAIN CRANK (D), ANSELL PUPPET and GREGORY PUPPET. Press the wheel (E) and books (F). Touch the left puppet (G) and take the LAVENDER (H).
- Return to the Winding corridor.
- Place the COILED SERPENT; take the LION'S PAW (I).
- Place the SMALL PAINTING for a puzzle. Solution (J). Take the DRAWING (K).
- Go forward.
- Place the LION'S PAW (L) for a puzzle.
- Solution: Hx2-Fx3-E-G-Jx2-Gx2-B-Ax4-Bx2.
- Enter the Secret room.
- Place the COTTON SCARF (K); take the SLINGSHOT (L). Pull the lever (M) and take the MISSING BOOK (N).
- Take the LOTUS (O) and read the note.
- Look at the instructions and take the METAL CARD 1/3 (P).
- Place the LAVENDER (S). Select the pestle (R). Place S-Q, T-Q and U-Q to get the HERBICIDE.
- Walk down.
- Place the DRAWING (V) and look at it. Position the levers as follows (W-W1).
- Take the TUNING FORK (X).
- Use the HERBICIDE (X1); select 2-3-1. Take the DRAGONFLY (Y).
- Go to the Mirror Room (Z).
- Use the TUNING FORK; take the TAIL FEATHER 1/2 (A).
- Place the MISSING BOOK. Arrange as shown (B). Take the METAL CARD 2/3 (C).
- Place the DRAGONFLY (D) for a HOP; play it to get the BLOODSTONE CROWN.
- Return to the Secret room.
- Place the BLOODSTONE CROWN (E); take the METAL CARD 3/3 (F).
- Place the 3 METAL CARDS for a puzzle (G).
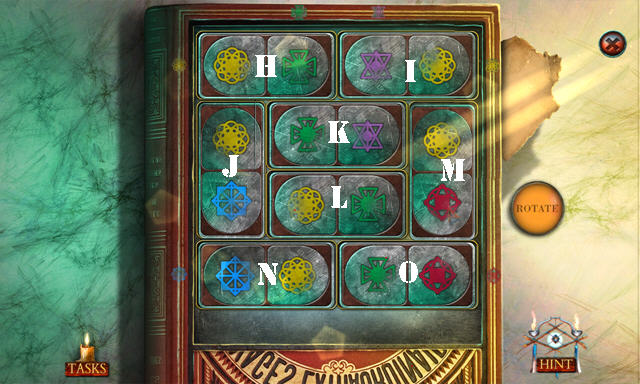
- Solution: (H-O)-(I-N)-(L-J)-(K-M).
- Take the TAIL FEATHER 2/2.
- Walk down.
- Place the 2 TAIL FEATHERS on the BROKEN PEACOCK; take the PEACOCK (inventory).
- Place the PEACOCK; take the CLOCKWORK MOTH 1/3 (N) and read the note.

- Play the HOP (O) to get the NAIL PULLER.
- Select the two boxes (1-2); take the CONSTELLATION (P).
- Go (Q).
- Take the WIRE SPONGE (R). Use the NAIL PULLER; open the window and take the KITE STRING (S).
- Take the SMELLING SALTS (T) and MASK SPATULA (U).
- Walk down.
- Use the SCALPEL (V); take the MARBLE (V1).
- Place the MARBLE on the SLINGSHOT to get the LOADED SLINGSHOT (inventory).
- Walk down.
- Take the HOOK (W).
- Use the HOOK on the KITE STRING to get the HOOK AND LINE (inventory).
- Use the HOOK AND LINE (X); take the LOTUS BASE.
- Place the LOTUS on the LOTUS BASE to get the LOTUS FLOWER (inventory).
- Use the WIRE SPONGE; take the SEASHELL (Y).
- Return to the Victorian bathroom.
- Place the LOTUS FLOWER; take the BLOOD PRESSURE CUFF (Z).
- Use the SEASHELL; take the TWEEZERS and CLOCKWORK MOTH 2/3 (Z1).
- Walk down.
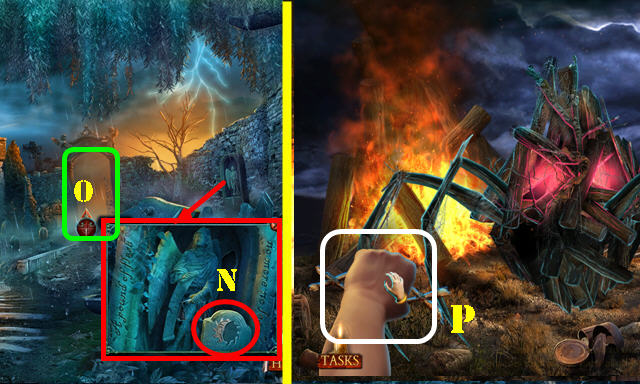
- Use the BLOOD PRESSURE CUFF; pump it 3x and take the CLOCKWORK MOTH 3/3 and VAMPIRE BAT (A).
- Place the 3 CLOCKWORK MOTHS for a puzzle (B).
- Solution (1-22).
- Go (C).
Chapter 5: Attic
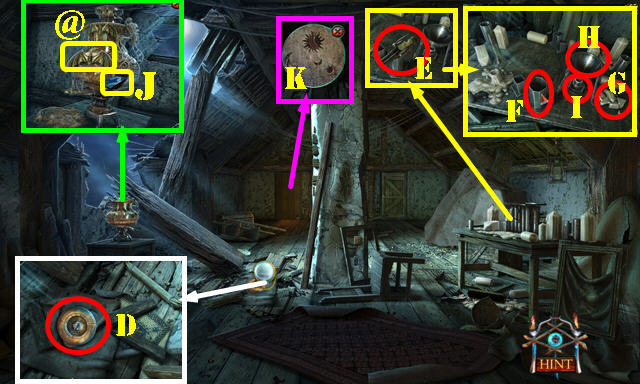
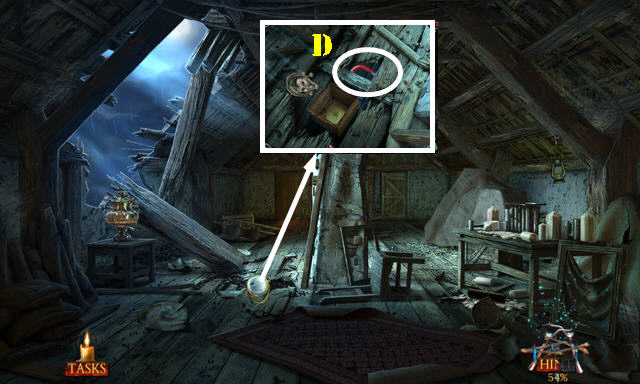
- Take the DIAL (D). Move the cloth.
- Take the TIN SOLDIER (E).
- Use the MASK SPATULA (F). Place G in H and touch (I). Use the TWEEZERS to get the GOLDEN CLAW (H).
- Place the VAMPIRE BAT (@); take the CERAMIC TILE 1/2 (J).
- Place the CONSTELLATION (K); walk left.
- Use the LOADED SLINGSHOT (L) to get the MANNEQUIN HEAD HALF.
- Move the pillows twice. Use the GOLDEN CLAW; take the WOODEN HORSESHOE and MYSTERIOUS BUTTON (M).
- Walk down and go into the Sewing room (N).
- Remove the coat (O).
- Place the MYSTERIOUS BUTTON and press all the buttons; take the CERAMIC TILE 2/2 (P).
- Take the AMETHYST JEWEL from the MANNEQUIN HEAD HALF (inventory).
- Place the AMETHYST JEWEL; take the JAGGED CHAIN and STAR SIGIL (Q).
- Return to the Victorian bathroom.
- Place the 2 CERAMIC TILES (R) for a HOP; play it to get the TAP.
- Return to the Attic.
- Place the TAP (S); take the JESTER (T).
- Place the JESTER; take the MANNEQUIN HEAD PART (U).
- Place the MANNEQUIN HEAD PART on the MANNEQUIN HEAD HALF to get the MANNEQUIN HEAD (inventory).
- Go to the Sewing room.
- Place the MANNEQUIN HEAD (V); take the ZODIAC SIGN (W).
- Return to the Observatory.
- Place the ZODIAC SIGN for a puzzle (X).
- Solution one (Y).
- Solution two (Z).
- Place the STAR SIGIL (A) and use the SMELLING SALTS (B).
- Take the METAL FANGS and SEWING MACHINE BELT (C).
- Walk down.
- Use the METAL FANGS to get the MAGNET (D).
- Go to the Sewing room.
- Place the SEWING MACHINE BELT (E); take the LEATHER GLOVES (F).
- Use the MAGNET (G) for a HOP; play it to get the RINGS.
- Place the RINGS on the JAGGED CHAIN; take the WIRE SAW (inventory).
- Return to the Olsen courtyard.

- Use the LEATHER GLOVES; take the METAL COMB (H).
- Use the WIRE SAW; remove the board (I) and take the SEAM RIPPER (J).
- Go to the Toy workshop (K).
- Take the RIBBON (L). Place the WOODEN HORSESHOE; take the SPRING 1/3 (M). Use the SEAM RIPPER; take the SPRING 2/3 (M1).
- Place the TIN SOLDIER (N) for a HOP; play it to get the MASK MOLD.
- Take the RUBBER TUBE (O) and remove the top (O1). Take the HAND RAKE (P) and look at the note. Talk to the man.
- Use the METAL COMB; take the METAL BOWL and INCAN MASK (Q).
- Go to the Attic.
- Put down the MASK MOLD; take the AZTEC MASK (R).
- Go to the Observatory (S).
- Place the INCAN MASK and AZTEC MASK for a puzzle. Solution (T).
- Take the MATRYOSHKA PIECE (T1).
- Return to the Toy workshop.
- Place the MATRYOSHKA PIECE; take the SPRING 3/3 (U).
- Walk down.
- Place the 3 SPRINGS for a puzzle (V).
- Solution (W).
- Enter the Cable car platform.
- Play the HOP (X) to get the SPARK PLUG 1/2.
- Walk down.
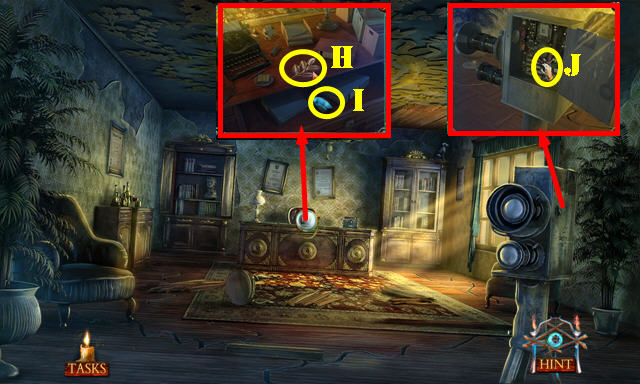
- Place the DIAL; take the PAINTING KEY and BOAT KEY (Y).
- Go left.
- Use the BOAT KEY; open the compartment and take the STONE CADUCEUS (A).
- Walk down.
- Place the STONE CADUCEUS (B); take the TOGGLE SWITCH (C).
- Return to the Cable car platform.
- Place the TOGGLE SWITCH (D) and flip it; take the SPARK PLUG 2/2 (E).
- Return to the Stone bridge.
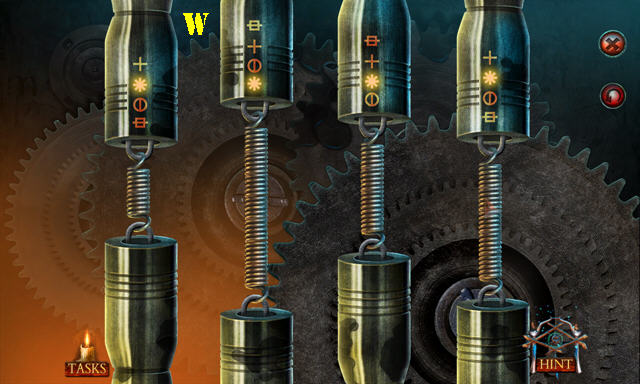
- Place the RUBBER TUBE and 2 SPARK PLUGS for a puzzle (F).
- Solution (G).
- Go forward to the Meditation garden.
Chapter 6: Meditation Garden
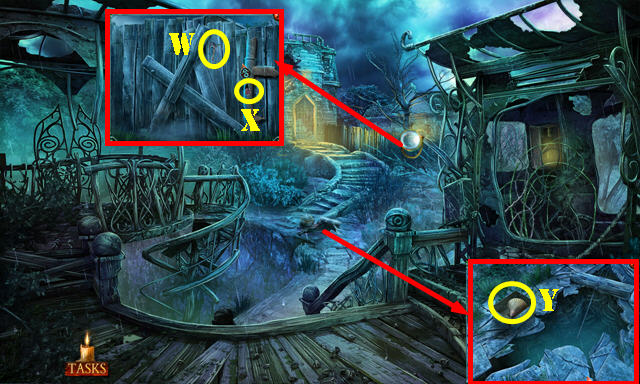
- Open the drawer (H). Look at the note (I).
- Use the HAND RAKE; take the SMALL JEWEL 1/3 and CHAIN (J).
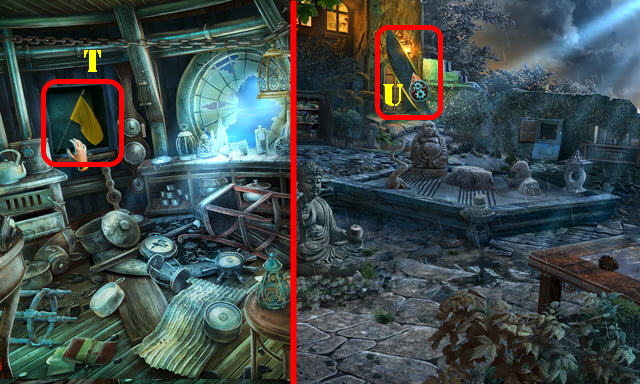
- Use the PAINTING KNIFE (K) for a HOP; play it to get the ASH SHOVEL.
- Go (L).
- Read the note and take the METAL SNAKE (M).
- Select the door 3x. Place the CHAIN and take the LEVER (N).
- Use the ASH SHOVEL 3x; take the DRIED FLOWER (O).
- Walk down.
- Place the DRIED FLOWER and assemble as shown (P). Take the THERMOMETER (Q).
- Place the LEVER; take the SMALL GAUGE (R).
- Go to the Lighthouse.
- Place the THERMOMETER and SMALL GAUGE for a puzzle (S).
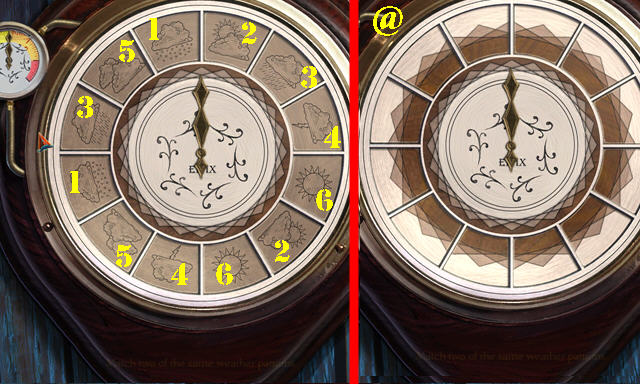
- Solution one (1-6).
- Solution two is random (@).
- Take the LIGHTHOUSE FLAG (T).
- Walk down.
- Remove the flag from the LIGHTHOUSE FLAG to get the FLAGPOLE (inventory).
- Use the FLAGPOLE (U) and go through the door.
- Play the HOP (V) to get the CAGE KEY.
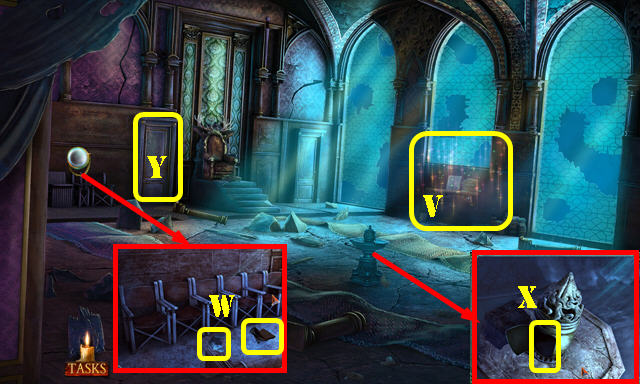
- Unfold the chairs; take the PAINTING PIECE and RUBBER SHEET (W).
- Open the compartment (X).
- Go (Y).
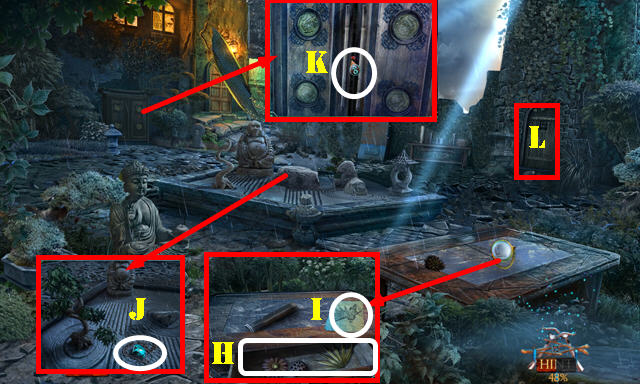
- Place the METAL SNAKE; take the INCENSE and BALLERINA (A).
- Take the SMALL VALVE (B).
- Open the doors (C).
- Walk down twice.
- Use the RUBBER SHEET to get the RESISTORS (D).
- Enter the Lighthouse.
- Use the CAGE KEY; take the BURNER (E).
- Return to the Throne room.
- Place the INCENSE and BURNER (F); take the GOLDEN LEAVES and SMALL JEWEL 2/3 (G).
- Go to the Doctor's study.
- Place the GOLDEN LEAVES (H); take the SMALL JEWEL 3/3 (I).
- Open the compartment. Place the RESISTORS; touch the reel and then take the FAIRY ORNAMENT (J).
- Walk down.
- Place the FAIRY ORNAMENT (K); read the note and take the JEWELRY LOUPE (L).
- Go to the Doctor's study.
- Place the 3 SMALL JEWELS and the JEWELRY LOUPE for a puzzle (M).
- Solution: 3-2-1-6-5-4-3-2-6.
- Enter Evangeline's room.
- Select the 5 symbols (white) for a HOP (N); play it to get the FRAMED PICTURE.
- Place the BALLERINA (O); take the LOCKET COVER (P).
- Place the RIBBON; open the window and take the HINGE (Q).
- Talk to the man.
- Place the PAINTING PIECE (R); take the LOCKET BAIL and HORSE FIGURINE (S).
- Place the HINGE, LOCKET COVER and LOCKET BAIL on the FRAMED PICTURE; take the LOCKET (inventory).
- Return to the Throne room.
- Place the LOCKET (T).
- Enter the Crypt.
- Place the SMALL VALVE (U); take the WOODEN CHERUB (V). Place the METAL BOWL (W) to get the WATER BOWL.
- Walk down.
- Place the WOODEN CHERUB; take the STONE SKULL (X).
- Go to the Crypt.
- Place the STONE SKULL for a puzzle (Y).
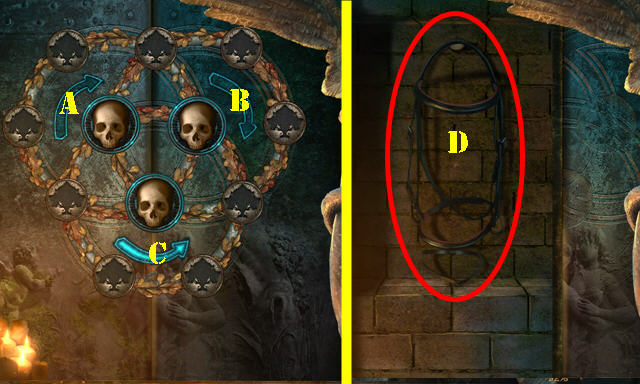
- Solution: Ax5-Bx3-Cx4.
- Take the BRIDLE (D).
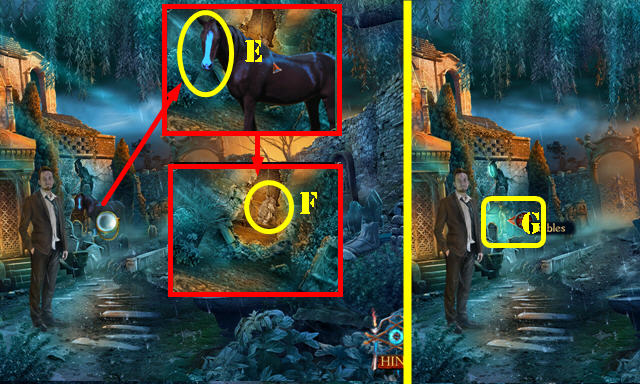
- Place the BRIDLE (E); take the GRAIN EMBLEM (F).
- Go to the Stables (G).
- Place the HORSE FIGURINE; take the GOLDEN SUN (H).
- Place the GRAIN EMBLEM (I) for a HOP; play it to get the HALF-POUND WEIGHT 1/2.
- Use the WATER BOWL; take the HALF-POUND WEIGHT 2/2 (J).
- Walk down.
- Place the 2 HALF-POUND WEIGHTS (K); take the BAG LOCK (L).
- Return to the Stables.
- Remove the hay and place the BAG LOCK; take the SILVER MOON (M).
- Walk down.
- Place the GOLDEN SUN and SILVER MOON (N).
- Go (O).
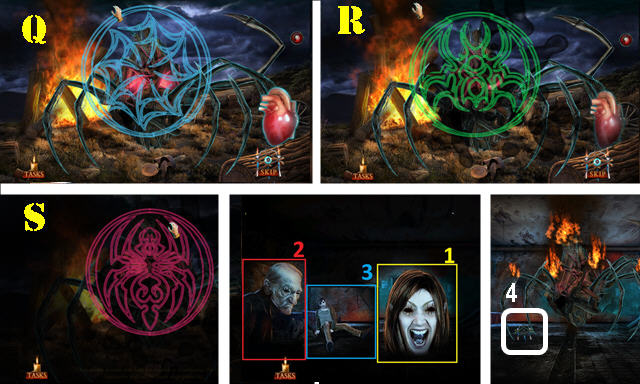
- Select (P) for a puzzle.
- Solution (Q-R-S). Please select the hand after each puzzle.
- Select images 1-2-3-4 for a puzzle.
- Solution: B-D-A-D-C (The 'D' rotates the large circle).
- Congratulations, you've completed Phantasmat: The Dread of Oakville!
Created at: 2015-08-07