

Walkthrough Menu
- General Tips
- Chapter 1: The School
- Chapter 2: The Infirmary
- Chapter 3: Amusement Park
- Chapter 4: Roller Coaster
- Chapter 5: Cinema
- Chapter 6: Corcrest Cosmetics
General Tips
- This is the official guide for Phantasmat: The Endless Night!
- This guide will not mention each time you have to zoom into a location; the screenshots will show each zoom scene.
- Hidden-object puzzles are referred to as HOPs. This guide will not show screenshots of the HOPs, however, it will mention when an HOP is available and the inventory item you'll collect from it.
- This guide will give step-by-step solutions for all puzzles which are not random. Please read the instructions in the game for each puzzle.
Chapter 1: The School
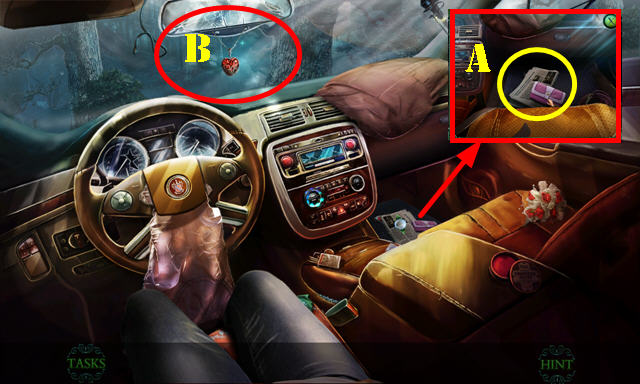
- Touch the scene and then the cellphone 2x.
- Take the WALLET, NEWSPAPER and AIMEE'S SHOE (A).
- Open the WALLET; take the QUARTER (inventory).
- Use AIMEE'S SHOE (B). Try to exit and then exit the car through the window.
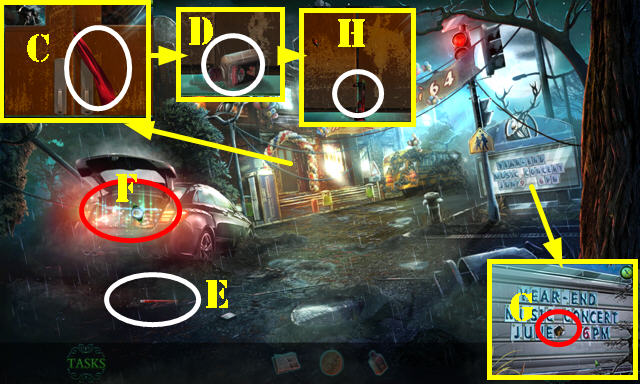
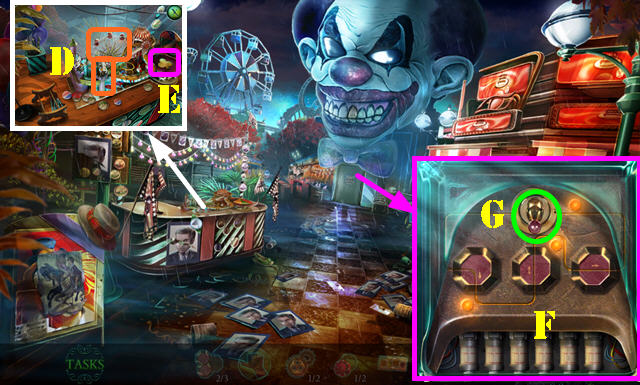
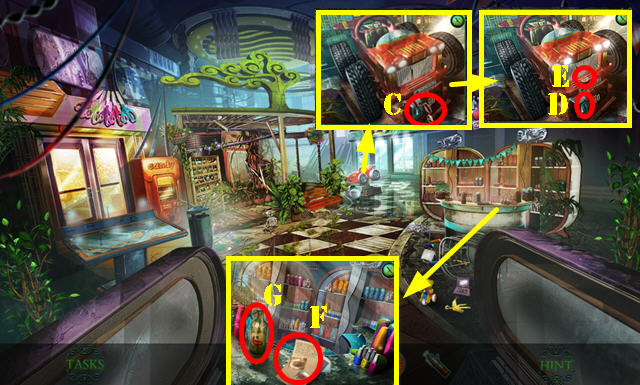
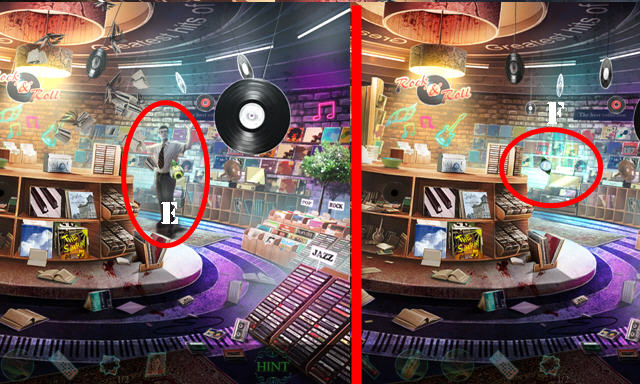
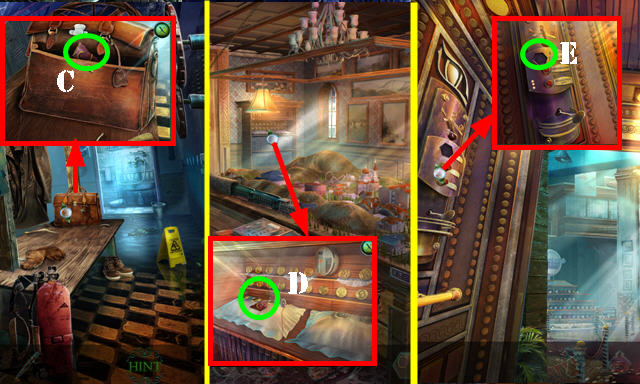
- Try to grab the scarf (C); take the NAIL POLISH REMOVER (D).
- Open the trunk; take the ROAD FLARE (E).
- Play the HOP (F) to get the JACK.
- Use the QUARTER; take the STAG BADGE 1/2 (G).
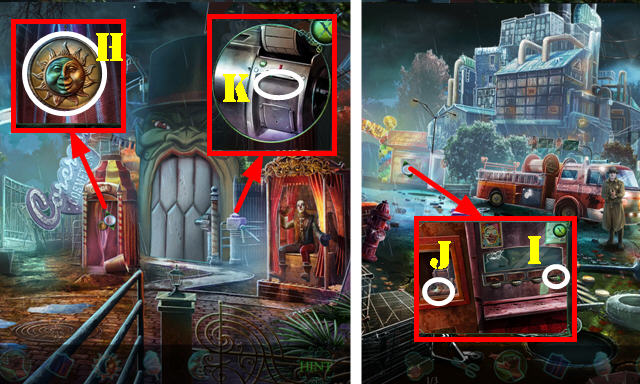
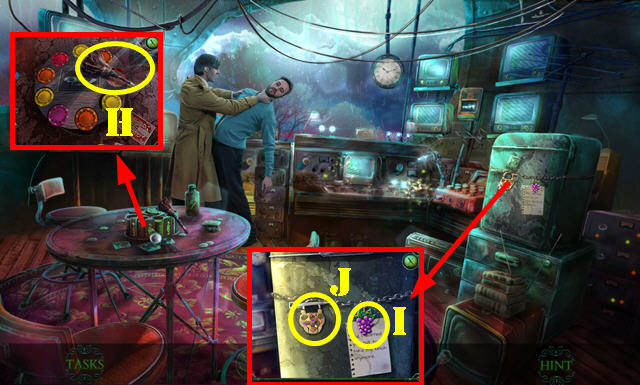
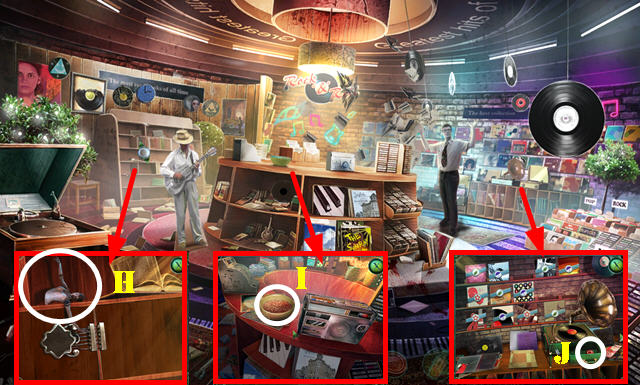
- Use the JACK (H); go through the door.
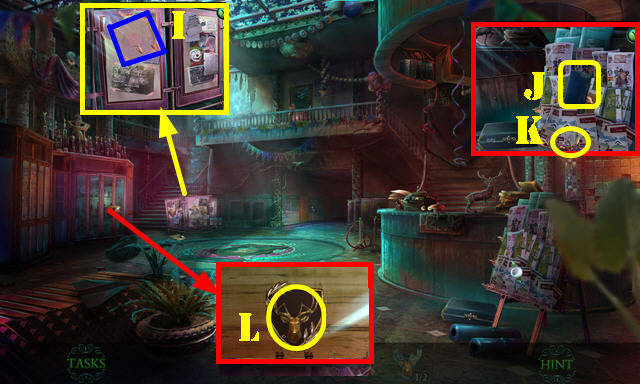
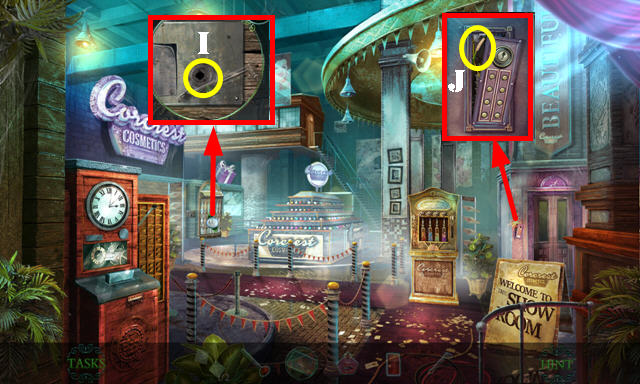
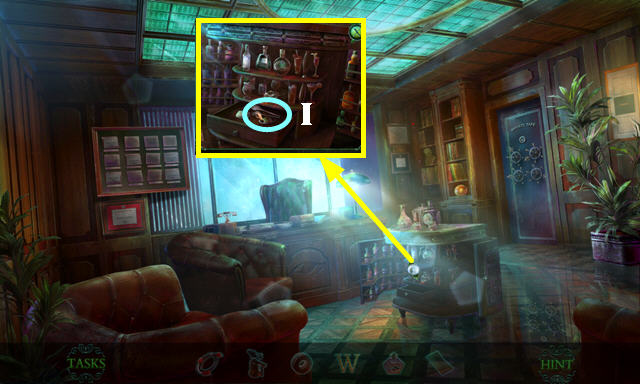
- Move the panel; take the VINYL RECORD (I).
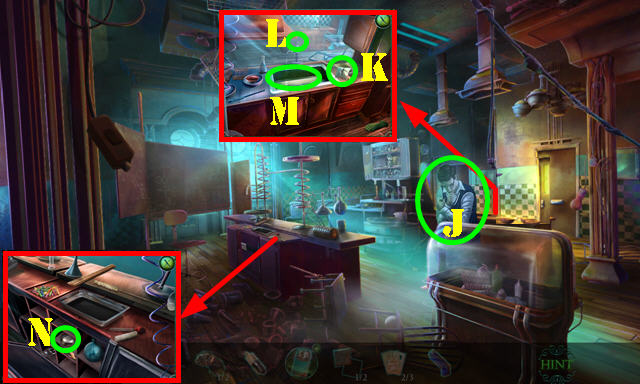
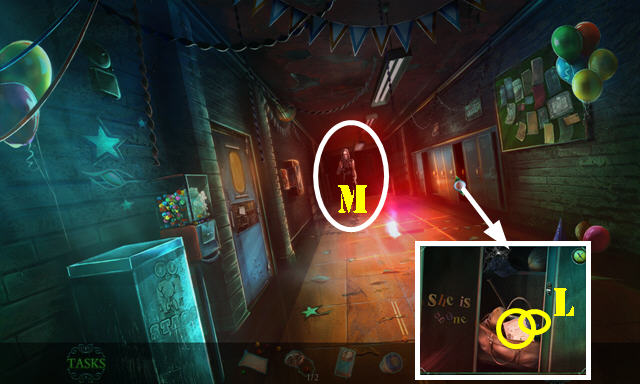
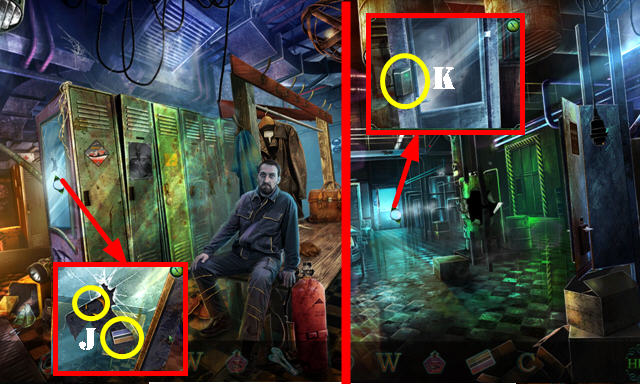
- Take the MAP (J). Move the brochure; touch the STAG BADGE 2/2 and then take it (K).
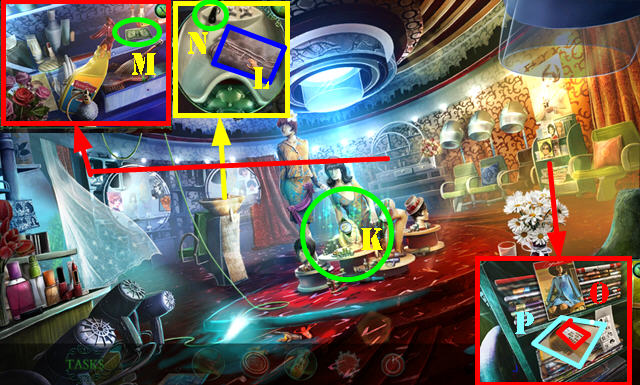
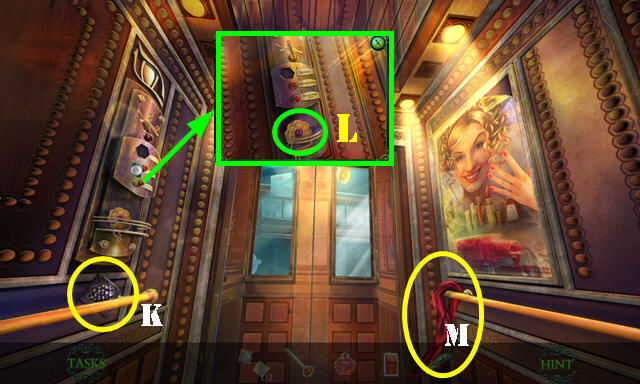
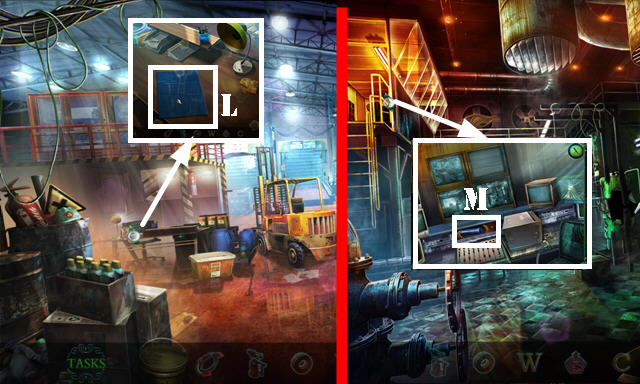
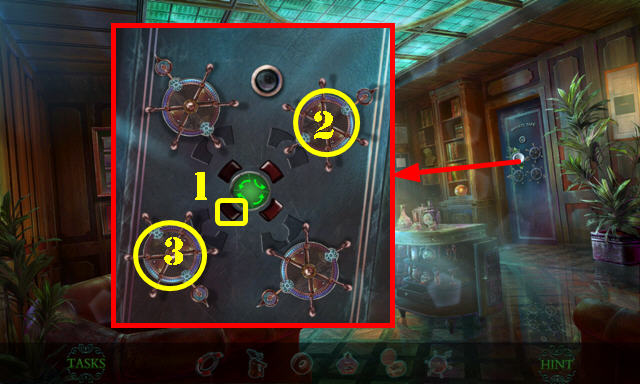
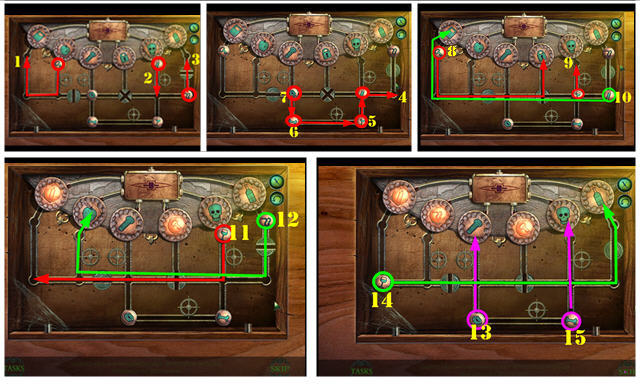
- Place the 2 STAG BADGES to activate a puzzle (L).
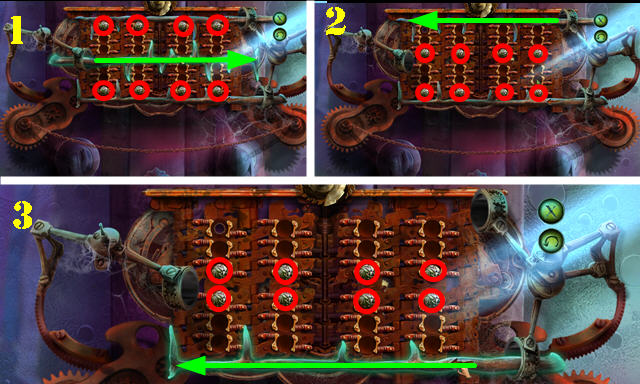
- Place the buttons as shown in each section and then pull the horns in the directions of the arrows (green).
- Solution (1-2-3).
- Enter the Corridor.
- Throw the ROAD FLARE on the scene.
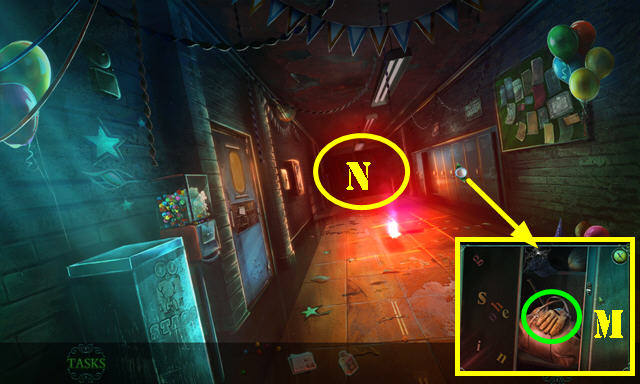
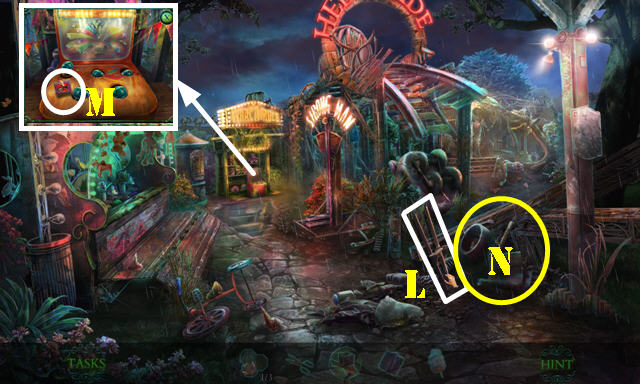
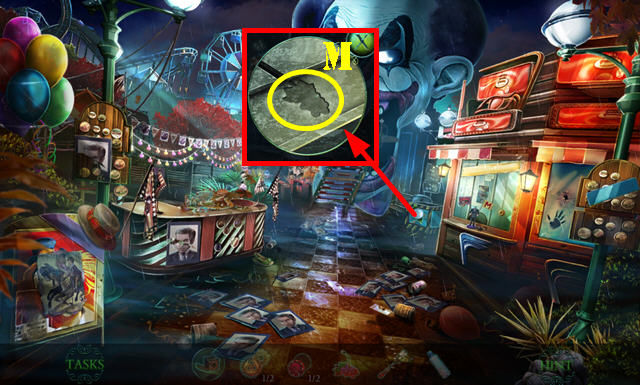
- Use the NAIL POLISH REMOVER and slide the latch; take the BASEBALL GLOVE (M).
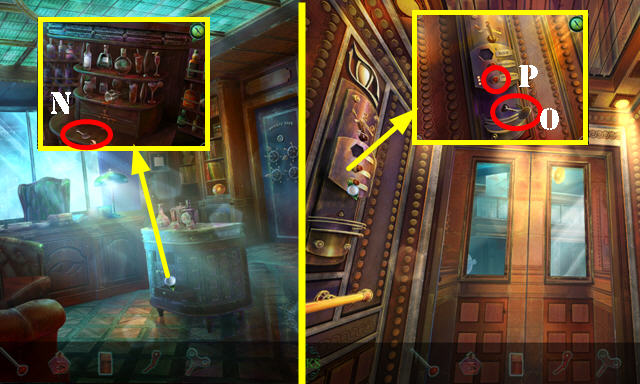
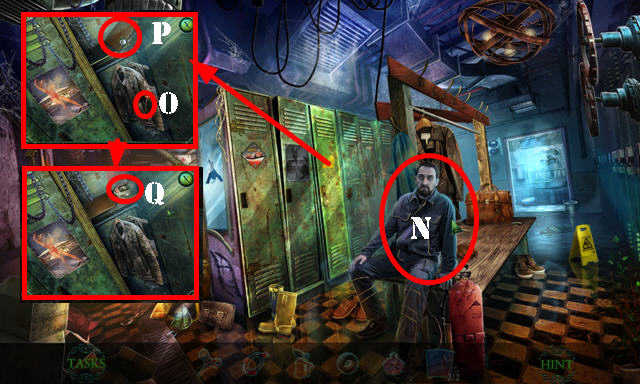
- Try to go forward (N). Talk to the hall monitor.
- Walk down.
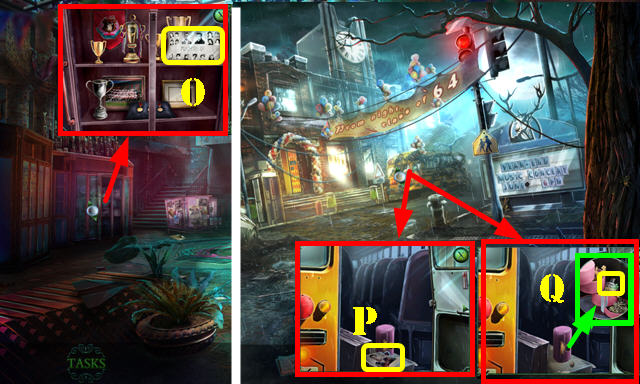
- Look at the photo; take the HEART LOCK (O).
- Walk down.
- Use the BASEBALL GLOVE; look at the photo and take the VALVE (P).
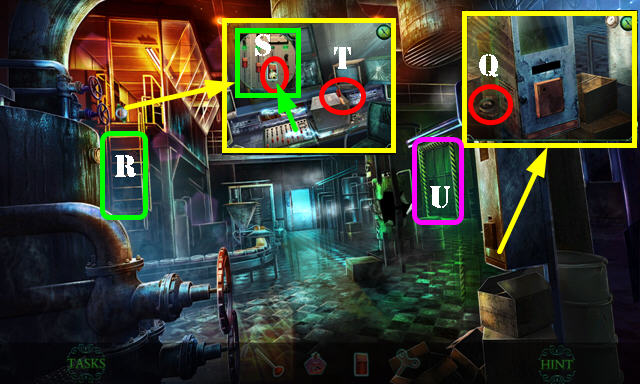
- Place the HEART LOCK; take the HAIR OIL (Q).
- Go to the Entrance Hall and then up to the Chemistry Classroom.
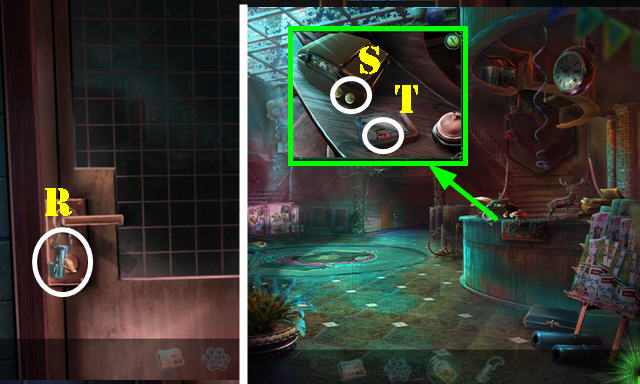
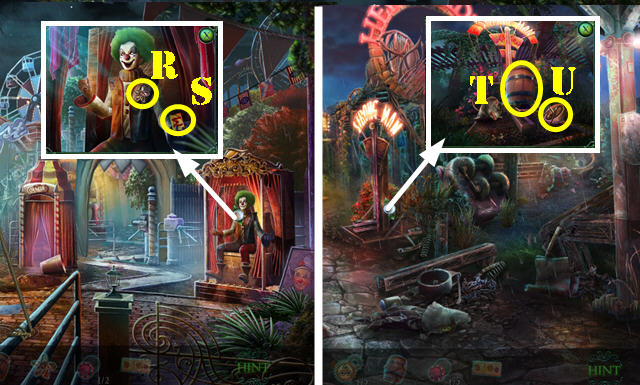
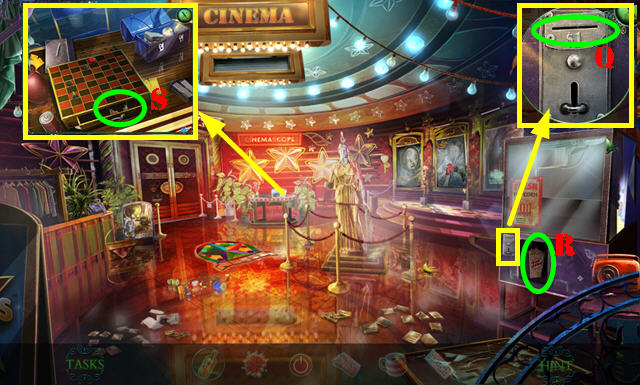
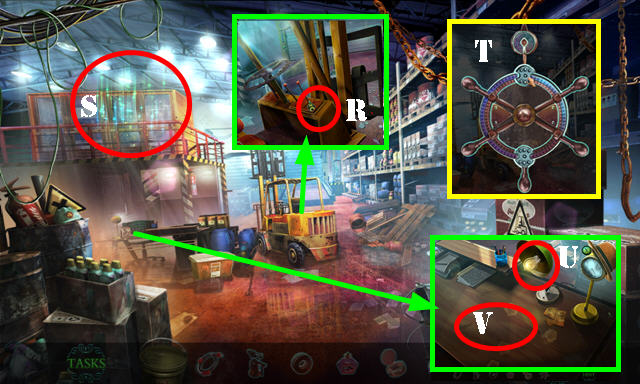
- Take the CAN OPENER (R) and talk to Billy.
- Walk down.
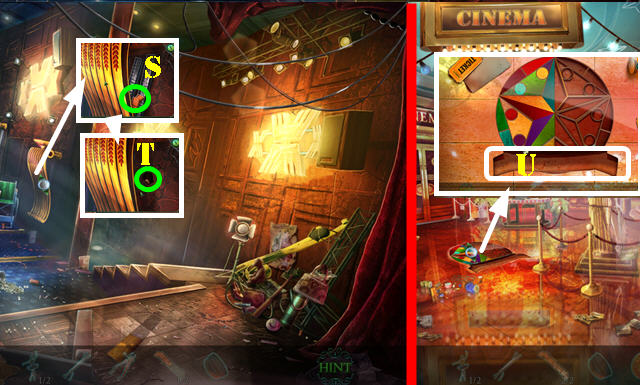
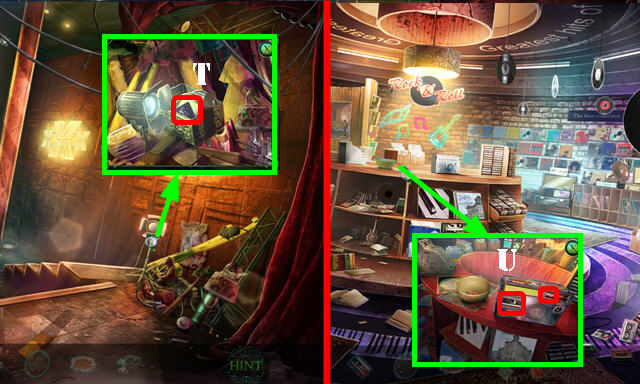
- Turn the knob (S).
- Use the CAN OPENER; take the FIRST-AID KEY (T).
- Go to the Corridor.
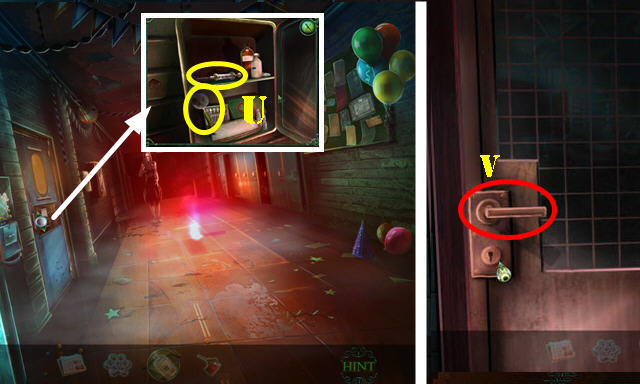
- Use the FIRST-AID KEY; take the DIRTY MAGNIFIER and the EMPTY SYRINGE (U).
- Open the HAIR OIL; dip the EMPTY SYRINGE in it to get the SYRINGE WITH OIL (inventory).
- Return to the Chemistry Classroom.
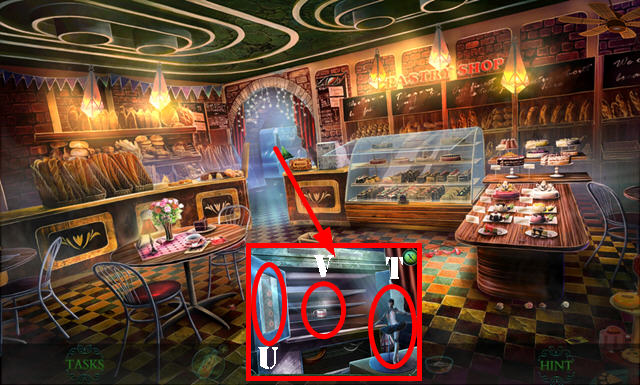
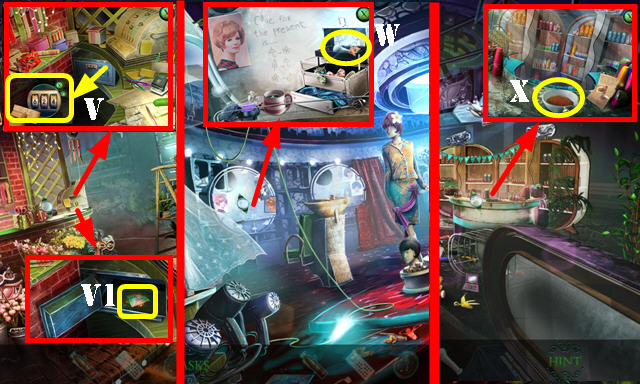
- Use the SYRINGE WITH OIL (V).
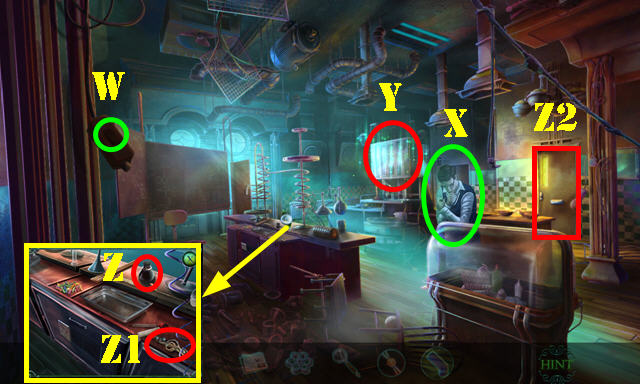
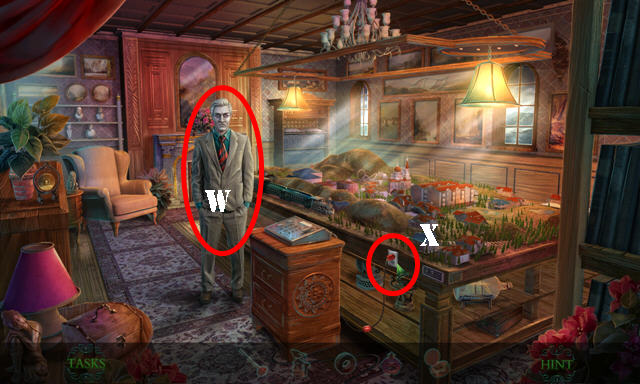
- Flip the switch (W).
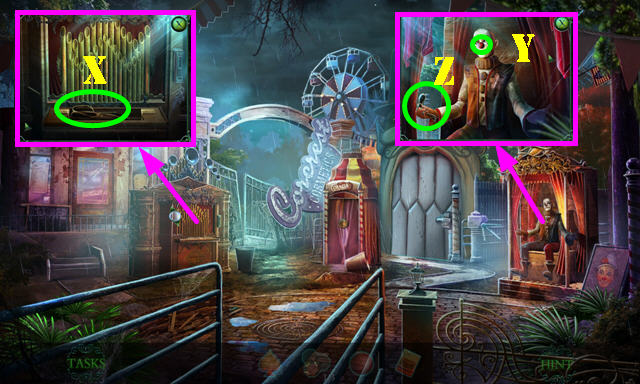
- Talk to Billy (X) to get the EMPTY INHALER.
- Play the HOP (Y) to get the PERIODIC TABLE OF ELEMENTS.
- Select the ink bottle (Z); take the G-CLEF (Z1).
- Go to the Teacher's Office (Z2).
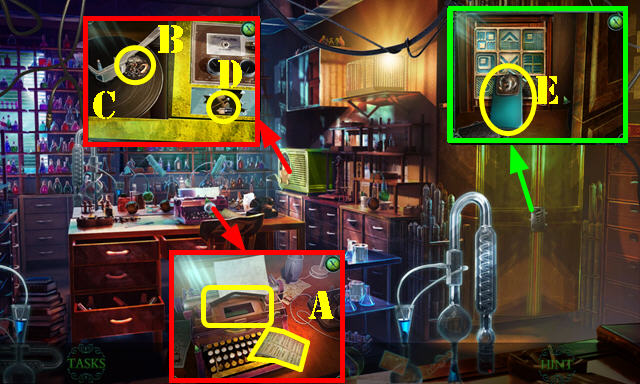
- Take the CLASS SCHEDULE and DRY TYPEWRITER RIBBON (A).
- Place the G-CLEF; take the INFIRMARY SEAL 1/2 (B).
- Place the VINYL RECORD (C); take the MINI BULB and CADUCEUS PART (D).
- Place the CADUCEUS PART; take the BATTERY LAMP and ELEMENT LOCK 1/2 (E).
- Walk down.
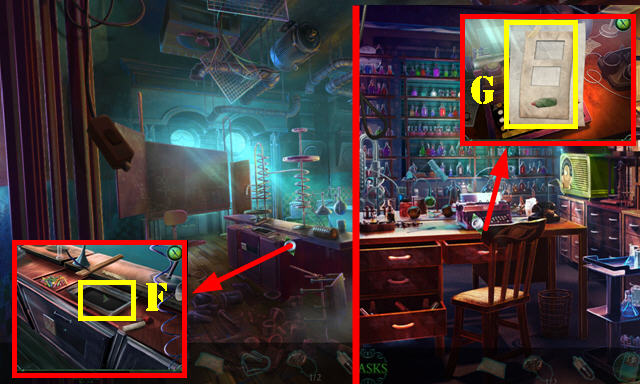
- Place the DRY TYPEWRITER RIBBON to get the TYPEWRITER RIBBON (F).
- Go to the Teacher's Office.
- Place the TYPEWRITER RIBBON; look at the note, flip it and take the INSTRUCTIONS 1/3 (G).
- Walk down 2x.
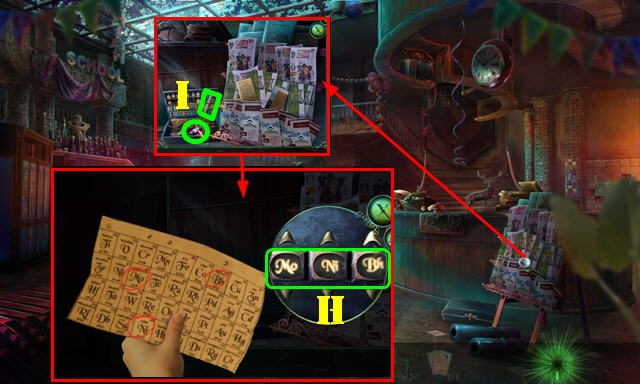
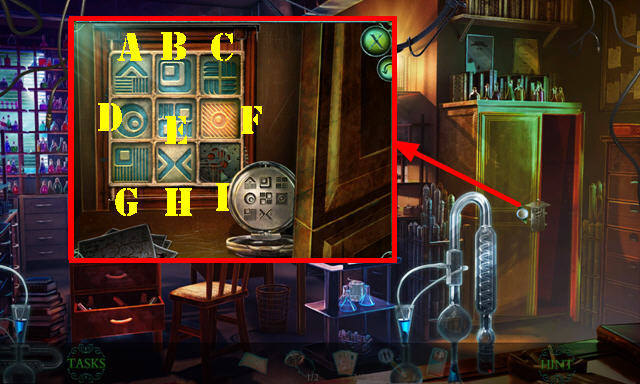
- Select the lock and then place the PERIODIC TABLE OF ELEMENTS to activate a puzzle.
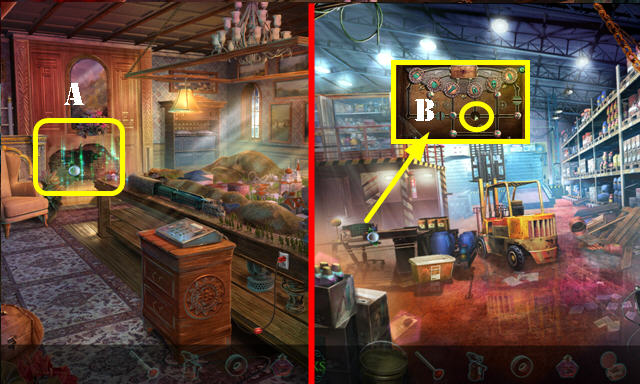
- Solution (H).
- Take the INHALER CANISTER and INSTRUCTIONS 2/3 (I).
- Return to the Chemistry Classroom.
- Place the INHALER CANISTER in the EMPTY INHALER to get the INHALER (inventory).
- Use the INHALER on Billy and then talk to him (J). Give him the NEWSPAPER and talk to him again.
- Take the PAPER FORTUNE-TELLER (K); touch it 4x and take the ELEMENT LOCK 2/2 (inventory).
- Place the VALVE (L); place the DIRTY MAGNIFIER under the water to get the CLEAN MAGNIFIER (M).
- Place the 2 ELEMENT LOCKS; take the SAFE CODE (N).
- Go to the Teacher's Office.
- Put down the SAFE CODE to activate a puzzle.
- Solution: H-E-D-A-B-E-D-A-B-C-F-E-B-A-D-G-H-I-F-E-D-G-H-I-F-E-H-I-F-E-D-G-H-E-F-I.
- Take the FUSE and INSTRUCTIONS 3/3.
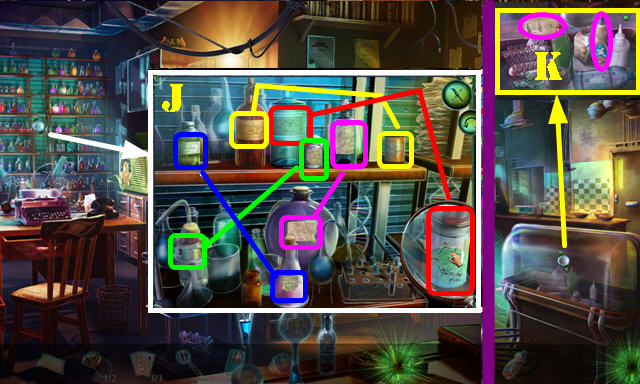
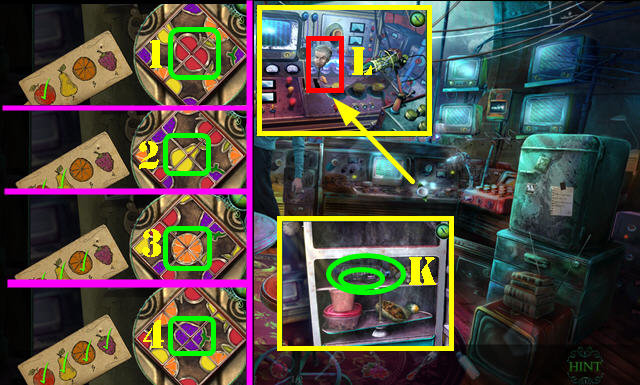
- Use the CLEAN MAGNIFIER. Select matching notes (J). Take the BLEACH.
- Walk down.
- Put down the 3 INSTRUCTIONS and the BLEACH for a puzzle (K).
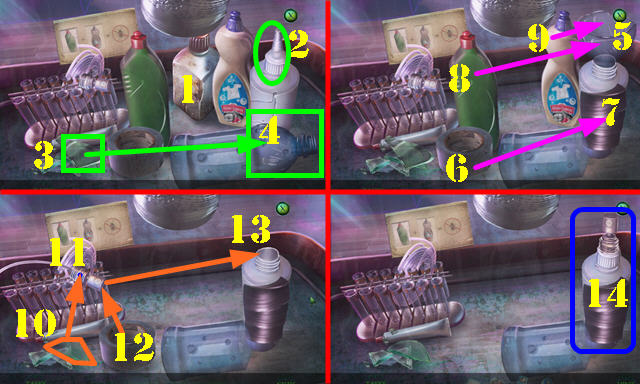
- Remove the bottle (1) and the top (2).
- Use the shard (3) on the bottle (4) to make a funnel. Place the funnel (5) and tape (6) the bottle (7).
- Pour the two bottles (8-9) into the funnel (5) and then remove the funnel.
- Use the shard (10) to cut the sprayer (11) and put tape on it (12). Insert the sprayer (13).
- Take the INSECTICIDE (14).
- Return to the Corridor.
Chapter 2: Infirmary
- Use the INSECTICIDE; take PAPER CLIP and the INVITATION (L).
- Give the INVITATION (M).
- Go forward.
- Open the BATTERY LAMP; place the MINI BULB (inventory).
- Use the BATTERY LAMP on the scene.
- Place the CLASS SCHEDULE on the scene.
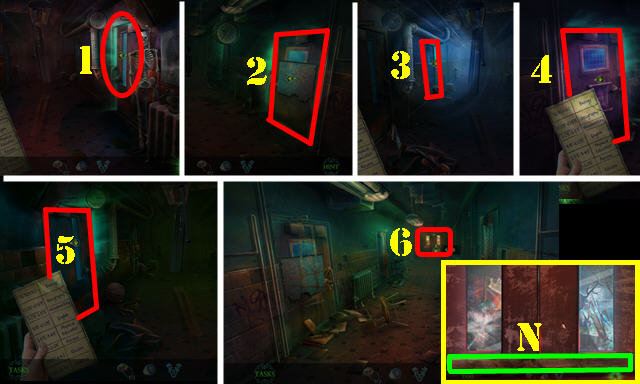
- Go through the doors as shown by looking at the clocks in each section and selecting the right classrooms (1-2-3-4-5-6). If you make a mistake, you'll have to start over.
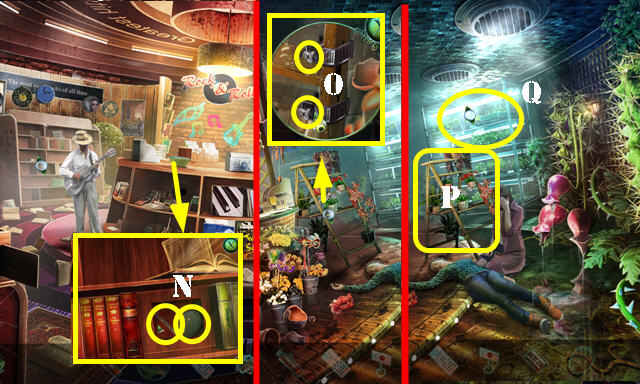
- Remove the board (N).
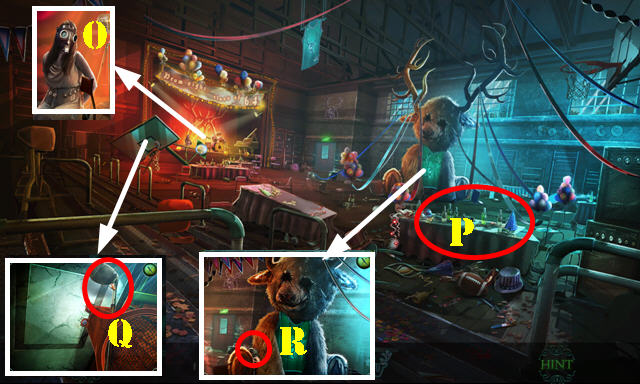
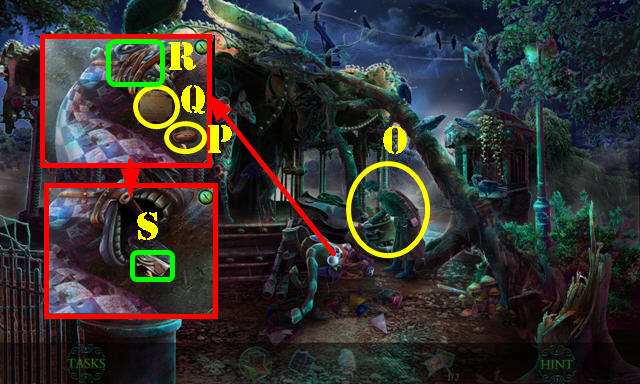
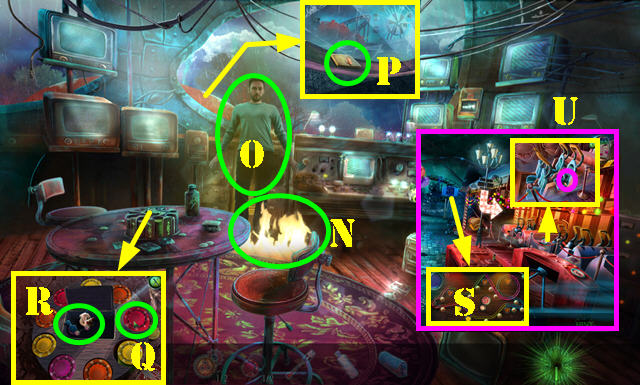
- Open the curtains and zoom in (O).
- Play the HOP (P) to get the CORKSCREW.
- Take the GOLF CLUB (Q) and INFIRMARY SEAL 2/2 (R).
- Walk down.
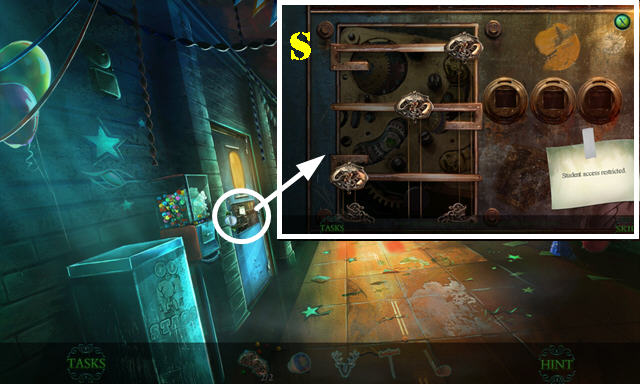
- Place the 2 INFIRMARY SEALS for a puzzle.
- Solution (S).
- Enter the Infirmary.
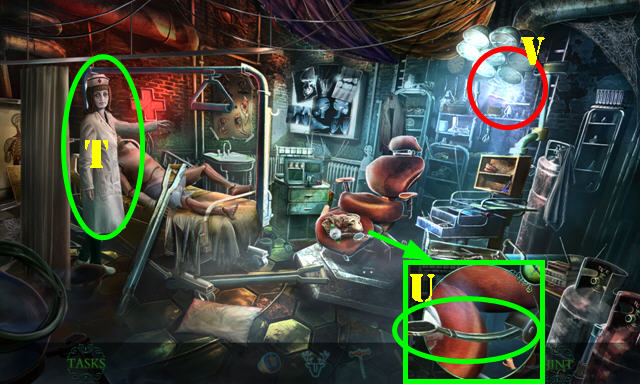
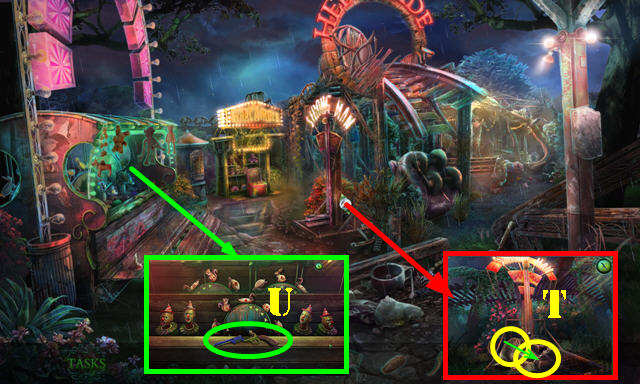
- Open the curtain; talk to the nurse (T).
- Remove the pedal; place the GOLF CLUB and pull it (U).
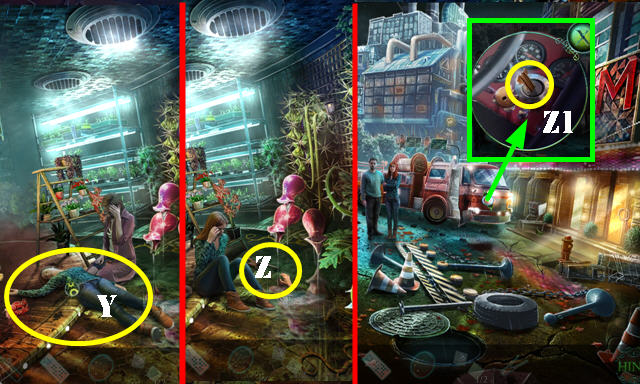
- Play the HOP (V) to receive the PAINKILLERS.
- Give the PAINKILLERS to the nurse.
- Return to the Chemistry Classroom.
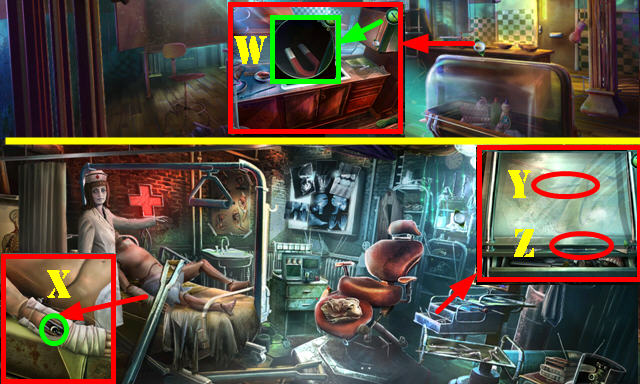
- Use the CORKSCREW; take the MAGNET and SCALPEL (W).
- Return to the Infirmary.
- Use the SCALPEL; remove the cover and take the STAG EYE 1/2 (X).
- Use the MAGNET (Y); take the TWEEZERS (Z).
- Walk down.
- Use the TWEEZERS to get the SCHOOL CREST PART (A); take the STAG EYE 2/2 (B).
- Go forward.
- Place the 2 STAG EYES (C); take the BUTTON and HANDCUFF LOCK (D).
- Return to the Infirmary.
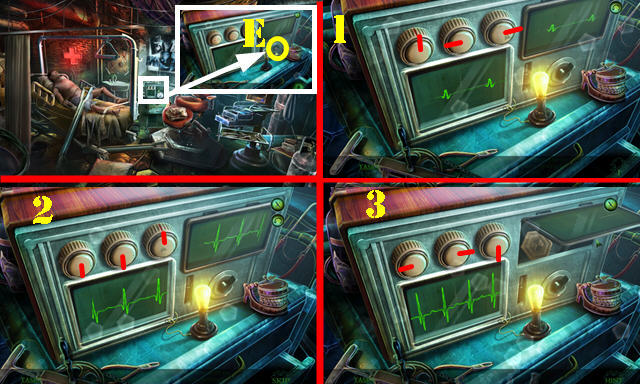
- Place the BUTTON and turn it (E).
- Adjust the knobs as shown (1-2-3).
- Take the MASK LOCK.
- Return to the Gym.

- Use the HANDCUFF LOCK and MASK LOCK (F).
- Talk to Jake.
- Go to the School Yard (G).
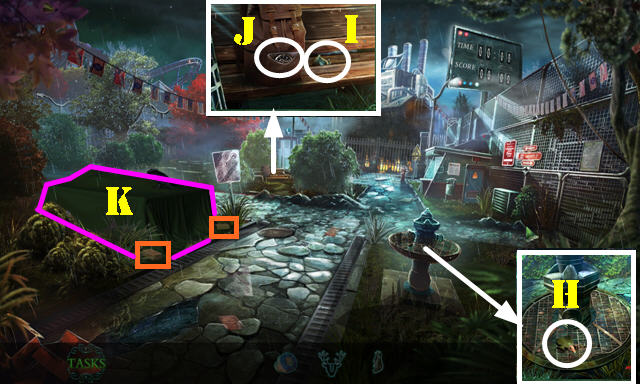
- Take the GOLDEN SPADE (H) and SCHOOL CREST BASE (I).
- Use the PAPER CLIP; take the DIAL LOCK PART (J).
- Move the bricks (orange) and remove the tent (K).
- Place the SCHOOL CREST PART on the SCHOOL CREST BASE to get the SCHOOL CREST (inventory).
- Place the SCHOOL CREST; take the TOWER KEY 1/3 (L).
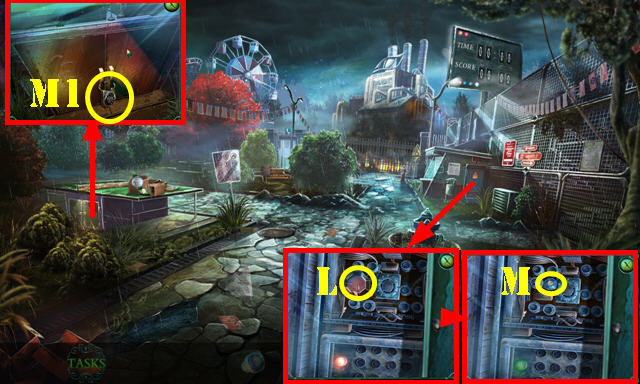
- Place the FUSE (M).
- Place the DIAL LOCK PART and zoom in for a puzzle (M1).
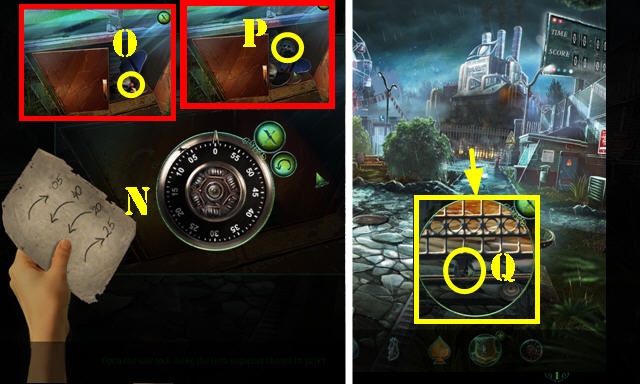
- Solution: 5 clockwise, 40 counterclockwise, 20 counterclockwise, 25 clockwise (N).
- Take the RUBBER BALL (O); move the items and take the GATE WHEEL (P).
- Remove the wheel (Q); place the GATE WHEEL. Open the gate and go forward.
Chapter 3: Amusement Park
- Talk to the fireman.
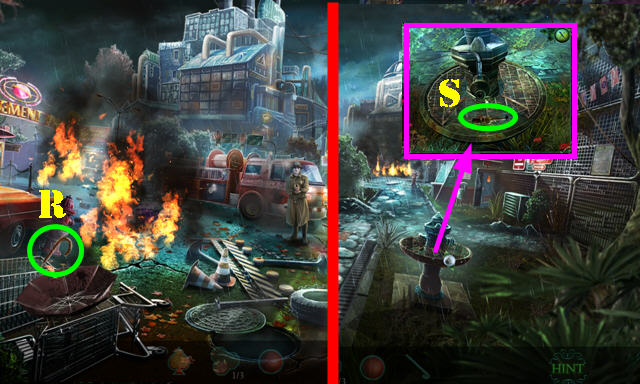
- Take the UMBRELLA HANDLE (R).
- Walk down.
- Use the UMBRELLA HANDLE; take the FIRE HOSE NOZZLE (S).
- Go forward.
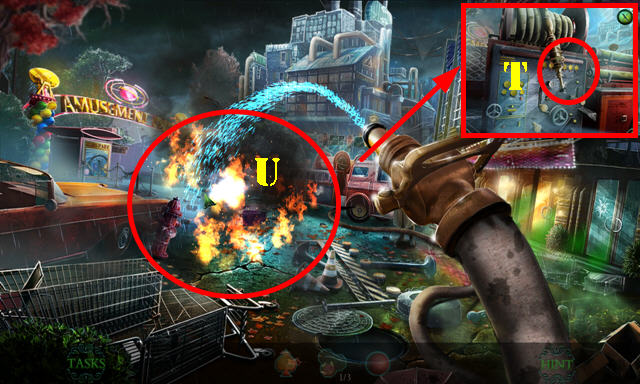
- Attach the FIRE HOSE NOZZLE (T). Douse the fire with the water (U) and select sections of the fire to extinguish.
- Talk to the fireman and then to Aimee.
- Take the COUPON CODE (V).
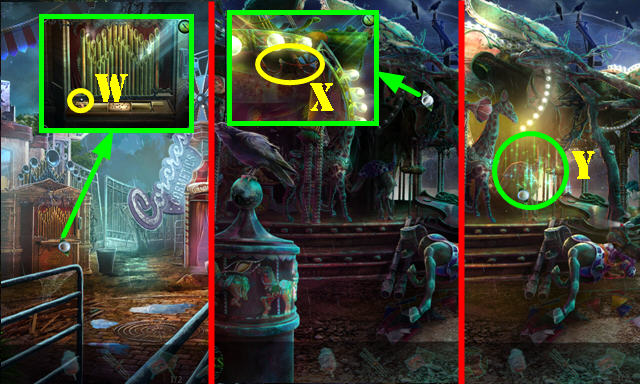
- Go to the Fairground (W).
- Take the SCISSORS (X).
- Place the RUBBER BALL (Y); take the CASH REGISTER HANDLE (Z).
- Enter the Diner.
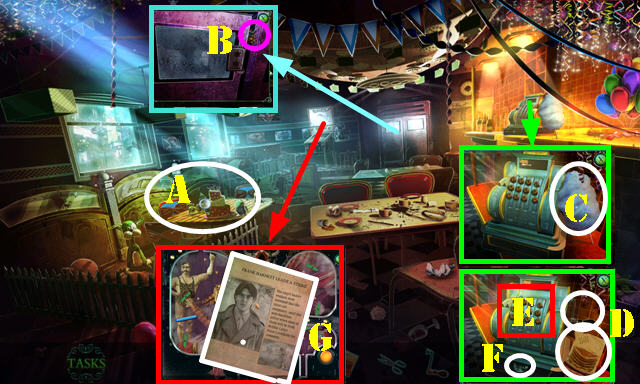
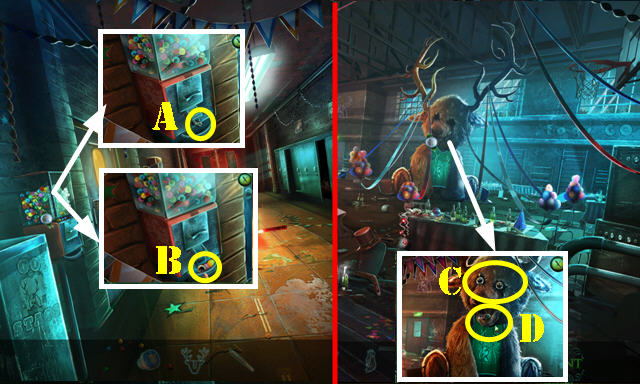
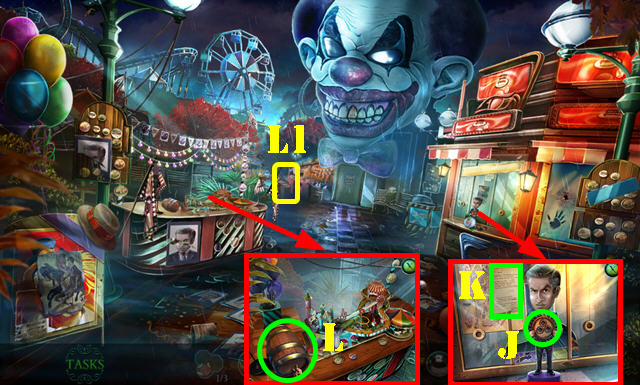
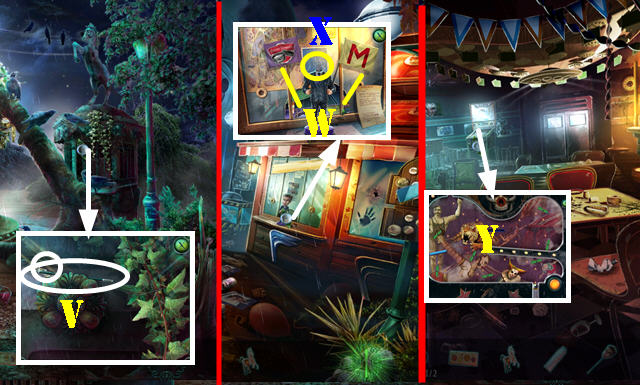
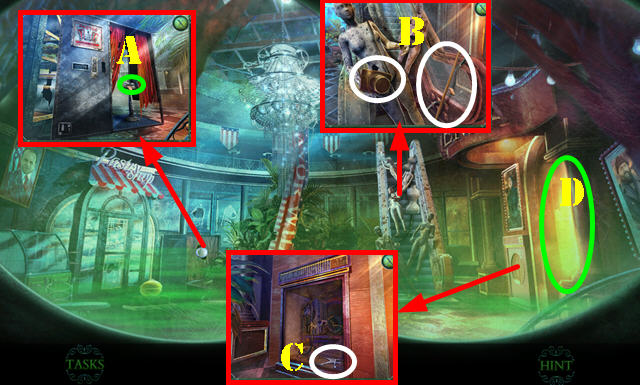
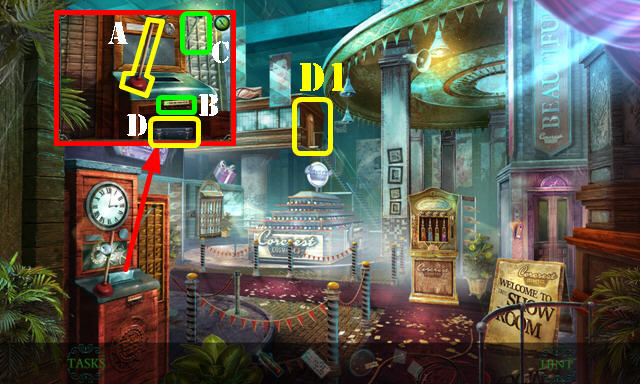
- Play the HOP (A) to get the PUZZLE BOX.
- Place the GOLDEN SPADE on the PUZZLE BOX; take the CYLINDER (inventory).
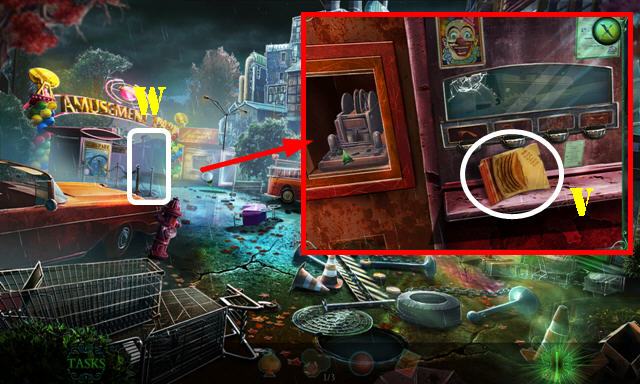
- Take the SUN EMBLEM (B).
- Take the COTTON CANDY (C). Place the CASH REGISTER HANDLE and COUPON CODE (D).
- Enter 35488 (E); take the MOON EMBLEM (F).
- Remove the article (G).
- Walk down.
- Place the MOON EMBLEM and SUM EMBLEM to activate a HOP (H); play it to get the GAME COURT TOKEN.
- Walk down.
- Place the GAME COURT TOKEN (I); take the GAME COURT TICKET (J).
- Return to the Fairground.
- Place the GAME COURT TICKET (K); enter the Game Court.
- Take the STILTS (L) and FLAG 1/2 (M).
- Move the items; go to the Carousel (N).
- Talk to the fireman (O).
- Take the PEANUT (P); read the note (Q). Use the SCISSORS (R). Open the coin purse and take the TRIGGER (S).
- Walk down.
- Give the PEANUT; take the CAKE SERVER (T).
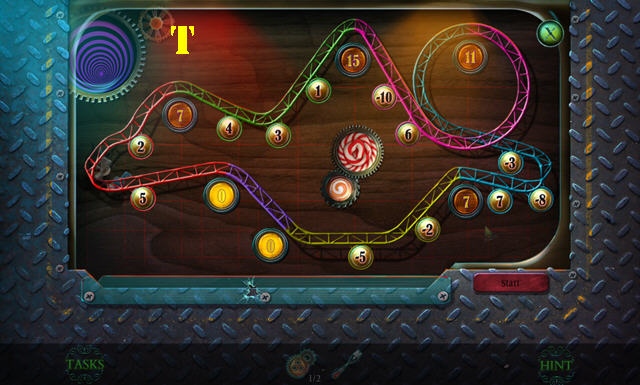
- Place the CYLINDER and TRIGGER for a puzzle (U).
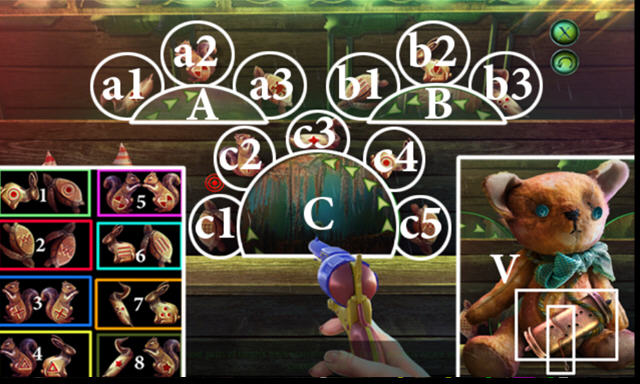
- Shoot at the wheel (B) once (x1), then shoot the fifth pair (5) on positions (a1, c5) and the eighth pair (8) on (b2, c2). Continue in this manner as follows:
- Bx1, (1), (b1,c2); Bx1, (4), (a3, c5); Bx1, (2), (a3, c1); Bx1, (6), (a3, b3); Bx2, (3), (b2, c3); Cx4, (7), (a1, b3).
- Take the CABLE CONNECTOR and MUSIC CYLINDER (V).
- Walk down.
- Place the MUSIC CYLINDER; take the PINBALL BALL (W).
- Return to the Carousel.
- Place the CABLE CONNECTOR (X) to activate a HOP; play it to get the PARTS OF FIREMAN'S HELMET (Y).
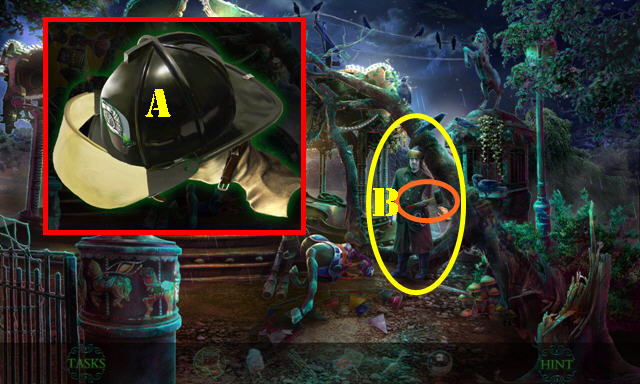
- Assemble the PARTS OF FIREMAN'S HELMET (inventory). Solution (A). Take the FIREMAN'S HELMET.
- Give the FIREMAN'S HELMET (B); talk to the fireman and take the RUBBER HAMMER (orange).
- Walk down.

- Place the RUBBER HAMMER; hit the targets in order (1-3); take the CLOWN WIG (C).
- Walk down.
- Place the CLOWN WIG (D); take the SNOWFLAKE EMBLEM 1/2 (E).
- Go to the Diner.

- Cut the cake with the CAKE SERVER; take the SNOWFLAKE EMBLEM 2/2 (F).
- Place the 2 SNOWFLAKE EMBLEMS (G). Talk to the Fireman and take the ROPE (H).
- Walk down.
- Use the ROPE (I). Open the gate and go forward.
Chapter 4 : Roller Coaster
- Take the GEAR 1/2 (J).
- Read the note (K).
- Take the JUICE KEG (L).
- Go to the Roller Coaster Entry (L1).

- Talk to the fireman to get the TOWER KEY 2/3 (M).
- Take the CLOWN'S FLOWER (N).
- Open the cover (O); put the COTTON CANDY in and take the POKER CHIP 1/2.
- Place the STILTS (P); take the LUNCH FRIDGE CODE (Q).
- Walk down twice.
- Place the CLOWN'S FLOWER (R); take the FLAG 2/2 (S).
- Go to the Game Court.
- Place the JUICE KEG (T); take the TIE (U).
- Go to the Carousel.
- Use the TIE; take the MAGICIAN'S WAND and DIORAMA PART (V).
- Return to the Information Area.
- Place the 2 FLAGS to get the DOLL HEAD (W). Take the SPRING (X).
- Place the MAGICIAN'S WAND on the DOLL HEAD to get the IMPROVISED HANDLE (inventory).
- Return to the Diner.
- Place the PINBALL BALL and the SPRING to activate a puzzle (Y).
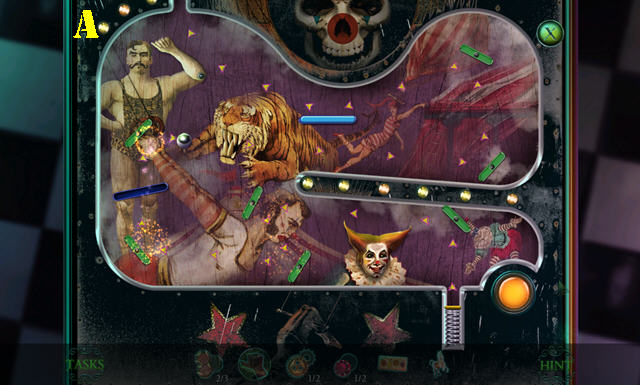
- Solution 1 (A).
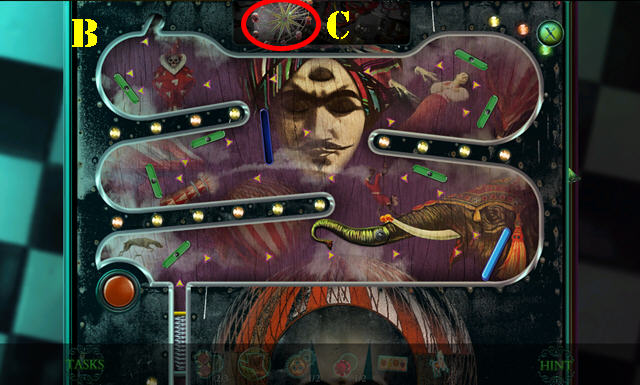
- Solution 2 (B).
- Take the DIORAMA PART (C).
- Return to the Information Area.
- Place the 2 DIORAMA PARTS (D); take the GOLDEN CLUB (E).
- Place the GOLDEN CLUB on the PUZZLE BOX; take the TOWER KEY 3/3 (inventory).
- Place the 3 TOWER KEYS for a puzzle. Solution (F). Flip the switch (G).
- Enter the Control Tower.
- Talk to Frank.
- Select the feather duster (H).
- Take the FRIDGE MAGNET (I).
- Place the LUNCH FRIDGE CODE for a puzzle (J).
- Solution 1-4.
- Open the fridge; take the FORK and BOTTLE OF WATER (K).
- Place the IMPROVISED HANDLE and pull it (L).
- Walk down.
- Place the FRIDGE MAGNET (M) to activate a HOP; play it to get the BLANKET.
- Return to the Control Tower.
- Place the BLANKET (N).
- Give the BOTTLE OF WATER to Jake (O). Talk to him.
- Take the GOLDEN DIAMOND (P).
- Place the GOLDEN DIAMOND on the PUZZLE BOX; take the POKER CHIP 2/2 (inventory).
- Place the 2 POKER CHIPS (Q); take the CARRIAGE FIGURE (R).
- Return to the Roller Coaster Entry.
- Place the CARRIAGE FIGURE for a puzzle (S).
- Solution (T).
- Talk to the fireman. Take the RADIO (U).
- Return to the Street.
- Talk to the 2 firemen.
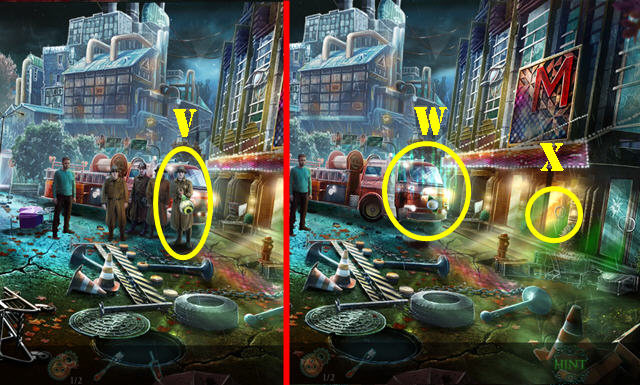
- Give the RADIO (V). Talk to Jake.
- Play the HOP (W) to receive the GAS MASK.
- Talk to Jake.
- Place the GAS MASK (X).
- Talk to Janet.
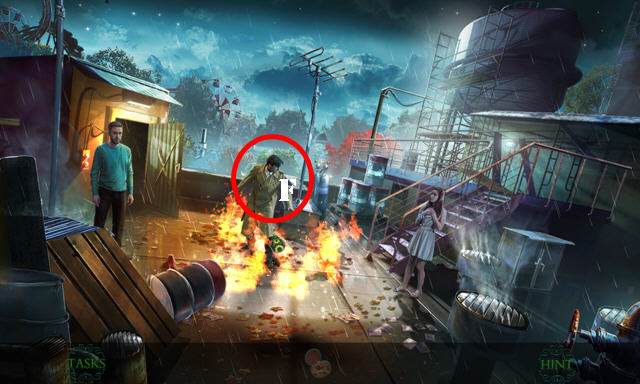
- Pull the curtain; take the DANCER FIGURINE 1/2 (A).
- Take the TRASH GRABBER and touch the camera (B).
- Remove the cover; take the REPAIR TOOL (C).
- Go to the Cinema Entrance (D).
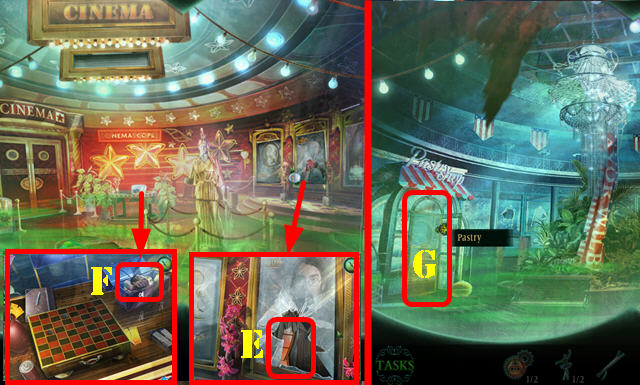
- Take the MARBLE MOVIE REEL 1/2 (E).
- Use the FORK; take the CUPCAKE EMBLEM (F).
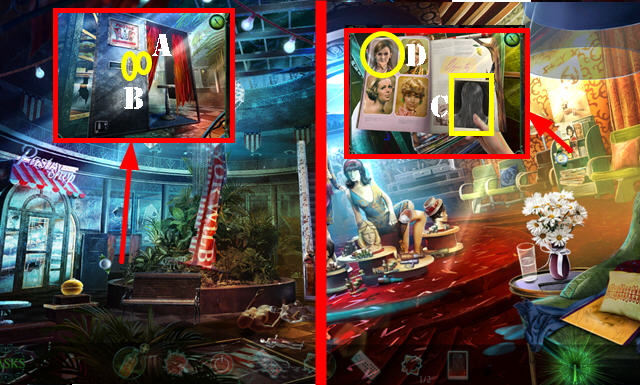
- Walk down and enter the Pastry Shop (G).
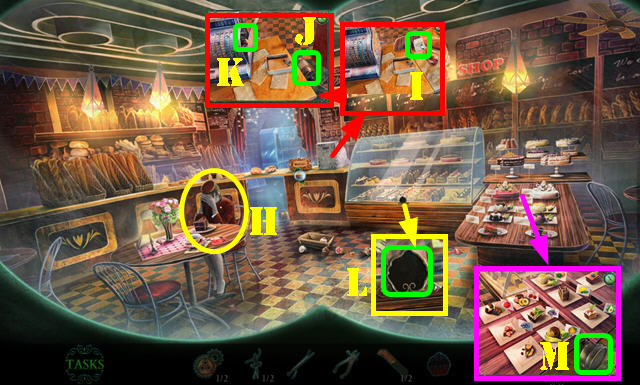
- Talk to the lady (H).
- Read the note (I); move the items and take the COOLANT (J).
- Use the REPAIR TOOL; take the GEAR BELT (K).
- Place the CUPCAKE EMBLEM (L) to activate a HOP; play it to get the PASTRY WHEEL.
- Take the SIEVE (M).
- Go to the Cinema Entrance.
Chapter 5: Cinema
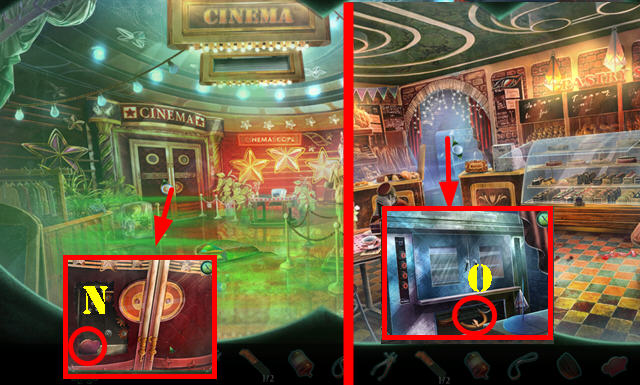
- Use the PASTRY WHEEL; take the BAKER HAT EMBLEM (N).
- Return to the Pastry Shop.
- Place the BAKER HAT EMBLEM; take the HOSE (O).
- Walk down.
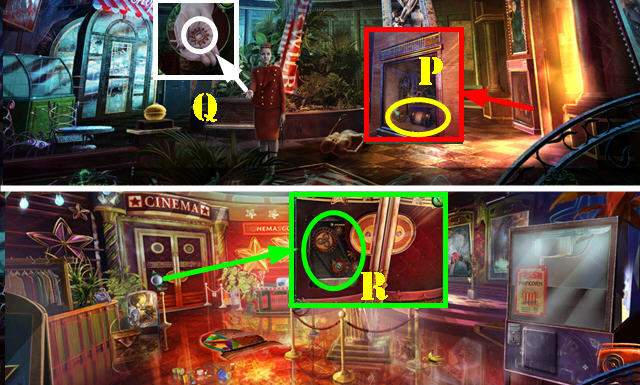
- Place the COOLANT and HOSE (P).
- Talk to the lady and take the GEAR 2/2 (Q).
- Go to the Cinema Entrance.
- Place the 2 GEARS and GEAR BELT (R).
- Enter the Projection Hall.
- Take the MARBLE MOVIE REEL 2/2 (S). Move the boards; take the CAR COIN with the REPAIR TOOL (T).
- Play the HOP to get the FIRE EXTINGUISHER.
- Walk down.
- Place the 2 MARBLE MOVIE REELS for a puzzle (U).
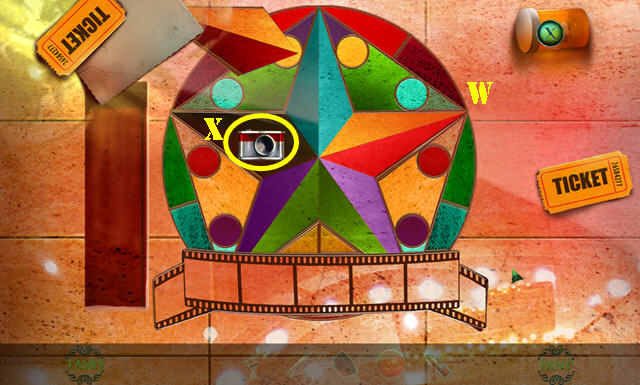
- Solution (W).
- Take the CAMERA FIGURE (X).
- Walk down.
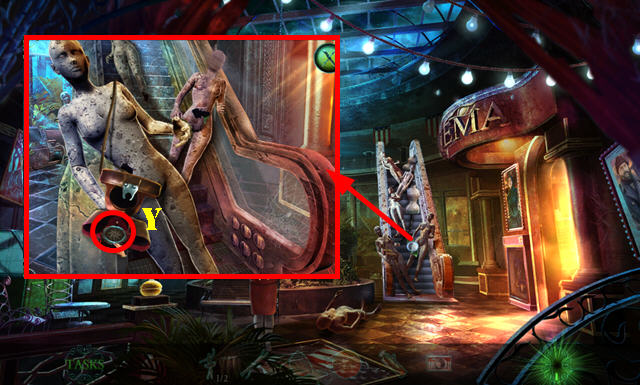
- Place the CAMERA FIGURE; take the CAMERA IRIS (Y).
- Return to the Projection Hall.
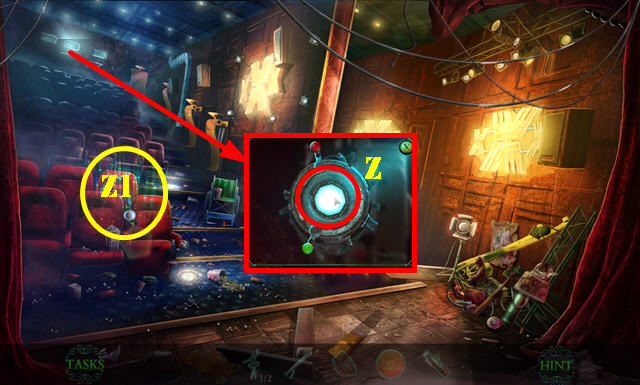
- Place the CAMERA IRIS and rotate it (Z).
- Talk to Janet.
- Play the HOP to receive the DIODES (Z1).
- Return to the Atrium.

- Talk to the lady.
- Place the DIODES (A).
- Go to the Second Floor (B).
- Take the HAND DRILL (C).
- Insert the CAR COIN (D); take the CHECKER PIECE (E).
- Look at the note (F); take the VINEGAR (G).
- Enter the Book and Record Store.
- Talk to Jerry.
- Take the DANCER FIGURE 2/2 (H) and SEEDS (I).
- Use the HAND DRILL; take the CANDY MACHINE BUTTON (J).
- Walk down and enter the Hairdresser.
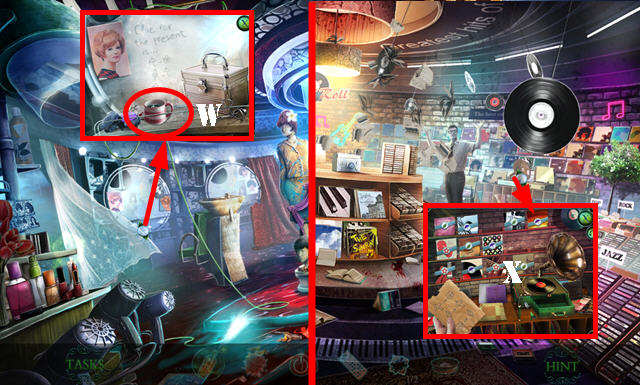
- Play the HOP (K) to get the EMPTY MUG.
- Take the WET TOWEL (L) and DOLLAR BILL (M).
- Place the EMPTY MUG to get the MUG WITH WATER (N).
- Take FRANK'S PUNCH CARD (O).
- Open the magazine (P).
- Return to the Cinema Entrance.
- Insert the DOLLAR BILL (Q); take the POPCORN BOX (R).
- Put down the CHECKER PIECE; take the BOOKSHELF LOCK PART 1/2 (S).
- Return to the Pastry Shop.
- Place the 2 DANCER FIGURINES (T) and touch it, then press 3-1-2 on the buttons (U).
- Place the MUG WITH WATER (V). Use the WET TOWEL on the handles; take the MUG WITH HOT WATER.
- Return to the Hairdresser.
- Use the MUG WITH HOT WATER (W) to get the RECORD PATTERN.
- Return to the Book and Record Store.
- Place the RECORD PATTERN for a puzzle (X).
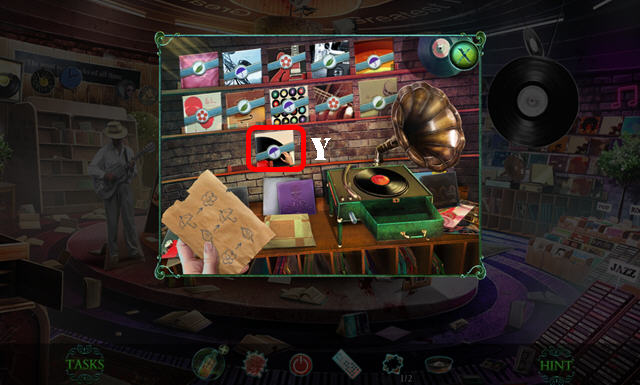
- Solution. Take the RECORD COVER (Y).
- Look at the note and then take the CAMERA FILM from the RECORD COVER (inventory).
- Return to the Atrium.
- Place the CAMERA FILM (A), press the button (B) to get the PHOTOGRAPH OF HAIRSTYLE.
- Return to the Hairdresser.
- Place the PHOTOGRAPH OF HAIRSTYLE (C). Flip pages twice and take the PHOTOGRAPH OF FACE (D).
- Return to the Book and Record Store.
- Give Jerry the PHOTOGRAPH OF FACE (E) and talk to him.
- Play the HOP (F) to get the LETTER OPENER.
- Return to the Hairdresser.
- Use the LETTER OPENER; take the SPRAY NOZZLE (G).
- Use the SIEVE on the POPCORN BOX to get the SALT. Use the SALT on the VINEGAR; place the SPRAY NOZZLE to get the VINEGAR AND SALT SPRAY (inventory).
- Walk down.
- Use the VINEGAR AND SALT SPRAY (H).
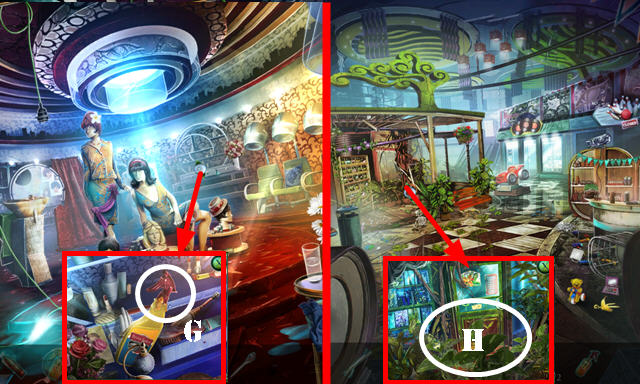
- Enter the Flower Shop.
- Talk to the lady.
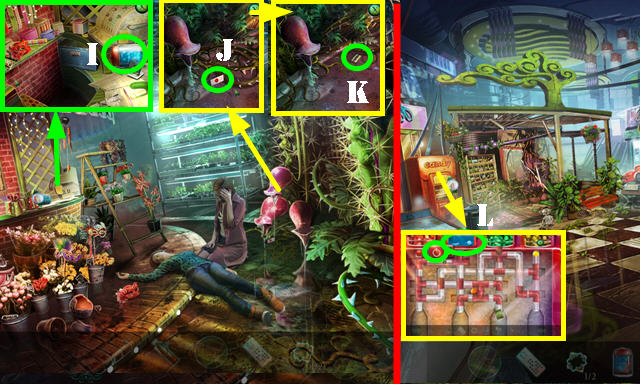
- Take the CANDY REFILLS (I).
- Take the CAKE TAG (J).
- Use the TRASH GRABBER 3x; take the AUDIO CASSETTE (K).
- Walk down.
- Place the CANDY MACHINE BUTTON and the CANDY REFILLS (L) to activate a puzzle.
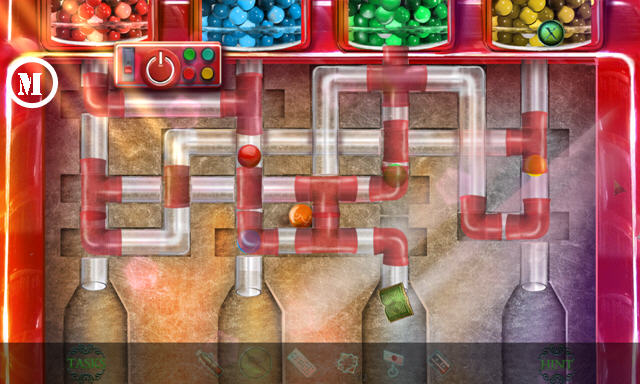
- Solution (M). Take the BOOKSHELF LOCK PART 2/2.
- Return to the Book and Record Store.
- Place the 2 BOOKSHELF LOCK PARTS; touch the books; take the CIGAR BOX LOCK and DRILL BIT (N).
- Place the DRILL BIT on the HAND DRILL to get the WORKING HAND DRILL (inventory).
- Return to the Flower shop.
- Use the WORKING HAND DRILL (O). Move the ladder (P) and zoom in (Q) for a puzzle.
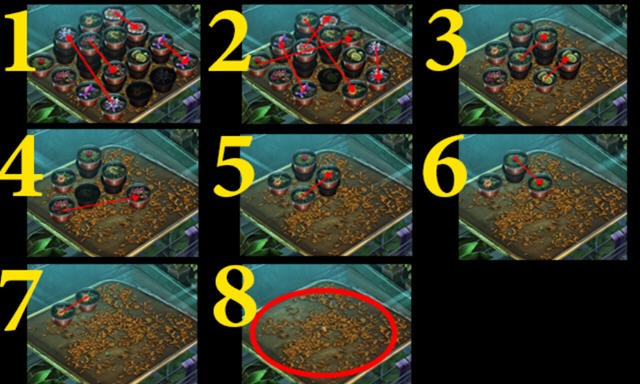
- Solution (1-7). Take the SEEDS.
- Return to the Pastry Shop.
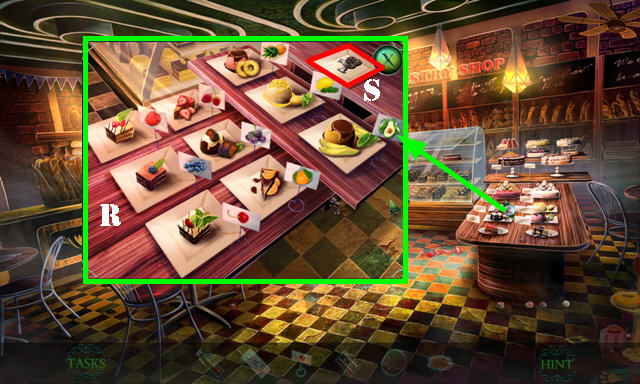
- Place the CAKE TAG for a puzzle. Solution (R). Take the PROJECTOR LOCK (S).
- Return to the Projection Hall.
- Place the PROJECTOR LOCK; take the PINECONE 1/2 and BATTERY (T).
- Return to the Book and Record Store.
- Place the AUDIO CASSETTE and BATTERY to get the SAFE CODE (U).
- Return to the Flower Shop.
- Place the SAFE CODE and touch. Enter 625 (V). Take the DIAMOND LOCK (V1).
- Return to the Hairdresser.
- Place the DIAMOND LOCK; take the PESTLE (W).
- Walk down.
- Place the 2 SEEDS; use the PESTLE and take the PUNGENT REMEDY (X).
- Return to the Flower shop.
- Give the PUNGENT REMEDY (Y).
- Talk to the 2 girls.
- Take the PLIERS (Z).
- Return to the Street.
- Talk to Jake.
- Use the PLIERS (Z1).
- Go forward.
Chapter 6: Corcrest Cosmetics
- Take the PLUNGER (A).
- Insert FRANK'S PUNCH CARD (B). Pull the lever (C) and take the SANITARY KIT (D).
- Go to the Manager's Office (D1).
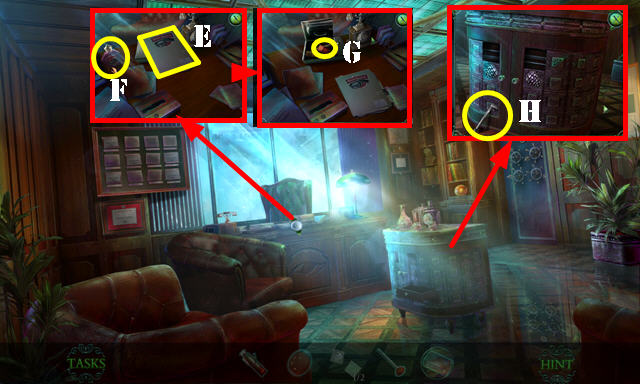
- Zoom into the desk for a message. Look at the file (E).
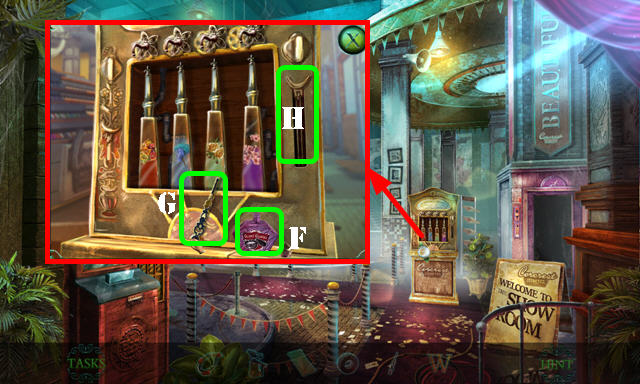
- Take the PERFUME VIAL (F).
- Place the CIGAR BOX LOCK; take the SLIDER (G).
- Take the SHUTTER HANDLE (H).
- Walk down.
- Place the SHUTTER HANDLE for a HOP (I); play it to get the SANITARY KIT HANDLE.
- Place the SANITARY KIT HANDLE on the SANITARY KIT; take the MEDICAL PATCH and CUTTER (inventory).
- Use the FIRE EXTINGUISHER; connect the wires and place the MEDICAL PATCH on it (J).
- Enter the Elevator.
- Talk to Aimee.
- Take the PINECONE 2/2 (K), MEDALLION (L), and AIMEE'S SCARF (M).
- Use the CUTTER on the MEDALLION. Open the note and take the KEY (inventory).
- Return to the Manager's Office.
- Place the 2 PINECONES; take the ELEVATOR KEY (N).
- Return to the Elevator.
- Use the ELEVATOR KEY (O); push the button (P) and exit the elevator.
- Take the DUCT TAPE (Q).
- Use AIMEE'S SCARF (R).
- Place the SLIDER (S).
- Take the POWER CORD (T).
- Go to the Locker Room (U).
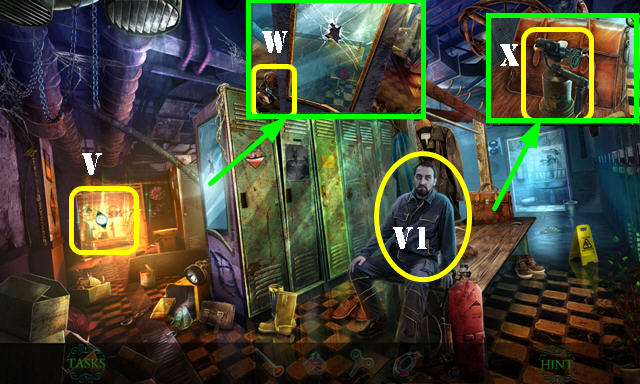
- Talk to the coworker (V1).
- Play the HOP (V) to get the SANITARY DISPENSER LOCK.
- Take the PRODUCTION LINE PART (W) and BLOWTORCH (X).
- Walk down.
- Place the SANITARY DISPENSER LOCK; take the NAPKIN (A).
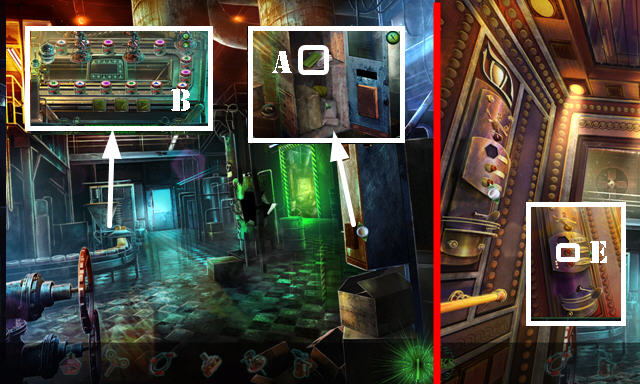
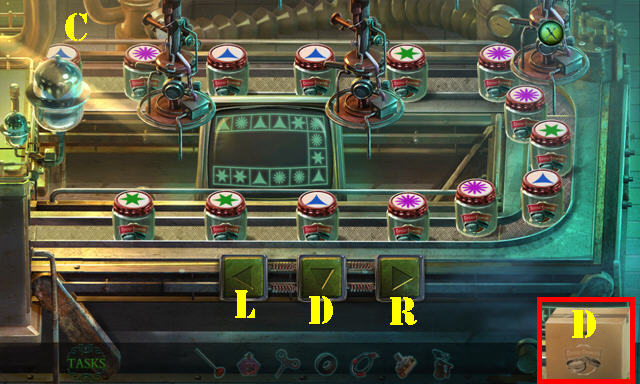
- Place the PRODUCTION LINE PART for a puzzle (B).
- Solution (C) is: left-down-right-down-down-left-down-left-left-down-down-right-right-right.
- Take the PRODUCT BOX (D).
- Open the PRODUCT BOX; take the ORNATE DIAL and GOLDEN W (inventory).
- Walk down; press the button (E) and exit.
- Place the PERFUME VIAL (F) and ORNATE DIAL (G).
- Pull the dial and slide the lever (H) to get the PERFUME.
- Use the NAPKIN on the PERFUME to get the SOAKED NAPKIN and the PERFUME back (inventory).
- Return to the Manager's Office.
- Use the SOAKED NAPKIN; open the drawer and take the ICE TONGS (I).
- Return to the Locker Room.
- Use the ICE TONGS; take the GOLDEN C and KEY CARD (J).
- Walk down.
- Use the KEY CARD (K). Enter the Storage.
- Take the BLUEPRINTS 1/2 (L).
- Walk down.
- Place the GOLDEN W and the GOLDEN C; take the BLUEPRINTS 2/2 (M).
- Return to the Locker Room.
- Give the 2 BLUEPRINTS to the coworker to receive the LOCKER KEY (N).
- Use the LOCKER KEY; take the BRAKE LEVER (O). Look at the note (P).
- Use the KEY; take the MUSIC BOX and LIGHTBULB (Q).
- Return to the Storage.
- Place the BRAKE LEVER (R) to activate a HOP.
- Play the HOP (S) to get the TURN HANDLE PARTS.
- Assemble the TURN HANDLE PARTS as shown (T) (inventory). Take the TURN HANDLE.
- Put the LIGHTBULB (U); touch the desk to reveal a puzzle (V).
- Return to the Manager's Office.
- Place the TURN HANDLE for a puzzle.
- Solution: 1-2-3.
- Enter the Model Room.
- Talk to Wilbur (W).
- Place the POWER CORD (X) and zoom in for a puzzle.

- Solution (Y).
- Play the HOP (A) to get the STOREROOM PUZZLE PART.
- Return to the Storage.
- Place the STOREROOM PUZZLE PART for a puzzle (B).
- Solution (1-15). Take the GLASS CUTTER and FOUNTAIN PEN.
- Return to the Locker Room.
- Use the FOUNTAIN PEN; take the CORCREST COSMETICS SYMBOL 1/2 (C).
- Return to the Model room.
- Place the PLUNGER and then the DUCT TAPE. Use the GLASS CUTTER and take the CORCREST COSMETICS SYMBOL 2/2 (D).
- Return to the Elevator.
- Place the 2 CORCREST COSMETICS SYMBOL (E) and press it. Exit to the Roof.
- Talk to Frank and Aimee.
- Use the PERFUME on Frank (F).
- Talk to Jake.
- Use the BLOWTORCH, then talk to Frank.
- Use the MUSIC BOX on Frank.
- Talk to Aimee.
- Congratulations, you have completed Phantasmat: The Endless Night.
Created at: 2015-02-08