

Walkthrough Menu
General Tips
- This is the official guide for Phantasmat: Town of Lost Hope.
- This guide will not show when you have to zoom into a location; the screenshots will show each zoom scene.
- Hidden-object puzzles are referred to as HOPs. This guide will not show screenshots of the HOPs, however, it will mention when an HOP is available and the inventory item you'll collect from it.
- Use the Map to fast travel to a location.
Chapter 1: Pam
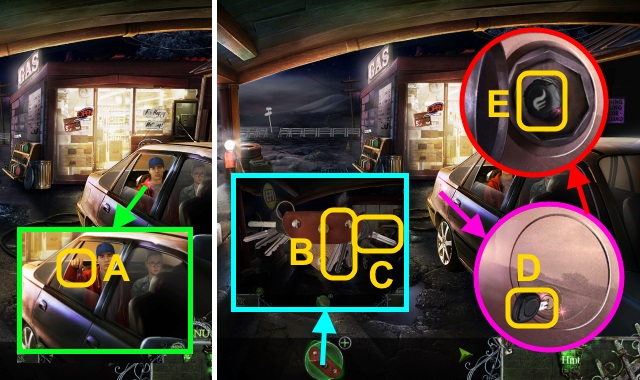
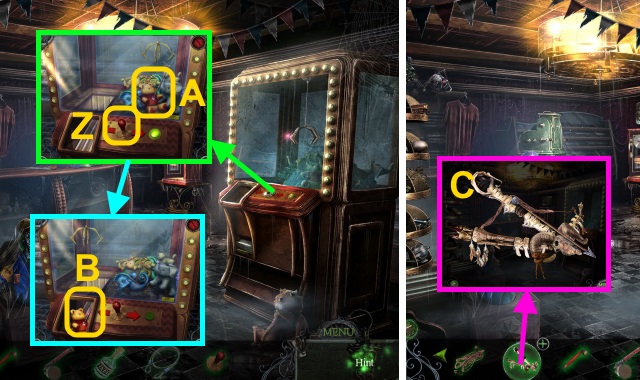
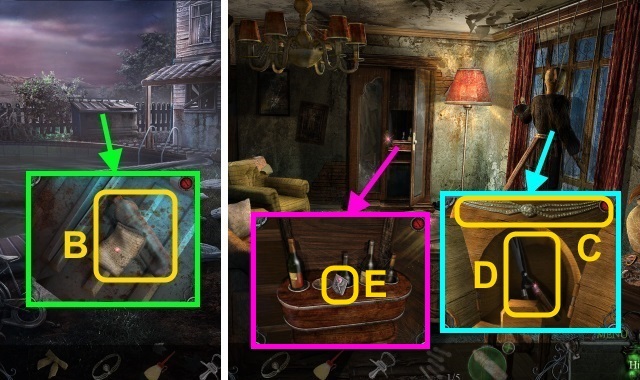
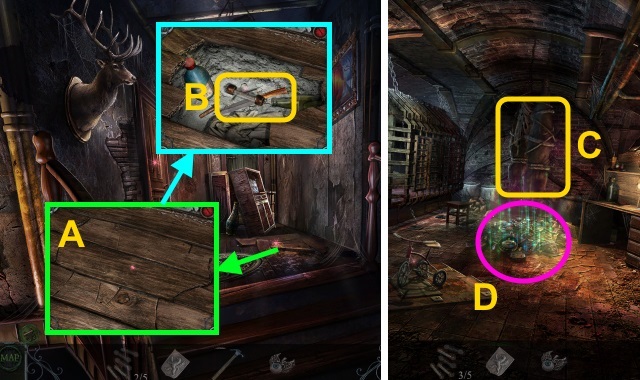
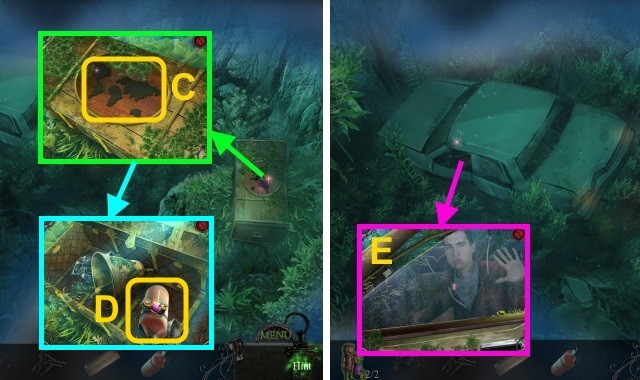
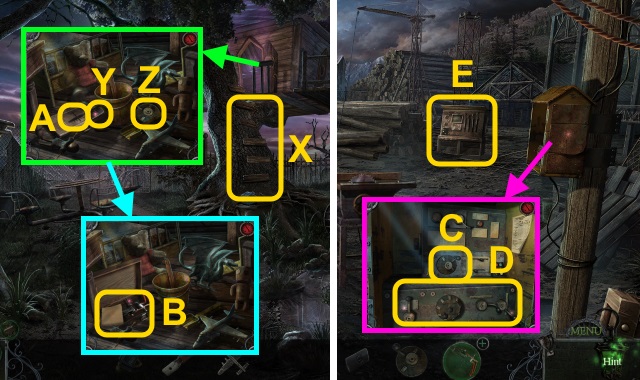
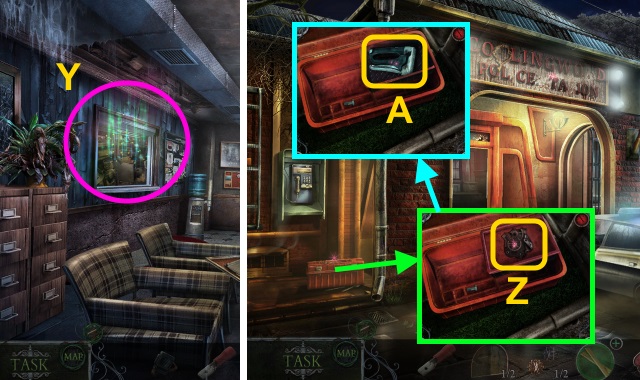
- Talk to Doug; take the KEY HOLDER (A).
- Open the KEY HOLDER; move the keys 3x (B). Take the CAR KEY (C).
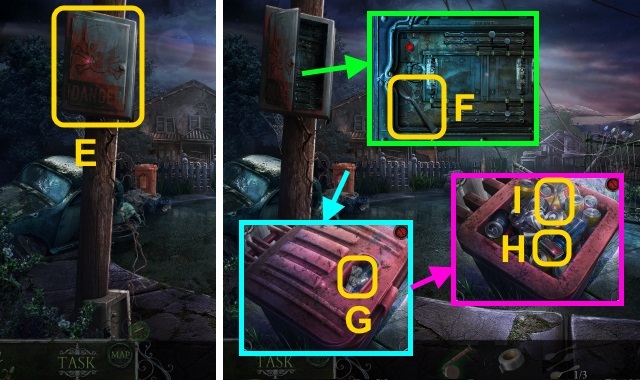
- Use the CAR KEY (D); take the GAS CAP (E).
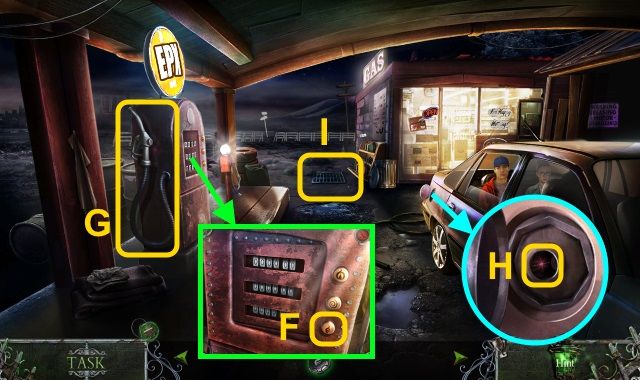
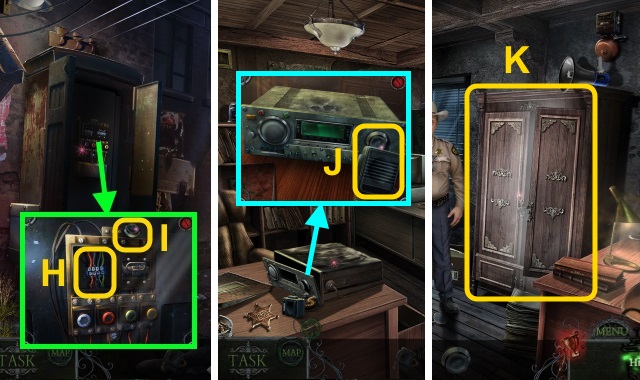
- Press the button (F).
- Examine the hose (G).
- Use the GAS CAP (H).
- Examine the grate (I).
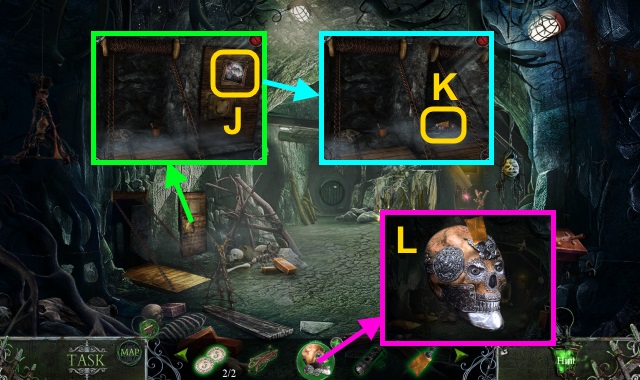
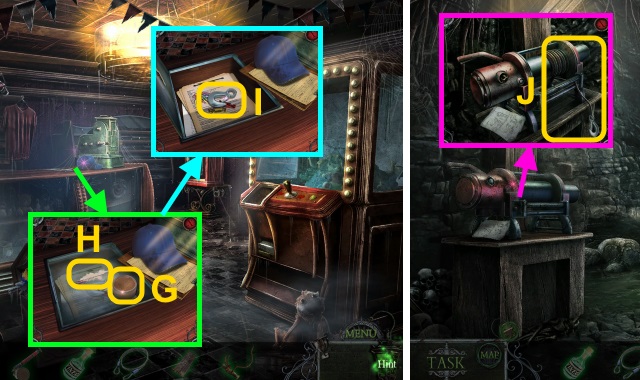
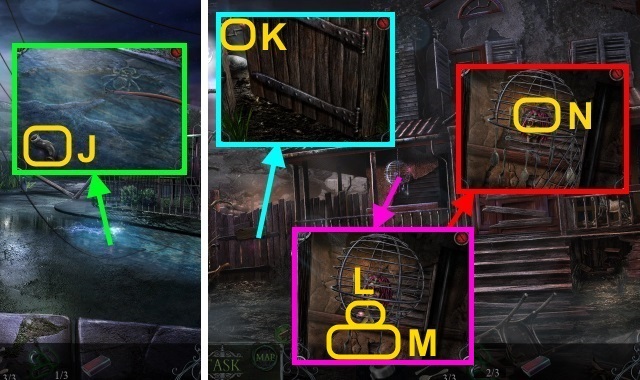
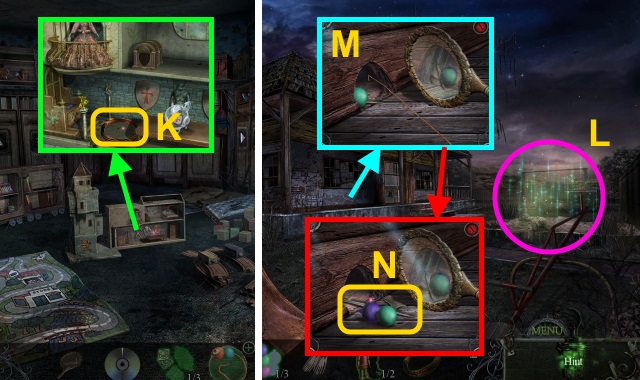
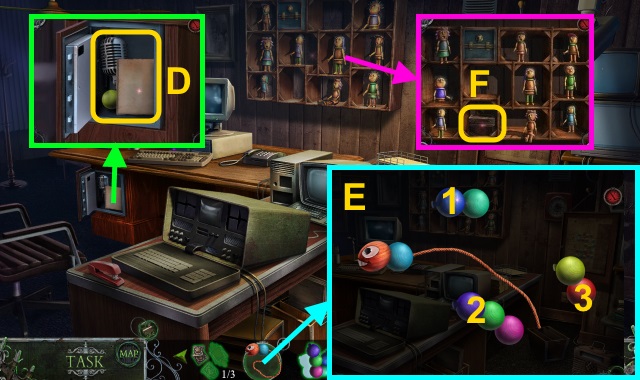
- Take the TOY TRAIN (J) and WOODEN SPARROW (K).
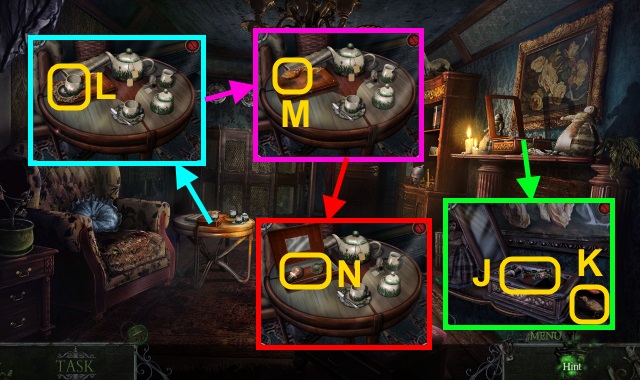
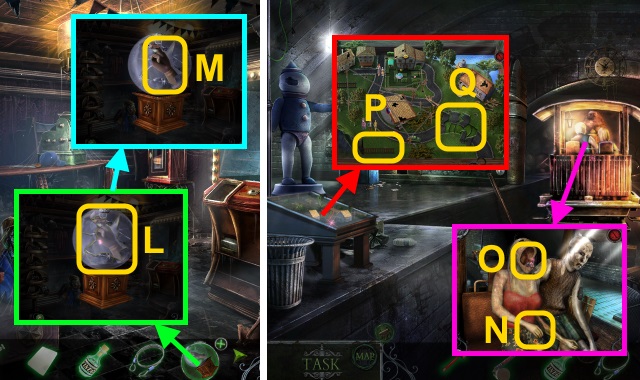
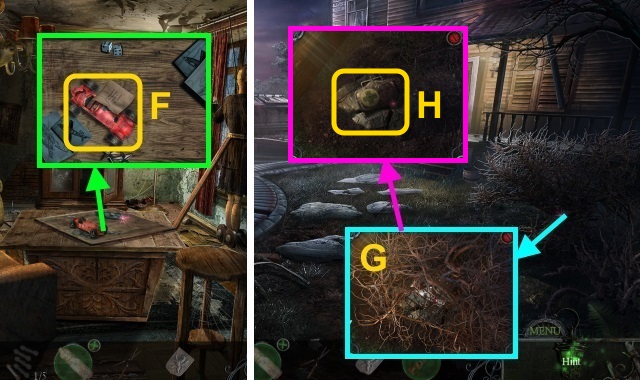
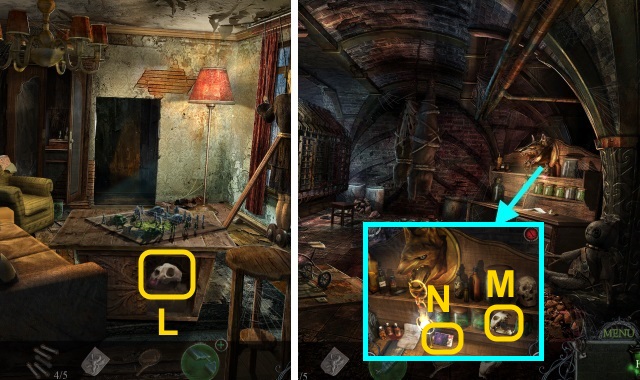
- Take the CUP; examine the portrait (L). Take the WOMAN'S PORTRAIT.
- Place the WOODEN SPARROW (M); open the box.
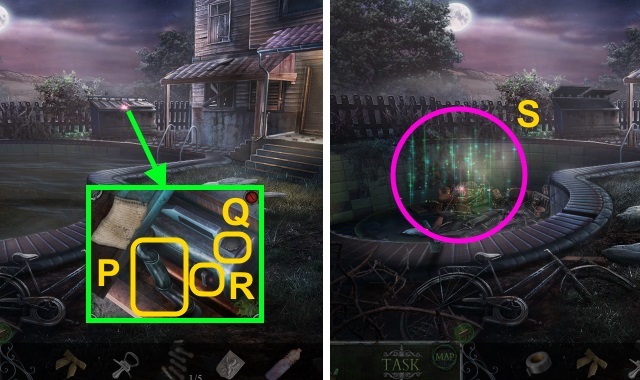
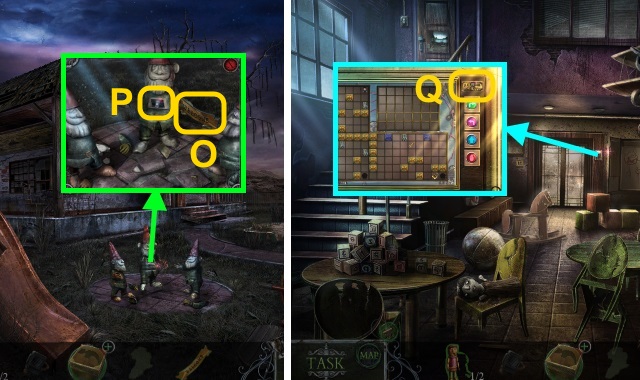
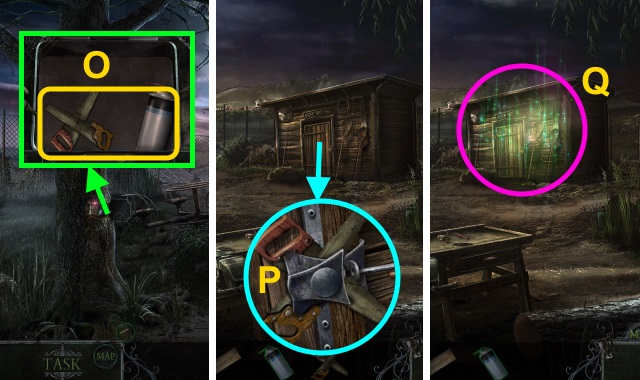
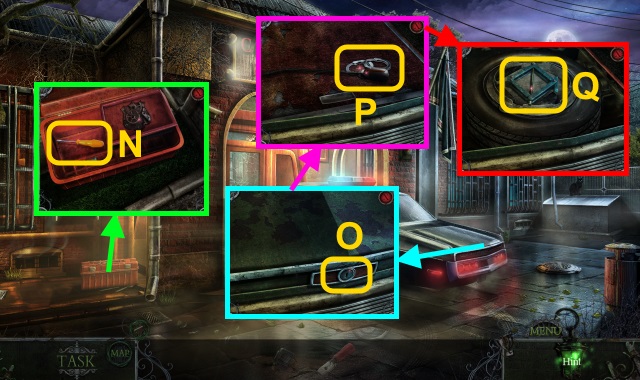
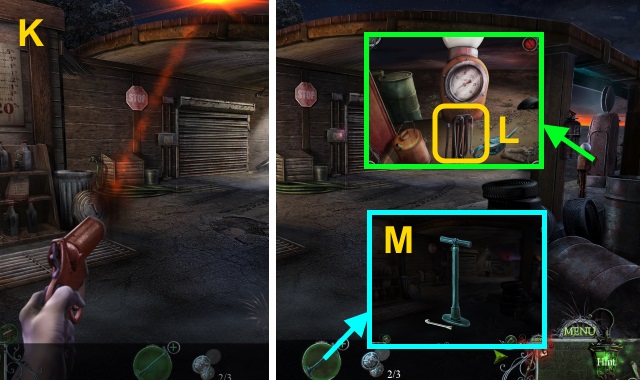
- Take the LIGHT BULB and LOCK TOKENS (1/4) (N).

- Place the LIGHT BULB (O).
- Move the screen; play the HOP (P).
- Receive the SEAM RIPPER.
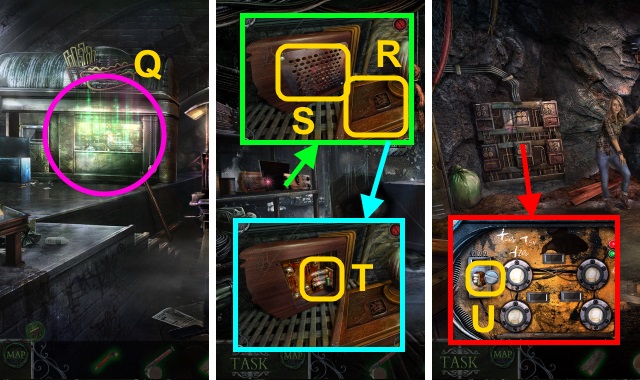
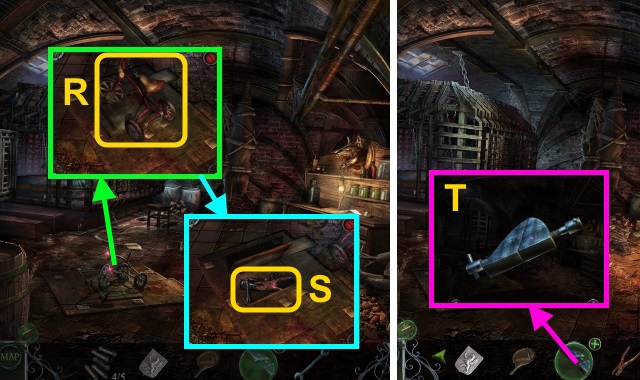
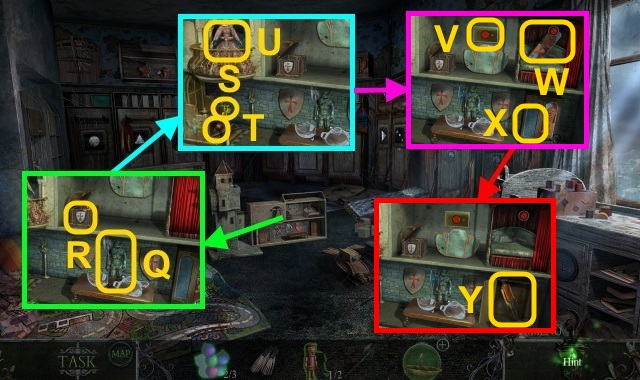
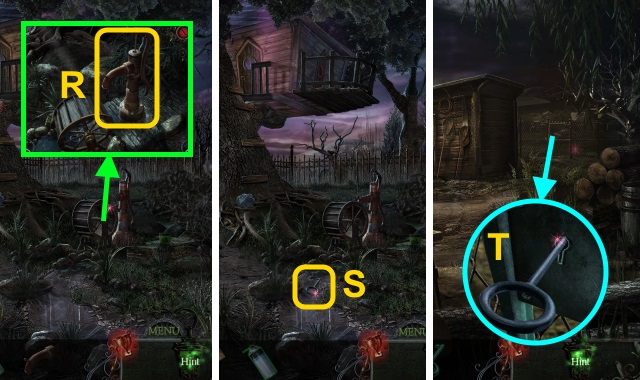
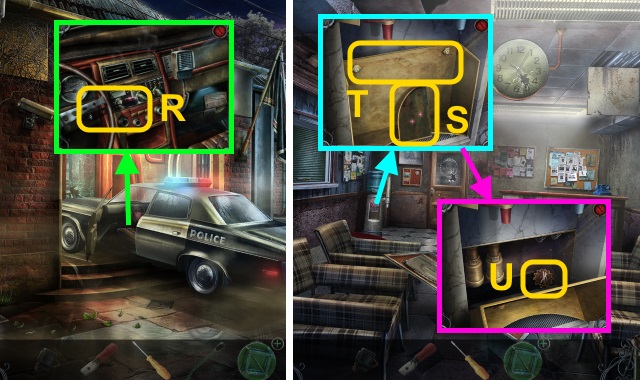
- Take the LOCK TOKENS (2/4) (Q) and MUSIC BOX TOP (R).
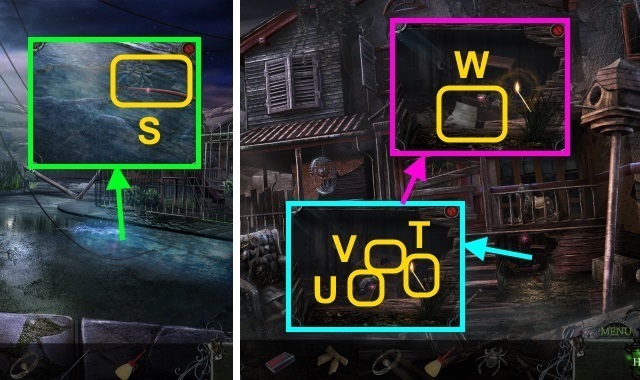
- Place the CUP; take the NICKEL (1/2) (S).
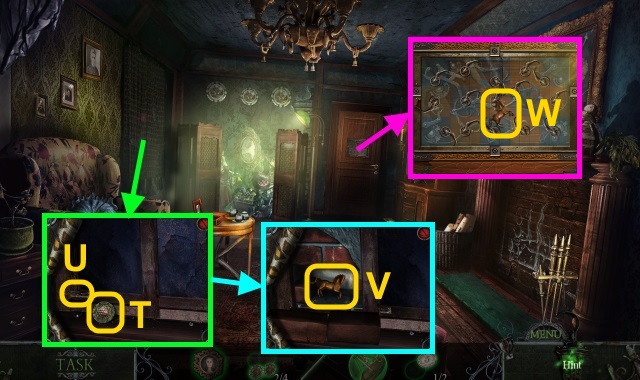
- Move the CURTAIN; take the LOCK TOKENS (3/4) (T).
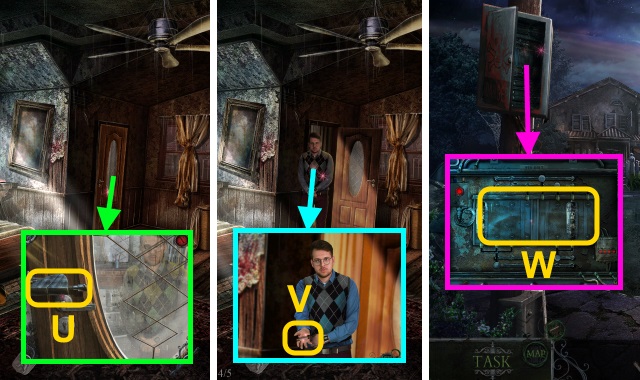
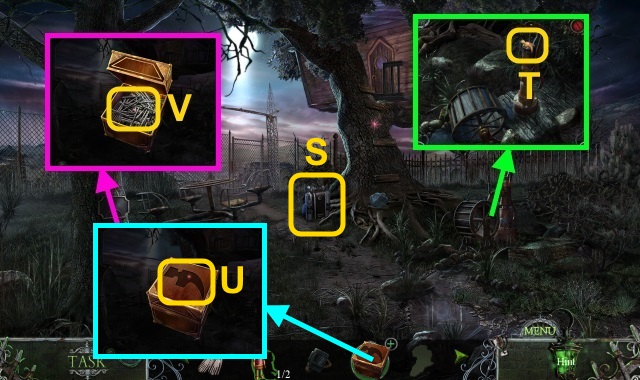
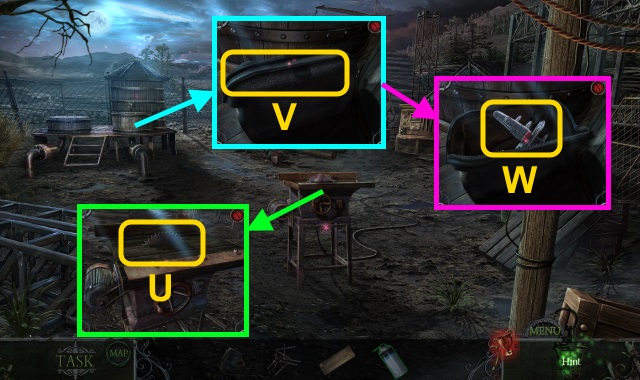
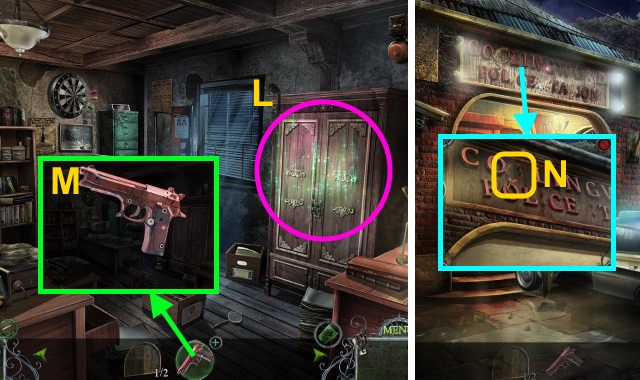
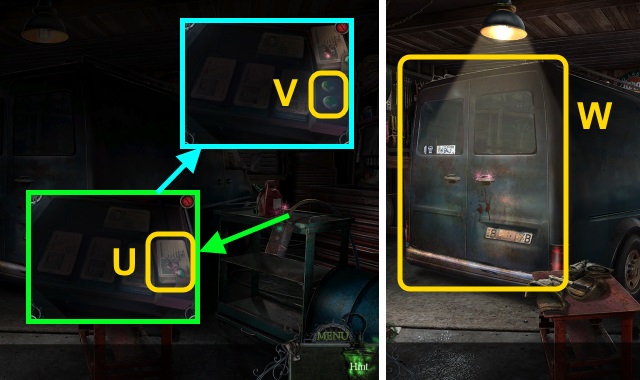
- Use the SEAM RIPPER (U).
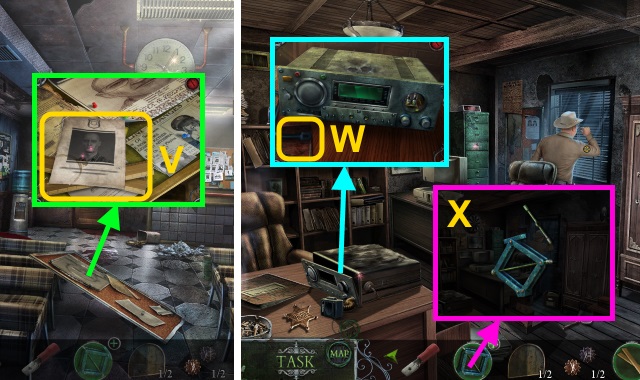
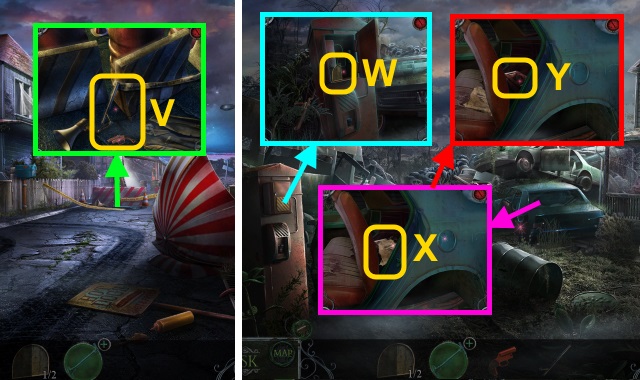
- Move the bricks; take the HORSE (1/2) (V).
- Take the HORSE (2/2) (W).
- Combine the MUSIC BOX TOP and HORSE (2/2) (X); receive the MUSIC BOX TOP.
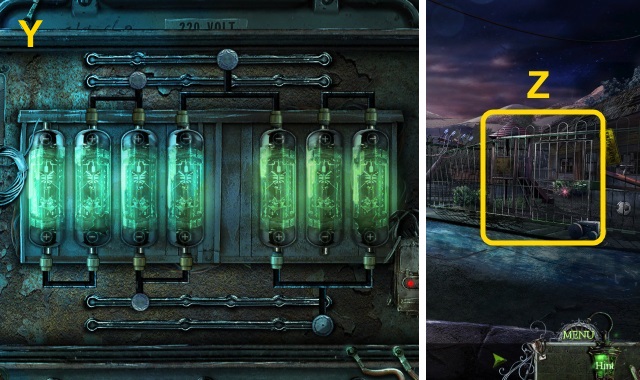
- Place the MUSIC BOX TOP (Y).
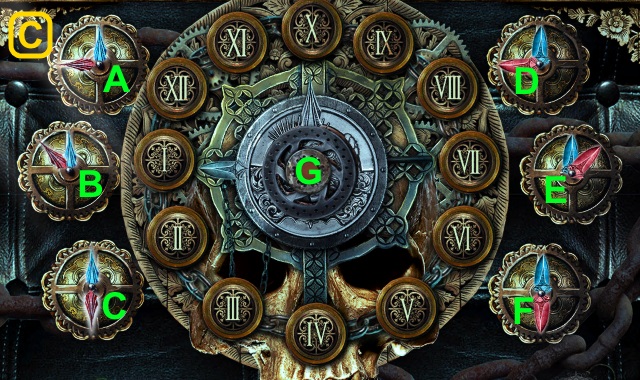
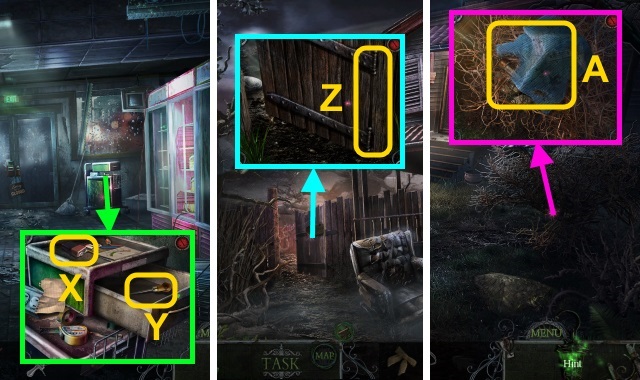
- Read the note; take the LOCK TOKENS (4/4) (Z).
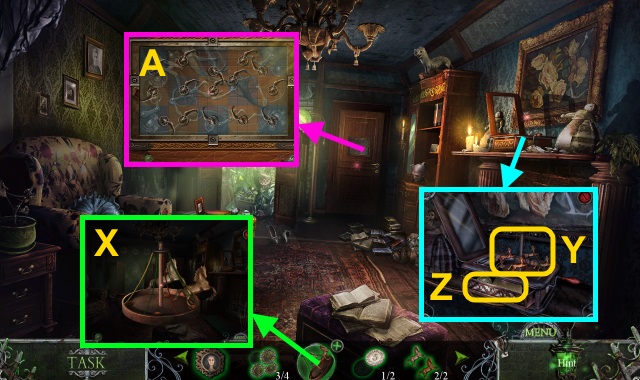
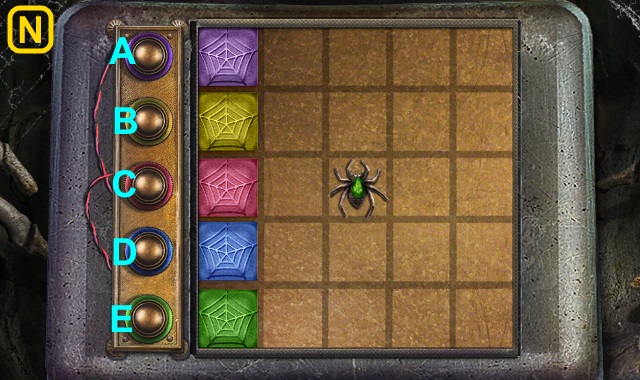
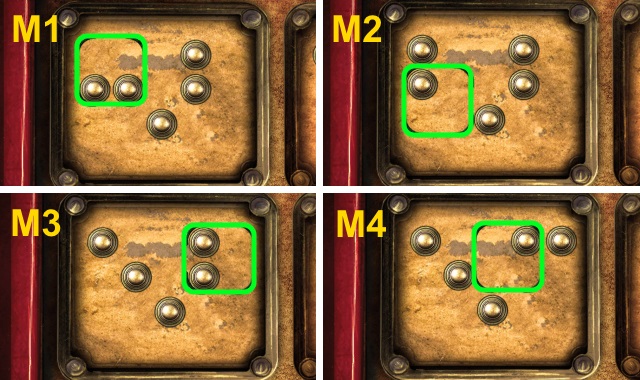
- Place the LOCK TOKENS (4/4) for a mini-game (A).
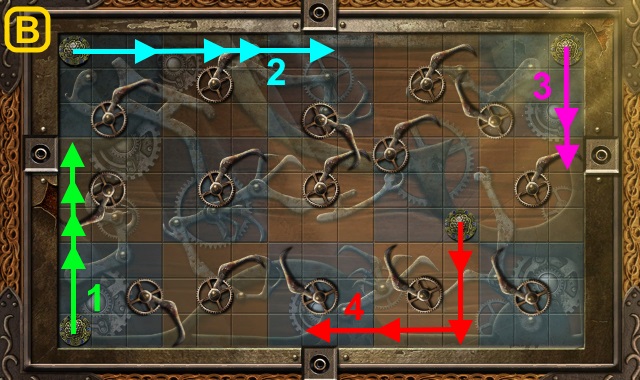
- Solution (B).
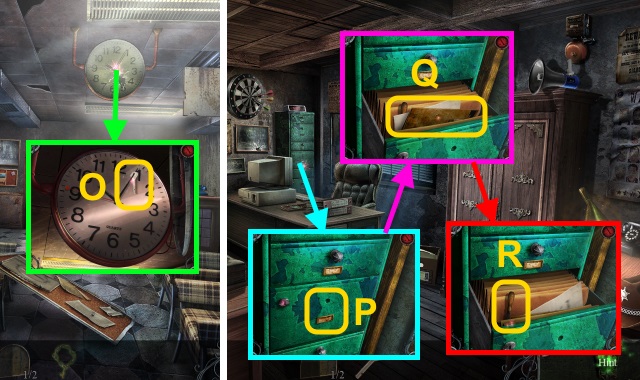
- Walk forward.
- Pull the switch (C).
- Place the PORTRAIT; turn it 2x (D).
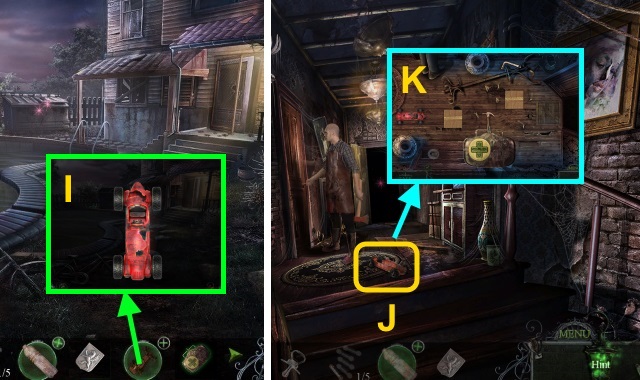
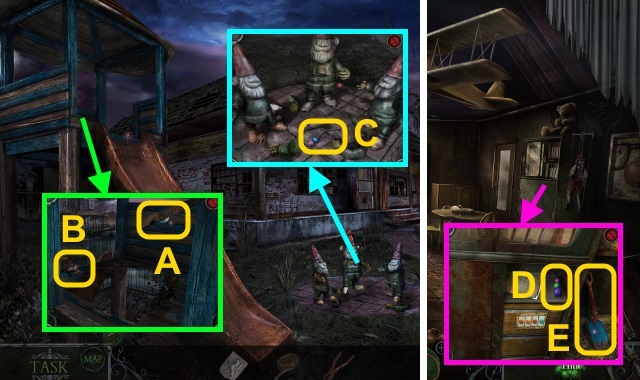
- Take the Map, NICKEL (2/2), and RUBBER BAND (E).
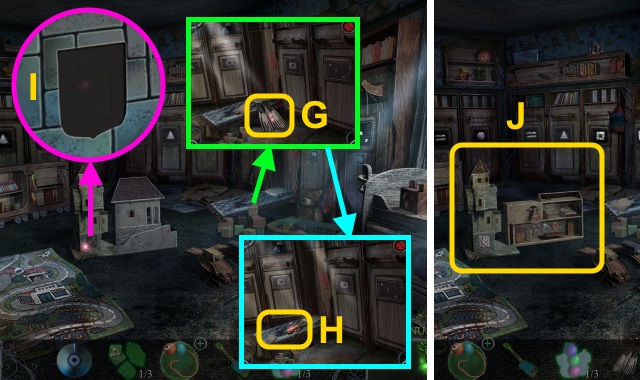
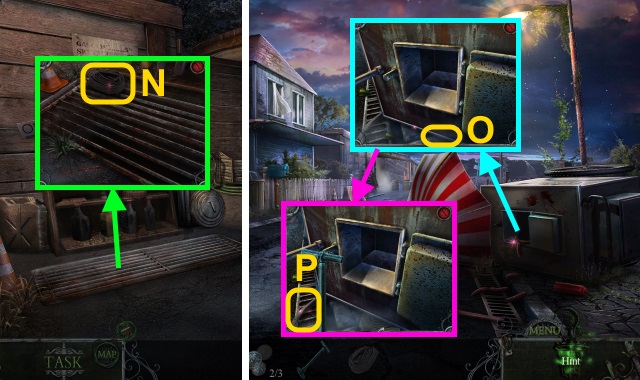
- Take the FLAP TILE (F).
- Walk left.
- Place the FLAP TILE (G); turn it.
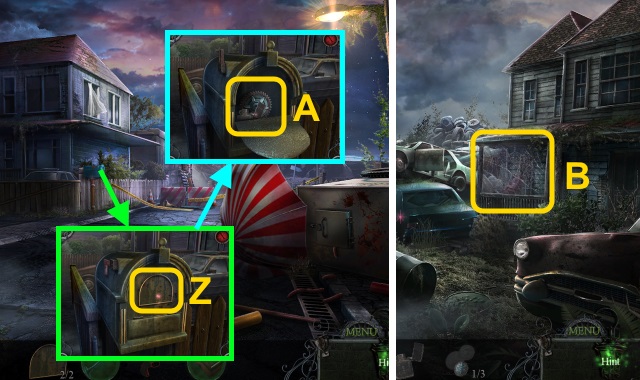
- Take the SILVER SKULL PARTS (H).
- Take the MAN'S PORTRAIT (I).
- Walk down.
- Place the MAN'S PORTRAIT; turn it 2x (J).
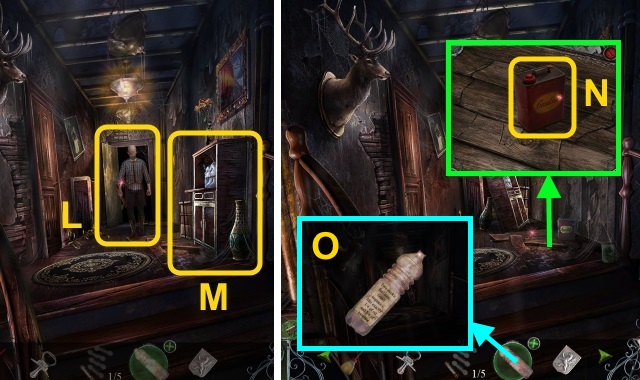
- Take the FLASHLIGHT and GLUE (K).
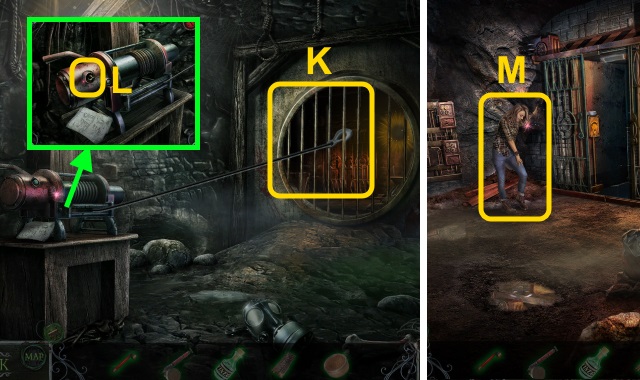
- Examine the SILVER SKULL PARTS. Place the parts; use the GLUE (L).
- Receive the SILVER SKULL.
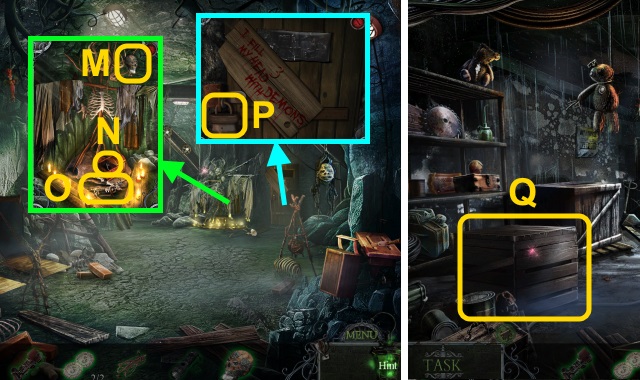
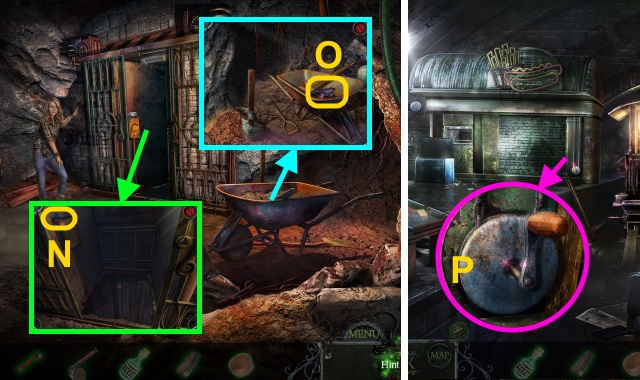
- Place the SILVER SKULL (M); take the STORAGE ROOM KEY (N) and CROSSBOW (O).
- Use the STORAGE ROOM KEY (P).
- Walk right.
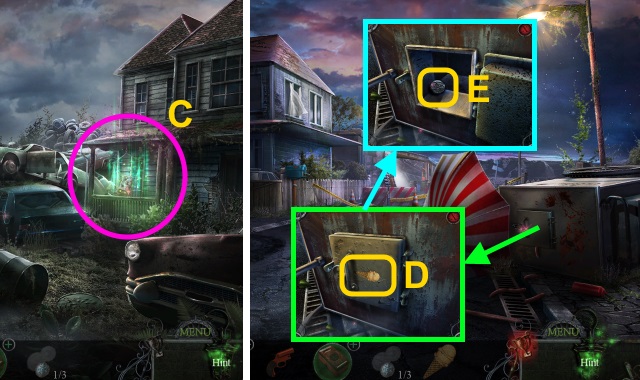
- Go Behind the Crate (Q).
- Go forward.
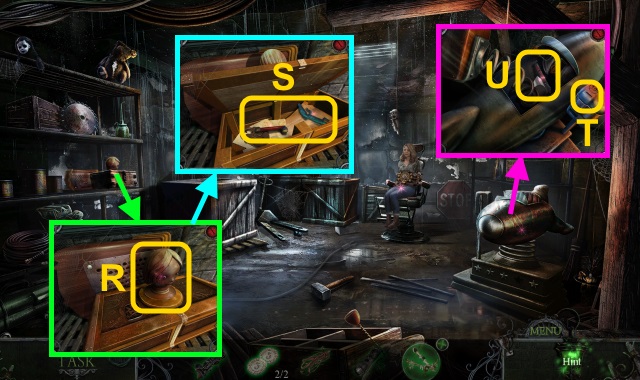
- Turn the head (R).
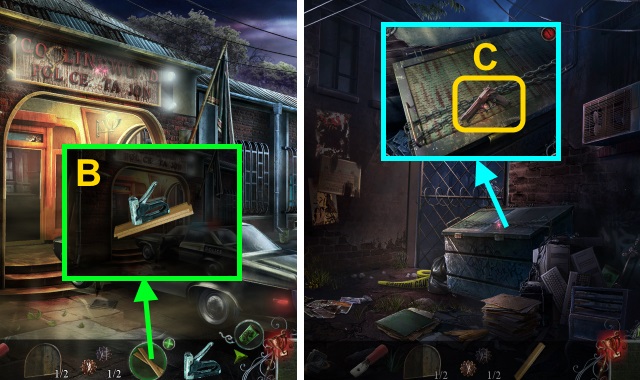
- Take the LEVER and ALLIGATOR HANDLE (S).
- Place the NICKEL (2/2) (T); take the BUG REPELLENT and TIN SHEET (U).
- Walk down, then left.
- Read the newspaper; place the ALLIGATOR HANDLE (V).
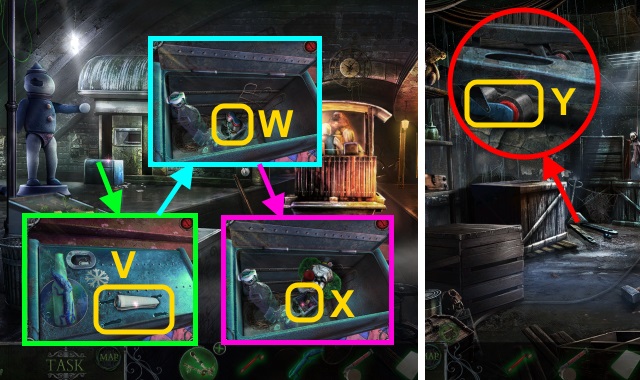
- Take the PALETTE JACK WHEEL (W).
- Take the VINEGAR (X).
- Walk down, then right.
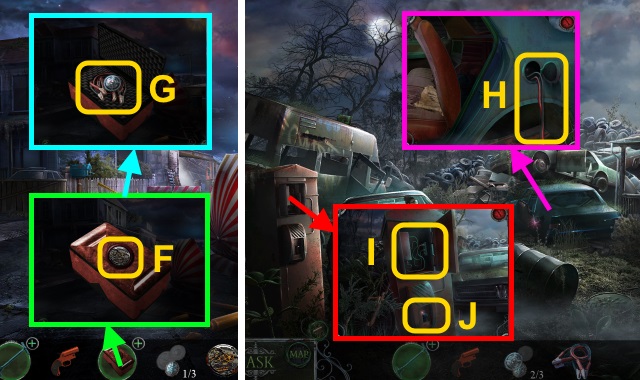
- Place the PALETTE JACK WHEEL (Y).

- Examine the forklift (Z).
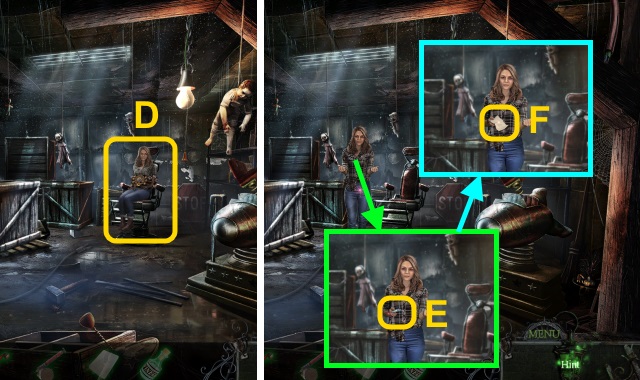
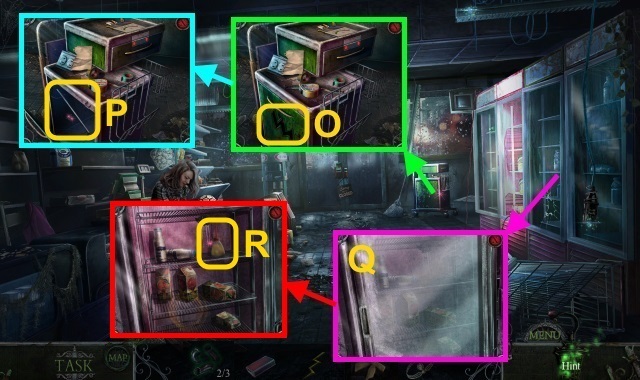
- Use the FLASHLIGHT; play the HOP (A).
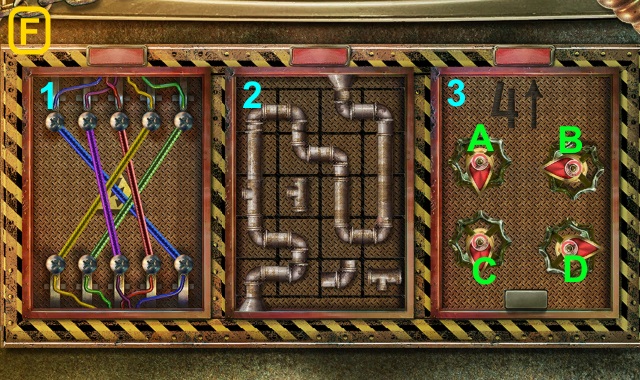
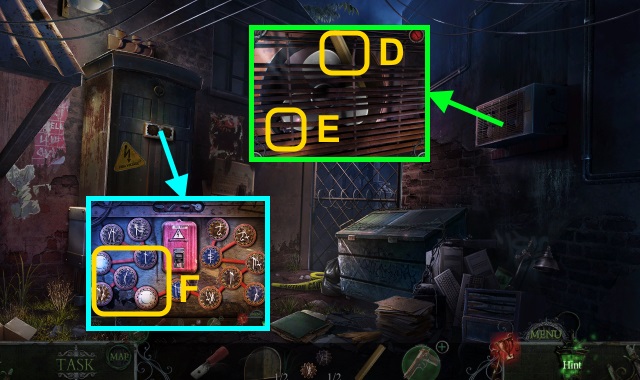
- Receive the MECHANISM SWITCH.
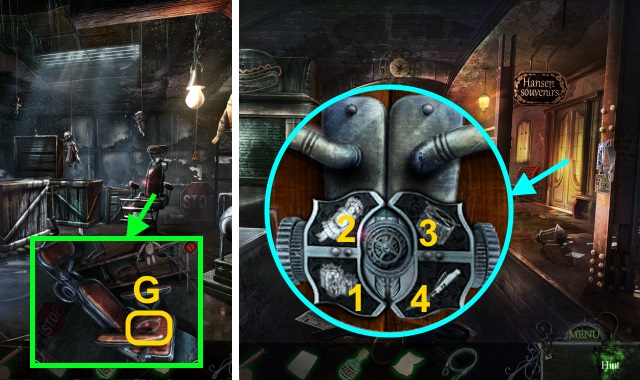
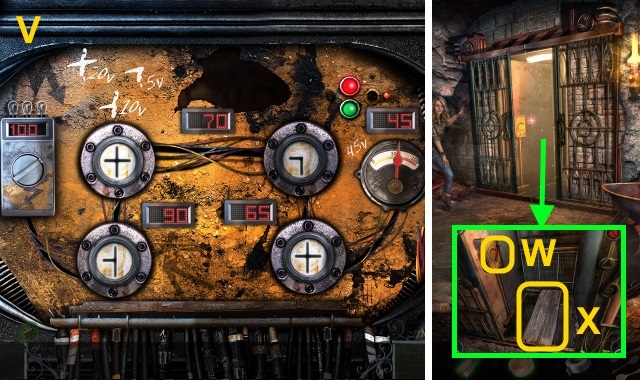
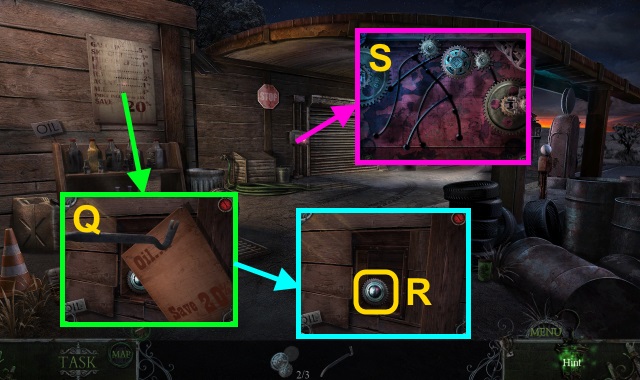
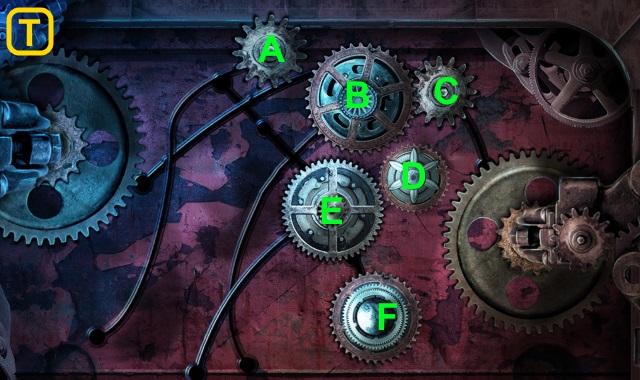
- Place the MECHANISM SWITCH for a mini-game (B).
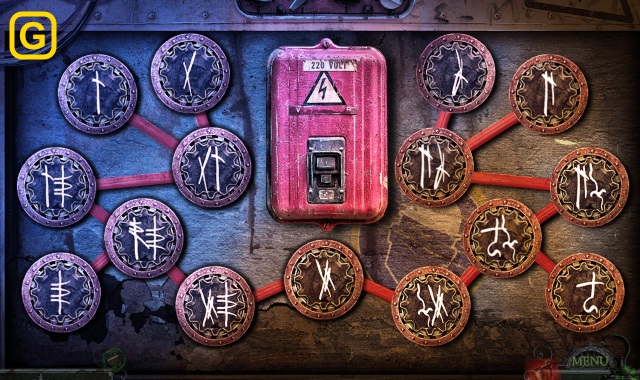
- Solution (C): C-B-A-G-Ax2-Dx2.
- G-E-D-F-A-B-G-B-E-G-F-C-G.
- Remove the lock (D).
- Talk to Pam; take the ID (E).
- Take the POEM (F).
- Take the STEEL CABLE (G).
- Walk down, then left.
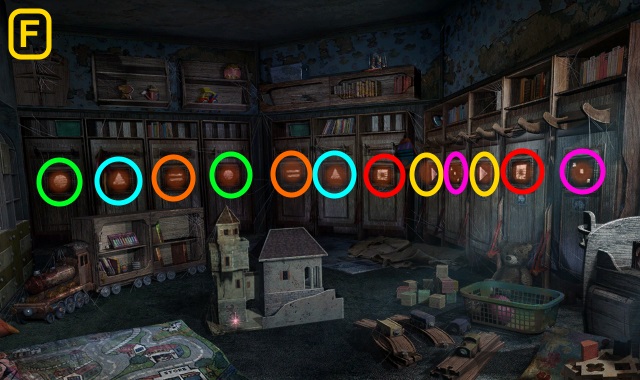
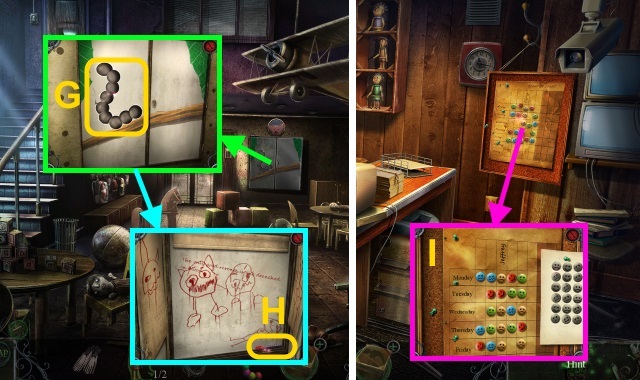
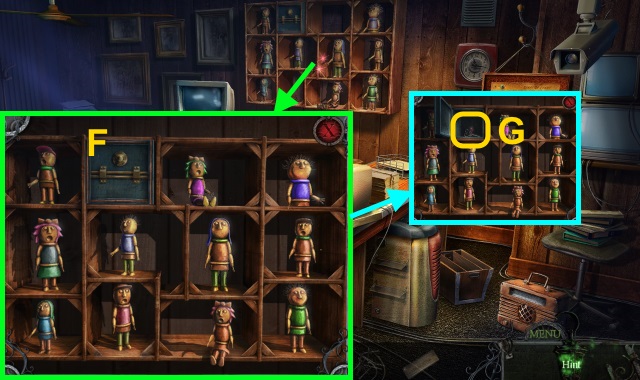
- Place the POEM; select the pictures (1-4).
- Walk right.
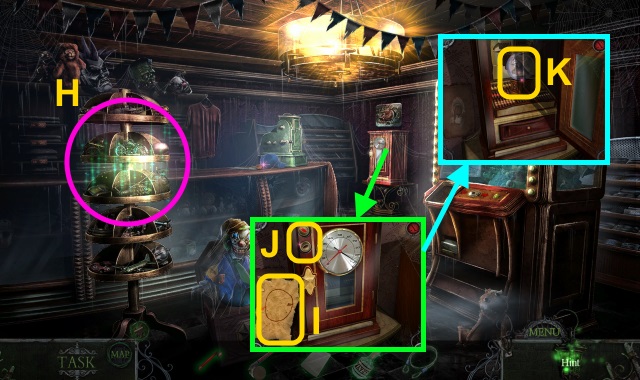
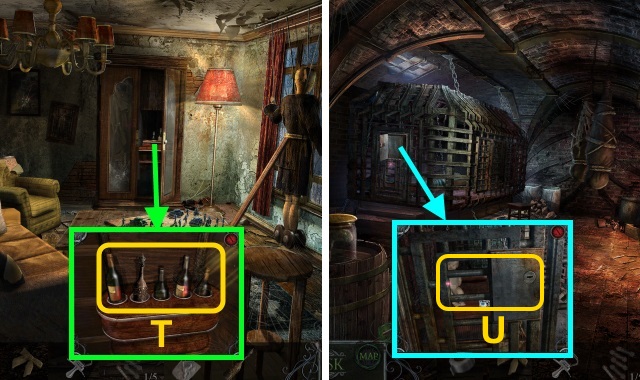
- Play the HOP; receive the HUMIDOR INSTRUCTIONS (H).
- Place the HUMIDOR INSTRUCTIONS (I); turn each knob 3x (J).
- Take the SNOW GLOBE (K).
- Combine the SNOW GLOBE and TIN SHEET (L); remove the glass.
- Take the MANNEQUIN'S HAND (M).
- Walk down.
- Place the MANNEQUIN'S HAND (N); take the TOY CRANE (O).
- Place the TOY TRAIN (P) and TOY CRANE (Q) for a mini-game.
- Solution (R): Use the crane to move the pieces into position.
- Solution (S-V).
- Take the JADE SKULL (W).
- Walk down.
- Place the JADE SKULL (X); take the JOYSTICK (Y).
- Walk left, then right.
- Place the JOYSTICK (Z); use the crane to pick up the bear (A).
- Take the ARROW (B).
- Combine the CROSSBOW, RUBBER BAND, and ARROW (C); receive the LOADED CROSSBOW.
- Walk down twice.

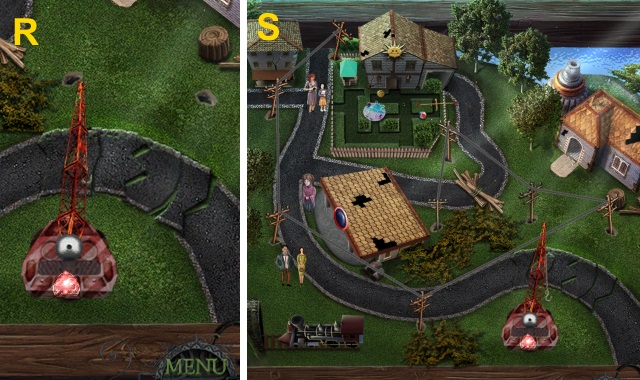
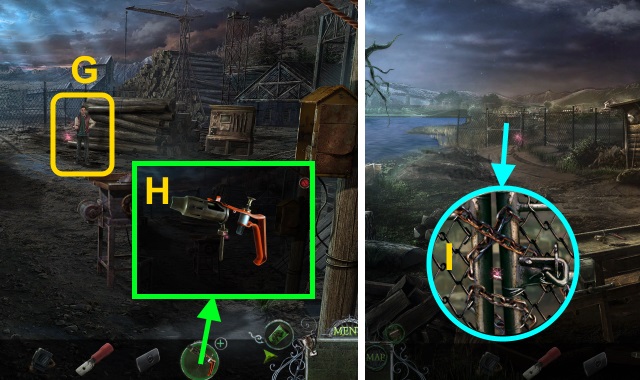
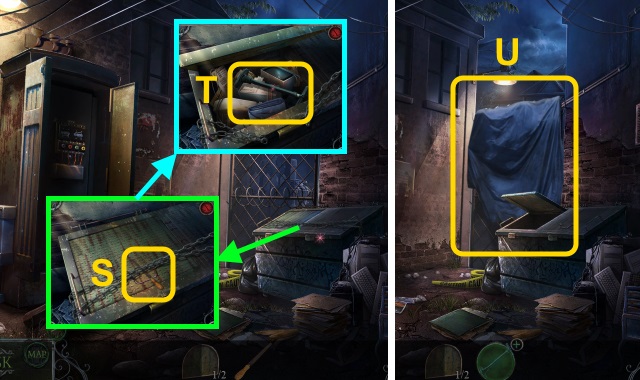
- Try to walk forward. Use the LOADED CROSSBOW; shoot the gears (D).
- Walk forward.
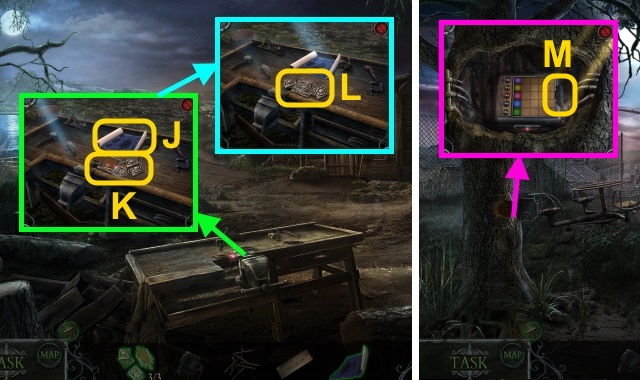
- Take the WIDE BOARD (E).
- Take the WOOD WITH THREAD (F).
- Go to the Gift Shop.
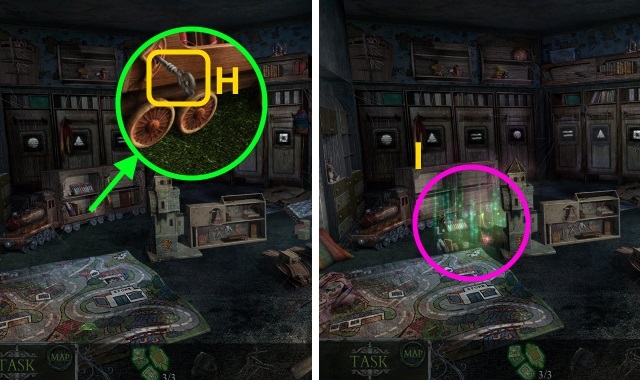
- Take the POWDER (G); use the WOOD WITH THREAD (H).
- Take the WINCH HOOK (I).
- Go to the Sewer Exit.
- Use the STEEL CABLE and WINCH HOOK (J).
- Attach the hook (K).
- Turn the switch (L).
- Walk forward.
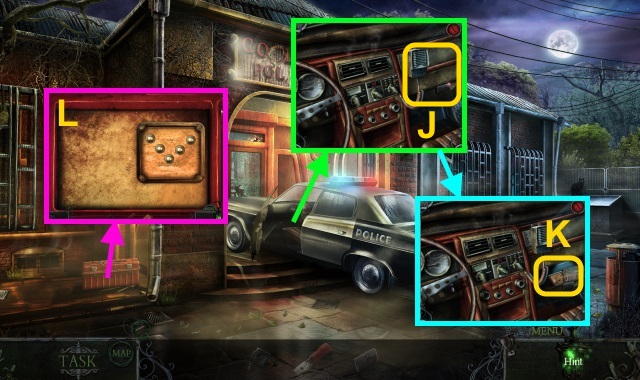
- Talk to Pam (M).
- Take the ELECTRICAL TAPE (N).
- Move the dirt; take the METAL BRUSH (O).
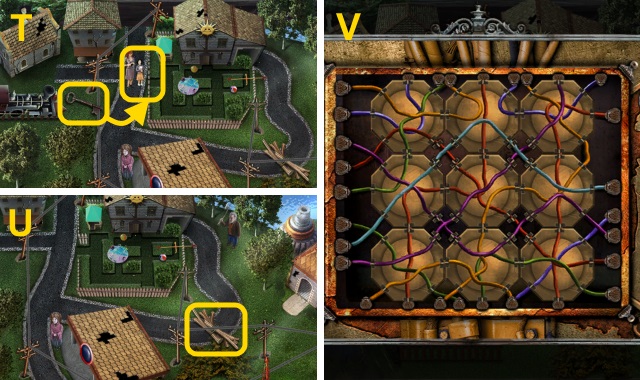
- Walk down twice, then left.
- Pour the VINEGAR; use the METAL BRUSH (P). Turn the handle.
- Play the HOP; receive the SPATULA (Q).
- Walk down, then right.
- Move the box (R). Use the SPATULA (S); receive the CHIMES (1/3).
- Take the CIRCUITS (T).
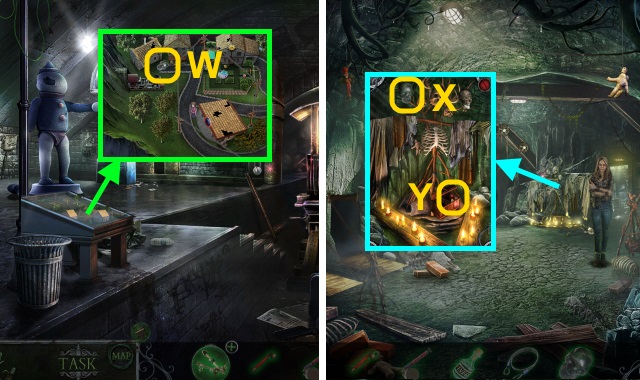
- Go to the Elevator.
- Place the CIRCUITS (U); place the cover for a mini-game.
- Solution (V).
- Place the LEVER (W) and WIDE BOARD (X).
Chapter 2: Terry
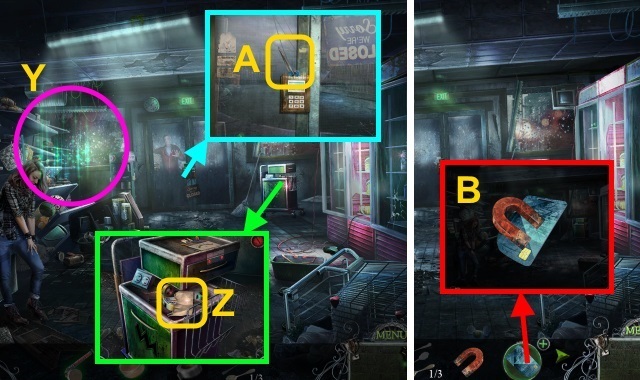
- Play the HOP; receive the MAGNET (Y).
- Read the note; take the TWEEZERS (Z).
- Use the TWEEZERS (A); receive the DEMAGNITIZED ACCESS CARD.
- Combine the DEMAGNITIZED ACCESS CARD and MAGNET (B); receive the ACCESS CARD.

- Use the ACCESS CARD and POWDER (C).
- Press the buttons (D).
- Open the box (E).
- Take the CHIMES (2/3) (F).
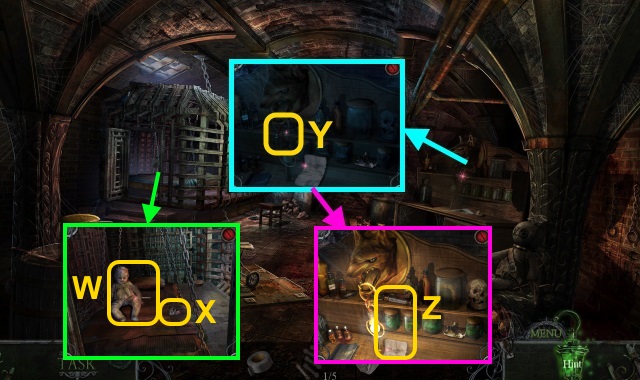
- Use the BUG REPELLENT; take the PIPE SEGMENTS (1/3) (G).
- Open the bin; take the MATCHES (H) and CHIMES (3/3) (I).
- Take the PIPE SEGMENTS (2/3) (J).
- Walk left.
- Open the door; take the LIGHTNING TRINKET (K).
- Take the BOW TIE (L); place the CHIMES (3/3) (M).
- Open the cage; take the TIARA (N).
- Walk down twice.
- Place the LIGHTNING TRINKET (O); take the LITTER PICKER (P).
- Use the MATCHES (Q); take the OIL (R).
- Walk forward.
- Use the LITTER PICKER (S); take the SILVER SPIDER.
- Walk left.
- Use the MATCHES (T); take the PIPE SEGMENTS (3/3) (U).Place the SILVER SPIDER (V).
- Read the note; take the METAL PACIFIER and BATTERY (W).
- Walk down twice.
- Place the BATTERY (X); take the AWL (Y).
- Walk forward, then left.
- Use the AWL (Z).
- Walk left.
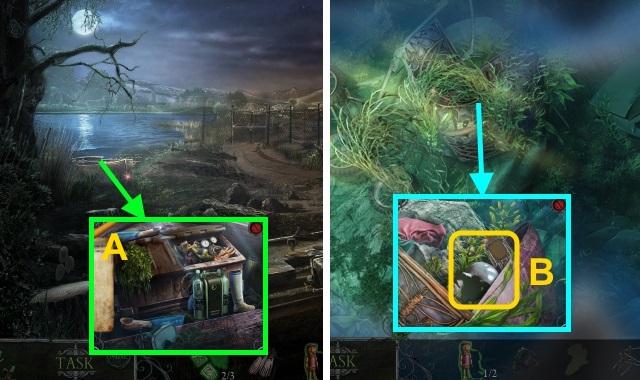
- Move the cloth; take the FUSES (1/5) (A).
- Read the note; take the PLASTIC BOTTLE (B).
- Walk forward.
- Place the TIARA (C); take the SHEARS (D).
- Take the LION EMBLEM (E).
- Read the note; take the TOY CAR (F).
- Walk down.
- Use the SHEARS (G).
- Take the REMOTE CONTROL (H).
- Combine the TOY CAR and REMOTE CONTROL (I); receive the RC CAR.
- Walk forward, then left.
- Use the RC CAR; examine it for a mini-game (J).
- Use the controls to move the car to the door. (K).
- Examine Jeffrey (L); move the furniture 3x (M).
- Take the GASOLINE (N).
- Combine the PLASTIC BOTTLE, OIL, and GASOLINE (O); receive the FUEL MIXTURE.
- Walk down twice.
- Open the lid; place the PIPE SEGMENTS (3/3) (P) and FUEL MIXTURE (Q).
- Flip the switch (R).
- Play the HOP; receive the BOTTLE (S).
- Walk forward.
- Place the BOTTLE; examine the bottles 3x (T).
- Walk forward.
- Examine the cage; use the METAL PACIFIER for a mini-game (U).
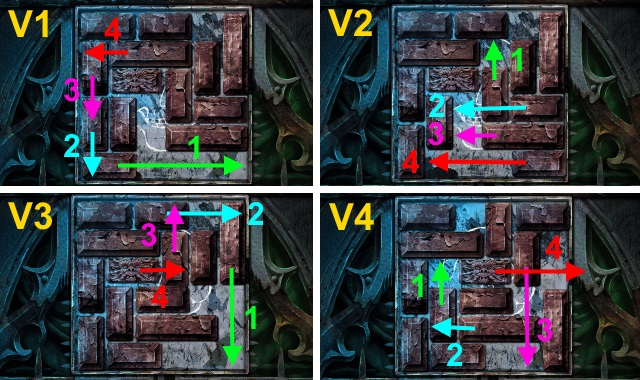
- Solution (V1-V4).
- Place the BOW TIE (W); take the HAMMER and WINGED EYE (X).
- Use the ELECTRICAL TAPE (Y).
- Read the note; take the FUSES (2/5) (Z).
- Walk down, then left.
- Use the HAMMER (A); remove the boards.
- Take the FUSES (3/5) and HUNTING KNIFE (B).
- Walk down, then forward.
- Use the HUNTING KNIFE (C).
- Play the HOP; receive the ROOM KEY (D).
- Walk down, then left.
- Use the ROOM KEY (E).
- Walk left.
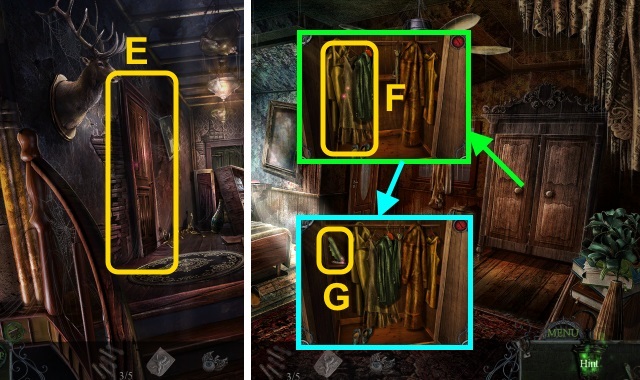
- Open the closet; move the clothes (F).
- Take the FUSES (4/5) and GAME BOARD (G).
- Place the WINGED EYE (H).
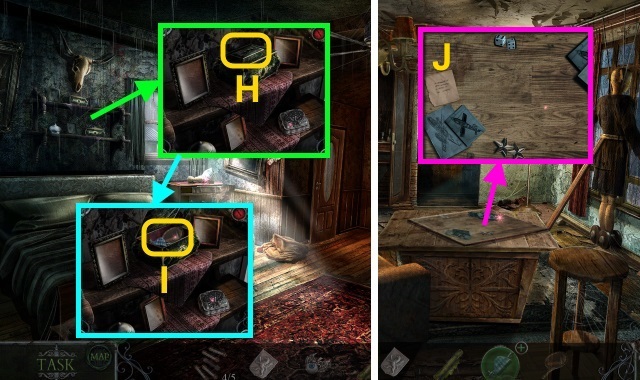
- Take the HAND MIRROR and CLAMP BASE (I).
- Walk down twice.
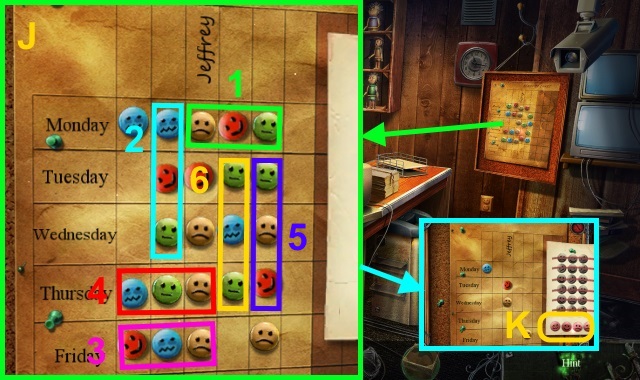
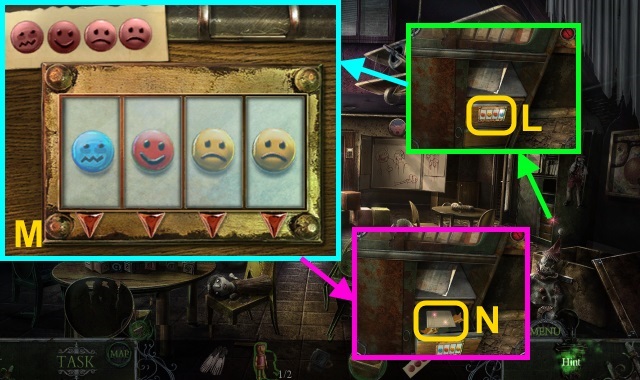
- Place the GAME BOARD for a mini-game (J).
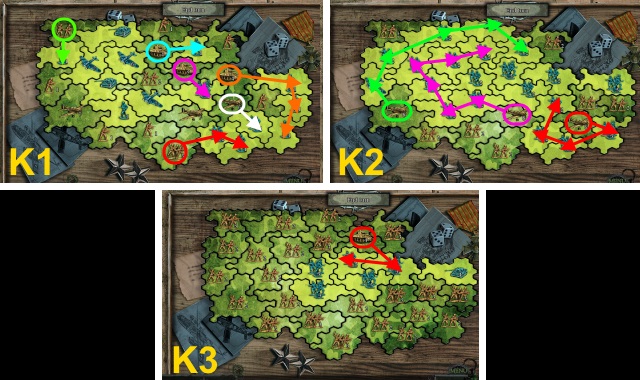
- Solution (K1-K6). Select ‘End Turn' after completing each set of steps.
- Take the ANIMAL SKULL (L).
- Walk forward.
- Place the ANIMAL SKULL (M); take the PAINT THINNER (N).
- Go to the Bedroom.

- Use the PAINT THINNER (O); play the HOP. Receive the TREE EMBLEM.
- Place the TREE EMBLEM (P).
- Take the WRENCH (Q).
- Go to the Basement.
- Use the WRENCH; move the tricycle (R).
- Open the lid; take the PLIERS and TENSION SCREW (S).
- Combine the CLAMP BASE and TENSION SCREW (T); receive the CLAMP.
- Go to the Bedroom.
- Use the CLAMP (U).
- Talk to Terry; take the FUSES (5/5) (V).
- Walk down five times.
- Place the FUSES (5/5) for a mini-game (W).
- Solution (Y).
- Open the gate (Z).
- Walk right.
Chapter 3: Doug
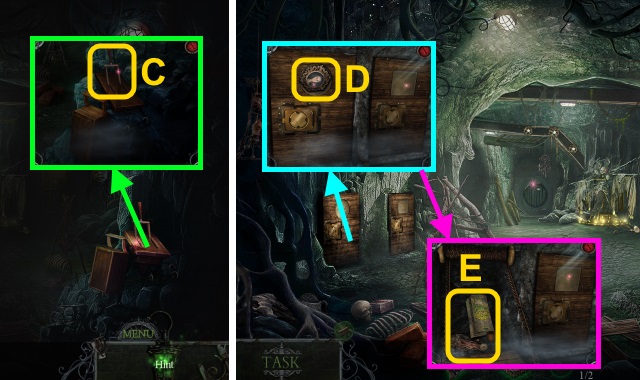
- Use the PLIERS; take the SOFTWARE CD (A) and MECHANISM COMPONENTS (1/3) (B).
- Take the CATERPILLAR TOY (C).
- Walk forward.
- Open the door; take the CATERPILLAR PARTS (1/3) (D) and SHOVEL TOY (E).
- Walk right.
- Match the shapes (F).
- Take the DIVING FINS (G).
- Read the note; take the CLAY FIGURINES (1/2) (H).
- Place the LION EMBLEM (I).
- Open the dollhouse (J).
- Take the COPPER WIRE (K).
- Walk down twice.
- Use the SHOVEL TOY; play the HOP (L).
- Receive the PENKNIFE.
- Use the HAND MIRROR and COPPER WIRE (M); examine the wire 3x.
- Take the CATERPILLAR PART (2/3) and HALBERD (N).
- Walk forward.

- Examine the bag; use the PENKNIFE (O).
- Read the note; take the TOY BOAT (P).
- Walk right.
- Give the HALBERD (Q); place the shield (R).
- Place the decoration (S); give the scepter (T) to the doll (U).
- Push the button (V); place the decoration (W) on the door (X).
- Take the SAILOR (Y).
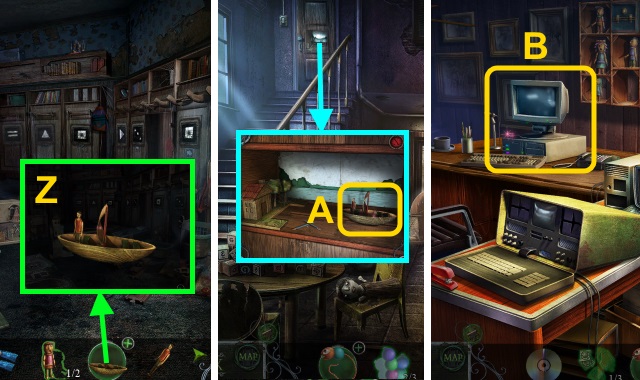
- Combine the TOY BOAT and SAILOR (Z); receive the BOAT AND SAILOR.
- Walk down.
- Place the BOAT AND SAILOR (A).
- Walk left.
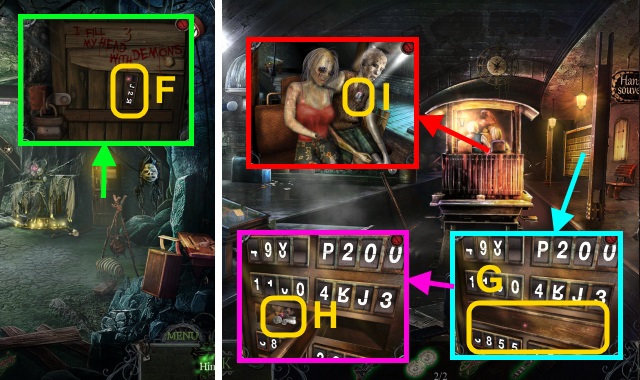
- Place the SOFTWARE CD (B); examine the computer for a mini-game.
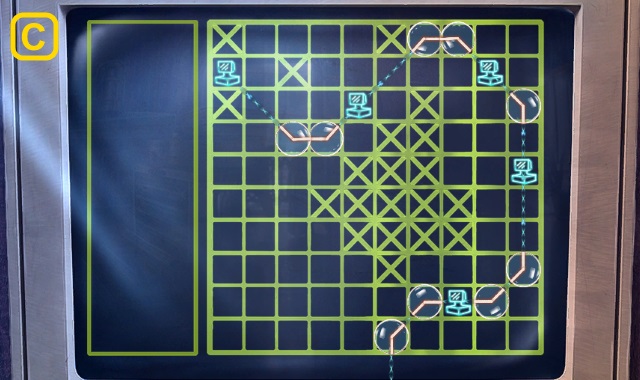
- Solution (C).
- Read the note; take the RADIO MICROPHONE and CATERPILLAR PARTS (3/3) (D).
- Combine the CATERPILLAR TOY and CATERPILLAR PARTS (3/3) (E); receive the CATERPILLAR.
- Take the BOX (F).
- Walk down.
- Place the CATERPILLAR (G).
- Take the MARKER (H).
- Walk left.
- Use the MARKER for a mini-game (I).
- Solution (J).
- Take the COMBINATION (K).
- Walk down.
- Place the COMBINATION (L); enter it (M).
- Read the note; take the AFRICA and WELCOME SIGN (N).
- Walk down.
- Place the WELCOME SIGN (O); take the START BUTTON (P).
- Walk forward.
- Place the START BUTTON for a mini-game (Q).
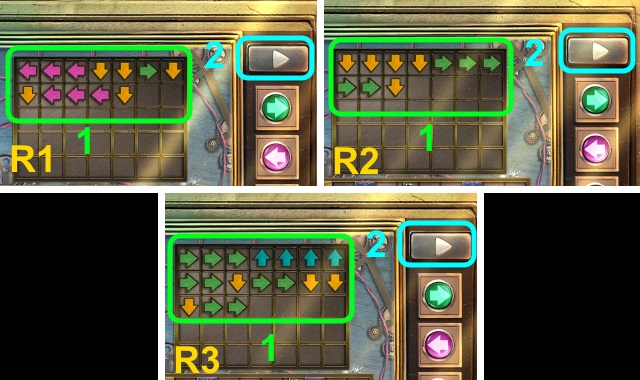
- Solution (R1-R3).
- Walk forward.
- Take the OXYGEN TANK (S).
- Take the HAMMER EMBLEM (T).
- Combine the BOX and HAMMER EMBLEM (U); take the NAILS (V).
- Walk forward.

- Read the clipboard; take the BULLDOZER PLAQUE (W).
- Take the PLANK (X).
- Walk down.
- Place the BULLDOZER PLAQUE (Y).
- Take the MASK and MECHANISM COMPONENTS (2/3) (Z).
- Walk forward.
- Open the box; use the DIVING FINS, OXYGEN TANK, and DIVING MASK (A).
- Go left.
- Move the plants; take the NORTH AMERICA and COMPONENTS (3/3) (B).
- Place the AFRICA and NORTH AMERICA (C).
- Take the CLAY FIGURINES (2/2) and FIRE EXTINGUISHER (D).
- Use the FIRE EXTINGUISHER (E).
- Go to the Office.
- Place the CLAY FIGURINES (2/2); arrange the figurines (F).
- Take the WINDING KEY (G).
- Walk down, then right.
- Use the WINDING KEY (H).
- Play the HOP; receive the BLUEPRINT (I).
- Go to the Castle Park Pond.
- Place the BLUEPRINT (J) and MECHANISM COMPONENTS (3/3) (K); assemble the components.
- Take the BOX MECHANISM (L).
- Walk down.
- Place the BOX MECHANISM (M); examine the box for a mini-game.
- Solution (N): Ex4-A-Dx5-A-Cx2-Ax5-Bx4-Ax11-Bx3-Ax9.
- Take the SPRAY LUBRICANT and HANDSAW KEY (O).
- Walk forward.
- Use the HANDSAW KEY (P).
- Play the HOP; receive the PUMP SPOUT (Q).
- Walk down.
- Place the PUMP SPOUT; use the pump (R).
- Take the LUMBERYARD KEY (S).
- Walk forward.
- Use the LUMBERYARD KEY (T).
- Walk right.
Chapter 4: Kirk and Sammy
- Place the PLANK (U); receive the LADDER RUNGS.
- Use the SPRAY LUBRICANT (V).
- Take the CONNECTOR and PLANE BADGE (W).
- Walk down twice.
- Place the LADDER RUNGS and NAILS (X).
- Take the GLOVE COMPARTMENT LOCK (Y) and CRANE LEVER (Z).
- Place the PLANE BADGE (A).
- Read the note; take the BLOWTORCH MECHANISM (B).
- Walk forward, then right.
- Place the CRANE LEVER (C); turn the levers (D).
- Examine the controls for a mini-game (E).
- Solution (F): B-D-C-Dx2.
- Talk to Kirk (G); receive the GAS TANK.
- Combine the BLOWTORCH MECHANISM and GAS TANK (H); receive the BLOWTORCH.
- Walk down.
- Use the BLOWTORCH (I).
- Walk forward.
- Examine the radio. Place the GLOVE COMPARTMENT LOCK (J); examine it.
- Read the newspaper; take the LOCK SEGMENT (K).
- Place the LOCK SEGMENT for a mini-game (L).
- Solution (M1-M4).
- Open the box; take the SCREWDRIVER (N).
- Use the SCREWDRIVER (O); take the GEARSHIFT LEVER (P).
- Examine the trunk; take the JACK (Q).
- Place the GEARSHIFT LEVER (R); pull it.
- Walk forward.
- Take the MAILBOX ITEM (1/2) (S); use the SCREWDRIVER (T).
- Take the METAL TOKENS (1/2) (U).
- Examine the flyer; take the WOODEN SLATS (V).
- Walk forward.
- Close the radio; take the CRANK (W).
- Combine the JACK and CRANK (X); receive the SCISSOR JACK.
- Walk down.
- Use the SCISSOR JACK; play the HOP (Y). Receive the HANDYMAN BADGE.
- Walk down.
- Place the HANDYMAN BADGE (Z); examine it.
- Take the STAPLE GUN (A).
- Combine the WOODEN SLATS and STAPLE GUN (B); receive the WEDGE.
- Walk forward, then right.
- Take the BB GUN (C).
- Use the WEDGE (D); take the METAL TOKENS (2/2) (E).
- Use the METAL TOKENS (2/2) for a mini-game (F).
- Solution (G).
- Place the CONNECTOR (H); take the DIAL (I).
- Walk down, then forward.
- Use the RADIO MICROPHONE and DIAL (J); turn the dial.
- Hide in the closet (K).
- Go forward.
- Play the HOP; receive the BB GUN AMMO (L).
- Combine the BB GUN and BB GUN AMMO (M); receive the LOADED BB GUN.
- Walk down twice.
- Use the LOADED BB GUN (N); receive the CLOCK KEY.
- Walk forward.
- Place the CLOCK KEY; take the FILE DRAWER KEY (O).
- Walk forward.
- Use the FILE DRAWER KEY (P); move the files and read the note (Q).
- Take the FILE (R).
- Walk down, then right.
- Use the FILE (S).
- Take the BROKEN HAND PUMP and TARP (T).
- Use the TARP (U).
- Go forward.
- Take the FLARE GUN and POLICE NIGHTSTICK (V).
- Walk left.
- Open the door; take the MAILBOX ITEM (2/2) (W).
- Use the POLICE NIGHTSTICK; read the note (X).
- Take the REPAIR KIT (Y).
- Walk down.
- Place the MAILBOX ITEM (2/2) (Z).
- Take the LIGHTER and GEARS (1/3) (A).
- Walk left.
- Use the LIGHTER (B).
- Play the HOP; receive the ICE-CREAM TOKEN (C).
- Walk down.
- Use the ICE-CREAM TOKEN (D); open the door.
- Take the CLOCKWORK KEY (E).
- Combine the REPAIR KIT and CLOCKWORK KEY (F); open the kit.
- Take the GEARS (2/3) and JUMPER CABLE (G).
- Walk left.
- Open the door; use the JUMPER CABLE (H).
- Use the JUMPER CABLE (I); flip the switch (J).
- Walk down, then forward.
- Use the FLARE GUN (K).
- Take the INFLATOR CHUCK (L).
- Combine the BROKEN HAND PUMP and INFLATOR CHUCK (M); receive the HAND PUMP.
- Take the FLAT TIRE (N).
- Walk down.
- Place the FLAT TIRE (O); use the HAND PUMP.
- Take the CROWBAR (P).
- Walk forward.
- Use the CROWBAR (Q).
- Take the GEARS (3/3) (R).
- Use the GEARS (3/3) for a mini-game (S).
- Solution (T): A-E-B-Cx2-B-Fx2-E-B.
- Walk forward.
- Open the wallet; examine the ID (U).
- Press the button (V).
- Examine the van (W).
- Congratulations! You have completed Phantasmat: Town of Lost Hope.
Created at: 2016-05-06