

Walkthrough Menu
- General Tips
- Chapter 1: The Tower
- Chapter 2: The City
- Chapter 3: The Upper Terraces
- Chapter 4: The Research Lab
- Chapter 5: The Castle
General Tips
- This is the official guide for Phenomenon: Outcome.
- This guide will not show when you have to zoom into a location; the screenshots will show each zoom scene.
- Hidden-object puzzles are referred to as HOPs in this guide. Interactive items in HOPs are color-coded.
- Use the Map to travel to a location.
Chapter 1: The Tower
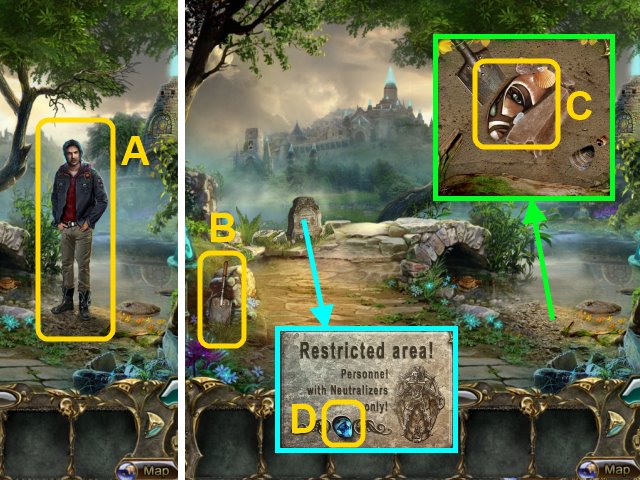
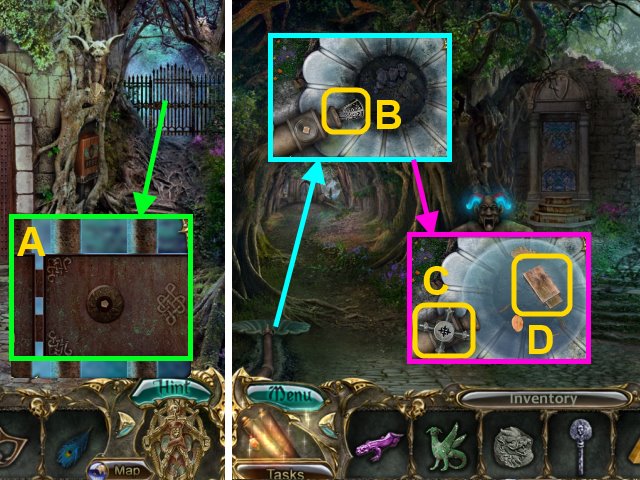
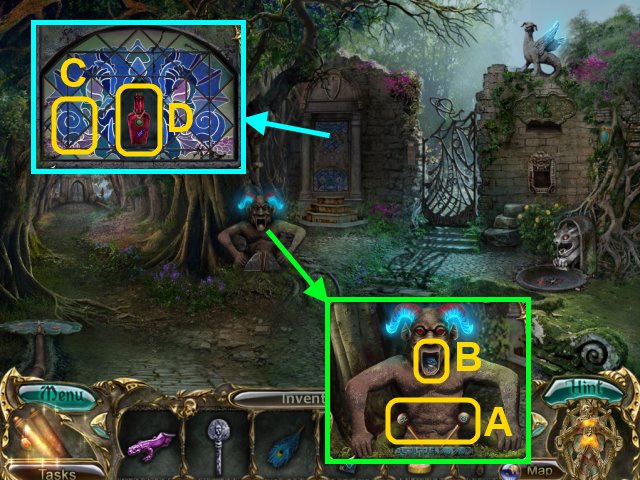
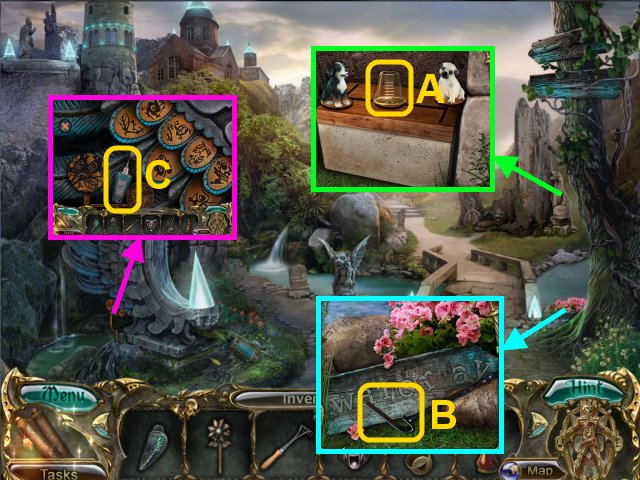
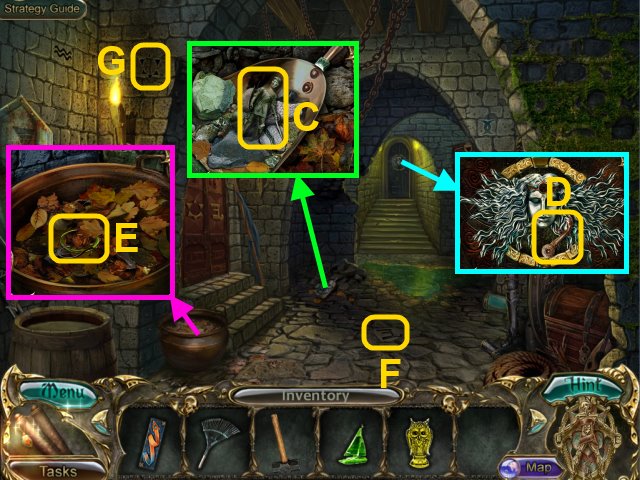
- Talk to the man (A).
- Take the SHOVEL (B).
- Use the SHOVEL on the sand; take the MASK HALF (C).
- Take the BLUE CRYSTAL (D).
- Walk forward.
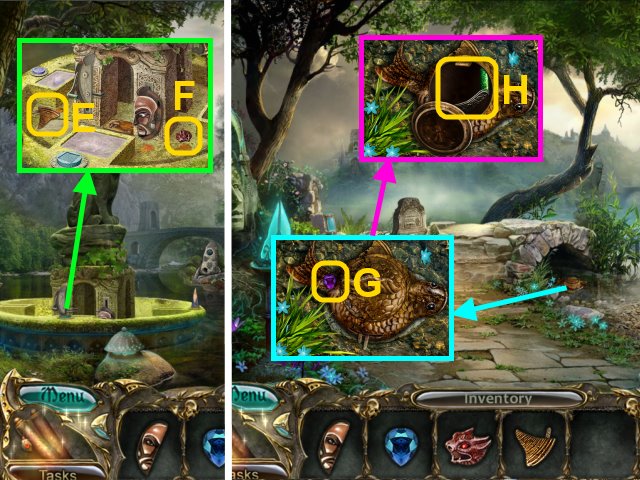
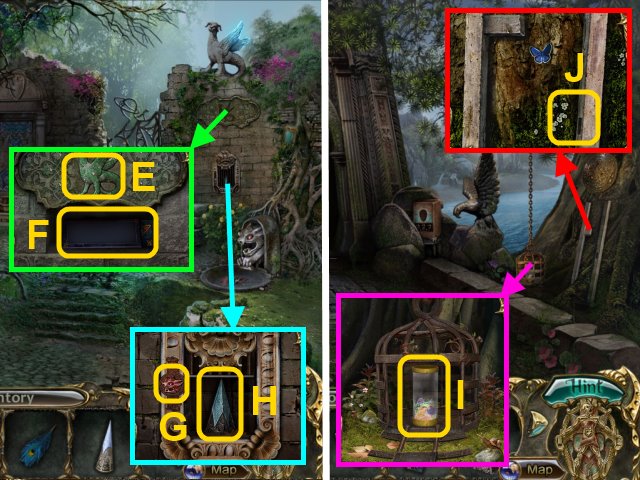
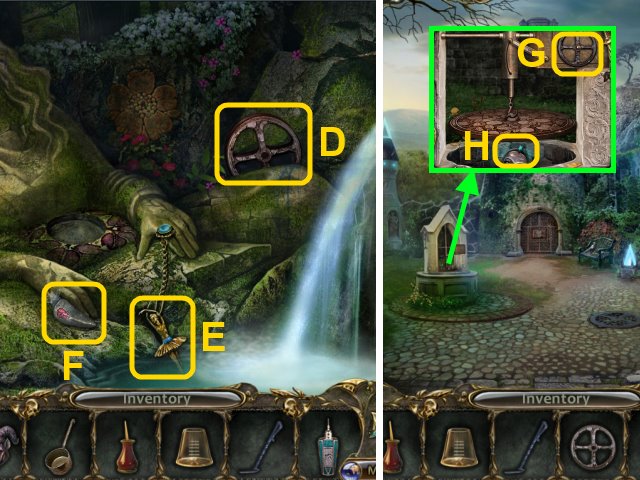
- Take the MONSTER BAS-RELIEF (E) and FIN (F).
- Walk down.
- Take the PURPLE CRYSTAL (G).
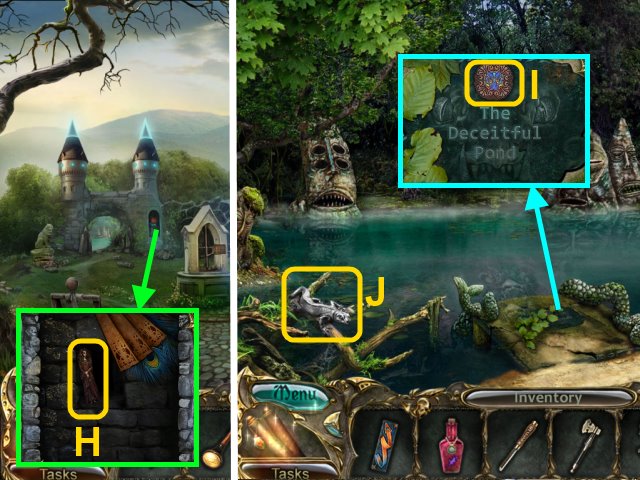
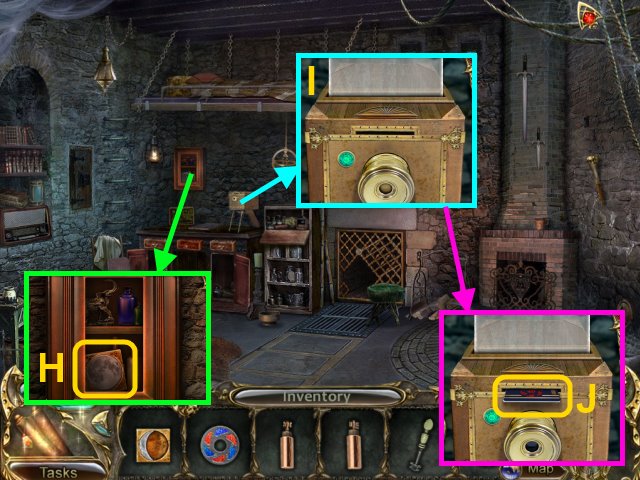
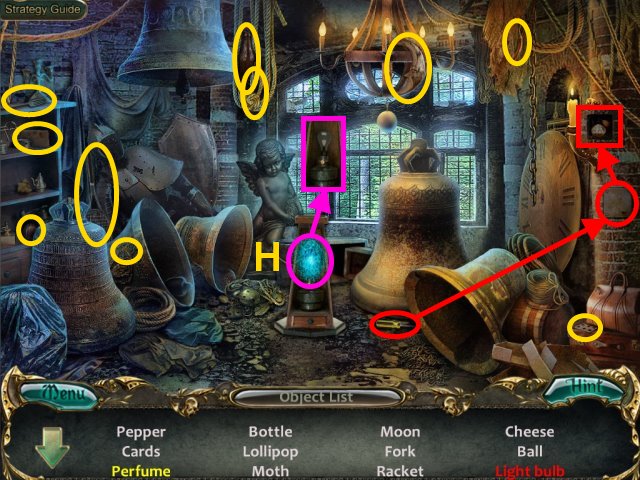
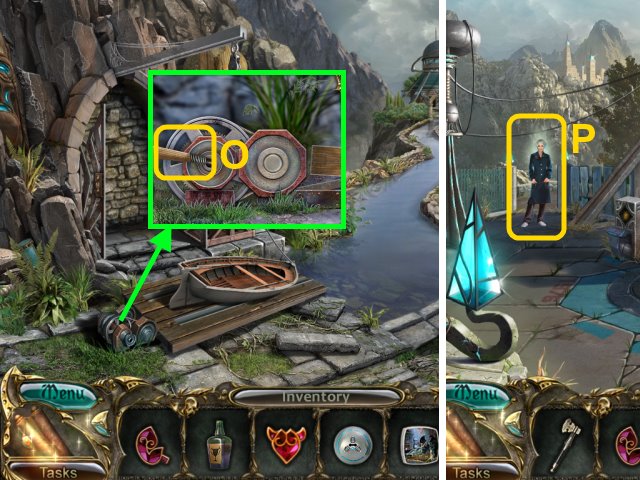
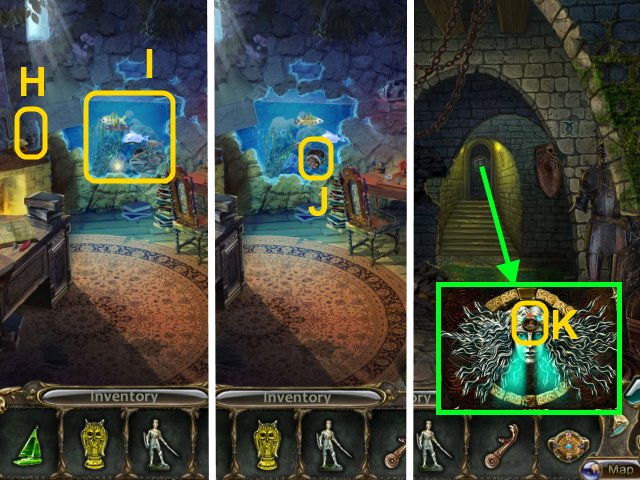
- Place the FIN on the fish; take the CRANK (H).
- Walk forward.
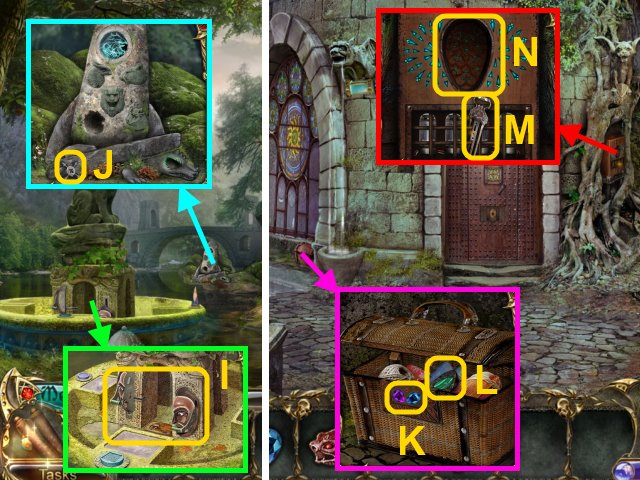
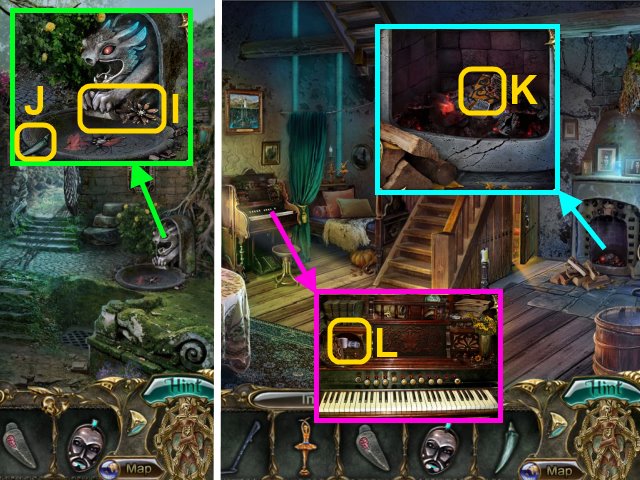
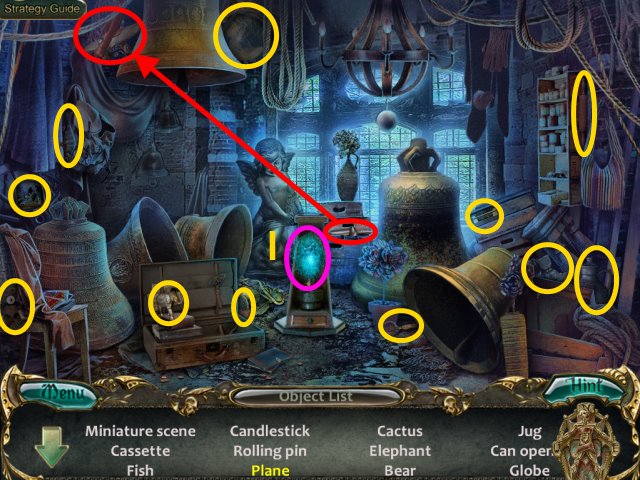
- Place the MASK HALF and CRANK on the mechanism (I).
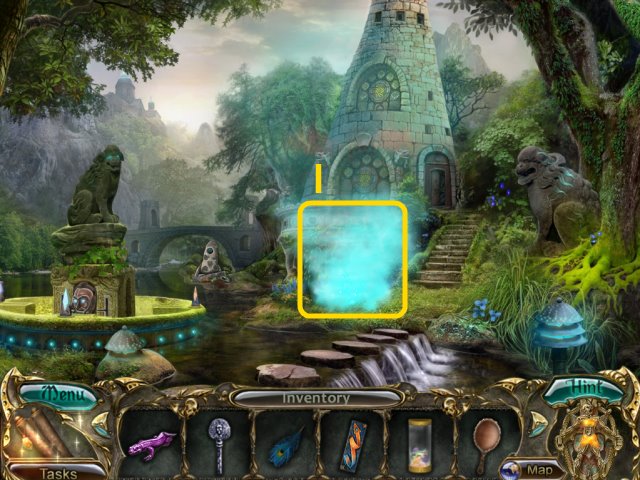
- Take the WATER TAP (J).
- Walk forward.
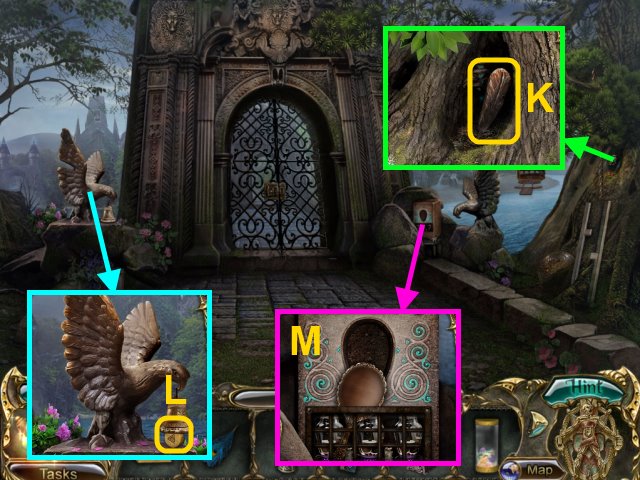
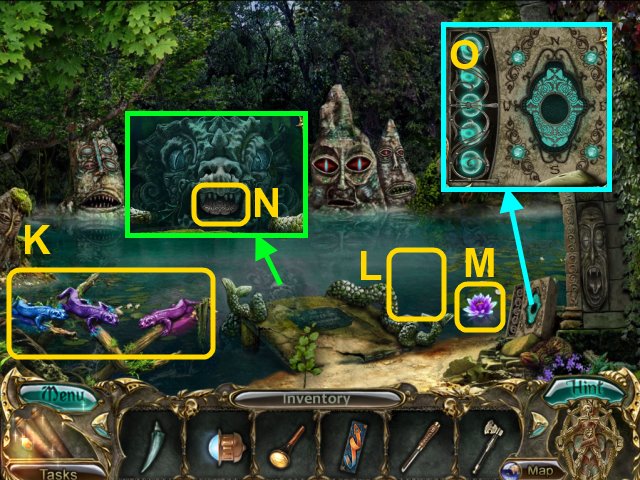
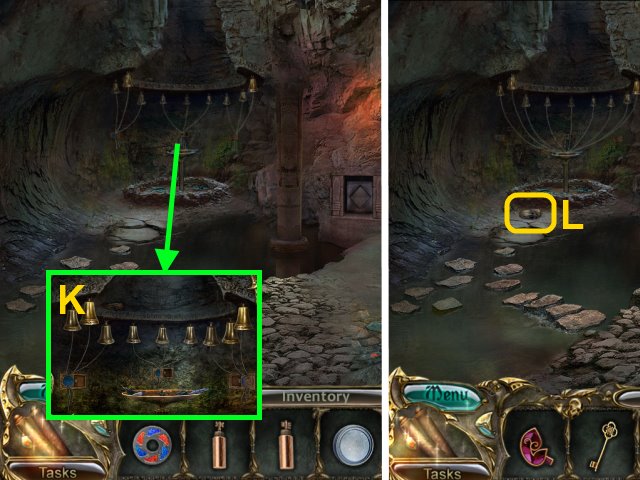
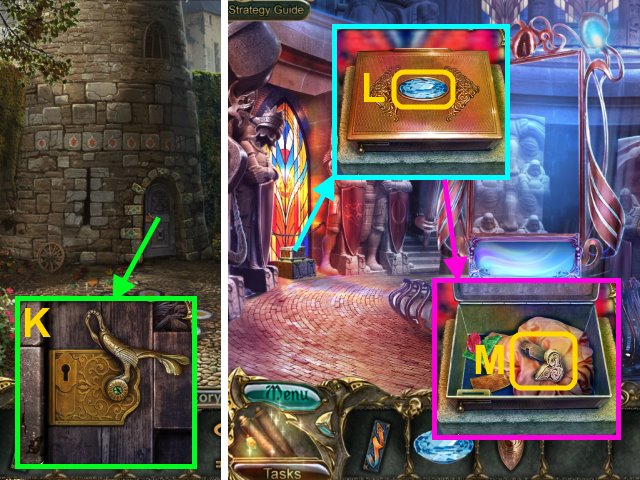
- Place the BLUE CRYSTAL and PURPLE CRYSTAL on the basket (K); take the MALACHITE EYE (L).
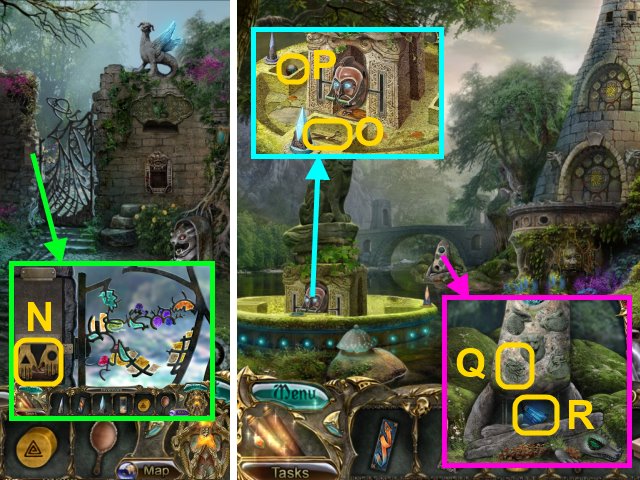
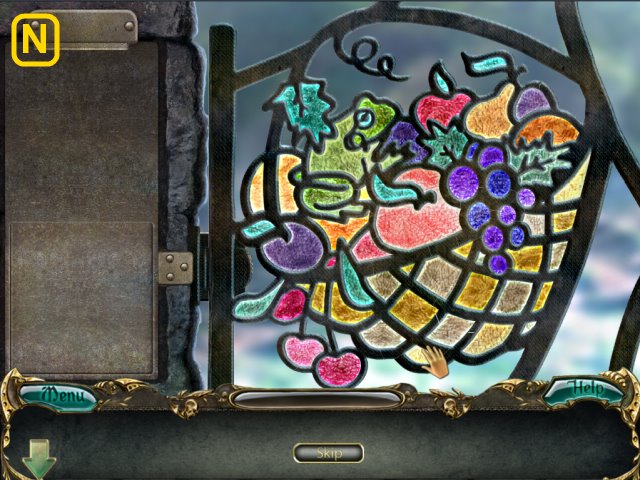
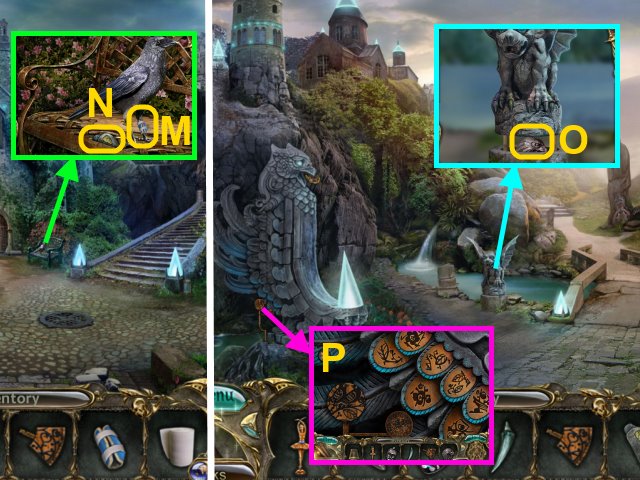
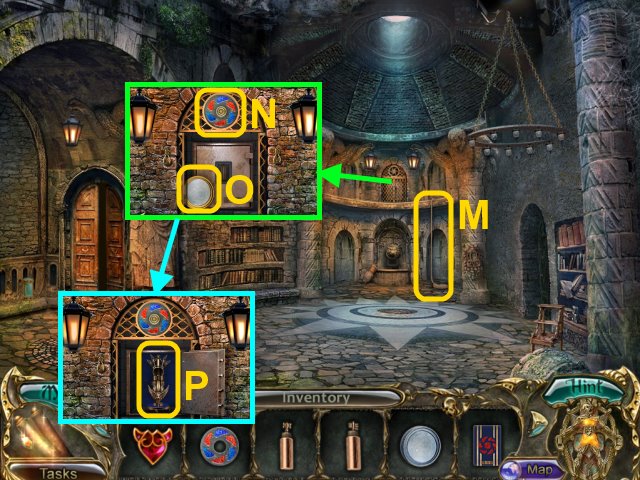
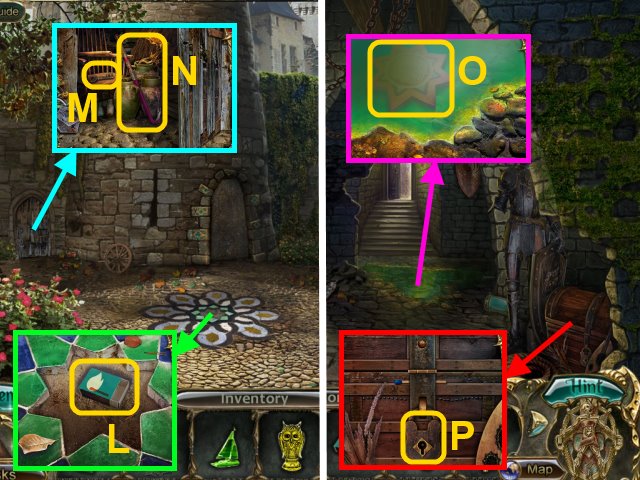
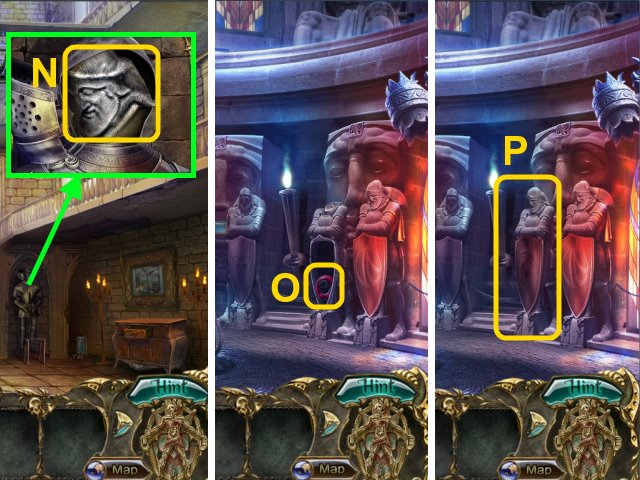
- Take the JEWELED KEY (M); place the Neutralizer in the slot (N).
- Walk down.
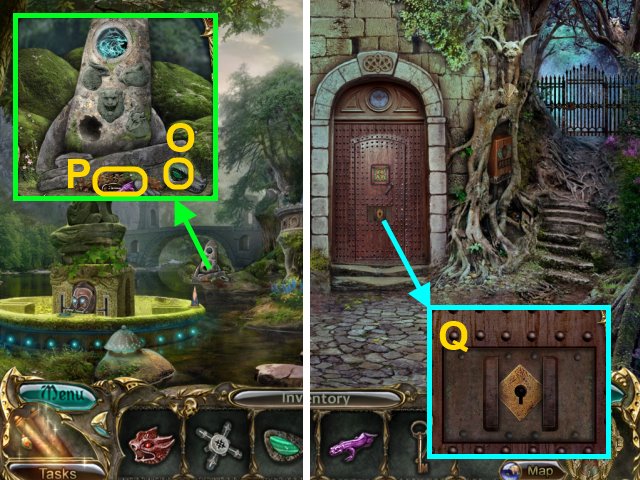
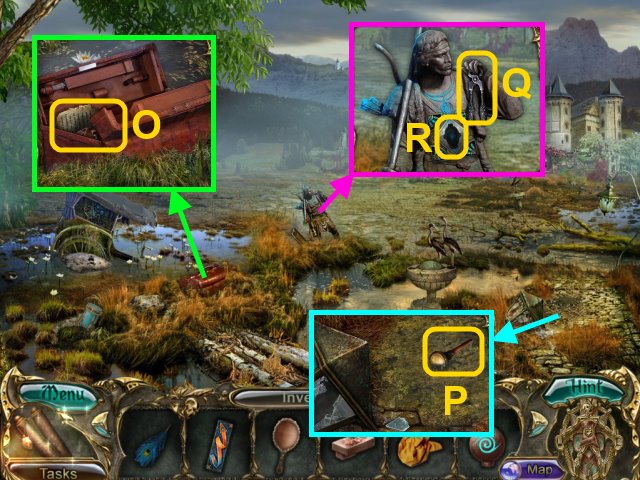
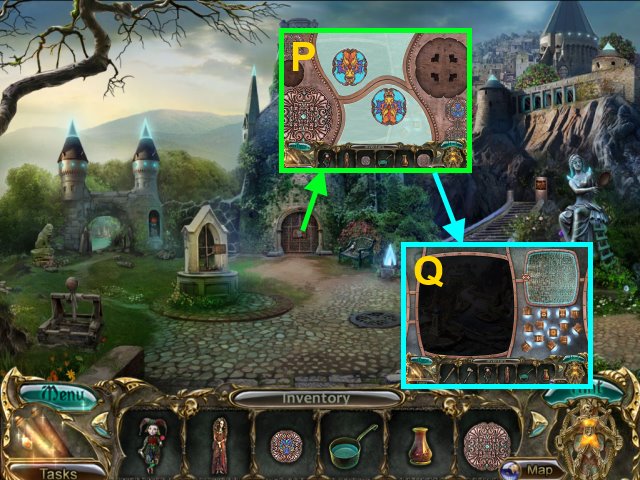
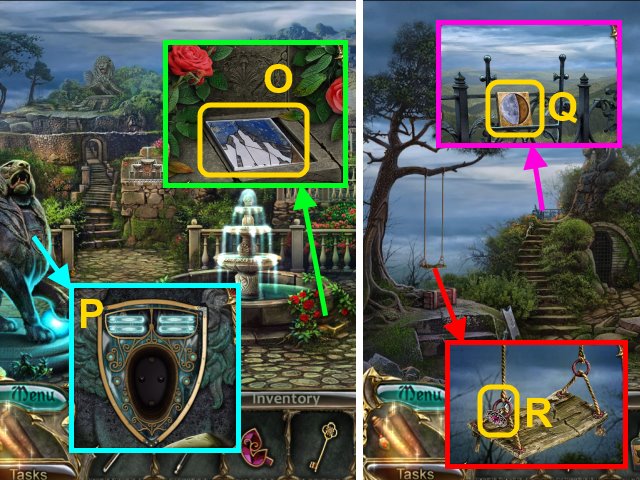
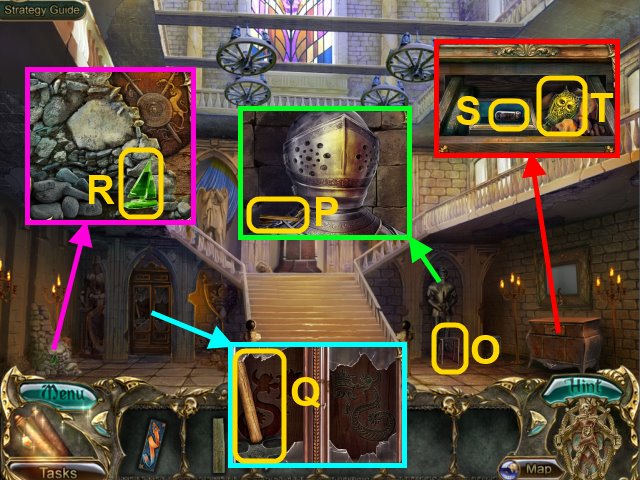
- Place the MALACHITE EYE on the statue (O); take the PURPLE LIZARD and KEY (P).
- Walk forward.
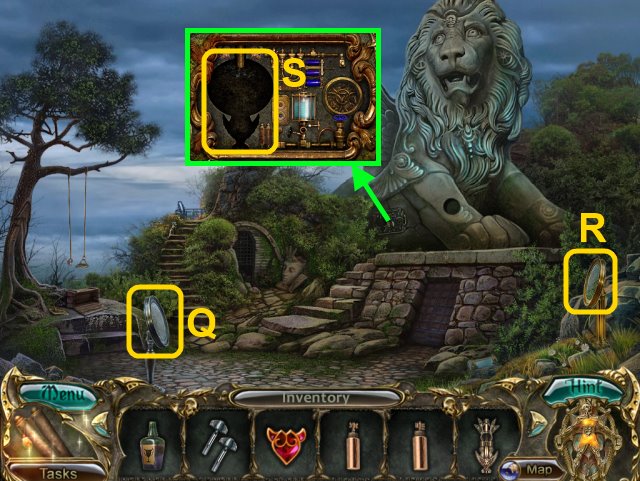
- Use the KEY on the lock (Q).
- Walk forward.
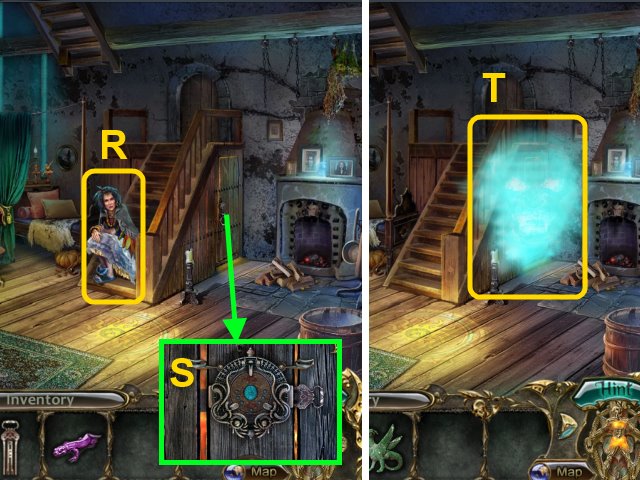
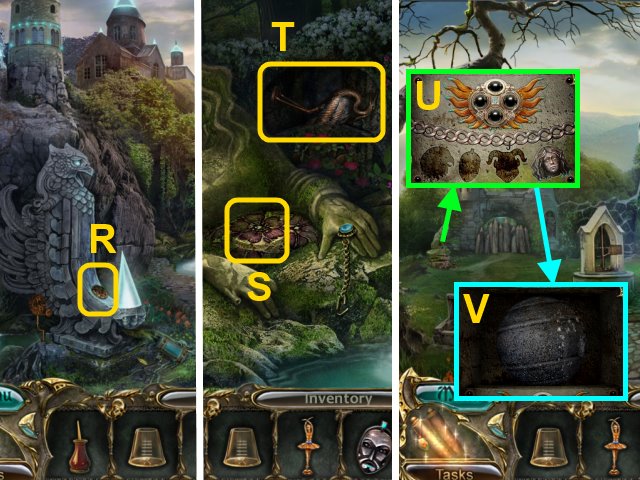
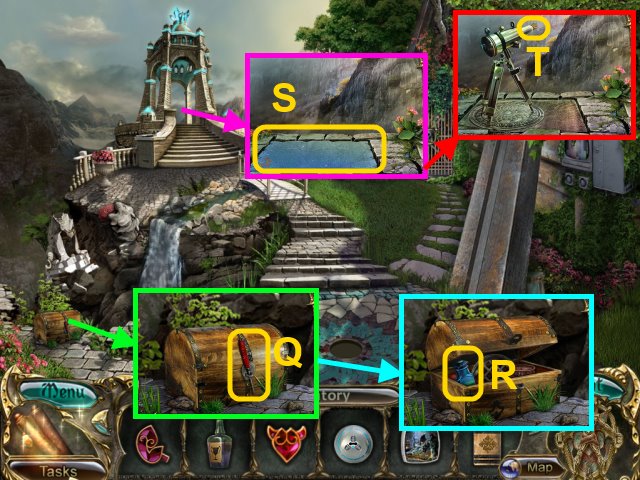
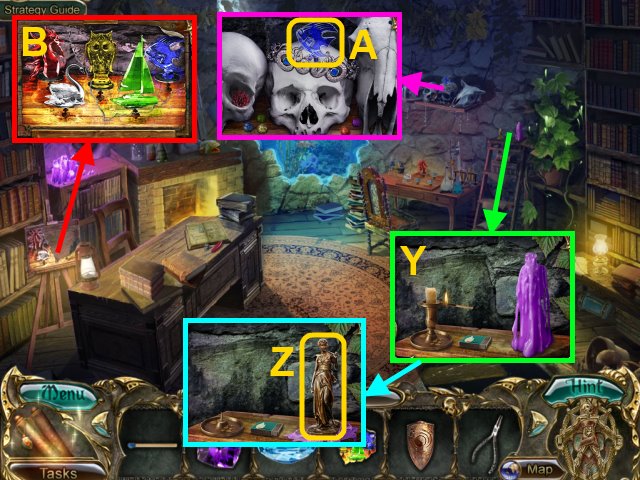
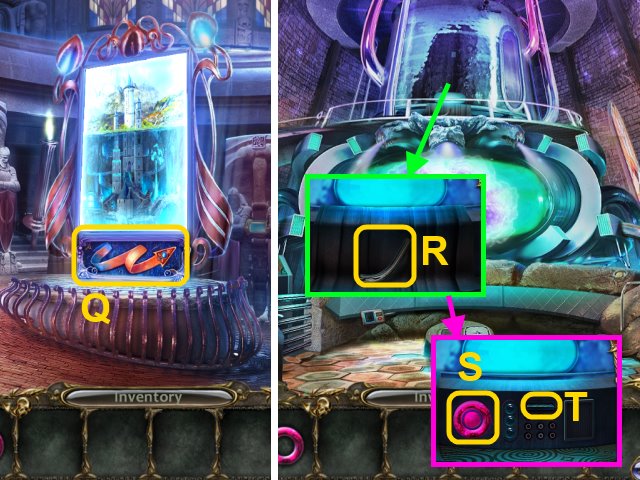
- Talk to the woman (R); you receive the CREATURE FIGURINE.
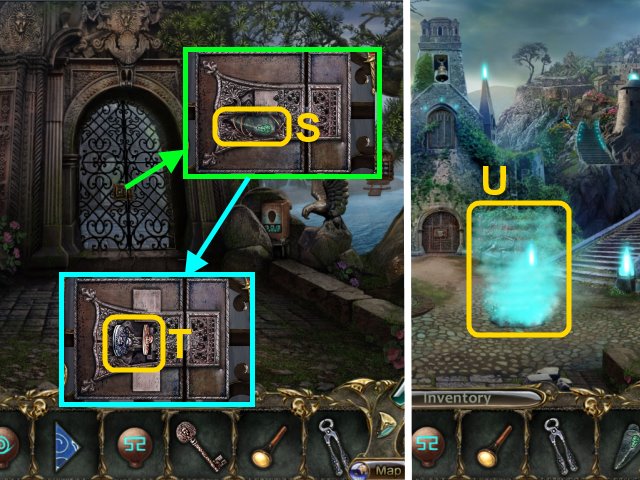
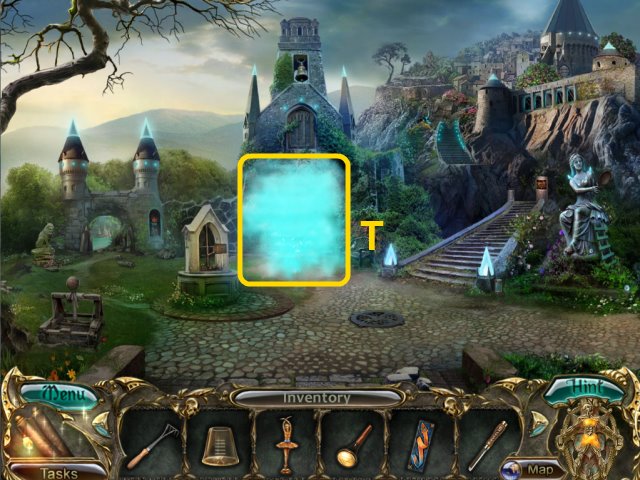
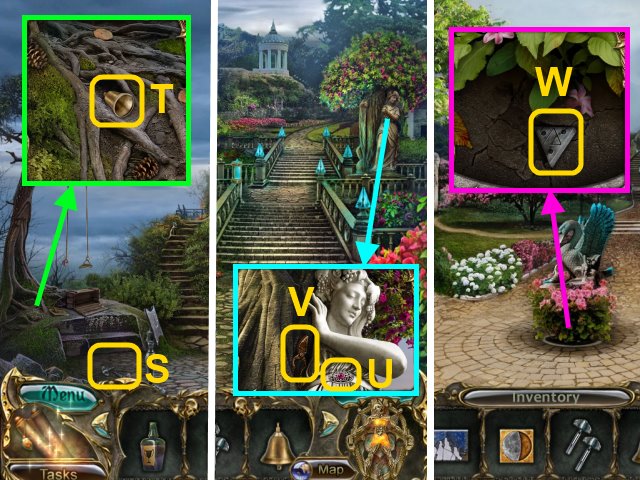
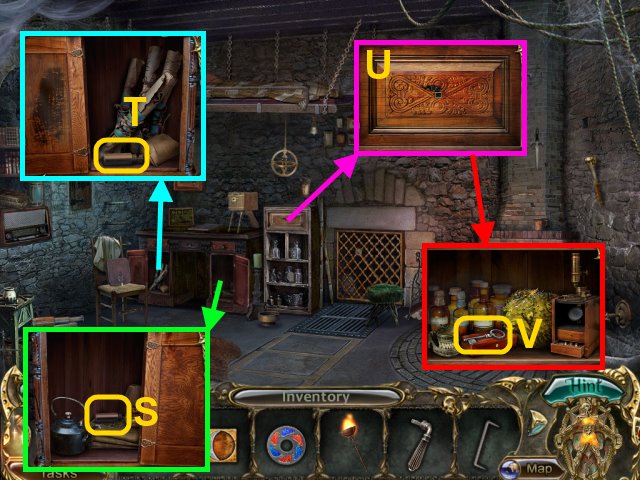
- Use the JEWLED KEY on the lock (S).
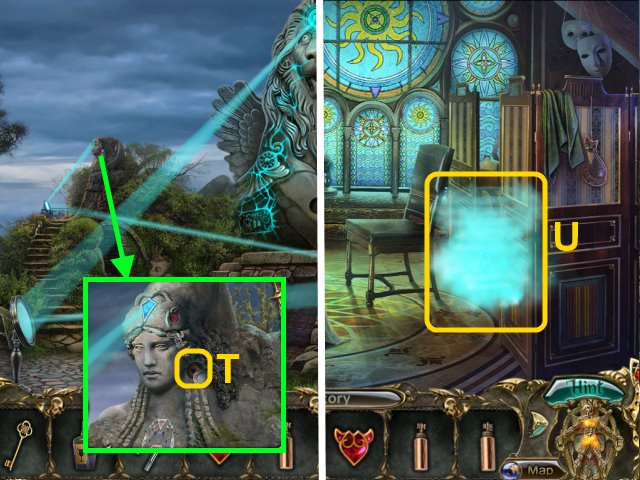
- Use the Neutralizer on the plasma (T).
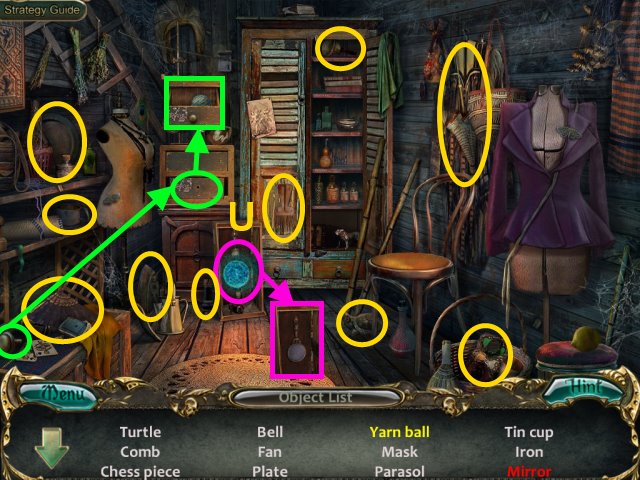
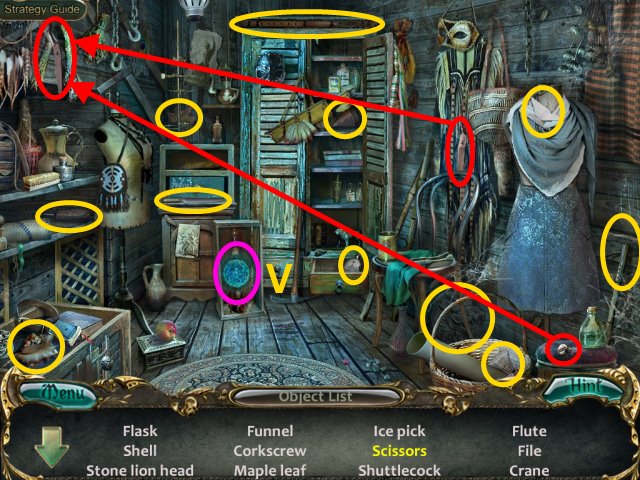
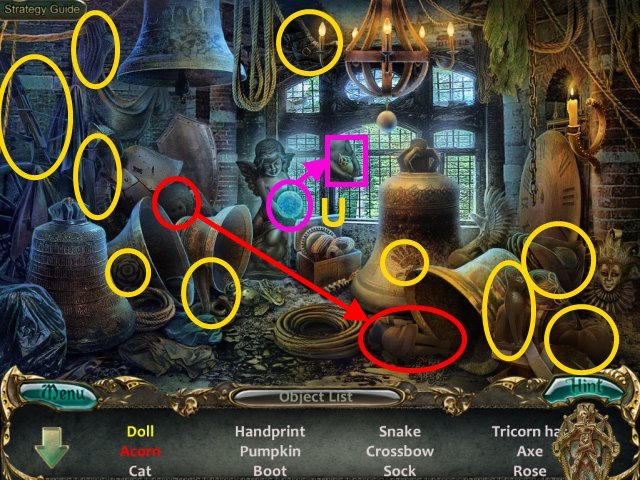
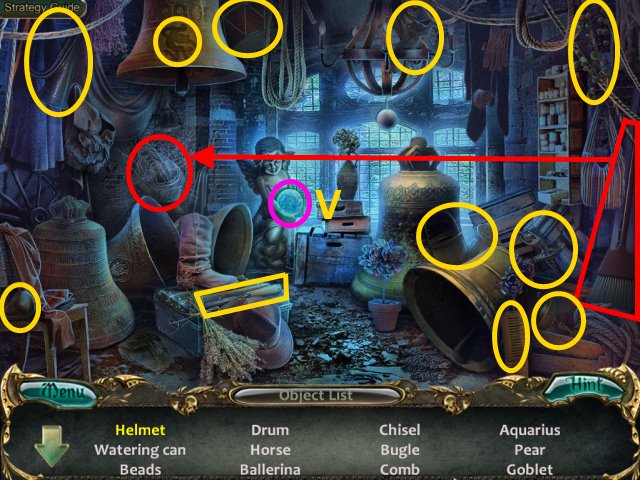
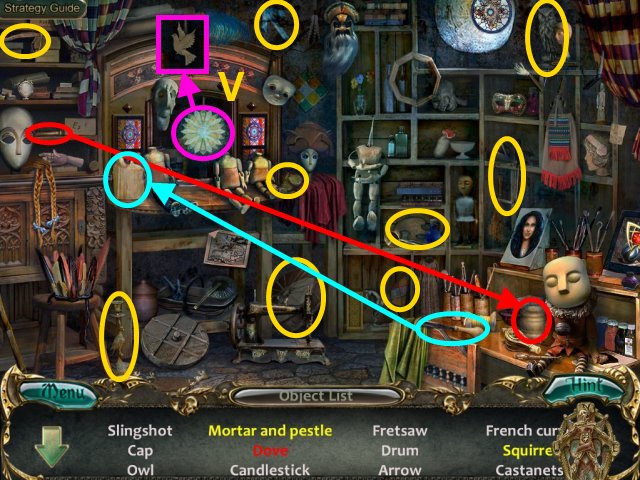
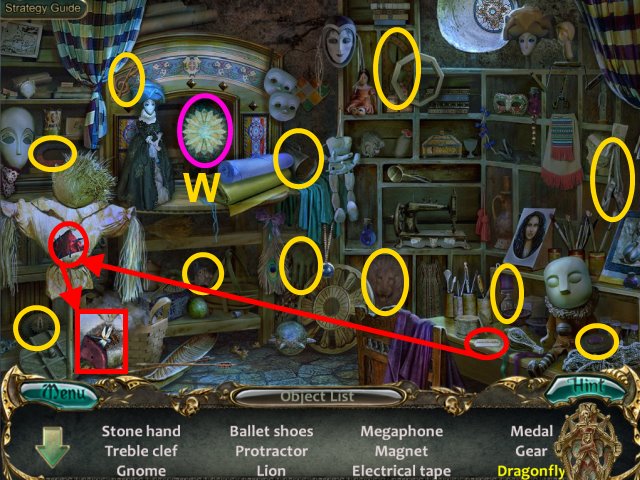
- Play the HOP.
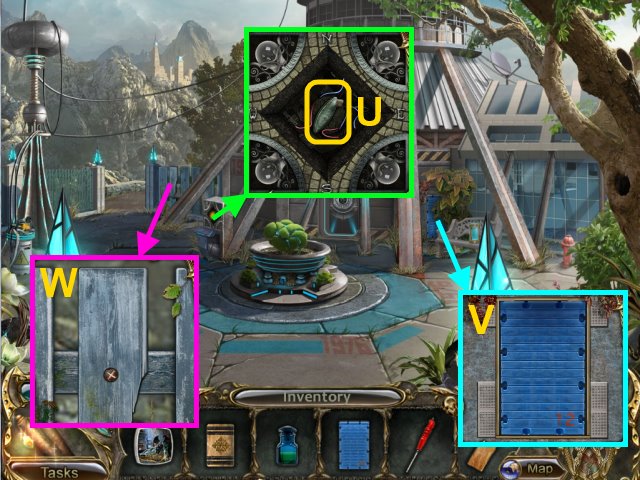
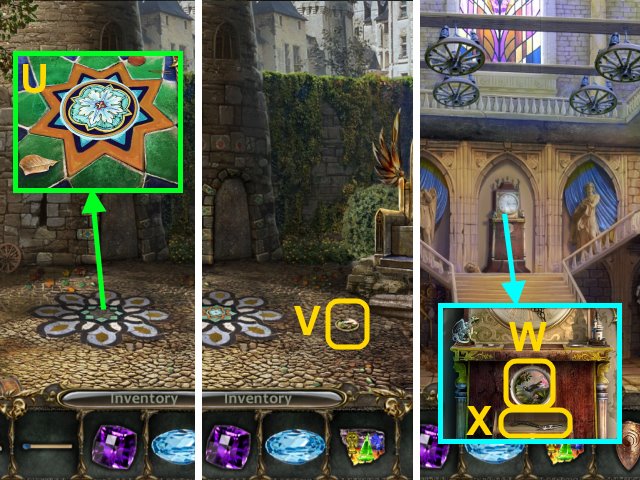
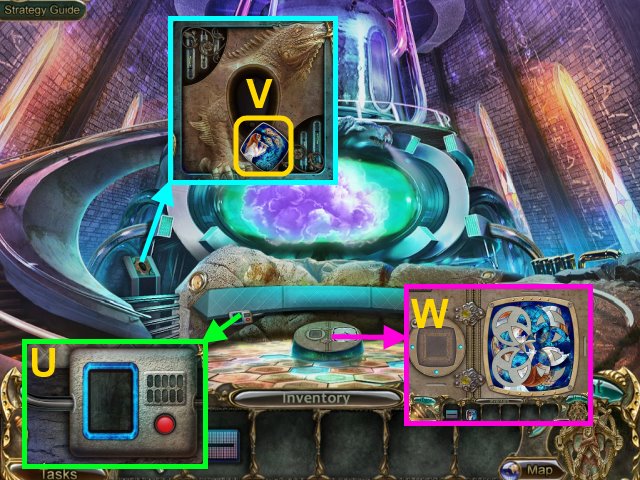
- Select the orb to return to time travel (U, V).
- You receive the STONE LION HEAD.
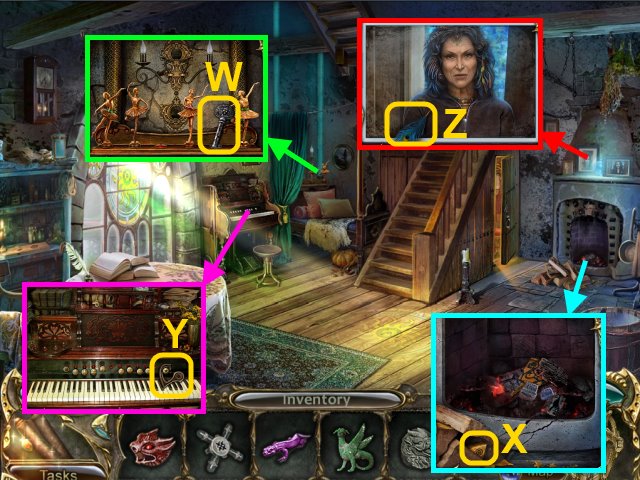
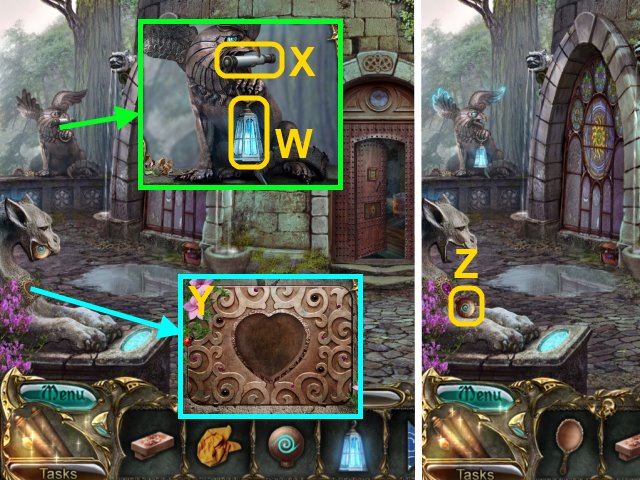
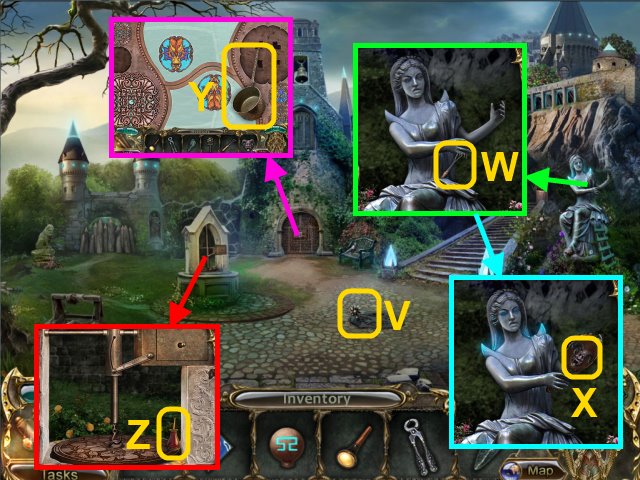
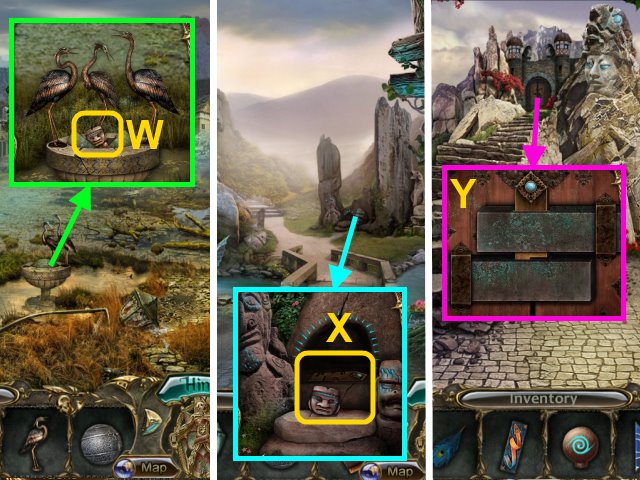
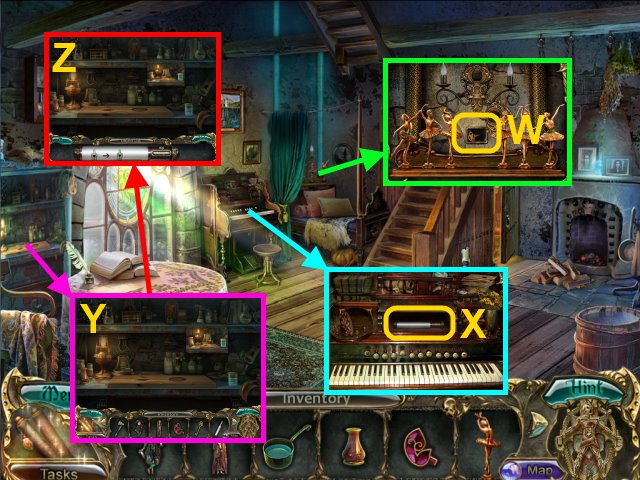
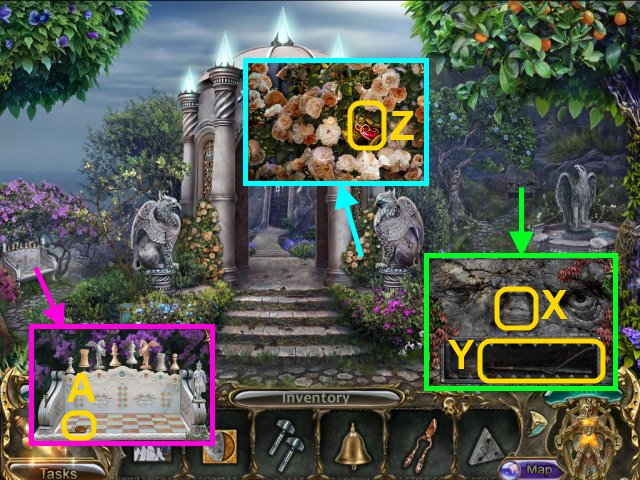
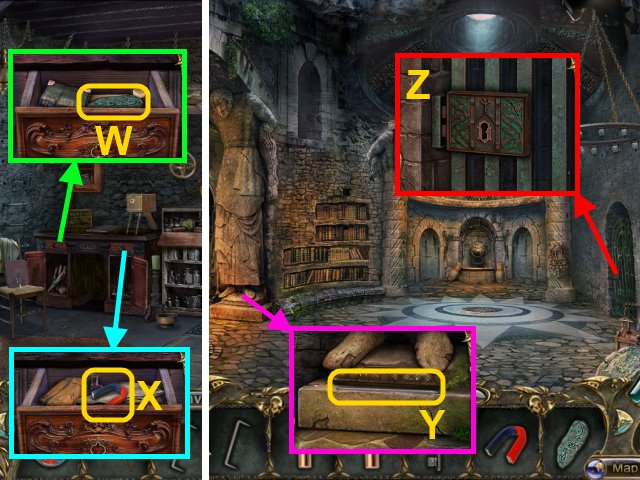
- Take the SILVER KEY (W).
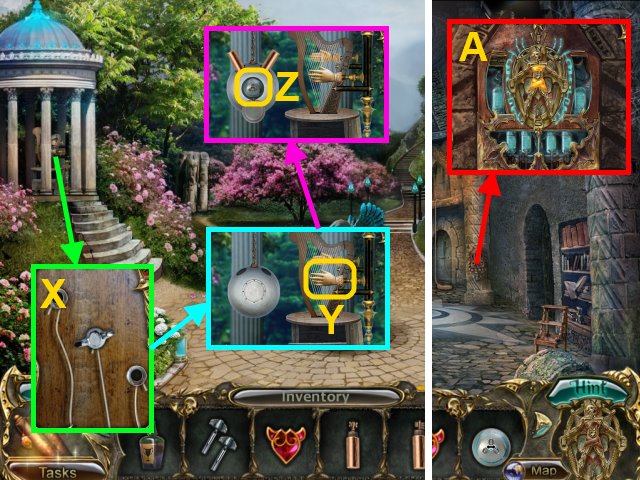
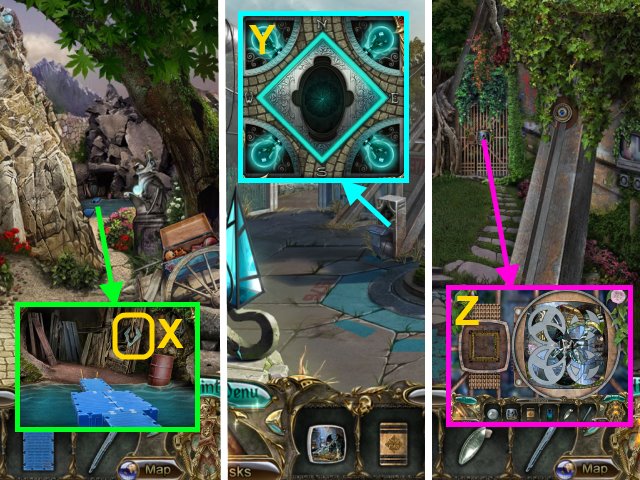
- Take the TRIANGULAR KEY (X).
- Take the IRON HANDLE (Y).
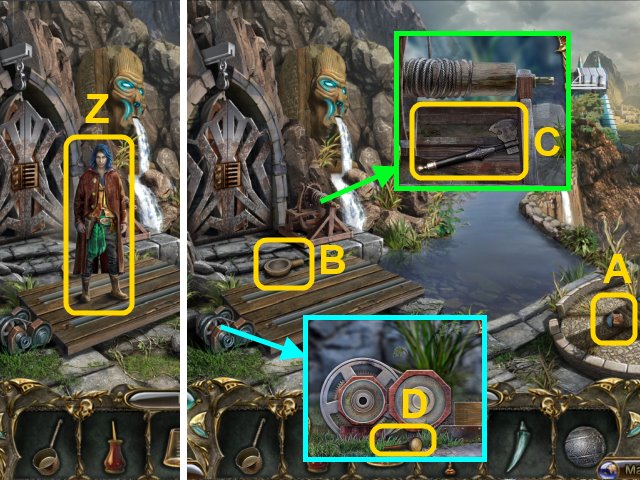
- Examine the picture; take the FEATHER (Z).
- Walk down.
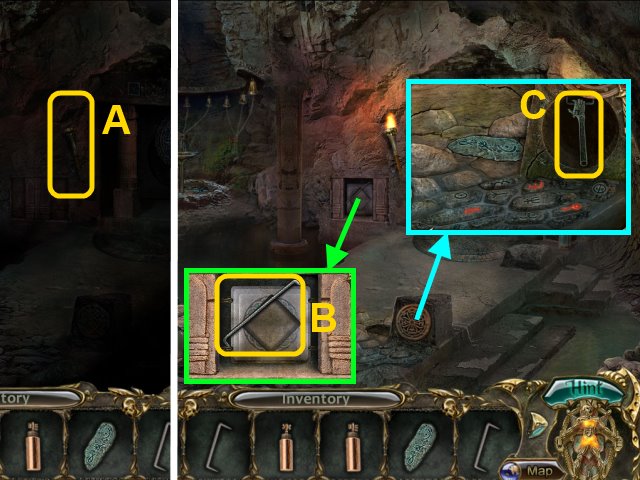
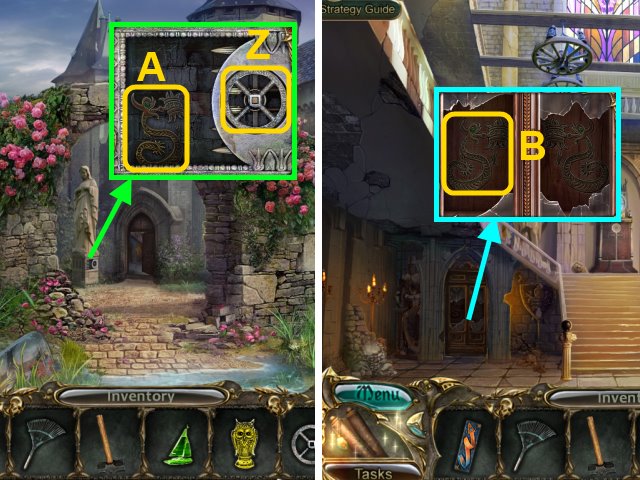
- Place the IRON HANDLE on the gate (A).
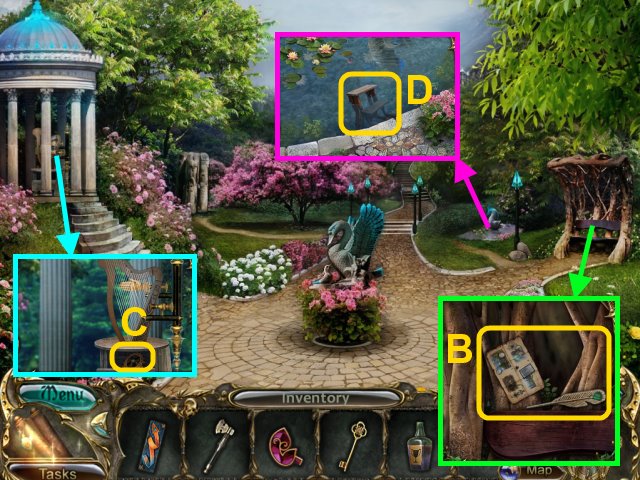
- Walk through the gate.
- Take the CONE (B).
- Place the WATER TAP on the pipe (C); turn it.
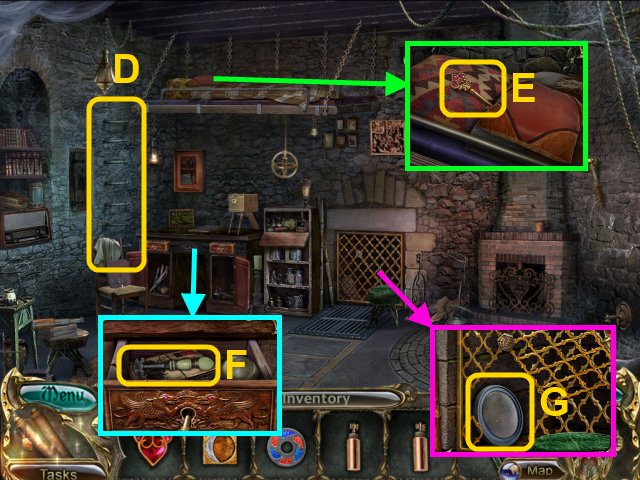
- Take the WOODEN STEP (D).
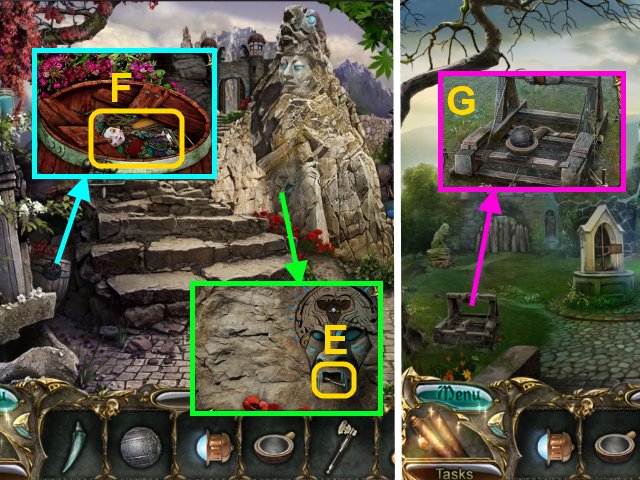
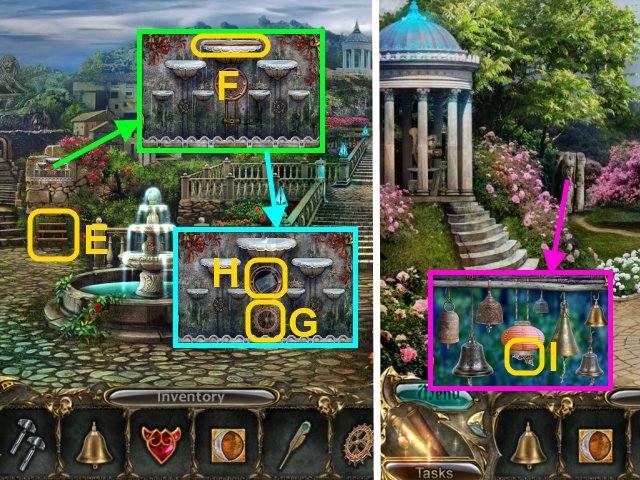
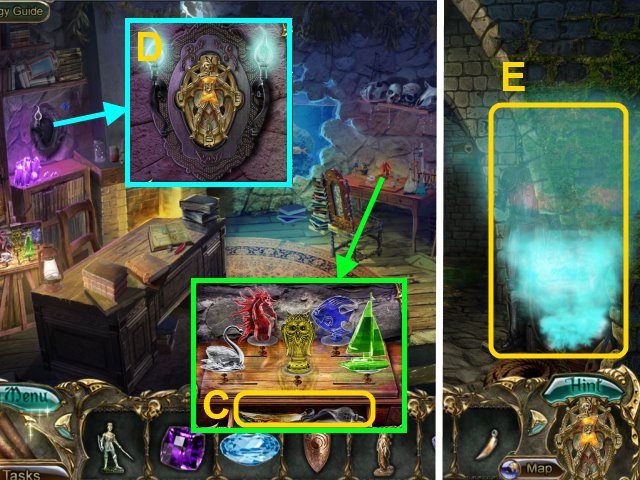
- Place the CREATURE FIGURINE on the plaque (E).
- Read the message; take the ENABLER (F).
- Place the MONSTER BAS-RELIEF in the slot (G); take the PYRAMID (H).
- Walk forward.
- Open the cage; take the FLASK WITH SHARDS (I).
- Place the WOODEN STEP on the stilts (J).
- Take the STONE FEATHER (K).
- Place the STONE FEATHER on the statue; take the CIRCULAR KEY (L).
- Take the HAND MIRROR; recharge the Neutralizer (M).
- Walk down.
- Place the TRIANGULAR KEY and CIRCULAR KEY on the hands (N); take the BAG CLASP and CLOTH.
- Walk down twice.
- Place the PYRAMID and CONE on the stand; take the SCISSORS (O) and KNOB (P).
- Place the STONE LION HEAD in the slot (Q); take the LANTERN (R).

- Use the SCISSORS on the bonds (S); take the DECORATED BLOCK (T) and MOSAIC PLATE (U).
- Walk down.
- Place the DECORATED BLOCK under the carving; take the HEART CRYSTAL (V).
- Walk forward twice.
- Place the LANTERN on the ring (W); take the INSTRUCTIONAL SCROLL (X).
- Place the HEART CRYSTAL in the slot (Y).
- Take the KNOB (Z).
- Go Behind the Tower.
- Place the 2 KNOBS on the levers (A); pull them.
- Take the BLUE LIZARD (B).
- Place the MOSAIC PLATE on the mosaic (C); take the RED DYE (D).
- Walk down; enter the tower.
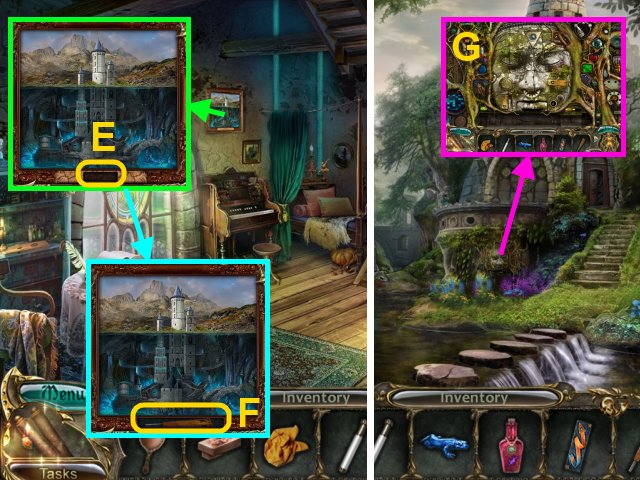
- Place the ENABLER on the frame (E); take the FAN PART (F).
- Walk down twice.
- Place the INSTRUCTIONAL SCROLL in the slot for a mini-game (G).
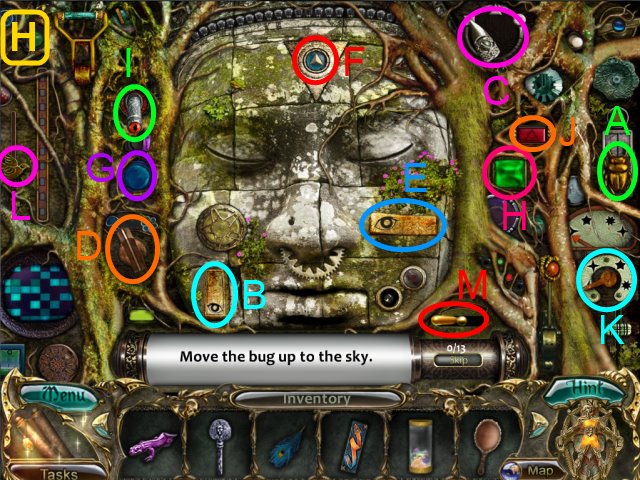
- Solution (H): A, B, Cx2, D, E, F, G, H, I, J, Kx3, Lx2, M.
- Use the Neutralizer on the plasma (I).
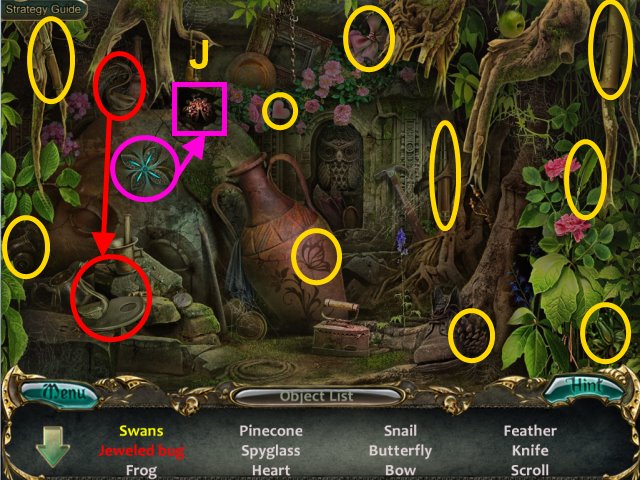
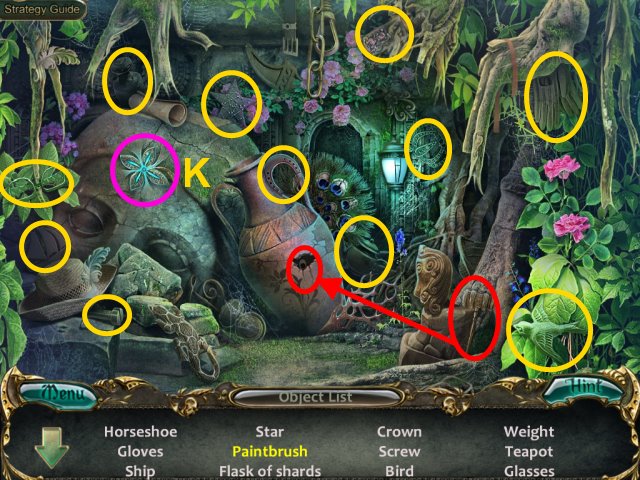
- Play the HOP.
- Select the symbol to time travel (J, K).
- You receive the FLASK WITH SHARDS.
- Go Behind the Tower.
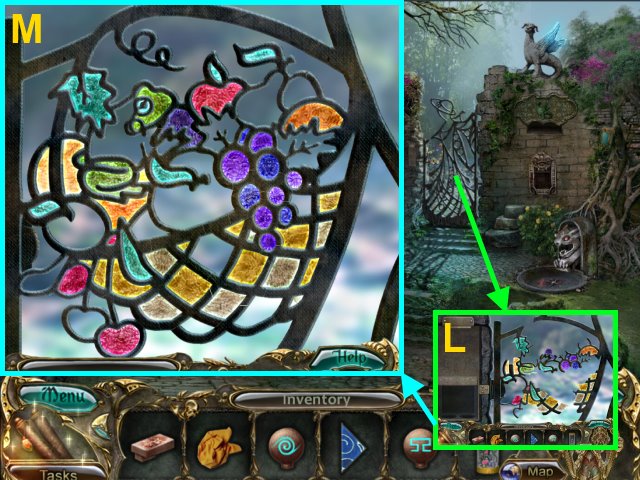
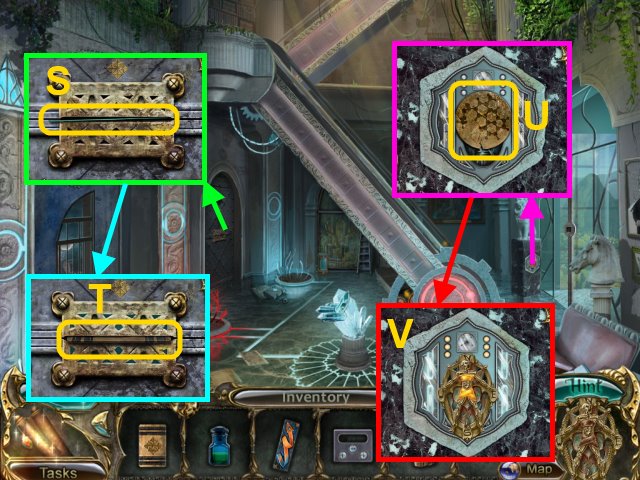
- Place the 2 FLASKS WITH SHARDS on the stand for a mini-game (L).
- Solution (M-N).
- Go through the gate.
- Place the BAG CLASP on the bag; take the note and BRONZE KEY (O).
- Use the CLOTH on the mud; take the STOP TUBE (P).
- Take the WIRE CUTTERS (Q); charge the Neutralizer (R).
- Go to the City Gates.
Chapter 2: The City
- Use the WIRE CUTTERS on the wire; take the CLAW (S).
- Use the SILVER KEY and BRONZE KEY on the gate (T).
- Walk forward.
- Use the Neutralizer on the plasma (U).
- Take the COPPER FLOWER (V).
- Take the SMALL RAKE (W).
- Give the HAND MIRROR to the statue; take the HORNED MEDALLION (X).
- Take the SMALL DIPPER (Y).
- Take the VIAL WITH BRUSH (Z).
- Walk right.
- Take the LAB FLASK (A).
- Take the FIREPLACE POKER (B).
- Take the GLUE SOLVENT (C).
- Go to the Stone Woman.
- Take the WELL WHEEL (D).
- Use the WIRE CUTTERS on the chain; take the BALLERINA (E).
- Use the GLUE SOLVENT on the claw; take the CLAW (F).
- Walk down twice.
- Use the WELL WHEEL on the mechanism (G); take the MASK MEDALLION (H).
- Walk down twice.
- Give the COPPER FLOWER to the statue (I); take the STONE FANG (J).
- Go down, then into the tower.
- Use the FIREPLACE POKER to take the PLATE SECTION (K).
- Place the STOP TUBE on the harmonium; take the SPLINT and BANDAGE (L).
- Go to the City Square.
- Use the BANDAGE and SPLINT on the crow (M); take the CLAW (N).
- Walk right.
- Place the 3 CLAWS on the statue; take the GRIFFIN MEDALLION (O).
- Place the PLATE SECTION on the owl statue for a mini-game (P).

- Solution (Q): 1-7.
- Take the STONE FLOWER (R).
- Go to the Stone Woman.
- Place the STONE FLOWER in the slot (S); take the HERON STATUETTE (T).
- Walk down twice.
- Place the HORNED MEDALLION, MASK MEDALLION, and GRIFFIN MEDALLION in the slot (U); take the IRON BALL (V).
- Go to the Swamp.
- Place the HERON STATUETTE on the stand; take the SMALL TOTEM (W).
- Go to the Riverside.
- Place the SMALL TOTEM in the slot; take the BOOKMARK KEY (X).
- Walk forward.
- Place the BOOKMARK KEY in the lock (Y).
- Walk forward.
- Talk to the man (Z).
- Take the LIGHT (A) and CATAPULT BUCKET (B).
- Take the SMALL AXE (C).
- Take the STOP TUBE (D).
- Walk down.
- Take the CHISEL (E).
- Use the SMALL AXE on the barrel; take the DOLL (F).
- Walk down twice.
- Place the CATAPULT BUCKET and IRON BALL on the catapult (G).
- Place the FAN PART and FEATHER on the fan; take the DOLL (H).
- Walk forward.
- Move the branch; take the SMALL MEDALLION (I).
- Use the RED DYE on the lizard (J).
- Place the PURPLE LIZARD and BLUE LIZARD on the logs (K).
- Use the SMALL DIPPER on the water to receive the LADLE OF WATER (L).
- Use the VIAL WITH BRUSH on the flower to receive the VIAL OF POLLEN (M).
- Place the STONE FANG on the statue; take the BIG MEDALLION (N).
- Charge the Neutralizer (O).
- Walk down.
- Place the SMALL MEDALLION and BIG MEDALLION on the gate (P).
- Use the LIGHT for a mini-game (Q).
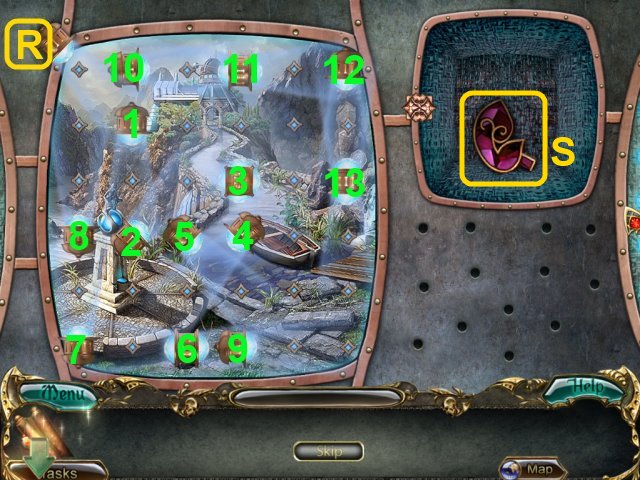
- Solution (R): 1-13.
- Take the RUBY INSERT (S).
- Use the Neutralizer on the plasma (T).
- Play the HOP.
- Select the orb to time travel (U, V).
- You receive the BALLERINA.
- Walk down three times; enter the tower.
- Place the 2 BALLERINAS on the stand; take the GOLD KEY (W).
- Place the STOP TUBE on the harmonium; take the CURATIVE SCROLL (X).
- Pour the LADLE OF WATER into the flask; place the LAB FLASK and VIAL OF POLLEN on the shelf (Y).
- Place the CURATIVE SCROLL on the shelf for a mini-game (Z).
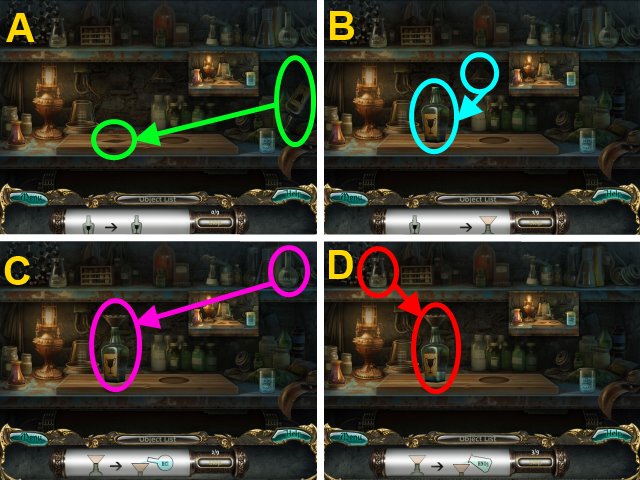
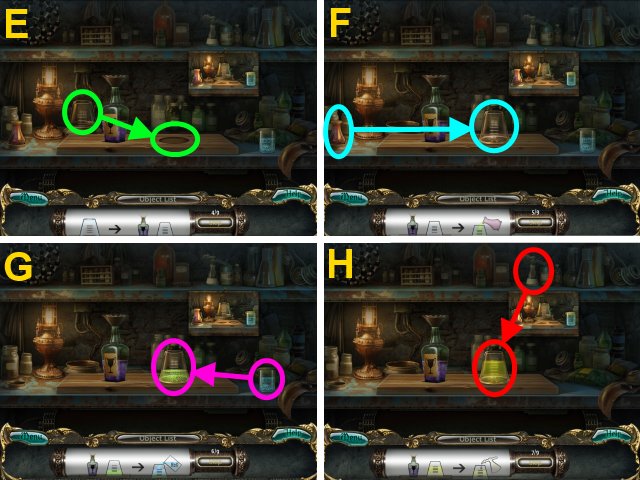

- Solution (A-I).
- Take the WISEWOMAN'S POTION (J).
- Give the WISEWOMAN'S POTION to the woman; you receive the WINDING KEY (K).
- Go up.
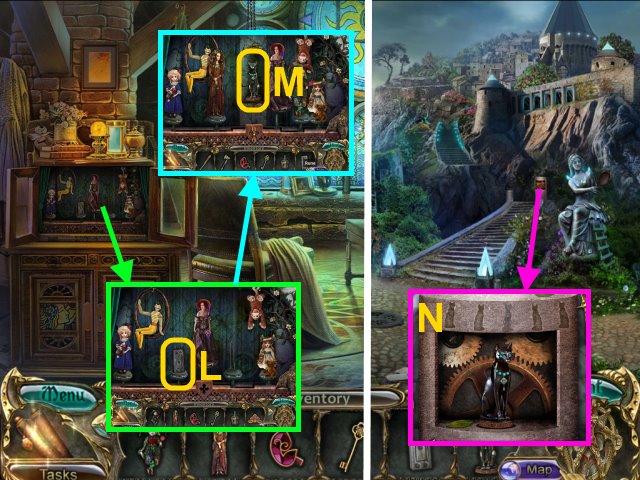
- Take the STONE RUNE (L); place the 2 DOLLS on the stand.
- Place the WINDING KEY in the slot; take the CAT FIGURINE (M).
- Go to the City Square.
- Place the CAT FIGURINE on the stand (N).
- Cross the bridge.
Chapter 3: The Upper Terraces
- Use the CHISEL on the mosaic; take the MOSAIC PIECE (O).
- Charge the Neutralizer (P).
- Go to the Viewing Platform.
- Take the HALF-MOON PLATE (Q).
- Take the BELT BUCKLE (R).
- Take the HARP TUNING PINS (S).
- Use the CHISEL on the roots; take the BELL (T).
- Walk down.
- Place the BELT BUCKLE on the statue (U); take the SHEARS (V).
- Go to The Park.
- Use the SMALL RAKE on the dirt; take the STONE RUNE (W).
- Walk forward.
- Place the 2 STONE RUNES in the slots (X); take the BOATHOOK and CROWBAR (Y).
- Use the SHEARS on the roses; take the RUBY INSERT (Z).
- Take the CRESCENT-MOON PLATE (A).
- Walk down.
- Use the CROWBAR on the feather; take the scheme and FEATHER-SHAPED LEVER (B).
- Use the CROWBAR on the board; take the FOUNTAIN WHEEL (C).
- Use the BOAT HOOK on the stool; take the STEPLADDER (D).
- Walk down.
- Place the STEPLADDER under the fountain (E); take the BELL CLAPPER (F).
- Place the FOUNTAIN WHEEL in the slot (G); take the RECTANGULAR MIRROR (H).
- Go to the Park.
- Place the BELL on the stand; use the BELL CLAPPER.
- Take the DECORATIVE INSERT (I).
- Go to the viewing platform.

- Place the RECTANGULAR MIRROR on the gate (J).
- Place the FEATHER-SHAPED LEVER on the statue (K); take the DECORATIVE RING (L).
- Place the DECORATIVE INSERT on the statue (M); take the MOSAIC PIECE (N).
- Go to the Marble Pavilion.

- Place the 2 MOSAICS PIECES in the frame (O).
- Walk forward.
- Take the TORCH (P).
- Move the books; take the CHEST HANDLE (Q).
- Take the BRACKET (R).
- Walk forward.
- Open the cupboard; take the CODE TUBE (S).
- Open the other cupboard; take the CODE TUBE (T).
- Place the CHEST HANDLE on the drawer (U); take the GRILL KEY (V).
- Take the PLATE WITH SYMBOLS (W).
- Take the MAGNET (X).
- Walk down.
- Use the MAGNET on the bracket (Y); take the BRACKET.
- Use the GRILL KEY on the door (Z).
- Walk right.
- Use the TORCH (A).
- Take the BRACKET (B).
- Place the PLATE WITH SYMBOLS in the slot; press the 3 runes.
- Take the WRENCH (C).
- Go to the Room.
- Place the 3 BRACKETS on the wall (D).
- Move the pillow; take DRAWER KEY (E).
- Use the DRAWER KEY on the drawer; take the GLASS CUTTER (F).
- Use the WRENCH on the grate; take the ROUND MIRROR (G).
- Use the GLASS CUTTER on the case to receive the GLASS; take the FULL-MOON PLATE (H).
- Place the GLASS in the box; examine the lens (I).
- Take the SAFE CARD (J).
- Walk down, then right.
- Place the HALF-MOON PLATE, CRESCENT-MOON PLATE, and FULL-MOON PLATE in the slots (K).
- Take the ROPE WITH HOOK (L).
- Walk down.
- Use the ROPE WITH HOOK on the niche (M).
- Place the DECORATIVE RING in the slot (N); take the ROUND MIRROR (O).
- Place the SAFE CARD on the safe; take the PLASMA BATTERY (P).
- Go to the Viewing Platform.
- Place the 2 ROUND MIRRORS on the stands (Q, R).
- Place the PLASMA BATTERY in the slot (S).
- Take the BLUE CRYSTAL (T).
- Go to the Second Floor.
- Use the Neutralizer on the plasma (U).
- Play the HOP.
- Use the symbol to time travel (V, W).
- You receive the STONE HAND.
- Go to the Park.
- Use the HARP TUNING PINS on the harp (X).
- Place the STONE HAND on the harp (Y).
- Place the 2 CODE TUBES in the ball; take the CODE CIRCLE (Z).
- Walk forward twice.
- Charge the Neutralizer (A).
- Walk right.

- Place the BLUE CRYSTAL on the stand; take the CHESS QUEEN (B).
- Take the CODE FIGURINE (C).
- Walk down twice.
- Place the CHESS QUEEN on the bench (D).
- Take the MOSAIC ARROW (E).
- Walk forward.

- Place the MOSAIC ARROW in the slot; take the BOAT-LIFT WHEEL (F).
- Walk down four times.
- Use the Neutralizer on the plasma (G).
- Play the HOP.
- Select the orb to time travel (H, I).
- You receive the MINIATURE SCENE.
- Go to the Mountain Gate.
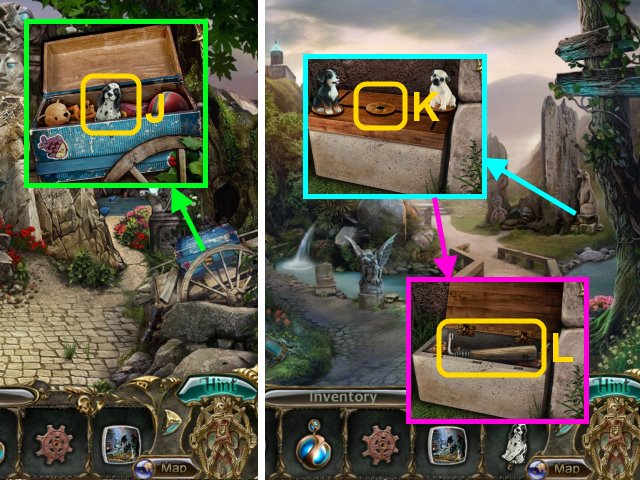
- Use the GOLD KEY on the lock; take the DOG STATUE (J).
- Walk down.
- Place the DOG STATUE on the stand (K); take the WOODEN LEVER (L).
- Go to the Waterway.
Chapter 4: The Research Lab
- Place the CODE FIGURINE on the stand (M).
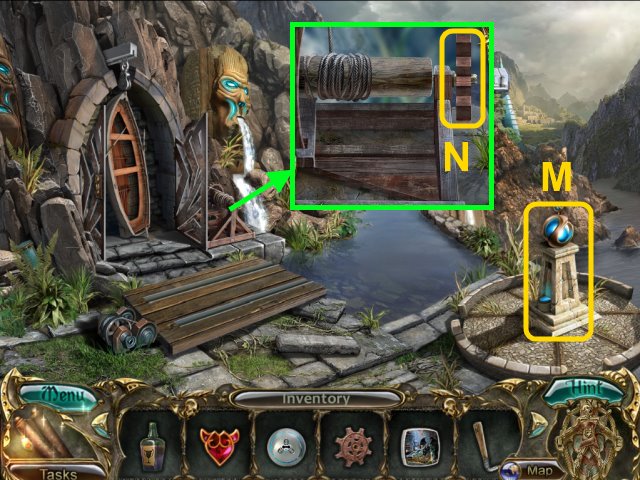
- Place the BOAT-LIFT WHEEL on the lever (N).
- Place the WOODEN LEVER on the mechanism (O).
- Go forward.
- Talk to the woman (P); you receive the ACCESS CARD.
- Walk forward.
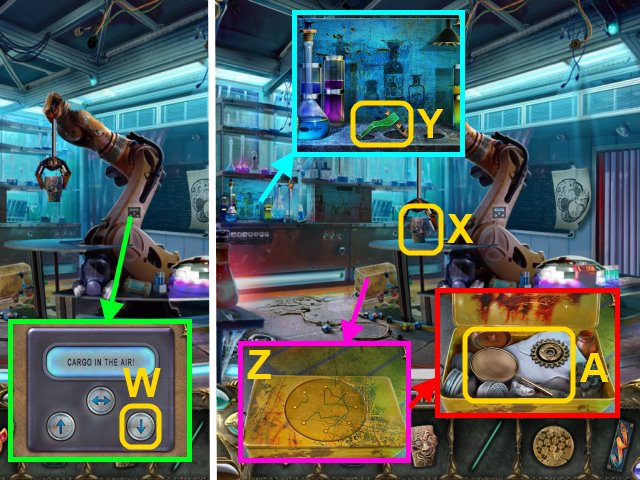
- Take the SCREWDRIVER (Q); take the CHEMICAL (R).
- Use the SCREWDRIVER to take the PONTOON (S).
- Take the RUBBER GLOVE (T).
- Walk down.
- Use the RUBBER GLOVE on the wires; take the DOOR SCREW (U).
- Use the SCREWDRIVER to take the PONTOON (V).
- Use the SCREWDRIVER on the bolt; take the PLANK PART (W).
- Walk down twice.
- Place the 2 PONTOONS on the water; use the SMALL AXE to take the CHARGER PLATE (X).
- Walk forward twice.
- Place the CHARGER PLATE in the slot; charge the Neutralizer (Y).
- Walk left.
- Use the MINIATURE SCENE on the gate for a mini-game (Z).
- Solution (A).
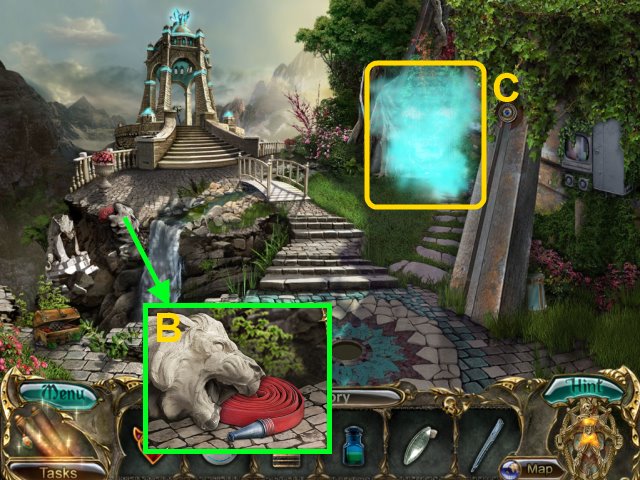
- Use the PLANK PART on the statue; take the FIRE HOSE (B).
- Use the Neutralizer on the plasma (C).
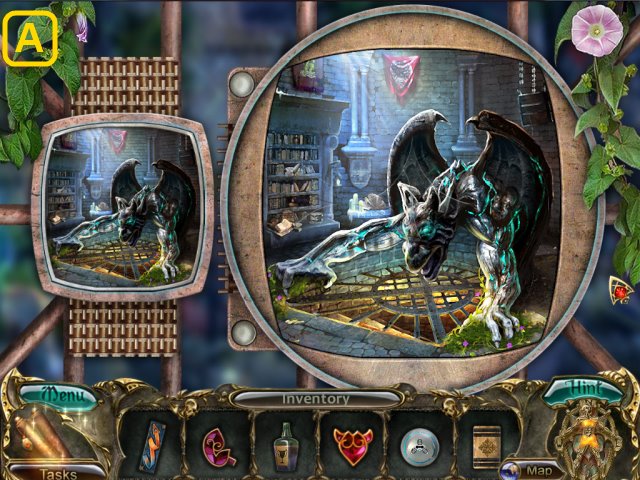
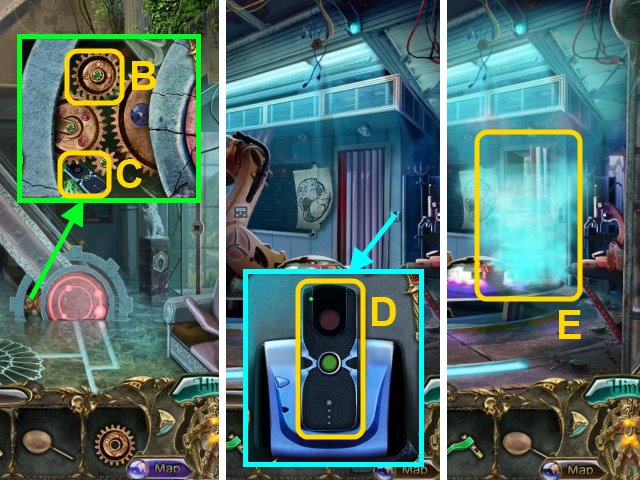
- Play the HOP.
- Use the crystal to time travel (D, E).
- You receive the HYDRANT HANDLE.
- Walk down.
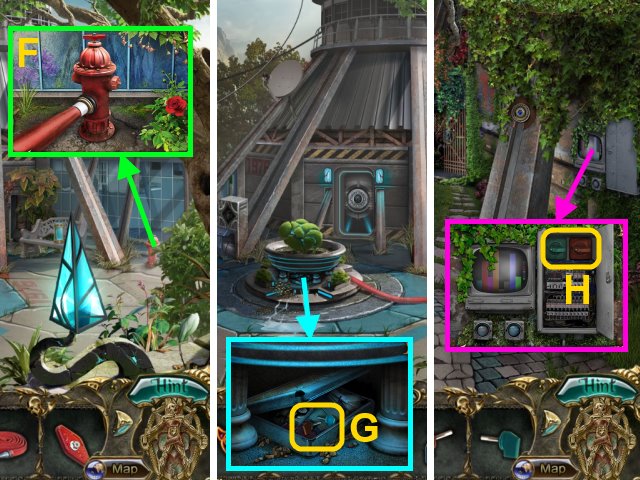
- Attach the FIRE HOSE and HYDRANT HANDLE to the hydrant (F).
- Open the case; take the 2 PANEL SWITCHES (G).
- Walk left.
- Place the DOOR SCREW on the door.
- Place the 2 PANEL SWITCHES on the panel-board (H).
- Walk down.
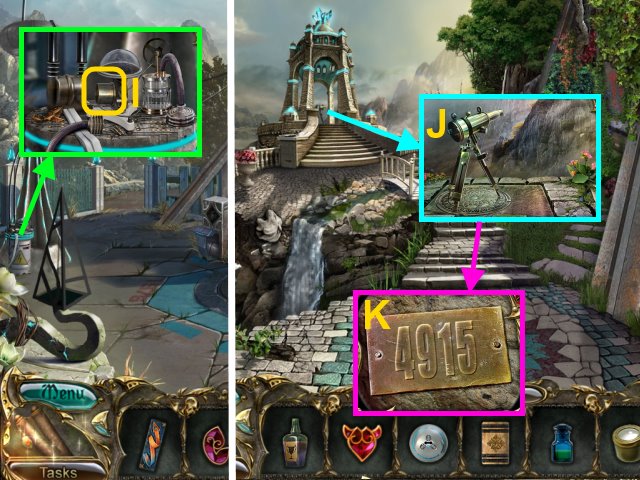
- Move the wires; take the EYEPIECE (I).
- Walk left.
- Place the EYEPIECE on the telescope (J); examine it (K).
- Walk down.
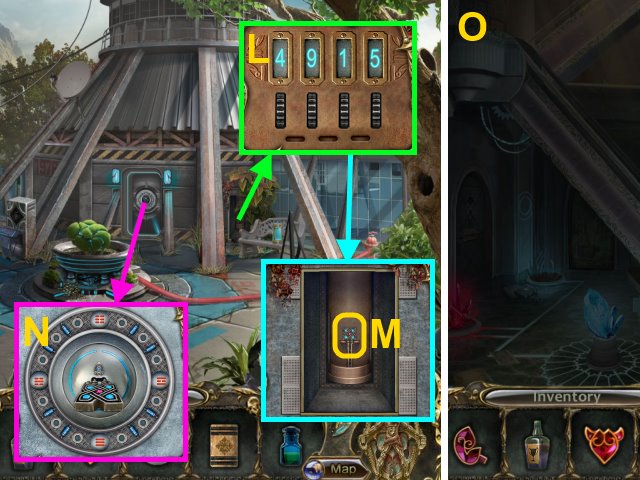
- Enter the code (L).
- Take the RESEARCH-BASE KEY (M).
- Place the CODE CIRCLE in the slot; use the RESEARCH-BASE KEY (N).
- Enter the building (O).
- Go Behind the Building.
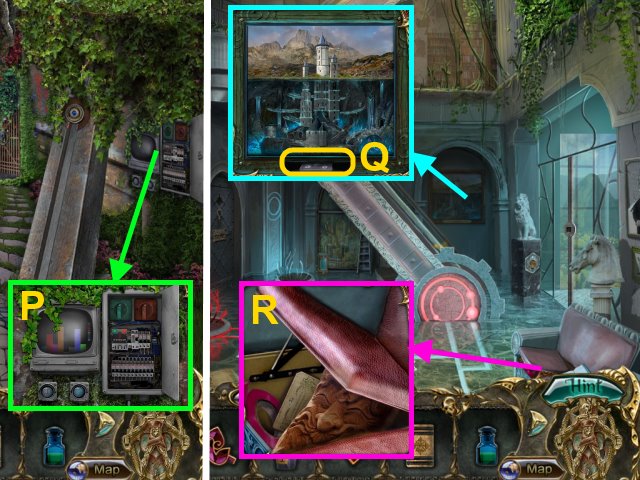
- Turn the switches (P).
- Go to the Building Entrance.
- Place the ENABLER in the slot; take the CONTROL-PANEL COVER (Q).
- Move the cushion; take the OLD-MAN STATUE, note, and TAPE (R).
- Use the TAPE on the slot; take the KNITTING NEEDLE (S).
- Insert the ACCESS CARD into the slot (T).
- Use the KNITTING NEEDLE on the disc; take the EMBOSSED METAL DISC (U).
- Charge the Neutralizer (V).
- Walk forward.
- Place the CONTROL PANEL COVER on the panel; press the button (W).
- Take the OLD-MAN STATUE (X).
- Take the VALVE HANDLE (Y).
- Place the EMBOSSED METAL DISC on the box (Z); take the BUTTERFLY NET and GEAR (A).
- Walk down.
- Place the GEAR on the mechanism (B).
- Use the KNITTING NEEDLE; take the CONTROL PANEL (C).
- Walk forward.
- Place the CONTROL PANEL on the door (D); press the button.
- Use the Neutralizer on the plasma (E).
- Play the HOP.
- Use the orb to time travel (F, G).
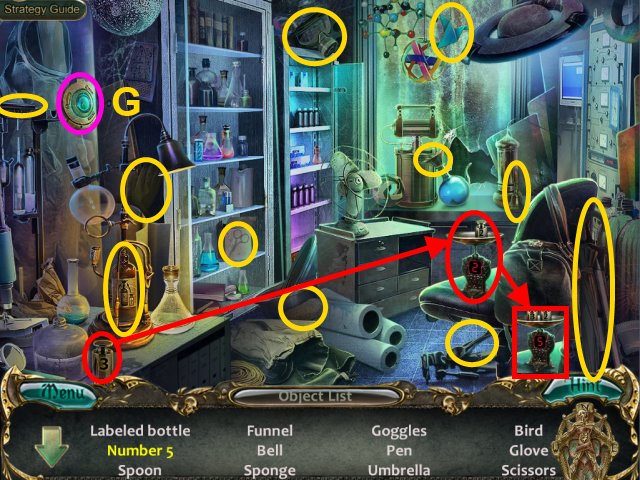
- You receive the LABELED BOTTLE.
- Walk down; go up.

- Take the SAW (H).
- Place the 2 OLD-MAN STATUES in the slots; take the MOSAIC CIRCLE (I).
- Walk down.
- Use the SAW to take the 2 CRYSTAL FIGURINES (J, K).
- Go up.
- Place the 2 CRYSTAL FIGURINES in the slots (L).
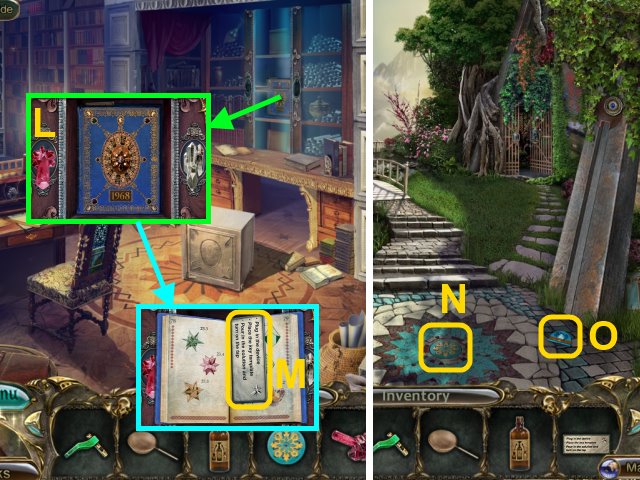
- Open the book; take the CRYSTAL-GROWING INSTRUCTIONS and book (M).
- Go to Behind the Building.
- Place the MOSIAC CIRCLE in the mosaic (N); take the FANCY CARD (O).
- Go to the Building Entrance.
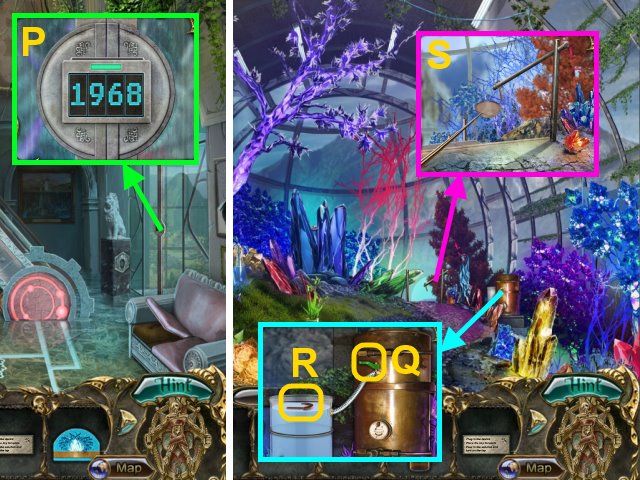
- Place the FANCY CARD in the slot; enter the code (P).
- Go right.
- Place the VALVE HANDLE on the machine (Q); take the GLOBE HANDLE (R).
- Place the BUTTERFLY NET under the railing; take the DRAWER KEY (S).
- Walk down; go up.
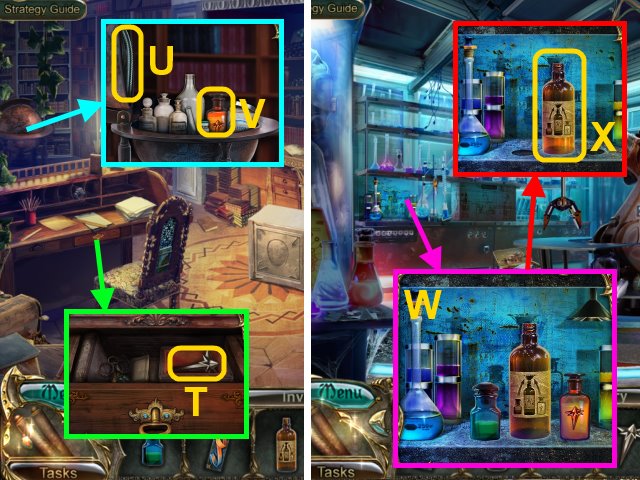
- Use the DRAWER KEY on the drawer; take the CRYSTAL-KEY TEMPLATE (T).
- Place the GLOBE HANDLE on the globe; take the HOSE (U) and CHEMICAL (V).
- Walk down; go forward.
- Place the LABELED BOTTLE and 2 CHEMICALS on the shelf (W).
- Select the funnel; pour the green chemical, then the orange chemical into the bottle.
- Take the CRYSTAL-KEY SOLUTION (X).
- Walk down; go right.
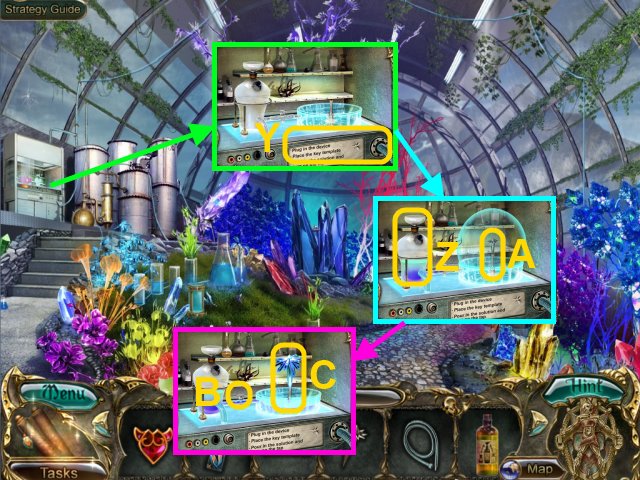
- Place the CRYSTAL-GROWING INSTRUCTIONS in the frame; insert the HOSE (Y).
- Pour the CRYSTAL-KEY SOLUTION into the beaker (Z); place the CRYSTAL-KEY TEMPLATE on the stand (A).
- Turn the handle (B); take the CRYSTAL KEY (C).
- Go to the Library.
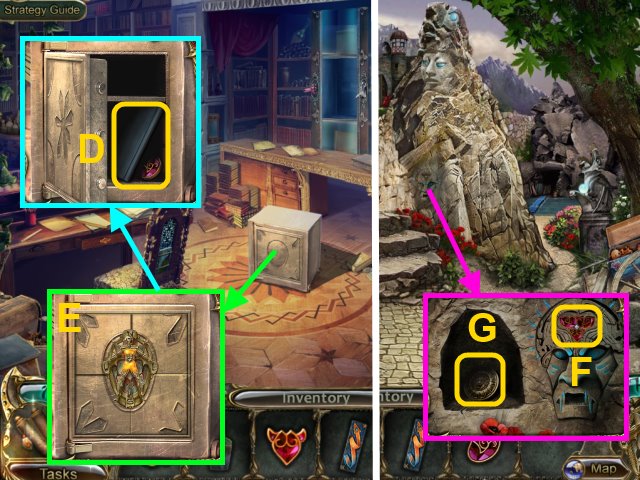
- Place the Neutralizer on the safe (D); place the CRYSTAL KEY in the slot.
- Read the notebook; take the RUBY INSERT (E).
- Walk down four times.
- Place the 3 RUBY INSERTS in the statue (F); take the LION MEDALLION (G).
- Go to the Viewing Platform.
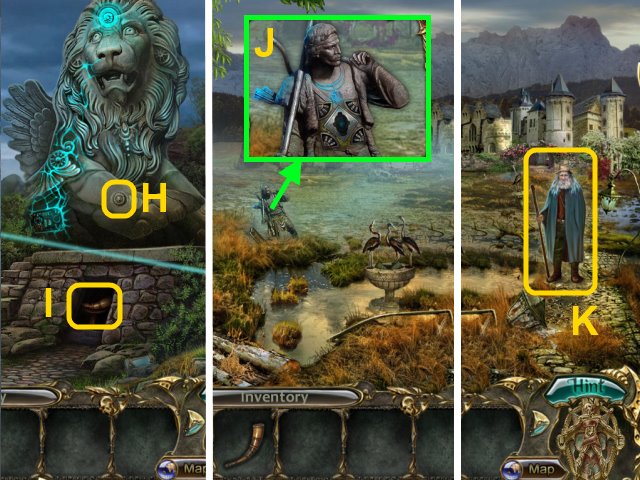
- Place the LION MEDALLION in the hole (H); take the BUGLE (I).
- Go to the Swamp.
- Give the BUGLE to the statue (J).
- Give the WISEWOMAN'S POTION to the hermit (K).
- Walk forward.
Chapter 5: The Castle
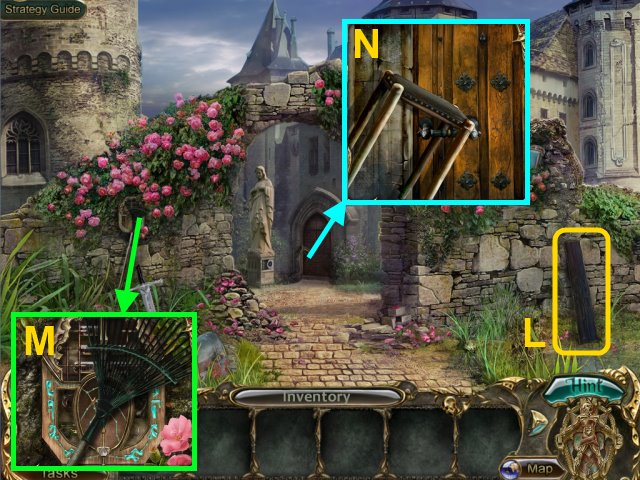
- Take the BOARD (L).
- Take the RAKE (M).
- Take the STOOL (N).
- Go forward.
- Place the STOOL under the armor (O); take the KEY (P).
- Take the HAMMER (Q).
- Take the GLASS YACHT (R).
- Use the KEY on the drawer; take the CHARGER BULB (S) and GLASS OWL (T).
- Walk down.

- Place the CHARGER BULB on the charger; charge the Neutralizer (U).
- Walk down.
- Place the BOARD on the water (V).
- Use the Neutralizer (W).
- Play the HOP.
- Use the orb to time travel (X, Y).
- You receive the STATUE WHEEL.
- Walk forward.
- Place the STATUE WHEEL in the slot (Z); take the DRAGON (A).
- Walk forward.
- Place the DRAGON on the door (B).
- Walk forward.
- Take the KNIGHT FIGURINE (C).
- Take the DECORATIVE LEVER (D).
- Use the RAKE on the leaves; take the HOOK ON A LINE (E).
- Press the runes (F, G).
- Go through the door.
- Take the FISH FOOD (H).
- Give the FISH FOOD to the fish (I).
- Use the HOOK ON A LINE to take the HERMIT'S RING (J).
- Walk down.
- Place the HERMIT'S RING on the statue (K).
- Walk forward.
- Take the MATCHBOX (L).
- Use the HAMMER on the lock; Take the JEWEL-BOX KEY (M) and TIRE IRON (N).
- Walk down.
- Use the TIRE IRON to take the MOSAIC FRAGMENT (O).
- Use the JEWEL-BOX KEY on the lock (P); you receive the MATCH.
- Walk down.

- Place the DECORATIVE LEVER on the frame; take the TRIANGLE GEM, SQUARE GEM, and OVAL GEM (Q).
- Walk forward.
- Place the TRIANGLE GEM in the slot (R); take the PAINTING FRAGMENT (S).
- Take the SHIELD (T).
- Go forward.
- Place the MOSAIC FRAGMENT on the mosaic (U).
- Take the MINIATURE SCENE (V).
- Walk down twice.
- Place the MINIATURE SCENE on the clock (W); take the JEWELER'S PLIERS (X).
- Go to the Study.
- Place the MATCHBOX on the shelf; light the MATCH (Y).
- Take the PRINCESS FIGURINE (Z).
- Use the JEWELER'S PLIERS on the skull; take the GLASS FISH (A).
- Place the PAINTING FRAGMENT on the easel (B).
- Place the GLASS OWL, GLASS YACHT, and GLASS FISH on the stand; take the GOLD FEATHER and CHARGER BULB (C).
- Place the CHARGER BULB on the charger; charge the Neutralizer (D).
- Walk down.
- Use the Neutralizer on the plasma (E).
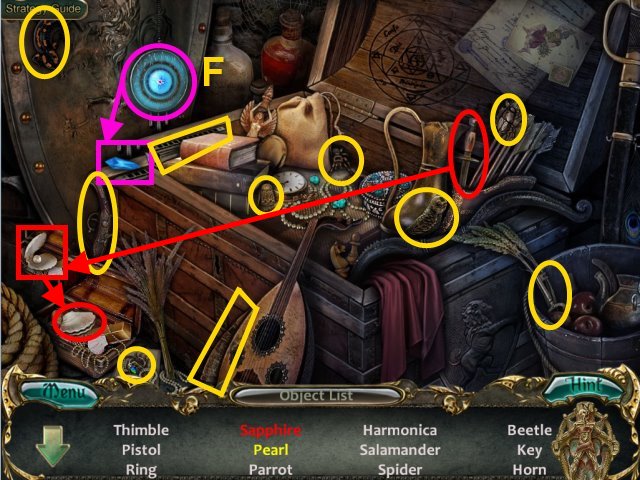

- Play the HOP.
- Select the orb to time travel (F, G).
- You receive the CASTLE KEY.
- Walk down.
- Place the KNIGHT FIGURINE and PRINCESS FIGURINE on the clock; take the GOLD FEATHER (H).
- Go forward twice.
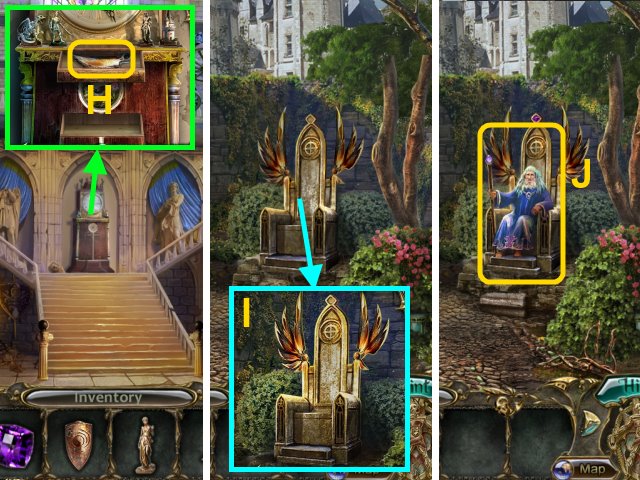
- Place the SQUARE GEM and 2 GOLD FEATHERS on the throne (I).
- Talk to the hermit (J).
- Use the CASTLE KEY on the lock (K).
- Go forward.
- Place the OVAL GEM on the box (L); take the HELMET LATCH (M).
- Walk down three times.
- Use the HELMET LATCH on the armor; take the STONE HEAD (N).
- Go to the Castle.
- Take the RUBY CIRCLE (O).
- Use the SHIELD on the statue; place the STONE HEAD on it (P).
- Place the ENABLER in the slot (Q).
- Go forward.
- Take the CONNECTING ROD (R).
- Place the RUBY CIRCLE in the slot (S); take the MICROCHIP (T).
- Place the CONNECTING ROD in the device; press the button (U).
- Take the MINIATURE SCENE (V).
- Place the MINIATURE SCENE on the panel for a mini-game (W).

- Solution (X).
- Press the button (Y).
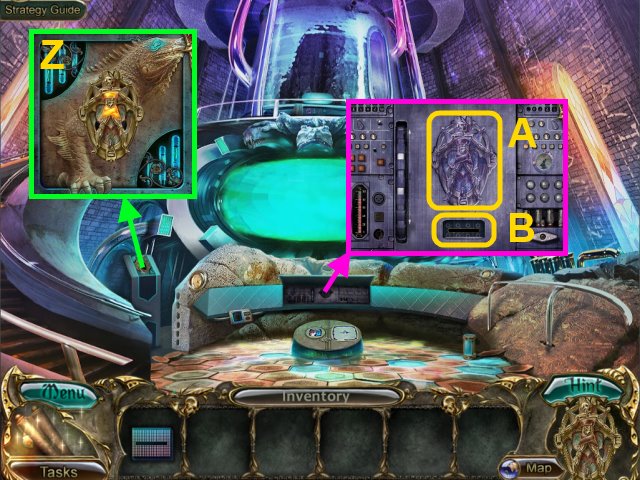
- Charge the Neutralizer (Z).
- Place the Neutralizer on the panel (A).
- Place the MICROCHIP in the slot (B).
- Congratulations! You have completed Phenomenon: Outcome.
Created at: 2014-06-01