

Walkthrough Menu
- General Tips
- Chapter 1: Dr. Hopkins
- Chapter 2: Dr. Fowler
- Chapter 3: The Astronomer
- Chapter 4: The Garden
- Chapter 5: The Treasury
- Chapter 6: The Fisherman's Cabin
General Tips
- This is the official guide for Punished Talents: Stolen Awards.
- This guide will not tell you when you have to zoom into a location; the screenshots will show each zoom scene.
- Hidden-object puzzles are referred to as HOPs. This guide will not show screenshots of the HOPs, however, it will mention when an HOP is available and the inventory item you'll collect from it.
- Use the Map to fast travel to a location.
Chapter 1: Dr. Hopkins
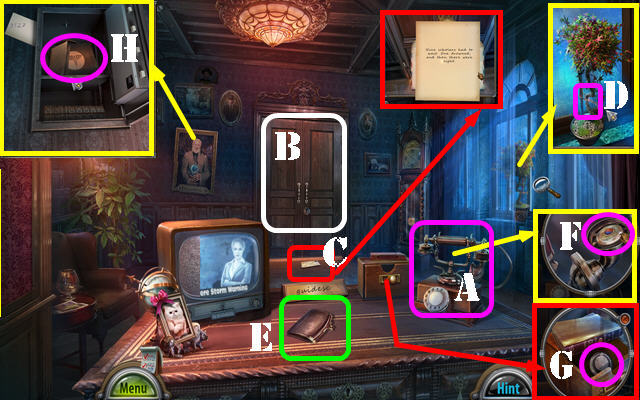
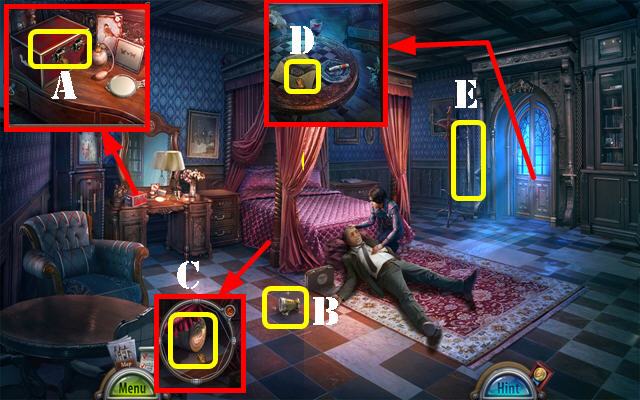
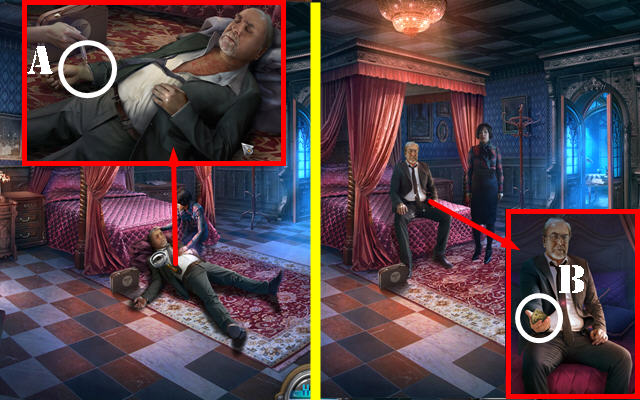
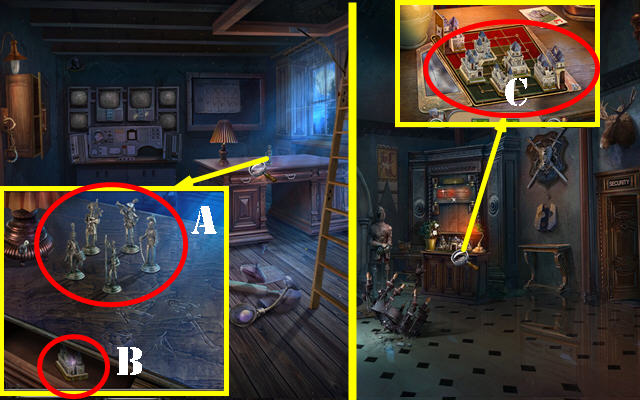
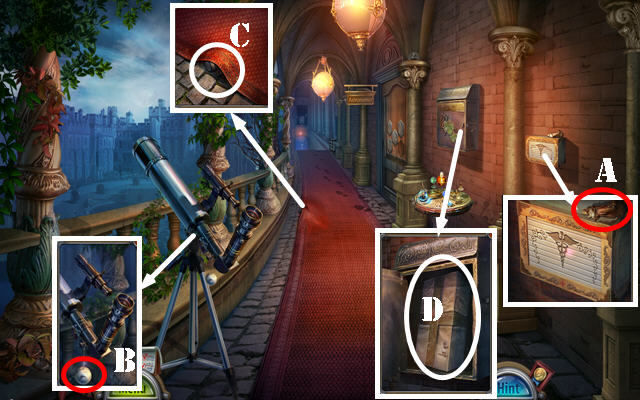
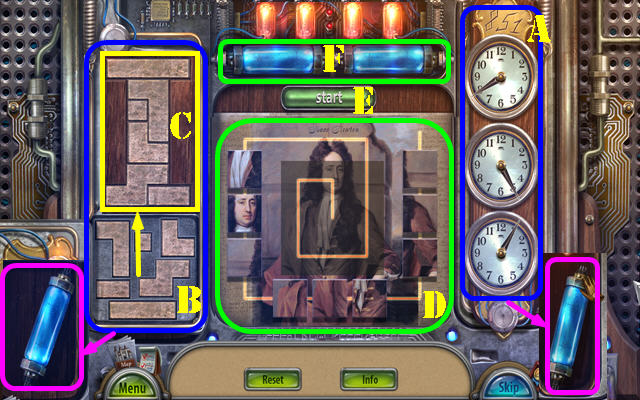
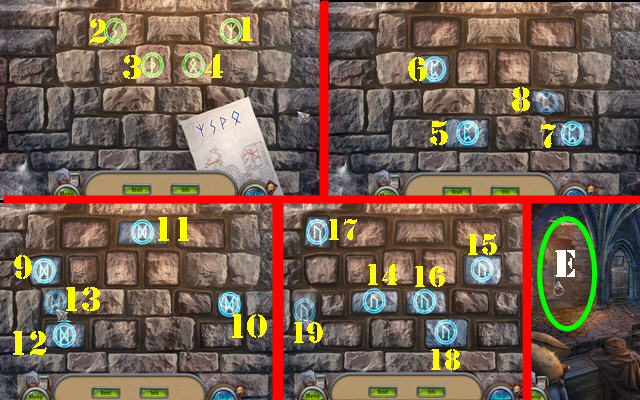
- Answer the phone (A).
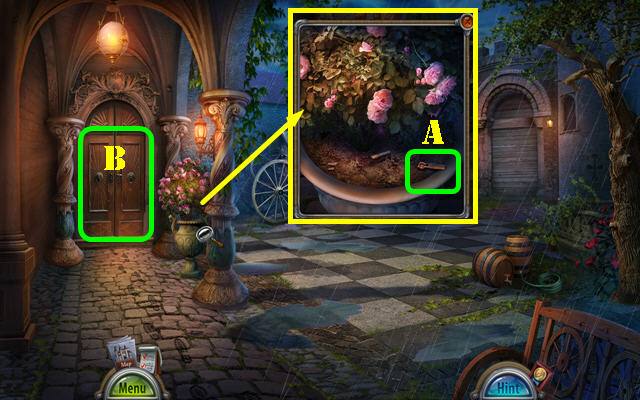
- Select the door (B); open the letter (C) and read it.
- Select the WIRE 4x (D).
- Select the WIRE 4x (inventory).
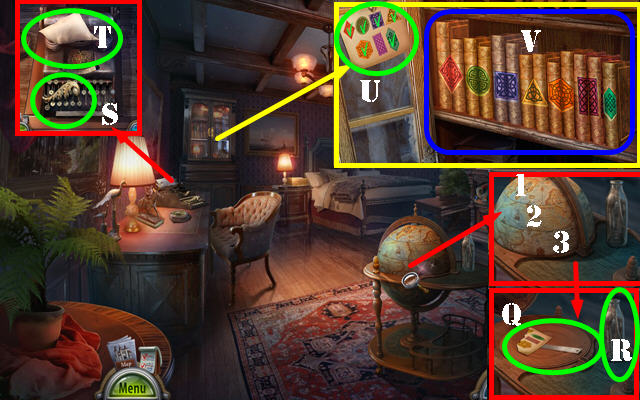
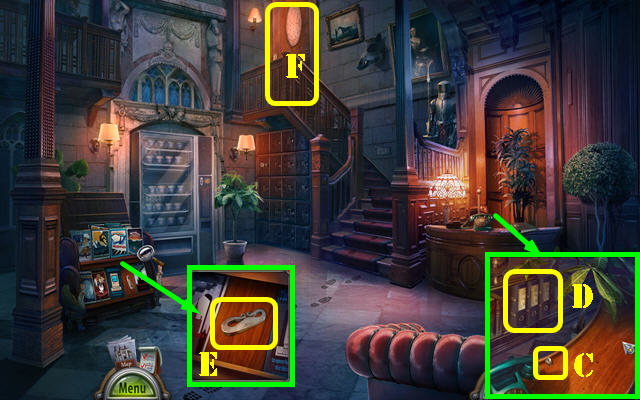
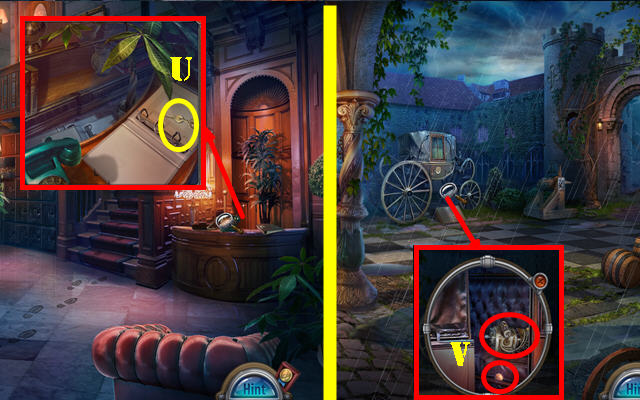
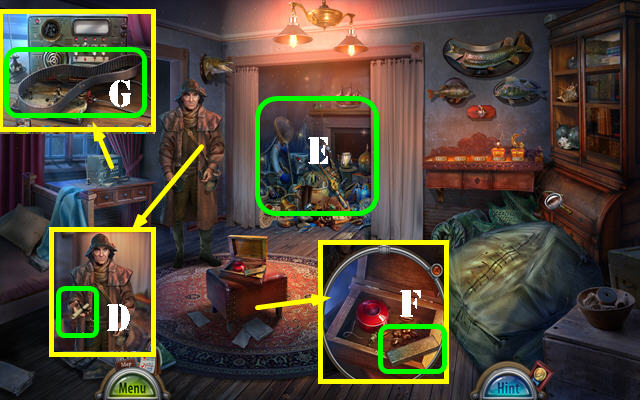
- Take the PURSE (E). Open the PURSE; move the lipstick and take the COIN. Flip the card; take the CODE (inventory).
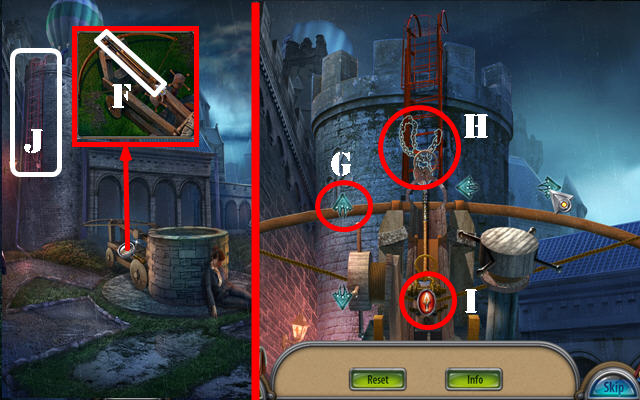
- Use the COIN; remove the receiver; take the MAGNET (F).
- Open the drawer; take the SAFE DIAL (G).
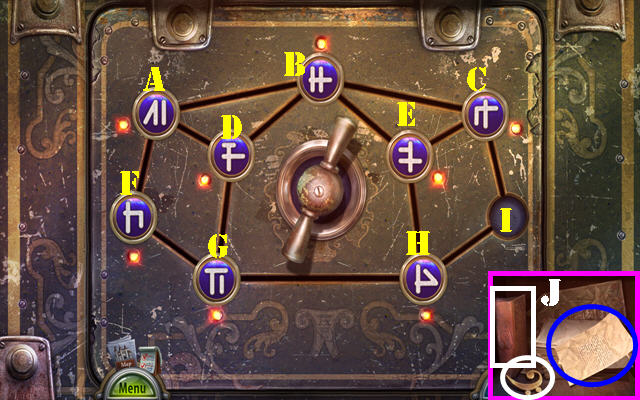
- Remove the painting; place the SAFE DIAL and CODE. Rotate the dial to 9, 5, 2 and 7 and open the safe; take the Map, MEDICAL KIT and CLIPPERS (H).
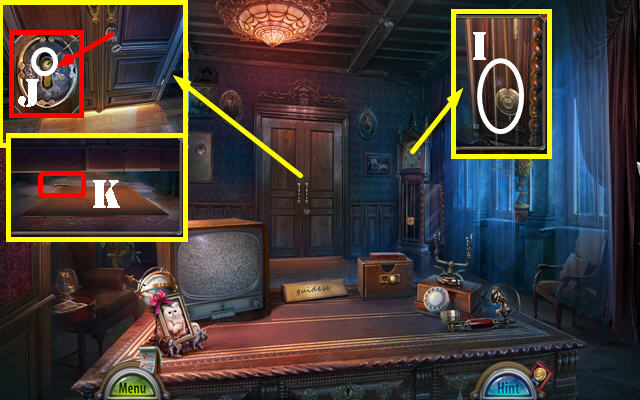
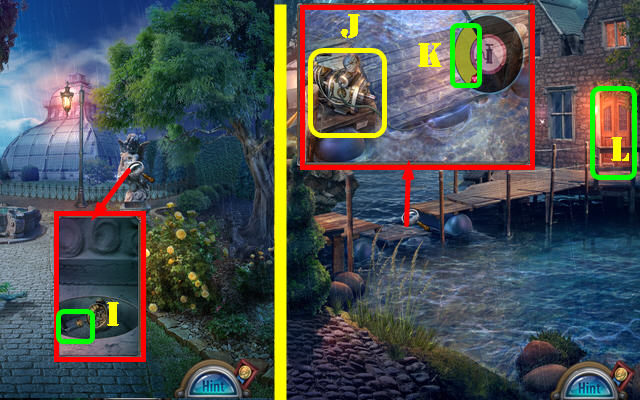
- Open the door. Use the CLIPPERS to get the CHAIN (I).
- Place the CHAIN on the MAGNET; take the MAGNET WITH CHAIN (inventory).
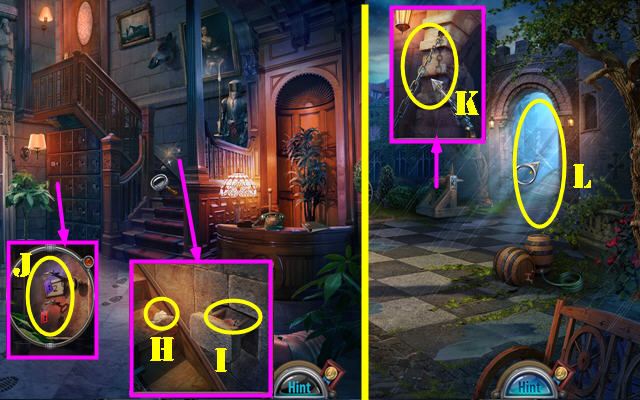
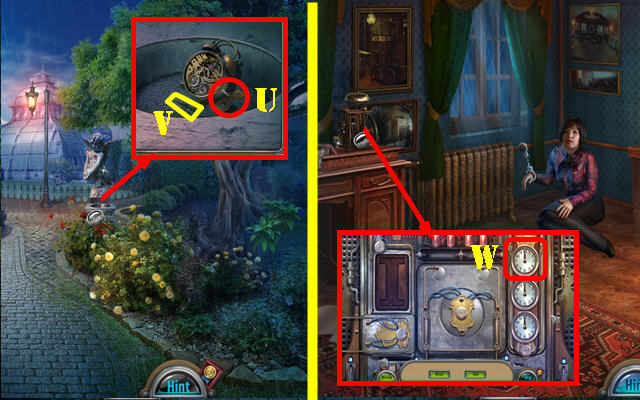
- Use the WIRE (J). Use the MAGNET WITH CHAIN; take the OFFICE KEY (K).
- Use the OFFICE KEY (J); turn it twice; go through the door.
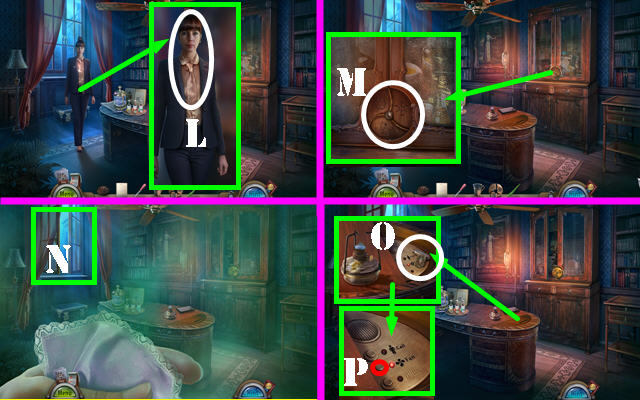
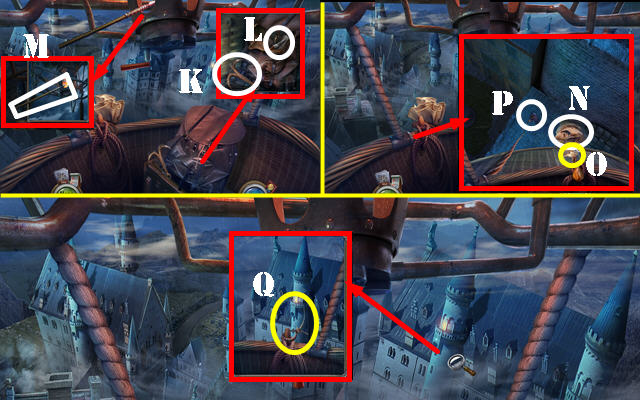
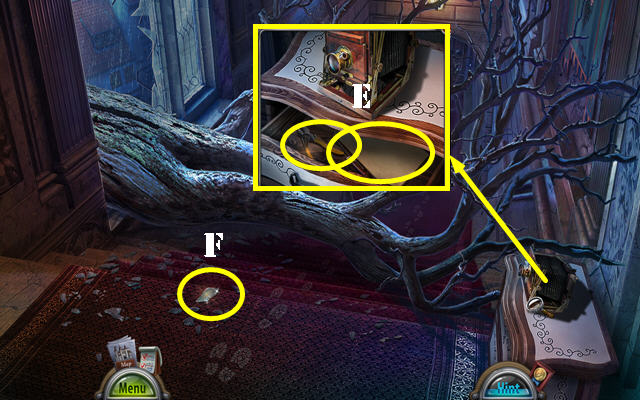
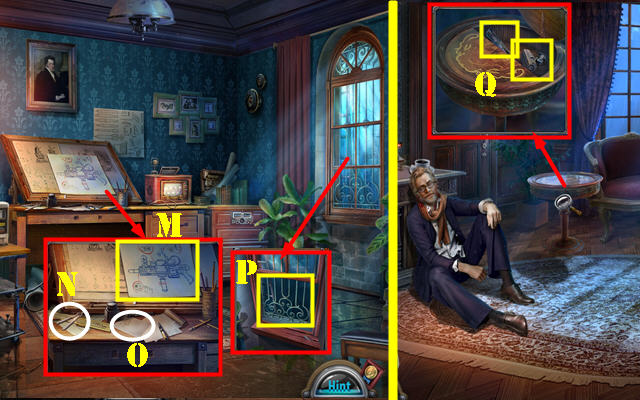
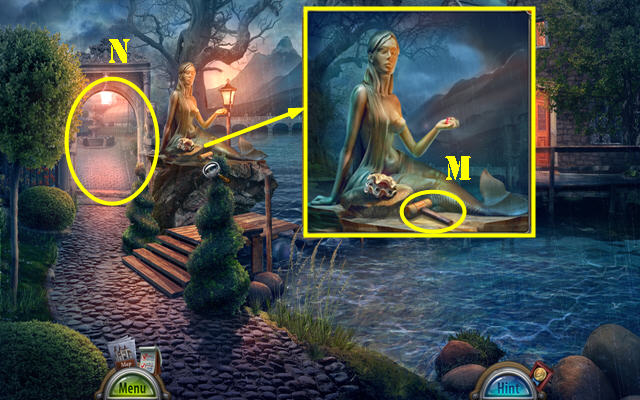
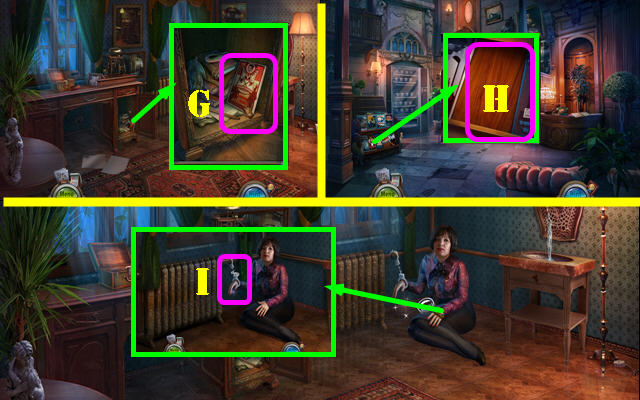
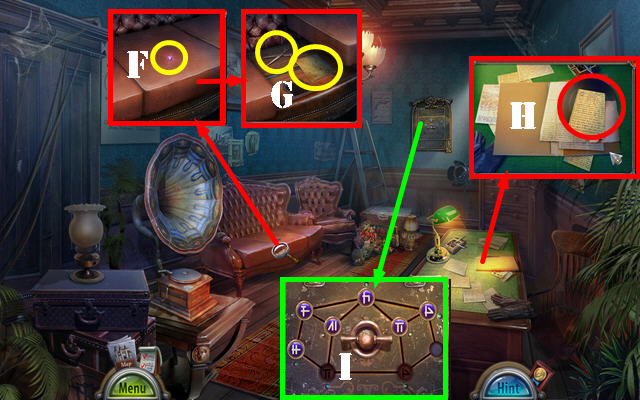
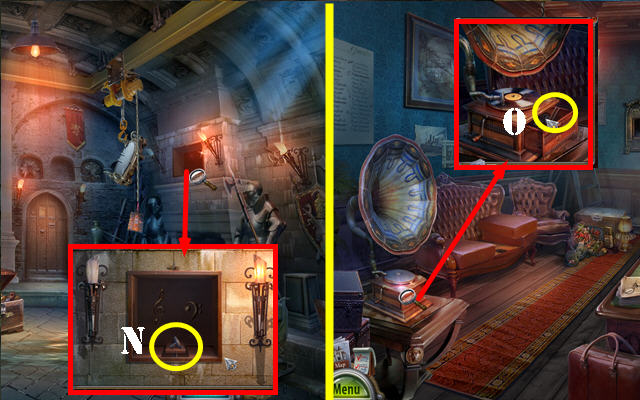
- Remove the cover; Look at the invitation; take the TEA LEAVES (L). Move the bottle (M).
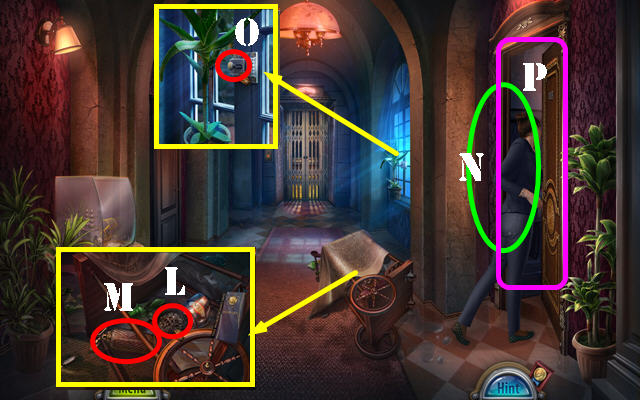
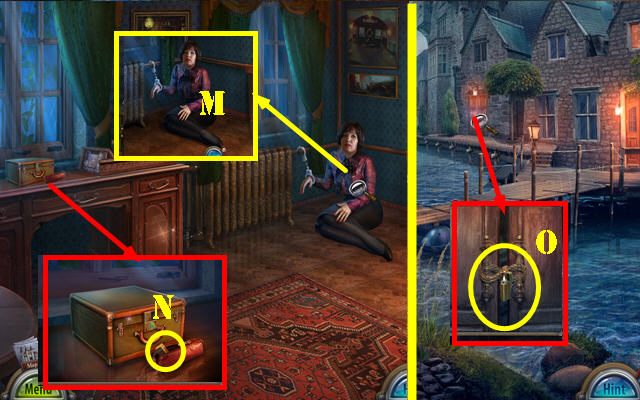
- Talk to Lana (N).
- Take the LATCH KNOB (O).
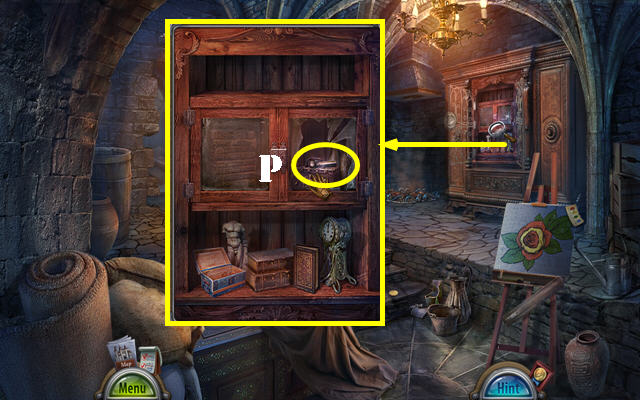
- Enter Dr. Hopkins's Room (P).
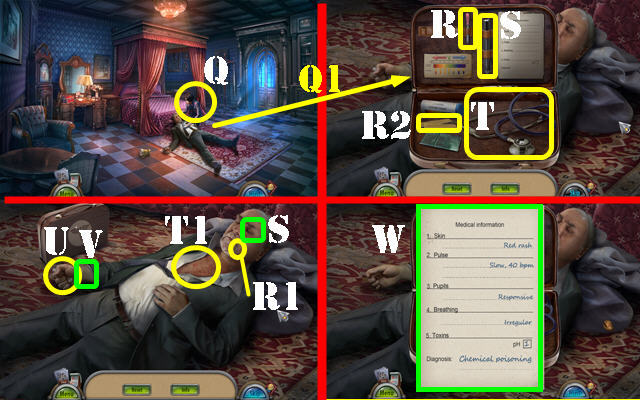
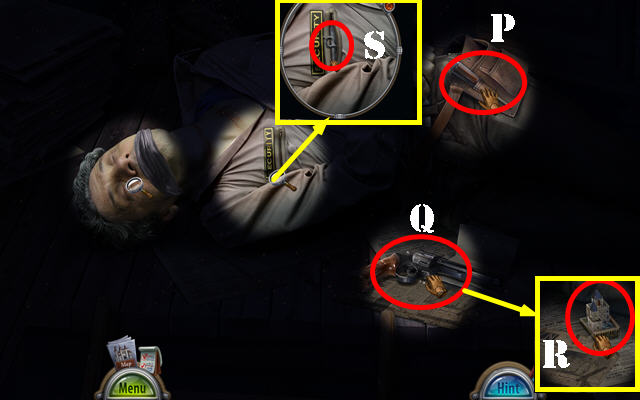
- Talk to Mrs. Hopkins (Q).
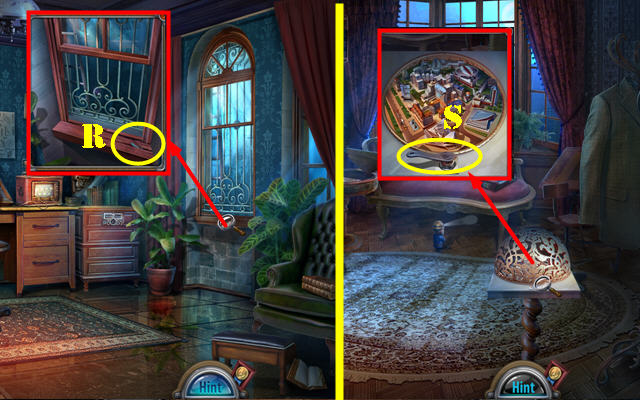
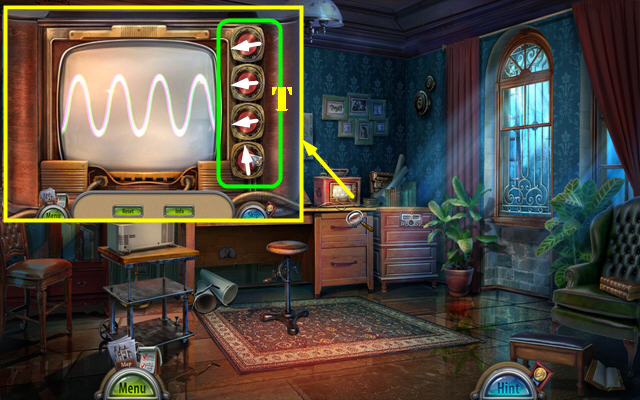
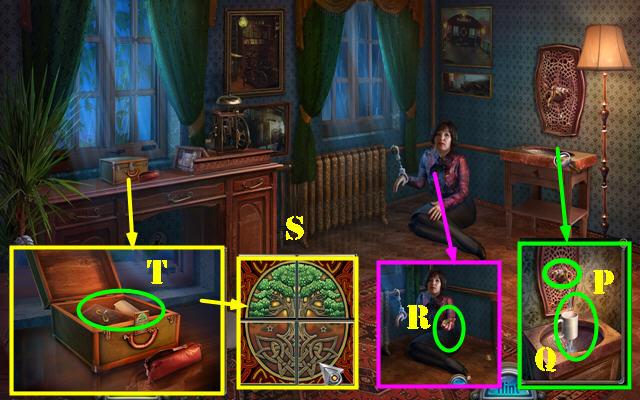
- Place the MEDICAL KIT and open it for a puzzle (Q1). Use the eyedropper (R) here (R1) and then here (R2).
- Use the flashlight (S) on the eye (S1).
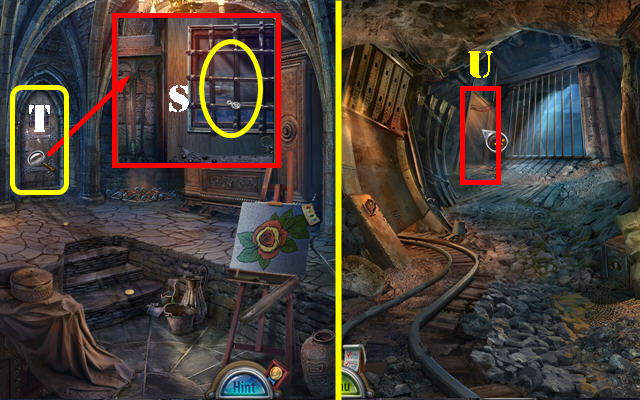
- Select the shirt twice; use the stethoscope (T) on the chest (T1).
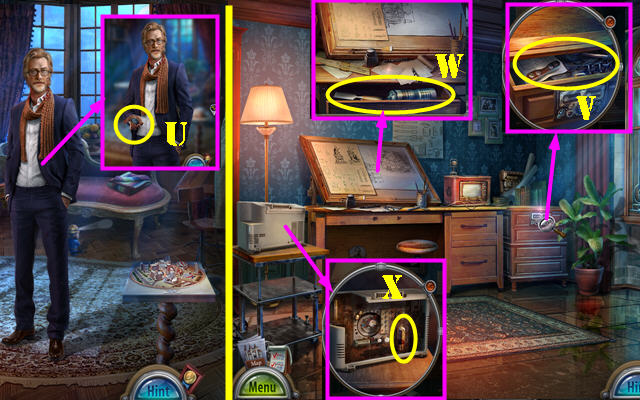
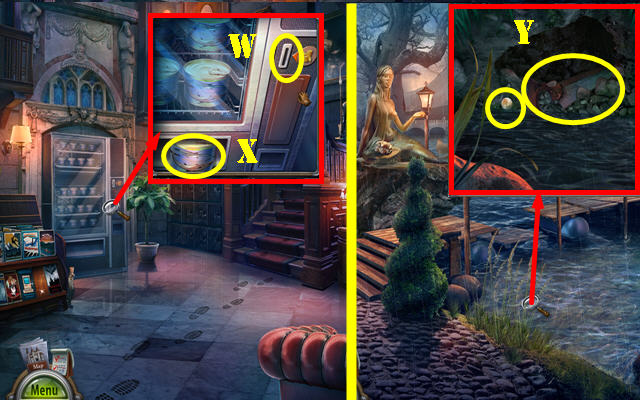
- Open the hand; take the note (U); select the wrist (V).
- Take the DIAGNOSIS (W); you'll automatically receive the SALIVA SAMPLE.
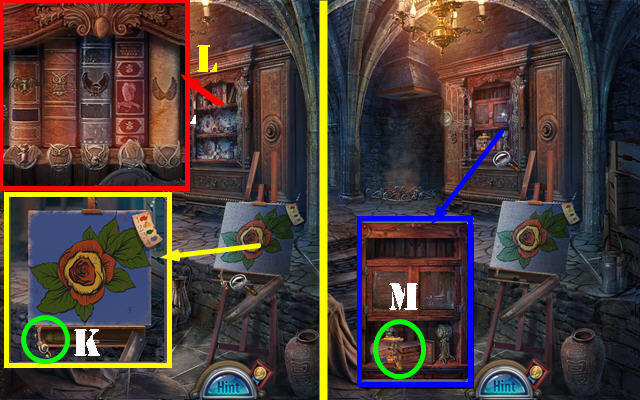
- Open both latches for an HOP (A); play it to get the RAZOR.
- Select the RAZOR 4x; take the BLADE (inventory).
- Take the CUP (B).
- Lift the cover; take the CAN OF PEANUTS (C).
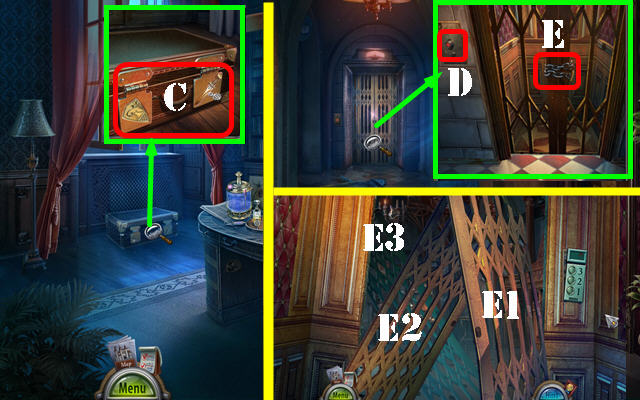
- Place the LATCH KNOB and pull it; take the BROKEN TOKEN 1/3 (D).
- Open the CAN OF PEANUTS; take the PEANUTS (inventory).
- Take the CLOSED UMBRELLA (E). Select the CLOSED UMBRELLA twice; take the LONG UMBRELLA (inventory).
- Walk down.

- Place the PEANUTS (G); take the BROKEN TOKEN 2/3 (H).
- Use the BLADE to get the ALOE (I).
- Use the LONG UMBRELLA to get the BROKEN TOKEN 3/3 (J).
- Go to Dr. Jones's Room (K).
- Give the DIAGNOSIS (L).
- Place the 3 BROKEN TOKENS (M); open the door for an HOP; play it to get the SNAKE VENOM.
- Open the window (N).
- Open the compartment and look at the note; take the COAT OF ARMS 1/4 and SODA CARTRIDGE (O). Press the Fan button (P).
- Walk down.
- Take the note (Q) and SWORD (R).
- Insert the SODA CARTRIDGE (S) and place the CUP (T); select the lever and take the CUP OF WATER.
- Go to Dr. Jones's Room.
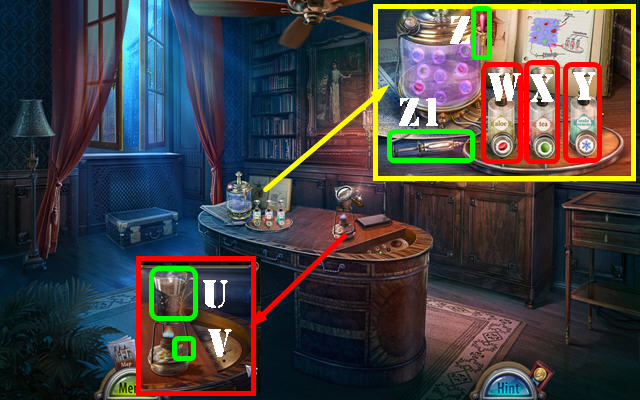
- Place the CUP OF WATER (U); select the burner (V). Place the TEA LEAVES in the cup; take the TEA.
- Place the ALOE (W), TEA (X), SNAKE VENOM (Y) and SALIVA SAMPLE (Z) for a puzzle.
- Solution: Wx3-X-Yx5.
- Take the ANTIDOTE (Z1).
- Return to dR. Hopkins's Room.
- Use the ANTIDOTE (A).
- Talk to Mr. Hopkins; take the SHIELD (B).
- Return to Dr. Jones's Room.
- Place the SHIELD and SWORD (C); open the suitcase for an HOP; play the HOP to get the ACID.
- Walk down.
- Press the button (D). Open the door; use the ACID (E). Enter the elevator, then select (E1-E2-E3).
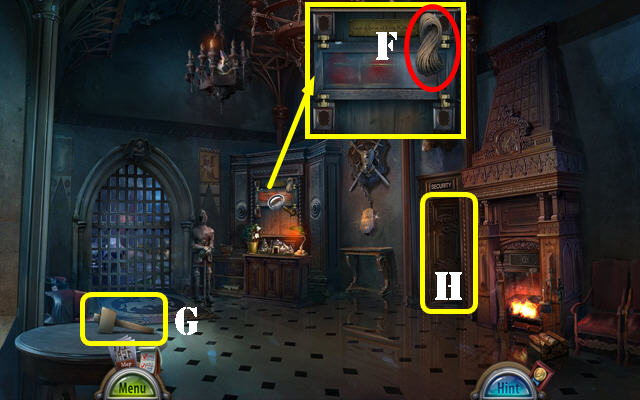
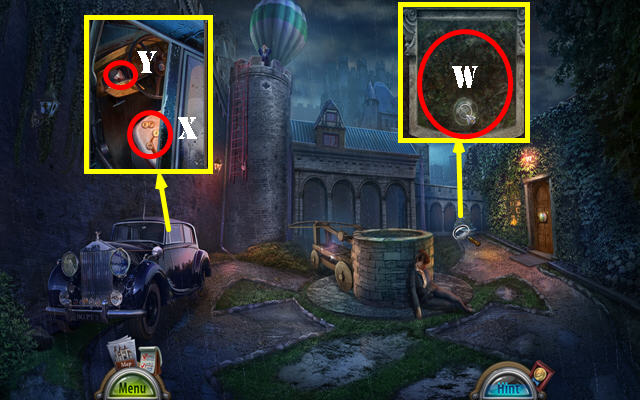
- Take the ROPE (F) and MALLET (G).
- Enter the Security Room (H).
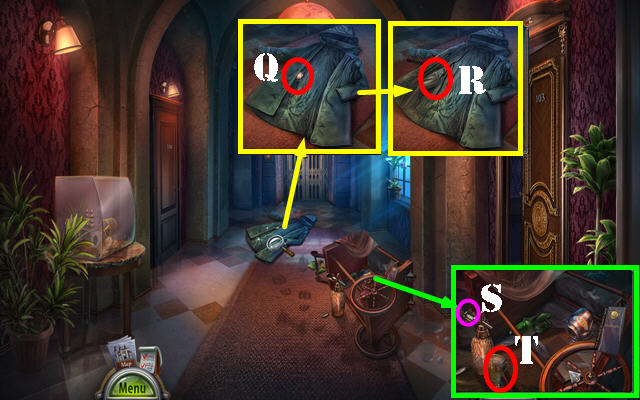
- Pull the latch (I) for an HOP (J); play it to get the BATTERY.
- Take the DEAD FLASHLIGHT (K).
- Remove the old battery from the DEAD FLASHLIGHT and insert the BATTERY; select it to get the FLASHLIGHT (inventory).
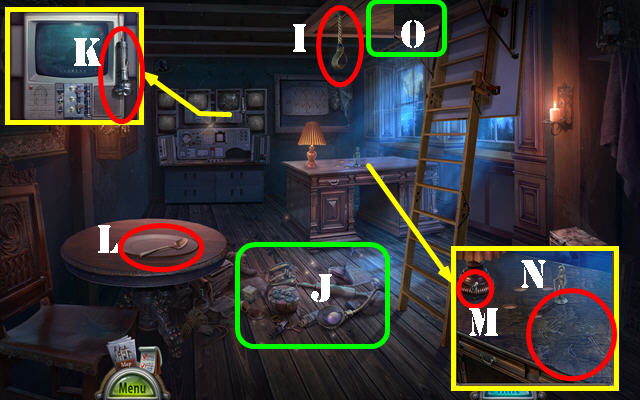
- Take the SPOON (L).
- Select the switch (M) to view a clue (N).
- Go to the Attic (O).
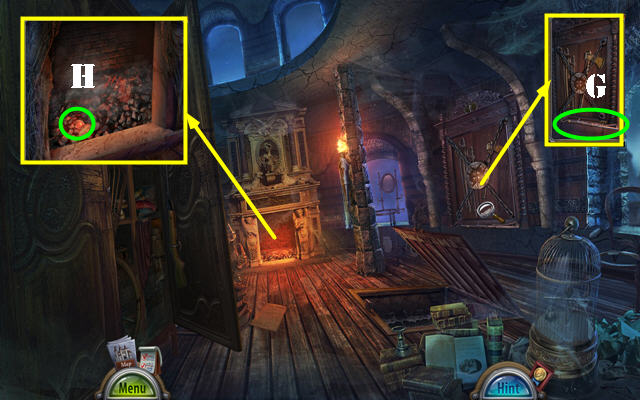
- Use the FLASHLIGHT on the scene; take the SCREWDRIVER (P) and EMPTY REVOLVER (Q).
- Look at the note; take the CASTLE PARTS 1/3 (R).
- Open the zipper; take the HANDCUFF KEY (S).
- Walk down.
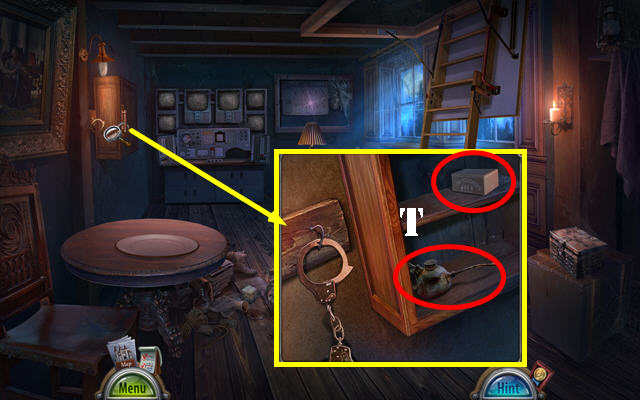
- Use the HANDCUFF KEY; take the OILER and COOL MOLD (T).
- Select the COOL MOLD twice; take the EMPTY MOLD (inventory).
- Walk down.
- Use the OILER; take the RING (U).
- Use the RING (V); select it. Take the CASTLE PARTS 2/3 (W).
- Use the SCREWDRIVER; take the BRUSH (X).
- Go to the Security Room.
- Use the BRUSH; take the GLOVES (Y).
- Walk down.
- Place the EMPTY MOLD; place the SPOON on it. Use the GLOVES; take the HOT MOLD (Z).
- Select the HOT MOLD twice; take the SOLDIERS (inventory).
- Go to the Security Room.
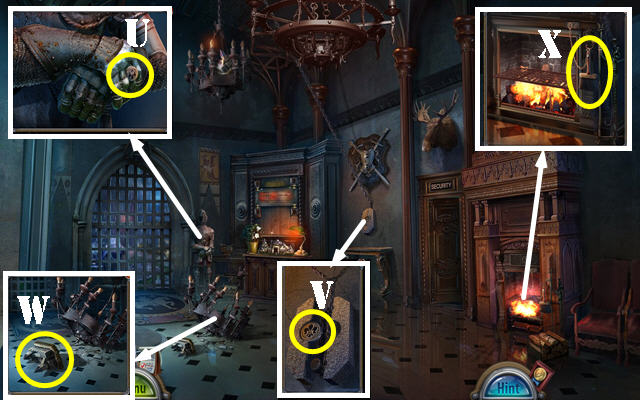
- Place the SOLDIERS; arrange as shown (A). Take the CASTLE PARTS 3/3 (B).
- Walk down.
- Place the 3 CASTLE PARTS for a puzzle (C).
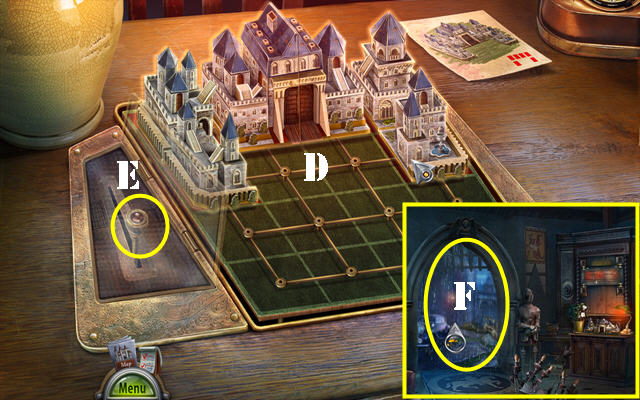
- Solution (D).
- Pull the lever (E).
- Go through the door (F).
Chapter 2: Dr. Fowler
- Use the MALLET (G).
- Place the ROPE; select it (H).
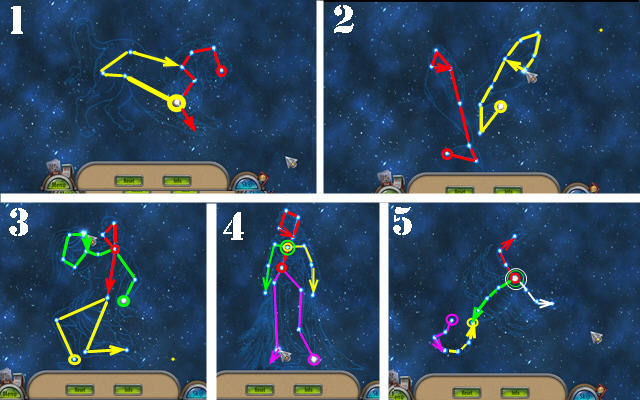
- Select Lana for a puzzle (I).
- Solution: press the hand button (J) when the red line touches the green heartbeat (K).
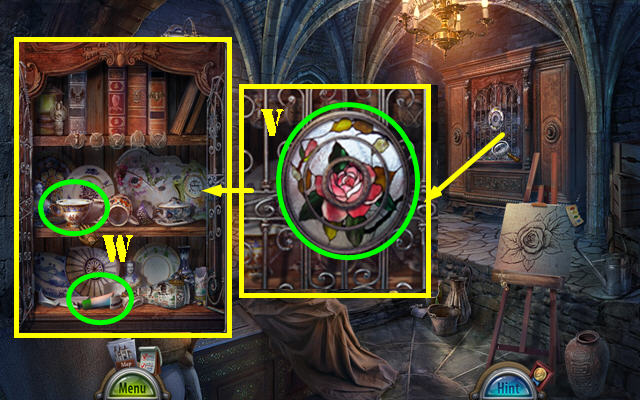
- Talk to Lana; take the STAINED-GLASS PART (L).
- Use the SCREWDRIVER; take the LENS (M).
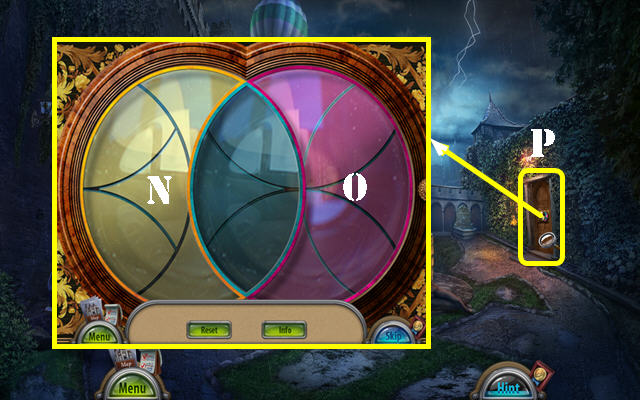
- Place the STAINED-GLASS PART and LENS for a puzzle. Solution: N-O-N-Ox2-N-O-N-O-N-Ox3.
- Go to Dr. Fowler's Room (P).
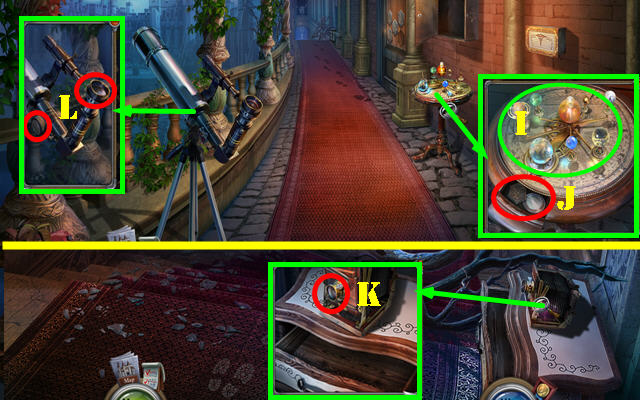
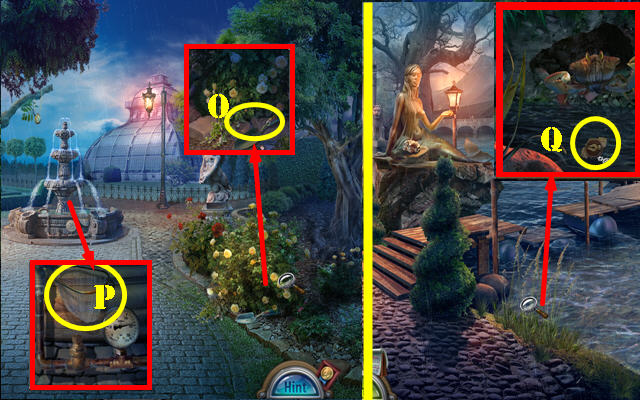
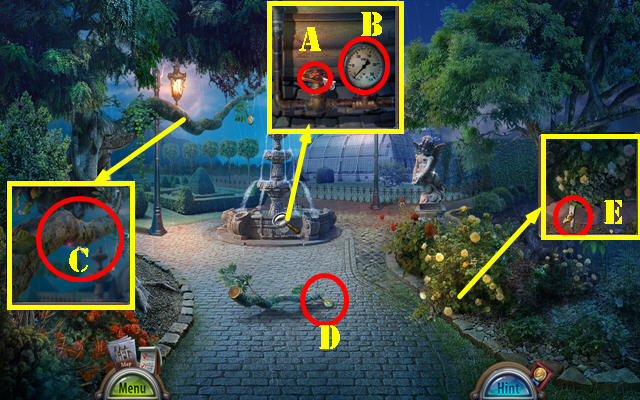
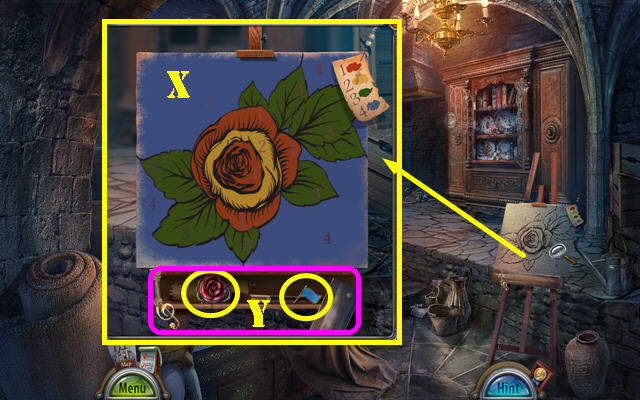
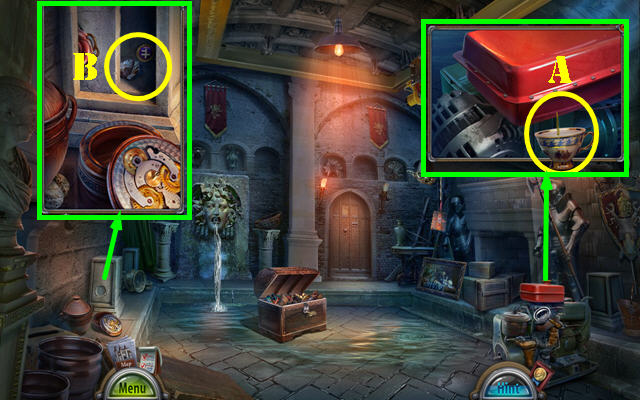
- Spin each part (1-3) of the globe once and open it; take the CLUE PART and RULER (Q). Take the BOTTLE (R).
- Take the HANDLE (S); read the note (T).
- Place the HANDLE and pull it; place the CLUE PART (U). Solution (V). Take the GREEN CRYSTAL.
- Walk down.
- Use the BOTTLE (W) for an HOP; play it to get the COAT OF ARMS 2/4.
- Use the RULER; take the KEYS (X). Open the compartment; take the RED CRYSTAL (Y).
- Return to Dr. Fowler's Room.
- Place the GREEN CRYSTAL and RED CRYSTAL (A); select the cabinet for an HOP; play it to get the SHEARS.
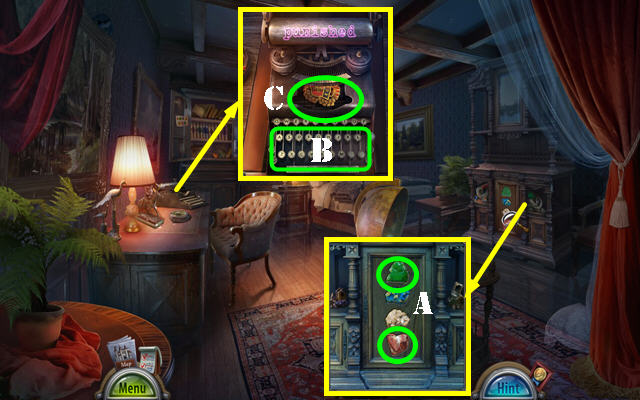
- Place the KEYS for a puzzle (B). Type in 'PUNISHED'. Take the COAT OF ARMS 3/4 (C).
- Walk down.
- Use the SHEARS; take the COAT OF ARMS 4/4 (D).
- Walk down.
- Place the 4 COAT OF ARMS; take the SPEAR (E).
- Go to the Courtyard.
- Place the SPEAR for a puzzle (F).
- Go up (G). Aim the ballista at the lock (H) and shoot (I).
- Go up the ladder (J).
- Take the HOOK (K). Open the bag; take the KNIFE (L).
- Take the SPEAR (M).
- Use the KNIFE to get the SANDBAG (N).
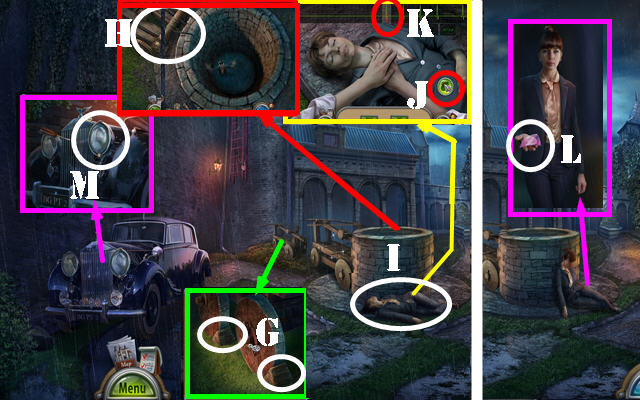
- Take the ROPE (O). Use the SANDBAG and hit the target (P).
- Combine the ROPE with the HOOK to get the GRAPPLING HOOK (inventory).
- Attach the GRAPPLING HOOK (Q) and use the SPEAR for a puzzle.
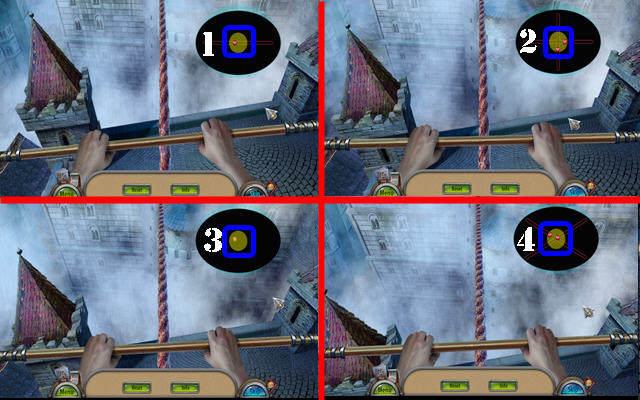
- Select the balls once they're in the center of the target (1-4).

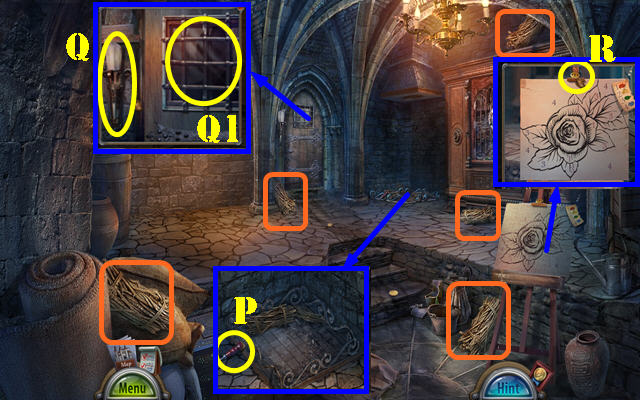
- Take the TORCH (R) and RUSTY GLASS CUTTER (S).
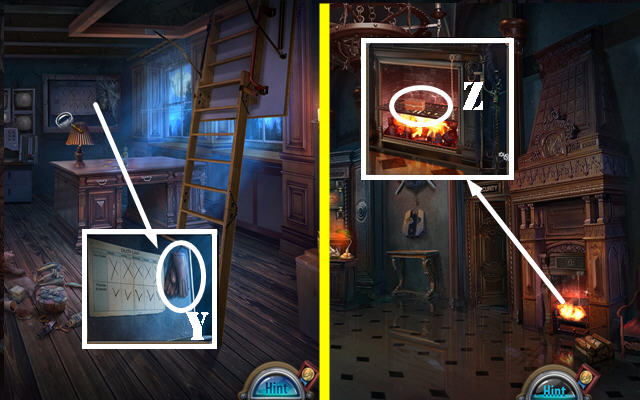
- Light the TORCH in the fireplace (T). Place the TORCH back in the holder.
- Take the BOARDS 1/4, 2/4, 3/4, and 4/4 (purple).
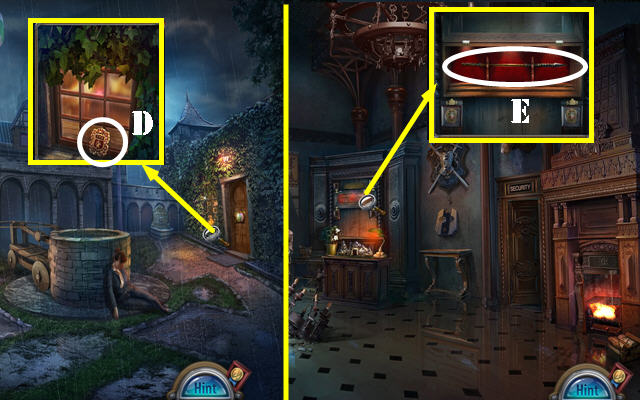
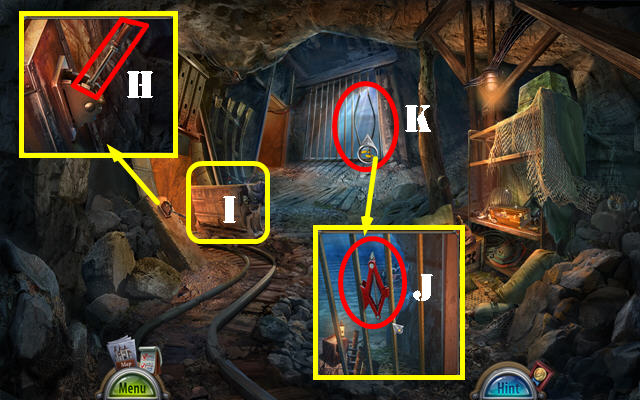
- Open the trapdoor; take the TINY KEY (U).
- Use the TINY KEY (V); turn it for an HOP; play it to get the BROKEN ROPE LADDER.
- Place the 4 BOARDS on the BROKEN ROPE LADDER to get the ROPE LADDER (inventory).
- Place the ROPE LADDER (W); go down to the Veranda.
Chapter 3: The Astronomer
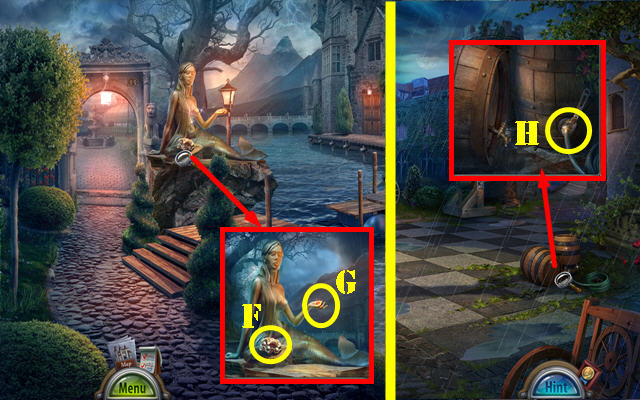
- Take the GALILEO STATUE (A) and PLANETS 1/3 (B).
- Lift the rug; take the ADJUSTMENT KNOB (C).
- Open the mailbox; take the PACKAGE (D).
- Go forward.
- Open the drawer; take the NIPPERS and NOTEPAD AND PEN (E).
- Take the SHARP SHARD (F).
- Use the SHARP SHARD on the PACKAGE; open it and take the PLANETS 2/3 (inventory).
- Walk down twice.
- Use the NIPPERS; take the HEX KEY and POKER (G).
- Use the POKER to get the PLANETS 3/3 (H).
- Return to the Veranda.
- Place the 3 PLANETS (I); take the CONSTELLATION TILE and TELESCOPE LENSES 1/2 (J).
- Go forward.
- Use the HEX KEY; take the TELESCOPE LENSES 2/2 (K).
- Walk down.
- Place the ADJUSTMENT KNOB and 2 TELESCOPE LENSES for a puzzle (L).
- Solution 1-5. Follow the lines in order: red-yellow-green-purple-white.
- Place the NOTEPAD AND PEN on the constellations; take the CONSTELLATION SKETCH (not pictured).
- Place the CONSTELLATION TILE and CONSTELLATION SKETCH. Swap the tiles as shown (M).
- Enter the Astronomer's Room (N).
- Remove the note; take the CADUCEUS EMBLEM (O). Take the PUZZLE PART 1/2 (P).
- Take the LEMON JUICE (Q).
- Use the LEMON JUICE on the RUSTY GLASS CUTTER; take the GLASS CUTTER (inventory).
- Use the GLASS CUTTER; select the glass; take the PUZZLE PART 2/2 (R).
- Place the 2 PUZZLE PARTS for a puzzle (S).
- Solution (T). Take the HEADPHONES and COPERNICUS STATUE.
- Place the GALILEO STATUE and COPERNICUS STATUE. Open the door (U) for an HOP; play it to get the DEFIBRILLATOR PADDLES.
- Walk down.
- Place the CADUCEUS EMBLEM; open the door; take the SUNSCREEN (V).
- Return to the Astronomer's Room.
- Remove the sensors on his chest; feel the chest and apply the SUNSCREEN (W).
- Put down the DEFIBRILLATOR PADDLES (X) and select them. Talk to the man; take the CROSS SYMBOL (Y).
- Return to the Tower.

- Place the CROSS SYMBOL; take the AXE (Y).
- Return to the Staircase.
- Use the AXE (Z); go forward.
- Take the ZIPPER PULL (A).
- Enter the Lobby (B).
- Take the PEARL 1/3 (C). Move the three books (D).
- Take the STEEL (E).
- Enter the Engineer's Room (F).

- Use the HEADPHONES on the scene.
- Open the bag; take the BATTERIES (G).
- Take the GNOME LIGHT (H).
- Select the GNOME LIGHT twice; place the BATTERIES and select the right size (I). Replace the cover (J) (inventory).
- Use the GNOME LIGHT; take the KEY CARD (K).
- Use the KEY CARD (L); enter the Engineer's Study.
- Take the LASER GUN DIAGRAM (M) and DIVIDER (N). Look at the note (O).
- Open the window (P).
- Walk down.
- Use the DIVIDER; take the TWEEZERS and REFLECTOR (Q).
- Return to the Engineer's Study.
- Use the TWEEZERS to get the MAGNETIC HANDLE (R).
- Walk down.
- Use the MAGNETIC HANDLE (S) for an HOP; play it to get the FREQUENCY CASSETTE.
- Return to the Engineer's Study.
- Place the FREQUENCY CASSETTE and close the lid. Adjust the buttons as shown (T).
- Walk down.
- Talk to the man; take the BUTTON (U).
- Return to the Engineer's Study.
- Place the BUTTON and select it; take the SCREWDRIVER and HANDLE (V).
- Place the HANDLE and open the drawer; take the CHISEL and LIGHT CONVERTER (W).
- Flip the radio and use the SCREWDRIVER; take the RAY TUBE (X).
- Walk down.
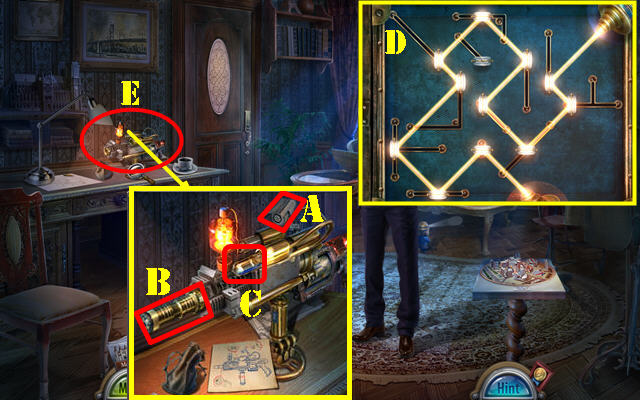
- Put down the LASER GUN DIAGRAM; place the REFLECTOR (A), LIGHT CONVERTER (B) and RAY TUBE (C). Select the ray tube for a puzzle.
- Solution (D).
- Take the LASER GUN (E).
- Return to the Engineer's Study.
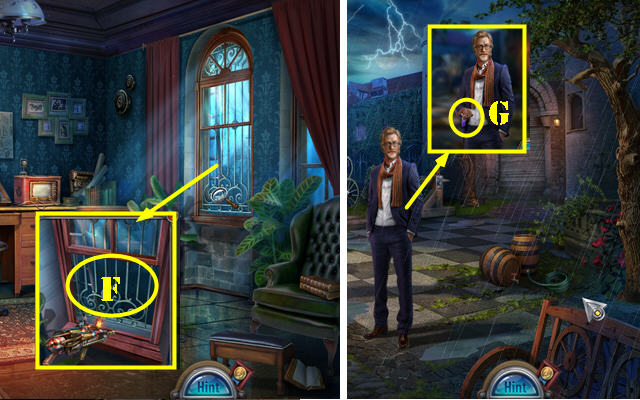
- Use the LASER GUN; remove the bars and go out the window (F).
- Talk to the man; take the KEYS 1/2 (G).
- Go to the Lobby.
- Take the CRUMPLED PAPER (H). Use the CHISEL; take the KEYS 2/2 (I).
- Open the CRUMPLED PAPER; take the PAPER THREAT (inventory).
- Insert the 2 KEYS (J); select both keys for an HOP; play it to get the BULLETS.
- Place the BULLETS in the EMPTY REVOLVER; take the REVOLVER (inventory).
- Walk down.
- Use the REVOLVER (K); go to the Pontoon Bridge (L).
Chapter 4: The Garden
- Take the MALLET (M).
- Go to the Garden (N).
- Take the SHOVEL (O) and NET (P).
- Walk down.
- Use the NET to get the PEN LOCK PART (Q).
- Return to the Courtyard.
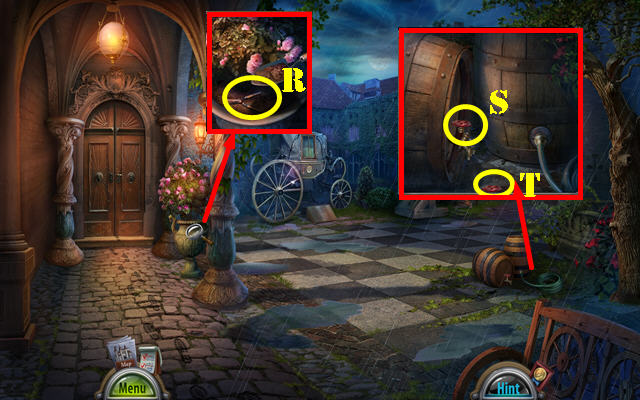
- Use the SHOVEL; take the PRUNERS (R).
- Use the MALLET (S); take the VALVE (T).
- Return to the Lobby.
- Use the PEN LOCK PART and select it; flip the page and take the CARRIAGE KEY (U).
- Walk down.
- Use the CARRIAGE KEY and select it twice. Take the BROKEN PUMP and COIN (V).
- Return to the Lobby.
- Insert the COIN (W); take the CANNED FISH (X).
- Open the CANNED FISH; take the FISH (inventory).
- Return to the Pontoon Bridge.
- Give the FISH to the crab; take the PEARL 2/3 and SAW (Y).
- Return to the Garden.
- Place the VALVE and turn it (A); take the PRESSURE GAUGE (B).
- Use the SAW (C); take the LOCKET (D).
- Open the LOCKET; take the PEARL 3/3 (inventory).
- Use the PRUNERS; take the SPECIAL WRENCH (E).
- Walk down.
- Place the 3 PEARLS (F); take the RUBY HEART (G).
- Walk down.
- Use the SPECIAL WRENCH (H); take the HOSE.
- Return to the Garden.
- Place the RUBY HEART; take the HANDLE (I).
- Remove the broken lens from the BROKEN PUMP; replace it with the PRESSURE GAUGE, then place the HOSE and HANDLE; take the PUMP (inventory).
- Walk down.
- Place the PUMP (J) for a puzzle. Select the ball once it's in the green area (K). Repeat until the bridge is fixed.
- Enter the Physics Building (L).
- Talk to Dr. Riley (M).
- Place the ZIPPER PULL; pull it and take the LIGHTER (N).
- Walk down.
- Use the LIGHTER (O); open the door for an HOP. Play it to get the MUG.
- Return to the Physics Building.
- Turn on the faucet (P); place the MUG (Q) to get the MUG OF WATER.
- Give the MUG OF WATER; take the PATTERN CODE (R).
- Place the PATTERN CODE; arrange as shown (S). Take the WINDER KEY (T).
- Return to the Garden.
- Place the WINDER KEY (U); take the CLOCK HAND (V).
- Return to the Physics Building.
- Place the CLOCK HAND for a puzzle (W).
- Set the clocks to 851 (A) by Moving the first hand to 8 clockwise, and the third hand to 1 clockwise.
- Drag the pieces (B) in place (C).
- Slide the pieces over each other: arrange as shown (D) and press start (E).
- Place the 2 tubes (purple) in place (F).
- Take the PAMPHLET (G).
- Return to the Lobby.
- Place the PAMPHLET (H) for an HOP; play it to get the SPIRAL NOTEBOOK.
- Select the SPIRAL NOTEBOOK 4x to get the BENT WIRE (inventory).
- Return to the Physics Building.
- Use the BENT WIRE (I) to be transported to the Treasury.
Chapter 5: The Treasury

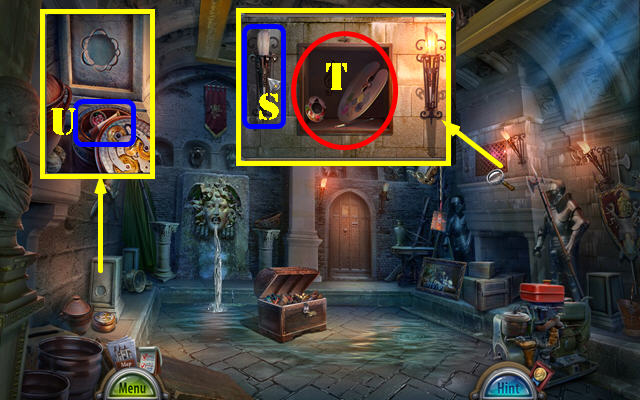
- Select the chest (J).
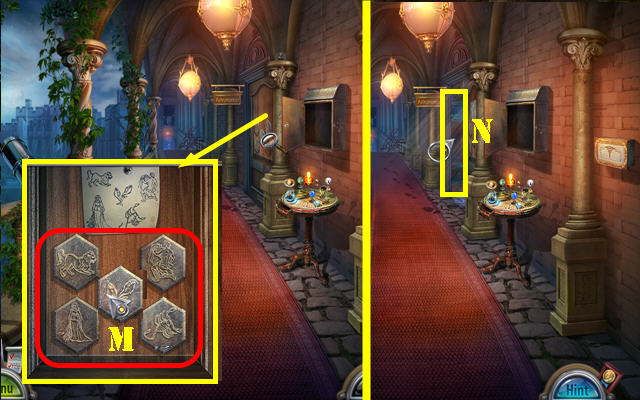
- Remove the painting; take the CHEST KEY (K).
- Use the CHEST KEY for an HOP (L); play it to get the REMOTE CONTROL.
- Use the REMOTE CONTROL (M).
- Take the BLUE PAINT (N).
- Enter the Dungeon (O).
- Take the BRUSHWOOD 1/5, 2/5. 3/5, 4/5, 5/5 (orange).
- Take the AWL (P).
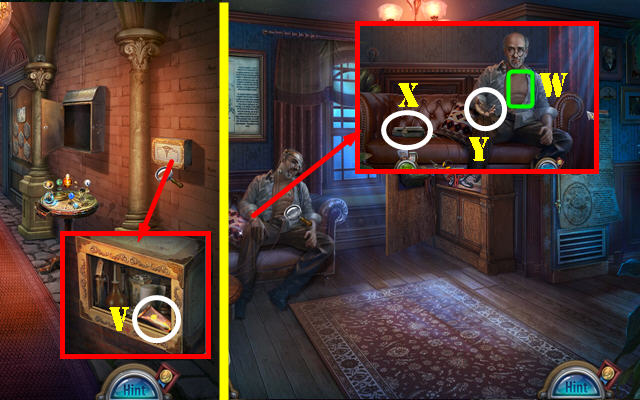
- Take the TORCH (Q); select the bars (Q1).
- Take the GEAR (R).
- Walk down.
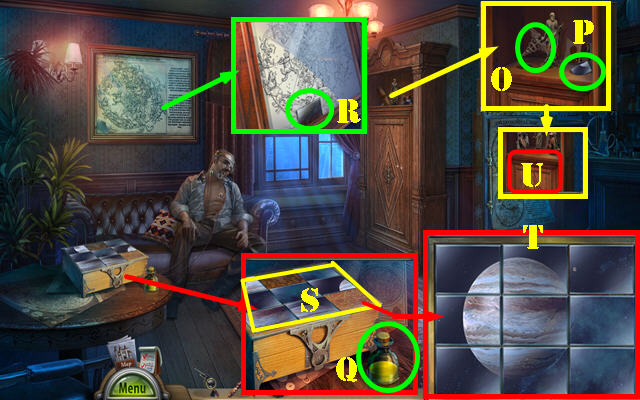
- Place the TORCH (S) and pull it; take the PAINT PALETTE and PUZZLE PART 1/2 (T).
- Place the GEAR; take the PUZZLE PART 2/2 and RED PAINT (U).
- Return to the Dungeon.
- Place the 2 PUZZLE PARTS for a puzzle. Arrange as shown (V). Take the GREEN PAINT and TEACUP (W).
- Use the BLUE PAINT, RED PAINT and GREEN PAINT on the PAINT PALETTE (inventory).
- Place the PAINT PALETTE for a puzzle. Solution (X).
- Take the ROSE SYMBOL and FLAG CHARMS 1/3 (Y).
- Walk down.
- Use the AWL; place the TEACUP to get the CUP OF PETROL (A).
- Place the ROSE SYMBOL; take the SAFE BUTTONS 1/2 and FLINT (B).
- Place the FLINT on the STEEL to get the FLINT AND STEEL (inventory).
- Go to the Dungeon.
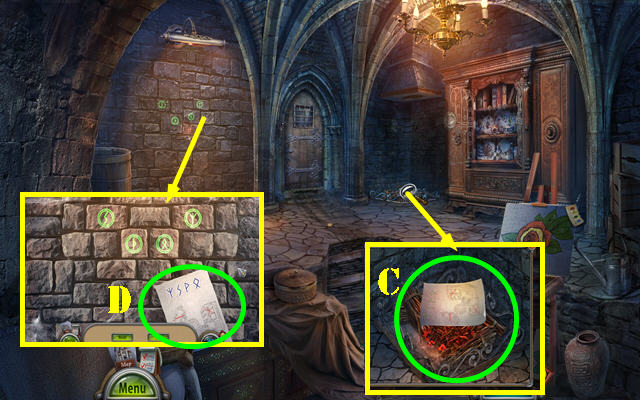
- Place the 5 BRUSHWOOD pieces. Use the CUP OF PETROL and add the FLINT AND STEEL. Place the PAPER THREAT to get the NOTE TIP (C).
- Place the NOTE TIP for a puzzle (D).
- Solution one 1-4.
- Solution two: 5-8.
- Solution three: 9-13.
- Solution four: 14-19.
- Enter the Secret Room (E).
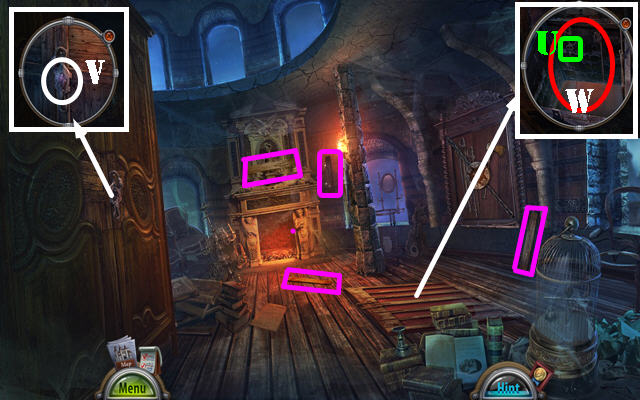
- Take the SAFE BUTTONS 2/2 (F). Lift the cushion; look at the note and take the SCISSORS (G).
- Open the folder; look at the note (H) and take the RECORD.
- Place the 2 SAFE BUTTONS for a puzzle (I).
- Solution: H-G-F-A-B-E-H-G-D-A-F-G-D-B-A-F-G-D-B-C-I-H-E-C-I-H-E-B-C-I-H-E-C-I.
- Select the note; take the BOOK and BASS CLEF SYMBOL (J).
- Walk down.
- Use the SCISSORS to get the TREBLE CLEF SYMBOL (K).
- Place the BOOK for a puzzle. Solution (L).
- Take the BIG FISH TROPHY (M).
- Walk down.
- Place the TREBLE CLEF SYMBOL and BASS CLEF SYMBOL; take the PHONOGRAPH NEEDLE (N).
- Return to the Secret Room.
- Place the RECORD and PHONOGRAPH NEEDLE; take the TUNING FORK (O).
- Walk down.
- Use the TUNING FORK; take the TRIANGULAR KEY (P).
- Go to the Secret Room.

- Use the TRIANGULAR KEY (Q); turn it for an HOP; play it to get the FILM SYMBOL.
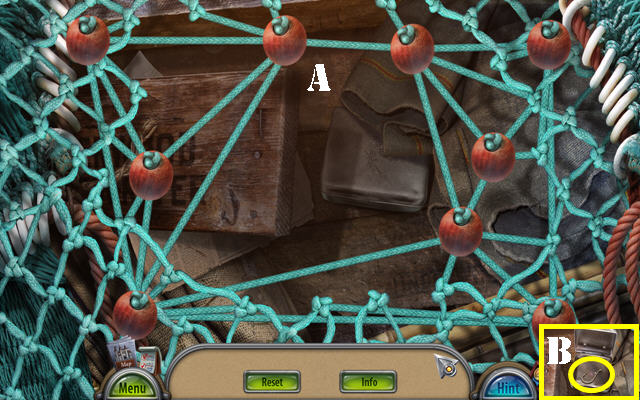
- Place the FILM SYMBOL; open the compartment; take the THREAD AND HOOK (R).
- Walk down.
- Use the THREAD AND HOOK (S).
- Enter the Abandoned Mine (T) and then enter the Forest Trail (U).
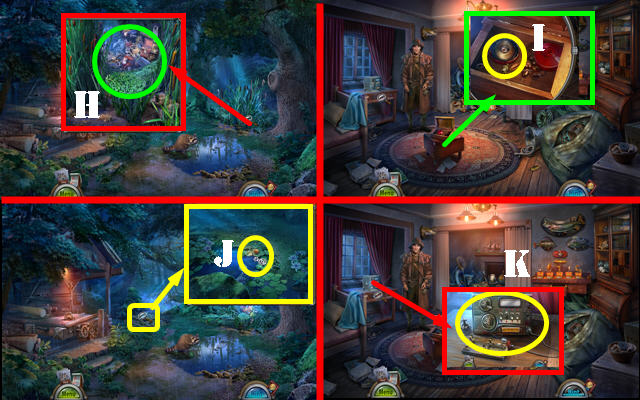
Chapter 6: The Fisherman's Cabin
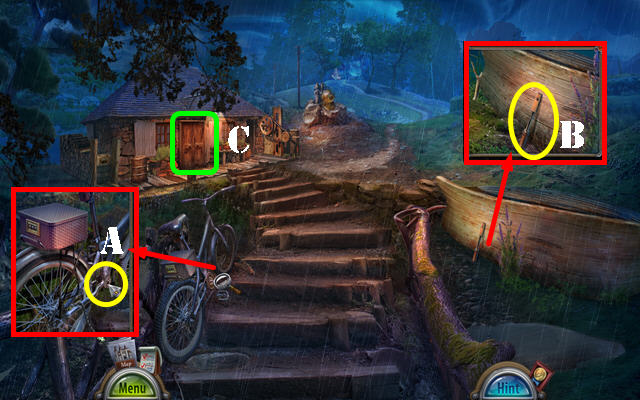
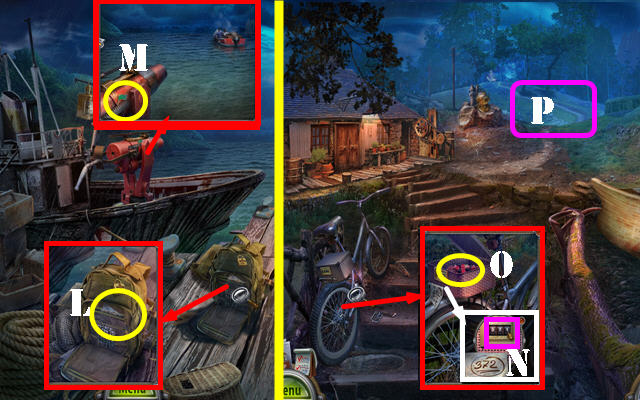
- Remove the pedal and chain; take the BIKE GEAR (A).
- Take the LEVER (B).
- Enter the Fisherman's Cabin (C).
- Talk to the fisherman; take the MORSE CODE SHEET (D).
- Open the curtain (E) for an HOP; play it to get the FISHING POLE.
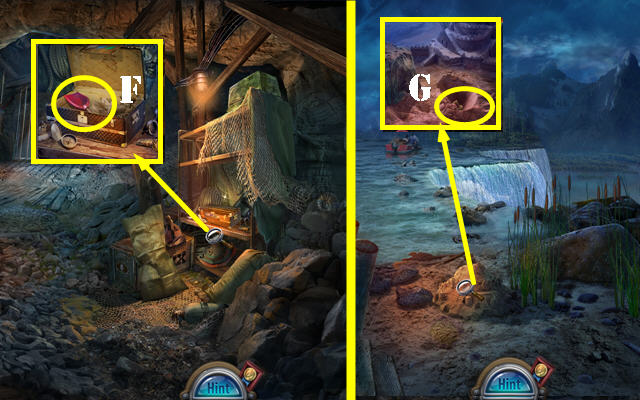
- Take the GRINDSTONE (F) and BELT (G).
- Use the GRINDSTONE on the BIKE GEAR; take the SHARPENED GEAR (inventory).
- Return to the Abandoned Mine.
- Place the LEVER and pull it (H) for an HOP (I); play it to get the CAR JACK.
- Use the CAR JACK (J); go to the Pier (K).
- Take the CODE (L) and FLAG CHARMS 2/3 (M).
- Return to the Forest Trail.
- Place the CODE; enter 372 (N); take the BERRIES (O).
- Go to the Saw Mill (P).
- Give the BERRIES (Q); take the BIG CATCH TROPHY (R).
- Take the LURE TROPHY (S).
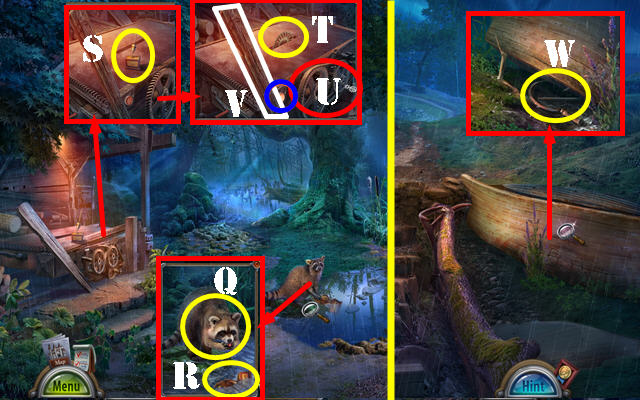
- Place the SHARPENED GEAR (T) and BELT (U). Push the button (blue); select the wooden beam (V) to get the PADDLE.
- Walk down.
- Use the PADDLE; take the SICKLE and ANTENNA (W).
- Return to Fisherman's Cabin.
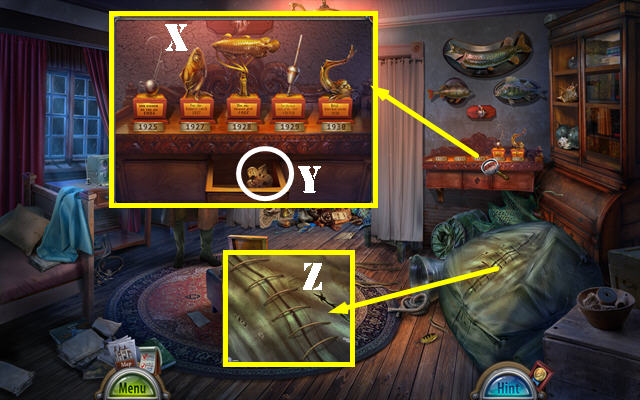
- Place the BIG FISH TROPHY, BIG CATCH TROPHY and LURE TROPHY for a puzzle. Swap the trophies as shown (X). Take the FLEUR-DE-LIS CHARM (Y).
- Use the SICKLE for a puzzle (Z).
- Solution (A).
- Open the case; take the FISH HOOK (B).
- Return to the Pier.
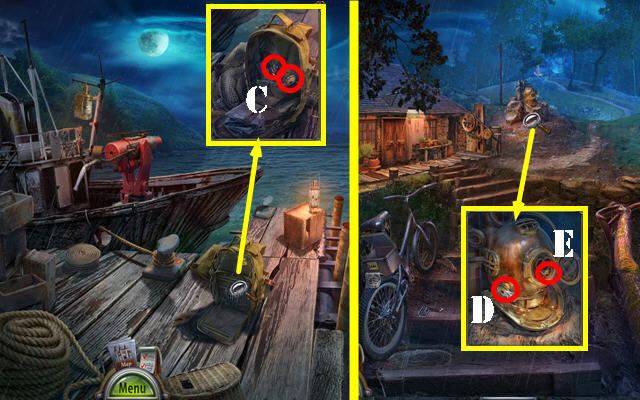
- Place the FLEUR-DE-LIS CHARM; take the HELMET KNOB and TELEGRAPH BUTTON (C).
- Return to the Forest Trail.
- Place the HELMET KNOB (D); take the FLAG CHARMS 3/3 (E).
- Walk down.
- Place the 3 FLAG CHARMS; take the TOY SHOVEL (F).
- Return to the Pier.
- Use the TOY SHOVEL; take the AIMING MODULE (G).
- Return to the Saw Mill.
- Use the SICKLE (H) for an HOP; play it to get the RED BUTTON.
- Return to the Fisherman's Cabin.
- Place the RED BUTTON; select it twice; take the FISHING LINE (I).
- Place the FISHING LINE and FISH HOOK on the FISHING POLE (inventory).
- Return to the Saw Mill.
- Use the FISHING POLE to get the RADIO SPEAKER (J).
- Return to the Fisherman's Cabin.
- Place the MORSE CODE SHEET, ANTENNA, TELEGRAPH BUTTON, and RADIO SPEAKER for a puzzle (K).
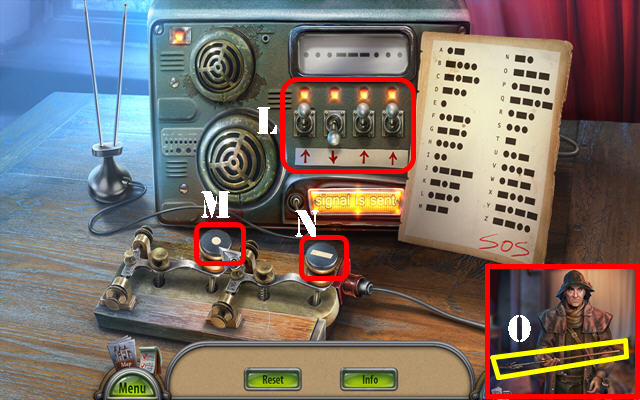
- Flip the switches as shown (L).
- Select: Mx3-Nx3-Mx3.
- Take the HARPOON (O).
- Return to the Pier.
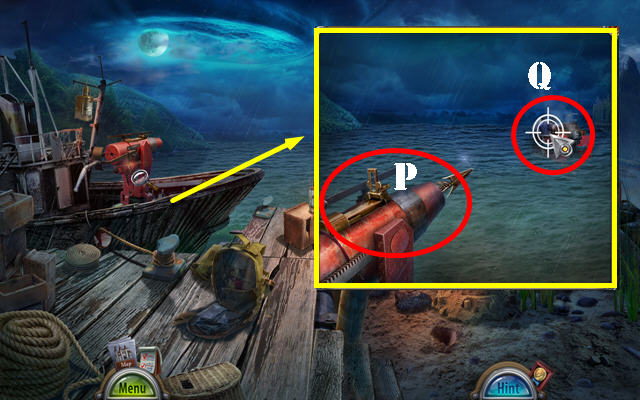
- Place the AIMING MODULE and HARPOON (P). Aim the target at the boat (Q); select it.
- Congratulations, you've completed Punished Talents: Stolen Awards!
Created at: 2016-04-03