

Walkthrough Menu
- General Tips
- Chapter 1: Hat Shop
- Chapter 2: The Pawn Shop
- Chapter 3: The Theater
- Chapter 4: Fishing Store
- Chapter 5: Rosie's Room
- Chapter 6: Cemetery
General Tips
- This is the official guide for Puppet Show: Bloody Rosie.
- This guide will not tell you when you have to zoom into a location; the screenshots will show each zoom scene.
- Hidden-object puzzles are referred to as HOPs. This guide will not show screenshots of the HOPs, however, it will mention when an HOP is available and the inventory item you'll collect from it.
- Use the Map to fast travel to a location.
Chapter 1: Hat Shop
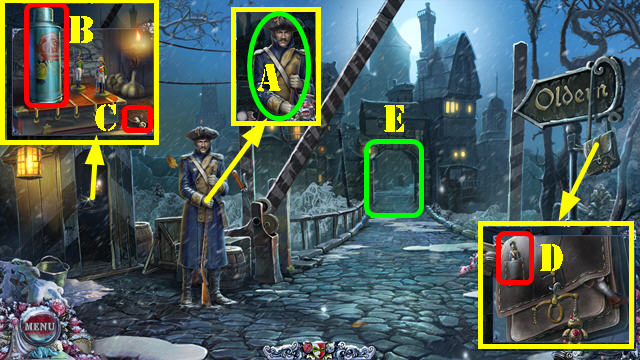
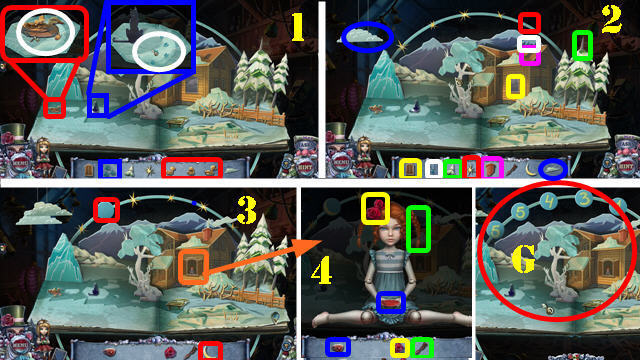
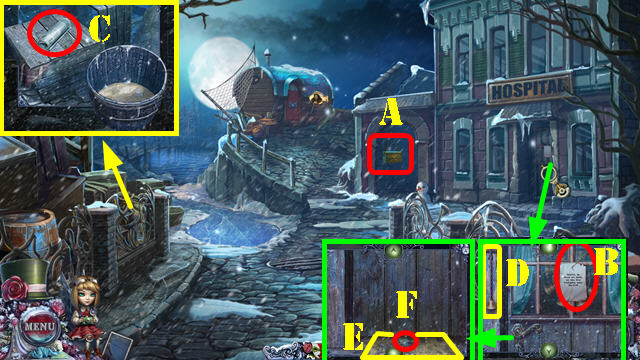
- Take the LETTER on the scene.
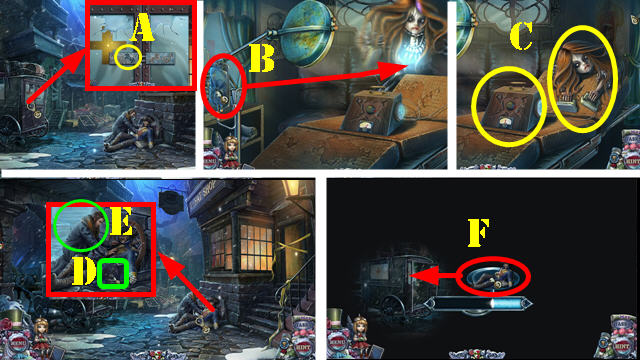
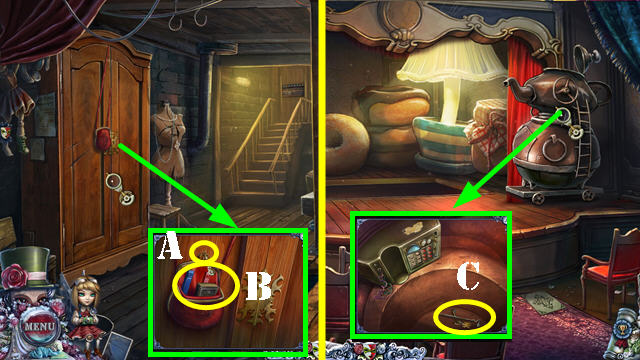
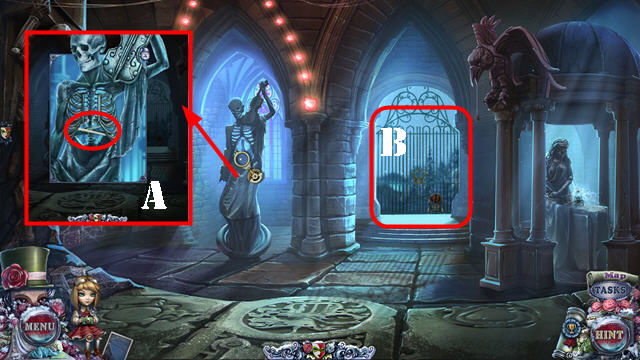
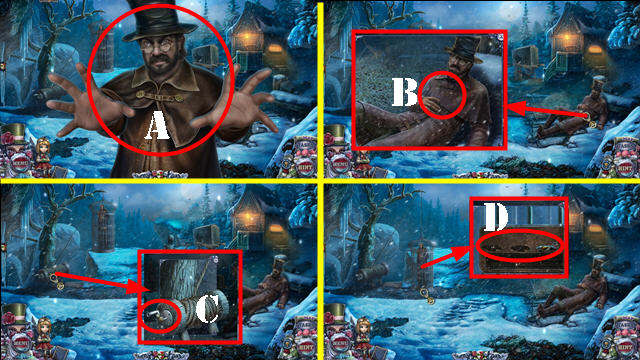
- Talk to the guard; give him the LETTER (A).
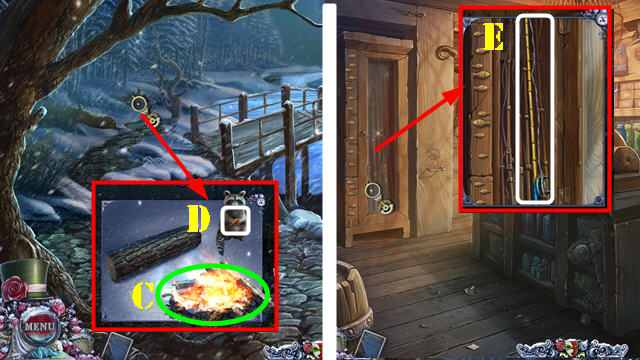
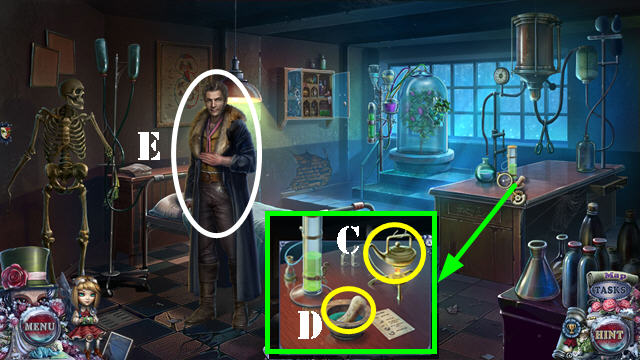
- Take the INSULATED BOTTLE (B) and select the bread (C).
- Take the TIN SOLDIER (D).
- Select the top of the INSULATED BOTTLE twice; receive the HOT TEA.
- Go forward (E).
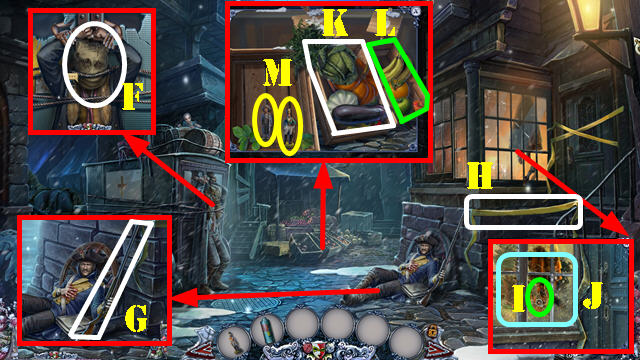
- Select the scene.
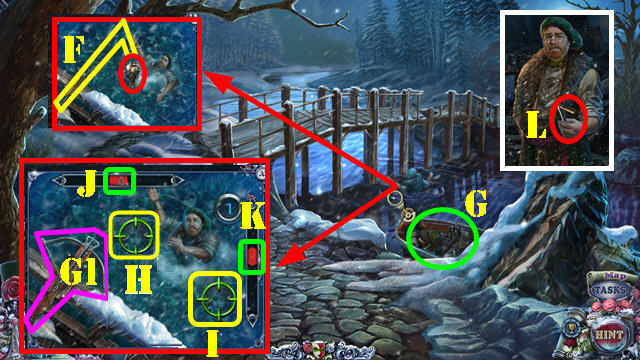
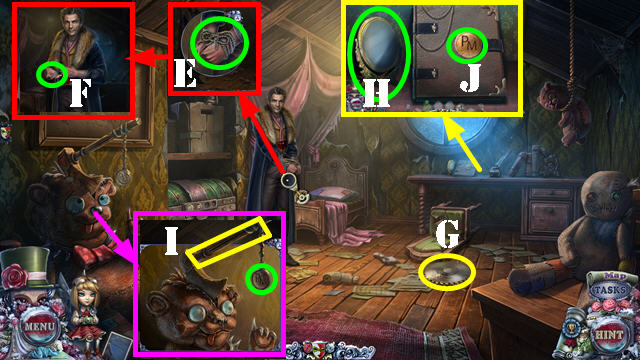
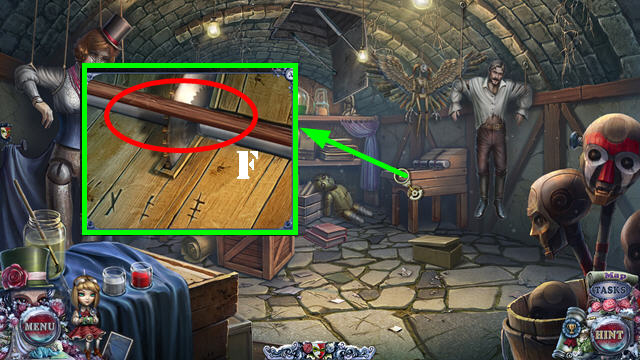
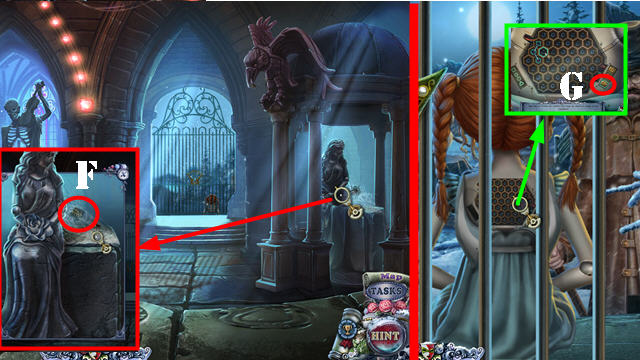
- Talk to the man (F).
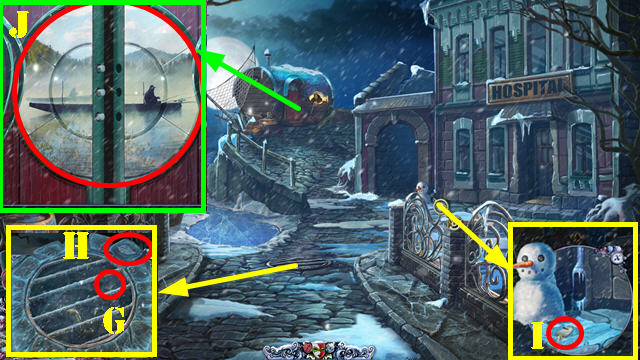
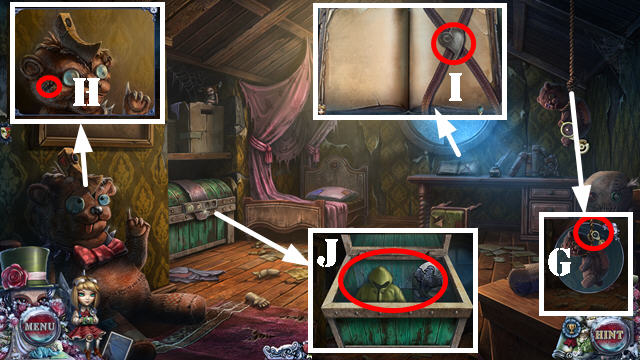
- Talk to the guard; take the RIFLE (G).
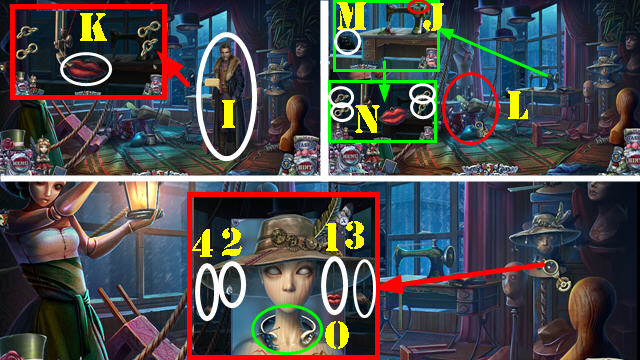
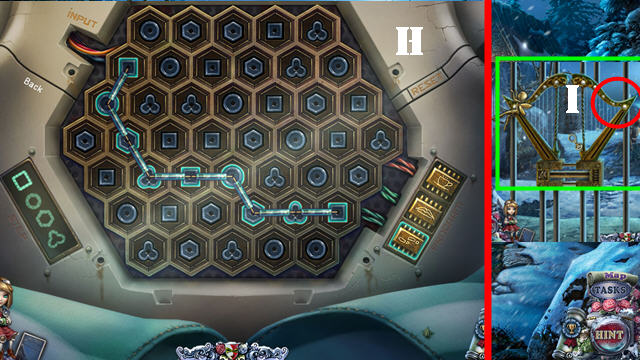
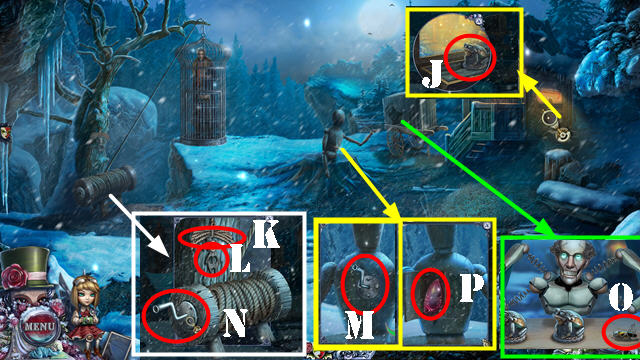
- Remove the tape (H); take the DOLL'S LEG (I). Select the window (J).
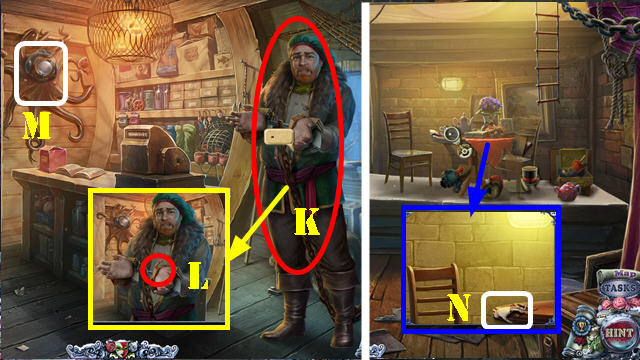
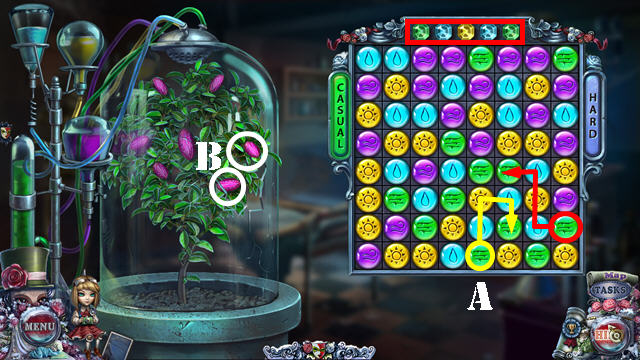
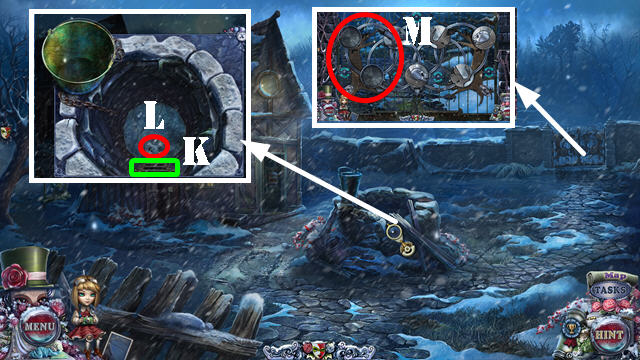
- Move the vegetables (K) and fruits (L) into the correct bins. Take the two TIN SOLDIERS (M).
- Walk down.
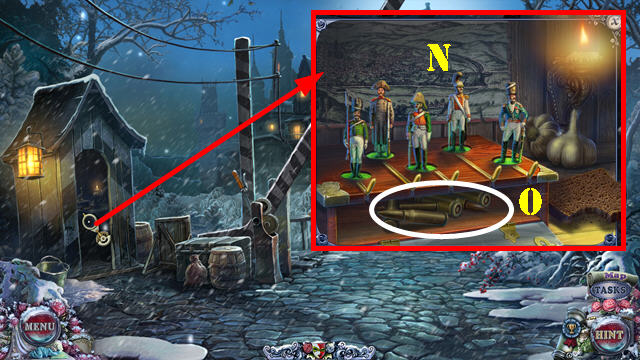
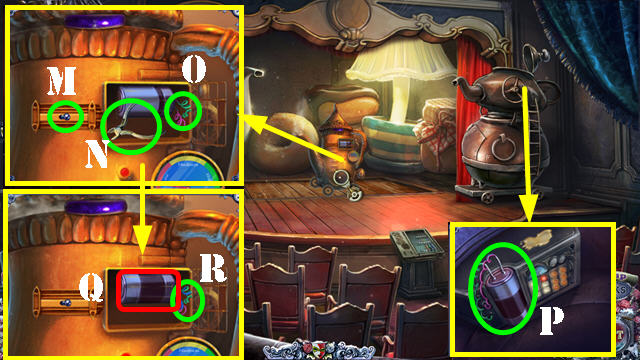
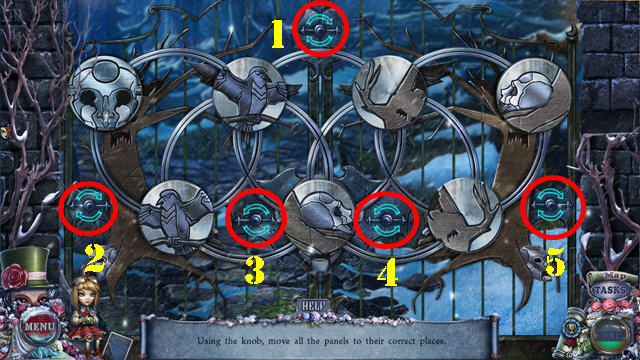
- Place the three TIN SOLDIERS for a puzzle. Solution (N). Open the compartment; take the BULLETS (O).
- Open the RIFLE; insert the BULLETS and close it; take the LOADED RIFLE.
- Go forward.
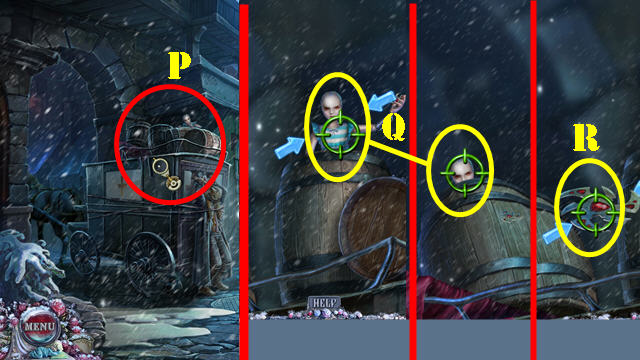
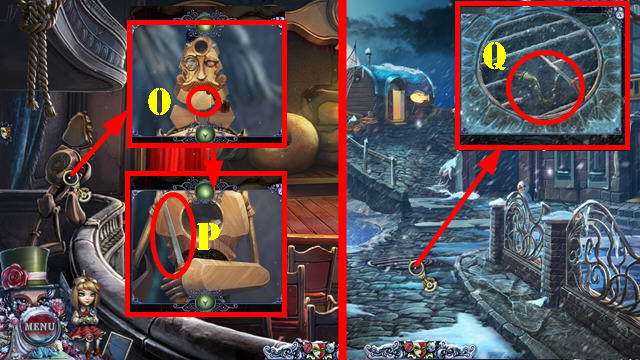
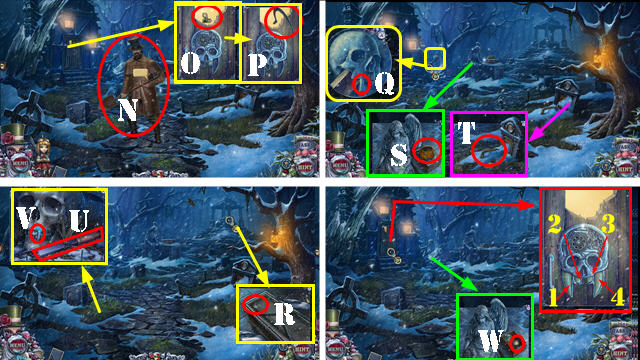
- Use the LOADED RIFLE (P) for a puzzle.
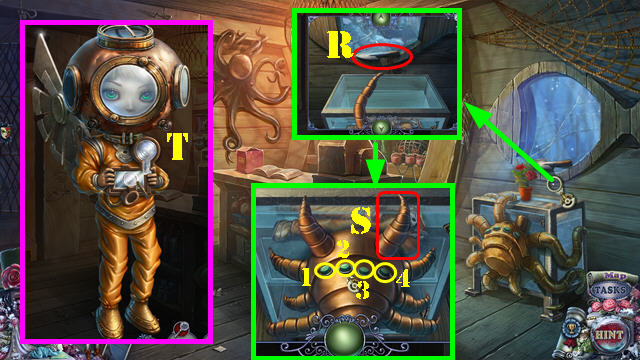
- The solution is random. Shoot the puppet (Q) five times and shoot the shuriken as they are thrown (R).
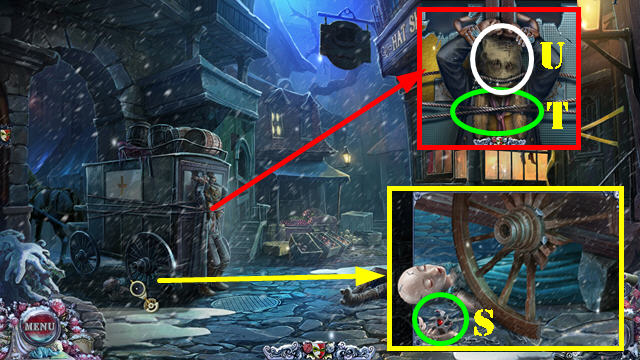
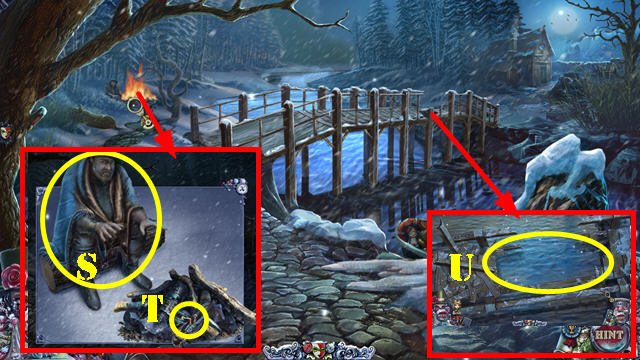
- Take the SHURIKEN (S).
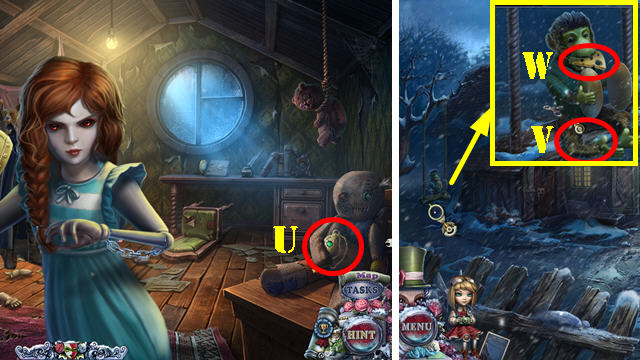
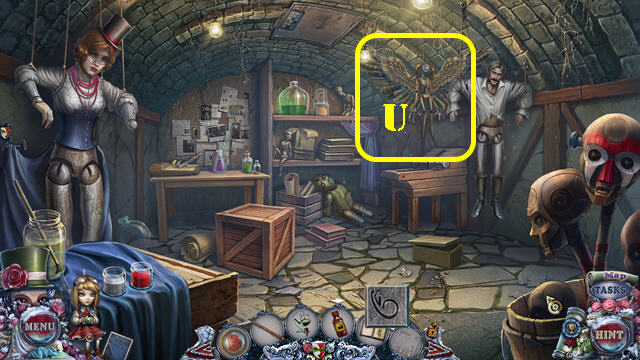
- Use the SHURIKEN (T); receive the PENDANT. Remove the sack on Thomas' face (U).
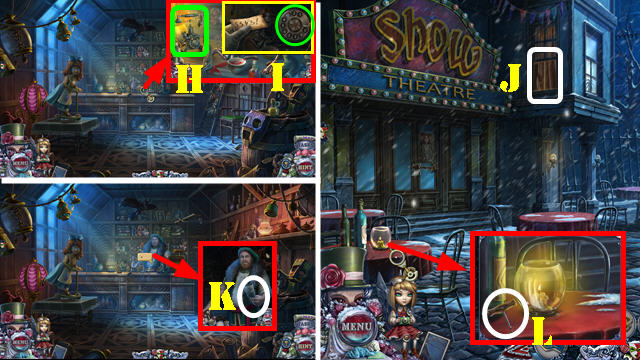
- Walk down.
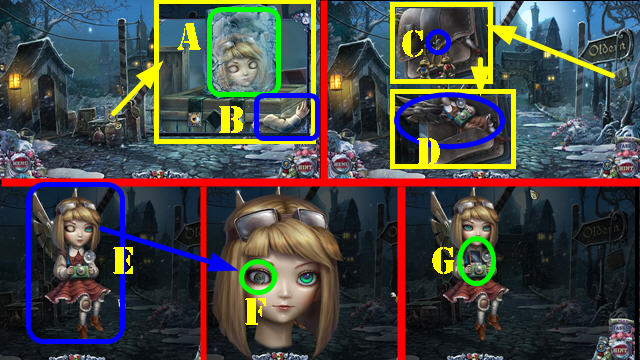
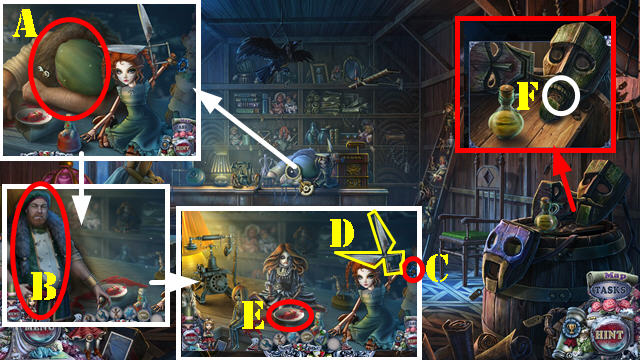
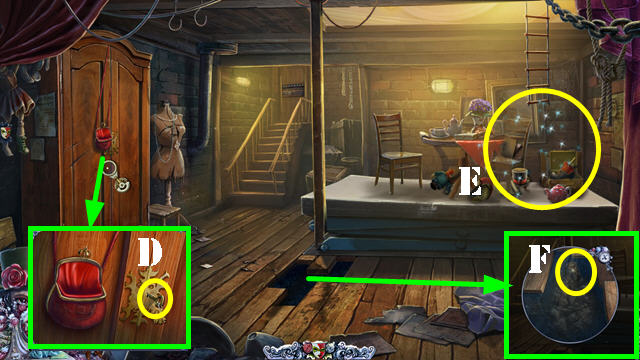
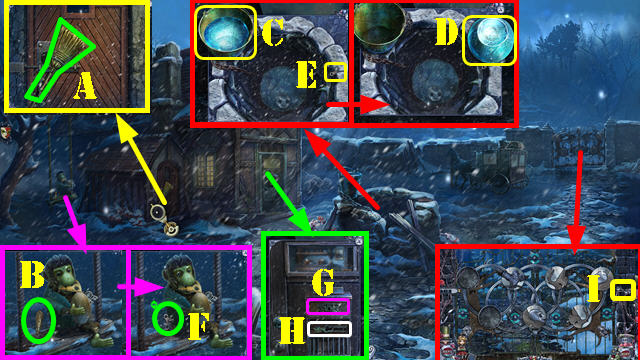
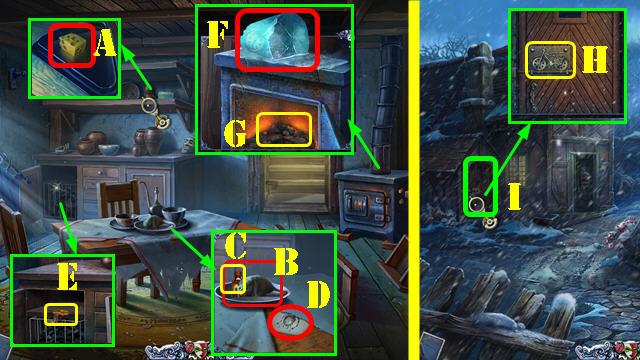
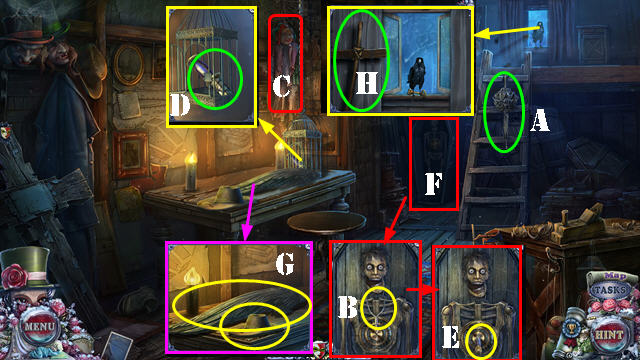
- Use the HOT TEA 5x (A); take the DOLL'S HEAD and DOLL'S ARM (B).
- Place the PENDANT; take the RING (C).
- Open the bag; take the BROKEN DOLL (D).
- Place the DOLL'S ARM, DOLL'S HEAD, and DOLL'S LEG on the BROKEN DOLL (E).
- Select the eye; take the RING (F). Select the eye twice. Select the camera and look at the picture (G). Take the doll.
- Go forward.
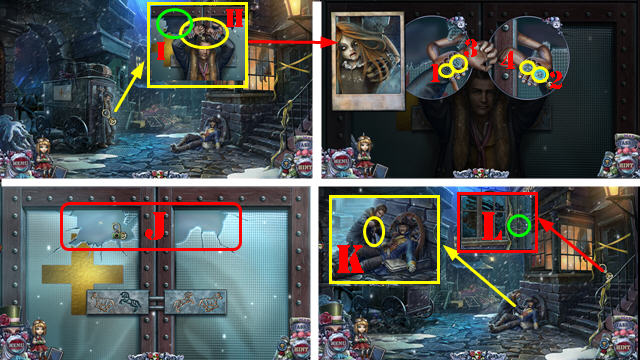
- Place the RING 2/2 (H).
- Snap a photo; receive the PHOTO (I).
- Place the PHOTO; select 1-4.
- Snap a photo (J).
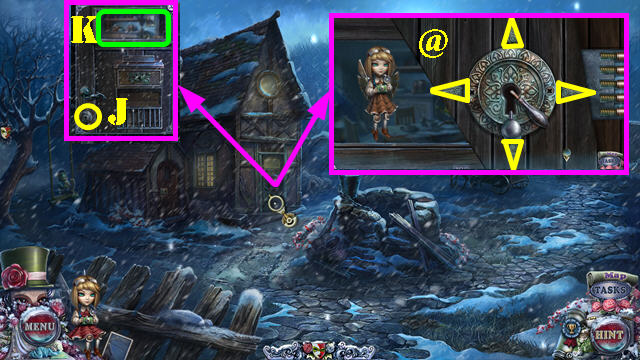
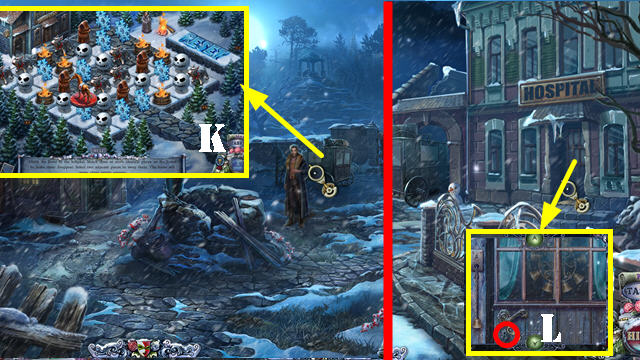
- Talk to Thomas; take the KEY (K).
- Use the KEY and select it twice (L). Go through the door.
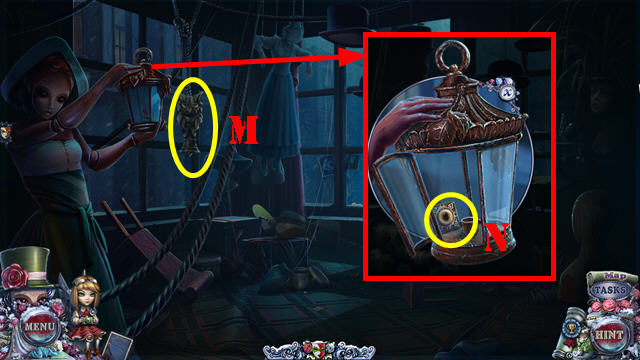
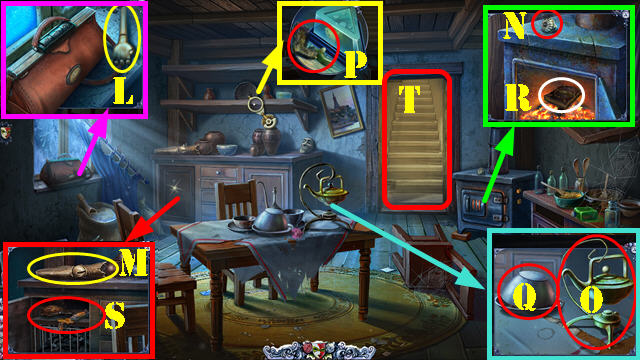
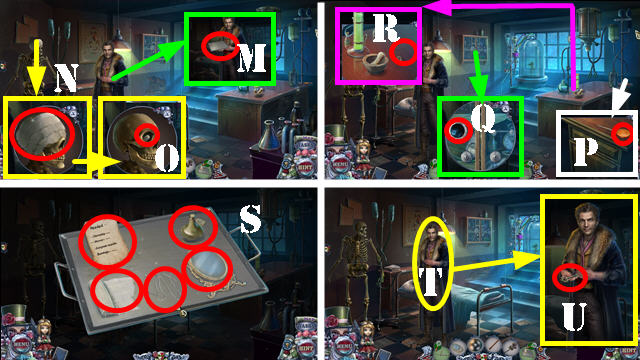
- Select the BELL twice (M).
- Open the lantern; take the BOX KEY (N).
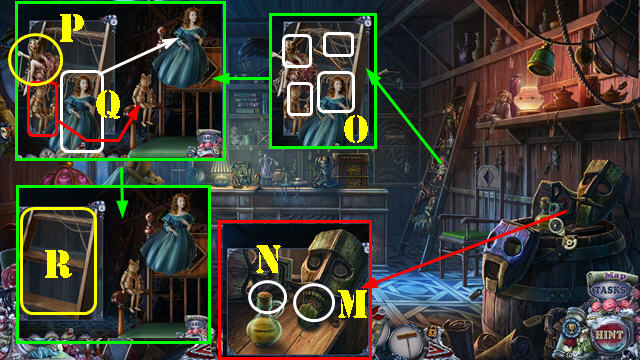
- Walk down twice.
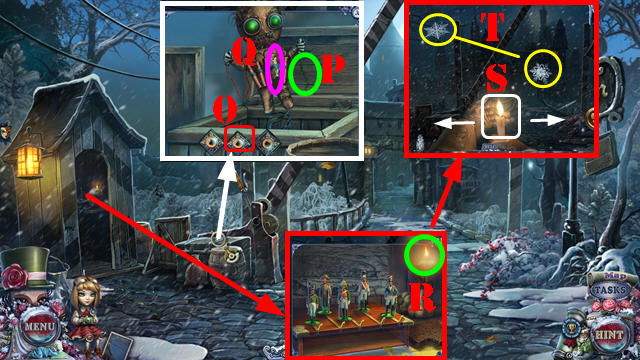
- Place the BOX KEY and select (O). Use the SHURIKEN on the green wire (P). Take the CANDLE (Q).
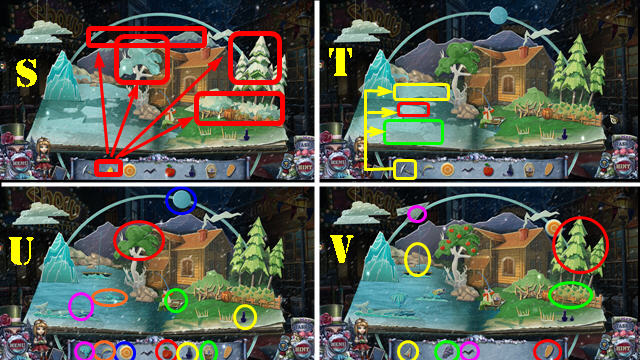
- Use the CANDLE for a puzzle (R). The solution is random; drag the candle (S) left or right to avoid the snowflakes (T).
- Receive the BURNING CANDLE.

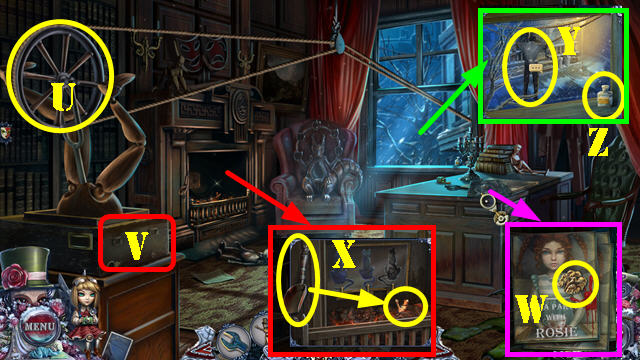
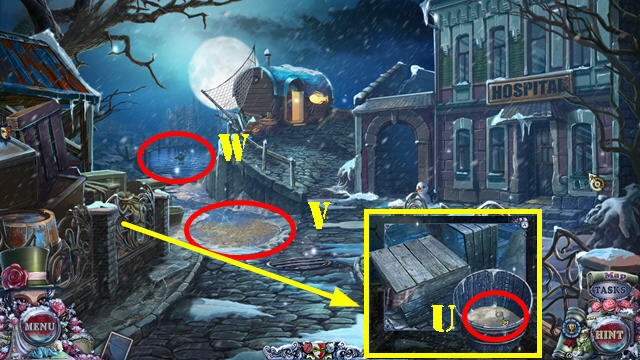
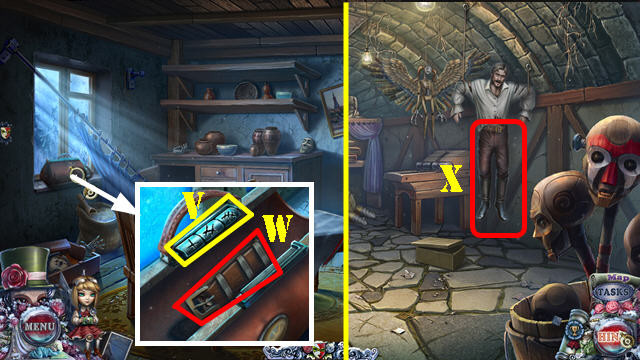
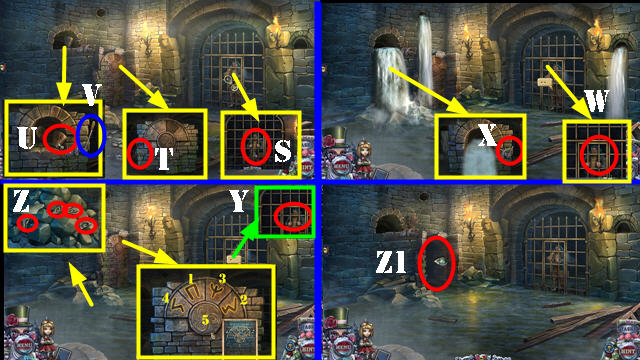
- Use the BURNING CANDLE (U).
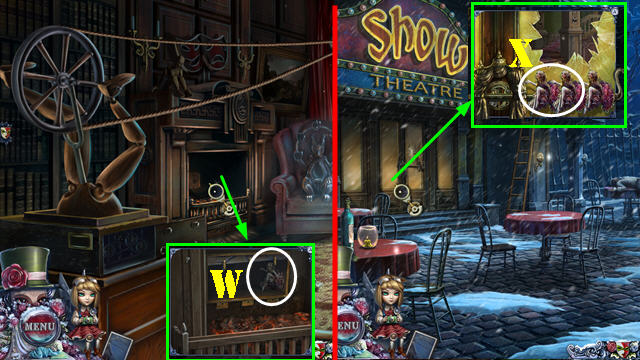
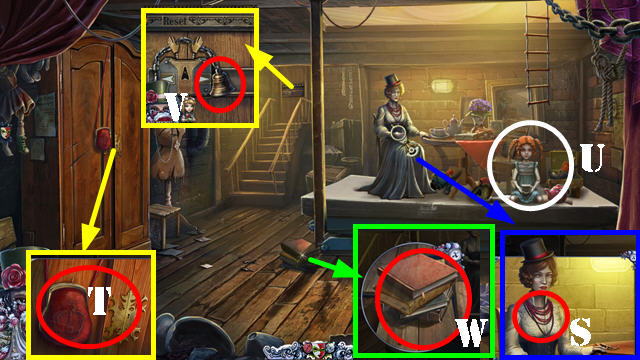
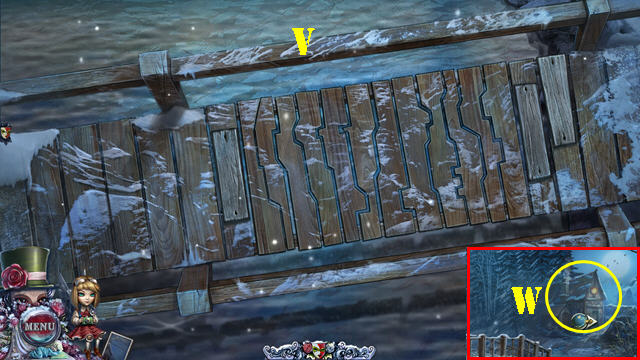
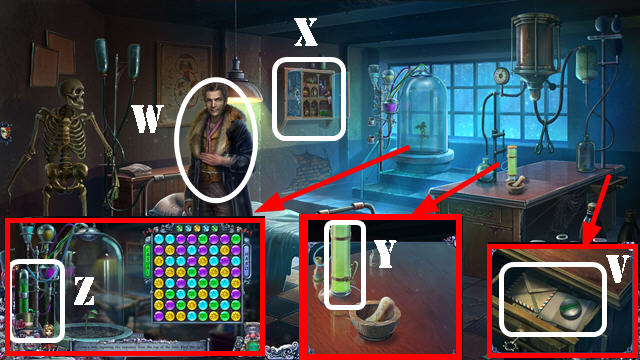
- Play the HOP (V) to receive the METAL HORSE.
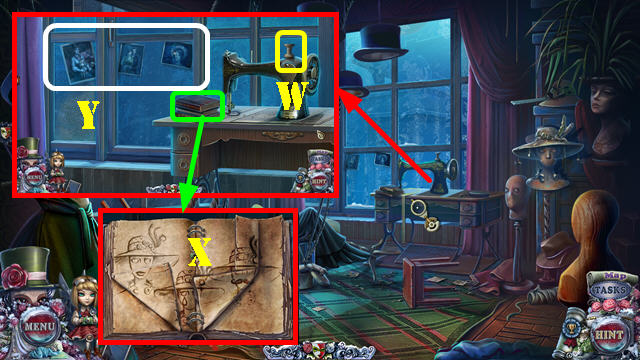
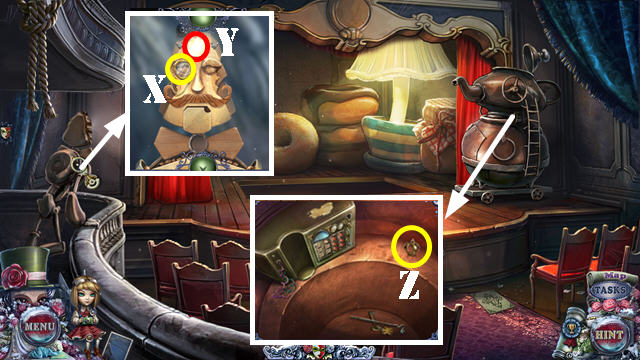
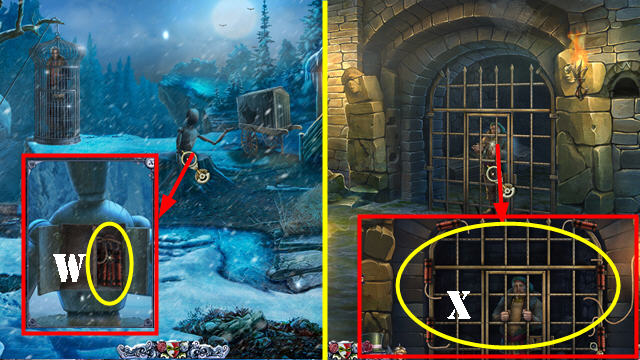
- Take the BOBBIN (W). Select the books twice and open the diary. Select the pages 4x. Snap a photo (X).
- Select the three photos (Y).
- Walk down.
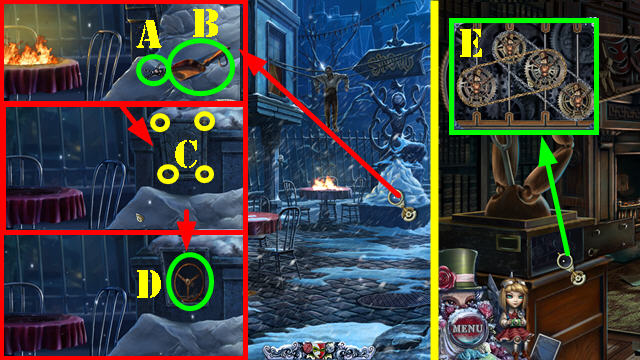
- Place the METAL HORSE (A) and open the door.
- Squeeze the bag (B) until the doll falls. Take the DOLL and DEFIBRILLATOR (C).
- Place the DEFIBRILLATOR and select it (D).
- Give the DOLL (E).
- Slide the guard into the ambulance (F).
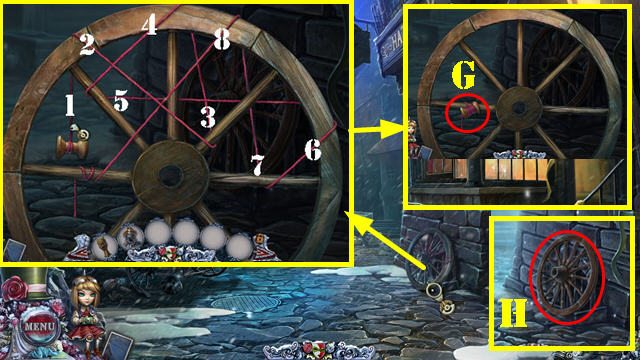
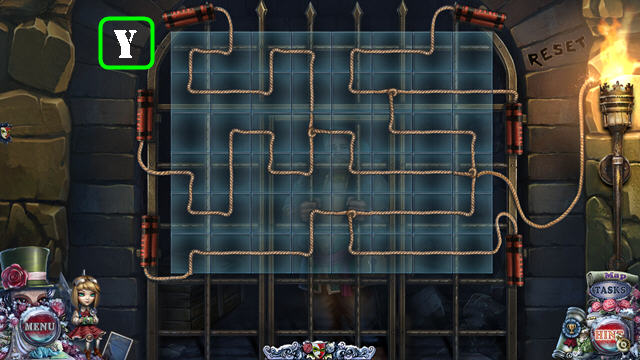
- Place the BOBBIN; select 1-8.
- Take the THREAD (G) and WHEEL (H).
- Go to the Hat shop.
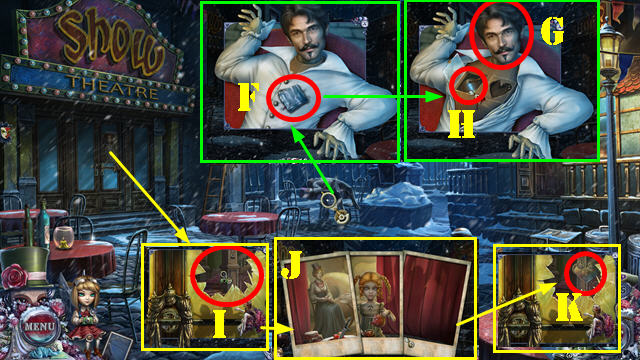
- Talk to Thomas (I).
- Place the THREAD (J); select the lips twice (K). Select the scene.
- Play the HOP (L) to get the BONE.
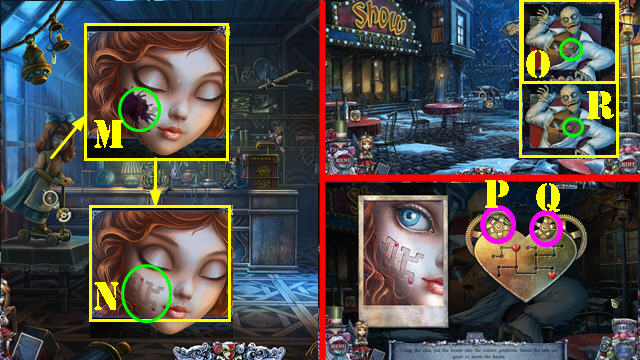
- Throw the bone (M).
- Add the four links (N); take the LIPS PENDANT and select it.
- Place the LIPS PENDANT and hang them. Select 1-4; take the WRENCH (O).
- Walk down.
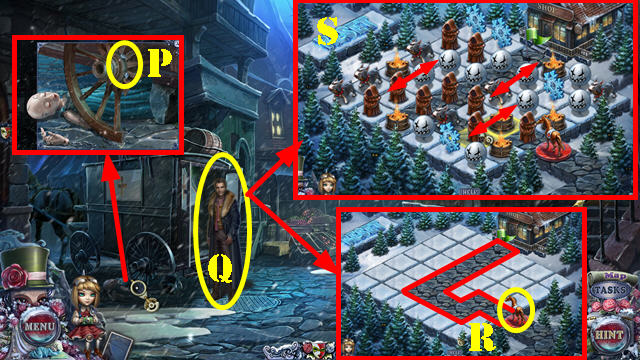
- Use the WRENCH; take the BOLTS (P). Remove the broken wheel; place the WHEEL and the BOLT. Use the WRENCH on the bolts.
- Talk to Thomas (Q).
- Enter the carriage for a puzzle. The solution is random. Move the horse along the path (R) by matching three or more identical pieces (S).
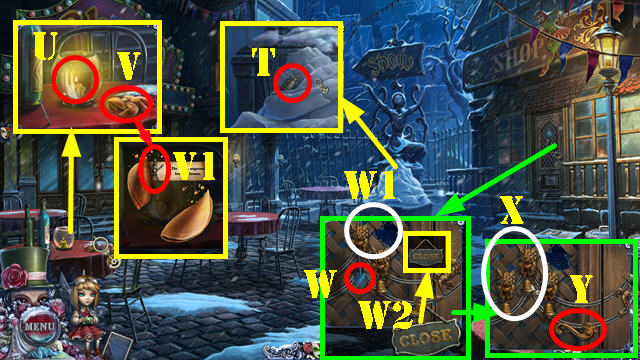
- Take the FROZEN BELL (T).
- Place the FROZEN BELL; receive the BELL (U).
- Open four fortune cookies (V); take the PUPPET 1/3 (V1).
- Take the SILVER SNOWFLAKE (W). Snap a photo (W1). Take the CHAIN (W2).
- Place the two BELLS (X). Pull the handle (Y); enter the pawn shop.
Chapter 2: The pawn shop
- Talk to Gabriel (A); give him the DOLL (B) and receive the BOOK.
- Select the valve (C); take the SCISSORS (D). Select the plate (E).
- Place the SILVER SNOWFLAKE on the BOOK; open the book for a puzzle.
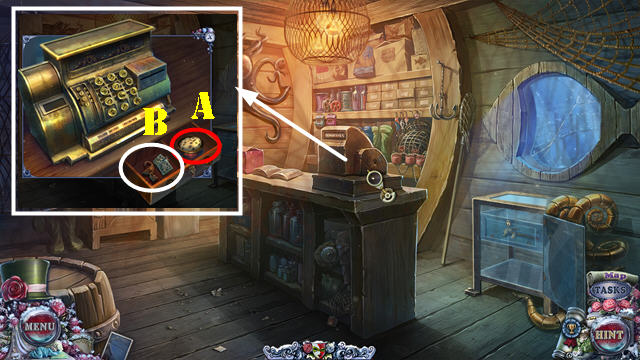
- Place the items as shown (1-4); select the scene twice to receive TIM'S NUMBER (G).
- Use TIM'S NUMBER (H); dial 55431 (I).
- Walk down.
- Look at the window; Snap a photo to receive TIM'S PHOTO (J).
- Go back to the pawn shop.
- Talk to Gabriel; give him TIM'S PHOTO. Take the CORKSCREW HANDLE and look at the newspaper (K).
- Walk down.
- Use the CORKSCREW HANDLE; take the CORKSCREW (L).
- Return to the pawn shop.
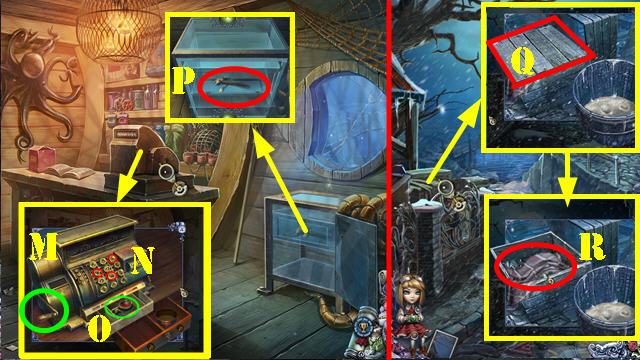
- Open the mouth; take the WALNUT KERNEL 1/3 (M).
- Use the CORKSCREW (N); select twice and take the OIL.
- Use the OIL on the SCISSORS.
- Use the SCISSORS 4x (O); take the BALLERINA 1/2 (P). Place the puppets and the lantern as shown (Q). Take the LADDER (R).
- Walk down.
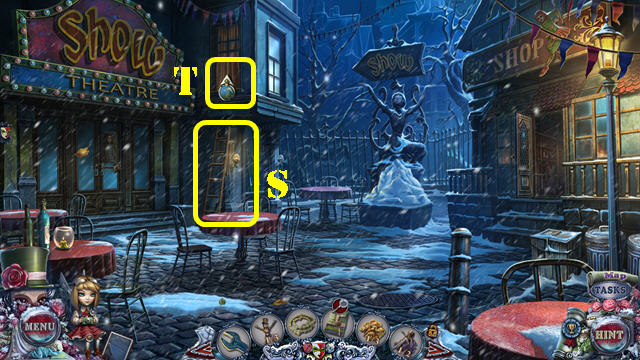
- Place the LADDER (S).
- Enter the director's office (T).
- Spin the wheel (U); open the compartment (V).
- Take the WALNUT KERNEL 2/3 (W).
- Use the scoop (X); receive the HOT PUPPET.
- Talk to the man (Y); take the SOLVENT (Z).
- Walk down.
- Place the HOT PUPPET on the snow; take the PUPPET 2/3 (A). Select the scoop (B).
- Use the WRENCH 4x and remove the cover (C); take the VALVE and PUPPET 3/3 (D).
- Go to the director's office.
- Place the CHAIN and PUPPET 3/3 (E).
- Walk down.
- Take the HANDKERCHIEF (F) and open the shirt.
- Select the head twice (G); open the compartment and select it (H).
- Snap a picture (I). Swap the pictures as shown (J). Take the HEART (K).
- Enter the pawn shop.
- Use the SOLVENT and the HANDKERCHIEF (M); Snap a photo (N); take the MAZE PHOTO.
- Walk down.
- Place the HEART and look at it (O); place the MAZE PHOTO for a puzzle. Solution: Px2-Q-P-Qx8.
- Remove the heart pump; take the GOLDEN SUN (R).
- Place the GOLDEN SUN on the BOOK and open it for a puzzle.
- Use the broom 4x (S).
- Use the pickaxe 3x (T).
- Place the items (color-coded) as shown (U-V).
- Receive the CAT FIGURINE.
- Return to the director's office.
- Select the CAT FIGURINE twice. Place the CAT FIGURINE; take the BALLERINA 2/2 (W).
- Walk down.
- Place the BALLERINA 2/2 (X) and select it twice.
- Enter the theater.
Chapter 3: The Theater
- Select the scene.
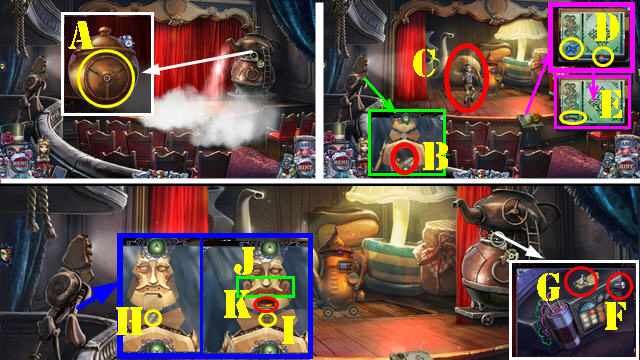
- Place the VALVE and spin it (A).
- Open the compartment; look at the note; take the FISH (B).
- Select the puppet (C).
- Take the CHISEL and INSULATING TAPE (D). Remove the cover; take the MUSTACHE (E).
- Take the BOLT (F). Use the CHISEL (G); receive the SUCTION CUP.
- Place the SUCTION CUP (H); receive the GLASS. Take the GEAR (I).
- Place the MUSTACHE (J); take the ORANGE RING (K).
- Place the GEAR; arrange as shown (L).
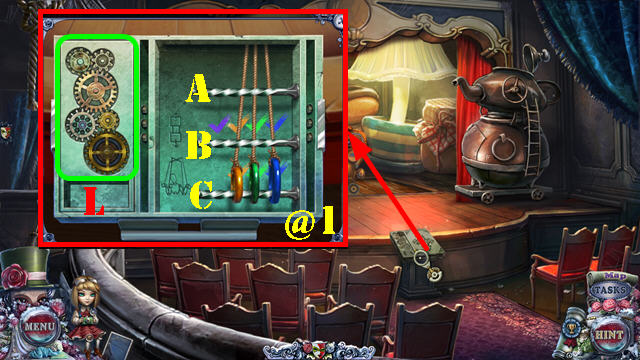
- Place the ORANGE RING for a puzzle. Solution (@1): (A-C)-(A-B)-(C-B)-(A-C)-(B-A)-(B-C)-(A-C).
- Place the BOLT (M); slide the latch. Open the cage; take the NIPPERS (N). Use the NIPPERS (O); remove the old battery.
- Use the NIPPERS; take the BATTERY (P).
- Place the BATTERY (Q). Use the INSULATING TAPE (R); receive the RING VIOLET.
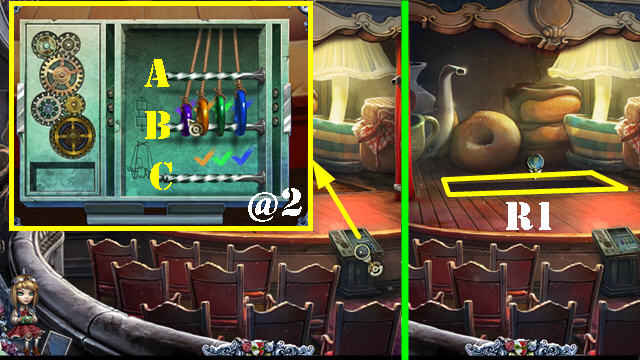
- Place the VIOLET RING for a puzzle. Solution (@2): (C-A)-(C-B)-(A-B)-(C-A)-(B-C-)-(B-A)-(C-A)-(C-B)-(A-B)-(A-C)-(B-C)-(A-B)-(C-A)-(C-B)-(A-B).
- Go to the theater basement (R1).
- Take the BEADS (S).
- Look at the door (T); play the HOP (U) to receive the MONOCLE.
- Take the SHARD from the MONOCLE and place the GLASS; take the MONOCLE.
- Take the DOORBELL (V).
- Select the books 4x and the boards 2x (W).
- Return to the theater.
- Place the MONOCLE (X); take the FLASHLIGHT (Y).
- Use the FLASHLIGHT; take the CROWN (Z).
- Go to the theater basement.
- Place the CROWN (A); take the MATCHES and MAGNET (B).
- Walk down.
- Use the MAGNET on the BEADS; take the STRUNG MAGNET.
- Use the STRUNG MAGNET (C); receive the WIRE and KEY.
- Return to the theater basement.
- Use the KEY and select it (D).
- Play the HOP (E) to receive the MASK.
- Use the WIRE (F); receive the PACKAGE.
- Use the SHARD on the PACKAGE; remove the wrapper. Use the MATCHES on the wax and remove the lid; take the MASK and NUT.
- Return to the pawn shop.
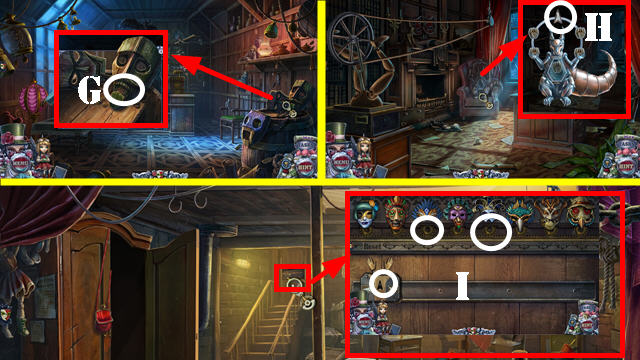
- Place the NUT and select it twice; take the WALNUT KERNEL 3/3 (G).
- Go to the director's office.
- Place the WALNUT KERNEL 3/3; take the BUTTON (H).
- Return to the theater basement.
- Place the 2 MASKS and the BUTTON for a puzzle (I).
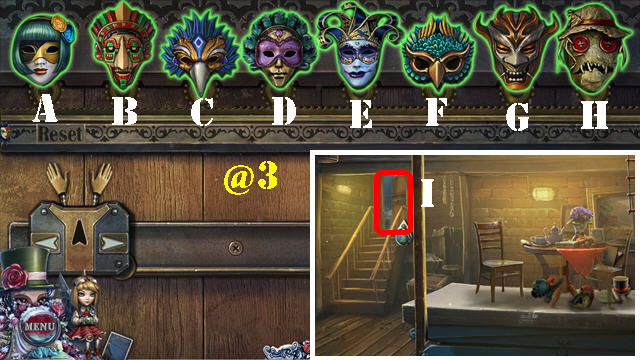
- Swap the masks (A-H) until you get the image shown. The solution is random (@3).
- Exit to the street (I).
Chapter 4: Fishing Store
- Take the CASE (A).
- Take the NEEDLE and look at the note (B).
- Use the NEEDLE on the CASE and open the compartment; take the PICK and TWEEZERS.
- Take the NEWSPAPER (C).
- Place the DOORBELL (D); scroll down and place the NEWSPAPER (E). Scroll up and select the doorbell. Take the PLATE 1/3 (F).
- Use the TWEEZERS (G); receive the PLATE 2/3. Remove the leaf and use the PICK; receive the STONE (H).
- Use the STONE; take the PLATE 3/3 (I).
- Place the PLATE 3/3 for a puzzle. Solution (J). Go to the bridge.
- Talk to Gabriel (K); take the FINGER (L).
- Take the DIVING HELMET (M).
- Return to the theater basement.
- Place the FINGER; take the TOBACCO PIPE (N).
- Walk down.
- Place the TOBACCO PIPE (O); take the SAW (P).
- Return to the street.
- Use the SAW; take the TENTACLE (Q).
- Go to the fishing store.
- Take the TROWEL (R).
- Scroll down; place the TENTACLE (S); select: 3-1-4-2. Open the case; take the DIVING SUIT.
- Select the DIVING SUIT; place the DIVING SUIT and DIVING HELMET on the doll; take the DOLL IN DIVING SUIT (T).
- Walk down.
- Use the TROWEL to get the TROWEL WITH SAND (U).
- Use the TROWEL WITH SAND (V); go forward (W).
- Select the scene.
- Play the HOP (X) to get the SEA HORSE.
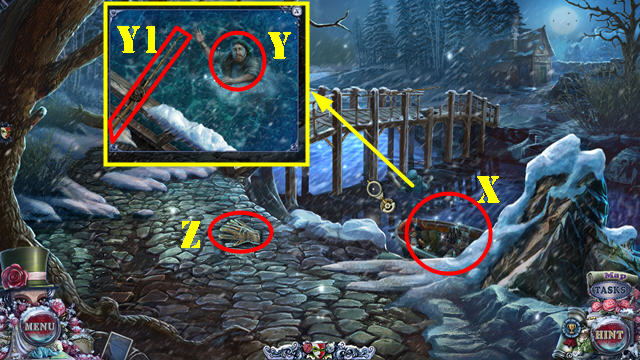
- Talk to Gabriel (Y); remove the broken fishing rod (Y1).
- Take the GLOVES (Z).
- Return to the fishing store.
- Place the SEA HORSE and open the drawer; remove the cap and take the COOKIE (A). Take the SNAKE and CIGARETTE LIGHTER (B).
- Place the SNAKE on the CASE and select it; take the ALCOHOL.
- Return to the bridge.
- Remove the snow; pour the ALCOHOL and use the CIGARETTE LIGHTER (C).
- Give the COOKIE; take the FISH (D).
- Return to the fishing store.
- Place the 2 FISH; open the case and take the FISHING ROD (E).
- Return to the Bridge.
- Place the FISHING ROD and DOLL IN DIVING SUIT (F); select the fishing rod and look at the photo. Remove the fishing rod.
- Play the HOP (G) to get the CROSSBOW.
- Place the CROSSBOW; select it (G1). Place the cursors as shown in two spots (H-I) and select the arrow once it's in each of the red zones (J-K).
- Take the HANDLE (L).
- Return to the fishing store.
- Place the HANDLE and pull it (M); select the buttons (N); take the FLOWER BUTTON and KEY (O).
- Scroll down. Use the KEY and select it twice; take the CLAW HAMMER (P).
- Walk down.
- Use the CLAW HAMMER; receive the NAIL 1/6- 5/6 (Q). Take the PLANKS and BLANKET (R).
- Go to the bridge.
- Use the BLANKET (S).
- Use the GLOVES to get the NAIL 6/6 (T).
- Put down the PLANKS for a puzzle (U).
- Solution (V). Place the NAILS 6/6 and use the CLAW HAMMER.
- Go to the courtyard (W).
- Take the LONG STICK (A) and AWL (B).
- Place the BUCKET (C). Use the GLOVES (D); receive the ICE BLOCK.
- Use the AWL (E); receive the TOY KEY.
- Use the TOY KEY (F) and select it; receive the CARRIAGE.
- Place the CARRIAGE (G); open the grid and take the CLIPPERS (H).
- Use the CLIPPERS; take the LOCKPICK TOOLS (I).
- Use the LOCKPICK TOOLS (J); Snap a photo (K) for a puzzle.
- Round one: up-right-down-left-up (@).
- Round two: up-left-down-right-up.
- Round three: up-down-left-right-down.
- Round four: down-up-left-up-right.
- Round five: down-up-left-right-down.
- Enter the Marionni house.
- Take the MECHANICAL ARM (L), DOLL'S LEG (M), DOORKNOB (N), TEAPOT (O), and MONKEY'S LEG (P).
- Open the lid (Q).
- Use the GLOVE and MECHANICAL ARM; receive the JOURNAL (R).
- Place the DOORKNOB and select it; take the GLUE and BELLOWS (S).
- Go to Rosie's room (T).
Chapter 5: Rosie's Room
- Select the scene.
- Take the HEAD KEY (U).
- Walk down twice.
- Place the MONKEY'S LEG (V); take the PLASTIC CHEESE (W).
- Return to the Marionni house.
- Place the PLASTIC CHEESE and select it; take the NATURAL CHEESE (A).
- Give the NATURAL CHEESE (B); take the SOLVENT (C). Lift the cloth; take the PAPER (D).
- Use the HEAD KEY on the JOURNAL and select it. Take the COGWHEEL 1/2. Place the PAPER in the JOURNAL; take the JOURNAL.
- Use the SOLVENT and select 3x; receive the COAL (E).
- Place the ICE BLOCK (F). Place the COAL (G) and use the BELLOWS. Take the COGWHEEL 2/2.
- Walk down.
- Place the COGWHEEL 2/2 and select twice (H); enter the puppet workshop (I).
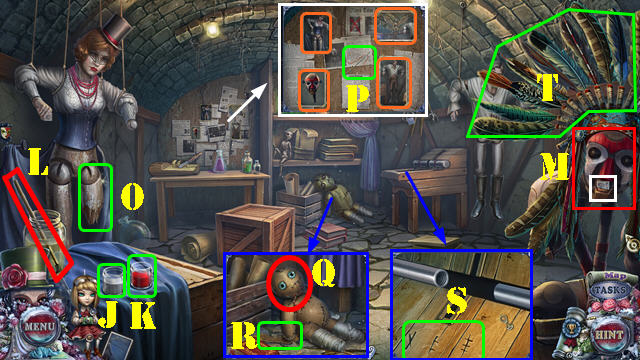
- Open the lids (J-K); dip the brush (L) In (J) and use it on the mask (M). Dip the brush in (K) and use it on the mask (M); take the BUTTON 1/4 (N).
- Place the DOLL'S LEG (O); receive the BUTTON 2/4.
- Look at each photo (orange); take the THREADED NEEDLE (P).
- Use the THREADED NEEDLE (Q); take the FRAME (R).
- Snap a photo (S). Receive a PHOTO.
- Take the WAR BONNET (T).
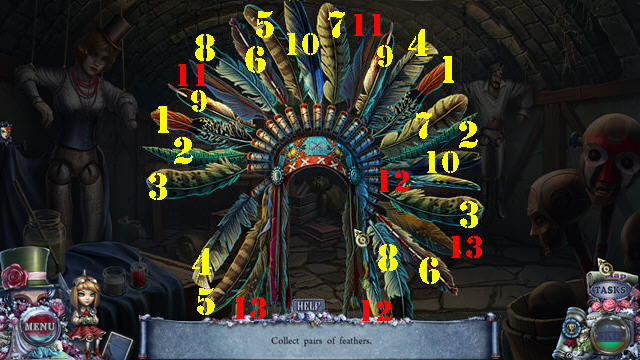
- Open the WAR BONNET for a puzzle. Select matching pairs (1-13).
- Receive the FEATHERS.
- Use the GLUE on the FRAME and place the FEATHERS on it; take the WINGS.
- Place the WINGS (U); receive the BUTTONS 3/4.
- Return to The Marionni house.
- Place the PHOTO and arrange the symbols as shown (V). Take the TROUSERS (W).
- Return to the Puppet workshop.
- Place the TROUSERS (X); receive the BUTTONS 4/4.
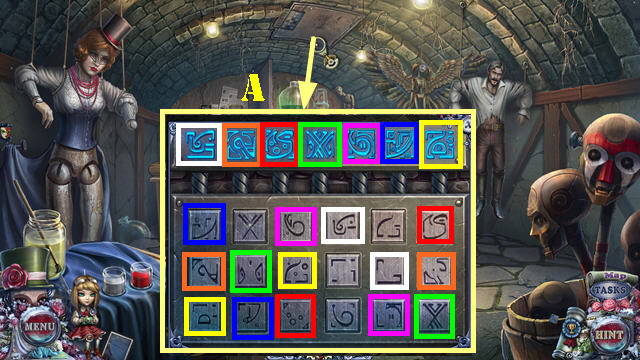
- Place the BUTTON 4/4 for a puzzle. Solution (A).
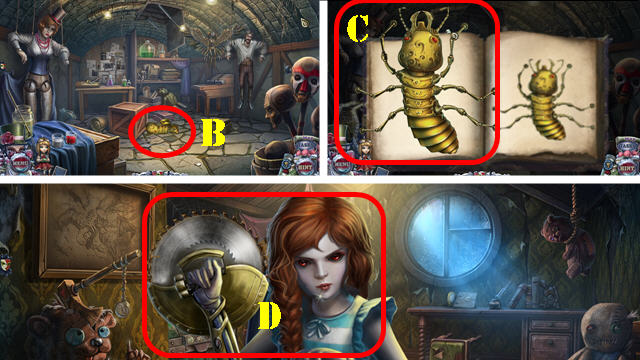
- Take the INSECT PARTS (B).
- Place the JOURNAL on the INSECT PARTS for a puzzle. Arrange the insect as shown (C). Take the TERMITE.
- Return to Rosie's room.
- Use the TERMITE (D).
- Select the rope 3x (E); receive the PART OF ROPE LADDER. Take the HOSPITAL KEY (F).
- Take the CIRCULAR SAW (G) and MIRROR (H).
- Take the 'PM' and STICK (I).
- Place the 'PM' (J) and open the book for an HOP. Receive the DRIED ROSES.
- Go to the courtyard.
- Play the puzzle (K). The solution is random.
- Scroll down. Use the HOSPITAL KEY and enter the hospital (L).
- Talk to Thomas; take the TRAY (M).
- Select the BANDAGE 4x to receive it (N). Take the WEIGHT (O).
- Take the LOLLIPOP (P).
- Use the WEIGHT (Q) and open the door; play the HOP to receive the PEROXIDE.
- Take the SURGICAL NEEDLE (R).
- Look at the note on the TRAY; place the MIRROR, BANDAGE, PEROXIDE, and SURGICAL NEEDLE; take the FILLED TRAY (S).
- Give the FILLED TRAY (T); take the KEY (U).
- Use the KEY and select it; take the PETROLEUM JELLY, RECIPE, and LETTER (V).
- Talk to Thomas; give him the LETTER (W).
- Play the HOP (X) to get the GLASS CONTAINER.
- Use the GLASS CONTAINER; receive the FERTILIZER (Y).
- Place the FERTILIZER for a puzzle (Z).
- The solution is random. Random examples shown (A).
- Take the BERRY 2/2 (B).
- Put down the RECIPE and TEAPOT; place the DRIED ROSES and BERRY 2/2 (C).
- Place the PETROLEUM JELLY (D).
- Select the mortar; receive the TINCTURE.
- Give the TINCTURE receive the SCALPEL (E).
- Return to the puppet workshop.
- Place the CIRCULAR SAW and select it. Use the LONG STICK to get the STICKS (F).
- Return to Rosie's room.
- Use the SCALPEL; receive the ROPE (G).
- Use the SCALPEL; take the HEART (H).
- Place the HEART and select it (I); play the HOP to get the FLOWER BUTTON.
- Place the two FLOWER BUTTONS and open the chest; take the GATE PART and COAT (J).
- Return to the courtyard.
- Place the STICK, STICKS, and ROPE on the PART OF ROPE LADDER; take the ROPE LADDER.
- Use the ROPE LADDER (K); take the GATE PART (L).
- Place the two GATE PARTS for a puzzle (M).
- Solution: 3-4-3-2-2-3-5.
- Go to the cemetery.
Chapter 6: Cemetery
- Talk to Peter (N).
- Select the door twice; snap a photo (O). Take the SICKLE (P).
- Take the TOOTH 1/3 (Q), CAGE KEY (R), PUMPKIN (S) and PUPPET ARM (T).
- Use the SICKLE 3x; take the CHISEL (U). Use the SOLVENT; take the TOOTH 2/3 (V).
- Use the CHISEL and open the box; take the JAW (W).
- Select the knob on the JAW and place the LOLLIPOP in the mouth; take the TOOTH 3/3.
- Place the TOOTH 3/3; select 1-4-2-3 and enter the undertaker's house.
- Take the UMBRELLA (A).
- Open the coffin; take the SILVER BULLET (B).
- Use the PUPPET ARM (C); use the CAGE KEY and select it; take the STRANGE KEY (D).
- Use the STRANGE KEY and select it (E); play the HOP (F).
- Take the ANGEL WING and HAT (G).
- Take the CROSS (H).
- Walk down.
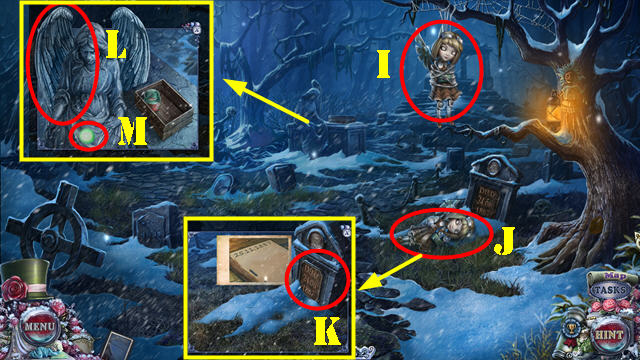
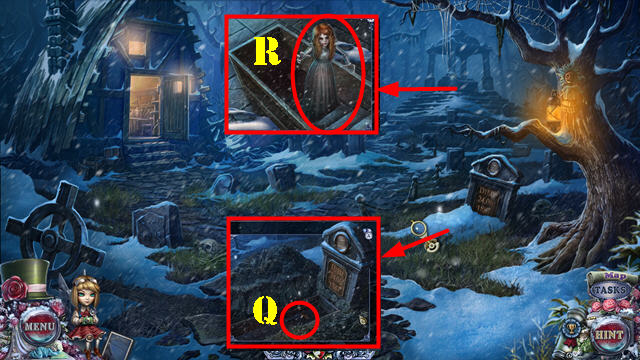
- Select the doll (I); take the PHOTO (J).
- Place the PHOTO (K).
- Place the ANGEL WING (L); take the PHOSPHORESCENT BALL (M).
- Return to the undertaker's house.
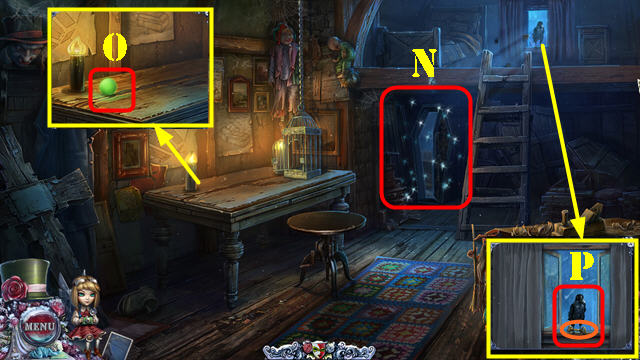
- Play the HOP to get the SHOVEL (N).
- Place the PHOSPHORESCENT BALL; take the GLOWING BALL (O).
- Place the COAT, PUMPKIN, GLOWING BALL, and HAT on the CROSS; take the SCARECROW.
- Use the SCARECROW (P); take the KEY (orange).
- Walk down.
- Use the SHOVEL; take the GUN (Q).
- Place the SILVER BULLET in the GUN; close the chamber and take the LOADED GUN.
- Use the KEY and select. Use the LOADED GUN (R) and enter the chamber.
- Talk to Gabriel(S).
- Take the KEY (T) and STONE (U).
- Pull the lever (V).
- Talk to Gabriel; receive the SCREWDRIVER (W).
- Use the SCREWDRIVER and remove the handle; place the UMBRELLA and select it (X).
- Talk to Gabriel (Y). Snap a photo; receive a SOLUTION.
- Select the stones several times; take the STONE PART 1/4-4/4 (Z).
- Place the STONE PART 4/4, STONE, and SOLUTION. Select 1-5. Go to the crypt (Z1).
- Open the ribs; take the BROKEN FORCEPS (A).
- Go forward (B).

- Select the scene.
- Use the SCREWDRIVER (C); select the reset button (D).
- Take the ELASTIC and the PIXIE (E).
- Walk down.
- Put together the 2 BROKEN FORCEPS; place the ELASTIC on them; take the FORCEPS.
- Use the FORCEPS; receive the FIGURE (F).
- Go forward.
- Place the FIGURE for a puzzle (G).
- Random solution shown (H).
- Place the PIXIE (I). Go forward.
- Take the FROG (J), FUSE (K), and FIRE-BOY (L).
- Select the arrow; use the SCREWDRIVER; receive the SCREWS and take the WINCH HANDLE (M).
- Place the WINCH HANDLE and SCREWS; use the SCREWDRIVER (N).
- Place the FROG for a puzzle. The solution is random. Take the GRASSHOPPER 1/2 (O).
- Place the FIRE-BOY; take the LUNG (P).
- Walk down.

- Place the LUNG (Q).
- Play the HOP to get the PENDANT (R).
- Place the PENDANT (S); take the SPRAY (T). Use the KEY and select it; take the LUNG (U).
- Place the LUNG (V).
- Play the HOP (R) to get the FIRE-GIRL.
- Go forward.
- Place the FIRE-GIRL; take the DYNAMITE (W).
- Return to the chamber.
- Place the DYNAMITE and FUSE for a puzzle (X).
- Solution (Y).
- Return to the precipice.
- Use the SPRAY (A).
- Take the GRASSHOPPER 2/2 (B).
- Pull the handle (C). Place the GRASSHOPPER 2/2 (D).
- Congratulations, you've completed Puppet Show: Bloody Rosie!
Created at: 2016-12-16