

Walkthrough Menu
- General Tips
- Chapter 1: The Kidnapping
- Chapter 2: The Hospital
- Chapter 3: The Hideout
- Chapter 4: Marjory
- Chapter 5: Dr. Marvin's House
General Tips
- This is the official guide for PuppetShow: Her Cruel Collection.
- This guide will not show when you have to zoom into a location; the screenshots will show each zoom scene.
- Hidden-object puzzles are referred to as HOPs. This guide will not show screenshots of the HOPs, however, it will mention when an HOP is available and the inventory item you'll collect from it.
- Use the Map to fast travel to a location.
Chapter 1: The Kidnapping
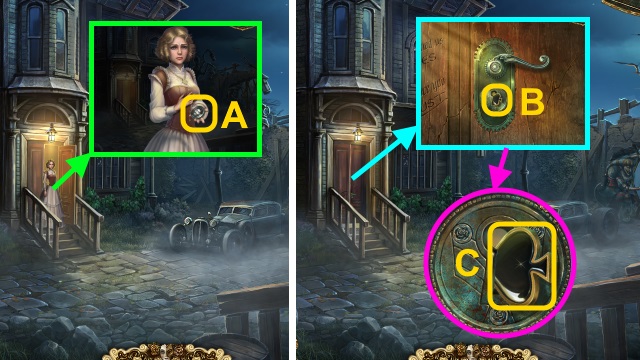
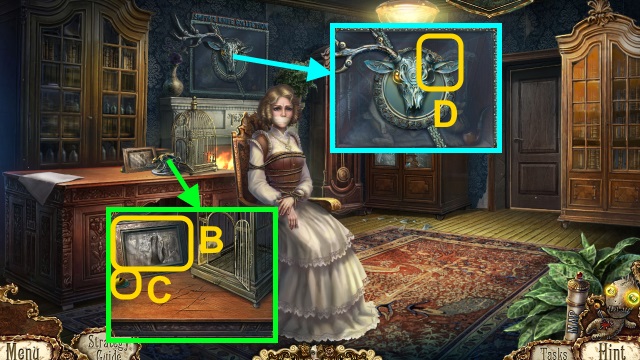
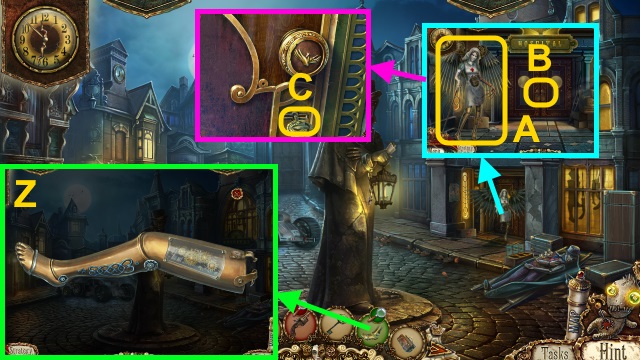
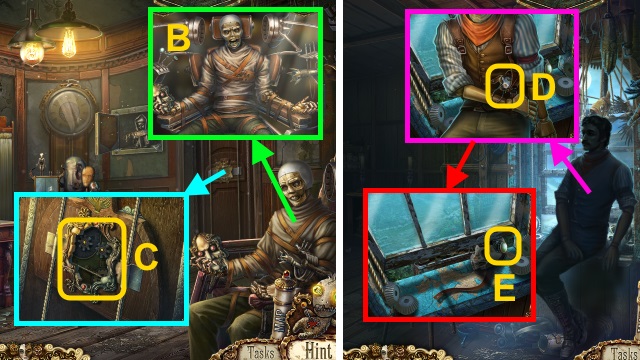
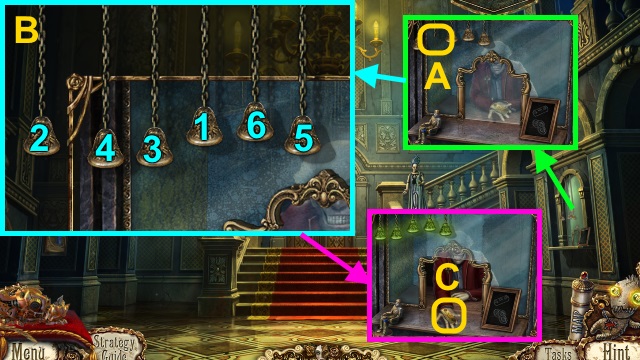
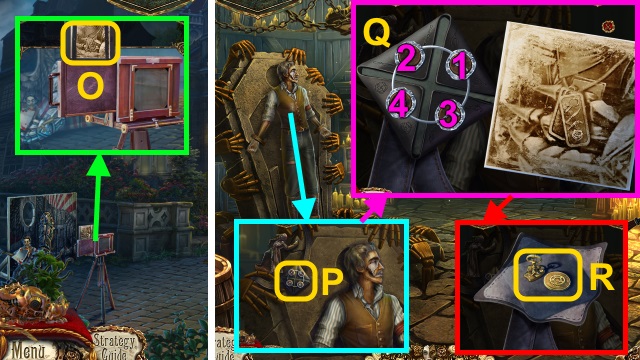
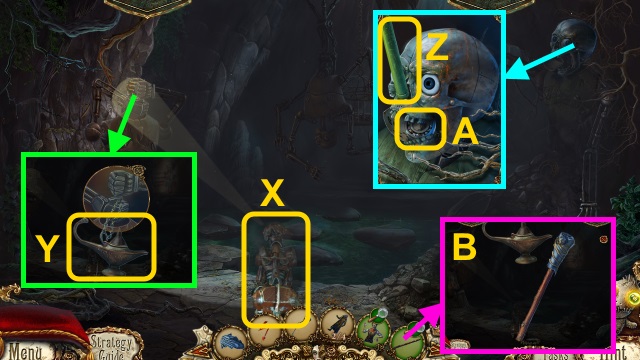
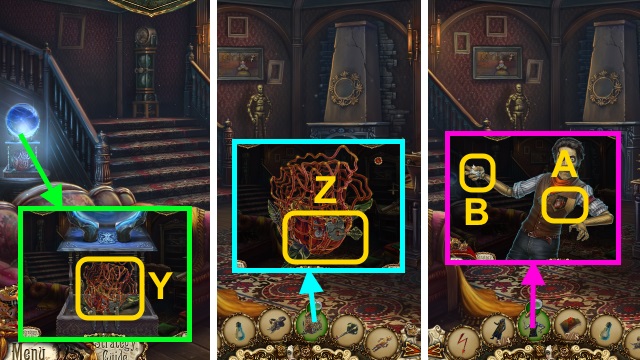
- Talk to Marjory; take JAMES' PORTRAIT (A).
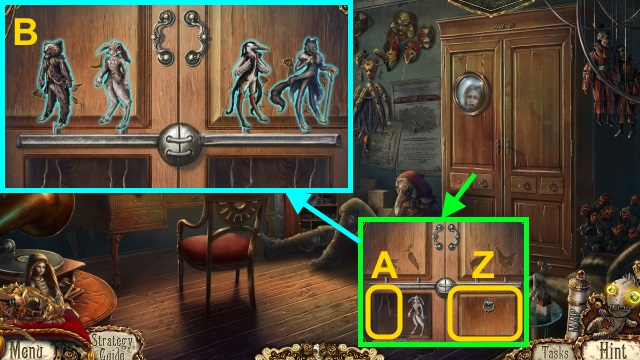
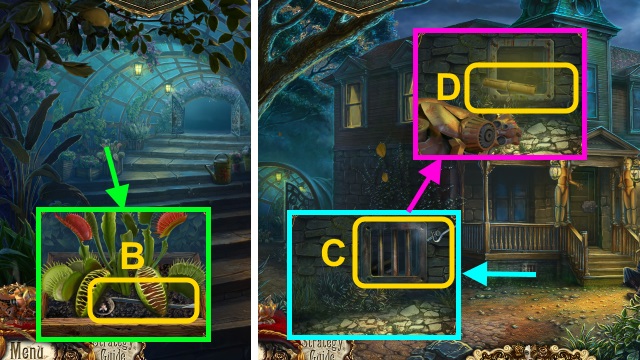
- Examine the door (B).
- Take the SPADE (C).
- Examine the window (D).
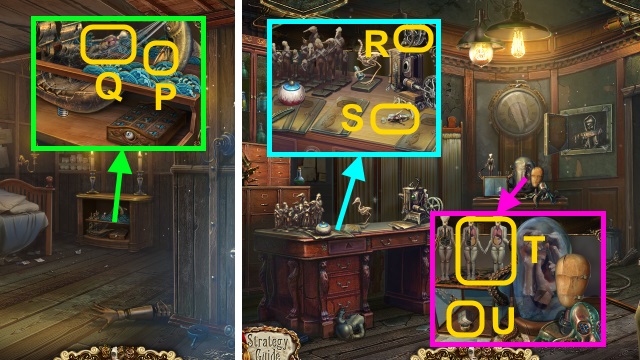
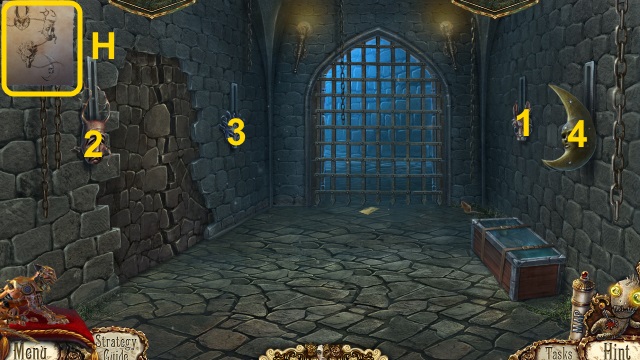
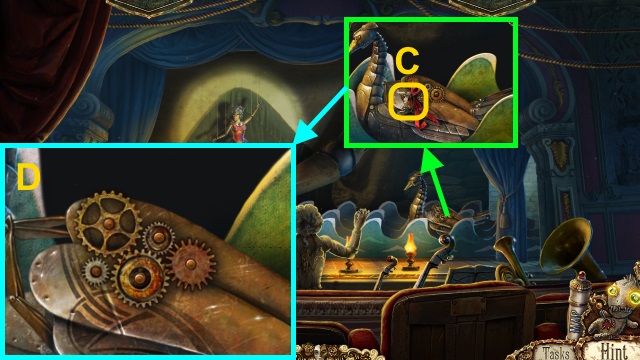
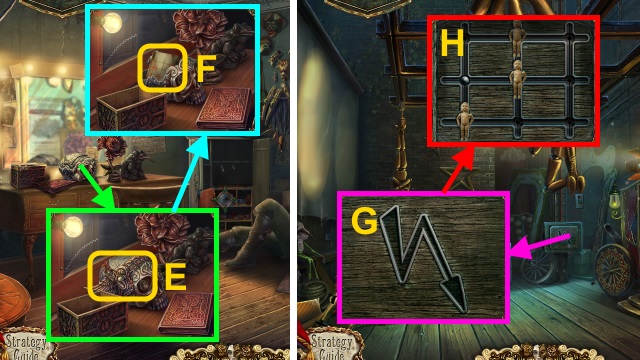
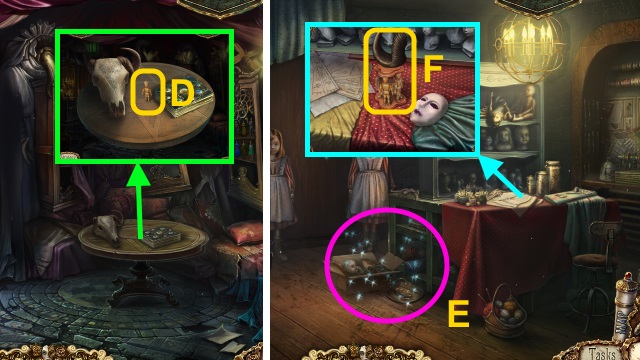
- Take the AWL (E) and HEART (F).
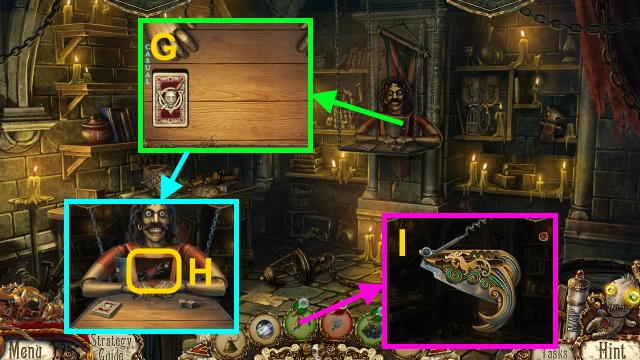
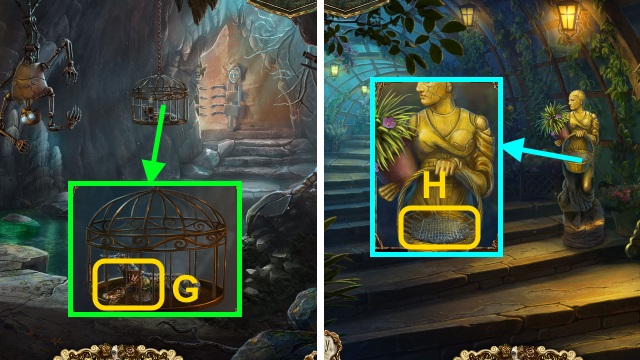
- Take the GEAR (1/3) (G).
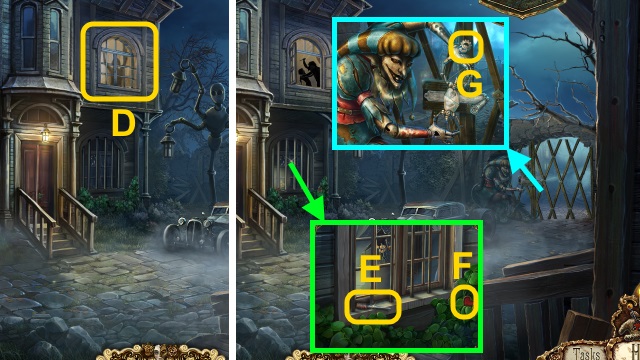
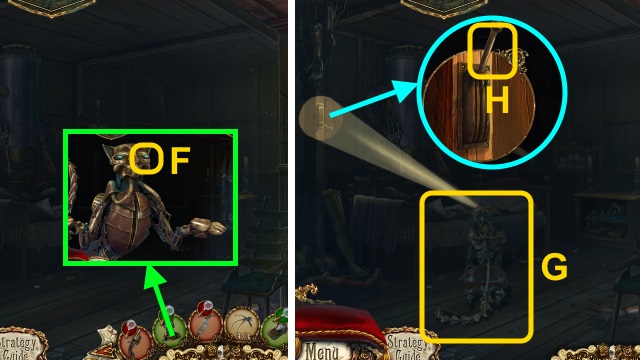
- Place the HEART (H) and SPADE (I).
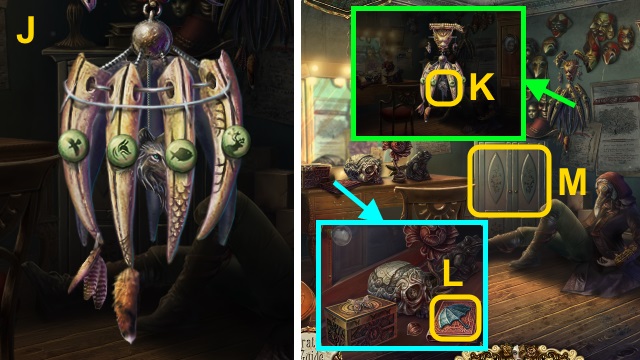
- Try to open the latch (J).
- Use the AWL; open the latch (K).
- Walk right.
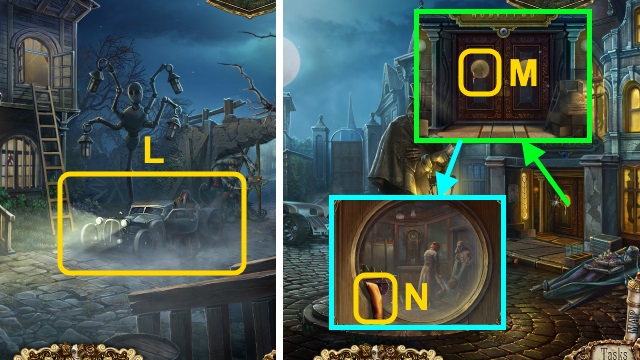
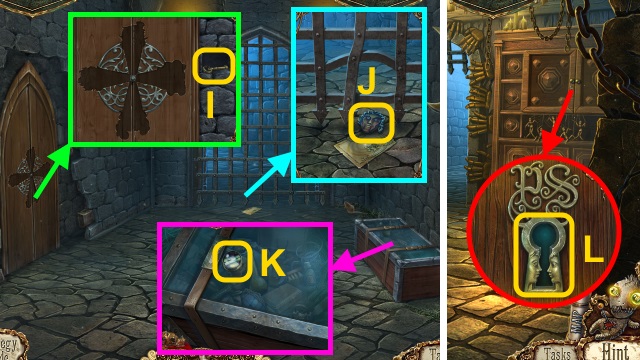
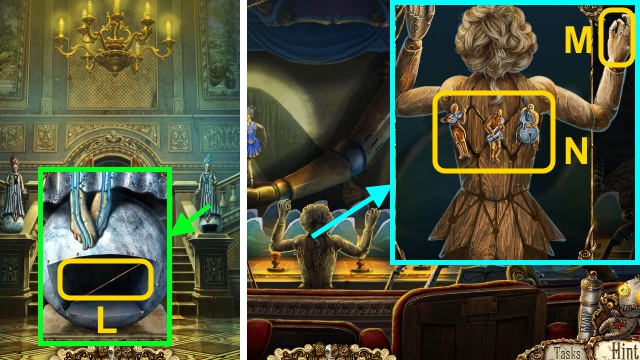
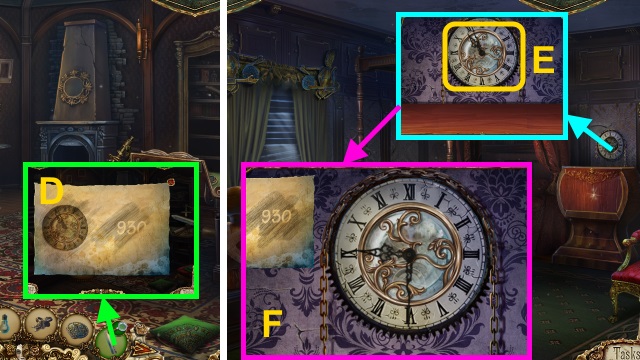
- Examine the paper (L).
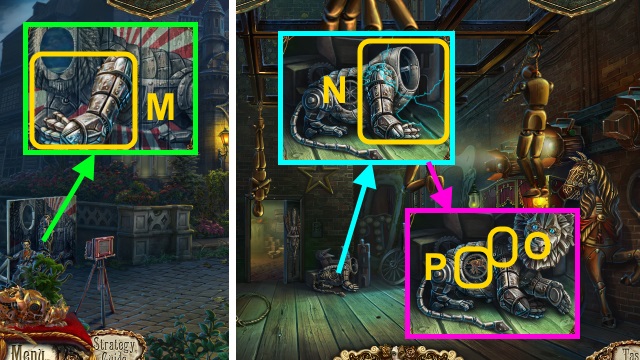
- Take the OILER (M).
- Take the SCREW (N).
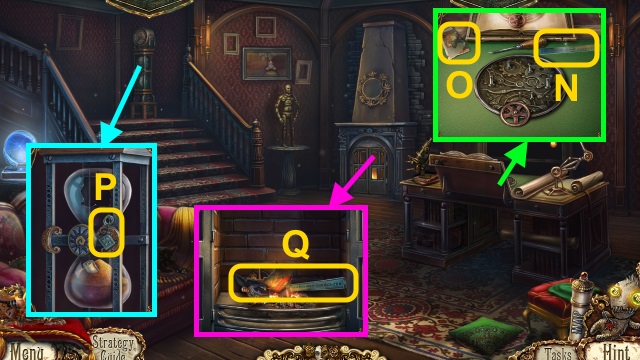
- Take the GEAR (2/3) (O).
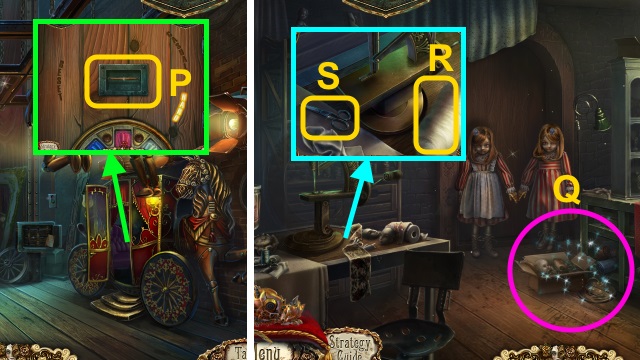
- Take the MAGNET (P).
- Walk down.
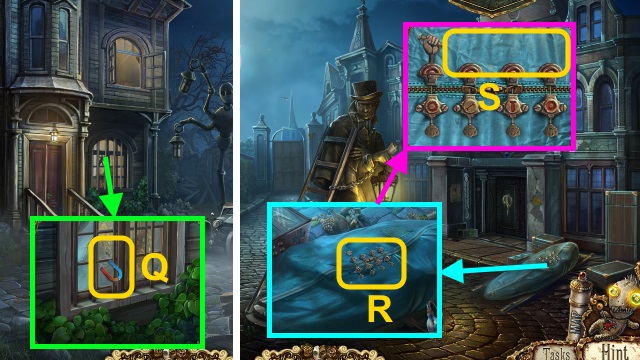
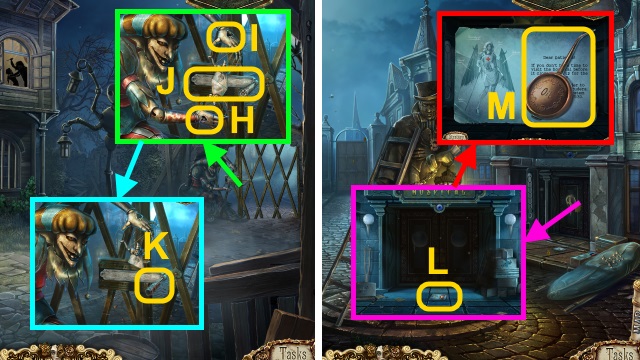
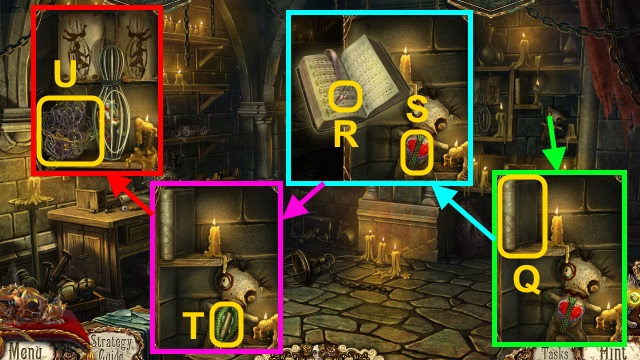
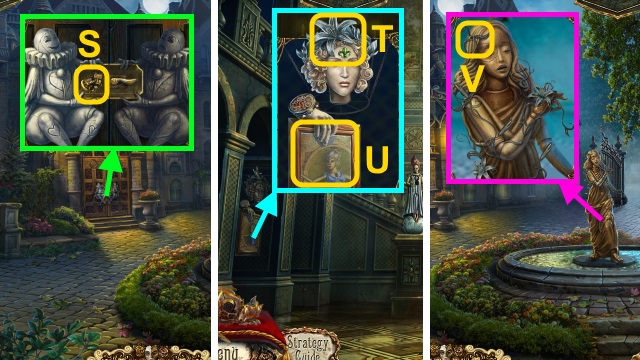
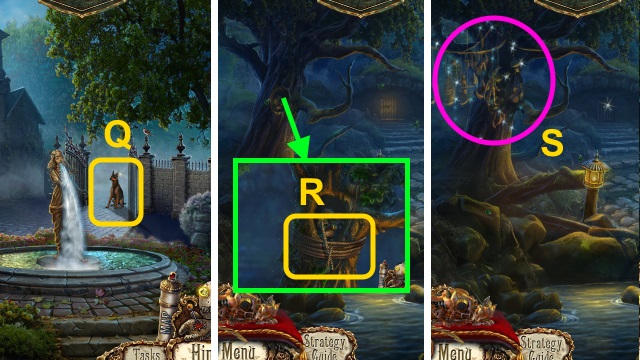
- Examine the gear; use the MAGNET to pull it up (Q). Receive the GEAR (3/3).
- Walk right.
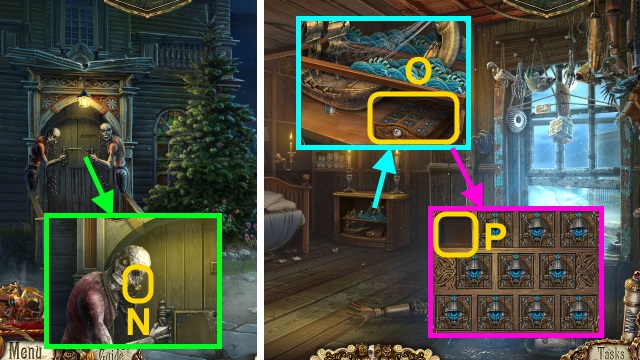
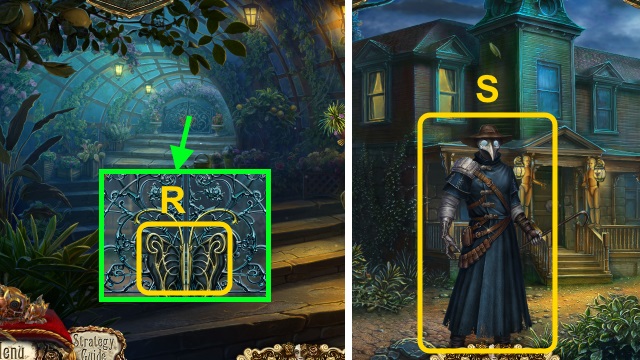
- Examine the zipper (R).
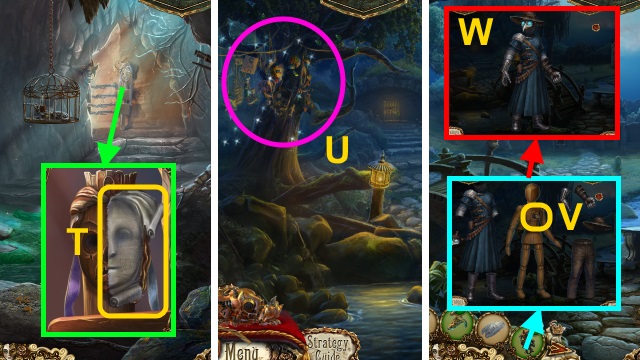
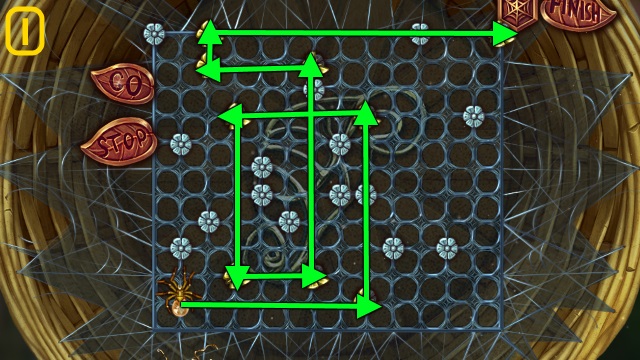
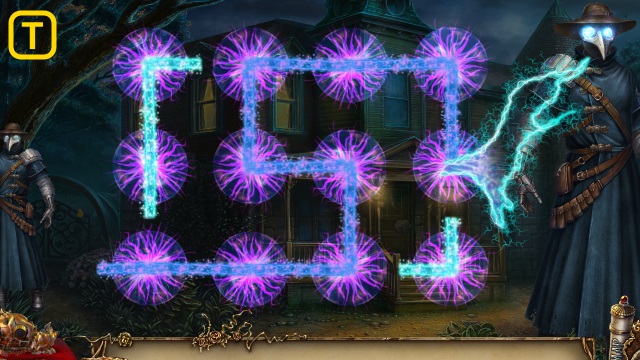
- Place the GEAR (3/3) for a mini-game (S).
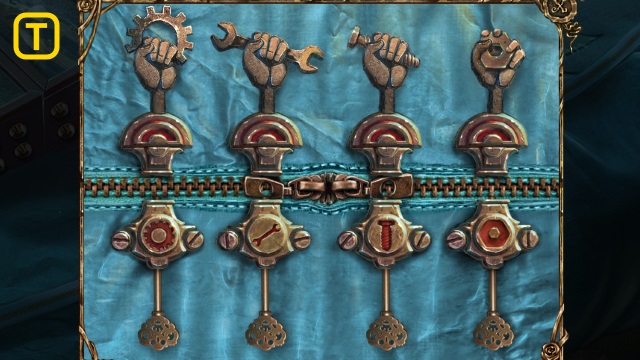
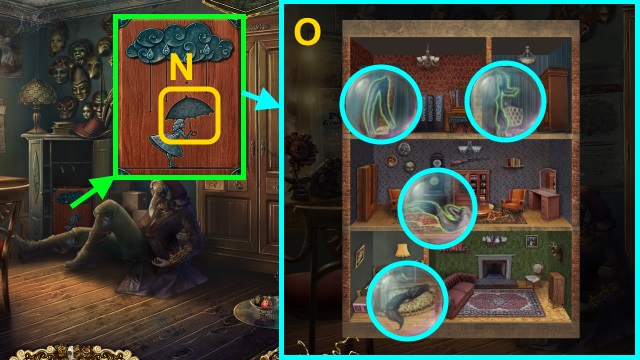
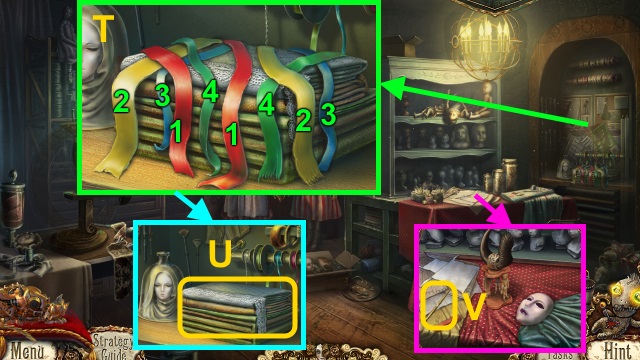
- Solution (T); open the bag.
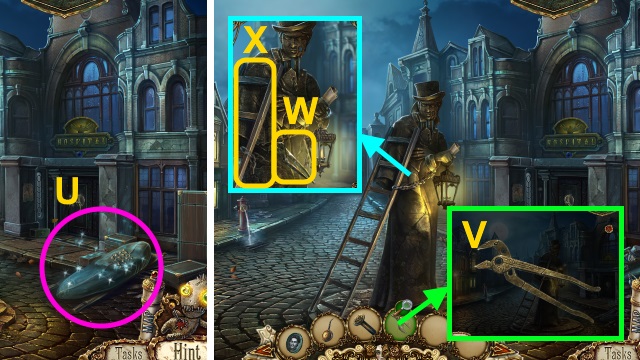
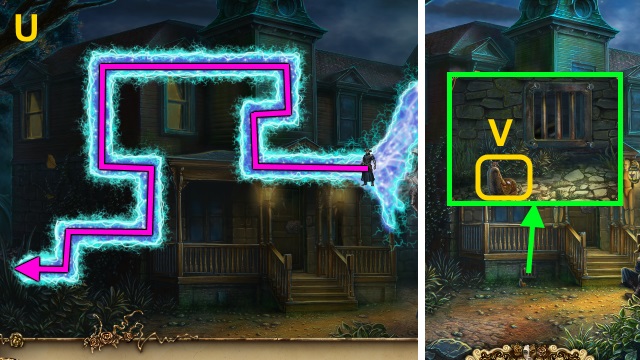
- Play the HOP; receive the PLIERS (U).
- Examine the PLIERS; use the SCREW (V). Take the PLIERS.
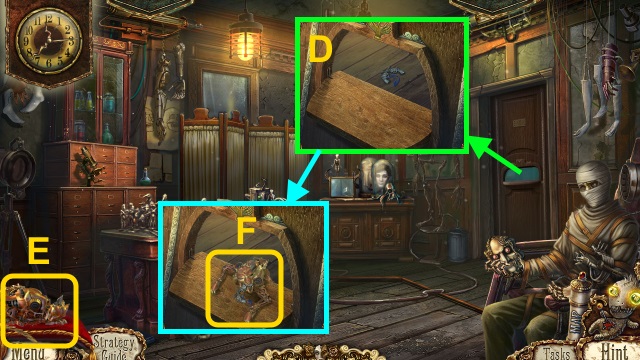
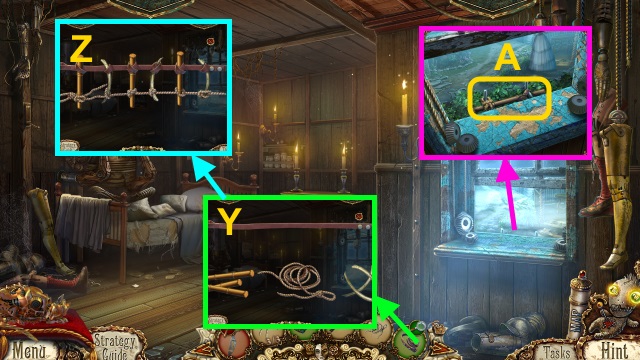
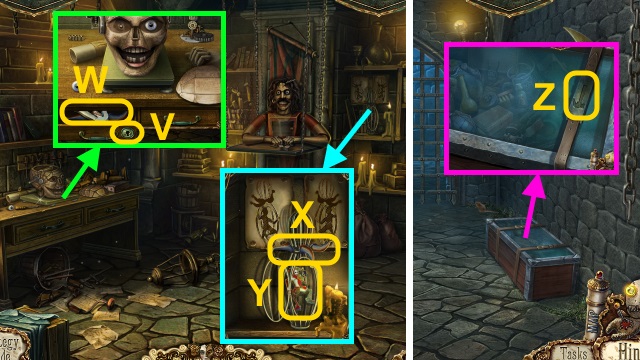
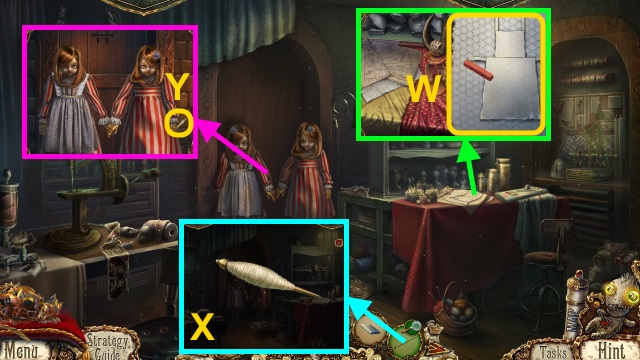
- Use the PLIERS (W); take the LADDER (X).
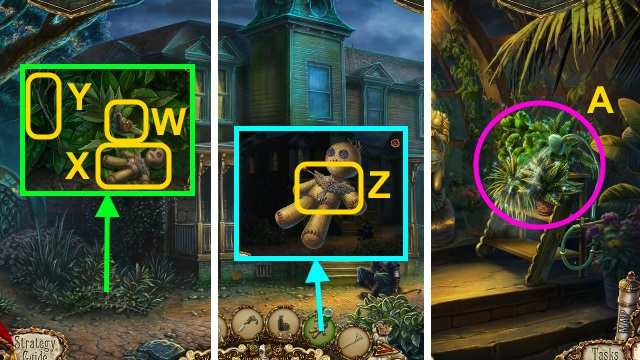
- Walk down.
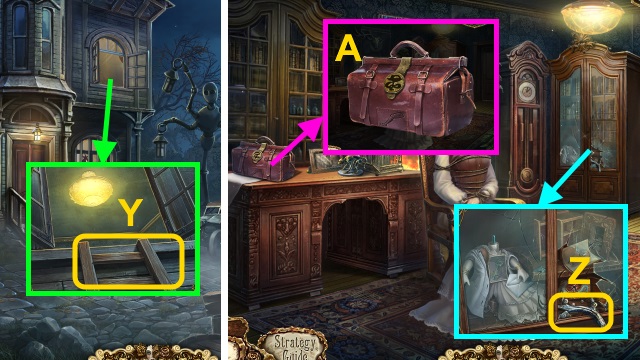
- Place the LADDER (Y).
- Go up.
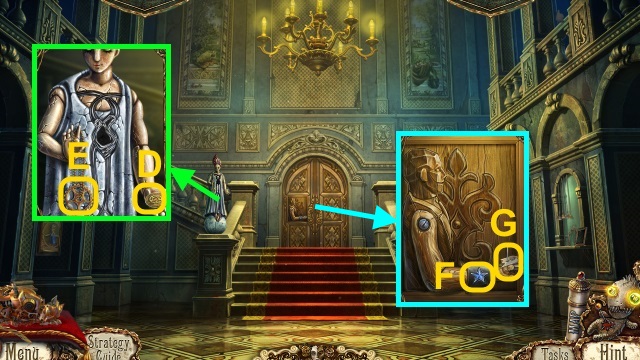
- Take the ANTLER (Z).
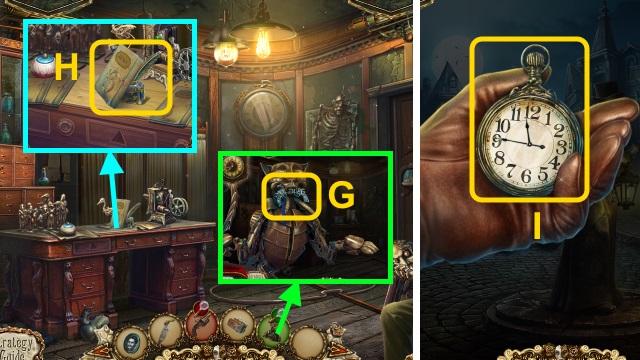
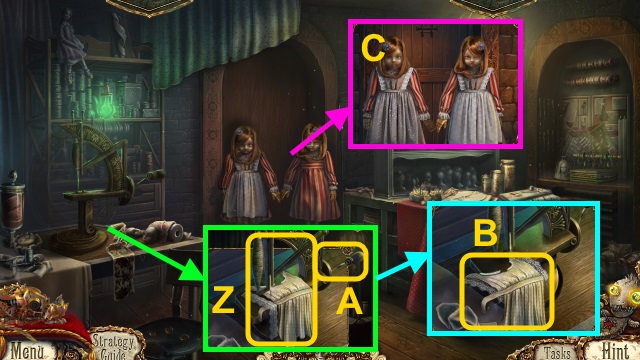
- Take the HOSPITAL BAG (A).
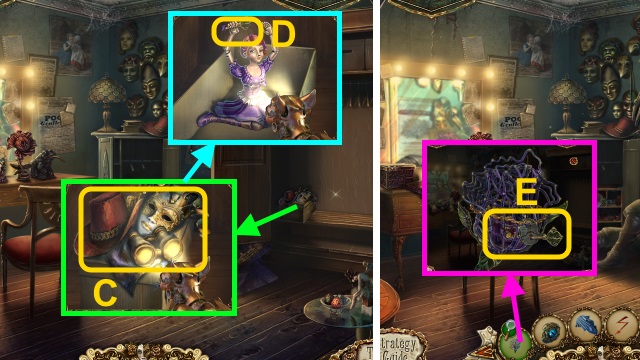
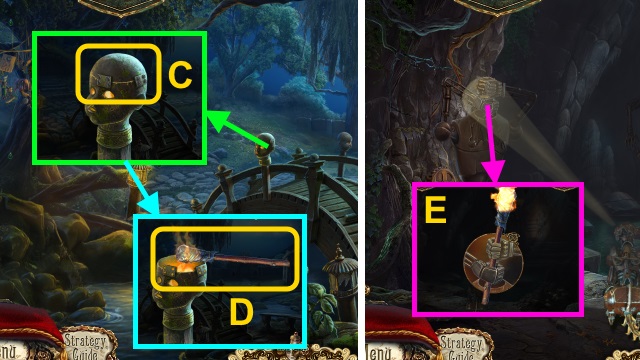
- Examine the frame (B); take the DEER EYE (C).
- Place the DEER EYE and ANTLER (D).
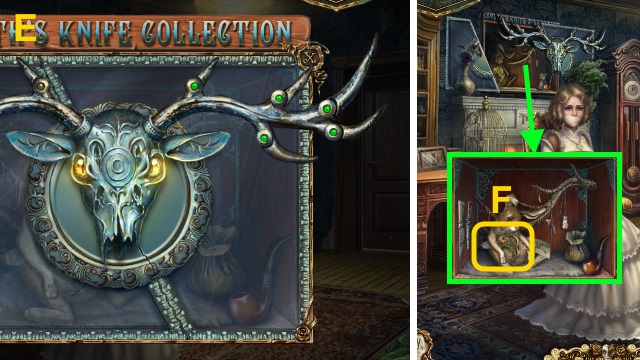
- Arrange the parts (E).
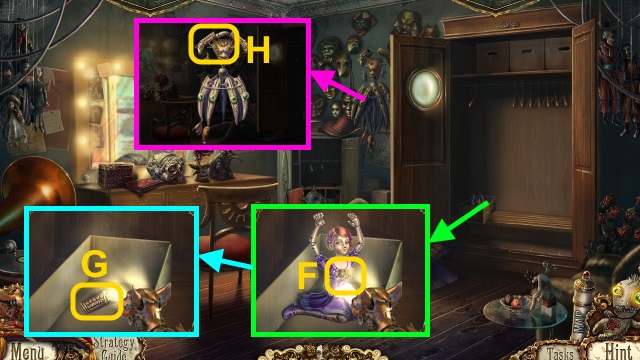
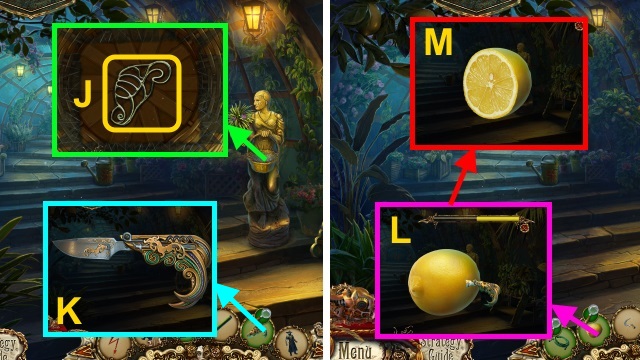
- Take the MULTI-PURPOSE HUNTING KNIFE (F).
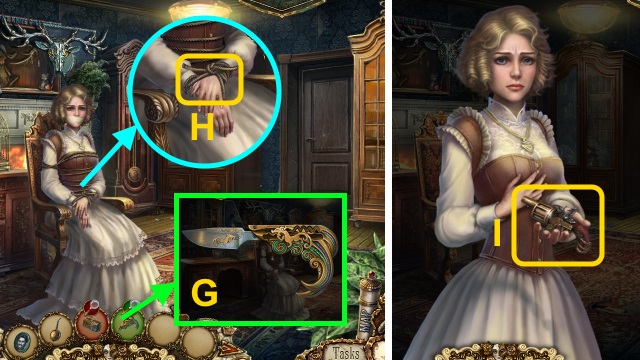
- Examine the MULTI-PURPOSE HUNTING KNIFE (G); take the HUNTING KNIFE.
- Use the HUNTING KNIFE (H).
- Take the UNLOADED PISTOL (I).
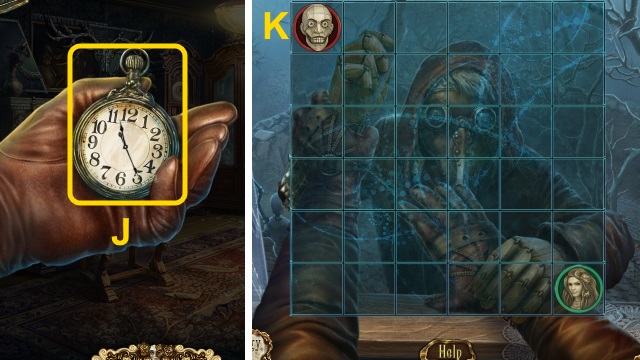
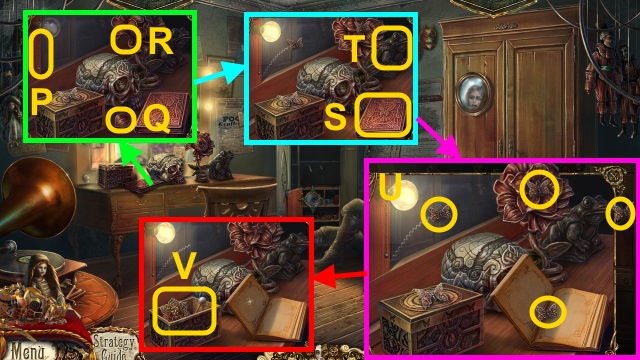
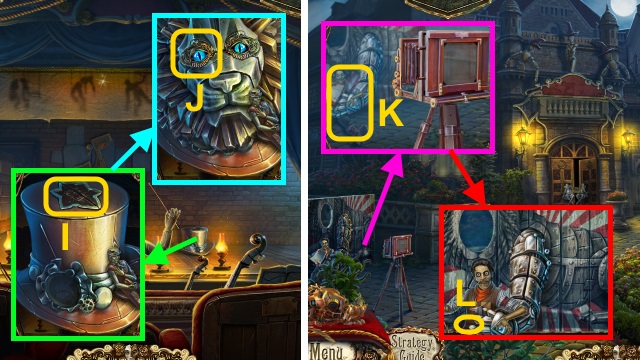
- Examine the watch (J).
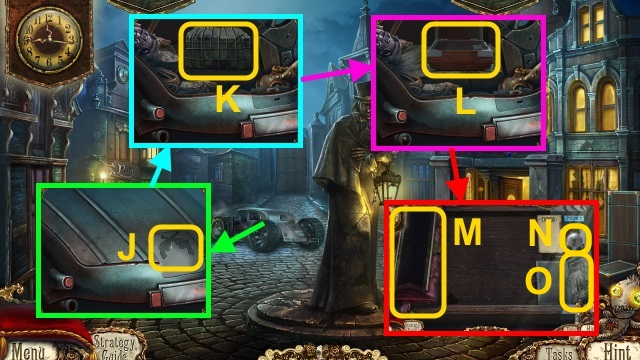
- Walk down for a mini-game.
- Solution is random (K).
- Go forward.
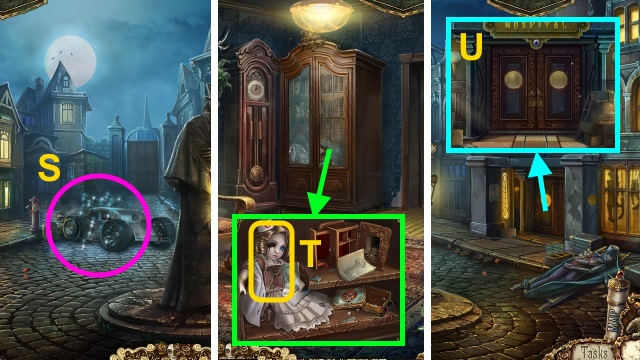
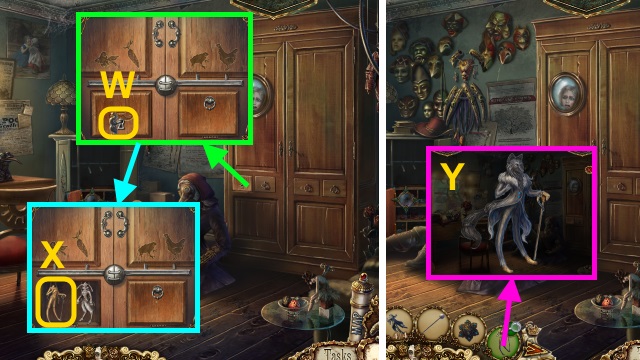
- Examine the car (L).
- Walk right.
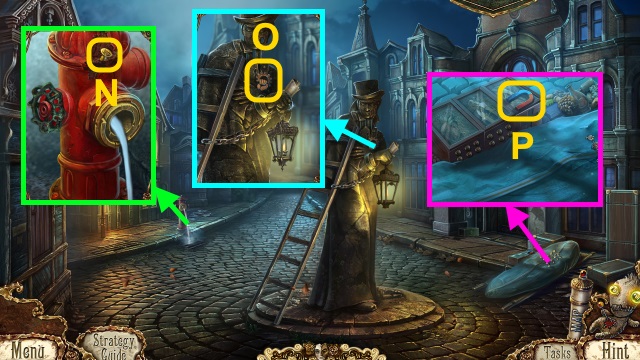
- Examine the window (M).
- Take the FIRE HOSE (N).
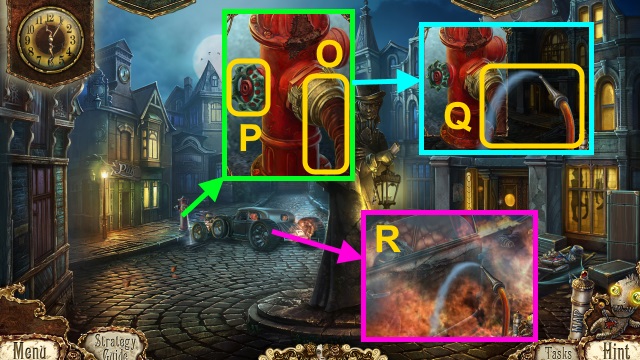
- Place the FIRE HOSE (O).
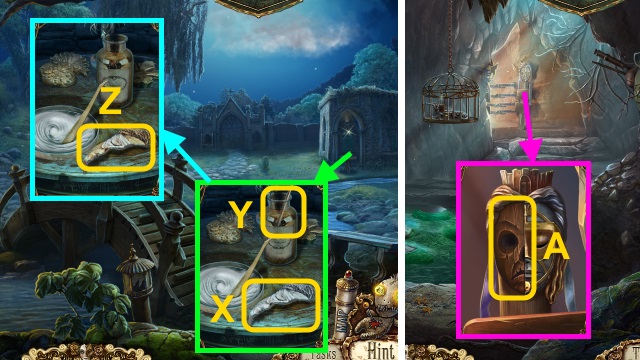
- Use the OILER; turn the valve (P).
- Examine the hose (Q).
- Use the hose (R).
- Play the HOP; receive the Cat and NURSE'S HEAD (S).
- Walk down, then forward.
- Open the cupboard. Place the NURSE'S HEAD; take the HOSPITAL KEY (T).
- Walk down, then right.
- Examine the door (U).
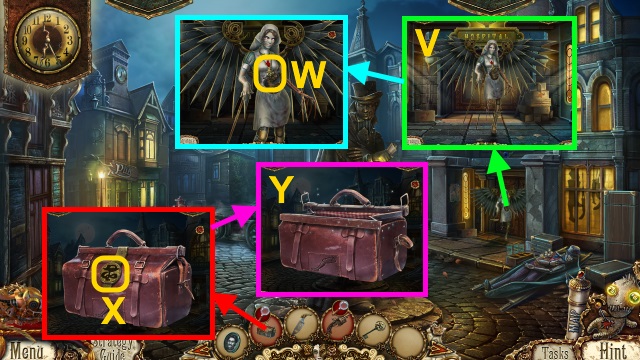
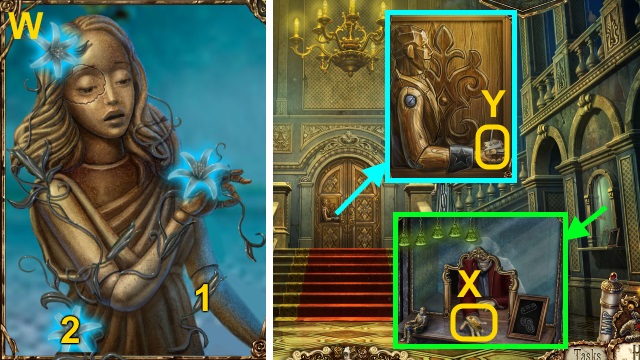
- Talk to the nurse (V); take the HOSPITAL EMBLEM (W).
- Combine the HOSPITAL BAG and HOSPITAL EMBLEM (X).
- Play the HOP; receive the BROKEN ARTIFICIAL LEG (Y). Take the HOSPITAL BAG.
- Examine the BROKEN ARTIFICIAL LEG; place the parts (Z). Take the ARTIFICIAL LEG.
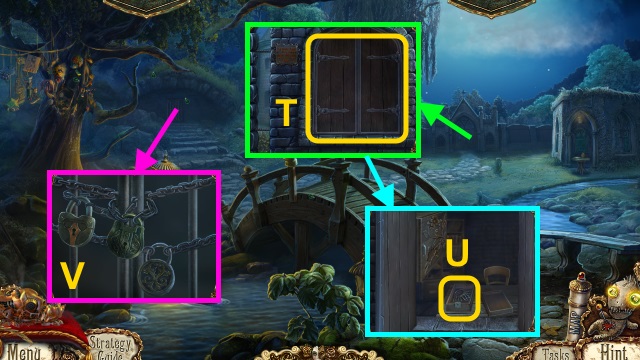
- Give the ARTIFICIAL LEG (A); examine the door (B).
- Use the HOSPITAL KEY (C).
- Walk forward.
Chapter 2: The Hospital
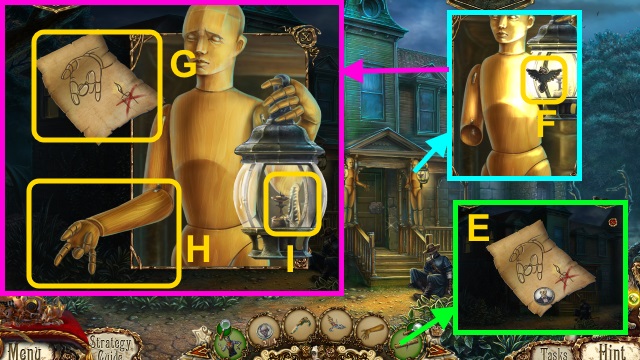
- Examine the door (D); use the Cat (E).
- Take the MECHANICAL CAT (F).
- Examine the MECHANICAL CAT; take the TRUNK EMBLEM (G).
- Read the file (H). Remove the quill; take the INKWELL.
- Walk down.
- Examine the watch (I).
- Use the TRUNK EMBLEM (J).
- Move the items; use the HUNTING KNIFE (K). Remove the paper.
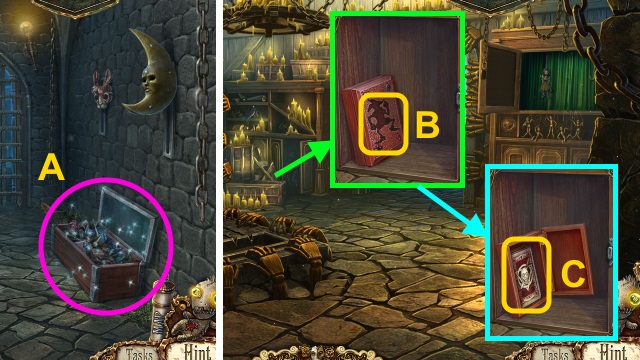
- Open the trunk; examine it (L).
- Place the HOSPITAL BAG (M); use the INKWELL (N). Examine the stamp for a mini-game (O).
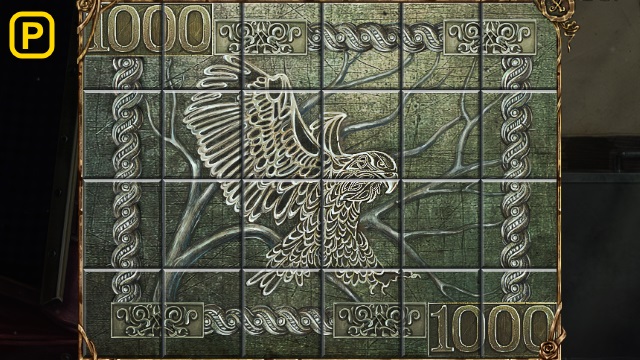
- Solution (P).
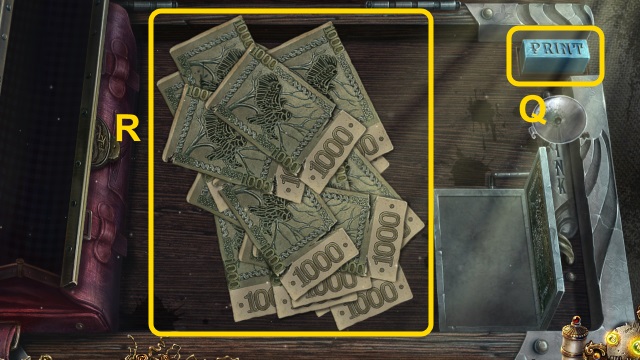
- Press print twice (Q).
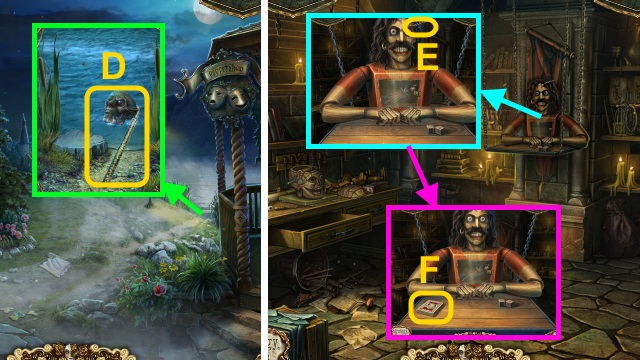
- Match the bills (R); solution is random.

- Take the RANSOM (S).
- Walk right.
- Examine the watch (T).
- Give the RANSOM (U).
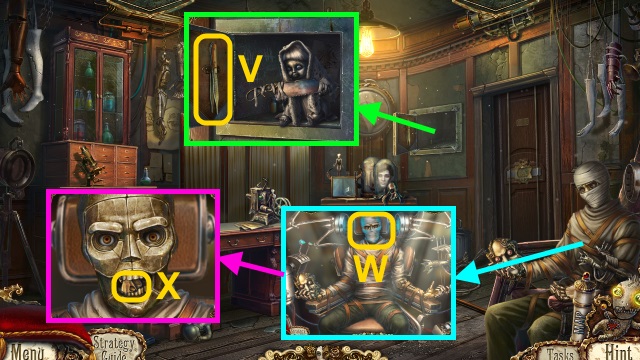
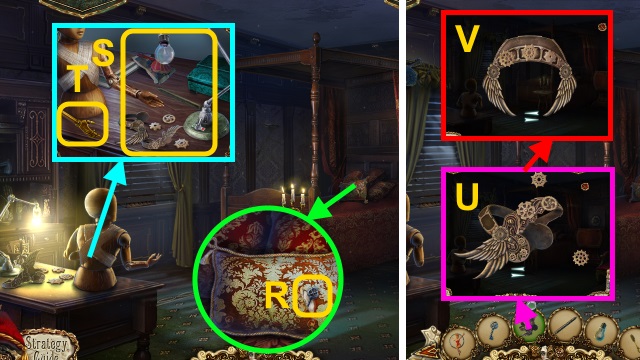
- Take the TWEEZERS (V).
- Examine the puppet (W); remove the bandages.
- Use the TWEEZERS (X); receive the CRUMPLED PAPER.
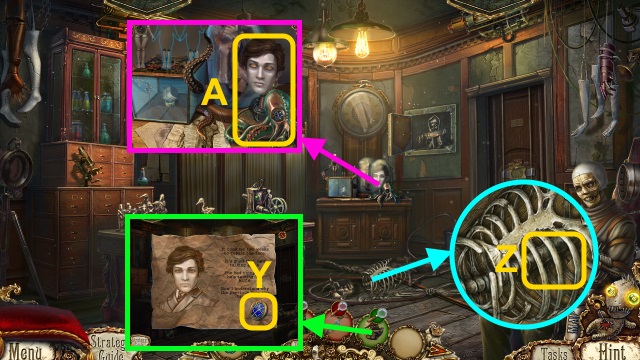
- Examine the CRUMPLED PAPER; take the OCTOPUS EYE (Y).
- Take the RIB BONE (1/3)-(3/3) (Z).
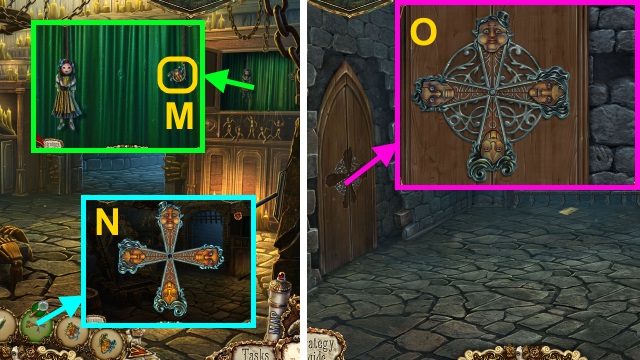
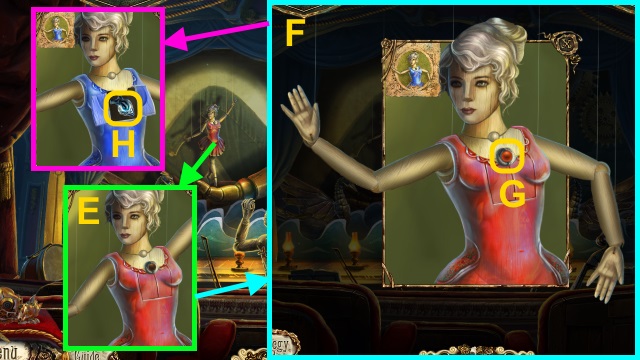
- Place the OCTOPUS EYE; examine it (A). Take the FACE.
- Give the FACE (B); receive the FACEPLATE.
- Place the FACEPLATE (C).
- Walk right.
- Open the holster; take JAMES' WALLET (D).
- Move the puppet; take the EYE LENS (E).
- Combine the MECHANICAL CAT and EYE LENS (F); take the Cat.
- Use the Cat (G).
- Pull the lever (H).
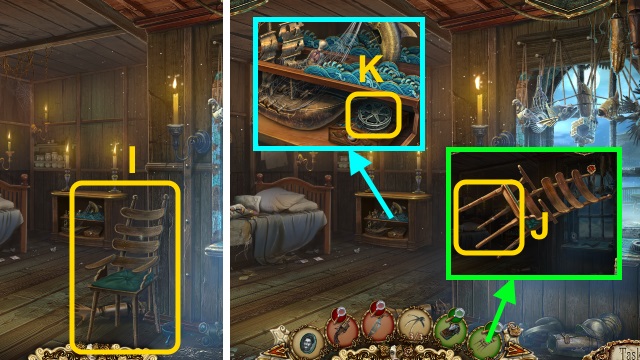
- Take the CHAIR (I).
- Examine the CHAIR; take the WOODEN RODS (J).
- Take the FILM REEL (K).
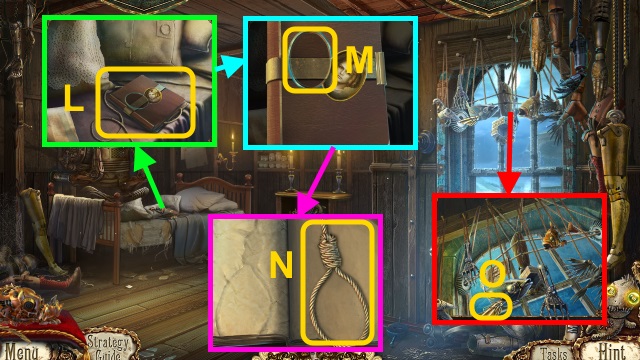
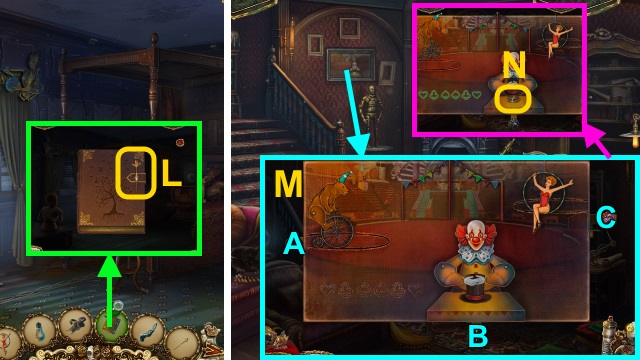
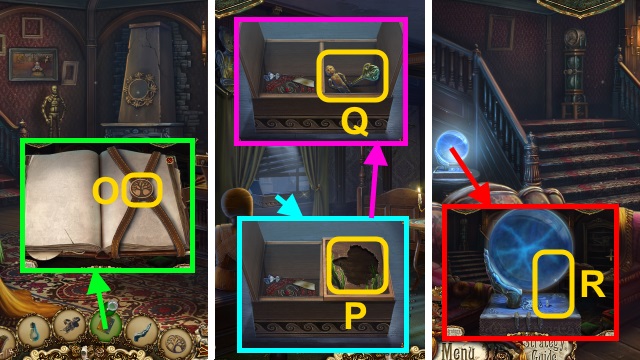
- Move the pillow; examine the book (L).
- Place JAMES' PORTRAIT (M).
- Read the book; take the ROPE (N).
- Take the SHARK FIN (O).
- Place the SHARK FIN (P); take the HUMAN FIGURINE (Q).
- Walk down.
- Place the FILM REEL (R); take the HUMAN FIGURINE (S).
- Place the 2 HUMAN FIGURINES (T); take the CUBE PART (U).
- Walk right.

- Match the puppets (V).
- Place the CUBE PART (W).
- Examine the window; take the LEATHER BELT (X).
- Combine the LEATHER BELT, WOODEN RODS, ROPE, and RIB BONE (3/3) (Y).
- Place the pieces; take the IMPROVISED LADDER (Z).
- Move the flowers; place the IMPROVISED LADDER (A).
- Go forward.
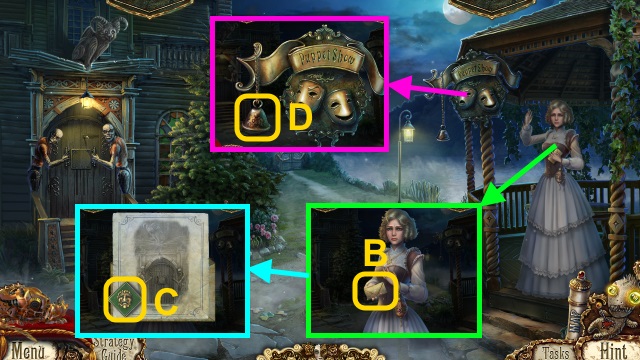
- Talk to Marjory (B).
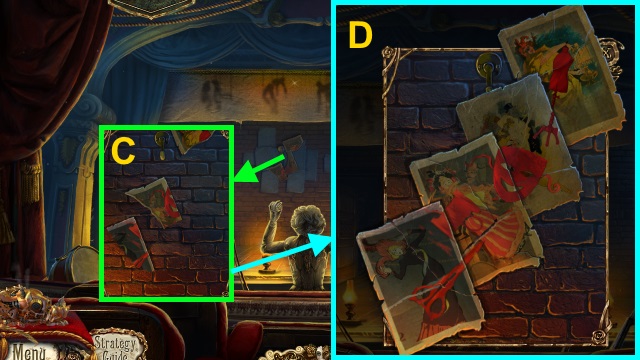
- Read the letter; take the TRAGEDY TILE (C).
- Take the BELL (D).

- Examine the frog; take the SHARPENING TOOL (E).
- Combine the BLUNT HUNTING KNIFE and SHARPENING TOOL (F); take the HUNTING KNIFE.
- Examine the door (G); take the WALLET KEY (H).
- Examine JAMES' WALLET; read the note (I).
- Use the WALLET KEY (J); take the BULLETS (K).
- Combine the UNLOADED PISTOL and BULLETS (L); take the LOADED PISTOL.
- Examine the door (M).
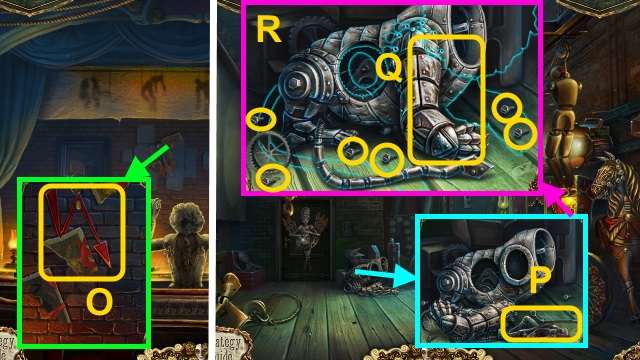
- Take the BROKEN EYE (N).
- Walk down.
- Examine the box (O).
- Place the BROKEN EYE for a mini-game (P).
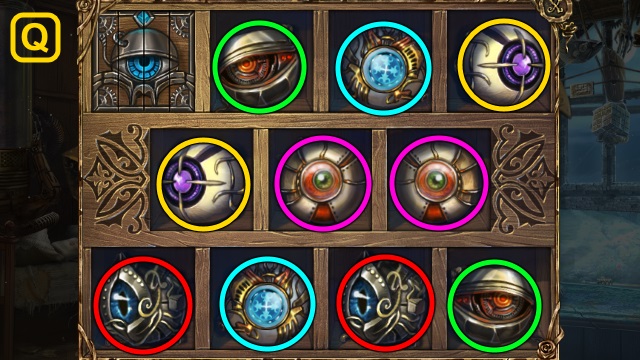
- Solution (Q).
- Take the MECHANICAL EYE (R).
- Walk right.
- Take MARJORY'S BAG (S).
- Open MARJORY'S BAG; read the note (T).
- Take the COMEDY TILE (U).
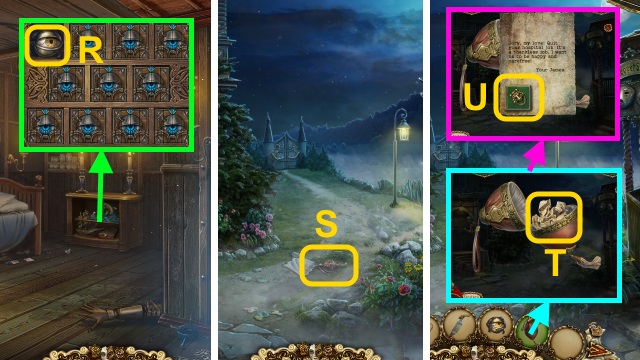
- Place the MECHANICAL EYE (V).
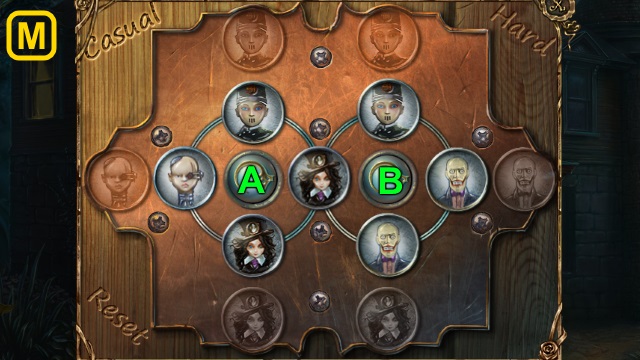
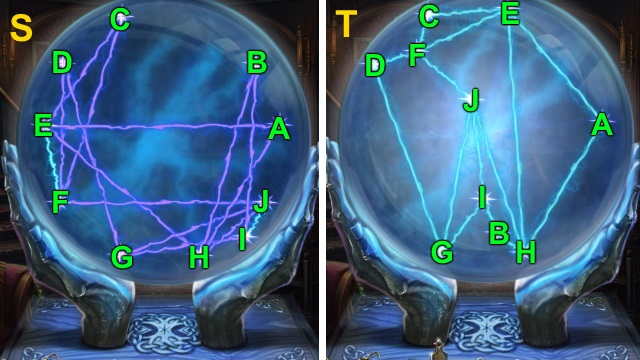
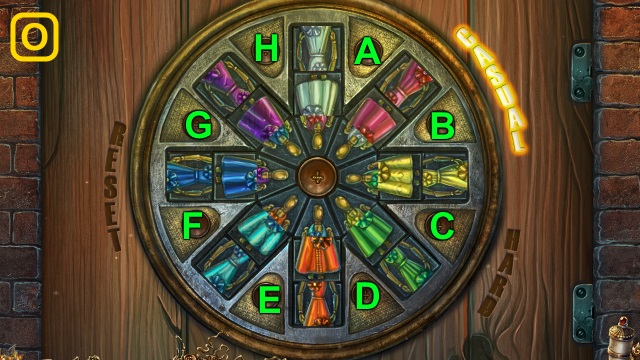
- Examine the door; place the TRAGEDY TILE and COMEDY TILE for a mini-game (W).
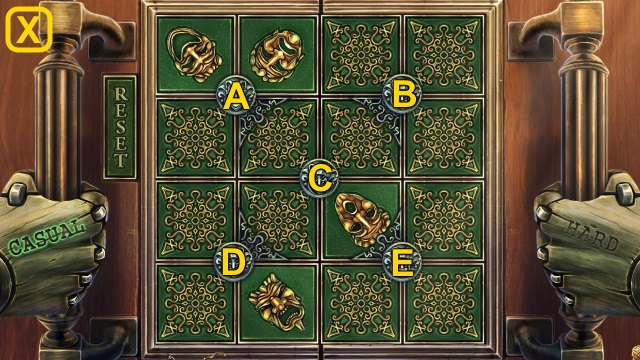

- Casual solution (X): Dx3-Ax2-Cx3-Ax3.
- Hard solution (Y): C-Ax2-Cx3-Ex3-Cx2-Dx3.
- Walk left.
Chapter 3: The Hideout
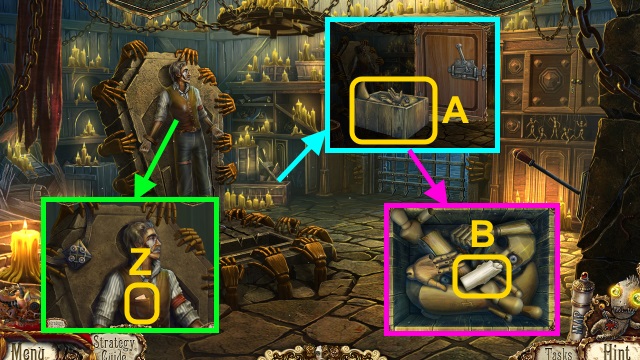
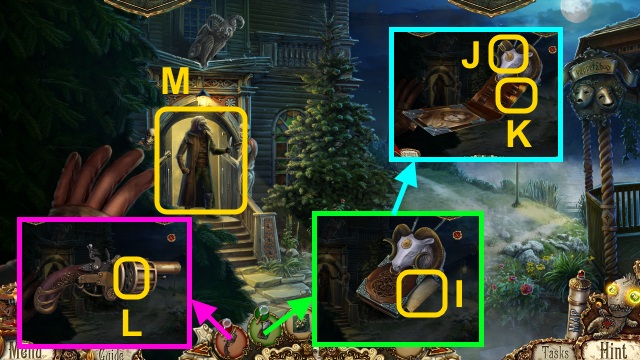
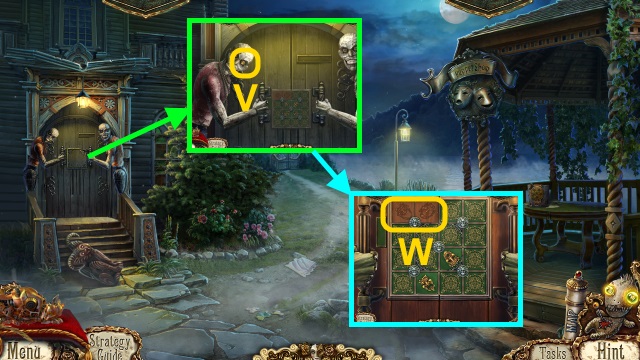
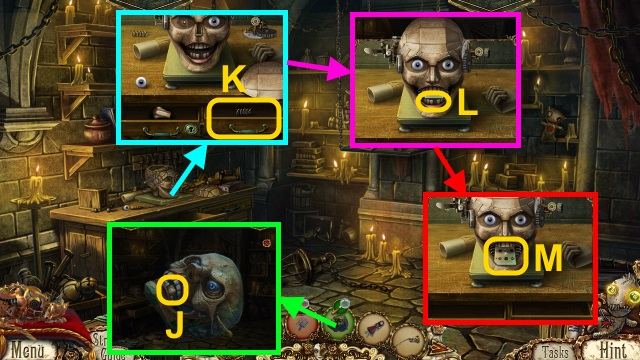
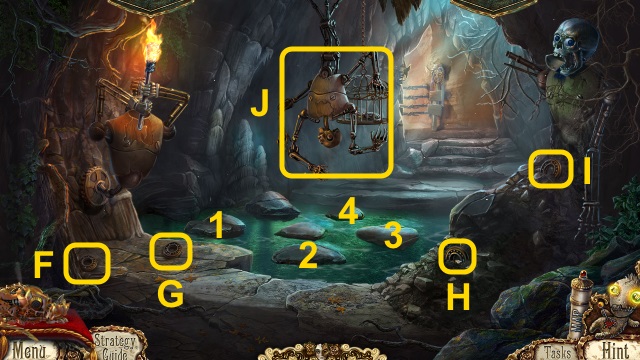
- Take the MASK CLUE (Z).
- Examine the box (A).
- Take the CANDLE (B).
- Match the parts (C).
- Take the BROKEN CROSS (D).
- Examine the latch (E).
- Take the CROSS PART (F).
- Pull the lever (G).
- Walk forward.
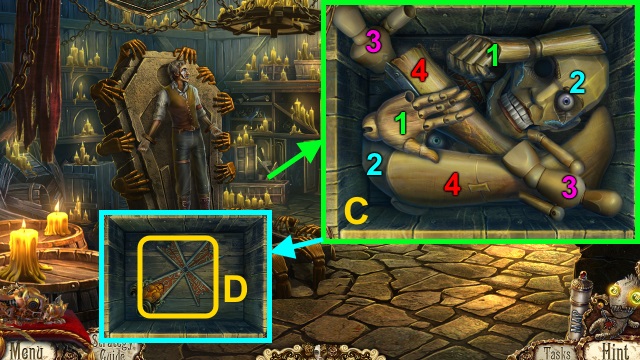
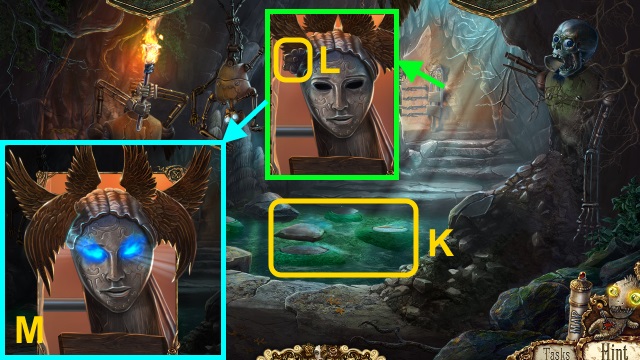
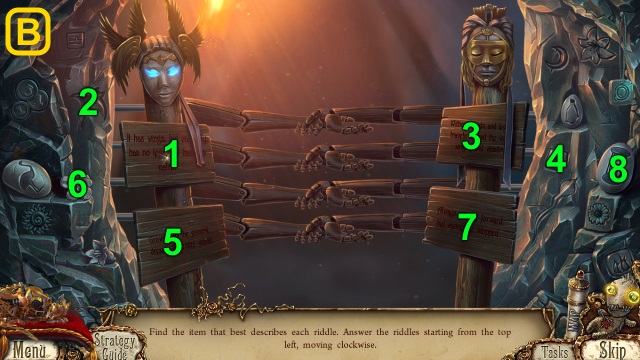
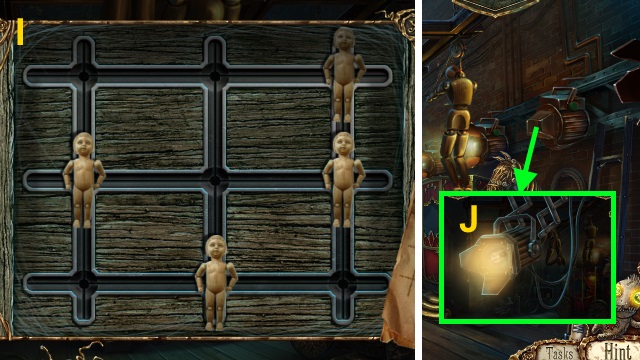
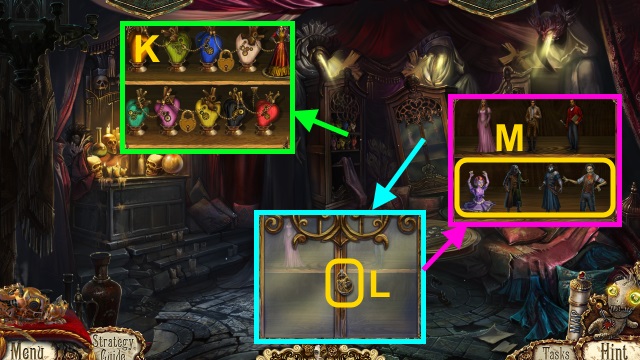
- Place the MASK CLUE (H); examine the masks in order (1-4).
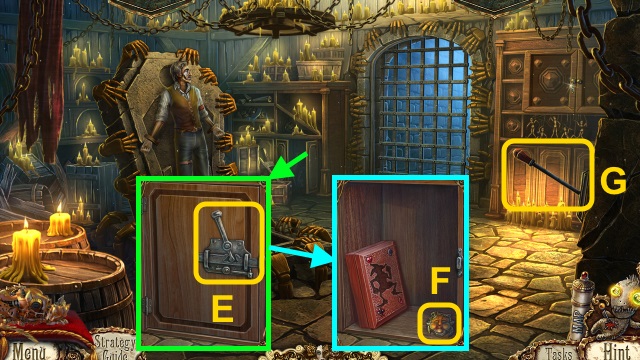
- Remove the brick; take the CUPBOARD KEY (I).
- Use the Cat; take the CROSS PART (J).
- Take the LENS (K).
- Walk down.
- Use the CUPBOARD KEY (L).
- Take the CROSS PART (M).
- Combine the BROKEN CROSS and 3 CROSS PARTS (N); take the CROSS.
- Walk forward.
- Place the CROSS; arrange the parts (O).
- Walk left.
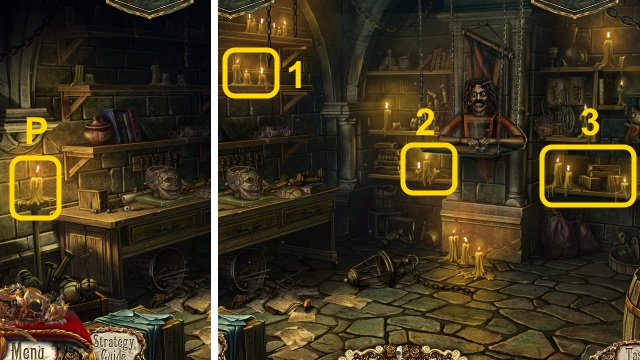
- Use the CANDLE (P); receive the LIT CANDLE.
- Use the LIT CANDLE 3x (1-3).
- Examine the book (Q).
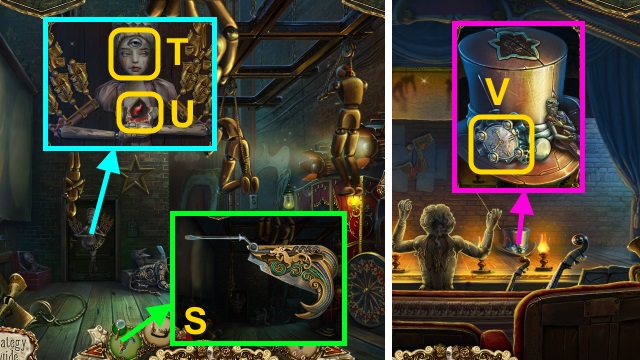
- Use the HUNTING KNIFE (R); place the hook on the doll (S).
- Unzip the doll. Read the note; take the DRAWER KEY (T).
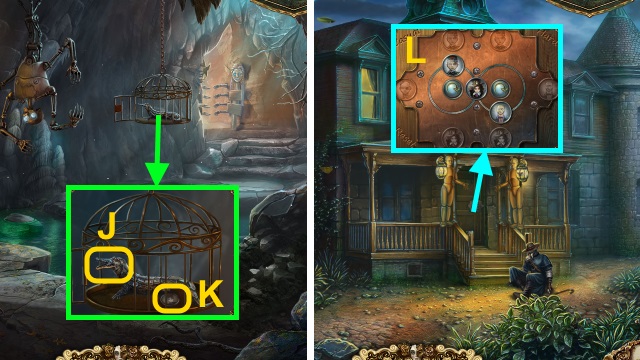
- Scroll left; take the VIOLET CAGE (U).
- Use the DRAWER KEY (V); take the HAMMER EMBLEM and JOKER HAT (W).
- Scroll left; place the JOKER HAT (X).
- Examine the hat; take the JOKER EMBLEM (Y).
- Walk down.
- Place the HAMMER EMBLEM (Z); examine the case.
- Play the HOP; receive the CANE (A).
- Walk down.
- Place the JOKER EMBLEM (B); take the CARD DECK (C).
- Walk down.
- Use the CANE; take the PUPPET HEAD (D).
- Walk left, forward, then left.
- Take the CORKSCREW (E).
- Place the CARD DECK (F); examine it for a mini-game.
- Solution is random (G).
- Take the PUPPET (H).
- Combine the MULTI-PURPOSE HUNTING KNIFE and CORKSCREW (I); take the CORKSCREW.
- Examine the PUPPET HEAD 3x. Use the CORKSCREW (J); receive the TOOTH.
- Open the drawer (K).
- Place the parts; place the TOOTH (L).
- Take the GATE CODE (M).
- Walk down twice.

- Place the PUPPET (N).
- Play the HOP; receive the GATE BUTTON (O).
- Walk down.
- Use the GATE BUTTON and GATE CODE (P).

- Press the buttons in order (Q).
- Walk forward.
- Examine the statue (R).
- Examine the MULTI-PURPOSE HUNTING KNIFE; take the HUNTING KNIFE (S).
- Use the HUNTING KNIFE; receive the LION'S EYE (T).
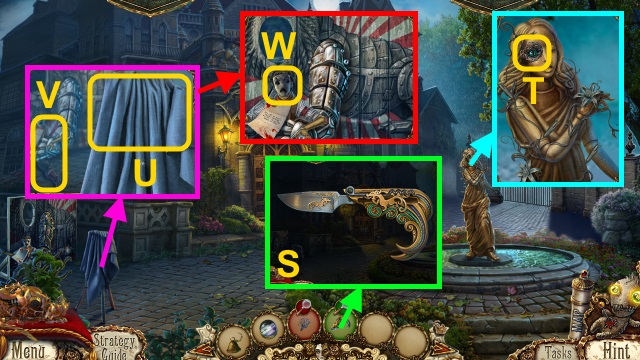
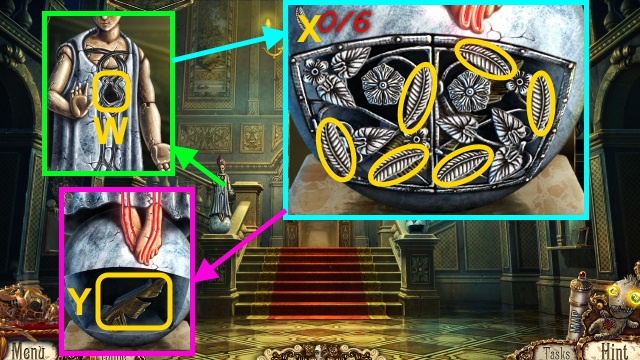
- Take the FABRIC (U); examine the puppet (V).
- Take the MIME MASK (W).
- Place the MIME MASK (X).
- Arrange the parts (Y); turn the handle (Z).
- Walk forward.
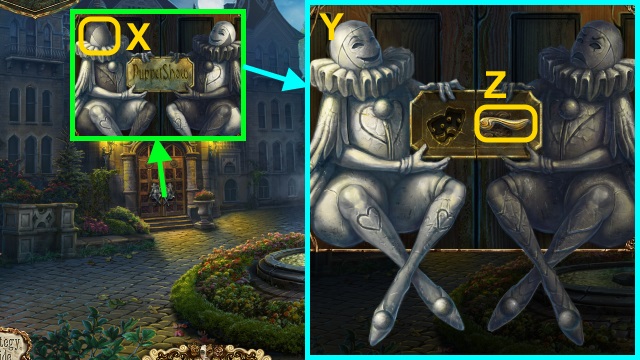
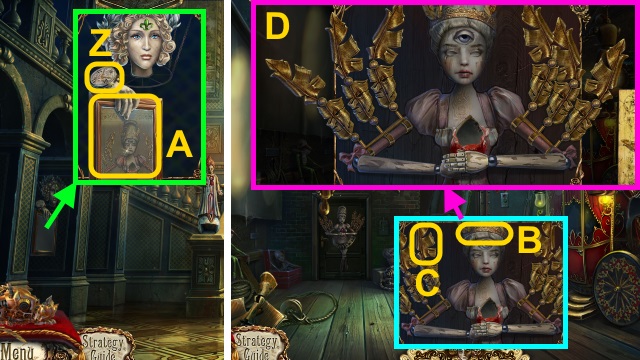
- Place the BELL for a mini-game (A).
- Solution (B).
- Take the TICKET (C).
- Take the COIN (1/3) (D) and COGWHEEL (E).
- Use the HUNTING KNIFE (F); receive the STAR. Place the TICKET (G).
- Walk down.

- Place the STAR (H).
- Arrange the stars (I).
- Take the EMERALD INSIGNIA and FILM SLIDE (J).
- Walk forward.
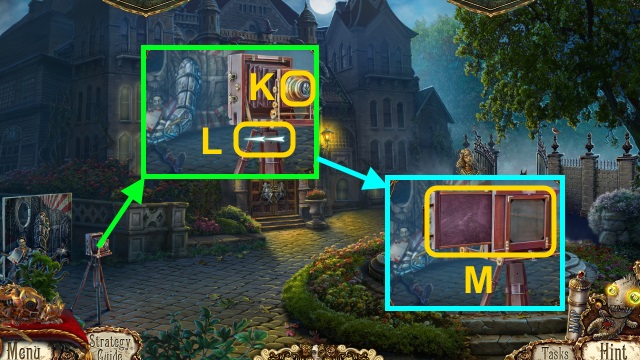
- Examine the lens; place the LENS (K).
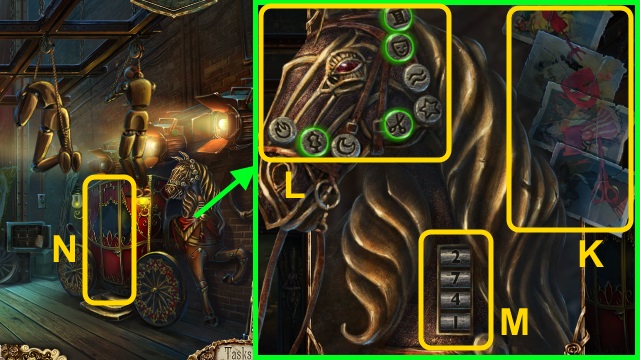
- Turn the camera (L); examine it.
- Place the FILM SLIDE; examine the camera for a mini-game (M).
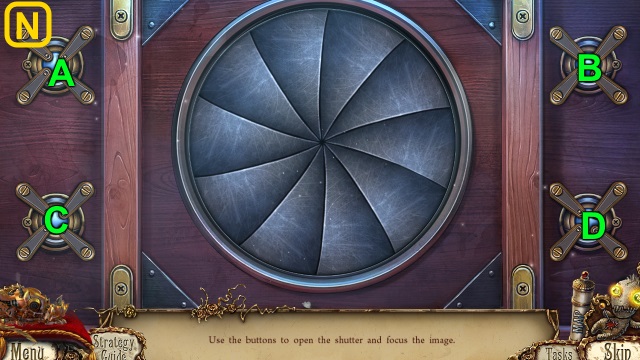
- Solution (N): A-B-C-D-Ax4-Cx4.
- Take the SYMBOLS CLUE (O).
- Walk down, then left.
- Examine the wallet (P).
- Use the SYMBOLS CLUE; select the symbols in order (Q).
- Open the wallet; take the COIN (2/3) and THEATER KEY (R).
- Walk down, then forward.
- Use the THEATER KEY (S); open the door.
- Walk forward.
- Place the EMERALD INSIGNIA (T); take the METAL LILY and BALLERINA CLUE (U).
- Walk down.
- Place the METAL LILY for a mini-game (V).
- Solution (W).
- Receive the COIN (3/3).
- Walk forward.
- Give the COIN (3/3); take the TICKET (X).
- Place the TICKET (Y).
- Walk forward.
- Examine the door (Z).
- Arrange the parts (A).
- Take the MUSIC NOTE (B).
- Take the ANGEL CROWN (C); place the COGWHEEL.
- Arrange the cogs (D).
- Place the BALLERINA CLUE (E).
- Arrange the parts (F); select the jewel 2x (G).
- Take the BLUE HEART (H).
- Walk down.
- Place the BLUE HEART (I).
- Place the MUSIC NOTE (J); examine the sphere for a mini-game.
- Solution (K): Ax3-C-Dx3.
- Take the CONDUCTOR WAND (L).
- Walk forward.
- Arrange the instruments (M); give the CONDUCTOR WAND (N).
- Take the LIGHTING BOLT (O).
- Walk forward.
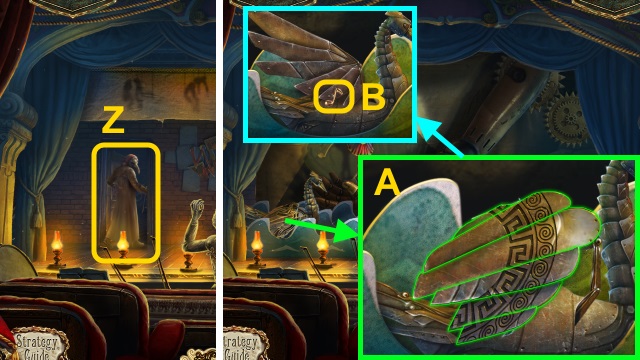
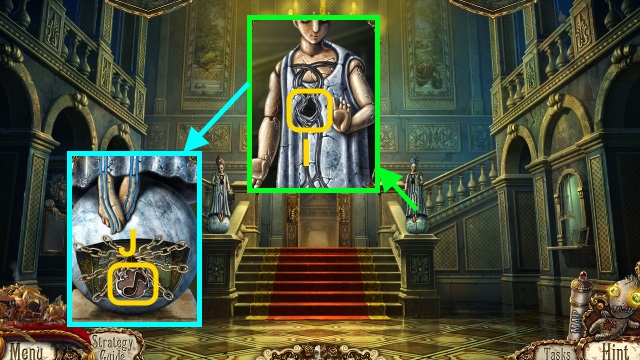
- Take the TRICKSTER PUPPET and SCREWDRIVER EXTENSION (P).
- Attach the leg (Q); gather the SCREWS (1/6)-(6/6) (R).
- Combine the MULTI-PURPOSE HUNTING KNIFE and SCREWDRIVER EXTENSION (S); take the SCREWDRIVER.
- Examine the puppet (T).
- Move the hand; take the RED HEART (U).
- Walk down.
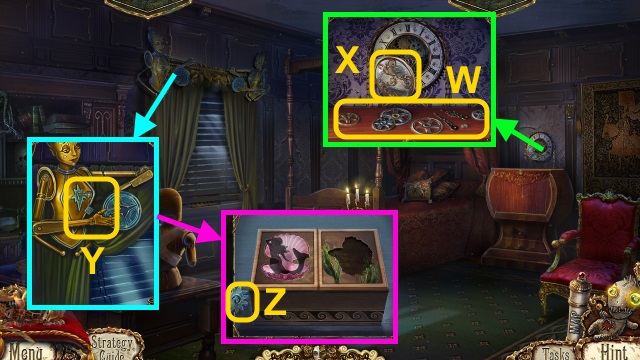
- Use the SCREWDRIVER 4x; take the CLOCK FACE (V).
- Walk down.
- Place the RED HEART (W).
- Find the feathers (X).
- Take the ANGEL WING PART (Y).
- Place the CLOCK FACE; examine it (Z).
- Take the ANGEL CLUE (A).
- Walk forward twice.
- Place the ANGEL CROWN (B), ANGEL WING PART (C), and ANGEL CLUE.
- Arrange the wings (D).
- Walk forward.
Chapter 4: Marjory
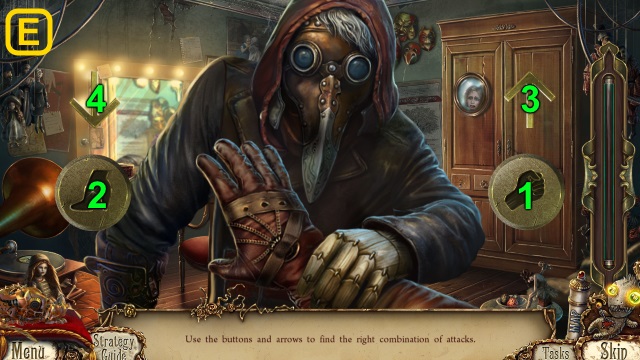
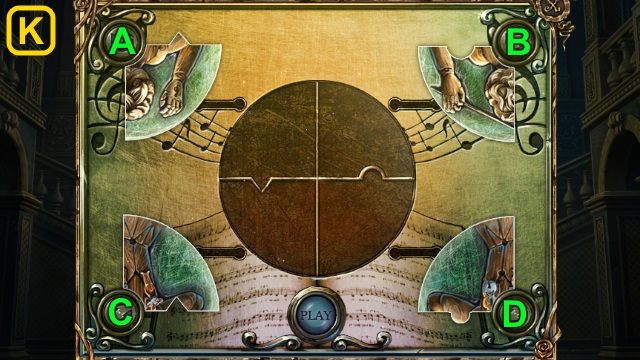
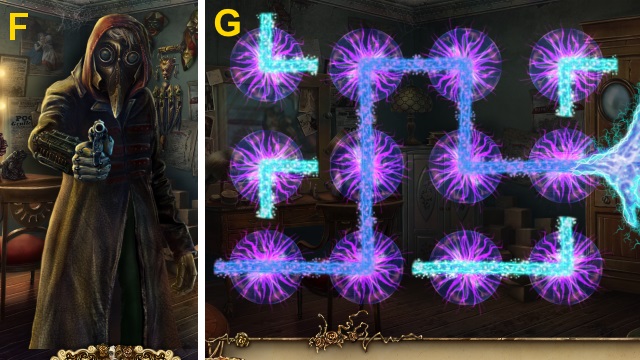
- Examine the man for a mini-game; solution (E).
- Use the TRICKSTER PUPPET for a mini-game (F).
- Solution (G-H).
- Receive the PUPPET SOULS (1/4) and WARDROBE KEY.
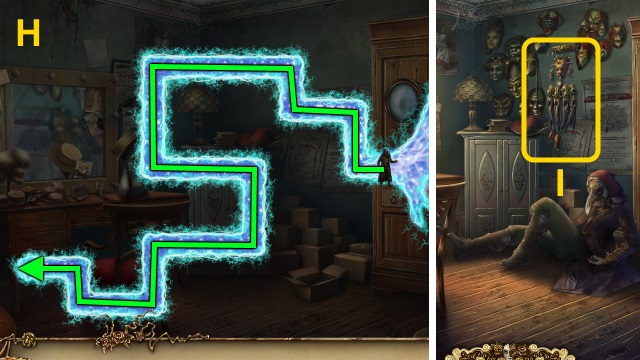
- Examine the wall for a mini-game (I).
- Solution (J).
- Take the WOLF HEAD (K).
- Take the UMBRELLA EMBLEM (L).
- Open the cupboard (M).
- Place the UMBRELLA EMBLEM for a mini-game (N).
- Solution (O).
- Receive the WOLF SKINS (4/4).
- Pull the chain (P); place the petal (Q) on the flower (R).
- Open the book (S); examine the frog (T).
- Gather the butterflies (U).
- Take the PIN and LION MEDALLION (V).
- Use the WARDROBE KEY (W); take the WOLF BODY (X).
- Combine the WOLF BODY, WOLF SKIN (4/4) and WOLF HEAD (Y); take the WOLF PUPPET.
- Open the cupboard (Z); place the WOLF PUPPET (A).
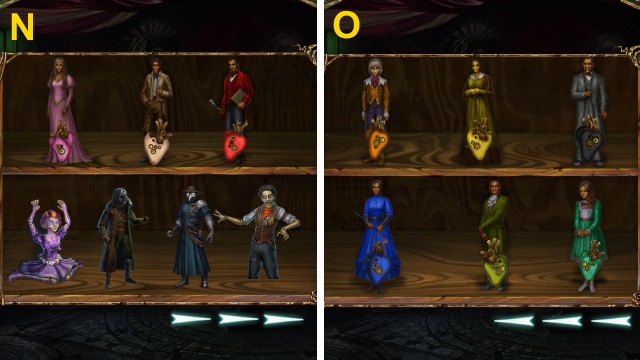
- Arrange the puppets (B).
- Use the Cat; move the items (C).
- Open the box; take the VIOLET KEY (D).
- Combine the VIOLET CAGE and VIOLET KEY; take the VIOLET HEART (E).
- Open the puppet; place the VIOLET HEART (F); receive the PUPPET SOULS (2/4).
- Take the SNAKE HEAD (G).
- Place the SNAKE HEAD; take the LION CLAW (H).
- Walk down twice.
- Place the LION MEDALLION (I).
- Place the LION'S EYE (J); take the LION HEAD.
- Walk down twice.
- Examine the puppet (K).
- Read the note; place the LION CLAW (L).
- Examine the claws; receive the JAMES DOLL. Take the LION LIMB (M).
- Walk forward twice, then left.
- Arrange the parts. Place the LION HEAD, LION LIMB, and SCREWS (6/6) (N).
- Use the SCREWDRIVER (O); place the Cat (P). Receive the ARMORED CAT.
- Walk down three times.
- Use the ARMORED CAT (Q).
- Walk right.
- Take the STICK and ROPE (R).
- Play the HOP; receive the METAL WING (S).
- Examine the door (T); open it.
- Use the PIN; open the box. Take the MASTER KEYS (U).
- Use the MASTER KEYS (V).
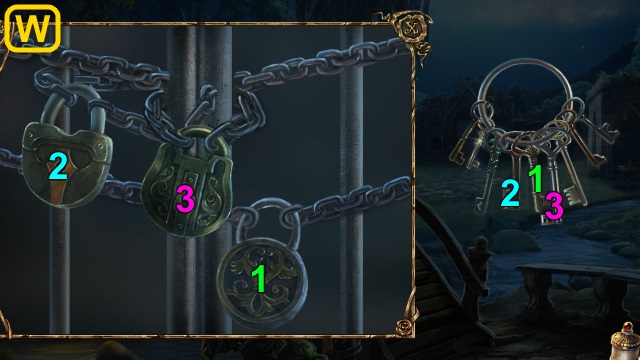
- Use the keys on the locks (W).
- Walk left.
- Use the Cat (X).
- Take the OIL LAMP (Y).
- Take the TUBE (Z) and BEARINGS (1/5) (A).
- Combine the STICK, FABRIC, ROPE, and OIL LAMP (B); take the TORCH.
- Walk down.
- Use the SCREWDRIVER 2x; take the BOWL (C).
- Use the TORCH (D); receive the LIT TORCH.
- Walk left.
- Place the LIT TORCH (E).
- Take the BEARINGS (2/5)-(5/5) (F-I).
- Use the BEARINGS (5/5) (J); press the stones (1-4).
- Use the BOWL; receive the BOWL OF WATER (K).
- Take the WOODEN CHAMOMILE; place the METAL WING (L).
- Arrange the wings (M).
- Walk down.

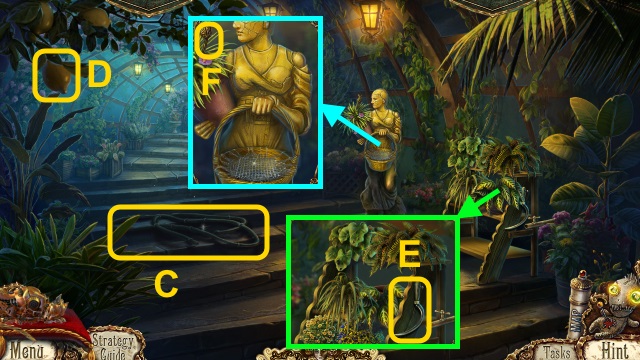
- Place the WOODEN CHAMOMILE (N); examine the flowers (O).
- Open the cupboard; take the BANDAGE (P).
- Remove the cork (Q). Use the BOWL OF WATER (R); stir the mixture.
- Use the BANDAGE; take the BANDAGE WITH CLAY (S).
- Walk left.
- Use the BANDAGE WITH CLAY (T); take the GYPSY MASK MOLD.
- Walk down.
- Play the HOP; receive the TRICKSTER PUPPET PARTS (U).
- Examine the TRICKSTER PUPPET PARTS; open the puppet. Place the heart (V); close the puppet.
- Place the clothes; take the TRICKSTER PUPPET (W).
- Place the GYPSY MASK MOLD (X); place the brush (Y).
- Use the brush; take the FACEPLATE HALF (Z).
- Walk left.
- Place the FACEPLATE HALF for a mini-game (A).
- Solution (B).
- Take the TORN HOSE (C).
- Take the LEMON (D).
- Take the SICKLE (E).
- Take the CAGE KEY (F).
- Walk down.
- Use the CAGE KEY; open the cage. Take the SPIDER and PUPPET COIN (1/4) (G).
- Walk forward.
- Place the SPIDER for a mini-game (H).
- Solution (I).
- Take the LEFT BUTTERFLY WING (J).
- Examine the MULTI-PURPOSE HUNTING KNIFE (K); take the HUNTING KNIFE.
- Combine the LEMON and HUNTING KNIFE for a mini-game. Solution (L): Slice the lemon until the meter is full.
- Take the LEMON HALF (M).
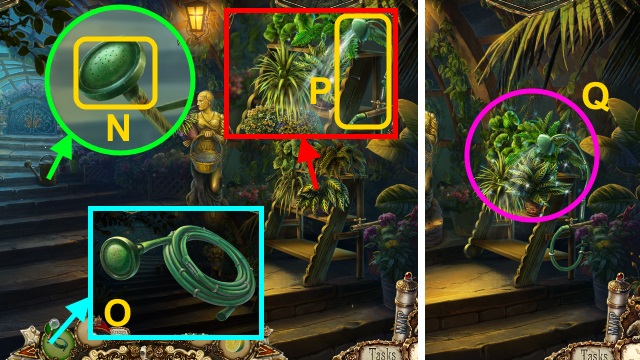
- Use the LEMON HALF; take the WATERING NOZZLE (N).
- Combine the TORN HOSE, TUBE, and WATERING NOZZLE; take the HOSE (O).
- Use the HOSE; turn the valve (P).
- Play the HOP; receive the RIGHT BUTTERFLY WING (Q).
- Place the RIGHT BUTTERFLY WING and LEFT BUTTERFLY WING (R); examine the wings.
- Walk forward.
- Use the TRICKSTER PUPPET for a mini-game (S).
- Solution (T-U).
- Receive the PUPPET SOULS (3/4).
- Take the SNAILS (1/2) (V).
- Use the SICKLE; take the SNAILS (2/2) (W), VOODOO DOLL (X), and BRANCH (Y).
- Examine the VOODOO DOLL; take the PHOENIX CHARM (Z).
- Walk down.
- Play the HOP; receive the PUPPET HAND (A).
- Use the SNAILS (2/2); take the PUPPET COIN (2/4) and NAIL PULLER (B).
- Walk forward.
- Use the NAIL PULLER 4x (C); use the Cat.
- Use the BRANCH; receive the SCROLL (D).
- Combine the SCROLL and HUNTING KNIFE; open the scroll. Take the PUPPET COIN (3/4) and LANTERN CLUE (E).
- Place the PHOENIX CHARM (F); open the lantern.
- Place the PUPPET HAND and LANTERN CLUE (G).
- Arrange the fingers (H); take the CROCODILE JAW (I).
- Walk down twice.
- Place the CROCODILE JAW (J); take the PUPPET COIN (4/4) (K).
- Walk forward twice.
- Place the PUPPET COIN (4/4) for a mini-game (L).
- Solution (M).
- Casual: Bx2-A-B-Ax3.
- Hard: A-Bx4-Ax2-Bx3-A-B-A-B-Ax2-Bx3-Ax2-Bx2.
- Walk forward.
Chapter 5: Dr. Marvin's House
- Take the RULER (N) and PHOTO SCRAPS (1/8) (O).
- Take the PUPPET KEY (P).
- Open the door; use the RULER 2x (Q); receive the PHOTO SCRAPS (2/8) and GYMNAST.
- Walk left.
- Use the HUNTING KNIFE; examine the pillow. Take the DRAWER KEY (R).
- Flip the switch; take the UNASSEMBLED CROWN, PHOTO SCRAPS (3/8), PENCIL, and LIGHTBULB (S).
- Use the HUNTING KNIFE (T); receive the MECHANICAL ARM.
- Examine the UNASSEMBLED CROWN; place the pieces (U).
- Rotate the crown; place the pieces (V). Take the CROWN OF GEARS.
- Take the CLOCK HANDS WITH GEARS (W) and CLOCK COVER (X).
- Place the MECHANICAL ARM; use the PUPPET KEY (Y).
- Scroll down; take the HOURGLASS EMBLEM (Z).
- Walk down.
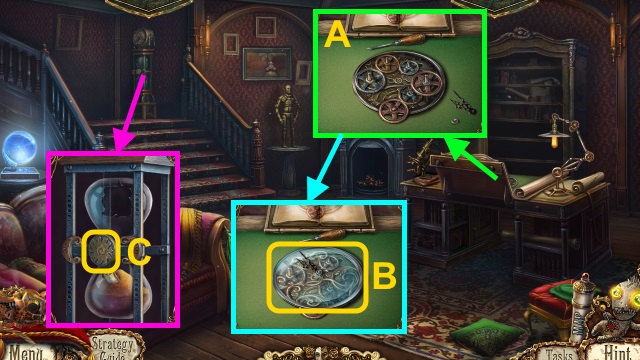
- Place the CLOCK HANDS WITH GEARS; arrange the gears (A).
- Place the CLOCK COVER; place the pieces. Take the CLOCK MECHANISM (B).
- Place the HOURGLASS EMBLEM; examine it (C). Receive the CLOCK CLUE.
- Combine the CLOCK CLUE and PENCIL (D).
- Walk left.
- Place the CLOCK MECHANISM (E); use the CLOCK CLUE for a mini-game.
- Solution (F).

- Open the cupboards; take the WATER NYMPH and STONE HAND (G-H). Open the drawers; take the PHOTO SCRAPS (3/8)-(6/8).
- Use the DRAWER KEY; take the DIARY (I).
- Place the WATER NYMPH (J).
- Take the DIARY PIN and PHOTO SCRAPS (7/8) (K).
- Combine the DIARY and DIARY PIN; open the diary (L). Play the HOP; receive the BEAR FIGURINE.
- Walk down.
- Place the GYMNAST FIGURINE and BEAR FIGURINE for a mini-game (M); solution: C-A-Bx2-A-C..
- Take the DIARY EMBLEM.
- Combine the DIARY and DIARY EMBLEM (O); open the diary. Play the HOP; receive the FISH FIGURINE.
- Walk left.
- Place the FISH FIGURINE (P).
- Take the CHILD FIGURINE and ROSE KEY (Q).
- Walk down.
- Place the STONE HAND for a mini-game (R).
- Solution (S-V).
- Solution (W-X).
- Take the ROSE CAGE (Y).
- Combine the ROSE CAGE and ROSE KEY (Z).
- Take JAMES' HEART.
- Open the JAMES DOLL; place JAMES' HEART (A). Close the door.
- Take the PHOTO SCRAP (8/8) (B) and PUPPET SOULS (4/4).
- Go to the Auditorium.
- Place the PHOTO SCRAPS (8/8) for a mini-game (C).
- Solution (D); take the SYMBOLS CLUE.
- Walk left, then forward.
- Place the CROWN OF GEARS (E); open the skull.
- Take the CHILDREN CLUE (F).
- Walk down.
- Place the LIGHTNING BOLT (G); examine it.
- Place the CHILDREN FIGURINE and CHILDREN CLUE for a mini-game (H).
- Solution (I).
- Open the cover; place the LIGHTBULB (J).
- Walk down, then left.
- Place the SYMBOLS CLUE (K).
- Select the symbols (L); enter the code (M).
- Examine the carriage for a mini-game (N).
- Solution (O).
- Casual: Cx2-Ax2-Gx2-Ex2.
- Hard: G-F-E-D-C-B-C-Bx3-C-B-C-Bx2.
- Gx3-F-E-Fx3-E-D-Ex3-D-Ex3.
- Examine the handle (P).
- Walk right.
- Open the box. Play the HOP; receive the BARRETTE (Q).
- Take the YARN (R) and SCISSORS (S).
- Match the ribbons (T); take the FRILL and FABRIC (U).
- Take the SPINDLE (V).
- Place the FABRIC; place the apron. Use the chalk, then the SCISSORS (W); take the APRON.
- Combine the SPINDLE and YARN; take the THREAD (X).
- Take the NEEDLE (Y).
- Place the NEEDLE, THREAD, APRON, and FRILL (Z); turn the handle (A).
- Take the PUPPET DRESS (B).
- Place the BARRETTE and PUPPET DRESS (C).
- Go forward.
- Take the PUPPET FIGURINE (D).
- Walk down.
- Play the HOP; receive the GLASS EYE (E).
- Place the PUPPET FIGURINE; take the HORN (F).
- Walk forward.

- Place the HORN; take the SHELF KEY (G).
- Examine the book (H); place the GLASS EYE for a mini-game.
- Solution (I).
- Read the note; take the MAGIC PUPPET and HEART SHELF KEY (J).
- Use the HEART SHELF KEY; take the HEARTS (K).
- Use the SHELF KEY (L); open the cupboard.
- Place the PUPPET SOULS (4/4) (M) and HEARTS.
- Place the hearts (N).
- Scroll right; place the hearts (O).

- Play the mini-game. Solution (P).

- Take SHANTA'S BLOOD (Q).
- Use SHANTA'S BLOOD; place the MAGIC PUPPET for a mini-game (R).
- Solution (S): Cx4-Bx4.
- Congratulations! You have completed Puppetshow: Her Cruel Collection.
Created at: 2016-10-14