

Walkthrough Menu
- General Tips
- Chapter 1: Yard
- Chapter 2: Master's House
- Chapter 3: Puppet Warehouse
- Chapter 4: Mayor's House
- Chapter 5: Auction Warehouse
General Tips
- This is the official guide for Puppet Show: Porcelain Smile.
- This guide will not mention each time you have to zoom into a location; the screenshots will show each zoom scene.
- Hidden-object puzzles are referred to as HOPs. This guide will not show HOP solutions. It will identify the location of the HOP and the inventory item acquired.
- This guide will show solutions for non-random puzzles. Please read the in-game instructions for each puzzle.
- In this game, you will sometimes have to select the new scene to trigger dialog, cut-scenes, or tasks prior to interacting with the scene.
Chapter 1: Yard
- Open and read letter.
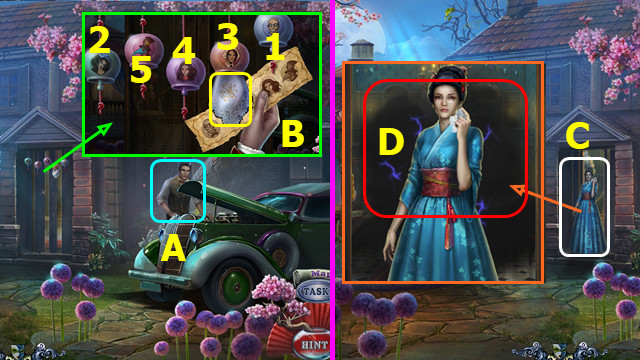
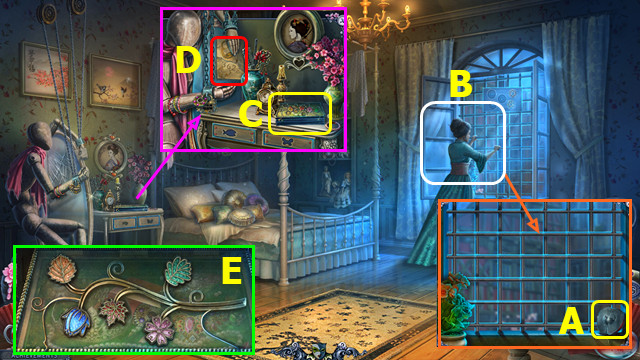
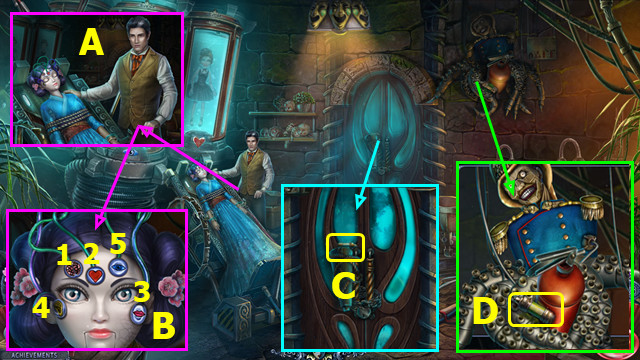
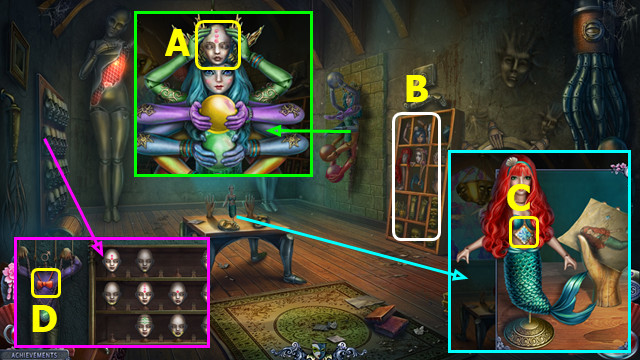
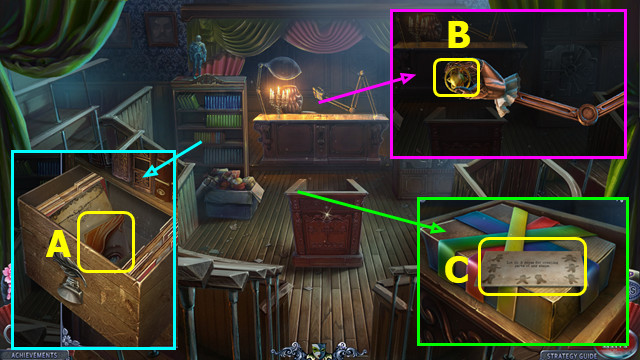
- Talk; take BELLS CODE (A).
- Take HANDKERCHIEF; place BELLS CODE; select 1-5 (B).
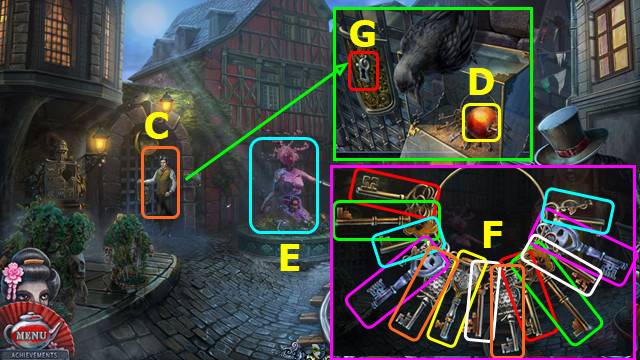
- Talk; take and read note (C).
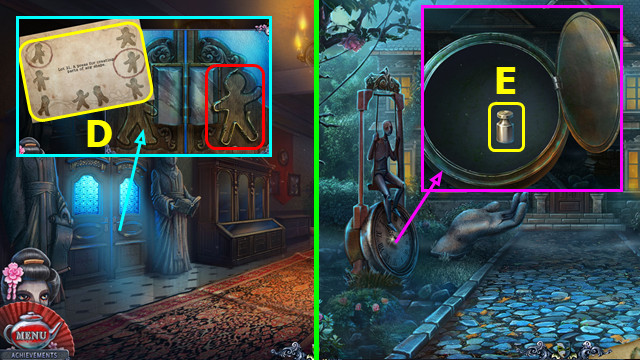
- Select (D).
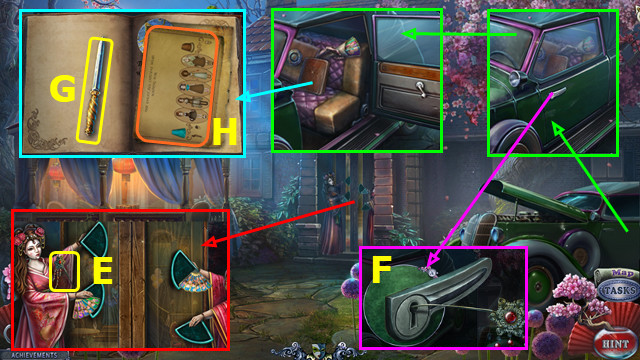
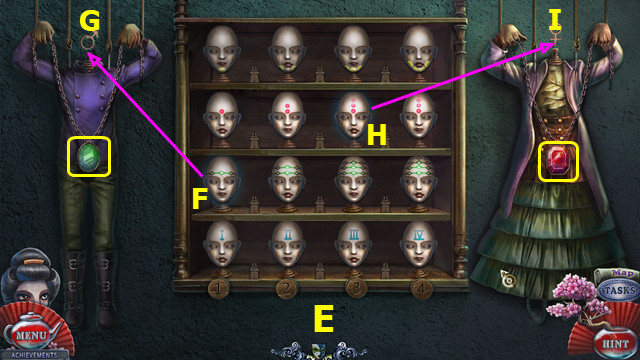
- Take PIN (E); select door.
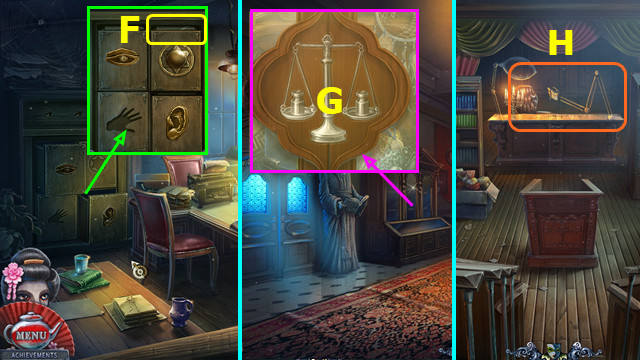
- Place PIN; select 2x (F).
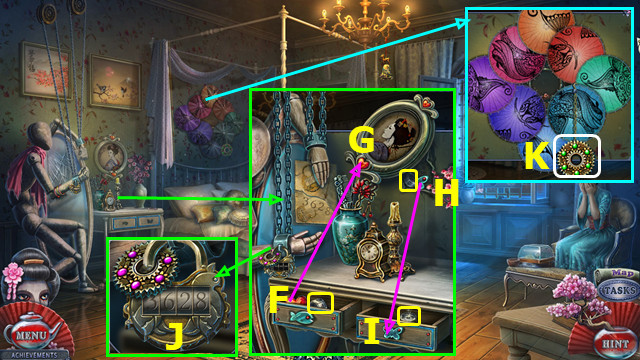
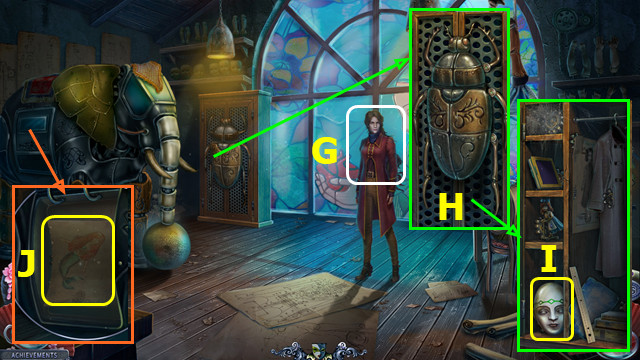
- Open diary; take KNIFE (G); select (H).
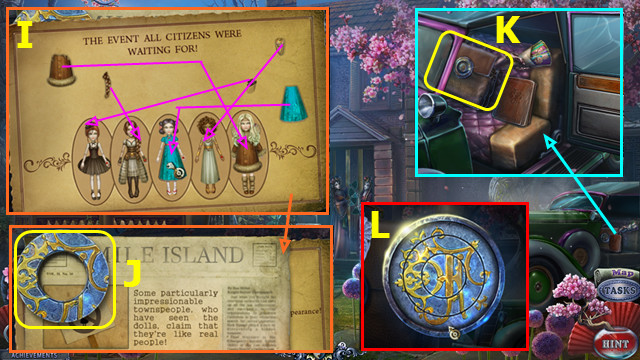
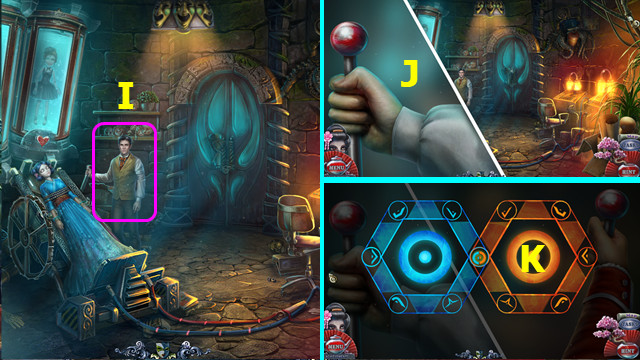
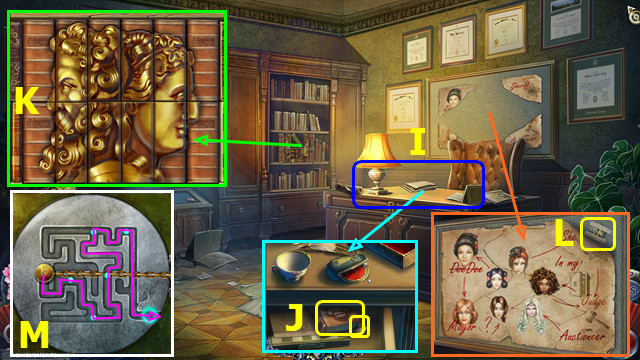
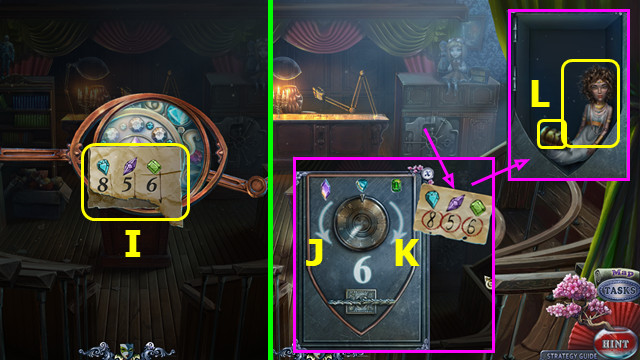
- Solution (I); select.
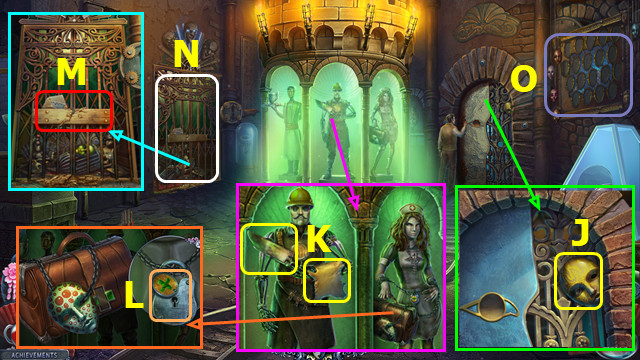
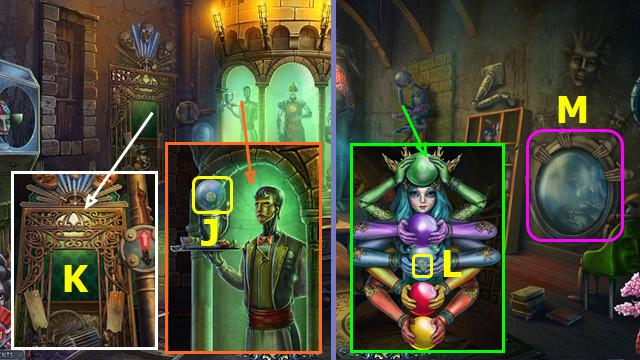
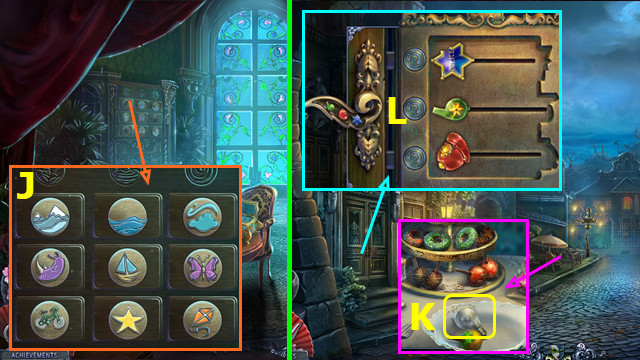
- Take BAG DISK (J).
- Take BAG (K).
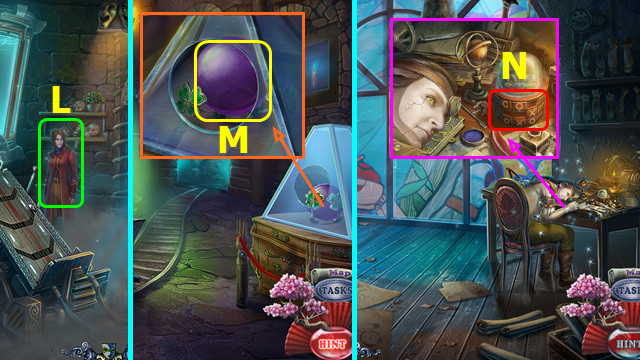
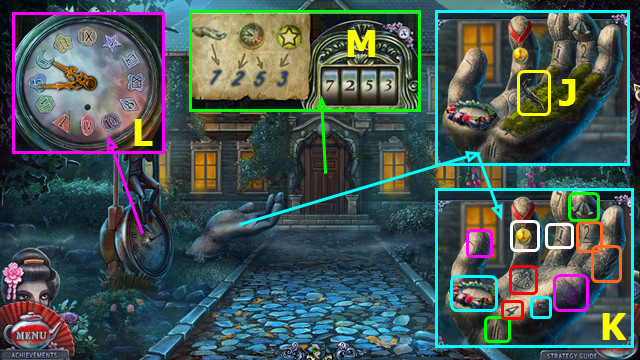
- BAG DISK on BAG; solution (L).
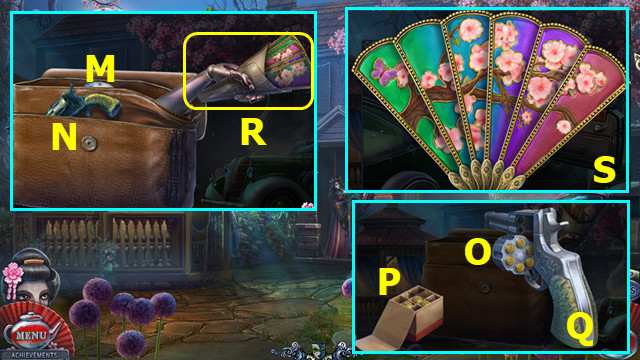
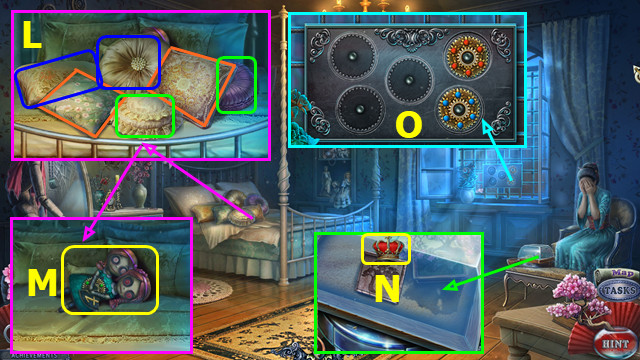
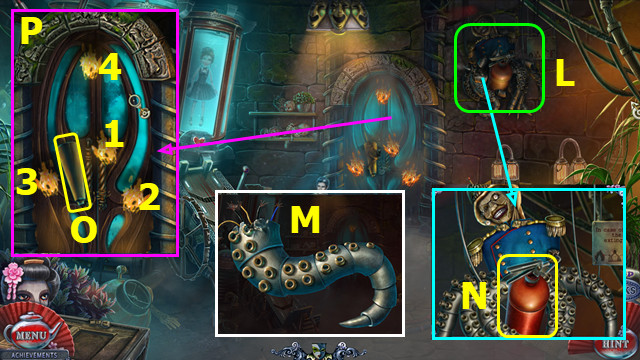
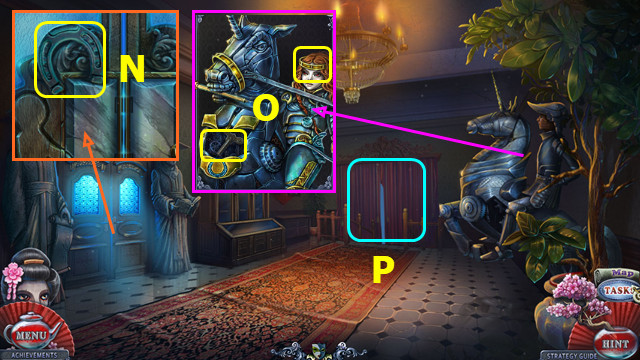
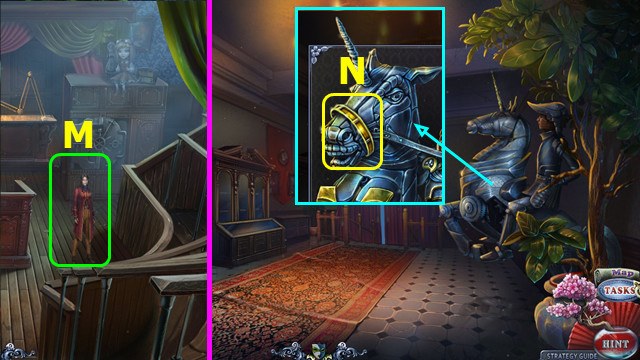
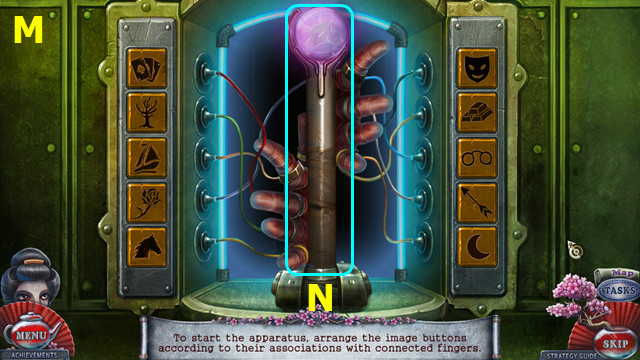
- Select M-N.
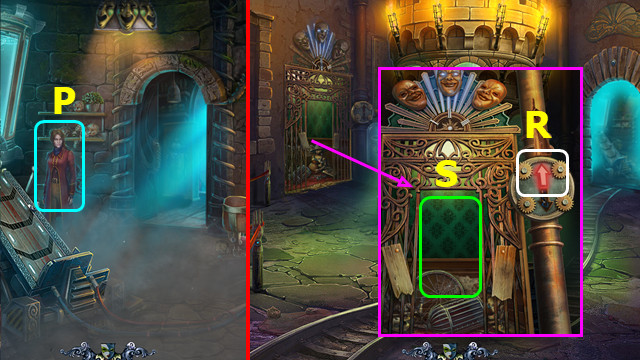
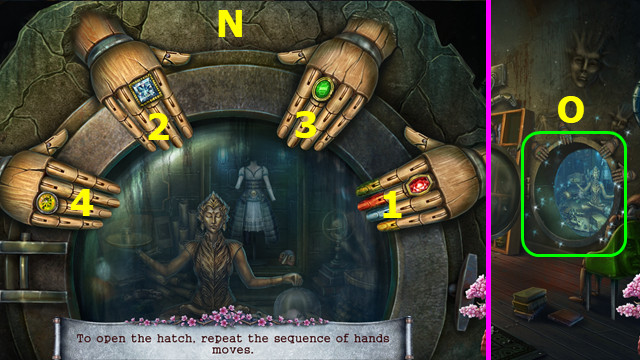
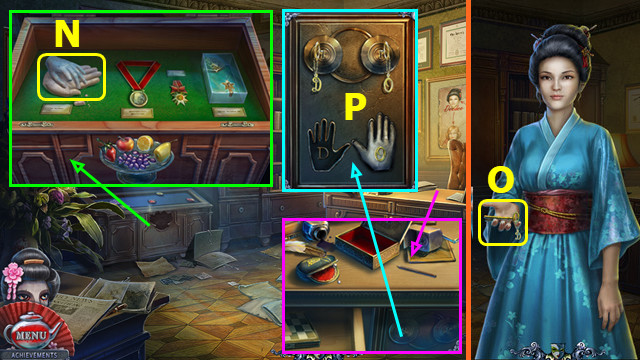
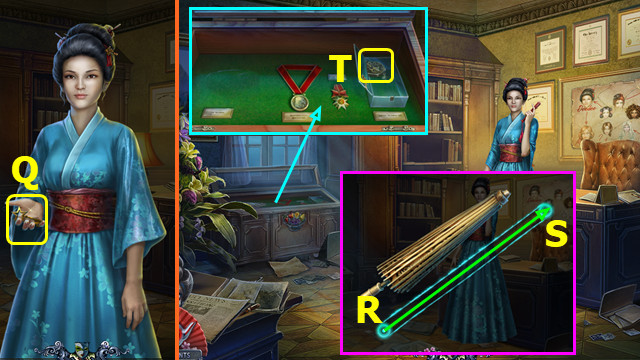
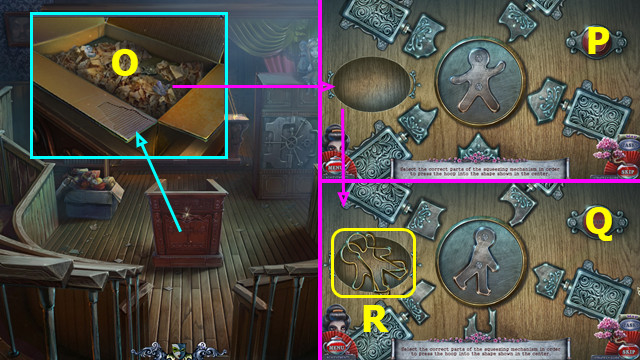
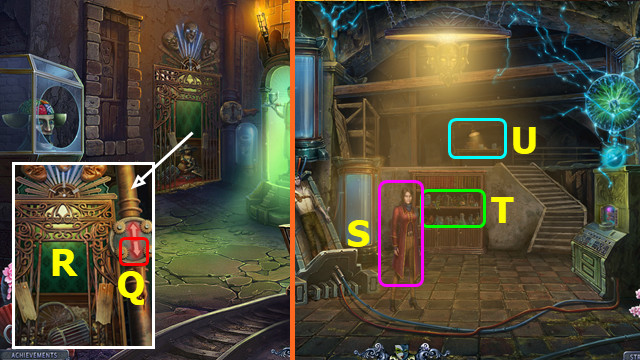
- Select O-P; load 6 bullets; close and take GUN (Q).
- Take FAN (R).
- Open FAN; solution (S); earn 1/2 FANS.
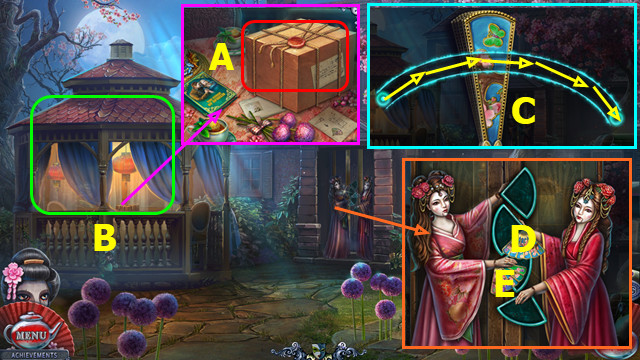
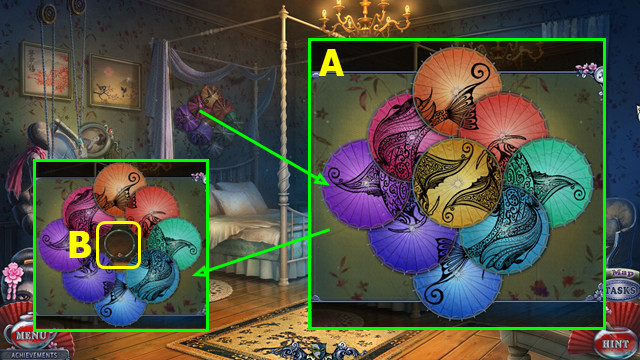
- Use KNIFE; select (A).
- Play HOP; earn FAN (B).
- Select FAN; drag bubble on path; take 2/2 FANS (C).
- Select D-E; place FANS.
- Go forward.
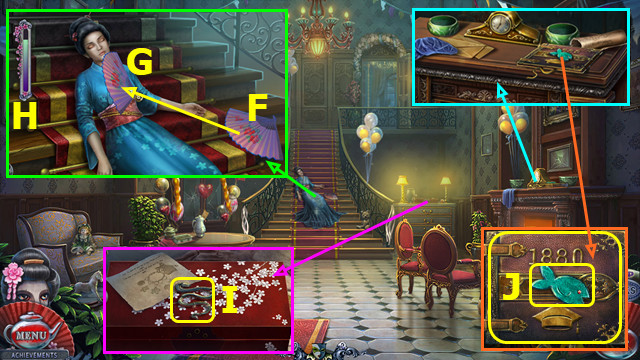
- Use fan (F) on (G) several times to fill meter (H); talk; take 1st MEDICINE KEY PART.
- Take PRESCRIPTION from 1st MEDICINE KEY PART.
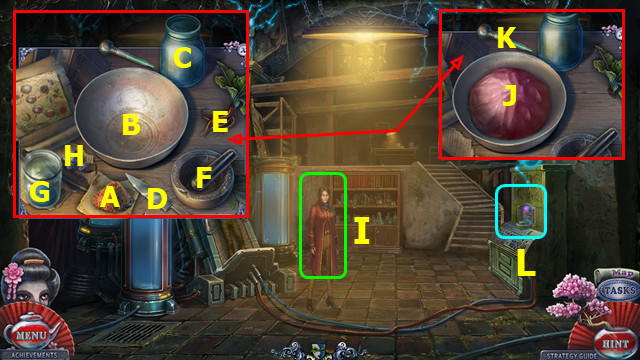
- Take 2nd MEDICINE KEY PART (I).
- Take FISH; read book; take 3rd MEDICINE KEY PART (J).
- 2nd and 3rd MEDICINE KEY PARTS on 1st MEDICINE KEY PART; earn MEDICINE KEY.
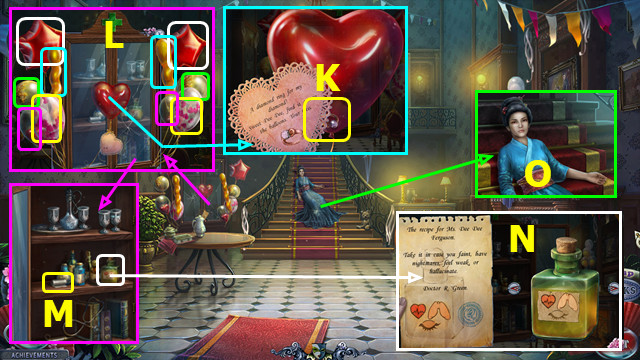
- Use PIN; earn DIAMOND RING (K); select pairs (L).
- Use MEDICINE KEY; take BANDAGE (M).
- Scroll to correct bottle; take MEDICINE (N).
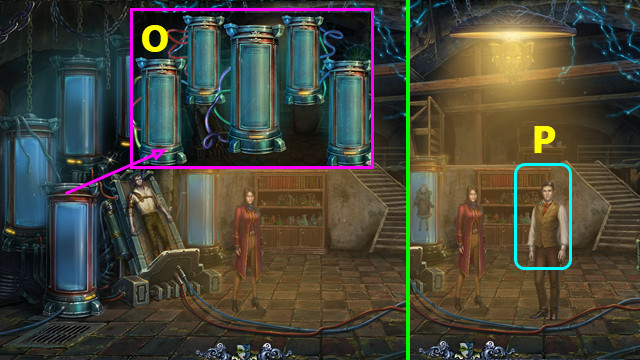
- Open MEDICINE. Give MEDICINE (O); talk.
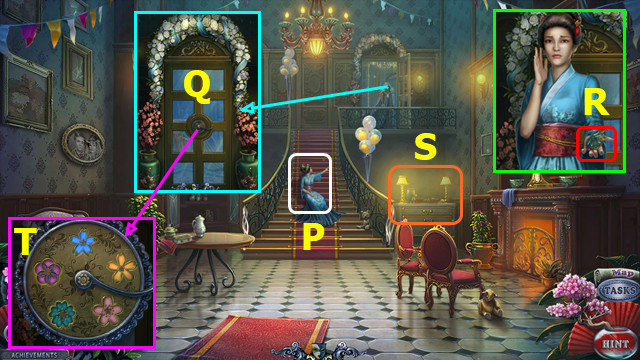
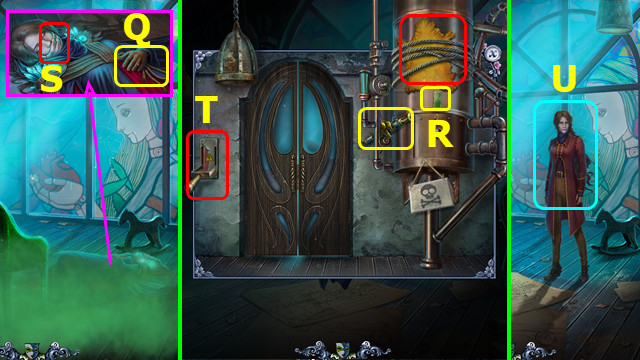
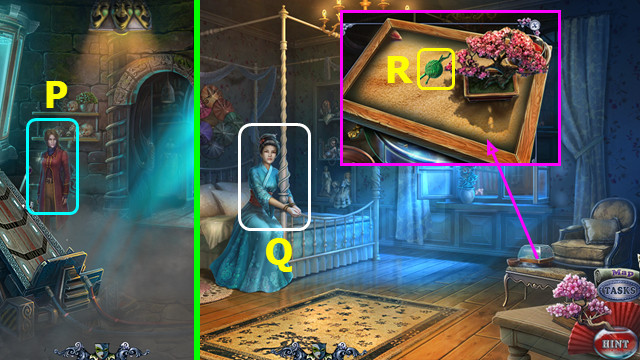
- Select (P); select (Q).
- Select (R).
- Select; play HOP; earn FLOWER KEYS (S).
- Use FLOWER KEYS; solution (T); select handle.
- Go right.
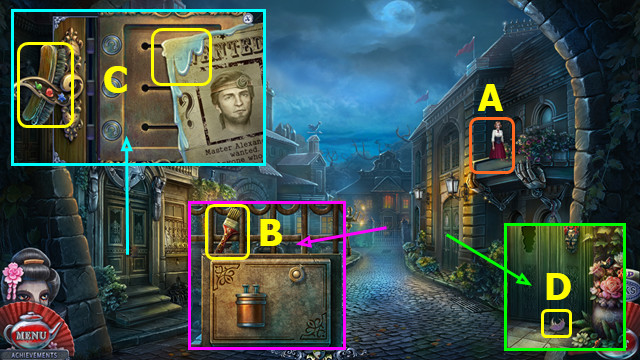
- Take APPLE KEY (A).
- Talk; take LOCK CODE (B).
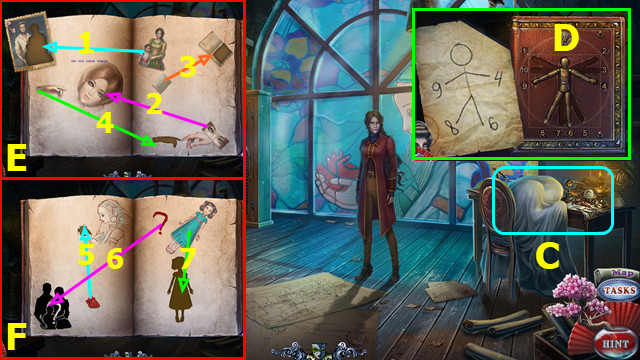
- Take BOX (C).
- Place LOCK CODE (D).
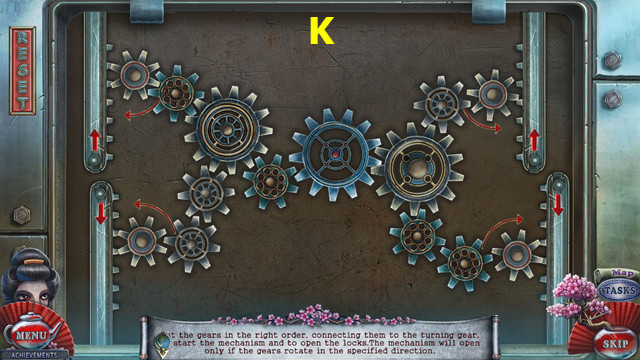
- Select BOX; solution (E).
- Play HOP; earn 1/3 GEARS.
- Place FISH; select lock dial; move (F-G).
- Select lock dial; move (H-I); select lock dial.
- Solution; earn 2/3 GEARS (J).
- Select (K).
- Select PAIRS (L).
- Take DOLL (M).
- Take BOX KEY and 3/3 GEARS from DOLL.
- Take CROWN (N).
- Place GEARS (O).
- Go forward.
- Talk; give BANDAGE; take BOX (A).
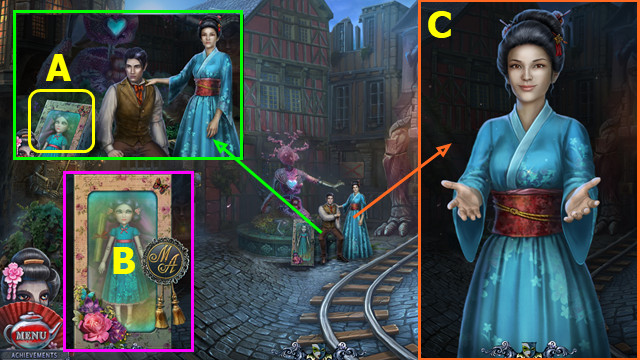
- BOX KEY on BOX; solution (B). Open box; read note and take DOLL.
- Talk; give DOLL (C).
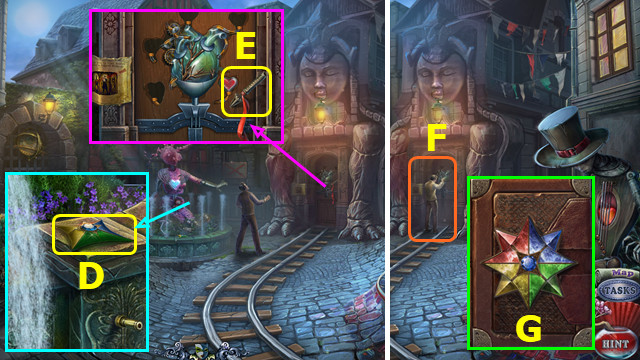
- Take STAR (D).
- Read note; take SPEARHEAD (E).
- Talk (F); take BAG.
- APPLE KEY on BAG; take 1/4 HEARTS and DIARY.
- STAR on DIARY; solution (G). Read DIARY; take CLOCK KEY.
- Talk (H).
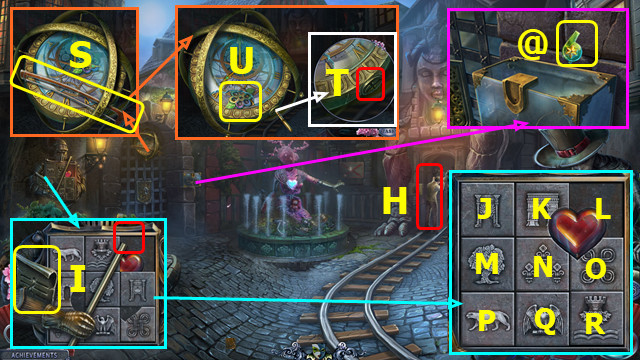
- Take MUSIC; place SPEARHEAD (I).
- Solution O-R-Q-N-K-L-O-N-M-J-K-N-Q-P-M-N-Q-R-O-L; take 2/4 HEARTS.
- Take 1/3 POLICE KEY (@).
- Take BOW (S). Select; use CLOCK KEY (T); take VALVE (U).
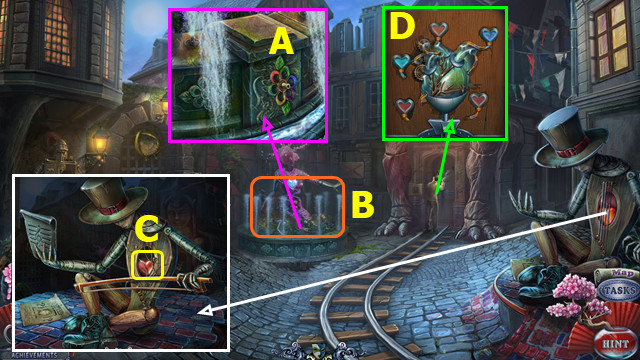
- Use VALVE (A).
- Play HOP; earn 3/4 HEARTS (B).
- Read note; place BOW and MUSIC; take 4/4 HEARTS (C).
- Place HEARTS (D).
- Go right.
Chapter 2: Master's House
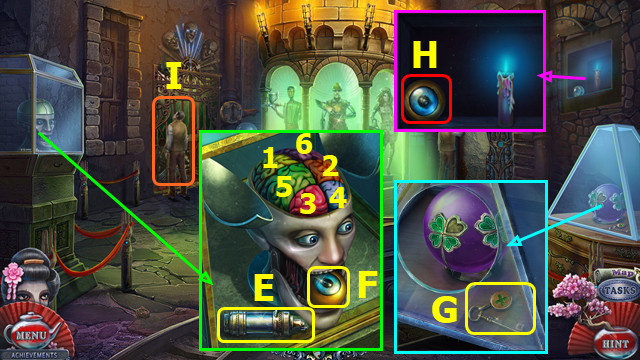
- Use DIAMOND RING; take 1/4 FUSES (E).
- Open skull; select 1-6; take 1/2 EYES (F).
- Use DIAMOND RING; take NURSE'S KEY (G).
- Select (H).
- Select; talk (I).
- Take 1/3 MASKS (J).
- Take SAW and LEATHER (K).
- Select; use NURSE'S KEY; earn MEDICAL KIT (L).
- Take 2/3 MASKS from MEDICAL KIT.
- Read note; use SAW; open gate (M).
- Play HOP; earn 3/3 MASKS (N).
- Select (O).
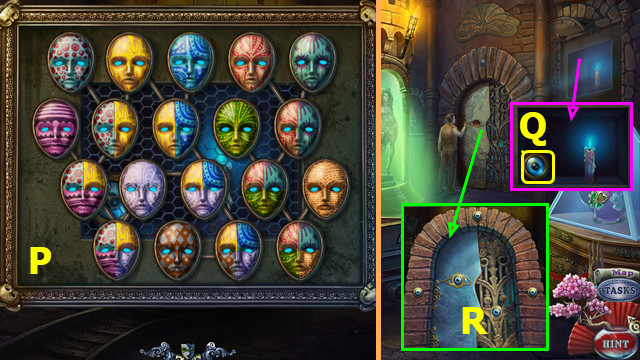
- Place MASKS; solution (P).
- Take 2/2 EYES (Q).
- Place EYES (R).
- Go right.
- Talk (A).
- Select 1-5 (B).
- Take 2/4 FUSES (C).
- Take 3/4 FUSES (D).
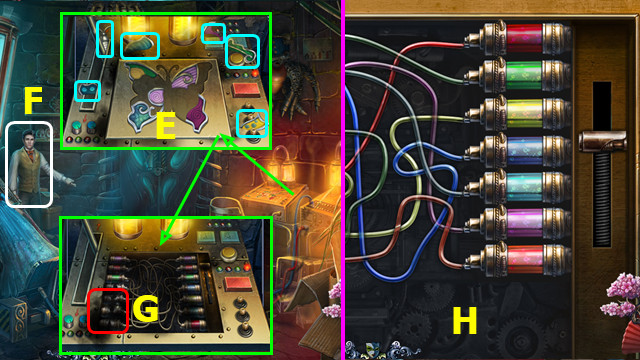
- Select lever; select 6 pieces (E).
- Talk; take 4/4 FUSES (F).
- Open panel; replace FUSES (G).
- Solution (H). Tip: solve from the top to the bottom.
- Talk (I).
- Select (J).
- Select 3x (K).
- Play HOP; earn TENTACLE (L).
- Select, restore, and take TENTACLE (M).
- Place TENTACLE; take BROKEN EXTINGUISHER (N).
- Take EXTINGUISHER PART (O).
- EXTINGUISHER PART on BROKEN EXTINGUISHER; take EXTINGUISHER.
- Use EXTINGUISHER; select 1-4 (P); open door.
- Go forward.
- Take ROPE (Q).
- Walk down.
- Use LEATHER and ROPE; take ELEPHANT HANDLE and BAG KEY (R).
- BAG KEY on MEDICAL KIT; take AMMONIA and CLOVERLEAF.
- Remove mask; use AMMONIA (S); talk; take SWITCH.
- Walk down.
- Use SWITCH (T).
- Talk; take DIARY (U).
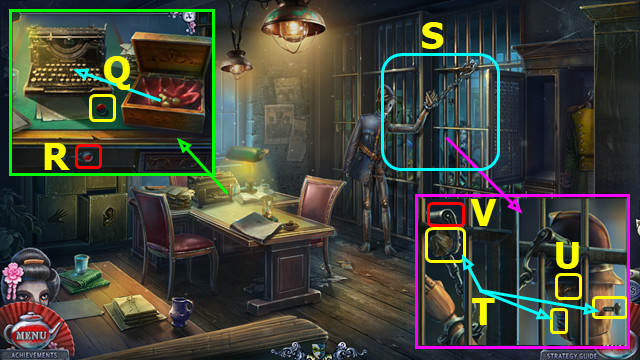
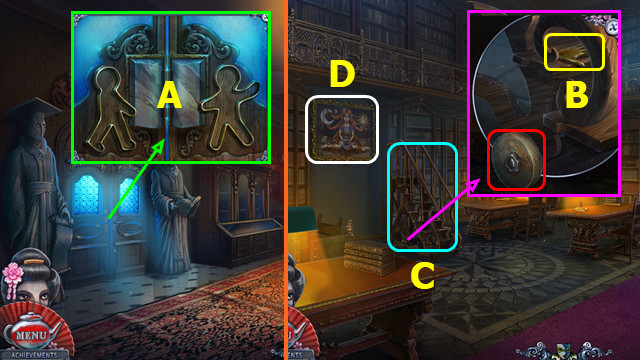
- Select; play HOP; earn PASSWORD (C).
- PASSWORD on DIARY; solution (D).
- Open diary; restore 1-4 (E); turn page.
- Restore 5-7 (F); turn page; take DOCUMENT TUBE and 'MA' SEAL.
- Talk; take BEETLE KEY (G).
- Move legs as shown; use BEETLE KEY (H).
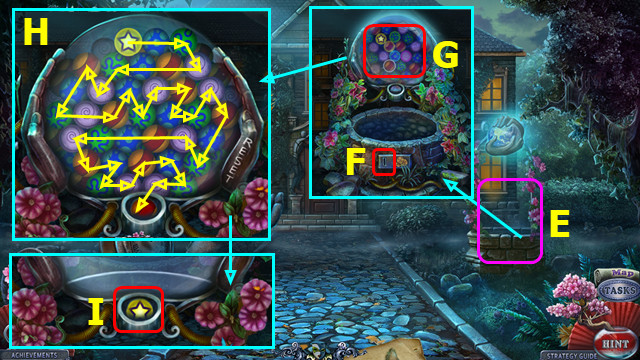
- Take 1/2 DOLL HEADS (I); play HOP; earn GEARS.
- Use ELEPHANT HANDLE; take MERMAID SOLUTION; place GEARS (J).
- Solution (K).
- Walk down.
- Talk; take BUTTONS (L).
- Walk down.
- Place CLOVERLEAF; take 1/2 SPHERES (M).
- Go right, forward.
- Place BUTTONS (N); play HOP; earn 1/2 AMULETS.
- Walk down.
- Talk; take GEAR (P). GEAR on DIARY; take 2/2 AMULETS. Give AMULETS; take 'UP' BUTTON.
- Walk down.
- Place 'UP' BUTTON; select (R).
- Go (S).
Chapter 3: Puppet Warehouse
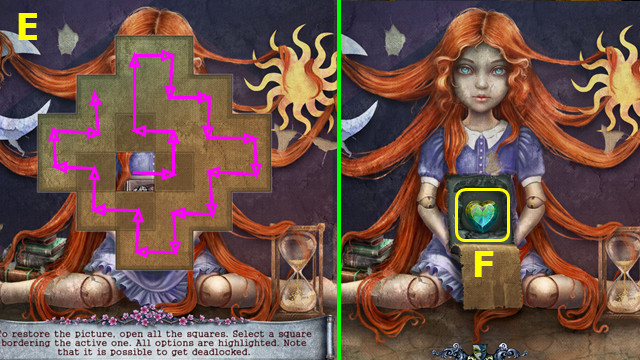
- Take 2/2 DOLL HEADS (A).
- Play HOP; earn MERMAID PARTS (B).
- Take 1/2 FAIRY WINGS; place MERMAID SOLUTION and MERMAID PARTS; arrange as shown; take 1/4 GEMS (C).
- Take BOW TIE; place DOLL HEADS (D).
- Solution (E).
- Move (F-G); earn 2/4 GEMS.
- Move (H-I); earn 3/4 GEMS.
- Walk down.
- Place BOW TIE; take 2/2 SPHERES (J).
- Go (K).
- Place SPHERES; solution (L); take 4/4 GEMS.
- Select (M).
- Place GEMS; solution 1-4 (N).
- Play HOP; earn 1st DOLL (O).
- Walk down, right.
- Talk; take KNIFE (P).
- Walk down 3x.
- Use KNIFE; take TREE (Q).
- Select TREE; take TREE and INSTRUCTION.
- Place and select TREE; take BALL OF YARN (R).
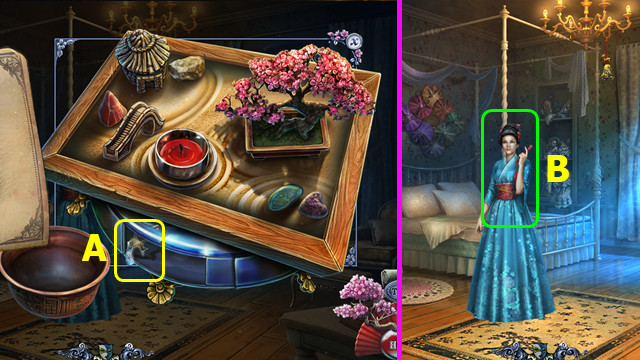
- Restore rock garden; take REVOLVER (A).
- Talk (B).
- Walk down.
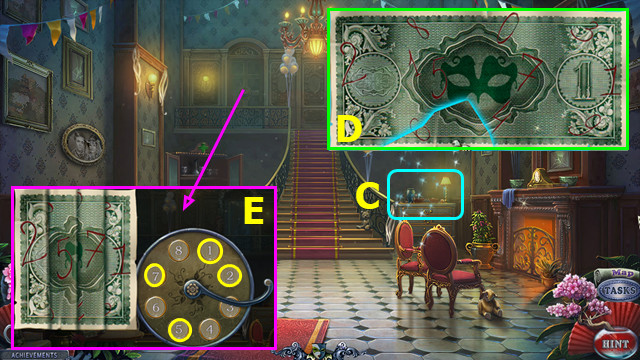
- Play HOP (C).
- Restore bill (D); select and take PASSWORD.
- Place PASSWORD; select 2-5-7-1-handle (E).
- Go left.
- Talk; use REVOLVER (F).
- Restore orb (G).
- Play HOP; earn SCRAPS (I).
- Place CROWN; take BOOK and COIN (J).
- Take DIARY; place BOOK; solution (K). Take CUP.
- Place SCRAPS; solution; take MONOGRAM (L).
- MONOGRAM on DIARY; solution (M); take 1/2 KEYS.
- Place CUP; select 5 fruits; read note; take PALM (N).
- Take 2/2 KEYS (O).
- Use KEYS and PALM; select; take 2nd DOLL (P).
- Take...
- Take STAR KEY and PARASOL (Q).
- Select PARASOL; drag dot (R-S); take PARASOL.
- Use STAR KEY; take MAYOR'S BADGE (T).
- Walk down, right.
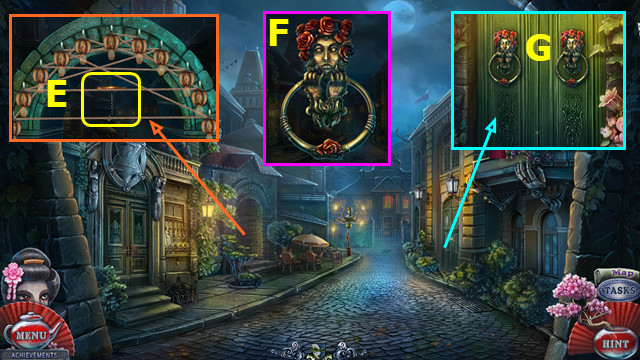
- Place PARASOL; solution (A).
- Take DOOR KNOCKER RING (B).
- Go right.
- Select (C).
- Use MAYOR'S BADGE; take APPLE; select keys (D).
- Use APPLE; play HOP; earn KEYS (E).
- Select KEYS; select pairs; take KEY (F).
- Use KEY (G).
- Go left.
- Talk (A).
- Take BRUSH (B).
- Take SCRUB BRUSH; use BRUSH to take GLUE (C).
- Take 1/3 SYMBOLS (D); play HOP; earn DOOR KNOCKER.
- Take CORKSCREW (E).
- Restore DOOR KNOCKER; use GLUE; take DOOR KNOCKER (F).
- Place DOOR KNOCKER and DOOR KNOCKER RING; select (G).
- Go right.
Chapter 4: Mayor's House
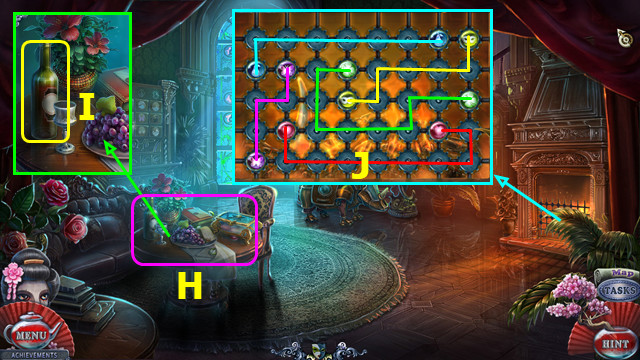
- Play HOP; earn GEARS (H).
- Use CORKSCREW; take BOTTLE (I).
- Place GEARS; solution (J).
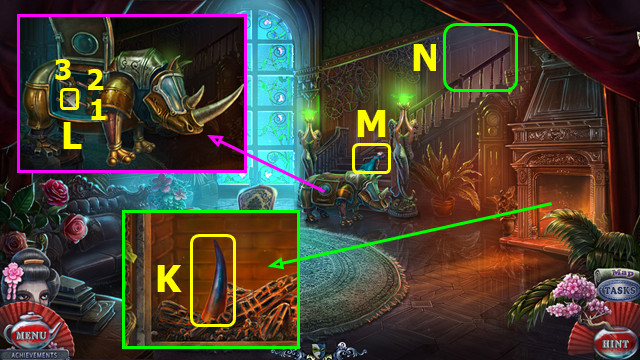
- Use BOTTLE; take RHINO HORN (K).
- Place RHINO HORN; take SEGMENT; select 1-3 (L).
- Take 3rd DOLL (M).
- Go (N).
- Take 1st PLIERS PART (O).
- Place SEGMENT; solution (P).
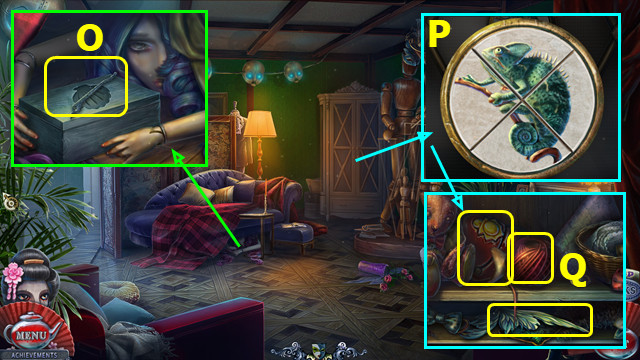
- Place BALL OF YARN; take 2/2 FAIRY WINGS, STRING, and 2/3 POLICE KEY (Q).
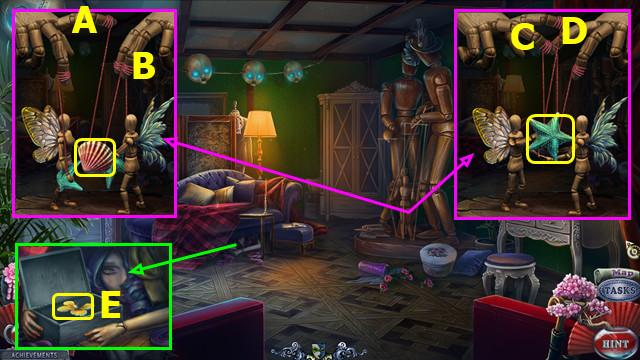
- Use FAIRY WINGS and STRING; select Ax2-B; take SHELL.
- Select Cx3-Dx2; take 2/3 SYMBOLS.
- Place SHELL; take FLOWER (E).
- Walk down.
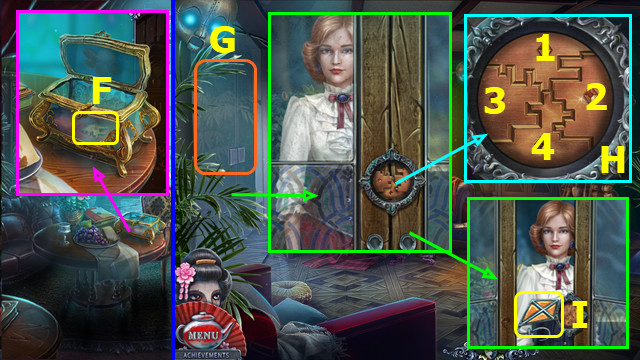
- Place FLOWER; take LOCK DETAIL (F).
- Go right.
- Talk (G).
- Place LOCK DETAIL; select 2-1-3-4 (H).
- Take 3/3 SYMBOL (I).
- Walk down.
- Place SYMBOLS; solution (J); take 3/3 POLICE KEYS, 2nd PLIERS PART, and SMOKER.
- Walk down.
- Use SMOKER; play HOP; take LIGHTBULB (K).
- Place 3 POLICE KEYS; rotate as shown; select handle (L).
- Go left.

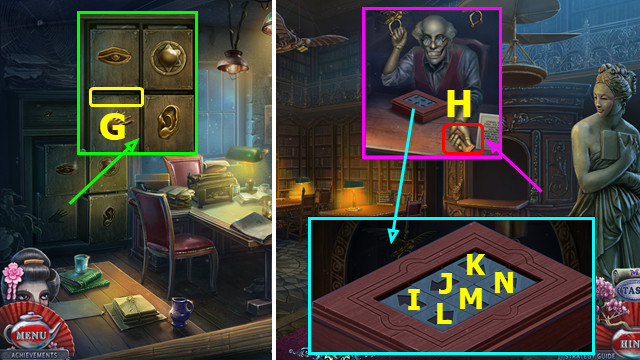
- Read note; take EYE FILE KEY (M).
- Take EAR FILE KEY A (N).
- Place EAR FILE KEY; read note; take CODE (O).
- Place EYE FILE KEY; read note; take REVOLVER (P).
- Place REVOLVER; move keys to typewriter; take CELL BUTTON (Q).
- Place and select CELL BUTTON (R).
- Play HOP; earn 4th DOLL (S).
- Walk down.
- Take BROOCH SOLUTION, TAPE, and SCREW (T).
- Combine 2 PLIERS PARTS and SCREW; earn PLIERS.
- Use PLIERS; earn WIRE (U).
- Select wire 3x; take LOCKPICK.
- Use LOCKPICK (V).
- Walk down 2x.
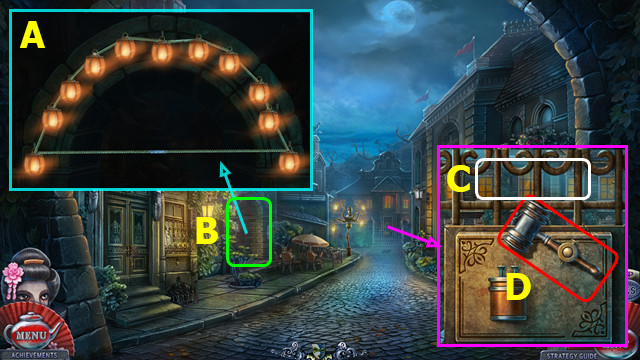
- Use LIGHTBULB and TAPE; solution (A).
- Play HOP; earn GAVEL (B).
- Look (C).
- Place HAMMER (D).
- Go forward.
- Play HOP; earn NUMBERS (E).
- Place COIN (F); select (G).
- Solution (H).
- Select (Ix2).
- Take FEATHER; use SCRUB BRUSH (J).
- Select pairs (K).
- Use NUMBERS; solution (L).
- Use CODE; enter 7-2-5-3 (M).
- Go forward.
- Take HORSESHOE (N).
- Place HORSESHOE; take CLOCK KEY and 1/2 HOOPS (O).
- Select (P).
- Go forward.
Chapter 5: Auction Warehouse
- Place FEATHER; take TILE; read note (A).
- Take BADGE FILE KEY (B).
- Read note; take PAPER; select 4 bands and open box (C).
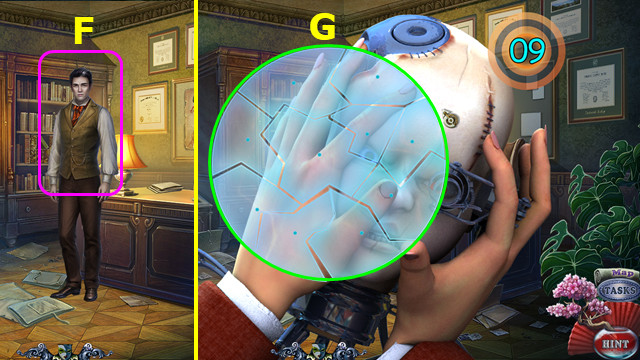
- Walk down.
- Remove broken man; use PAPER and select; earn MEN DESIGN (D).
- Walk down.
- Use CLOCK KEY; take 1/2 WEIGHTS (E).
- Walk down, left.
- Place BADGE FILE KEY; read note; take 2/2 WEIGHTS (F).
- Walk down; go forward 2x.
- Place WEIGHTS (G); play HOP; earn BROOCH.
- Go forward.
- Select (H).
- Place BROOCH and BROOCH SOLUTION; play HOP; take BROOCH CODE (I).
- Place BROOCH CODE; select Jx8-Kx2.
- Take CONE and 5th DOLL (L).
- Talk; take TUBE KEY (M).
- TUBE KEY on DOCUMENT TUBE; read note; take TICKET.
- Walk down.
- Place CONE; take 2/2 HOOPS (N).
- Go forward.
- Place MEN DESIGN; play HOP; earn MEN (O).
- Place MEN and HOOPS; change pieces as shown; select (P).
- Change pieces as shown; select (Q).
- Take MEN (R).
- Walk down.
- Place MEN (A).
- Walk left.
- Take HAND FILE KEY; use SCRUB BRUSH (B).
- Select (C).
- Select (D).
- Place TILE; select the path (E).
- Take BOOK HEART (F).
- Walk down 3x; go left.
- Place HAND FILE KEY; read note; take KIOSK KEY (G).
- Walk down; go forward 2x; go left.
- Use KIOSK KEY; give TICKET (H).
- Select I-N-J-I-K-N-M-J-L-M-N open case; take LETTERS and PHOTO.
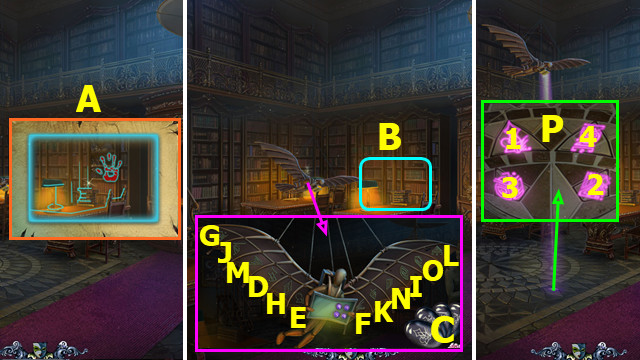
- Place PHOTO (A).
- Play HOP; earn SYMBOLS (B).
- Place SYMBOLS (C); select sets (D-E-F)-(G-H-I)-(J-K-L)-(M-N-O).
- Select 1-4 (P); take BOOK.
- BOOK HEART on BOOK; take 'DOWN' BUTTON and RECIPE.
- Walk down 4x; go right.
- Place and select 'DOWN' BUTTON (Q).
- Go (R).
- Talk; take RECIPE (S).
- Place RECIPE; play HOP; earn INGREDIENTS (T).
- Play HOP; earn CHIPS (U).
- Place INGREDIENTS; use (A-B)-(C-B)-(D-E)-(E-F)-(G-F)-(H-F)-(F)-(B)-(F-B)-(B).
- Talk; take MEDALLION (I).
- Open MEDALLION; take LOCK OF HAIR.
- Add LOCK OF HAIR (J); use (K-J); select; take SEALING WAX.
- Combine the 5 DOLLS, SEALING WAX, and 'MA' SEAL; take DOLLS.
- Select (L).
- Place CHIPS; solution (M).
- Select (N).
- Place DOLLS (O).
- Talk; give DOLLS (P).
- Congratulations! You have completed Puppet Show: Porcelain Smile!
Created at: 2019-02-22