

Walkthrough Menu
- General Tips
- Chapter 1: Girl’s Bedroom
- Chapter 2: Puppet Shop
- Chapter 3: The Workshop
- Chapter 4: Fortune Teller’s House
- Chapter 5: Castle Gates
- Chapter 6: First Tower
- Chapter 7: Factory
- Chapter 8: Second Tower
- Chapter 9: Arsenal
- Chapter 10: Puppet Storage
- Chapter 11: Third Tower
- Chapter 12: Laboratory
- Extra Levels
General Tips
- Choose Regular Mode or Expert Mode at the beginning of the game.
- All scenes will have an area in which one, or more, sparkles appear.
- A single sparkle indicates an interactive area in the game. This area may allow you to move to a different scene, exit a scene, or indicate an area you need to investigate further.
- Several sparkles in a cluster indicate a Hidden Object Scene. These scenes contain inventory items needed to complete your journey.
- Certain Hidden Object Scenes will require you to click on a part of the scene to uncover a hidden area.
- You can skip a mini-game once the Skip button is full. The skip button only appears in the mini-game sections and is located in the lower left corner.
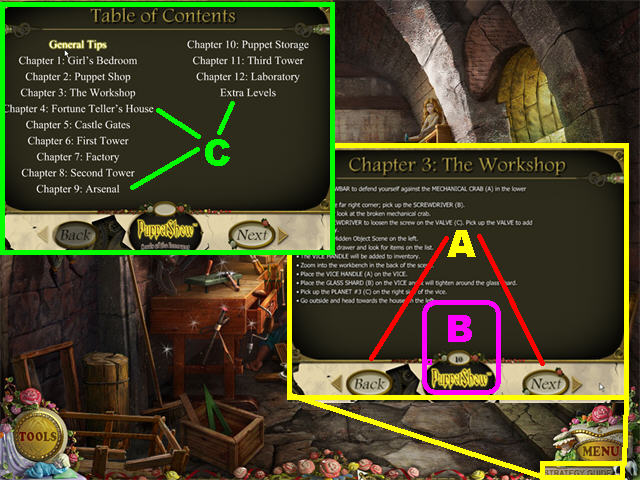
- To access the built-in strategy guide, click on STRATEGY GUIDE in the lower right corner, below the MENU. Scroll through each page by clicking on the Next and Back Buttons (A).
- Click on the PuppetShow Button (B) to return to the Table of Contents. From this section you can click on any chapter(C) to be taken to that section.
- Once you complete the game, you can click on “Extra Content” in the Main Menu to access extra levels.
- Once the Extra Levels are completed you can access the Soundtrack, Wallpapers, Screensaver, and Concept Art.
- When the cursor turns into a magnifying glass you can zoom in on an area in the scene. You can sometimes find inventory items in these areas. In other instances, a magnifying glass will allow you to read helpful clues, or open a mini-game.
- If a door is open you can travel to that location by clicking on the area in which your cursor turns into a globe icon.
- When your cursor changes into a hand icon, click on that area to interact with it. The hand icon allows you to pick up inventory items or explore certain areas.
- When you can’t find an item in one of the Hidden Object Scenes, you can use a hint in the lower left.
- When you use a hint, a circle will appear around a random item from your list.
- You can only use the hints for the Hidden Object Scenes. The Hint button will not appear in other scenes; it will be replaced by the Tools or Skip button.
- You have unlimited hints in the game, but you have to wait for hints to recharge between uses.
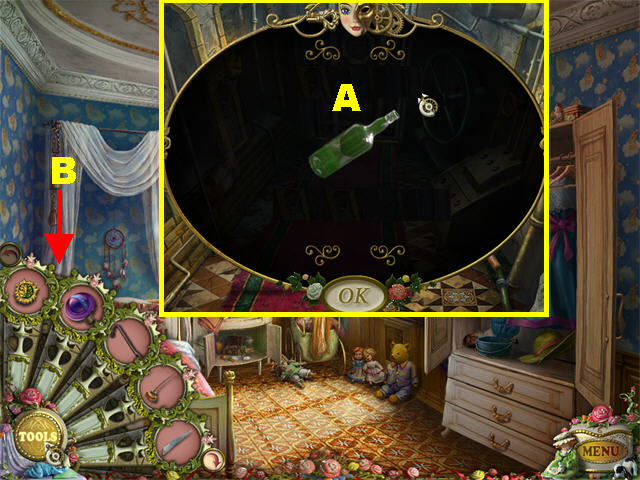
- You will find one inventory (A) item in each Hidden Object Scene. You will not know which item goes into inventory until all the items have been cleared from the list.
- You can also find inventory items in areas which have a magnifying glass icon.
- The inventory items will go into the Tools tab in the lower left corner.
- Click on the Tools button (B) in the lower left to see all available items. If your inventory is full, use the arrows on each end of the Tools section to scroll through your items.
- To use an item click on the Tools button and select an inventory item. Drag the selected item to the appropriate area and click on it.
Chapter 1: Girl’s Bedroom
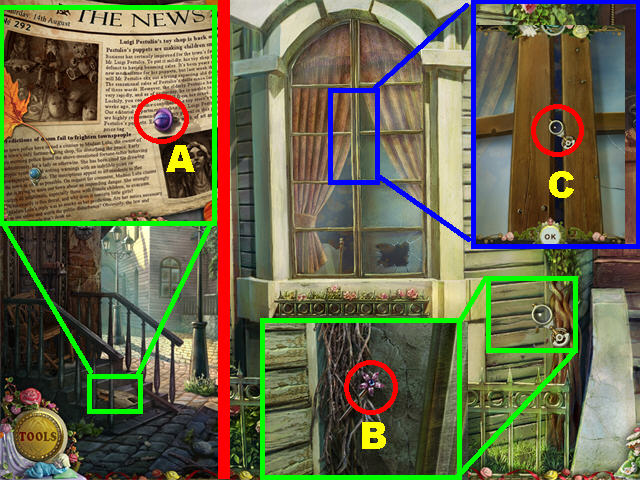
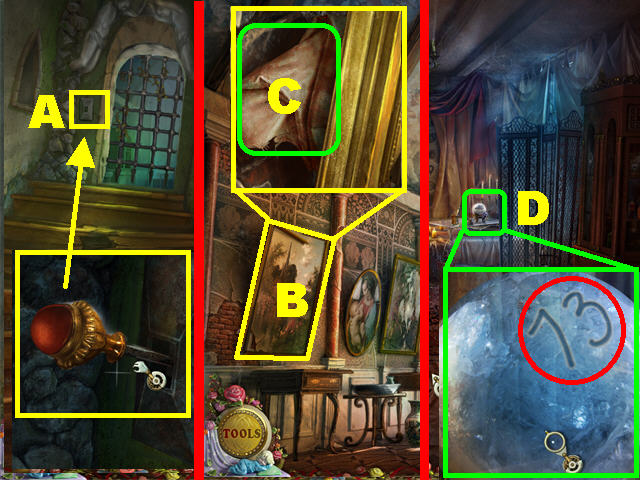
- Zoom into the newspaper in the lower left; pick up the PLANET (A).
- Click on the door on the right for a closer look.
- Zoom into the lower right side of the house; pick up the PIN (B).
- Take a closer look at the window (C); open it with the PIN in your Tools section.
- Go in through the window.
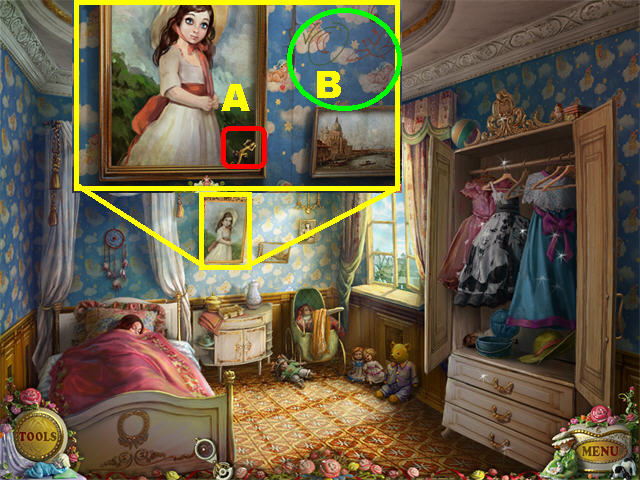
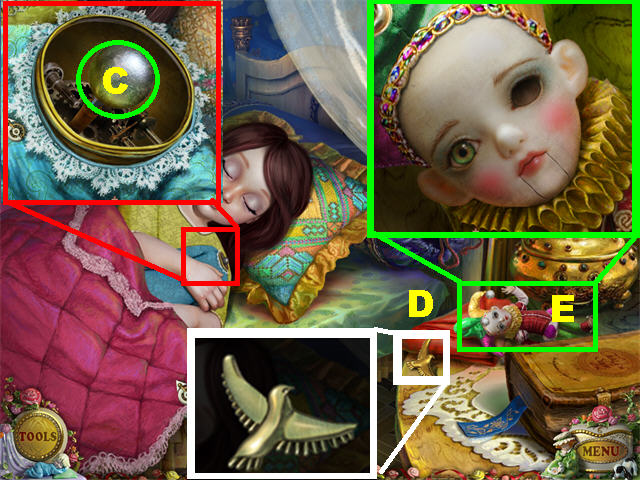
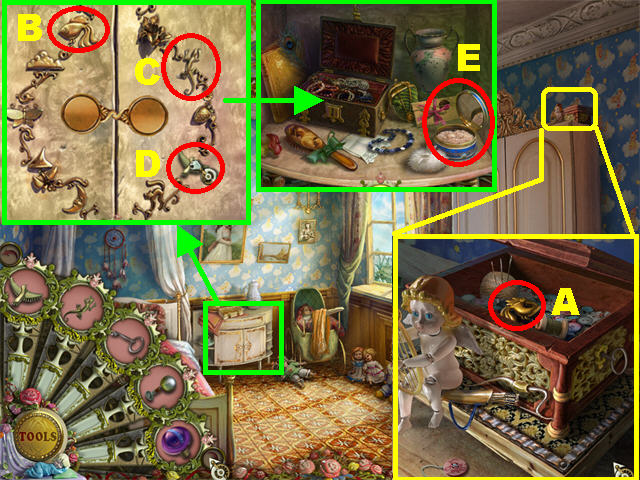
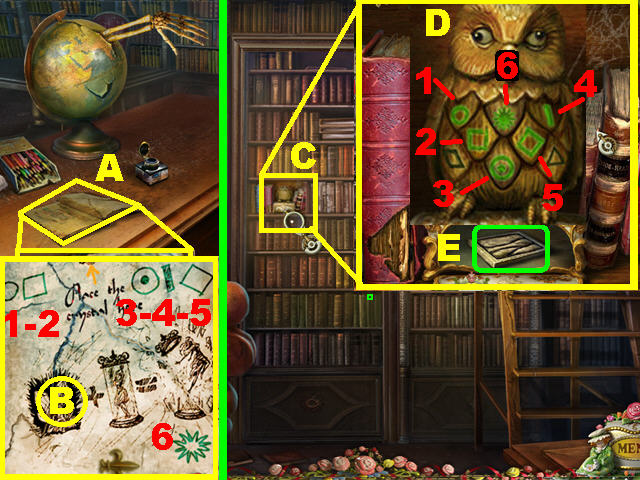
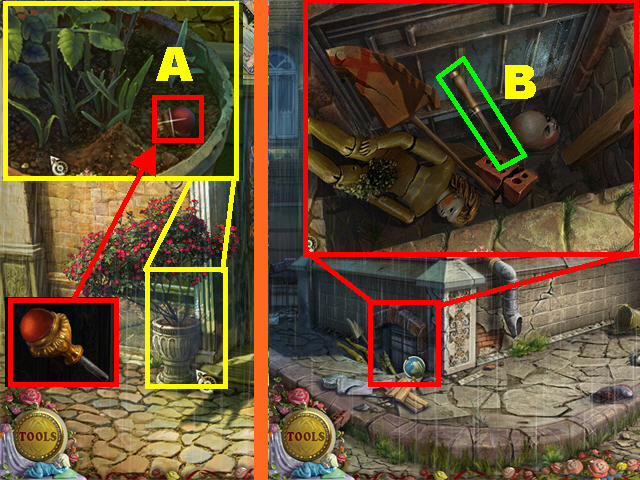
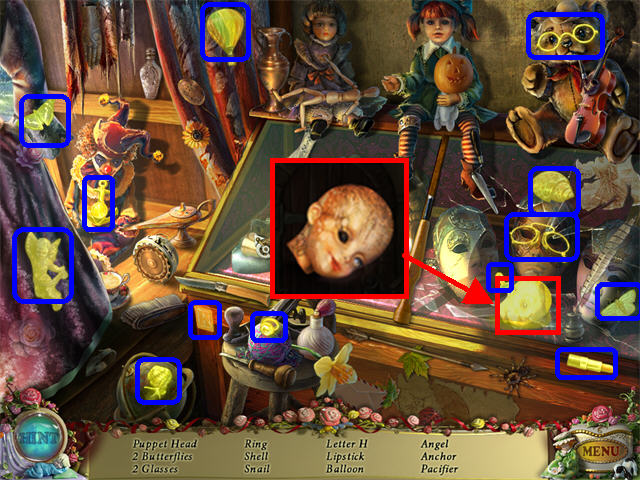
- Zoom into the LARGE PORTRAIT on the back wall; pick up the LIZARD ORNAMENT (A) in the lower right side of the frame.
- Note the PATTERN (B) on the wallpaper; you will need that solution for a puzzle.
- Zoom into the bed; then the little girl. Pick up the MECHANICAL DOLL PART (C) on the headless doll.
- Pick up the BIRD ORNAMENT (D) on the dresser.
- Note the JESTER PUPPET (E) on the dresser, when you click on it you will see it is missing an eye. Close the pop-up window.
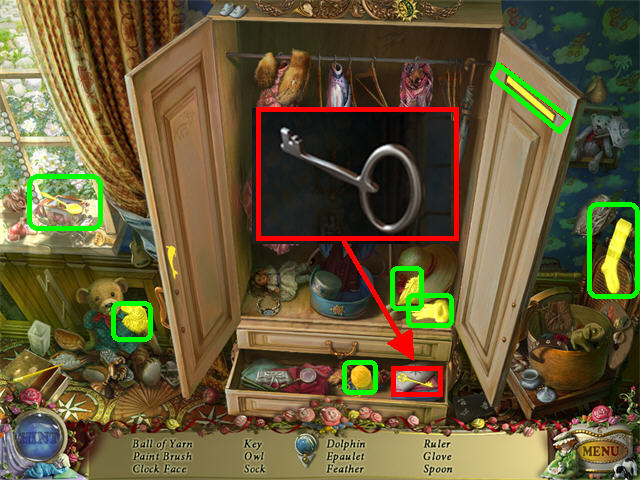
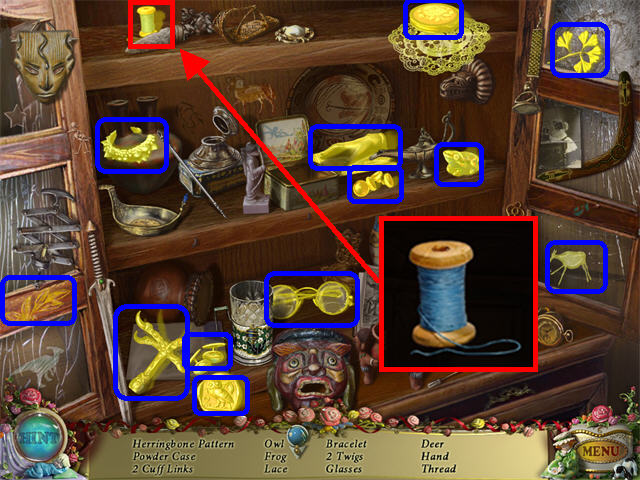
- Click on the wardrobe to open it; click again to trigger a Hidden Object Scene.
- Open the middle drawer to look for objects.
- The KEY will be added to inventory once your search has been completed.
- Take a closer look above the wardrobe to find a music box.
- Place the KEY on the side of the music box; click on the KEY 3 times to make it play.
- Pick up the FISH ORNAMENT (A) inside the music box once it opens.
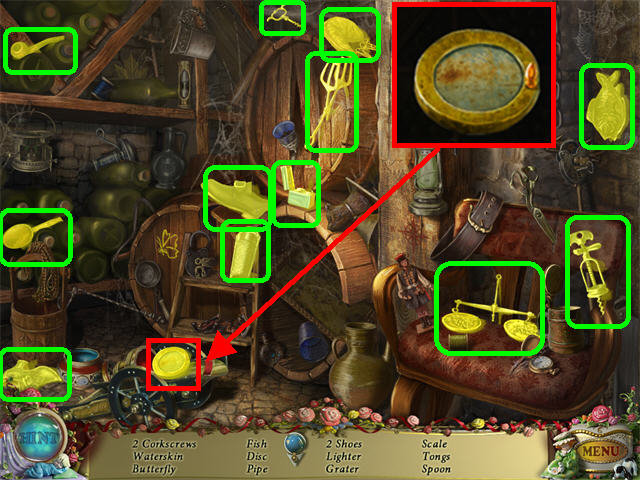
- Take a closer look at the dresser and place the FISH ORNAMENT (B), LIZARD ORNAMENT (C), and BIRD ORNAMENT (D) as shown in the screenshot to unlock the drawer.
- Zoom into the drawer; pick up the POWDER COMPACT (E) inside.
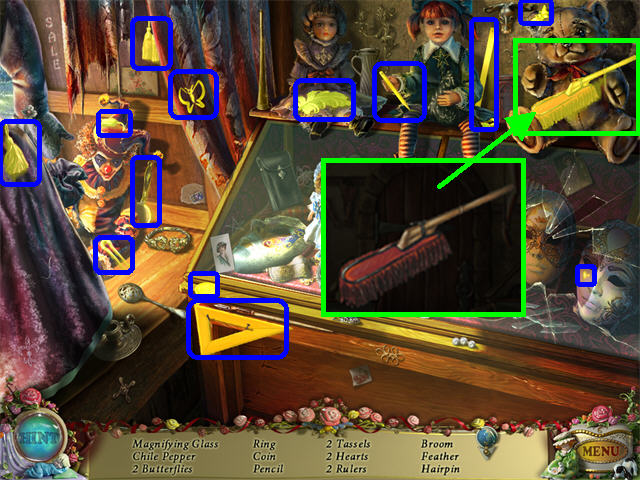
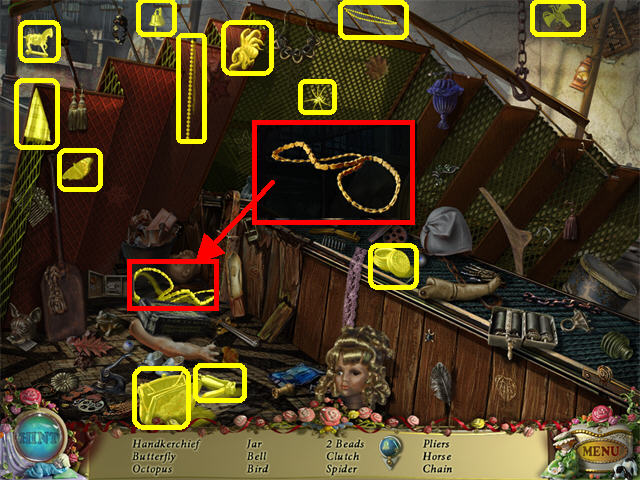
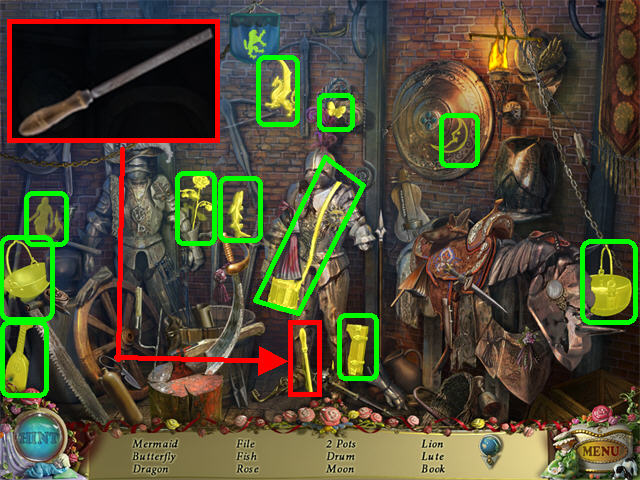
Chapter 2: Puppet Shop
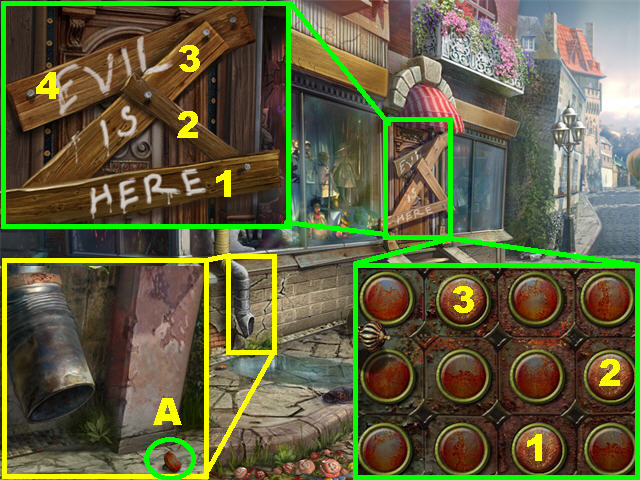
- Go down twice, forward and right towards the Guard’s Hut.
- Click on the door twice to trigger a Hidden Object Scene.
- The CROWBAR will be added to inventory.
- Note the oil-dripping lamp (A) on the side of the hut.
- Go down and then forward.
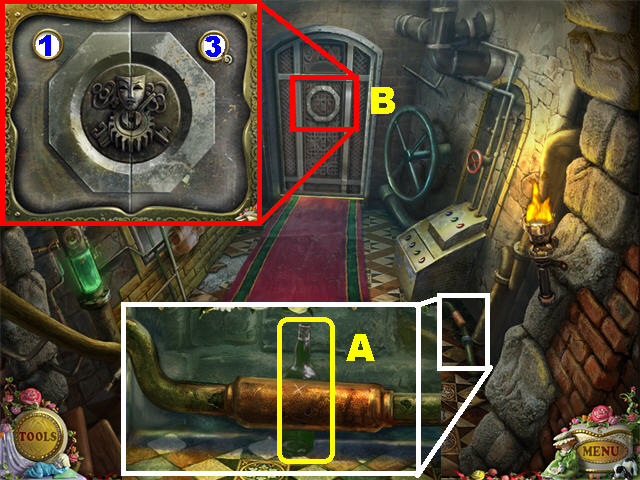
- Zoom into the dripping pipe on the side of the shop; pick up the RED BUTTON (A) in the lower right.
- Take a closer look at the door; eliminate the boards with the CROWBAR, always pulling the board on top first.
- Zoom into the buttons on the door.
- Place the RED BUTTON on the panel.
- Place the COMPACT POWDER on the buttons so you can see which ones need to be pressed.
- Click the buttons according to the order in the screenshot; then click the handle to open the door.
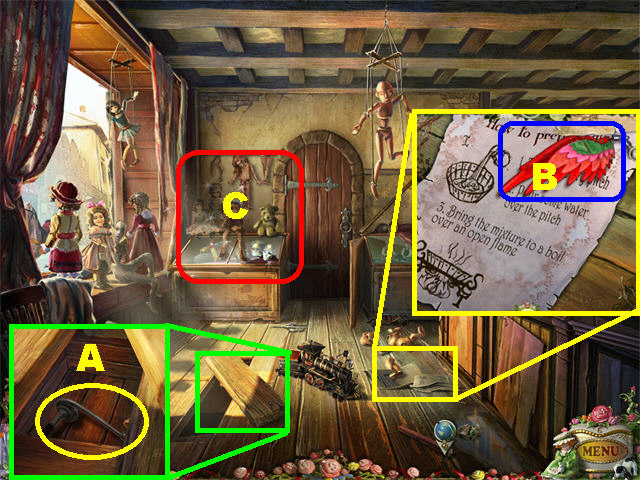
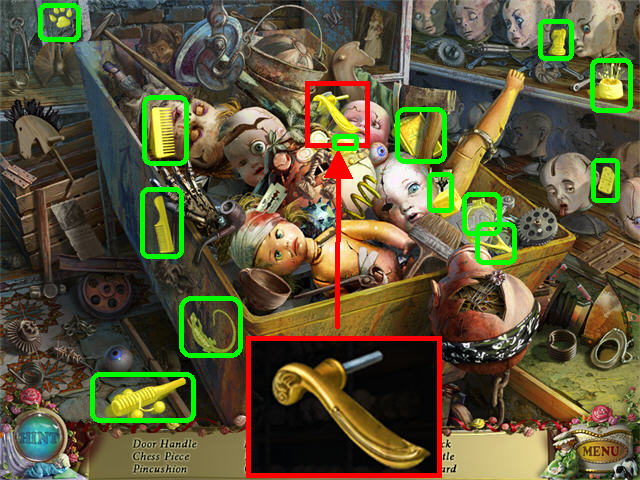
- Loosen the FLOORBOARD in the lower left side of the ground with the CROWBAR; pick up the HANDLE (A).
- Zoom into the SKETCH on the ground. Click on the papers several times and pick up the MECHANICAL WING (B).
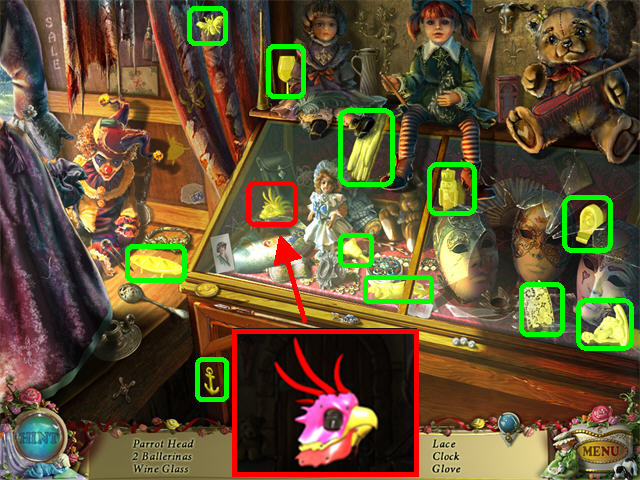
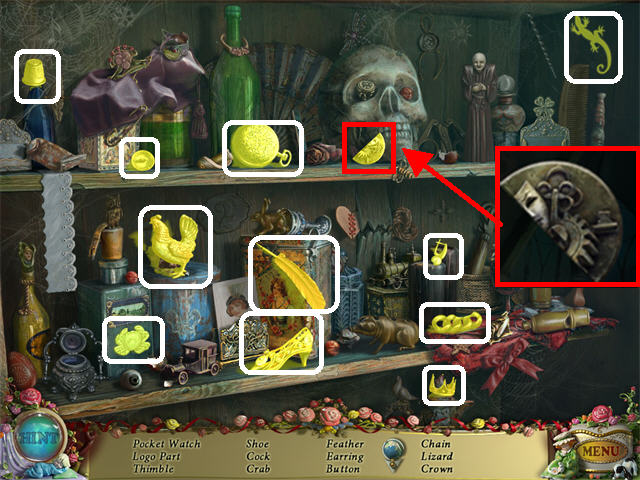
- Click on the Hidden Object Scene (C) on the left.
- Pick up all the items on the list.
- The PARROT HEAD will be added to inventory.
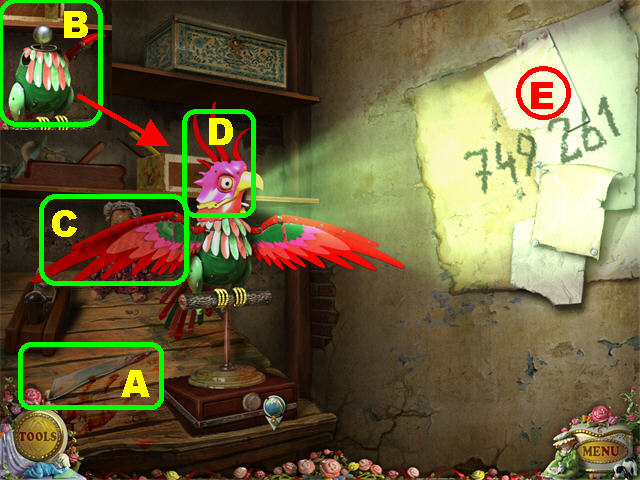
- Take a closer look at the shelves on the right.
- Pick up the GLASS SHARD (A) in the lower left.
- Place the DOLL PART (B) in the head socket of the MECHANICAL BIRD.
- Place the MECHANICAL WING (C) and the PARROT HEAD (D) on the MECHANICAL BIRD.
- The Bird projects a film on the wall. Note the numbers “749261” (E) projected on the right side of the wall.
- Exit out of that view.
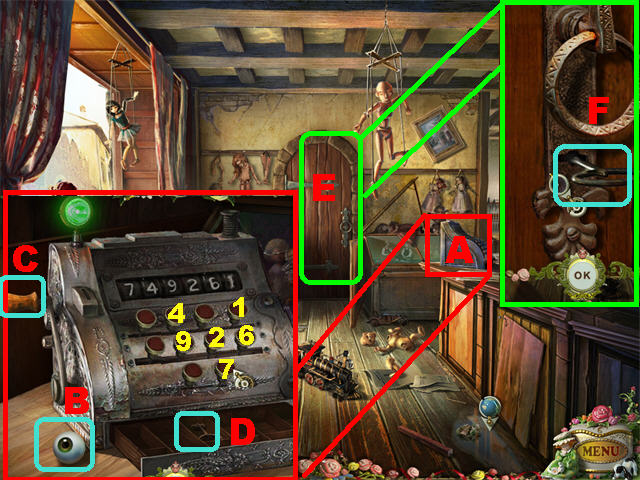
- Zoom into the CASH REGISTER (A) on the counter.
- Pick up the PUPPET EYE (B) on the counter.
- Place the HANDLE (C) on the side of the cash register.
- Enter the correct combination to open the cash register.
- If you make a mistake, click on the HANDLE (C) to reset the numbers.
- Enter the numbers “749261” on the cash register keys. Please look at the screenshot for the solution.
- Pick up the KEY (D) inside the cash register.
- Take a closer look at the back door (E).
- Place the KEY (F) in the lock. The lock needs oil.
- Go back to the Girl’s Bedroom.
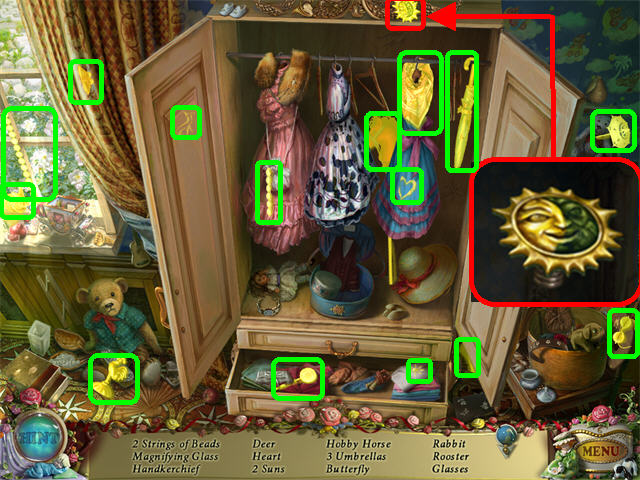
- Click on the wardrobe to trigger a Hidden Object Scene.
- The SUN will be added to inventory.
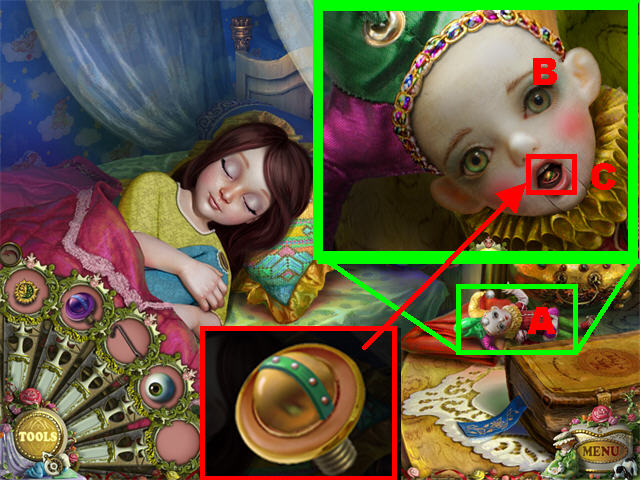
- Zoom into the bed on the left; click on the JESTER DOLL (A) and place the PUPPET EYE (B) in the eye sockets.
- Pick up the PLANET (C) in the jester’s mouth.
- Go back to the Guard’s Hut.
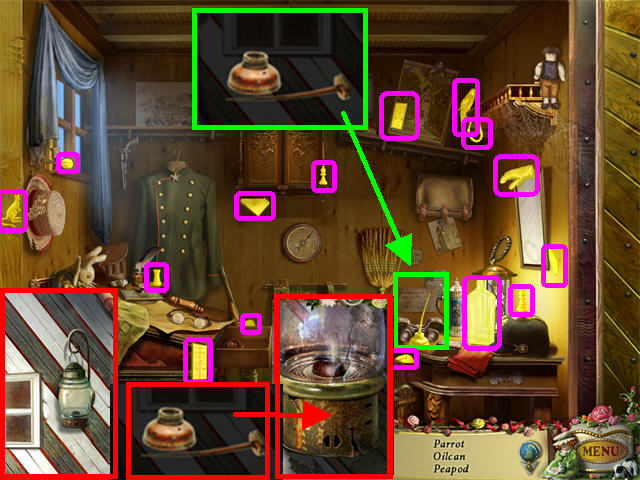
- Click on the Hidden Object Scene.
- The EMPTY OIL CAN will be added to inventory.
- Zoom into the LAMP in the upper right side of the hut and fill up the OIL CAN with the oil dripping from the lamp.
- Go back to the Puppet Shop.
- Click on the Hidden Object Scene.
- The BROOM will be added to inventory.
- Take a closer look at the door; place the full OILCAN in the lock. Click on the key to unlock the door.
- Go through the door to reach the Workshop.
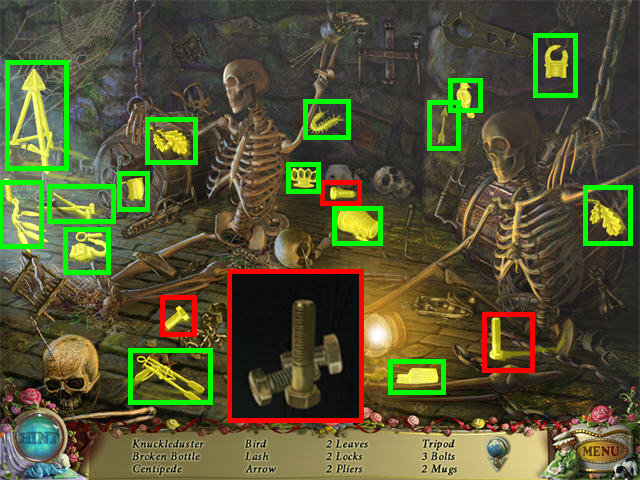
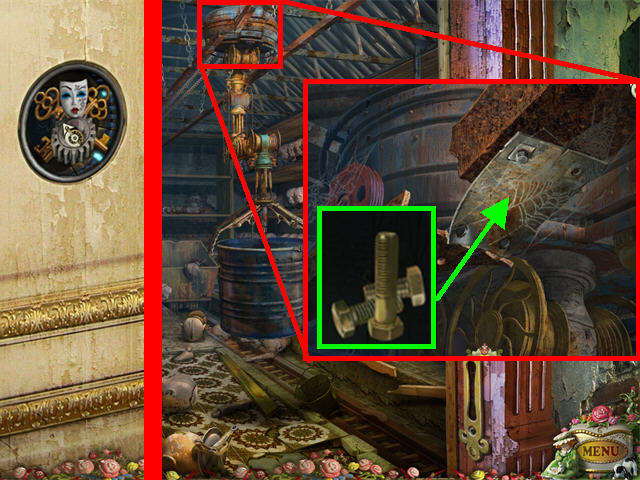
Chapter 3: The Workshop
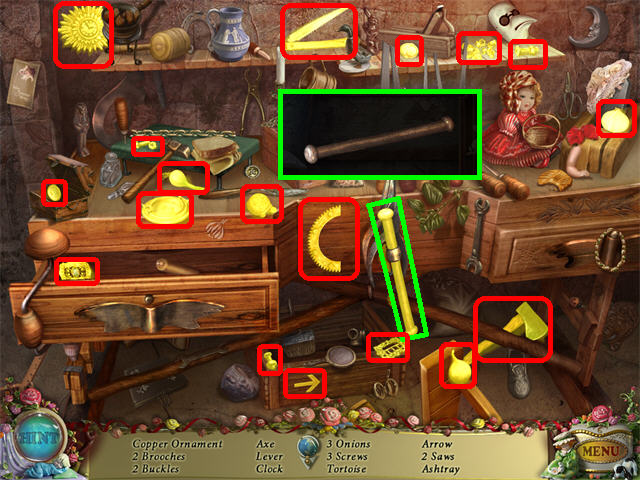
- Use the CROWBAR to defend yourself against the MECHANICAL CRAB (A) in the lower center.
- Zoom into the far right corner; pick up the SCREWDRIVER (B).
- Take a closer look at the broken mechanical crab.
- Use the SCREWDRIVER to loosen the screw on the VALVE (C). Pick up the VALVE to add it to inventory.
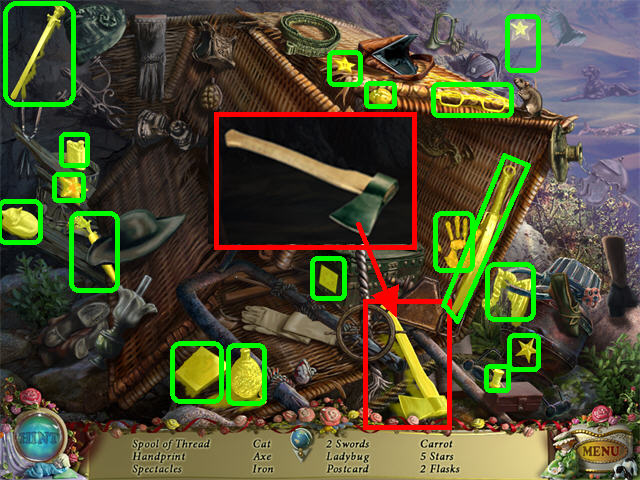
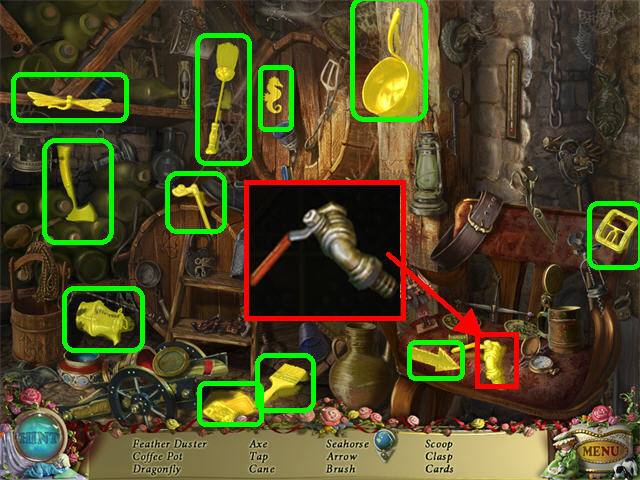
- Click on the Hidden Object Scene on the left.
- Open the left drawer and look for items on the list.
- The VICE HANDLE will be added to inventory.
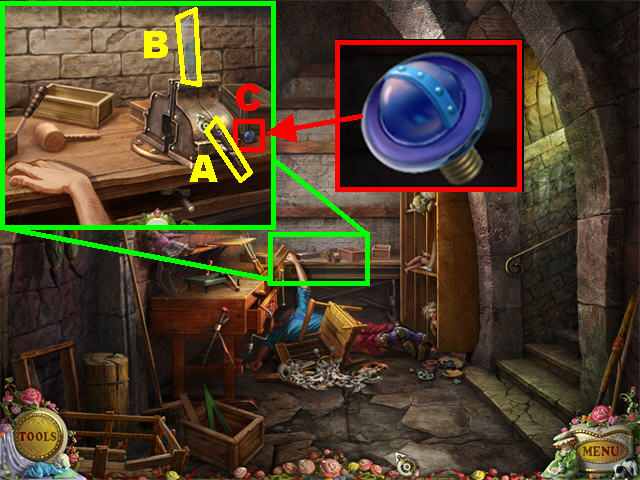
- Zoom into the workbench in the back of the scene.
- Place the VICE HANDLE (A) on the VICE.
- Place the GLASS SHARD (B) on the VICE and it will tighten around the glass shard.
- Pick up the PLANET #3 (C) on the right side of the vice.
- Go outside and head towards the house on the left.
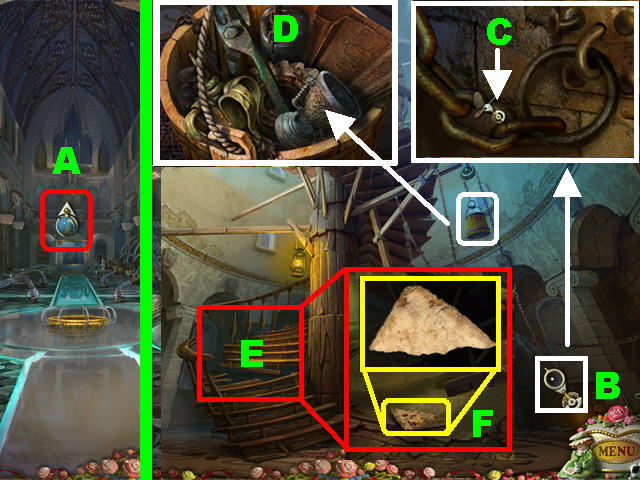
Chapter 4: Fortune Teller’s House
- Take a closer look at the poster on the right.
- Click twice on the poster to tear it.
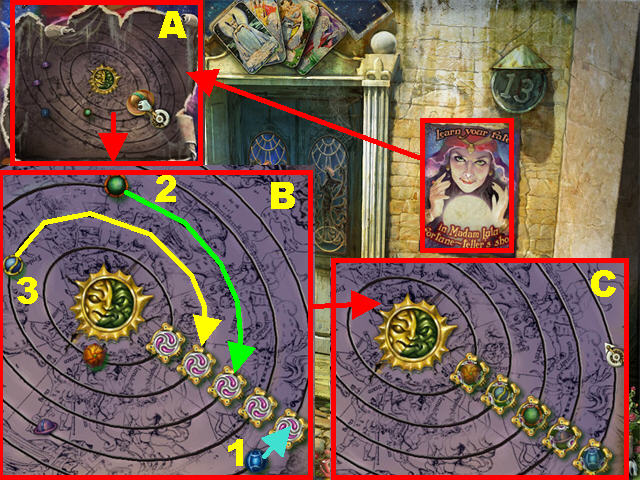
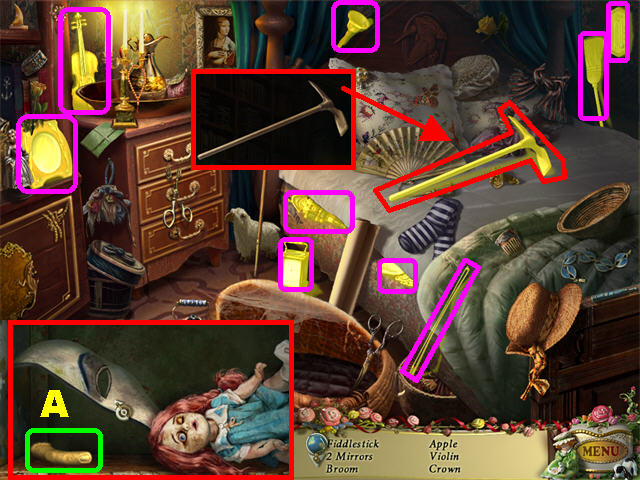
- Use the BROOM on the cobwebs three times (Fig A).
- Place the SUN and the 3 PLANETS on the galaxy (Fig A).
- Click on the galaxy to trigger a puzzle.
- Click the Large Blue Planet towards the swirl in its track; then click the Green and Small Blue Planets into their swirls (Fig B).
- Fig. C shows you the final solution. Go through the door.
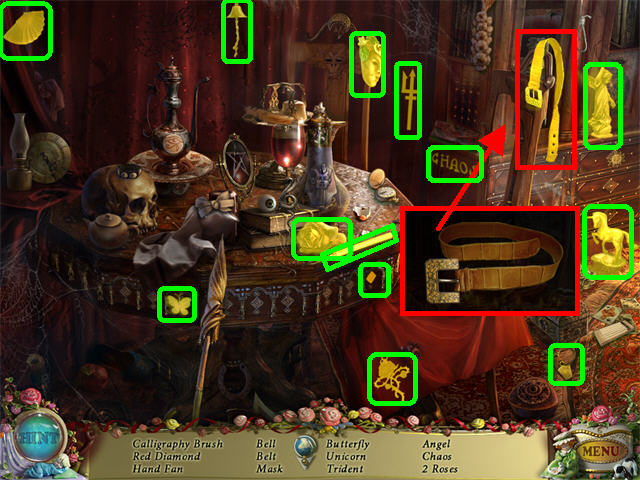
- Click on the Hidden Object Scene on the left.
- The LEATHER BELT will be added to inventory.
- Go back to the Workshop in the Puppet Shop.
- Click on the Hidden Object Scene in the Workshop.
- The BURNER OF DRIED PITCH is added to inventory.
- Go back to the Fortuneteller’s House.
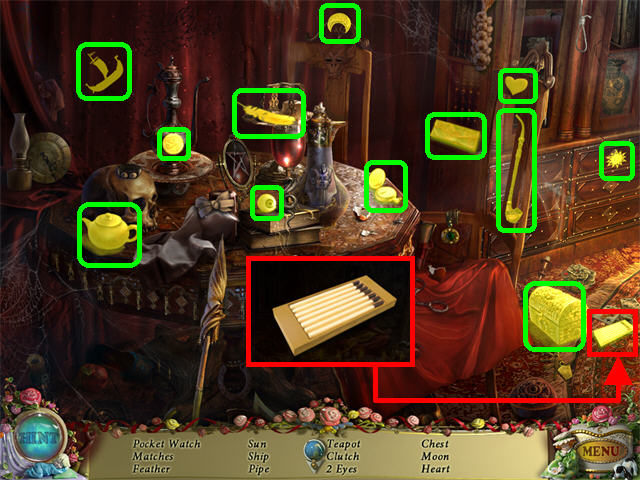
- Click on the Hidden Object Scene.
- The MATCHES will be added to inventory.
- Go outside of the Puppet Shop.
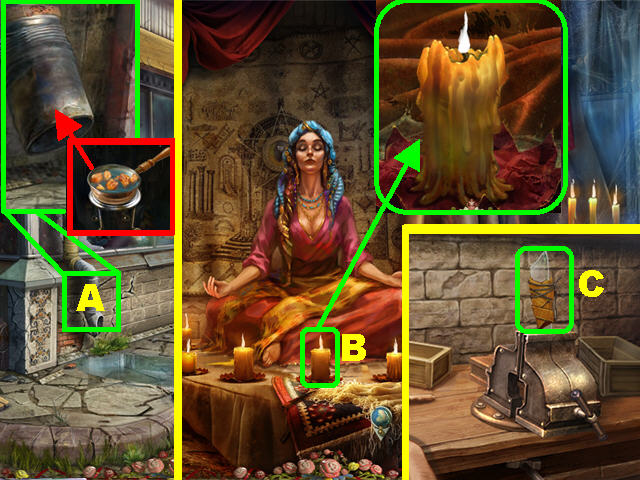
- Zoom into the dripping PIPE (A); place the BURNER OF DRIED PITCH under the pipe to acquire the PITCH MIXTURE.
- Go back inside the Fortuneteller’s House.
- Zoom into the fortune teller.
- Click on the center CANDLE for a closer look; place the PITCH MIXTURE on the flame to create GLUE.
- Go back to the Workshop inside the Puppet Shop.
- Zoom into the workbench; place the LEATHER BELT on the GLASS SHARD.
- Pick up the GLASS KNIFE (C).
- Leave the shop and go right.
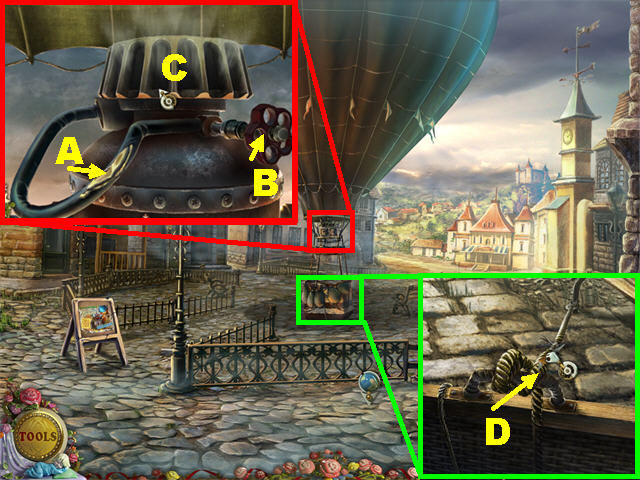
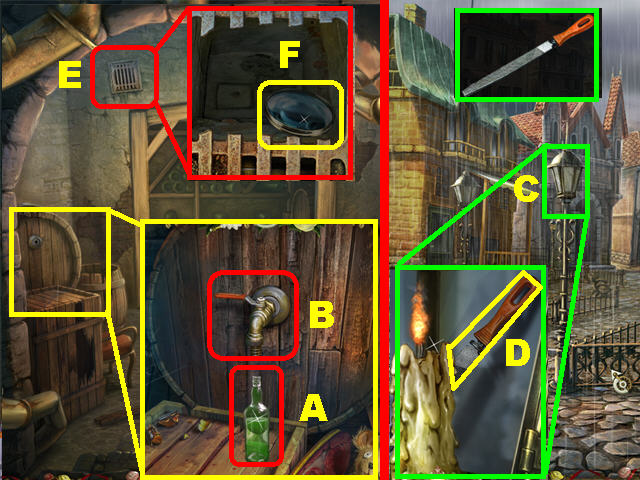
- Zoom into the upper part of the hot air balloon.
- Place the GLUE on the broken HOSE (A) to patch it up.
- Place the VALVE on the BURNER (B); turn the VALVE to start the flow of gas.
- Place the MATCHES on the BURNER (C).
- Take a closer look at the edge of the basket; cut the ROPE (D) three times with the GLASS KNIFE.
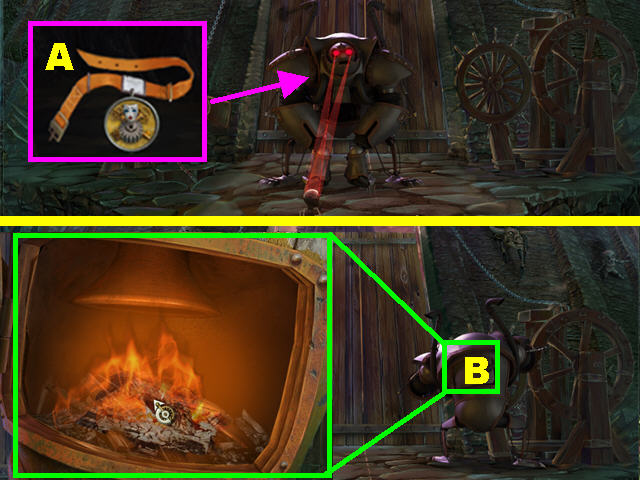
Chapter 5: Castle Gates
- The MATCHES and the CROWBAR will still be in your inventory at the beginning of this chapter.
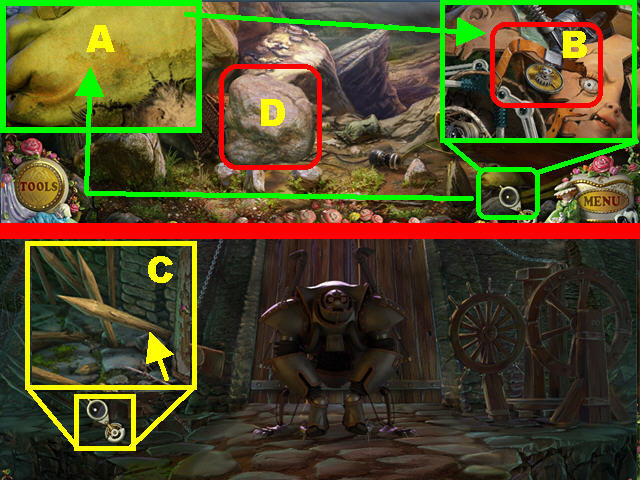
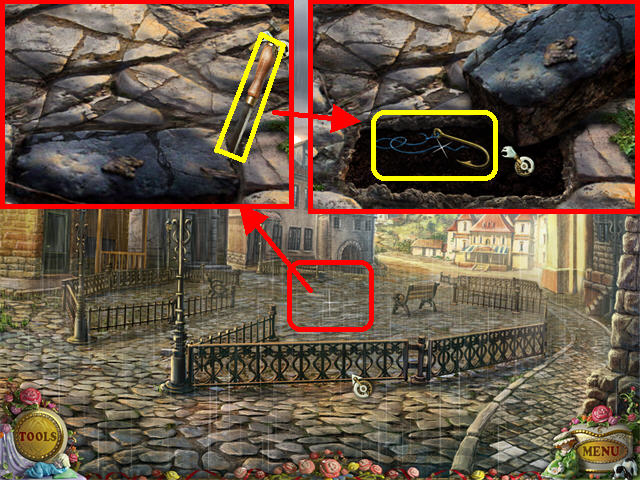
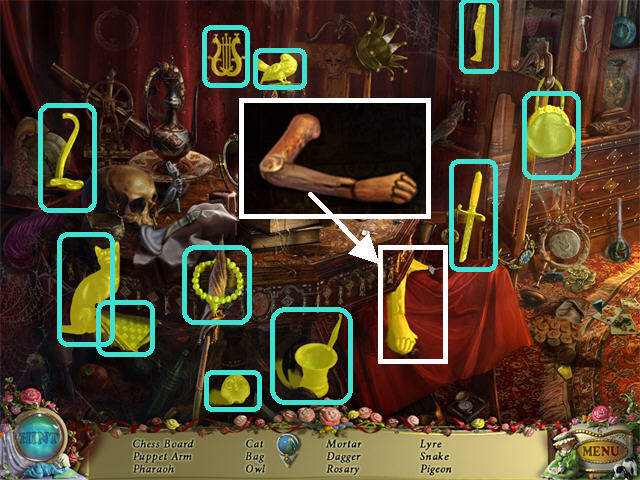
- Zoom into the lower right; pick up the SANDBAG (A) and the SPIDER PUPPET’S BADGE (B).
- Go forward.
- The Giant Puppet is blocking the door.
- Zoom into the lower left and use the CROWBAR on the POLE (C) three times to loosen it.
- Pick up the POLE.
- Return to the crash site.
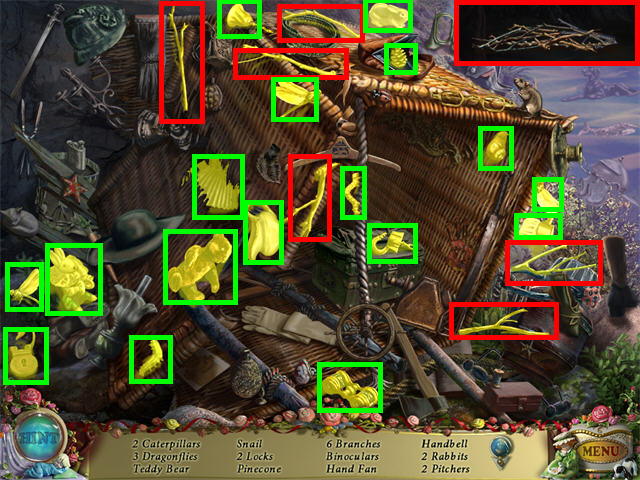
- Remove the large STONE in the lower left with the POLE (D) to trigger a Hidden Object Scene.
- Look for all the items on the list.
- KINDLING will be added to inventory.
- Go back to the gate.
- Give the Giant Puppet the SPIDER PUPPET’S BADGE (A) after one of the puppet’s passes by him and it will start to open the gate.
- Open the back of the Giant Puppet (B); place the KINDLING and the MATCHES on the coal.
- The Giant Puppet will finish opening the gate; go through it.
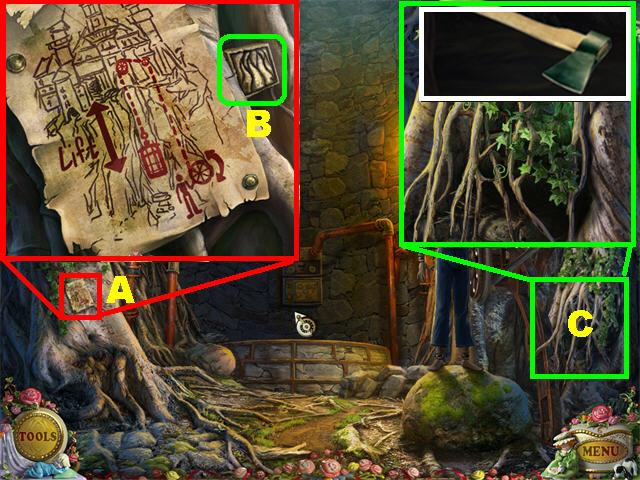
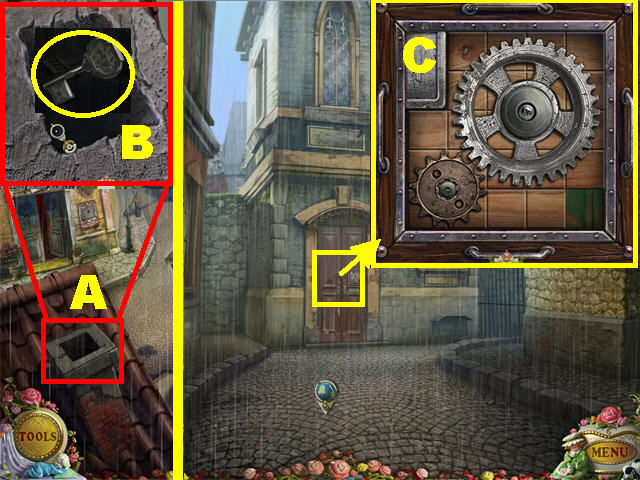
- Zoom into the NOTE (A) on the lower left; pick up the RUNE (B).
- Go back to the crash site; play the Hidden Object Scene.
- The AXE will be added to inventory.
- Go back to the elevator.
- Zoom into the lower right (C).
- Cut the ROOTS three times with the AXE to trigger a Hidden Object Scene.
- Click on the SWITCH (D) to turn the lights on and off.
- The LEVER will be added to inventory.
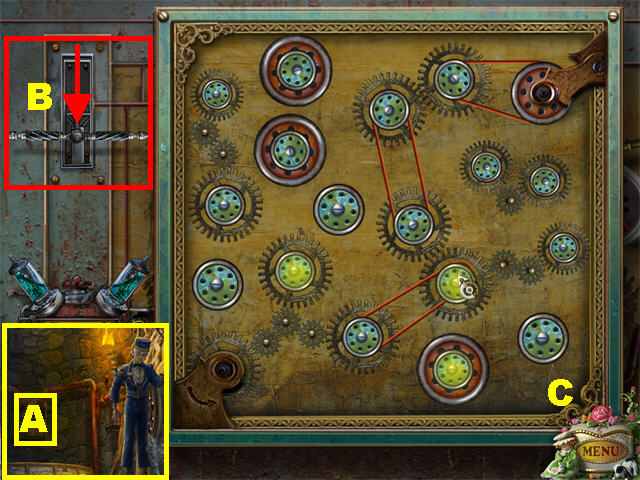
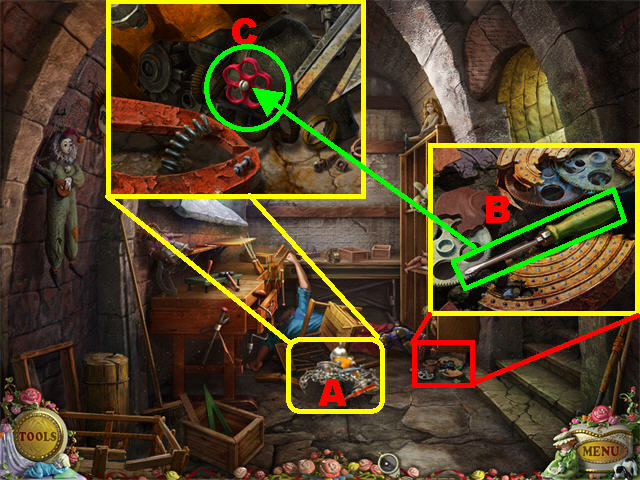
- Click on the MECHANISM (A) on the back wall for a closer look.
- Place the LEVER (B) in the upper left.
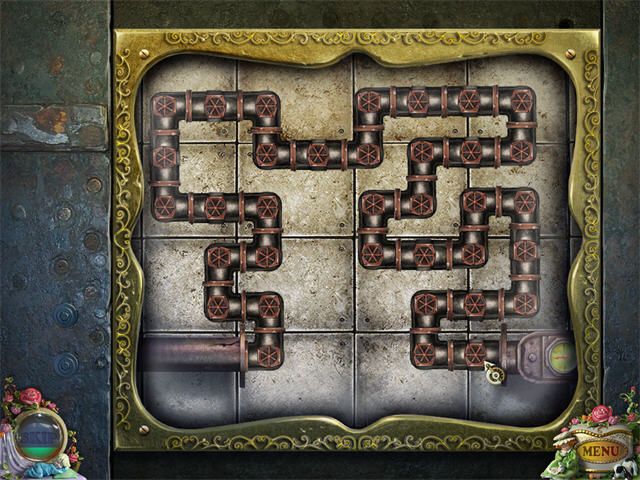
- Pull the LEVER to activate the mechanism.
- Connect the gears with the belts.
- Remove a belt and all possible connections will light up. Choose a connection.
- Please look at the screenshot for the solution (Fig. C).
- The elevator will come down after the puzzle has been solved. Click on the elevator to go upstairs.
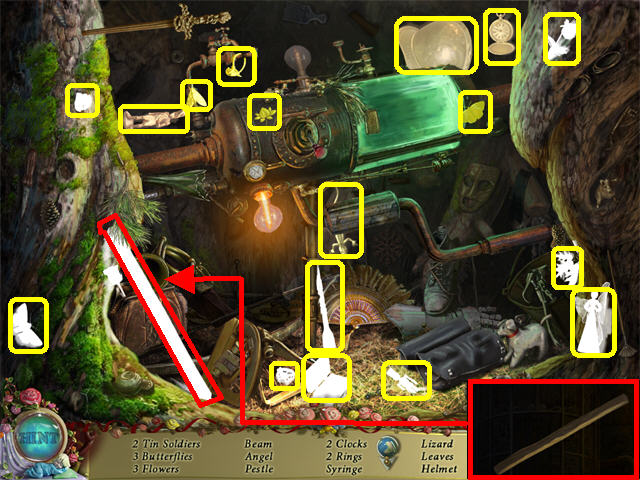
Chapter 6: First Tower
- Zoom into the HOLE (A) on the far left side; place the SANDBAG in the hole.
- Go to the far left (B) after the puppet on a bicycle enters that section.
- Zoom into the GLASS (C); pick up the CLAY TABLET (D).
- Exit and go through the RIGHT STEPS (E).
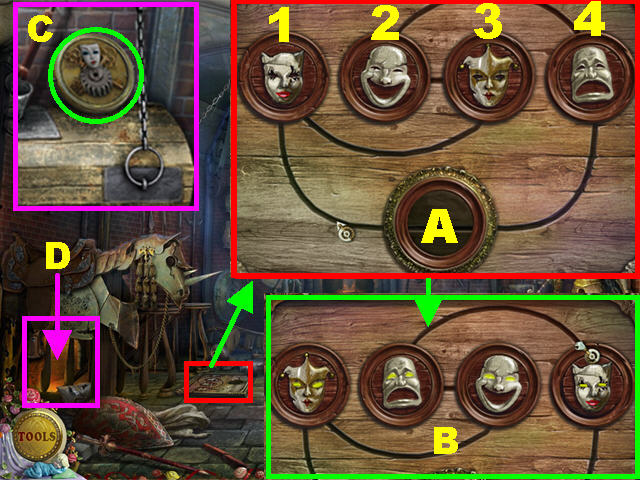
- Click on the puzzle on the door.
- Place the CLAY TABLET on the door.
- Drag the puzzle pieces around until you form three figures of different colors. The bars can slide up and down, or left to right.
- Once a color is in the right spot, the light below it will light up.
- Please look at the screenshot for the final solution.
- Go through the door to access the Gallery.
- Click on the Hidden Object Scene on the right.
- The DOMINOES will be added to inventory.
- Go forward.
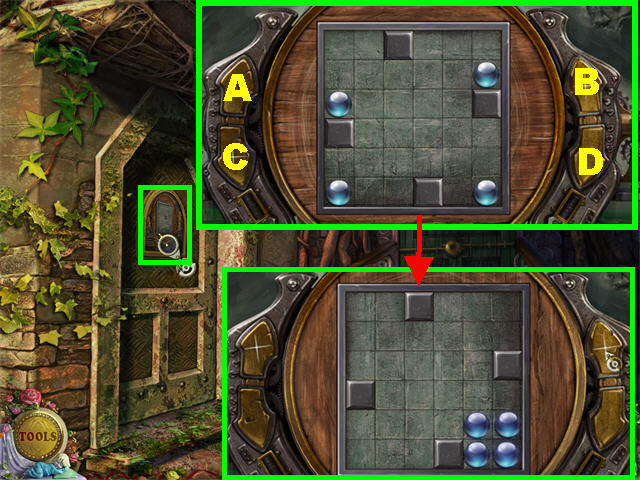
- Click on the left door to trigger a puzzle.
- The levers on both sides of the puzzle go up or down.
- The goal is to place all the balls adjacent to one another, in the corner.
- The ARROWS have been labeled A, B, C, and D.
- Click on the arrows in the following manner to solve the puzzle: D-D-B-B-B-D-D-B
- Here is an alternate solution: A-A-C-C-B-D-D-B
- Go through the door to access the factory.
Chapter 7: Factory
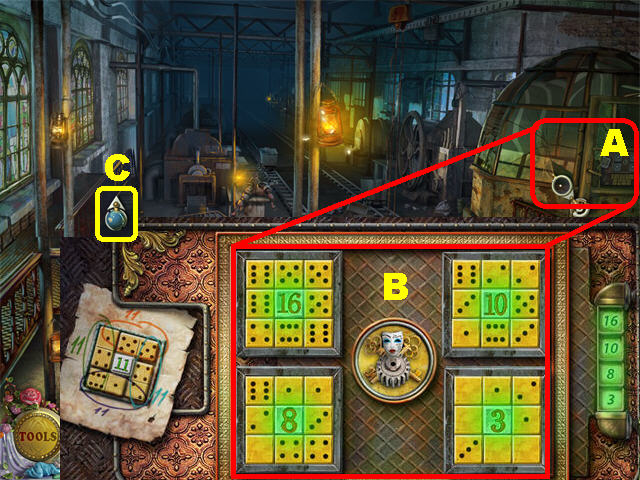
- Take a closer look at the DOOR (A) on the right.
- Place the DOMINOES on the board.
- The dominoes must be placed on the board so the sum of their rows or columns adds up to the total in the center of the box.
- The dominoes cannot be rotated; you have to use the vertical or horizontal ones in the right spots.
- The correct boxes will light up green.
- Please look at the screenshot (B) for the solution.
- Go left (C) to reach the Conveyor Area.
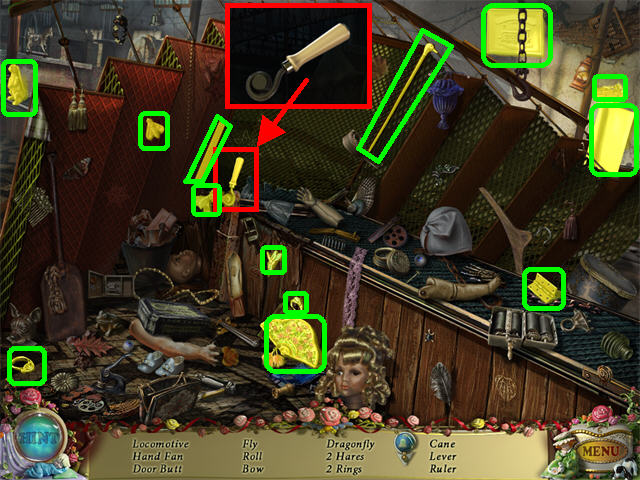
- Click on the Hidden Object Scene.
- The HANDLE will be added to inventory.
- Click on the lower right and exit.
- Click down to exit.
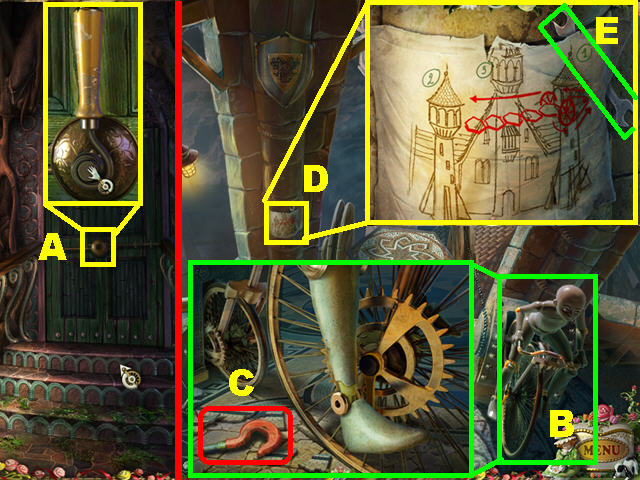
- Zoom into the DOOR (A) on the right, place the HANDLE on the lock and turn the lever to open the door.
- Zoom into the BICYCLE (B); pick up the CRANE HOOK (C) on the ground.
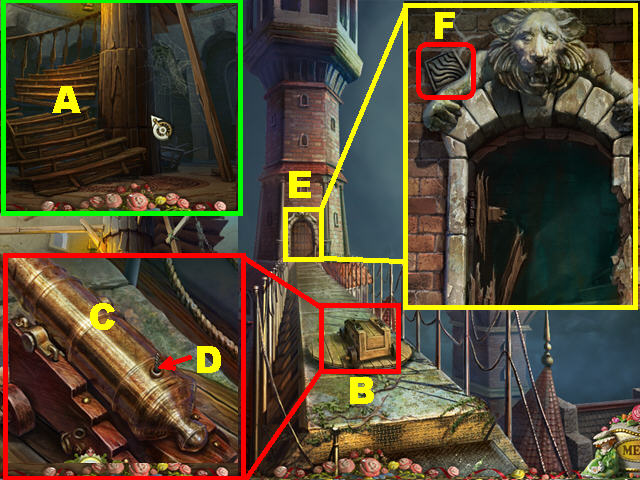
- Look at the DIAGRAM (D) on the left side of the wall, it shows you the three towers in the castle; two are connected by a drawbridge.
- Pick up the WRENCH (E) in the upper right side of the drawing.
- Return to the Conveyor Area by going down, through the left door and left.
- Open the Hidden Object Scene on the right.
- The BICYCLE CHAIN will be added to inventory.
- Go back to the Balcony area with the BICYCLE.
- Place the BICYCLE CHAIN on the BICYCLE; the bridge will appear as the puppet pedals.
- Cross the bridge by clicking on the Second Tower in the back of the scene.
Chapter 8: Second Tower
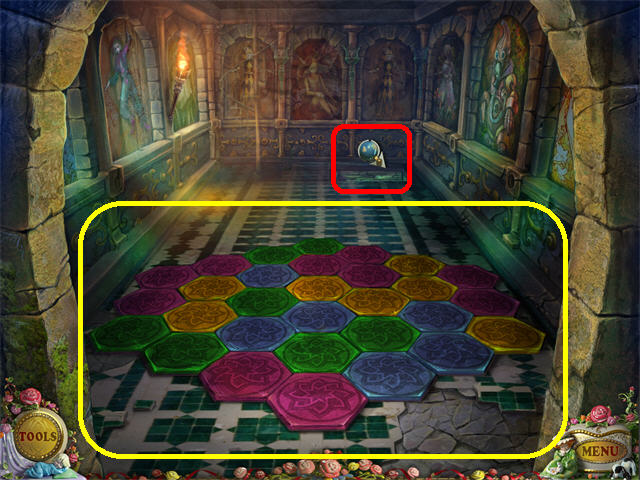
- To unlock the grid, place the colors on the floor so that no like colors touch each other.
- Click on two sets of tiles to swap their positions.
- Please look at the screenshot for the solution.
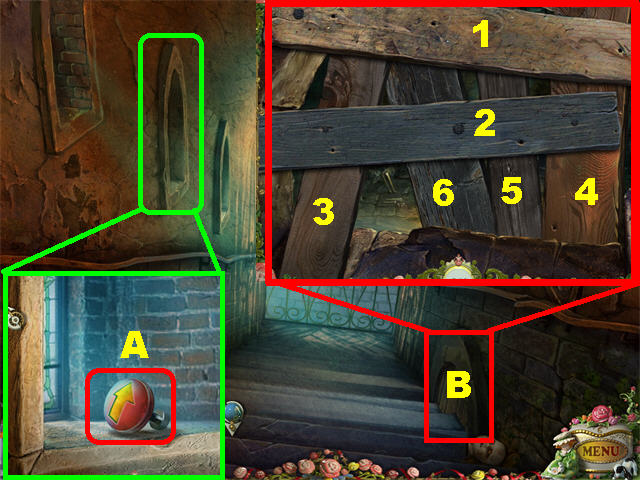
- Click on the far right corner to reach the stairway.
- Zoom into the middle left window; pick up the ARROW BUTTON (A).
- Zoom into the small DOOR (B) in the lower right; remove the PLANKS with the CROWBAR in the order shown on the screenshot.
- Click on the Hidden Object Scene that appears at the door in the lower right.
- The AWL will be added to inventory.
- Go down three times, through the left door and left to return to the Conveyor Area.
- Zoom into the CRANE on the right; place the CRANE HOOK there (A).
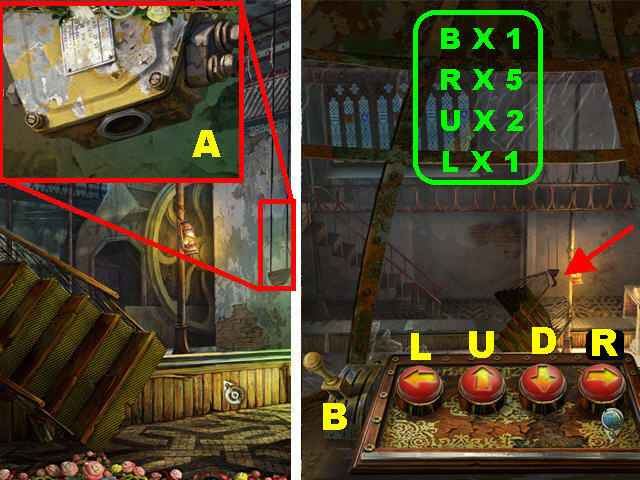
- Exit this location; enter the Control Room on the right.
- Place the ARROW BUTTON on the panel.
- Use the buttons to lift the bridge with the crane.
- The buttons have been labeled in the screenshot: L=Left, R= Right, U=Up, D= Down and B = Lever.
- To solve the puzzle, press the buttons in the following order:
- Lever (B) 1 Time
- Right 5 Times
- Up 2 Times
- Left 1 Time
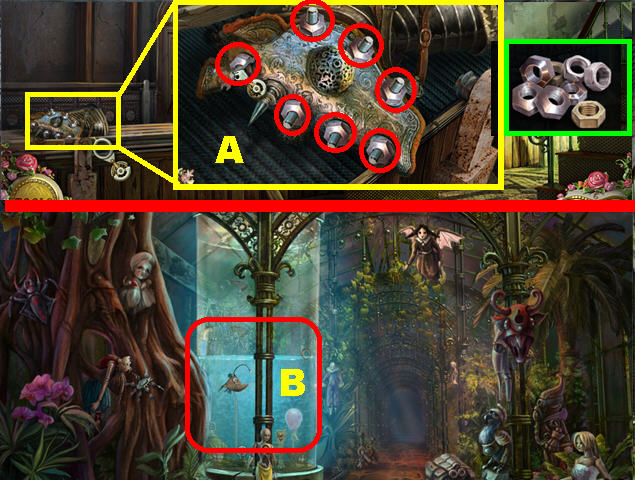
- Return to the Conveyor Area; zoom into the mechanism on the lower left.
- Remove the NUTS (A) circled in red with the WRENCH.
- Go back to the Gallery (B), the area that houses the large fish tank.
- Zoom into the fish tank.
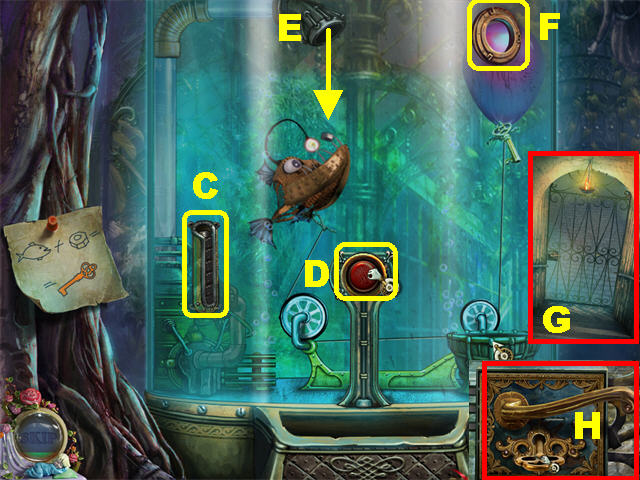
- Place the NUTS in the SLOT (C) on the lower left.
- Click on the RED BUTTON (D) to drop the nuts as the fish moves forward. Time it so that you click the button as you hear the bell ring.
- The fish will catch the nuts as they fall down from the PIPE (E) in the upper center.
- Each time the fish swallows a nut, the balloon on the right will rise.
- After the fish eats four nuts, the balloon will rise to the OPENING (F) in the upper right; pierce the balloon with the AWL.
- The KEY will be added to inventory.
- Go forward three times and click on the far right corner of the Trapdoor.
- Zoom into the DOOR (G) at the bottom of the steps; place the KEY on the LOCK (H). Click on the key to unlock it. Go through the door to enter the Arsenal.
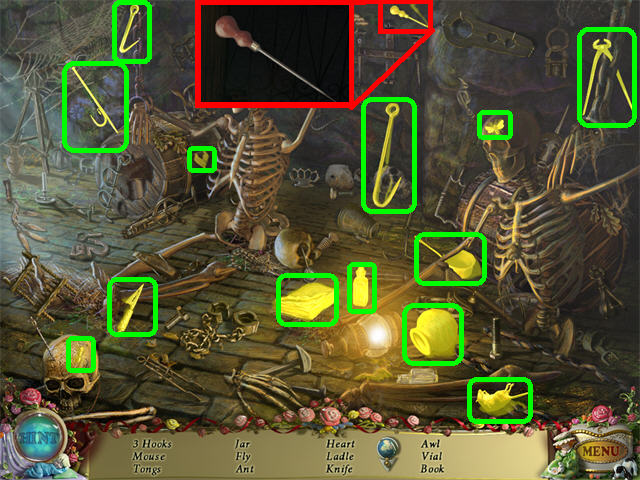
Chapter 9: Arsenal
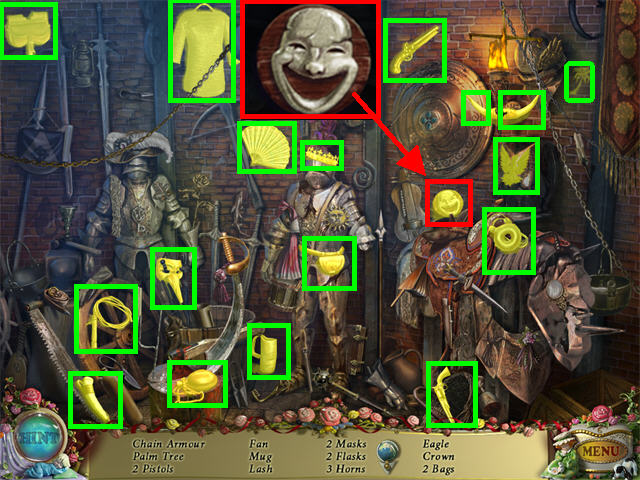
- Play the Hidden Object Scene on the right.
- The MASK will be added to inventory.
- Zoom into the board on the lower left side of the ground.
- Place the MASK on the board to begin the puzzle.
- Move the masks around so they are on top of their matching silhouettes.
- The masks can only move through the grooved lines on the board.
- The mask eyes will glow green when placed correctly.
- The masks have been marked with numbers in the screenshot (Fig. A). Move Masks 1, 3, 2, 4, and 1 (in that order) to solve the puzzle.
- Please look at Fig. B for the image of the final solution.
- Zoom into the back of the scene; pick up the SIGN (C) in the lower right.
- Exit that view, click in the lower left (D) to access the Candle Room; then go right to the Library.
- Click on the Hidden Object Scene in the lower right.
- The PAPER will be added to inventory.
- Click down to exit.
- Zoom into the spider puppet in the back wall; burn the cobwebs with the MATCHES.
- Go into the room.
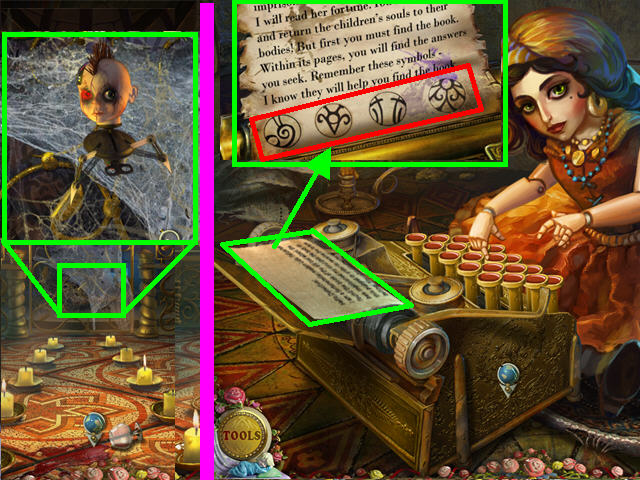
- Place the PAPER into the typewriter; click on the doll to start it typing.
- Click on the PRINTED PAPER; make note of the symbols at the bottom of the page.
- Exit, go right and zoom into the desk.
- Click on the drawer to begin the puzzle.
- Click and change the symbols to reflect the images on the paper from the typewriter.
- The scratches on the wood show the order of the symbols.
- Please look at the screenshot (A) for the correct order.
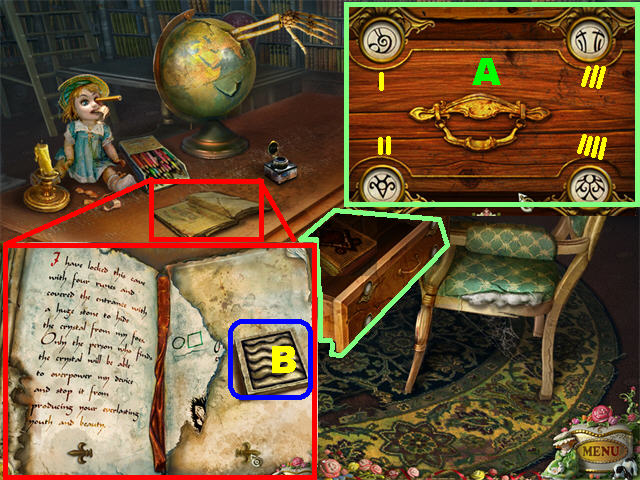
- Click on the book in the drawer and it will land on the desk; click it again to open it.
- Turn all the pages and pick up RUNE #2 (B) on the last page.
- Note the book has a torn page in the last section; you must go find two pages and place them back in the book.
- Exit, return to the Arsenal by going down three times.
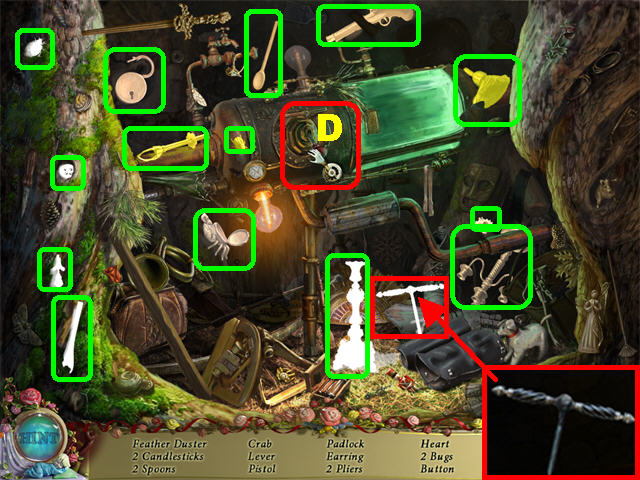
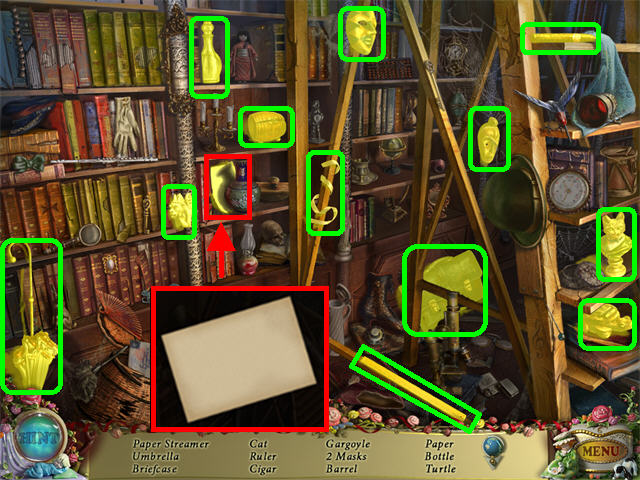
- Click on the Hidden Object Scene on the right.
- The FILE will be added to inventory.
- Go down.
- Play the Hidden Object Scene.
- The BOLTS will be added to inventory.
- Go down three times, through the left door, left again, and zoom into the left door.
Chapter 10: Puppet Storage

- Place the SIGN on the door to enter the Puppet Storage.
- Zoom into the mechanism in the upper center; place the BOLTS to fix it.
- Click on the Hidden Object Scene in the back.
- The PUPPET KEY will be added to inventory.
- Go back to the Lobby (A) for a brief cut scene; go forward after the cut scene ends.
- Zoom into the CHAINS (B) in the lower right; cut them with the FILE (C) three times.
- Take a closer look at the bucket; pick up the SCRAP IRON (D).
- Zoom into the stairs (E); pick up the TORN PAGE (F).
- Go down to the Elevator; open the Hidden Object Scene.
- The BEAM will be added to inventory.
- Return to the Arsenal in the Second Tower.
- Zoom into the back of the scene.
- Zoom into the BUCKET (A) on the left and place the SCRAP IRON (B) inside.
- Zoom into the PUPPET (C); place the PUPPET KEY (D) on the lock and click on the KEY three times to animate it.
- Pick up the CANNON (E) on the right after the puppet’s animation stops.
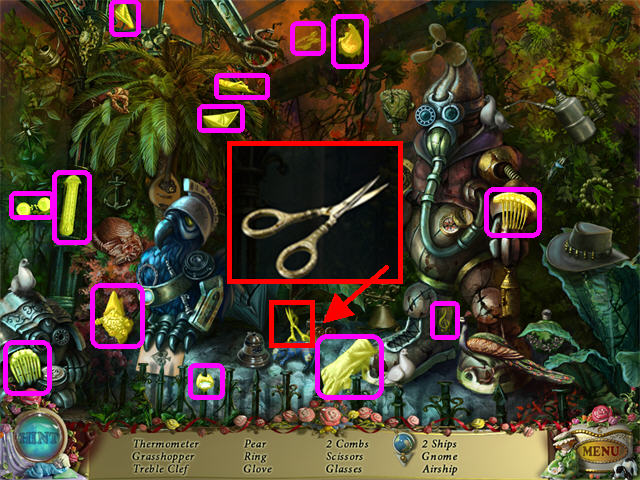
- Go to the Gallery (fish tank area); click on the Hidden Object Scene.
- The SCISSORS will be added to inventory.
- Return to the Puppet Storage by the Conveyor Area.
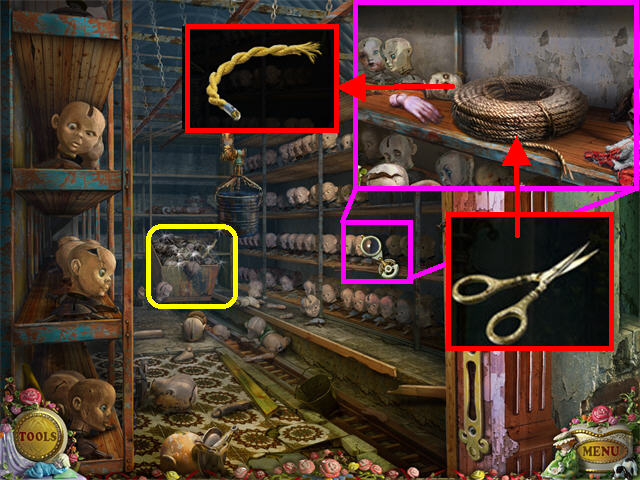
- Zoom into the third shelf on the right; cut a piece of ROPE with the SCISSORS to obtain a WICK.
- Play the Hidden Object Scene in the back.
- The DOOR HANDLE will be added to inventory.
Chapter 11: Third Tower

- Return to the Lobby and go forward.
- Zoom into the STAIRS (A); repair them with the BEAM and go up the stairs.
- Take a closer look at the GUN CARRIAGE (B) on the bridge; place the CANNON (C) and the WICK (D) on it.
- Light the WICK (D) with the MATCHES.
- Zoom into the DOOR (E) in the back of the scene; pick up the RUNE (F) in the upper left side of the door.
- Go through the door.
- Take a closer look at the bottom door; place the DOOR HANDLE on it and click on the handle to unlock the door. Go through the door.
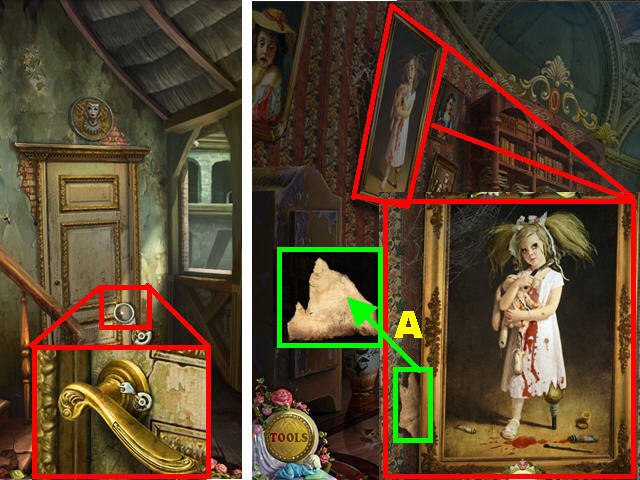
- Take a closer look at the painting in the upper left; pick up the TORN PAGE (A).
- Play the Hidden Object Scene in the back.
- The OWL HEAD will be added to inventory.
- Return to the Library in the second Tower, to the right of the Candle Room.
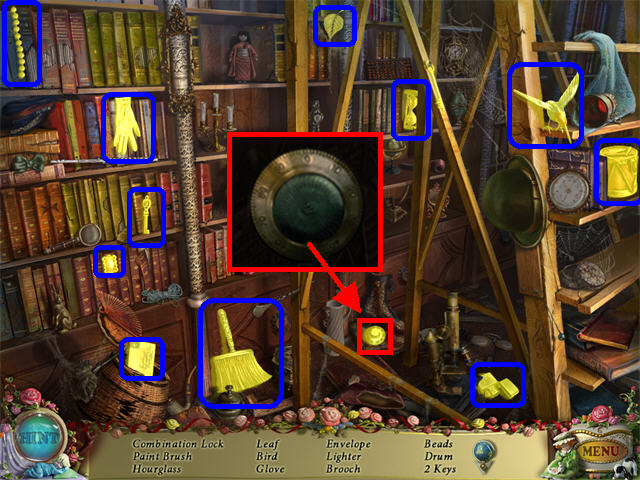
- Play the Hidden Object Scene.
- The COMBINATION LOCK will be added to inventory.
- Zoom into the desk; open the BOOK (A).
- Place the TORN PAGES (B) on the right side of the book. The pages show that you need to find a Crystal; the symbols represent the solution to a puzzle.
- Exit and zoom into the left side of the bookcase.
- Take a closer look at the center (C) of the bookcase.
- Place the OWL HEAD (D) on the body to trigger a puzzle.
- Click the symbols in the order shown in the screenshot; pick up the RUNE (E) at the base of the statue.
- Go through the door, which was just revealed, to the Lobby. Go forward, up stairs, forward three times.
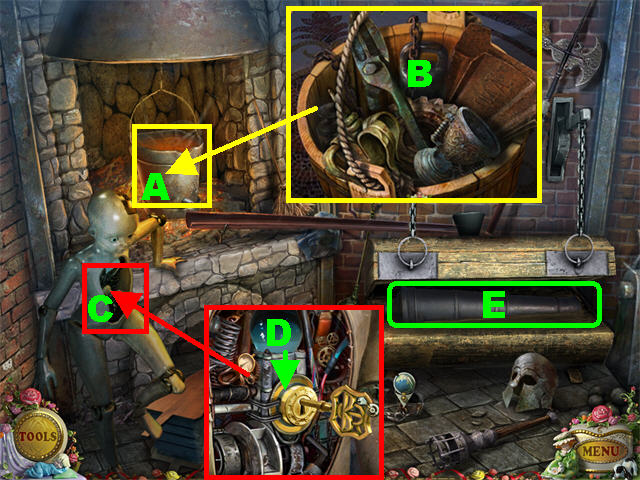
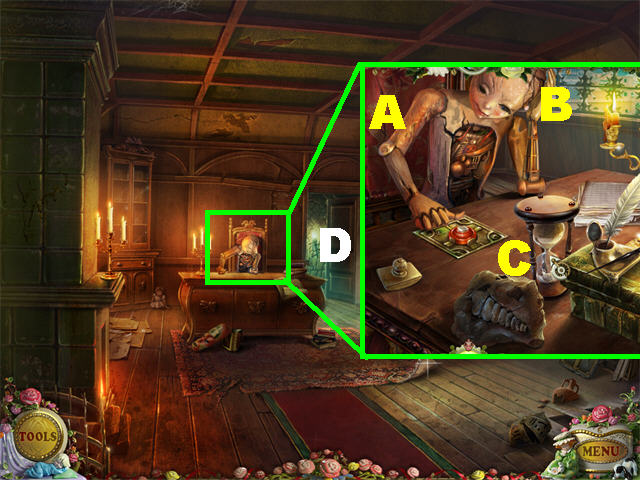
- Take a closer look at the SAFE in the lower left.
- Place the COMBINATION LOCK on the safe; click on it and pick up the FINGER (A) inside the safe.
- Play the Hidden Object Scene in the back.
- The PICKAXE will be added to inventory.
Chapter 12: Laboratory
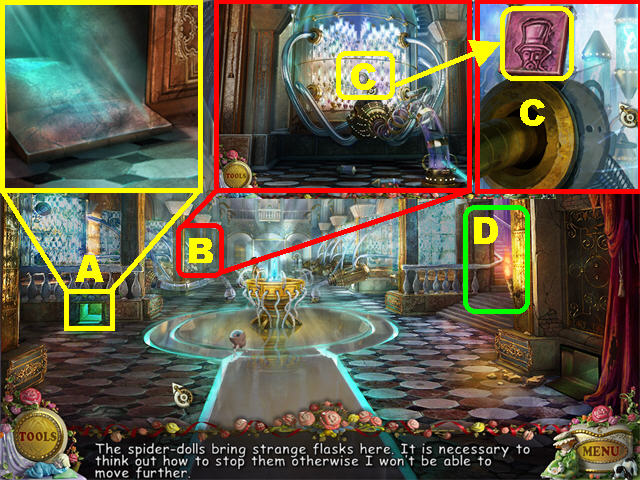
- Click downwards until you reach the balloon crash site.
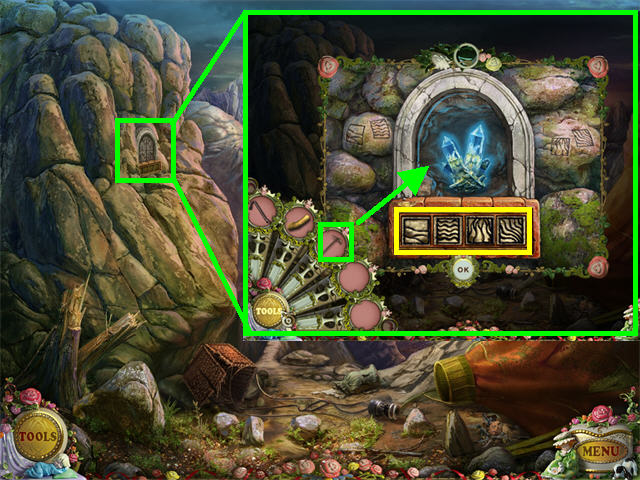
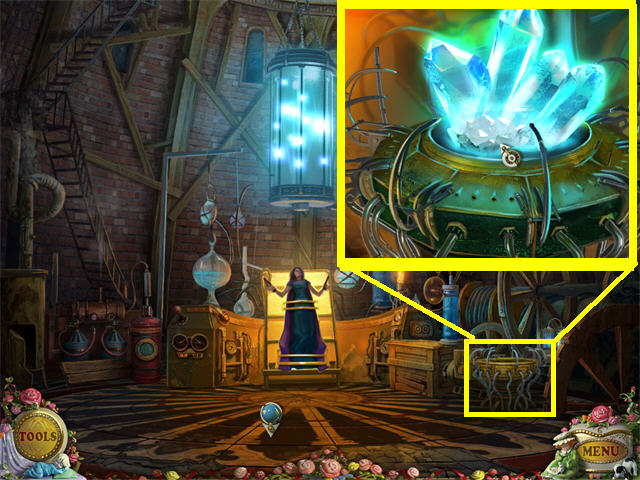
- Zoom into the small door in the upper left; place the RUNES at the bottom of the door.
- Use the PICKAXE to retrieve the CRYSTAL.
- From this location go forward seven times; go up the stairs to reach the Observatory door in the upper left.
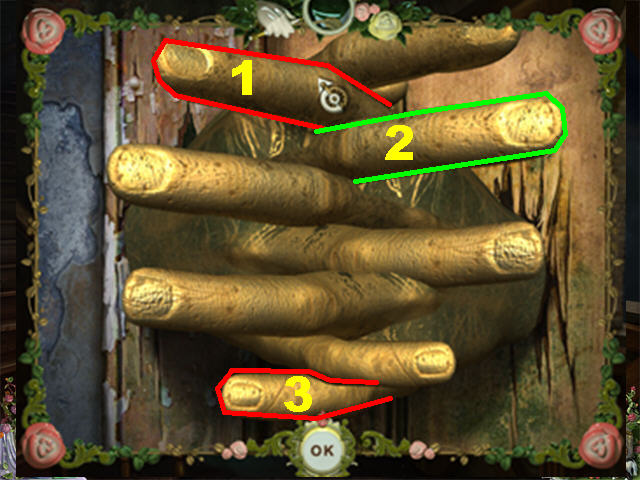
- Zoom into the door; place the FINGER on the door to trigger a puzzle.
- You must click on the fingers in the correct order so that all the fingers remain open.
- Click on the 3 fingers in the order shown in the screenshot.
- Go through the door to enter the Laboratory.
- Zoom into the device on the lower right; destroy the spider puppet with the CROWBAR, then place the CRYSTAL in the device.
- The extra levels have now been unlocked. Go to the Main Menu.
Extra Levels
- The Extra Content will be available once the Extra Levels have been completed. Click on “Extra Contents” in the Main Menu and then press “Play.”
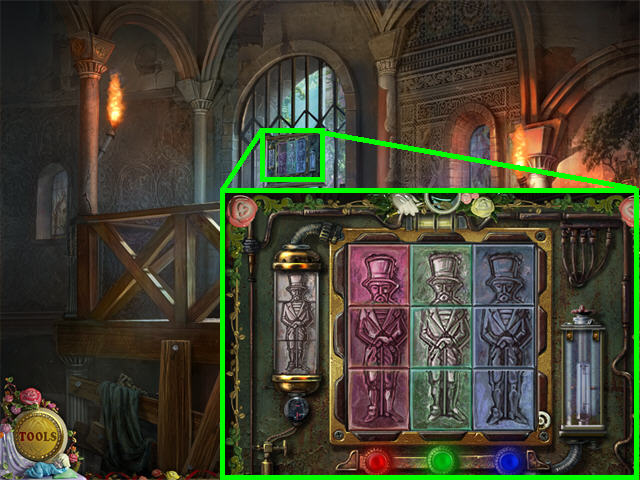
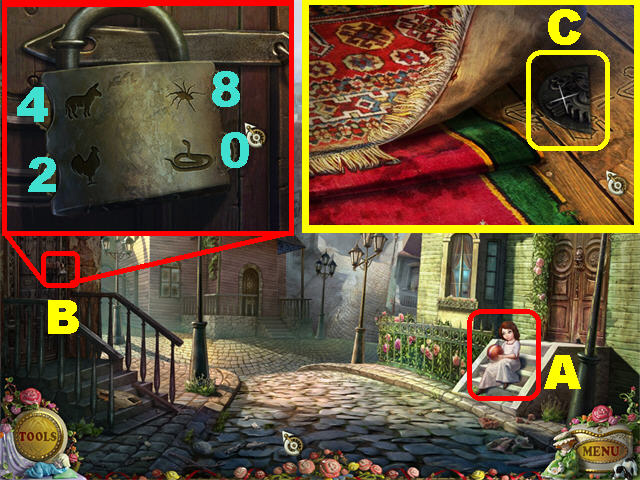
- Click on the LITTLE GIRL (A) playing on the steps.
- Zoom into the LEFT DOOR (B) for a puzzle.
- The lock has different animals next to it. Each animal has a differing numbers of legs.
- Unlock the lock by matching the numbers next to the creatures to the number of legs each creature possesses.
- Go through the door to enter the Historic House.
- Take a closer look at the right edge of the carpet; pick up the LOGO PART (C) below it.
- Note the marks on the wood; they show how to fix the puppet at the desk.
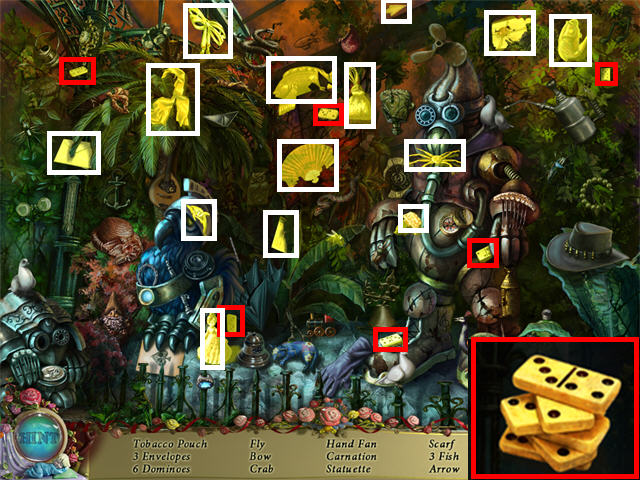
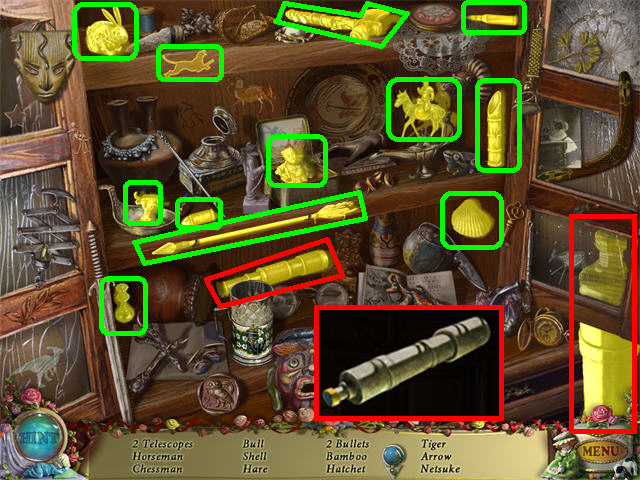
- Play the Hidden Object Scene on the far left.
- The TELESCOPE will be added to inventory.
- Exit and go inside the Fortune Teller’s House on the left.
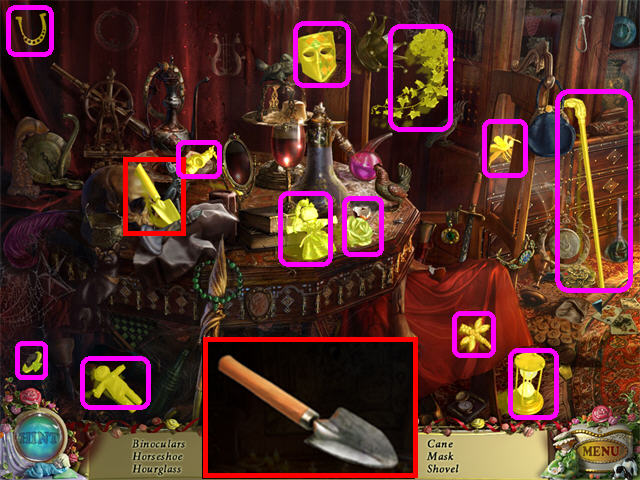
- Play the Hidden Object Scene.
- The TROWEL will be added to inventory.
- Go outside the Fortune Teller’s house; zoom into the left potted plant.
- Use the TROWEL to dig up the LEVER (A).
- Go outside the Puppet Shop.
- Zoom into the small window on the lower left side of the shop; pick up the CHISEL (B).
- Go inside the shop.
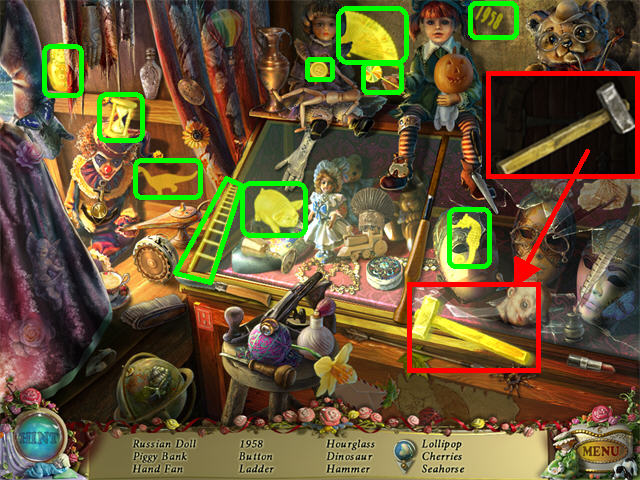
- Play the Hidden Object Scene.
- The HAMMER will be added to inventory.
- Return to the Town.
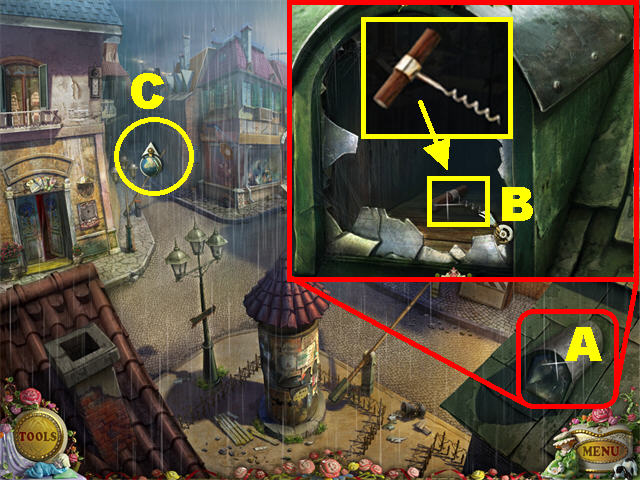
- Zoom into the chimney in the lower right (A); use the HAMMER to break the glass and pick up the CORKSCREW (B).
- A new location has opened up. Go on the dead end street, between the Fortune Teller’s House and the Puppet Shop (C).
- Zoom into the left window; pick up BUTTON (A).
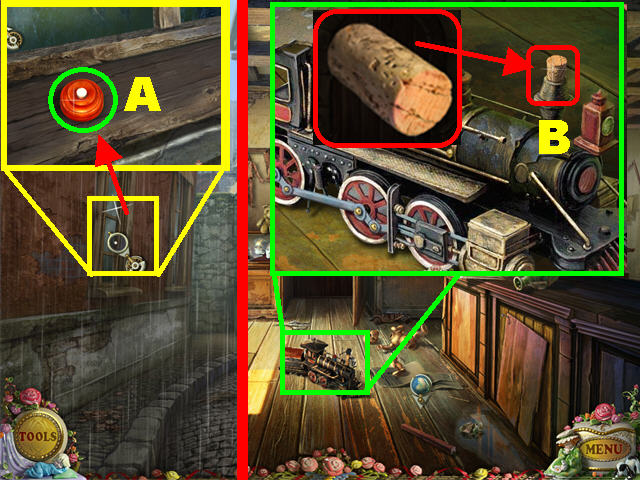
- Return to the inside of the Puppet Shop.
- Zoom into the train in the lower right; retrieve the CORK with the CORKSCREW (B).
- Play the Hidden Object Scene in the back.
- The PUPPET HEAD will be added to inventory.
- Return to the Historic House.
- Play the Hidden Object Scene.
- The SPOOL OF THREAD will be added to inventory.
- Return to the outside of the Puppet Shop and head right.
- Zoom into the part of the GROUND (A) shown on the screenshot.
- Place the CHISEL on the stone.
- Place the HAMMER on the CHISEL to remove the stone.
- Put the SPOOL OF THREAD on the FISHING HOOK; pick up the HOOK.
- Return to the Town.
- Zoom into the CHIMNEY (A) in the lower left; use the HOOK to retrieve the KEY (B).
- Return to the street between the Fortuneteller’s House and the Puppet Shop.
- Zoom into the back door; place the KEY in the lock to trigger a puzzle.
- Slide the squares around until they form the image shown on the screenshot (C).
- Go through the door to enter the Observatory.
- Zoom into the SLOT (A) near the gate; place the LEVER in the slot.
- Click on the LEVER to open the gate; go through the gate.
- Zoom into the LEFT PICTURE (B); pick up the RAG (C).
- Play the Hidden Object Scene.
- A LOGO PART will be added to inventory.
- Return to the Fortune Teller’s House.
- Zoom into the CRYSTAL BALL (D) in the back; wipe the CRYSTAL BALL with the RAG. The number 13 appears on the ball.
- Play the Hidden Object Scene on the left.
- The PUPPET ARM will be added to inventory.
- Return to the Historic House.
- Zoom into the desk.
- Place the PUPPET ARM (A) and the PUPPET HEAD (B) on the puppet.
- Put the BUTTON (C) on the desk; the Puppet will press the button and the door will open.
- Go through the DOOR (D) to access the Vault.
- Zoom into the PIPE in the lower right; pick up the EMPTY BOTTLE (A) behind the pipe.
- Take a closer look at the BACK DOOR (B); place the LOGO PARTS on the door.
- Change the numbers above to “13” to activate a puzzle.
- You must connect the lower left and lower right sections of pipe into one solid piece.
- All pipes must be used in this solution.
- Start in the lower left corner to solve this puzzle faster.
- Please look at the screenshot for the solution.
- Go through the door.
- Play the Hidden Object Scene.
- The TAP will be added to inventory.
- Zoom into the barrel in the lower left.
- Place the EMPTY BOTTLE (A) on the crate.
- Place the TAP (B) on the barrel; click on the TAP to fill the bottle.
- Place the CORK on the bottle to create the FULL BOTTLE.
- Exit and go right past the Puppet Shop to the Town Square.
- Zoom into the LAMPPOST (C); click on it to expose the candle.
- Use the FULL BOTTLE to extinguish the candle’s fire.
- Take the FILE behind the candle.
- Return to the vault in the Historic House.
- Zoom into the GRID (E) in the upper left; saw the grid with the FILE and pick up the LENS (F).
- Play the Hidden Object Scene in the back.
- The DISC will be added to inventory.
- Return to the Observatory in the building by the dead end street.
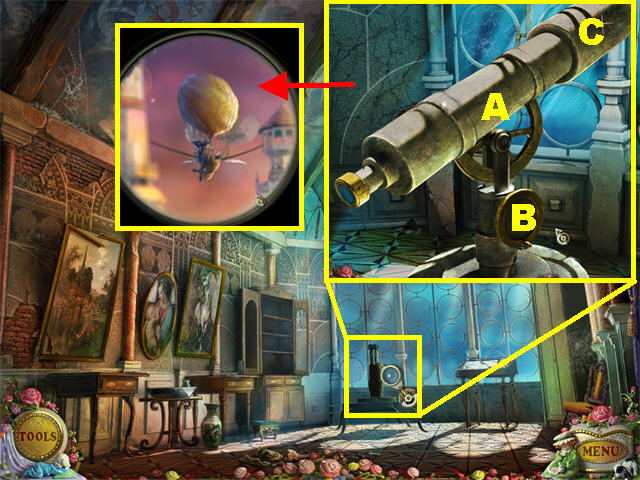
- Zoom into the stand in the back; place the TELESCOPE (A) and the DISC (B) on the stand.
- Place the LENS (C) on the top part of the TELESCOPE.
- Click on the telescope to view it and end the game!
- Congratulations! You have completed PuppetShow: Souls of the Innocent!
Created at: 2010-05-28