
Walkthrough Menu
General Tips
- This is the official guide for Queen's Quest 4: Sacred Truce.
- This guide won't tell you when to zoom into a location; the screenshots show each zoom scene.
- Hidden-object puzzles are referred to as HOPs. Only the locations of the HOPs will be shown.
- Use the Map to fast travel to a location.
Chapter 1: War
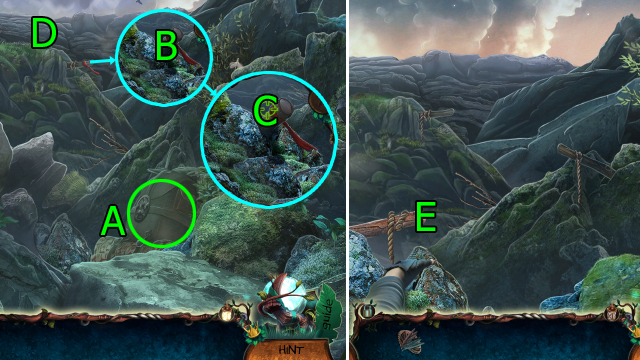
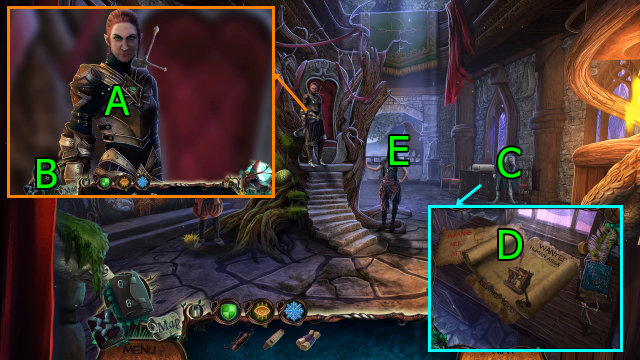
- Get BACKPACK (A).
- Use BACKPACK; get Spell Kit, Rune, CLIMBING SPIKES, and GRAPPLING HOOK.
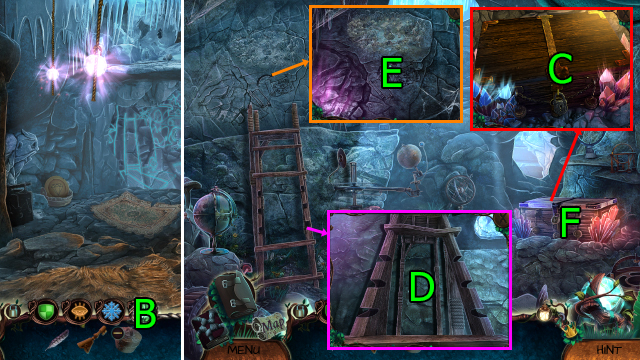
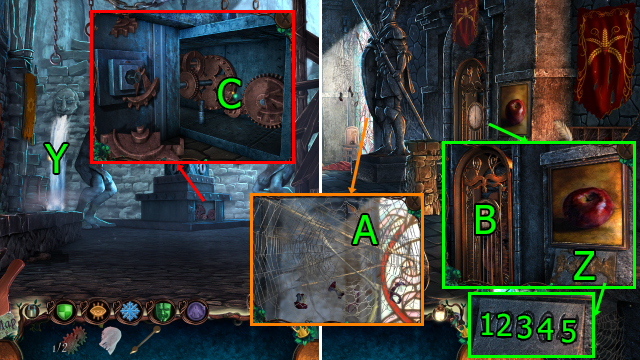
- Use GRAPPLING HOOK on (B).
- Press (C) when green.
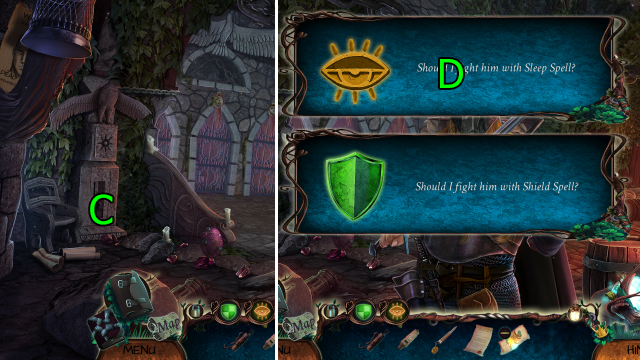
- Go (D).
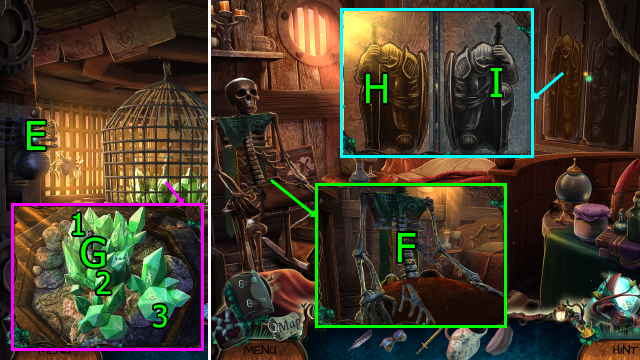
- Use CLIMBING SPIKES on (E).
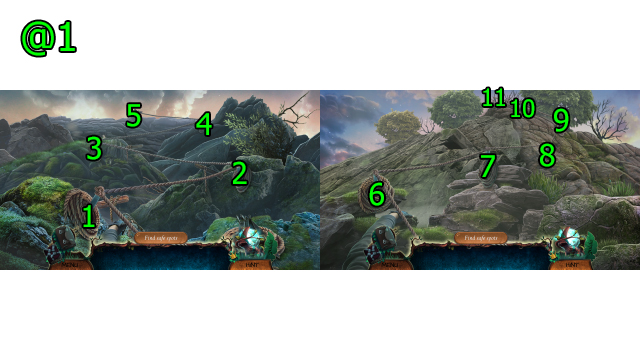
- Solution (@1): Press (1-2-3-4-5x2)-(6-7-8-9-10-11x2).
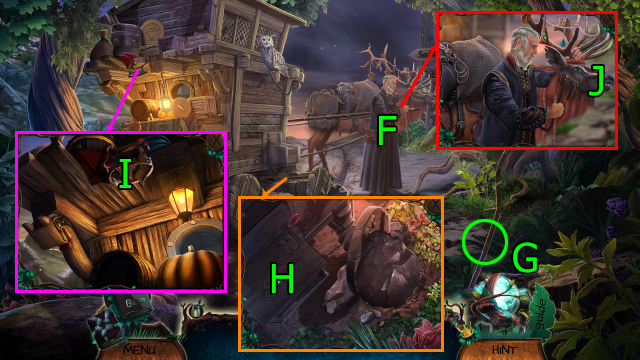
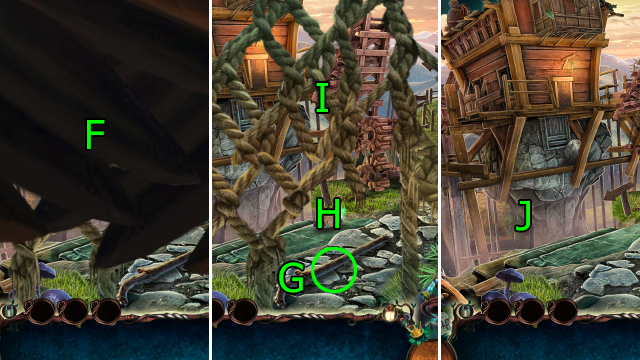
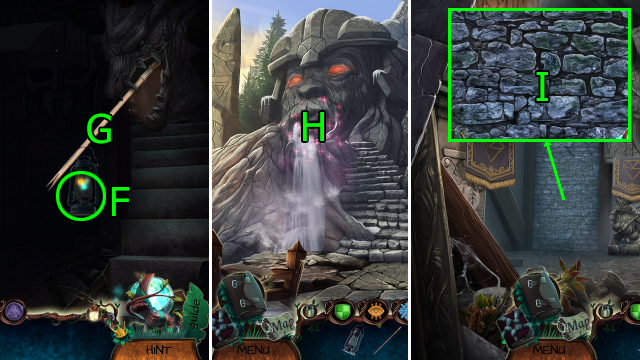
- Press (F).
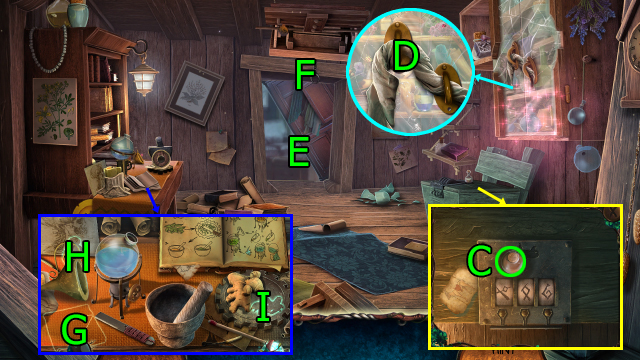
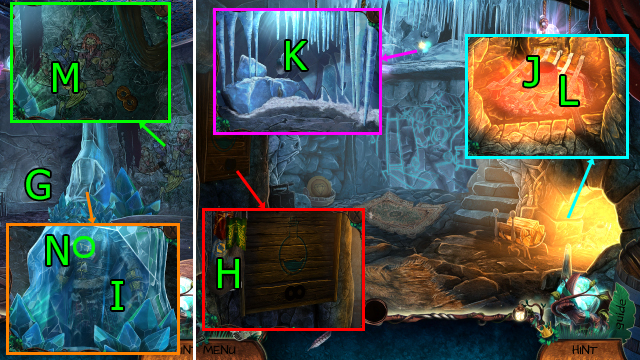
- Get LONG STICK (G).
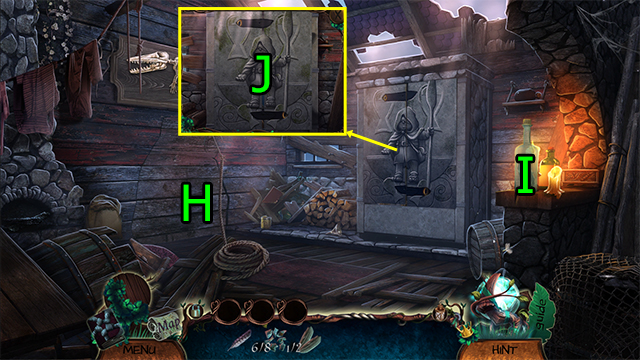
- Press (Hx3); get BUCKLE.
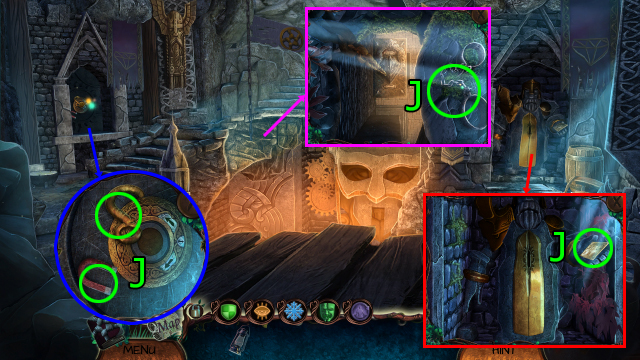
- Use LONG STICK on (I); get MUZZLE.
- Use BUCKLE and MUZZLE on (J); get SCALES KEY.
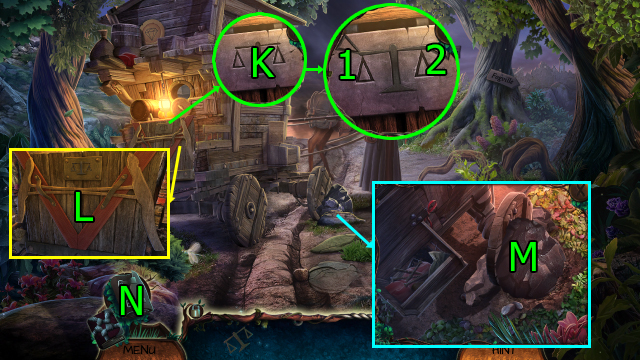
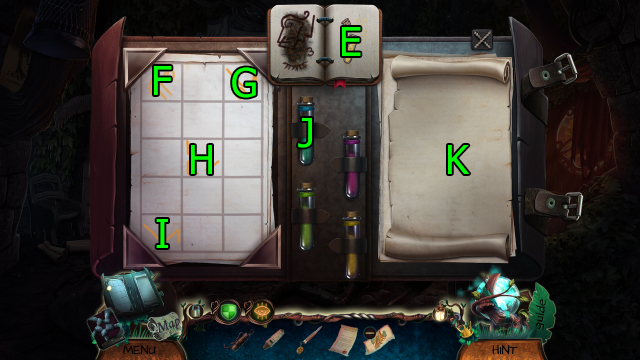
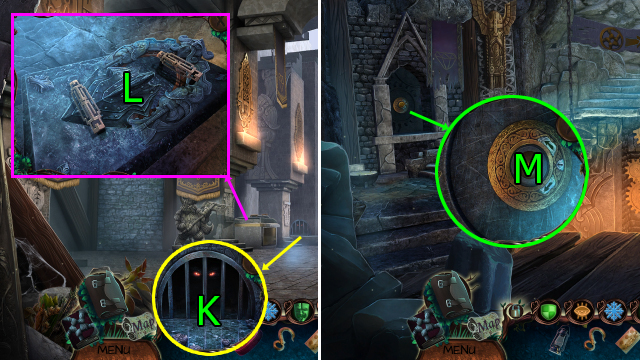
- Use SCALES KEY on (K); press (1x2-2).
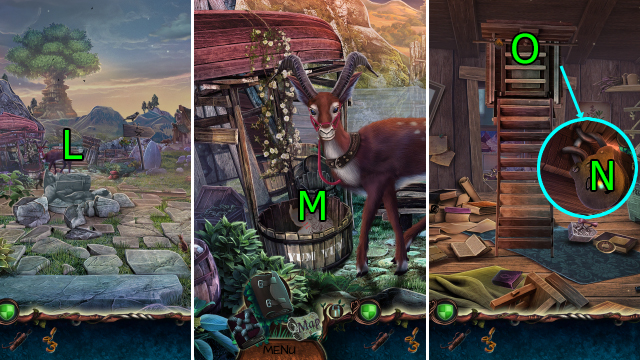
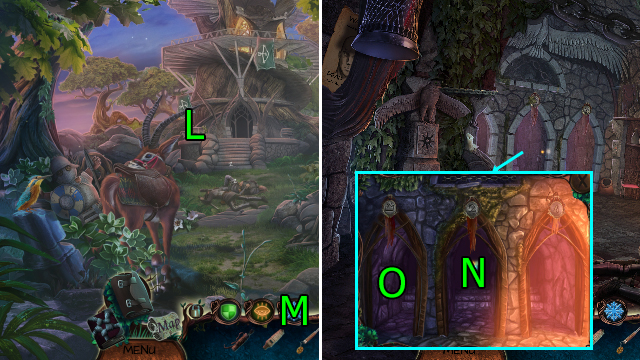
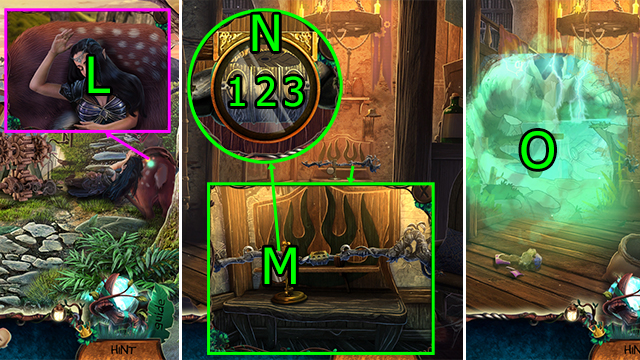
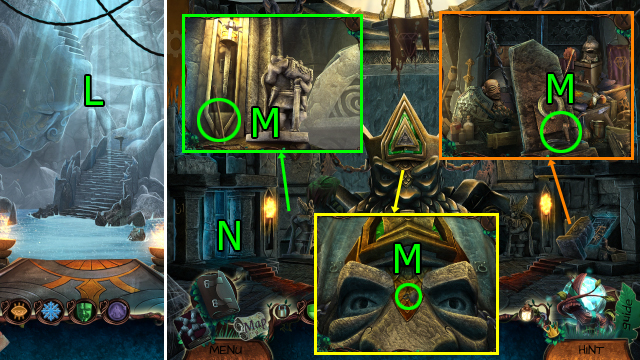
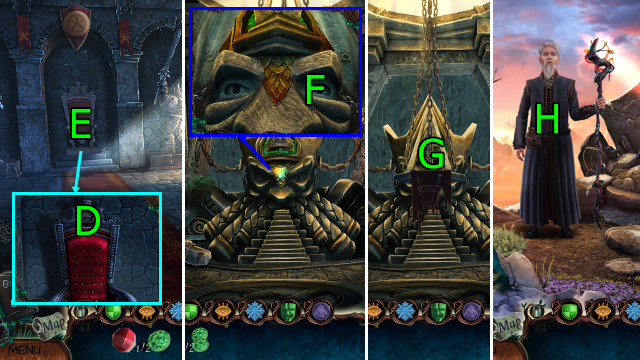
- Press (L); solve HOP, get TOOLBOX.
- Use TOOLBOX; get HAMMER, Rune, BIG CHISEL.
- Use BIG CHISEL and HAMMER on (M); get Rune.
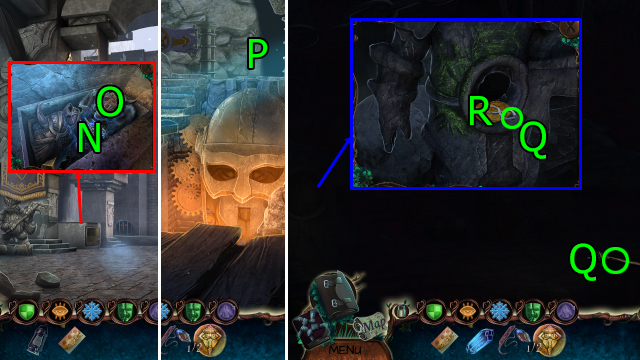
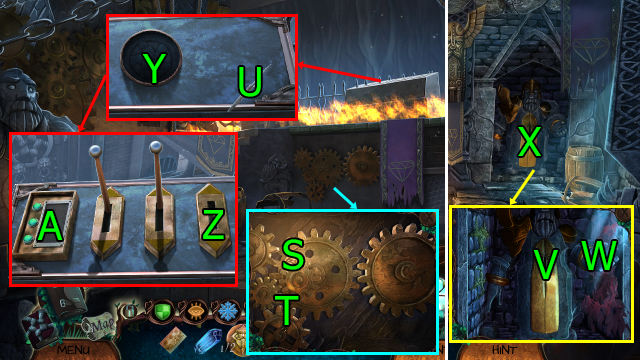
- Go (N).
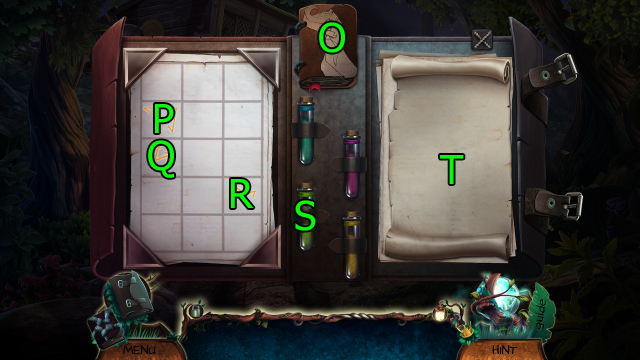
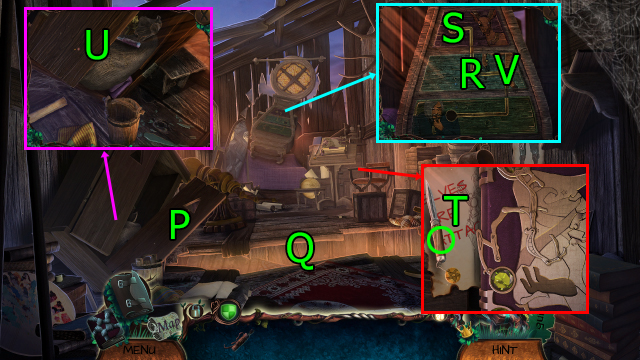
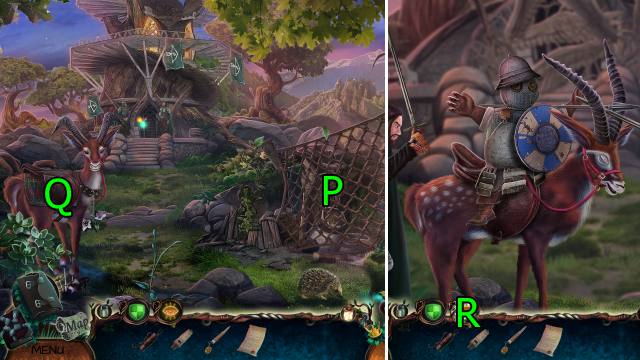
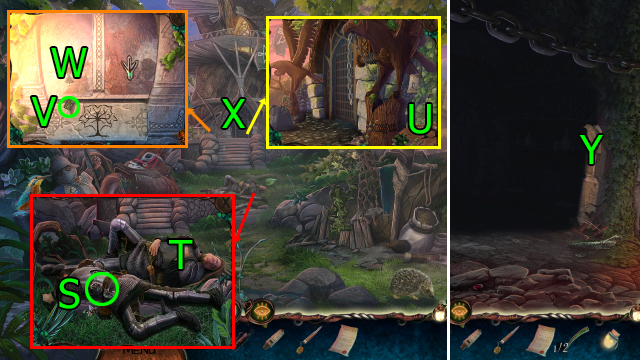
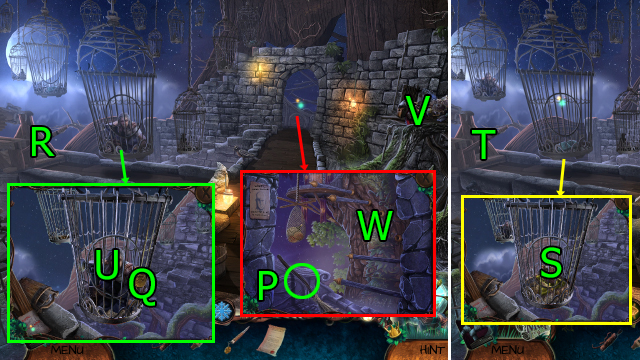
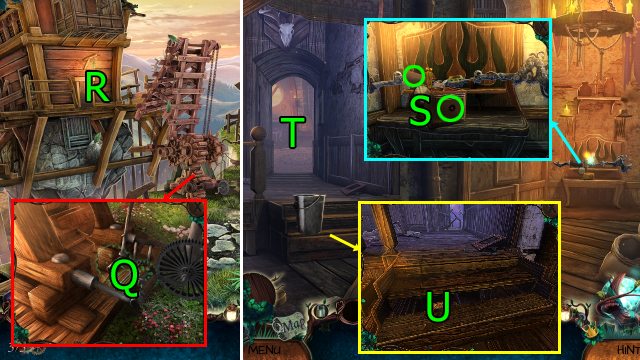
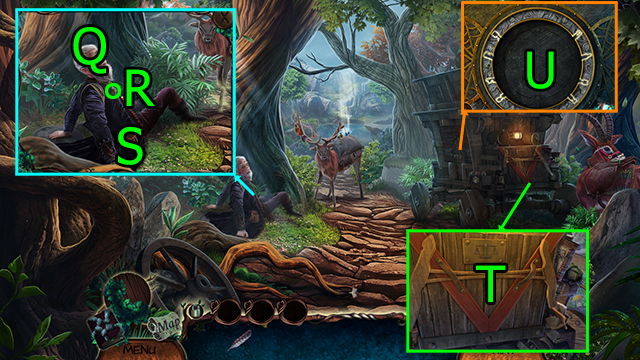
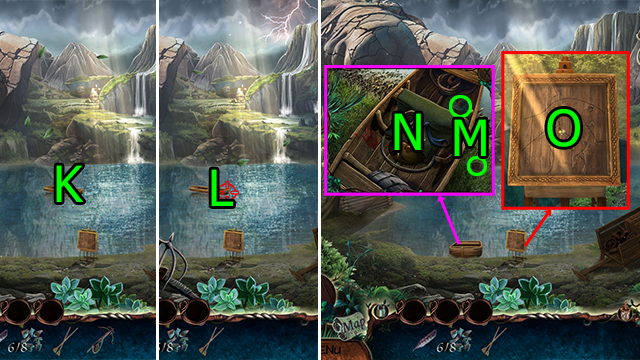
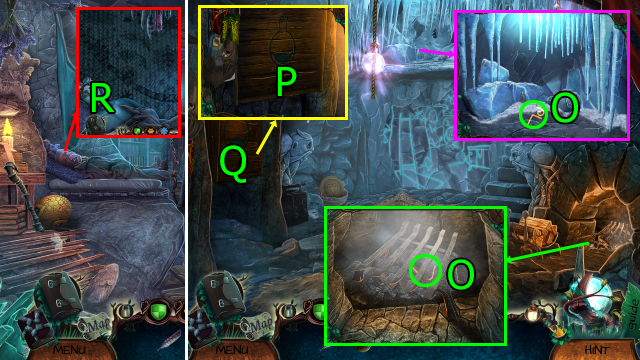
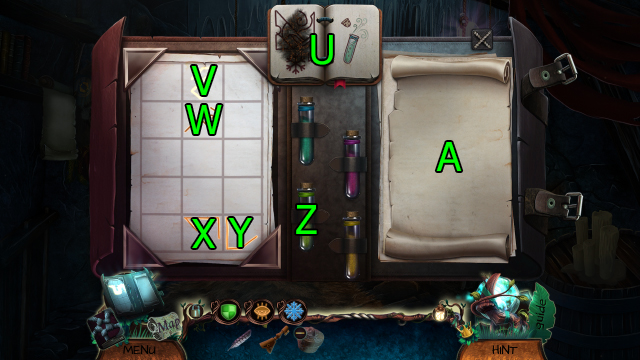
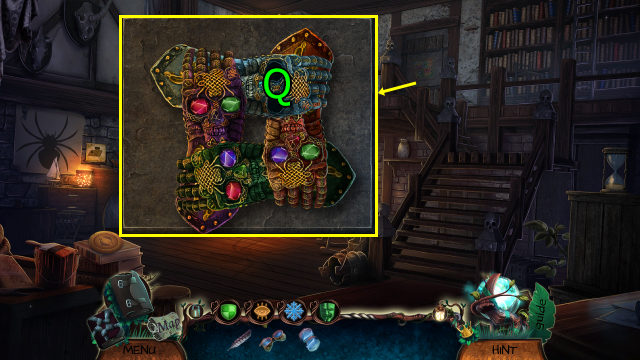
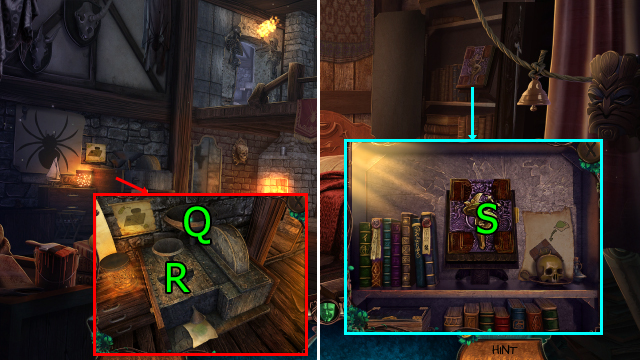
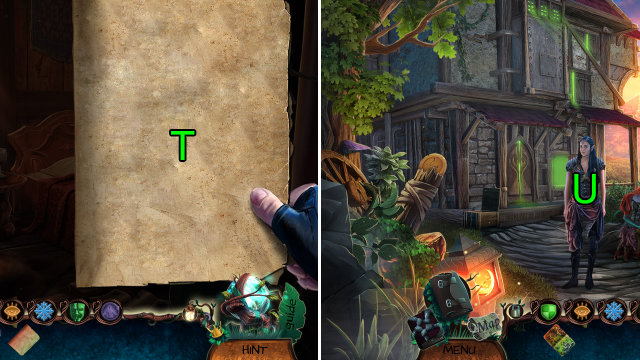
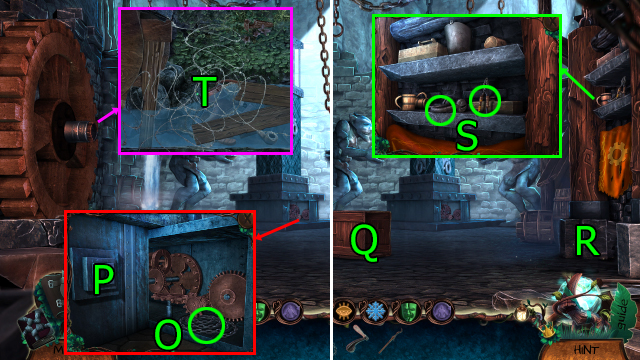
- Press (O)-(P-Q-R), drag (S)-(T); get Shield Spell.
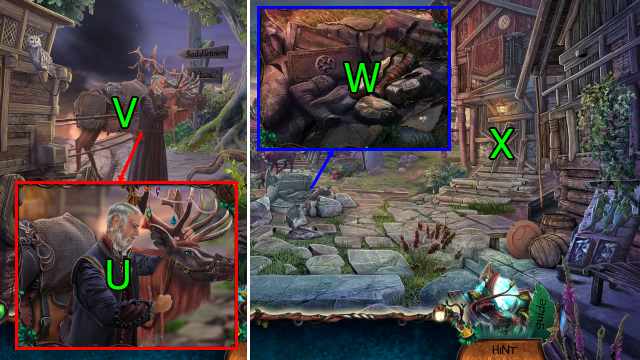
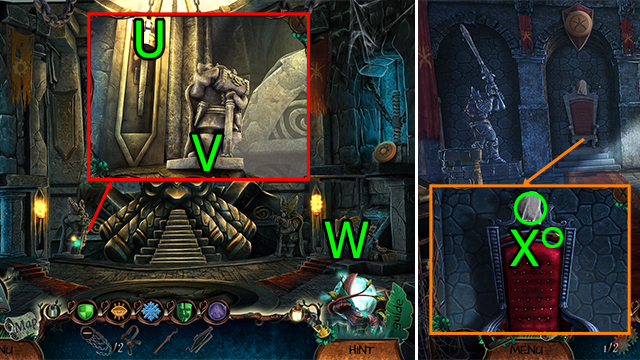
- Press (U); get Map.
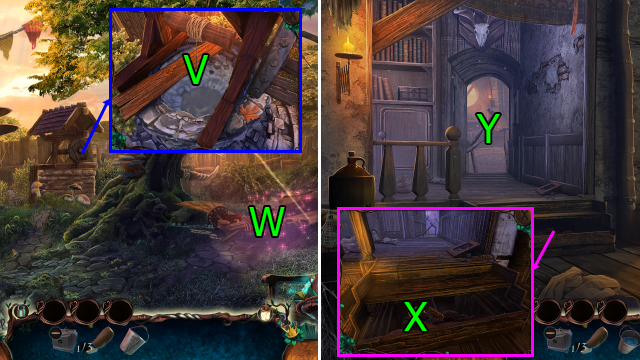
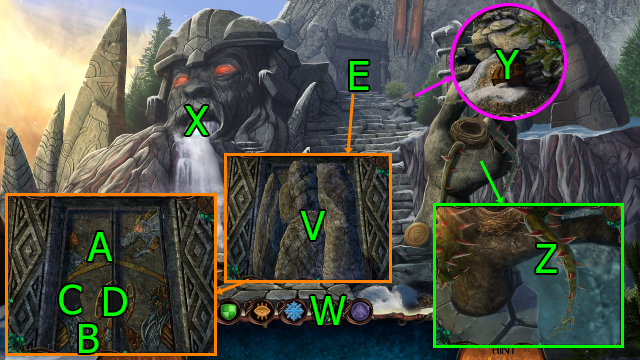
- Go (V).
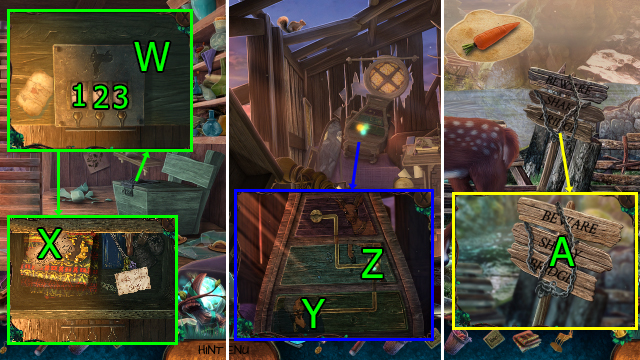
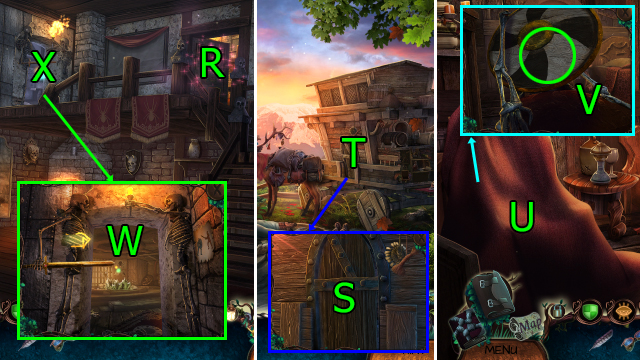
- Press (Wx6); get BLACK ARROWS QUIVER and PICKAXE.
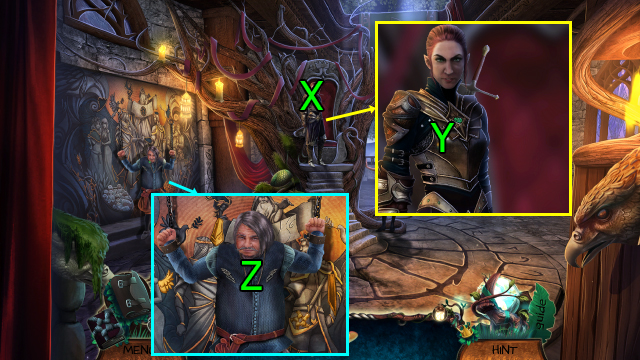
- Press and use PICKAXE on (X).
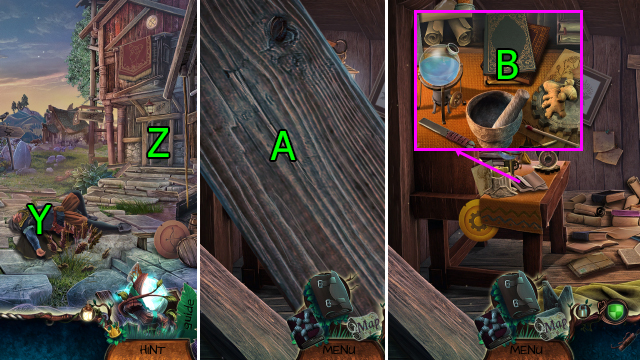
- Press (Y).
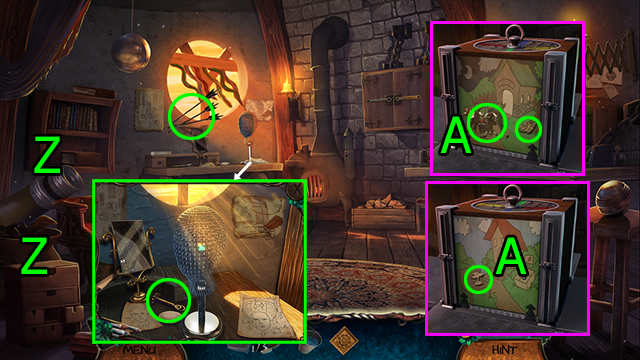
- Go (Z).
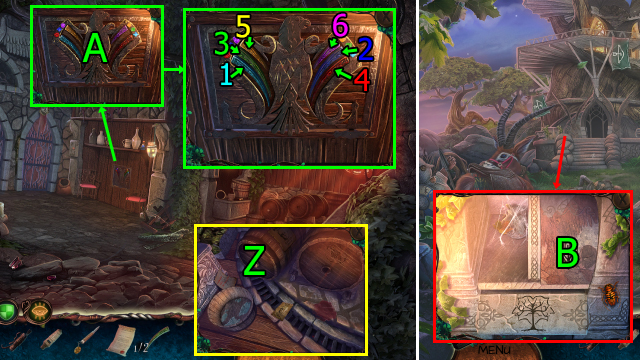
- Press (A).
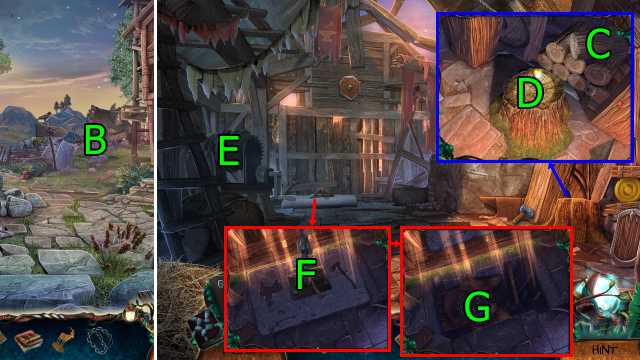
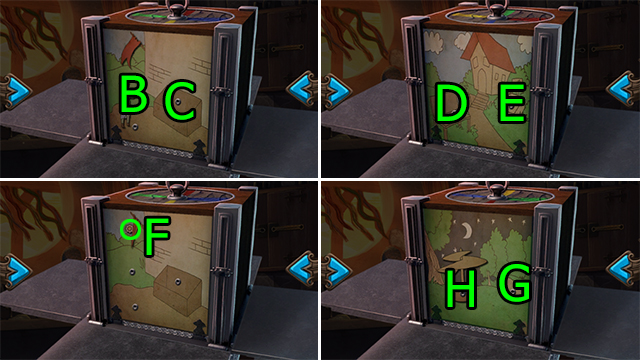
- Press (Bx2).
- Get CALENDULA OIL (C).
- Press (Dx2) and solve HOP; get SAGE LEAVES and CLEAN WRAP.
- Press (E) and (F).
- Use CLEAN WRAP on (G), use CALENDULA OIL on (H), use SAGE LEAVES on (I).
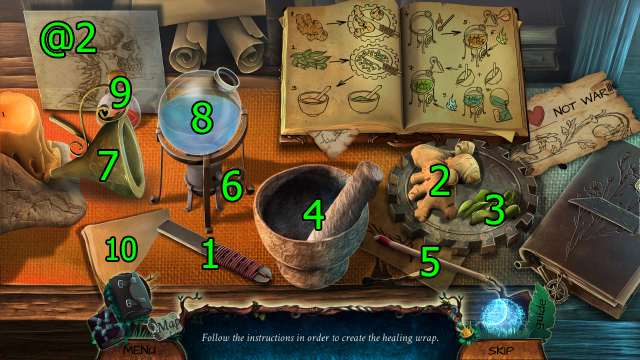
- Solution (@2): Press (1-2-3)-(2-4-3-4x2)-(5-6-7-8-9-8)-(6x3-4-8-6x4)-(8-10x2).
- Get HEALING WRAP.
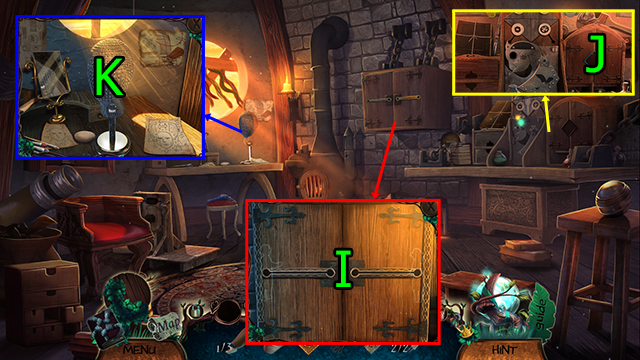
- Go Saddletown Square.
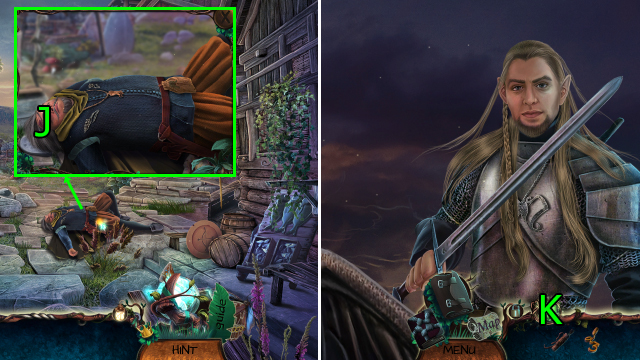
- Use HEALING WRAP on (J); get KEY TO THE ATTIC.
- Press (K).
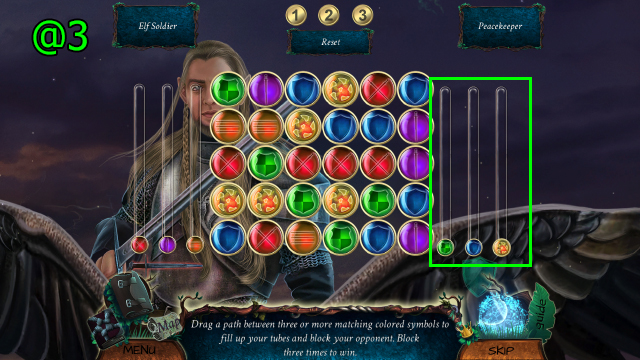
- Solution (@3): Match three or more colored symbols to fill up the green, blue, and yellow tubes three times.
- Go (L).
- Press (Mx2).
- Go Inside the House.
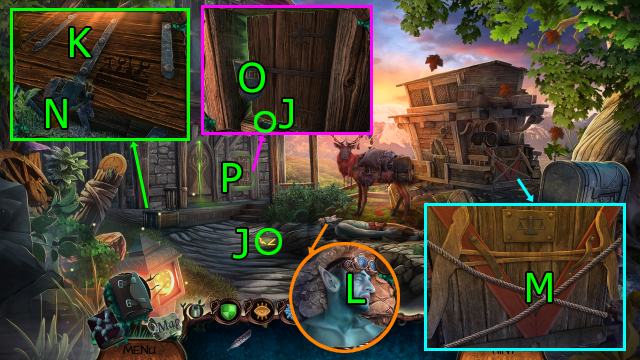
- Use KEY TO THE ATTIC on (N).
- Go (O).
- Drag (P)-(Q).
- Press (R) and (S); get WHISTLE and RUNE COMBINATION.
- Get POCKET KNIFE (T).
- Press (U); get METAL FILE, BUCKET OF CARROTS, and SQUARE INSET.
- Use SQUARE INSET on (V); press (S) and (V), get Rune and HAND KEY MOLD.
- Go Inside the House.
- Use RUNE COMBINATION on (W).
- Press (1x2)-(2x3)-(3x3); press (X), get ROUND INSET and SADDLE BLANKET.
- Go Secret Room.
- Use ROUND INSET on (Y); press (Z) and (Y); get GOLDEN ELK.
- Go Broken Bridge.
- Use METAL FILE and press (A); get CHAIN.
- Go Saddletown Square.
- Go (B).
- Drag (C)-(D); get HOOK.
- Use CHAIN on (E).
- Use HOOK on (F).
- Press (E).
- Press (G); get SADDLE and AXE.
- Use AXE on (D); get CHOPPED WOOD.
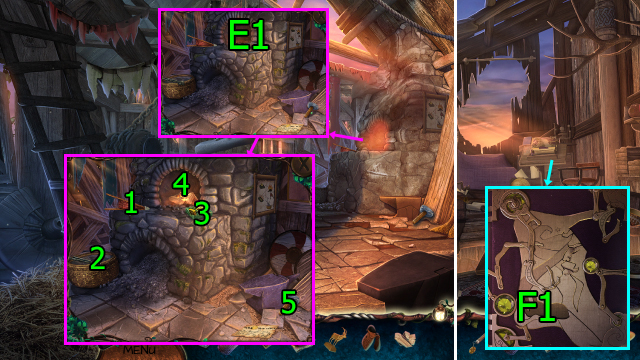
- Use HAND KEY MOLD, GOLDEN ELK, and CHOPPED WOOD on (E1).
- Press (1)-(2-3)-(3-4)-(3-2)-(5x2); get HAND KEY.
- Go Secret Room.
- Use HAND KEY on (F2).
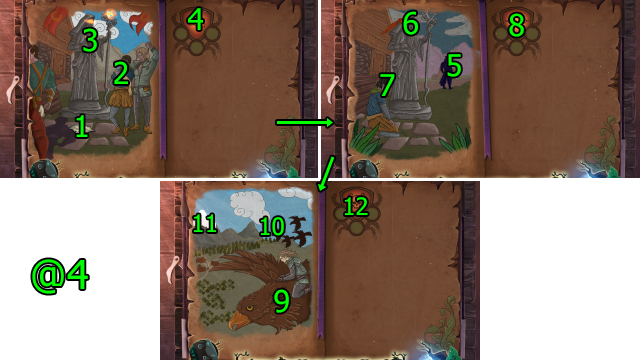
- Solution (@4): Press (1x2-2x2-3x2)-(4), press (5x2-6x2-7x2)-(8), press (9x2-10x2-11x2)-(12).
- Get Rune, HUMANS' SACRED TRUCE, and PATH TO THE GREAT TREE.
- Go Broken Bridge.
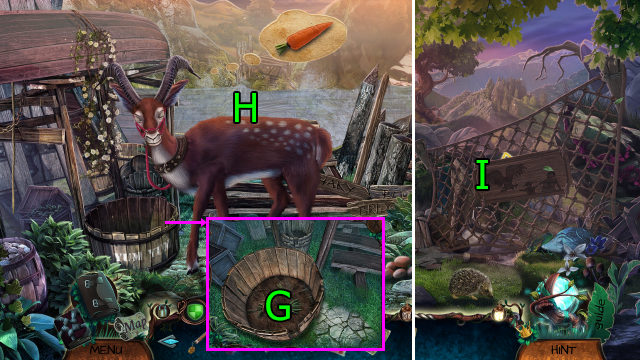
- Use BUCKET OF CARROTS on (G).
- Use SADDLE BLANKET, SADDLE, and PATH TO THE GREAT TREE on (H).
- Use POCKET KNIFE on (I); get Rune.
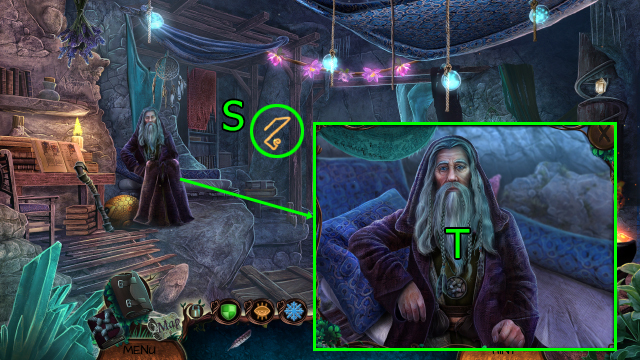
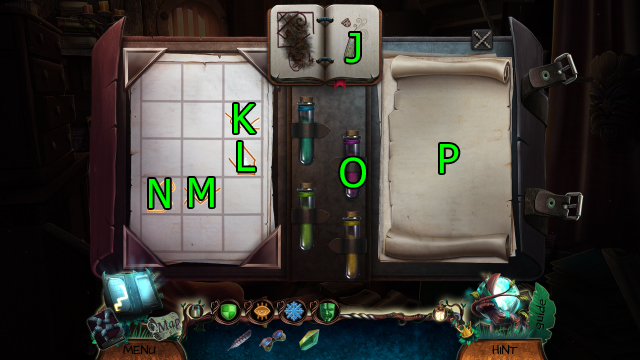
- Go Spell Kit.
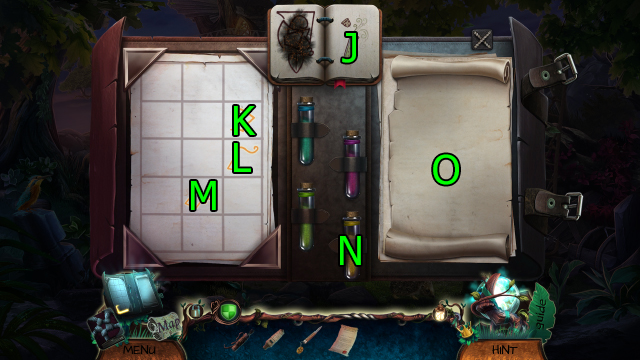
- Press (J)-(K-L-M), drag (N)-(O); get Sleep Spell.
- Use POCKET KNIFE on (P); solve HOP (P), get WARRIOR DUMMY.
- Use WARRIOR DUMMY on (Q).
- Press (R).
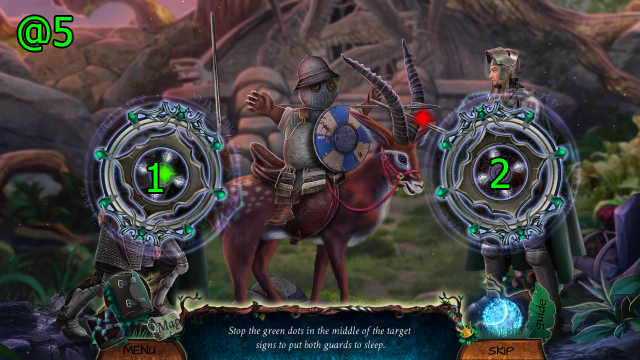
- Solution (@5): Press (1) and (2) when the dots turn green.
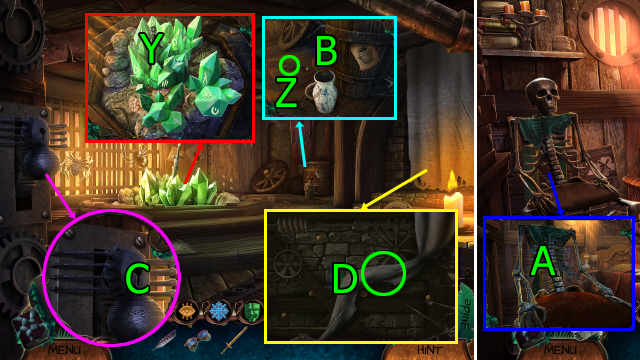
- Get EAGLE HOOK (S).
- Press (T); get WING INSET.
- Use EAGLE HOOK on (U).
- Get METAL FEATHER (1/2) (V).
- Use WING INSET on (W); get Rune and LAMP.
- Go (X).
- Use LAMP and press (Y).
- Use POCKET KNIFE on (Z); get METAL FEATHERS (2/2).
- Use METAL FEATHERS (2/2) on (A); drag (1-2)-(3-4)-(5-6), get Rune, MAP OF THE GREAT TREE, and CLAW INSET.
- Go Great Tree Entrance.
- Use CLAW INSET on (B); get Rune and WHEEL LEVER.
- Go Great Elven Tree.
- Use WHEEL LEVER and press (C).
- Press (D); get Rune.
- Go Spell Kit.
- Press (E)-(F-G-H-I), drag (J)-(K); get Frost Spell.
- Go Great Tree Entrance.
- Go (L) and press (M); get MAP PART.
- MAP PART on MAP OF THE GREAT TREE; get MAP OF THE GREAT TREE.
- Go Great Elven Tree.
- Use MAP OF THE GREAT TREE on (N).
- Go (O).
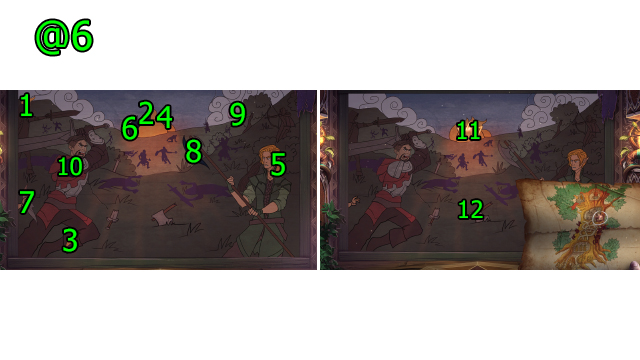
- Solution (@6): Drag (1-2)-(3-4)-(5-6)-(7-8)-(9-10), press (11-12).
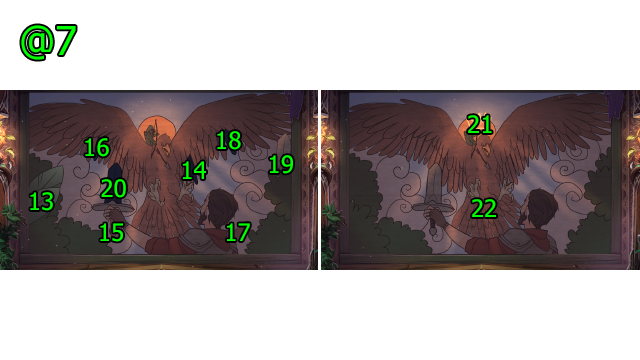
- Solution (@7): Press and drag (13-14), drag (15-16)-(17-18)-(19-20), press (21-22).
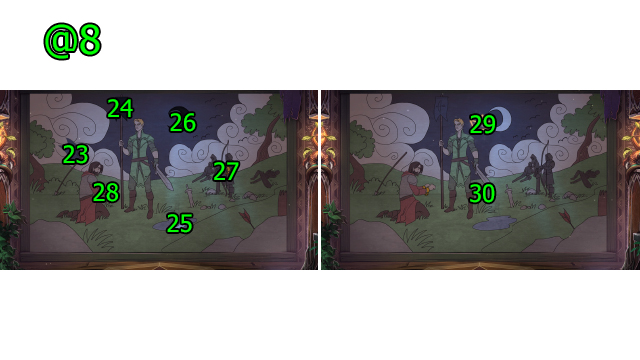
- Solution (@8): Drag (23-24)-(25-26)-(27-28), press (29-30).
- Get IMPROVISED POLES (1/2) (P).
- Use POCKET KNIFE on (Q).
- Press (R).
- Press (S); get SIGN OF MAYOR, WATER FLASK, and GREEN CLOAK.
- Press (T).
- Use GREEN CLOAK on (U).
- Solve HOP (V); get HAM.
- Use WATER FLASK and HAM on (U); get IMPROVISED POLES (2/2).
- Use IMPROVISED POLES (2/2) and go (W).
- Press (X).
- Use HUMANS' SACRED TRUCE on (Y); get KEY.
- Use SIGN OF MAYOR and KEY on (Z).
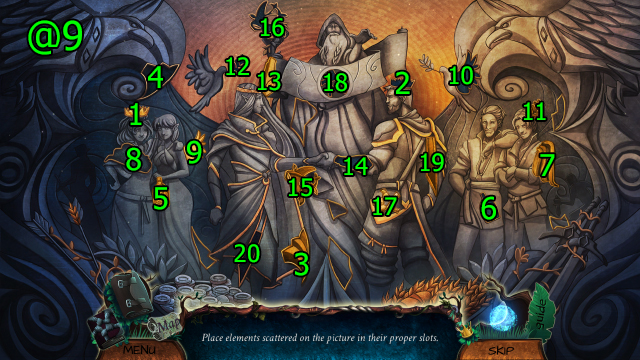
- Solution (@9): Drag (1-2)-(3-4)-(5-6)-(7-8)-(9-10)-(11-12)-(13-14)-(15-16)-(17-18)-(19-20).
- Get ELVEN SACRED TRUCE.
- Use ELVEN SACRED TRUCE and BLACK ARROWS QUIVER on (A).
- Drag (B) to (A); get FREE ROAM PERMIT.
- Use FREE ROAM PERMIT on (C).
- Press (Dx5); get MAP TO ROTTA'S HOME.
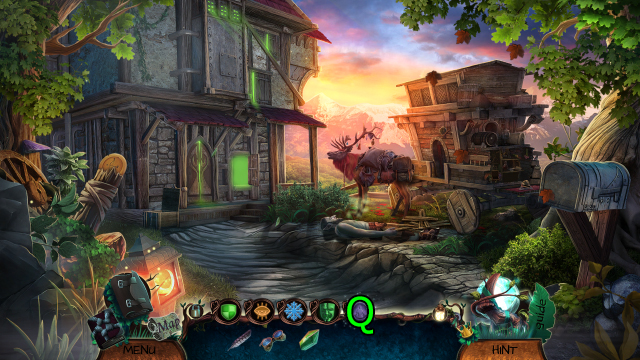
- Use MAP TO ROTTA'S HOME on (E).
Chapter 2: Investigation
- Press (Fx2).
- Get BRANCH (G).
- Use BRANCH on (H); get WHISTLE.
- Use WHISTLE on (I).
- Go (J).

- Get CANDLE (K).
- Use CANDLE on (L); get BURNING CANDLE.
- Use BURNING CANDLE on (M); get WOODEN GEAR (1/3).
- Solve HOP (N); get SAW.
- Use SAW on (O); get WOODEN GEARS (2/3) and FISHING ROD.
- Use FISHING ROD on (P); get WOODEN GEARS (3/3).
- Go Outside Rotta's House.
- Use WOODEN GEARS (3/3) on (Q).
- Go (R).
- Get STRANGE BOX and FAKE HEAD PART (1/3) (S).
- Press (T); get BUCKET.
- Press (U).
- Go Behind Rotta's House.
- Use BUCKET on (V); get BUCKET OF WATER.
- Solve HOP (W); get MECHANIC HAND.
- Go Rotta's House.
- Use MECHANIC HAND, and press (Xx2); get GOLDEN SLOT.
- Go (Y).
- Get BLACK ARROWS and STRANGE BOX KEY (Z).
- STRANGE BOX KEY on STRANGE BOX.
- Get GOBLINS CROWD, WHEAT INSET, and FLYING CONTRAPTION (A).
- Use GOBLINS CROWD on (C), use FLYING CONTRAPTION on (B); get TIRED ROTTA.
- Use TIRED ROTTA on (D), use WHEAT INSET on (E); get IRIS.
- Get GOBLIN GEAR (F).
- Use IRIS on (G), use GOBLIN GEAR on (H); get STAFF COMBINATION and GOBLIN INSETS (2/2).
- Use GOBLIN INSETS (2/2) on (I); get MESSAGE FROM KIDNAPPER and FAKE HEAD PARTS (2/3).
- Use GOLDEN SLOT on (J); solve HOP, get FAKE HEAD PARTS (3/3).
- Use FAKE HEAD PARTS (3/3) on (K); get FAKE HEAD.
- Go Outside Rotta's House.
- Use BUCKET OF WATER, BLACK ARROWS, FAKE HEAD, and MESSAGE FROM KIDNAPPER on (L); get EAGLE FEATHER.
- Go Rotta's House.
- Press (M).
- Use EAGLE FEATHER and STAFF COMBINATION on (N).
- Press (1x3)-(2x2)-(3).
- Press (O).
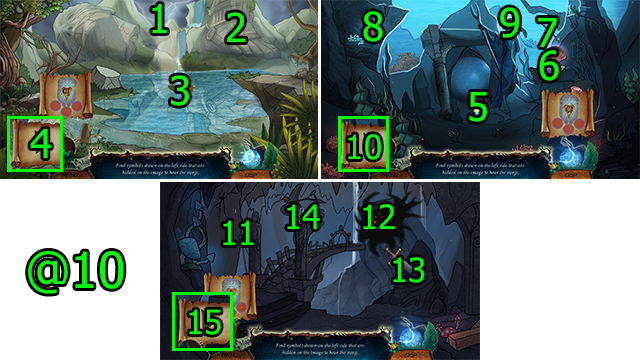
- Solution (@10): Press (1)-(2x2)-(3x2)-(4), drag (5-6)-(7-8), press (6-8-9x2)-(10), drag (11-12), press (12-13x2-14)-(15).
- Get MAP PATH.
- Go Outside Rotta's House.
- Use MAP PATH on (P).
- Solution (@11): Press (1x2)-(2x2)-(3x2)-(4), (5x2)-(6x2)-(7x2)-(8), (9x2)-(10x2)-(11x2)-(12), (13x2)-(14x2)-(15x2)-(16).
- Press (Q).
- Get SECRET CACHE KEY (R).
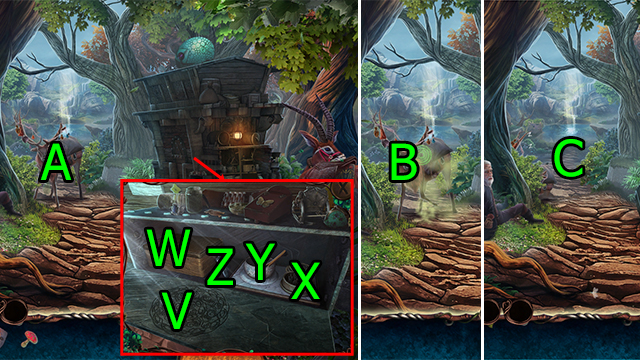
- Press (S); get SLEEPING BREW INSTRUCTIONS.
- Press (T); solve HOP, get SLEEPING MUSHROOM.
- Use SECRET CACHE KEY on (U).
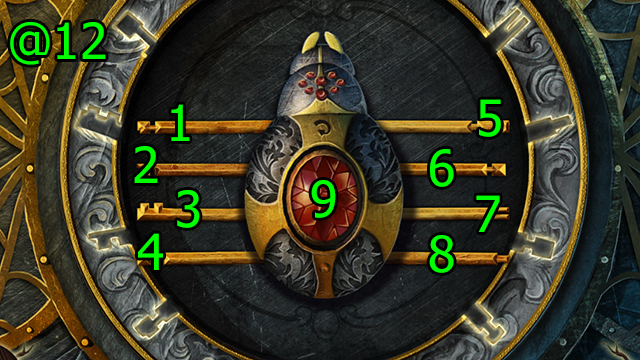
- Solution (@12): Press (1-4-1)-(2-3-2)-(5-8-6-7-5)-(9).
- Use SLEEPING BREW INSTRUCTIONS on (V).
- Press (W); get DART and BLOW PIPE.
- Use SLEEPING MUSHROOM on (X); drag (X-Y)-(Z-Y).
- Use DART on (Y); get SLEEPING SET.
- Use SLEEPING SET on (A); press (B) when the dot turns green.
- Go (C).
- Press (D).
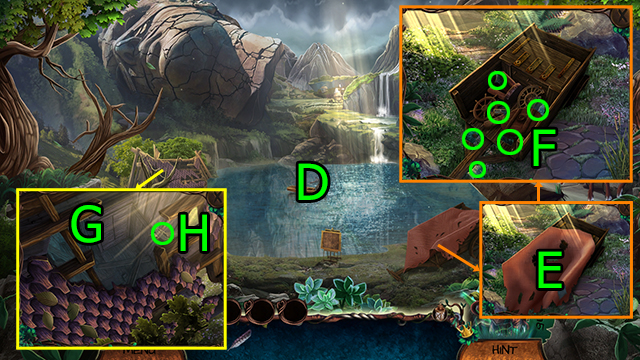
- Get SHEET ROPE (E).
- Use SHEET ROPE; get SHEET ROPE.
- Get CANVAS PIECES (6/8) (F).
- Use SHEET ROPE and press (G).
- Get BOAT INSET (1/2) (H).
- Go (G).
- Press (Hx2); get GRAPPLING HOOK.
- Solve HOP (H); get CROSSBOW.
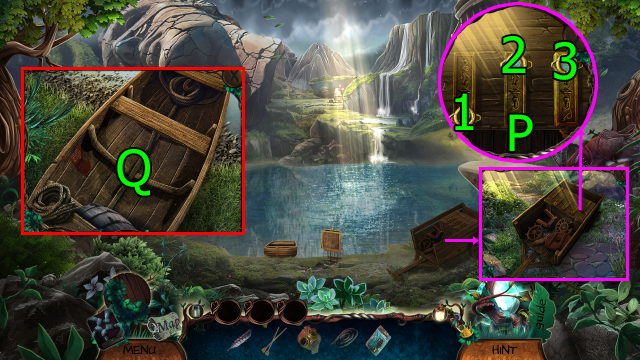
- Press (I); get BOAT INSETS (2/2).
- Use BOAT INSETS (2/2) on (J); get OARS.
- GRAPPLING HOOK on CROSSBOW; get CROSSBOW WITH GRAPPLING HOOK.
- Go Lake.
- Use CROSSBOW WITH GRAPPLING HOOK on (K); press (L) when the dot turns green.
- Get CANVAS PIECES (7/8), CANVAS PIECES (8/8) (M).
- Press (Nx5); get HELMET and HOSE.
- Use CANVAS PIECES (8/8) on (O).
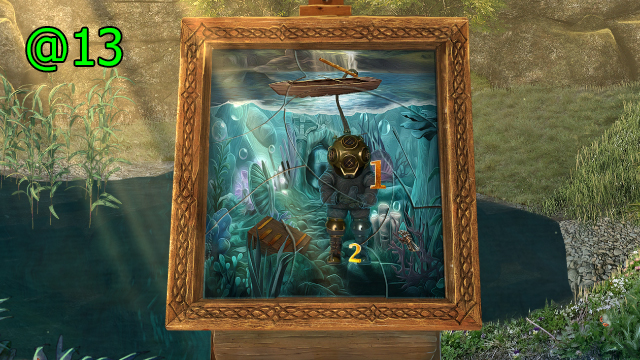
- Solution (@13).
- Get DIVING SUIT DRAWING.
- Use DIVING SUIT DRAWING on (P); press (1x4)-(2x3)-(3x2), get DIVING SUIT.
- HELMET and HOSE on DIVING SUIT.
- Use OARS on (Q).

- Get EMPTY POUCH and COINS (R).
- COINS on EMPTY POUCH; get FULL POUCH.
- Press (Sx2); get OLD CLOTH.
- Use FULL POUCH and OLD CLOTH on (T); get METAL ARROWHEAD.
- Use METAL ARROWHEAD on (U); get PEARL, GLOWING FLOWERS (1/2), and GLOWING FLOWERS (2/2).
- Use PEARL on (V); get GLOWING FLOWERS (3/4) and GLOWING FLOWERS (4/4).
- Use GLOWING FLOWERS (4/4) on (W).
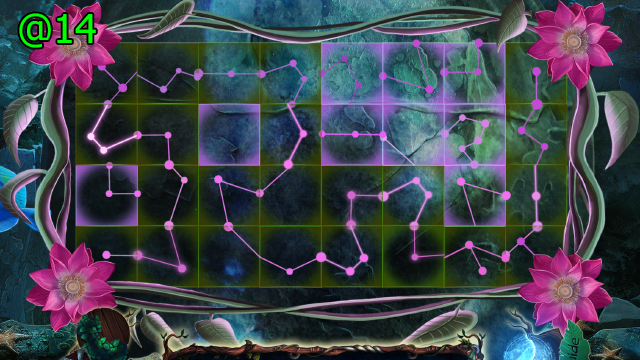
- Solution (@14).
- Go (X).
- Press (Y); get CRYSTALS (1/2).
- Get BLOODY CLOTH and SPEAR (Z).
- Use SPEAR on (A); get CRYSTALS (2/2) and CRYSTAL SHARD.
- Use CRYSTALS (2/2) on (B).
- Go (C).
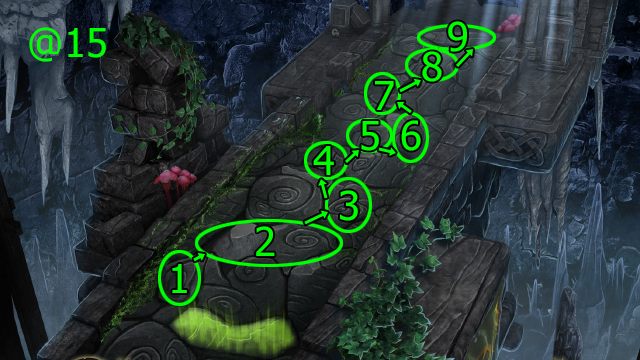
- Solution (@15): Press (1-2-3-4-5-6-7-8-9).
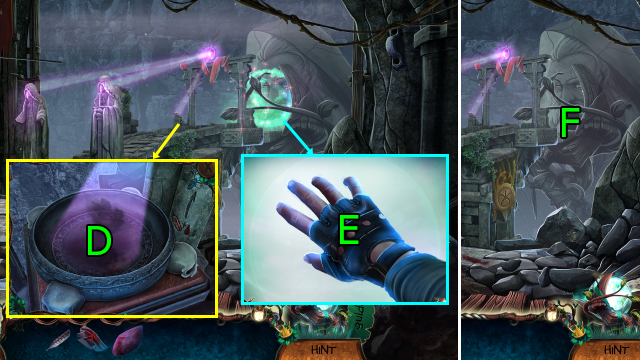
- Use BLOODY CLOTH and CRYSTAL SHARD on (D); get TINTED CRYSTAL.
- Use TINTED CRYSTAL on (E); solve HOP.
- Go (F).
Chapter 3: Discovery
- Go (G).
- Press (H); get DIAMOND.
- Go Druid's Cave.
- Use DIAMOND on (I); get RED GAUNTLET.
- Go Alchemist Room.
- Use RED GAUNTLET on (J); get KETTLE.
- Use KETTLE on (K); get HUMAN HAND INSERT and ICE.
- Use ICE on (L); get ELF HAND INSERT.
- Go Druid's Cave.
- Use HUMAN HAND INSERT and ELF HAND INSERT on (M); get Spell Kit and CABINET KEY.
- Get Rune (N).
- Go Alchemist Room.
- Get Rune and Rune (O).
- Use CABINET KEY on (P).
- Solve HOP (Q); get HEALING POTION.
- Go Druid Cave.
- Use HEALING POTION on (R).
- Solution (@16): Press (1)-(2)-(3), (4)-(5)-(6), (7)-(8)-(9).
- Get Rune (S).
- Press (T); get CHEST KEY and ROUND BOX.
- Go Alchemist Room.
- Go Spell Kit.
- Press (U)-(V-W-X-Y), drag (Z)-(A); get Unveil Spell.
- Press (B).
- Use CHEST KEY and press (Cx8); get FILLED PAPYRUS and PLANKS (3/3).
- Use PLANKS (3/3) on (D).
- Press (E).
- Solve HOP (F); get ROUND KEY.
- ROUND KEY on ROUND BOX; get SCRAPER and FINE BRUSH.
- SCRAPER and FINE BRUSH on FILLED PAPYRUS; get CLEAN PAPER.
- Use CLEAN PAPER on (E); get MAP OF THE WOODS.
- Go Druid's Cave.

- Use MAP OF THE WOODS on (G).
- Solve HOP (H); get STAFF LOCATION.
- Go Secret Chamber.
- Use STAFF LOCATION on (I).
- Get Rune and KNIFE HANDLE (J).
- Use KNIFE HANDLE on (K); get RUSTY KNIFE.
- Press (L); get GOGGLES.
- Use RUSTY KNIFE on (M); solve HOP, get MECHANICAL BRAIN.
- Use MECHANICAL BRAIN on (N); get HAND DRILL and BLUE GEMS.
- Use HAND DRILL on (O).
- Go (P).
- Use BLUE GEMS on (Q).
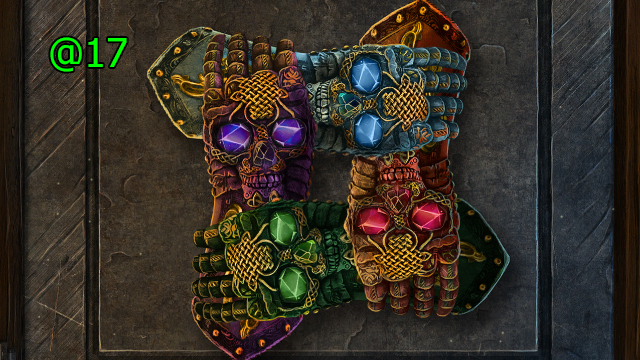
- Solution (@17).
- Solve HOP (R); get AXE.
- Go Outside Krenk's House.
- Use AXE on (S).
- Go (T).
- Press (U).
- Get SHIELD (V).
- Go Krenk's House.
- Use SHIELD on (W); get BROKEN SHIELD and Rune.
- Use BROKEN SHIELD; get GOLDEN SWORD.
- Go (X).
- Press (Y).
- Get METAL RASP (Z).
- Go Krenk's Carriage..
- Use METAL RASP on (A); get FAUCET VALVE and GOLD KEY.
- Go Special Room.
- Use FAUCET VALVE and press (B); get JUG WITH TAR.
- Use GOLD KEY on (C).
- Get CLEAN CLOTH (D).
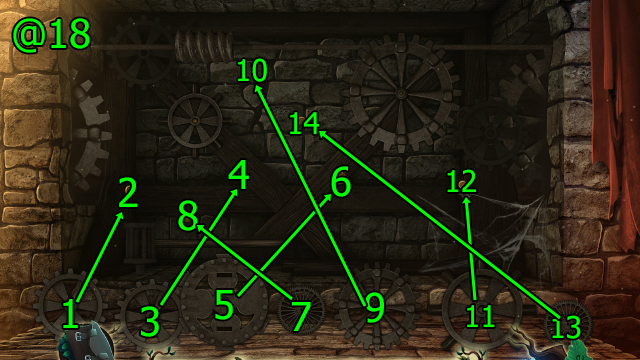
- Solution (@18): Press (1-2)-(3-4)-(5-6)-(7-8)-(9-10)-(11-12)-(13-14).
- Press (E).
- Go Krenk's Carriage.
- Use JUG WITH TAR and CLEAN CLOTH on (F); get THREE SYMBOLS.
- Go Special Room.
- Use THREE SYMBOLS on (G); press (1-2-3), get SILVER SWORD, GREEN CRYSTAL, and Rune.
- Go Krenk's CARRIAGE.
- Use GOLDEN SWORD on (H), use SILVER SWORD on (I); get Rune.
- Go Spell Kit.
- Press (J)-(K-L-M-N), drag (O)-(P); get Transformation Spell.
- Go Outside Krenk's House.
- Press (Q).
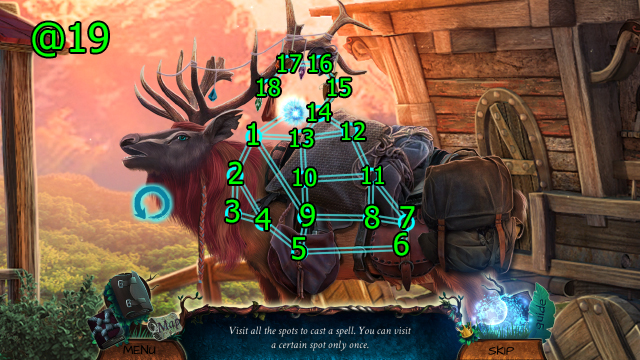
- Solution (@19): Press (1-2-3-4-5-6-7-8-9-10-11-12-13-14-15-16-17-18).
- Get CRANK.
- Go Krenk's House.
- Use GREEN CRYSTAL on (Q), use CRANK and press (R); get GREEN POWDER.
- Go Krenk's Carriage.
- Use GREEN POWDER on (S).

- Solution (@20): Press (1x2)-(2x2)-(3x2)-(4), (5x2)-(6x2)-(7x2)-(8), (9x2)-(10x2)-(11-12)-(13), drag (14-15)-(16-17), press (15)-(17)-(18x2)-(19).
- Get MAP.
- Press, use EAGLE FEATHER, and press (T); get MAP TO THE MOUNTAIN.
- Go Outside Krenk's House.
- Press and use MAP TO THE MOUNTAIN on (U).
Chapter 4: Pursuit
- Press (V)-(W); get SHIELD.
- Use SHIELD on (X); solve HOP (X), get HAMMER HANDLE.
- Use HAMMER HANDLE on (Y); get HAMMER and PLATE GLOVE.
- Use PLATE GLOVE on (Z); get CROSSBOW INSET.
- Use CROSSBOW INSET on (A); drag (B)-(C).
- Use HAMMER on (D).
- Go (E).
- Get LANTERN WITH OIL (F).
- Press (Gx2); get BROKEN SPEAR.
- Go MOUNTAIN ENTRANCE.
- Solve HOP (H); get HARPOON.
- Go Mountain Hall.
- Use BROKEN SPEAR and HARPOON on (I).
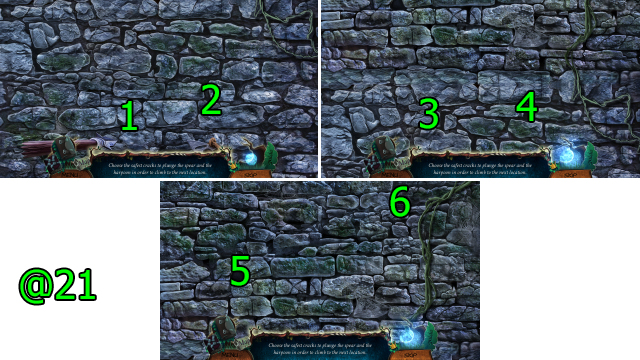
- Solution (@21): Press (1-2)-(3-4)-(5-6).
- Get SHACKLES, MAGNET, HOOK, and DOOR SEQUENCE (J).
- Go Mountain Hall.
- Use MAGNET on (K); get HOIST SWITCH.
- Use SHACKLES on (L).
- Go Upper Level.
- Use HOIST SWITCH and press (M).
- Go Mountain Hall.
- Use HOOK on (L).
- Go Upper Level.
- Press (M).
- Go Mountain Hall.
- Press (N); get BLUE CRYSTAL.
- Use LANTERN WITH OIL and press (Ox2); get FLINTS and COIN (1/2).
- Go Upper Level.
- Go (P).
- Get TORCH and PINCERS (Q).
- FLINTS on TORCH; get LIT TORCH.
- Use LIT TORCH on (R).
- Use PINCERS on (S); get COINS (2/2).
- Press (T); get RASP HANDLE.
- Use RASP HANDLE on (U); get METAL RASP.
- Go Upper Level.
- Use BLUE CRYSTAL on (V), use COINS (2/2) on (W).
- Solve HOP (X); get CONSOLE KEY.
- Go Mechanism Room.
- Use CONSOLE KEY on (Y).
- Use METAL RASP on (Z), use DOOR SEQUENCE on (A).
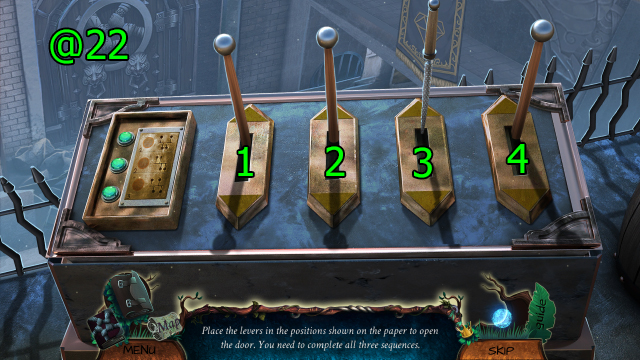
- Solution (@22): Press (1-2-3-4)-(3-2-1)-(2-3-1-4).
- Go Mountain Hall.
- Go (B).
- Press (C).
- Press (D); get CROWBAR.
- Press (E); get BELT (1/2).
- Press (F); get BELT (2/2).
- Press (G); get TRICK BOX.
- Use CROWBAR on (H); get BOARDS WITH NAILS.
- BELT (2/2) on BOARDS WITH NAILS, get MAKESHIFT CLEATS.
- Use MAKESHIFT CLEATS on (I).
- Get STRANGE COMPASS (J).
- STRANGE COMPASS on TRICK BOX; press (1-2-3-4), get SILVER HAND.
- Use SILVER HAND on (K).
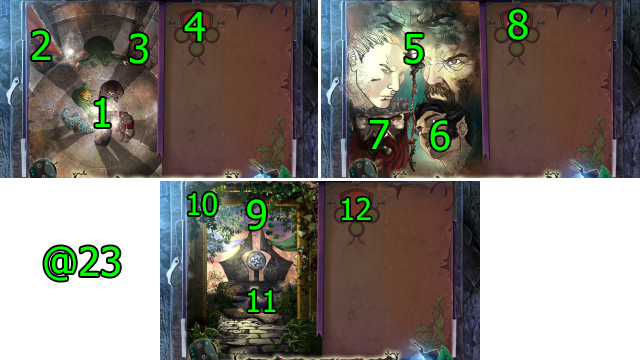
- Solution (@23): Press (1)-(2x2)-(3x2)-(4), (5)-(6x2)-(7x2)-(8), (9)-(10x2)-(11x2)-(12).
- Get STAIRS SCROLL.
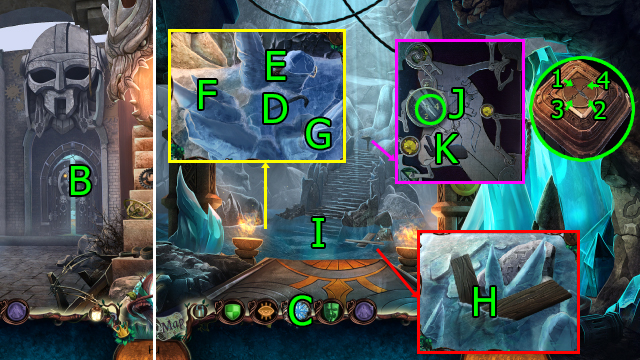
- Use STAIRS SCROLL and go (L).
- Get HOIST HANDLE, STAFF, and OCTAGON KEY (M).
- Go (N).
- Get CHAIN (O).
- Use OCTAGON KEY on (P); get SICKLE.
- SICKLE on STAFF; get STAFF WITH SICKLE.
- Drag (Q-R).
- Get PLIERS and CONNECTORS (1/2) (S).
- Use PLIERS on (T).
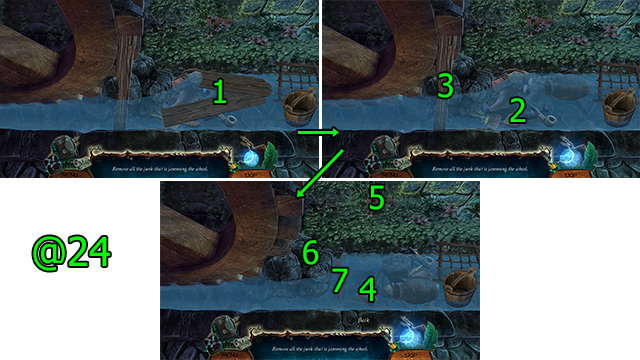
- Solution (@24): Press (1)-(2-3)-(4-5)-(5-6)-(7-6).
- Get HOIST.
- HOIST HANDLE on HOIST; get HOIST.
- Go Chamber of Dwarves.
- Use STAFF WITH SICKLE on (U); get CONNECTORS (2/2).
- CONNECTORS (2/2) on CHAIN; get CHAIN WITH SHACKLES.
- Use HOIST on (V).
- Use CHAIN WITH SHACKLES on (W).
- Press (V).
- Solve HOP (W); get GEARS (1/2).
- Go (W).
- Get CLOTH and BIG HAND (X).
- Go Chamber of Goblins.
- Use CLOTH on (Y); get WET CLOTH.
- Go Chamber of Humans.
- Use WET CLOTH on (Z).
- Press (3-1-4-5-2); get APPLE.
- Press and use APPLE on (A); get SMALL HAND.
- Use BIG HAND and SMALL HAND on (B); get GEARS (2/2).
- Go Chamber of Goblins.
- Use GEARS (2/2) on (C); get OCTAGON INSET and DWARF STATUE EYES (1/2).
- Go Chamber of Humans.
- Use OCTAGON INSET on (D).
- Solve HOP (E); get DWARF STATUE EYES (2/2).
- Go Chamber of Dwarves.
- Use DWARF STATUE EYES (2/2) on (F).
- Go (G).
- Press (H).
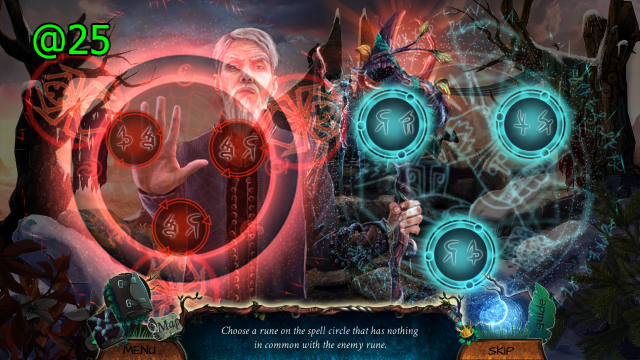
- Solution (@25): Press the circle on the right containing no runes in common with the left.
- Press (I).
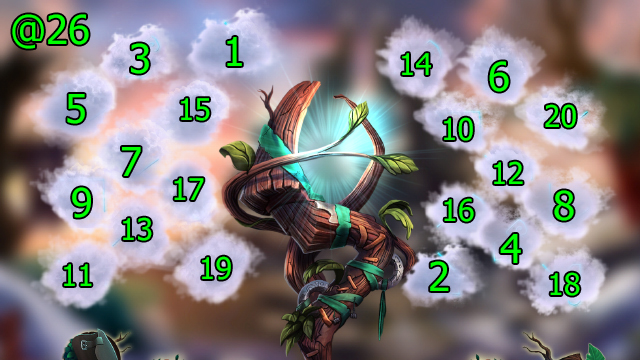
- Solution (@26): Press (1-2)-(3-4)-(5-6)-(7-8)-(9-10)-(11-12)-(13-14)-(15-16)-(17-18)-(19-20).
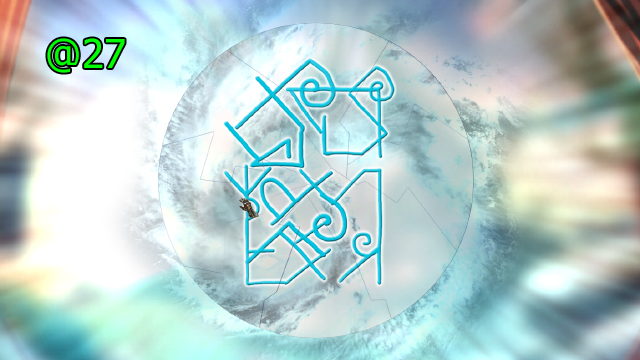
- Solution (@27).
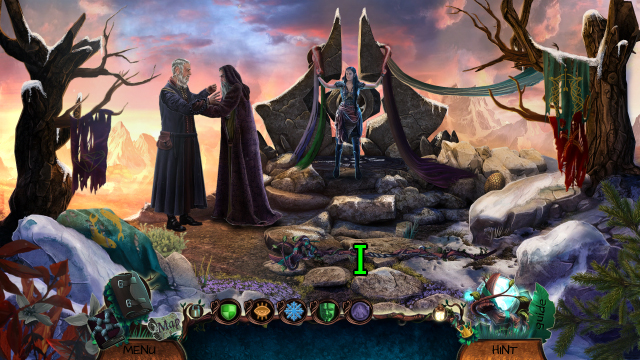
- Press (J).
- Congratulations! You've completed Queen's Quest 4: Sacred Truce!
Created at: 2018-07-17