

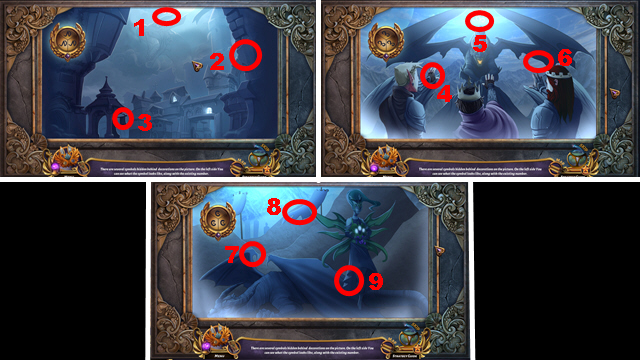
Walkthrough Menu
- General Tips
- Chapter 1: The Headmaster's Office
- Chapter 2: The City Gates
- Chapter 3: The Mountain Passage
- Chapter 4: The Queen's Office
- Chapter 5: The Grand Tree
- Chapter 6: The Cliff
General Tips
- This is the official guide for Queen's Quest: End of Dawn.
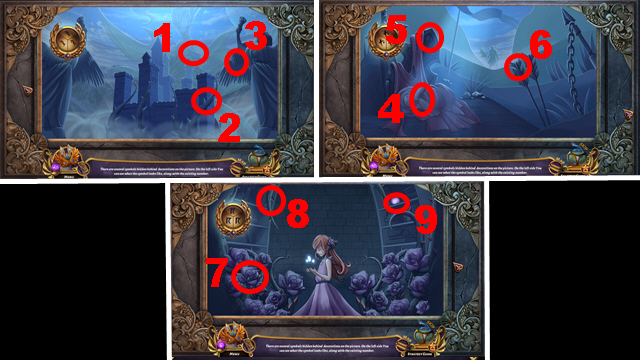
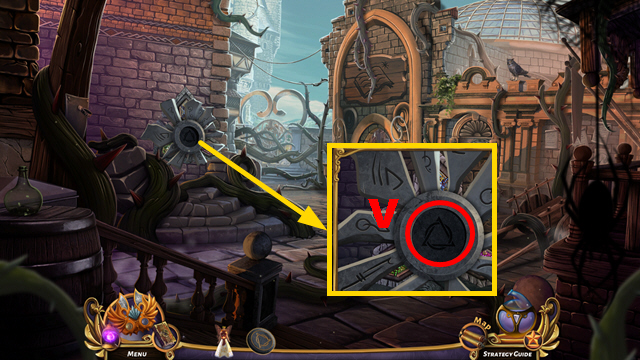
- Hidden-object puzzles are referred to as HOPs. This guide will not show screenshots of the HOPs, however, it will mention when an HOP is available and the inventory item you'll collect from it.
- This guide will not mention each time you have to zoom into a location; the screenshots will show each zoom scene.
Chapter 1: The Headmaster's Office
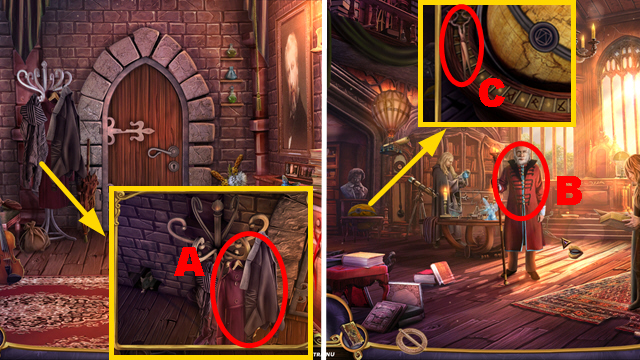
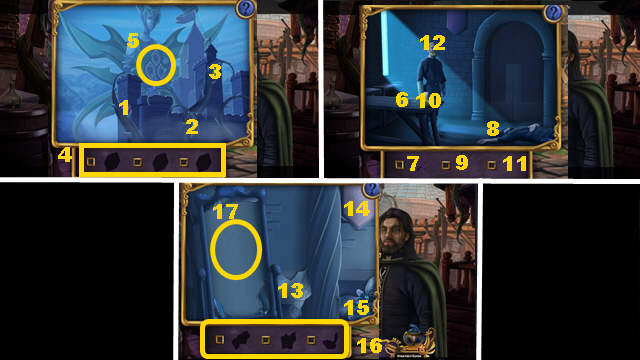
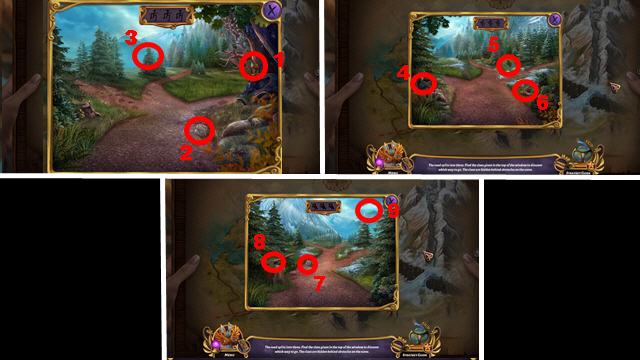
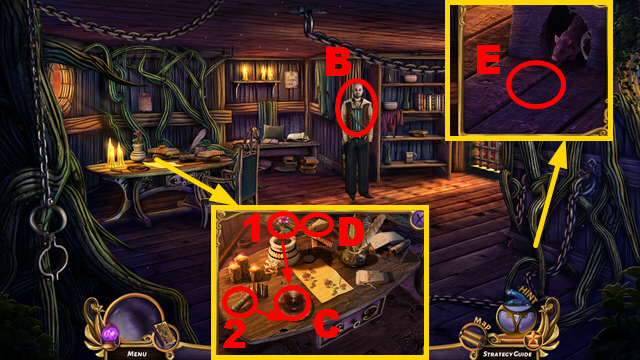
- Move the coats, select the bag, open it, take the book, and LUCKY SCARF (A).
- Take the BUCKLE from the LUCKY SCARF.
- Go forward.
- Talk to the headmaster (B).
- Take the SCISSORS (C).
- Go left.
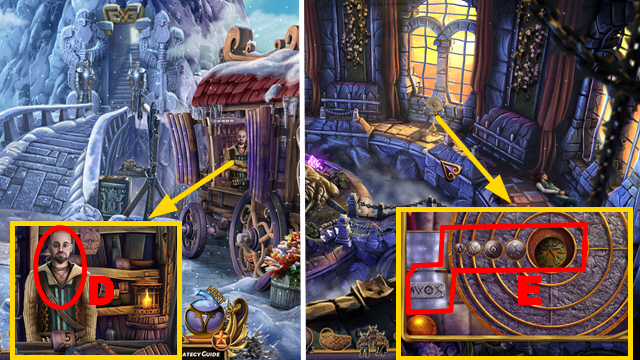
- Talk to Murdoch (D).
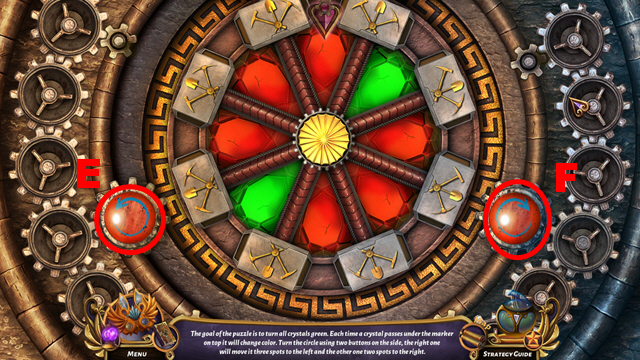
- Read the note and take the BUCKLE (E).
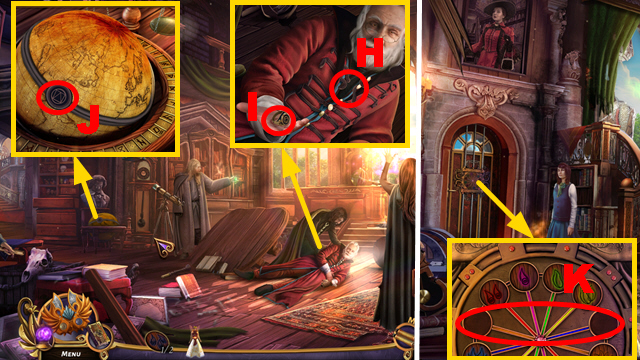
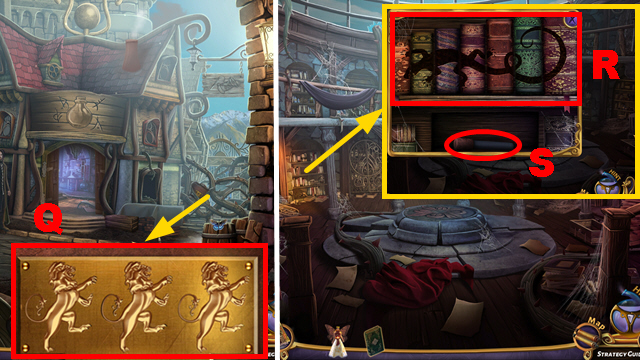
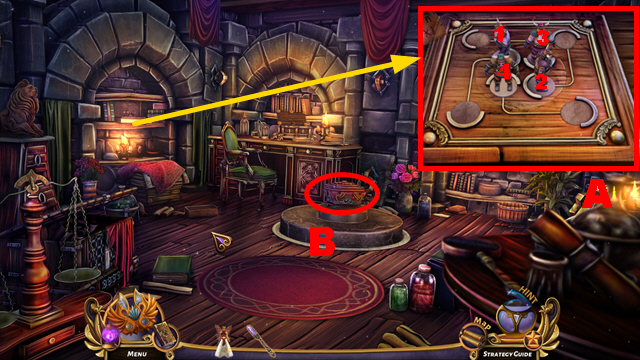
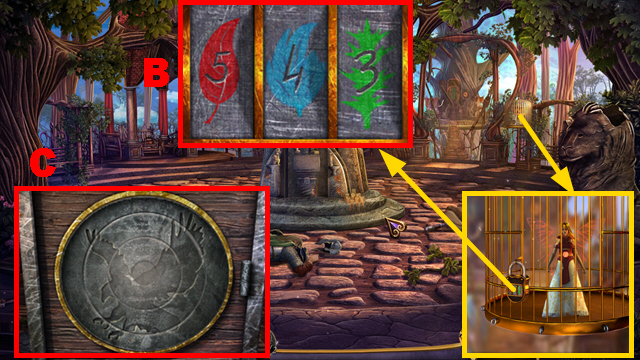
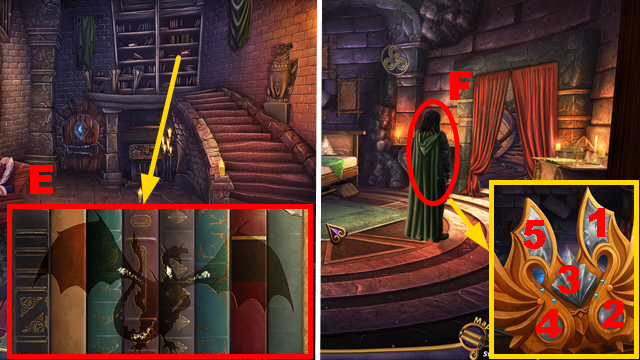
- Use 2 BUCKLES (purple) and play the HOP (F); receive the KEY WITH A NOTE.
- Select the note from the KEY WITH A NOTE twice; take the CABINET KEY.
- Go back.
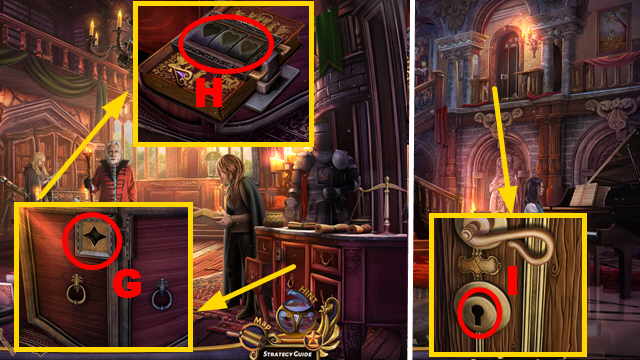
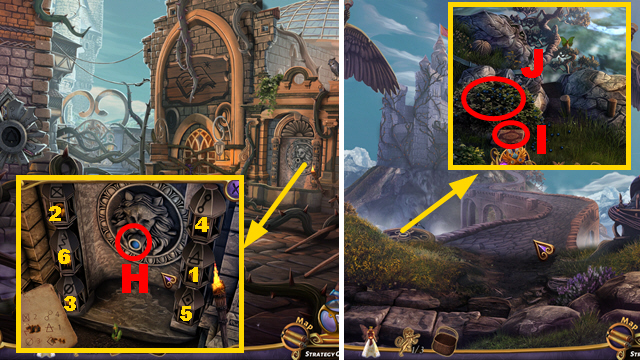
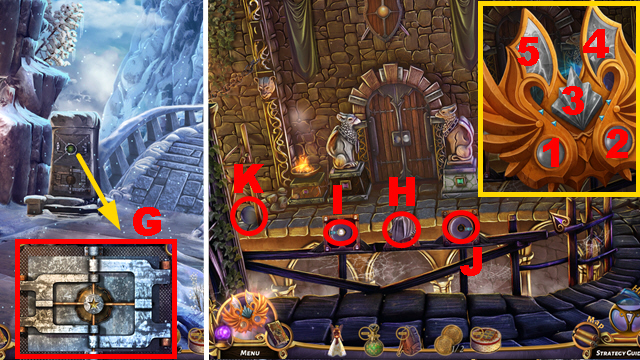
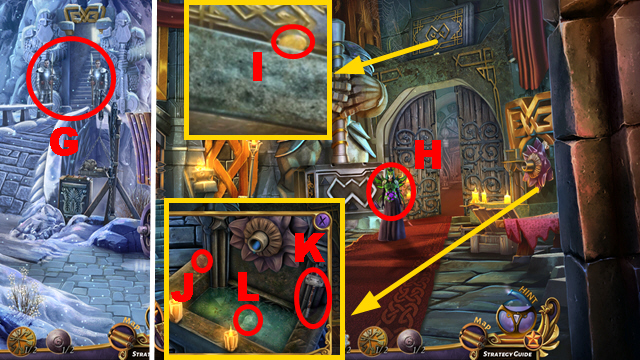
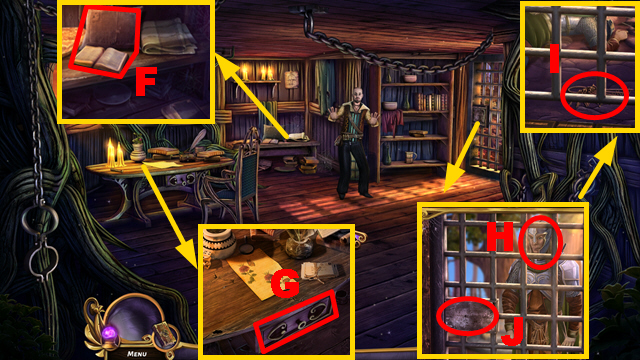
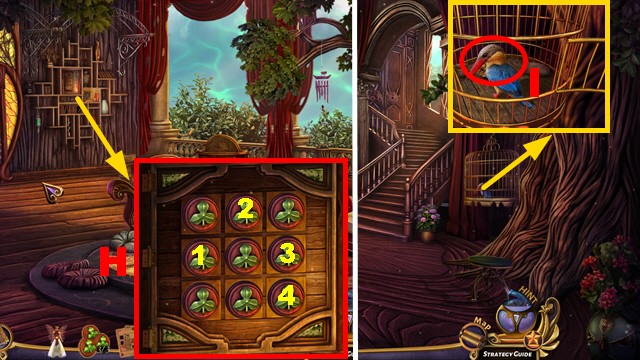
- Insert the CABINET KEY, take the note, and select the book (G); adjust the symbols and take the ROOM KEY (H).
- Go left.
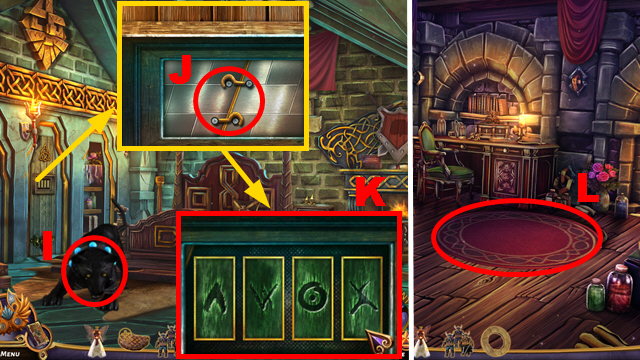
- Insert the ROOM KEY (I).
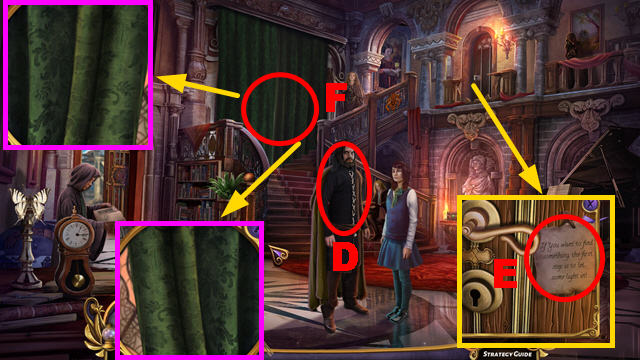
- Enter the Bedroom.
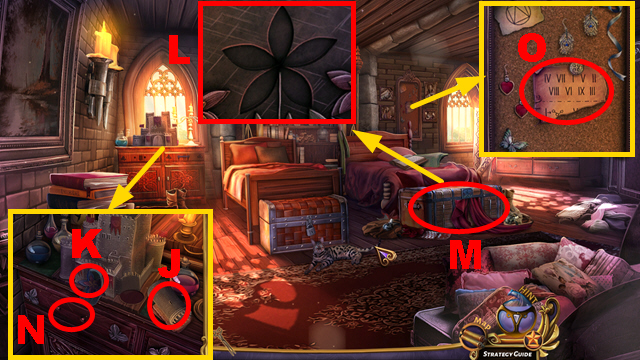
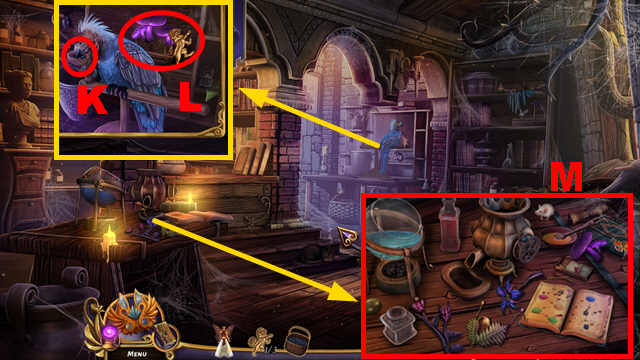
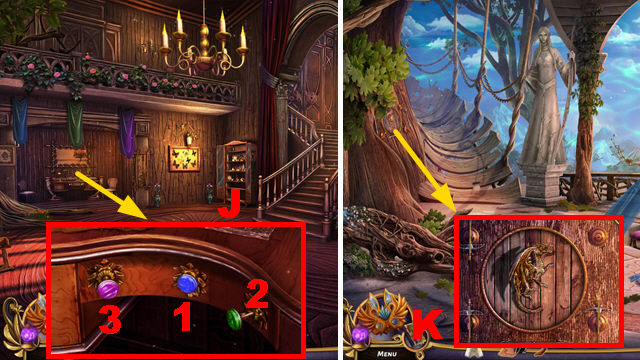
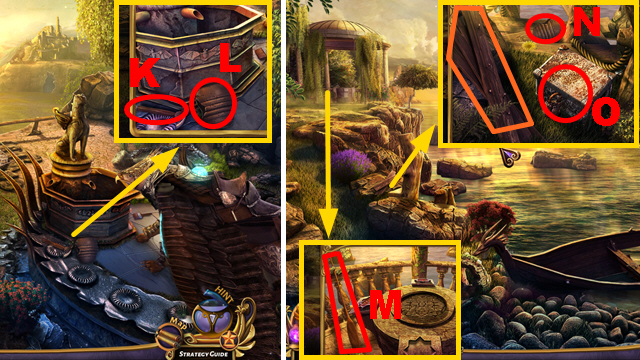
- Move the tower (J) and take the FLOWER TILE (K).
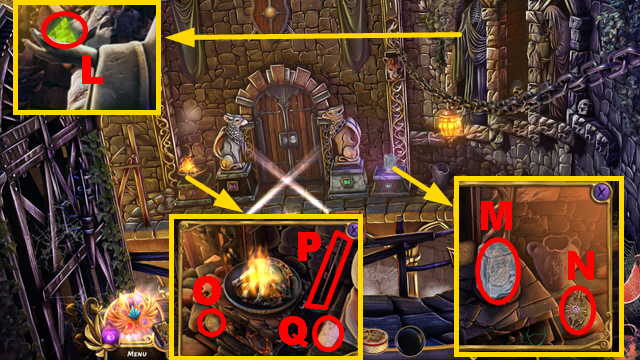
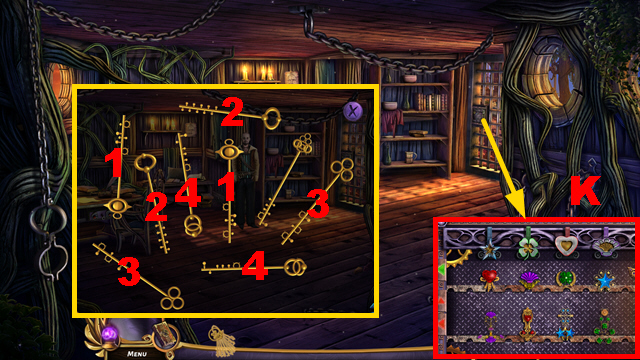
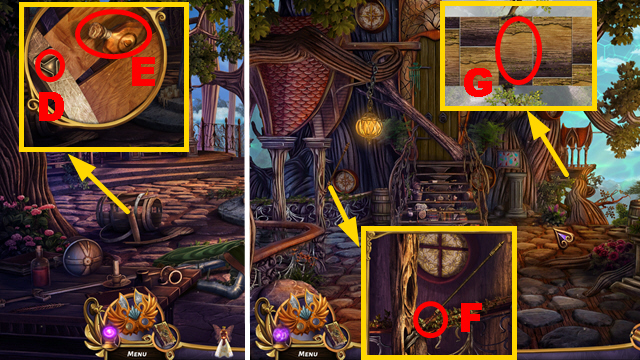
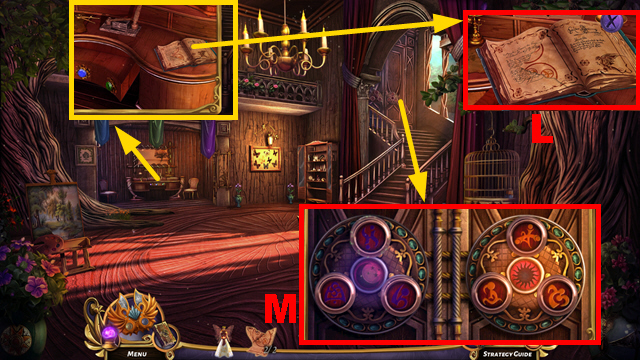
- Place the FLOWER TILE (L) and play the HOP (M); receive the DRAWER HANDLE.
- Place the DRAWER HANDLE and take the POUCH (N).
- Use the SCISSORS to open the POUCH; take the PIECE OF PAPER and LOCK TILE 1/2.
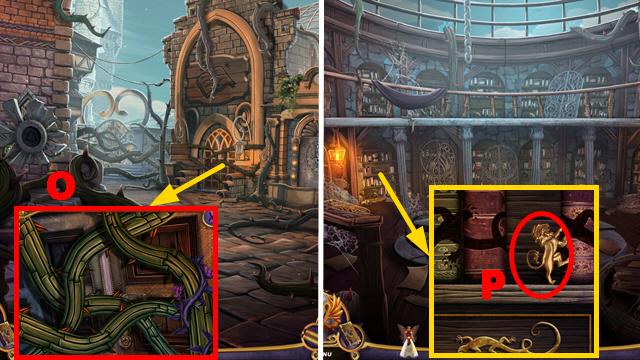
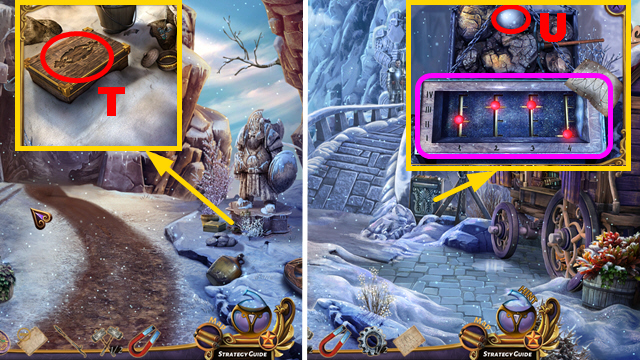
- Place the PIECE OF PAPER and take the CABINET SEQUENCE (O).
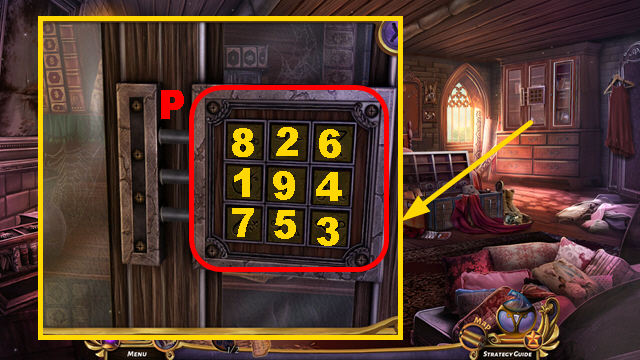
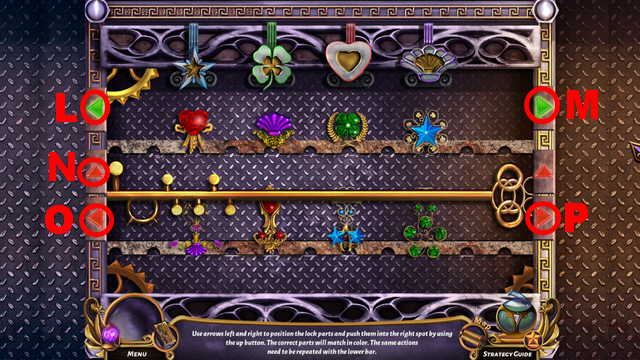
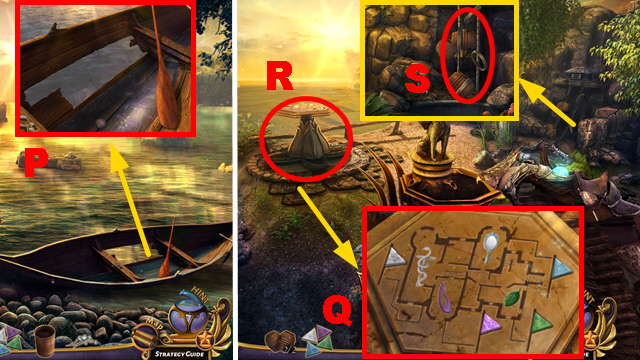
- Place the CABINET SEQUENCE (P); play the mini-game.
- Solution: 1-9.
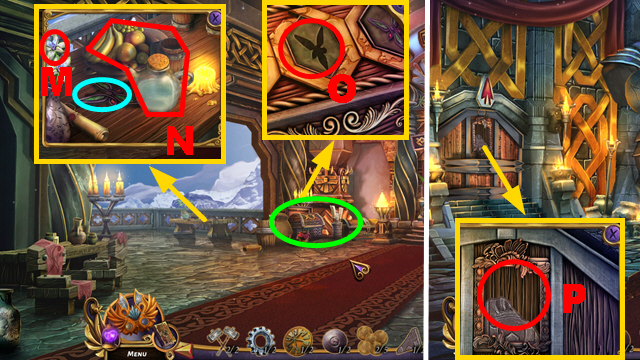
- Take the POTIONS.
- Go back twice.
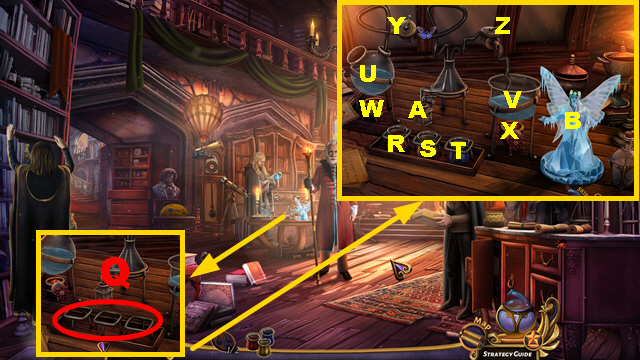
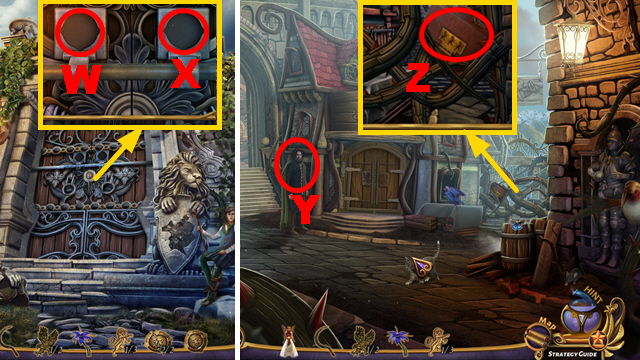
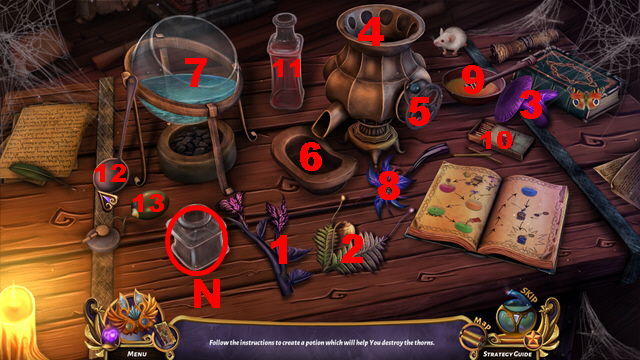
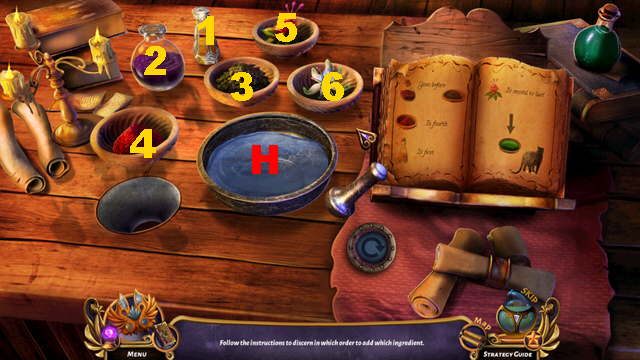
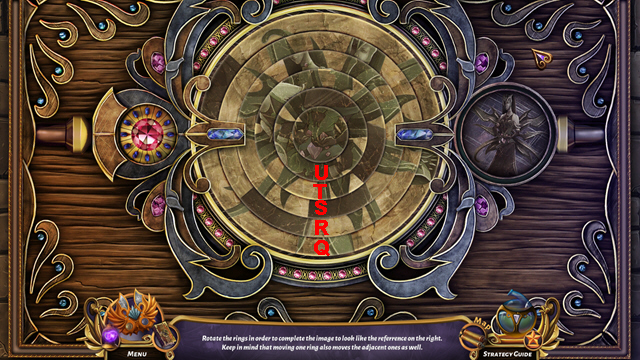
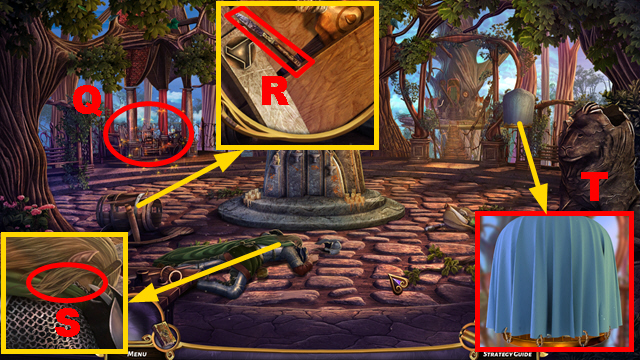
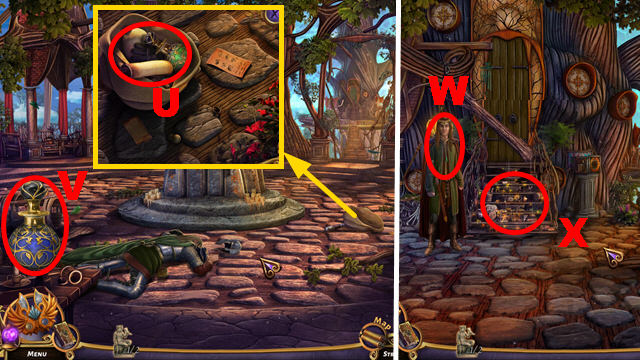
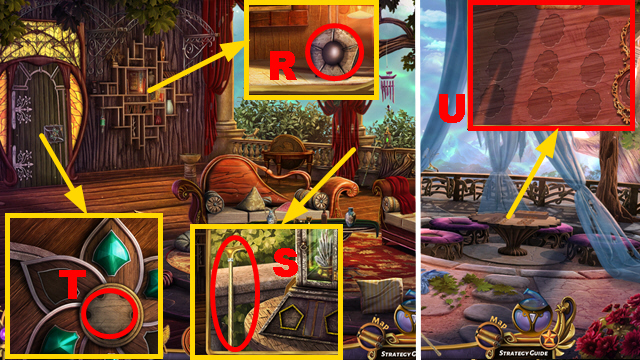
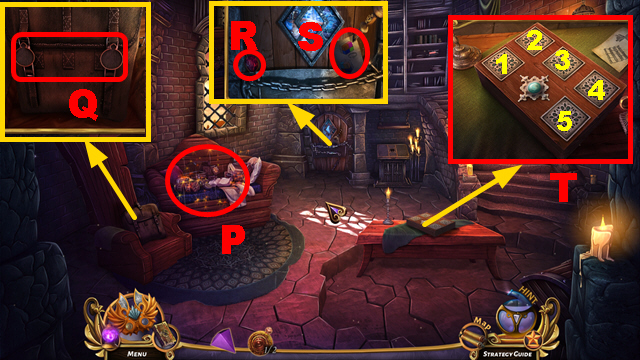
- Place the POTIONS (Q).
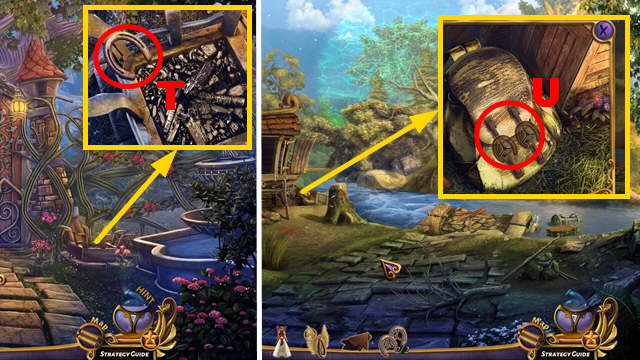
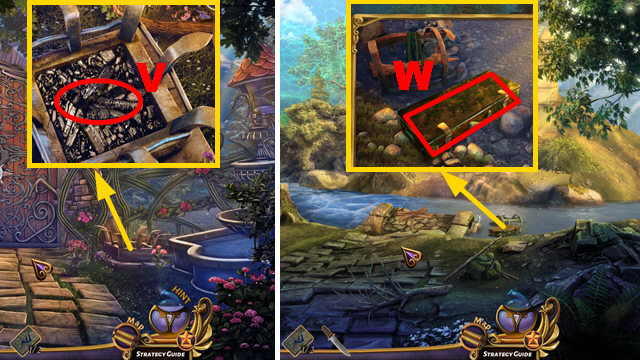
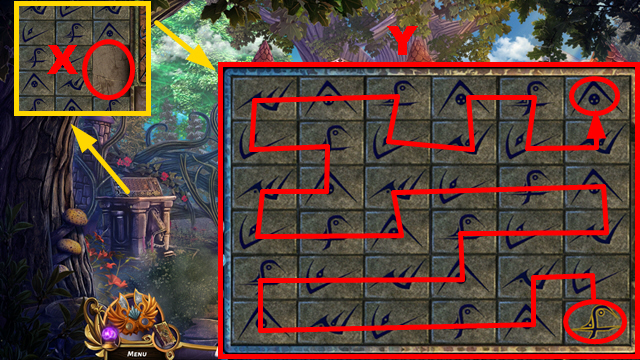
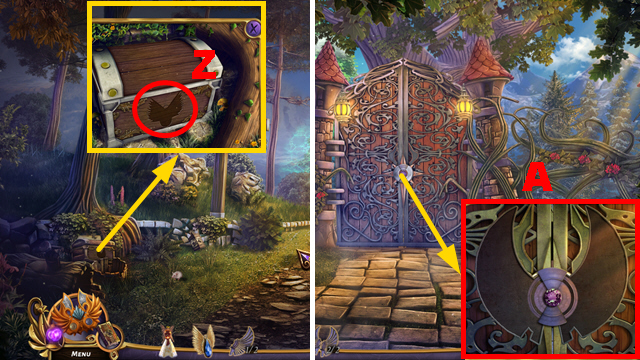
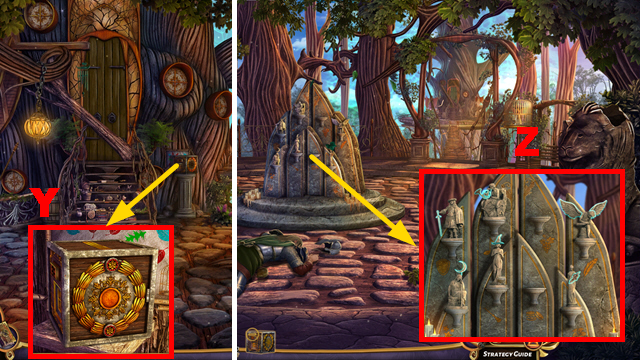
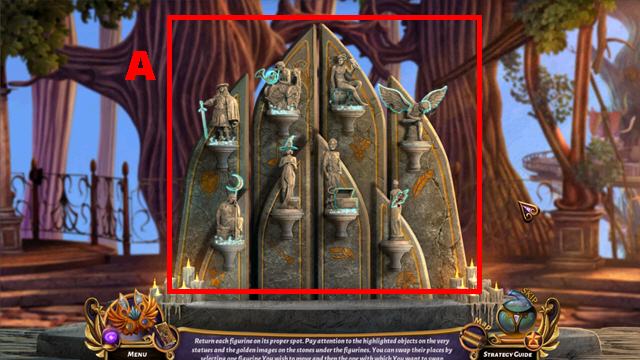
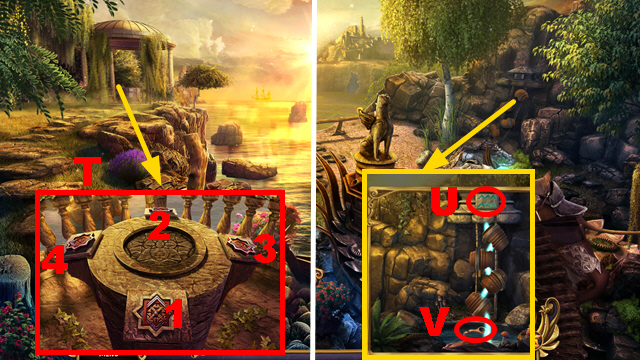
- Prepare the potion: (R-U)-(S-U)-(S-V)-(T-V)-(Wx2)-(Xx3)-(Yx3)-(Zx2)-A-(A-B).
- Take DAHLIA (B).
- Use DAHLIA (C); receive the CERTIFICATE OF ALCHEMY.
- Read the CERTIFICATE OF ALCHEMY.
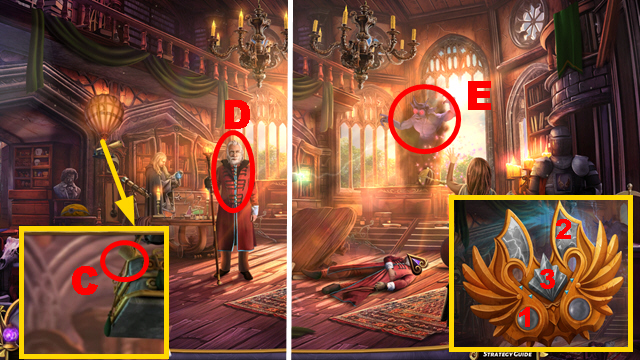
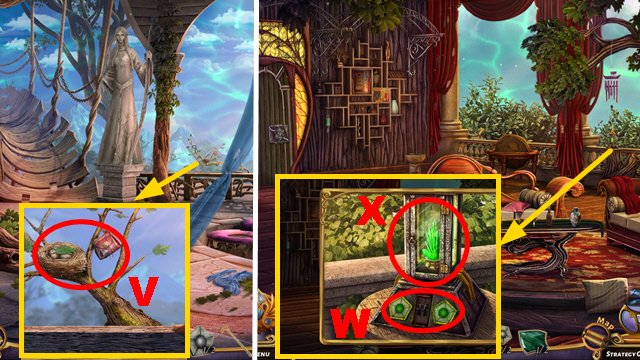
- Talk to the Headmaster (D); take the AMULET.
- Open and select the AMULET; enter sequence 1-3.
- Use the AMULET (E).
- Go left.
- Activate the AMULET; enter sequence 1-5.
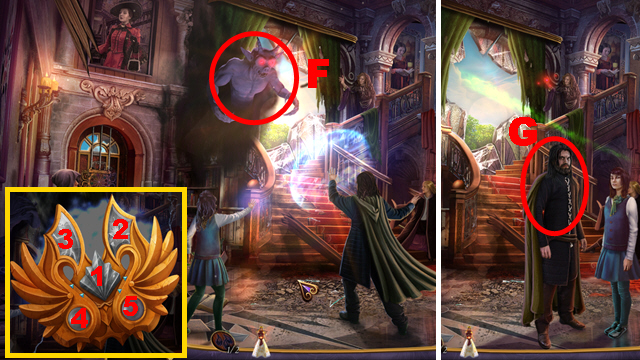
- Use the AMULET (F).
- Talk to Murdoch (G).
- Go back.
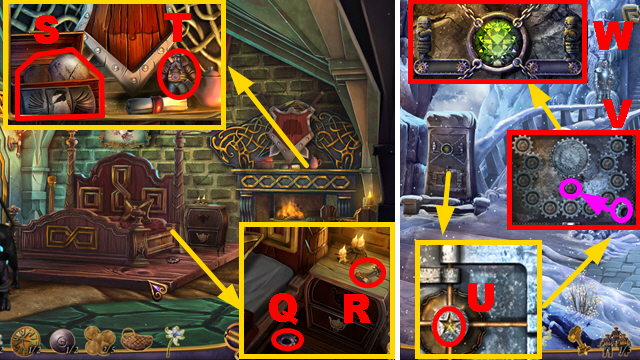
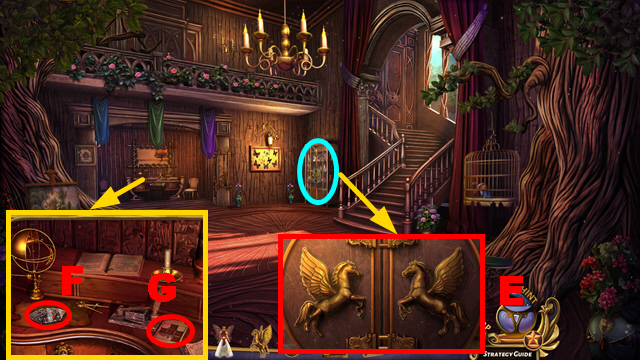
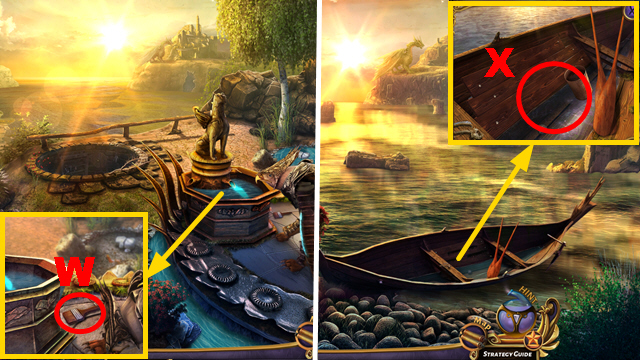
- Open the coat (H) and take the HEADMASTER'S RING (I).
- Use the HEADMASTER'S RING, take 2 notes, select and open the casket, take the LION EMBLEM, and LOCK TILE 2/2 (J).
- Go left.
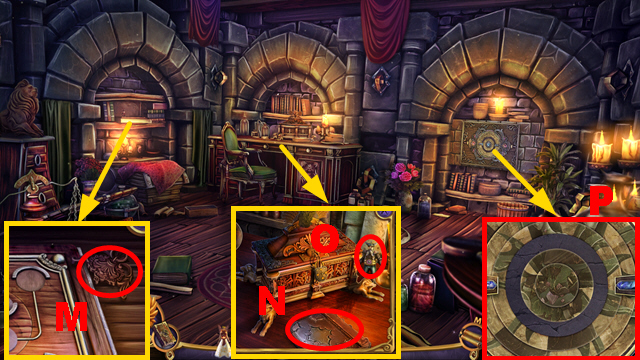
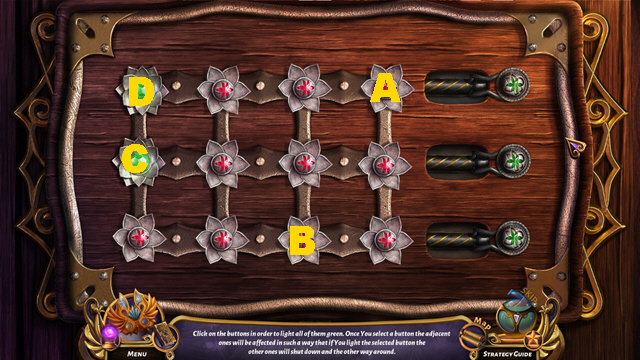
- Place 2 LOCK TILES (K).

- Play the mini-game.
- Solution: (L).
- Enter the Docks.
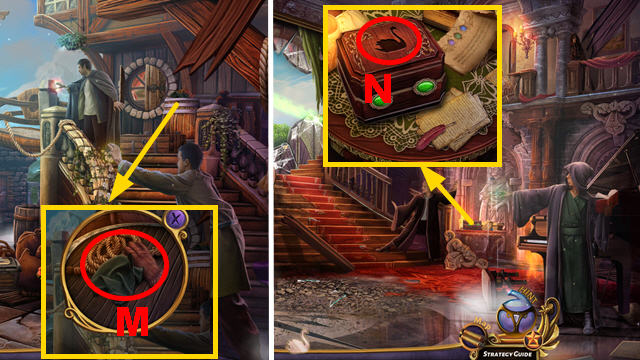
- Move 3 items and take the SWAN (M).
- Go back.
- Place the SWAN and take the GEAR (N).
- Go left.
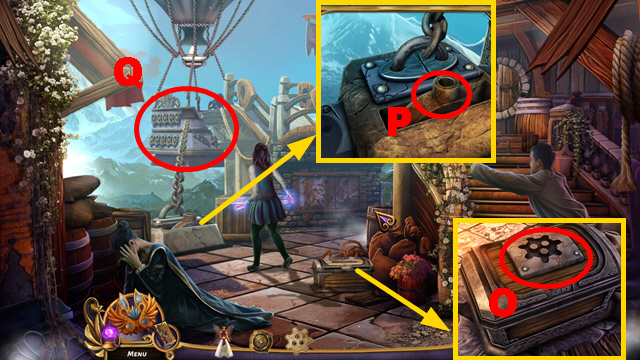
- Place the GEAR, take the LEVER, and CAN OF OIL (O).
- Use the CAN OF OIL and place the LEVER (P).
- Inspect the balloon (Q).
- Play the mini-game.
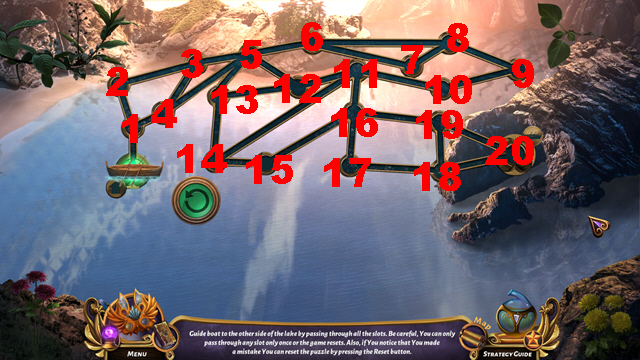
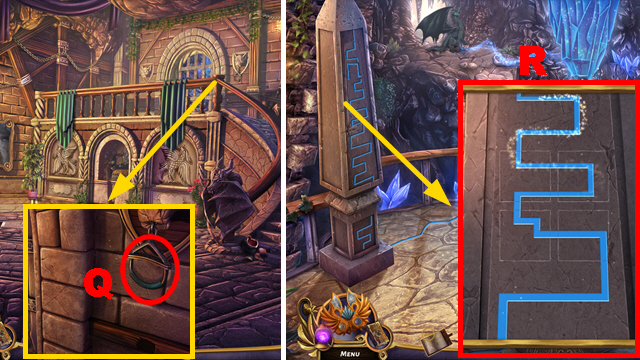
- Solution: S-R-S-Rx2-U-R-T-U-S-R-T-R-U-Rx2.
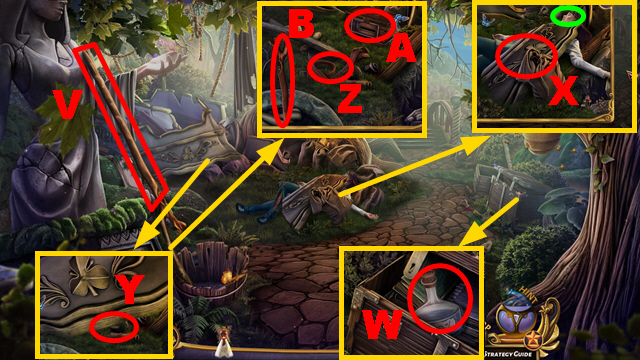
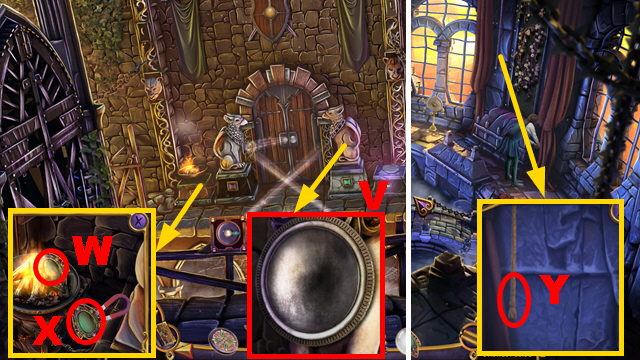
- Take the LONG BRANCH (V) and AROMATIC SOLVENT (W).
- Move 2 items (X) and use the AROMATIC SOLVENT (green).
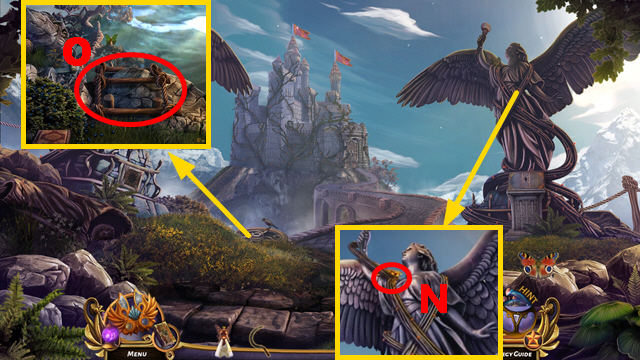
- Use the LONG BRANCH (Y); take the LEATHER STRAPS (Z), TOOLBOX (A), and LONG BRANCH (B).
- Use the LONG BRANCH and LEATHER STRAPS (C).
- Go forward.
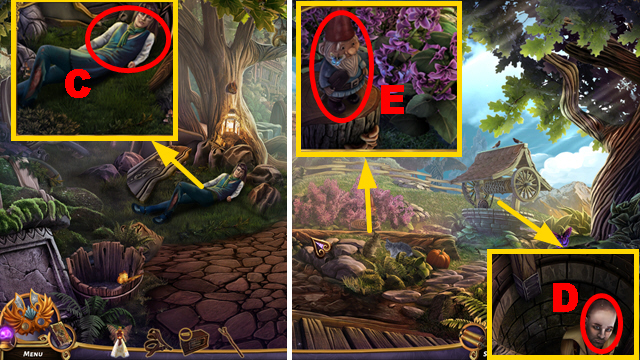
- Talk to the man (D).
- Move the dwarf and take the WAGON KEY (E).
- Insert the WAGON KEY (F).
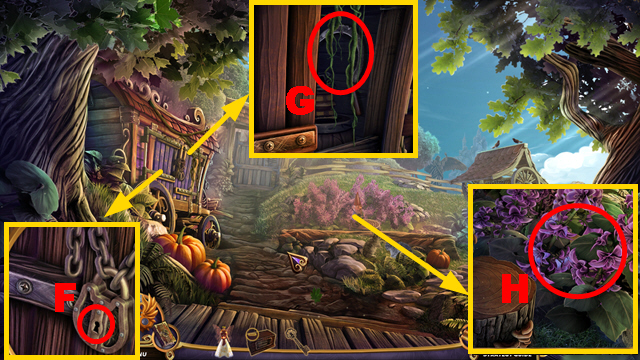
- Move 2 vines and take the SICKLE (G).
- Use the SICKLE, take the HAMMER, and FLOWER KNOB 1/2 (H).
- Place the HAMMER on the TOOLBOX; take the CRANK.
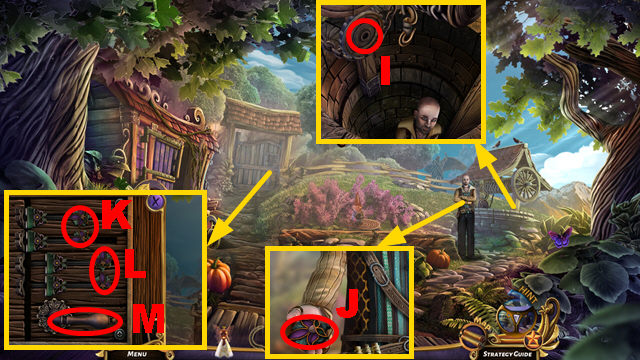
- Place the CRANK (I).
- Take FLOWER KNOB 2/2 (J).
- Place 2 FLOWER KNOBS (L) and move 2 flower knobs (K); pull the handle (M).
- Go forward.
- Use DAHLIA (N); receive BIRD 1/2.
- Take the BROKEN LADDER (O).
- Select the BROKEN LADDER; receive the STICKS.
- Go forward.
Chapter 2: The City Gates
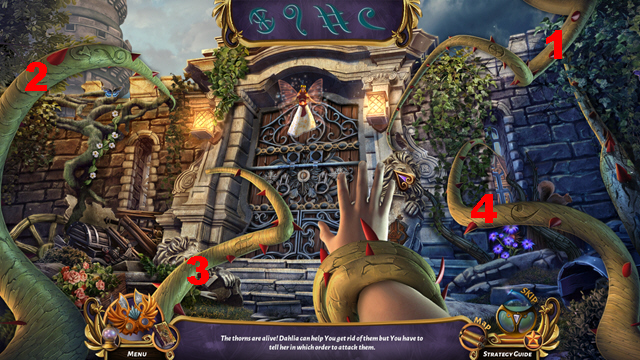
- Play the mini-game.
- Solution: 1-4.
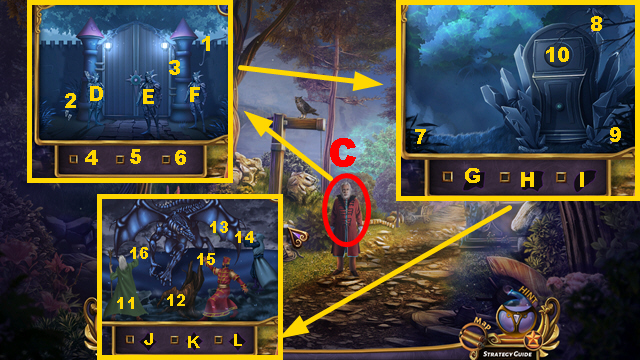
- Play the HOP (P); receive the GLOVES.
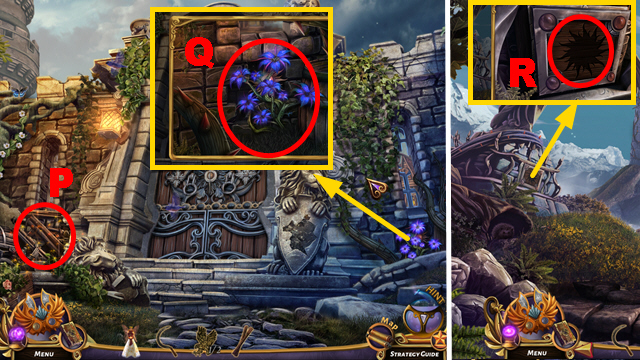
- Use the SICKLE, take the SUN, and WORMGRASS (Q).
- Go back.
- Place the SUN, move 2 stones, and take LION 1/3 (R).
- Go back twice.
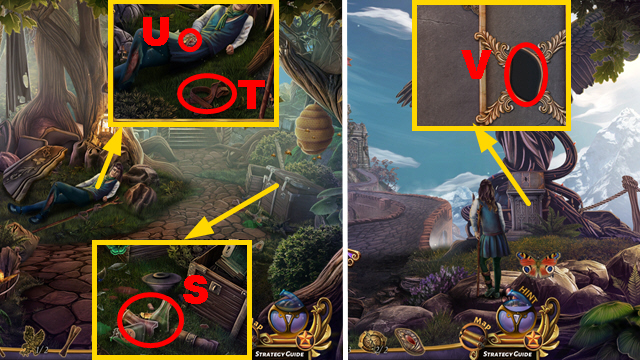
- Use the GLOVES and take BROKEN EMBLEM 1/2 (S).
- Place the STICKS, select the sticks, and 2 leather straps (T); take the DRAGON EYE and BROKEN EMBLEM 2/2 (U).
- Go forward twice.
- Insert the DRAGON EYE (V).
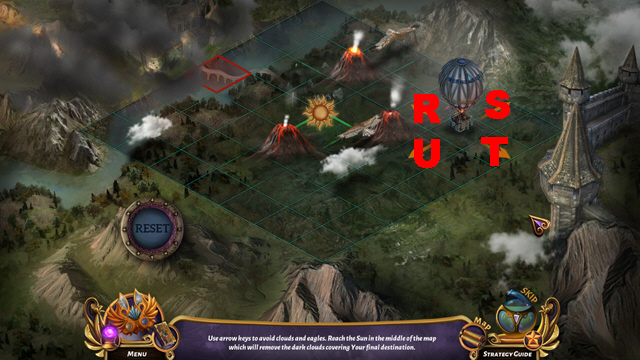
- Play the mini-game.
- Solution: 1-2-2-3-3-4-4-5-6-6-7-7-8-8-9-9.
- Take the LION EMBLEM.
- Go forward.
- Place the LION EMBLEM (W) and 2 BROKEN EMBLEMS (X).
- Go forward.
- Talk to Murdoch (Y).
- Inspect the bag (Z).
- Go left.
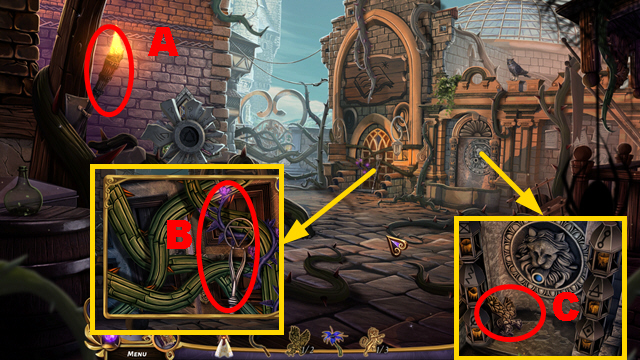
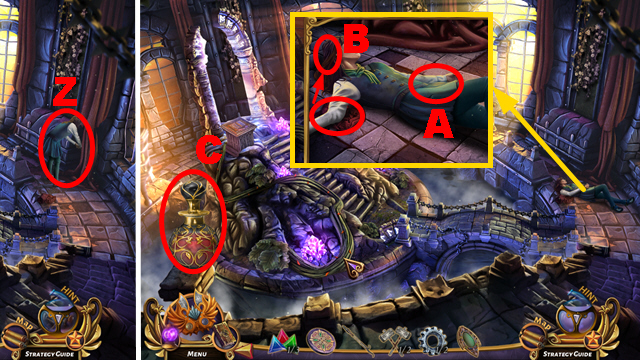
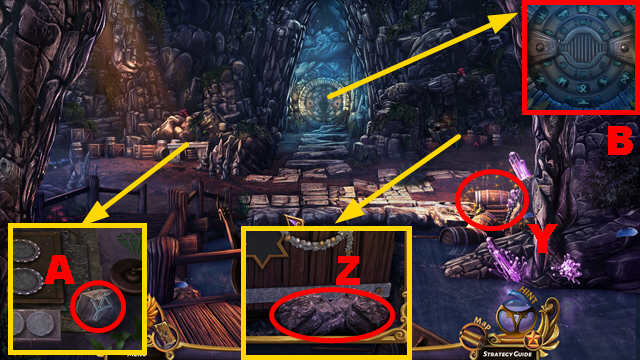
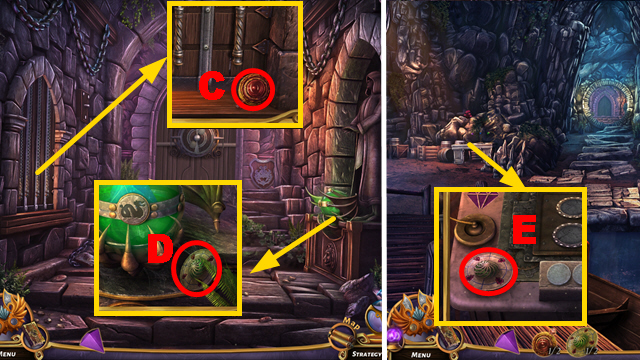
- Take the TORCH (A).
- Take the IRON ROD and use the SICKLE (B); receive the VOID PLANT.
- Take BIRD 2/2 and place the TORCH (C).
- Go back.
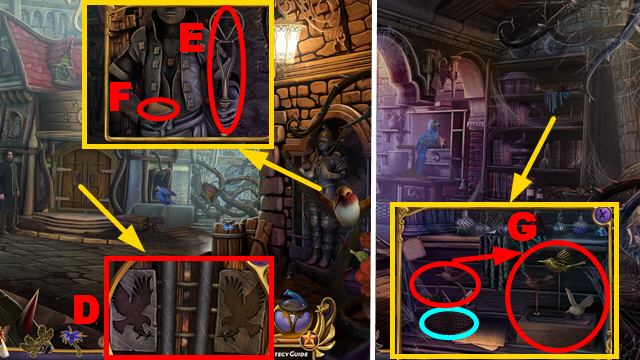
- Place 2 BIRDS (D).
- Place the IRON ROD (E), take the note, unfold it twice, and take the INSTRUCTIONS (F).
- Enter the Apothecary.
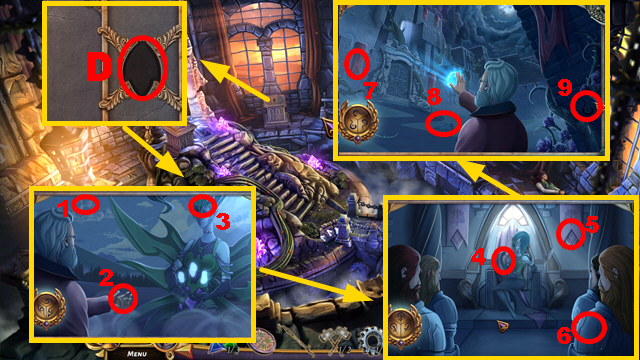
- Place the birds correctly, take the book, and turn 3 pages (G); take the EMPTY BASKET (blue).
- Go to the Upper City.
- Place the INSTRUCTIONS (H) and light candles 1-6; take the NETTLE.
- Go to the Castle Bridge.
- Place the EMPTY BASKET (I); collect berries twice (J) and take the FULL BASKET.
- Go to the Apothecary.
- Empty the FULL BASKET (K); take LION 2/3 and the MUSHROOMS (L).
- Place the WORMGRASS, VOID PLANT, NETTLE, and MUSHROOMS (M).
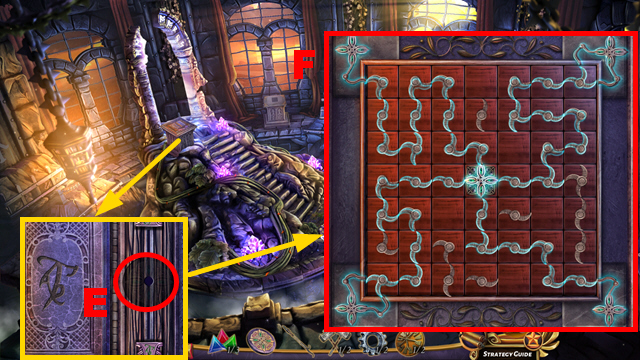
- Play the mini-game.
- Solution: (1-4)-(2-4)-(3-4)-5-(6-7)-(8-7)-(9-7)-10-(11-7)-(12-7)-(13-N).
- Take the THORN KILLER (N).
- Go to the Upper City.
- Use the THORN KILLER (O).
- Enter the Library.
- Take LION 3/3 (P).
- Go back twice.
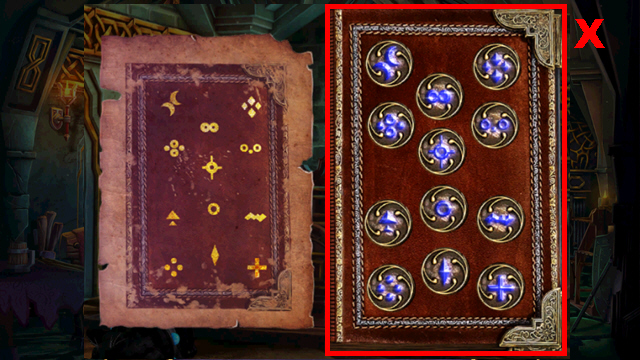
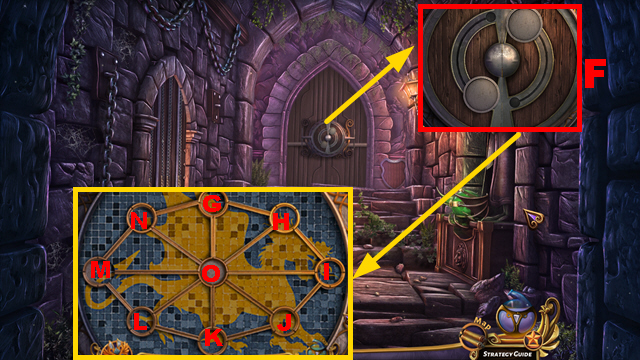
- Place 3 LIONS and arrange them correctly (Q); take the LIBRARY BOOK.
- Go to the Library.
- Place the LIBRARY BOOK, arrange the books correctly (R), and take the LEVER (S).
- Place the LEVER and arrange the levers correctly (T).
- Inspect the statue (U).
- Play the mini-game.
- Solution: 1-1-2-2-3-3-4-5-6-6-7-7-8-8-9-9.
- Take the STONE DISK.
- Go back.
- Place the STONE DISK (V).
- Push the stone disk.
- Play the mini-game.
- Solution: 1-1-2-2-3-3-(4-5)-6-6-(7-8)-(9-10)-10-(11-12)-13-14-14-15-15-(16-17).
- Take the SHAPESHIFTING POTION and pouch.
- Go forward.
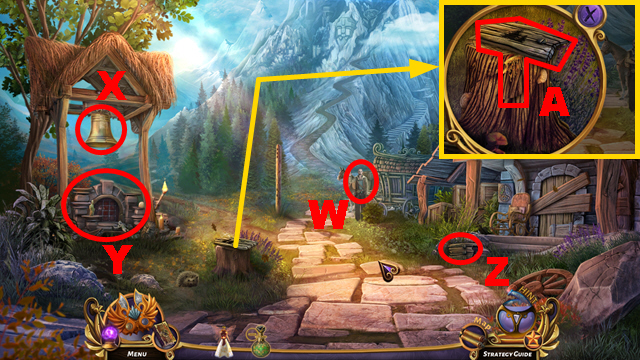
- Talk to the man (W).
- Ring the bell (X).
- Play the HOP (Y); receive the SMALL CHEST.
- Take DIRECTION ARROW 1/3 (Z).
- Open the SMALL CHEST; take the LOCKER KEY.
- Take DIRECTION ARROW 2/3 and rip the bark twice (A).
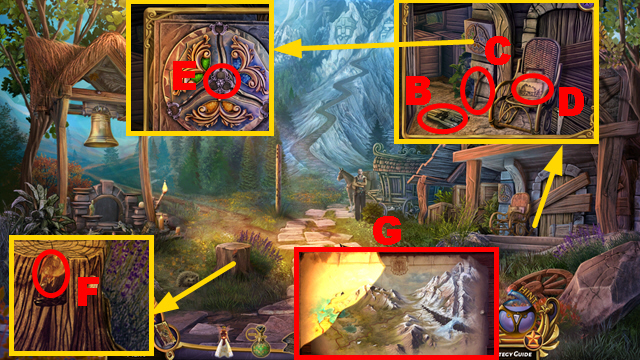
- Take DIRECTION ARROW 3/3 (B) and the STICK (C); move 3 notes and take the INCOMPLETE MAP (D).
- Place the LOCKER KEY and take the MAP PIECES (E).
- Use the STICK (F); receive the STICK WITH RESIN.
- Place the MAP PIECES and STICK WITH RESIN on the INCOMPLETE MAP; recreate the map (G) and receive the MAP.
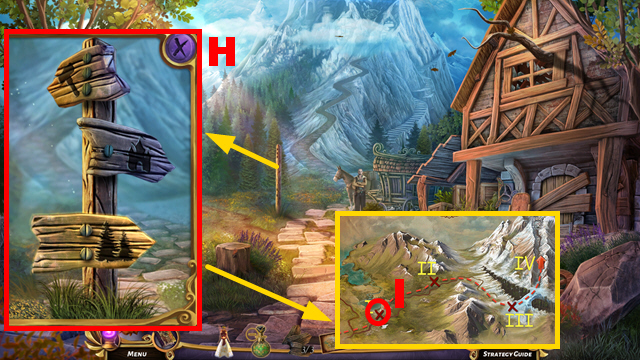
- Use 3 DIRECTION ARROWS and arrange them correctly (H).
- Activate arrows (I) to play different phases of the mini-game.
- Solution part 1-3: 1-1-2-2-3-3-4-4-5-5-6-6-7-7-8-8-9-9.
- Solution part 4-6: J-K-L-M-N-O-J-P-1-2-3-4-5-6-7-8-9-10-S-Q-R.
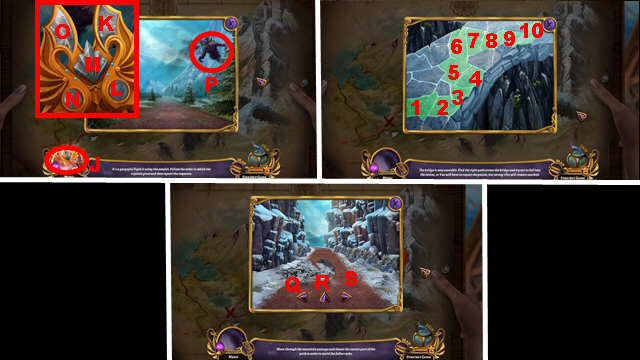
Chapter 3: The Mountain Passage
- Talk to the man (T).
- Take WRENCH 1/2 (U).
- Take the DUNGEONEERING BAG (V), WRENCH 2/2 (W), and GOLD PIECE 1/2 (X).
- Use 2 WRENCHES (Y).
- Take the SEWING BOX (Z); move the statue, crate, and use DAHLIA (A) to play the HOP.
- Receive the PERMISSION TOKEN.
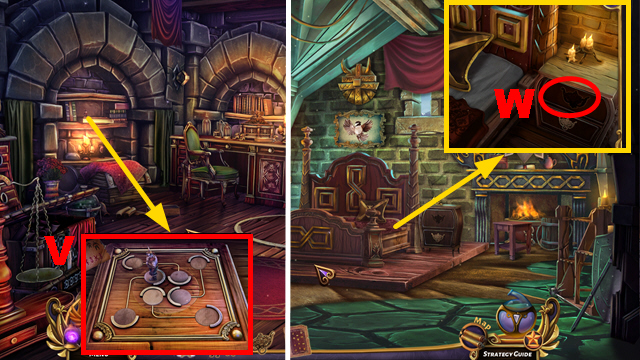
- Select the SEWING BOX; play the mini-game.
- Solution: 1-4.
- Place the PERMISSION TOKEN (B) and push the button (C).
- Inspect the area (D).
- Play the mini-game.
- Solution: E-Fx2-E-Fx2.
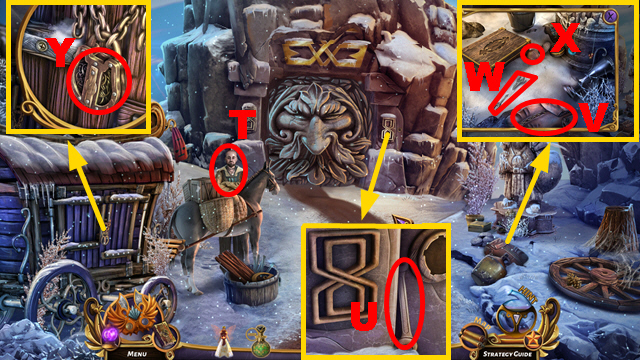
- Go forward.
- Zoom down (G).
- Go left.
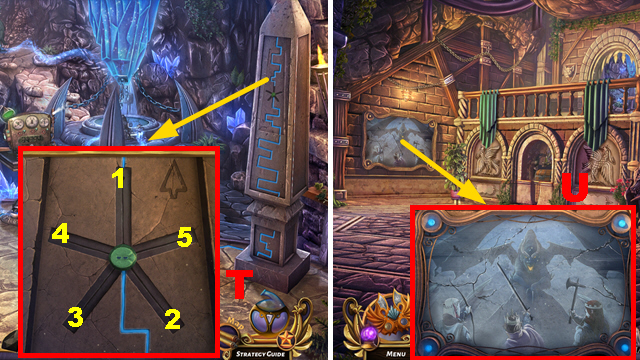
- Remove the cloth (H); move mirrors Ix2-Jx2.
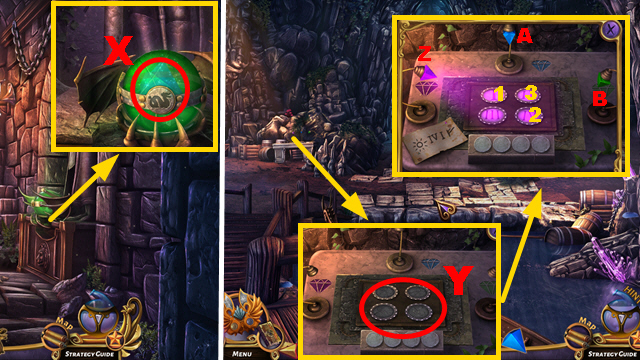
- Select the AMULET; push gems 1-5.
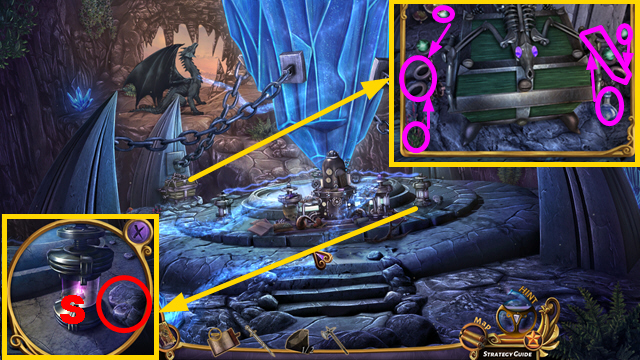
- Take the BLACK ORB (K).
- Use DAHLIA (L); receive GREEN TRIANGLE CRYSTAL 1/3.
- Use the AMULET and take the ROUND PENDANT (M); take the INSIGNIA (N).
- Take the LOCKPICK from the ROUND PENDANT.
- Insert the LOCKPICK into the SEWING BOX; take the BALL OF YARN.
- Take the NEEDLE from the BALL OF YARN.
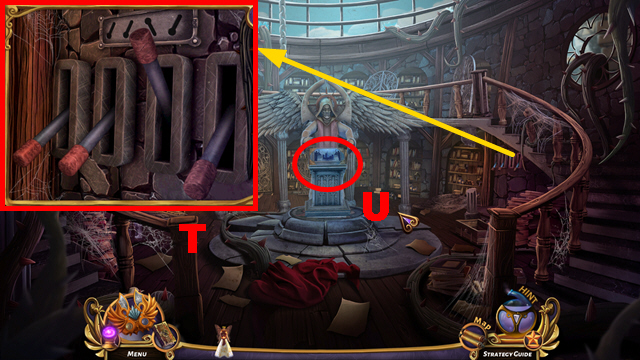
- Take GOLD PIECE 2/2 (O), the FIRE POKER (P), and PULLEY SCHEMATICS PART (Q).

- Place the BLACK ORB (R).
- Unfold the PULLEY SCHEMATICS PART twice.
- Use the NEEDLE to open the DUNGEONEERING BAG; take HAMMER 1/2.
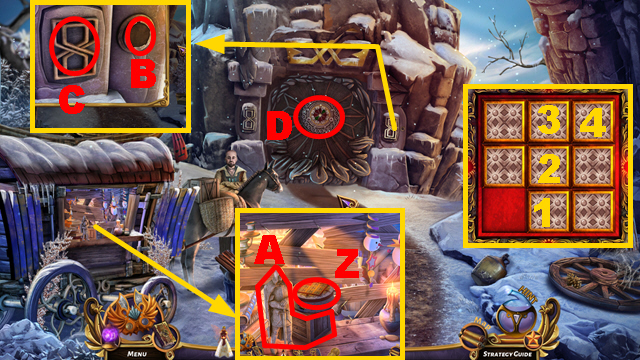
- Go back.
- Give 2 GOLD PIECES (S) and receive the MAGNET; zoom right.
- Go back.
- Place the INSIGNIA, take GEAR 1/2 and the PULLEY SCHEMATICS PART (T).
- Combine 2 PULLEY SCHEMATICS PARTS; receive the PULLEY SCHEMATICS.
- Go forward.
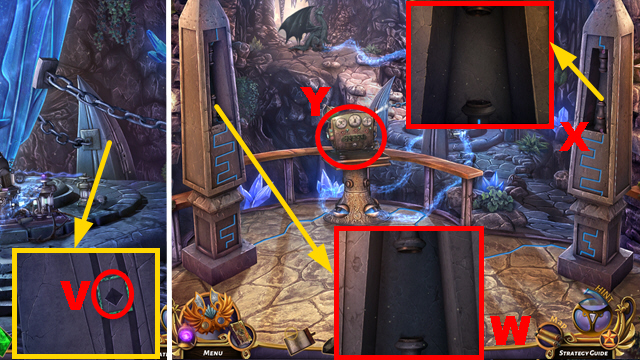
- Place the PULLEY SCHEMATICS and adjust the pointers (purple); take the WHITE ORB (U).
- Go left.
- Place the WHITE ORB (V).
- Use the MAGNET (W); take the PENDANT (X).
- Go forward.
- Use DAHLIA (Y); receive the ROPE.
- Talk to Anna (Z).
- Use the ROPE (A); move the cloth and use the scissors (B) to receive ANNA'S HAIR.
- Place ANNA'S HAIR into the SHAPESHIFTING POTION.
- Drink the SHAPESHIFTING POTION (C).
- Place the PENDANT (D).
- Play the mini-game.
- Solution: 1-1-2-2-3-4-4-5-5-6-6-7-7-8-8-9.
- Take GOLDEN TILE 1/2.
- Place the ROUND PENDANT (E); play the mini-game.
- Solution: (F).
- Take RUNIC MARBLE 1/2.
- Go back twice.
- Talk to the guards (G).
- Talk to Cera (H).
- Use DAHLIA (I); receive GOLD COIN 1/5.
- Take GOLD COIN 2/5 (J) and HAMMER 2/2 (K); use the FIRE POKER, take TRIANGLE CRYSTAL 2/3, and RELIEF PIECE 1/2 (L).
- Enter the Throne Room.
- Take the WHITE BELL (M) and CRYSTAL INSET (blue); move 3 items and take the MEAT (N).
- Place the CRYSTAL INSET (O) and play the HOP (green); receive RELIEF PIECE 2/2.
- Go back.
- Place 2 RELIEF PIECES (P).
- Enter the Queen's Room.
- Take GEAR 2/2 (Q) and the STAR KEY (R).
- Arrange the tiles correctly, take GOLD COIN 3/5, RUNIC MARBLE 2/2 (S), and DWARF FIGURINE 1/3 (T).
- Go back twice.
- Use the STAR KEY (U), place 2 GEARS (V), and the gear (purple); place 2 HAMMERS and take TRIANGLE KEY 3/3 (W).
- Go forward.
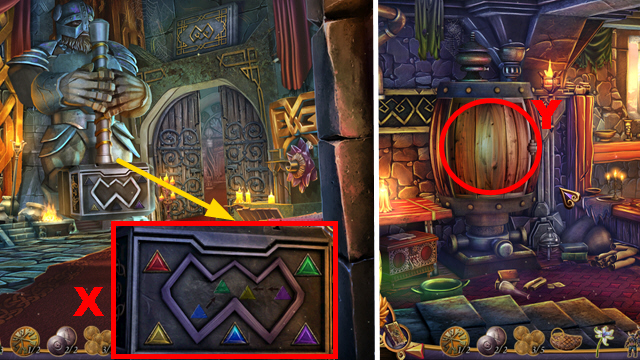
- Place 3 TRIANGLE KEYS and arrange them correctly (X).
- Enter the Brewery.
- Open the barrel and play the HOP (Y); receive the CRIMSON CRYSTAL.

- Take GOLD COIN 4/5 (Z), place pieces 1-3, and take the SLEEPING POWDER (3); move 2 items and take the CALMING JUICE (A).
- Place the CRIMSON CRYSTAL, WHITE BELL, SLEEPING POWDER, and CALMING JUICE (B); open the book and take GOLD COIN 5/5 (C).
- Go back twice.
- Give 5 GOLD COINS (D); receive the POTION BOOK.
- Go to the Altar Room.
- Place 2 RUNIC MARBLES, arrange them correctly, take the ENGRAVED CODE, and GOLDEN TILE 2/2 (E).
- Go to the Brewery.

- Insert 2 GOLDEN TILES, take the ENHANCING SOLUTION, and RING (F).
- Place the ENHANCING SOLUTION and POTION BOOK (G).
- Play the mini-game.
- Solution: (1-H)-(2-H)-(3-H)-(4-H)-(5-H)-(6-H).
- Receive the SLEEPING POTION.
- Go to the Queen's Room.
Chapter 4: The Queen's Office
- Pour the SLEEPING POTION over the MEAT; take the DOUSED MEAT.
- Give the DOUSED MEAT (I).
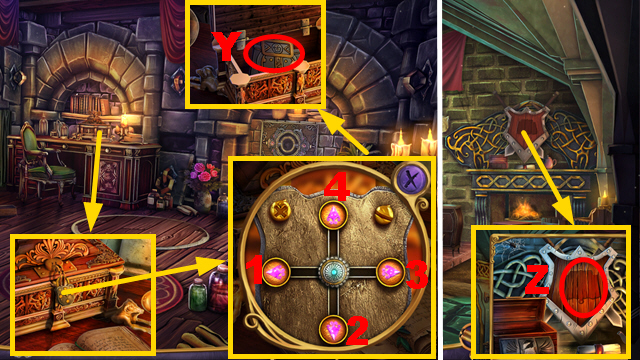
- Move 2 hooks and place the ENGRAVED CODE (J); enter the correct code (K).
- Enter the Queen's Office.
- Move the carpet twice (L).
- Take the DRAWER HANDLE (M).
- Open the book and take the JOURNAL PAGE (N); take DWARF FIGURINE 2/3 (O).
- Place the RING (P).
- Play the mini-game.
- Solution: Move (R) to put (Q) into the correct position, (S) to put (R) into the correct position, (T) to move (S) into the correct position, and (U) to put (T) into the correct position.
- Take DWARF FIGURINE 3/3.
- Place 3 DWARF FIGURINES (V).
- Go back.
- Place the DRAWER HANDLE, pull it, and take the QUEEN'S JOURNAL (W).
- Place the JOURNAL PAGE on the QUEEN'S JOURNAL.
- Play the mini-game.
- Solution: (X).
- Go left.
- Move buttons 1-4; take the EMBLEM (Y).
- Go back.
- Place the EMBLEM, move the shield, and take the MAGIC WAND (Z).
- Go left.
- Use the MAGIC WAND (A) and move dwarf figurines 1-4; push the button.
- Take the CHARMED CHEST (B).
- Go to the Throne Room.
- Talk to the headmaster (C).
- Play the mini-game.
- Solution: 1-2-2-3-(4-F)-(5-D)-(6-E)-7-7-8-8-9-9-(G-10)-(H-10)-(I-10)-11-11-12-12-13-13-(J-14)-(K-15)-(L-16).

- Use DAHLIA (M); receive the CHEST PENDANT.
- Take the HOOK (N).
- Take the CLOTH (O); move the lantern and examine the rope (P).
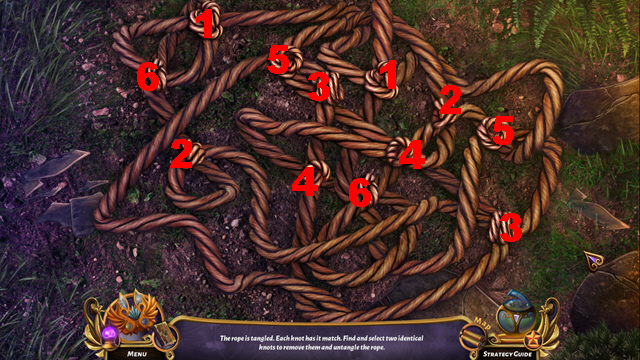
- Play the mini-game.
- Solution: Match pairs of knots 1-6.
- Receive the ROPE.
- Place the HOOK on the ROPE.
- Go forward.
- Play the HOP (Q); receive HORSESHOE 1/2.
- Activate the AMULET; push gems 1-5.
- Use the AMULET (R).
- Throw the ROPE (S).
- Go right.
- Take HORSESHOE 2/2 (T).
- Go back.
- Place 2 HORSESHOES, move 2 items, take the TROWEL, and RUNE TILE 1/2 (U).
- Go right.
- Use the TROWEL, CLOTH, and take the KNIFE (V).
- Go back.
- Use the KNIFE, take WING 1/2, and RUNE TILE 2/2 (W).
- Go right.
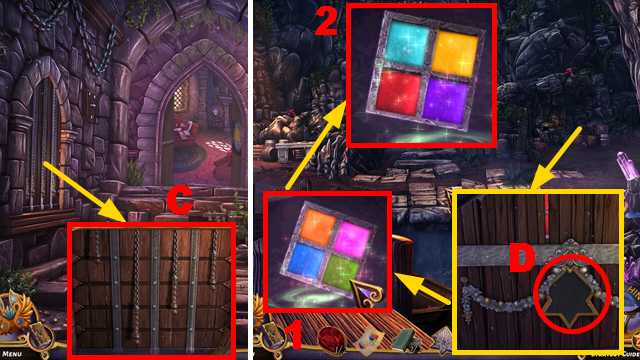
- Place 2 RUNE TILES (X); play the mini-game.
- Solution: (Y).
- Take the BLUE CRYSTAL.
- Place the BLUE CRYSTAL on the CHEST PENDANT.
- Go back twice.
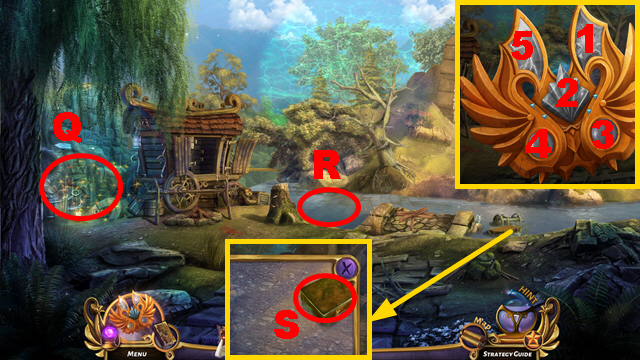
- Place the CHEST PENDANT and take WING 2/2 (Z).
- Go to the City Gate.
- Place 2 WINGS (A).
- Go forward.
- Talk to the man (B).
- Move the flower (1), pestle (2), and take the SLEEPING POWDER (C); take the CHEESE (D).
- Give the CHEESE and take LEAF HANDLE 1/2 (E).
- Move 2 items and take LEAF HANDLE 2/2 (F).
- Place 2 LEAF HANDLES and take the SPOON (G).
- Use the SLEEPING POWDER (H) and take the BUNDLE OF KEYS (I); use the SPOON and inspect the area (J).
- Select the BUNDLE OF KEYS; match pairs of keys 1-4 and receive the GOLDEN KEY.
- Place the GOLDEN KEY (K).
- Play the mini-game.
- Solution: (Mx4-Px6-N)-(Px2-N)-(Lx6-Ox4-N)-(Lx4-Ox2-N)-(Lx4-N)-(Px2-N)-(Mx6-Px2-N)-(Mx4-Px2-N).
- Go right.
- Play the HOP (Q); receive the AMULET.
- Take the POCKET KNIFE (R).
- Use the POCKET KNIFE (S); receive the GUARD'S HAIR.
- Use the POCKET KNIFE (T).
Chapter 5: The Grand Tree
- Move an item, take the SHAPESHIFTING POTION, move 2 items, and take FIGURINE 1/2 (U).
- Put the GUARD'S HAIR into the SHAPESHIFTING POTION.
- Drink the SHAPESHIFTING POTION (V).
- Enter the Grand Tree.
- Talk to the man (W).
- Play the HOP (X); receive FIGURINE 2/2.
- Take the BOX (Y).
- Open the BOX, take the FLOWER BADGE, and place the FLOWER BADGE on the BOX.
- Go back.
- Place 2 FIGURINES (Z).
- Play the mini-game.
- Solution: (A).
- Take RING 1/2.
- Enter the correct code (B); receive RING 2/2 and DAHLIA.
- Place 2 RINGS on the BOX; arrange them correctly (C) and take the TRIANGLE KEY.
- Insert the TRIANGLE KEY (D); take the OIL BOTTLE (E).
- Go forward.
- Use the OIL BOTTLE (F); receive the SPEAR.
- Place the SPEAR (G).
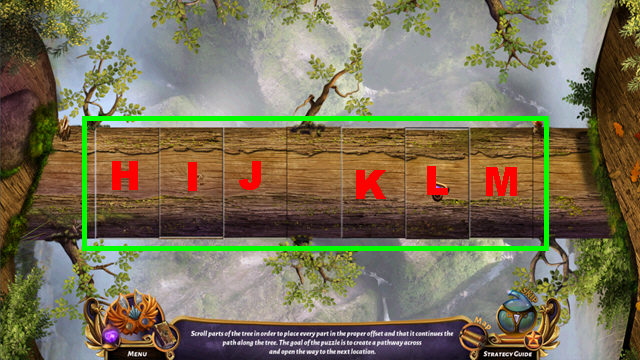
- Play the mini-game.
- Solution: Scroll pieces I-H-J-M-K-L into the correct position (green).
- Play the HOP (N); receive the HORSE FIGURINE.
- Take LEAF BUTTON 1/3 (O).
- Go forward.
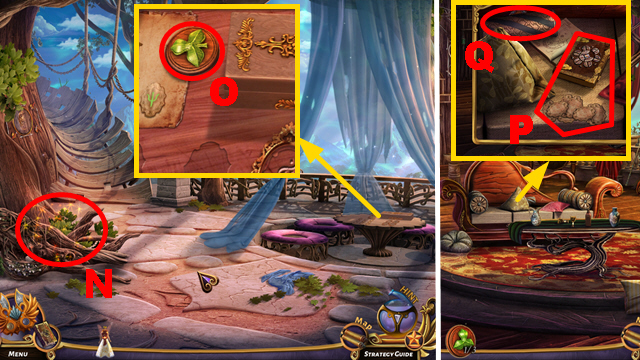
- Take the CARDS and BOOK (P); move an item and take the ROUND MEDALLION (Q).
- Take LANTERN BUTTON 1/2 (R) and the CANE (S).
- Place the ROUND MEDALLION (T).
- Go back.
- Place the CARDS (U).
- Use the CANE, take the PURSE, move 3 items, and take CRYSTAL PETAL 1/2 (V).
- Open the PURSE; take LANTERN BUTTON 2/2 and LEAF BUTTON 2/3.
- Go forward.
- Place 2 LANTERN BUTTONS, select the correct color, and pull the lever (W); take the GREEN LANTERN and PAPER CUTOUT 1/2 (X).
- Go back.

- Place the GREEN LANTERN (Y), move cards 1-4, and take CRYSTAL PETAL 2/2 (purple).
- Go forward.
- Place 2 CRYSTAL PETALS (Z).
- Play the mini-game.
- Solution: A-D.
- Enter the Hall.
- Place the HORSE FIGURINE, assemble the shapes correctly (E), and play the HOP (blue); receive RUNE PIECE 1/2.
- Take the COLORED GLASS (F) and PAPER CUTOUT 2/2 (G).
- Place the COLORED GLASS on the BOOK; take LEAF BUTTON 3/3.
- Go back.
- Place 3 LEAF BUTTONS and 2 PAPER CUTOUTS (H); push buttons 1-4 and take the BIRD FOOD.
- Go forward.
- Open the cage, give the BIRD FOOD, and take the BLUE KNOB (I).
- Place the BLUE KNOB, push buttons 1-3, and take the CROSSBOW (J).
- Go back twice.
- Place the CROSSBOW and take RUNE PIECE 2/2 (K).
- Go to the Hall.
- Place 2 RUNE PIECES and take the RUNE PAGE (L).
- Place the RUNE PAGE and assemble the runes correctly (M).
- Go forward.
- Activate the AMULET; push gems 1-4.
- Use the AMULET (N).
- Play the mini-game.
- Solution: Ox2-Q-Ox3-T-Ox2-U-O-P-Ox2-R-S.
- Take the KING'S NECKLACE (V).
- Place the KING'S NECKLACE (W).
- Take the DRAGON CRYSTALS (X).
- Place the DRAGON CRYSTALS and examine the compartment (Y).
- Play the mini-game.
- Solution: (Z).
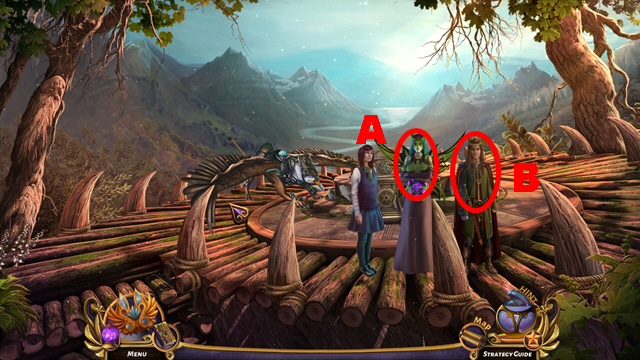
- Talk to Cera (A).
- Talk to the King (B).
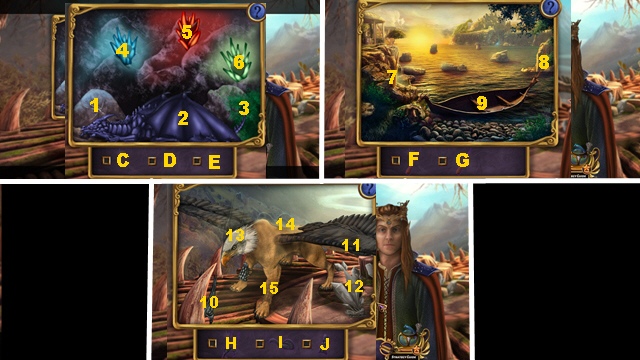
- Play the mini-game.
- Solution: 1-1-2-2-3-3-(C-4)-(D-5)-(E-6)-7-8-8-(F-9)-(G-9)-10-11-11-12-12-(H-13)-(I-14)-(J-15).
Chapter 6: The Cliff
- Take the HAMMER (K) and VASE 1/2 (L).
- Go forward.
- Take OAR 1/2 (M).
- Take the PLANKS (orange) and VASE 2/2 (N); use the HAMMER, take the TAR, and FLAG HEADS (O).
- Use the HAMMER on the PLANKS; receive the NAILS.
- Use the OAR, PLANKS, NAILS, HAMMER, and TAR (P).
- Go back.
- Place the FLAG HEADS, arrange them correctly (Q), and play the HOP (R); receive the COLORFUL STAR.
- Place 2 VASES (S).
- Go forward.
- Place the COLORFUL STAR (T), activate stars 1-4, and take the AQUARIUS.
- Go back.
- Place the AQUARIUS (U); take the WOODEN SCOOP (V).
- Take the BRUSH (W).
- Go forward.
- Use the BRUSH and WOODEN SCOOP (X).
- Play the mini-game.
- Solution: 1-20.
- Play the HOP (Y); receive the PURPLE CRYSTAL.
- Move 2 stones and take STONE RUNE 1/2 (Z).
- Take STONE RUNE 2/2 (A).
- Place 2 STONE RUNES (B).
- Go forward.
- Take BROOCH 1/2 (C) and CRYSTAL INLET 1/2 (D).
- Go back.
- Take CRYSTAL INLET 2/2 (E).
- Go forward.
- Place 2 CRYSTAL INLETS (F); play the mini-game.
- Solution: G-H-O-L-K-J-I-H-O-J-K-L-M-O-L-K-O-I-J-K-O-J-I-H-G-N-O-K-J-I-H-G-N-M-L-K-J-I-H-G-N-M-O.
- Go forward.
- Play the HOP (P); receive BROOCH 2/2.
- Place 2 BROOCHES, take the CODE SEQUENCE, and GREEN CRYSTAL (Q).
- Take DRAGON EYE 1/2 (R) and the RUBIK'S IMAGE (S).
- Place the CODE SEQUENCE, push buttons 1-5, and take BOOK 1/2 (T).

- Take the SYMBOL INSTRUCTION (U).
- Go back.
- Arrange the symbols correctly, take the LEVER CLUE, and BOW INSET (V).
- Go forward.
- Place the BOW INSET (W).
- Play the mini-game.
- Solution: 1-1-2-2-3-3-3-3-3-4-5-5-6-6-7-7-8-9-9.
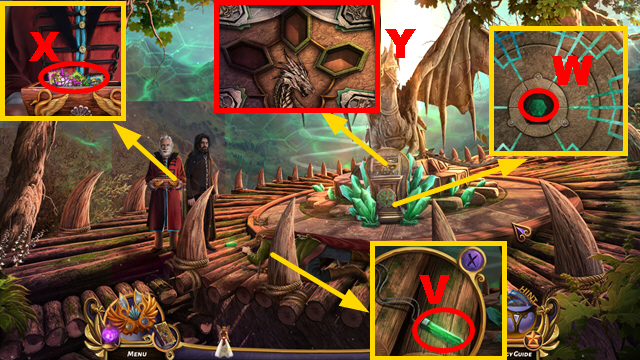
- Take the DRAGON FIGURINE.
- Go back.
- Place the DRAGON FIGURINE and take the BLUE CRYSTAL (X).
- Go back.
- Place the PURPLE CRYSTAL, BLUE CRYSTAL, GREEN CRYSTAL, and SYMBOL INSTRUCTION (Y); play the mini-game.
- Solution: 1-2-A-3-B-1.
- Take BOOK 2/2 and the LEVER CLUE.
- Combine 2 LEVER CLUES.
- Go forward.
- Place the LEVER CLUE and adjust the levers correctly (C); take the RUBIK'S SYMBOL.
- Go back.
- Place the RUBIK'S SYMBOL and RUBIK'S IMAGE (D); assemble the rubiks 1-2. and take the SILVER INSET.
- Go forward twice.
- Place 2 BOOKS and arrange the books correctly (E).
- Enter Murdoch's Room.
- Activate the AMULET; push gems 1-5.
- Use the AMULET (F).
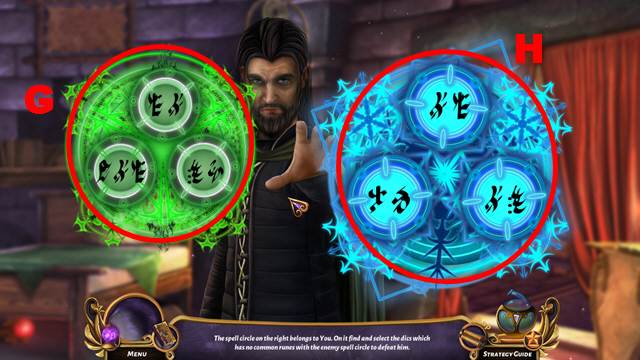
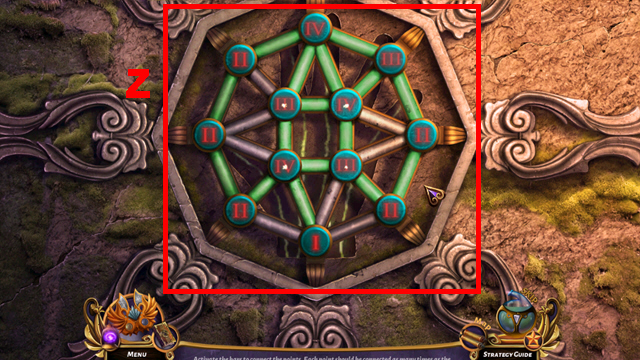
- Play the mini-game.
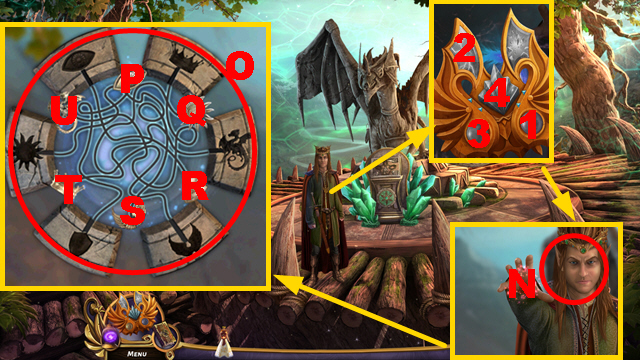
- Solution: Select runes in your own circle (G) that cannot be found in the opponent's circle (H) three times.
- This puzzle is randomized.
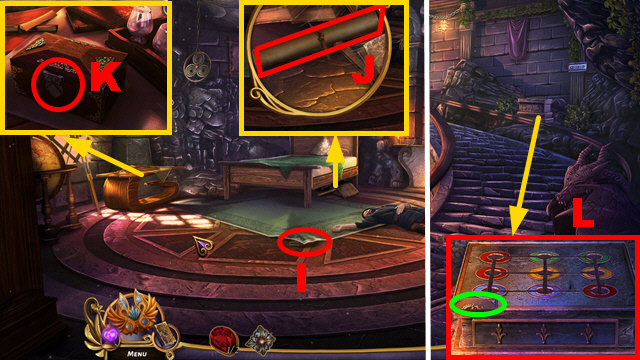
- Move the carpet (I).
- Open the scroll and take the HANDLE (J).
- Place the SILVER INLET and take DRAGON TILE 1/2 (K).
- Go forward.
- Place the HANDLE (L) and take DRAGON TILE 2/2 (green).
- Go back.
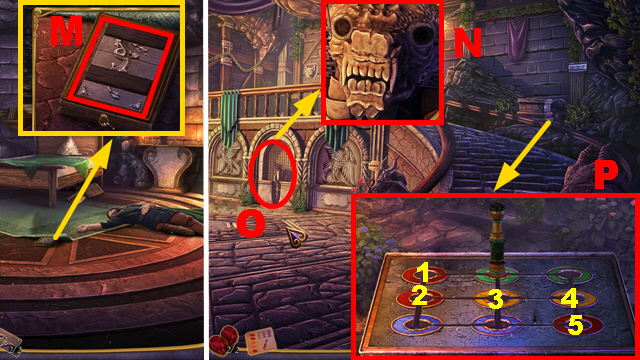
- Place 2 DRAGON TILES, take DRAGON EYE 2/2, and the INSTRUCTIONS (M).
- Go forward.
- Place 2 DRAGON EYES (N) and play the HOP (O); receive the INSTRUCTION MANUAL.
- Read the INSTRUCTION MANUAL.
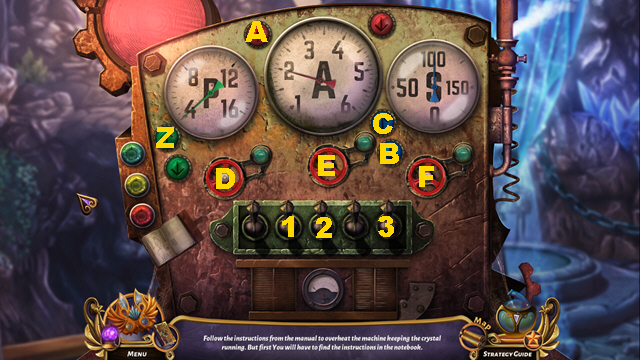
- Place the INSTRUCTIONS (P); play the mini-game.
- Solution: 1-5.
- Take the STONE SWORD, BLACK CORE 1/2, and SCEPTER.
- Use the SCEPTER (Q).
- Go forward.
- Set the pillar correctly and take the STONE AXE (R).
- Go forward.
- Collect and place 4 marbles (purple); take the STONE BOW and WHITE CORE 1/2.
- Move the stones and take the LEVER (S).
- Go back.
- Place the LEVER (T) and move it 1-3; take the GREEN DIAMOND.
- Go back.
- Place the STONE SWORD, STONE AXE, and STONE BOW (U); take BLACK CORE 2/2.
- Go forward twice.
- Place the GREEN DIAMOND and take WHITE CORE 2/2 (V).
- Go back.
- Place 2 BLACK CORES (W) and 2 WHITE CORES (X).
- Inspect the device (Y).
- Play the mini-game.
- Solution: Zx3-Ax2-B-C-Dx3-Ex4-Fx3-1-2-3.
- Go forward.
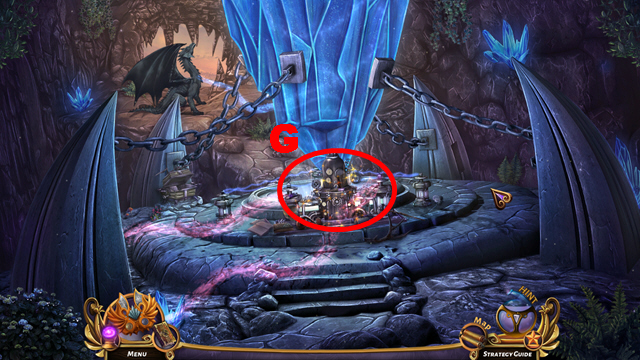
- Play the HOP (G).
- Go forward.
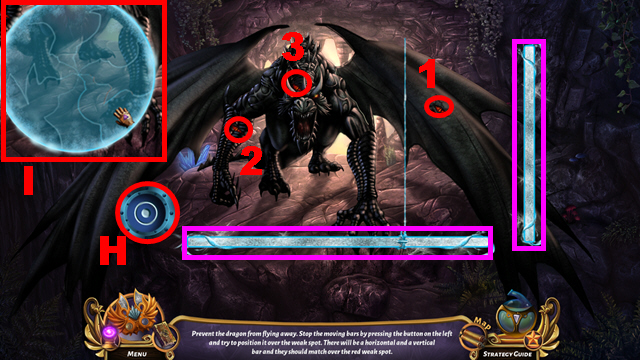
- Play the mini-game.
- Solution: Push the button (H) when both bars (purple) aim at areas 1-3; rebuild the mirror (I) twice to protect yourself.
- Congratulations! You have completed Queen's Quest: End of Dawn.
Created at: 2017-04-23