

Walkthrough Menu
- General Tips
- Chapter 1: The King's Request
- Chapter 2: Silverclaw Manor
- Chapter 3: The Shack
- Chapter 4: The Kidnapper
General Tips
- This is the official guide for Queen's Quest 5: Symphony of Death.
- This guide won't tell you when to zoom into a location; the screenshots show each zoom scene.
- Hidden-object puzzles are referred to as HOPs. Only the locations of the HOPs will be shown.
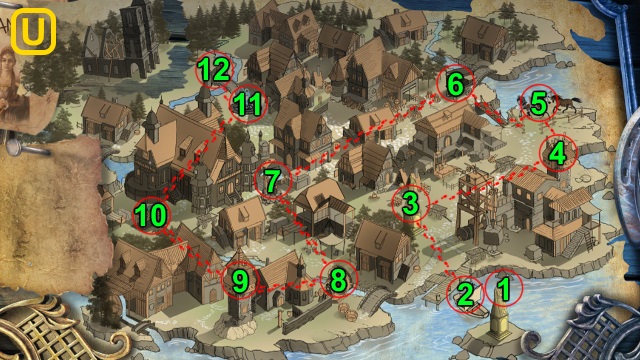
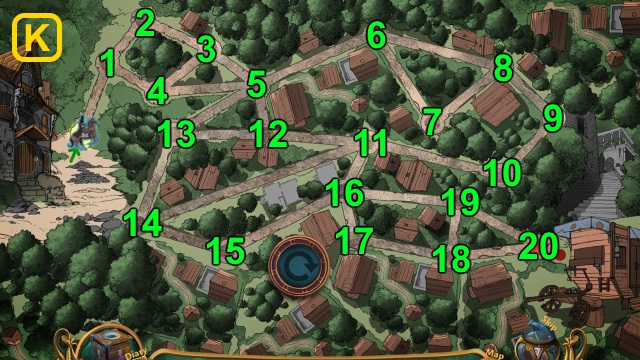
- Use the Map to fast travel to a location.
Chapter 1: The King's Request
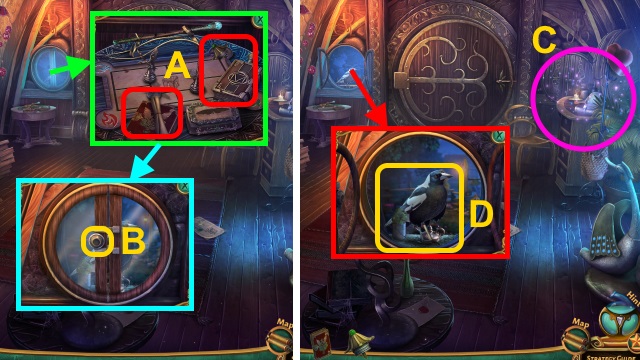
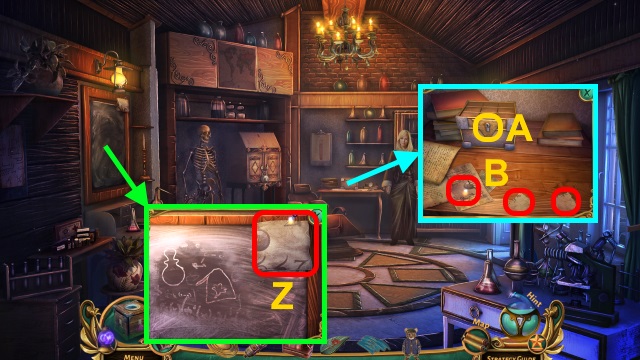
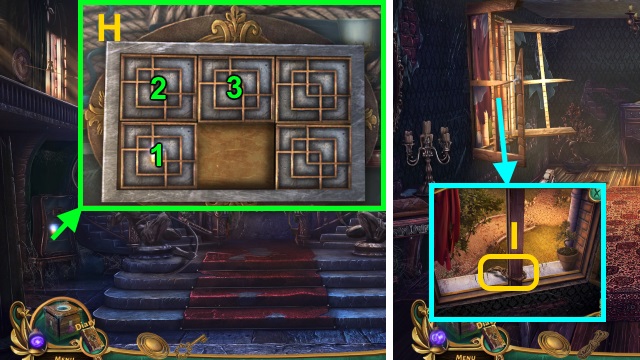
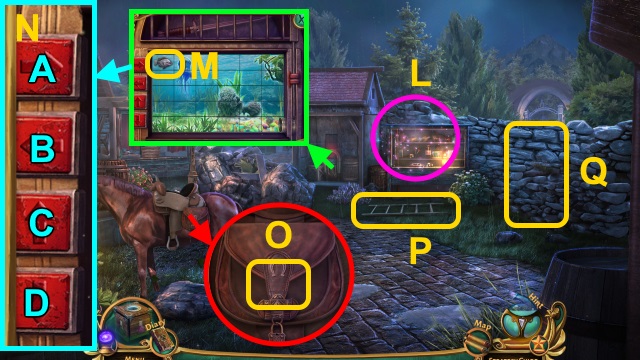
- Scroll down; take Diary, Map, WINDOW HANDLE, POTION BOOK, and LANTERN HANDLE (A).
- Scroll up; place WINDOW HANDLE (B).
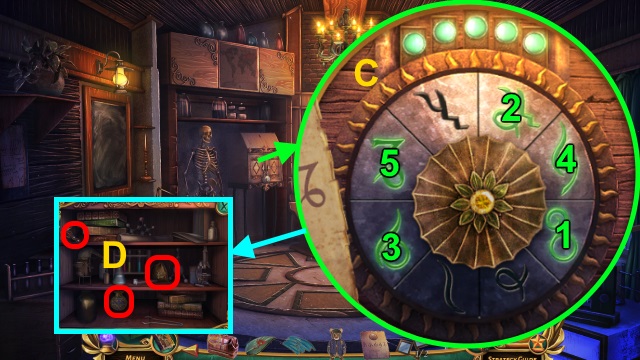
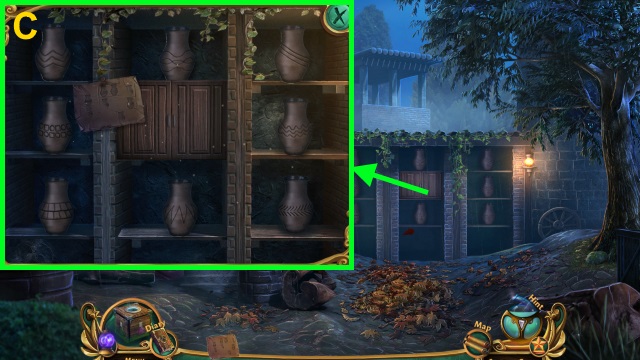
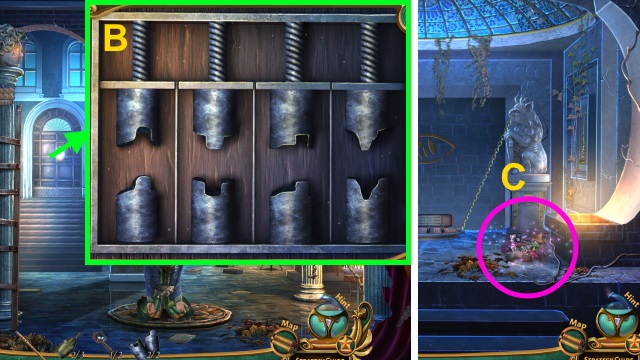
- Play HOP; receive BIRD SEEDS (C).
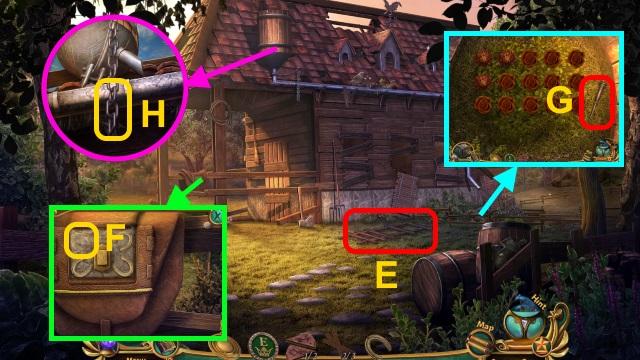
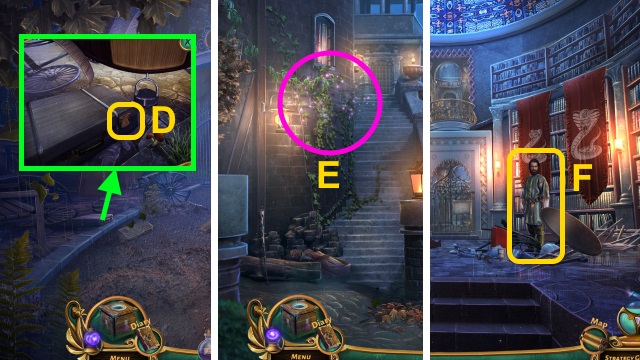
- Give BIRD SEEDS (D); take note and OIL.
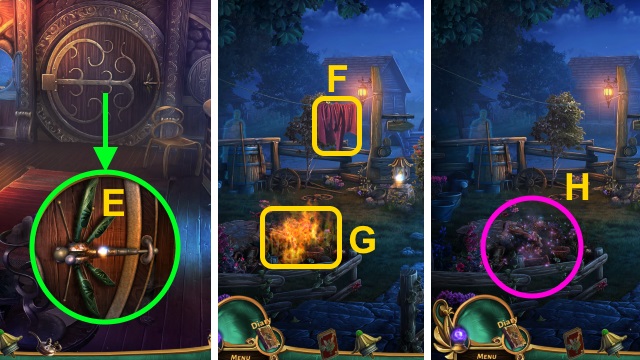
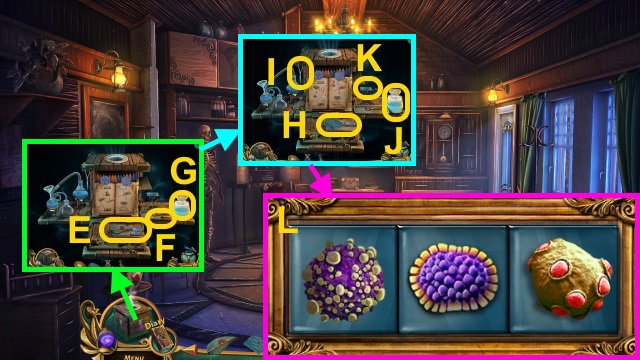
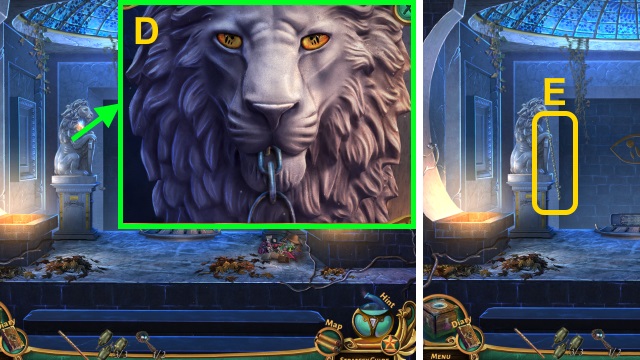
- Use OIL (E); examine.
- Walk forward.
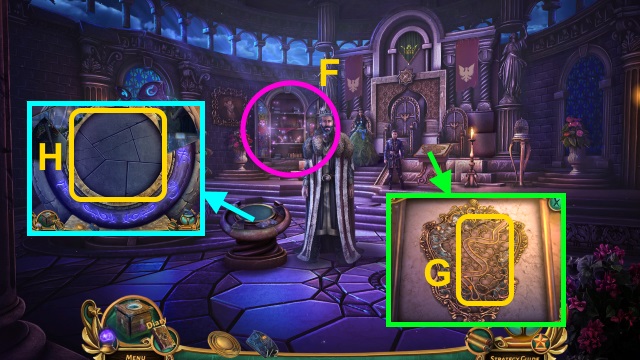
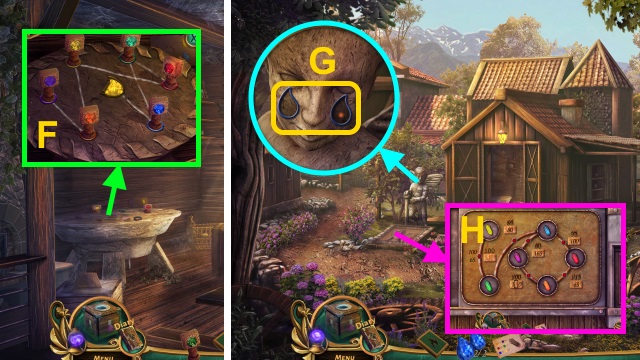
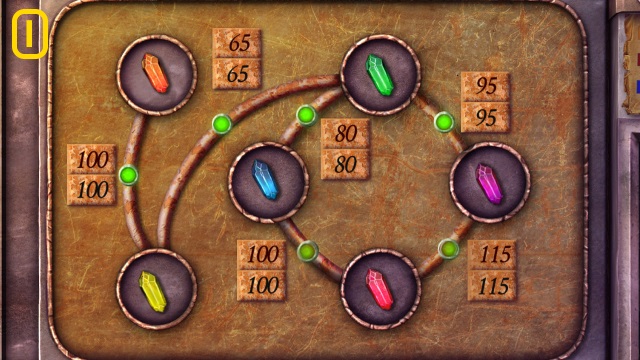
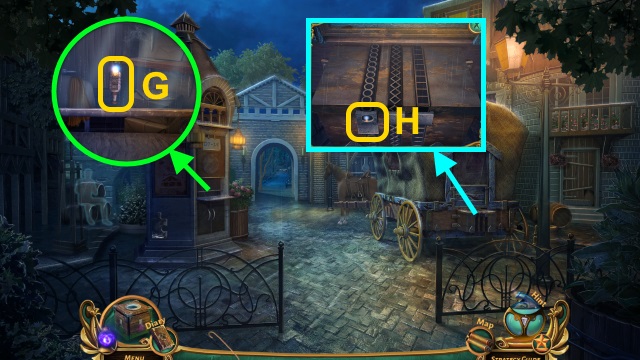
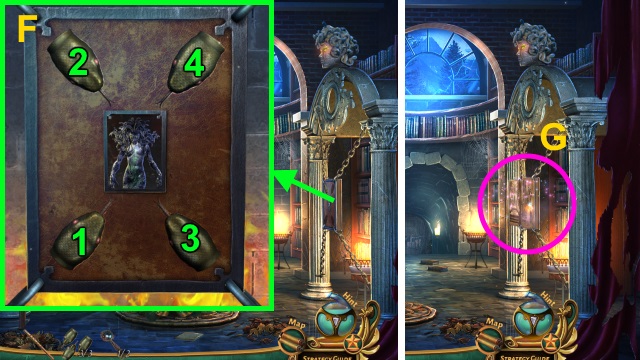
- Place cloth (F) on fire (G); remove.
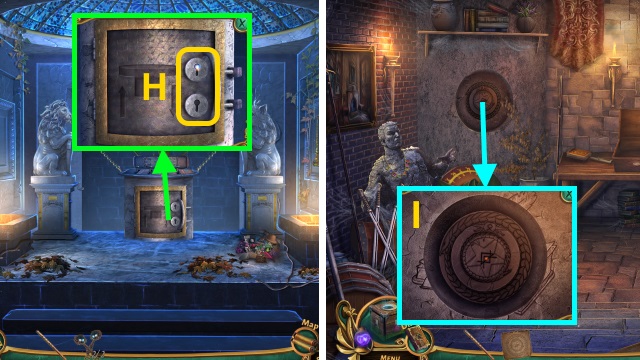
- Play HOP; receive EMBER BERRY (H).
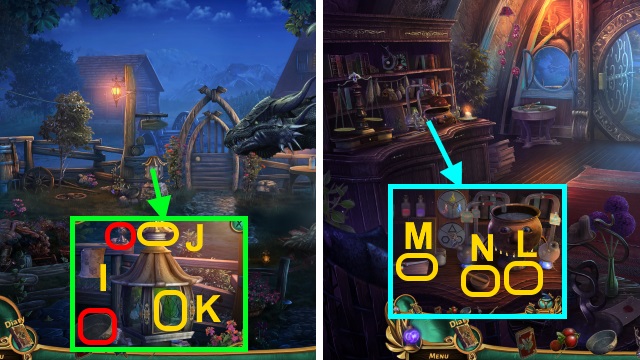
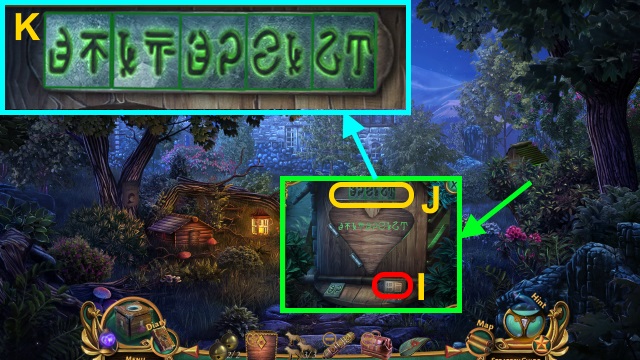
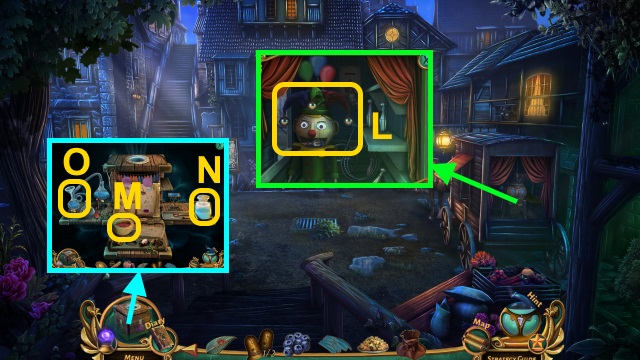
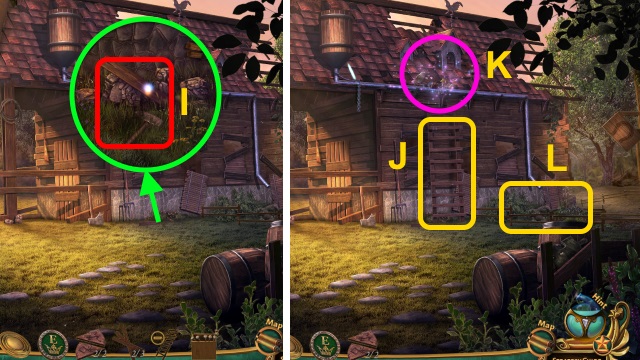
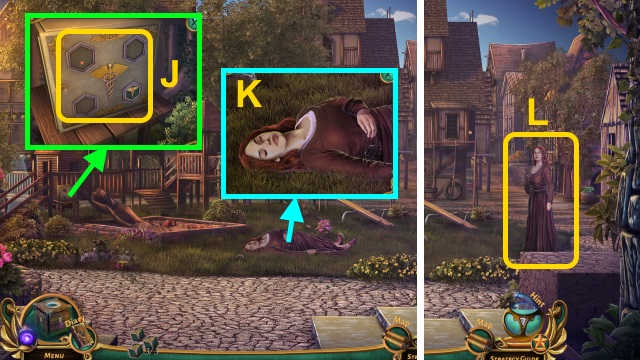
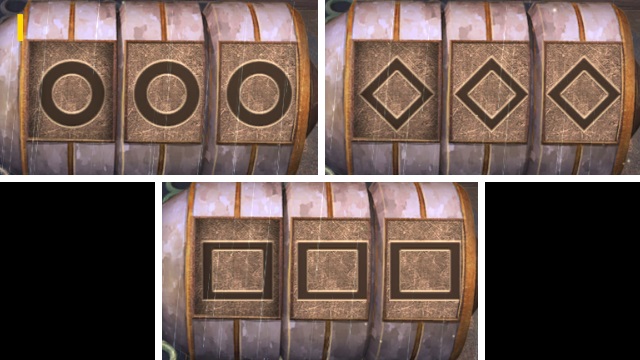
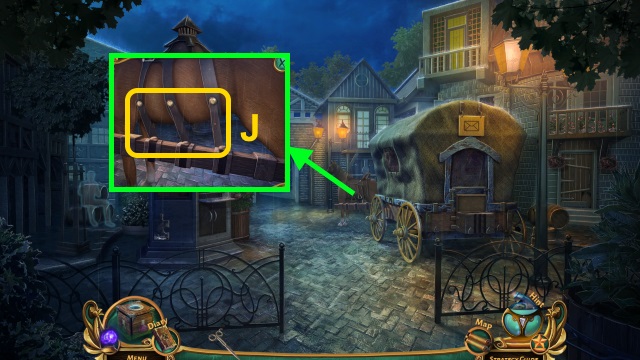
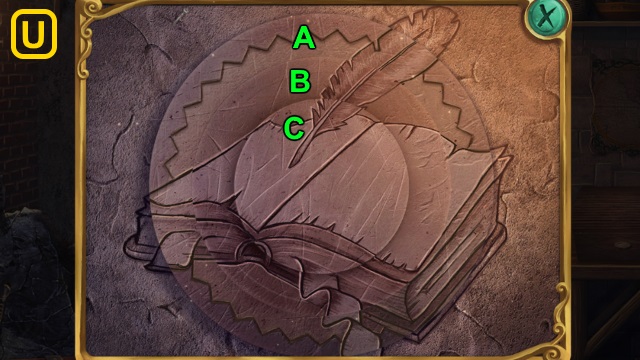
- Take DRAGON PLATE and SNAIL FIGURINE (I); place LANTERN HANDLE (J). Change all images to leaves (K), using handle to rotate. Take EARTH ROOT.
- Walk down.
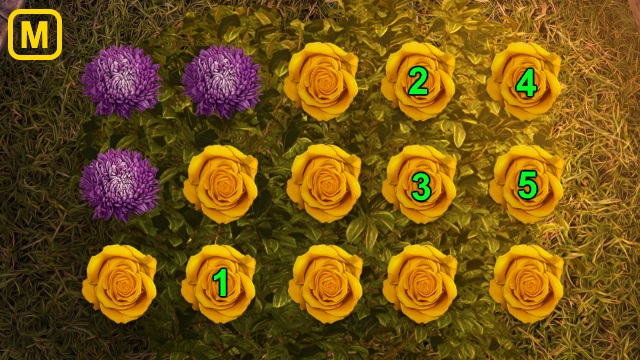
- Open recipe book; place DRAGON PLATE (L), EARTH ROOT (M), and EMBER BERRY (N).
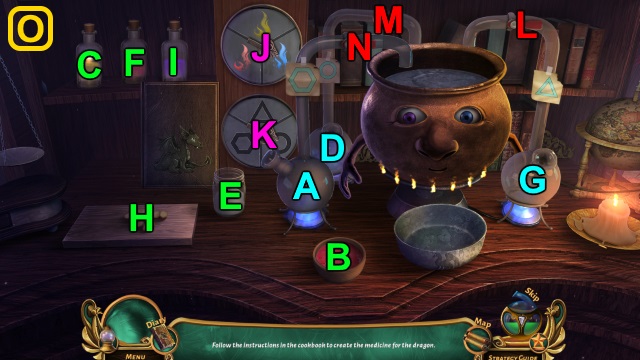
- Solution (O): (B-A)-(C-A)-(E-D)-(F-D)-(H-G)-(I-G)-(Jx2)-(K)-(J)-(Kx2)-(J)-(Kx2)-(L-M-N).
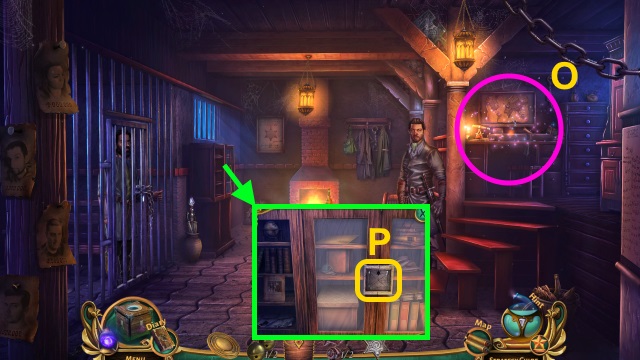
- Take ASH'S MEDICINE.
- Walk forward.
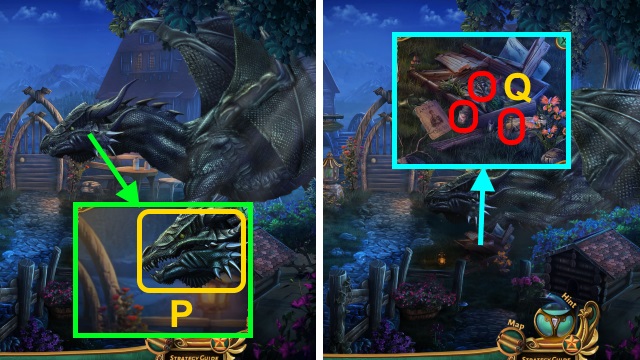
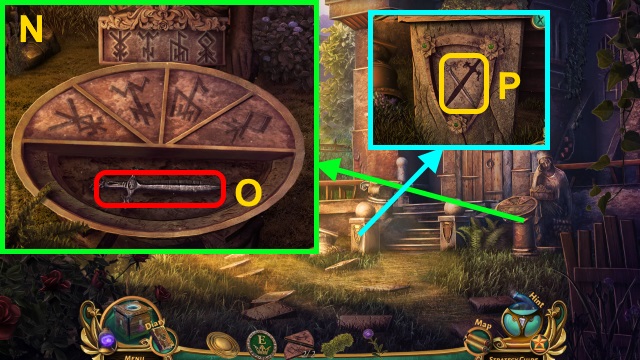
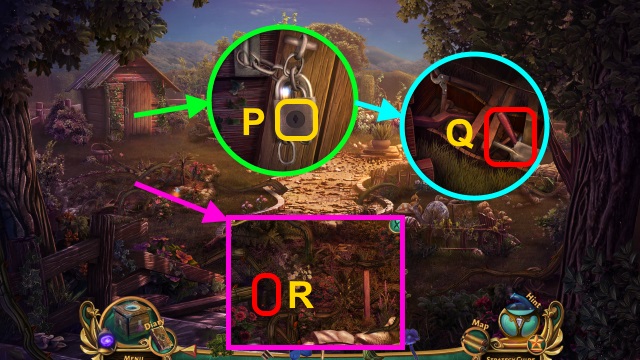
- Give ASH'S MEDICINE (P).
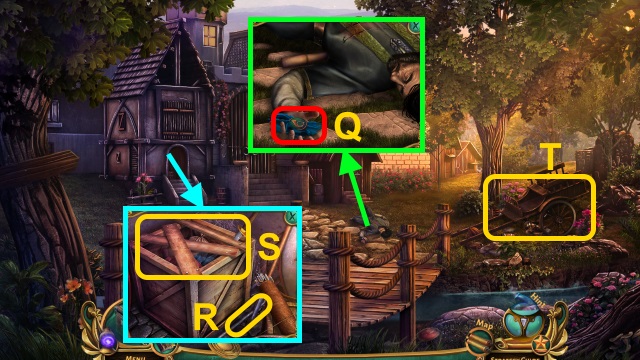
- Move debris; take BIRD FIGURINE, DRIED WINGS and FLIGHT ESSENCE (Q).
- Walk down.
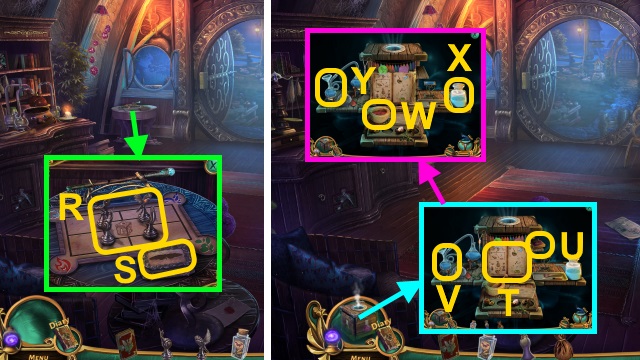
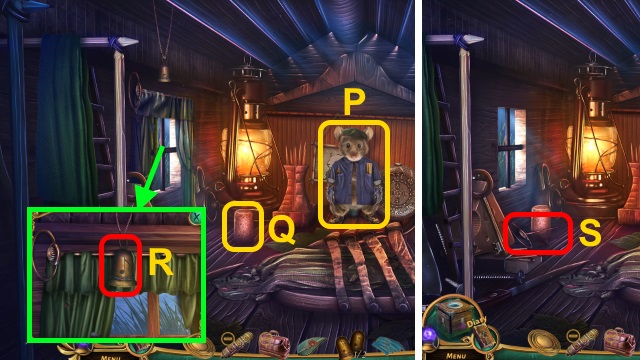
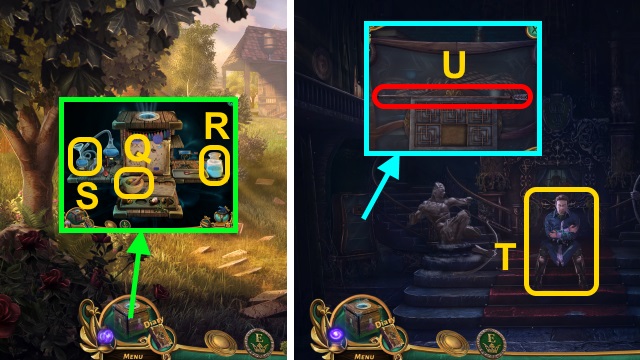
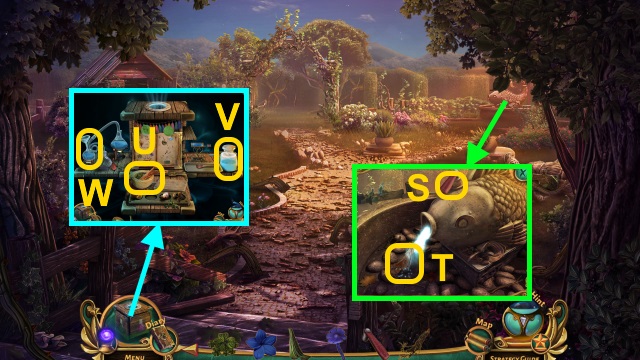
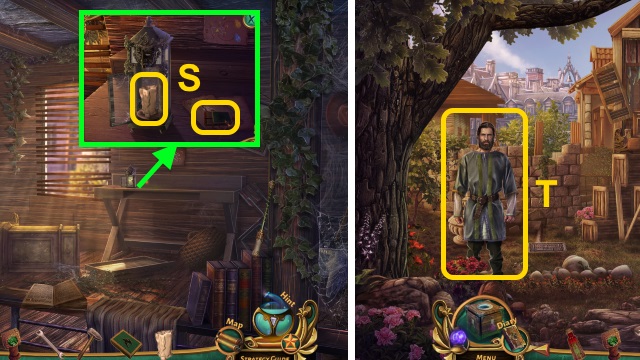
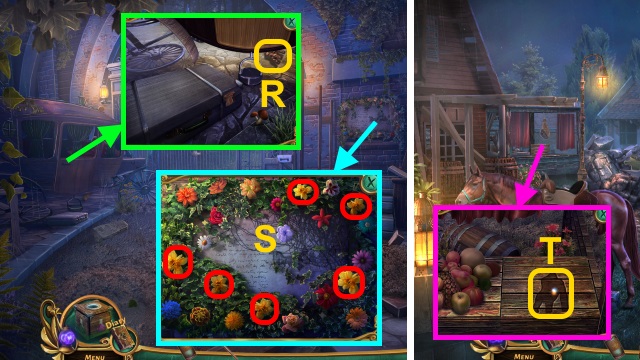
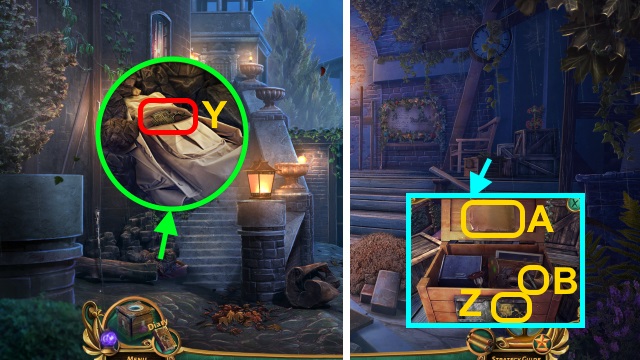
- Scroll down; place SNAIL FIGURINE and BIRD FIGURINE (R). Select each figurine. Place butterfly on box (S); take POTION POWDER and Potion Cube.
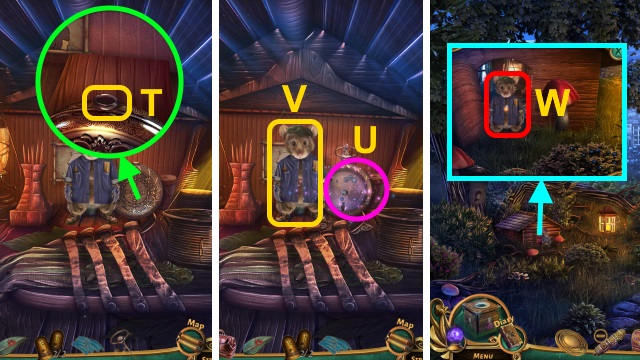
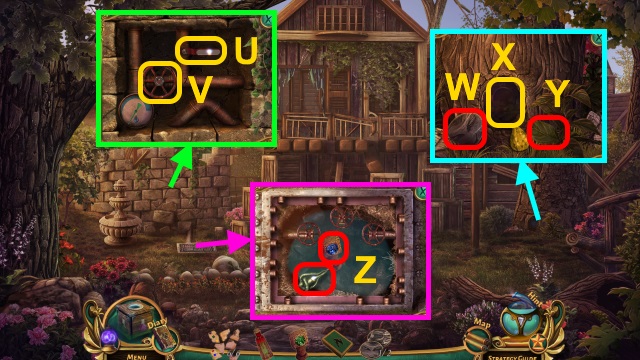
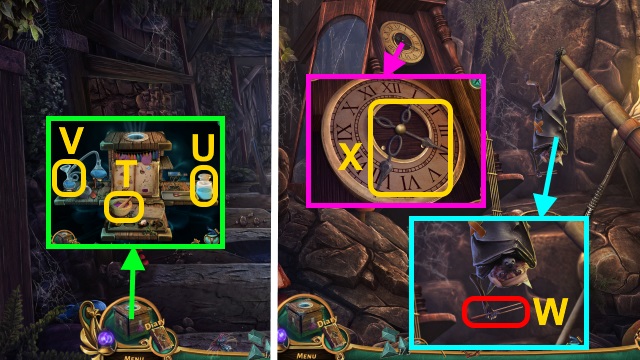
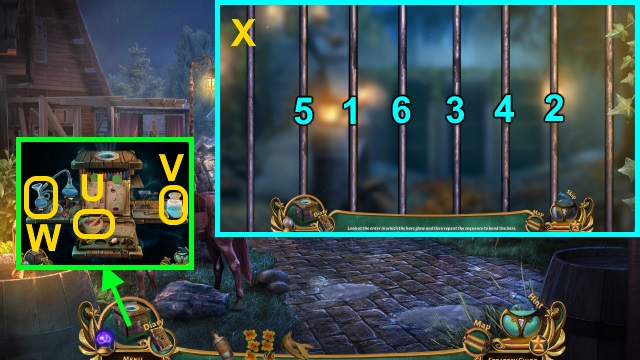
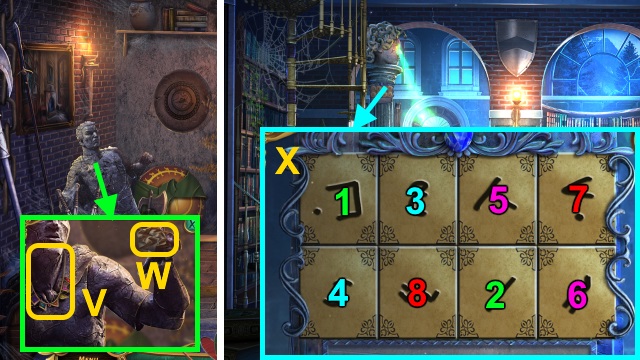
- Open Potion Cube. Place POTION BOOK (T); use matches (U) on flask (V).
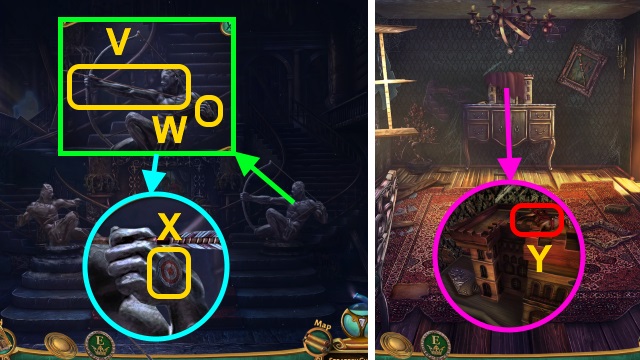
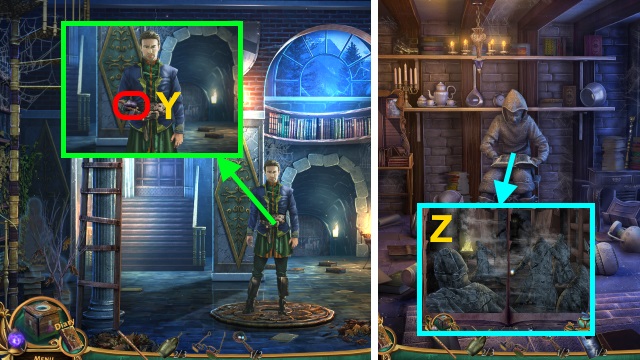
- Place POTION POWDER, FLIGHT ESSENCE, and DRIED WINGS (W); pour blue potion (X) into bowl (W). Pour bowl into flask (Y); drink potion.
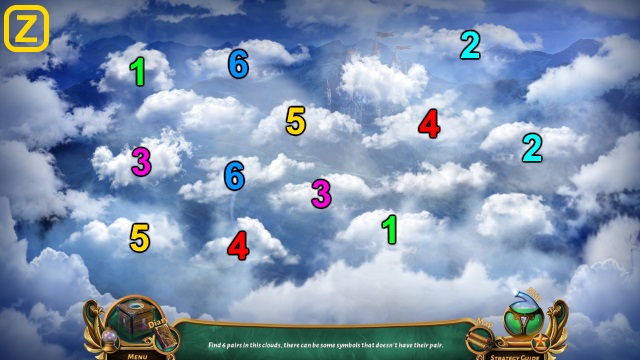
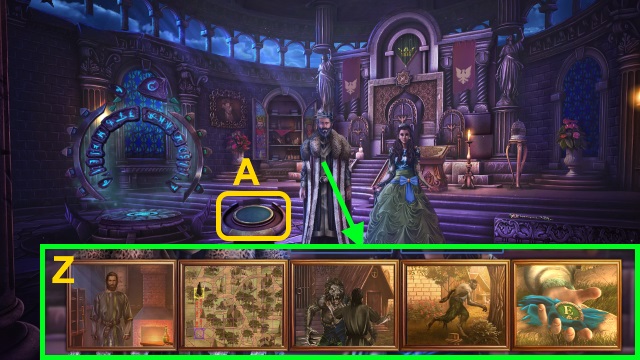
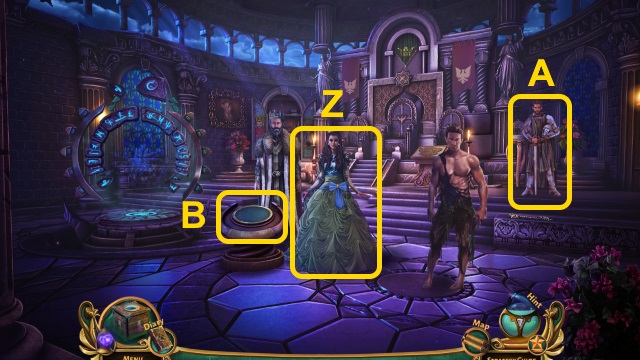
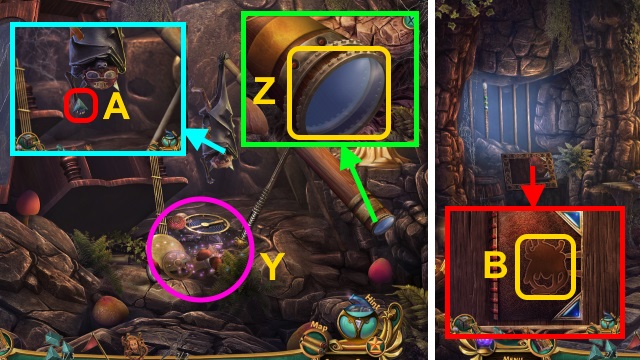
- Solution (Z).
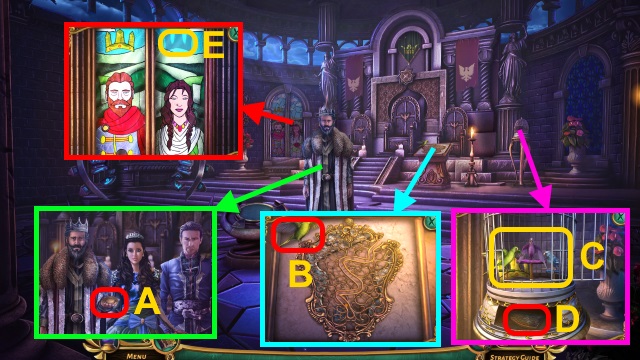
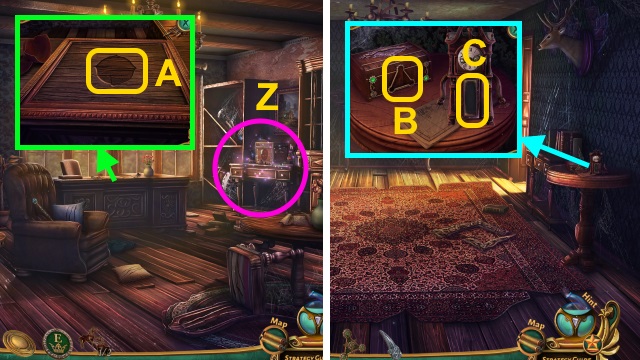
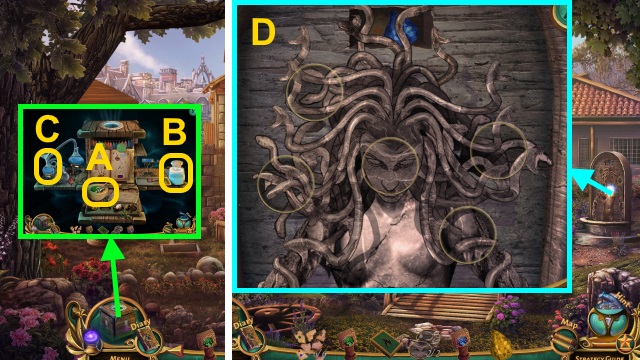
- Talk; take PORTAL DEVICE (A).
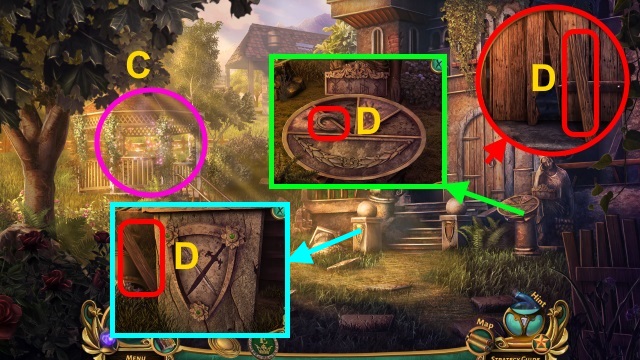
- Take GREEN BIRD (B).
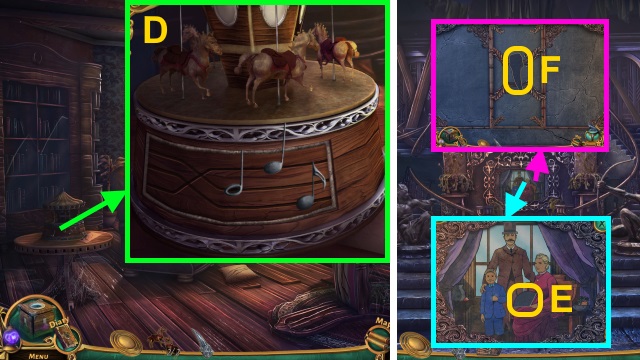
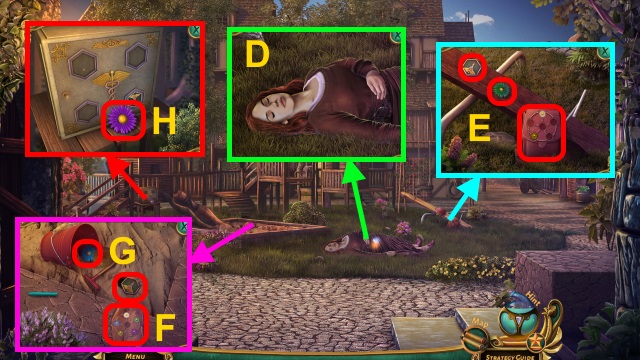
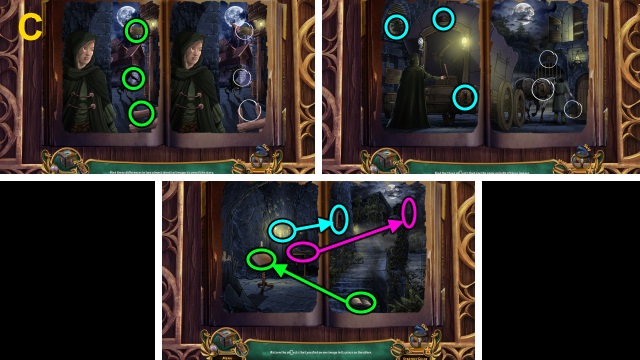
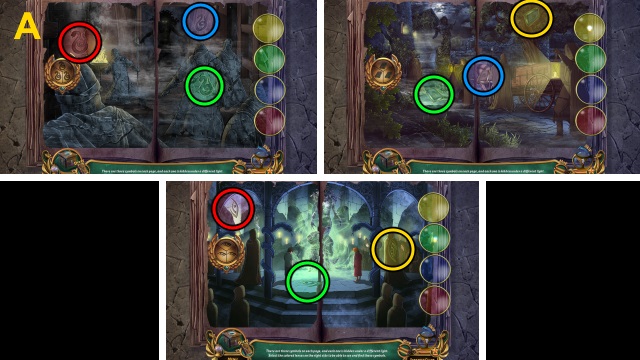
- Place birds and GREEN BIRD (C); take CROWN PICTURE and TILES (1/2) (D).
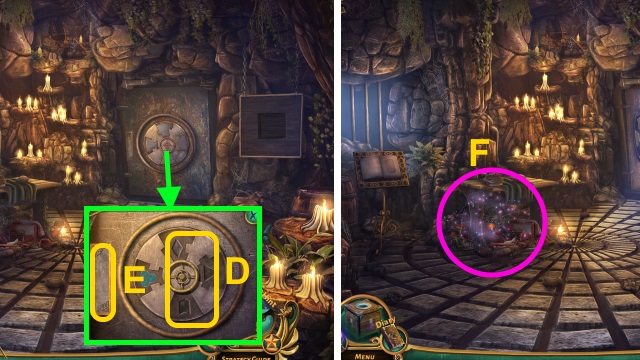
- Place CROWN PICTURE (E).
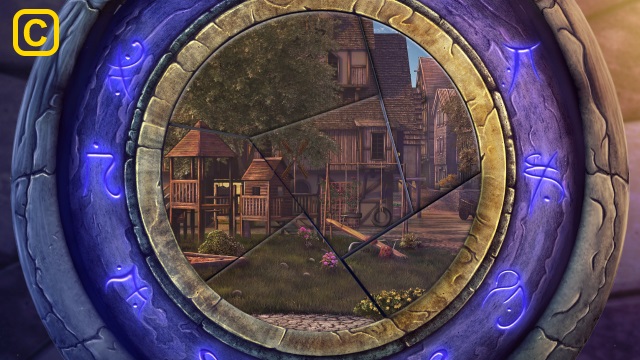
- Play HOP; receive ORNATE PEN (F).
- Use ORNATE PEN (G); take TILES (2/2).
- Place TILES (2/2) (H).
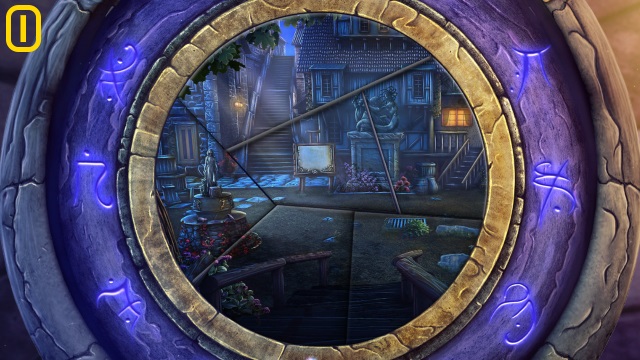
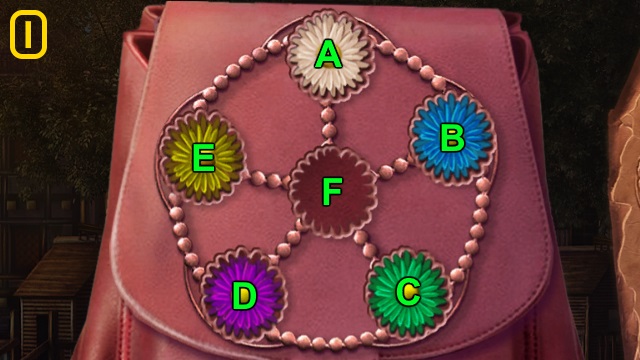
- Solution (I).
- Walk left.
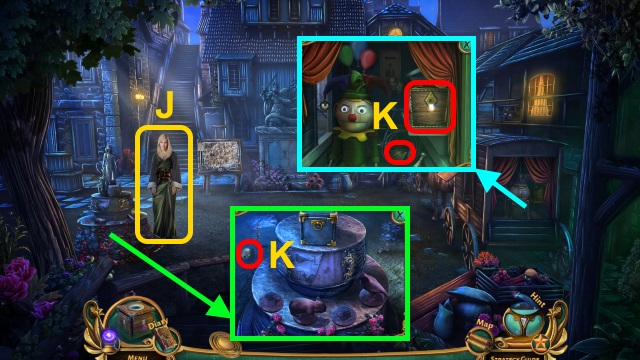
- Talk (J).
- Take TASSEL (1/2), BOX, and WOODEN FIGURINES (1/2) (K).
- Walk right.
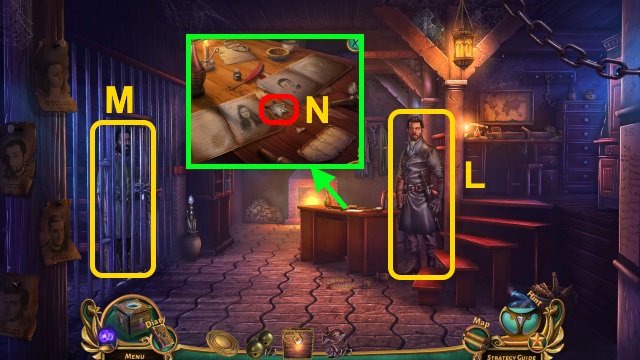
- Talk (L).
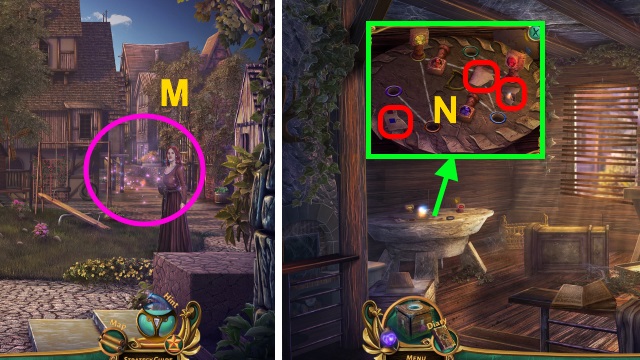
- Talk (M).
- Read paper; take BADGE (N).
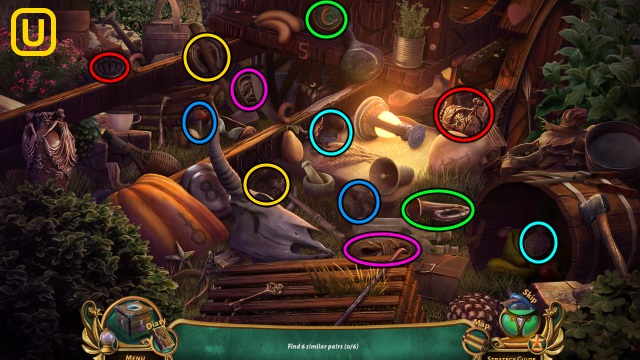
- Play HOP; receive WOODEN FIGURINES (1/3) (O).
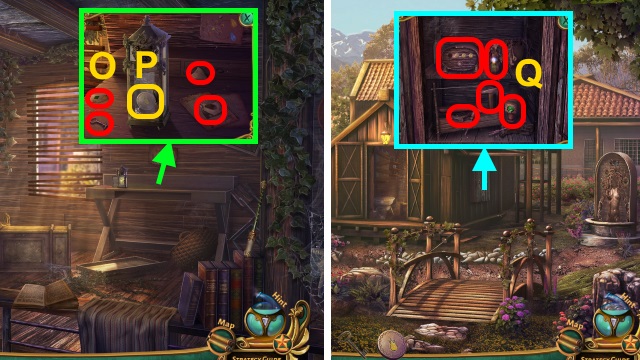
- Examine (P); place BADGE.
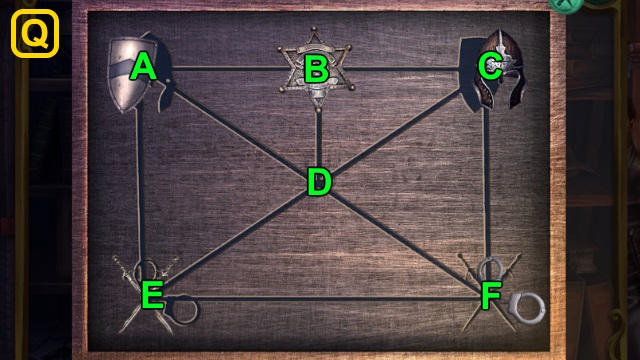
- Solution (Q): E-F-D-C-B-A-D-B-C-D.
- Open box; take COMPLEX LOCK (R). Examine (S); take WOODEN FIGURINES (2/3) and PAPER CLUE.
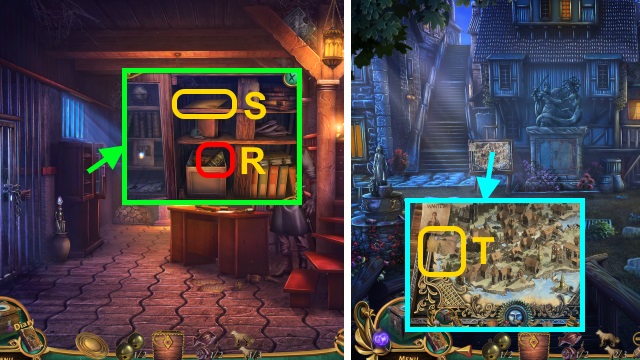
- Walk down.
- Place PAPER CLUE (T).
- Solution (U).
- Receive CITY MAP PIECE.
- Walk left.
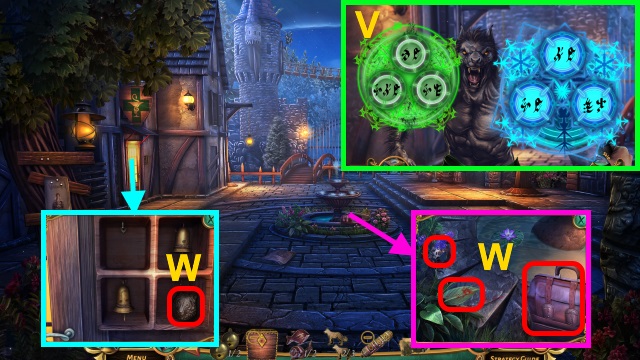
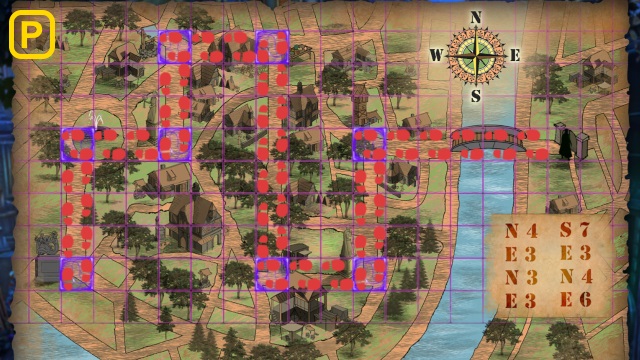
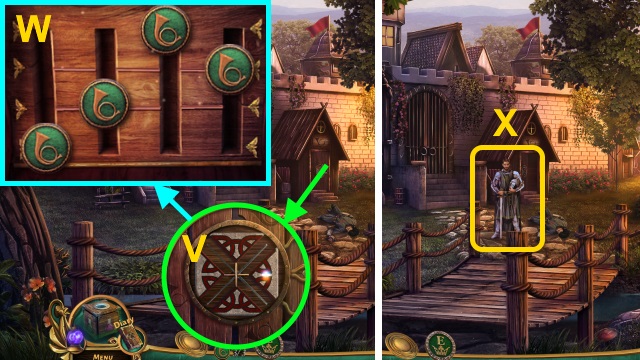
- Solution is random (V).
- Take WOLF KEY, DOCTOR'S BAG, BEAR KEY, and EVIDENCE (W).
- WOLF KEY and BEAR KEY on COMPLEX LOCK; take COIN and BELLS (1/2).
- Take SNAIL PARTS (1/2)-(2/2) and SNAIL FIGURINE (X).
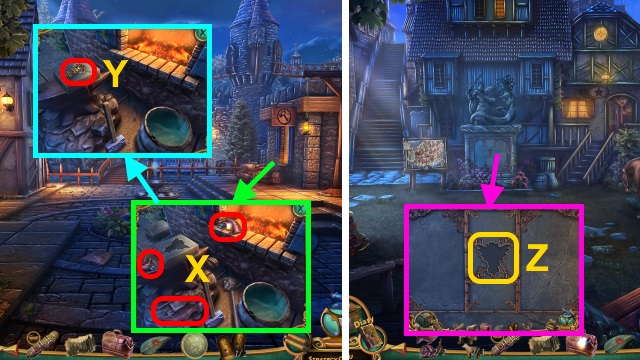
- Read note; place ore in spoon. Place mold cover on mold; take MEDUSA HEAD (Y).
- SNAIL PARTS (2/2) and COIN on SNAIL FIGURINE; receive WOODEN FIGURINES (2/2).
- Walk down.
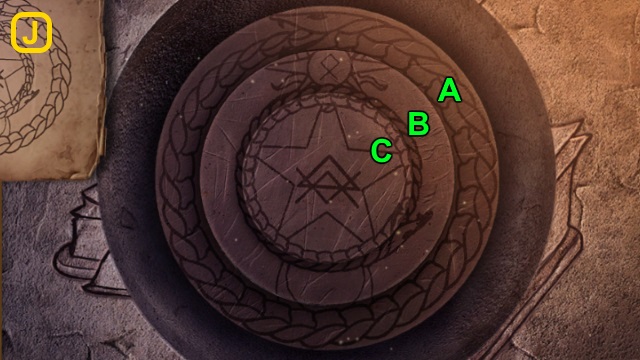
- Place MEDUSA HEAD (Z).
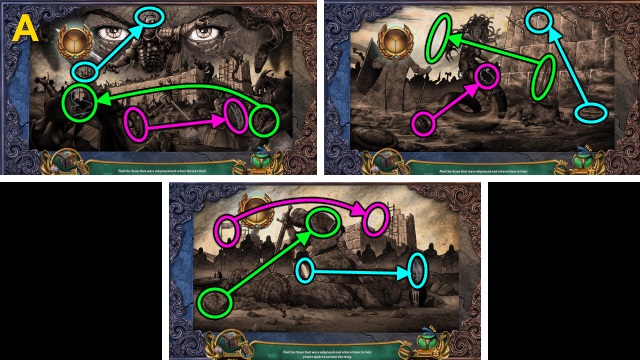
- Solution (A).
- Take HISTORY BOOK.
- Read HISTORY BOOK; take STONE TILE.

- Place WOODEN FIGURINES (2/2) and STONE TILE; solution (B).
- Take CITY KEY (C).
- Walk left.
- Use CITY KEY (D).
- Walk forward.

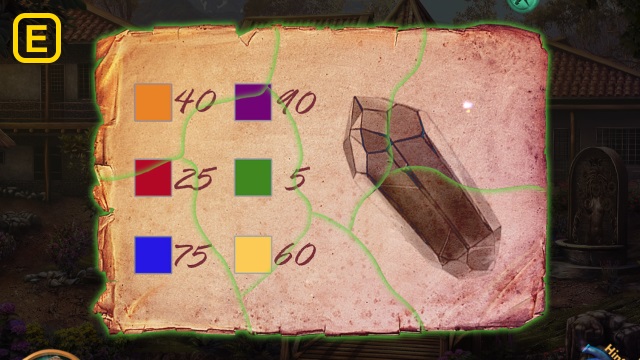
- Examine (E).
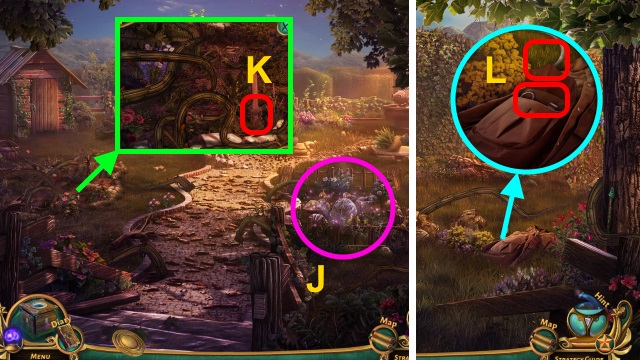
- Take BLUEBERRIES (F).
- Take TASSEL (2/2) and SHREDDED PIECE (G). Move items; take WOODEN FIGURINES (3/3) (I).
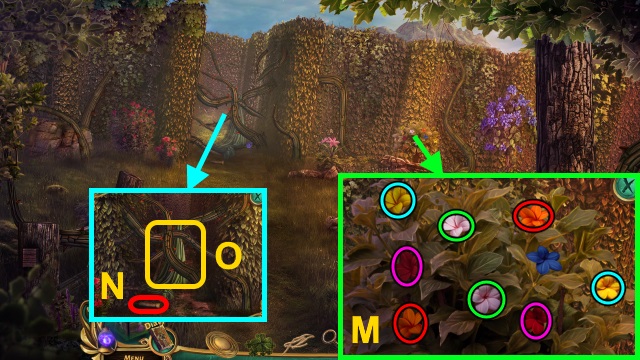
- Move plants; take HOUSES (1/2) (I). Place tiles on plaque (J).
- Solution (K).
- Take MYRRH.
- WOODEN FIGURINES (3/3) on BOX. Take HOUSES (2/2); rotate. Place HOUSES (2/2); take FLUTE. Rotate; place FLUTE. Take HANDLE; rotate. Place HANDLE; take TRANSFORMATION POWDER.
- Walk down twice.
- Place TASSELS (2/2); take LAVENDER WATER (L).
- Place TRANSFORMATION POWDER, MYRRH, BLUEBERRIES, and LAVENDER WATER (M). Pour blue potion (N) into bowl. Pour bowl into flask (O); drink potion.
- Talk (P).
- Move (Q).
- Take BELLS (2/2) (R); examine curtain 3x.
- Take CLOCK PIN (S).
- Place CLOCK PIN (T).
- Play HOP (U).
- Talk (V).
- Take MOUSE (W).
- Walk down.
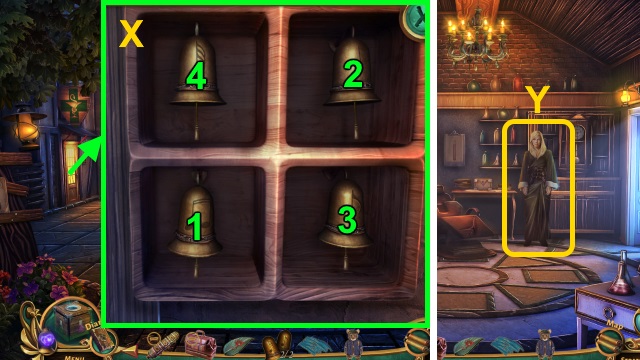
- Place BELLS (2/2); solution (X).
- Walk left.
- Talk (Y).
- Take PIN NEEDLE and INSTRUCTION PIECE (Z).
- Examine. Use PIN NEEDLE (A); take DEER KEY. Move paper; take PAPER PIECES (1/3)-(3/3) (B).
- PAPER PIECES (3/3) on INSTRUCTION PIECE; receive PAPER PIECE.
- DEER KEY on COMPLEX LOCK; take MAGNIFYING GLASS (1/2).
- Place PAPER PIECE; solution (C).
- Move potions; take DILUTER, IMPRINT POWDER, and BAG ITEM (D).
- BAG ITEM on DOCTOR'S BAG; take MAGNIFYING GLASS (2/2).
- Place MAGNIFYING GLASS (2/2), EVIDENCE, and IMPRINT POWDER (E). Use knife (F) on leaf; pour blue potion (G) on glass.
- Place SHREDDED PIECE (H); use scissors (I) on piece. Pour blue potion (J) on glass; pour DILUTER. Examine (K).
- Solution (L).
- Take COMPARED EVIDENCE.
- Go to Sheriff's Office.
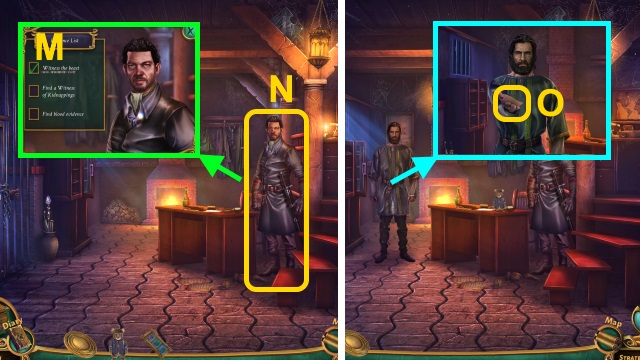
- Give MOUSE and COMPARED EVIDENCE (M).
- Talk (N).
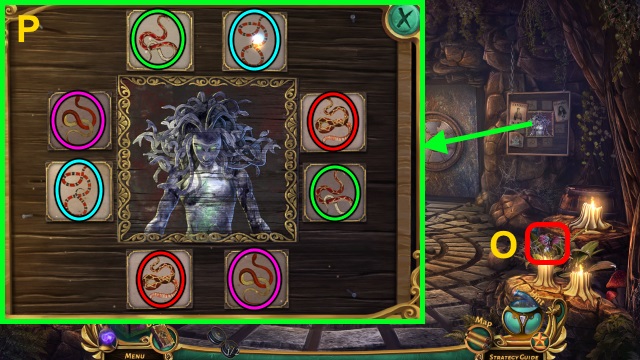
- Talk; examine (O).
- Solution (P).
Chapter 2: Silverclaw Manor
- Examine; take HORNS (1/3) (Q). Move cloth; take INSIGNIA ADDITION.
- Use crowbar (R) on boards (S); move items. Take HORNS (2/3).
- Examine (T).
- Solution (U).
- Receive HORNS (3/3).
- Place pieces (V).
- Place HORNS (3/3); solution (W).
- Talk.
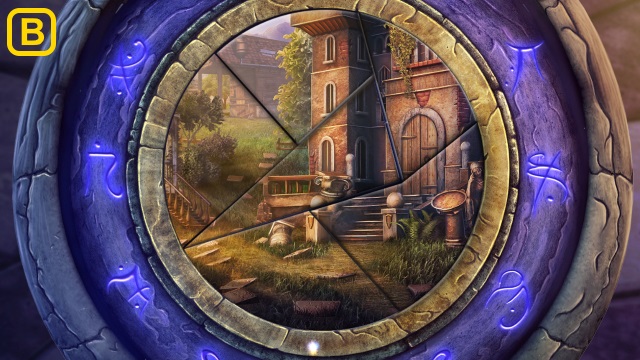
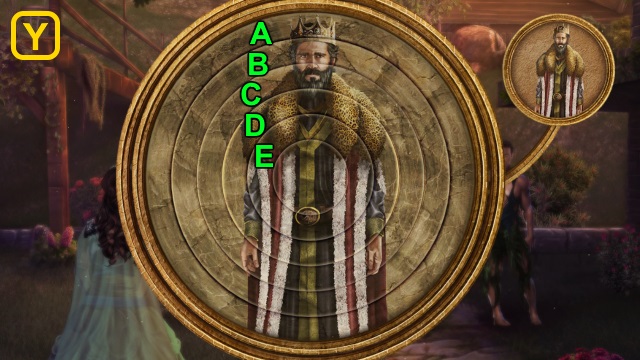
- Use PORTAL DEVICE on scene (X).
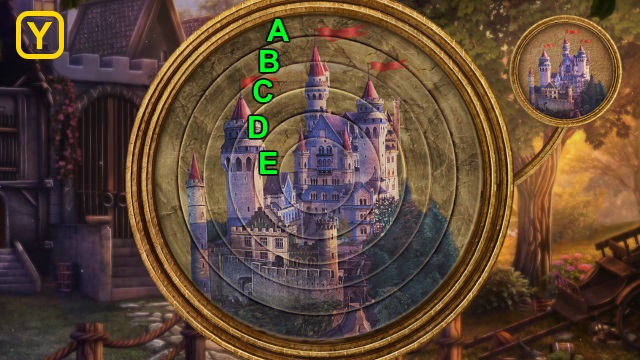
- Solution (Y): rotate A into place; rotate C until B is in place; rotate D until C is in place; rotate E until D is in place; rotate E into place.
- Talk; solution (Z).
- Examine (A).
- Solution (B).
- Walk left.
- Play HOP; receive STONE TILES (1/2) (C).
- Take HORSESHOE and PLANK (1/3)-(2/3) (D).
- Walk forward.
- Take BROKEN LADDER (E).
- Place HORSESHOE (F); take STONE TILES (2/2) and NAILS.
- Take HOOF PICK (G).
- Use HOOF PICK (H).
- Take PLANKS (3/3) and HAMMER (I).
- PLANKS, NAILS, and HAMMER on BROKEN LADDER; receive LADDER.
- Use LADDER (J).
- Play HOP; receive MOSS (K).
- Examine (L).
- Solution (M).
- Receive PURPLE TEAR FLOWER.
- Walk down.
- Place STONE TILES (2/2); solution (N).
- Take SWORD (O).
- Place SWORD (P); take SUN GRASS.
- Place PURPLE TEAR FLOWER, MOSS, and SUN GRASS (Q). Pour blue potion (R) into bowl. Pour bowl into flask (S); drink potion.
- Talk (T).
- Take ARROW (U).
- Place ARROW (V); examine. Examine (W).
- Press (X).
- Go up.
- Move cloth; take HORSE (1/2) (Y).
- Walk right.
- Play HOP; receive INSIGNIA ADDITION (Z).
- Combine INSIGNIA ADDITIONS; receive INSIGNIA BADGE.
- Move papers; place INSIGNIA BADGE (A). Take DIARY and TRIANGLE KEY.
- Read DIARY; take SILVER CLAW.
- Walk down.
- Place TRIANGLE KEY; take PENDULUM. Place PENDULUM; take HORSES (2/2).
- Walk right.
- Place notes and HORSES (2/2) (D); take FAN.
- Walk down twice.
- Place FAN (E).
- Place SILVER CLAW (F).
- Solution (G).
- Take GOLDEN KEY.
- Select tiles in order (H); use GOLDEN KEY. Take ROPE.
- Go up.
- Use ROPE (I).
- Go left.
- Play HOP; receive CLOVER (J).
- Take STRING (K).
- Walk forward.
- Open; take TOOL KEY and SICKLE BLADE (L).
- Solution (M).
- Take BLUE SPRITE.
- Take SICKLE HANDLE (N).
- SICKLE BLADE and STRING on SICKLE HANDLE; receive SICKLE.
- Use SICKLE (O); take DRESS PIECE and MUSHROOM.
- Walk down.
- Use TOOL KEY (P).
- Move items; take TROWEL and HANDLE (Q).
- Use SICKLE. Use TROWEL; take DIRTY SYLTH ROOT (R).
- Use HANDLE (S); pull. Use DIRTY SYLTH ROOT (T); receive SYLTH ROOT.
- Open Potion Cube; place CLOVER, BLUE SPRITE, MUSHROOM, and SYLTH ROOT (U). Pour blue potion (V) in bowl. Pour bowl into flask (W); drink potion.
- Solution (X).
- Examine scene; use PORTAL DEVICE on scene.
- Solution (Y): rotate A into place; rotate C until B is in place; rotate D until C is in place; rotate E until D is in place; rotate E into place.
Chapter 3: The Shack
- Talk (Z).
- Talk (A).
- Examine (B).
- Solution (C).
- Enter portal.
- Examine (D).
- Move hat; take DAISY (1/3), MEDICAL INSET (1/3), and CLOSED BAG (E).
- Move leaves and ball; take BAG INSTRUCTIONS (F). Use SHOVEL on heart; take MEDICAL INSET (2/3) and DAISY (2/3) (G).
- Take DAISY (3/3) (H).
- DAISY (3/3) and BAG INSTRUCTIONS on CLOSED BAG.
- Solution (I): B-C-D-E-F.
- Take MEDICAL INSET (3/3).
- Place MEDICAL INSET (3/3) (J); take AROMATIC SALT.
- Use AROMATIC SALT (K).
- Talk (L).
- Play HOP (M).
- Walk forward.
- Collect INSTRUCTION PIECES (1/6)-(3/6) (N).
- Read paper; take INTRUCTION PIECES (4/6)-(6/6) and PADLOCK KEY (O). Examine (P); take FLAME INSET.
- Walk down.
- Use PADLOCK KEY; open. Take GREEN TOTEM, WRENCH, HAMMER, CANDLE BOX, and SALT POTION (Q).
- FLAME INSET on CANDLE BOX.
- Solution (R).
- Move items; take MATCHES and CANDLE.
- Walk forward.
- Place CANDLE and MATCHES (S); light candle. Take MEDUSA PIECES (1/2).
- Walk down, then left.
- Talk (T).
- Use HAMMER; turn handle (U). Use WRENCH (V); take VALVE.
- Take MEDUSA PIECES (2/2) (W); examine tree (X). Take BLEEDING SPADE (Y).
- Remove grate; place VALVE. Take GREEN ROOT and BLUE CRYSTAL TOTEM (Z).
- Place SALT POTION, GREEN ROOT, and BLEEDING SPADE (A). Pour blue potion (B) into bowl; pour bowl into flask (C). Drink potion.
- Play HOP; receive CRYSTAL TEAR UNCHARGED.
- Walk down.
- Place MEDUSA PIECES (2/2); solution (D).
- Take CRYSTAL TEARS (1/2) and INSTRUCTION PIECE.
- INSTRUCTION PIECES (6/6) ON INSTRUCTION PIECE.
- Solution (E).
- Receive GEMs INSTRUCTIONS.
- Walk forward.
- Place totems, GREEN TOTEM, BLUE CRYSTAL TOTEM, and CRYSTAL TEAR UNCHARGED (F); take CRYSTAL TEARS (2/2).
- Walk down.
- Place CRYSTAL TEARS (2/2) (G).
- Place GEMS INSTRUCTIONS (H).
- Solution (I).
- Go Under the Shack.

- Take TORCH BASE (J).
- Take OIL and CLOTH (K).
- OIL, CLOTH, and MATCHES on TORCH BASE; receive FIRED TORCH.
- Place FIRED TORCH (J).
- Take WALL KEY (1/2) and DOOR KEY (L).
- Use DOOR KEY (M).
- Walk forward.
- Examine (N).
- Take BAT FLOWER (O).
- Remove papers; solution (P).
- Take DOOR GEMS (1/3) and WALL KEY (2/2).

- Take FLAG (Q).
- Walk down.
- Place WALL KEY (2/2) (R); examine each key. Take MEDUSA HEAD and MOON FLOWER ESSENCE.
- Play HOP; receive MOON CACTUS (S).
- Examine MOON CACTUS; take CACTUS FLOWER.
- Place BAT FLOWER, MOON FLOWER ESSENCE, and CACTUS FLOWER (T). Pour blue potion (U) into bowl. Pour bowl into flask (V); drink potion.
- Talk; take FORK (W).
- Use FORK (X); receive CLOCK HANDS (2/2).
- Play HOP; receive HAT (Y).
- Use CLOCK HANDS (2/2) (Z); receive LENS (2/2).
- Examine HAT; place LENS (2/2). Receive HAT.
- Talk; give HAT. Take DOOR GEMS (2/3) (A).
- Place MEDUSA HEAD (B).
- Solution (C).
- Take DOOR GEMS (3/3).
- Examine; place DOOR GEMS (3/3) (D). Pull lever (E); place FLAG.
- Walk forward; walk down.
- Play HOP; receive SLINKY (F).
- Examine SLINKY 2x; take HOOK.
- Walk forward.
- Use HOOK (G); receive POST KEY.
- Examine; use POST KEY (H).
- Solution (I).
- Open; move letter. Take SCISSORS.
- Use SCISSORS (J).
- Walk forward.
- Solution (K).
Chapter 4: The Kidnapper
- Play HOP; receive FISH (L).
- Place FISH (M).
- Solution (N): D-A-C-A-D-A-D.
- Take DAGGER and LONG STICK.
- Use DAGGER (O); take MONKEY ORCHID ESSENCE.
- Place ladder (P) against wall (Q).
- Go right.
- Use LONG STICK (R); take GORILLA INSET.
- Move plants; collect YELLOW FLOWER (6/6) (S).
- Walk down.
- Place GORILLA INSET (T); open. Take BANANA PEEL.
- Place MONKEY ORCHID ESSENCE, YELLOW FLOWER (6/6), and BANANA PEEL (U). Pour blue potion (V) into bowl. Pour bowl into flask (W); drink potion.
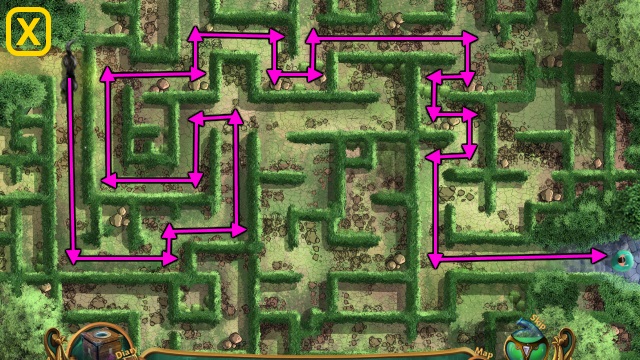
- Solution (X).
- Walk forward.
- Move stones and note; take CRATE INSERT (Y).
- Walk down.
- Place CRATE INSERT (Z); place paper (A). Open; use chalk (B). Take VASE INSTRUCTION.
- Walk forward.
- Place VASE INSTRUCTION; solution (C).
- Take SULPHURIC ACID.
- Walk down.
- Pour SULPHURIC ACID (D); open. Move items; take GLOVES.
- Walk forward.
- Use GLOVES; play HOP (E).
- Talk; receive AMBER GLASSES (F).

- Play HOP (G).
- Use AMBER GLASSES (H).
- Solution (I): select notes as the glass crosses over them.

- Talk (J).
- Take MAGIC PIPE and GOLDEN NECKLACE CRYSTALS (K).
- Walk left.
- Use broom (L) on chime (M).
- Move items; take SNAKE KEY, GLASSES LENSES (1/2), and BOOK INSET (N).
- Take note; open (O). Take MOON.
- Walk down.
- Place snake and SNAKE KEY; examine 2x (P). Take STAR and SNAKE KEY (1/3). Place BOOK INSET; take CIRCLE INSET.
- Place MOON and STAR (Q); examine each charm.
- Walk forward.
- Take GOLDEN NECKLACE CHAIN (R).
- GOLDEN NECKLACE CRYSTALS on GOLDEN NECKLACE CHAIN.
- Walk forward.

- Open; move items. Take GLASSES FRAME and SNAKE KEYS (2/3) (S).
- Place CIRCLE INSET (T).
- Solution (U): Rotate A until A and B are in place; rotate C into place.
- Take MEDUSA KEY (1/2) and note.
- Place GOLDEN NECKLACE CHAIN (V). Examine note (W); take GLASSES LENSES (2/2) and RUNE INSTRUCTIONS.
- GLASSES LENSES (2/2) on GLASSES FRAME.
- Walk down.
- Place RUNE INSTRUCTIONS; solution (X).
- Talk; take DOOR KNOBS (1/2) (Y).
- Walk down, then left.
- Use SPECIAL GLASSES (Z).
- Solution (A).
- Take DOOR KNOBS (2/2).
- Walk down, then forward.
- Place DOOR KNOBS (2/2); solution (B).
- Walk left.
- Play HOP; receive SNAKE KEYS (3/3) (C).
- Arrange eyes (D).
- Place chain (E).
- Walk down.
- Place SNAKE KEYS (3/3); solution (F).
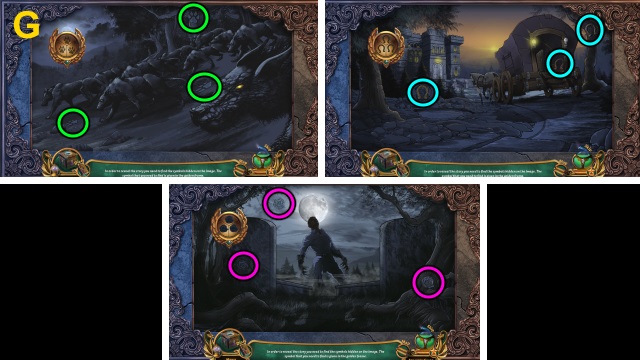
- Play HOP; receive MEDUSA KEYS (2/2) (G).
- Walk left.
- Use MEDUSA KEYS (2/2) (H); open. Take CIRCLE MODEL.
- Go to Under Room.
- Place CIRCLE MODEL (I).
- Solution (J): Rotate A until A and B are in place. Rotate C into place.
- Take GEAR.
- Walk down, then left.
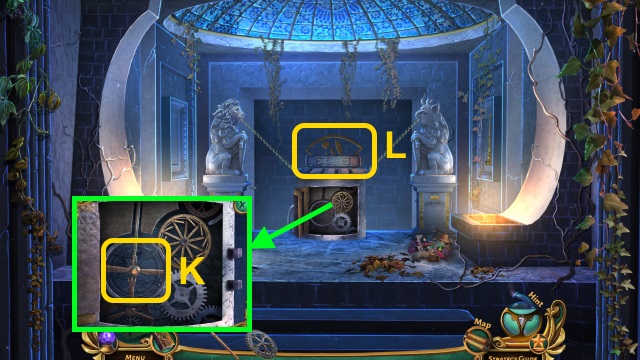
- Place GEAR (K).
- Examine (L).
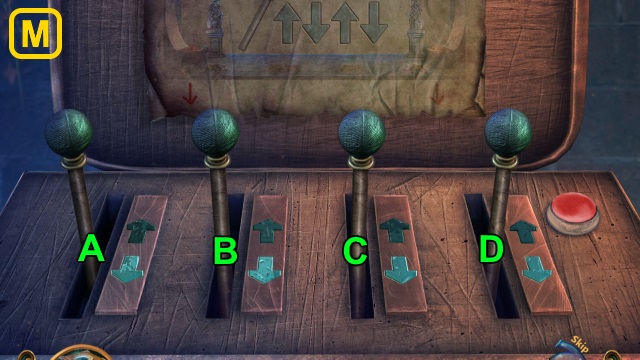
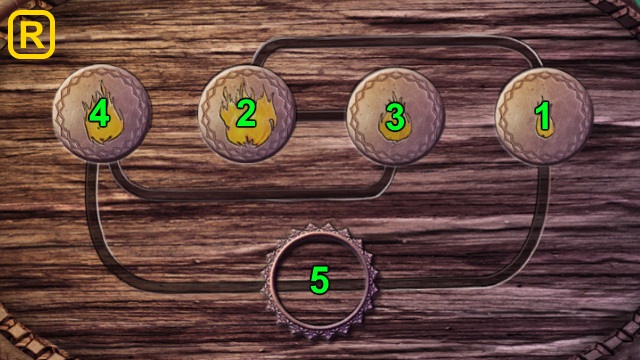
- Solution (M): D-A-D-B-A-C-D.
- Go forward.
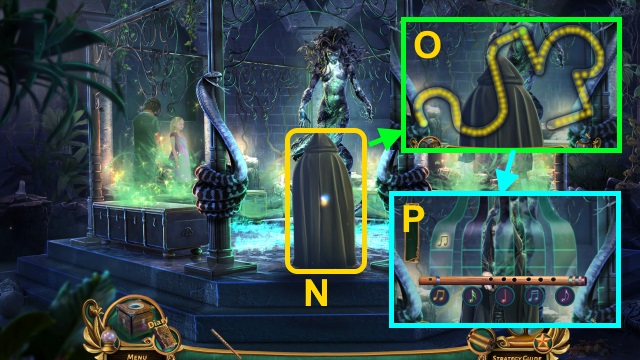
- Examine (N).
- Solution (O): trace shape.
- Solution is random (P).
- Congratulations! You have completed Queen's Quest 5: Symphony of Death.
Created at: 2019-02-17