

Walkthrough Menu
- General Tips
- Chapter 1: The Castle
- Chapter 2: Mushroom Garden
- Chapter 3: The Witch
- Chapter 4: Black Forest
- Chapter 5: The Gnome's Village
- Chapter 6: The Cave of Portals
- Chapter 7: The Red Portal
- Chapter 8: The Green Portal
General Tips
- This is the official guide for Queen's Tales: Sins of the Past.
- This guide will not show when you have to zoom into a location; the screenshots will show each zoom scene.
- Hidden-object puzzles are referred to as HOPs. This guide will not show screenshots of the HOPs, however, it will mention when an HOP is available and the inventory item you'll collect from it.
- Use the Map to fast travel to a location.
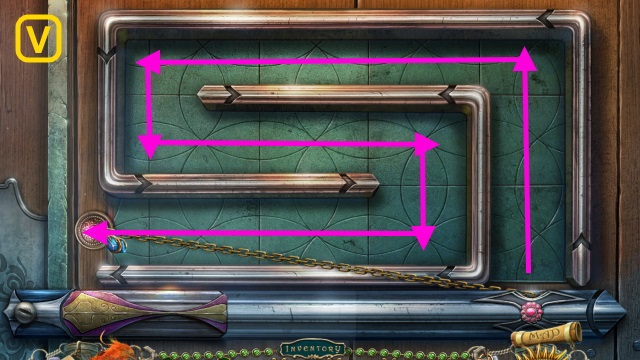
Chapter 1: The Castle
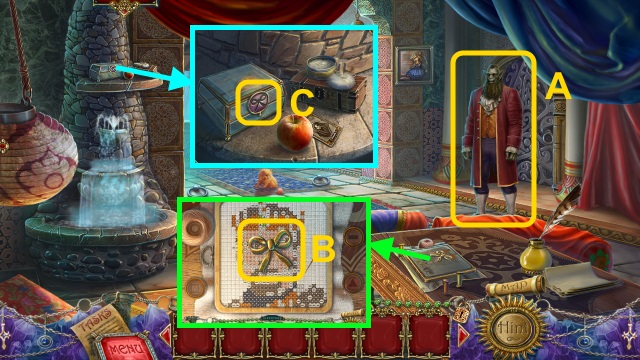
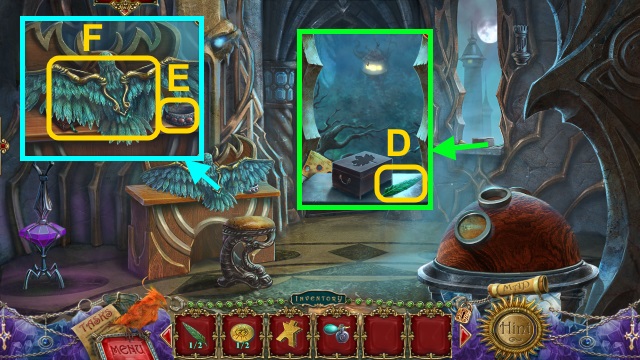
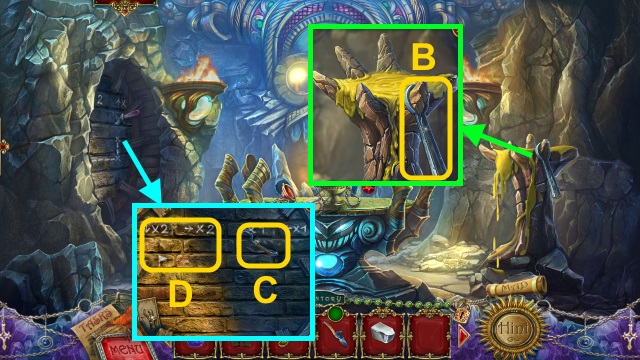
- Talk to the Orc (A).
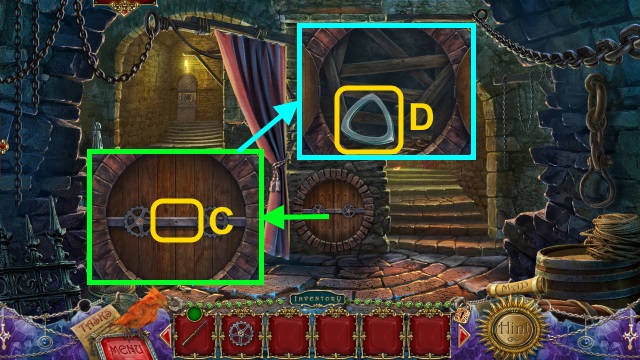
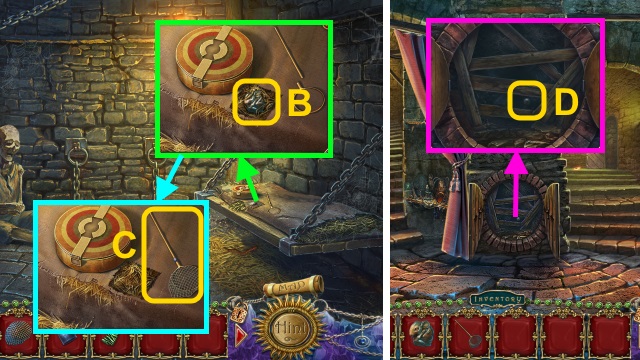
- Take the BOW CHARM (B).
- Place the BOW CHARM (C); open the box.
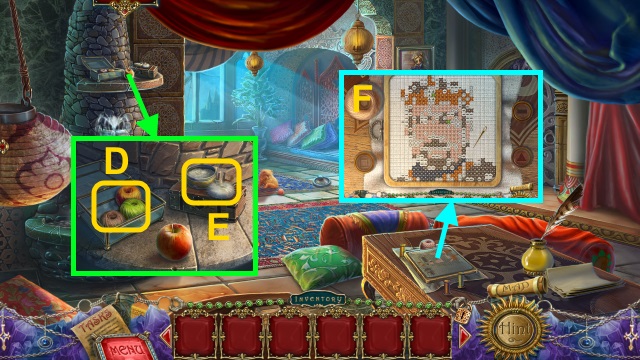
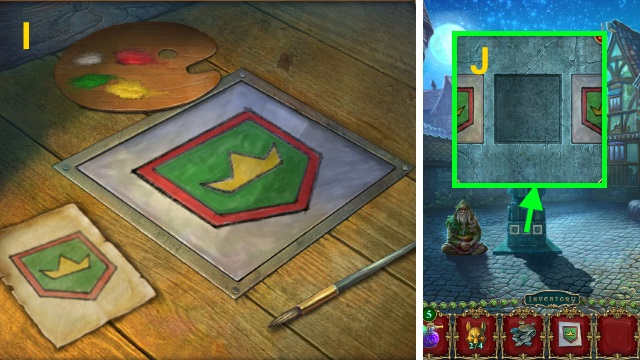
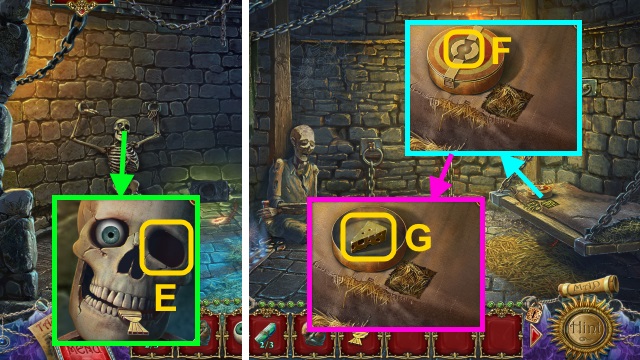
- Take the COLORED THREADS (D) and FACE POWDER (E).
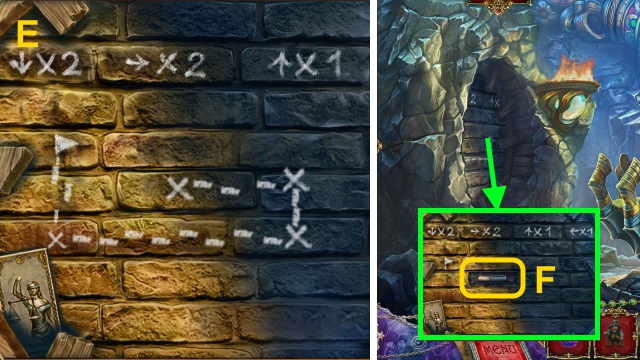
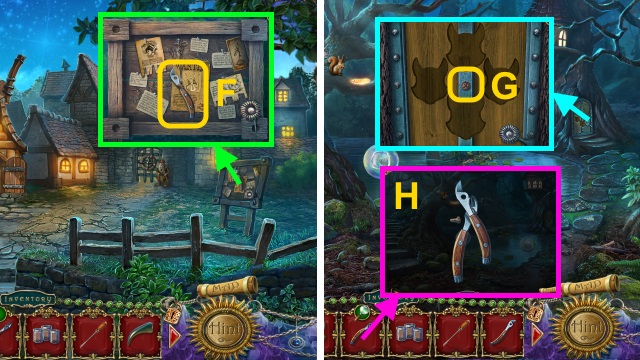
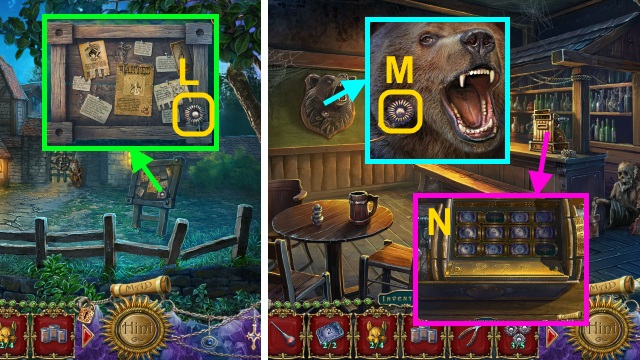
- Use the COLORED THREADS for a mini-game (F).
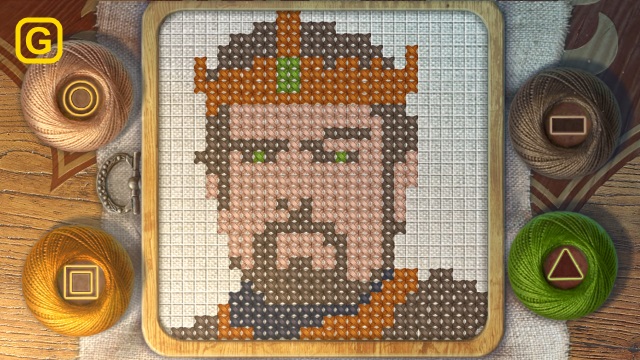
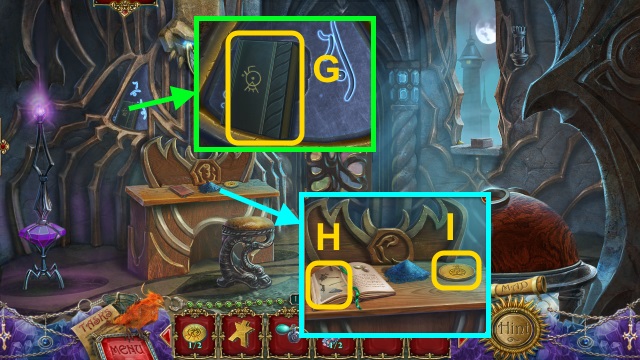
- Solution (G).
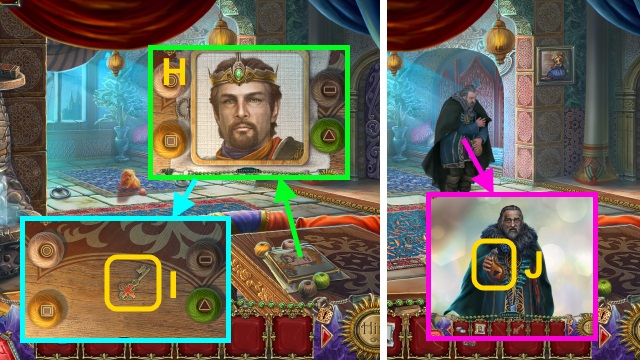
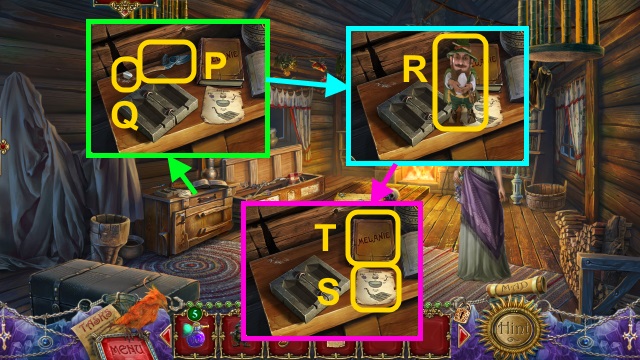
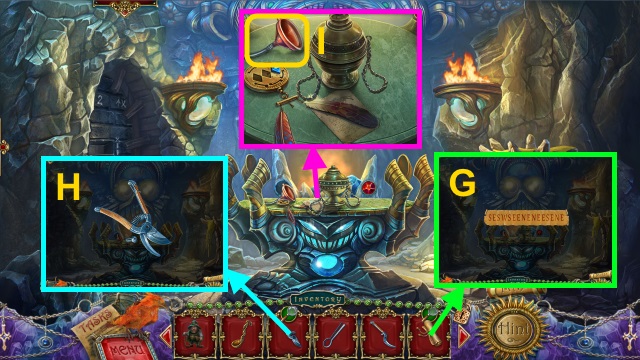
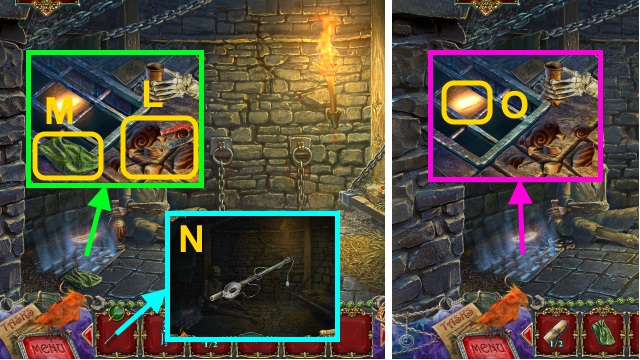
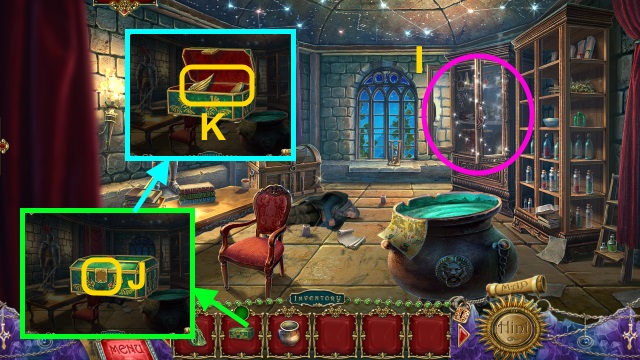
- Take the EMBOIDERY (H) and CROSS KEY (I).
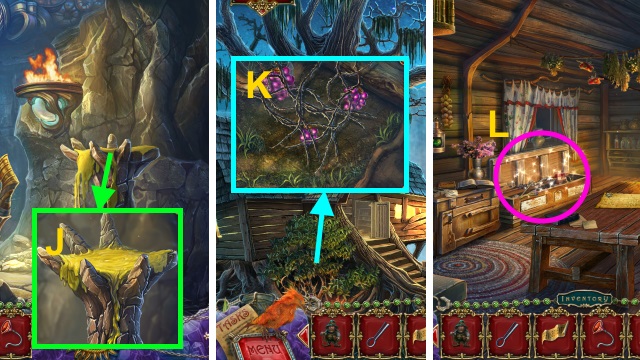
- Talk to the Mage; take the LEAKY GOATSKIN (J).
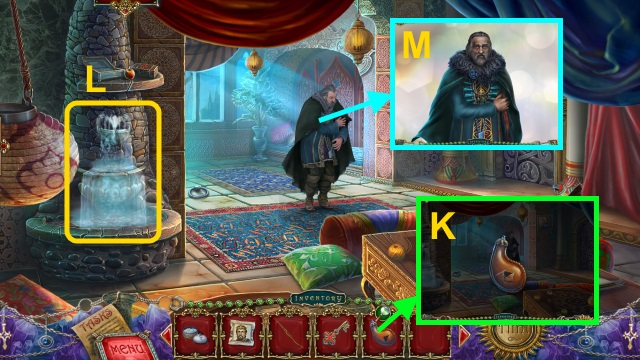
- Use the NEEDLE AND THREAD on the LEAKY GOATSKIN to receive the EMPTY GOATSKIN (K).
- Use the EMPTY GOATSKIN to receive the GOATSKIN WITH WATER (L).
- Give the GOATSKIN WITH WATER (M).
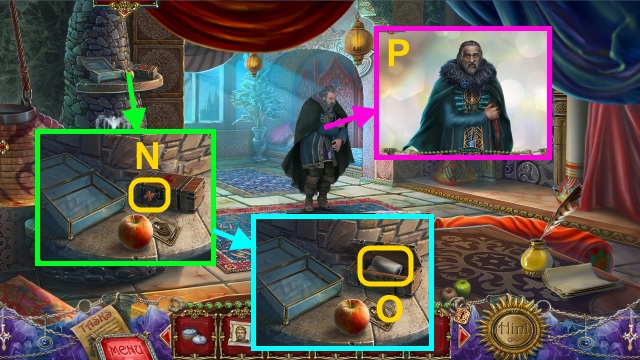
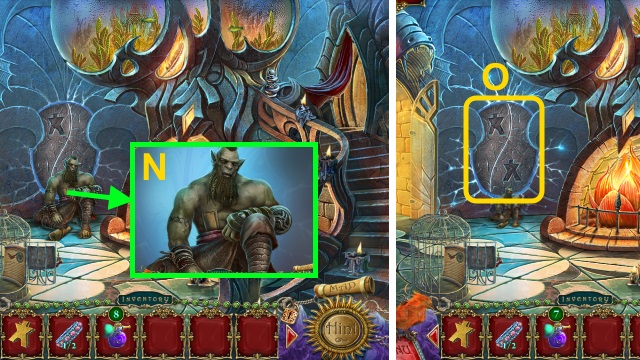
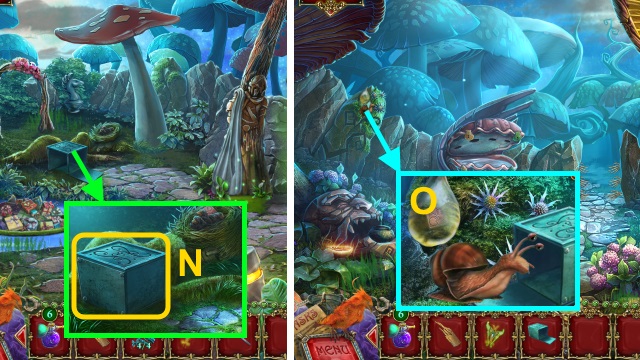
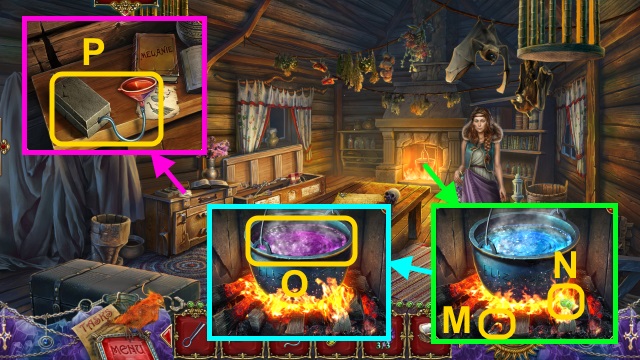
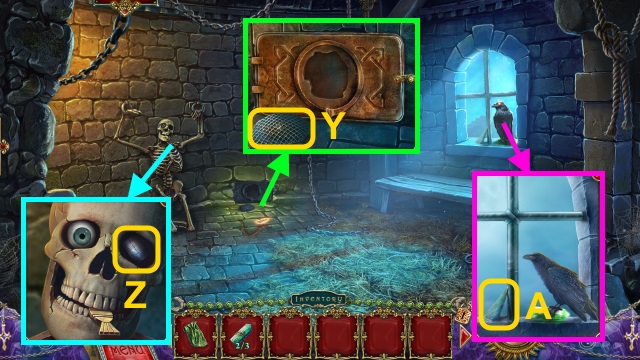
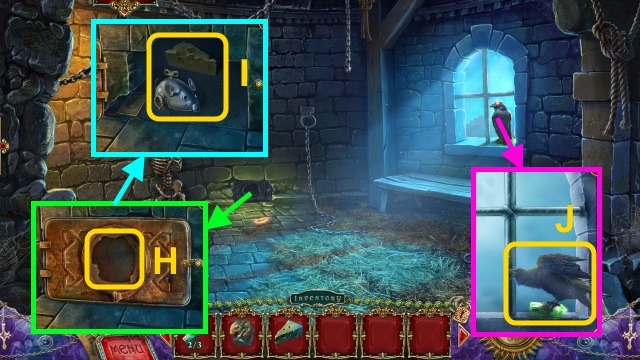
- Use the CROSS KEY (N); take the BANDAGE (O).
- Use the BANDAGE (P).
- Walk forward.
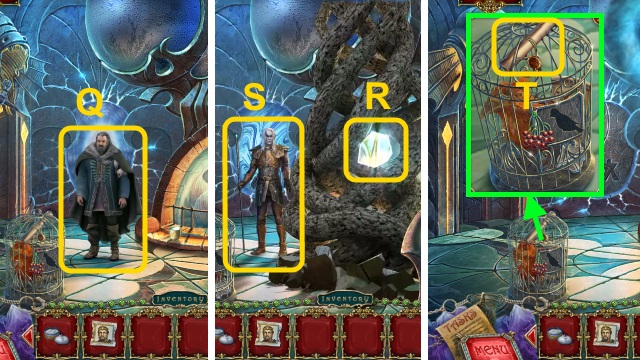
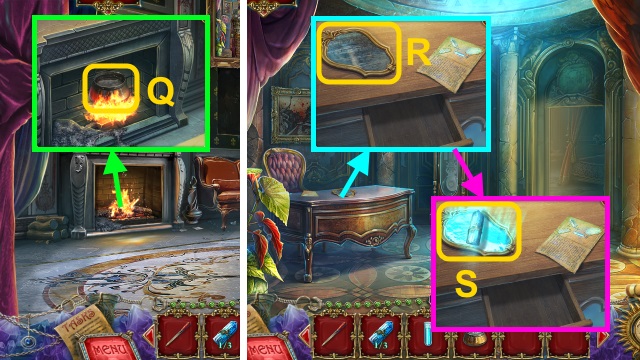
- Talk to the Mage (Q).
- Examine the glass (R).
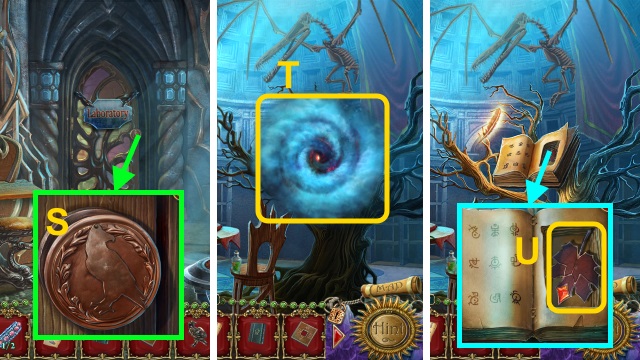
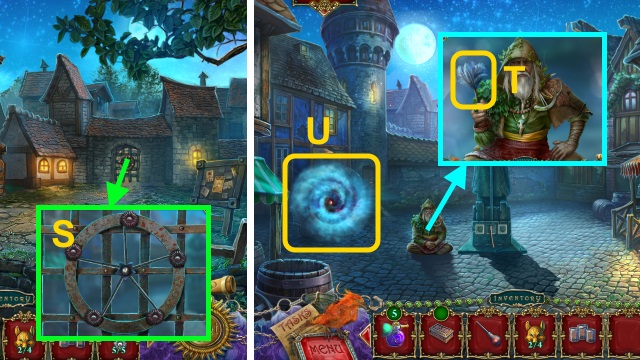
- Talk to the Elf (S).
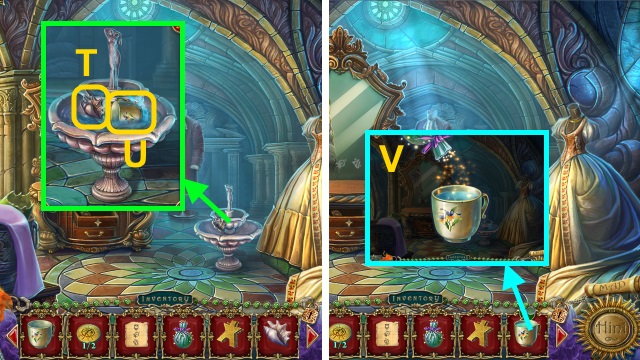
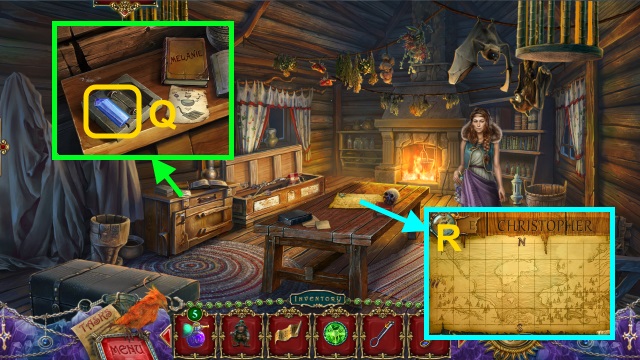
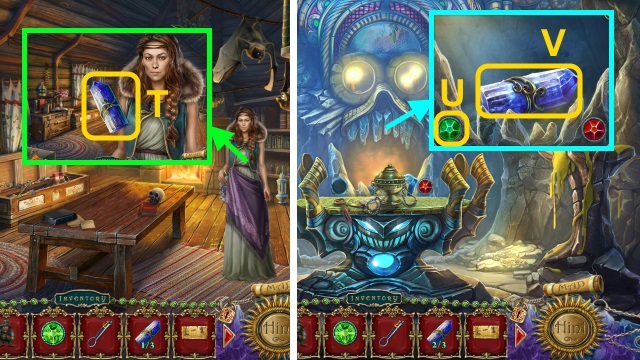
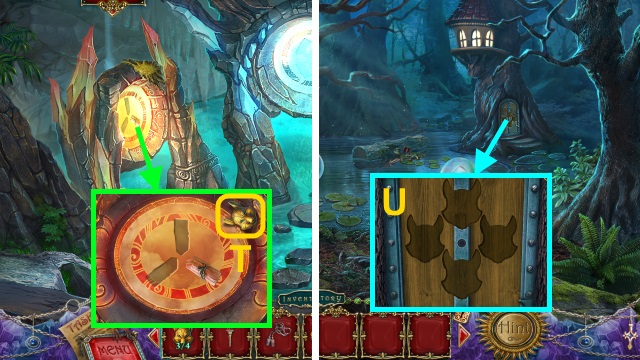
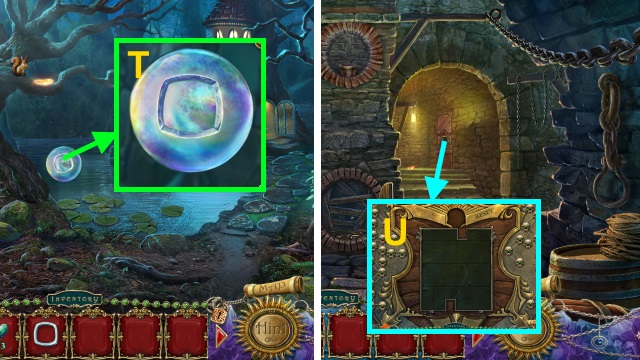
- Take the Map (T).
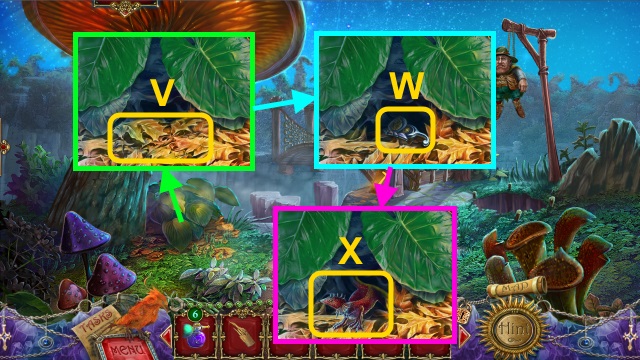
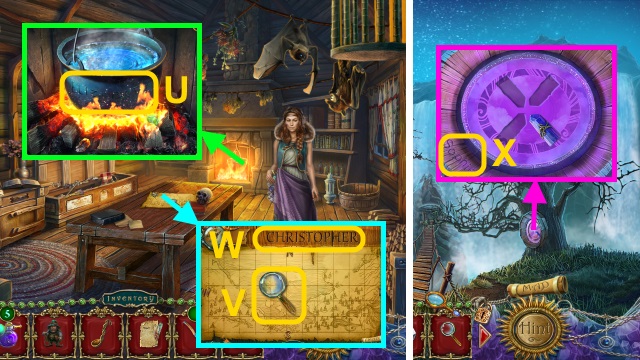
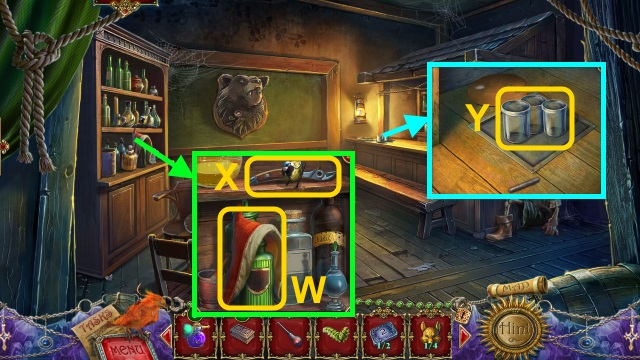
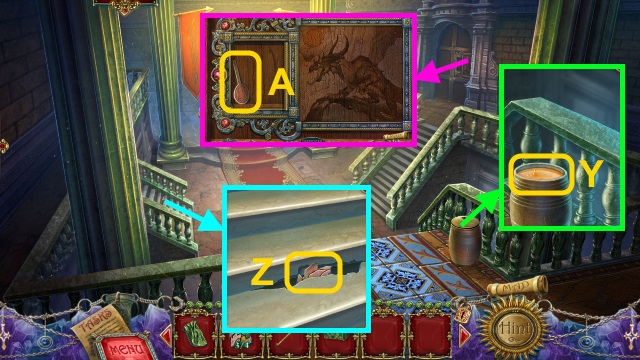
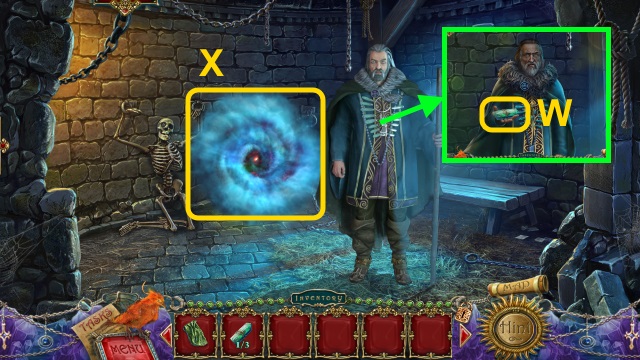
- Take the GLASS FEATHER (1/2) (U).
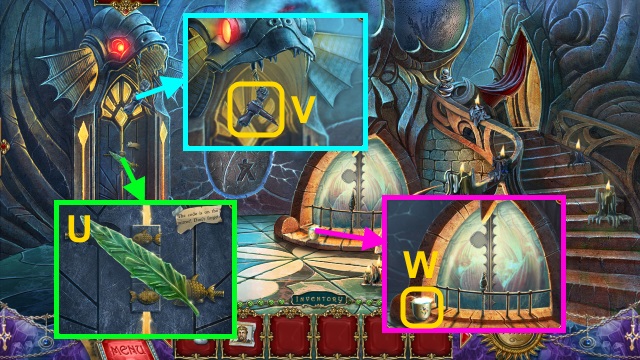
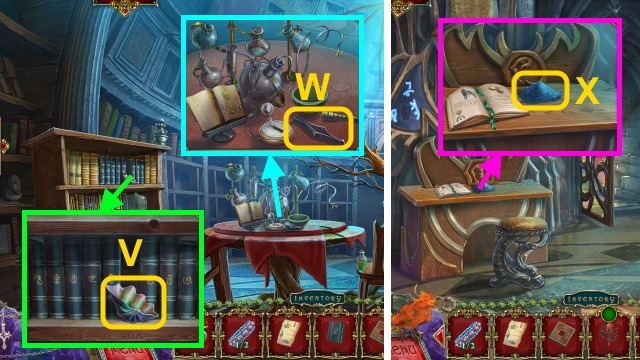
- Remove the handle; take the HAMMER HEAD (V).
- Take the HOT WATER (W).
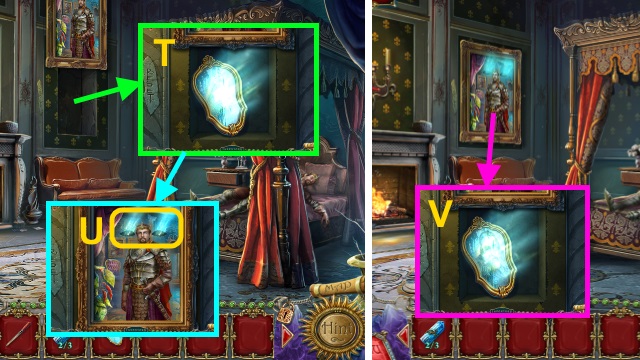
- Walk right.
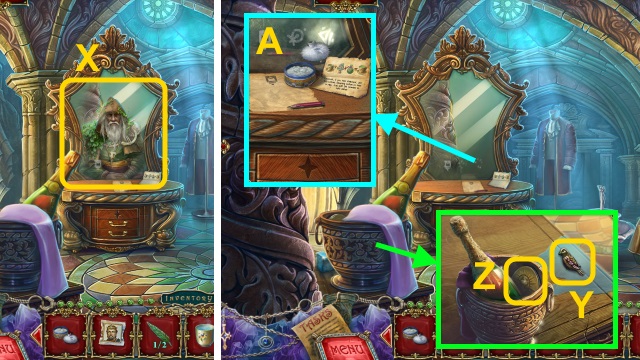
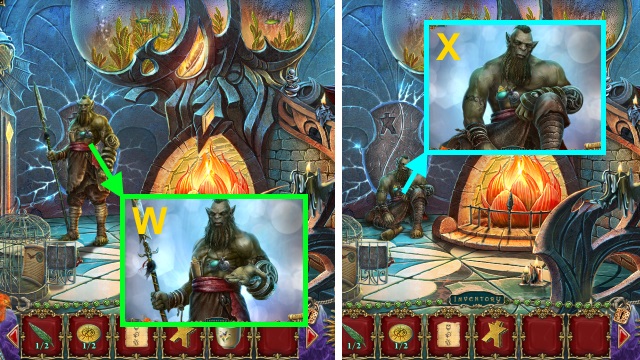
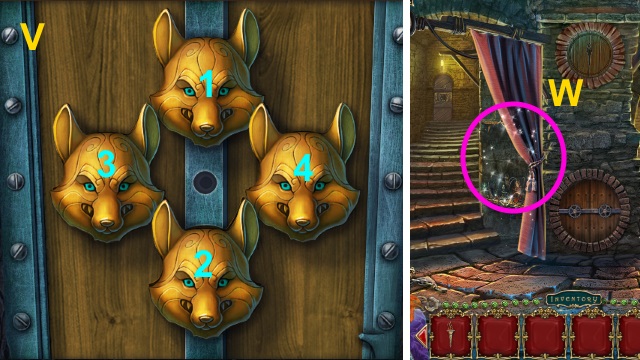
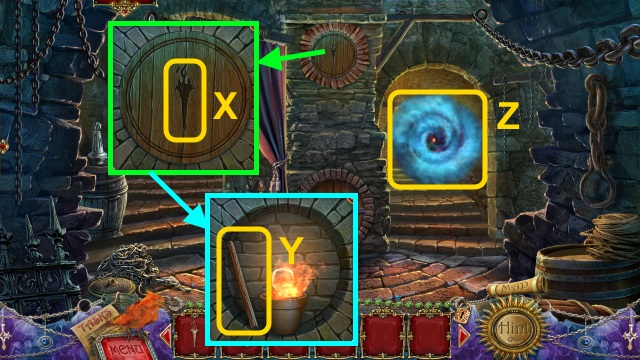
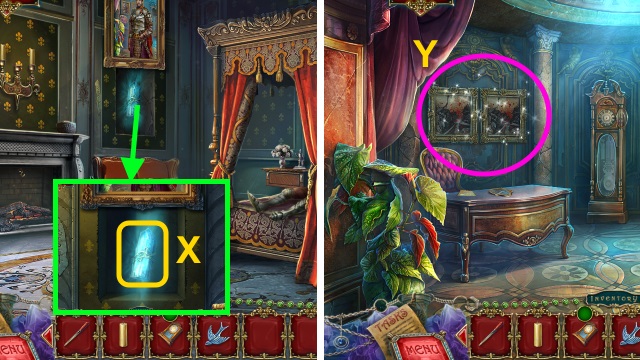
- Examine the mirror (X).
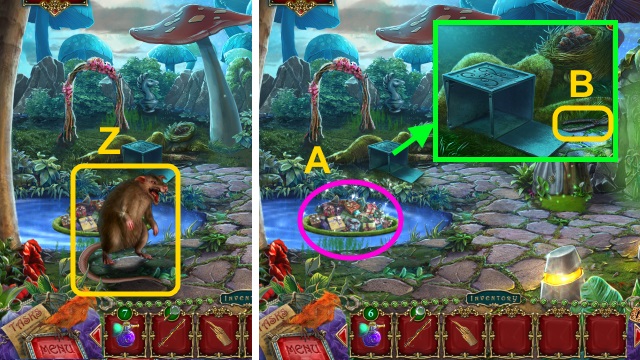
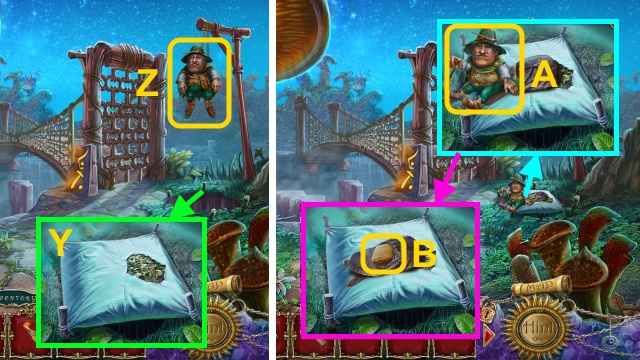
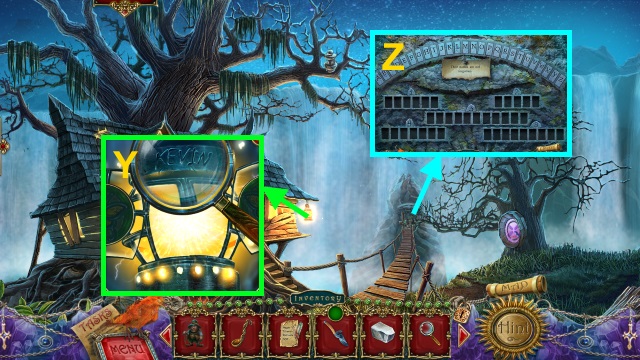
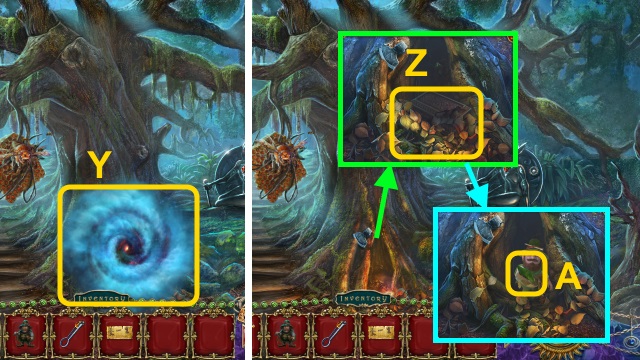
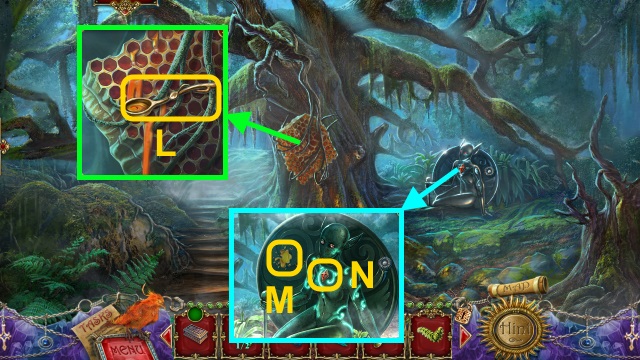
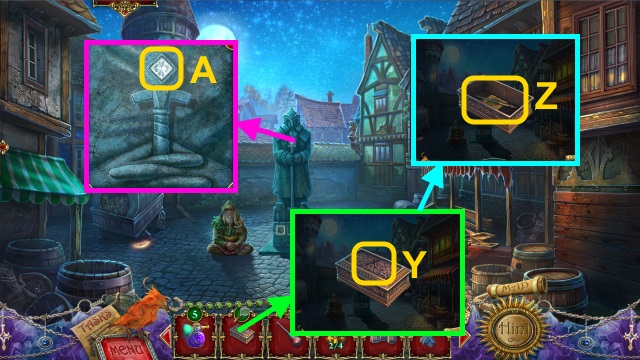
- Pour the HOT WATER; take the BIRD CHARM (Y) and TOKEN (1/2) (Z).
- Use the FACE POWDER to receive the CODE (A).
- Take the HAMMER HANDLE (B).
- Place the HAMMER HANDLE on the HAMMER HEAD to receive the HAMMER (C).
- Walk down.
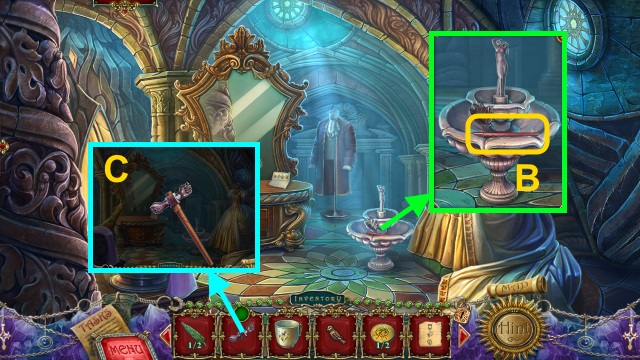
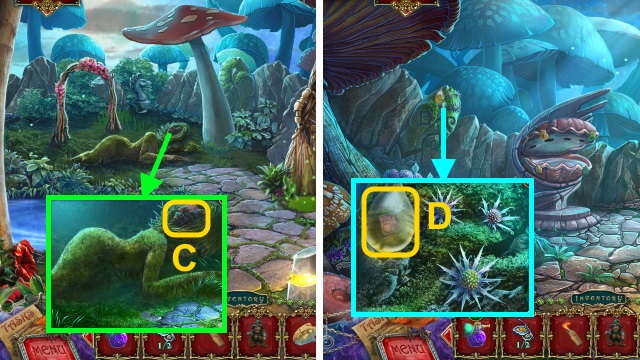
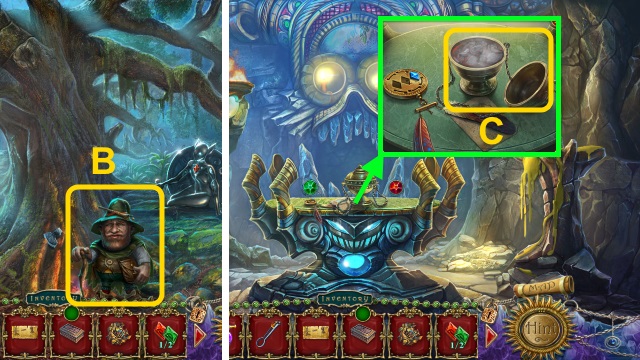
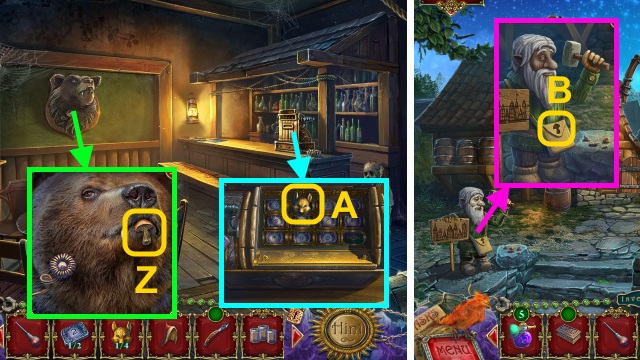
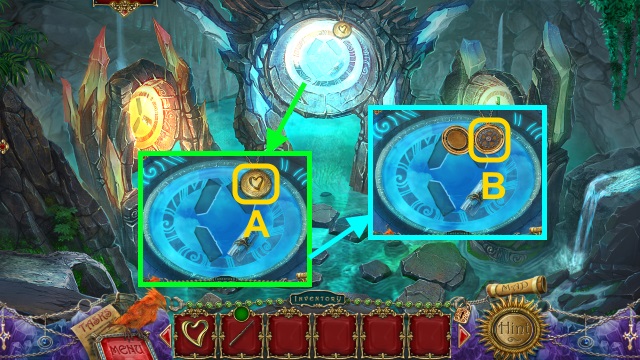
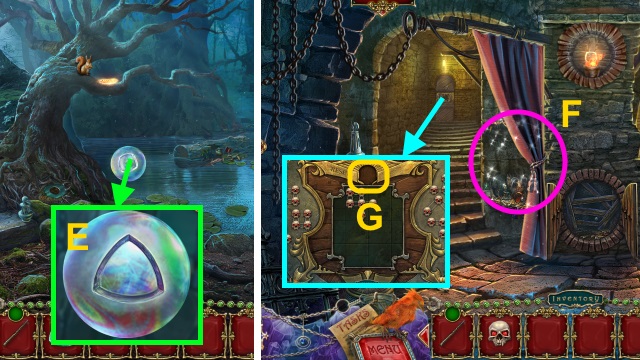
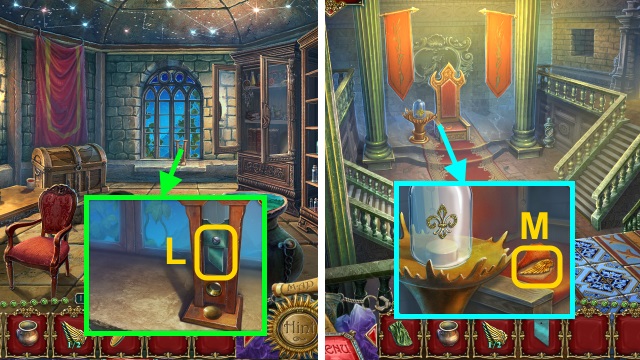
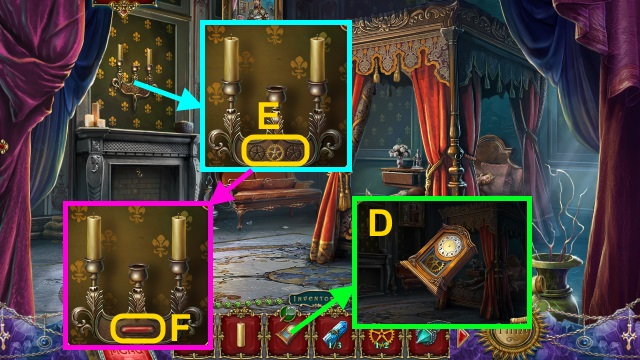
- Place the BIRD CHARM (D); take the FLOWER CHARM (E) and Phoenix (F).
- Use the Phoenix (G).
- Play the HOP to receive the GAUNTLET (H).
- Walk right.
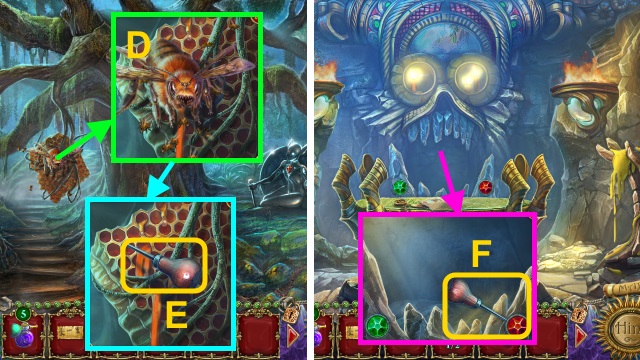
- Use the HAMMER; use the GAUNTLET to take the FIRE ROSE PETAL (I).
- Walk down.
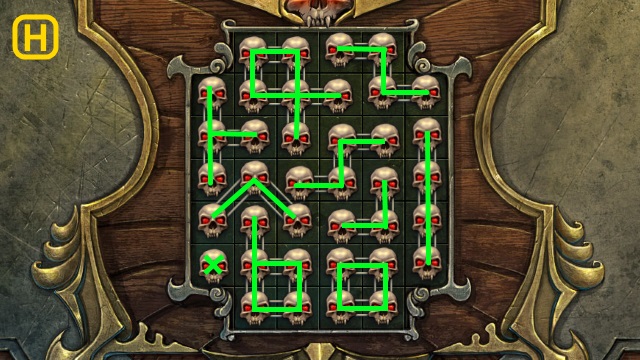
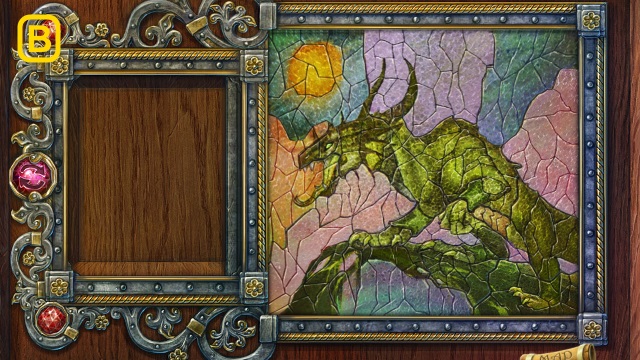
- Place the FLOWER CHARM (J); use the FIRE ROSE PETAL for a mini-game (K).
- Solution is random (L).
- Place the EMBROIDERY; take the PLIERS (M).
- Play the HOP to receive the EYE STAR (N).
- Walk right.
- Talk to the Druid (O).
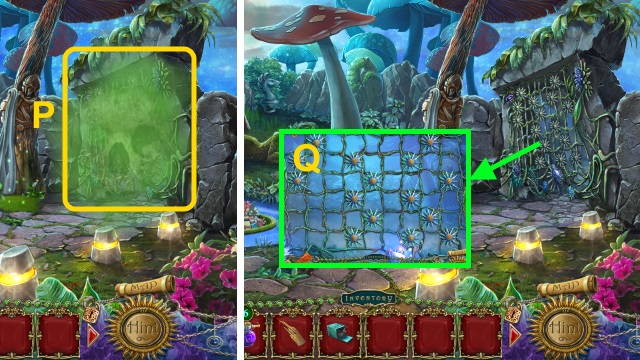
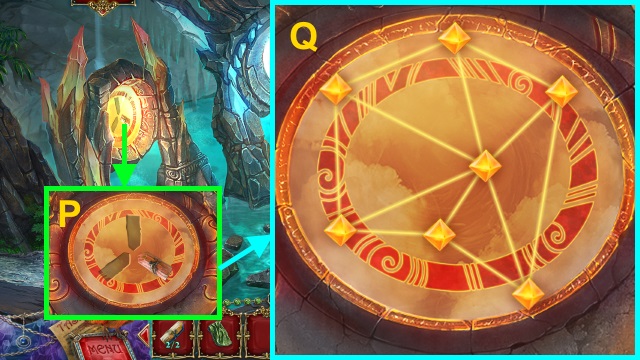
- Place the EYE STAR (P); take the SLEEP POWDER (Q).
- Use the PLIERS to take the PORTAL KEYS (R).
- Walk down.
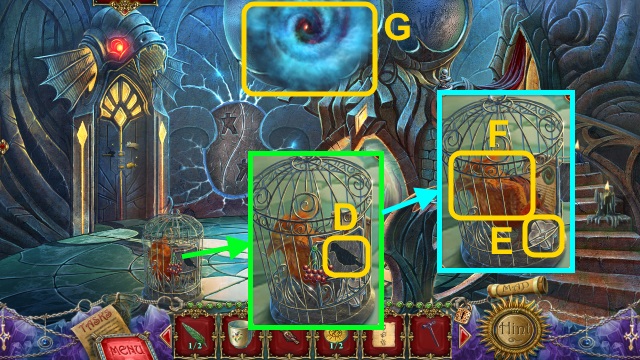
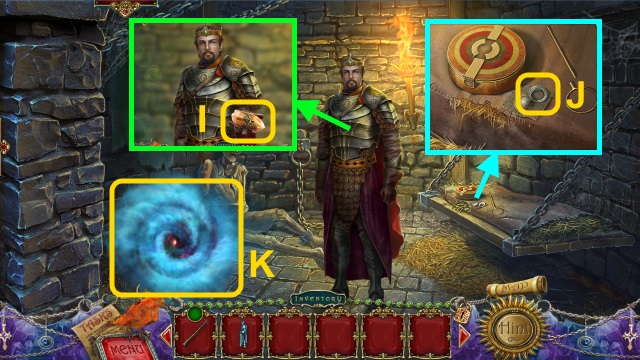
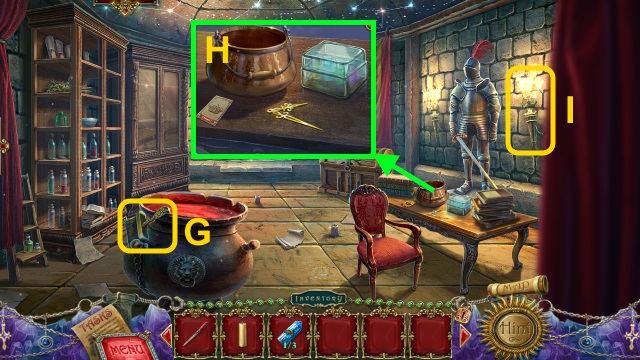
- Talk to the Orc; take the SHELL (S).
- Walk right.
- Place the SHELL; press it (T).
- Use the EMPTY CUP to receive the CUP OF WATER (U).
- Use the SLEEP POWDER on the CUP OF WATER to receive the SLEEPING POTION (V).
- Walk down.
- Give the SLEEPING POTION (W).
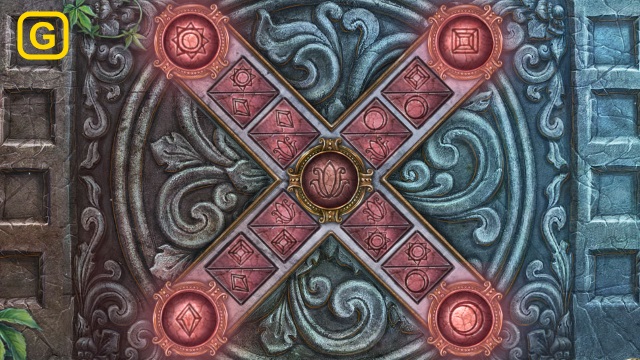
- Examine the Orc for a mini-game (X).
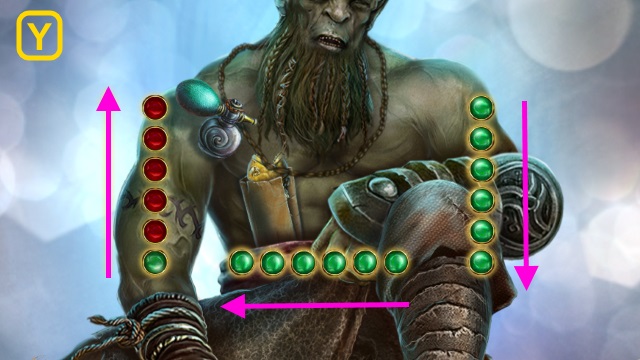
- Solution (Y).
- You receive the EMPTY VIAL.
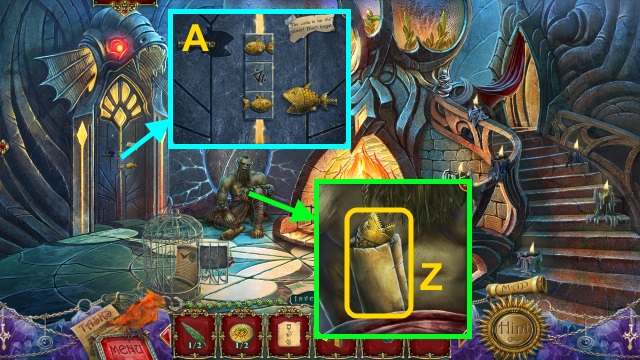
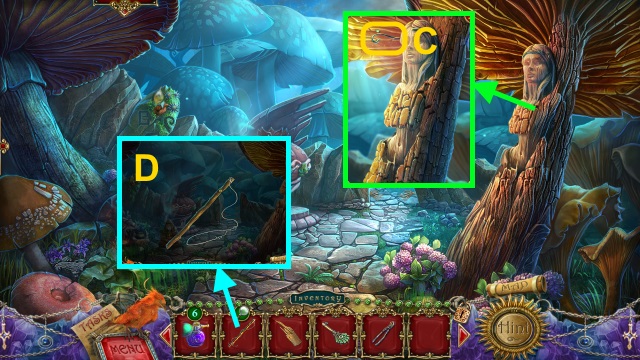
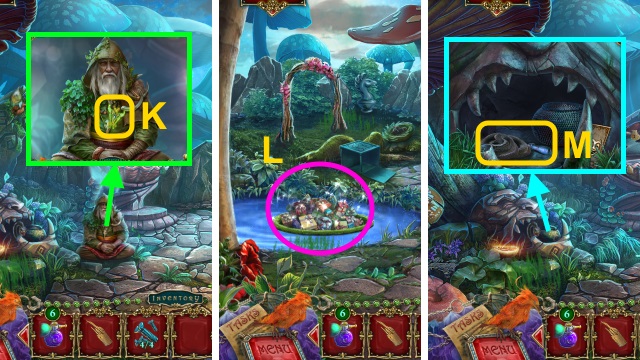
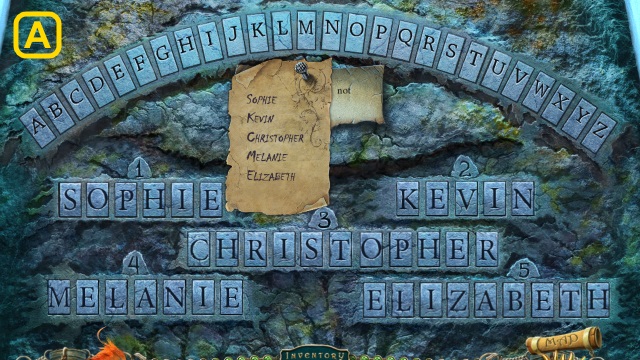
- Take the GOLDEN FISH and note (Z).
- Place the GOLDEN FISH and CODE for a mini-game (A).

- Solution (B).
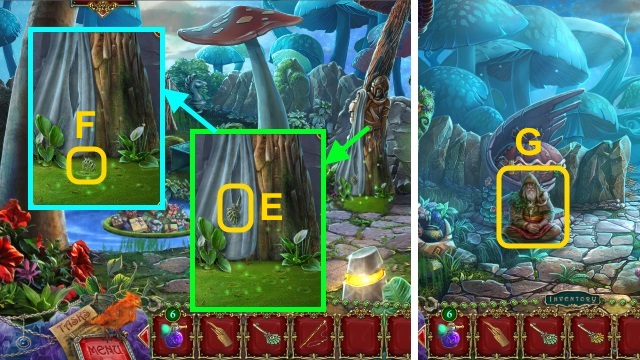
- Walk left.
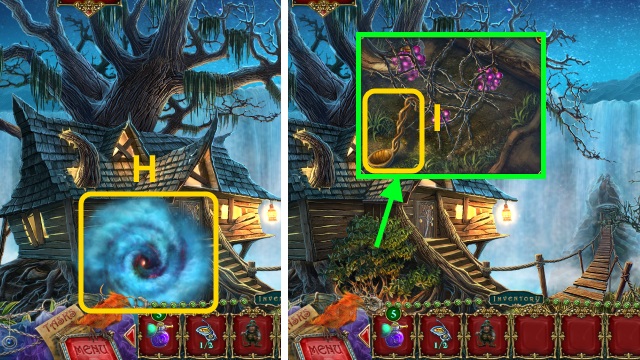
- Use the Phoenix (C).
- Take the GLASS FEATHER (2/2) (D).
- Take the BRACELET (1/2) (E); place the GLASS FEATHER (2/2) (F).
- Take the BOOK (G).
- Open the book; take the RECIPE (H) and TOKEN (2/2) (I).
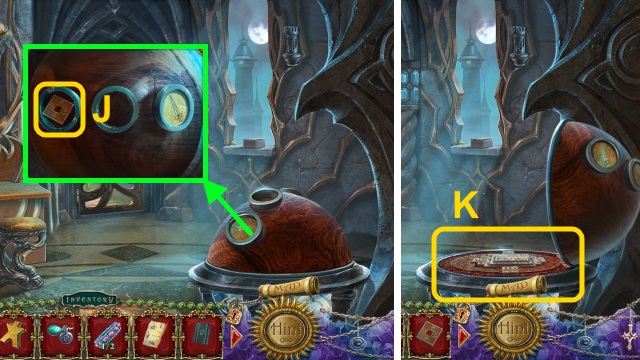
- Take the SQUARE COIN (J); place the TOKEN (2/2).
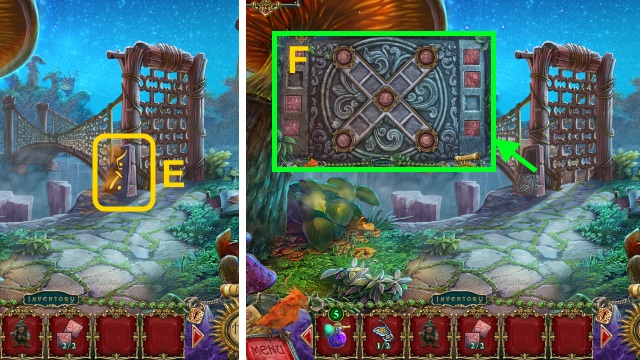
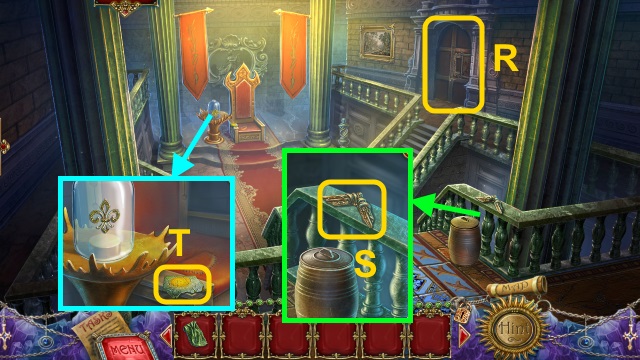
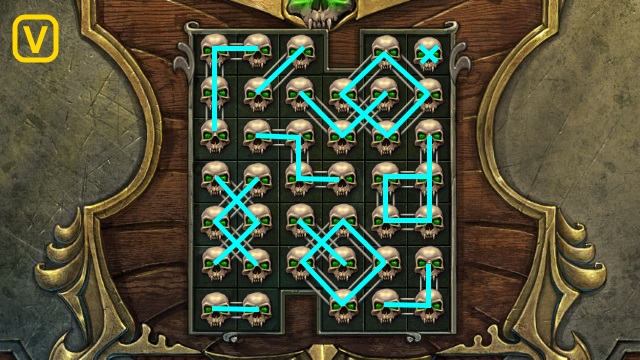
- Examine the board for a mini-game (K).
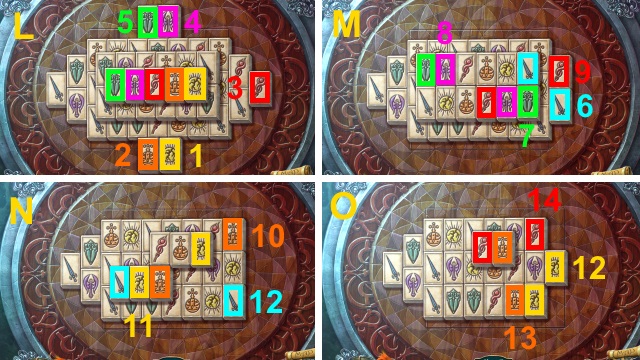

- Solution (L-Q).
- Take the EAGLE KEY (R).
- Examine the lock; use the EAGLE KEY (S).
- Walk forward.
- Use the Phoenix (T).
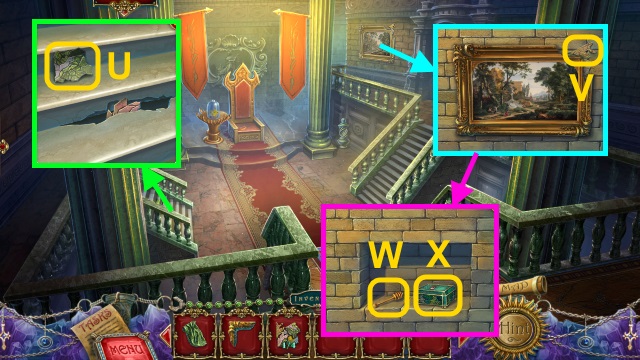
- Take the BROKEN LEAF (U).
- Take the SHELL (V); place the BOOK.
- Take the TWEEZERS (W).
- Walk down.
- Use the SHELL to take the BLUE SAND (X).

- Use the TWEEZERS to take the CARD WITH HOLES (Y).
- Walk forward.
- Place the CARD WITH HOLES (Z).

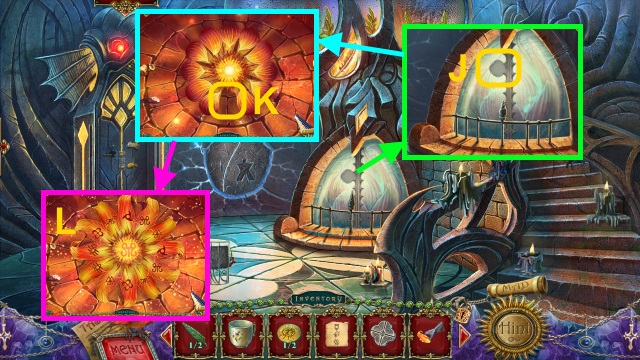
- Select the symbols (A).
- Place the SQUARE COIN (B); take the SKULL and SPRIG OF LAURUS (C).
- Walk down.

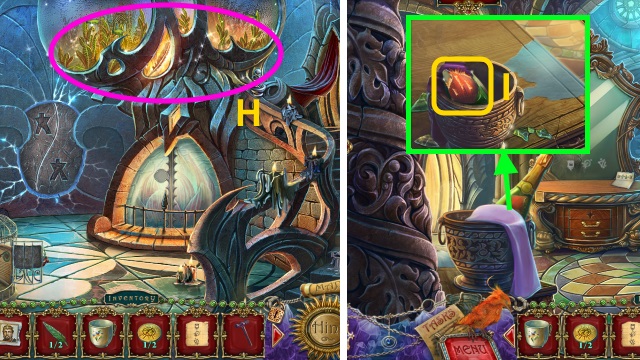
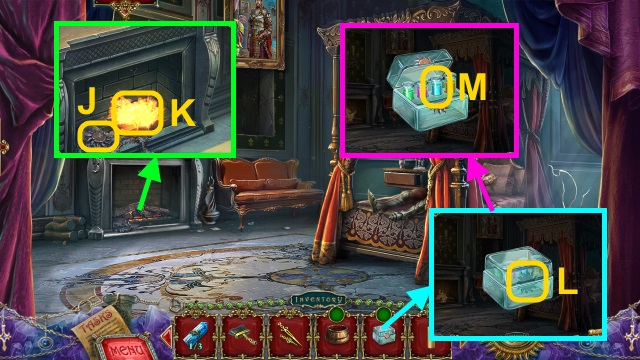
- Place the SKULL (D); take the GEMS (E).
- Open the doll; take the BLOOD OF ELF (F).
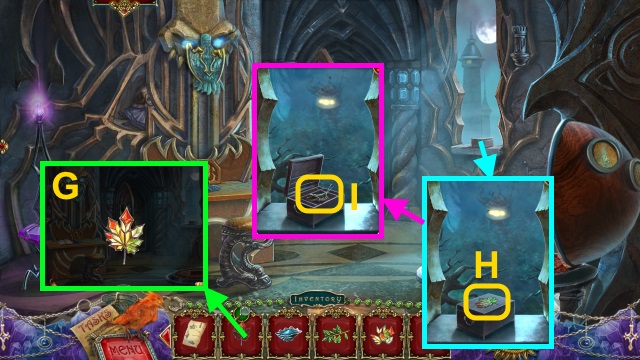
- Place the GEMS on the BROKEN LEAF to make the BLAZE MAPLE LEAF (G).
- Place the BLAZE MAPLE LEAF (H); open the box.
- Take the DRIED GRASSHOPPER (I).
- Walk forward.
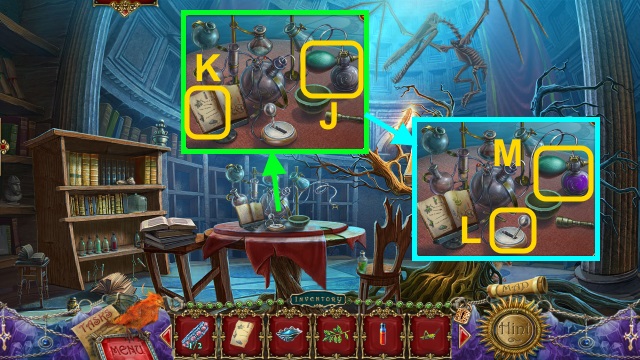
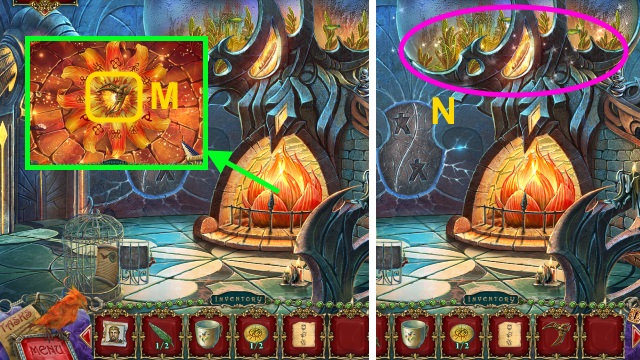
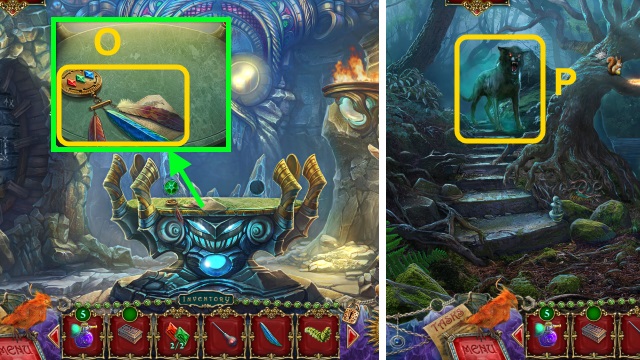
- Place the EMPTY VIAL (J) and RECIPE (K); use the BLUE SAND, SPRIG OF LAURUS, DRIED GRASSHOPPER, and BLOOD OF ELF.
- Flip the switch (L); take the SHRINKING POTION (M).
- Walk down twice.
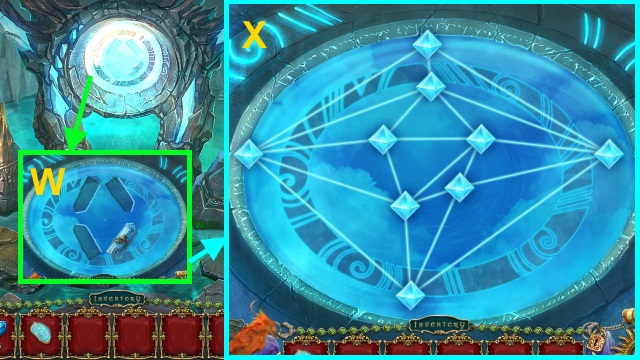
- Use the SHRINKING POTION (N).
- Place the PORTAL KEYS (O).
- Walk forward.
Chapter 2: Mushroom Garden
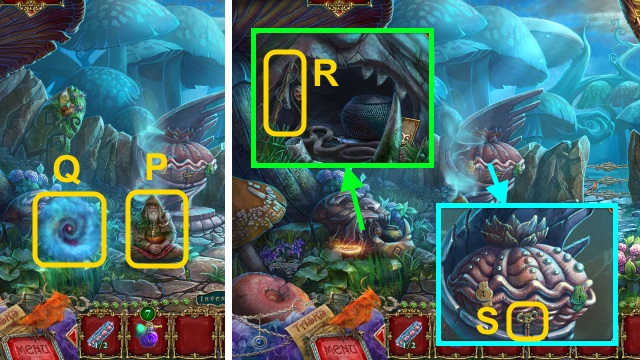
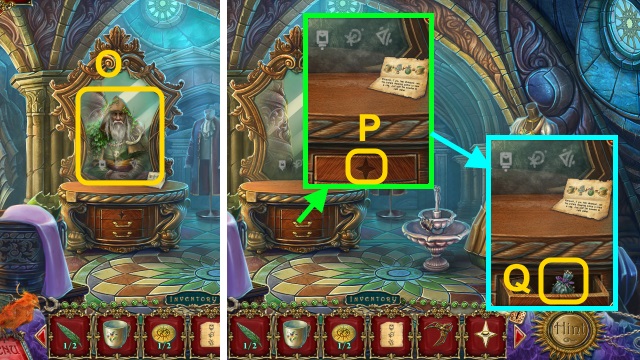
- Talk to the Druid (P).
- Use the Phoenix (Q).
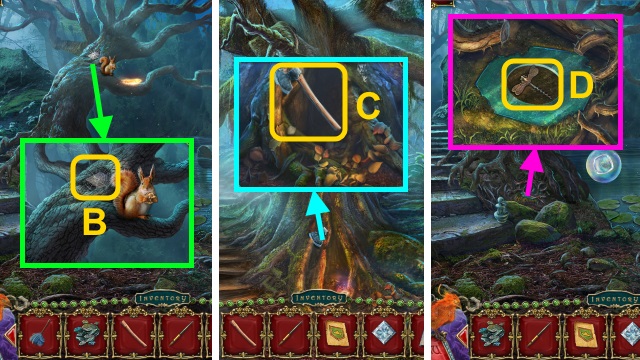
- Take the POLE AND LINE (R).
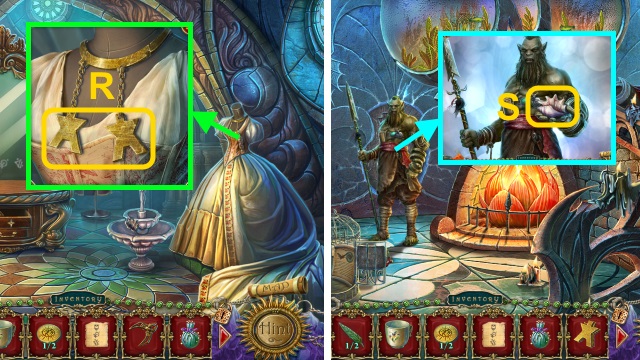
- Take the WIND-UP KEY (S).
- Take the TOY WOODPECKER (T).
- Use the WIND-UP KEY on the TOY WOODPECKER (U).
- Use the TOY WOODPECKER to take the BRACELET (2/2) (V); take the WOOD SLIVER (W).
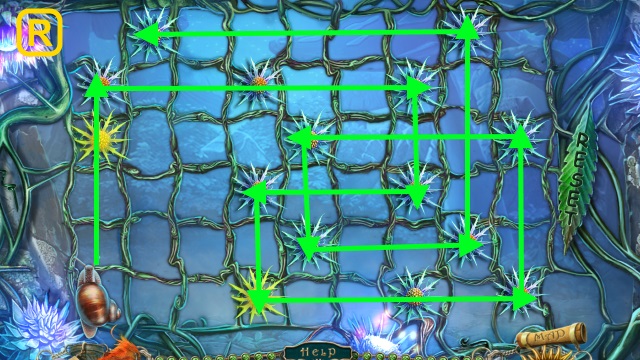
- Place the BRACELET (2/2) for a mini-game (X).
- Solution (Y).
- Walk forward.
- Use the SHRINKING POTION (Z).
- Play the HOP to receive the GREEN KEY (A).
- Take the NIPPERS (B).
- Walk down.
- Bend the crown; use the NIPPERS to take the HOOK (C).
- Place the HOOK on the POLE AND LINE to make the FISHING POLE (D).
- Walk forward.
- Try to take the key (E); use the FISHING POLE to take the YELLOW KEY (F).
- Walk down.
- Talk to the Druid (G).

- Use the GREEN KEY and YELLOW KEY (H); touch the blade (I).
- Take the SCREWS (4/4) (J).
- Take the MAGIC BUTTERFLY (K).
- Walk forward.
- Play the HOP to receive the REED PIPE (L).
- Walk down.
- Use the REED PIPE; take the SCREWDRIVER (M).
- Walk forward.
- Use the SCREWS (4/4) and SCREWDRIVER; take the IRON CUBE (N).
- Walk down.
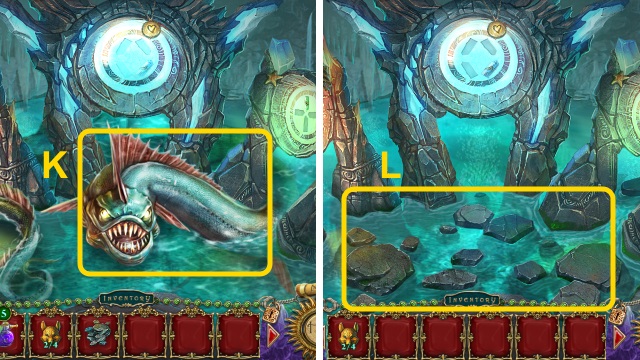
- Use the IRON CUBE to receive the MONSTROUS SNAIL (O).
- Walk forward.
- Use the MAGIC BUTTERFLY (P).
- Use the MONSTROUS SNAIL for a mini-game (Q).
- Solution (R).
- Walk right.
- Talk to the Gnome (S).
- Move the leaves; take the THREAD AND NEEDLE (T).
- Walk down.
- Use the THREAD AND NEEDLE; take the DUVET COVER (U).
- Walk right.
- Use the DUVET COVER to receive the FILLED DUVET (V); take the BUTTERFLY HALF (W).
- Examine the lizard; use the WOOD SLIVER to receive the LIT SLIVER (X).
- Place the FILLED DUVET (Y).
- Use the SHRINKING POTION (Z).
- Talk to the Gnome; take the SHRUNKEN GNOME (A).
- Open the bag; take the BREAD (B).
- Walk down.
- Give the BREAD; take the LOCK PART (1/2) (C).
- Walk down.
- Use the LIT SLIVER to receive the LOCK PART (2/2) (D).
- Walk forward, then right.
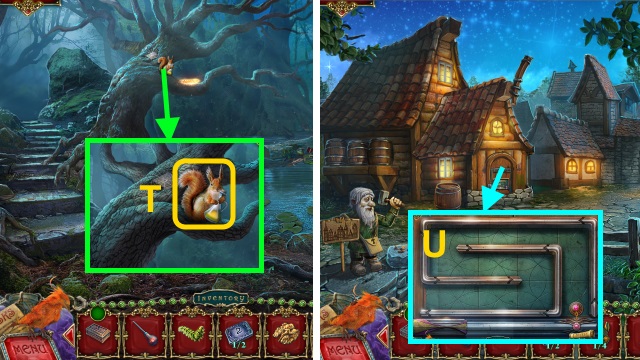
- Open the case (E); place the LOCK PART (2/2) for a mini-game (F).
- Solution (G).
- Walk forward.
Chapter 3: The Witch
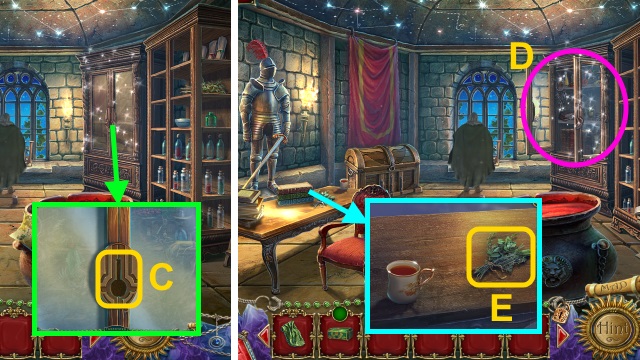
- Use the Phoenix (H).
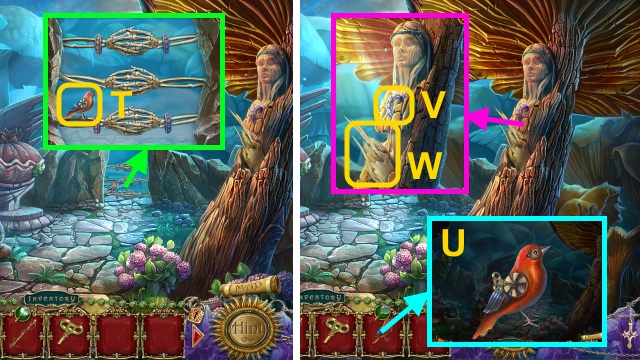
- Take the LADLE (I).
- Take the BUTTERFLY HALF (2/2) (J).
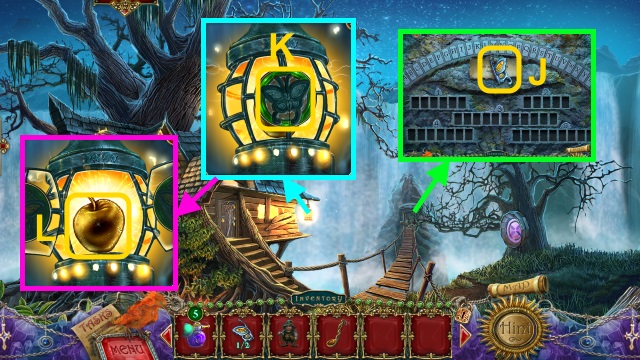
- Place the BUTTERFLY HALF (2/2) (K); open the lantern.
- Take the APPLE (L).
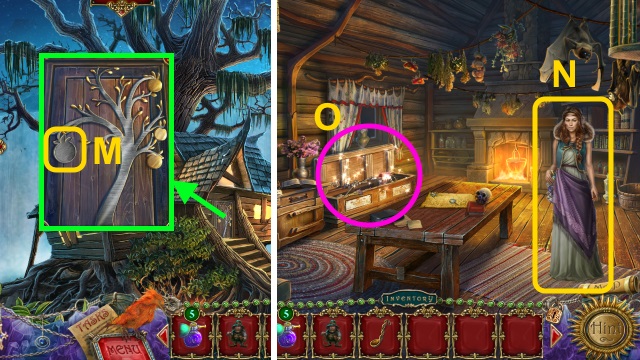
- Place the APPLE (M).
- Go forward.
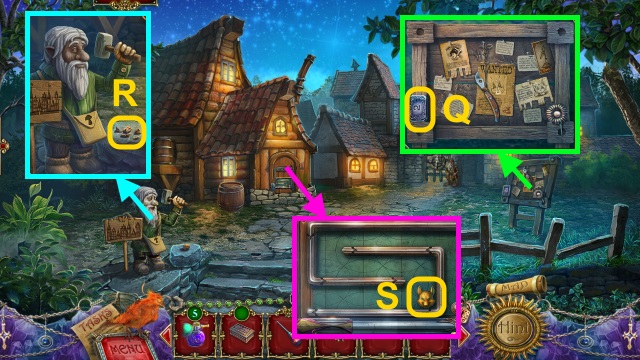
- Talk to the Witch (N).
- Open the chest; play the HOP to receive the PAPER WITH QUILL (O).
- Take the GARDEN PRUNER PART (P); try to take the chalk (Q).
- Use the SHRUNKEN GNOME; take the CHALK (R).
- Examine the paper (S); use the PAPER WITH QUILL (T).
- Use the PAPER WITH QUILL (U).
- Take the MAGNIFIER (V); use the PAPER WITH QUILL (W).
- Walk down.
- Use the PAPER WITH QUILL (X).
- Use the MAGNIFIER and PAPER WITH QUILL to receive the PAPER WITH NAMES (Y).
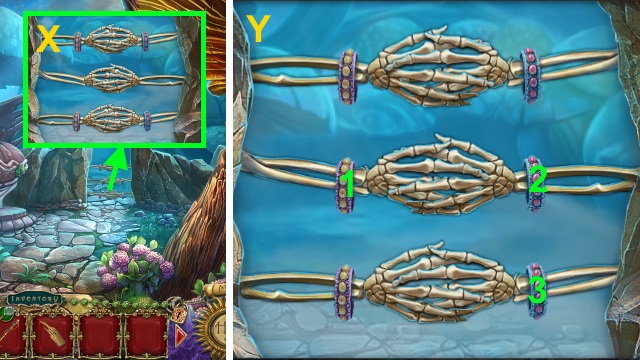
- Place the PAPER WITH NAMES for a mini-game (Z).
- Solution (A).
- Walk forward.
- Take the FIRE TONGS (B).
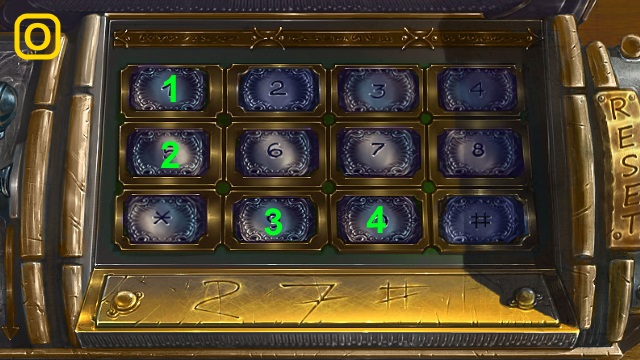
- Take the GARDEN PRUNER PART (C); use the CHALK for a mini-game (D).
- Solution (E).
- Take the MAP PATH (F).
- Open the MAP PATH (G).
- Combine the GARDEN PRUNER PARTS to make the GARDEN PRUNER (H).
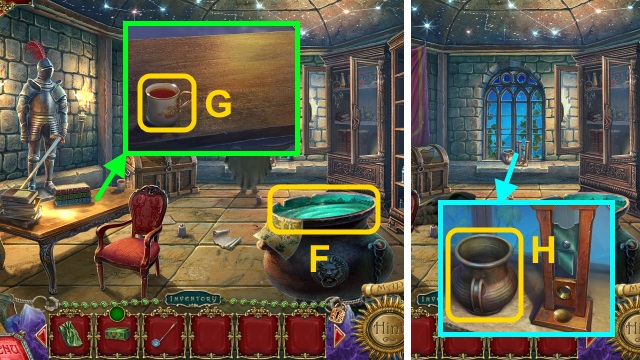
- Take the FUNNEL (I).
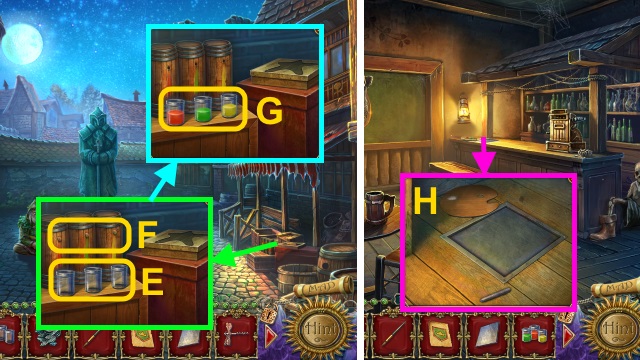
- Use the LADLE to receive the LADLE WITH DYE (J).
- Walk down.
- Use the GARDEN PRUNER (K); take the BERRIES (3/3).
- Walk left.
- Play the HOP to receive the SEA SALT (L).
- Use the FIRE TONGS to take the HOT EMBER (M) and EMERALD BUTTON (N).
- Use the SEA SALT, BERRIES, and LADLE WITH DYE; you receive the LADLE.
- Use the LADLE to take the LIQUID FOR CRYSTAL (O).
- Close the mold; place the FUNNEL (P).
- Use the LIQUID FOR CRYSTAL; open the mold.
- Take the CRYSTAL (1/3) (Q).
- Place the MAP PATH for a mini-game (R).
- Solution (S).
- Take the MAP.
- Talk to the Witch; take the CRYSTAL (2/3) (T).
- Walk down, then forward.
- Place the EMERALD BUTTON (U); take the CRYSTAL (3/3) (V).
- Walk down.

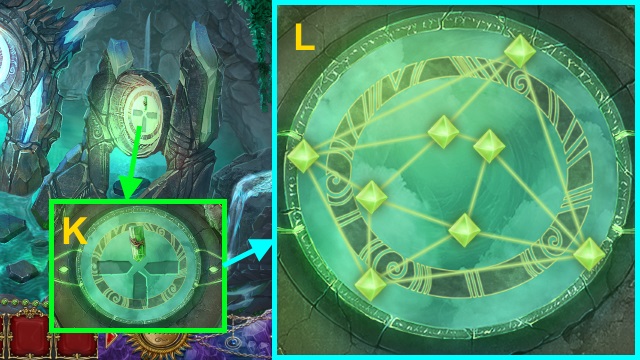
- Place the CRYSTAL (3/3) for a mini-game (W).
- Solution (X).
- Go right.
Chapter 4: Black Forest
- Use the Phoenix (Y).
- Take the DEAD LEAVES and CLOSED CASKET (Z).
- Use the SHRUNKEN GNOME; take the AMULET PART (1/2) (A).
- Talk to the Gnome (B).
- Walk down, then forward.
- Open the burner; place the HOT EMBER and DEAD LEAVES (C).
- Take the SMOKING THURIBLE.
- Walk down, then right.
- Use the SMOKING THURIBLE (D); take the AWL (E).
- Walk down, then forward.
- Use the AWL to take the RUBY (F).
- Walk down, then right.

- Place the RUBY (G).
- Walk forward.
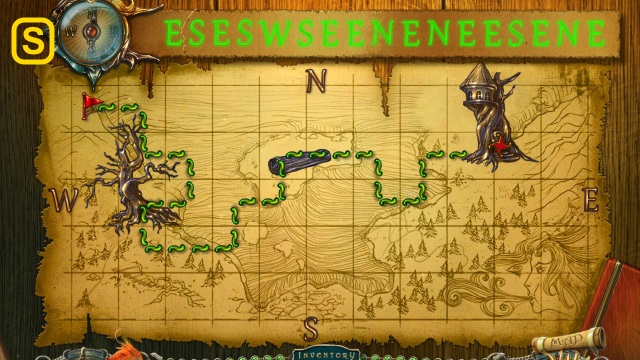
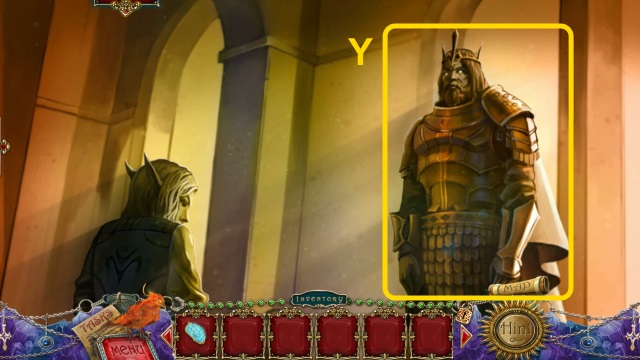
- Use the MAP.
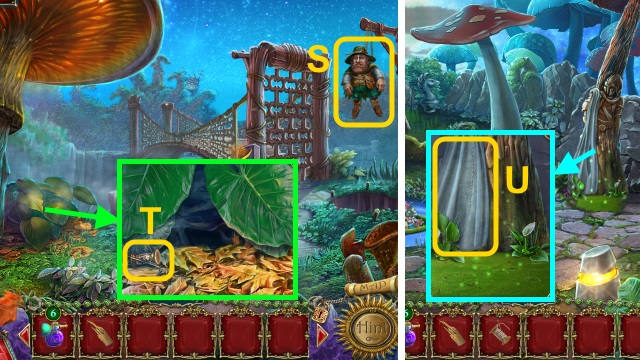
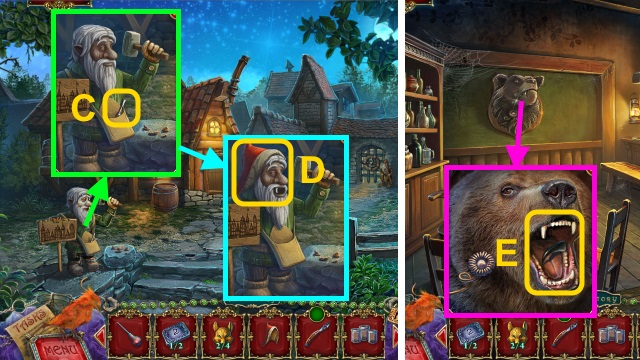
- Talk to the King; take the FEATHER (H).
- Play the HOP to receive the SPOON (I).
- Use the Phoenix (J).
- Take the CATERPILLAR (K).
- Try to walk left.
- Walk down.
- Use the SPOON to take the HONEY (L).
- Use the HONEY (M); use the AWL to take the AMULET PART (2/2) (N).
- Walk down, then forward.
- Place the AMULET PART (2/2) and FEATHER; take the AMULET (O).
- Go to the Forest.
- Use the AMULET (P).
- Walk left.
Chapter 5: The Gnome's Village
- Take the BUTTON (1/2) (Q).
- Smash the walnut; take the NUT (R).
- Take the FOX FIGURINE (1/4) (S).
- Walk down.
- Give the NUT to receive the OIL (T).
- Walk left.
- Use the OIL for a mini-game (U).
- Solution (V).
- Walk left.
- Take the GNOME'S HAT (W).
- Give the CATERPILLAR (X); take the PLIERS PART.
- Take the EMPTY BOTTLES (Y).
- Take the MUSHROOM FIGURINE (Z).
- Take the FOX FIGURINE (2/4) (A).
- Walk down.
- Place the MUSHROOM FIGURINE (B); open the bag.
- Take the SCREWDRIVER (C).
- Place the GNOME'S HAT; take the BEAR'S FANG (D).
- Walk left.
- Place the BEAR'S FANG; take the SHARP CLAW (E).
- Walk down.
- Use the SHARP CLAW to take the PLIERS PART (F).
- Walk down.
- Use the SCREWDRIVER to take the SCREW (G).
- Combine the 2 PLIERS PARTS and SCREW to make the PLIERS (H).
- Use the PLIERS to take the METAL FLOWER (1/5) (I).
- Walk down.
- Use the PLIERS to take the METAL FLOWER (2/5) (J).
- Walk forward.
- Play the HOP to receive the BUTTON (2/2) (K).
- Walk left.
- Use the PLIERs to take the METAL FLOWER (3/5) (L).
- Walk left.
- Use the PLIERS to take the METAL FLOWER (4/5) (M).
- Place the BUTTON (2/2) for a mini-game (N).
- Solution (O).

- Take the COINS (5/5) (P).
- Walk down.
- Give the COINS (5/5) (Q).
- Take the METAL FLOWER (5/5) (R).
- Place the METAL FLOWER (5/5) (S).
- Walk forward.
- Talk to the Druid; take the FEATHER DUSTER (T).
- Use the Phoenix (U).

- Move the cover; Play the HOP to receive the STONES (V).
- Take the AXE HANDLE (W).
- Take the SCISSORS FIGURINE (X).
- Place the SCISSORS FIGURINE on the CLOSED CASKET (Y); take the BRUSH and PICTURE (Z).
- Use the AWL to take the DIAMOND (A).
- Walk down twice.
- Use the FEATHER DUSTER (B); take the TILE.
- Walk down.
- Place the AXE HANDLE; take the AXE (C).
- Walk left.
- Use the AXE and DIAMOND; take the CORKSCREW (D).
- Walk forward, then right.
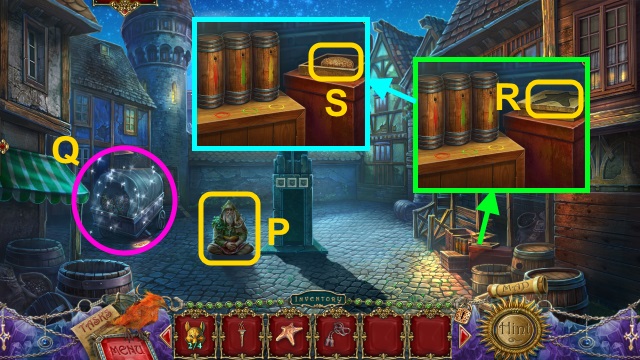
- Place the EMPTY BOTTLES (E); use the CORKSCREW (F).
- Take the PAINTS (G).
- Walk down, then left.
- Place the PICTURE, BRUSH, TILE, and PAINTS for a mini-game (H).
- Solution (I).
- Take the MOSAIC PIECE.
- Walk down, then right.
- Place the MOSAIC PIECE (J).
- Go forward.
Chapter 6: The Cave of Portals
- Use the SHRINKING POTION (K).
- Place the STONES (L).
- Take the TORCH CHARM (M).
- Take the CURTAIN ROPE (N).
- Take the STARFISH (O).
- Walk down.
- Talk to the Druid (P).
- Play the HOP to receive the FOX FIGURINE (3/4) (Q).
- Place the STARFISH (R); open the box.
- Take the SEA SPONGE (S).
- Walk forward.
- Use the SEA SPONGE; take the FOX FIGURINE (4/4) (T).
- Walk down three times.
- Place the FOX FIGURINE (4/4) for a mini-game (U).
- Solution (V).
- Go forward.
- Use the CURTAIN ROPE; play the HOP to receive the HEART (W).
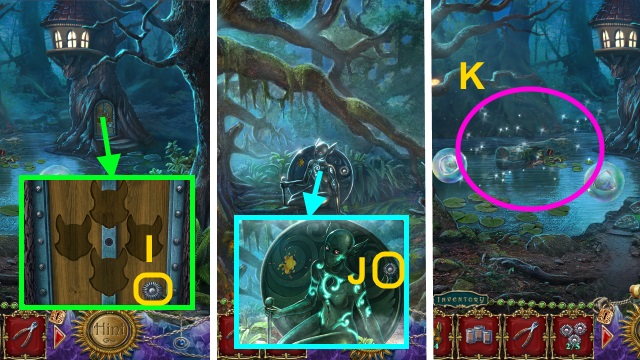
- Place the TORCH CHARM (W); take the STICK (X).
- Use the Phoenix (Y).
- Go to the Cave of Portals.
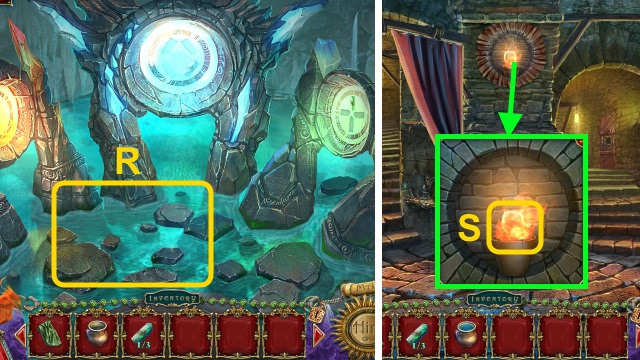
- Place the HEART (A); take the GEAR (B).
- Go to the Tower.
- Place the GEAR (C); take the TRIANGLE KEY (D).
- Walk down.
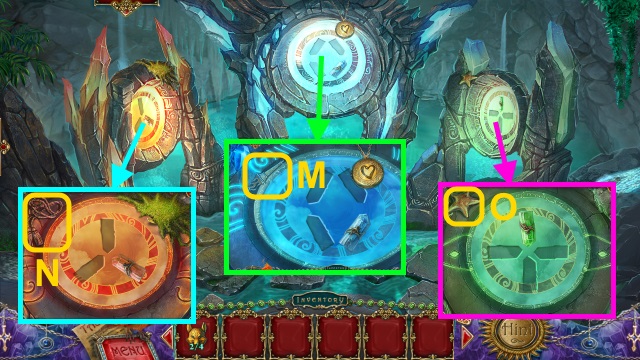
- Place the TRIANGLE KEY (E); you receive the RED SKULL.
- Walk right.
- Play the HOP to receive the STATUETTE (F).
- Place the RED SKULL for a mini-game (G).
- Solution (H).
- Walk left.
- Talk to the King; take the RED CRYSTAL (1/2) (I).
- Take the FISHING LINE (J).
- Use the Phoenix (K).
- Use the STATUETTE; take the MAGNET (L) and RAG (M).
- Combine the FISHING LINE and MAGNET with the STICK to make the STICK WITH MAGNET (N).
- Use the STICK WITH MAGNET to take the RED CRYSTAL (2/2) (O).
- Go to the Cave of Portals.
- Place the RED CRYSTAL (2/2) for a mini-game (P).
- Solution (Q).
- Go forward.
Chapter 7: The Red Portal
- Examine the door (R).
- Take the FRAME PART (S).
- Take the MOSAIC PIECE (1/4) (T).
- Take the MOSAIC PIECE (2/4) (U).
- Take the MOSAIC PIECE (3/4) (V); place the FRAME PART.
- Take the HONEY DIPPER (W) and LOCKED CASKET (X).
- Open the jar; use the HONEY DIPPER to take the FULL HONEY DIPPER (Y).
- Use the FULL HONEY DIPPER to take the MOSAIC PIECE (4/4) (Z).
- Take the FLASK FIGURINE (A); place the MOSAIC PIECE (4/4) for a mini-game.
- Solution (B).
- Walk right.
- Place the FLASK FIGURINE (C).
- Play the HOP to receive the LADLE (D).
- Take the LEMON BALM (E).
- Place the LEMON BALM; use the LADLE to receive the SLEEPING POTION (F).
- Pour the SLEEPING POTION (G).
- Take the PITCHER (H).
- Play the HOP to receive the TREFOIL (I).
- Place the TREFOIL on the LOCKED CASKET (J); take the GOLDEN WING (1/2) and COIN (K).
- Use the COIN to take the BLADE (L).
- Walk down.
- Use the BLADE; take the GOLDEN WING (2/2) (M).
- Walk right.

- Place the GOLDEN WING (2/2) (N); open the chest.
- Take the ARTIFACT (O).
- Walk down.
- Open the case; place the ARTIFACT (P).
- Take the GREEN CRYSTAL (1/3) (Q).
- Use the PITCHER to receive the PITCHER WITH WATER (R).
- Go to the Forest; walk right.
- Use the PITCHER WITH WATER (S); take the SQUARE KEY.
- Walk down.
- Place the SQUARE KEY to receive the GREEN SKULL (T).
- Walk right.
- Place the GREEN SKULL for a mini-game (U).
- Solution (V).
- Walk right.
- Talk to the Mage; take the GREEN CRYTSAL (W).
- Use the Phoenix (X).
- Take the NET (Y).
- Take the TAPE (Z).
- Use the RAG to take the WRAPPED GLASS (A).
- Walk down, then left.
- Use the WRAPPED GLASS; take the MOUSE FIGURINE (B).
- Place the NET and TAPE; take the BUTTERFLY NET (C).
- Walk down.
- Use the BUTTERFLY NET to take the EYE (D).
- Walk right.
- Place the EYE to receive the CANDY FIGURINE (E).
- Walk down, then left.
- Place the CANDY FIGURINE (F); take the METAL CHEESE (G).
- Walk down, then right.
- Place the MOUSE FIGURINE (H).
- Place the METAL CHEESE; take the CHEESE (I).
- Give the CHEESE (J); take the GREEN CRYSTAL (3/3).
- Go to the Cave of Portals.
- Place the GREEN CRYSTAL (3/3) for a mini-game (K).
- Solution (L).
- Go forward.
Chapter 8: The Green Portal
- Play the HOP to receive the CARRIAGE (M).
- Examine the door (N).
- Take the STATIONARY KNIFE (O).
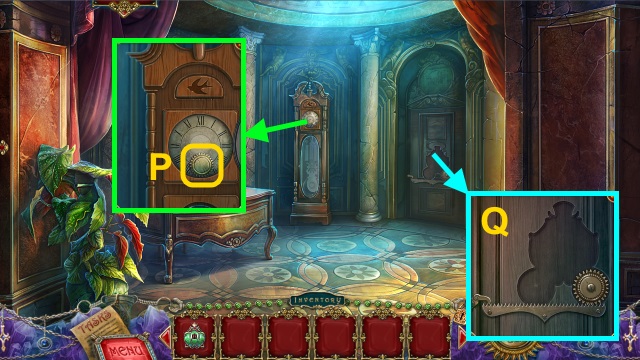
- Open the CLOCK; take the CARRIAGE WHEEL (P).
- Place the CARRIAGE WHEEL and CARRIAGE (Q).
- Go forward.
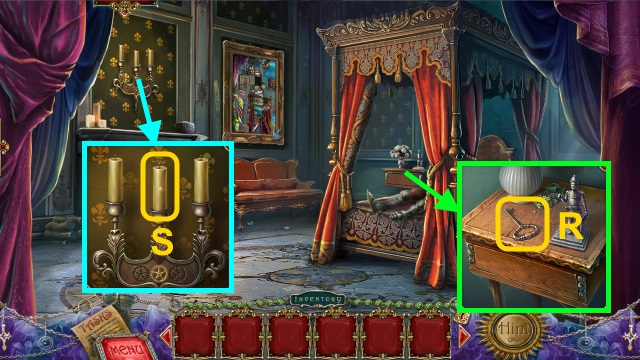
- Take the CABINET KEY (R).
- Take the CANDLE (S).
- Walk down.
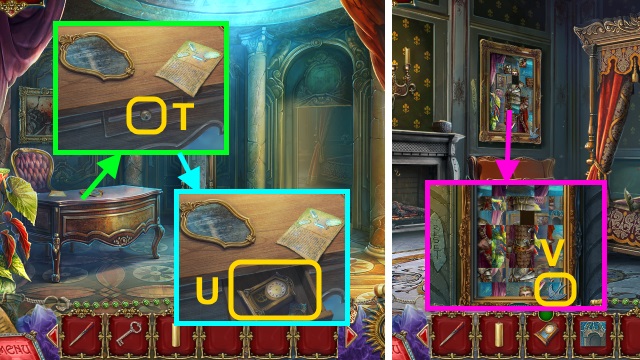
- Use the CABINET KEY (T); take the CLOCK and PAINTING PIECE (U).
- Walk right.
- Take the BIRD FIGURINE (V); place the PAINTING PIECE for a mini-game.
- Solution (W).
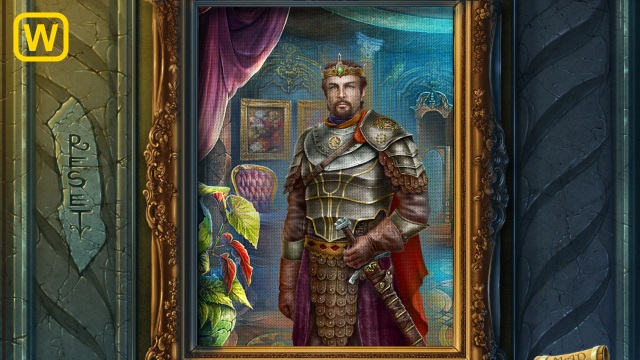
- Move the painting; take the BLUE CRYSTAL (1/3) (X).
- Walk down.
- Play the HOP to receive the KNIGHT'S SWORD (Y).

- Place the BIRD FIGURINE (Z); take the GEAR (1/2) (A).
- Walk right.
- Place the KNIGHT'S SWORD (B); take the RING WITH DIAMOND (C).
- Walk down.
- Use the RING WITH DIAMOND on the CLOCK; take the GEAR (2/2) (D).
- Place the GEAR (2/2) (E); press the button (F).
- Walk left.
- Take the FIREPLACE BRUSH (G).
- Take the CLOCK HANDS, METAL BOWL, and BOX WITH ELIXIRS (H).
- Use the CANDLE to receive the LIT CANDLE (I).
- Walk down.
- Use the FIREPLACE BRUSH; take the SUN (J).
- Use the LIT CANDLE (K).
- Place the SUN on the BOX WITH ELIXIRS (L); open it.
- Take the ELIXIR OF MEMORY (M).
- Walk down.

- Place the CLOCK HANDS (N); take the SILVER BAR (O).
- Place the SILVER BAR in the METAL BOWL to make the BOWL WITH SILVER (P).
- Walk right.
- Place the BOWL WITH SILVER; take the MOLTEN SILVER (Q).
- Walk down.
- Pour the MOLTEN SILVER and ELIXIR OF MEMORY (R); take the BLUE CRYSTAL (2/3) and MIRROR OF MEMORY (S).
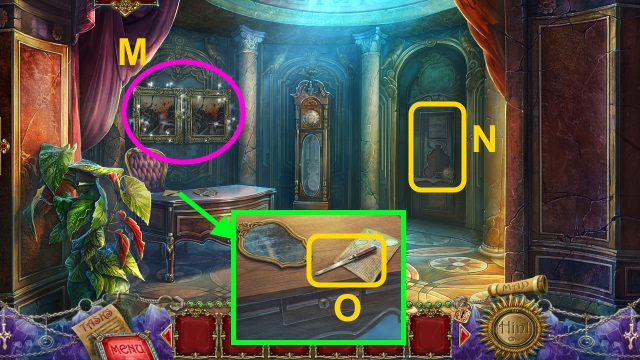
- Walk right.
- Place the MIRROR OF MEMORY (T); move the painting.
- Use the STATIONARY KNIFE (U).
- Move the painting; take the MIRROR OF MEMORY and BLUE CRYSTAL (3/3) (V).
- Place the BLUE CRYSTAL (3/3) for a mini-game (W).
- Solution (X).
- Go forward.
- Use the MIRROR OF MEMORY (Y).
- Congratulations! You have completed Queen's Tales: Sins of the Past.
Created at: 2015-05-08