

Walkthrough Menu
- General Tips
- Chapter 1: The Nightingale
- Chapter 2: Lost
- Chapter 3: The Forest Edge
- Chapter 4: The Oracle
- Chapter 5: Varga's Den
- Chapter 6: The Castle
- Chapter 7: The Dungeon
- Chapter 8: The Upper Castle
General Tips
- This is the official guide for Queen's Tales; The Beast and the Nightingale.
- This guide will not mention each time you have to zoom into a location; the screenshots will identify each location.
- Hidden-object puzzles are referred to as HOPs in this guide. Items listed in green are hidden or they require additional actions to locate. Interactive items in HOPs are color-coded.
- Mini-games and HOPs are sometimes randomized; your solution may vary.
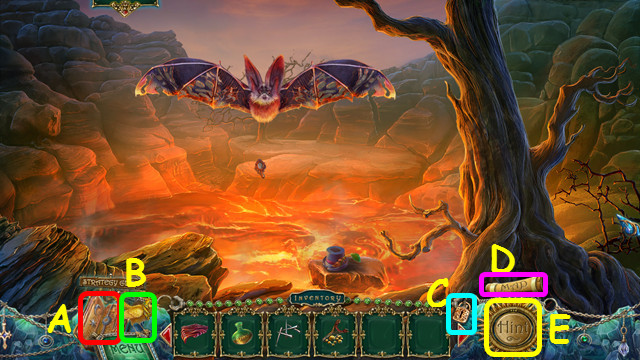
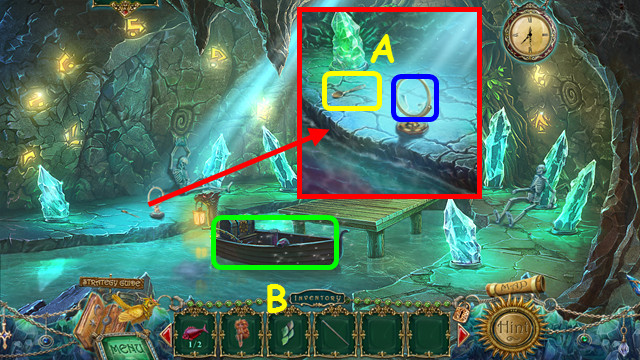
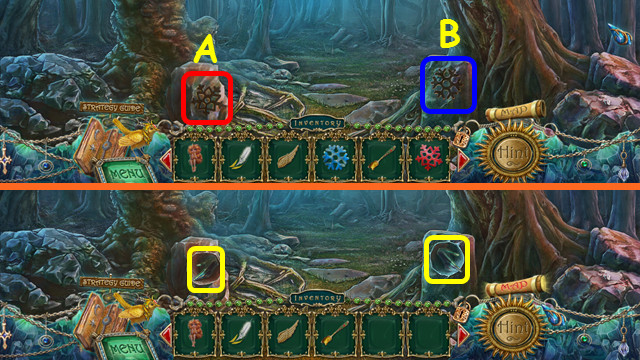
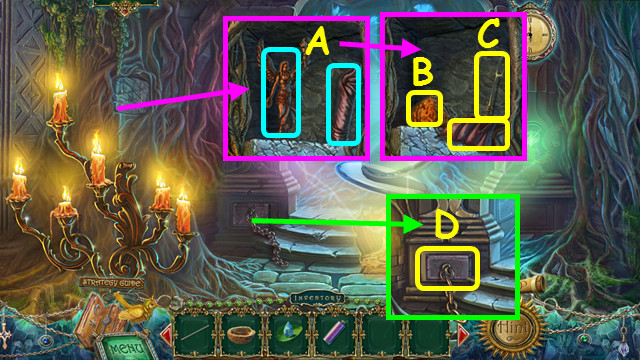
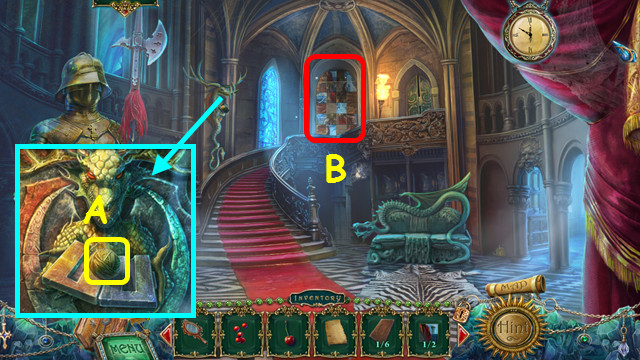
- Refer to your Journal for notes and clues (A).
- Use the Nightingale to grow plants (B).
- Prevent your inventory from auto-hiding by selecting the lock (C).
- Use your map to see where actions are available and quickly travel (D).
- Select the Sun for a hint (E).
Chapter 1: The Nightingale
- You have the option of an interactive tutorial.
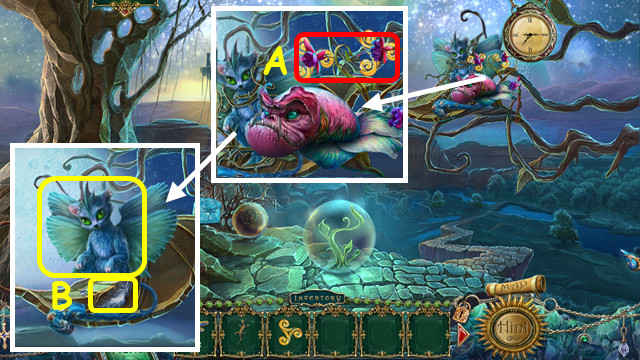
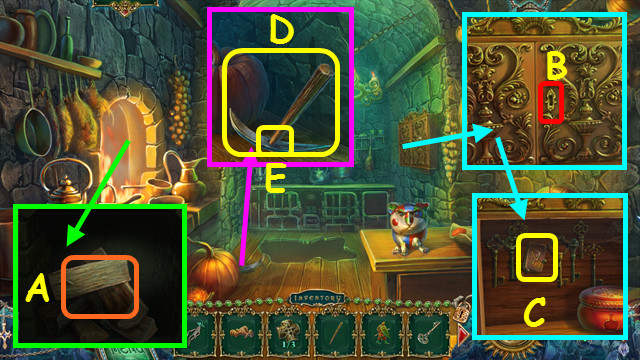
- Talk to your father; take the CAGE WITH NIGHTINGALE (A).
- Take the 1/4 PETAL (B).
- Hang the CAGE WITH NIGHTINGALE on the hook and take the CLOTH cover (C).
- Take the 2/4 PETAL and read the love note (D).
- Look through the keyhole (E).
- Take the KEY (F).
- Use the KEY in the lock, turn the handle, and walk forward.
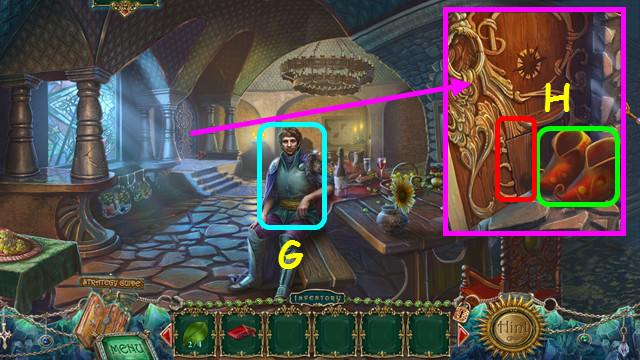
- Talk to Dorian (G).
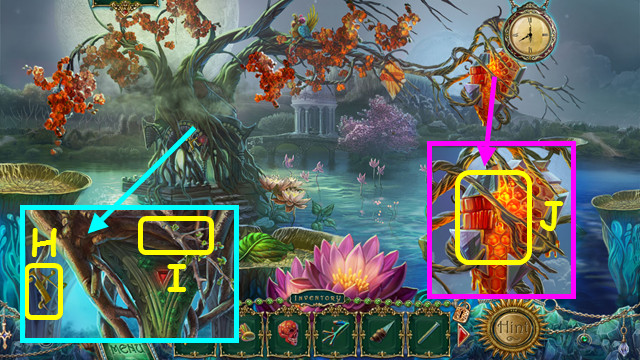
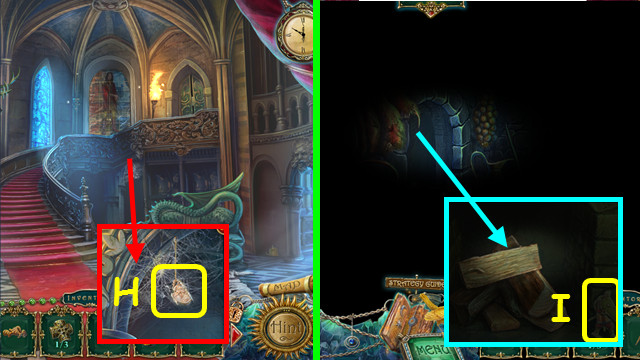
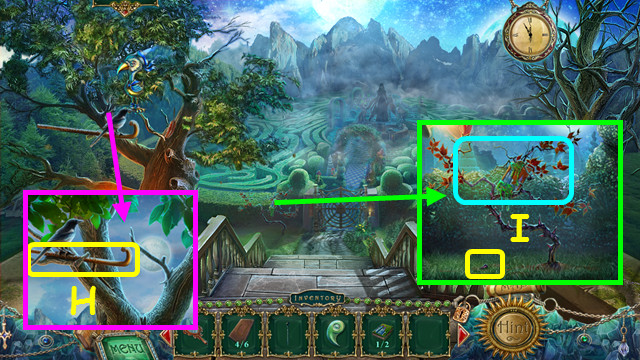
- Take the SHOES and look in the doggie-door (H).
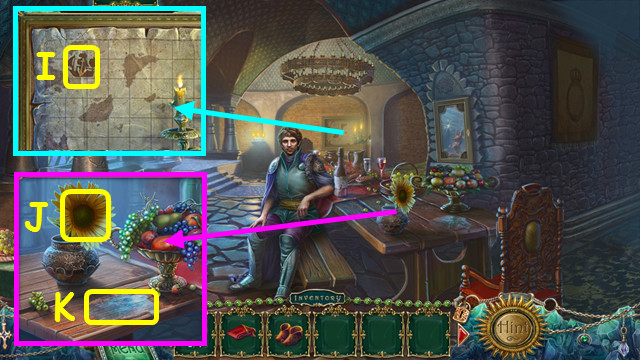
- Take the ANCHOR (I).
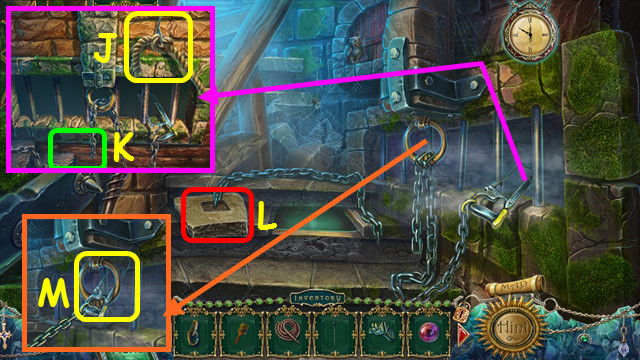
- Take the SUNFLOWER SEEDS (J) and use the CLOTH on the spill to get the WET CLOTH (K).
- Walk down.
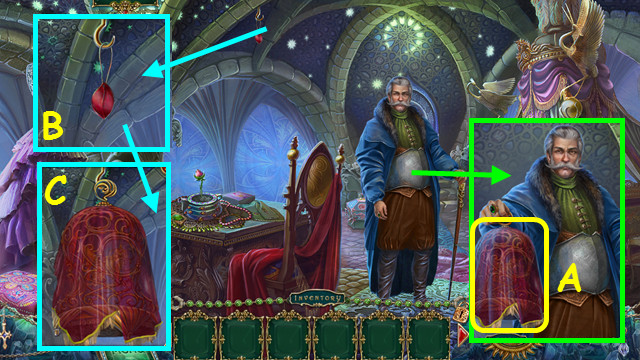
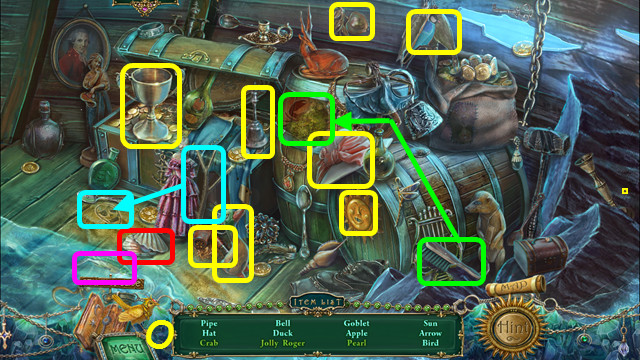
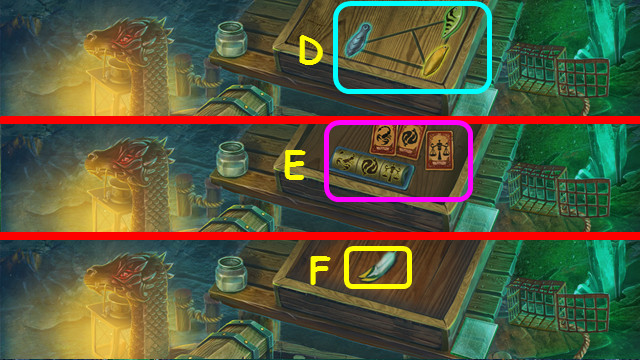
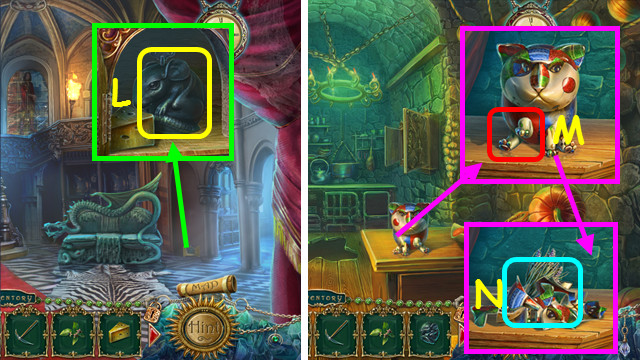
- Touch the hat and give the SHOES to the puppy (L); take the HATPIN and the SHIP (M).
- 1 SHOE will remain in your inventory.
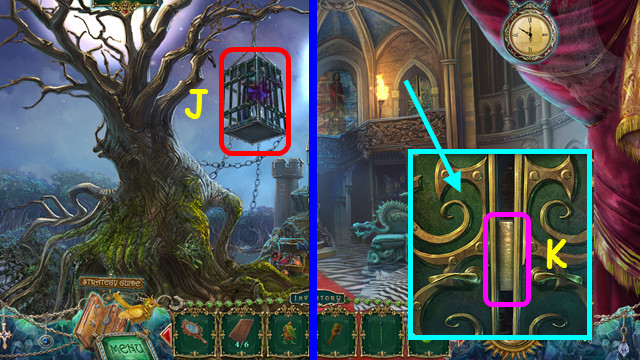
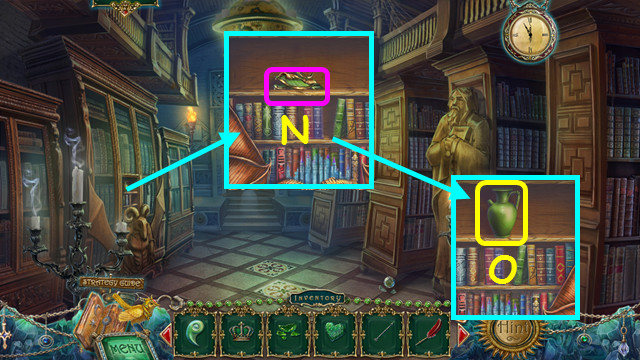
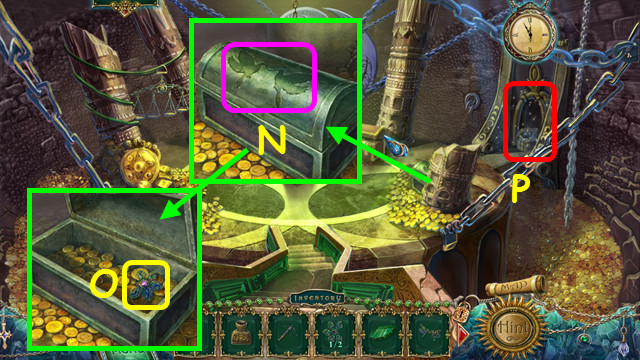
- Open the cage and give the SUNFLOWER SEEDS to the Nightingale (N).
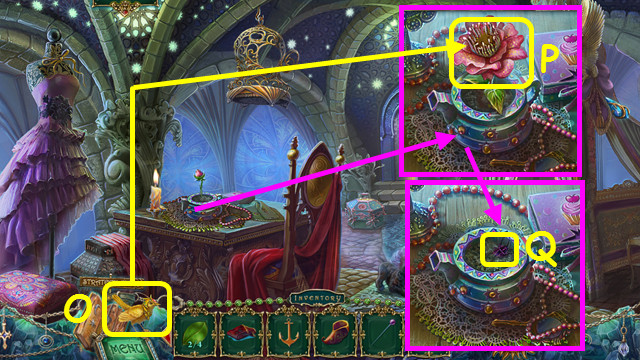
- The NIGHTINGALE is now in your bottom panel (O).
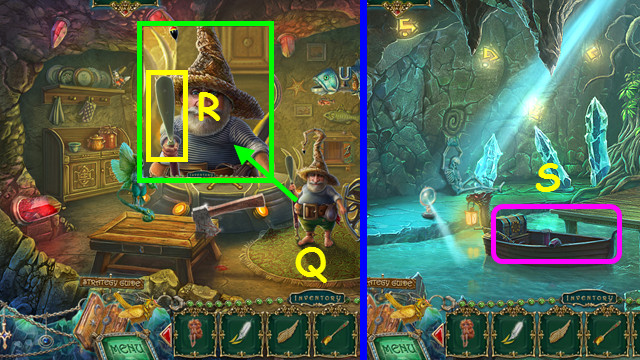
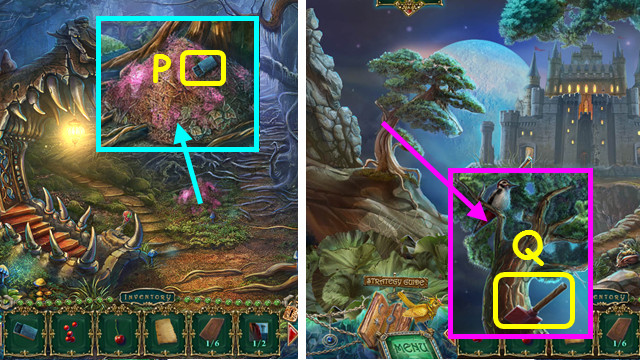
- Use the NIGHTINGALE on the flower; take the FLOWER (P), and take the 1/2 BEETLE (Q).
- Walk forward.
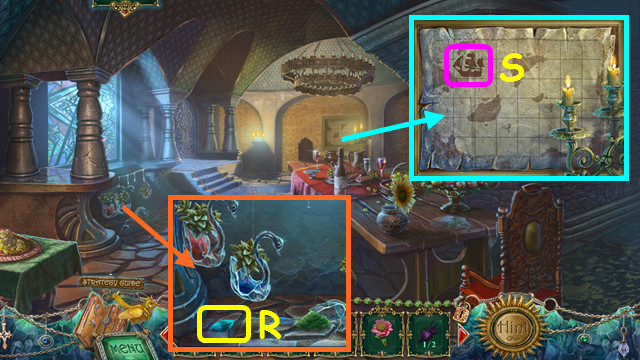
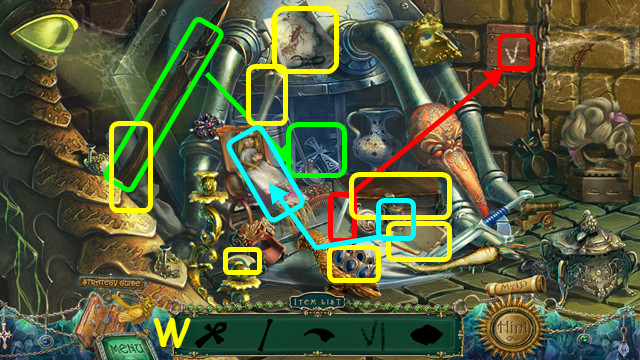
- Take the 3/4 PETAL (R).
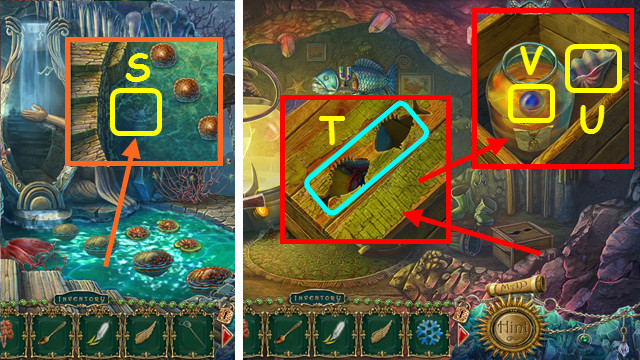
- Place the SHIP on the map (S).
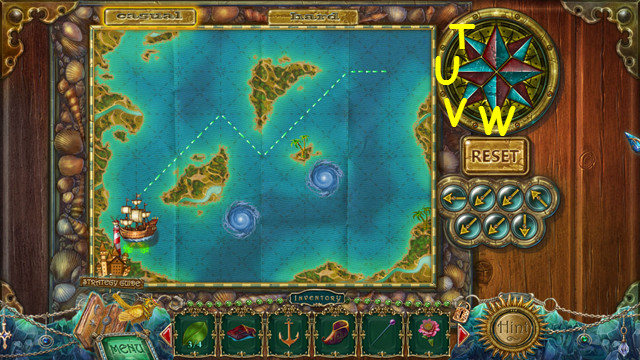
- Use the compass to steer the boat to port in seven moves or less.
- Press U, V, V, T, V, V, and W.
- You earn the WIND ROSE.
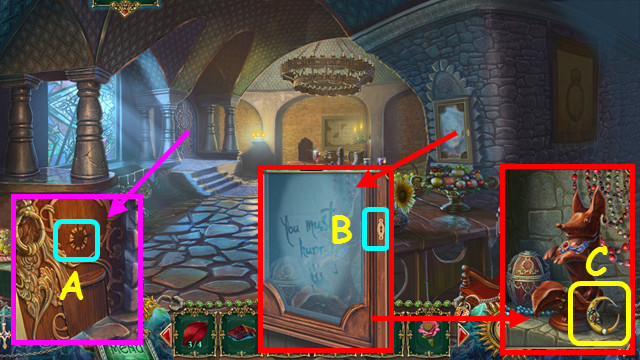
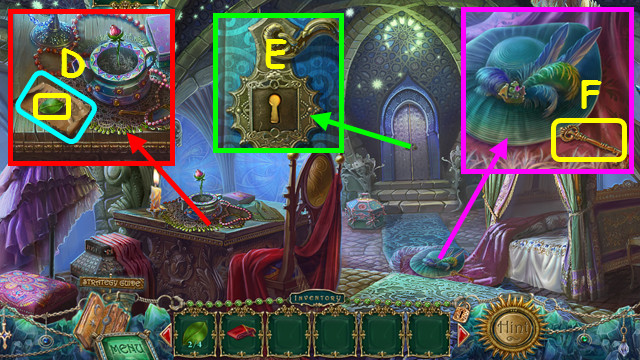
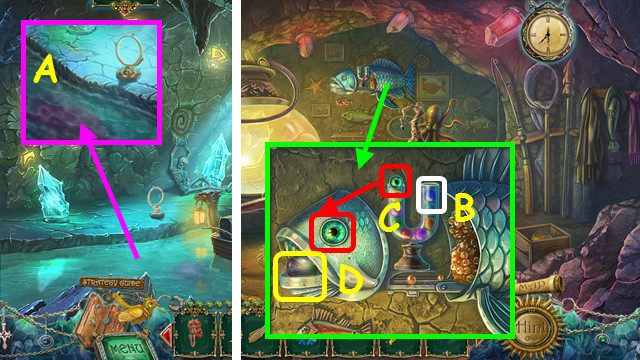
- Place the WIND ROSE on the door to earn the WIND ROSE HALF (A).
- Use the HATPIN on the lock (B).
- Take the MOON (C).
- Walk down.
- Place the WIND ROSE HALF on the box and open it (D).
- Take the CANDY (E).
- Walk forward.
- Give the CANDY to the Goblin (F).
- Walk left.

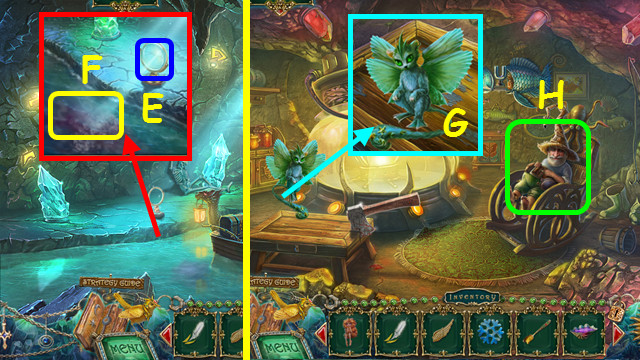
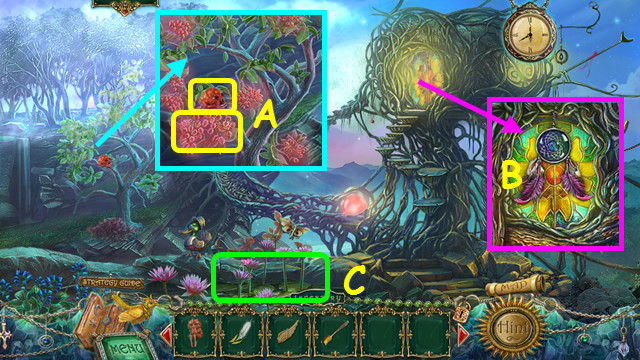
- Use the NIGHTINGALE on the flowers (G).
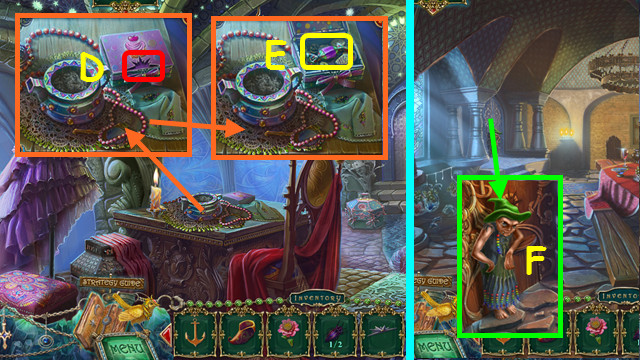
- Select the cup (H).
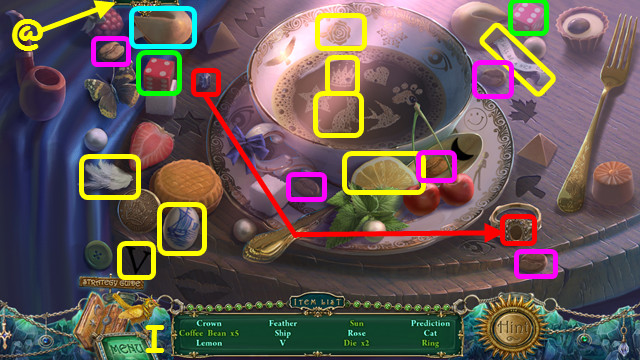
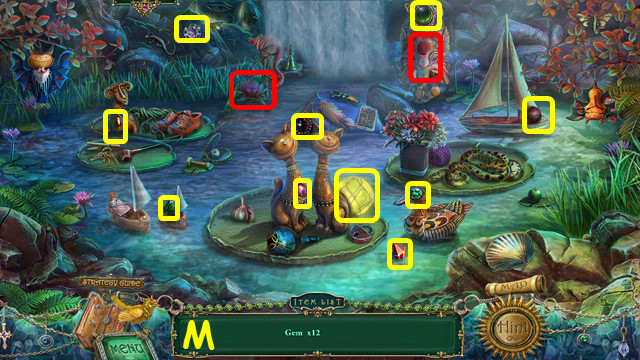
- Play the HOP to earn the SUN (I).
- Select the tab to play a match three game instead of the HOP (@).
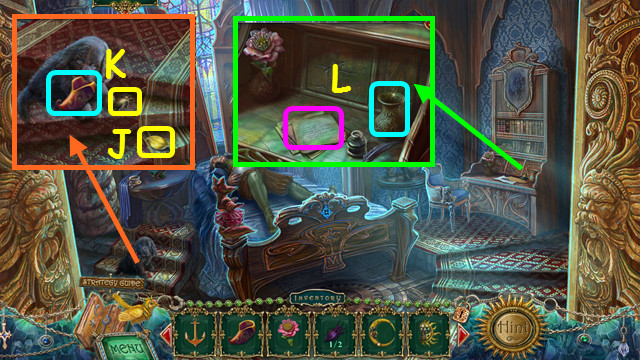
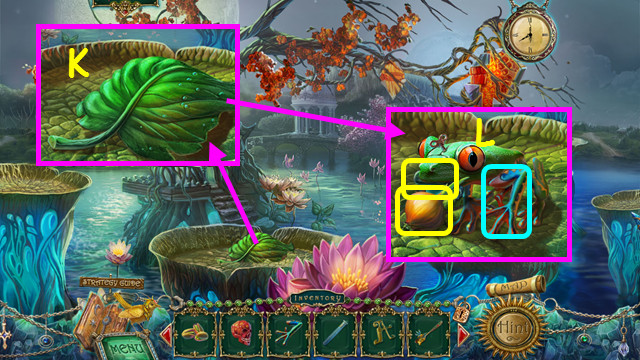
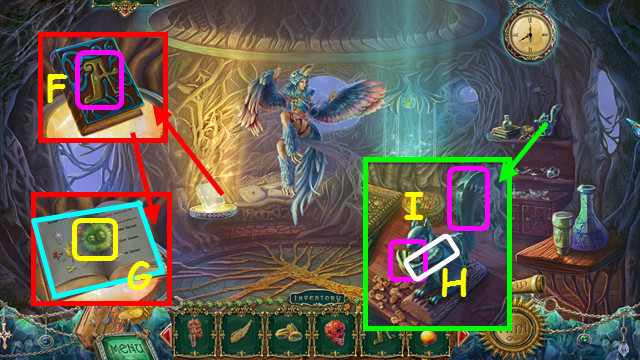
- Take the 4/4 PETAL (J).
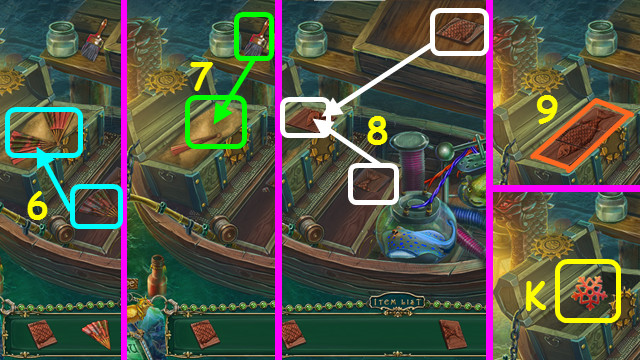
- Give the SHOE to the dog and take the 2/2 BEETLE (K).
- Read the letter and place the FLOWER in the vase (L).

- Take the PLANT SEEDS (M).
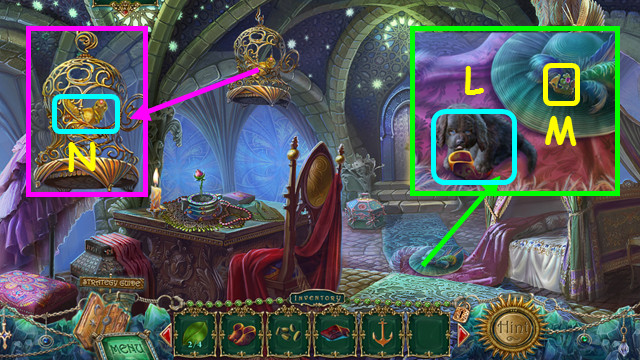
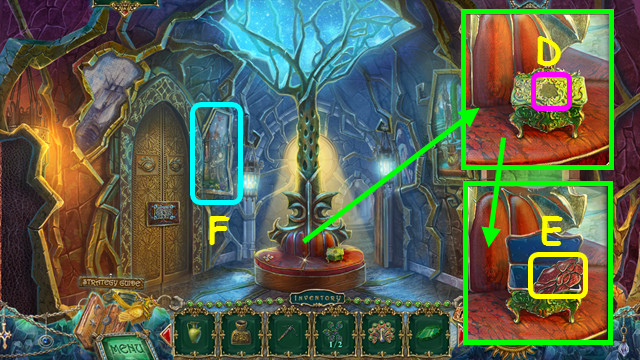
- Place the 2 BEETLES in the indentations (N).
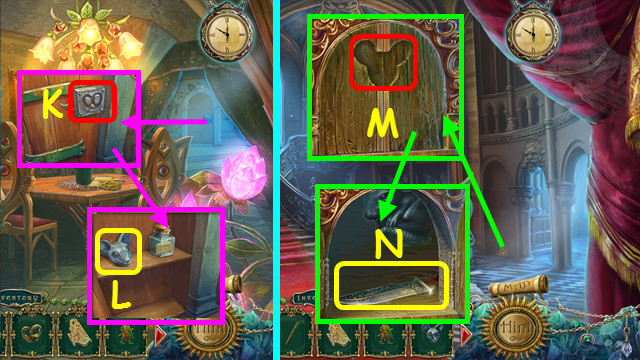
- Take the GLASS SWAN (O).
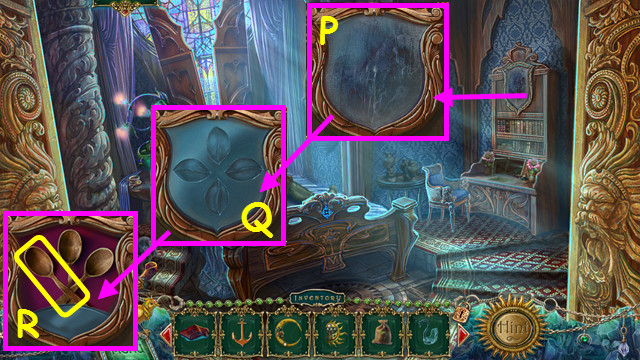
- Use the WET CLOTH on the mirror (P).
- Place the 4 PETALS into the indentations (Q).
- Take the SPOON (R).
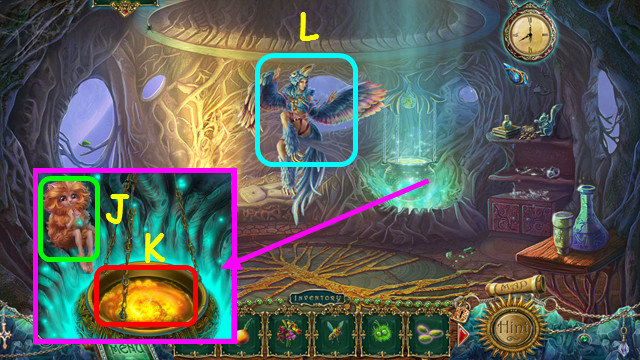
- Walk down.
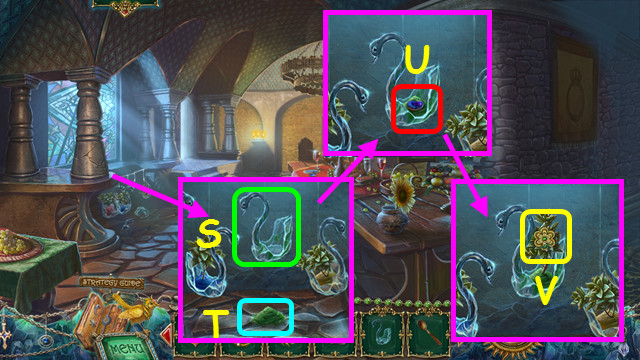
- Hang the GLASS SWAN on the hook (S).
- Use the SPOON to take the GREEN SOIL and place it in the swan (T).
- Place the PLANT SEEDS in the swan (U).
- Use the NIGHTINGALE on the swan, and then take the 1/2 FLOWER (V).
- Walk down.
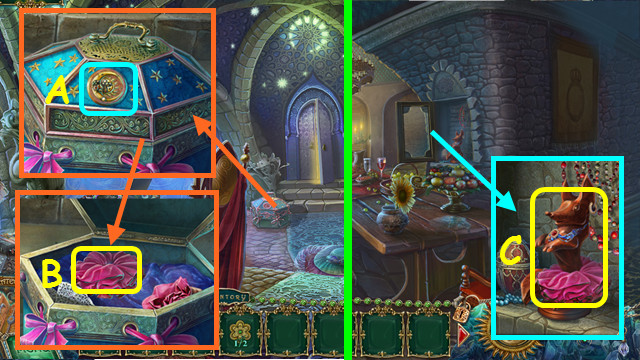
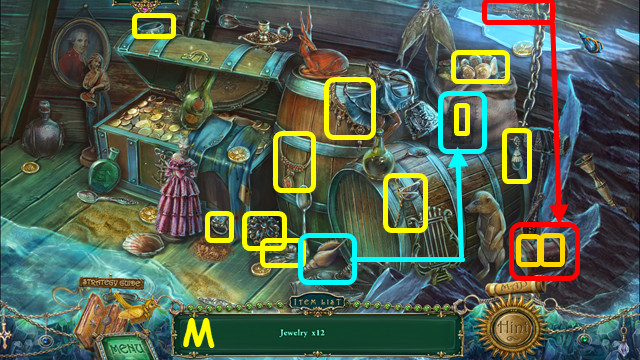
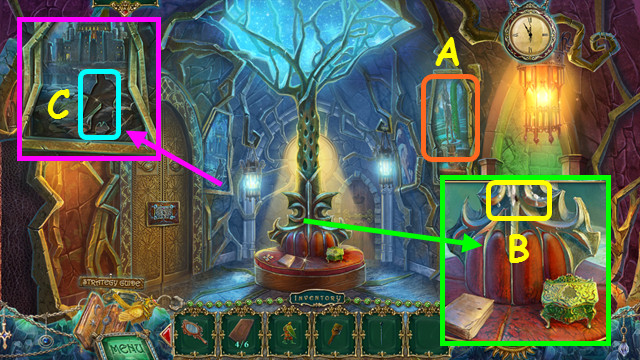
- Place the MOON and SUN on the lid (A).
- Open the box; move items to find the SKIRT (B).
- Walk forward.
- Place the SKIRT on it and take the FOX (C).
- Walk left.
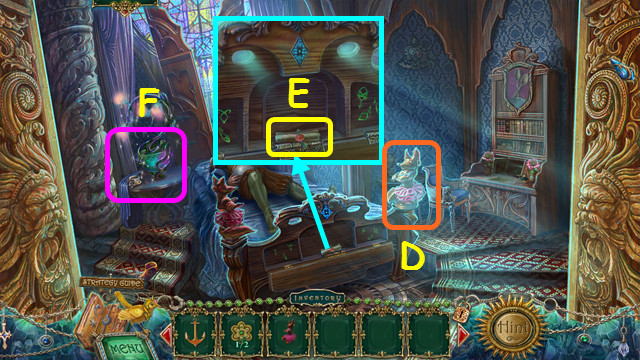
- Place the FOX on the bedpost (D).
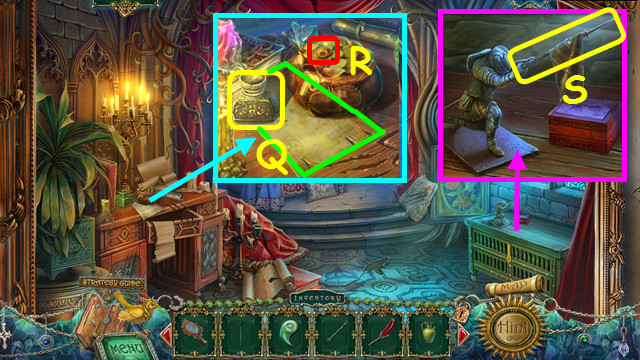
- Take the SEALED SCROLL (E).
- Select the cup on the nightstand (F).
- Play the HOP to earn the 2/2 FLOWER (G).
- Walk down.
- Use the SEALED SCROLL on the candle to get the CODE (H).
- Walk left.
- Place the CODE in the center and select the symbols in order (1-6).
- Select the box (I).
- Place the 2 FLOWERS on the box.
- Rotate the flowers to move the petals to complete the design in the center.
- Select Jx4 and Kx2.
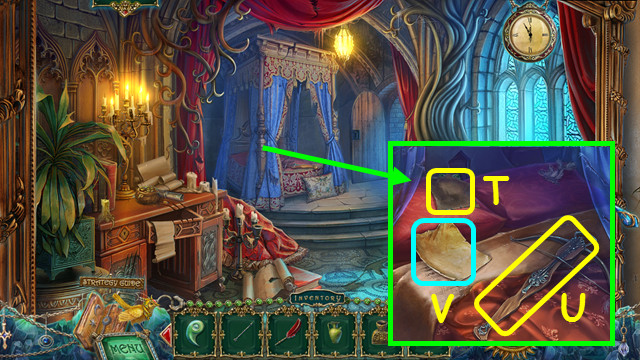
- Take the BRACELET and take the ring to travel (L).
Chapter 2: Lost
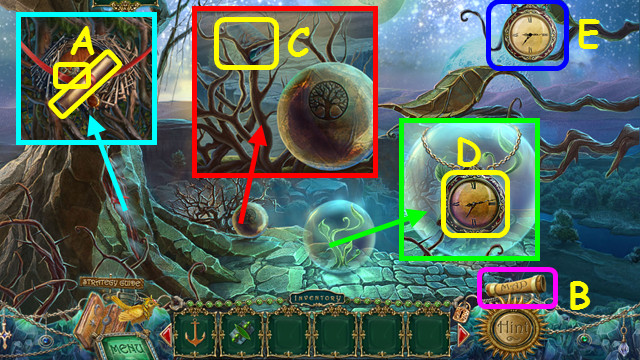
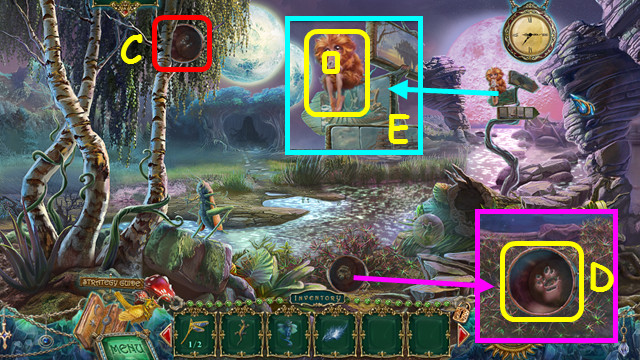
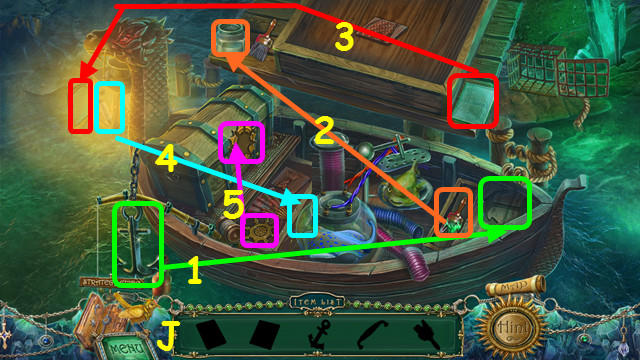
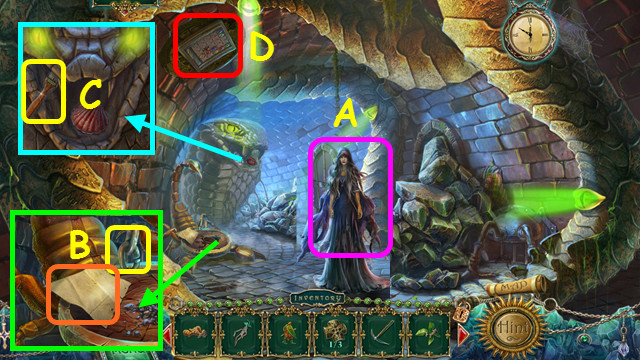
- Take the MAP and the OCTOPUS (A).
- The MAP is now available in your menu bar (B).
- Take the PUZZLE PART (C).
- Select the bubble for a message, and then take the clock (D).
- The clock will now appear in the upper right corner (E).
- Walk forward.
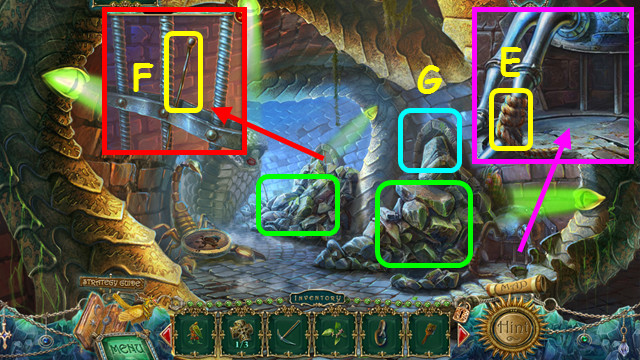
- Take the SKATE (F).
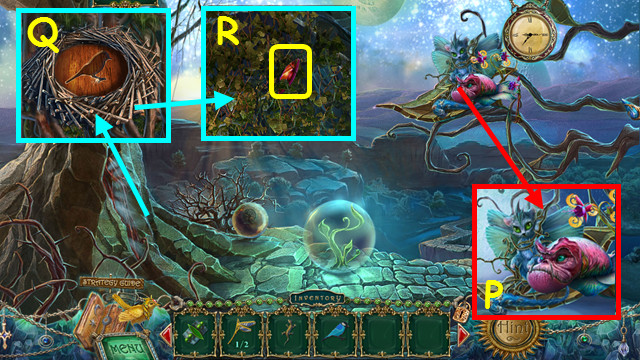
- Take the 1/2 DRAGONFLY HALF (G).
- Talk to the Weepie (H).
- Walk to the right.

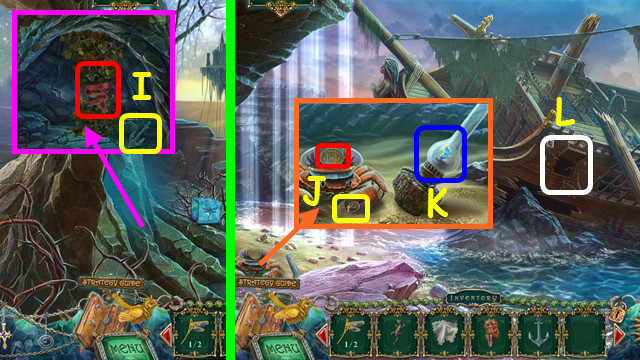
- Place the ANCHOR on the crab's hat; take the 2/3 PUZZLE PART and the LIZARD (I).
- Take the 3/3 PUZZLE PART (J).
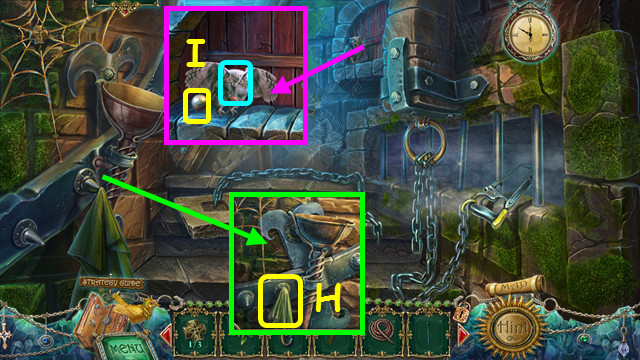
- Walk down.
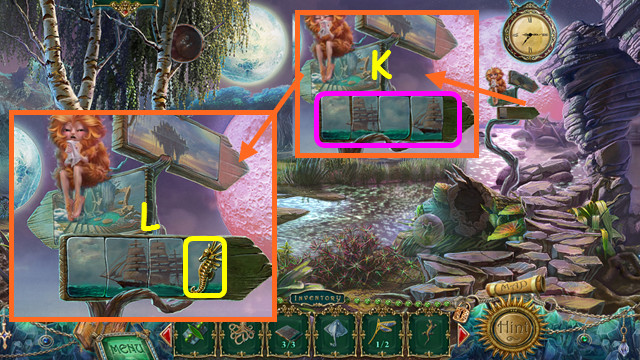
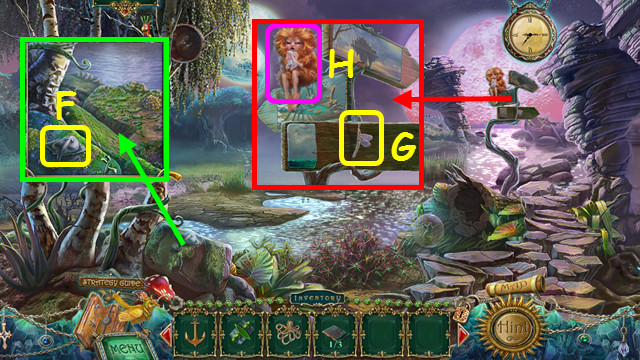
- Place the 3 PUZZLE PARTS on the sign (K).
- Swap the pieces to restore the picture; take the SEAHORSE (L).
- Walk to the right.
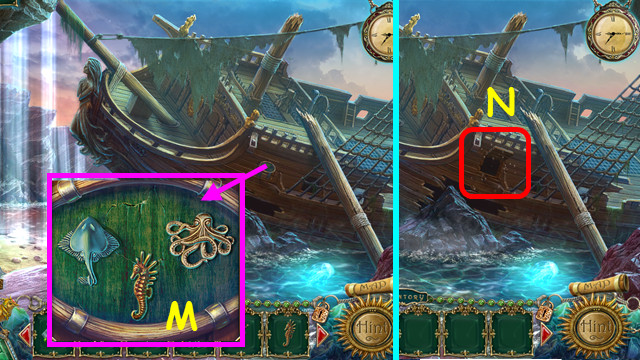
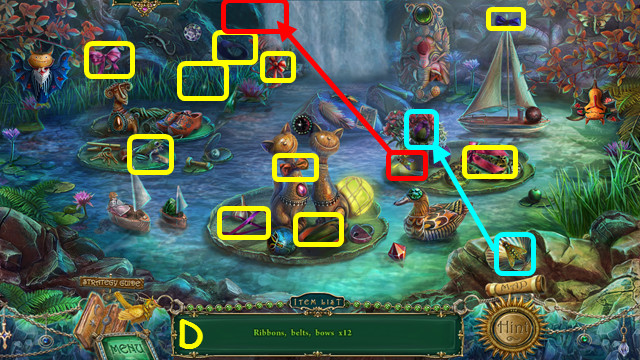
- Place the SKATE, OCTOPUS, and the SEAHORSE in the indentations (M).
- Select the opening (N).
- Play the HOP to earn the BIRD (O).
- Walk down twice.
- Talk to Little Johnny (P).
- Place the BIRD in the indentation (Q).
- Take the RUBY (R).
- Return to the shipwreck.
- Place the BRACELET on the figurehead, and then place the RUBY on the bracelet (S).
- Take the HOOK (T).
- Walk down.
- Use the HOOK to take the CLAW (U).
- Walk to the right.
- Place the CLAW on the figurehead (V).
- Take the MAGIC FAN (W).
- Walk down twice.
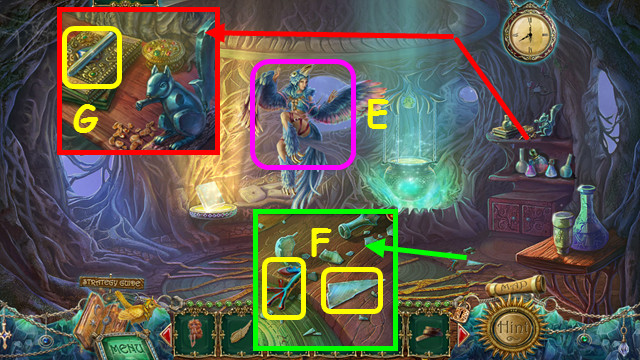
- Place the MAGIC FAN on the flower (A).
- Take LITTLE JOHNNY and the FEATHER (B).
- Walk forward.
- Use LITTLE JOHNNY on the tree (C).
- Take the POT (D).
- Use the FEATHER on the WEEPIE; take the HANDKERCHIEF and the WEEPIE (E).
- Walk right.
- Use the POT to take the GLOWING JELLYFISH (F).
- Walk down.
- Place the GLOWING JELLYFISH near the log (G).
- Take the note and the RIBBON (H).
- Walk down.
- Use the RIBBON on the vines and take the ANCHOR (I).
- Return to the shipwreck.
- Place the ANCHOR on the crab's hat; take the TREE (J).
- Use the HANDKERCHIEF on the lamp and release the butterfly (K).
- Select the opening (L).
- Play the HOP to receive the 2/2 DRAGONFLY HALF (M).
- Walk down.
- Take the BUTTERFLY (N).
- Walk down.
- Use the BUTTERFLY on the sphere (O).
- Place the 2 DRAGONFLY HALVES on the box; take the DIRTY VIAL (P).
- Place the TREE on the orb; open it and take the SHOVEL (Q).
- Use the SHOVEL to take the SAPLING (R).
- Travel to the shipwreck.
- Clean the DIRTY VIAL in the water to get the VIAL (S).
- Walk down.
- Use the VIAL on the tree to get the BIRCH JUICE (T).
- Pour the BIRCH JUICE on the weeds (U).
- Select the weeds.
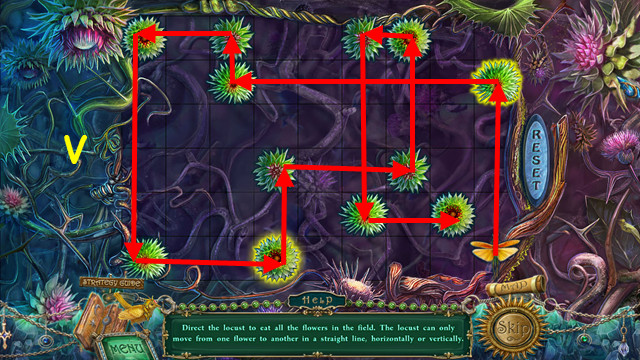
- Move the locust through all the flowers, hitting each once.
- Select the path shown here (V).
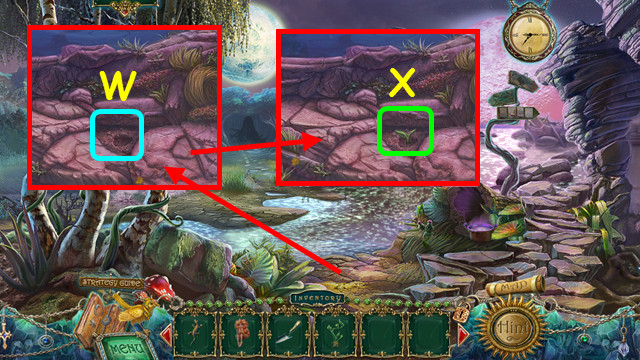
- Use the SHOVEL to dig a hole; place the SAPLING in the hole (W).
- Use the NIGHTINGALE on the sapling (X).
- Walk across the bridge.
Chapter 3: The Forest Edge
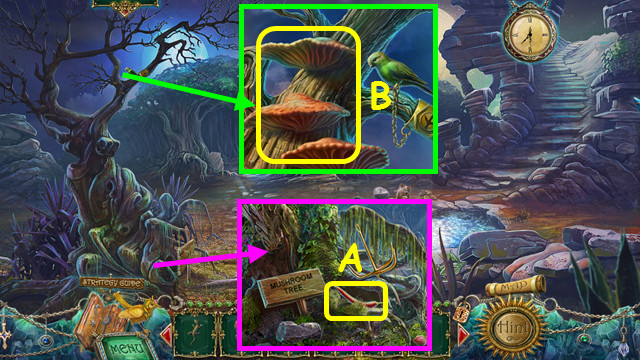
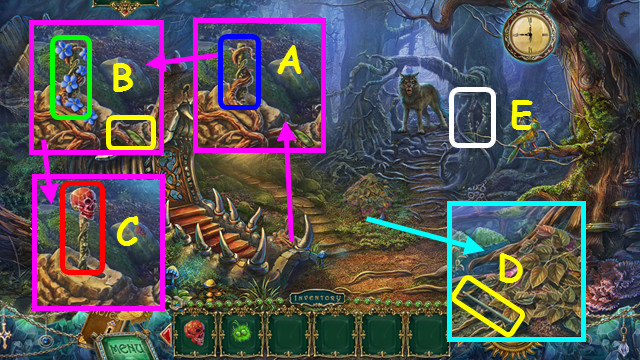
- Take the CHILI (A).
- Use the NIGHTINGALE on the mushrooms, and then take the GIANT MUSHROOMS (B).
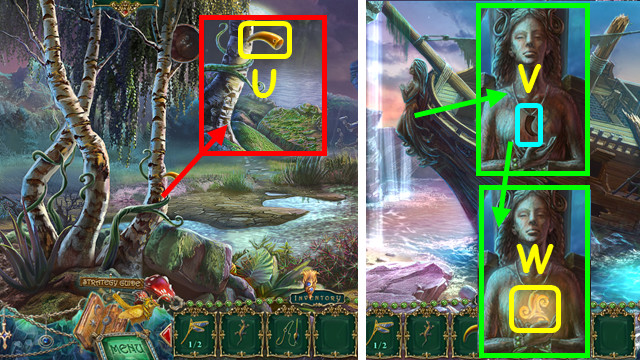
- Place the LIZARD on the rock and take the 1/2 SPIRAL (C).
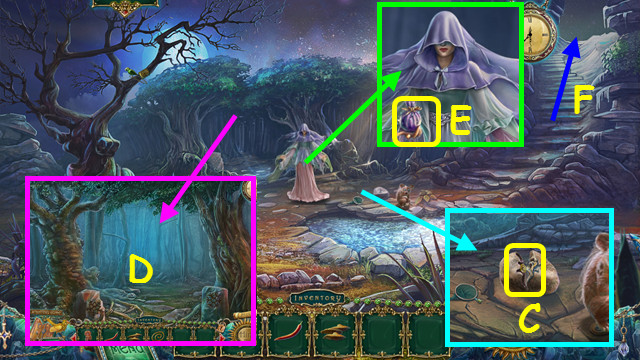
- Look at the forest entrance, and then try to walk forward (D).
- Walk down.
- Talk to the Fairy and take the WAKING POLLEN (E).
- Walk up the stairs on the right (F).

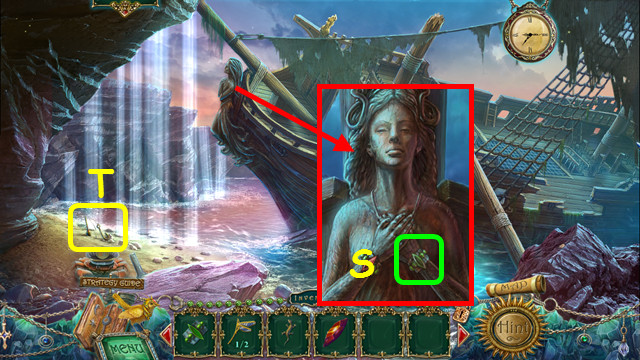
- Use the WAKING POLLEN on the mermaid (G).
- Take the ROPE (H).
- Try to take the snowflake (I).
- Place the GIANT MUSHROOMS in the water (J).
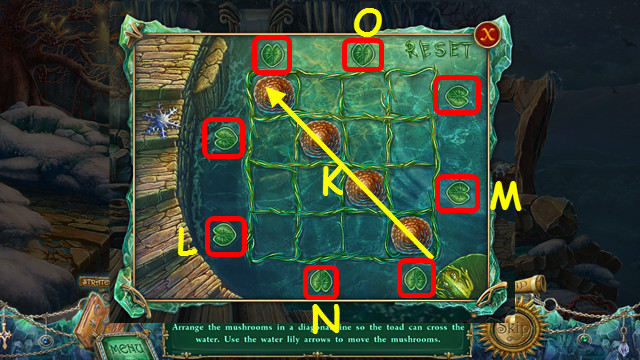
- Use the water lily buttons (red) to move the mushrooms into a diagonal line (K).
- Press the buttons Lx2, Mx2, Nx1, and Ox1.
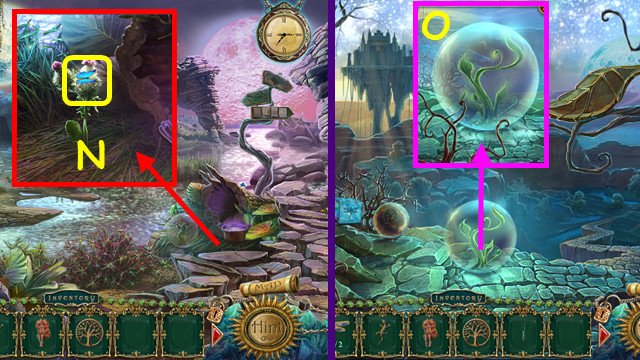
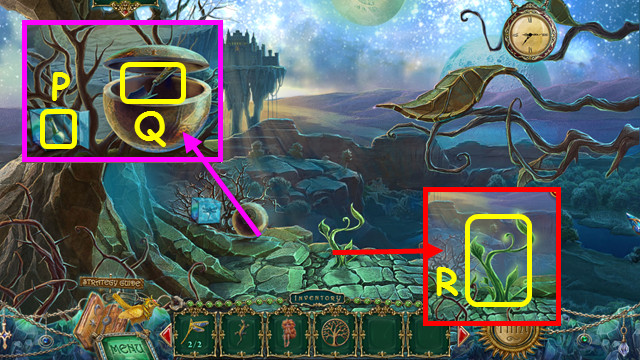
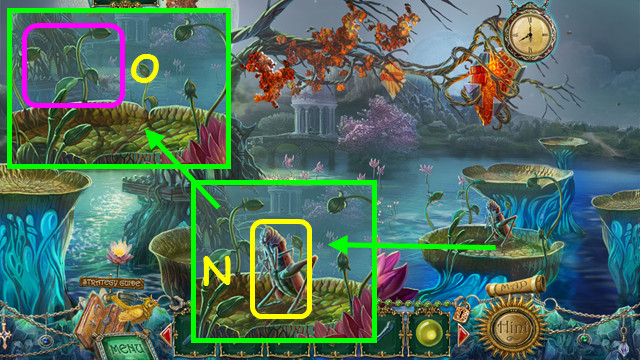
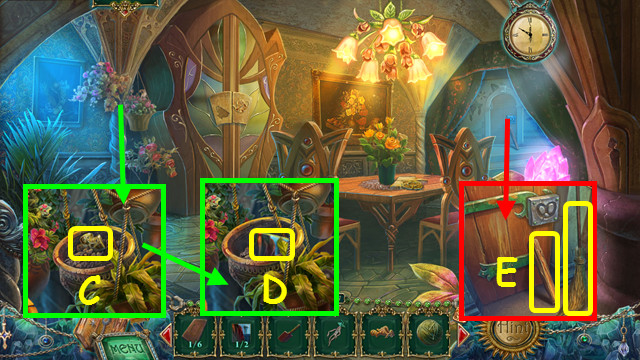
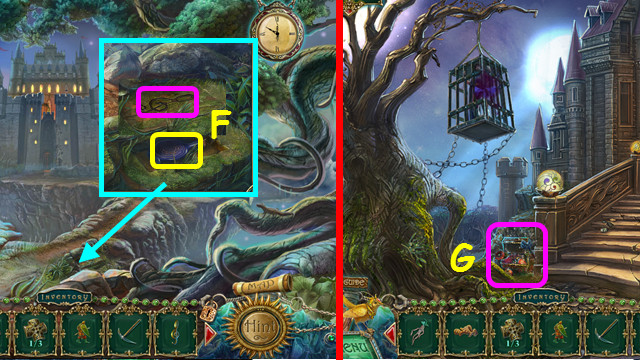
- Use the NIGHTINGALE on the plant and take the BERRY (A).
- Use the WEEPIE on the ice, and then give the CHILI to the Weepie (B).
- Take the 1/2 FISH and the WEEPIE (C).
- Walk down.
- Give the BERRY to the animal (F).
- Take the POCKET WATCH (G).
- Use the ROPE on the hook to make the GRAPPLING HOOK (H).
- Walk up the stairs.
- Use the GRAPPLING HOOK to take the CRYSTAL (I).
- Take the SCALES (J).
- Use the POCKET WATCH on the snake; take the 2/2 SPIRAL (K).
- Place the 2 SPIRALS on the eyes (L).
- Walk forward (M).
- Take the NET HANDLE (O).
- Place the CRYSTAL in the hole (P).
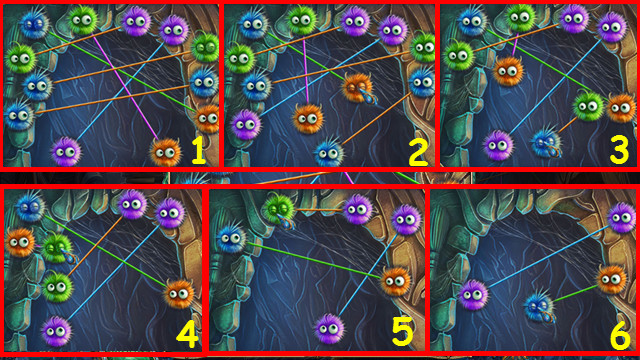
- Swap the panels to recreate the 3 animals on each tower (1-3).
- Select 2 panels located in the same level to swap.
- Use the arrows to rotate the towers (red).
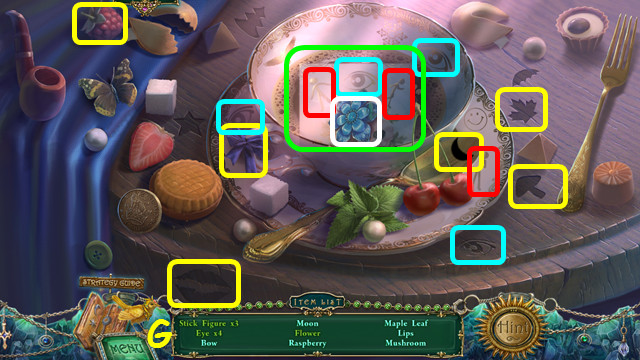
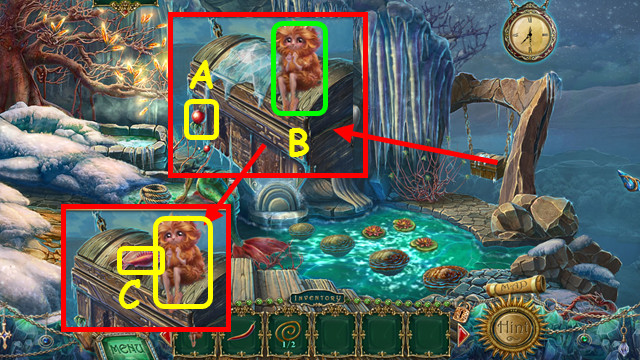
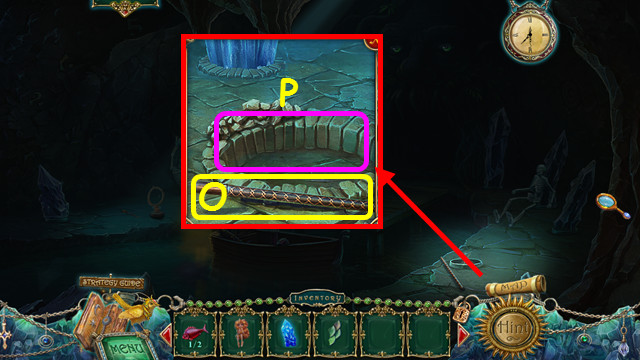
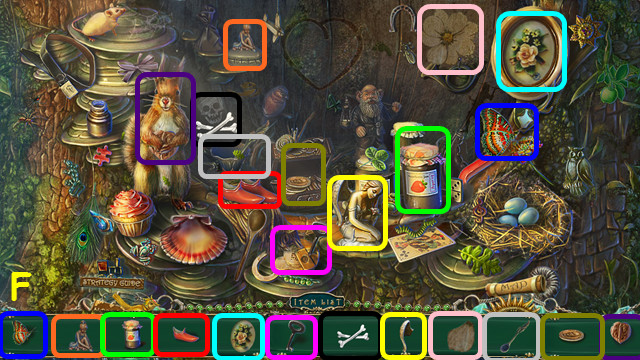
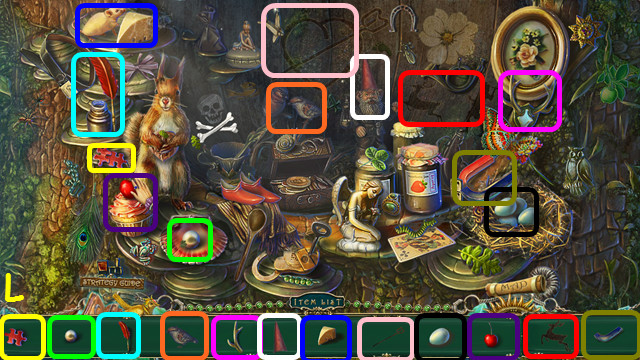
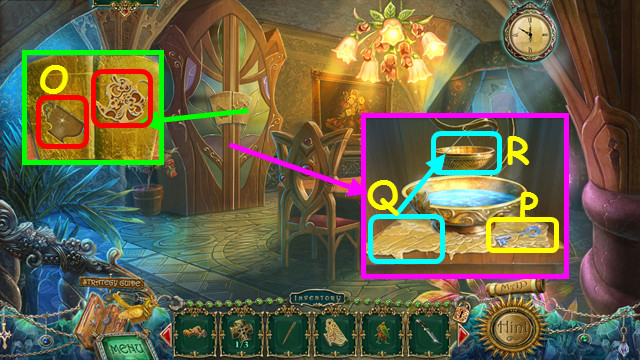
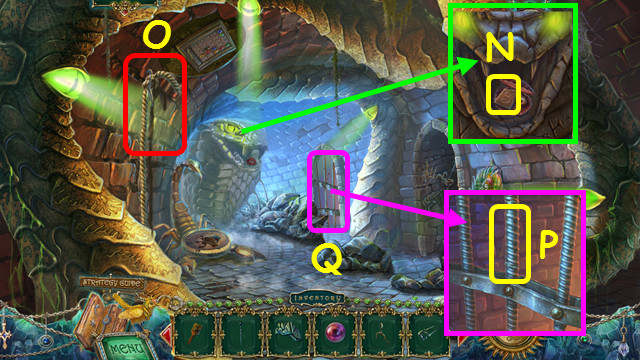
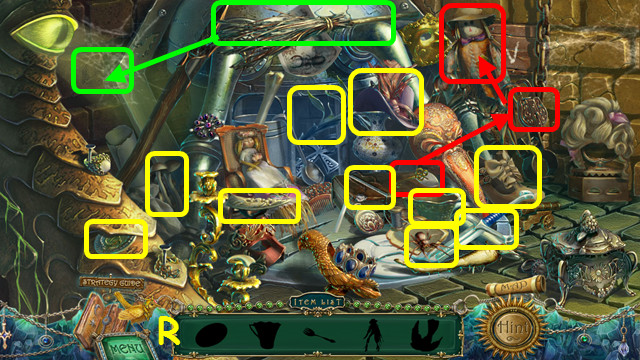
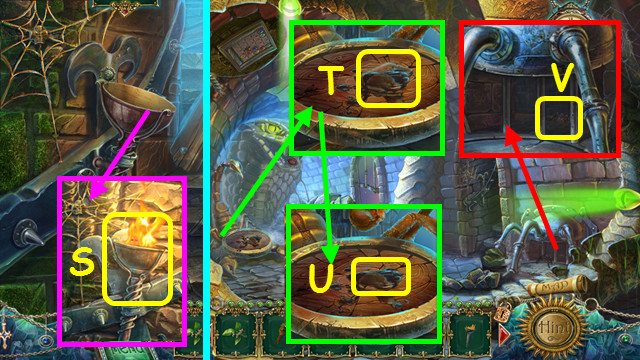
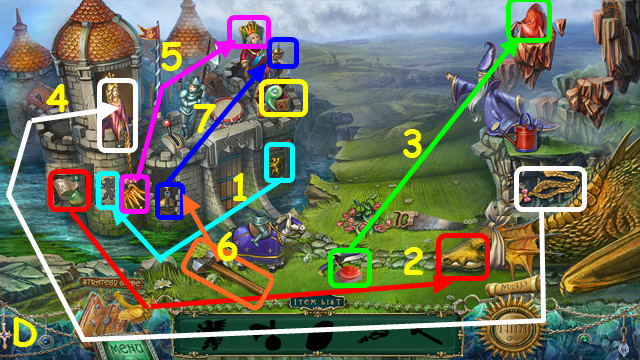
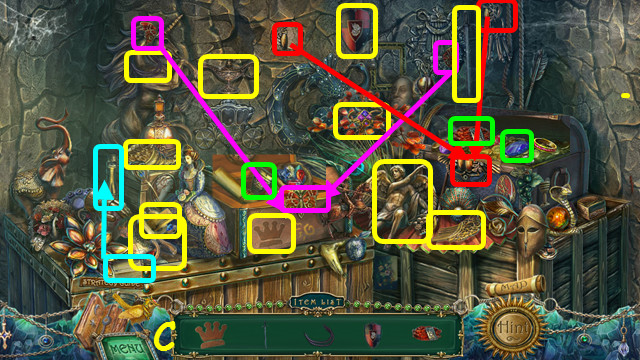
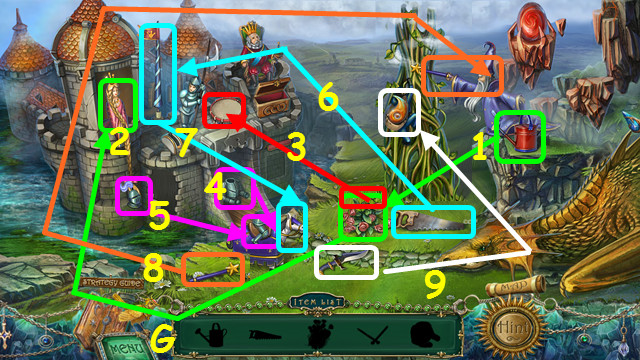
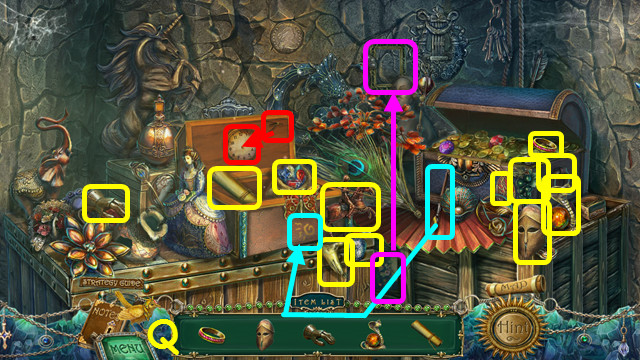
- Take the SPOON and remove the broken lens (A).
- Select the boat (B).
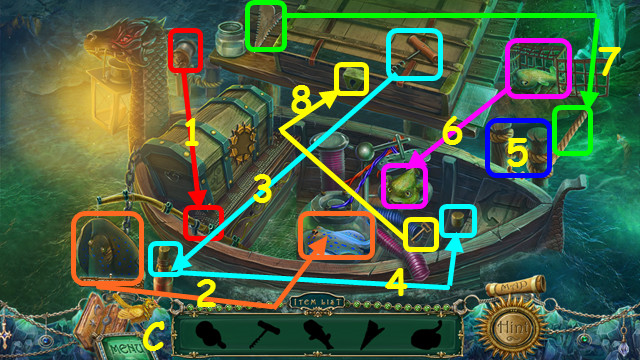
- Play the HOP (C); find the items to use in the scene (1-8).
- Move the lures to the matching indentations (D).
- Rotate the dials to match the cards (E).
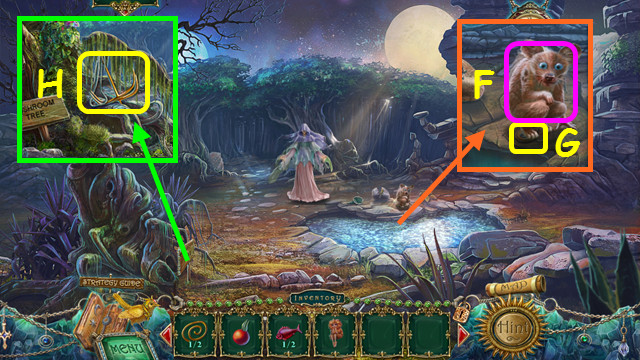
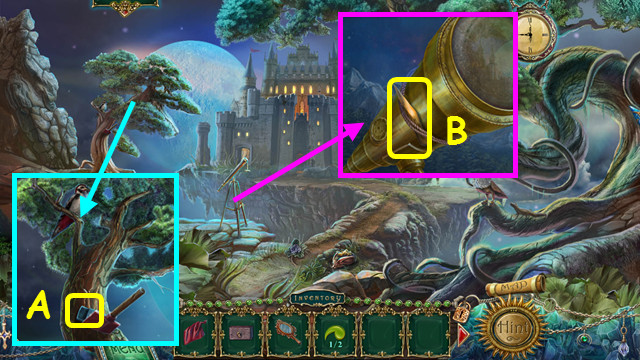
- Take the MAGIC FEATHER (F).
- Use the MAGIC FEATHER on the nose (J).
- Walk forward (K).
- Talk to the Gnome (L).
- Take the WING (M).
- Place the SCALES on the fish (N).
- Take the BIRD CLAW (O).
- Walk down 3 times.
- Place the BIRD CLAW in the band (P).
- Take the 2/2 FISH (Q).
- Use the NET HANDLE on the scoop to make the NET (R).
- Walk up the stairs.
- Use the NET to take the BLUE SHOWFLAKE (S).
- Return to the Gnome's home.
- Place the 2 FISH in the lid (T).
- Take the SHELL (U).
- Remove the cover and use the SPOON to take the STICKY BALL (V).
- Walk down.
- Wash the STICKY BALL to get the BALL (A).
- The SPOON WITH HONEY will return to your inventory.
- Walk forward.
- Place the BALL in the tube (B).
- Take the EYE (C).
- Place the EYE in the socket; take the lens (D).
- Walk down.
- Place the LENS in the frame (E).
- Use the SHELL on the water to get the MOONLIGHT WATER (F).
- Walk forward.
- Give the MOONLIGHT WATER to Little Johnny (G).
- Talk to the Gnome (H).
- Talk to Little Johnny.
- Walk down and select the boat.
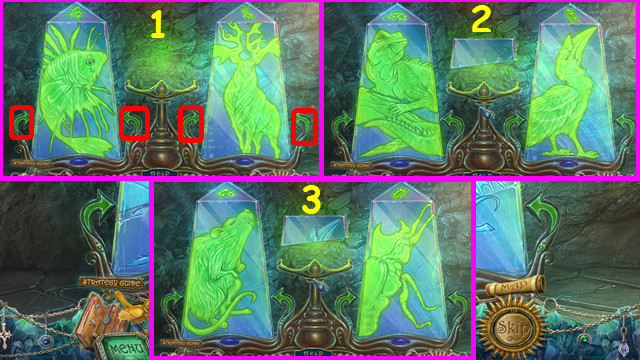
- Play the HOP (J).
- Use the items in numerical order (1-9).
- Take the RED SNOWFLAKE (K).
- Walk down twice and go forward to the forest.
- Place the RED SNOWFLAKE on the left stone (A) and the BLUE SNOWFLAKE on the right stone (B).
- Take the 2 METAL HANDS from the stones (yellow).
- Walk down, go up the stairs, and walk forward twice.
- Place the 2 METAL HANDS into the indentations (C).
- Take the MAGIC SIEVE (D).
- Walk down twice.
- Use the MAGIC SIEVE to capture the MAGICAL NOTES (E).
- Walk forward twice.
- Select the harp (F).
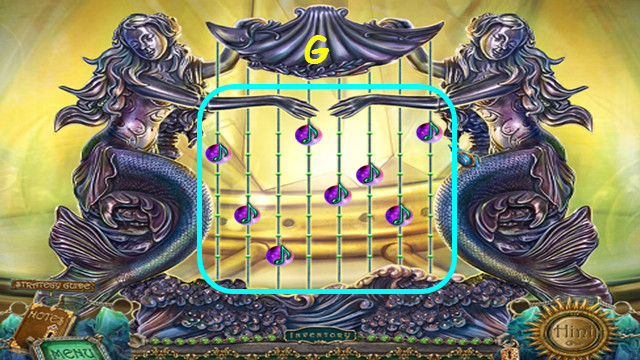
- Place the MAGICAL NOTES on the harp.
- Slide the notes to the correct positions (G).
- Select the mermaids to check your choices; green indicates a correct location, red is incorrect.
- Take the MAGIC HARP.
- Walk down twice.
- Give the MAGIC HARP to the Mermaid (H).
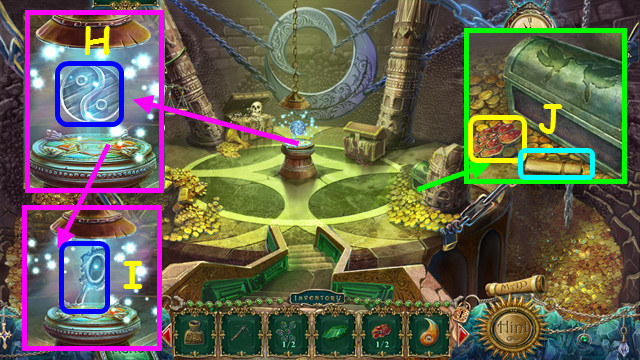
- Take the STAR (I).
- Place the STAR on the lid and open the chest (J).
- Take the MAGIC COMB (K).
- Walk forward twice.
- Use the MAGIC COMB on Little Johnny to get the MAGIC CORAL (L).
- Walk down twice.
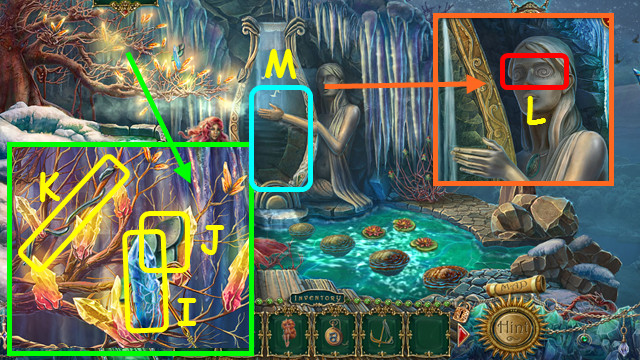
- Use the MAGIC CORAL on the mirror; take the MAGIC MIRROR (M).
- Walk down.
- Give the MAGIC MIRROR to the Fairy (N).
- Take the IMMUNITY POTION (O).
- Walk forward.
- Use the IMMUNITY POTION anywhere on the screen (P).
- Talk to the Gnome (Q).
- Take the OAR (R).
- Walk down.
- Use the OAR on the boat (S).
- Go to the left.
Chapter 4: The Oracle
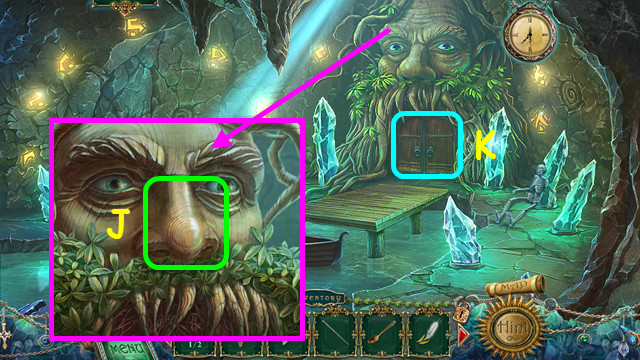
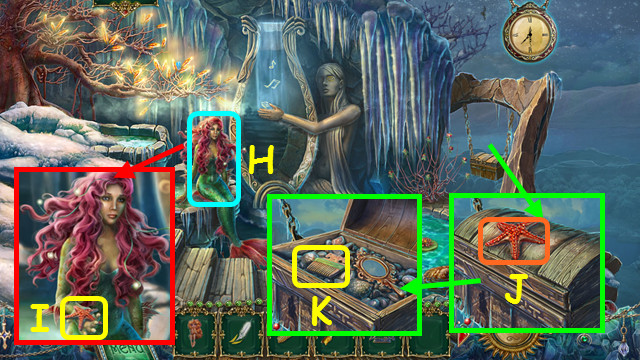
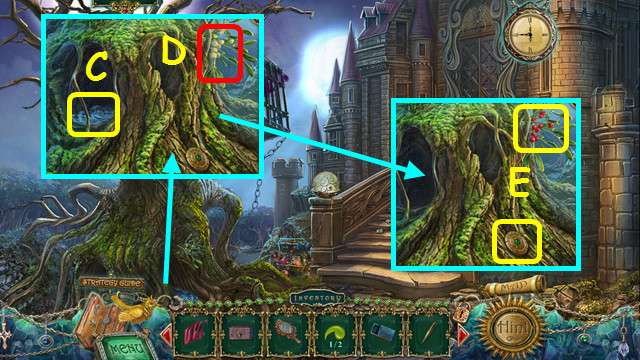
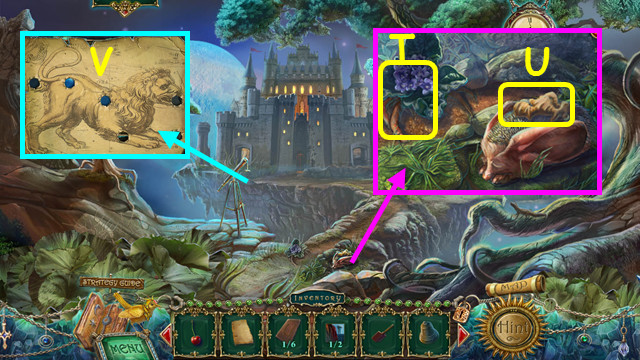
- Use the NIGHTINGALE on the tree; take the PISTACHIOS and the SKULL (A).
- Place the MAGIC FEATHER on the dreamcatcher (B).
- Select the pond (C).
- Play the HOP to earn the LEATHER BELT (D).
- Enter the Oracle's Hut.
- Talk to the Oracle (E); after the cut-scene, talk to her again.
- Use the LEATHER BELT on the shard to get the WRAPPED GLASS and take the FROG'S LEG (F).
- Take the FLASK (G).
- Walk down and forward to the trees.
- Use the WRAPPED GLASS to get the LETTER A (H).
- Use the WRAPPED GLASS on the vine, and then use the FLASK to collect the LIANA SAP (I).
- Use the SPOON WITH HONEY on the hive to get the SPOON WITH BEE (J).
- Move the leaf (K).
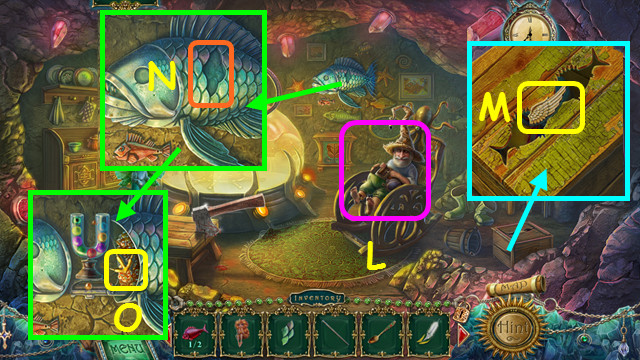
- Place the FROG'S LEG on the frog; take the ONION and the METAL PAW (L).
- Walk down and select the pond.
- Play the HOP to earn the GLOWING SPHERE (M).
- Walk forward.
- Use the GLOWING SPHERE on the Locust, and then take the LOCUST (N).
- Use the NIGHTINGALE on the plants (O).
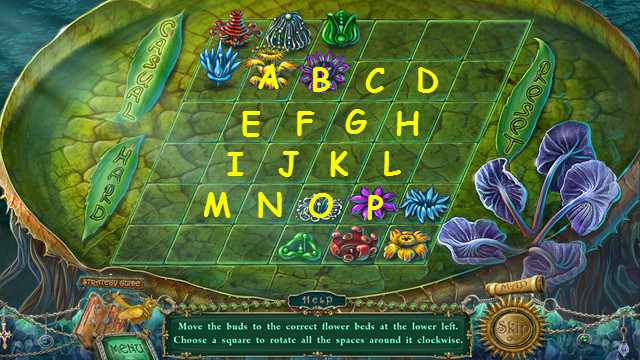
- Move the buds from the upper right (P) to the matching location on the lower right (Q).
- Select a square to rotate the buds around it.
- Select these squares for the casual solution: Bx5, Lx3, Px2, Ax2, Cx4, Kx1, Ox2, Ex4, Nx3, Bx2, Dx4, Lx2, Bx5, and Kx4.
- The hard solution is: Fx3, Px3, Ax2, Gx4, Ox2, Bx3, Jx2, Nx1, Hx4, Lx1, Hx3, Fx1, Kx4, and Jx1.
- You earn the FLOWERS.
- Walk down.
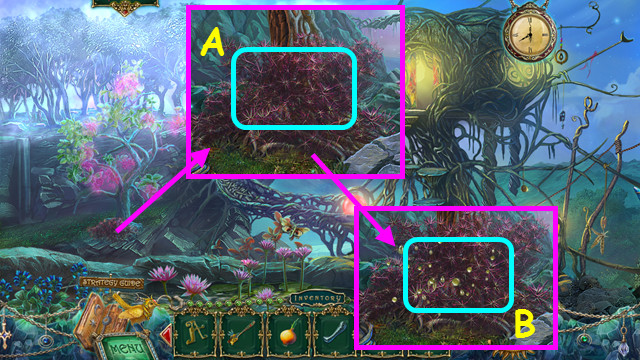
- Use the LIANA SAP on the weeds (A).
- Place the LOCUST on the weeds (B).
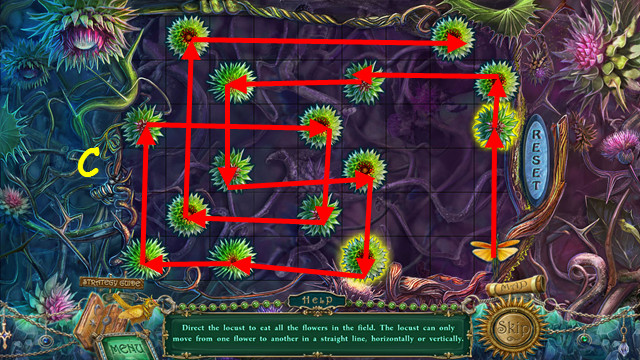
- Move the locust through all the flowers, hitting each once.
- Select the path shown here (C).
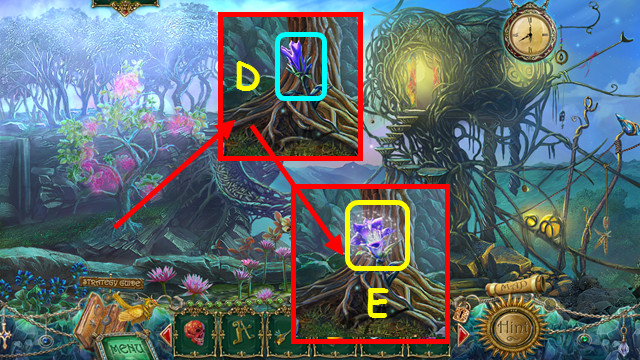
- Use the NIGHTINGALE on the bud (D).
- Use the SPOON WITH BEE on the lily (E).
- You receive the BEE WITH POLLEN.
- Enter the Oracle's Hut.
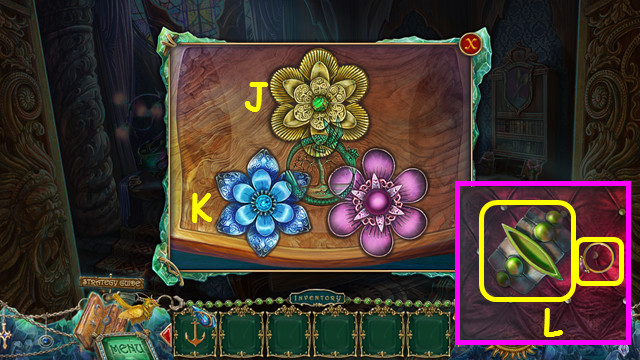
- Place the LETTER A on the book (F).
- Open the book, take the 1st PUFFBALL, and read the potion recipe (G).
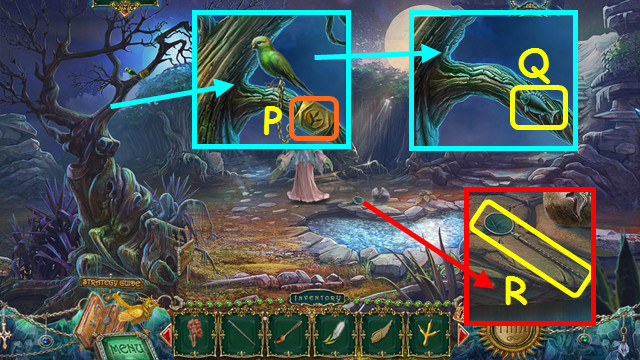
- Place the METAL PAW on the squirrel (H).
- Use the PISTACHIOS on the squirrel and pull the tail to earn the PISTACHIO KERNELS (I).
- Place the WEEPIE in the corner and give her the ONION (J).
- Place the WING, the FLOWERS, the BEE WITH POLLEN, and PISTACHIO KERNELS in the kettle (K).
- You receive the STRENGTH POTION.
- Give the STRENGTH POTION to the Oracle (L).
Chapter 5: Varga's Den
- Use the NIGHTINGALE on the vine stump (A).
- Pull the vine and take the LEAF (B).
- Place the SKULL on the stick and pull the lever (C).
- Take the IRON ROD (D).
- Select the tree hollow (E).
- Return the items to the scene to receive the NUTSHELL (F).
- Walk left into Varga's den.
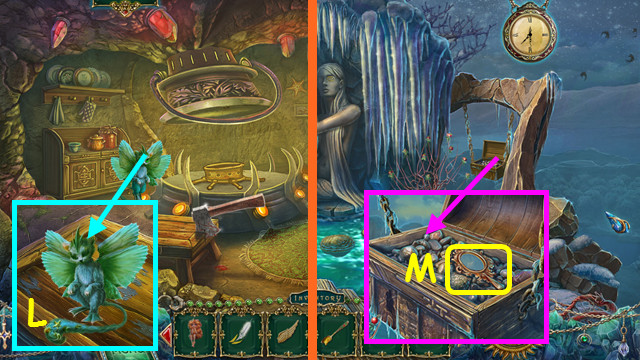
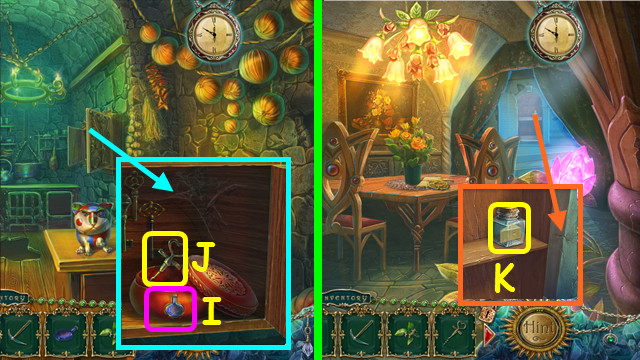
- Place the LEAF on the table and use the NIGHTINGALE on the flower (G).
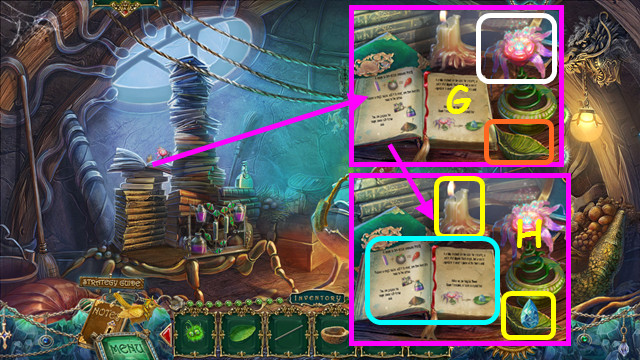
- Read the recipe; take the CANDLE and the CRYSTAL TEAR (H).
- Take the EMPTY VIAL from the vials mini-game (I).
- Take the FIREPLACE BRUSH (J).
- Note the puffball mini-game on the door (@).
- Walk down.
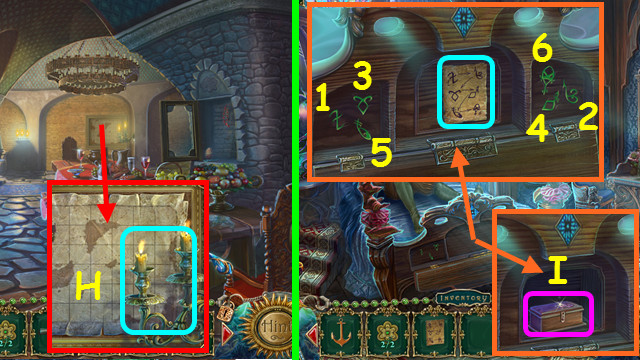
- Use the CANDLE on the spider; take the 2nd PUFFBALL (K).
- Use the FIREPLACE BRUSH on the leaves (L).
- Use the EMPTY VIAL on the anthill to get the FORMIC ACID (M).
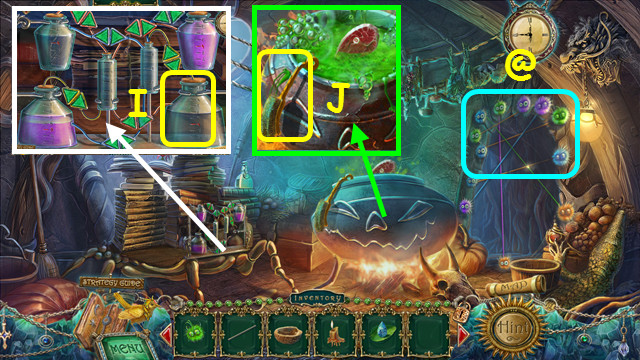
- Walk left and select the vials mini-game.
- Place the FORMIC ACID in the holder.
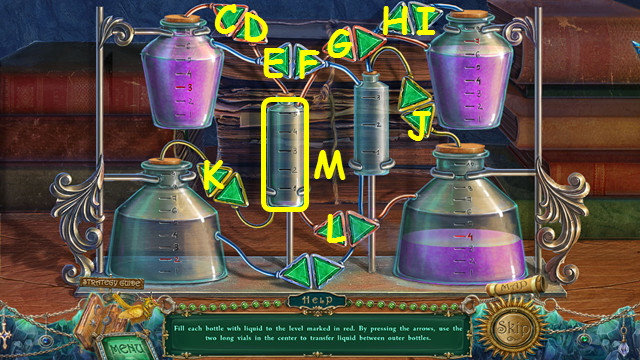
- Use the green arrows to move the fluid around so each vial is filled to the red line.
- Press the buttons: S, P, R, N, Z, T, Z, T, X, Q, and Y.
- Take the MAGIC SAUCE (@).
- Place the 2 PUFFBALLS on the door.
- Move puffballs over strings of the same color to untangle the pairs.
- Move the puffballs to match the screenshot (1-6).
- Enter the doorway.
- Remove the panel; touch the 2 items (A).
- Use the NUTSHELL on the sand to get the SHELL WITH SAND (B).
- Take the FORK and the CLOTH (C).
- Use the IRON ROD to pull out the COBBLESTONE (D).
- Walk down.

- Pour the MAGIC SAUCE into the cauldron; Use the FORK to take the ENCHANTED MEAT (E).
- Walk down.
- Give the ENCHANTED MEAT to the wolf (F).
- Take the FAN (G).
- Walk left and forward.

- Use the SHELL WITH SAND on the left candle (H).
- Use the FAN on the center candle (I).
- Use the CRYSTAL TEAR on the right candle (J).
- Take the MAGIC MIRROR (K).
- Walk down twice and select the tree hollow.
- Return the items to the scene to earn the 1/2 SPHERE PART (L).
- Walk forward.
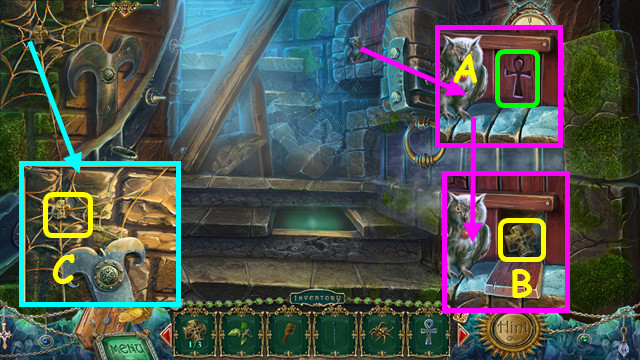
- Take the STAKE (A).
- Take the IRONBOX (B).
- Walk forward.
- Use the CLOTH on the water to get the WET CLOTH (C).
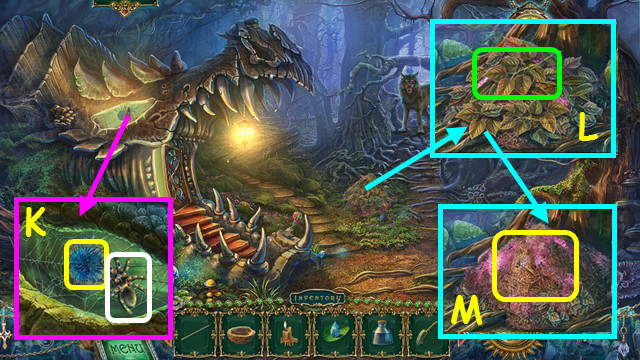
- Use the NIGHTINGALE on the unripe berries (D).
- Take the WHEEL and the MISTLETOE BERRIES (E).
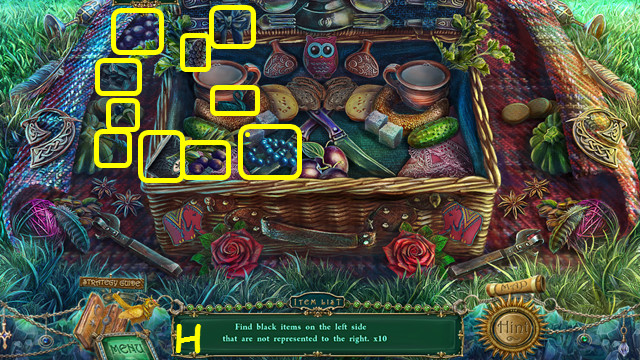
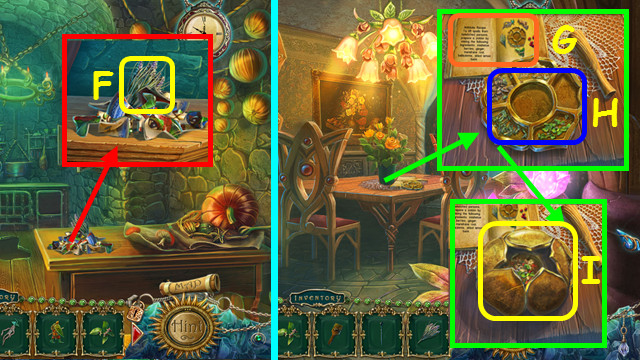
- Select the picnic basket.
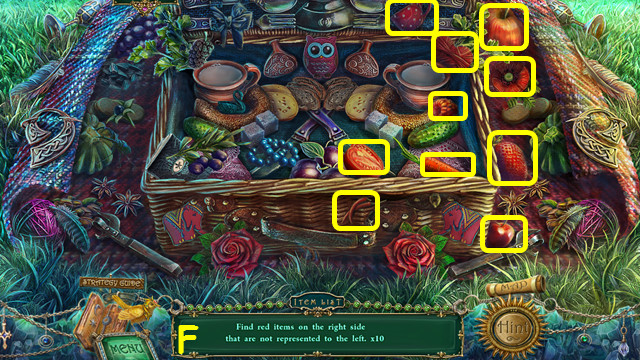
- Locate items on the right half of the scene that are not on the left (F).
- You receive the CHERRY.
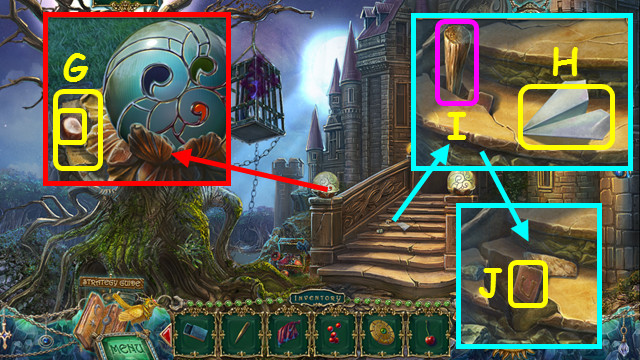
- Take the CHESTNUT and the BOOK PAGE (G).
- Fold the paper to make a PAPER AIRPLANE (H).
- Place the IRON BOX in the crack and use the COBBLESTONE on the iron box (I).
- Take the 1/6 SYMBOL TILE (J).
- Walk down.
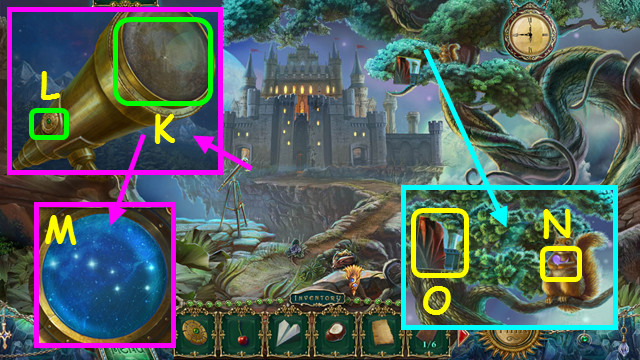
- Use the WET CLOTH on the lens (K).
- Place the WHEEL on the control (L).
- Note the stars (M).
- Give the CHESTNUT to the squirrel to receive the 2/2 SPHERE PART (N).
- Use the PAPER AIRPLANE to take the 1/2 PICTURE PART (O).
- Walk down.
- Use the IRON BOX to collect the ANTS (P).
- Walk forward.
- Place the ANTS on the tree to get the SHOVEL (Q).
- Walk forward.
- Place the 2 SPHERE PARTS on the sphere (R).
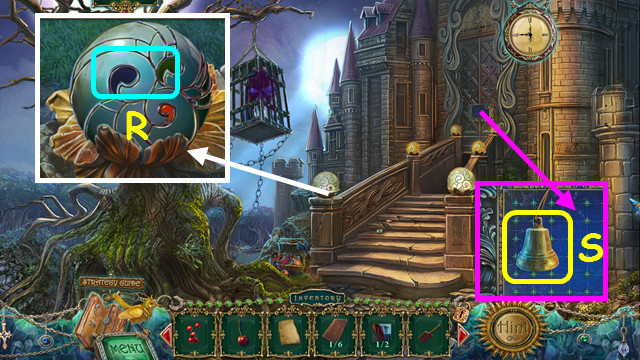
- Take the BELL and note the mini-game (S).
- Walk down.
- Use the SHOVEL to take the MANDRAKE ROOK (T).
- Use the BELL on the hedgehog and take the GINGER (U).
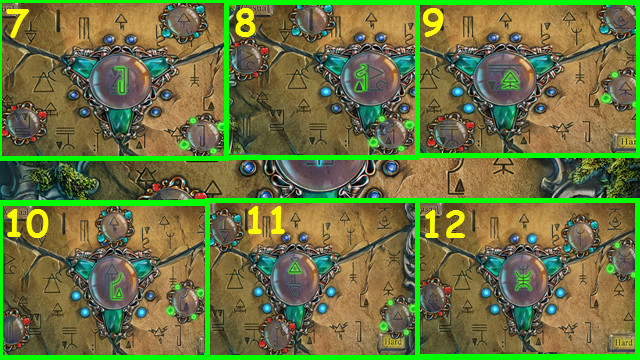
- Look at the telescope to find the door solution (V).
- Walk forward and select the door mini-game.
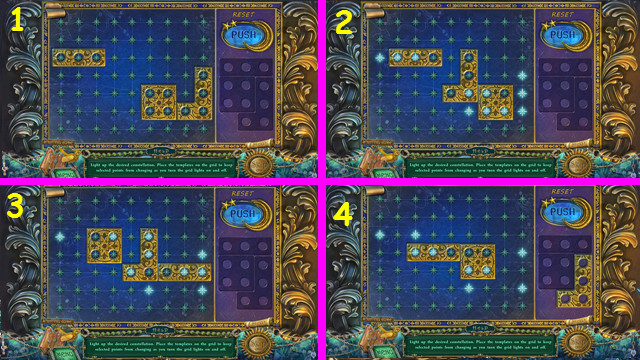
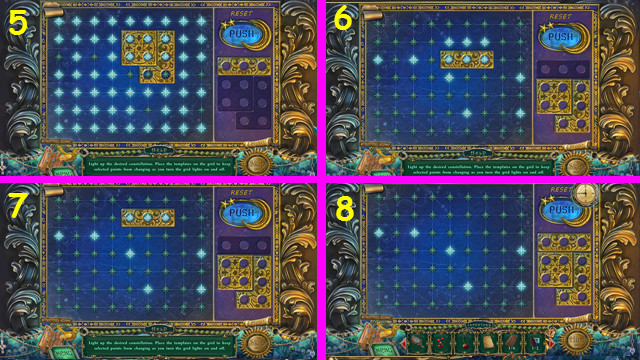
- Select the overlay in the lower right corner to roll it up.
- Use the pieces to prevent the lights from changing when you select the PUSH button.
- Form the pattern shown by the overlay.
- For each image, place the tiles as shown, press the button, remove the tiles, and press the button again (1-8).
- Enter the Castle.
Chapter 6: The Castle
- Take the STRING (A).
- Note the portrait mini-game (B).
- Walk to the right.
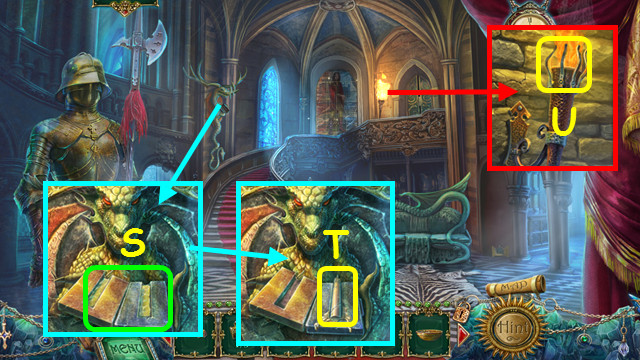
- Take the BRONZE CROSS (C).
- Use the SHOVEL on the dirt and take the 2/2 PICTURE PART (D).
- Take the PICK PART and use the STRING to make the BROOM (E).
- Walk down and select the door mini-game.
- Place the 2 PICTURE PARTS on the door.
- Move the pieces to the 2 outer spaces (green) and use the buttons (red) to rotate the piece under it.
- Restore the portrait (F); the portrait is the same for the Hard level.
- Take the KEY (G).
- Use the BROOM on the cobwebs and take the CUP SYMBOL (H).
- Walk to the left.
- Take the KNIGHT FIGURINE (I).
- Walk down and right.
- Place the KEY in the lock (K).
- Take the MOUSE HEAD (L).
- Walk down.
- Use the MOUSE HEAD to open the door (M).
- Take the KITCHEN KNIFE (N).
- Walk right.
- Place the CUP SYMBOL in the indentation, and then push the teapot (O).
- Take the KEY (P).
- Use the KITCHEN KNIFE to take the WAX (Q).
- Place the WAX in the bowl, and then take the BOWL WITH WAX (R).
- Walk down.
- Use the BOWL WITH WAX on the mold (S).
- Close and open the mold; take the CANDLE (T).
- Use the CANDLE on the TORCH to get the LIT CANDLE (U).
- Walk left.
- Use the LIT CANDLE on the wood (A).
- Use the KEY to open the cabinet (B).
- Take the 2/6 SYMBOL TILE (C).
- Use the PICK PART on the blade to make the PICK (D).
- Take the TREBLE CLEF (E).
- Walk down 3 times.
- Place the TREBLE CLEF in the indentation; take the BOTTLE INSIGNIA (F).
- Walk forward.
- Select the picnic basket (G).
- Locate the black items on the left half of the scene (H).
- You receive the BELLADONNA.
- Walk forward and left.
- Place the BOTTLE INSIGNIA on the container (I).
- Open the container and take the CORKSCREW (J).
- Walk down and right.
- Use the CORKSCREW on the jar and take the METAL CHEESE (K).
- Walk down.
- Place the METAL CHEESE on the floor and take the METAL MOUSE (L).
- Walk left.
- Give the METAL MOUSE to the cat (M).
- Touch the broken cat (N).
Chapter 7: The Dungeon
- Talk to Varga (A).
- Read the note and take the CHAIN LINK (B).
- Take the BRUSH (C).
- Note the mini-game (D).
- Take the ROPE (E).
- Use the pick twice on each pile of rocks (green).
- Take the KNITTING NEEDLE (F).
- Walk to the right (G).
- Take the RAG (H).
- Give the CHERRY to the owl; take the PEARL (I).
- Use the ROPE on the hook to make the HOOK WITH ROPE (J).
- Use the CHAIN LINK on the chain (K).
- Push the stone in the hole (L).
- Take the HACKSAW (M).
- Walk down.
- Use the PEARL on the shell and take the 3/6 SYMBOL TILE (N).
- Use the HOOK WITH ROPE on the wall (O).
- Use the HACKSAW to take the IRON ROD (P).
- Select the doorway (Q).
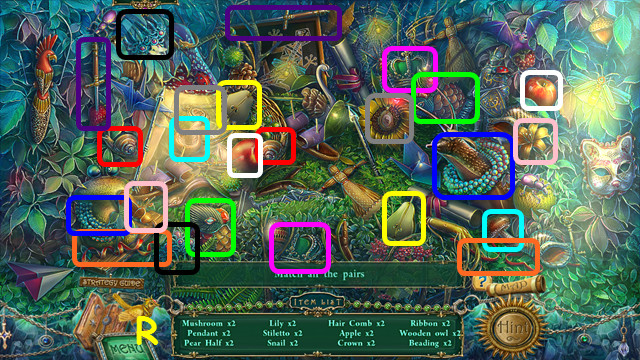
- Play the HOP to earn the FLINT (R).
- Walk to the right.
- Use the FLINT on the torch and take the LIT TORCH (S).
- Walk down.
- Use the LIT TORCH to melt the resin and use the RAG to take the 4/6 SYMBOL TILE (T).
- Use the IRON ROD on the resin to get the STICKY ROD (U).
- Use the STICKY ROD to take the GOLDEN SPIDER (V).
- Select the doorway.
- Play the HOP to receive the ANKH (W).
- Walk right.
- Place the ANKH into the indentation (A).
- Open the door and take the 2/3 BRONZE CROSS (B).
- Place the GOLDEN SPIDER on the web; take the 3/3 BRONZE CROSS (C).
- Walk down and select the mini-game.
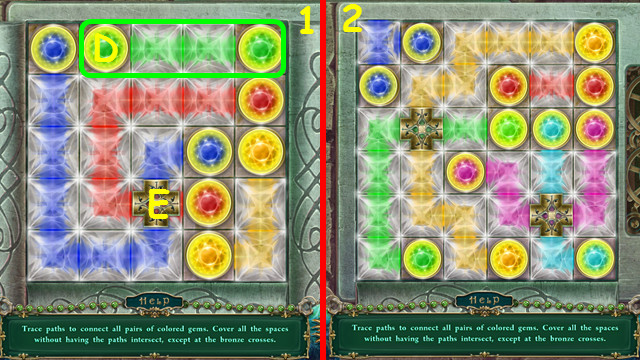
- Place the 3 BRONZE CROSSES on the board.
- Connect the colored gems (D); paths can only intersect at the bronze crosses (E).
- Select a gem, and then a tile to make a path.
- There are 2 levels to complete (1-2).
- Climb up to the kitchen.
- Take the DRIED LEMON BALM (F).
- Walk down and right.
- Place the BOOK PAGE on the book (G).
- Place the GINGER, MANDRAKE ROOT, MISTLETOE BERRIES, BELLADONNA, and DRIED LEMON BALM on the plate (H).
- Take the ANTIDOTE (I).
- Walk down twice.
- Use the ANTIDOTE on the cage; you receive the DRAGON POISON (J).
- Walk forward.
- Use the DRAGON POISON on the door (K).
- Walk forward.
Chapter 8: The Upper Castle
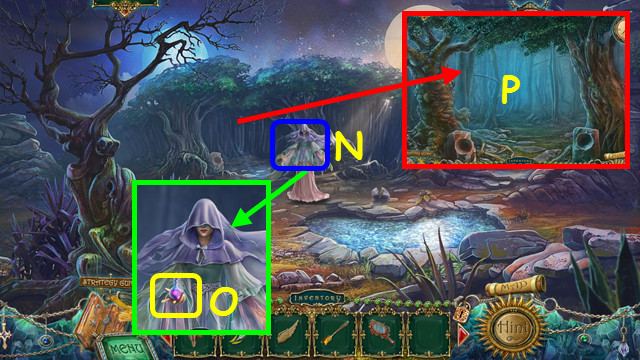
- Note the symbols in the right painting (A).
- Use the BRUSH on the glue to get the BRUSH WITH GLUE (B).
- Place the KNIGHT FIGURINE in the left painting; select the painting (C).
- Play the HOP to receive the YIN (D).
- Use the items in numerical order (1-7).
- Walk right.
- Take the 1/2 BOOK (E).
- Use the BRUSH WITH GLUE on the fragments (F).
- Open the door and walk forward (G).
- Move the bird and take the CANE (H).
- Use the NIGHTINGALE on the bush; take the THORN (I).
- Walk down.
- Use the CANE to knock down the sphere (J).
- Take the CLOVER (K).
- Walk forward.
- Use the CLOVER on the gate (L).
- Walk forward.
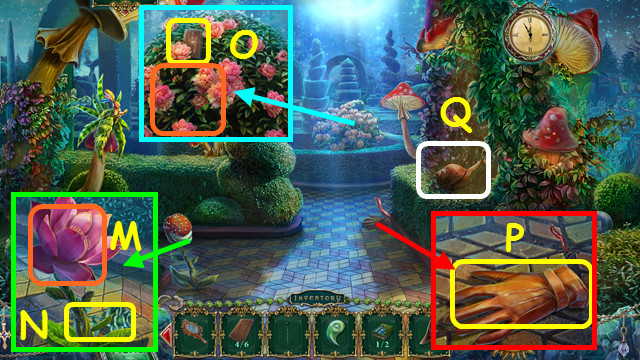
- Use the NIGHTINGALE on the carnivorous flower (M).
- Take the STONE FLOWER (N).
- Use the NIGHTINGALE on the bush; take the 5/6 STONE TILE (O).
- Take the GLOVE (P).
- Select the snail (Q).
- Play the HOP to earn the CROWN SYMBOL (R).
- Walk down.
- Use the GLOVE to take the BOOK COVER (S).
- Walk down twice.
- Place the BOOK COVER on the book; take the 2/2 BOOK (T).
- Use the THORN on the painting; take the RHOMBUS (U).
- Walk to the right.
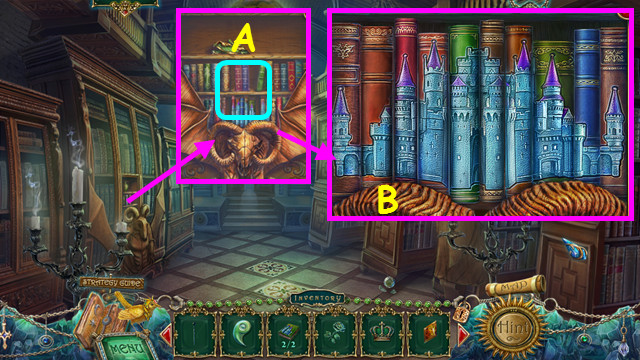
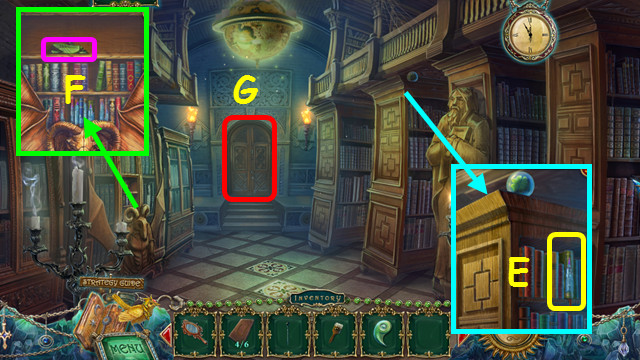
- Place the 2 BOOKS on the shelf (A).
- Rearrange the books to form a castle (B).
- Select 2 books to swap positions.
- Place the RHOMBUS in the indentation (C).
- Take the 6/6 SYMBOL TILE (D).
- Walk forward twice, and then walk left.
- Take the JAR FRAGMENTS (E).
- Use the NIGHTINGALE on the tree; take the APPLE (F).
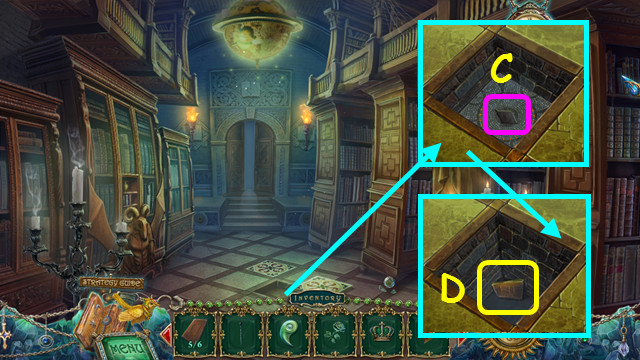
- Place the 6 SYMBOL TILES on the base of the statue (G).

- Place the lenses over the pieces that make up the symbol in the center (H).
- There are 6 symbols for both casual (1-6) and hard (7-12).
- The symbol pieces will highlight when you are over the correct piece.
- Place the STONE FLOWER in the statue's hand (I).
- Take the HEART SYMBOL (J).
- Walk down and select the snail.
- Play the HOP (K).
- You earn the ARROW.
- Use the APPLE on the worm to get the APPLE WITH WORM (L).
- Walk down.
- Give the APPLE WITH WORM to the bird; take the QUILL (M).
- Walk down.
- Place the JAR FRAGMENTS on the shelf (N).
- Take the JAR (O).
- Walk down.

- Note the mini-game on the left (O).
- Place the CROWN SYMBOL and the HEART SYMBOL in the door (P).
- Walk forward.
- Take the INK BOTTLE and read the note (Q).
- Try to take the coin (R).
- Take the TOY LANCE (S).
- Use the TOY LANCE to take the 1/2 FLOWER FIGURINE (T).
- Place the ARROW on it, and then take the CROSSBOW (U).
- Read the note (V).
- Walk forward.

- Take the PEACOCK and note the scales mini-game (A).
- Select the doorway (B).
- Play the HOP to earn the EMERALD (C).
- Walk down twice.
- Place the PEACOCK on the lid (D).
- Open the box and take the 1/2 STAINED GLASS PART (E).
- Select the painting (F).
- Play the HOP to earn the YANG (G).
- Walk forward twice.
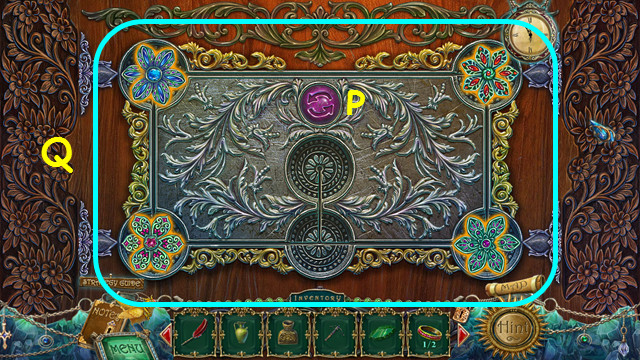
- Place the YIN and YANG in the indentations (H).
- Place the MAGIC MIRROR in the indentation (I).
- Take the 2/2 STAINED GLASS PART and the code (J).
- Walk down.
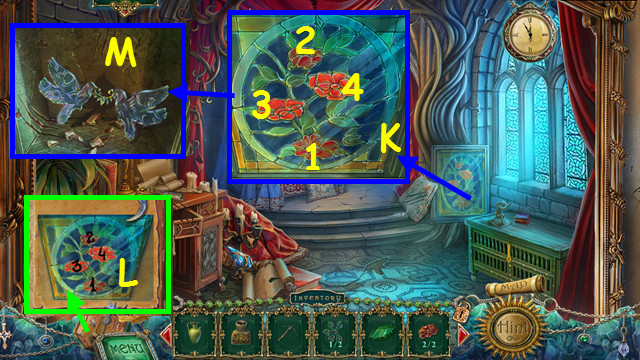
- Place the 2 STAINED GLASS PARTS in the frame (K).
- Look at the code in your journal (L).
- Press the flowers (1-4).
- Take the DOVES INSIGNIA (M).
- Walk forward.
- Place the DOVES INSIGNIA on the chest (N).
- Take the 2/2 FLOWER FIGURINE (O).
- Select the alcove (P).
- Play the HOP to earn the 1/2 WEDDING RING (Q).
- Walk down twice and select the door mini-game on the left.
- Place the 2 FLOWER FIGURINES on the mechanism.
- Use the button to rotate the flowers to match up with their petal (P).
- The button does not turn the bottom row.
- Move the flowers around the board to the correct location (Q).
- The start position of the flowers is randomly generated.
- Walk to the left.
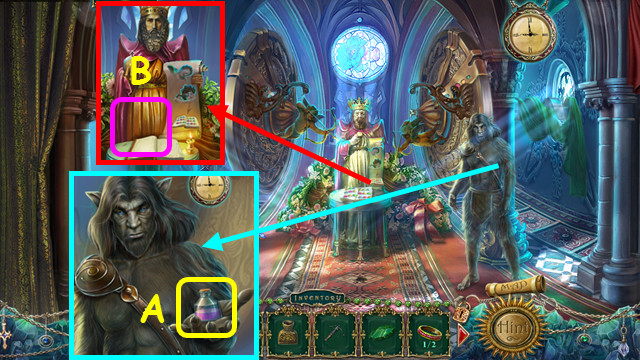
- Talk to the beast and take the SECRET INGREDIENT (A).
- Place the INK BOTTLE and QUILL on the table (B).
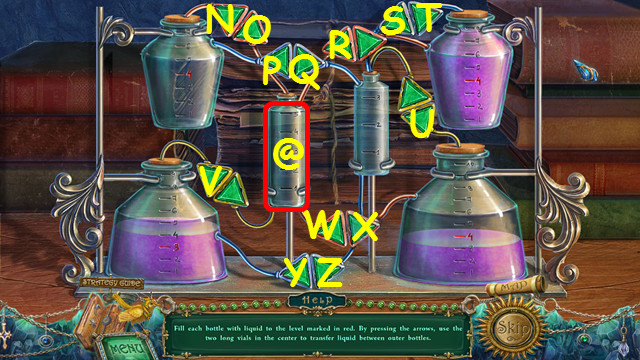
- Walk down 5 times, enter the hut, and select the vial mini-game.
- Place the SECRET INGREDIENT in the holder.
- Press the green arrows to move the liquid to the red levels in each vial.
- Press; L, G, H, J, H, J, F, I, F, I, F, I, C, F, D, K, and E.
- Take the ANTIMAGIC POTION (M).
- Walk down and go forward twice.
- Use the CROSSBOW on the cage (N).
- Use the ANTIMAGIC POTION on the cage (O).
- Use the KNITTING NEEDLE to take the SAPPHIRE (P).
- Talk to Dorian (Q).
- Walk forward twice, and then go left.
- Place the SAPPHIRE in the cherub's eye (A).
- Walk down, go right, forward twice, and then go left.
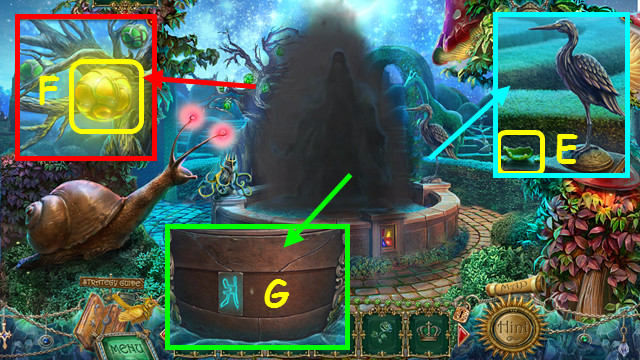
- Use the JAR on the fountain to get the JAR WITH WATER (B).
- Walk down twice.
- Use the JAR WITH WATER on the flames (C).
- Take the HERON LEG (D).
- Walk forward and left.
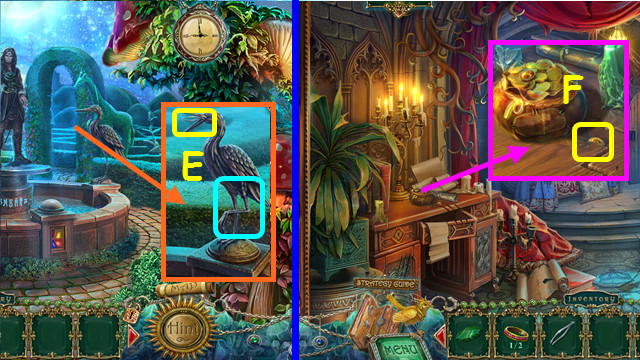
- Place the HERON LEG on the heron and take the TWEEZERS (E).
- Walk down 4 times and go forward.
- Use the TWEEZERS to take the COIN (F).
- Walk forward and select the scales mini-game.
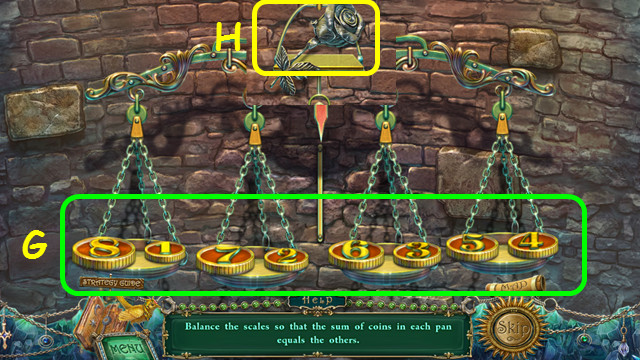
- Place the COIN on the scale.
- Swap the coins so each scale totals the same amount (G).
- Take the ROSE INSIGNIA (H).
- Walk down.
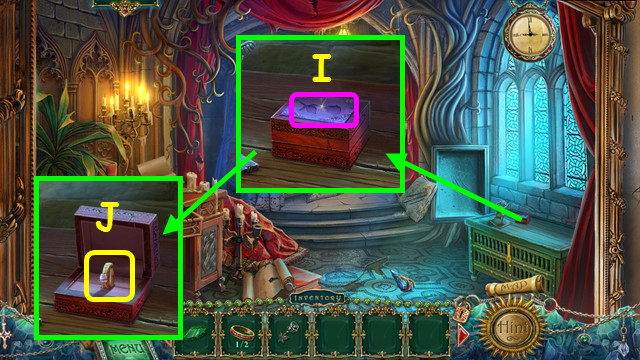
- Place the ROSE INSIGNIA on the box (I).
- Take the 2/2 WEDDING RING (J).
- Walk down and left.
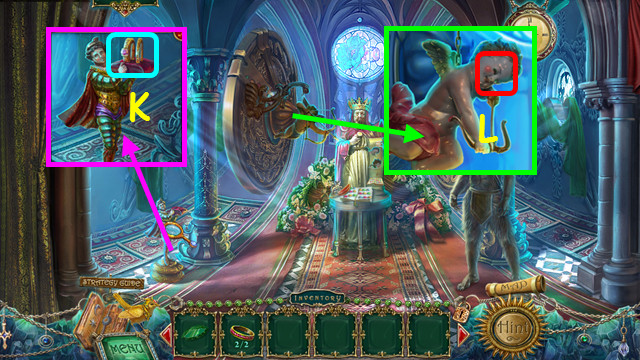
- Place the 2 WEDDING RINGS on the pillow (K).
- Place the EMERALD in the cherub's eye (L).
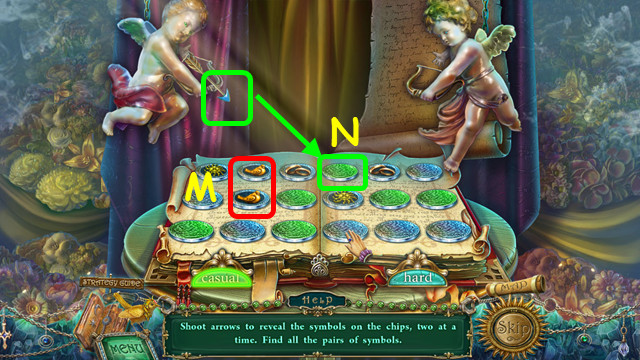
- Play this memory match game by shooting arrows at the coins.
- Matching pairs will remain up (M).
- Shoot the coins with the same colored arrow (N).
- This mini-game is randomly generated; the coin locations may vary.
- Congratulations! You have completed Queen's Tales: The Beast and the Nightingale!
Created at: 2013-11-29