

Walkthrough Menu
- General Tips
- Chapter 1: Archie and Elisa
- Chapter 2: The Hermit in the Tower
- Chapter 3: Derek and Charlie
- Chapter 4: The Mines
- Chapter 5: Emma and Jimmy
- Chapter 6: The Schoolhouse
General Tips
- This is the official guide for Redemption Cemetery: At Death's Door.
- This guide will not mention each time you have to zoom into a location; the screenshots will show each zoom scene.
- Hidden-object puzzles are referred to as HOPs. This guide will not show screenshots of the HOPs, but it will mention when a HOP is available and the inventory item you'll collect from it.
- This guide will give step-by-step solutions for all puzzles that are not random. Please read the instructions in the game for each puzzle.
Chapter 1: Archie and Elisa
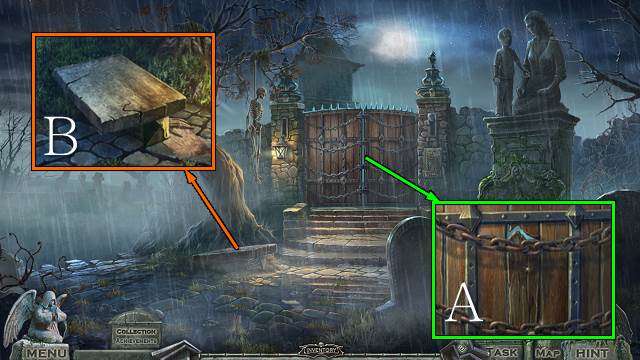
- Try to walk forward.
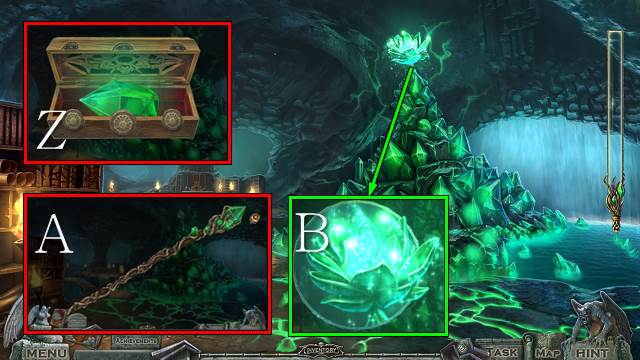
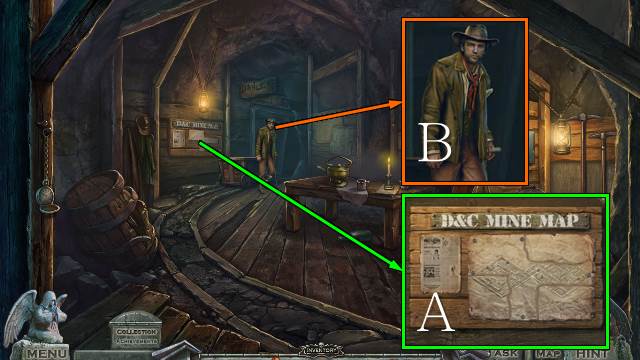
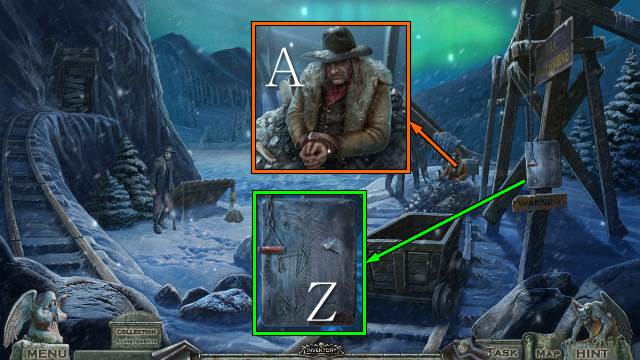
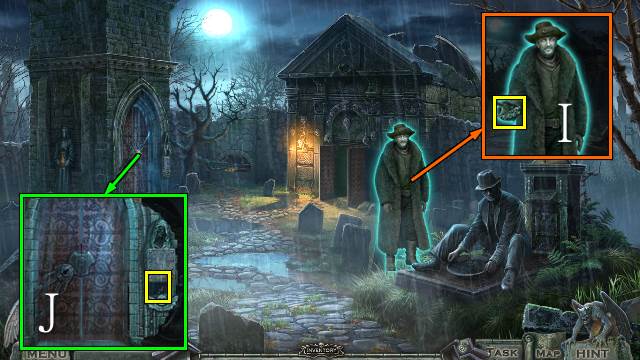
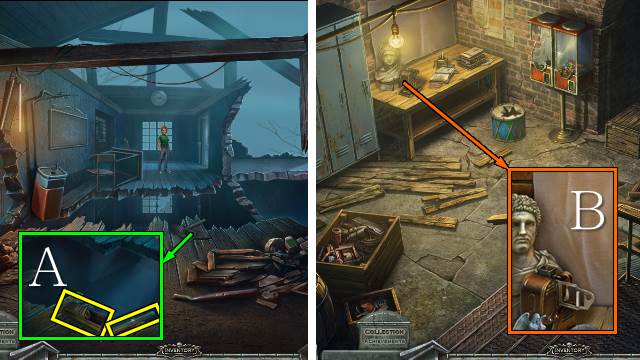
- Move the PLANK until it comes off; look through the gap (A).
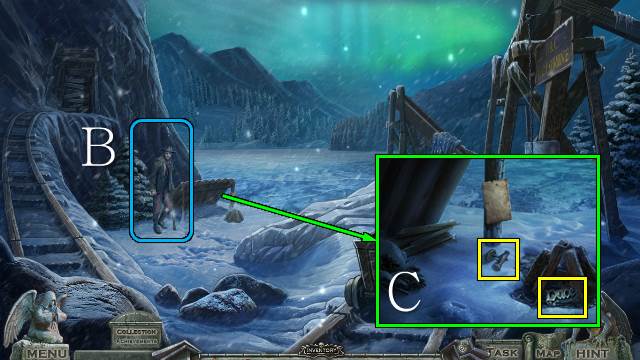
- Use the PLANK to receive a LANTERN (B).

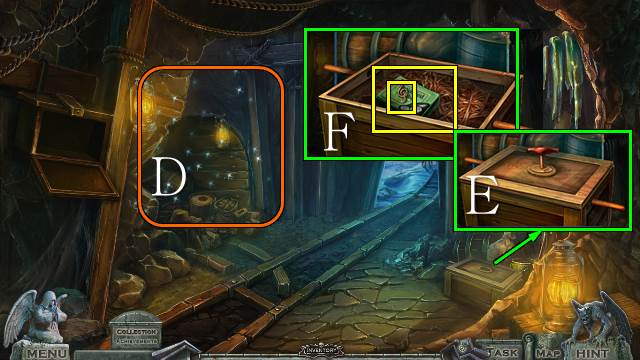
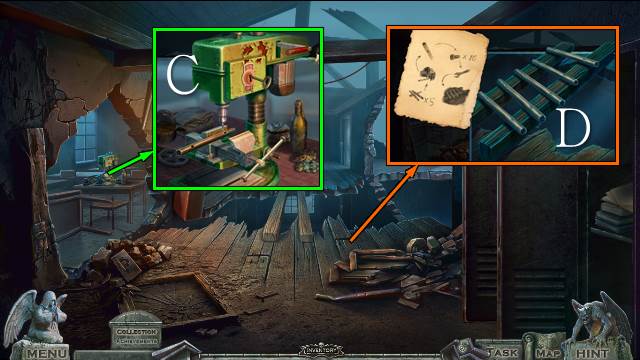
- Take RUNE 1/3 (C); hang the LANTERN and pull it down (D).
- Go forward.
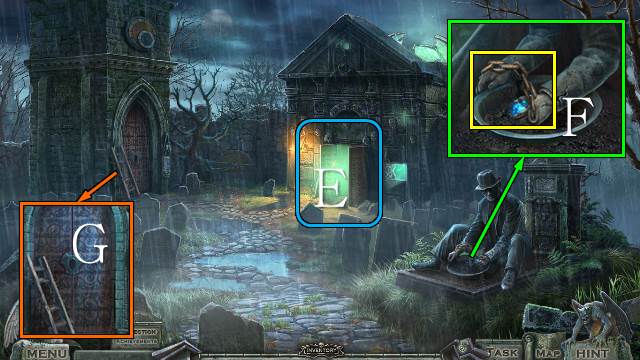
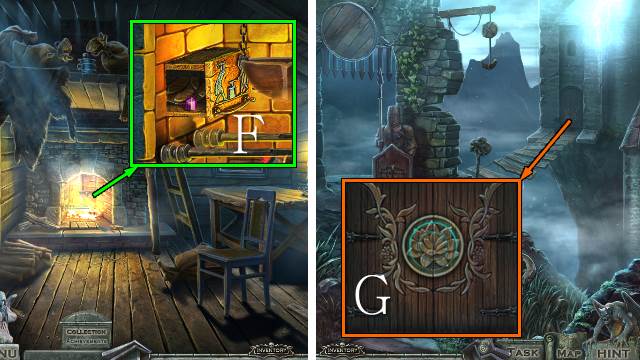
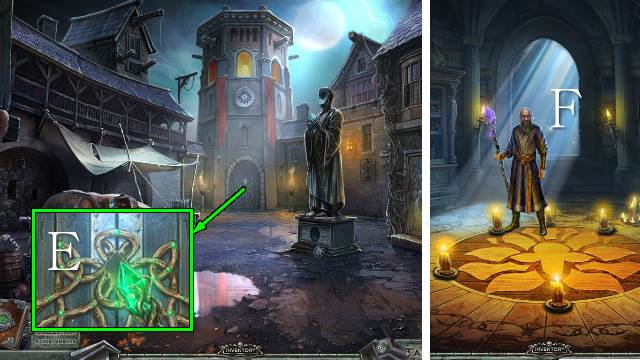
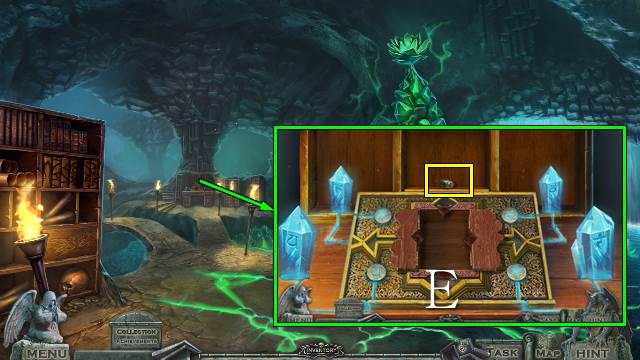
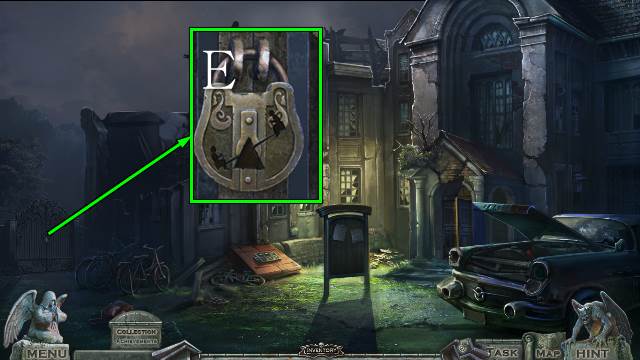
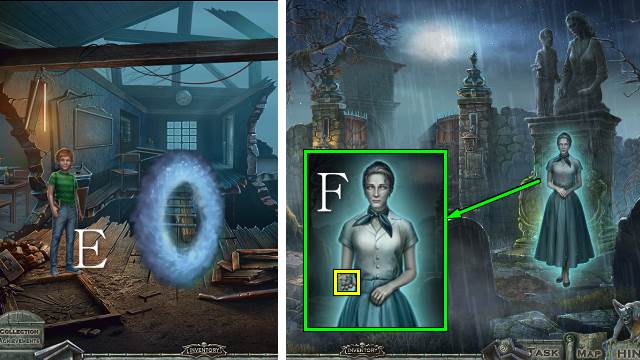
- Inspect the tomb (E).
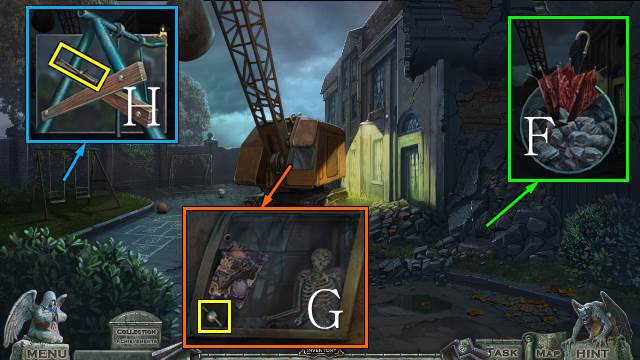
- Take the CHAIN (F).
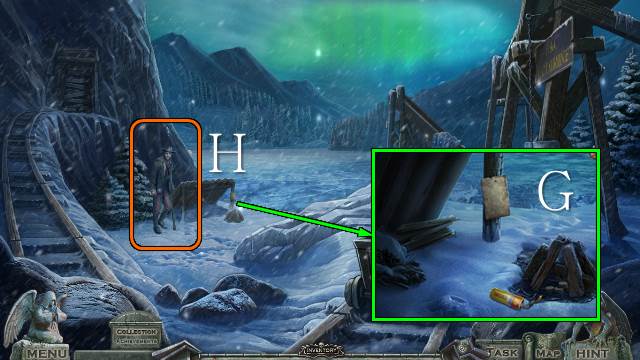
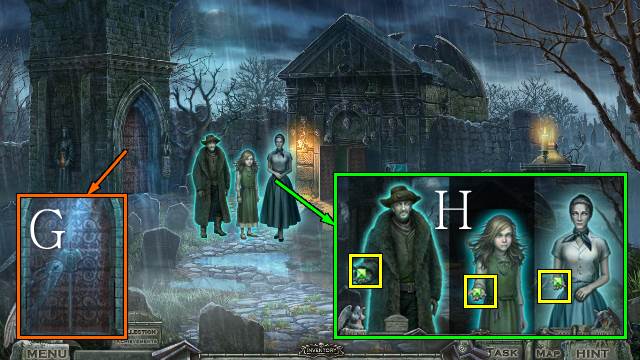
- Take the BROKEN LADDER (G).
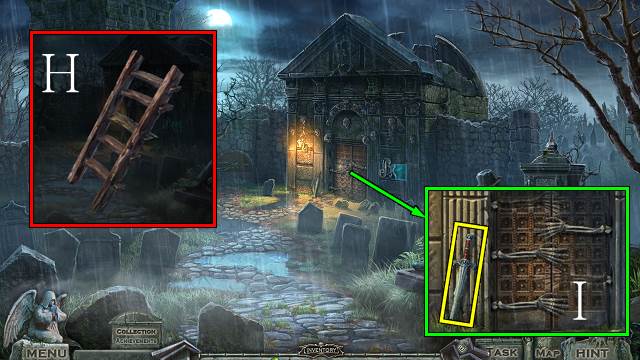
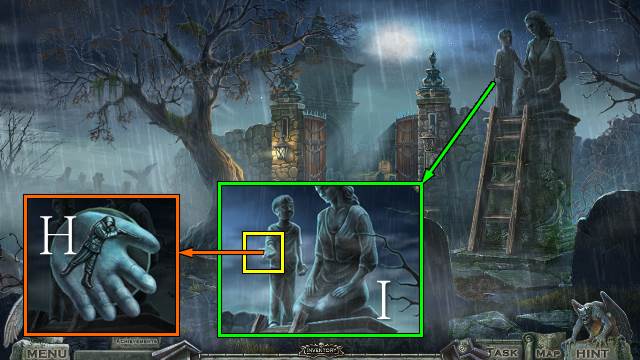
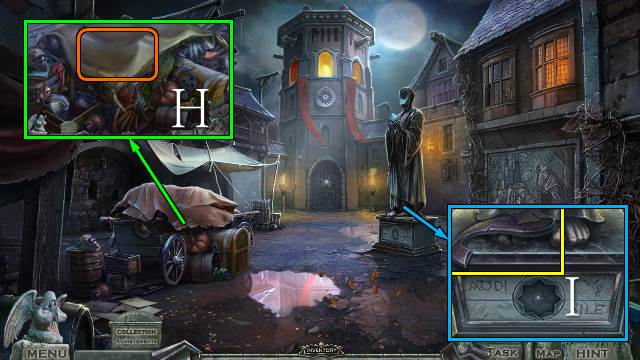
- Access the BROKEN LADDER and place the PLANK; take the LADDER (H).
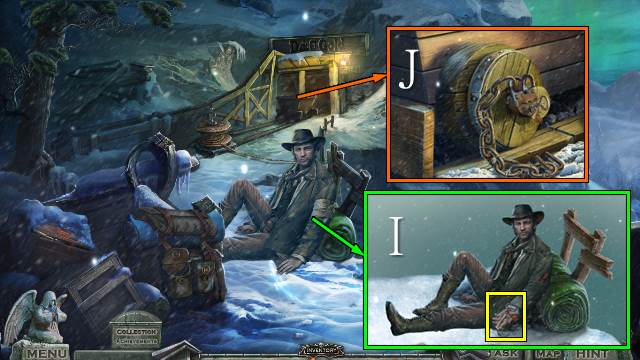
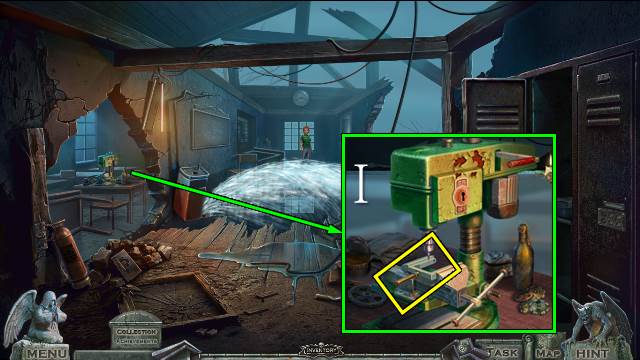
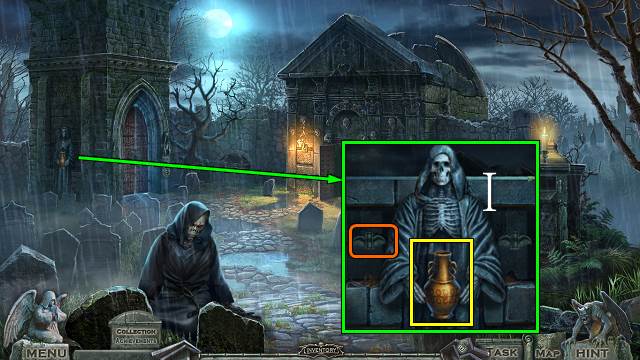
- Take the SWORD (I).
- Walk down.
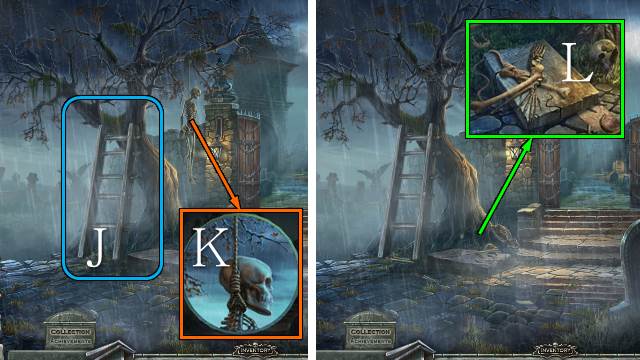
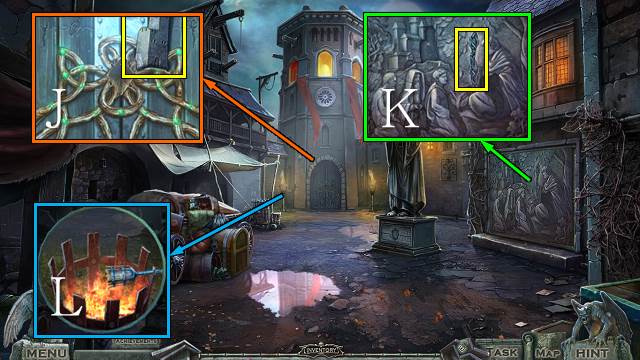
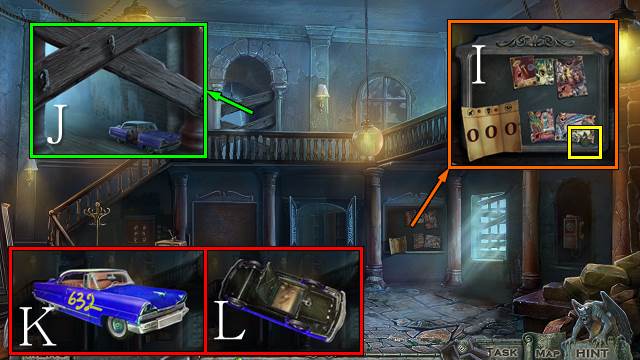
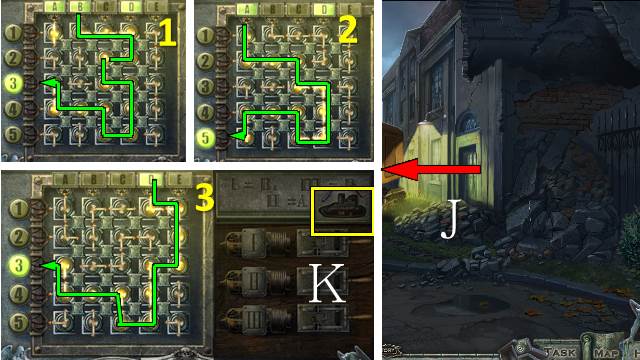
- Place the LADDER (J).
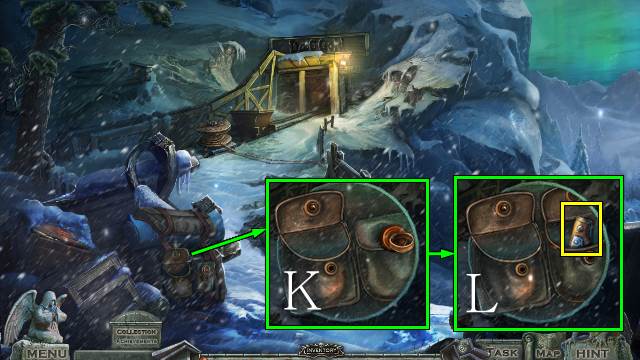
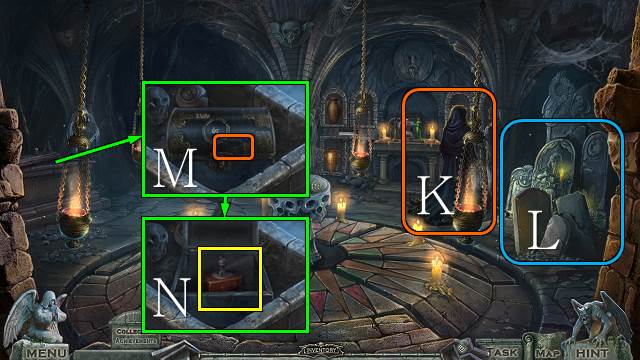
- Use the SWORD (K).
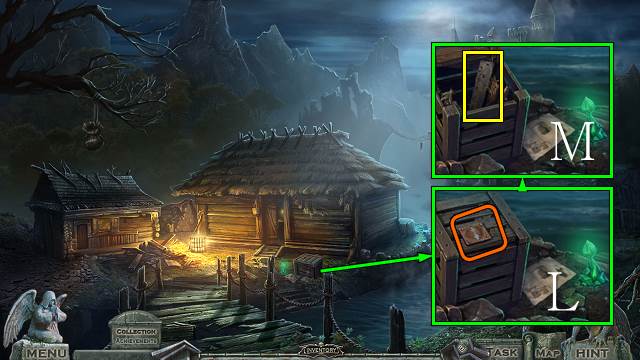
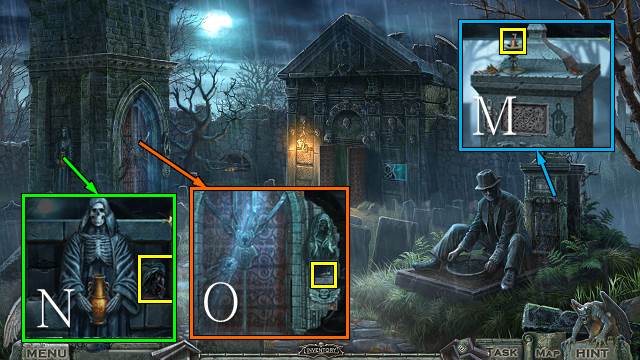
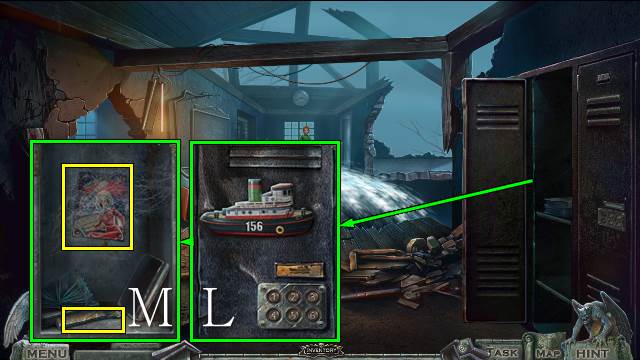
- Move the bones and take SKELETON ARMS 1/2 and the ROPE (L).
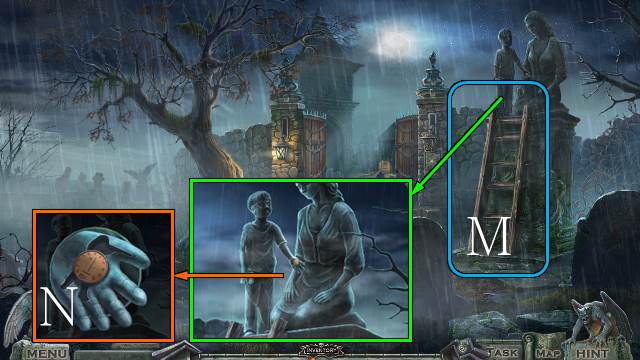
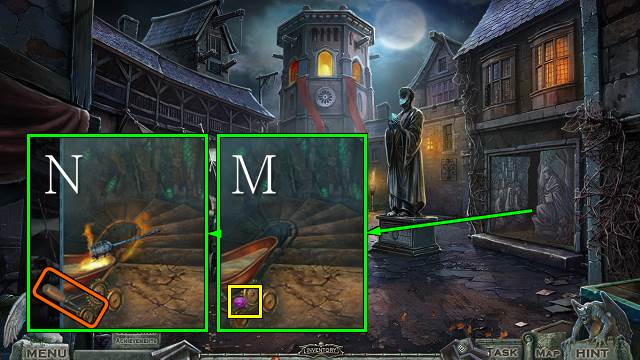
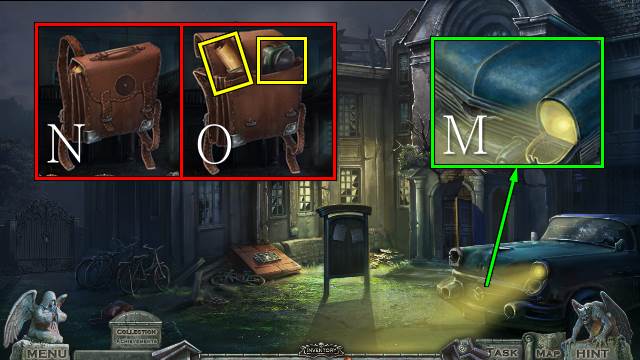
- Move the ladder (M).
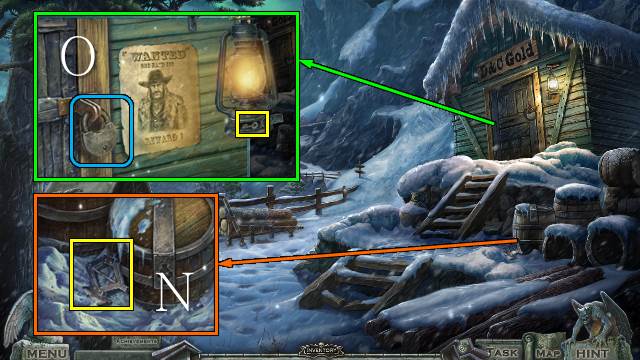
- Take the COIN (N).
- Go forward.
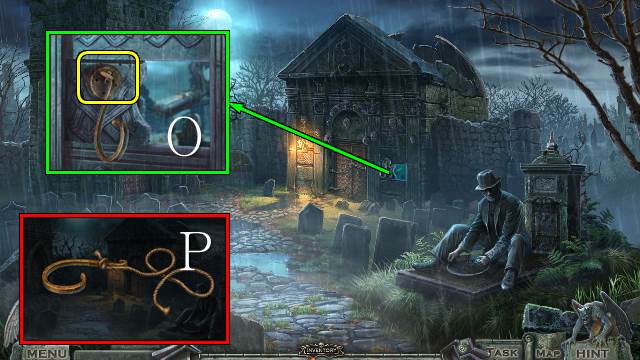
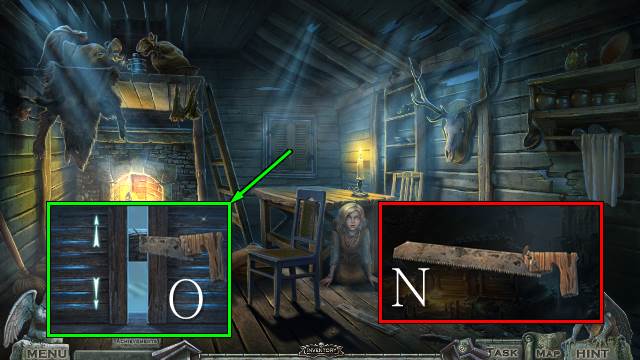
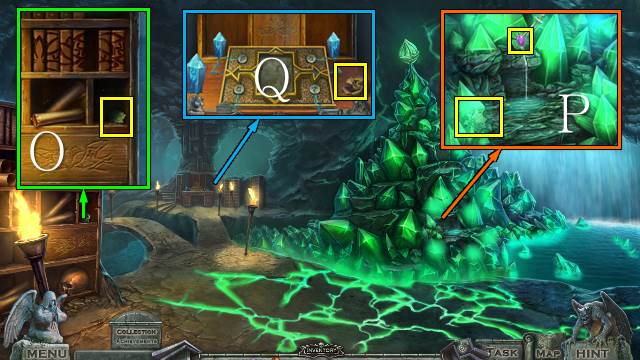
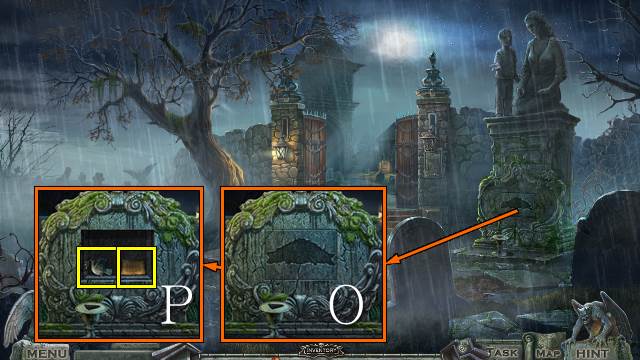
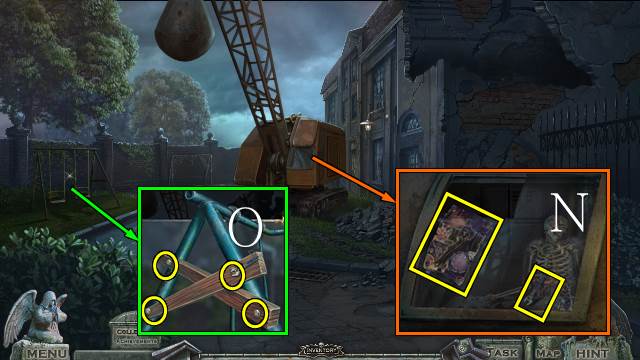
- Look through the window; take the HOOK with the COIN (O).
- Access the ROPE and place and attach the HOOK; take the ROPE WITH HOOK (P).
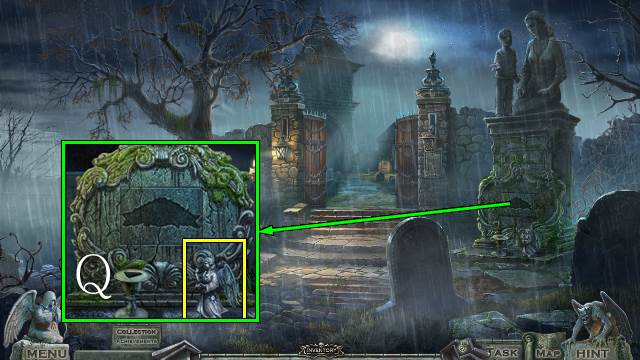
- Walk down and look left.
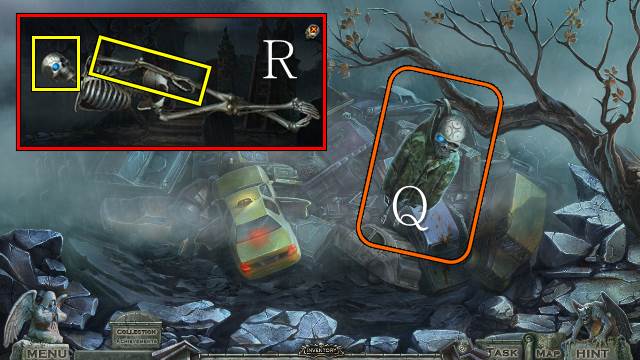
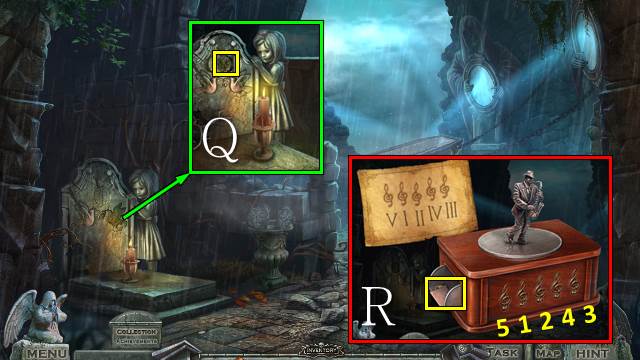
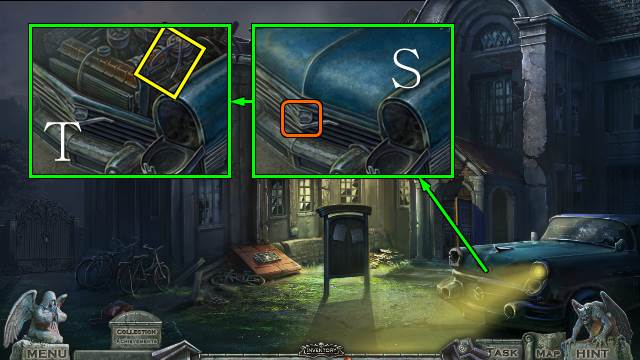
- Take the SKELETON with the ROPE WITH HOOK (Q).
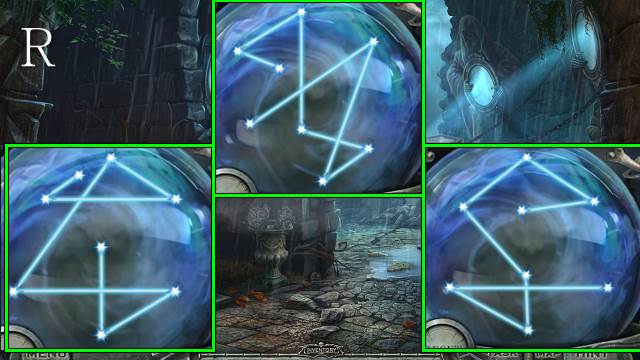
- Access the SKELETON, remove the coat and take the SKULL and SKELETON ARMS 2/2 (R).
- Go forward.
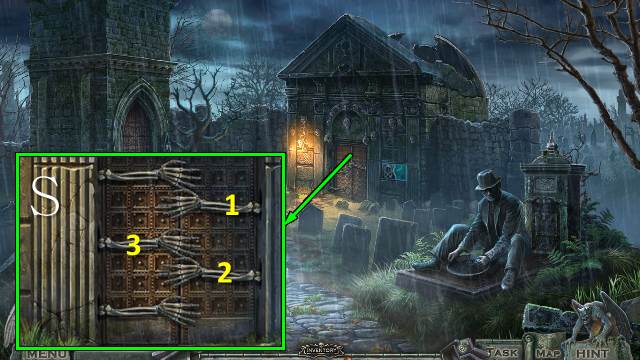
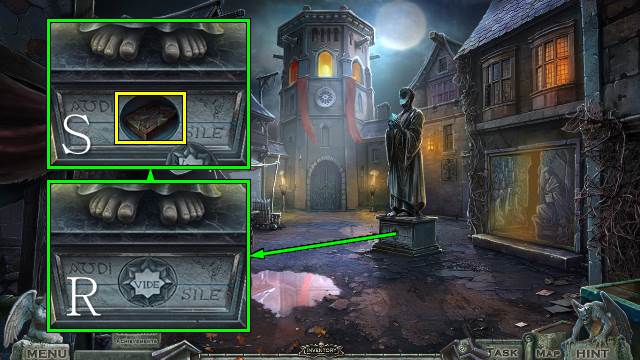
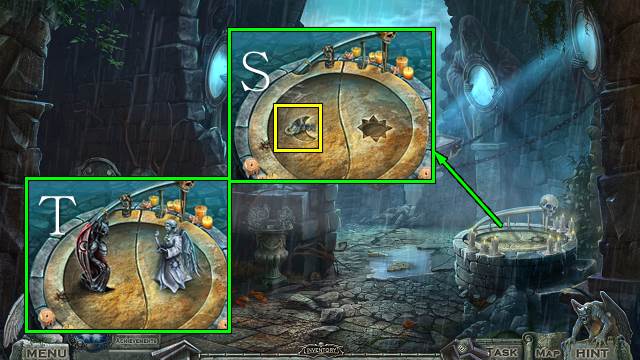
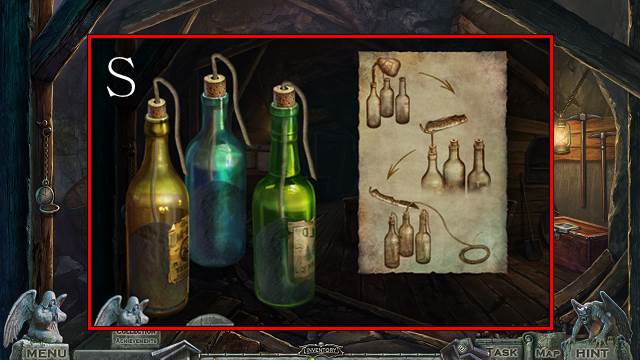
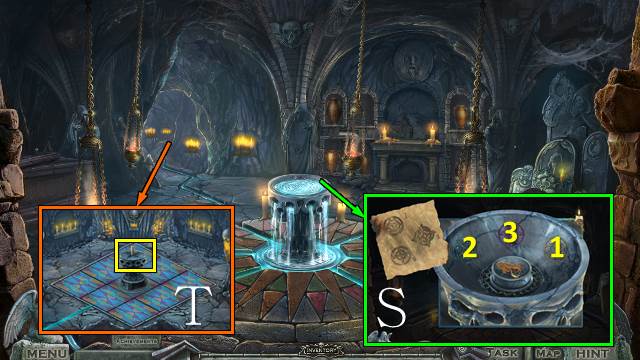
- Place the SKELETON ARMS for a mini-game (S).
- Go forward.

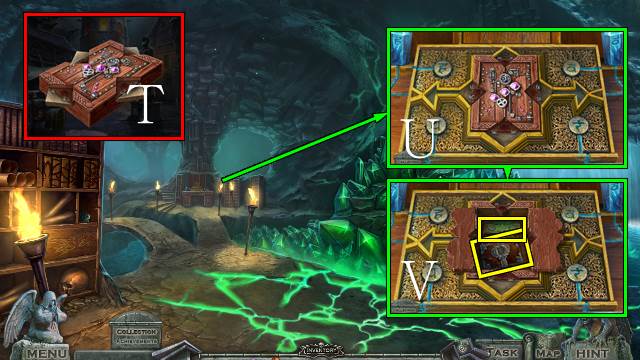
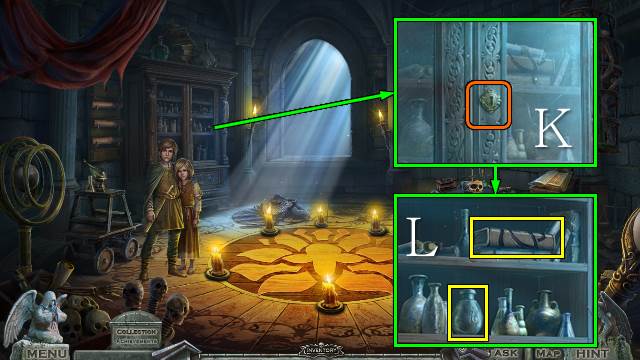
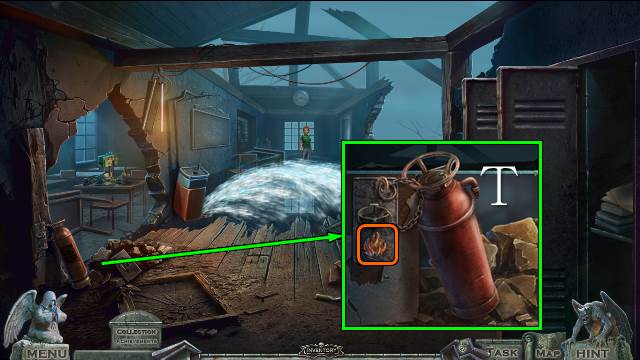
- Take HUNTING SCENE 1/2 (T).
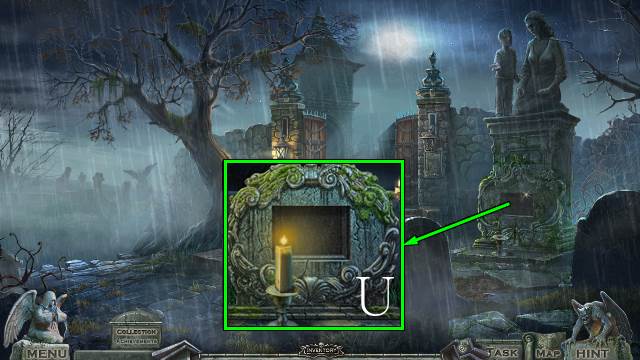
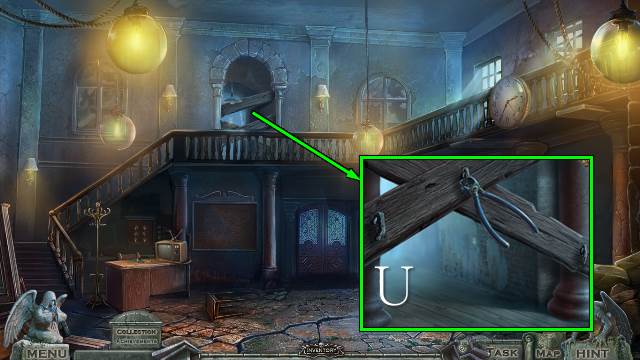
- Move the flowers and take the TOY SOLDIER (U).
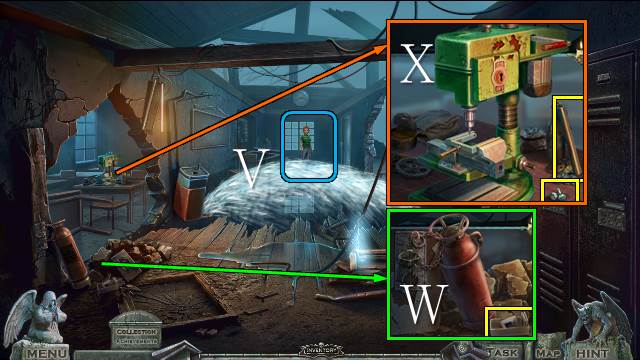
- Remove all the debris and take the SCROLL (V).
- Walk down.
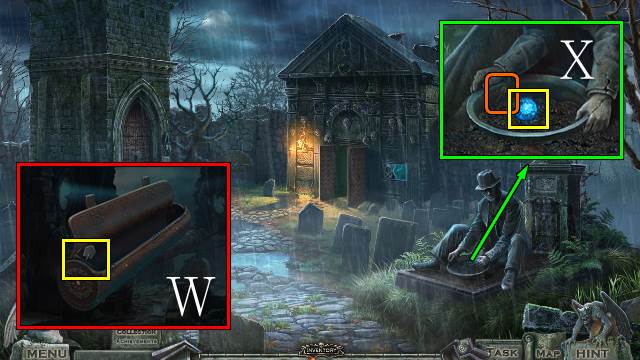
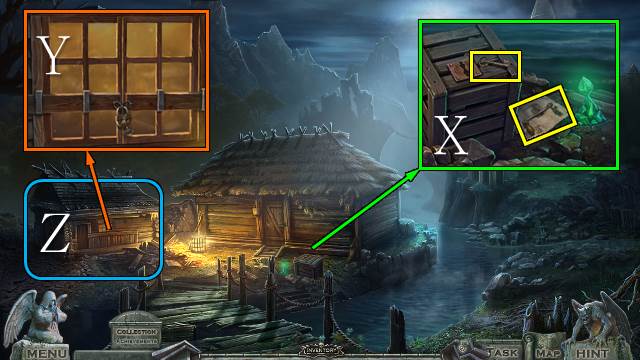
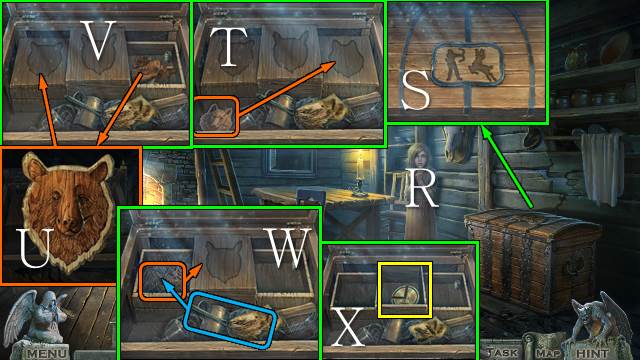
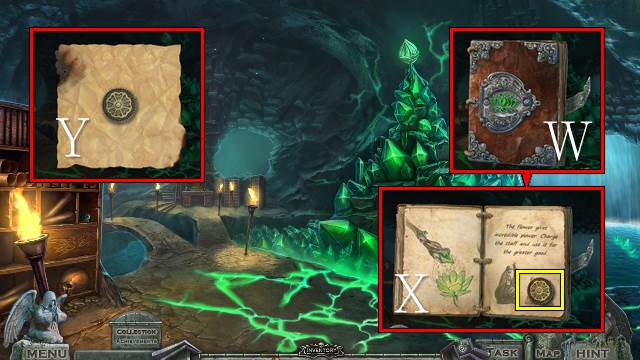
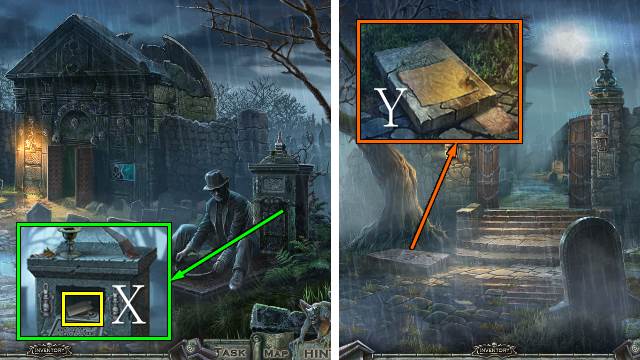
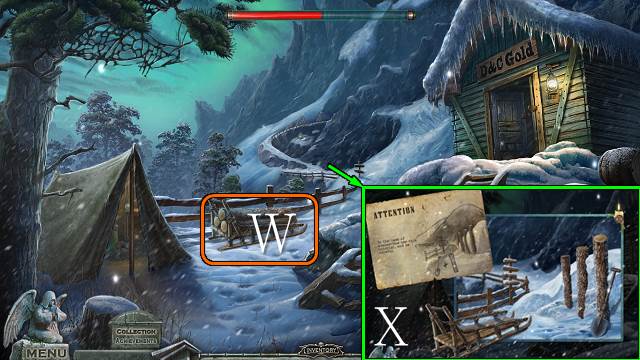
- Access and open the SCROLL and take the note and TOOL EMBLEM (W).
- Place the TOOL EMBLEM and take the CRYSTAL EYE (X).
- Go forward.

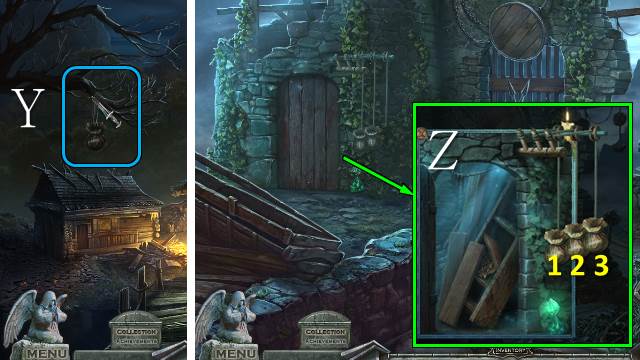
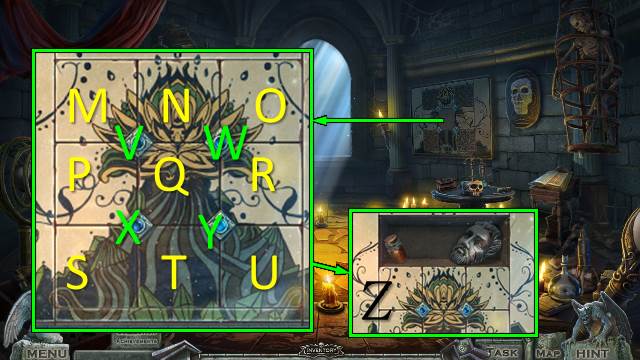
- Access the SKULL and place the CRYSTAL EYE; take the MYSTIC SKULL (Y).
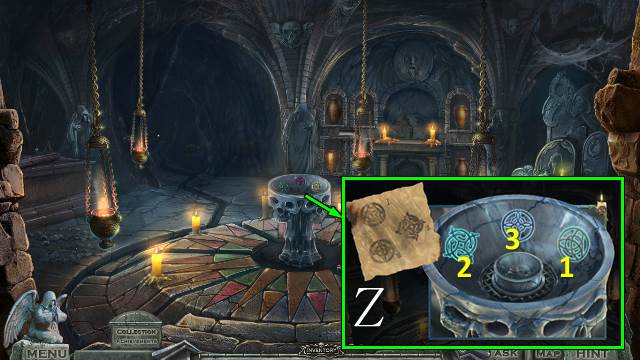
- Place the MYSTIC SKULL (Z).
- Take the STONE SYMBOL (A).
- Walk down.
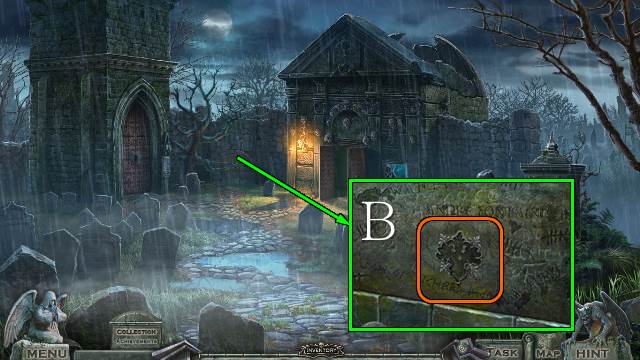
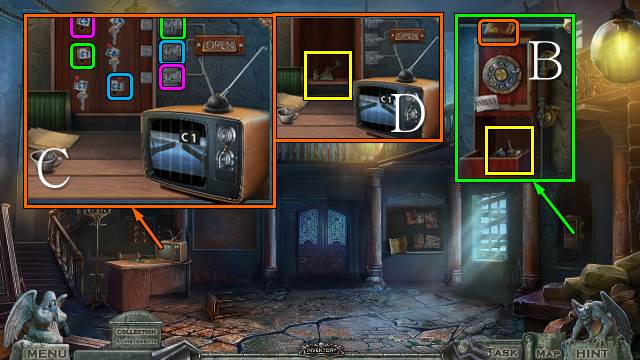
- Place the STONE SYMBOL and play the HOP (B).
- You receive a MIRROR.
- Go forward.
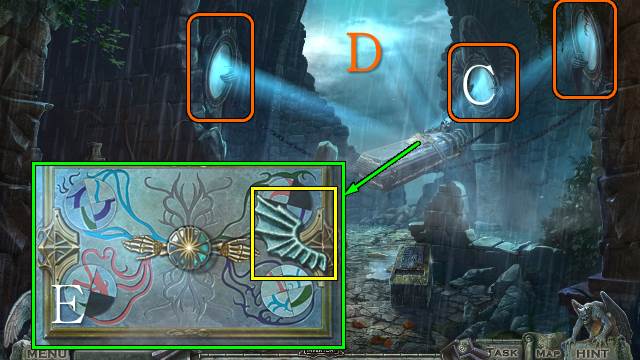
- Remove the broken mirror and place the MIRROR (C).
- Move all three mirrors (D).
- Take the BAT'S WING (E).
- Walk down.
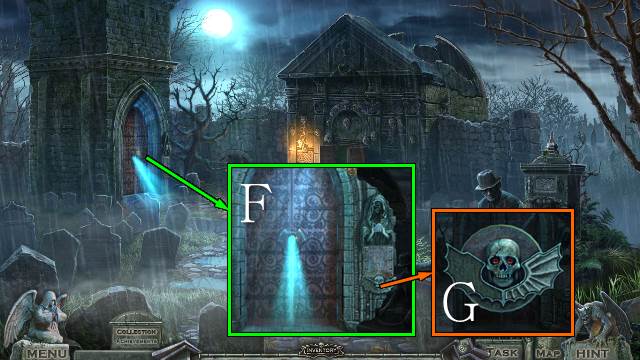
- Look through the gap (F); place the BAT'S WING to receive RUNE 2/3 (G).
- Walk down.
- Place the TOY SOLDIER (H); take RUNE 3/3 (I).
- Go forward twice.
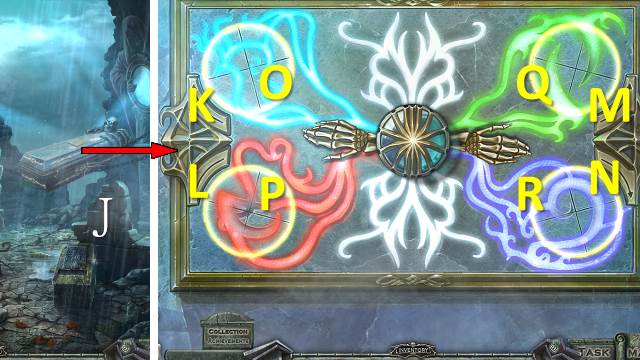
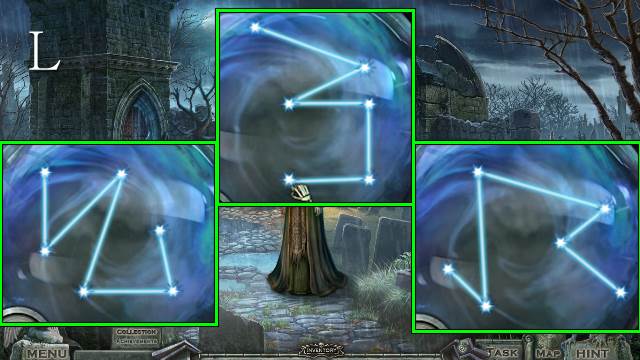
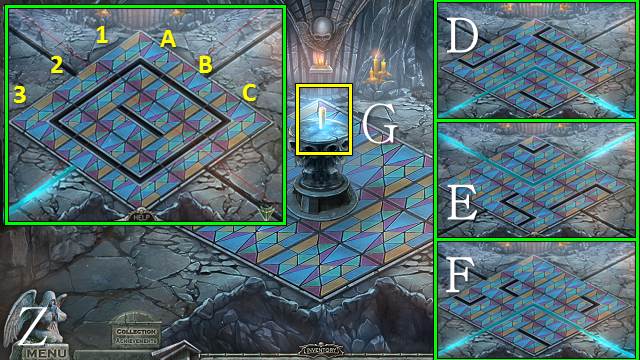
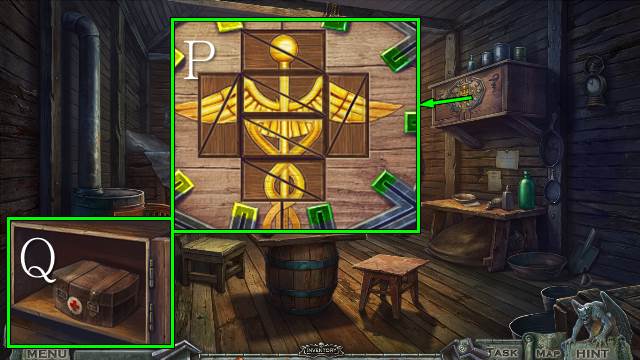
- Place the RUNES for a mini-game.
- Solution: N2-QR-N2-PR-L2-PR-M-QR-L3-PR-M2-QR-K3-M3-OQ-K-OQ-N-QR-OQ-K2-OQ-N3-QR-N3-QR-K-OQ-K3-OQ-L3-M2-N3.
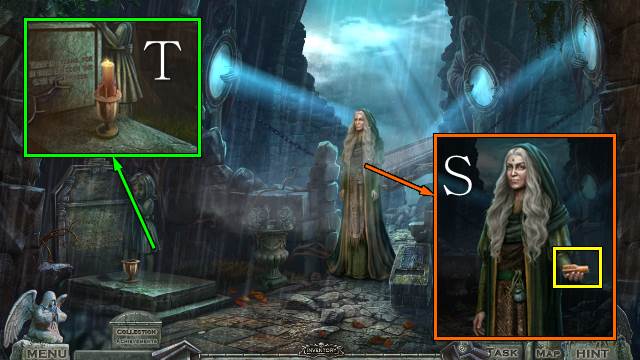
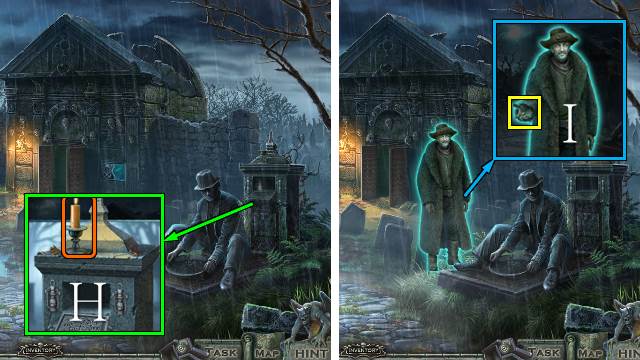
- Talk to the Keeper; take the CANDLE (S).
- Place the CANDLE (T).
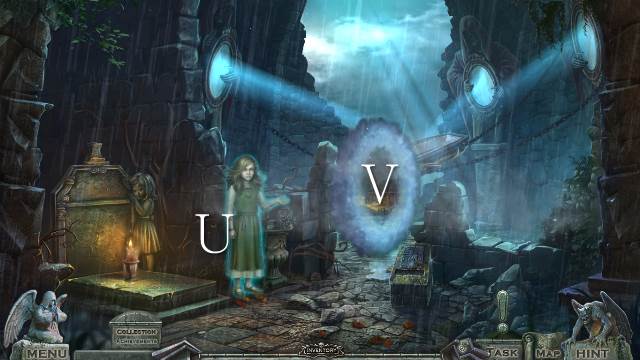
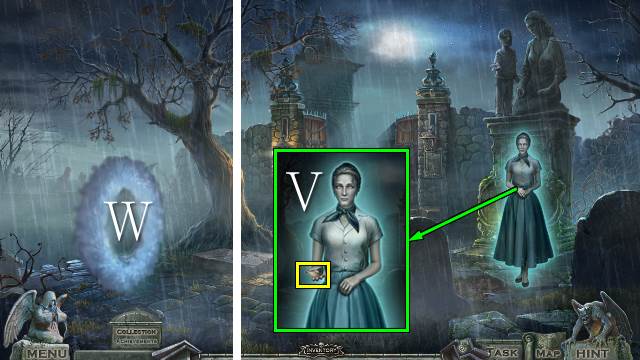
- Talk to Elisa (U).
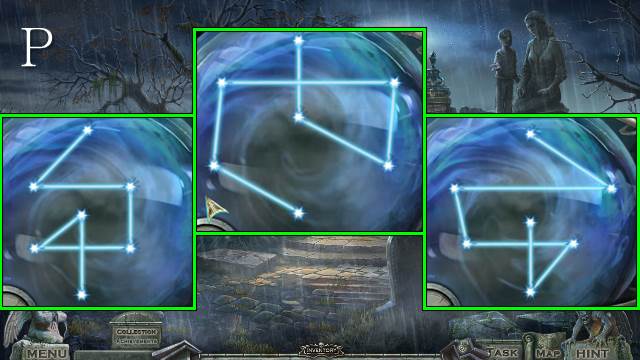
- Enter the portal for a mini-game (V).

- The solution is random (W).
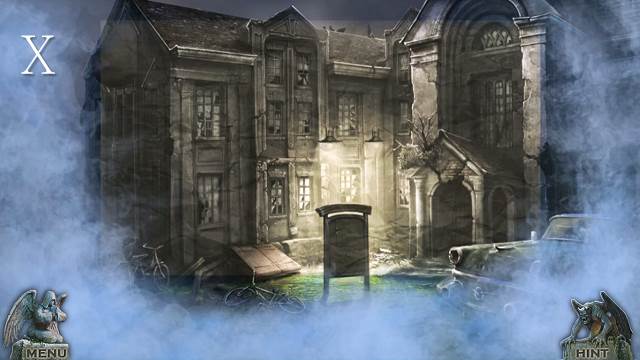
- Try to walk forward.
- Take the HANDLE and BARN KEY (X).
- Place the BARN KEY, open and remove the lock and open the windows (Y).
- Play the HOP (Z).
- You receive the TONGS.

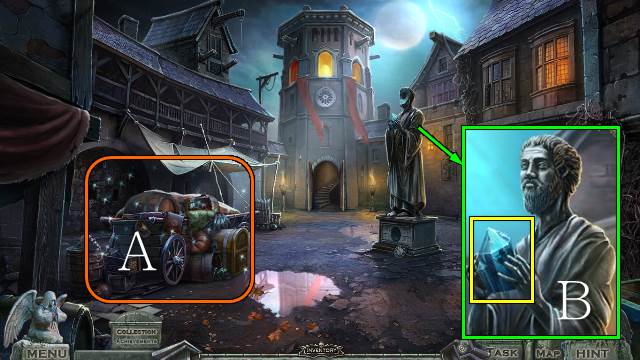
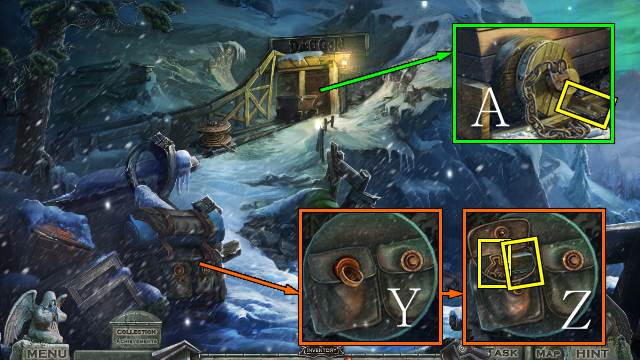
- Look through the gap and try to move the lever; scroll down (A).
- Scroll down, take the 8 NAILS (B) and take the HOUSE HANDLE with the TONGS (C); place the HOUSE HANDLE and move it (A).
- Go forward.
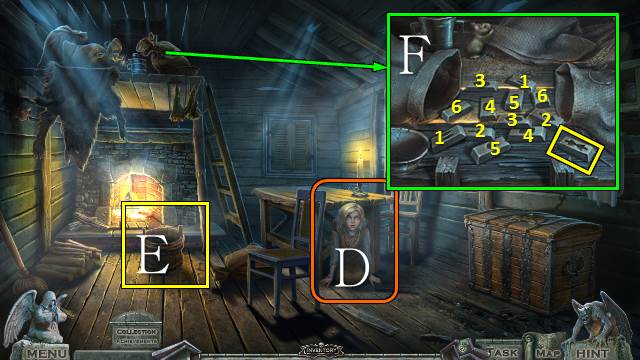
- Talk to Elisa (D).
- Take the BUCKET (E).
- Open the sacks for a mini-game; take the MOLD (F).
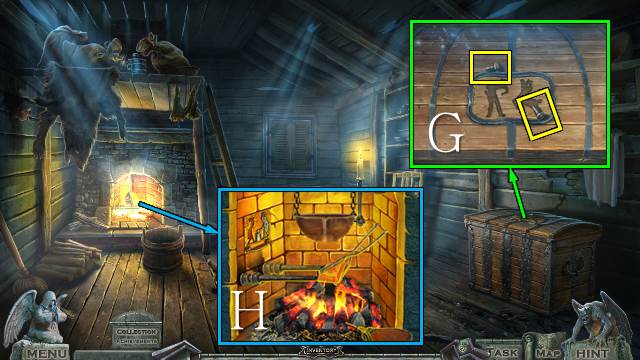
- Take the two SCREWS (G).
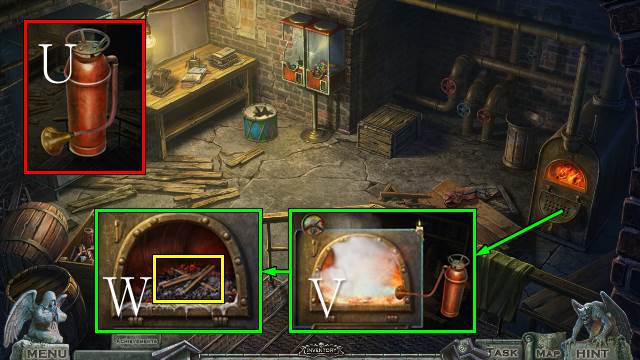
- Place the CHAIN and move the cauldron; place the NAILS, MOLD and HANDLE, use the bellows, pull the handle and use the TONGS to get a TONGS AND MOLD (H).
- Walk down.
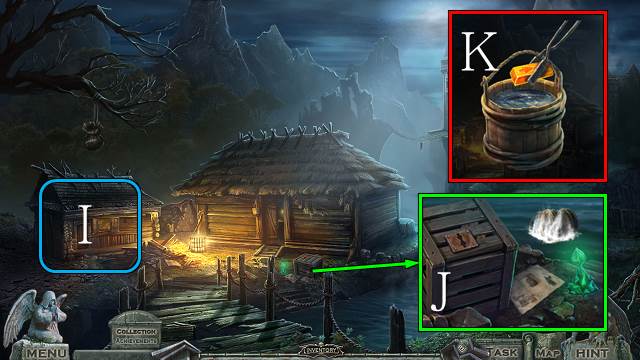
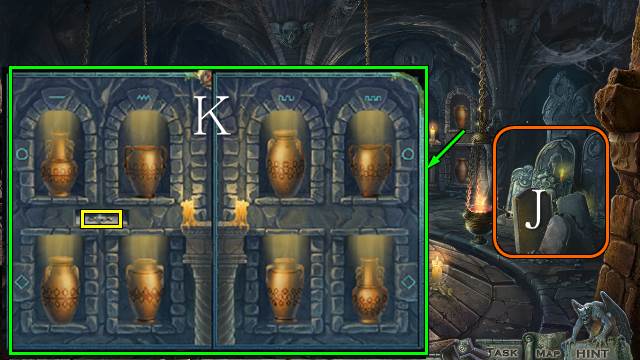
- Play the HOP (I).
- You receive a SAW HANDLE.
- Use the BUCKET to get a BUCKET WITH WATER (J).
- Access the BUCKET WITH WATER, place the TONGS AND MOLD, put the mold in the water and take it out to receive the BOX BUTTON (K).
- Place the BOX BUTTON and turn it (L); take the SAW BLADE (M).
- Go forward.
- Access the SAW BLADE, place the SAW HANDLE and SCREWS and use the COIN; take the SAW (N).
- Place the SAW and move it up and down until the latch breaks; open the window (O).
- Go forward.
- Try to move forward.
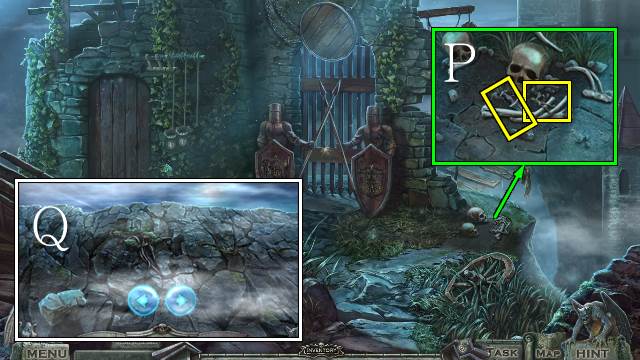
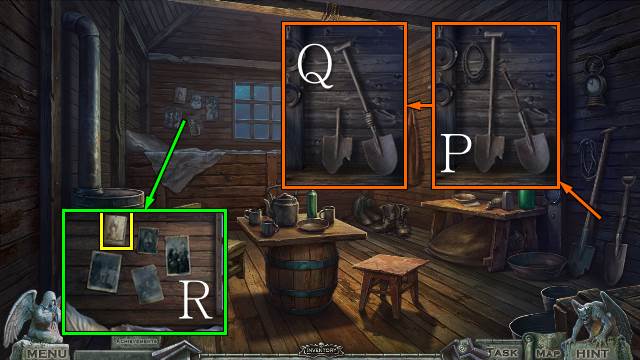
- Move the bones and take HUNTING SCENE 2/2 and the KNIFE (P).
- Play the mini-game (Q).
- Walk down.
- Talk to Elisa (R).
- Place the HUNTING SCENE (S), move the items and place the wolf's head (T).
- Pour the glue and restore the head (U).
- Move the head (V), use the duster and move the owl's head (W); take the GOLDEN GEAR (X).
- Walk down.
- Take the BAG with the KNIFE (Y).
- Go forward twice.
- Place the BAG for a mini-game (Z).
- Select bag 1, then 2.
- Take the 3 PLANKS and the LOCK PART (Z).
- Access the LOCK PART and dismantle it to get 3 LOCK PIECES (A).
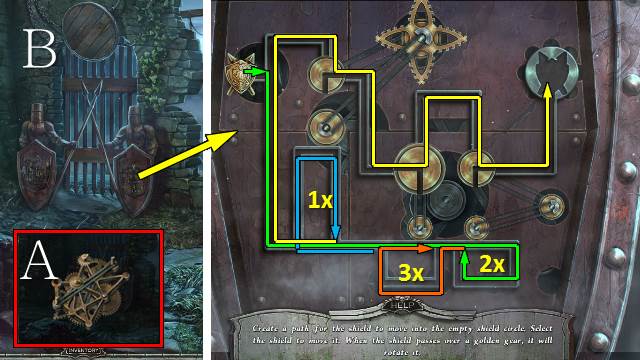
- Place the GOLDEN GEAR and LOCK PIECES for a mini-game; solution 1 (B).
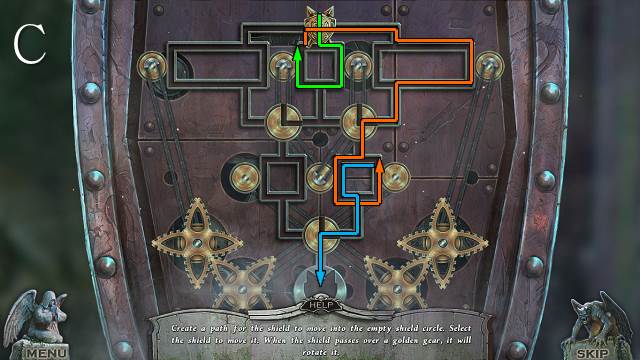
- Solution 2 (C).
- Try to go forward.
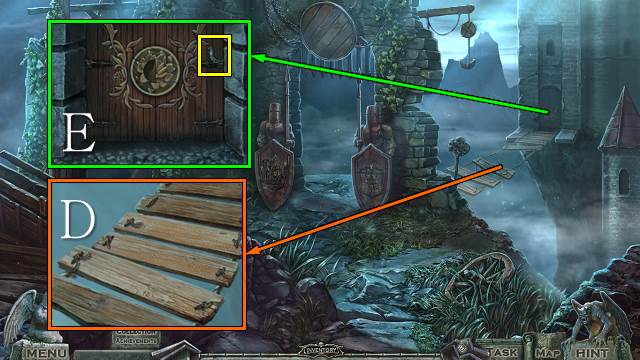
- Place the PLANKS and tie the knots (D).
- Take the BLACKSMITH (E).
- Walk down.
- Place the BLACKSMITH and pull out the stone; take TOPAZ 1/3 and the HALF LOTUS (F).
- Go forward.
- Place the HALF LOTUS and align the rings (G).
- Go forward.
Chapter 2: The Hermit in the Tower
- Try to walk forward.
- Use the KNIFE and play the HOP (H).
- You receive a TORCH.
- Take the STONE SCROLL (I).
- Take the CASTLE PART (J).
- Place the STONE SCROLL and CASTLE PART; take the EMPTY STAFF (K).
- Light the TORCH to get a LIT TORCH (L).
- Take TOPAZ 2/3 (M); pull the lever and use the LIT TORCH (N).
- Go right.
- Take the FLORAL SYMBOL (O).
- Take the INSCRIPTION and take TOPAZ 3/3 with the KNIFE (P).
- Take the ORIGAMI (Q).
- Walk down.
- Place the INSCRIPTION (R); take the BOX (S).
- Go right.
- Access the BOX and place the TOPAZ; take the BOOK BOX (T).
- Place the BOOK BOX (U); open it and take the BOX WITH CRYSTAL and MANUSCRIPT (V).
- Access the MANUSCRIPT and place the FLORAL SYMBOL (W); open the book and take FLOWER 1/2 and your journal (X).
- Access the ORIGAMI, unfold it and take FLOWER 2/2 and the PAPER (Y).
- Access the BOX WITH CRYSTAL, place the FLOWERS, open the box and take the GREEN CRYSTAL (Z).
- Access the EMPTY STAFF and place the GREEN CRYSTAL; take the STAFF (A).
- Use the STAFF (B).
- Walk down twice.

- Use the KNIFE and STAFF (C).
- Walk down twice.
- Use the STAFF; you receive a FILLED STAFF (D).
- Go to the Castle Yard.
- Use the FILLED STAFF (E).
- Go forward.
- Use the FILLED STAFF (F).
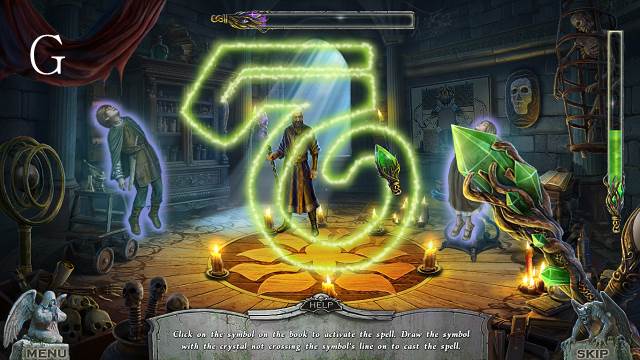
- Play the mini-game (G).
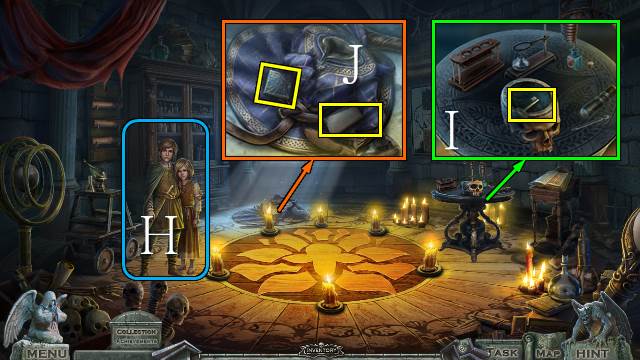
- Talk to the children (H).
- Take the KEY (I).
- Move the clothes and take the FORMULA and PICTURE PART (J).
- Use the KEY and open the cabinet (K); move some items and take the BOOK and EMPTY BOTTLE (L).
- Place the PICTURE PART for a mini-game.
- Solution: Nx2-Px3-Qx3-Rx1-Tx2-V-Mx2-W-Ox3-X-Sx1-Y-Ux2.
- Take the ORANGE POWDER and the STONE FACE (Z).
- Walk down.
- Play the HOP (A).
- You receive the HERBS.
- Place the STONE FACE and take the BLUE CRYSTAL (B).
- Go right.
- Place the BOOK for a mini-game (C).
- Take the RED POWDER.
- Use the EMPTY BOTTLE to get a BOTTLE WITH WATER (D).
- Place the BLUE CRYSTAL and push buttons in the order they light up (random); take the GREEN POWDER (E).
- Walk down and forward.
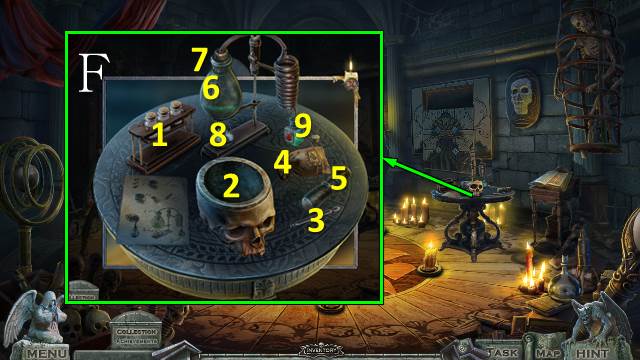
- Place the FORMULA, POWDER, HERBS and BOTTLE WITH WATER (F); put the three powders (1) in the skull (2) and stir (3), open the sack (4) and add the herbs, use the pestle (5), add the mixture to the bottle (6), close (7) and activate the mechanism (8) and take the POTION (9).
- Give the POTION to the children and talk to them (G).
- Go forward.
- Talk to Elisa and take ELISA'S CHAPEL KEY (H).
- Walk down.
Chapter 3: Derek and Charlie
- Try to go to the chapel.
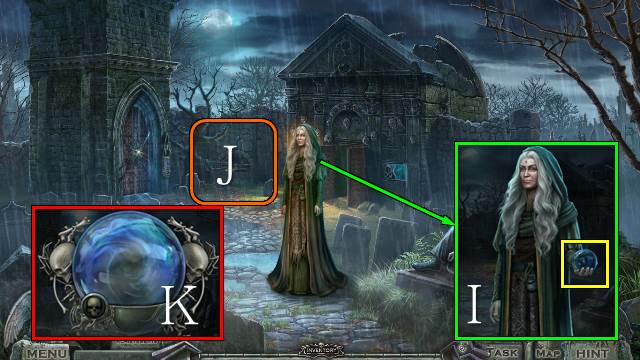
- Talk to the Keeper and take the ORACLE (I).
- Play the HOP (J).
- You receive the ORACLE BASE.
- Access the ORACLE and place the ORACLE BASE (K).
- Play the mini-game; possible solutions are shown (L).
- Take the CORK KEY (M).
- Take the DEMON STATUETTE (N).
- Place and turn ELISA'S CHAPEL KEY; take the SKULL LEVER (O).
- Walk down.
- Play the mini-game (P).
- Take the ANGEL STATUETTE (Q).
- Go forward twice.
- Play the mini-game (R).
- You receive a SYMBOL.
- Take MEDI-KEY 1/2 (S); place the DEMON STATUETTE and ANGEL STATUETTE (T).
- Go forward.

- Place the SKULL LEVER and move the levers until they form a skull (U); push the skull down and take the CARVED LAMP (V).
- Take the CHARCOAL (W).
- Walk down twice.
- Place the CARVED LAMP; take the note and WATCH (X).
- Walk down.
- Place the PAPER and CHARCOAL; take the SYMBOL NOTE (Y).
- Go to the Catacombs.
- Place the SYMBOL, SYMBOL NOTE AND WATCH and select the symbols in order (Z).
- Go forward for a mini-game.
- Solution 1 (D): A1-A2, A2-B2, A3-B3.
- Solution 2 (E): C1-C3, C3-A3, A3-A2.
- Solution 3 (F): A3-B3, A1-A2, A2-B2.
- Take DEREK'S CANDLE (G).
- Walk down twice.
- Place DEREK'S CANDLE (H).
- Talk to Derek; take DEREK'S RING (I).
- Enter the portal for a mini game.
- Solution (J).
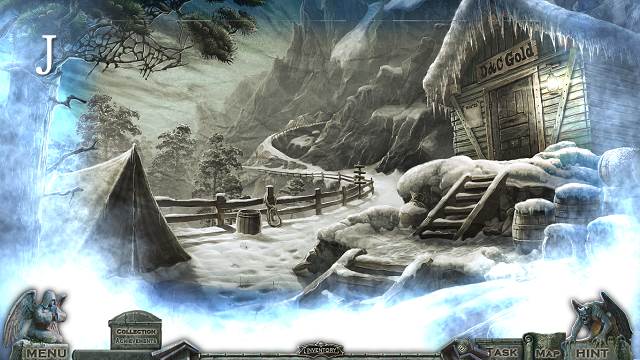
- Try to walk forward.
- Take the AVALANCHE ADVISORY and undo the buttons (K).
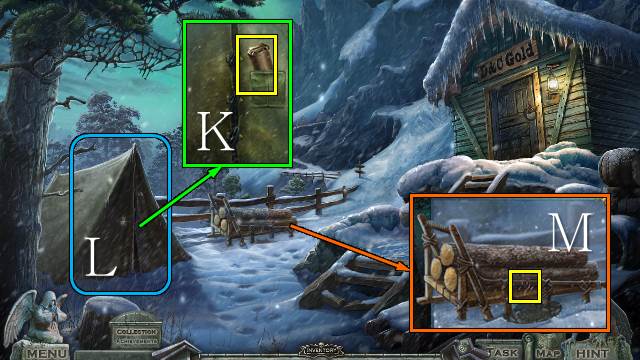
- Play the HOP (L).
- You receive a SKI.
- Take the WIRE (M).
- Take the JACK (N).
- Place and move the WIRE and take the PADLOCK KEY; place and turn the PADLOCK KEY, remove the lock and open the door (O).
- Go right.
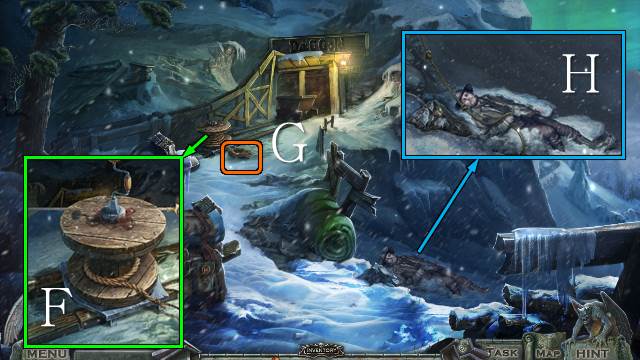
- Remove the broken handle and replace it with the other one (P); use the rope and take the SHOVEL (Q).
- Take DAISY'S PHOTO (R).
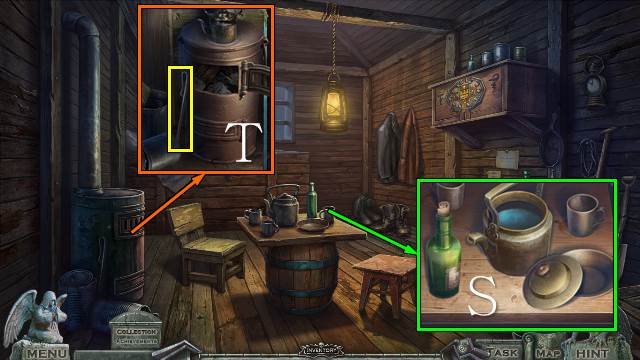
- Place the lid and take the BOTTLE and KETTLE (S).
- Take the METAL HANDLE, open the hatch and place the KETTLE (T).
- Walk down.
- Place the JACK and METAL HANDLE and move the handle down three times (U); place the SKI and remove the jack (V).
- Repeatedly select the sleigh until the red bar fills up; do this twice (W).
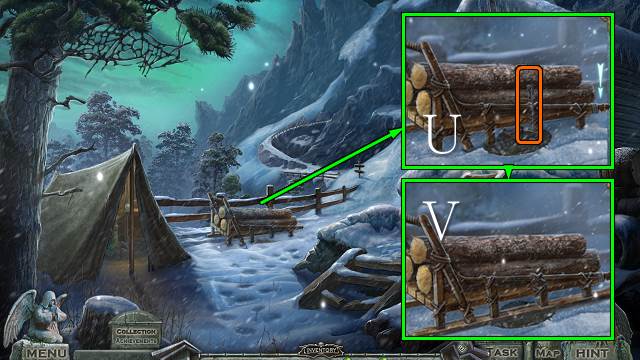
- Place the AVALANCHE ADVISORY and SHOVEL; use the shovel, take a log, shovel, log, shovel x2, log, shovel (X).
- Go forward.
Chapter 4: The Mines
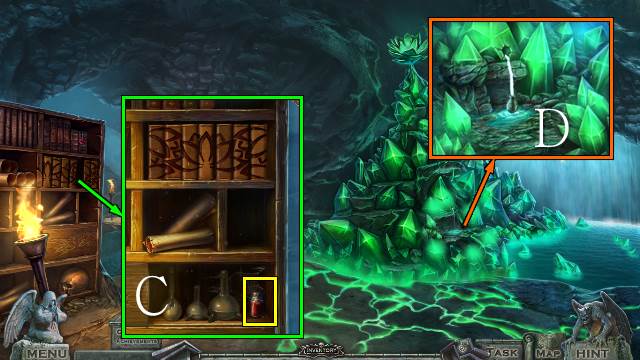
- Use DEREK'S RING (Y); take the LIGHTER and BARREL SEAL (Z).
- Take the PLANK (A).
- Walk down.

- Place the BARREL SEAL, open the barrel and take the LEVER (B).
- Play the HOP (C).
- You receive a LONG ROPE.
- Go right.
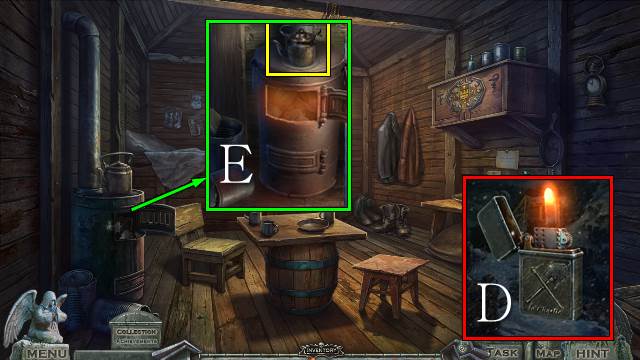
- Access and open the lighter and light it (D).
- Use the LIGHTER and take the HOT KETTLE (E).
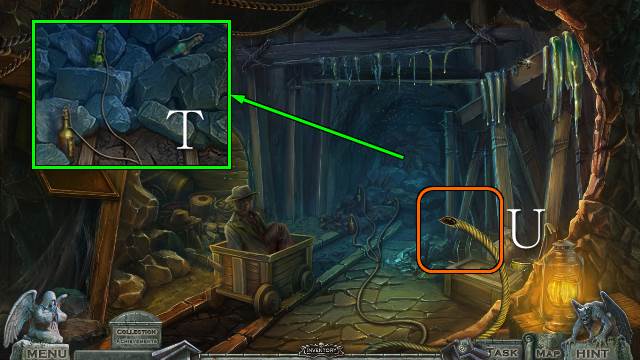
- Go down and forward.
- Attach the LONG ROPE, use the HOT KETTLE and place the LEVER (F).
- Move the rope (G).
- Talk to Charlie (H).
- Turn the handle three times (F).
- Talk to Charlie and take the TROLLEY KEY (I).
- Place and turn the TROLLEY KEY (J).
- Go forward.
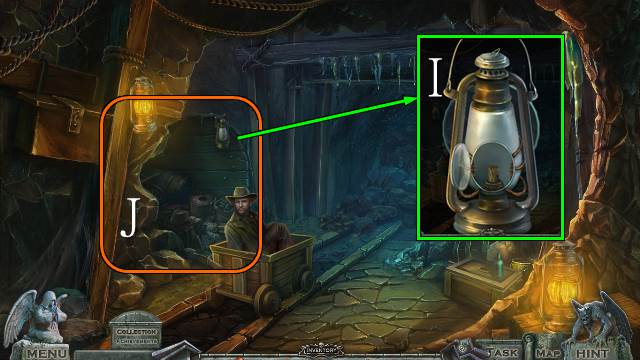
- Take the CRUTCH (K).
- Take MEDI-KEY 2/2 (L).
- Take the GLUE (M).
- Take the BOTTLE OF WHISKEY (N).
- Go to the Miners House.
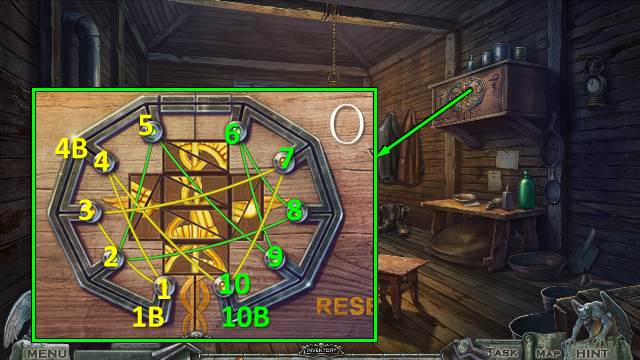
- Place the MEDI-KEY for a mini-game (O).
- Solution 1: 2-10B, 1-2, 4-1, 7-4, 6-7, 9-6, 10B-9, 10-4B, 5-10, 4B-5.
- Solution 2 (P).
- Take the MEDICINE CHEST (Q).
- Walk down and forward.
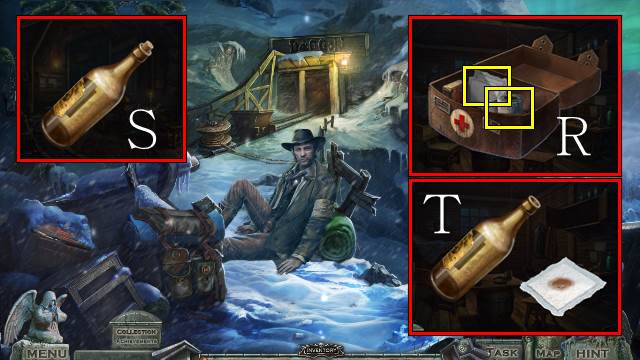
- Access and open the MEDICINE CHEST and take the BANDAGE and GAUZE PADS (R).
- Access the BOTTLE OF WHISKEY and take CORK 1/2 and the WHISKEY (S).
- Access the GAUZE PADS and use the WHISKEY; take the ANTISEPTIC BANDAGE and BOTTLE 1/2 (T).
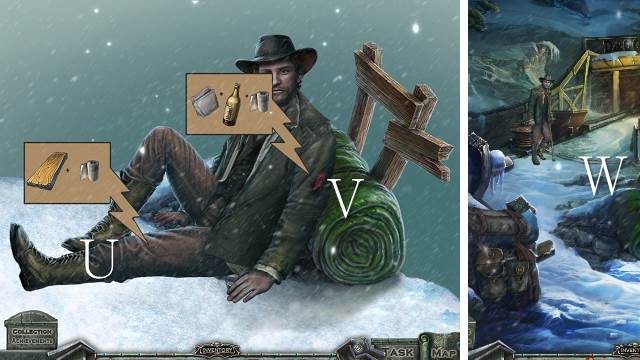
- Place the PLANK and BANDAGE (U), the ANTISEPTIC BANDAGE and BANDAGE (V), and the CRUTCH.
- Talk to Charlie (W).
- Go forward.
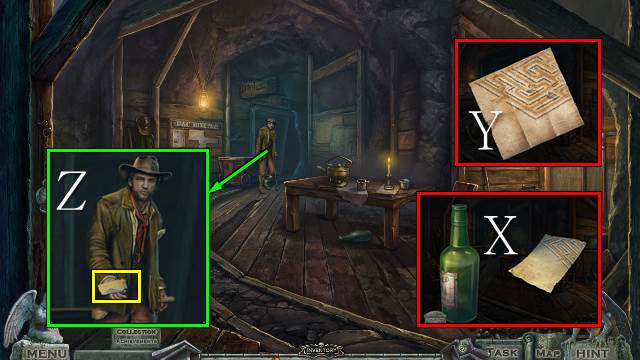
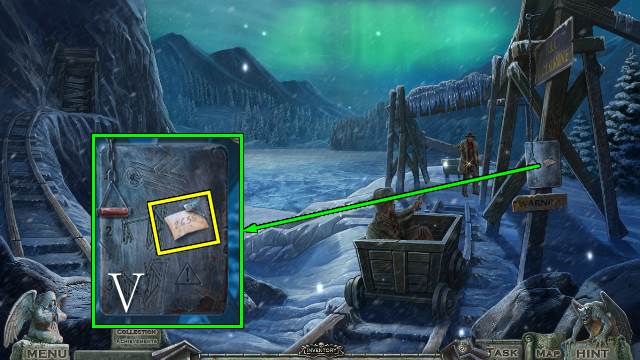
- Access the BOTTLE, turn it over and take the BOTTLE and MAP SECTION 1/3 (X).
- Access DAISY'S PHOTO, unfold it and take MAP SECTION 2/3 (Y).
- Talk to Charlie and take MAP SECTION 3/3 (Z).
- Place the MAP SECTION and GLUE and take the MAP (A).
- Give the MAP to Charlie (B).
- Go forward for a mini-game.
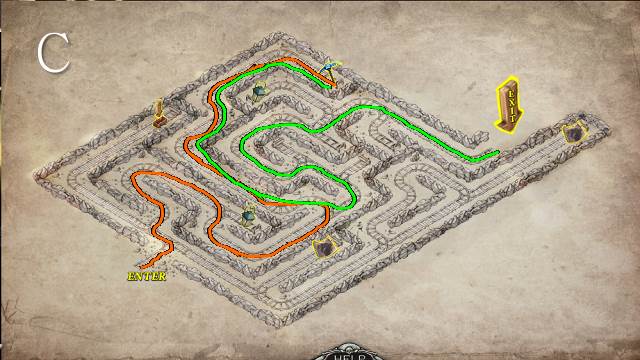
- Level 1 (C).
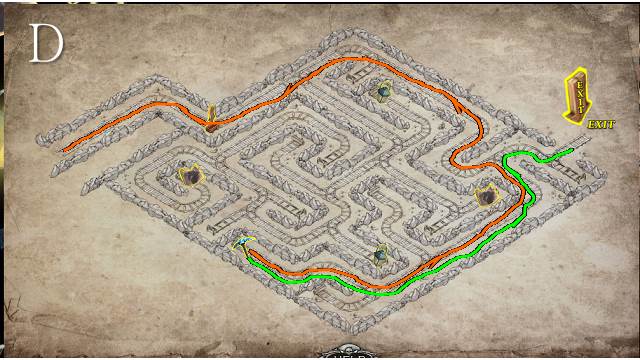
- Level 2 (D).

- Talk to Charlie (E).
- Take BOTTLE 2/2 (F).
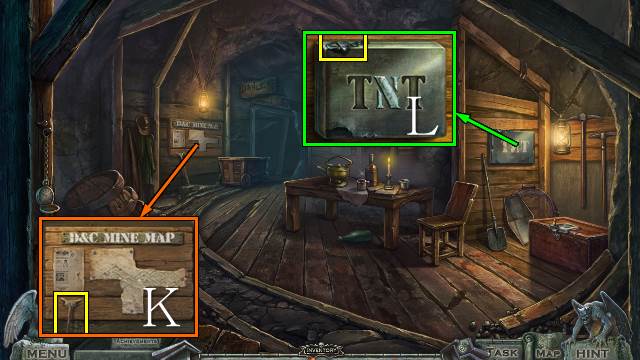
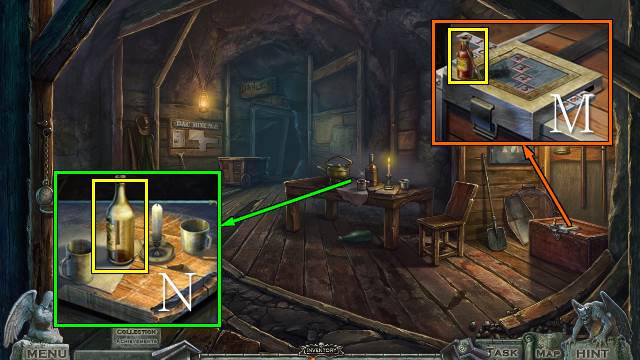
- Place the CORK KEY and take CORK 2/2 (G); open the box and take the TNT INSTRUCTION and LETTER T 1/2 (H).
- Open the glass door and use the LIGHTER (I).
- Play the HOP (J).
- You receive CHARLIE'S RING.
- Walk down twice.
- Place CHARLIE'S RING (K); take the POCKET KNIFE (L).
- Go forward twice.
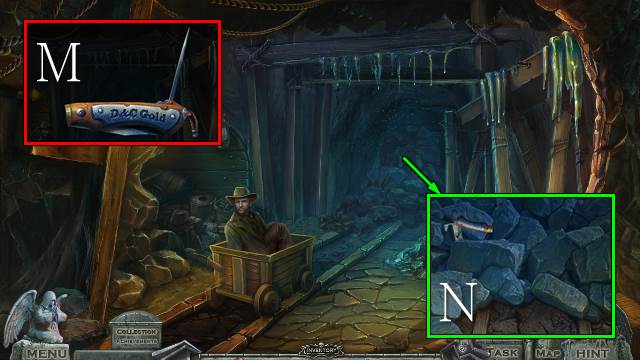
- Access the POCKET KNIFE, open and close the blade, open the awl attachment and take the AWL (M).
- Take LETTER T 2/2 with the AWL (N).
- Walk down.
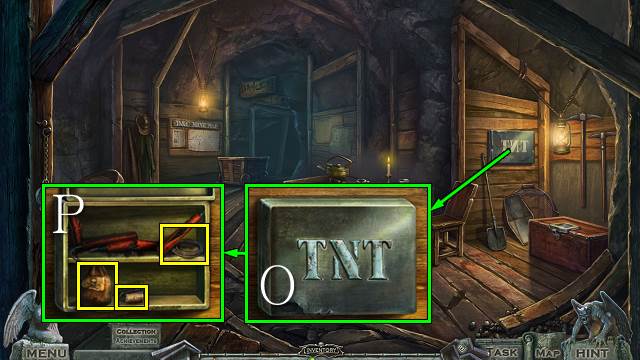
- Place the LETTER T and open the box (O); take the GUNPOWDER, CORK WITH FUSE and SAFETY FUSE (P).
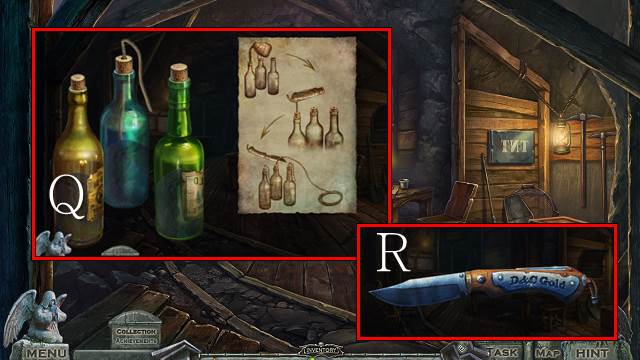
- Access the BOTTLE, place the TNT INSTRUCTION, BOTTLES, GUNPOWDER, CORK and CORK WITH FUSE; use the AWL on the left and right corks to get a POCKET KNIFE (Q).
- Access the POCKET KNIFE, close the awl, open the knife and take the KNIFE (R).
- Access the BOTTLE, place the SAFETY FUSE twice and use the KNIFE twice; take the EXPLOSIVE (S).
- Go forward.
- Place the EXPLOSIVE and attach the SAFETY FUSE to all three bottles (T).
- Use the LIGHTER (U).
- Take the CODE (V).
- Walk down twice.
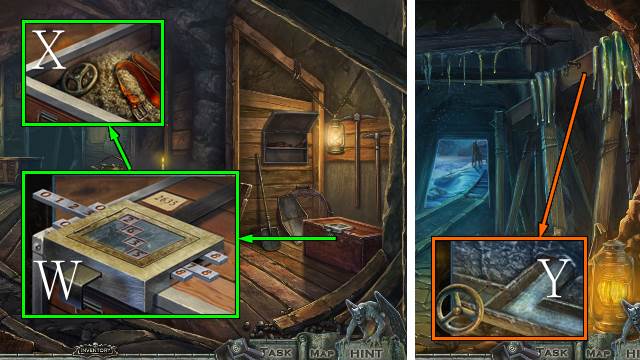
- Place the CODE and move the sliders to enter the code (W); open the box and take the BELT and CIRCULAR HANDLE (X).
- Go forward.
- Place and turn the CIRCULAR HANDLE (Y).
- Go forward.
- Pull the handle (Z).
- Use the BELT (A).
- Talk to Charlie (B).
- Take the PACE and KEY HANDLE (C).
- Walk down.
- Play the HOP (D).
- You receive a SMOKE BOMB.
- Place the KEY HANDLE, turn it and open the crate (E); take TREBLE CLEF 1/3 and the DRY ALCOHOL (F).
- Go forward.
- Place the DRY ALCOHOL, LIGHTER and SMOKE BOMB (G).
- Talk to Charlie (H).
- Go forward.
- Talk to Derek; take DEREK'S KEY (I).
- Place and turn DEREK'S KEY; take TREBLE CLEF 2/3 (J).
- Go forward twice.
Chapter 5: Emma and Jimmy
- Interact with the Demid (K).
- Play the HOP (L).
- You receive the FLOWER HEART.
- Place the PACE (M); take the MUSIC BOX (N).
- Walk down three times.
- Place the FLOWER HEART (O); take the STONE DOVE OF PEACE and MELODY (P).
- Go forward twice.
- Place the STONE DOVE OF PEACE and take TREBLE CLEF 3/3 (Q).
- Access the MUSIC BOX and place the TREBLE CLEFS and MELODY; select the clefs in order and take the note and RING (R).
- Go forward.
- Place the RING and select the runes (S).
- Take the CANDLE (T).
- Walk down three times.
- Place the CANDLE (U).
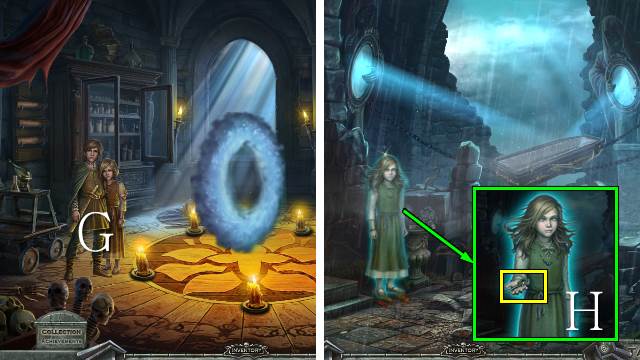
- Talk to Emma and take the DISK 1/2 (V).
- Enter the portal for a mini-game (W).
- Solution (X).
- Talk to Jimmy (Y).
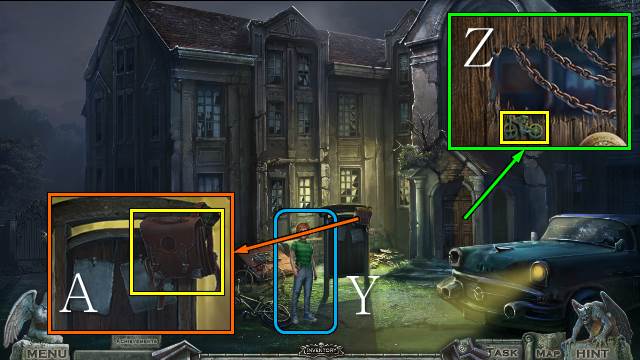
- Take the BICYCLE (Z).
- Take the BAG (A).
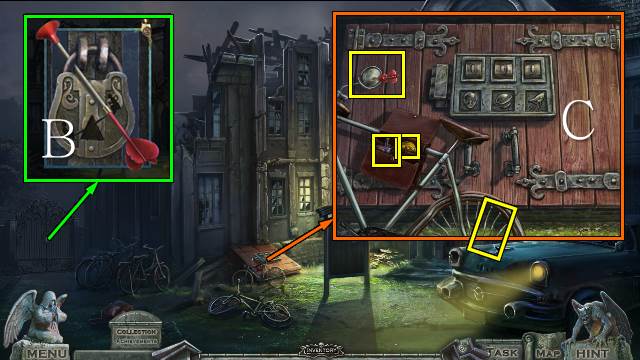
- Look through the gate and take the ARROW (B).
- Place the ARROW and take the MIRROR STICK; place the BICYCLE, open the bag and take the COIN, CAR DOOR and SPOKE (C).
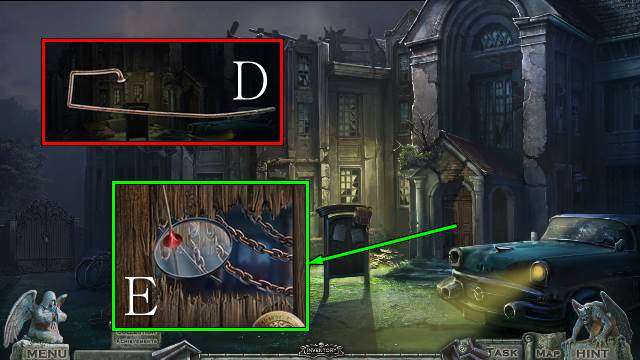
- Access the SPOKE and bend it into a BENT SPOKE (D).
- Place the MIRROR STICK and BENT SPOKE; move the spoke until you can unhook the three chains (E).
- Go right.
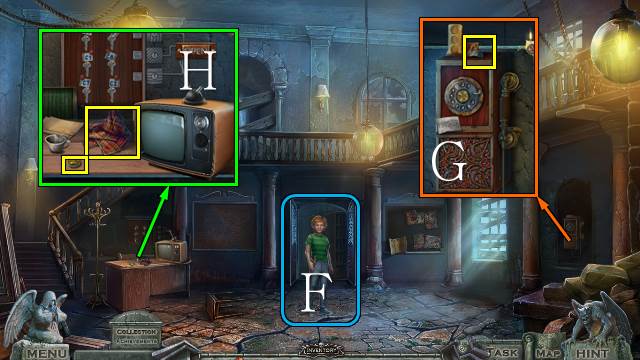
- Talk to Jimmy again (F).
- Take DISK 2/2 (G).
- Take COIN 2/3 and the RAG (H).
- Take CAR EMBLEM 1/2 (I).
- Take the CAR (J).
- Access the CAR and place the CAR DOOR (K); turn over the car, open the compartment, take the BATTERY, close and take the CAR (L).
- Walk down.
- Open the headlight and take the LAMP with the RAG (M).
- Access the BAG and place the DISK (N); take POSTER 1/3 and the FLASHLIGHT (O).
- Go forward.

- Access the FLASHLIGHT, open it and place the BATTERY and LAMP (P); close the compartment and switch on and take the FLASHLIGHT (Q).
- Go forward and use the FLASHLIGHT for a mini-game (R).
- You receive the CAR EMBLEM 2/2.
- Walk down.
- Place the CAR EMBLEM (S); open the hood and take the NAIL PULLER (T).
- Go forward.
- Use the NAIL PULLER to remove the three nails (U).
- Go forward.
- Talk to Jimmy (V).
- Take the SLIDES (W).
- Take PIPE 1/5 and BOLT 2/10 (X).
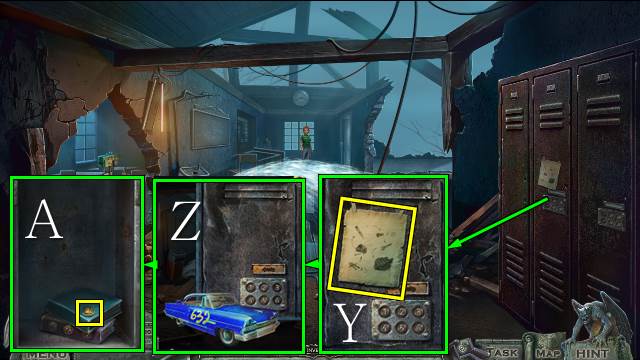
- Take the SCHEME and place the CAR (Y); enter 632 (Z) and take COIN 3/3 (A).
- Walk down.
- Enter the COINS, dial the number and take ELECTRICAL COMPONENT 1/2 and the KNOB (B).
- Place the SPOKE and KNOB, check the three channels, place keys C1, C2 and C3, and push Open (C); take the TEETER-TOTTER KEY (D).
- Walk down.
- Place the TEETER-TOTTER KEY (E).
- Go left.
Chapter 6: The Schoolhouse
- Move the UMBRELLA HANDLE until you can take it (F).
- Take ELECTRICAL COMPONENT 2/2 (G).
- Take the VISE HANDLE (H).
- Go to the Corridor.
- Place the VISE HANDLE, turn it and take the LEVER (I).
- Go to the Backyard.
- Place the ELECTRICAL COMPONENTS and LEVER for a mini-game (J).
- Take the PERFORATED CARD (K).
- Go to the Corridor.
- Scroll right and place the PERFORATED CARD (L); enter 156 and take the WINDOW HANDLE and POSTER 2/3 (M).
- Go to the Backyard.
- Place the WINDOW HANDLE and open the window; take POSTER 3/3 and take the WRENCH with the UMBRELLA HANDLE (N).
- Take BOLT 3-6/10 with the WRENCH and take the two PLANKS (O).
- Go down and right.
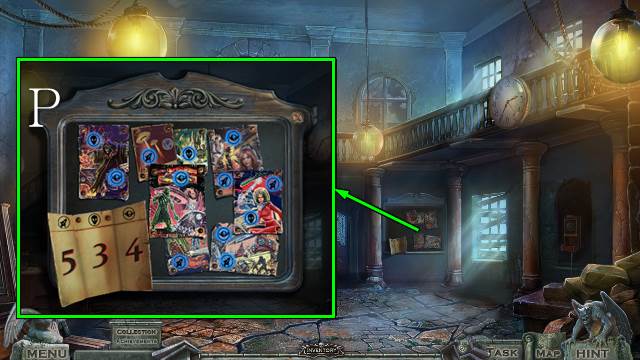
- Place the POSTER; select all the symbols and take the SYMBOL CODES (P).
- Walk down.
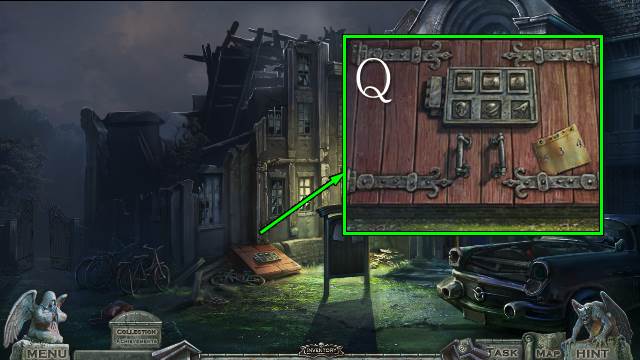
- Move the bike, place the SYMBOL CODES and enter 534 (Q).
- Go down the hatch.
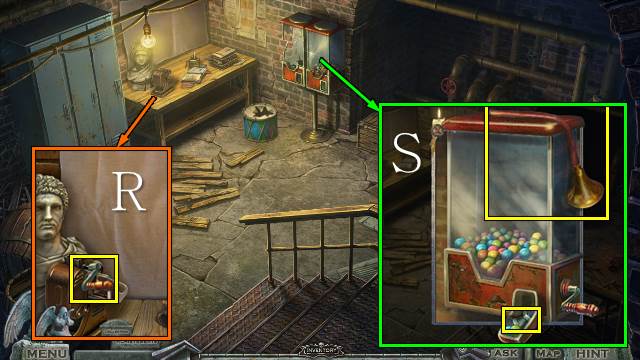
- Take the VENDING HANDLE and place the SLIDES for a HOP (R).
- You receive a FIRE EMBLEM.
- Take the FIREHOSE; place the VENDING HANDLE, turn it twice and take BOLT 7-10/10 as they come out (S).
- Go to the Corridor.
- Place the FIRE EMBLEM, remove the shackle and take the EXTINGUISHER (T).
- Go to the Basement.
- Access the EXTINGUISHER and attach the FIREHOSE (U).
- Use the EXTINGUISHER (V); take PIPE 2-4/5 (W).
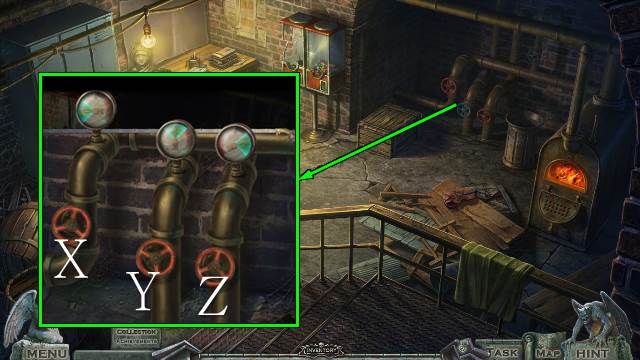
- Play the mini-game.
- Solution: Yx8-Xx3-Zx4.
- Go to the Corridor.
- Take the SLIDES and PIPE 5/5 (A).
- Go to the Basement.
- Place the SLIDES for a HOP (B).
- You receive the DRILL KEY.
- Go to the Corridor.
- Place the PIPE and DRILL KEY; turn the handle and key, pull the lever and take the PIPE (C).
- Place the SCHEME, PLANK and PIPE and move the pipes one by one; place and move the BOLTS and use the WRENCH (D).
- Talk to Jimmy (E).
- Go forward.
- Talk to Emma; take EMMA'S KEY (F).
- Go forward.
- Place and turn EMMA'S KEY (G).
- Talk to the ghosts and take the CRYSTALS and STONE CLOCK (H).
- Place the STONE CLOCK to receive a VASE (I).
- Go forward twice.
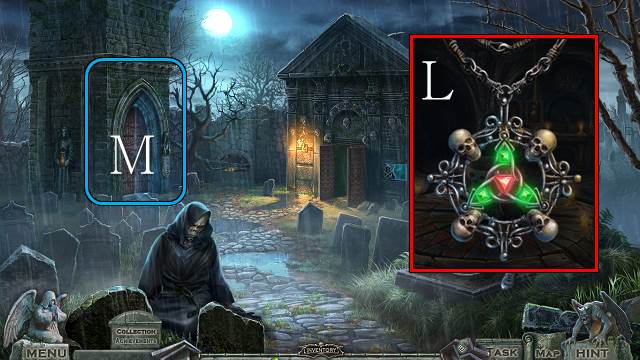
- Play the HOP (J).
- You receive an AMULET CRYSTAL.
- Place the VASE for a mini-game (K).
- Take the AMULET.
- Walk down twice.
- Access the AMULET and place the CRYSTALS and AMULET CRYSTAL; take the SOUL AMULET (L).
- Use the SOUL AMULET (M).
- Congratulations, you have completed Redemption Cemetery: At Death's Door.
Created at: 2016-06-03