

Walkthrough Menu
- General Tips
- Chapter 1: The Subway
- Chapter 2: The Clock of Fate
- Chapter 3: Wilhelm and Sophia
- Chapter 4: Leticia
- Chapter 5: The Final Choice
General Tips
- This is the official guide for Redemption Cemetery: Clock of Fate.
- This guide will not show when you have to zoom into a location; the screenshots will show each zoom scene.
- Hidden-object puzzles are referred to as HOPs. This guide will not show screenshots of the HOPs, however, it will mention when an HOP is available and the inventory item you'll collect from it.
- Use the Map to fast travel to a location.
Chapter 1: The Subway
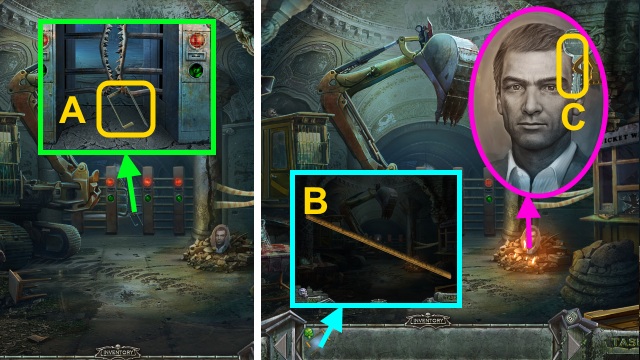
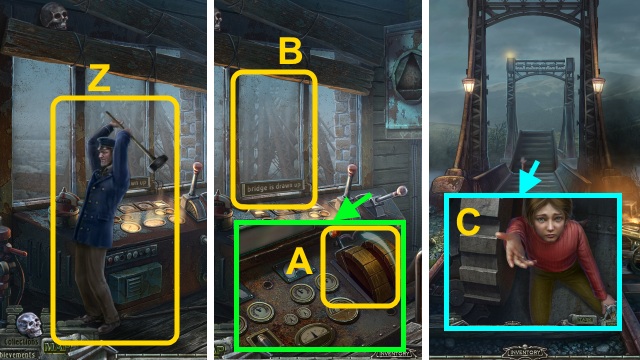
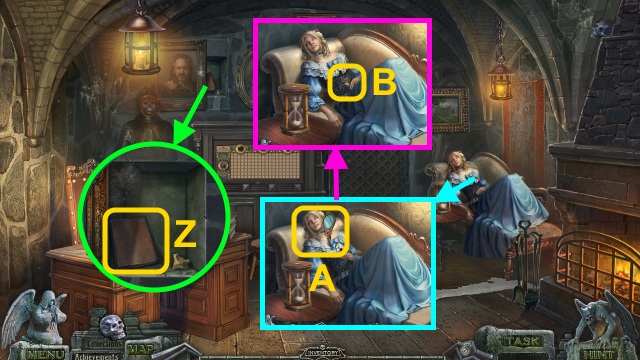
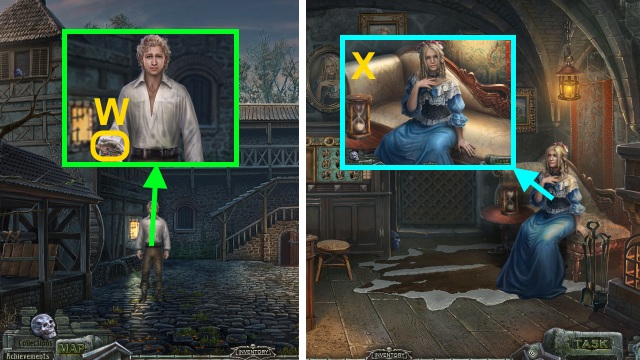
- Walk forward.
- Take the BENT RULER (A).
- Unbend the BENT RULER; take the RULER (B).
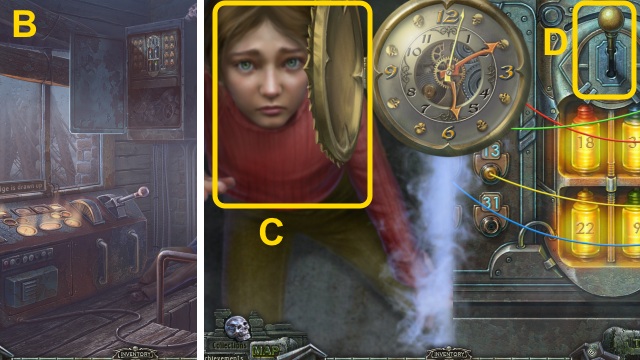
- Take the KEY (C).
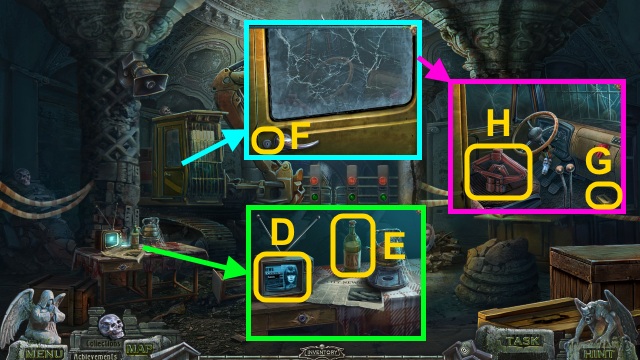
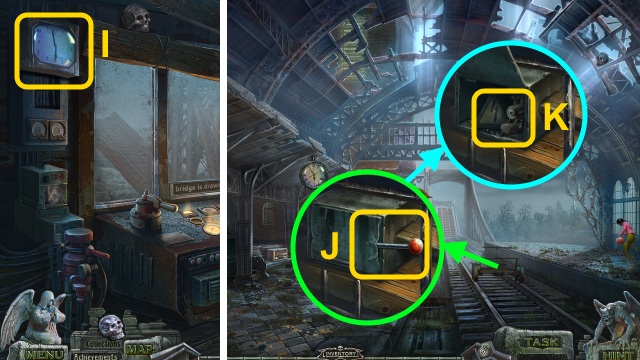
- Examine the TV (D); take the GAS (E).
- Use the KEY (F); open the door.
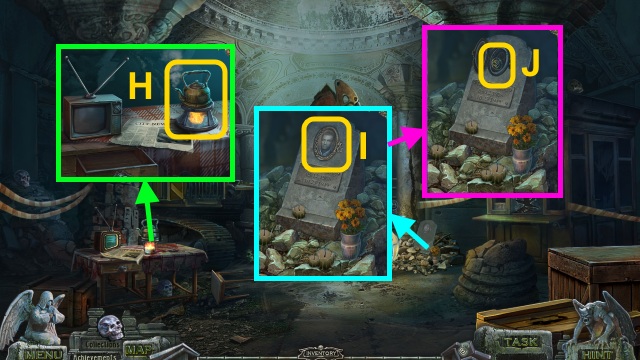
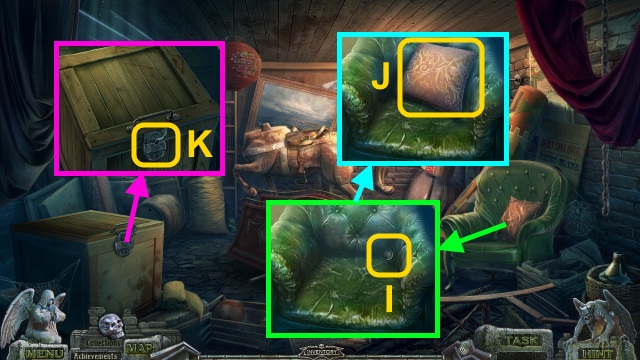
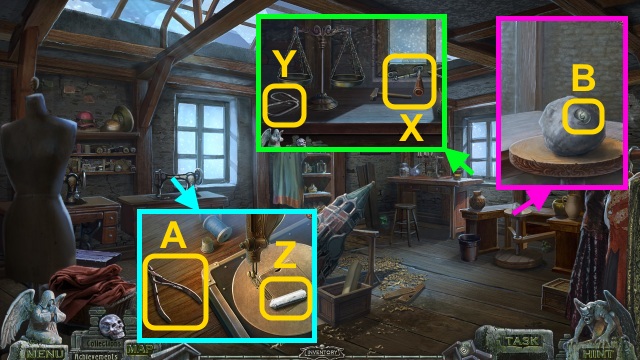
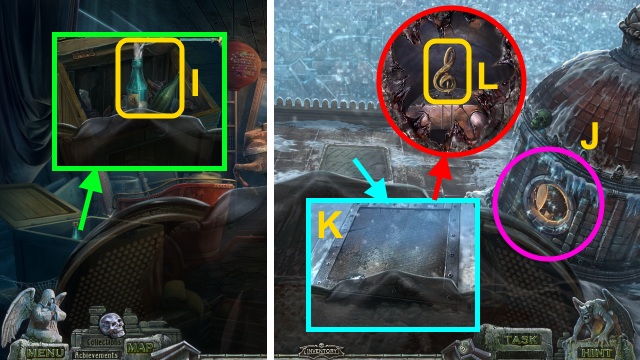
- Take the NUMBERS (1/7) (G) and JACK (H).
- Take the NUMERS (2/7) (I).
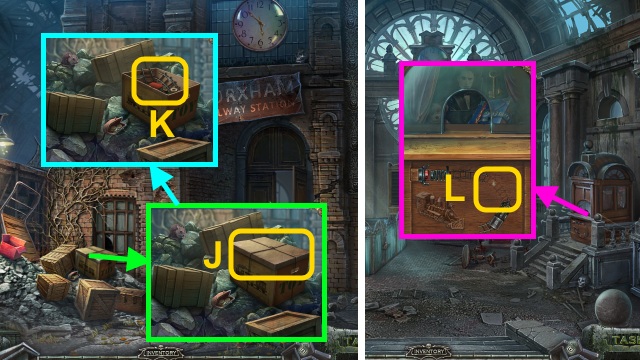
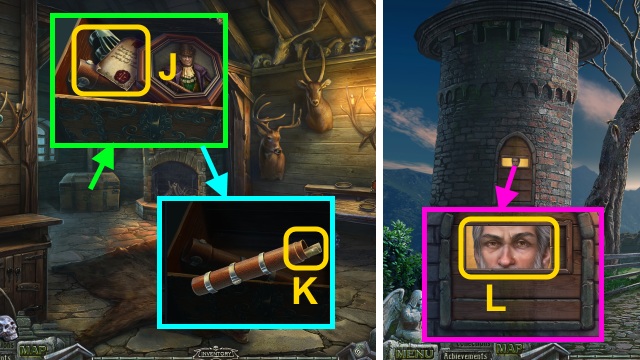
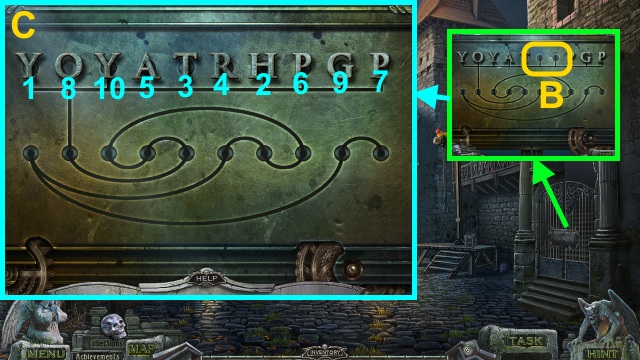
- Use the RULER (J); take the TOKEN.
- Use the TOKEN (K); use the JACK 2x (L).
- Walk forward.
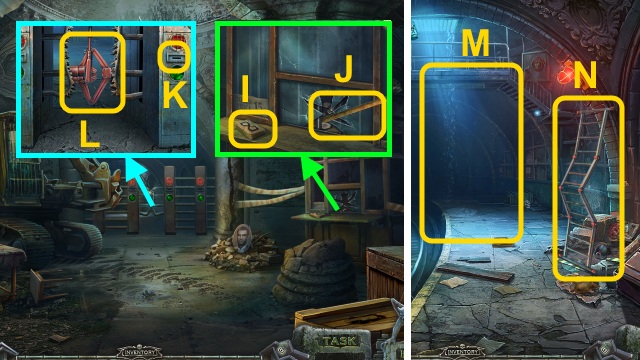
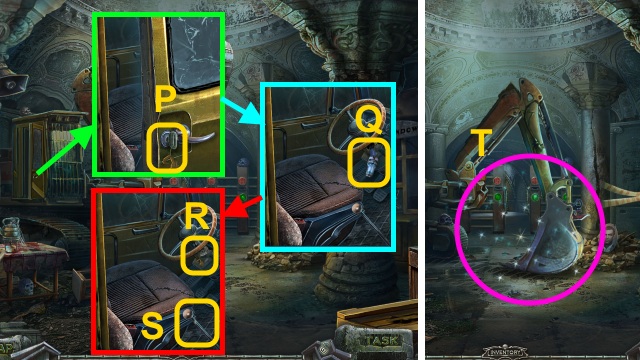
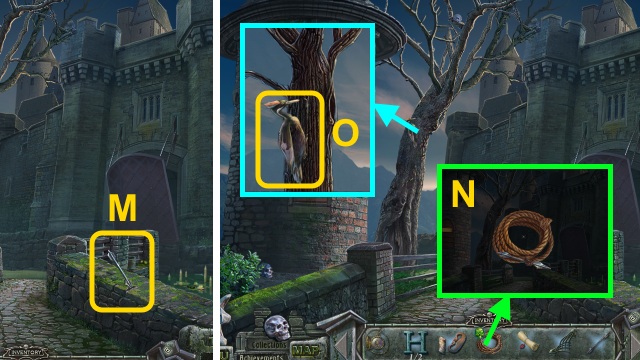
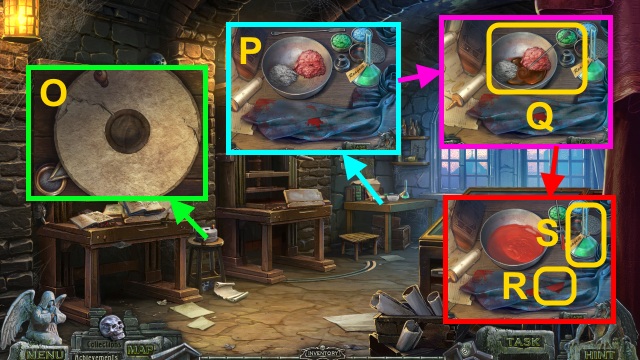
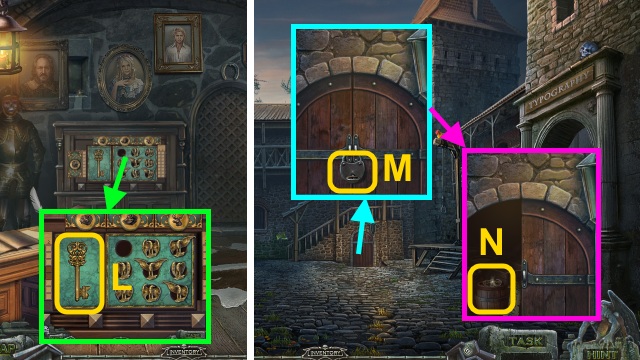
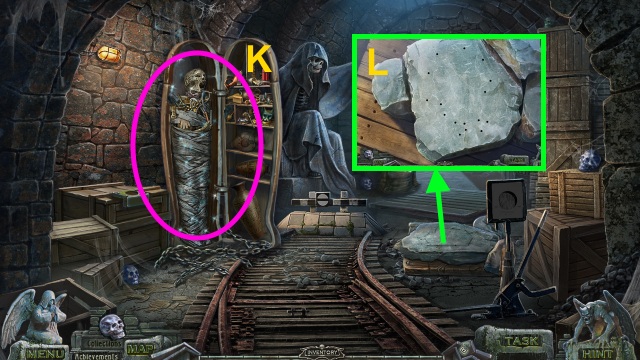
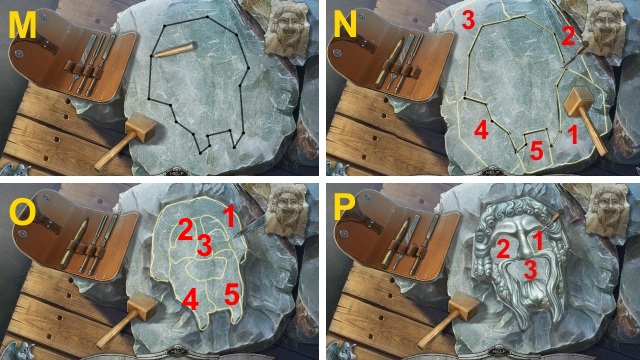
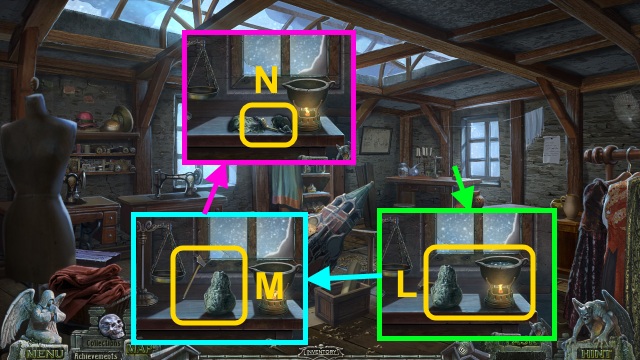
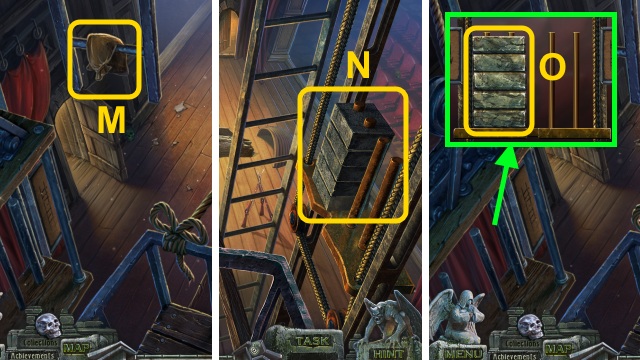
- Examine the tunnel (M).
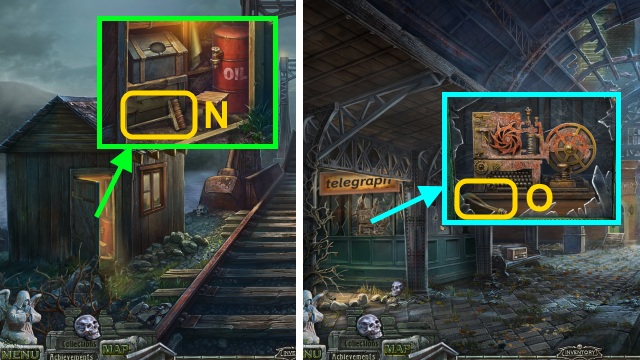
- Move the ladder (N).
- Play the HOP to receive the LADDER (O).
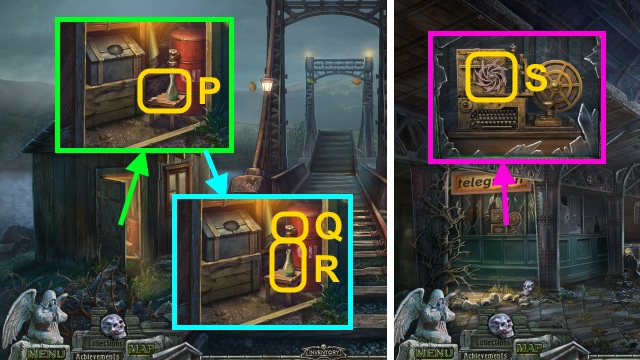
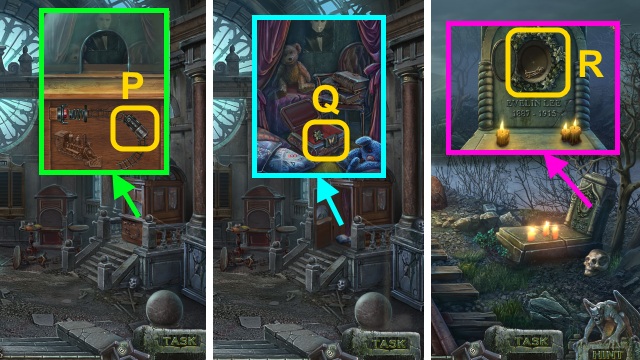
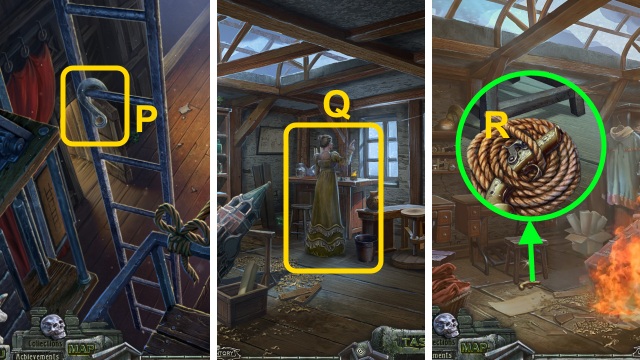
- Unfold the LADDER (P).
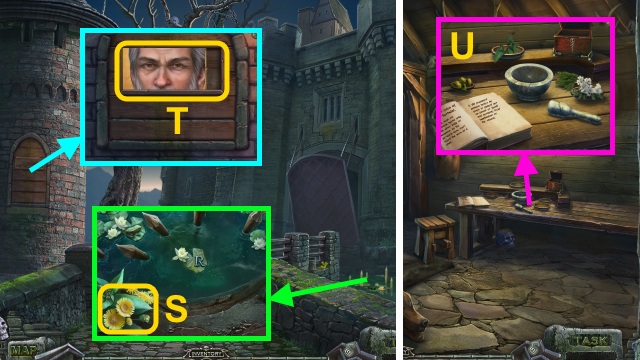
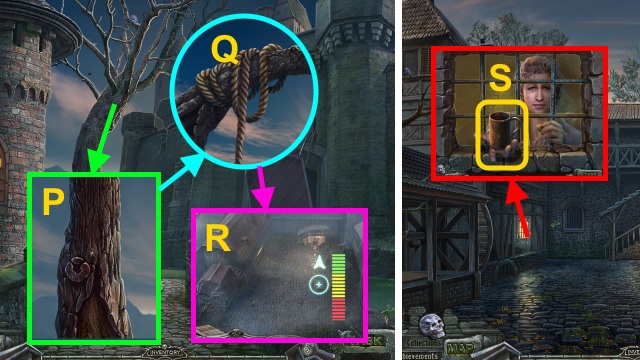
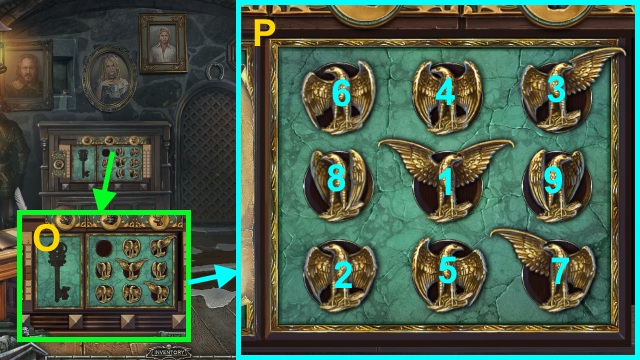
- Take the NUMBERS (3/7) (Q), BUG (1/3), and DOLL (R).
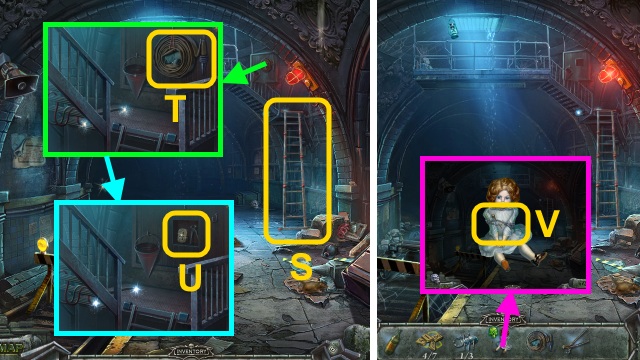
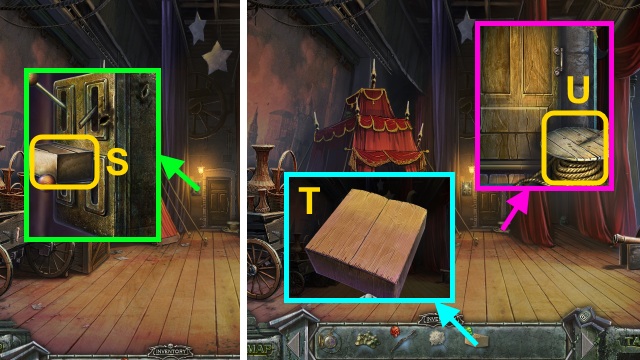
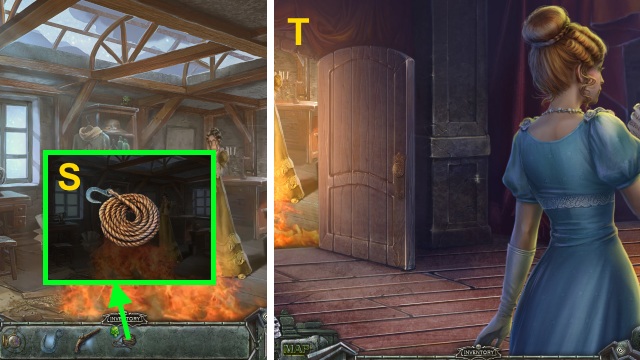
- Place the LADDER (S).
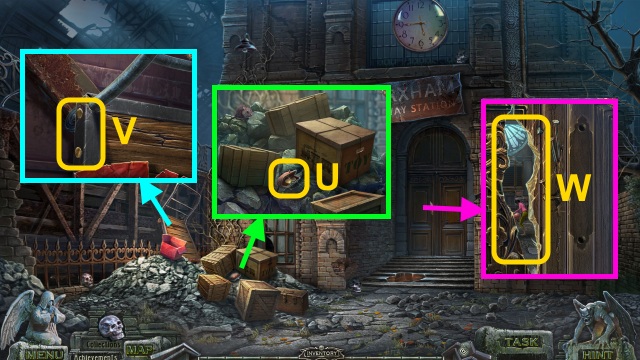
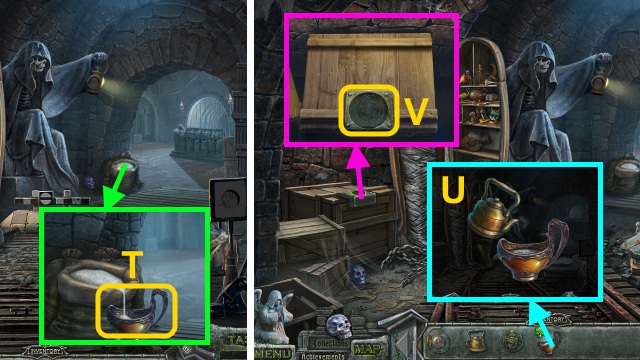
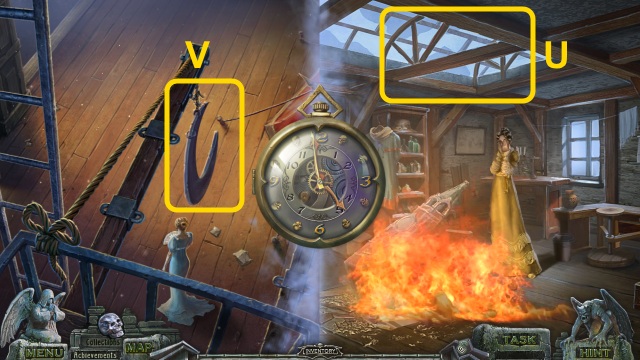
- Take the HOSE (T), CUTTERS, and NUMBERS (4/7) (U).
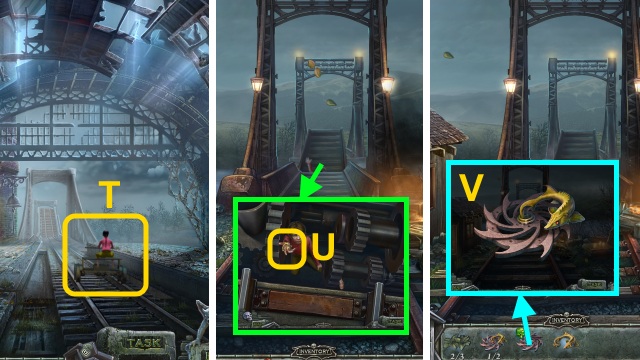
- Use the CUTTERS on the DOLL (V); take the PIN.
- Walk down.
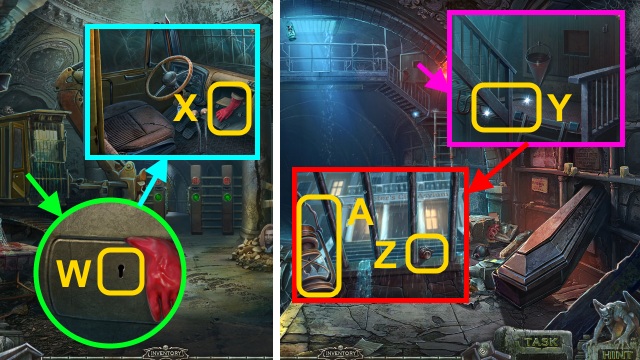
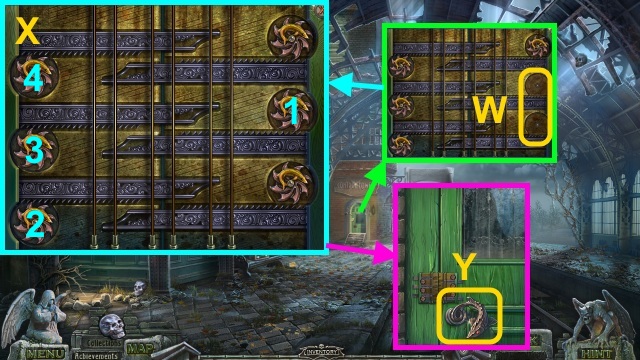
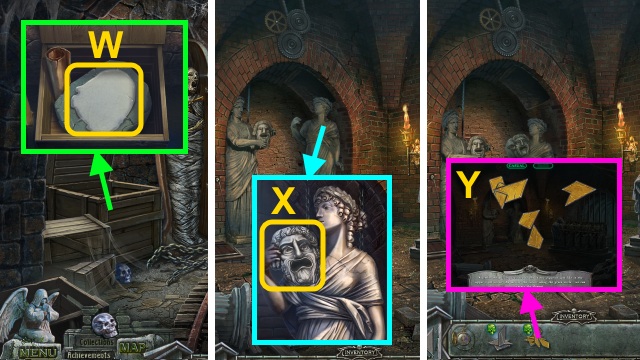
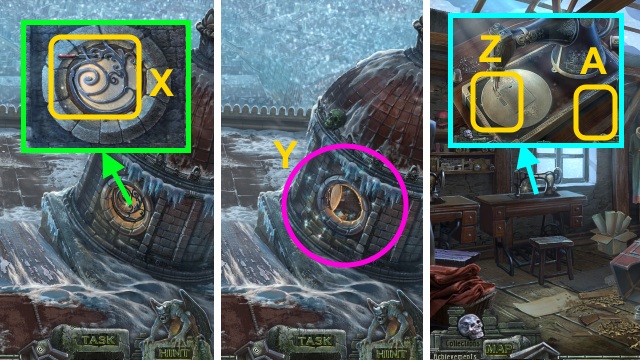
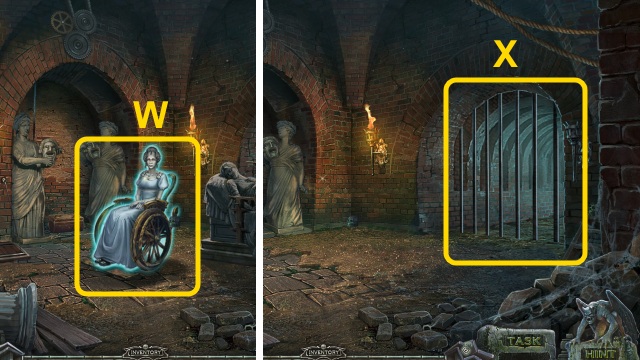
- Use the PIN (W); take the GLOVE (X).
- Walk forward.
- Use the GLOVE (Y); scroll left.
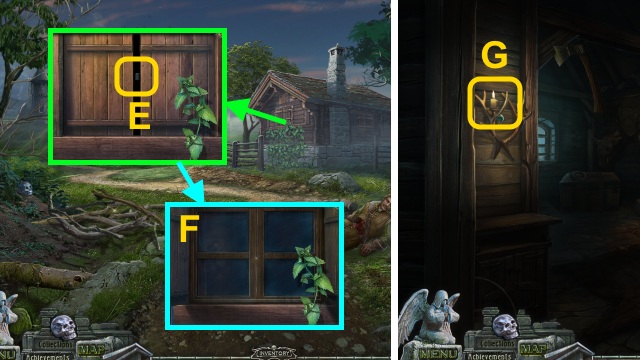
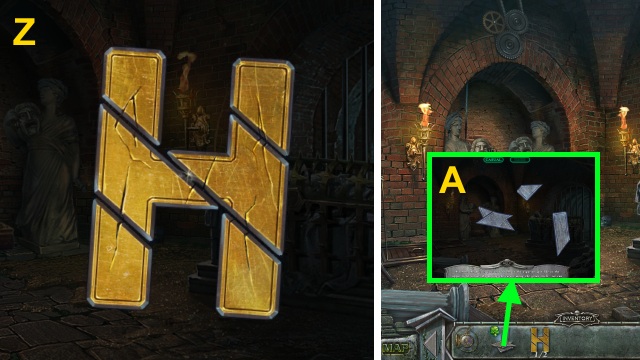
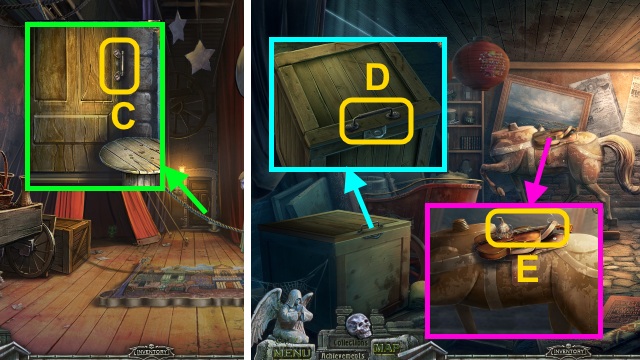
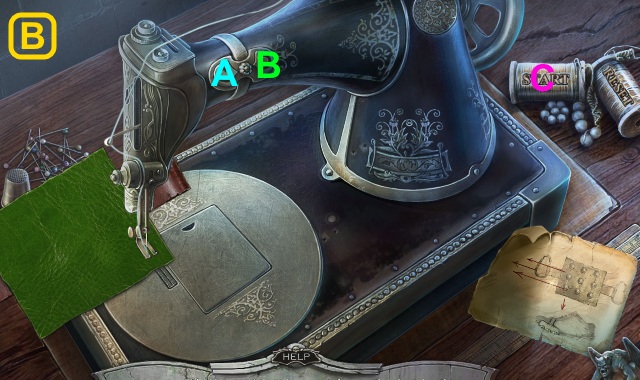
- Examine the building; take the KNOB (Z) and LAMP (A).
- Walk down.
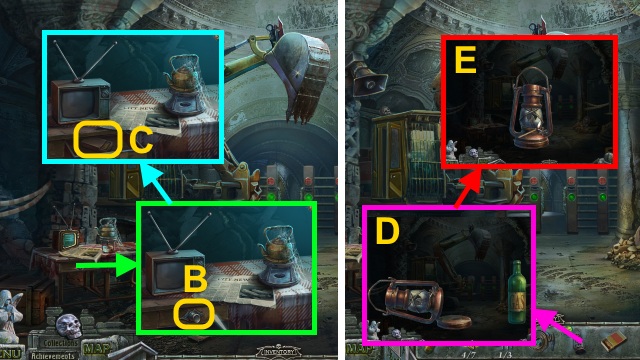
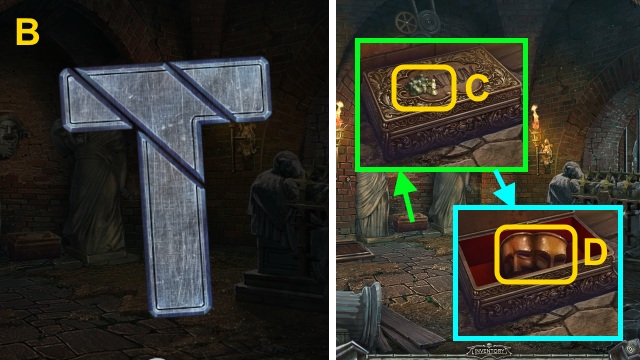
- Place the KNOB (B); open the drawer.
- Take the MATCHES (C).
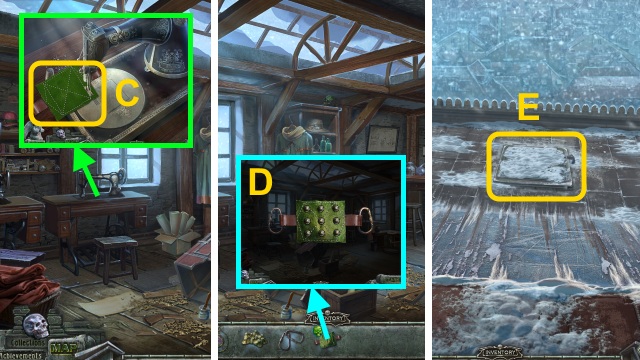
- Open the LAMP; use the GAS (D).
- Close the LAMP; use the MATCHES (E).
- Receive the LIT LAMP.
- Walk forward.
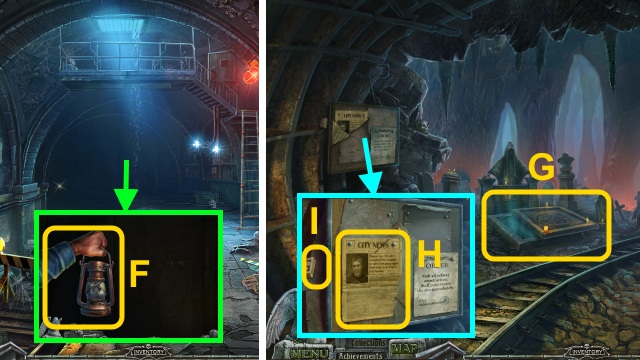
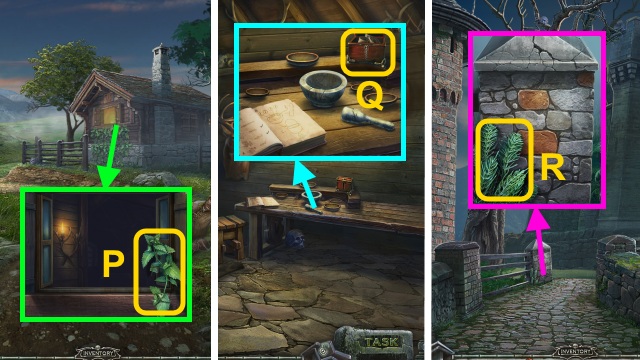
- Use the LIT LAMP (F); examine the lamp 2x.
- Examine the grave (G).
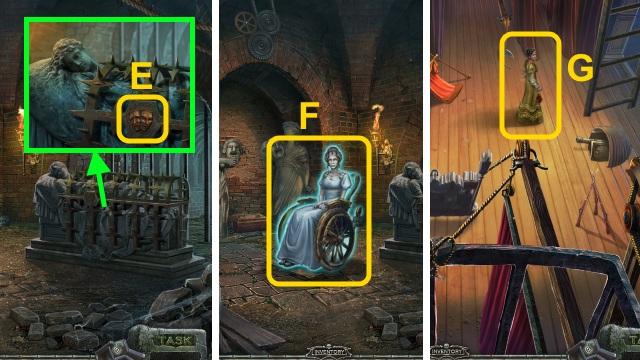
- Place the pieces; take the NEWSPAPER (H) and NUMBERS (5/7) (I).
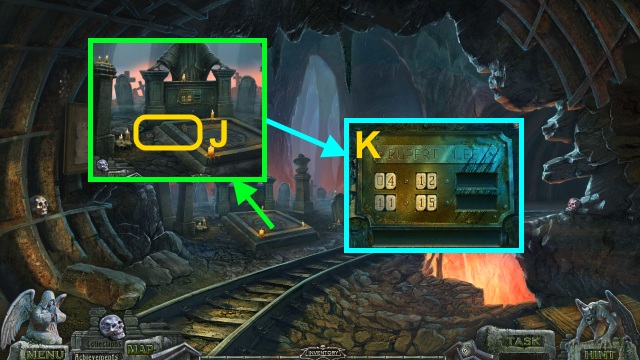
- Take the NUMBERS (6/7) and NUMBERS (7/7) (J).
- Place the NUMBERS (7/7) and NEWSPAPER for a mini-game (K).
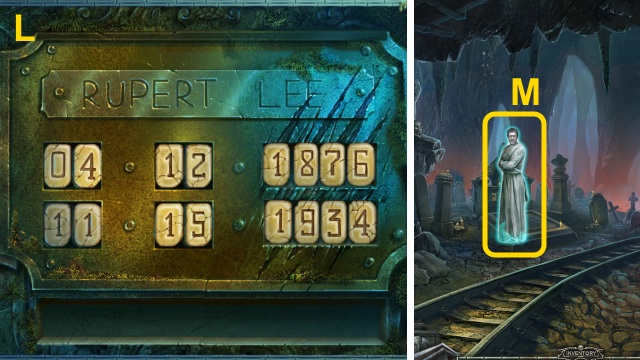
- Solution (L).
- Talk to Rupert (M).
- Walk forward.
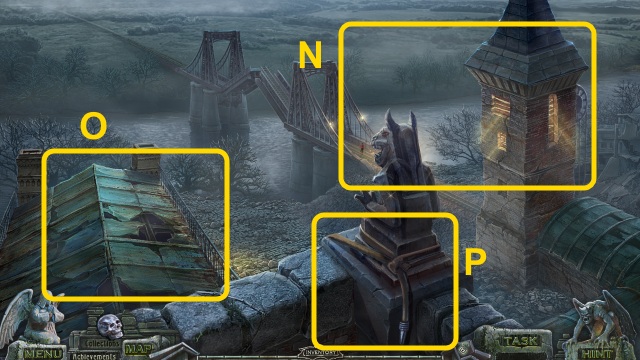
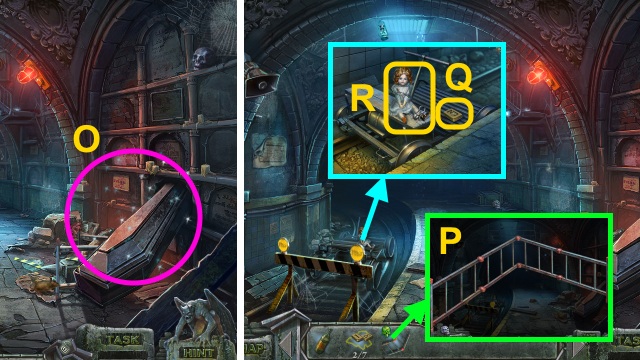
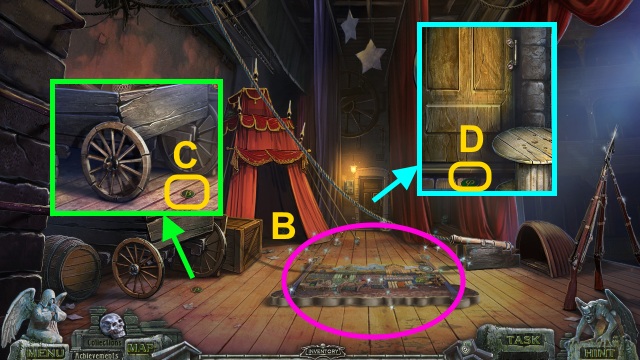
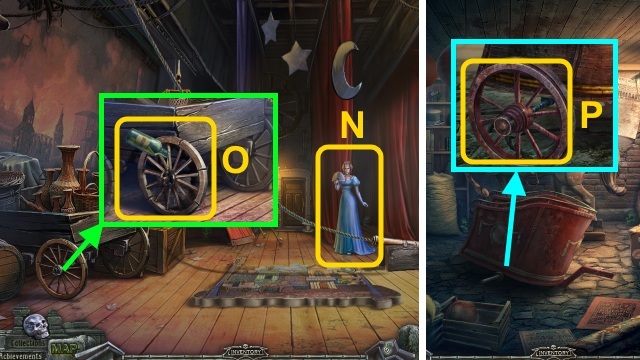
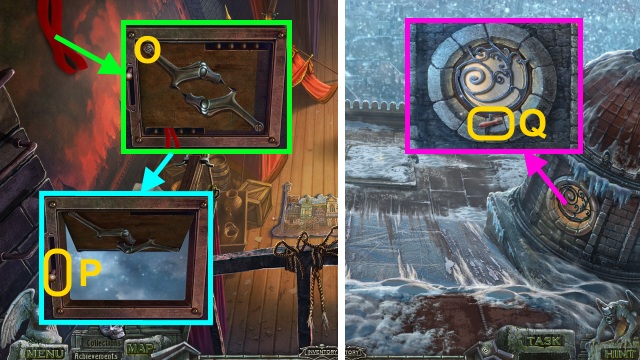
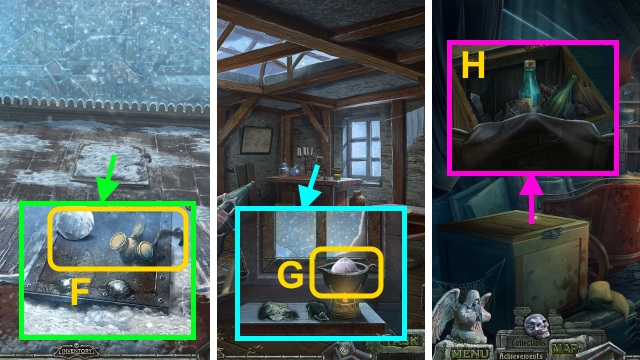
- Examine the bridge (N).
- Examine the roof (O).
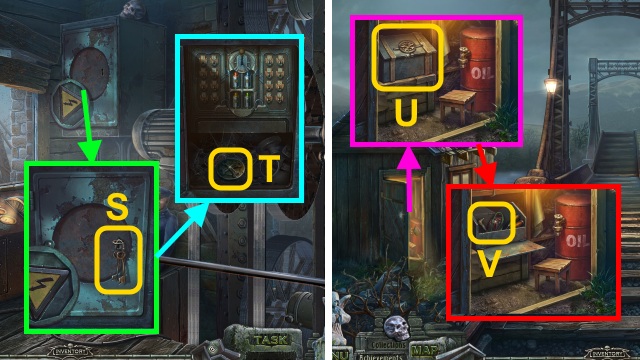
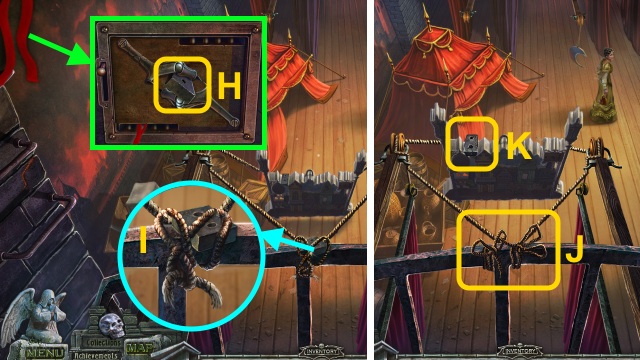
- Place the HOSE (P); examine it for a mini-game.
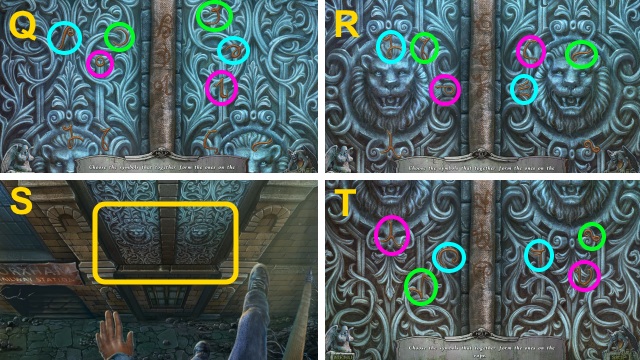
- Solution (Q-T).
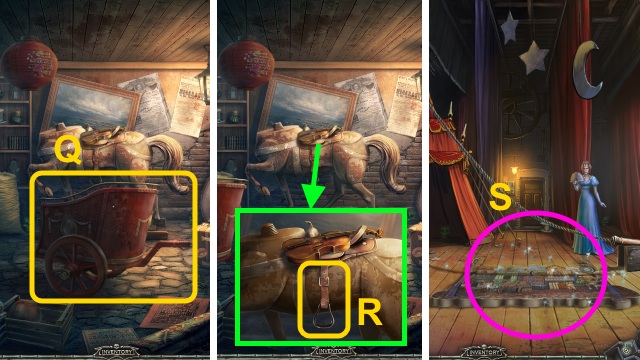
- Open the purse; take the COIN (U).
- Take the BOLTS (V).
- Examine the door (W).
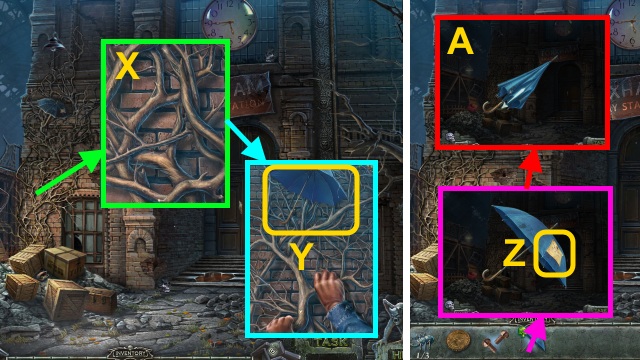
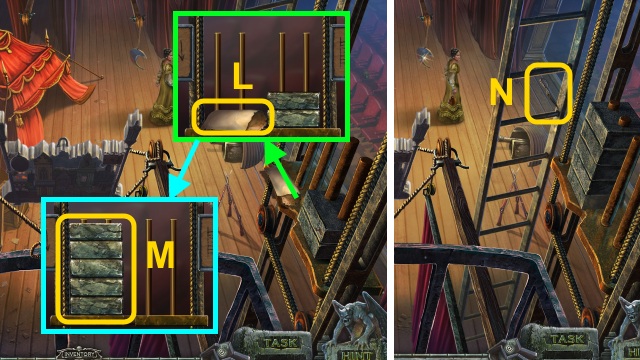
- Climb 6x (X); take the UMBRELLA (Y).
- Examine the UMBRELLA; read the schedule (Z).
- Close the UMBRELLA (A).
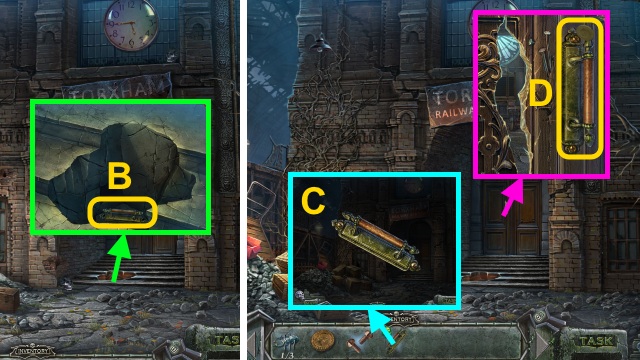
- Use the UMBRELLA; receive the BROKEN HANDLE (B).
- Combine the BROKEN HANDLE and BOLTS (C); take the HANDLE.
- Place the HANDLE; use the COIN 2x (D).
- Open the door.
- Walk forward.
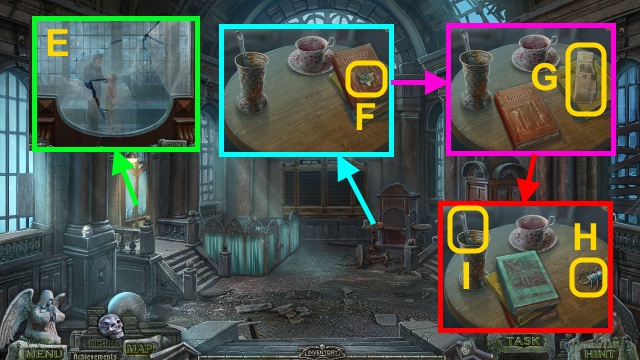
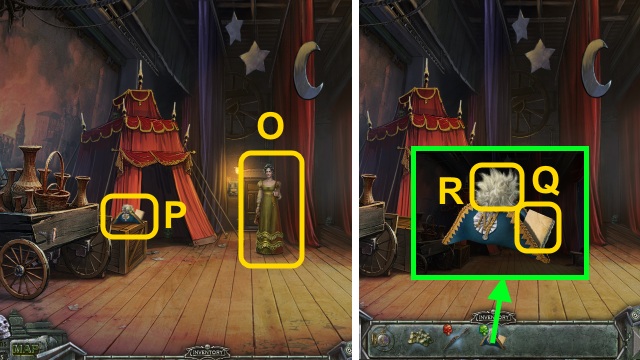
- Examine the room.
- Move the glass (E).
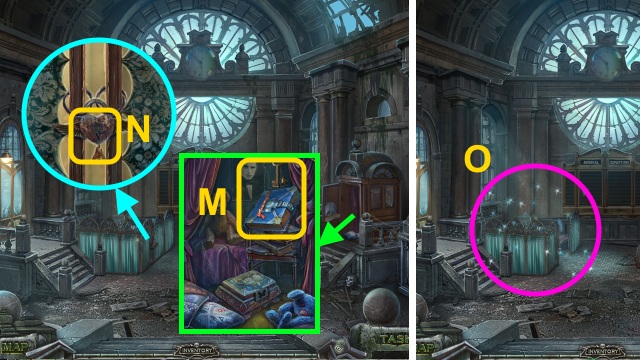
- Take the LILY (1/3) (F); move the book.
- Take the PIECE OF PAPER (G); move the books.
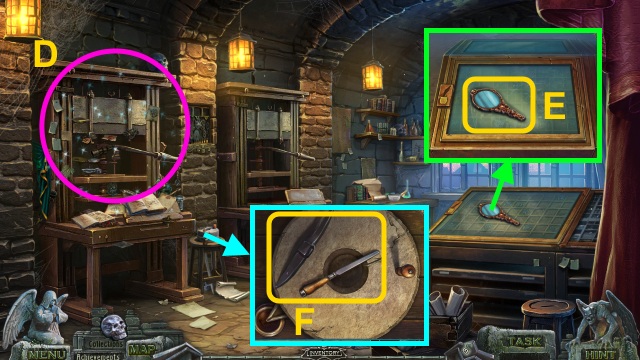
- Take the BUG (2/3) (H) and KNIFE (I).
- Walk down.
- Use the KNIFE (J); open the box.
- Take the TRACK (K).
- Walk forward.
- Place the TRACK (L).
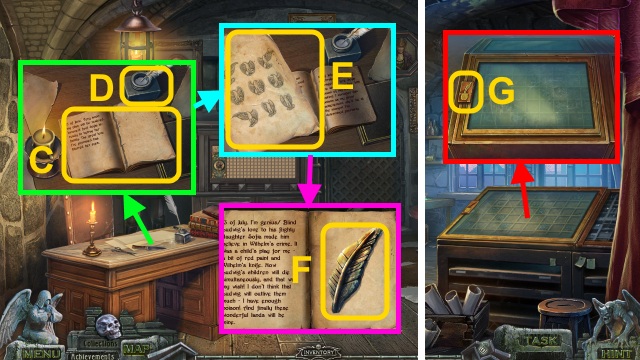
- Take the KEY and IVY's DIARY (M).
- Use the KEY (N).
- Play the HOP to receive the BUG (3/3) (O).
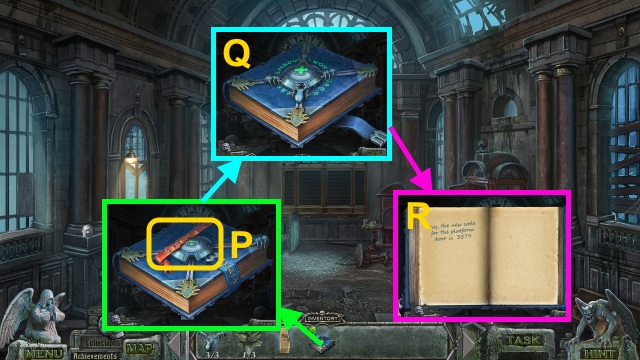
- Examine IVY'S DIARY; move the ribbon (P).
- Place the BUG (3/3); move them (Q).
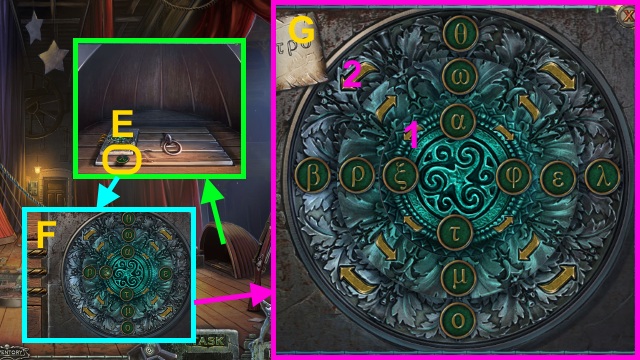
- Flip through the diary; take the NOTE WITH CODE (R).
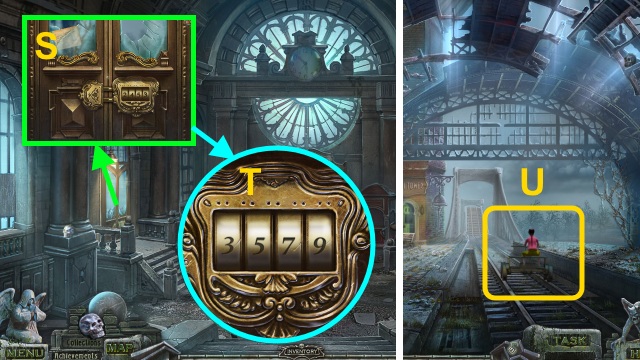
- Use the NOTE WITH CODE (S); examine the code.
- Enter the CODE (T); open the door.
- Walk left.
- Examine Ivy (U).
- Walk forward.
Chapter 2: The Clock of Fate
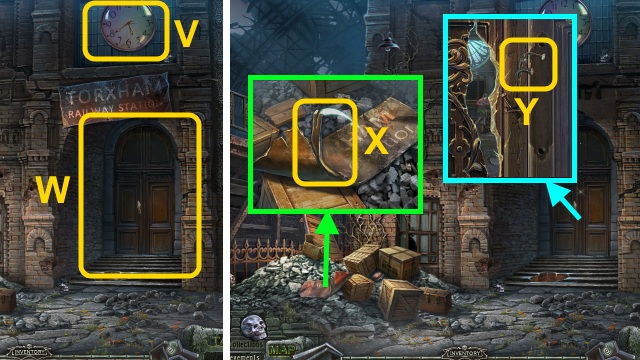
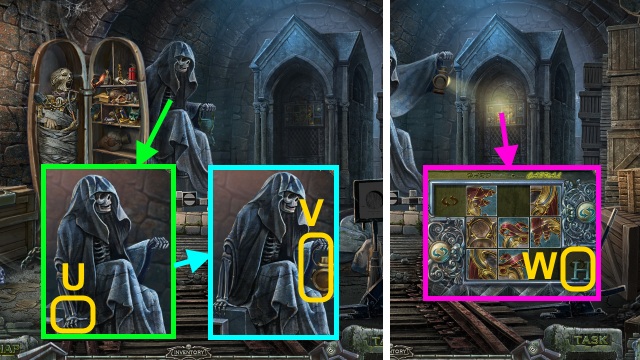
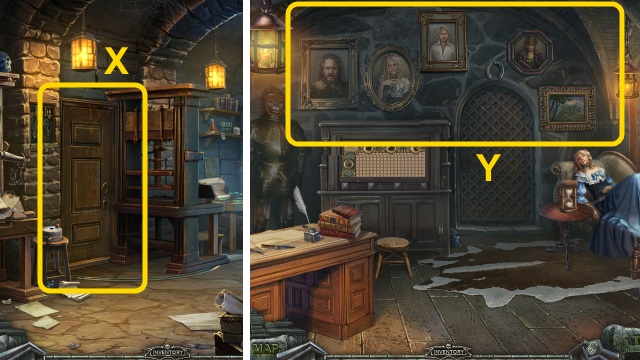
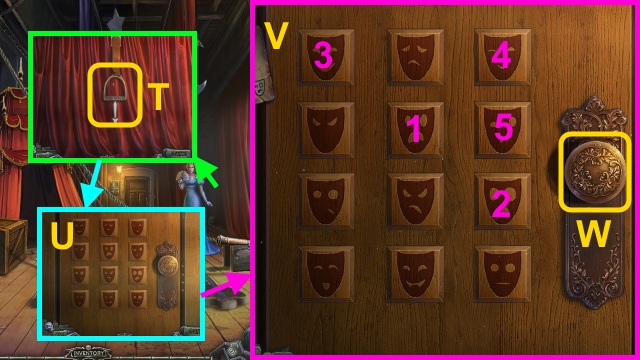
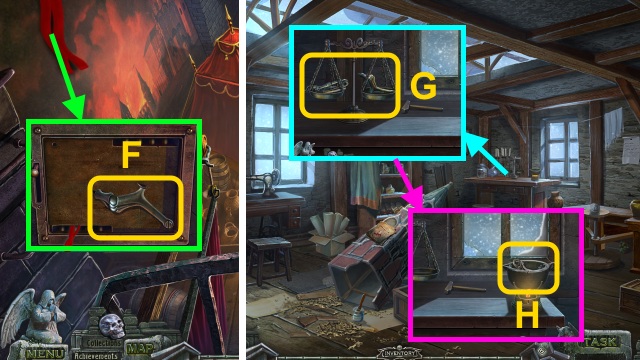
- Examine the clock (V); examine the door (W).
- Bend the sign (X); receive the NAIL PULLER.
- Use the NAIL PULLER (Y); open the door.
- Walk forward.
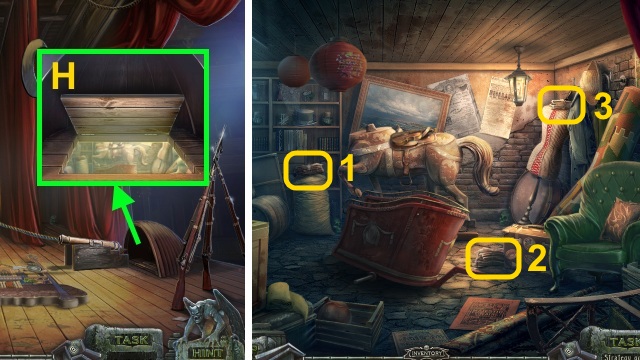
- Move the screen; play the HOP to receive the BUG (2/2) (Z).
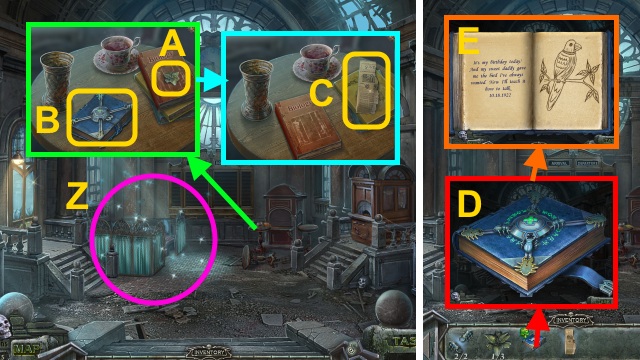
- Take the LILY (1/3) (A) and IVY'S DIARY (B); move the BOOK.
- Take the PIECE OF PAPER (C).
- Place the BUG (2/2) on IVY'S DIARY (D); open the book.
- Take the NOTE WITH CODE (E).
- Use the NOTE WITH CODE (F).
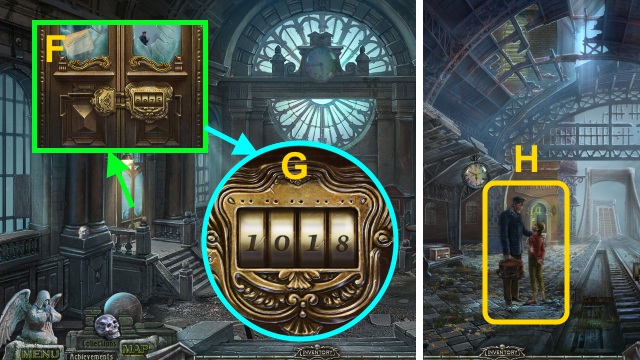
- Enter the code (G); open the door.
- Walk left.
- Examine Ivy (H).
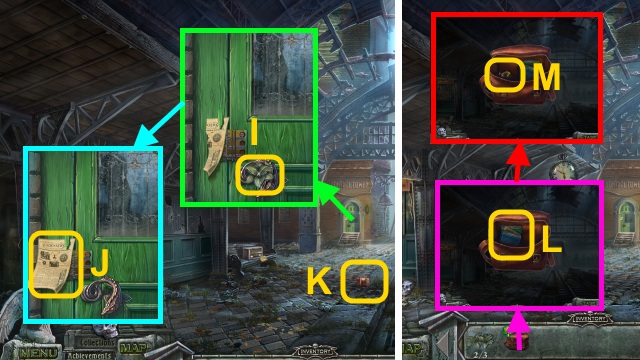
- Take the LILY (2/3) (I).
- Place the PIECE OF PAPER (J); read the newspaper.
- Take the BAG (K).
- Open the BAG; move the books and paper (L).
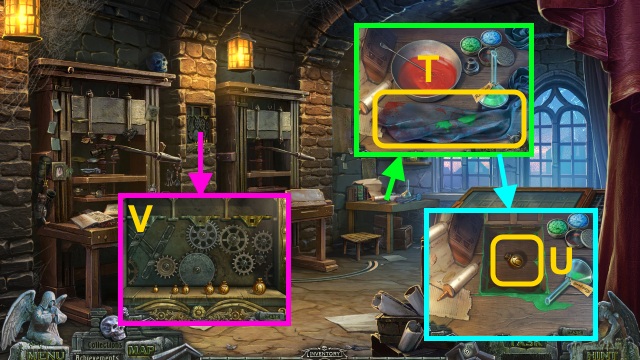
- Take the GEAR (1/2) (M).
- Walk forward.
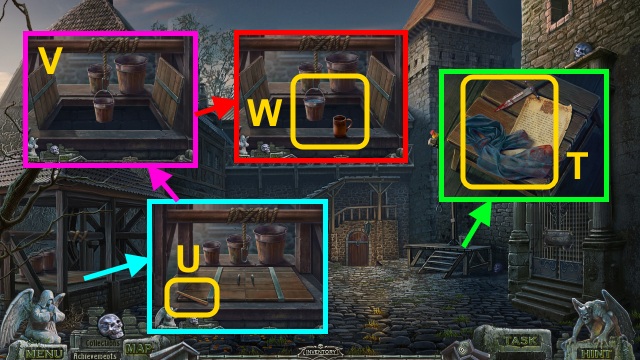
- Open the door; take the BRUSH (N).
- Walk down.
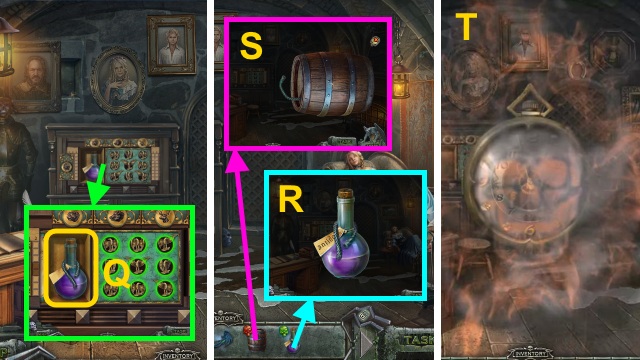
- Use the BRUSH; take the EMPTY BOTTLE (O).
- Walk forward.
- Place the EMPTY BOTTLE; remove the cork (P).
- Turn the valve (Q).
- Place the cork (R); take the OIL.
- Walk down.
- Use the OIL; take the GEAR PART (S).
- Examine Ivy (T).
- Walk forward.
- Take the HANDLE (U).
- Combine the GEAR PART and HANDLE (V); take the GEAR (2/2).
- Walk down.
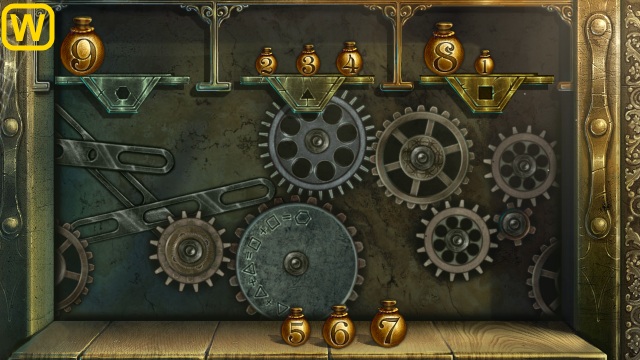
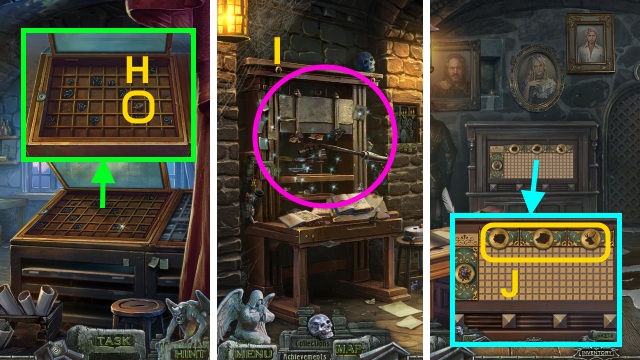
- Place the GEAR (2/2) for a mini-game (W).
- Solution (X).
- Turn the handle (Y).
- Walk forward.
- Examine Rupert (Z).
- Pull the lever (A); receive the LEVER.
- Examine the window (B).
- Walk down, then forward.
- Help Ivy (C).
- Select 'Yes' for a mini-game.
- Solution (D-H); order is random.
- Receive the CLOCK.
- Examine the clock (I).
- Walk down.
- Use the LEVER (J); take the LOCOMOTIVE and SIGN (K).
- Walk left.
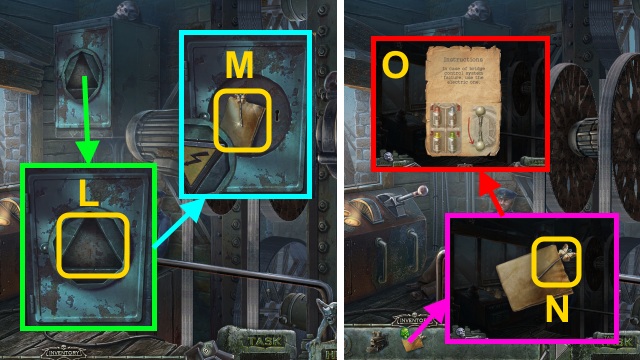
- Place the SIGN (L); turn it.
- Take the PAPER (M).
- Examine the PAPER; take the BARRETTE (N).
- Open the paper; take the INSTRUCTIONS (O).
- Walk down twice.
- Place the LOCOMOTIVE (P).
- Place the BARRETTE; take the LILY (3/3) (Q).
- Walk left, then forward.
- Place the LILY (3/3); take the KEYS (R).
- Walk down, then left.
- Use the KEYS (S); take the SYMBOL (T).
- Walk down, then forward.
- Place the SYMBOL; open the box (U).
- Take the WIRES and ALLEN KEY (V).
- Walk down.

- Use the ALLEN KEY 4x (W); take the FUSE (X).
- Walk left.
- Place the FUSE and INSTRUCTIONS (Y).
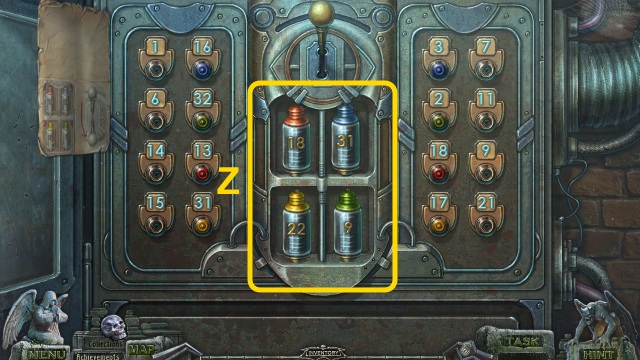
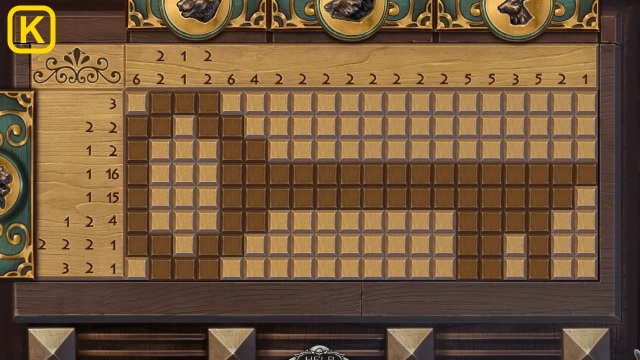
- Arrange the fuses (Z); use the WIRES for a mini-game.
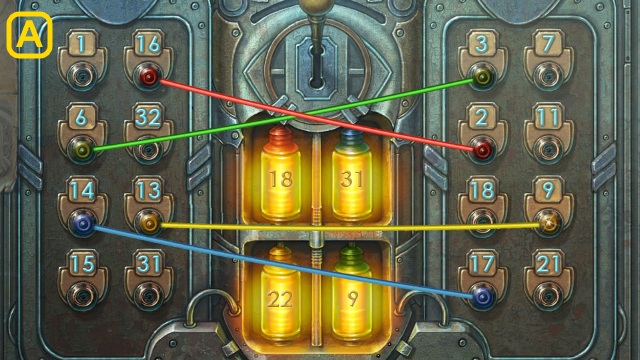
- Solution (A).
- Use the CLOCK (B).
- Help Ivy (C); pull the lever (D).
- Talk to Rupert (E).
- Walk right.
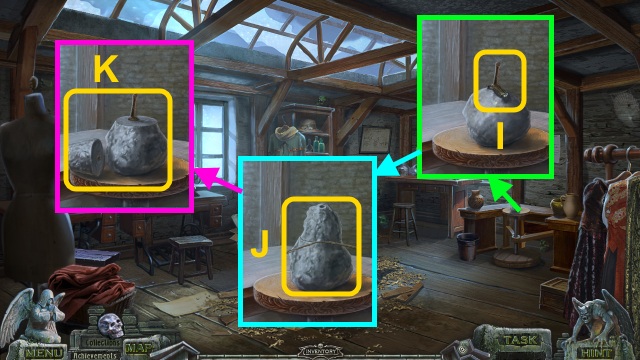
- Take the SCRAPER (F) and ELECTRICAL TAPE (G).
- Take the EMBLEM (1/2) (H).
- Walk down.
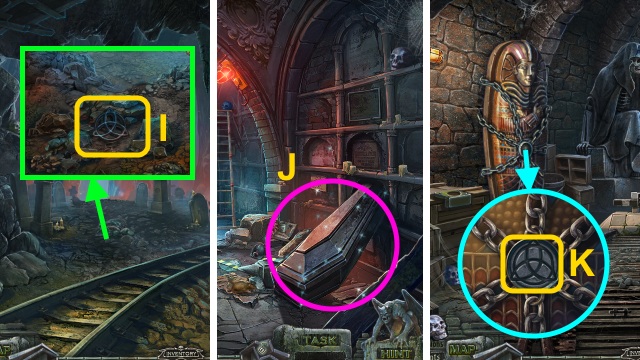
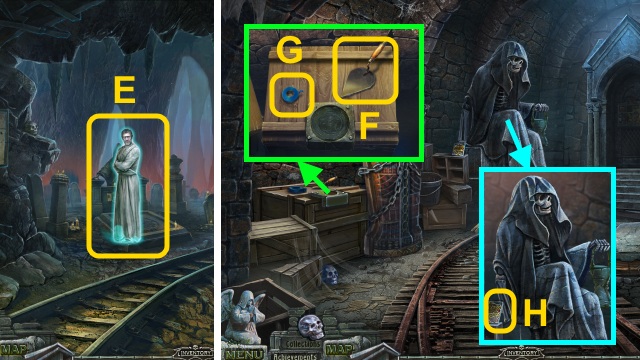
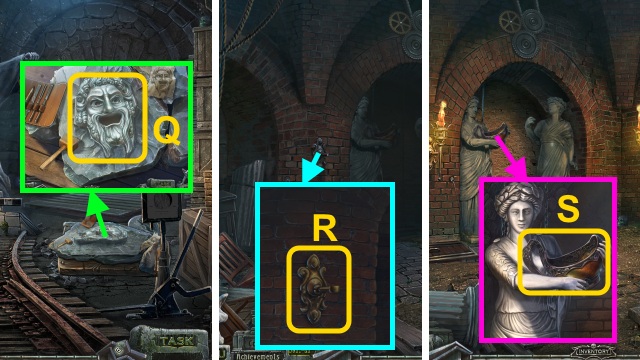
- Move the rocks; take the TRIQUETRA (I).
- Walk down.
- Play the HOP to receive the SKELETAL HAND (J).
- Walk forward, then right.
- Place the TRIQUETRA (K).
- Play the HOP to receive the SCARAB (L).
- Walk down twice.
- Move the paper; use the SCRAPER (M).
- Place the SCARAB (N); take the EMBLEM (2/2) (O).
- Walk down.
- Take the KEY (P); open the door.
- Use the ELECTRICAL TAPE; place the ignition (Q).
- Use the KEY (R); pull the lever (S).
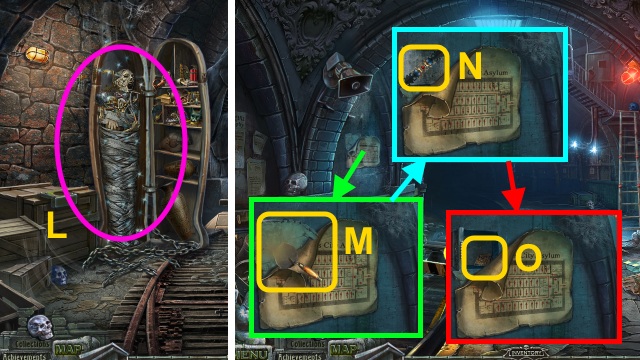
- Play the HOP to receive the LANTERN (T).
- Walk forward twice, then right.
- Place the SKELETAL HAND (U); move the statue.
- Give the LANTERN (V).
- Take the CHARACTER (1/2) (W); place the EMBLEM (2/2) for a mini-game.
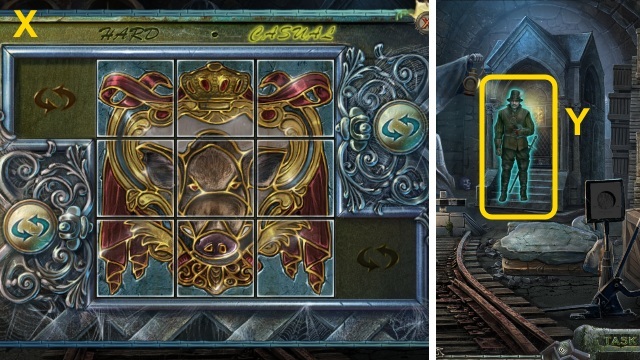
- Solution (X).
- Talk to Lotar (Y).
- Walk forward.
Chapter 3: Wilhelm and Sophia
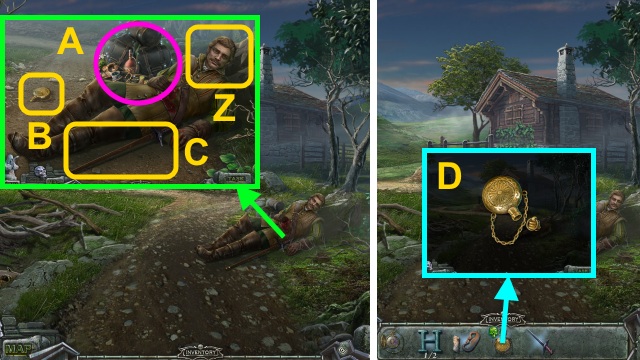
- Talk to Lotar (Z).
- Play the HOP to receive the FLINT (A).
- Take the FLASK (B) and SWORD (C).
- Open the FLASK (D); take the EMPTY FLASK.
- Use the SWORD (E); open the window (F).
- Go forward.
- Use the FLINT; take the candle (G).
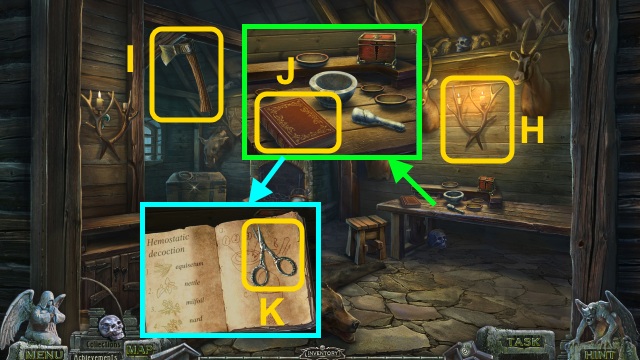
- Light the candles (H).
- Take the AXE (I).
- Read the book (J); take the SILVER SCISSORS (K).
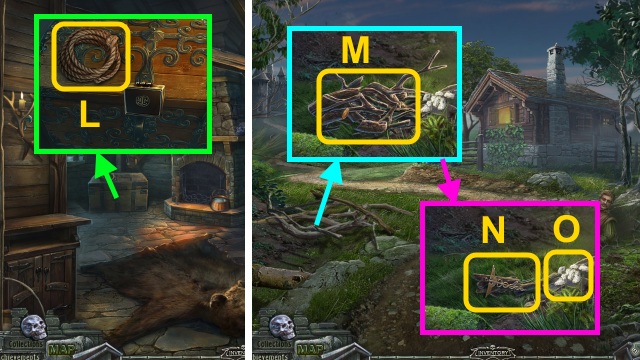
- Take the ROPE (L).
- Walk down.
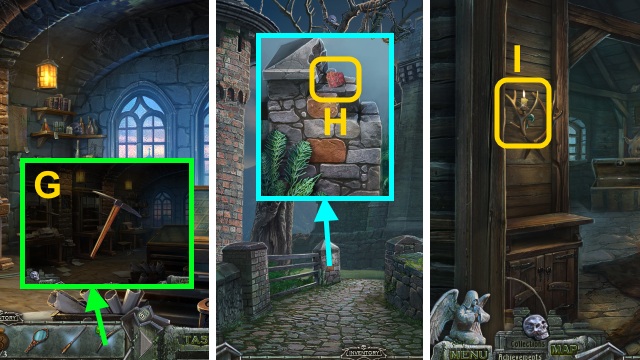
- Use the AXE; take the FIREWOOD (M).
- Take the CADUCEUS (N); use the SILVER SCISSORS (O).
- Receive the MILFOIL.
- Use the SILVER SCISSORS (P); receive the NETTLE.
- Walk right.
- Place the CADUCEUS; open the box (Q).
- Take the BANDAGES.
- Walk down, then left.
- Use the SILVER SCISSORS (R); receive the EQUISETUM.
- Use the SILVER SCISSORS (S); receive the NARD.
- Examine the door; talk to the man (T).
- Walk down, then right.
- Place the NETTLE, MILFOIL, NARD, and EQUISETUM (U).
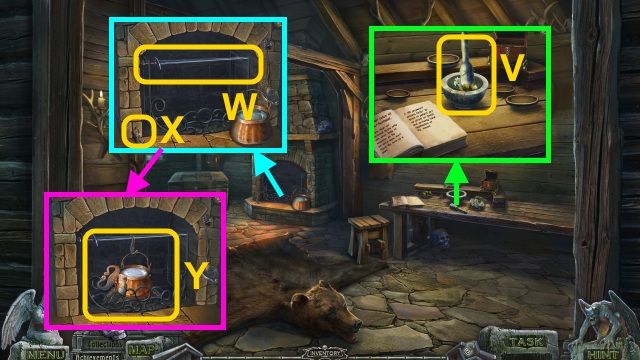
- Place the herbs; use the pestle (V).
- Take the HERBS.
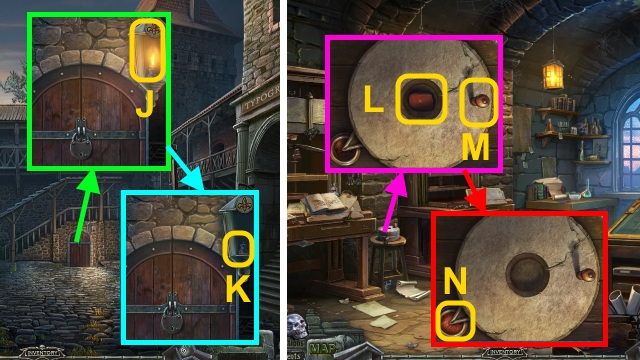
- Place the SWORD (W) and hook (X).
- Place the pot and FIREWOOD; use the FLINT (Y).
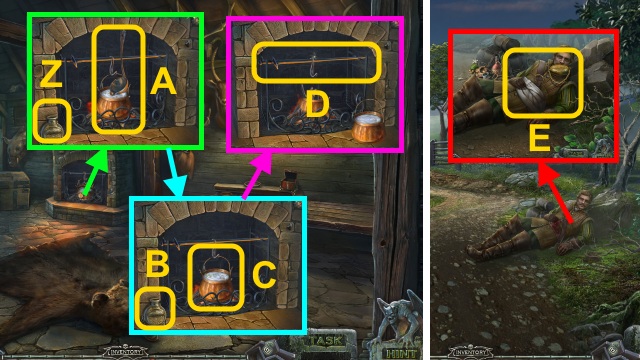
- Use the HERBS and EMPTY FLASK (Z); use the ladle (A).
- Take the DECOCTION (B).
- Use the BANDAGES (C); receive the DECOCTION.
- Remove the pot; take the SWORD (D).
- Walk down.
- Use the DECOCTION; give the DECOCTION (E).
- Talk to Lotar; give the SWORD (F).
- Talk to Lotar; take the LETTER (G).
- Play the HOP to receive the RING (H).
- Walk right.
- Use the RING (I); open the chest.
- Read the letter (J); take the CLAWS.
- Open the case; take the PASS (K).
- Walk down, then left.
- Give the PASS and RING (L); talk to the man.
- Take the CROSSBOW BOLT (M).
- Combine the CROSSBOW BOLT and ROPE (N); take the GRAPPLING HOOK.
- Examine the woodpecker (O).
- Use the CLAWS 4x (P).
- Place the GRAPPLING HOOK (Q); examine it for a mini-game.
- Use the arrows to swing, then jump (R).
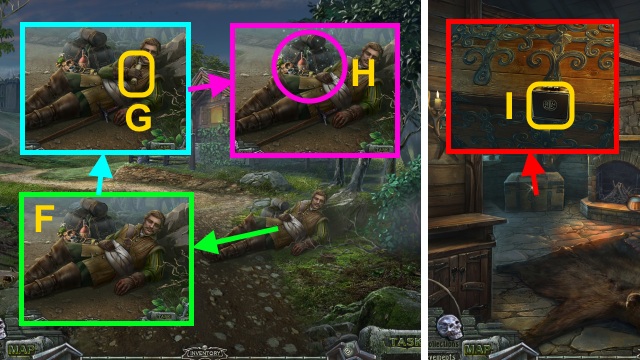
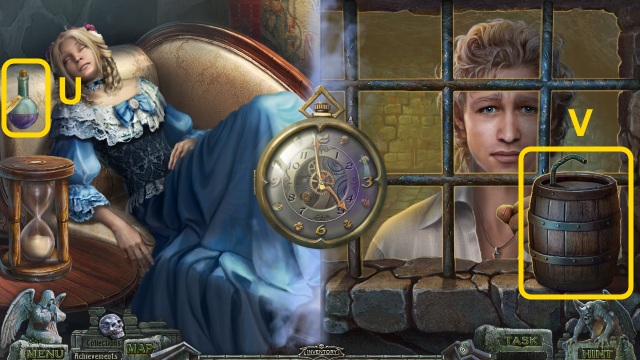
- Talk to the Wilhelm; take the CUP (S).
- Take the BLOODIED SHAWL and DAGGER (T).
- Take the STICK (U); open the door.
- Place the bucket (V); lower it.
- Raise the bucket; place the CUP (W).

- Pour the water; take the WATER (X).
- Use the DAGGER (Y); receive the EMPTY BUCKET.
- Give the WATER; take the WEIGHT (1/3) (Z).
- Walk down.
- Use the EMPTY BUCKET (A); receive the CHARACTER (2/2).
- Go forward.
- Place the CHARACTER (2/2) for a mini-game (B).
- Solution (C).
- Walk right.
- Play the HOP to receive the WEIGHT (2/3) (D).
- Take the MIRROR (E).
- Take the FILE and PEEN PICK (F).
- Place the STICK on the PEEN PICK (G); take the PICK.
- Walk down twice.
- Use the PICK; take the CINNABAR (H).
- Walk down, then right.
- Move the candle; use the FILE (I).
- Take the HORN and LILY.
- Go to the Courtyard.
- Place the LILY; open the lantern (J).
- Examine the flame; take the OIL (K).
- Walk right.
- Place the CINNABAR (L); turn the handle (M).
- Take the CINNABAR POWDER (N).
- Place the HORN; turn the handle (O).
- Take the HORN POWDER.
- Place the BLOODIED SHAWL, CINNABAR POWDER, HORN POWDER, and OIL (P).
- Pour the oil; stir the mixture (Q).
- Place the paint (R); use the reagent (S).
- Take the BLOODIED SHAWL (T).
- Use the DAGGER; take the WEIGHT (3/3) (U).
- Place the WEIGHT (3/3) for a mini-game (V).
- Solution (W).
- Open the door (X).
- Walk left.
- Examine the paintings; rearrange them (Y).
- Take the DIARY (Z).
- Use the MIRROR (A).
- Take the DEER (B).
- Place the DIARY; open it (C).
- Use the quill (D).
- Move the paper; take the CODE (E).
- Read the diary; take the FEATHER (F).
- Walk down.
- Place the FEATHER (G); turn the lock.
- Open the case; take the BOAR (H).
- Play the HOP to receive the BEAR (I).
- Walk left.
- Place the DEER, BOAR, and BEAR for a mini-game (J).
- Solution (K).
- Take the CELLAR KEY (L).
- Go to the Courtyard.
- Use the CELLAR KEY (M); take the EAGLE and POWDER (N).
- Walk right, then forward.
- Place the CODE and EAGLE for a mini-game (O).
- Solution (P).
- Take the VIAL (Q).
- Examine the VIAL; take the WICK and ANTIDOTE (R).
- Combine the WICK and POWDER (S); take the POWDER.
- Use the CLOCK (T).
- Give the ANTIDOTE (U).
- Place the POWDER (V); use the FLINT.
- Talk to Wilhelm; take the CROSS (W).
- Walk right, then forward.
- Talk to Sophia (X).
- Talk to Ludwig (Y); give the letter.
- Talk to Ludwig; give the BLOODIED SHAWL (Z).
- Give the CROSS (A).
Chapter 4: Leticia
- Talk to Lotar (B).
- Walk forward.
- Take the MASK DRAWING (C).
- Take the SPLINTER and TORCH (D).
- Walk down.
- Use the SPLINTER (E); open the bag.
- Take the FRAME (F).
- Walk down three times.
- Play the HOP to receive the HAMMER (G).
- Take the BOILING WATER (H); use the TORCH.
- Receive the BURNING TORCH.
- Place the FRAME (I); open the portrait.
- Take the SYMBOL (J).
- Go to the Dungeon Museum.
- Play the HOP to receive the TOOL KIT (K).
- Place the MASK DRAWING, HAMMER, and TOOL KIT for a mini-game (L).
- Solution (M-P).
- Take the MASK (Q).
- Walk forward.
- Place the BURNING TORCH (R).
- Take the BOWL (S); give the MASK.
- Walk down.
- Place the BOWL (T); receive the GYPSUM.
- Combine the GYPSUM and BOILING WATER (U); take the GYPSUM MORTAR.
- Place the SYMBOL (V); open the crate.
- Pour the GYPSUM MORTAR (W); receive the MASK.
- Walk forward.
- Give the MASK (X); play the HOP to receive the T and H.
- Examine the H for a mini-game (Y).
- Solution (Z); take the H (1/2).
- Examine the T for a mini-game (A).
- Solution (B); take the T (2/2).
- Take the STUDS (C); place the H (2/2).
- Open the chest; take the MASKS (D).
- Place the MASKS (E); examine them.
- Talk to Leticia (F).
- Walk forward.
- Examine Vanessa (G).
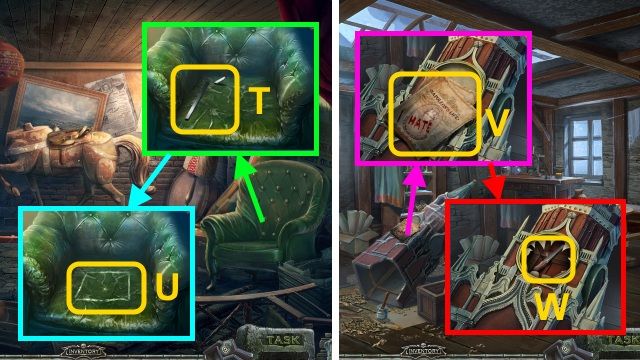
- Take the PLUMMET (1/3) (H).
- Untie the rope; take the PLUMMET (2/3) (I).
- Tie the rope (J); take the PLUMMET (3/3) (K).
- Read the note (L).
- Move the weights; place the PLUMMET (3/3) (M).
- Take the BROKEN SCISSORS (N).
- Go down.
- Talk to Vanessa (O).
- Take the HAT (P).
- Examine the HAT; read the note (Q).
- Take the PIN (R).
- Take the BOLT BOX (S).
- Open the BOLT BOX (T); play the HOP to receive the BOLT.
- Take the BROKEN SCISSORS and ROPE (U).

- Combine the two BROKEN SCISSORS and BOLT (V); take the SCISSORS.
- Take the CORKSCREW (W).
- Walk down.
- Place the ROPE (X).
- Go down.

- Move the rope to the canon (Y); attach the rope (Z).
- Walk down.
- Use the SCISSORS (A).
- Go down.
- Play the HOP to receive the LOCK CODE (B).
- Take the LOCK PART (1/3) (C).
- Take the LOCK PART (2/3) (D).
- Take the LOCK PART (3/3) (E).
- Place the LOCK PART (3/3) and LOCK CODE for a mini-game (F).
- Solution (G).
- Open the trapdoor (H).
- Go down.
- Take the WASTEPAPER (1/3)-(3/3) (1-3).
- Move the pillow (I); take the CHIP (1/2) (J).
- Use the PIN (K); remove the lock.

- Open the crate; take the BOTTLE OF BENZENE (L).
- Use the CORKSCREW on the BOTTLE OF BENZENE (M); take the BENZENE.
- Walk down.
Chapter 5: The Final Choice
- Talk to Leticia (N).
- Place the WASTEPAPER; use the BENZENE (O).
- Take the WHEEL.
- Go right.
- Place the WHEEL (P); attach it.
- Push the chariot (Q).
- Take the STIRRUP (R).
- Walk down.
- Play the HOP to receive the DOOR CODE (S).
- Place the STIRRUP (T); pull it.
- Place the DOOR CODE for a mini-game (U).
- Solution (V).
- Open the door (W).
- Walk forward.
- Use the screwdriver; receive the SCREWDRIVER (X).
- Take the CARBINER (Y).
- Take the CHALK (Z) and SMALL CUTTERS (A).
- Take the CHIP (2/2) (B).
- Walk down.
- Use the screwdriver 2x; take the HANDLE (C).
- Go down the trapdoor.
- Use the SCREWDRIVER; take the HANDLE (D).
- Use the SMALL CUTTERS; take the STRING (E).
- Walk down twice.
- Use the SCREWDRIVER (F); take the PAW.
- Go to the Workshop.
- Place the latch, HANDLES, and PAW (G); take the PAW.
- Place the latch and handles (H).
- Place the PAW (I); mold the clay 2x.
- Use the STRING (J).
- Remove the clay; take the PAW and FORM (K).
- Place the FORM; pour the metal (L).
- Examine the mold x2; use the hammer (M).
- Take the PAW (2/2) (N).
- Go to Left Backstage.
- Place the PAW (2/2) (O); Use the SCREWDRIVER 2x.
- Pull the lever (P); open the door.
- Go forward.
- Take the STICK (Q).
- Place the CHIP (2/2) for a mini-game (R).
- Solution (S).
- Receive the RULER.
- Go to Under Stage.
- Use the CHALK and RULER (T).
- Use the SCISSORS (U); receive the LEATHER.
- Go to the Workshop.
- Read the posters (V).
- Examine the clock; place the STICK (W).
- Take the FILE.
- Go to the Theater Roof.
- Use the FILE 4x (X); remove the grate.
- Open the window; play the HOP to receive the ICESHOE DRAWING (Y).
- Go to the Workshop.
- Place the LEATHER (Z) and ICESHOE DRAWING (A) for a mini-game.
- Solution (B): C-Ax2-C-Ax2-C-Ax2-C-A-C-Ax2-C-Ax2-C-Bx2-C-Bx2-C-Bx2-C.
- Take the LEATHER (C).
- Combine the LEATHER, CARBINER, and STUDS (D); take the ICESHOE.
- Go to the Theater Roof.
- Use the ICESHOE (E).
- Examine the snow 3x; take the SNOWBALL and RESPIRATOR (F).
- Go to the Workshop.
- Place the SNOWBALL (G); take the WATER.
- Go to Under Stage.
- Open the crate; use the RESPIRATOR (H).
- Open the bottle; pour the water (I).
- Take the ACID.
- Go to the Theater Roof.
- Play the HOP to receive the KEY (J).
- Pour the ACID (K).
- Use the KEY (L); open the hatch.
- Go forward.
- Take the BAG (M).
- Walk down twice.
- Use the BAG (N); receive the PLUMMET.
- Walk left, then forward.
- Place the PLUMMET (O).
- Take the HOOK (P).
- Go down, then left.
- Examine Vanessa (Q).
- Take the GUN and ROPE (R).
- Combine the ROPE and HOOK; take the ROPE WITH HOOK (S).
- Walk down.
- Select 'Save both'; use the CLOCK (T).
- Use the GUN (U) and ROPE WITH HOOK (V).
- Talk to Leticia (W).
- Examine the gate (X).
- Congratulations! You have completed Redemption Cemetery: Clock of Fate.
Created at: 2015-10-23