

Walkthrough Menu
- General Tips
- Chapter 1: At the Gate
- Chapter 2: The Park Entrance
- Chapter 3: Below the Stage
- Chapter 4: Outside the Pharmacy
- Chapter 5: The Laboratory
- Chapter 6: By the Lake
General Tips
- This is the official guide for Redemption Cemetery: Embodiment of Evil.
- This guide will not mention each time you must zoom into a location; the screenshots will show each zoom scene.
- Hidden-object puzzles are referred to as HOPs. This guide will not show HOP solutions. It will identify the location of the HOP and the inventory item acquired.
- This guide will show solutions for non-random puzzles. Please read the in-game instructions for each puzzle.
- In this game, you will sometimes have to select the new scene to trigger dialog, cut-scenes, or tasks prior to interacting with the scene.
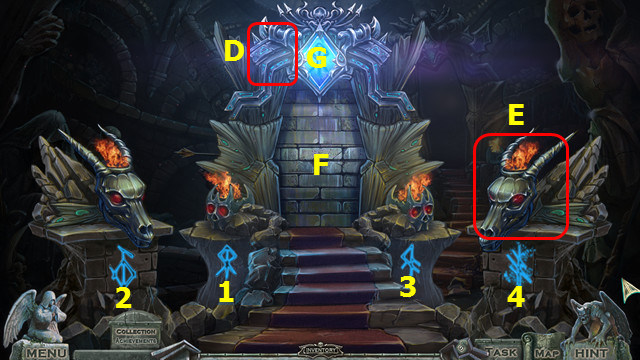
Chapter 1: At the Gate
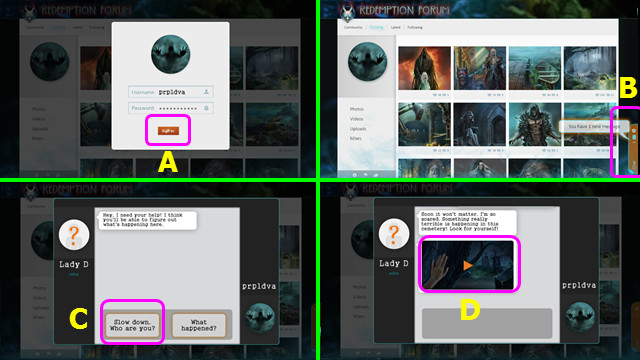
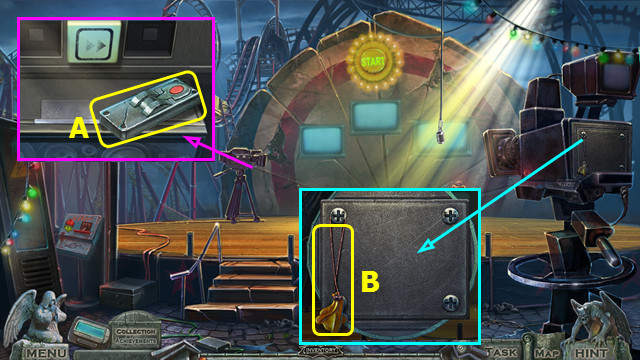
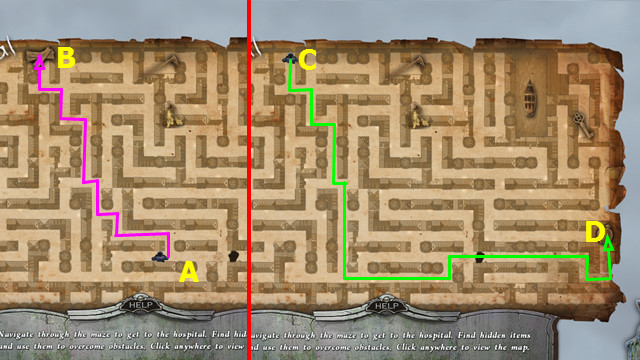
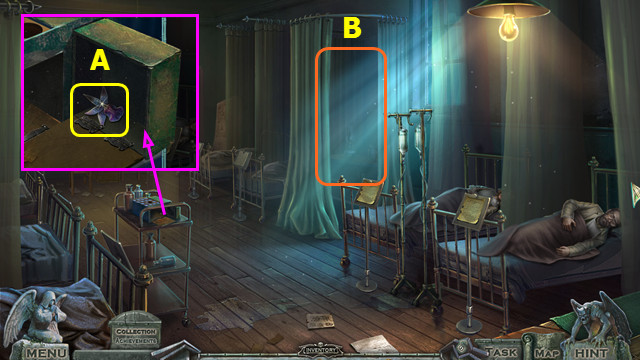
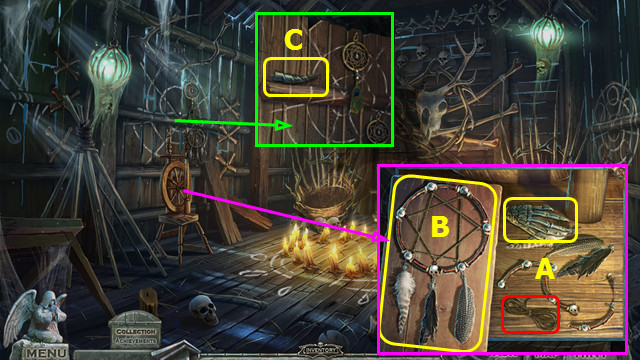
- Select (A).
- Select (B).
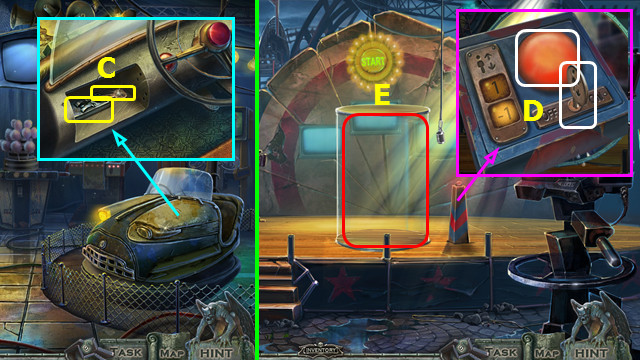
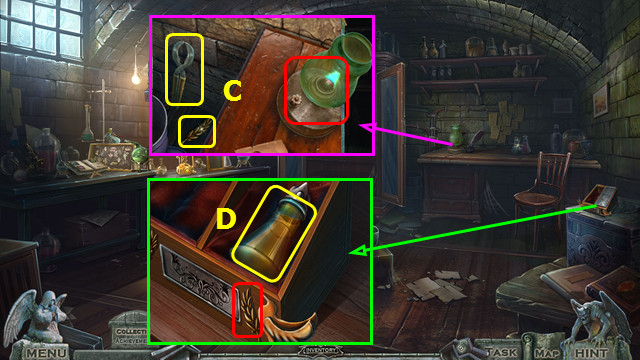
- Select (C).
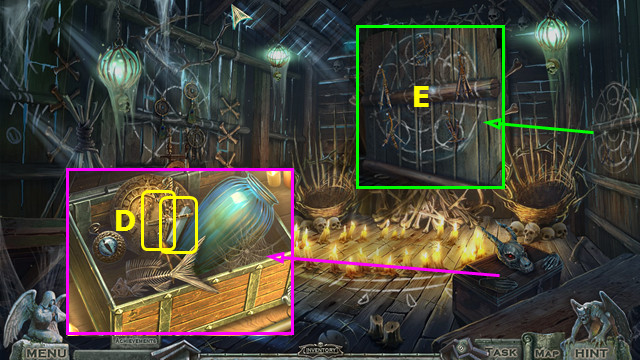
- Select (D).
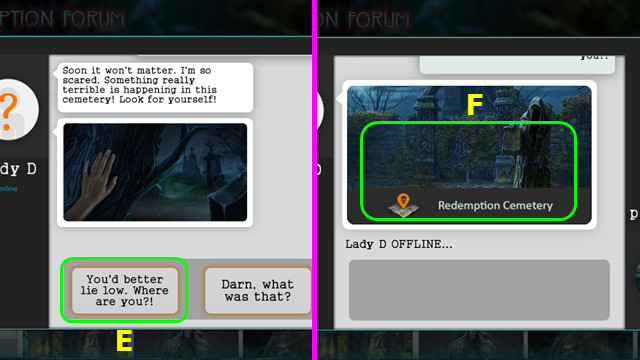
- Select (E).
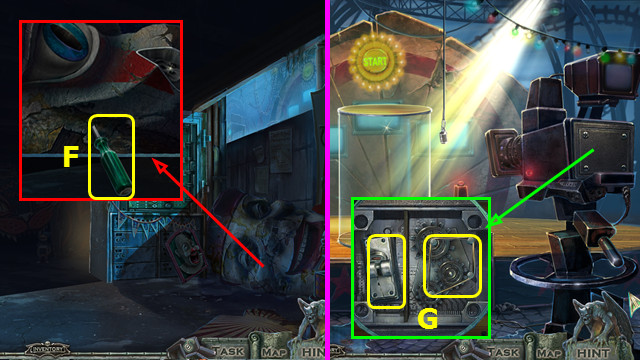
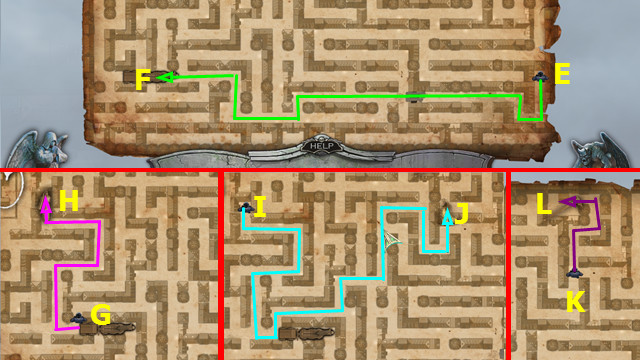
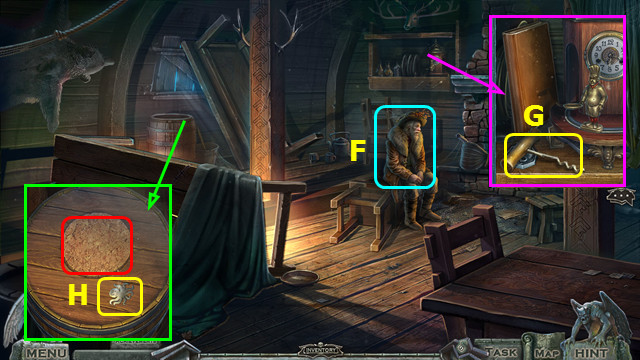
- Select (F).
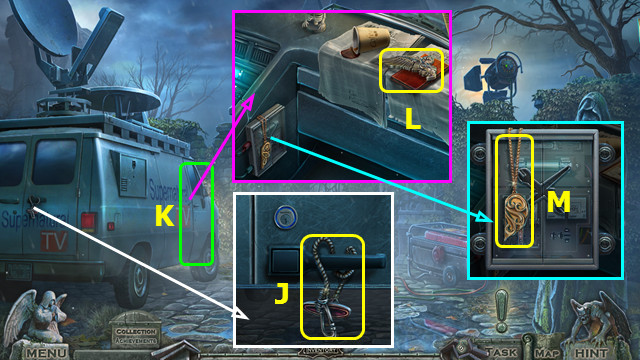
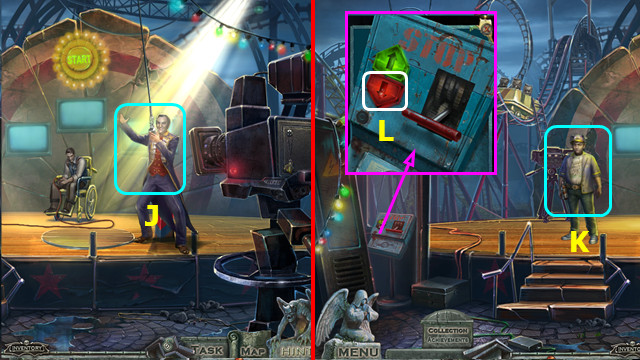
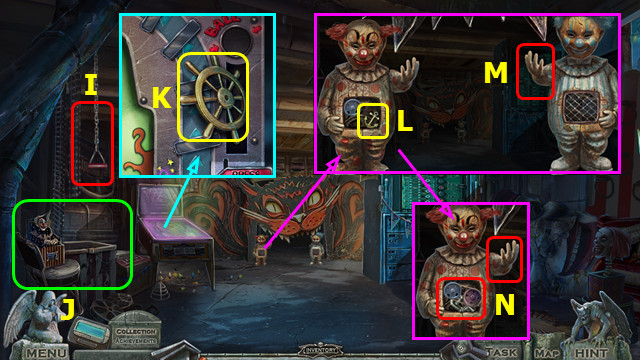
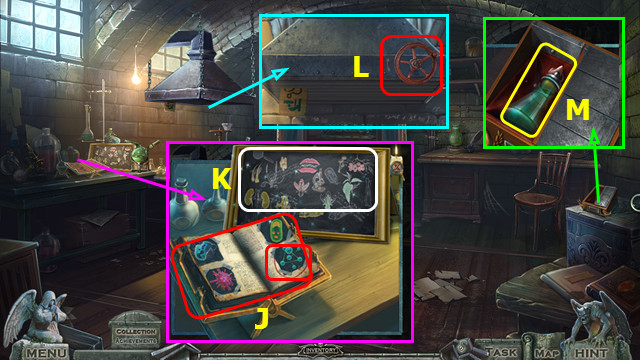
- Take the GENERATOR PLUG (J).
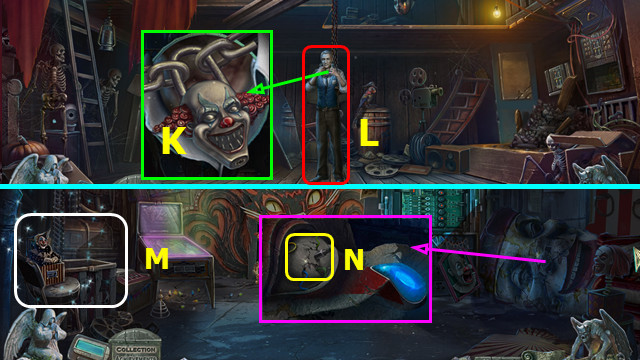
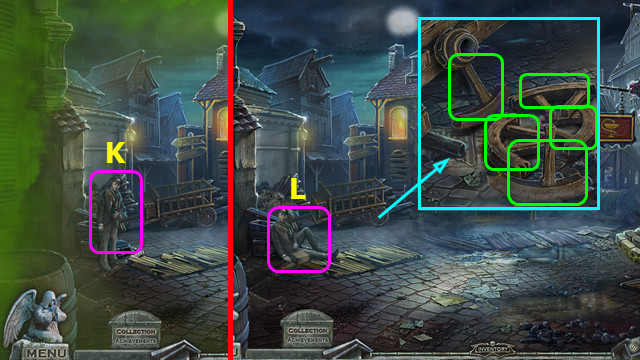
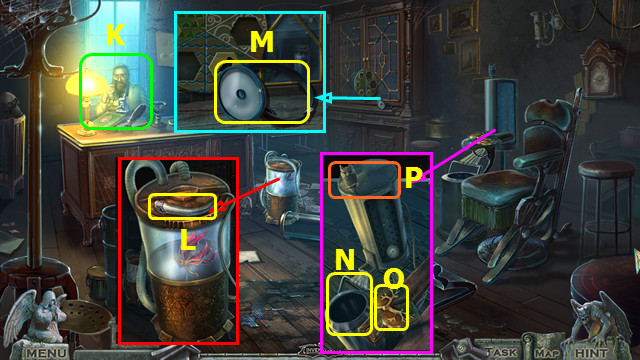
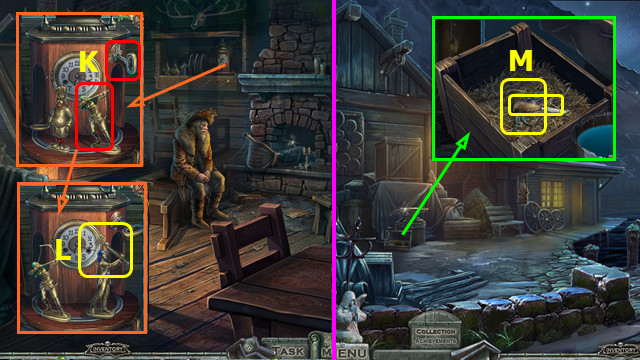
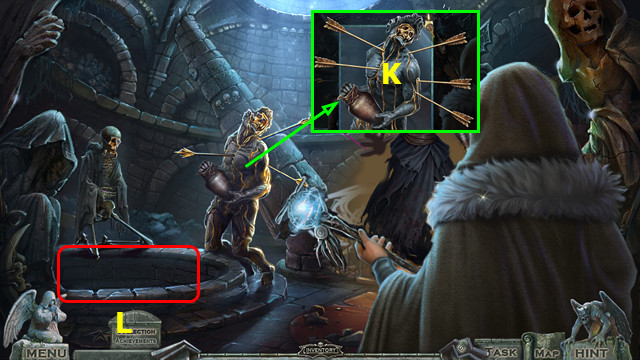
- Select (K).
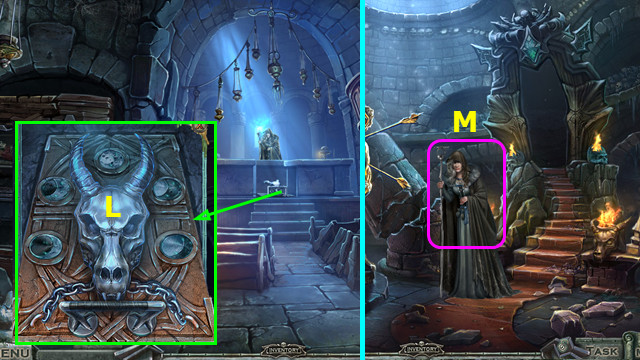
- Take the ANGEL HANDLE; take and read the diary (L).
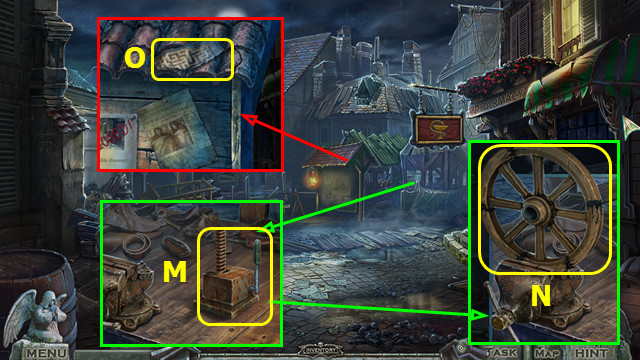
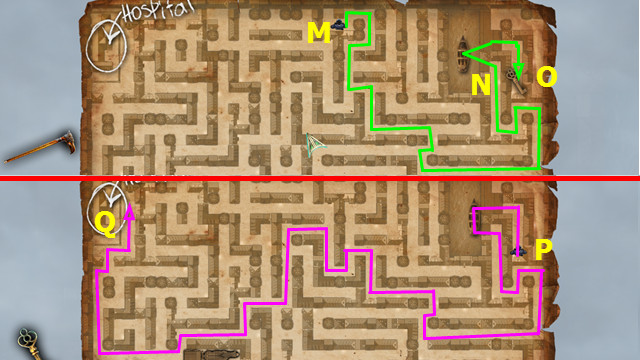
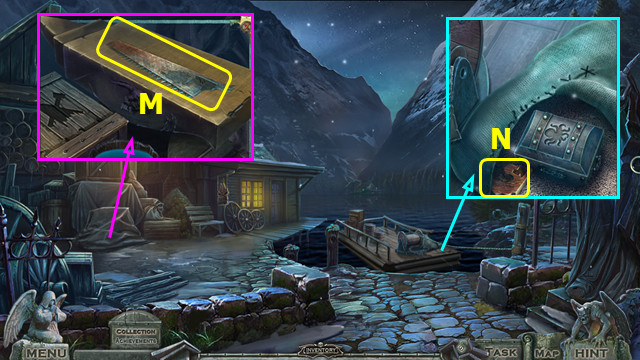
- Take the 1/2 HEART EMBLEM (M).
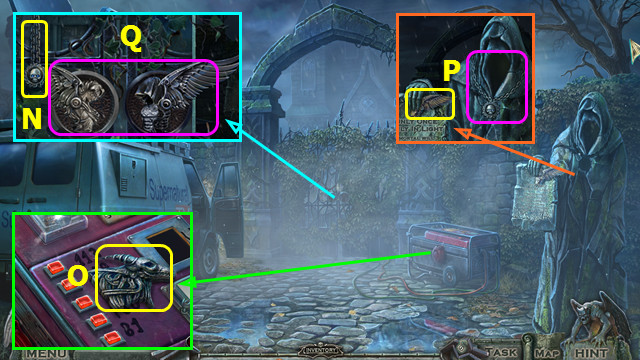
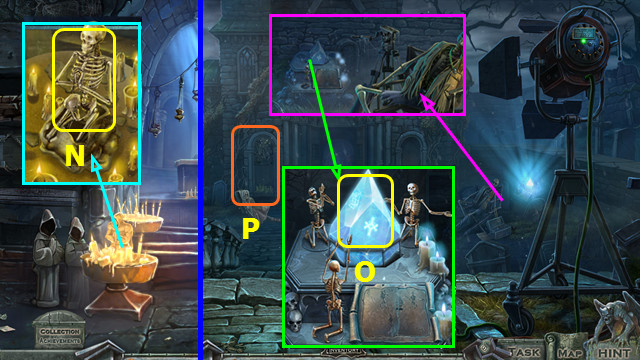
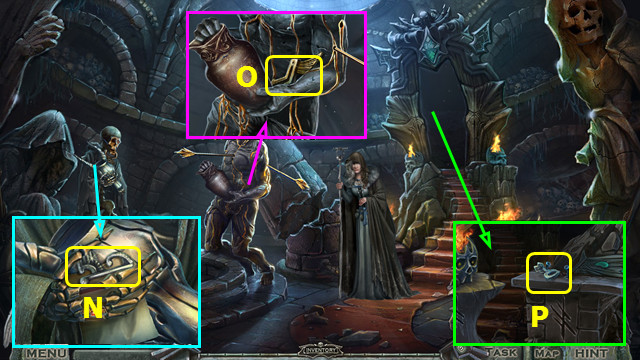
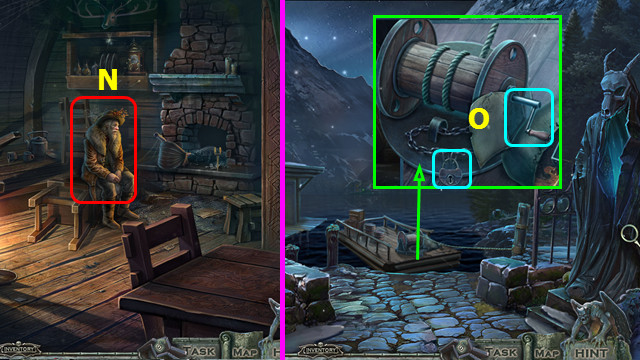
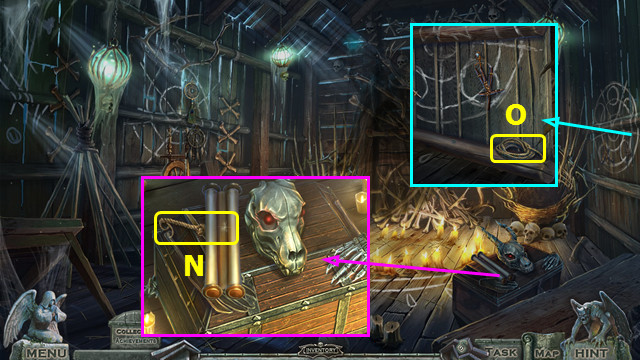
- Take the SKULL MEDALLION (N).
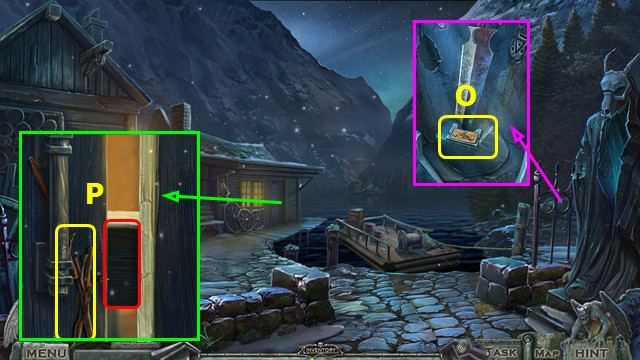
- Take the 1/2 GOAT HEAD SYMBOL (O).
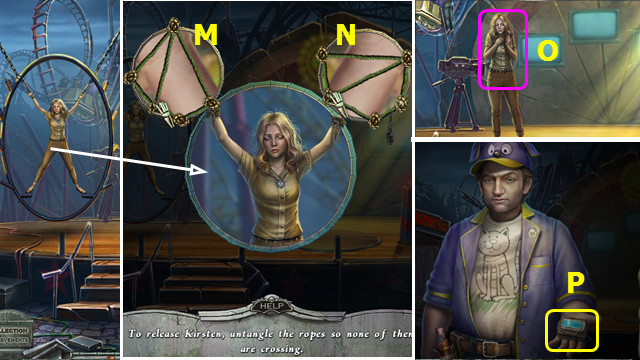
- Place the SKULL MEDALLION; earn the DEMON HANDLE (P).
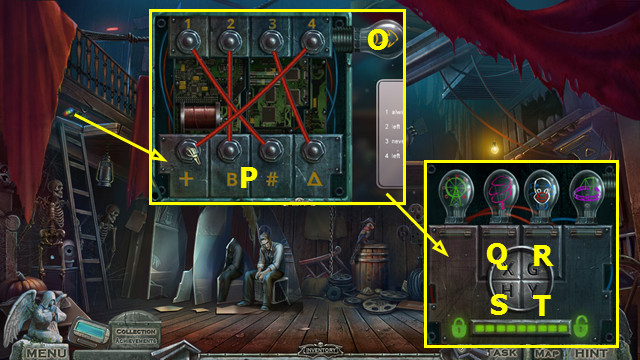
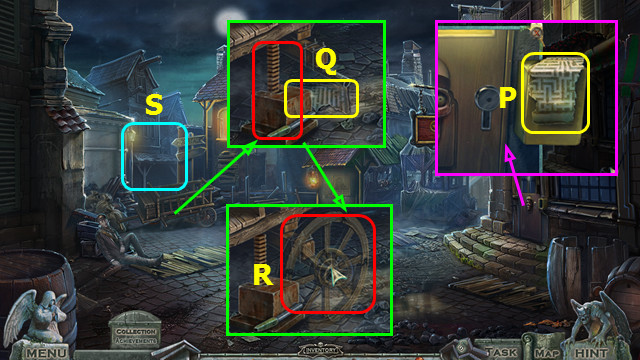
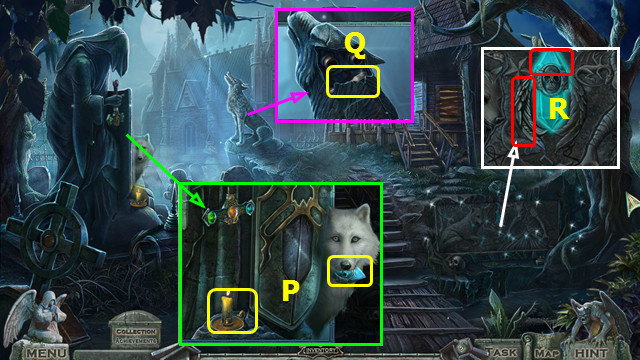
- Place the ANGEL HANDLE and DEMON HANDLE; select (Q).
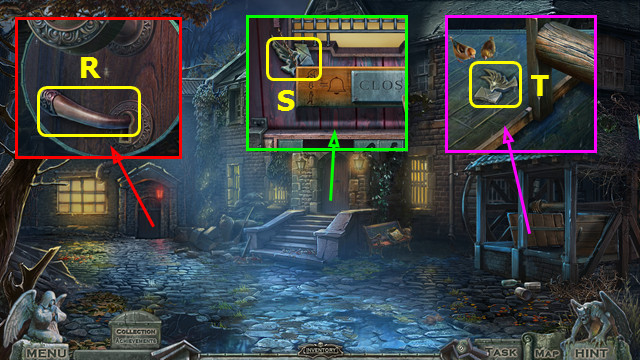
- Walk forward.
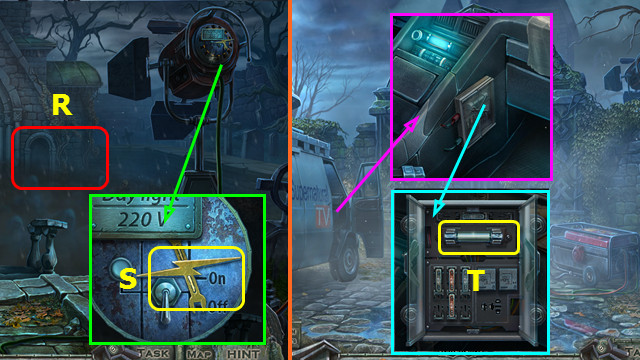
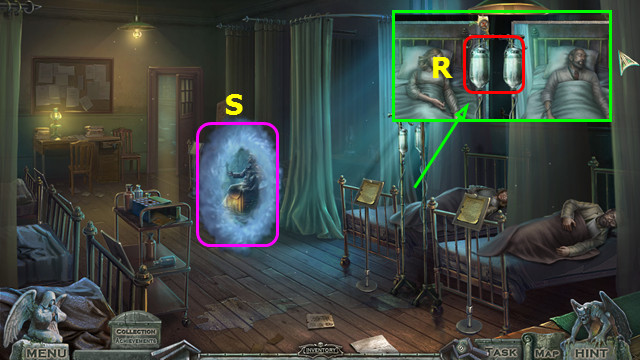
- Select (R).
- Take the GLOVE BOX EMBLEM (S).
- Walk down.
- Place the GLOVE BOX EMBLEM; select 2x and take the ELECTRICAL FUSE (T).
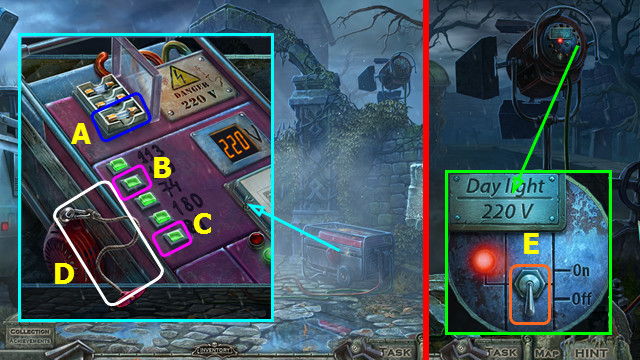
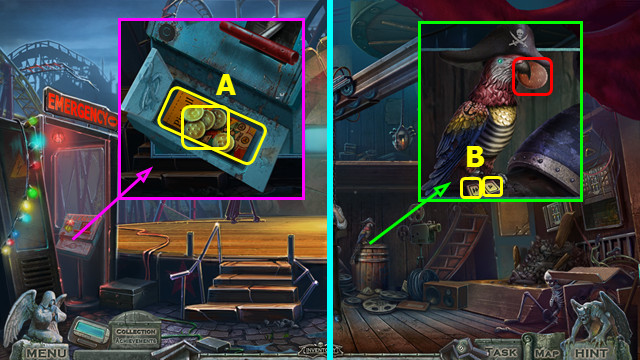
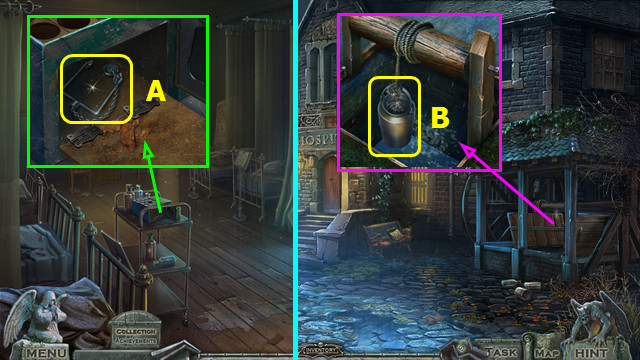
- Open the fuse box, take the burnt-out fuse, and place the ELECTRICAL FUSE (A).
- Select (B) and (C).
- Place and select the GENERATOR PLUG (D).
- Go forward.
- Select (E).
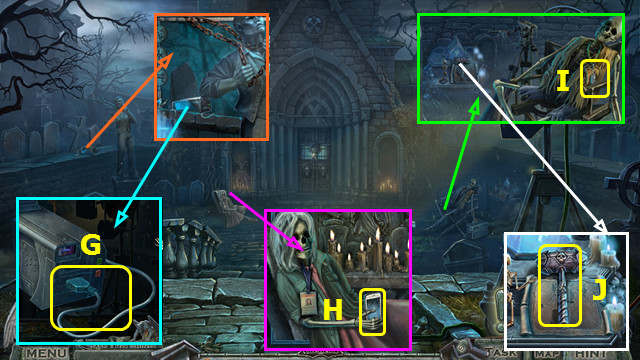
- Take the USB PLUG (G).
- Take the BROKEN PHONE (H).
- Take the CAR KEY (I).
- Take the SKULL HAMMER (J).
- Walk down.
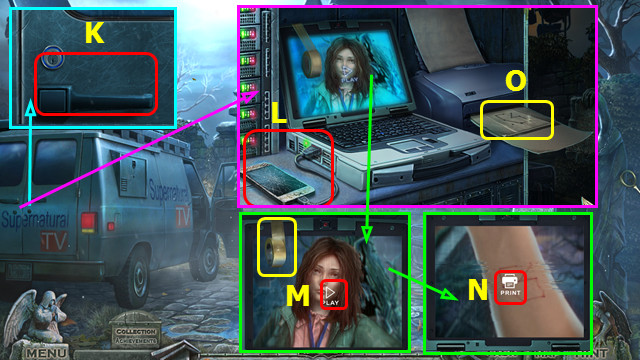
- Use the CAR KEY; select the handle (K).
- Take the 1/2 MYSTICAL RUNE and place the USB PLUG; add the BROKEN PHONE (L).
- Take the ELECTRICAL TAPE; select play (M).
- Select (N).
- Take the STRANGE CODE (O).
- Walk forward.
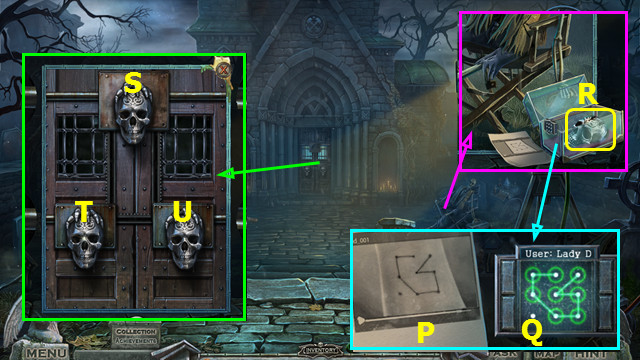
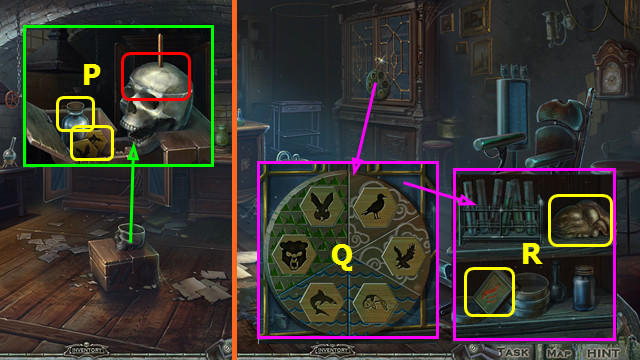
- Place the STRANGE CODE (P).
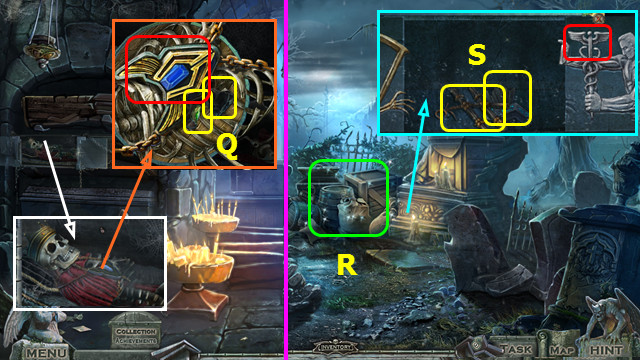
- Duplicate the symbol (Q).
- Take the SKULL (R).
- Place the SKULL (S).
- Move T right, U left, and T left.
- Go forward.
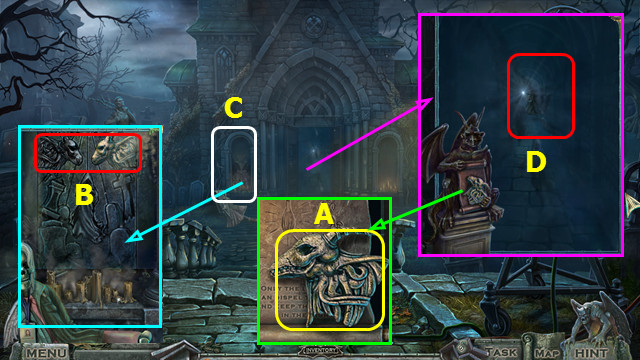
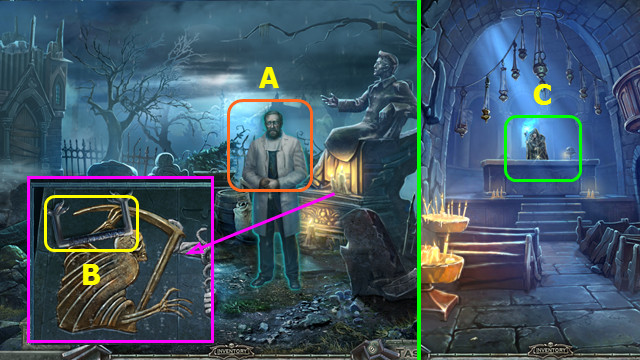
- Take the 2/2 GOAT HEAD SYMBOL (A).
- Place the 2 GOAT HEAD SYMBOLS (B).
- Play the HOP; earn the LIGHT OF SOULS (C).
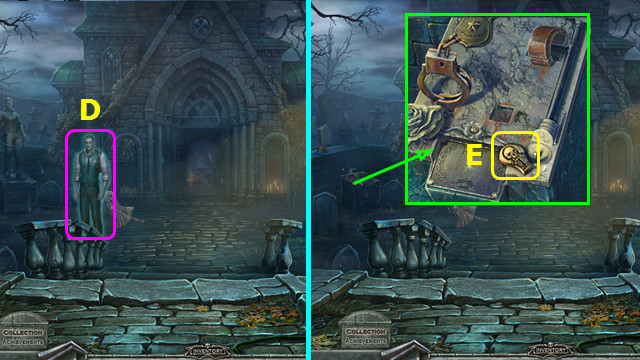
- Use the LIGHT OF SOULS (D).
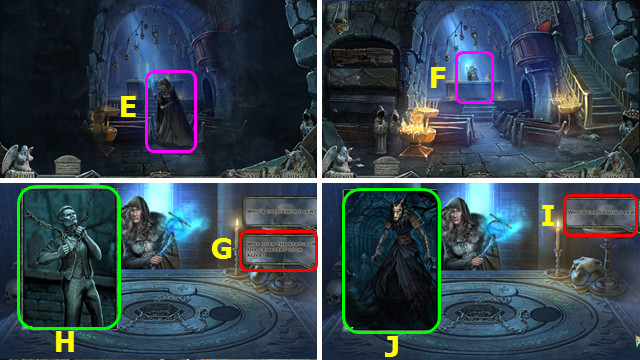
- Talk to Astrid; give the LIGHT OF SOULS (E).
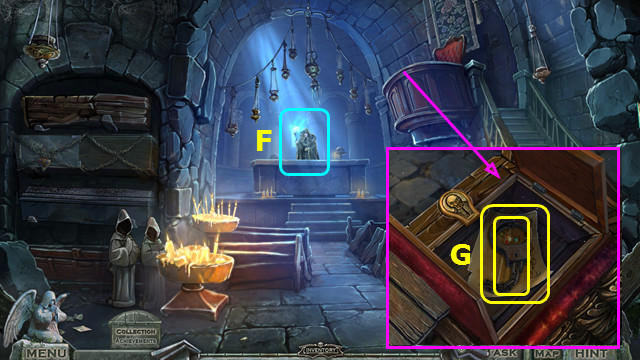
- Talk to Astrid (F).
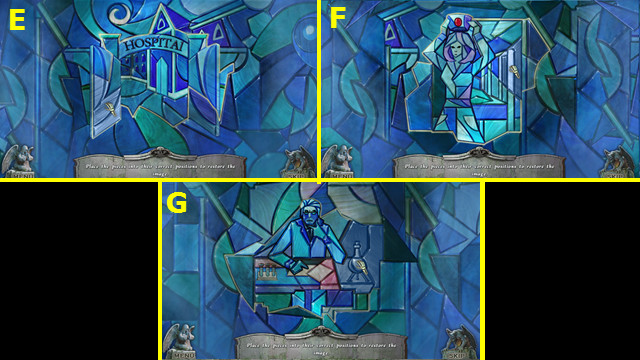
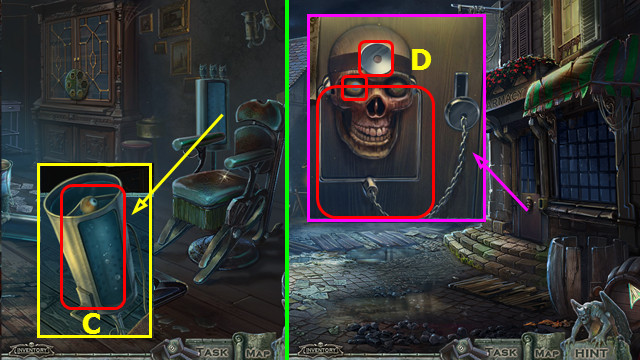
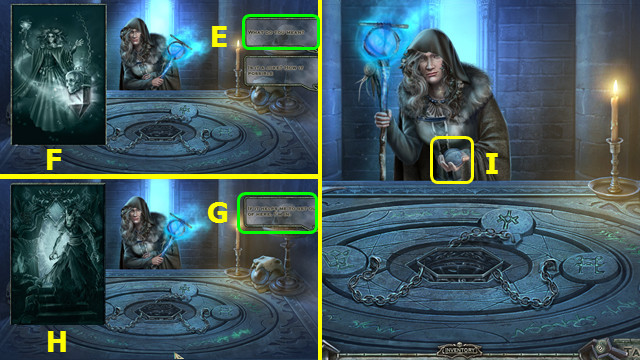
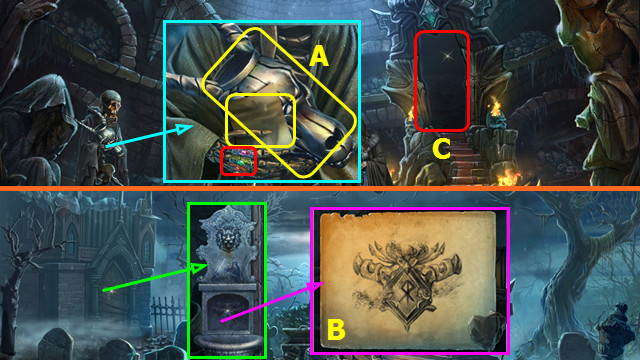
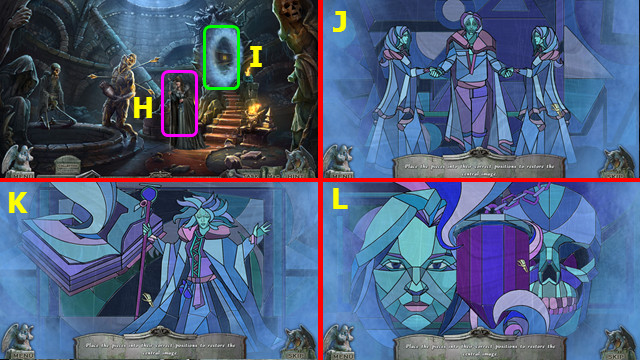
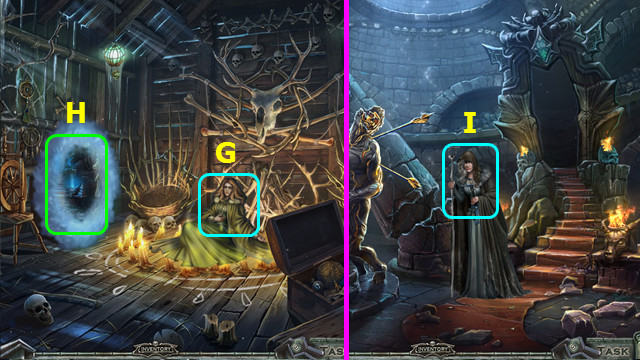
- Select (G).
- Restore the image (H).
- Select (I).
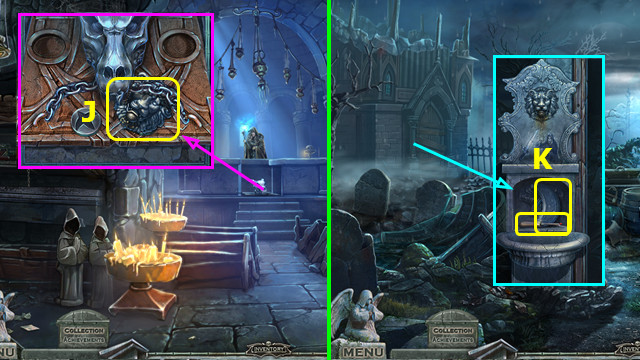
- Restore the image (J).
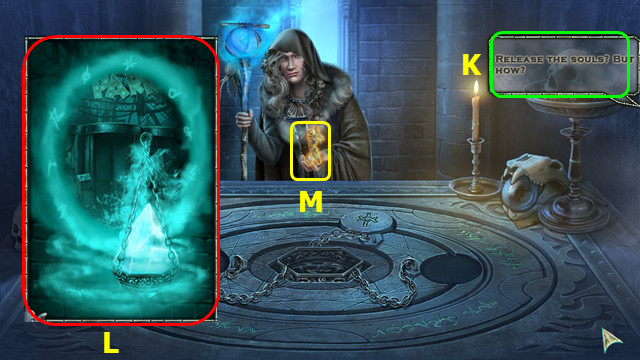
- Select (K).
- Restore the image (L).
- Take the 1/2 SKELETON FIGURINE (M).
- Take the 2/2 HEART EMBLEM; use the SKULL HAMMER and take the 2/2 SKELETON FIGURINE (N).
- Walk down.
- Place the 2 SKELETON FIGURINES; adjust the positions of the 3 skeletons as shown and take the SOUL CRYSTAL (O).
- Play the HOP; earn the 2/2 MYSTICAL RUNE (P).
- Go forward.
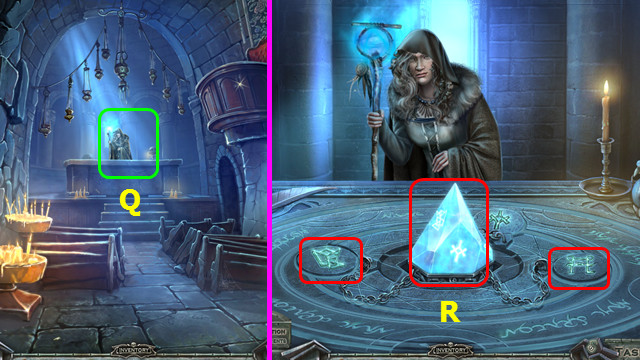
- Select (Q).
- Place the SOUL CRYSTAL and the 2 MYSTICAL RUNES (R).
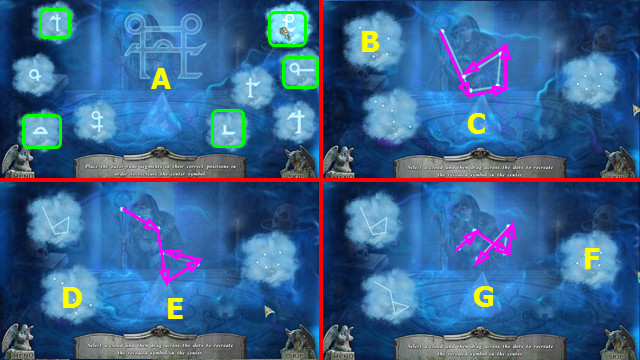
- Use the 5 pieces (green) to assemble the symbol (A).
- Select (B); recreate the symbol (C).
- Select (D); recreate the symbol (E).
- Select (F); recreate the symbol (G).


- Select the pairs (1-6).
- Note: the clouds will move after each pair.
- Select (H).
- Take the GLOWING ARTIFACT (I).
- Walk down.
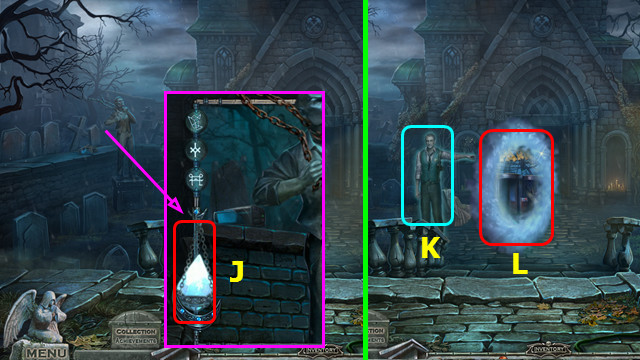
- Place the GLOWING ARTIFACT (J).
- Talk to Felix; take KIRSTEN'S LETTER (K).
- Enter the portal (L).
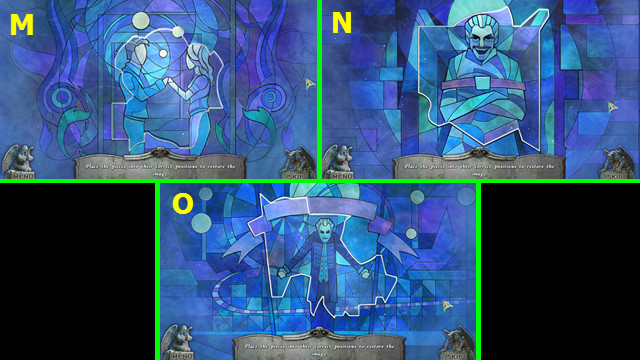
- Restore the image (M).
- Restore the image (N).
- Restore the image (O).
Chapter 2: The Park Entrance
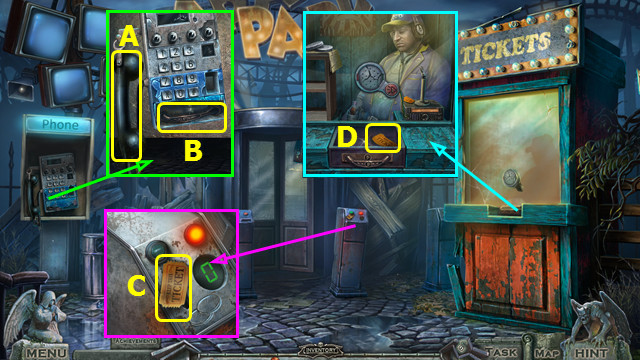
- Take the HANDSET (A).
- Remove the cover; take the DRAWER HANDLE (B).
- Take the 1/5 TICKETS (C).
- Place and select the DRAWER HANDLE; take the 2/5 TICKETS and push the drawer back in (D).
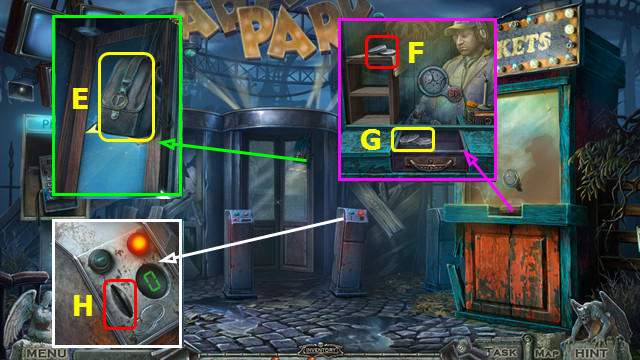
- Take the BAG; look through the hole (E).
- Place and select the 2 HEART EMBLEMS on the BAG; take the 4 LETTER PARTS, the MAGNET, and the 3/5 and 4/5 TICKETS.
- Combine KIRSTEN'S LETTER, 4 LETTER PARTS, and ELECTRICAL TAPE to make the CLOWN CLUE.
- Use the MAGNET (F); select the drawer and take the 2 ENTRANCE COINS (G).
- Use the 2 ENTRANCE COINS (H).
- Go forward.
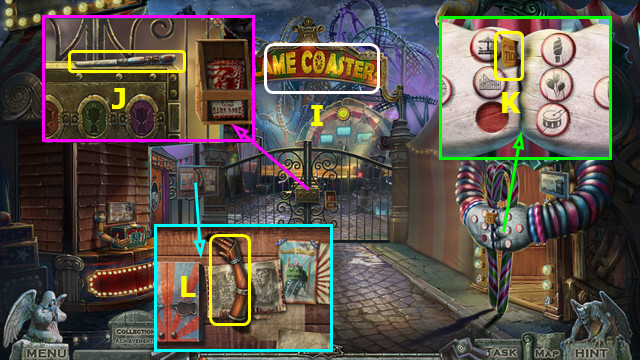
- Select (I).
- Take the LETTER OPENER; read the brochure (J).
- Use the LETTER OPENER on the HANDSET; take the MICROPHONE.
- Take the 5/5 TICKETS (K).
- Take the WOODEN ARM (L).
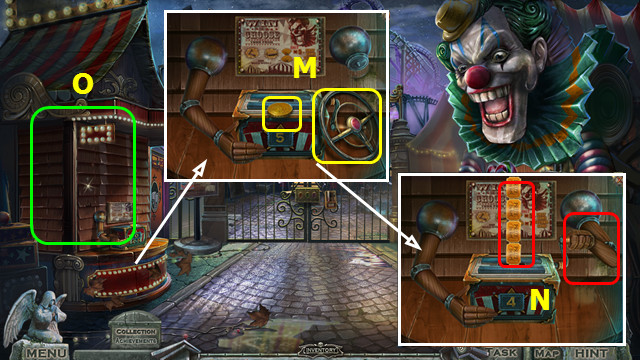
- Take the 1/2 GAME COIN and STEERING WHEEL (M).
- Place the WOODEN ARM and 5 TICKETS (N).
- Play the HOP; earn the GIFT BOX (O).
- Use the LETTER OPENER on the GIFT BOX; open it and take the HORN.
- Walk down.
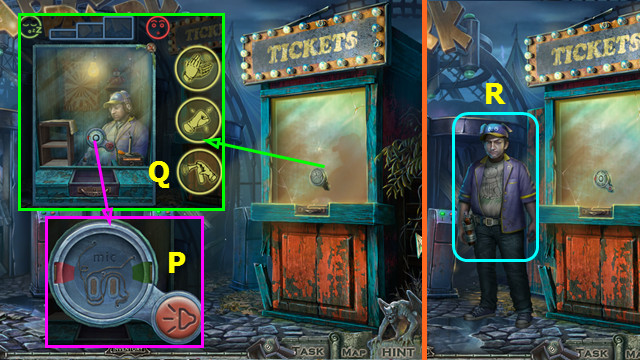
- Remove the cover and place the MICROPHONE (P).
- Select (Q).
- Talk to the Ticket Taker; take the CLOWN BUTTON (R).
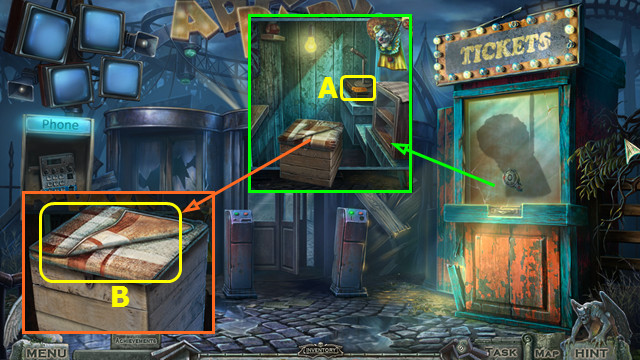
- Take the 1/7 and 2/7 TICKETS (A).
- Take the BLANKET (B).
- Go forward.
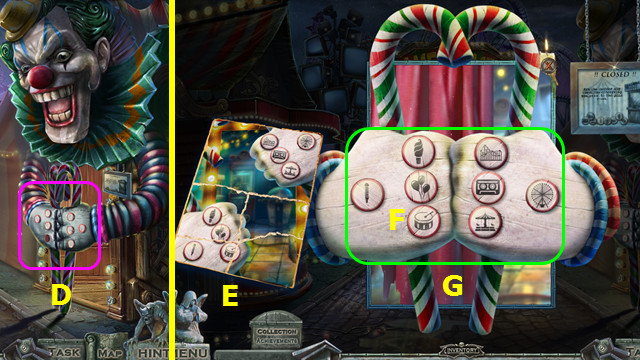
- Select (D).
- Place the CLOWN CLUE (E) and CLOWN BUTTON (F).
- Arrange the buttons as shown (G).
- Walk right.
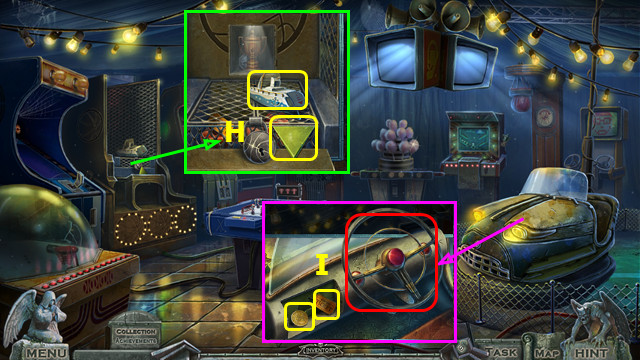
- Take the TOY SHIP and ARROW BUTTON (H).
- Place and select the STEERING WHEEL; take the 2/2 GAME COIN and 3/7 TICKETS (I).
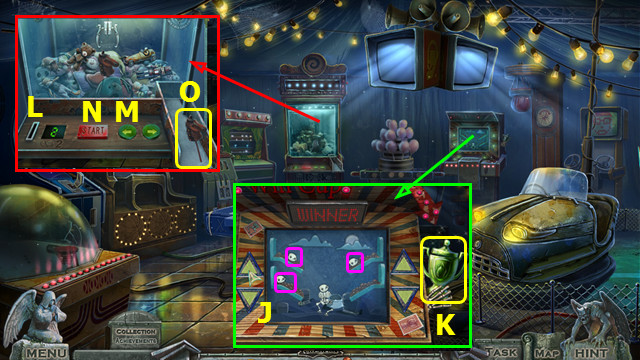
- Place the ARROW BUTTON; use the buttons to collect 9 skulls (J).
- Take the 1/3 TROPHY (K).
- Place the 2 GAME COINS (L).
- Select M-N; take the TOY HORSE (O).
- Walk down 2x.
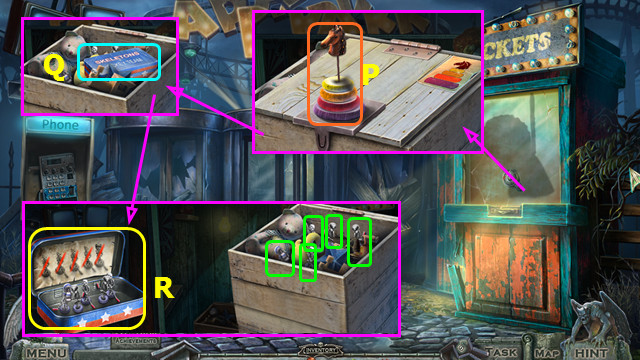
- Arrange the pieces as shown; place TOY HORSE and select 2x (P).
- Select the little box (Q).
- Open the little box (R).
- Move the items and select the 5 skeletons (green).
- Take the UNDEAD HOCKEY TEAM (R).
- Go forward and right.
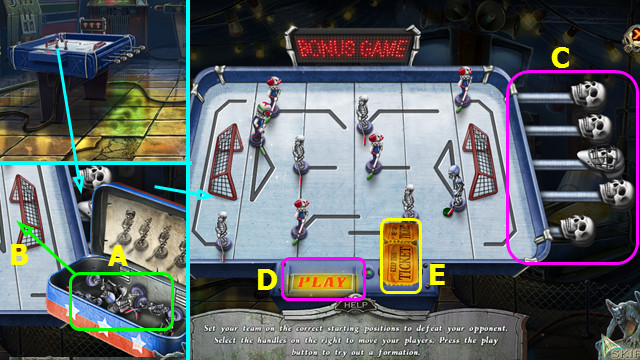
- Place the UNDEAD HOCKEY TEAM (A); move them to the rink (B).
- Move the levers to set up your team (C); select (D).
- This is randomly generated; your solution may differ.
- Take the 4/7, 5/7, and 6/7 TICKETS (E).
- Play a second game; take the POINTER and 2/3 TROPHY.
- Walk down.
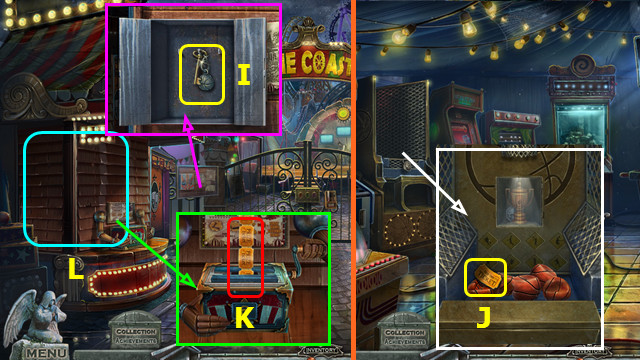
- Place the POINTER; take the BASKETBALL KEY (I).
- Walk right.
- Use the BASKETBALL KEY; open the grate and take the 7/7 TICKETS (J).
- Walk down.
- Place the 7 TICKETS (K).
- Play the HOP; earn the GIFT BOX (L).
- Use the LETTER OPENER on the GIFT BOX; open it and take the PUMP.
- Walk right.
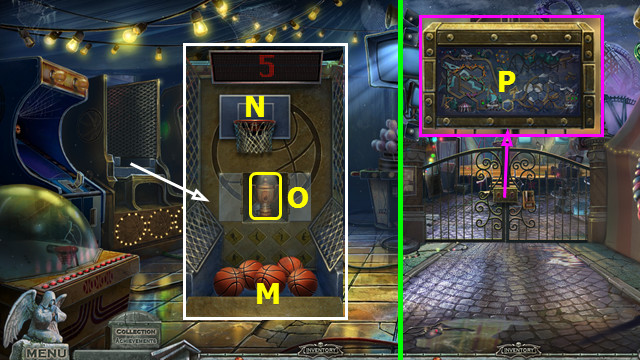
- Use the PUMP (M).
- Place 5 basketballs in the hoop (N).
- Take the 3/3 TROPHY (O).
- Walk down.
- Place the 3 TROPHIES; select the device (P).
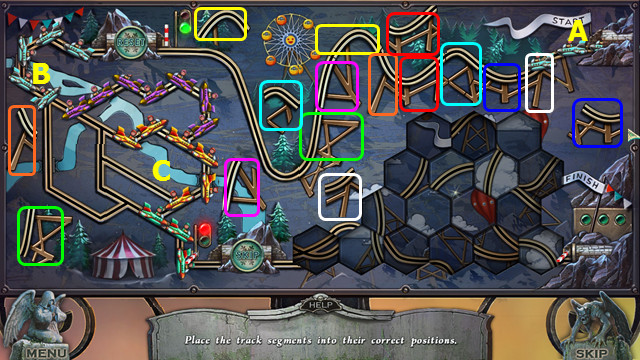
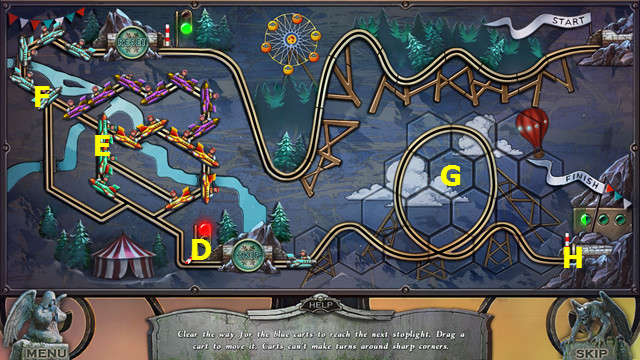
- Restore the tracks (color-coded).
- Drag the blue carts from (A) to (B).
- Move the purple, yellow, and green carts to the shown positions (C).
- Drag the green carts from (D) to (E).
- Drag the blue carts from (F) to (D).
- Restore the tracks (G).
- Drag the blue cars from (D) to (H).
- Go forward.
- Select (J).
- Talk to the Ticket Taker; take the SWITCH (K).
- Place and select the SWITCH (L).
- Move the knots as shown (M) and (N).
- Talk to Kirsten; give the BLANKET and take the 1/2 AUTOMOBILE EMBLEM HALF (O).
- Talk to the Ticket Taker and take the PAGER (P).
- Take the 1/3 FUSE SWITCH (A).
- Take the 2/2 AUTOMOBILE EMBLEM HALF (B).
- Walk down and right.
- Place the 2 AUTOMOBILE EMBLEM HALVES; take the 2/3 FUSE SWITCH and LIFT KEY (C).
- Walk down and forward.
- Place and select the LIFT KEY; press the red button (D).
- Select (E).
Chapter 3: Below the Stage
- Take the SCREWDRIVER (F).
- Walk down.
- Use the SCREWDRIVER on the 4 screws and remove the cover; take the 3/3 FUSE SWITCH and BELT (G).
- Go forward.
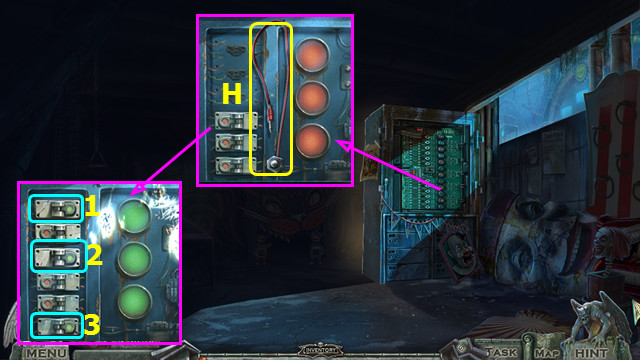
- Take the 1/2 CONNECTOR; place the 3 FUSE SWITCHES (H).
- Select (1-3).
- Select (I).
- Play the HOP; earn the HYDRAULIC ARM (J).
- Take the SHIP WHEEL (K).
- Take the ANCHOR EMBLEM (L); place the HYDRAULIC ARM (M).
- Combine the TOY SHIP, SHIP WHEEL, and ANCHOR EMBLEM; take the MOTOR.
- Place the MOTOR and BELT; select (N).
- Go forward.
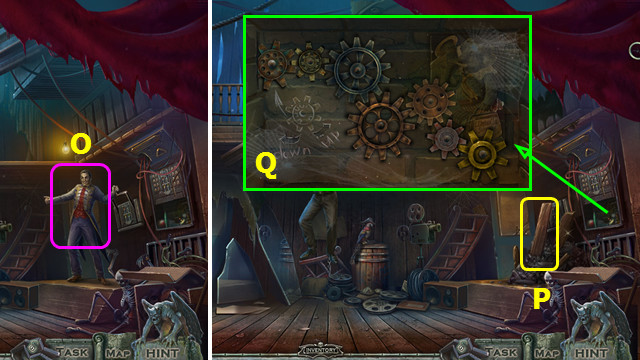
- Speak to Simon (O).
- Take the BOARD (P).
- Move the items; place the gears as shown (Q).
- Take the WRENCH EMBLEM (R).
- Use the SCREWDRIVER to remove the 4 screws; take the 1/2 NUMERICAL CYLINDER (S).
- Walk down 2x.
- Place and select the WRENCH EMBLEM; take the CRACKERS and METAL BALLS (A).
- Go forward 2x.
- Place the CRACKERS: take the 2 RECORDER BUTTONS (B).
- Walk down 2x.
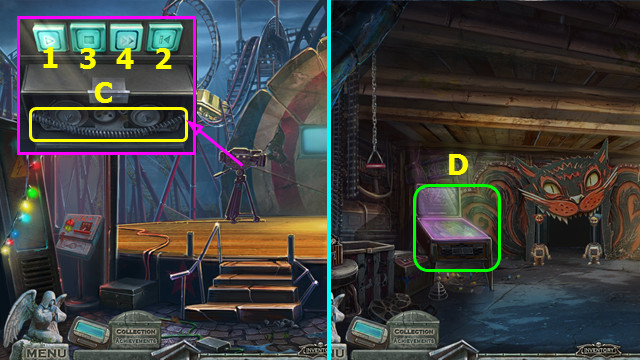
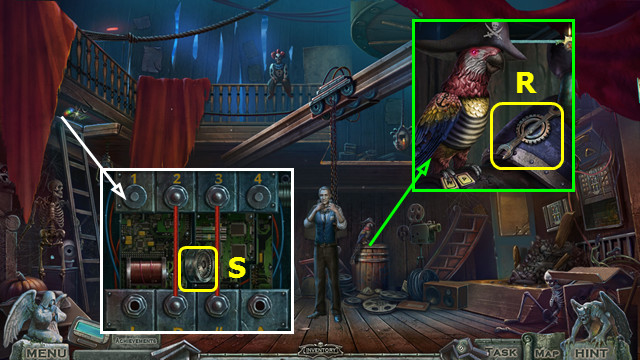
- Place the 2 RECORDER BUTTONS; select (1-4).
- Take the SPRING (C).
- Go forward.
- Select (D).
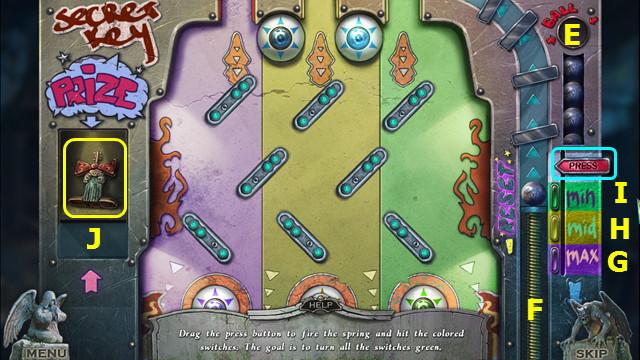
- Remove the damaged spring and place the SPRING (F); place the METAL BALLS (E).
- Drag the button to (G) 5x.
- Drag the button to (H).
- Drag the button to (I) 5x.
- Take the CLOWN KEY (J).
- Go forward.
- Place and select the CLOWN KEY (K).
- Talk to Felix; take the CLOWN TEAR (L).
- Walk down.
- Play the HOP; earn the LIGHTBULB (M).
- Place the CLOWN TEAR; take the 2/2 CONNECTOR (N).
- Go forward.
- Place the 2 CONNECTORS and LIGHTBULB (O).
- Arrange the wires as shown (P).
- Select: (R-T-Q-R), (Q-S-Q-Q-R), (S-T-R-R-S-Q).
- Go left.

- Use the BOARD (A).
- Enter the portal (B).
- Talk to Felix; take the 1/3 COFFIN KEY (D).
- Take the SKULL CHARM (E).
- Go forward.
- Talk to Astrid; take the STONE FLOWER (F).
- Place the SKULL CHARM; take the HANDCUFF and SWORD CLUE (G).
- Walk down.
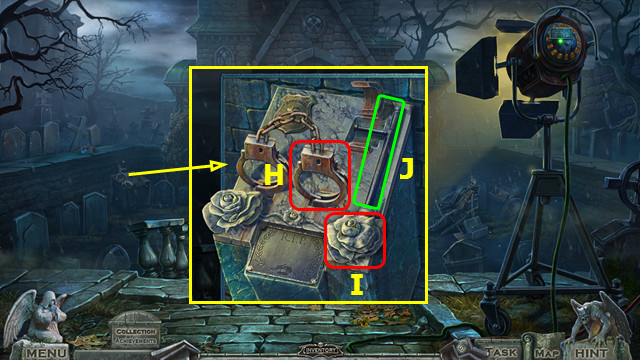
- Place the HANDCUFF (H) and STONE FLOWER (I).
- Select (J).
- Walk left.
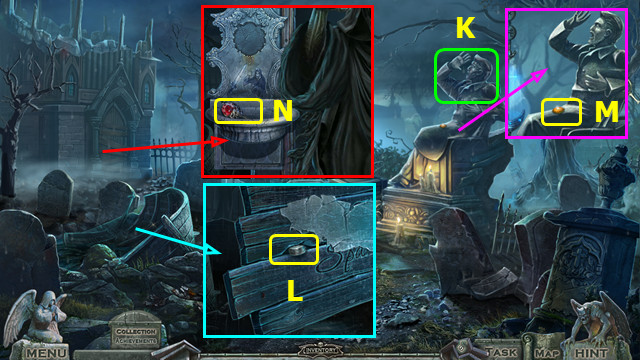
- Select (K).
- Take the 2/2 NUMERICAL CYLINDER (L).
- Take the 1/2 GLISTENING JEWEL (M).
- Take the 2/3 COFFIN KEY (N).
- Take the 1/2 OWL FIGURINE and GARDEN SPADE (O).
- Use the GARDEN SPADE (P).
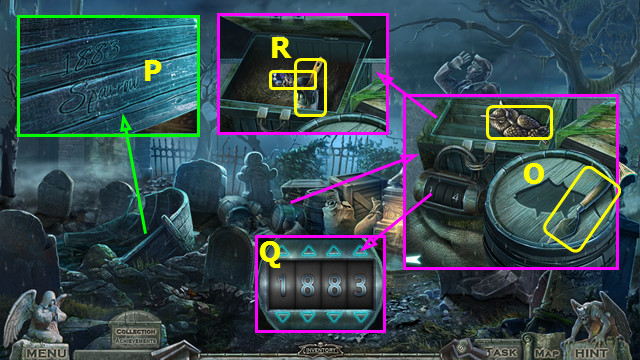
- Place the 2 NUMERICAL CYLINDERS; enter 1-8-8-3 (Q).
- Open the crate; take the 3/3 COFFIN KEY and GLUE (R).
- Walk down and forward.
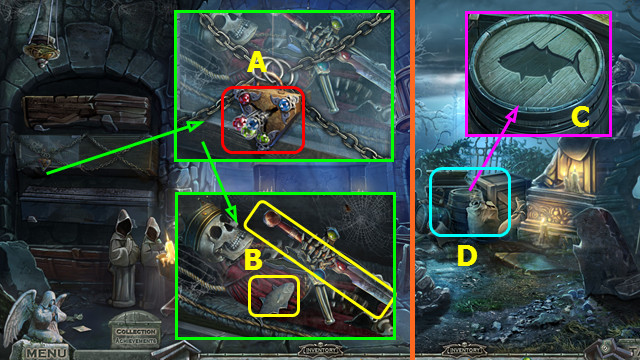
- Place and select the 3 COFFIN KEYS (A).
- Take the FISH EMBLEM and DRAINED SOUL SWORD (B).
- Walk down and left.
- Place the FISH EMBLEM (C).
- Play the HOP; earn the 2/2 GLISTENING JEWEL (D).
- Combine the DRAINED SOUL SWORD, SWORD CLUE, and 2 GLISTENING JEWELS.
- Select (1-5); take the CHARGED SOUL SWORD (E).
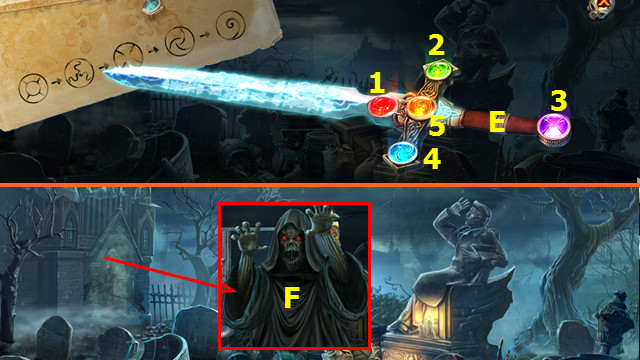
- Use the CHARGED SOUL SWORD (F).
- Select Gx2-H-I-J.
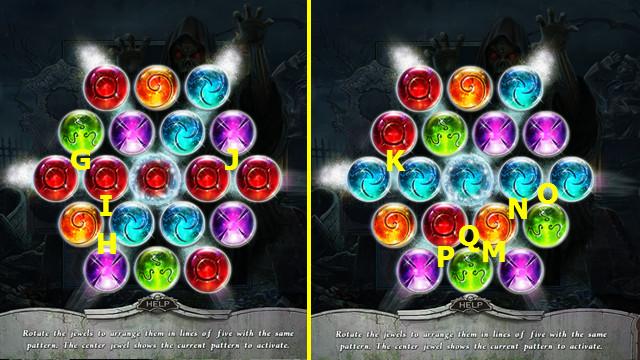
- Select Kx2-Qx2- N-O-P-Q-N.
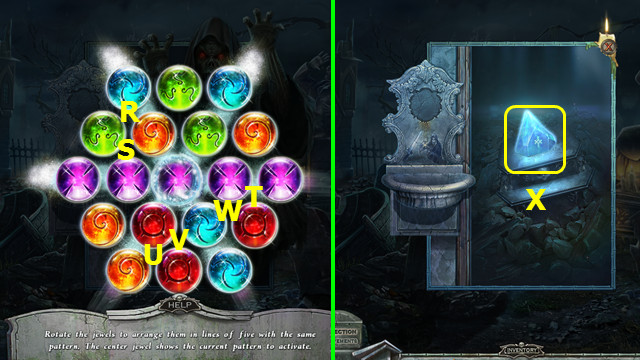
- Select R-S-Tx2-U-V-W.
- Take the SOUL CRYSTAL (X).
- Walk down and forward.
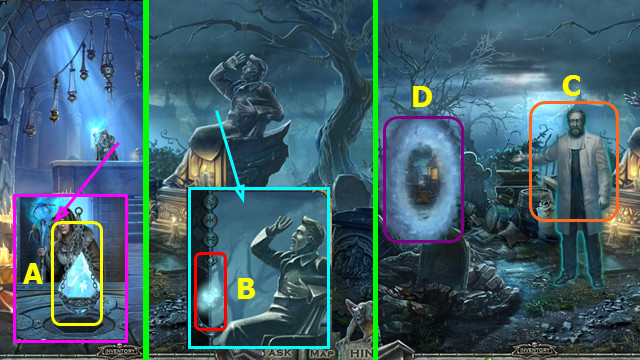
- Place the SOUL CRYSTAL; take the GLOWING ARTIFACT (A).
- Walk down and left.
- Place the GLOWING ARTIFACT (B).
- Talk to Karl; take the MEDICAL KIT (C).
- Enter the portal (D).
- Restore the image (E).
- Restore the image (F).
- Restore the image (G).
Chapter 4: Outside the Pharmacy

- Open the MEDICAL KIT.
- Read the instructions (H).
- Use (1-4) on (I).
- Take the PROTECTIVE MASK (J).
- Use the PROTECTIVE MASK on the scene.
- Select (K).
- Talk to the Courier; take the PARCEL (L).
- Take the LETTER from the PARCEL; open the PARCEL and take the VIRUS SAMPLES.
- Take the 5 WHEEL PARTS (green).
- Take the JACK and place the 5 WHEEL PARTS (M).
- Assemble the wheel and use the GLUE; take the WHEEL (N).
- Take the MAP SCRAP (O).
- Take the 1/2 MAP PART (P).
- Place and select the JACK 2x; take the 2/2 MAP PART (Q).
- Place the WHEEL (R).
- Combine the MAP SCRAP, 2 MAP PARTS, and GLUE to make the CITY MAP.
- Use the CITY MAP and walk left (S).
- Move from (A) to (B) to earn the boards.
- Move from (C) to (D) to earn the apple.
- Move from (E) to (F) to move the horse.
- Move from (G) to (H) to earn the extinguisher.
- Move from (I) to (J). to put out the fire.
- Move from (K) to (L) to earn the cane.
- Move from (M) to (N) to pull the boat in; continue to (O) to earn the key.
- Move from (P) to (Q) to unlock and enter the hospital.
- Take the 1/4 BONE (R).
- Take the 1/2 BIRD EMBLEM (S).
- Take the 2/2 BIRD EMBLEM (T).
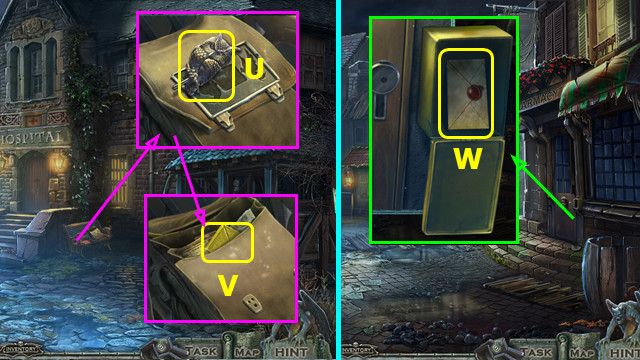
- Take the 2/2 OWL FIGURINE; place the 2 BIRD EMBLEMS (U).
- Open the bag and take the PLATED LETTER (V).
- Walk down.
- Place the PLATED LETTER; take the ENVELOPE (W).
- Open the ENVELOPE, read the letter, and take the 2 HOSPITAL BUTTONS.
- Walk left.
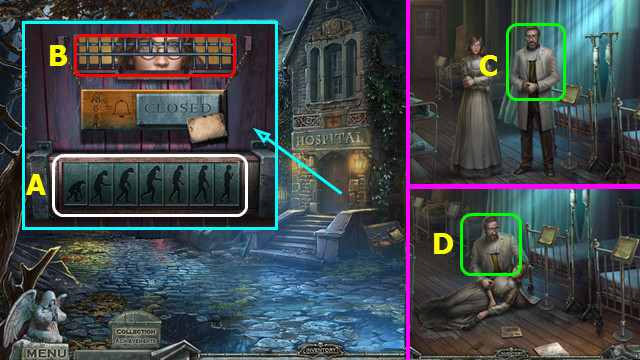
- Place the 2 HOSPITAL BUTTONS; arrange as shown (A).
- Use the LETTER (B).
- Go forward.
- Talk to Karl (C).
- Talk to Karl again (D).
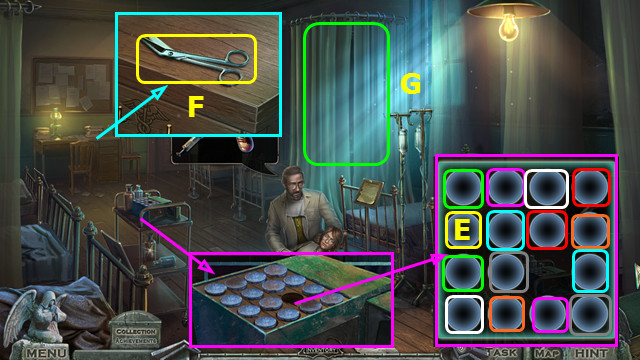
- Select pairs (color coded); take the MEDICINE (E).
- Take the SCISSORS (F).
- Select and play the HOP; earn the SYRINGE (G).
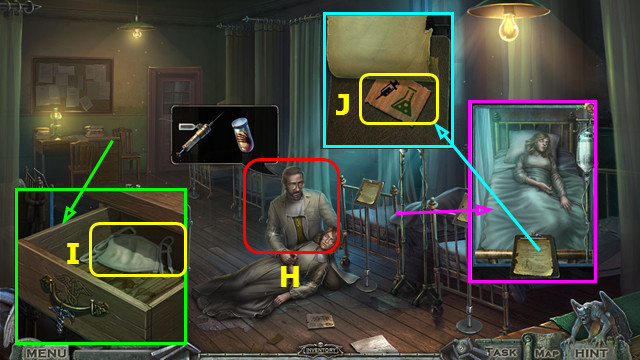
- Give the SYRINGE and MEDICINE; take the DRAWER HANDLE (H).
- Place and select the DRAWER HANDLE; take the PROTECTIVE MASK (I).
- Move the paper; take the 1/2 MEDICAL CARD (J).
- Walk forward.
- Use the PROTECTIVE MASK on the scene.
- Talk to Karl and give the VIRUS SAMPLES; take the LENS INSTRUCTIONS (K).
- Take the 2/4 BONE (L).
- Take the REFLECTOR (M).
- Use the SCISSORS and take the EMPTY BUCKET (N).
- Take the WOODEN LUNGS (O).
- Place the 2 OWL FIGURINES (P).
- Walk down.
- Place the WOODEN LUNGS; take the STETHOSCOPE (A).
- Walk down.
- Place the EMPTY BUCKET and select it 2x; take the BUCKET WITH WATER (B).
- Walk forward 2x.
- Use the BUCKET WITH WATER; earn the WOODEN EYE (C).
- Walk down 3x.
- Place the REFLECTOR, STETHOSCOPE, and WOODEN EYE (D).
- Walk right.
- Take the 1/2 FLOWER EMBLEM (E).
- Take the 2/2 FLOWER EMBLEM (F).
- Take the 3/4 BONE (G).
- Take the VALVE (H).
- Walk down and left.
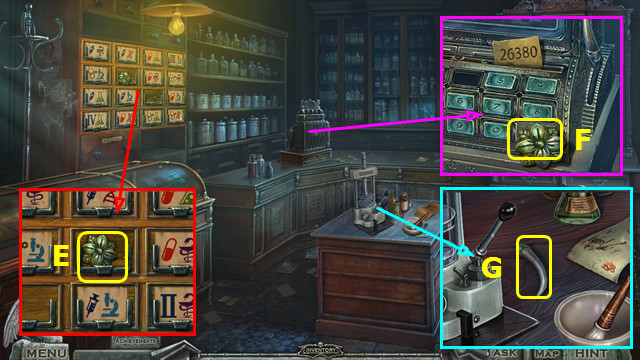
- Place the 2 FLOWER EMBLEMS; take the CASH REGISTER BUTTON (I).
- Walk down and right.

- Place the CASH REGISTER BUTTON; select 2-6-3-8-0 (J).
- Take the 4/4 BONE (K).
- Place the 4 BONES; take the 1/2 CADUCEUS HALF (L).
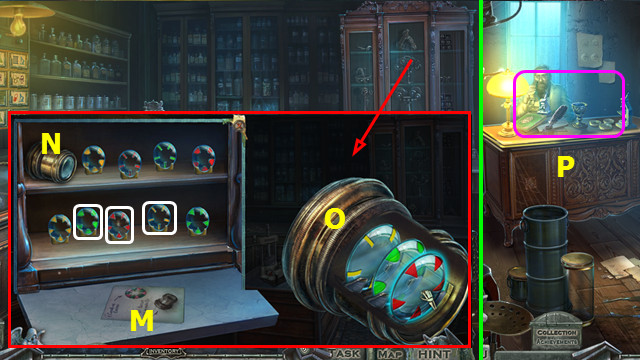
- Open the glass and place the LENS INSTRUCTIONS (M).
- Select the eyepiece (N).
- Open and place the lenses as shown; take the MODIFIED LENS (O).
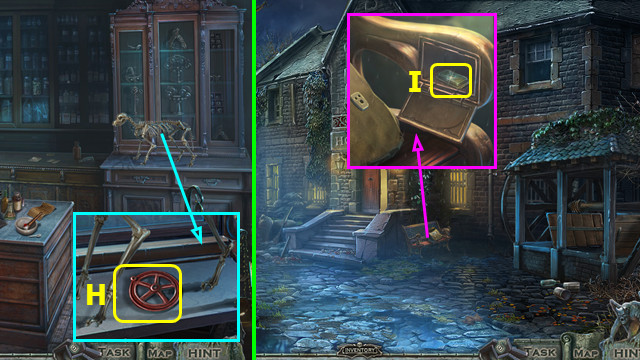
- Walk down, left, and forward 2x.
- Select (P).
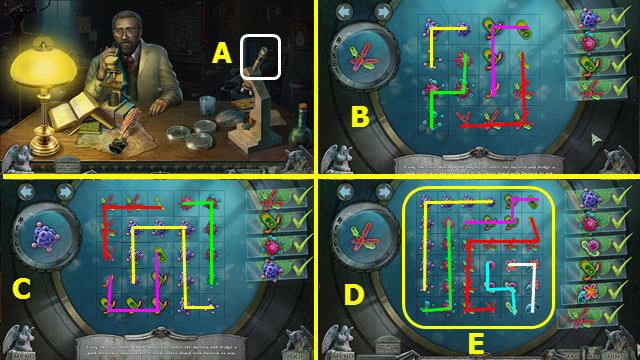
- Place and select the MODIFIED LENS (A).
- Connect the bacteria as shown (B).
- Connect the bacteria as shown (C).
- Connect the bacteria as shown (D).
- Take the BACTERIA SAMPLE (E).
- Drag (F) to (G).
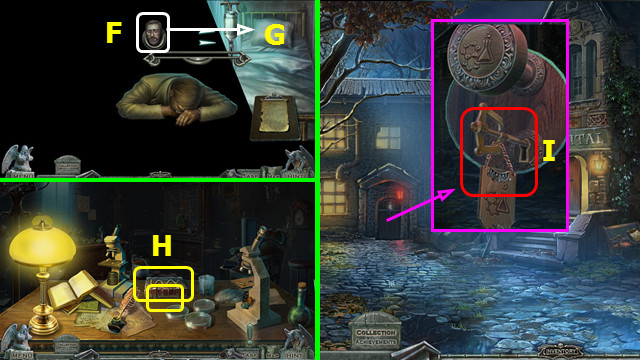
- Take the MEDICAL BOOK and LABORATORY KEY (H).
- Walk down 2x.
- Place and select the LABORATORY KEY (I).
- Walk left.
Chapter 5: The Laboratory
- Place the MEDICAL BOOK and BACTERIA SAMPLE (J).
- Play the HOP; earn the PINK CRYSTAL RECIPE (K).
- Place and select the VALVE; earn the 2/2 MEDICAL CARD (L).
- Take the GREEN LIQUID (M).
- Walk down 2x, and go right.

- Place the 2 MEDICAL CARDS in the frames.
- Arrange the cards as shown (N).
- Take the BRAIN HALF (O).
- Walk down and go left 2x.
- Remove the cap and place the BRAIN HALF; take the ANIMAL TILES and PURPLE POWDER (P).
- Walk down and go forward 2x.
- Place the ANIMAL TILES and arrange as shown (Q).
- Open the cupboard; take the WOODEN HEART and MATCHES (R).
- Walk down.
- Place the WOODEN HEART; take the 1/2 FLOWERS (A).
- Play the HOP; earn the BLUE PILLS (B).
- Walk down and left.
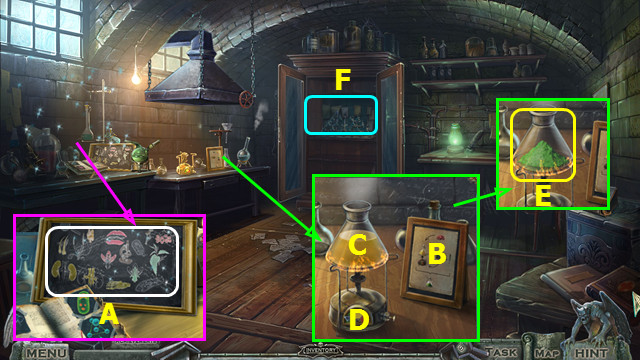
- Use the MATCHES; take the JAR OPENER and BRONZE LEAF (C).
- Place the BRONZE LEAF; take the ORANGE LIQUID (D).

- Place the PINK CRYSTAL RECIPE (E).
- Use the MATCHES; and place the GREEN LIQUID (F).
- Select 2x (G).
- Add the BLUE PILLS; take the PINK CRYSTALS (H).
- Walk down, go forward 2x.
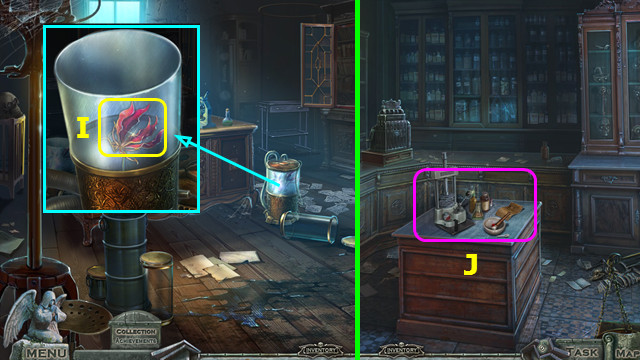
- Use the JAR OPENER; take the 2/2 FLOWERS (I).
- Walk down 3x; walk right.
- Select (J).
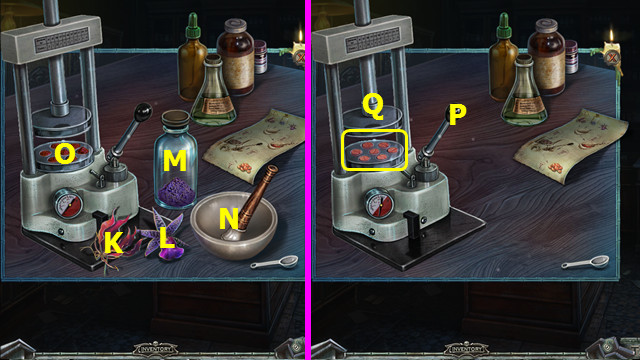
- Place the 2 FLOWERS (K-L), and PURPLE POWDER (M).
- Add K-L-M to N.
- Use N on O.
- Select P; take the RED PILLS (Q).
- Walk down and go left 2x.
- Play the HOP; earn the GREEN CRYSTAL RECIPE (A).
- Place the GREEN CRYSTAL RECIPE (B).
- Place the ORANGE LIQUID (C).
- Select (D).
- Add the RED PILLS; take the GREEN CRYSTALS (E).
- Select (F).
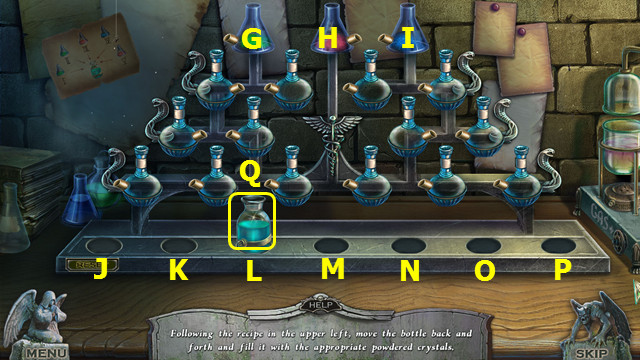
- Place the PINK CRYSTALS (H).
- Place the GREEN CRYSTALS (G).
- Move L-K, select Gx2, move K-M, select G.
- Move M-N, select Hx2.
- Move N-P; select I.
- Move P-L, select H.
- Take the CURE (Q).
- Walk down and forward.
- Use the CURE (R).
- Enter the portal (S).
- Talk to Karl; take the 1/2 ANGELIC AMULET (A).
- Take the BONE HANDLE (B).
- Walk down and forward.
- Select (C).
- Select (E).
- Restore the image (F).
- Select (G).
- Restore the image (H).
- Take the 1/2 LUNAR TILE (I).
- Take the LION'S HEAD and place the BONE HANDLE (J).
- Walk down and left.
- Place the LION'S HEAD; take the SEAM RIPPER and 2/2 LUNAR TILE (K).
- Walk down and forward.
- Place the 2 LUNAR TILES; arrange as shown (L).
- Go forward.
- Talk to Astrid; take the 1/3 ORNATE RING (M).
- Take the 2/2 CADUCEUS HALF (N).
- Take the 2/2 ANGELIC AMULET (O).
- Take the CLOCK KEY (P).
- Walk down.
- Place the 2 ANGELIC AMULETS; take the COAL and 2/3 ORNATE RING (Q).
- Walk down and left.
- Play the HOP; earn the 3/3 ORNATE RING (R).
- Place the 2 CADUCEUS HALVES; take the PORTAL FRAME and 1/3 BRONZE CHARM (S).
- Walk down and go forward 2x.
- Place the 3 ORNATE RINGS; take the PAPER and KYRKOGRIMM SKULL (A).
- Walk down 2x, and go left.
- Use the PAPER and COAL; take the PORTAL CLUE (B).
- Walk down and go forward 2x.
- Select (C).
- Place the PORTAL FRAME (D) and KYRKOGRIMM SKULL (E).
- Place the PORTAL CLUE (F).
- Drag the 4 runes from (G) to (1-4).
- Talk to Astrid; take the 1/3 KYRKOGRIMM RUNE (H).
- Enter the portal (I).
- Restore the image (J).
- Restore the image (K).
- Restore the image (L).
Chapter 6: By the Lake
- Remove the cover; take the SAW BLADE (M).
- Use the SEAM RIPPER; take the SAW HANDLE (N).
- Take the BLADE HOLDER (O).
- Combine the SAW BLADE, SAW HANDLE, and BLADE HOLDER to make the SAW.
- Take the STICKS and use the SAW (P).
- Go left.

- Select (A).
- Click 1-13 when the ball is near to move through the maze.
- Do this 2 more times as you go through the dialog.
- Talk to the Old Man; take the ARROW RECIPE (F).
- Take the CORKSCREW (G).
- Take the OCTOPUS EMBLEM and use the CORKSCREW (H).

- Remove the items and collect the HERBS (pink); take the FERRY HANDLE (I).
- Walk down.
- Place the OCTOPUS EMBLEM; take the HUNTER FIGURINE and ROPE (J).
- Go left.
- Place the HUNTER FIGURINE; place and select the CLOCK KEY (K).
- Take the HAMMER EMBLEM (L).
- Walk down.
- Place the HAMMER EMBLEM; take the WHITTLING KNIFE and STONE WING (M).
- Combine the ARROW RECIPE, STICKS, HERBS, ROPE, and WHITTLING KNIFE to make the ARROWS.
- Go left.
- Give the ARROWS and talk to the Old Man; take the FERRY KEY (N).
- Walk down.
- Use the FERRY KEY and place the FERRY HANDLE (O).
- Go forward.
- Take the STONE FRAGMENT and LIT CANDLE (P).
- Take the ANTIQUE FORK (Q).
- Place the STONE FRAGMENT and STONE WING (R).
- Play the HOP; earn the ANCIENT SCROLL.
- Open the ANCIENT SCROLL and read the instructions; take the 2/3 KYRKOGRIMM RUNE.
- Walk down and left.
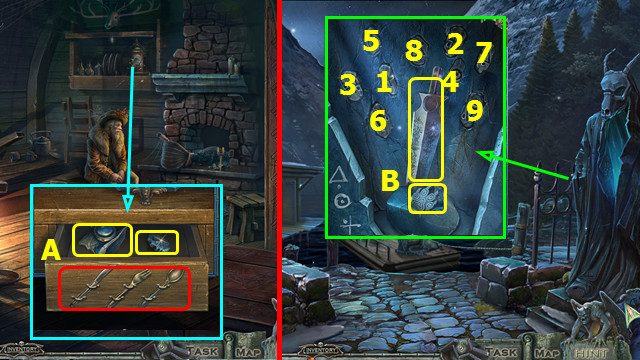
- Place the ANTIQUE FORK and swap the utensils as shown; take the DAMAGED WOLF MECHANISM and 3/3 KYRKOGRIMM RUNE (A).
- Walk down.
- Place the 3 KYRKOGRIMM RUNES and select 1-9; take the SHIELD INSIGNIA and RUSTY BLADE (B).
- Go forward.
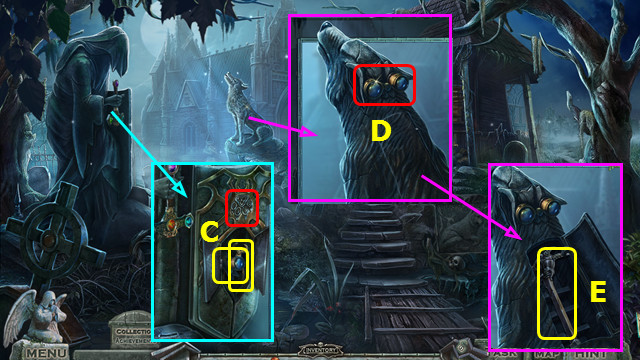
- Place the SHIELD INSIGNIA; take the MECHANISM PART and TONGS (C).
- Add the MECHANISM PART to the DAMAGED WOLF MECHANISM to make the WOLF MECHANISM.
- Place and select the WOLF MECHANISM; play the HOP (D).
- Take the WOLF HAMMER (E).
- Walk down and left.
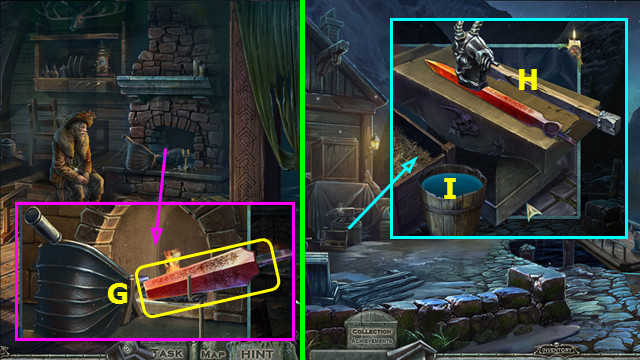
- Place the RUSTY BLADE and select the bellows; use the TONGS to take the SCORCHED BLADE (G).
- Walk down.
- Place the SCORCHED BLADE and WOLF HAMMER; select 3x (H).
- Move the blade to the bucket to make the DRAINED SWORD (I).
- Go forward.
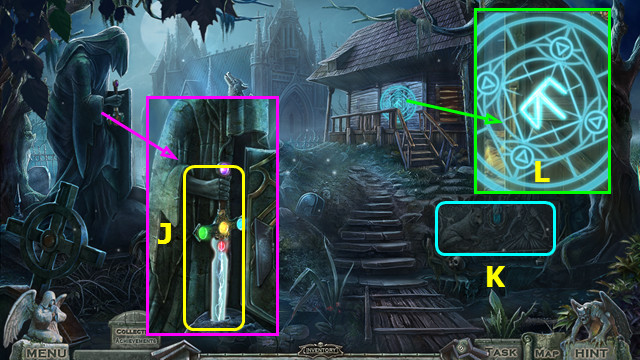
- Place the DRAINED SWORD; take the SWORD OF LIGHT (J).
- Play the HOP; earn the SHIELD OF LIGHT (K).
- Use the SHIELD OF LIGHT and go forward (L).
- Use the LIT CANDLE on the scene 2x.
- Read the scroll and take the 2/3 BRONZE CHARM (N).
- Take the ROPE (O).
- Take the SKELETAL HAND and place the ROPE (A).
- Move all the items to the board; take the DREAMCATCHER (B).
- Take the SKELETAL HORN and place the DREAMCATCHER (C).
- Place the SKELETAL HAND and SKELETAL HORN; take the 3/3 BRONZE CHARM and CHALK (D).
- Use the CHALK and 3/3 BRONZE CHARM (E).
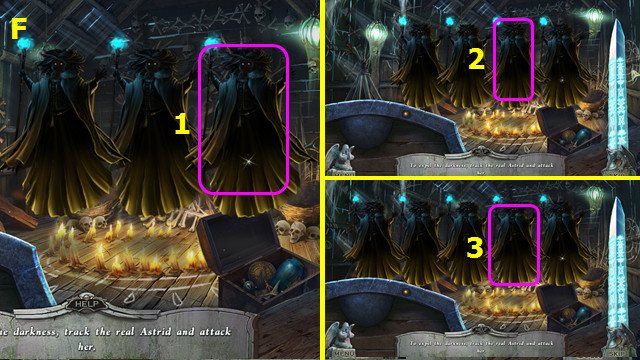
- Select the real Astrid 1-3 (F).
- This mini-game is random.
- Talk to Astrid; take the DARK AMULET (G).
- Enter the portal (H).
- Talk to Astrid; take the CEMETERY SKETCH (I).
- Walk down 2x and go left.
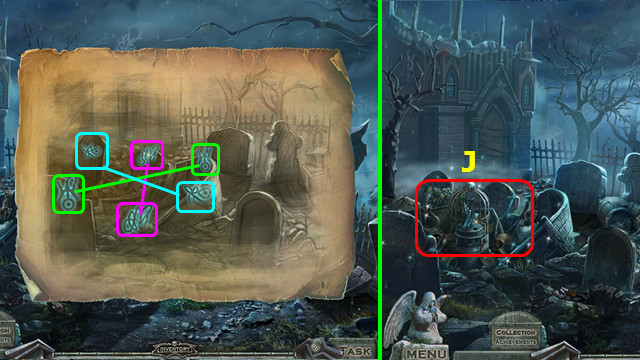
- Use the CEMETERY SKETCH on the scene; connect the pairs (color-coded).
- Play the HOP; earn the GOLDEN ARROWS (J).
- Walk down and go forward 2x.
- Use the GOLDEN ARROWS (K).
- Select (L).
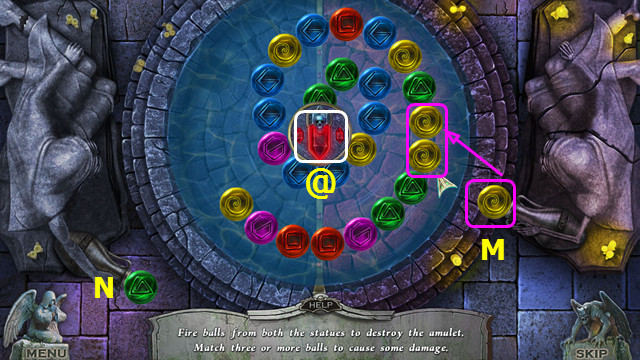
- Place the DARK AMULET (@).
- Shoot the balls to make sets of 3 or more (M).
- You can shoot from both sides (N).
- Continue shooting to destroy the chain.
- Congratulations! You have completed Redemption Cemetery: Embodiment of Evil!
Created at: 2017-06-09