

Walkthrough Menu
- General Tips
- Chapter 1: Skull Hill
- Chapter 2: The Bar and Workshop
- Chapter 3: The Church
- Chapter 4: The Mine
- Chapter 5: A One Horse Town
- Chapter 6: The Judge's House
- Chapter 7: The Swamp
- Chapter 8: The Secret Lab
- Chapter 9: The Ship
- Chapter 10: The Finale
General Tips
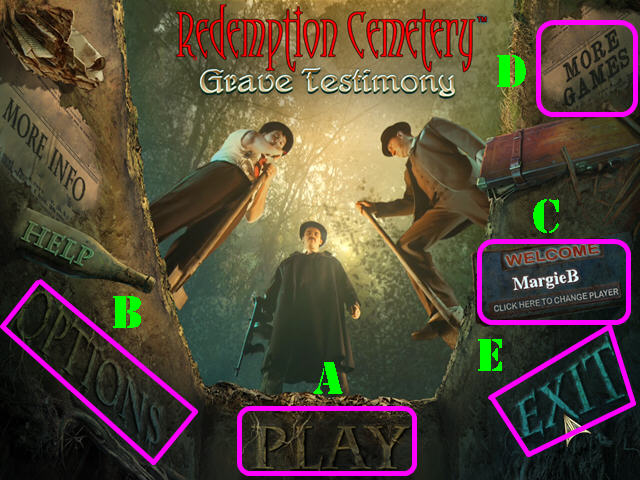
- Click on 'Play' (A) to access the main chapters in the game.
- The 'Options' (B) button allows you to adjust the screen, music, cursor, and sound.
- The 'Click here to change player' button (C) can be used to add or delete a player.
- Go to 'More Games' to view other titles from this developer.
- Exit the game here (E).
- You can skip a puzzle once the 'SKIP' button fills. The 'SKIP' button only appears in puzzle sections; it is located in the lower right corner.
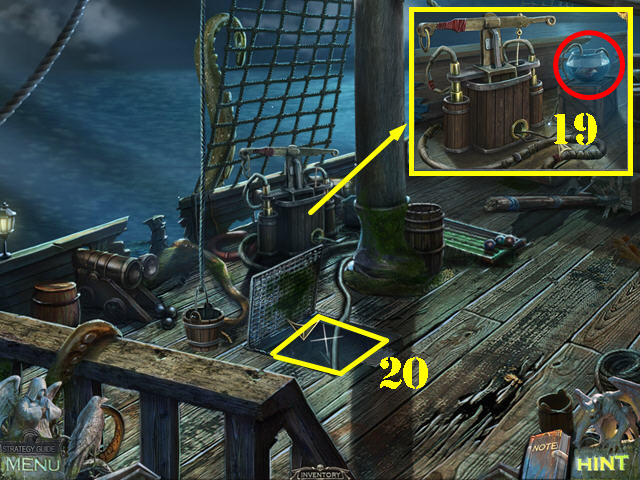
- In this guide we will use the acronyms 'HOS' for Hidden Object Scenes and 'HOP' for Hidden Object Puzzles.
- Items written in yellow in HOS are hidden; you must open or click on something to make the hidden items appear.
- Collect the CROW RUNES to bring the mystical crow back to life and allow you to use its help. The Mystical Crow can help you access out of reach items. Select the crow in the lower left corner (your cursor will turn into a crow) and then use it on an area to access that item once you see the crow's beak open and close.
- Items marked with a green '+' can be combined with others to create new items. Drag one item over another to combine them in inventory. If they are matched a new item will be created, if they are not a match, the items will remain intact.
Chapter 1: Skull Hill
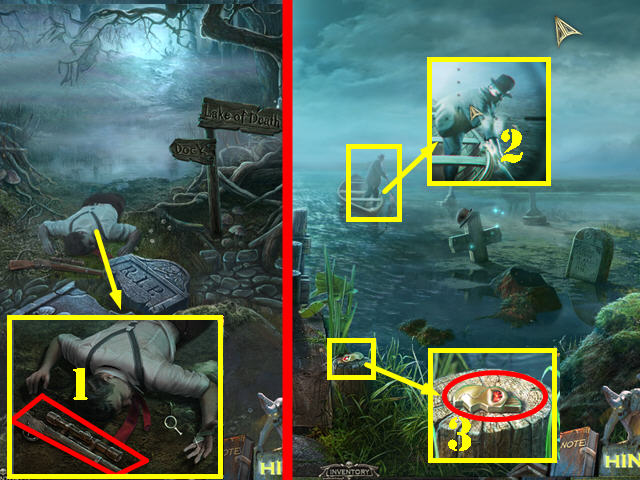
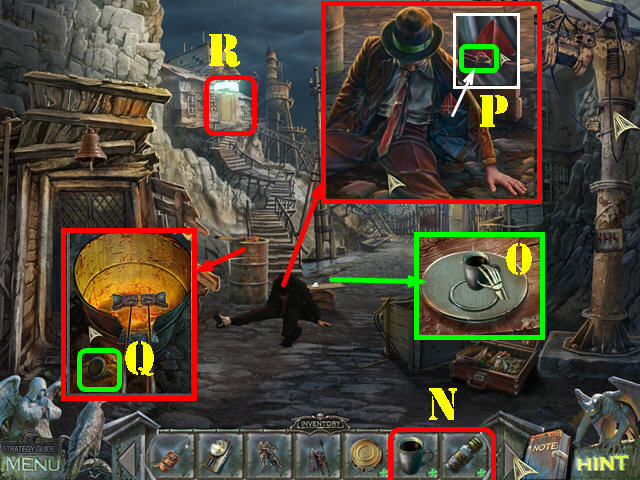
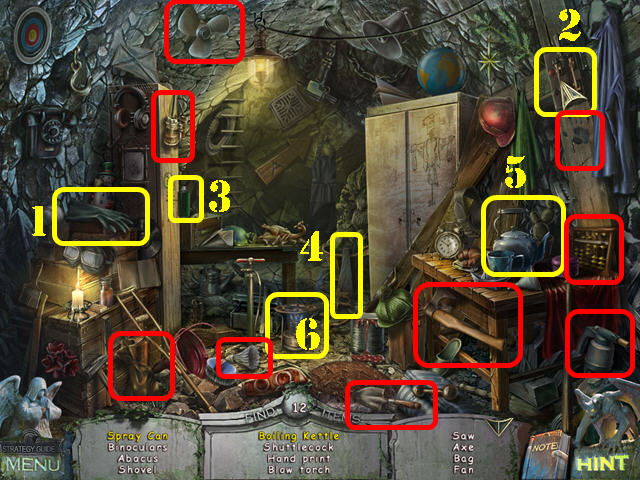
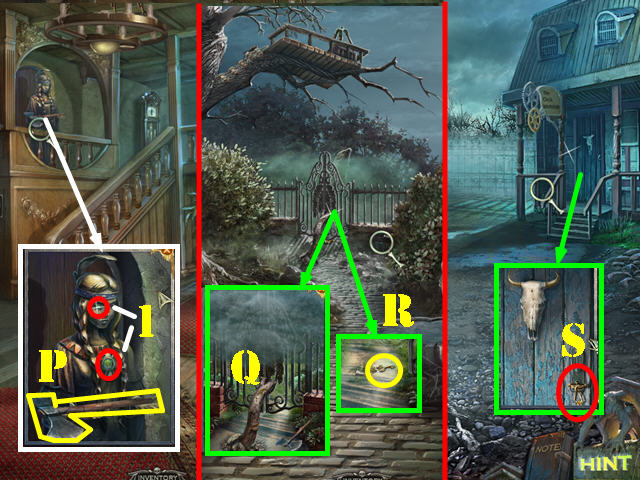
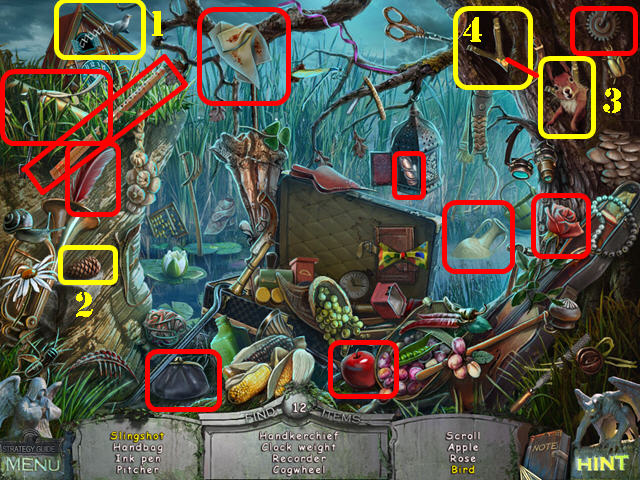
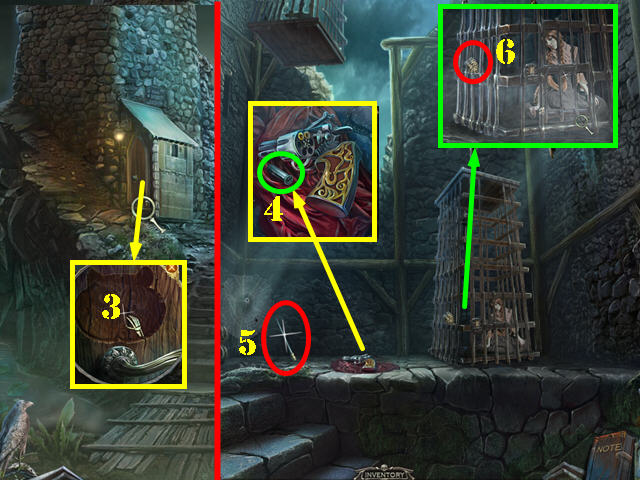
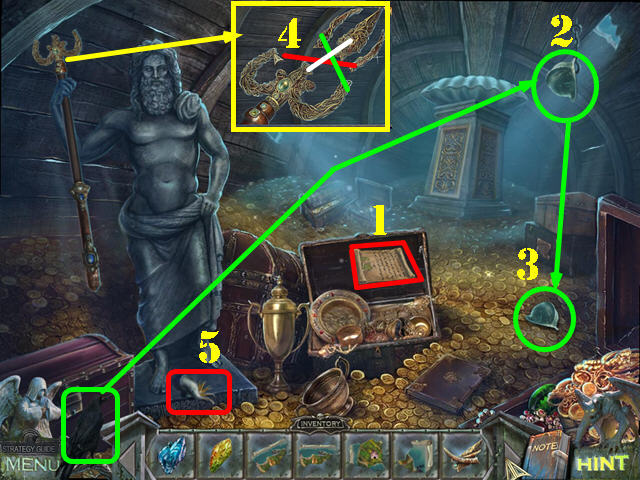
- Zoom into the man; take the OPTICAL SIGHT (1).
- Go left.
- Put the OPTICAL SIGHT on the gangster in the boat (2).
- Examine the stump; take the SKULL PIECE (3).
- Walk down and go right.
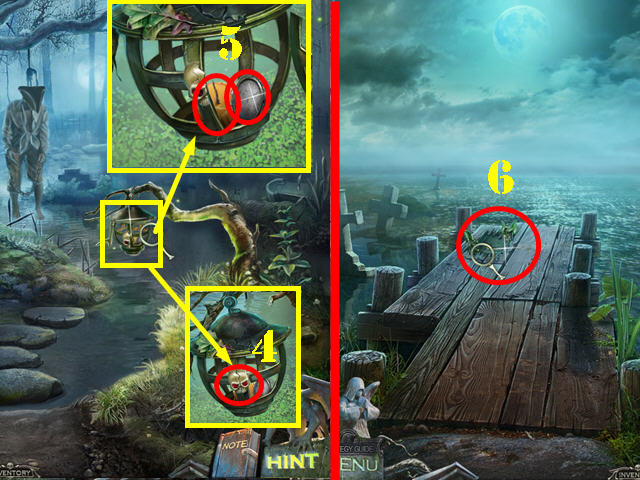
- Examine the lantern; put the SKULL PIECE over the other (4).
- Take the EMPTY LOCKET HALF and the CANDLE (5).
- Return to the dock.
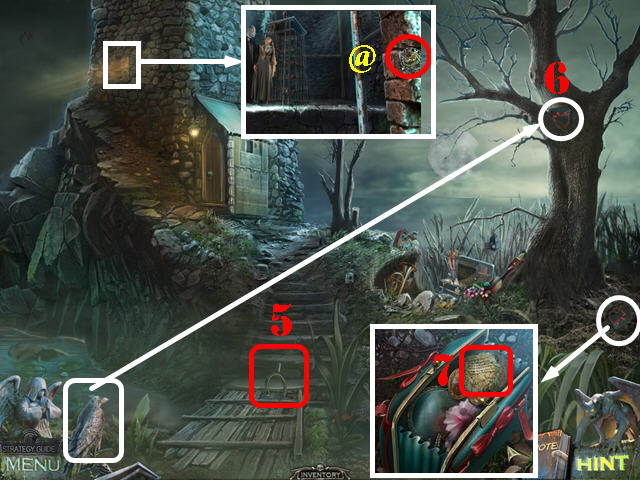
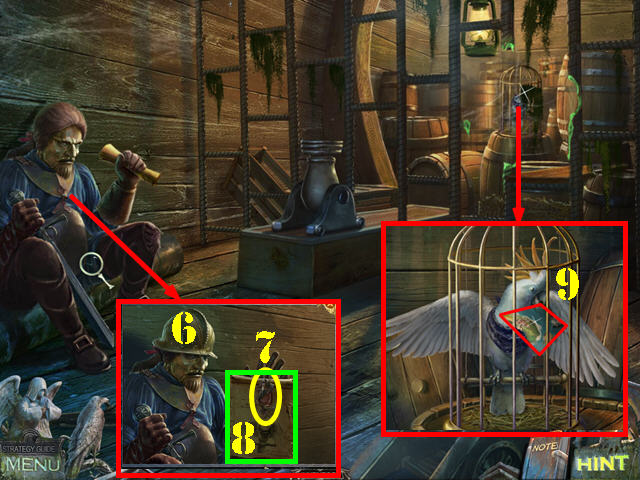
- Zoom into the hole on the dock (6); put the CANDLE on the skull to activate a puzzle.
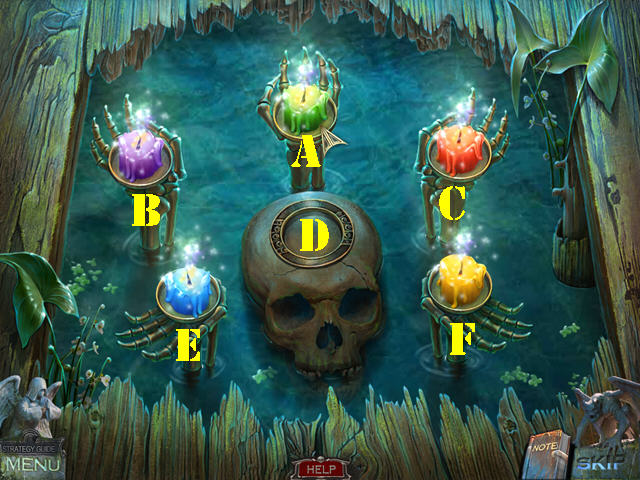
- Move the candles to the stands with matching colors.
- To solve the puzzle swap the pieces in this order: D to F, E to D, B to E, A to B, C to A, D to C, E to D, B to E, A to B, and D to A.
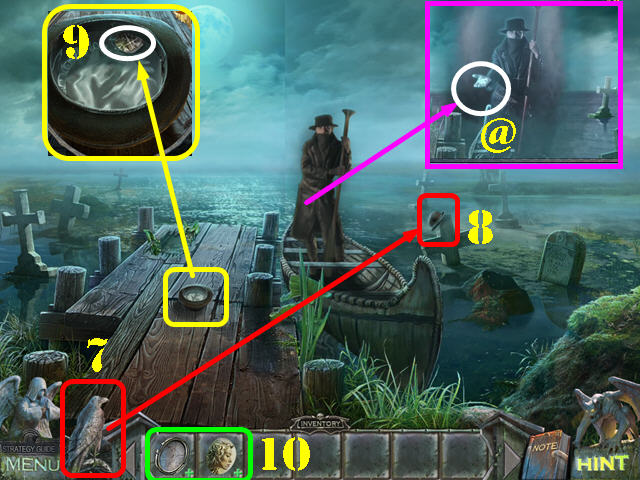
- Talk to the boatman. Take the CROW RUNE from his hand (@).
- Use the Mystical Crow (7) on the hat in the water (8); then zoom into the hat on the dock and take the PHOTO (9).
- Drag the EMPTY LOCKET HALF onto the PHOTO from inventory to create the LOCKET HALF (10).
- Walk down.
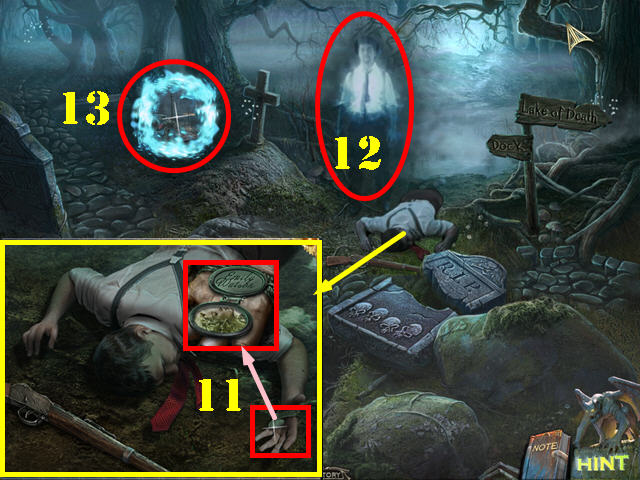
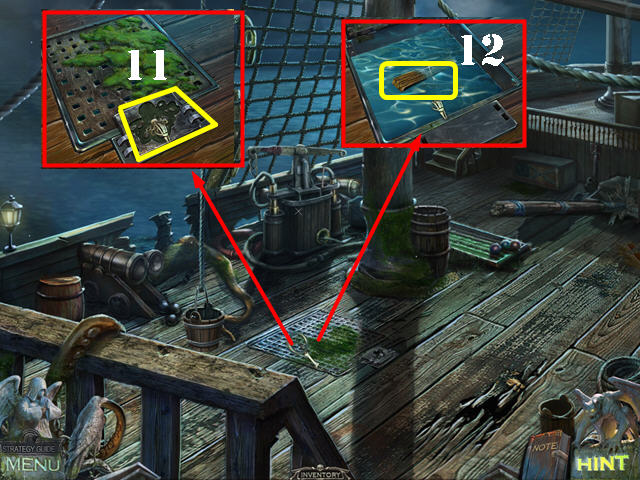
- Zoom into the man and then on his hand; put the LOCKET HALF over the other to make the ghost appear (11).
- Talk to the ghost (12).
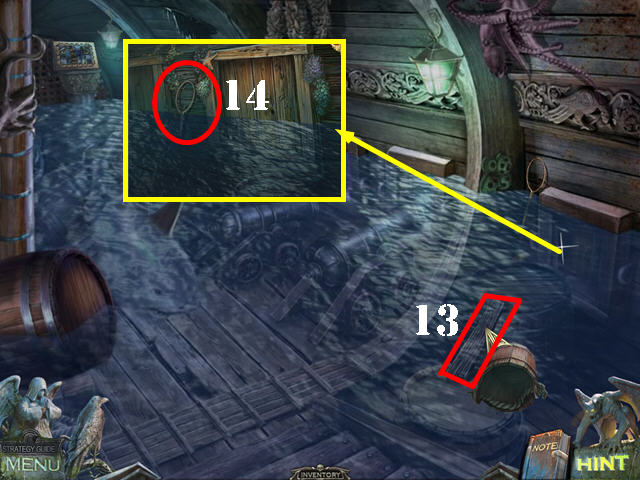
- Go through the portal (13).
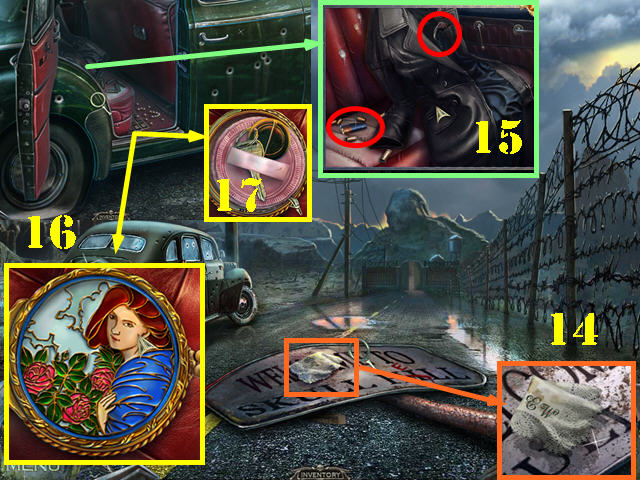
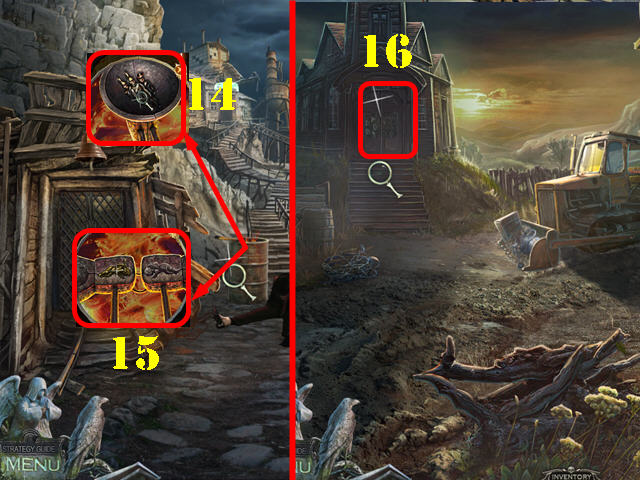
- Examine the sign; take the HANDKERCHIEF (14).
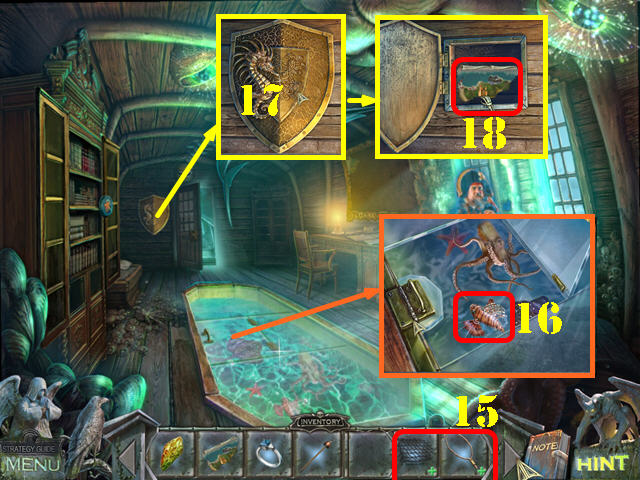
- Zoom into the car. Open the back door and zoom into it; take the BATTERIES and the ELASTIC BAND (15).
- Examine the floor mat; lift it and look at the locket for a mini-puzzle. Select any piece and you can swap the 2 highlighted pieces.
- Please look at the screenshot for the solution (16).
- Take the TRUNK KEY (17).
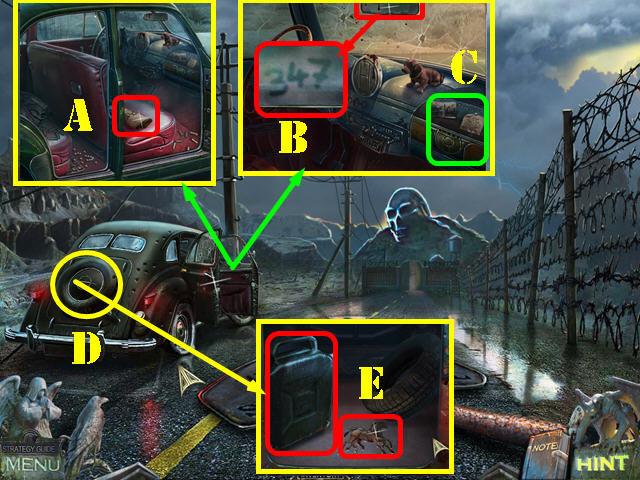
- Open the front door and zoom into it.
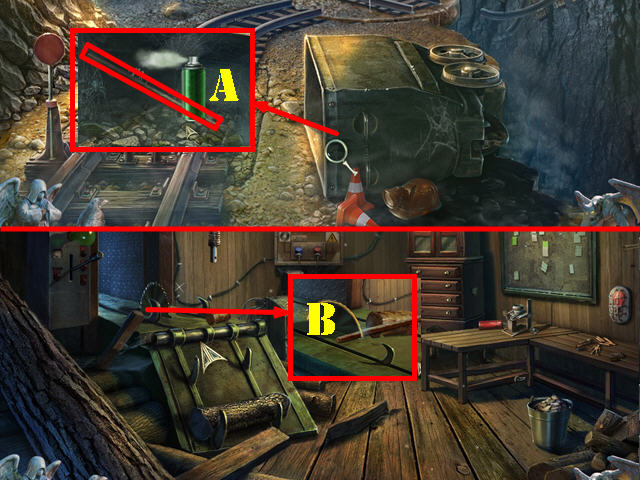
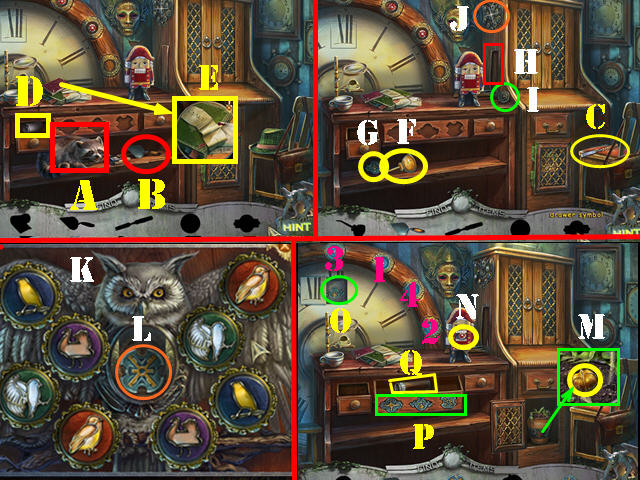
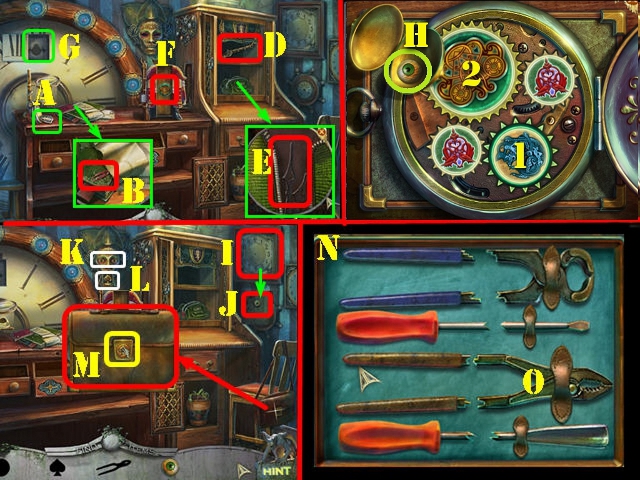
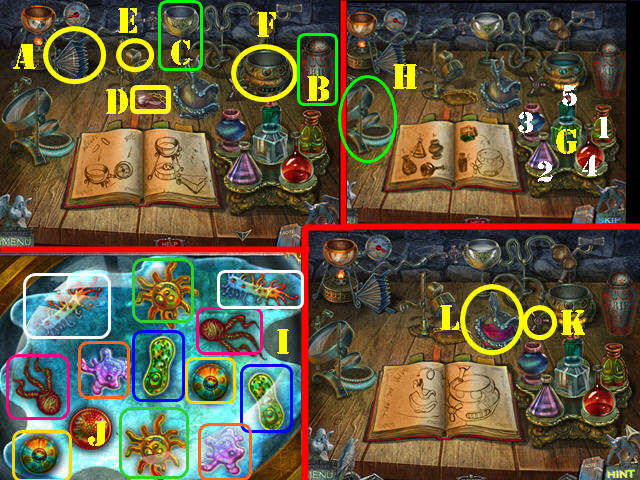
- Take the note (A).
- Examine the visor and clean it with the HANDKERCHIEF; note the number 347 (B).
- Look at the dashboard (C).
- Exit the front seat and inspect the trunk; use the TRUNK KEY in the lock (D).
- Take the FUEL CANISTER and the HORSES STATUETTE (E).
- Go forward.
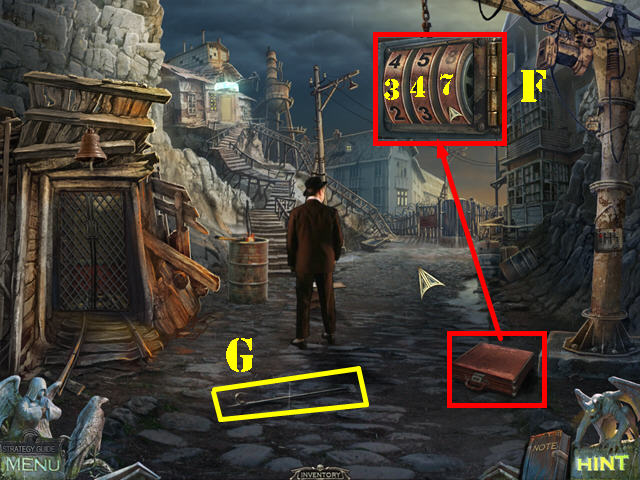
- Take the HOOK (F).
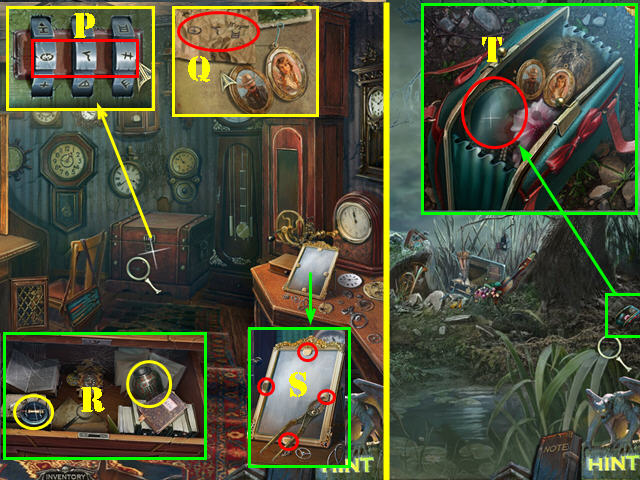
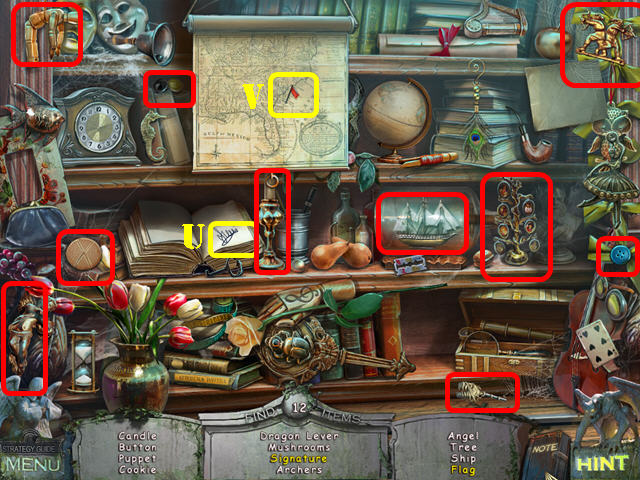
- Examine the suitcase; enter the number 347 into the tumblers (G) to activate a HOP.
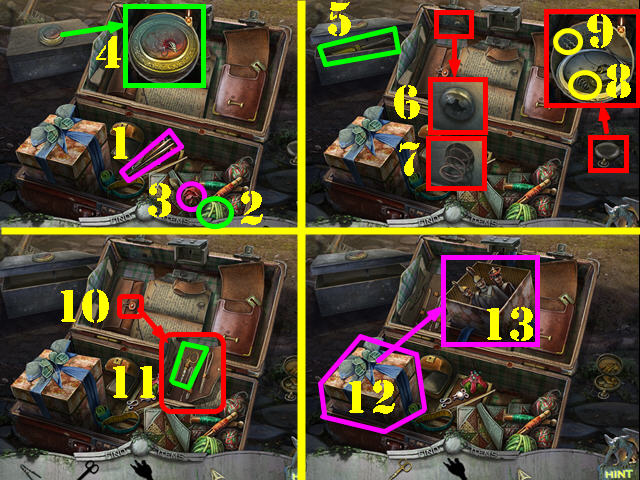
- Play the HOP.
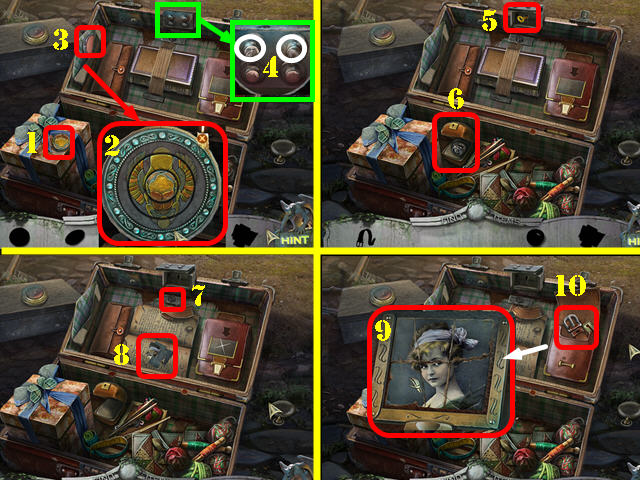
- Take the medallion (1).
- Zoom into the side pocket of the suitcase; put the medallion into the slot and realign the rings (2).
- Take the powder compact (3); zoom into the buttons and put the powder box on them. Push the top two buttons marked in white (4). Take the key (5).
- Insert the key into the lock and take the signet ring (6).
- Put the signet ring on the lock (7) and take the photo pieces (8).
- Zoom into the album and put the photo pieces on it to activate a mini-puzzle. Assemble the puzzle as shown in the screenshot (9).
- Take the BELT to add it to inventory (10).
- Walk down.

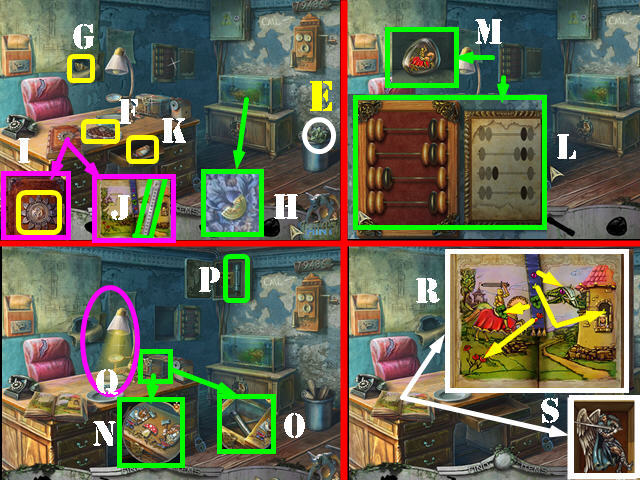
- Zoom into the sign; use the HOOK on the sign and take the GLASS SHARD (H).
- Combine the BELT and the GLASS SHARD from inventory to create the GLASS KNIFE (I).
- Inspect the car; zoom into the front seat and then on the glove compartment. Cut the fabric with the GLASS KNIFE (J).
- Put the HORSES STATUETTE on the coach to activate a puzzle.
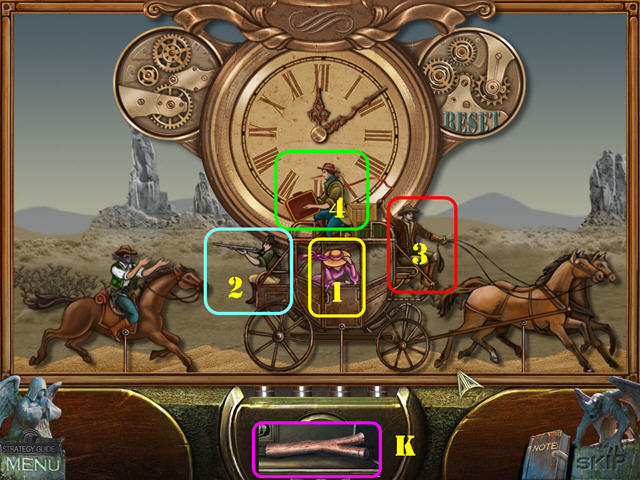
- Select the people in the correct order to defeat the bad guys.
- To solve the puzzle, select the people in the order shown in the screenshot (1-4).
- Take the FORKED STICK (K).
- Exit the car and go forward.
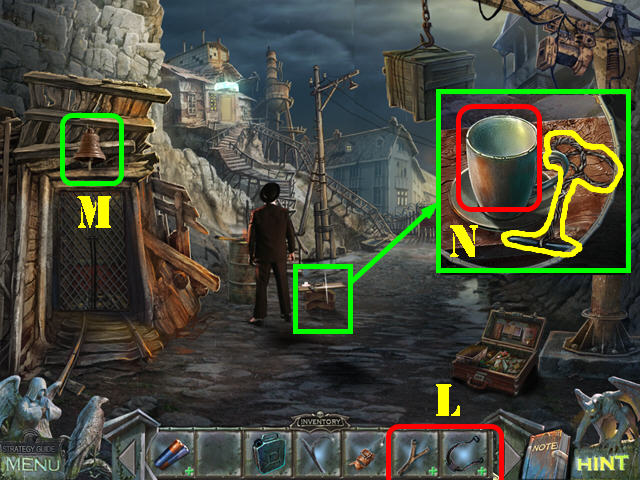
- Combine the FORKED STICK with the ELASTIC BAND from inventory to create the SLINGSHOT (L).
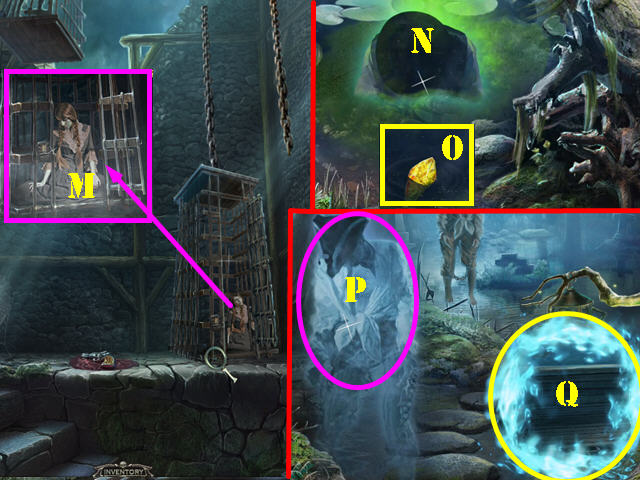
- Use the SLINGSHOT on the bell to distract the gangster (M).
- Examine the cup; take the CUP and the GARROTE (N).
- Go forward.
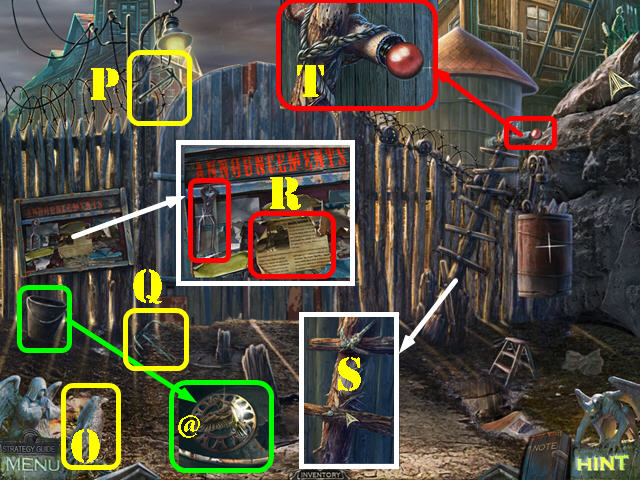
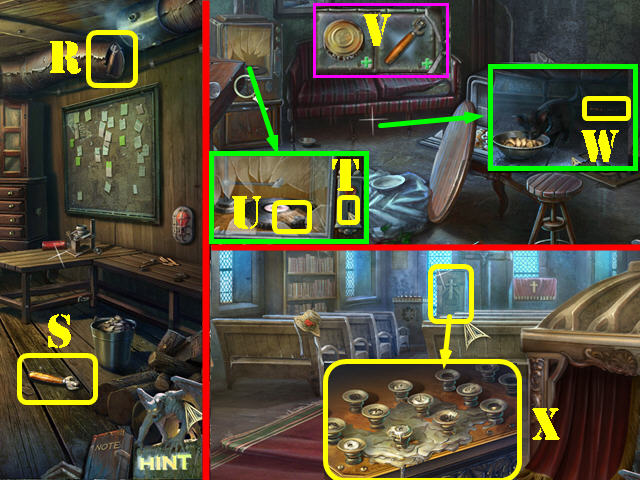
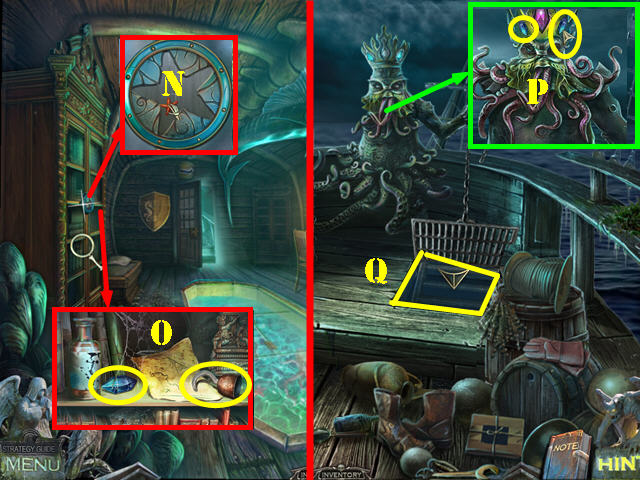
- Zoom into the bucket; remove the leaves and take the CROW RUNE (@).
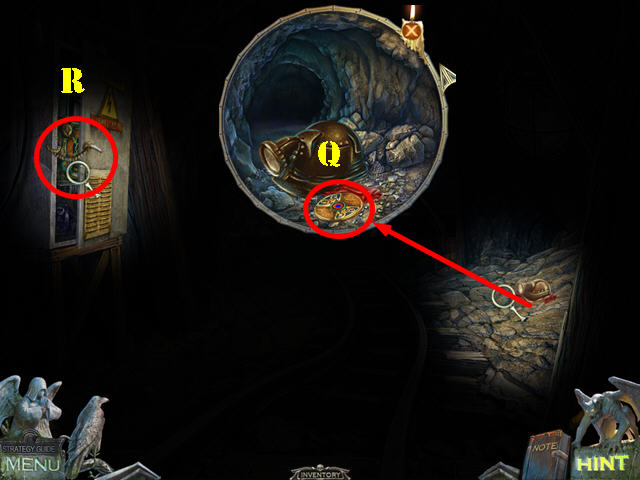
- Select the Mystical Crow (O) and then put your crow cursor on the grapple (P). Take the GRAPPLE (Q) on the ground.
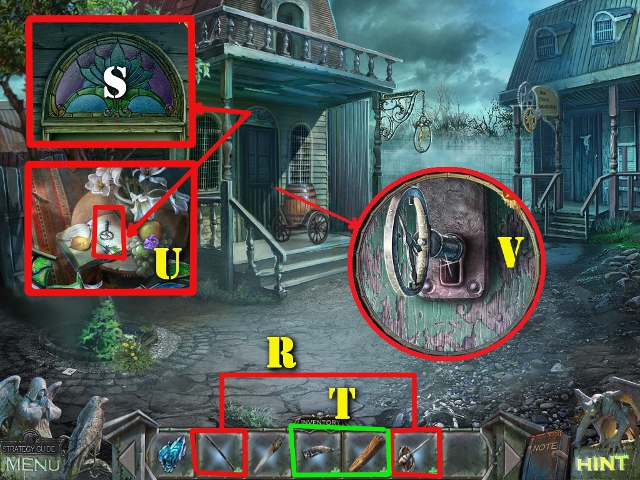
- Examine the board; take the PLIERS and the note (R).
- Inspect the broken ladder; put the GARROTE on it (S).
- Look at the tower and take the LEVER (T).
- Walk down.
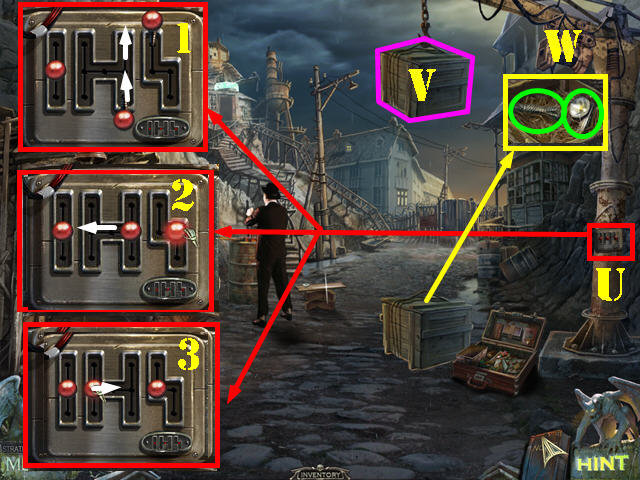
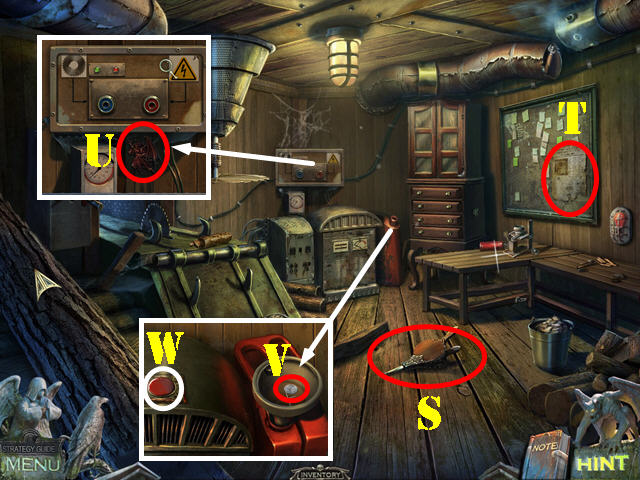
- Examine the lever on the pole (U); put the LEVER on it to activate a puzzle.
- Move the levers in the order shown on the screenshot (1-3).
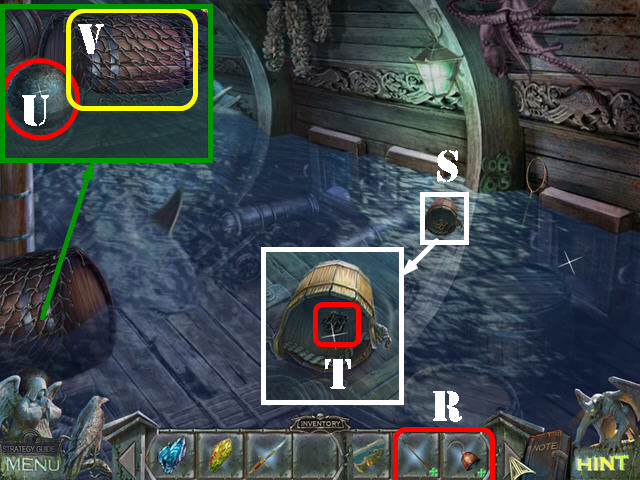
- Inspect the crate; cut the wires with the PLIERS (V).
- Take the FLASHLIGHT WITHOUT BATTERIES and the ROPE (W).
- Go forward.
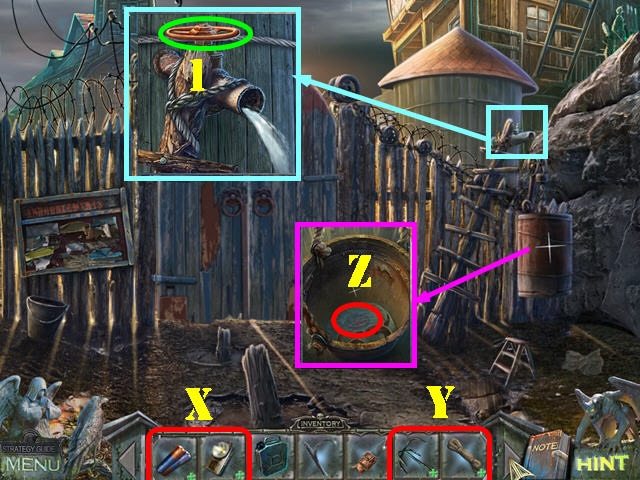
- Combine the FLASHLIGHT WITHOUT BATTERIES and the BATTERIES from inventory to create the FLASHLIGHT WITH BATTERIES (X).
- Combine the GRAPPLE with the ROPE from inventory to create the GRAPPLING HOOK (Y). Walk forward.
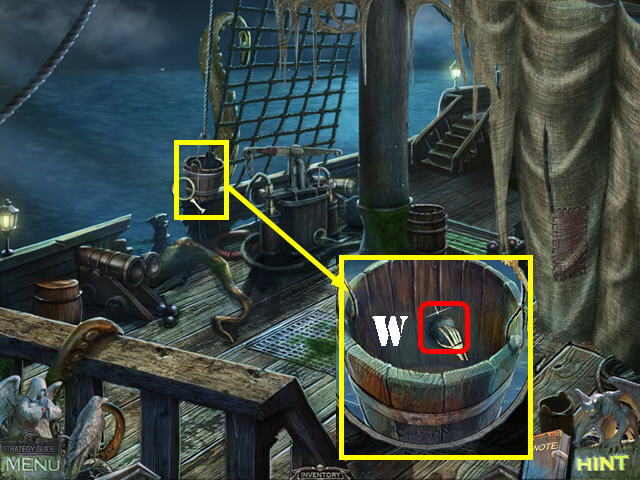
- Zoom into the barrel; use the FLASHLIGHT WITH BATTERIES in it and then use the HOOK to retrieve the VALVE (Z).
- Examine the tower and inspect the tap; add the VALVE to it and turn the valve (1) to fill the barrel with water and open the gate.
- Go through the gate.
Chapter 2: The Bar and Workshop
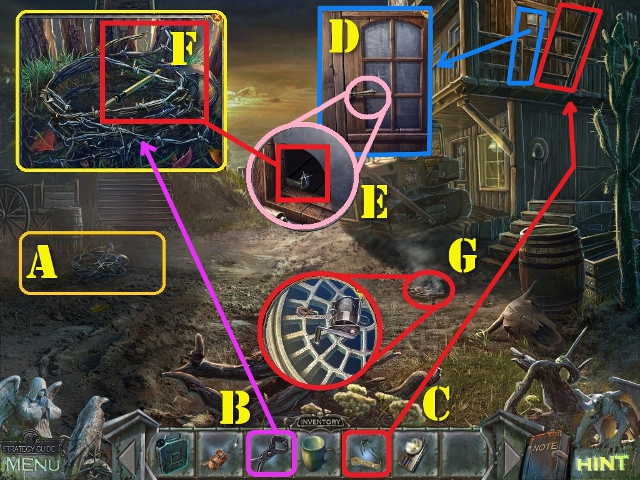
- Zoom in on the barbed wire on the left side of the screen (A); use the PLIERS on the barbed wire to get the GLASS CUTTER (F).
- Use the GRAPPLING HOOK to pull down the ladder to the Workshop (C).
- Zoom in on the door and then on the door handle (D). Use the GLASS CUTTER to cut the glass and unlock the door (E).
- Zoom in on the sewer grate; take the WINCH (G).
- Walk into the Workshop.
- Play the HOP.
- Take the code message (E) and the steak (F).
- Tear the paper and take the left medallion half (G).
- Inspect the tank; put the steak in it and take the right medallion half (H).
- Examine the book; put the right medallion half and the left medallion half on the book (I) and then take the ruler (J).
- Slide the ruler on the center drawer; take the gnome (K).
- Examine the abacus; put the code message on the right. Slide the beads according to the code (L) and take the resin lump (M).
- Examine the box; put the gnome on the box (N) and take the fuse (O).
- Open the power box and insert the fuse in it to light the lamp on the table (P).
- Put the resin lump below the magnifying glass to get the knight (Q).
- Inspect the book; put the knight on it. Take the items from the bookmark and put them in the right spots as shown in the screenshot (R).
- Take the ANGEL to add it to inventory (S).
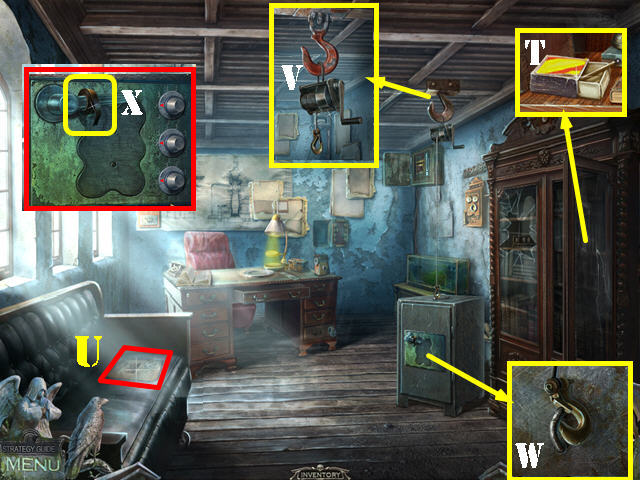
- Open the right cabinet door and zoom into it; take the MATCHES (T).
- Take the note (U).
- Inspect the hook; add the WINCH to it and press on the winch (V).
- Inspect the safe and attach the hook to the handle (W); zoom into winch again and pull on it.
- Look at the safe and take the INSULATING TAPE (X).
- Walk down.
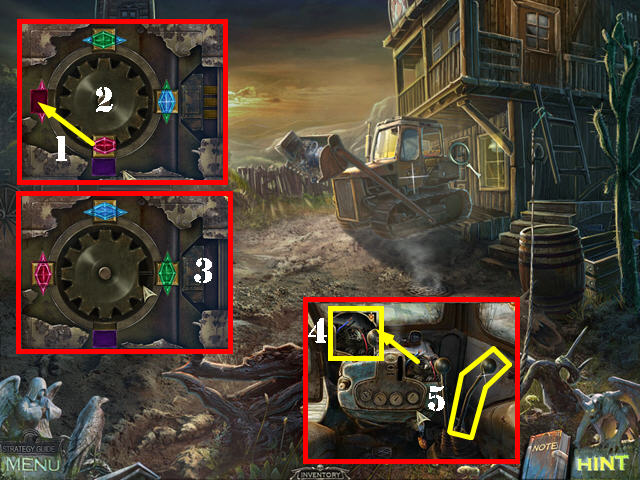
- Examine the bulldozer; remove the cover to activate a puzzle.
- Put the lock pieces into the right slots (1). Select the gear to rotate it (2) and then press on the gem to put it into an empty slot.
- Please look at the screenshot for the solution (3).
- Zoom into the wires on the bulldozer; put the INSULATING TAPE on them (4) and pull the lever (5).
- Enter the bar.
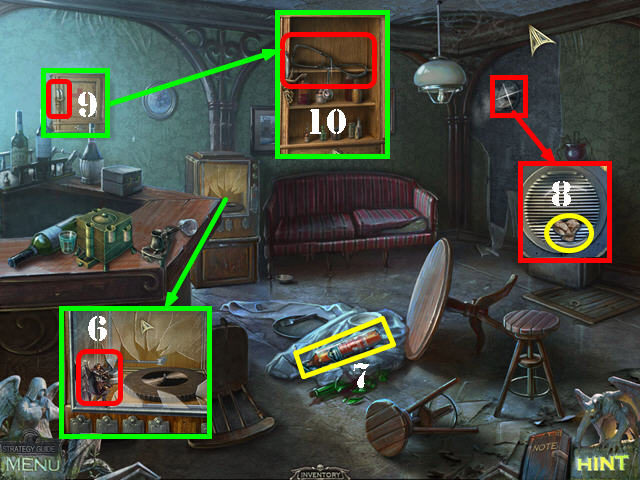
- Examine the jukebox and take the ANGEL (6).
- Take the FIRE EXTINGUISHER (7).
- Examine the vent; take the note (8).
- Examine the first aid kit (9); cut the knot with the GLASS KNIFE; open the door and take the STETHOSCOPE (10).
- Walk down.
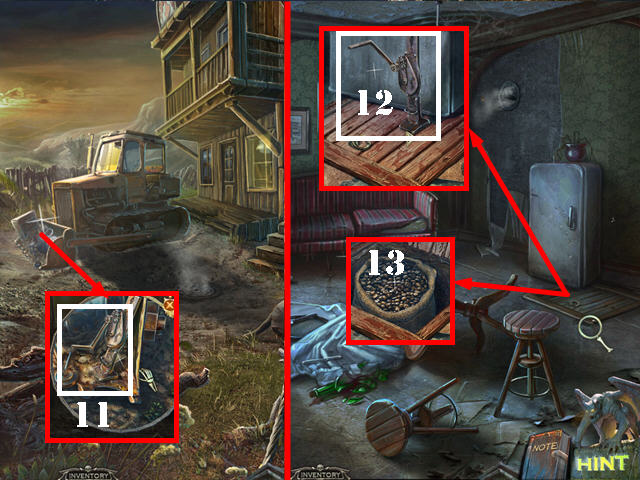
- Use the FIRE EXTINGUISHER on the bulldozer; examine the crane and take the JACK (11).
- Go back into the bar.
- Examine the hatch; put the JACK under the fridge; crank the jack and open the hatch (12).
- Cut the bag with the GLASS KNIFE and take the COFFEE BEANS (13).
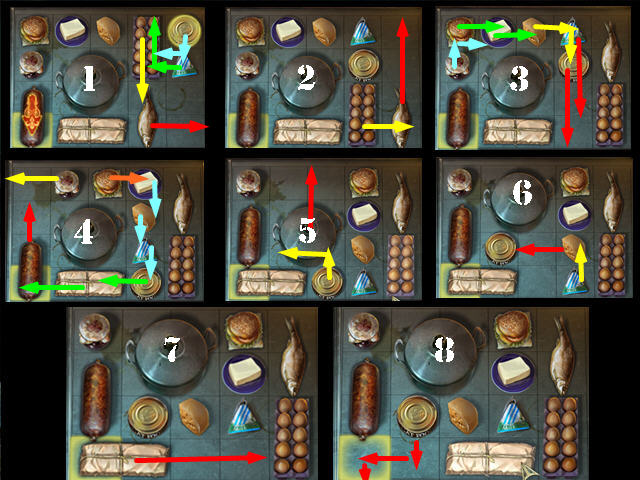
- Examine the fridge for a slider puzzle.
- Move the items out of the way so the cat food can come out of the lower left slot.
- Please look at the screenshot for the solution (1-8) and follow the arrows in this order: Red, Yellow, Green, Blue, and Orange.
- The CAT FOOD CAN will be added to inventory.
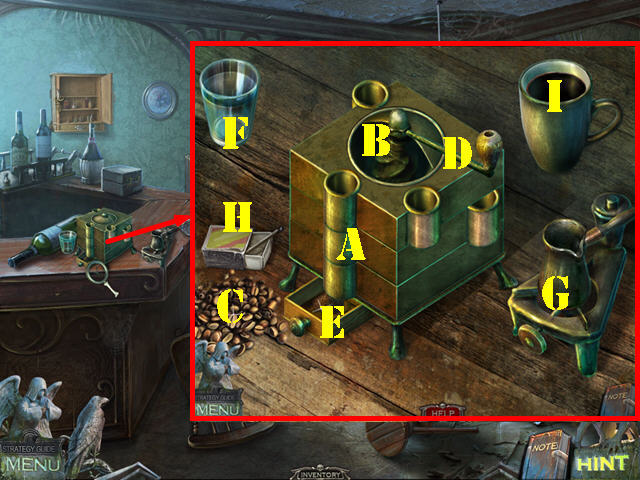
- Zoom into the coffee machine; put down the COFFEE BEANS, the CUP, and MATCHES on the table to activate a puzzle.
- Arrange the coffee machine drawers as shown in the screenshot (A) and then open the lid (B).
- Put the COFFEE BEANS (C) into the machine; close the lid and turn the handle (D).
- Put the ground coffee (E) and the water (F) into the coffee pot (G).
- Select the matches (H) to light the burner.
- Pour the coffee into the cup (I).
- Take the CUP OF COFFEE to add it to inventory.
- Return to the office.
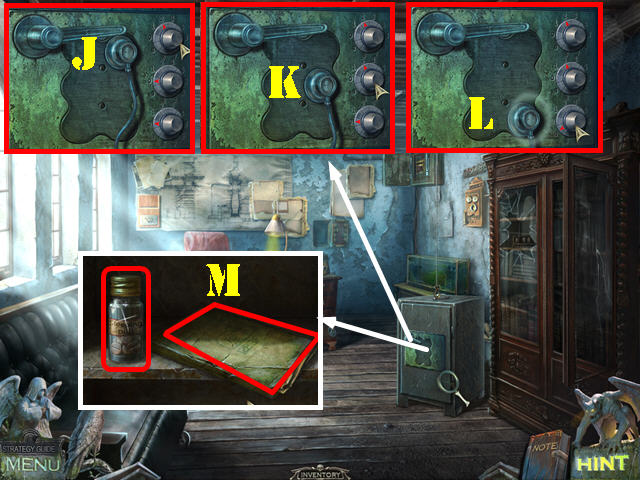
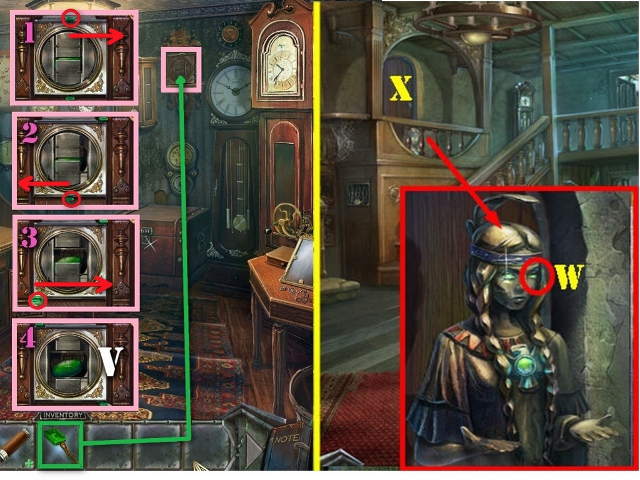
- Inspect the safe; use the STETHOSCOPE on it to activate a puzzle.
- Move the stethoscope to the top right; turn the top dial until you hear a click or see animation on the button once it reaches the number 2 (J).
- Move the stethoscope to the center right; turn the middle dial until you hear a click or see animation on the button once it reaches the number 2 (K).
- Move the stethoscope to the lower right; turn the lower dial until you hear a click or see animation on the button once it reaches the number 9 (L).
- Turn the handle and inspect the safe; take the SLEEPING PILLS (M).
- Walk down 3 times.
- Combine the SLEEPING PILLS and the CUP OF COFFEE from inventory to create the COFFEE WITH SLEEPING PILLS (N).
- Zoom into the saucer; put the COFFEE WITH SLEEPING PILLS on it (O).
- Zoom into the gangster and then on his pocket and take the LIGHTER (P).
- Examine the burning trash can; take the FUNNEL (Q).
- Go up the steps to the workshop (R).
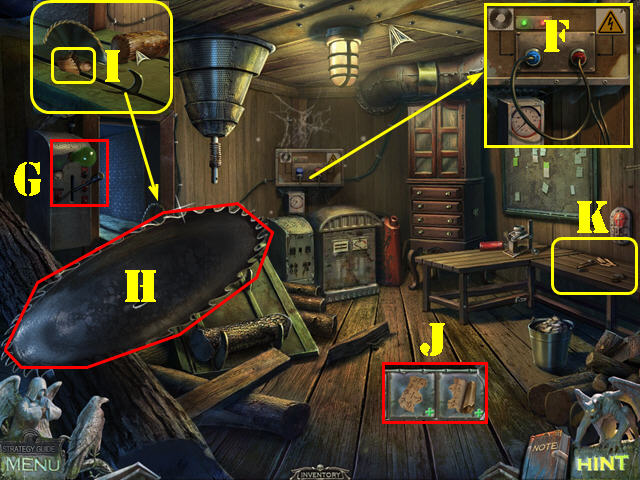
- Take the FORGE BELLOWS (S).
- Take the note (T) on the bulletin board.
- Examine the power box and take the DEMON (U).
- Examine the tank; remove the cap and put the FUNNEL in it. Put the FUEL CANISTER in the funnel; take the COIN (V) and press the button (W).
- Walk down.
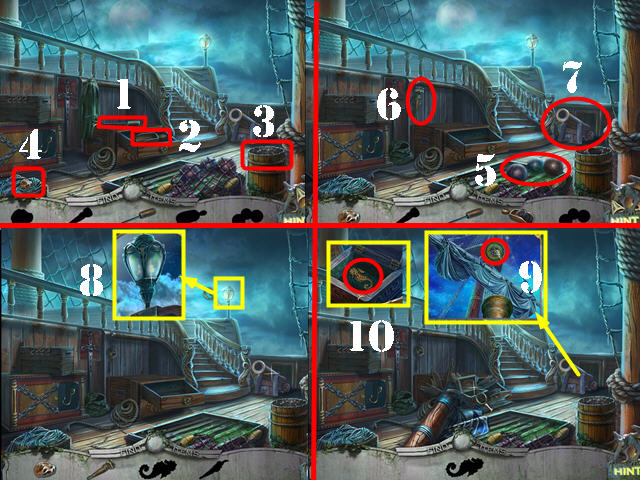
- Play the HOP.
- Take the knitting needles (1); use them on the yarn (2) to get the gloves.
- Use the gloves on the thorny rose (3) to get the rose.
- Inspect the box; put the rose on the lid (4).
- Take the screwdriver (5).
- Zoom into the screw (6); remove it with the screwdriver and take the spring (7).
- Examine the pocket watch; put the spring in it (8) and take the hairpin (9).
- Use the hairpin on the cord (10); take the scissors (11).
- Cut the bow with the scissors (12); take the TIN SOLDIERS to add them to inventory (13).
- Zoom into the burning can and then the mold; put the TIN SOLDIERS in the mold (14).
- Put the FORGE BELLOWS on the fire and press on the bellows to flame the fire; zoom into the mold, open it, and take the ANGEL (15).
- Go forward twice.
- Examine the church door; put the 2 ANGELS and the DEMON on the door to activate a puzzle (16).
- Find a way to make all the angels raise their wings.
- Select an angel to make them attack the demons.
- The solution to the puzzle is random. The result of the puzzle must appear like the screenshot.
- Go into the church.
Chapter 3: The Church
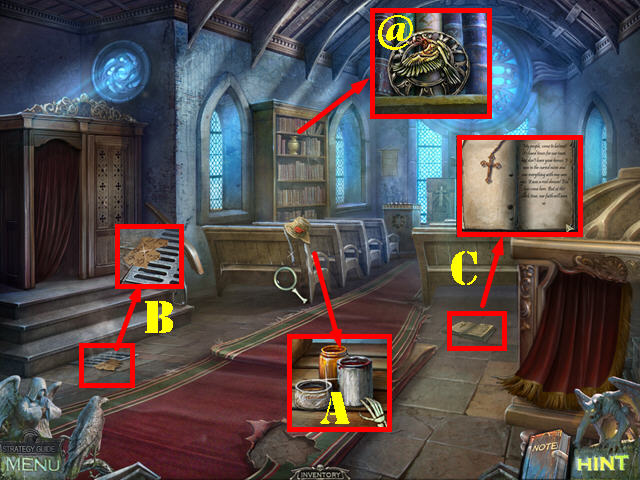
- Examine the pew; take the PAINTS (A).
- Zoom into the grate; take the DESIGN PIECE (B).
- Look at the book (C).
- Look at the bookcase; take the CROW RUNE (@).
- Go back to the office.
- Play the HOP.
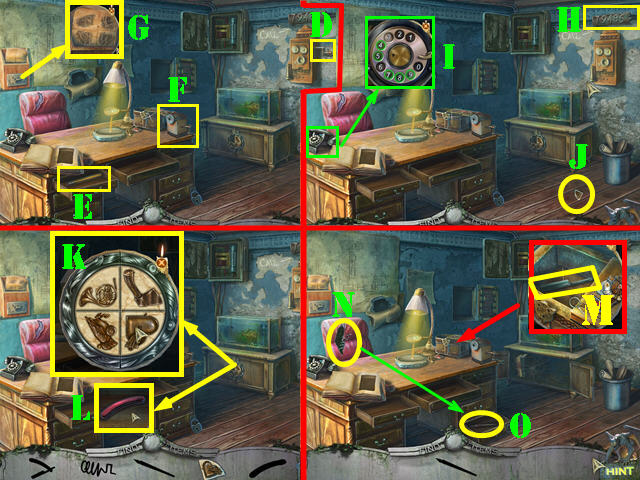
- Take the handle (D).
- Open the drawer and take the pencil (E).
- Put the handle on the sharpener; put the pencil in the sharpener to get the sharpened pencil (F).
- Zoom into the letter holder; put the sharpened pencil on the paper to see the symbol sequence (G).
- Look at the number on the wall (H). Zoom into the table phone; dial 79485 (I); take the piece of lock on the ground (J).
- Look at the cabinet; put the piece of lock on it to activate a mini-puzzle. Select two pieces to swap their positions. Arrange them in the order shown on the clue (K).
- Take the razor handle (L).
- Examine the box; put the razor handle on the blade to get the razor (M).
- Cut the chair with the razor and take the broken spring (N).
- Pick the lock with the broken spring and take the BRUSH to add it to inventory (O).
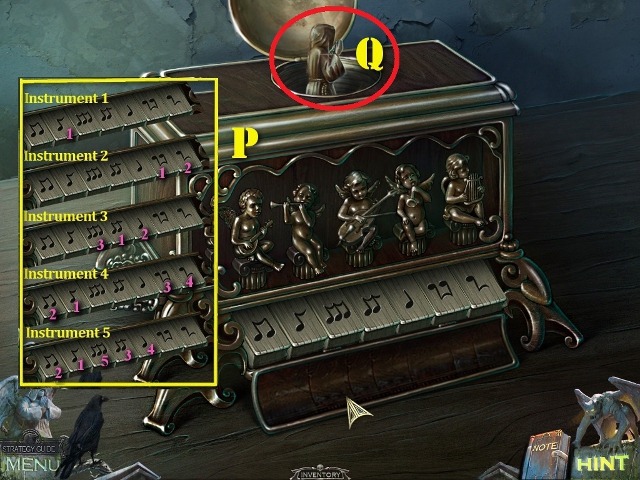
- Open the wardrobe and zoom into it; put the ANGEL on the box to activate a puzzle.
- Give the right instrument to the right angel; after you give the instrument to the angel, press the key on the keyboard that matches the musical notes that appear.
- Please look at the screenshot for the solution (P).
- Take the MONK (Q).
- Return to the workshop.
- Use the Mystical Crow on the can opener stuck in the pipe (R); take the CAN OPENER on the ground (S).
- Return to the bar.
- Inspect the jukebox; insert the COIN in the slot (T) and take the DESIGN PIECE (U).
- Combine the CAT FOOD CAN and the CAN OPENER from inventory to create the OPENED CAT FOOD CAN (V).
- Look below the couch; put the OPENED CAT FOOD CAN in the bowl and take the CHISEL (W).
- Go back to the church.
- Zoom into the podium; use the CHISEL to remove the WAX (X).

- Return to the workshop.
- Examine the table; put the WAX in the device (A) and turn the valve (B).
- Use the LIGHTER on the wax; open the mold and take the CANDLE (C).
- Return to the church.
- Open the curtain; zoom into that area; put the CANDLE in the candleholder and then light the candle with the LIGHTER (D).
- Take the CABLE (E).
- Return to the workshop.
- Zoom into the power box; put the CABLE on the mechanism (F).
- Flip the switch (G) and take the SAW BLADE (H).
- Look at the circular saw machine; touch the wood piece and take the WOODEN STATUETTE (I).
- Combine the 2 DESIGN PIECES from inventory to create the DESIGN (J).
- Zoom into the worktable (K).

- Put down the PAINTS, BRUSH, DESIGN, and WOODEN STATUETTE on the table to activate a puzzle.
- Use the chisel (1) on the 4 wooden blocks (2) to form 4 body parts.
- Use the sandpaper (3) on the 4 wooden body parts.
- Place the 2 arms and the 2 legs on the wooden body (4). Note: to attach the pieces you must place the cursor over the joints.
- Put the 4 screws (5) on the 4 joints (6).
- Use the screwdriver (7) on the 4 screws.
- Dip the large brush (8) in the varnish (9) and then use that brush on the wooden doll.
- Put the clothes (10) on the doll.
- Dip the small paintbrush (11) in the brown paint (12) and apply that paintbrush to the clothes.
- Dip the small paintbrush in the copper paint (13) and apply that paintbrush to the face.
- Take the MONK.
- Return to the church.
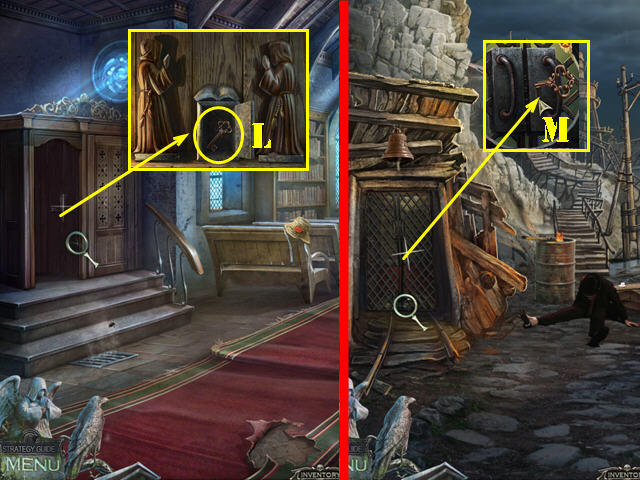
- Open the wardrobe and zoom into it; put the 2 MONKS on the 2 stands and take the KEY (L).
- Walk down 3 times.
- Examine the elevator door; put the KEY in the lock and enter the elevator (M).
Chapter 4: The Mine
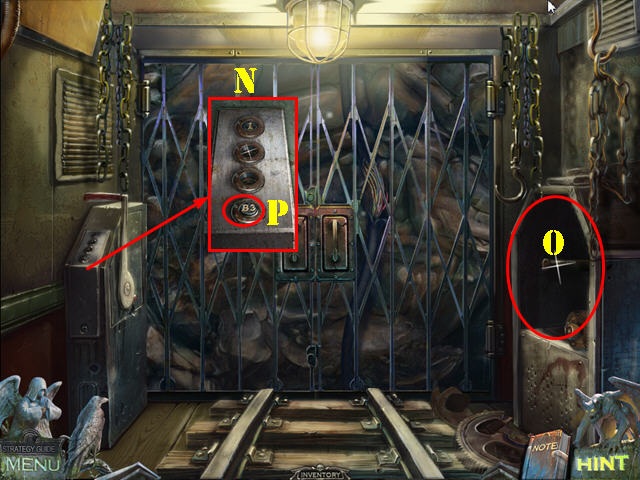
- Examine the controls and push any button (N).
- Put the SAW BLADE in the niche (O).
- Examine the controls and select the B3 button (P).
- Exit the elevator once the doors open.
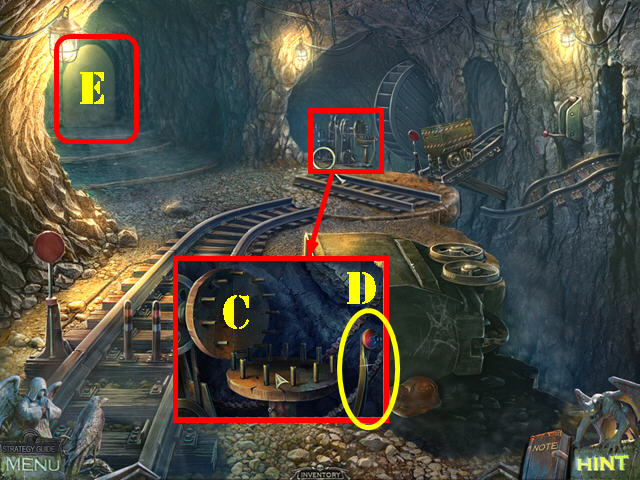
- Put the FLASHLIGHT WITH BATTERIES in the scene to light up the mine.
- Look in the lower right; move the helmet and take the CENTRAL PANEL ELEMENT (Q).
- Locate the power box on the left and use the GLASS KNIFE on the knot (R).
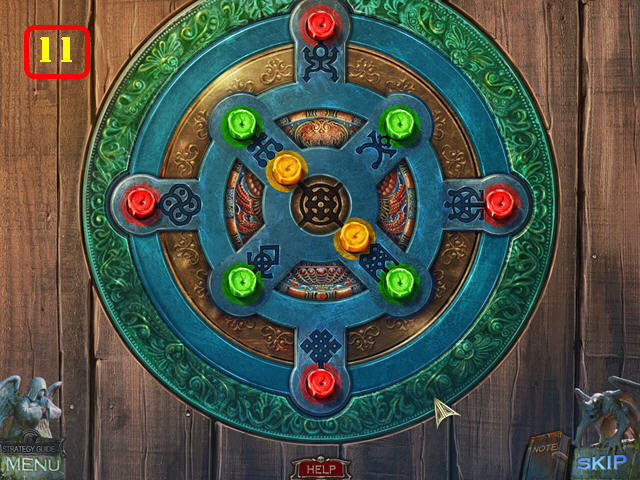
- Zoom into the box and put the CENTRAL PANEL ELEMENT on the box to activate a puzzle.
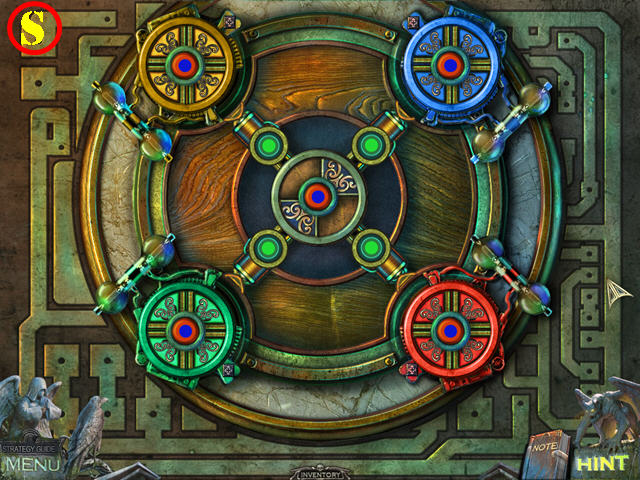
- Your goal is to put all the puzzle pieces into the spots of matching color.
- Press on the center dials to move the rings. Press on the green dials to move the segments into the spaces in the center.
- Please look at the screenshot for the solution (S).
- Take the CROW RUNE (@) on the ground.
- Go forward.
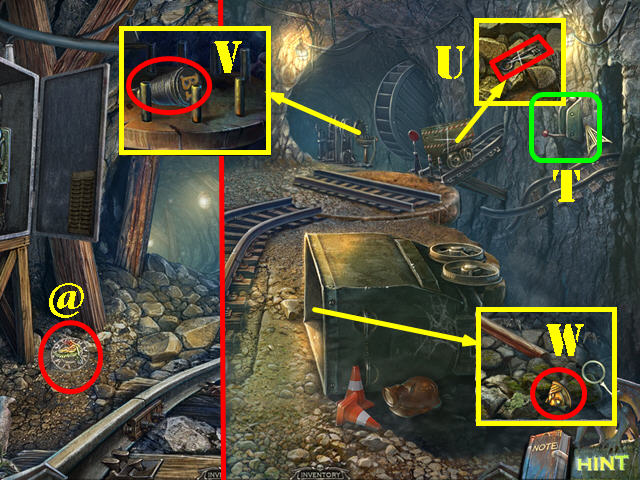
- Use the Mystical Crow on the lever (T); examine the cart and take the CELL KEY (U).
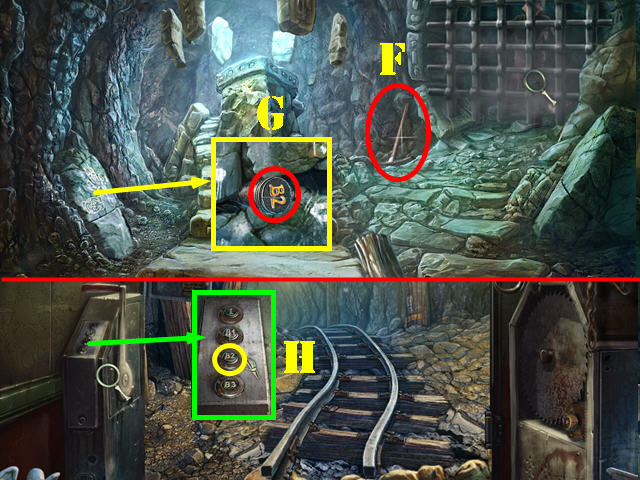
- Examine the mechanism; take the B1 ELEVATOR BUTTON (V).
- Inspect the turned over cart; take the first AMULET PIECE (W).
- Walk down twice.
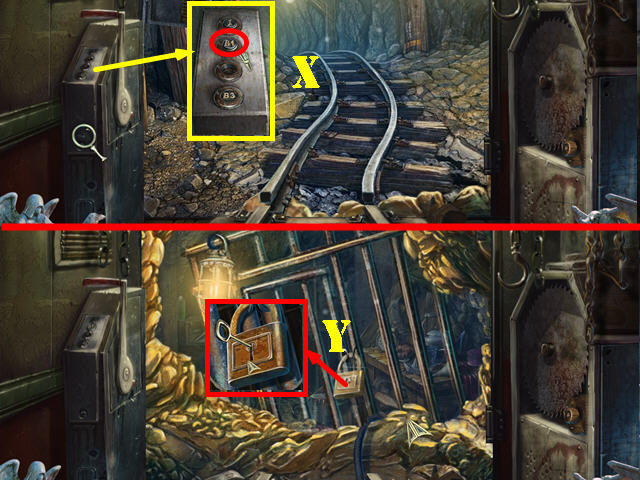
- Examine the elevator controls; put the B1 ELEVATOR BUTTON on it; press on the elevator button to go to B1 (X).
- Inspect the lock; put the CELL KEY in the lock to activate a HOS (Y).
- Play the HOS.
- Use the rubber glove (1) on the switch (2); take the spray can (3) and saw (4).
- Put the kettle (5) on the burner (6); take the boiling kettle.
- The INSECT SPRAY will be added to inventory.
- Examine the elevator controls; press the B3 Button. Exit the elevator and go forward.
- Zoom into the large cart; use the INSECT SPRAY to get rid of the spiders. Take the STICK (A).
- Go back to the elevator and go to level 1; exit the elevator by walking down and then return to the workshop.
- Zoom into the circular saw machine; put the STICK in it to get the STICK PIECES (B).
- Take the elevator back to B3; close the gate when the man trying to open it appears. Exit the elevator once you reach the B3 floor and go forward.
- Examine the mechanism; put the STICK PIECES on it (C) and pull the lever (D).
- Go through the back door to reach the burial site (E).
- Look at the miner.
- Take the PICKAX (F).
- Zoom into the wall; take the B2 ELEVATOR BUTTON (G).
- Go back to the elevator; zoom into the controls and put the B2 ELEVATOR BUTTON on. Select the B2 Button (H).
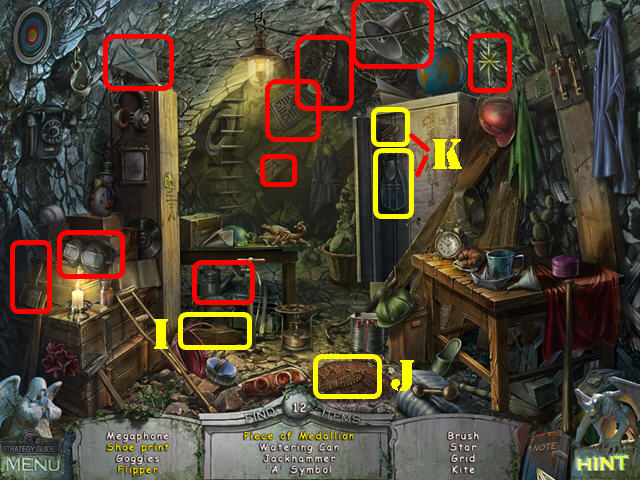
- Play the HOS.
- Put the shoe (I) in the sand; take the shoe print (J).
- Open the locker; take the flipper and the piece of medallion (K).
- The second AMULET PIECE will be added to inventory.
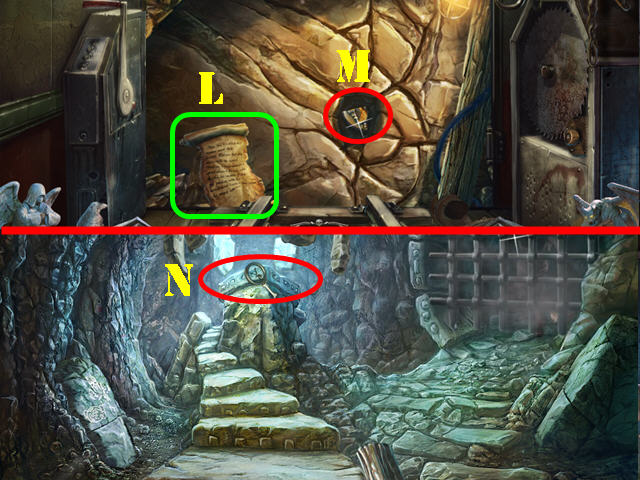
- Take the elevator to B2; take the note (L).
- Use the PICKAXE on the stone; take the third AMULET PIECE (M).
- Take the elevator to B3; exit the elevator and return to the burial site.
- Zoom into the altar; put the 3 AMULET PIECES on the puzzle to activate it (N).
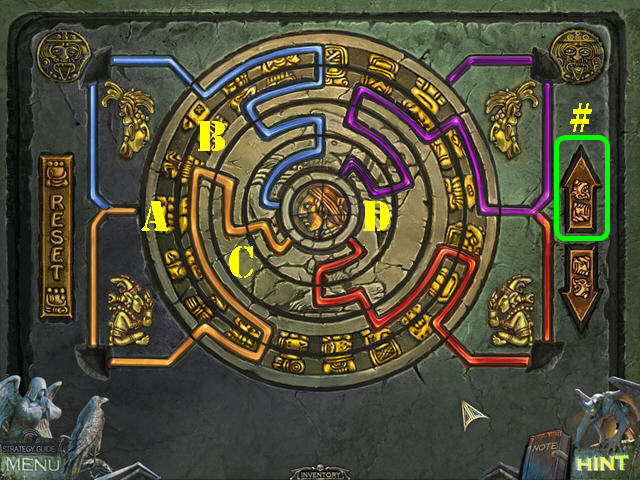
- Select a ring to highlight it and then use the up and down arrows to rotate the rings. Rotating a ring may affect others.
- To solve the puzzle using the top arrow only (#), follow these steps: A x 2, C x 6, B x 3, and D x 1.
- You will be automatically taken back outside.
Chapter 5: A One Horse Town
- Talk to the ghost.
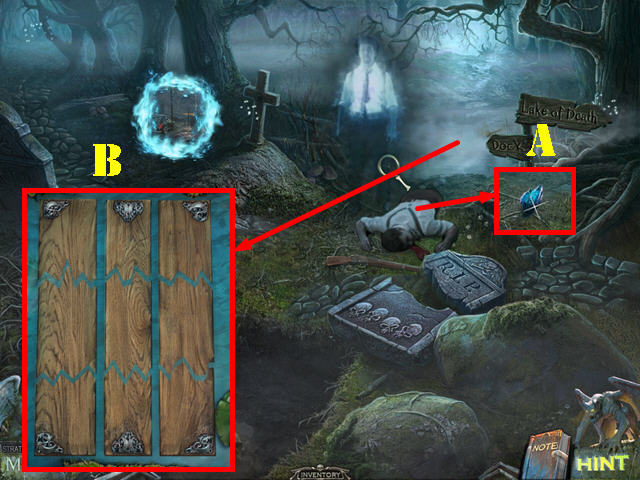
- Take the SOUL STONE (A).
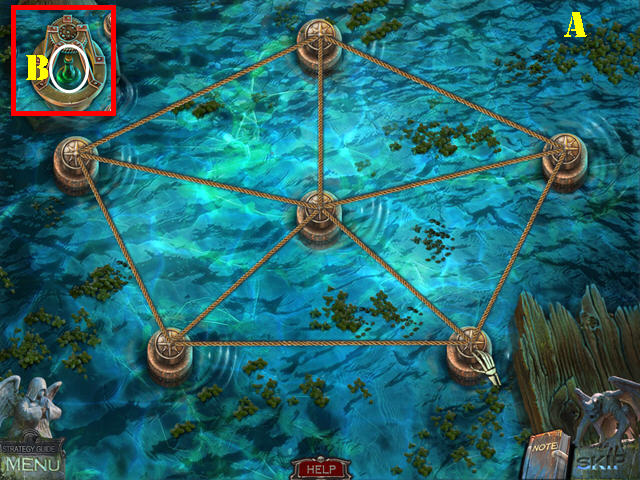
- Examine the water for a puzzle. Select two pieces to swap their positions.
- Arrange the boards so the break points match the pieces above or below them.
- Please look at the screenshot for the solution (B).
- Go forward.
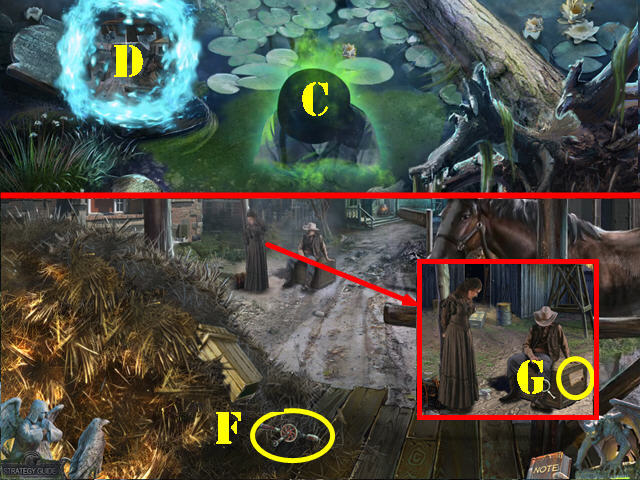
- Press on the water for a ghost to appear (C). Then go through the portal (D).
- Press on the box in the upper left to make it fall; take the HAND DRILL on the ground (F).
- Zoom into the couple; talk to the lady and then talk to the man.
- Take the note (G).
- Go forward.
- Inspect the barrel; use the HAND DRILL on it and then move the barrel (H).
- Take the PITCHFORK (I).
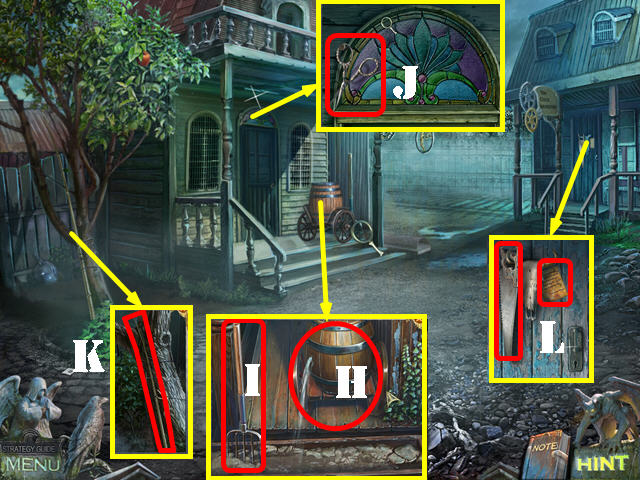
- Look at the stained glass window above the door; take the SCISSORS (J).
- Zoom into the tree; cut the rope with the SCISSORS and take the FISHING ROD (K).
- Examine the right door; take the SAW and the note (L).
- Walk down.
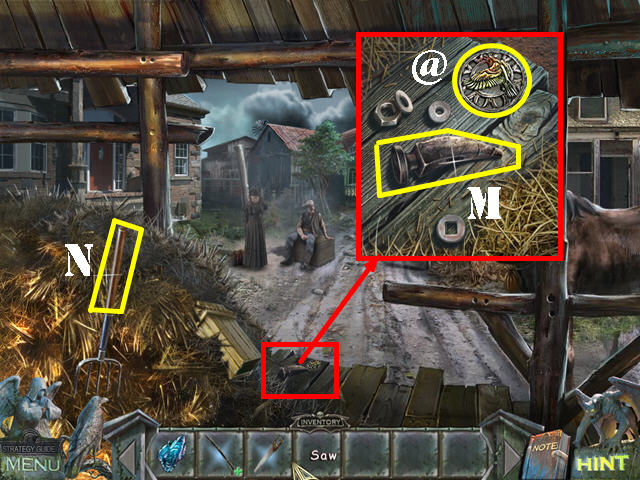
- Use the PITCHFORK on the hay.
- Examine the ground; take the CROW RUNE (@) and the IRON HAMMER (M).
- Cut the pitchfork handle with the SAW (N) and take the HAMMER HANDLE.
- Go forward.
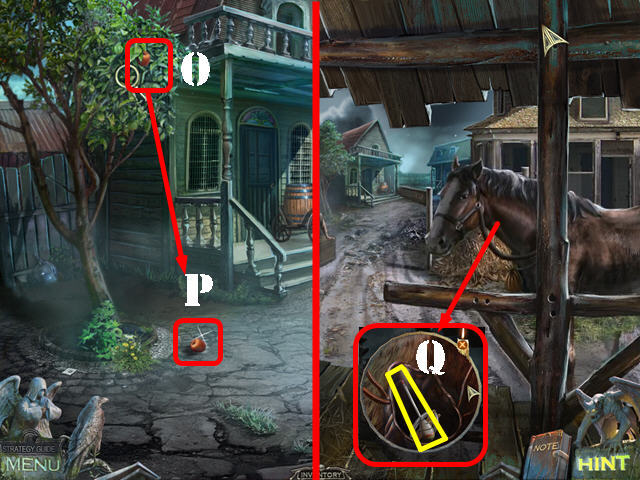
- Use the Mystical Crow on the apple in the tree (O); take the APPLE (P).
- Walk down.
- Give the APPLE to the horse; examine the horse's neck; open the bag and take the FISHING TACKLE (Q).
- Go forward.
- Combine the IRON HAMMER and the HAMMER HANDLE from inventory to create the HAMMER (R).
- Zoom into the stained glass window; break it with the HAMMER and look inside (S).
- Combine the FISHING TACKLE and the FISHING ROD from inventory to create the ROD (T).
- Use the ROD on the key; take the KEY (U).
- Examine the left door; put the KEY in the keyhole; turn the key and go inside (V).
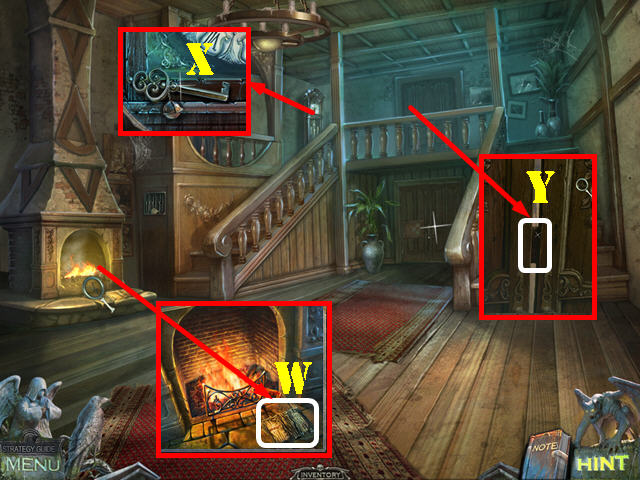
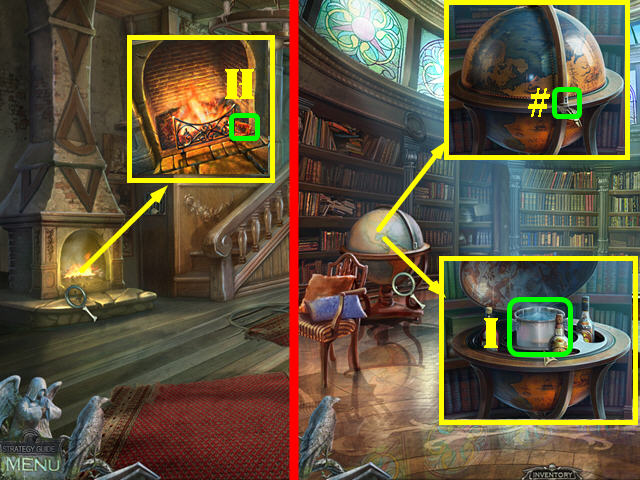
- Zoom into fireplace; take the note (W).
- Examine the grandfather clock; take the GLOBE KEY (X).
- Inspect the top door; cut the bolt with the SAW (Y). Go through the door to access the library.
Chapter 6: The Judge's House
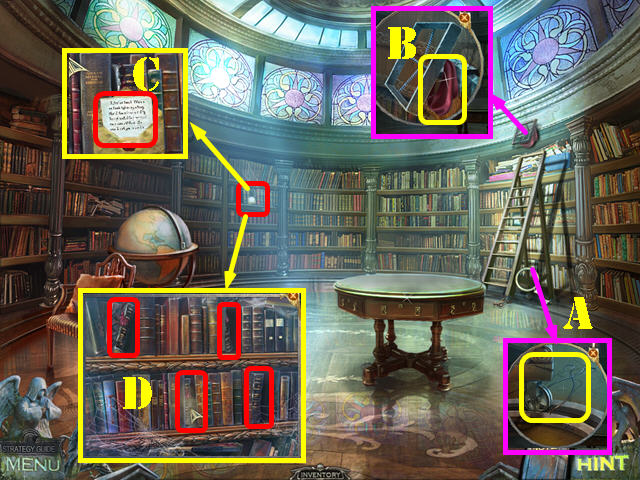
- Examine the bottom of the ladder; take the COAL TONGS (A).
- Inspect the area above the ladder; take the SHAWL (B).
- Inspect the bookcase; take the note (C).
- Move the 4 books to activate a HOS (D).
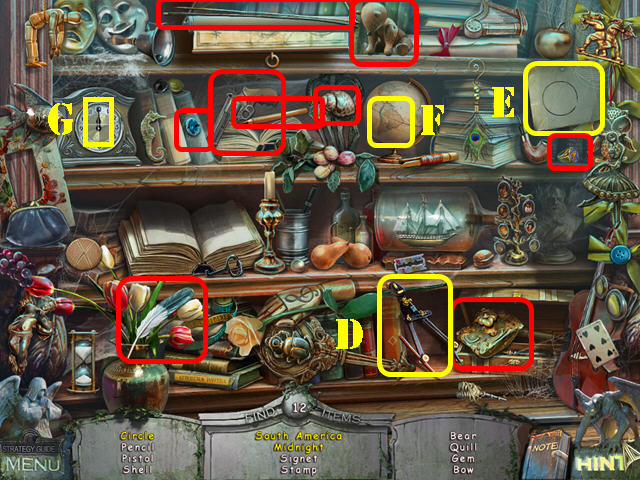
- Play the HOS.
- Put the compass (D) on the paper and take the circle (E).
- Spin the globe and take South America (F).
- Touch the clock and take midnight (G).
- The SIGNET RING will be added to inventory.
- Walk down.
- Zoom into the fireplace; use the COAL TONGS to retrieve the COAL (H).
- Return to the library.
- Examine the globe; use the GLOBE KEY in the keyhole (#) and turn the key to unlock the globe.
- Melt the ice with the COAL and take the BUCKET OF WATER (I).
- Walk down.
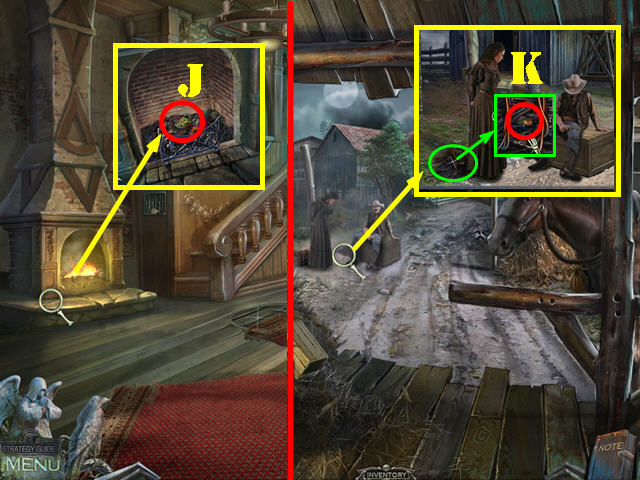
- Zoom into the fireplace; throw the BUCKET OF WATER in it and take the second SIGNET RING (J).
- Walk down twice.
- Zoom into the man and the woman.
- Examine the brushwood; use the COAL TONGS on it and then take the third SIGNET RING (K).
- Go back into the judge's house.
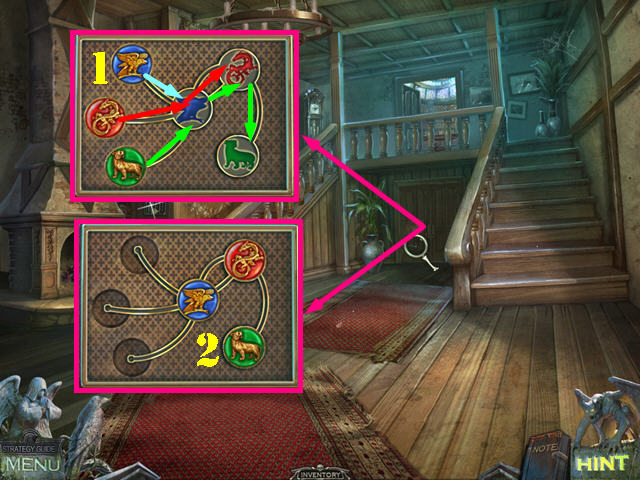
- Examine the bottom door; put the 3 SIGNET RINGS on it to activate a puzzle.
- Drag the rings into their matching spots. Press on a ring and then press on a highlighted spot.
- To solve the puzzle, place the rings in this order: Dog, Dragon, and Eagle (1) until you solve the puzzle (2).
- Go through the door to reach the backyard.
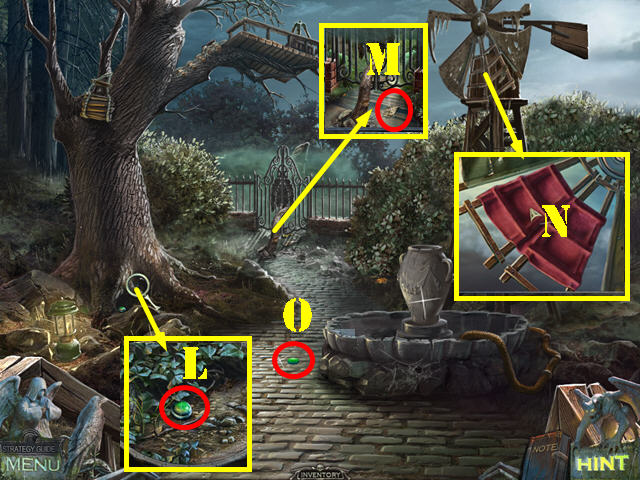
- Examine the base of the tree; take the AMULET (L).
- Inspect the gate; take the GUIDE HALF (M).
- Examine the windmill; put the SHAWL on it to activate the fountain (N).
- Take the GEM EYE on the ground (O).
- Walk down.
- Examine the statue; put the GEM EYE and the AMULET on it (1); take the AX (P).
- Go to the backyard.
- Inspect the gate; cut the tree with the AX (Q).
- Take the WORKSHOP KEY (R).
- Walk down twice.
- Zoom into the right door; use the WORKSHOP KEY in the lock; turn the key and enter the workshop (S).
- Play the HOP.
- Touch the raccoon (A) and take the trowel (B).
- Move the hat on the chair and take the chisel (C).
- Open the drawer and take the bandage (D).
- Examine the book; touch the paper and read the clue: 1, 3, 12, 2 (E).
- Use the bandage on the raccoon; take the oiler (F) and the first drawer symbol (G).
- Use the chisel on the board (H) and take the owl coin (I).
- Zoom into the owl and put the owl coin on it to activate a mini-puzzle (J). Find the matching pairs. Please look at the screenshot for the solution (K). Take the second drawer symbol (L).
- Put the oiler on the hinges in the lower right door and open the door. Use the trowel in the dirt and take the golden nut (M).
- Give the golden nut to the nutcracker and take the clock button (N) from its mouth.
- Put the clock button in the slot of the large clock; press on the clock buttons in the order shown in the screenshot (1-4).
- Take the third drawer symbol (O).
- Put the 3 drawer symbols on the drawer (P).
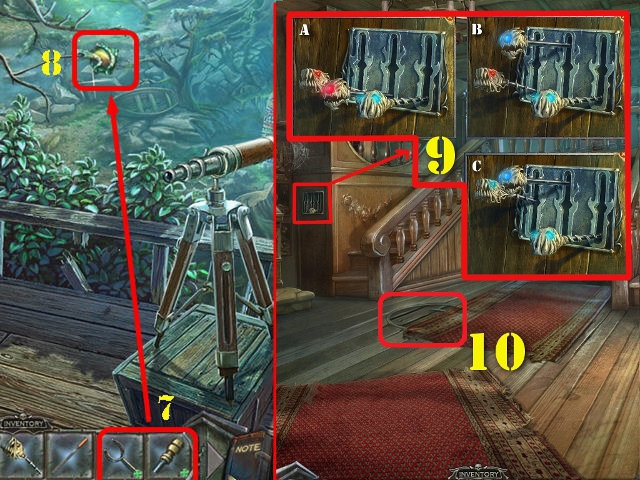
- Take the INCOMPLETE TELESCOPE to add it to inventory (Q).
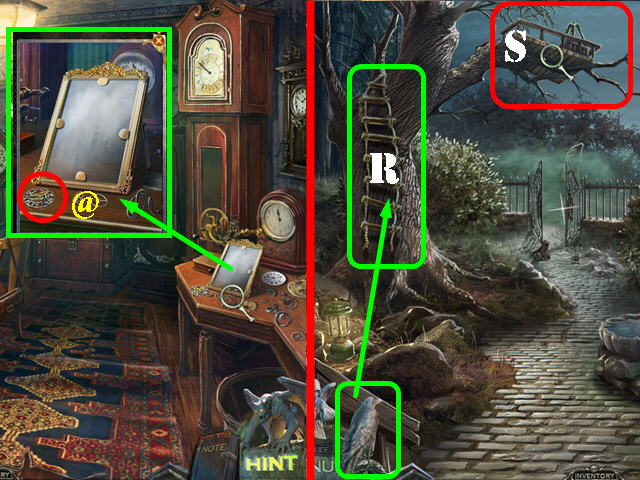
- Examine the mirror; take the CROW RUNE (@).
- Return to the backyard.
- Use the Mystical Crow on the rope ladder (R).
- Go up to the tree house (S).
- Take the LEVER (T).
- Grab the note (U).
- Return to the clockmaker's shop.
- Zoom into the faceless clock; put the LEVER on it to activate a puzzle.
- Drag the levers left or right and arrange them correctly until all the panels open up.
- Please look at the screenshot for the solution and take the GEM EYE (V).
- Return to the hallway.
- Examine the statue; put the GEM EYE in the eye socket (W) and go through the newly-opened door (X).
- Take the GUIDE HALF (Y).
- Examine the casket; take the EYEPIECE and the note (Z).
- Return to the tree house.
- Combine the 2 GUIDE HALVES from inventory to create the UNMARKED GUIDE (A).
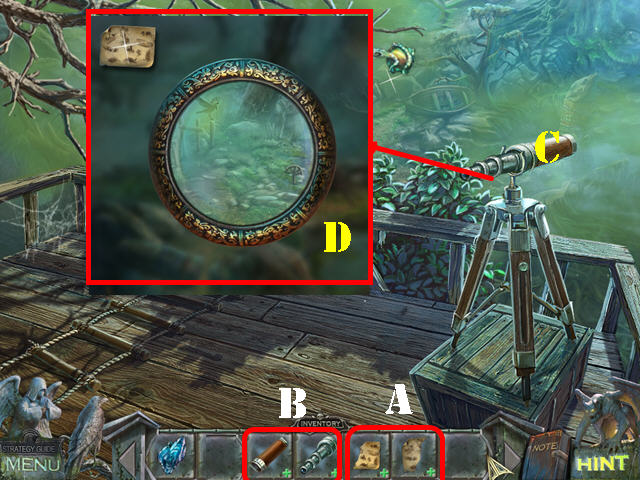
- Combine the EYEPIECE and the INCOMPLETE TELESCOPE from inventory to create the TELESCOPE (B).
- Put the TELESCOPE on the tripod (C); zoom into the telescope and put the UNMARKED GUIDE on the scene to activate a mini-game (D).
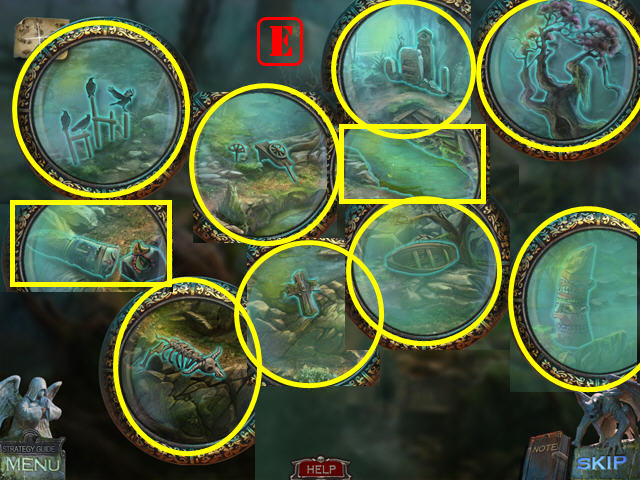
- Select the guide in the upper left for a closer view; find those items in the guide on the scene with the telescope.
- Once you find an item select it to highlight it.
- Once you highlight a correct item, it will also light up in the guide.
- Please look at the screenshot for the solution (E).
- Take the SWAMP GUIDE.
- Walk down.
- Zoom into the gate; put the SWAMP GUIDE on the scene and go through the gate.
Chapter 7: The Swamp
- Play the HOS.
- Touch the clock and take the bird (1).
- Give the pinecone (2) to the squirrel (3) and take the slingshot (4).
- The CLOCK WEIGHT will be added to inventory.
- Take the FORK (5).
- Look at the tower; take the CROW RUNE (@). Exit the tower.
- Use the Mystical Crow on the purse in the tree (6).
- Examine the purse; open it and take the note (7).
- Return to the watch workshop.
- Play the HOP.
- Touch the cup and take the shield (A).
- Zoom into the book and take the clip (B).
- Open the door; put the shield on the box and take the toy gun (D). Examine the zipper; put the clip on it; pull on the clip and take the clock hands (E).
- Give the toy gun to the soldier and take the gear (F).
- Inspect the mechanism and put the gear on it (G) to activate a mini-puzzle. Press on the gears in the order shown in the screenshot (1-2) and then take the mask eye (H).
- Put the clock hands on the clock (I); take the second mask eye (J).
- Put the 2 mask eyes on the mask (K); take the spade clip (L).
- Zoom into the bag; put the spade clip on it (M) to activate a mini-puzzle.
- Select two handles to swap their positions. Place all the handles with the correct heads. Once all the right pieces are together, they will slide into the handles as shown in the screenshot (N).
- Take the PLIERS (O) to add them to inventory.
- Zoom into the trunk; input the code (P) found in the diary (Q); take the URN and the SUCTION CUP (R).
- Zoom into the mirror; remove the 4 clasps with the PLIERS (S).
- Take the SQUARE MIRROR.
- Go to the backyard and then go through the gate.
- Zoom into the purse; put the SUCTION CUP on the glass to get the MIRROR (T).
- Return to the library.
- Play the HOS.
- Turn the page and take the signature (U).
- Open the scroll and take the flag (V).
- The DRAGON LEVER will be added to inventory.
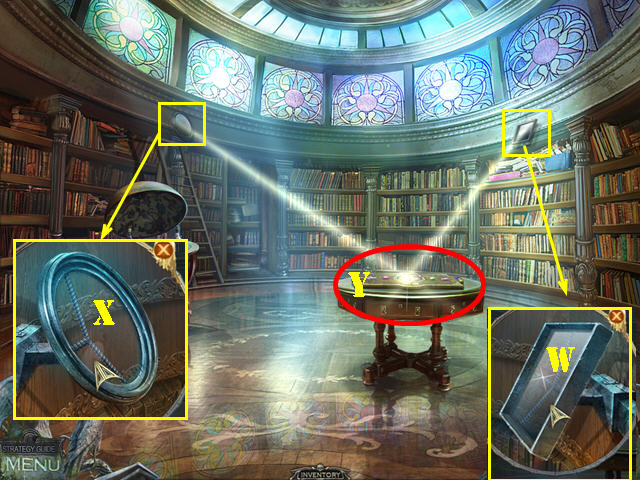
- Examine the frame above the ladder on the right; put the SQUARE MIRROR in it (W).
- Touch the ladder to move it to the left.
- Examine the frame above the ladder; insert the MIRROR in it (X).
- Zoom into the table to activate a puzzle (Y).
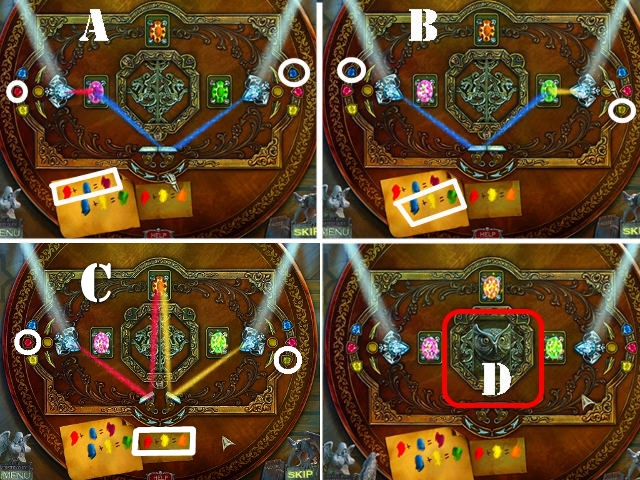
- Use the arrows next to the gems to refocus the beams; use the arrows below the mirrors to change the position of the mirrors.
- Your goal is to create the color combinations shown on the paper by focusing the right beam combinations.
- Please look at the screenshot for the solution (A, B, and C).
- Take the TOWER KEY (D).
- Return to the swamp.
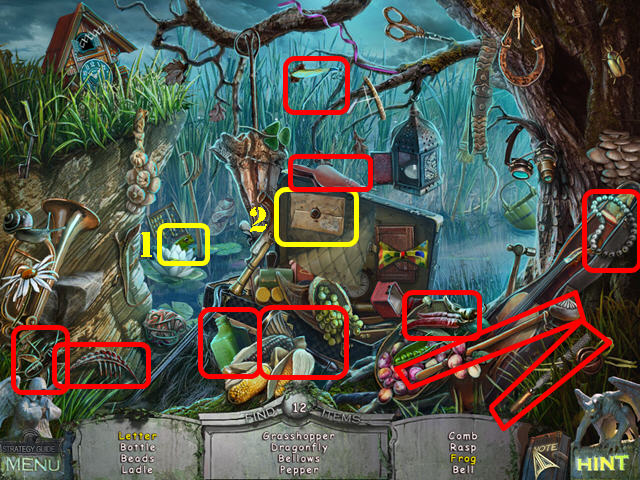
- Play the HOS.
- Open the flower; take the frog (1).
- Cut the inside of the suitcase with the razor; take the letter (2).
- The FILE will be added to inventory.
- Examine the door; put the TOWER KEY in the lock (3).
- Enter the tower.
- Examine the gun; take the BULLET (4).
- Take the STICK (5).
- Look at the cage; take the DRAGON LEVER (6).
- Return to the tree house.
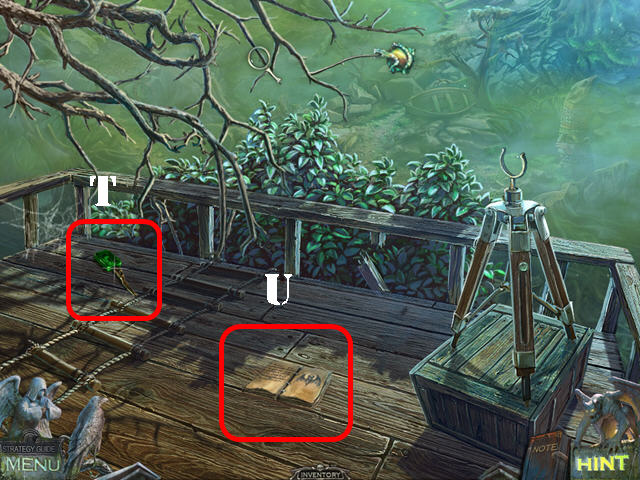
- Combine the STICK and the FORK from inventory to create the TONGS (7).
- Use the TONGS to retrieve the FLASK (8).
- Walk down twice.
- Zoom into the controls; put the 2 DRAGON LEVERS on it.
- Drag the levers up and down until their eyes turn blue. Please look at the screenshot for the solution (9).
- Examine the hatch on the ground for a puzzle (10).
- Put the candles on top of their matching bases.
- Select a candle and switch with another within the same beam.
- Please look at the screenshot for the solution (11).
- Go forward to find the secret lab.
Chapter 8: The Secret Lab
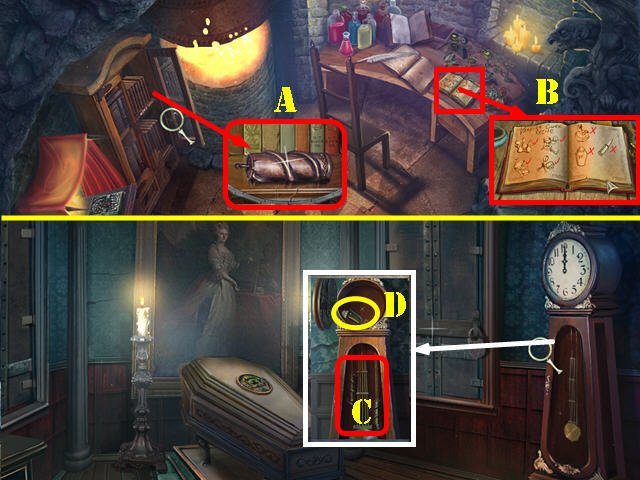
- Open the door and zoom into the shelf; take the CLOCK WEIGHT (A).
- Look at the table; look at the book to see the items you need (B).
- Walk down and go through the upper left door.
- Zoom into the clock.
- Put the 2 CLOCK WEIGHTS on it (C) and take the SET OF PICKLOCKS (D).
- Return to the tower.
- Zoom into the cage and then on the lock; put the SET OF PICKLOCKS on it to activate a puzzle.
- Use the arrows to move the blocks left and right. Look at the symbol on the block, turn the block and put the symbols in the right slot.
- Please look at the screenshot for the solution (E-H).
- Take the note (I) at the bottom of the cage.
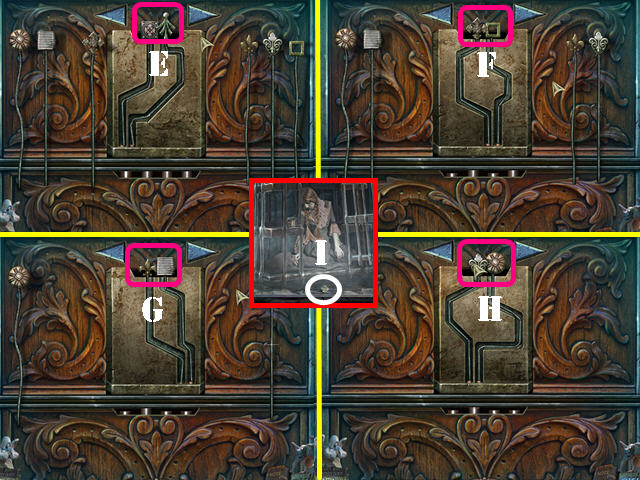
- Return to the vampire's coffin.
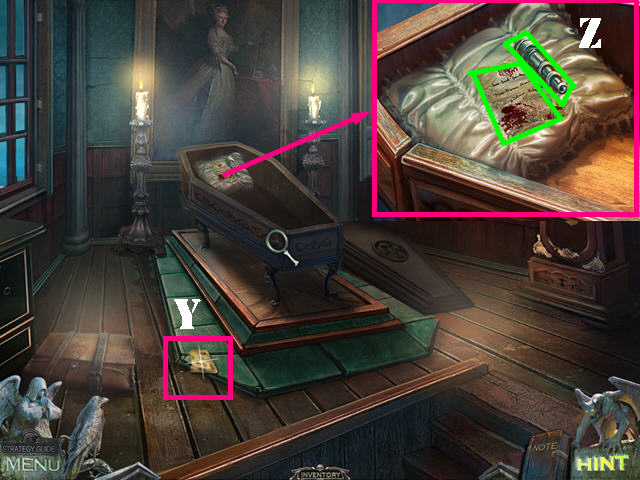
- Zoom into the lock and cut it with the FILE (J).
- Take the SKULL KNOB (K).
- Return to the secret lab.
- Zoom into the book; put the SKULL KNOB on the cover (L).
- Take the note (M) and then take the CENTRAL CIRCLE (N).
- Return to the vampire's coffin.
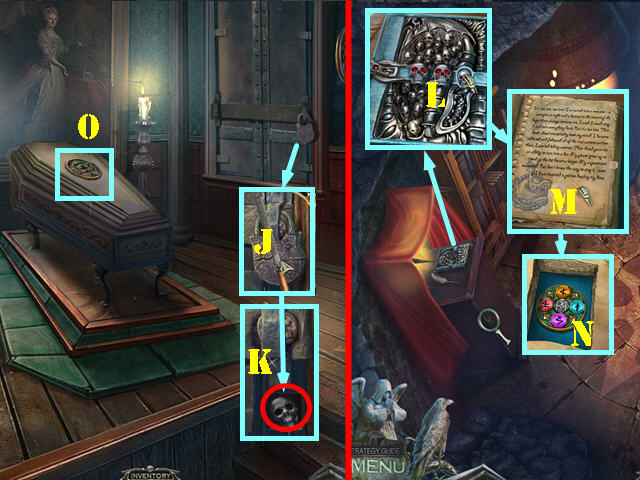
- Zoom into the coffin and add the CENTRAL CIRCLE to activate a puzzle (O).
- Arrange the gems so that you have matching symbols on connecting lines.
- Use the arrows on the left and right sides to rotate the center circle. Then use the small arrows in the center of each circle to rotate the smaller rings.
- Please look at the screenshot for the solution (P).
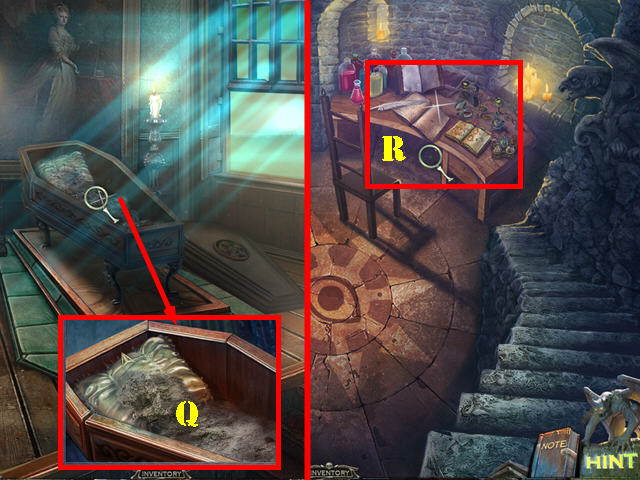
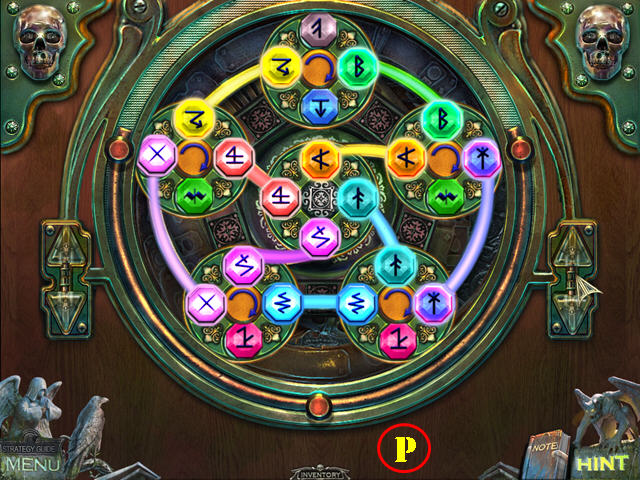
- Zoom into the coffin; use the URN in the ashes to get the VAMPIRE ASHES (Q).
- Return to the secret lab.
- Zoom into the table; put the VAMPIRE ASHES, BULLET, and FLASK on the table to activate a puzzle (R).
- Mix the ingredients according to the instructions in the book. The book page will automatically turn each time you complete step.
- Pump the bellows 4 times (A).
- Pour the urn ashes (B) into the goblet (C).
- Put the garlic (D) into the press (E). Put the pressed garlic into the bowl (F).
- Touch the flasks in the right order (1-5).
- Pour the green liquid (G) into the bowl.
- Examine the telescope for a mini-puzzle (H).
- Touch the matching pairs to eliminate them. Please look at the screenshot for the solution (I). Put the last remaining item in the bowl (J).
- Turn the valve (K).
- Take the POTION (L).
- Return to the tower.
- Zoom into the cage and give the POTION to the girl (M).
- Touch the ghost in the water (N).
- Take the SOUL STONE (O).
- Walk down and go right.
- Talk to the ghost (P) and then go through the portal (Q).
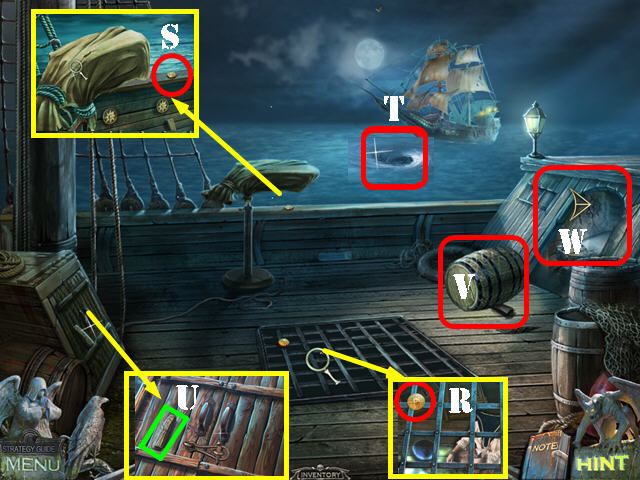
- Examine the grate; talk to the pirate and then take the COIN (R).
- Examine the side of the boat and take the COIN (S).
- Inspect the whirlpool for a cut scene and a boat to appear (T).
- Examine the hatch; take the WEDGE (U).
- Put the WEDGE below the barrel (V).
- Open the door and go through it (W).
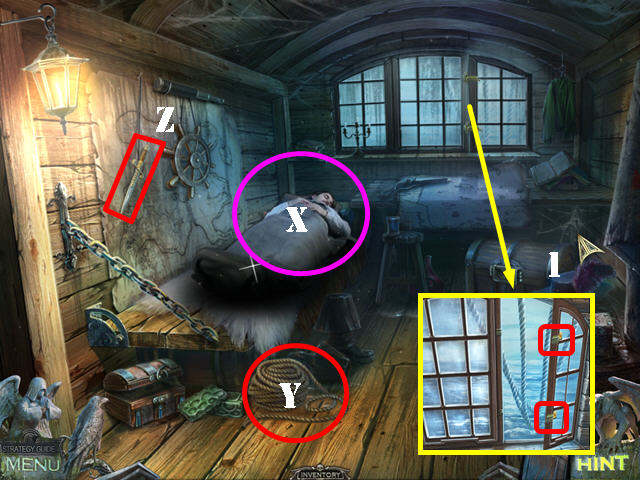
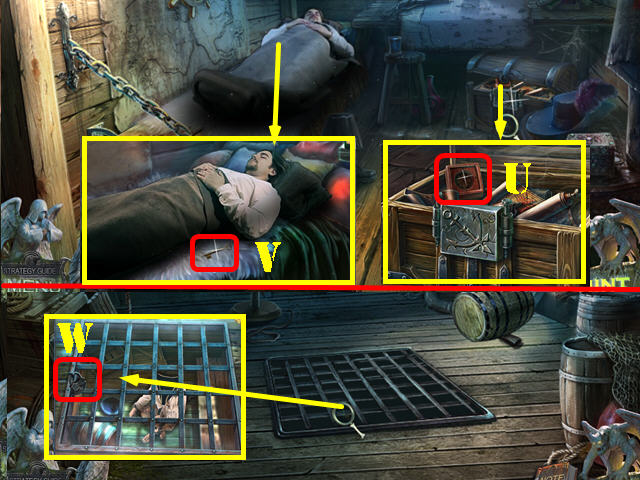
- Talk to the man in the bed (X).
- Take the ROPE (Y) and the DIRK (Z).
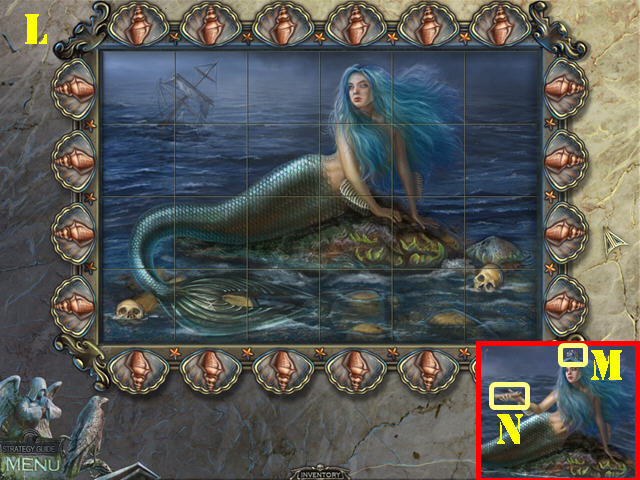
- Inspect the window; put the 2 COINS on the latches and look through the window for a mini-game (1).
- Untangle the ropes so no ropes cross each other.
- Please look at the screenshot for the solution (A).
- Take the MEDICINE (B).
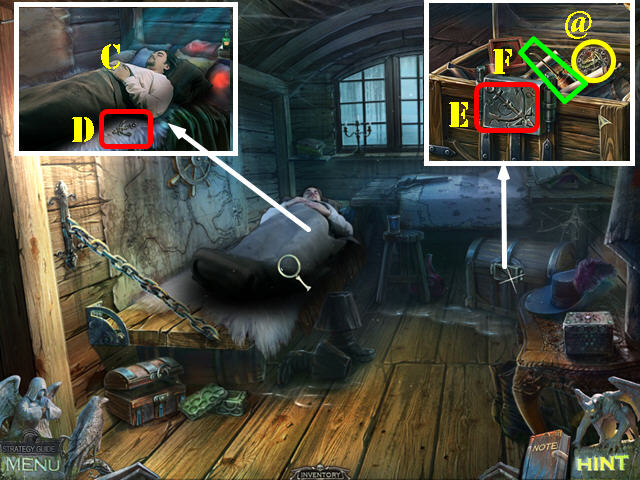
- Zoom into the man in the bed; give him the MEDICINE (C).
- Take the CHEST KEY (D).
- Examine the chest; put the CHEST KEY in the lock (E).
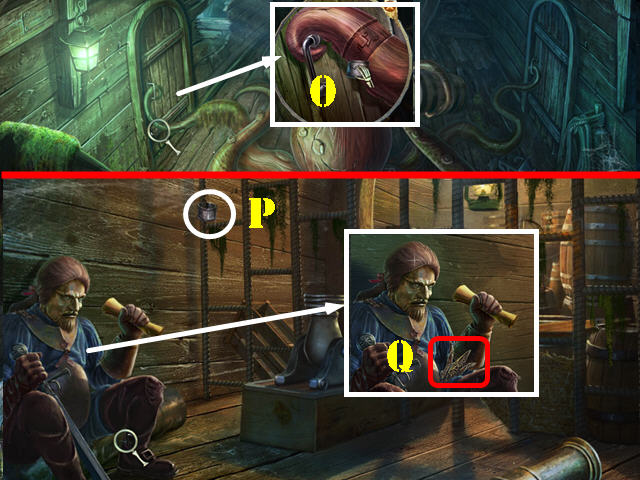
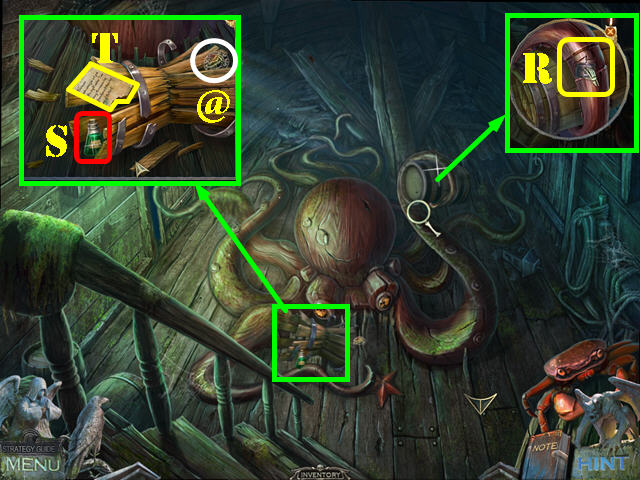
- Take the OIL CAN (F) and the CROW RUNE (@).
- Walk Down.
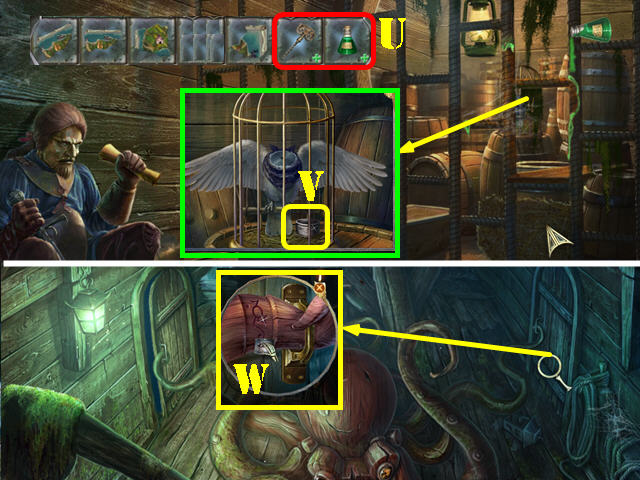
- Examine the hatch; put the OIL CAN on the lock (G).
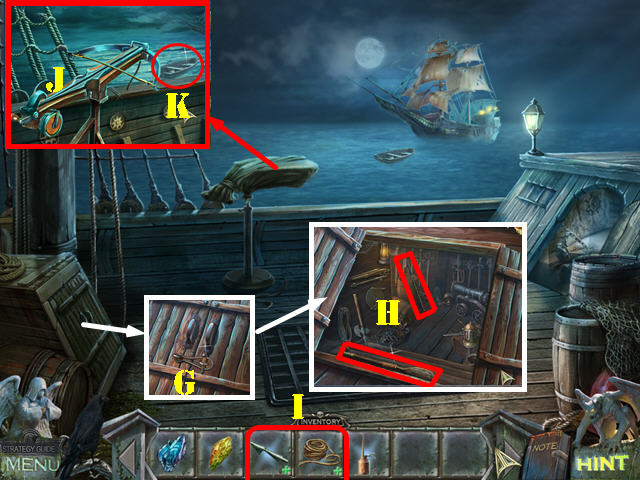
- Open the door; take the HARPOON and the OAR (H).
- Combine the HARPOON with the ROPE from inventory to create the HARPOON WITH ROPE (I).
- Zoom into the canvas; cut it with the DIRK to reveal a crossbow. Put the HARPOON WITH ROPE on the crossbow (J).
- Put the OAR on the boat (K).
Chapter 9: The Ship

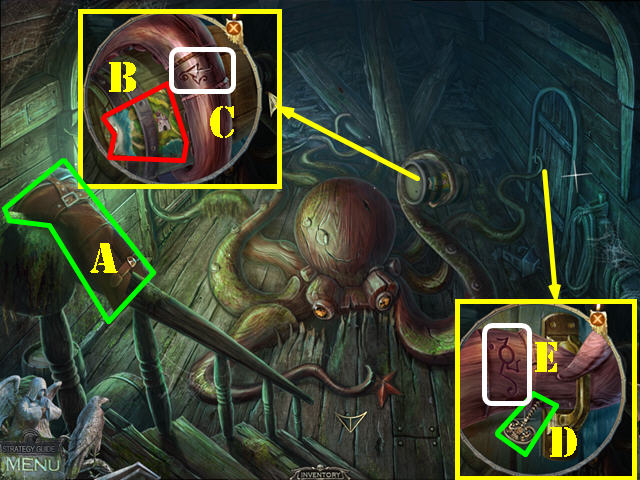
- Inspect the monster; take the HORN (L).
- Use the Mystical Crow on the rope (M).
- Go up the rope.
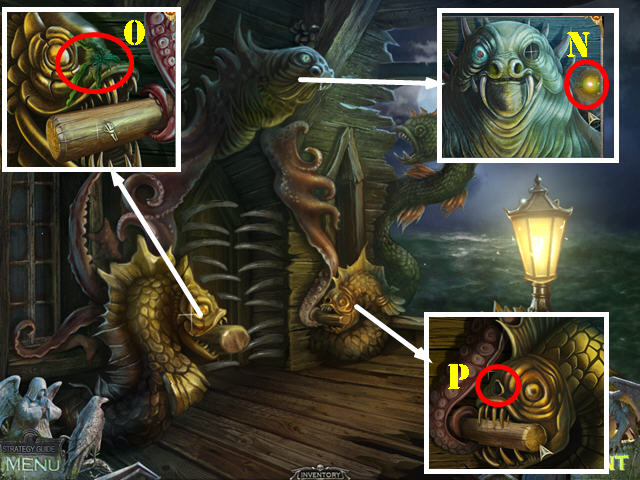
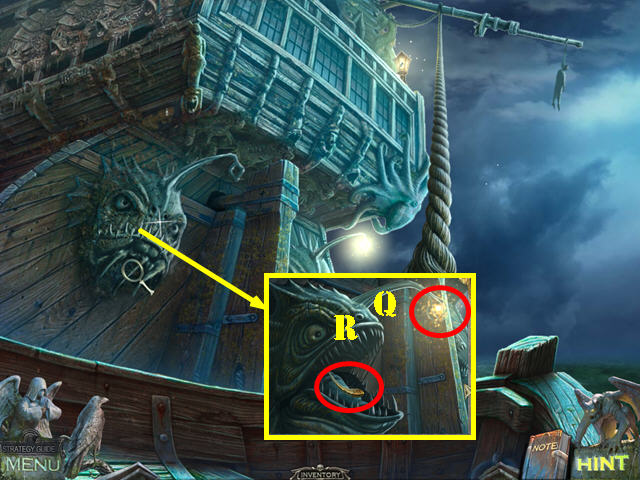
- Zoom into the top monster; take the ANGLERFISH LIGHT (N).
- Zoom into the left monster; remove the dirt with the DIRK (O).
- Zoom into the right monster; put the HORN on it (P).
- Walk down.
- Zoom into the monster; give him the ANGLERFISH LIGHT (Q).
- Take the HORN (R).
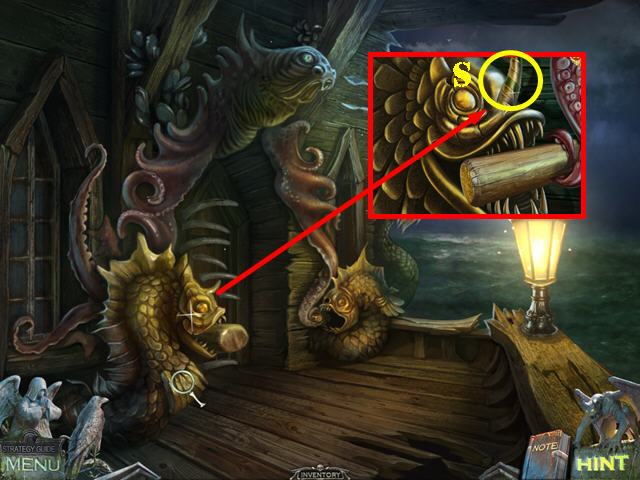
- Go up.
- Zoom into the monster; put the HORN on it (S).
- Go through the door.
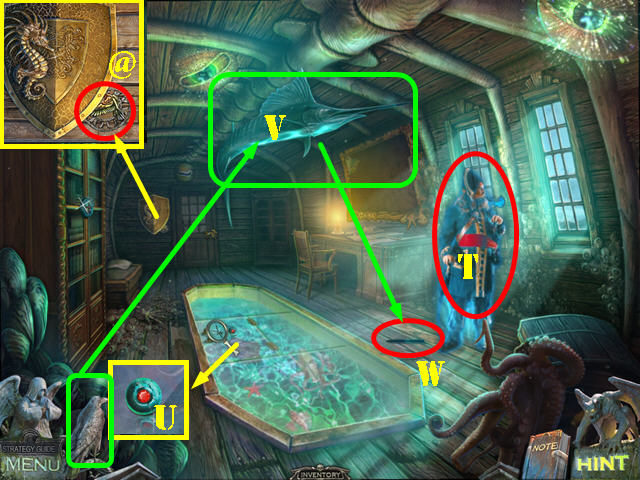
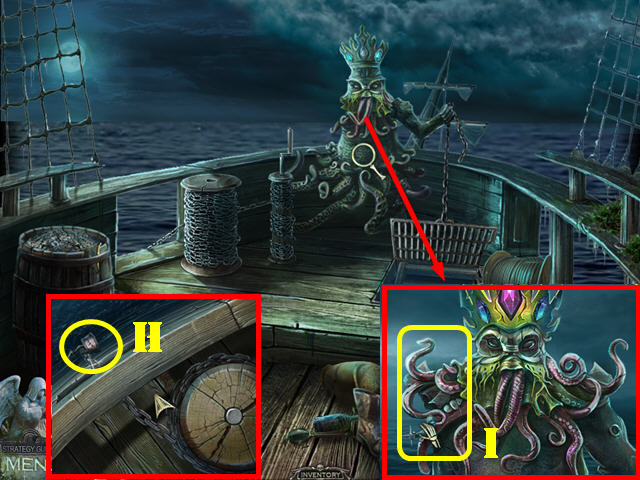
- Talk to the ghost (T).
- Examine the aquarium; take the BEHEMOTH EYE (U).
- Examine the shield; take the CROW RUNE (@).
- Use the Mystical Crow on the swordfish (V); take the FISH NOSE on the ground (W).
- Walk down.
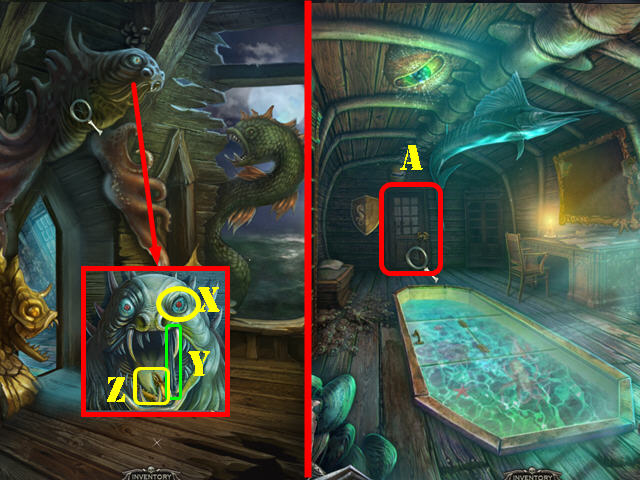
- Examine the monster; put the BEHEMOTH EYE in the eye socket (X).
- Put the FISH NOSE in the mouth (Y) and take the CRAB CLAW (Z).
- Go through the door.
- Examine the door; put the CRAB CLAW on it to activate a puzzle (A).
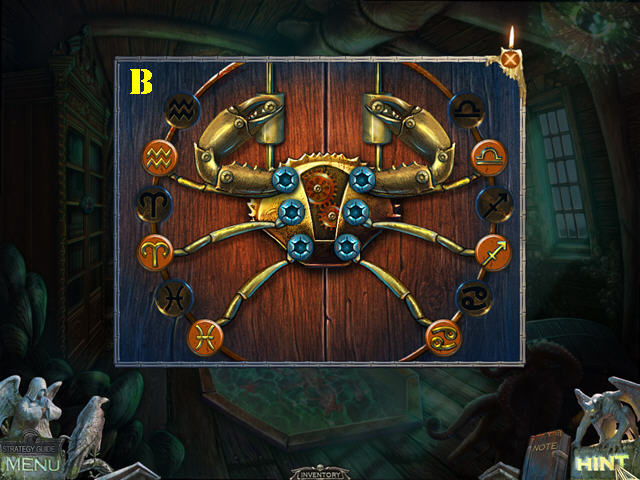
- Place the matching symbols next to each other. Select two buttons on the crab legs to swap the position of the symbols.
- Please look at the screenshot for the solution (B).
- Go through the door.
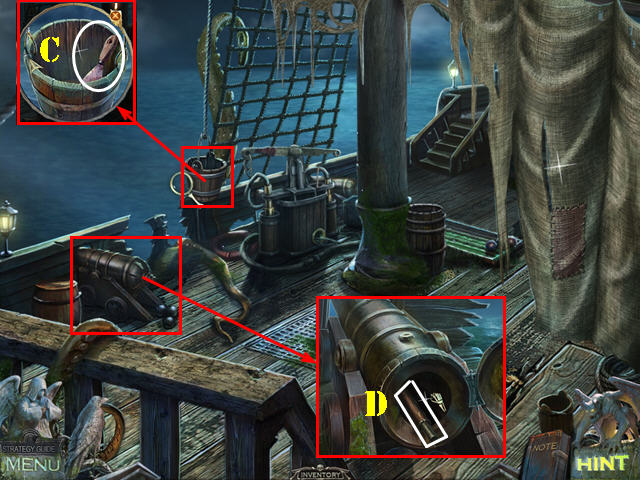
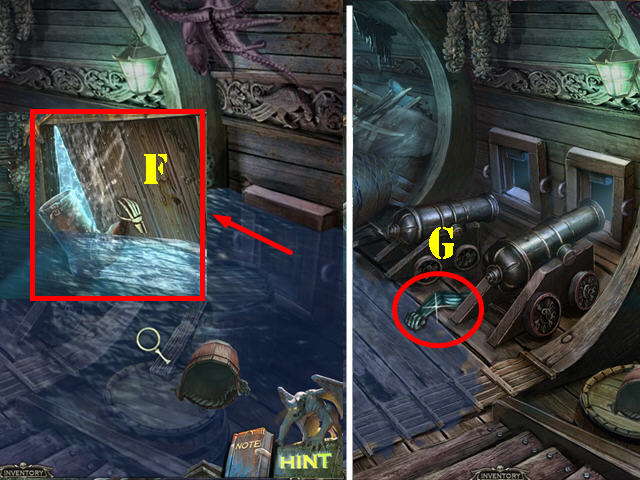
- Examine the bucket; take the SCRAPER (C).
- Inspect the cannon; open it and take the RAMROD (D).
- Take the stairs.
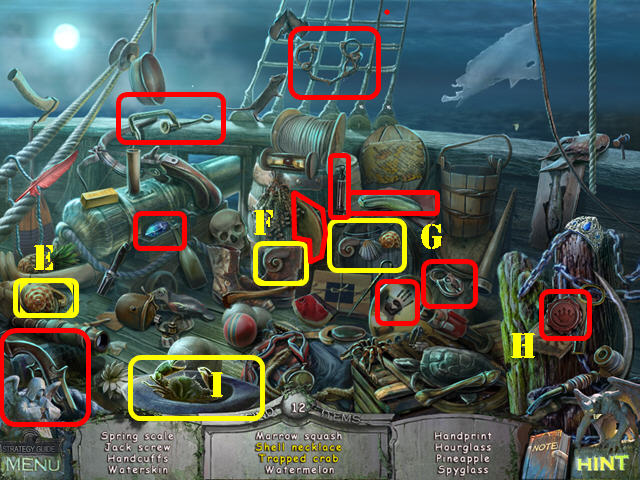
- Play the HOS.
- Drag the 2 shells (E, F) to the necklace; take the shell necklace (G).
- Put the hat around section (H) over the crab (I); take the trapped crab.
- The GEM will be added to inventory.
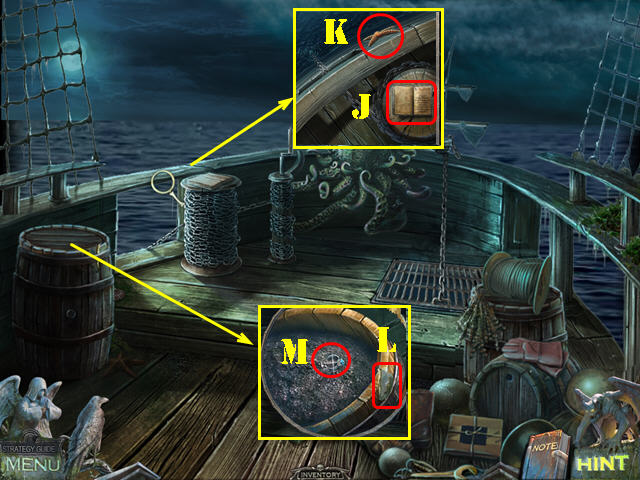
- Inspect the side of the boat; take the note (J). Use the SCRAPER to remove the STARFISH (K).
- Look at the barrel; take the first MAP piece (L). Use the DIRK to open the barrel lid and take the RING (M).
- Walk down twice.
- Look at the cabinet; put the STARFISH in the slot (N); take the GEM and the PIRATE HOOK (O).
- Go back to the deck.
- Examine the octopus; put the 2 GEMS in the crown (P) to open the hatch. Go down the hatch to reach the ship hold (Q).
- Touch the water and the shark will attack.
- Combine the RAMROD with the PIRATE HOOK from inventory to create the RAMROD WITH HOOK (R).
- Use the RAMROD WITH HOOK on the bucket (S). Zoom into the bucket and take the HATCH KEY (T).
- Examine the barrel; take the CANNONBALL (U).
- Cut the net with the DIRK to get the FISHNET (V).
- Walk down twice.
- Examine the bucket.
- Put the CANNONBALL into the bucket (W) to raise the curtain and activate a HOP.
- Play the HOP.
- Touch the rope and take the ramrod (1).
- Open the drawer and take the scoop (2).
- Use the scoop in the barrel to get the powder (3).
- Take the stone (4).
- Remove the net and take the cannonballs (5).
- Touch the coat and take the torch (6).
- Put the powder in the cannon (7). Use the ramrod in the cannon. Put the cannonballs in the cannon.
- Zoom into the lamp; break it with the stone (8); put the torch on the fire to get the lit torch.
- Put the lit torch on the cannon. Move the cannon to the target and shoot (9).
- Look inside the chest and take the SEAHORSE to add it to inventory (10).
- Examine the hatch; put the HATCH KEY on the lock (11) and take the BOARDS (12).
- Go back to the ship hold.
- Put the BOARDS on the right side of the water and zoom into that area (13).
- Take the NET (14).
- Walk down 3 times.
- Combine the NET and the FISHNET from inventory to create the NET (15).
- Examine the aquarium; cut the glass with the RING. Use the NET to catch the ELECTRIC RAY (16).
- Examine the shield; put the SEAHORSE on it (17) and take the second MAP piece (18).
- Go forward.
- Examine the water pump; put the ELECTRIC RAY in the fish bowl (19) and press on the pump.
- Go down to the cargo hold (20).
Chapter 10: The Finale
- Take the BOOT (A).
- Examine the barrel; take the third MAP piece (B) and make a note of the symbol (C).
- Examine the right door; take the CORKSCREW (D) and note the symbol (E).
- Return to the ship hold.
- Zoom into the right door; put the BOOT on the door to drain the water (F).
- Take the STATUE HAND (G).
- Walk down.
- Zoom into the statue; put the STATUE HAND on it (I).
- Take the BRACELET with the RAMROD WITH HOOK (H).
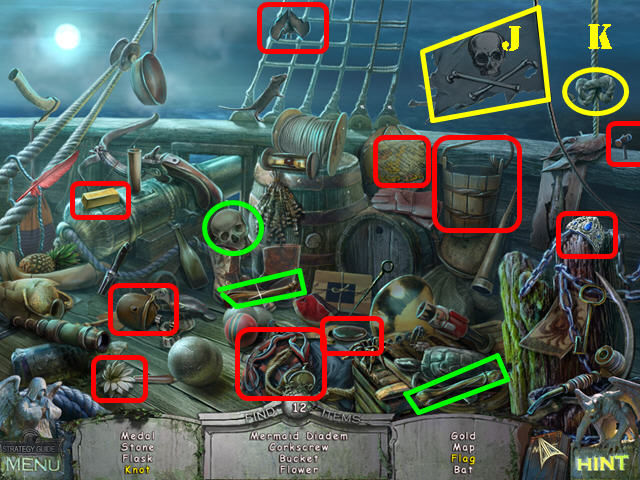
- Play the HOS.
- Put the skull and the 2 bones marked in green on the flag; take the flag (J).
- Pull on the rope and take the knot (K).
- The DIADEM will be added to inventory.
- Go to the ship hold.
- Examine the picture for a mini-game.
- Select any 2 tiles to swap their positions until you form the correct image.
- Please look at the screenshot for the solution (L).
- Put the DIADEM on her head (M).
- Take the fourth MAP piece (N).
- Walk down twice and go into the cargo hold.
- Zoom into the left door; put the BRACELET on and go through the door (O).
- Use the RAMROD WITH HOOK to get the BRACELET (P).
- Look at the statue; take the TRIDENT TINES (Q).
- Walk down.
- Zoom into the barrel; put the BRACELET on the octopus' arm (R).
- Inspect the broken barrel; take the CORKED ACID (S), the CROW RUNE (@) and the note (T).
- Go through the left door.
- Combine the CORKED ACID with the CORKSCREW from inventory to get the ACID (U).
- Use the ACID on the bars; examine the cage and take the BRACELET (V).
- Walk down.
- Zoom into the right door; put the BRACELET on and go through the door (W).
- Take the note (1).
- Put the Mystical Crow on the helmet (2); take the HELMET (3).
- Zoom into the trident; put the TRIDENT TINES on it one by one (4). Note: to place the tines put your cursor at the end of the broken tip.
- Take the PARROT HEAD on the ground (5).
- Walk down and go through the left door.
- Look at the statue; put the HELMET on his head (6). Take the MERMAID FIGURINE (7) and look at the parrot sketch (8).
- Zoom into the cage; put the PARROT HEAD on the body. Adjust the wings as shown in the screenshot (move the right wing twice) and take the fifth MAP piece (9).
- Walk down and go through the right door.
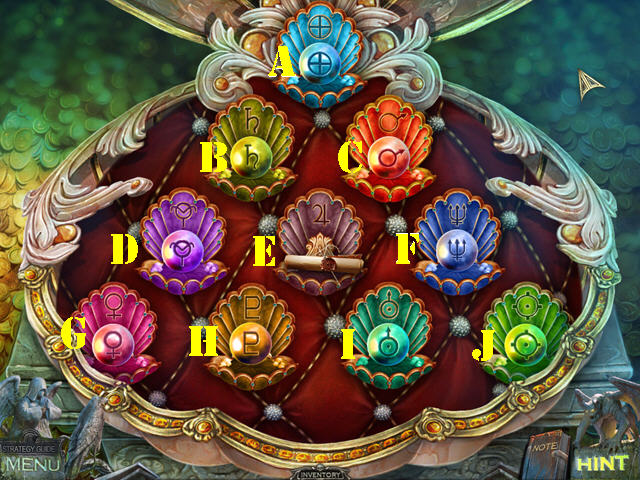
- Examine the pedestal; put the MERMAID FIGURINE on it to activate a puzzle.
- Put the pearls into their matching shells.
- To solve the puzzle, swap the pearls in this order: A-C, B-E, D-H, E-H, C-E, J-F, C-F, I-F, G-H, H-I, I-J, G-D, E-H, and D-H.
- Take the sixth MAP piece.
- Walk down twice.
- Play the HOP.
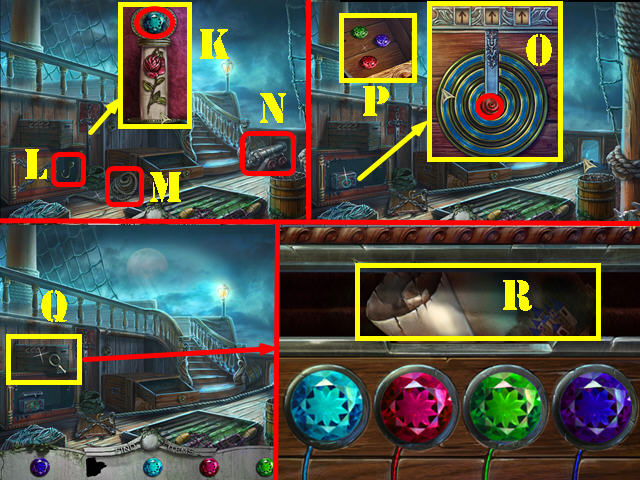
- Examine the sword; form the rose by clicking on the parts on the sword and take the blue gem (K).
- Take the hook (L) and put it on the rope (M) to get the rope with hook.
- Put the rope with hook on the cannon (N); touch the cannon to yank off the chains ().
- Examine the chest; press on the symbols until they are all lined up at the top and then press on the red button (O).
- Look in the chest; take the violet gem, red gem, and green gem (P).
- Look at the trunk; put the green, red, violet, and blue gems into the slots (Q). Select two gems to swap their positions; put the gems next to their matching wires (blue, red, green, and violet).
- Take the seventh MAP piece (R).
- Walk down.
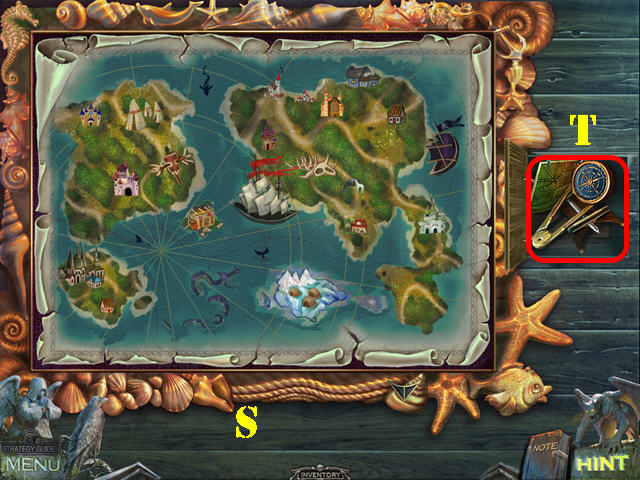
- Zoom into the frame; put the 7 MAP PIECES on the frame to activate a puzzle.
- Right-click on a piece to rotate it and then put it in place.
- Please look at the screenshot for the solution (S).
- Take the GUIDES (T).
- Walk down 3 times and go through the right door.
- Zoom into the chest; put the GUIDES into the box (U).
- Take the HOLD KEY (V).
- Walk down.
- Zoom into the grate; use the HOLD KEY in the lock (W); turn the key and remove the grid.

- Take the SOUL STONE (X).
- Walk down and go left.
- Zoom into the boatman 3 times to give him the 3 SOUL STONES (Y).
- Congratulations, you have completed Redemption Cemetery: Grave Testimony Standard Edition!
Created at: 2012-08-31