

Walkthrough Menu
- General Tips
- Chapter 1: Cemetery
- Chapter 2: Village
- Chapter 3: Comet Spirit
- Chapter 4: Settlement
- Chapter 5: Lily
- Chapter 6: Final Solution
General Tips
- This is the official guide for Redemption Cemetery: One Foot in the Grave.
- This guide won't tell you when to zoom into a location; the screenshots show each zoom scene.
- Hidden-object puzzles are referred to as HOPs. Only the locations of the HOPs will be shown.
- Use the Map to fast travel to a location.
Chapter 1: Cemetery
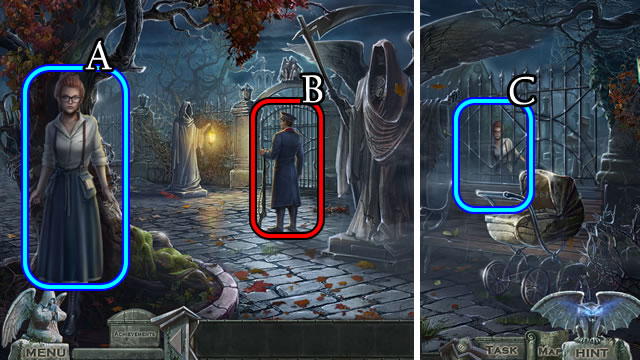
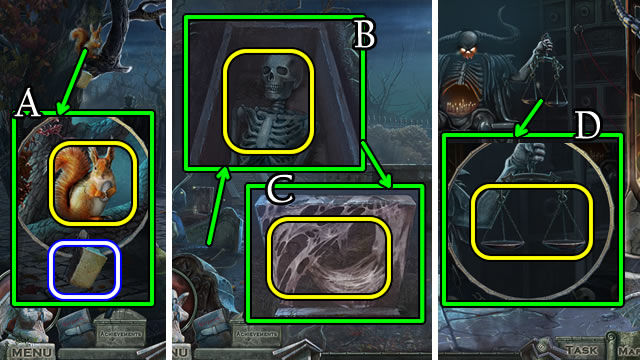
- Speak (A); take Notebook and PENCIL.
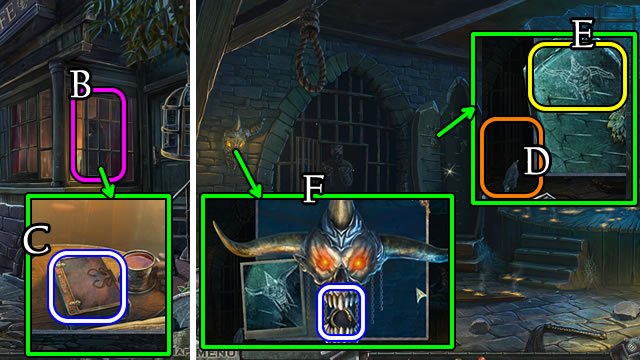
- Speak (B).
- Speak (C).
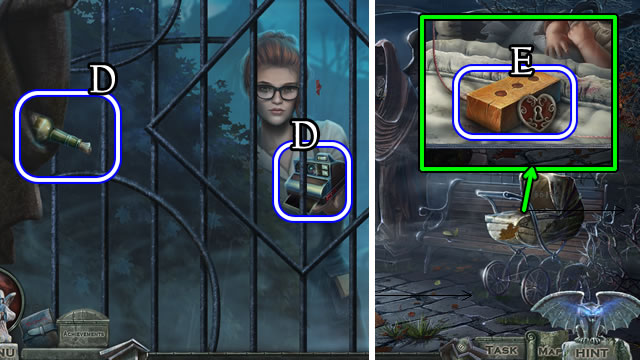
- Take CAMERA and BOTTLE (D).
- Take METAL HEART and BRICK (E).
- BRICK on BOTTLE for BROKEN BOTTLE and 1/2 BATTERY.
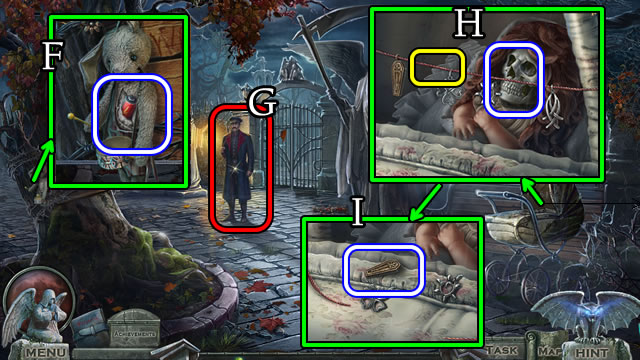
- Use BROKEN BOTTLE for 2/2 BATTERY (F).
- 2/2 BATTERIES in CAMERA for SKELETON PHOTO.
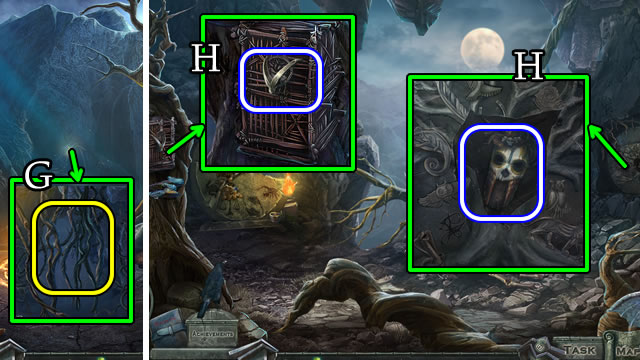
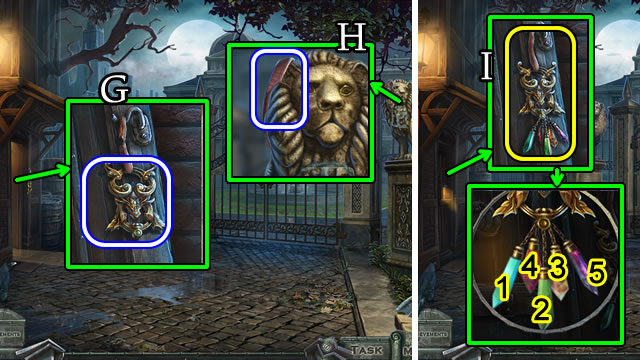
- Give SKELETON PHOTO (G).
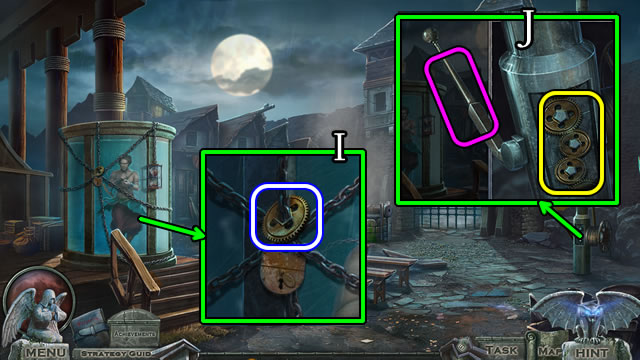
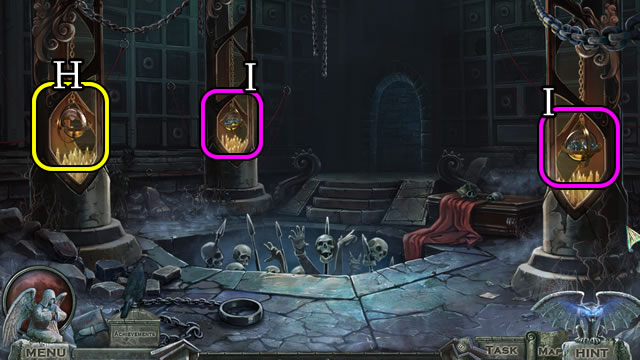
- Take 1/3 SKULL; use BROKEN BOTTLE (H) for IRON COFFIN (I).
- Go forward.
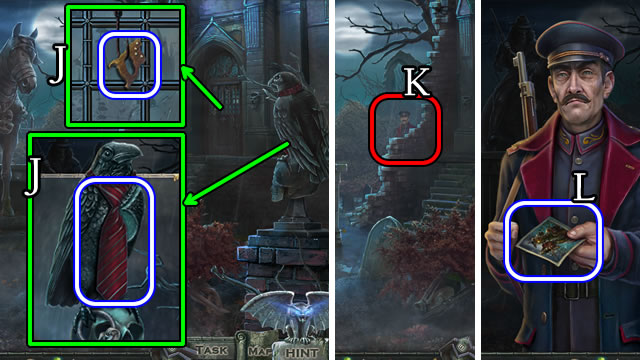
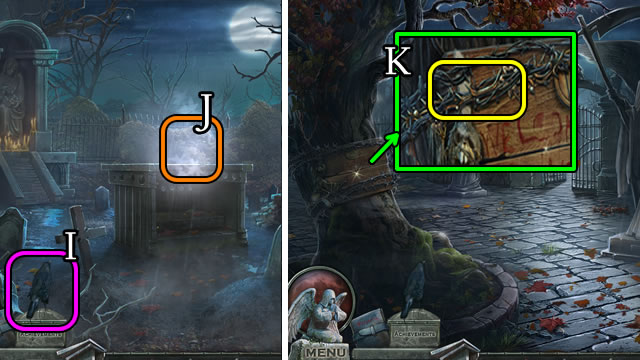
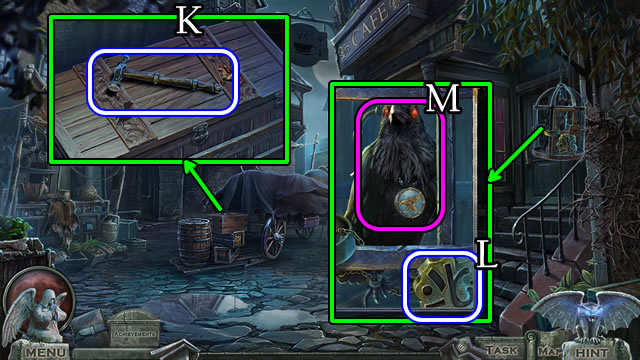
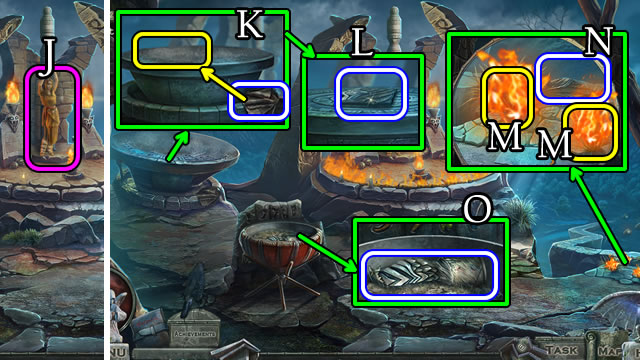
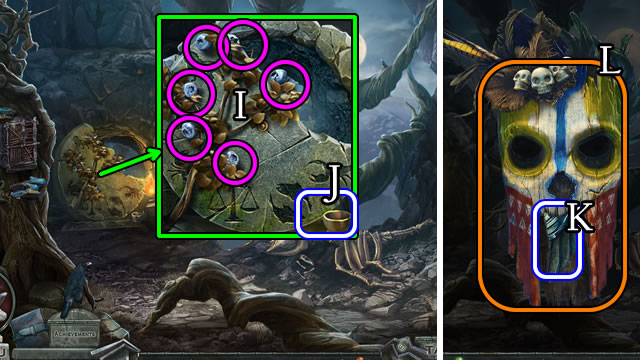
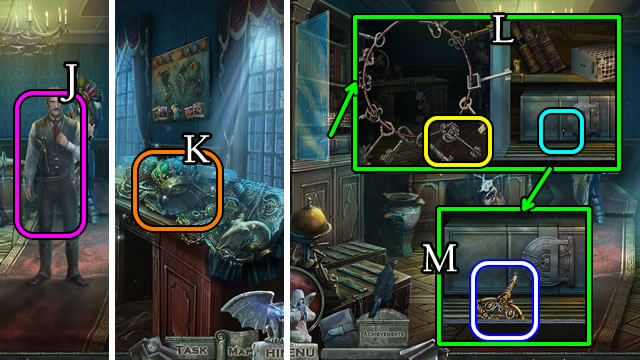
- Take NECKTIE; SAW HANDLE (J).
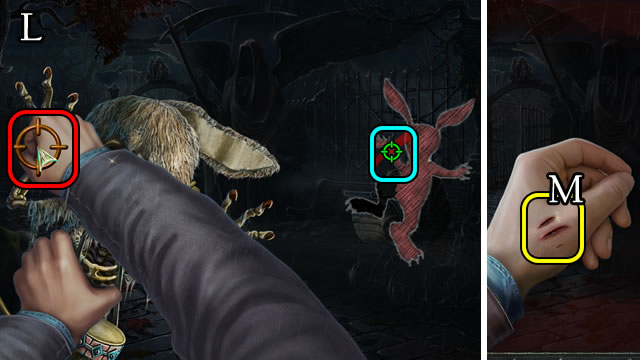
- Speak (K); take PHOTO (L).
- PENCIL on PHOTO.
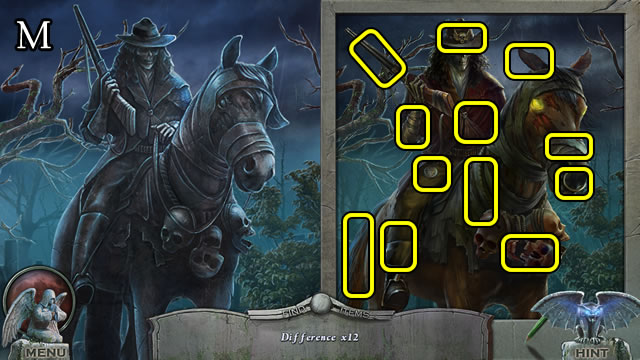
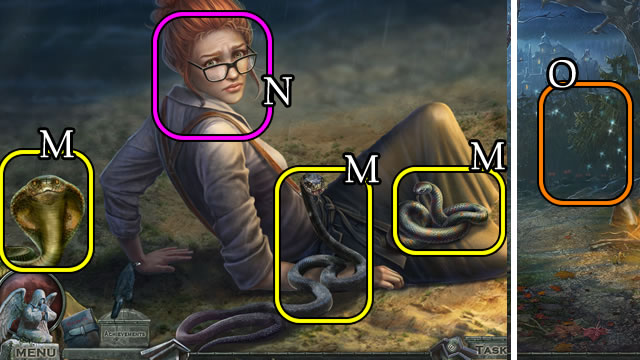
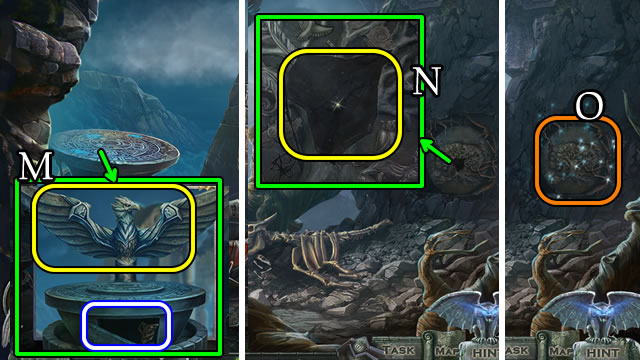
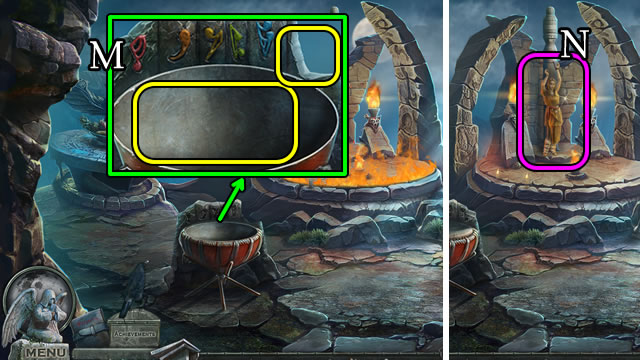
- Solution (M).
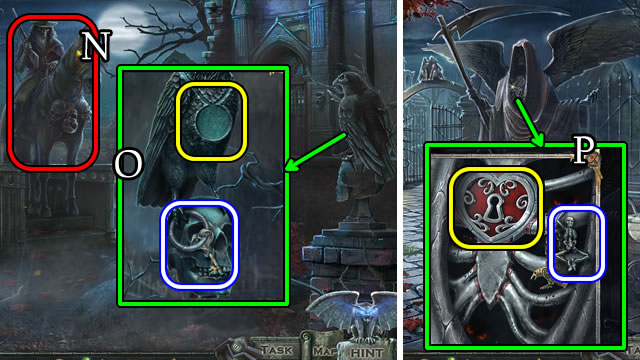
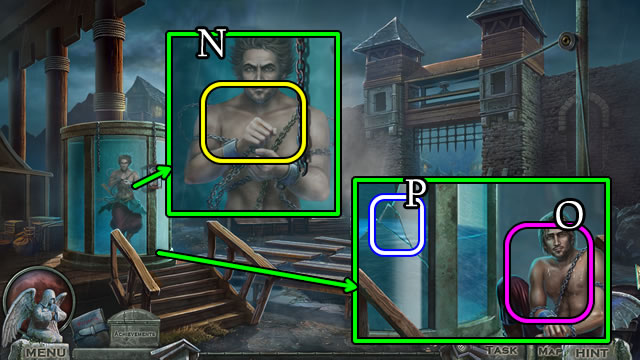
- Speak (N); take RAVEN AMULET.
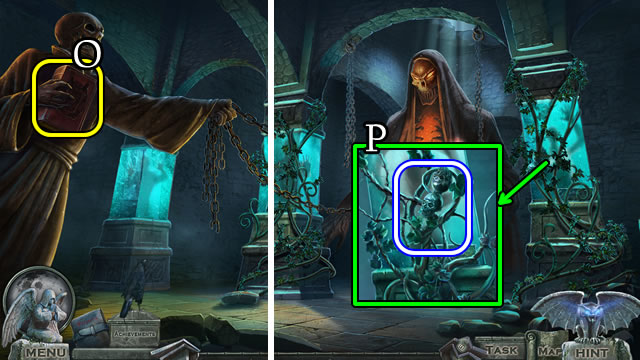
- Place RAVEN AMULET; take KEY (O).
- Go down.
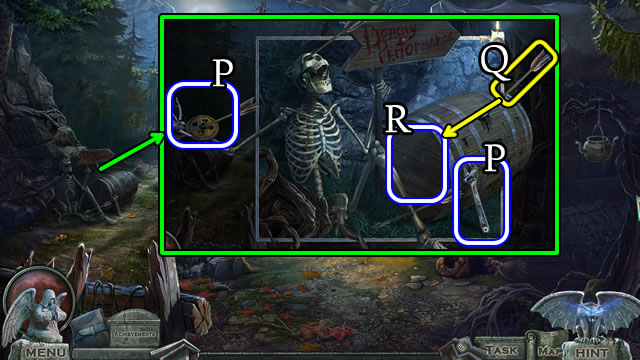
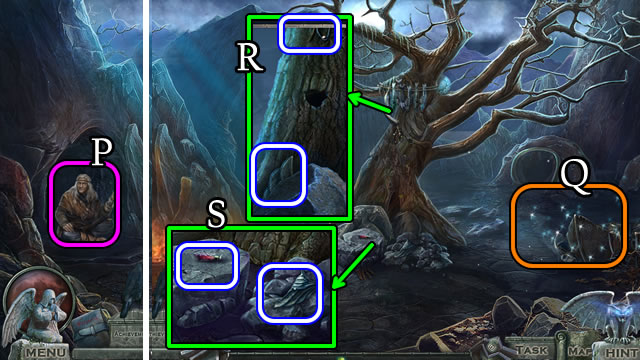
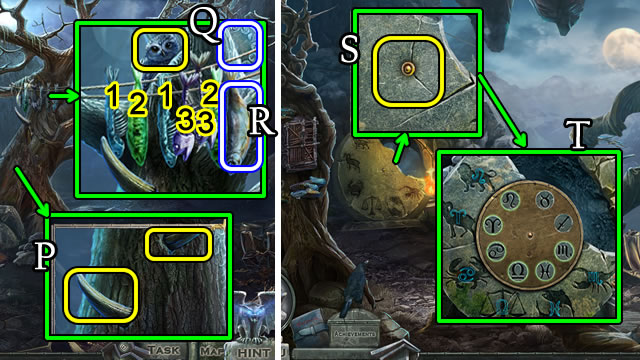
- Place METAL HEART; use KEY; take IRON SKELETON (P).
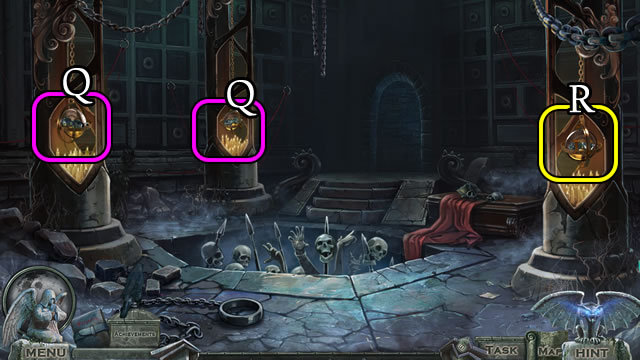
- IRON SKELETON in IRON COFFIN.
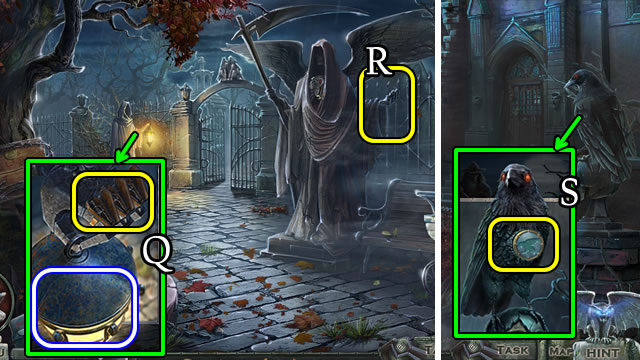
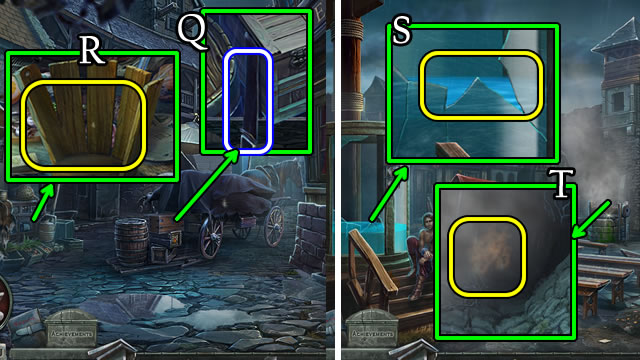
- Place IRON COFFIN; close coffins; receive LAMP (Q).
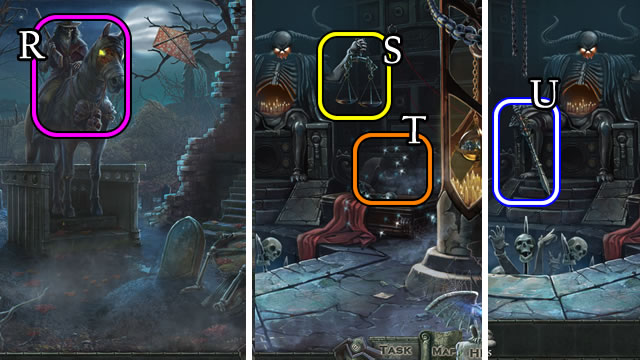
- Place LAMP (R).
- Solutions vary.
- Take GOLDEN RAVEN.
- Go forward.
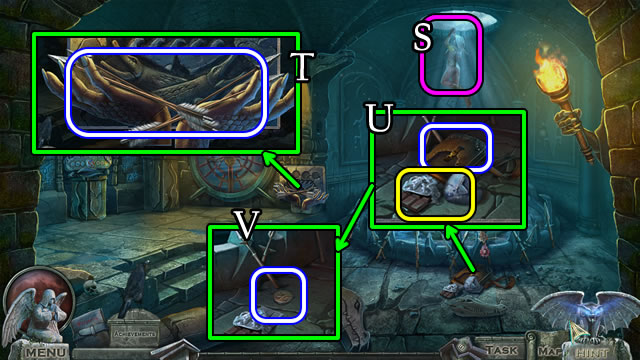
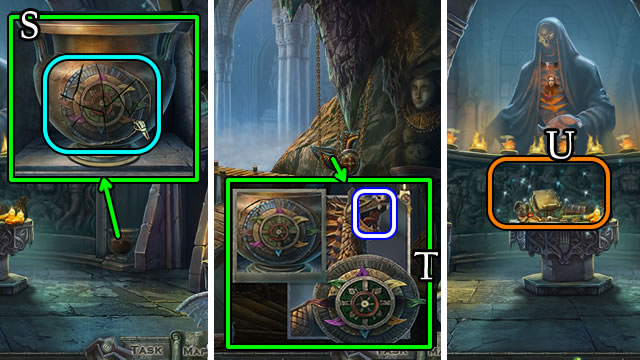
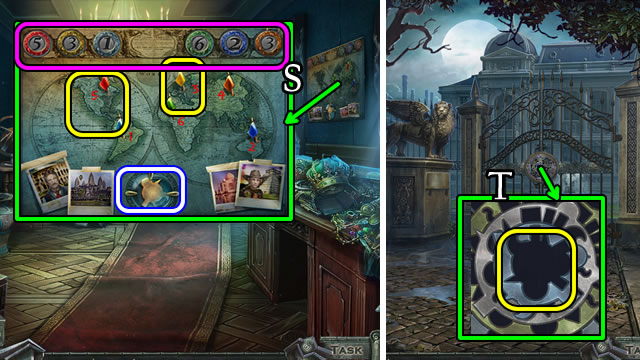
- Place GOLDEN RAVEN; take Raven (S).
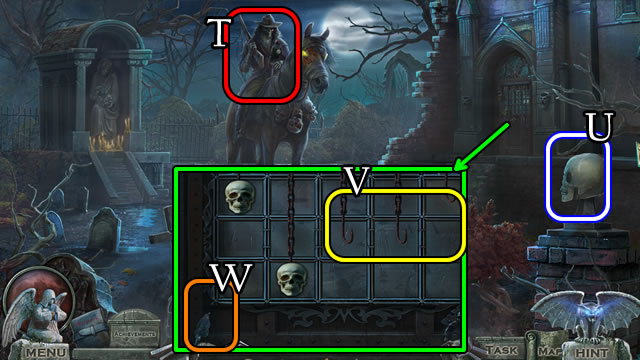
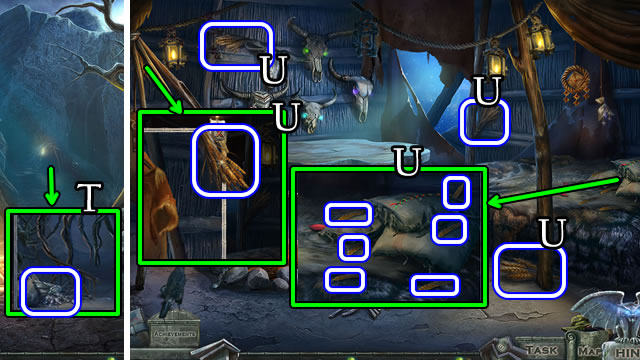
- Speak (T); receive 2/3 SKULL.
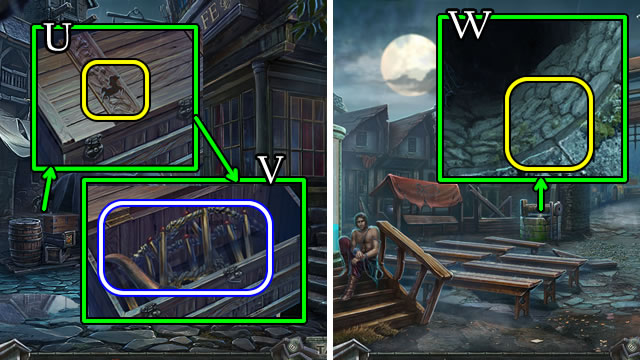
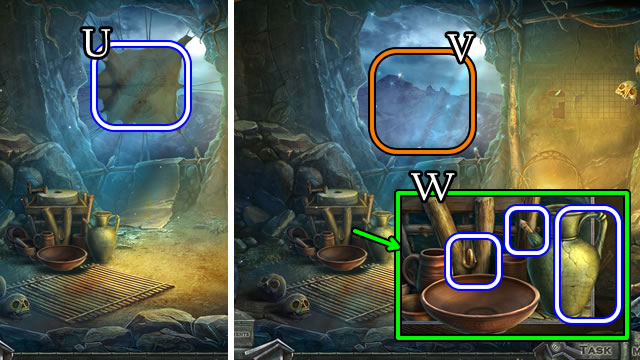
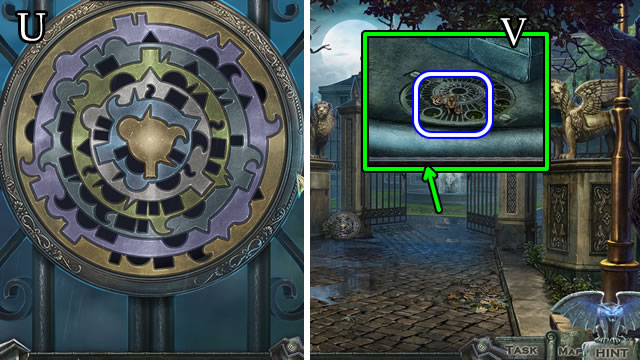
- Take 3/3 SKULL (U).
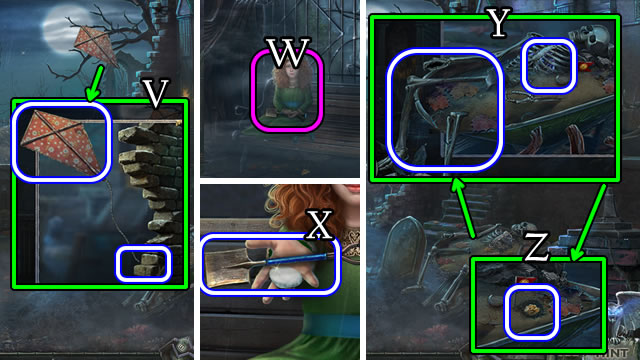
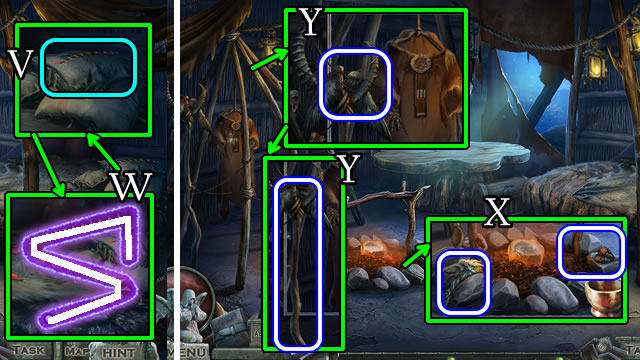
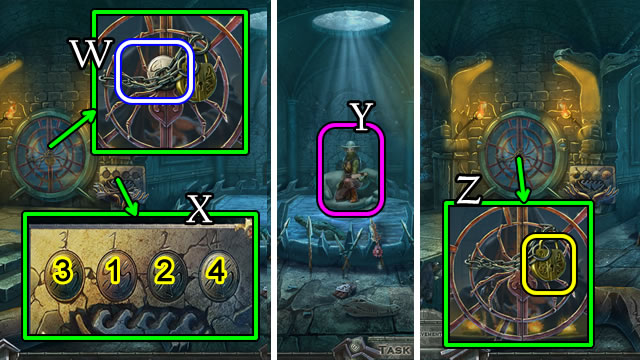
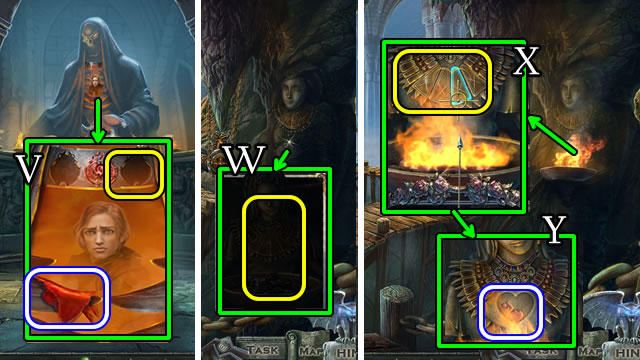
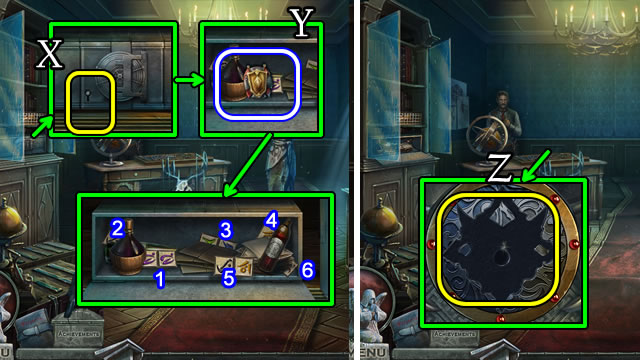
- Place 3/3 SKULLS (V); select (W).
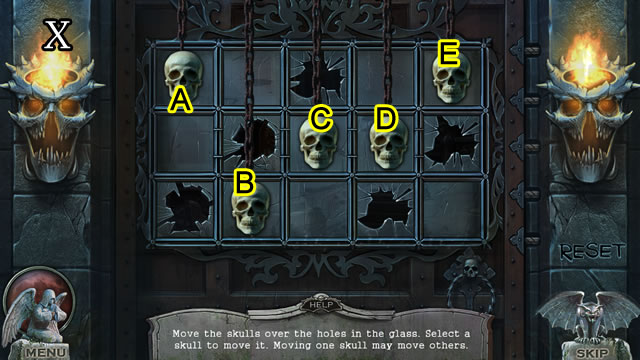
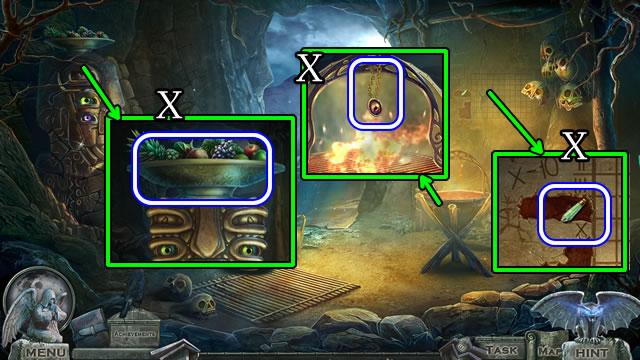
- Solution (X). D-E-Ax2-B.
- Go forward.
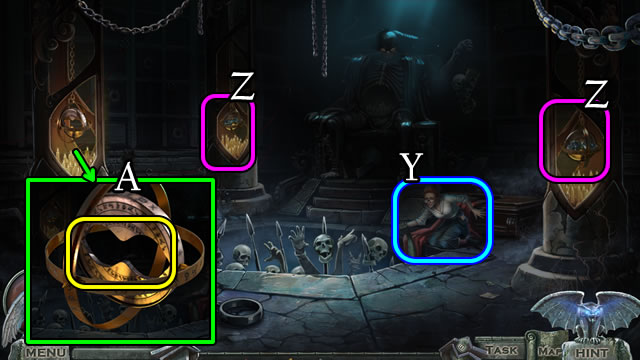
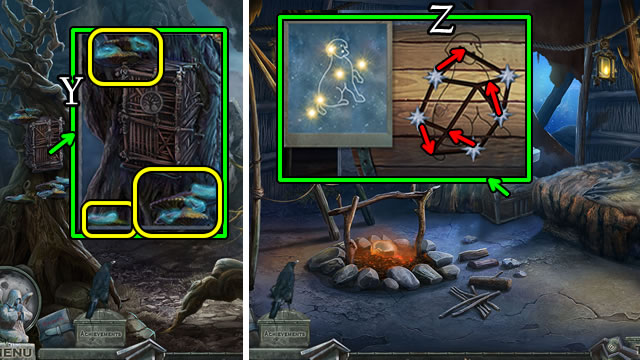
- Speak (Y); take SCEPTER.
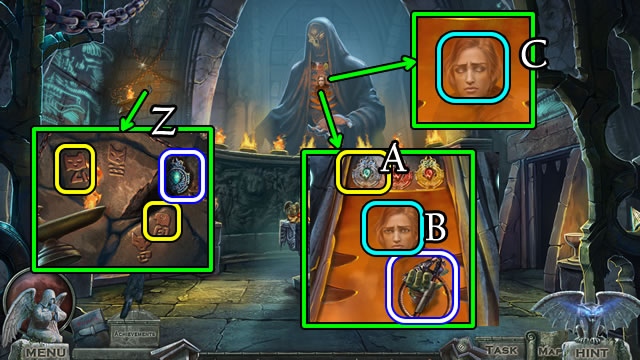
- SCEPTER for note.
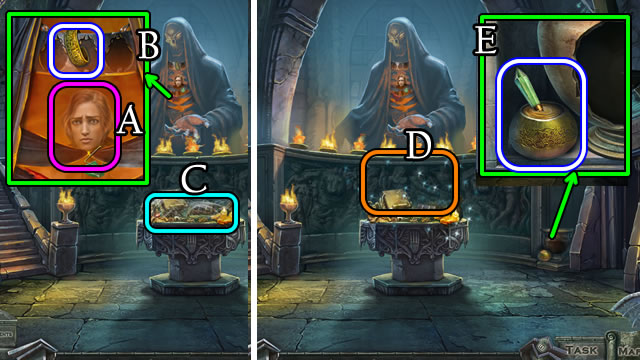
- Select (Z); place, select SCEPTER (A).
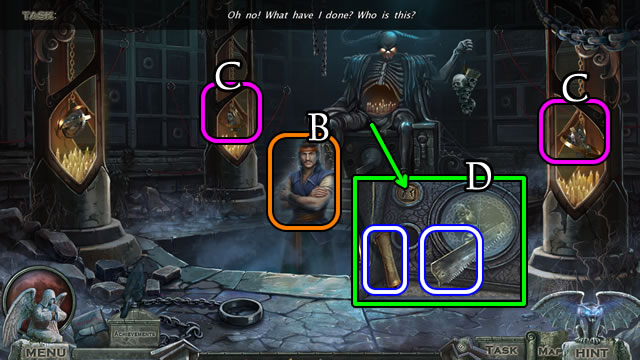
- Speak (B).
- Remove 2 scepters (C).
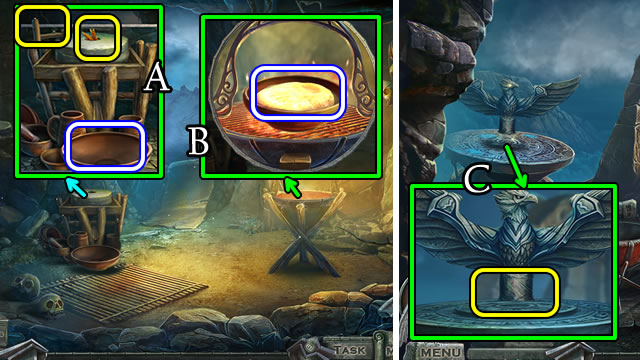
- Take MAP; use SAW HANDLE for SAW (D).
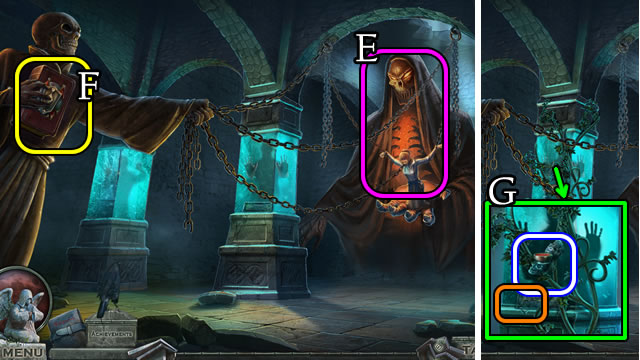
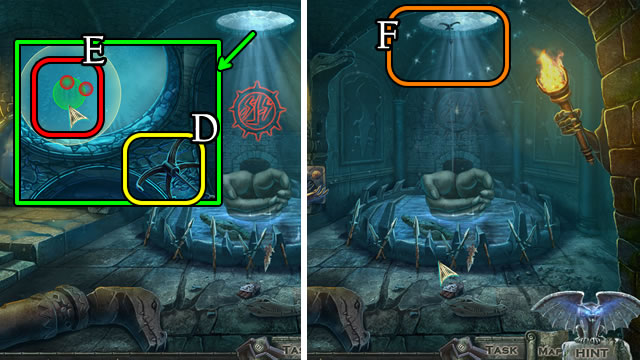
- Go down.
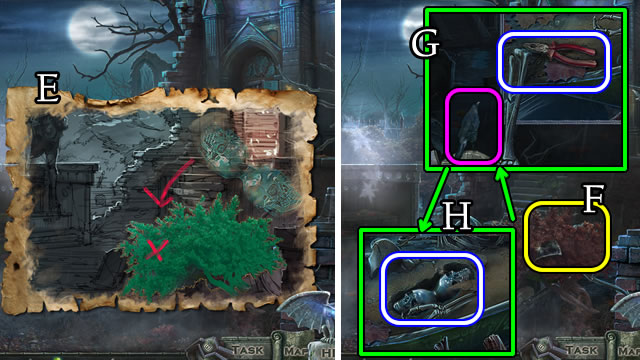
- Position MAP (E).
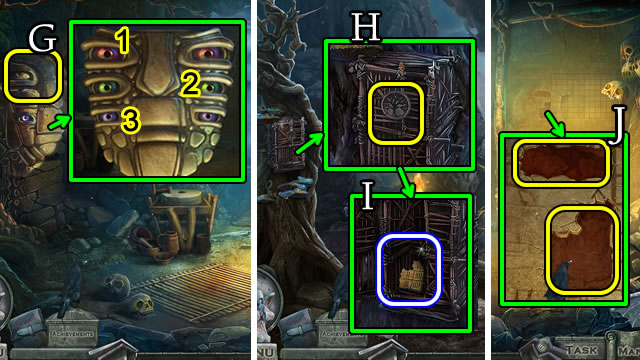
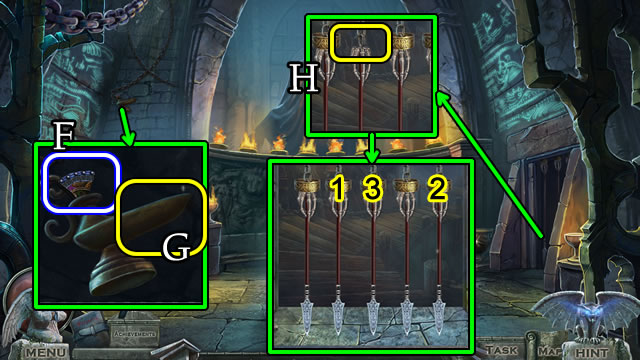
- Use SAW (F); take CLIPPERS; use Raven (G); take SCEPTER (H).
- Select (I) for dialogue (J).
- Go down.
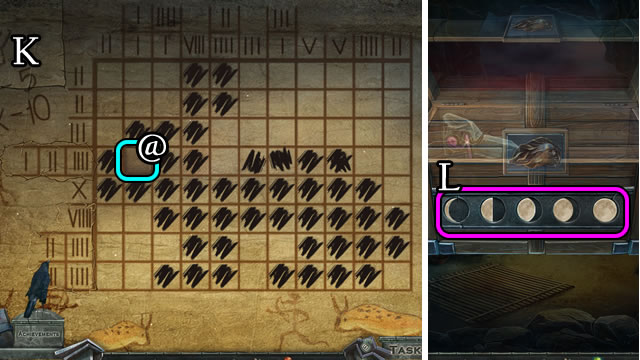
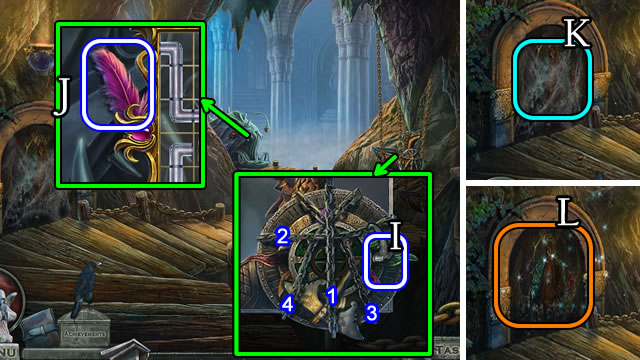
- Use CLIPPERS (K).
- Solution (L).
- Use NECKTIE (M).
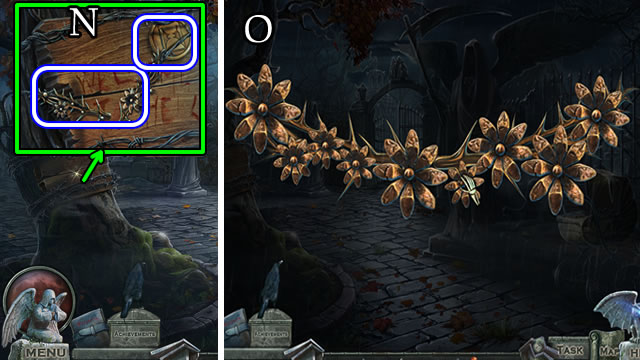
- Take 1/3 PIECE and UNFINISHED WREATH (N).
- UNFINISHED WREATH; solution for WREATH (O).
- Go forward.

- Place WREATH; take 2/3 PIECE (P).
- Go forward.
- Use CLIPPERS, select lever (Q).
- Select HOP (R) and place LAMP; receive 3/3 PIECE.

- Place 3/3 PIECES; select Raven; solution; take SCEPTER (S).
- Place, select 2 SCEPTERS (T).
- Select (U).
- Enter portal.
Chapter 2: Village

- Speak (V).
- Go right.
- Take GLUE (W).
- Take MASK HALF; use GLUE for KNIFE (X).
- Move left poster; take AIR SYMBOL (Y).
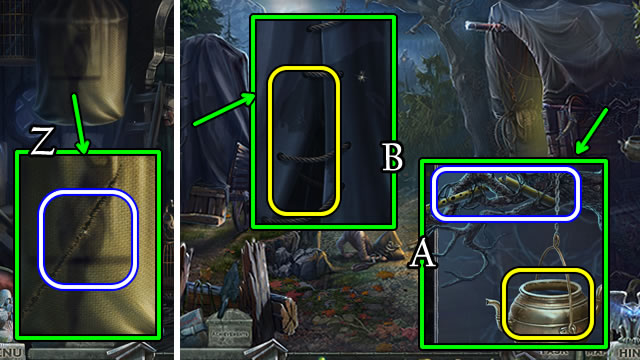
- Use KNIFE; take RAG (Z).
- Go down.
- Use SAW for BROKEN FLUTE; place RAG for WET RAG (A).
- Use KNIFE (B).
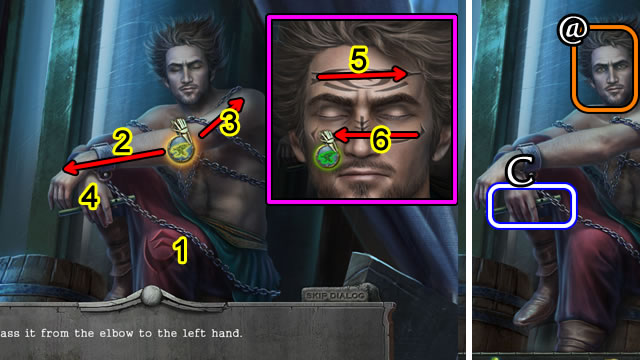
- Speak Raven; use Raven's locket; solution (1-6).
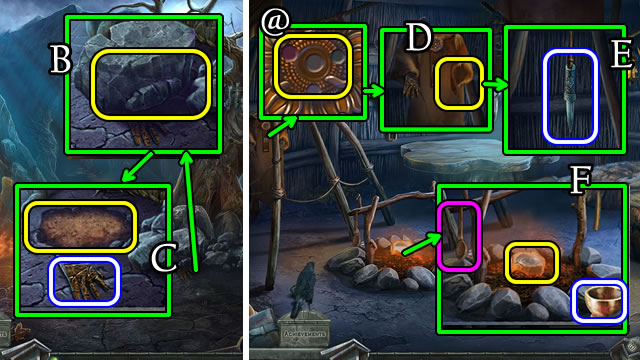
- Speak (@); take 1/4 FLUTE PART (C).
- Go right.
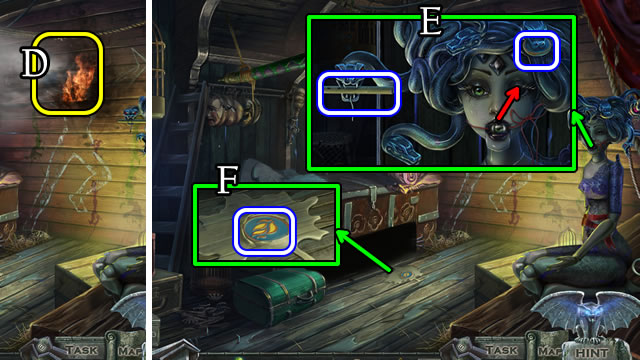
- Use WET RAG (D).
- Replace eyeball; take 2/4 FLUTE PART; take WATER SYMBOL (E).
- Use KNIFE; take FIRE SYMBOL (F).
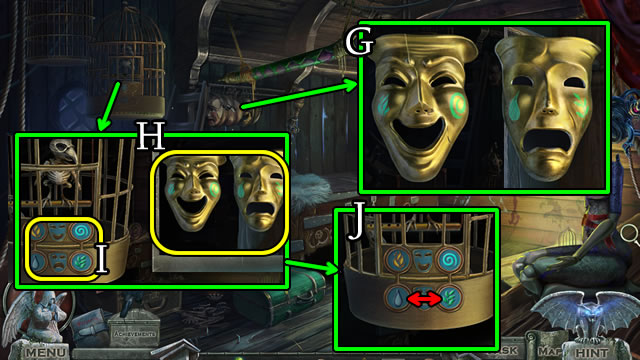
- Move masks; place MASK HALF; use WET RAG; use CAMERA for MASK PHOTO (G).
- Place AIR, FIRE and WATER SYMBOLS and MASK PHOTO (H).
- Solution (I); use Raven; solution (J).
- Take 3/4 FLUTE PART.
- GLUE on BROKEN FLUTE for 4/4 FLUTE PART.
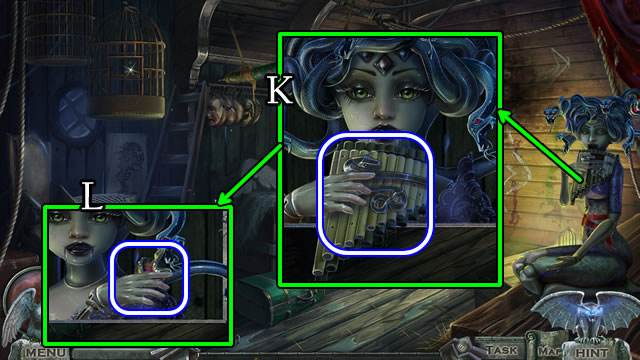
- Place 4/4 FLUTE PARTS; take FLUTE (K), then ANTIDOTE (L).
- Go down.
- Use FLUTE (M); give ANTIDOTE (N).
- Select (O).
- Take WRENCH and 1/3 GEAR (P); use arrow (Q) for WOODEN LID (R).
- Go right.

- Use WRENCH for TORCH (S).
- Go down.
- Remove arrow; place TORCH for TORCH WITH TAR (T).
- Place TORCH WITH TAR for BURNING TORCH (U).
- Place BURNING TORCH (V) for HOP.
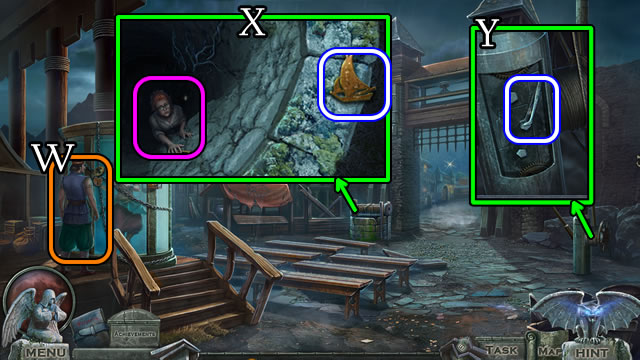
- Select (W); receive BOARDS.
- Speak to character; take 1/2 SHIP FIGURINE (X).
- Open, take TWEEZERS (Y).
- Take 2/2 SHIP FIGURINE (Z).
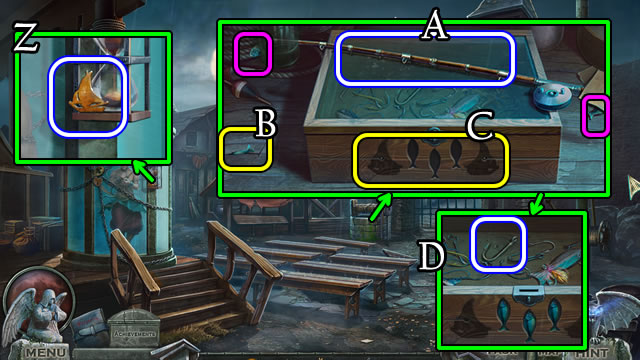
- Take FISHING ROD (A).
- Use TWEEZERS (B) for fish; place fish and 2/2 SHIP FIGURINES (C) for HOOK (D).
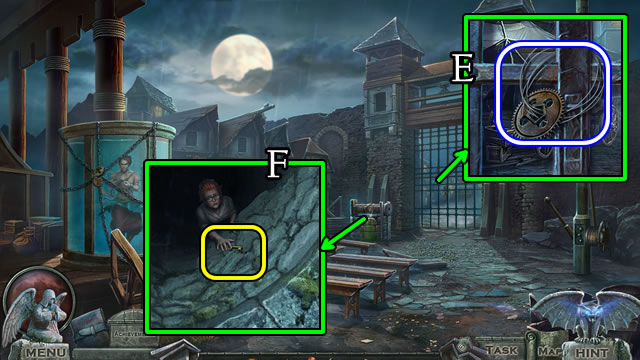
- Take FISHING LINE and 2/3 GEAR (E).
- FISHING LINE and HOOK on FISHING ROD.
- Use FISHING ROD (F).
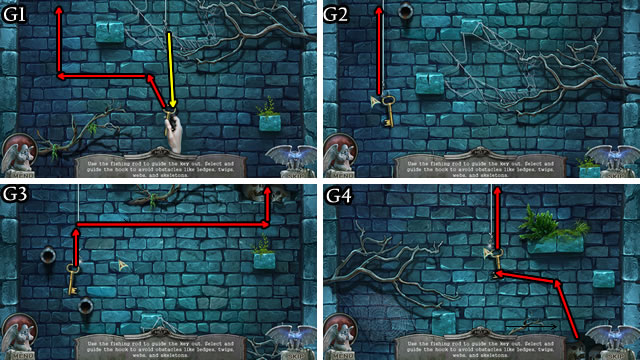
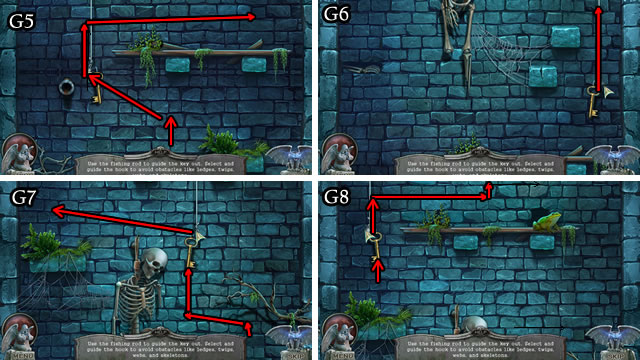
- Solution (G1-G8).
- Receive KEY.
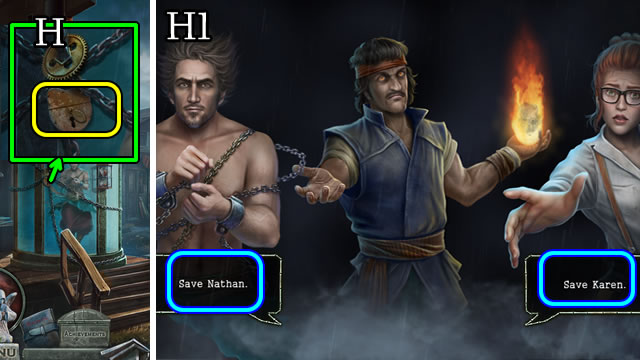
- Attempt to use KEY (H); make selection (H1).
- Take 3/3 GEAR (I).
- Use 3/3 GEARS; pull lever (J).
- Go forward.
- Take HAMMER (K).
- Take RUNE (L); speak (M).
- Go down.
- Use HAMMER (N).
- Speak (O); take GLASS SHARD (P).
- Go forward.
- Use GLASS SHARD for BELT (Q).
- Place 3/3 BOARDS and BELT (R); take BUCKET.
- Go down.
- Use BUCKET for BUCKET WITH WATER (S).
- Use BUCKET WITH WATER (T).
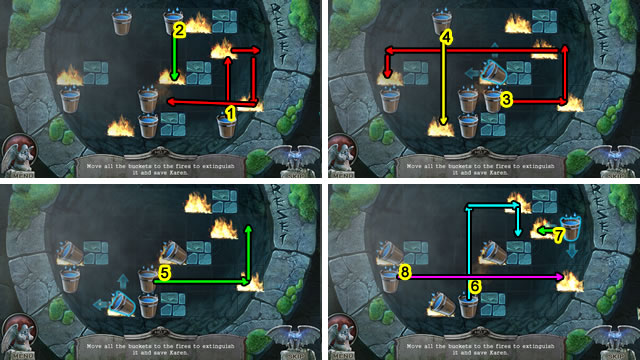
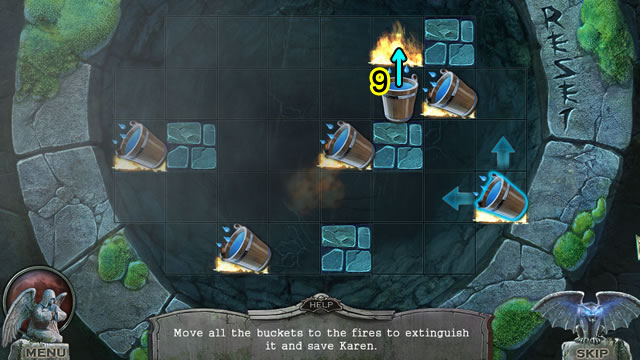
- Solution (1-9).
- Take METAL HORSE.
- Go forward.
- Place METAL HORSE (U).
- Open, take HORN and ROPE LADDER (V).
- Go down.
- Use ROPE LADDER (W).
- Climb down ladder.
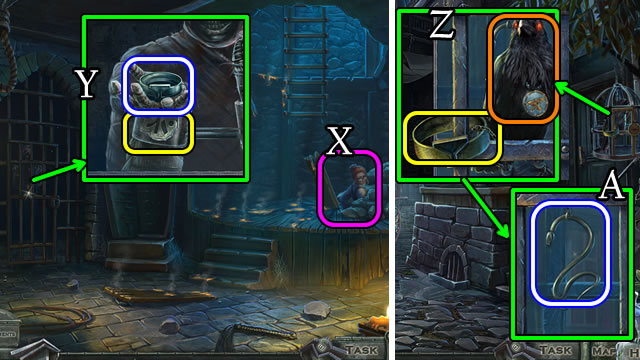
- Speak (X).
- Open; place RUNE; take MANACLE PART (Y).
- Go forward 2x.
- Use MANACLE PART, take Raven (Z) and 1/2 GOLDEN SNAKE (A); speak with Raven.
- Open (B); take RECIPE BOOK (C).
- Return to Well.
- Use (D); use CAMERA for SKULL PHOTO (E).
- Place HORN and SKULL PHOTO; solution; take 2/2 GOLDEN SNAKE (F).
- 2/2 GOLDEN SNAKES on RECIPE BOOK for RUNE and SLEEP RECIPE.

- Place RUNE for SHIELD; take GAUNTLET (G).
- Go forward 2x.
- Use SLEEP RECIPE for HOP (H); receive RECIPE.
- Return to Well.
- Position RECIPE; use GAUNTLET for GINGER (I).
- Go forward 2x.
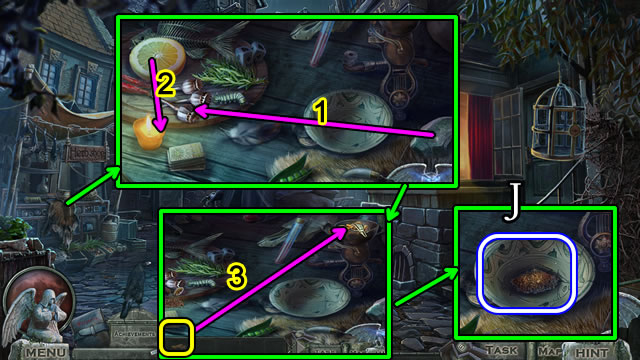
- Place GINGER (J1); take HERBS (J2).
- Go down 2x.
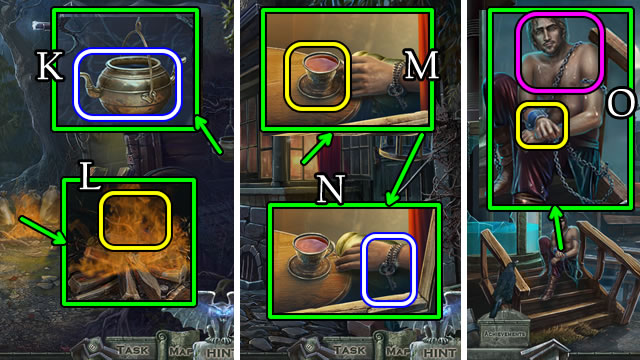
- Place HERBS; take KETTLE (K).
- Place KETTLE; take SLEEPING POTION (L).
- Go forward 2x.
- Use SLEEPING POTION (M); take SHACKLE KEY (N).
- Go down.
- Use SHACKLE KEY; speak (O).
- Return to Well.
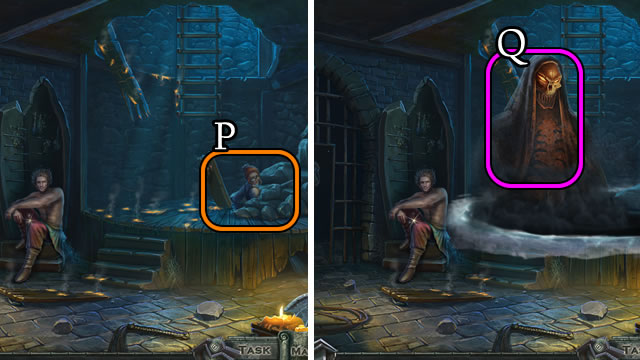
- Select (P).
- Solutions vary.
- Speak (Q).
- Enter portal.
Chapter 3: Comet Spirit
- Speak (R); receive SCALES.
- Go forward.
- Place SCALES (S).
- Play HOP (T) for 1/5 STONE.
- Take SWORD (U).
- Go down.
- Use SWORD; receive 2/5 STONE; take KITE (V).
- Go down.
- Speak (W); give KITE; take 3/5 STONE and SHOVEL (X).
- Go forward.
- Take parts for SKELETON; take URN (Y).
- Use SHOVEL; take NUTS (Z).
- Go down.
- Take SPONGE; give NUTS; receive 4/5 STONE (A).
- Go forward.
- Place SKELETON; use SHOVEL (B) and SPONGE (C); take 5/5 STONE.
- Go forward.
- Place 5/5 STONES (D).
- Go forward.
- Speak (E).
- Replace SHIELD (F).
- Solutions vary.
- Take 1/3 PAINT and SCEPTER; read plaque (G).
- Go down.
- Replace, select SCEPTER (H); select (I).
- Speak to character.
- Enter portal.
Chapter 4: Settlement
- Speak (J).
- Use, receive RAG (K); take 1/8 STATUE PIECE (L).
- Use RAG (M); take 2/8 STATUE PIECE (N).
- Take 3/8 STATUE PIECE (O).
- Go forward.
- Use Raven's locket for hidden symbols; speak (P).
- Play HOP (Q); receive 1/2 TUSK.
- Take 4/8 STATUE PIECE and NECKLACE (R).
- Take 1/5 CRYSTAL and 5/8 STATUE PIECE (S).
- Take 6/8 STATUE PIECE (T).
- Go forward.
- Take 10/10 WHEAT (U).
- Select (V); solution (W).
- Take 2/2 TUSK.
- Take COAL and 7/8 STATUE PIECE (X).
- Take 1/4 COMET SYMBOL and STAFF (Y).
- Go down.
- Use STAFF (B).
- Take GLOVE; use URN; receive CLAY (C).
- Go forward.
- NECKLACE for BEADS.
- Use BEADS (@); place GLOVE (D); take robe and DAGGER (E).
- Place CLAY; use ladle; take 2/3 PAINT (F).
- Go down.
- Use DAGGER (G) and enter.
- Take METAL PIECE; MASK (H).
- Select (I) for 3/3 PAINT (J).
- 3/3 PAINT on MASK.
- Take 8/8 STATUE PIECE (K); select (L).
- Go down 2x.
- 8/8 STATUE PIECES for THUNDER SPIRIT STATUE.
- Place THUNDER SPIRIT STATUE; take STONE PIECE (M).
- Return to Near Cave.
- Place STONE PIECE (N); play HOP (O) for OWL FIGURINE.
- Go down.
- Place 2/2 TUSKS (P); scroll up; place OWL FIGURINE; make owl decision; take METAL PLATE (Q).
- Remove pairs (1-3); take 1/3 GIFT (R).
- Return to Near Cave.
- Place METAL PLATE (S).
- Solution (T).
- Go forward.
- Take LEATHER PIECE (U); play HOP (V). Use CAMERA for STAR PHOTO.
- Take 2/4 COMET SYMBOL, 2/5 CRYSTAL and JUG (W).
- Take 2/3 GIFT; 1/2 EYE; 3/5 CRYSTAL (X).
- Go down.
- Use JUG (Y) for WATER.
- Return to Hut.
- Place STAR PHOTO; solution (Z).
- Take HANDLE.
- Return to Cave.
- Place 10/10 WHEAT, WATER; replace and select HANDLE; take DOUGH (A).
- Place DOUGH; take 3/3 GIFT (B).
- Go down 3x.
- Place 3/3 GIFTS (C); take PHOTO.
- Return to Near Cave.

- Position PHOTO (D).
- Remove bones (E); use Raven. Take 2/2 EYE, CHEST and 1/2 WALL PIECE (F).
- Go forward.
- Place 2/2 EYES (G).
- Solution (1-3).
- Take TREE.
- Go down.
- Place TREE (H); take 2/2 WALL PIECE (I).
- Go forward.
- Place 2/2 WALL PIECES and COAL (J).
- Solution (K); select (@).
- Take CLOUD.
- CLOUD on CHEST.
- Solution (L).
- Take MUSICAL NOTE.
- Go down 3x.
- Place LEATHER PIECE and MUSICAL NOTE (M).
- Solutions vary.
- Speak (N); take SHIELD.
- Enter portal.
- Go forward.
- Place SHIELD (O).
- Solutions vary.
- Take SCEPTER (P), read plaque.
- Go down.
- Select (Q); replace, select SCEPTER (R).
- Speak to character.
- Enter portal.
Chapter 5: Lily
- Speak (S).
- Take ARROWS (T).
- Throw object; take BAG (U) and 3/4 COMET SYMBOL (V).
- Take 4/4 COMET SYMBOL (W).
- Place 4/4 COMET SYMBOLS; select Raven; select 1-4 (X).
- Speak (Y); take BIRD.
- BIRD on BAG for LIGHTER and KEY.
- Use KEY (Z).
- Go forward.
- Speak (A); take BRACELET (B).
- Select (C), play HOP (D) for FIRE SYMBOL.
- Take 4/5 CRYSTAL and OIL (E).
- Take 1/3 VASE PIECE (F); use OIL and LIGHTER (G).
- Place BRACELET (H).
- Solution (1-3).
- Go right.
- Take METAL PIECE (I); select 1-4; receive AXE.
- Take 1/2 FEATHER (J).
- Clean (K); receive 5/5 CRYSTAL.
- Play HOP (L) for BOW.
- Go down 2x.
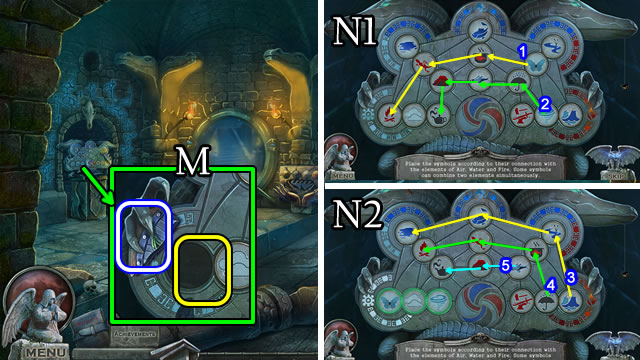
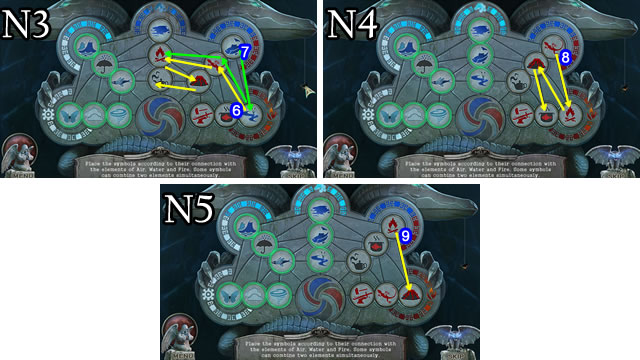
- Take 2/3 VASE PIECE; place FIRE SYMBOL (M).
- Solution (N1-N5).
- Take SHIP'S WHEEL.
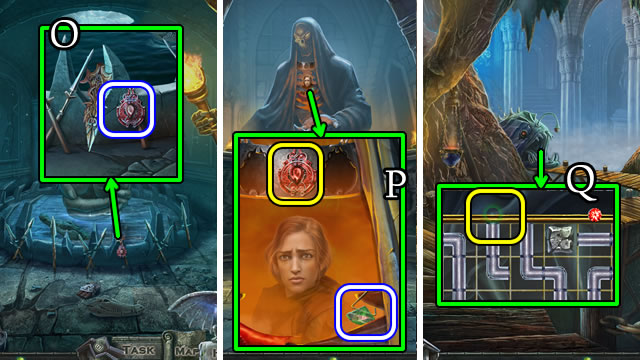
- Use AXE; take HEART (O).
- Go forward.
- Place HEART; take GEM (P).
- Go right.
- Place GEM (Q).
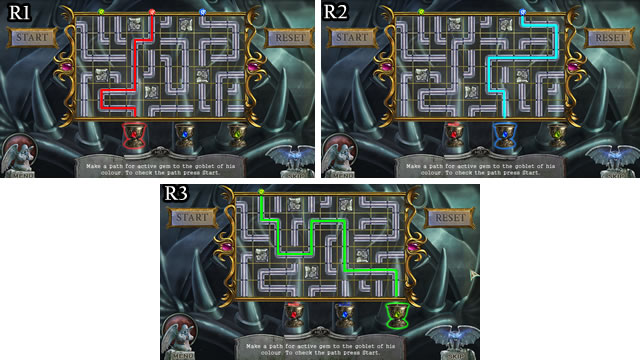
- Solution (R1-R3).
- Take 3/3 VASE PIECE and ANCIENT KEY.
- Go down.
- Place 3/3 VASE PIECES; solution (S); use CAMERA for VASE PHOTO.
- Go right.
- Place SHIP'S WHEEL and VASE PHOTO; solution; take PICTURE (T).
- Go down.
- Play HOP (U); receive HEART.
- Place HEART; receive CLOTH (V).
- ARROWS, CLOTH, and LIGHTER on BOW for LOADED BOW.
- Go right.
- Use LOADED BOW (W).
- Solutions vary.
- Use Raven; use LOADED BOW (X); use Raven for PICTURE (Y).
- Go down.
- Place 2 PICTURES; take HEART (Z).
- Place HEART (A); speak (B); receive WHIP.
- WHIP for Map; 2 METAL PIECES on WHIP for GRAPPLING HOOK.
- Speak (C), speak to Raven; receive SYMBOLS PHOTO.
- Go down.
- Use GRAPPLING HOOK (D).
- Solution (E).
- Play HOP (F).
Chapter 6: Final Solution
- Take DOORBELL (G).
- 5/5 CRYSTALS on DOORBELL for WORKING DOORBELL.
- Take RIBBON (H).
- Use RIBBON and WORKING DOORBELL (I).
- Solution (1-5).
- Go left.
- Speak (J); play HOP (K) for RING OF KEYS.
- Use RING OF KEYS (L); take BROKEN KEY (M).
- Go down.

- Uncover; use BROKEN KEY (N); take EUROPE and 2/2 FEATHER (O).
- Take CUP WITH WATER (P).
- Go left.
- Place 2/2 FEATHERS; solution (Q).
- Take AMERICA (R).
- Place EUROPE and AMERICA; enter 5-3-1-6-2-4; take GATE PART (S).
- Go down.
- Place GATE PART (T).
- Solution (U).
- Uncover, take ORIGINAL KEY (V).
- Go left.
- Speak to character.
- Use ORIGINAL KEY (X).
- Take SHIELD (Y) and TILES (1-6).
- Place ANCIENT KEY and TILES (Z).
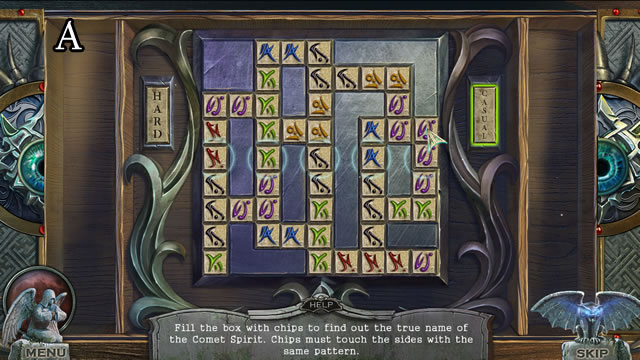
- Casual and Hard solutions (A).
- Use CAMERA.
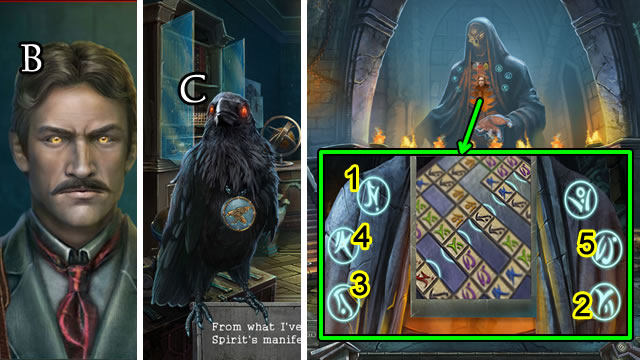
- Speak (B) select scene, speak (C); receive CODE PHOTO.
- Return to Great Hall.
- Place CODE PHOTO; select 1-5.
- Speak (D); take DREAM AMULET.
- Enter portal.
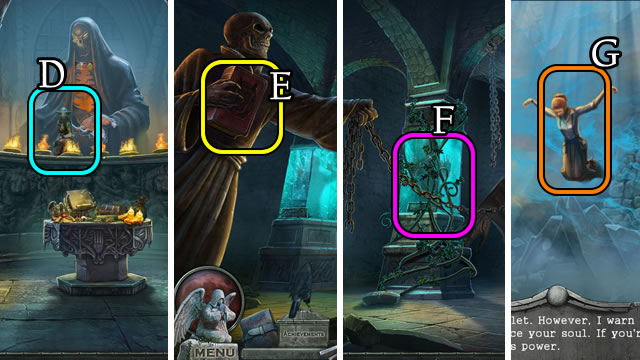
- Place SHIELD (E).
- Solutions vary.
- Select (F); speak to Raven; use DREAM AMULET (G).
Created at: 2017-12-15