

Walkthrough Menu
- General Tips
- Chapter 1: Cemetery
- Chapter 2: School
- Chapter 3: Cemetery-Part 2
- Chapter 4: Castle
- Chapter 5: Cemetery-Part 3
- Chapter 6: Tower
General Tips
- This is the official guide for Redemption Cemetery: The Island of the Lost!
- This guide will not mention each time you have to zoom into a location; the screenshots will show each zoom scene.
- Hidden-object puzzles are referred to as HOPS. This guide will not show screenshots of the HOPS, however, it will mention when an HOP is available and the inventory item you'll collect from it.
- This guide will give step-by-step solutions for all puzzles which are not random. Please read the instructions in the game for each puzzle.
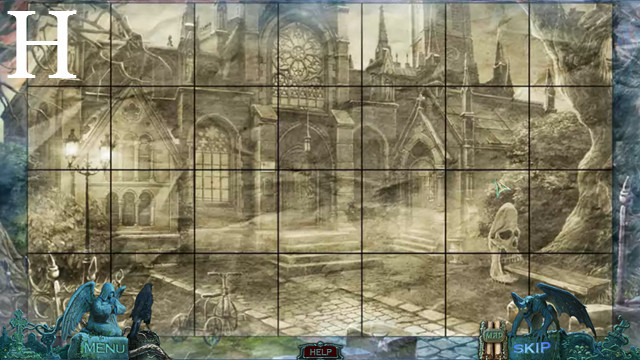
Chapter 1: Cemetery
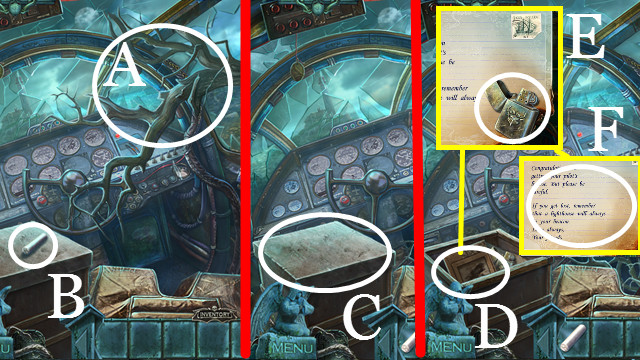
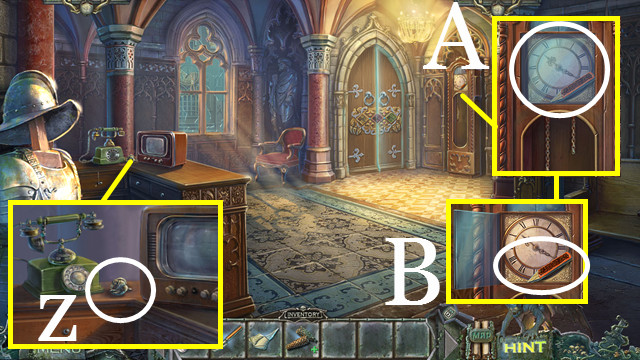
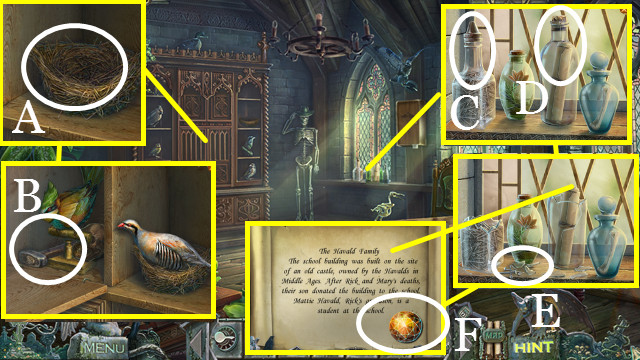
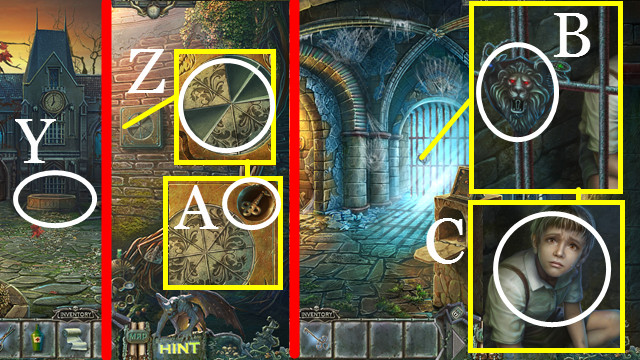
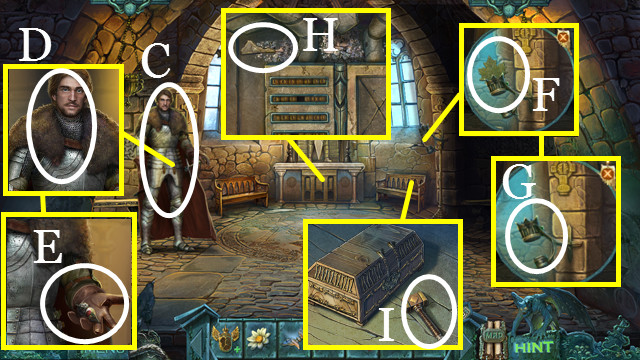
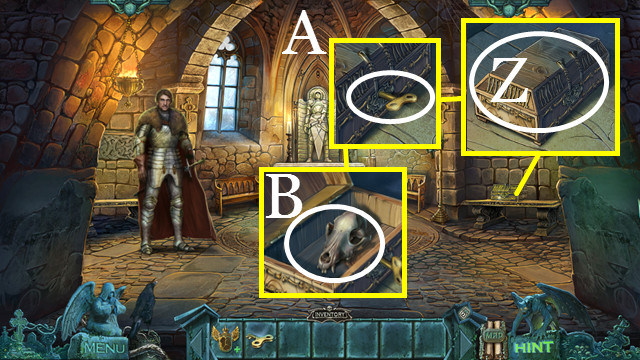
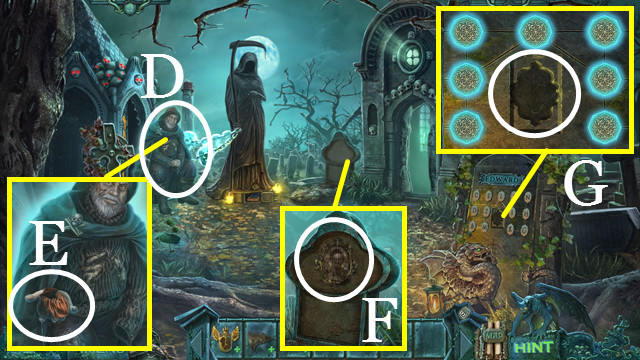
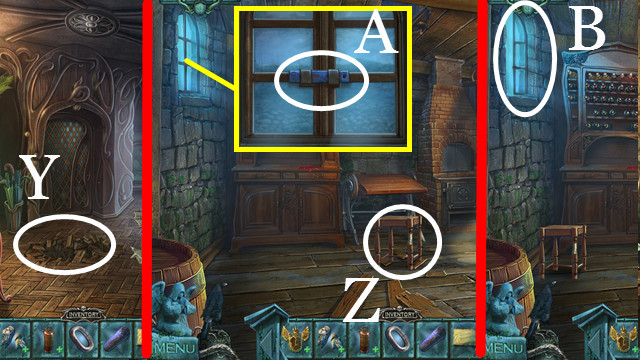
- Touch (A) twice.
- Take the CHALK (B).
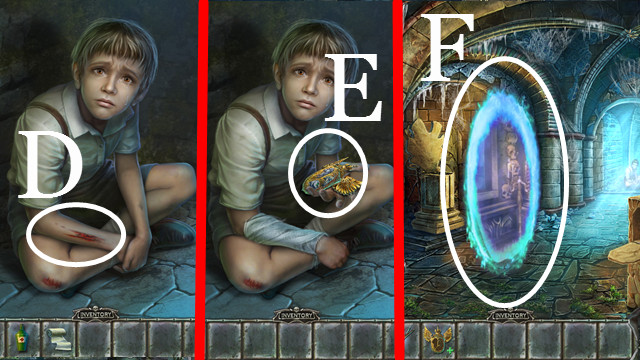
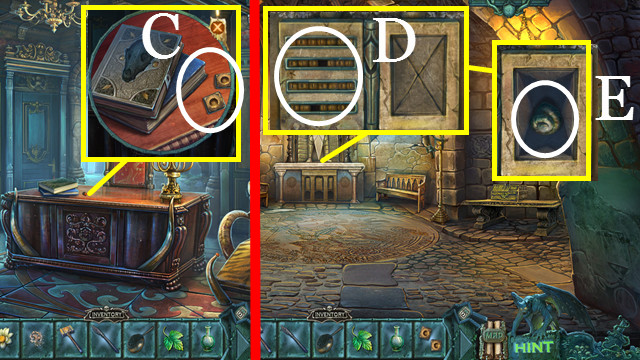
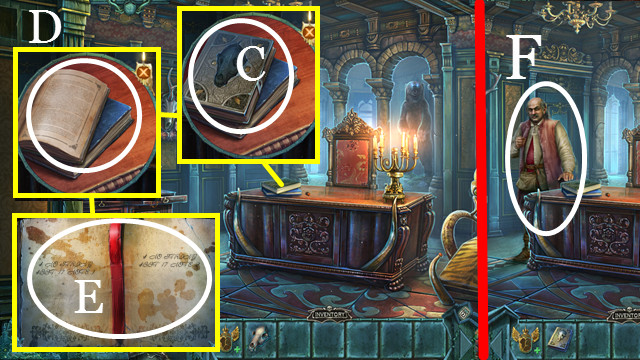
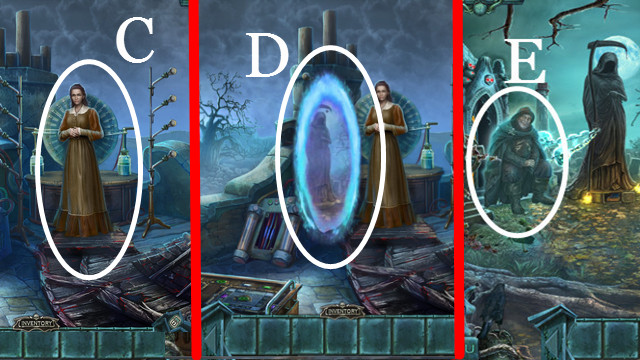
- Open (C); touch (D); take the LIGHTER (E); touch (F).
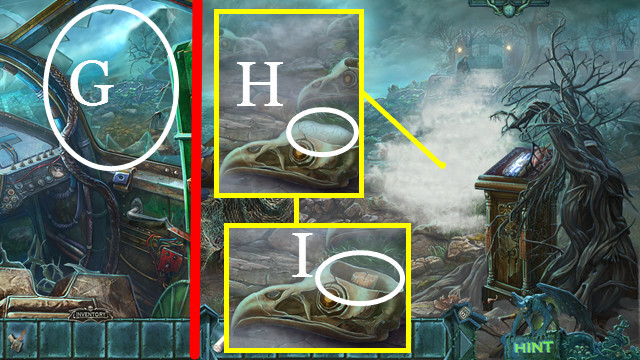
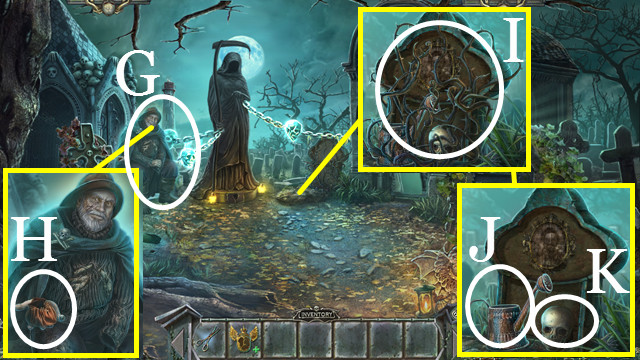
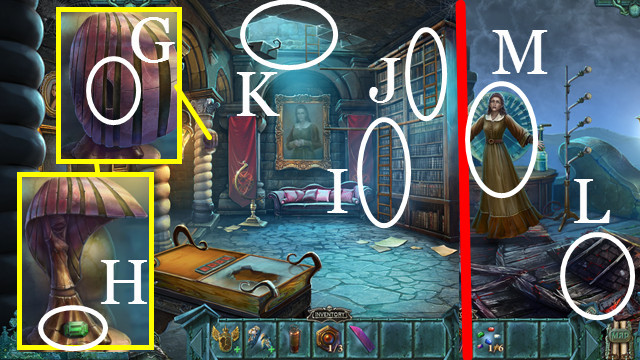
- Exit (G).
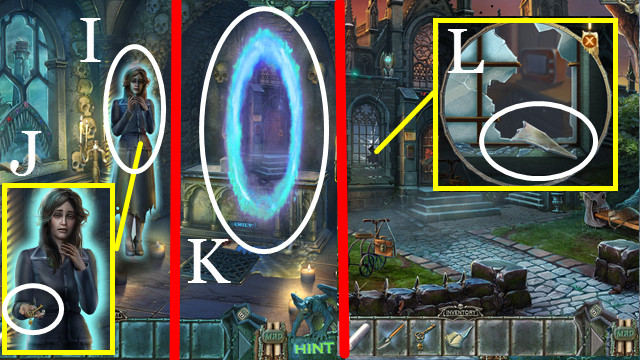
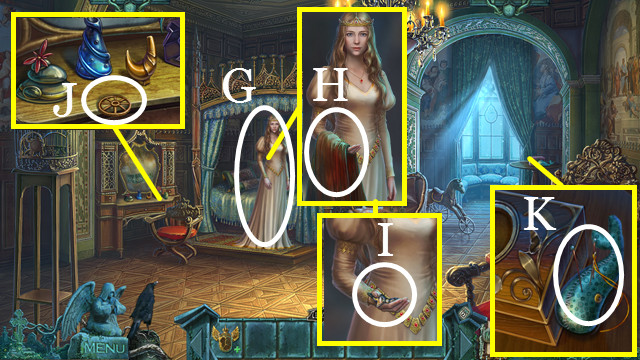
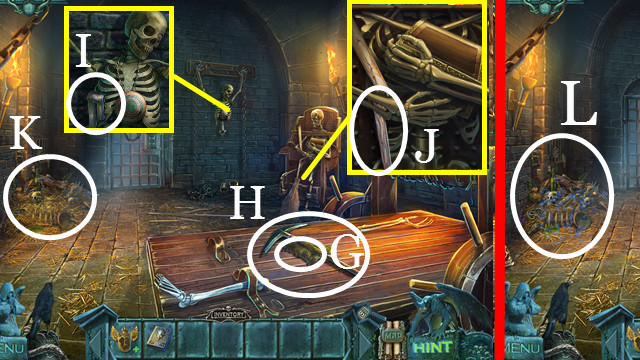
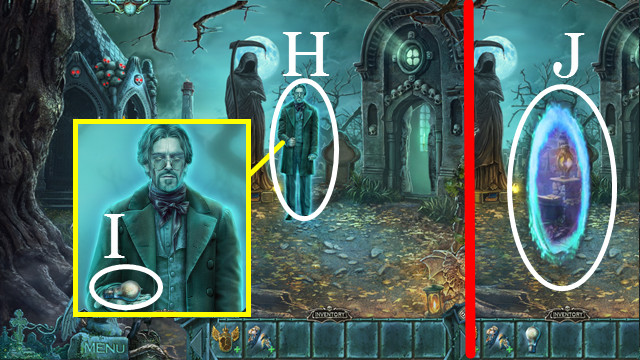
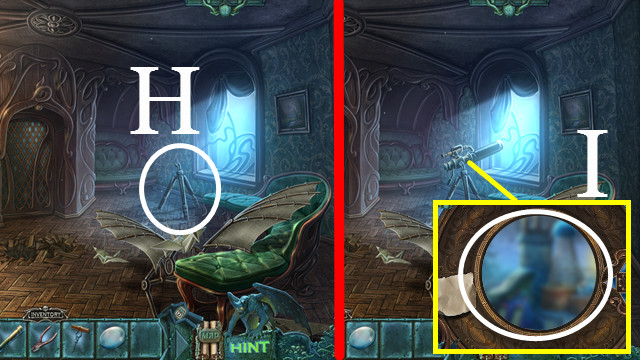
- Touch (H); use the LIGHTER (I).
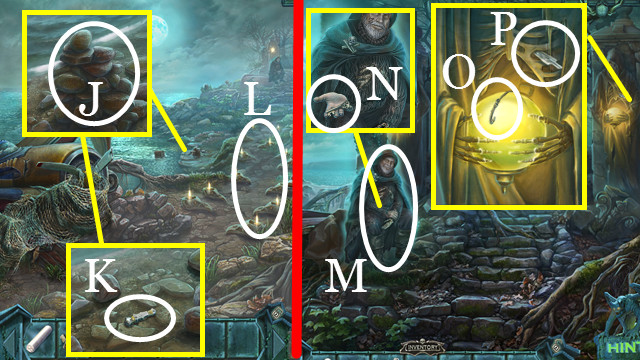
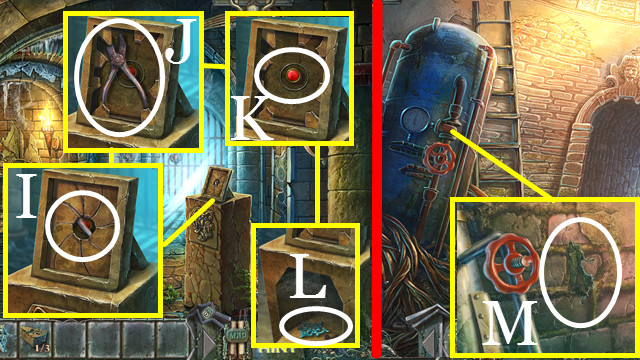
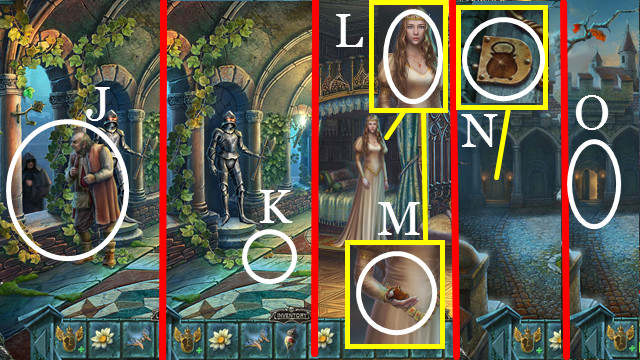
- Touch (J) three times; take the KNIFE HANDLE (K).
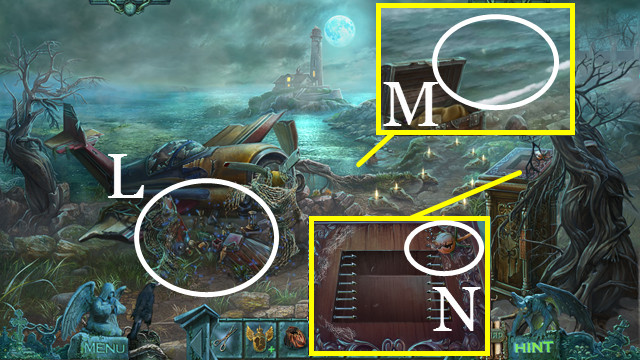
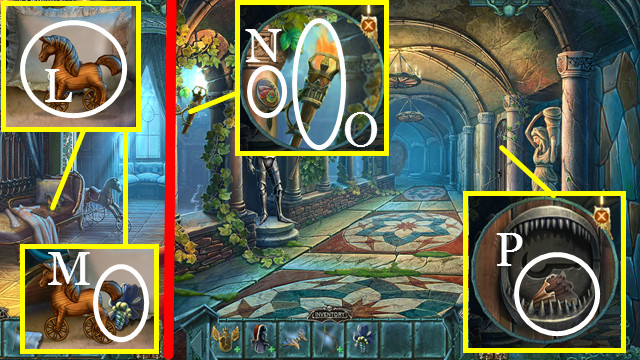
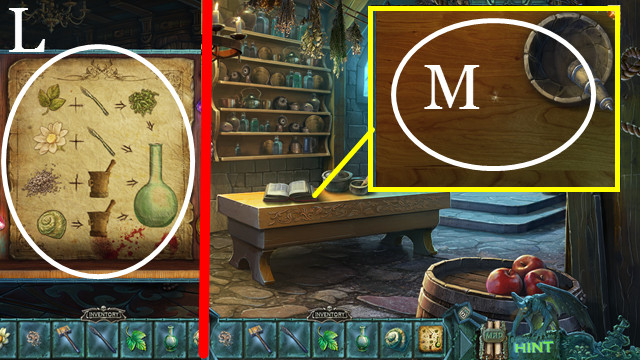
- Walk forward (L).
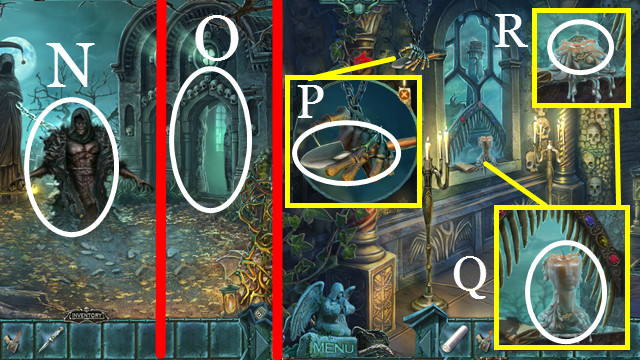
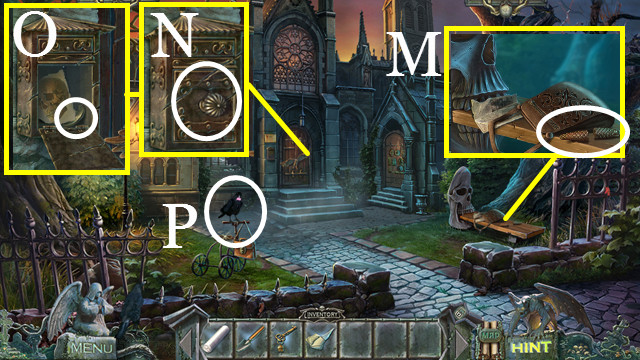
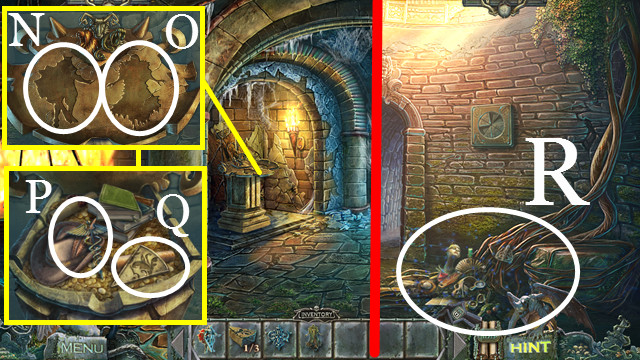
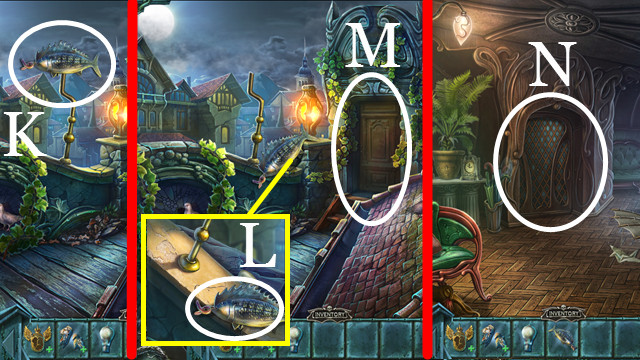
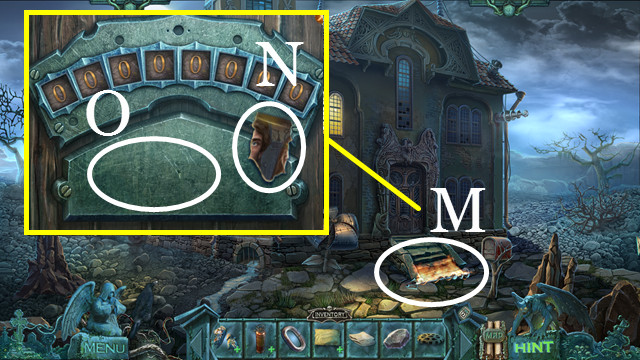
- Talk (M); take the SKULL KEY (N).
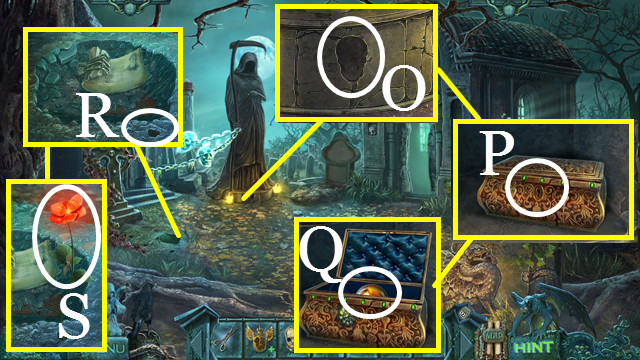
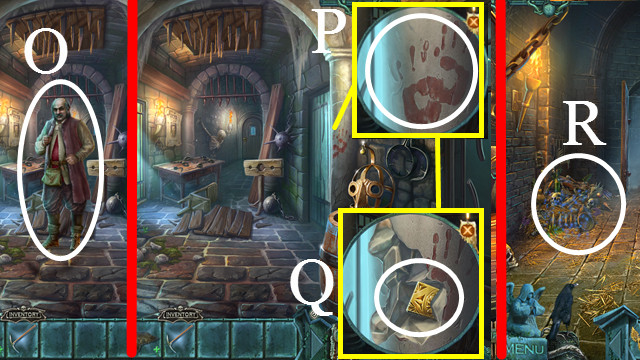
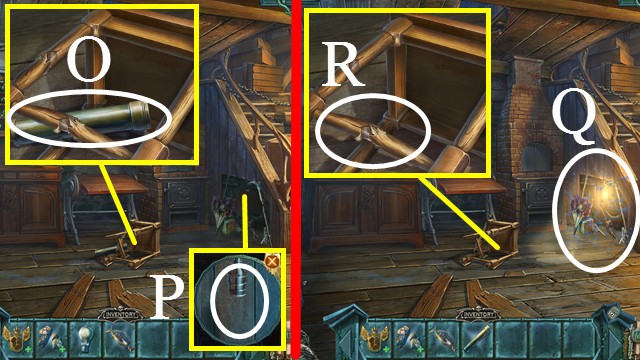
- Take the FISHING LINE (O).
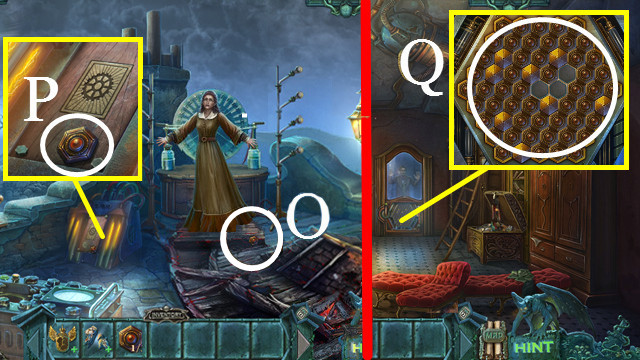
- Use the KNIFE HANDLE (P); receive the KNIFE.
- Walk down.
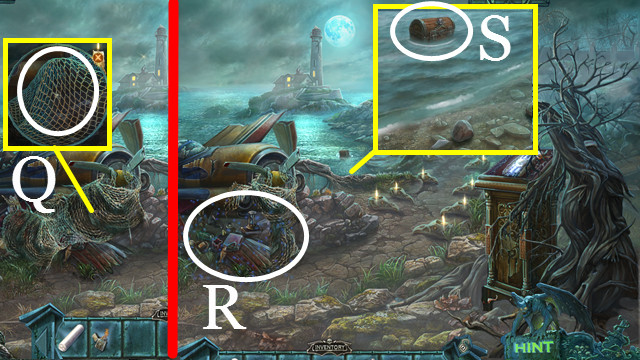
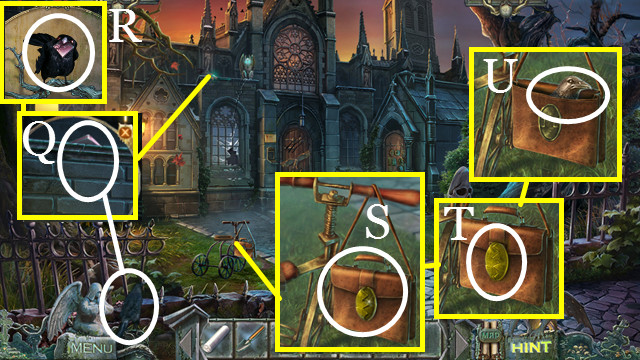
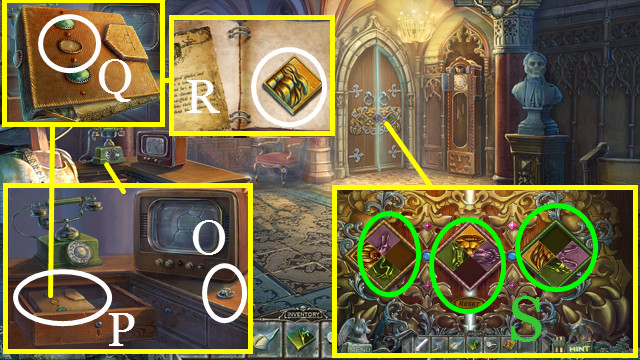
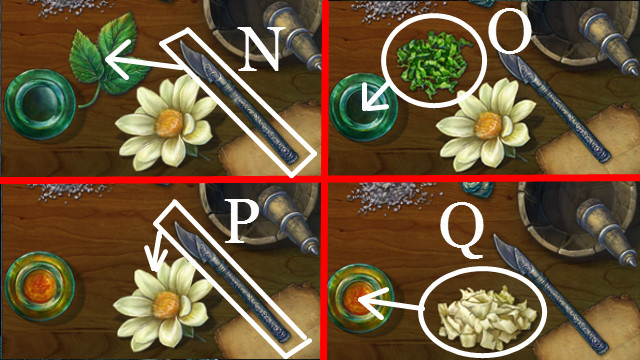
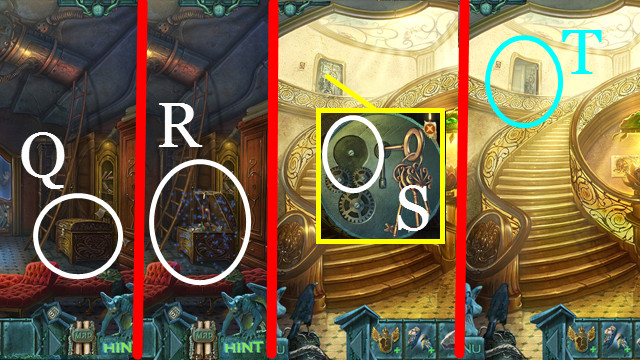
- Use the KNIFE (Q) to trigger a HOP.
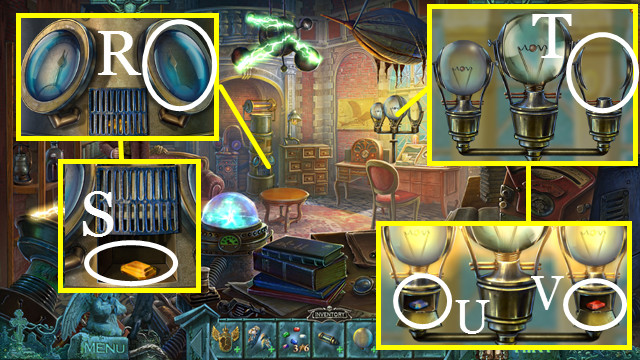
- Play the HOP (R); receive the FISHING ROD.
- Combine the FISHING LINE and FISHING ROD (inventory); receive the FISHING ROD WITH HOOK.
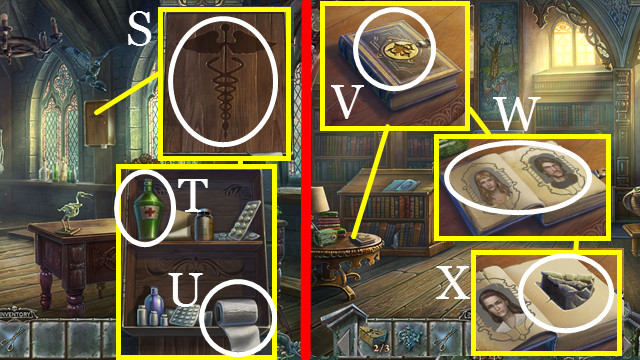
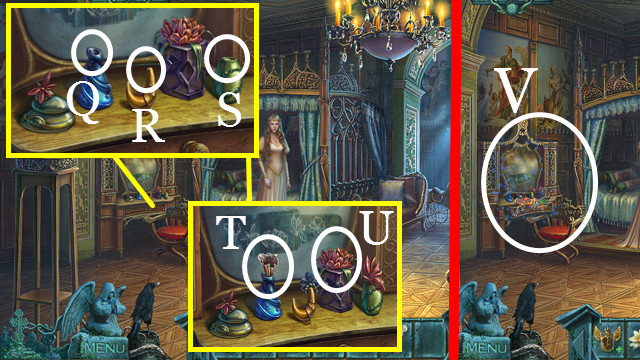
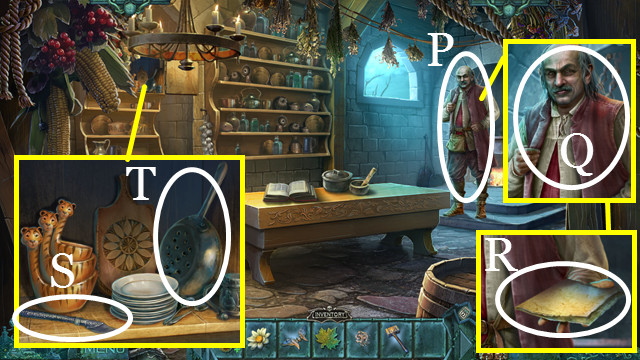
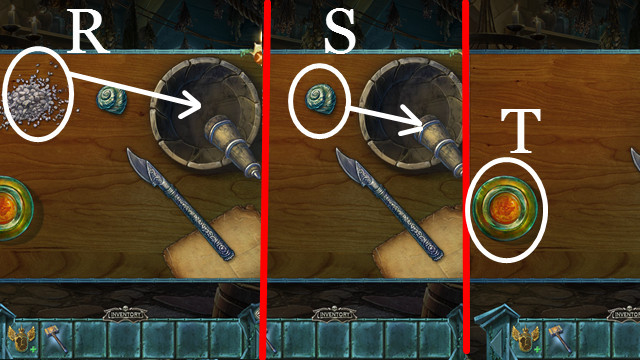
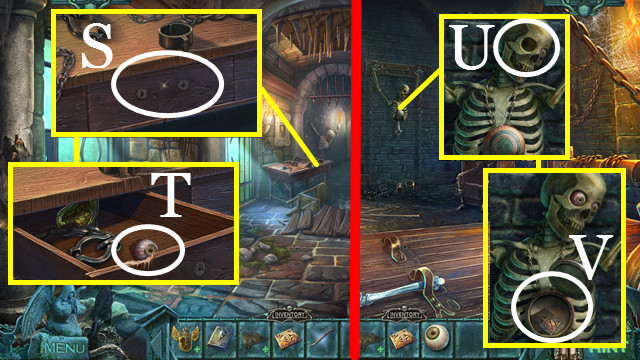
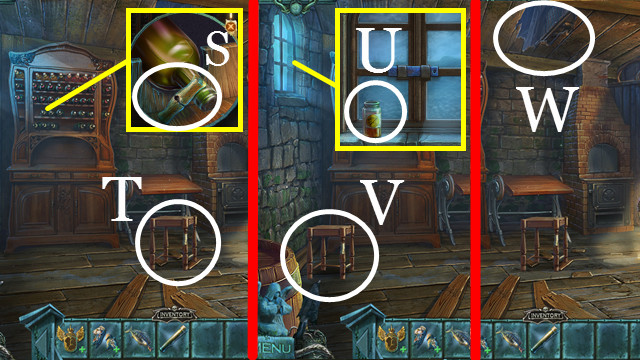
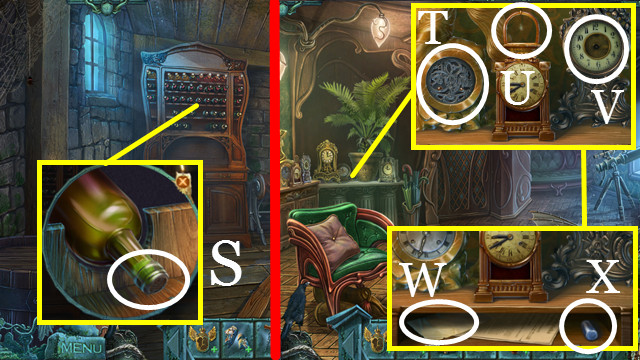
- Use the FISHING ROD WITH HOOK (S).
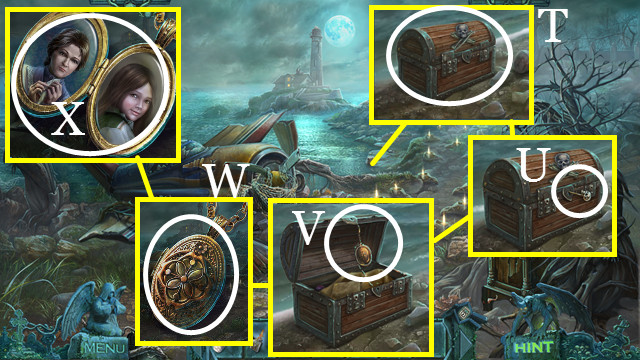
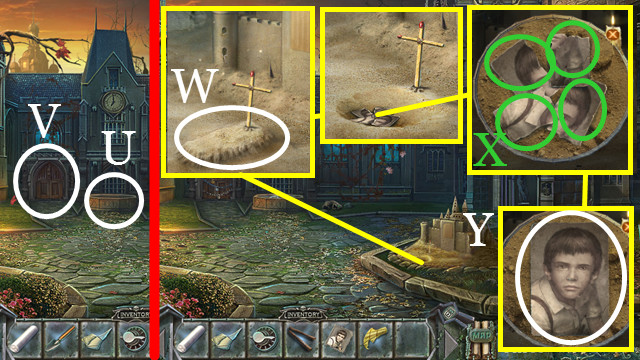
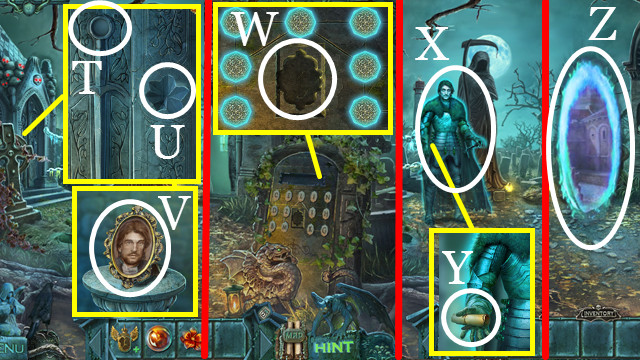
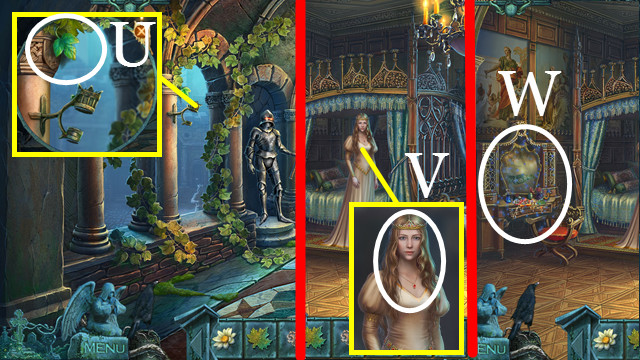
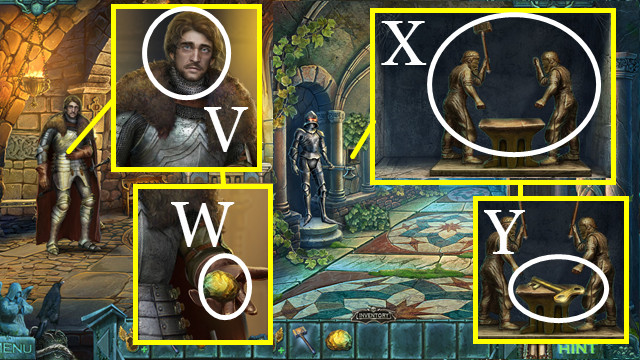
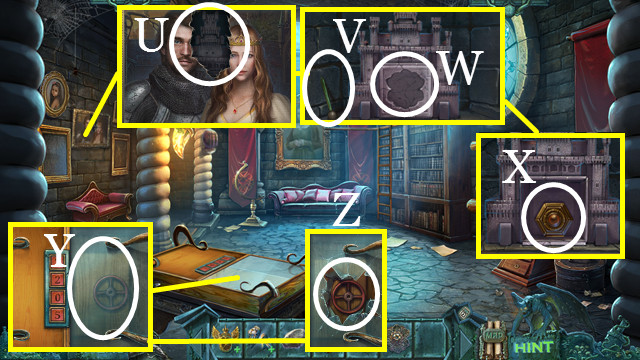
- Use the SKULL KEY (T); touch (U).
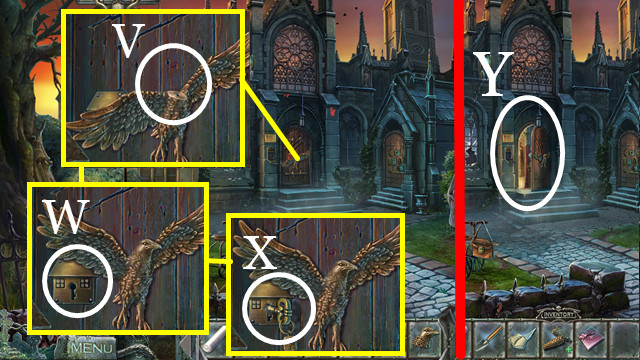
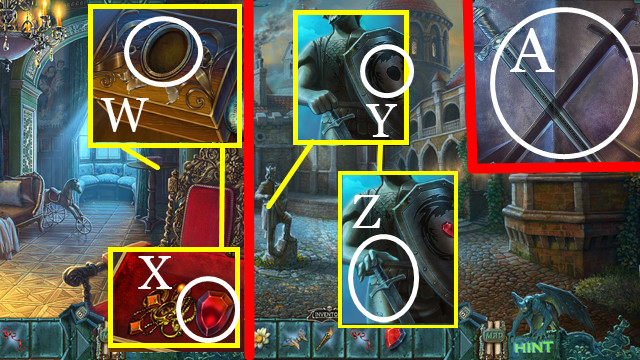
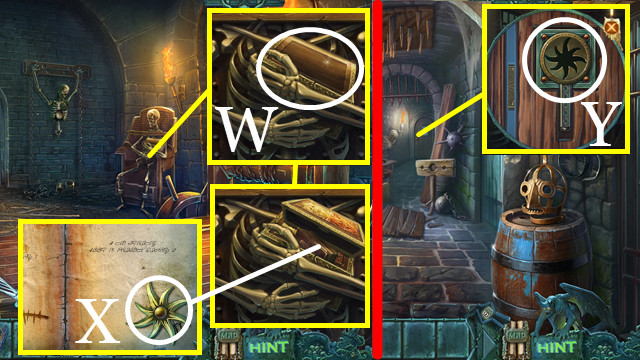
- Touch (V); open (W).
- Take the FISHERMAN'S LOCKET (X).
- Walk forward.
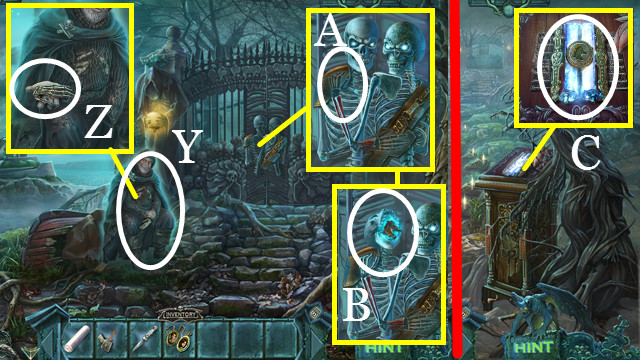
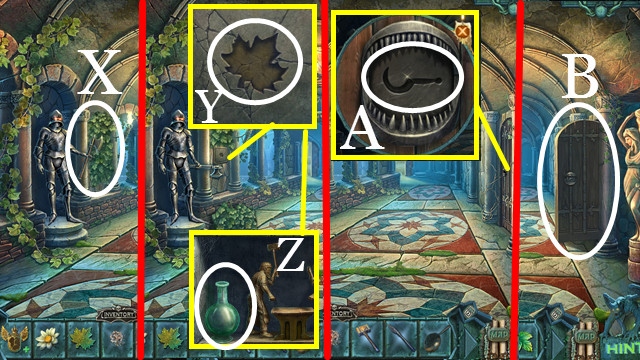
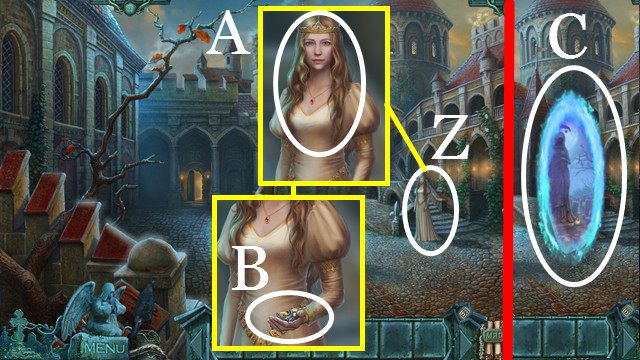
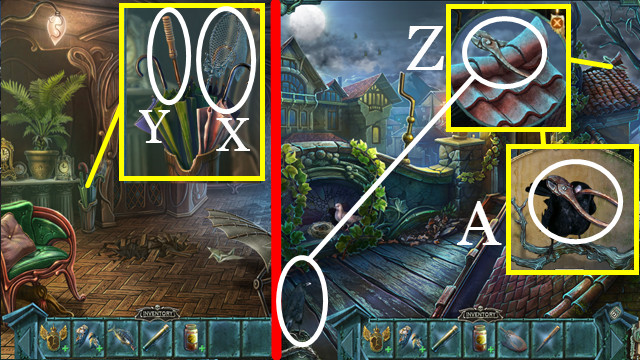
- Give the FISHERMAN'S LOCKET (Y); take the BONE (Z).
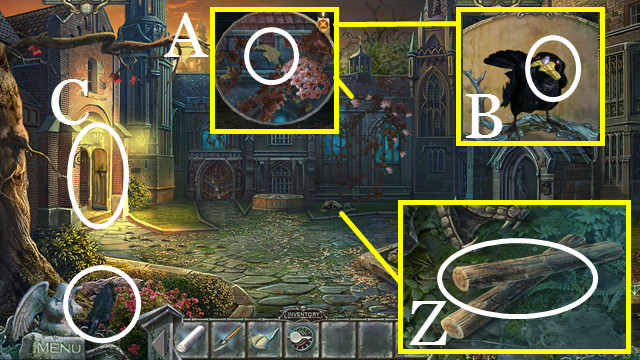
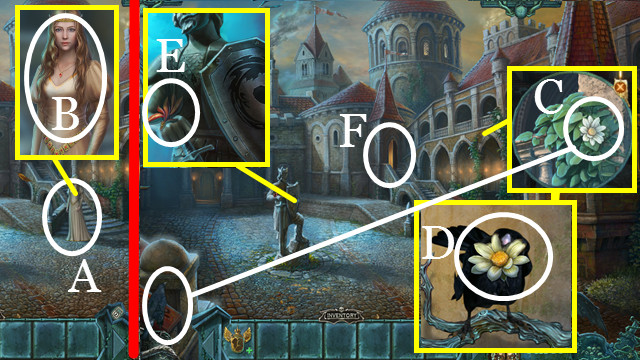
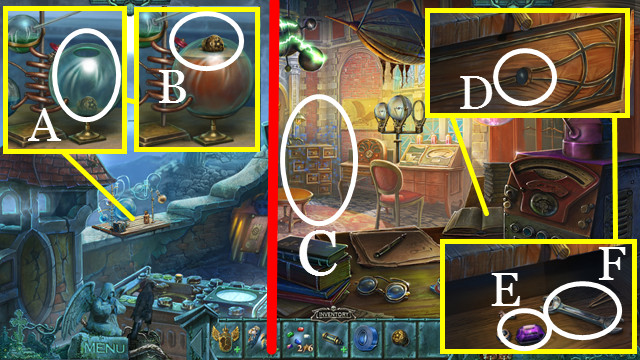
- Place the BONE (A); take the RAVEN HEAD (B).
- Walk down.
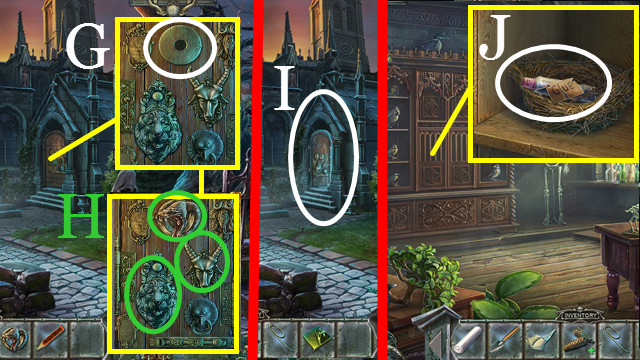
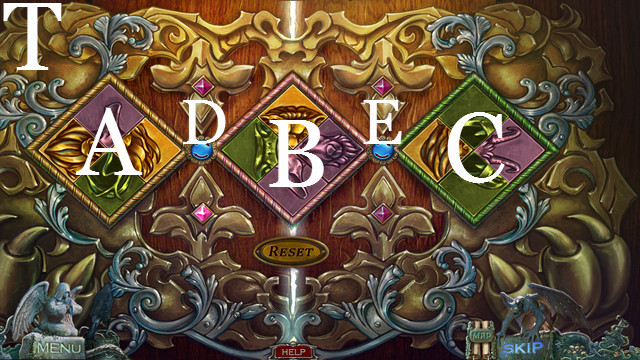
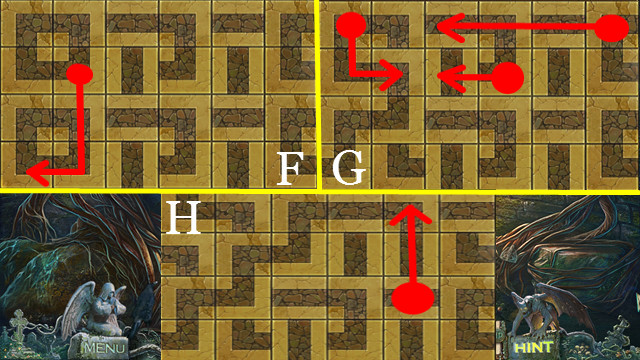
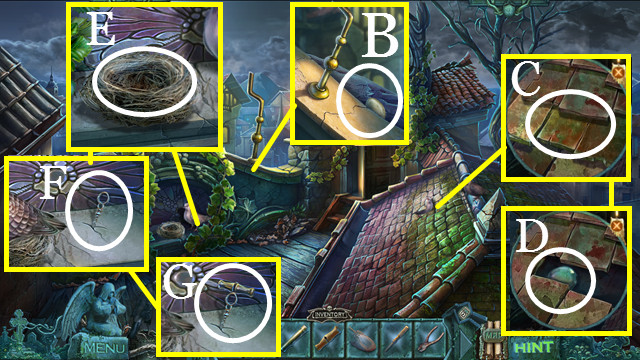
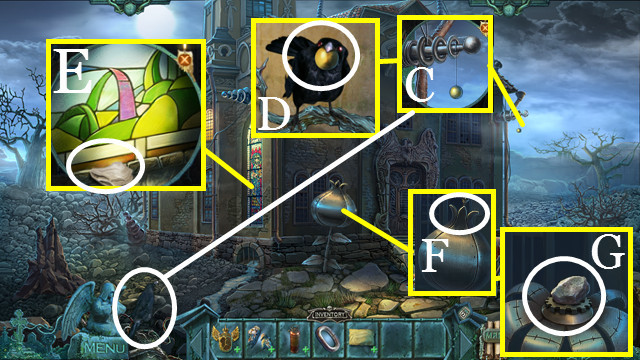
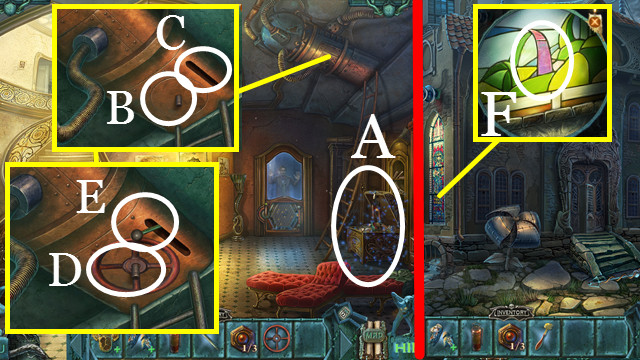
- Place the RAVEN HEAD (C) to trigger a mini-game.
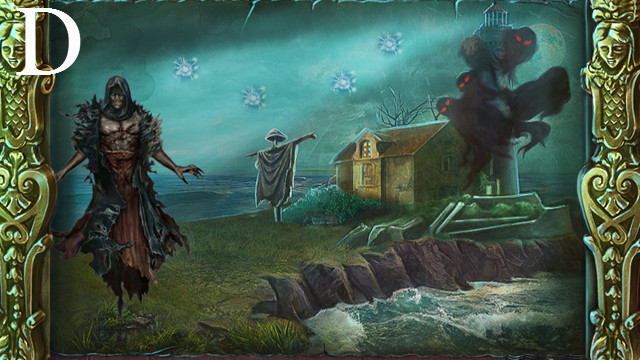
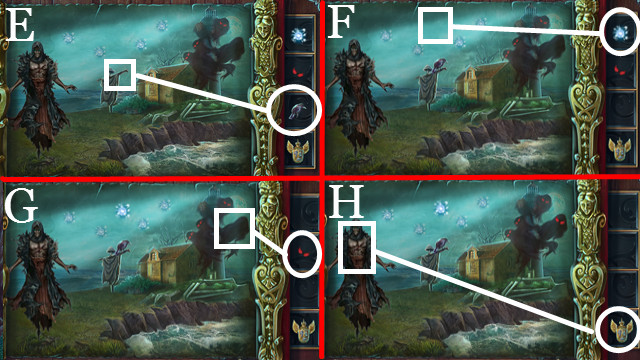
- Solution: (D-E-F-G-H).

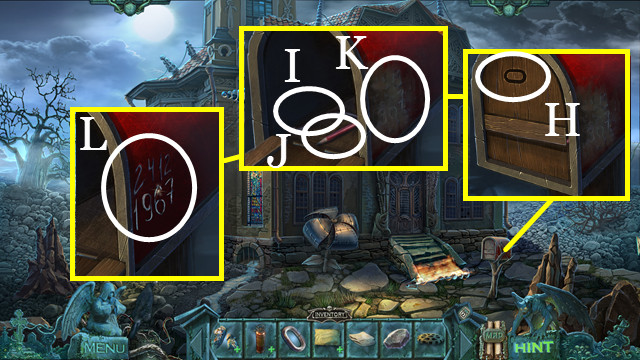
- Take (I); remove (J); take the SKELETAL HAND (K).
- Walk forward.
- Place the SKELETAL HAND (L).
- Walk forward.
- Touch anywhere.
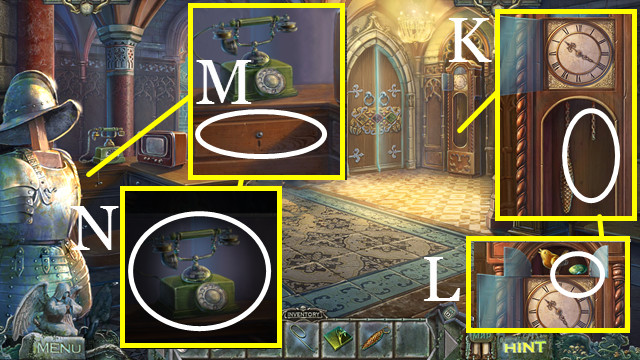
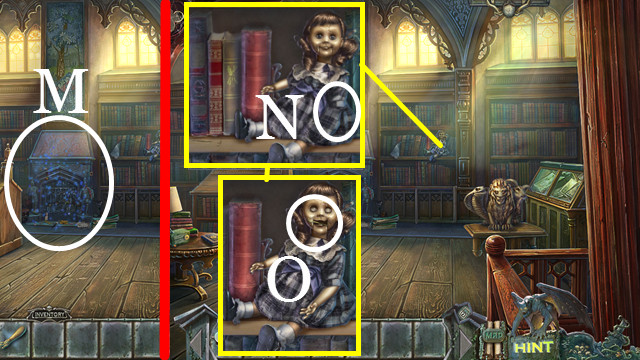
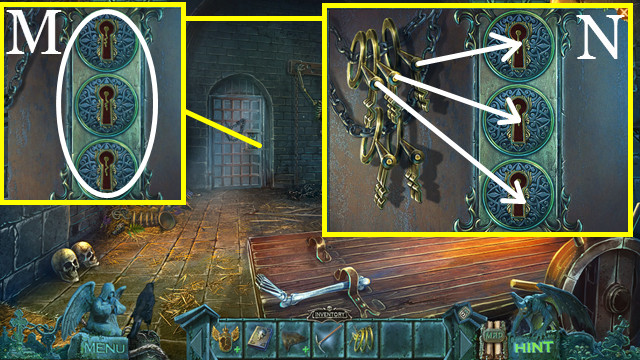
- Touch (M).
- Talk (N).
- Enter (O).
- Take the SHOVEL (P).
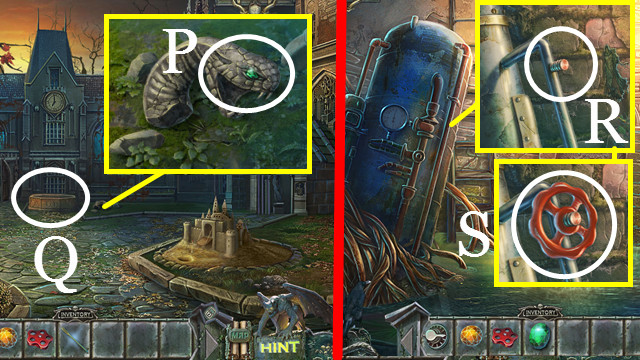
- Use the LIGHTER (Q); take the TOKEN 1/3 (R).
- Walk down.
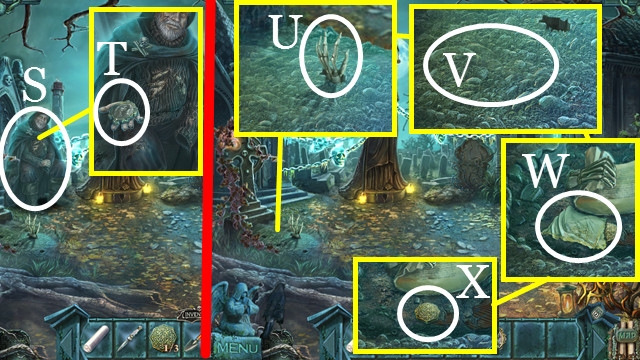
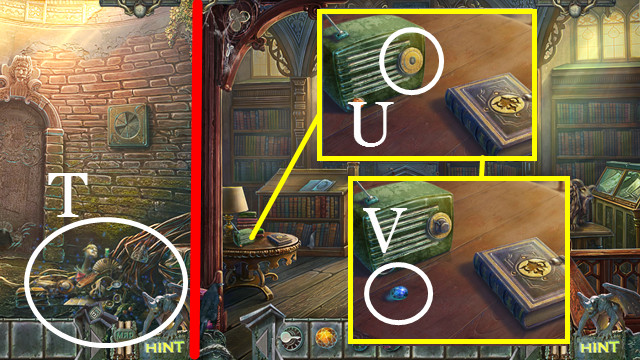
- Talk (S); take the PHOTO (T).
- Touch (U).
- Use the SHOVEL (V).
- Take the SHAWL (W) and TOKEN 2/3 (X).
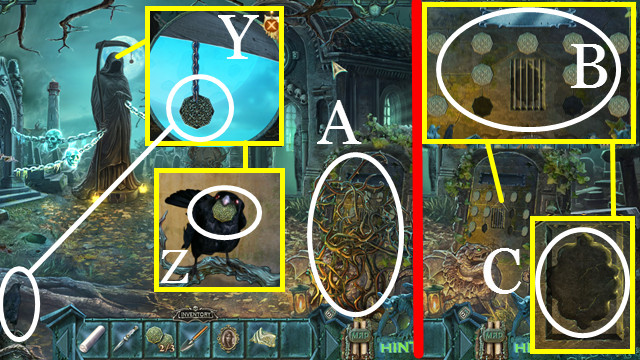
- Use the Raven (Y); take the TOKEN 3/3 (Z).
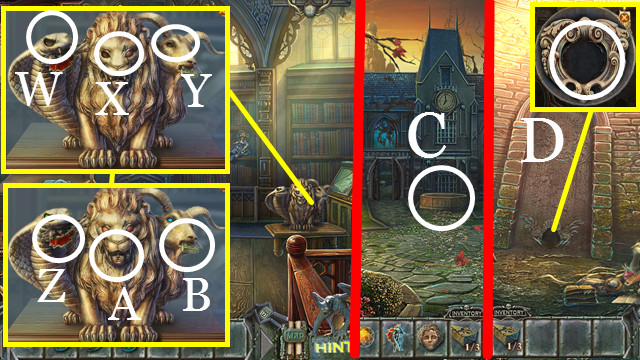
- Use the KNIFE (A) three times.
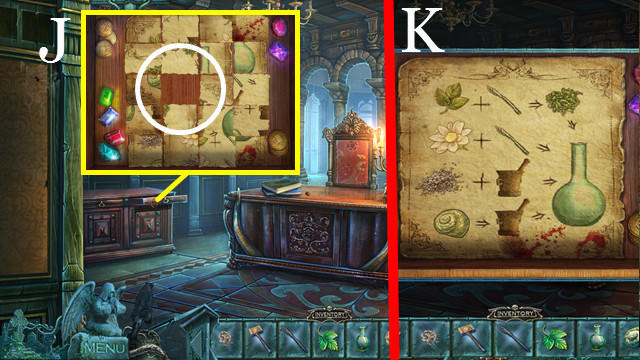
- Place the TOKENS (B) and PHOTO (C) to trigger a mini-game.
- Solution: E-M-I-L-Y. Letter placements are randomized.
- Receive EMILY'S PLATE.
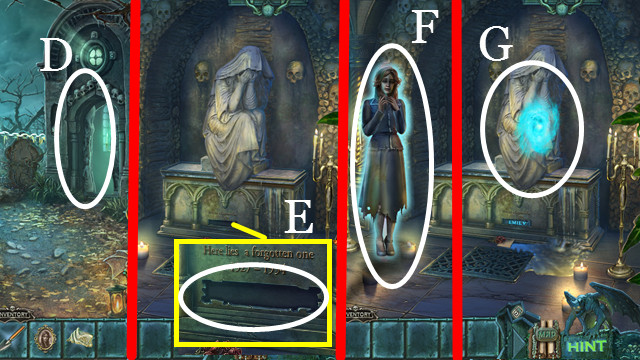
- Enter (D).
- Place EMILY'S PLATE (E).
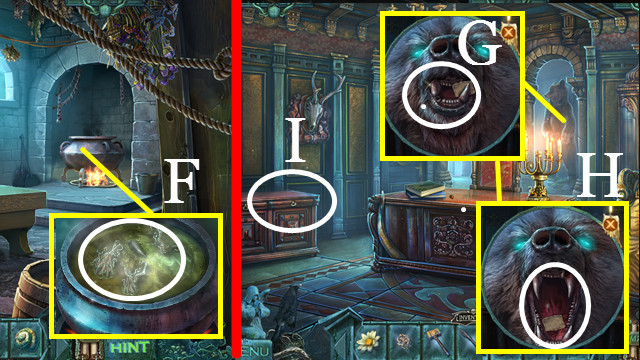
- Talk (F).
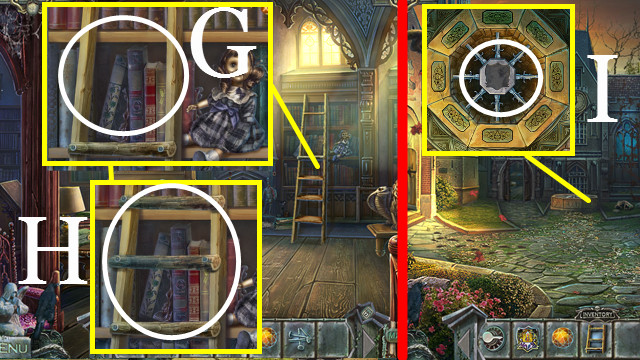
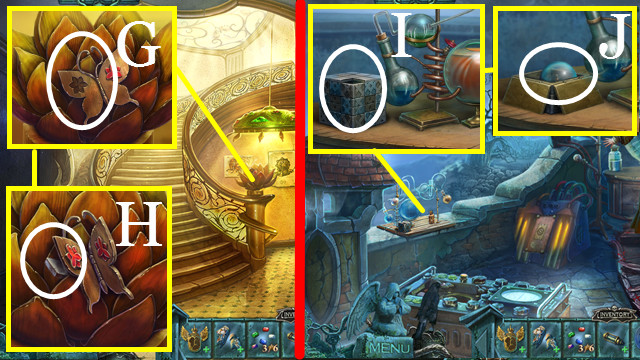
- Touch (G) to trigger a mini-game.
- Solution (H).
Chapter 2: School
- Talk (I); take the SCHOOL KEY (J).
- Enter (K).
- Touch anywhere to trigger a cutscene.
- Use the SHAWL (L); receive the GLASS SHARD.
- Take the BROKEN CLOCK WEIGHT (M).
- Open (N); take the LOCK PART (O).
- Touch (P).
- Use the Raven (Q); take the PUZZLE PIECE (R).
- Place the LOCK PART (S).
- Touch (T); take the RAVEN'S HEAD (U).
- Place the RAVEN'S HEAD (V).
- Use the SCHOOL KEY (W); touch (X).
- Enter (Y).
- Touch anywhere to trigger a cutscene.
- Take the SNAKE HANDLE (Z).
- Open (A); take the PENCIL KEY (B).
- Walk down.

- Use the PENCIL KEY (C); take the PAPER CLIP (D).
- Use the PAPER CLIP (E); take the PUZZLE PIECE (F).
- Place the SNAKE HANDLE (G).
- Touch (H).
- Enter (I).
- Take the GLUE (J).
- Combine the BROKEN CLOCK WEIGHT and GLUE (inventory); receive the CLOCK WEIGHT.
- Walk down then left.
- Use the CLOCK WEIGHT (K); take the GEM (L).
- Use the PAPERCLIP (M).
- Touch (N).
- Take the KNOB (O).
- Touch (P); place the GEM (Q); take the PUZZLE PIECE (R).
- Touch anywhere to trigger a cutscene.
- Place the PUZZLE PIECES (S) to trigger a mini-game.
- Solution (T): B-B-B-D-A-A-A-D-E-B-B-A-A-D-E-B-C-C-E.
- Walk forward.
- Touch anywhere to trigger a cutscene.
- Touch (U) then (V).
- Use the SHOVEL (W); touch (X); take the PHOTO (Y).
- Take the PLANKS (Z).
- Use the Raven (A); take the GLOBE PART (B).
- Enter (C).

- Take the STATUE (D).
- Place the PHOTO (E).
- Place the GLOBE PART (F); take the SILVER KEY (G).
- Use the GLASS SHARD (H); take the SAND BUCKET (I).
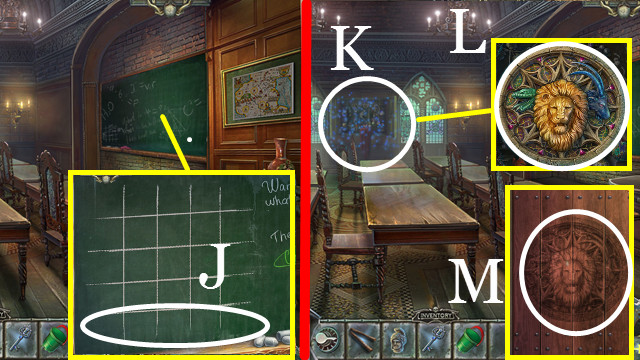
- Use the CHALK (J) to trigger a mini-game.
- Solution is random.
- Play the HOP (K); take the CHIMERA DISK (L).
- Walk down; place the CHIMERA DISK (M); walk down.
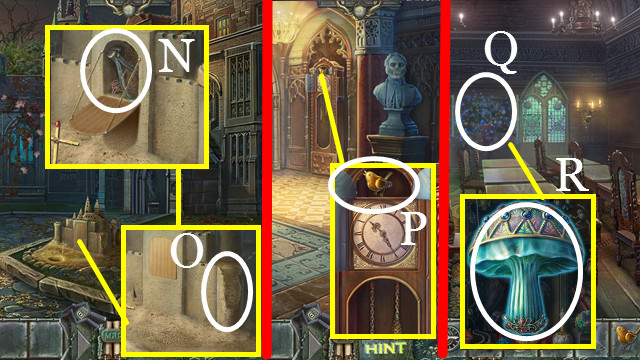
- Use the SAND BUCKET (O); take the PINCERS and GOLDEN KEY (N).
- Walk down.
- Use the PINCERS (P); receive the BIRD.
- Walk up then left.
- Play the HOP (Q); take the CRYSTAL MUSHROOM (R).
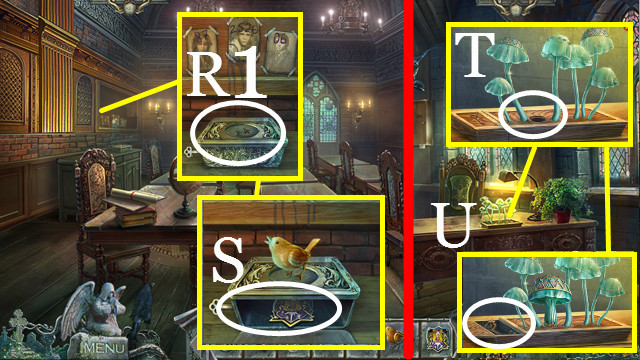
- Place the BIRD (R1); take the SCHOOL SHIELD (S).
- Walk down, down, down, right.
- Place the CRYSTAL MUSHROOM (T); take the COPPER KEY (U).
- Walk down, up, up.
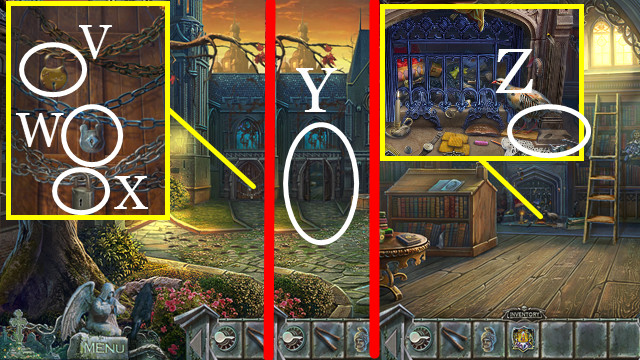
- Place the GOLDEN KEY (V), SILVER KEY (W), and COPPER KEY (X).
- Enter (Y).
- Place the STATUE (Z) to trigger a HOP.
- Play the HOP; receive the STUFFED BIRD.
- Walk down three times, then right.
- Place the STUFFED BIRD (A); take the HAMMER (B).
- Use the HAMMER (C-D); take the NAILS (E) and SUN GEM (F).
- Walk down, up, up, up.
- Use the PLANKS, NAILS, and HAMMER (G); take the LADDER (H).
- Walk down.
- Place the SCHOOL SHIELD (I) to trigger a mini-game.
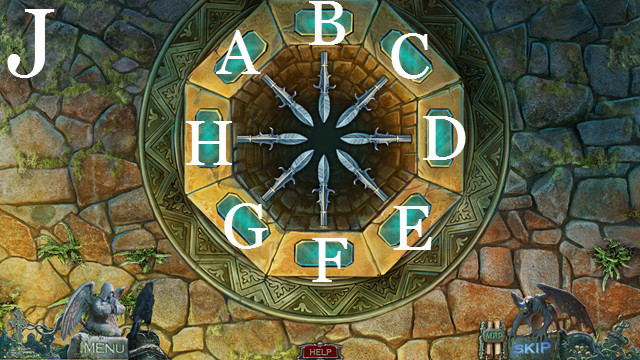
- Solution (J): C-D-E-F-G-H-A-B.
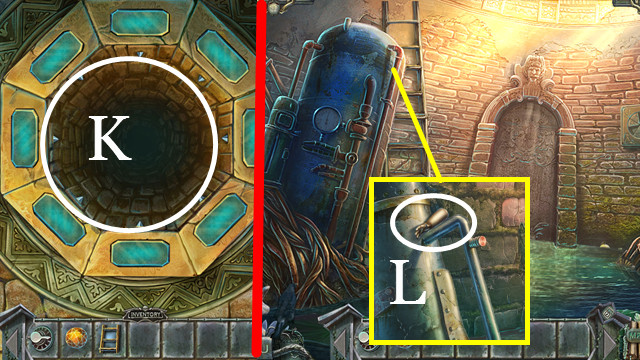
- Use the LADDER (K).
- Take the DOLL'S ARM (L).
- Walk up, forward.
- Play the HOP (M); receive the VALVE.
- Use the DOLL'S ARM (N); take the NEEDLE (O).
- Walk down.
- Use the NEEDLE (P); receive the EMERALD EYE.
- Climb down (Q).
- Use the VALVE (R); touch (S) to trigger a HOP.
- Play the HOP (T); receive the RUBY EYE.
- Walk up, forward.
- Use the KNOB (U); take the SAPPHIRE EYE (V).
- Place the EMERALD EYE (W), RUBY EYE (X) and SAPPHIRE EYE (Y).
- Take the KNIGHT FIGURINE (Z), ANGEL (A) and STONE WEDGE 1/3 (B).
- Walk down; climb down (C).
- Use the ANGEL (D).

- Touch (E) to trigger a mini-game.
- Solution (F-G-H).
- Walk forward.
- Place the SUN GEM (I); take the TONGS (J).
- Press (K); take the INSIGNIA (L).
- Walk down.
- Use the TONGS (M); receive the GHOST FIGURINE.
- Walk forward.
- Place the KNIGHT FIGURINE (N) and GHOST FIGURINE (O).
- Take the CADUCEUS (P) and STONE WEDGE 2/3 (Q).
- Walk down.
- Play the HOP (R); receive the SCISSORS.
- Climb up; walk down, down, right.
- Use the CADUCEUS (S).
- Take the MEDICINE (T).
- Use the SCISSORS (U); receive the BANDAGE.
- Walk down, up, up, up.
- Place the INSIGNIA (V); touch (W); take the STONE WEDGE 3/3 (X).
- Walk down.
- Climb down (Y).
- Place the STONE WEDGE (Z); take the CHIMERA KEY (A).
- Walk forward.
- Use the CHIMERA KEY (B).
- Talk (C).
- Use the MEDICINE and BANDAGE (D).
- Take the ANCIENT AMULET (E).
- Enter (F).
Chapter 3: Cemetery-Part 2
- Walk down.
- Talk (G).
- Take the BAG (H).
- Use the SCISSORS (I).
- Take the EMPTY CANISTER (J) and STONE SKULL (K).
- Walk down twice.
- Play the HOP (L); receive the ENCRUSTED KEY.
- Use the BAG (N); receive the BAG WITH SEEDS.
- Use the EMPTY CANISTER (M); receive the CANISTER WITH WATER.
- Walk up twice.
- Use the STONE SKULL (O).
- Use the ENCRUSTED KEY (P); take the AMBER (Q).
- Use the BAG WITH SEEDS and CANISTER WITH WATER (R).
- Use the SCISSORS (S); receive the FLOWER.
- Place the AMBER (T) and FLOWER (U).
- Take the PORTRAIT (V).
- Place the PORTRAIT (W) to trigger a mini-game.
- Solution: E-D-W-A-R-D. Letter placements are randomized.
- Talk (X); take the LETTER FOR LIANNAH (Y).
- Enter (Z).
Chapter 4: Castle
- Talk (A).
- Give the LETTER FOR LIANNAH (B).
- Use the Raven (C); take the WHITE FLOWER (D).
- Take the PERFUME BOTTLE CAP (E).
- Walk up (F).
- Talk (G); take the TORN CLOAK (H) and GUARD INSIGNIA (I).
- Take the TOY WHEEL (J) and NEEDLE (K).
- Combine the TORN CLOAK and NEEDLE (inventory); receive the CLOAK.
- Use the TOY WHEEL (L); take the PERFUME BOTTLE CAP (M).
- Walk down then right.
- Use the CLOAK anywhere.
- Take the BUTTERFLY TOKEN (N), TORCH (O) and PERFUME BOTTLE CAP (P).
- Walk down, up.
- Place the PERFUME BOTTLE CAPS (Q-R-S).
- Touch (T-U).
- Play the HOP (V); receive the RIBBON.
- Use the BUTTERFLY TOKEN (W); take the SHIELD GEM (X).
- Walk down.
- Use the SHIELD GEM (Y); take the SWORD (Z).
- Walk right, forward.
- Place the SWORD (A) to trigger a mini-game.
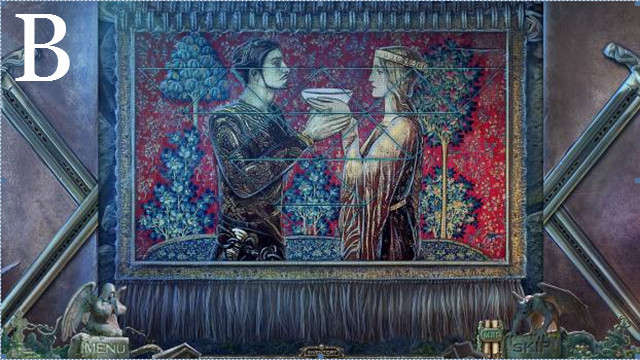
- Solution (B).
- Walk forward.
- Talk (C).
- Give the RIBBON (D); take the PENDANT (E).
- Take the STONE LEAF (F); place the TORCH (G).
- Take the FRAGMENT (H) and TOY HAMMER (I).
- Walk down.
- Observe (J).
- Walk up; talk to Edward.
- Walk down; take the CAULDRON EMBLEM HALF (K).
- Return to Liannah's chambers.
- Give the PENDANT (L); take the CAULDRON EMBLEM HALF (M).
- Combine the CAULDRON EMBLEM HALF and CAULDRON EMBLEM HALF (inventory); receive CAULDRON EMBLEM.
- Walk down.
- Use the CAULDRON EMBLEM (N); Enter (O).
- Talk (P).
- Use the GUARD INSIGNIA (Q); take the ORDER (R).
- Take the KNIFE (S) and COLANDER (T).
- Walk down then right.
- Use the KNIFE (U); receive the LEAF.
- Walk down then up the stairs.
- Give the ORDER (V).
- Play the HOP (W); receive the SICKLE.
- Walk down then right.
- Touch (X).
- Use the STONE LEAF (Y); take the BOTTLE (Z).
- Use the SICKLE (A).
- Walk right (B).
- Take the BUTTONS (C).
- Walk down, up.
- Use the BUTTONS (D); take the SHELL (E).
- Walk down, down, forward.
- Use the COLANDER (F); receive the BEAR TOOTH.
- Walk down, right, right.
- Use the BEAR TOOTH (G); take the RECIPE PART (H).
- Open (I).
- Place the RECIPE PART (J) to trigger a mini-game.
- Solution (K).
- Take the ANTIDOTE RECIPE (L).
- Walk down, down, up.
- Place the ANTIDOTE RECIPE, LEAF, WHITE FLOWER, FRAGMENT, SHELL, BOTTLE, and KNIFE (M).
- Use (N-O-P-Q).
- Use (R-S).
- Take the ANTIDOTE (T).
- Walk down, right, up.
- Give the ANTIDOTE (V); take the GOLD (W).
- Walk down.
- Place the TOY HAMMER and the GOLD (X).
- Take the KEY (Y).
- Walk up.
- Use the KEY (Z); touch (A); take the RAT SKULL (B).
- Walk down, right.
- Use the RAT SKULL (C); touch (D); take the PRISONERS DIARY (E).
- Talk (F).
- Take the RAG (G), MATTOCK (H), BAND (I) and BROKEN BROOM (J).
- Combine the BAND and BROKEN BROOM (inventory); receive the BROOM.
- Use the BROOM (K) to trigger a HOP.
- Play the HOP (L); receive the KEYS.
- Place the KEYS (M) to trigger a mini-game.
- Solution (N).
- Walk forward.
- Talk (O).
- Use the MATTOCK (P); take the PATTERN PLATE (Q).
- Walk down.
- Play the HOP (R); receive the CROWBAR.
- Walk up.
- Use the CROWBAR (S).
- Take the EYE (T).
- Walk down.
- Place the EYE (U); take the PATTERN PLATE (V).
- Place the PATTERN PLATE and PATTERN PLATE (W).
- Take the STAR CREST (X).
- Walk forward.
- Place the STAR CREST (Y).
- Walk forward.
- Talk (Z); give the PRISONER'S DIARY (A).
- Take the AMULET GEMS (B).
- Enter (C).
Chapter 5: Cemetery-Part 3
- Talk (D). Take the AWL (E).
- Use the AWL (F); receive the DIRTY PHOTO.
- Combine the RAG and DIRTY PHOTO (inventory); receive the OLD PHOTO.
- Place the OLD PHOTO (G) to trigger a mini-game.
- Solution: R-I-C-K. Letter placements are randomized.
- Talk (H). Take the BULB (I).
- Enter (J).
Chapter 6: Tower
- Touch anywhere to trigger a cutscene.
- Touch (K); take the SHARP METAL FISH (L).
- Open (M).
- Walk forward.
- Touch (N).
- Take the TELESCOPE TUBE (O).
- Use the BULB (P) to trigger a HOP.
- Play the HOP (Q); receive the BANDAGE.
- Use the BANDAGE (R).
- Take the CORKSCREW HANDLE (S).
- Move (T).
- Take the SOLVENT (U).
- Move (V).
- Climb up (W).
- Take the NET (X).
- Use the SHARP METAL FISH (Y); receive the STICK.
- Walk down.
- Use the Raven (Z); take the METAL SNIPS (A).
- Use the NET (B); receive the EGG.
- Use the STICK (C); take the DIRTY LENS (D).
- Combine the SOLVENT and DIRTY LENS (inventory); receive the LENS.
- Place the EGG (E).
- Use the CORKSCREW HANDLE (F); take the CORKSCREW (G).
- Walk forward.
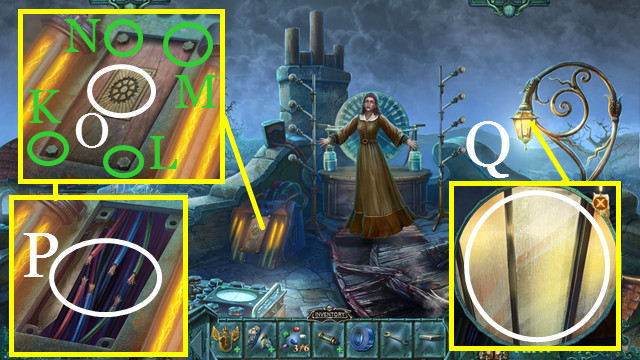
- Place the TELESCOPE TUBE (H) and LENS (I) to trigger a mini-game.
- Solution (J-K-L).
- Take the CLOCK BELL (M).
- Climb down (N).
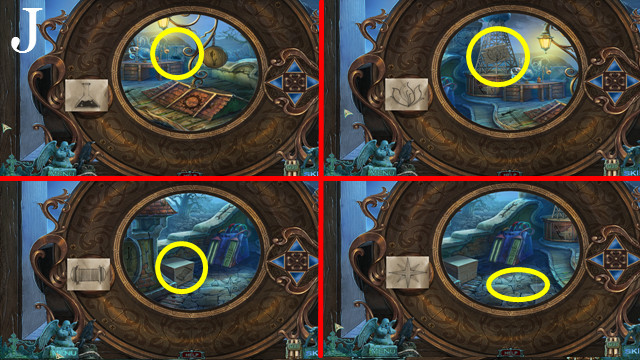
- Play the HOP (O); receive the CLOCK FACE.
- Use the METAL SNIPS (P).
- Take the INCOMPLETE FIRE EXTINGUISHER (Q) and CHAIN LINK (R).
- Use the CORKSCREW (S); receive the CLOCK HANDS.
- Walk up.
- Place the CLOCK FACE (T), CLOCK BELL (U), and CLOCK HANDS (V).
- Take the PAPER (W) and LATCH (X).
- Climb down (Y).
- Move (Z).
- Use the LATCH (A).
- Walk left (B).
- Use the Raven (C); take the PISTIL (D).
- Take the RAG (E).
- Place the PISTIL (F); take the STONE and GEAR (G).
- Place the CHAIN LINK (H); take the TUBE (I) and PENCIL (J).
- Combine the PAPER and PENCIL (inventory); receive the WRITING TOOLS.
- Use the RAG (K).
- Use the WRITING TOOLS (L); receive the CODE.
- Combine the INCOMPLETE FIRE EXTINGUISHER and TUBE (inventory); receive the FIRE EXTINGUISHER.
- Use the FIRE EXTINGUISHER (M).
- Take the PICTURE FRAGMENT (N).
- Place the CODE (O).

- Solution (P).
- Walk forward.
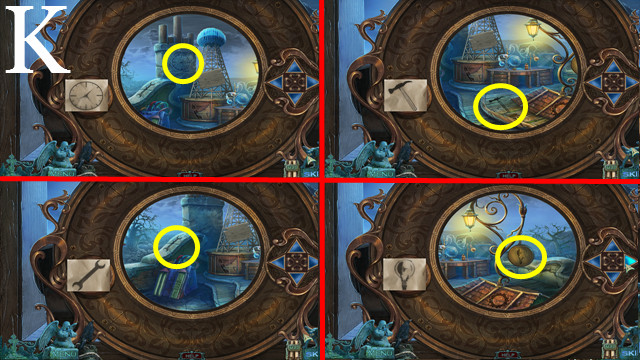
- Touch (Q) to trigger a HOP.
- Play the HOP (R); receive the METAL FLOWER.
- Place the GEAR (S); touch the key.
- Enter (T).
- Place the PICTURE FRAGMENT (U); take the LEVER (V).
- Place the METAL FLOWER (W); take the LIGHTBULB 1/3 (X).
- Use the STONE (Y); take the VALVE (Z).
- Walk down.
- Play the HOP (A); receive the GLASS CUTTER.
- Place the VALVE (B) and LEVER (C).
- Touch (D-E).
- Walk down.
- Use the GLASS CUTTER (F); receive the GLASS.
- Walk forward, up.
- Place the GLASS (G); take the GEM 1/6 (H).
- Move (I-J).
- Walk up (K).
- Use the FIRE EXTINGUISHER (L).
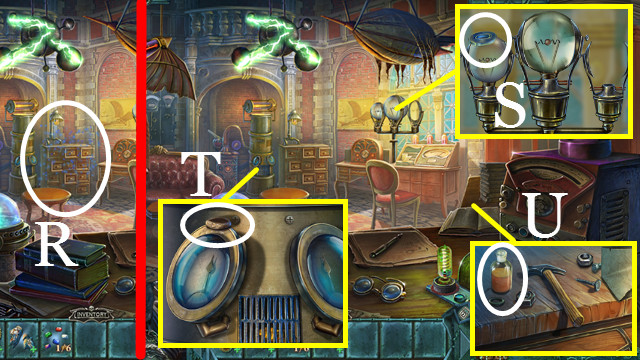
- Take the LIGHTBULB 2/3 (O) and LIGHTBULB 3/3 (P).
- Walk down twice.
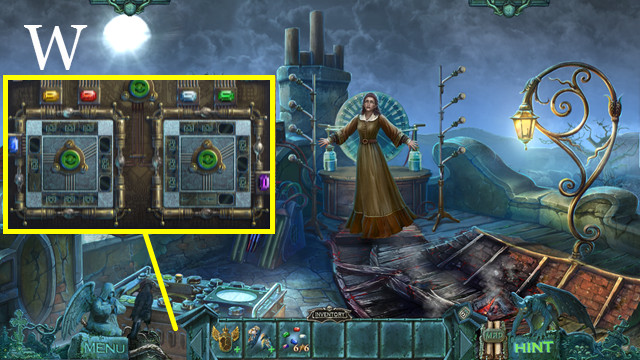
- Place the LIGHTBULBS to trigger a mini-game (Q).
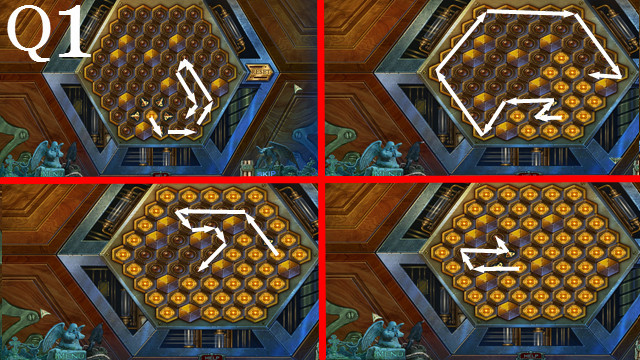
- Solution (Q1).
- Walk forward.
- Touch anywhere to trigger dialogue.
- Play the HOP (R); receive the ELECTRICAL STEM.
- Take the INSULATING TAPE (S), STATUE BELT (T) and LIQUID (U).
- Walk down, up.
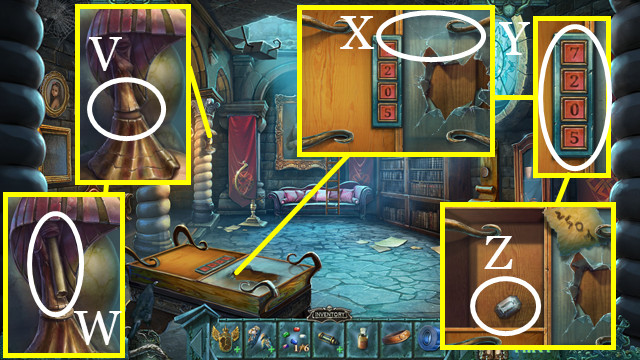
- Place the STATUE BELT (V); take the CODE (W).
- Place the CODE (X).
- Press (Y) 2-5-0-7.
- Take the GEM 2/6 (Z).
- Climb up.
- Pour the LIQUID (A); take the KNOB (B).
- Walk down, down, forward.
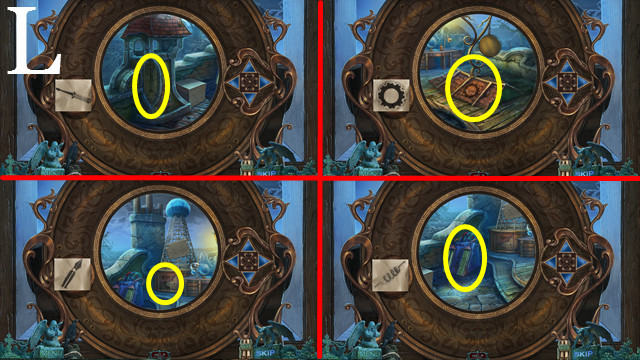
- Play the HOP (C); receive the WOODEN FLOWER.
- Use the KNOB (D); take the GEM 3/6 (E) and WRENCH (F).
- Walk down.
- Place the WOODEN FLOWER (G); take the CUBE PART (H).
- Return to rooftop.
- Place the CUBE PART (I); take the GLASS BULB (J).
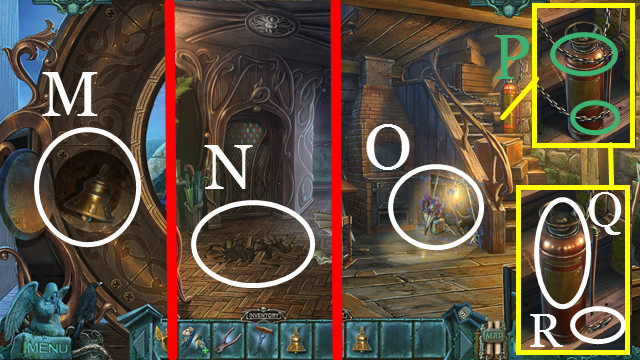
- Use the WRENCH (K-L-M-N); touch (O).
- Use the INSULATING TAPE (P).
- Take the GAUGE BACKGROUND (Q).
- Walk down, down, forward.
- Use the GAUGE BACKGROND (R); take the GEM 4/6 (S).
- Combine the ELECTRICAL STEM and GLASS BULB (inventory); receive the INCANDESCENT BULB.
- Place the INCANDESCENT BULB (T); take the GEM 5/6 (U) and GEM 6/6 (V).
- Return to rooftop.
- Place the GEM 6/6 (W) to trigger a mini-game.
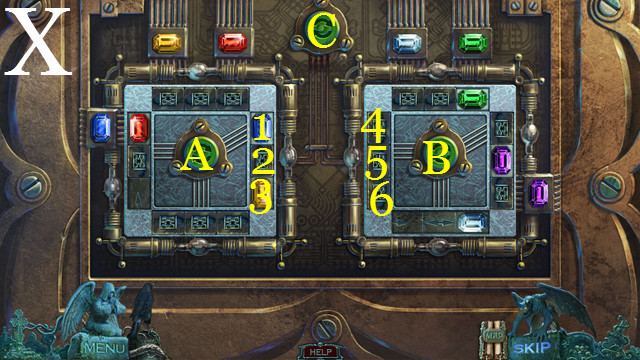
- Solution (X): B-C-5-3-C-B-B-C-2-6-C-A-A-C-B-B-C-2.
- 4-C-A-A-C-5-1-C-B-B-B-C-2-4-C-A-A-A.
- C-5-3-C-B-C-2-6-C-A-C-5-3-C-B-B-C-A-A.
- A-C-5-A-C-B-B-B-C-A-A-A-4-C-A-C-5-B-B-A.
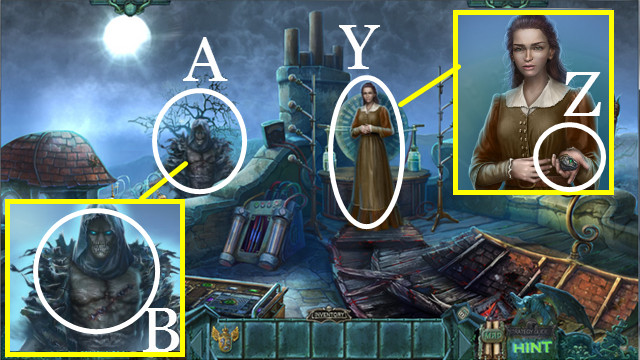
- Select anywhere to talk.
- Talk (Y); take the AMULET GEM (Z).
- Combine the ANCIENT AMULET and AMULET GEMS (inventory); receive the INCOMPLETE AMULET.
- Combine the INCOMPLETE AMULET and AMULET GEM (inventory); receive the COMPLETED AMULET.
- Talk (A).
- Use the COMPLETED AMULET (B).
- Talk (C).
- Enter (D).
- Talk (E).
- Congratulations! You've completed Redemption Cemetery: The Island of the Lost!
Created at: 2015-04-03