

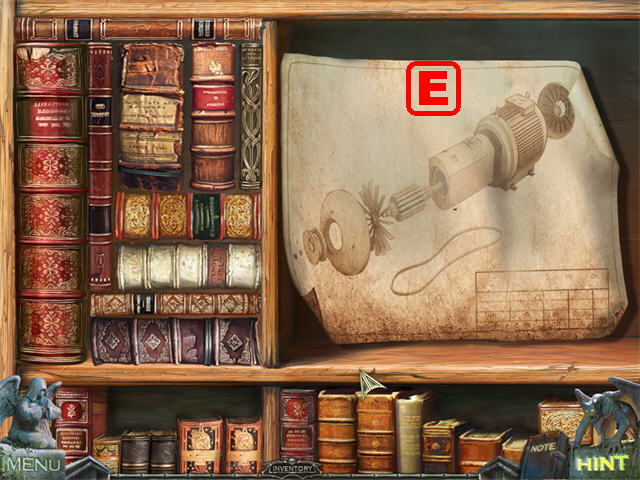
Walkthrough Menu
General Tips
- This is the Official Guide for Redemption Cemetery: Curse of the Raven, a chilling Hidden Object Puzzle Adventure!
- Choose Regular Mode or Expert Mode at the beginning of the game.
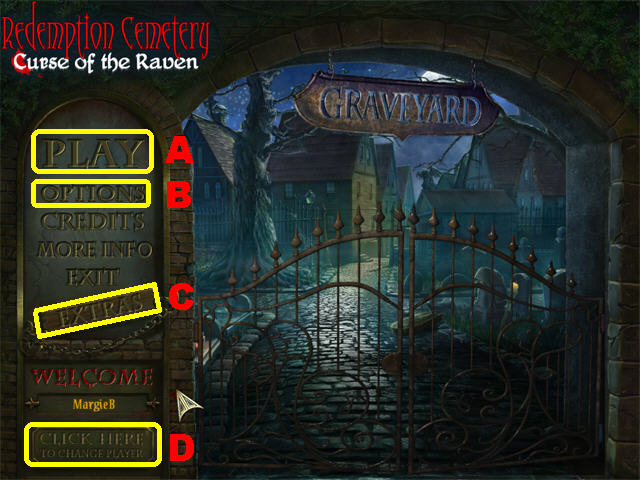
- Click on PLAY (A) to access the main chapters in the game. The OPTIONS (B) button allows you to adjust the screen, music, and sound.
- Clicking on the EXTRAS (C) button will link you to the Collector’s Edition version of the game which offers a Bonus Adventure along with some other extras not offered in this edition of the game.
- The CLICK HERE button (D) can be used to manage your profiles in the game.
- A single sparkle indicates an interactive area in the game. A cluster of sparkles indicates a Hidden Object Scene which will give you one inventory upon completion.
- Certain Hidden Object Scenes will require you to click on a part of the scene to uncover a hidden area.
- The Magnifying Glass allows you to take a closer look at something or to gain insight into the game.
- You can skip a mini-game once the Skip Button is full. The Skip Button only appears in the mini-game sections and is located in the lower left corner.
- When you can’t find an item in a Hidden Object Scene, or you need help with the next step in the game, you can use the hint in the lower left.
- You have unlimited hints in the game but you have to wait for them to recharge between uses.
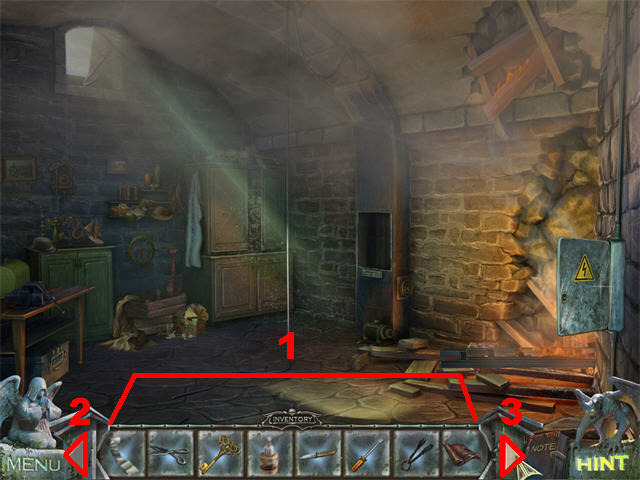
- Inventory Items are placed in the Inventory Tray (1) at the bottom of the screen.
- Place your cursor at the bottom of the screen to make the Inventory Tray appear.
- When your Inventory Tray gets full, use the arrows on the left (2) and right (3) sides to sort through all the items.
- To use an Inventory Item, drag it to the area in which you wish to use it and click it into place.
- Inventory Items can be used more than once and will remain in your inventory until you’ve used.
Novella 1
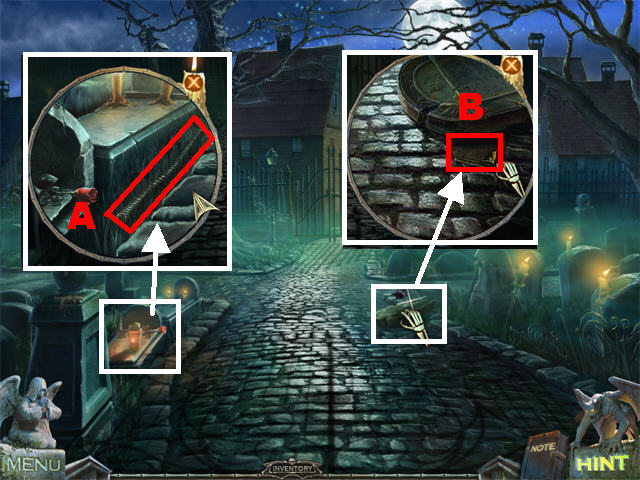
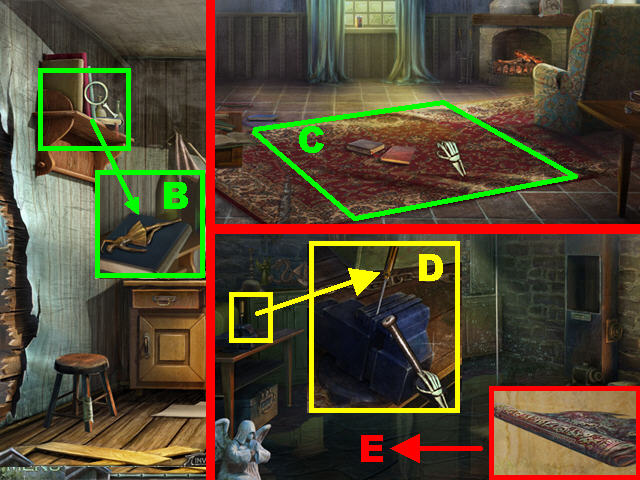
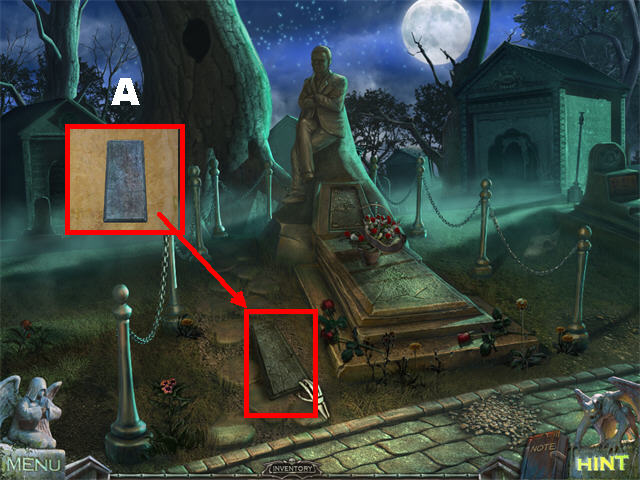
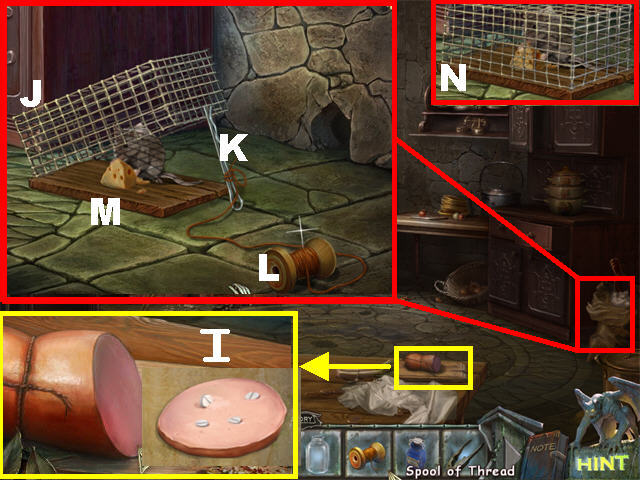
- Zoom into the lower left; pick up the METAL ROD (A).
- Click on the raven in the lower right; zoom into the tombstone (B).
- Lift the tombstone with the METAL ROD; pick up the NAMEPLATE PIECE 1/2.
- Turn right.
- Click on the raven in the lower left; zoom into the picture below the raven and remove the leaf.
- Zoom into the newspaper clipping in the lower center.
- Make a right.
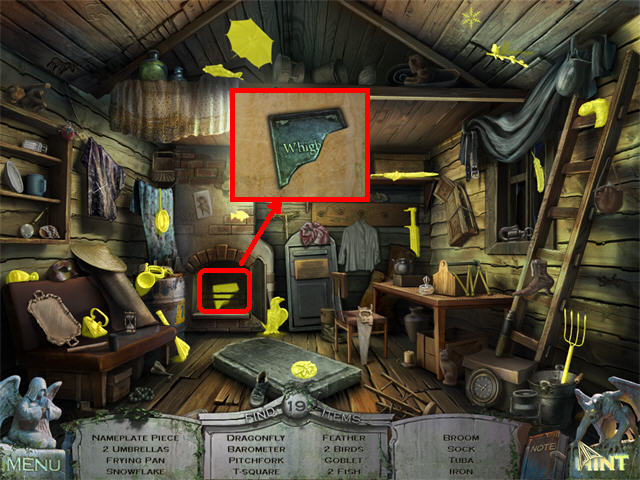
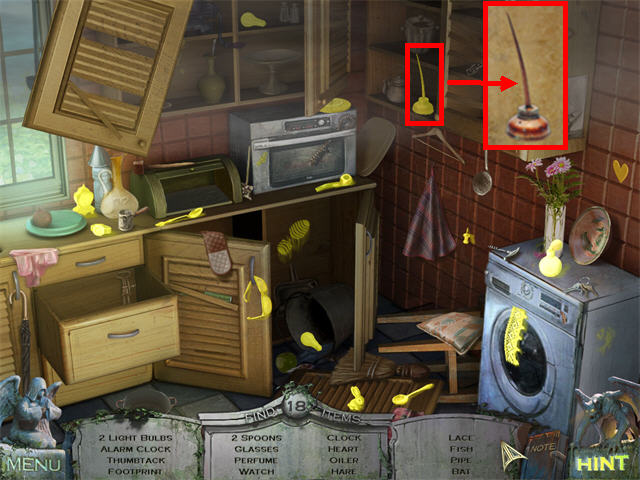
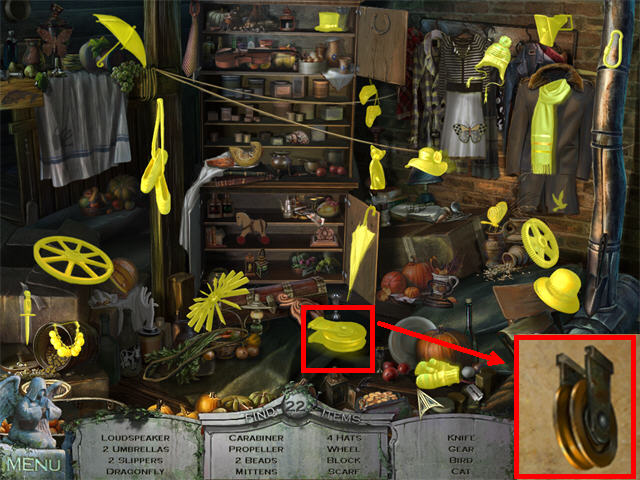
- Play the Hidden Object Scene.
- Move the clothes on the line and click on the barometer if it’s on your list.
- Open the oven in the lower left; pick up the NAMEPLATE PIECE 2/2.
- Exit this scene.
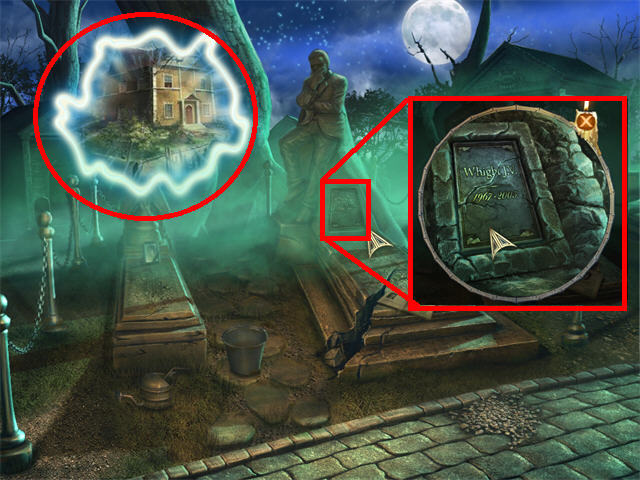
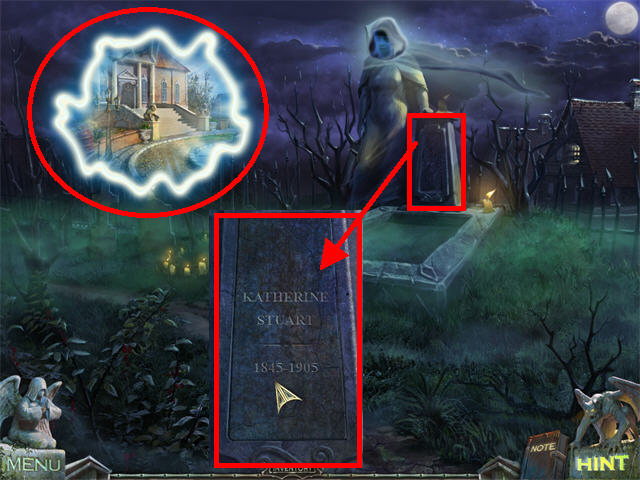
- Zoom into the tombstone below the statue.
- Place the 2 NAMPLATE PIECES into the tombstone’s recess; “X” out of there.
- Click on the portal that appears on the left.
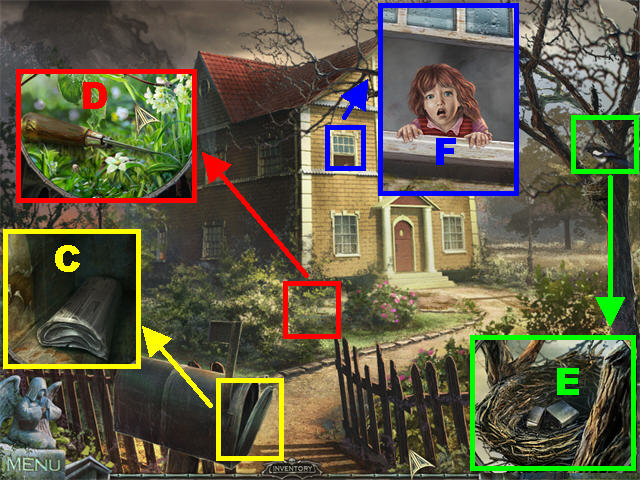
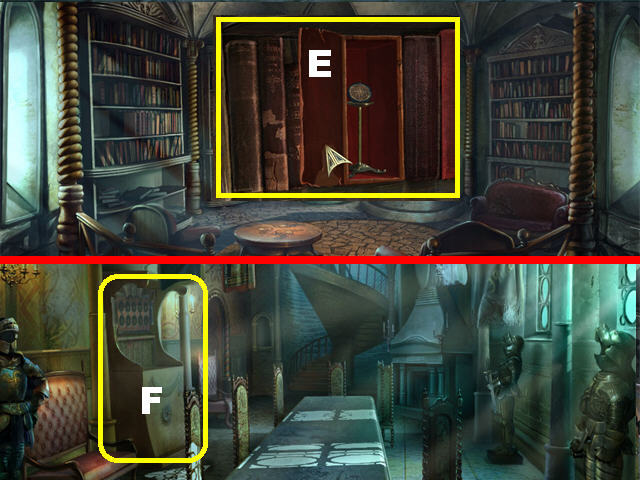
- Take a closer look at the little girl in the window (F).
- Zoom into the mailbox; pick up the NEWSPAPER (C).
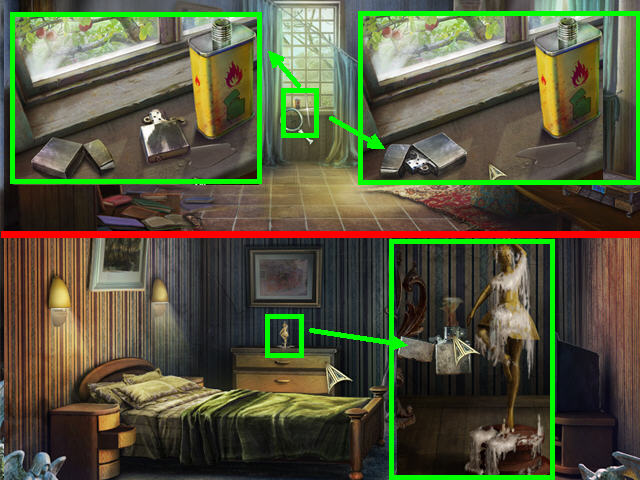
- Zoom into the bushes in the lower center; pick up the AWL (D).
- Click on the raven in the upper right; zoom into the bird’s nest and pick up the LIGHTER’S SHELL (E).
- Approach the house.
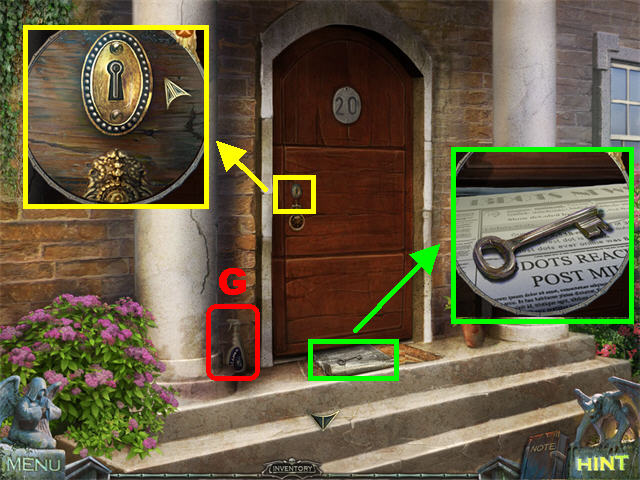
- Pick up the CLEANER by the door (G).
- Place the NEWSPAPER below the door and click on it to push it below the door.
- Zoom into the lock; place the AWL in the keyhole to drop the KEY onto the newspaper.
- Pull the newspaper out from below the door and pick up the KEY; open the door with the KEY.
- Turn the key once and go inside.

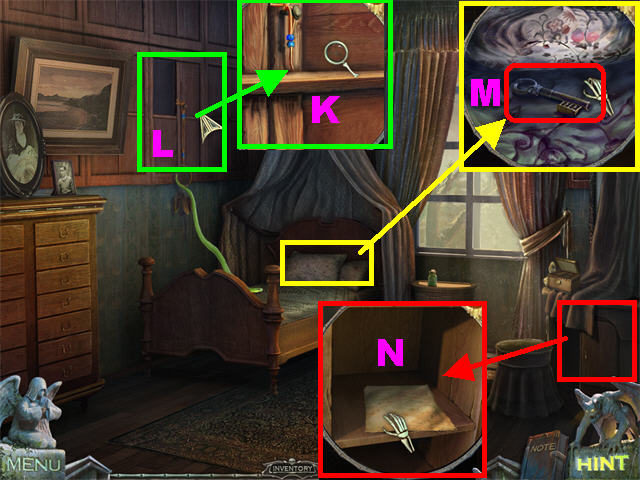
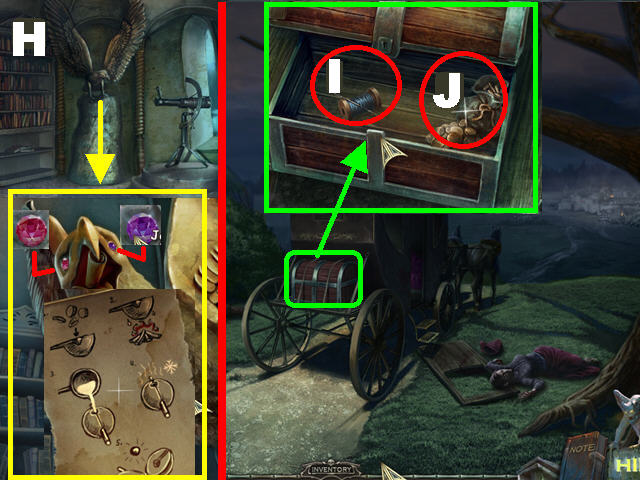
- Zoom into the shelf in the back wall; pick up the owl STATUETTE (H).
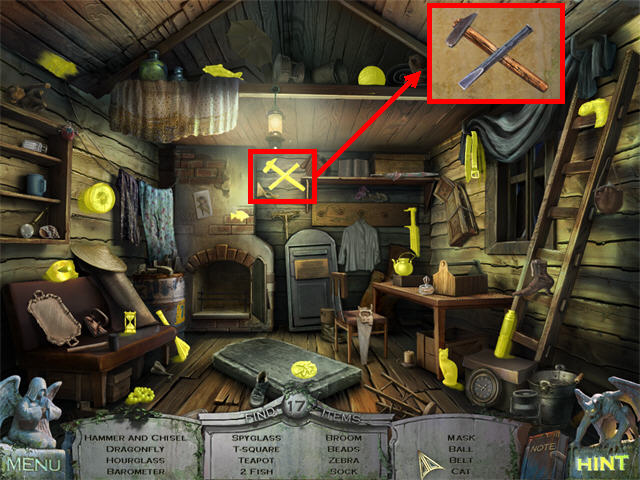
- Break the window on the right with the STATUETTE; zoom into the window and pick up the HAMMER (I).
- Open the cabinet by the window and pick up the FLASHLIGHT (J).
- Zoom into the photo on the table; pick up the BRUSH (K).
- Zoom into the book on the floor; the numbers 6385 will be added to your journal (L).
- Open the first aid kit on the floor; pick up the BANDAGE inside (M).
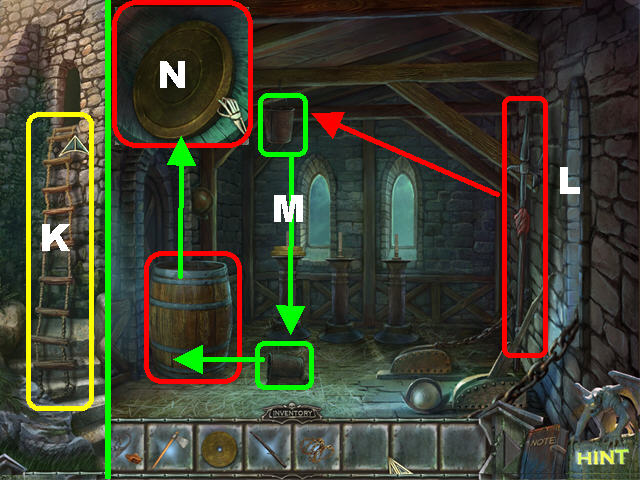
- Zoom into the grid in the upper left, use the FLASHLIGHT and pick up the FUSE (N).
- Zoom into the barrel and hit it with the HAMMER to roll it. Hit the barrel with the HAMMER one more time to extinguish the fire (O).
- Go left.
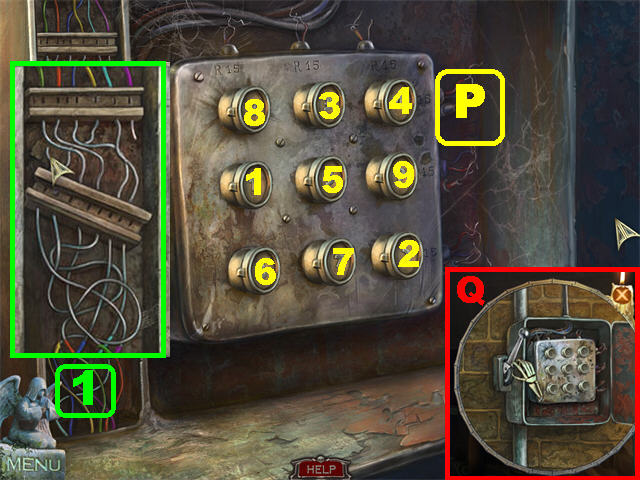
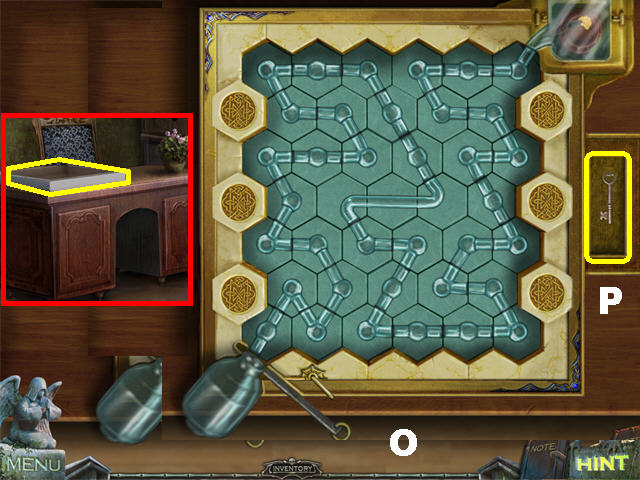
- Zoom into the panel on the right; place the FUSE in the box to trigger a puzzle.
- Place the FUSES on the panel so that each row and column adds up to 15.
- The first row should contain fuses 8, 3, and 4.
- The second row should contain fuses 1, 5, and 9.
- The third row should contain fuses 6, 7, and 2.
- Please look at the screenshot for the solution (P).
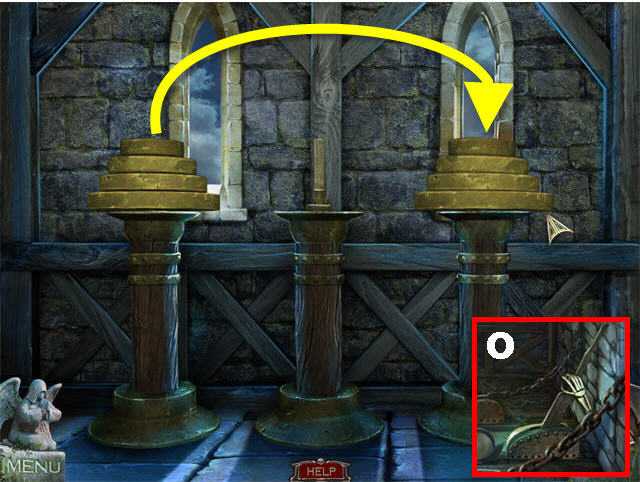
- Zoom into the wires on the left.
- Trace the wires at the bottom of the panel to the matching color above the panel. Click on both of them to connect them.
- Please look at the screenshot for the solution (1).
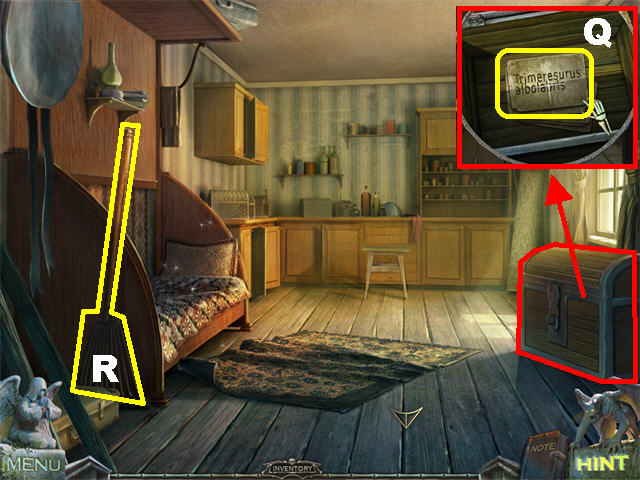
- Click on the lever after the puzzle has been solved (Q).

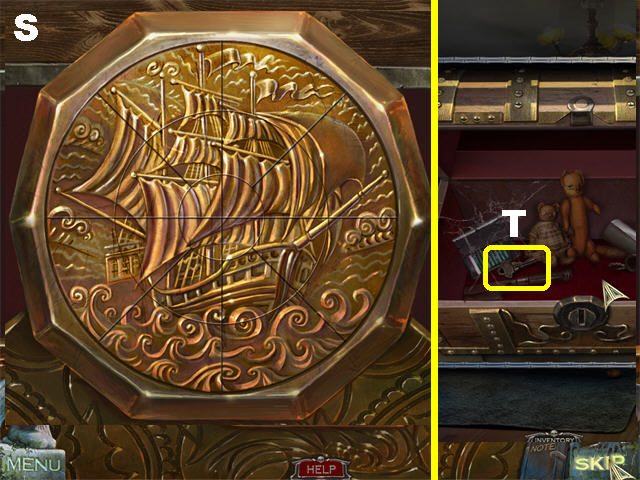
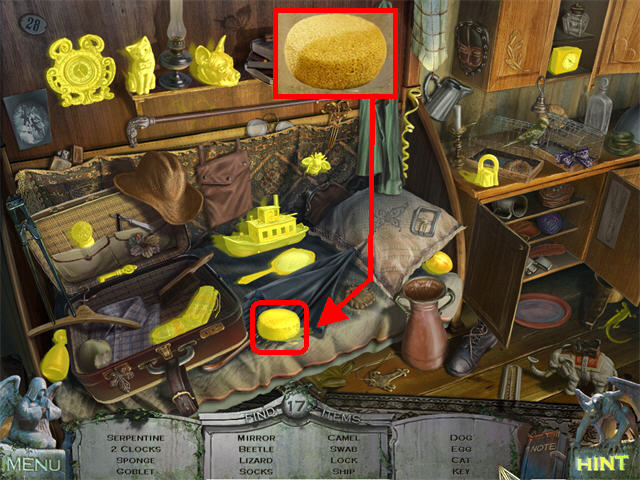
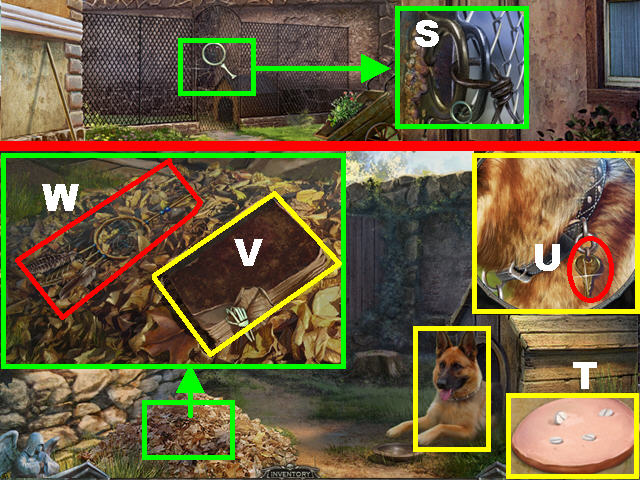
- Zoom into the table in the lower left; pick up the SCISSORS (R).
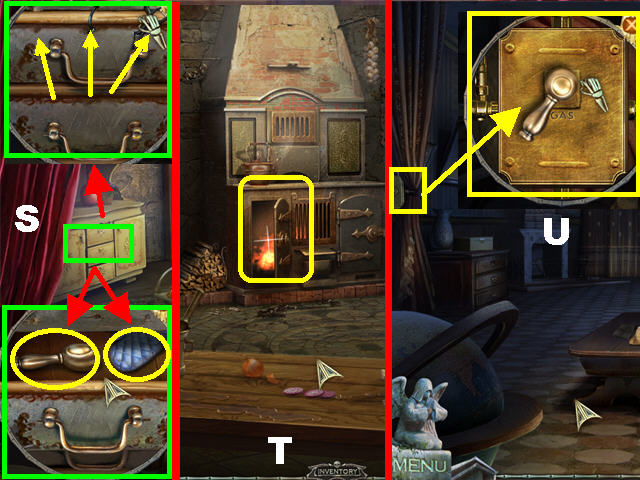
- Zoom into the case in the lower left; clean it with the CLEANER and the BRUSH (S).
- Change the numbers on the box to 6385 using the red arrows; pick up the GLOVES (T).
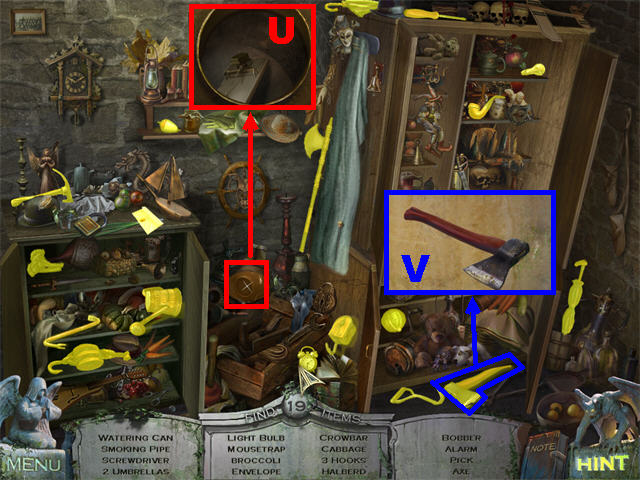
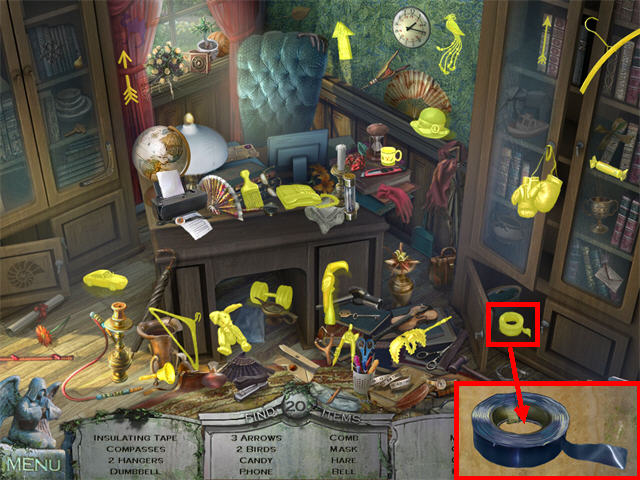
- Play the Hidden Object Scene on the left.
- Open the 3 cabinets to look for items.
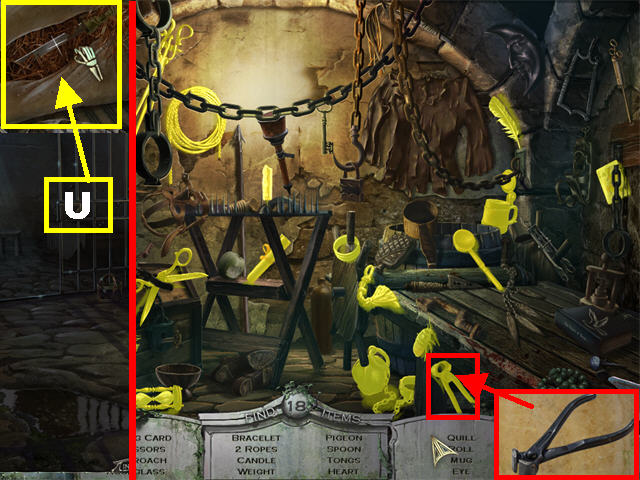
- Zoom into the helmet in the lower center; pick up the MOUSETRAP if it’s on your list (U).
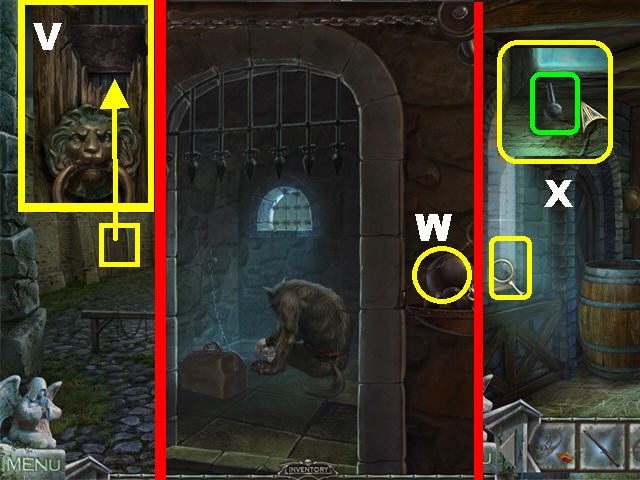
- The AXE will be added to inventory (V).
- Exit this scene.
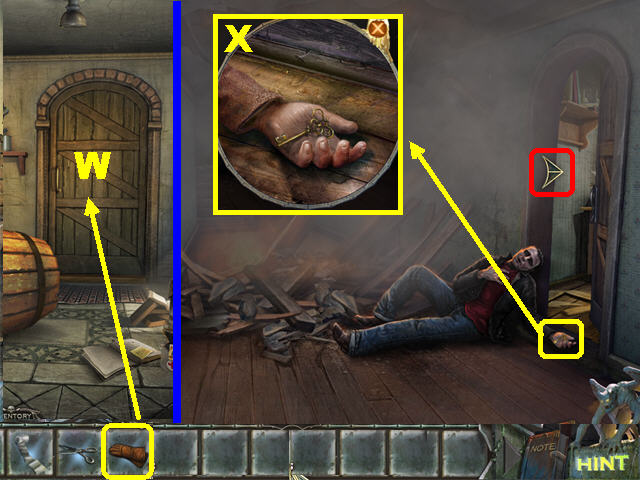
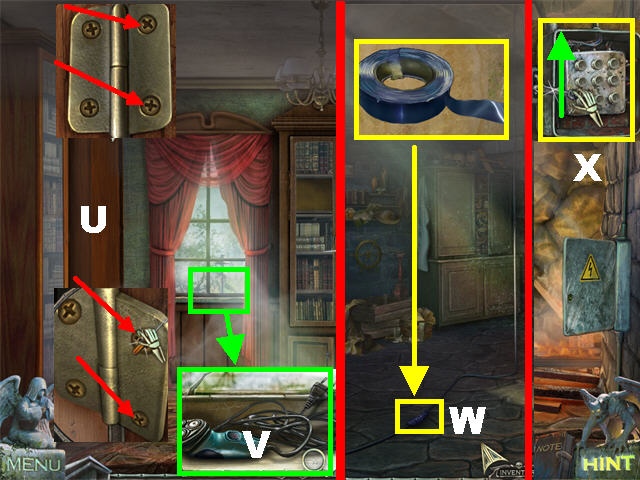
- Open the back door with the GLOVES (W).
- Click on any part of the screen and debris will fall, blocking your way.
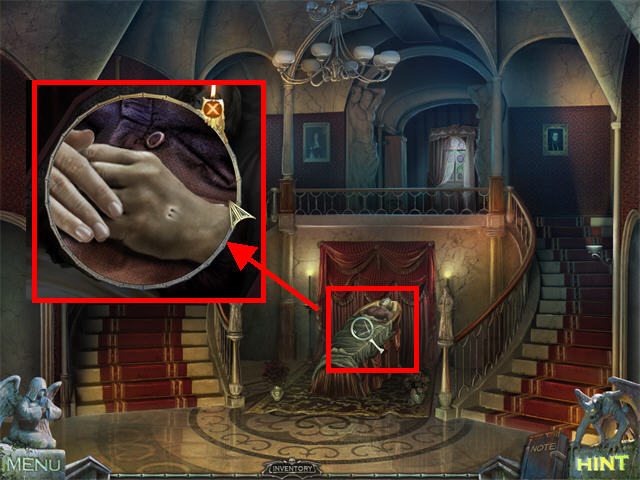
- Zoom into the man’s hand and pick up the KEY (X).
- Go through the right door.

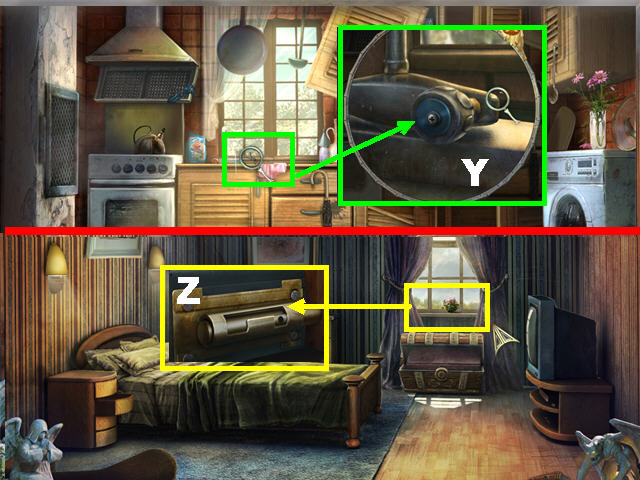
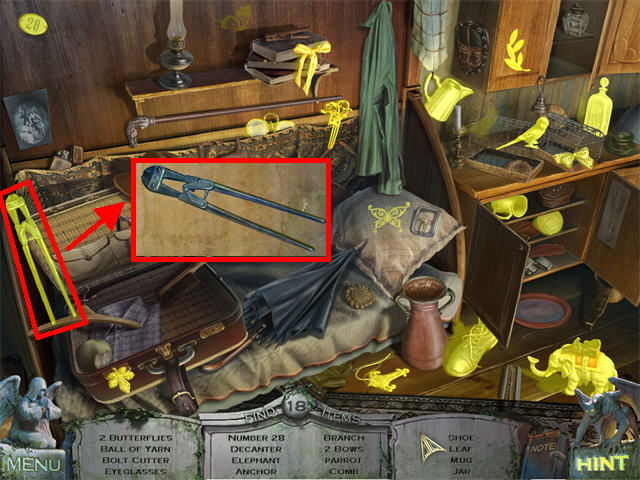
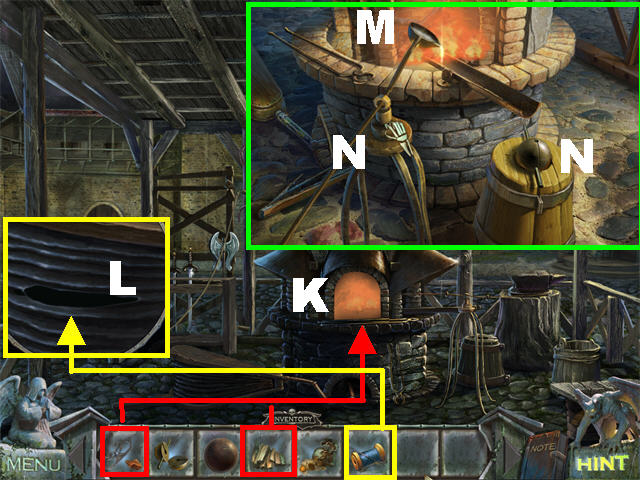
- Open the large cabinet’s left door and pick up the VISE HANDLE (Y).
- Open the top drawer on the left; pick up the GLUE (Z).
- Break the left wall twice with the AXE; go left.
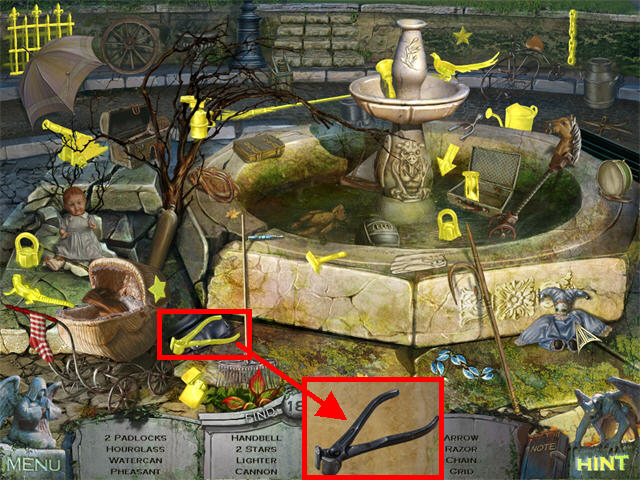
- Zoom into the spot next to the fireplace; pick up the TONGS (A).
- Return to the hallway and enter the left door to access the Kitchen.
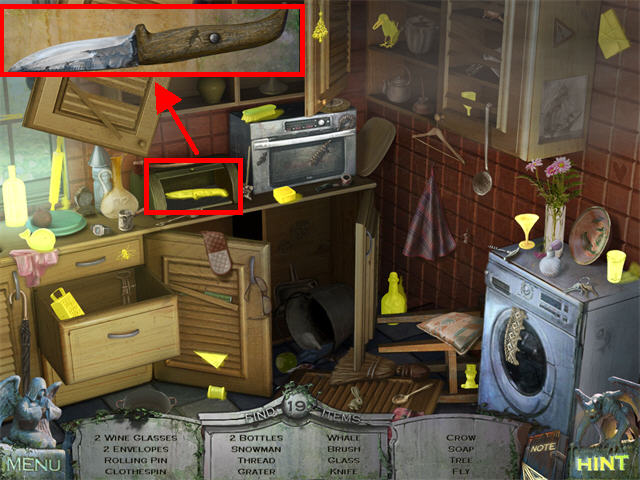
- Play the Hidden Object Scene by the microwave.
- Open the lower cabinet and the breadbox to look for hidden items.
- The KNIFE will be added to inventory.
- Return to the foyer area.
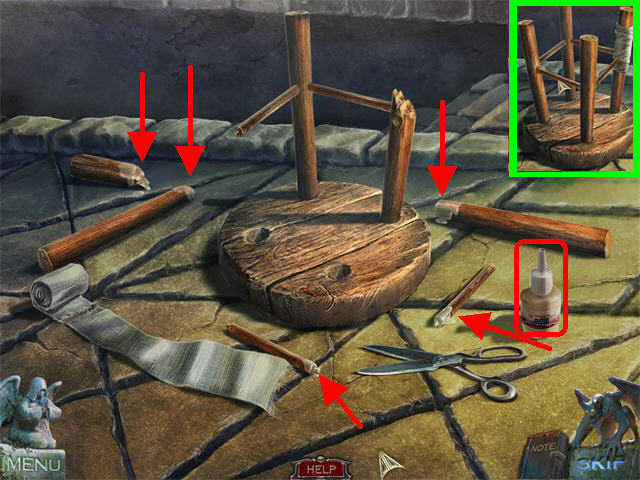
- Zoom into the broken stool on the left.
- Place the BANDAGE, GLUE, and SCISSORS on the ground.
- Cut the BANDAGE and the top of the GLUE with the SCISSORS.
- Put GLUE on each of the 5 broken sticks; place each stick in the appropriate hole. The larger sticks go on the seat and the rest of the pieces go between the larger pieces.
- Place the BANDAGE as shown in the screenshot and pick up the STOOL from the ground.
- Go through the back door and then through the right door.
- Place the STOOL next to the hole in the wall, zoom into the shelf and pick up BALLERINA 1/2 (B).
- Go left.
- Cut the carpet twice with the KNIFE; pick up the CARPET to add it to inventory (C).
- Return to the Basement.
- Zoom into the vice grip on the left, place the VISE HANDLE and click on it to release the SCREWDRIVER; pick up the SCREWDRIVER (D).
- Place the CARPET on the standing water to create the WET CARPET (E).
- Return to the hallway.
- Extinguish the fire with the WET CARPET and proceed forward.
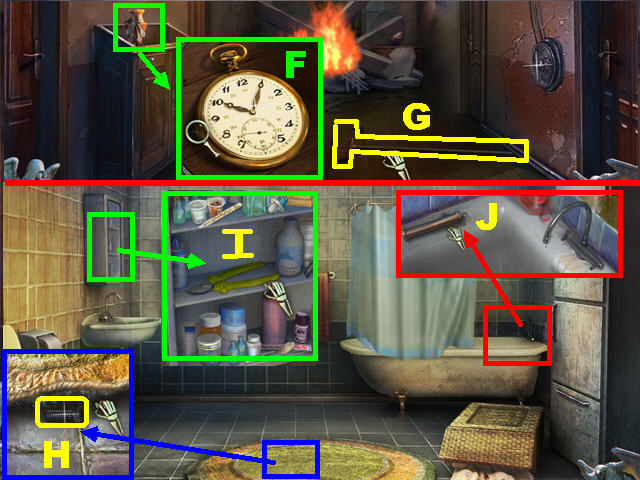
- Zoom into the table on the left; it shows that the clock stopped at 10:05 (F).
- Pick up the BROOM on the ground (G).
- Click on the back door and debris will fall to the ground.
- Go into the right door to reach the Bathroom.
- Zoom into the rug and pick up the SCREW below it (H).
- Zoom into the medicine cabinet; open it and pick up the PLIERS (I).
- Zoom into the bathtub; pick up the WEIGHT (J).
- Exit and go through the door in the far left to reach the bedroom.
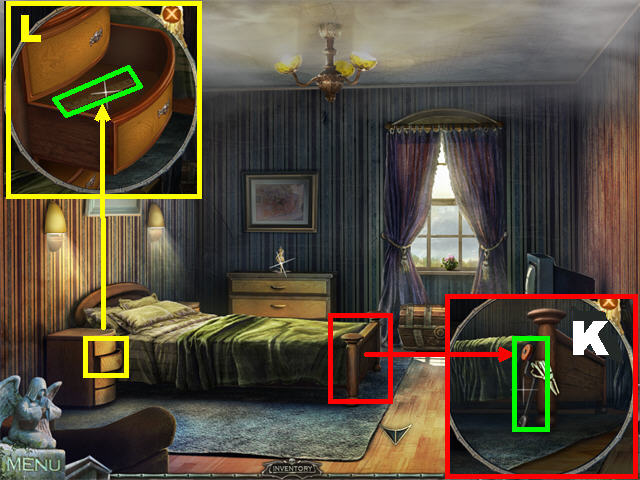
- Zoom into the foot of the bed; lift the covers and pick up the WINCH HANDLE (K).
- Open the drawer next to the bed and pick up the RULER (L).
- Return to the basement.
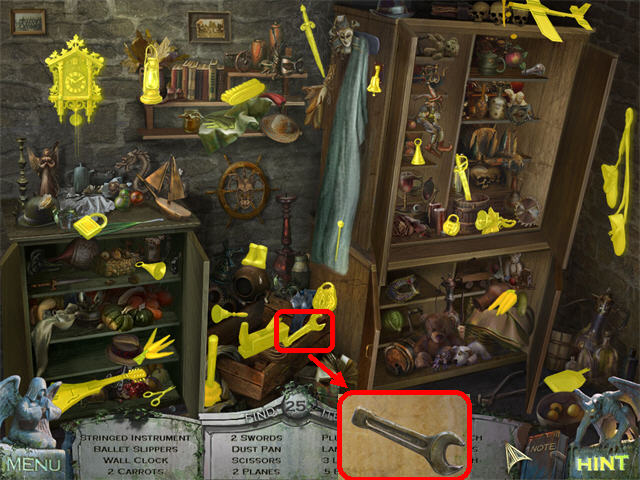
- Play the Hidden Object Scene.
- The WRENCH will be added to inventory.

- Place the BROOM on the window to grab the CROWBAR.
- Return to the kitchen.
- Open the hood with the CROWBAR.
- Zoom into the hood, cut the ribbon with the KNIFE and pick up the LIGHTER’S CORE.
- Play the Hidden Object Scene by the microwave.
- The OILCAN will be added to inventory; exit the scene.
- Go through the right door and then through the hole in the wall.
- Zoom into the back window; place the LIGHTER’S CORE and the LIGHTER’S SHELL on the window sill.
- Drag the LIGHTER’S CORE to the butane can to soak it with fluid.
- Place the FILLED LIGHTER’S CORE onto the LIGHTER’S SHELL to create the LIGHTER.
- Return to the bedroom at the end of the hall.
- Zoom into the ballerina on the dresser; melt the wax on the ballerina with the LIGHTER by passing it over the entire area.
- Pick up BALLERINA 2/2.
- Click down twice, enter the right door and go through the hole in the wall.
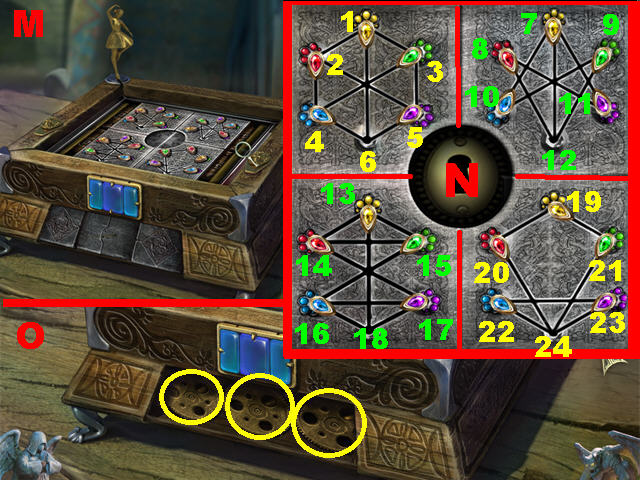
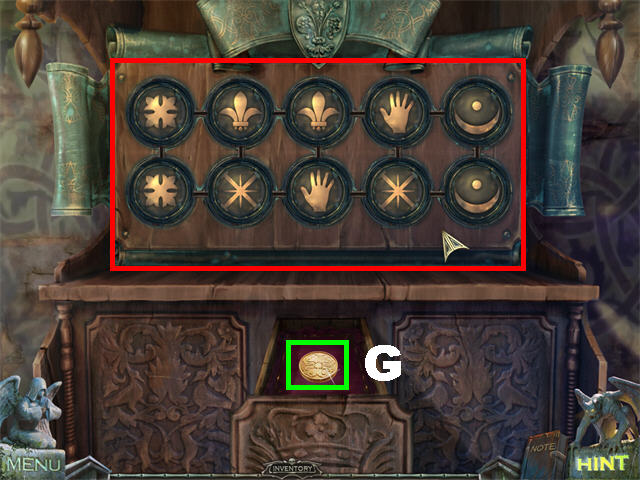
- Zoom into the music box in the lower right; place the 2 BALLERINAS on the box (M).
- Click on the box to trigger a puzzle.
- Slide the jewels to their matching slots to complete the puzzle.
- Click on a jewel and it will move to an empty spot.
- Each quarter you complete will open up part of the lock.
- Please look at the screenshot for the solution (N).
- Place the KEY in the center of the puzzle and click on it.
- Place the LID on the right back on the box.
- Zoom into the GEARS at the bottom of the puzzle; remove the screws in the center of the gears with the SCREWDRIVER and pick up the 3 GEARS (O). Please note that in order to remove the screws you must place your cursor on top of them.
- Return to the end of the hallway.
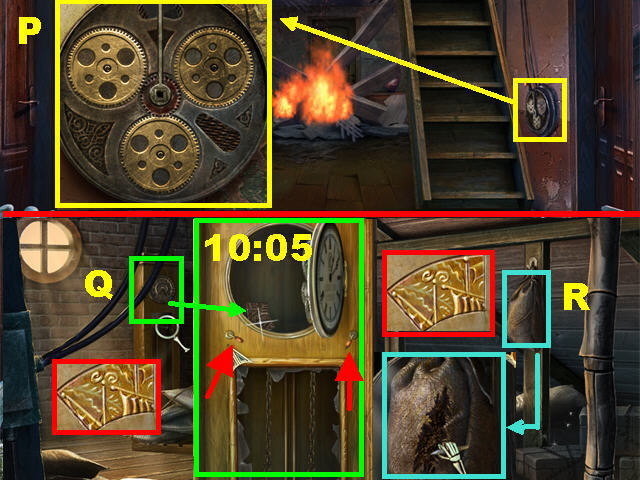
- Zoom into the winch on the right; remove the NUT with the WRENCH.
- Place the 3 GEARS, the WINCH HANDLE, and the OILCAN on the winch (P).
- Click on the WINCH HANDLE to lower the steps to the attic.
- Zoom into the clock; place the WEIGHT on the clock and set it to 10:05 by using the small levers below the clock’s face. The right handle moves the hour hand and the left handle moves the minute hand (Q).
- Pick up the RELIEF PIECE 1/2 inside the clock.
- Zoom into the BAG in the upper right; cut it thrice with the KNIFE and pick up the RELIEF PIECE 2/2 (R).
- Play the Hidden Object Scene.
- The PULLEY will be added to inventory.
- Go into the bedroom across from the end of the hall.
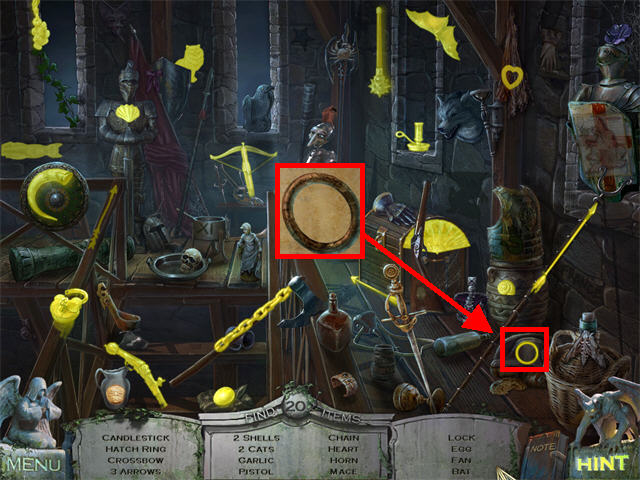
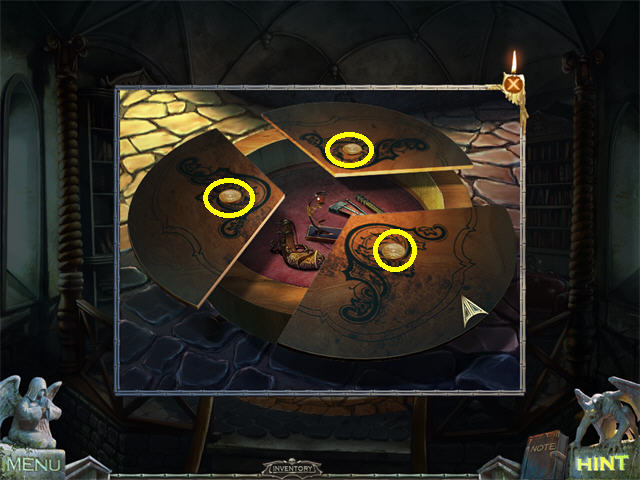
- Zoom into the chest; place the 2 RELIEF PIECES into the relief to trigger a puzzle.
- Click on adjacent pieces to swap their positions.
- Please look at the screenshot for the solution (S).
- Pick up the OFFICE KEY inside the chest (T); exit the scene.
- Zoom into the first door on the left, at the end of the hallway.
- Place the OFFICE KEY into the keyhole; click on the key to unlock the door and enter.
- Play the Hidden Object Scene.
- The INSULATING TAPE will be added to inventory.
- Open the panel on the left; remove the 2 screws at the top and the 2 screws at the bottom of the panel with the SCREWDRIVER. Click on the DOOR PANEL to add it to inventory (U).
- Zoom into the left window and cut the wire with the PLIERS; pick up the WIRE (V).
- Return to the Basement.
- Mend the wires on the left side of the ground with the INSULATING TAPE (W).
- Take a closer look at the fuse box; click on the handle to place it in the UP position and restore the power (X).
- Return to the Kitchen.
- Zoom into the faucet by the window; remove the VALVE with the SCREWDRIVER (Y).
- Go to the bedroom at the end of the hallway.
- Zoom into the window; place the SCREW in the lock and tighten it with the SCREWDRIVER (Z).
- Open the window and go through it.
- Place the DOOR PANEL outside the window (A).
- Click on the raven and pick up the BUREAU KEY it dropped (B).
- Zoom into the left window and use the RULER to pry it open. Go into the window to find the little girl; click on her and debris will fall.
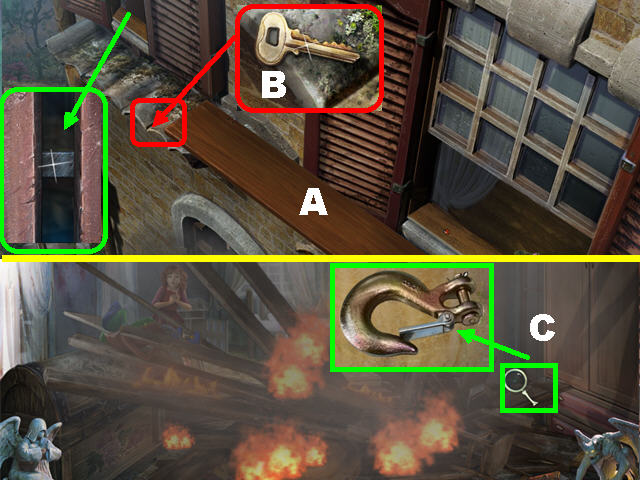
- Zoom into the lower right and pick up the HOOK with the TONGS (C).
- Return to the attic.
- Zoom into the upper left side; place the PULLEY on the post (D).
- Click on the rope to move it to the pulley; attach the HOOK to the end of the rope to trigger a Hidden Object Scene.
- The BELT will be added to inventory once you complete the scene.
- Return to the Office.
- Play the Hidden Object Scene.
- The FUSE will be added to inventory.
- Zoom into the bureau in the back; open the lock with the BUREAU KEY to trigger a puzzle.
- Stack the books onto the left shelf.
- Drag the books to the correct spots; right-click on a book to rotate it.
- Squeeze the books as tightly as you can next to each other.
- Please look at the screenshot for the solution (E).
- The SCHEME OF THE ENGINE MECHANISM will be added to your journal.
- Return to the Attic.
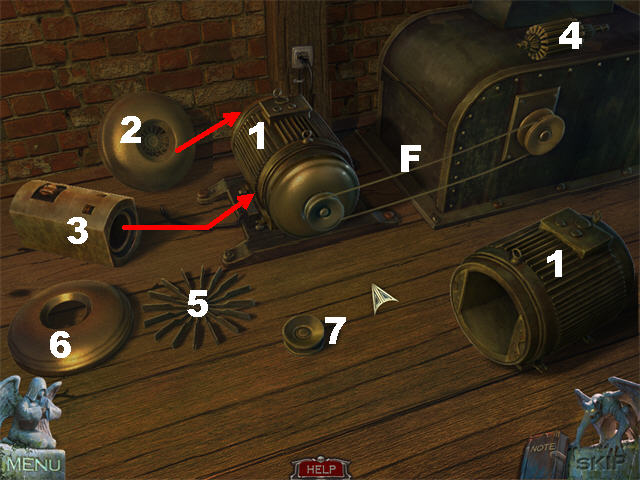
- Zoom into the engine on the left.
- Assemble the engine according to the diagram in your Journal. Please look at the screenshot for the correct assembly order.
- Place part (1) on the stand and the back cover (2) behind it.
- Place the starter (3) and the rotor (4) inside the engine, followed by the cooler (5), the front cover (6), and ending with the cap (7).
- Plug the WIRE in the socket after the engine has been assembled.
- Mend the torn wire with the INSULATING TAPE.
- Place the BELT (F) on the engine and exit out of the pop-up window (F).
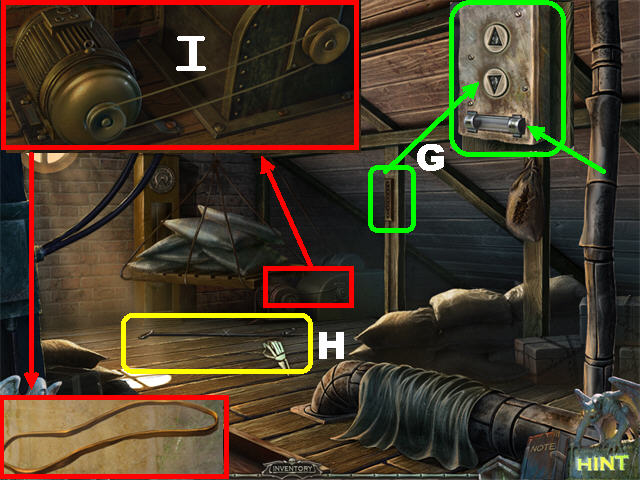
- Zoom into the winch motor in the center; put the FUSE in place and click on the bottom button to activate the lift mechanism (G).
- Pick up the GAFF below the packages (H).
- Zoom into the engine again; pick up the BELT (I).
- Return to the Basement.
- Zoom into the dumbwaiter engine in the lower center; put the BELT in place (J).
- Go to the Kitchen.
- Zoom into the dumbwaiter on the left and press the down button (K).
- Return to the Basement.
- Pick up the EMPTY BUCKET at the other end of the dumbwaiter (L).
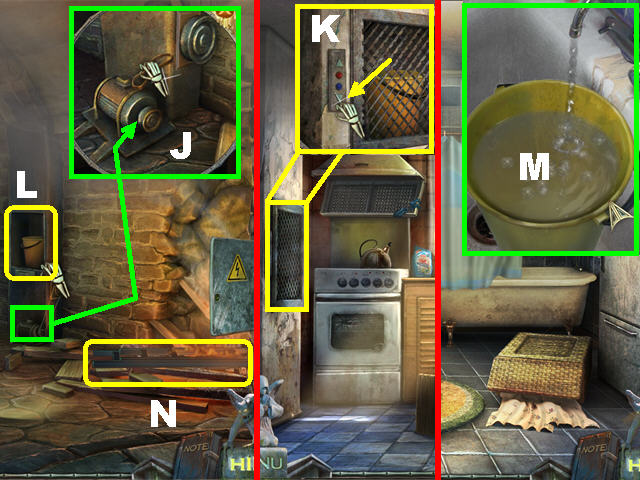
- Enter the Bathroom.
- Zoom into the bathtub; place the VALVE on the faucet and click on it to make the water run.
- Place the EMPTY BUCKET under the water to fill it; pick up the FULL BUCKET (M).
- Go to the Basement.
- Throw the FULL BUCKET on the fire in the lower right; retrieve the LADDER with the GAFF (N).
- Go outside the house; zoom into the window with the little girl and place the LADDER on the window sill to save her.
- You are transported back to the Cemetery.
Novella 2
- Pick up the EMPTY PLATE (A) on the ground.
- Go right.
- Play the Hidden Object Scene.
- The HAMMER AND CHISEL will be added to inventory.
- Click down twice and head left.
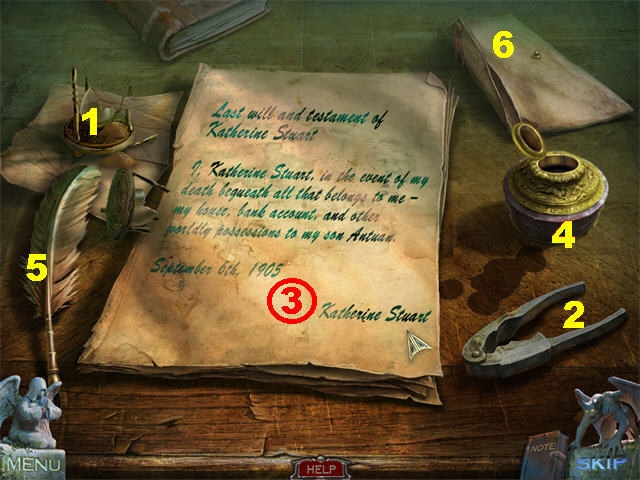
- Zoom into the grave in the back; place the EMPTY PLATE in the recess and carve it with the HAMMER AND CHISEL.
- Go through the portal.
- Click on the small house on the right.
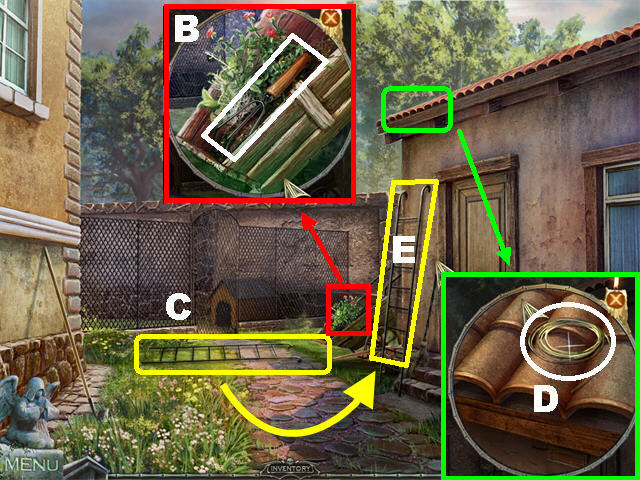
- Zoom into the bushes in the lower right; pick up the HAND RAKE (B).
- Pick up the LADDER on the ground; place it on the side of the house (C & E).
- Zoom into the roof and take the WIRE (D).
- Take the LADDER with you (E).
- Exit this scene.
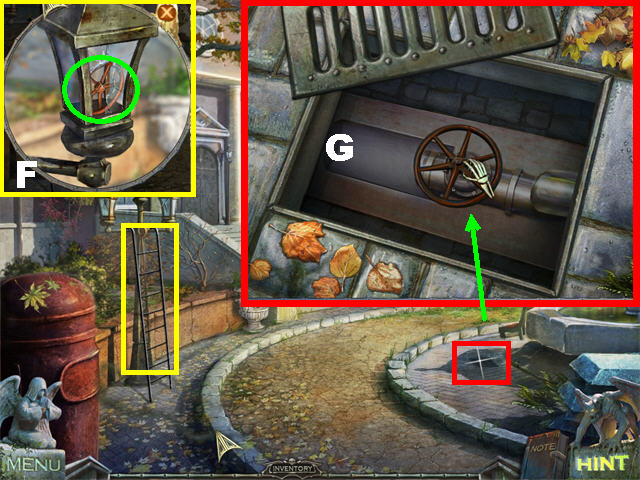
- Place the LADDER on the lamppost on the left; zoom into it and pick up the VALVE (F).
- Zoom into the grate by the fountain; click on the grate to remove it; use the HAND RAKE to remove the leaves.
- Place the VALVE on the pipes; turn the valve to restore the water (G).
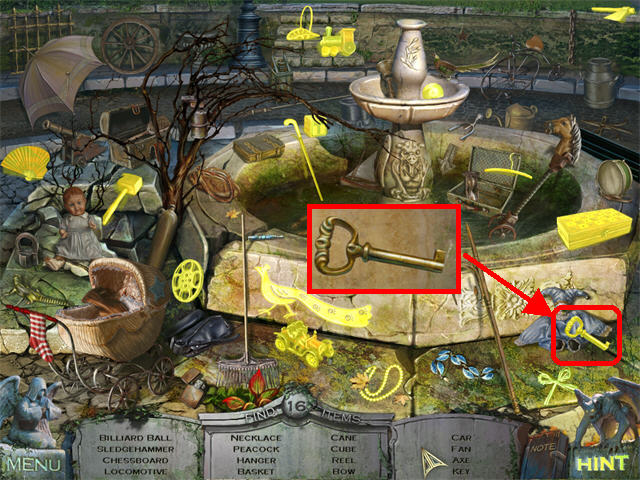
- Click on the Hidden Object Scene by the fountain.
- The HOUSE KEY will be added to inventory.
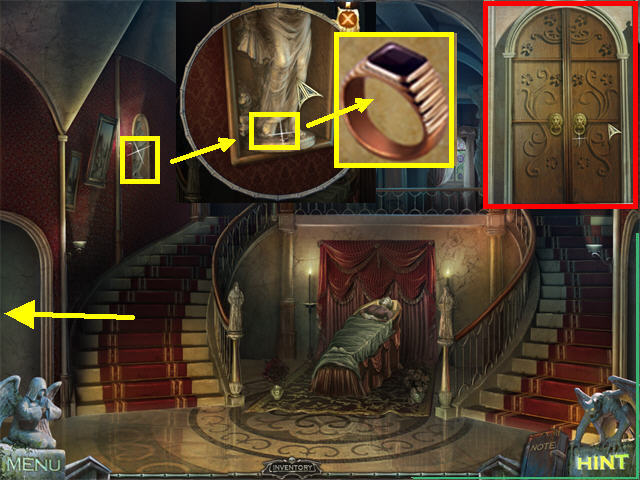
- Go towards the house; zoom into the lock and insert the HOUSE KEY into the lock; click on the key and enter the house.
- Zoom into the left side of the wall; pick up the RING.
- Go left into the Dining Room.
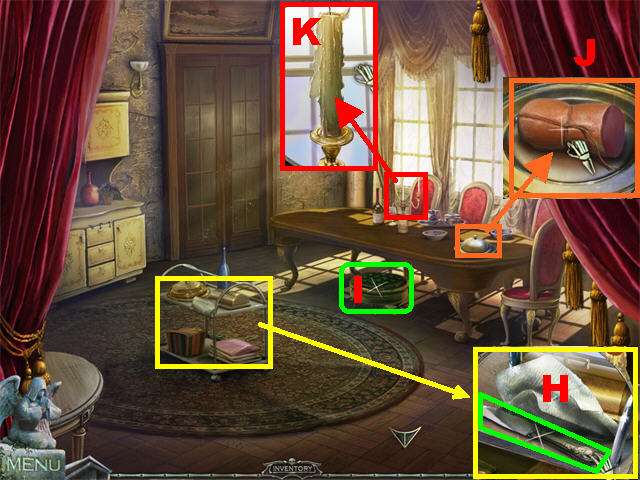
- Zoom into the cart on the left; click on the napkin and pick up the KNIFE underneath (H).
- Pick up the STOOL below the table (I).
- Zoom into the covered plate on the table; pick up the SAUSAGE (J).
- Take a closer look at the candelabra on the table; pick up the CANDLE (K).
- Go through the doors to reach the Kitchen.
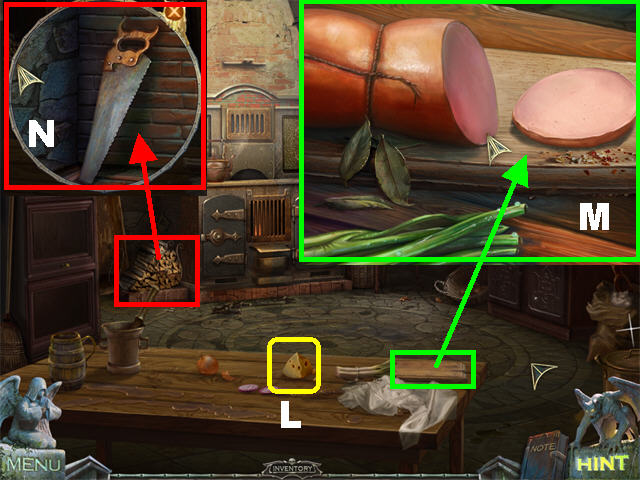
- Pick up the CHEESE on the counter (L).
- Zoom into the cutting board on the table; place the SAUSAGE on the board and cut it with the KNIFE.
- Pick up the SAUSAGE SLICE (M).
- Zoom into the wooden logs next to the fire; pick up the SAW (N).
- Play the Hidden Object Scene.
- Open the drawers and the cabinets to find items from your list.
- The CORKSCREW will be added to inventory.
- Click down twice and go through the entryway above the steps.
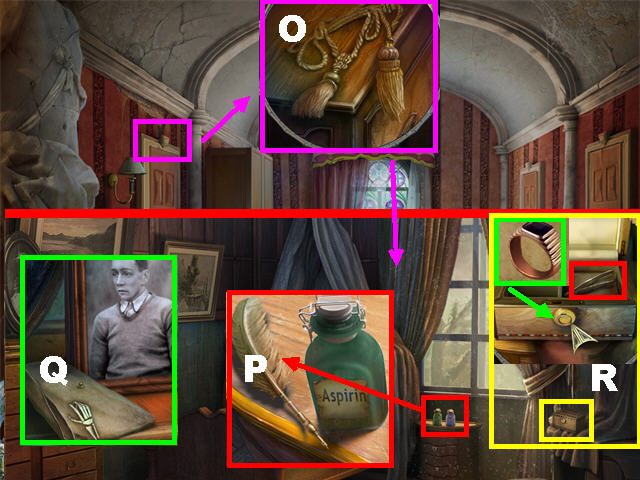
- Place the STOOL on the side of the wardrobe. Zoom into the top of the cabinet; pick up the TASSEL (O).
- Go into the right room.
- Place the TASSEL on the curtains to brighten up the room.
- Zoom into the dresser by the window; pick up the FEATHER (P).
- Zoom into the top of the tall bureau; pick up the ENVELOPE and then click on the photo (Q).
- Take a closer look at the case in the lower right; open it with the RING and pick up the TWEEZERS (R).
- Go outside the house.
- Zoom into the right window; cut the cracked shovel with the SAW.
- Place the CANDLE on the handle and tie it with the WIRE; pick up the CANDLE ON STICK.
- Play the Hidden Object Scene by the fountain.
- The PLIERS will be added to inventory.
- Return to the Dining Room.
- Zoom into the drawers in the lower left; remove the 3 nails with the PLIERS. Open the drawer; pick up the GAS SWITCH and the POTHOLDER (S).
- Go into the kitchen.
- Open the left oven door with the POTHOLDER and place the CANDLE ON A STICK into the fire to create the LIT CANDLE ON A STICK (T).
- Go into the library by turning in the upper left side of the staircase.
- Zoom into the gas panel on the left; place the GAS SWITCH on the panel and turn it (U).
- Place the LIT CANDLE ON A STICK on the chandelier to light up the room.
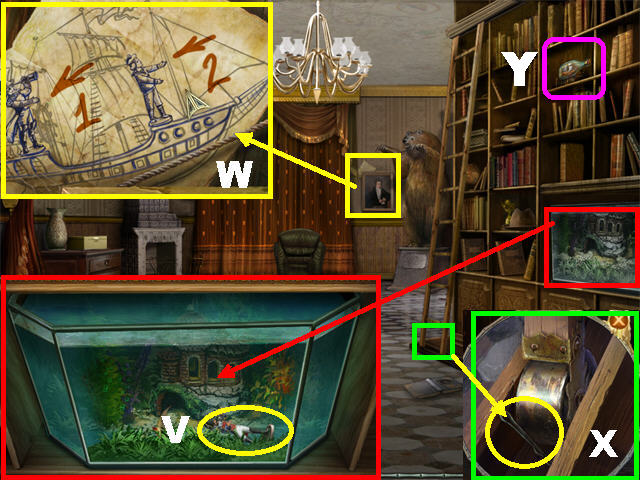
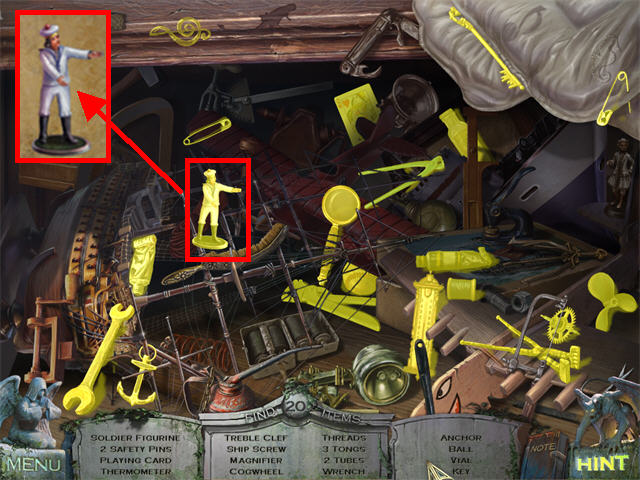
- Zoom into the fish tank in the bookcase. Place the SAUSAGE SLICE into the tank and grab the SAILOR FIGURINE while the piranha is eating the sausage (V).
- Zoom into the painting on the back wall; the picture of the ships with the notes will be added to the journal (W).
- Zoom into the bottom of the ladder; pick up the HAIRPIN with the TWEEZERS (X).
- Click on the ladder to move it out of the way; zoom into the ship in a bottle on the top shelf (Y).
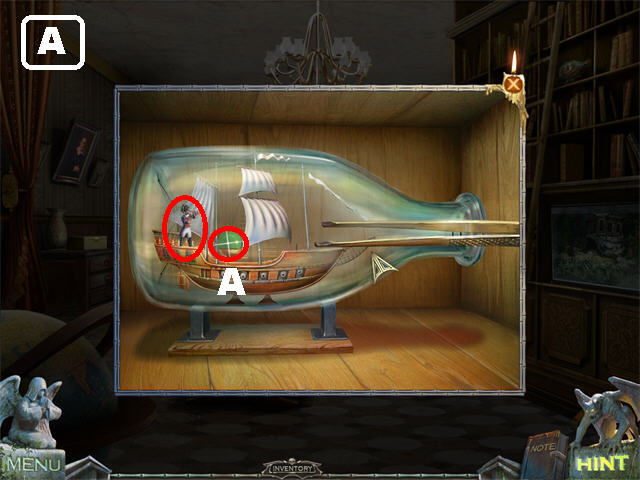
- Remove the cork from the ship in the bottle with the CORKSCREW.
- Place the SAILOR FIGURE inside the ship by clicking it directly onto the center of the bottle.
- Place the TWEEZERS into the bottle, pick up the SAILOR FIGURINE and drag it to the spot shown in the screenshot.
- Pick up the green BALL inside the bottle (A).
- Return to the upstairs hallway.
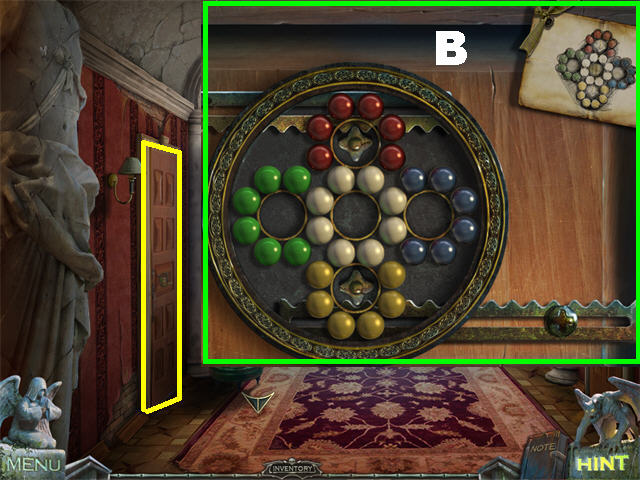
- Zoom into the left door; place the green BALL into the puzzle.
- Look at the diagram in the upper right side; move the balls around to reflect the image in the upper right corner.
- Click on the center of the puzzle to move the balls around. You can switch the balls from one circle to another by placing them in the areas that connect with the middle circle.
- Please look at the screenshot for the solution (B).
- Go through the door after the puzzle has been solved.
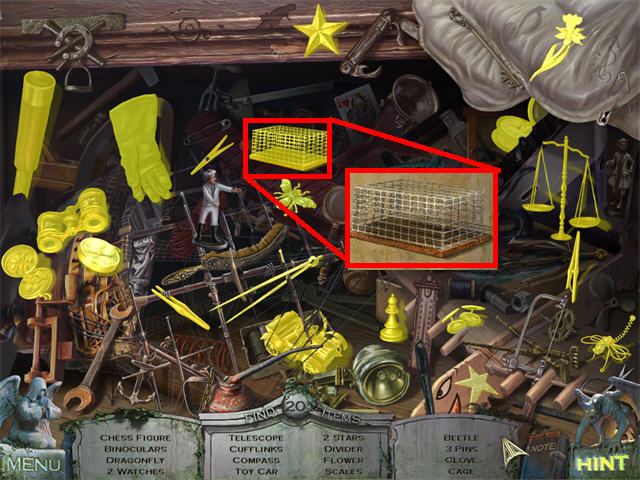
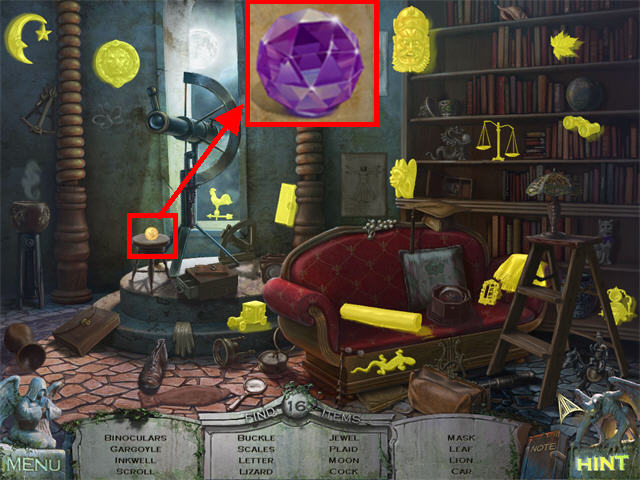
- Play the Hidden Object Scene.
- The CAGE will be added to inventory.
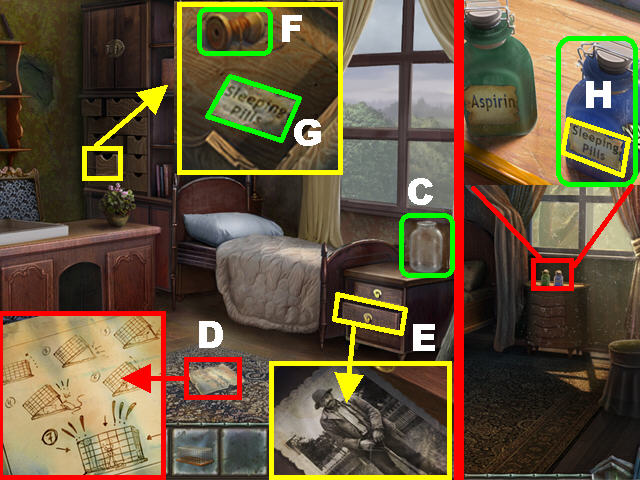
- Pick up the EMPTY JAR on the right (C).
- Take a closer look at the mousetrap sketch on the floor and it will be added to your journal (D).
- Zoom into the drawer on the right, click on the photo inside (E) and a ghost will appear.
- Zoom into the drawer in the bookcase; pick up the SPOOL OF THREAD (F) and the LABEL (G).
- Exit this scene and go into the right door.
- Zoom into the bottles by the window; place the LABEL on the blue bottle and take the SLEEPING PILLS (H).
- Go into the kitchen.
- Play the Hidden Object Scene.
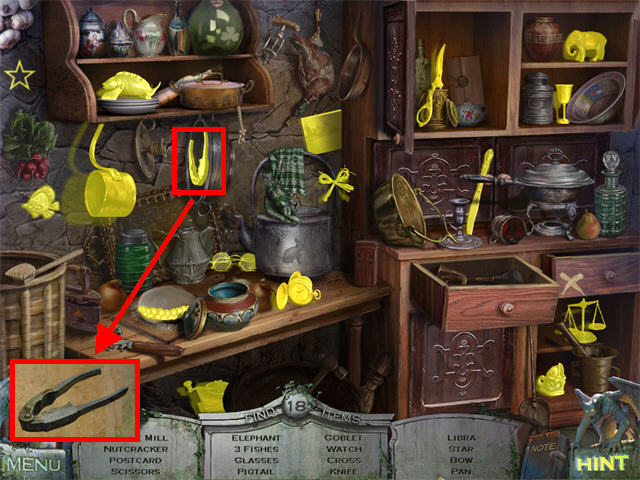
- The NUTCRACKER will be added to inventory.
- Zoom into the cutting board on the table; cut a SAUSAGE SLICE with the KNIFE. Place the SLEEPING PILLS on the SAUSAGE SLICE to obtain the SLEEPY SAUSAGE (I).
- Zoom into the mouse hole in the lower right; place the CAGE on the ground (J).
- Prop open the cage with the HAIRPIN (K) and tie it to the cage with the SPOOL OF THREAD (L).
- Place the CHEESE (M) into the cage; wait for the mouse to go into the cage and then pull on the THREAD to spring the trap.
- Pick up the TRAPPED MOUSE (N).
- Go into the bedroom on the left side of the upstairs hallway.
- Zoom into the tray on the table.
- Place the TRAPPED MOUSE on the glass jar in the lower left to activate the puzzle.
- Click on the pipes to rotate them.
- All pipes must be used in the solution.
- Once the puzzle has been assembled, remove the jar’s lid to release the mouse.
- Please look at the screenshot for the solution (0).
- Pick up the GARDENER’S HOUSE KEY on the tray after the puzzle has been solved (P).
- Play the Hidden Object Scene by the bed.
- The SOLDIER FIGURINE will be added to inventory.
- Return to the Library.
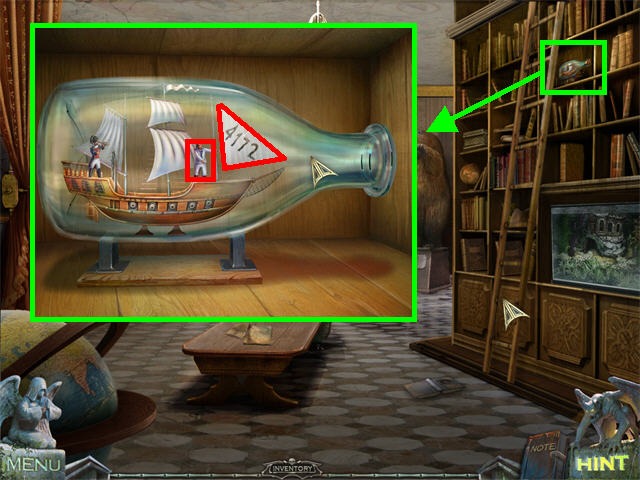
- Zoom into the ship in the bottle in the bookcase; place the SOLDIER FIGURINE inside the bottle.
- Move the SOLDIER FIGURINE into the bottle with the tweezers, as shown in the screenshot.
- The numbers 4172 appear inside the bottle and will be added to your Journal.
- Go outside and make a right.
- Zoom into the door. Place the GARDENER’S HOUSE KEY in the lock; turn the key and go into the house.
- Zoom into the chest in the lower right; pick up the NAME TAGS (Q).
- Pick up the RAKE on the left (R).
- Play the Hidden Object Scene.
- The SPONGE will be added to inventory.
- Go into the foyer.
- Zoom into the dead lady in the coffin; place the SPONGE on her hand to discover a snake bite.
- Return to the Gardener’s House.
- Play the Hidden Object Scene.
- The BOLT CUTTER will be added to inventory.
- Go outside.
- Zoom into the back fence; cut the wire with the BOLT CUTTER and go into the backyard (S).
- Give the dog the SLEEPY SAUSAGE (T).
- Zoom into the dog and pick up the HUSBAND’S ROOM KEY (U) on its collar.
- Remove the leaves with the RAKE; zoom into the ground and pick up the BOOK ON SNAKES (V) and the DREAMCATCHER (W).
- Go inside the Gardener’s House.
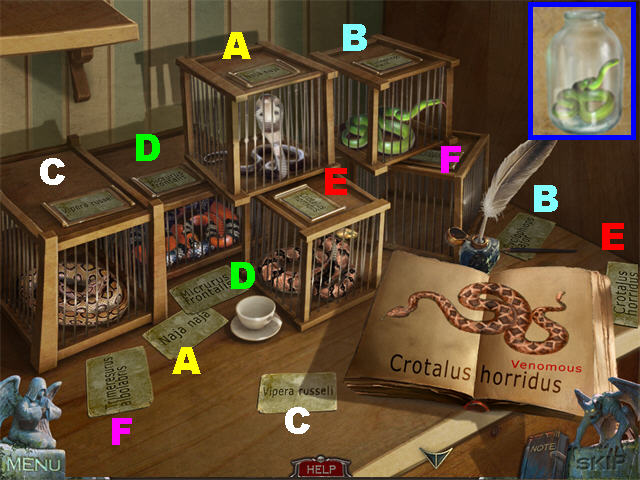
- Zoom into the snake cages; place the BOOK ON SNAKES on the table and the NAME TAGS on the cages.
- Flip through the book and place the name tags on top of the correct cages according to the images in the book.
- Please look at the screenshot for the solution and place the tags as follows:
- A: Naja naja.
- B: Cyclophios major – non-venomous.
- C: Vipera ruselli.
- D: Micrurus Frontalis.
- E: Crotalus horridus.
- F: Trimeresurus albolabris.
- Pick up the green non-venomous snake (B) with the EMPTY JAR to obtain the TRAPPED SNAKE.
- Return to the upstairs hallway.
- Zoom into the far right door; open the lock with the HUSBAND’S ROOM KEY; turn the key and go into the room.
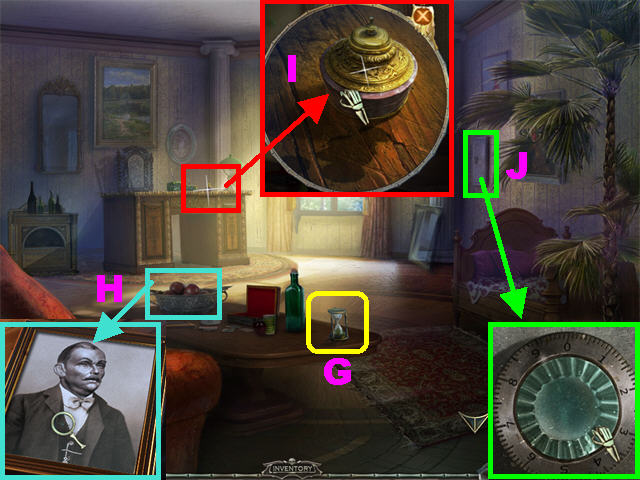
- Pick up the HOURGLASS (G) on the table.
- Zoom into the left side of the table (H) and click on the photo.
- Zoom into the desk by the window and pick up the INKWELL (I).
- Take a closer look at the safe (J) on the right.
- Turn the dial to 4172 in the following manner by going counterclockwise to 4, clockwise to 1, counterclockwise to 7, and clockwise to 2.
- Turn the dial counterclockwise, stop at 4, listen for the clicking sound and release the mouse.
- Turn the dial clockwise, stop at 1, listen for the clicking sound and release the mouse.
- Turn the dial counterclockwise, stop at 7, listen for the clicking sound and release the mouse.
- Turn the dial clockwise, stop at 2, listen for the clicking sound and release the mouse.
- Check out our video solution!
- Click inside the safe twice after it has been solved to trigger a new puzzle.
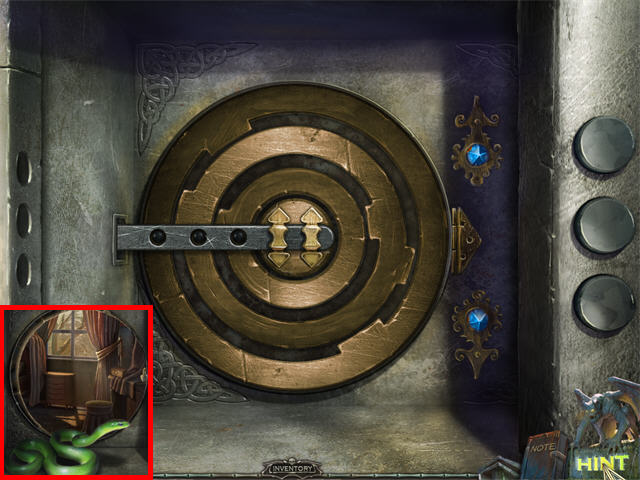
- Rotate the rings by using the up and down arrows until all 3 balls fall into the holes.
- Please look at the screenshot for the solution.
- Place the TRAPPED SNAKE in the hole and click on the safe to close it.
- Return to the hallway and enter the right door.
- Zoom into the lower hanging painting on the left side of the wall, click on the panel to remove it. Place the DREAMCATCHER (K) on the nail.
- Click on the cabinet (L) and the snake will crawl into the bed.
- Zoom into the pillow; click on it and pick up the KEY (M).
- Zoom into the cabinet in the lower right.
- Turn the KEY in the keyhole and open the cabinet; pick up the SHEET OF PAPER (N).
- Go to the Library.
- Zoom into the table; place the SHEET OF PAPER, INKWELL, NUTCRACKER, HOURGLASS, ENVELOPE, and the FEATHER on the table.
- Crack open the HOURGLASS (1) with the NUTCRACKER (2).
- Drag the HOURGLASS onto the center of the paper (3).
- Place the FEATHER on the paper (the writing will be faint).
- Open the INKWELL by clicking on it (4) and dip the FEATHER (5) inside. Place the INKED FEATHER on the paper.
- Drag the ENVELOPE (6) onto the letter to obtain the SEALED ENVELOPE.
- Go outside and place the SEALED ENVELOPE into the red mailbox in the lower left.
Novella 3
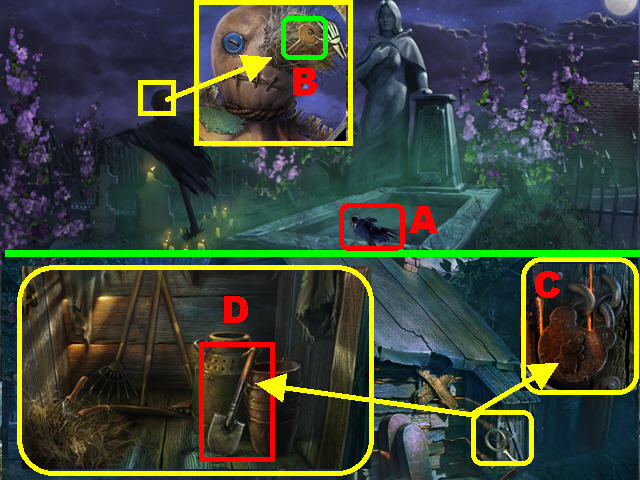
- Click on the raven (A) near the grave.
- Zoom into the scarecrow and pick up the SHED KEY (B).
- Click down and go right twice.
- Zoom into the right side of the shed; open the lock with the SHED KEY (C).
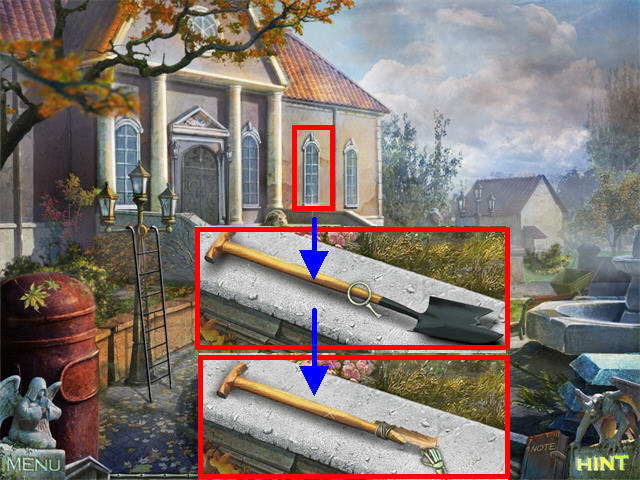
- Take a closer look at the door and pick up the SHOVEL (D).
- Click down twice; go left twice.
- Zoom into the base of the tree; use the SHOVEL on the ground to pick up the PLATE.
- Zoom into the grave; place the PLATE in the recess.
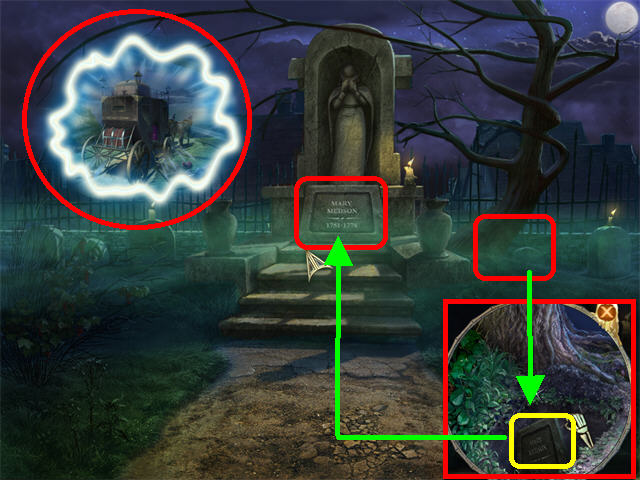
- Go through the portal.
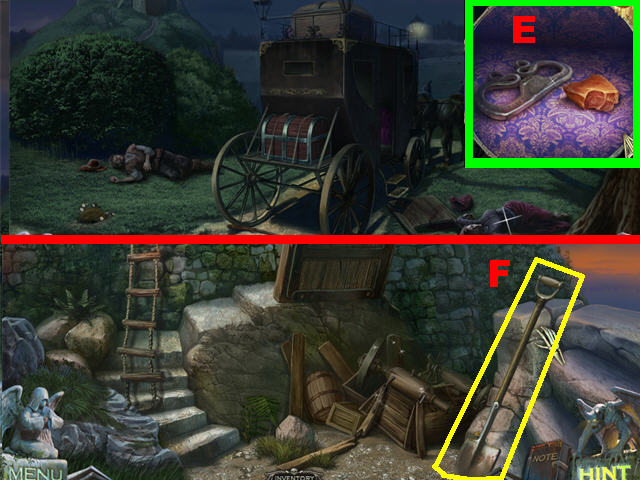
- Take a closer look at the coach’s door; pick up the FLINT (E).
- Go towards the Castle.
- Pick up the SHOVEL (F) on the right.
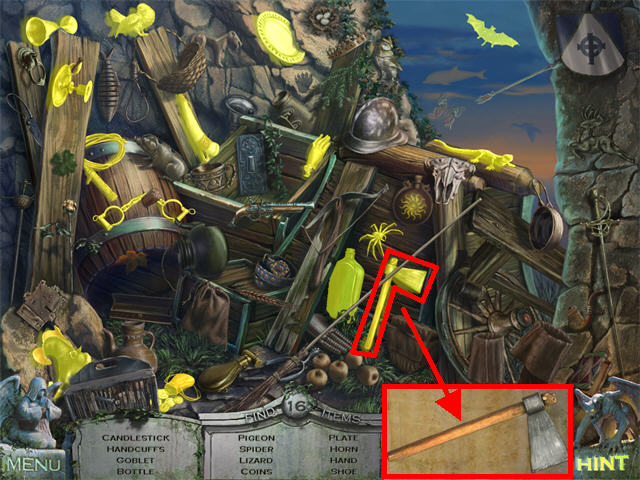
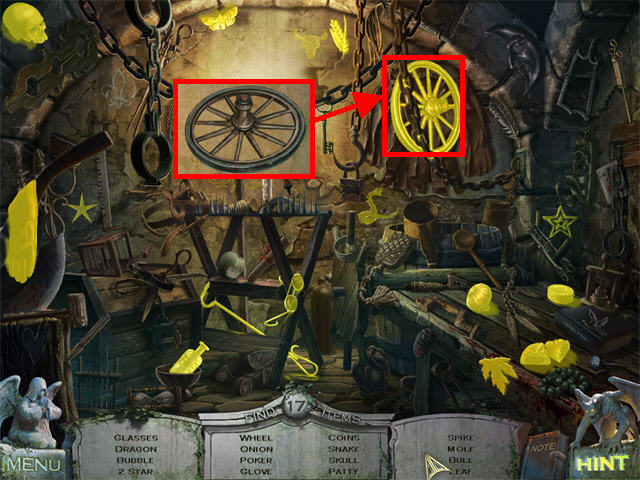
- Play the Hidden Object Scene.
- The AXE will be added to inventory.
- Exit the scene.
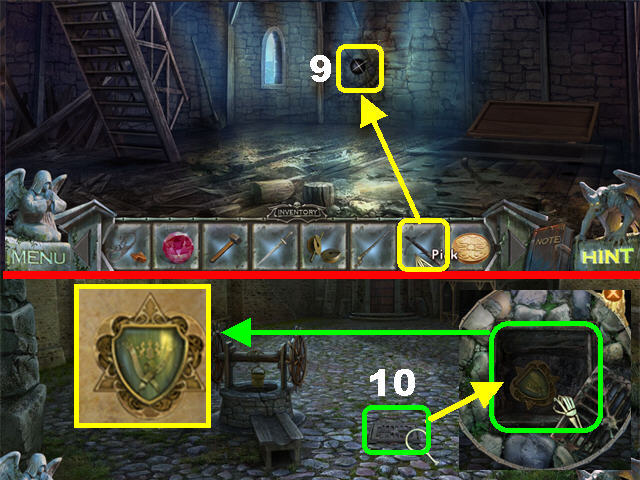
- Zoom into the left side of the ground; dig up the DISK 1/2 (G) with the SHOVEL.
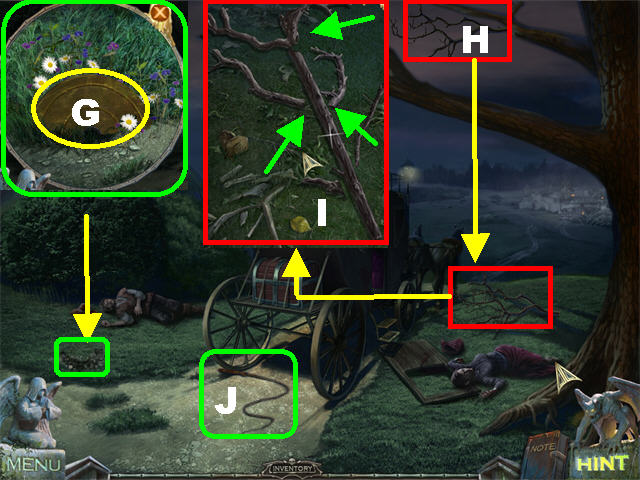
- Cut the BRANCH in the upper right with the AXE and it will fall to the ground (H).
- Take a closer look at the fallen branch; cut the 3 sides with the AXE, marked with green arrows on the screenshot, and pick up the STICK (I).
- Place the STICK below the wheel and pick up the WHIP (J).
- Go towards the Castle.
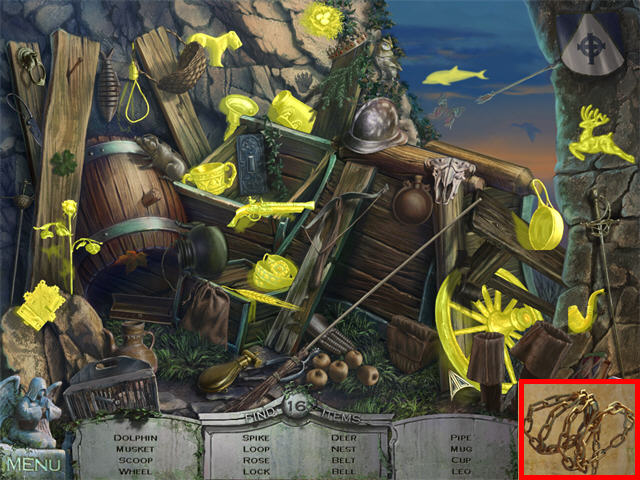
- Play the Hidden Object Scene.
- The CHAIN will be added to inventory.
- Click on the rope ladder (K) and a hand will pull it up.
- Place the WHIP on the rope ladder to bring it back down; go into the window.
- Pick up the POLEAXE (L) on the right.
- Knock down the BUCKET (M) with the POLEAXE and pick up the BUCKET on the ground.
- Zoom into the barrel; place the BUCKET into the barrel to drain the water and take the DISK 2/2 (N).
- Zoom into the columns in the back; place the 2 DISKS on the left column to trigger a puzzle.
- Move the disks onto the right column in the same order.
- Click on a disk to raise it and then click on the column to which you want it moved.
- A larger disk cannot go on top of a smaller disk.
- Please look at the screenshot for the final solution.
- Click on the LEVER (O) on the lower right to open the bridge.
- Click down and go to the Courtyard.
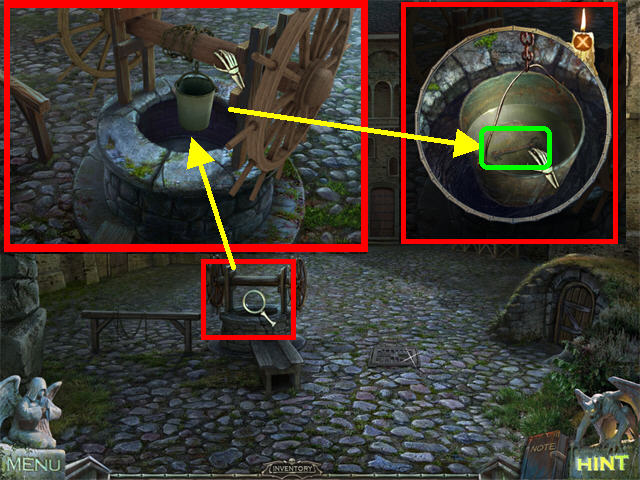
- Zoom into the well; place the CHAIN and the BUCKET on the pole; click twice on the POLE to lower and lift the bucket.
- Zoom into the bucket and pick up the PRISON CELL KEY.
- Go into the small door in the lower right.
- Play the Hidden Object Scene.
- The CANNON WHEEL will be added to inventory.

- Zoom into the sarcophagus on the right; pick up JEWEL 1/2 (P).
- Zoom into the cell door; open it with the PRISON CELL KEY (Q).
- Pick up the GUNPOWDER inside the cell (R).
- Exit the scene and head towards the blacksmith in the far right.
- Zoom into the swords on the left and pick up the SWORD (S).
- Pick up the HAMMER on the right (T).
- Return to the Prison.
- Zoom into the pillow inside the cell; cut the pillow with the SWORD and pick up the HACKSAW (U).
- Play the Hidden Object Scene.
- The PLIERS will be added to inventory.
- Exit and zoom into the left door; break it down three times with the AXE and saw the bolt with the HACKSAW. Go through the door (V).
- Pick up the CANNOBALL (W) on the scale, closing the gate.
- Return to the bridge and climb the window with the rope ladder.
- Zoom into the left window; retrieve the NAIL (X) with the PLIERS.
- Return to the Courtyard.

- Click in the section shown in the screenshot (1).
- Place the CANNON WHEEL on the cannon (2).
- Click on the cannon to move it; click on it again to take a closer look.
- Place the GUNPOWDER and CANNONBALL in the cannon to charge it (3).
- Place the FLINT on the fuse to fire the cannon (4).
- Go into the door.
- Play the Hidden Object Scene.
- The HATCH RING will be added to inventory.
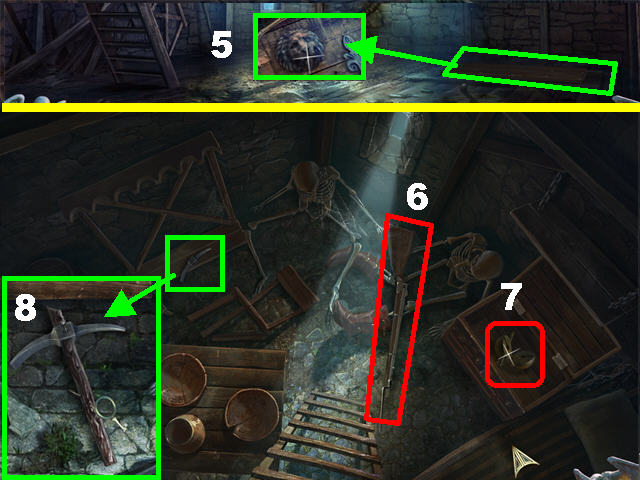
- Zoom into the hatch in the lower right and place the HATCH RING on the lion emblem; go inside the hatch (5).
- Pick up the BAYONET (6) on the ground.
- Open the chest in the lower right and pick up the MOLD (7).
- Zoom into the left side of the ground; fix the broken pick with the STICK and the NAIL. Use the HAMMER on the nail and grab the PICK (8).
- Exit this scene.
- Play the Hidden Object Scene.
- GOLDEN COIN 1/3 will be added to inventory.
- Retrieve the CANNONBALL (9) on the back wall with the PICK.
- Return to the courtyard.
- Zoom into the drain in the ground, lift it with the PICK and grab the COAT OF ARMS (10).
- Zoom into the back door.
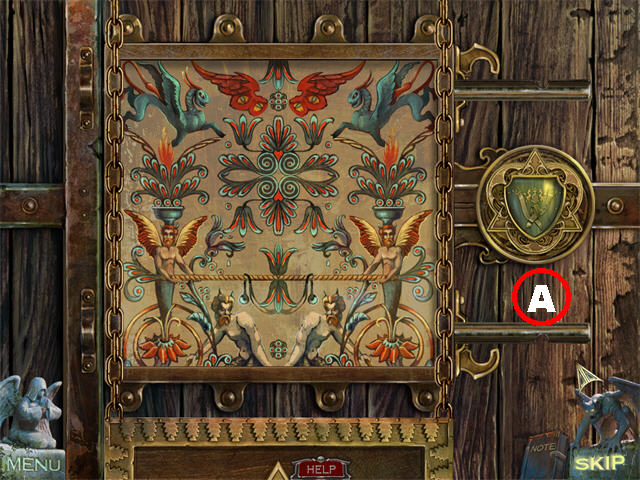
- Place the COAT OF ARMS on the right side of the panel to trigger a puzzle (A).
- Slide the images around until they form the image shown on the screenshot.
- Go through the door after the puzzle has been solved.
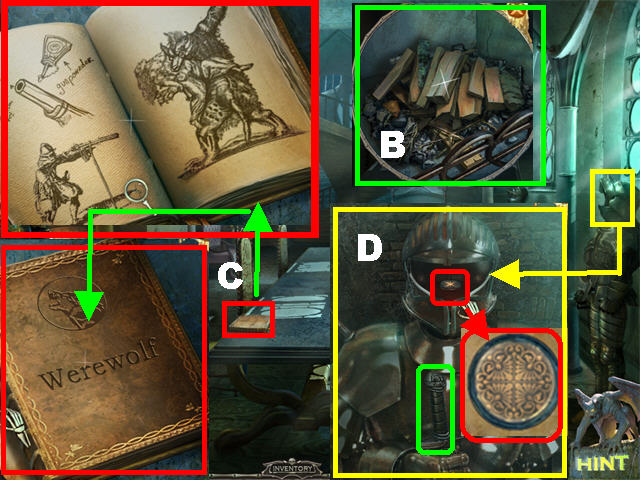
- Click on the BOOK on the table twice to enter it into inventory (B).
- Zoom into the fireplace and pick up the WOOD (C).
- Take a closer look at the suit of armor on the far right and give it the SWORD; pick up the PUZZLE PIECE 1/2 inside the helmet (D).
- Go up the steps.

- Play the Hidden Object Scene.
- GOLDEN COIN 2/3 will be added to inventory.
- Zoom into the left bookcase and place the BOOK in the empty slot; pick up the PUZZLE PIECE 2/2 (E) inside the book.
- Click down.
- Zoom into the furniture piece on the left; place the 2 PUZZLE PIECES in the empty slots to trigger a puzzle (F).
- Make matching pairs of identical items.
- Click on any two circles to see what is behind them. Make an incorrect choice and the circles will mix up.
- GOLDEN COIN 3/3 (G) will be added to inventory.
- Go up the steps.
- Zoom into the coffee table and place the 3 GOLDEN COINS in the empty slots to trigger a Hidden Object Scene in the room.
- Click on the chair on the right to begin playing the Hidden Object Scene.
- JEWEL 2/2 will be added to inventory.
- Zoom into the eagle in the back; add the 2 JEWELS into the eye sockets.
- Click in the eagle’s mouth to view the scroll (H).
- Return to the Coach.
- Zoom into the chest in the back of the coach; place the BAYONET into the lock and hit it with the HAMMER three times.
- Pick up the NEEDLE AND THREAD (I) and the PURSE FULL OF SILVER COINS (J) inside the chest.
- Return to the blacksmith.
- Place the WOOD and the FLINT in the oven (K).
- Zoom into the bellows; mend the hole with the NEEDLE AND THREAD (L).
- Click on the bellows to flame the fire in the oven.
- Zoom into the right side of the oven; place the PURSE FULL OF SILVER COINS in the cup (M).
- Place the MOLD on the stand, on the right (N).
- Click on the cup’s handle (O) to lower it into the flame; click on the mold (N) to open it and take the SILVER BULLET.
- Return to the Library.
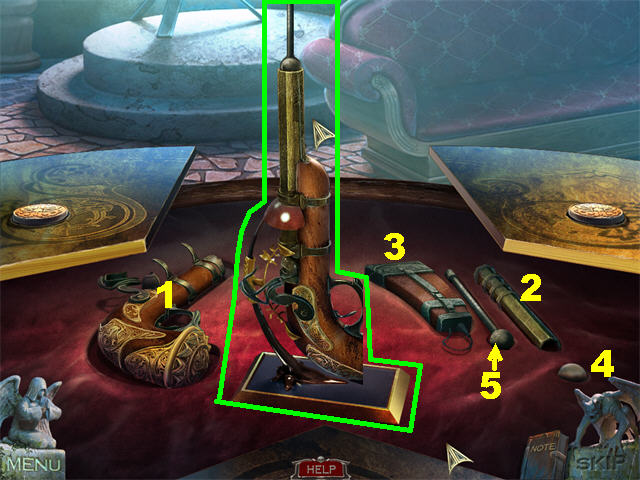
- Zoom into the coffee table and place the SILVER BULLET in the hole on the right (4).
- Place the GUN (1) on the stand.
- The GOLD CYLINDER (2) belongs on top of the gun.
- Place the GUNPOWDER (3) and the SILVER BULLET (4) into the gold cylinder.
- Place the silver cylinder last (5).
- The PISTOL will be added to inventory.
- Return to the werewolf.
- Fire the PISTOL at the werewolf.
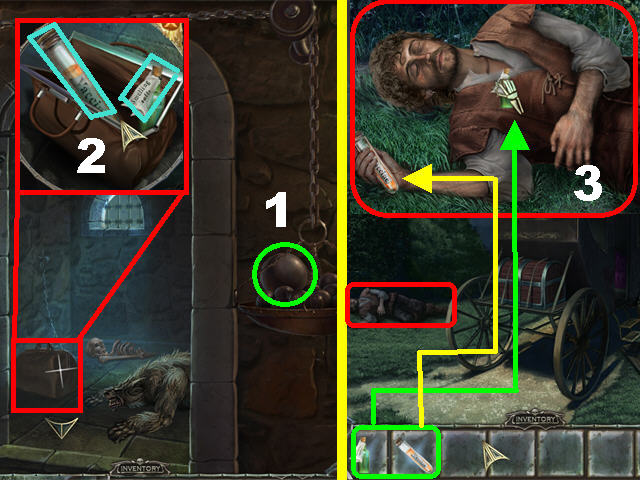
- Place the CANNONBALL (1) on the scale to lift up the gate; open the medicine bag and pick up the VACCINE and the SMELLING SALTS (2).
- Return to the Coach.
- Zoom into the man on the ground; give him the VACCINE first and then the SMELLING SALTS (3).
- You will return to Mary’s grave.
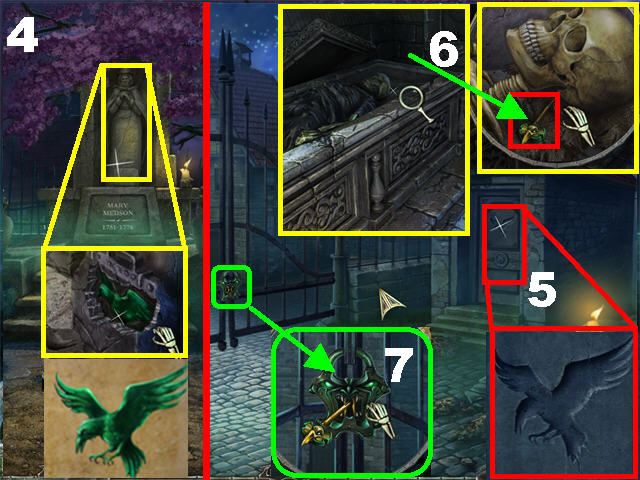
- Zoom into the grave; click on the stone bag thrice and pick up the RAVEN PLATE (4).
- Click down twice and approach the gate.
- Zoom into the mausoleum on the right and put the RAVEN PLATE into the recess (5).
- Click inside the mausoleum.
- Open the coffin; zoom into the skull and take the GATE KEY (6).
- Zoom into the gate; place the GATE KEY in the lock and turn the key (7).
- Congratulations! You’ve Completed Redemption Cemetery: Curse of the Raven!
Created at: 2010-08-21