

Walkthrough Menu
- General Tips
- Chapter 1: The Esoteric Shop
- Chapter 2: The Vegetable Garden
- Chapter 3: The Room
- Chapter 4: The Gates
- Chapter 5: The Kennels
General Tips
- This is the official guide for Reflections of Life: Call of the Ancestors.
- This guide will not mention each time you have to zoom into a location; the screenshots will show each zoom scene.
- Hidden-object puzzles are referred to as HOPs. This guide will not show HOP solutions. It will identify the location of the HOP and the inventory item acquired.
- This guide will show solutions for non-random puzzles. Please read the in-game instructions for each puzzle.
- In this game, you will sometimes have to select the new scene to trigger dialog, cut-scenes, or tasks prior to interacting with the scene.
Chapter 1: The Esoteric Shop
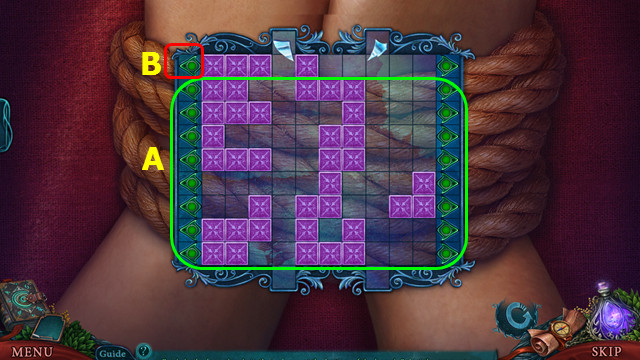
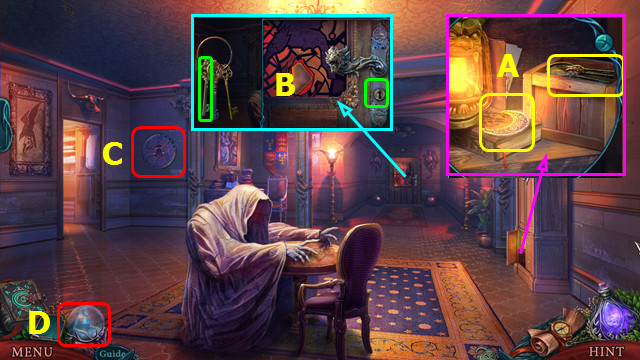
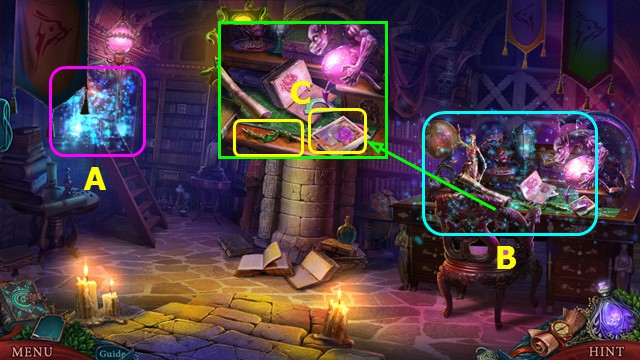
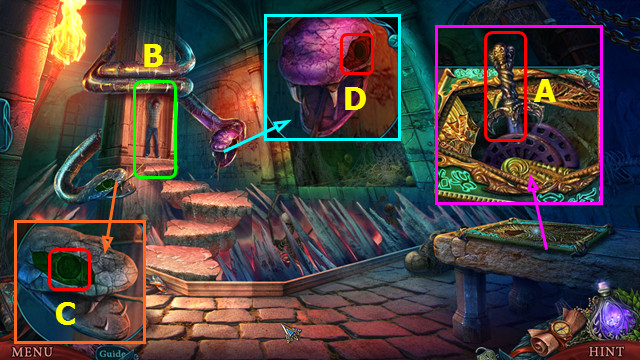
- Except for the top row, arrange the rows as shown (A).
- Select (B).
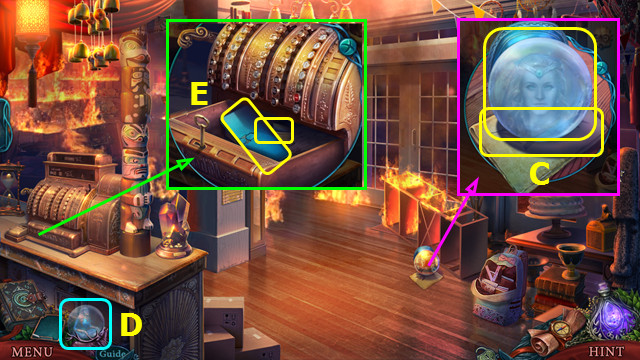
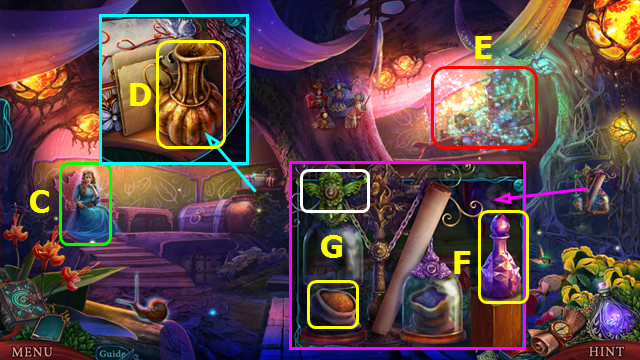
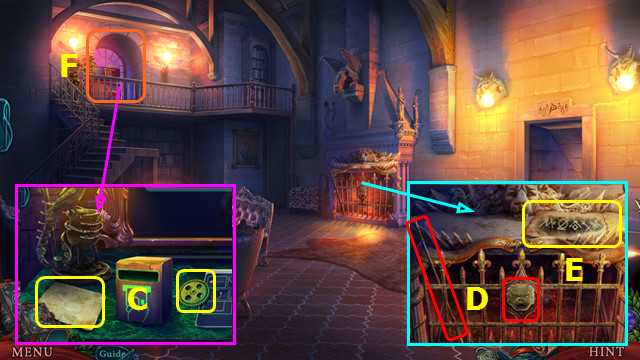
- Talk to Loreley; take the crystal ball, read the note, and take the REGISTER KEY (C).
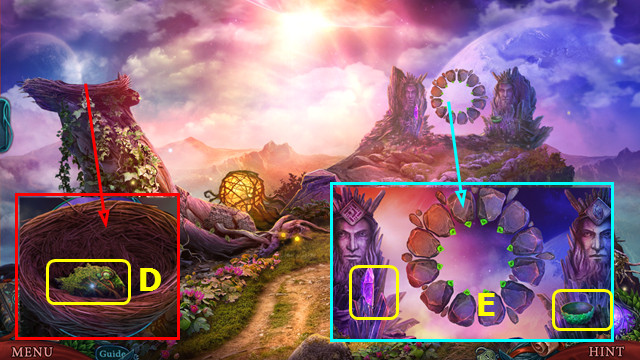
- Loreley is now on the menu bar in the CRYSTAL BALL (D).
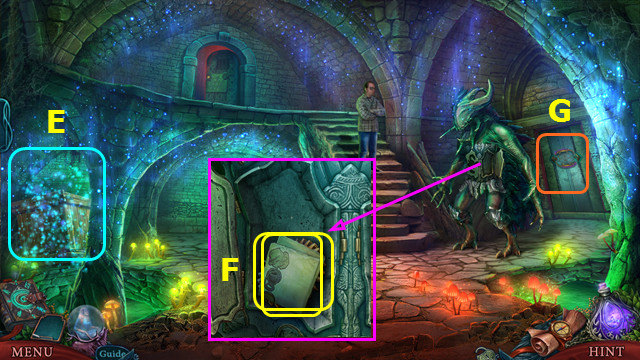
- Use the REGISTER KEY; take the WALLET and GANESHA GEM (E).
- Open the WALLET; take the DRIVER'S LICENSE and SCOOTER KEY (inventory).
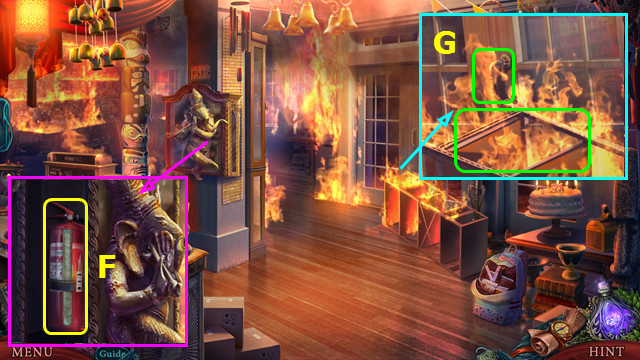
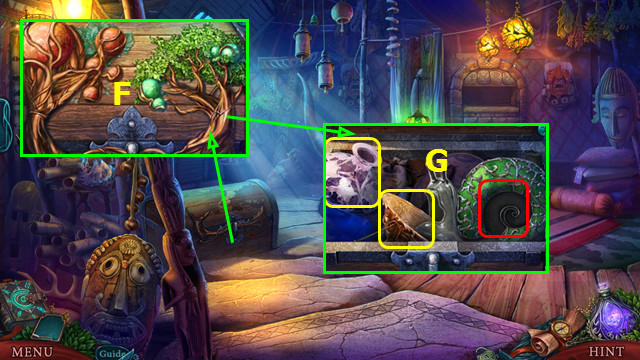
- Place the GANESHA GEM; take the EXTINGUISHER (F).
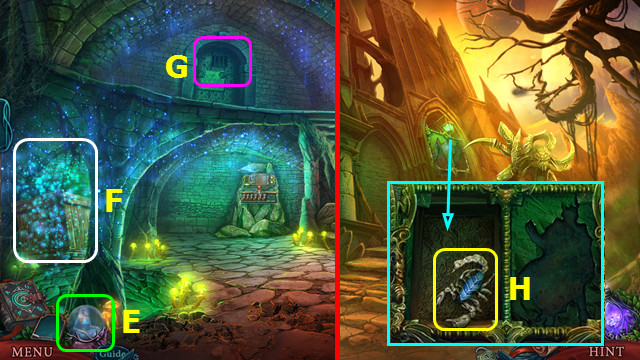
- Use the EXTINGUISHER; move the shelf and open the door (G).
- After Loreley removes the barrier, walk forward.
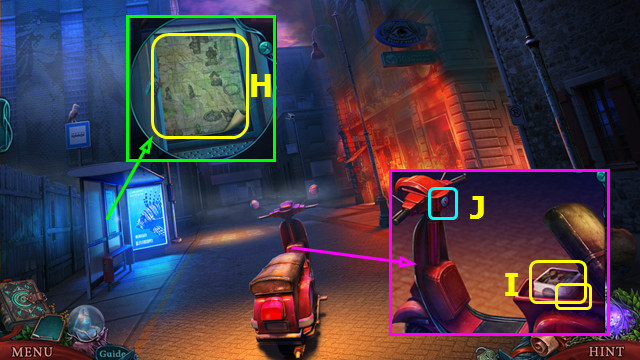
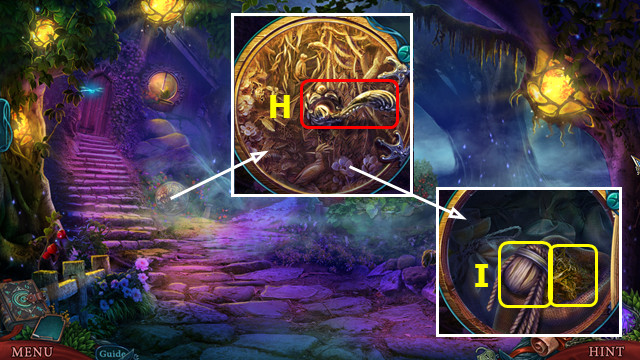
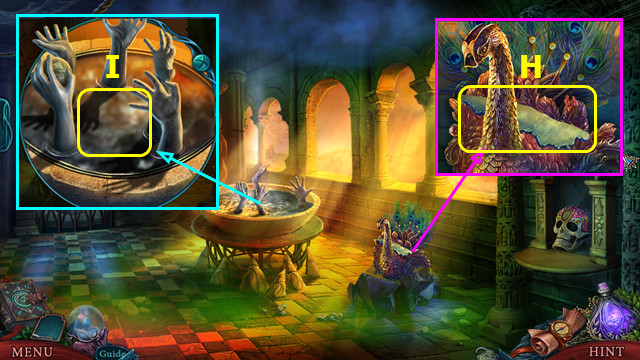
- Use the DRIVER'S LICENSE; take the MAP (H).
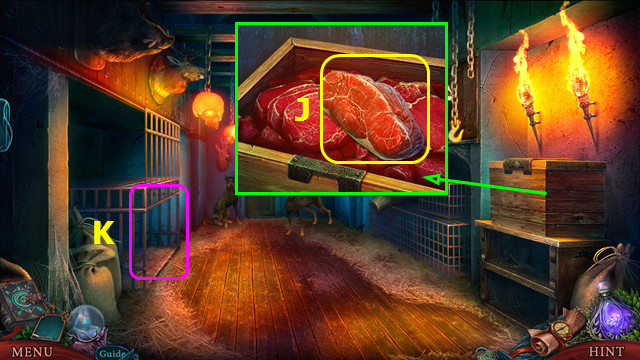
- Open the seat; take the LUNCHBOX and BENT NAIL (I).
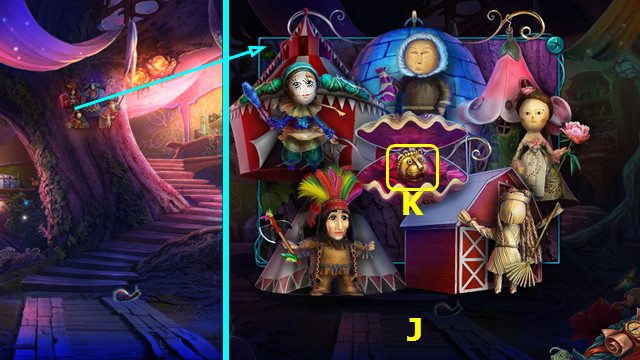
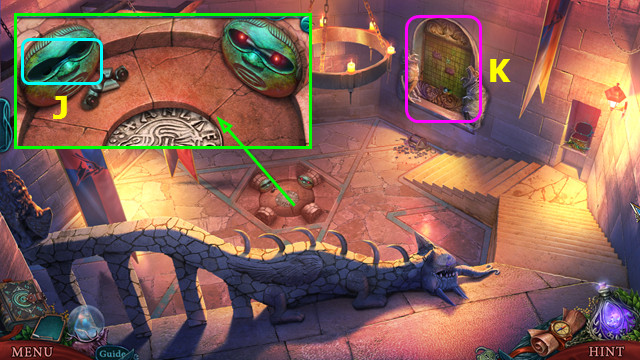
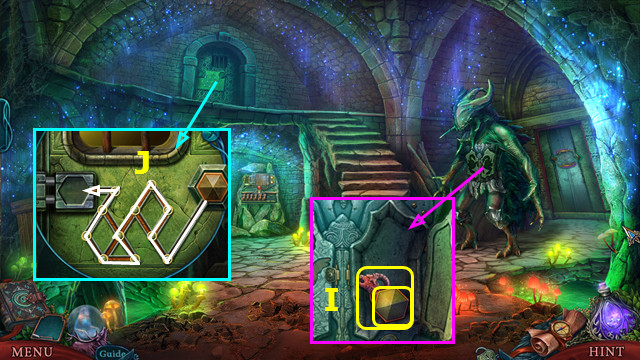
- Place the SCOOTER KEY (J).
- Try to walk right.
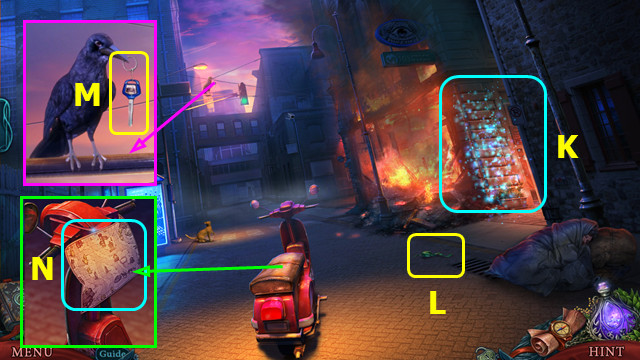
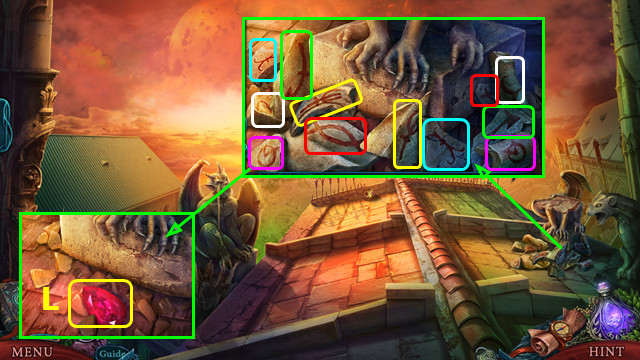
- Play the HOP; earn the MECHANICAL WATCH (K).
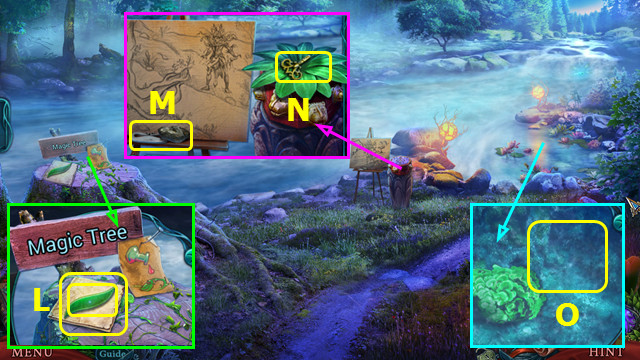
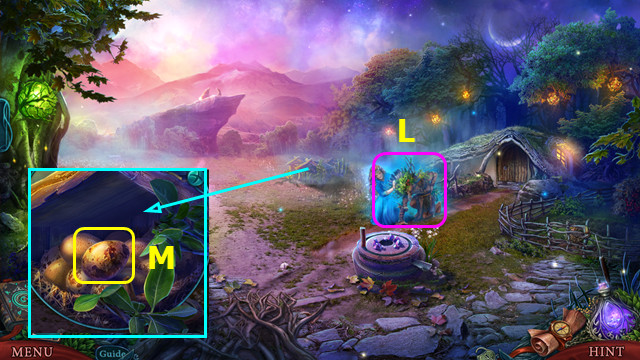
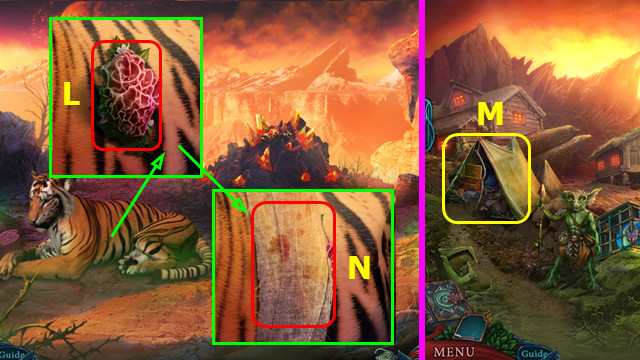
- Take the RIBBON (L).
- Combine the BENT NAIL and RIBBON to make the IMPROVISED HOOK (inventory).
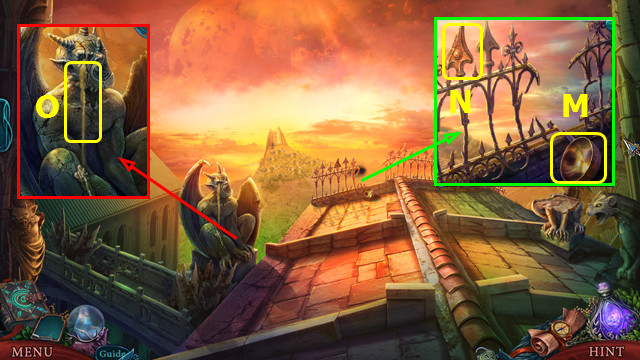
- Use the IMPROVISED HOOK to take the SCOOTER KEY (M).
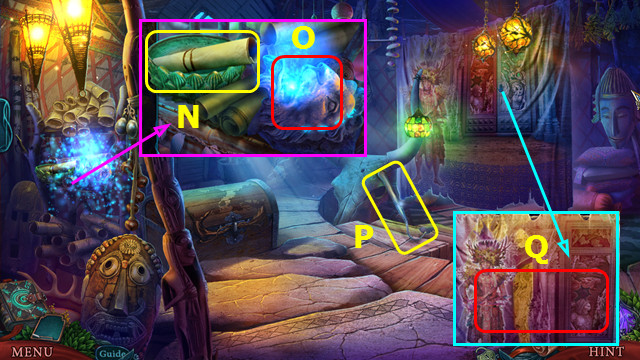
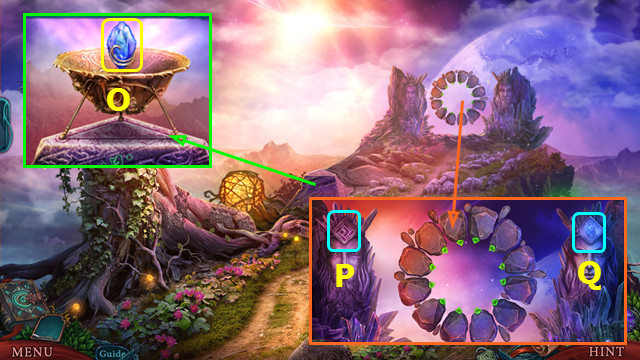
- Use the SCOOTER KEY and MAP (N).
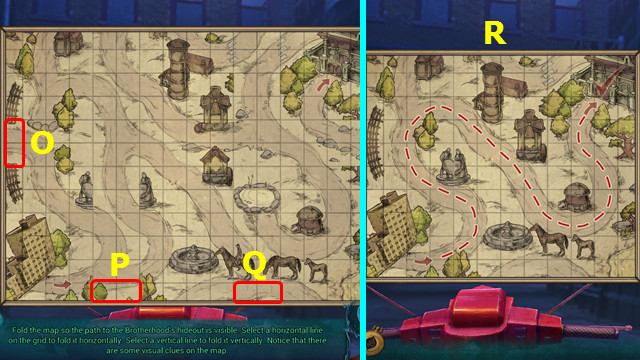
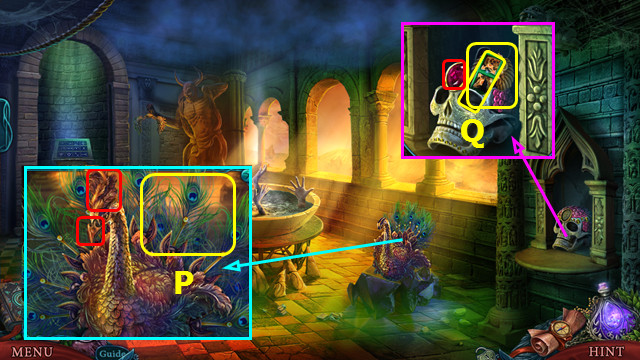
- Select O-P-Q.
- Final solution (R).
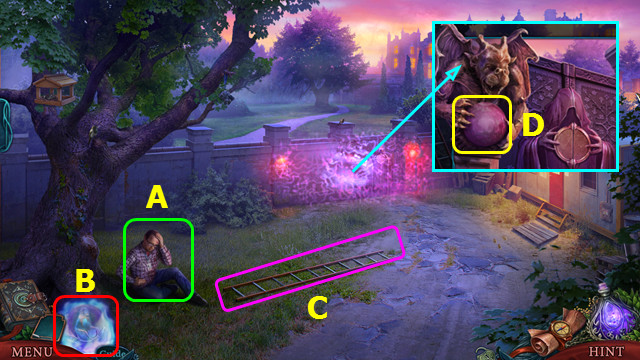
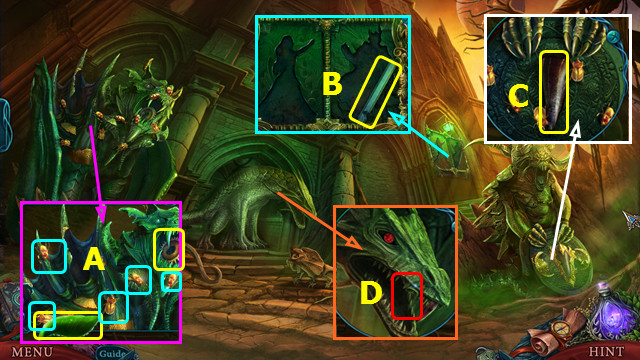
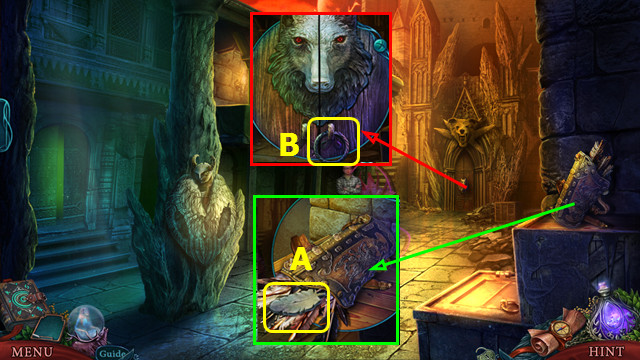
- Talk to Timmy (A).
- Select (B).
- Select (C).
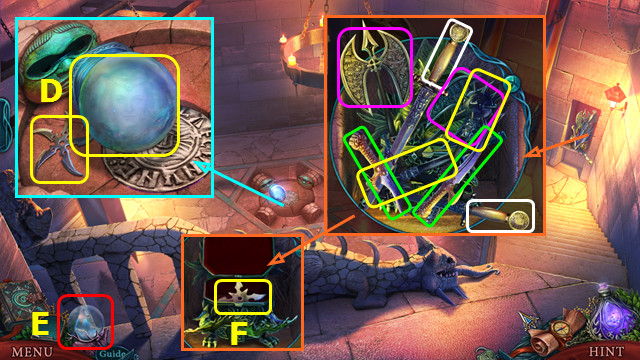
- Take the ORB (D).
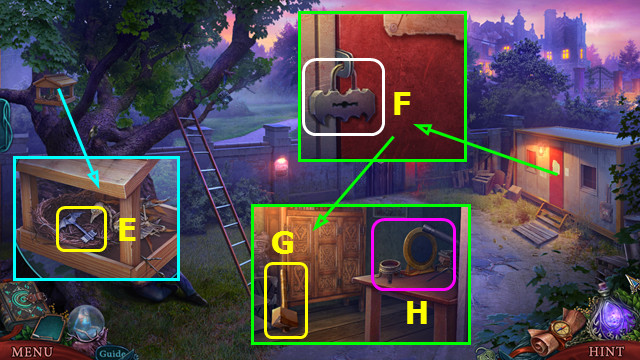
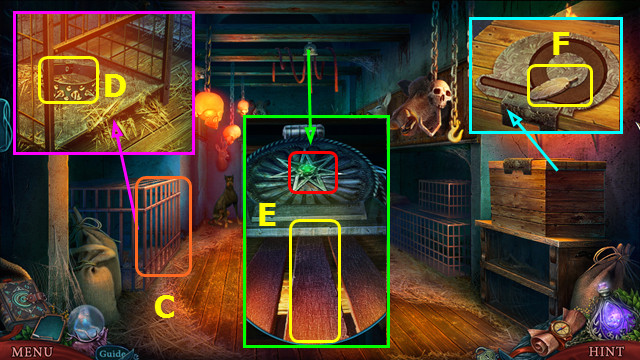
- Move the dead bird; take the BAT KEY (E).
- Use the BAT KEY (F).
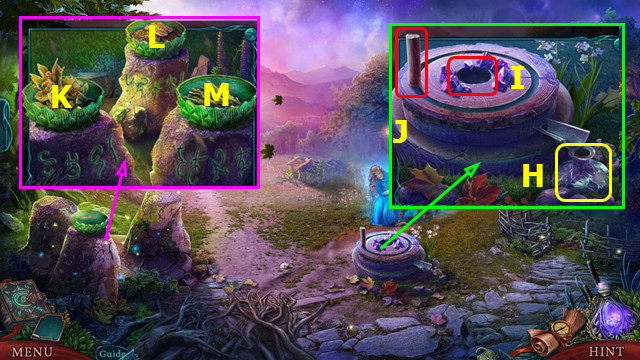
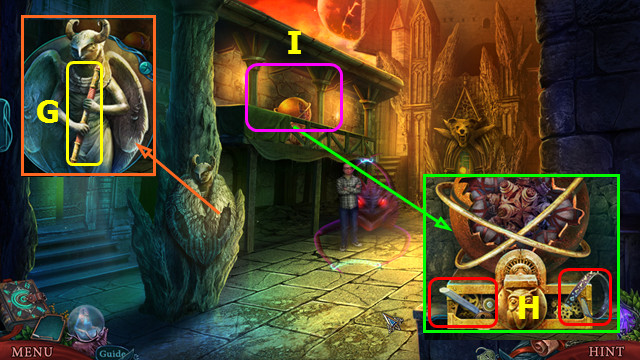
- Take the HAMMER (G); select (H).
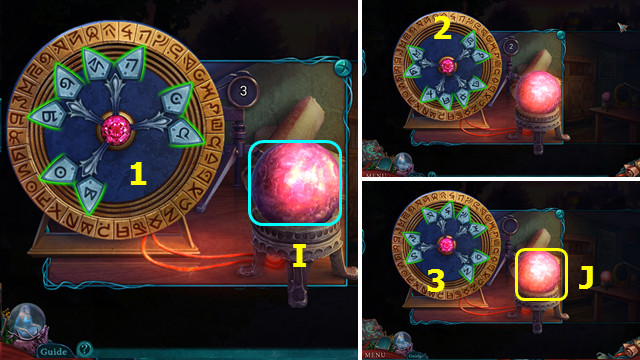
- Place the ORB (I).
- Turn the pointers as shown (1-3).
- Take the CHARGED ORB (J).
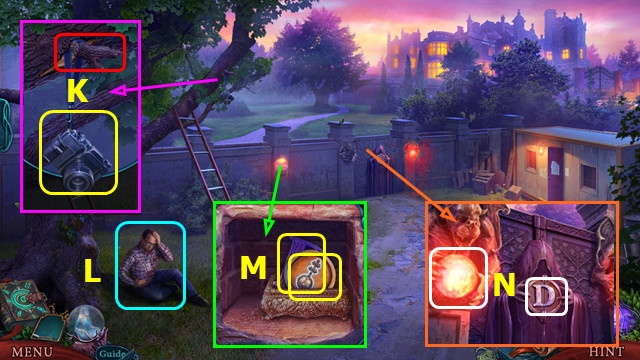
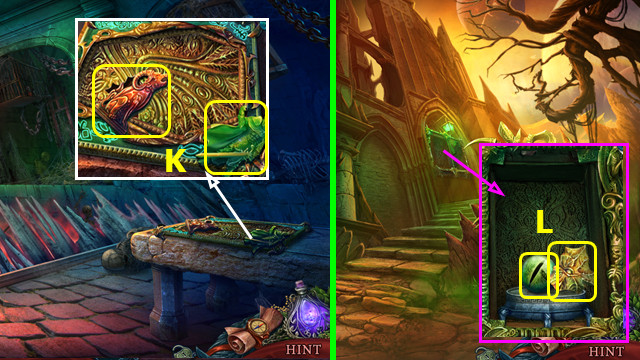
- Use the HAMMER to take the CAMERA (K).
- Give the CAMERA; take the FILE (L).
- Open and read the FILE; take the NECKLACE (inventory).
- Look at the photo on the LUNCHBOX; add the NECKLACE and take the SPORK (inventory).
- Use the SPORK; take the 1/3 TOKEN and DEMIEN'S SYMBOL (M).
- Place the CHARGED ORB and DEMIEN'S SYMBOL (N).
- Go forward, play the HOP, and go forward again.
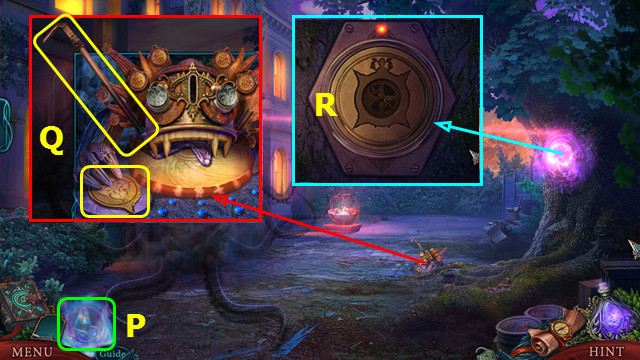
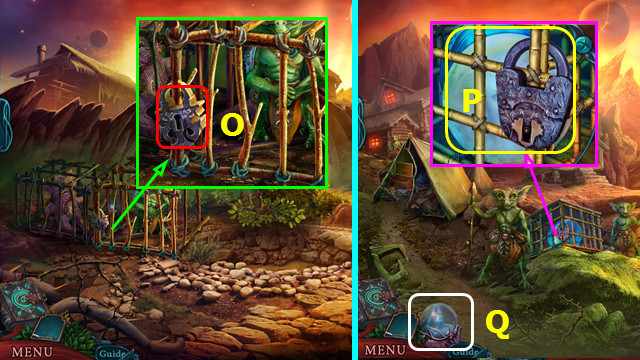
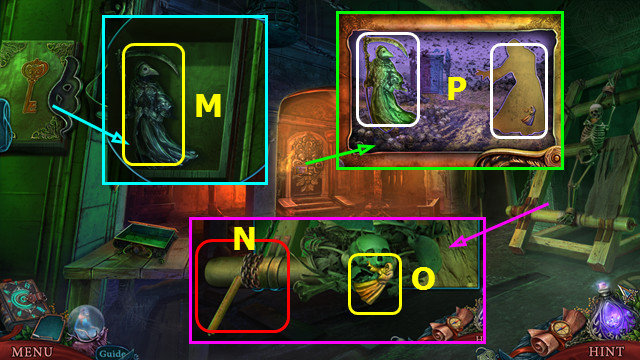
- Select (P).
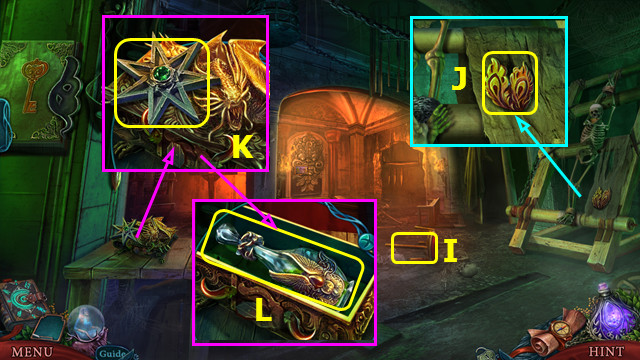
- Select and take the WATCH PART; take the METAL BAR (Q).
- Combine the WATCH and WATCH PART; select the watch part to make the MECHANICAL KEY (inventory).
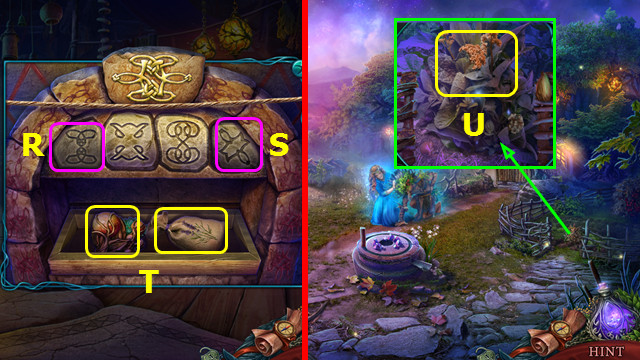
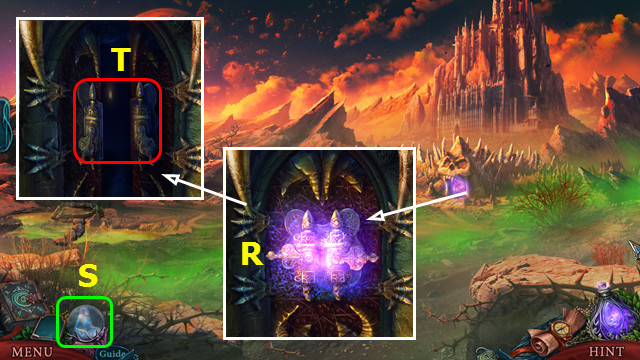
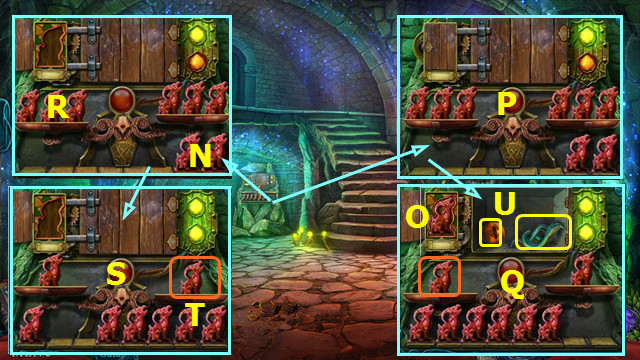
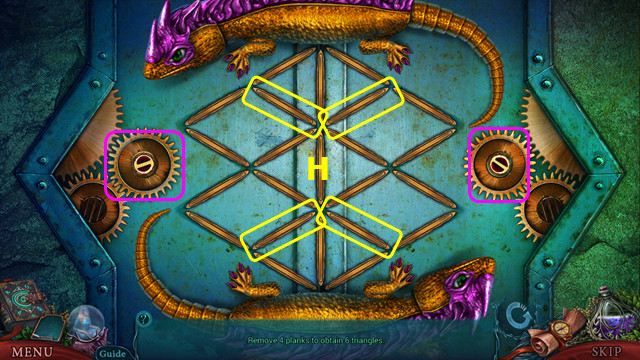
- Place the MECHANICAL KEY; select to play a HOP (R).
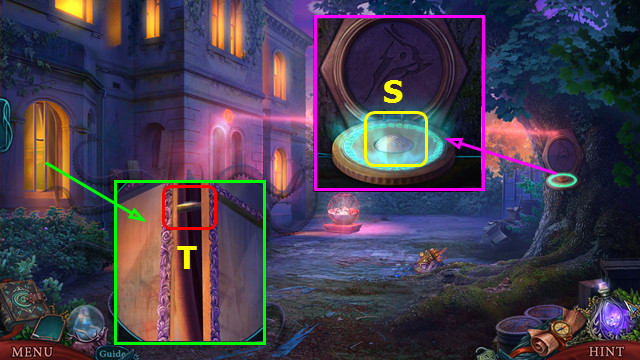
- Take the RUNE PART (S).
- Use the METAL BAR and open the window (T).
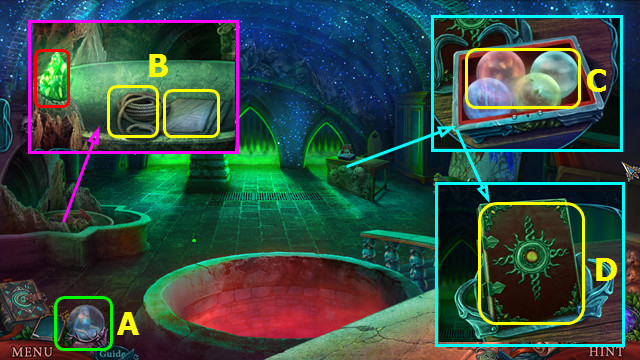
- Go left.
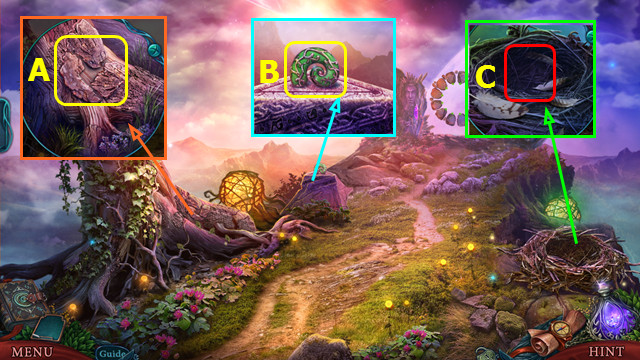
- Take the MOON; open the box and take the SPARE KEYS (A).
- Use the SPARE KEYS; select the left key (B).
- Try to go forward; earn the RUNE SPHERE.
- Select C-D-C.
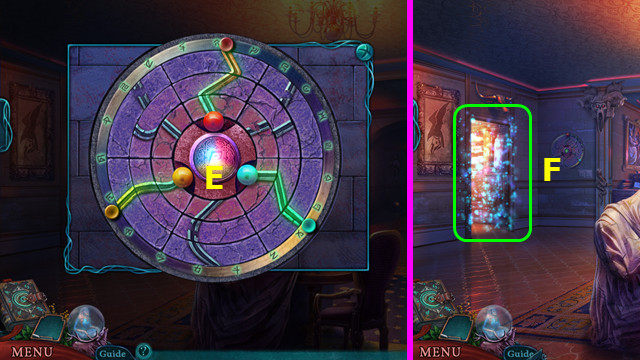
- Place the RUNE PART and RUNE SPHERE.
- Rotate the rings as shown; press (E).
- Play the HOP; earn the cloak (F).
- Walk forward.
- Take the COIN and PEN (G).
- Use the PEN; take the CHIP PICTURE (H).
- Walk down 2x.
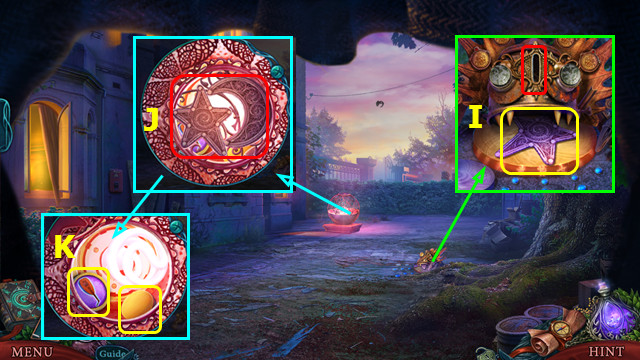
- Use the COIN; take the STAR (I).
- Place the STAR and MOON and open the cover (J).
- Take the 2/3 TOKEN and WOODEN CIRCLE (K).
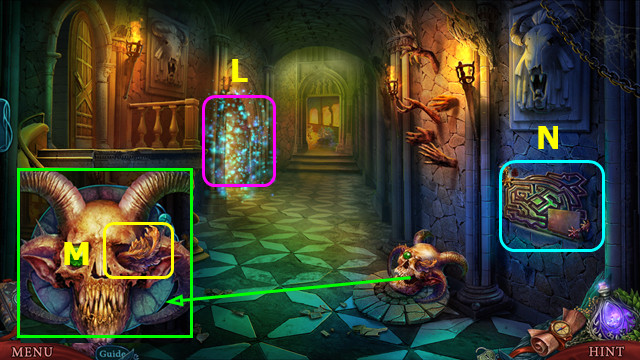
- Go left.
- Play the HOP; earn the 3/3 TOKEN (L).
- Select (M).
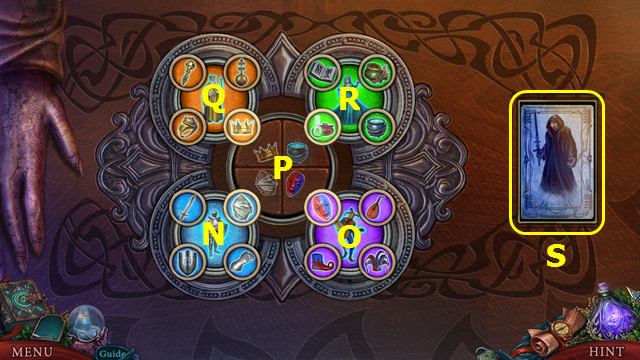
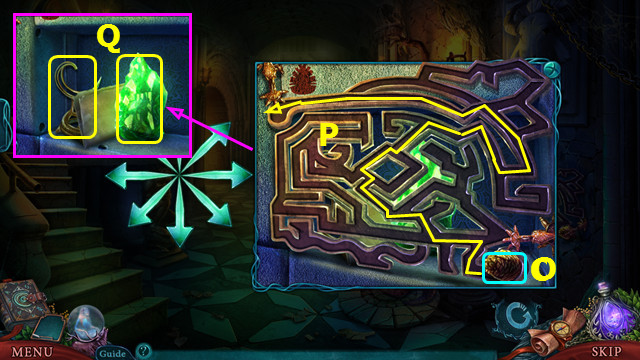
- Place the 3 TOKENS.
- Solution: Q-Ox2-P-R-P-Q-P-Q-Px2-Nx2-Ox2-.
- P-N-R-P-Rx2-P-R-O-P-Ox2-Px3.
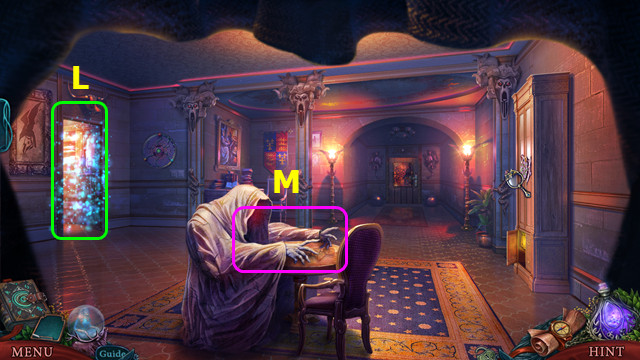
- Take the DAEMON CARD (S).
- Walk forward.
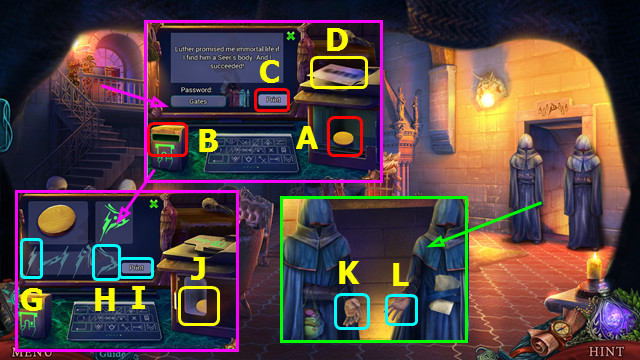
- Open the door and place the WOODEN CIRCLE (A).
- Place the DAEMON CARD (B); press print (C).
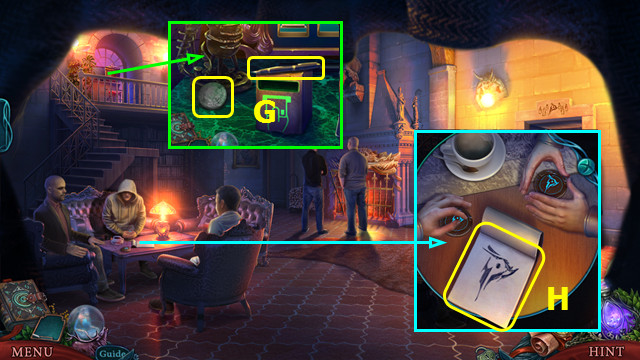
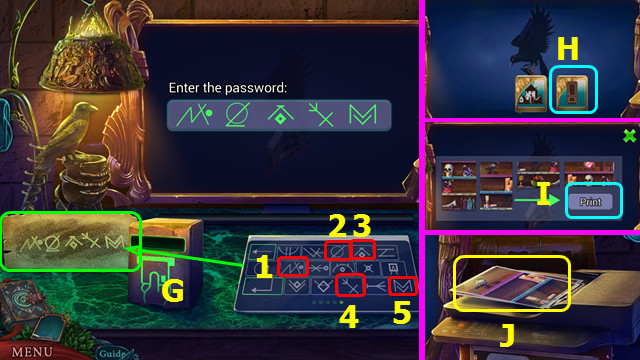
- Take the PASSWORD; place the CHIP PICTURE (D).
- Select G-H; press print (I).
- Open the door and take the CHIP (J).
- Select each guard; give the CHIP (K) and PASSWORD (L).
- Walk right.
Chapter 2: The Vegetable Garden
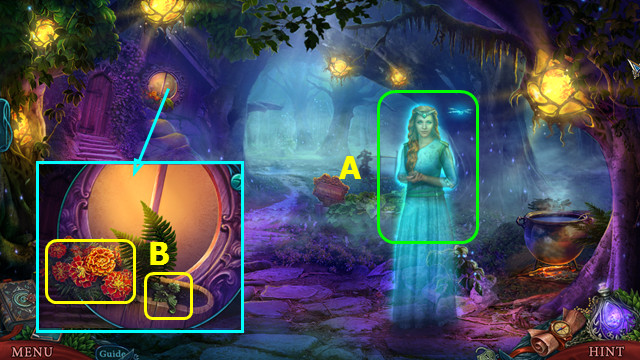
- Talk to Loreley (A).
- Take the MARIGOLD; move the fern and take the VALVE (B).
- Walk left.
- Talk to Loreley (C).
- Take the JUG and read the note (D).
- Play the HOP; earn the HANDLE (E).
- Read the note and take the FLACON FOR POTIONS (F).
- Place and select the VALVE; take the YELLOW POWDER (G).
- Walk down.
- Place and select the HANDLE (H).
- Take the DOLL'S HEAD and DRY ALGAE (I).
- Walk left.
- Place the DOLL'S HEAD; swap the heads and hand-held items as shown (J).
- Take the CHEST KNOB (K).
- Walk down and forward.
- Take the CHEST PART and POTION RECIPE (L).
- Take the FLINT AND STEEL (M).
- Place the CHEST KNOB and CHEST PART; take the KEY (N).
- Use the JUG to take the JUG OF WATER (O).
- Walk down and left.
- Play the HOP; earn the VALVE (P).
- Place and select the VALVE; take the BLUE POWDER (Q).
- Use the KEY; take the KNIFE (R).
- Walk down and forward.
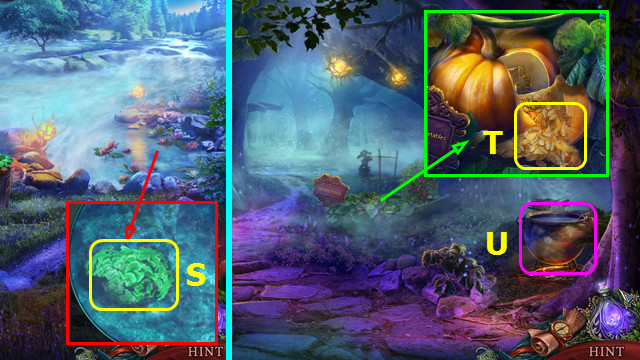
- Use the KNIFE; take the WATER MUSHROOMS (S).
- Walk down.
- Use the JUG OF WATER and KNIFE; take the PUMPKIN SEEDS (T).
- Select (U).
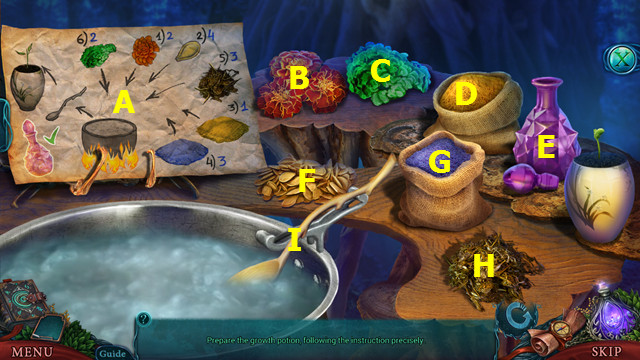
- Place the POTION RECIPE (A), MARIGOLD (B), WATER MUSHROOMS (C), YELLOW POWDER (D), FLACON FOR POTIONS (E), PUMPKIN SEEDS (F), BLUE POWDER (G), and DRY ALGAE (H).
- Select Bx2-Fx4-D-Gx3-Hx3-Cx2.
- Select (I); select (E) to take the GROWTH POTION.
- Walk forward.
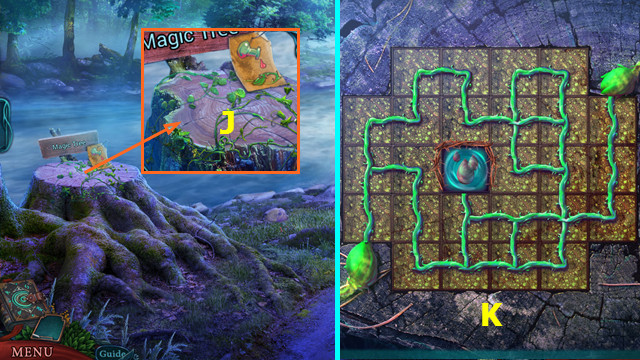
- Use the GROWTH POTION (J).
- Restore the vines (K).
- Go forward.
- Talk to the Shaman (L).
- Use the KNIFE; take the HAWK EGG (M).
- Walk right.
- Read the scroll and take the 1st CENSER PLATE (N).
- Play the HOP; earn the 1st SYMBOL OF SOUL PART (O).
- Take the MATTOCK (P).
- Select (Q).
- Select (R-S); take the RED TREE CROWN and HERBAL POUCH (T).
- Open the HERBAL POUCH; read the note and take the DRY PLANTS (inventory).
- Walk down.
- Open the gate; use the MATTOCK to take the HERBS (U).
- Walk forward.
- Use the KNIFE to take the BARK (A).
- Take the SNAIL SPIRAL (B).
- Place the HAWK EGG (C).
- Take the GREEN TREE CROWN (D).
- Take the CRYSTAL SHARDS and 2nd CENSER PLATE (E).
- Return to the Hut.
- Place the RED TREE CROWN and GREEN TREE CROWN (F).
- Take the INKWELL; place the SNAIL SPIRAL and take the CRUCIBLE (G).
- Walk down.
- Place the INKWELL (H).
- Place the CRYSTAL SHARDS (I); select the handle (J).
- Take the CRYSTAL POWDER (H).
- Place the HERBS (K), 1st CENSER PLATE and BARK (L), and the 2nd CENSER PLATE and DRY PLANTS (M); use the CRYSTAL POWDER and FLINT AND STEEL.
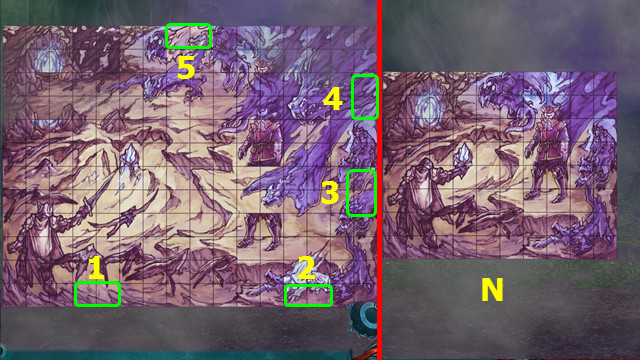
- Select 1-5.
- Final positions (N).
- You earn the 2nd SYMBOL OF SOUL PART.
- Combine the 2 SYMBOL OF SOUL PARTS to make the SYMBOL OF SOUL (inventory).
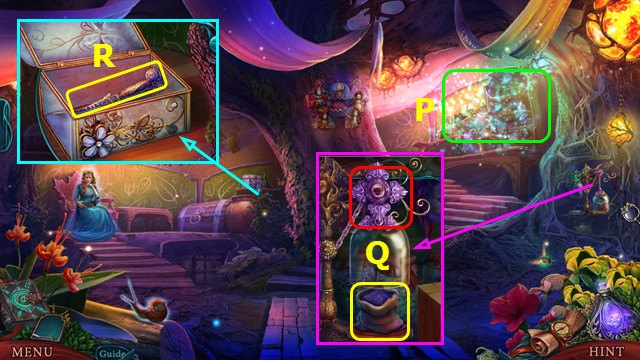
- Walk forward.
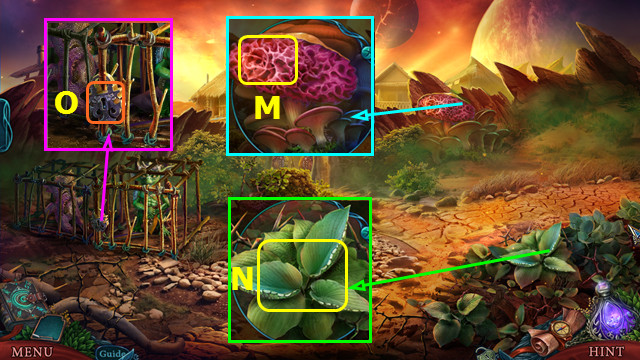
- Place the CRUCIBLE; take the ETERNAL PRISM (O).
- Place the SYMBOL OF SOUL (P) and the ETERNAL PRISM (Q).
- Select L-F-I-K-C-D-E-B-G.
- Go forward.
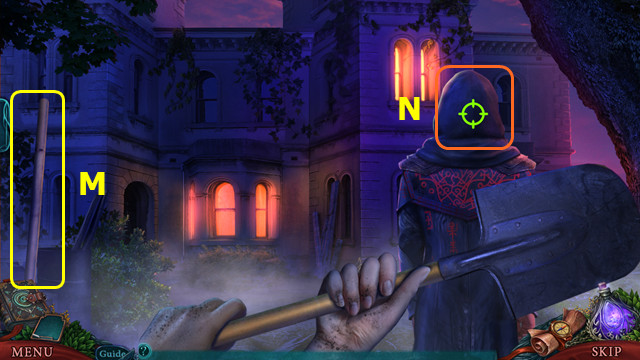
- Take the shovel (M).
- Select (N).
Chapter 3: The Room
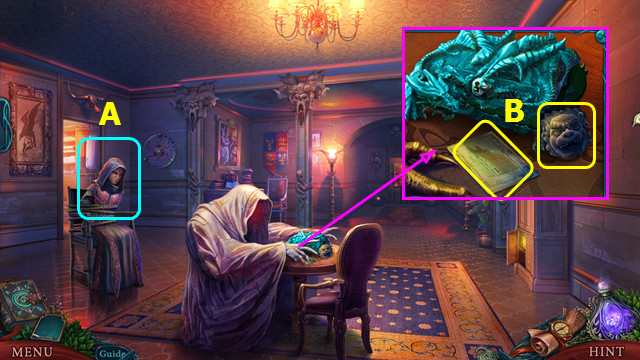
- Talk to Demien (A).
- Take the HOUSE CARD and FENDER PART (B).
- Walk forward.
- Shoo the crow 2x; take the PAPER and GEAR (C).
- Place the FENDER PART and select the poker to take the COAL (D).
- Take the GLOVE: use the PAPER and COAL to take the CODE (E).
- Select (F).
- Use the CODE on the keyboard (G).
- Select 1-5.
- Select (H) and print (I).
- Take the CUPBOARD PHOTOS (J).
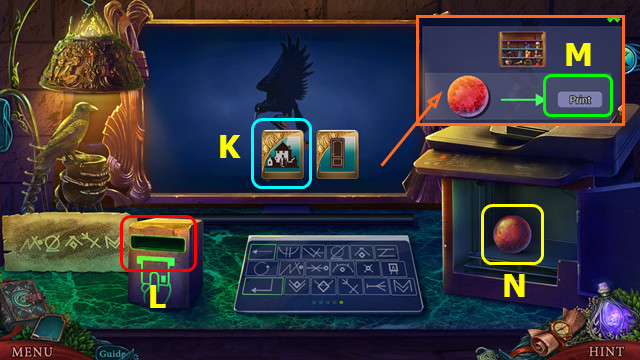
- Select (K); use the HOUSE CARD (L).
- Press print (M).
- Open the door and take the CUPBOARD PART (N).
- Walk down.
- Place the GEAR (O).
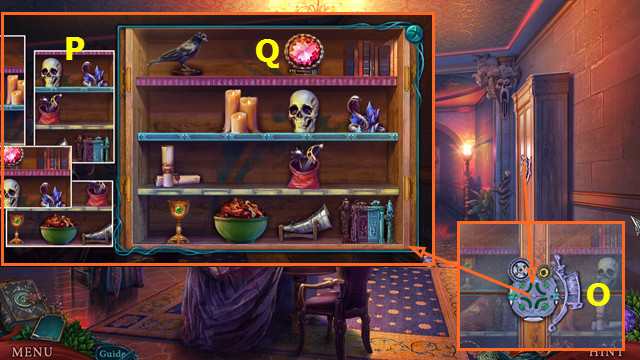
- Place the CUPBOARD PHOTOS (P).
- Place the CUPBOARD PART in the ring and arrange the items as shown (Q).
- Walk right.
- Play the HOP; earn the DRAGON TAIL (A).
- Play the HOP; earn the CHALK (B).
- Take the CASKET PART and photo; press the button under the photo (C).
- Walk down, forward, and right.
- Take the CRYSTAL BALL and 1st SHURIKEN (D).
- The CRYSTAL BALL is back on the menu bar (E).
- Select the pairs (color-coded).
- Place the CASKET PART; take the 2nd SHURIKEN (F).
- Walk down 2x.
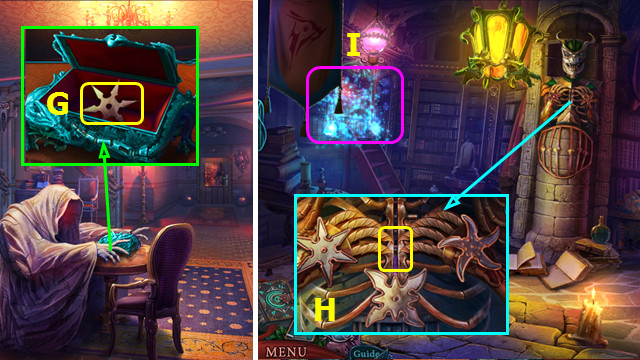
- Place and select the DRAGON TAIL; take the 3rd SHURIKEN (G).
- Walk right.
- Place the 3 SHURIKENS; take the FIGURINE (H).
- Play the HOP; earn the LASER (I).
- Return to the Cellar.
- Place the LASER (J).
- Select (K).
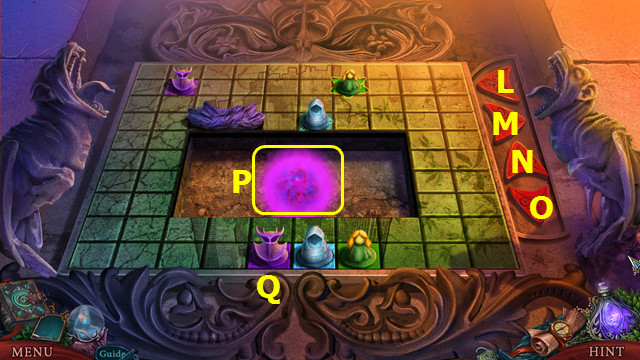
- Place the FIGURINE (Q).
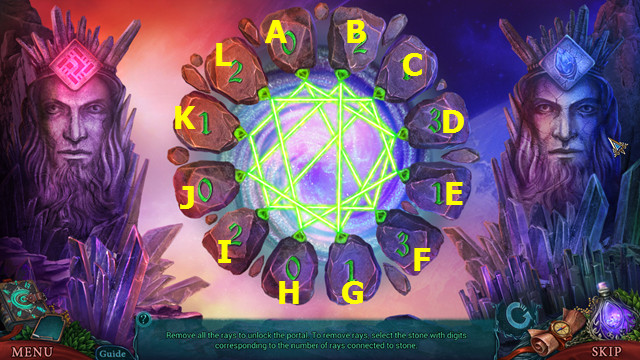
- Select: Nx4-M-Nx2-M-Nx4-O-Lx3-O-L-O-M-O-Mx2-O-Mx2-Nx4-Lx3.
- Take the EVIL ENERGY (P).
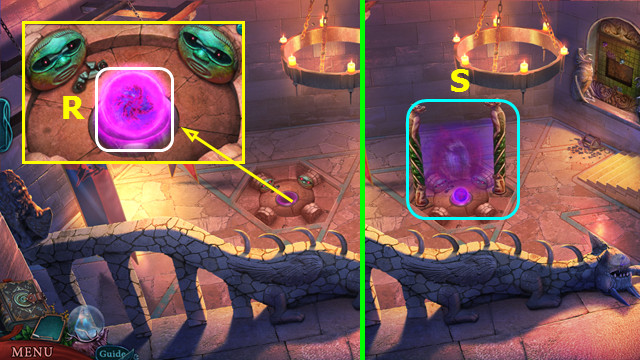
- Place the EVIL ENERGY (R).
- Enter the portal (S).
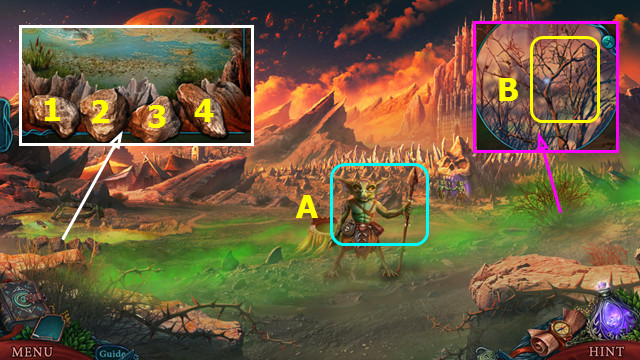
- Talk to the Guard (A).
- Use the GLOVE to take the BRUSHWOOD (B).
- Select (1-4).
- Walk left.
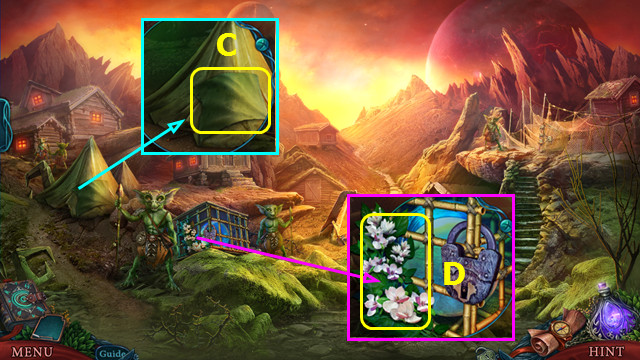
- Take the RAG (C).
- Take the HEALING HERBS (D).
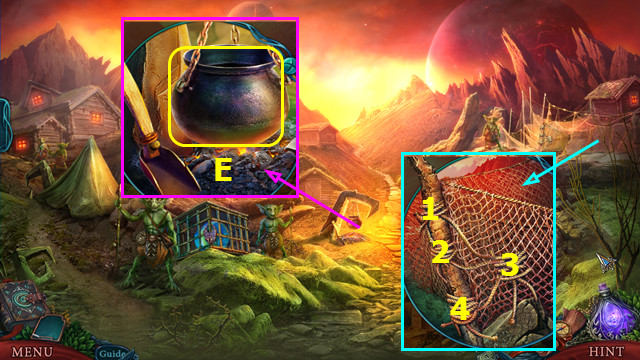
- Take the CAULDRON (E).
- Select 1-4 to take the FISHNET.
- Walk down.
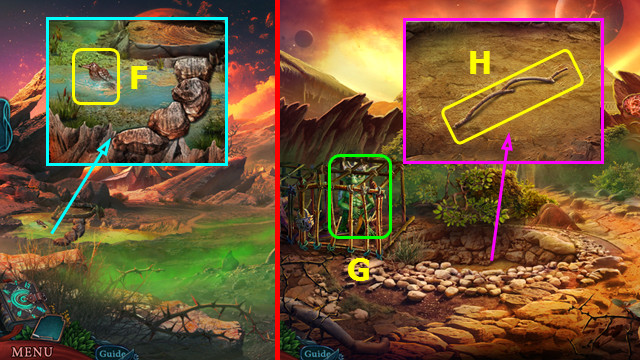
- Use the FISHNET to take the CROW BROOCH (F).
- Walk left and forward.
- Talk to the King and get the instructions (G).
- Take the STICK (H).
- Walk right.
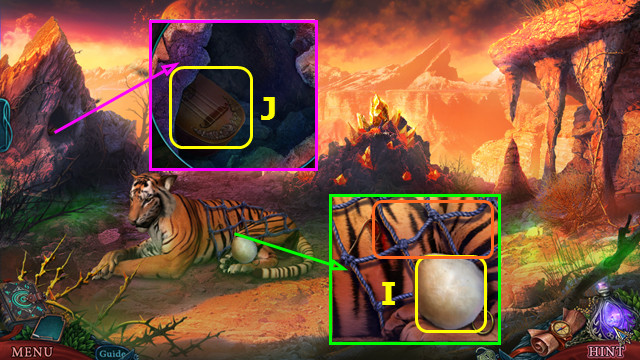
- Take the HARE TALISMAN and remove the net (I).
- Select and take the BROKEN LUTE (J).
- Take the TUNING FORK from the BROKEN LUTE (inventory).
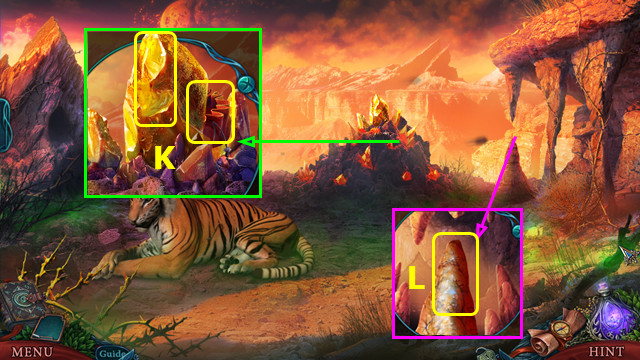
- Use the TUNING FORK to take the SHARP AMBER; take the POUCH (K).
- Use the SHARP AMBER to take the SOFT CLAY (L).
- Walk down.
- Use the SHARP AMBER to take the MUSHROOM SPONGE (M).
- Use the SHARP AMBER to take the BURDOCK LEAVES (N).
- Use the SOFT CLAY to make a KEY CAST (O).
- Open the CROW BROOCH and use the KEY CAST to make the LOCK PICK (inventory).
- Walk down.
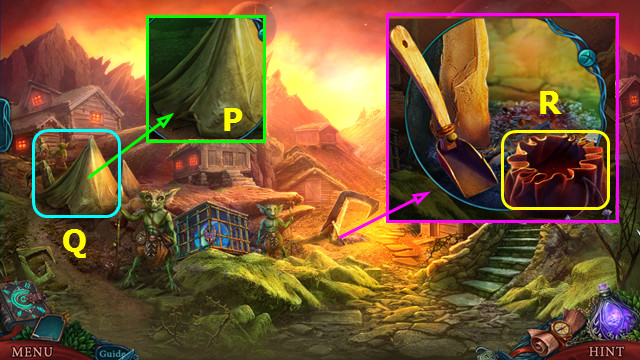
- Use the STICK (P).
- Play the HOP; earn the NIPPERS (Q).
- Place the POUCH and select the scoop; take the POUCH WITH CINDERS (R).
- Walk down.
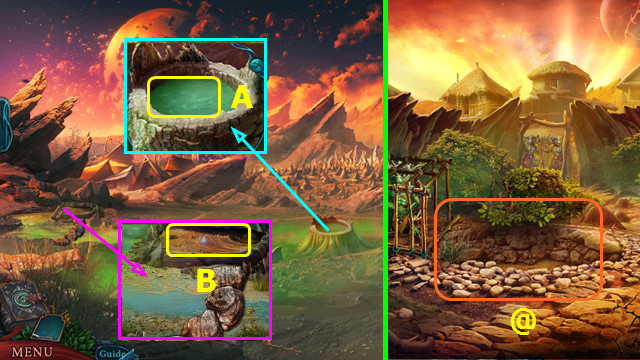
- Use the MUSHROOM SPONGE to take the SPONGE WITH LIQUID (A).
- Use the HARE TALISMAN to take the PITCH (B).
- Walk left and forward.
- Select (@).
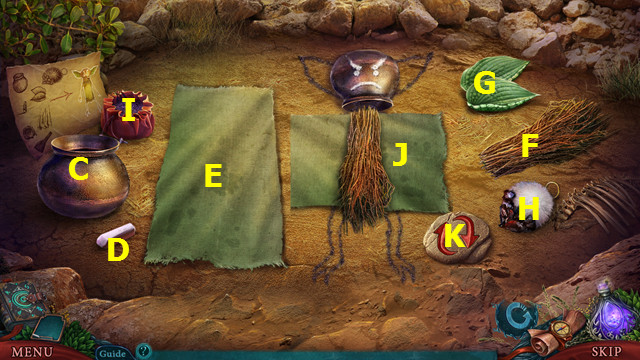
- Place the CAULDRON (C), CHALK (D), RAG (E), BRUSHWOOD (F), BURDOCK LEAVES (G), PITCH (H), and POUCH WITH CINDERS (I).
- One BURDOCK LEAF will remain in your inventory.
- Select I-C-D-E-F.
- Select the rag to wrap it around the brushwood (J).
- Press (K).
- Select F-G-H-K.
- Select (H).
- Take the DUMMY.
- Walk right.
- Use the NIPPERS, HEALING HERBS, and SPONGE WITH LIQUID (L).
- Walk down 2x.
- Play the HOP; earn the BANDAGE (M).
- Walk forward and right.
- Place the BANDAGE (N).
- Walk down.
- Use the LOCK PICK, open the cage, and place the DUMMY (O).
- You earn the CAGE KEY.
- Walk down.
- Use the CAGE KEY; take the CRYSTAL BALL (P).
- The CRYSTAL BALL in now on the menu bar (Q).
- Walk down.
- Look at the gates (R) and select the CRYSTAL BALL (S).
- Open the gates and go forward (T).
Chapter 4: The Gates
- Place the BURDOCK LEAF and select the 5 bugs (blue); take the BUGS and 1st GEAR (A).
- Take the METAL BAR (B).
- Place the BUGS; take the FANG (C).
- Place the FANG (D).
- Walk forward.
- Select the CRYSTAL BALL (E).
- Play the HOP; earn the SEER FIGURINE (F).
- Select (G).
- Walk down.
- Place the SEER FIGURINE; take the SCORPION (H).
- Go forward.
- Place the SCORPION; take the CELL KEY and 1st MONSTER (I).
- Place the CELL KEY; select the points on the indicated path (J).
- Go forward.
- Take the 2nd MONSTER and LUTHER FIGURINE (K).
- Walk down 2x.
- Place the LUTHER FIGURINE and play the HOP; take the GREEN EYE and PANEL KEY (L).
- Walk forward.
- Place the 2 MONSTERS (N).
- This mini-game is randomly generated.
- Weigh the monsters 2x; place the heaviest one (O).
- Easiest method is to weigh 6 monsters to determine where it is.
- If the 6 monsters are balanced (P), you know the heaviest in on the shelf; weigh those two to find the heaviest (Q).
- If the 6 monsters are not balanced, remove the lighter group (R). Move a monster from the heavier group to the other scale pan, return one to the shelf, and weigh them (S).
- If they balance, the monster on the shelf is the heaviest; otherwise, you know which the heaviest is (T).
- Take the ORANGE EYE and LOCKER KEY (U).
- Go forward.
- Place the PANEL KEY; move the lever (A).
- Talk to Timmy (B).
- Place the GREEN EYE (C).
- Place the ORANGE EYE (D).
- Talk to Timmy again to earn the SCORPION (B).
- Walk down.
- Play the HOP; earn the EMPTY OILCAN (E).
- Place the SCORPION; take the WINGS INSTRUCTIONS and 2nd GEAR (F).
- Select (G).
- Place the 2 GEARS.
- Select the 4 pieces (H).
- Walk right.
- Take the CHAIR LEG (I).
- Take the INTAGLIO (J).
- Take the STAR; place the INTAGLIO (K).
- Open the box and take the ACID (L).
- Combine the EMPTY OILCAN and ACID to make the ACID IN CAN (inventory).
- Place the LOCKER KEY; take the VERMIN KEY (M).
- Use the ACID IN CAN; place and select the CHAIR LEG (N).
- Take the PESTILENCE KEY (O).
- Place the VERMIN KEY and PESTILENCE KEY; play the HOP (P).
- Walk forward.

- Drag the energy ball through the symbols (1-3).
- If the energy ball leaves the lines, you must start that symbol again.
- Tip the quiver and take the 1st STONE FEATHER (A).
- Take the METAL RING and open the doors (B).
- Walk right.
Chapter 5: The Kennels
- Select (C).
- Move the hay; take the DOG COLLAR (D).
- Place and select the STAR; take the LEATHER STRIP (E).
- Take the 2nd STONE FEATHER (F).
- Walk down.
- Place the 2 STONE FEATHERS; take the WHIP HANDLE (G).
- Combine the WHIP HANDLE, LEATHER STRIP, and METAL RING to make the WHIP (inventory).
- Use the METAL BAR and DOG COLLAR (H).
- Play the HOP; earn the HOLLOW SPHERES (I).
- Walk right.
- Place and select the WHIP; take the DOG'S MEAT (J).
- Use the DOG'S MEAT (K).
- Go forward.
- Play the HOP; earn the CONE (L).
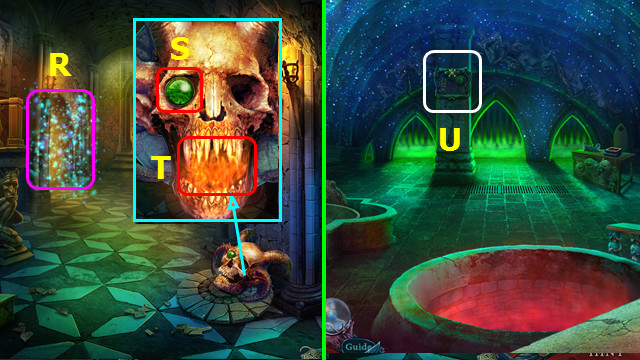
- Take the PEACOCK TUFT (M).
- Select (N).
- Read the note and place the CONE (O).
- Move the cone on the marked path (P).
- Take the SHINY JADE, read the note, and take the HEART OF ABYSS BASE (Q).
- Combine the HEART OF ABYSS BASE and ETERNAL PRISM to make the HEART OF ABYSS (inventory).
- Walk left.
- Select the CRYSTAL BALL (A).
- Place the SHINY JADE; take the LINEN THREADS and SAILCLOTH (B).
- Remove the lid and take the ELEMENT SPHERES; remove the box (C).
- Open the clasps and take the MONSTER BOOK and ELEVATOR CODE (D).
- Walk down and forward.

- Select the CRYSTAL BALL (E).
- Push all the green lights into the lantern (F).
- Take the 1st KEY (G).
- Take the JAGGED IRON (H).
- Use the HOLLOW SPHERES to make the SPHERES WITH TAR (I).

- Restore the image (J).
- Place the ELEVATOR CODE (K).
- Select 1-8.
- Go forward.
- Select the pairs (color-coded).
- Take the GEMSTONE (L).
- Take the EMPTY BOWL (M).
- Use the JAGGED IRON to take the PEACOCK BEAK (N).
- Use the EMPTY BOWL to take the WAX (O).
- Walk down.
- Place the PEACOCK TUFT and PEACOCK BEAK; take the FEATHERS (P).
- Place the GEMSTONE; take the 1st PLANK and 2nd KEY (Q).
- Walk down.
- Play the HOP; earn the 2nd PLANK (R).
- Press (S); use the WAX to make the MELTED WAX (T).
- Walk left.
- Select (U).
- Place the 2 PLANKS.
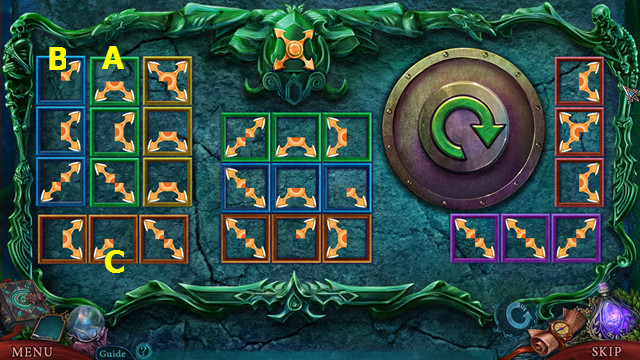
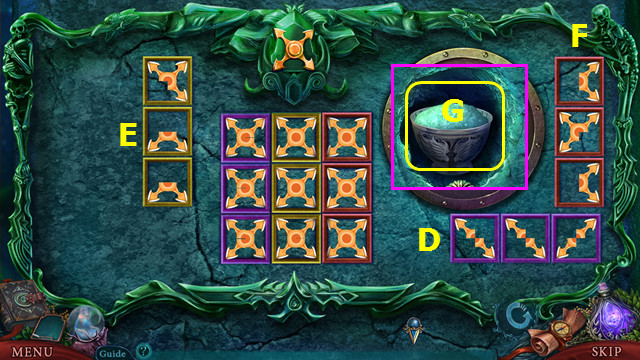
- Select green (A) rotate 1x and place as shown.
- Select blue (B) rotate 1x and place as shown.
- Select brown (C) rotate 2x and place as shown.
- Select purple (D) rotate 3x and place as shown.
- Select yellow (E) rotate 2x and place as shown.
- Place red (F) as shown.
- Take the FLYING POWDER (G).
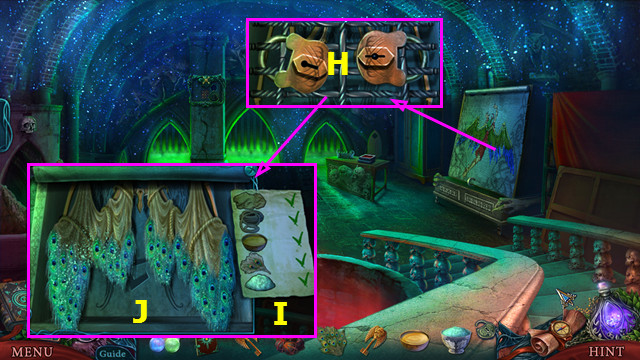
- Select the painting and use the 2 KEYS (H).
- Place the WINGS INSTRUCTIONS (I).
- Place the SAILCLOTH, LINEN THREADS, WAX, FEATHERS, and FLYING POWDER; take the FLYING WINGS (J).
- Go to the Roof.
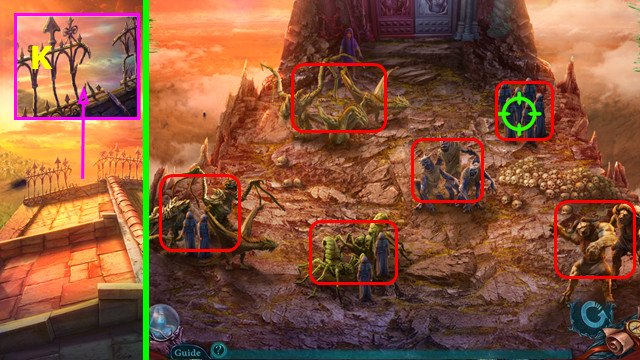
- Use the SPHERES WITH TAR and the FLYING WINGS (K).
- Select the targets (red).
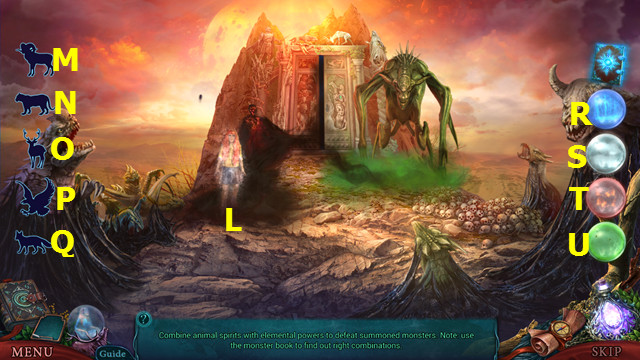
- Use the HEART OF ABYSS (L).
- Select (N-R)-(O-U)-(M-S)-(Q-U)-(P-T).
- Congratulations! You have completed Reflections of Life: Call of the Ancestors!
Created at: 2016-09-11