

Walkthrough Menu
- General Tips
- Chapter 1: Saving the Queen
- Chapter 2: The Mansion
- Chapter 3: To the Tower
- Chapter 4: Finding Jonas
- Chapter 5: The Room of Light
General Tips
- This is the official guide for Reflections of Life: Dark Architect!
- This guide does not mention each time you have to zoom into a location; the screenshots show each zoom scene.
- Hidden-object puzzles are referred to as HOPs. This guide does not show screenshots of the HOPs, however, it is mentioned when a HOP is available and the inventory item collected.
- This guide gives solutions for all puzzles that are not random. Please read the instructions in the game for each puzzle.
Chapter 1: Saving the Queen
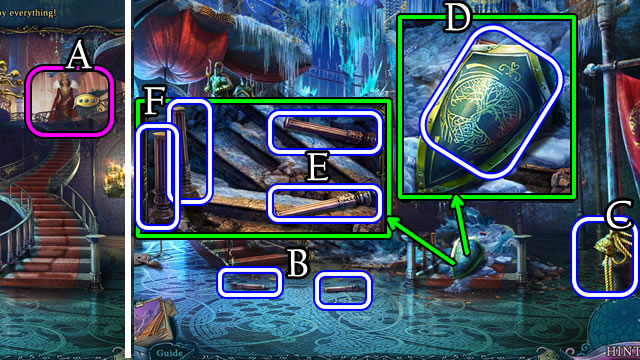
- Speak to the Queen (A).
- Grab BALUSTERS 1/6-2/6 (B).
- Grab ROPES 1/2 (C).
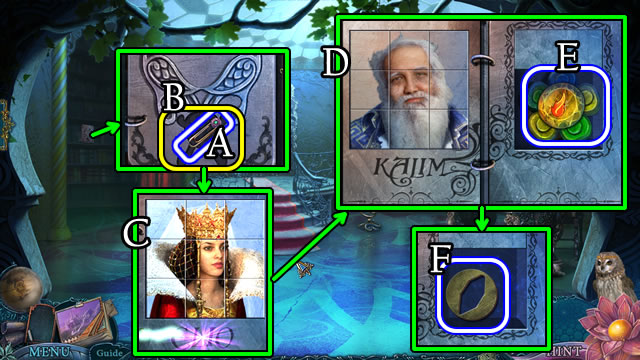
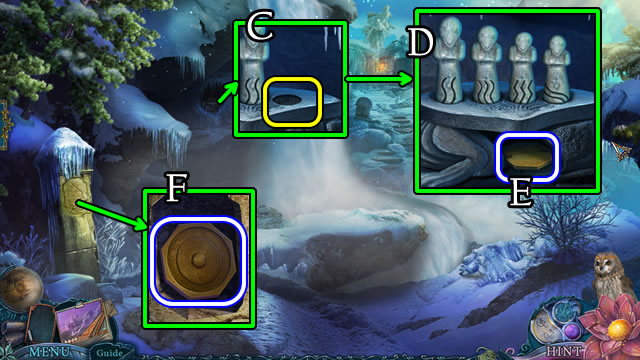
- Take the SHIELD (D).
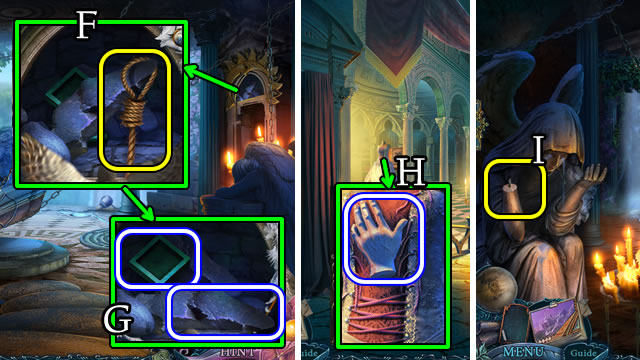
- Uncover and take BALUSTERS 3/6-4/6 (E). Loosen and take BALUSTERS 5/6-6/6 (F).
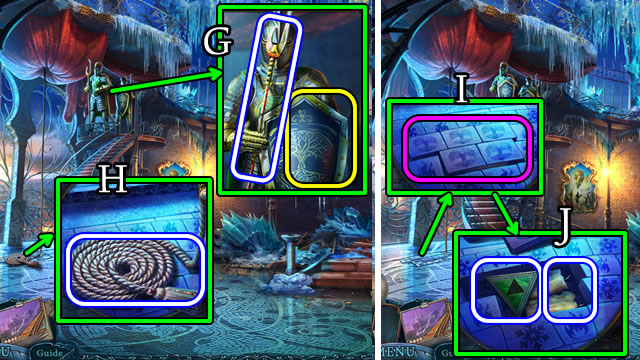
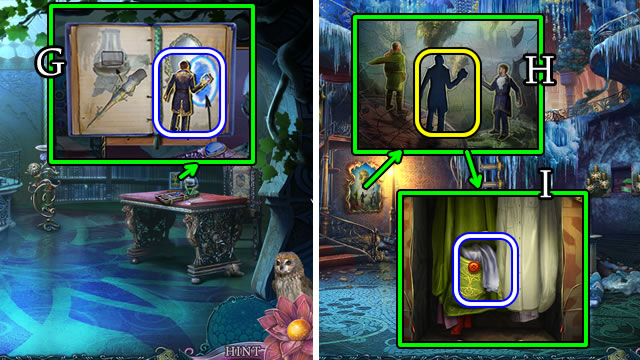
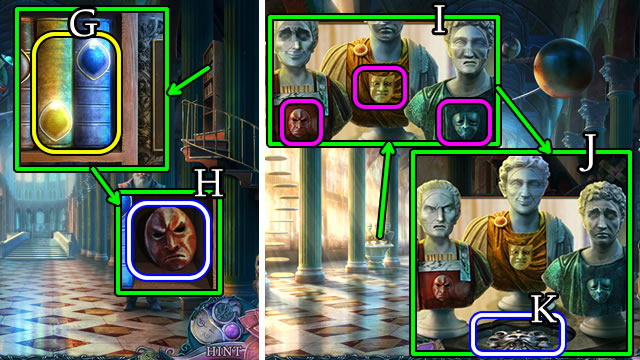
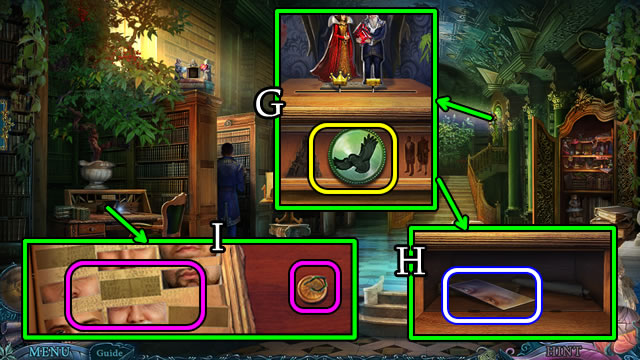
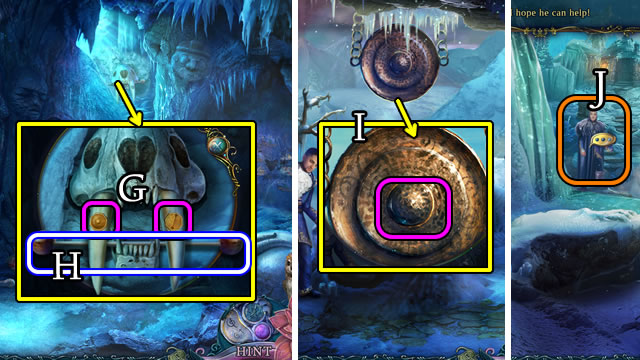
- Place the SHIELD; take the HALBERD (G).
- Use the HALBERD; take ROPES 2/2 (H).
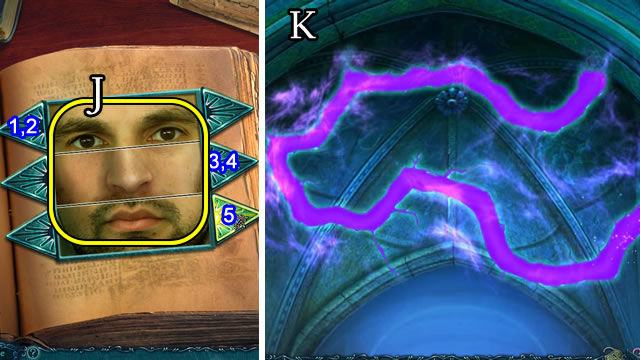
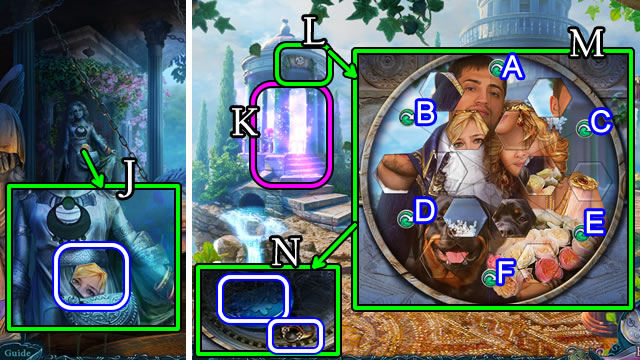
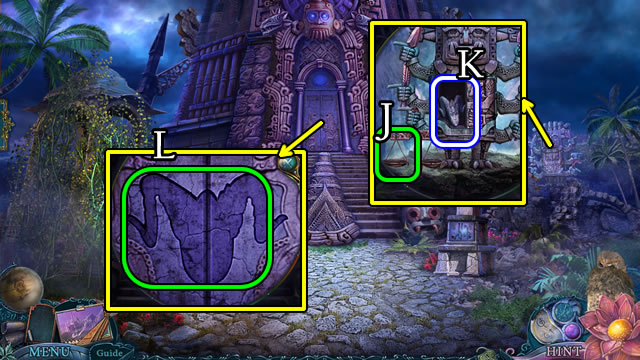
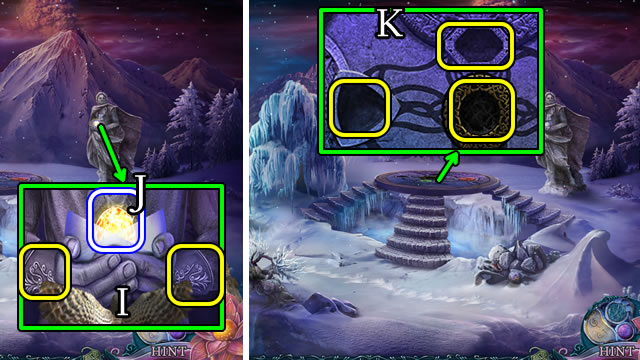
- Select the tiles (I). Open. Take the TRIANGLE and CANDLES (J).
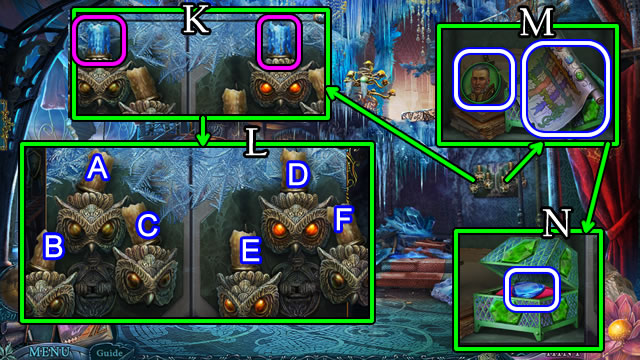
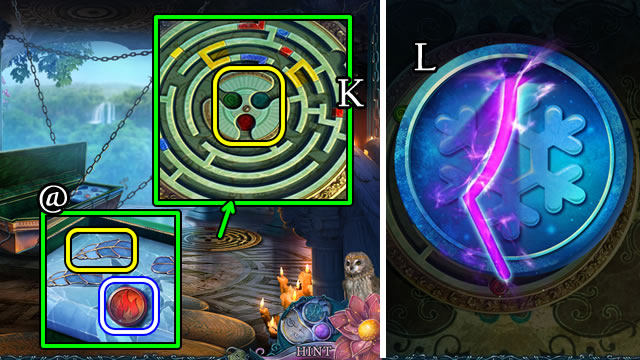
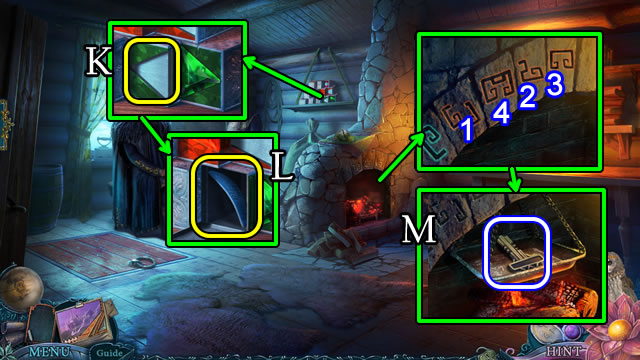
- Replace the CANDLES (K).
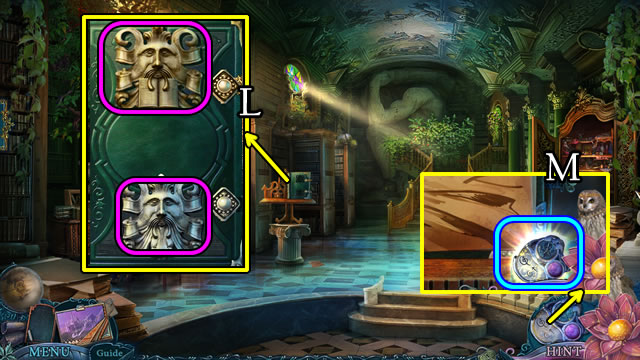
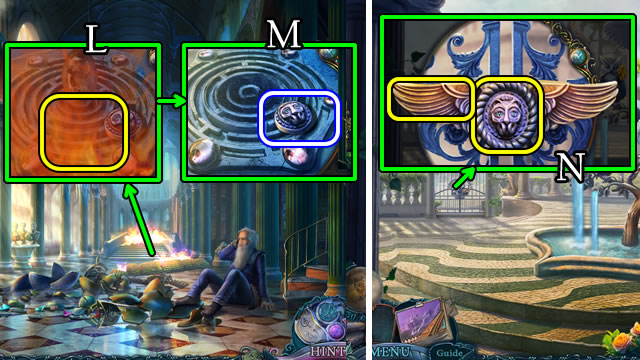
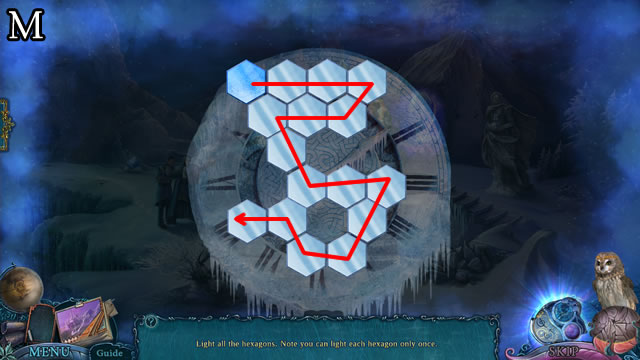
- Solution (L). C-B-Ax2-E-F.
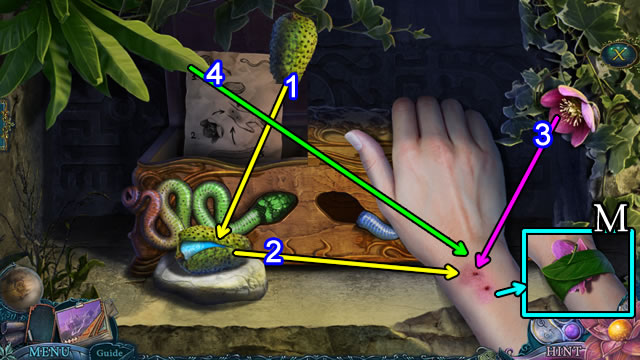
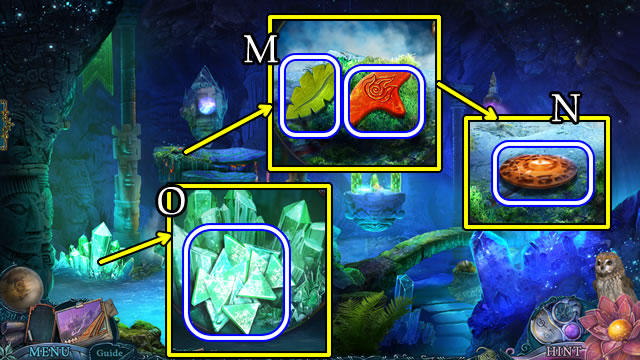
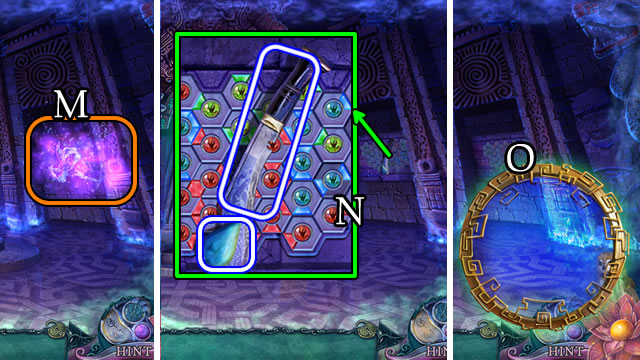
- Take GABOR'S PORTRAIT and INSTRUCTIONS (M).
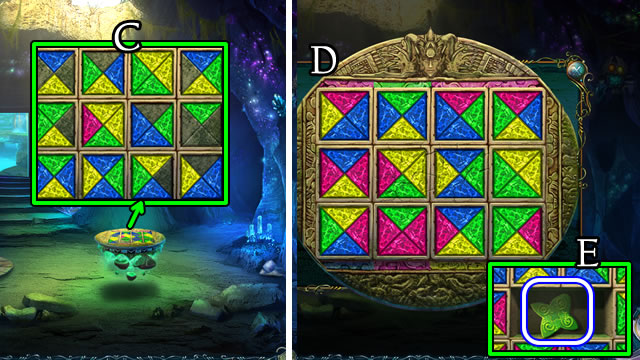
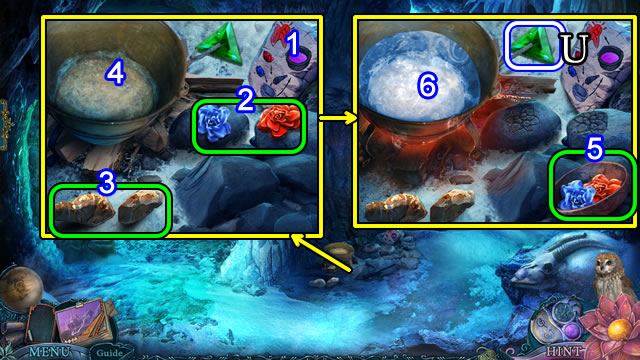
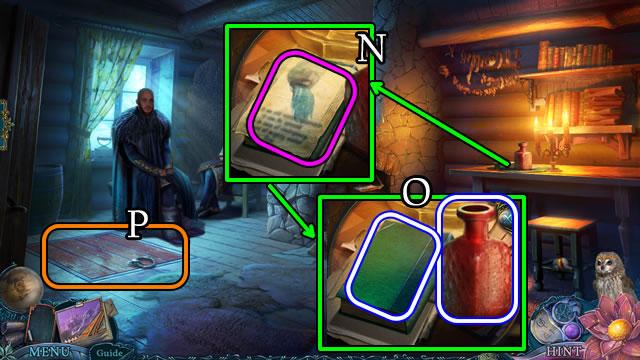
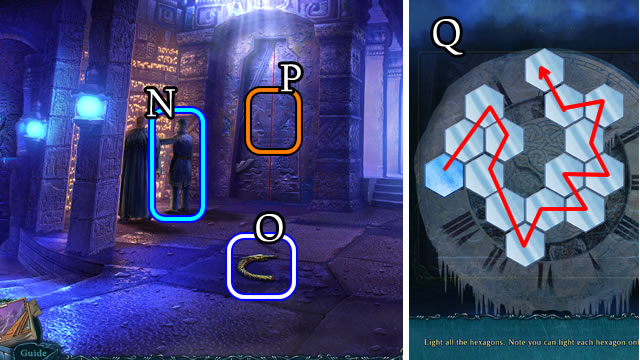
- Scroll each box pane to green. Take CRYSTALS 1/3 (N).
- Combine BALUSTERS 6/6 and ROPES 2/2 for a ROPE LADDER (Inventory).
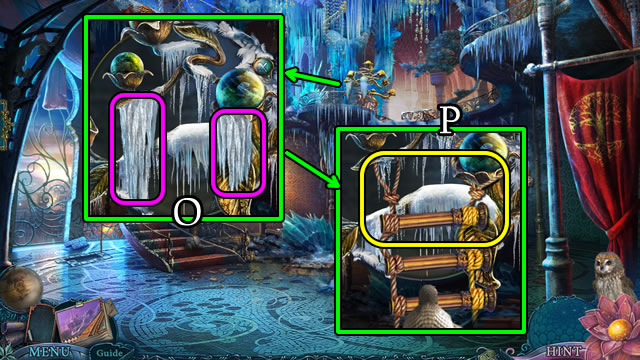
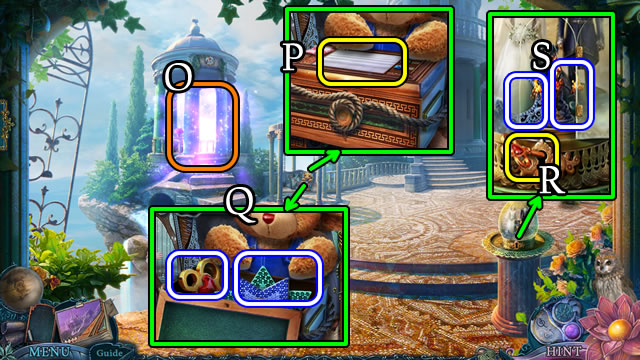
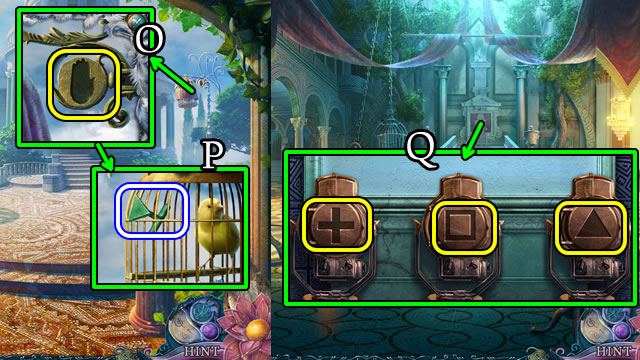
- Remove the ice (O); place the ROPE LADDER (P).
- Walk forward.
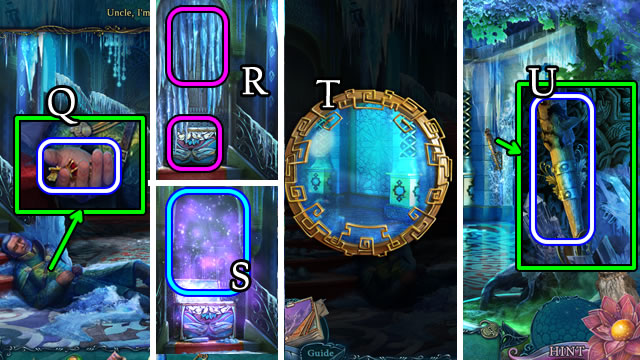
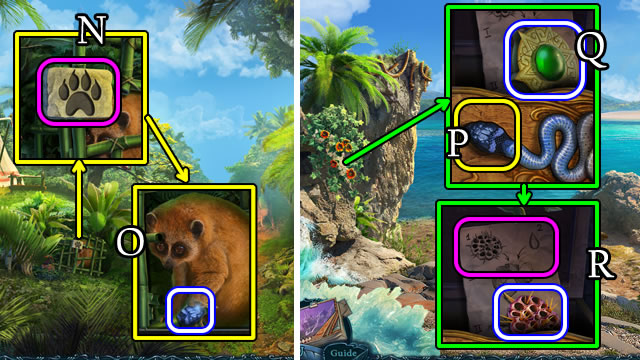
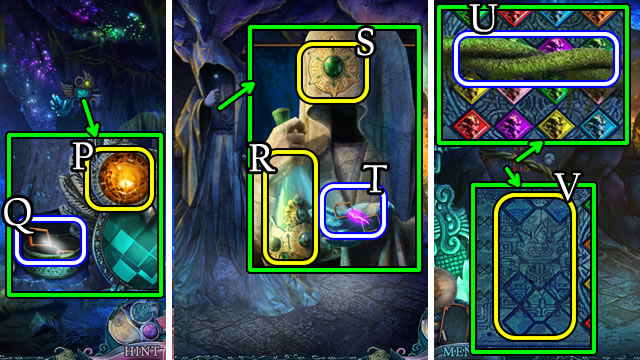
- Speak to Uncle. Take the note and KEY (Q).
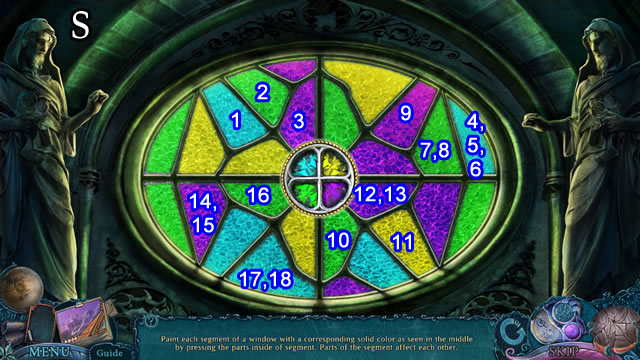
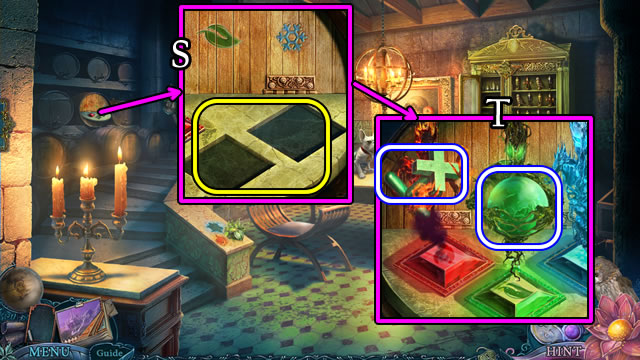
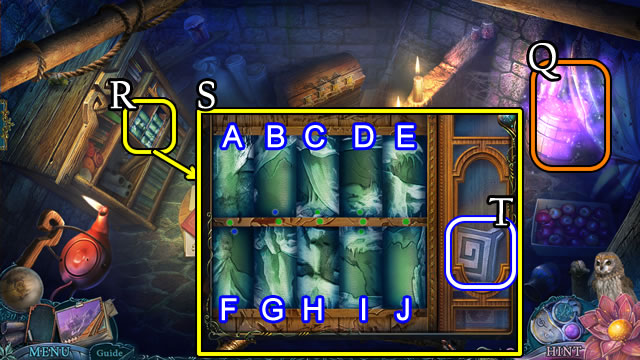
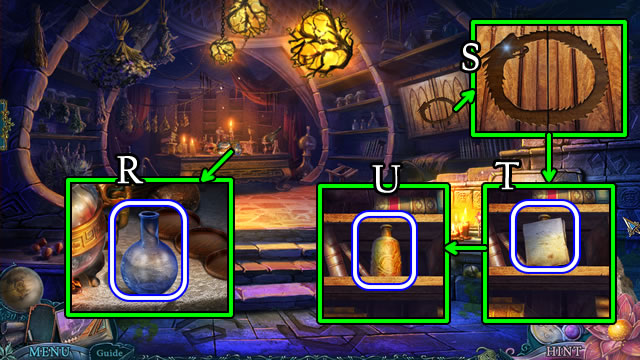
- Remove the ice; open (R) to play the HOP (S). Receive a POUCH.
- Open the POUCH (Inventory). Take the LENS and TILE.
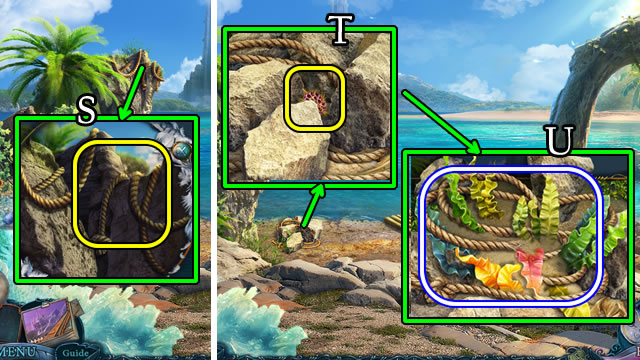
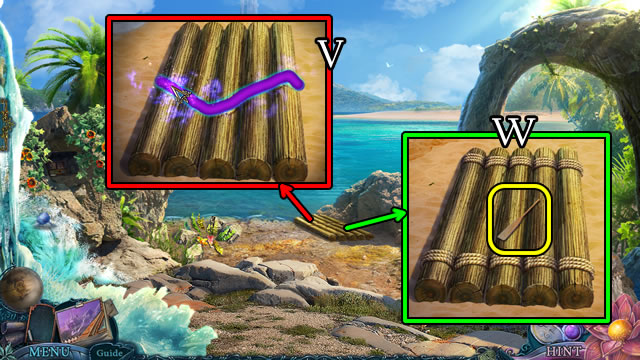
- Unwrap and select the LENS (Inventory).
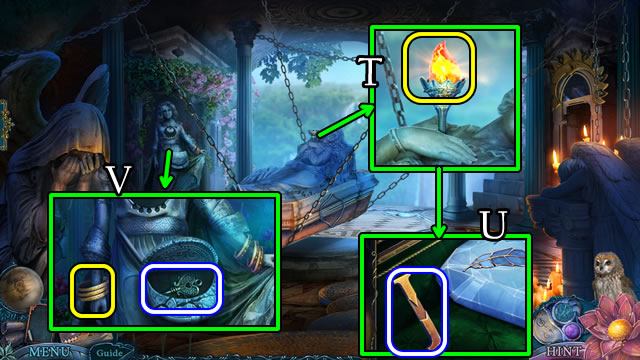
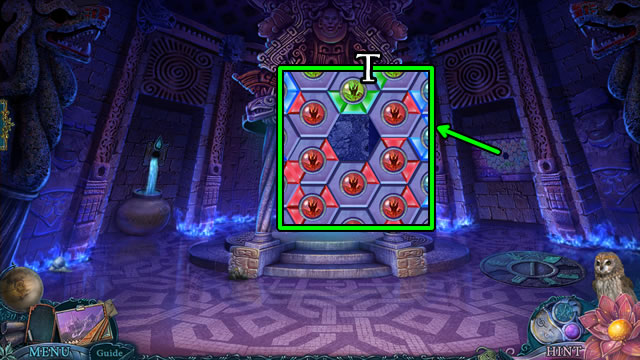
- Solution (T).
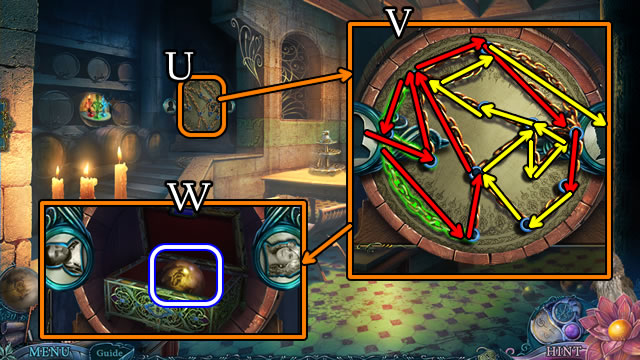
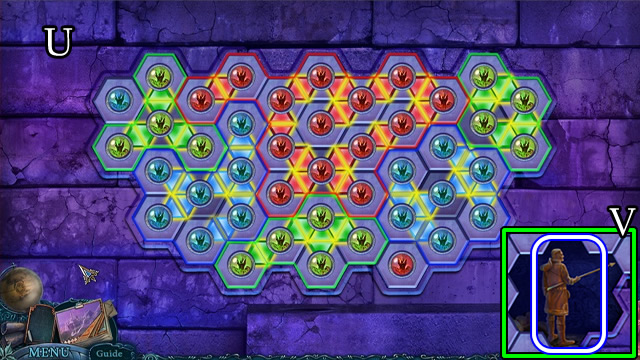
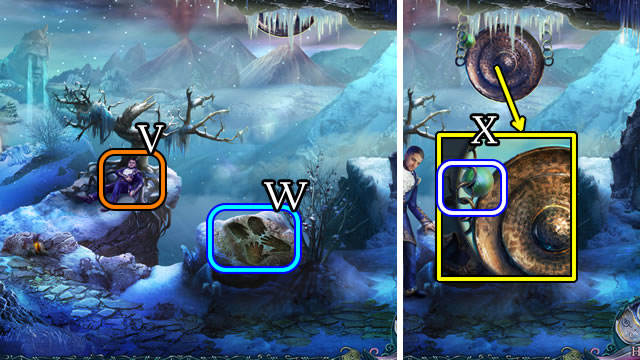
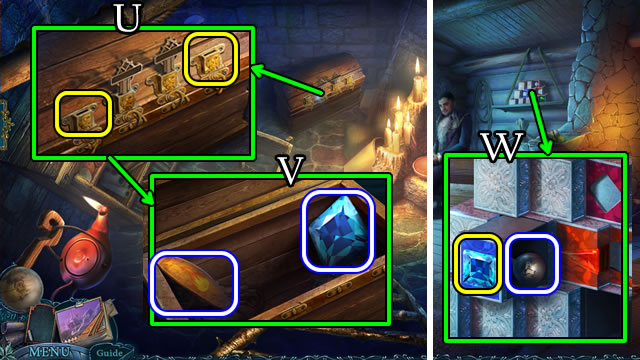
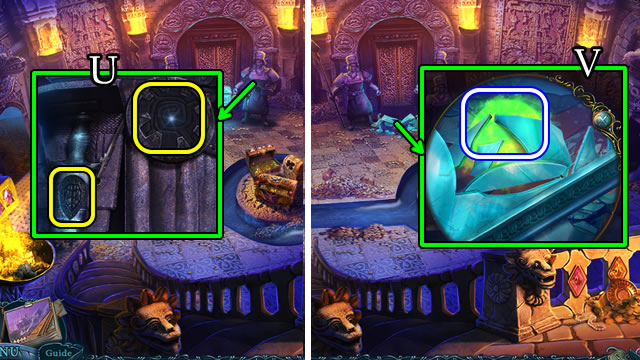
- Select and take the TORCH (U).
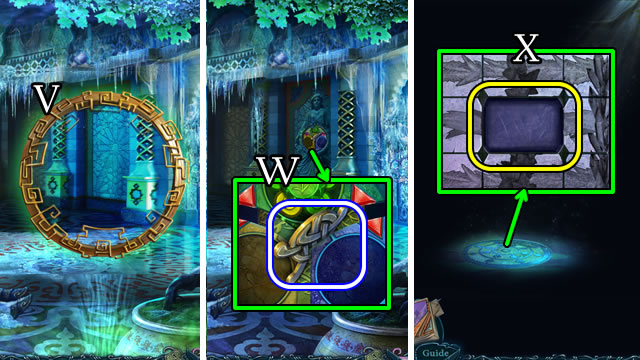
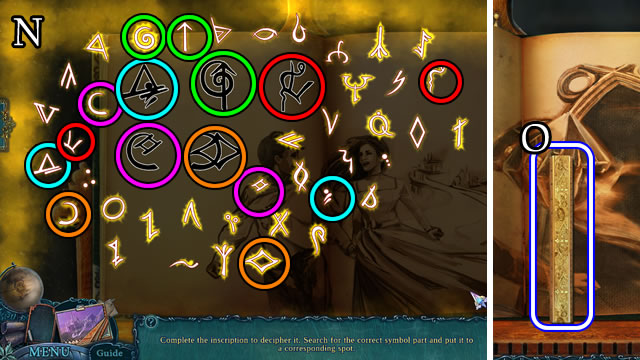
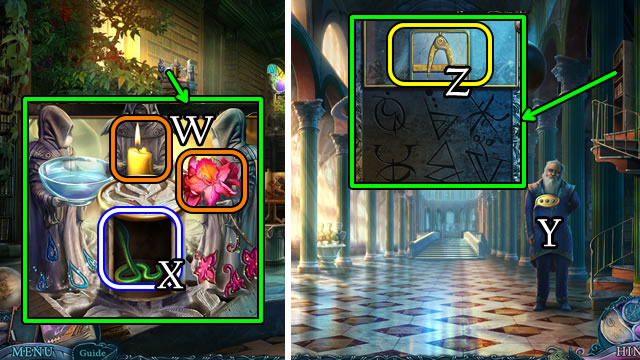
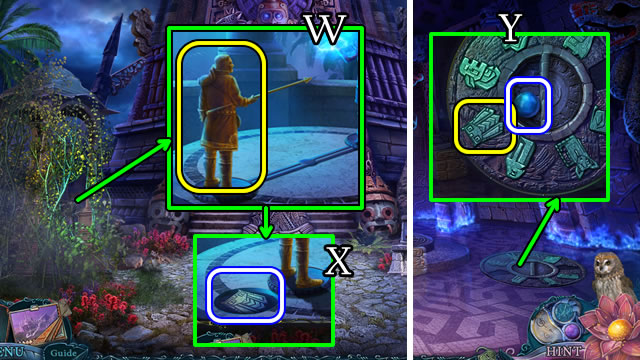
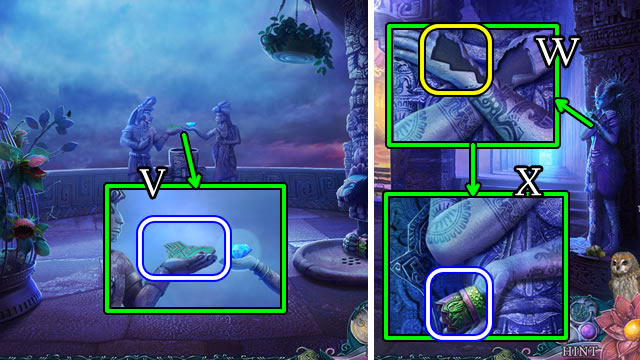
- Use the LENS (V). Take the BOOK PART (W).
- Walk left.
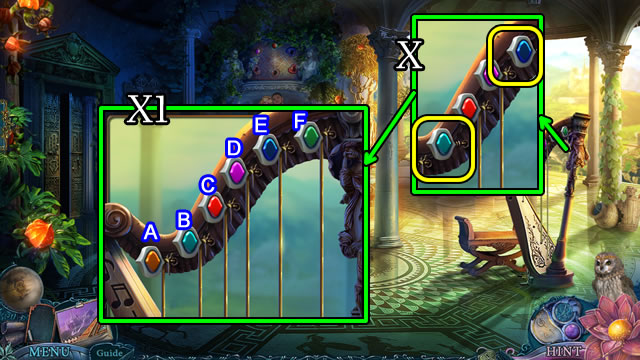
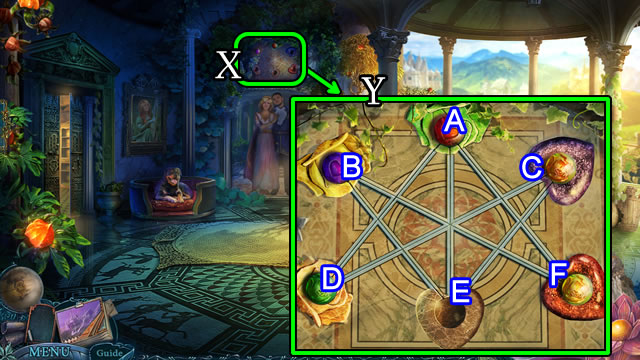
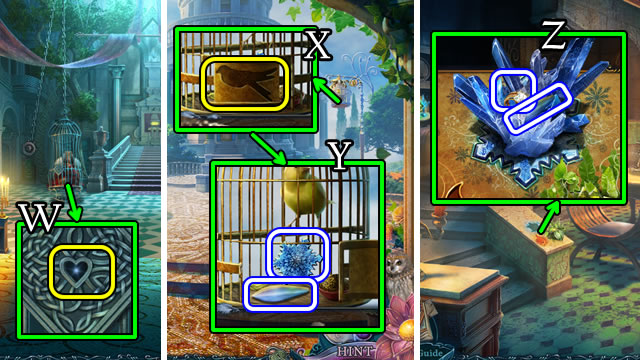
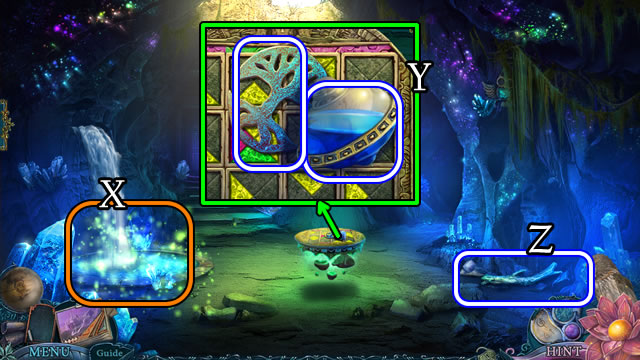
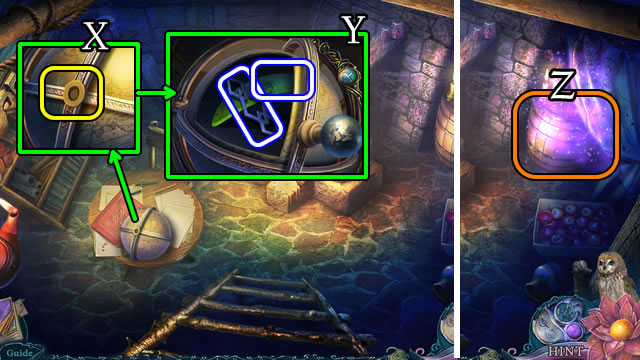
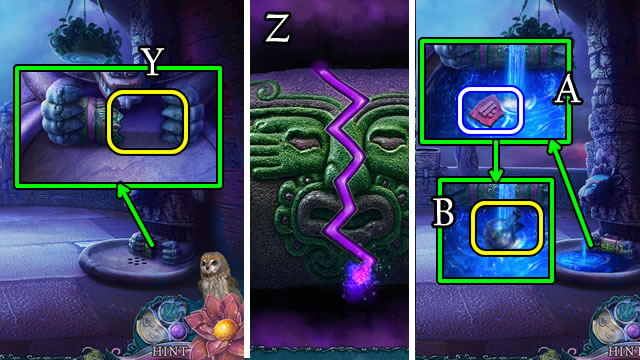
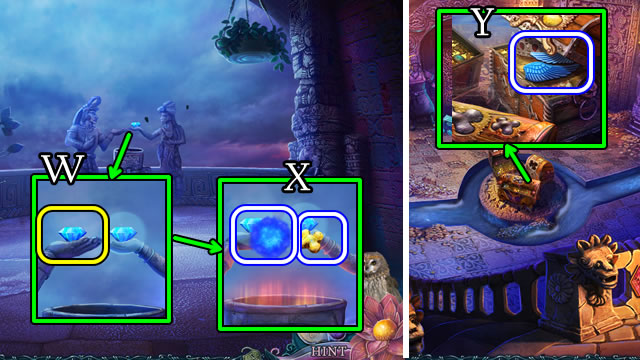
- Place the TILE and INSTRUCTIONS (X).
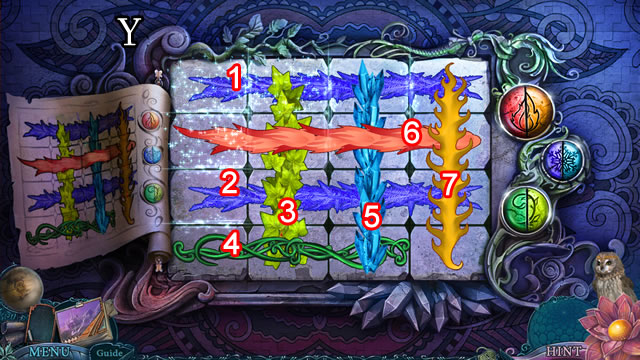
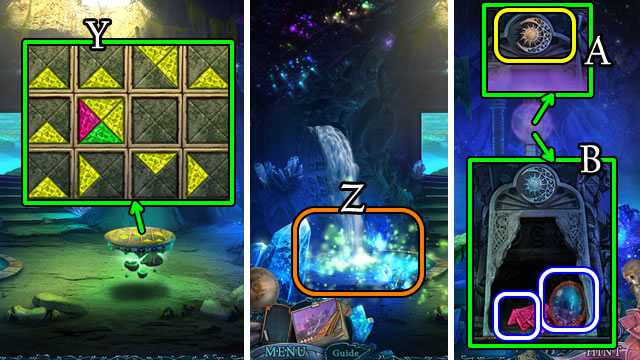
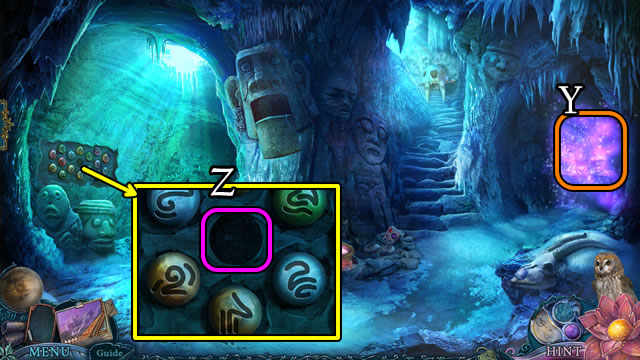
- Solution (Y). 1-7.
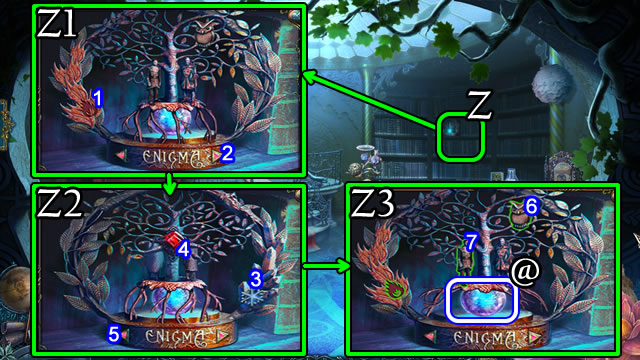
- Select (Z).
- Solution (Z1-Z3). 1-7.
- Take the SPHERE (@).
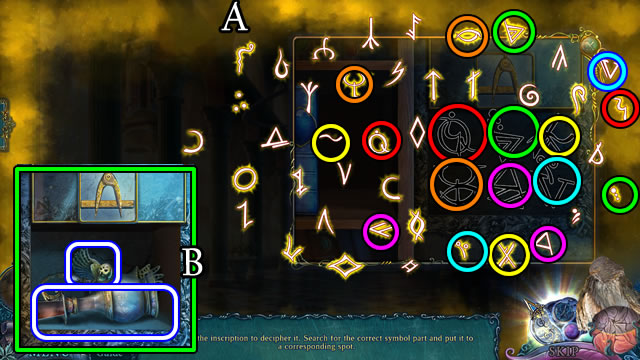
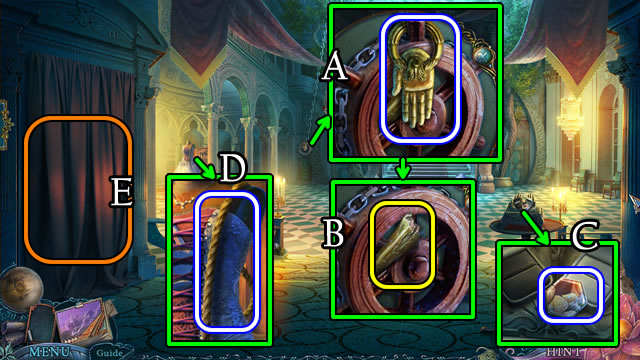
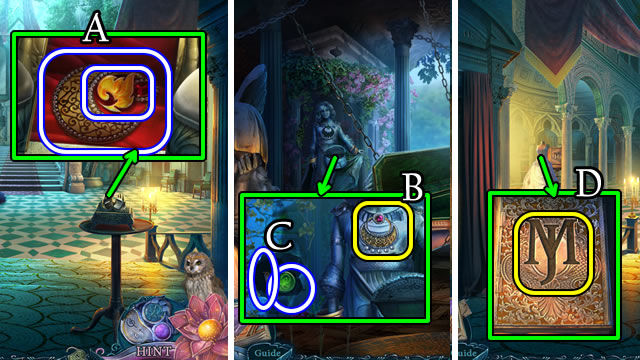
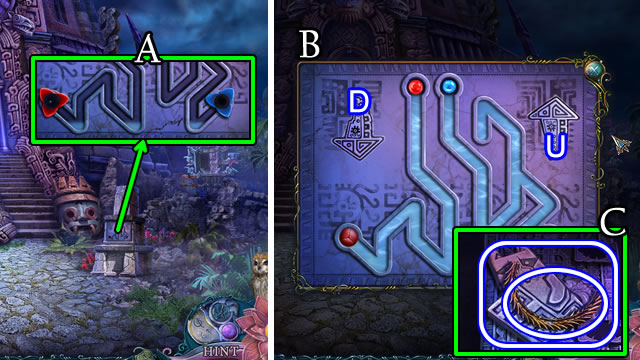
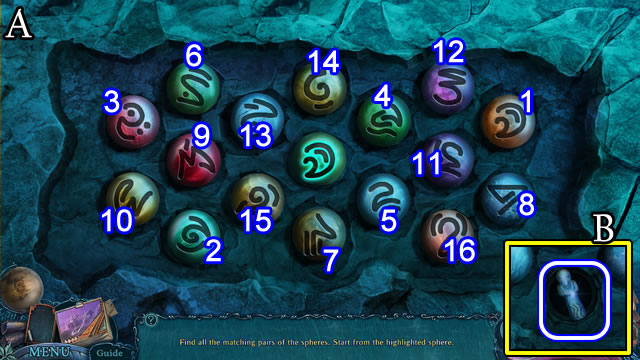
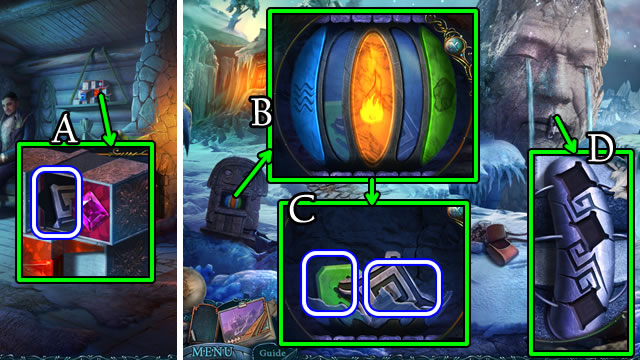
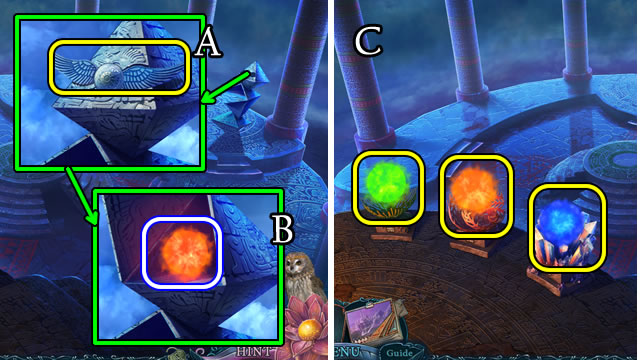
- Move the curtain. Take the PAPERCLIP (A). Place the BOOK PART (B).
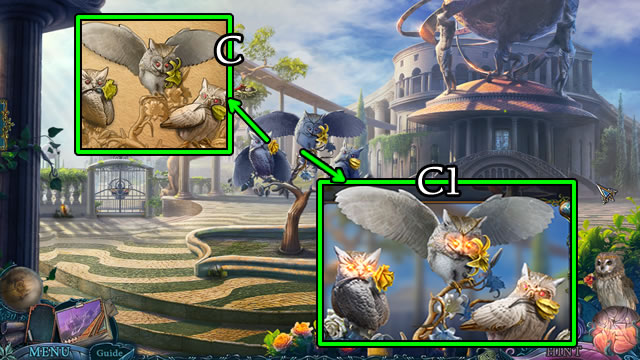
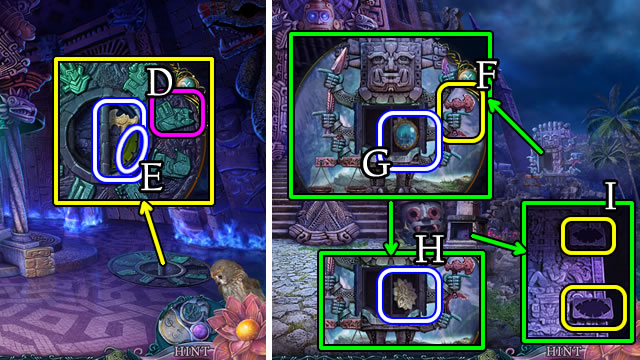
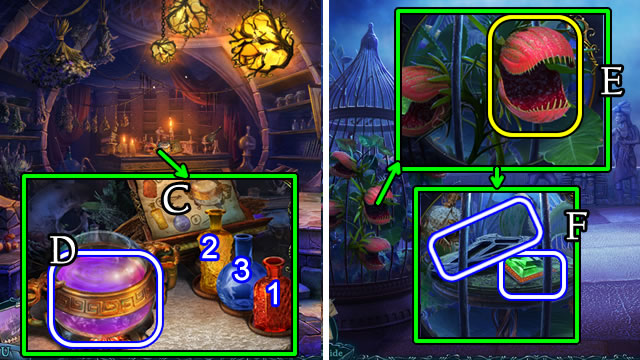
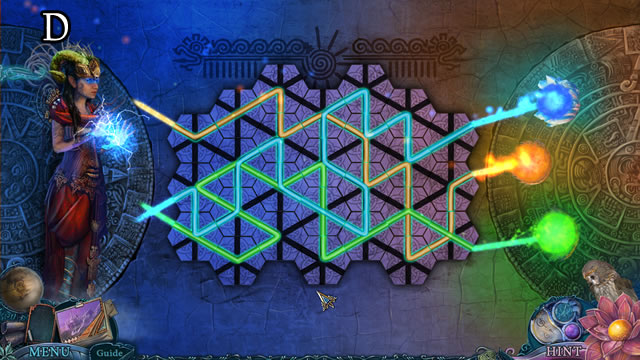
- Solution (C-D).
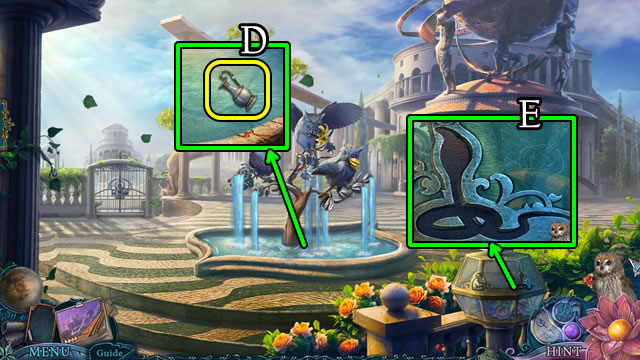
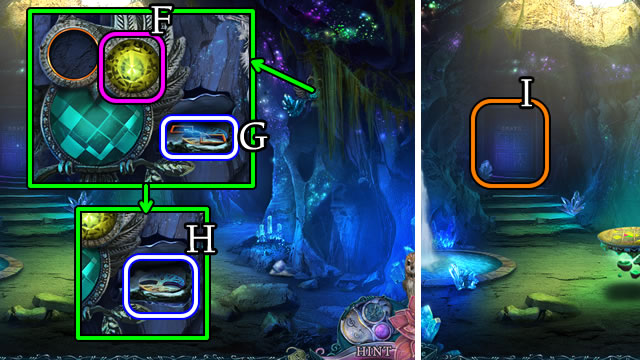
- Take the FLOWER (E) and TOKEN (F).
- Open the book; turn the page. Take the FIGURINE (G).
- Walk down 2x.
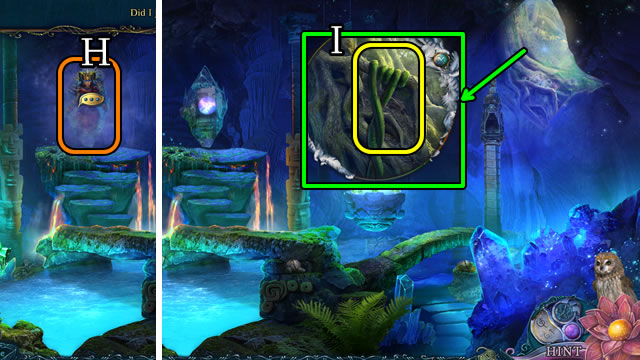
- Place the FIGURINE (H).
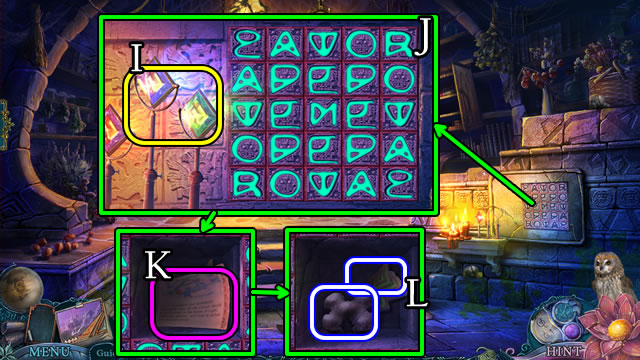
- Uncover and take the FABRIC SCROLL (I).
- Select the FABRIC SCROLL (Inventory). Take the LITTLE TRIANGLE and FABRIC.
- Combine the TORCH and FABRIC for a TORCH (Inventory).
- Walk forward and left.
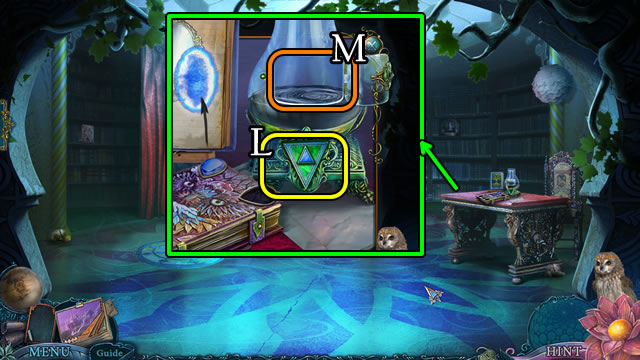
- Place the TRIANGLE and LITTLE TRIANGLE. Select the triangles (L).
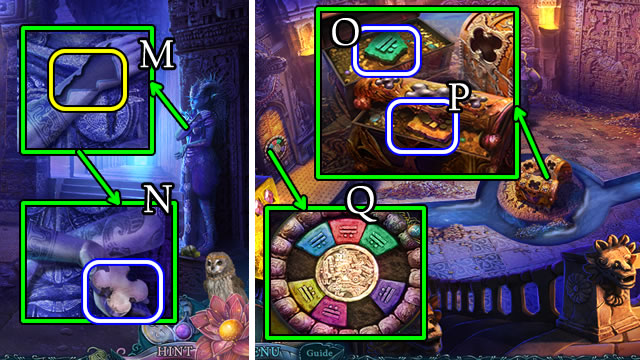
- Dip the TORCH (M); receive a TORCH.
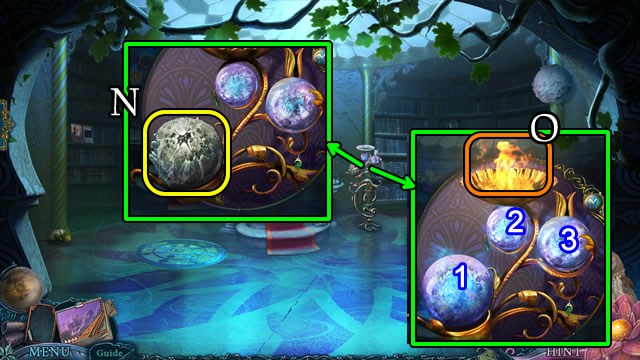
- Replace the SPHERE (N). Select 1-2-3.
- Place the TORCH (O) for TORCH FIRE.
- Walk down.
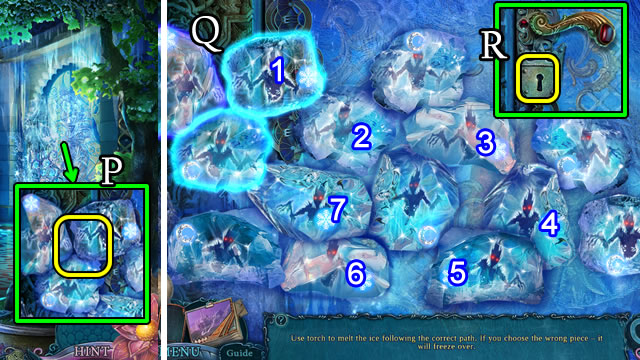
- Use the TORCH FIRE (P).
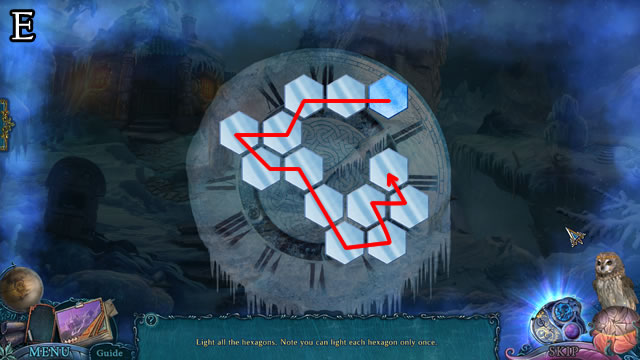
- Solution (Q). 1-7.
- Use the KEY (R).
- Walk right.
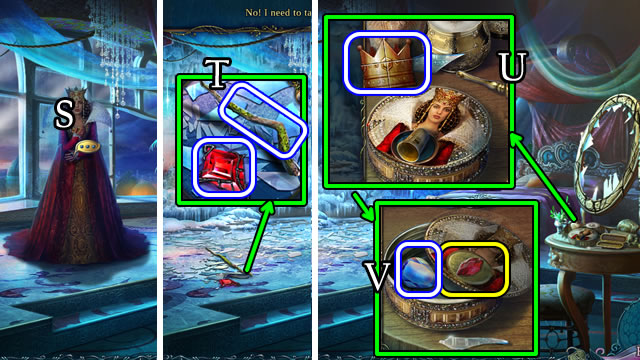
- Speak to the Queen (S).
- Puzzle solutions vary.
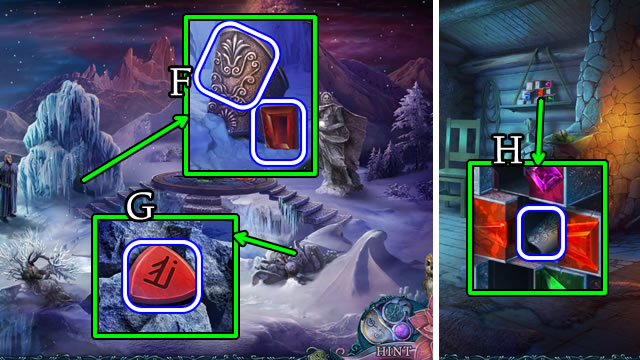
- Take the MONSTER'S PART and DARK RUBY (T).
- Play the mini-HOP to receive a CROWN BADGE (U).
- Place the TOKEN, take CRYSTALS 2/3 (V).
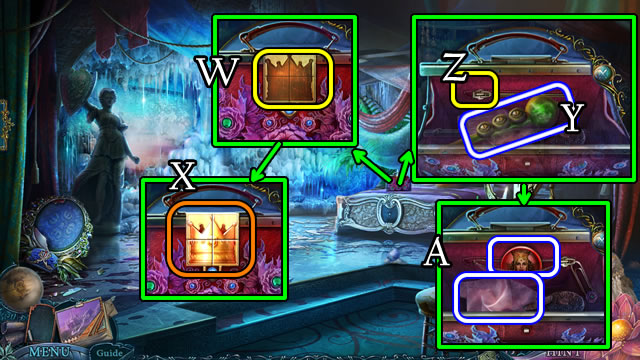
- Place the CROWN BADGE (W).
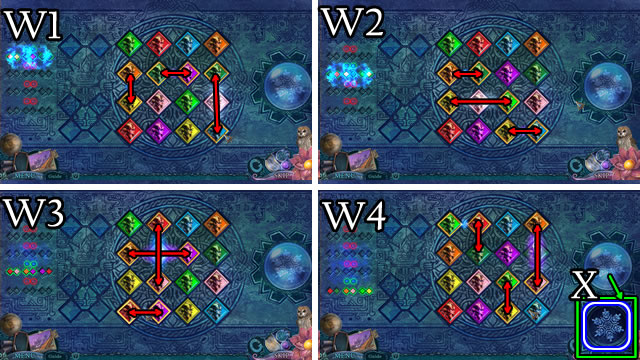
- Solution (X).
- Take the REED PIPE (Y). Use the PAPERCLIP (Z).
- Take the HANDKERCHIEF, note and CLIO'S PORTRAIT (A).
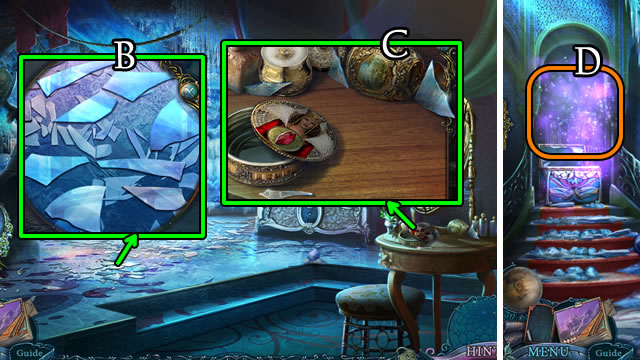
- Use the HANDKERCHIEF; receive MIRROR SHARDS 1/3 (B).
- Use the HANDKERCHIEF; receive MIRROR SHARDS 2/3 (C).
- Walk down.
- Play the HOP (D); receive MIRROR SHARDS 3/3.
- Walk left.
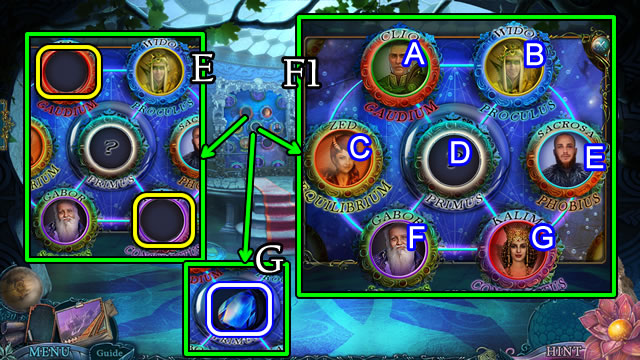
- Place GABOR'S and CLIO'S PORTRAIT (E).
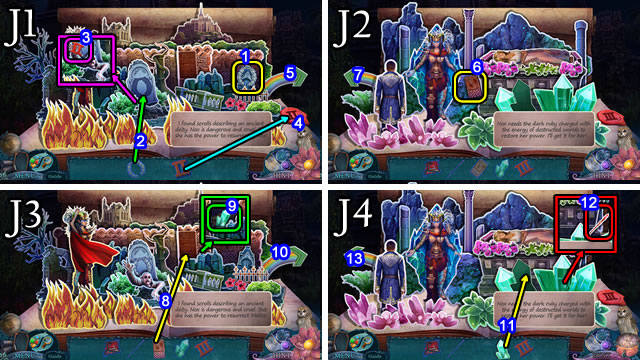
- Solution (F1). G-F-C-A-B-D-G-F-C-A-B-E-G-D.
- Take CRYSTALS 3/3 (G).
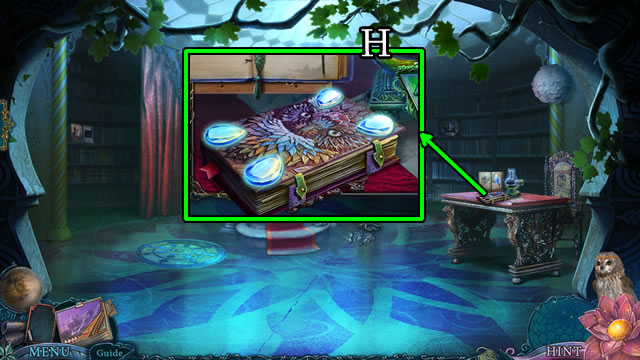
- Place CRYSTALS 3/3 (H). Open.
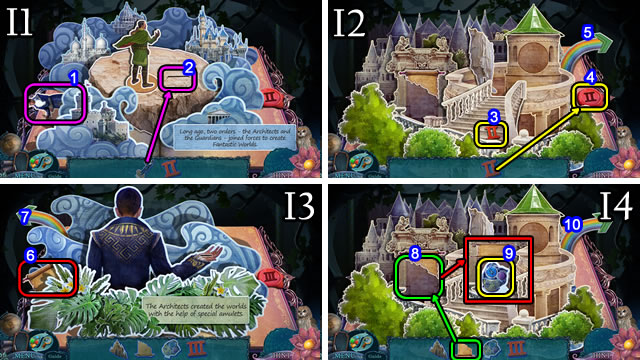
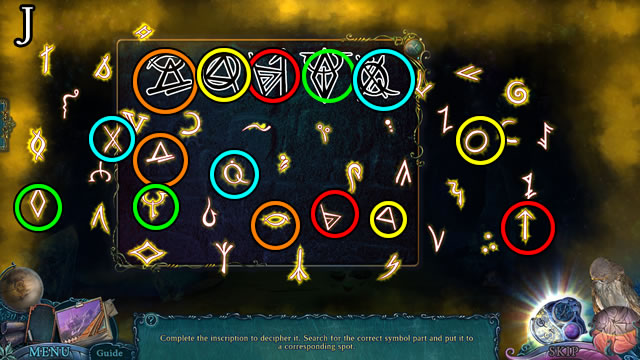
- Solution (I1-I4). 1-10.
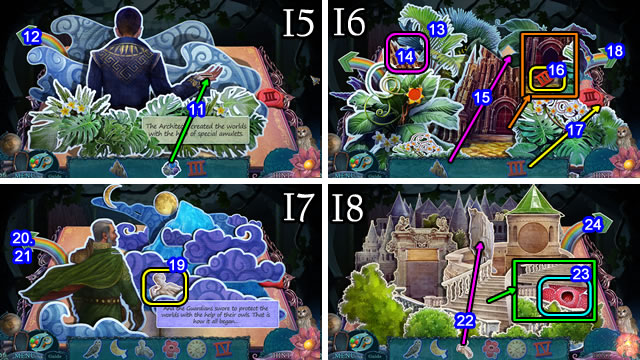
- Solution (I5-I8). 11-24.
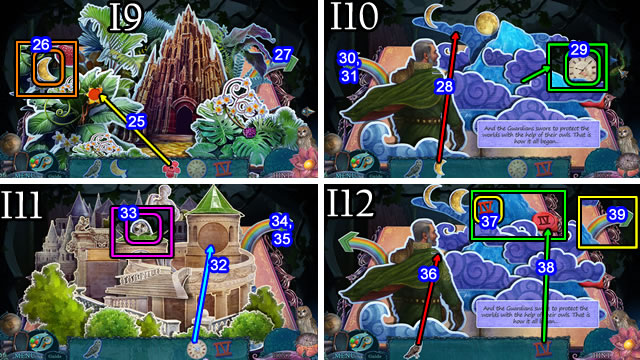
- Solution (I9-I12). 25-39.
- Take the GOLD ORNAMENT and FLOWER (J).
- Walk down.
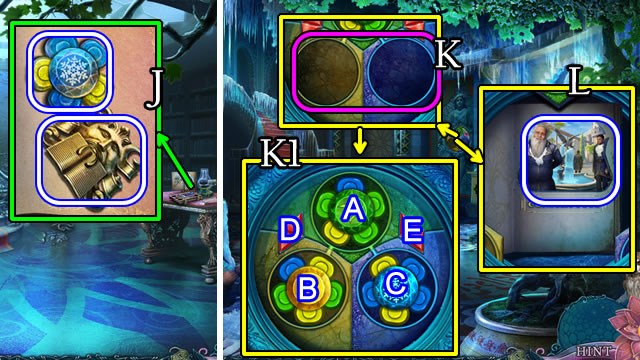
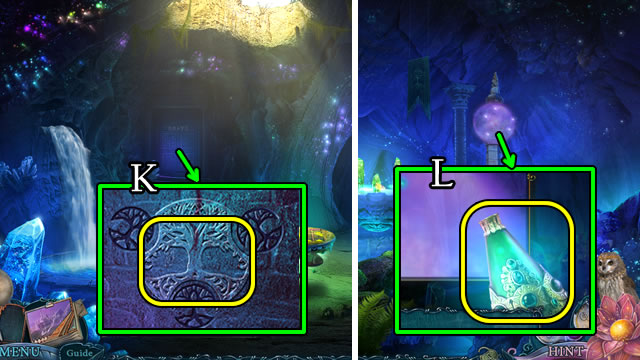
- Place the 2 FLOWERS (K).
- Solution (K1). B-D-Ax2-E-A-B-D-A-Cx2-E-A-Bx2-D.
- Open the book. Turn the pages. Take CONSTRUCTUS' PHOTO (L).
- Walk right.
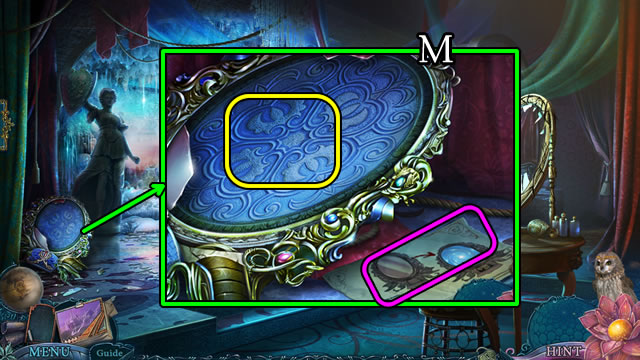
- Take the note; place the MIRROR SHARDS 3/3 (M).
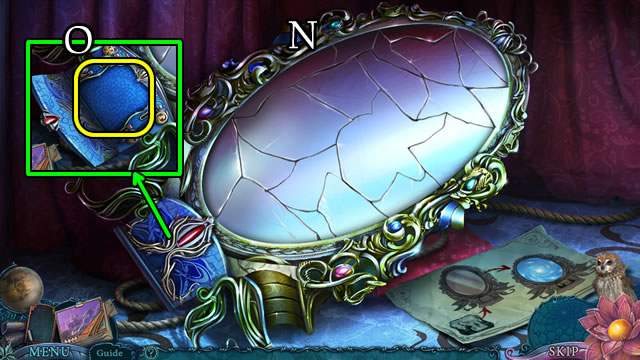
- Solution (N).
- Place CONSTRUCTUS' PHOTO (O).
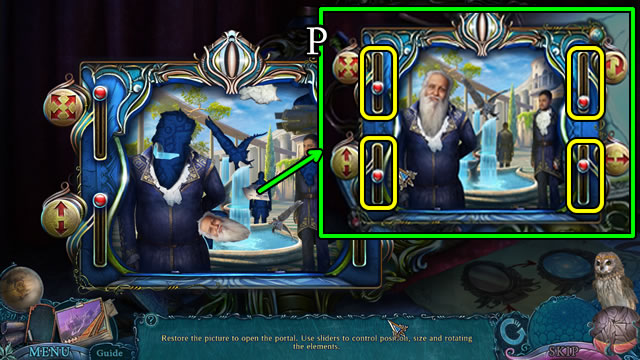
- Solution (P).
- Enter the portal.
Chapter 2: The Mansion
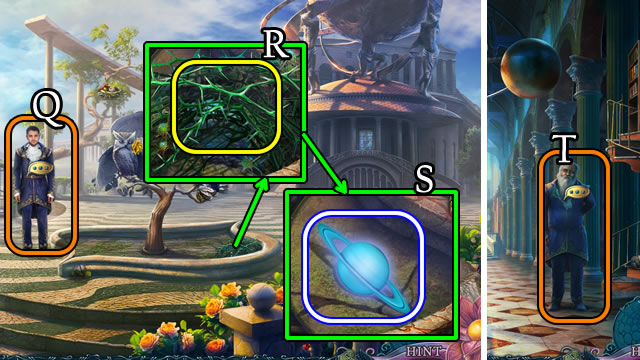
- Speak to the man (Q).
- Use the TORCH FIRE (R). Uncover, take the PLANET SOURCE (S).
- Walk forward.
- Speak to the man. Receive a Special Architects' Amulet (T).
- Walk left.
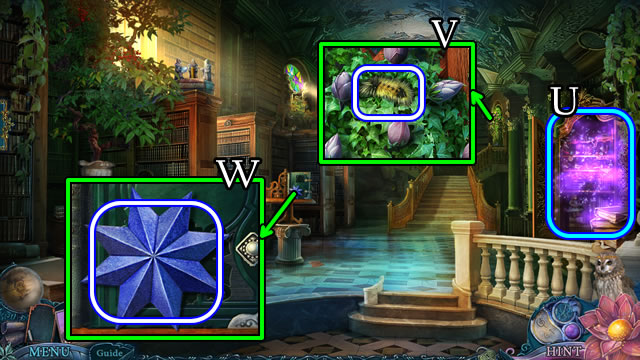
- Open the cabinet to play a HOP (U). Receive a GOLDEN TULIP.
- Take the CATERPILLAR (V).
- Take the STAR (W).
- Walk down.
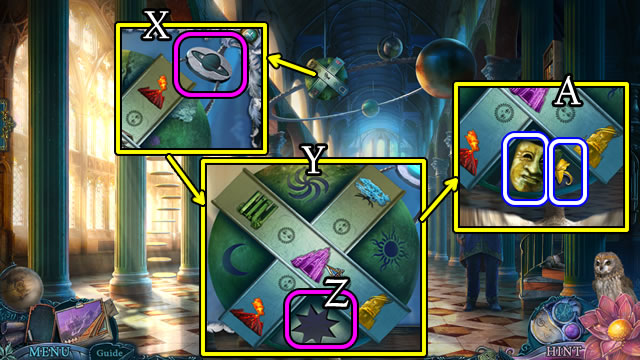
- Place the PLANET SOURCE (X).
- Solution (Y).
- Place the STAR (Z); take the CHEERFUL FACE and GOLDEN LILY (A).
- Walk down.

- Give the CATERPILLAR (B). Play the mini-HOP; receive DECORATIVE STONES 1/2 (C).
- Take the WING (D).
- Place the GOLDEN LILY and GOLDEN TULIP (E). Take the SAD FACE and DECORATIVE STONES 2/2 (F).
- Walk forward.
- Place DECORATIVE STONES 2/2 (G); take the ANGRY FACE (H).
- Place the HAPPY, SAD and ANGRY FACES (I).
- Solution (J).
- Take the SILVER ORNAMENT (K).
- Walk left.
- Place the GOLD and SILVER ORNAMENTS (L).
- Select (M), then touch the glowing amulet.
- Solution (N).
- Take the RULER (O).

- Play the HOP (P); receive a QUEEN.
- Take the GLASS, note and FOUNTAIN PICTURE (Q).
- Place the GLASS (R).
- Solution. 1-18.

- Solution (T).
- Receive a FLOWER.
- Place the QUEEN (U). Take the BOW COMPASSES (V).
- Use the TORCH FIRE. Place the FLOWER (W).
- Take the note and COBRA CHIP (X).
- Walk down.
- Speak to Kalim (Y). Receive a MONSTER DEVICE.
- Place the BOW COMPASSES and RULER (Z).
- Select, then touch the amulet.
- Solution (A).
- Take the JUG and OWL EMBLEM (B).
- Open the JUG (Inventory). Take PHOTOS 1/3 and the JUG.
- Walk down.
- Place the FOUNTAIN PICTURE (C).
- Solution (C1).
- Place the JUG. Receive a JUG OF WATER (D).
- Place the COBRA CHIP (E). Place the REED PIPE.

- Solution (F1). Ax3-Bx2-C-B-A-C-B-A.
- Take PHOTOS 2/3 and the SUN (F2).
- Walk forward and left.
- Place the OWL EMBLEM (G).
- Take PHOTOS 3/3 (H).
- Place PHOTOS 3/3 and the MONSTER DEVICE (I).
- Solution (J). 1-2-3-4-5.
- Walk down.
- Select and touch the Amulet.
- Solution (K).
- Speak to Kalim.
- Use the JUG OF WATER (L).
- Take the GATE STONE (M).
- Walk down.
- Place the WING and GATE STONE (N).
- Walk left.
- Play the HOP (O); receive an EMBROIDERY SET.
- Place the EMBROIDERY SET (P).
- Solutions vary.
- Take the STAR and KEY (Q).
- Use the KEY (R). Take the MONSTER STATUETTE and the MOON (S).

- Place the STAR, SUN and MOON (T).
- Walk forward.
- Take the PAW LOCKET (U).
- Select and touch the PAW LOCKET (Inventory). Take the STRING and PAW.
- Walk down.
- Place the PAW (V). Take the STRING (W).
- Walk forward.
- Place the 2 STRINGS (X).
- Solutions (X1). B-F-D. A-C-B-E. C-F-A-E-B.
- Take the HANDLE (Y).
- Uncover and take MELITAS BADGE (Z).
- Walk left.
- Use the TORCH FIRE 2x.
- Play the mini-HOP. Receive a LOLLIPOP (A).
- Open and take the GEAR (B).
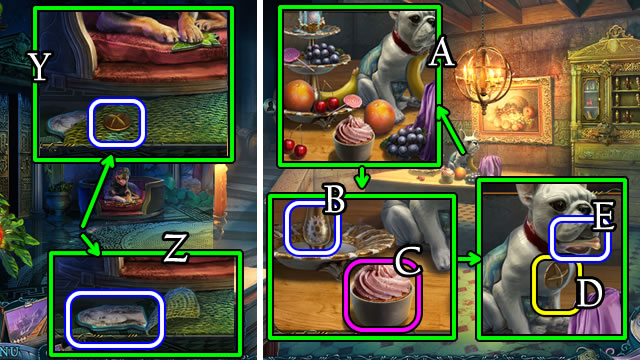
- Select the cupcake (C) take the cup for a CUP OF WATER.
- Place and select the HANDLE (D). Take the DOG COOKIE (E).
- Remove the purple cloth.
- Walk down.

- Give the DOG COOKIE (F). Take the EARTH SYMBOL (G).
- Take the MALLET (H). Place the GEAR (I).
- Take the OWL STATUETTE, LENS and JONAS BADGE (J).
- Walk left.
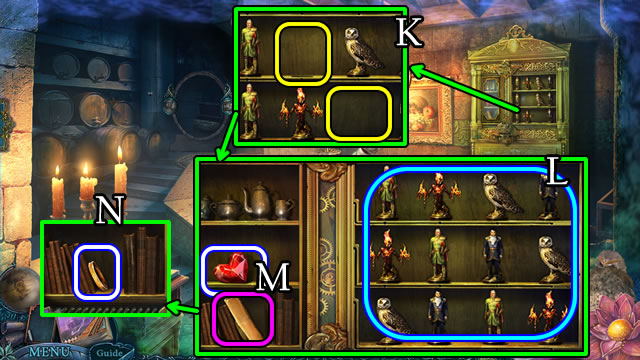
- Place the MONSTER and OWL STATUETTES (K).
- Solution (L).
- Open, take the HEART, note (M) and BRACELET 1/3 (N).
- Walk down 2x.
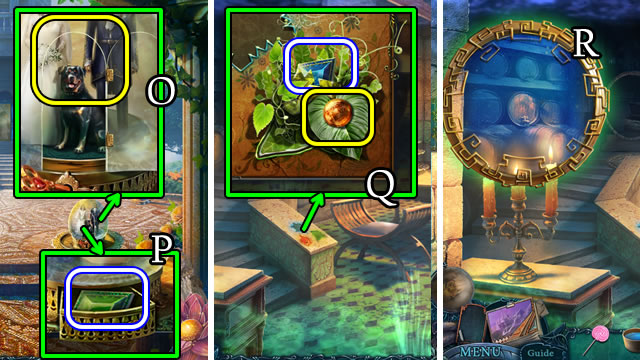
- Place the HEART (O).
- Open and take the ELEMENTAL BADGE (P).
- Walk forward and left.
- Place the EARTH SYMBOL. Take the ELEMENTAL BADGE. Uncover and take the ORANGE MARBLE BALL (Q).
- Place the LENS (R).
- Put the 2 ELEMENTAL BADGES (S).
- Take the T-WRENCH and GREEN MARBLE BALL (T).
- Select (U).
- Solution (V).
- Place the MELITAS and JONAS BADGES. Open the box; take the YELLOW MARBLE BALL (W).
- Walk down.
- Place the ORANGE, GREEN and YELLOW MARBLE BALLS (X).
- Solution (Y). B-F-A-D-C-E.
- Walk forward.
- Take the HAND (A); use the MALLET (B).
- Take the TILE 1/2 (C).
- Take the ROPE (D).
- Open the curtain (E).
- Walk left.
- Use the ROPE (F). Take the T-WRENCH and SHARP STONE (G).
- Walk down.
- Use the SHARP STONE. Take the STONE HAND (H).
- Walk left.
- Place the STONE HAND (I).
- Take the TILE 2/2 (J).
- Walk down 3x.
- Play the HOP (K); receive the BRACELET 2/3.
- Place TILES 2/2 (L).
- Solution (M). Dx3-Fx3-Ex3-Bx3-Cx3-Ax2.
- Uncover and take TOKEN PART 1/2 and a RING (N).
- Place the HAND (O). Take a T-WRENCH (P).
- Walk forward 2x.
- Place and select the 3 T-WRENCHES (Q).
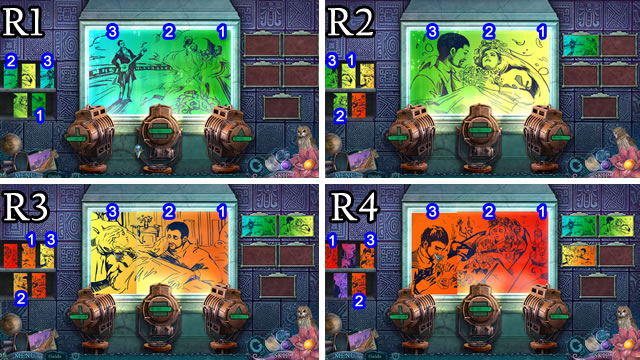
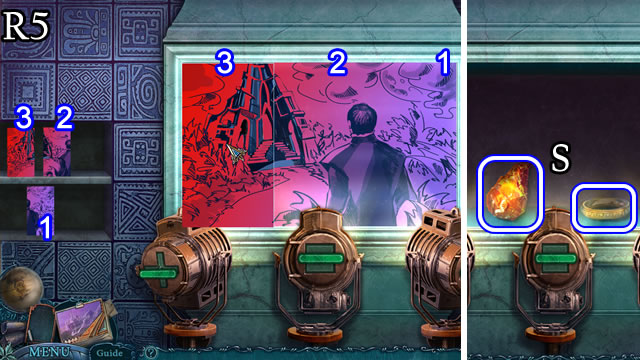
- Solutions (R1-R5).
- Take the CRYSTAL FIRE and BRACELET 3/3 (S).
- Walk left.
- Place the CRYSTAL FIRE (T). Take the letter J (U).
- Place the BRACELETS 3/3. Take the HEART KEY (V).
- Walk down.
- Use the HEART KEY (W).
- Speak to the Queen; receive a CANARY BADGE.
- Walk down 2x.
- Place the CANARY BADGE (X).
- Take the ICE SYMBOL and GLASS PETALS 1/3 (Y).
- Walk forward and left.
- Place the ICE SYMBOL. Select, then take the RING and GLASS PETALS 2/3 (Z).
- Walk down, then forward.
- Place the 2 RINGS. Take the NECKLACE and FIRE SYMBOL (A).
- Walk left.
- Place the NECKLACE (B). Take the EARTH TOKEN and letter M (C).
- Walk down.
- Combine the letters J and M for MJ (Inventory).
- Place MJ. Open the book (D).
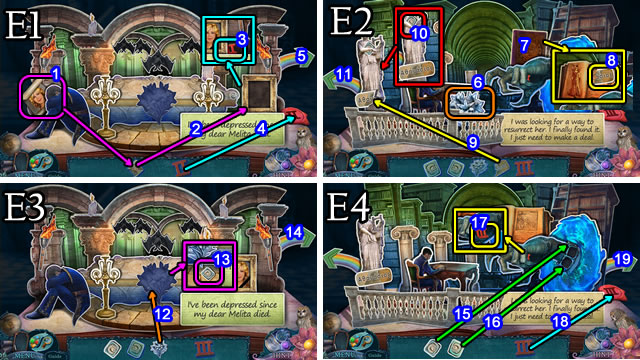
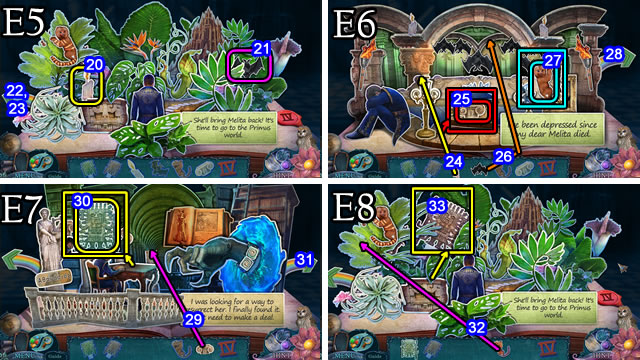
- Solution (E1-E4). 1-19.
- Solution (E5-E8). 20-33.
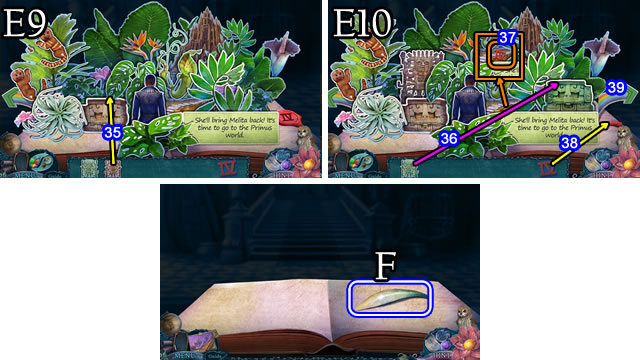
- Solution (E9-E10). 35-39.
- Take GLASS PETALS 3/3 (F).
- Walk down.
- Place GLASS PETALS 3/3 (G).
- Open; take the note and TOKEN PART (2/2) (H).
- Walk left.
- Place the FIRE SYMBOL. Use the CUP OF WATER (I). Select and take the CRYSTAL FEATHER (J).
- Walk down, forward, then left.
- Place the CRYSTAL FEATHER; take the FIRE TOKEN (@).
- Place the EARTH and FIRE TOKENS. Place the TOKEN PARTS (2/2) (K).
- Select and touch the Amulet.
- Solution (L).
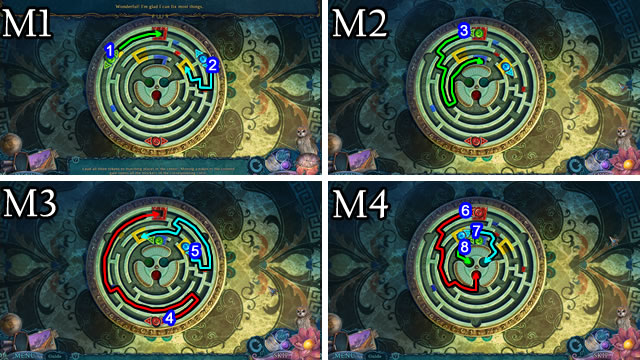
- Solution (M1-M4).
Chapter 3: To the Tower
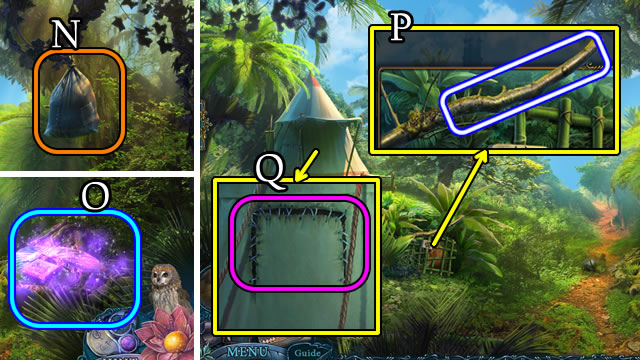
- Select (N) to play a HOP (O). Receive a POT.
- Take the STICK (P).
- Use the SHARP STONE (Q). Play the mini-HOP; receive a SNAKE HEAD.
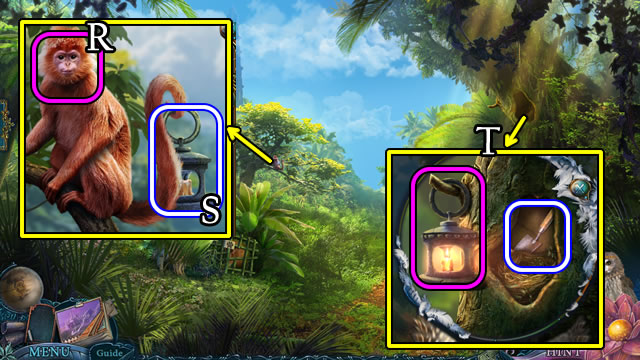
- Give the LOLLIPOP (R); receive a LANTERN (S).
- Place the LANTERN; use the TORCH FIRE. Take the TROWEL (T).
- Walk forward.
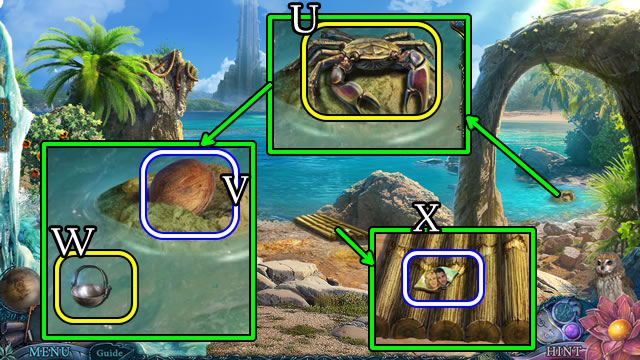
- Use the STICK (U). Use the TROWEL; take the COCONUT (V).
- Place the POT for a WATER POT (W).
- Take the LOVE BADGE (X).
- Walk down.
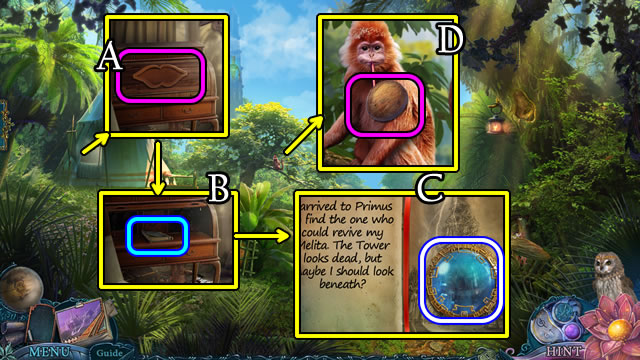
- Place the LOVE BADGE (A). Select (B) and take the book and LENS (C).
- Give the COCONUT (D). Receive a LOCK PART.
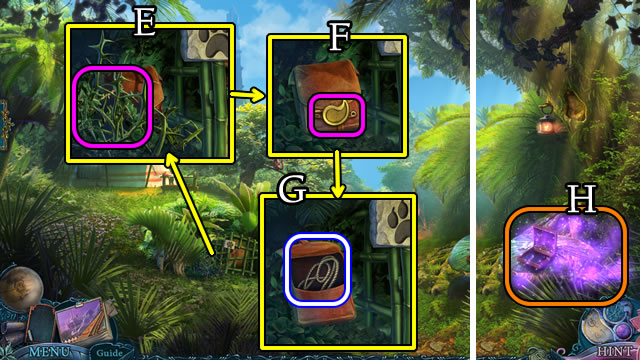
- Use the TORCH FIRE (E). Place the LOCK PART (F).
- Take the ROPE (G).
- Play the HOP (H); receive a PADDLE.
- Walk forward.
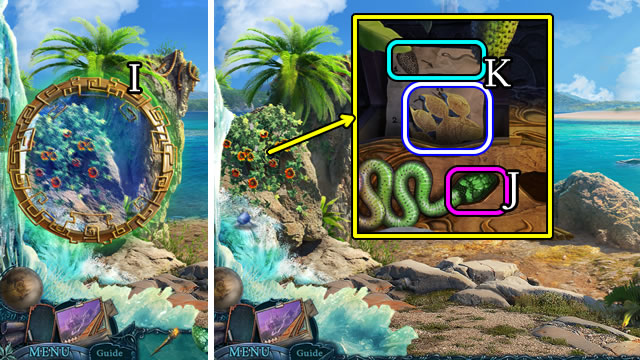
- Place the LENS (I).
- Uncover and place the SNAKE HEAD (J).
- Take the PAW BADGE and note (K).
- Solution (M). 1-4.
- Walk down.
- Place the PAW BADGE (N). Take the SNAKE HEAD (O).
- Walk forward.
- Place the SNAKE HEAD (P). Take the DÉCOR ELEMENT (Q), SEED and note (R).
- Select the rope (S).
- Place the SEED (T). Use the WATER POT. Take the ROPE (U).
- Select the raft.
- Select and touch the Amulet.
- Solution (V).
- Place the 2 ROPES and PADDLE (W).
- Remove the foliage.
- Play the HOP (X); receive BLUE CRYSTALS.
- Take the HUMMING TOP and TREE PART 1/3 (Y).
- Take the STICK (Z).
- Walk right.

- Use the TORCH FIRE (A).
- Take the YELLOW EYE and WEIGHT (B). Place the HUMMING TOP (C).
- Take TREE PART 2/3 (D).
- Take the VIAL (E).
- Walk down.
- Uncover. Place the YELLOW EYE (F).
- Open, take the ENERGY CHAIN (G) and TREE PART 3/3 (H).
- Select (I).
- Select and touch the Amulet.
- Solution (J).
- Place TREE PARTS 3/3 (K).
- Walk forward.
- Place the VIAL (L).
- Solutions vary. Take the LUMINOUS VIAL.
- Take the FIRE RUNE and LEAF EMBLEM (M).
- Uncover and take the ORANGE EYE (N).
- Use the STICK. Take the GREEN CRYSTALS (O).
- Walk down.
- Place the ORANGE EYE (P). Take the ENERGY CHAIN (Q).
- Walk right.
- Place the LUMINOUS VIAL (R). Place the DÉCOR ELEMENT (S). Take the ENERGY CHAIN (T).
- Take the VINE (U).
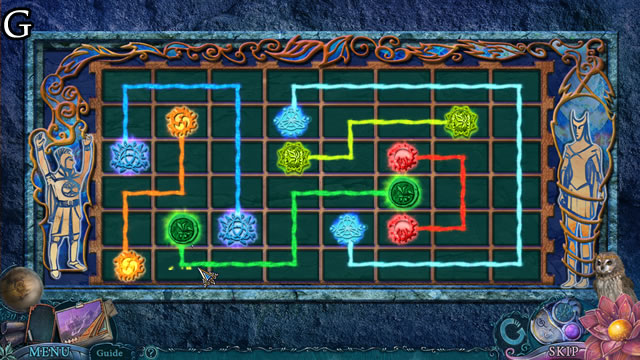
- Place the 3 ENERGY CHAINS (V).
- Solution (W1-W4).
- Take the ICE RUNE (X).
- Walk down.
- Place the BLUE and GREEN CRYSTALS (Y).
- Play the HOP (Z); receive a NIGHT SYMBOL.
- Walk forward.
- Place the NIGHT SYMBOL (A).
- Take the LENS and PINK CRYSTALS (B).
- Walk down.
- Place the PINK CRYSTALS (C).
- Solution (D).
- Take the note and EARTH RUNE (E).
- Walk forward.
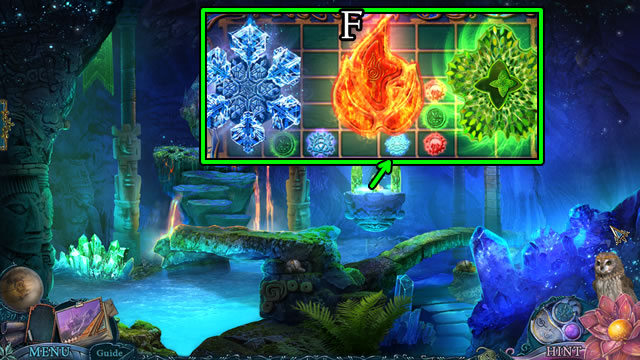
- Place the ICE, EARTH and FIRE RUNES (F).
- Solution (G).
- Speak to the Deity (H).
- Place the VINE (I).
- Walk forward.
Chapter 4: Finding Jonas
- Place the WEIGHT (J). Take the NOX FACE (K).
- Place the NOX FACE (L).
- Walk forward.
- Play the HOP (M).
- Take the WATER SYMBOL and KUKRI (N).
- Place the LENS (O).

- Place the WATER SYMBOL (P). Take the RED SPHERE (Q).
- Walk down.
- Use the KUKRI (R). Take the HEX (S).
- Walk forward.
- Place the HEX (T).
- Solution (U).
- Take the STATUETTE (V).
- Walk down.
- Place the STATUETTE (W).
- Take the STONE OWL (X).
- Walk forward.
- Place the STONE OWL. Take the BLUE SPHERE (Y).
- Walk down.
- Place the RED and BLUE SPHERES (A).
- Solution (B). Ux2-Dx2-Ux3-Dx2-Ux4.
- Take the OUROBOROS PART and STONE PANDA (C).
- Walk forward.
- Place the STONE PANDA (D). Take the STONE AXE and LEAF EMBLEM (E).
- Walk down.
- Place the STONE AXE (F). Take the LENS (G) and STONE SYMBOL (H).
- Place 2 LEAF EMBLEMS (I). Open.
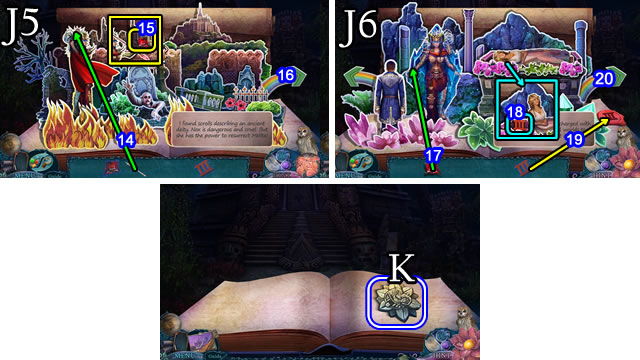
- Solution (J1-J4). 1-13.
- Solution (J5-J6). 14-20.
- Take the STONE SYMBOL (K).
- Walk forward.
- Place the 2 STONE SYMBOLS (L).
- Walk forward.
- Speak to Jonas (M).
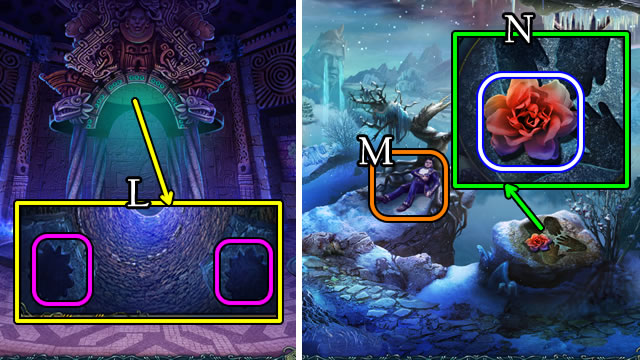
- Take the RED FLOWER (N).
- Walk left.
- Take the EARRING (O).
- Uncover and take the BLUE FLOWER (P).
- Walk down and right.
- Play the HOP (Q). Take the POUNDER.
- Place the EARRING (R). Take the BOWL (S).
- Walk down and left.
- Place the BOWL for a BOWL OF WATER (T).
- Walk down and right.
- Read the note (1). Place the RED and BLUE FLOWERS (2). Select (3). Place the BOWL OF WATER (4). Place the 2 flowers; use the POUNDER (5). Place in (6). Select the bowl; receive a CURE.
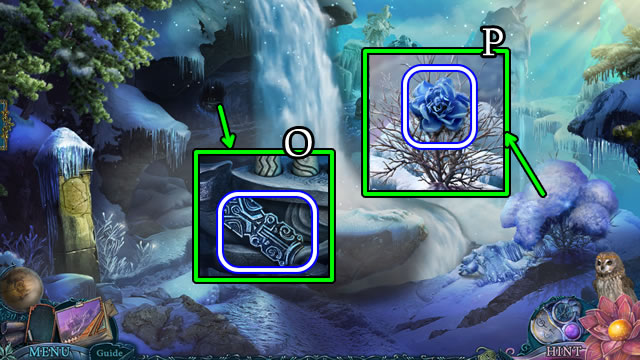
- Take the GREEN GLASS (U).
- Walk down.
- Give the CURE (V).
- Select and touch the stone (W).
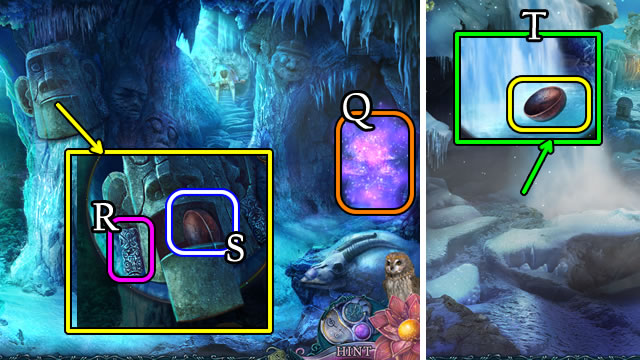
- Take the SPHERE (X).
- Walk right.
- Play the HOP (Y). Take the ARROW.
- Place the SPHERE (Z).
- Solution (A). 1-16.
- Take the STONE FIGURINE (B).
- Walk down and left.
- Place the STONE FIGURINE (C).
- Solution (D).
- Take the MALLET TOKEN (E).
- Use the ARROW. Take the GONG TOKEN (F).
- Walk down and right.
- Place the MALLET and GONG TOKENS (G). Take the MALLET (H).
- Walk down.
- Use the MALLET (I).
- Walk left. Speak to the man (J).
- Walk forward.

- Place the LENS (K).
- Take METAL EMBLEM 1/2 (L).
- Open. Take the HANDKERCHIEF and BOOK 1/3 (M).
- Walk forward. Speak to the man.
- Place the GREEN GLASS (K). Take the WATER BADGE (L).
- Select 1-4.
- Use the HANDKERCHIEF to take METAL EMBLEM 2/2 (M).
- Take the note (N), RED POTION and BOOK 2/3 (O).
- Open the hatch (P).
- Enter the Hermit's Cellar.
- Play the HOP (Q). Take BOOK 3/3.
- Place BOOKS 3/3 (R).
- Solution (S). (B-H)-(C-J)-(D-F)-(E-H)-(D-E)-(F-H)-(G-H)-(H-I)-(G-I)-(I-J)-(H-I).
- Take the STONE RHOMBOID 1/3 (T).
- Place the METAL EMBLEMS 2/2 (U). Take the FIRE BADGE and BLUE GLASS (V).
- Walk down.
- Place the BLUE GLASS. Take the GLOBE PART (W).
- Enter the Hermit's Cellar.
- Place the GLOBE PART (X).
- Take the EARTH BADGE and STONE ELEMENT (Y).
- Play the HOP (Z). Take the PURPLE GLASS.
- Walk down.
- Place the PURPLE GLASS. Take STONE RHOMBOID 2/3 (A).
- Walk down to the Hermit's Place.
- Place the EARTH, WATER and FIRE BADGES (B).
- Take STONE RHOMBOID 3/3 and PORTAL RUNE 1/2 (C).
- Place STONE RHOMBOIDS 3/3 (D).
- Select and touch the Amulet.
- Solution (E).
- Walk right.
- Uncover and take the BRACER 1/2 and RED GLASS (F).
- Uncover and take PORTAL RUNE 2/2 (G).
- Walk left and forward.
- Place the RED GLASS. Take BRACER 2/2 (H).
- Return to the Volcano.
- Place BRACERS 2/2 (I). Take the PORTAL SOURCE (J).
- Place the PORTAL SOURCE and PORTAL RUNES 2/2 (K).
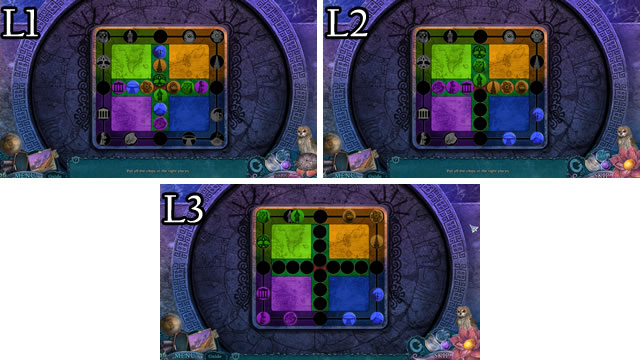
- Solution (L1-L3).
- Select and touch the Amulet.
- Solution (M).
Chapter 5: The Room of Light
- Speak to Jonas (N).
- Grab the OUROBOROS PART (O).
- Select (P).
- Select and touch the Amulet.
- Solution (Q).
- Enter the Alchemical Lab.
- Take the FLASK (R).
- Place the 2 OUROBOROS PARTS (S).
- Take the INSTRUCTIONS (T) and YELLOW POTION (U).
- Walk down and forward to the Balcony.
- Take the TATTOO (V).
- Walk down.
- Place the TATTOO (W). Take the FOUNTAIN PART (X).
- Return to the Balcony.
- Place the FOUNTAIN PART (Y).
- Select and touch the Amulet.
- Solution (Z).
- Take the TILE 1/3 (A). Place the FLASK for BLUE POTION (B).
- Return to the Alchemical Lab.
- Place the INSTRUCTIONS (C) and RED, BLUE and YELLOW POTIONS. Pour 1-2-3. Take the HERBICIDE (D).
- Return to the Balcony.
- Use the HERBICIDE (E).
- Take the EMERALD PRISM and STONE ELEMENT (F).
- Walk down.

- Place the 2 STONE ELEMENTS (G).
- Enter the Treasury.
- Play the HOP (H); receive an AQUAMARINE PRISM.
- Return to the Alchemical Lab.
- Place the AQUAMARINE and EMERALD PRISMS (I).
- Solution (J).
- Take the note (K), BLACK SIGNET and STONE ELEMENT (L).
- Walk down.
- Place the STONE ELEMENT (M). Take the WHITE SIGNET (N).
- Return to the Treasury.
- Place the BLACK SIGNET. Take TILE 2/3 (O).
- Place the WHITE SIGNET. Take TILE 3/3 (P).
- Place TILES 3/3 (Q).
- Walk left.

- Grab the BUCKLE (Q).
- Walk down.
- Play the HOP (R). Take the TAU SYMBOL.
- Walk left.
- Place the TAU SYMBOL (S).
- Take the DIAMOND and GEM (T).
- Walk down.
- Place the BUCKLE and GEM (U).
- Use the HANDKERCHIEF. Take the EARTH SPHERE (V).
- Return to the Balcony.
- Place the DIAMOND (W).
- Take the WATER SPHERE and YELLOW SIGNET (X).
- Return to the Treasury.
- Place the YELLOW SIGNET. Take the WINGS (Y).
- Walk left.
- Place the WINGS (A). Take the FIRE SPHERE (B).
- Place and select the EARTH, FIRE and WATER SPHERES (C).
- Solution (D).
- Congratulations. You have completed playing Reflections of Life: Dark Architect.
Created at: 2016-02-12